Plowboy
-
Posts
3,434 -
Joined
-
Last visited
Content Type
Profiles
Forums
Events
Gallery
Everything posted by Plowboy
-
I'd use one from the Revell '99 Silverado. There's also one in the latest generation Camaro. You can also find resin versions on ebay. But, they're almost as much as a kit would cost.
-
Very cool looking little truck Dennis! So many things to check out that you almost can't catch them all! I really like that you kept the doors operable! A lot of times, they're glued shut. Nice work!
-
I have a '53 and a '55.

-
I love what you did with this one Mark! Colors, wheels and stance!! I'm usually hardcore against Continental kits. But, I like it on this one!
-
I have several oldies on the shelf that I consider jewels.
-
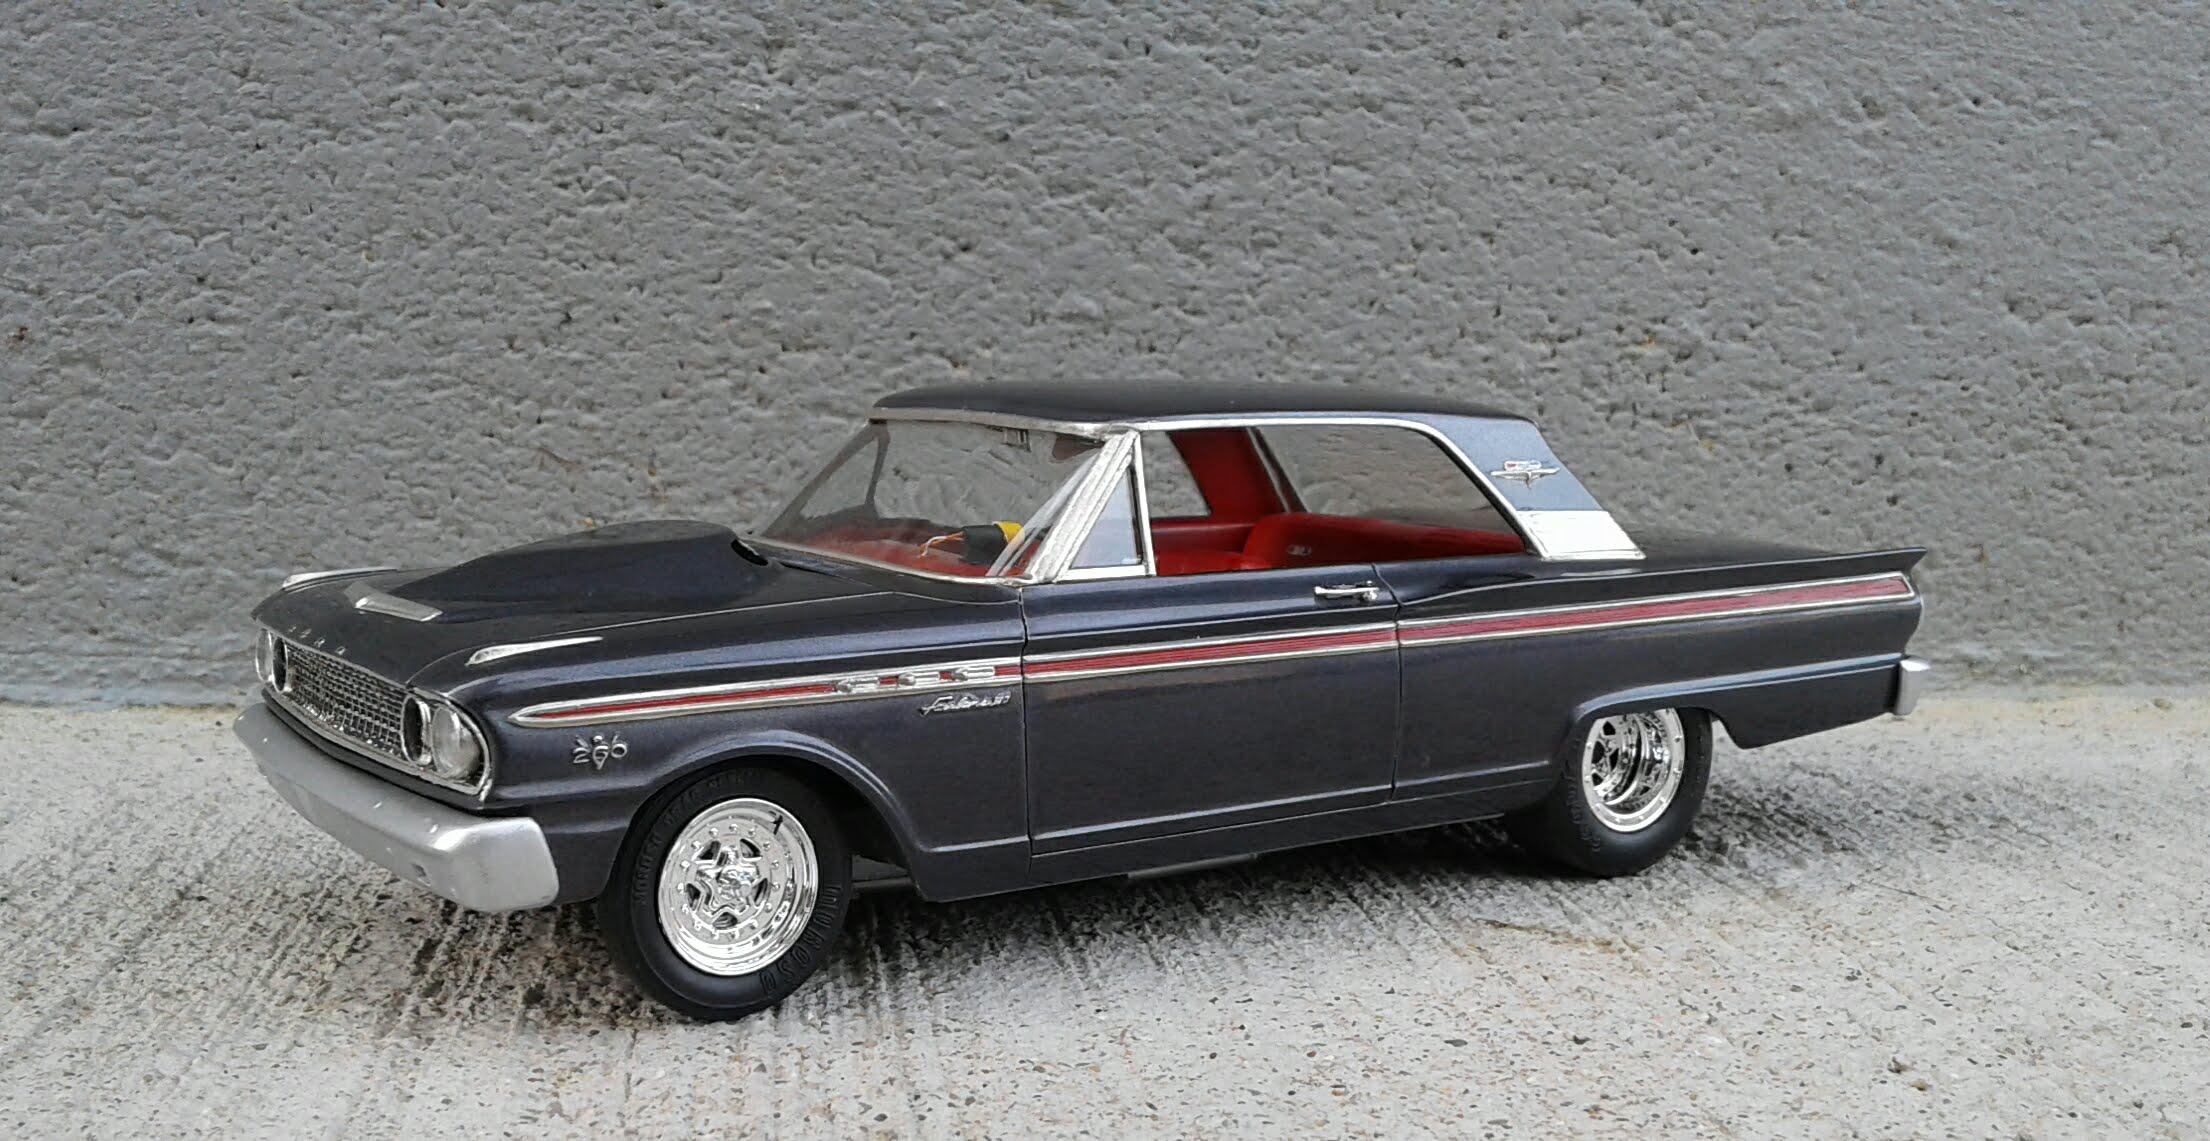
Stock 65 Ford Fairlane ?
Plowboy replied to Jon Haigwood's topic in Model Building Questions and Answers
I'd try to score a promo. That way, you'd have all the stock parts you need. -
I don't have a kit with a 455 or I would consider it. Thinking about going curbside with anyhow.
-
That's exactly how I was thinking it needed to be done. Too late, of course. I was also thinking about using the bottom of the quarters behind the wheel opening to keep the marker light. But, it's barely there. So, I don't know if the juice would be worth the squeeze. That's definitely the best way to do it. Wish I had seen it before I started this. I'm kinda thinking about punting this project and just building it as a curbside. The body isn't exactly right. The interior is pretty shallow. No way I want to cut it apart and fix it too. It's getting to be too involved for a fun build.
-
I don't remember that one Steve. But, that would be the best way to do one. If I wasn't so far into this one, I'd definitely have used a lot more of the Camaro body.
-
Sorry, no six cylinder in this model. It'll either be a BBC or an LS.
-
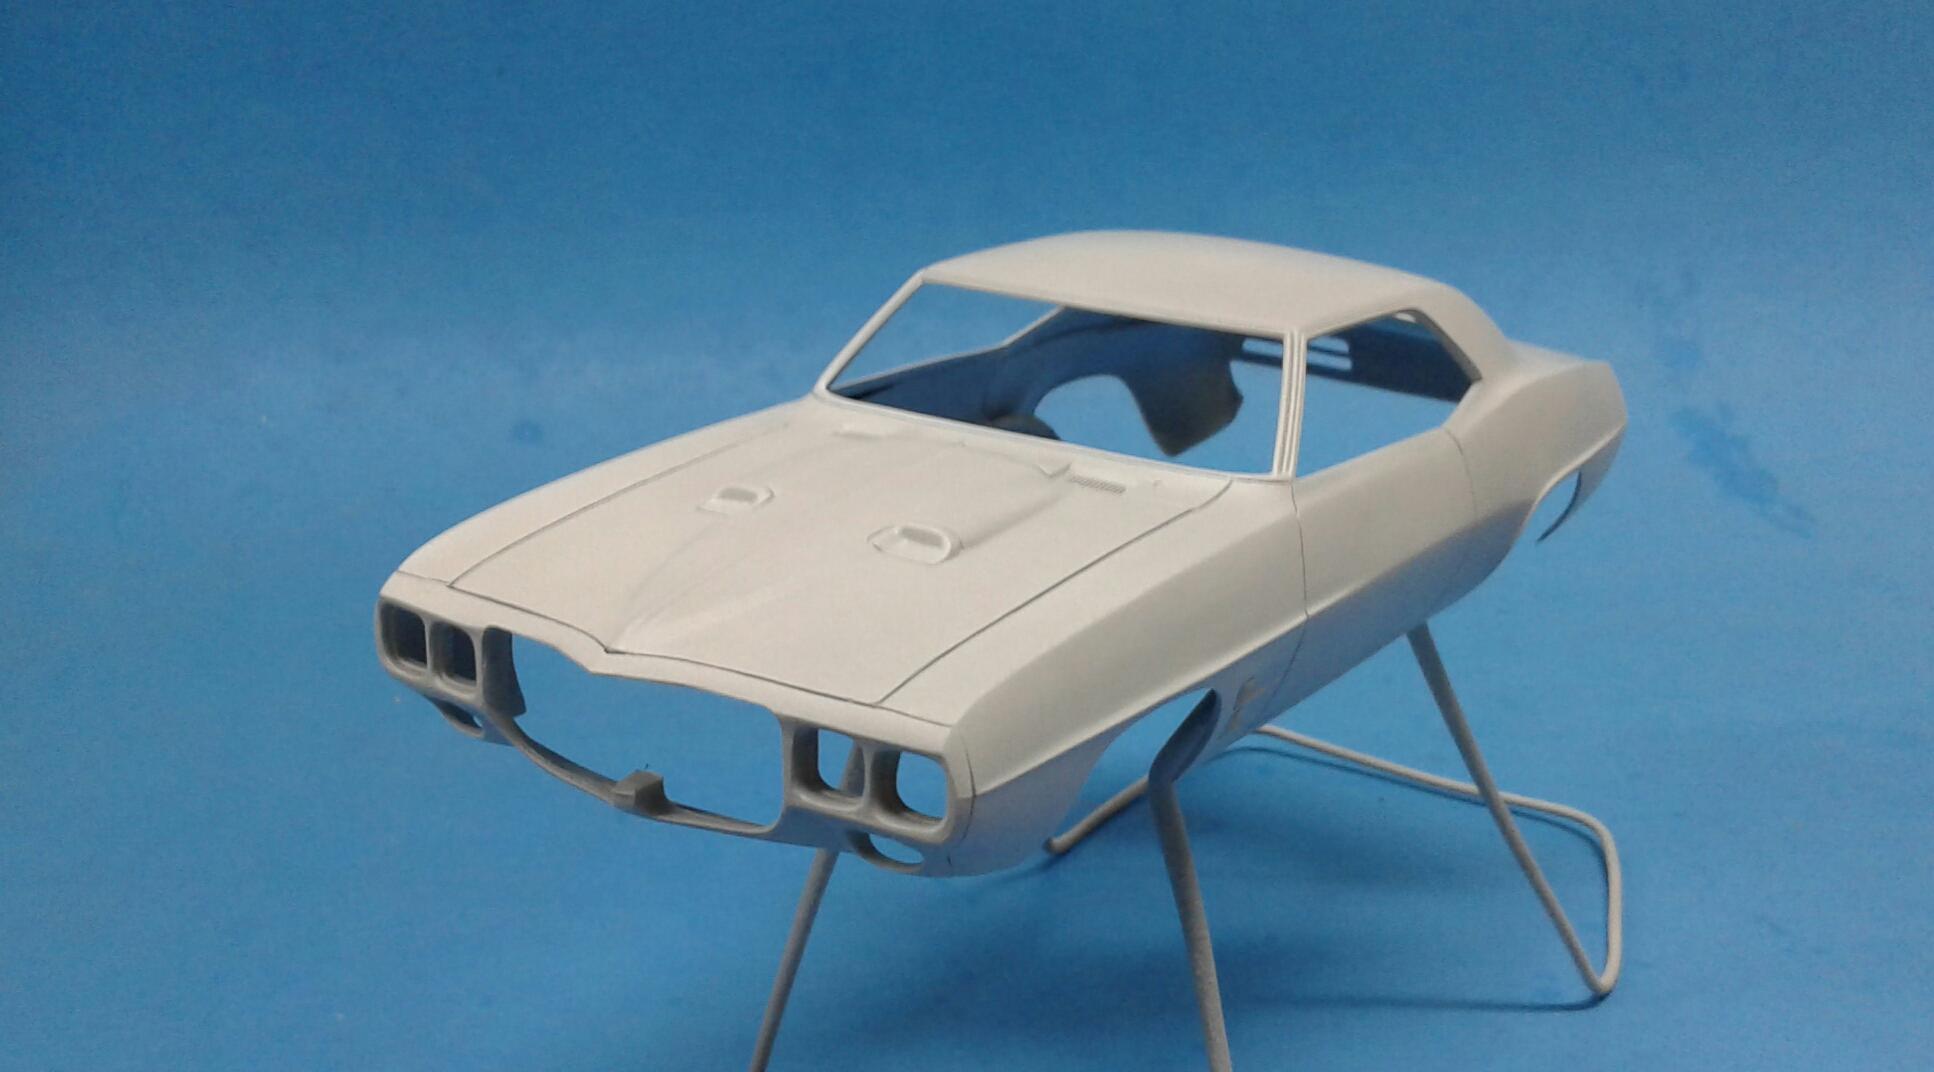
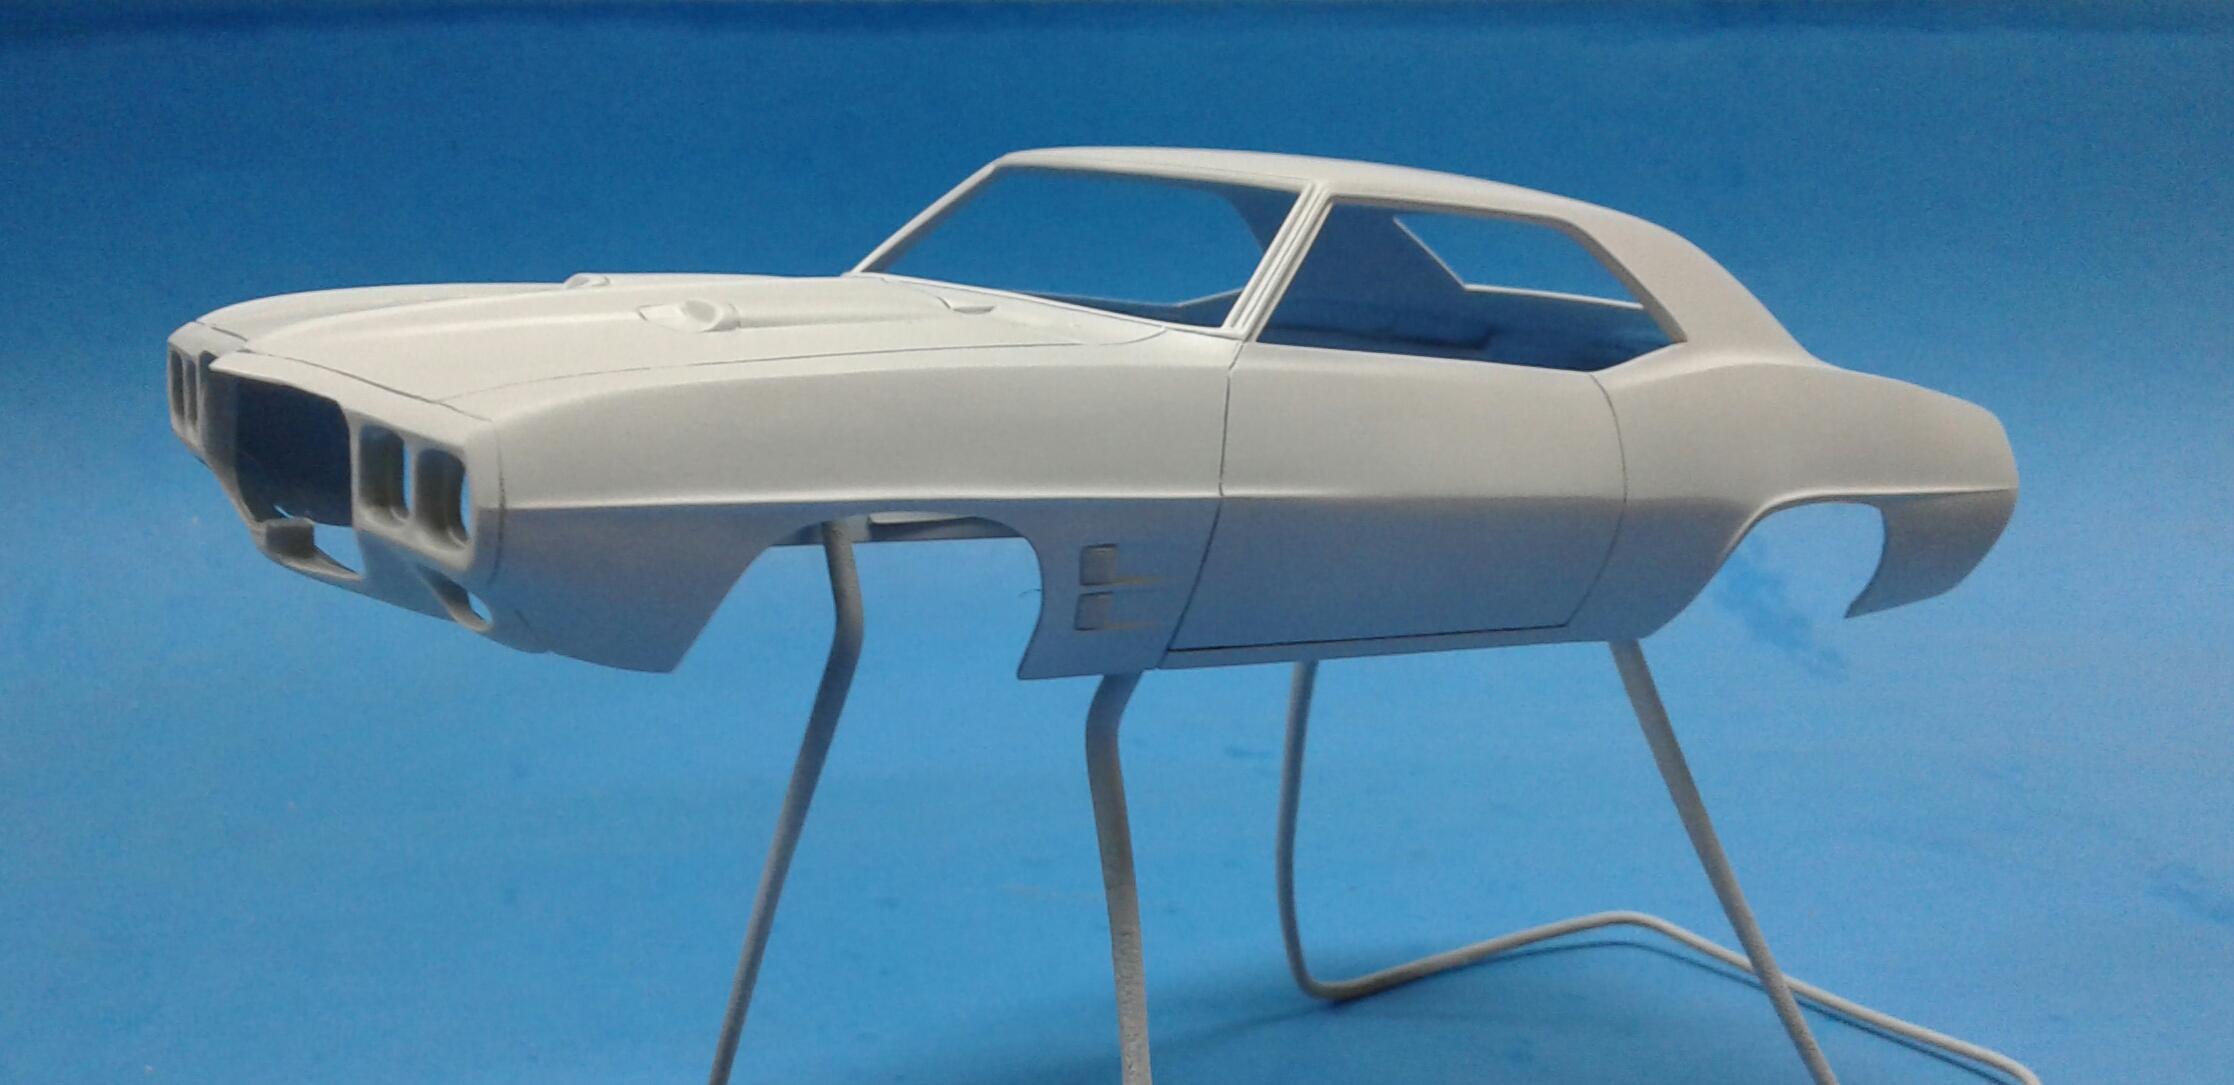
Thanx Steve! I already have my colors picked out. I like the Verdoro Green. But, I already have so many models painted green in one shade or another. I'm kinda like Richard Rawlings when it comes to green. I never did figure out where the 3mms went. Still baffled by that one. Maybe the hood was just 3mms too long? Yeah, that's it! I actually didn't do any measurements on the cuts. I just eyeballed the cuts across the trunk and front fenders. Then used the C channel down the side of the body. I lopped the roof off of the Firebird and placed the Camaro roof section on top of the body and marked the cross cuts after lining up the door lines. I used the C channel on the Firebird to mark it. I was just lucky that I cut well above the line when I cut it down the side of the body. That's when I discovered where the real issue is with the Firebird body. If I did another one, I'd do it differently for sure.
-
Thanx Carl! I think either set will work also. Just have to see which looks best. The turn downs are just pieces I cut from the tail pipes from the Phantom Vickie exhaust.
-
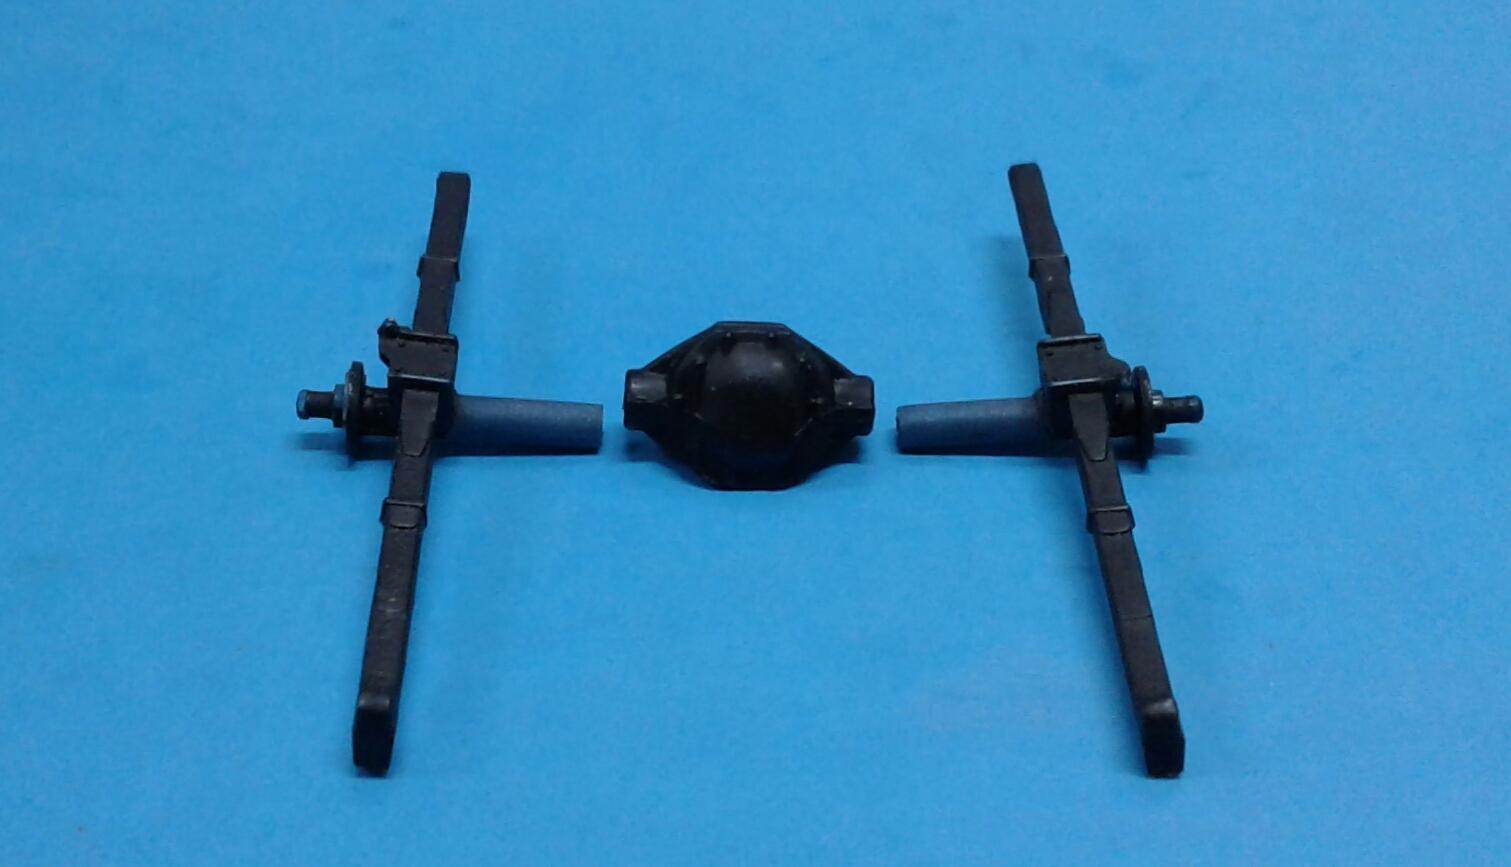
Thanx Steve! I'm pushing it along when I get a chance. I'm trying to get the body tuned in. I decided since I'm going with a modern look, to shave off all of the marker lights, emblems, rocker and wheelwell trim. The marker lights were barely there anyway. It's getting closer to being ready for final primer. Still have some putty work here and there to do. I came up with an easy way to narrow the rearend from the Camaro. I first cut the axle shafts loose from the rearend and sanded them to get rid of the mold lines. Then I drilled an appropriate sized hole through the stump. Then I slid the axle shafts into the stump and placed it on the frame in it's new location. Now all I have to do is center the stump, get the pinion angle where it needs to be and hit the joints with some Tamiya Extra Thin. It works like a charm! All I had to measure was the diameter of the axle shafts. The rest was simple. Next, I have to get the wheel tubs filled in and the gas tank glued back on. Then I'll see how much I can get the suspension lowered. I haven't got an engine picked out yet. I'd kinda like to have a Pontiac engine. But, I may just stick a big block from a Camaro in it. I know it'll fit easily!
-
Yep. One could find a basket case '68 body and be in business.
-
Styrene rod the same size as the hole. If you don't have styrene rod, heat and stretch a piece of sprue. Hit it with liquid cement or crazy glue, trim and sand.
-
Slammed GMC Squarebody
Plowboy replied to Fish_65's topic in WIP: Model Trucks: Pickups, Vans, SUVs, Light Commercial
This already looks cool Scott! Were you able to get the stance like it is with no modifications to the Foose chassis? I have a '68 C-10 that I want to build in a similar style. But, dread having to scratch build a frame for it. -
Need guidance ungluing built vintage kit
Plowboy replied to ismaelg's topic in Model Building Questions and Answers
I would strip it with your chosen method first. You'd be surprised at how many pieces sometimes comes apart. Then hit the remaining joints with Tamiya Extra Thin Cement and pry apart. The cement will usually soften the joint and make it easier to get apart. Past that, you're going to have to break out the photo etch saw blades. -
How does one paint/highlight badge scripts?
Plowboy replied to doorsovdoon's topic in Model Building Questions and Answers
The best way to do the foil method is to simply use a polishing pad to remove the paint. I have used 2000 grit also. Just have to sand carefully. -
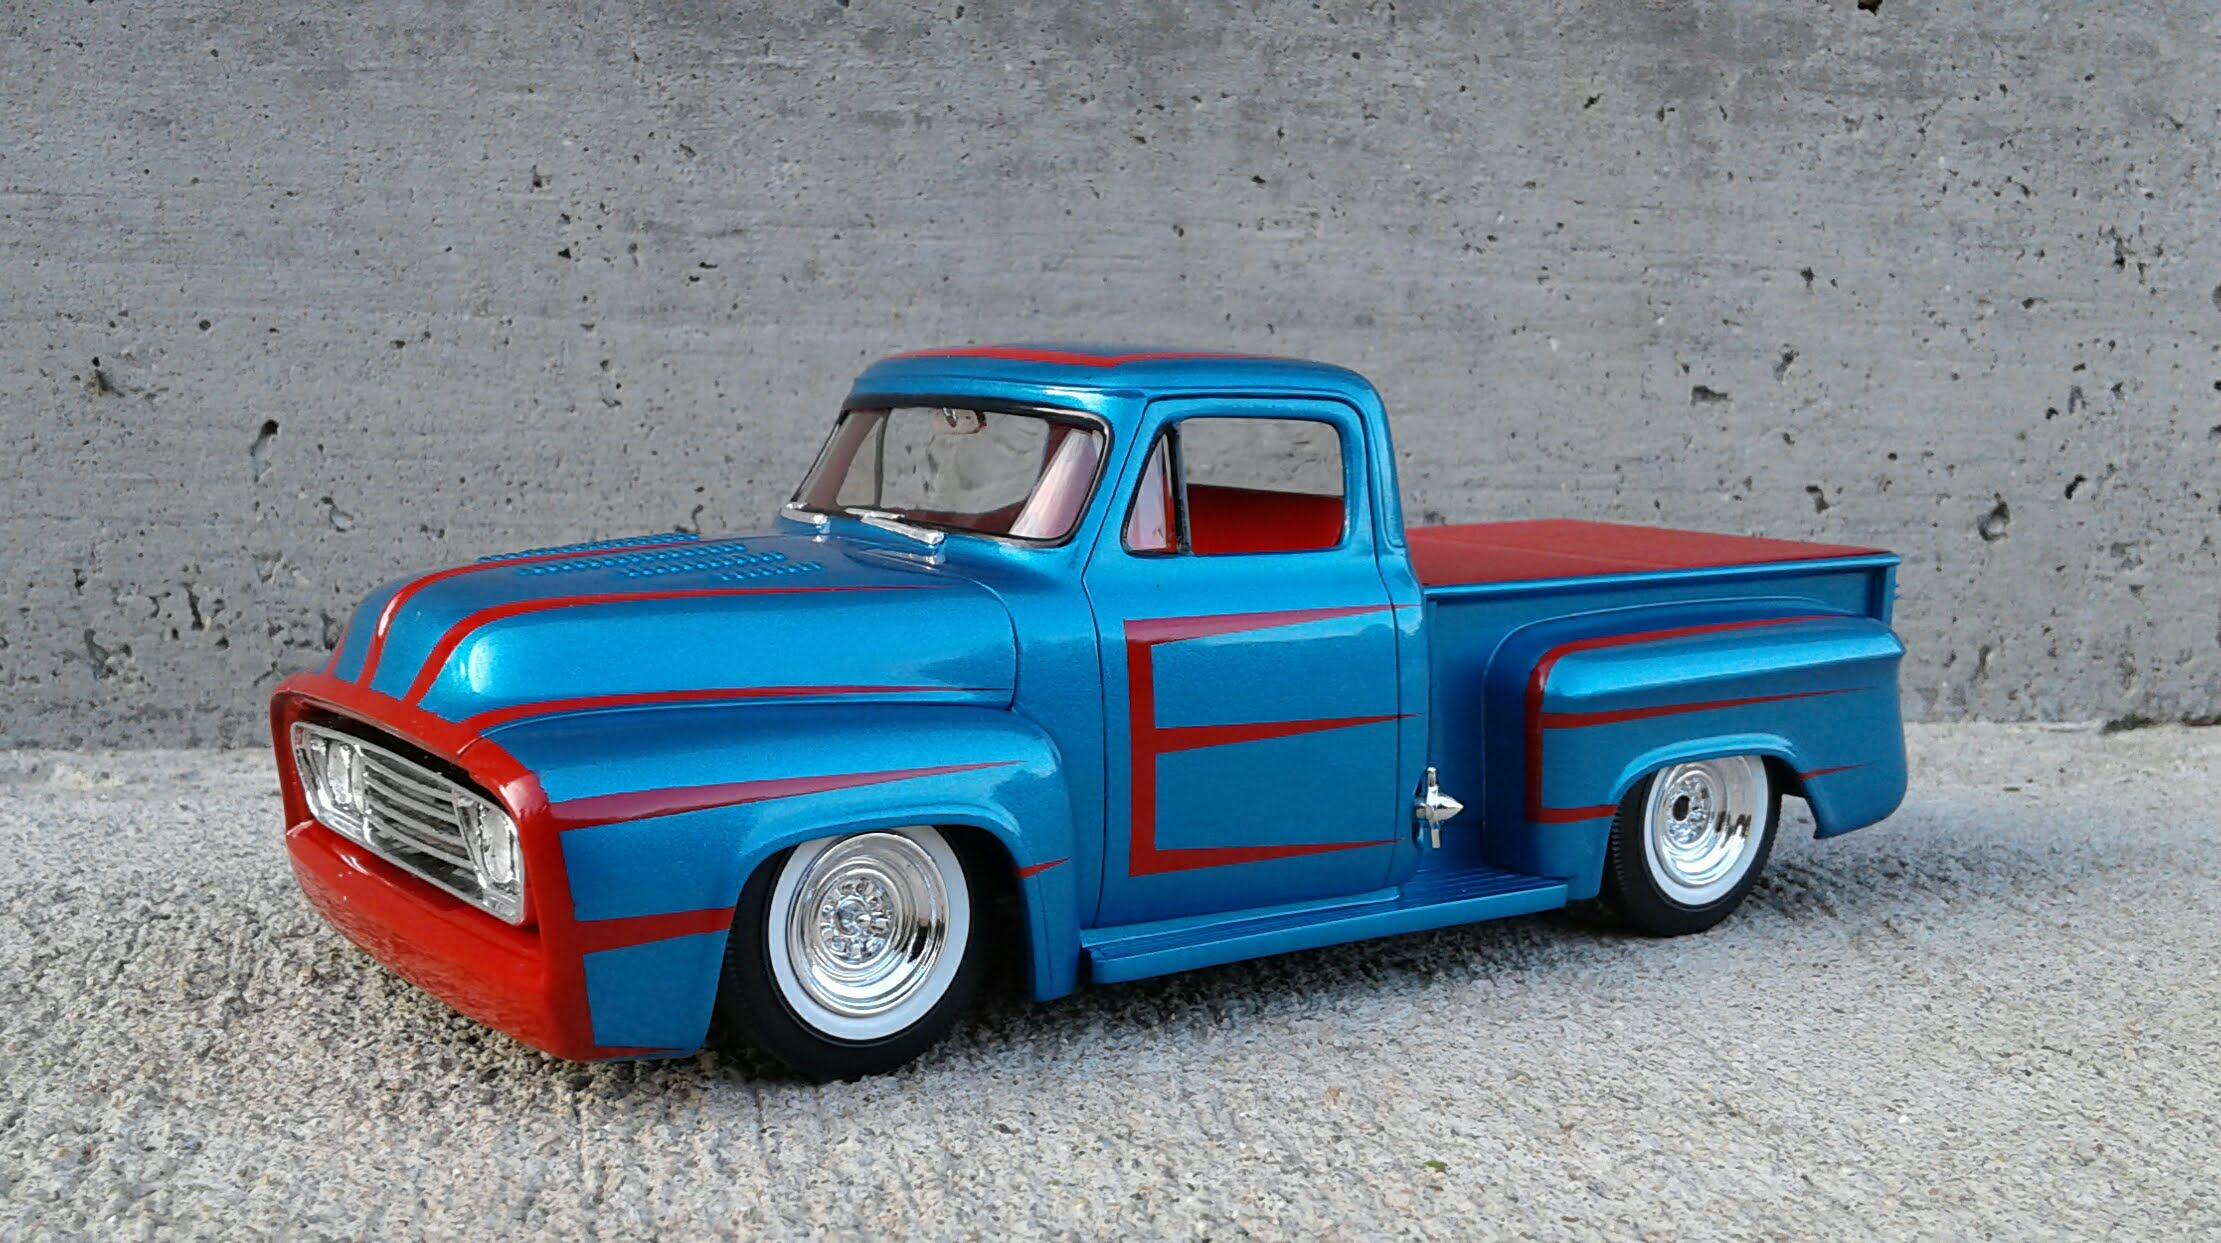
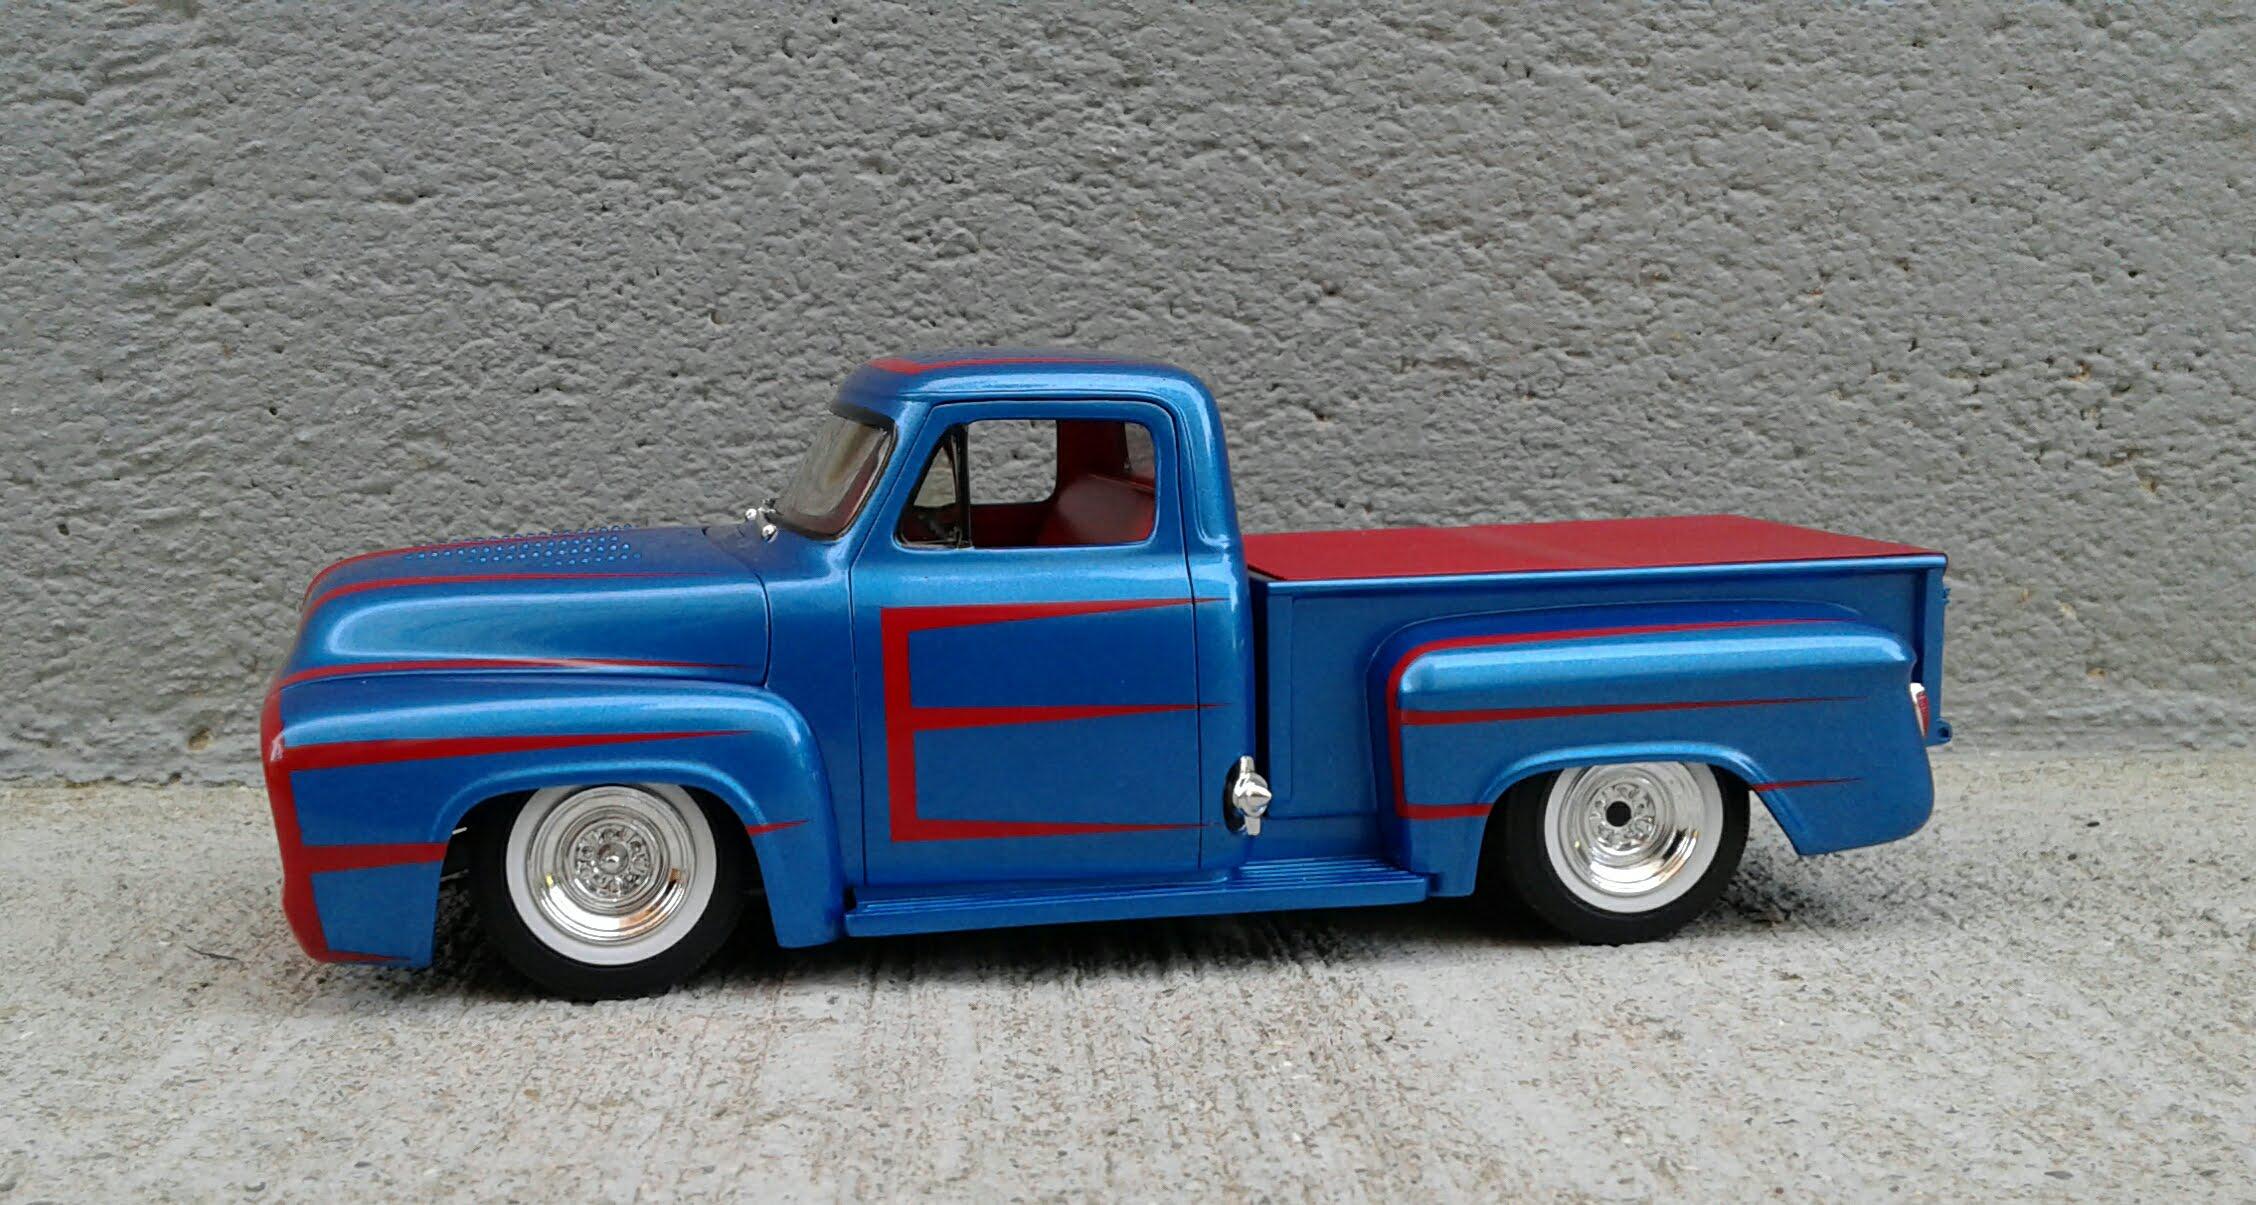
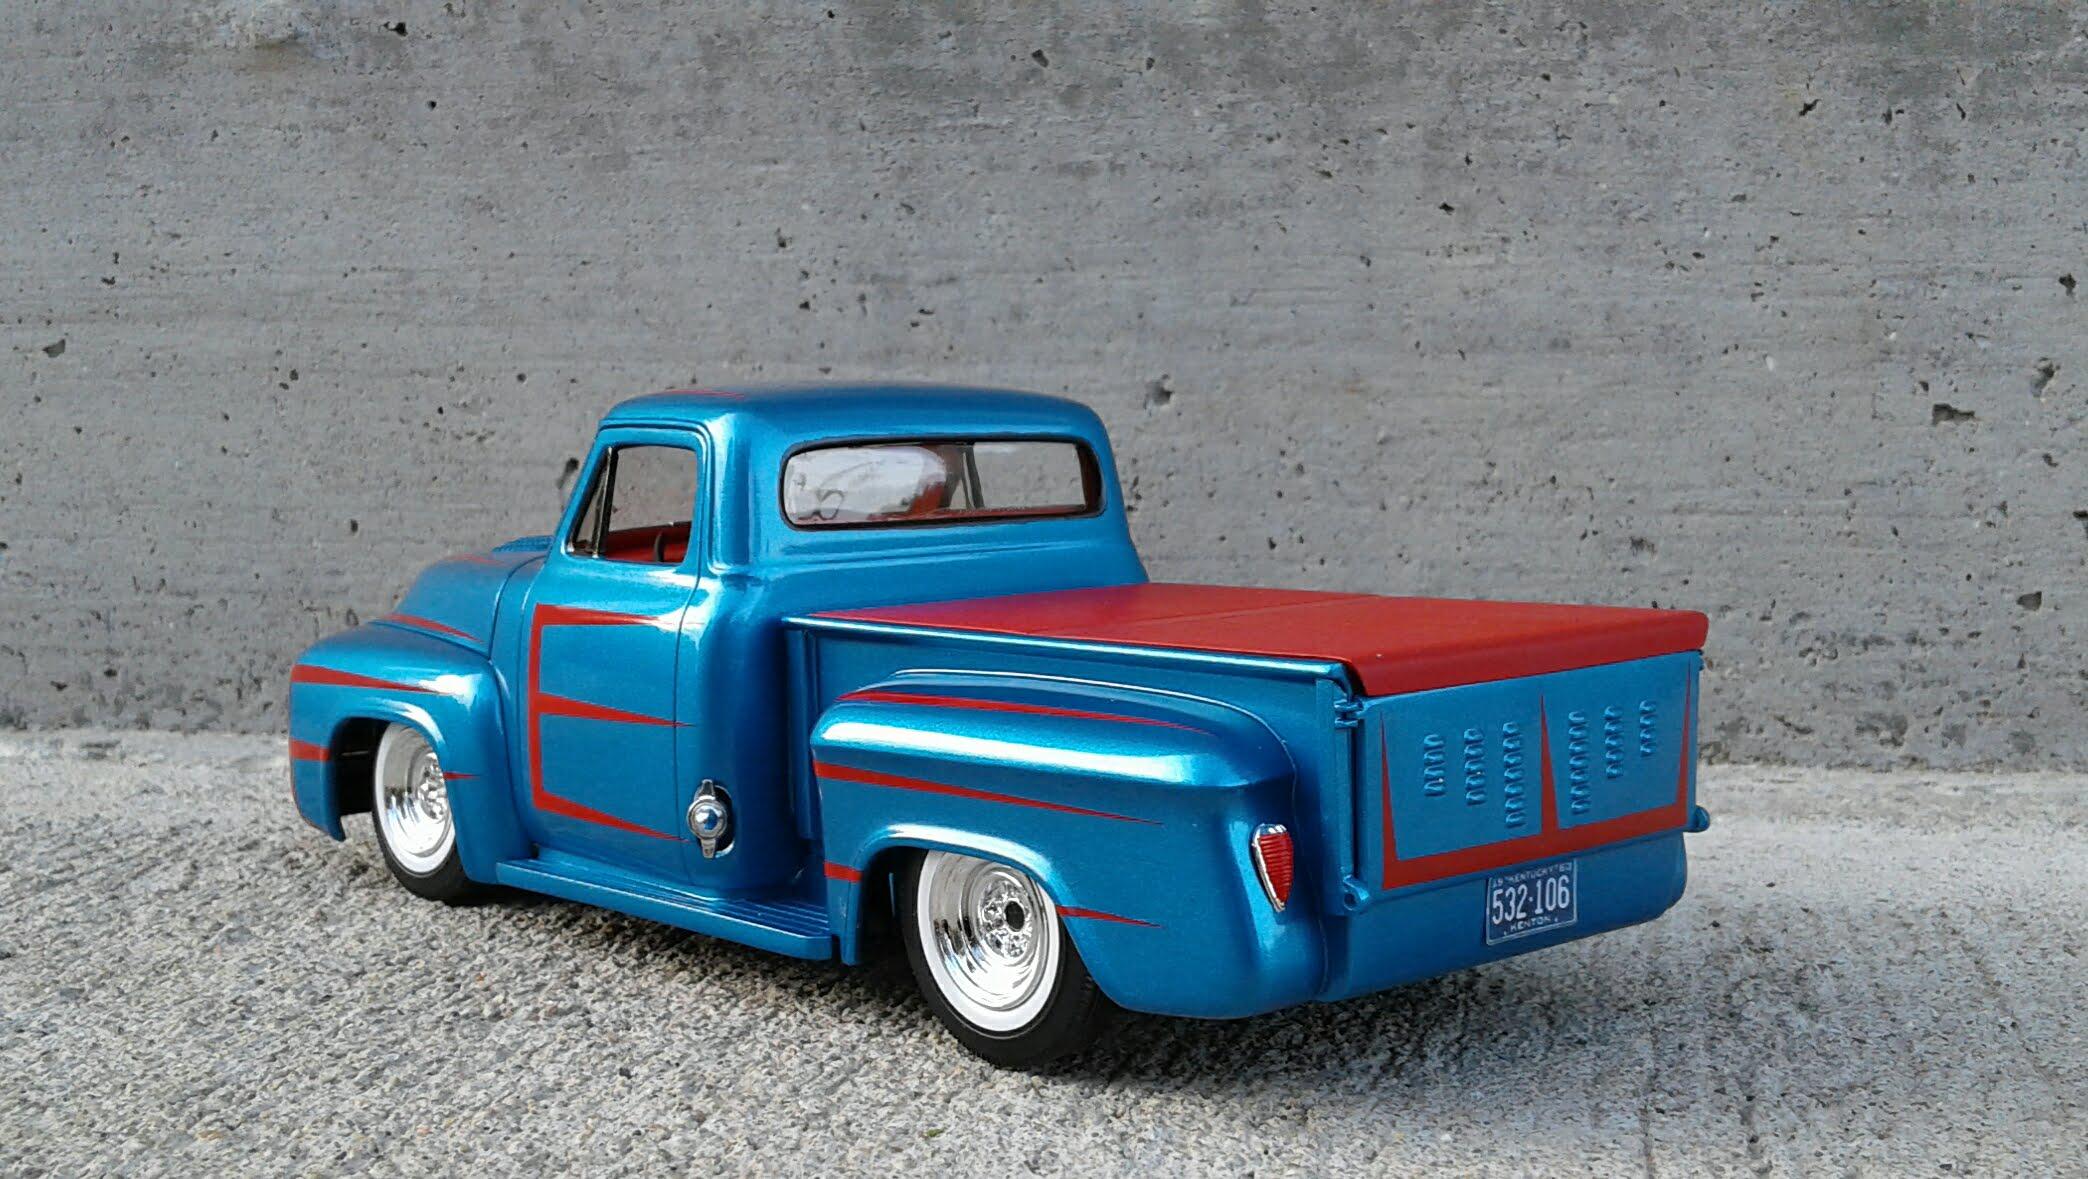
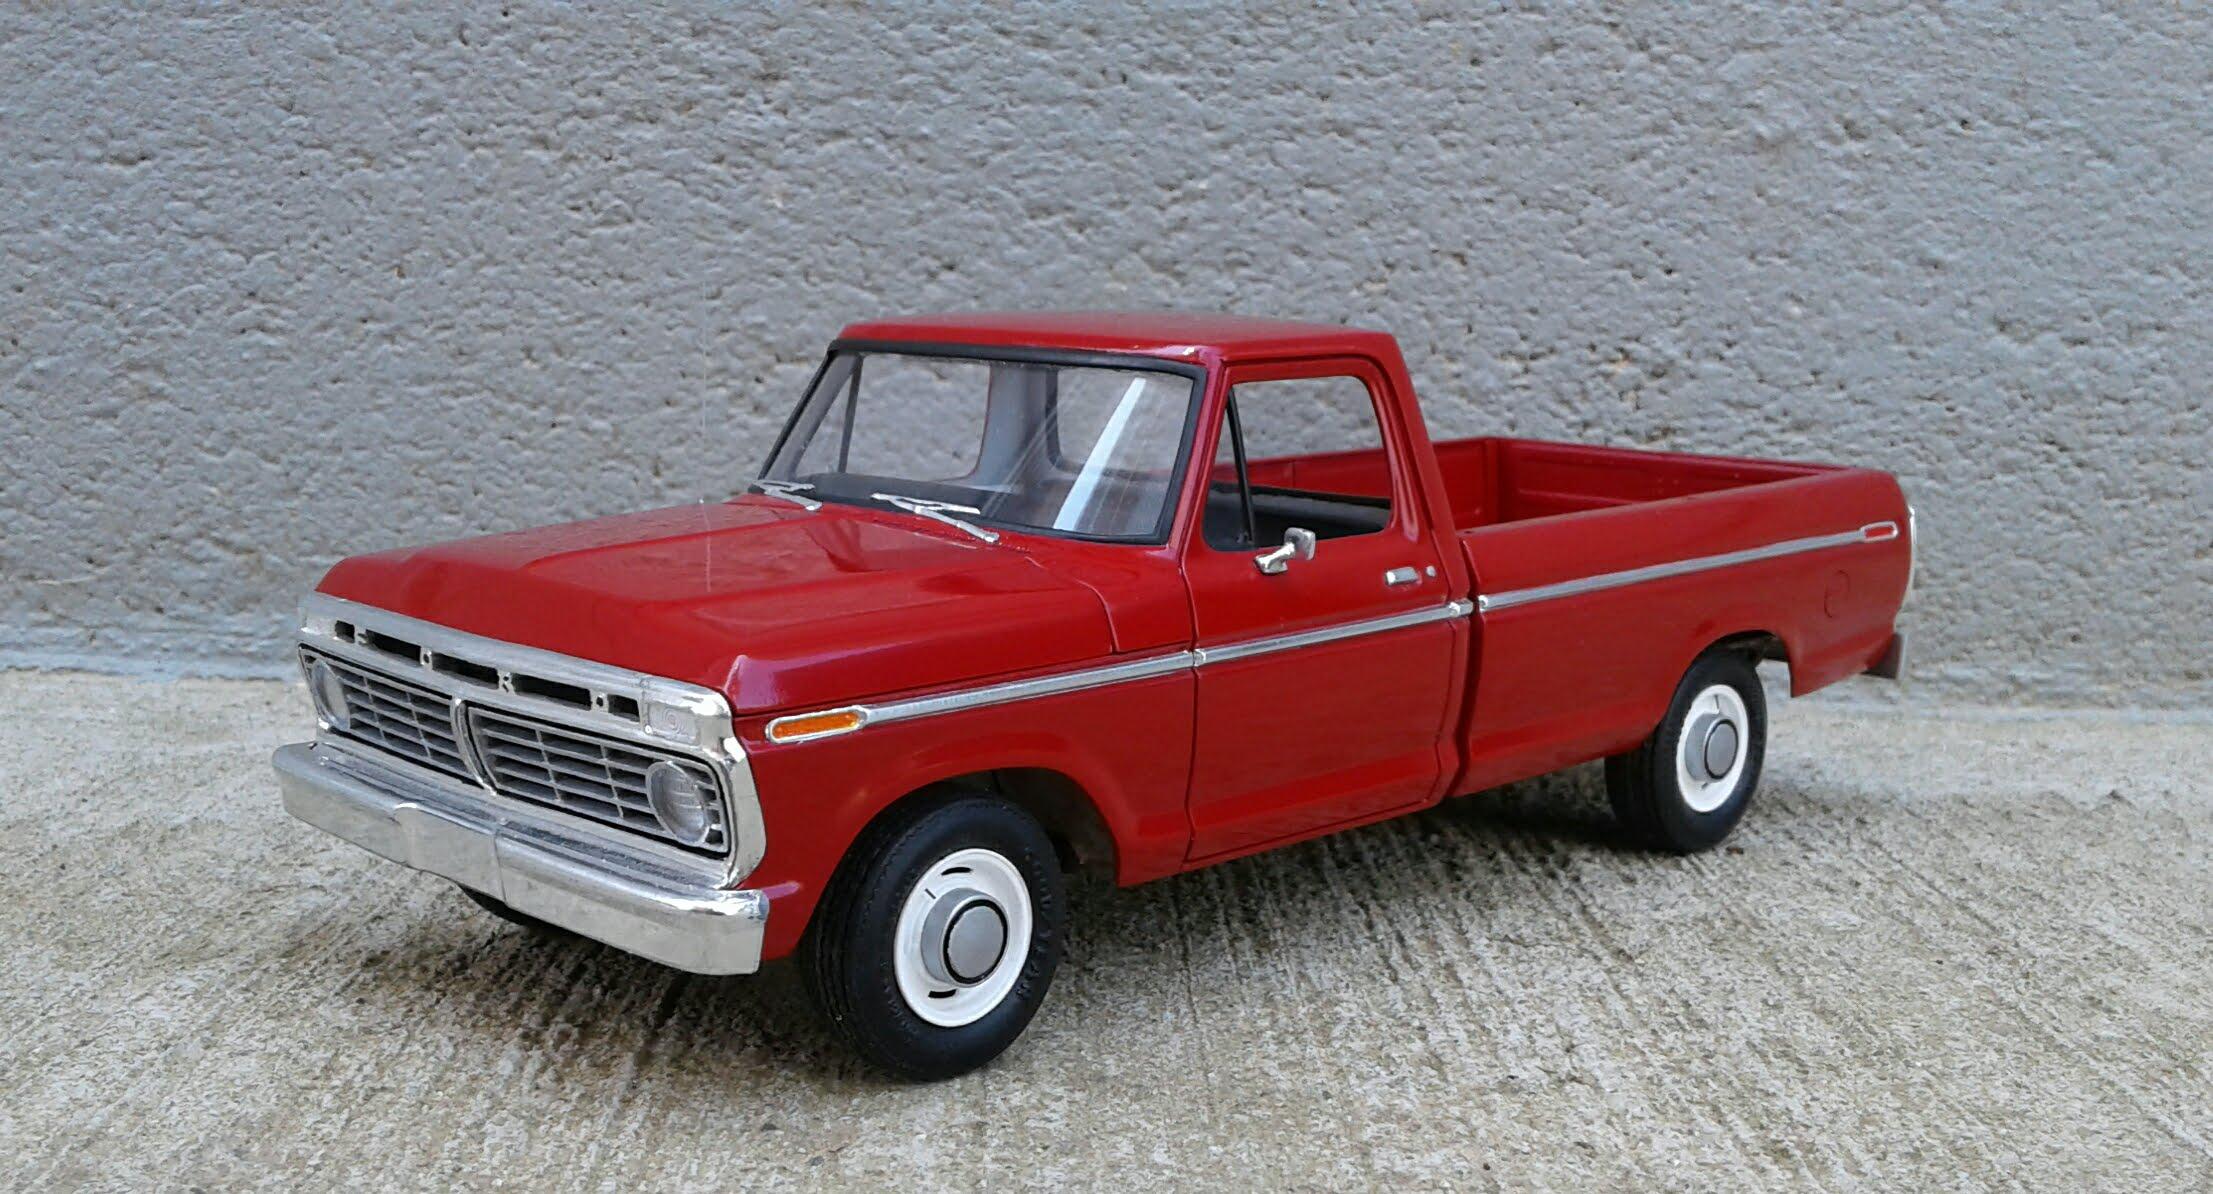
Thanx! This is actually Tamiya Bright Red. I've used the Mica Red a couple of times and it's a beautiful color. Thanx Carl! I'm not quite 100% on these wheels. I have a set of Chrome T's that I want to try out on it also. Thanx Jim! I finally have the exhaust done! The front section and headers (not shown) are from a Monogram '37 Ford Convertible. The rear section is from the Phantom Vickie. I switched sides with them, cut the tail pipes off, cut the tips from them, glued those to the mufflers and then glued to the front sections. They barely fit through and take some fiddling to get them there. I dread installing them after paint! As you can see, there's no room for the master cylinder to mount to the frame. So, it's going to have to go on the firewall. I doubt I'll use a booster. I'm going to have to narrow the rear track a bit to place the wheels and tires the way I want. I'll then make the front match. The steering rod will glue to the bottom of the engine mount with the wheels in the straight position. But, I'll still be able to turn the wheels. Once I get the exhaust and headers painted, all of the paint work will be done. Then, I'll start detailing the engine. I can't wait to start getting it dressed up! Some of the chrome will get matte clear. Some will get semi gloss clear.
-
I'm thinking there was one at one time Lee. But, I can't recall the caster. Have you checked MCW? I know they did a '68 Biscayne or Bel Air.
-
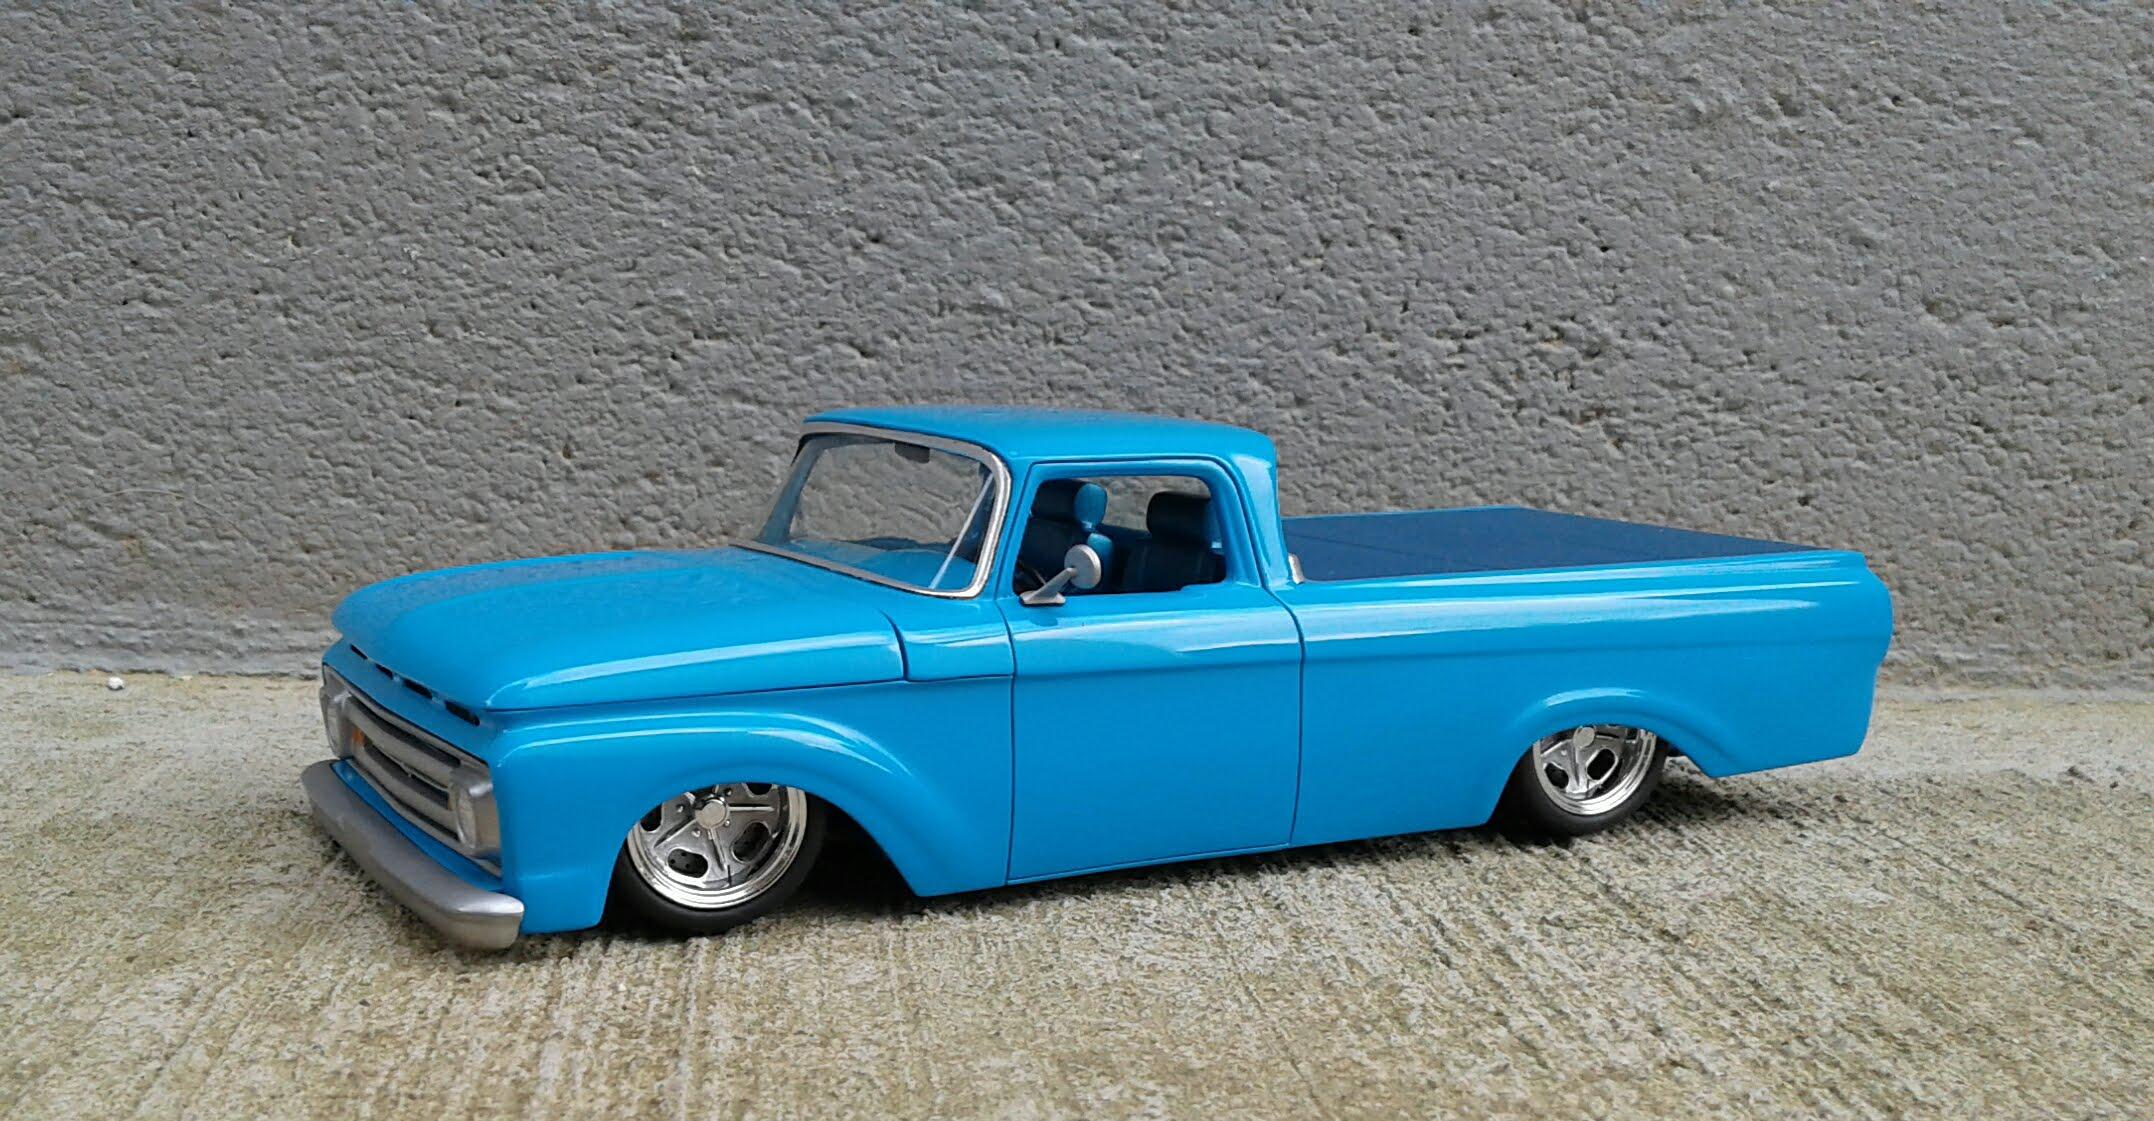
Thanx Bob! I didn't want to change the way it looked. I just wanted to improve the way it looked. You're the second one to suggest building a stock one. I may build one with stock proportions someday or one that's stock ish. Thanx Chris! Tamiya Dull Red is a great interior color. It has the perfect sheen right out of the can for seats and door panels.
-
It's looking good Roy! This is an interesting build since we don't see many longbed 3/4 tons getting built. Looking forward to seeing it finished up!
-
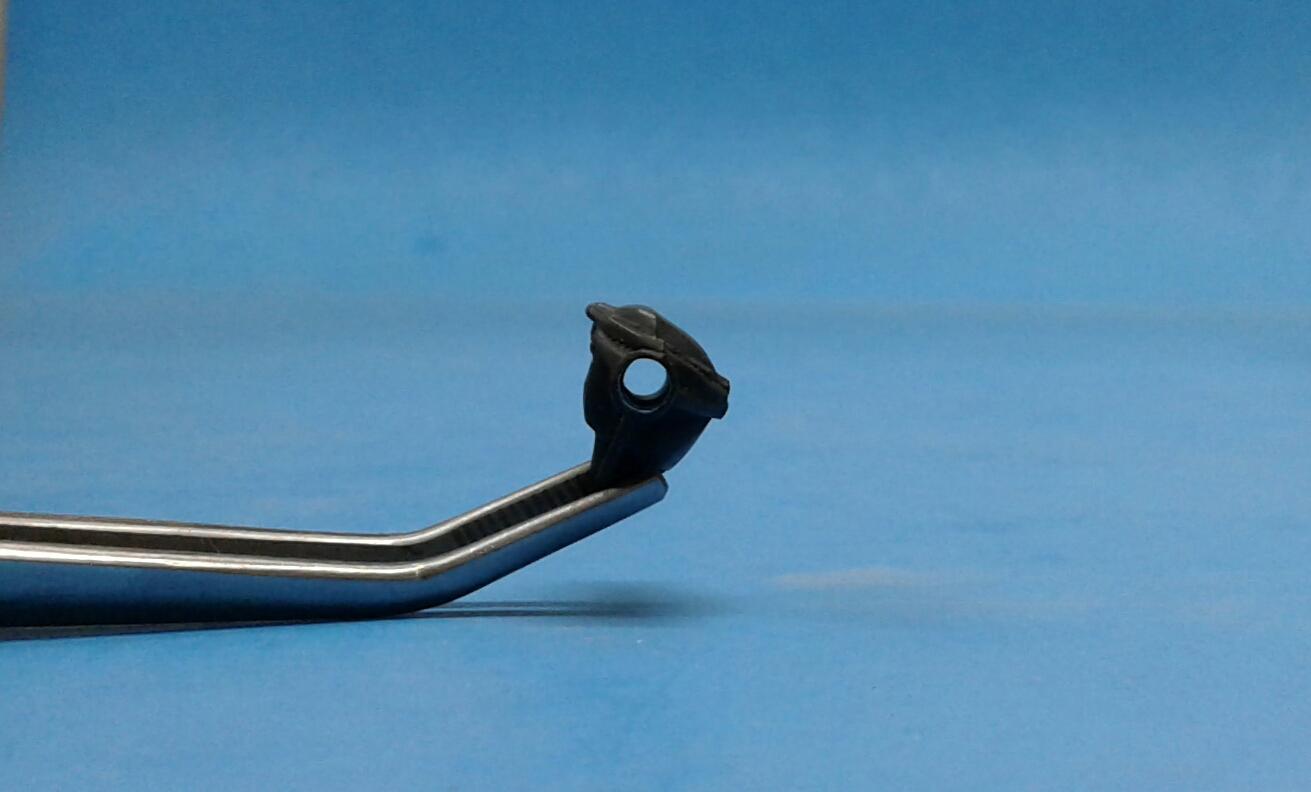
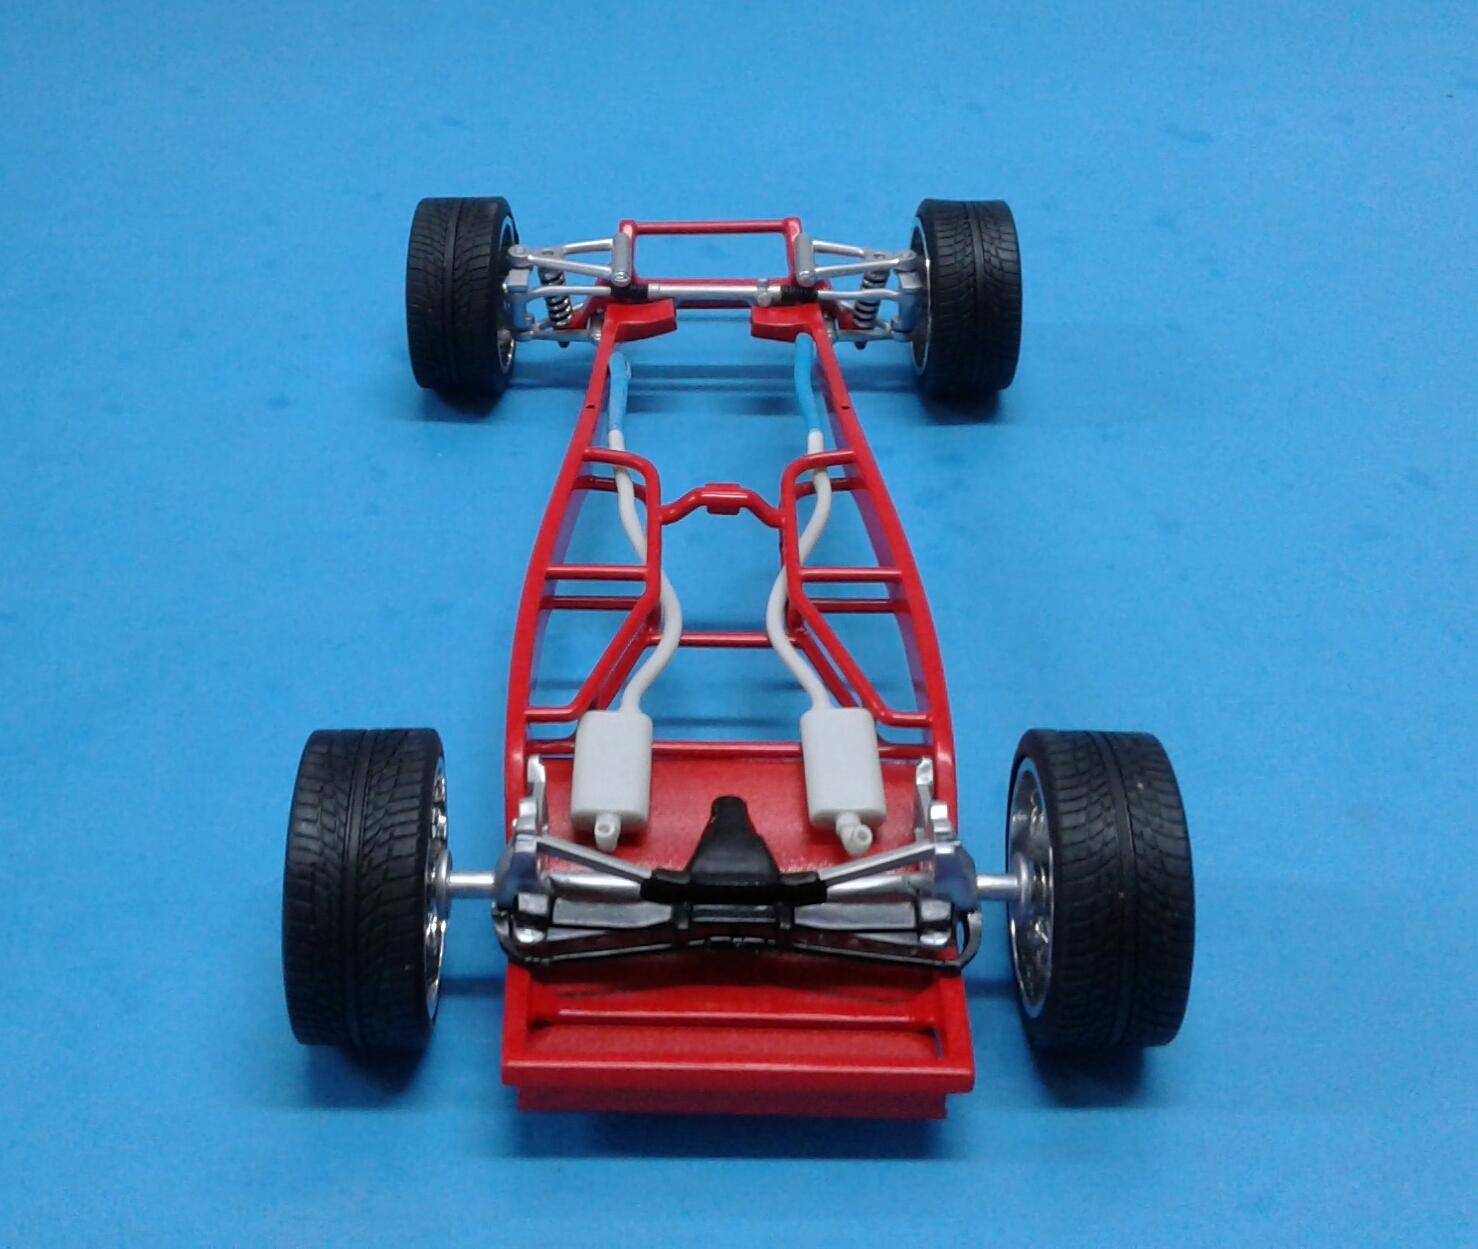
I finally have a rolling chassis! My time lately has been taken up fabbing the exhaust. What a pain! Especially trying to route it through the tube center section. No fun at all! I really like how the poseable front end worked out. It works just like I thought it would.
-
Exactly. I would rather see true stock bodied cars with a factory V-6 duking it out at slower speeds. I stopped watching the year they came out with the COT.
-
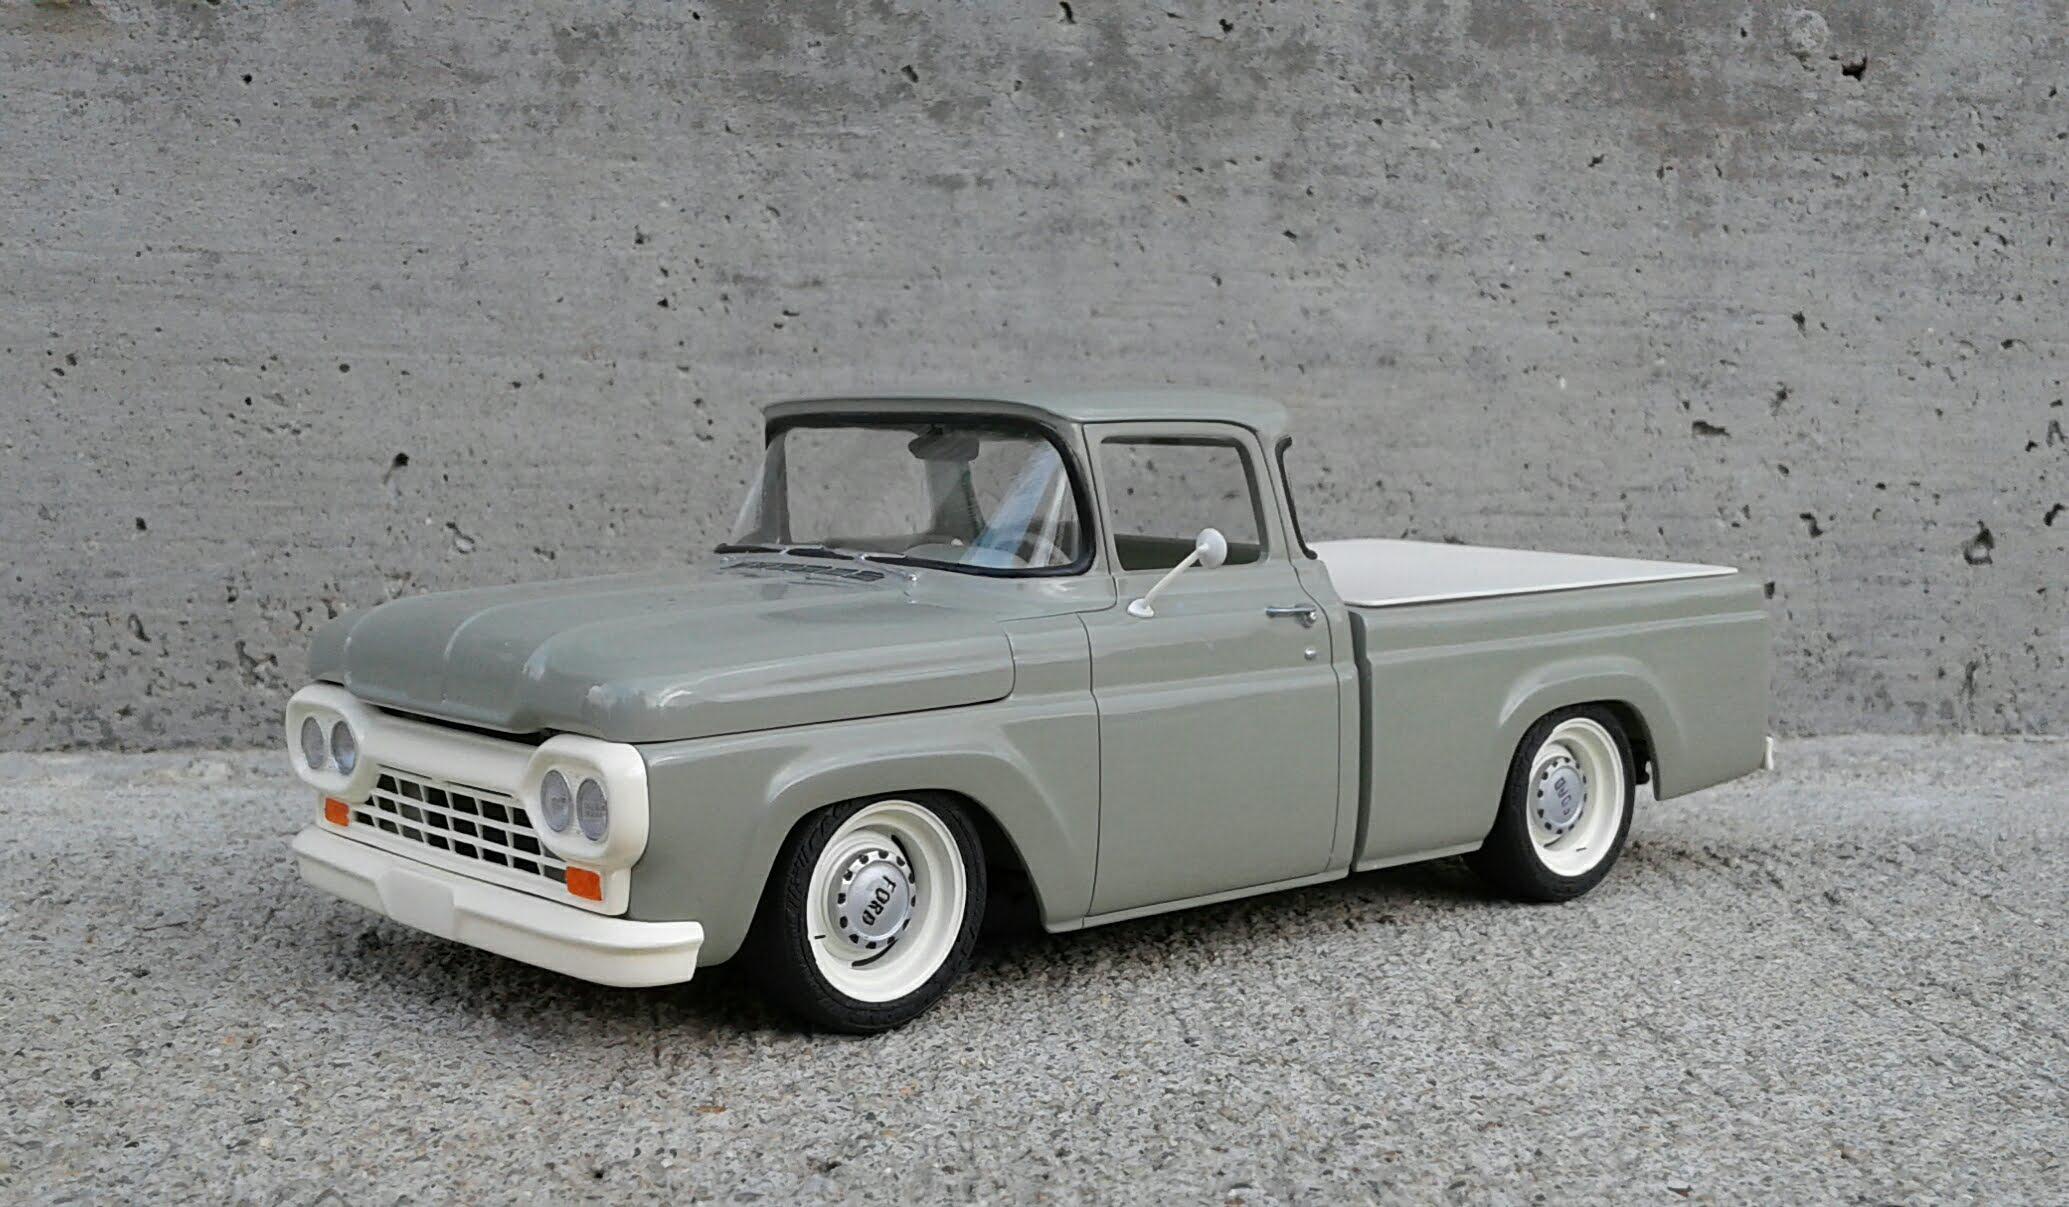
Thanx! That was exactly my intent. Thanx Mark! A local shop did a '62 F-100 the same way. He drug the body out of a junkyard, cut everything out from underneath it and welded it to an '07 Lincoln Town car chassis, floorpan and firewall. He even used the Lincoln's dash and seats. I didn’t care for the dash. But, the rest of it made up for it. I tried to get him to price it. But, he had no interest. Thanx Steve! I just built it the way I would want a full scale. There's no clear over the Satin Black. Just sprayed on straight out of the can. It has the exact sheen I wanted. I want to paint a body with it sometime.