AmericanMuscleFan
-
Posts
3,058 -
Joined
-
Last visited
Content Type
Profiles
Forums
Events
Gallery
Everything posted by AmericanMuscleFan
-

64 Dodge D100 Pickup Pro Street
AmericanMuscleFan replied to AmericanMuscleFan's topic in WIP: Drag Racing Models
Thanks Charlie! After seeing all the excellent work you have done so far, I have no doubt that you will pass this stage without any problem! ? Francis -
64 Dodge D100 Pickup Pro Street
AmericanMuscleFan replied to AmericanMuscleFan's topic in WIP: Drag Racing Models
Thank you so much for your confidence and appreciation of my project Ian, I really appreciate it my friend! The essence of my goal is achieved if I could bring any motivation of a future project from you. Your work is exemplary and I can't imagine that my work could influence a talent like yours! Your project will undoubtedly cross the finish line before mine, I still have a few months to go before delivering the goods... Come back whenever you want!!! ? Francis -
64 Dodge D100 Pickup Pro Street
AmericanMuscleFan replied to AmericanMuscleFan's topic in WIP: Drag Racing Models
Thanks Claude! You are absolutely right my friend but this is also the most intimidating part of the project if I may say so. It often doesn't take much for everything to go wrong, so it's best to take your time so as not to ruin what took so long to achieve... ? More to come soon! Francis -
64 Dodge D100 Pickup Pro Street
AmericanMuscleFan replied to AmericanMuscleFan's topic in WIP: Drag Racing Models
Thank you my friend! I think that the best is still to come and I hope not to have too many unforeseen events to spoil the work I have done so far... to be continued!!! Francis -
1/16 SCALE A/FC NITRO FUNNY CAR
AmericanMuscleFan replied to Ian McLaren's topic in WIP: Drag Racing Models
Quality assembly for a high caliber product! Your attention to detail is paying off my friend, this is to be confused with a photo of a real one! ? -
64 Dodge D100 Pickup Pro Street
AmericanMuscleFan replied to AmericanMuscleFan's topic in WIP: Drag Racing Models
Thanks for your kind comments Anton! You've pretty much expressed the way I see it in trying to create (or recreate...) each part in an effort to satisfy my quest for impossible perfection. I am definitely doing this for myself but I really appreciate if what I am doing can inspire others! I have found a lot of inspiration and motivation on this forum myself that keeps me going! ? Francis -
64 Dodge D100 Pickup Pro Street
AmericanMuscleFan replied to AmericanMuscleFan's topic in WIP: Drag Racing Models
You have the right philosophy and working methods Marcos, these precision tools are expensive but will only add new possibilities to your already exceptional work. It takes a lot of patience and adaptation but the moments you spend in front of these precision tools to see the desired part gradually appear is a pleasure that is hard to describe! ? There is something for everyone in this hobby and some may find it illogical to spend so much money and time doing all these details but as I like to say, the important thing is to be different! ? Francis -
64 Dodge D100 Pickup Pro Street
AmericanMuscleFan replied to AmericanMuscleFan's topic in WIP: Drag Racing Models
Thanks for the kind comments Ron! As for your truck, don't let disappointment set in, you have a beautiful project in the works and your construction techniques are top notch! People don't comment all the time (and some never...), but there will always be interest in out-of-the-ordinary subjects like yours! Just keep putting a log in the fireplace every now and then.... ? Francis -
64 Dodge D100 Pickup Pro Street
AmericanMuscleFan replied to AmericanMuscleFan's topic in WIP: Drag Racing Models
I'm always happy to help! Thanks for visiting and for your kind comment Dave! Thanks Trevor! I think the most interesting updates are still to come with even more assembly in the coming days and weeks... Thanks Marcos, I must say I'm pretty happy with the fit of the parts so far! Thanks Daniel, The high quality of your work and your ingenuity keeps me motivated! Thank you for that my friend!!! Thanks Roger! I'm always happy to have your visit, I can't wait to see your next updates on your Hornet Pro Stock, I love this project and I hope you make it to the finish line! -
ERTL International 4300 Eagle
AmericanMuscleFan replied to 1959scudetto's topic in Model Trucks: Big Rigs and Heavy Equipment
Very nice build Helmut, the hand painted eagle is very impressive and I love the color combination. Too bad it was damaged during your move, these styrene models don't like to be handled too much but fortunately it's usually possible to make these little damages disappear... ?? -
78 Dodge junkyard truck
AmericanMuscleFan replied to mchook's topic in Model Trucks: Pickups, Vans, SUVs, Light Commercial
There is no need to say Mark, you are a magician in this field! New York is part of the Rust Belt and I imagine there is some inspirational material around you, in any case it is very convincing!!! ? -
64 Dodge D100 Pickup Pro Street
AmericanMuscleFan replied to AmericanMuscleFan's topic in WIP: Drag Racing Models
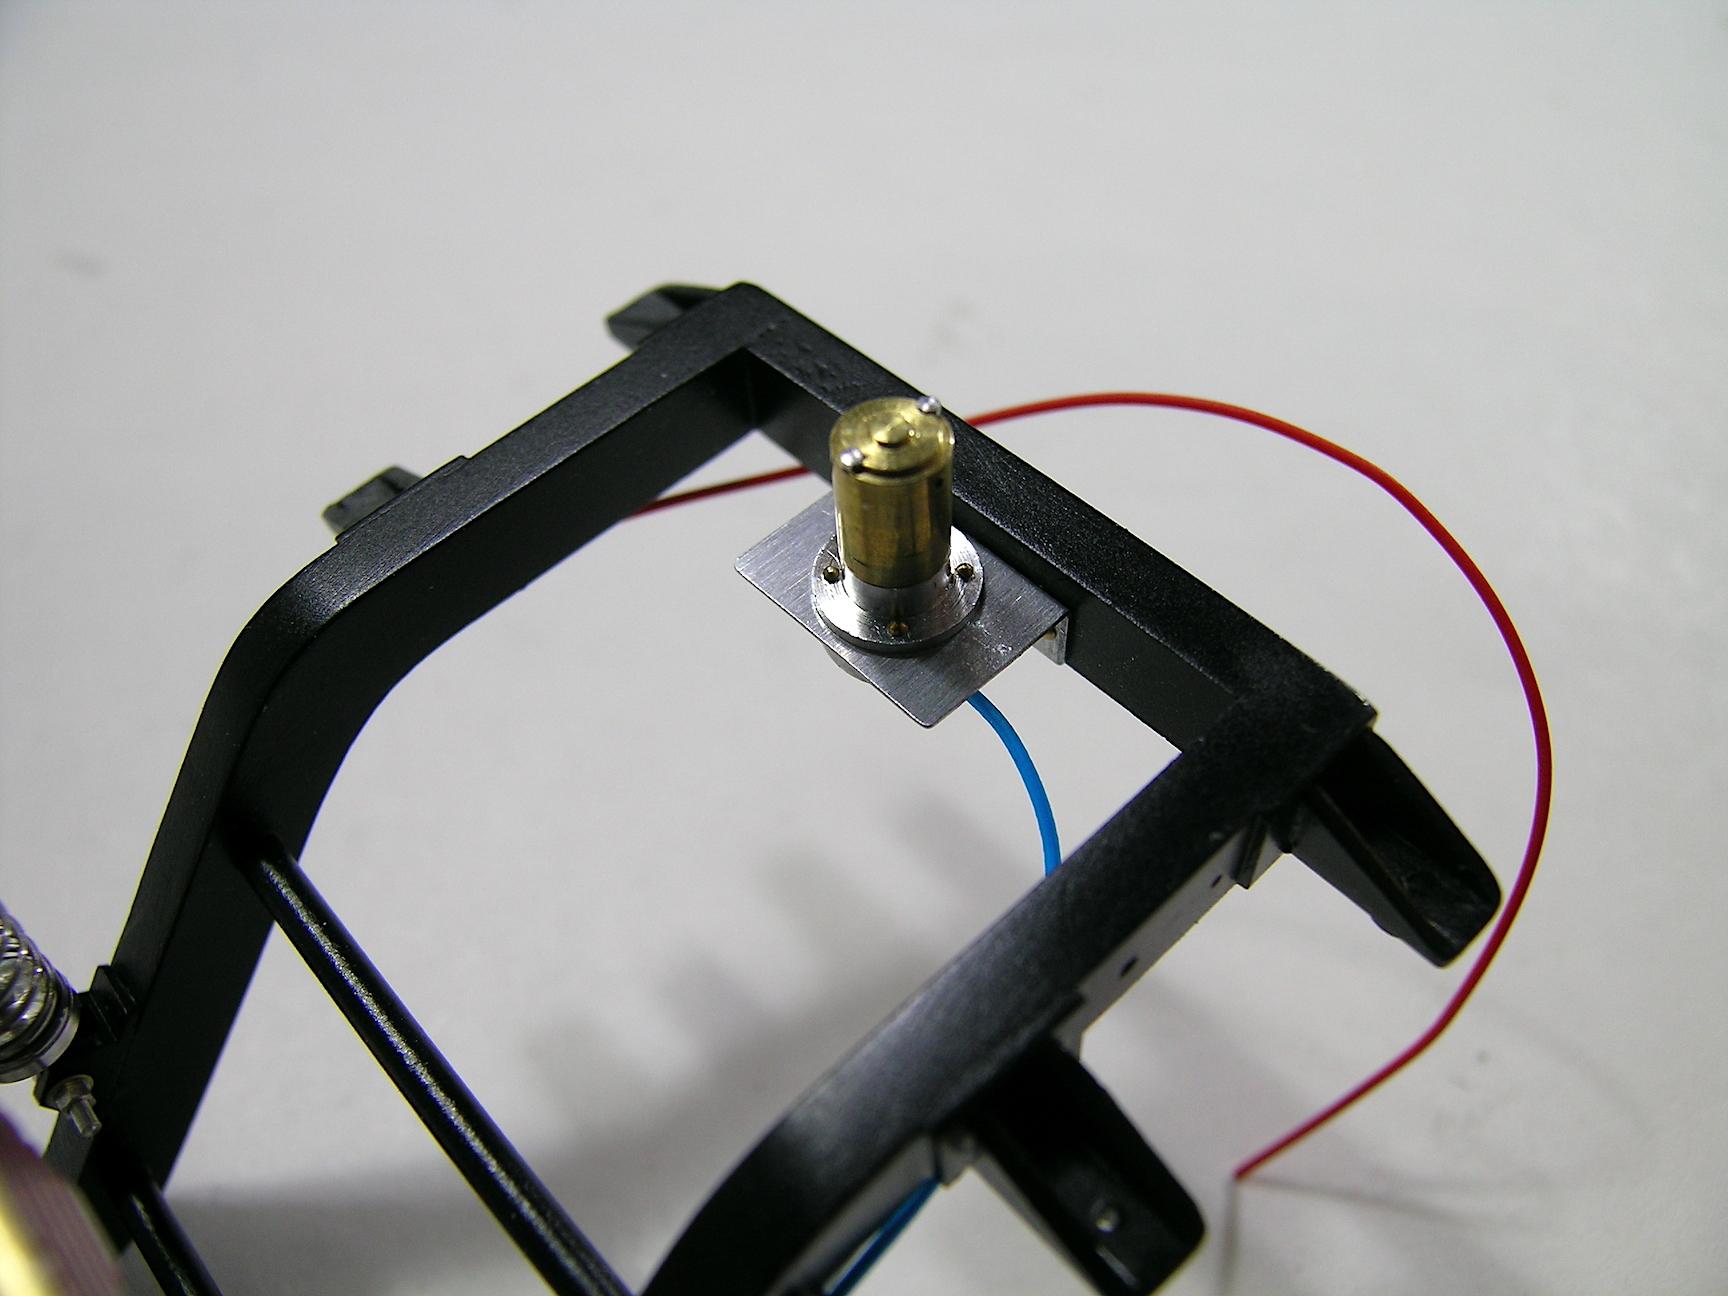
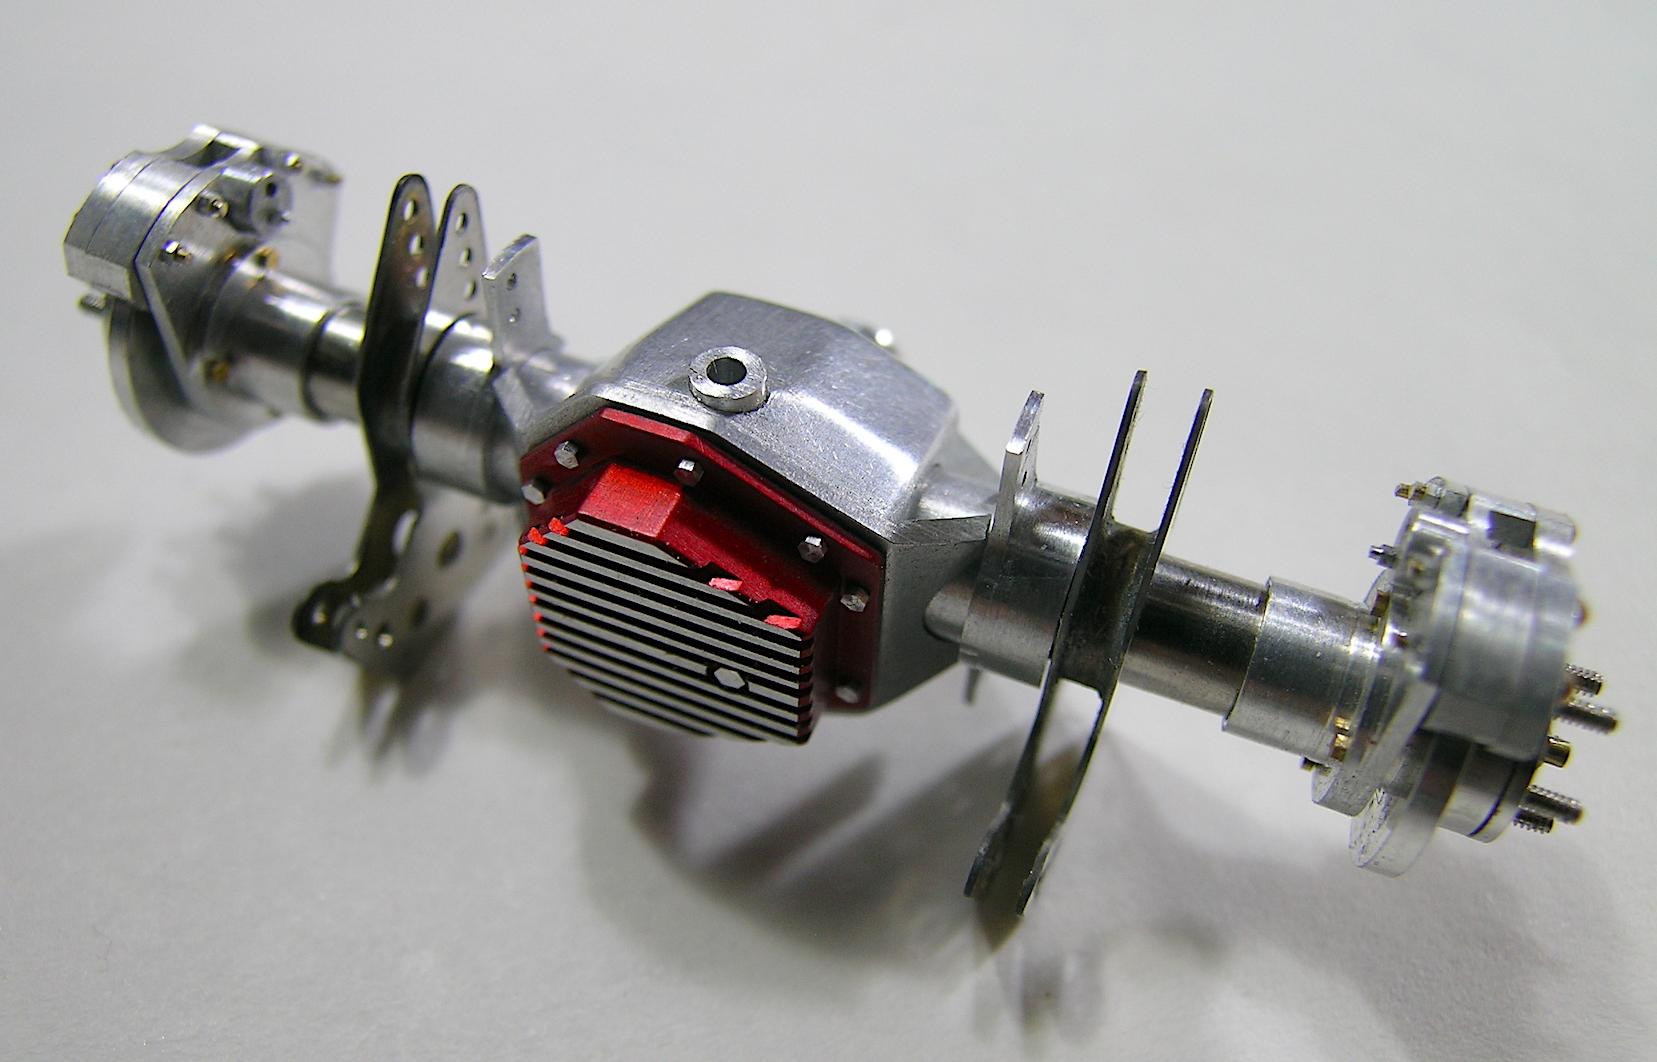
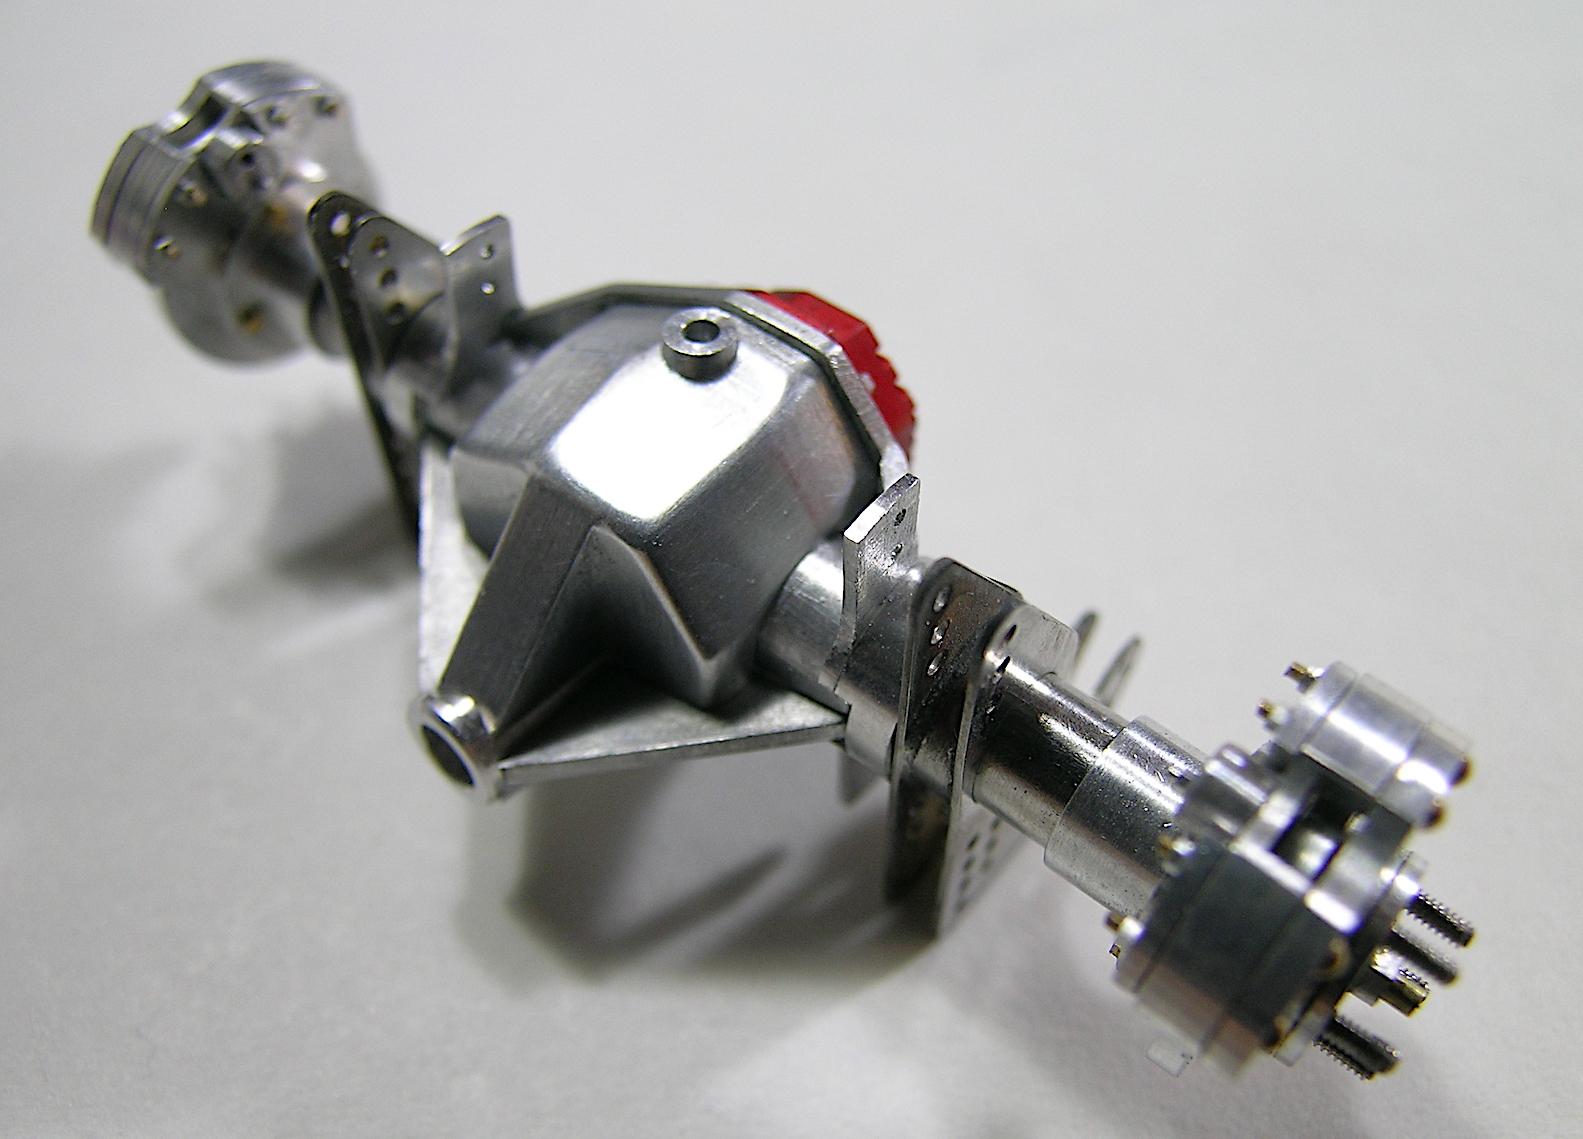
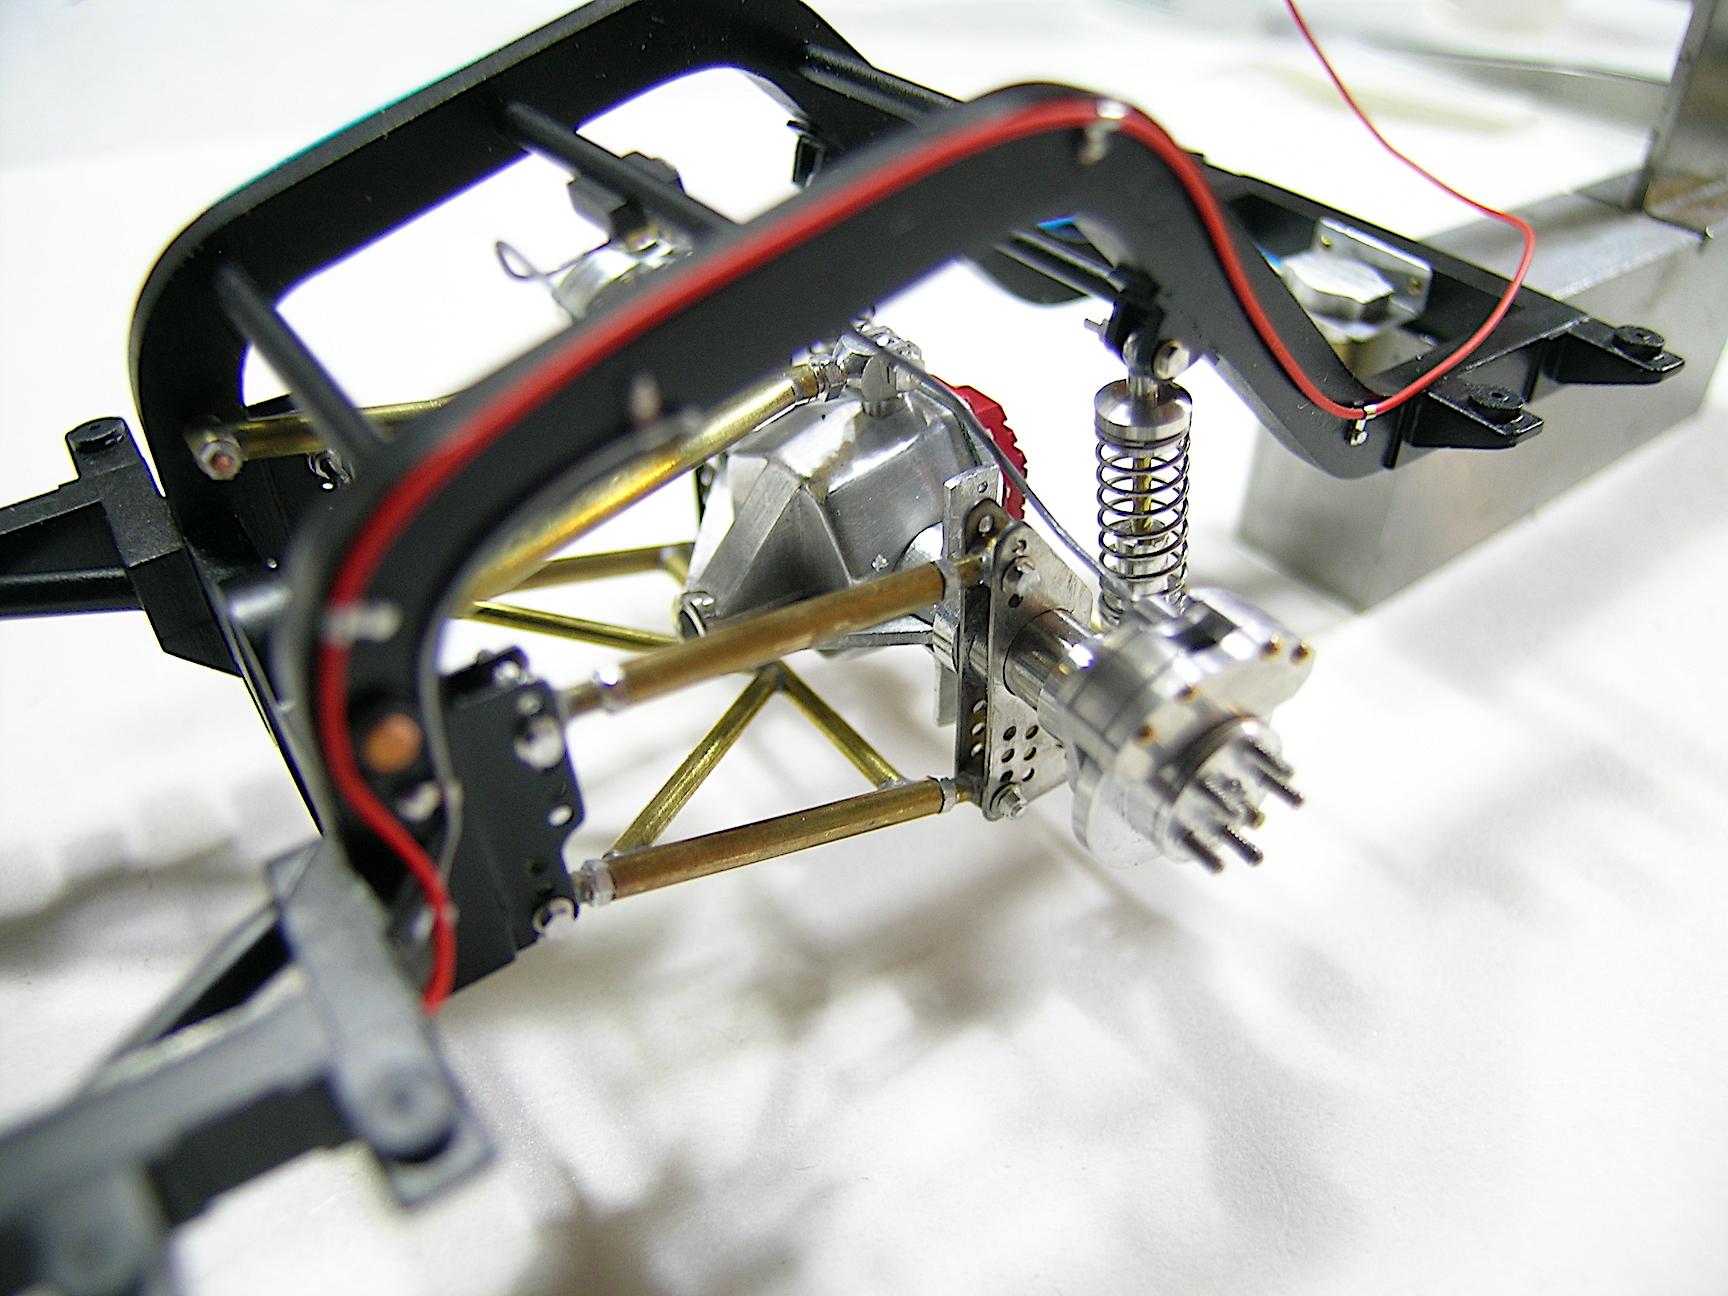
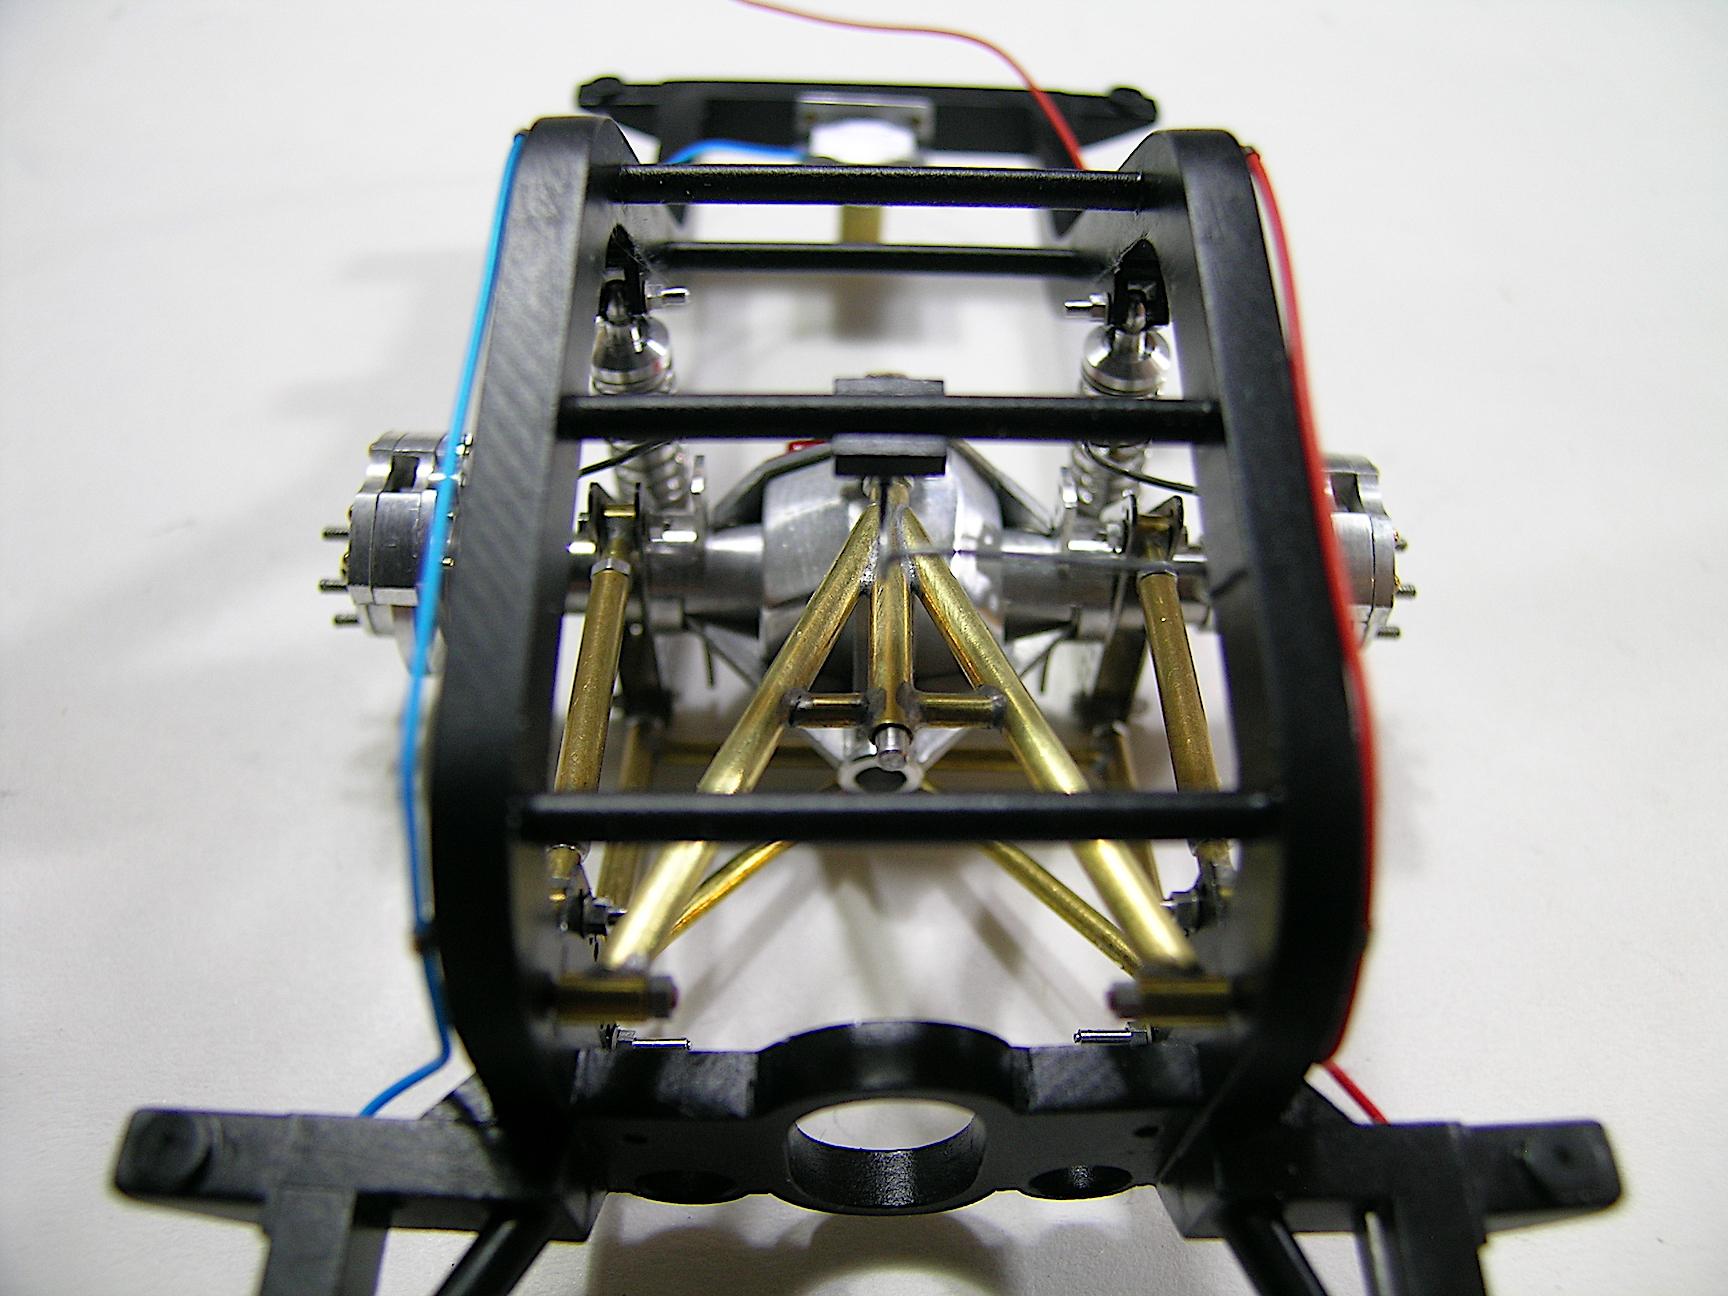
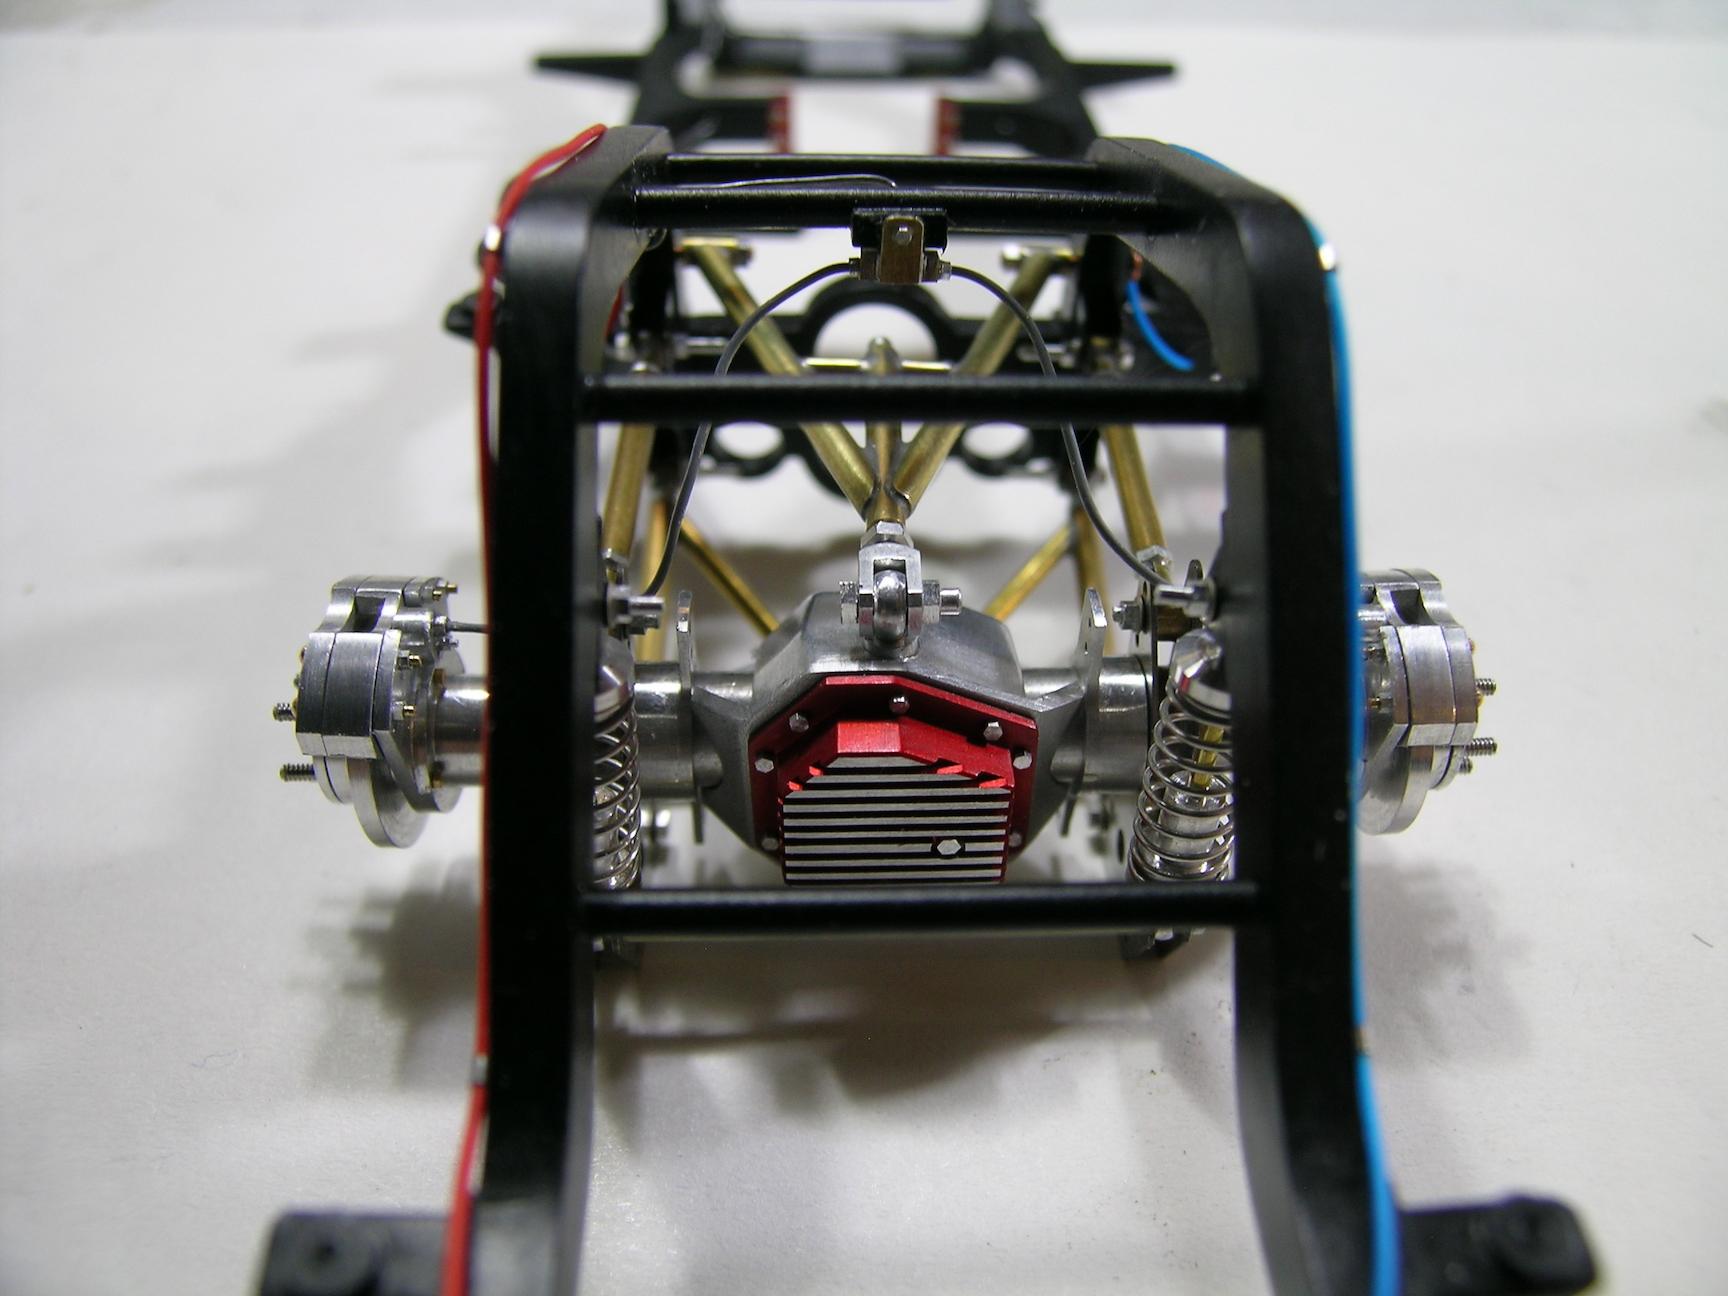
Hello everyone, Today's update is about assembly. I started with the rear because I need to make some modifications to the front so I can lower the front as much as possible (without modifying the frame). Basically, I'm going to have to make a new off-center front spindle and hope to lower the front a few inches to scale, to be continued... For now, I assembled the rear end and chrome plated the axle and 4-Link brackets using Caswell Copy Chorme, the result is what I was looking for, kind of a stainless color but not too chrome finished. The rear suspension is full functional and the brake disks spin freely in the caliper. I would have needed 4 hands to do the assembly but the space is very limited, I guess it wouldn't have been faster anyway... I hope to be able to show you a glimpse of the unpainted body on the frame soon! Comments and suggestions are welcome! I know I have to make this remark with diplomacy but if possible, in order not to repeat the photos I have uploaded, please avoid making a "quote" of the whole update but only of the photo on which you would have a question or comment to make. I'm already at more than 43 pages and I'm still far from the end with many pictures to come! Your support means a lot to me!!! ? Take care, Francis Fuel line connected to the electric pump. Rear end assembled. Other side view. I forgot to mention that the brackets for the wheelie bar are installed and I will make this one later. Rear end finally installed... hope for good... Another view, the battery cable is also installed in the same way as the gas line on the other side of the frame. Seen from the top. Seen from the back. Brake lines are connected to the calipers, I also put bleeder valves. Flexible brake lines connected to the T-valve. I'll smooth out the small wrinkles when the epoxy glue hardens. Lenco transmission support bolted to the frame.
-
Great project Larry! I love these Buicks, they are one of my favorite GM body styles along with the 71/72 442 Oldsmobile. One of my uncles had a '70 GS (red with white interior) and I was very attracted to that car, I remember the beautiful center console. I would love to build a 1/25 scale GSX '70 one of these days... Another long term project... Good start by the way, I will follow your progress with interest! ?
-
It's just amazing Dann (I know I'm repeating myself...) but this Super Car deserves all the praises it has received (and will receive)! I was wondering what type of glue you use to join all those styrene parts together? Also, where do you plan to put the gas tank? Will the piping run from the back to the front of the vehicle? Maybe I'm getting ahead of myself but I find this project so interesting...! ?
-
Monogram 1926 Mack
AmericanMuscleFan replied to Straightliner59's topic in WIP: Model Trucks: Big Rigs and Heavy Equipment
This is really a great job Daniel! I was just wondering if this truck model had front lights and I have my answer! It is now about to be completed and amazing build quality! We always want more so I can't wait to see your next project. For now, let's let this one get its well deserved praise! ? -
Oh I see... I am not an expert in the world of military aviation as you can see... So your final paint will be partially translucent so that your final color benefits from the texture of the base color?
-
Nice work Joe, the paint is beautiful, a lot of work... your index finger must hurt... By the way, I love that FORD mat... ?
-
Monogram 1926 Mack
AmericanMuscleFan replied to Straightliner59's topic in WIP: Model Trucks: Big Rigs and Heavy Equipment
Great work Daniel, I love the working hood and hinges! These are the kinds of features that make a model stand out and always astonish those who look at it. -
64 Dodge D100 Pickup Pro Street
AmericanMuscleFan replied to AmericanMuscleFan's topic in WIP: Drag Racing Models
This is great work Marcos! The photo etch parts are definitely smaller and certainly more difficult to work with but with a little patience (and your skills) you will certainly be able to tame them... ? Francis -
64 Dodge D100 Pickup Pro Street
AmericanMuscleFan replied to AmericanMuscleFan's topic in WIP: Drag Racing Models
Hello Doug! Thanks for your question, it depends on the shape and size of the material used to machine the part. If I'm machining from a round rod, I separate the part the vast majority of the time by going back to the lathe with the regular cut off tool blade, but if the part is rectangular in shape, I use a cutting disc directly on the milling machine. A little advice, if you use a cutting disc, get one with 110 teeth because the ones with smaller teeth tend to clog up easily, making then disturbing noises and the material stuck in them produce a less clean cut. I find the cutting disc method more difficult to control and the right speed of the milling machine more difficult to determine (I speak from personal experience). I hope this helps, Francis -
64 Dodge D100 Pickup Pro Street
AmericanMuscleFan replied to AmericanMuscleFan's topic in WIP: Drag Racing Models
Thanks Jeremy, I really appreciate your kind words! I think that when you love your subject, it helps to always want to do a little more! I'm having a lot of fun with this project and I've made a lot of progress in my machining techniques (I think...), I hope it will serve me well in my future projects! More picture of the assembly to come soon! Francis ?? -
64 Dodge D100 Pickup Pro Street
AmericanMuscleFan replied to AmericanMuscleFan's topic in WIP: Drag Racing Models
Thanks Marcos! They are photo etch parts from Detail Master, the hardest part is to roll them up perfectly and have the holes lined up right to insert the little aluminum bolt that are used to attach them to the frame. It takes a little patience... ? Francis -
64 Dodge D100 Pickup Pro Street
AmericanMuscleFan replied to AmericanMuscleFan's topic in WIP: Drag Racing Models
Thanks Lorne! I look forward to seeing more updates on your fantastic truck, but don't take it as pressure from me, my friend... ? Francis -
64 Dodge D100 Pickup Pro Street
AmericanMuscleFan replied to AmericanMuscleFan's topic in WIP: Drag Racing Models
Thank Ron! Any update of your great FD-100 build my friend? -
64 Dodge D100 Pickup Pro Street
AmericanMuscleFan replied to AmericanMuscleFan's topic in WIP: Drag Racing Models
Thanks for the kind words Dave! The brass rivets are 0.8mm from Scale Hardware and the small steel brackets are photo etch from Detail Master. Francis