AmericanMuscleFan
-
Posts
3,058 -
Joined
-
Last visited
Content Type
Profiles
Forums
Events
Gallery
Everything posted by AmericanMuscleFan
-
Thanks Mark, I started in my childhood like all the young people with a tube of Testor glue and brushes. It is by dint of contemplating the high quality work of master model makers that I decided to try new techniques. Everyone goes at their own pace, the goal is to have a good time, I hope you get lots of them!!!
-
Fantastic build Michal! The kit itself, despite its small flaws is of great quality, but your final product is certainly first class. The paint and assembly are absolutely flawless. You can be proud of your work sir! By the way, this beauty would command a very high price at a Barrett Jackson auction. ?
-

64 Dodge D100 Pickup Pro Street
AmericanMuscleFan replied to AmericanMuscleFan's topic in WIP: Drag Racing Models
Thanks Charles! Your excellent work forces me to innovate and your comments are a great source of motivation my friend, I hope to keep your interest on my project until the end of the build... Francis -
charlie libby 1965 mustang dragcar
AmericanMuscleFan replied to charlie libby's topic in WIP: Drag Racing Models
Great work Charlie! You are a very talented machinist and your components are made in a very clever way, I take note! I can't wait to see the painted body, I really like your choice of color. ? -
64 Dodge D100 Pickup Pro Street
AmericanMuscleFan replied to AmericanMuscleFan's topic in WIP: Drag Racing Models
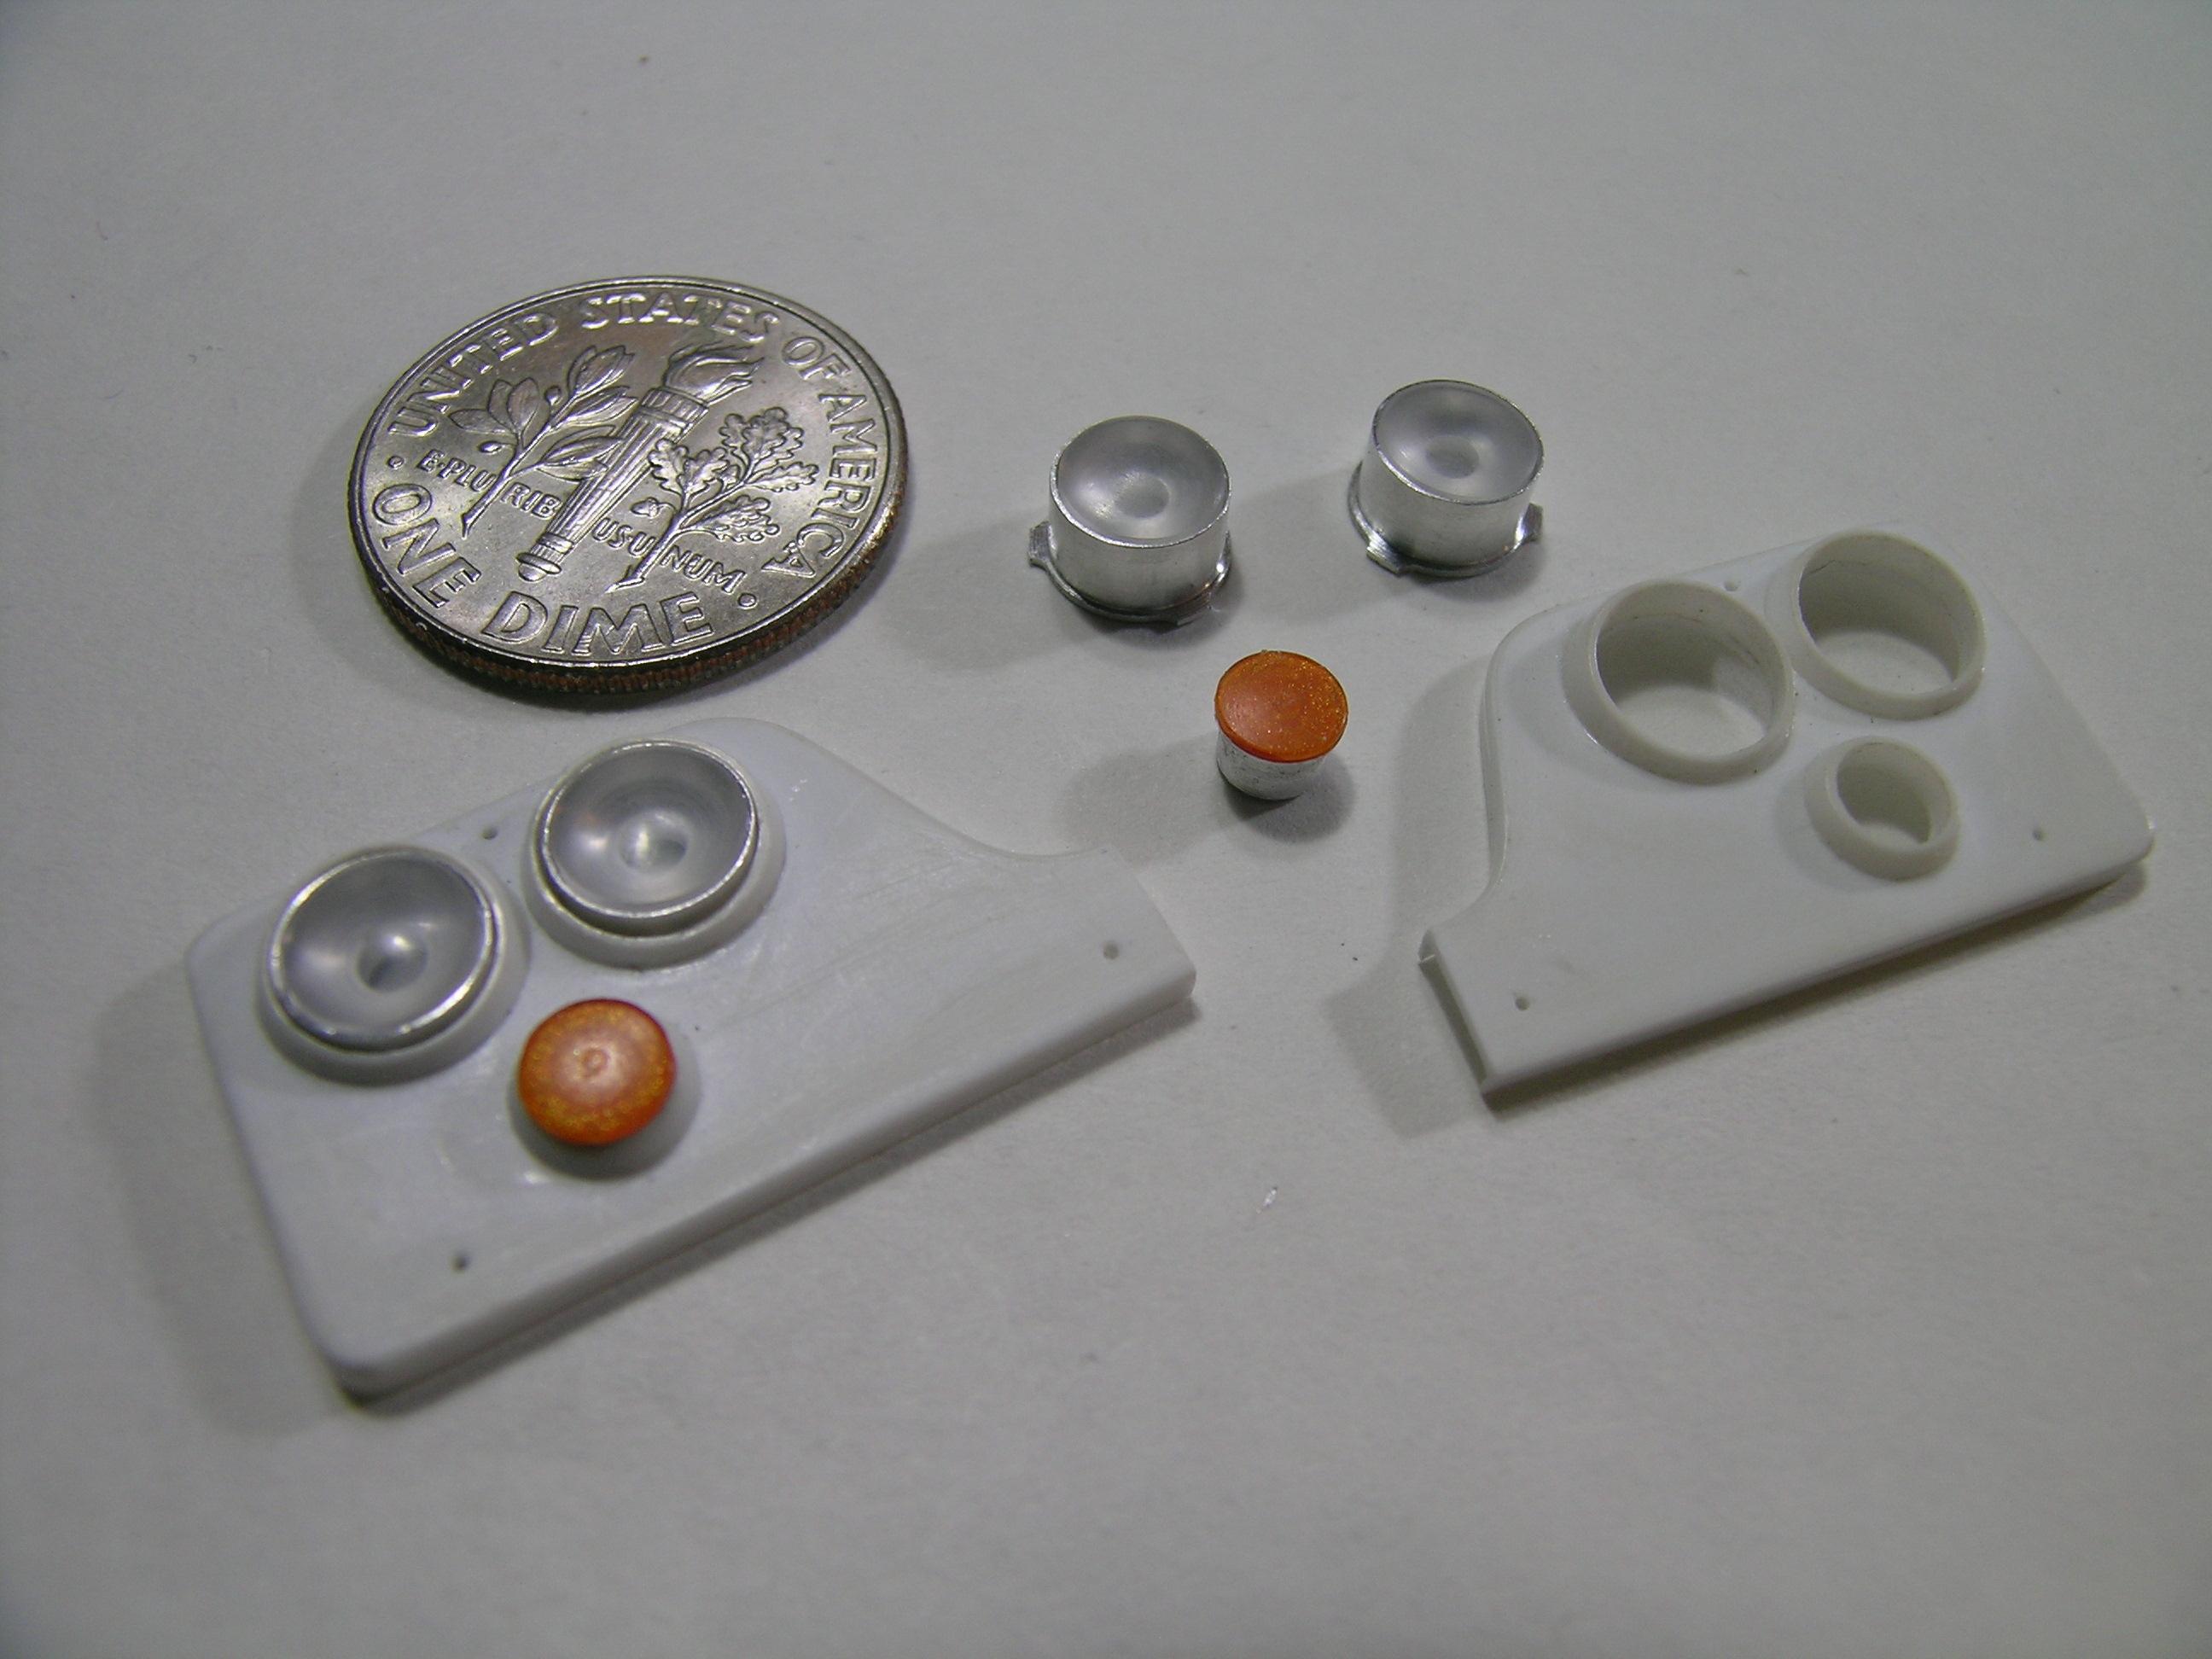
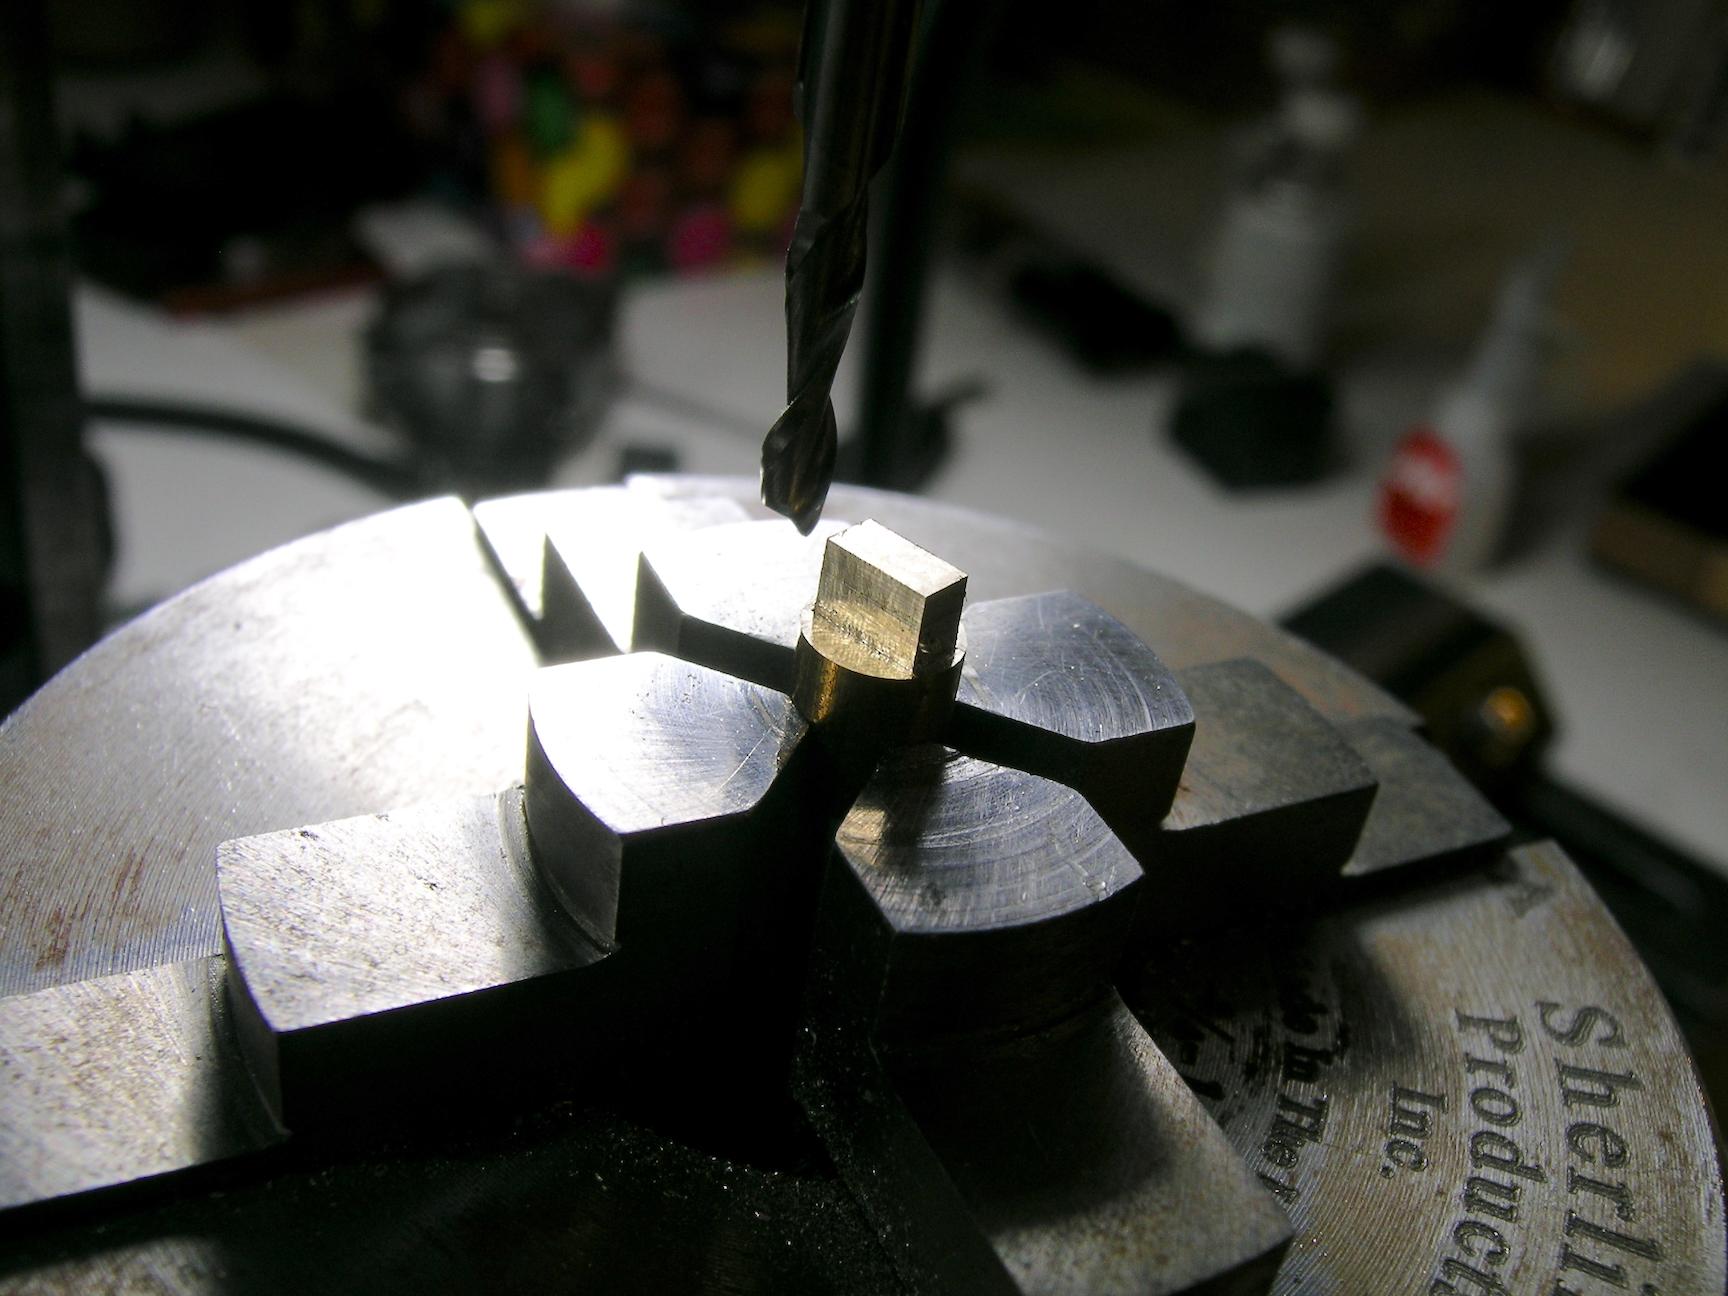
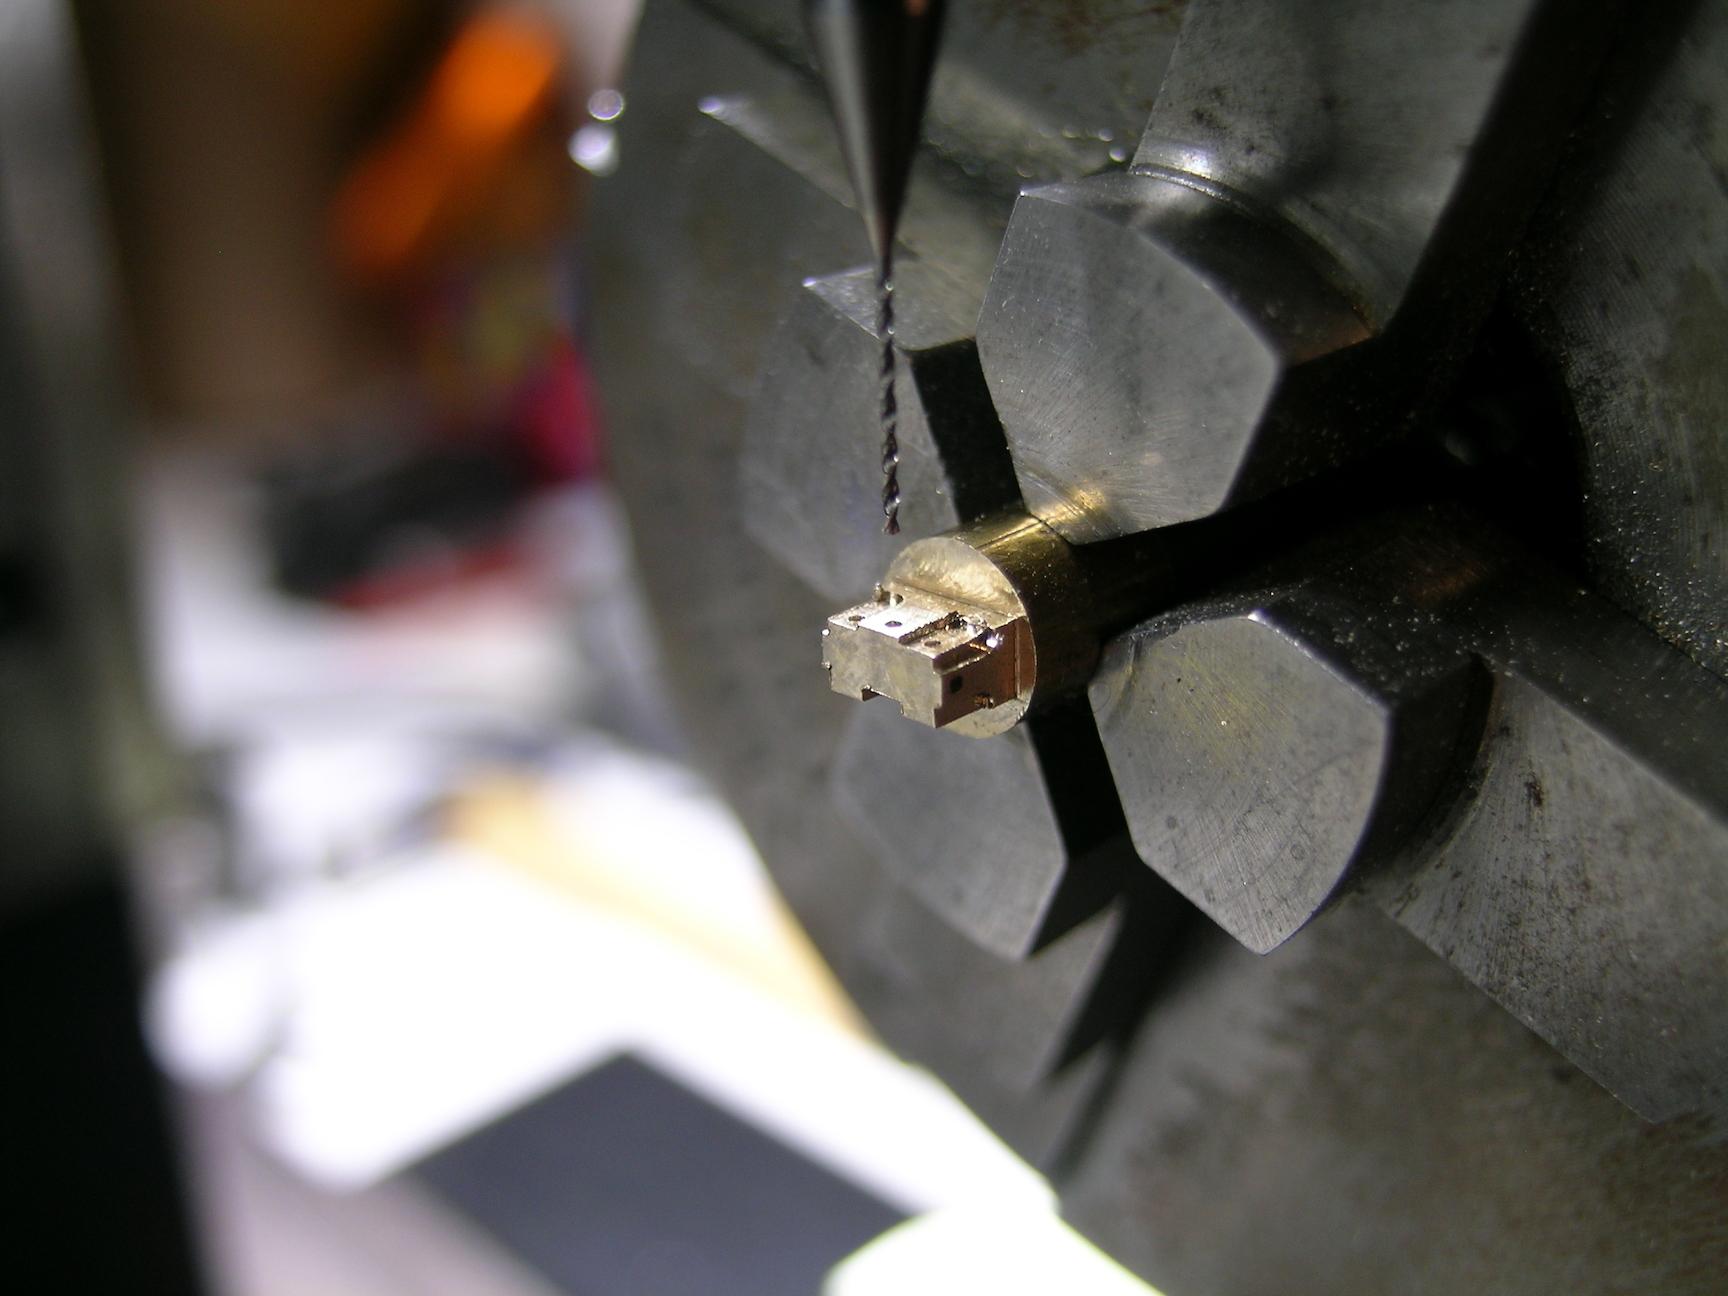
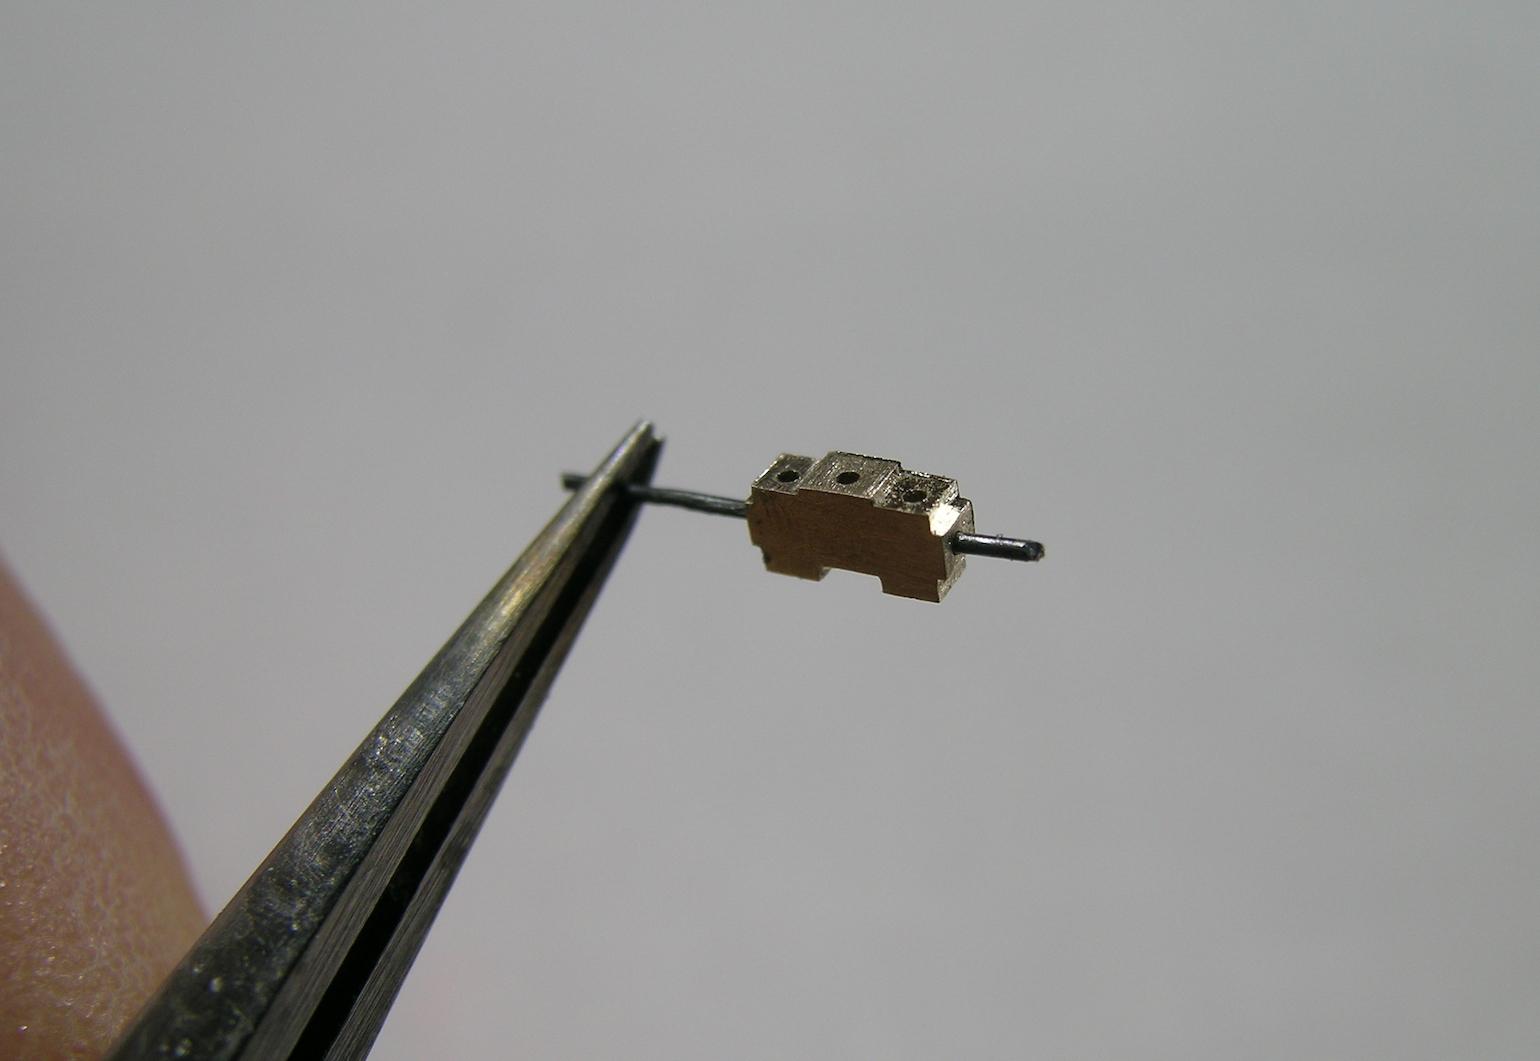
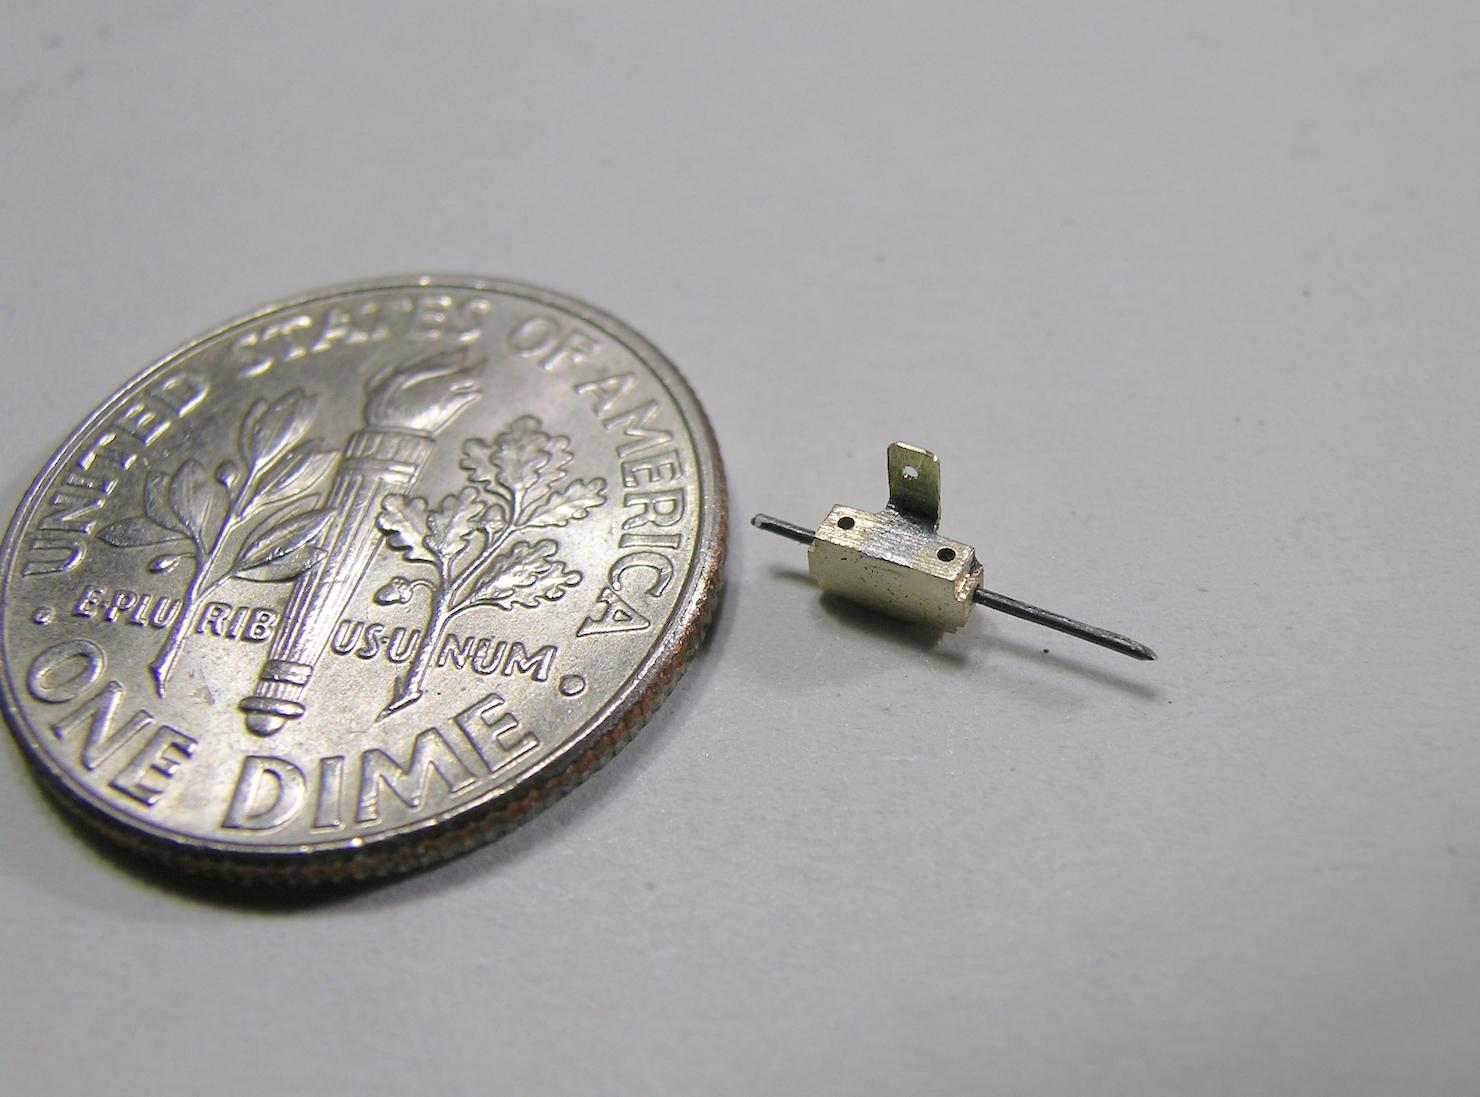
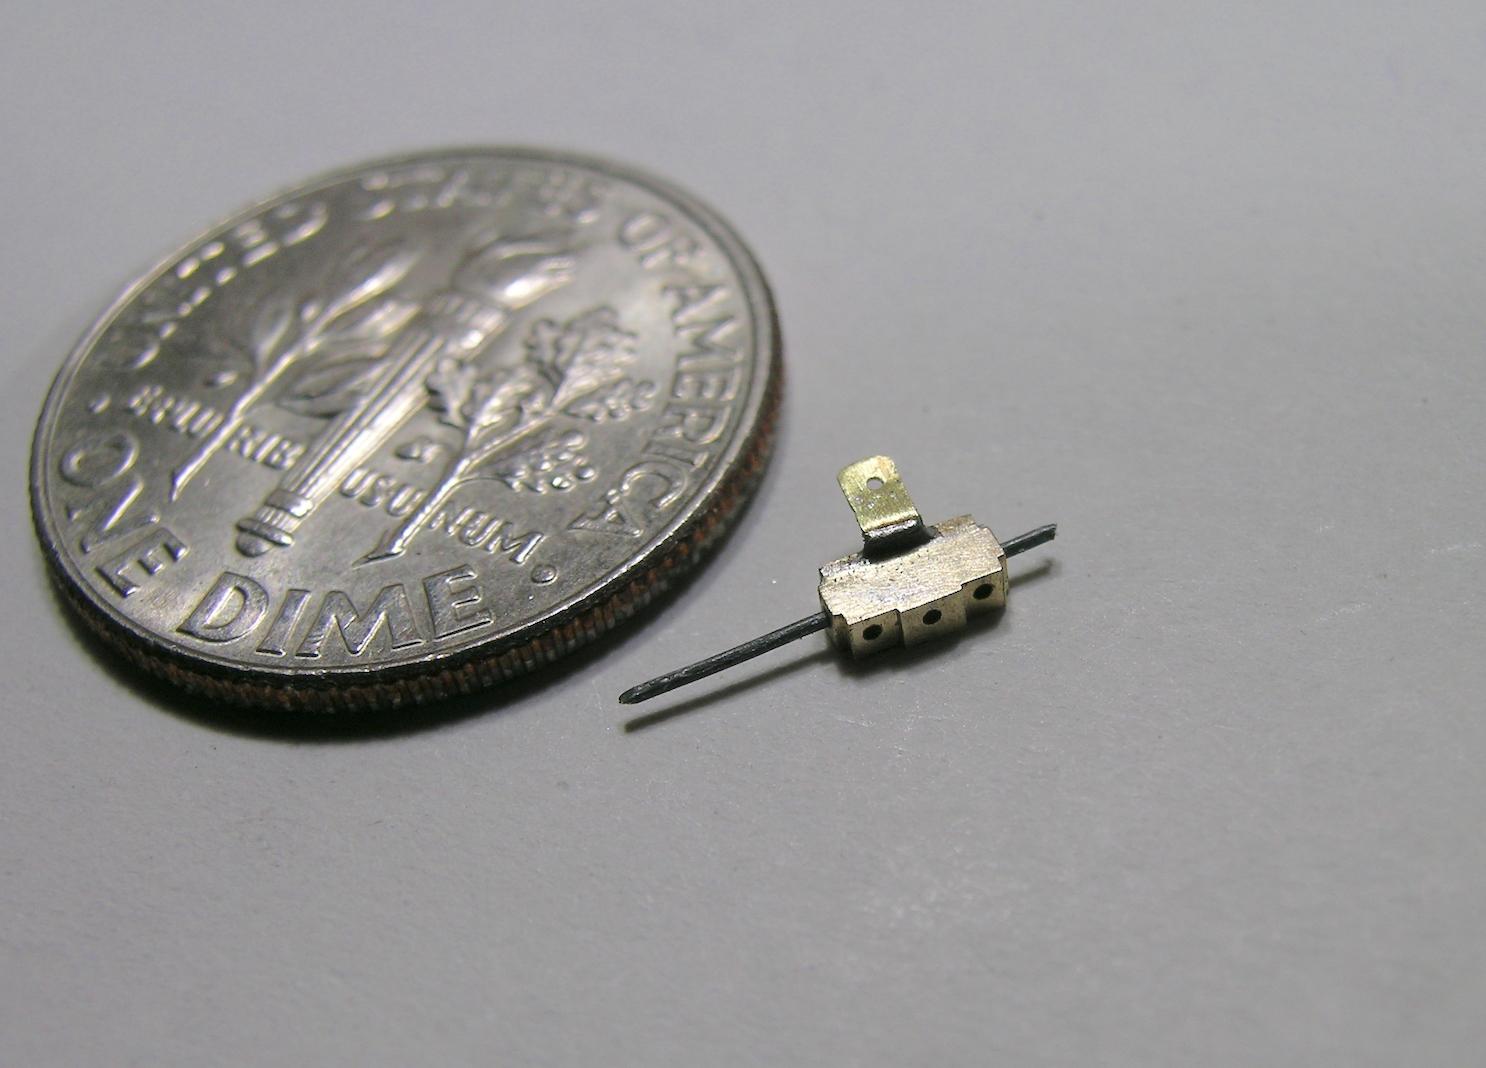
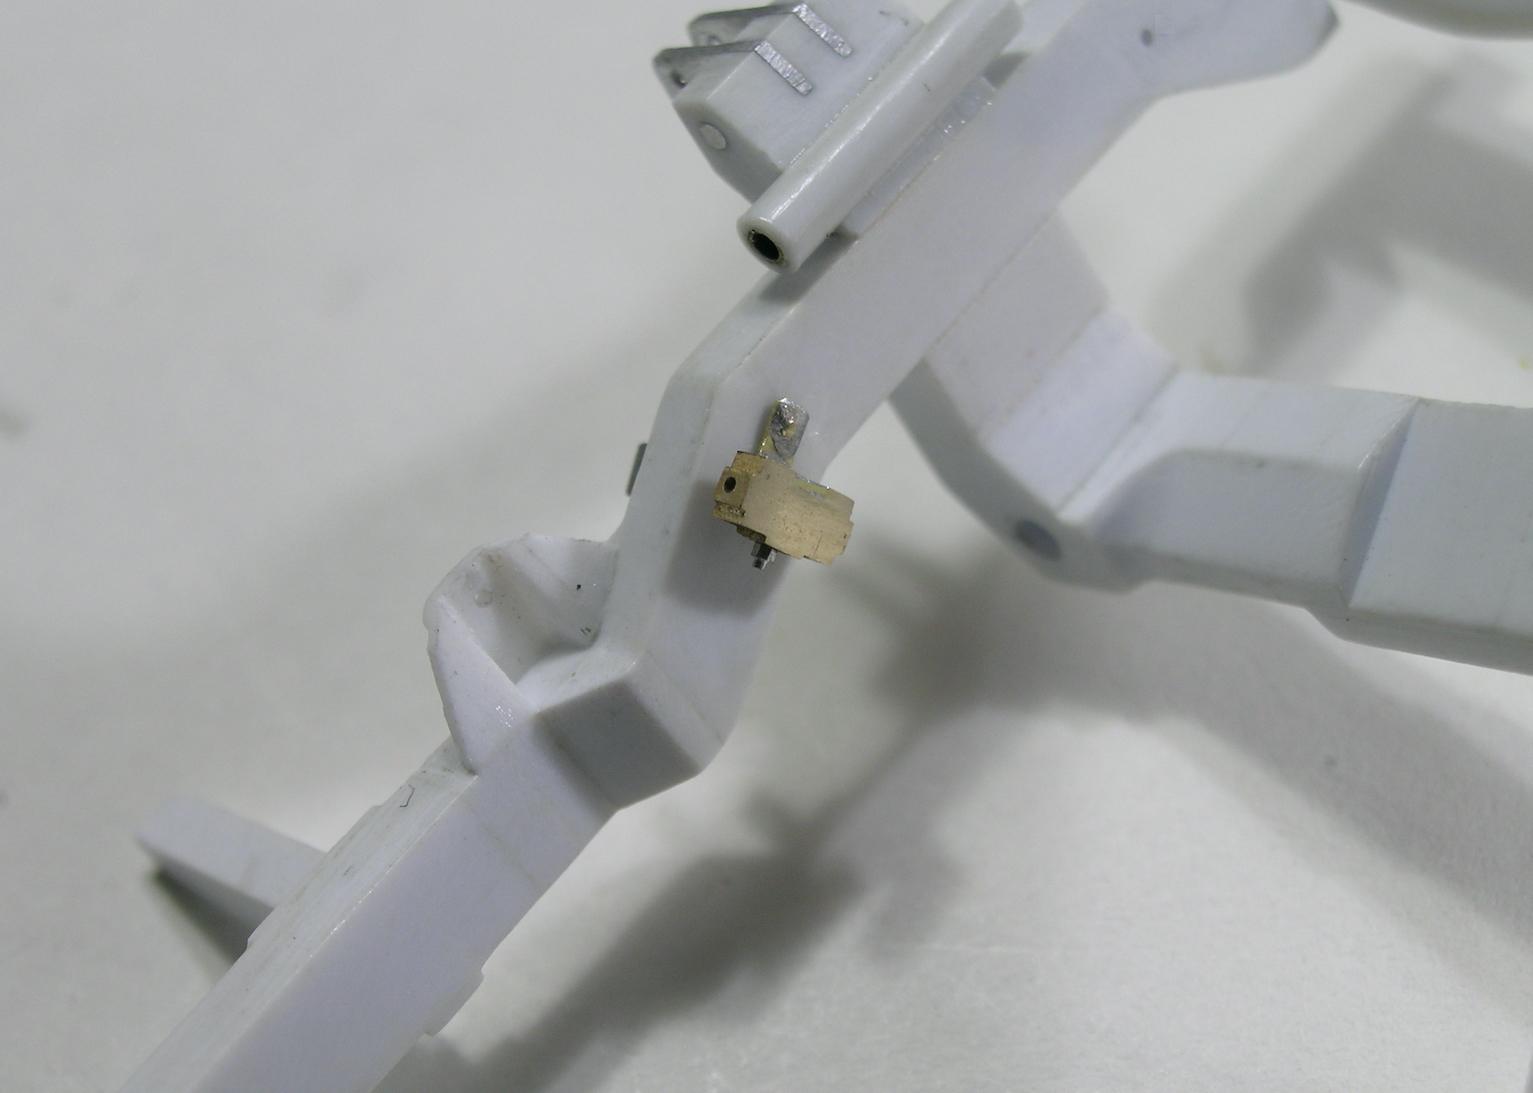
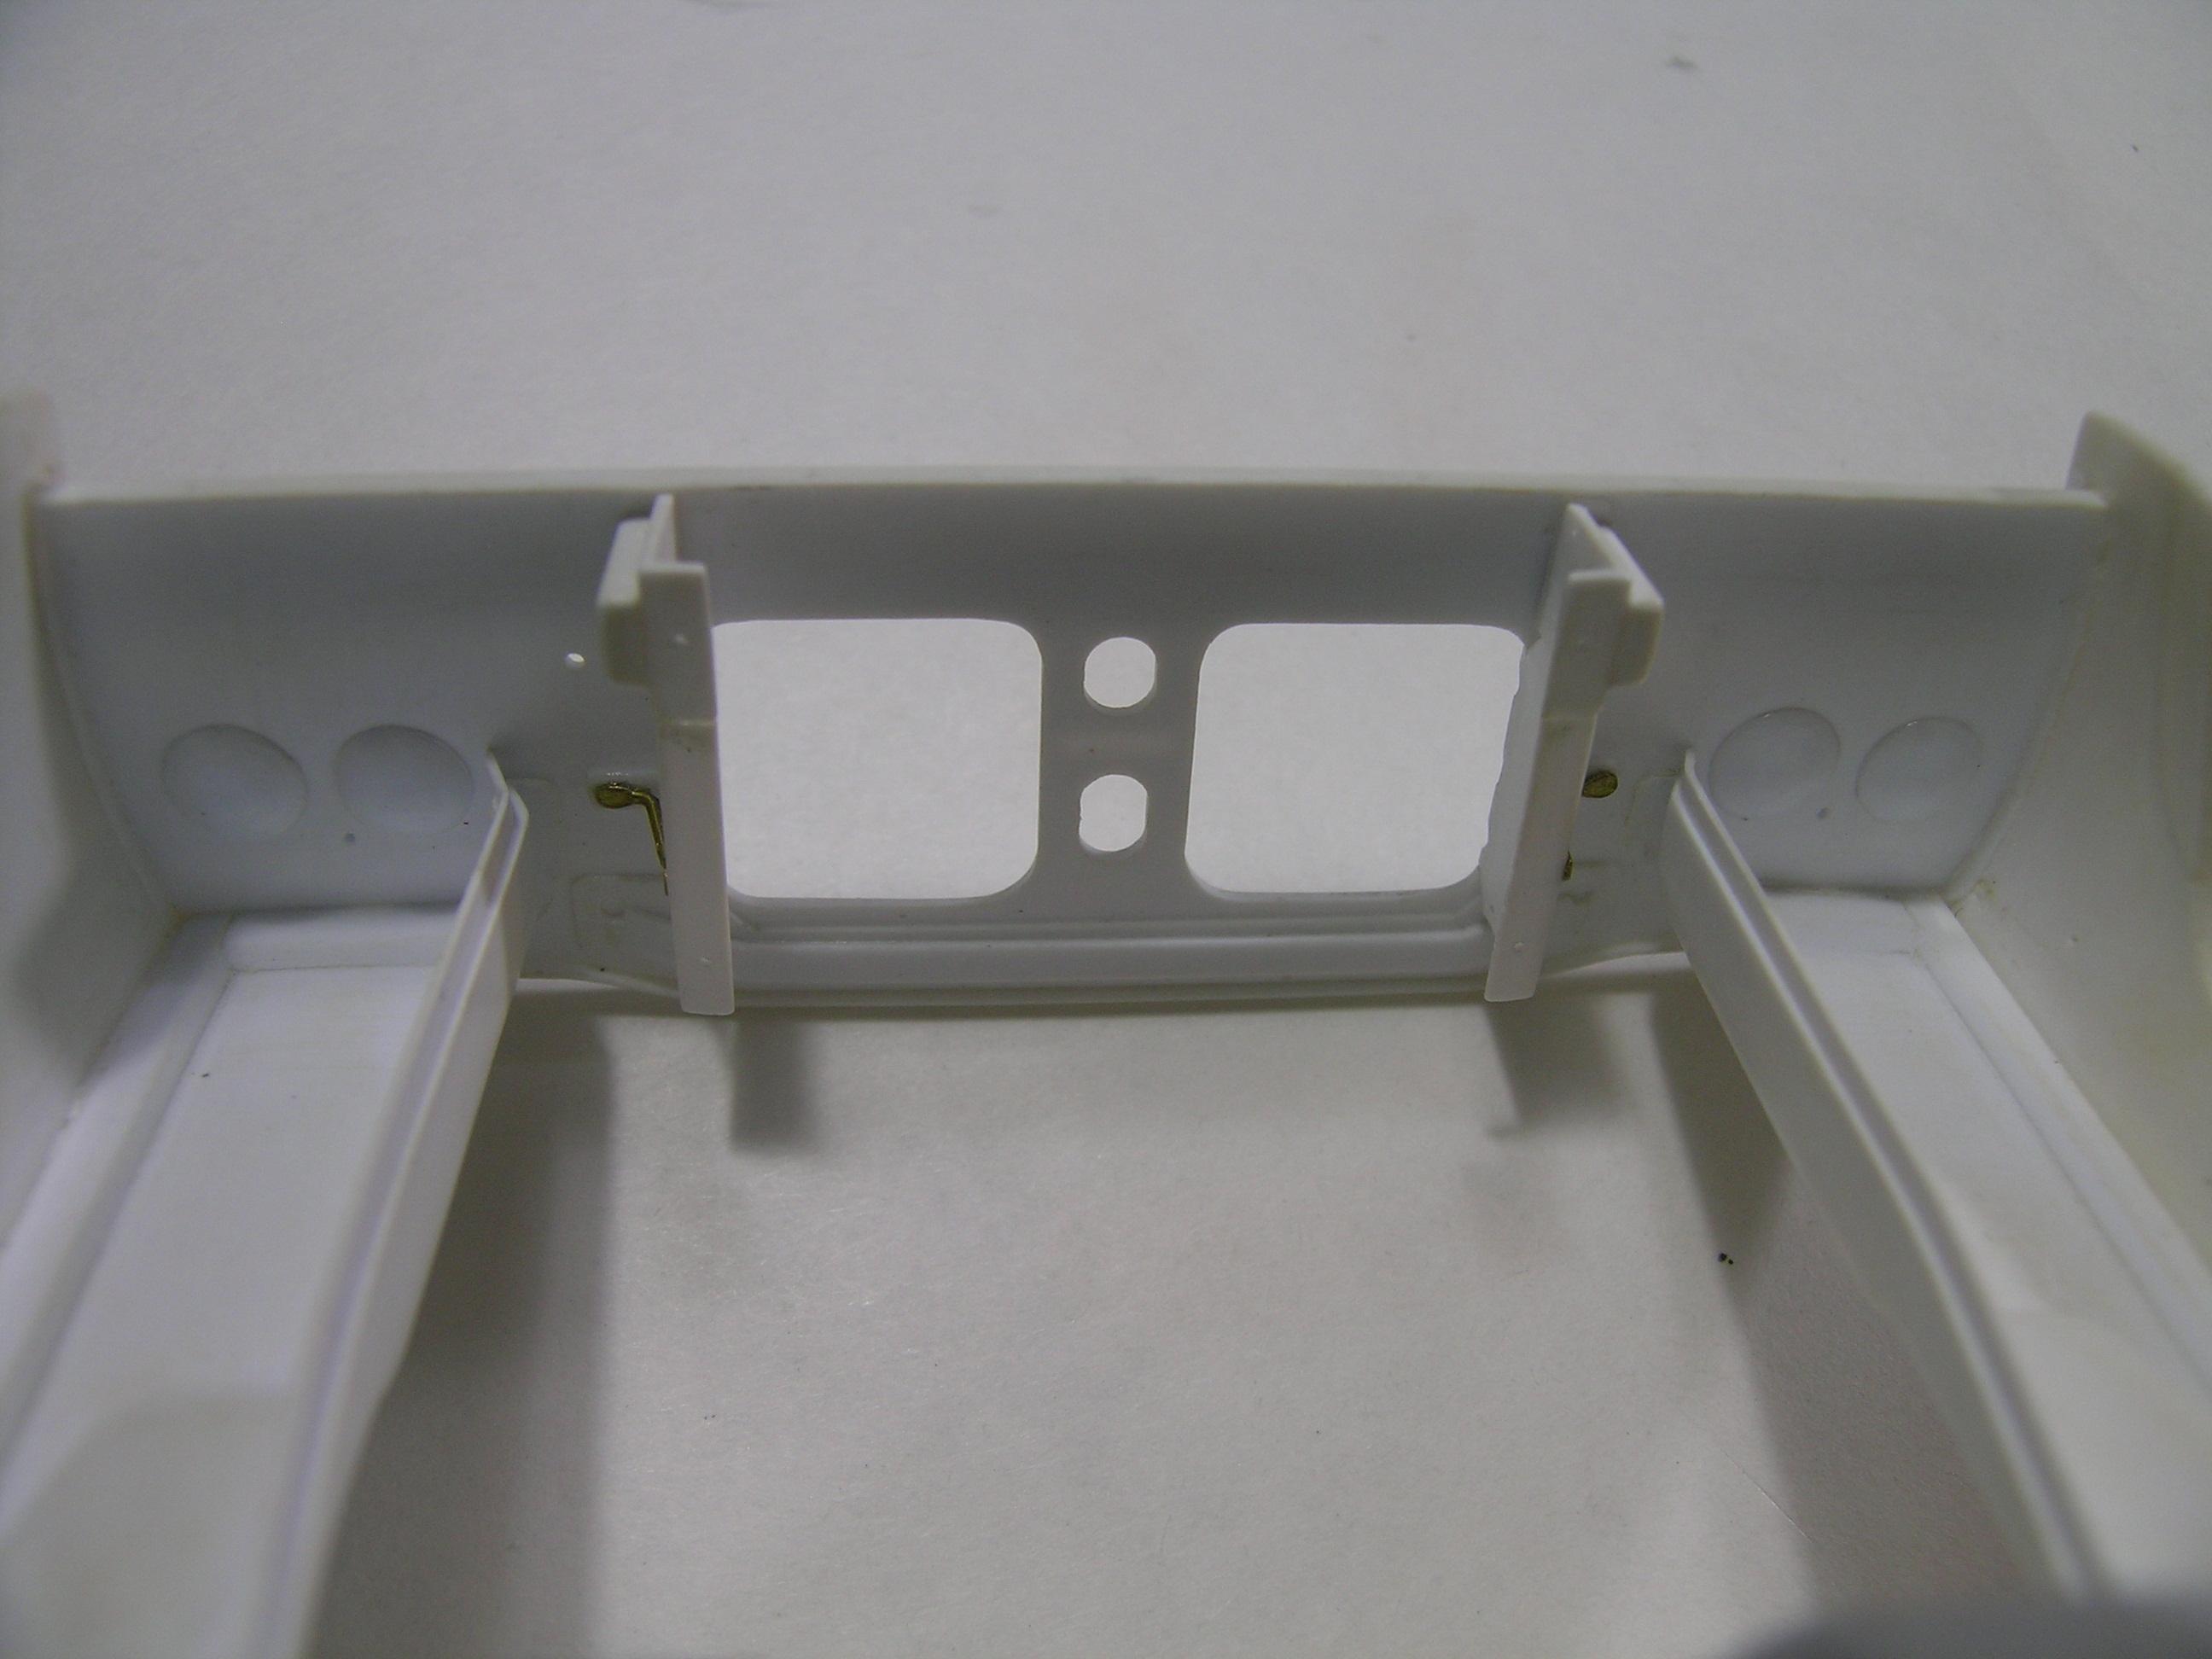
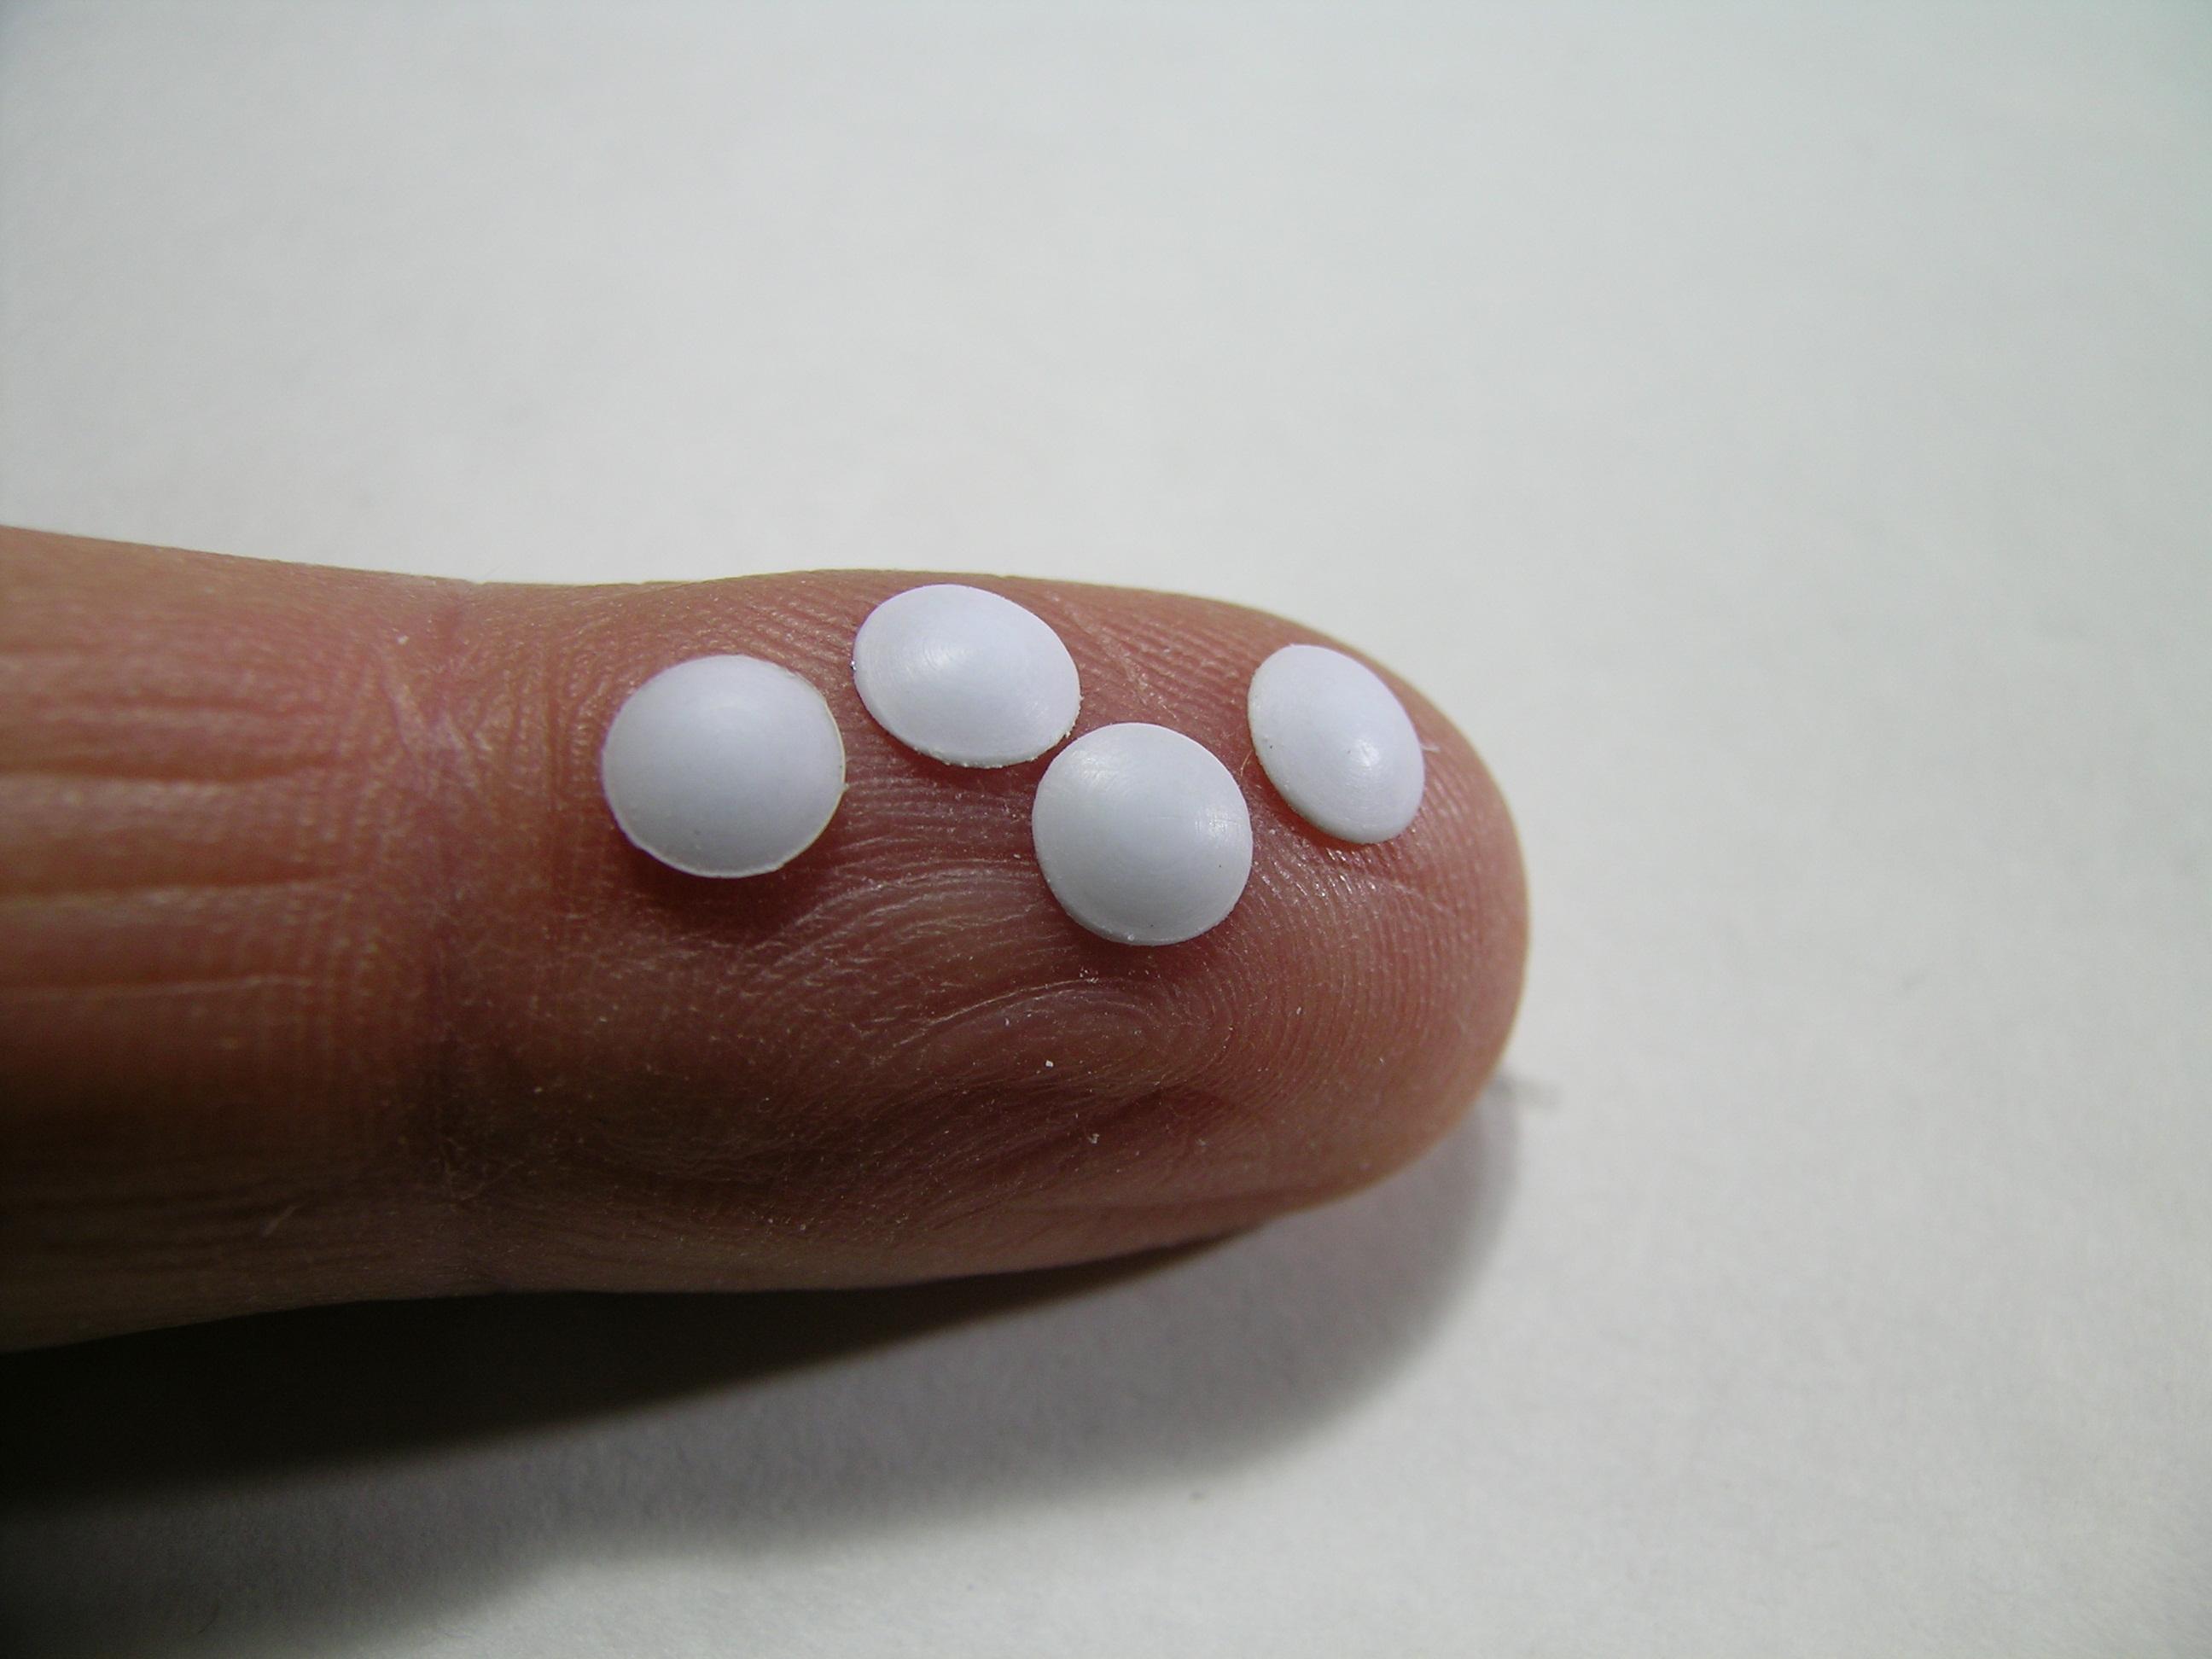
Hello everyone, Before I dive into the tedious plumbing work, I realize that I forgot to share with you the last fabrication/modifications of the front panel. I did the turn signals and separated the sign since it is in two separate parts on the real truck. Before I start painting the frame I noticed that I forgot to make some important parts of the brake system. Using brass I machined the proportioning valve as its the starting point for the brake lines. I will also have to make a Tee Valve for the rear brakes so I prefer to make this part before painting the frame as the part will be mounted on it and not on the differential cover. Its not a very complex part to make so I might be able to finish this one before I go back to work. Thanks for your patience, I hope to offer you some pictures of the beginning of the assembly soon even if I still have some parts to make, it will be updates of both in the future. Comments are welcome! Francis Front panel is now a 2 separate parts with turn signals made from aluminum and tinted acrylic. Test fit. Beginning of the machining of the proportioning valve. Drilling holes using a 0.016'' drill bit. Drilled side by side, brake lines will be 0.014" steel wire. I welded a small mounting bracket, the part is all brass. Different view. Test fit on the "unpainted..." frame. Note the added small aluminum stud ti simulate the sensor (I don't intend to connect a wire to it, it's just to fill the unused hole.)
-
Welcome from the East Coast of Canada, Mark! ?? Model making is the perfect hobby these days... ?
-
Welcome to the forum Craig! You have serious painting skills as others have mentioned and good taste in color selection I might add. You may be new to this forum but obviously not a beginner to this hobby... great work! I hope you will share your technique with us! ?
-
I really love these small Vega, they are the perfect canvas for a drag car or a street machine! You can't go wrong with this one and blue is certainly a good choice for this little car!
-
1955 Big Block Truck
AmericanMuscleFan replied to Lorne's topic in WIP: Model Trucks: Pickups, Vans, SUVs, Light Commercial
I'm glad to know that you are doing well Lorne! I'm so happy to see you back on this great truck build my friend. Good wine takes time to mature and there is no point in rushing things, we often don't have time to do it right the first time but always have time to do it again so why not step back and do it the right way... everything comes to those who wait! ? -
64 Dodge D100 Pickup Pro Street
AmericanMuscleFan replied to AmericanMuscleFan's topic in WIP: Drag Racing Models
They are just pieces like many others Ian. It puts some light in my project...LOL Francis -
64 Dodge D100 Pickup Pro Street
AmericanMuscleFan replied to AmericanMuscleFan's topic in WIP: Drag Racing Models
Thank you for your always colorful comments my friend. In any case, your support can only contribute to kick mine... and to motivate me! Francis -
64 Dodge D100 Pickup Pro Street
AmericanMuscleFan replied to AmericanMuscleFan's topic in WIP: Drag Racing Models
Thanks Mike! You're probably right about the rust problem, but it probably wouldn't have been used in winter, so they would have lasted forever anyway. Spoiler Alert: I'll be painting the frame today and hope to begin assembly soon, starting the long and tedious work of installing the brake lines and electrical wiring. ? Francis -
64 Dodge D100 Pickup Pro Street
AmericanMuscleFan replied to AmericanMuscleFan's topic in WIP: Drag Racing Models
Good idea Tim, we would probably have a lot to talk about as I would love to know how to machine titanium like you do. From enthusiast to enthusiast, the discussion could go on forever... ? Francis -
64 Dodge D100 Pickup Pro Street
AmericanMuscleFan replied to AmericanMuscleFan's topic in WIP: Drag Racing Models
Thanks Marcos, With the primary goal of building as many parts as possible for this project, I thought of this idea for the headlights and although they are not perfect, it opens new possibilities to work with new materials. This truck is as much a laboratory as a scale model if I can put it that way... Francis -
1/16 SCALE A/FC NITRO FUNNY CAR
AmericanMuscleFan replied to Ian McLaren's topic in WIP: Drag Racing Models
I really like all these new details Ian and it's always very motivating to add new ones when you see your project going in the right direction. I like that you took the time to use real wood for the steering wheel, it's a nice touch! ? -
Vintage Top Fuel FEDs, 1:16 brass chassis
AmericanMuscleFan replied to Mike Williams's topic in WIP: Drag Racing Models
That a great and inspiring build Mike, a superb example of the good use of the right material at the right place. Better lighting would have helped to appreciate the color of the body but I can imagine how beautiful it must be in person. I especially like the steering and your beautiful front wheels, great art! I hope you will continue to treat us with your prowess my friend!!! ? -
charlie libby 1965 mustang dragcar
AmericanMuscleFan replied to charlie libby's topic in WIP: Drag Racing Models
Great job on the Wilwood master cylinder Charles, you have nailed the shape perfectly! I do love your color choice, absolutely gorgeous my friend! ? -
64 Dodge D100 Pickup Pro Street
AmericanMuscleFan replied to AmericanMuscleFan's topic in WIP: Drag Racing Models
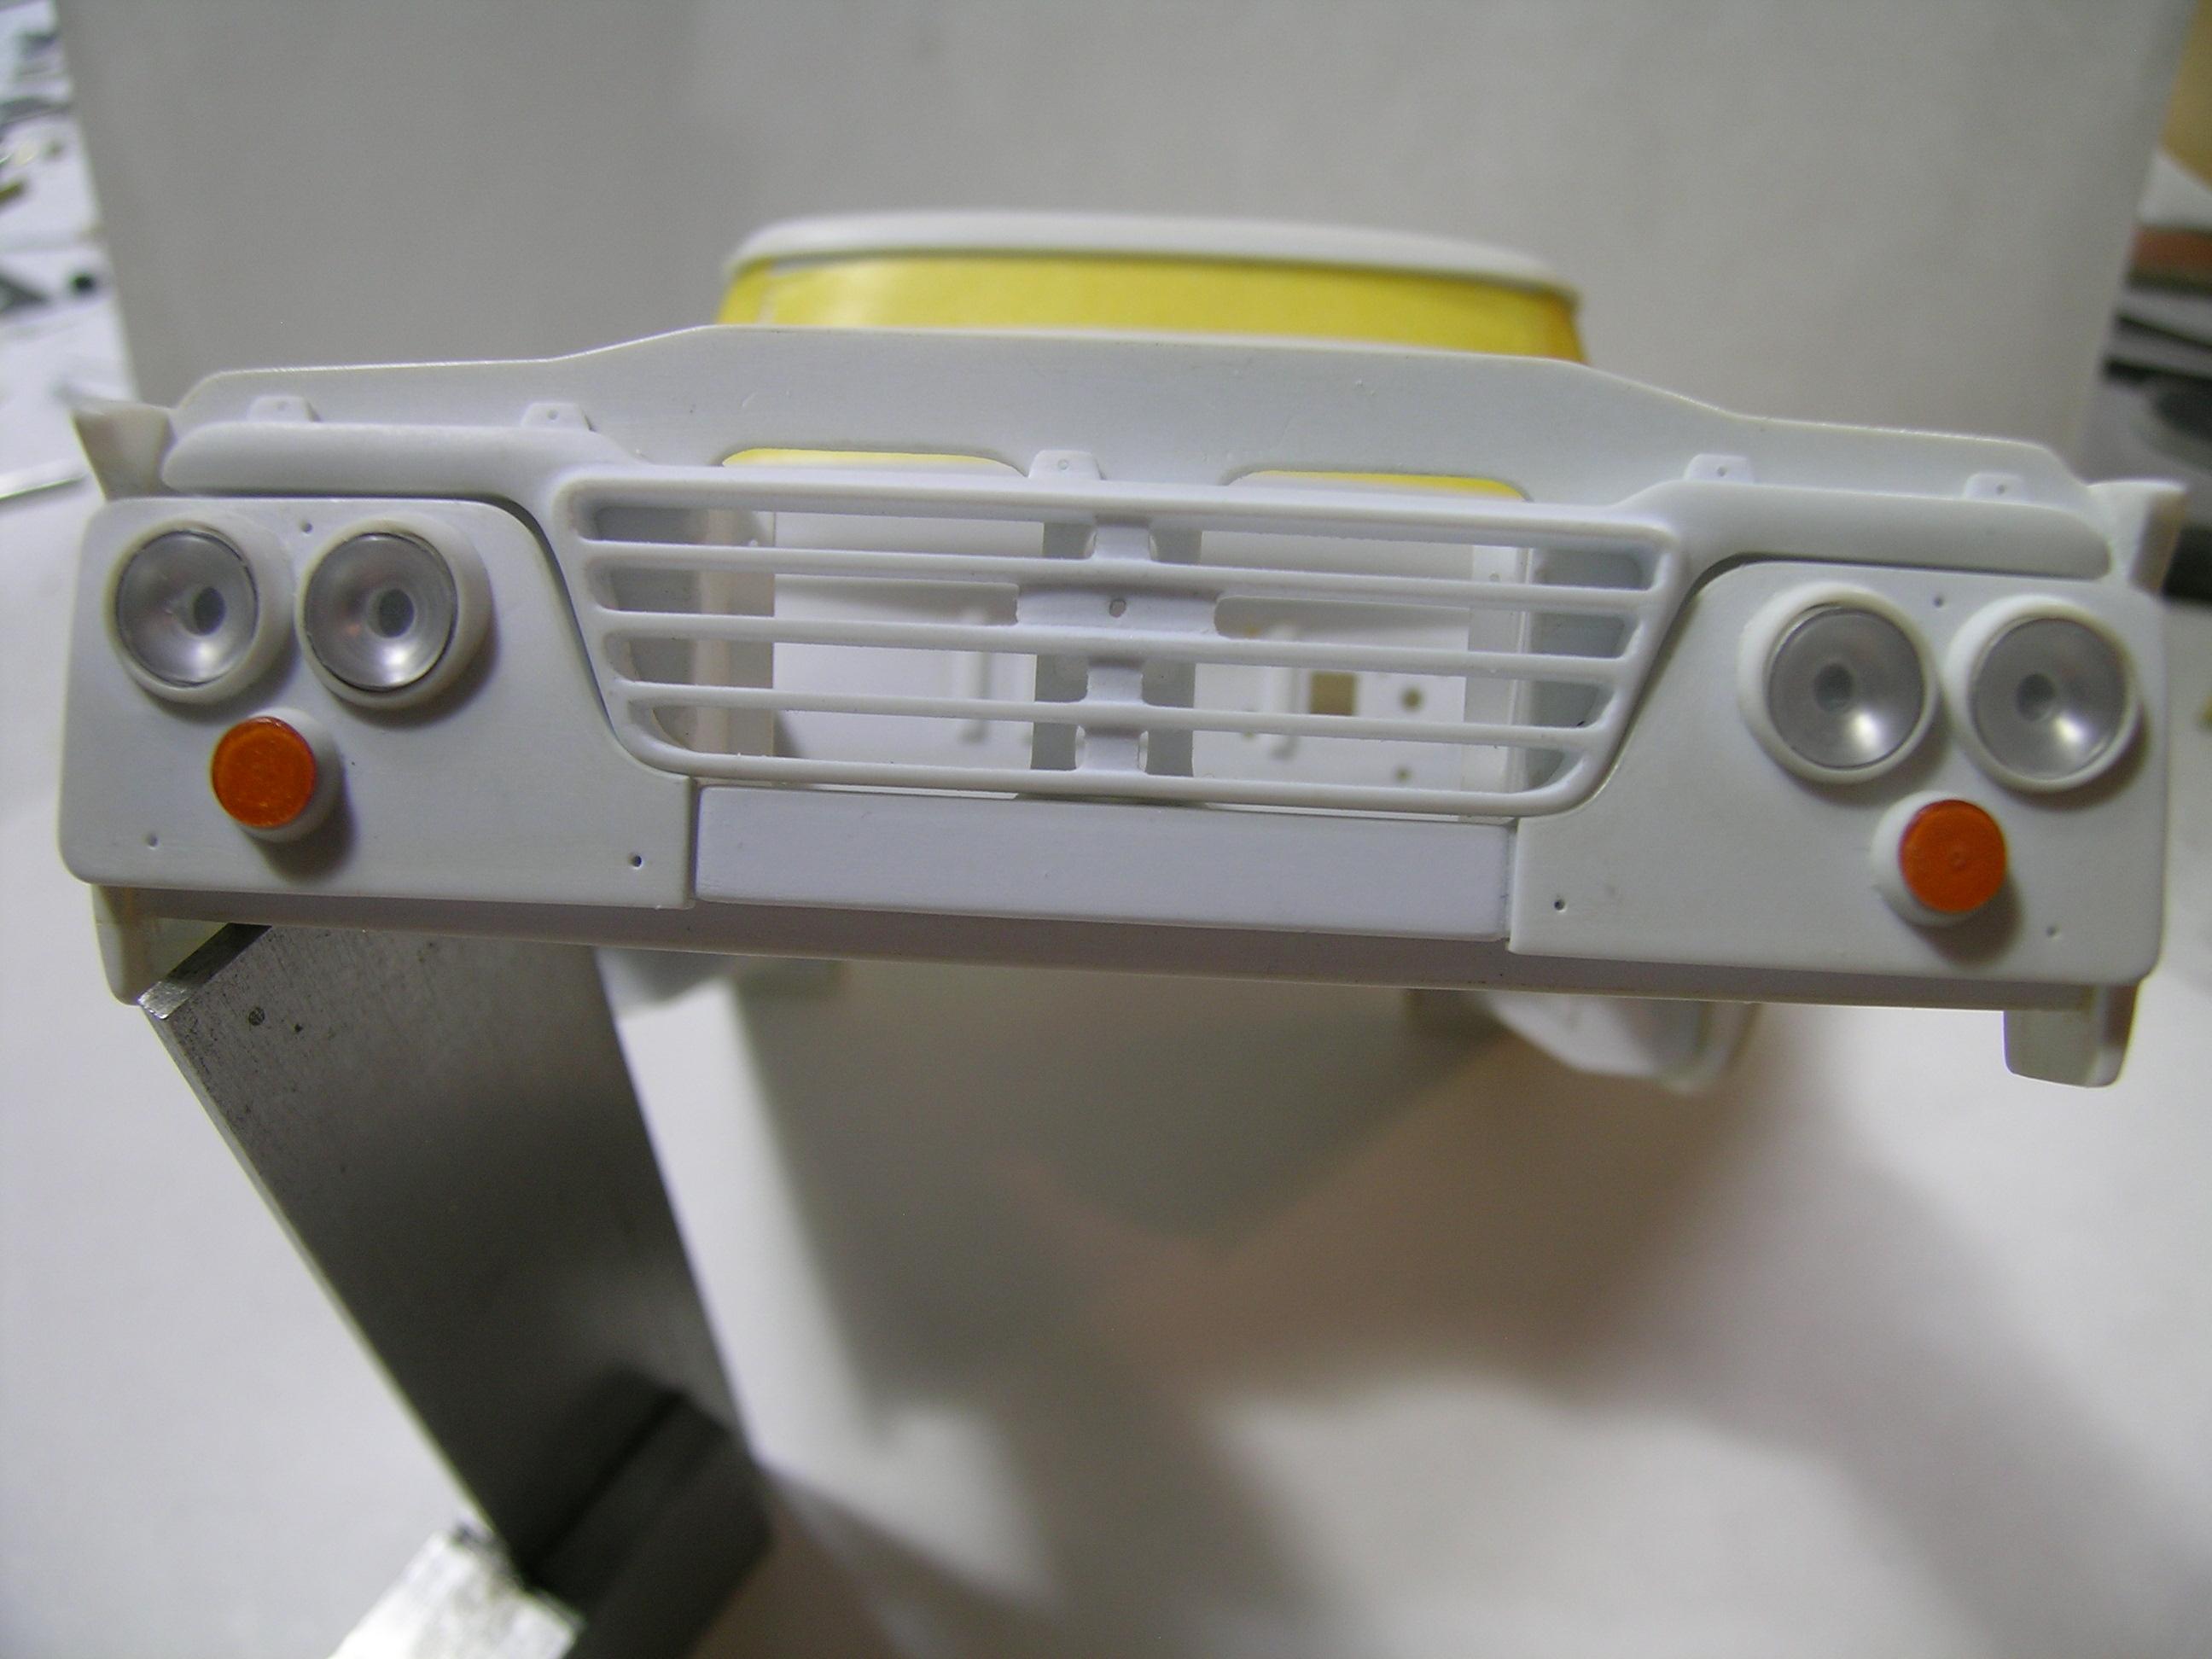
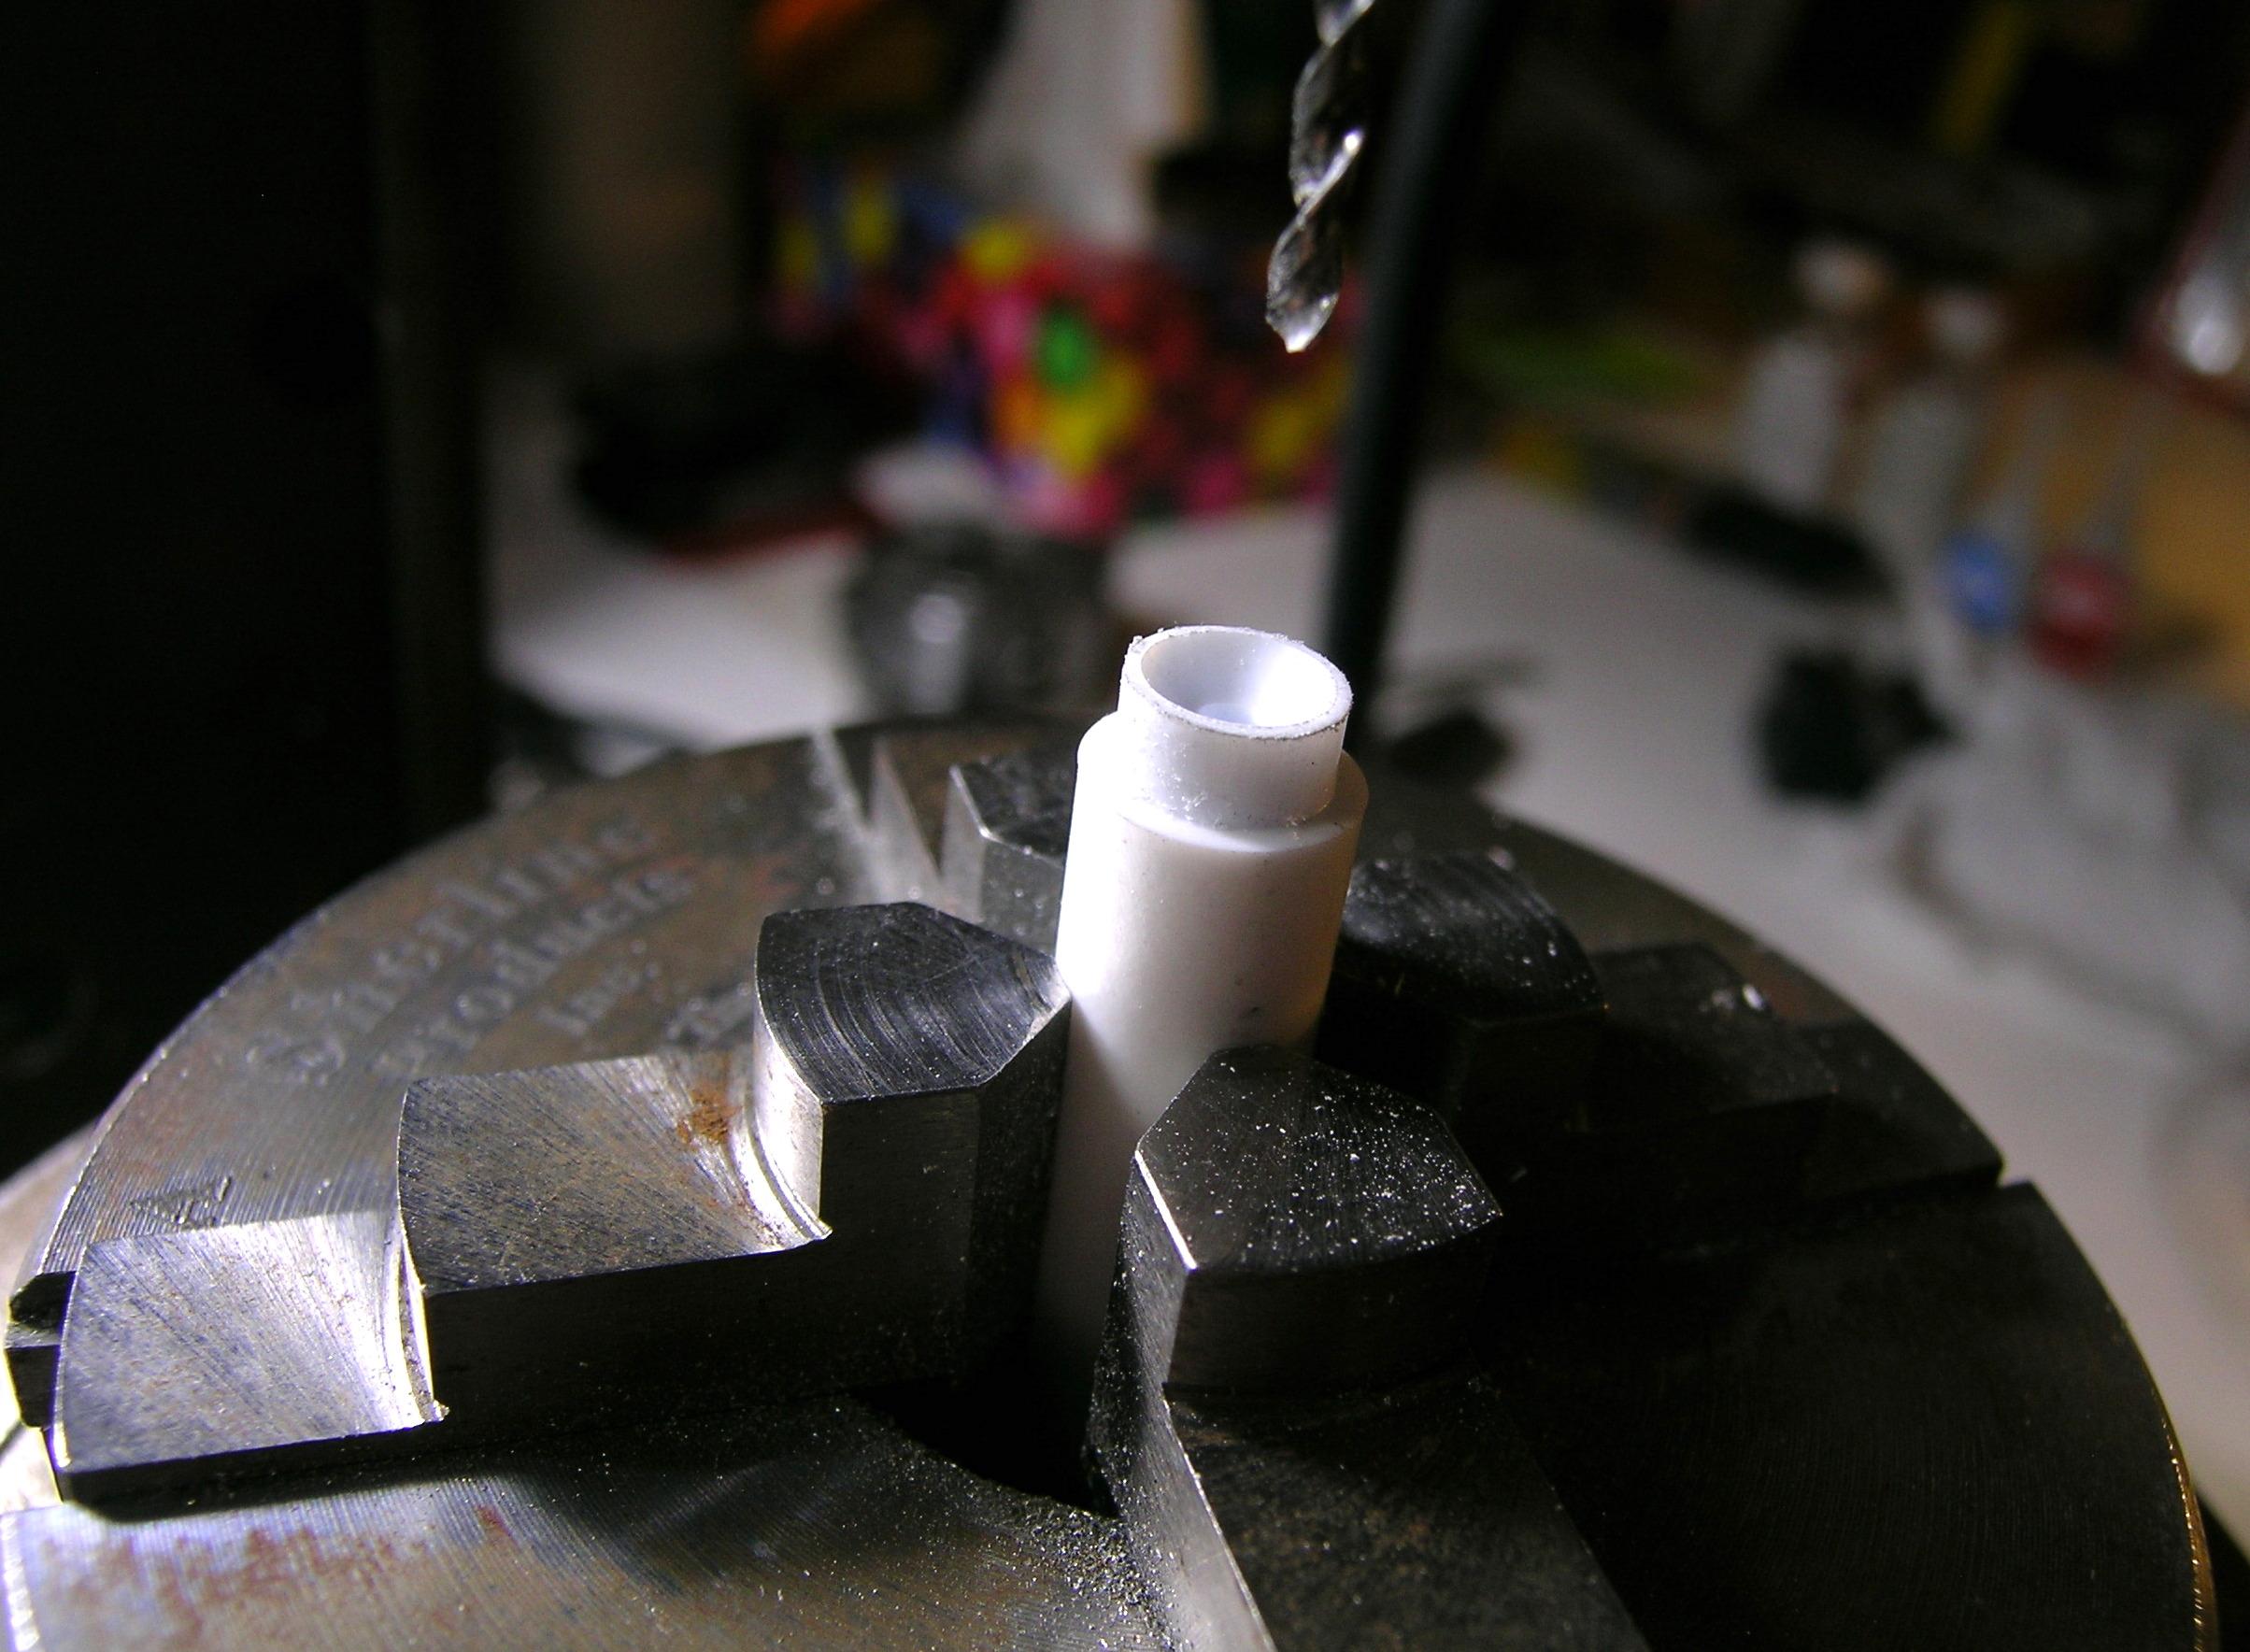
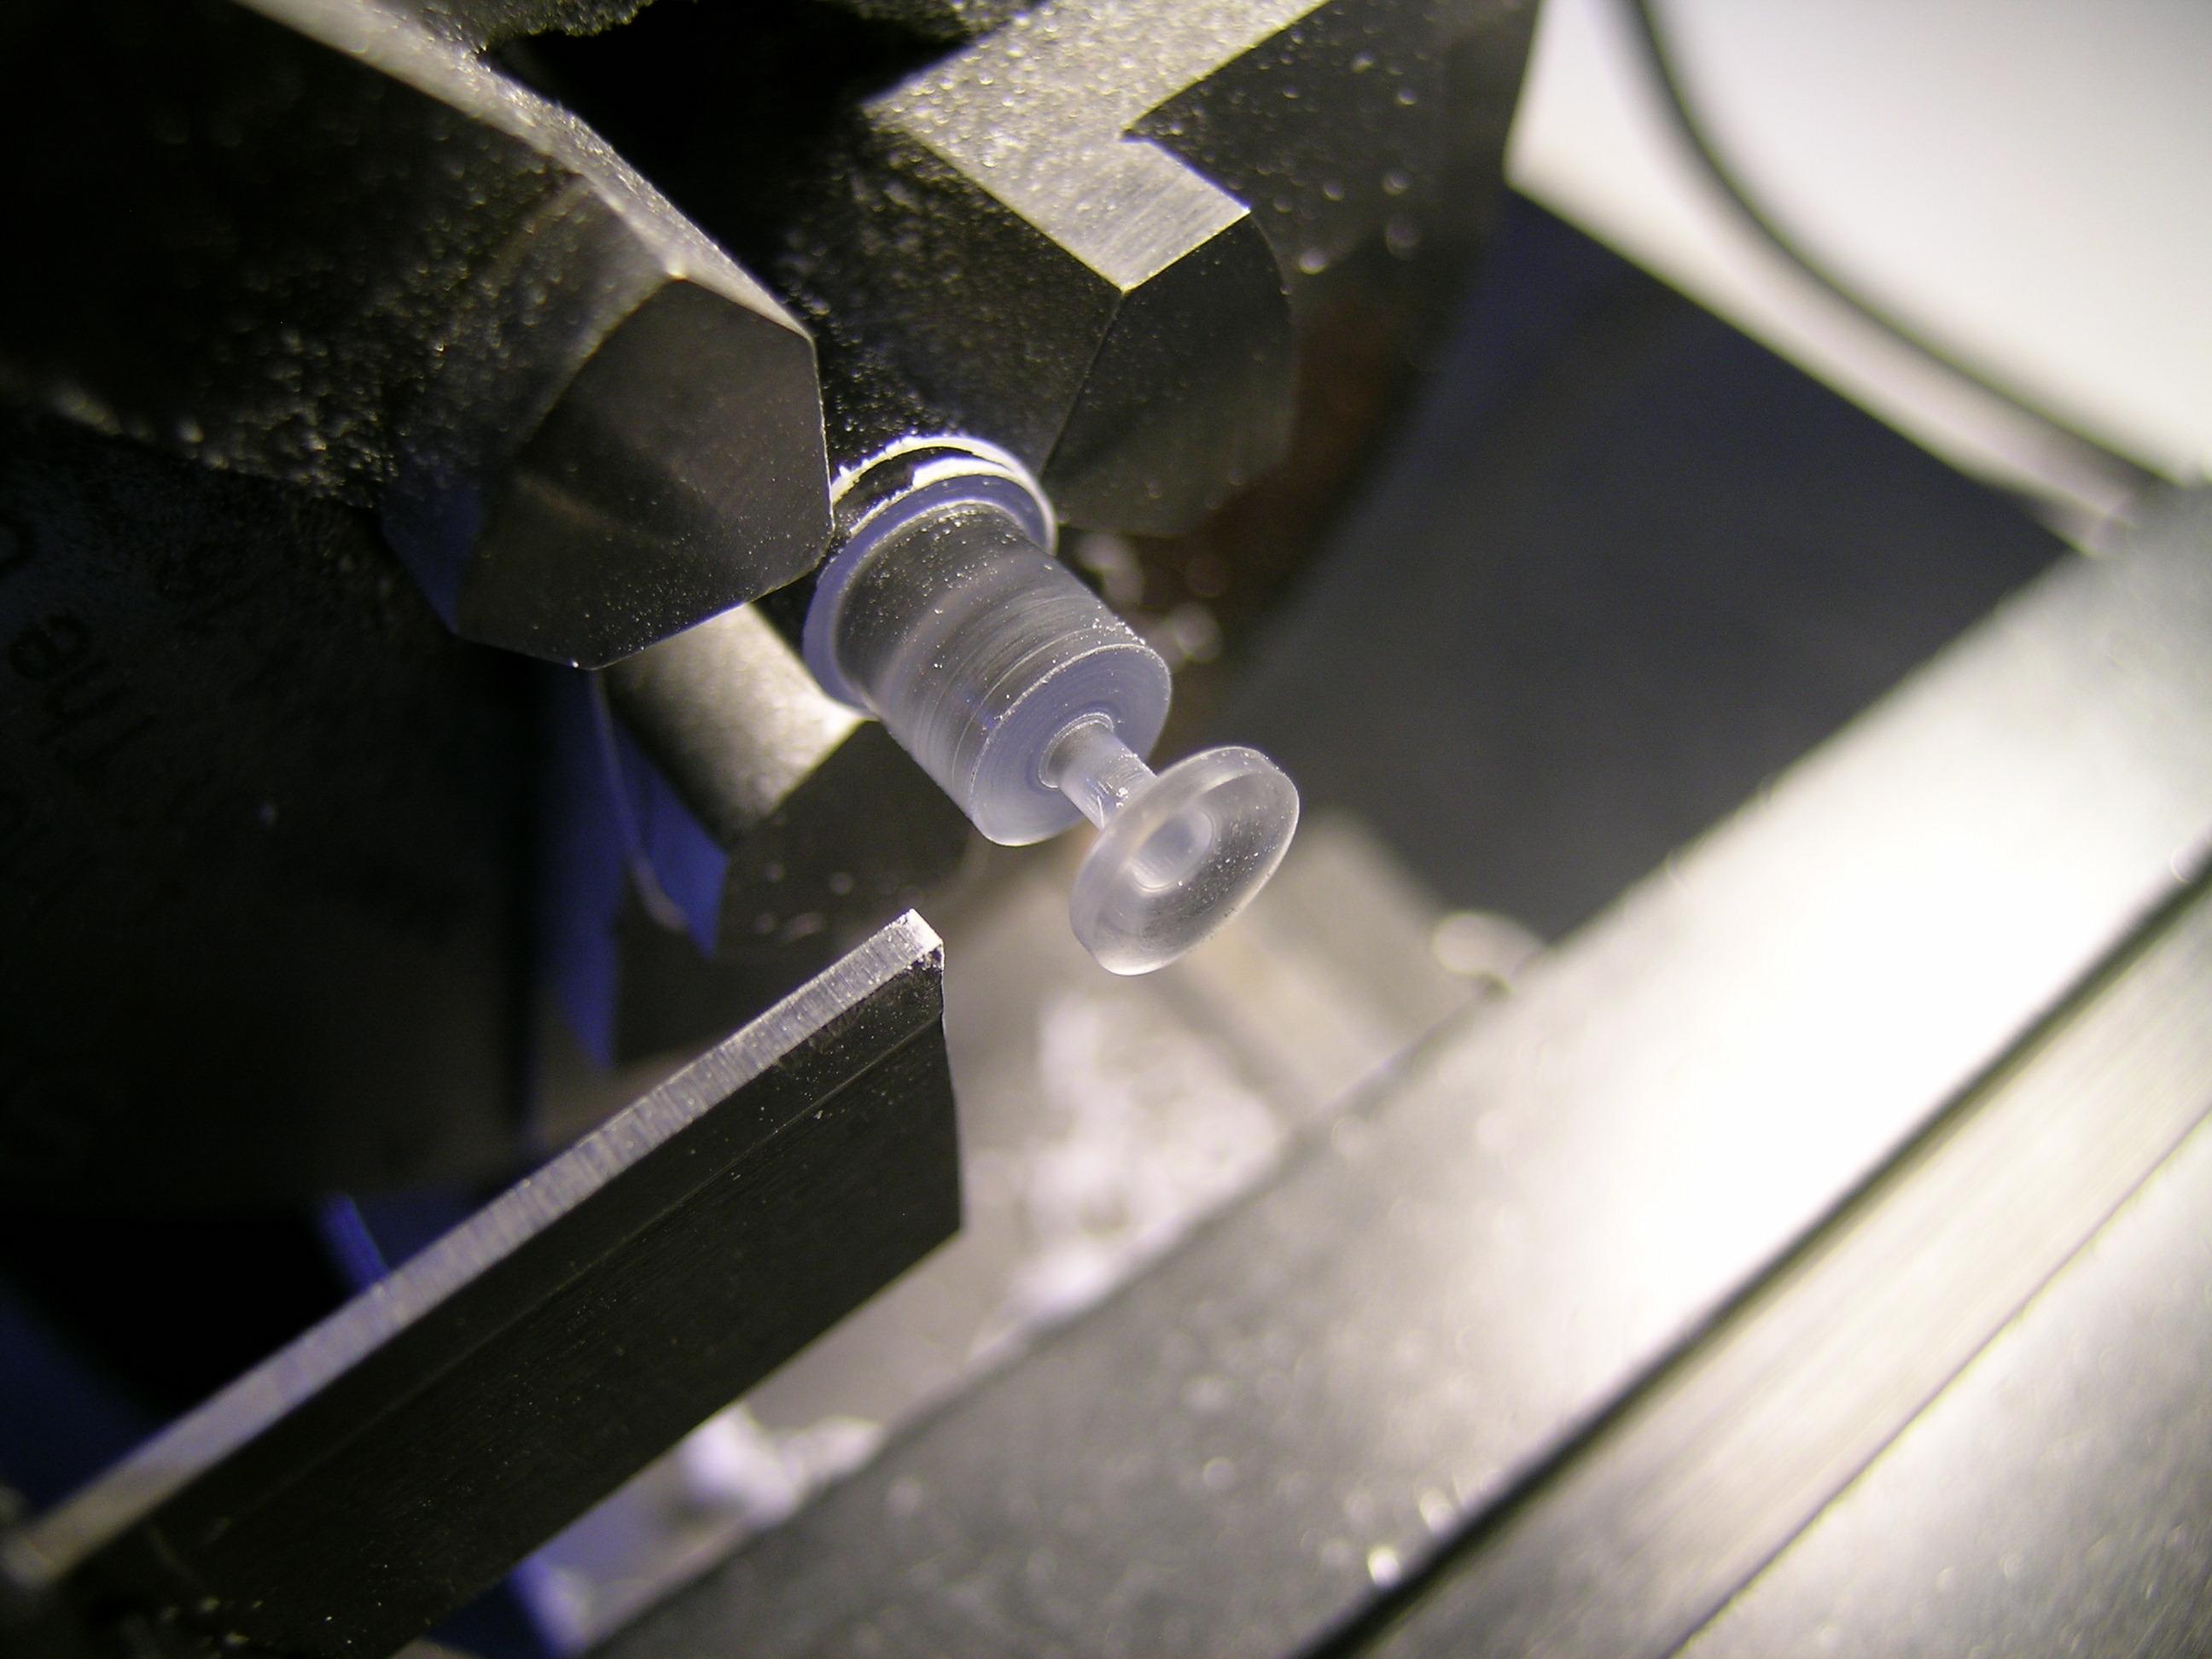
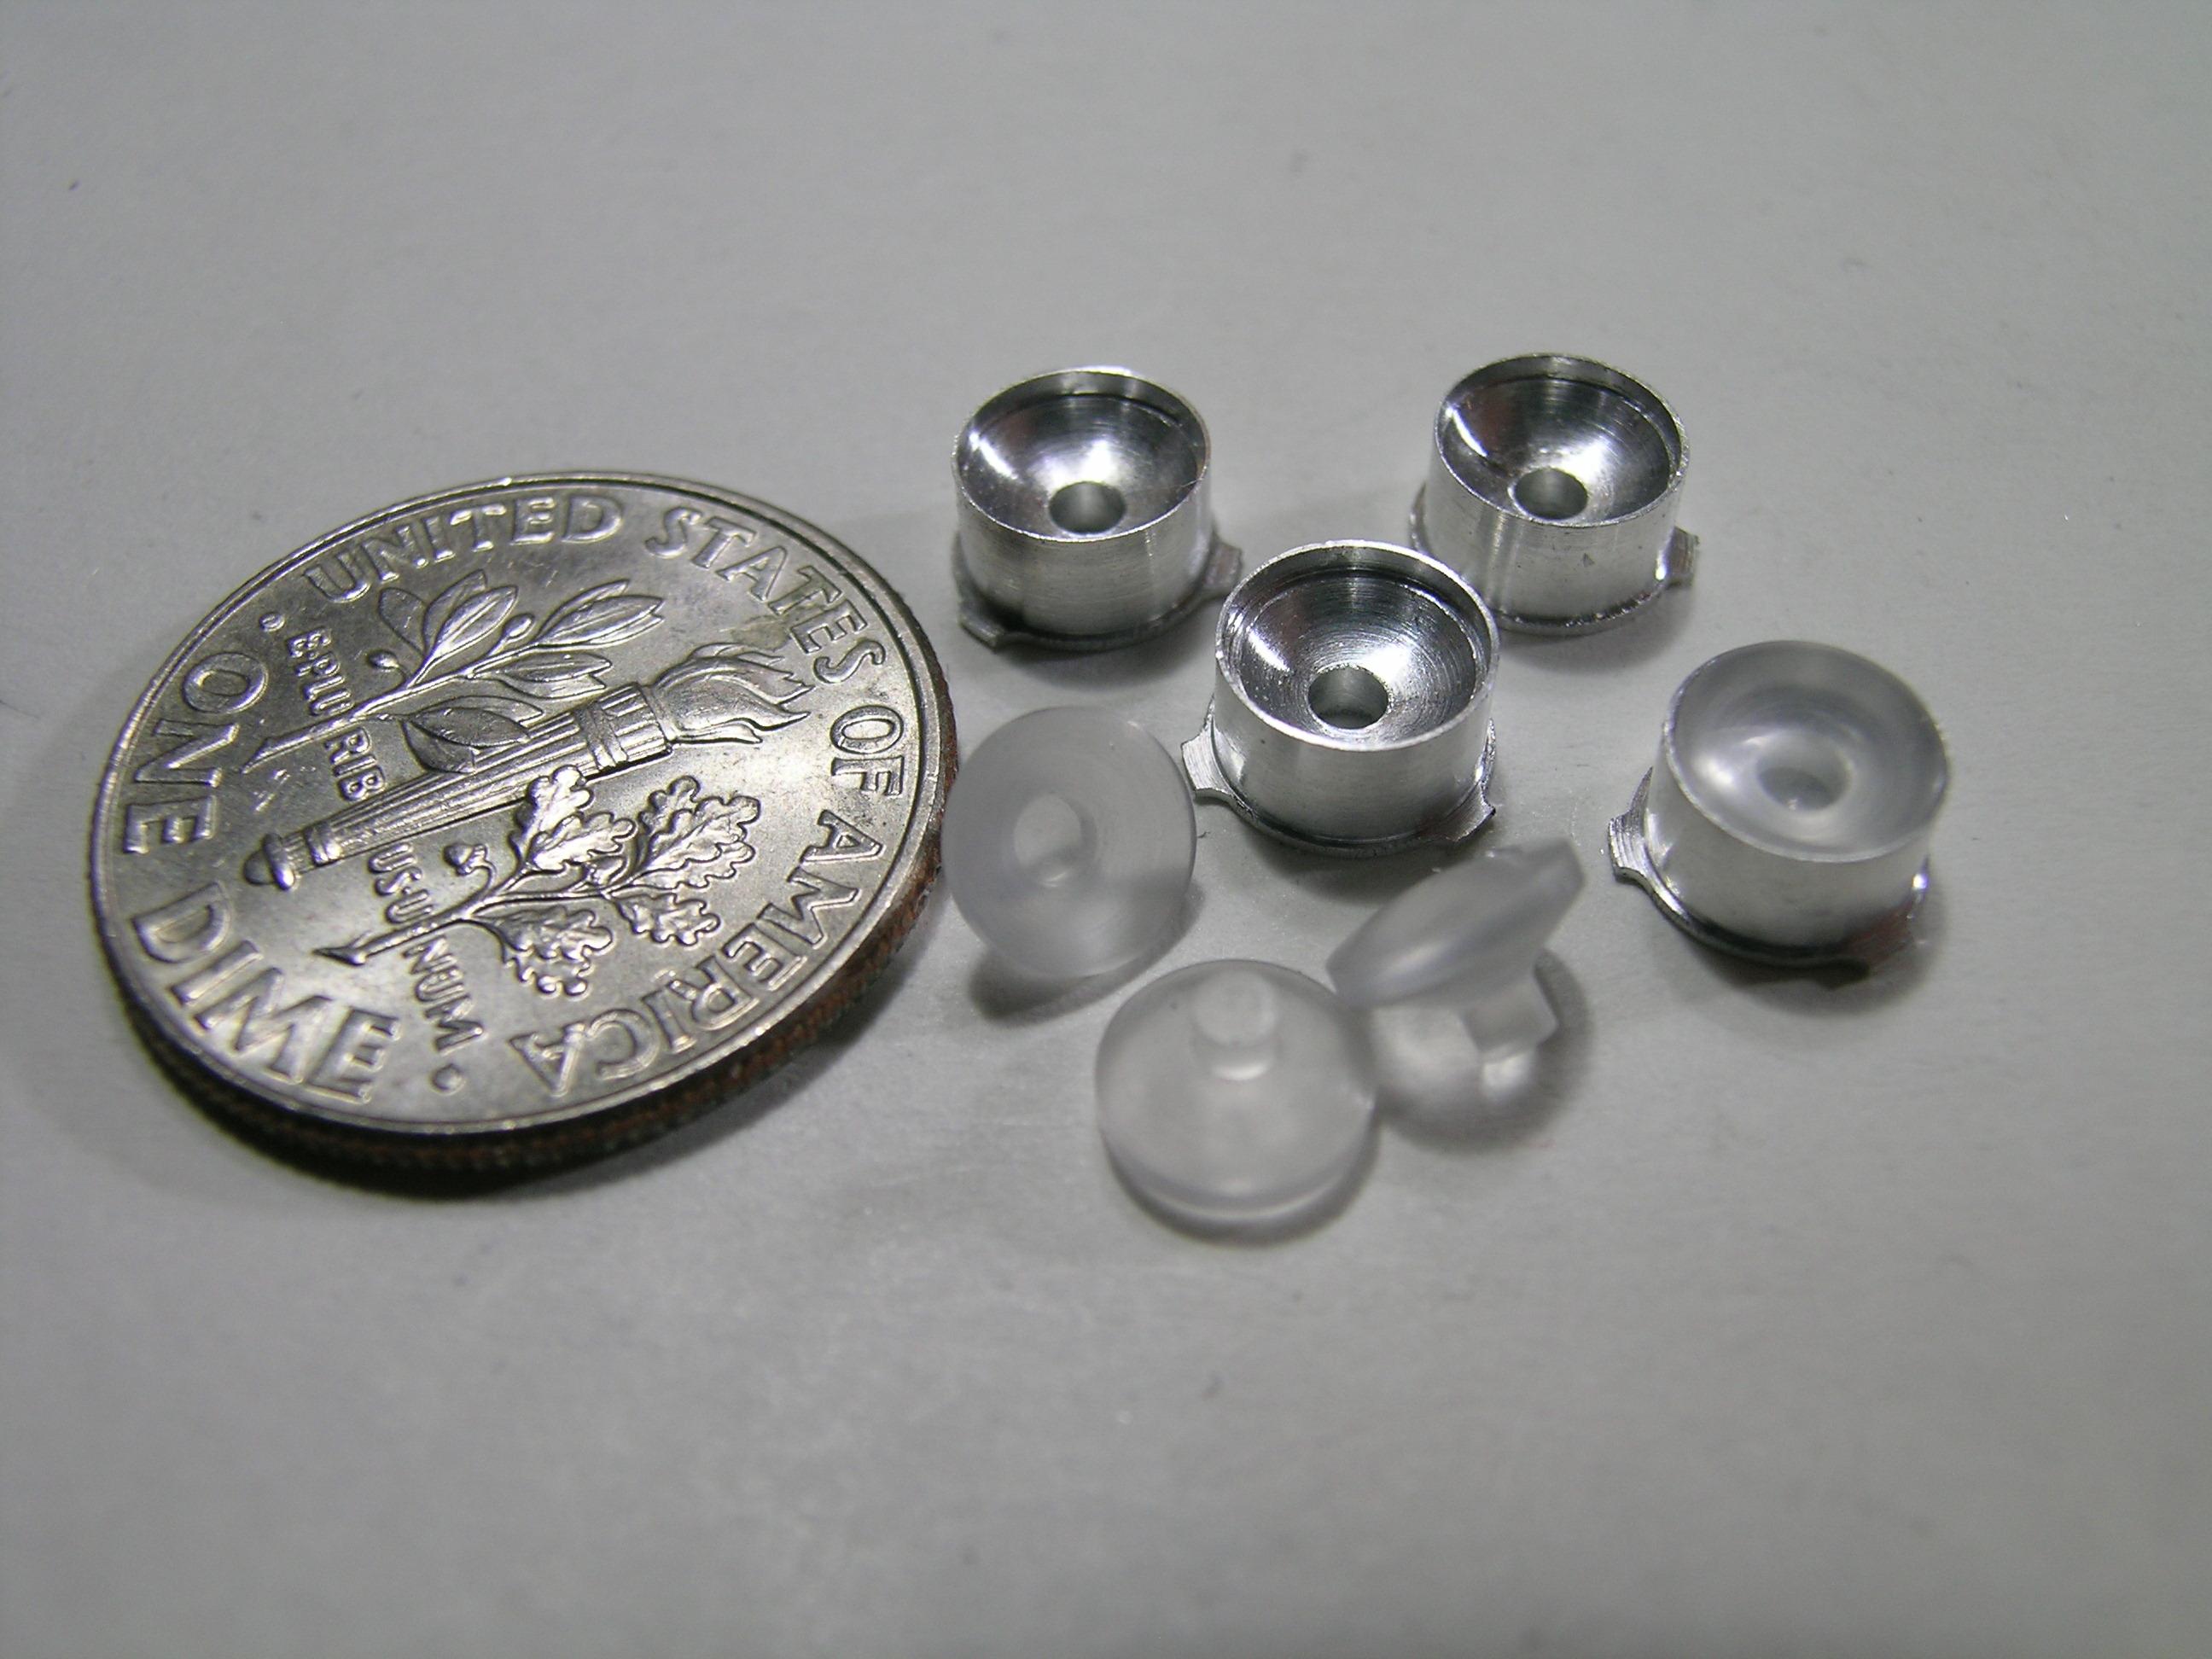
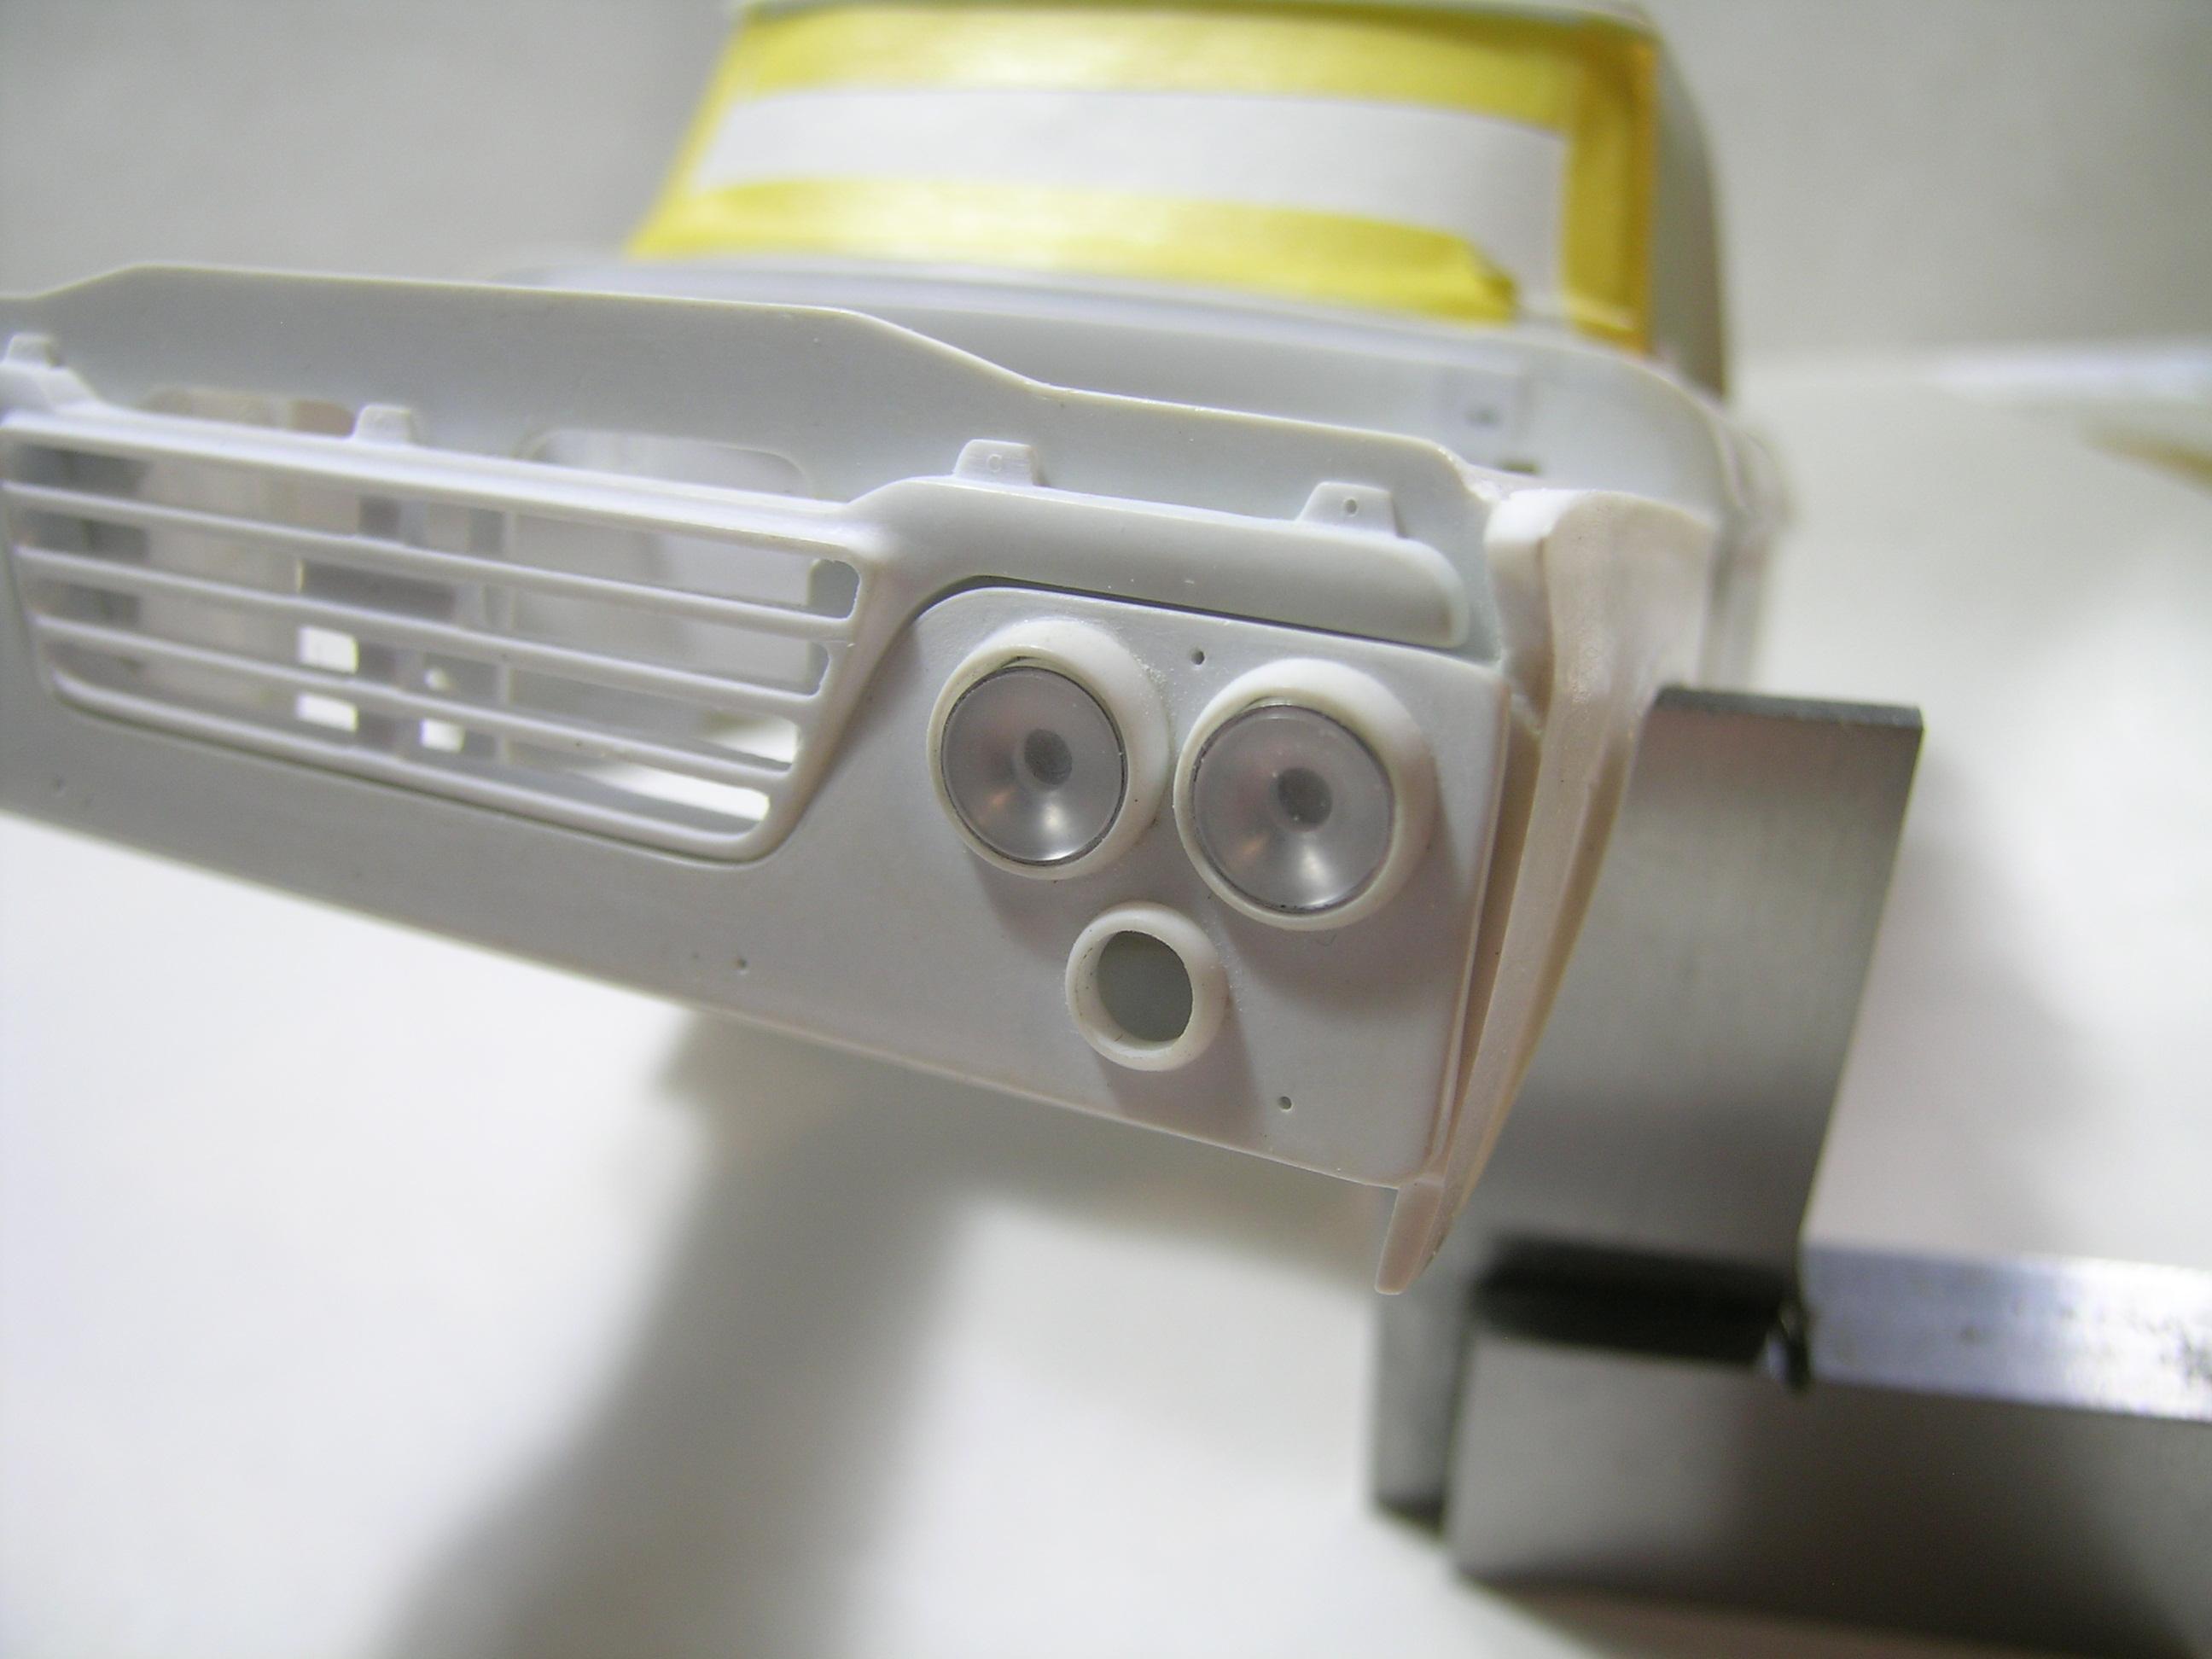
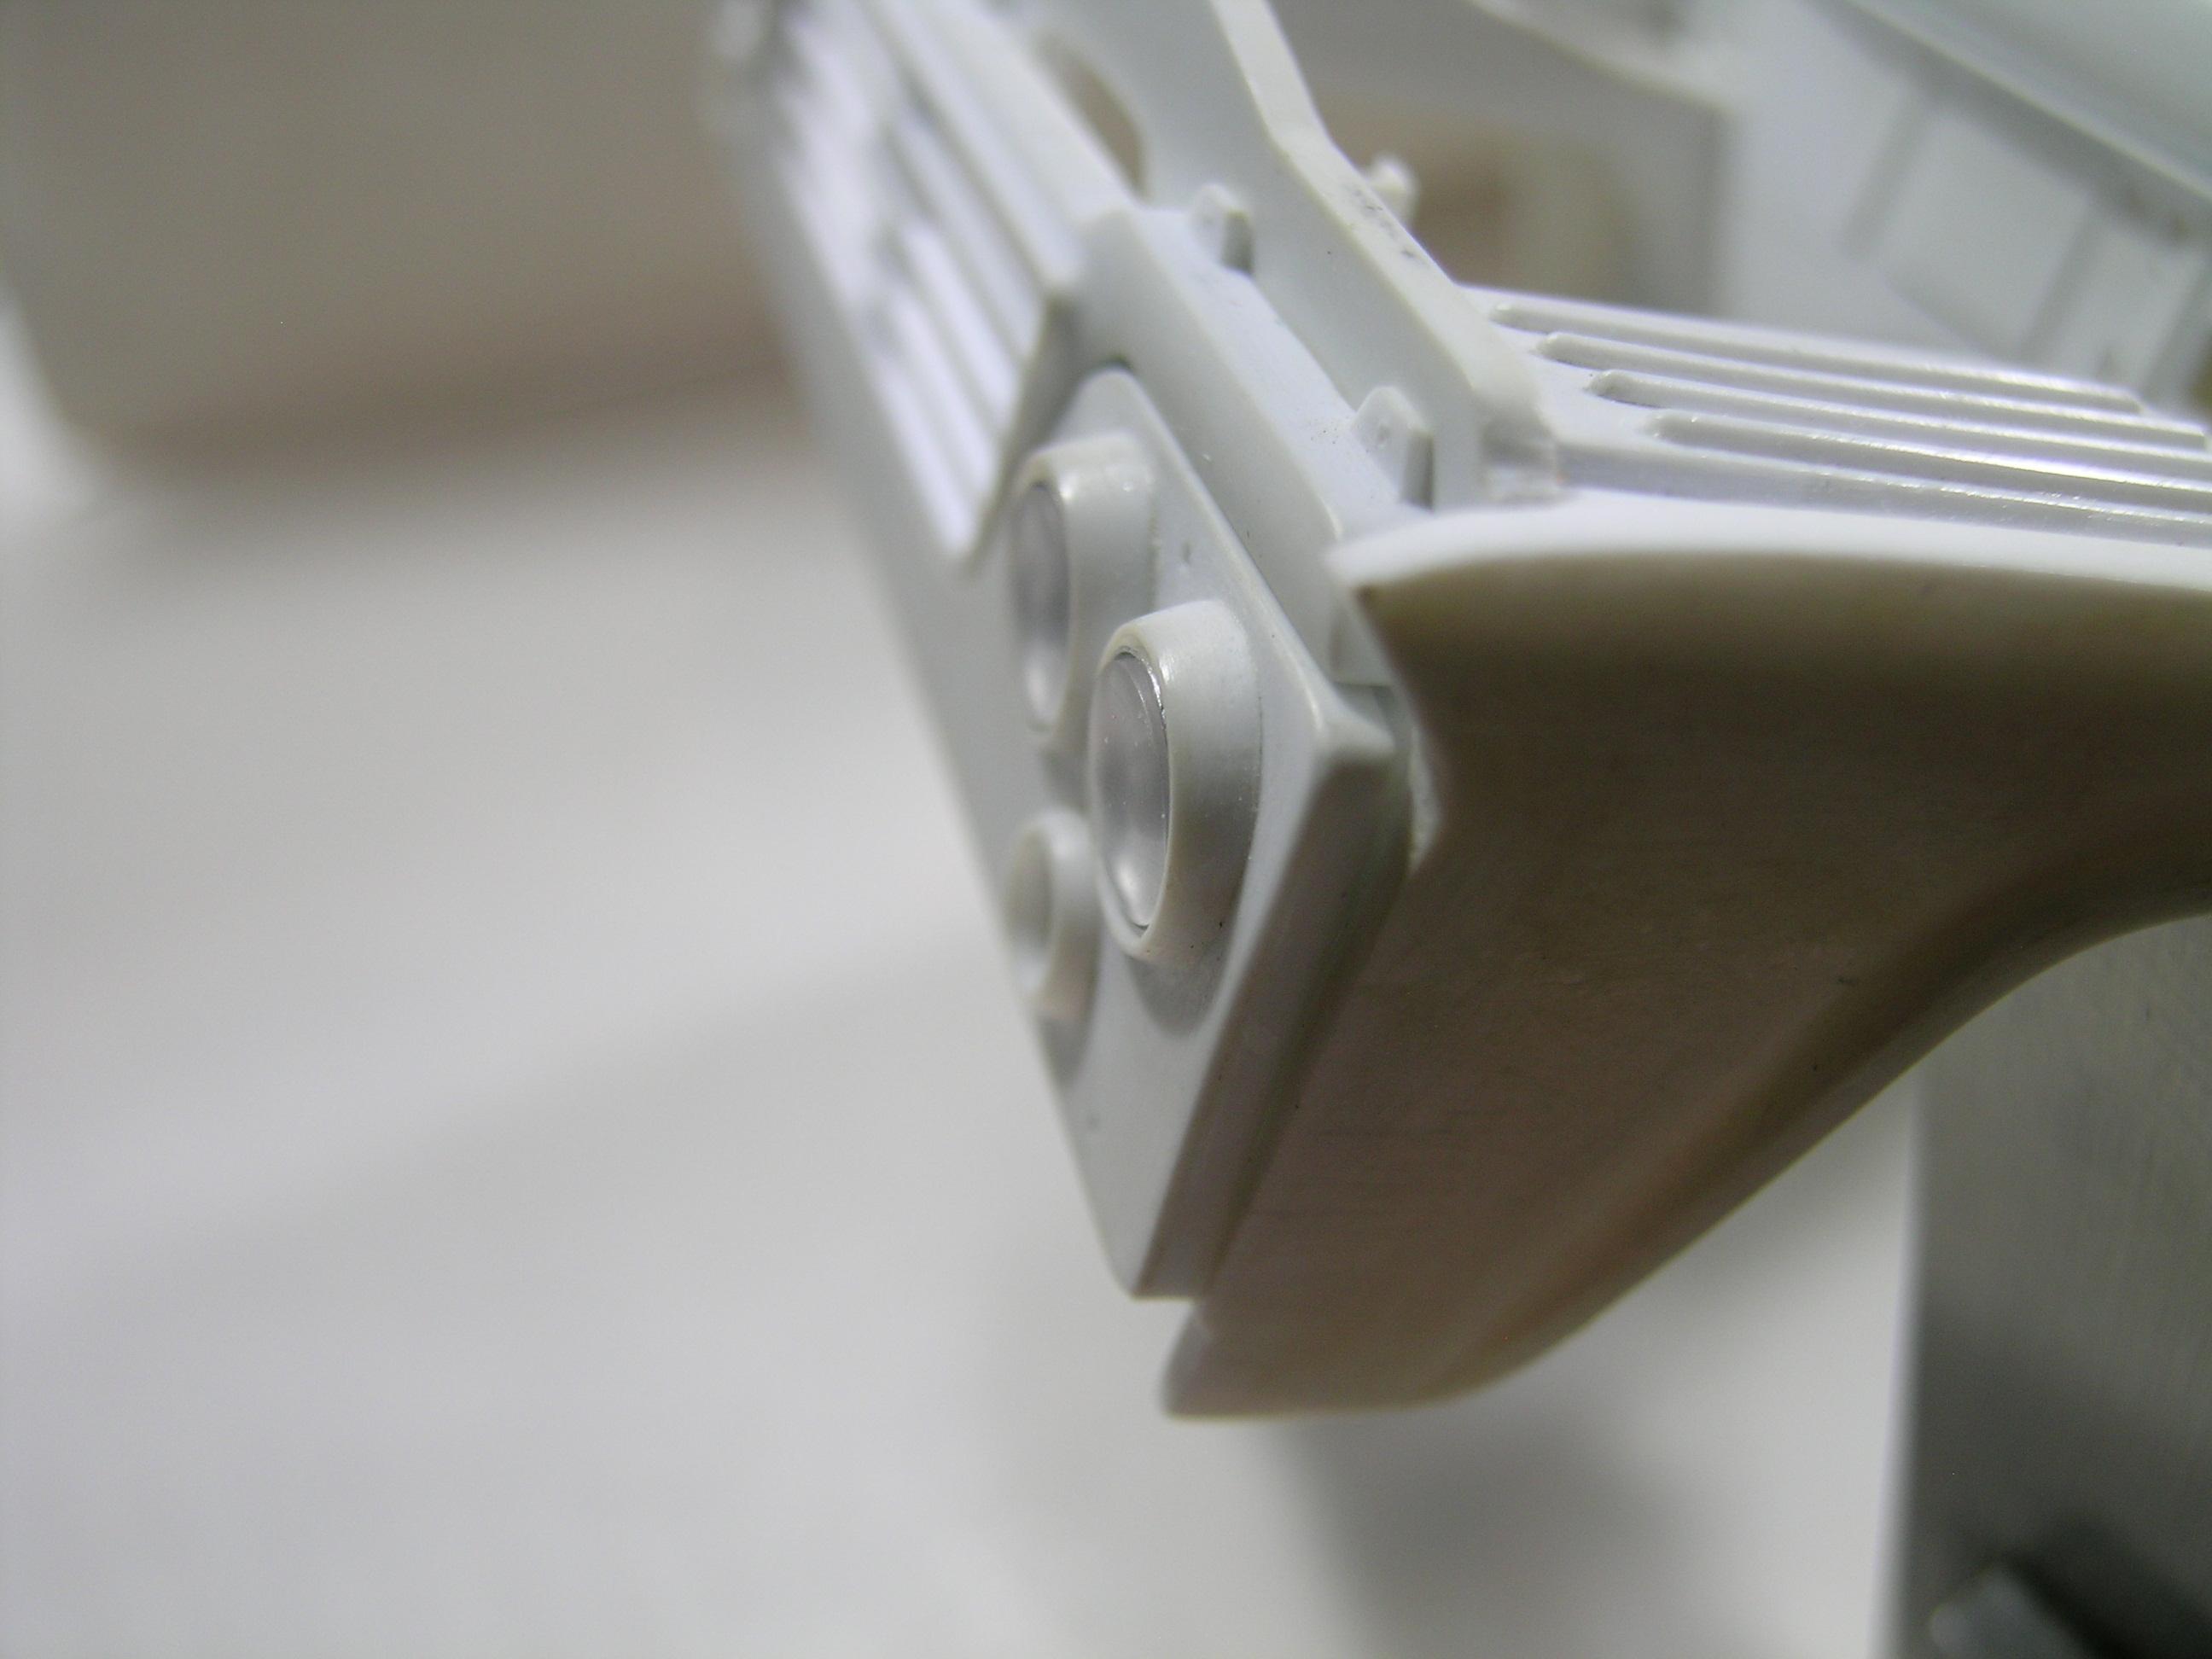
Hello everyone, Moving forward with more of the body components, I decided to make some headlight brackets to simulate those on the 1:1 D100. These parts are not the easiest to make so I limited myself to something plausible because they will be mainly hidden with the front panels in place. I started with plastic to test fit the part size and position but the final ones are aluminum, the outside perimeter will look like the chrome rings that hold the sealed beam headlight in place. I also made some styrene shapes to simulate the embossing seen from behind the radiator frame by the front wheel well. I have some other work done (not finished yet) on the front panel that I will show you soon. Comments and suggestions are welcome. Francis Test part made with styrene on the rotary table. I machined the sealed beam headlight from clear acrylic rods. Machined aluminum headlight brackets with sealed beam headlights. Test fit front view. Test fit side view, the headlights exceed the front panel exactly the way I wanted. Embossing shapes made with styrene. The parts are permanently glued in place.
-
It was worth the wait, Tim! It's great art... as usual!!! ?
-
Dodge (Color me Gone) Promod
AmericanMuscleFan replied to Tortuga Kustomz's topic in WIP: Drag Racing Models
These are all good updates Marcos! This bad boy will be well fed, the intake system is very impressive!!! -
Monogram 1926 Mack
AmericanMuscleFan replied to Straightliner59's topic in WIP: Model Trucks: Big Rigs and Heavy Equipment
There is a lot of ingenuity in this mechanism, the engineers of the time were very ''ingenious'' not to make a pun... The more I look at it, the more I like your ''well-worn'' finish, it really looks like oxidized steel. Do you have any idea of the weight limit that such a system could lift, I'm curious? -
64 Dodge D100 Pickup Pro Street
AmericanMuscleFan replied to AmericanMuscleFan's topic in WIP: Drag Racing Models
Many thanks Ian, I didn't expect this much of interaction but I realize that there are a lot of parts in a car (or truck...) and this build have bring the reality of this to my eyes! Although I already have made a lot of parts until now, I still have a lot to do so I hope you keep following me (you and all the friends). ? Francis -
64 Dodge D100 Pickup Pro Street
AmericanMuscleFan replied to AmericanMuscleFan's topic in WIP: Drag Racing Models
Thanks for the kind and supportive comments Tim, I truly appreciate them and especially coming from a master of detail like you sir! I can't wait to see your next update on your Maverick, you are certainly a good source of motivation for anyone who love extreme detail, in any case, I take great pleasure in contemplating your prowess! Francis -
Vintage Top Fuel FEDs, 1:16 brass chassis
AmericanMuscleFan replied to Mike Williams's topic in WIP: Drag Racing Models
That's absolutely gorgeous Mike! It looks like red anodized brass...! ?? -
70 Plymouth HEMI GTX 1/25 Scale
AmericanMuscleFan replied to AmericanMuscleFan's topic in WIP: Drag Racing Models
Thanks a lot for you kind comments Mike! Basically the cost of the parts I make is insignificant as I mostly use scraps that machine shops get rid of because the material is too small for them, I often pay less than the price of the metal at the pound. What costs the most are the bolts and nuts that I do not make myself and I use very few after market parts despite having a large inventory (from another era...). I'm going to have to do a warehouse sale...? Fortunately the Johan's promo body had been in my collection for decades so it didn't cost me much but that would be another story today! I could tell it probably costs me over $100 worth of small bolts depending on the project. On the other hand, I could not put a price on the hours invested, the model would probably cost more than a real one... even at minimum wage... ? Francis