AmericanMuscleFan
-
Posts
3,058 -
Joined
-
Last visited
Content Type
Profiles
Forums
Events
Gallery
Everything posted by AmericanMuscleFan
-

64 Dodge D100 Pickup Pro Street
AmericanMuscleFan replied to AmericanMuscleFan's topic in WIP: Drag Racing Models
Thank you for the kind words and for putting so much pressure on me Ron, you really inspired me my friend! The pivot points are the aluminum rivets that I have machined, they are roughly 0.001" smaller than the holes in the components and around 0.015" taller than 2 parts stacked together. I put a photo etch washer between the 2 parts (the support and arms) and crushed the rivets with my little "Punch Press". I obviously did a test before that to make sure the parts weren't seized and remained operational. I don't know if the opportunity will present itself to go to Uncle Sam's for an exhibition but if it happens, I'll let you know, in the meantime, don't hesitate if you have any questions I will do the same if you don't have no objections! Francis -
64 Dodge D100 Pickup Pro Street
AmericanMuscleFan replied to AmericanMuscleFan's topic in WIP: Drag Racing Models
Thanks for your kind words Tim, I can't wait to see your next update on your awesome Maverick, I miss you sir! Francis -
64 Dodge D100 Pickup Pro Street
AmericanMuscleFan replied to AmericanMuscleFan's topic in WIP: Drag Racing Models
Thanks Daniel, you give us so much with all your awesome techniques my friend so if i can inspire you (or help you) just a little it's like icing on the cake for me! Francis -
64 Dodge D100 Pickup Pro Street
AmericanMuscleFan replied to AmericanMuscleFan's topic in WIP: Drag Racing Models
Thanks for the kind comment Tim, I do appreciate! Francis -
Another great racing car in the making! I really love these old Pro Stock, simply the best era of drag racing history!
-
Beautiful car Tim! The stance is absolutely perfect and the end result speak for itself, you can be proud of it! Drag racing at it's best!!! ?
-
Great work Ray! The proof that it is not always necessary to get lost in the details to deliver a beautiful model...! Clean build and very nice choice of colors, although I am not a Budweiser consumer, I would still be very happy to have a case of cold beer delivered to me for next weekend... for now I have to start my week working... ?
-
Great build Aymer! I love seeing someone make improved or custom parts and you did a really good job, the results speak for themselves! ?
-
64 Dodge D100 Pickup Pro Street
AmericanMuscleFan replied to AmericanMuscleFan's topic in WIP: Drag Racing Models
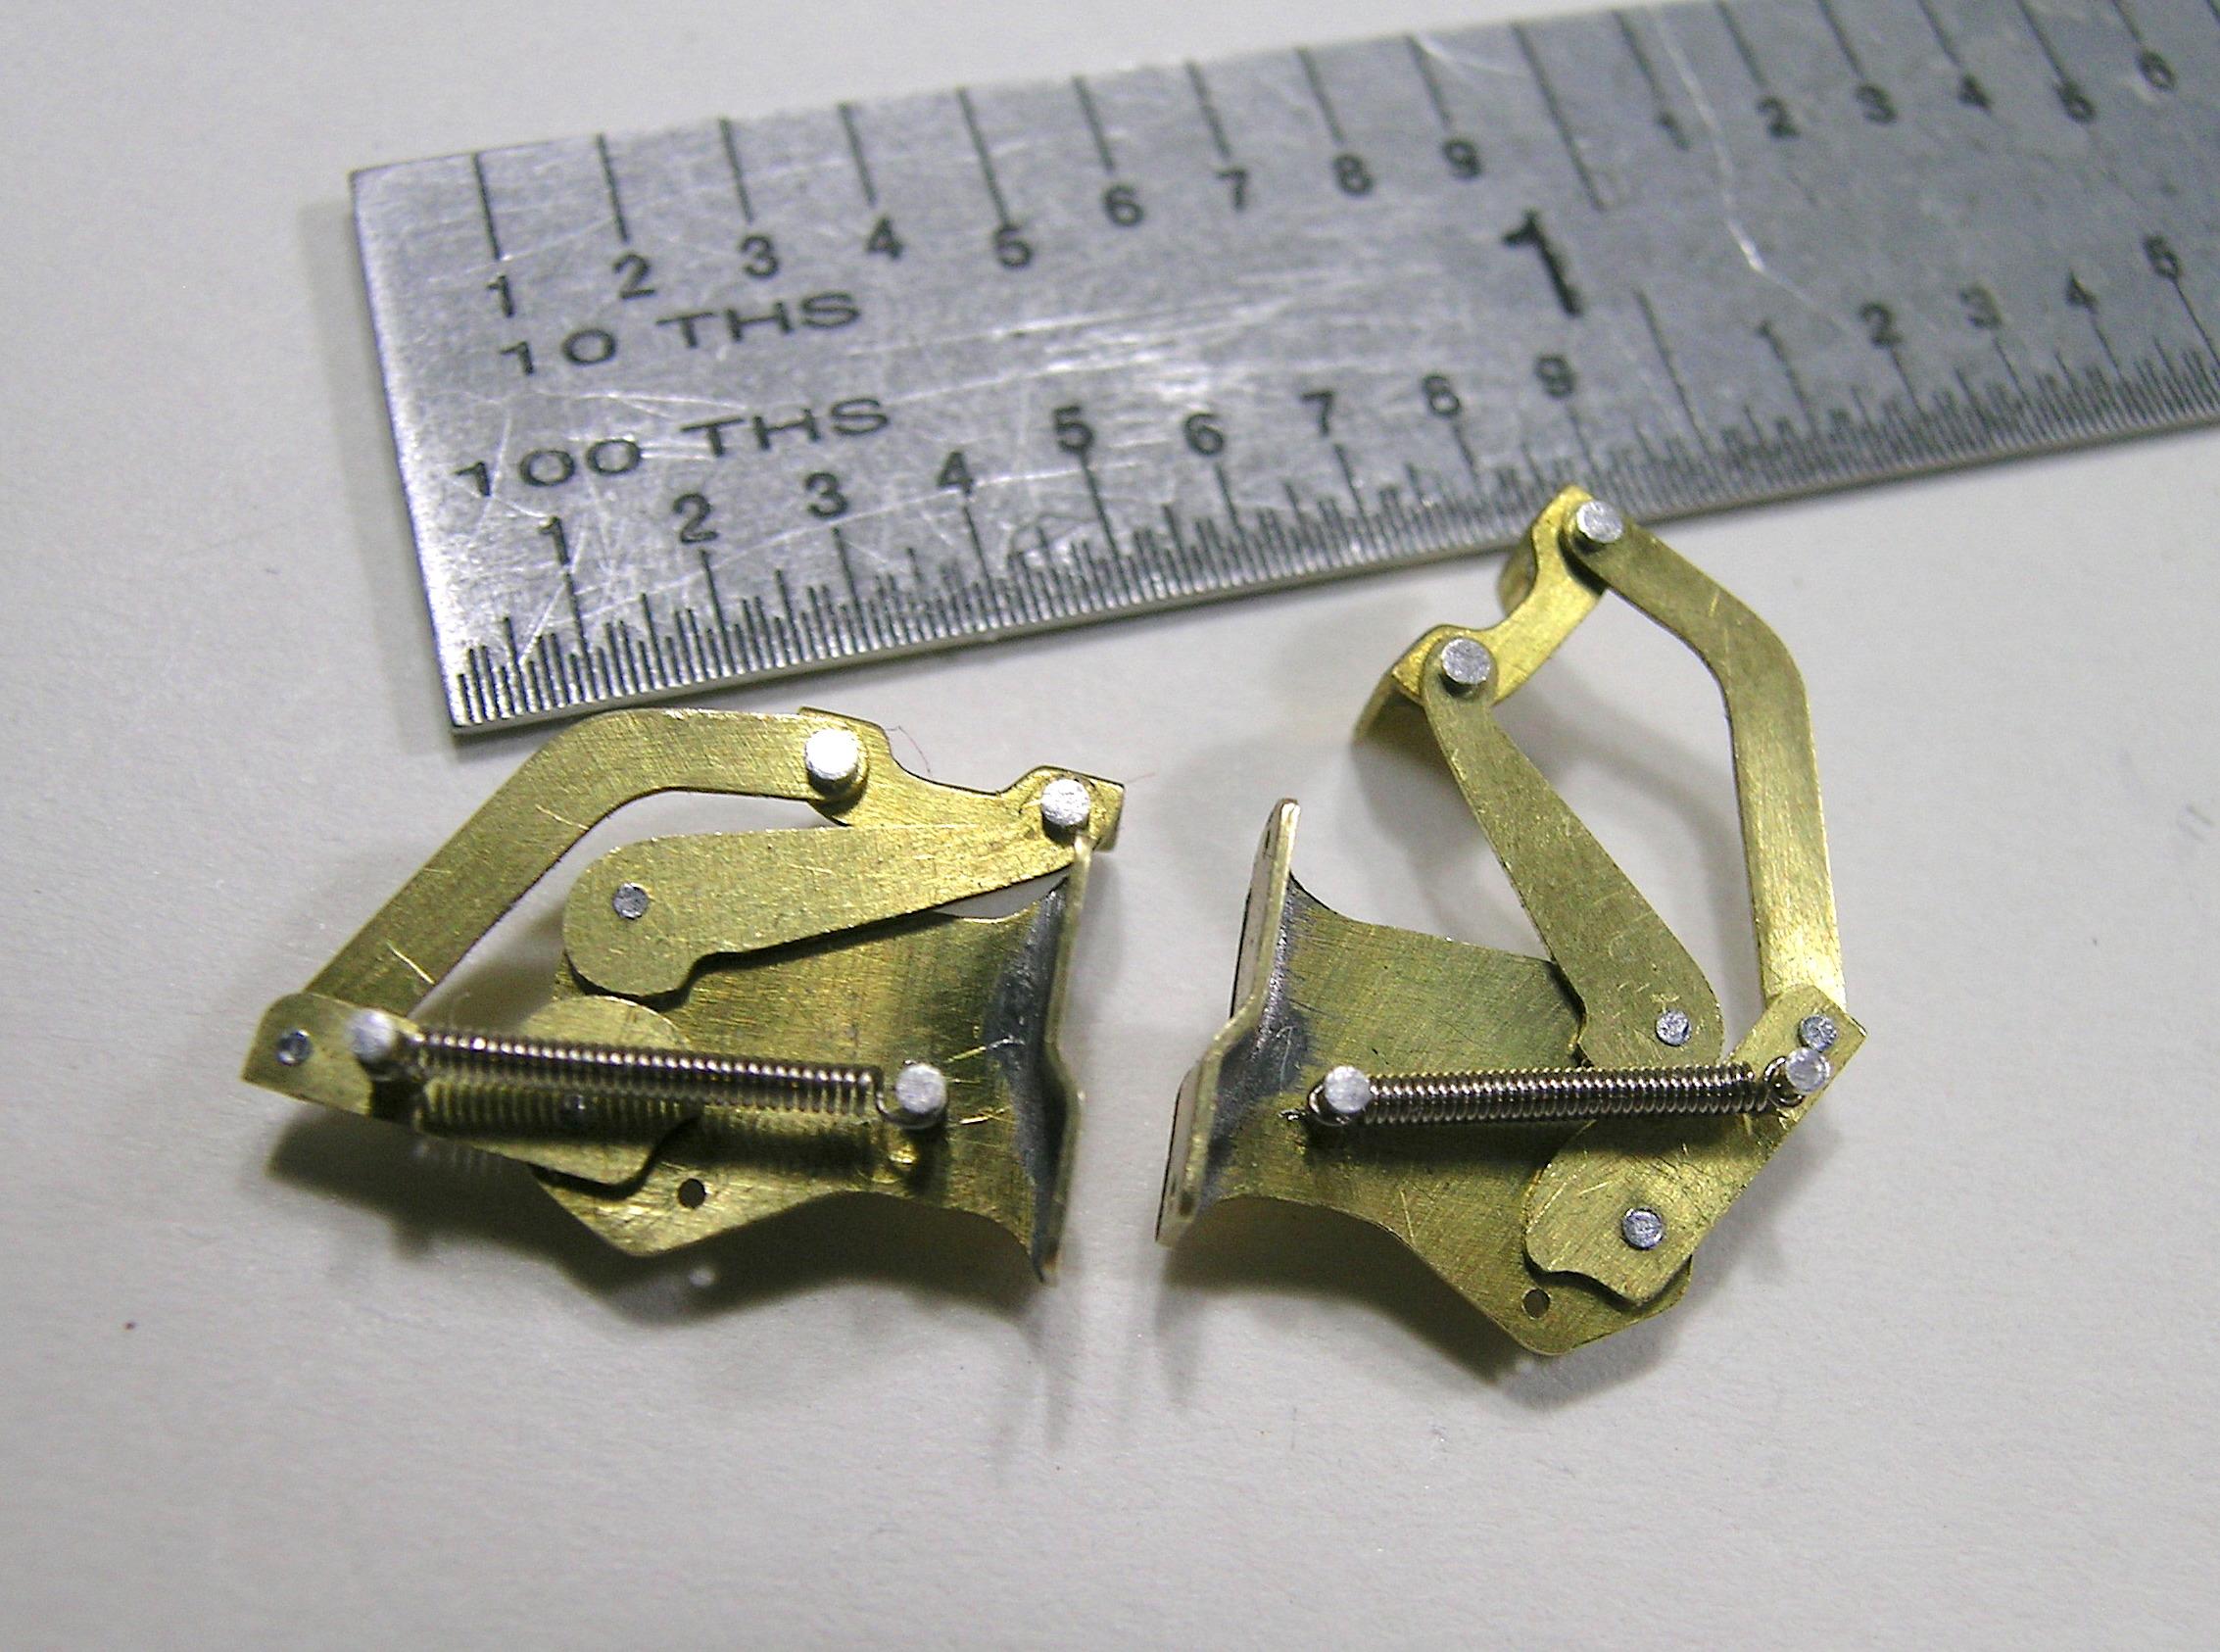
Thanks Claude! I'm quite proud of the result but don't worry, the little springs have just the right amount of resistance and the hood is raised or lowered with just the tip of my finger. I could even have shortened the springs of a coil and it would still have worked. I myself am surprised (and so happy) to see that it works so well! ? Francis -
Monogram 1926 Mack
AmericanMuscleFan replied to Straightliner59's topic in WIP: Model Trucks: Big Rigs and Heavy Equipment
WOW, great detailing, the base of the seat looks real, did you ask elves to do the wear work on this one? It really looks like the passage of time! ? -
I agree with Greg, the water bottle is a nice touch and in respect with the law: Don't drink and drive. Gorgeous car (or truck...) my friend, the bare metal job seem flawless!
-
64 Dodge D100 Pickup Pro Street
AmericanMuscleFan replied to AmericanMuscleFan's topic in WIP: Drag Racing Models
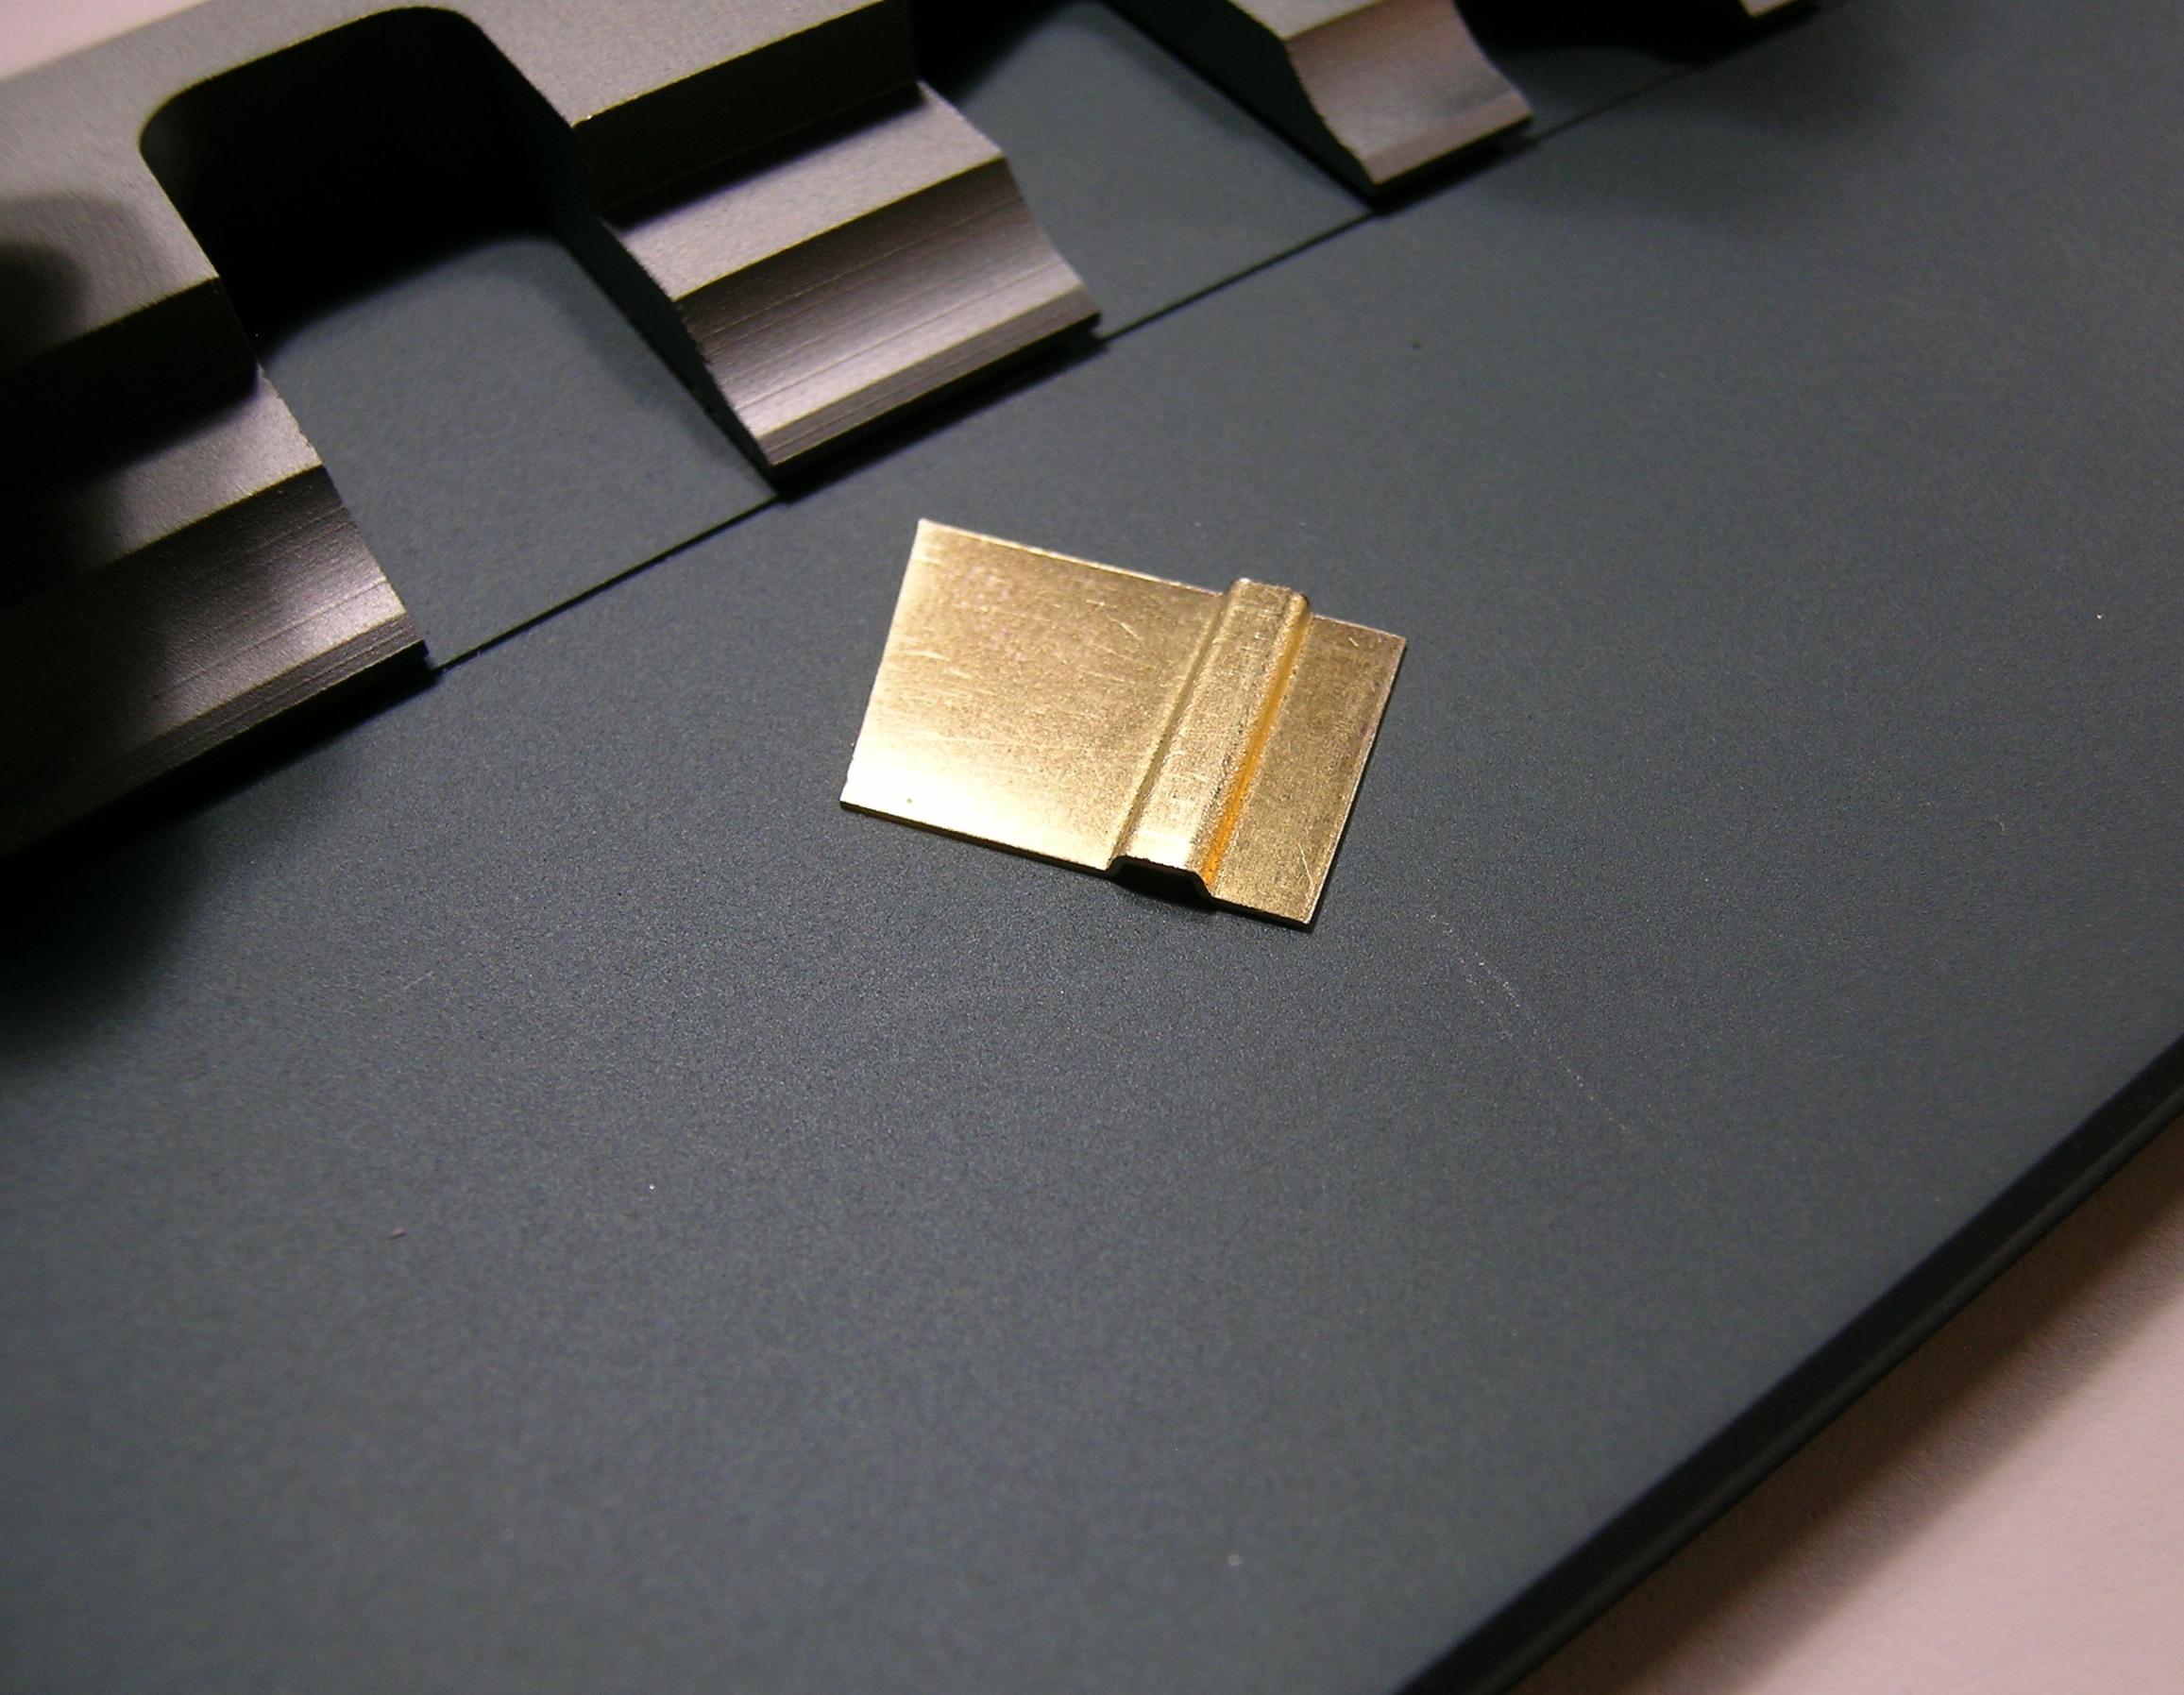
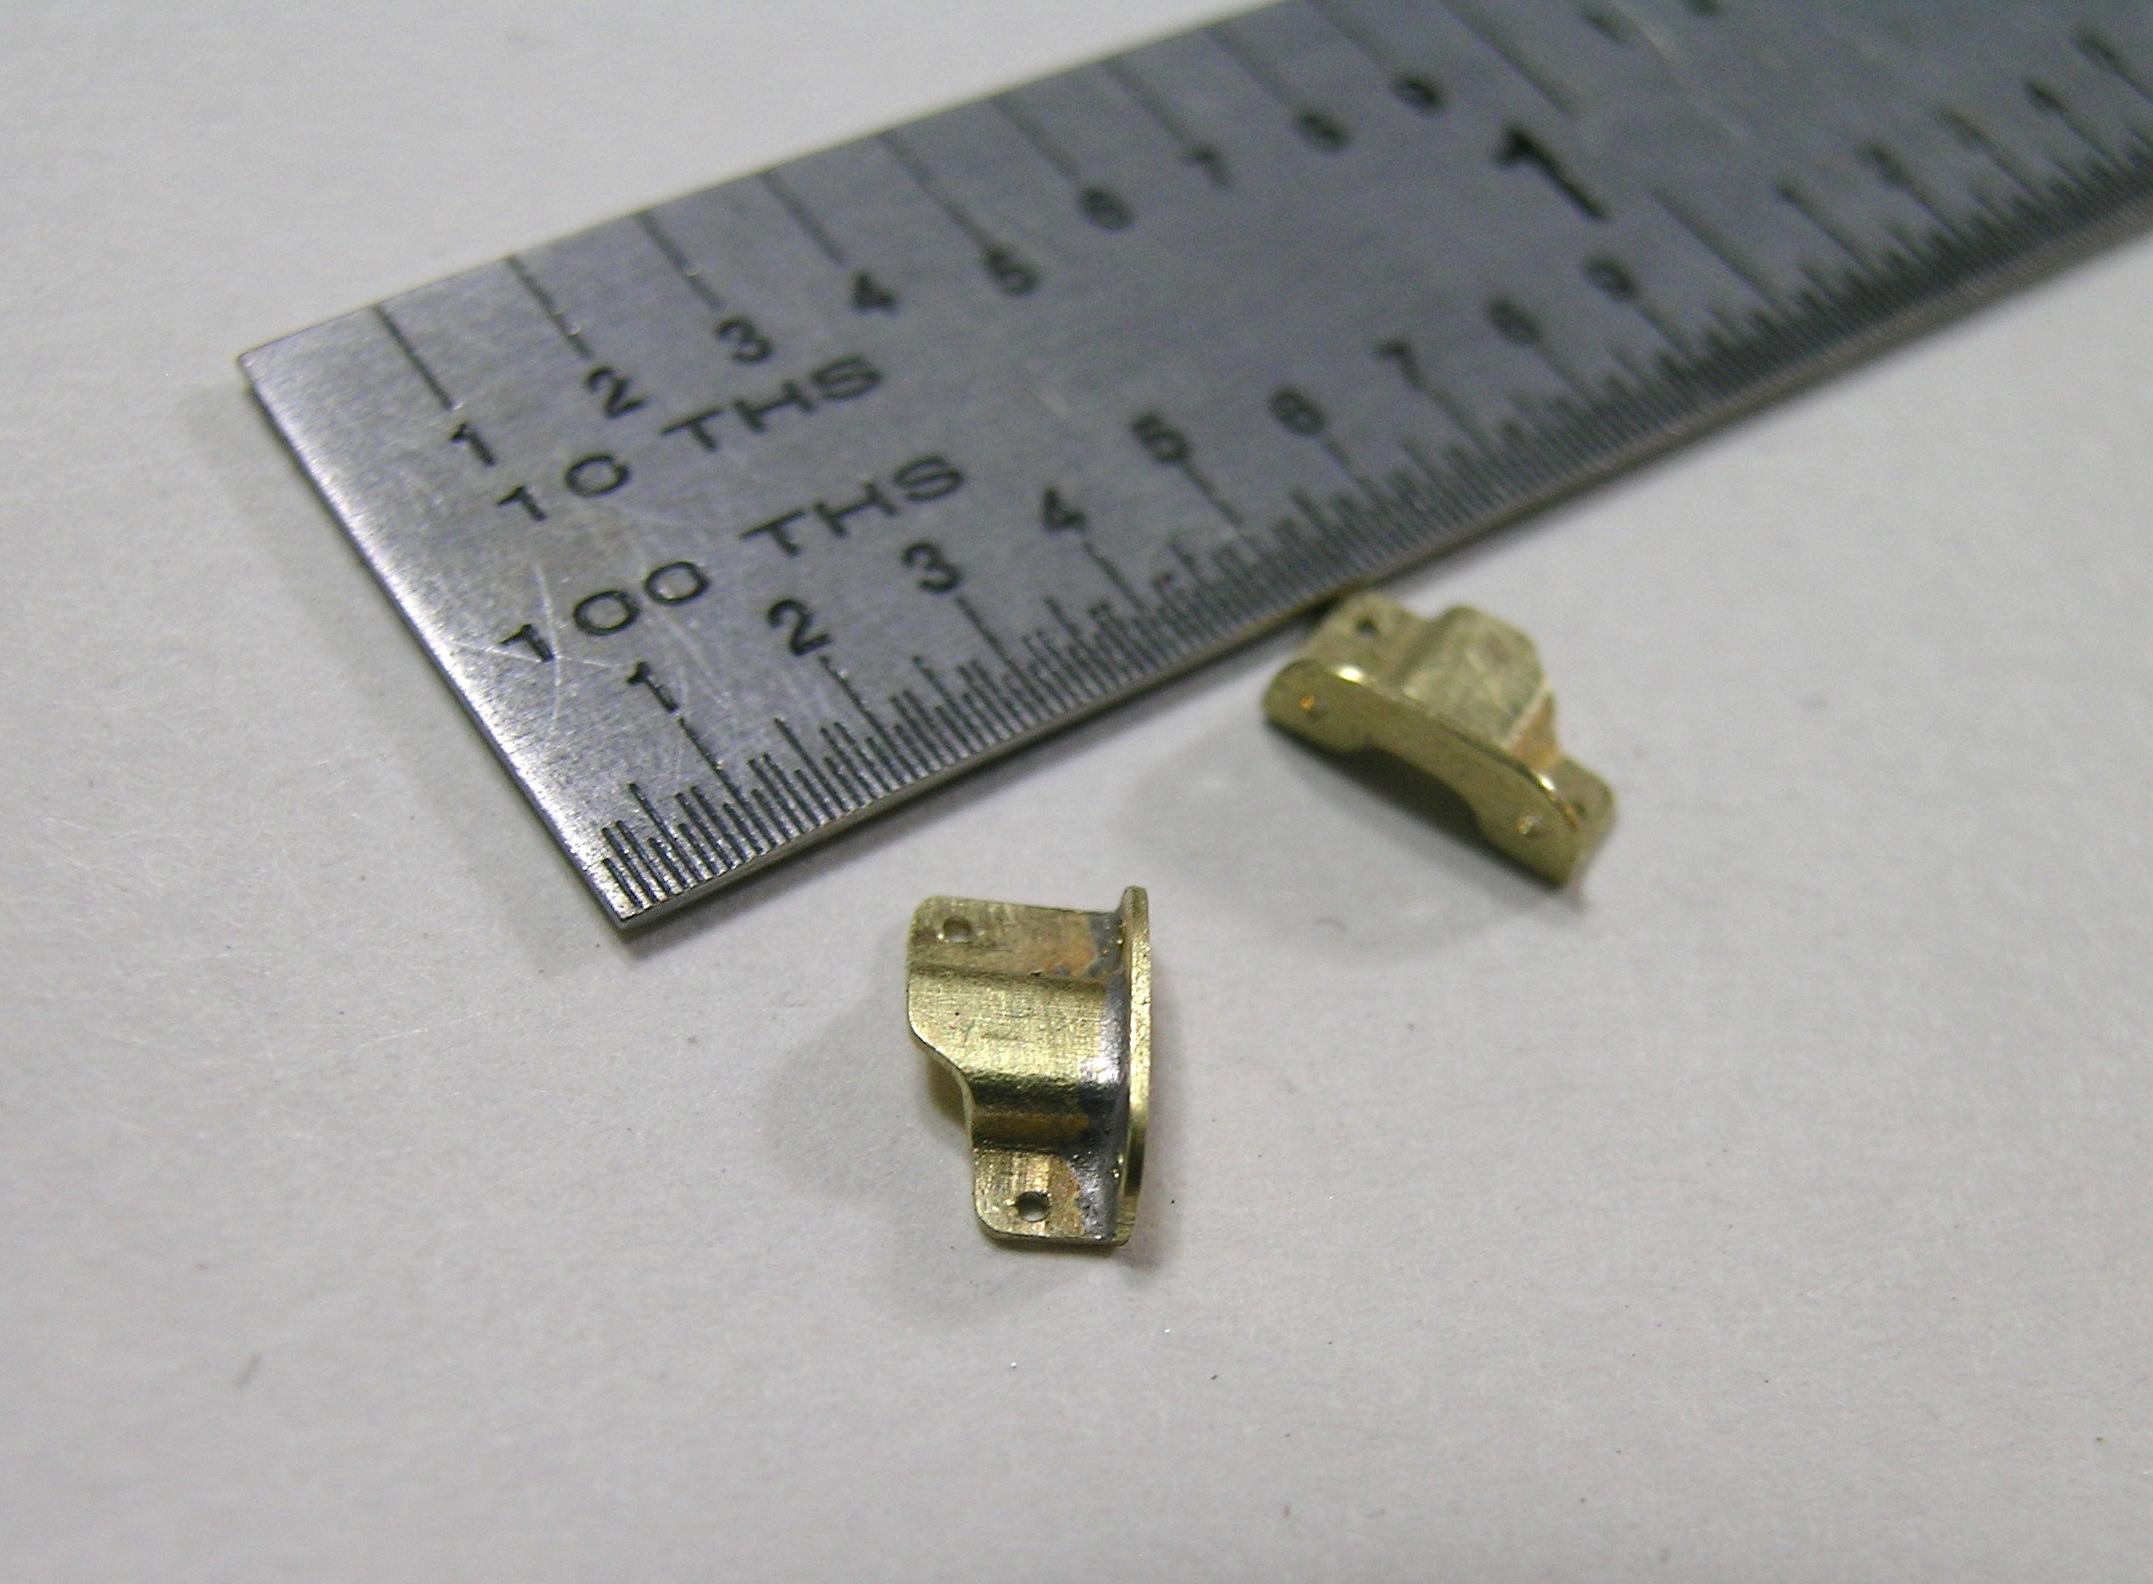
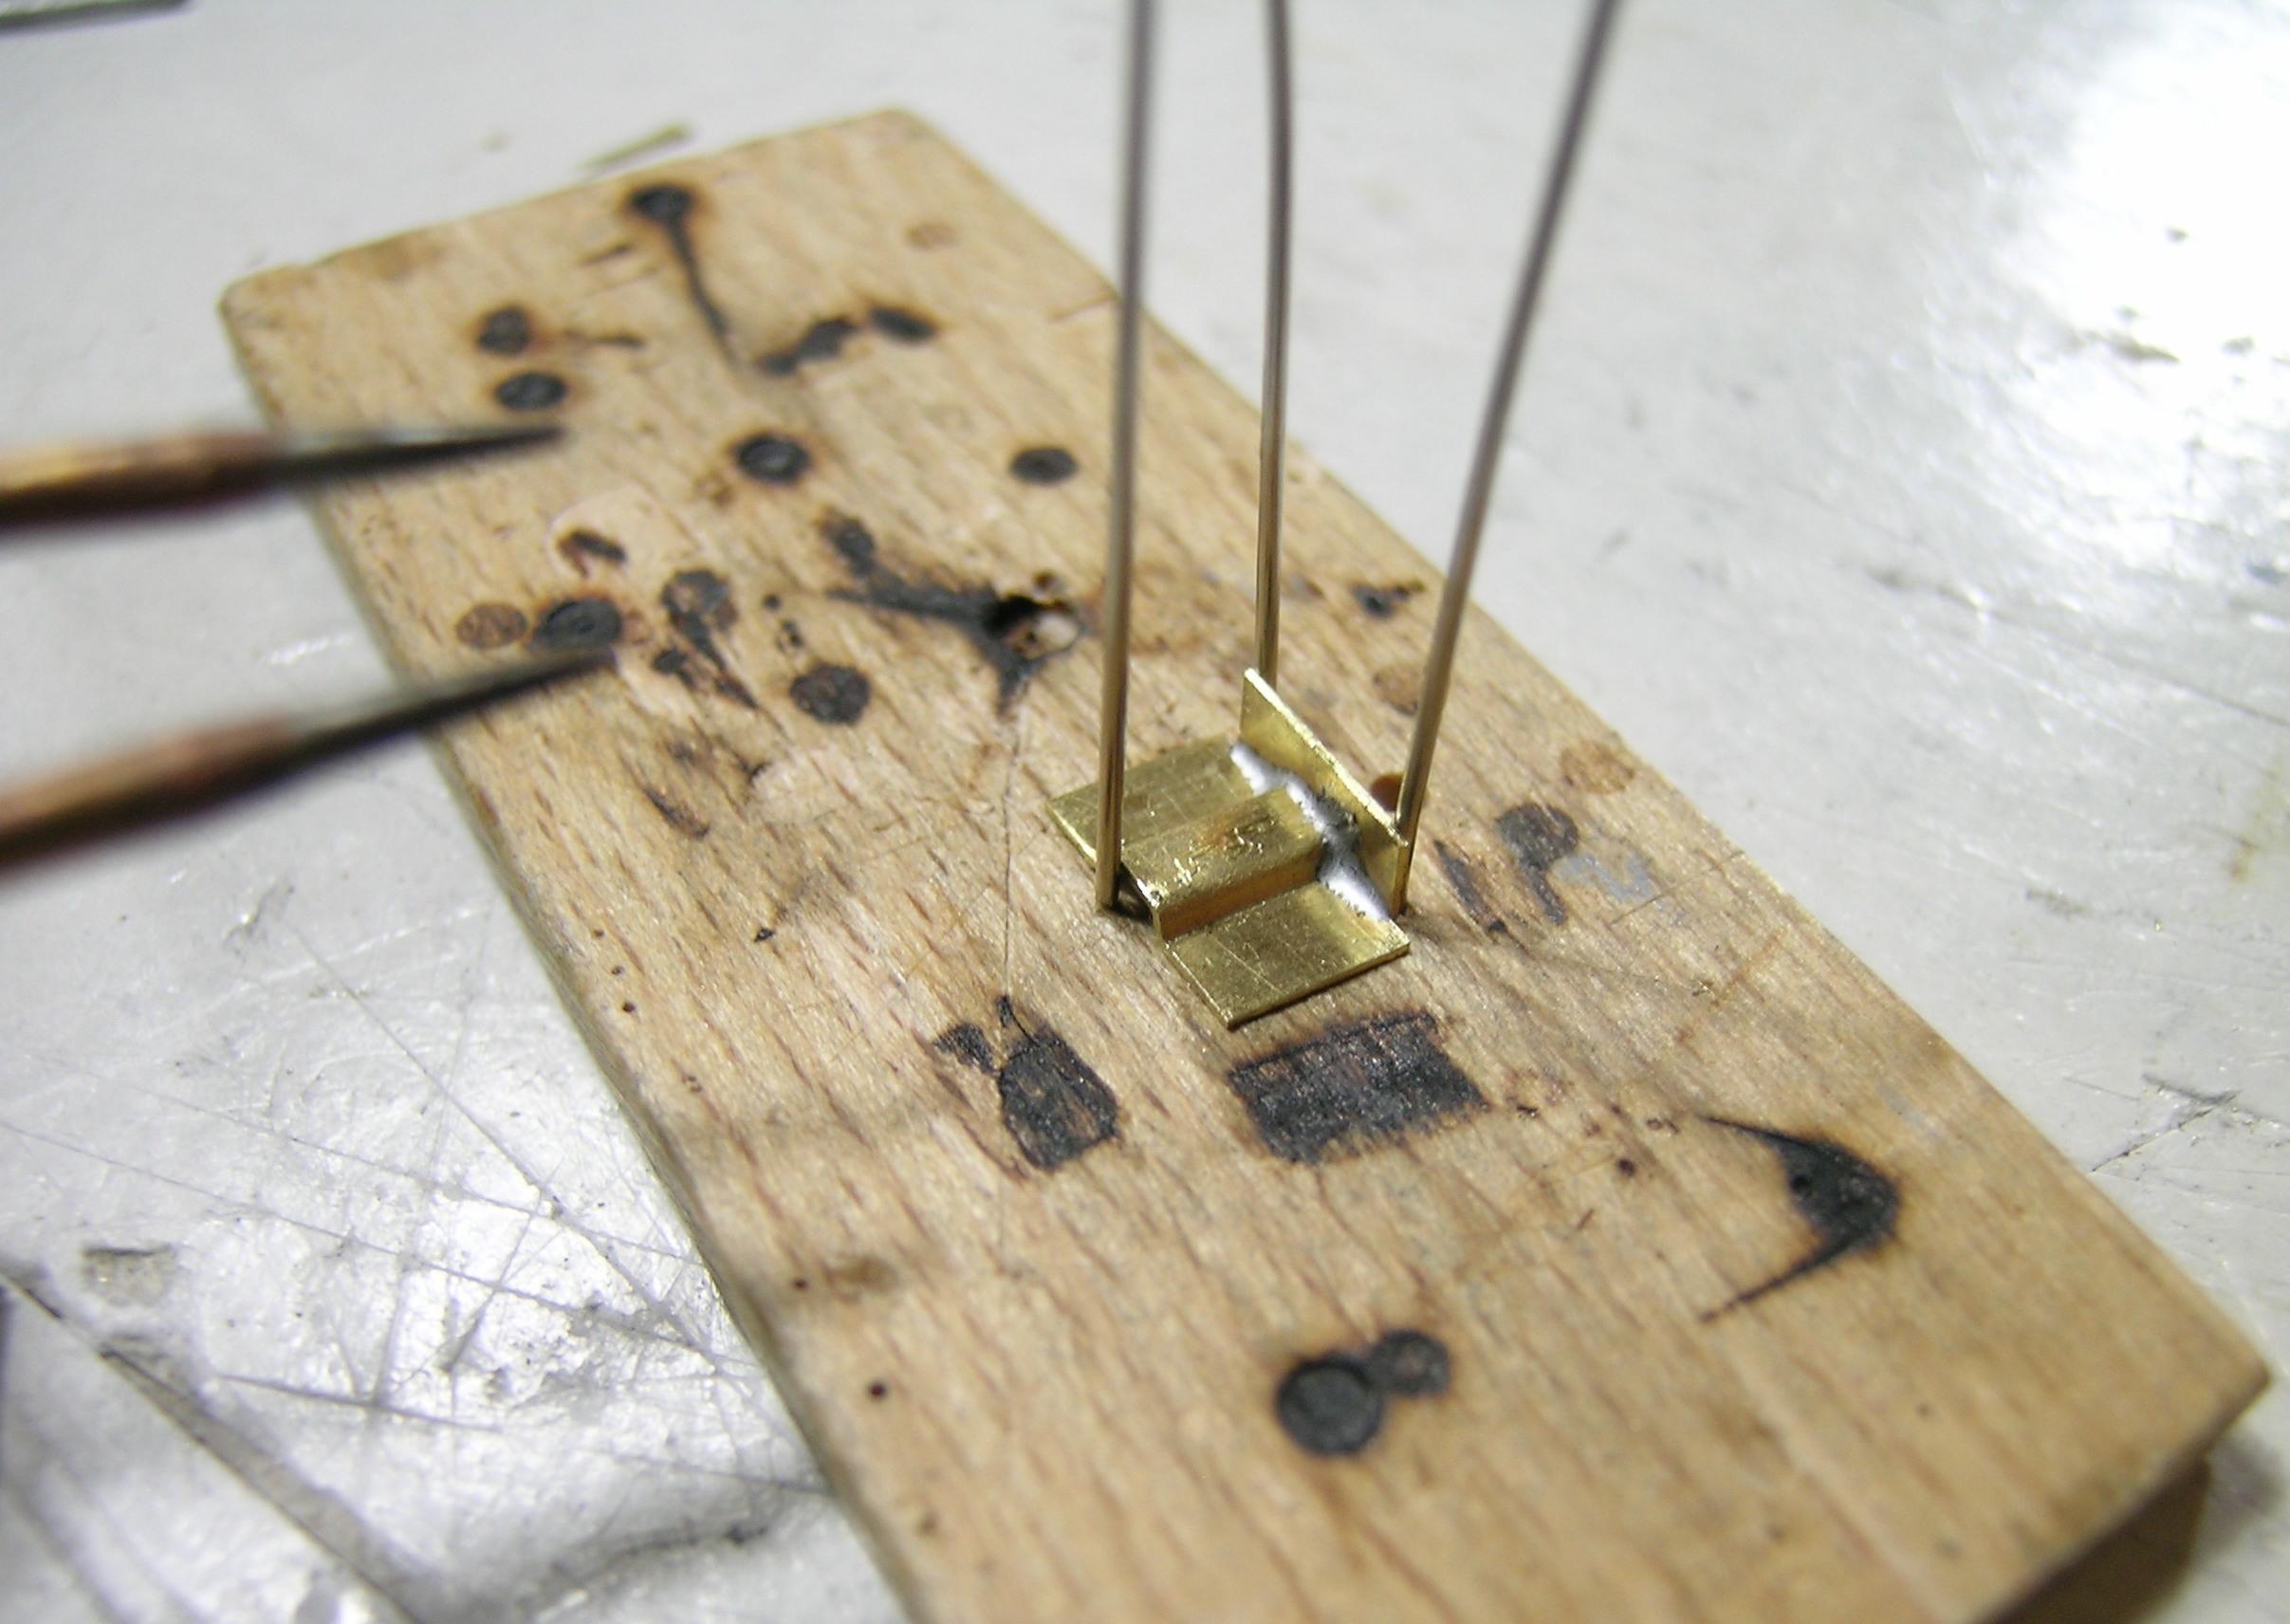
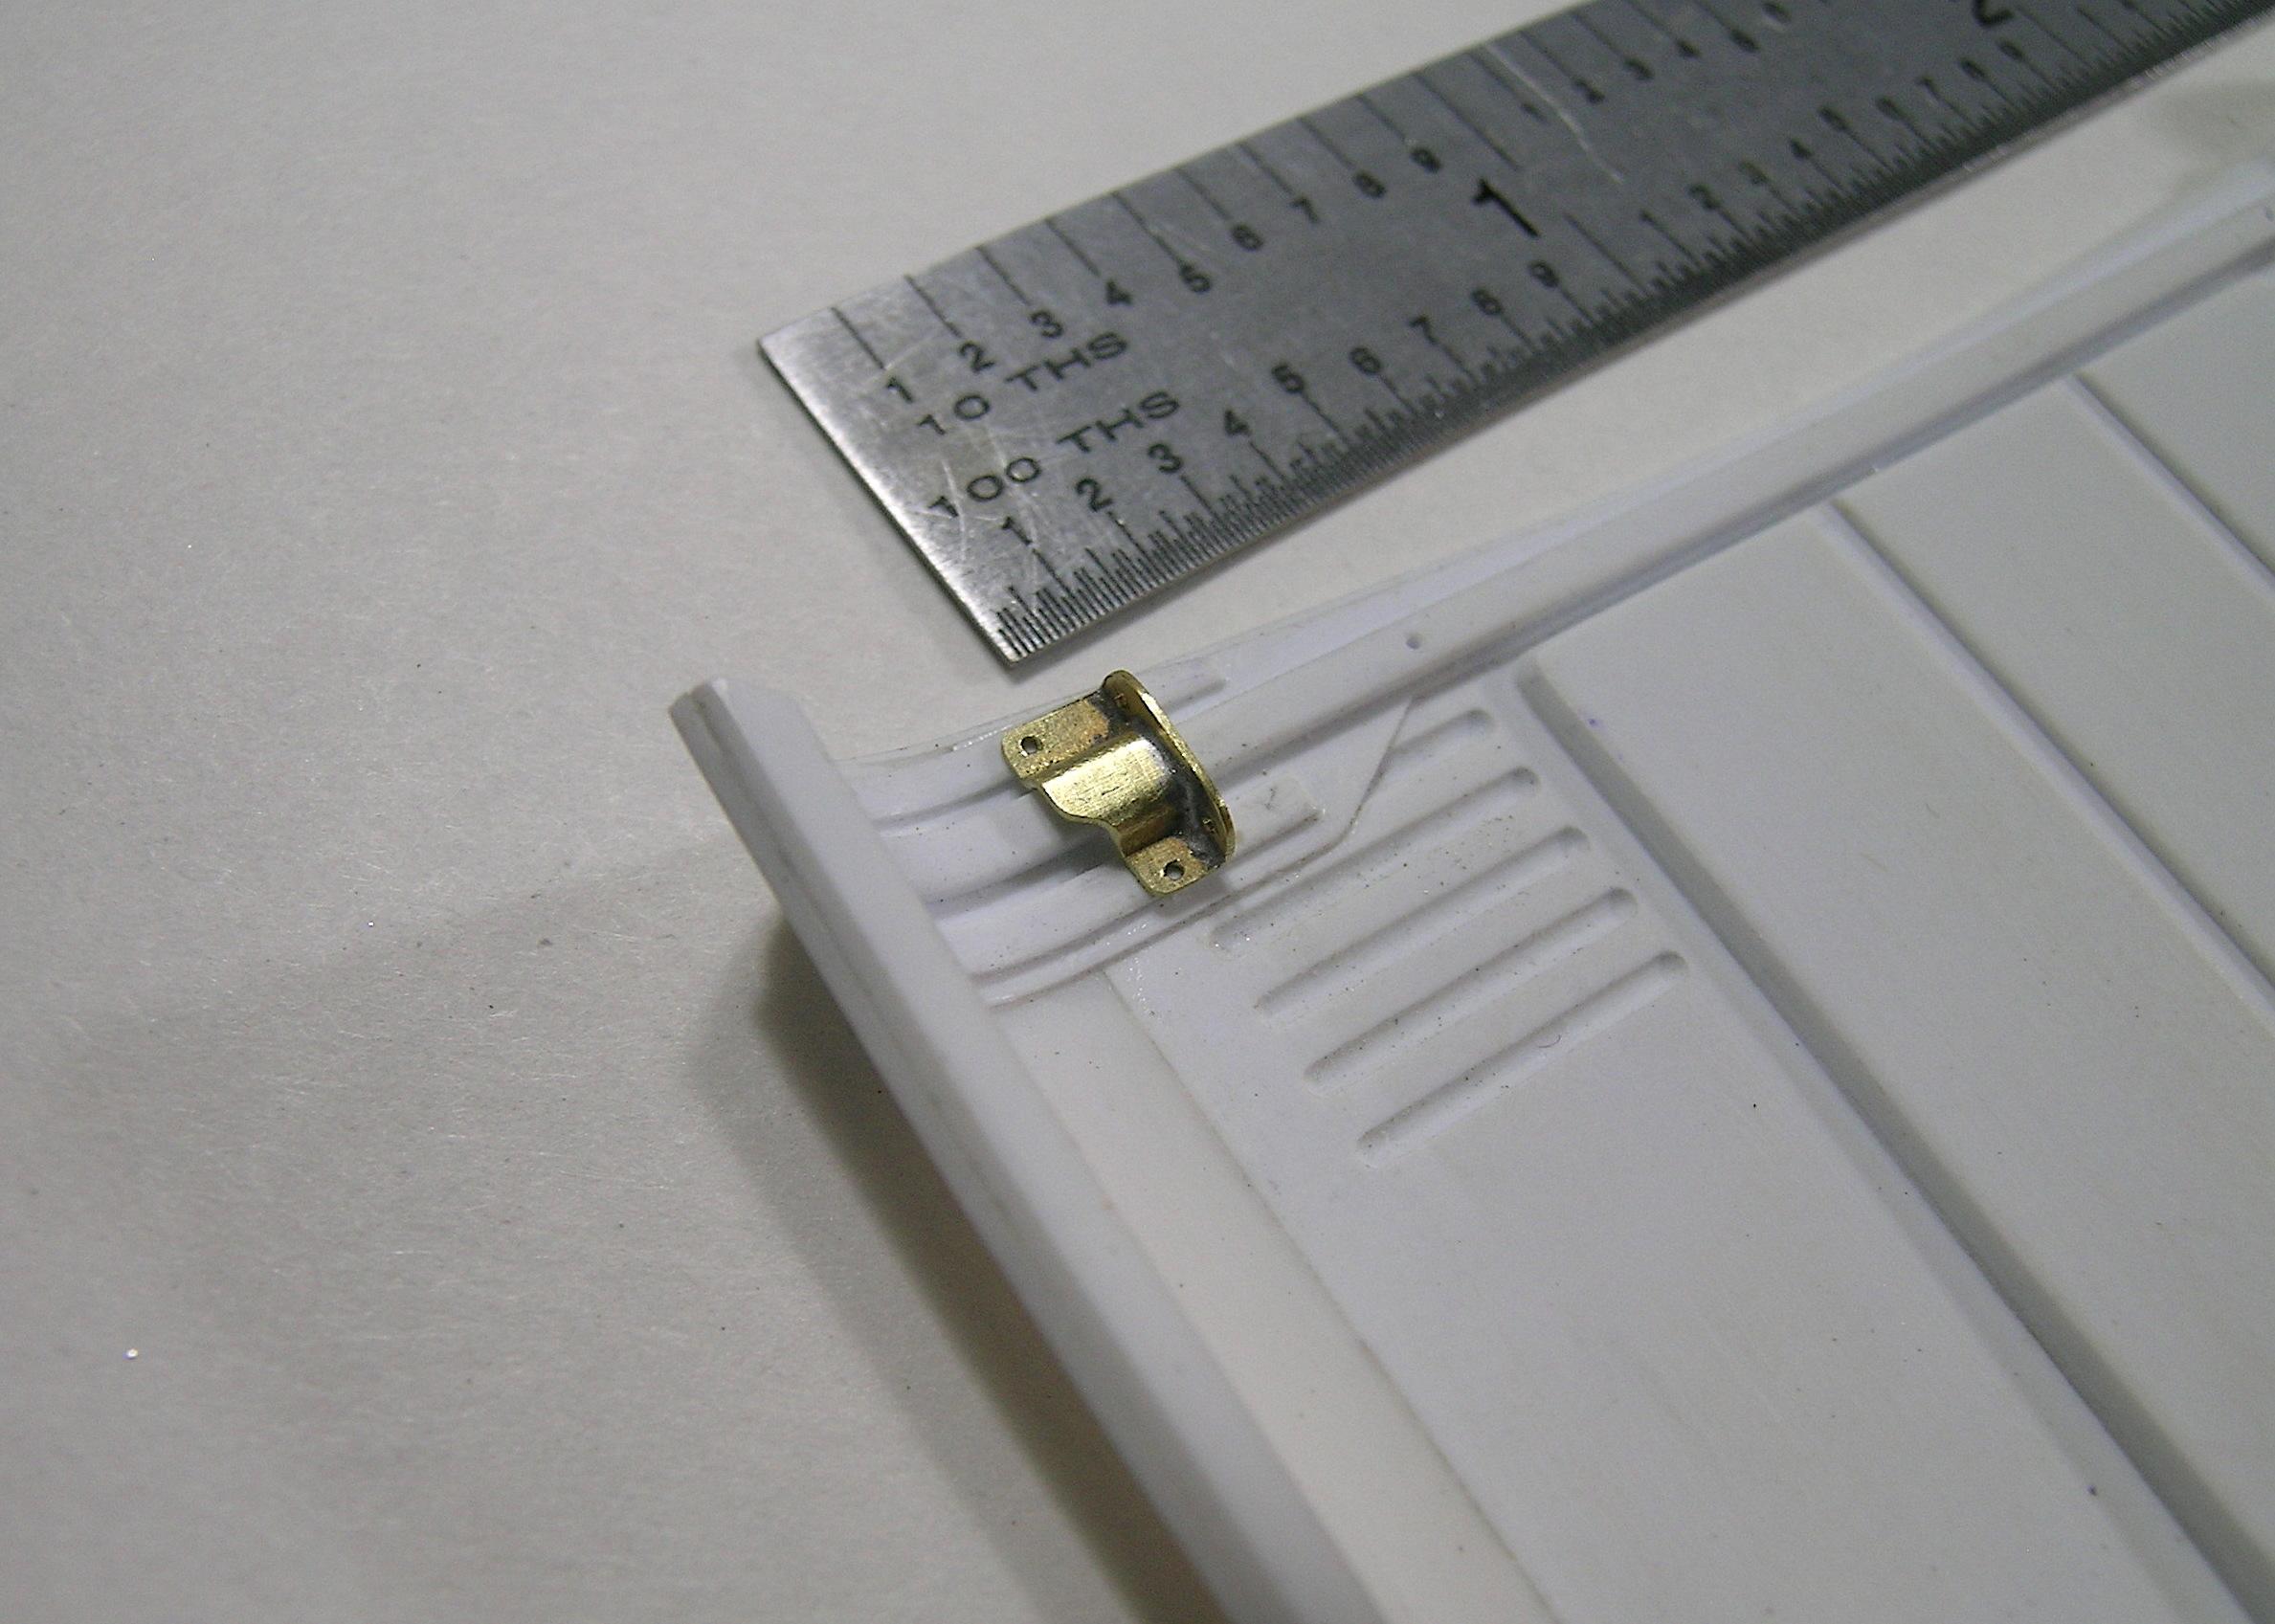
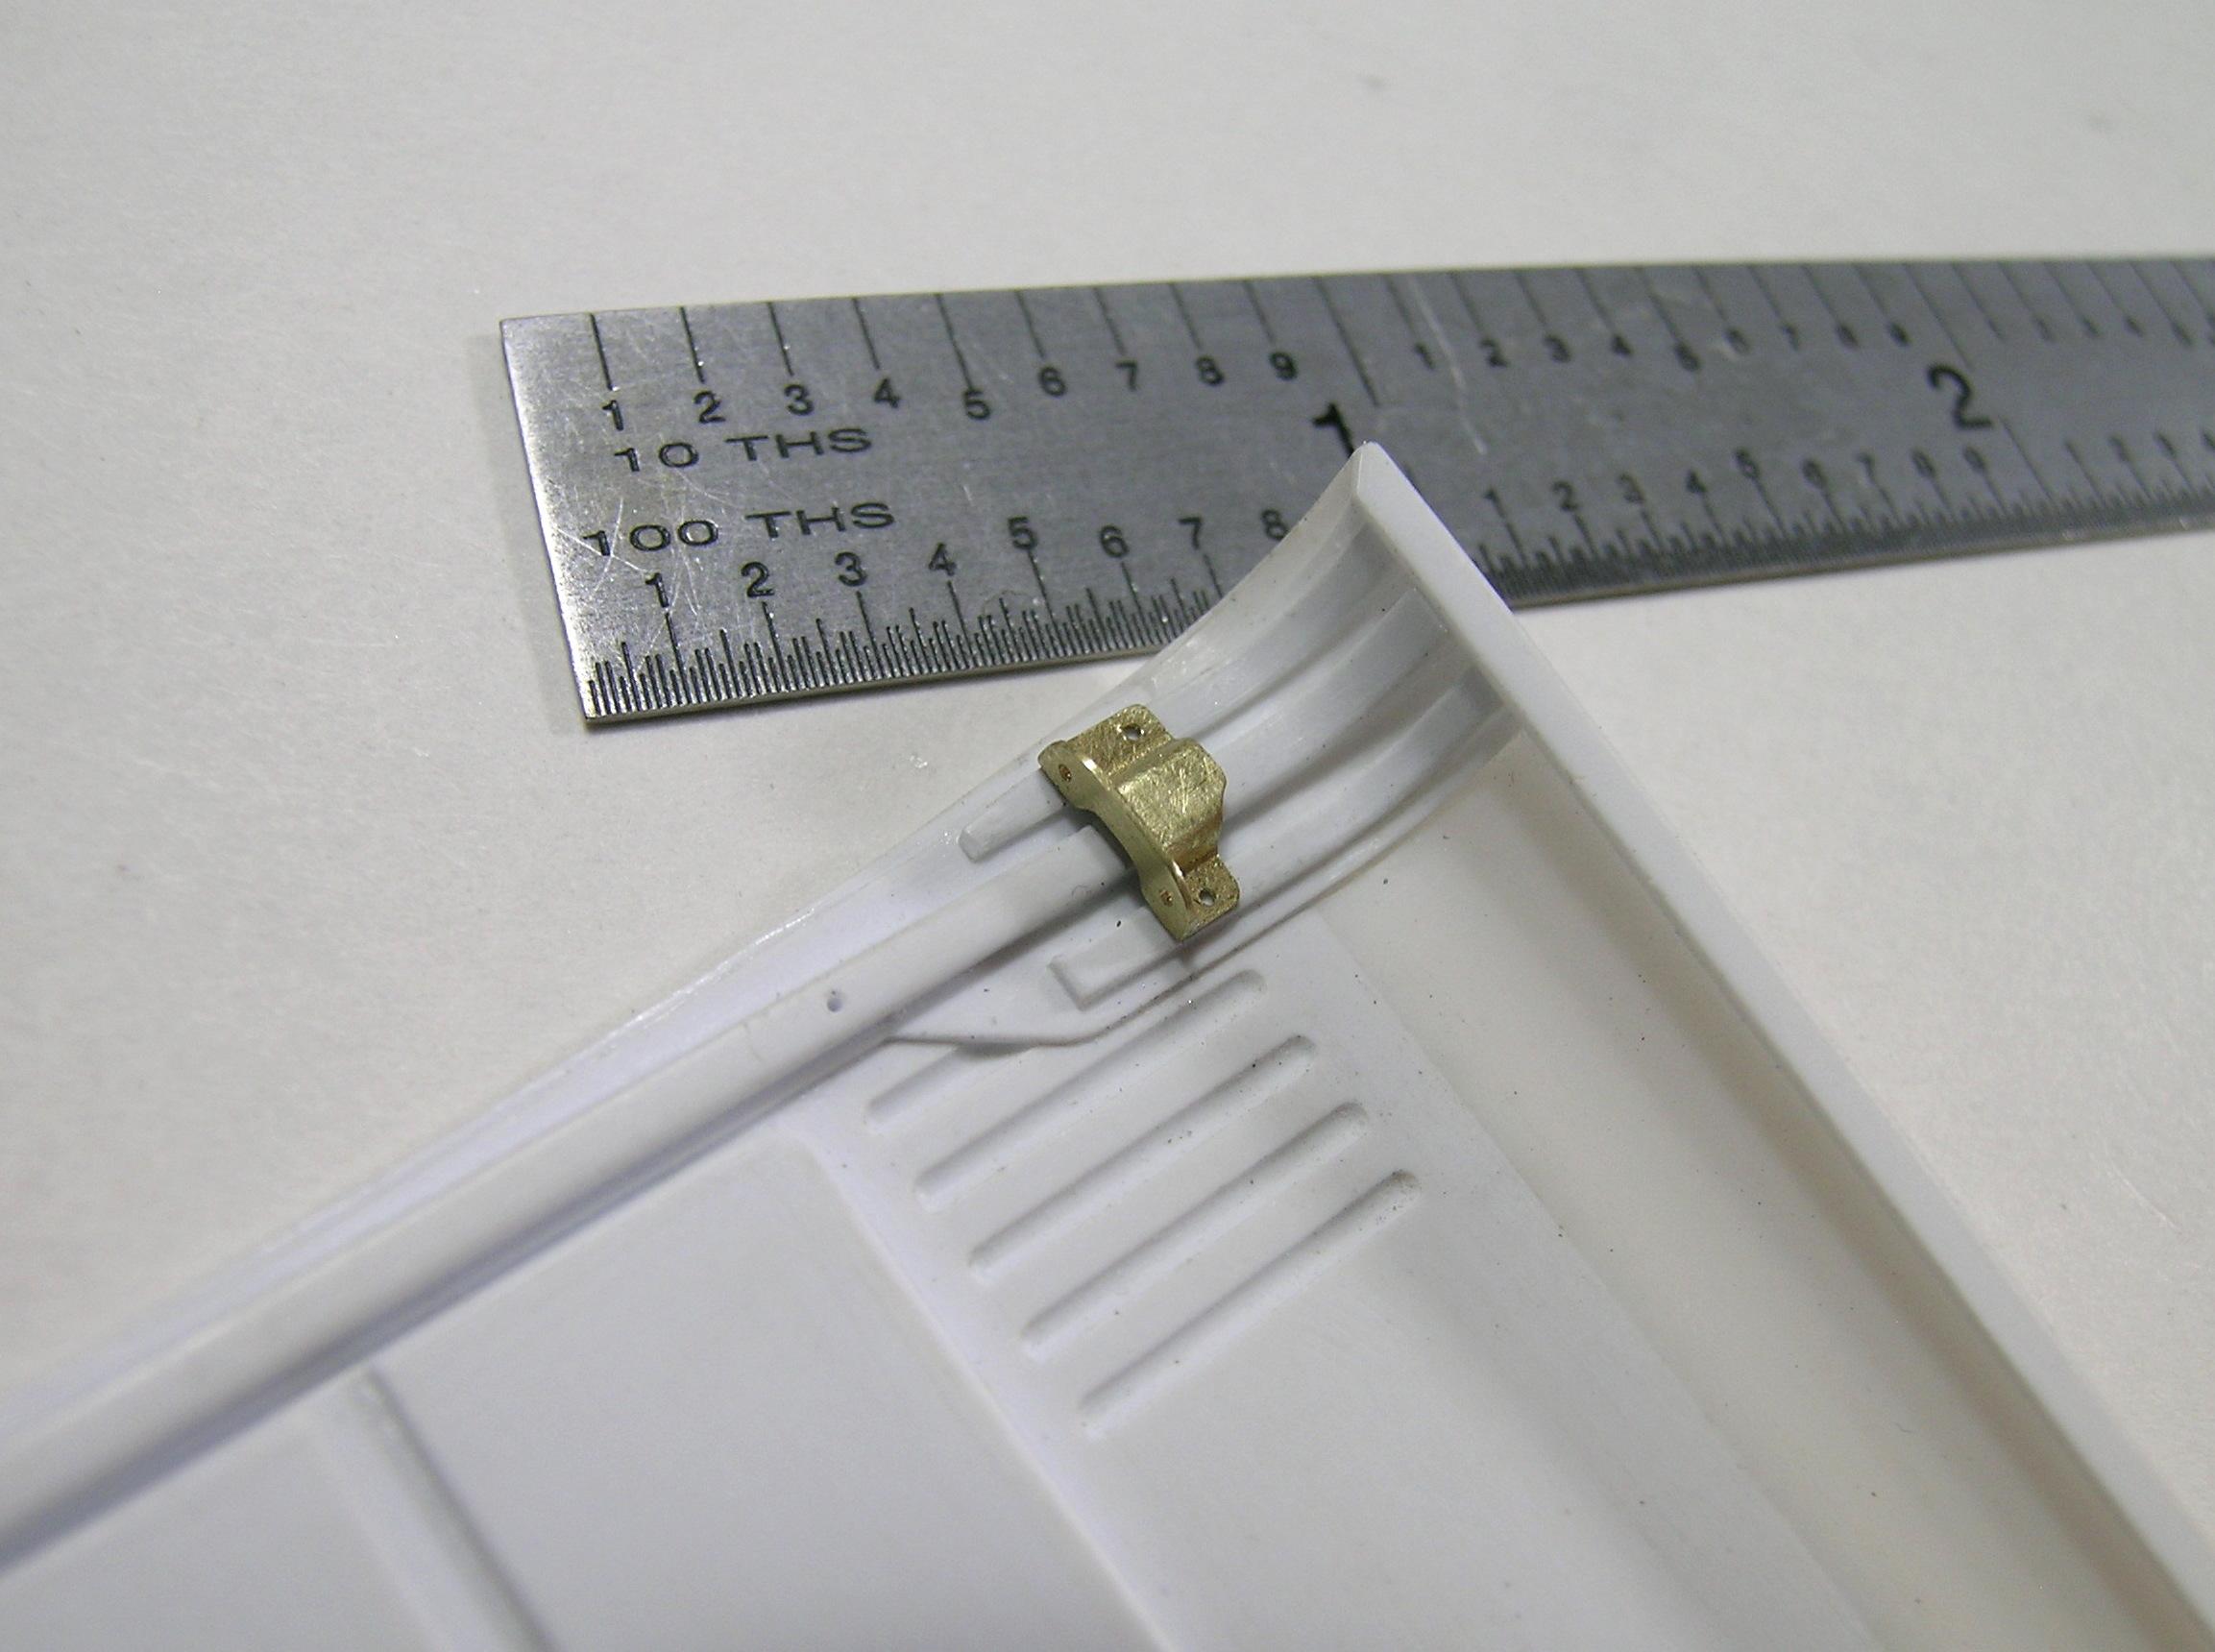
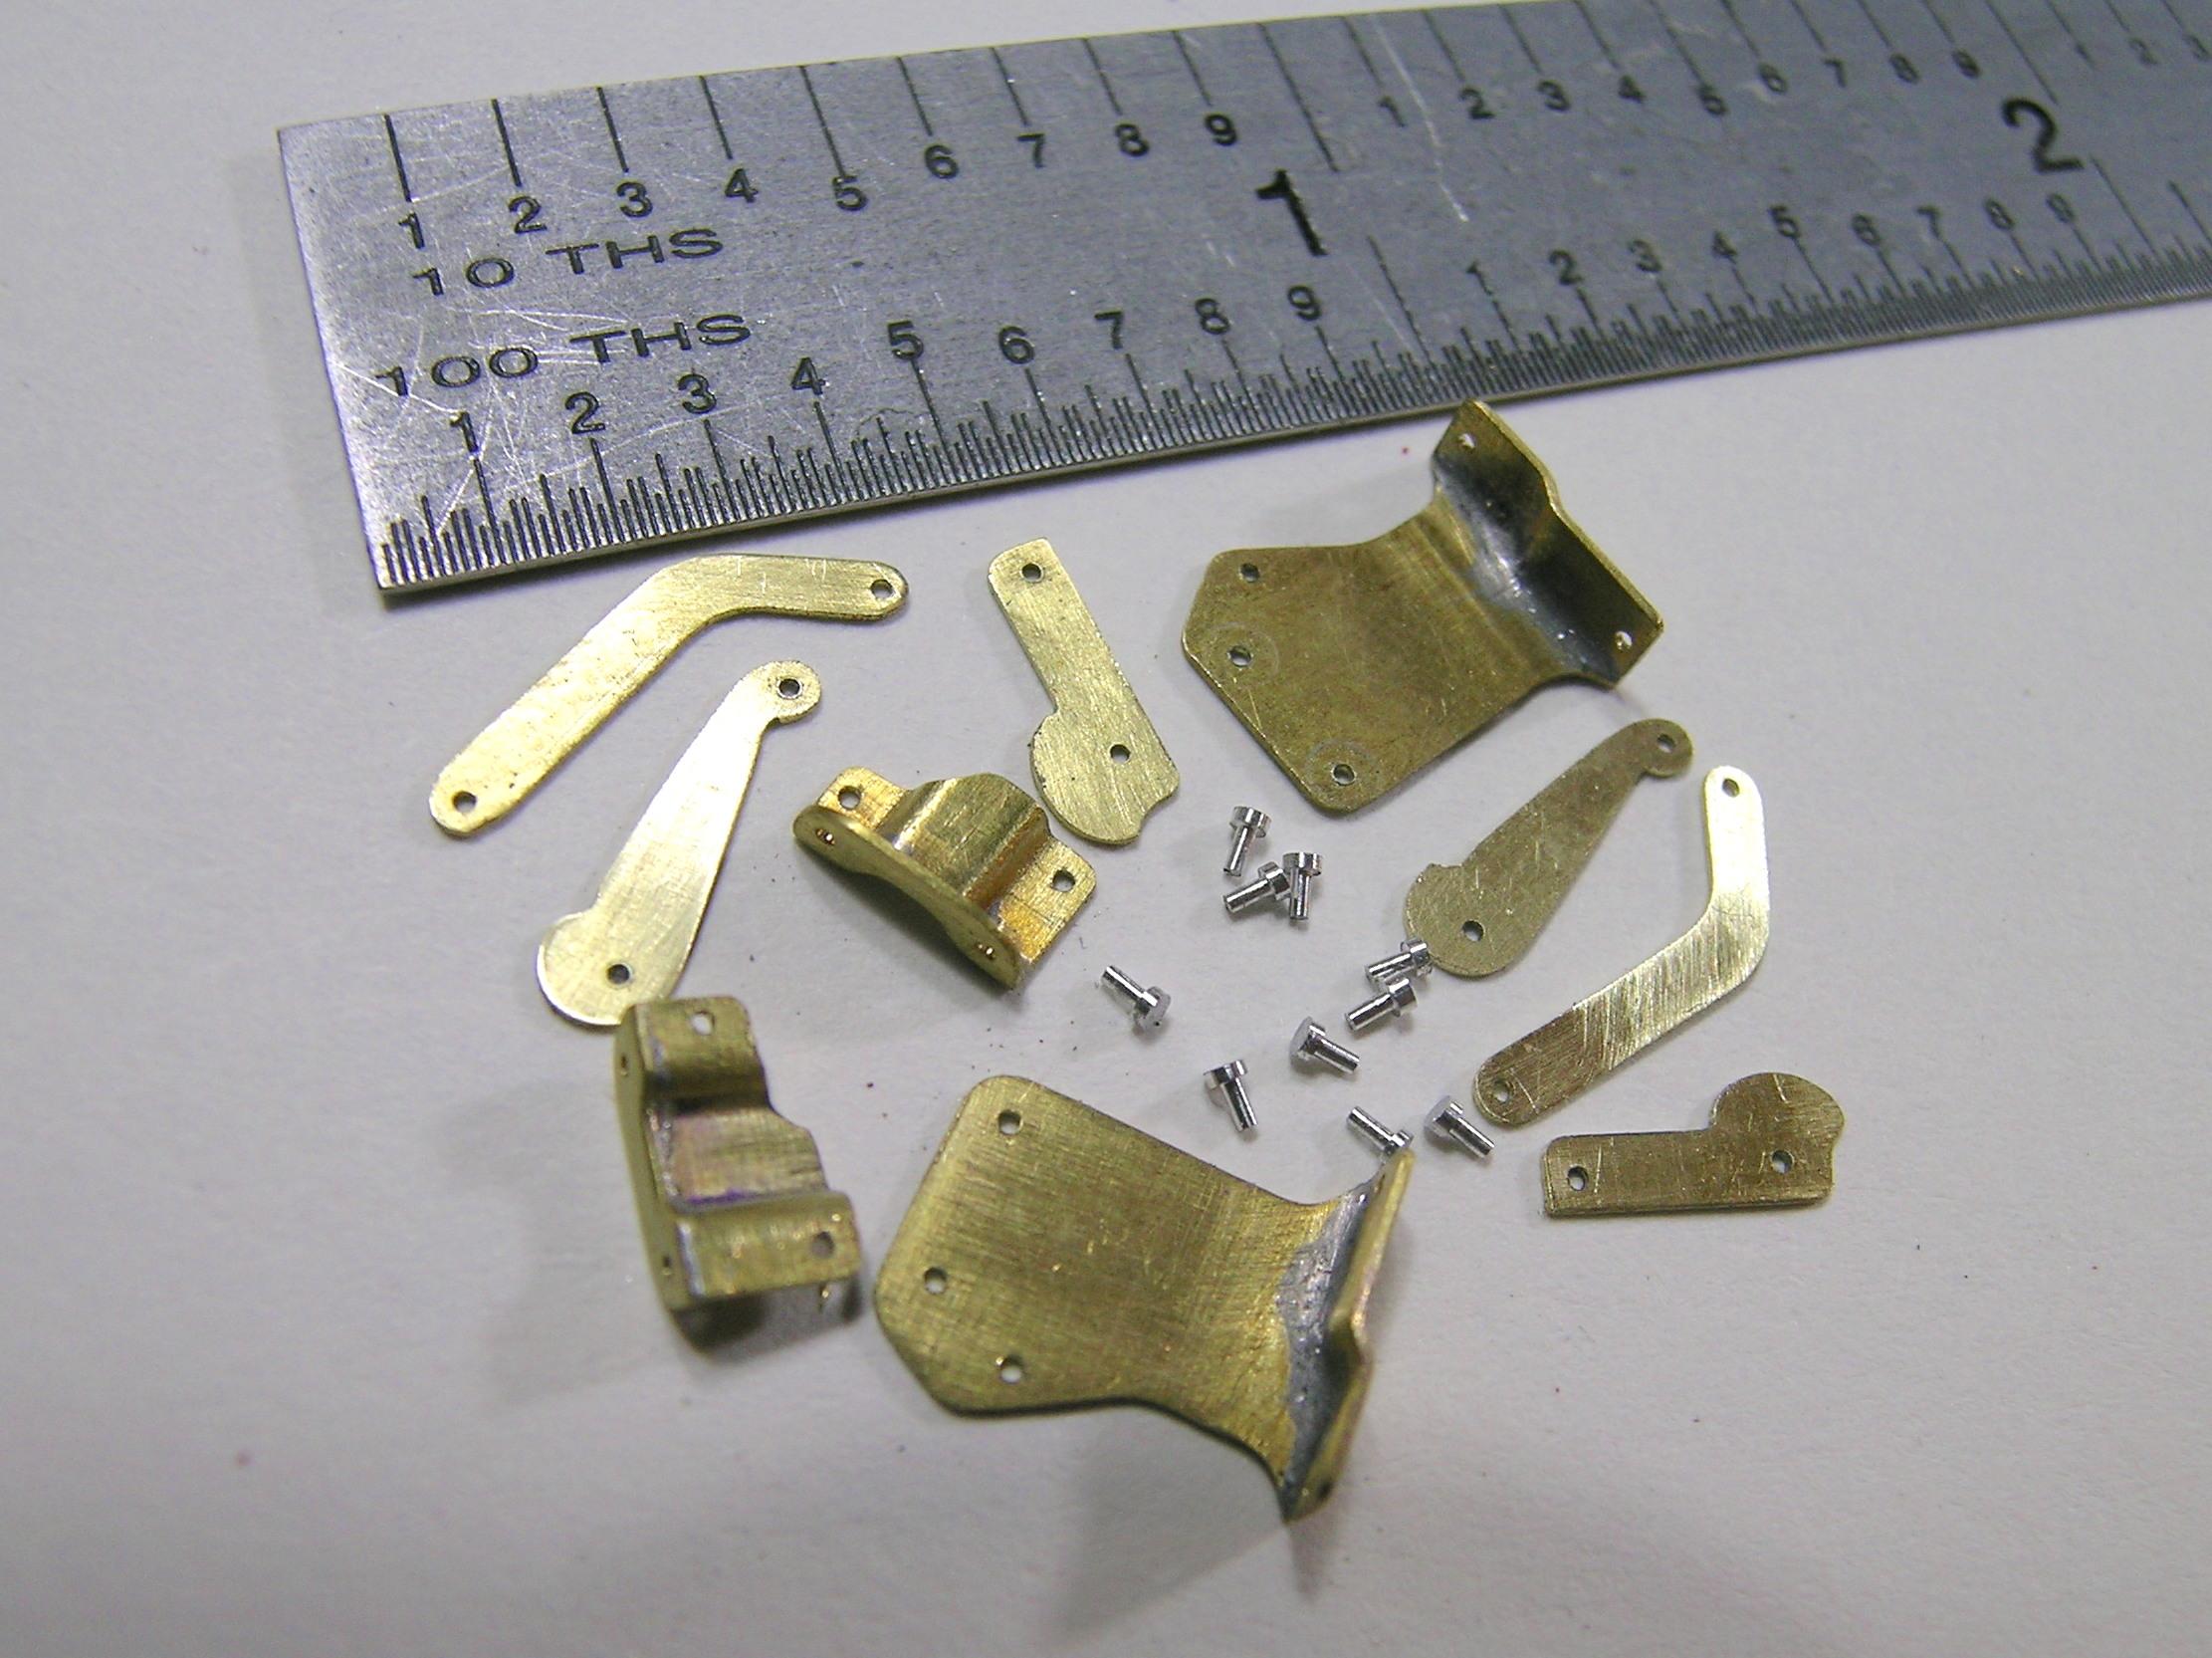
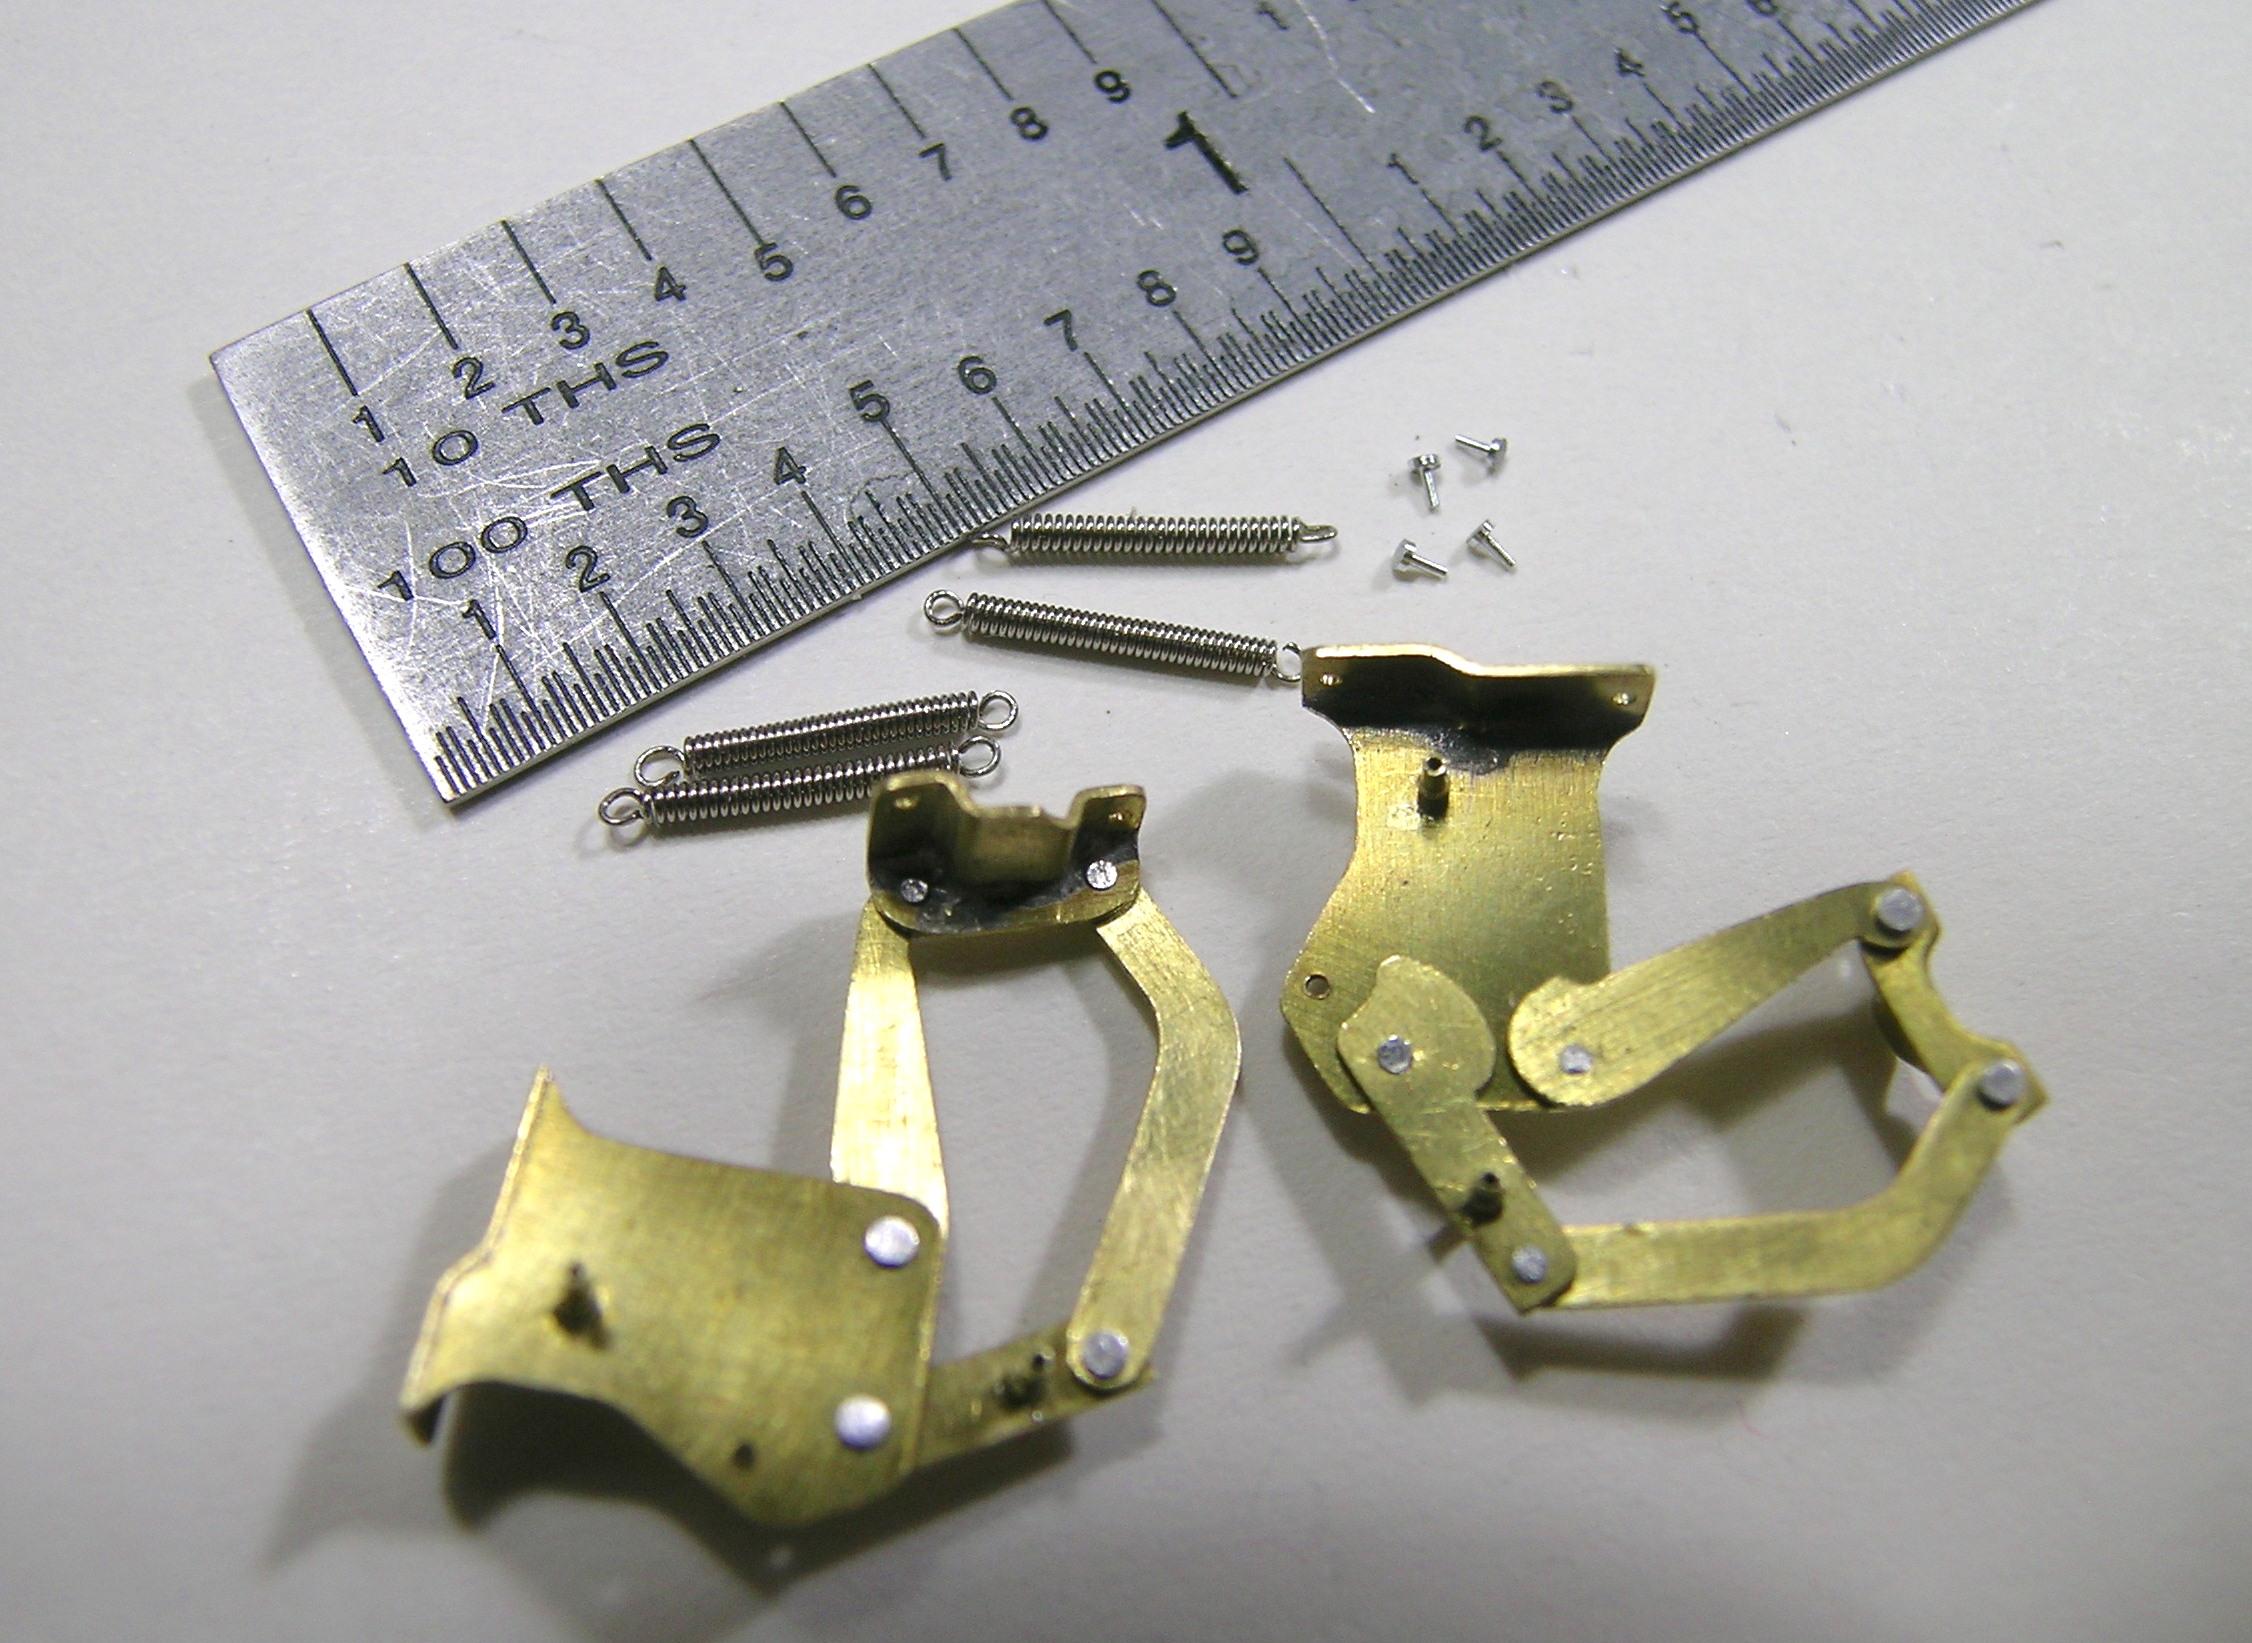
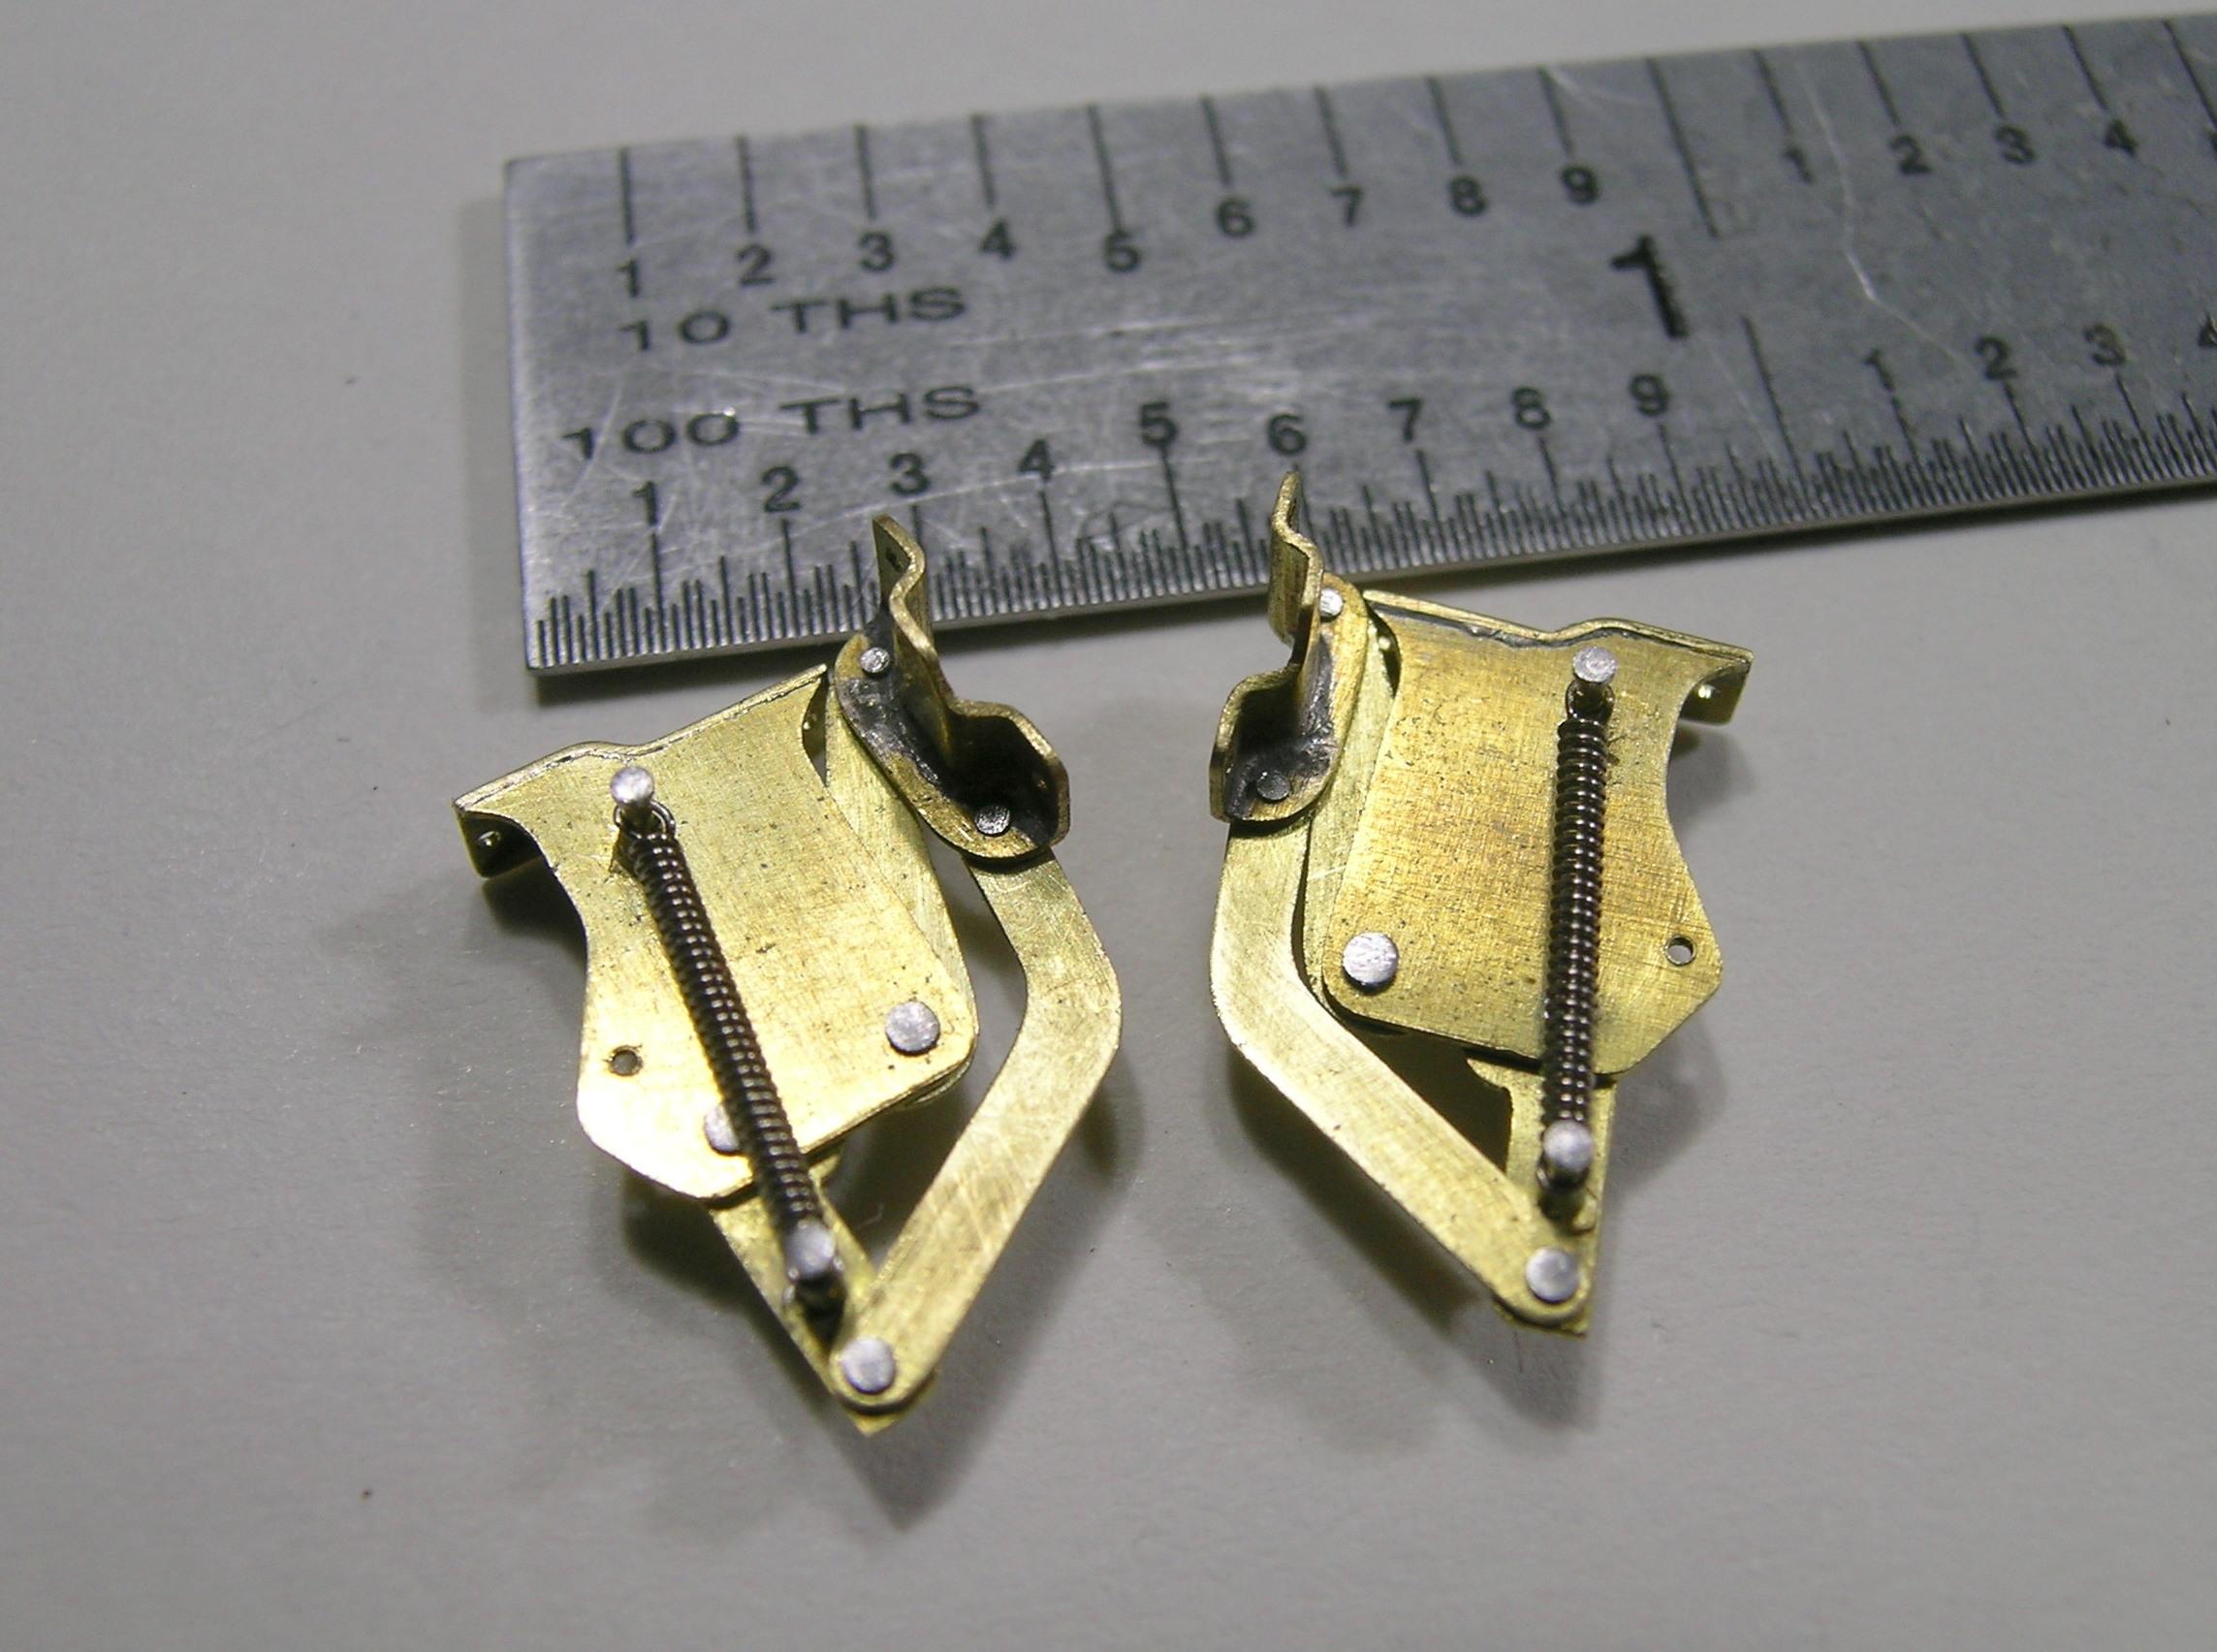
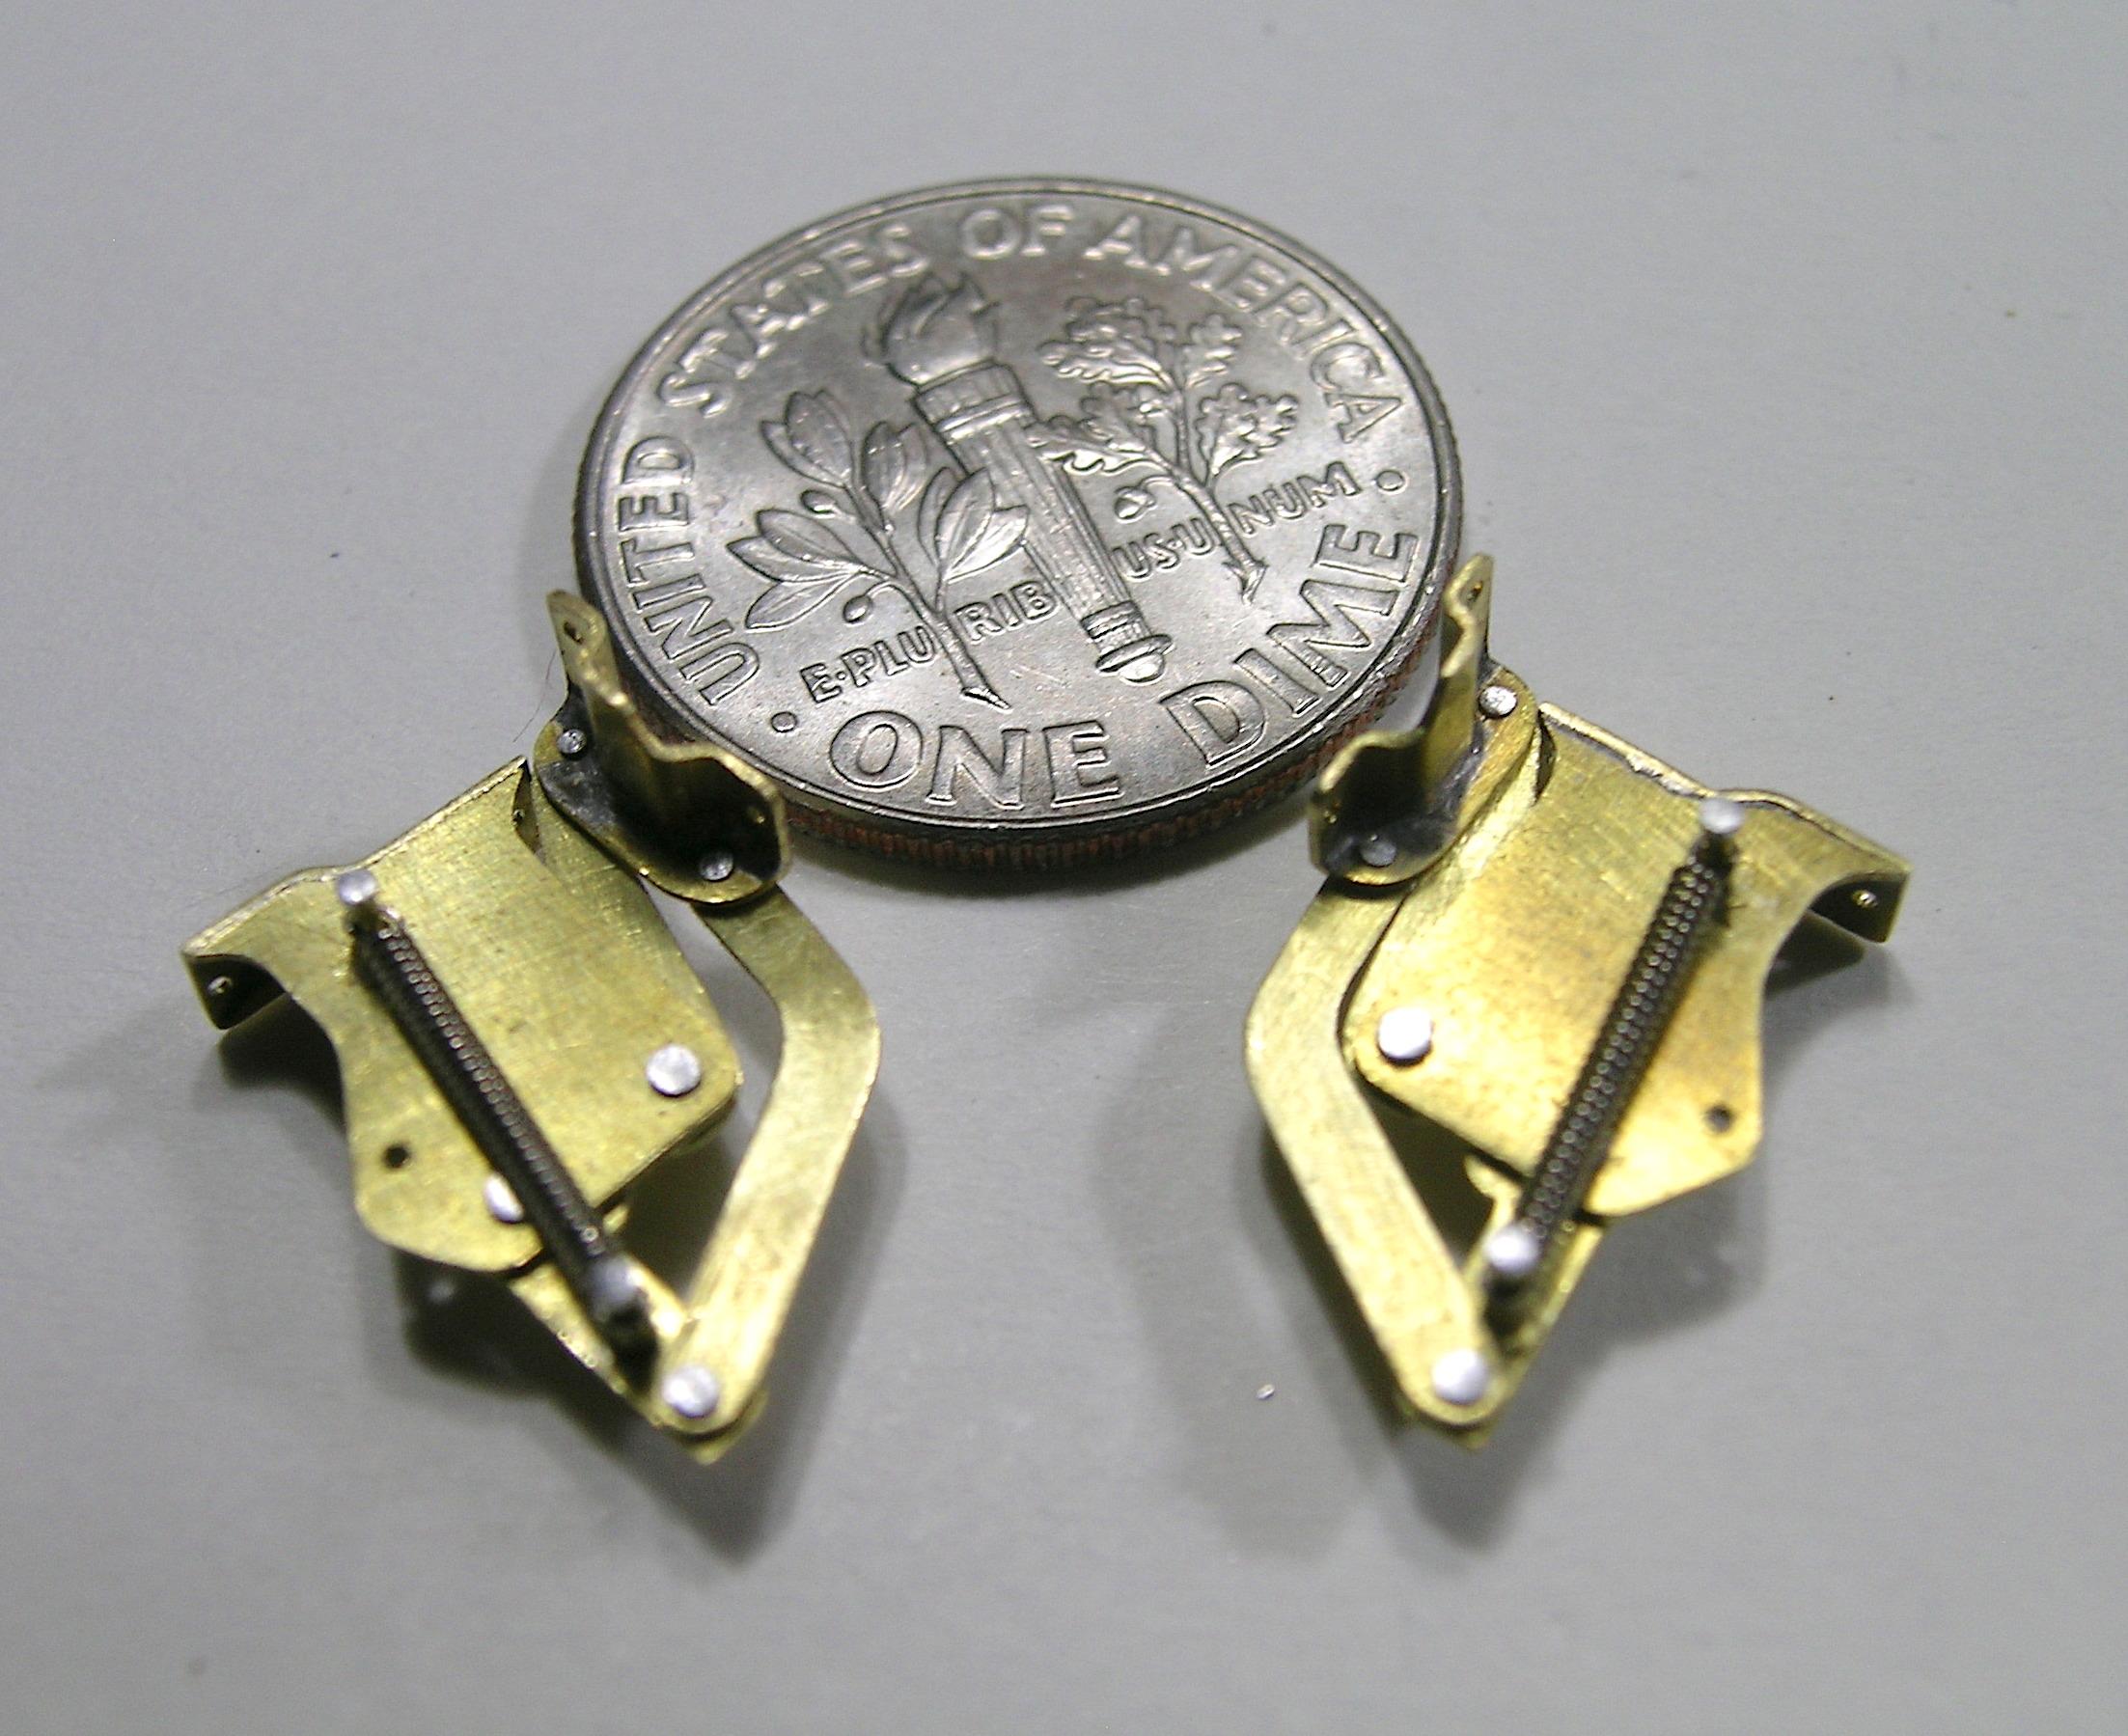
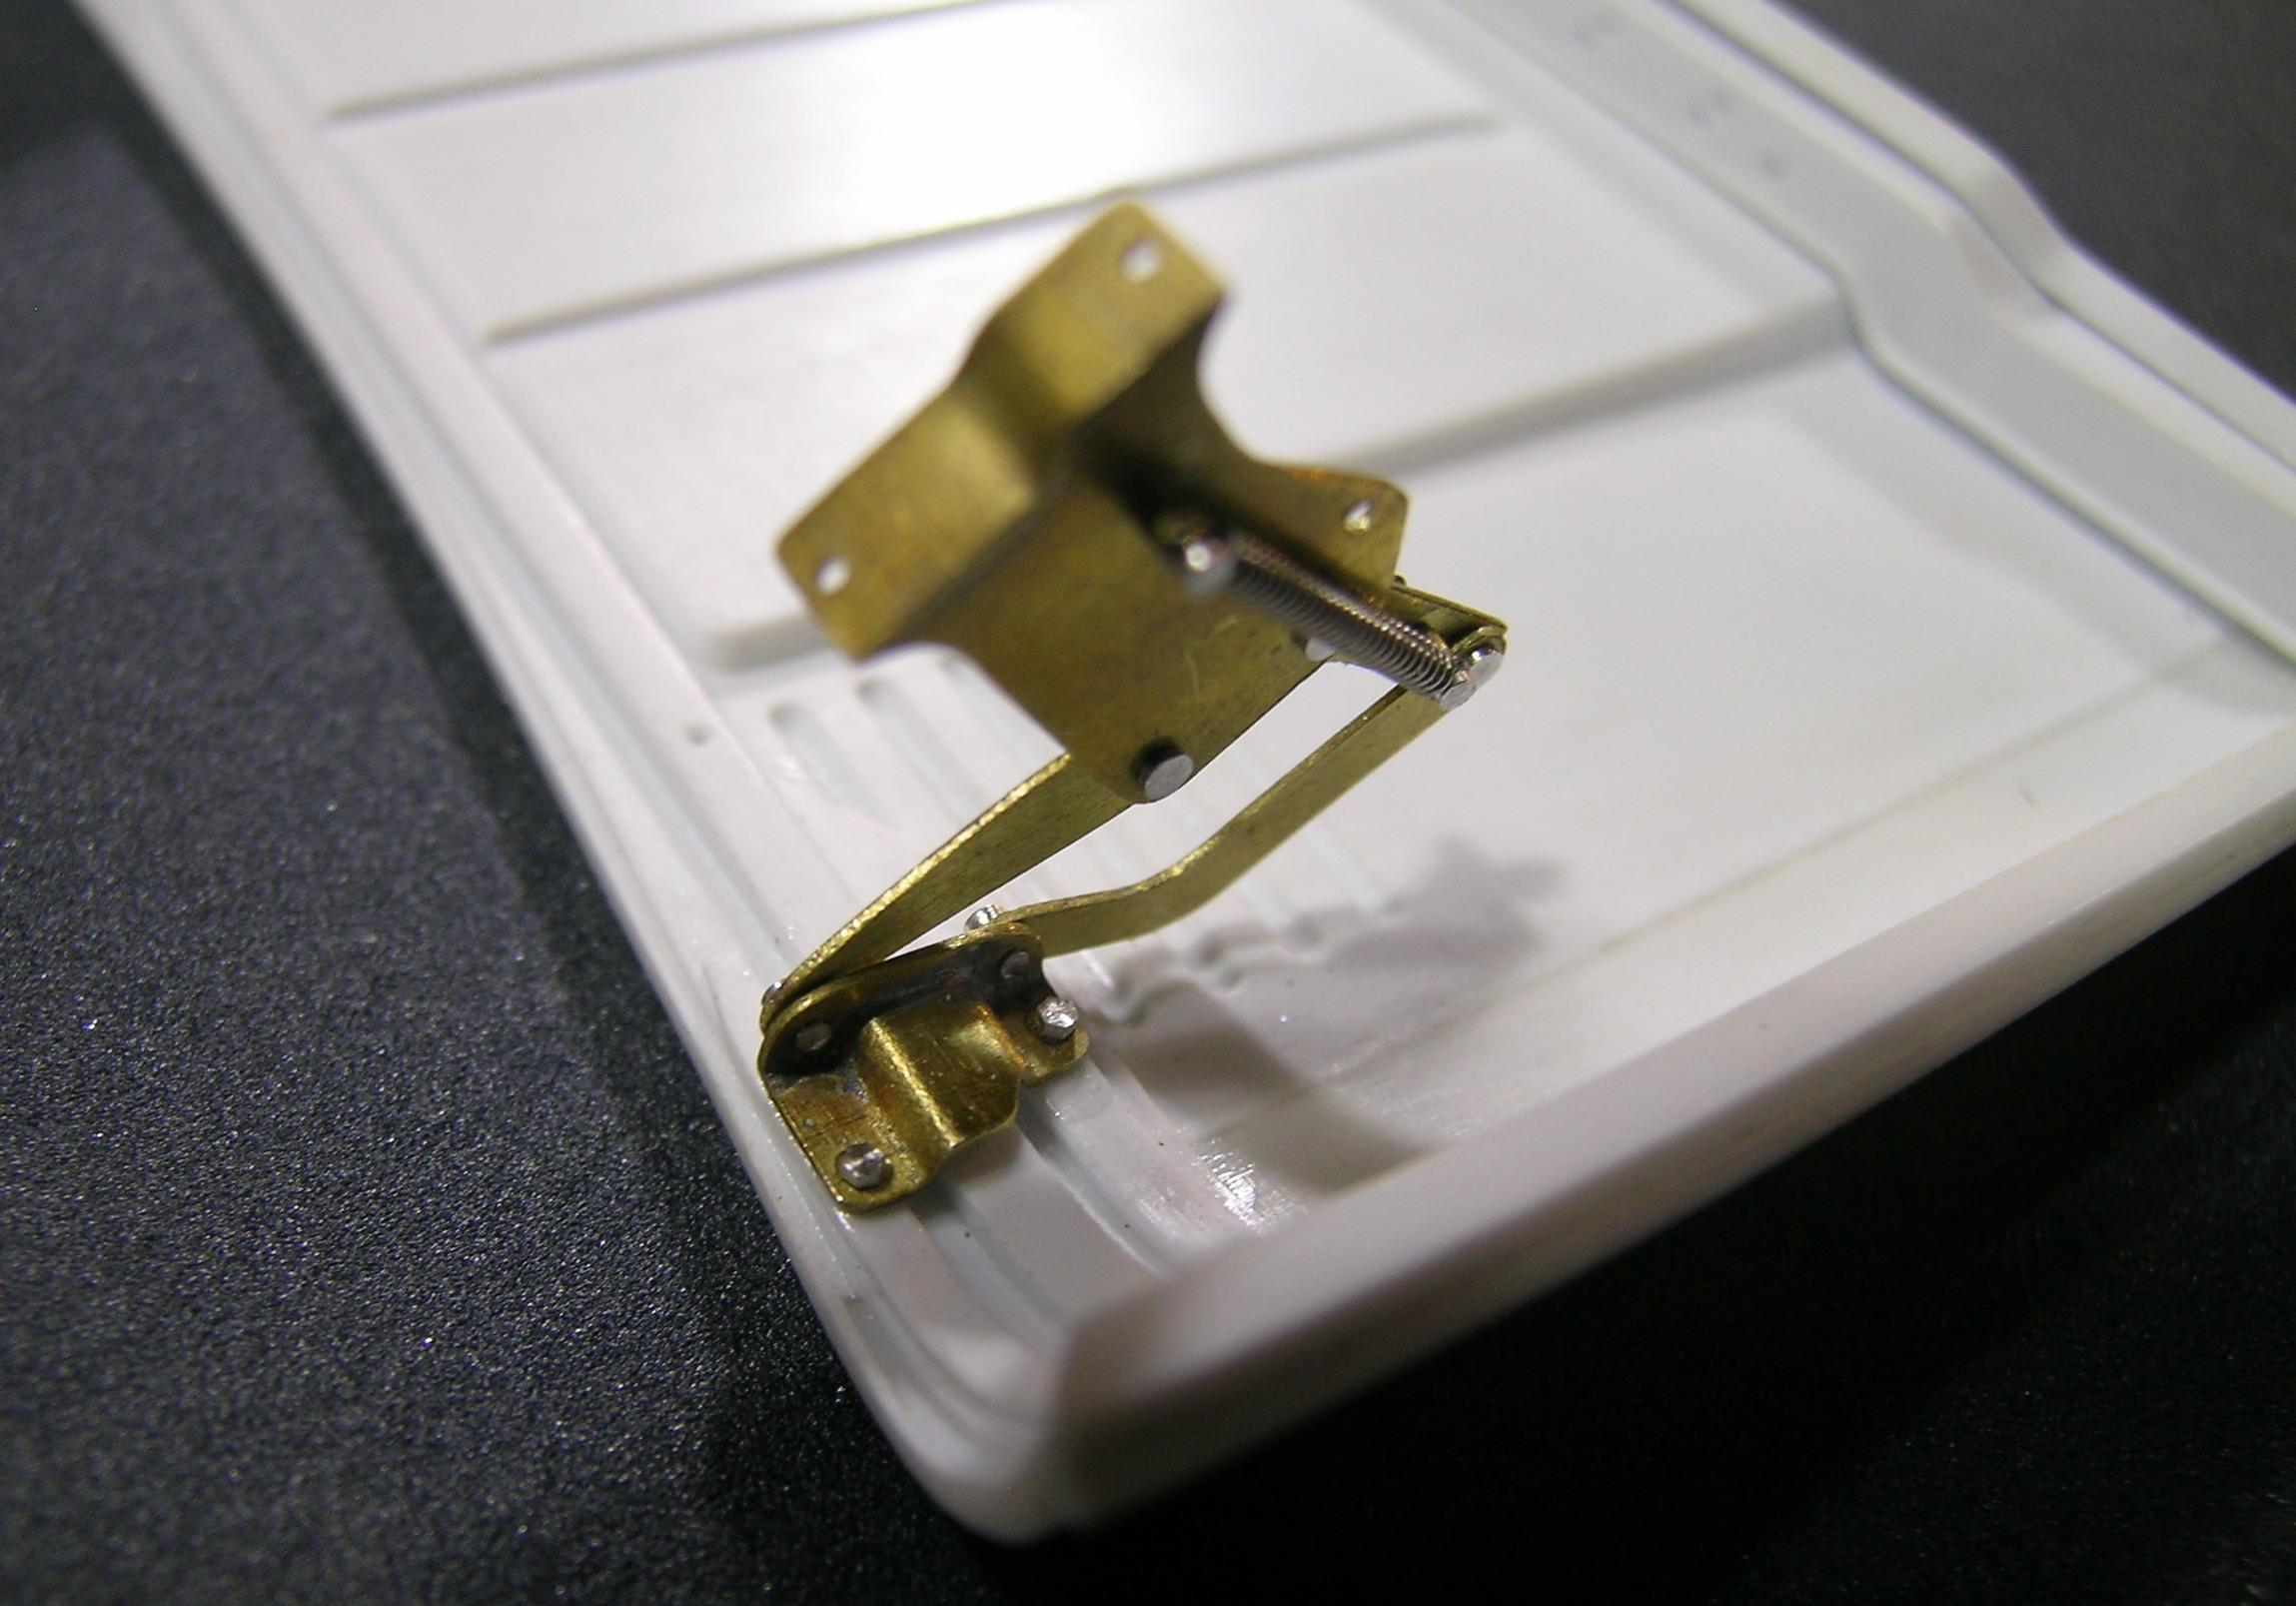
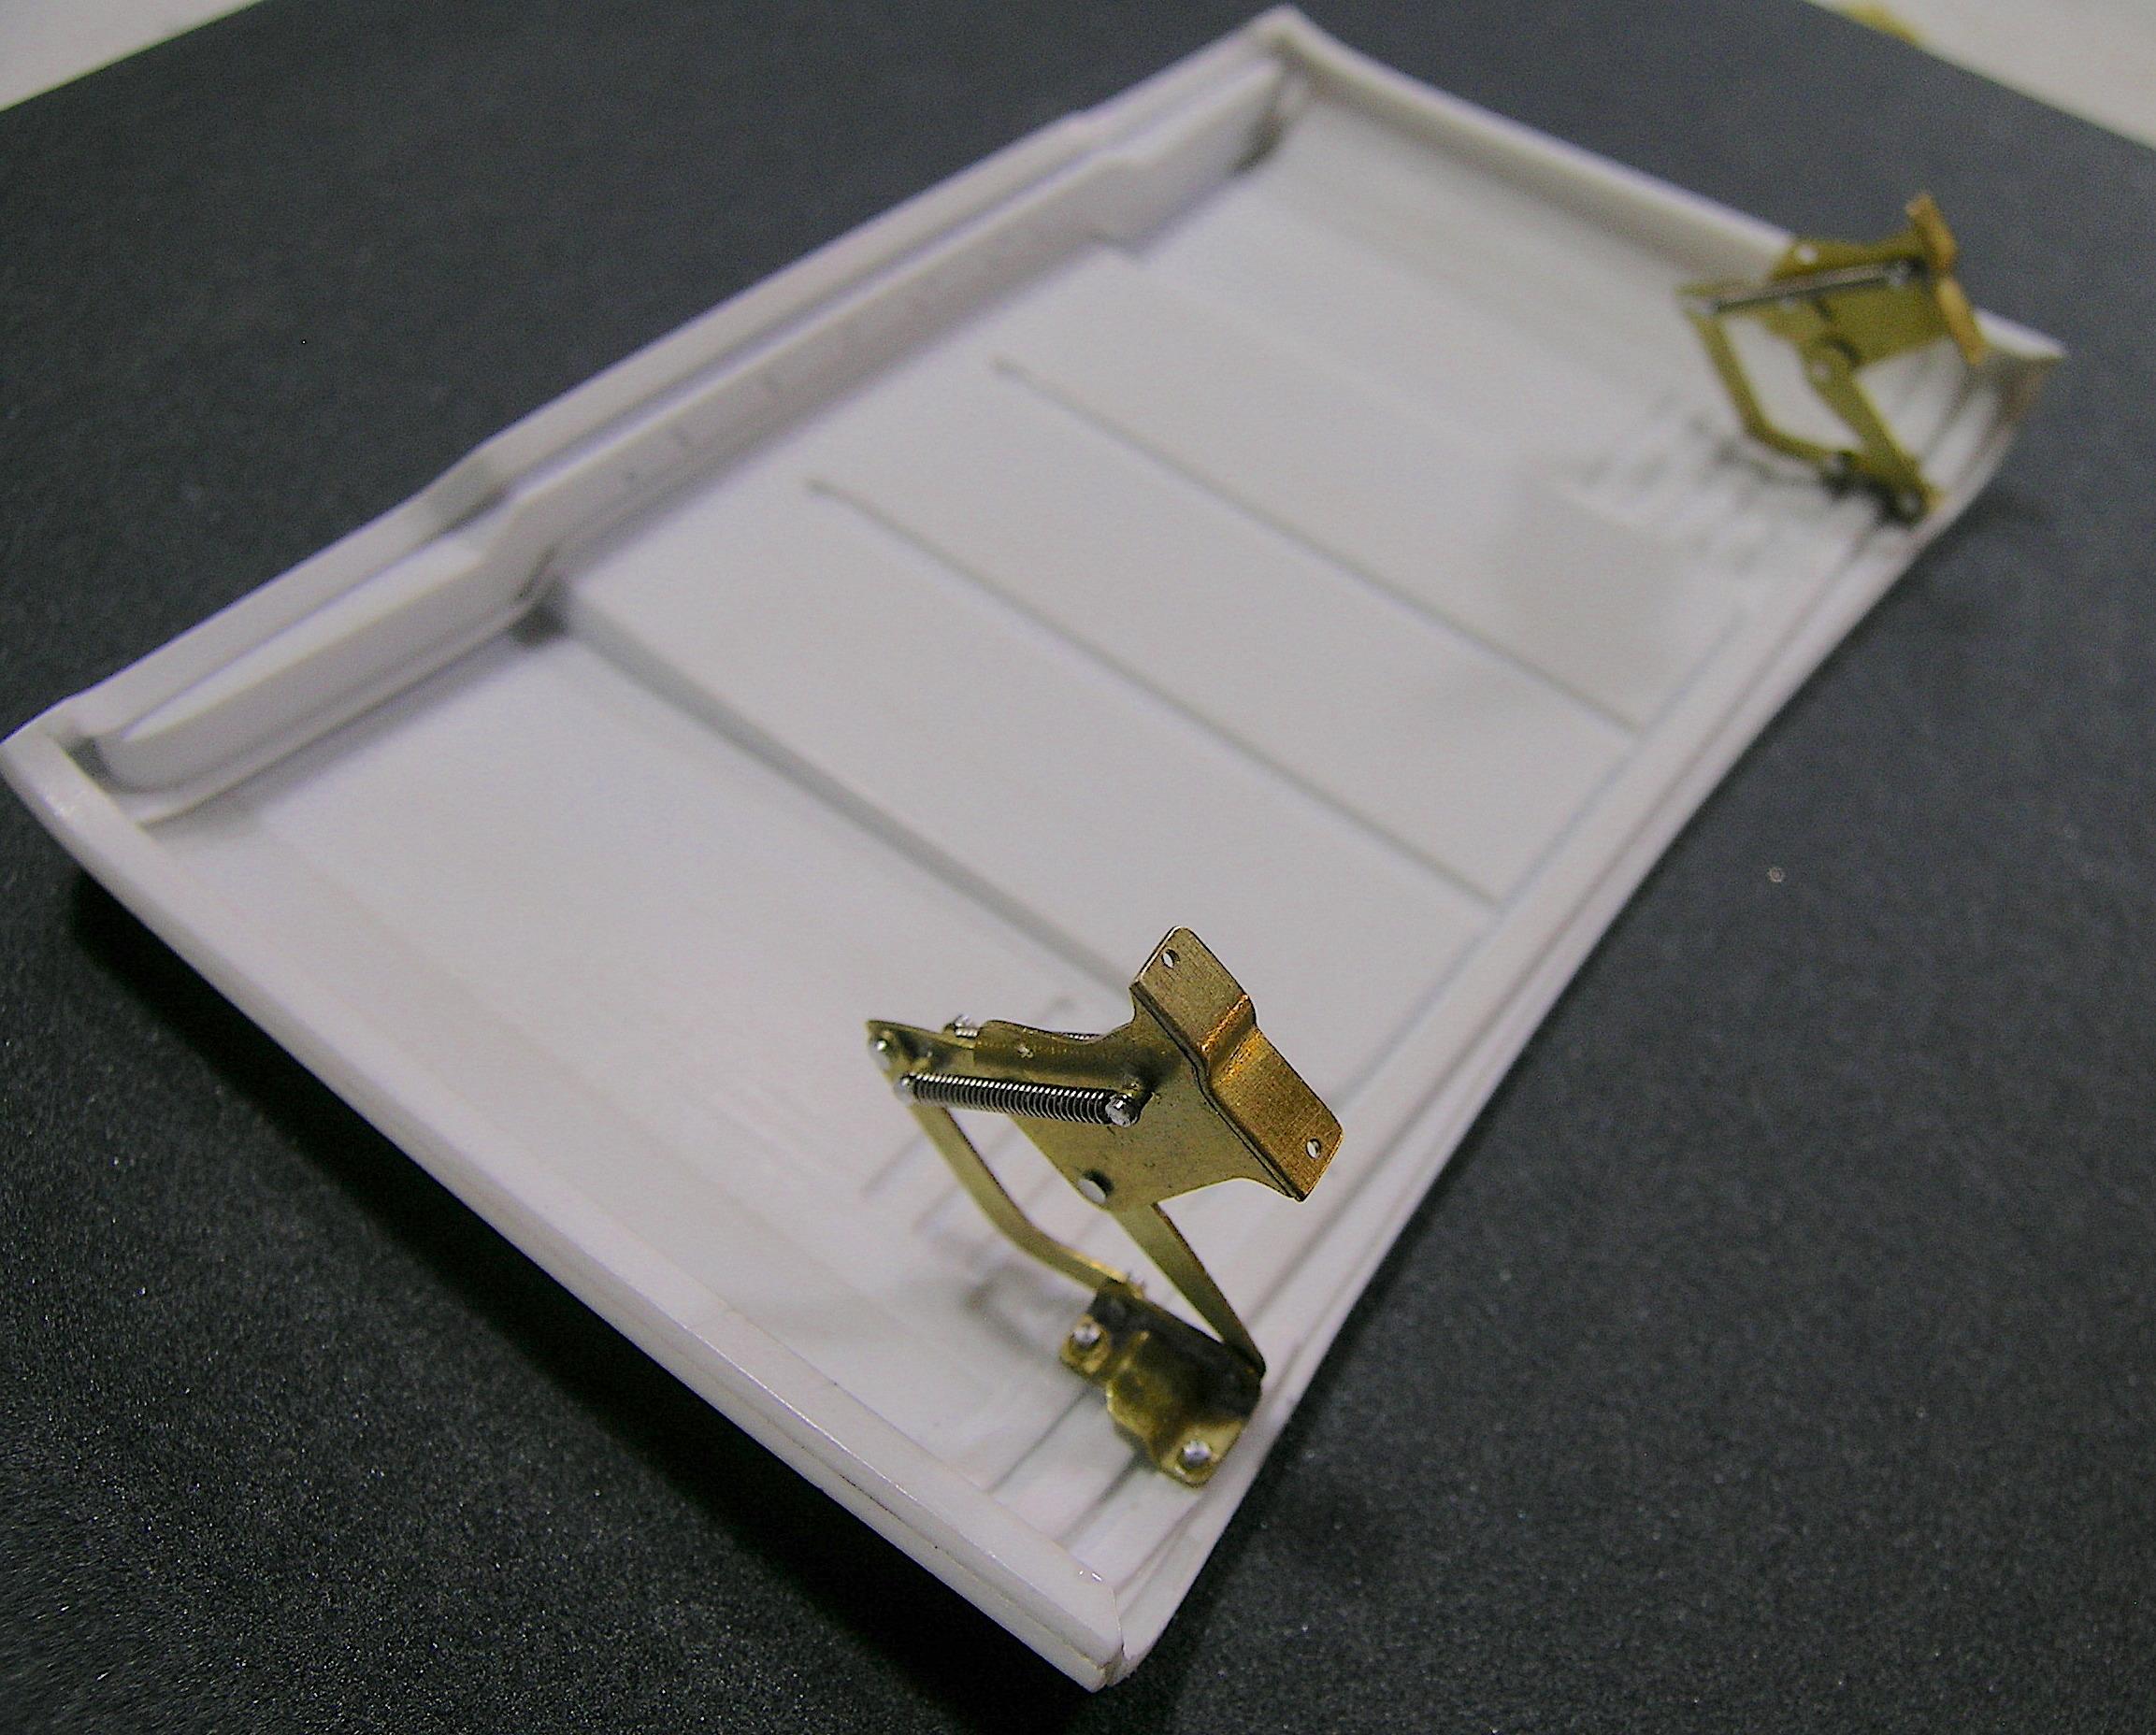
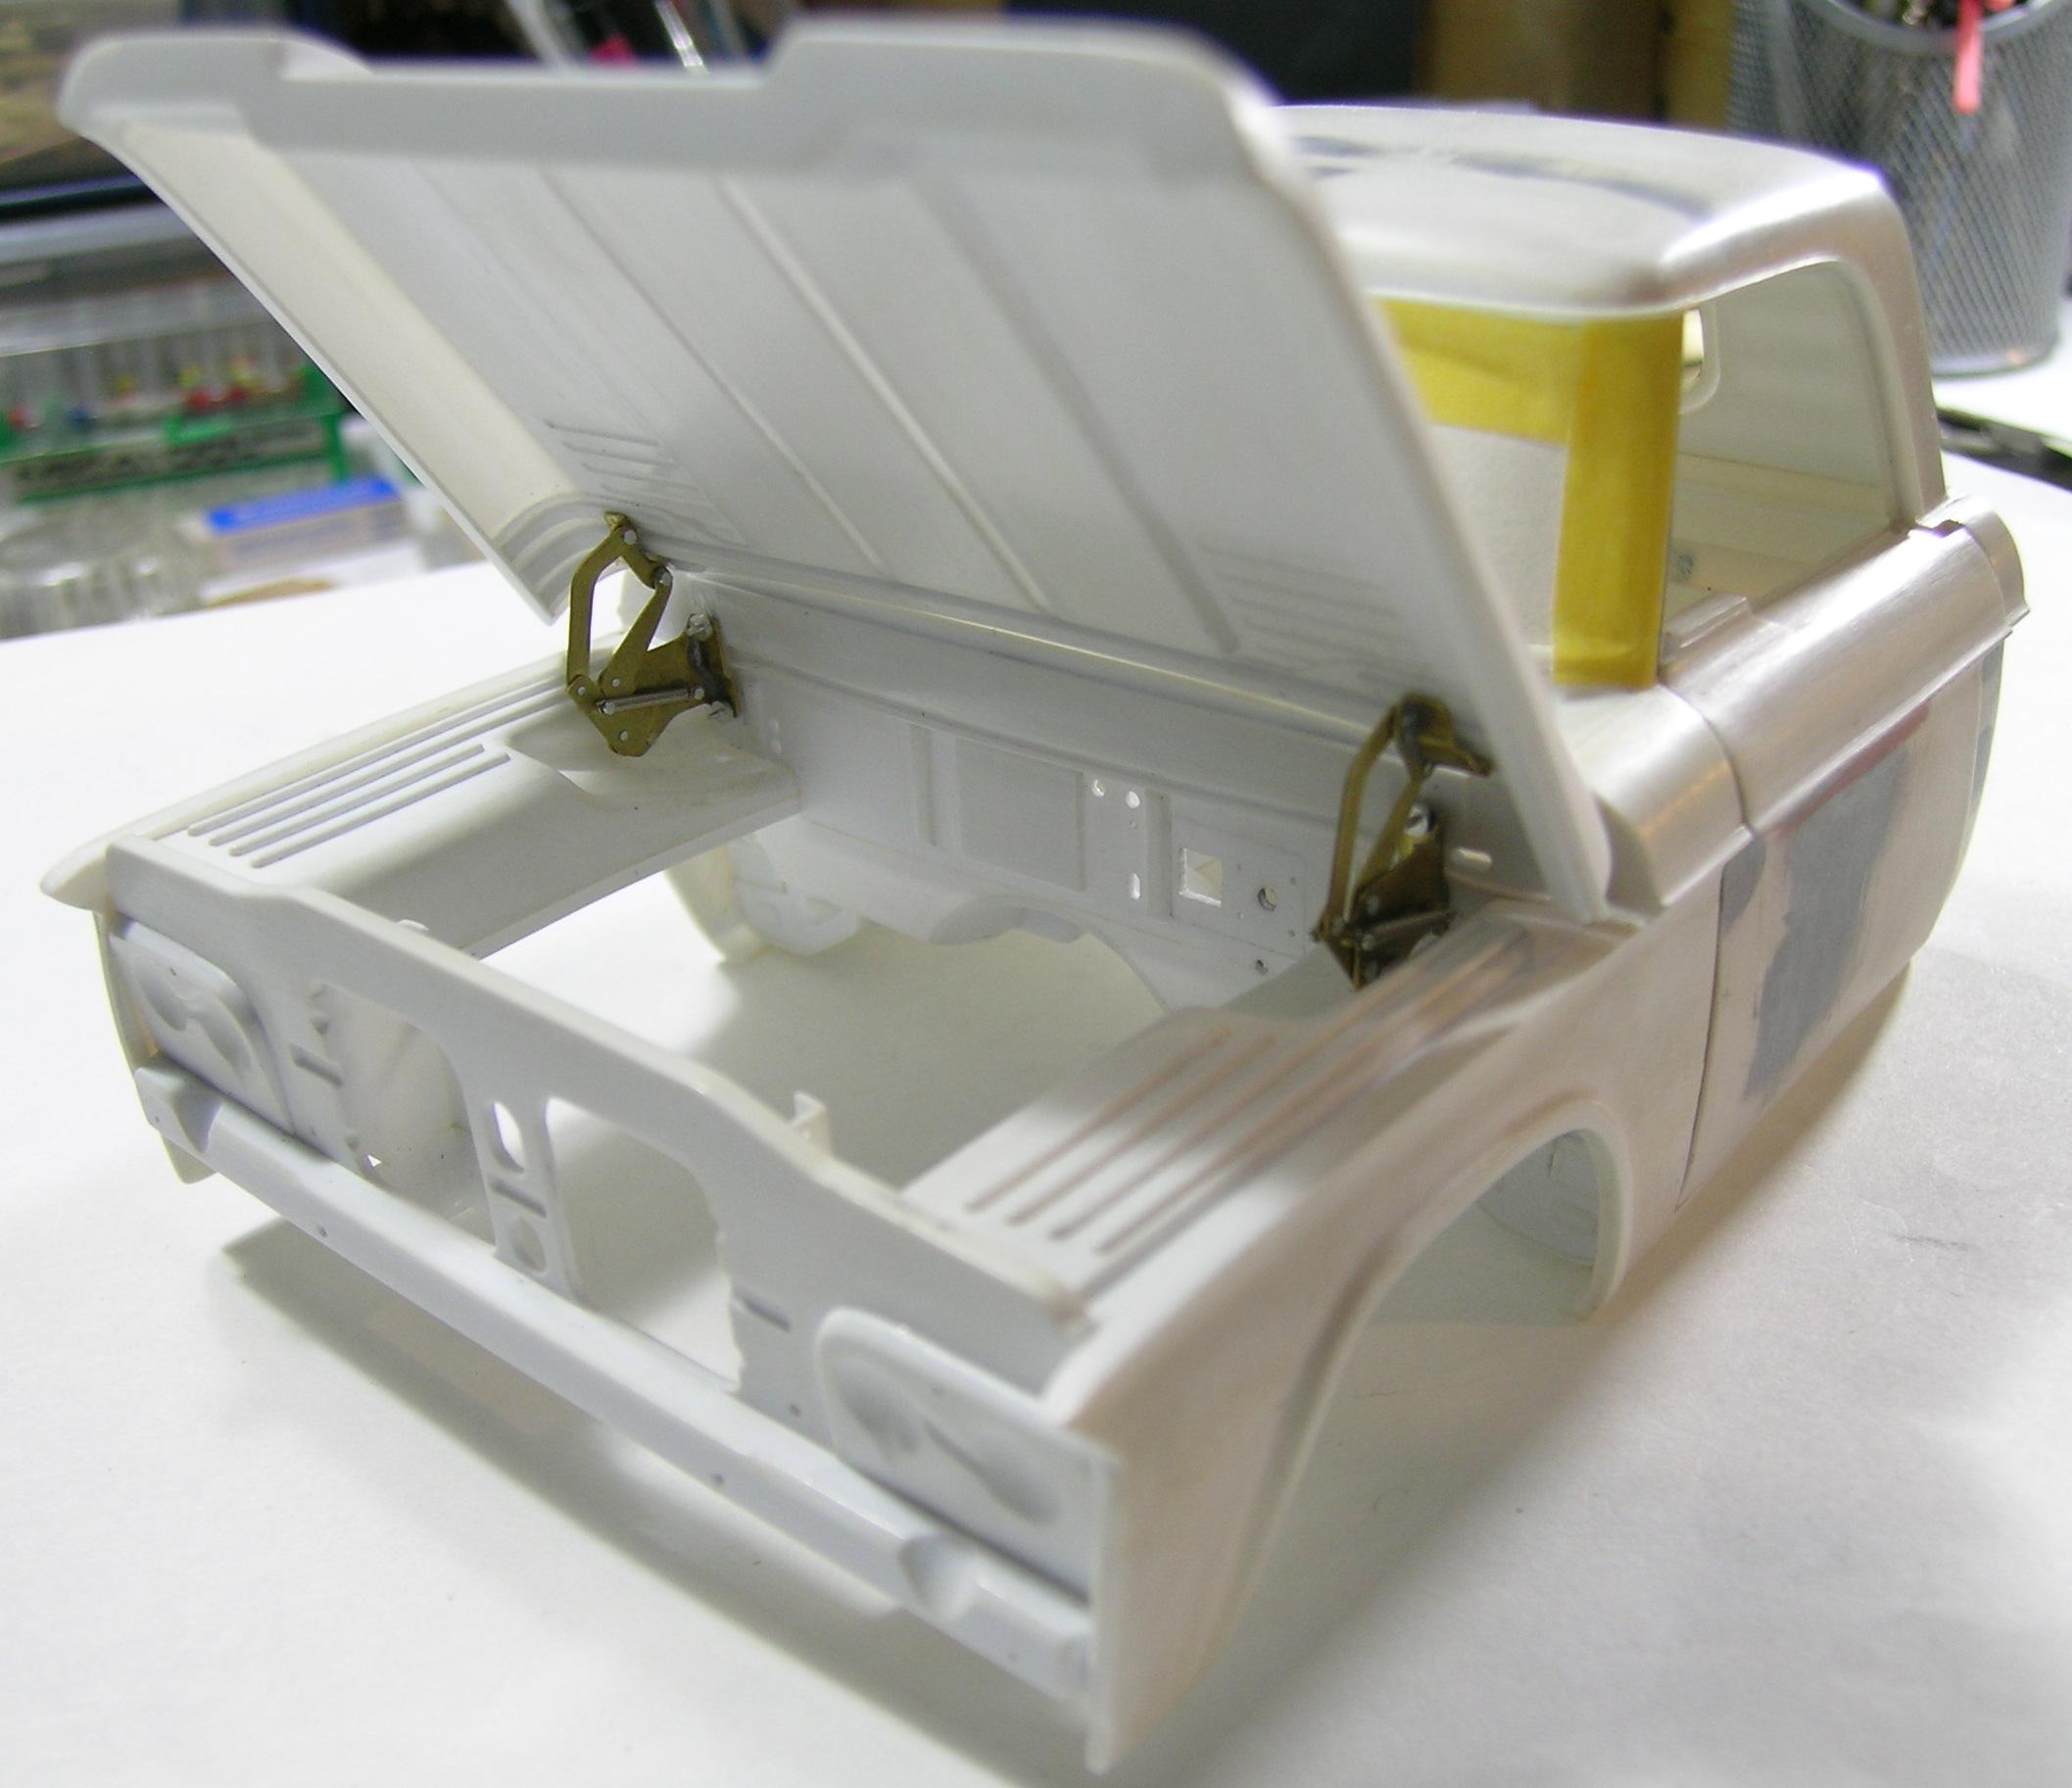
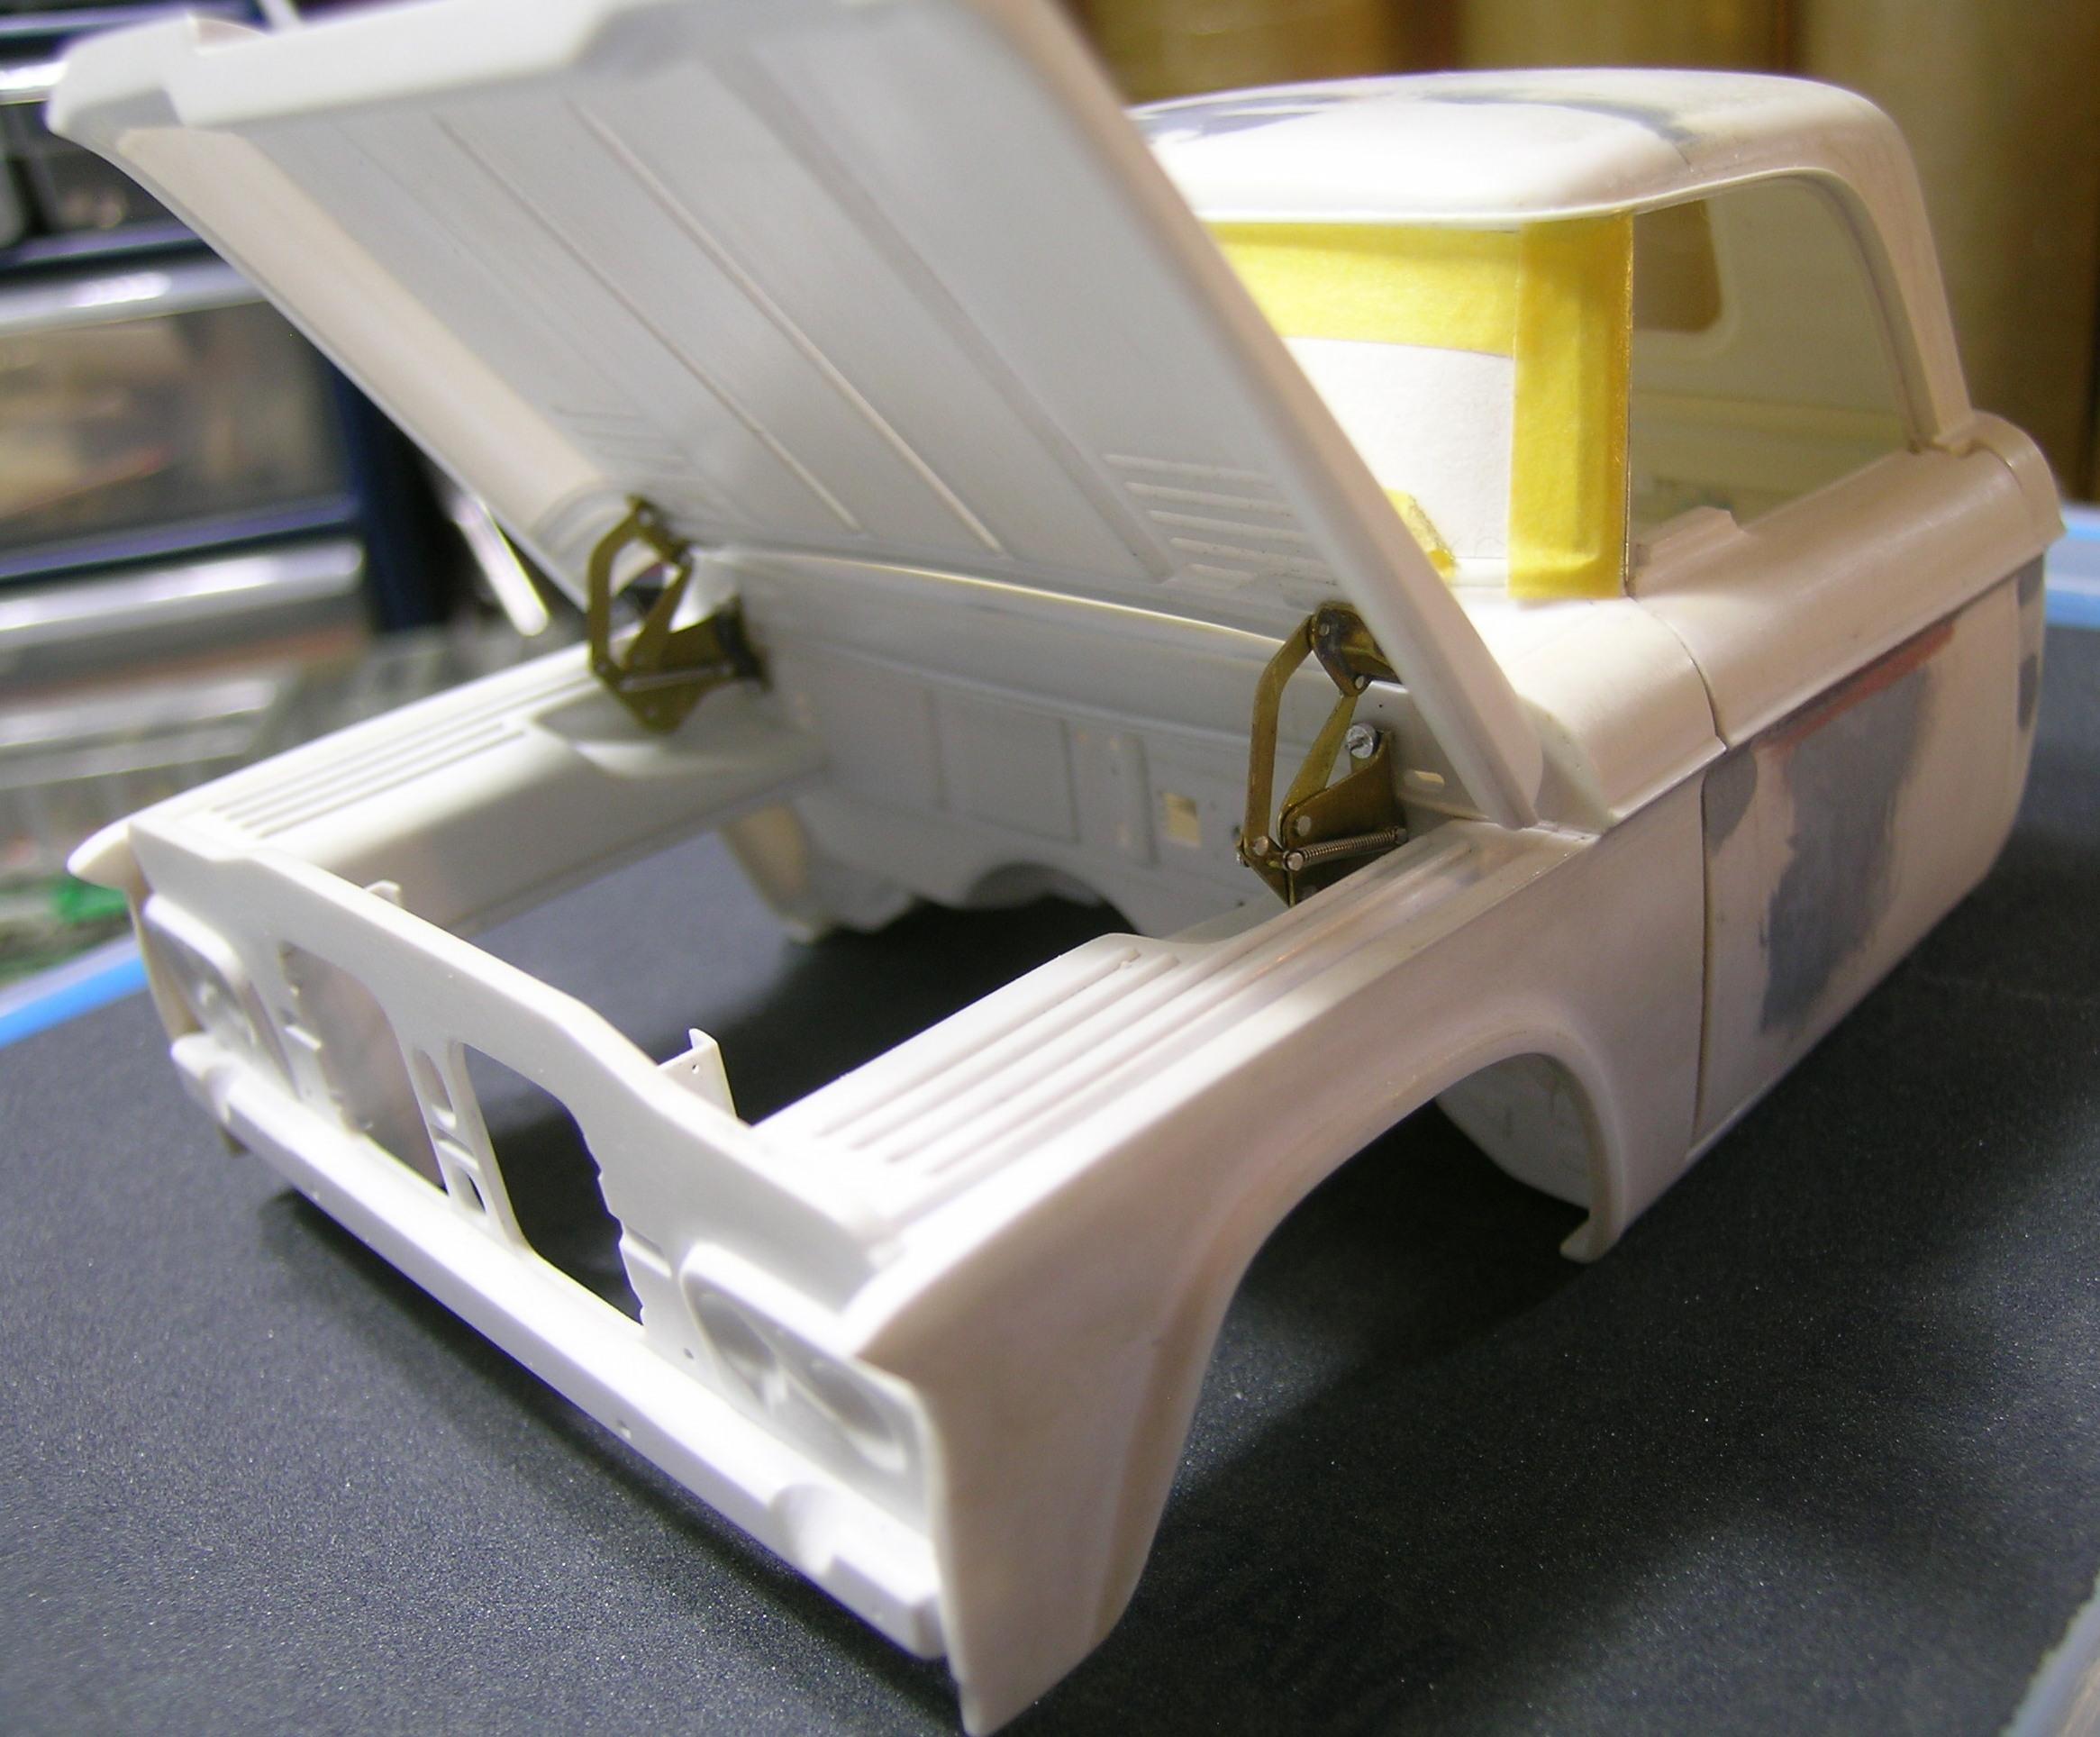
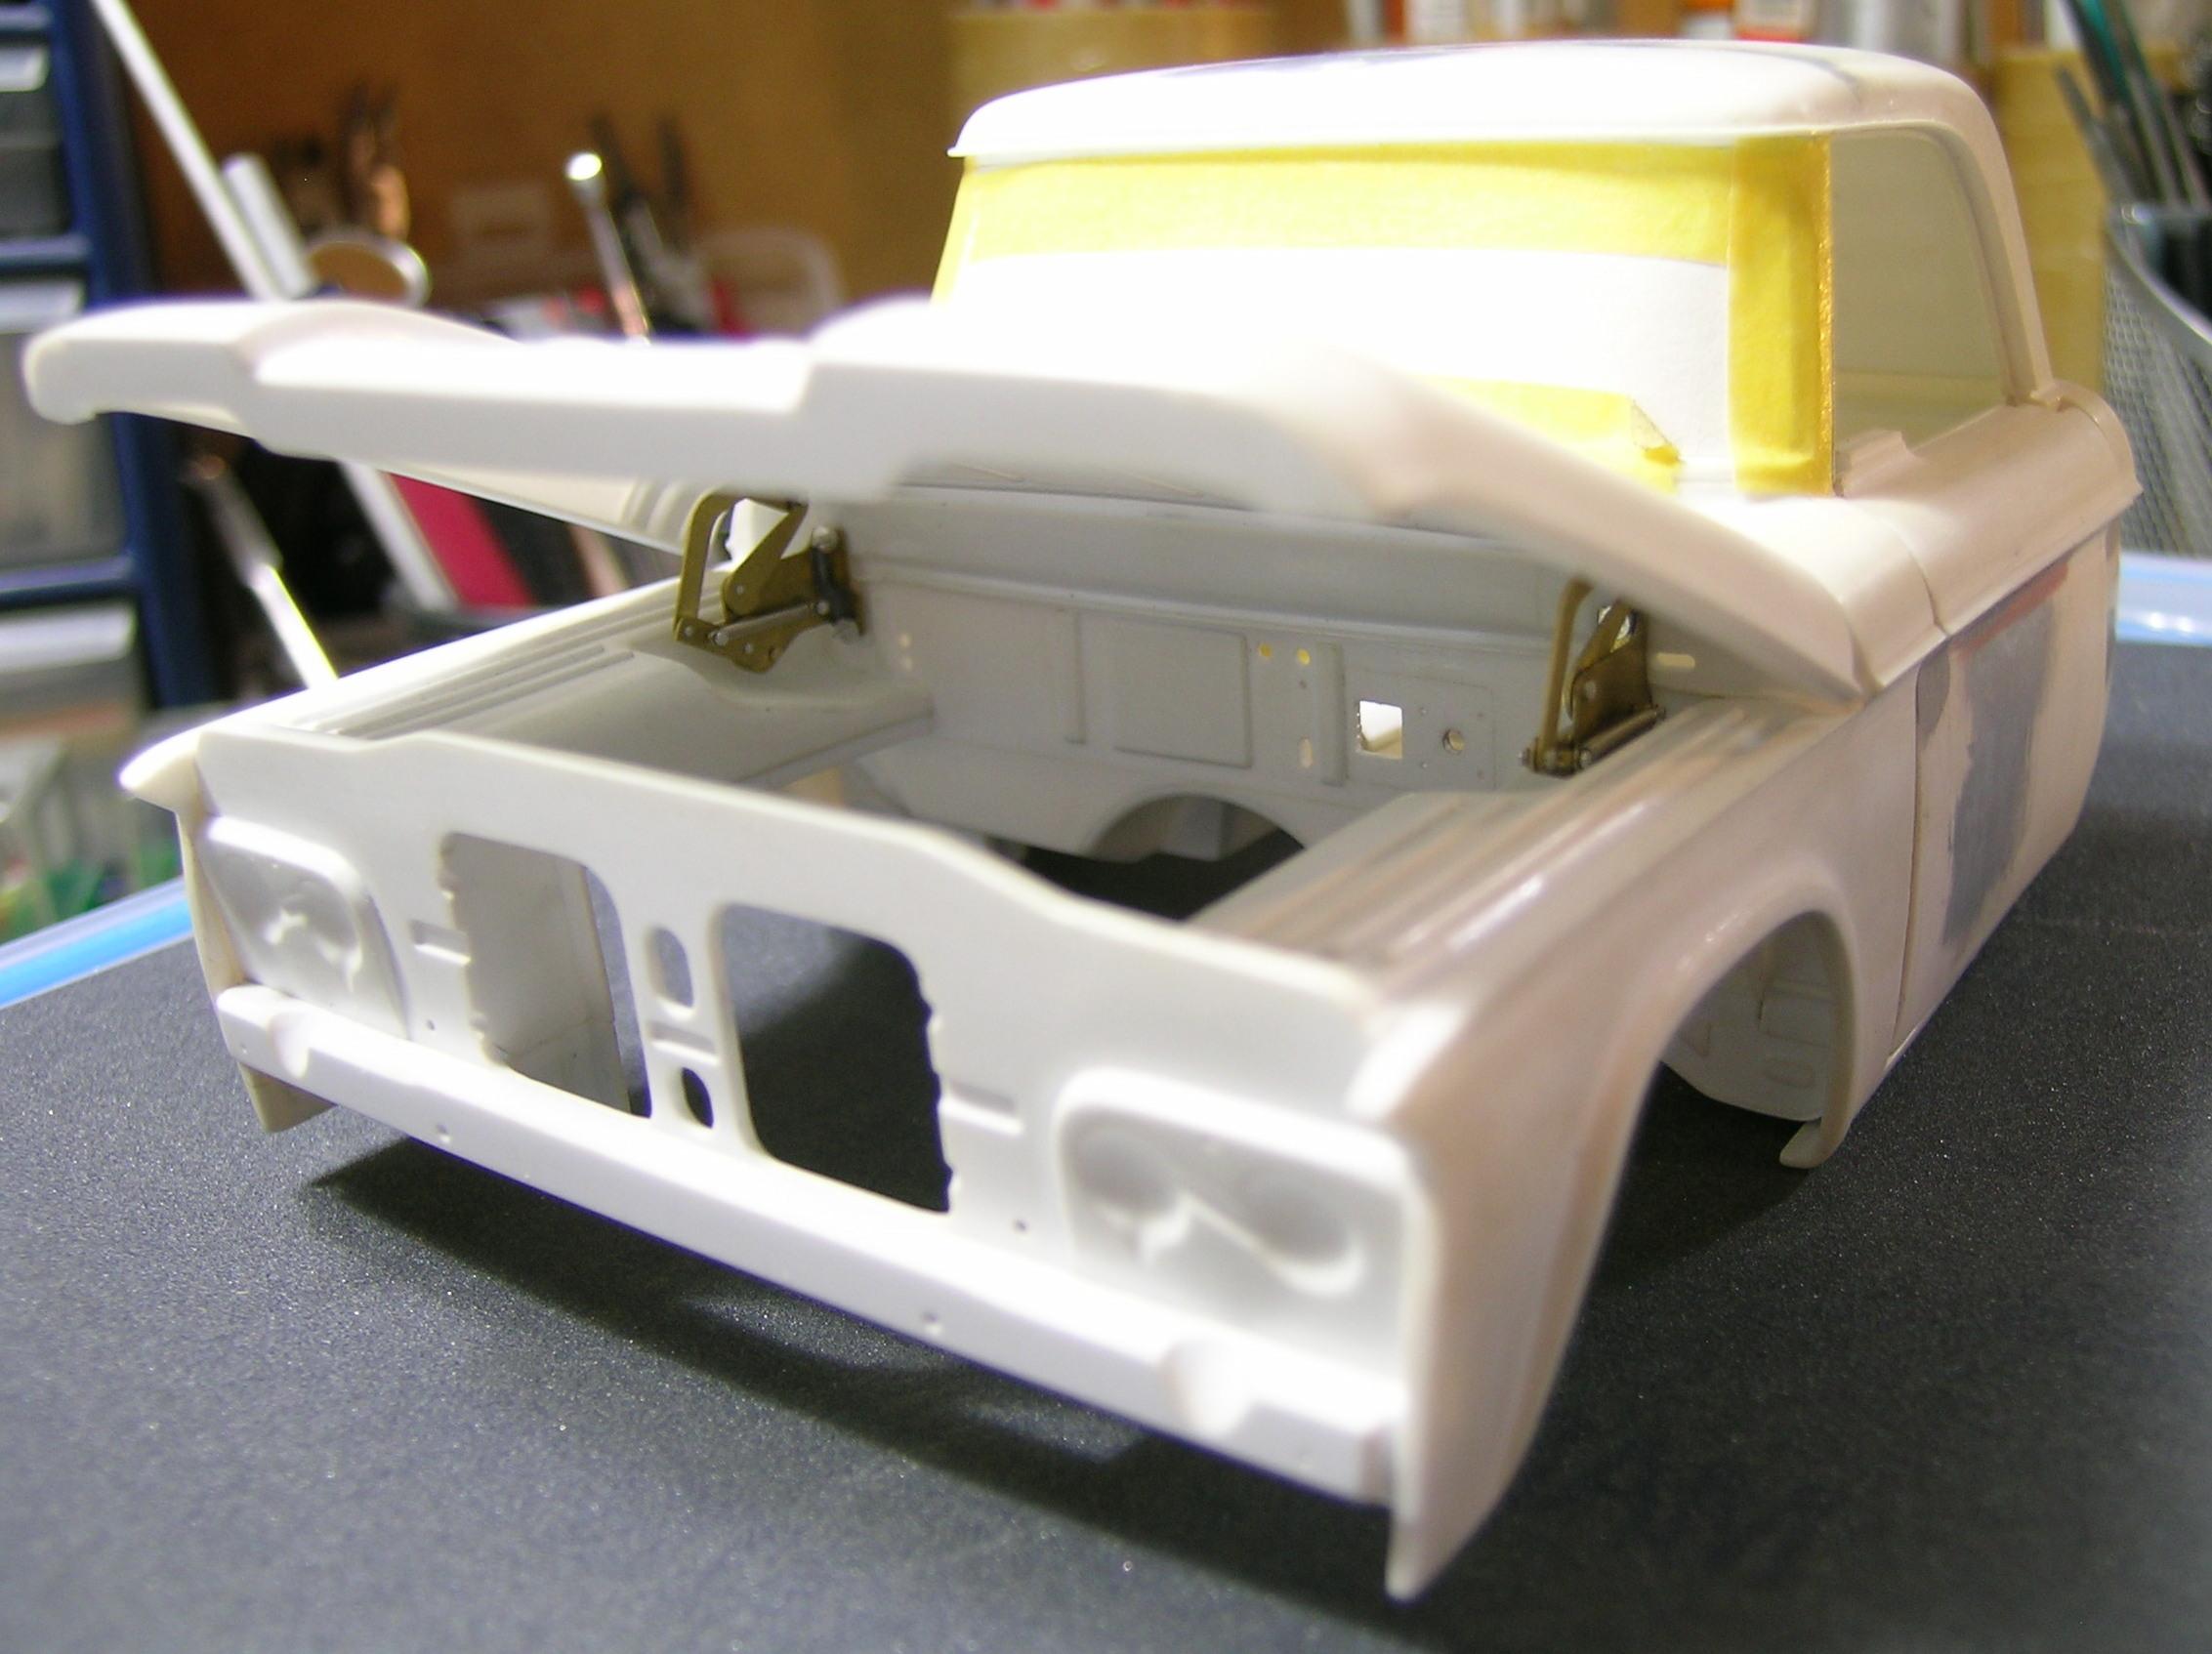
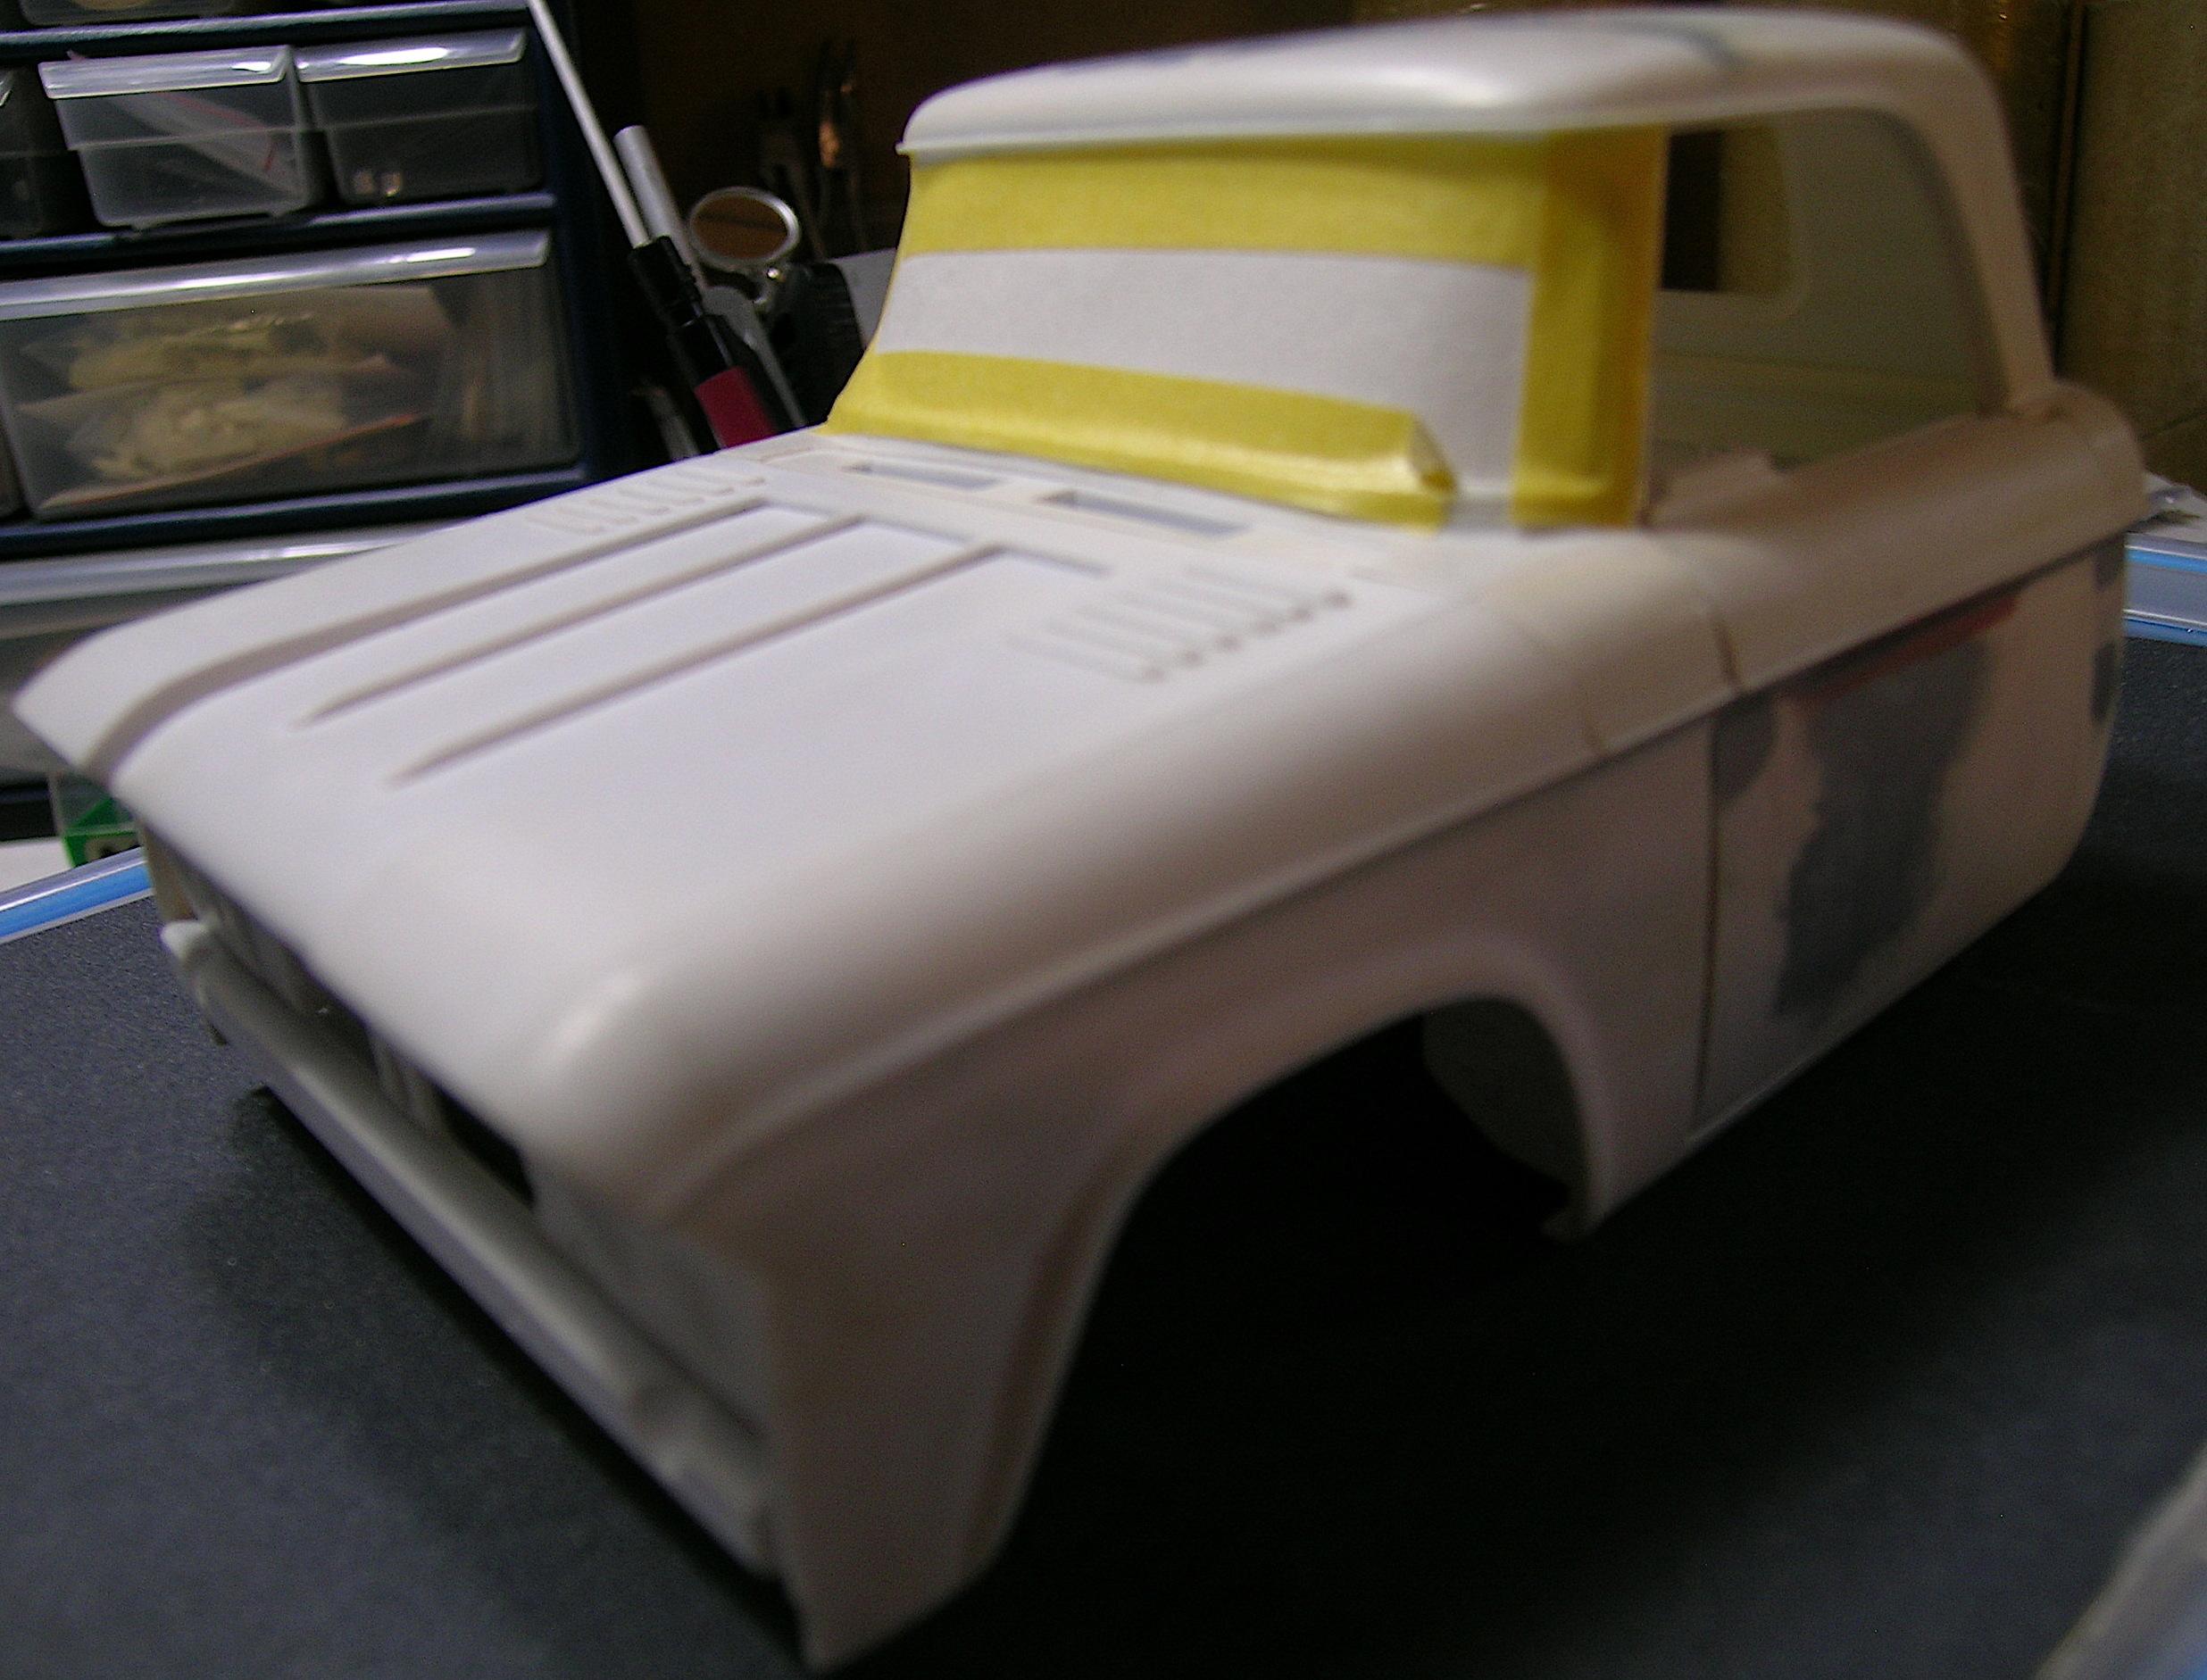
Hello everyone, Today's update is an important one for rather small parts... It's been a long time since the idea of making functional hood hinges has been in my head and after having collected several photos from different angles of the real parts I decided to embark on the adventure. I must admit that the work on this point by some talented modelers has forced my hand a bit but I am very happy to have taken the leap and I hope you will like the result, in any case, I am good happy with the final product. I had already made holes in the engine compartment at the start of construction to receive a static or decorative hinge shape so I used this as a starting point. Lots of photos are uploaded but feel free to ask if you have any questions. Comments are welcome as usual! Take care, Francis First part are the clamp that are "bolted" under the hood. Second part of the clamp which is one piece on the real one but I can't make them in one piece so it's 2 parts welded together. Both side shaped and completed. A quick test under the hood. The other side. The main parts of the hinghes with machined aluminum rivets. Assembled hinghes, the return springs are functional and made using the larger guitar strings. Final parts. Different view. With the bid dime... Glued and "bolted" in place. Different view. Test fit... success! Different view. The hood stays at any position with just the right friction. Hood closed and perfectly aligned. ?
-
64 Dodge D100 Pickup Pro Street
AmericanMuscleFan replied to AmericanMuscleFan's topic in WIP: Drag Racing Models
Thanks Scott, this wasn't my most spectacular update so far, but it's still another part of the completed puzzle... I'll have more interesting things to offer... Can't wait to see your next update on your fantastic truck sir! Francis -
64 Dodge D100 Pickup Pro Street
AmericanMuscleFan replied to AmericanMuscleFan's topic in WIP: Drag Racing Models
Thank you Claude, but I have no choice but to outdo myself on this one, with all the wonders you've been doing lately, most of the attention will be on you at the next model exhibition! Now I have to deliver the goods... Francis -
64 Dodge D100 Pickup Pro Street
AmericanMuscleFan replied to AmericanMuscleFan's topic in WIP: Drag Racing Models
Thank you very much for your kind words Ray, I must confess that I myself am surprised at all the new things I have done so far on this truck, but I must say that the high level of craftsmanship and support on this forum certainly has something to do with it! I still have a lot to do but I start to see the light at the end of the tunnel... Take care, Francis -
Perfect details, I love it already! Can't wait to see it finished but take your time, it's so nice to follow your progress! ?
-
64 Dodge D100 Pickup Pro Street
AmericanMuscleFan replied to AmericanMuscleFan's topic in WIP: Drag Racing Models
I can understand that Claude! I'm am a big fan of Rush but not the kind of crazy fan who don't miss an opportunity to meet the artists in person. In most cases, I prefer to listen to the CD on my sound system at home (while making models) or like a few years ago, late at night, listening to "Le traffic lourd" on the FM band with the comments and the incomparable voice of the host! ? -
1/16 SCALE A/FC NITRO FUNNY CAR
AmericanMuscleFan replied to Ian McLaren's topic in WIP: Drag Racing Models
Great job Ian, the injectors are perfectly positioned and straight! This seem easier to do than it looks but it's always difficult to achieve this and you nailed it. Good proof that your base is perfectly straight and that the time you have invested in this build will pay off in the end! ? -
Marcos, this is part of your signature and to add some links of you projects at the bottom of this one you just have to select the option "Account Settings" at the top right of your personal profile page then you will see some options on the left including "signature". Select this option and you will be able to add your links there (at the bottom) but keep in mind that you are limited to 3 URL links or 4 lines of text if I remember well. Hope it will be useful, Francis
-
I just found your new thread Brian and you did a fantastic job on this cab. They are very nice trucks and I wanted to buy one of these resin kits because the photos were quite tempting. I don't know if the problems you have had with your kit (from this company) are usual or if you have been unlucky? What I do know, however, is that resin models are not for everyone and we can sometimes expect surprises. By the way, your truck looks real good so far, I love it! ?
-
64 Dodge D100 Pickup Pro Street
AmericanMuscleFan replied to AmericanMuscleFan's topic in WIP: Drag Racing Models
I don't see any big cheating here Ron, making functional hood hinges for a scale model is already hard so you have developed your own concept and it works, there aren't many builders who can boast of having achieved this kind of detail so you can be proud of it. Can't wait to see your next update, your project is heading in the right direction! -
We are not mistaken with a slightly more refined look and I am sure that the engine will go perfectly with your concept! One thing is certain, there will be cylinders under this hood!
-
Fine workmanship, very realistic, the aging effect is really successful. ?
-
64 Dodge D100 Pickup Pro Street
AmericanMuscleFan replied to AmericanMuscleFan's topic in WIP: Drag Racing Models
Great story Claude! However, I would have thought that your chance to be in contact with Neil Peart would have been through your long experience of the radio world rather than that of automotive aesthetics (bike in this case)! Here is a great example of the advantages of being a man of many talents! ? -
Another great project Marcos! It's always a little intimidating to make a frame from scratch but it will definitely be very rewarding when you finish this project and can brag about doing it yourself! By the way, you are going to have good painting sessions this spring as I can see... ?