.jpg.b9265433dc8c3b550370b1d0e4e4d2fc.jpg)
MarkJ
-
Posts
4,698 -
Joined
-
Last visited
Content Type
Profiles
Forums
Events
Gallery
Everything posted by MarkJ
-
.jpg.b9265433dc8c3b550370b1d0e4e4d2fc.thumb.jpg.915f5b46e3c9402eeaa6972073121c87.jpg)
Trumpeter Ford GT40 with my twists
MarkJ replied to kensar's topic in WIP: Other Racing: Road Racing, Land Speed Racers
Ken, this should be an excellent adventure. If it's a long ride, I don't care. I Love to watch a highly skilled model builder at work. Great ref pictures. It's weird seeing basically a Nascar engine sitting in the engine bay of a prototype sports racing car of the highest level for the time it was competing. A simple push rod engine competing against Europe's finest racing engines and cars of that time. Hard to believe but true. -
Thanks for stopping by Jason and Ken . I really appreciate the kind words.
-
1955 Mille Miglia Mercedes 300SLR
MarkJ replied to Pierre Rivard's topic in WIP: Other Racing: Road Racing, Land Speed Racers
Sorry . The above post was posted after you had already answered the question. -
1955 Mille Miglia Mercedes 300SLR
MarkJ replied to Pierre Rivard's topic in WIP: Other Racing: Road Racing, Land Speed Racers
Thanks , Pierre. Thats some awesome information. I kind of figured they must have been Ferraris. You might not have seen my request about the Porsche you have pictured in your build above because it was a late edit to the thread. But what is the Porsche and what kit is that? -
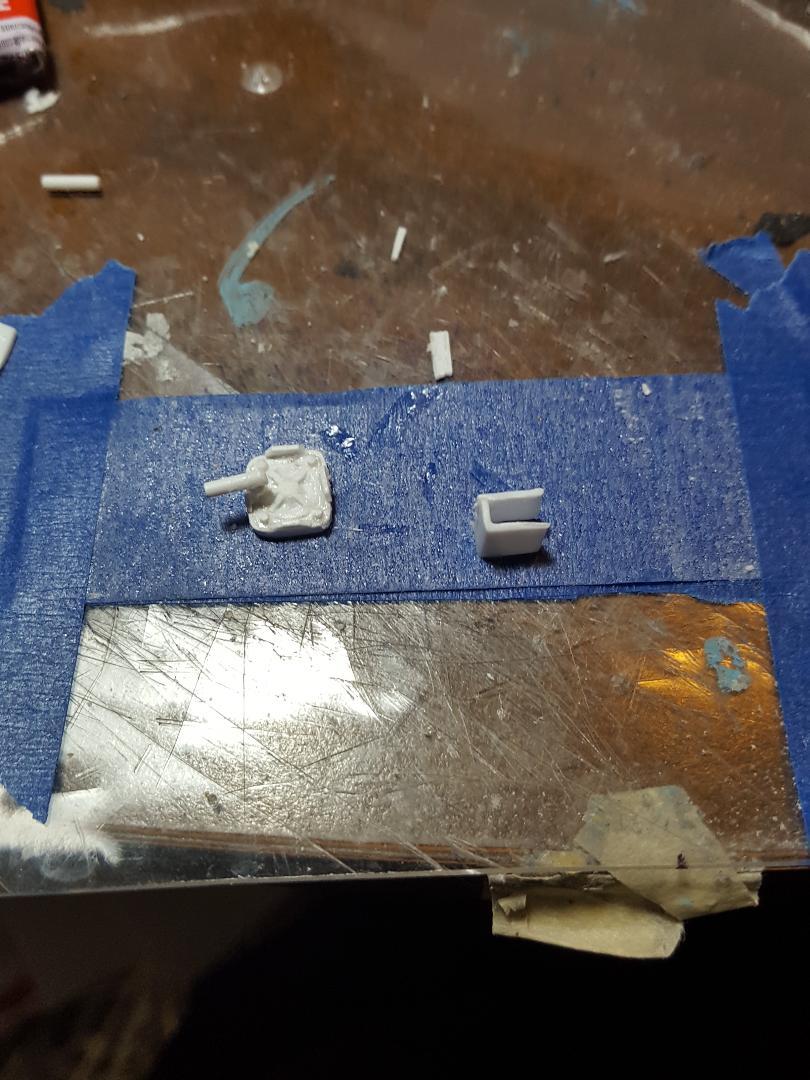
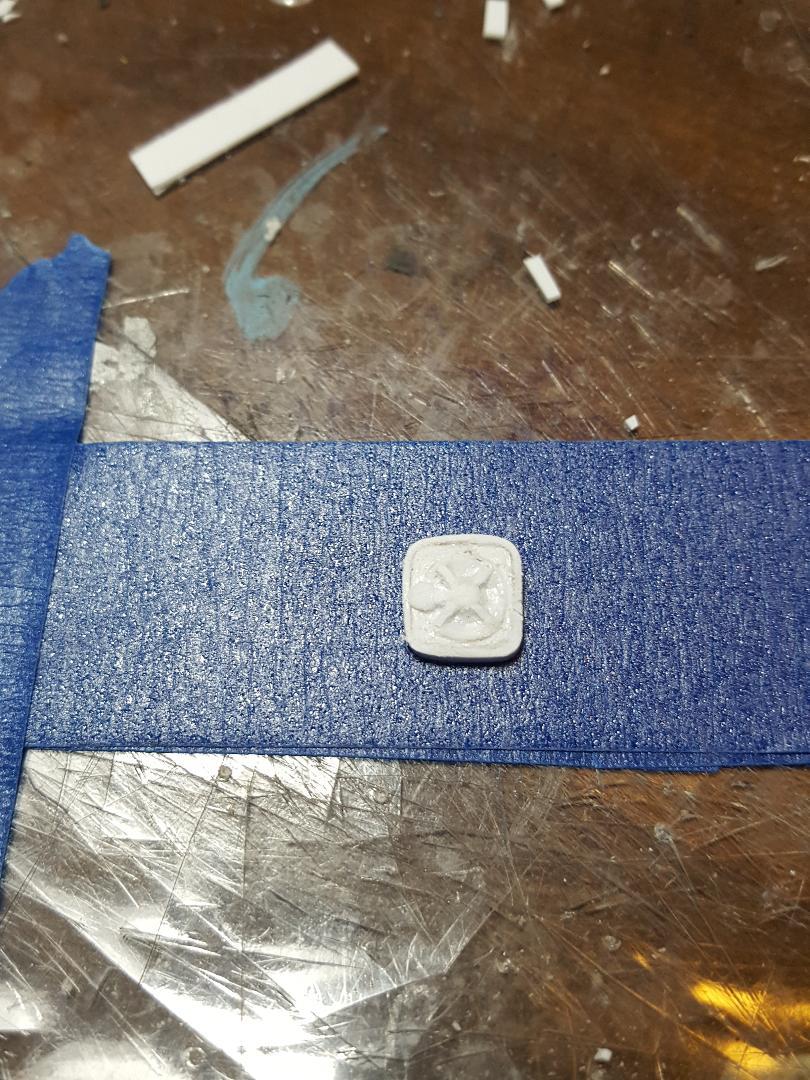
I think the fab on the oil filter and mounting bracket is through. Just need to install the bracket to the model and paint the oil filter. Still need to prime the chassis and paint it a very light gray.

-
1955 Mille Miglia Mercedes 300SLR
MarkJ replied to Pierre Rivard's topic in WIP: Other Racing: Road Racing, Land Speed Racers
I like what you did to the updated weathering. All you need now is those great wheels you have on order. Really looking forward to final photos. The orange Porsche in the background. What kit is that and where did you get it? -
1955 Mille Miglia Mercedes 300SLR
MarkJ replied to Pierre Rivard's topic in WIP: Other Racing: Road Racing, Land Speed Racers
I watched the whole movie this morning. Can you tell what kind of cars they used? Of course, they had to put fake logos on them for the movie. For a 1955 movie it holds up pretty well with no cgi whatsoever. Of course, all the racing scenes were on a sound stage but still very entertaining. -
1955 Mille Miglia Mercedes 300SLR
MarkJ replied to Pierre Rivard's topic in WIP: Other Racing: Road Racing, Land Speed Racers
Pierre, the Mille Miglia is in the first 20 minutes of the movie which is about 1 hour and 23 minutes long. It's really worth a look at. Pretty cool for a movie made back in 1955. The cars in the movie get very weathered so they tryed to get it right. -
1955 Mille Miglia Mercedes 300SLR
MarkJ replied to Pierre Rivard's topic in WIP: Other Racing: Road Racing, Land Speed Racers
the movie was called "The Racers" and it was made in 1955. Below is the link https://www.google.com/search?q=Kirk+Douglas+movie+about+the+Italian+race+Mille+Miglia&sca_esv=82662e44566a7af0&sca_upv=1&source=hp&ei=zdENZuOKEKnFkPIP9OmZ-AM&iflsig=ANes7DEAAAAAZg3f3cmUq1iY6rp5S_oAqauNvp7Y6dTr&ved=0ahUKEwijpcn0haeFAxWpIkQIHfR0Bj8Q4dUDCA8&uact=5&oq=Kirk+Douglas+movie+about+the+Italian+race+Mille+Miglia&gs_lp=Egdnd3Mtd2l6IjZLaXJrIERvdWdsYXMgbW92aWUgYWJvdXQgdGhlIEl0YWxpYW4gcmFjZSBNaWxsZSBNaWdsaWEyBRAhGKABMgUQIRigATIFECEYoAEyBRAhGKABMgUQIRigAUiakwRQAFiyhwJwAXgAkAEAmAGaAaAB0CiqAQUzNi4xObgBA8gBAPgBAZgCOKACujbCAhMQABiABBiKBRixAxiDARhGGPkBwgIREC4YgAQYsQMYgwEYxwEY0QPCAggQLhiABBixA8ICDhAAGIAEGIoFGLEDGIMBwgIFEAAYgATCAhMQLhiABBiKBRixAxjHARjRAxgKwgIIEAAYgAQYsQPCAgsQLhiABBixAxiDAcICDhAuGIAEGIoFGLEDGIMBwgIOEC4YgAQYsQMYxwEY0QPCAgsQLhiABBjHARjRA8ICCxAAGIAEGLEDGIMBwgIOEC4YgAQYsQMYgwEY1ALCAggQABiABBjJA8ICBRAuGIAEwgILEAAYgAQYigUYkgPCAg4QLhiABBiSAxjHARivAcICCxAuGIAEGMcBGK8BwgIQEAAYgAQYsQMYgwEYRhj7AcICBhAAGBYYHsICCxAAGIAEGIoFGIYDwgIFECEYnwXCAgQQIRgVmAMAkgcGMy41Mi4xoAf7zwM&sclient=gws-wiz#fpstate=ive&vld=cid:5a9f8fb1,vid:c9yeKLeqep4,st:0 -
1955 Mille Miglia Mercedes 300SLR
MarkJ replied to Pierre Rivard's topic in WIP: Other Racing: Road Racing, Land Speed Racers
It looks astonishingly real to me. Looks like it's been through the ringer on the tour of Italy it has just taken. How many total miles did that race cover and how many days were they at it? I remember watching a movie back in the sixtys that had Kirk Douglas in it and part of the movie was about the Mille Miglia. Can't remember the name of it. -
Thanks, Pierre and Edgar for stopping by and sharing your thoughts. Yes, I will be glad when this part is finished.
-
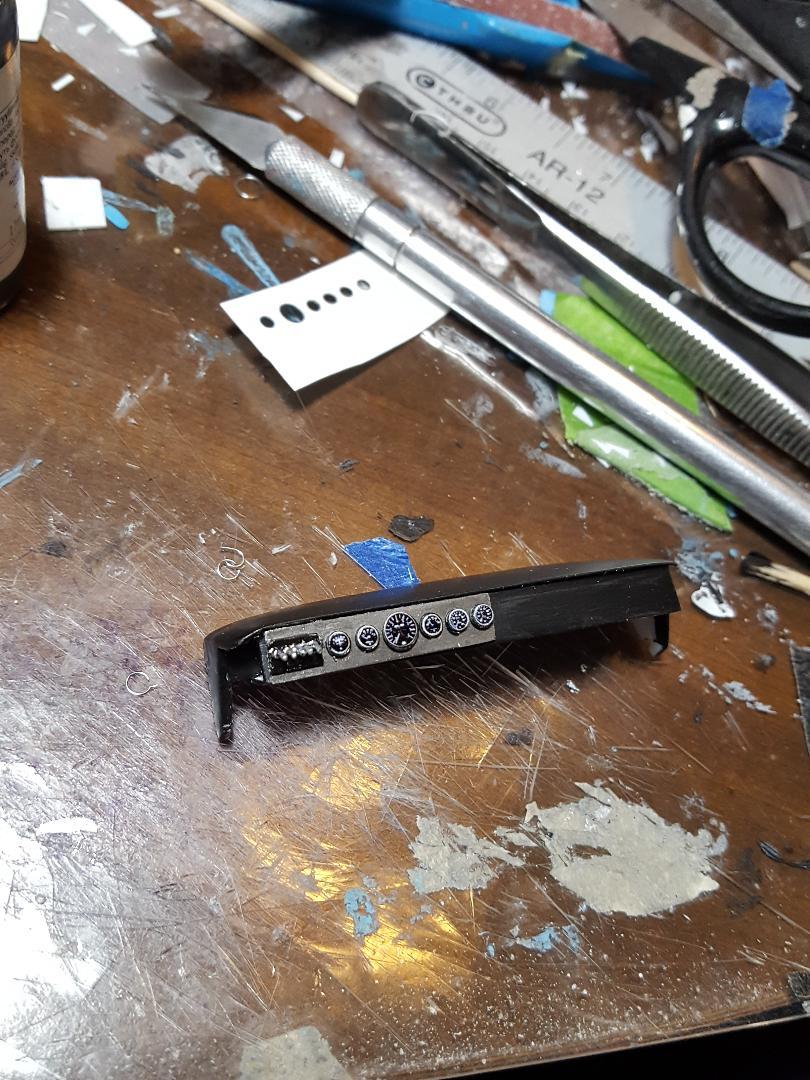
Got some work done on the tiny Oberg filter. Slow going because of the size. My fingers and eyes don't want to work that small. The pics are in the wrong order.
-
Ronnie Thomas #41 1983 Pontiac
MarkJ replied to Iraceitall's topic in WIP: Stock Cars (NASCAR, Super Stock, Late Model, etc.)
Joe, another great build in the making. Never seen this car before. The red and white pops very nicely. Thanks for another build to follow. -
Great job. Looking forward to more. Thanks for the wip. Wish more people would wip their builds. Love to watch the creation process. You can pick up ideas for your own builds.
-
1995 Valvoline T-Bird
MarkJ replied to Rattlecan Dan's topic in Stock Cars (NASCAR, Super Stock, Late Model, etc.)
Still looks great. Excellent build, Donato. -
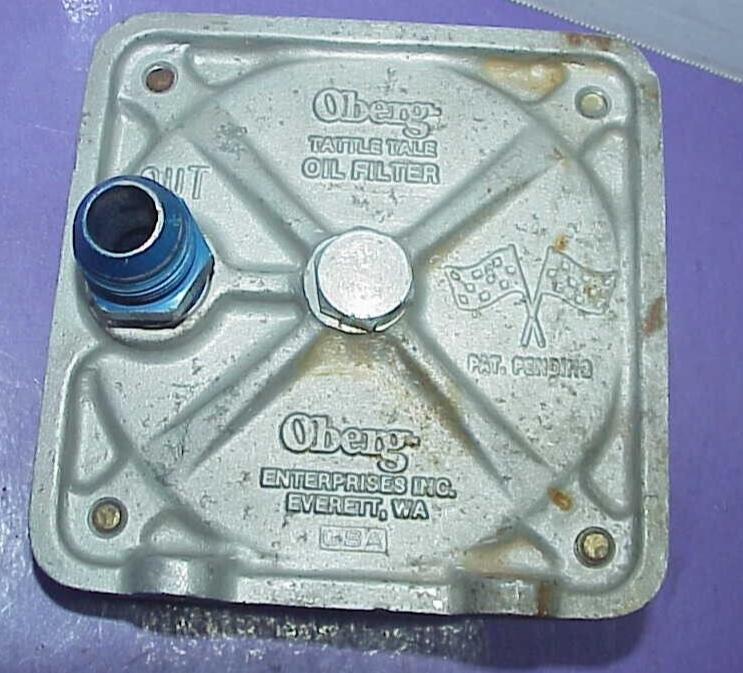
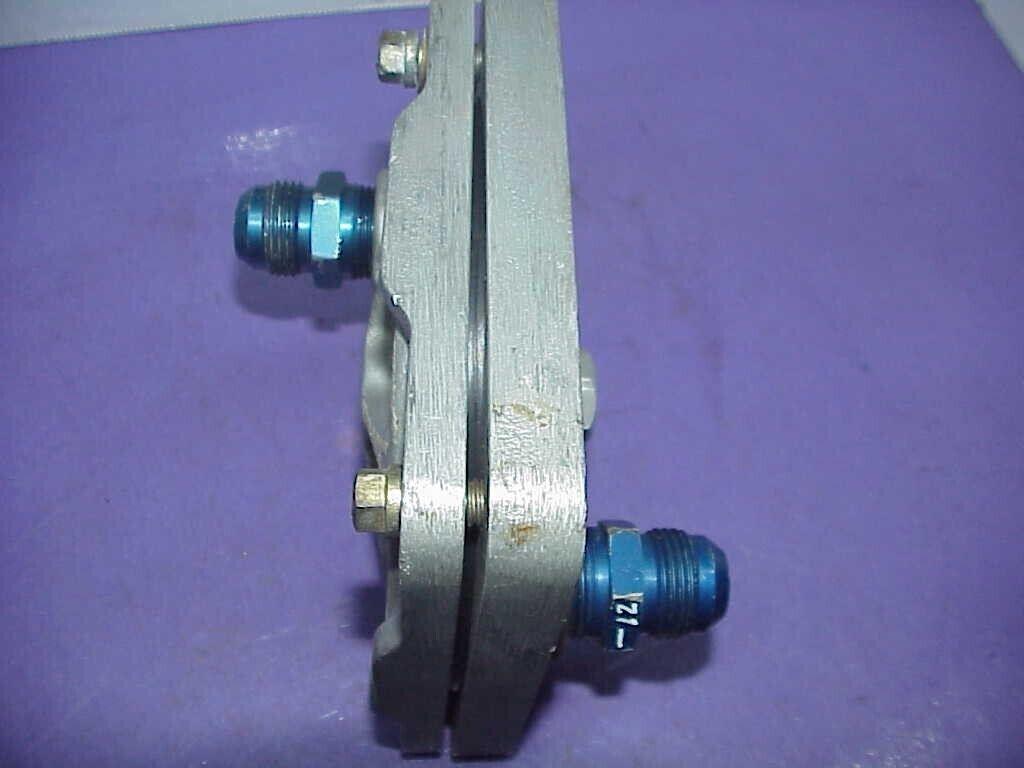
Okay, I have to thank Edgar again for the info about the Oberg tattle tale oil filter. I did some research on it, and it is not mounted on the tank. It is just mounted in the trunk, up high by itself, for easy access so the micron screen in it, that is easy to replace and because of its design, it does a much better job of filtration then a common automotive oil filter. I don't have to worry about the tank because it apparently is hidden from view between floor panels and the lower body panels in the back. Probably the only thing you might see is a drain plug for it. Not even sure what it looks like or how big it is. Doesn't really matter. Below is the bottom and side view of the filter. I just have to make a 1/25 scale version of it. I believe it is a little bigger than 8 inches by 8 inches which becomes a little bigger than 5/16 of an inch by 5/16 of an inch.
-
Thanks, Jason for the kind words.
-
Thanks for that Edgar. It must sit on top of the oil tank. Why else have it in the trunk. I need to read up on these things and see how they work.
-
1955 Mille Miglia Mercedes 300SLR
MarkJ replied to Pierre Rivard's topic in WIP: Other Racing: Road Racing, Land Speed Racers
I haven't got a clue how to weather, so I can't help on that at all. -
Or it might just have a rectangular top on it. I might just go that route. It would be easier to fabricate.
-
On to the oil tank in the trunk area. Its rectangular shaped and I have one fuzzy view of it, so probably not going to be that close.
-
Finally got the dash finished.
-
1955 Mille Miglia Mercedes 300SLR
MarkJ replied to Pierre Rivard's topic in WIP: Other Racing: Road Racing, Land Speed Racers
Pierre, you have such a special talent for making everything look so real. Under the hood and the interior of this build are phenomenal. -
I was thinking about using the vallejo gloss clear varnish for the glass.
-
Curtis Turner Smokey Yunick Chevelle
MarkJ replied to Hobbyguy's topic in Stock Cars (NASCAR, Super Stock, Late Model, etc.)
Very nice job on the gold and black. It might have been a little smaller, but 7/8 scale would have made it the size of a compact car. If you look at pictures of the car next to a Fairlane or Belvedere they are about the same length.