BK9300
-
Posts
1,993 -
Joined
-
Last visited
Content Type
Profiles
Forums
Events
Gallery
Everything posted by BK9300
-

1941 Autocar U60
BK9300 replied to RoninUtah's topic in WIP: Model Trucks: Big Rigs and Heavy Equipment
This will make a unique addition to your built collection! -
An early Christmas present!
-
Great scratch building, Steve - always interesting updates!
-
Pete 359 tanker with trailer
BK9300 replied to Jürgen M.'s topic in WIP: Model Trucks: Big Rigs and Heavy Equipment
Well, after your showcase is finished, looking forward to the trailer build! -
Home made decals. Advice needed !
BK9300 replied to Bugatti Fan's topic in Model Building Questions and Answers
People gave me a lot of good ideas in earlier thread of mine about decals. . . -
Coming along nicely - tedious now, but soon you’ll be building the frame! Good progress,
-
Incredibly, incredibly realistic - aside from all the other details, the dashboard is exquisite.
-
Very steady hand with your x-Acto knife - great job!
-
Back in the day, this car sure kept the 'muscle' in muscle cars!
-
Western Star 4900 FA plow truck
BK9300 replied to BK9300's topic in WIP: Model Trucks: Big Rigs and Heavy Equipment
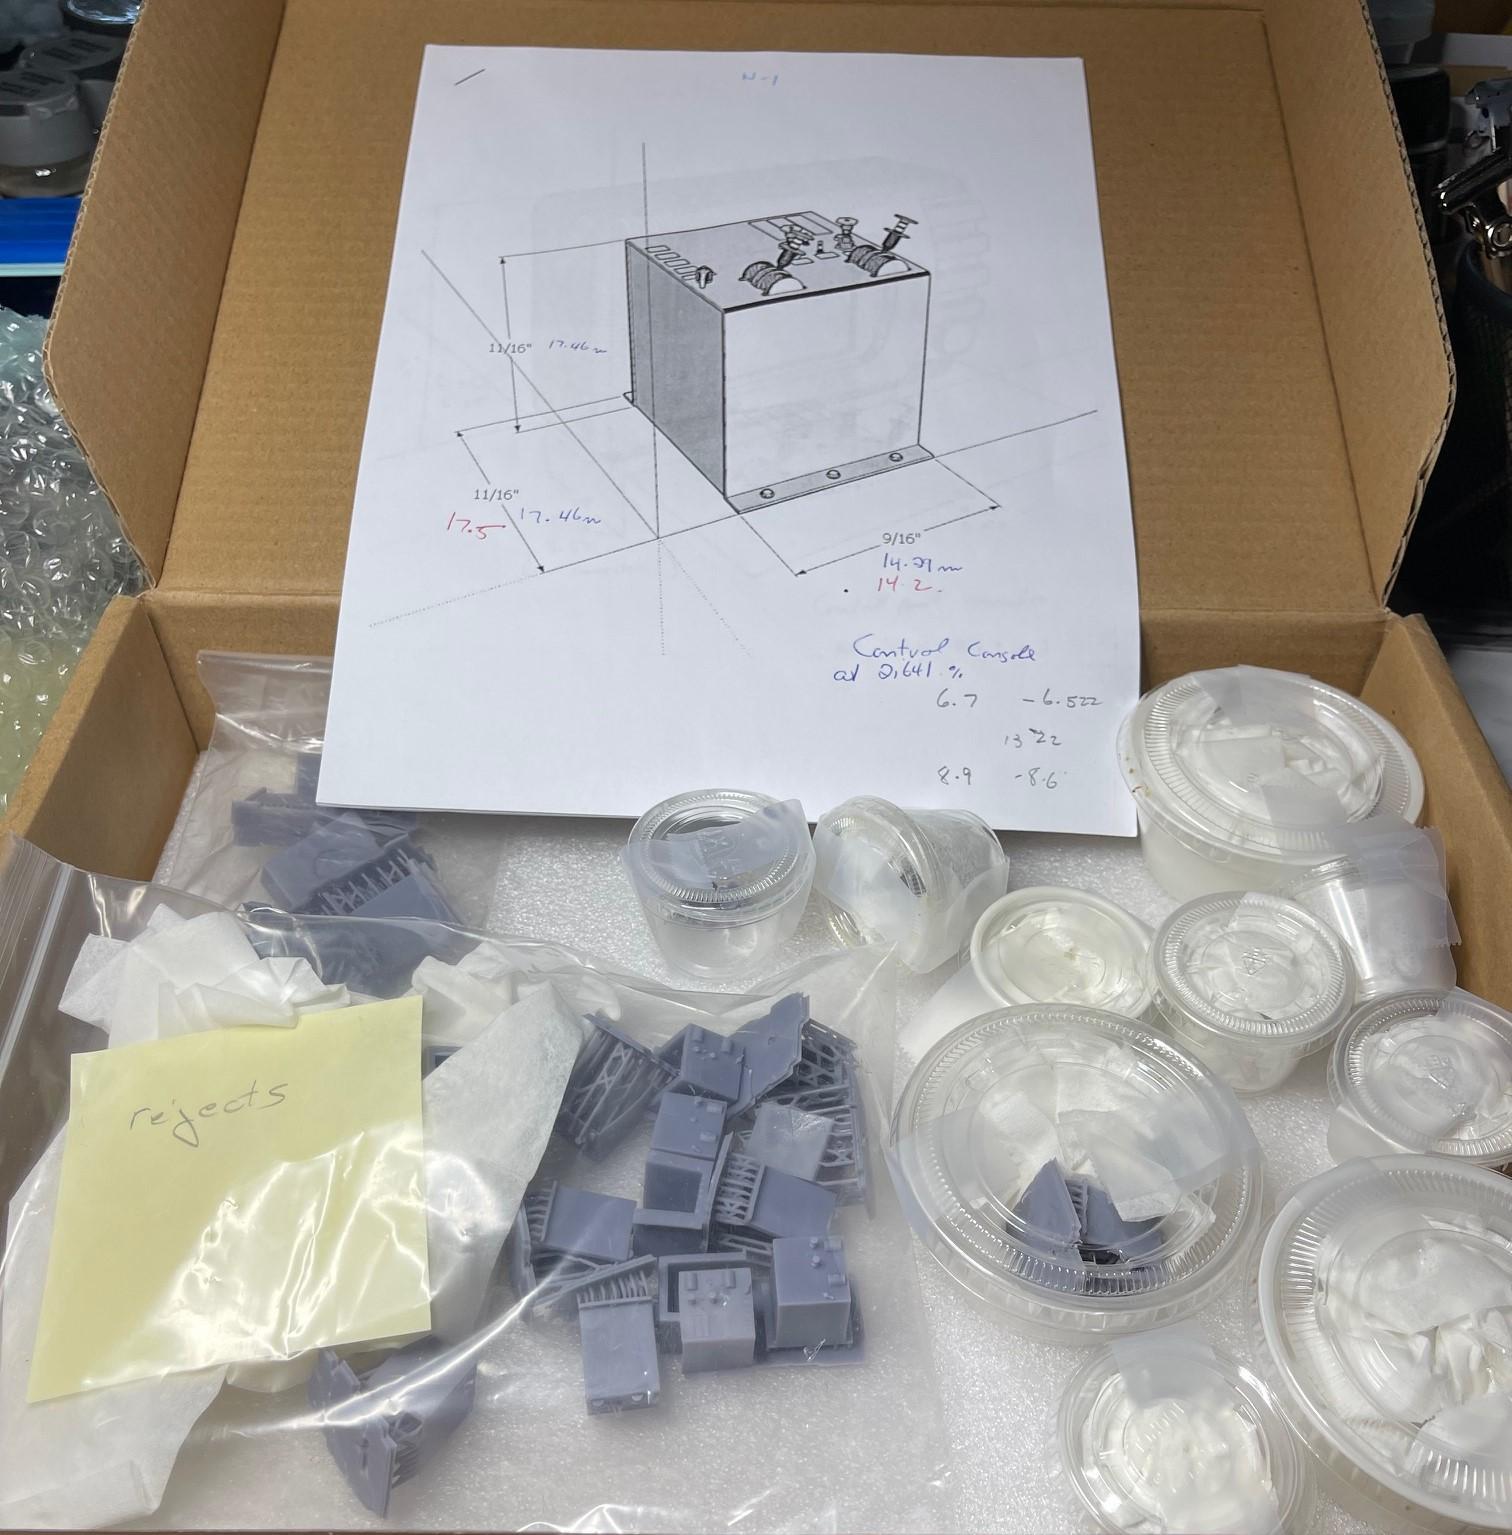
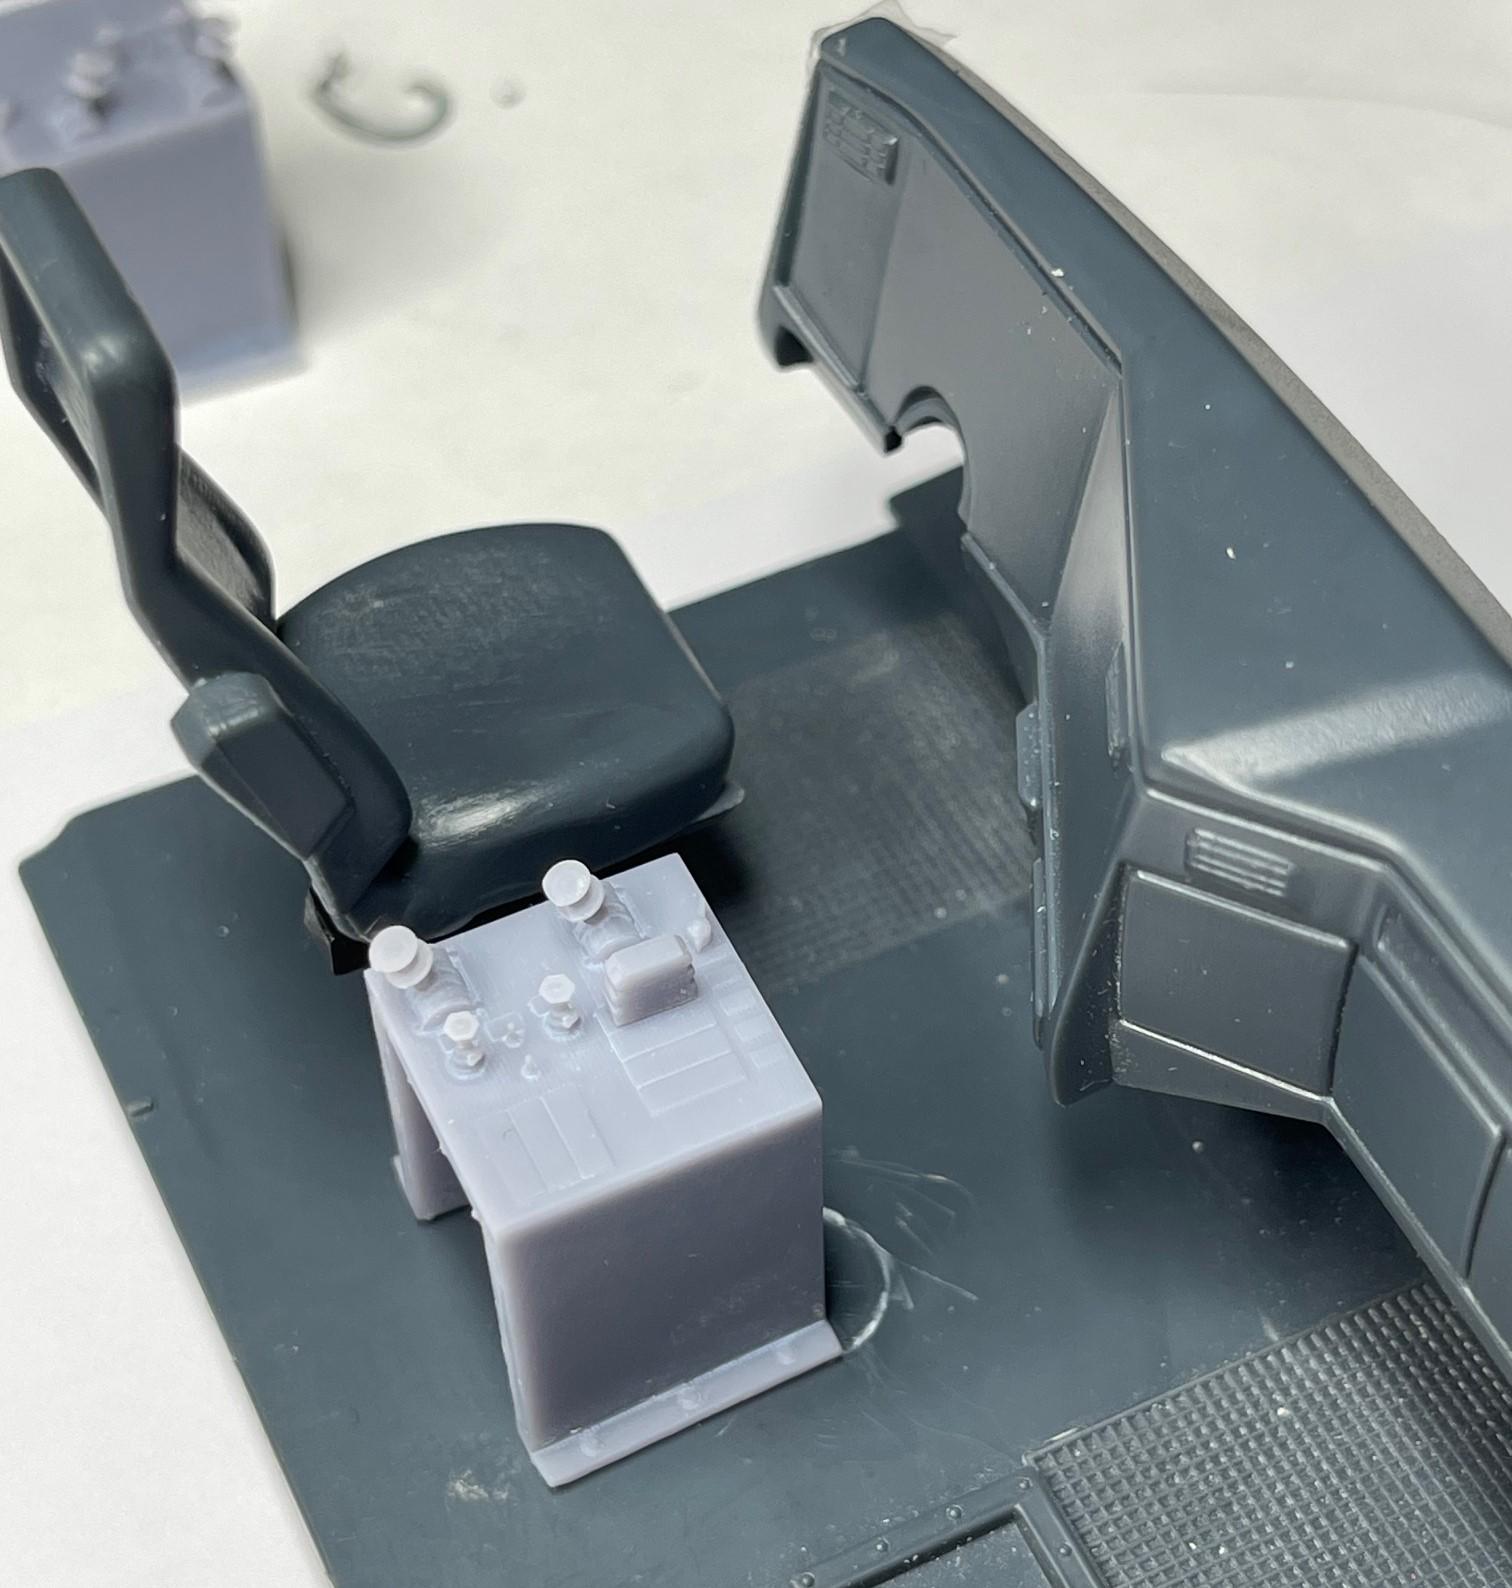
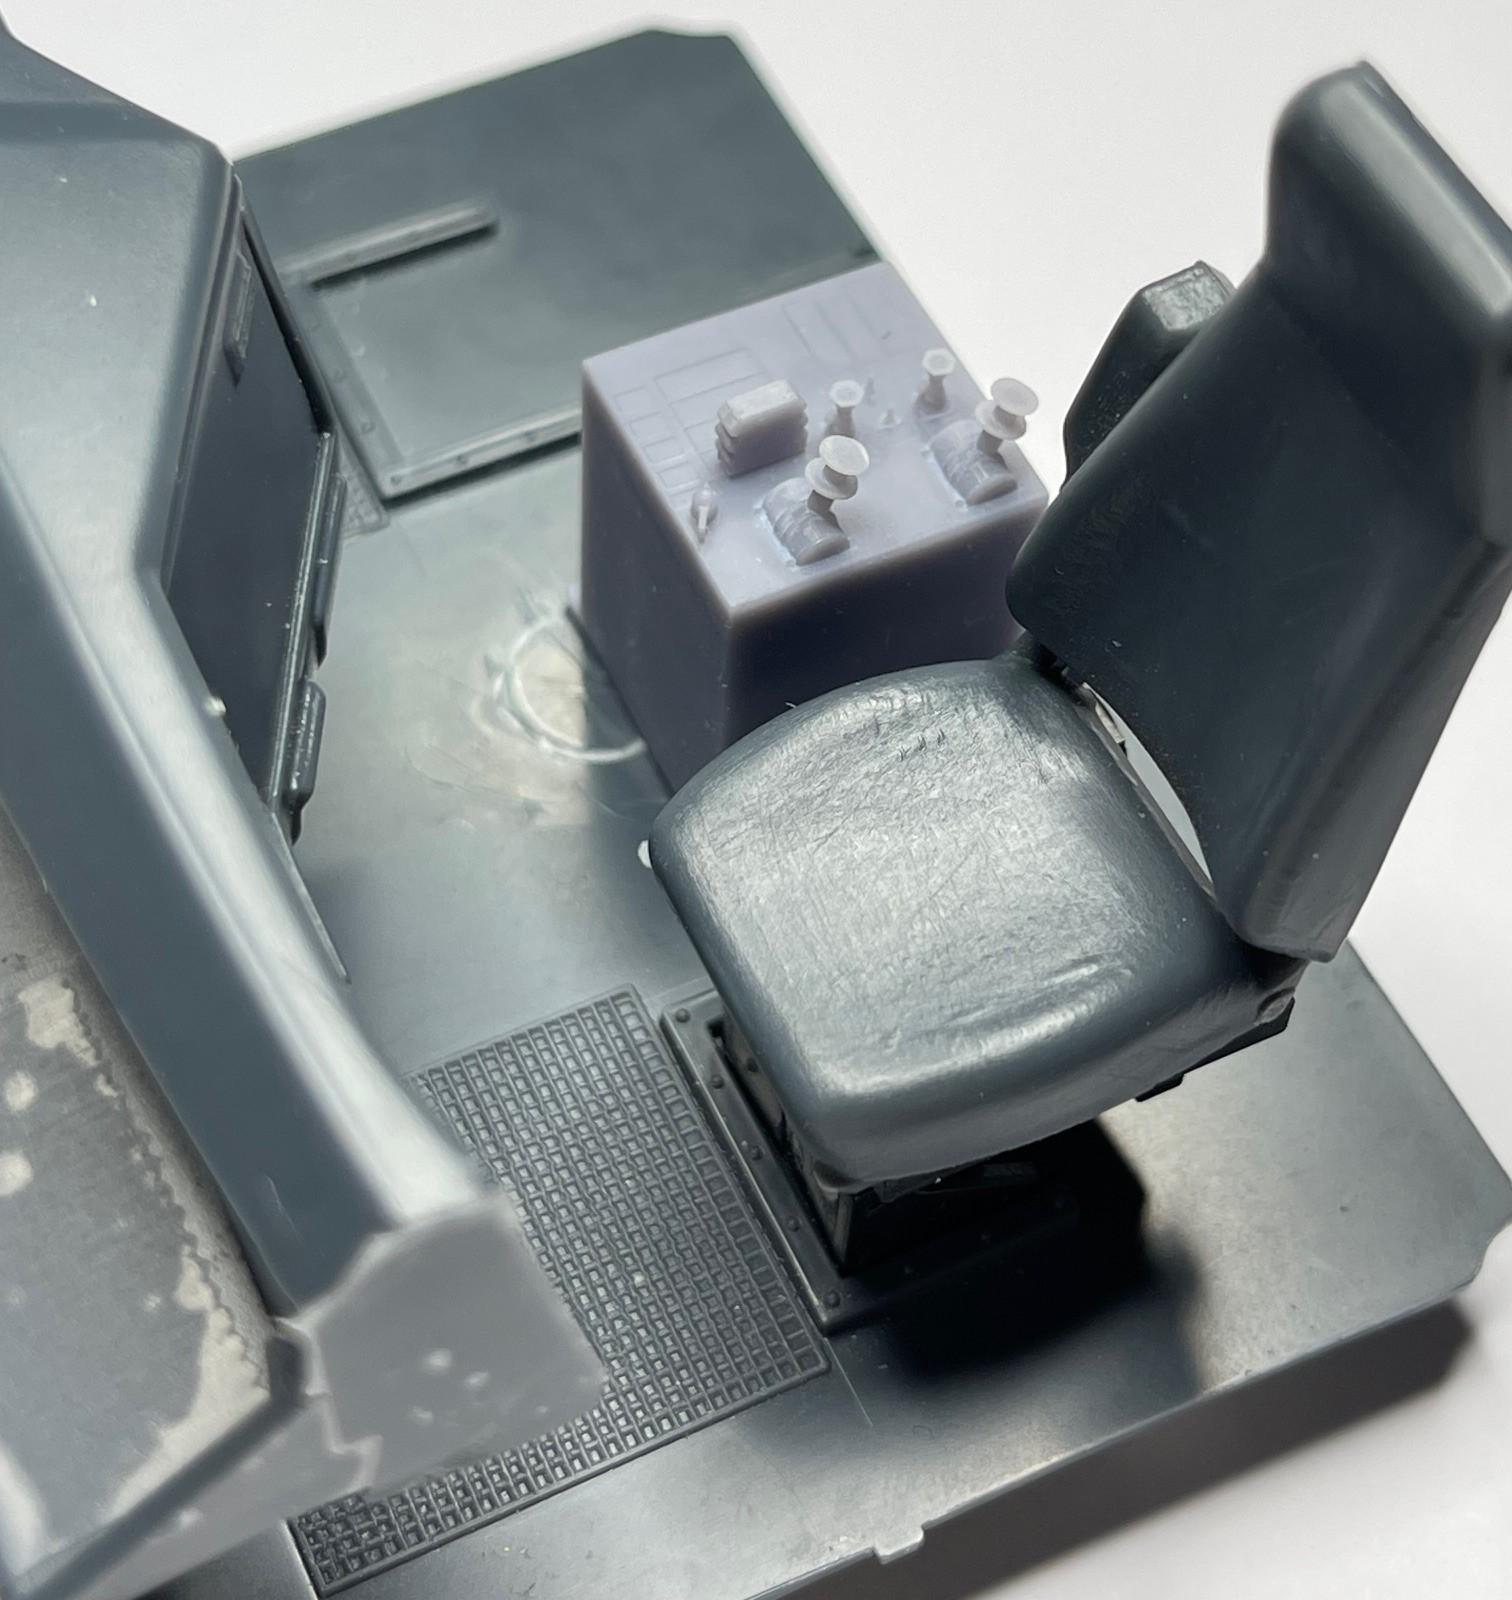
Short post but couldn't resist - Christmas came early yesterday afternoon when the package of printed parts sent by Bren arrived just as we were going out for dinner! Didn't open it until this morning. It might be hard to tell from pics, but the parts in hand have detail that is phenomenal. As promised awhile back, a quick, albeit incomplete, mockup of the interior, with console and one of four control lever boots set in place. Had a setting wrong in Sketchup when I created the print files - Bren needed to do a bunch of work re-scaling the files - many measurements to check against mine. Also sent along some console rejects so I could test paint them to avoid making a mess of the good ones! A couple of the interior with stuff just set place - if you zoom in on the console, you can even see two, very small toggle switches - on the real truck, one was for the pup trailer tailgate lock and the other was for the pup's tarp cover (summer use only, of course!). Apart from the control levers/boots for the plows, the other controls were also for summer operation - the two nearest the driver are for the main dump box hoist, and the other for the pup dump box hoist. Of the two smaller, vertical controls, one was for the sander diverter (don't spray cars as truck passes by), and the other was the main dump box tailgate lock. Have too much else going on at the moment to start inside the cab, so I'll have to set aside for now. Sure glad to have the parts, though! More to follow soon - thanks.
-
I agree with Jeff and those are very small U-joints - perfect.
-
Western Star 4900 FA plow truck
BK9300 replied to BK9300's topic in WIP: Model Trucks: Big Rigs and Heavy Equipment
Thanks, Gary - very kind words! There are no shortage of problems to solve in this build - very testing! -
Say what you will about your skills, but your detail painting is awesome!
-
Holy - you could make your own trucking company in miniature!
-
Western Star 4900 FA plow truck
BK9300 replied to BK9300's topic in WIP: Model Trucks: Big Rigs and Heavy Equipment
Appreciate the compliment, Scott! Am enjoying the progress on your wrecker build and had a look online at a few of the Century wreckers made by Miller Industries - they’re very complicated, but powerful trucks! -
Western Star 4900 FA plow truck
BK9300 replied to BK9300's topic in WIP: Model Trucks: Big Rigs and Heavy Equipment
Thanks a lot, Bren, I appreciate the compliment! I was hung up a bit on the tank, but I’m glad it turned out and is just about done. Glad you keep checking in because still a good ways to go yet! -
Western Star 4900 FA plow truck
BK9300 replied to BK9300's topic in WIP: Model Trucks: Big Rigs and Heavy Equipment
Thanks very much, Jeff. The fittings sure tested my patience but were worth the effort! -
Never built a 1/32 kit, let alone a 1/43. This kit/series seems to have lots of detail right out of the box.
-
To bad about the grille conflict, for the moment - you’ve done a ton of great body work here and good idea with the hood. Pretty sure you’ll solve it.
-
Chevrolet Road Tractor
BK9300 replied to DRIPTROIT 71's topic in WIP: Model Trucks: Big Rigs and Heavy Equipment
Great job on the weathering of your cab! I have to learn how to do this. . . -
Movin on KW
BK9300 replied to Old Buckaroo's topic in WIP: Model Trucks: Big Rigs and Heavy Equipment
That's a beautiful truck there, Sean! What did you use for your bug deflector? -
1/32 Monogram 1979 Kenworth W900 Aerodyne
BK9300 replied to Pete68's topic in WIP: Model Trucks: Big Rigs and Heavy Equipment
Quite the colour difference from inside to outside! -
Really like your scratch built work - very good looking units!
-
FDNY Wrecker
BK9300 replied to Scott Eriksen's topic in WIP: Model Trucks: Big Rigs and Heavy Equipment
It's a pricey model, if you can find them - one for sale at the moment on e-Bay for $475.00 US https://www.ebay.de/p/2254311008 -
Western Star 4900 FA plow truck
BK9300 replied to BK9300's topic in WIP: Model Trucks: Big Rigs and Heavy Equipment
Much appreciated, Gary - thanks!