BK9300
-
Posts
1,995 -
Joined
-
Last visited
Content Type
Profiles
Forums
Events
Gallery
Everything posted by BK9300
-

Western Star 4900 FA plow truck
BK9300 replied to BK9300's topic in WIP: Model Trucks: Big Rigs and Heavy Equipment
Thanks, Jeff, hope you can use the measurements and be good to have the decals - would get that part finished off as well -
Western Star 4900 FA plow truck
BK9300 replied to BK9300's topic in WIP: Model Trucks: Big Rigs and Heavy Equipment
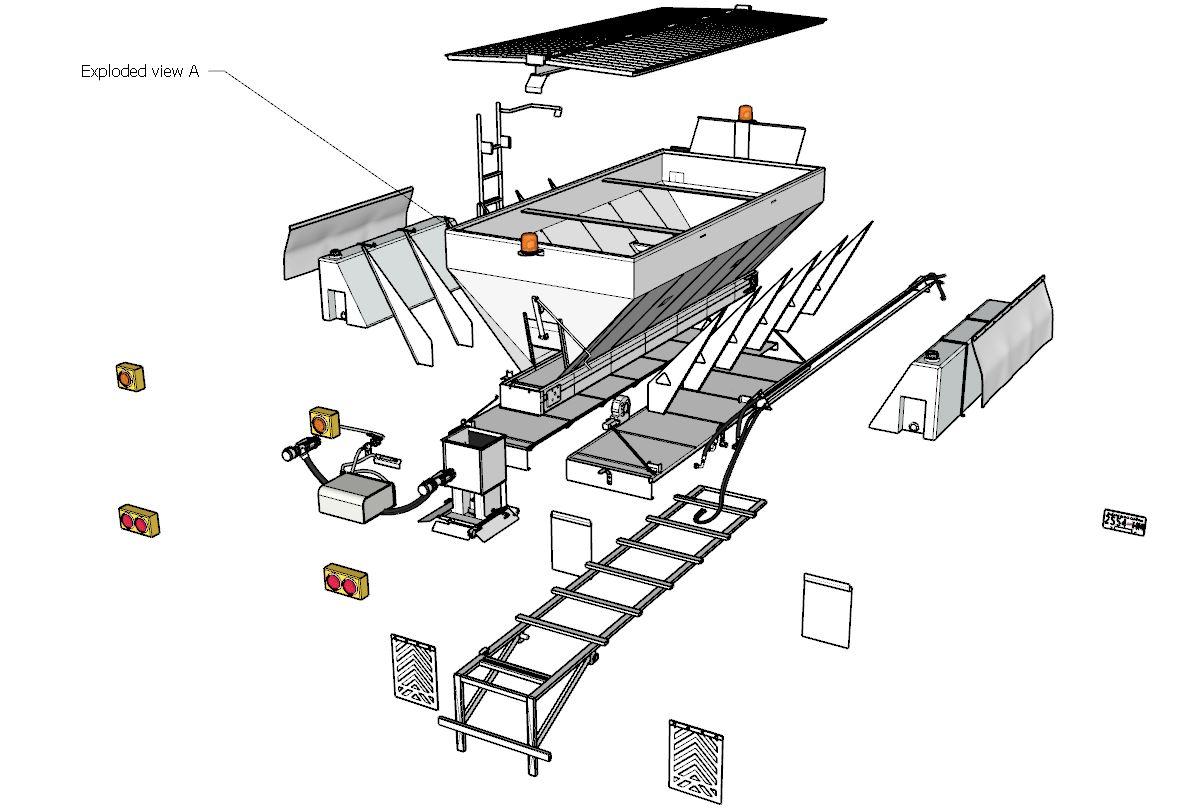
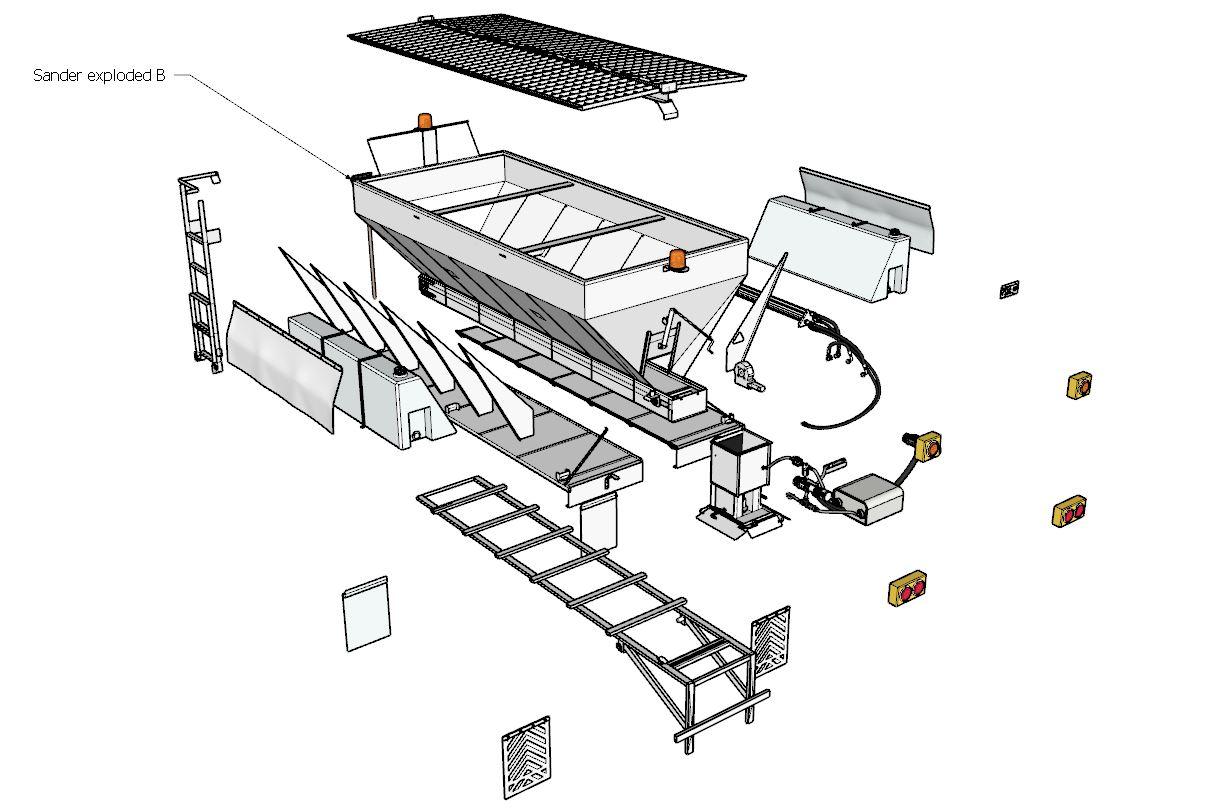
Been stalled again - stretch of cold, wet weather (heater in shed isn't keeping the humidity in a good enough place to paint), still no decals with postal strike on, and a bit stuck on how to proceed with a few details. Getting the details worked out, but still doing some trial and error fabrication on the side to be sure. For something a little different while on pause, thought I would share an interesting (to me, anyway) 'exploded' view of my sander model in Sketchup, as well as profile pattern with measurements. Not yet into resin printing, this 1/24, 3D model let me make profile patterns for almost every piece in the exploded view which were then cut out of appropriate styrene sheet stock. Like I said, might only be interesting to me, but has been a huge help to visualize what I needed to do! Lots of pieces to cut out and assemble along the way - The measurements are mostly because Sketchup has a feature to let me do this - I used actual paper printouts of panels, etc to cut out the sheet plastic More to come soon, I'm hoping!
-
Western Star 4900 FA plow truck
BK9300 replied to BK9300's topic in WIP: Model Trucks: Big Rigs and Heavy Equipment
Thanks, Lee - appreciate your thoughts! -
’72 Dodge Demon Drag Racer 1/25 scale
BK9300 replied to AmericanMuscleFan's topic in WIP: Drag Racing Models
The close ups of your machining bits remind me of pics of robotic, micro surgery set ups - and you’re just as precise. Always interesting updates! -
Pete 359 tanker with trailer
BK9300 replied to Jürgen M.'s topic in WIP: Model Trucks: Big Rigs and Heavy Equipment
Going to be an impressive pair, once you get around to adding your trailer to this build. -
Amazing carbon fibre application! Symmetrically lined up - that certainly must have been a patience tester. Keep noticing small details on engine - how did you get lettering on the hoses/wires? Marvelous.
-
Resto Rod Autocar
BK9300 replied to Gary Chastain's topic in WIP: Model Trucks: Big Rigs and Heavy Equipment
It certainly did - looks perfect! -
Resto Rod Autocar
BK9300 replied to Gary Chastain's topic in WIP: Model Trucks: Big Rigs and Heavy Equipment
Hi Gary - I used Hasegawa 'Mirror' finish film, trimmed very thin, with new x-acto blade, drawn at a very shallow angle over the film to cut it, otherwise the film gets damaged. Then, laying the thin strip of adhesive on the end of the hose, rotated the hose in my finger, doing best I could to keep the film strip going on straight enough while holding the end of the film with tweezers, to meet up with the other end. Its a bit stretchy, so that helps with any correction. Then just rolled the film/hose in my fingers to set the film - it sticks very well to itself. Great job on fabricating your air exchanger!
-
Incredibly realistic features you've added in! Especially like the seat detailing. What material did you use for your firewall heat shield?
-
Well done on your modifications - so much detail! Did you print the toggle switches for the dash, or were they molded in?
-
Pete 359 tanker with trailer
BK9300 replied to Jürgen M.'s topic in WIP: Model Trucks: Big Rigs and Heavy Equipment
Tremendous progress, Jürgen - every day on your bench is another day closer to completion - very methodical! -
You are a ‘brute for punishment’! All suffering aside, you take on very difficult fabrication and come out smiling on the other side. Great perserverance!
-
The Same but “ a little “ Different
BK9300 replied to Biggu's topic in WIP: Model Trucks: Big Rigs and Heavy Equipment
Ah, the dreaded ‘Do Over’! Not to worry - you got this. -
The Same but “ a little “ Different
BK9300 replied to Biggu's topic in WIP: Model Trucks: Big Rigs and Heavy Equipment
Awesome progress, Jeff and the weathering sure sets off nicely against that well maintained cab! -
International V190 Quarry Dump
BK9300 replied to Warren D's topic in WIP: Model Trucks: Big Rigs and Heavy Equipment
Got to love scratch building! Sure is handy when the kit parts are lacking in detail. -
Such a difference having the cab and wrecker body the same colour! Will you be re-working the boom at all or leaving as is?
-
Marvel's Hydra coupe 1/12 scale full scratch build
BK9300 replied to François's topic in WIP: Model Cars
Fabulous feat in miniature, François - hope your camshaft holds up against the hard surface push rod ends! Hard to imagine all the knowledge brought to bear to make this actually work. -
Western Star 4900 FA plow truck
BK9300 replied to BK9300's topic in WIP: Model Trucks: Big Rigs and Heavy Equipment
Yes, i have sent him a few along the way - I think I sent him link to the build thread so I don’t clutter his cell phone. -
Western Star 4900 FA plow truck
BK9300 replied to BK9300's topic in WIP: Model Trucks: Big Rigs and Heavy Equipment
Glad Ken likes it! I’ve also had occasion to talk with Craig off and on about ‘what is this’ kind of questions. No, I won’t be doing a wear saver - don’t think I ever had any pics of one. I had intended to add the protective hose for the ram hydraulic lines up front, and, in looking at pics of the underside of the truck, I see I need to do that for the fuel lines, too. Might have to be a split hose at this point but split would be hidden! Thanks for the observations - always appreciated -
Beautiful build - looks very cool in its shop!
-
1/32 Monogram Chevy Bison Flat Bed Hauler
BK9300 replied to Pete68's topic in Model Trucks: Big Rigs and Heavy Equipment
Another crisp looking build - you pay a great deal of attention to the paint, finishes and decaling of your builds and it shows up in your photos. I like the outdoors photography you and others do - adds a lot. -
Fine looking mockup! Good luck with ideas tomorrow.
-
Western Star 4900 FA plow truck
BK9300 replied to BK9300's topic in WIP: Model Trucks: Big Rigs and Heavy Equipment
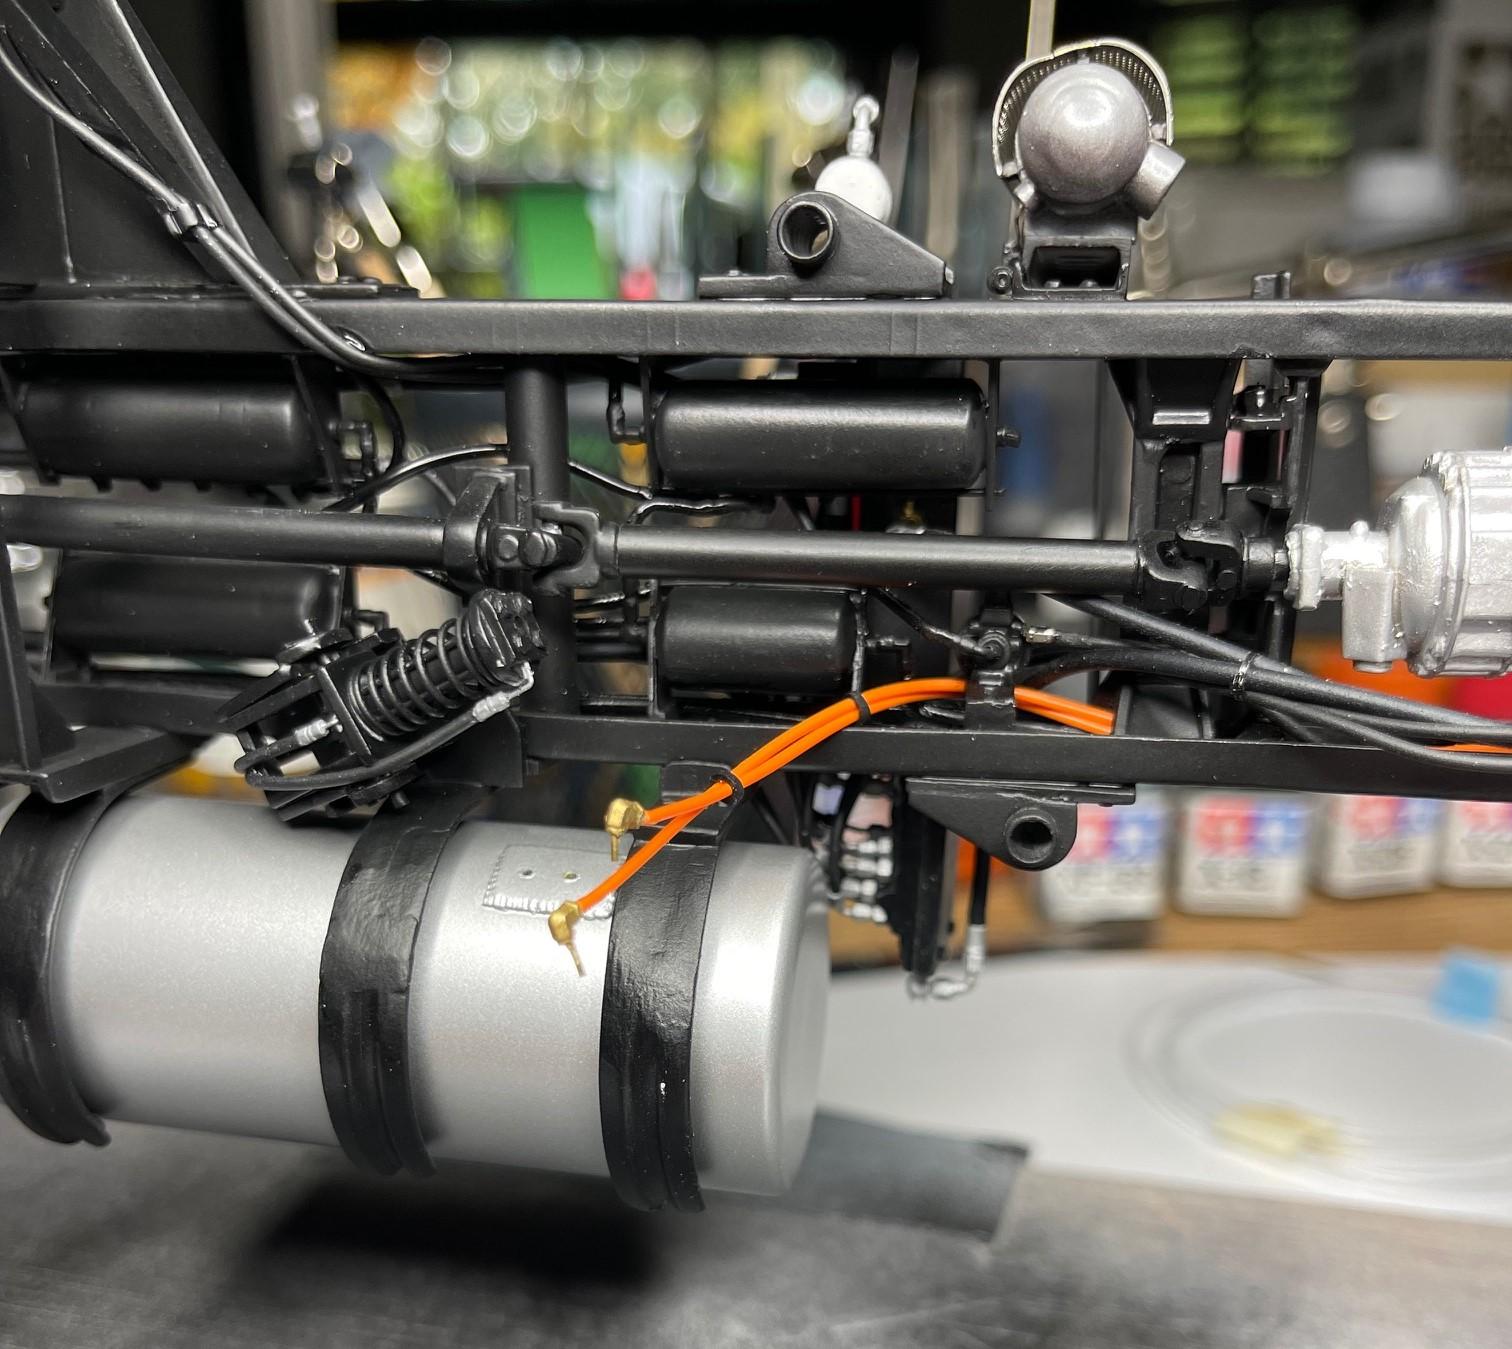
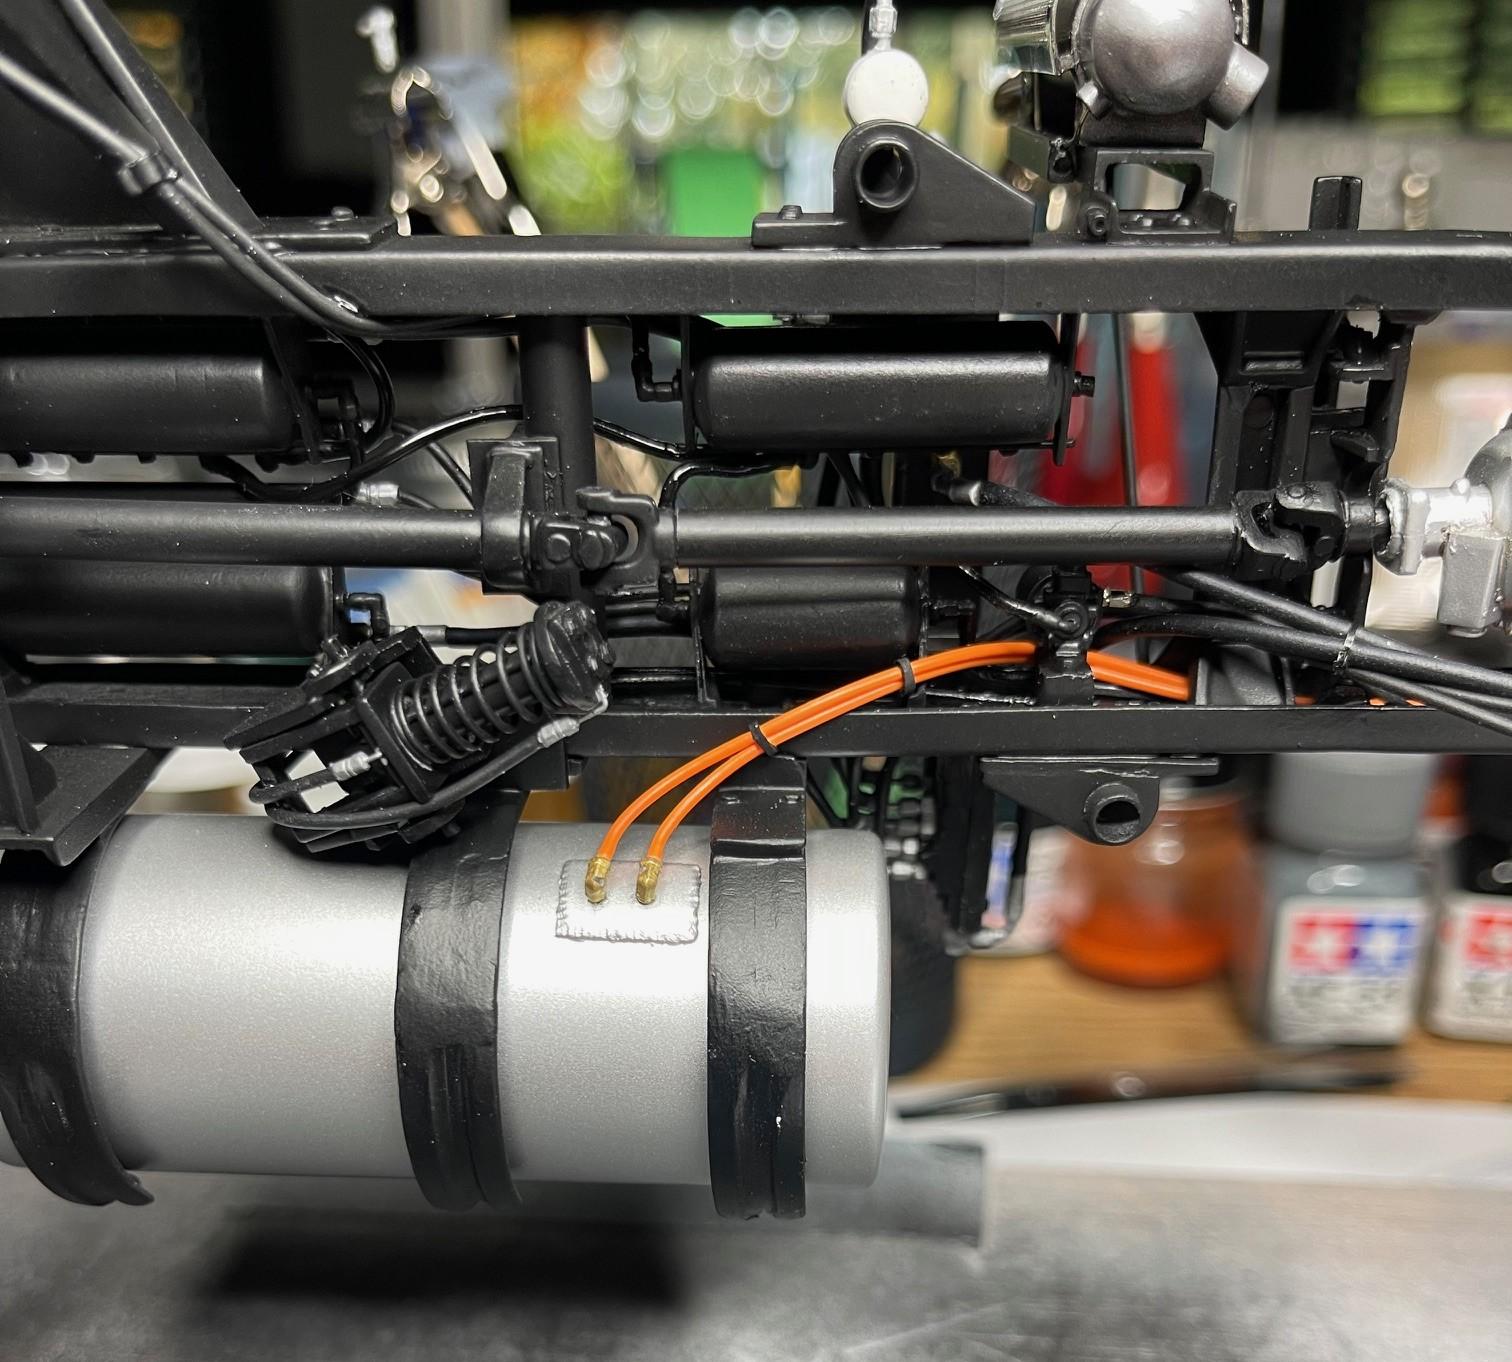
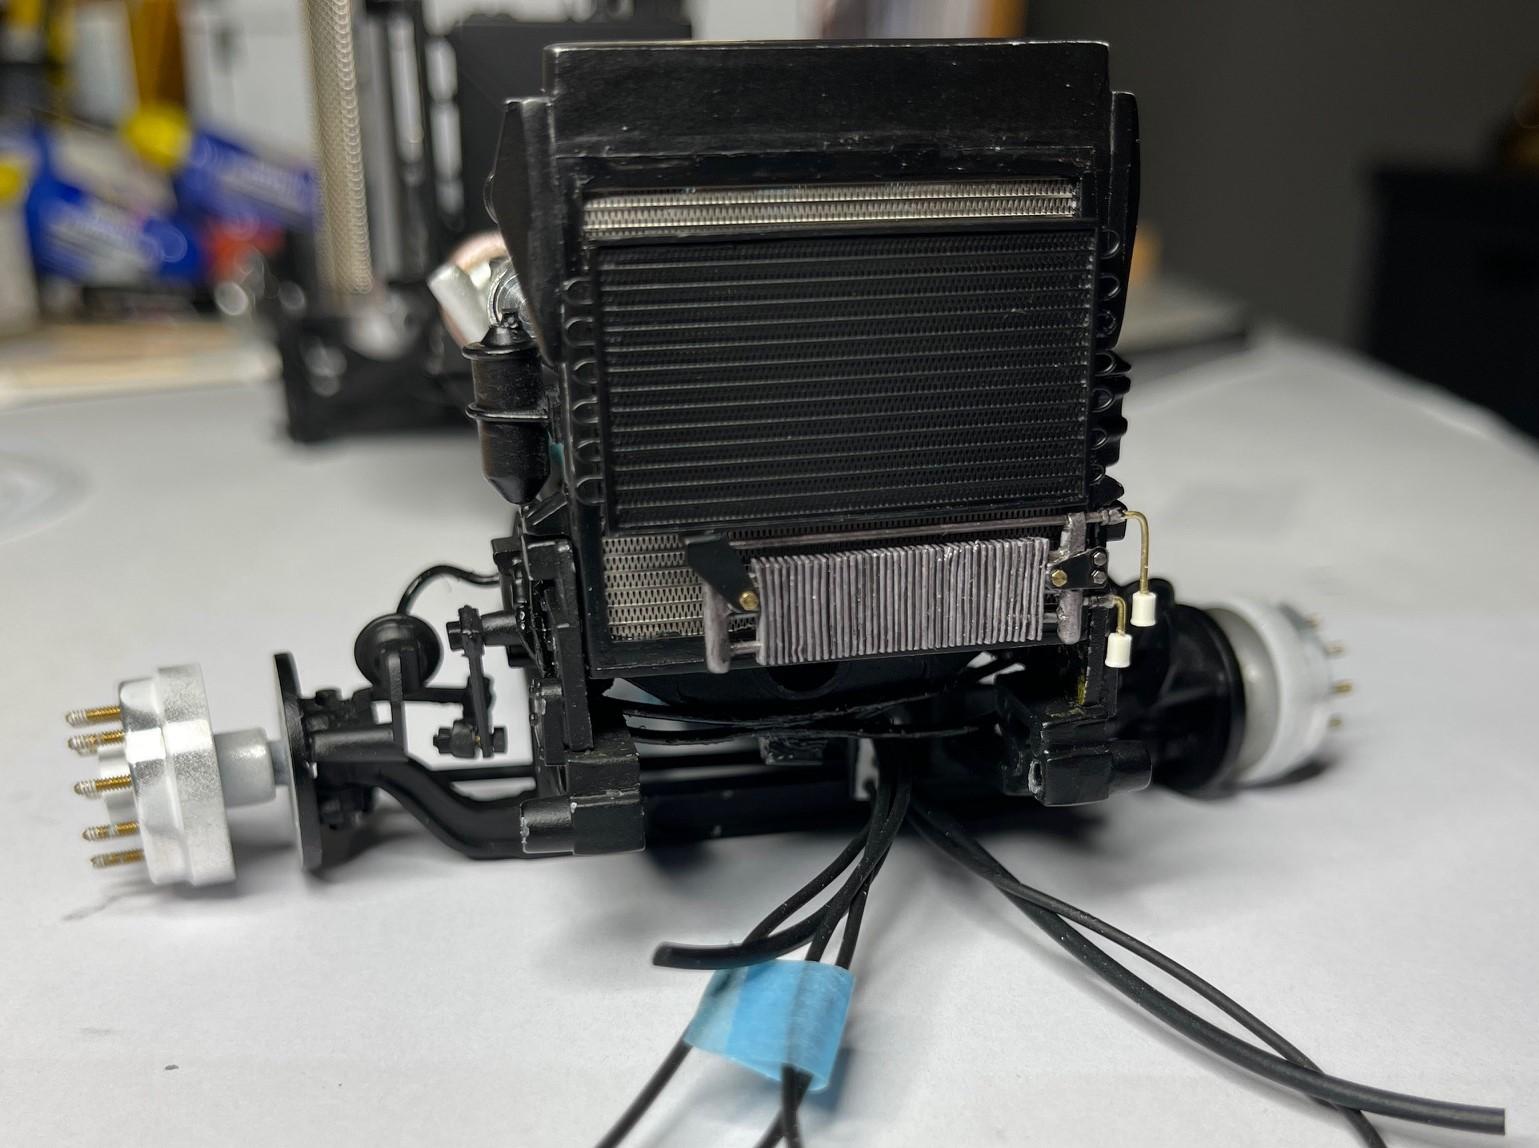
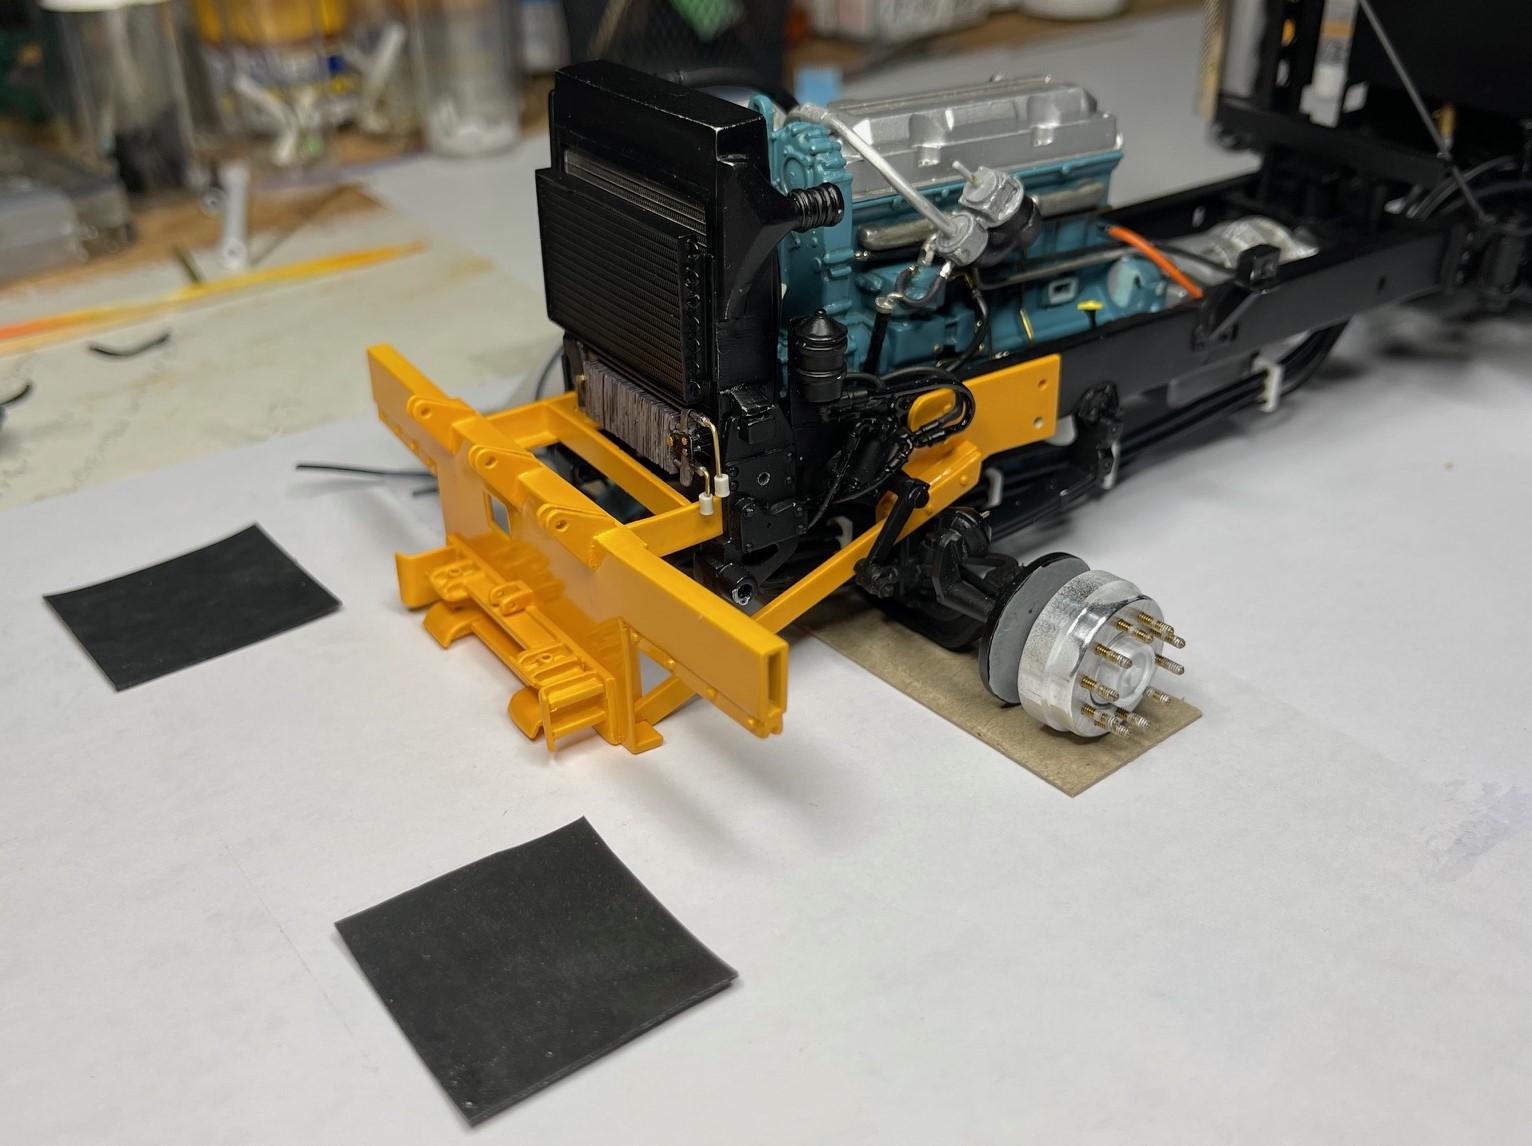
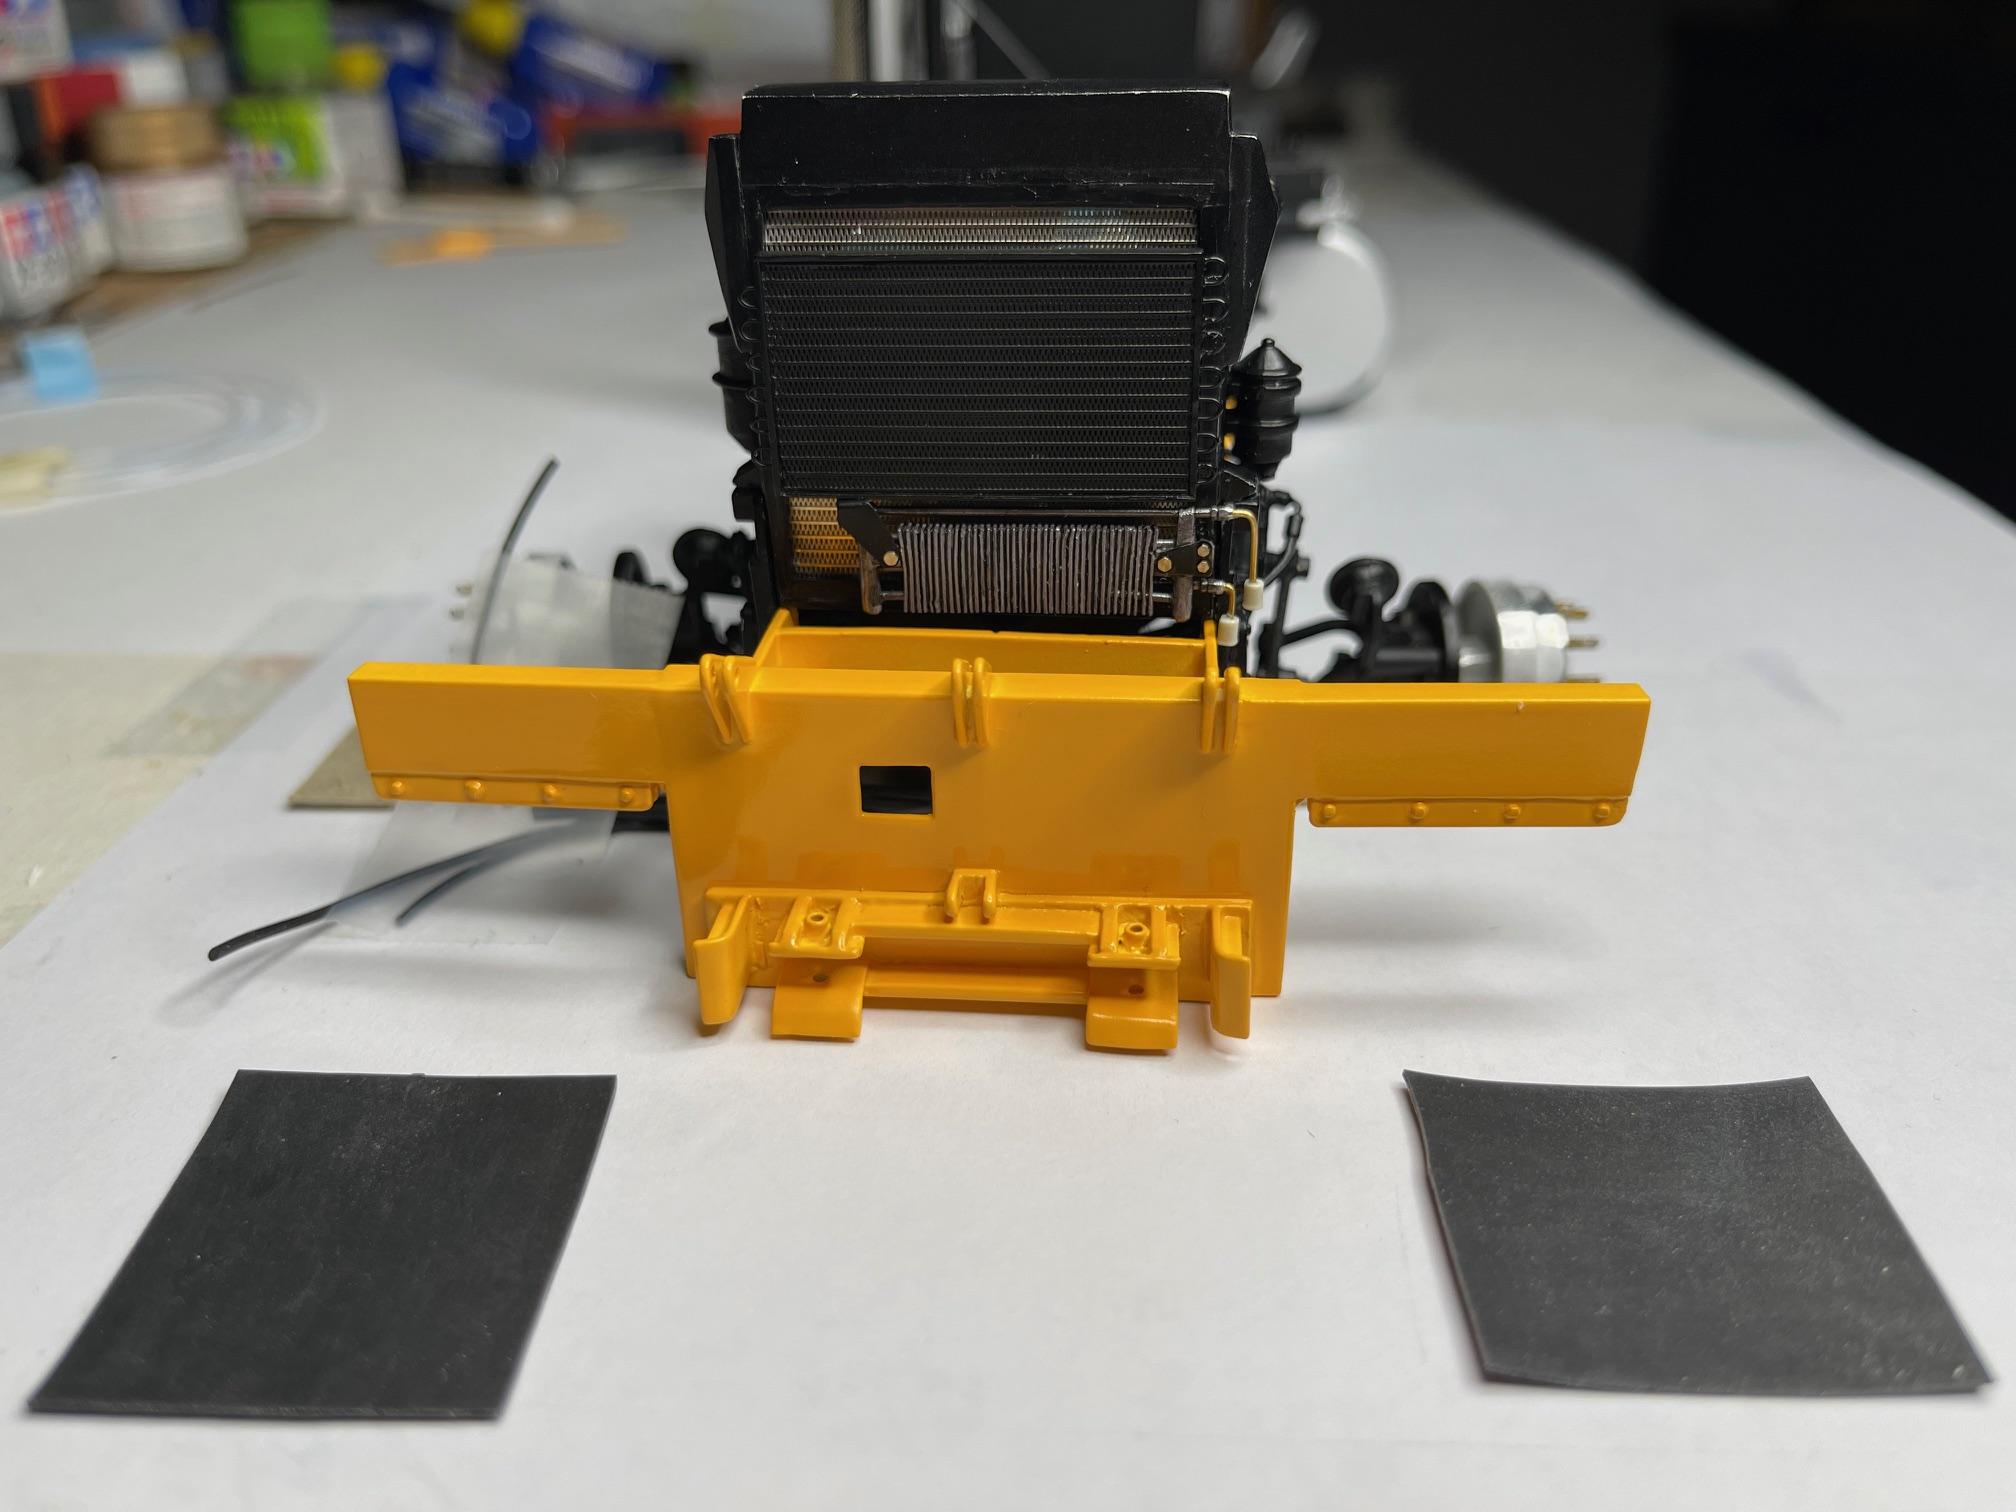
Didn't get to the tank straps today, but did make headway on the tank's fuel line/return line. Also got the start of the tranny cooler connections, then immediately got sidetracked into trying to better understand how the ends of the two hoses from the tranny actually needed to be routed to the cooler. This was a problem because of the front plow lift group/bumper assembly. Had to temporarily set the lift group in place, and position one of the frame side braces in position, to determine the best route to the fittings (no pictures from real truck for this). So, while I didn't get the hoses finally connected, I figured out a hose routing that worked and got excited by how the lift group looked in place, and took a couple pics of the mockup - bonus! A few things going on here - fuel line fittings attached to fuel supply/return lines and a couple of 'oops' items. I'm not, never have been, a truck driver - so don't always pay attention to otherwise important details. The driveshaft section from output shaft to steady bearing is not quite in phase - I understand that's not a good thing on full size trucks! Secondly, 'someone' backed another truck into the exhaust shroud before this one could even get out of the shop. . . Fittings in place - Best I could come with today for hose to pipe connections for the tranny cooler lines; also got the right hand mounting bracket painted black - I noticed in an earlier picture that I had not painted it All this was set up to finally determine the end routing for the hoses to tranny cooler. The two hoses will come up from under and then up beside the plow lift to truck frame connection - no pic from the real truck for this, but did see several versions of this online and in some Western Star's Builder Body series of publications. Always a problem to solve - in doing these temporary placements, the plow lift group will ultimately need to be brought forward a bit further - that meant the side braces needed to move forward as well - that meant the brace plate along side the frame now conflicted with pass through air line from the front brake pods. So, if you look closely, that line has been removed on this side, and will need to drill a hole in the brace plates for both air lines and reattach them. Again, if I kept looking at pics from real truck, that is exactly how it is supposed to be. Anyway, all makes for a good mockup! Hoses for plow lift cylinder will come out of (and go back into) the rectangular cutout in lift group. Going to have just enough room beside the cooler fittings to set in the Western Star hood hinges that I hope to make in the next little while (then I'll cut back the kit frame's much lower hood hinge pivots) Time for dinner! Take care, and as always, appreciate your comments and or questions.
-
Making Tracks
BK9300 replied to Chariots of Fire's topic in WIP: Model Trucks: Big Rigs and Heavy Equipment
Great update, Charles. Very trick, how you made the winch operable - good engineering! -
CHEVY 5500 SERVICE TRUCK
BK9300 replied to yh70's topic in WIP: Model Trucks: Pickups, Vans, SUVs, Light Commercial
Still waiting for my sander decals, too - unfortunately, Terry got them mailed to me just before the postal strike up here started.