BK9300
-
Posts
1,993 -
Joined
-
Last visited
Content Type
Profiles
Forums
Events
Gallery
Everything posted by BK9300
-
Terrific build, David - lots of new methods tried and many problems solved along the way - well done!
-
 I'll be following both builds, for sure. Glad to see a thread from your bench again - I really liked the 48' Loadking, 3 axle lowboy you did a few years back - great work.
 -
I keep saying it, but I always admire the changes you're able to bring to these kits - need a very small pair of tweezers to get those fuel lines in place! Your inspiration truck appears to have a slightly longer wheelbase. Maybe take a pic of your model on the same angle as the inspiration pic and compare?
-
Western Star 4900 FA plow truck
BK9300 replied to BK9300's topic in WIP: Model Trucks: Big Rigs and Heavy Equipment
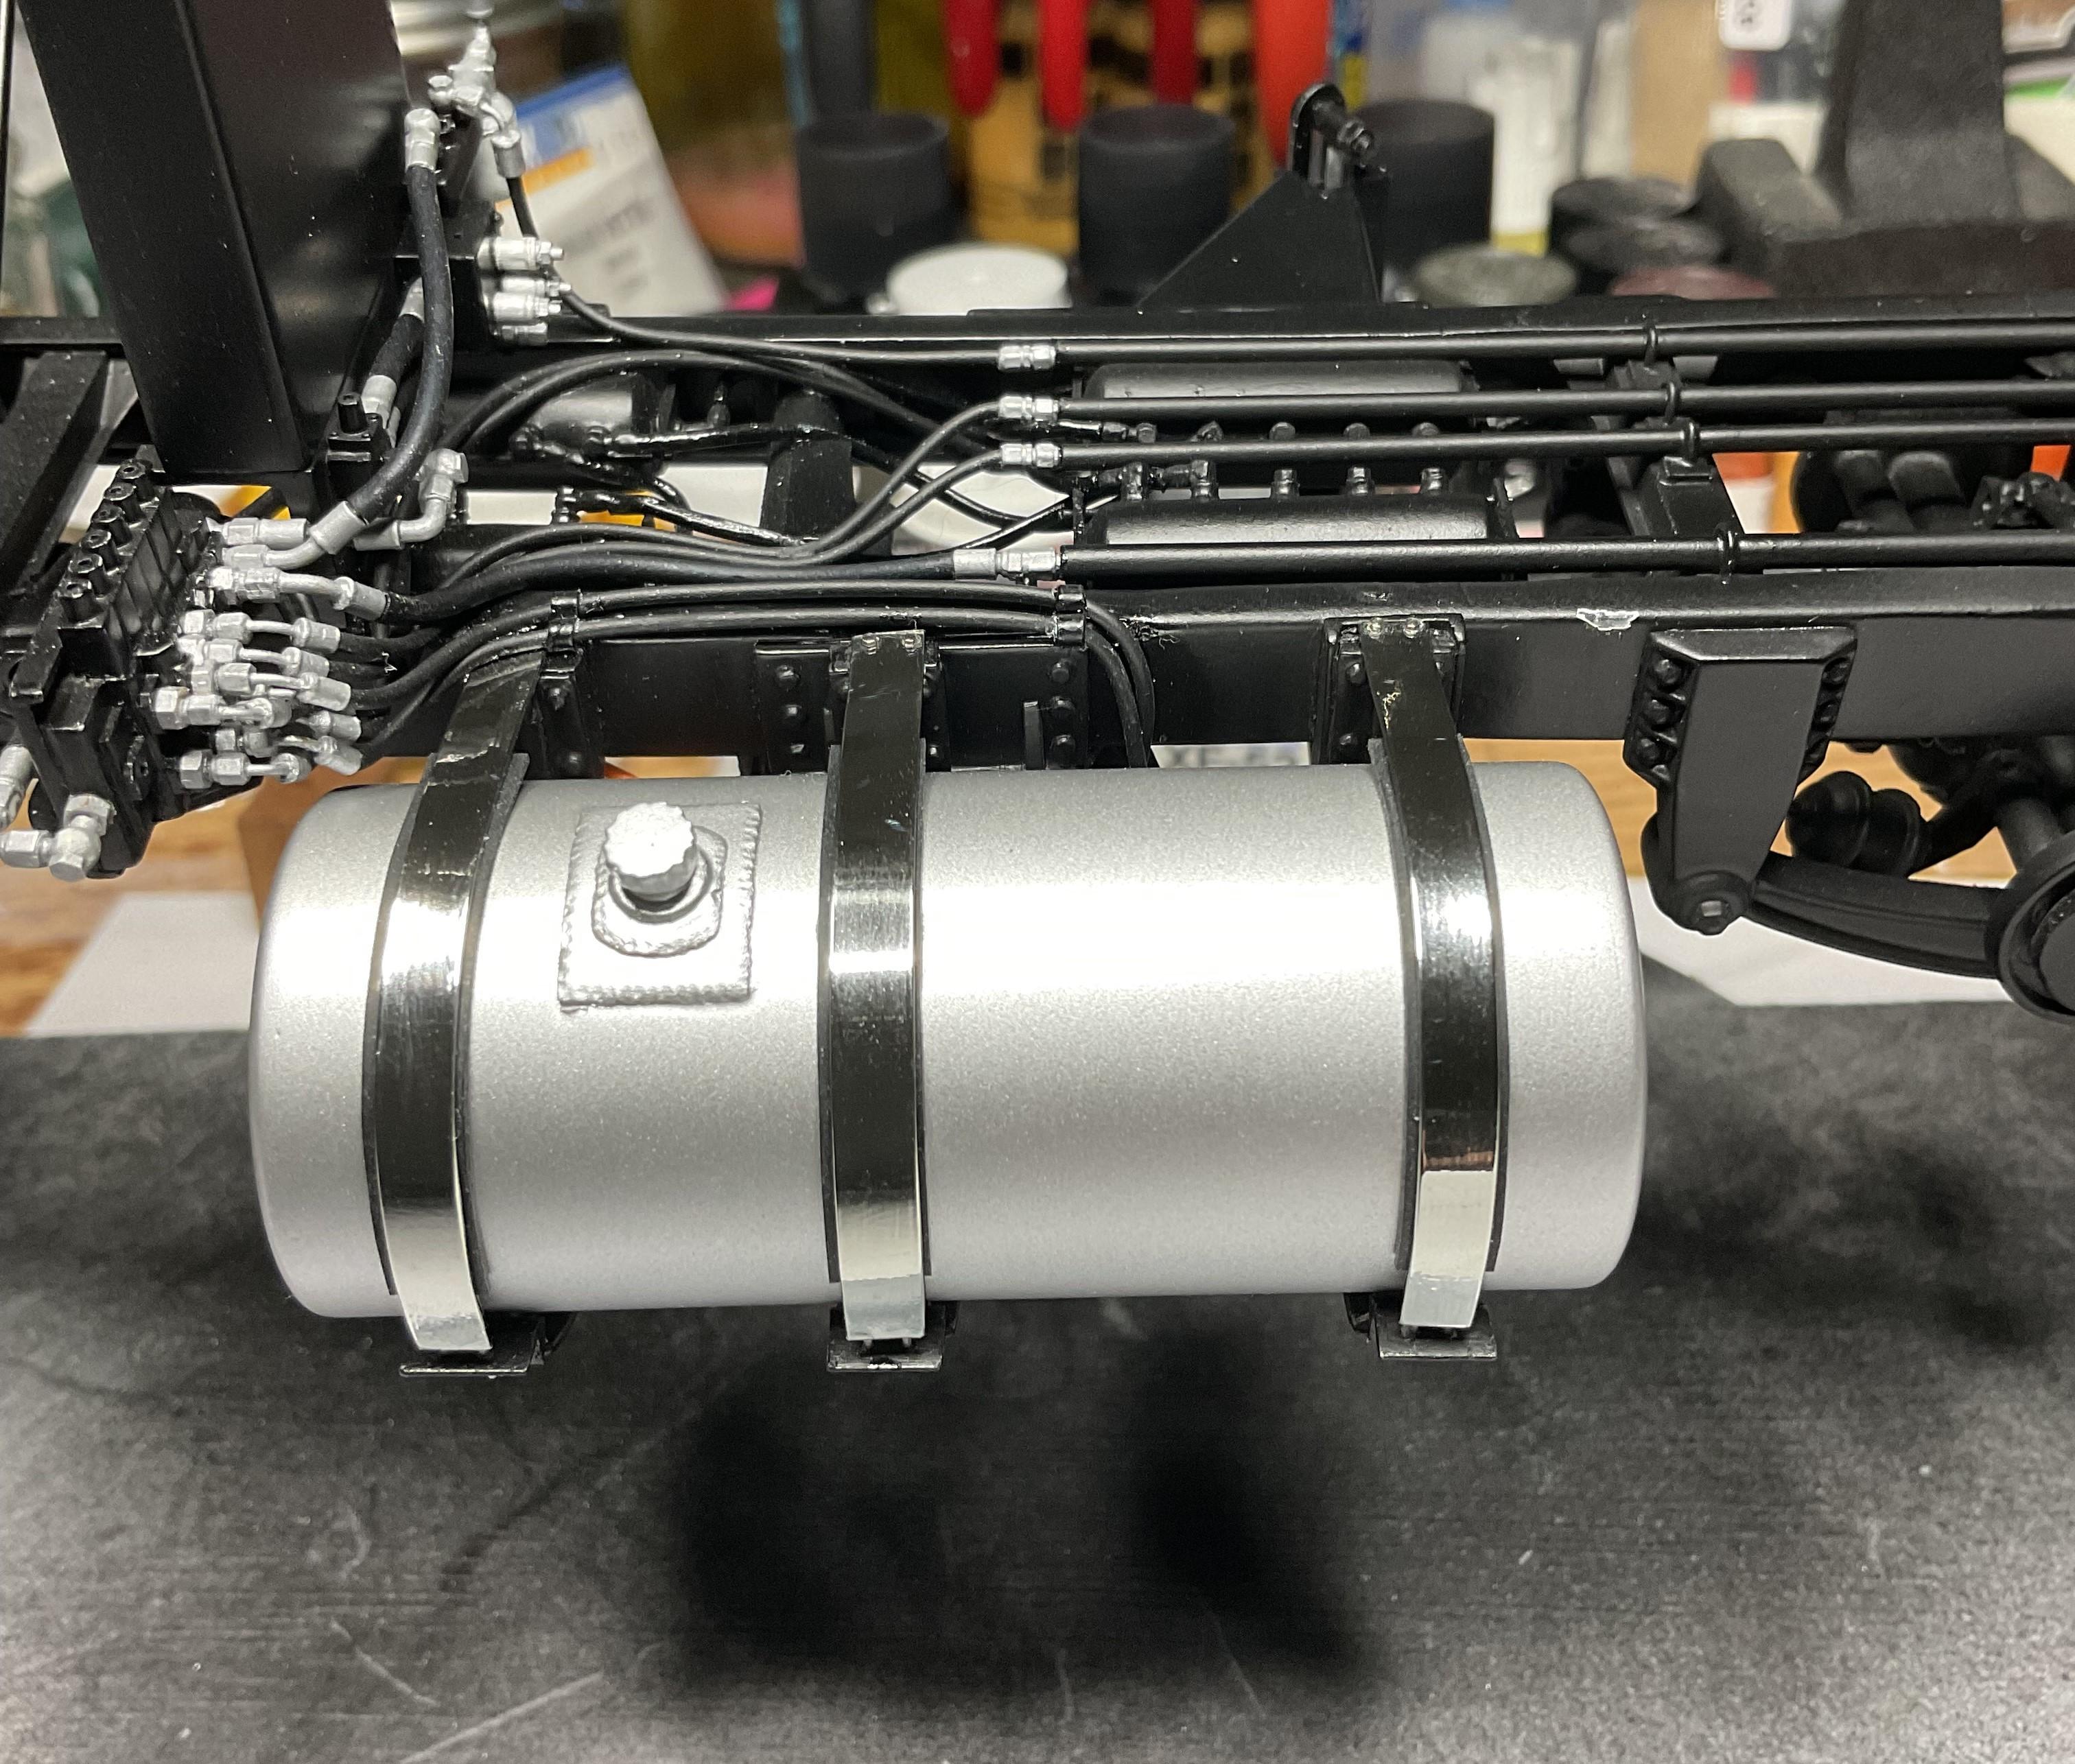
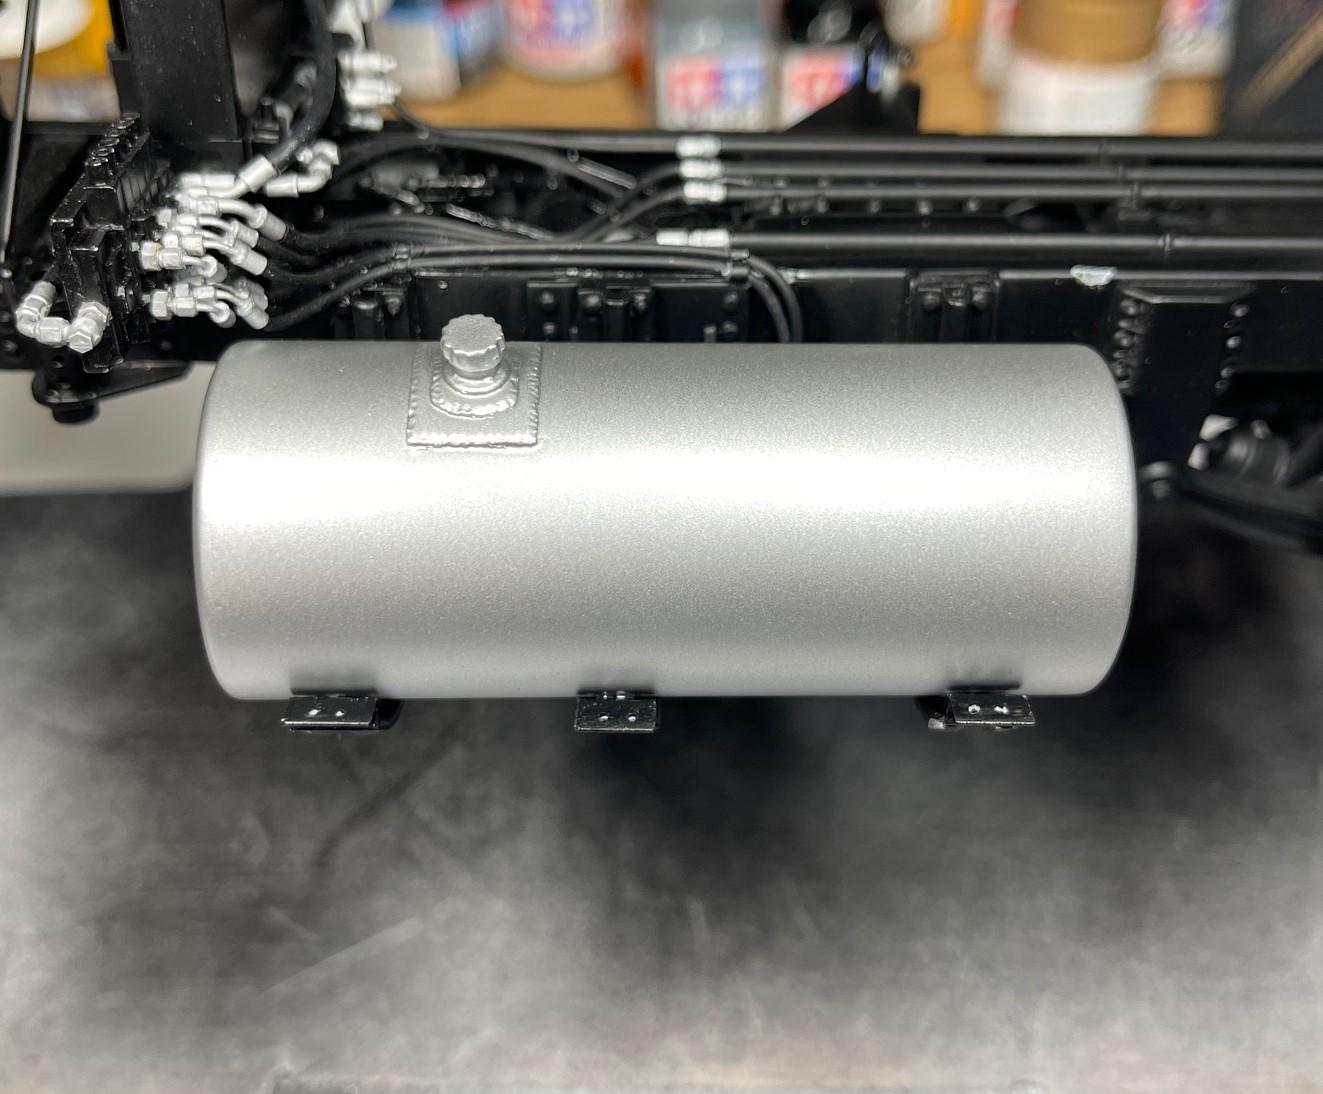
Thanks Guys - appreciate it! Good day today - and a big step towards finishing the fuel tank. Just need to make a semblance of a sending unit and it will be done. Pic of the real truck - this was the goal Very happy with results. . .quite anxious process using slow setting CA glue and not have it leak out the sides of the straps Placed a little blob of epoxy on the bolts, on inside of angle iron to add to some strength to strap. Painted them aluminum to represent the nuts A few hours left today - might get a start on the sending unit! Always appreciate your comments - take care!
-
FDNY Wrecker
BK9300 replied to Scott Eriksen's topic in WIP: Model Trucks: Big Rigs and Heavy Equipment
It would be a lot of work, but if you took the manual that Bob sent you, and knowing how wide the light bar is in relation to the cab, maybe all the other body parts, boom parts, could be scaled from that. A ton of work, but could be done. -
Western Star 4900 FA plow truck
BK9300 replied to BK9300's topic in WIP: Model Trucks: Big Rigs and Heavy Equipment
Thanks, Jeff - I made them out of styrene ‘angle iron’, with a bit of a backing, and pinned them for extra support when epoxied in place. -
1/32 Monogram 1979 Kenworth W900 Aerodyne
BK9300 replied to Pete68's topic in WIP: Model Trucks: Big Rigs and Heavy Equipment
Beautiful blue paint job you’ve laid down, Lee - any chrome should stand out great against that colour. -
Western Star 4900 FA plow truck
BK9300 replied to BK9300's topic in WIP: Model Trucks: Big Rigs and Heavy Equipment
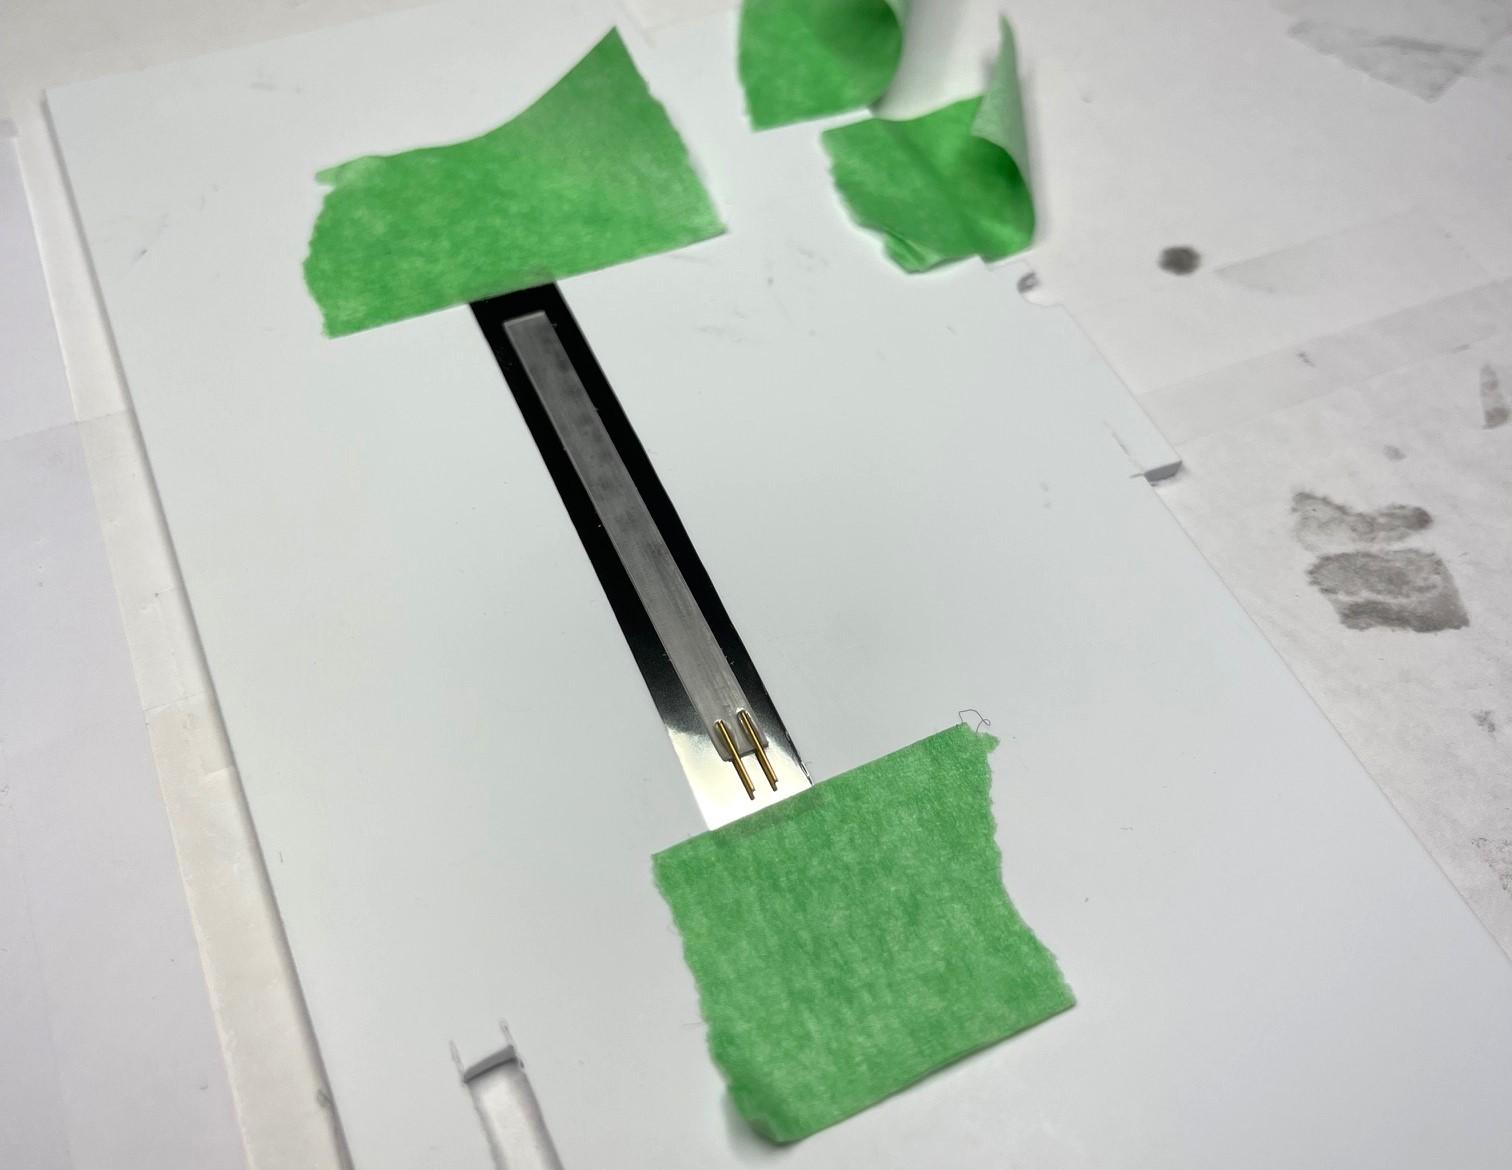
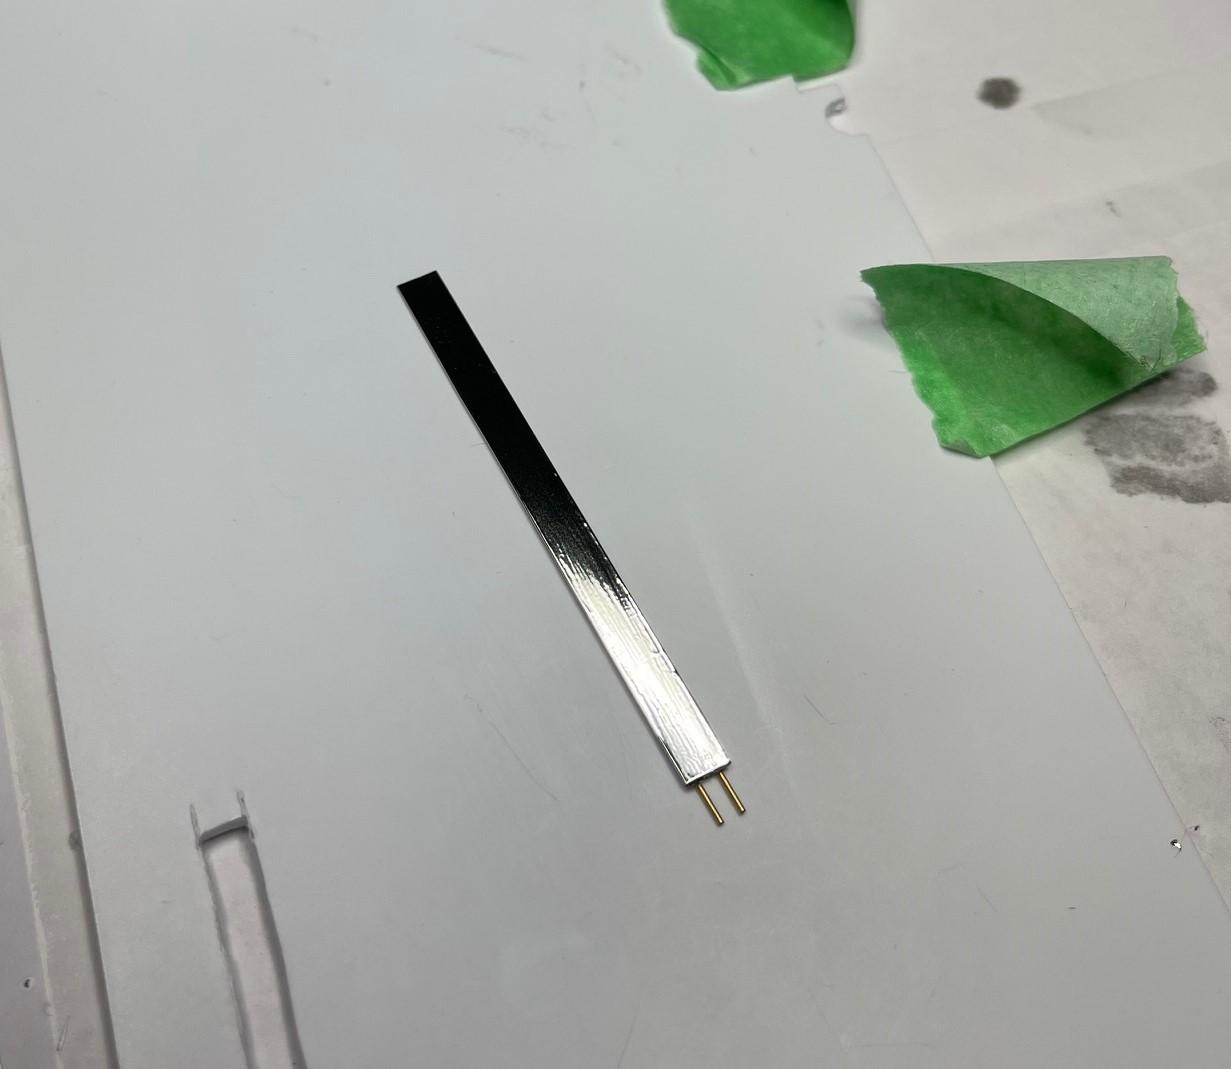
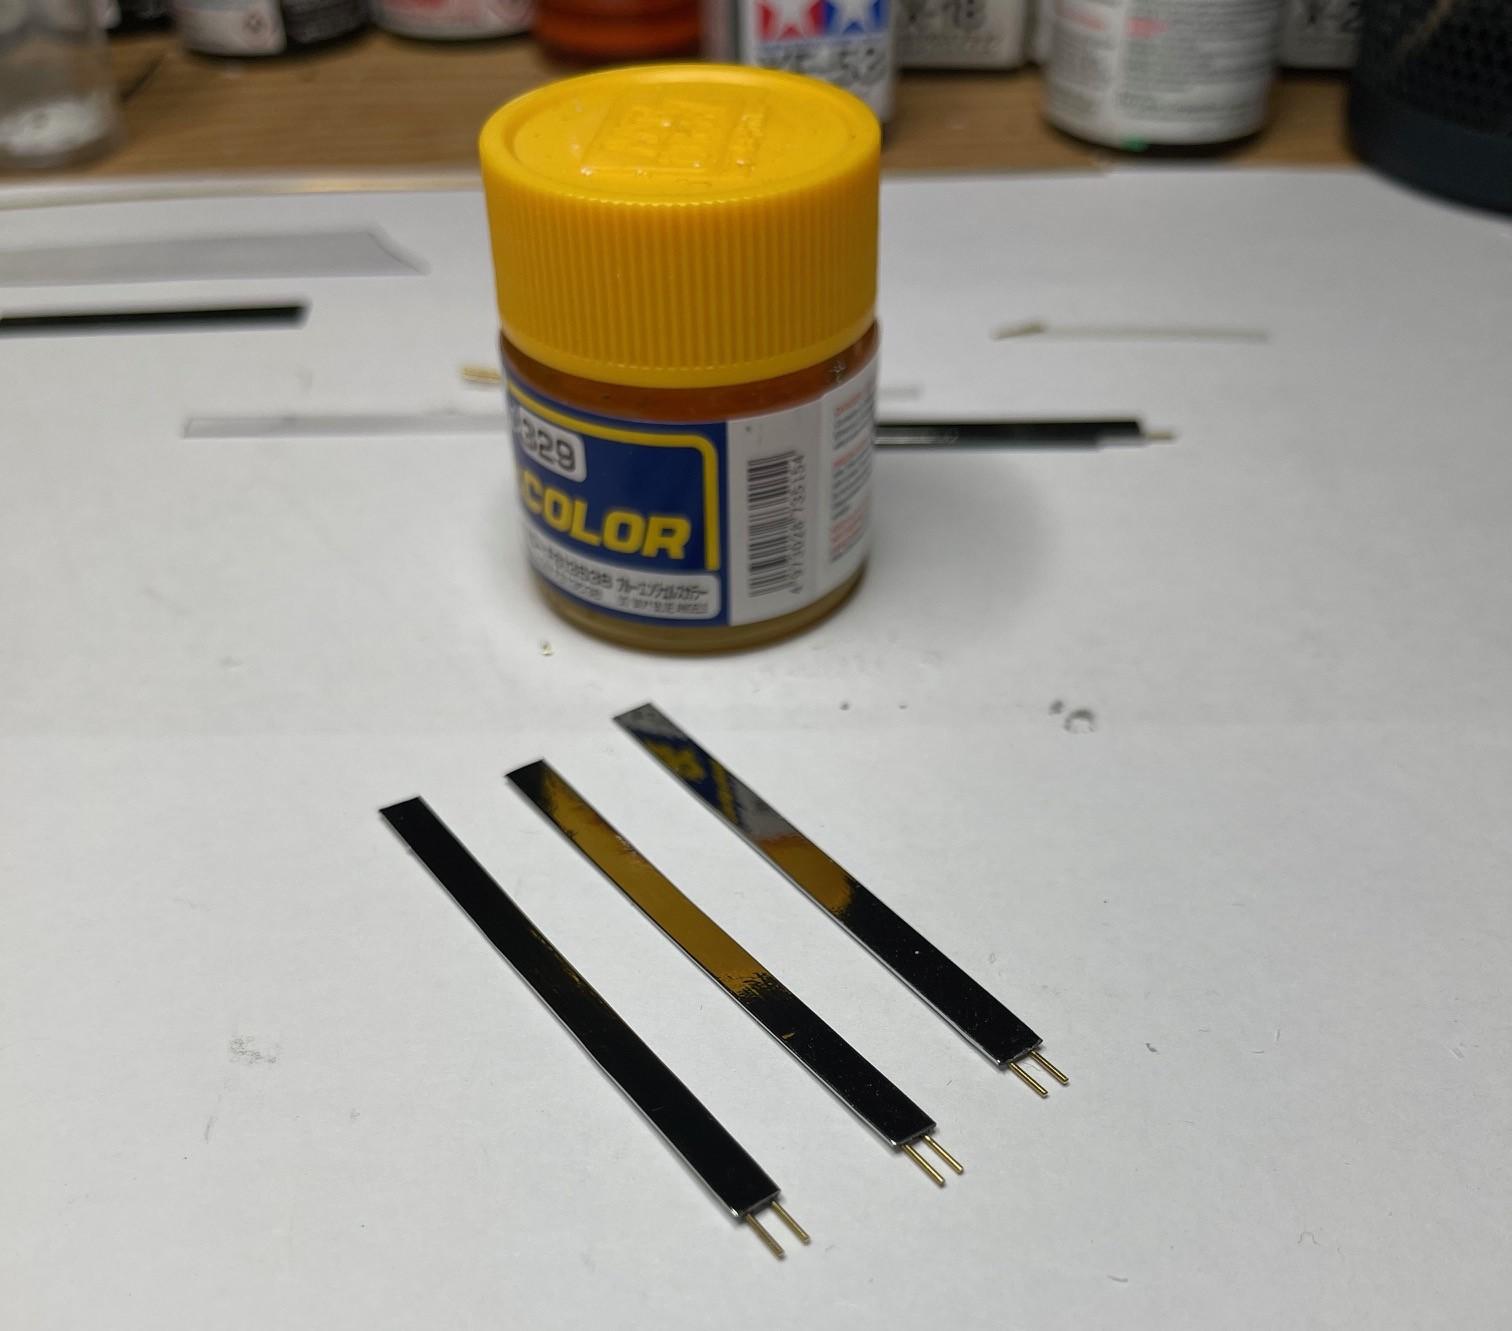
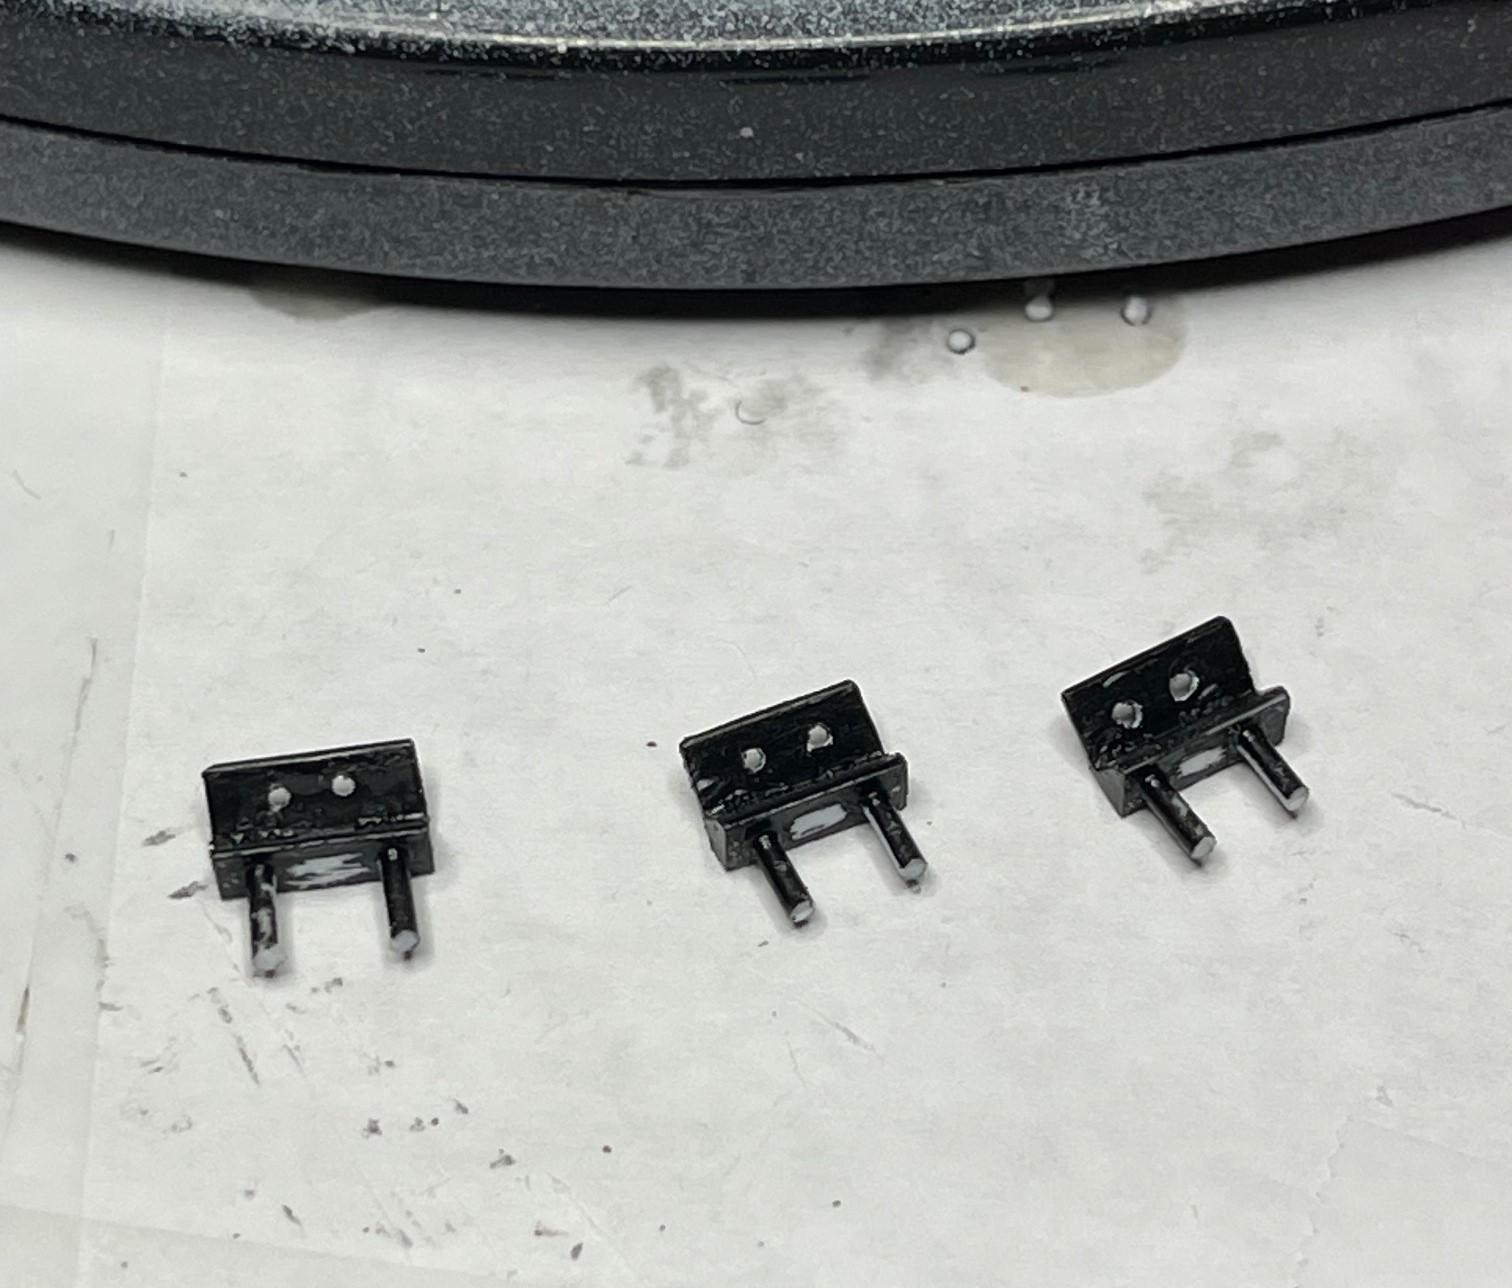
Bren's package of printed parts is on its way to me - looking forward to having them in hand! More than a little frustration these past few days, while working on tank straps. Using a chrome film to cover strips of thin, clear plastic 'straps' - if I didn't lay the strap quite properly on the film, I ended with a few tiny bubbles trapped in the film. I needed three straps - I think I covered and re-covered the equivalent of seven straps by the time I got the film right. Made some brackets that attach to the end of the tank hangers, that the straps 'bolt' through. Been a fun week, seems like a lot of work, with just three, tiny straps made! Epoxied 0.5 mm brass rod to the straps to act as 'bolts' Chrome film is lying adhesive side up - plan was to lay strap down on film, then fold edges across back of strap, trim the ends and be done. Nope, wrecked a few by trapping little bubbles underneath the film because I wasn't careful First successful strap Three done, finally Strap hold down brackets that will be epoxied to hanger ends (the 0.5mm plastic rods will slide along either side of raised rib of hangers) Epoxy has just set enough that brackets don't need adjusting (for reasons I don't know, the middle hanger isn't as long as the outer two, but will look ok when strap is in place). With a couple hours work tomorrow, should have straps and rubber backing in place! Once the tank is finished, I can get back at the front end of the truck and connect the trans cooler lines to fittings. When I get the printed hydraulic pump, I can get it plumbed and attached to the plow lift group and finally, set the plow lift group and frame braces in place. All for now - thanks!
-
Going to need a divider down the middle of your bench to keep track!
-
Pretty soon you'll need that second pair of glasses to see all these small pieces! They may not be noticed for themselves once painted, but taken as a whole, the engine will look better with them in place.
-
FDNY Wrecker
BK9300 replied to Scott Eriksen's topic in WIP: Model Trucks: Big Rigs and Heavy Equipment
Looking forward to this one, Scott. Great looking truck. -
Resto Rod Autocar
BK9300 replied to Gary Chastain's topic in WIP: Model Trucks: Big Rigs and Heavy Equipment
Lots of time, yes, but look at the results! Looking really good. -
Another superb build, Bob - and it photographs well!
-
Very amazing detailing in your build - lots to learn from and take note of - very well done!
-
This shock looks like you modified it, but is different from the ones you photographed on your car. Looks quite realistic!
-
The beginning of a lot of detailing to come!
-
You really do make all your builds way better than what the kits offers up out of the box - excellent work!
-
That's going to be an impressive load for your transporter - maybe on it's way to a Barrett-Jackson auction! Will you be making a new transporter or have you done one already? Great collection of cars you've built!
-
Nice add on - looks great!
-
Same thing has happened to me while trying to send a PM - Dave Ambrose is aware of the problem. Hard to replicate the error, but has happened to me twice in last week or so.
-
Welcome, Liam, look forward to seeing some of your work!
-
T41 Bugatti sport coupe
BK9300 replied to charlie libby's topic in WIP: Other Racing: Road Racing, Land Speed Racers
A pleasure to watch all this unfold. -
1/32 scale 1978 Kenworth K-100 Aerodyne
BK9300 replied to Pete68's topic in WIP: Model Trucks: Big Rigs and Heavy Equipment
Must feel good to get this one from 'waiting in line' to 'on the shelf'. Another clean build - Intended or not, the interior looks very cool with the reddish looking wear areas - good result! -
Me too - you're going to have a busy bench with these two on the go at the same time!
-
Resto Rod Autocar
BK9300 replied to Gary Chastain's topic in WIP: Model Trucks: Big Rigs and Heavy Equipment
Tell me about it - we have one of those Dyson vacuum cleaners with the green laser that shows stuff on the floor. When I vacuum, there's bits everywhere under the table!