BK9300
-
Posts
1,993 -
Joined
-
Last visited
Content Type
Profiles
Forums
Events
Gallery
Everything posted by BK9300
-

CHEVY 5500 SERVICE TRUCK
BK9300 replied to yh70's topic in WIP: Model Trucks: Pickups, Vans, SUVs, Light Commercial
Very fine looking build, Dave. I heard STS is very busy - will you have to wait long for your decals? -
Western Star 4900 FA plow truck
BK9300 replied to BK9300's topic in WIP: Model Trucks: Big Rigs and Heavy Equipment
Firstly, thanks for the compliment. Second, so many good things going on in your builds! - far cry from inadequate -
Western Star 4900 FA plow truck
BK9300 replied to BK9300's topic in WIP: Model Trucks: Big Rigs and Heavy Equipment
Very kind of you, Jürgen! Much appreciated. -
Western Star 4900 FA plow truck
BK9300 replied to BK9300's topic in WIP: Model Trucks: Big Rigs and Heavy Equipment
Thanks very much, Jeff - far more praise than might be deserved, but thank you! -
Great job on the Pruitt Kenworth, Steve. Always more surgery on your builds that add so much when completed.
-
Pete 359 tanker with trailer
BK9300 replied to Jürgen M.'s topic in WIP: Model Trucks: Big Rigs and Heavy Equipment
Great idea with the spare tire! In the 70’s, a pickup my Dad had at work had a spare tire held up underneath the back end by small chain and bracket. Was not fun getting the tire out on the side of the road! -
1/32 1977 Chevy Bison Steel Hauler.
BK9300 replied to Pete68's topic in WIP: Model Trucks: Big Rigs and Heavy Equipment
Really like the paint/decal combo on this - totally get the shaky hands bit. Good looking truck. -
Didn’t know this wrecker existed - going to be a great combo with your modified General.
-
Service Truck Kitbash
BK9300 replied to PHPaul's topic in WIP: Model Trucks: Big Rigs and Heavy Equipment
Do overs seem to be part of any scratch build - you’re making good progress, Paul -
Tremendous amount of extra work being done here - really pays off. Great colour choice!
-
Really like the build up of your engine (the whole car is coming along great) - where did you find decals for your blower belt?
-
Western Star 4900 FA plow truck
BK9300 replied to BK9300's topic in WIP: Model Trucks: Big Rigs and Heavy Equipment
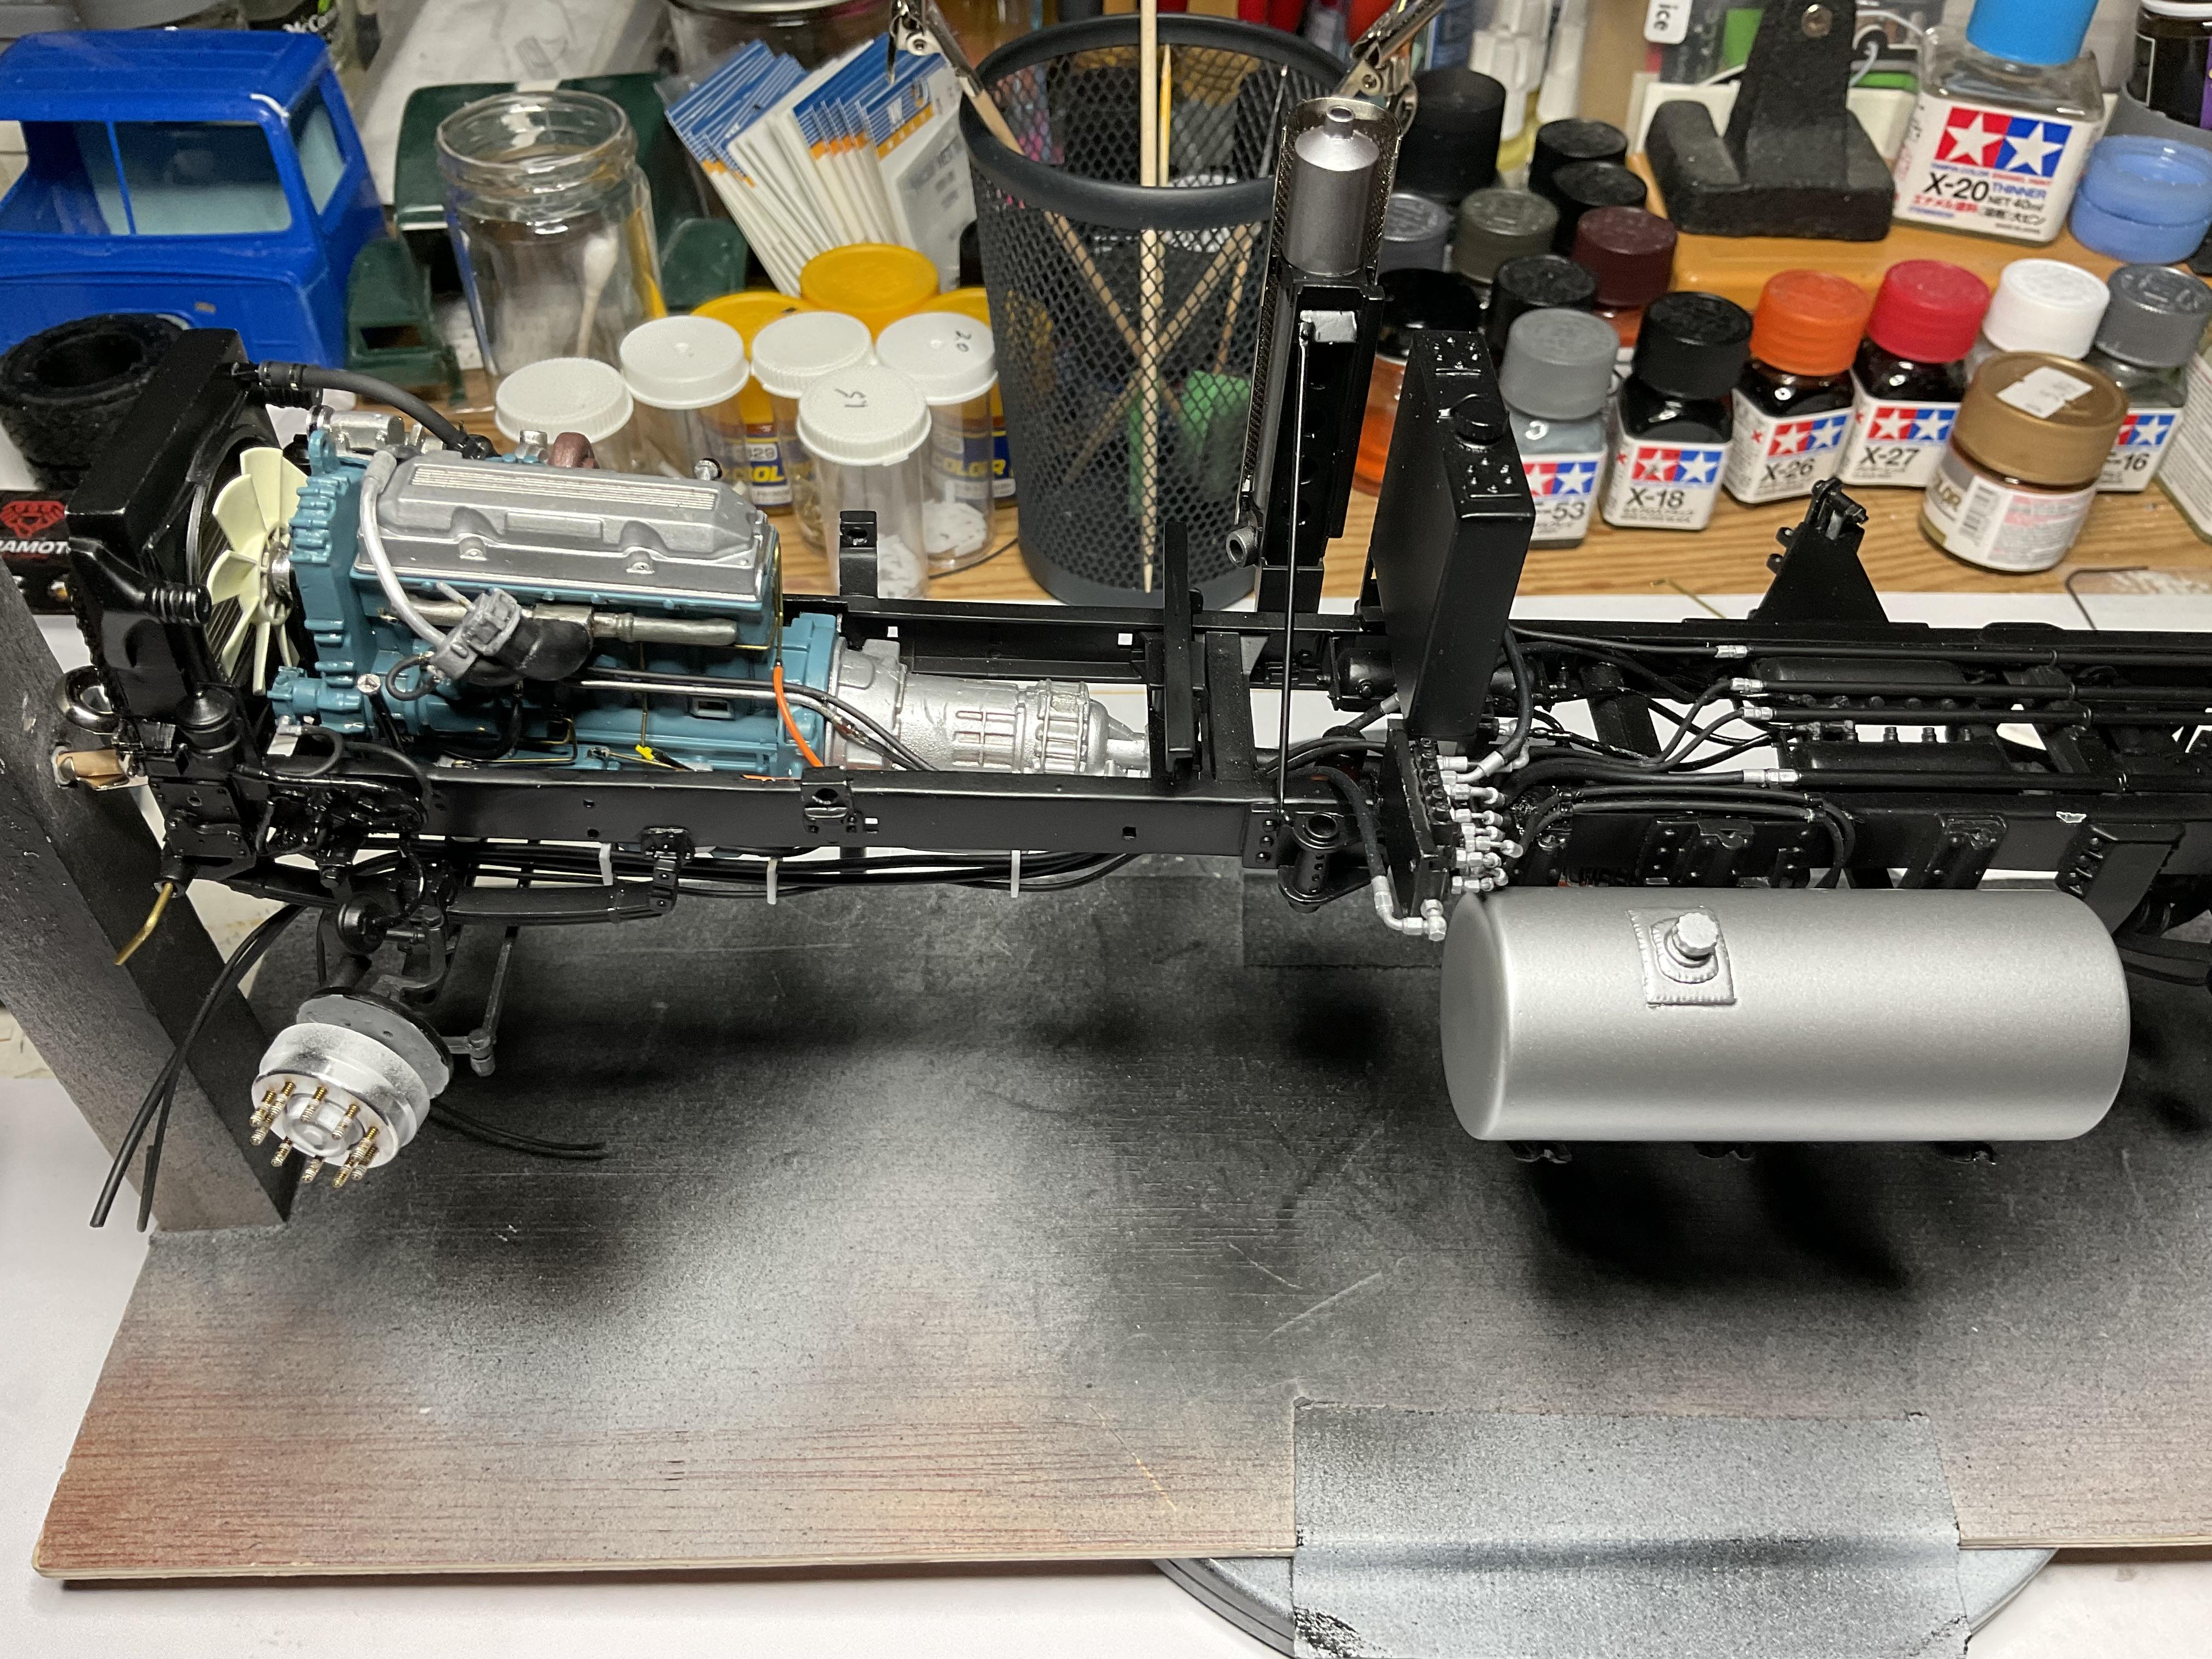
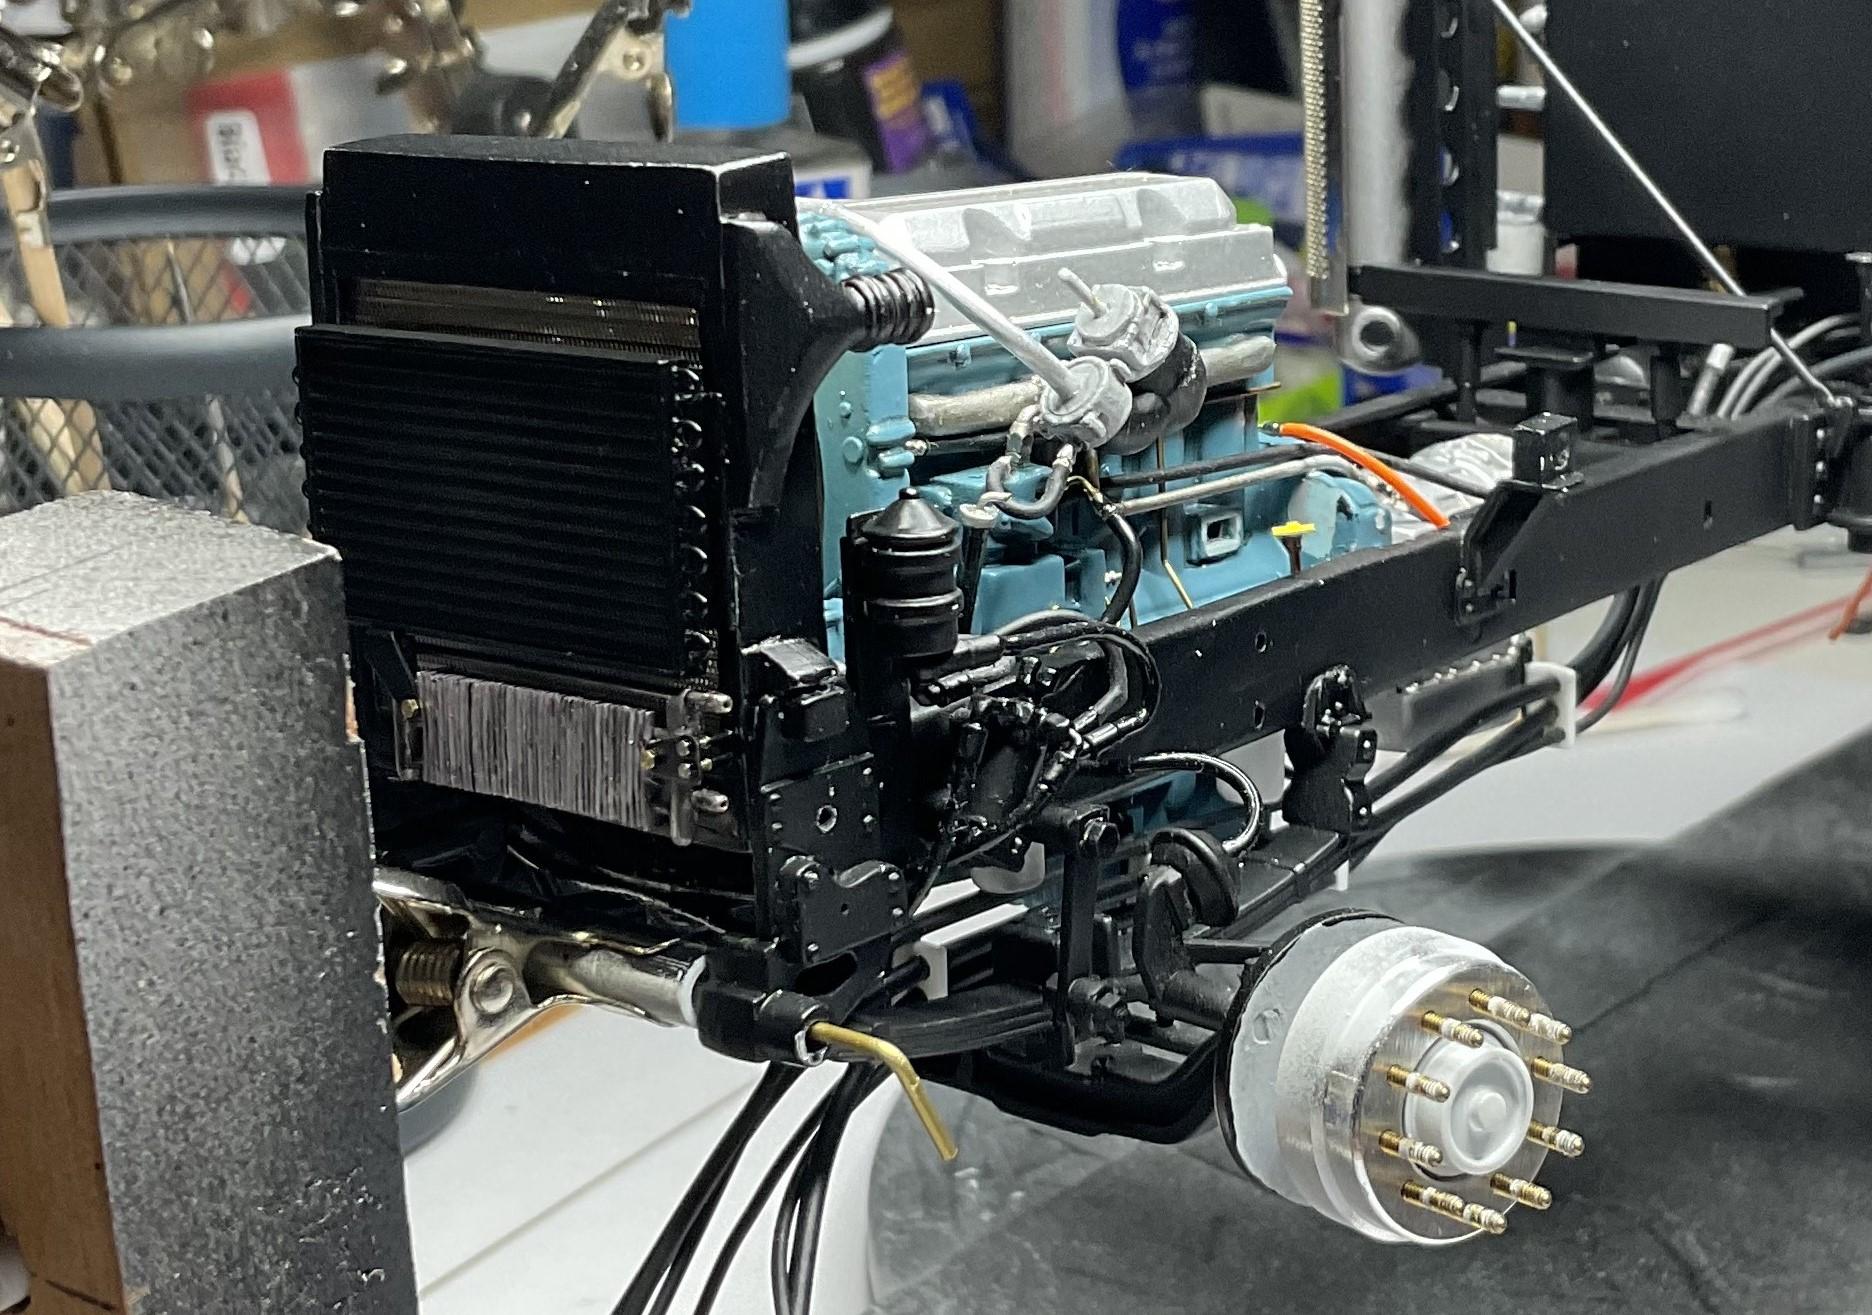
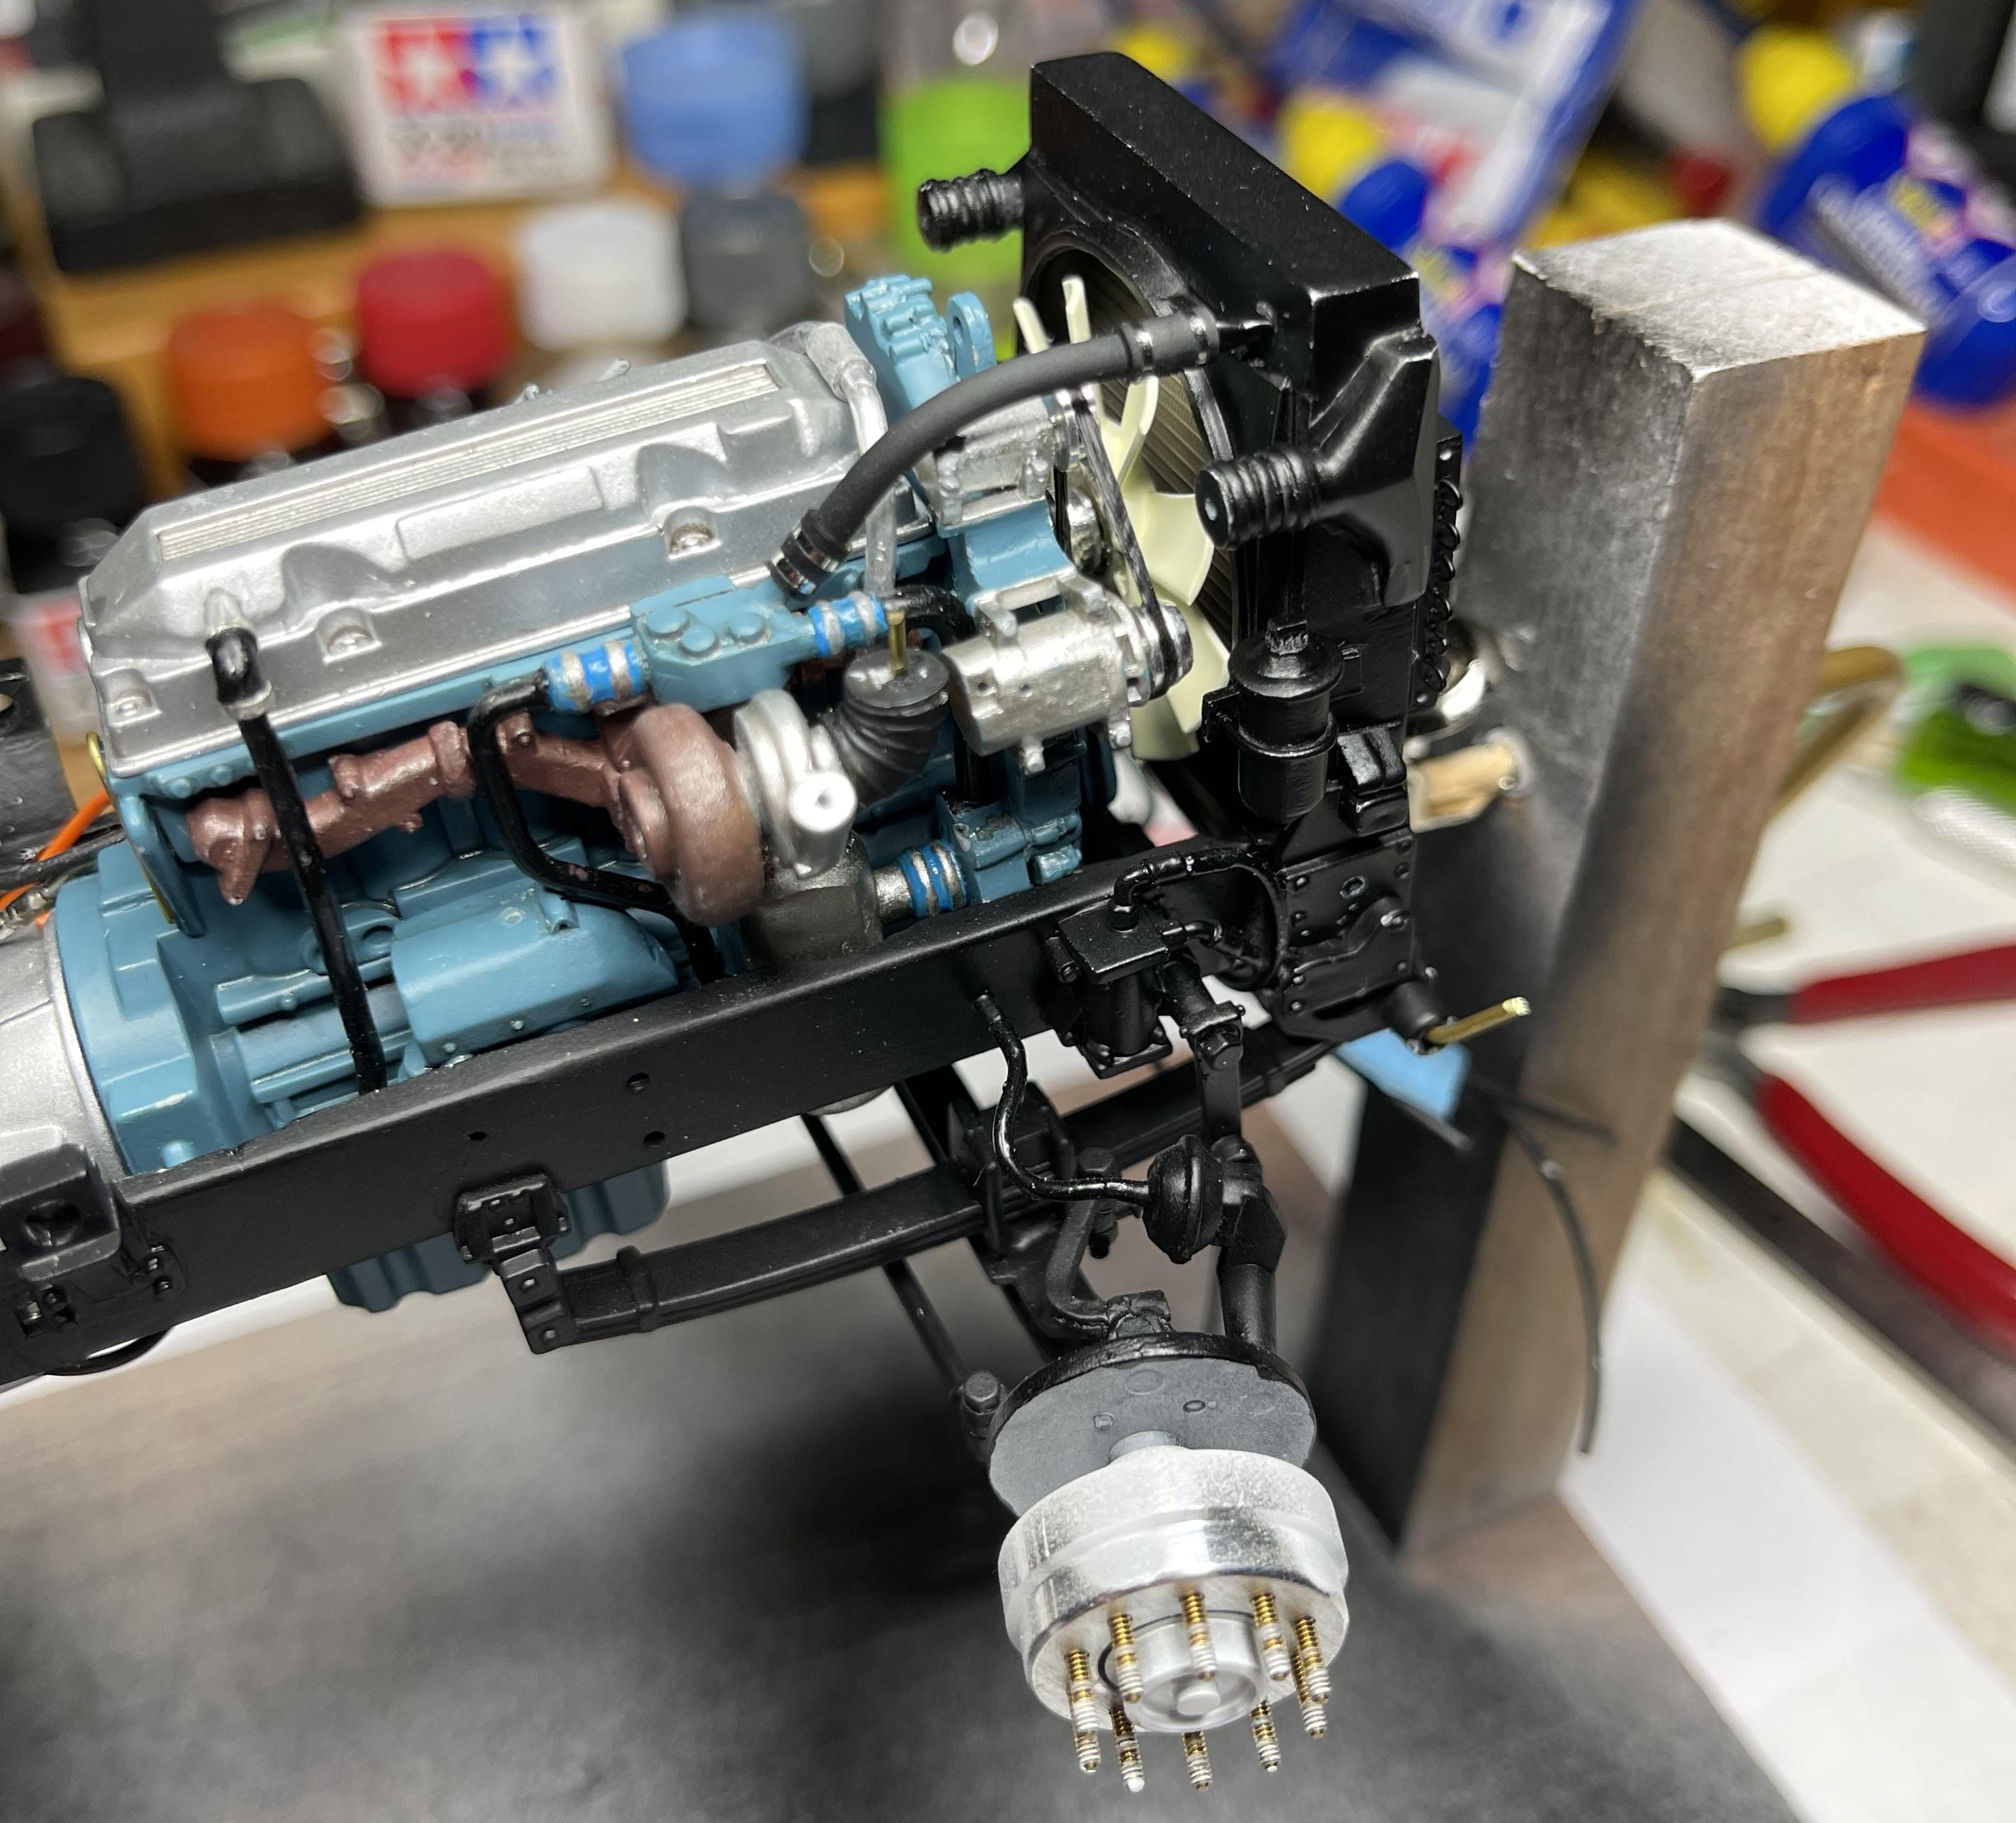
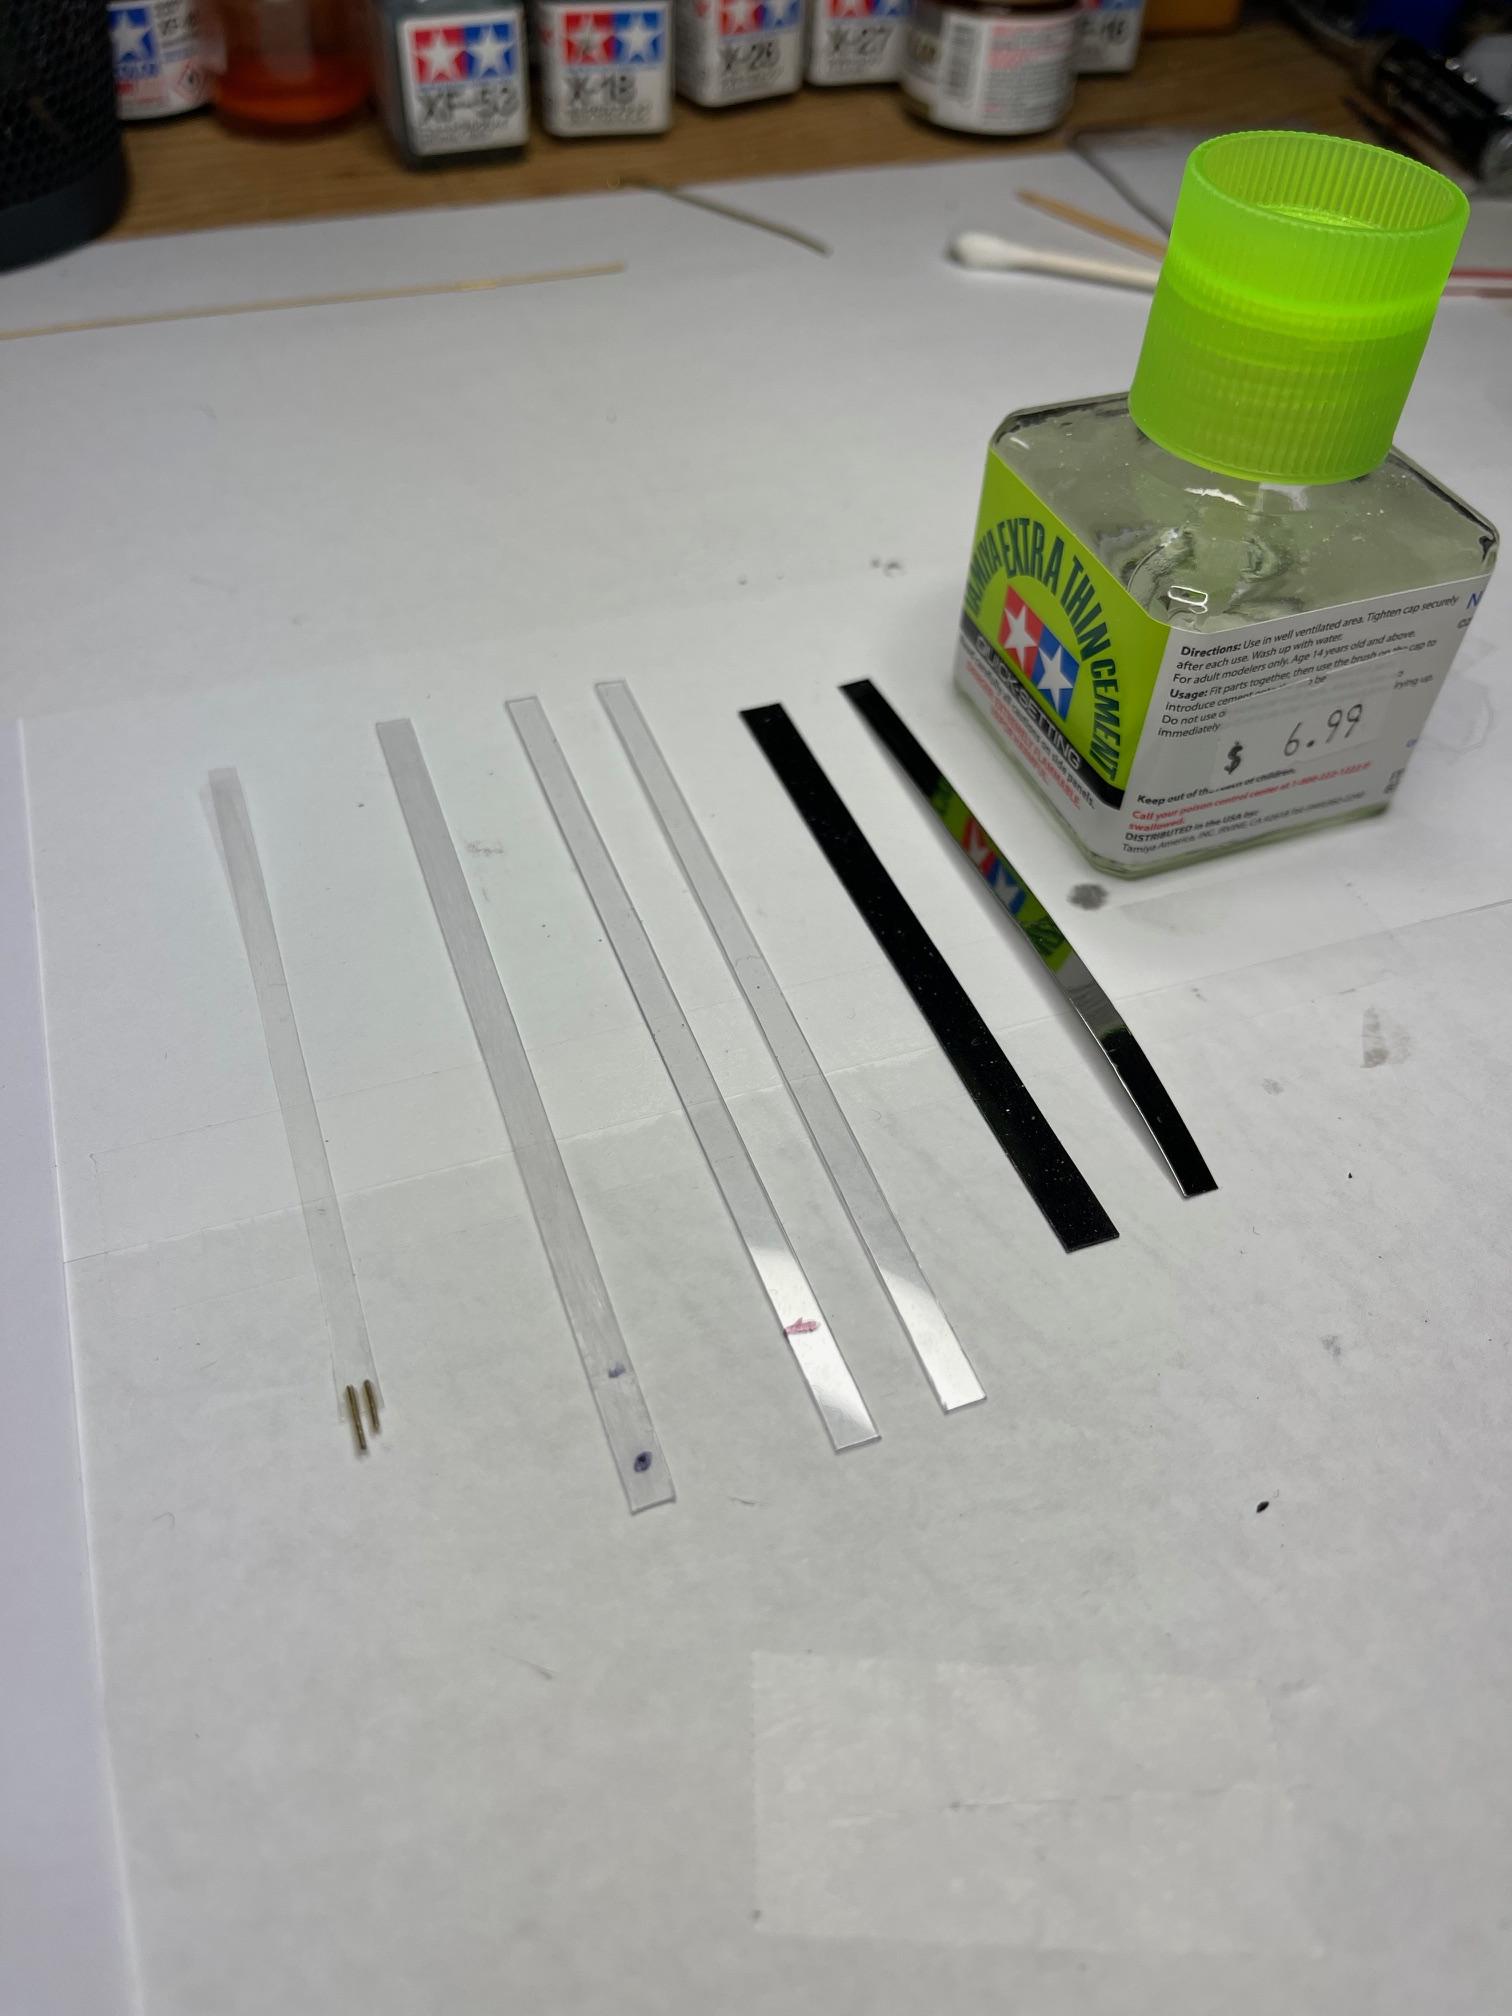
A bit of painting this morning, a few hours work at the bench this afternoon, and more progress. Hoses glued to rad, fan painted and attached to engine, rad glued in place and fuel tank epoxied in place on hangers as well. Fuel lines tomorrow and in between chores tomorrow, might get started on attaching the tranny cooler lines to the cooler. Had epoxied the fan in place, then CA glued the bottom hose to the rad, then used styrene glue to set rad in place. Put the truck frame back in the rotisserie so I could slip the bottom rad hose over the brass pin on lower front of the water pump. Hose is somewhat visible in this pic. Upper rad hose was CA glued to the rad and slipped over the brass pin in the molded fitting on thermostat housing Better view of fan Fuel tank epoxied in place ('brass' fittings have been painted and should be attached to fuel line and return line, and in place in back of tank tomorrow). Still need to figure out a semblance of a plate and wiring for fuel sender Can just see parts of the fan through the rad screen; better side view of trans cooler fittings and attachment to right side of rad frame. Second attempt at tank straps - using some thin, tough, clear plastic from some packaging as the straps; on the left is a test strap with 'bolts' for the bottom end of the strap; next three pieces will be actual straps (still need to figure how long they really need to be), then there is the rubber component of strap and finally, another test strap that has been covered with Hasegawa chrome film. Top end of the chromed straps will be 'bolted' in place using Top Studio aluminum bolts. Tomorrow's work should be fun (not!) I've tried to be careful handling the frame, engine, rad, etc., during the build, but it looks like lots of tiny paint wear has taken place. Uncertain at this point if I risk a mess doing paint touch ups, or maybe very tiny amount of metal highlighting to accent the worn parts. Hope in the next week to get the truck up on all wheels - that will be a mile stone for sure! Nothing more for today. Thanks for stopping in to have a look!
-
Hard to tell from your photos for sure, but driver's left leg rests lower than his right leg. Not sure how you might adjust the left leg higher, but that might make up a lot of the 10mm - might need to bend the ankles a bit too, to bring his backside forward a bit!
-
All good stuff, and - no mess!
-
Some delicate surgery going on here - will be quite the conversion overall when you're finished!
-
Chevrolet Road Tractor
BK9300 replied to DRIPTROIT 71's topic in WIP: Model Trucks: Big Rigs and Heavy Equipment
Not familiar with this type of truck, but looking forward to how you put it together. -
Pete 359 tanker with trailer
BK9300 replied to Jürgen M.'s topic in WIP: Model Trucks: Big Rigs and Heavy Equipment
Great job, Jürgen - the blue is going to tie everything together nicely! -
Service Truck Kitbash
BK9300 replied to PHPaul's topic in WIP: Model Trucks: Big Rigs and Heavy Equipment
Awesome progress, Paul - looking really good! -
Pearly Gates
BK9300 replied to TopherMcGinnis's topic in WIP: Model Trucks: Pickups, Vans, SUVs, Light Commercial
I've only done a couple opening door sets, on big rigs way back when, but it seems to me that using two hinges per door might help stabilize your doors. I would also run your inner strip of styrene all the way around your door to give it better support when the door is closed. I haven't used them myself, but seems that tiny magnets in each door jamb and inside each door also hold the doors in place quite securely - lots of work to do all that but might be worth it. Great idea to suicide the doors! -
Farm Floater Truck 1/24th scale
BK9300 replied to Randy D's topic in WIP: Model Trucks: Big Rigs and Heavy Equipment
Wow! Do you see making the cab and hood out of brass like your rat rod tow truck? Really like the brass work you incorporate in most of your builds. -
The Same but “ a little “ Different
BK9300 replied to Biggu's topic in WIP: Model Trucks: Big Rigs and Heavy Equipment
I think the road dirt and rust looks great - a hard working truck with a few more miles left in her! -
Resto Rod Autocar
BK9300 replied to Gary Chastain's topic in WIP: Model Trucks: Big Rigs and Heavy Equipment
Going to be (is!) an awesome looking truck, Gary! -
White Road Commander 2
BK9300 replied to DRIPTROIT 71's topic in Model Trucks: Big Rigs and Heavy Equipment
Your vision may have changed a lot along the way, but the finished truck and all its details, sure looks well planned and thought out! Like the outdoors photography too - really shows off your truck well. -
I agree with Jim about not putting it back in the box - very nice job so far! If you are considering alternatives, I find Hasegawa foils to have good adhesion, however, their products are more expensive for less quantity than BMF. Works well, though!
-
M-20 and M-9 trailer are complete.
BK9300 replied to Chariots of Fire's topic in Model Trucks: Big Rigs and Heavy Equipment
Always a pleasure to watch you create these excellent reproductions from scratch. Watched Doug Whyte’s interview of you from last year and learned even more! Amazing craftsmanship, Charles.