BK9300
-
Posts
1,993 -
Joined
-
Last visited
Content Type
Profiles
Forums
Events
Gallery
Everything posted by BK9300
-
Another well executed build underway, Bob - looks really good! If you still prefer the look of your ‘Essence’ wheels, but can’t file a file to modify, I notice Topher has a very similar set of resin wheels on page 2 in his ‘Hornet’ build. Maybe he has a file that the wheels could be modified for width.
-
More problems solved! I like the detailing of the top half of your engine, too.
-

Western Star 4900 FA plow truck
BK9300 replied to BK9300's topic in WIP: Model Trucks: Big Rigs and Heavy Equipment
Thanks for the kind words, Jürgen. Sure is taking awhile to do it all, but making progress - thanks again for having a look! -
My 1st Big Rig "Blue Collar"
BK9300 replied to James2's topic in WIP: Model Trucks: Big Rigs and Heavy Equipment
Your frame extension looks it will be quite strong with the aluminum bracing. Do you intend to lower your truck like the inspiration truck appears to be? -
Western Star 4900 FA plow truck
BK9300 replied to BK9300's topic in WIP: Model Trucks: Big Rigs and Heavy Equipment
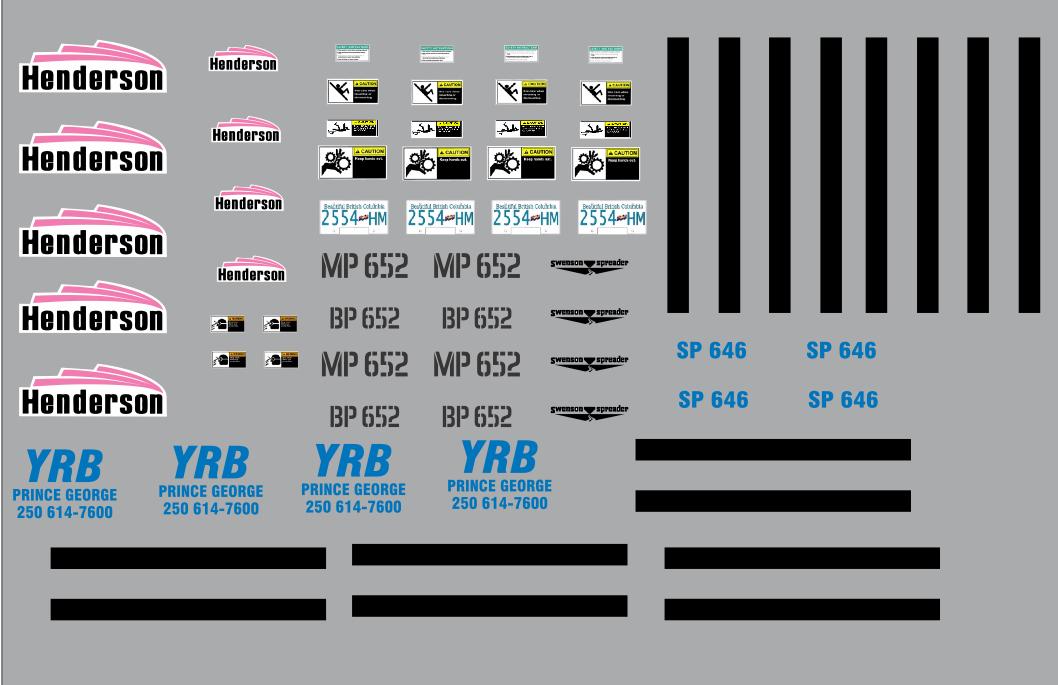
Thanks, Jeff - I always appreciate you having a look! The mud flap material is a sheet of 0.5 mm silicone rubber I found on Amazon. Takes a bit of work to lose the shiny finish it comes with, but looks good in the end and is quite flexible, too. STS sent me the proof below - needed a few minor changes - and Terry did the YRB logo, too (the decals will be printed on a clear background, not the grey in the proof). I had extras made of everything in case I mess up!
-
Western Star 4900 FA plow truck
BK9300 replied to BK9300's topic in WIP: Model Trucks: Big Rigs and Heavy Equipment
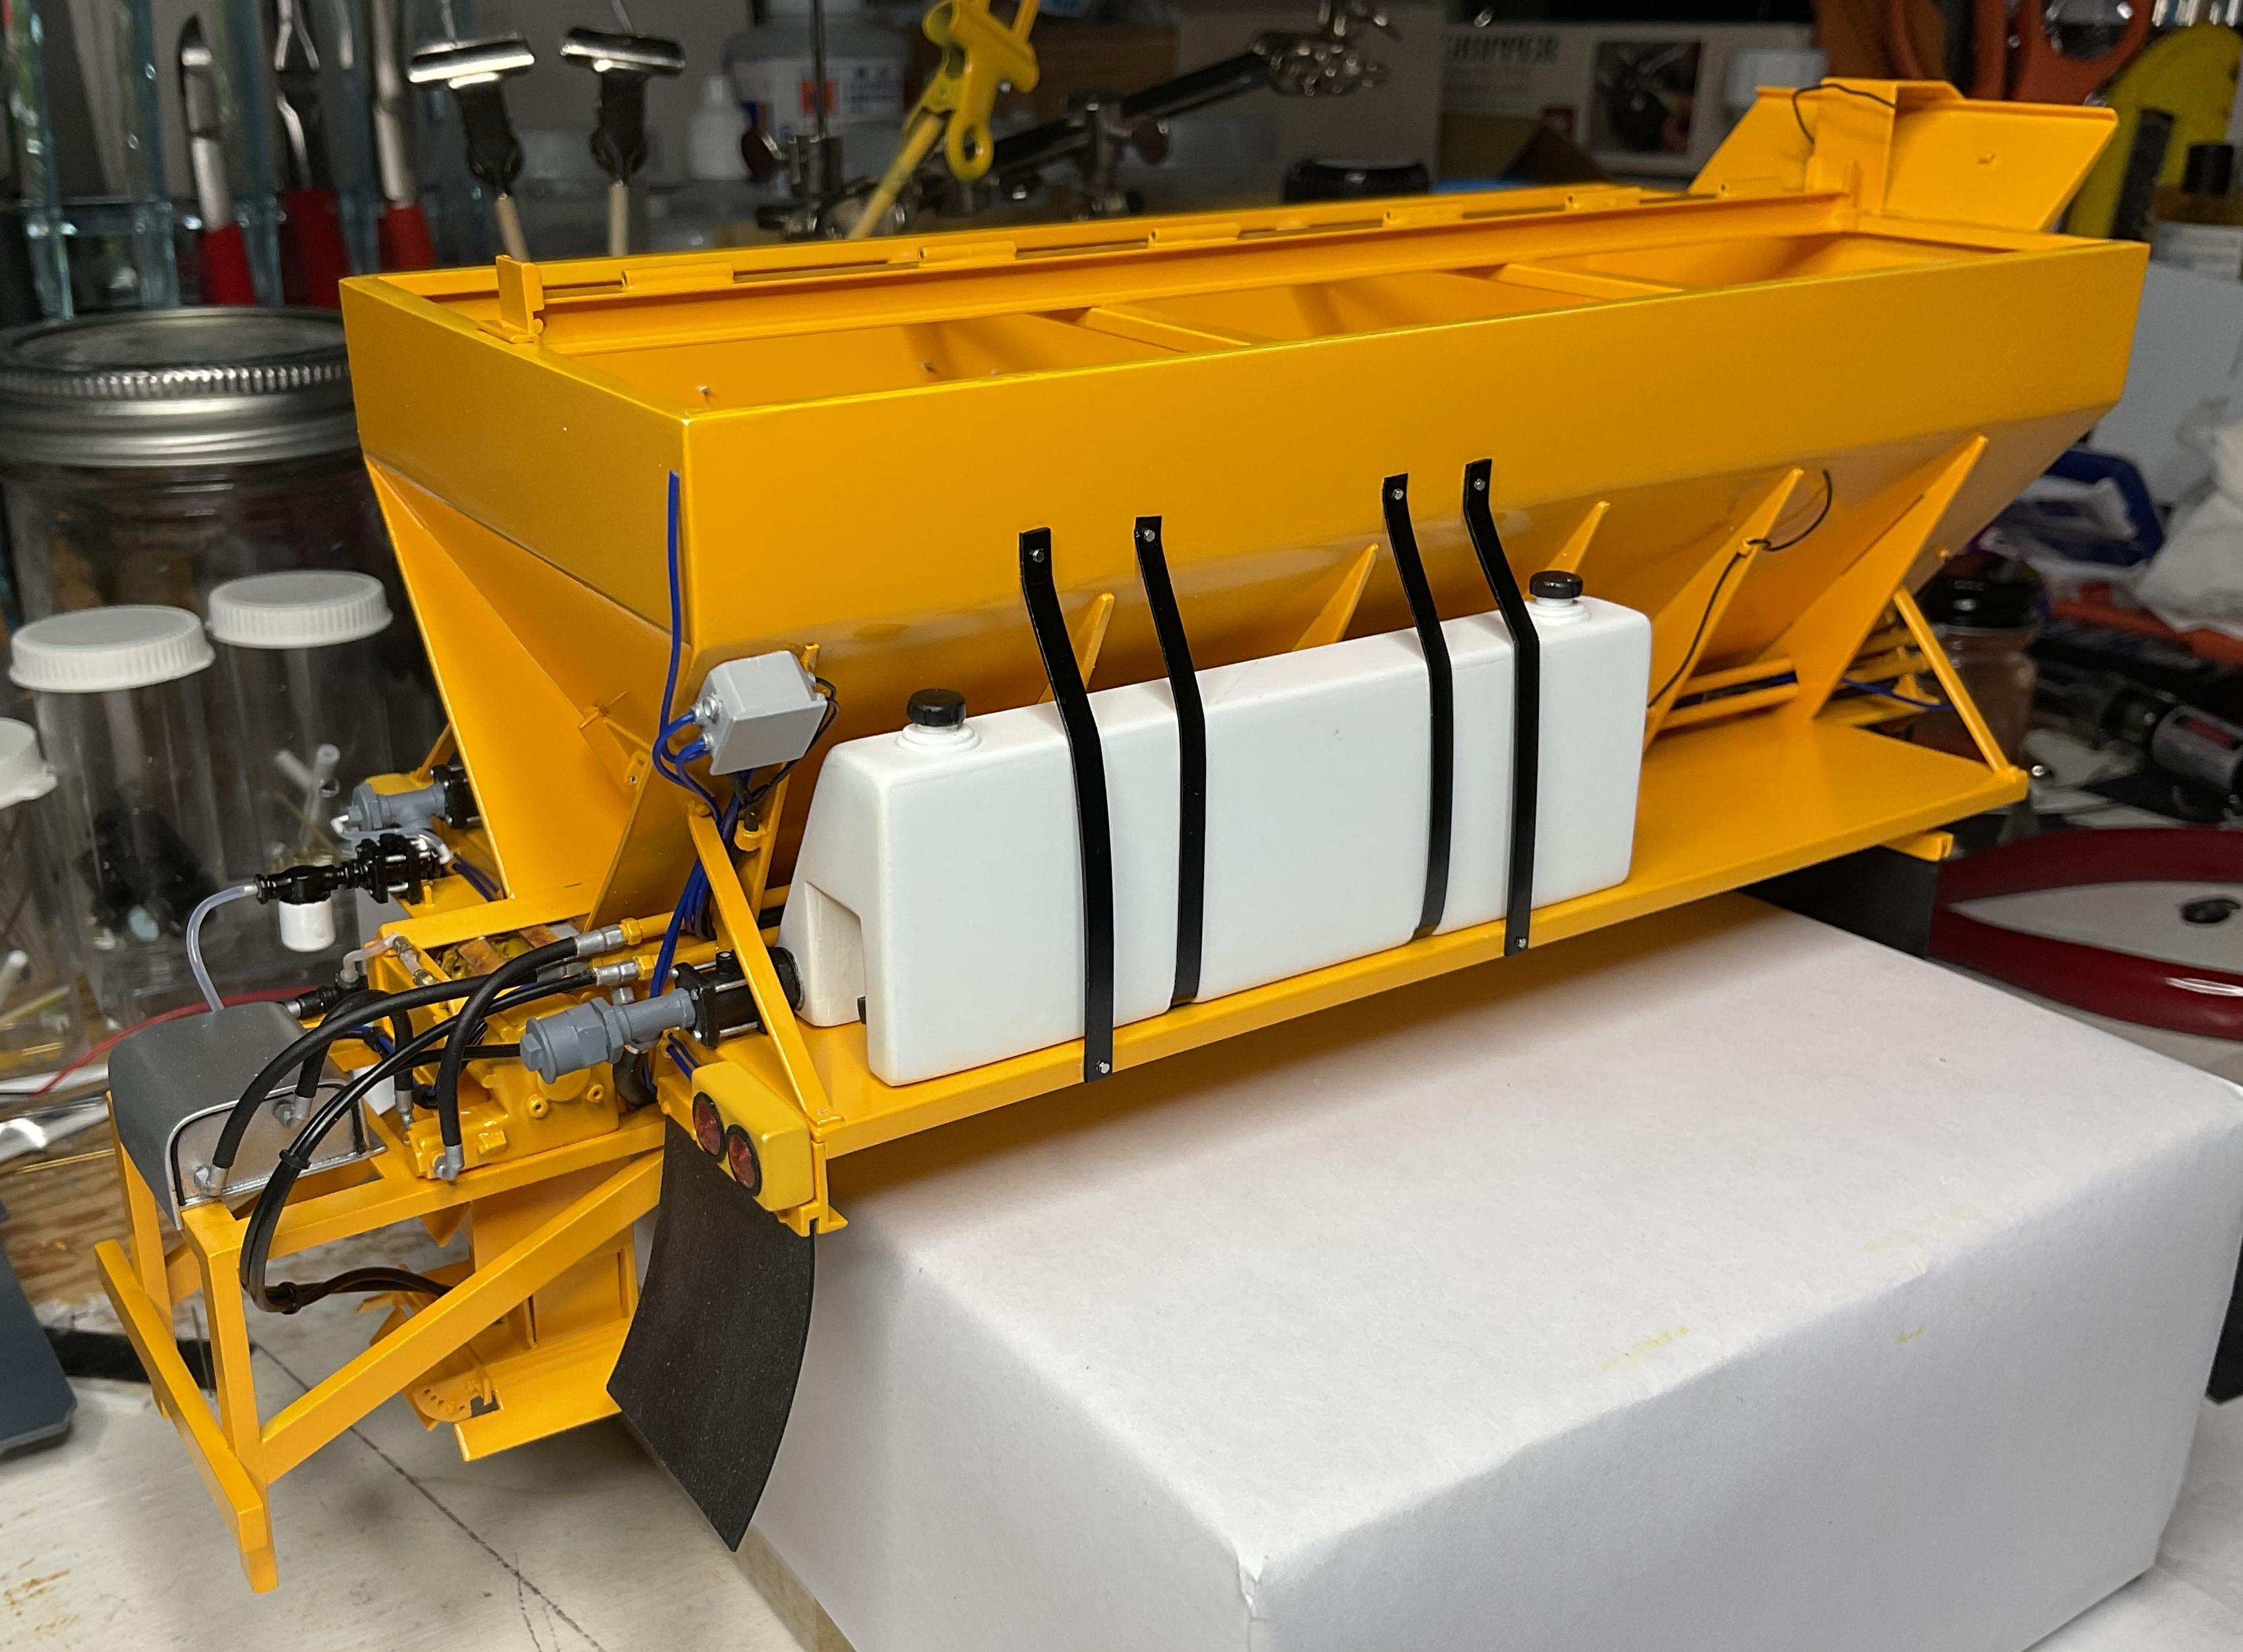
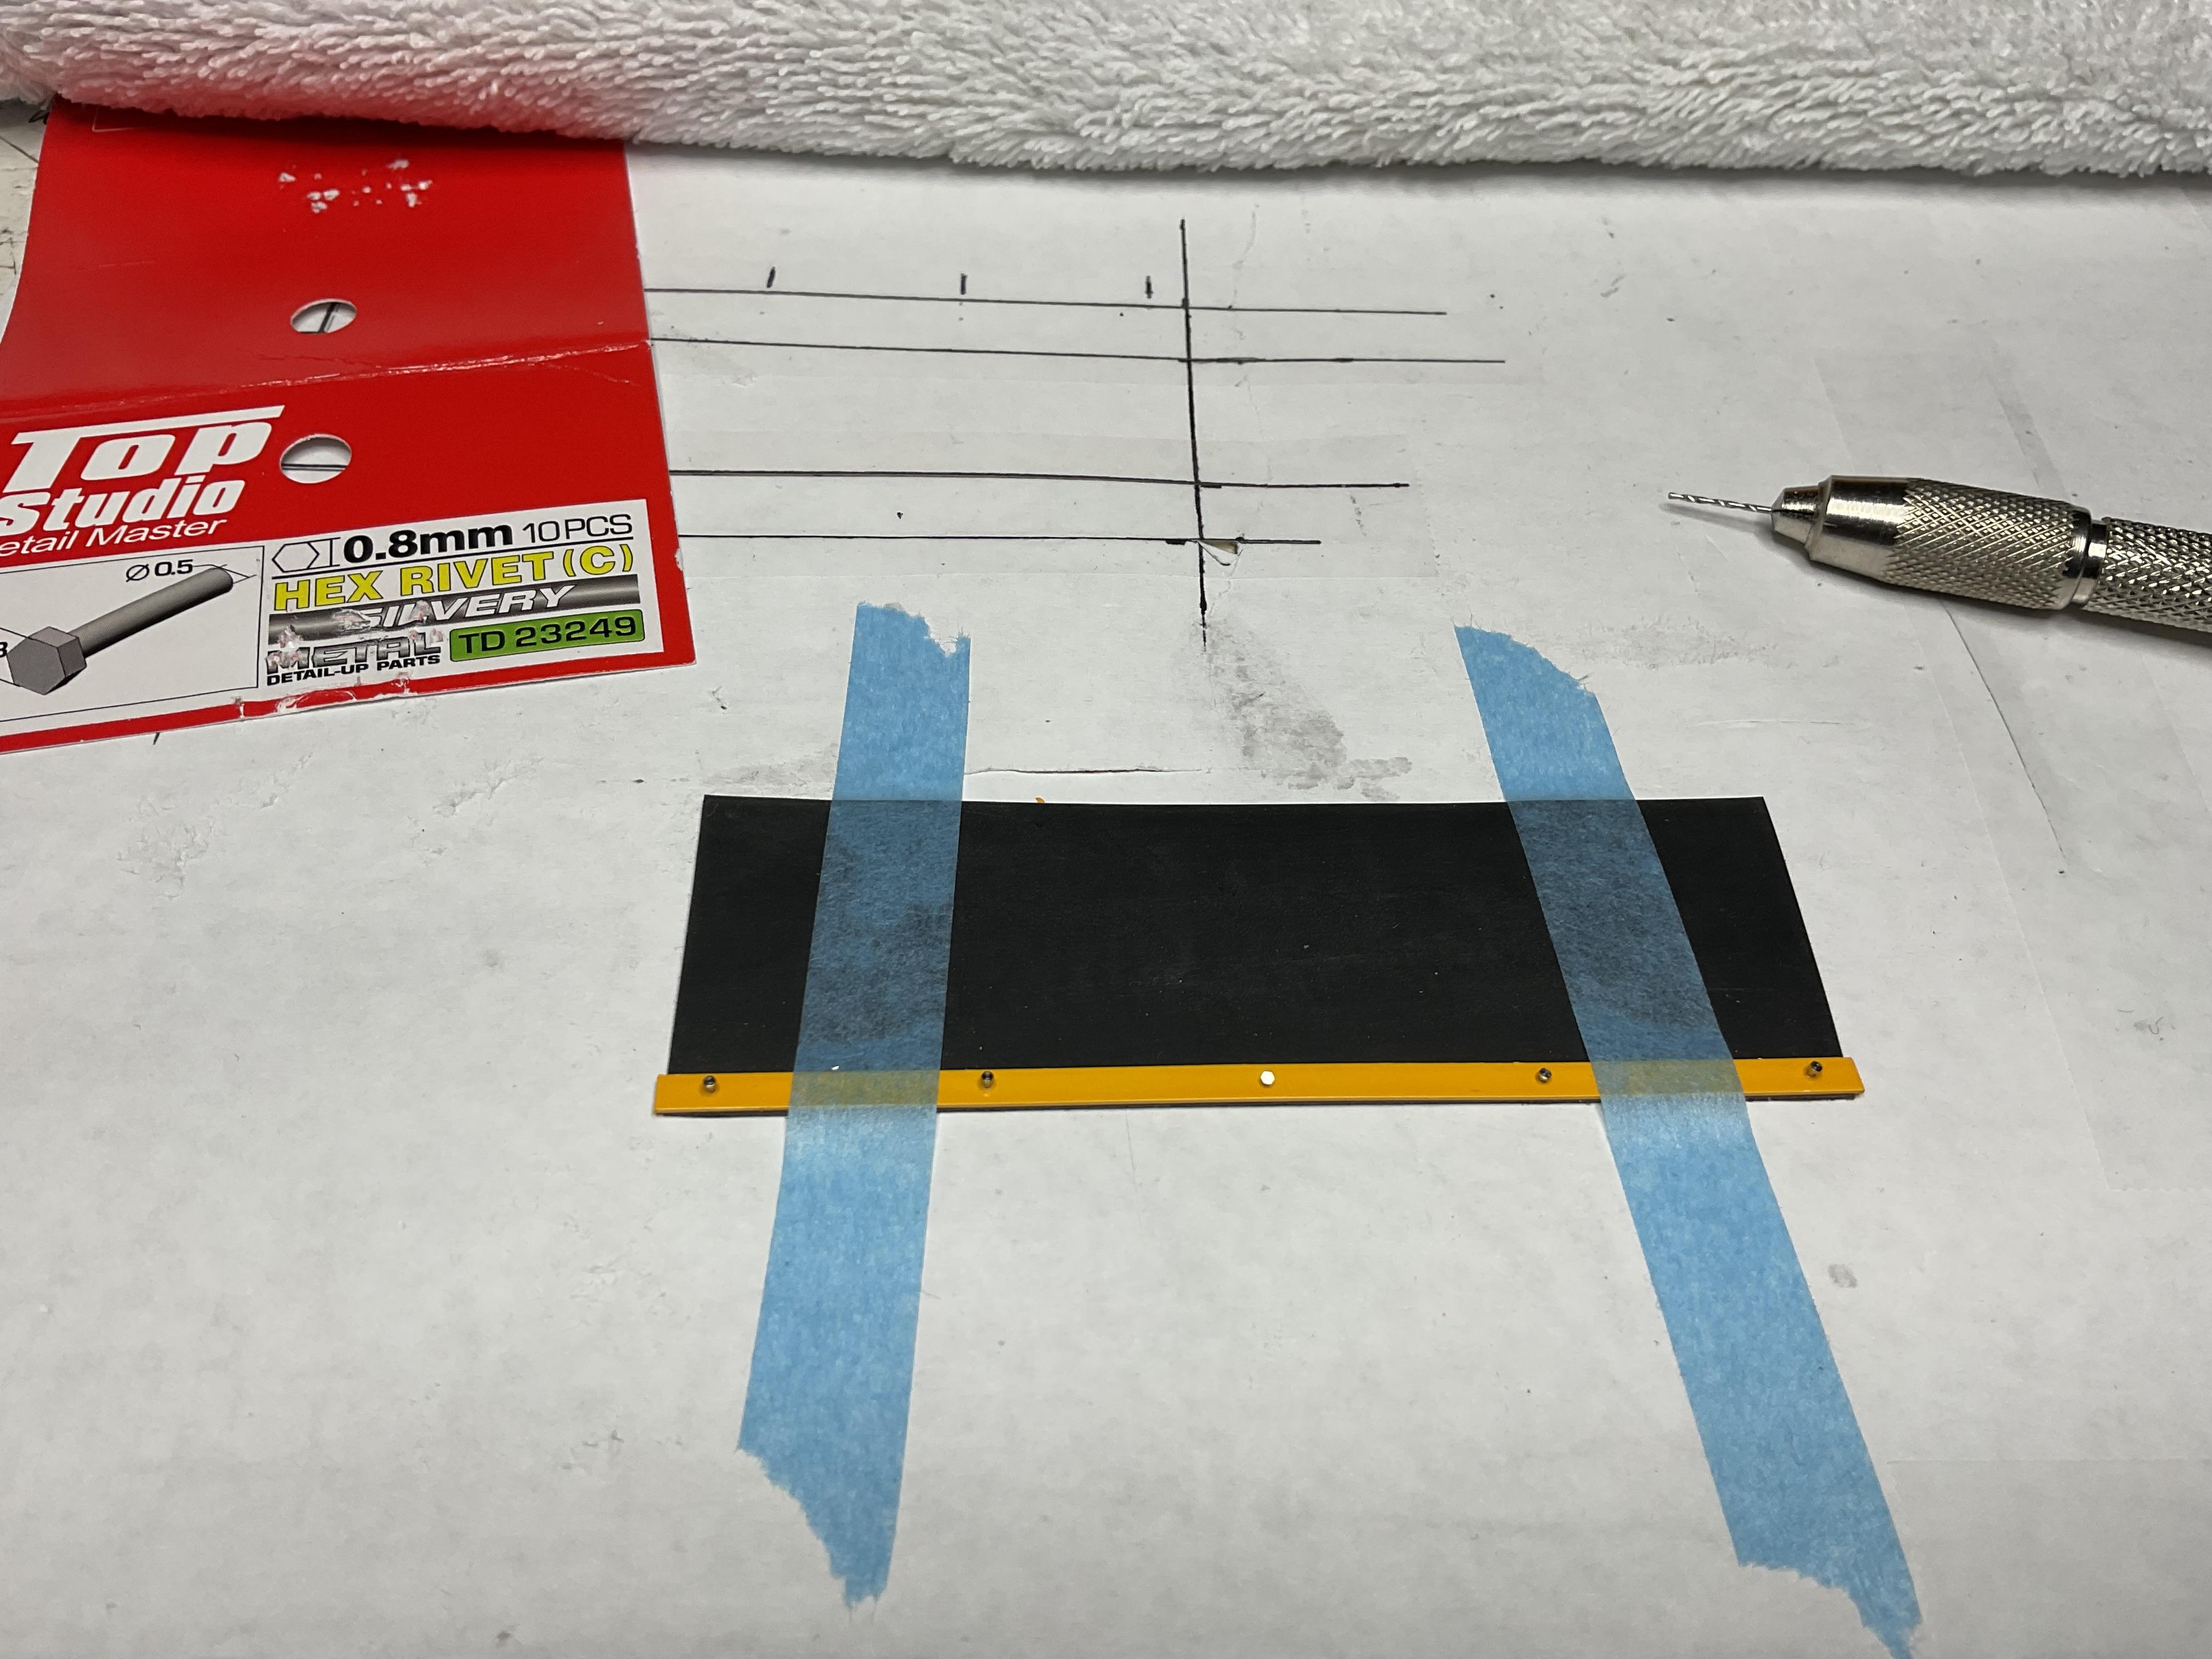
Back at it again. . .Nothing to update on 3D printing the console but I am waiting to hear back from one local company soon. So, I carried on with - you guessed it - the sander. The pre-wet tanks on the sander fenders are held in place with strapping and some brackets that are mounted on the fenders, lower edge of the front and back of the tanks (I still need to make those). The tanks also have a second set of sturdier straps that appear to provide some support for the rubber skirt/cover attached to the side of the sander (I am told these skirts keep sand/salt loaded into the sander from accumulating on top of the tanks). Some pics of the last few days work - Early in the week, had cut out and painted all the strapping needed for the tanks; pre-drilled the skirt support straps and secured Top Studio rivet ('bolts'!) on the end of each one with a bit of CA glue. I also pre-drilled bolt holes in the edge of the fenders for the bolts Support straps bolted in place; the tank hold down straps needed to be glued with styrene glue and left to set before I could handle them and determine where to drill holes for the top of the straps in the sander body; cut out the skirt from my sheet of 0.5mm silicone rubber, scuffed it up and painted a strap to attach it to the sander All support straps and hold down straps (both sides) are now 'bolted' in place Had pre-drilled holes in strap and used them to align slightly smaller pilot holes in the skirt - this made it easier to push the bolts through the rubber, but also held them in place with friction when I went to glue them in place on the sander Slightly bigger diameter bolt holes pre-drilled in sides of sander. I made them a bit bigger so I could apply thin CA glue to the bolts from the inside of sander and have it wick in the bolt holes This was fun - I placed a spot of slow drying CA glue on each of the pre-drilled holes and then had some (lots of!) difficulty getting each bolt into its respective bolt hole in the sander before the glue set too much - more than a little stressful! The real truck has bungee cords at the lower corners of the rubber skirt holding it from flapping around at speed - don't quite know yet if I can make anything at scale that will do that job; I have a couple ideas but first attempt looked too big, so will keep thinking! Decals from STS were shipped yesterday. When I get those in place, will still need to finish wiring lights on back of sander, including front and rear roto lights and attach the ladder to the driver's side of the sander. Getting close to finishing the sander - its been a model unto itself! Still have lots to do on the truck overall and will keep the updates coming! Always appreciate you stopping in!
-
Inspiring work - I always enjoy watching the extras you put into your builds.
-
The Same but “ a little “ Different
BK9300 replied to Biggu's topic in WIP: Model Trucks: Big Rigs and Heavy Equipment
The weathering looks great, Jeff - about the time it took, I read an article awhile back that said weathering a model might take longer than it takes to build the model, depending on what you're trying to achieve! -
Might the smallest Albion aluminum tubing and rod combination work for you? I don’t know how their smallest tube compares to the diameter of a needle.
-
Your paint sure looks good from the pics - I like the contrast of your detail painting on your chassis; you must be happy with the progress to date!
-
M-9 45 Ton Trailer Build
BK9300 replied to Chariots of Fire's topic in WIP: Model Trucks: Big Rigs and Heavy Equipment
I really like the brass work and all your detailing is very meticulous! -
Roanoke Railhouse Beer GMC General
BK9300 replied to Gary Chastain's topic in WIP: Model Trucks: Big Rigs and Heavy Equipment
The fiddly stuff can sure be frustrating and I totally get having to do things more than once. Sure looking good! -
Great modification with the antenna, and with the whole car. You put a lot of detail into this build and it really shows well.
-
'nam Guntruck
BK9300 replied to Scott Eriksen's topic in WIP: All The Rest: Motorcycles, Aviation, Military, Sci-Fi, Figures
I know nothing of these kind of trucks, but your build and weathering looks very realistic. Must have been scary as hell to be up in the back of one of those trucks. -
The Same but “ a little “ Different
BK9300 replied to Biggu's topic in WIP: Model Trucks: Big Rigs and Heavy Equipment
Jeff, you sure have that engine living up to it's reputation - great job! -
Off to a great start on another refurbish!
-
Looking really badass, Anton! A lot of work to get here, with more to come!
-
Volvo VNL860 - new 3D print
BK9300 replied to Bren's topic in Truck Aftermarket / Resin / 3D Printed
I should know what to expect next week - my first meet with the printer! -
Volvo VNL860 - new 3D print
BK9300 replied to Bren's topic in Truck Aftermarket / Resin / 3D Printed
Hope I can get detail that good from my local printing company. -
Volvo VNL860 - new 3D print
BK9300 replied to Bren's topic in Truck Aftermarket / Resin / 3D Printed
All good items to be able produce yourself! Thanks again. -
The Same but “ a little “ Different
BK9300 replied to Biggu's topic in WIP: Model Trucks: Big Rigs and Heavy Equipment
All looking good, Jeff - your plumbing still shows up well! Don’t know if you found this, but some of the soft tubing from Ted’s that I used for air lines kept the paint from fully curing. Might need to be careful where it’s used on your truck so that the lines don’t need to be painted. Your weathering is quite good so I’m sure any degree of ‘dirty’ you choose will look great! -
Superb custom interior you’ve built and the paint detail on the rear end sure makes it pop.
-
Awesome job on your interior - looks terrific!
-
Roanoke Railhouse Beer GMC General
BK9300 replied to Gary Chastain's topic in WIP: Model Trucks: Big Rigs and Heavy Equipment
Looking really good, Gary (of course the doors work!) -
ongoing oilfield project
BK9300 replied to cdntrucking's topic in WIP: Model Trucks: Big Rigs and Heavy Equipment
Just about ready for its first rig move! Your truck is loaded with detail - fine work, Lewis.