BK9300
-
Posts
1,989 -
Joined
-
Last visited
Content Type
Profiles
Forums
Events
Gallery
Everything posted by BK9300
-
 Very skilled work, Andrew.
 -
That’s an ‘all business’ interior you’re making - great craftsmanship!
-
Your leather interior looks very rich, and nice contrast with the body colour (Canadian spelling!)
-
Must feel good to get some paint laid down - been enjoying your progress!
-
Western Star 4900 FA plow truck
BK9300 replied to BK9300's topic in WIP: Model Trucks: Big Rigs and Heavy Equipment
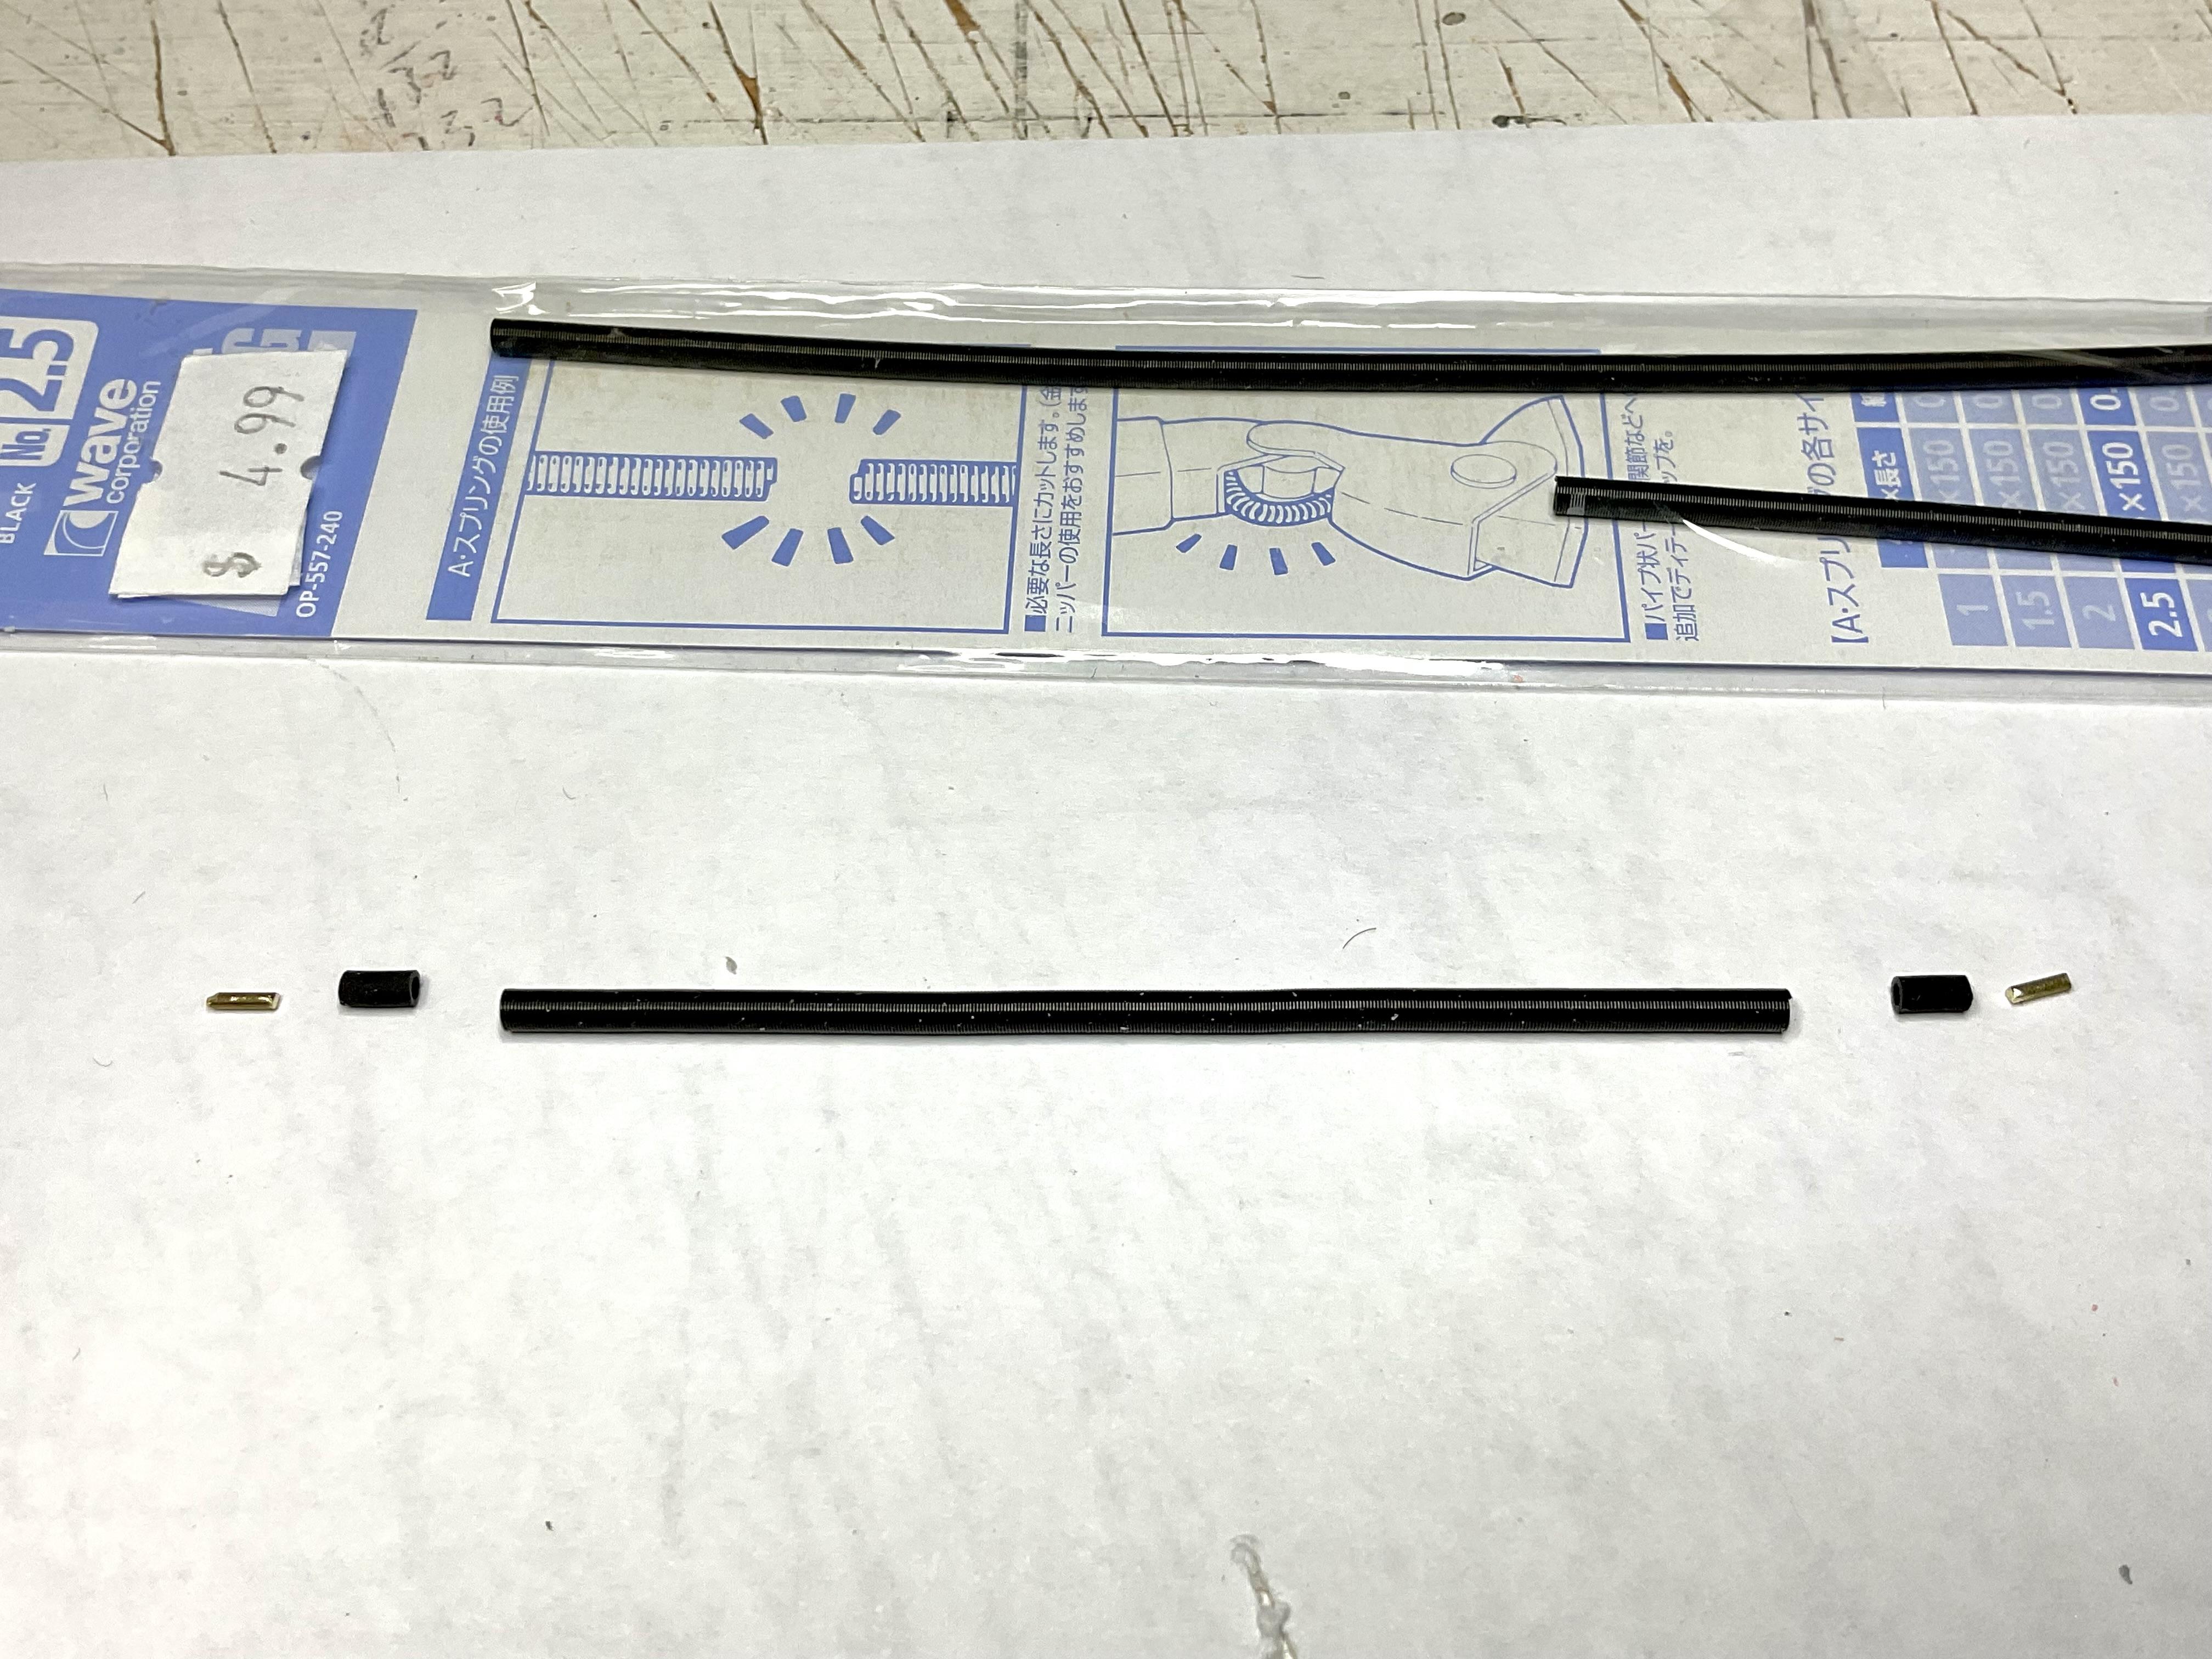
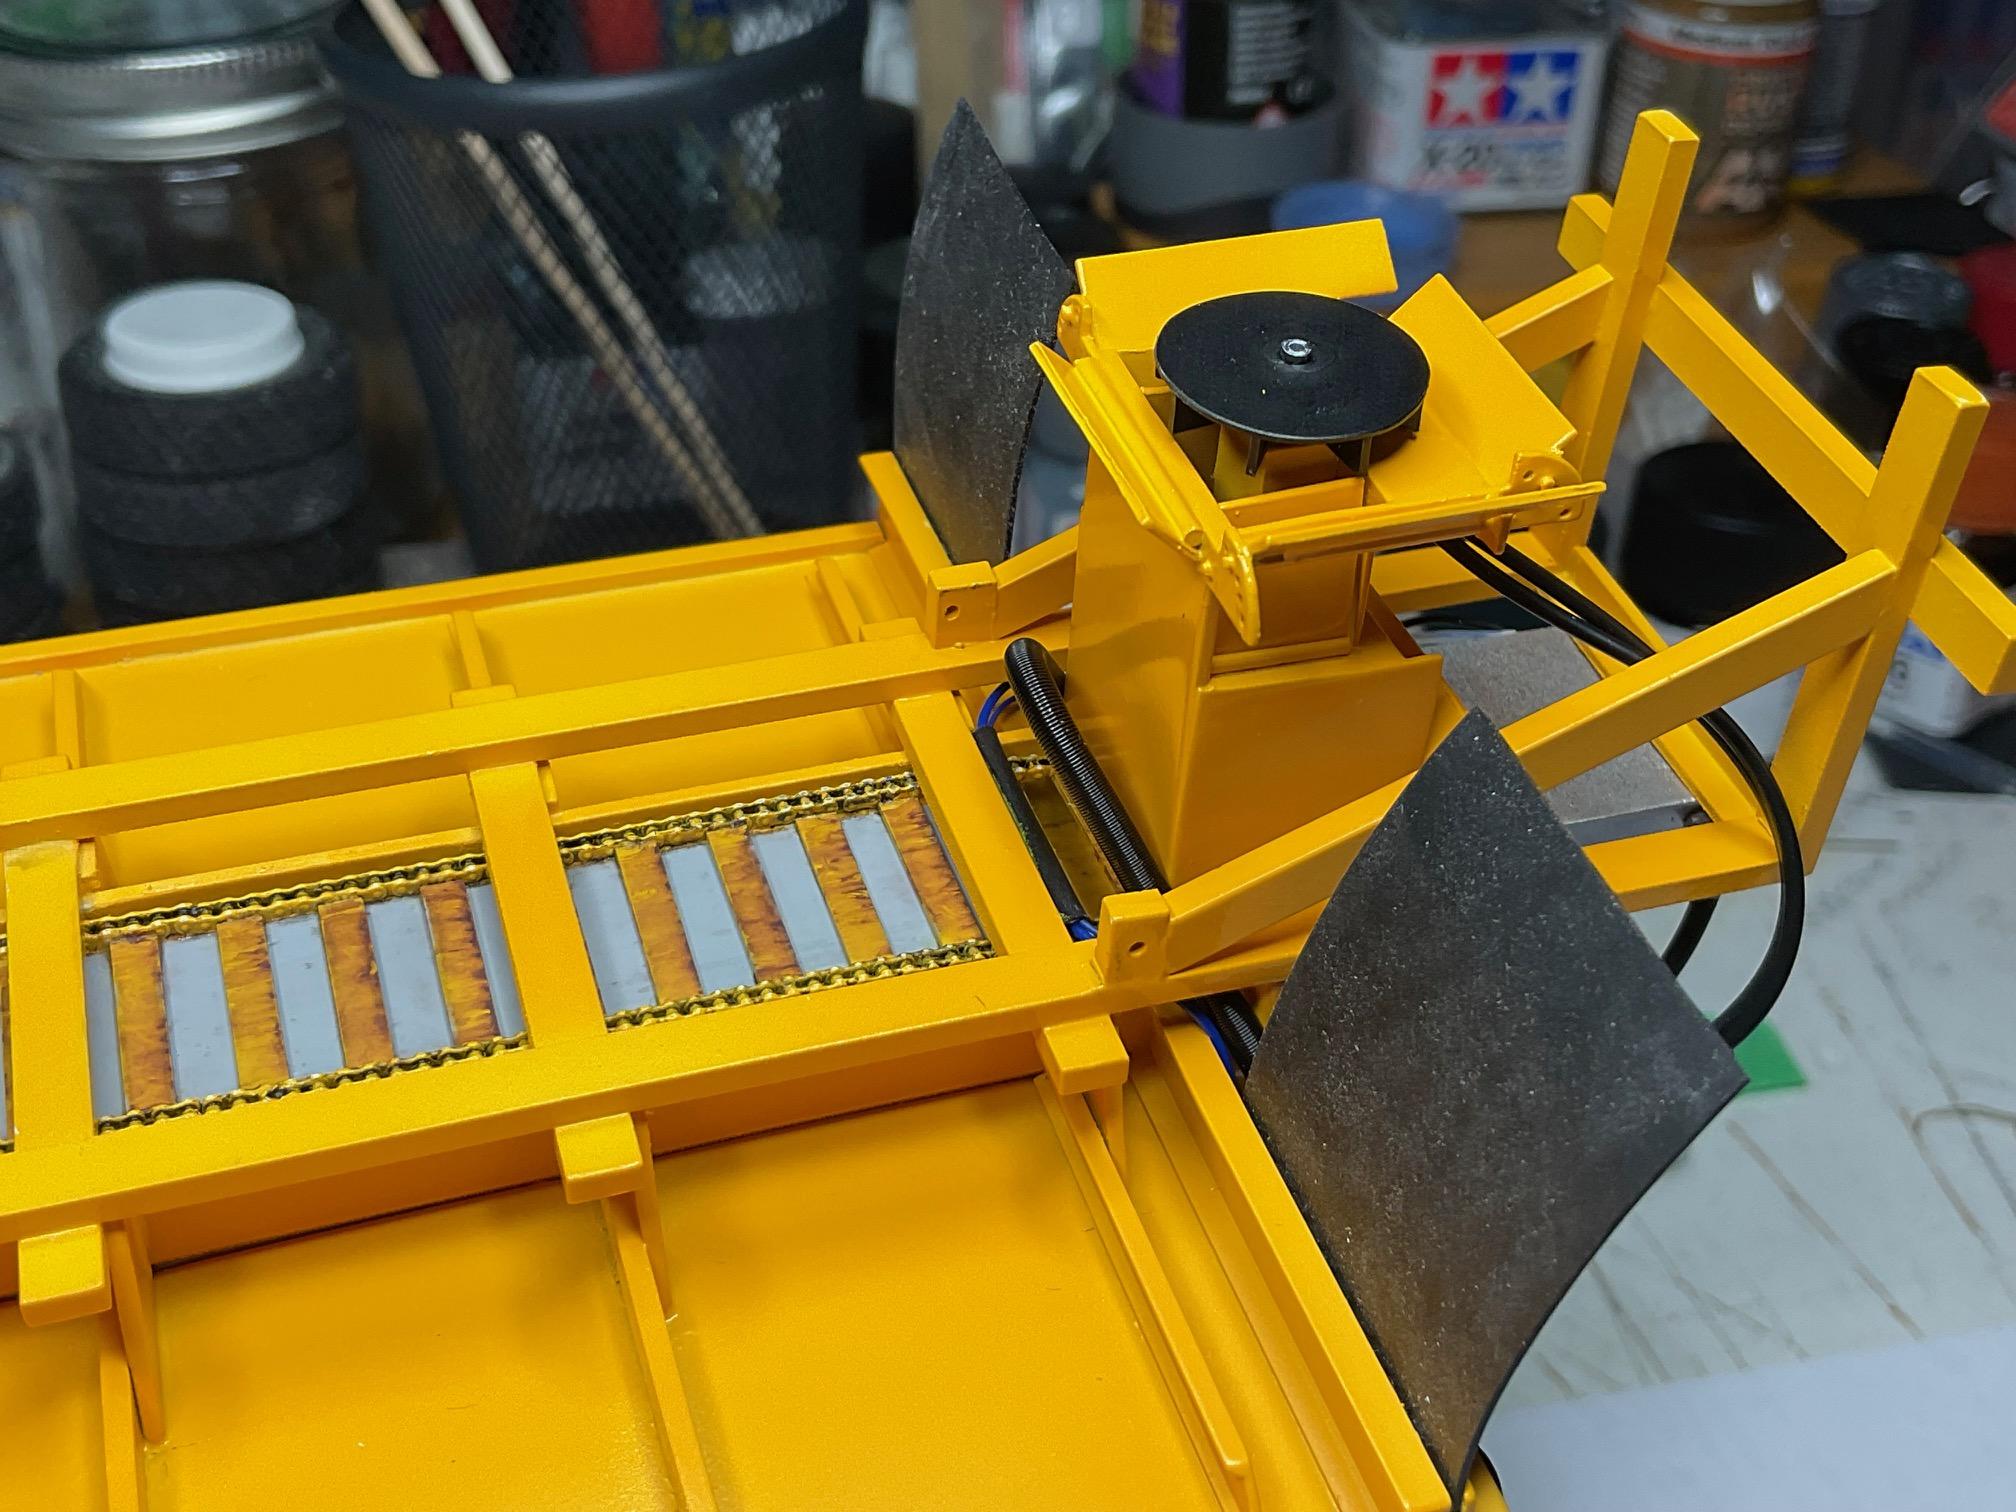
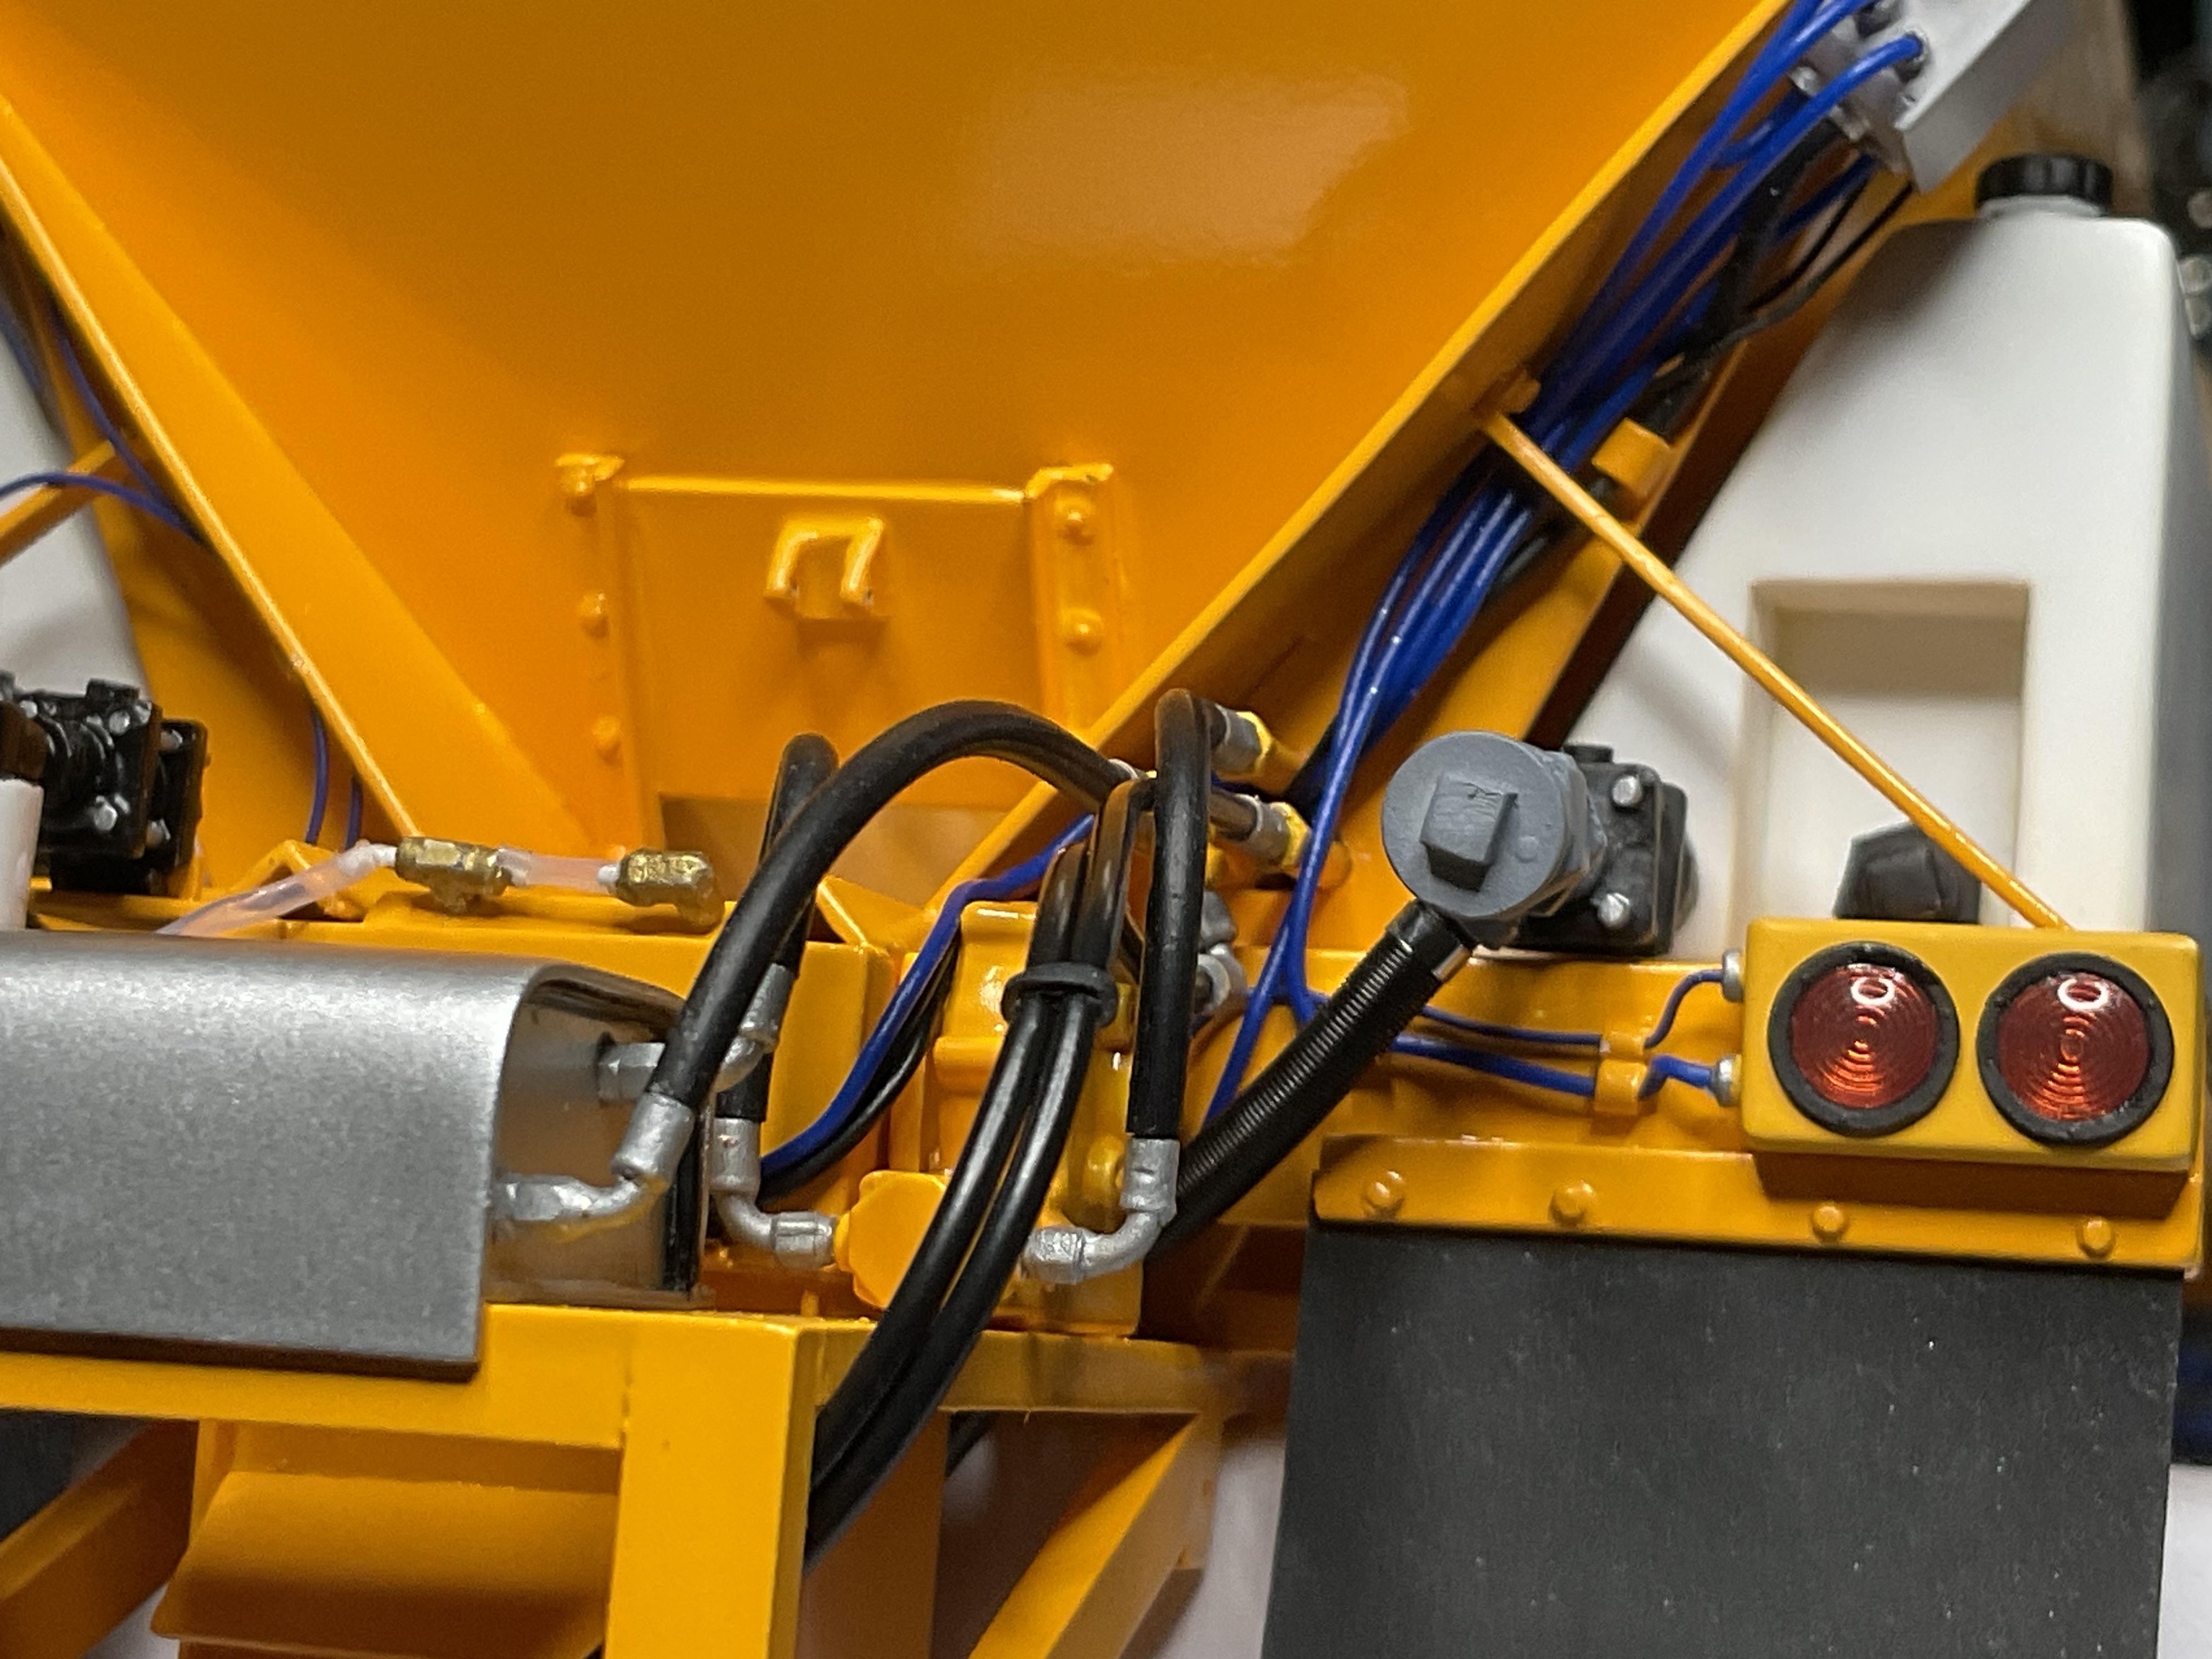
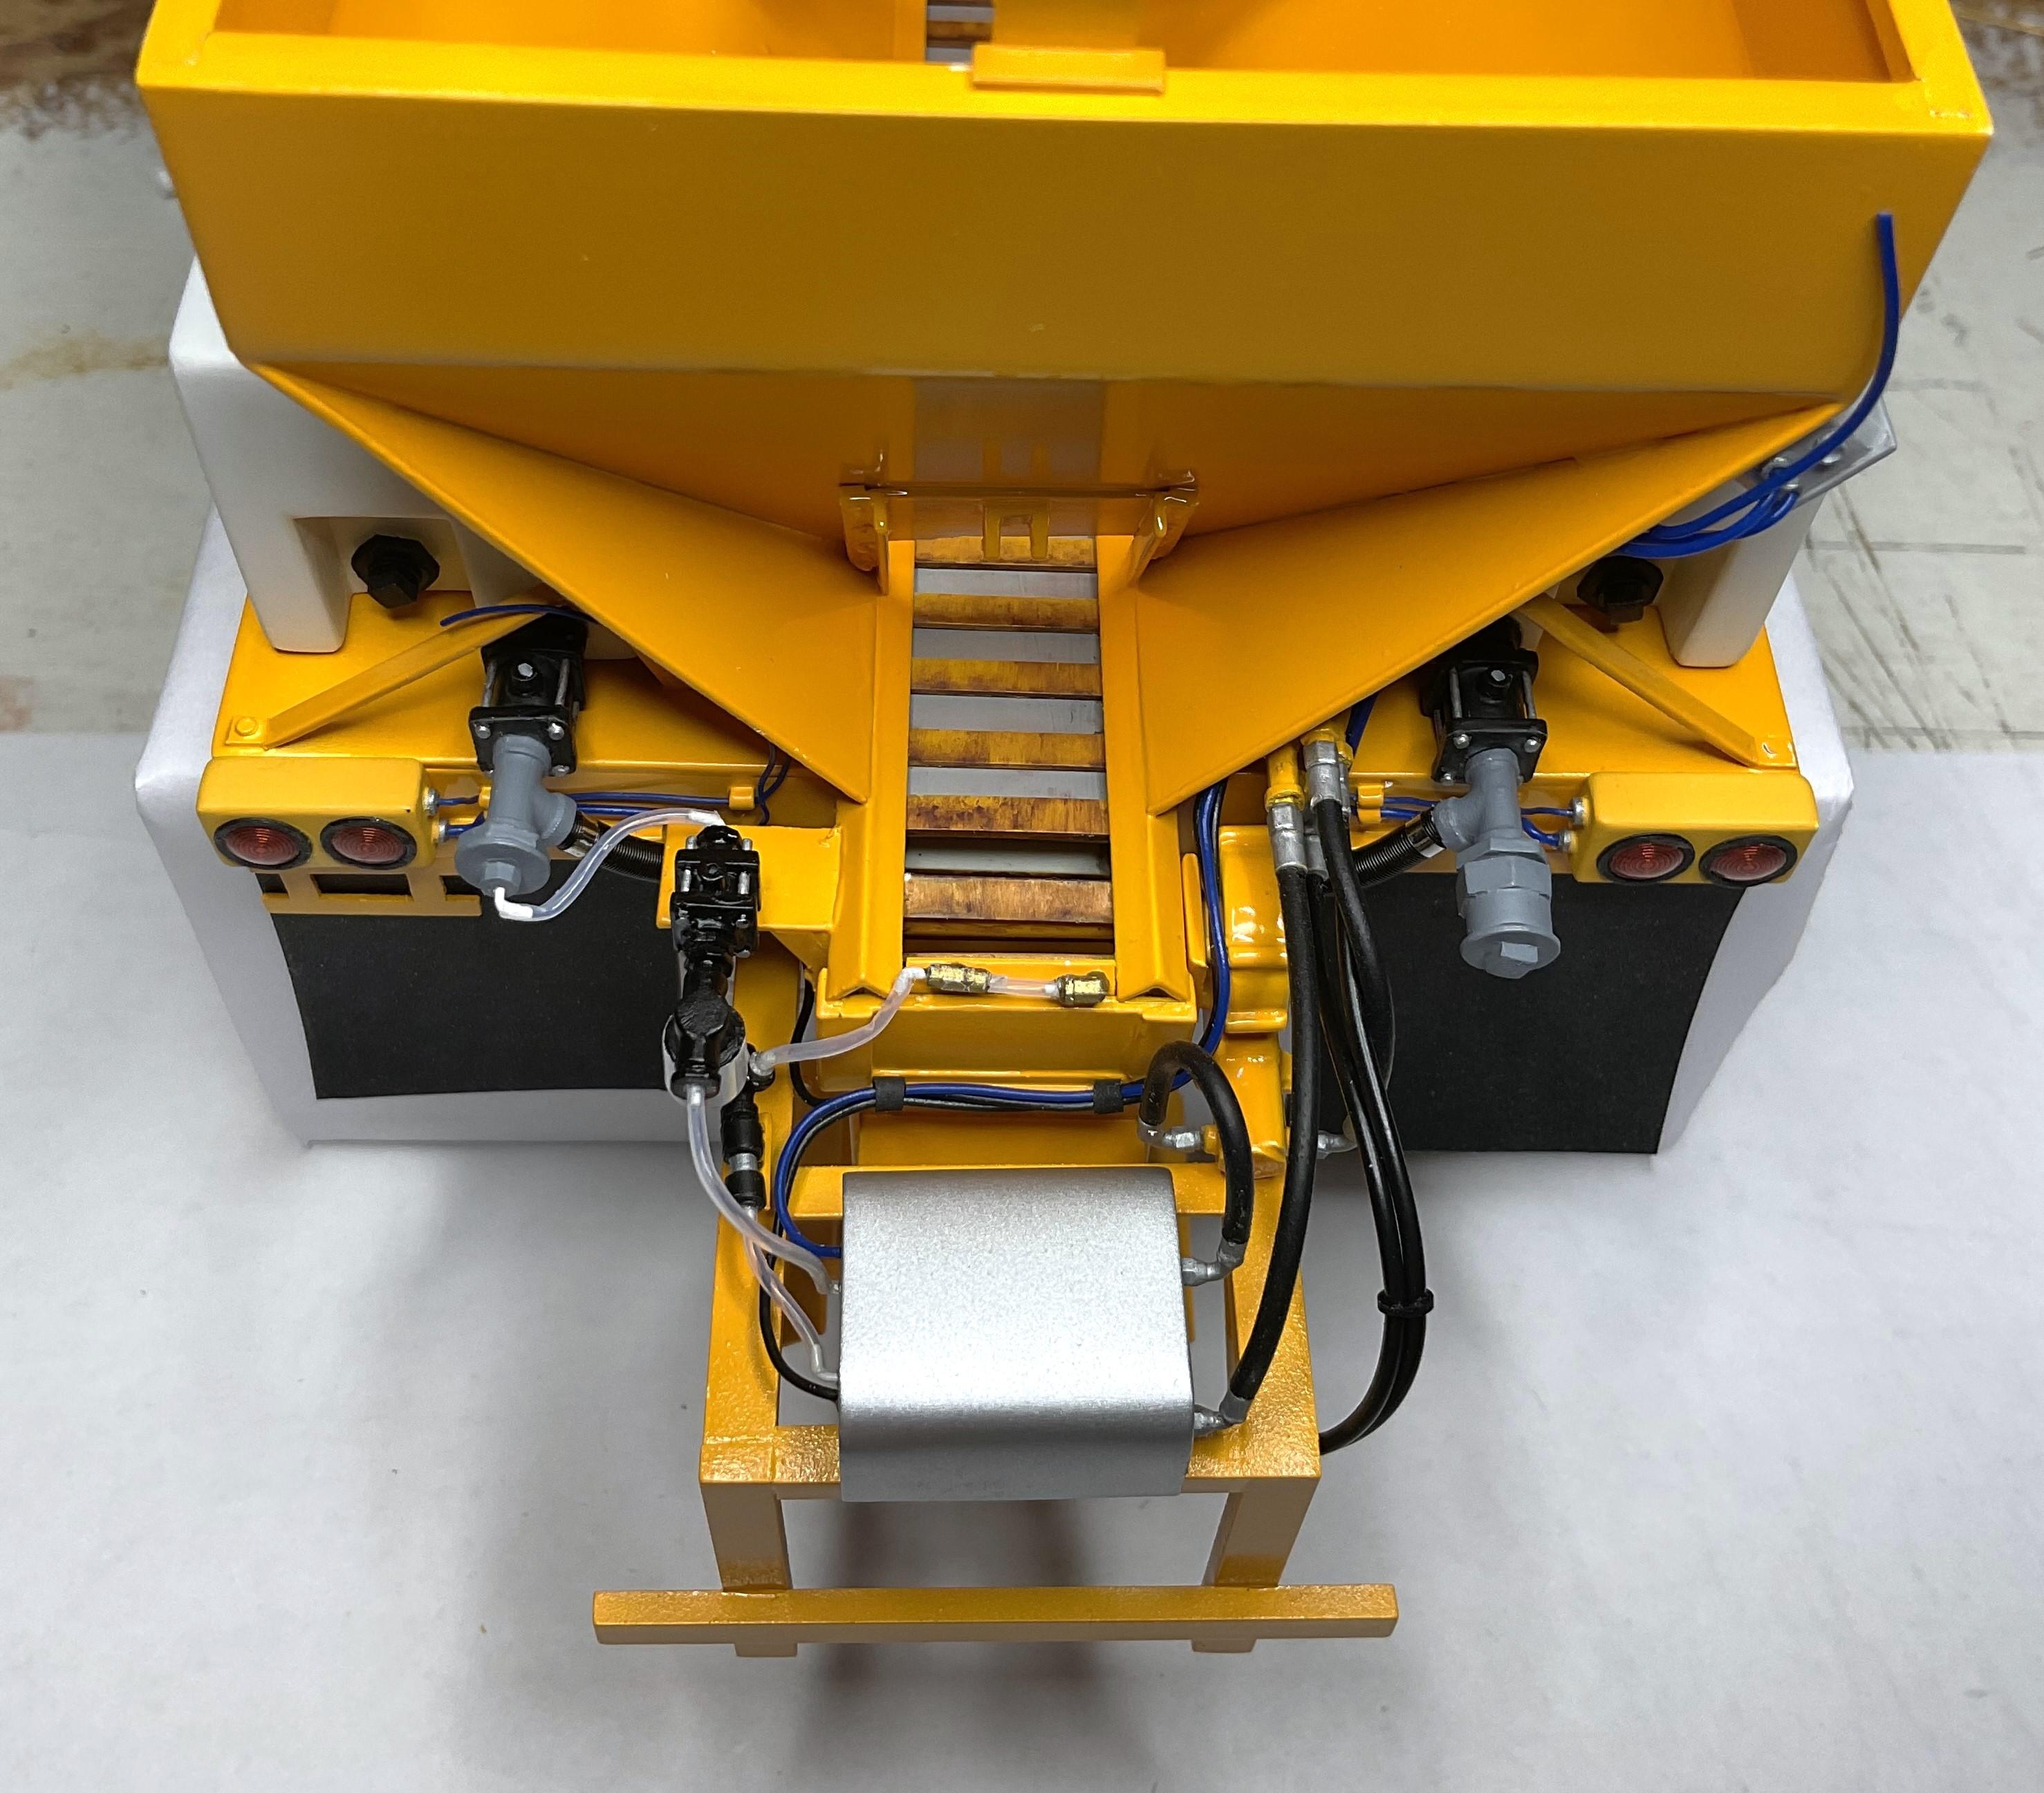
Seems like a lot of work got done the past few days, but little to show for it in the pics. Painted the wing plow surface with its 'plastic' coating - it may need to be scuffed up a bit as the blade on the actual truck was marked up during its installation on the truck. Managed to get good facsimile of a hose in place for the equalization line between the two pre-wet tanks' valve bodies. Finally, got the short length of clear line installed from tank valve on the left fender to the fluid filter valve inlet. Wing plow blade plasticized - I was trying to get to the finish of the plastic miter box behind the plow, but this was as close as my efforts got me I found a bunch of these springs at my hobby store last year and, thankfully, it was flexible enough for me to thread it down through the frame, behind the sand chute and up to the other valve body. The brass pins allowed me to better align the hose into pre-drilled holes in the 'T' fittings at the valves Ordered this adhesive backed material to simulate the clamps holding the hose to the fitting on the valves - its thin, a bit stretchy and sticks to itself firmly Hose passing behind sand chute Valve body on the left is now connected by clear line to the valve inlet for the pre-wet fluid filter before carrying on to pre-wet unit. Better view of Hasegawa tape 'clamp' on hose attached to valve body 'T'; all the hydraulic fittings on the truck will be given some degree of darker wash to bring out the fitting details better, at a later date Like I said, doesn't look like much difference from last set of pics, but lots of hours 'fussing' with little parts. Appreciate you having a look and comments/questions are welcome!
-
Looking good, as usual, Bob!
-
Welcome, Dave - hoping to learn about your weathering techniques along the way
-
Welcome, Nolan - back to hobby recently myself so I understand the 'relearn, unlearn, learn' process. Not there yet with 3D printing, so doing it with scratch building and aftermarket goodies. Nice builds!
-
Allan Moffat's 1969 Trans-Am Mustang
BK9300 replied to ShawnS's topic in WIP: Other Racing: Road Racing, Land Speed Racers
Great progress so far - amazing how being able to design and print your own parts can bring your ideas to life -
....... Chevrolet 15 CWT .......
BK9300 replied to 17741907's topic in Model Trucks: Pickups, Vans, SUVs, Light Commercial
You have very interesting trucks presented in your builds - all very well done! -
Mid 60s Peterbilt Unilite COE
BK9300 replied to RoninUtah's topic in WIP: Model Trucks: Big Rigs and Heavy Equipment
It's amazing how much you and Jeff know about the 1:1 trucks - will you be building trailers similar to ones in your pic above? -
PETERBILT WRECKER
BK9300 replied to Brutalform's topic in Model Trucks: Big Rigs and Heavy Equipment
Every vehicle is new once! Good looking wrecker. (did the broom come with the kit?) -
Batmobile
BK9300 replied to Pierre Rivard's topic in WIP: Other Racing: Road Racing, Land Speed Racers
I'd be terrified to brush paint a vehicle that has as much work done on it as yours! Probably answered elsewhere, but why do you prefer brush painting over air brushing? -
All together, an excellent innovation to hide your battery - looks really good.
-
Western Star 4900 FA plow truck
BK9300 replied to BK9300's topic in WIP: Model Trucks: Big Rigs and Heavy Equipment
Thanks, Jeff - the real truck that’s the inspiration for all this was built in 2010, and I guess lots has changed since. Another change I’ve noticed is the big, square (and bright) warning board on the back of the sand hoppers. Always more rules to keep people from running into something you’d think no one would miss seeing in front of them. -
You’ve done a lot of work on this one - sure looking good
-
Going to be a winner, whether or not it sees a checkered flag!
-
41 Willys rat rod wrecker
BK9300 replied to mchook's topic in Model Trucks: Pickups, Vans, SUVs, Light Commercial
Just proves again that many things get better with age - how fine this is! -
Beautiful paint, and I agree with Trevor about how much better it looks in the natural light.
-
Wow - what a process! I did find a blog that talked about the factory process - lots of paint applied along top edges and excess allowed to flow down into a collection system for use on another body in the assembly line. Amazing you could apply it similarly at this scale!
-
1/32 Ford LTL9000
BK9300 replied to Rockford's topic in WIP: Model Trucks: Big Rigs and Heavy Equipment
I'll say it again - the amount of work you are able to accomplish with these smaller scale kits is tremendous - so many enhancements! -
That’s a lot of precision modification - great work!
-
I didn’t know about the ‘flow’ method of painting till I read your thread. Do you have any pics of your paint being applied?
-
Tigercat 880E longer 1/48 scale
BK9300 replied to François's topic in WIP: Model Trucks: Big Rigs and Heavy Equipment
Tremendous detail, as always - very proficient with use of your printer! -
Nice work on your paint - the tires look like real rubber!