Andy Oldenburg
-
Posts
345 -
Joined
-
Last visited
Content Type
Profiles
Forums
Events
Gallery
Everything posted by Andy Oldenburg
-
Cool build, very close to the real thing. Also meaning that if you hadn´t mentioned your problem with the bumper fit, I wouldn´t have noticed. Nine shine on the paint! I like?
-
Well done build, exact details and great paint job!? That idea with the cassette recorder is fantastic!
-
Well done build, exact details and great paint job!? That idea with the cassette recorder is fantastic!
-
Beautiful job Jim, everything matches very well. Great idea with the wire! Much better that risking too much glue on the body. Great things we can learn here. Seems like everybody has a black hole under the shop table. I know that feeling of hearing the tiny part fall, but can´t locating where. I´v spent hours on my knees and still not finding the darn thing?
-

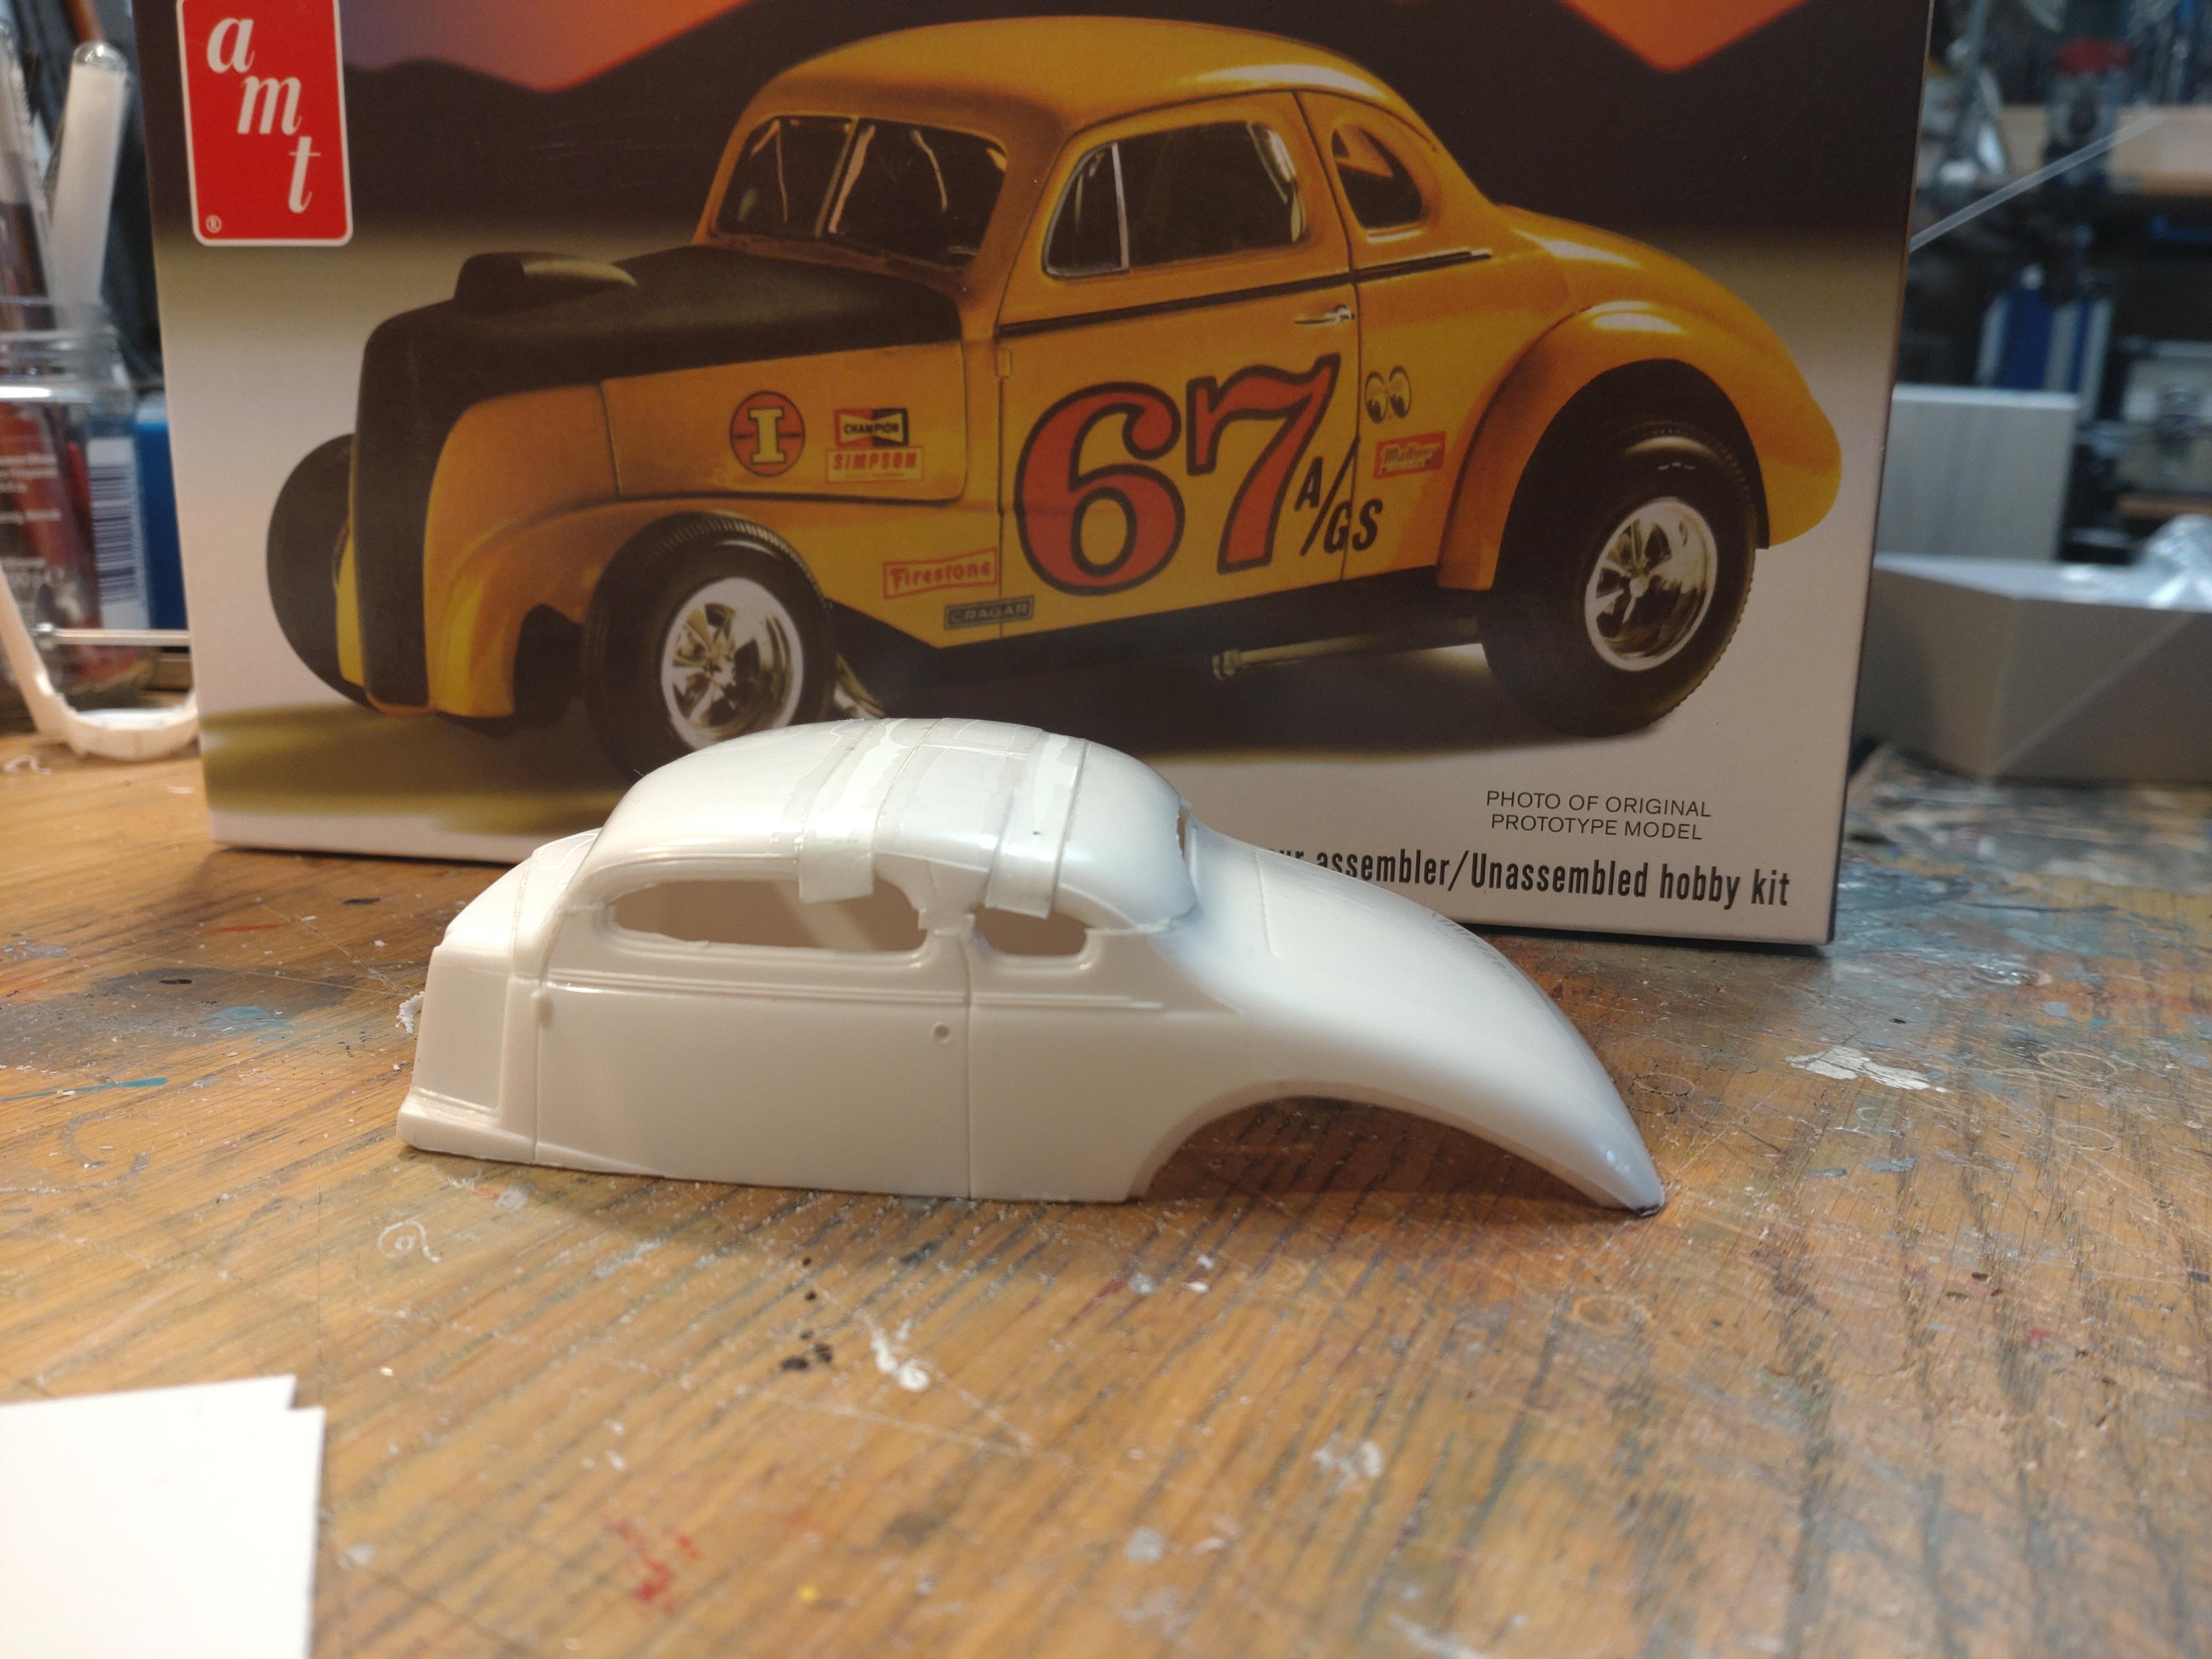
1937 Chevy Hot Rod - nasty and loooow
Andy Oldenburg replied to Andy Oldenburg's topic in Model Cars
Thanks everyone for your applause! ? Feels good. This was a very challenging build, but also very rewarding in the end. My next build will be something "easier" though. At least I believe so now....? -
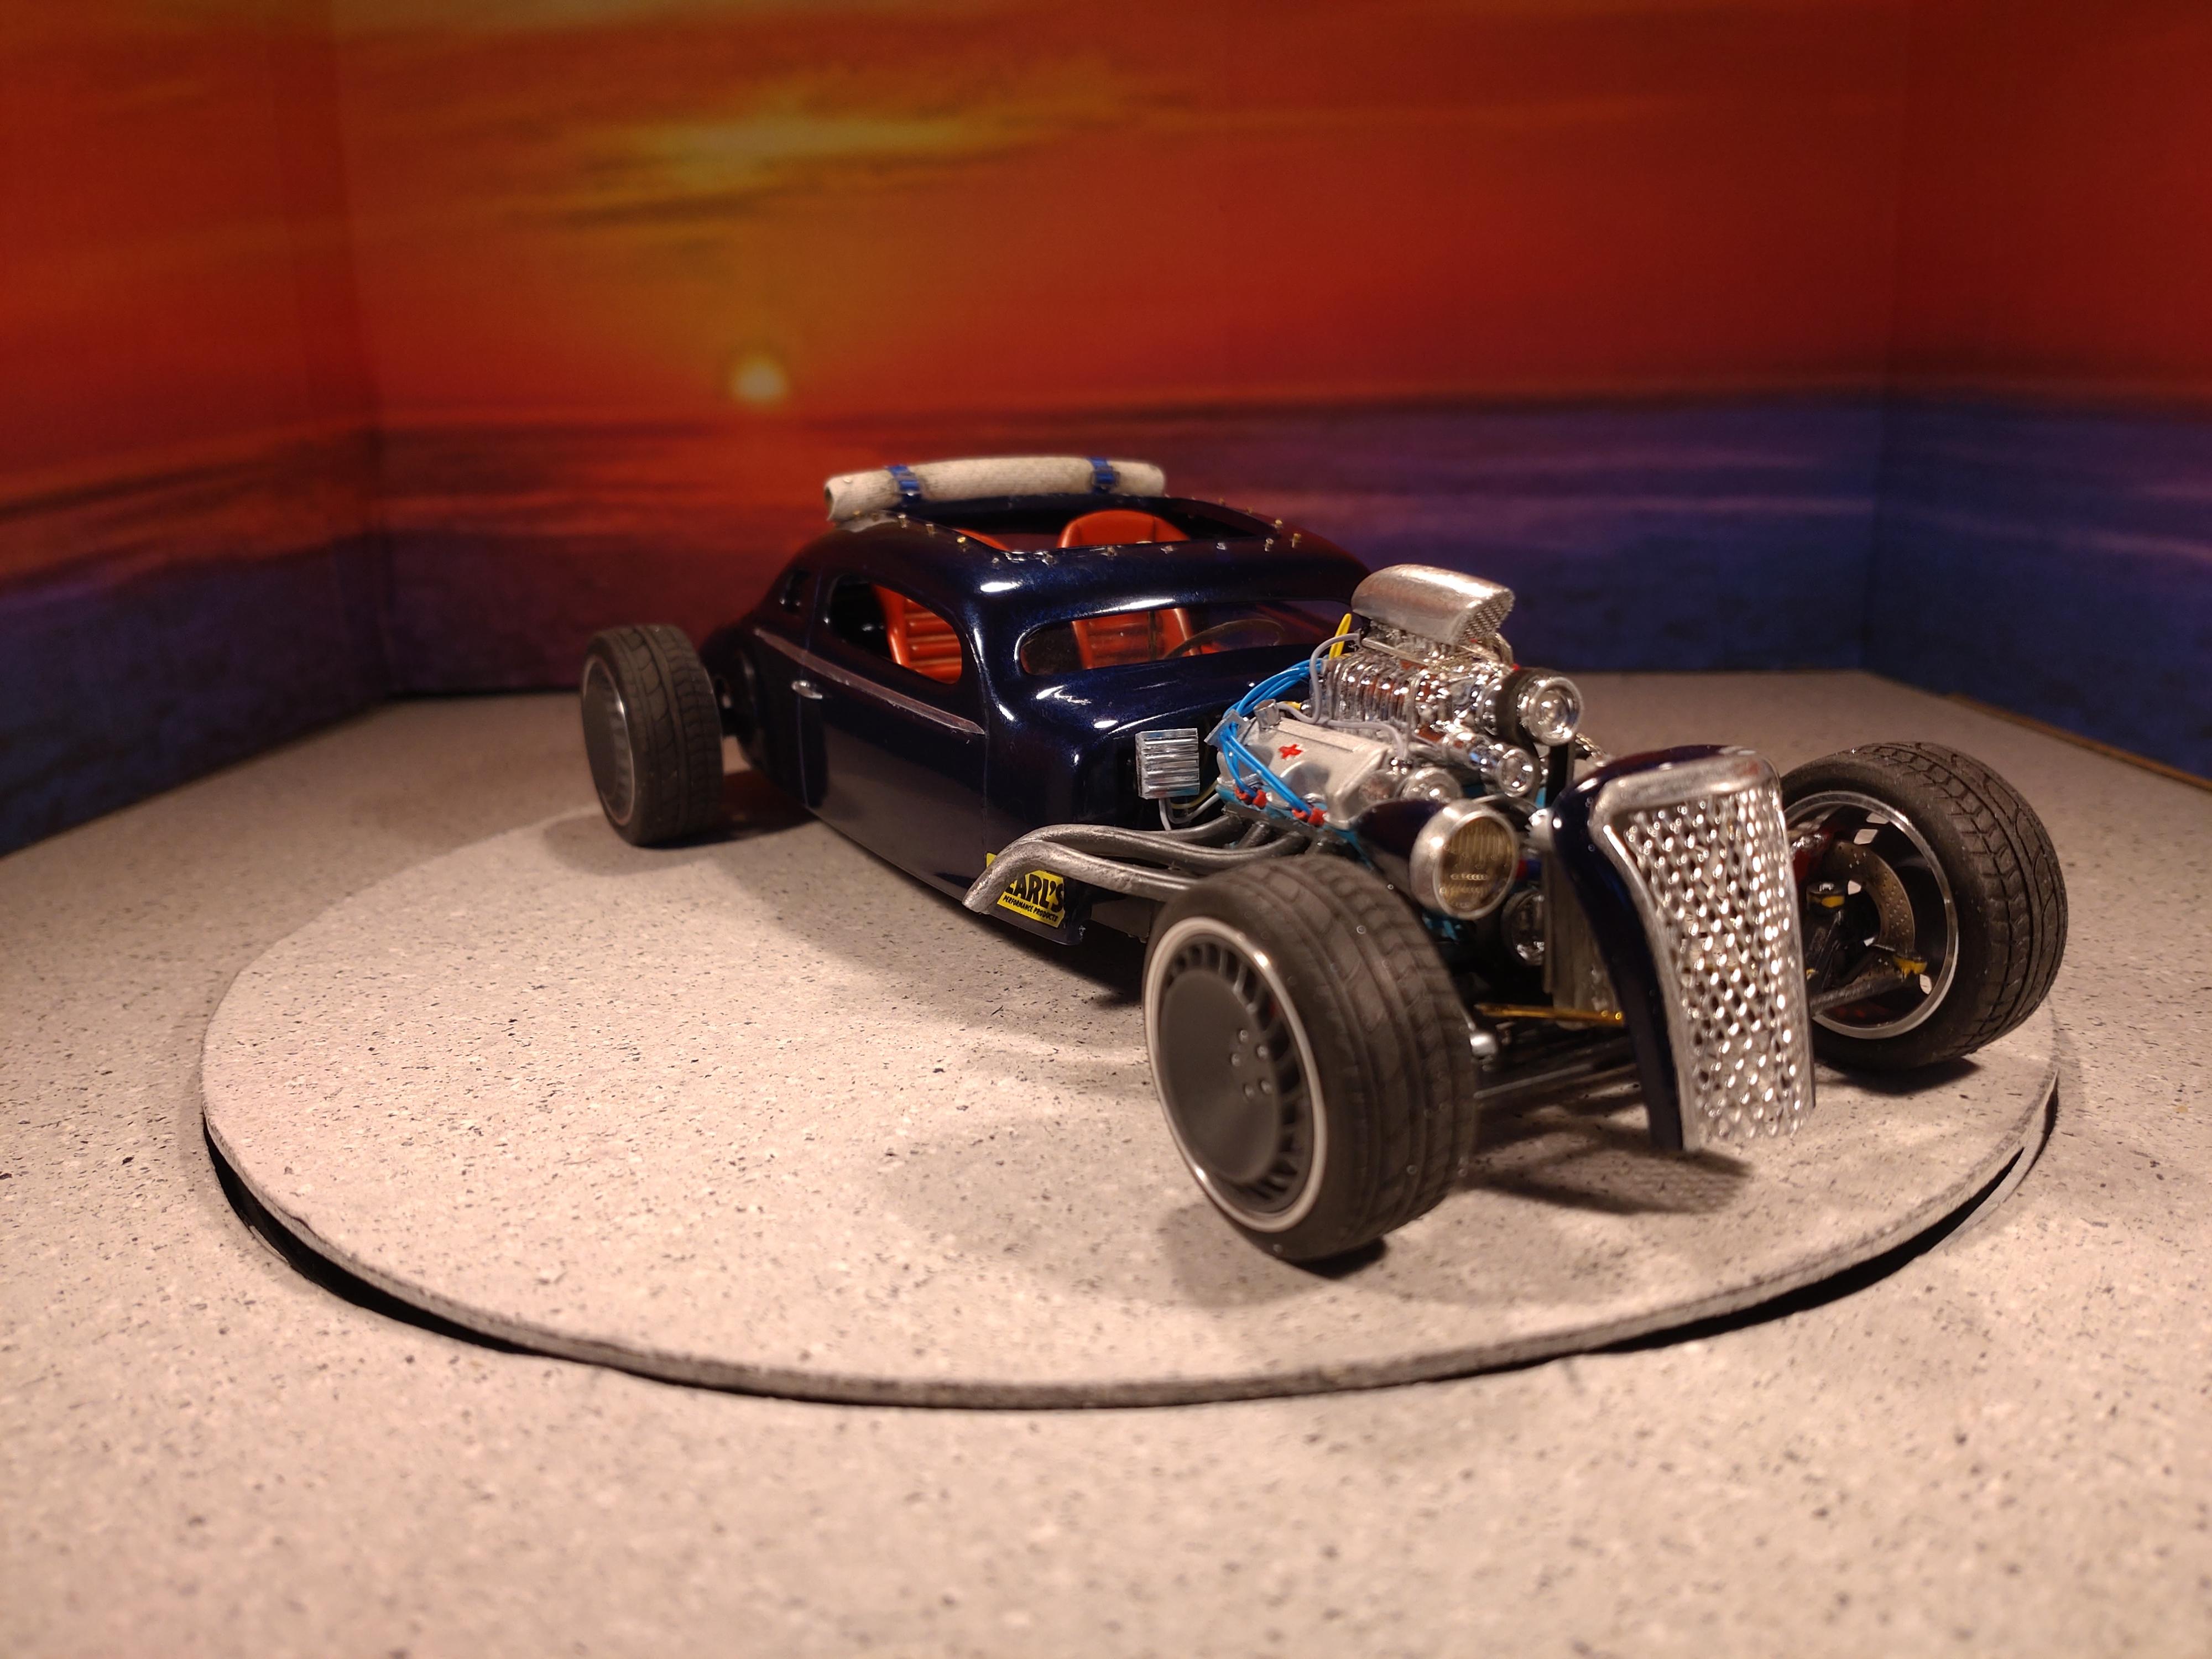
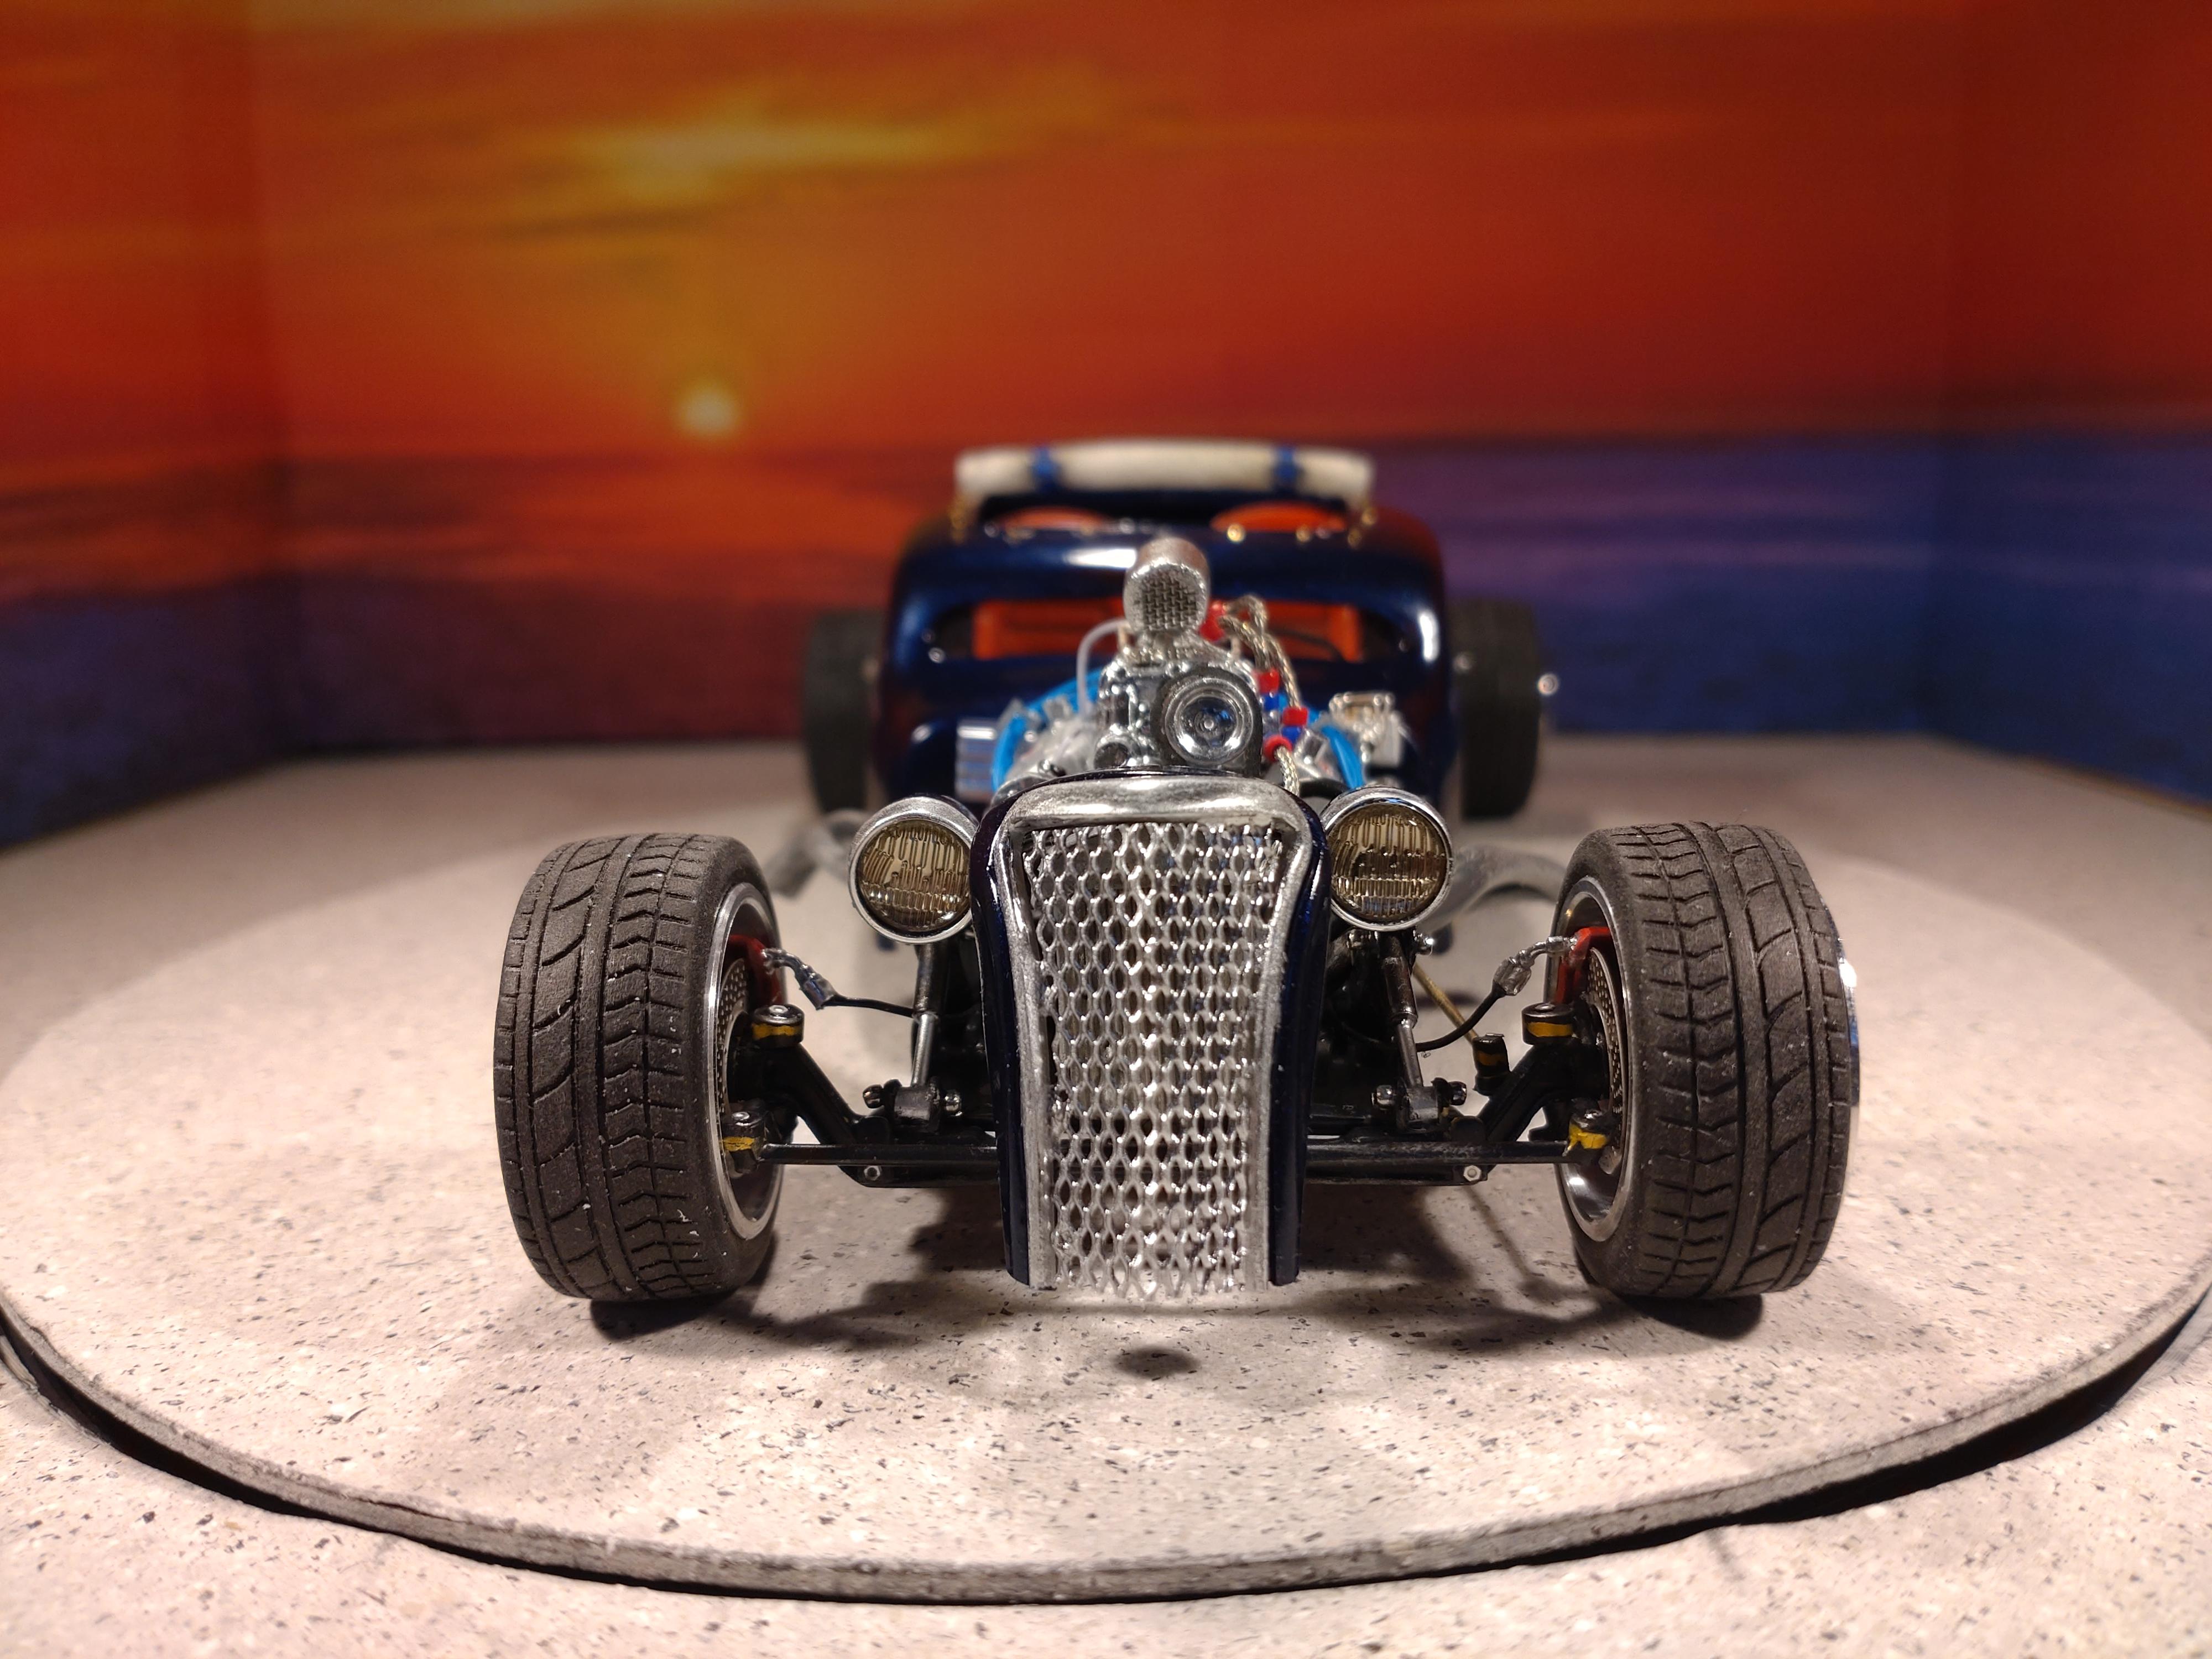
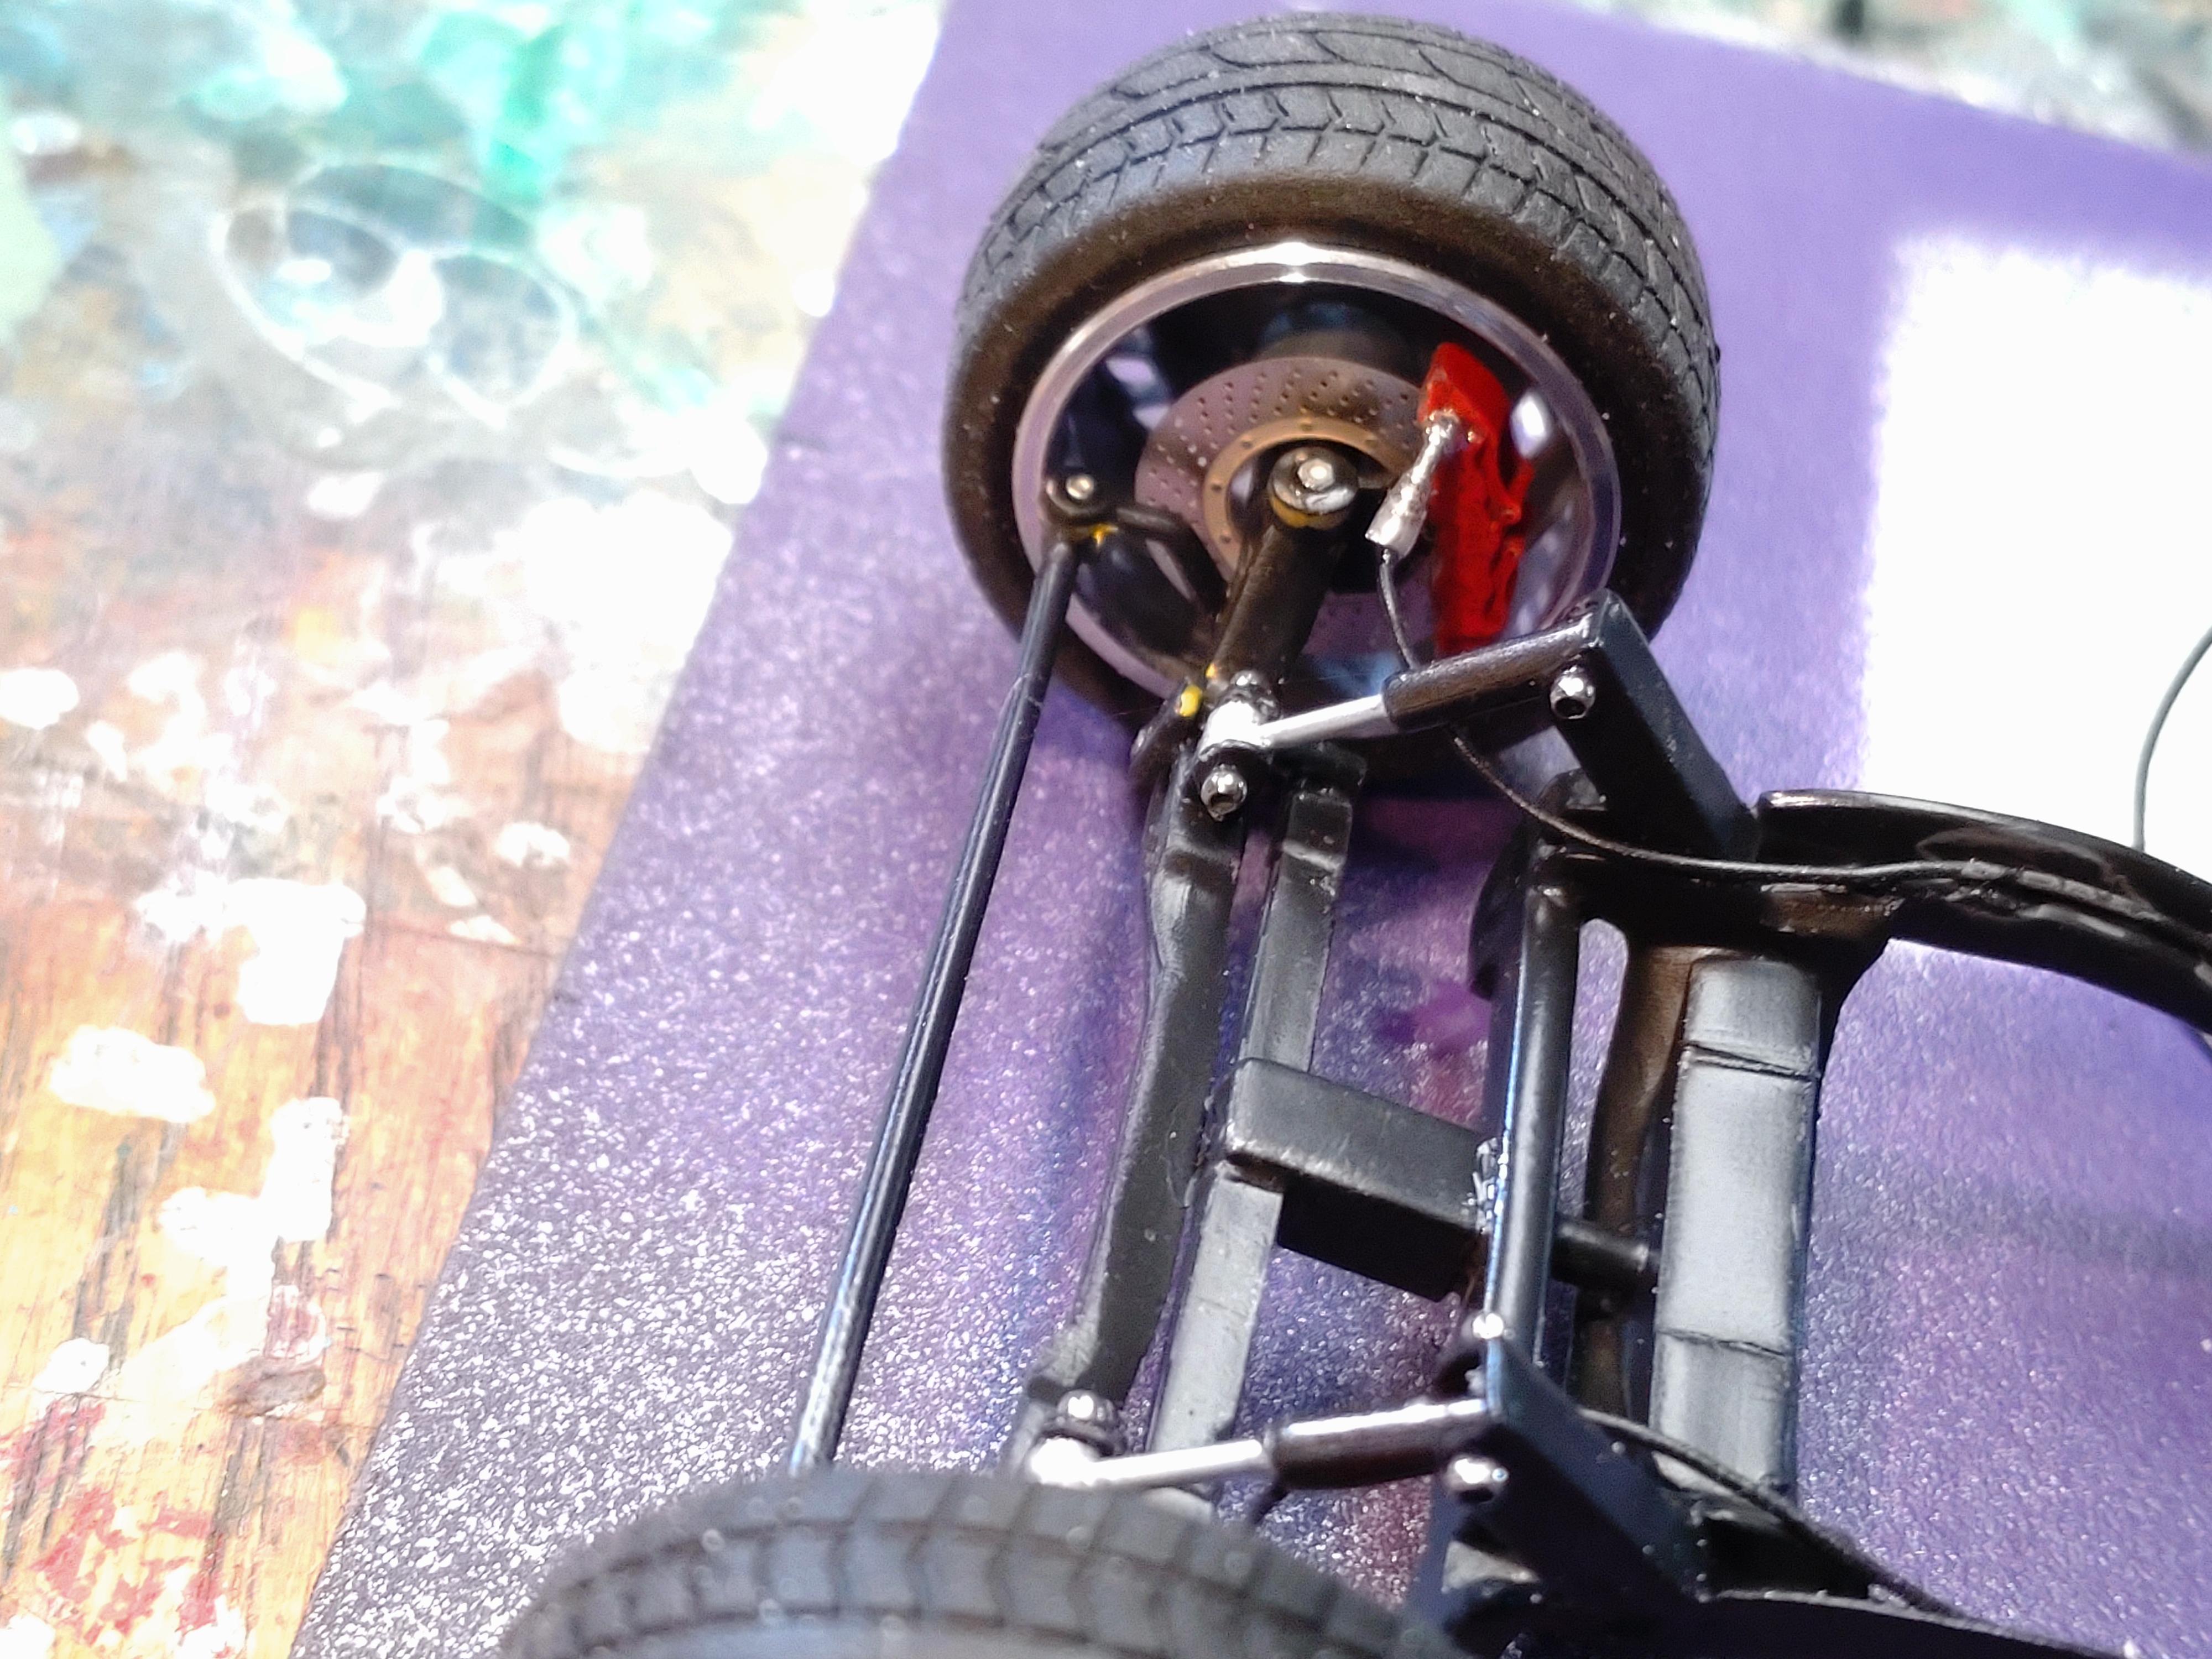
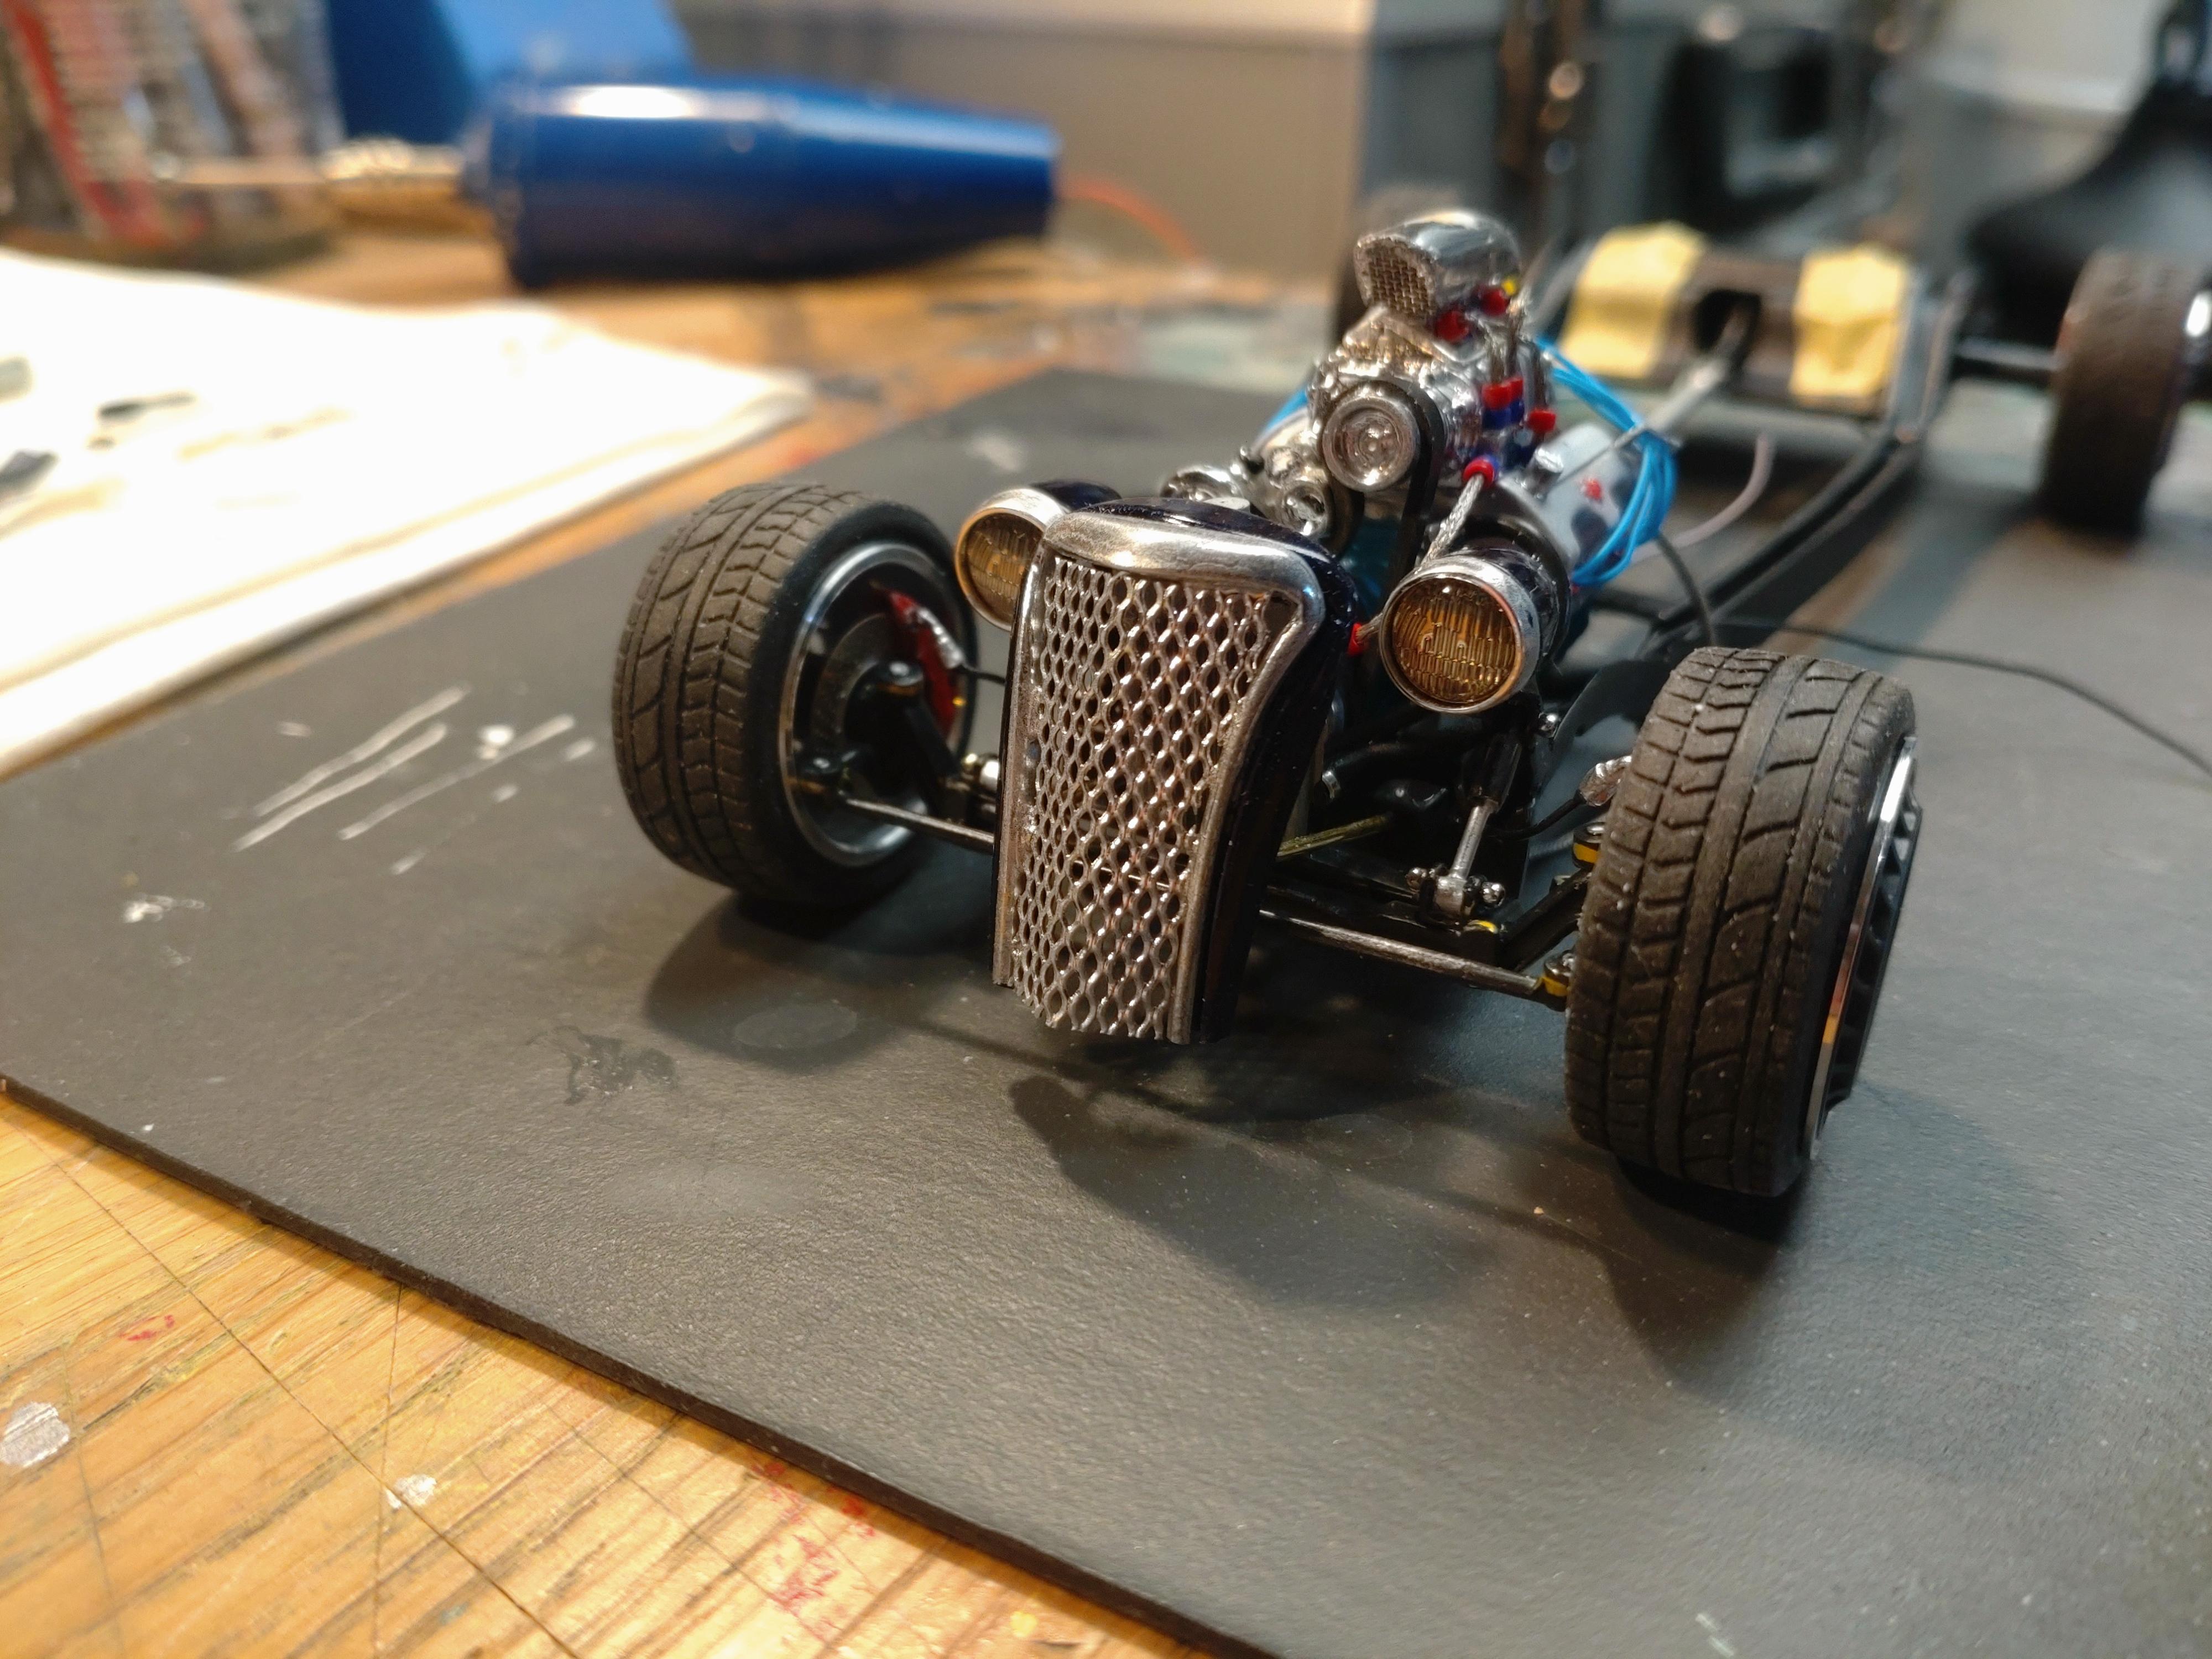
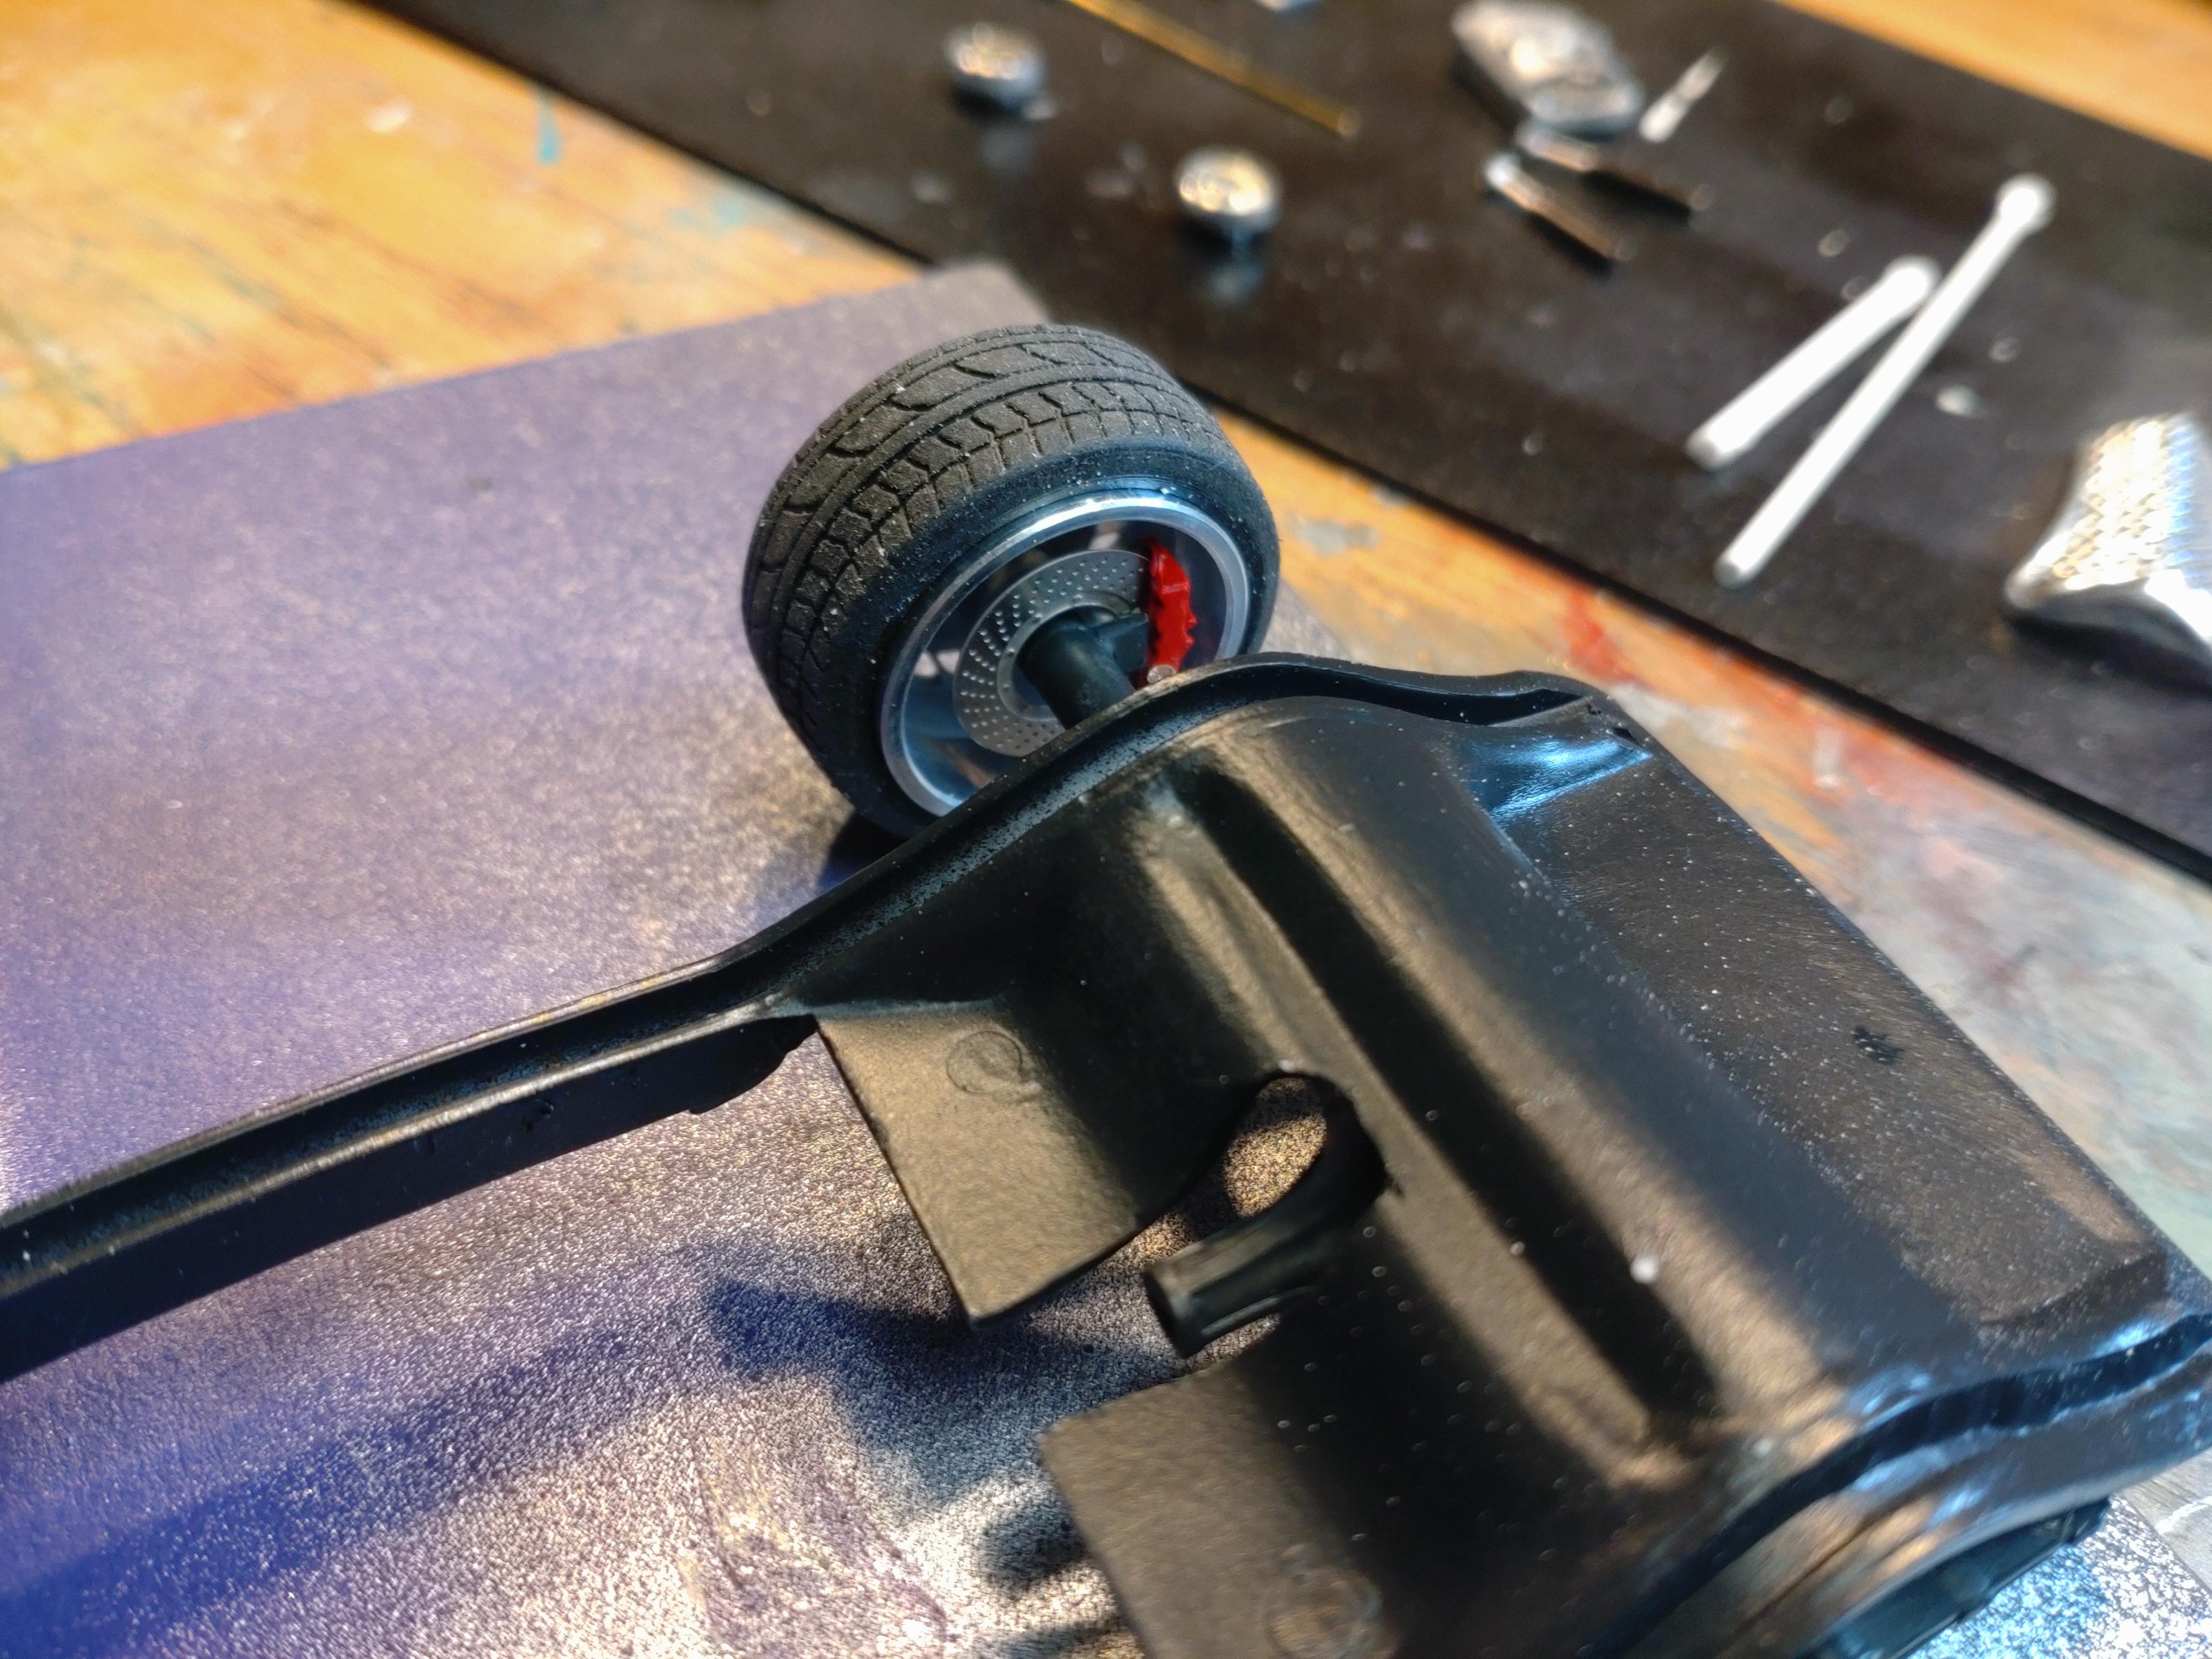
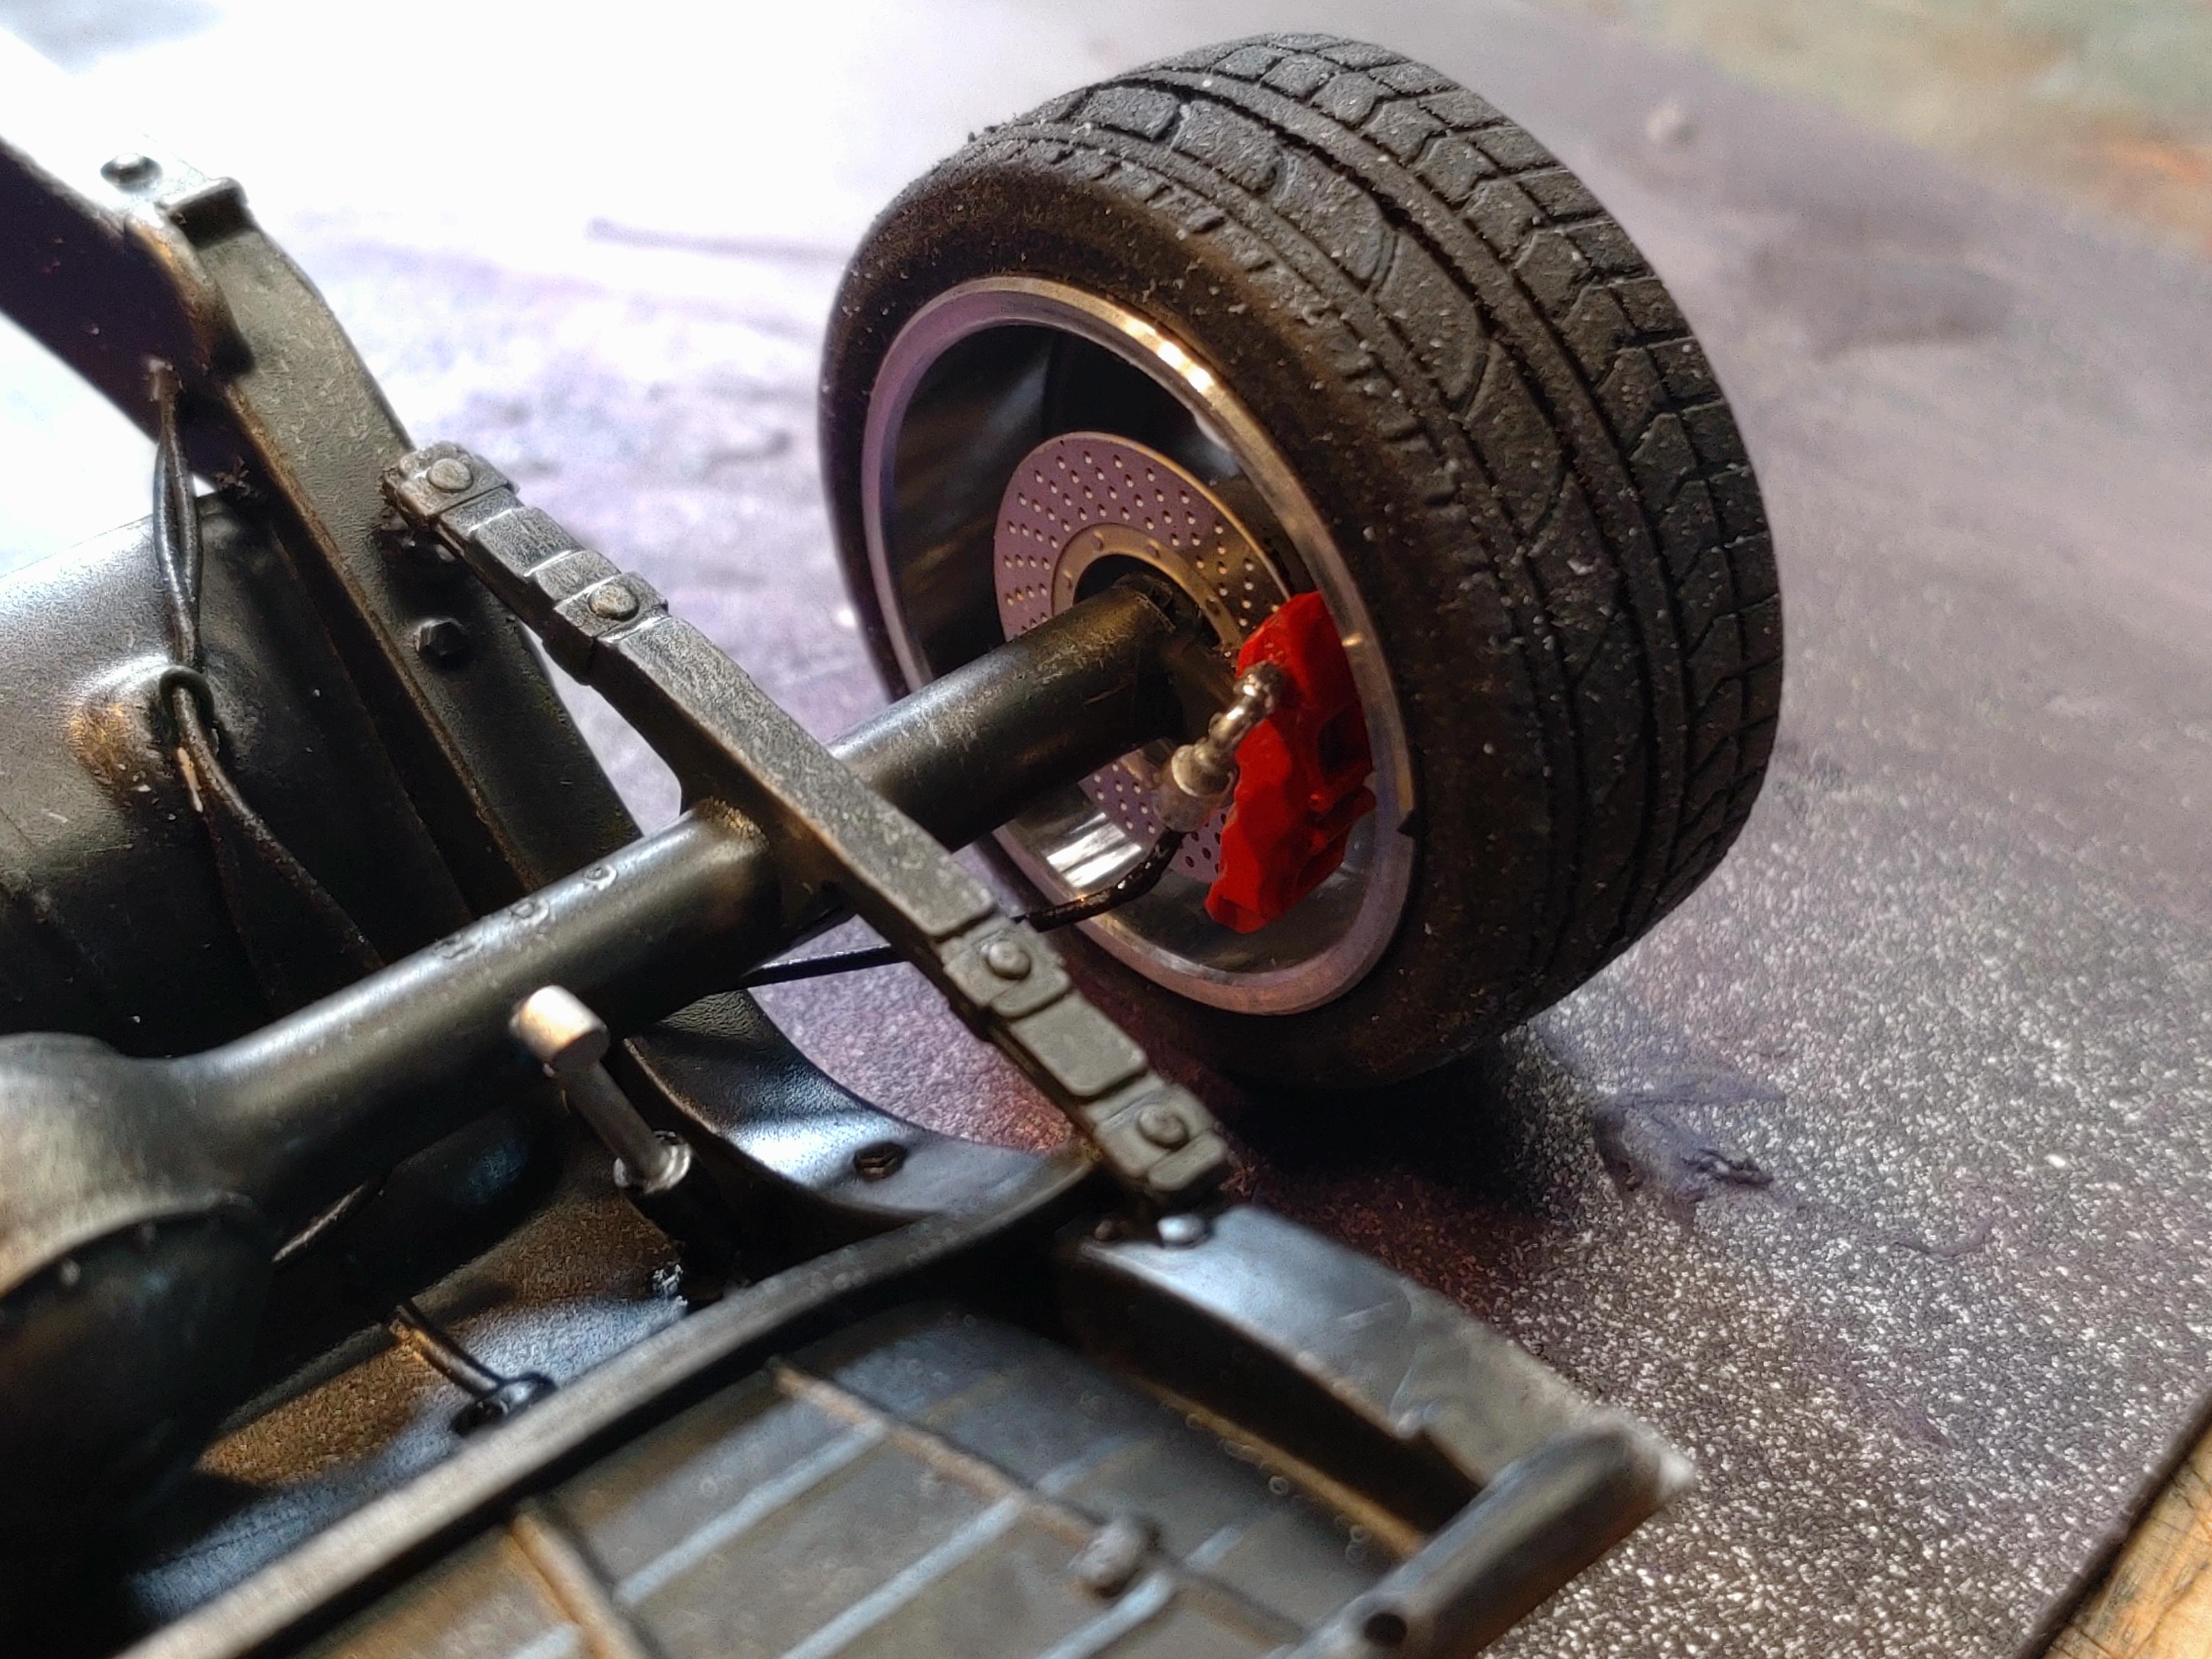
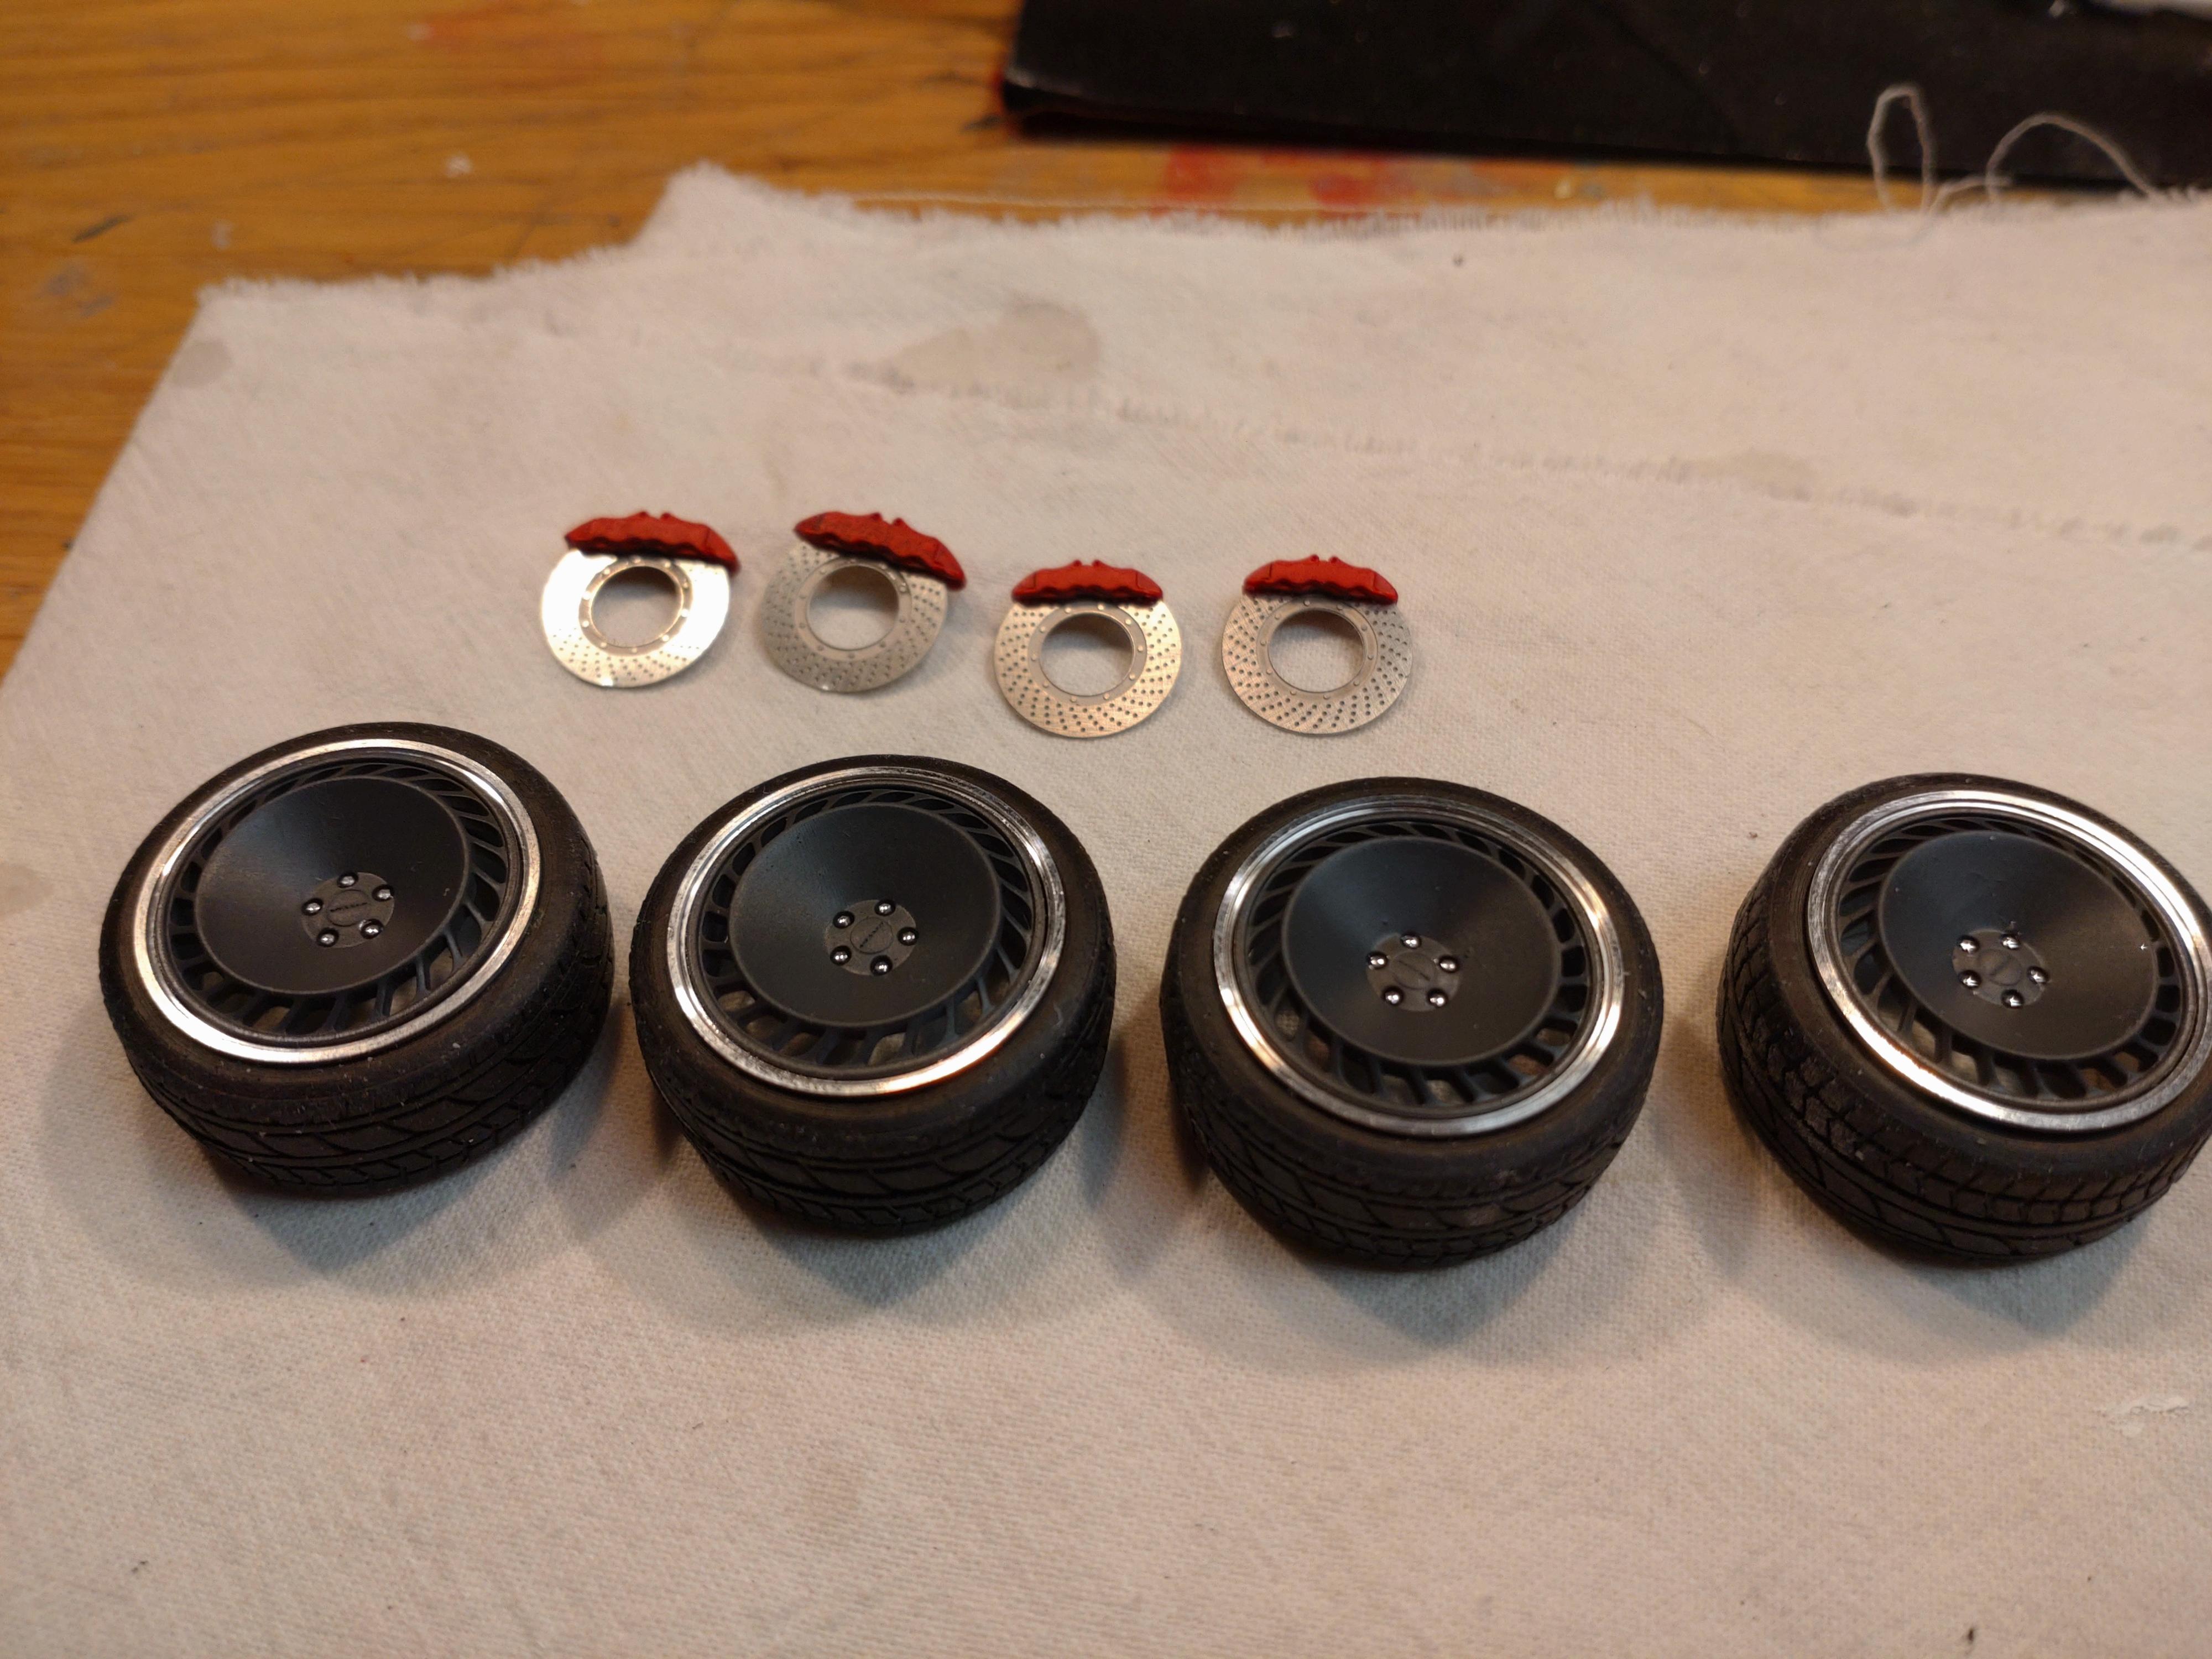
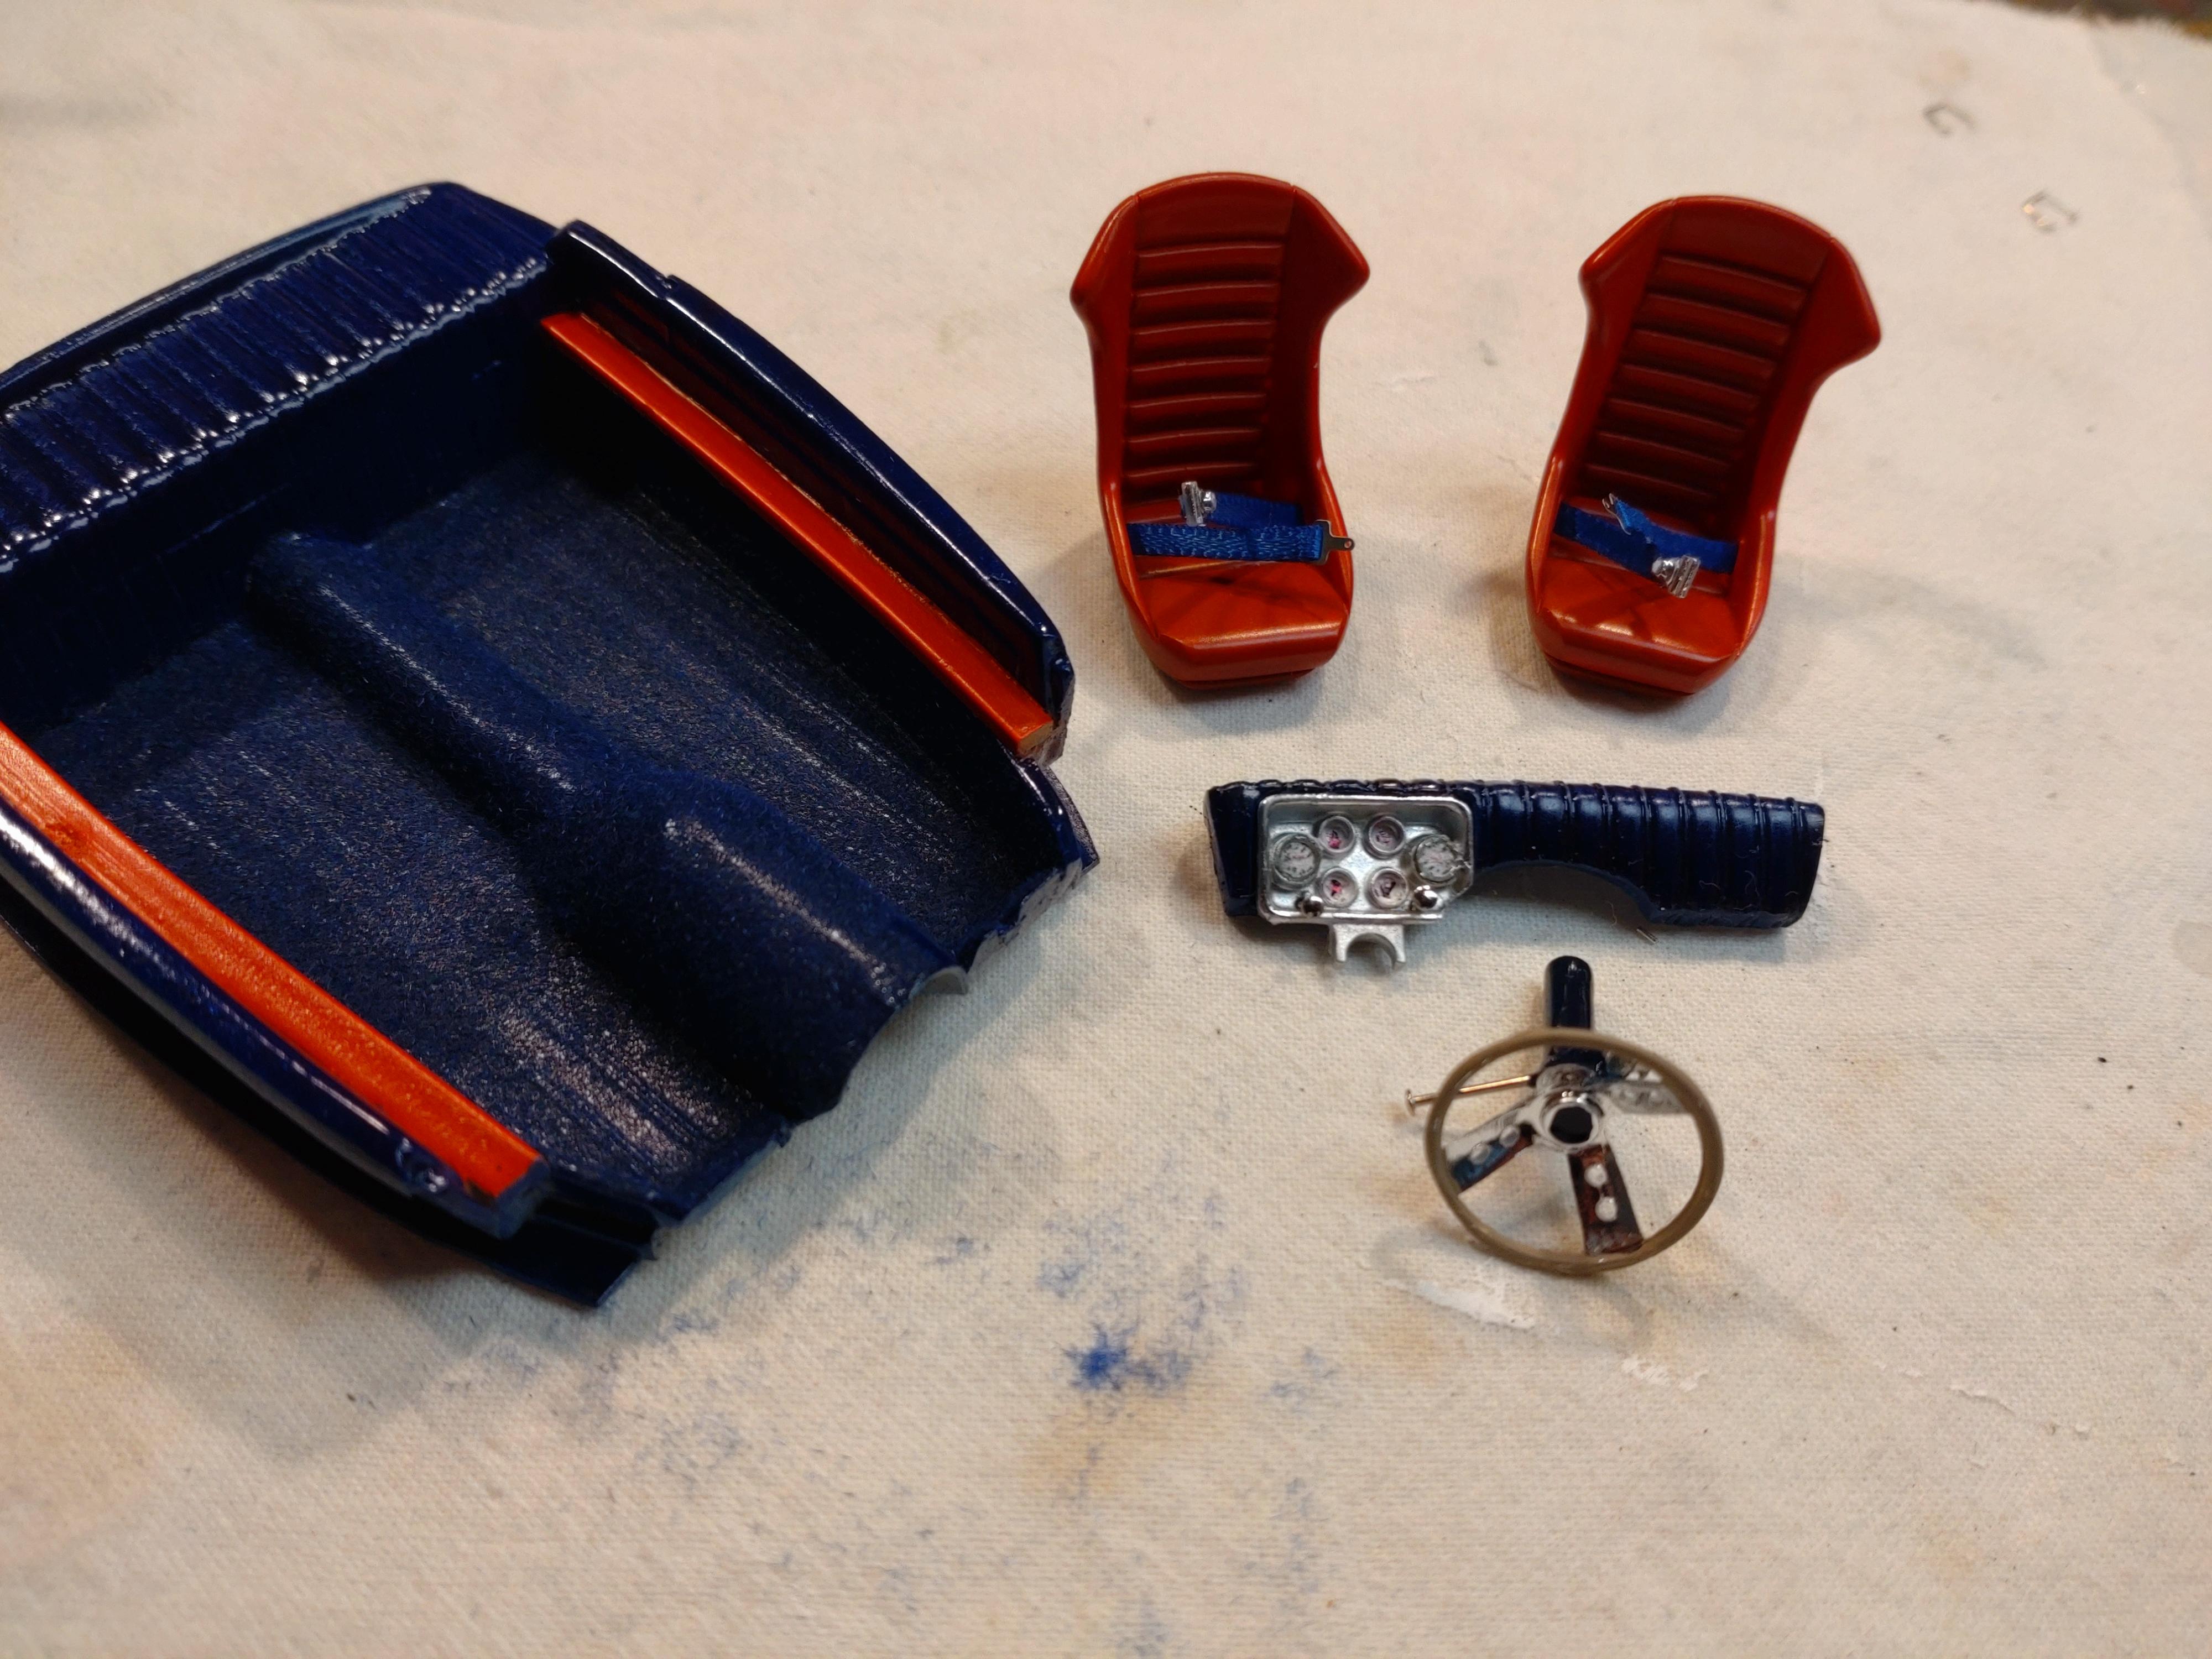
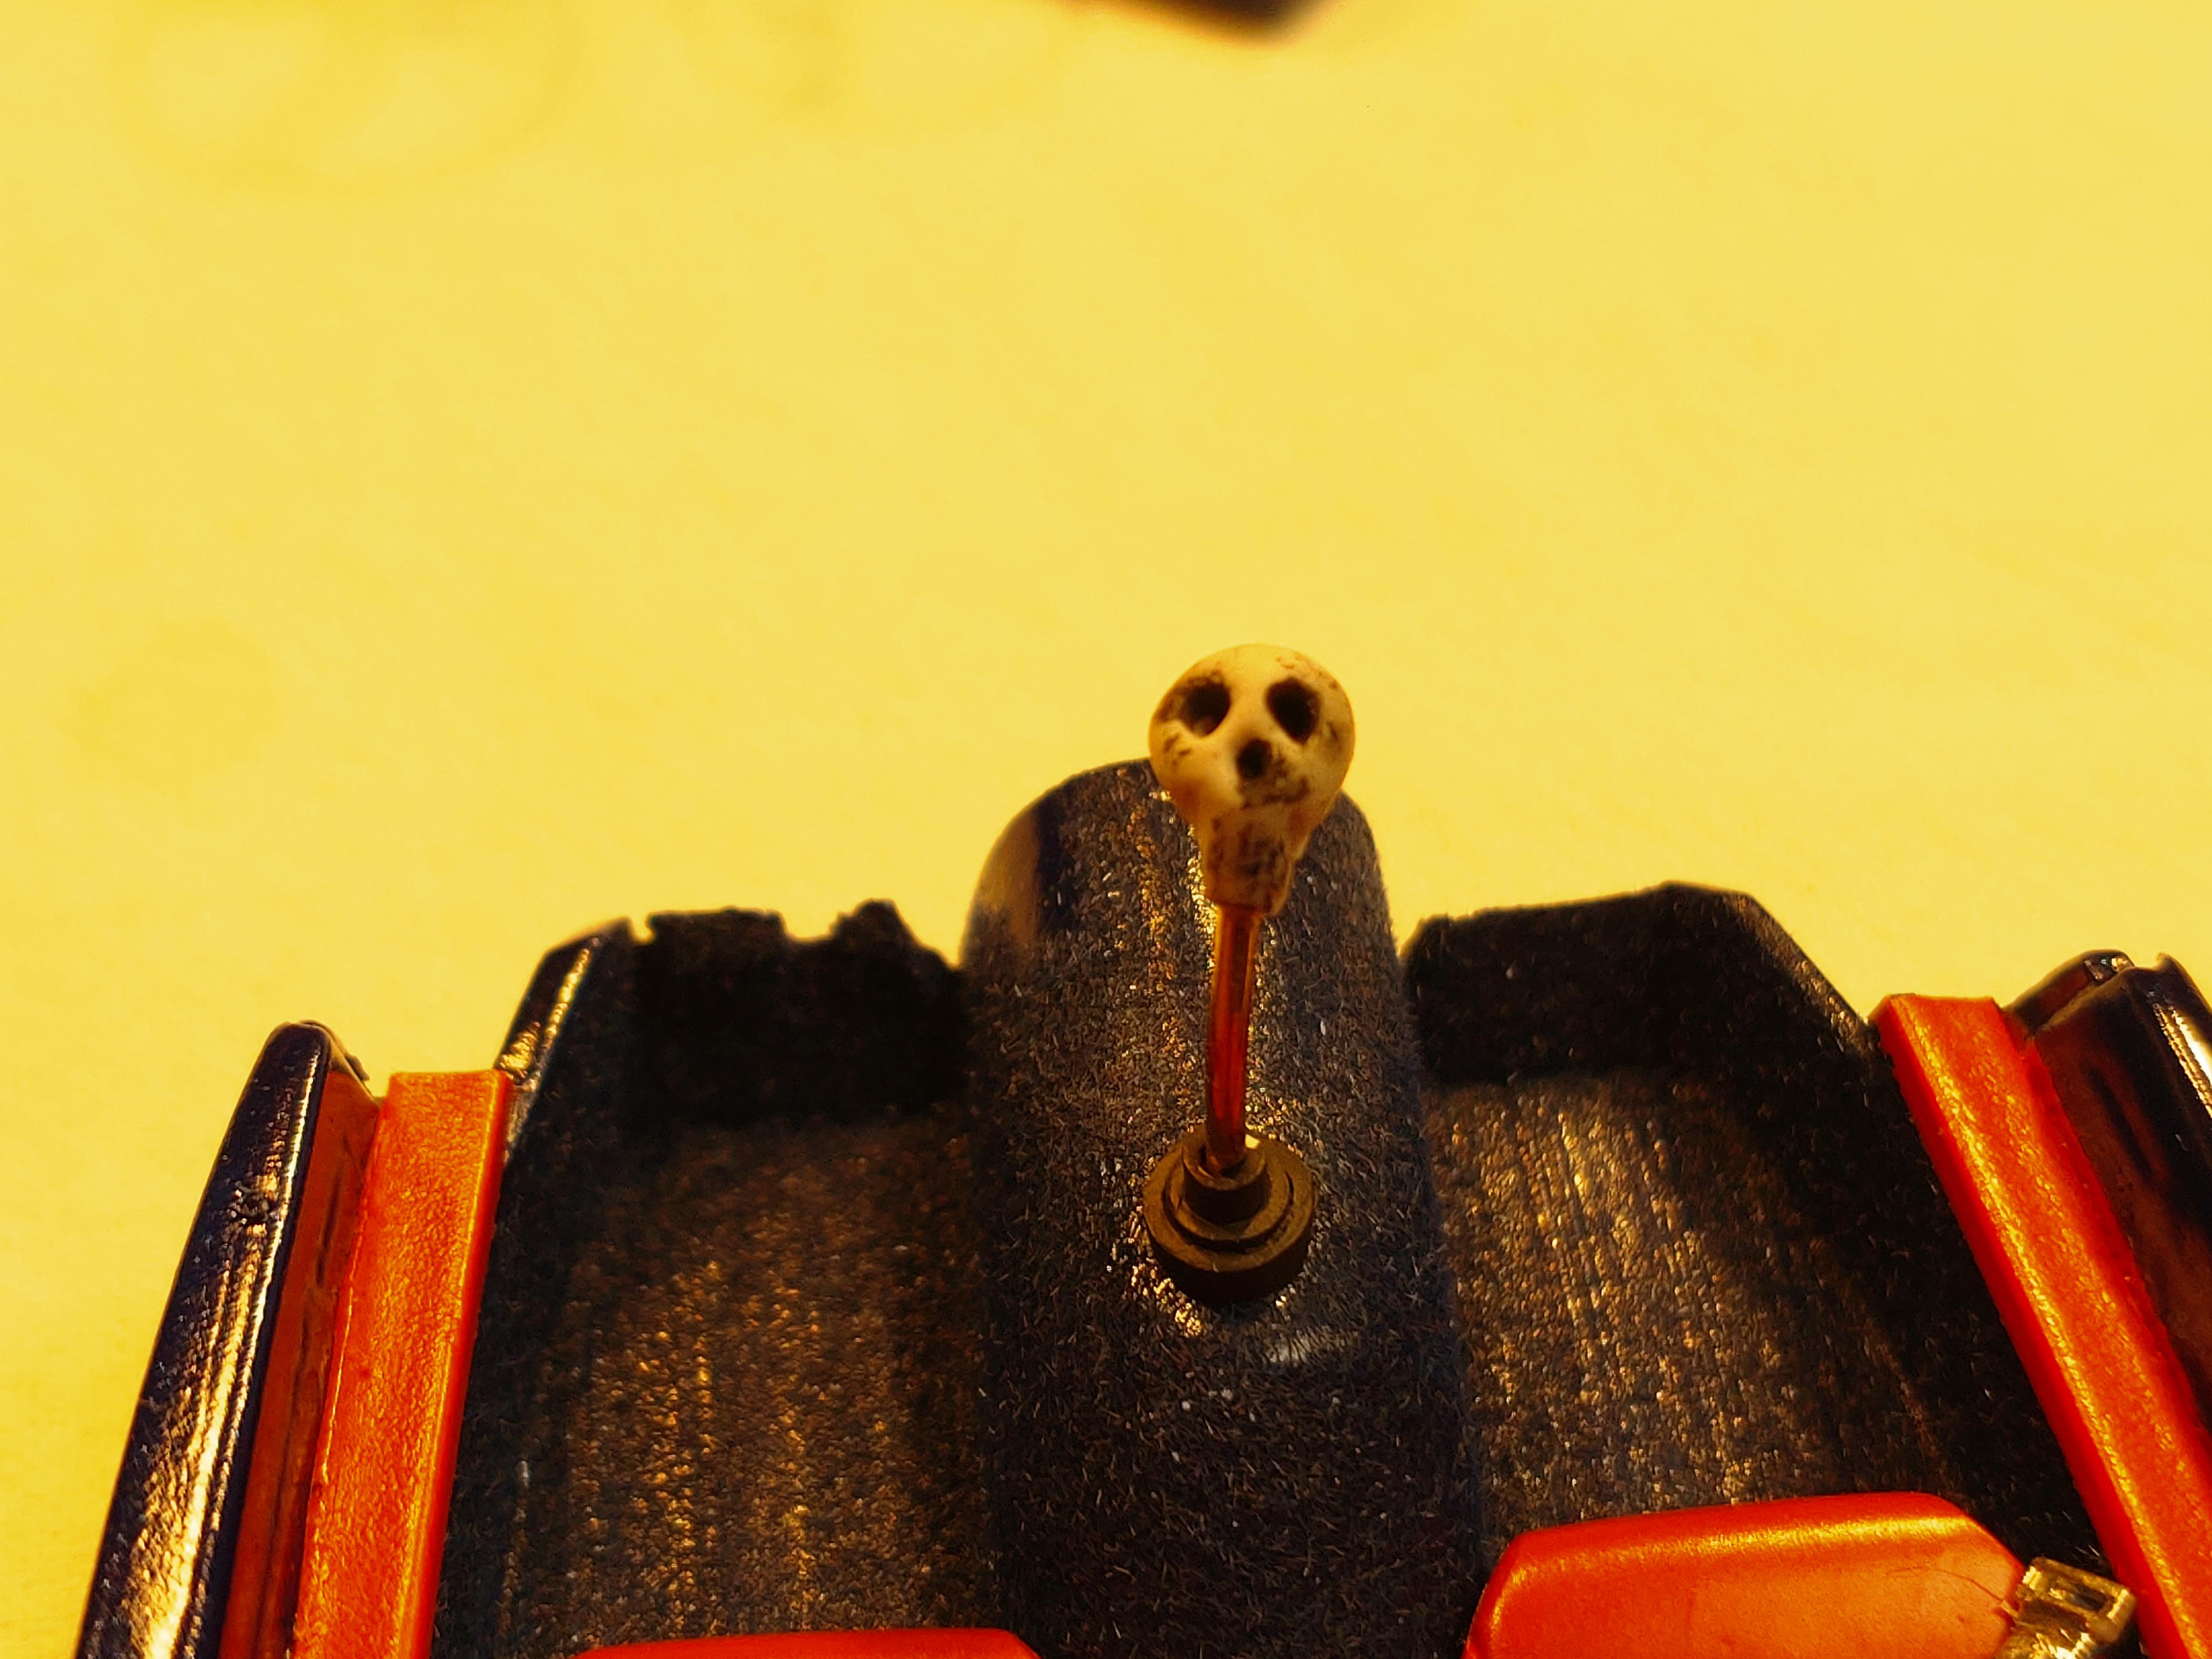
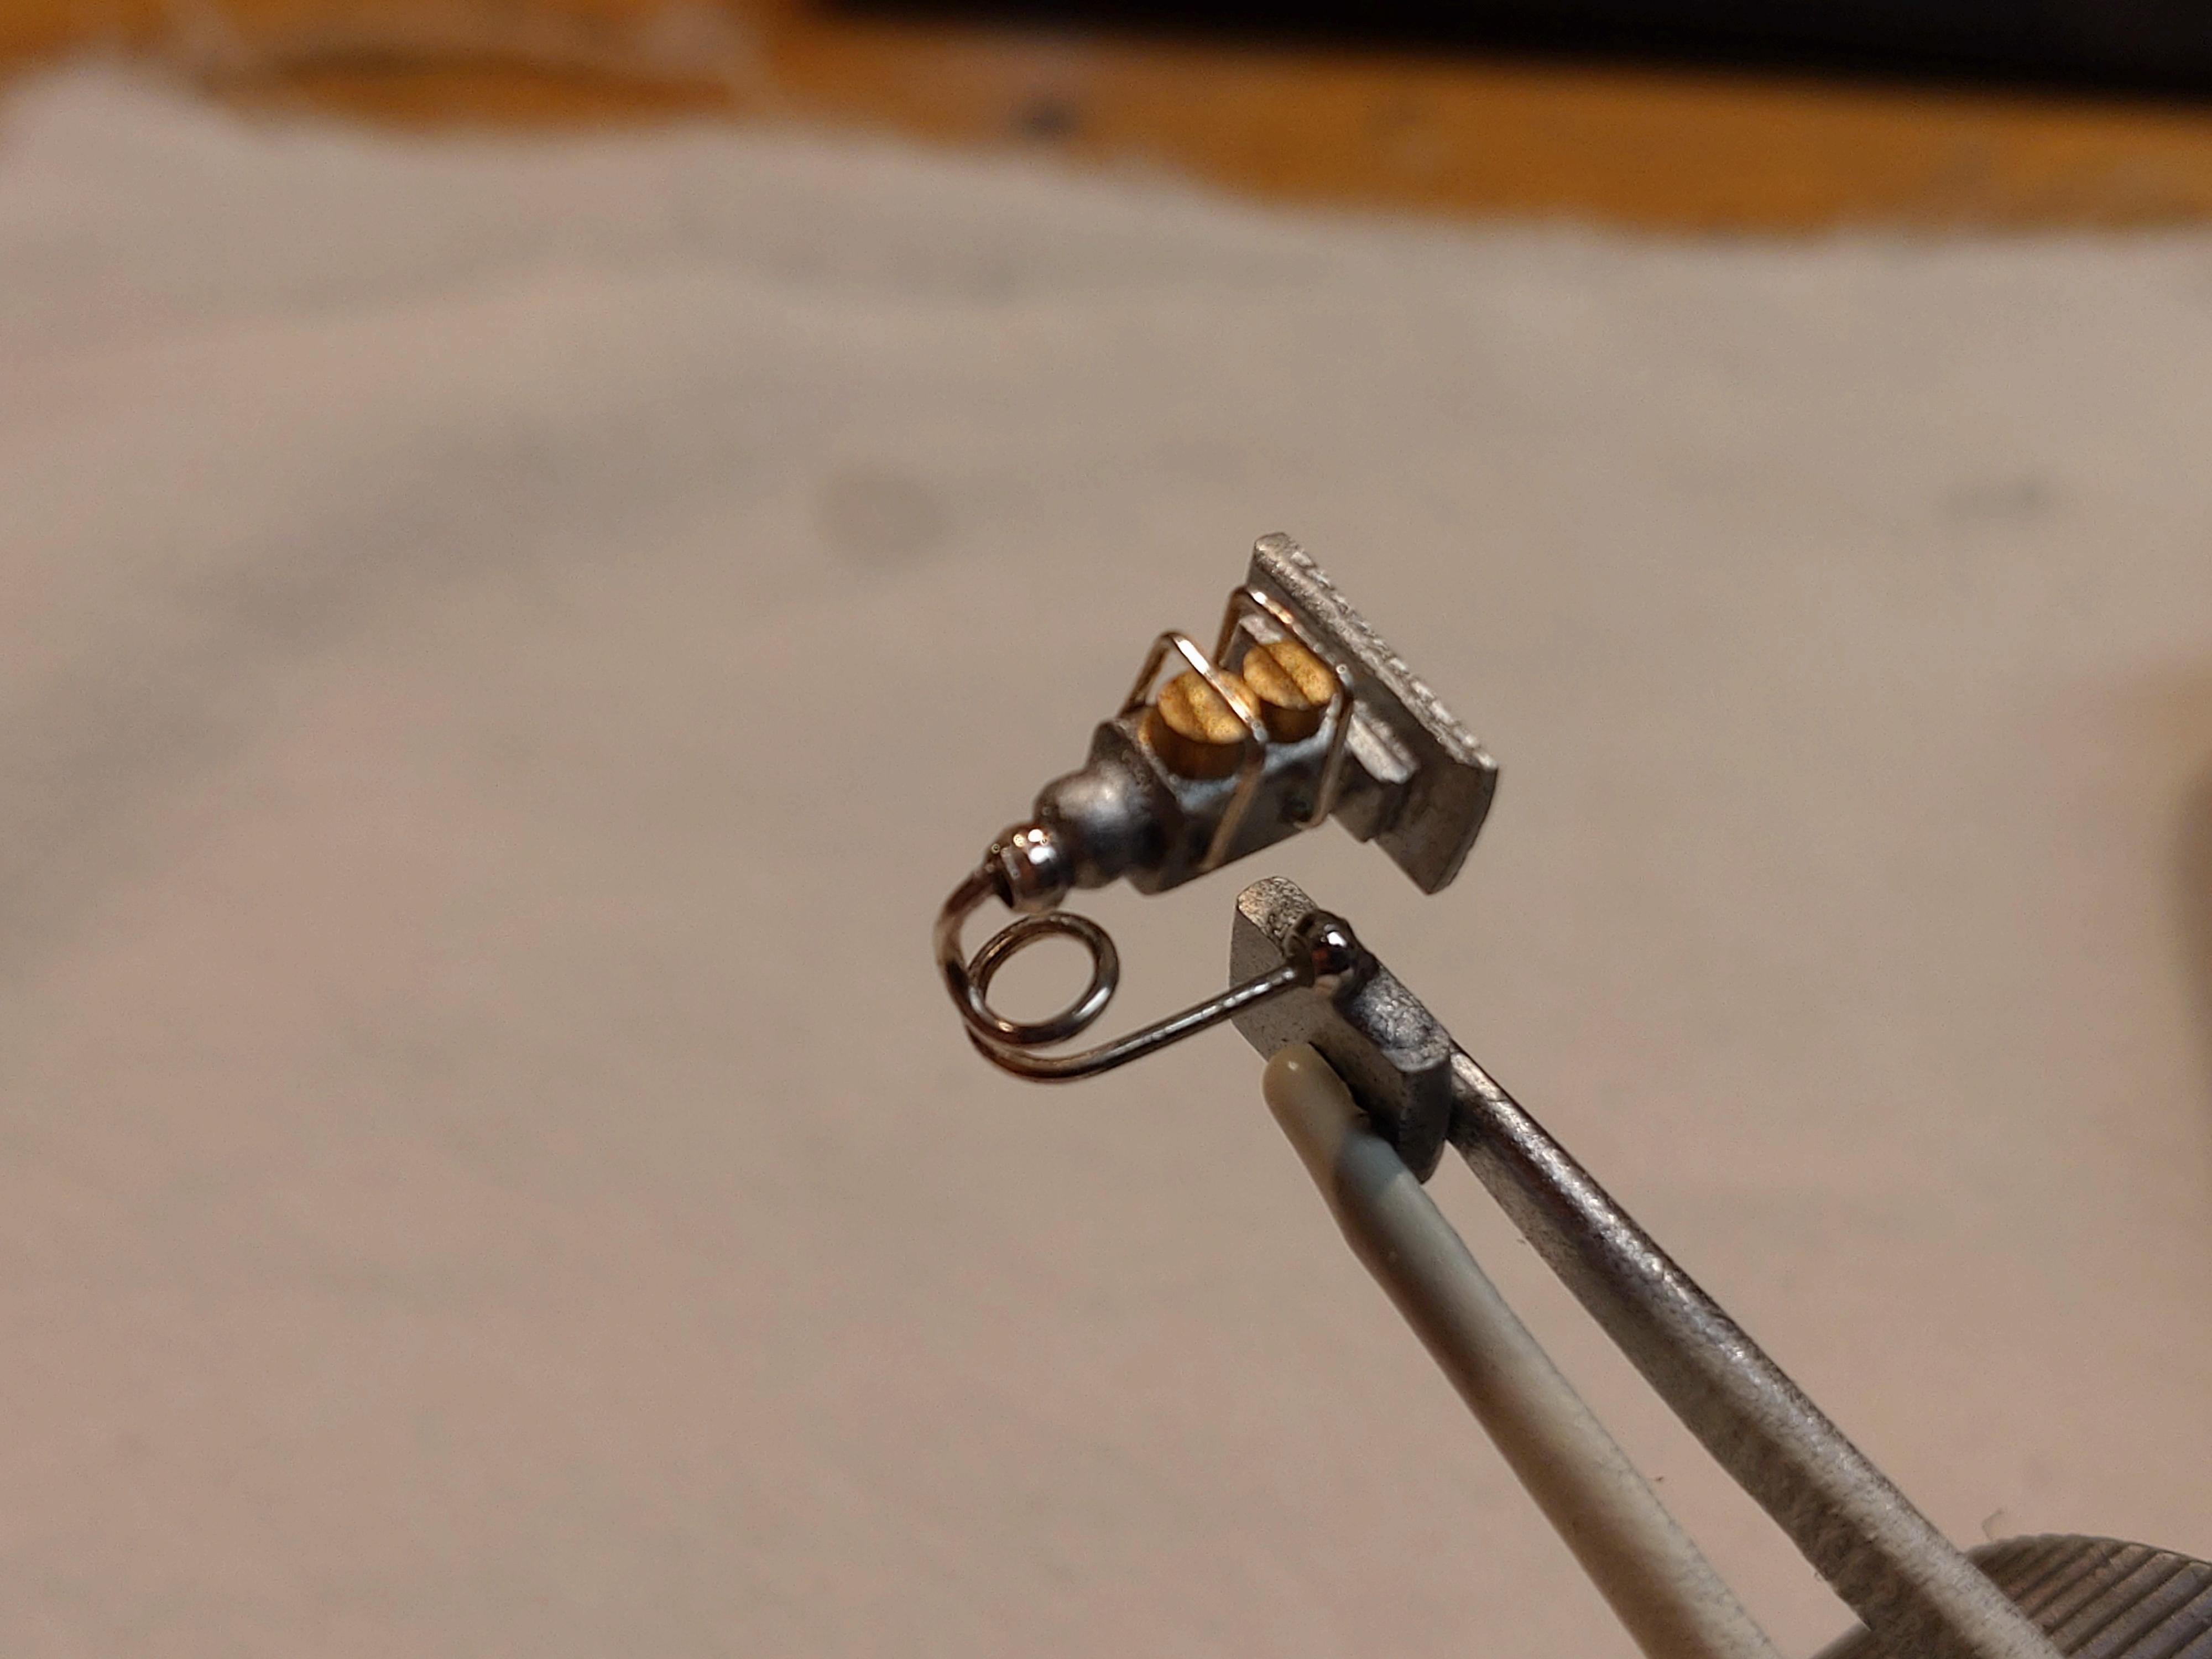
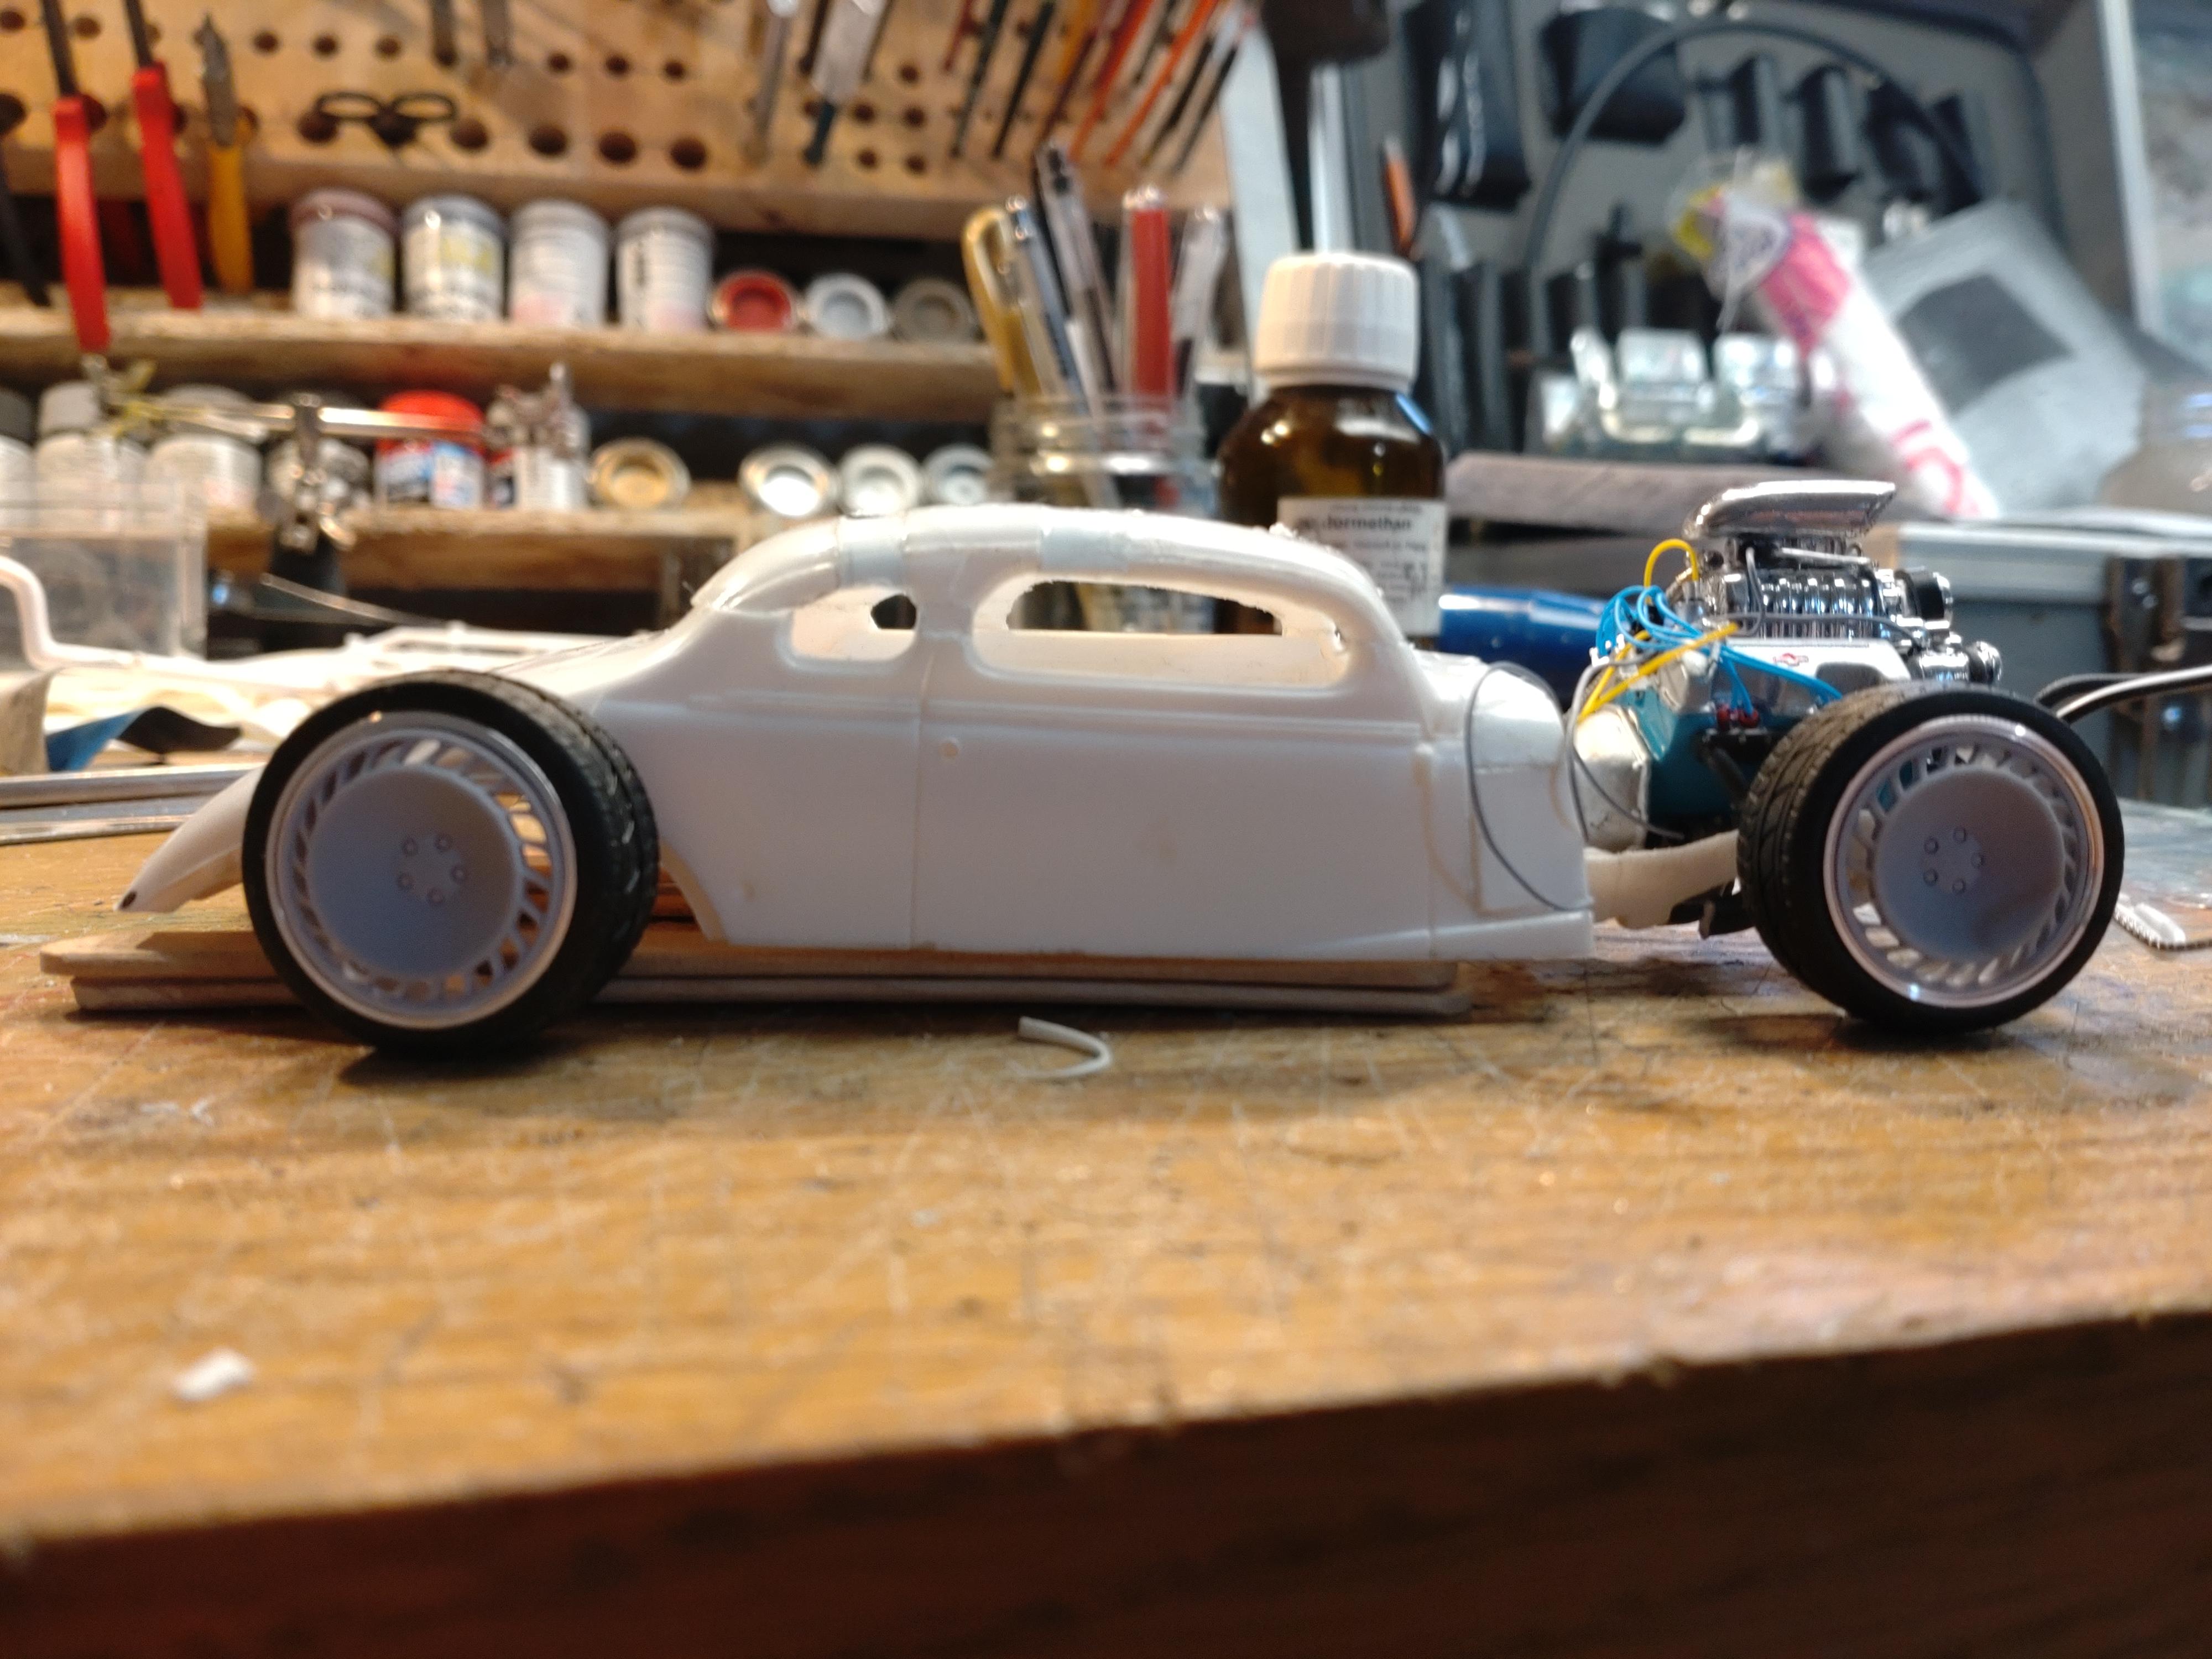
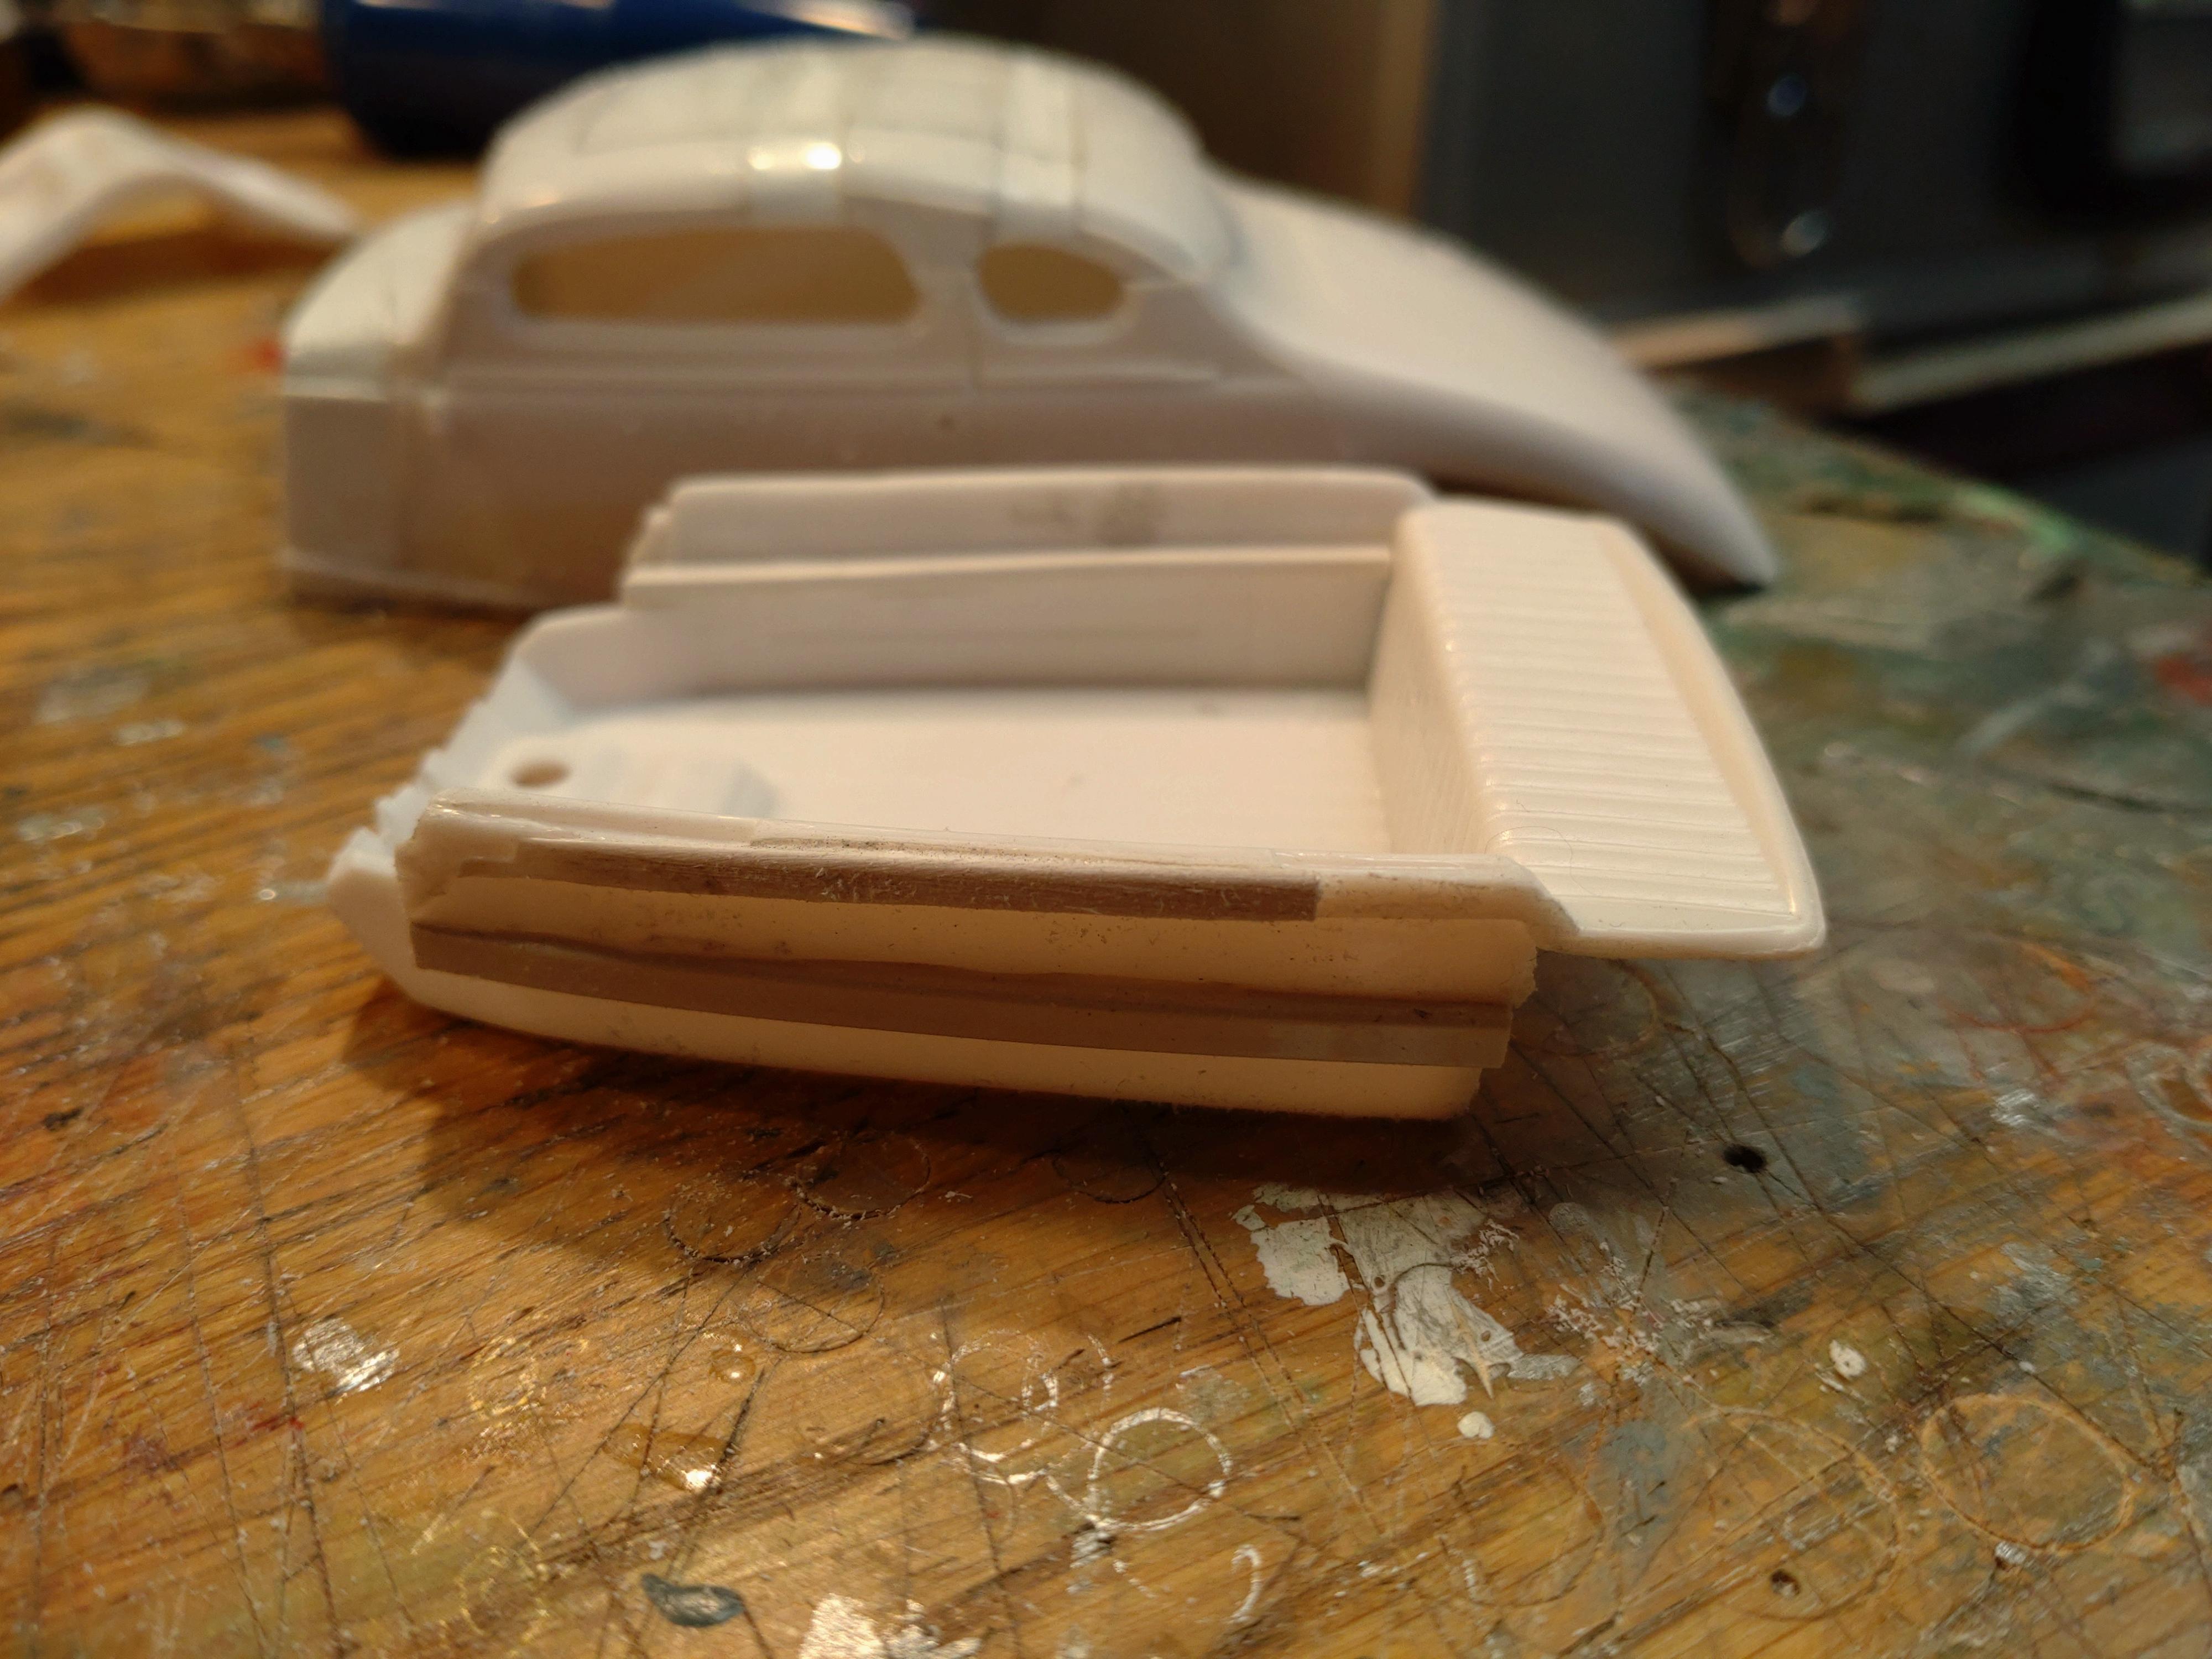
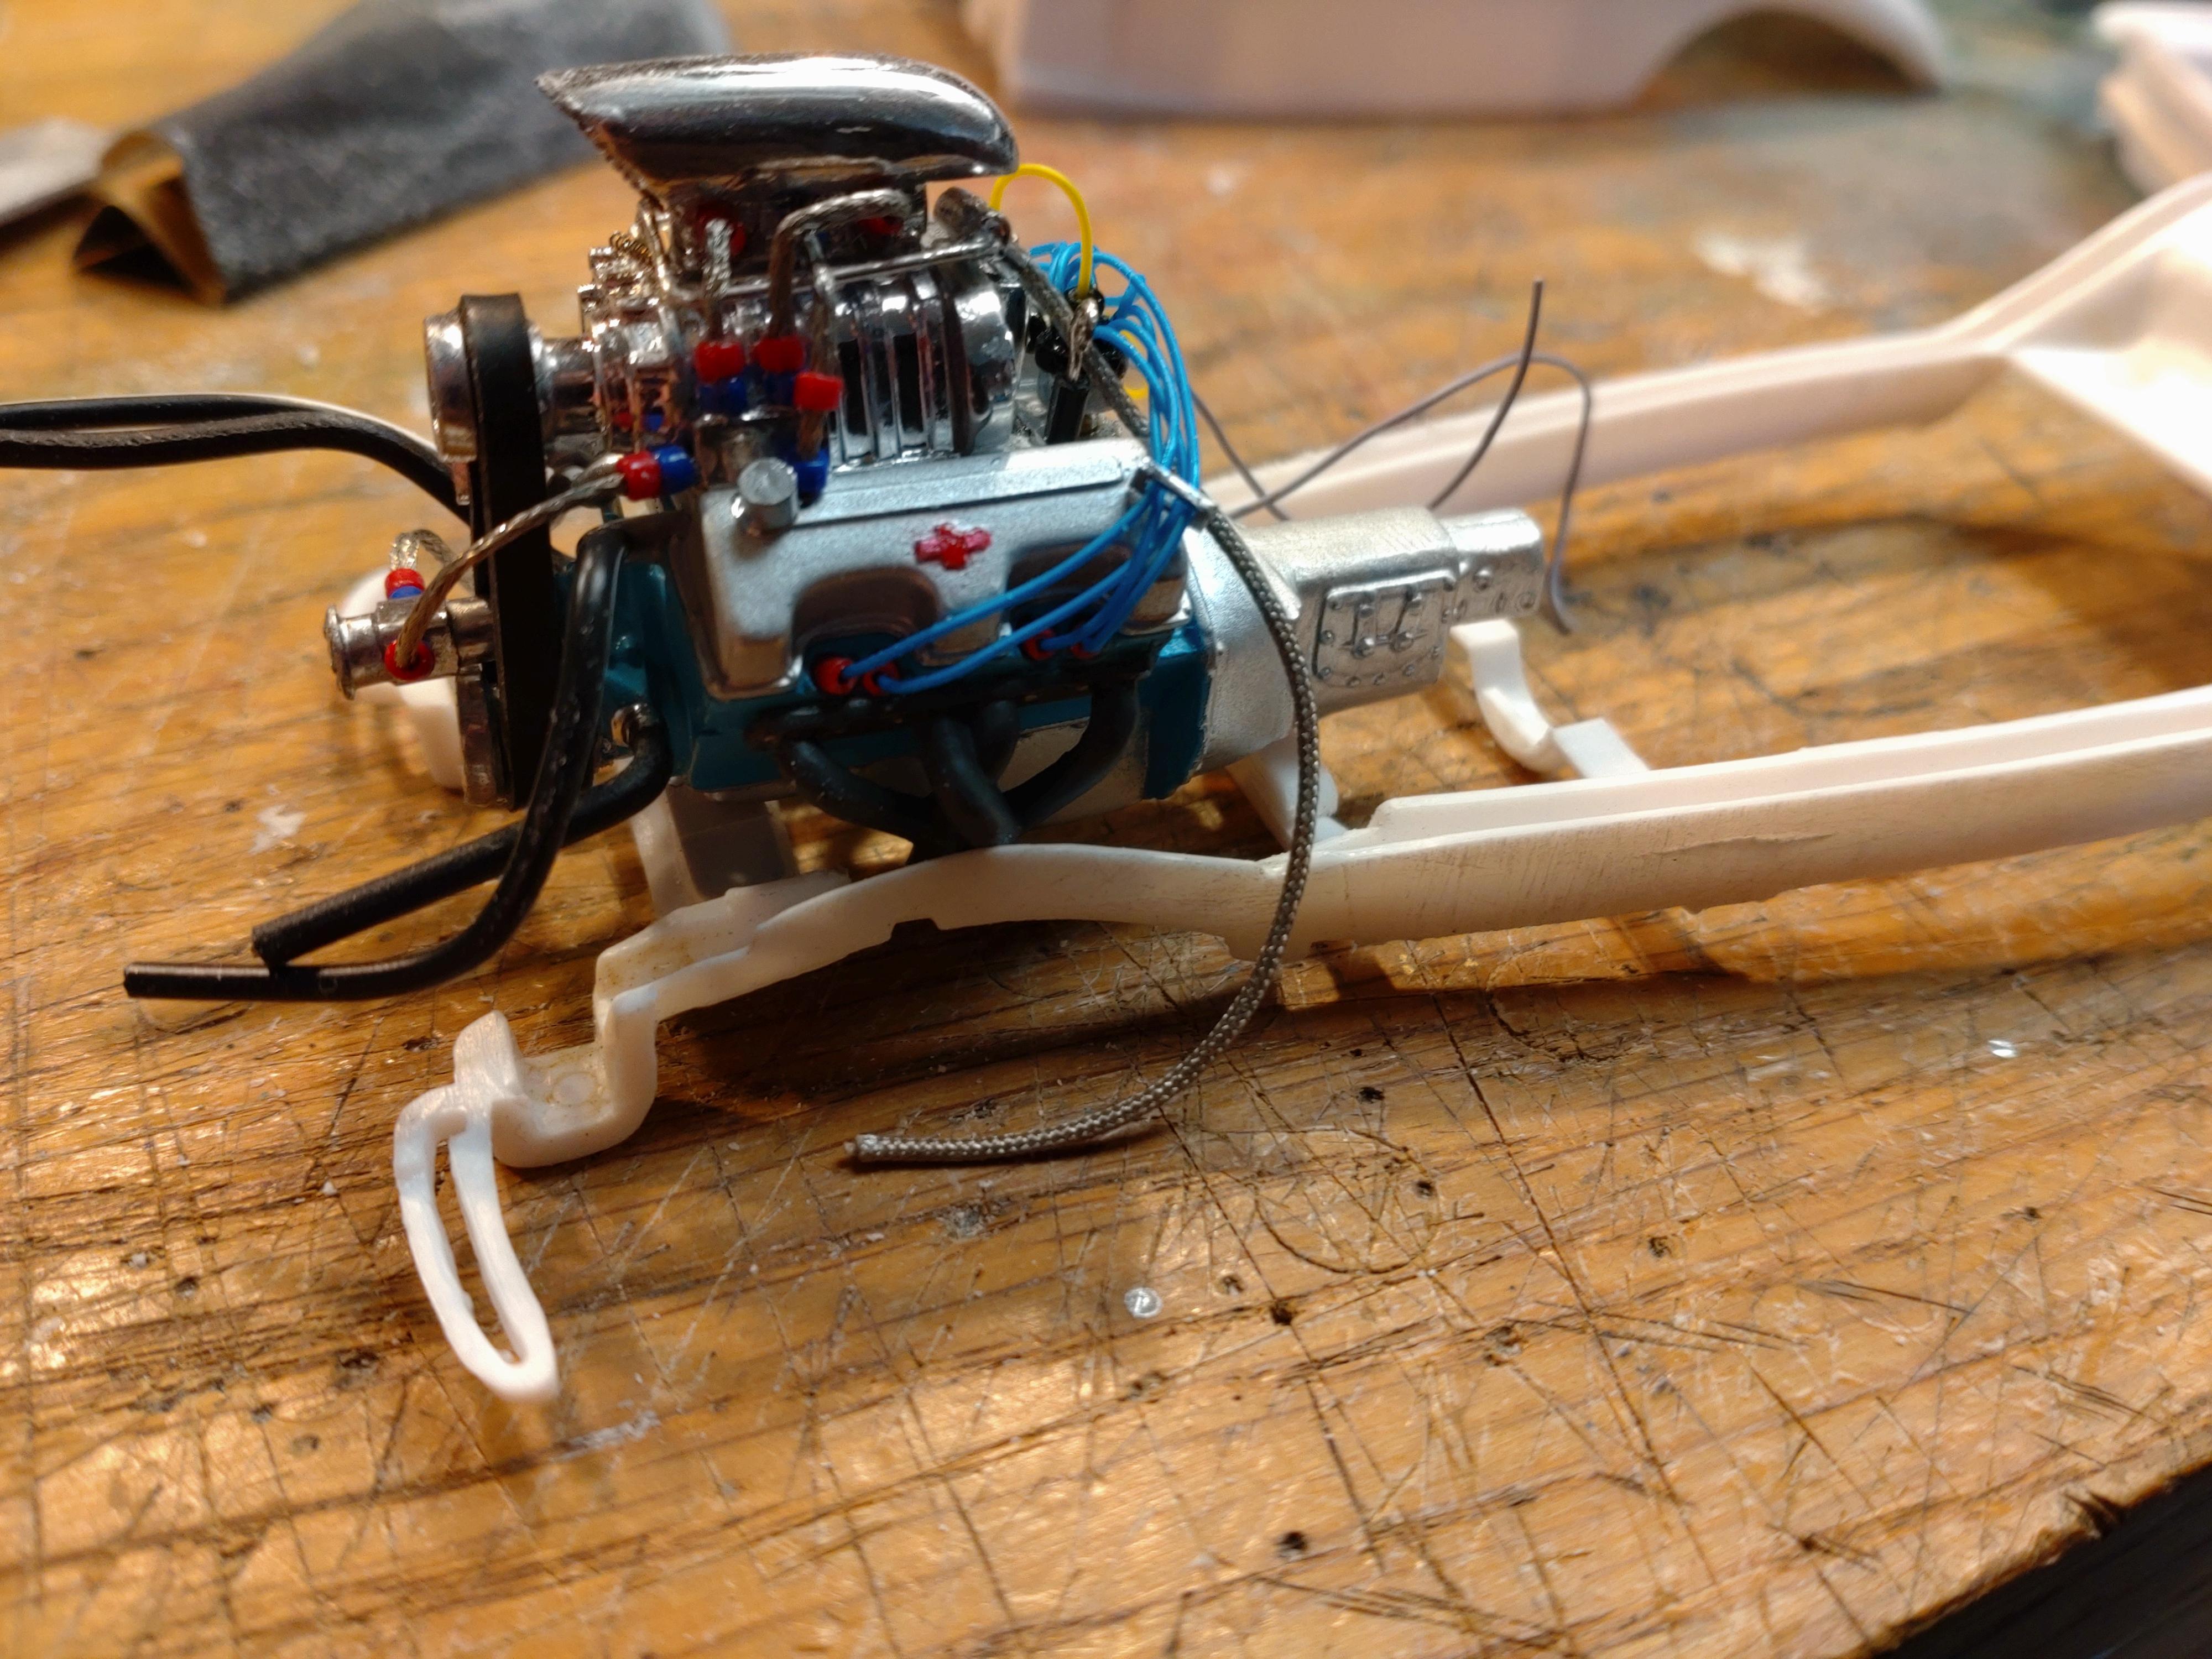
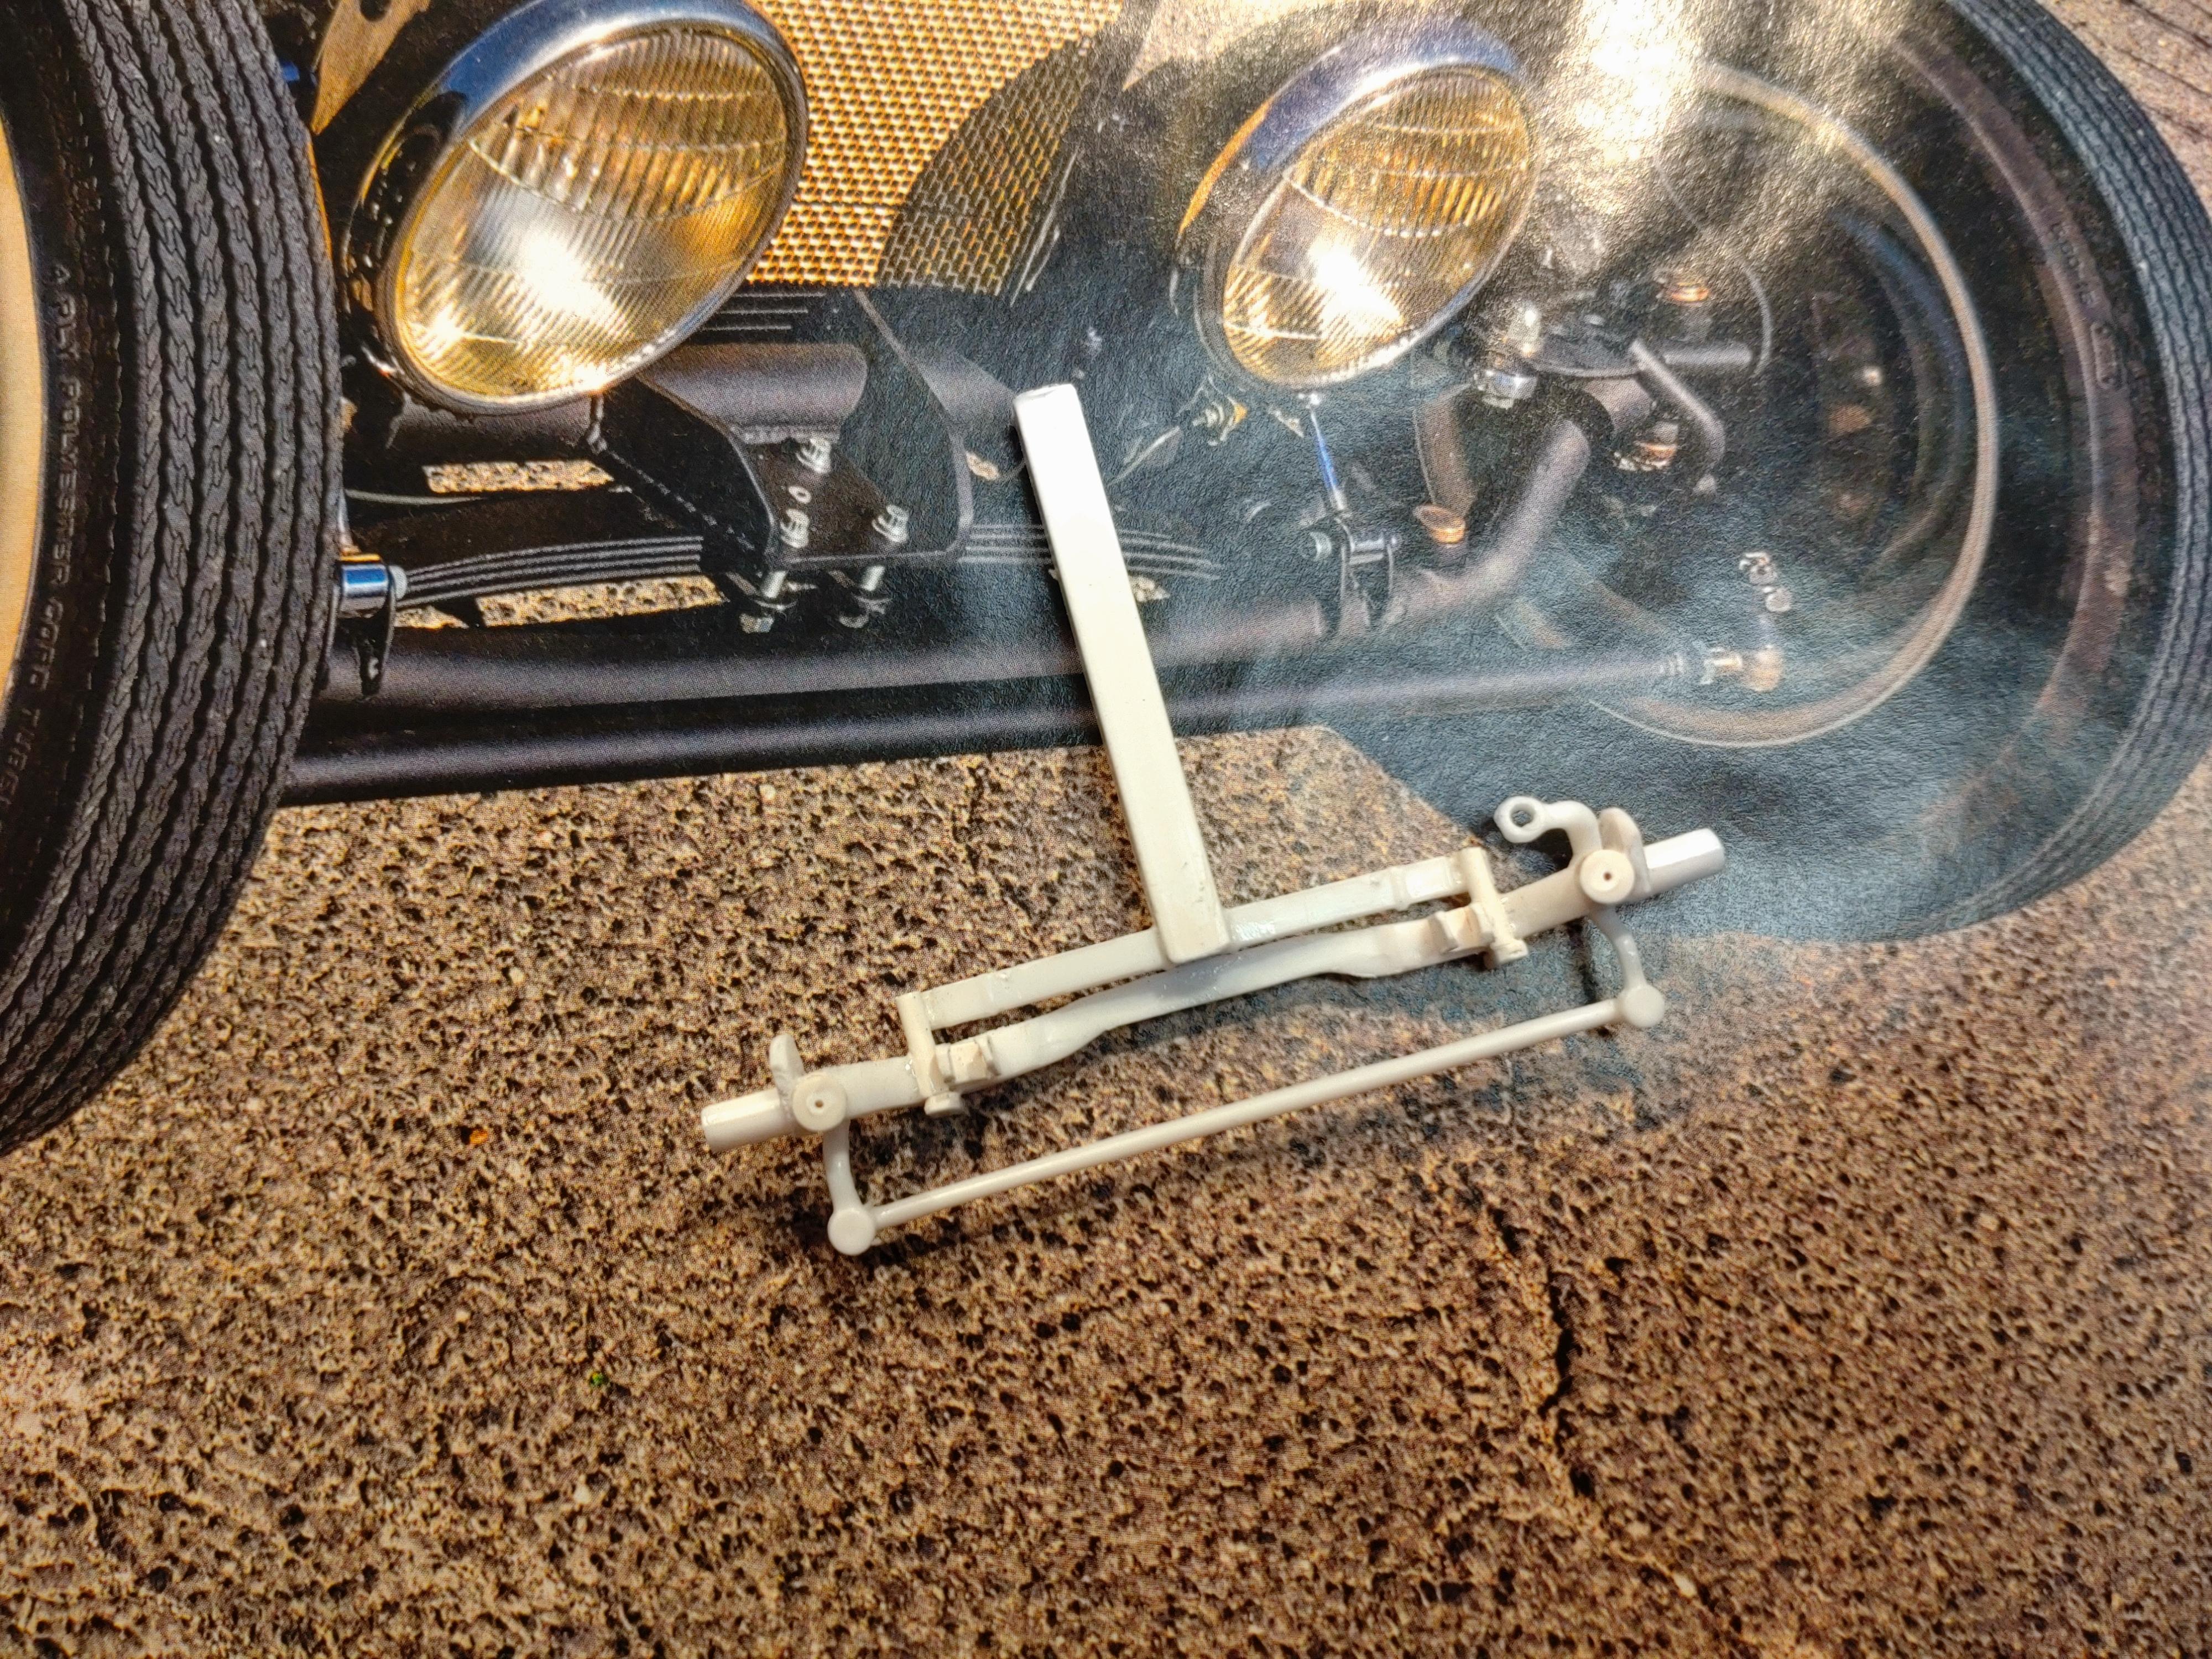
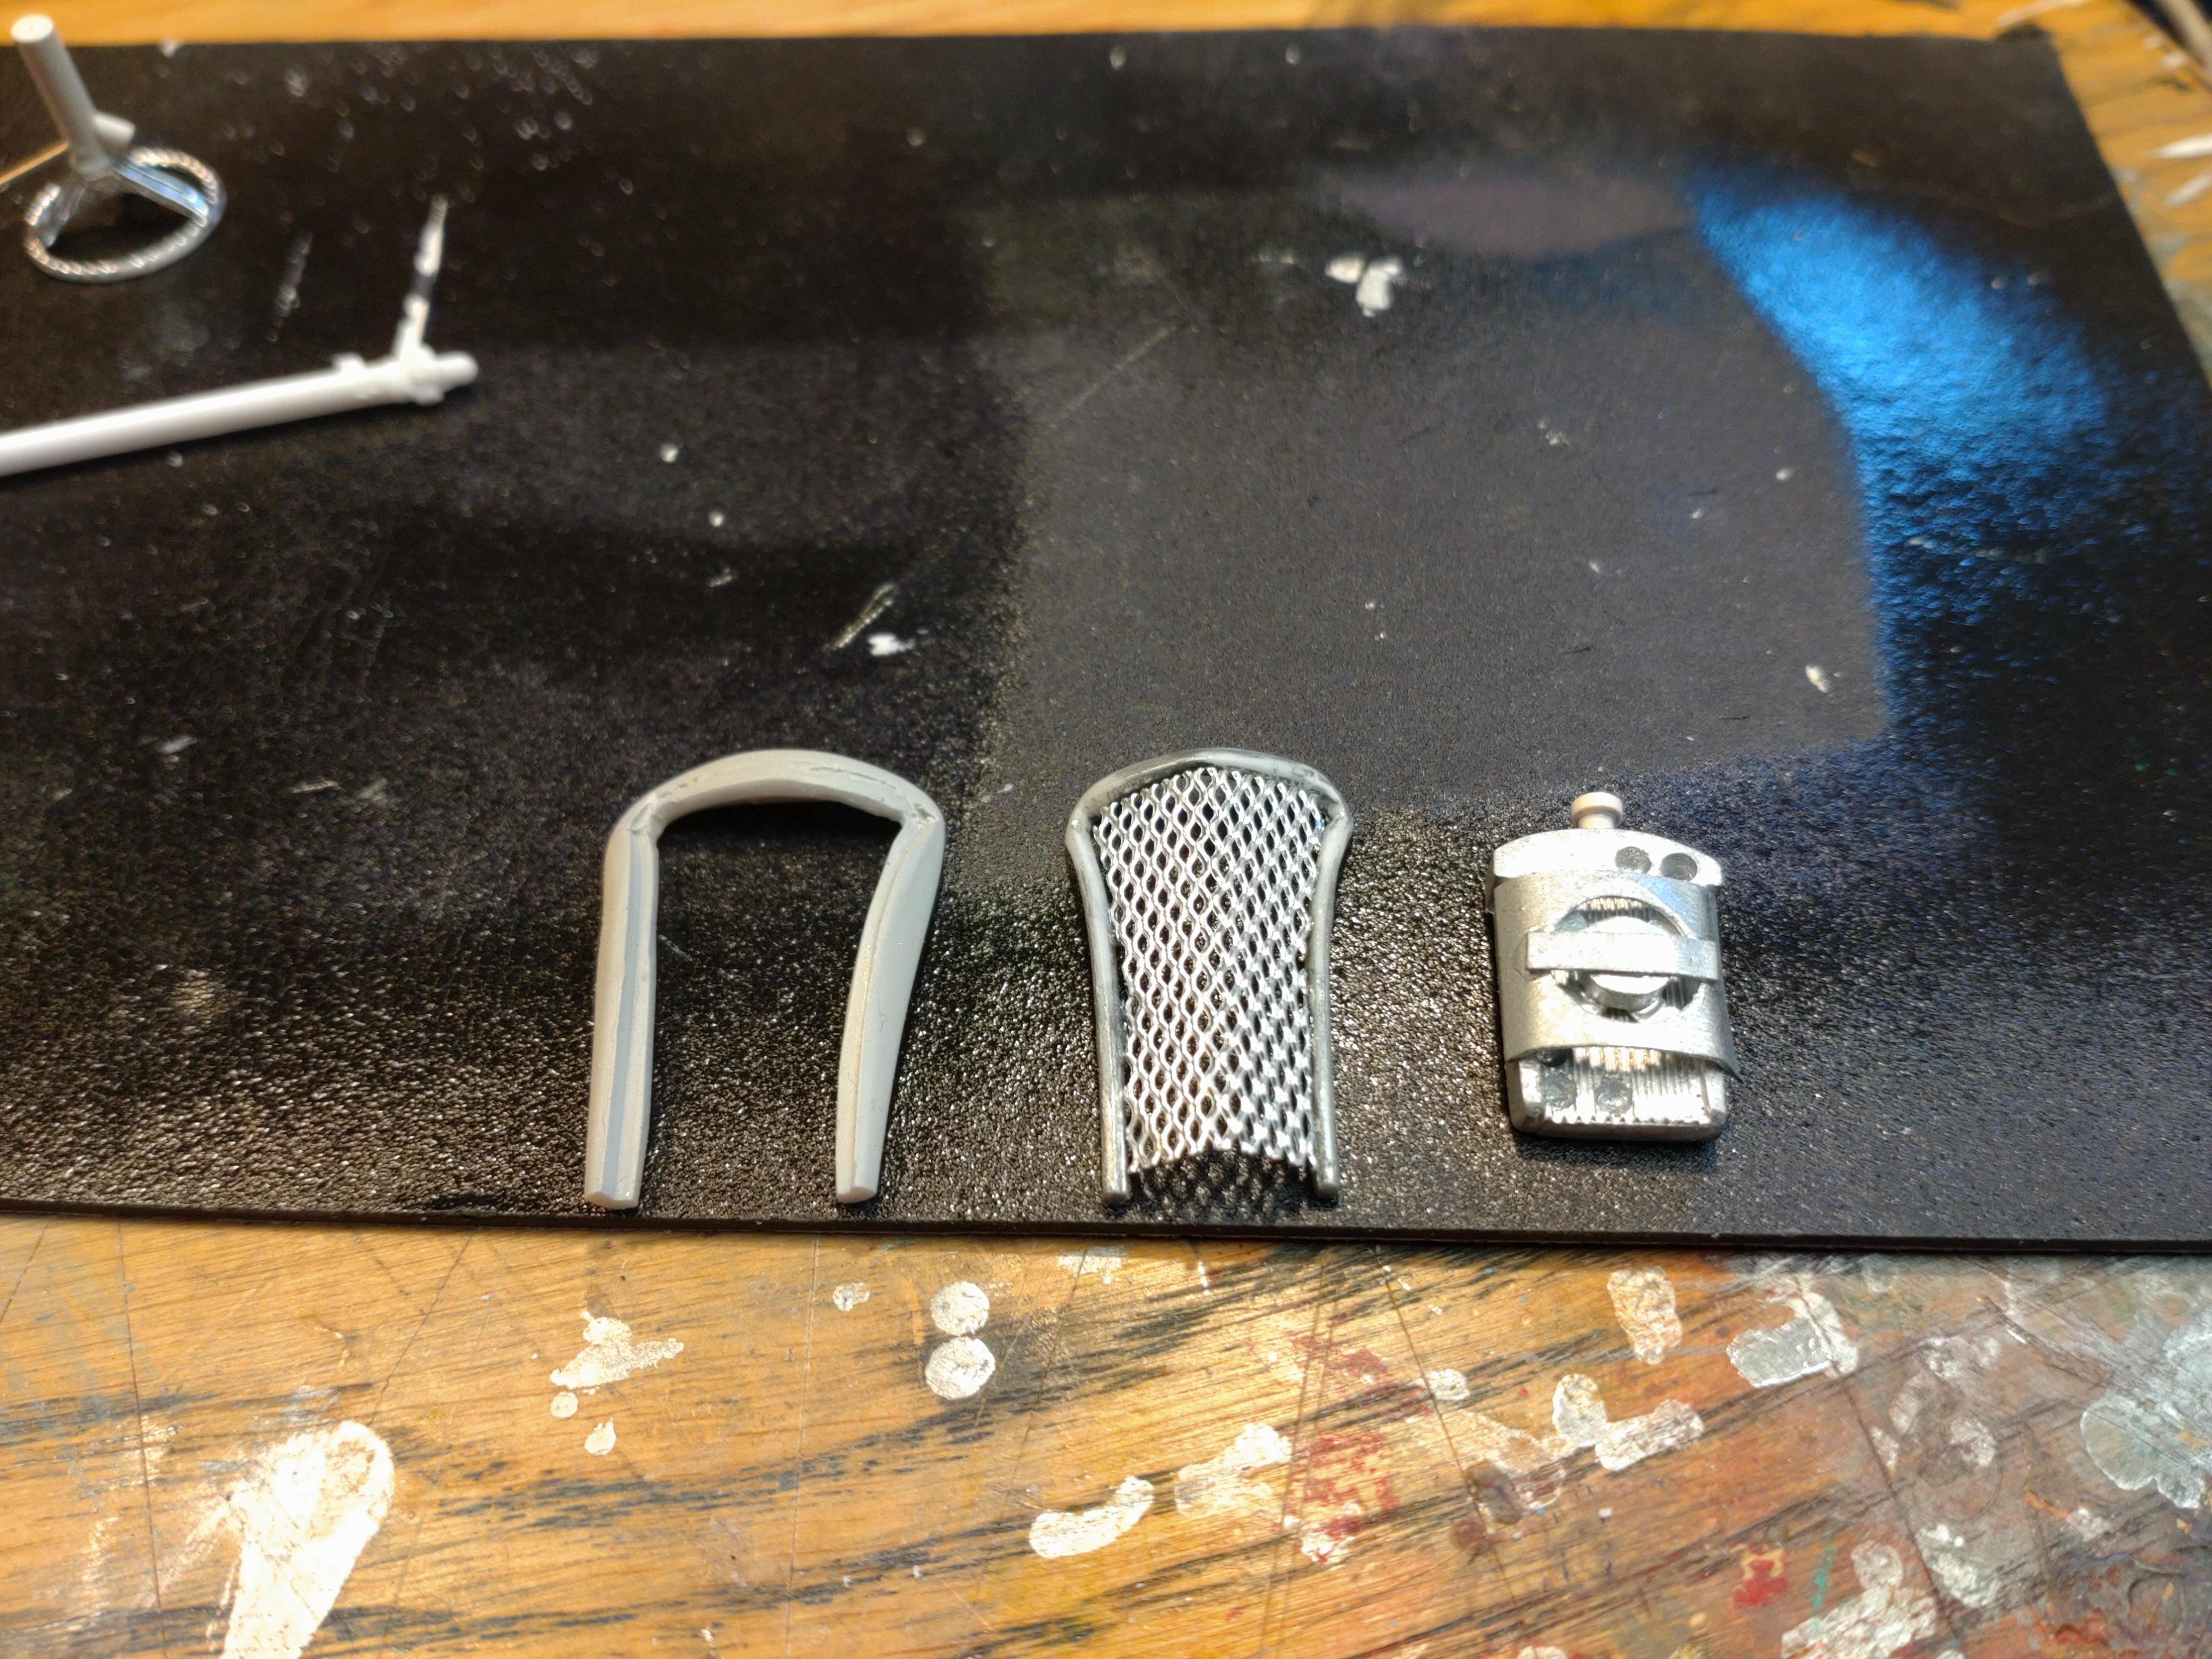
I had the naive belief that hot rods are quick an easy to build; until I finally made my first one. ? OK, this build is not an "out of the kit" weekend job. Since my last builds were stock or mild custom I wanted to do something very radical. How low can you chop, drop and tunnel a rod before it turns ridiculous? I chopped the roof by 6mm, cut 10mm off the bottom and lowered the chassis so that in real life the roof line would be about 50 cm lower than stock. Yes, that´s radical. If your interested in the making, please check my topic of this build in WIP. This is an AMT kit and I would like to warn beginners from starting with this model. The instruction sheet is a joke. Fortunately you get more parts than you need (2 engines). But try to figure things out without knowledge of what comes in, whats gets left? I´ve seen much better sheets than this. The paint is TAMIYA deep metalic blue. Had the idea with the roll roof after seeing a cut open roof on a hot rod in a magazine. The "press buttons" are short 0.8mm brass rods. Because the body is altered so much, NOTHING else would fit. So the interior tub got chopped, the custom seats were lowered and I had to fit the dash too. The skull shifter knob I molded out of FIMO, a plastic clay. The wheels and tires, the disc brakes and calipers are from scale production. The suspension and steering I had to manufacture completely new. The grill and frame were cut out to become see thru and the grill is aluminum mesh from my local crafts store. The engine has nothing to do with the kit. I built this engine in December from scratch and spare parts with a hot rod in mind, but no models at hand to build. Parts came from 4 engines and my own crafted items like the distributor and the pulleys and belt. The red and blue connectors are 1.5mm glass beads. The brake booster is made of styrene bits and wire. Yes I know, one could hardly drive this beast on public streets, or maybe not at all...? Would probably be a horrible ride for your back, but a showstopper at every traffic light. Front view is overrated if your driving the quarter mile! hope you like it and thanks for looking!

-
Zachary, applause for your build! You did a great job and your weathering and rusting are very convincing. Keep up the good work?
-
I´ve never seen so much rust on an model an I love it! Wonderful build. Thanks for sharing project.
-
`37 Chevy Rod how low can you gow
Andy Oldenburg replied to Andy Oldenburg's topic in WIP: Model Cars
Hi everyone, again, many thanks for your replies and thoughts! @Bob - This engine is a scrap build, from about 4 different kits. You can check the topic from DEC 26th. Had a lot of fun fitting unfittable parts together for a charged 409. @Ryan - I am stunned! Someone out there had the same idea and made a REAL car out of it. I do hope that the project will come to an end one day! Yes I know, that this car is probably undrivable, at least on public streets. I believe that a free street view is overrated on the 1/4 mile or a flying mile. ?lol! I finally got finished today but have to find time to take neat pics. Hope to introduce it on Under Glass this week. Best wishes! -
`37 Chevy Rod how low can you gow
Andy Oldenburg replied to Andy Oldenburg's topic in WIP: Model Cars
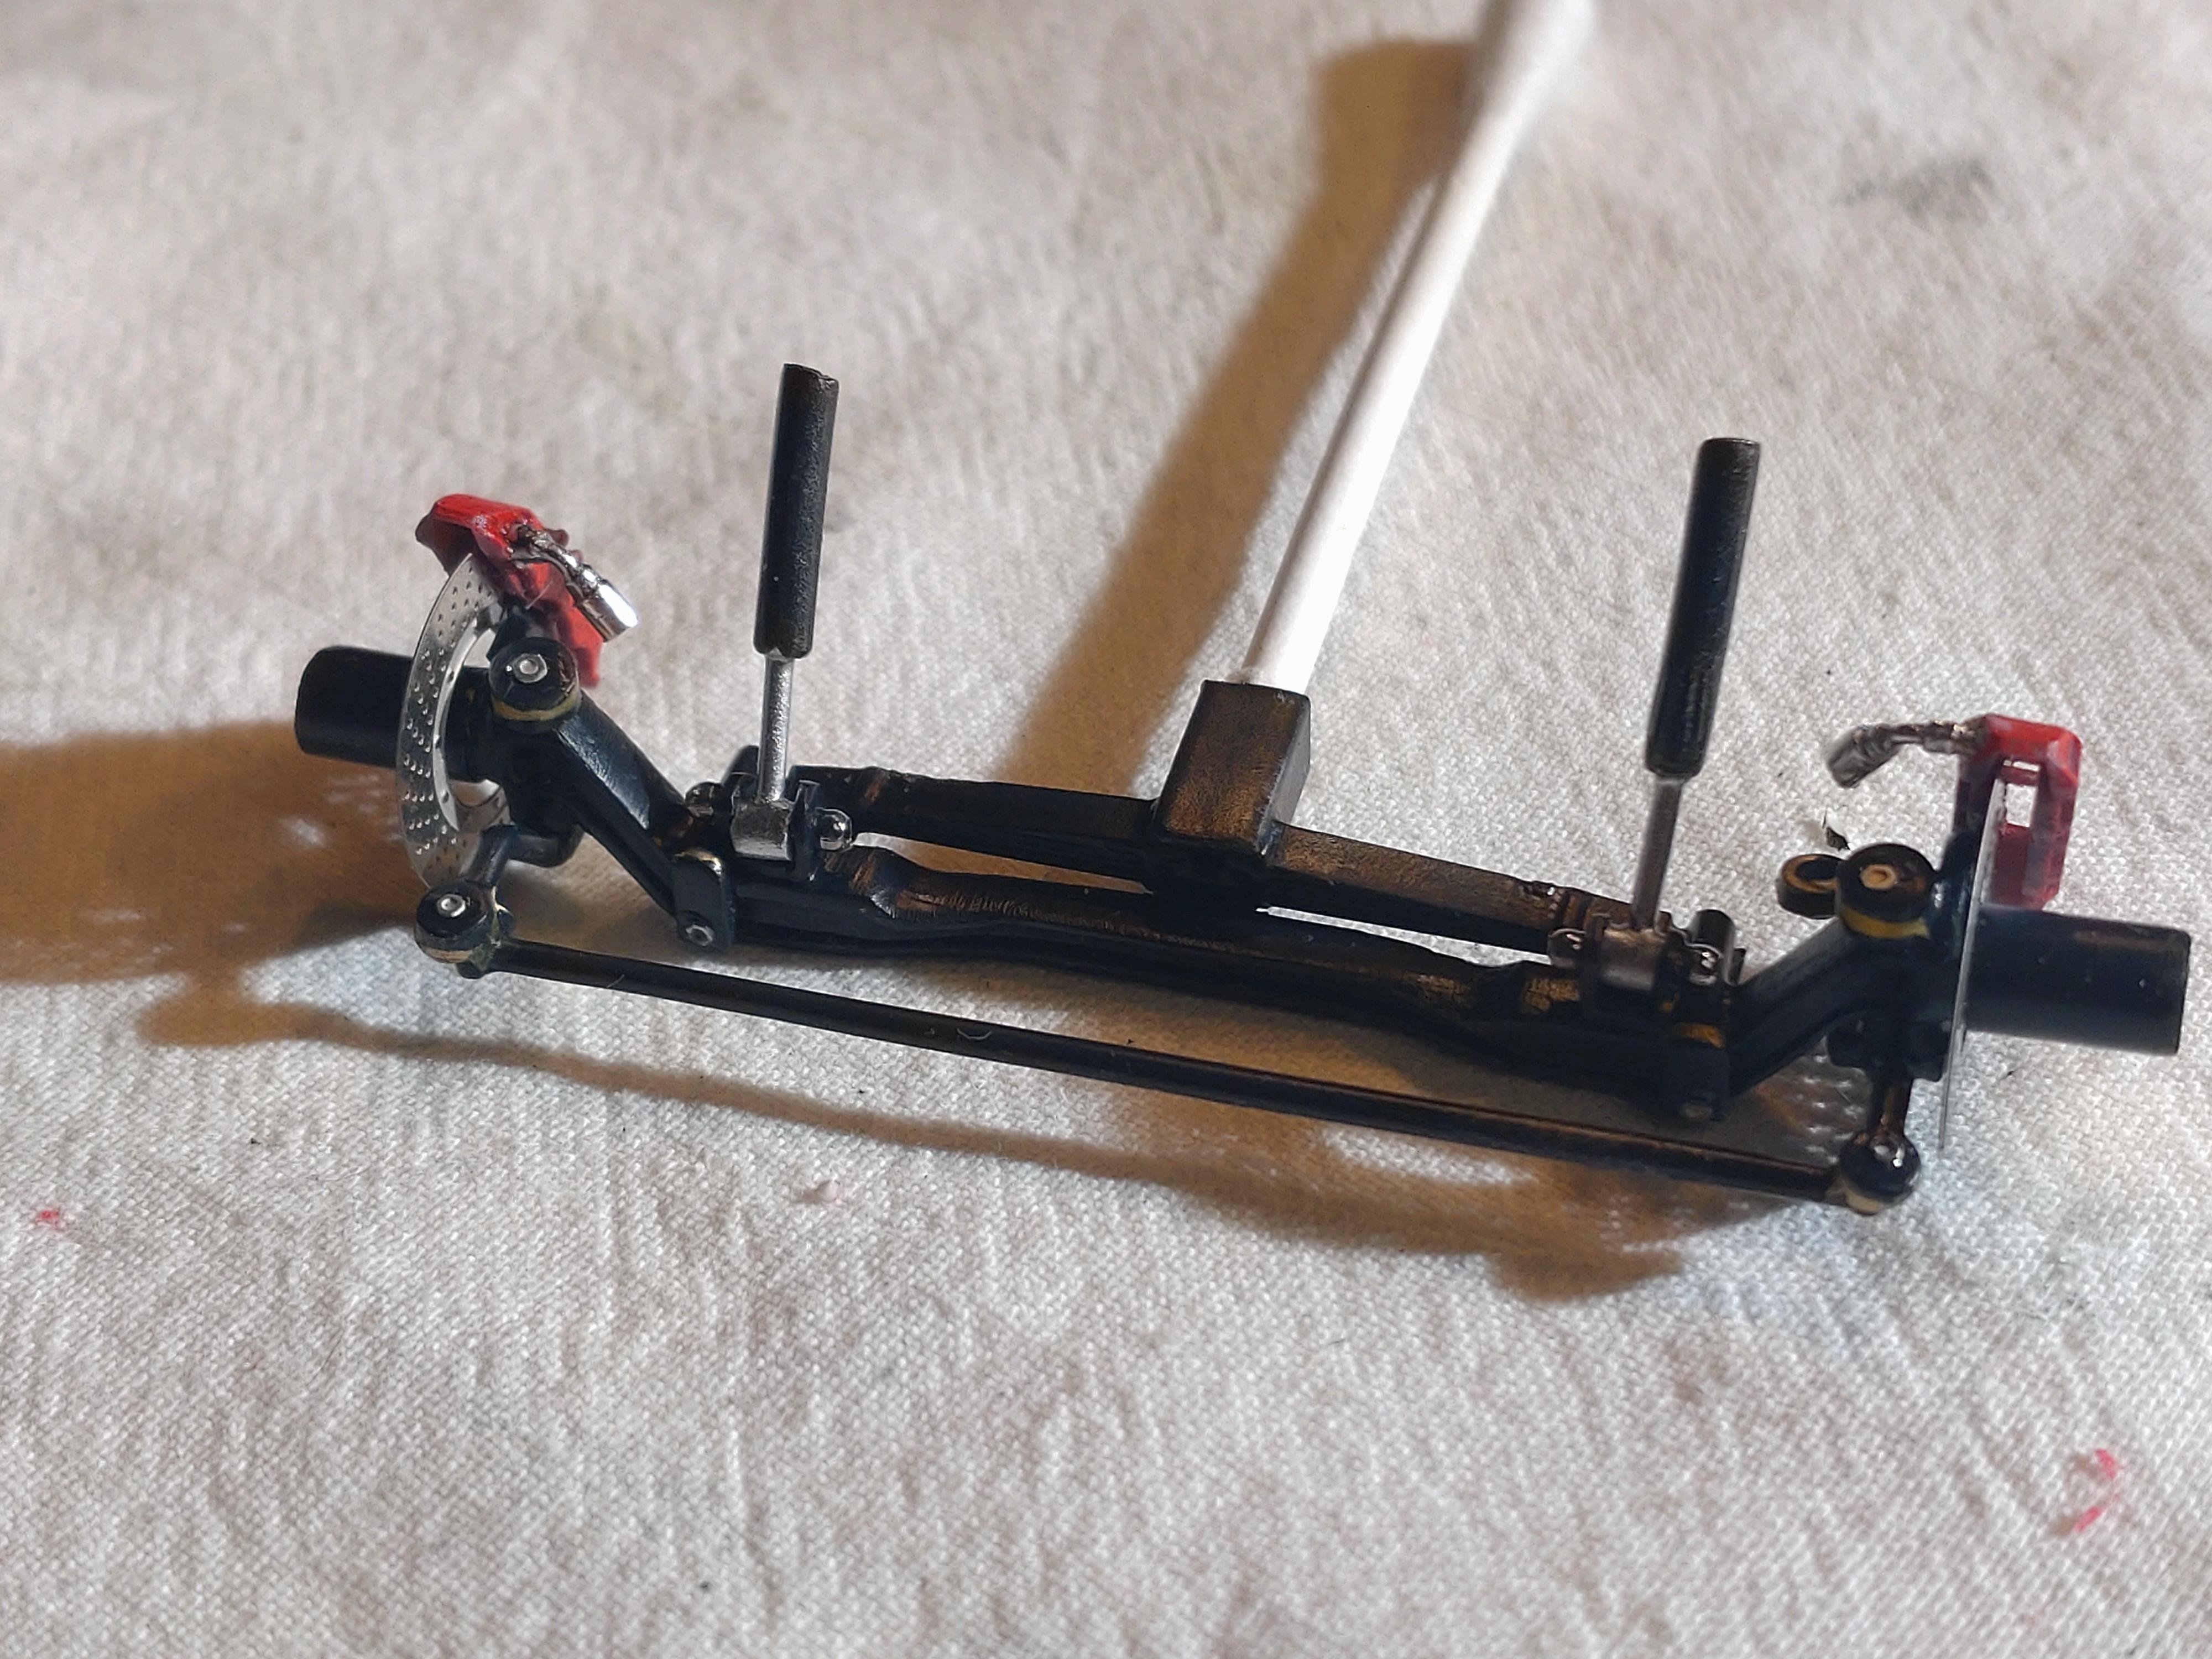
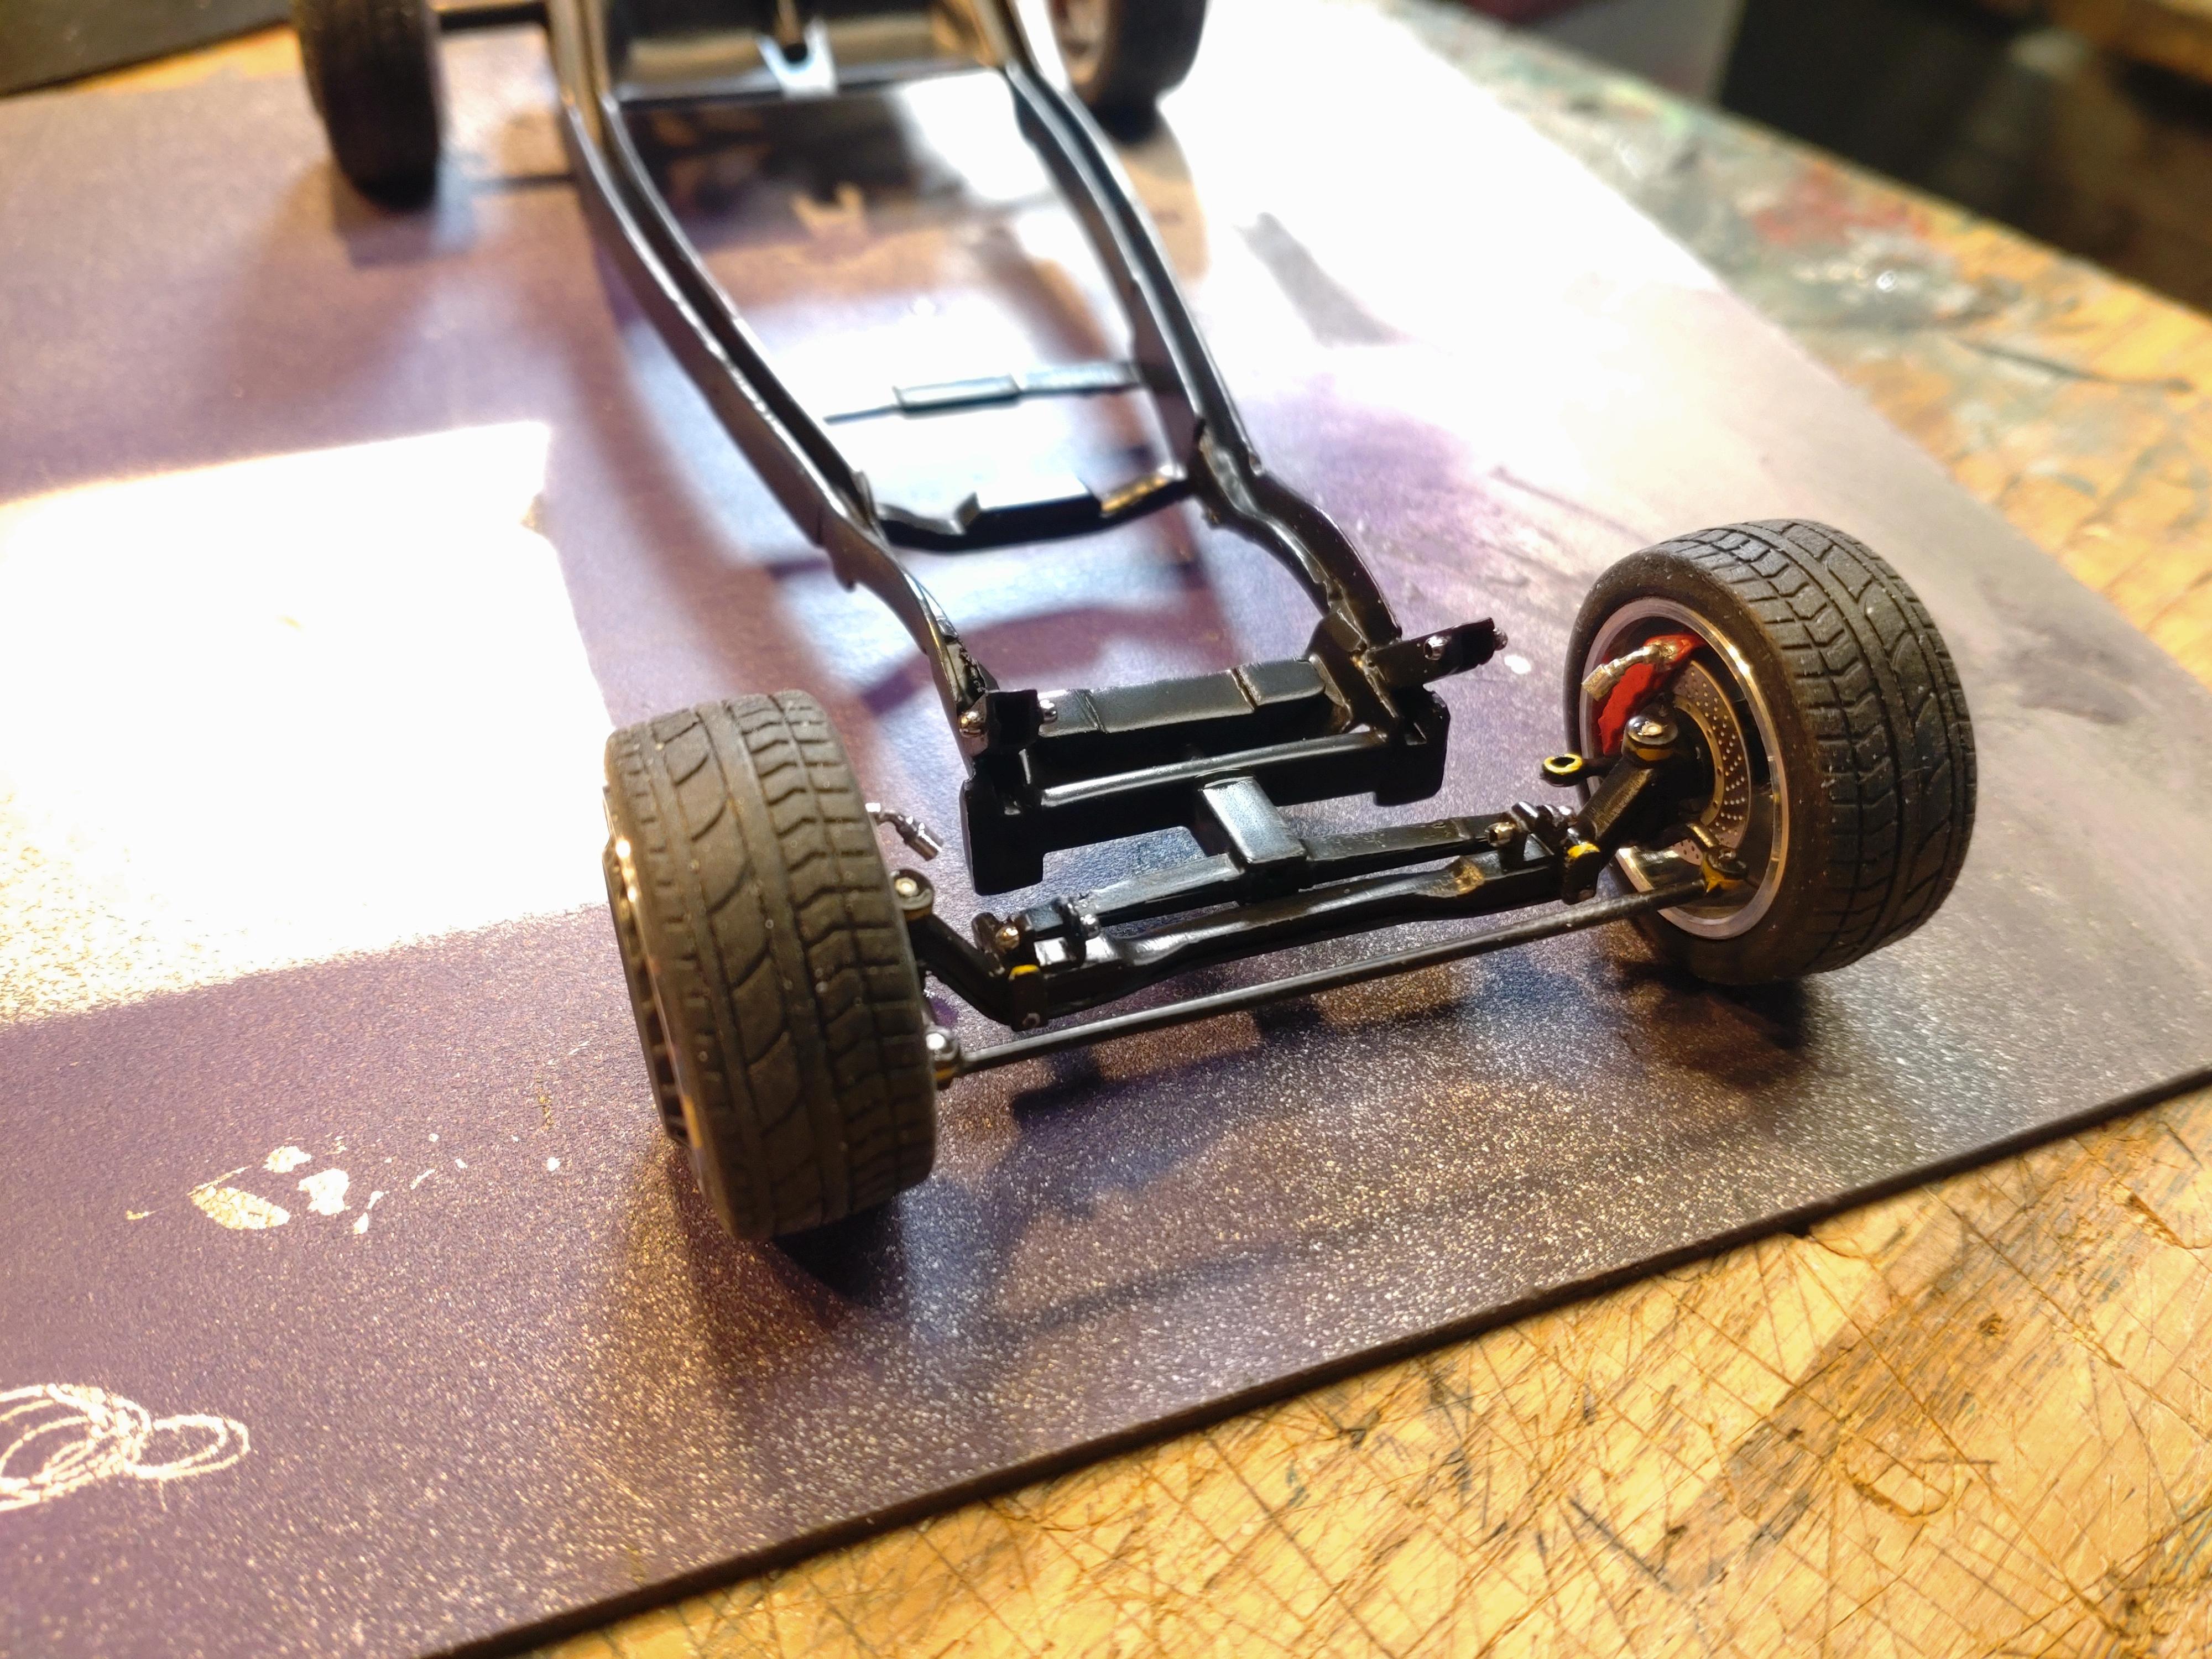
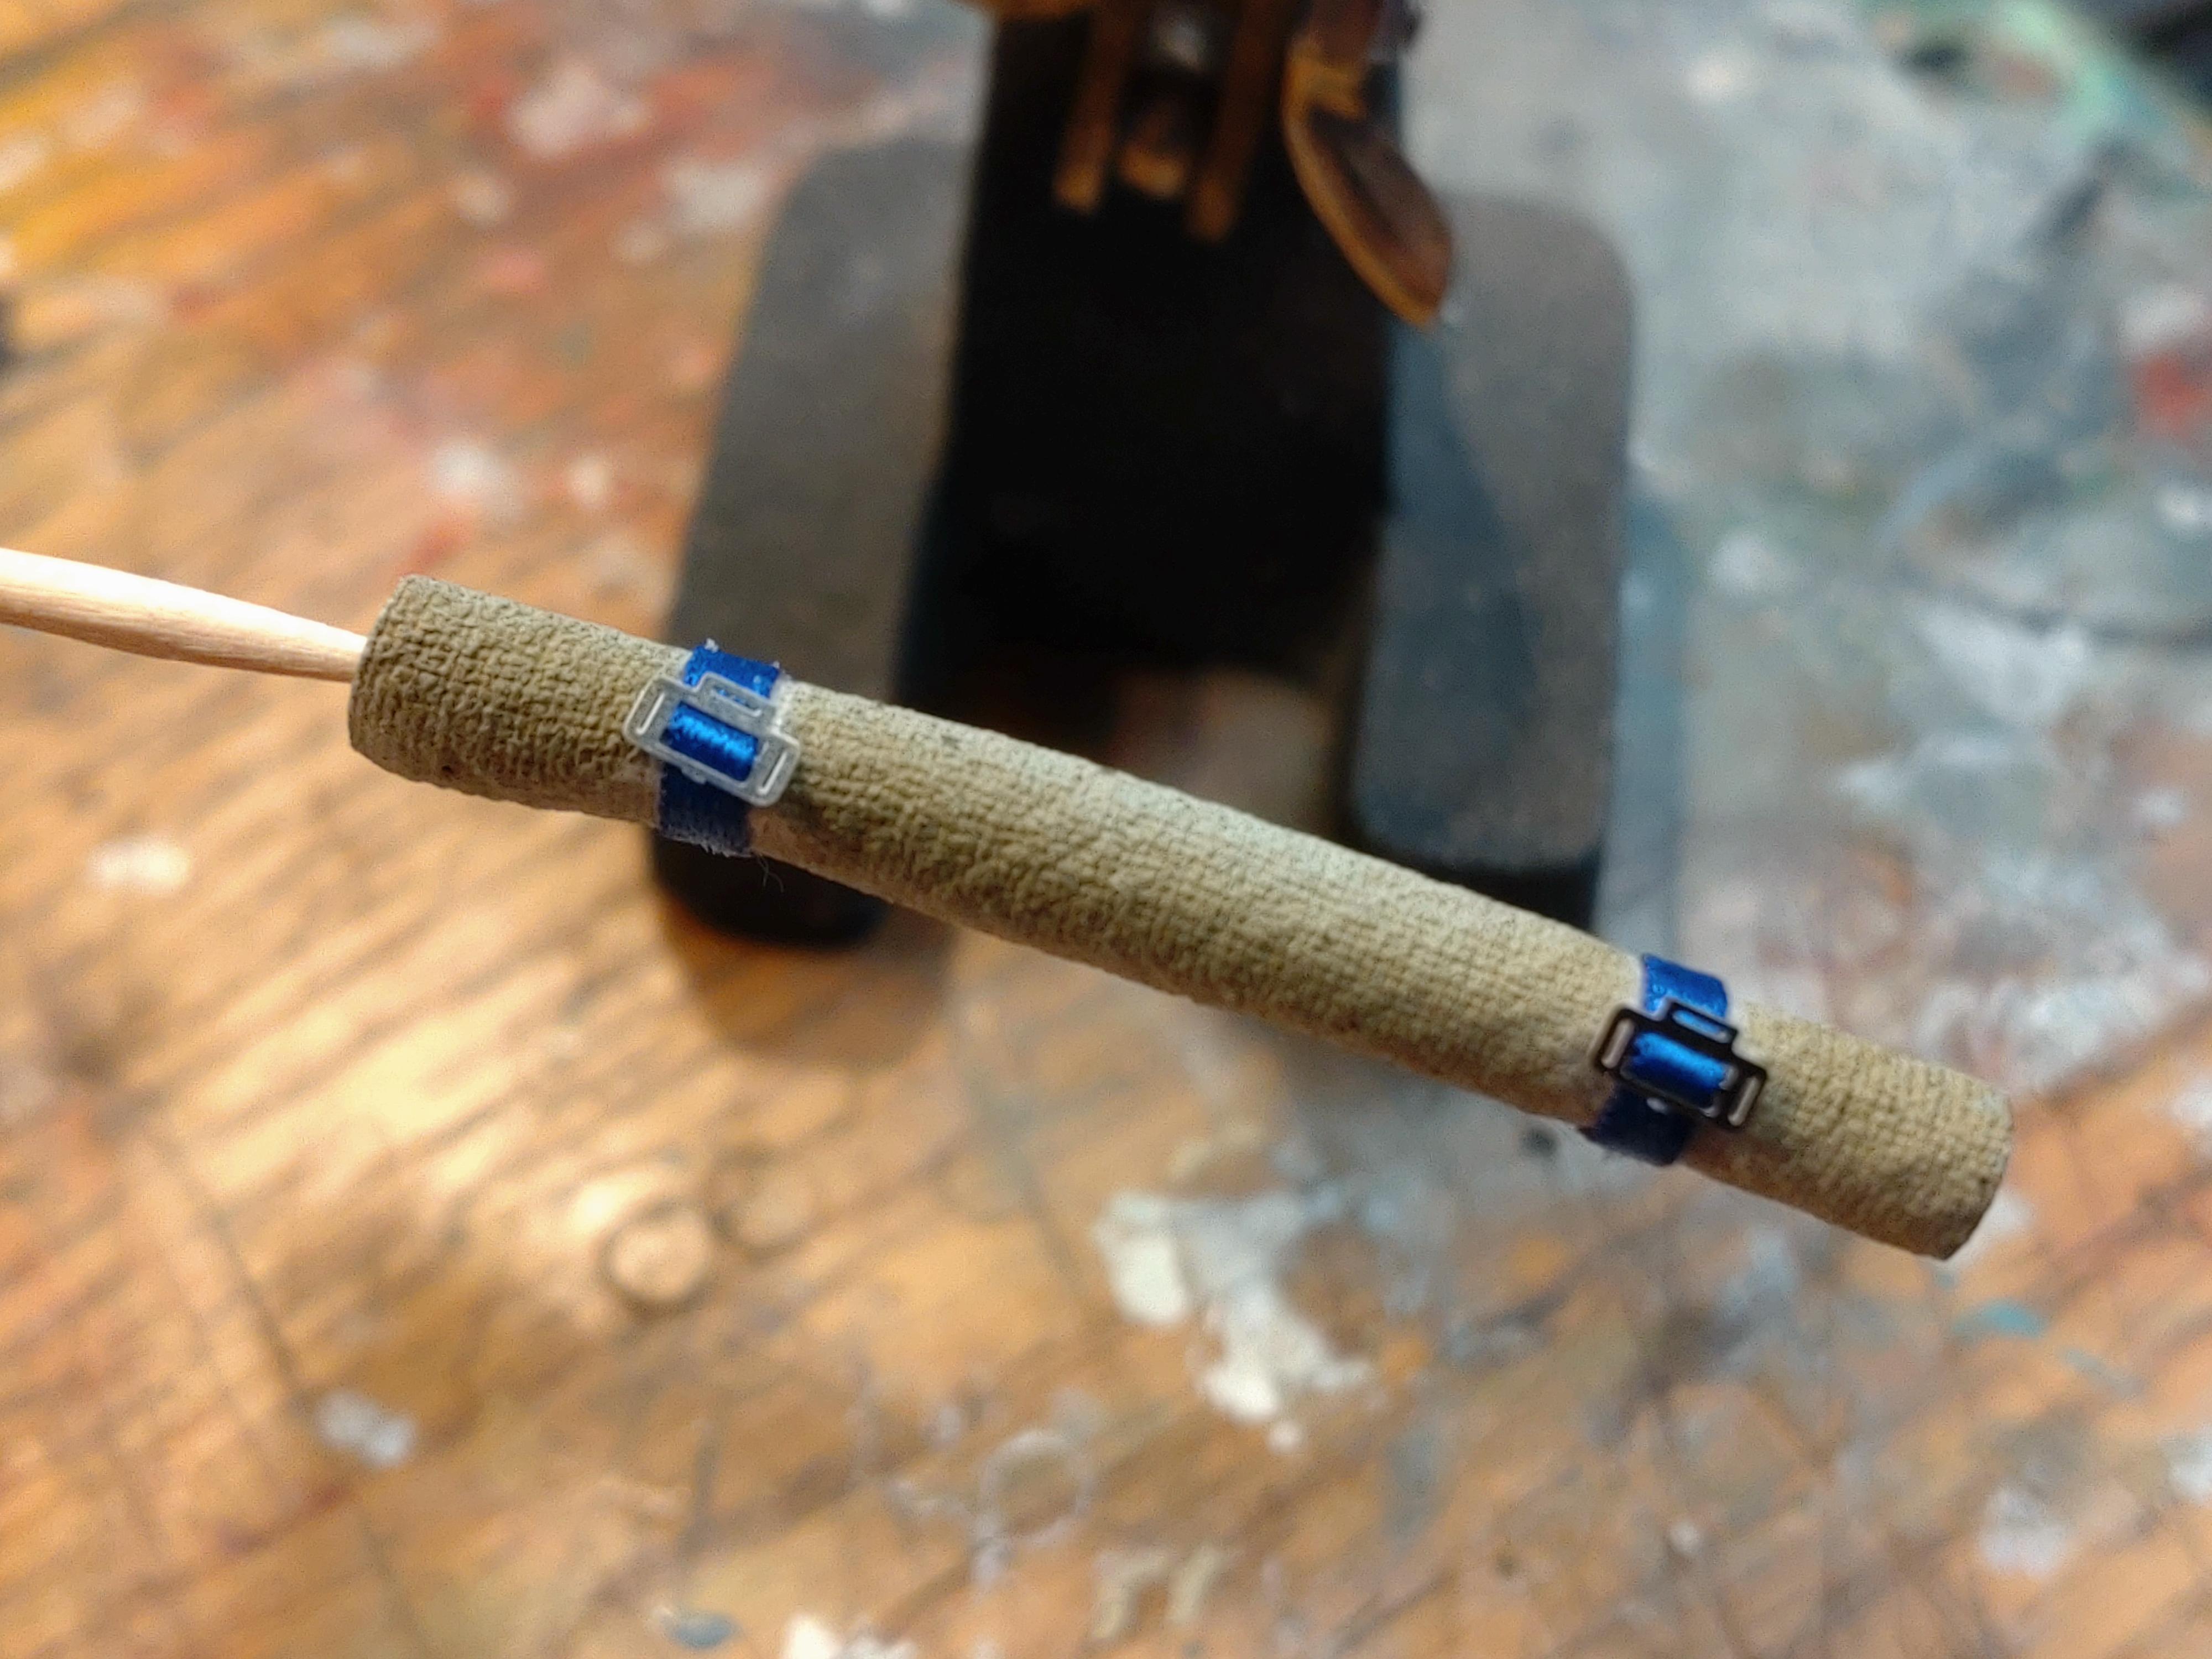
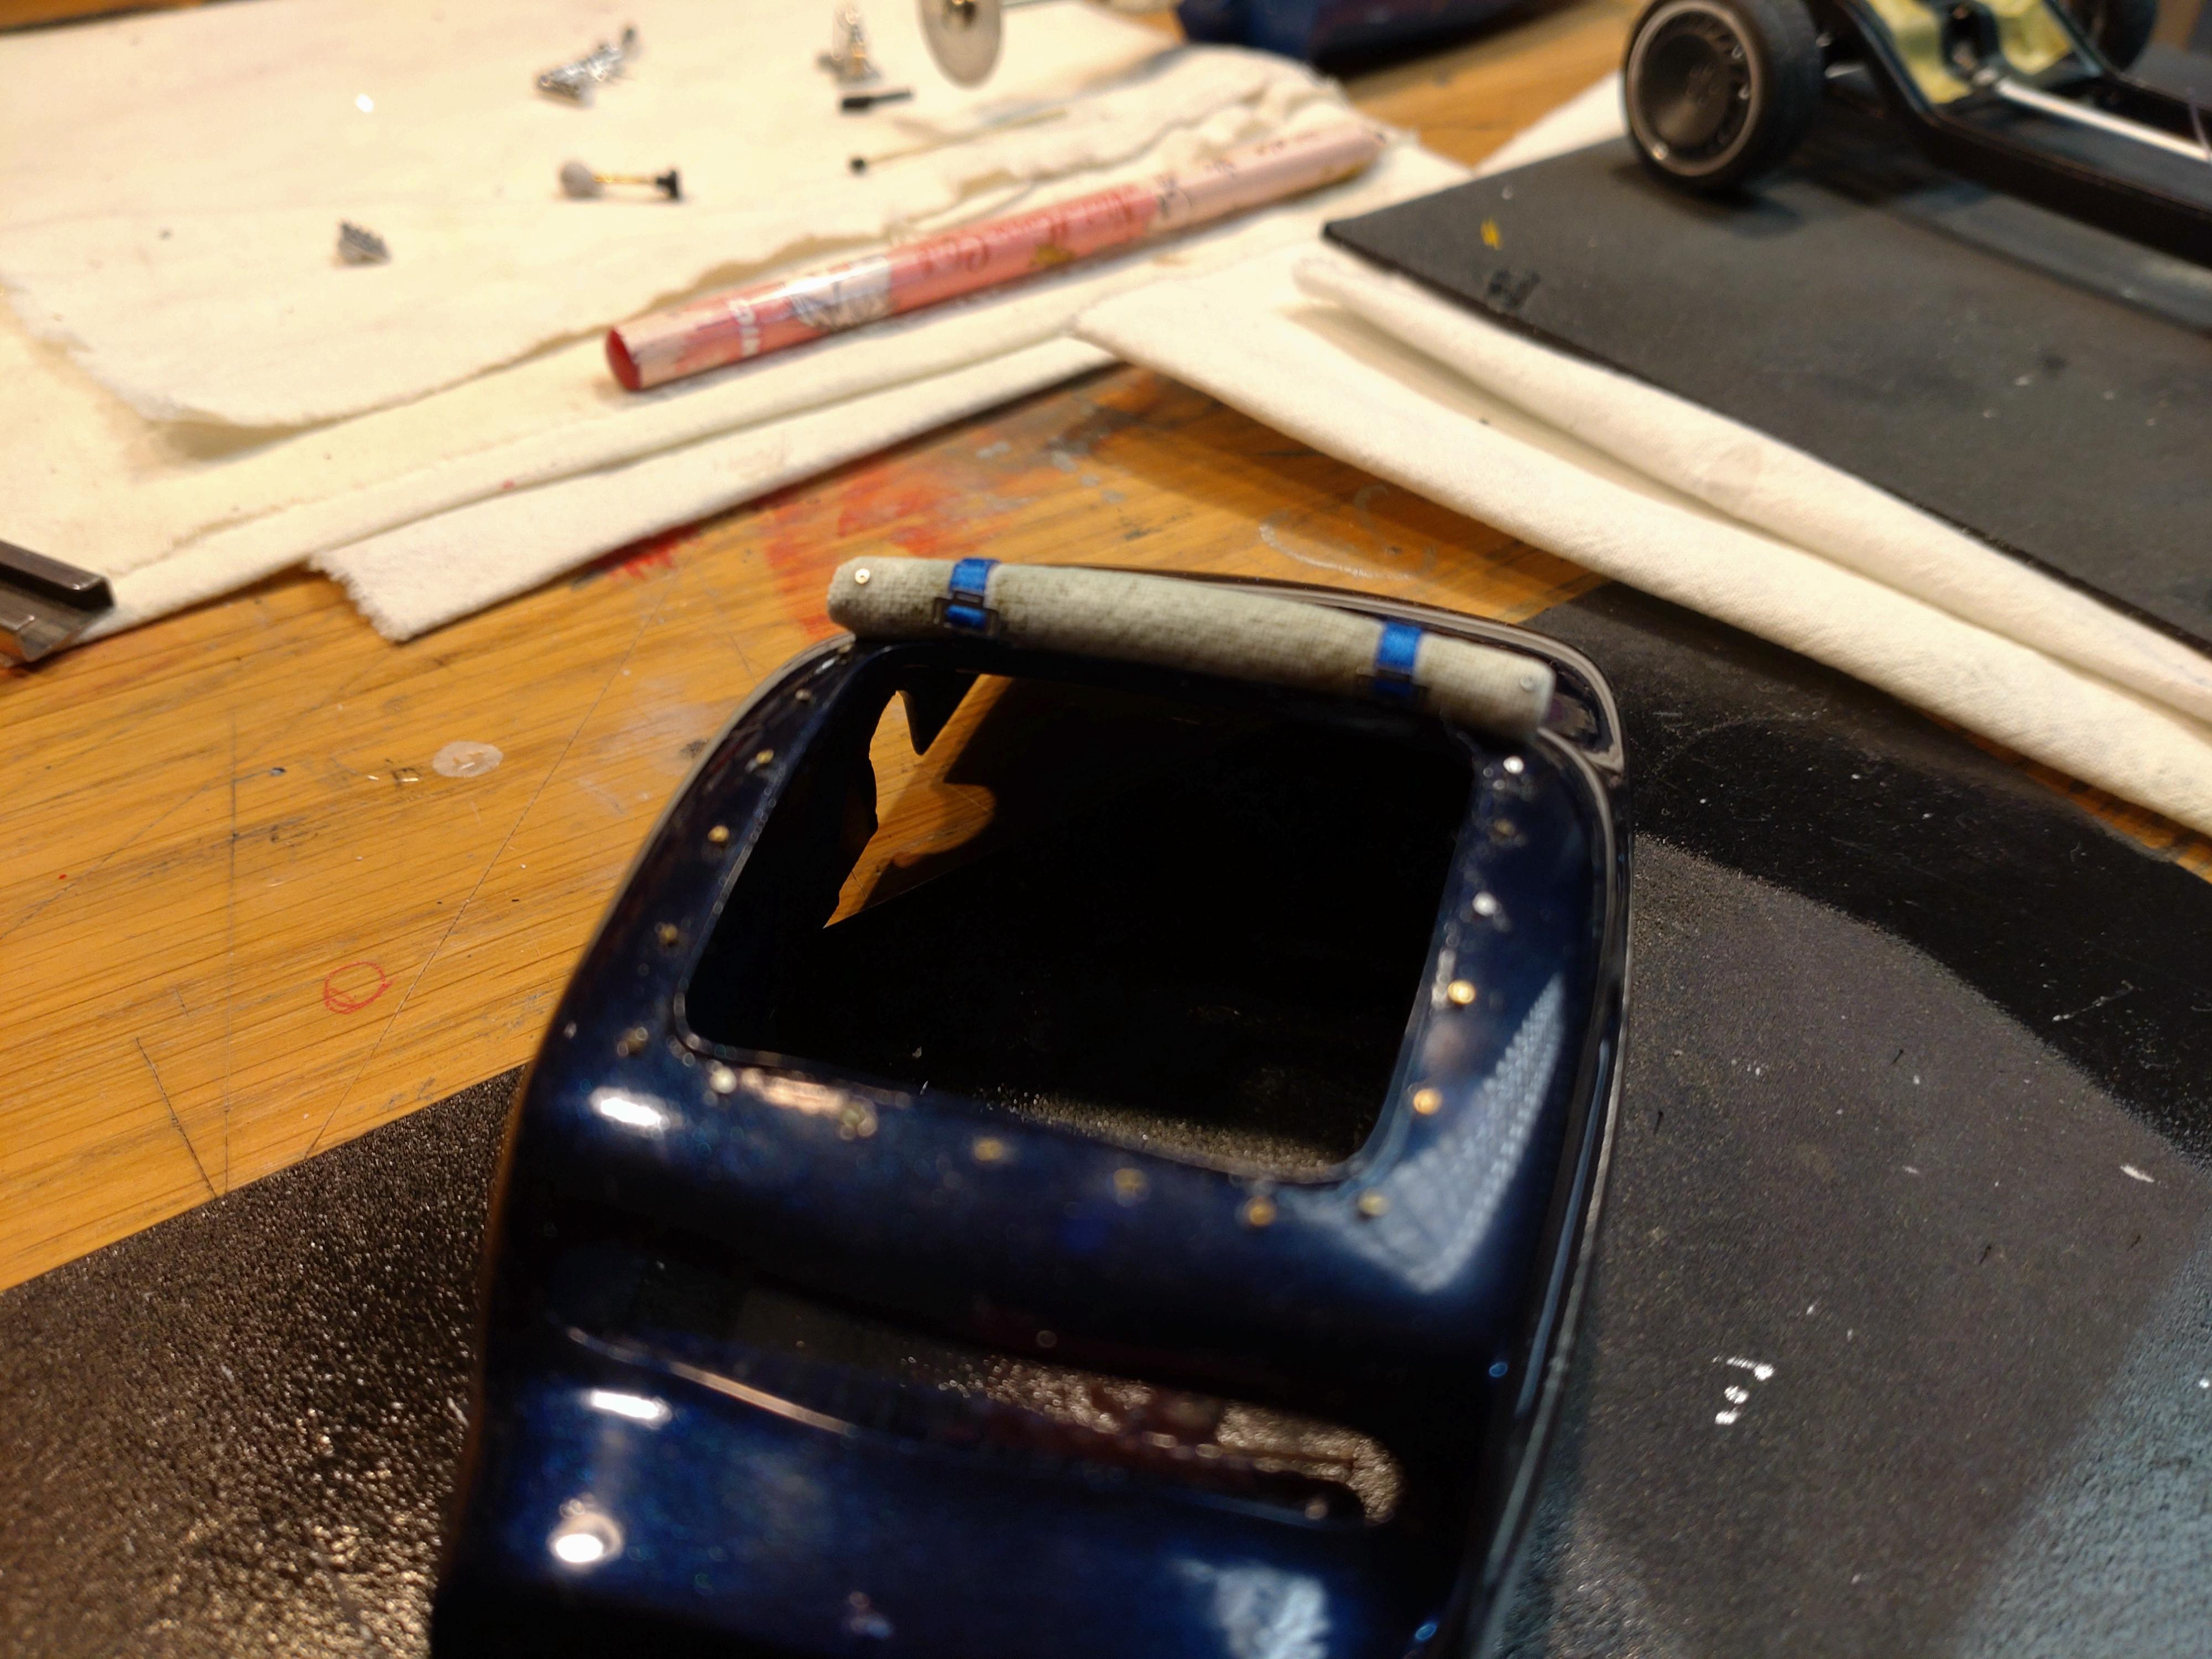
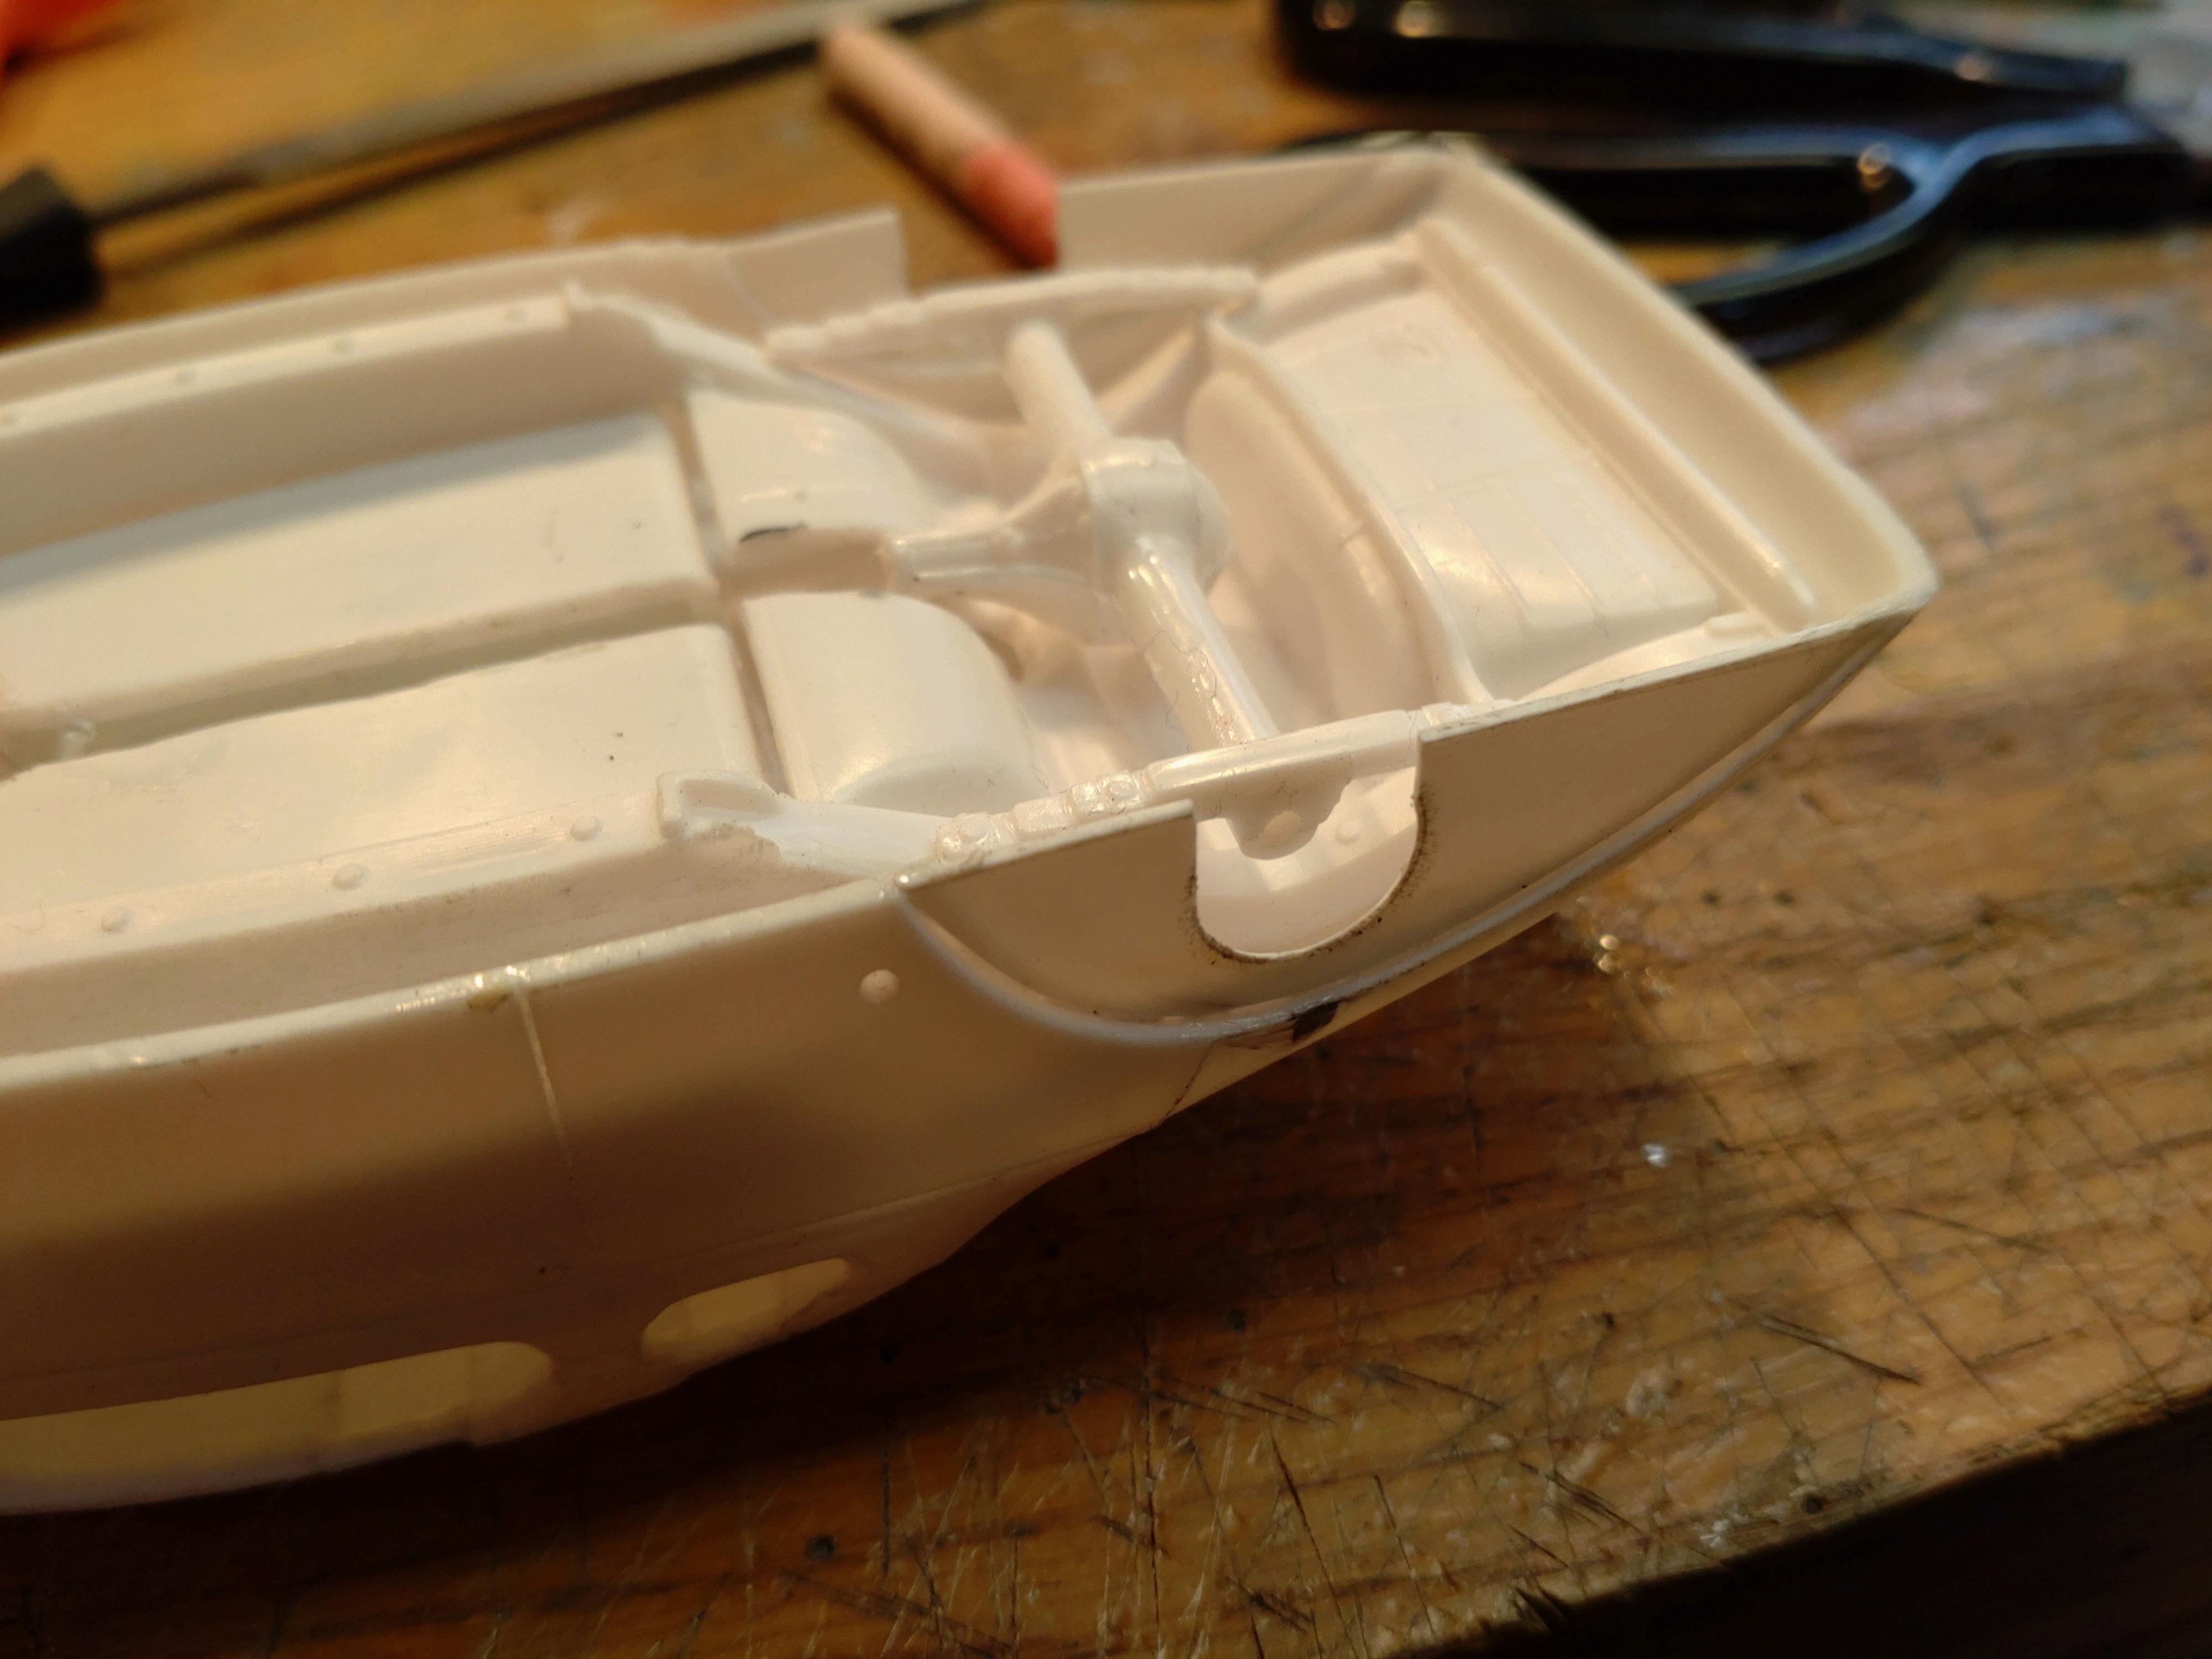
Thanks everyone for your support! I´ve got the front suspension and "steering" finished. Actually the complete front. The disc brakes were quite easy to attach, but the brake lines are very delicate and I had to take care not to put tension on those little connectors. The grill frame and the grill itself are cut out to make it see thru. The new grill is aluminum mesh metal from my local crafts store. The rear suspension is also completed. I had to widen the wheel track to make the custom wheels fit around the body. Also with disc brakes, but connecting them here was a bit tricky. In the end, the wheels all fit well and the chassis stance is loooow. The "press buttons" for the roll roof are inserted. Short pieces of 0.8mm brass rod. I like the look of brass on this hotty. Part of the steering and the grill support are also made of brass rods and they match well to the dark blue. The roll roof is made of simple thin white cotton painted with water based white glue. Before it got too dry and hard I cut it to size and rolled it up tightly. Did a little weathering on it with my airbrush. Next move will be the final assembly. I already have a hunch that I will have to rework something to make it all fit. And of course a final rubdown and blowing to get all those nasty cotton hairs off. I will show the finished build in the Under Glass forum. Thanks for accompanying me here and hope you look at this dude in a few days.
-
`37 Chevy Rod how low can you gow
Andy Oldenburg replied to Andy Oldenburg's topic in WIP: Model Cars
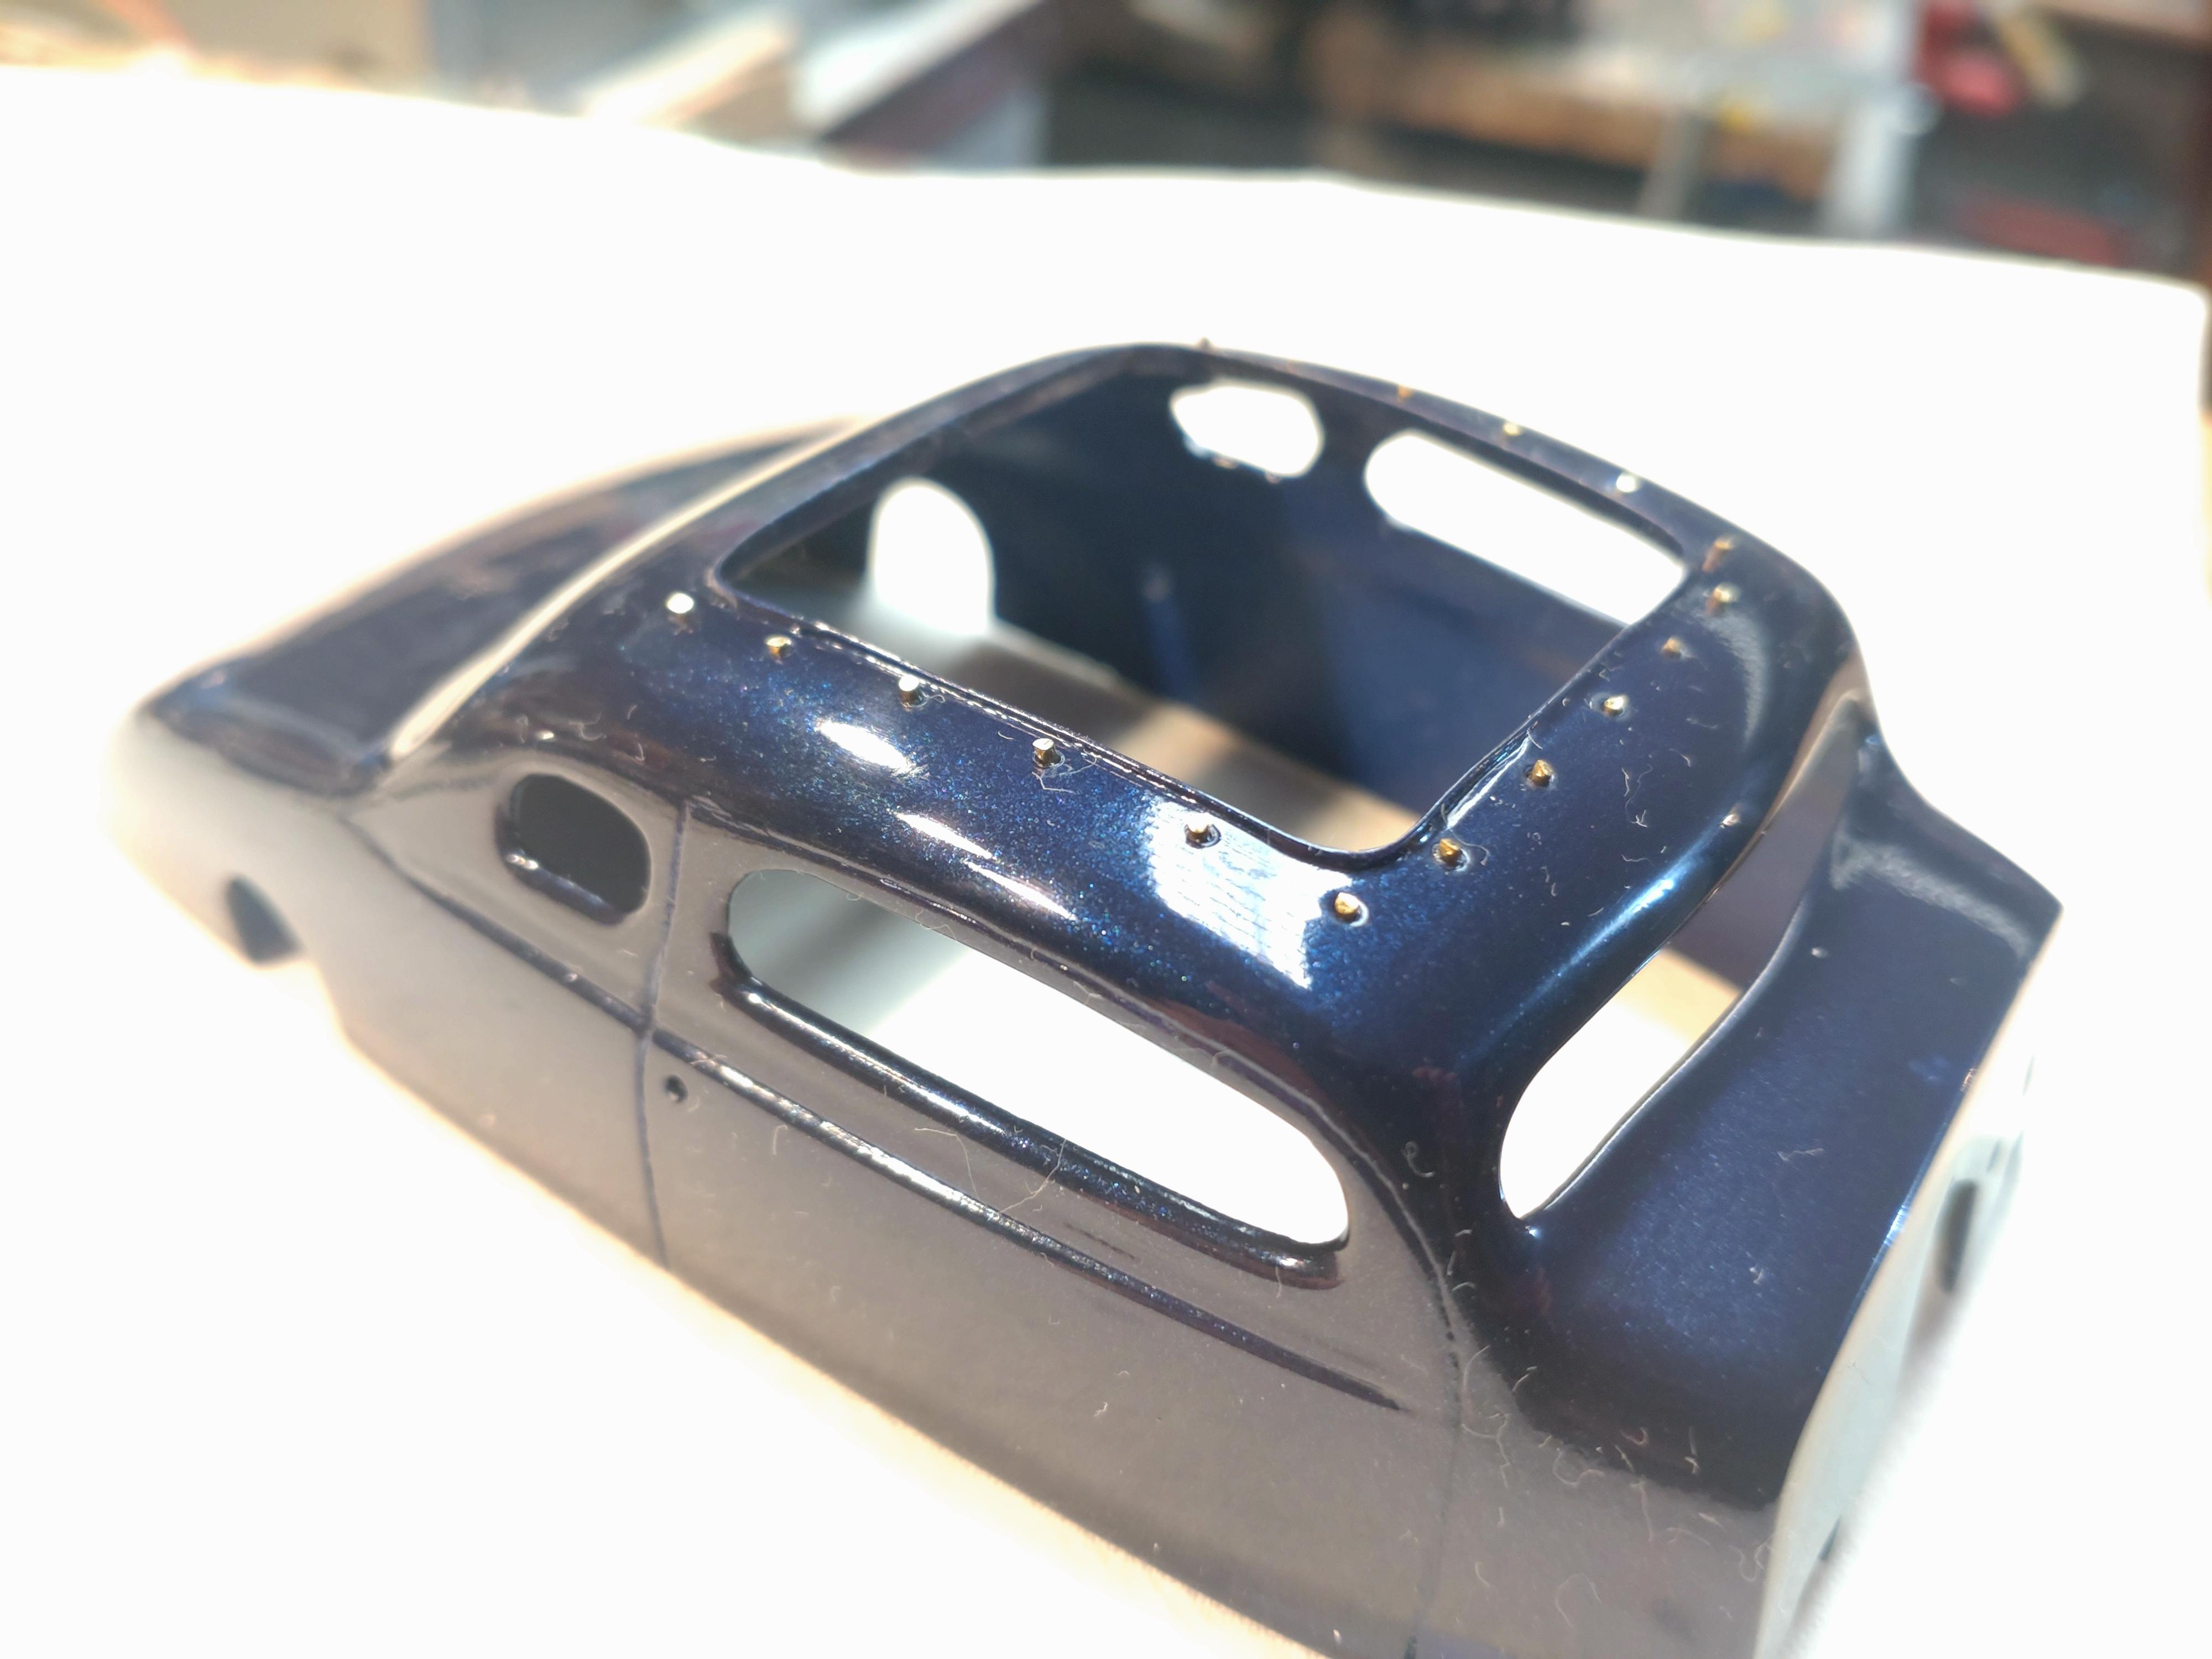
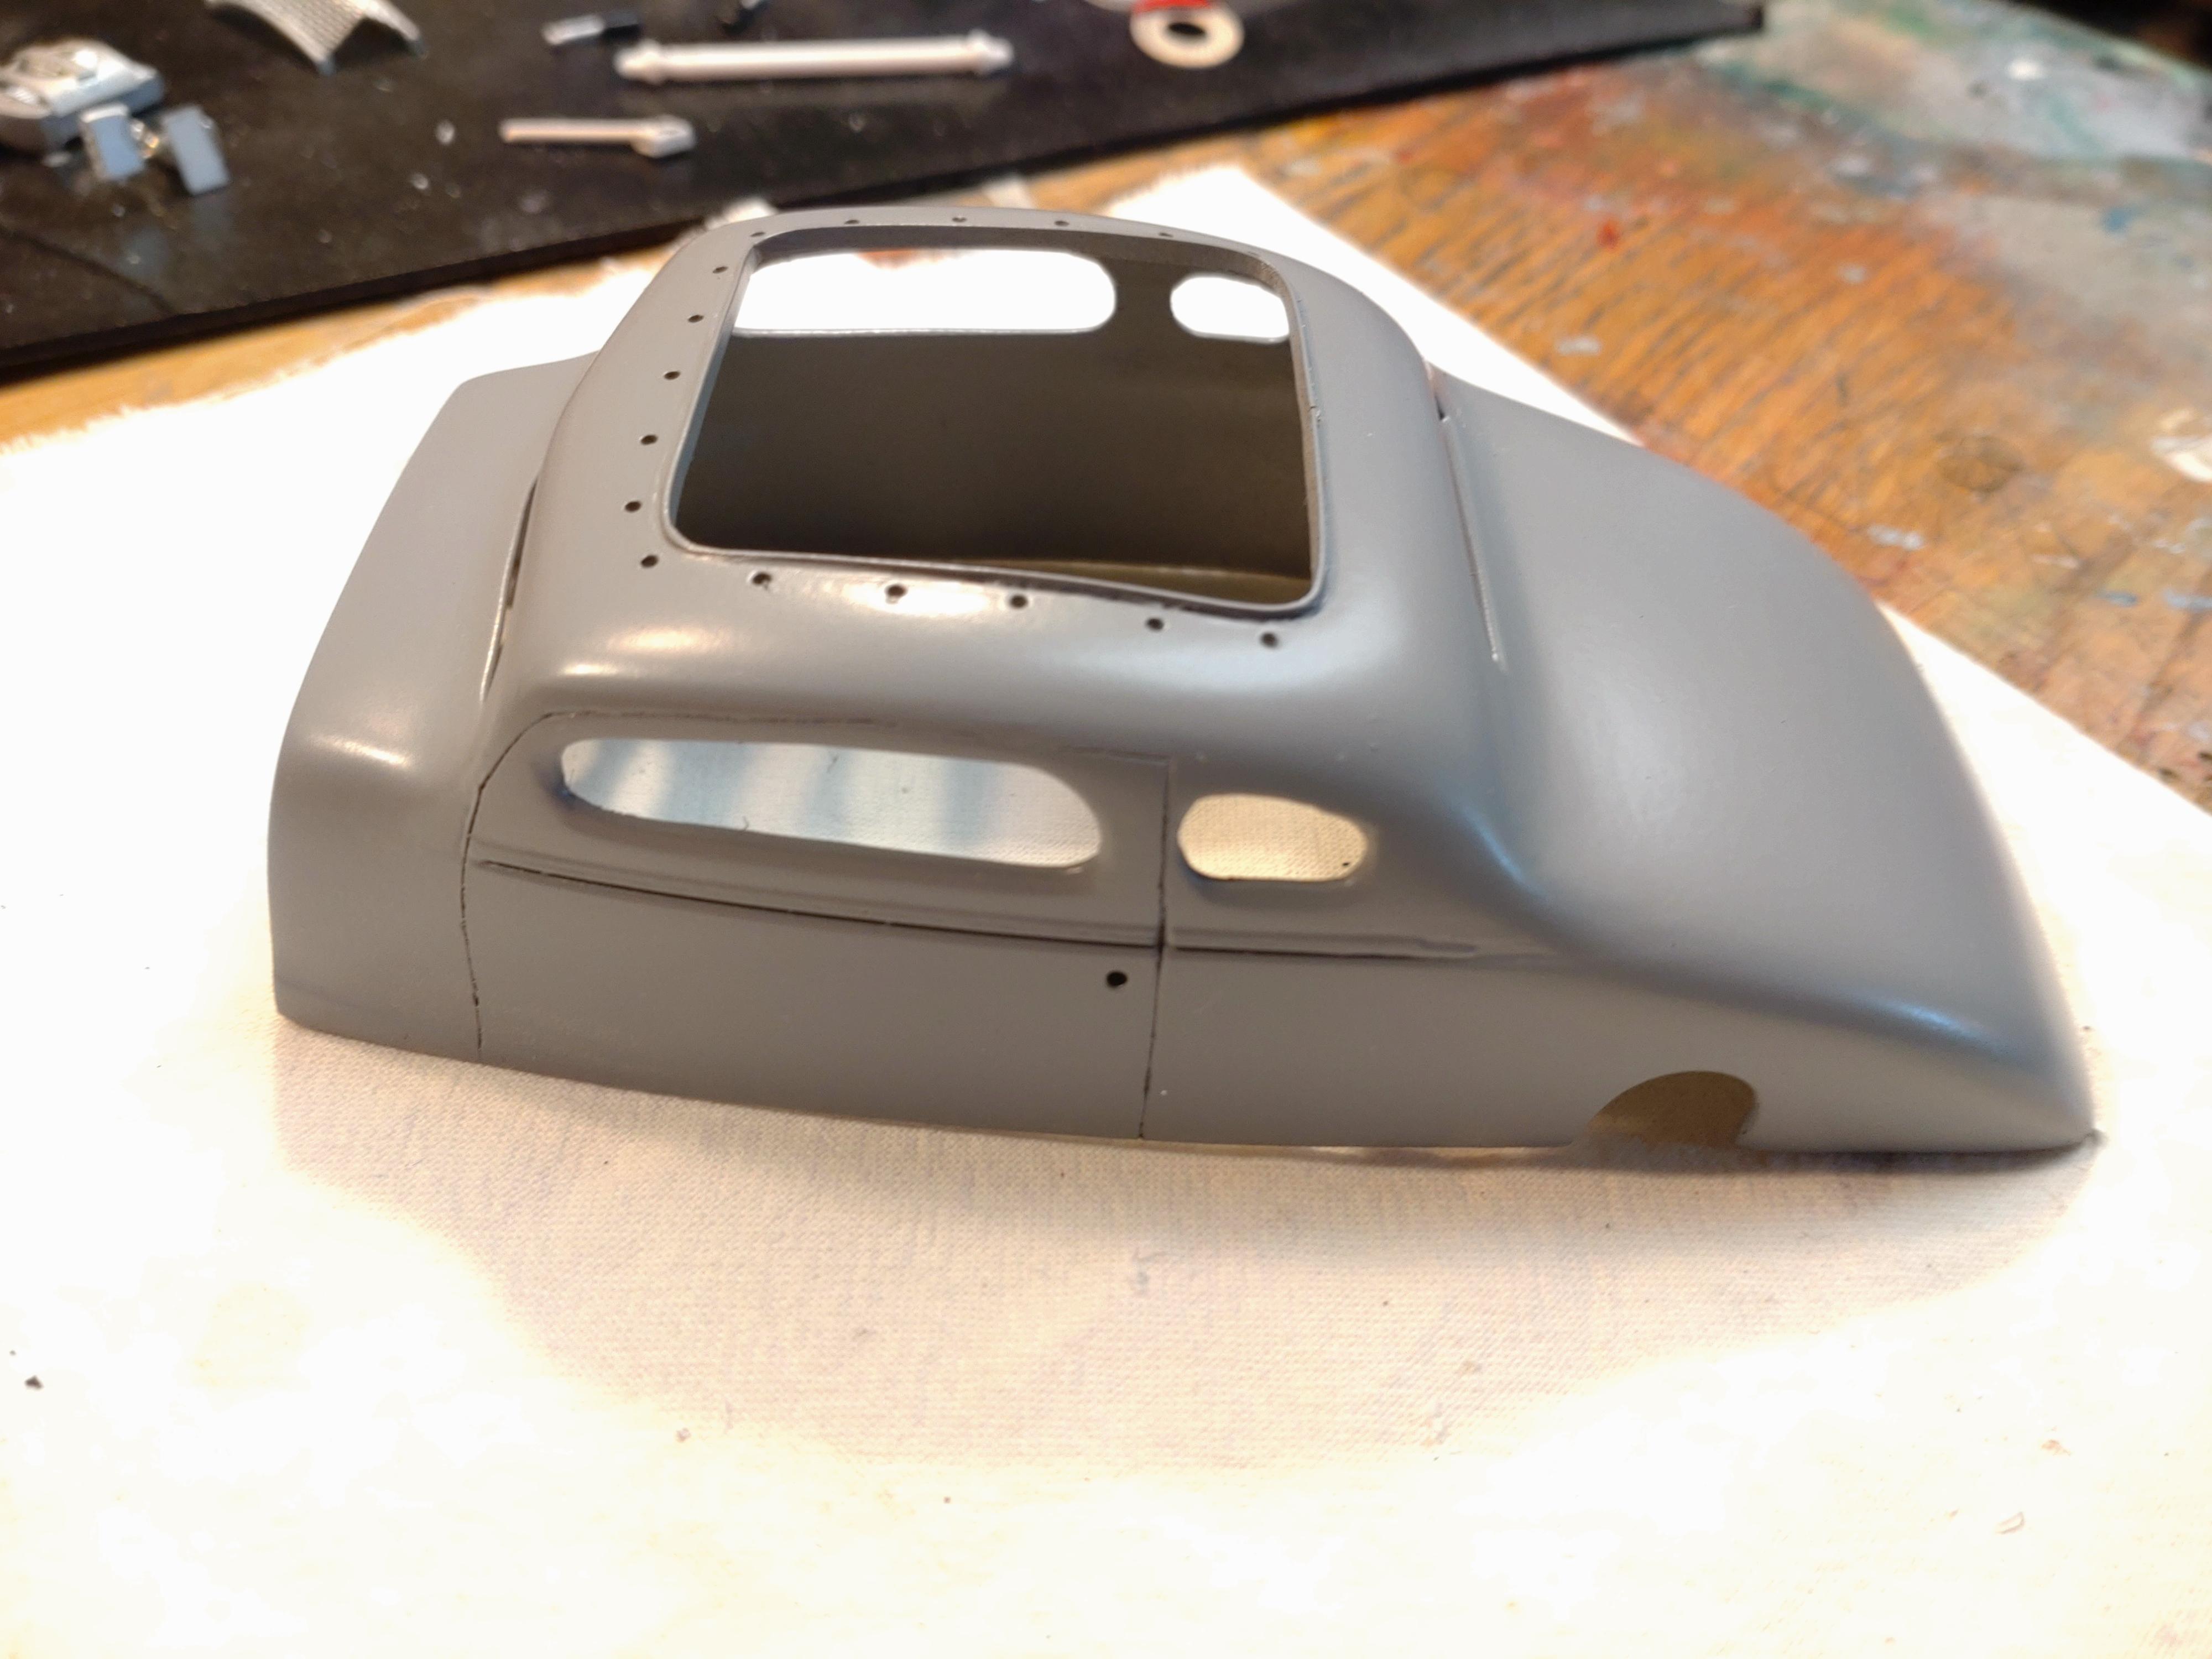
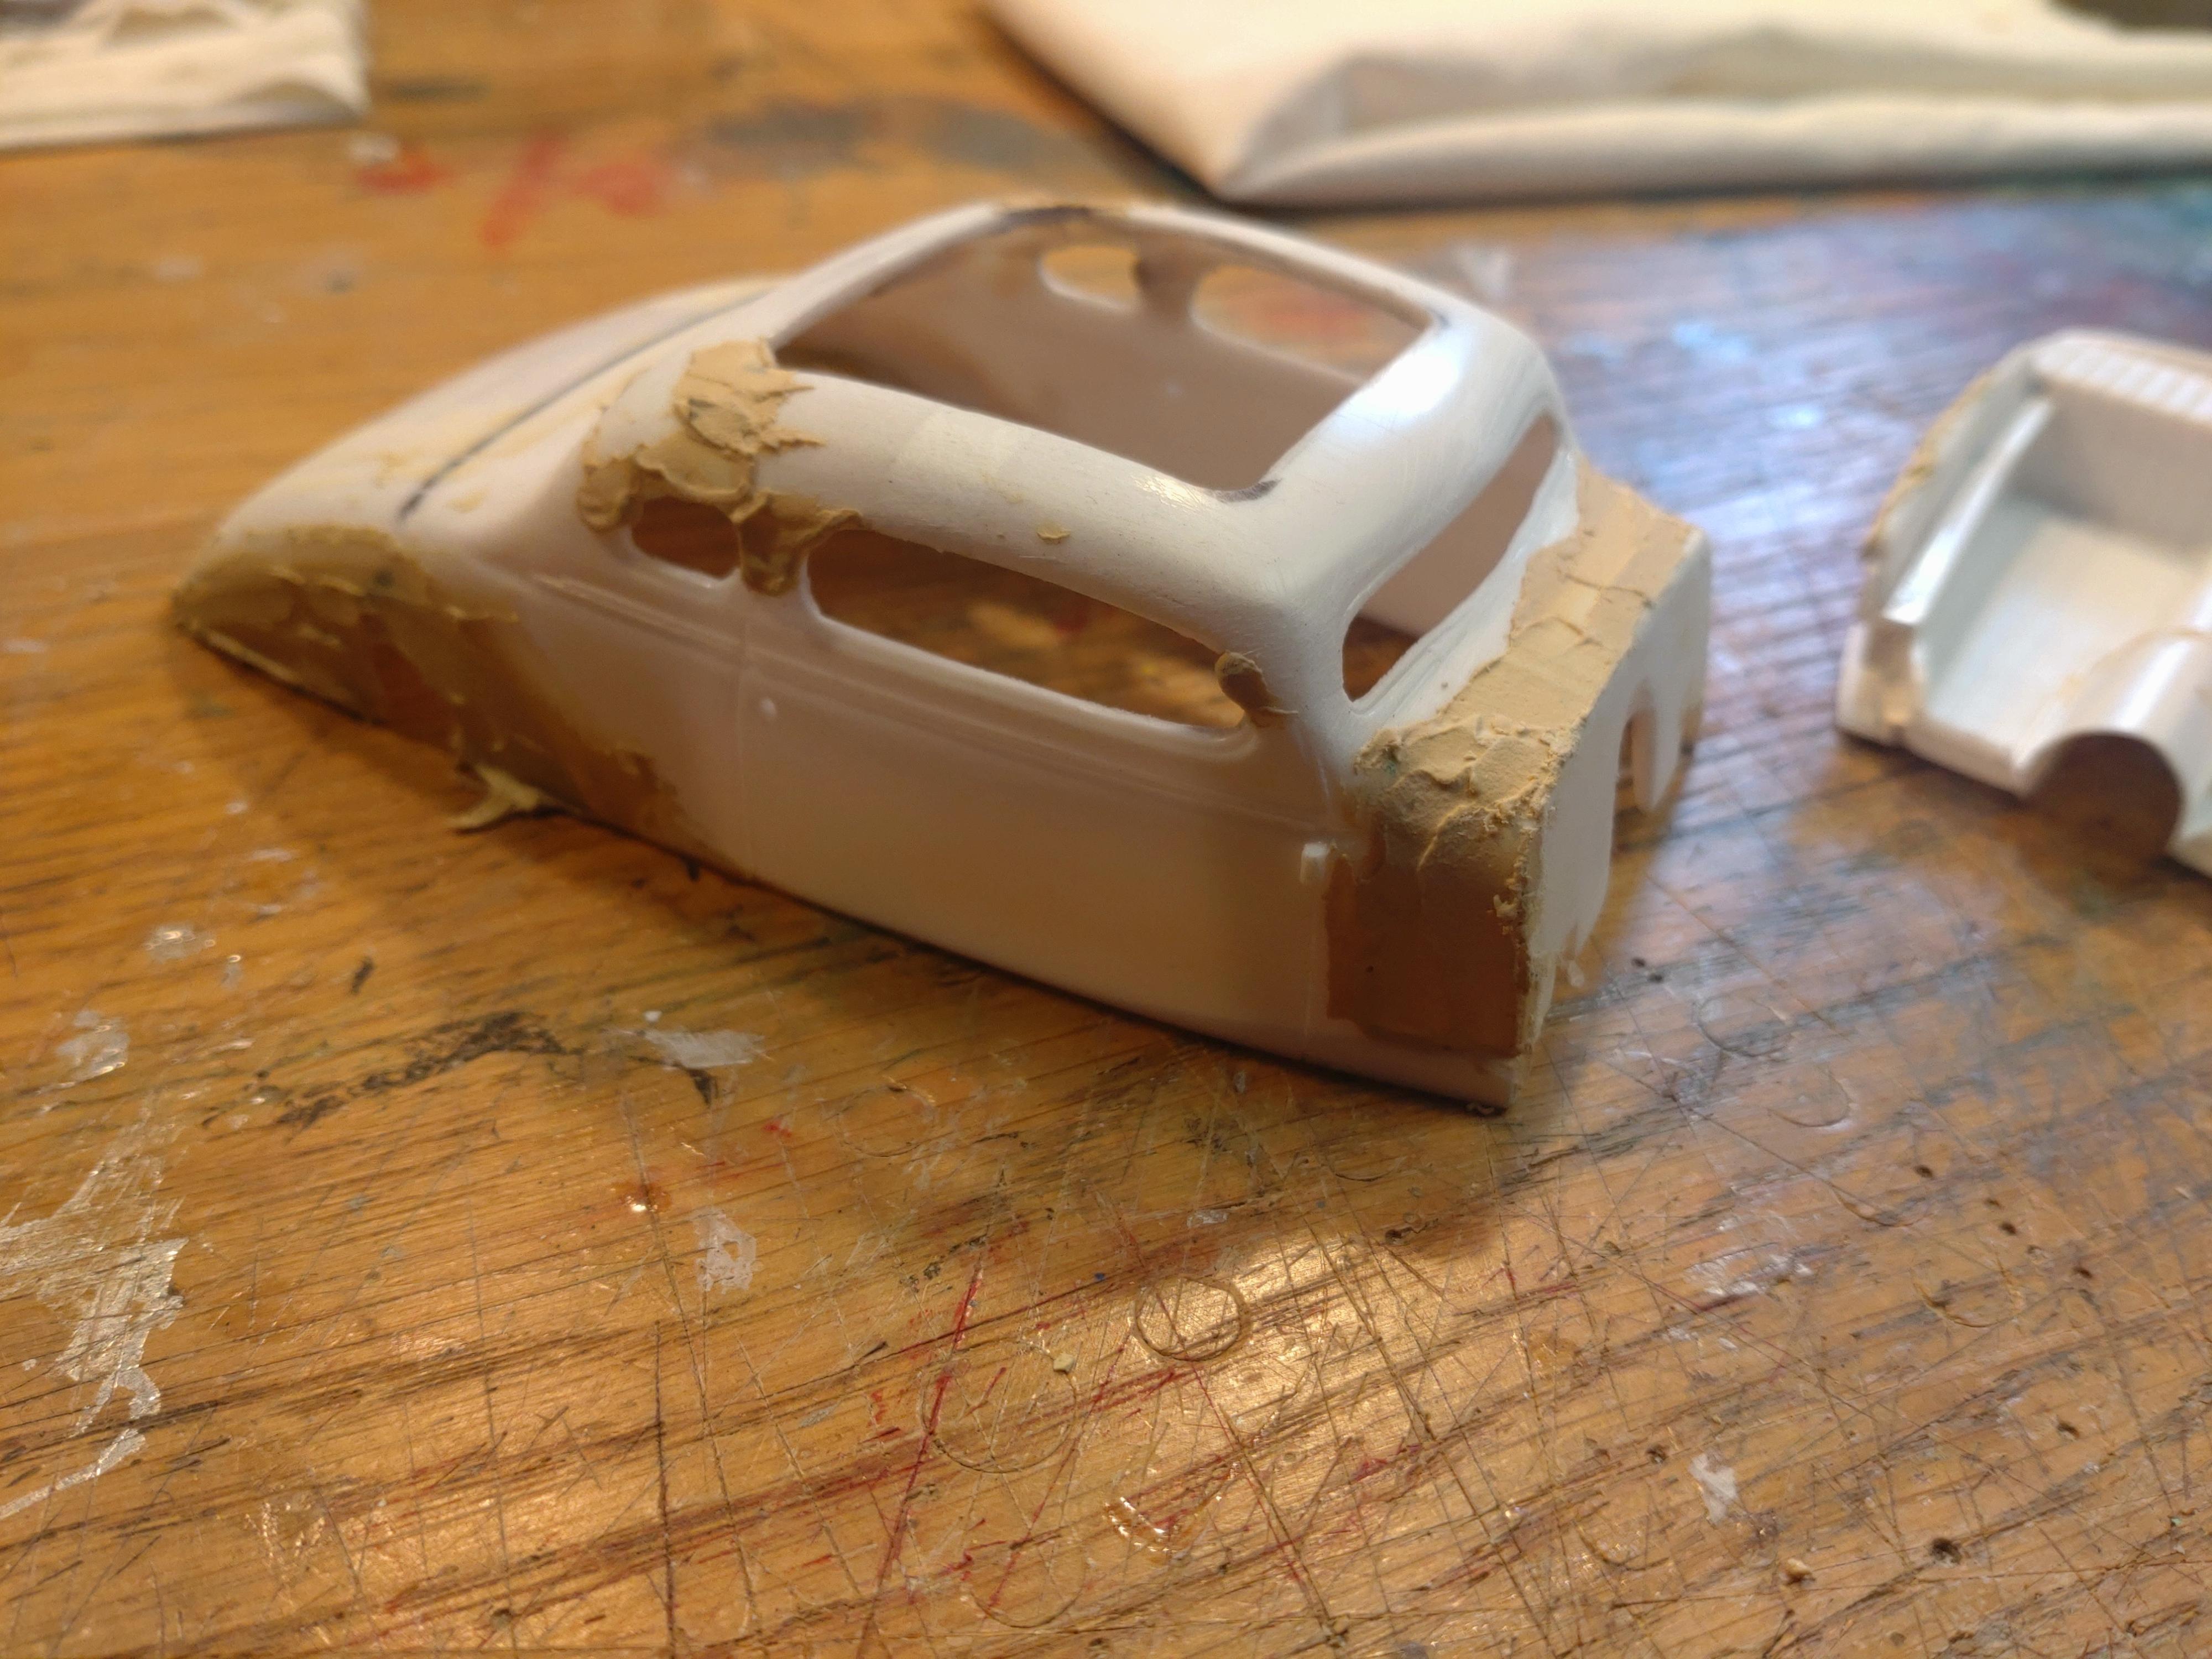
I´m finally happy with the primer finish of the body. I have added a lip to the roof and the holes all around with be filled by "press buttons" for the textile roof cover. Next step on this weekend will be the paint job in dark blue metallic. The interior is almost finished. Made some door handles for the panels but the Molotow paint is still drying. I had to lower the seat by about 5mm. These are racing seats from scale production. The kit does not contain any decals except from racing flames and engine equipment. I copied images of speedometers from the web and reduced the size until they fit. Covered them with metal rings. I will not paint them with clear enamel, because the print will smear. The skull shifter knob I molded out of FIMO, a plastic modelling clay. The wheels and disc brake parts are also from scale production. I´m still figuring out how to attach them to make it look real. Of course the kit dosn´t have a brake booster, so I crafted it out of styrene and wire. I feel like coming to the final round, but have a hunch that it will still take a while. Thanks for watching!
-
`37 Chevy Rod how low can you gow
Andy Oldenburg replied to Andy Oldenburg's topic in WIP: Model Cars
For headroom the driver has the open ceiling?. Yup, the engine is somewhat in the line of view. Everybody get out of the way! -
Hi Ludwig, well executed build! A very good rebuild of the original classic Firebird. ?
-
My last builds were stock and mild customs. So I wanted to do something really radical again. I´ve never done a hot rod so this amt kit was the perfect victim. I wanted to test out how much I could chop off the body before it starts to look comical. I ended up cutting off 10 mm from the bottom and chopping the roof by 6 mm. Getting the chassis dropped adds up to a lowered rooftop of about 50 cm if this was a real rod. I guess that´s radical enough. The gaps in the roof were filled with 1mm styrene. Next to fill were the wheel housings and the area around the firewall. To be honest, I hate the putty work. Every time I think I´ve got all the cracks and dents filled I seem to find more after the next round of primer. To motivate my self I made a mock up and was electrified by the look. The roof will receive a button down tarpaulin, rolled up towards the back. Cutting the roof succeeded without messing up. The engine was already finished. I built it a few weeks ago from scratch and leftovers and showed the process in WIP in December. What I underestimated with this build was that chopping the body like this has consequences! Just about nothing else will fit anymore? Next on the list was the interior tub. Here too I had to cut out about 20 mm, because the chassis needs room to get lowered. Had to add a transmission tunnel for the shaft and cut down on the rear suspension. The chassis I had to adapt to the engine. The front suspension and steering out the kit were very crude. Fortunately I found some good images in a custom magazine and rebuilt a decent suspension step by step. Now I´m busy with sanding, filling, applying putty on the body and making various parts that needed a work over or had to be built completely new from scratch styrene. The cooling unit with grill I´ve cut open and inserted a metal mesh grill. The radiator needed a heavy duty fan. So much left to do! Stay tuned and thanks for watching.
-
Your rod is HOT! Cool paint job and nice details. Are you going to make that brass knuckles shifter too?
-
Hi everybody, thanks for your response! Well, those wheels are a bit crazy and for some controversial. I saw them and had to have, ? lol! A show car can be a bit over the top. In real life this ride would not make much mileage on the asphalt. Best model building wishes to all of you!?
-
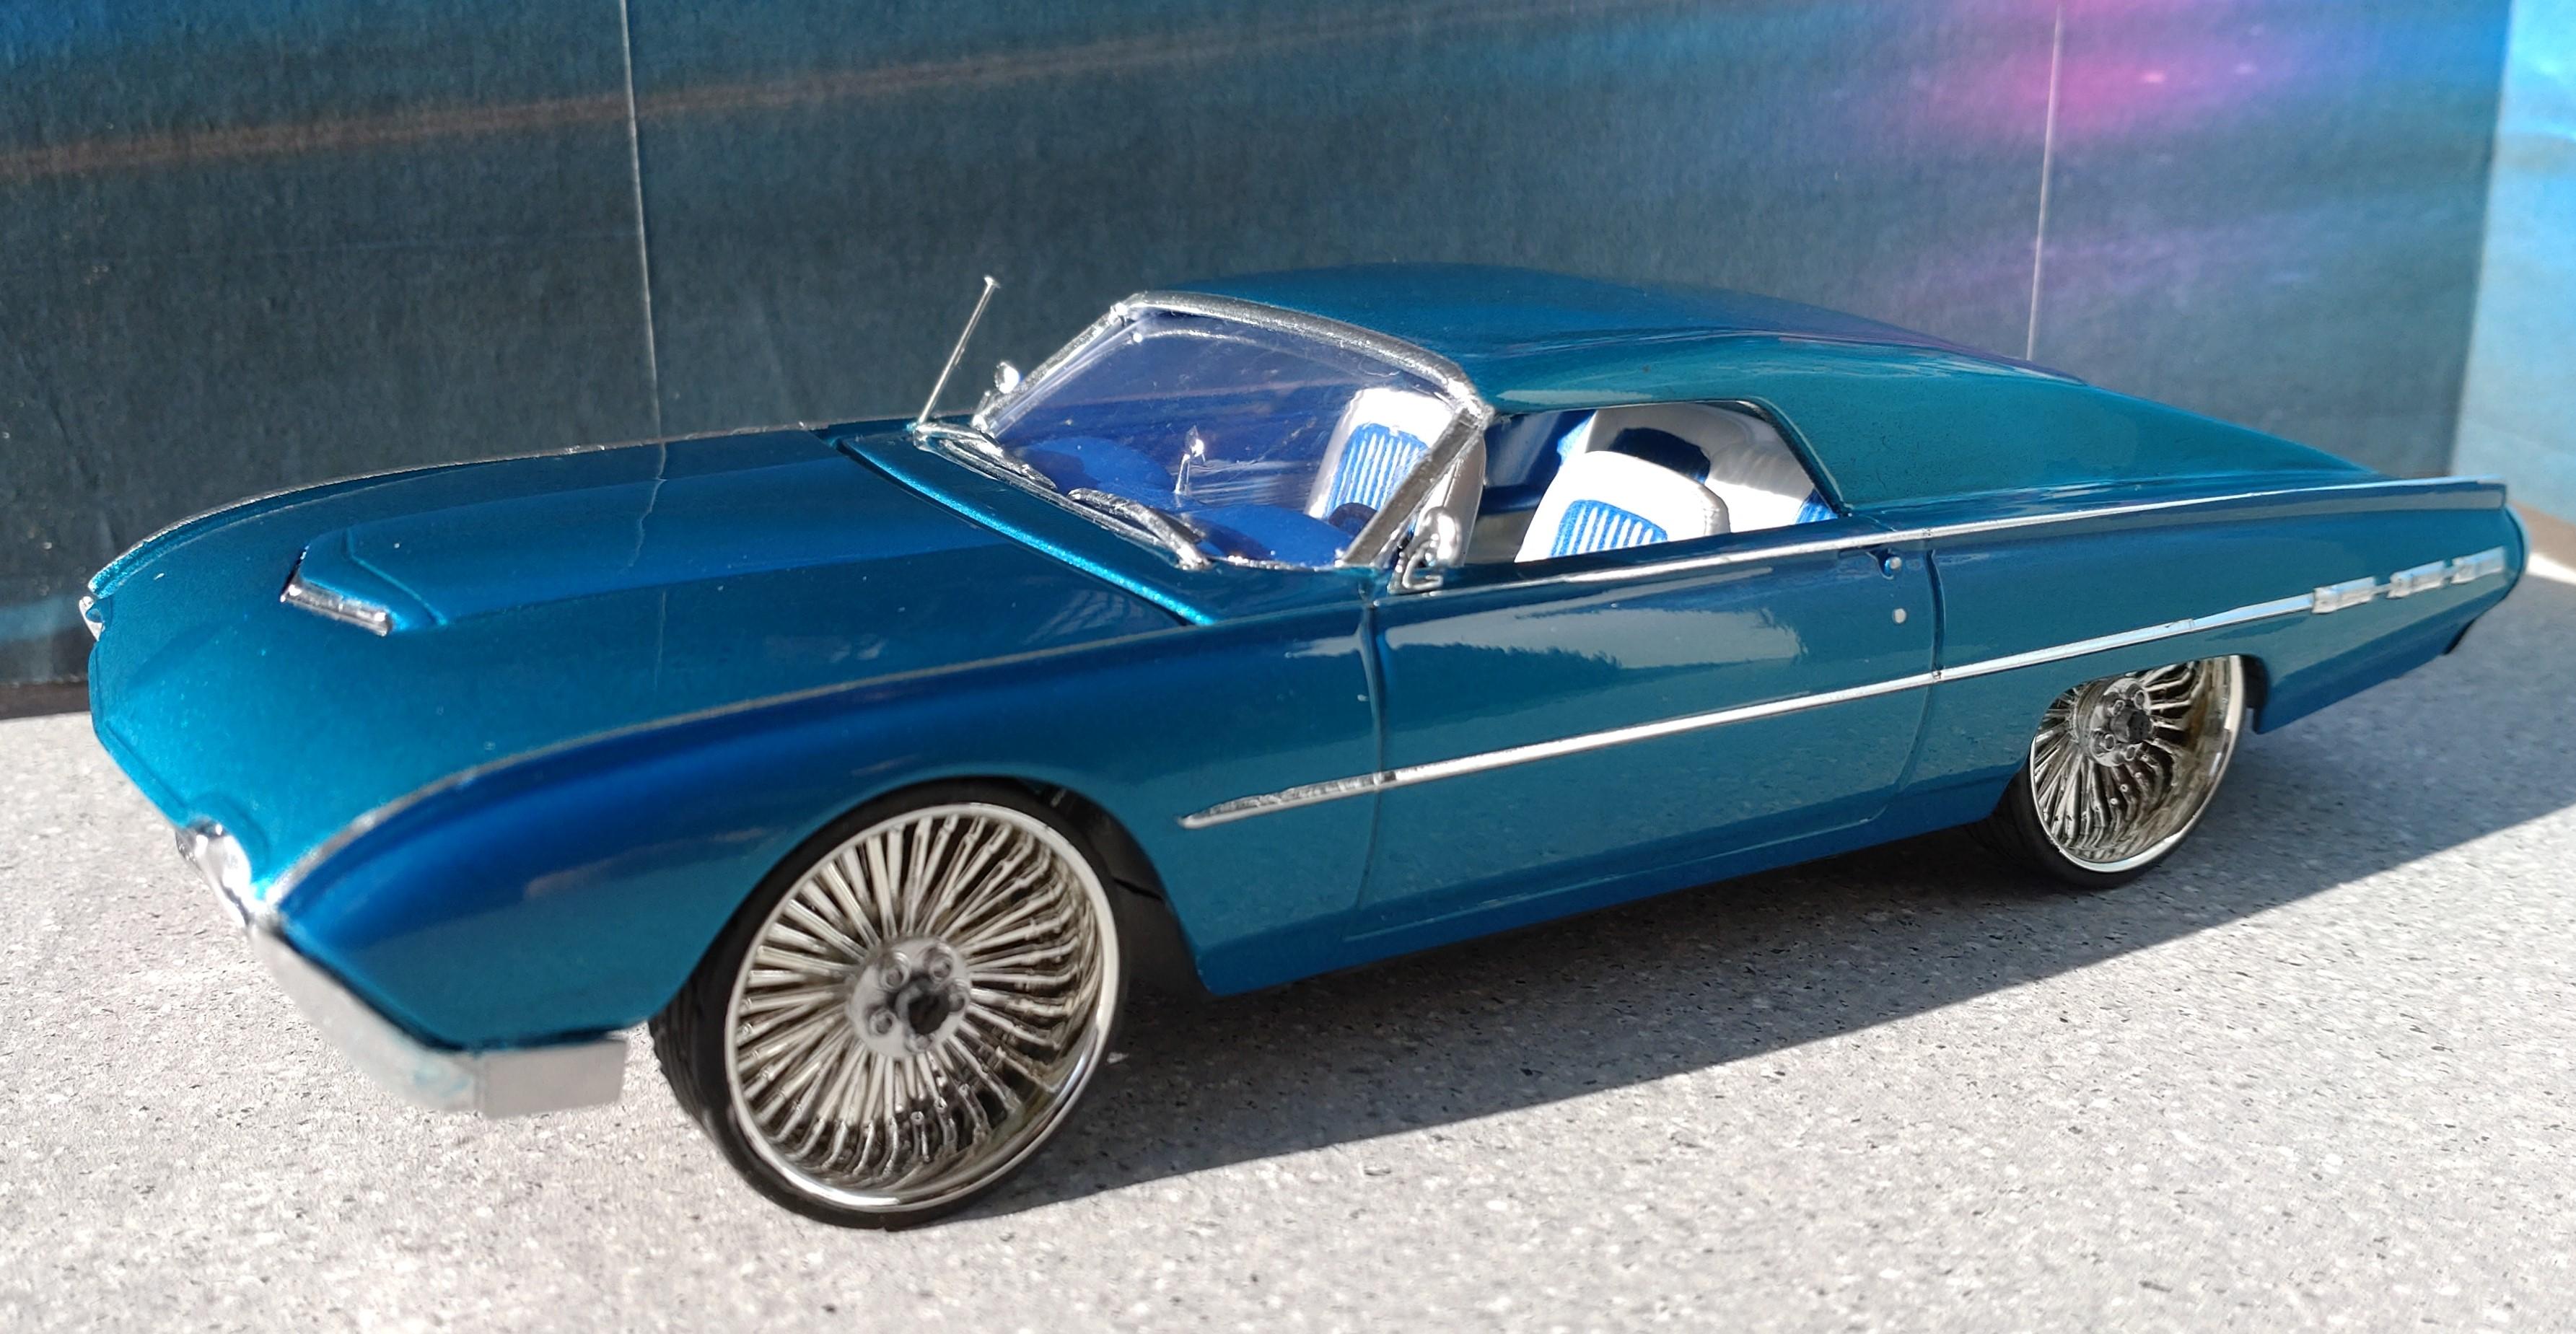
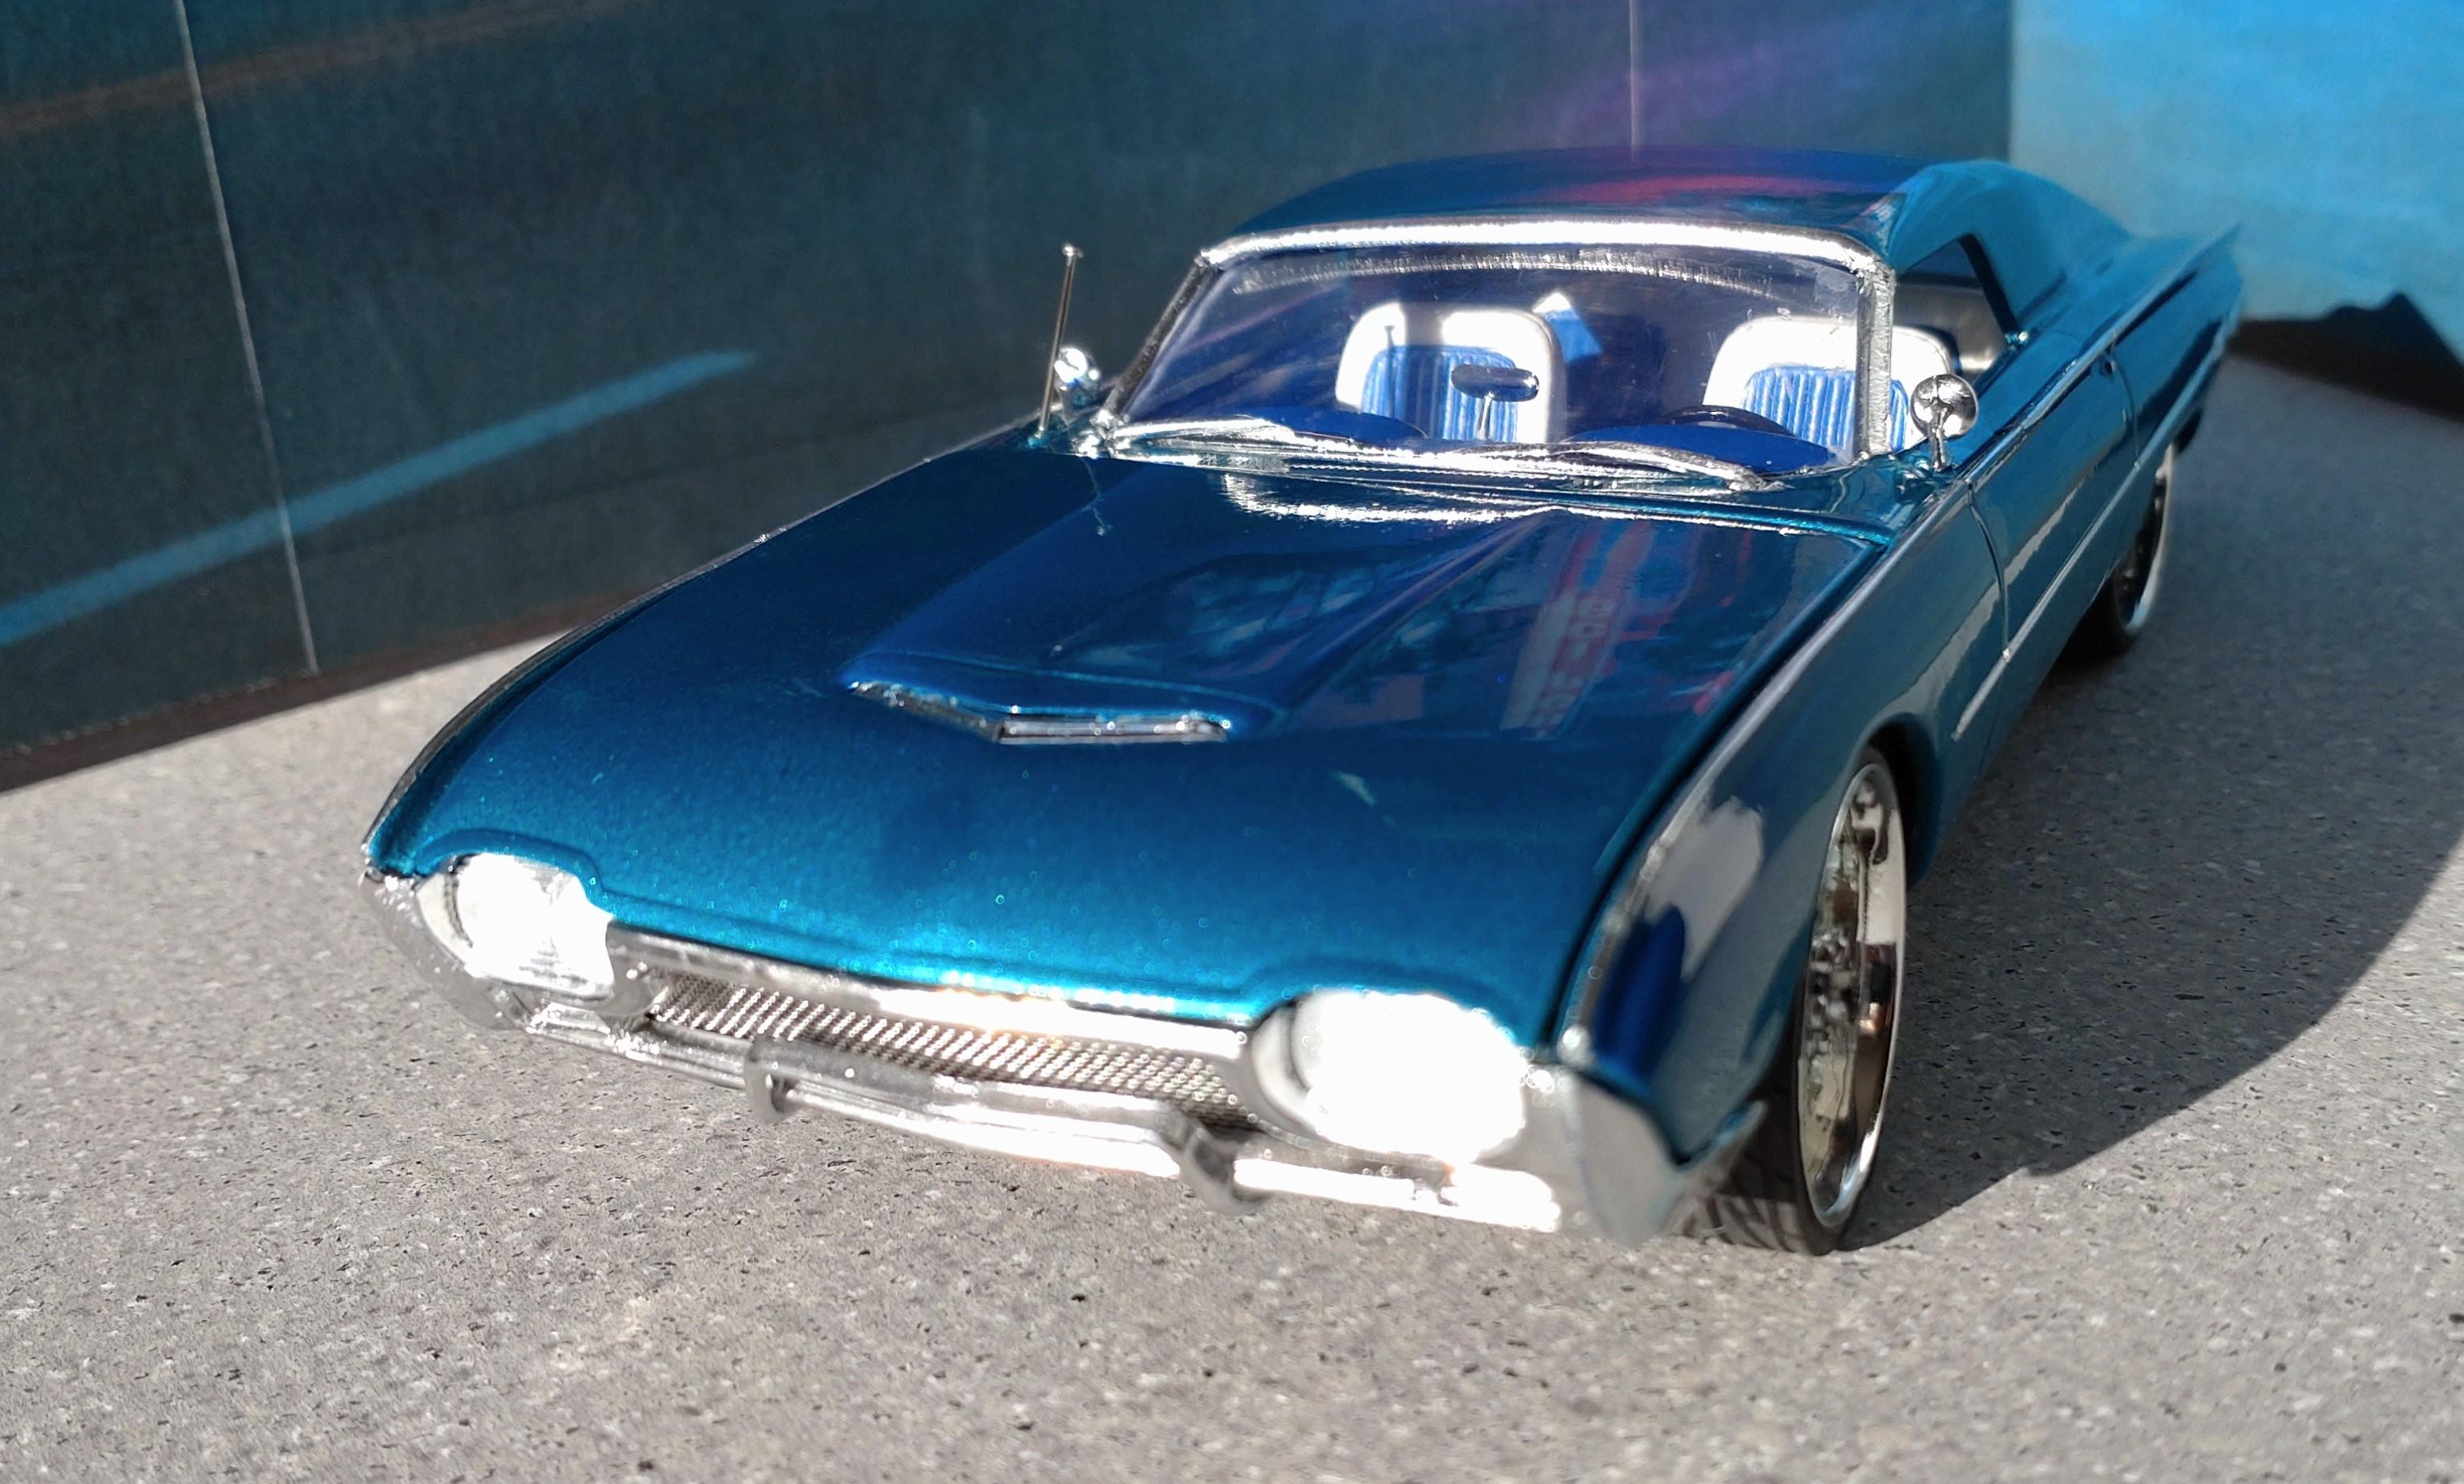
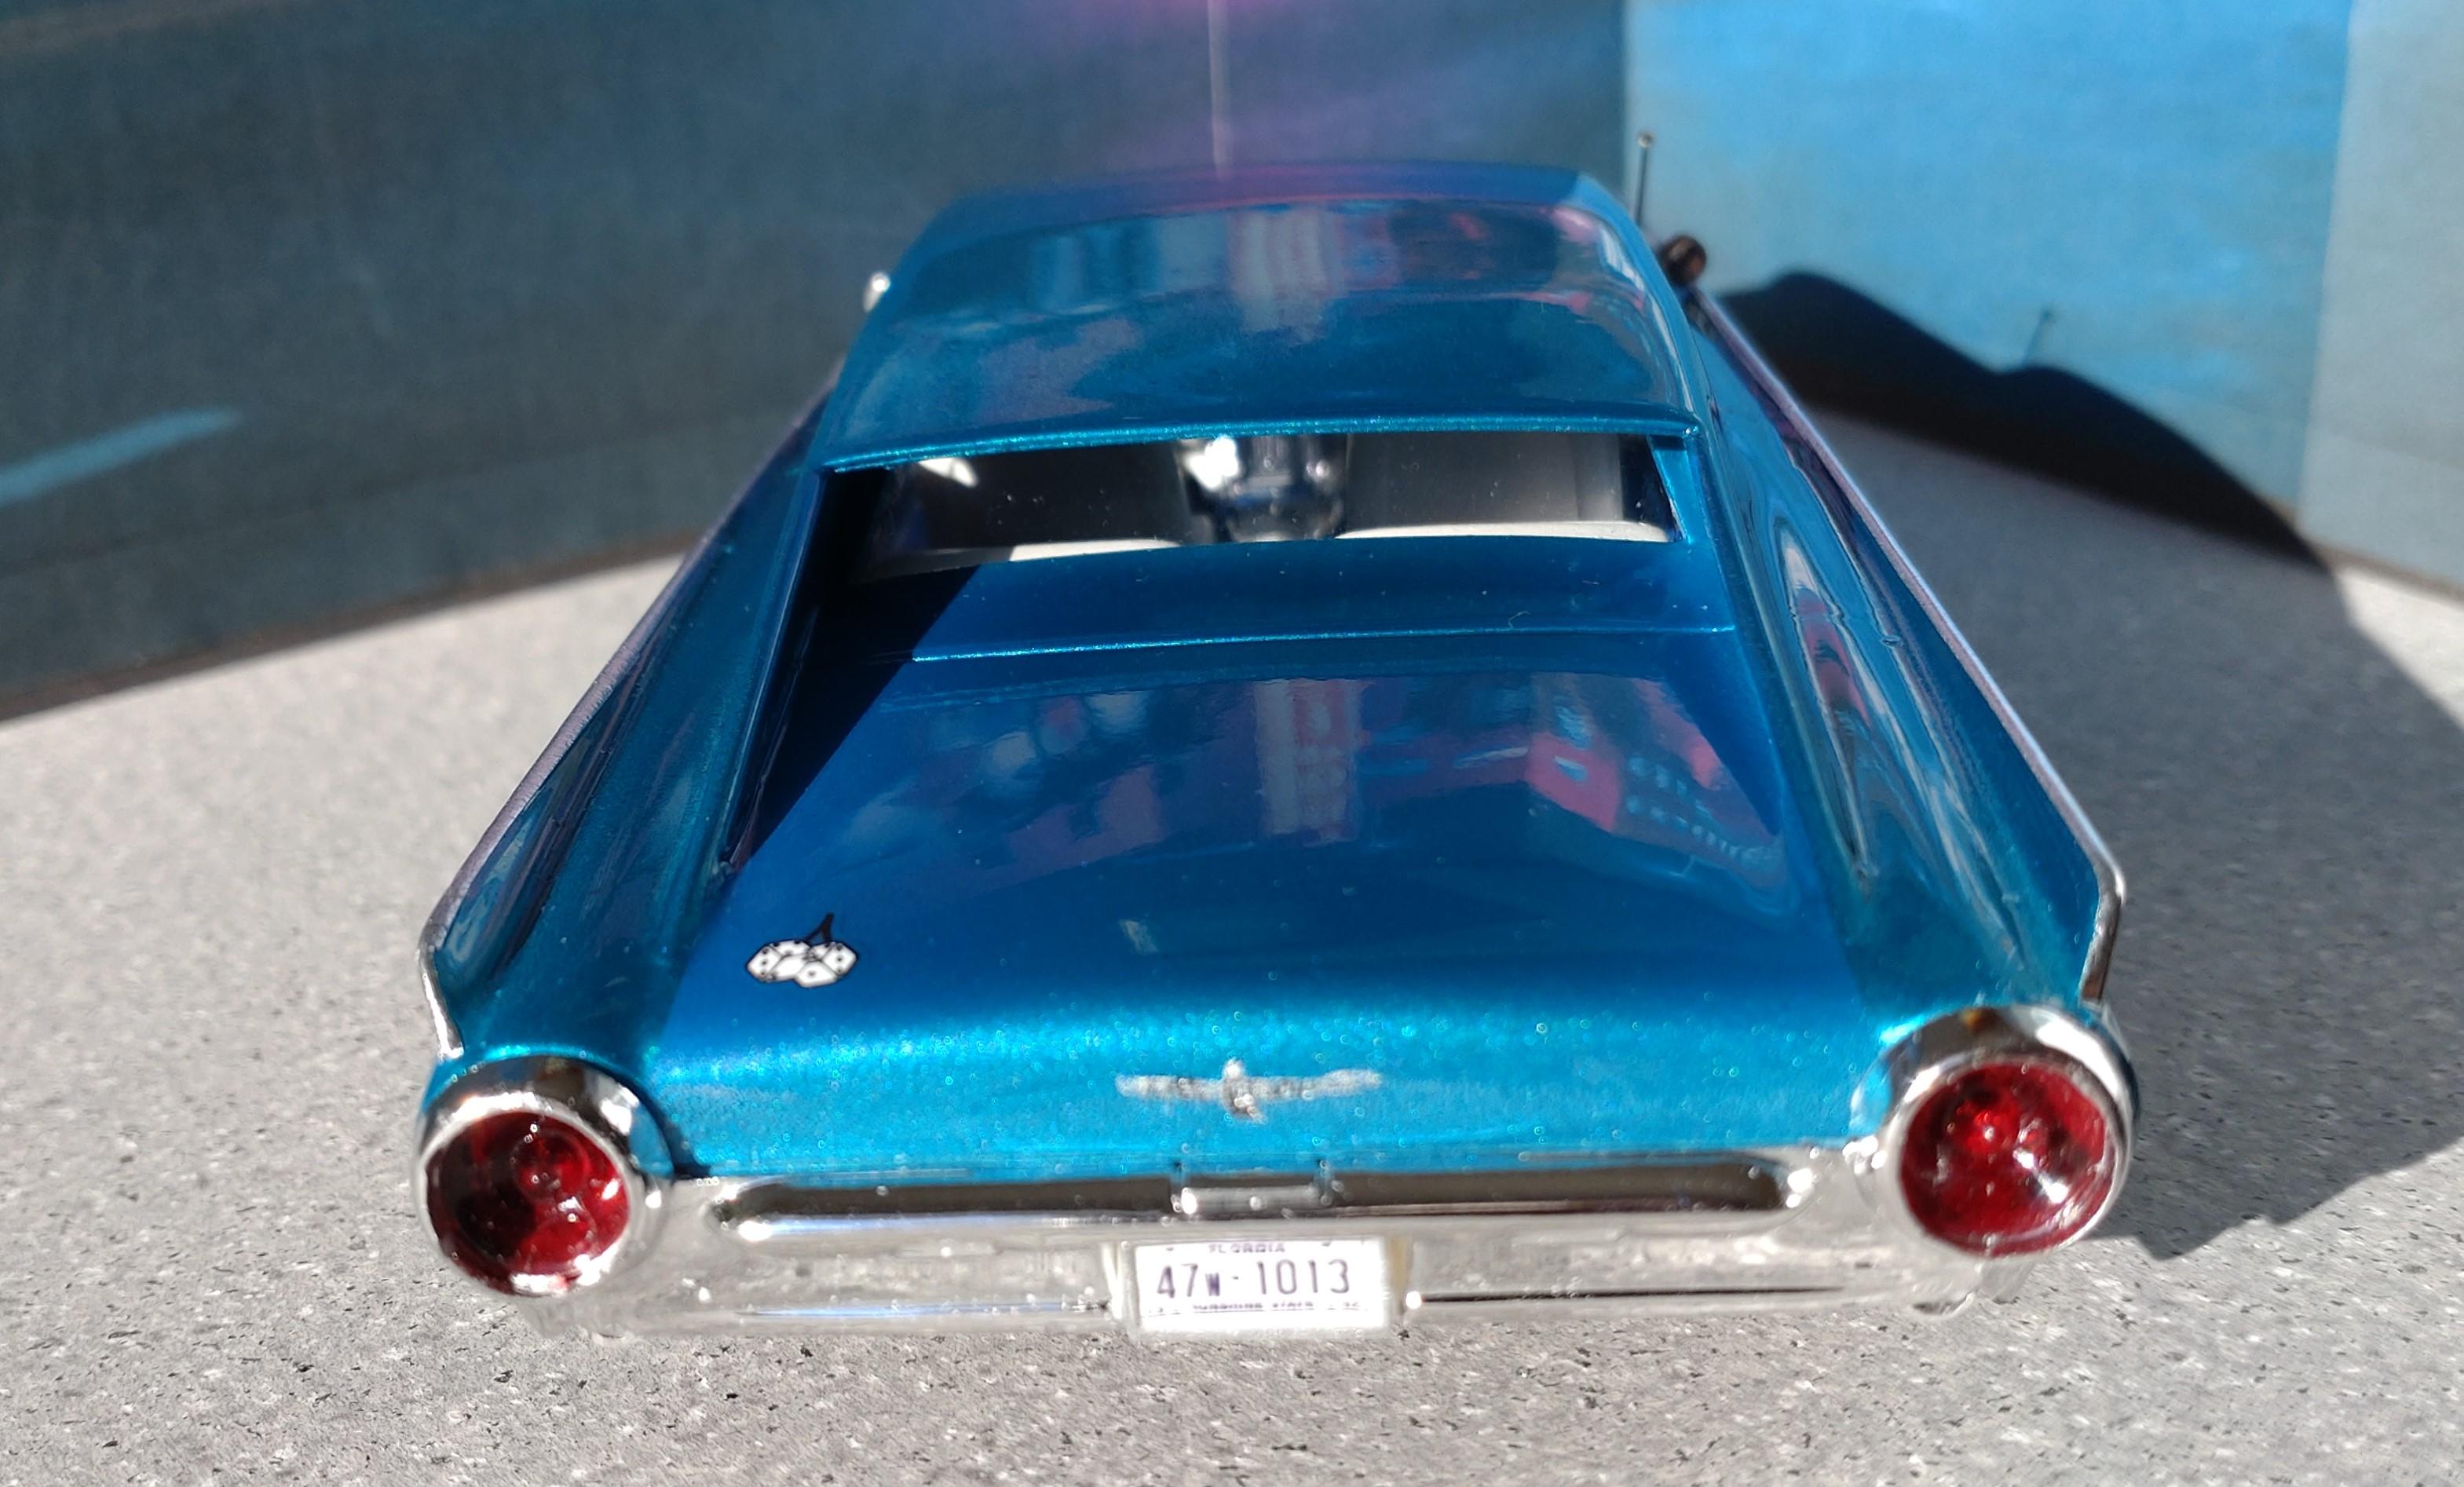
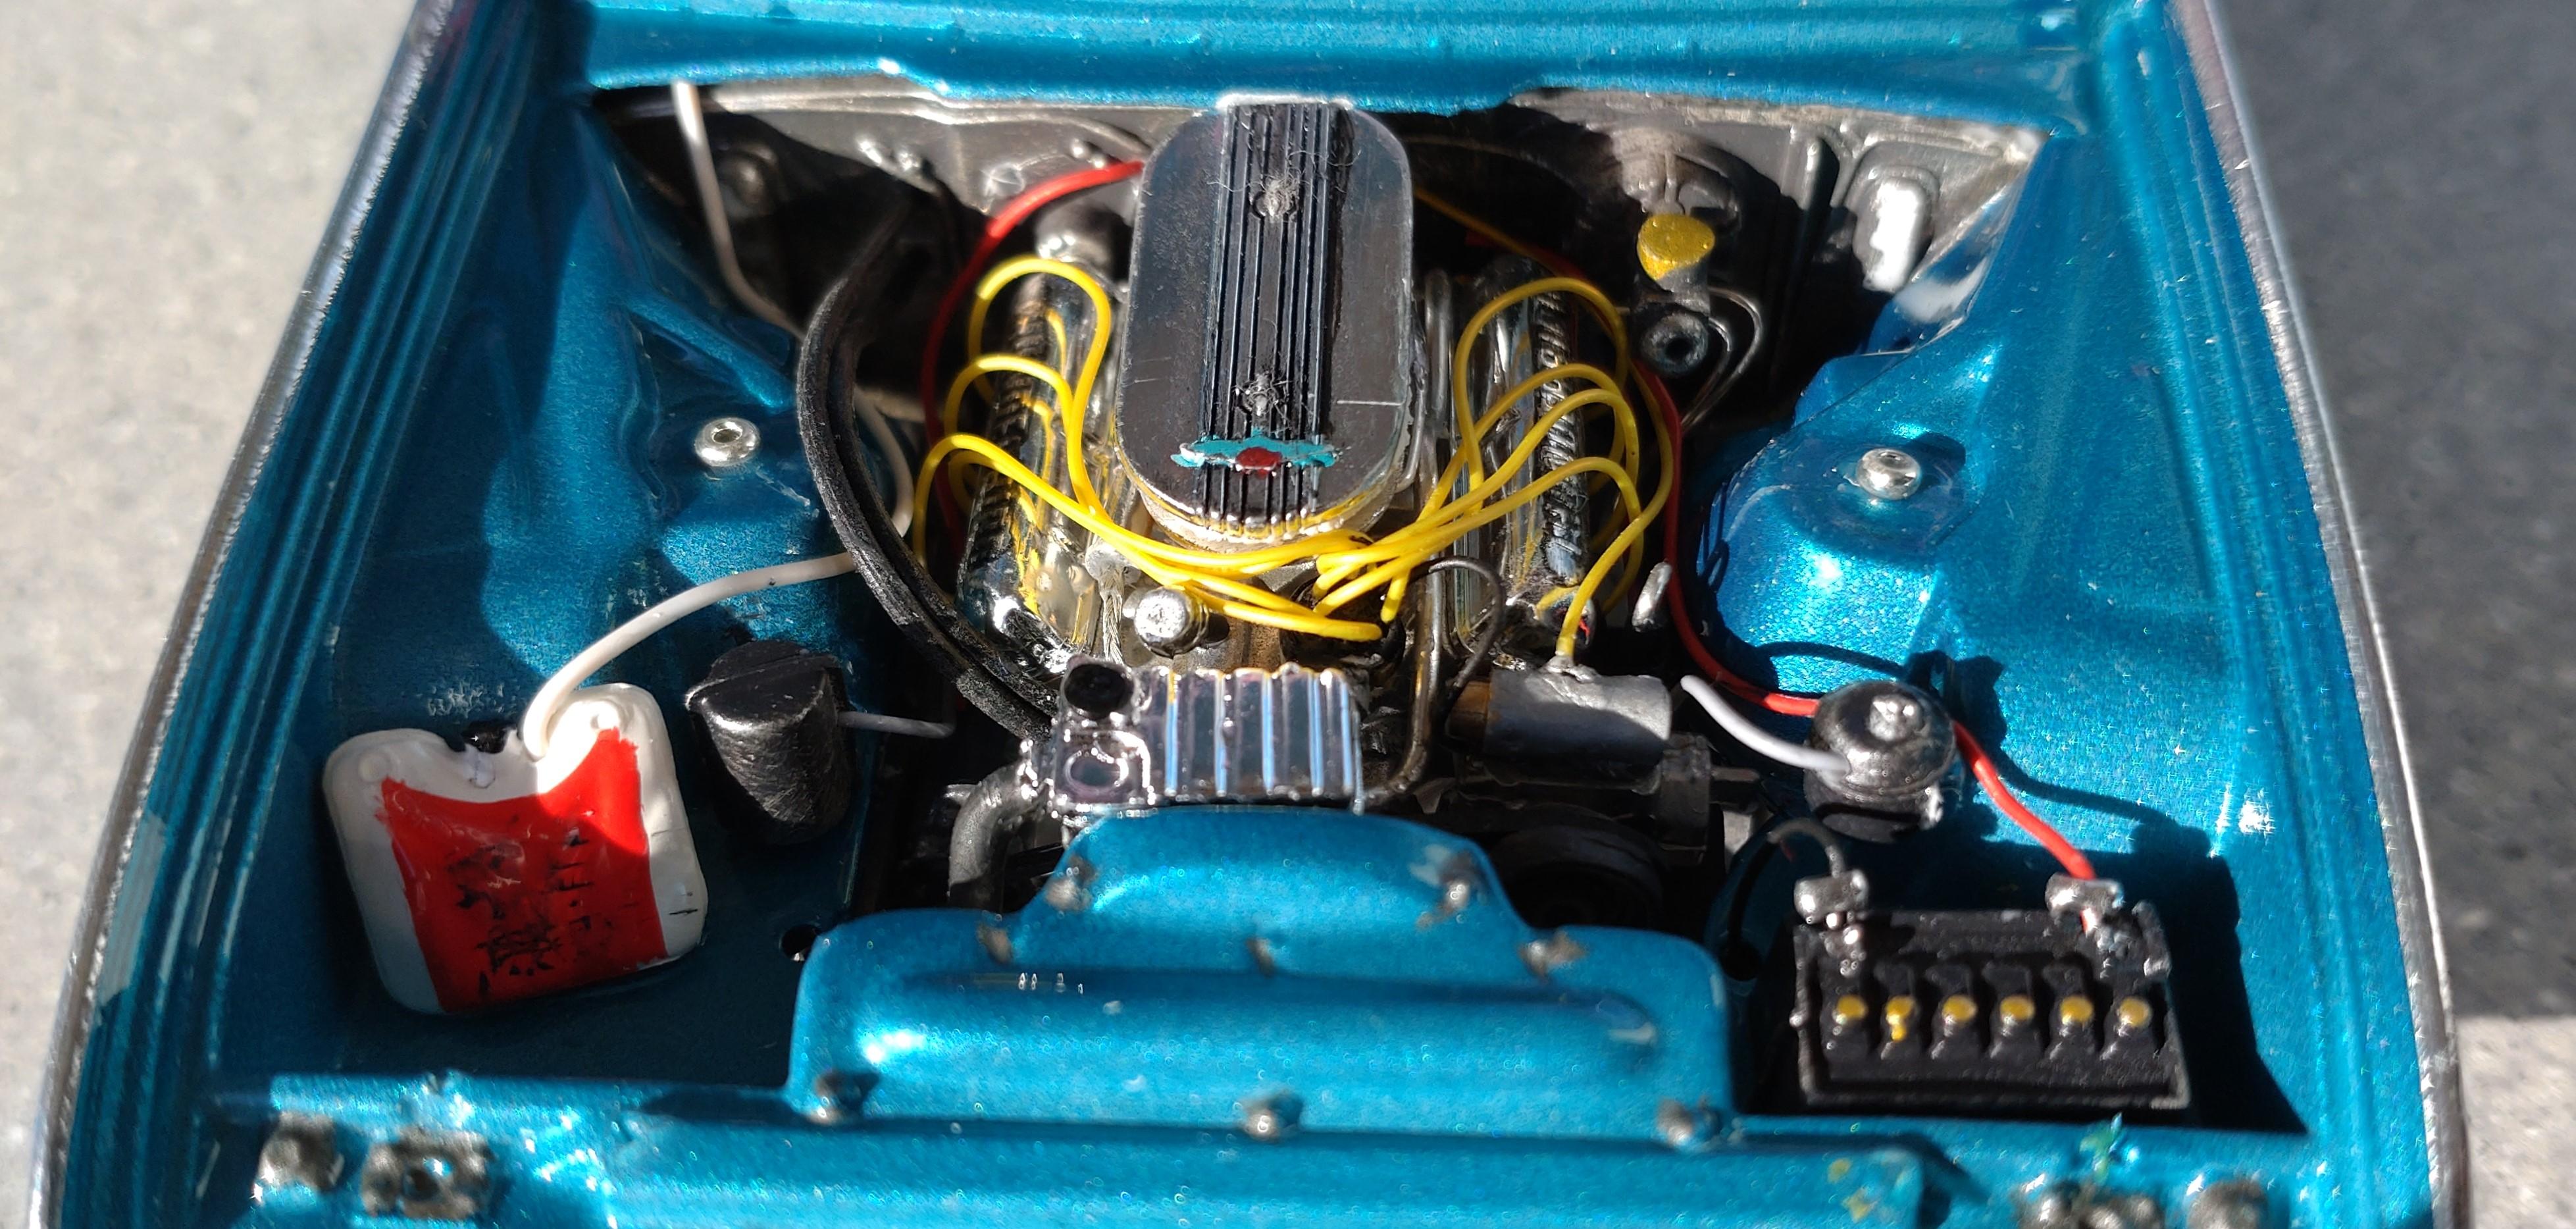
The `62 "Bullet Bird" has a unique design that, even by today`s standards, makes it a beautiful car. I saw some things that Chip Foose built and it inspired me to give my model a twist. I chopped the roof and added more rooftop and B-pillar out of 1,5mm styrene to turn it into a fastback. The windshield with its frame did not fit anymore, so I had to improvise with clear sheet vinyl and styrene. After the putty-work and primer, the color coat is Schmincke Aero Color airbrush acrylic fluid. I added a 50% part of metallic fluid to the turquoise and with 4 coats of AK gloss it turned into that show car sparkle I was after. Chrome work is bare metal covered by the top clear coat. I really love those wheels, super low profile tires, but the rims were basically just spokes. I added the middle part with the hub and wheel nuts (these are tiny metal beads) and now it looks more real. The engine was a bit of work. The motor has 3 pulley satellites (alternator, AC and power steering). Each pulley has its own wheel and 3 thin rubber belts were necessary to hook them all up. Interior floor was velvet flocked. Seat belts added and the chrome is bare metal and Molotov. On the undercarriage I added disk brakes to ever axle. Plus brake and fuel lines. Thanks for watching!
-
Hello Anthony, a classic muscle car well built?. Color fits perfect and I like your work on the interior. Was the woodwork on the dash and console your job or a decal?
-
my third model kit ever, what do you think?
Andy Oldenburg replied to drugsarebad420's topic in Model Cars
Hello Samuel, you have every reason to be proud. Nice work done on your build. We all started one day on a lower level than we are now, whatever the case: Model building, cooking, whatever. Take it the Zen way; learning, growing and above all having fun with your art. -
Hello Sam, this is a hot looking Merc! ? Color fits perfect and the wheels are lovely.
-
Wow, looking evil! Very creative.
-
Wonderful stories on this build from everybody! The ´64 is a real classic that deserves as many models built as possible. You did a good job on your Impala and the patina. ?
-
A radical idea! Very curious about where this is going?
-
To all who have replied: THANK YOU! A bit of applause in the end feels good.
-
Johan ‘70 Cadillac ElDorado pro touring (low and aggressive)
Andy Oldenburg replied to Steve H's topic in WIP: Model Cars
That low mock up looks nasty! ? My wheel choice would be # 1. Very cool interior job so far and looking forward to see the finished job. Especially all those PE parts you mentioned. Hard too get items like that here in Europe.