OldNYJim
-
Posts
249 -
Joined
-
Last visited
Content Type
Profiles
Forums
Events
Gallery
Everything posted by OldNYJim
-
Tint looks good David! Tamiya Clear Blue acrylic is another option that works well - but yours looks good! Making good progress, keep going!
-

T-Bucket (the pickup kind)
OldNYJim replied to OldNYJim's topic in WIP: Model Trucks: Pickups, Vans, SUVs, Light Commercial
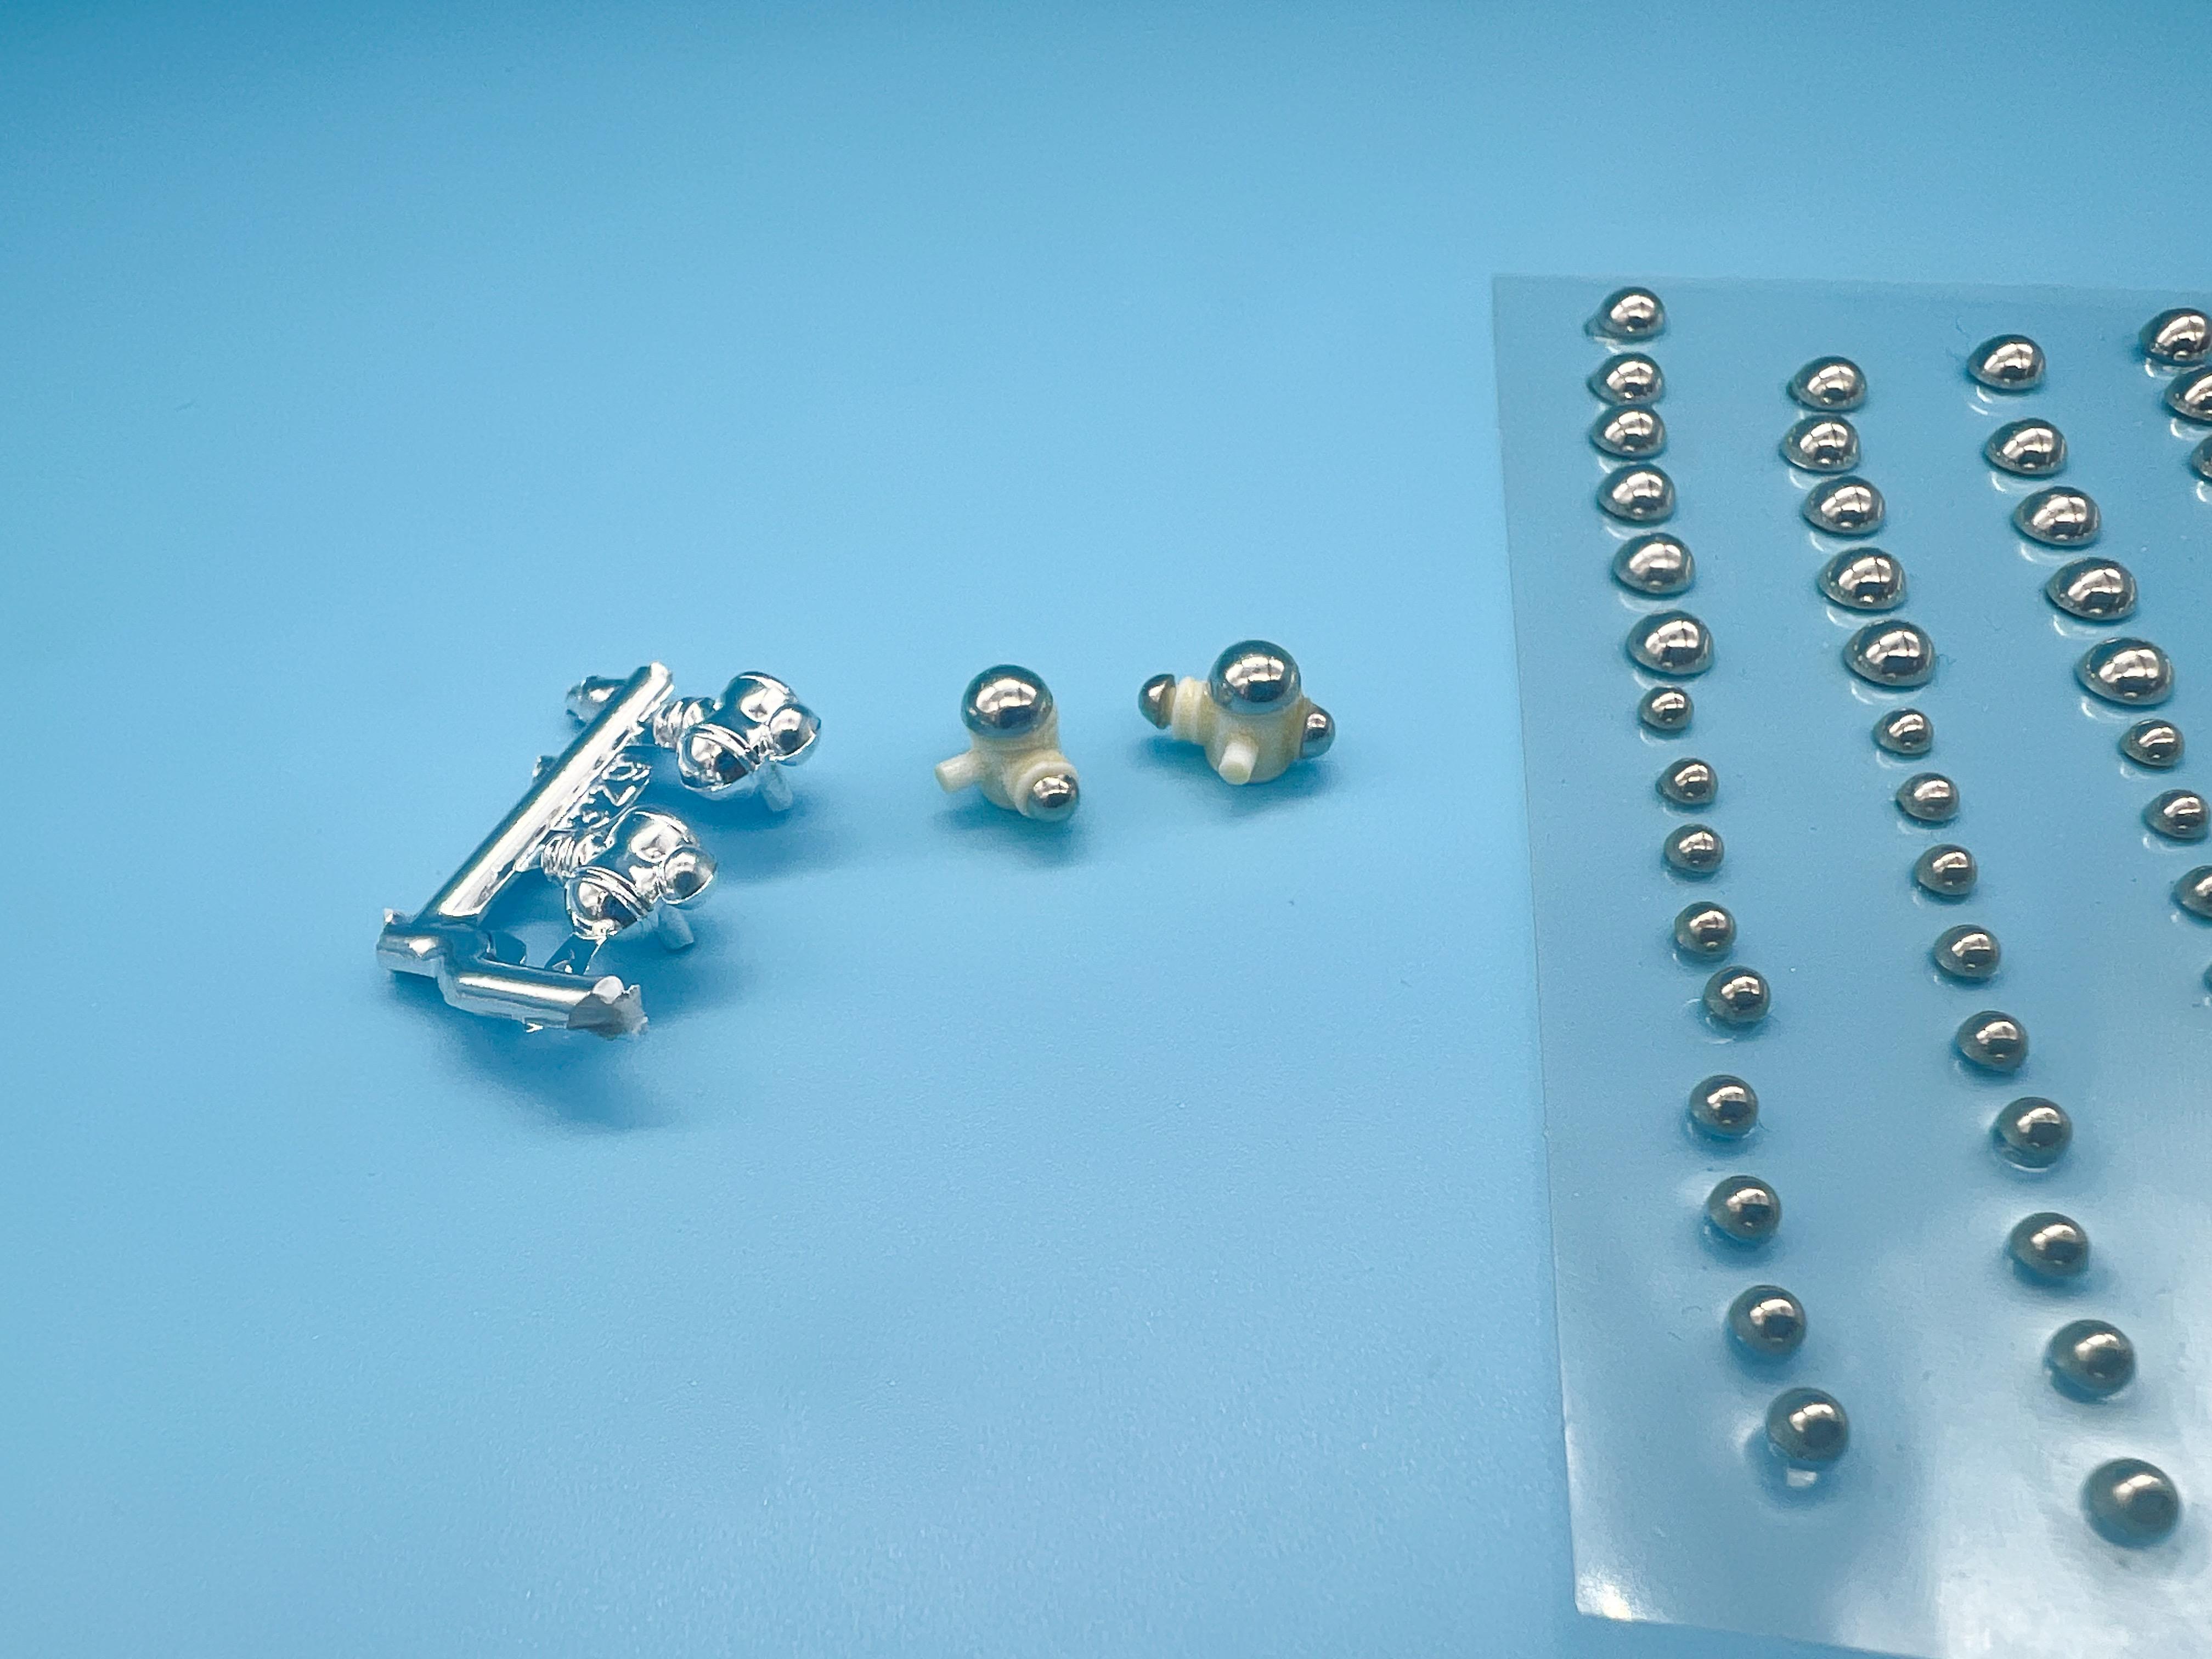
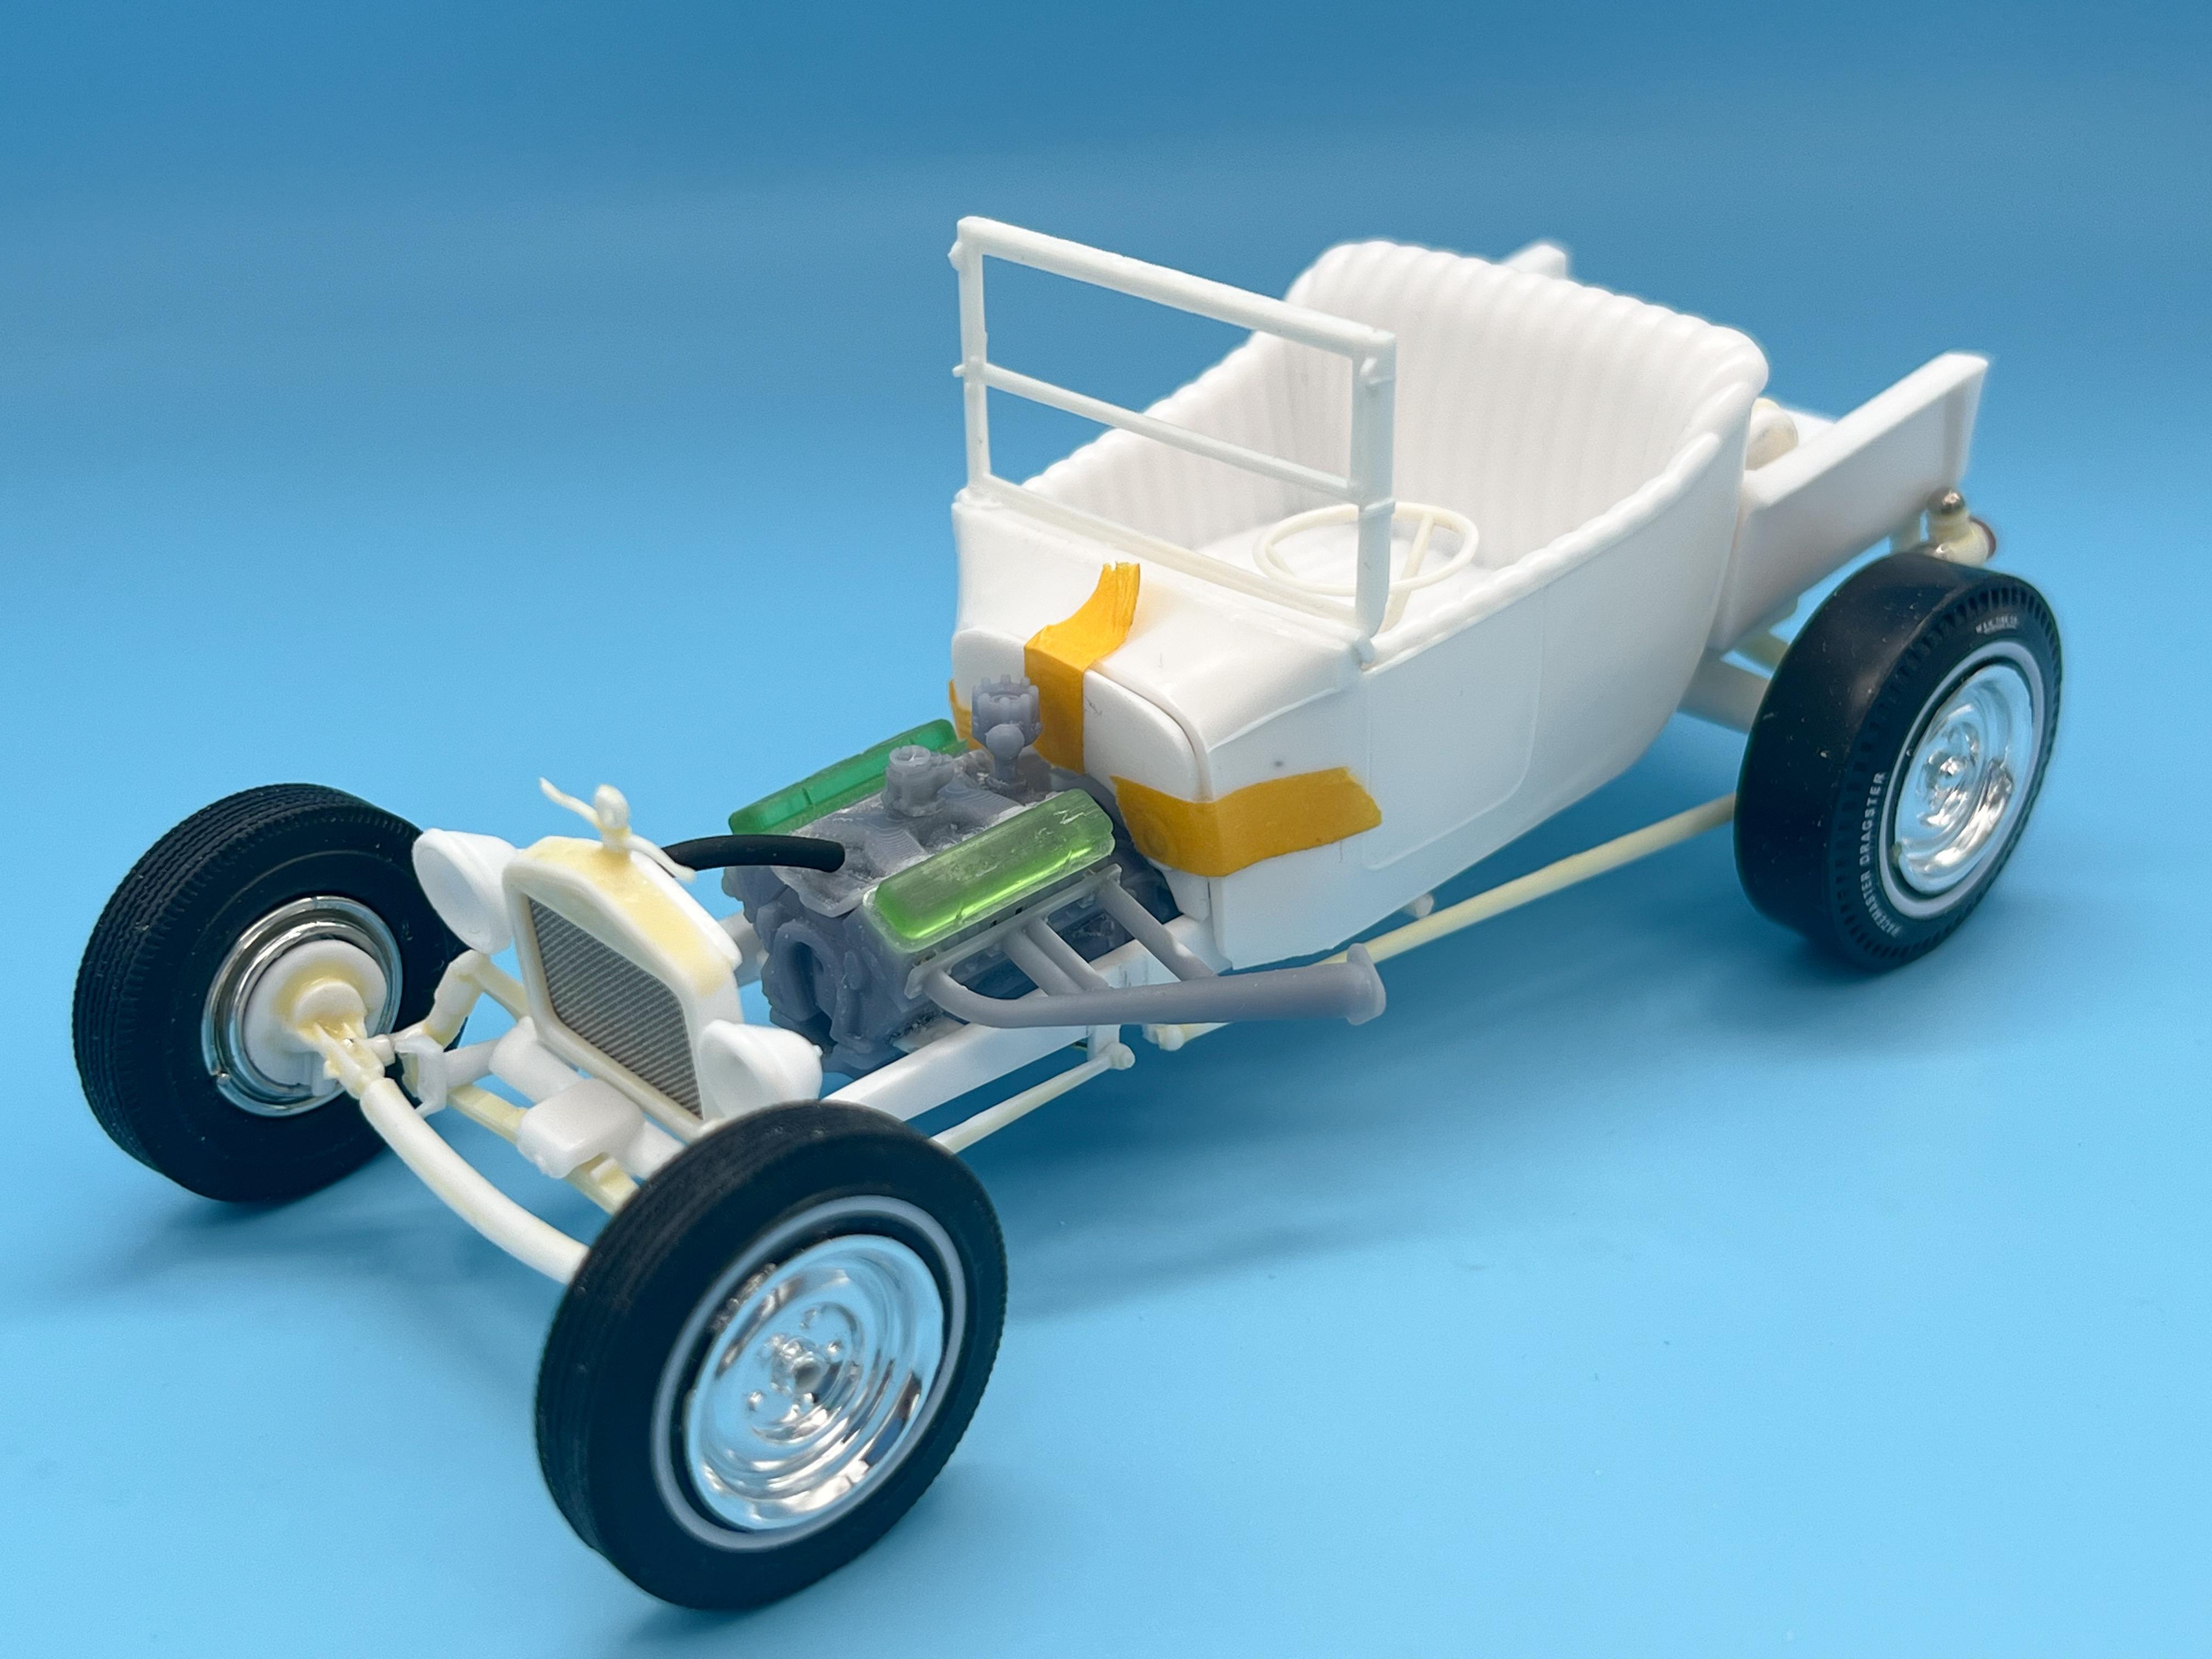
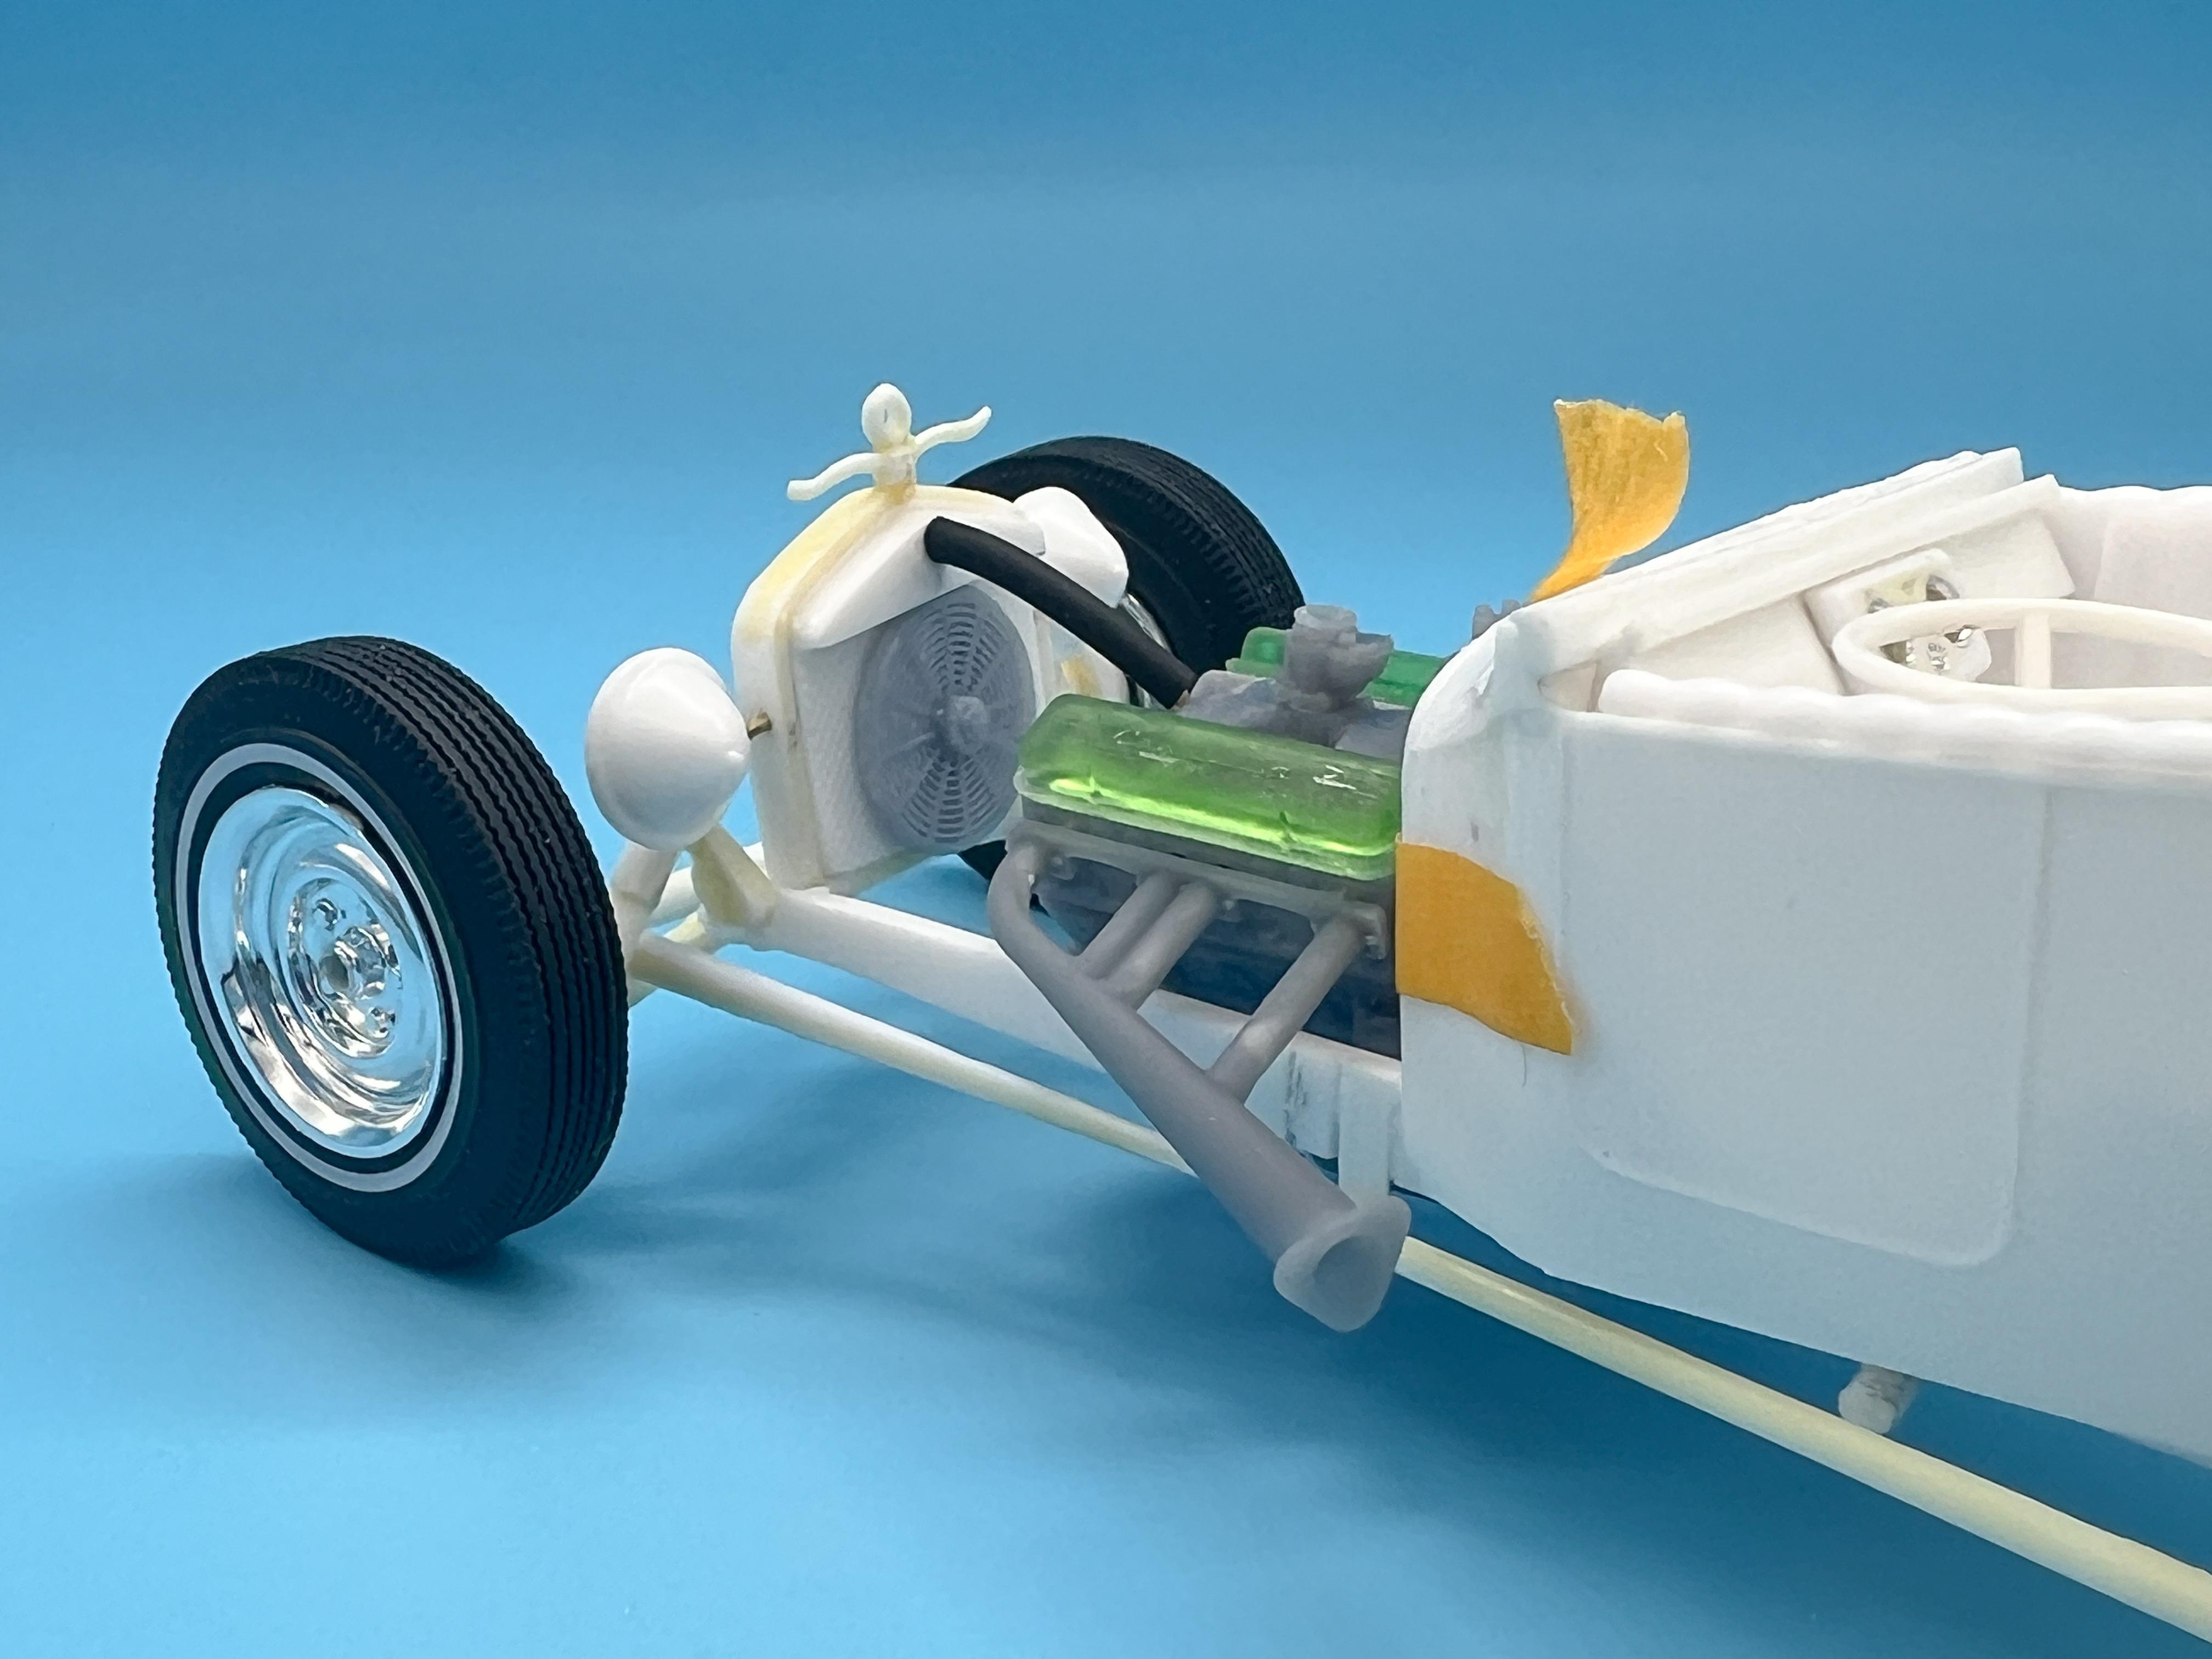
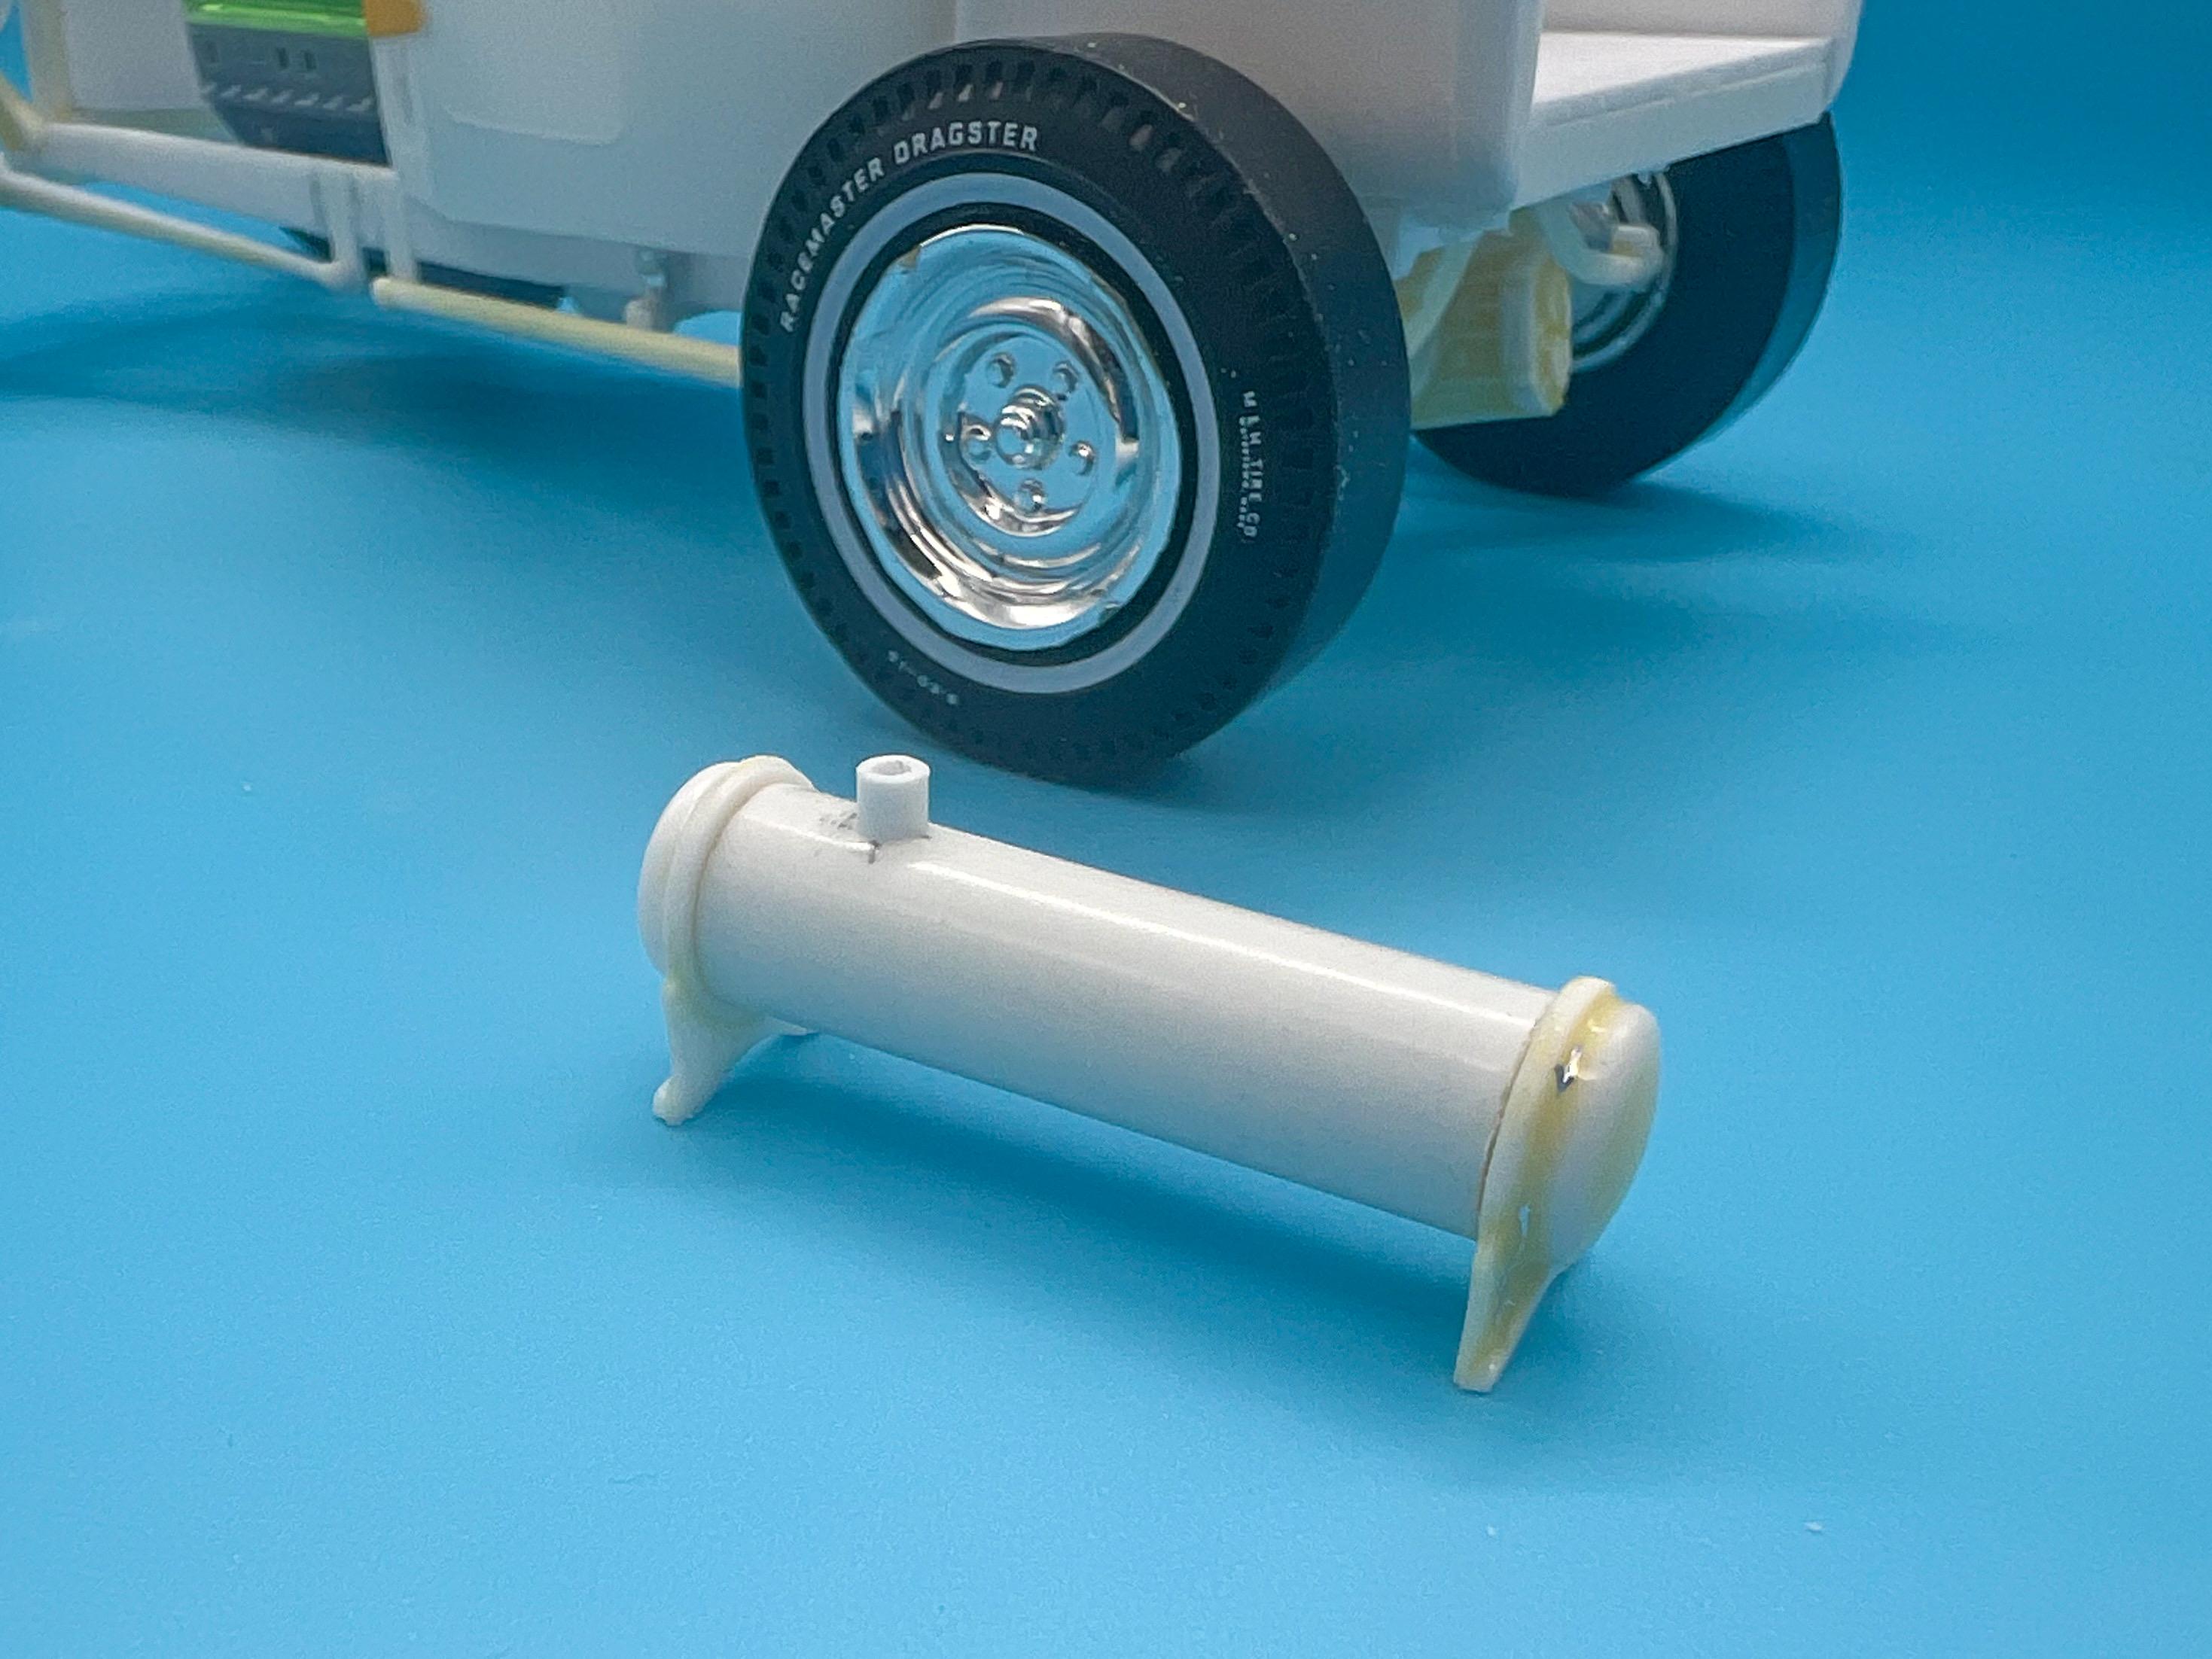
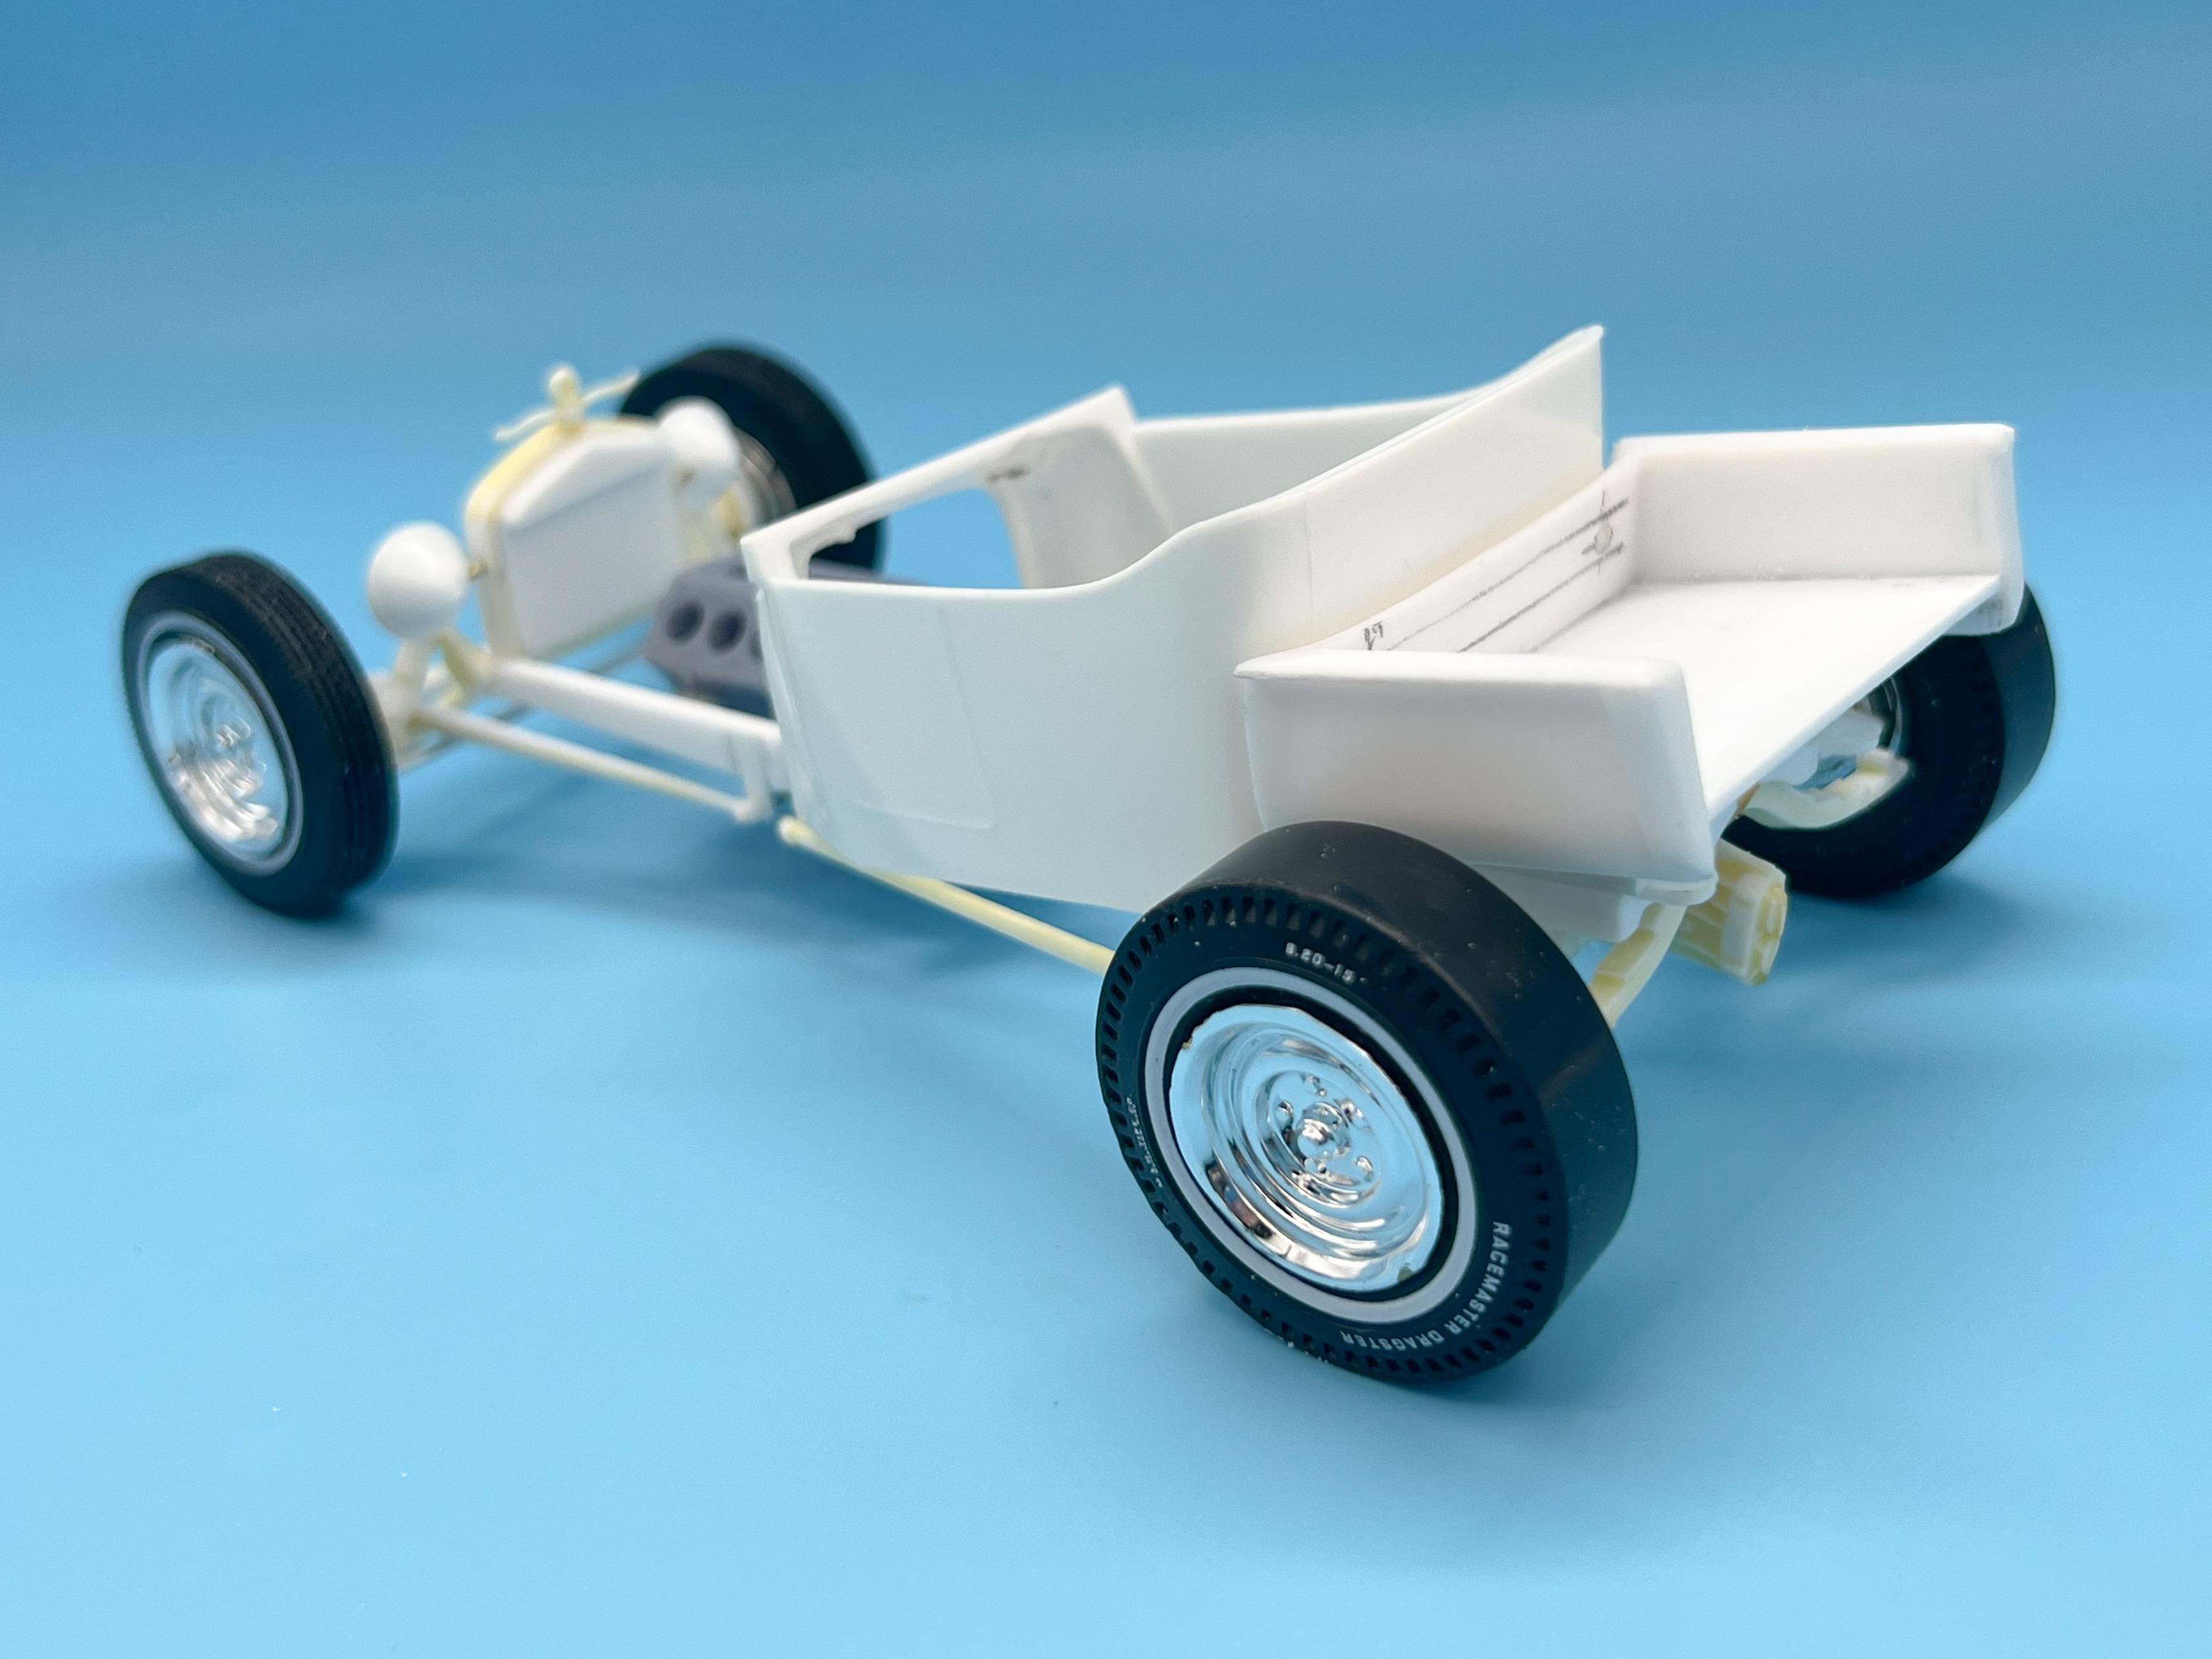
Thanks fellas! You’re right - they DO have the body sit way back…that’s something that, if I were designing this, I would change too - it looks more ‘right’ to me with the body forward a little. That said, I really wanted to build a loosely (!!) box-stock T Bucket from each of the available kits for my shelf, and that long-snout look is definitely a distinctive feature of these. Of course, ‘loosely’ box stock means I’m also changing a BUNCH of stuff on this, but I’m trying to keep the bones mostly as it comes out of the box ? A little more progress today…first up was figuring out the tail lights. I wanted to use the old lantern-style ones that come with the kit, but the detail is pretty soft. Stripped the chrome, sanded flat the domes and replaced with with some scrapbooking half-spheres that were about the perfect size: They’ll mount to the bedside like so: Lenses are from the parts box…there was some old semi kit that came with trees and trees of little round red and amber lenses of various sizes, and these are from what, whatever it was…super useful to have in the stash if you ever see them… I wanted to make some brackets to mount the fuel tank, and then realized that the kit COMES with the perfect part, assuming you have two of these kits on your shelf… there’s a little two-part Moon tank in this kit, and I used the end piece (just a tank-end and a bracket) times two: I had some engine parts to print, so I printed a cap…this is SUPPOSED to be a Ford Falcon radiator cap, but it made a nice cap for the gas tank instead… Also fresh off the printer today was all the bolt-on stuff to finish the engine, besides one piece I forgot…dohhh. I did print up some headers though: Plus, I don’t know how legit an electric fan would be for a mid-sixties period guide but I didn’t want a mechanical fan on there so I printed an electric one: That kit radiator is crying out for some more detail, so I’ll probably work on that this coming week…I also need to figure out the pedals and shifter, but before I could do that I had a big hole to fill in the floor…couldn’t find a perfect diameter piece of styrene rod so I spun up a scrap piece of sprue to make a plug instead: Plenty more to do, but I’m pleased with my weekend’s progress…more soon, soon as I’ve done more!
-
Fujimi 1981 Ayrton Senna Kart
OldNYJim replied to IanH's topic in WIP: Other Racing: Road Racing, Land Speed Racers
It’s coming together Ian! Enjoying this build! -
T-Bucket (the pickup kind)
OldNYJim replied to OldNYJim's topic in WIP: Model Trucks: Pickups, Vans, SUVs, Light Commercial
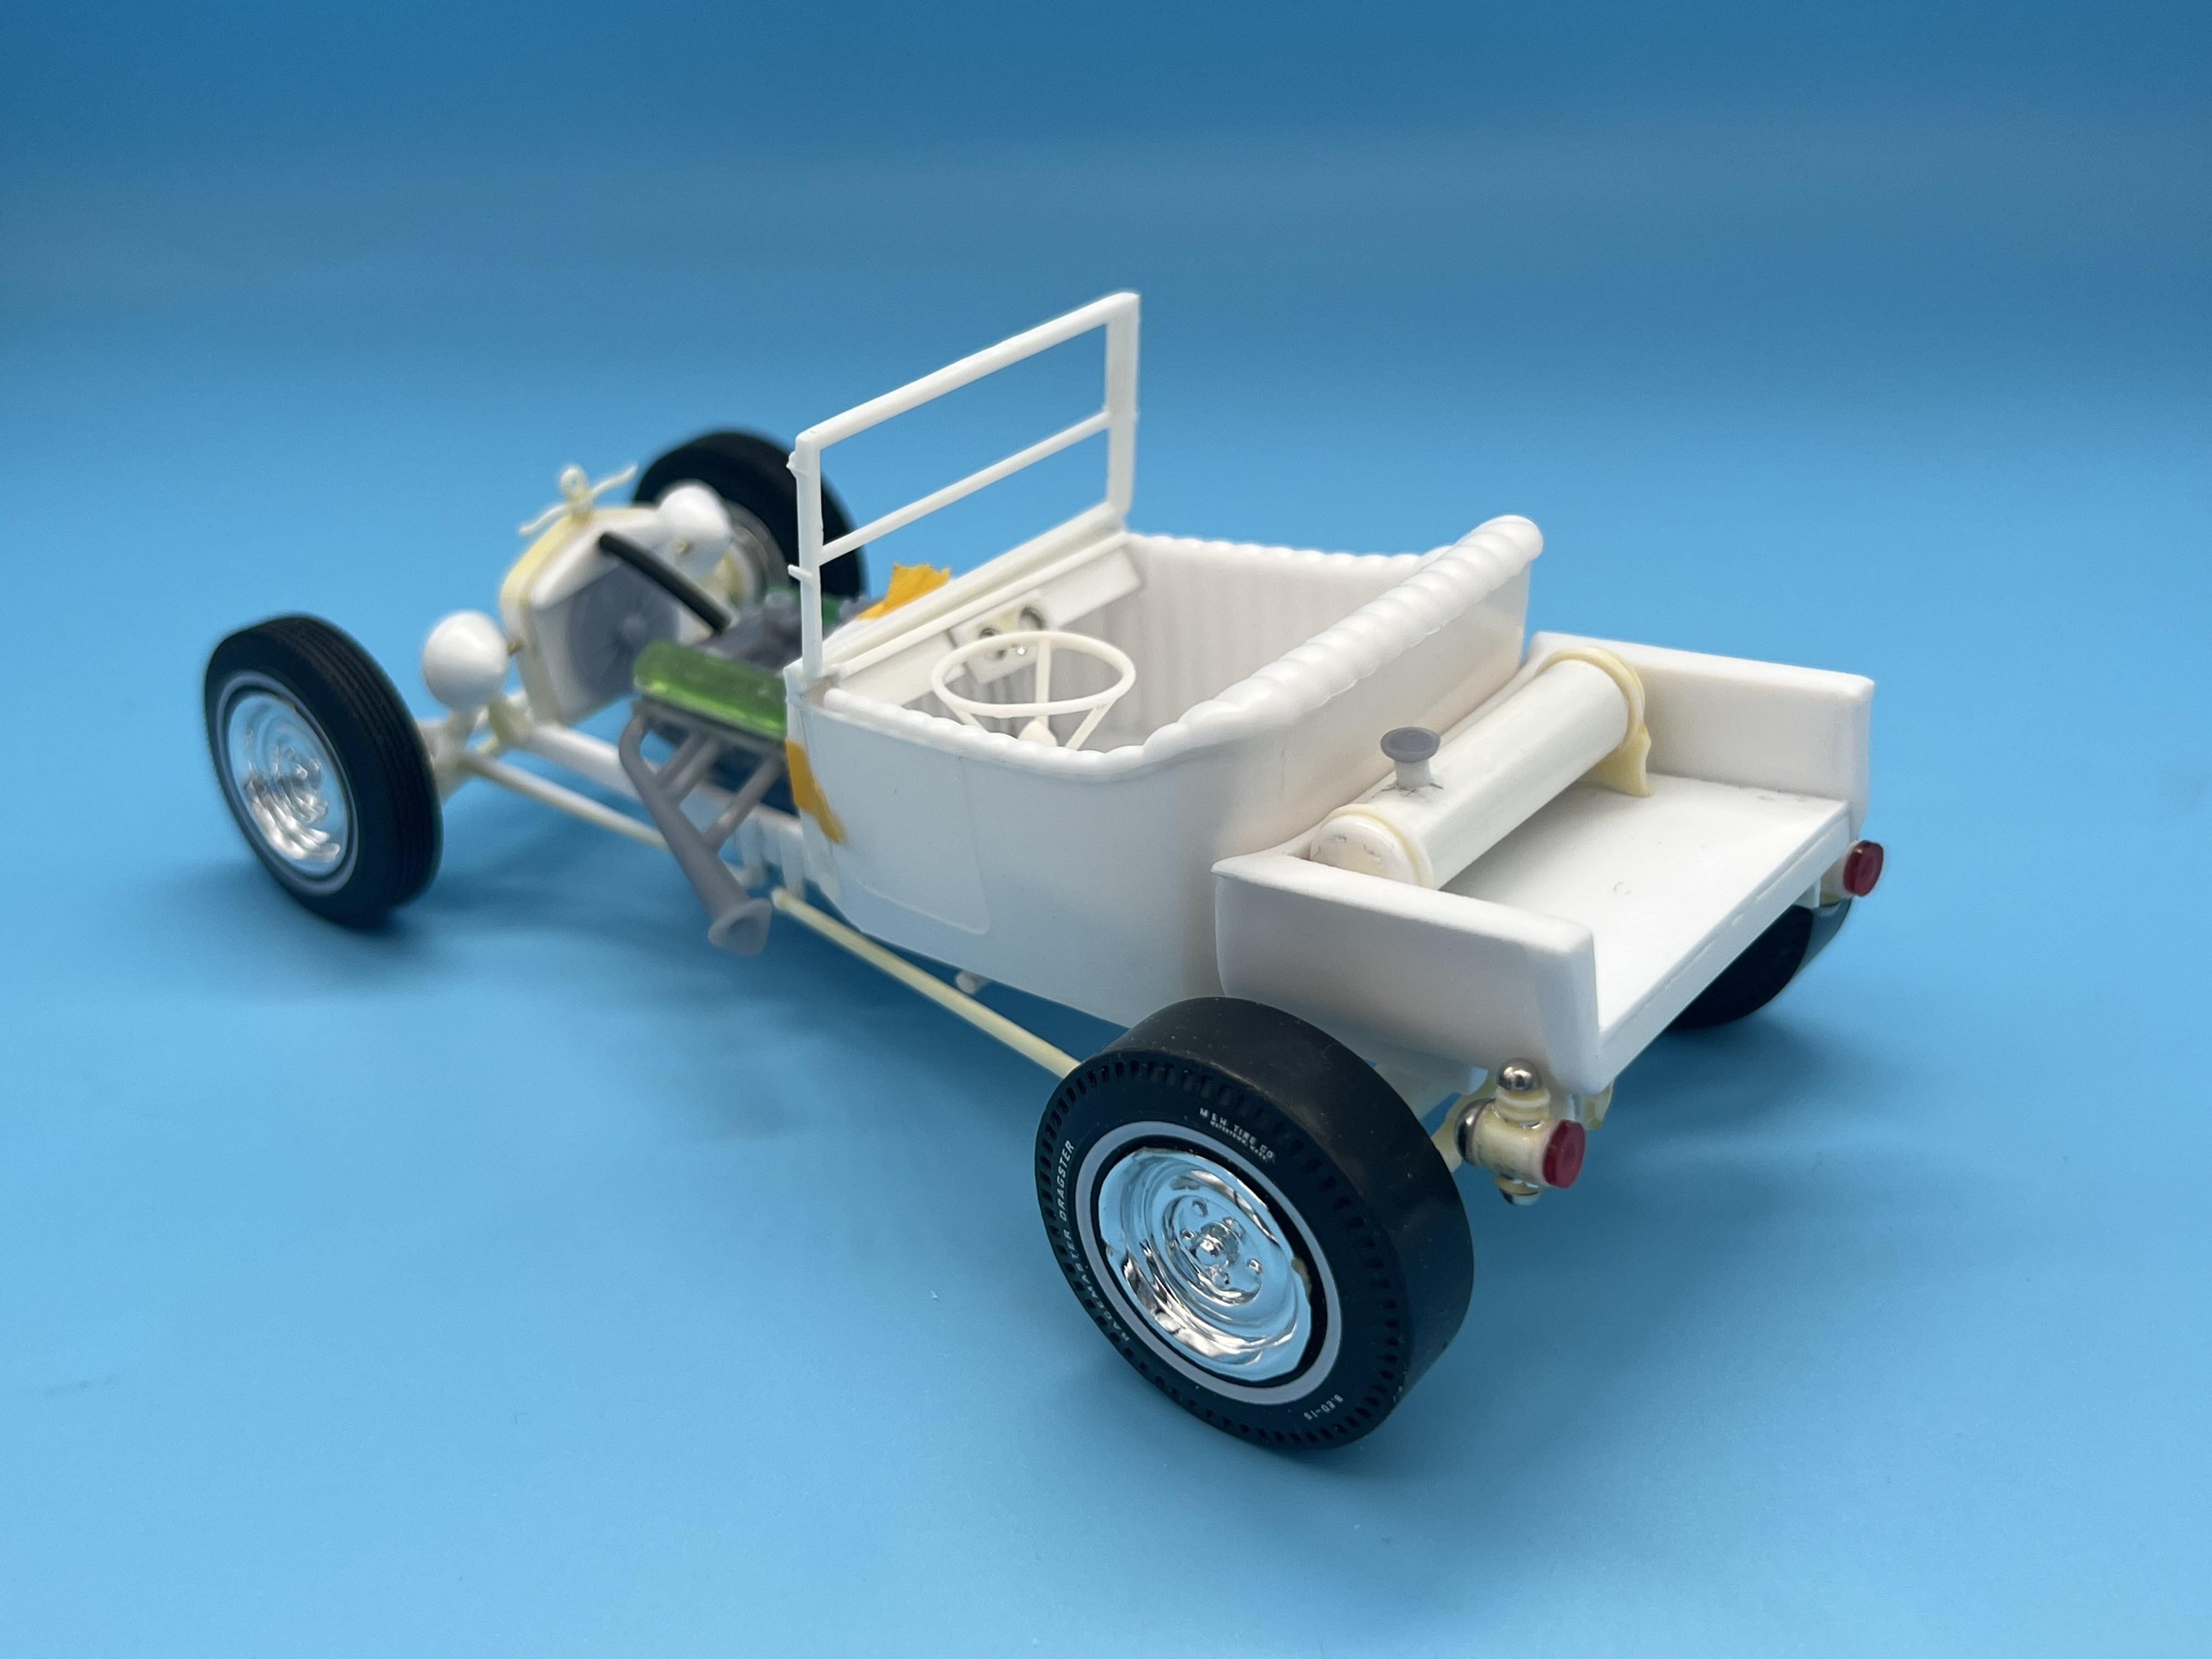
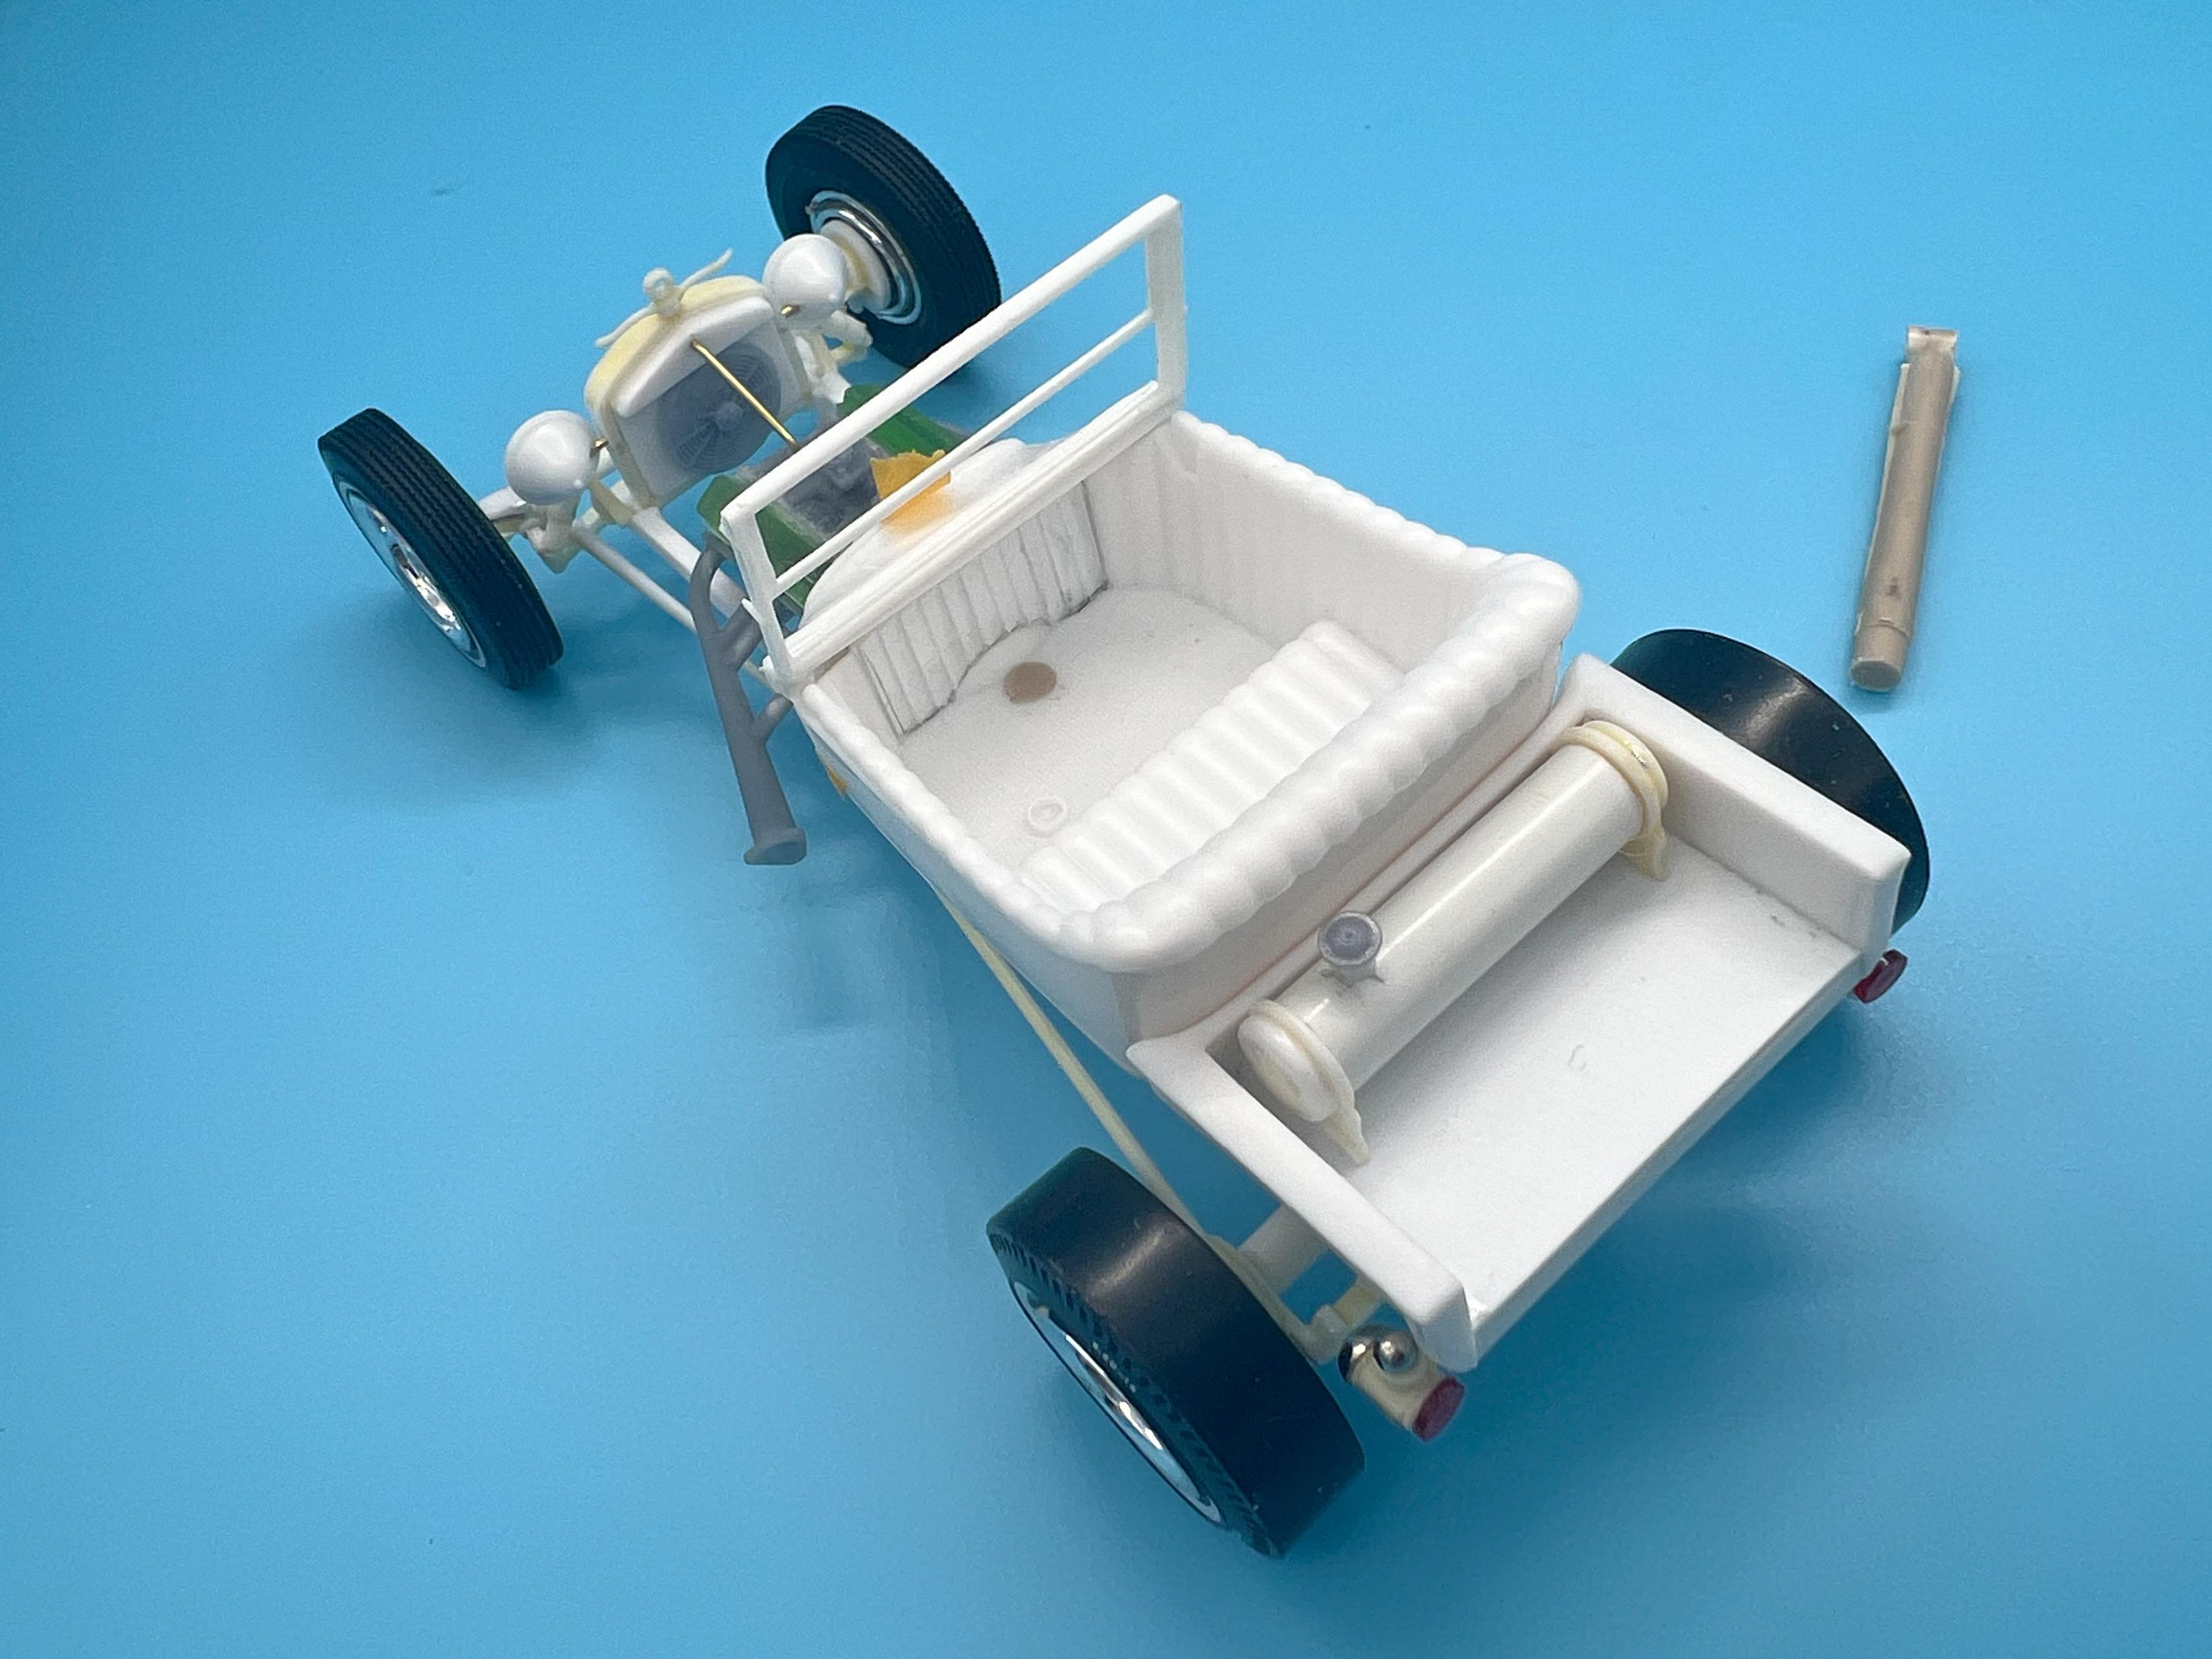
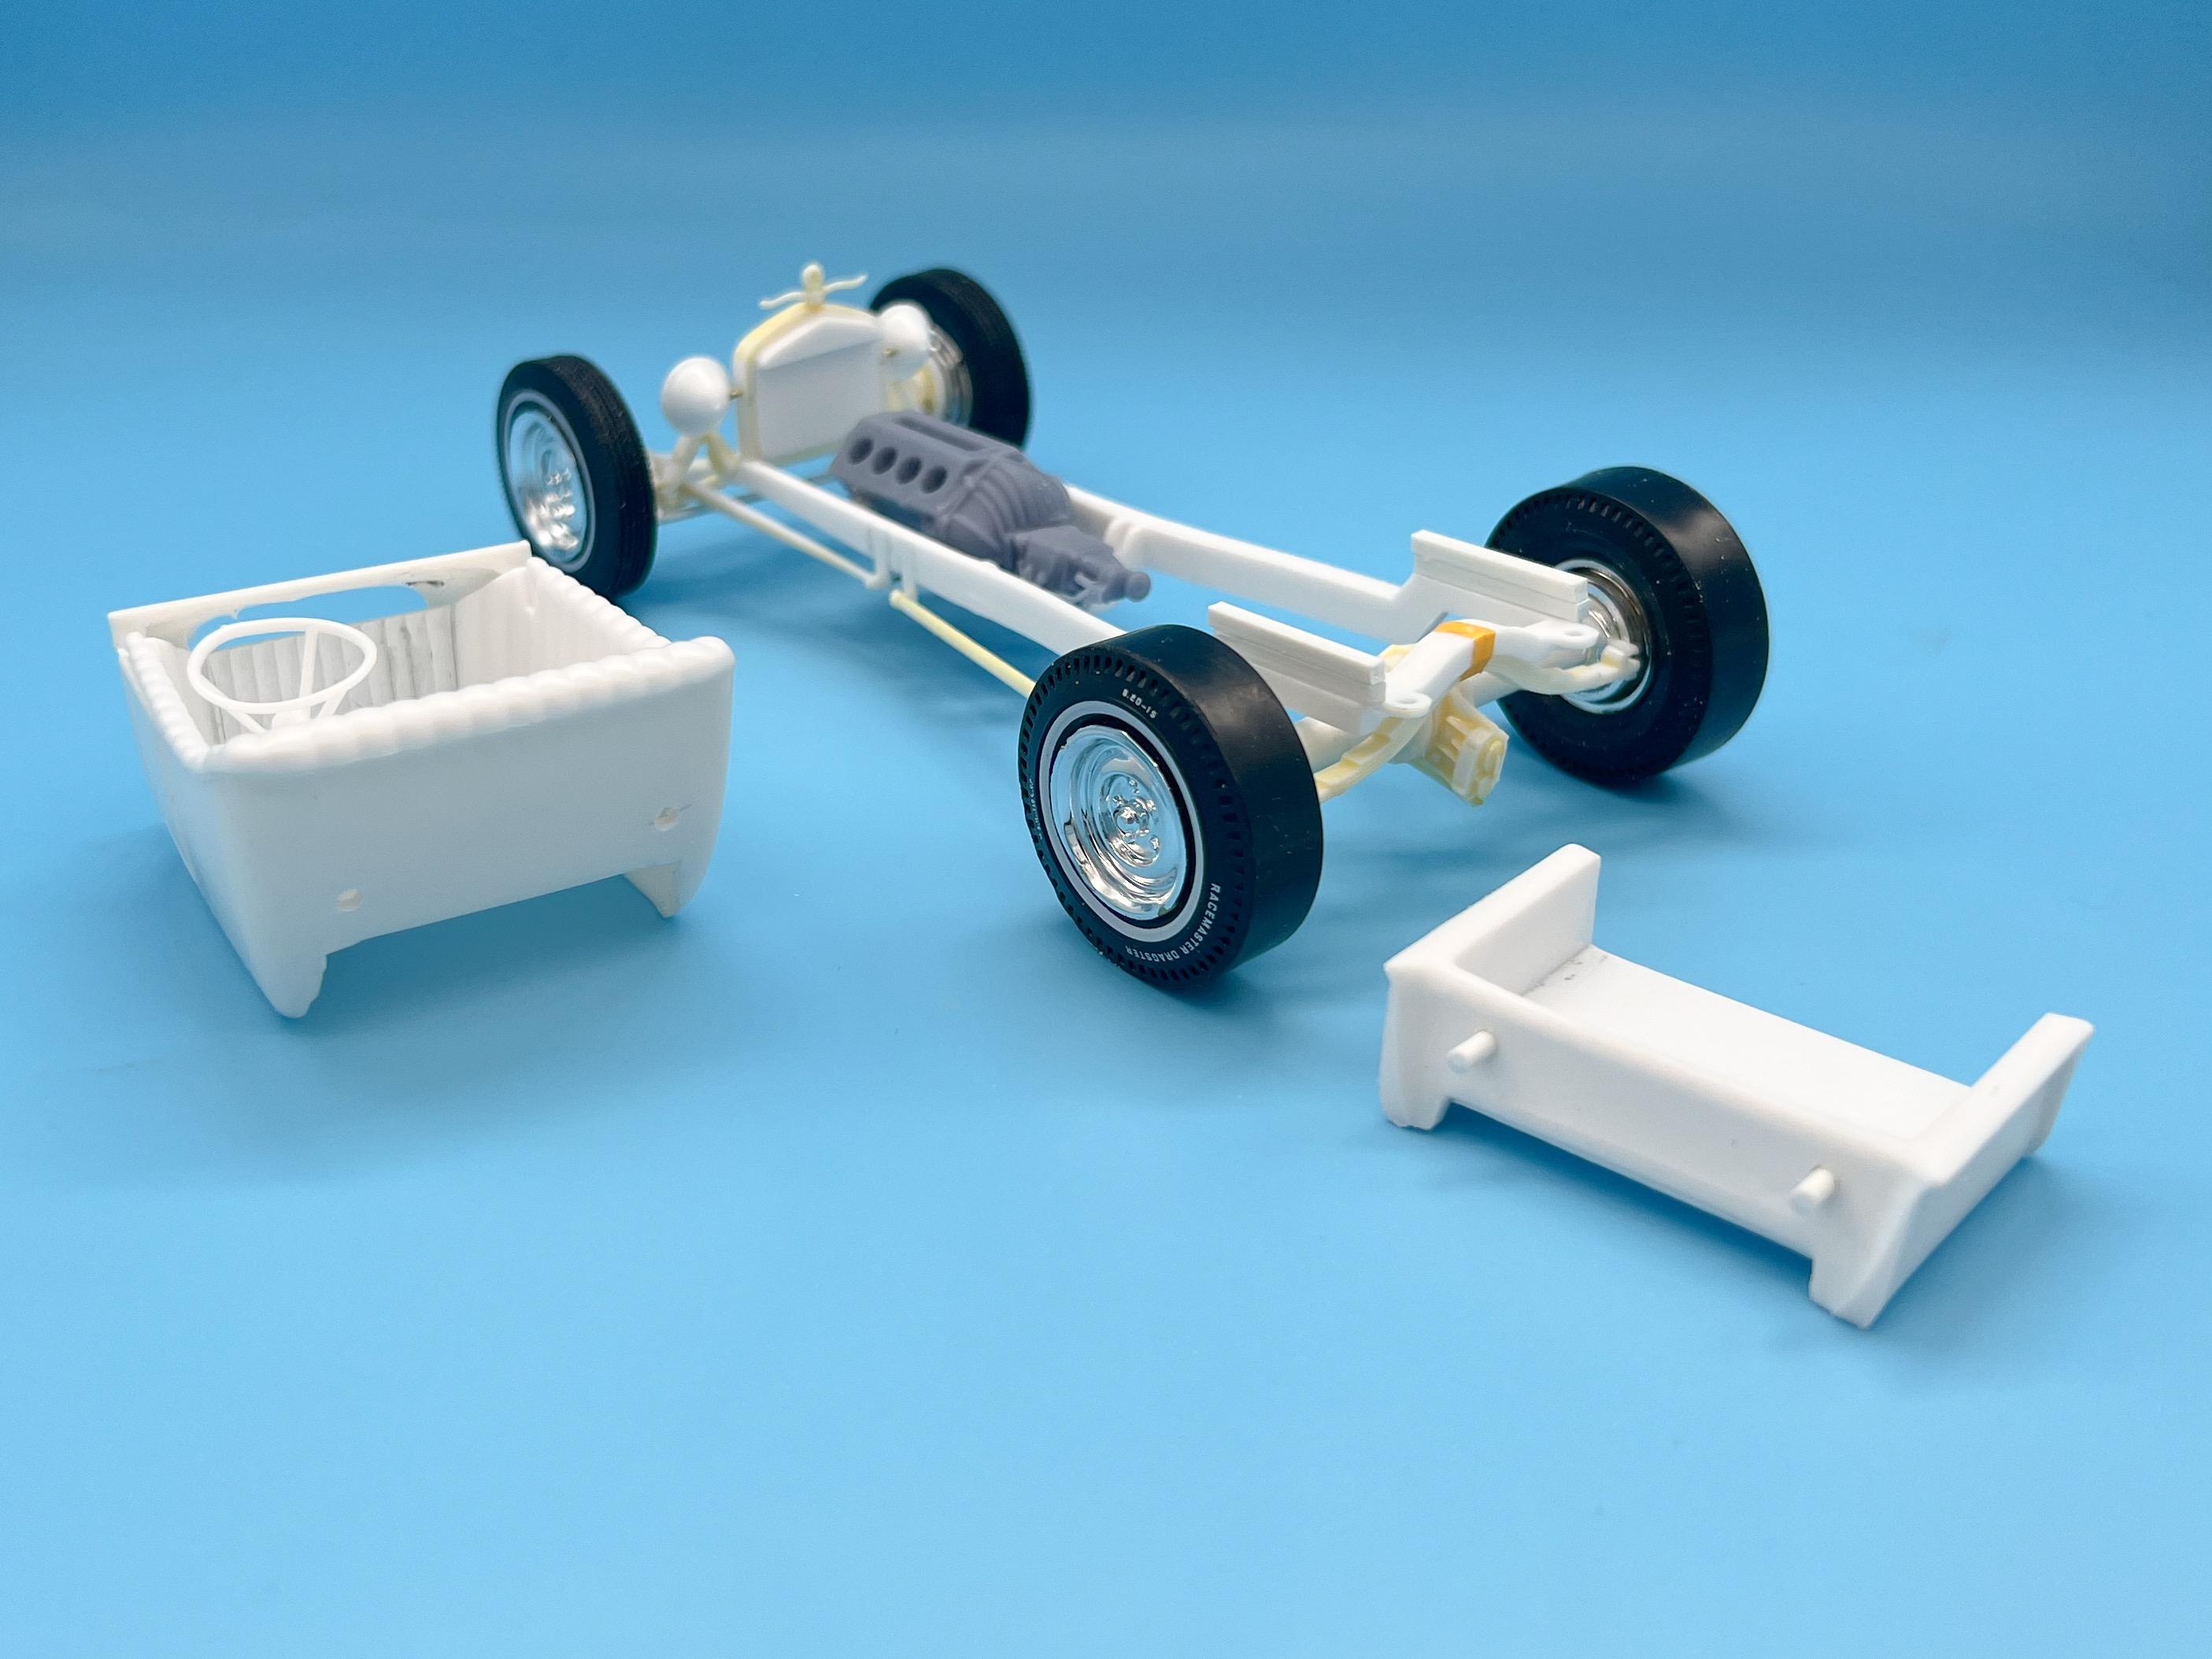
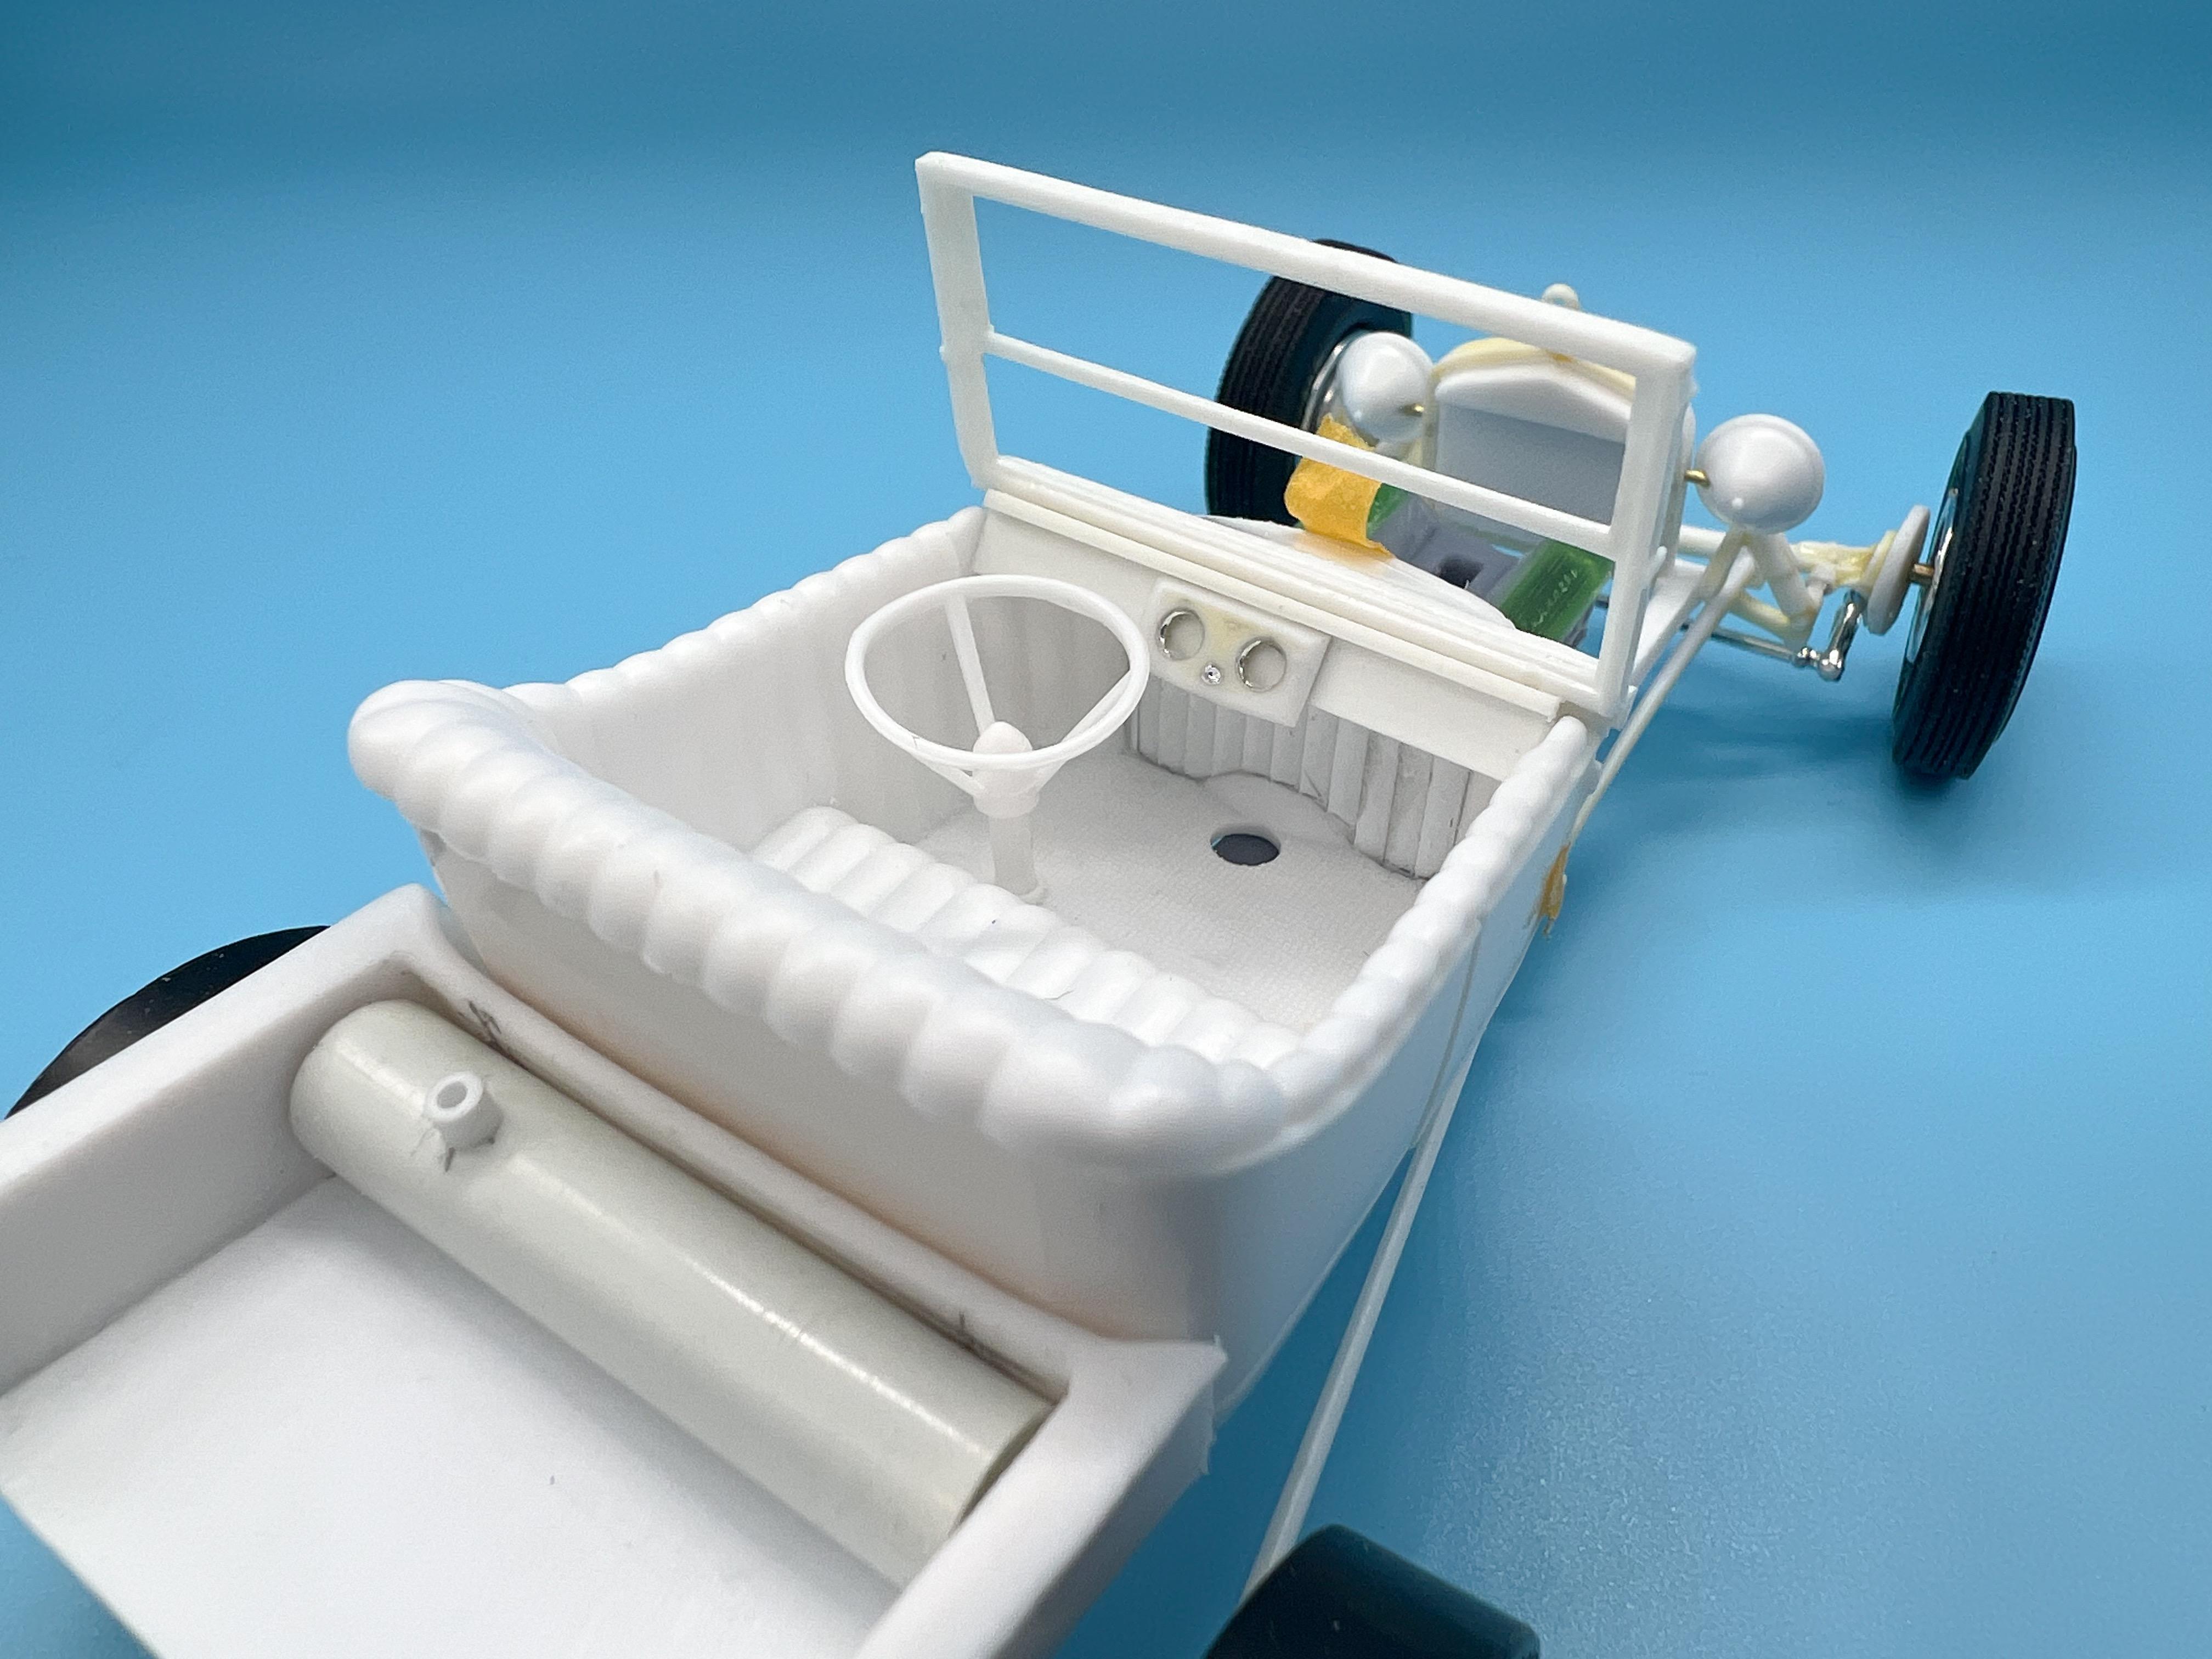
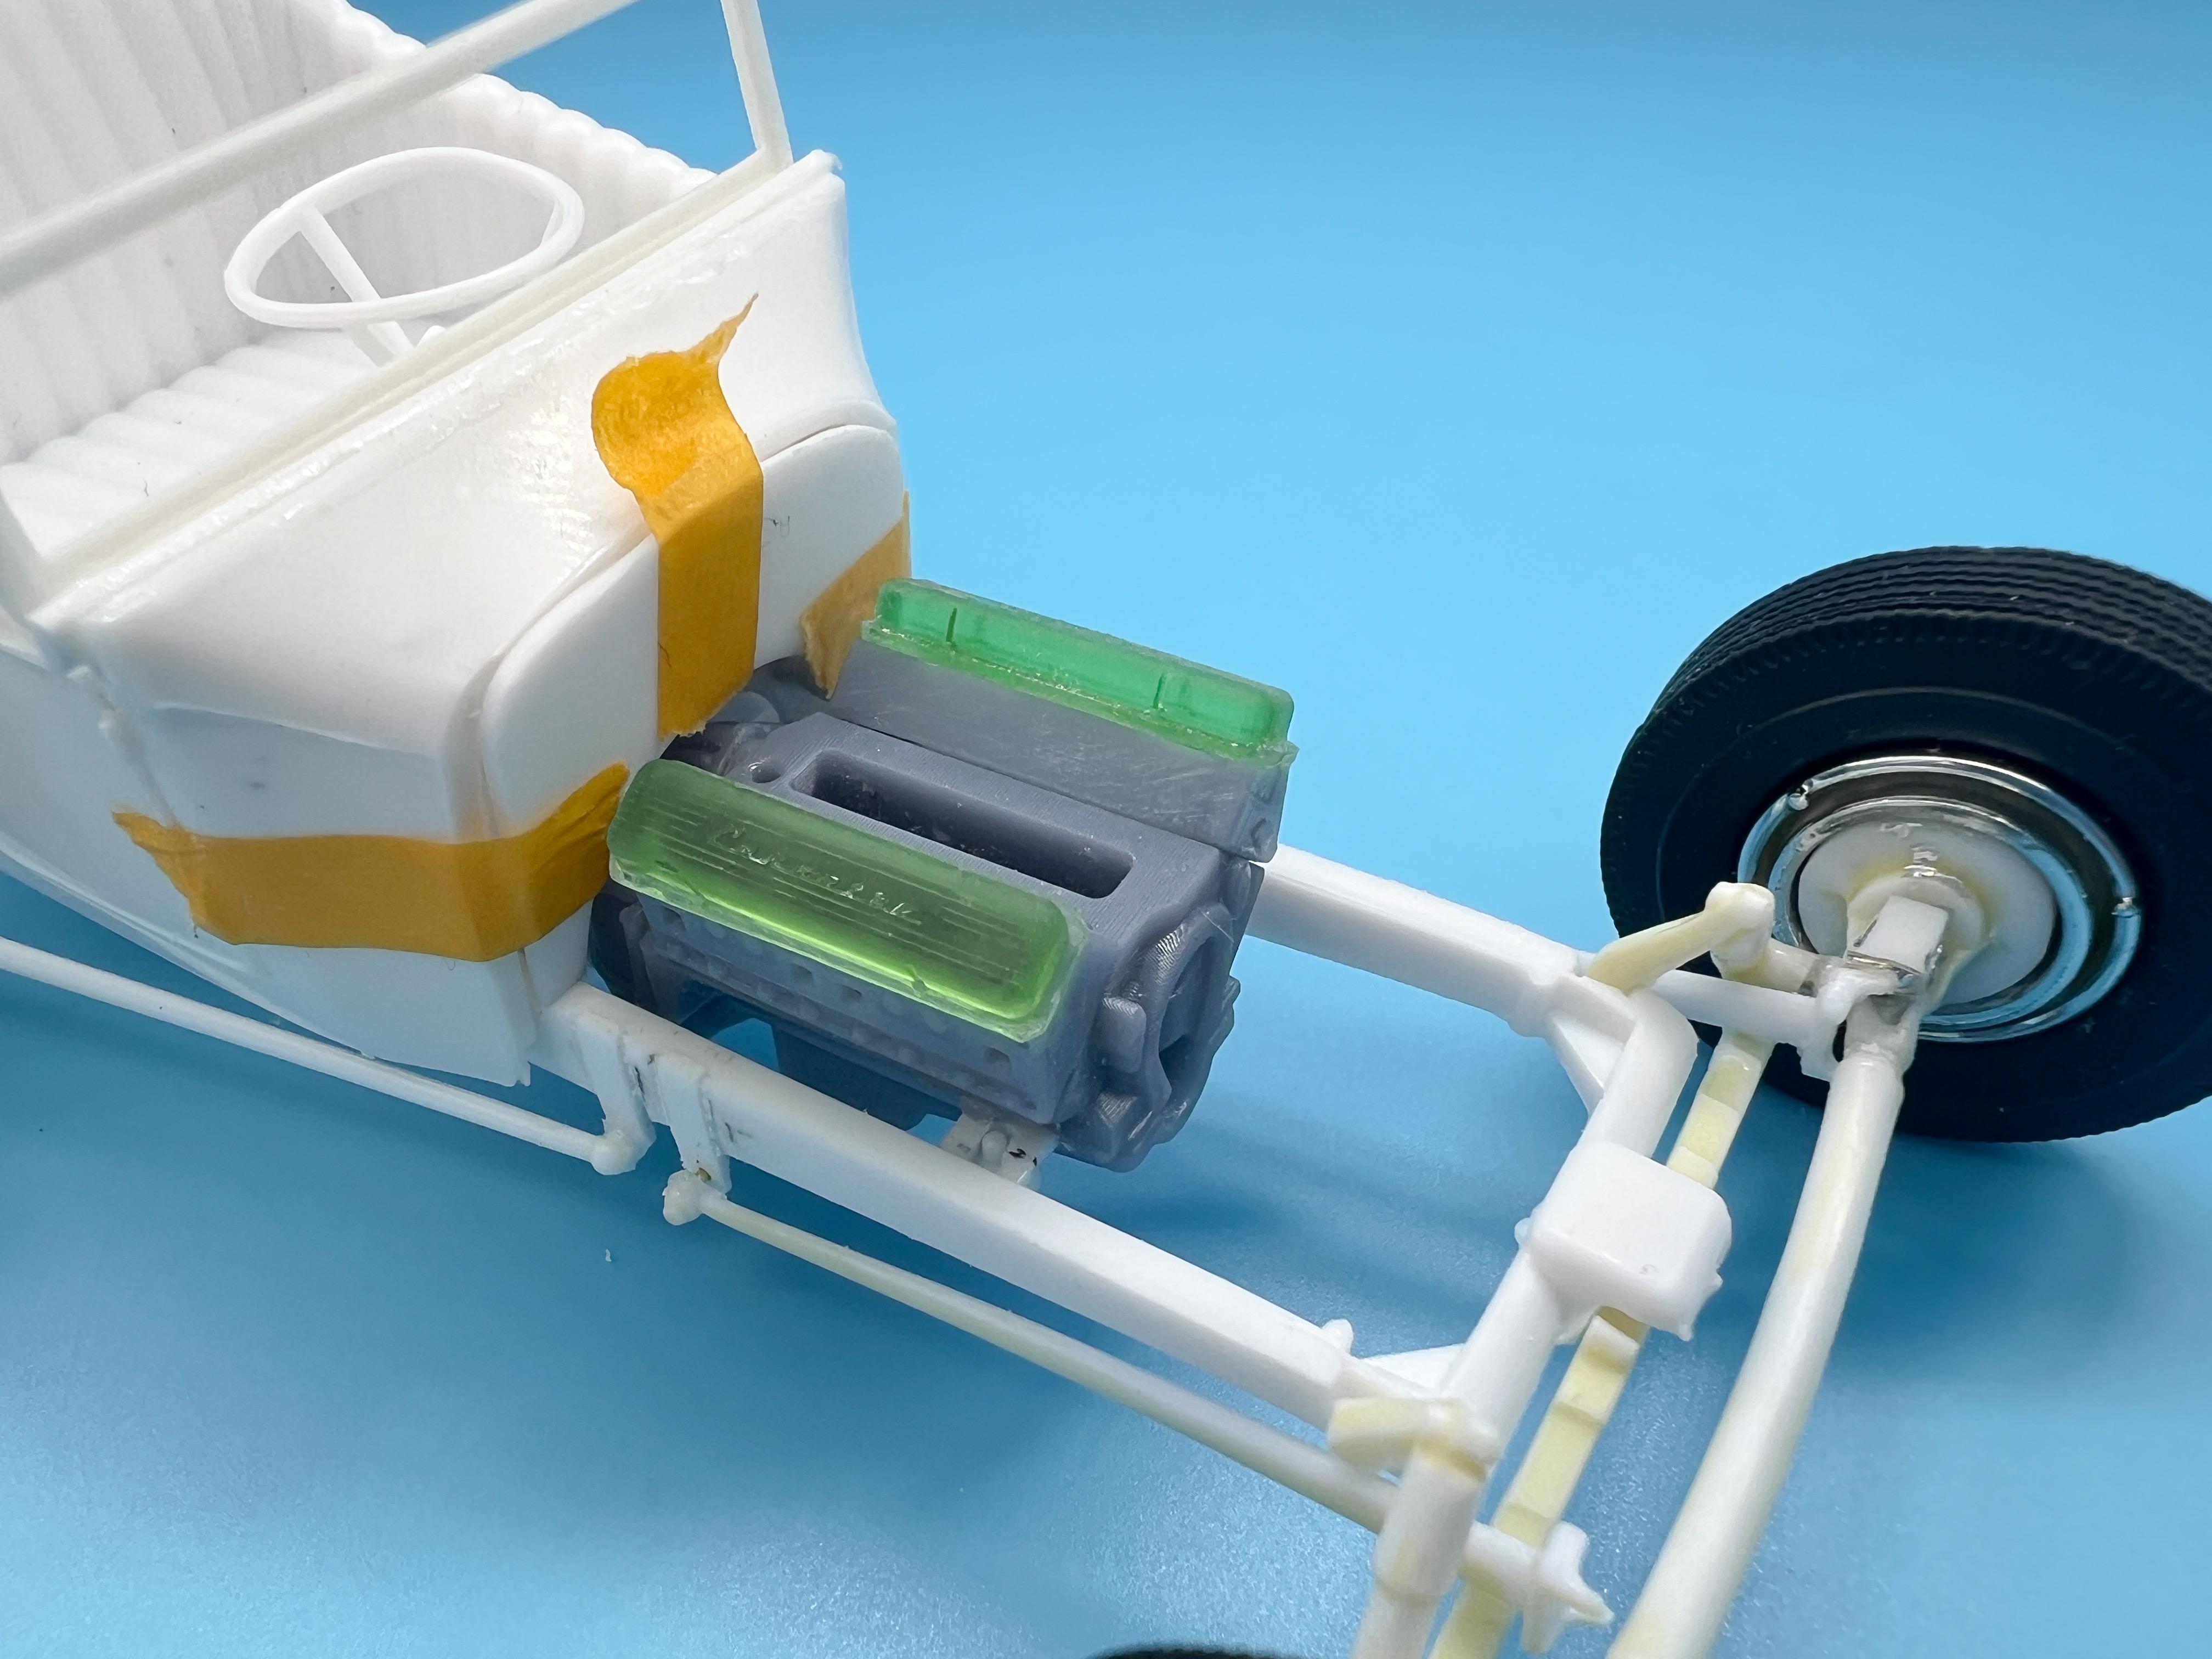
Thanks fellas! Got some more done on this over the past week or so… Figured out the headlamp situation…I really liked the idea of using the stock T headlamps, but cleaned up the installation somewhat by mounting to the grille shell… I didn’t like the chunky hairpin suspension linkages that came with the kit so I swapped in some from the Revell 29/30 kits…I REALLY wanted to find some AMT ones that would work but didn’t have anything suitable in my stash… Added some spacers to the frame to get the rear bed sitting where I wanted it, and added some mounting pegs to help locate it consistently: Got my holes in the right place! I wanted to use the upright-mounted steering wheel setup like the kit gives you, so I modified a Revell steering box and the kit pitman arm…replaced the plastic linkage with a more in-scale one and got that mostly wrapped up: As you can see, the kit steering wheel is pretty disfigured so I’ll have to mess with that a little still… Made a driveshaft out of some parts-box UJs and some thin-wall styrene tube: ‘Sketched in’ the start of the gas tank, and made a dash panel: I’d like to play off the idea of a dash that references the stock T dash, which has two gauges in a panel on the center - modified the custom kit dash (which has, like, 8 gauges) into something more modest: Found some early ‘Vette valve covers that I had printed a while back that would dress up this base-level Small Block Chevy nicely: And that’s about where she sits right now…plenty to do still - probably tomorrow I’ll handle the pedals and what I’d like to do with the taillights, but it’s coming along ok! Thanks for looking; more soon, soon as I’ve done more!
-
Those leaf springs are really nicely done - nice job!
-
I love that looks - how big of a tip did you have to use?
-
I don’t believe I’ve heard of these before…are they rubbery, like rubber o-rings, or stiffer where you can glue to them? Any particular size that you like? I’m always looking for decent hoops for steering wheels! Great looking build so far!
-
Same here - since I discovered that trick I’ve used it on all kinds of kits - works great on the kits it works on!
-
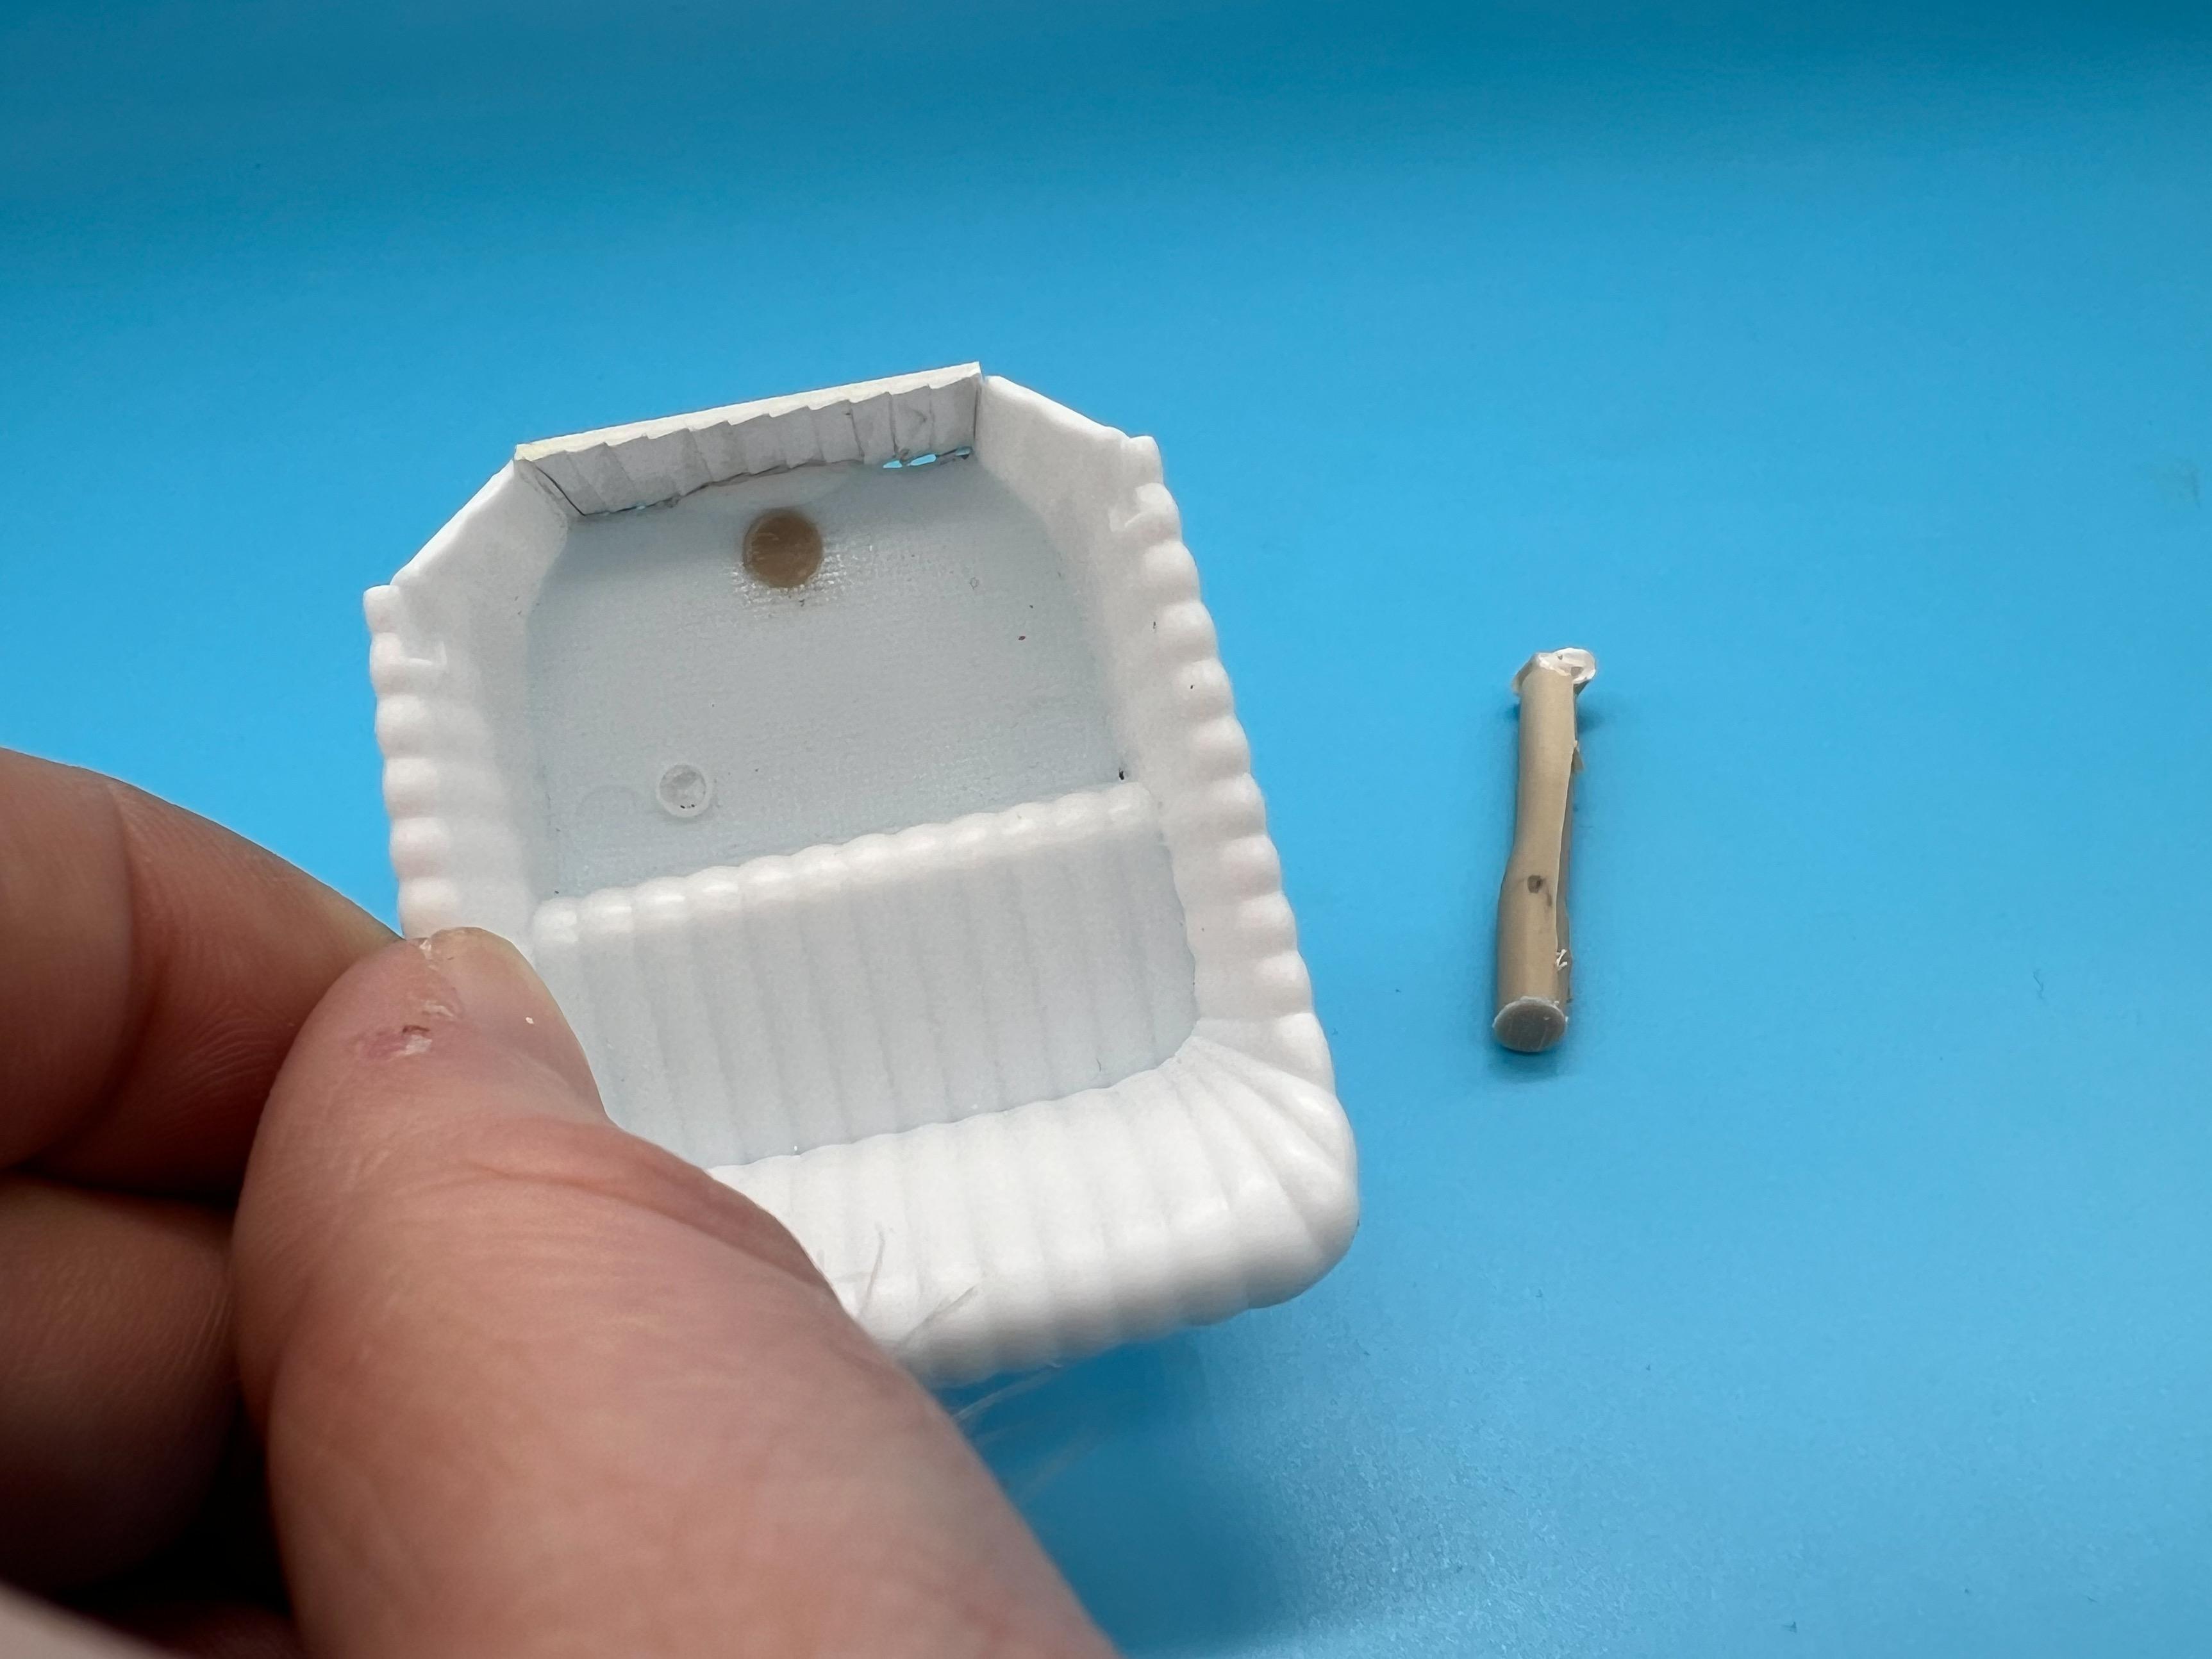
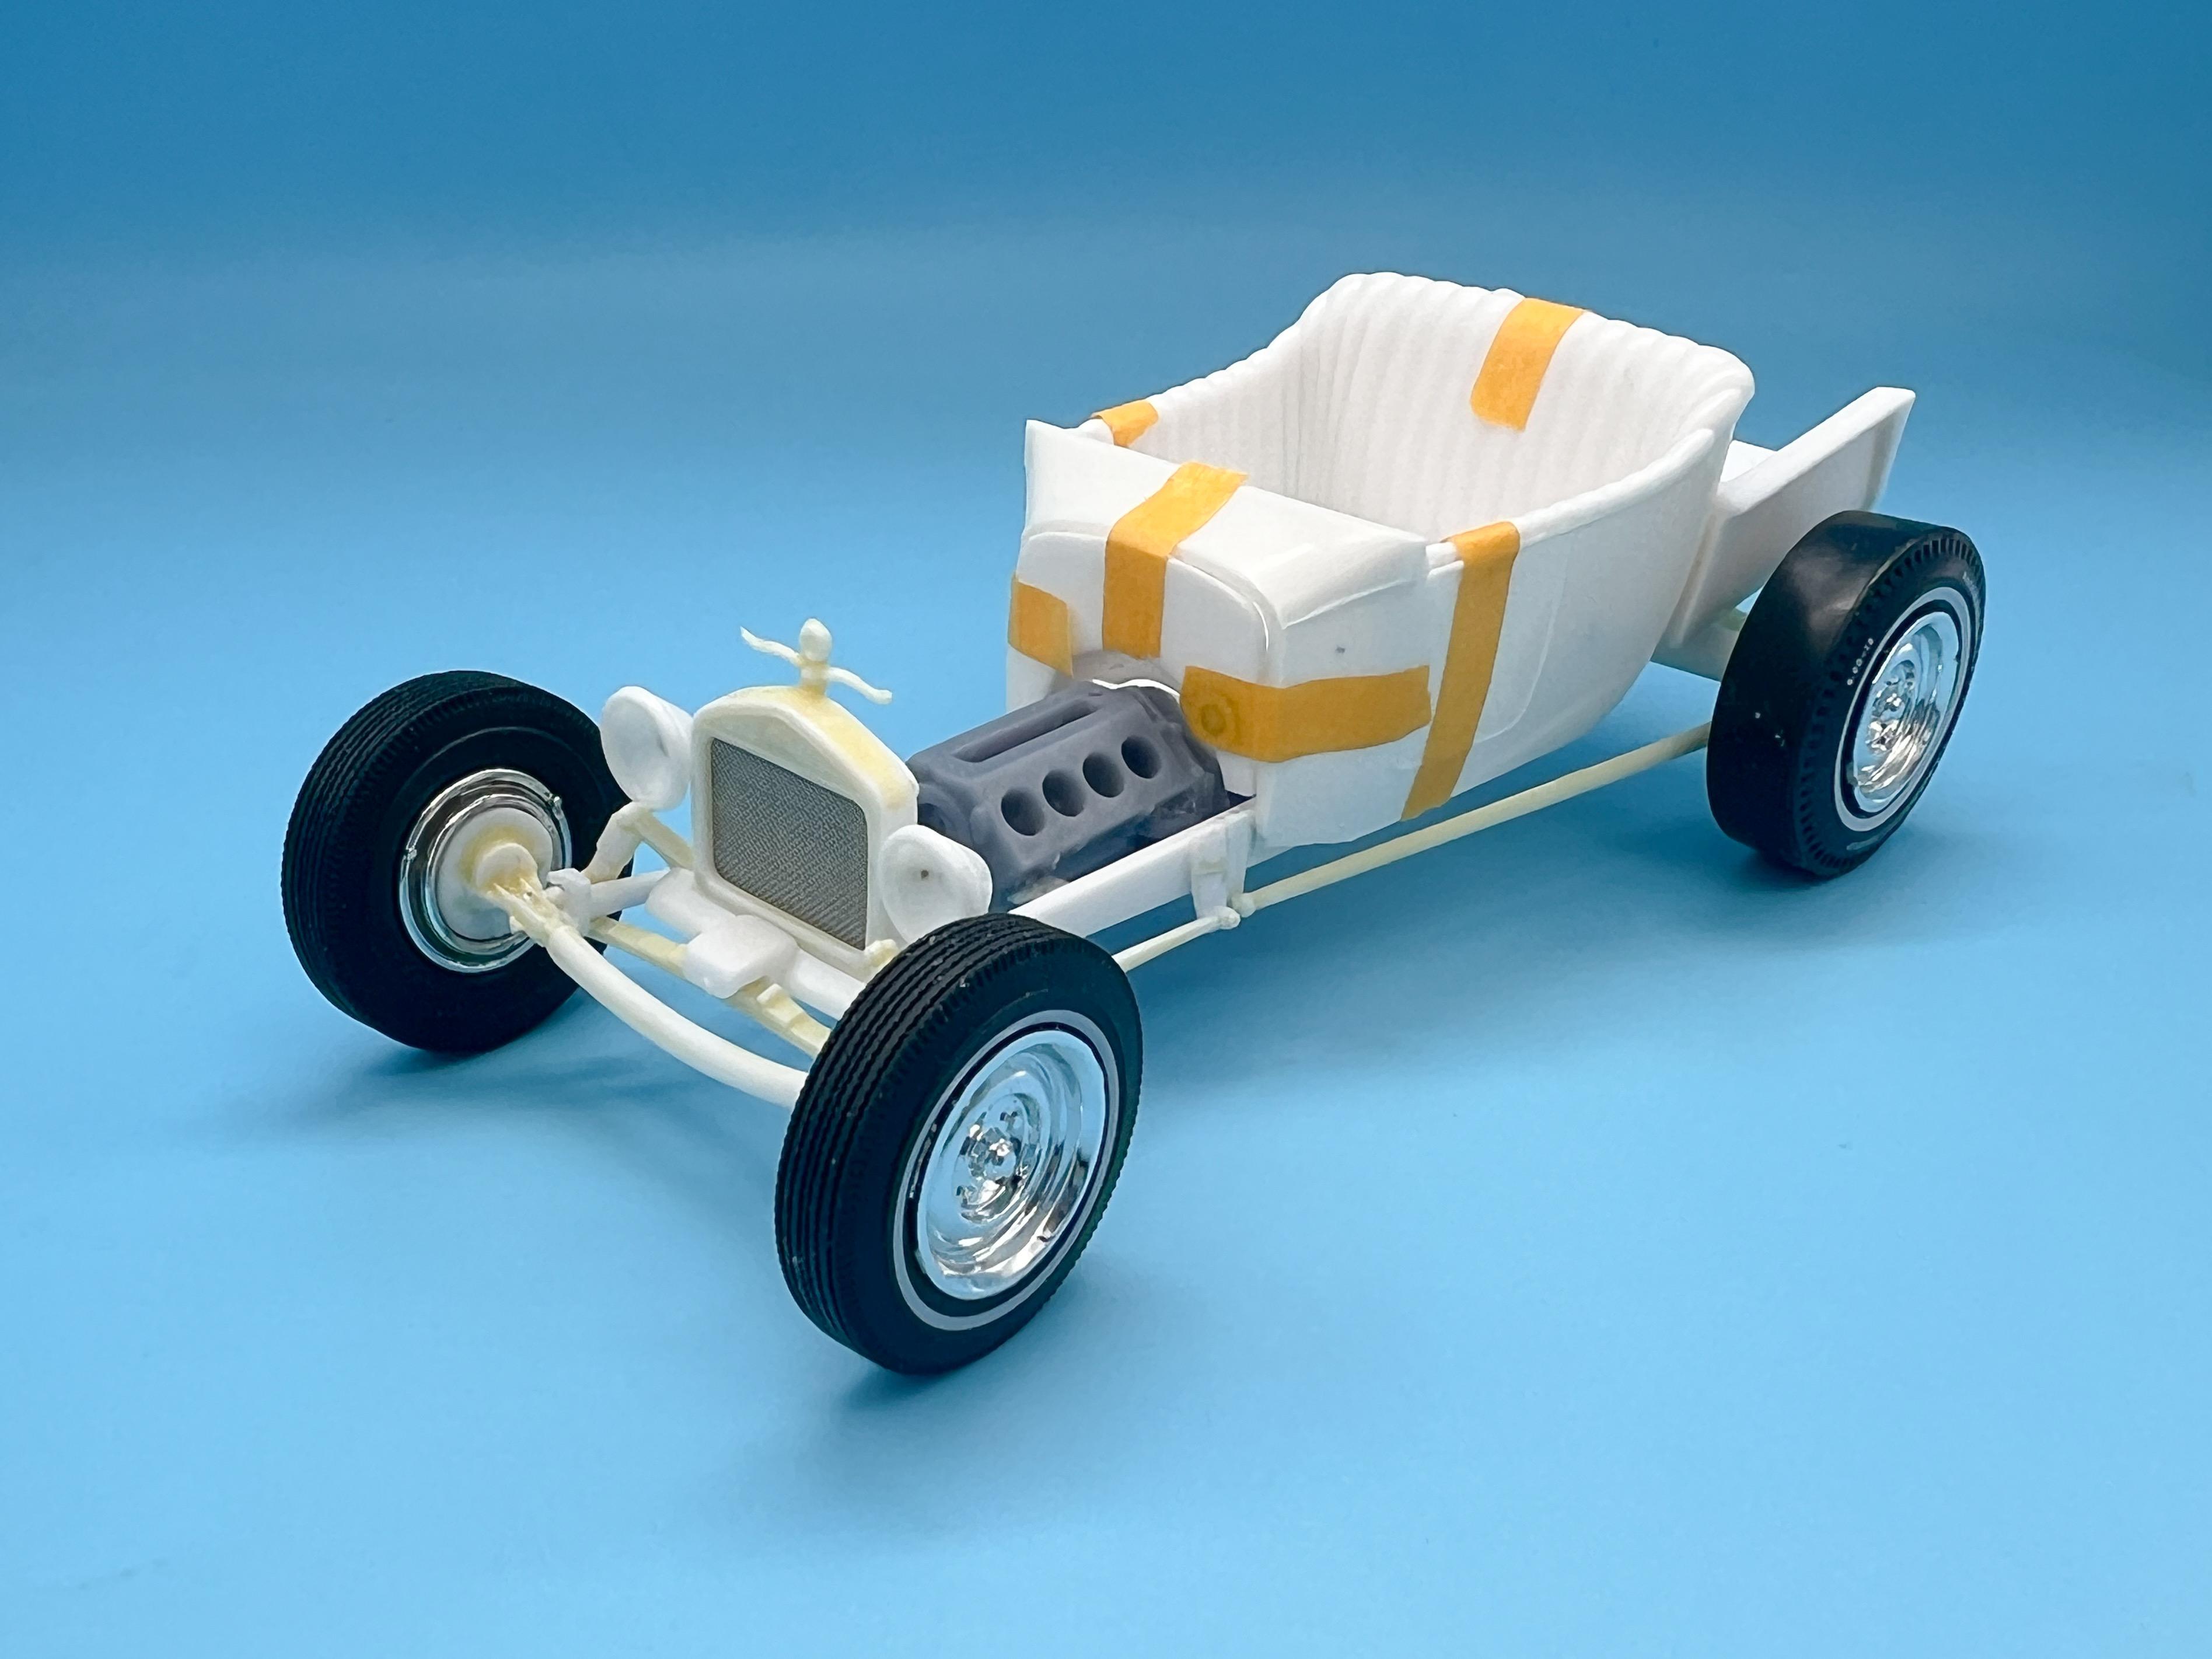
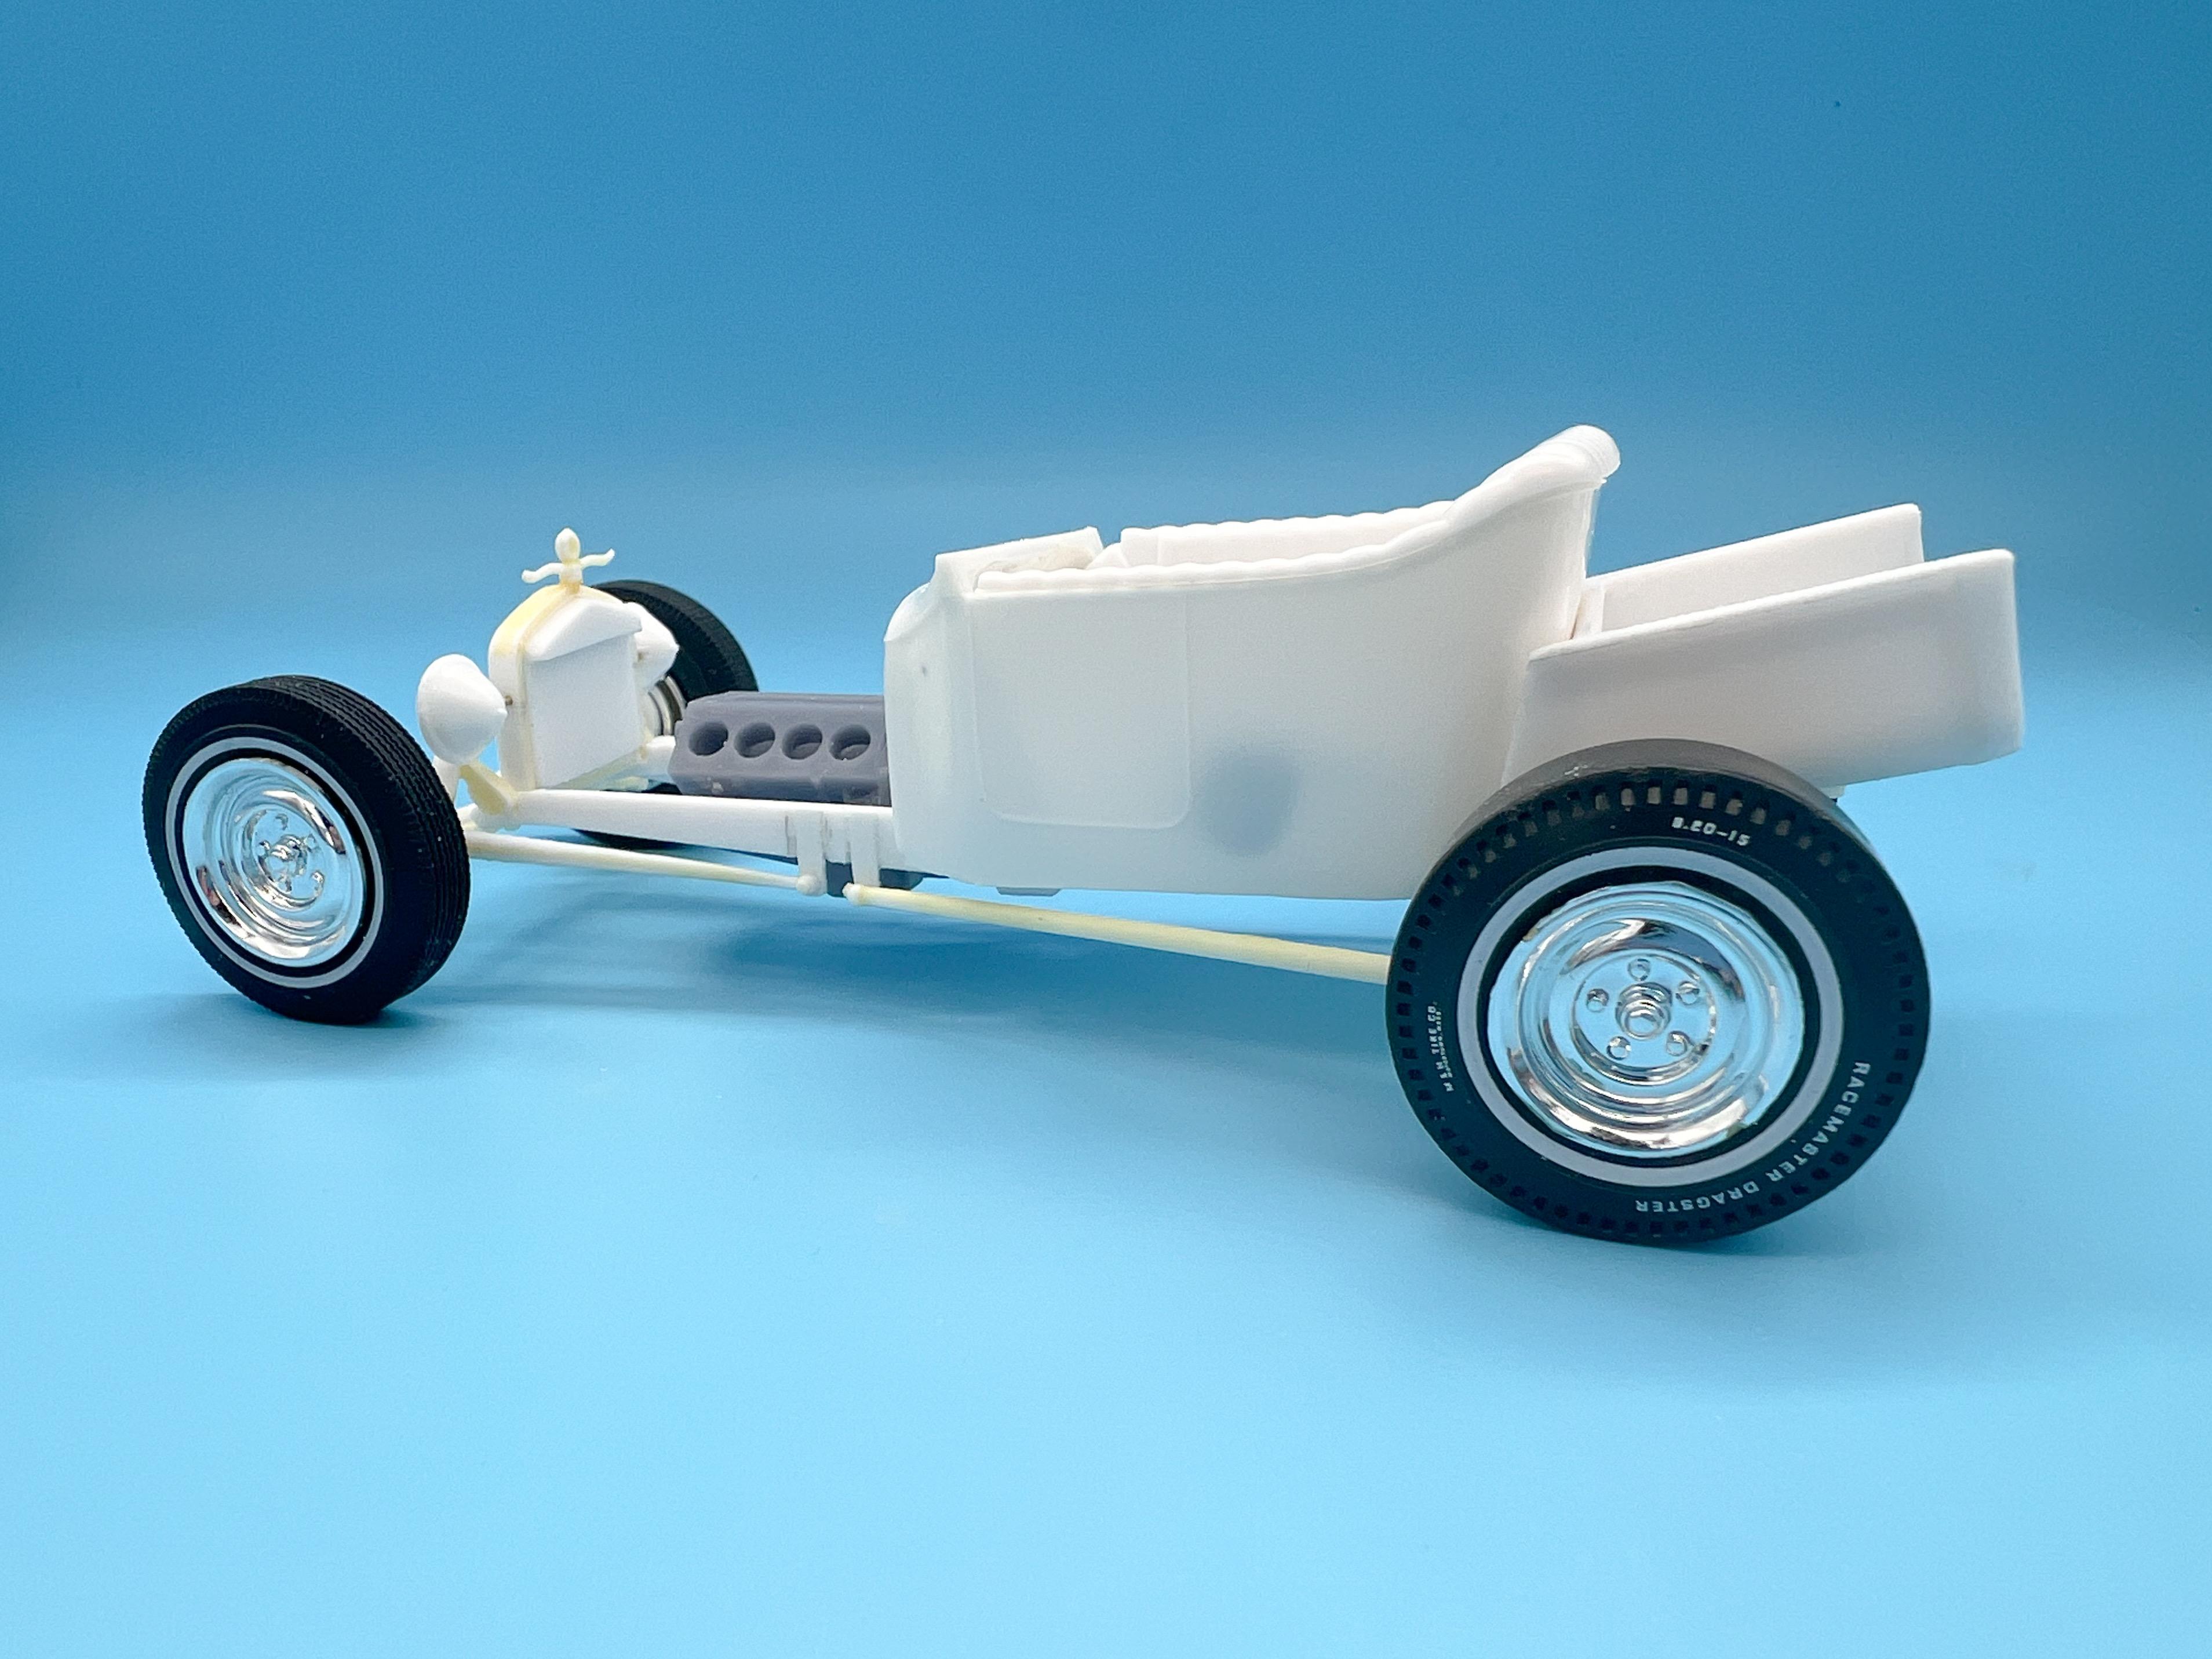
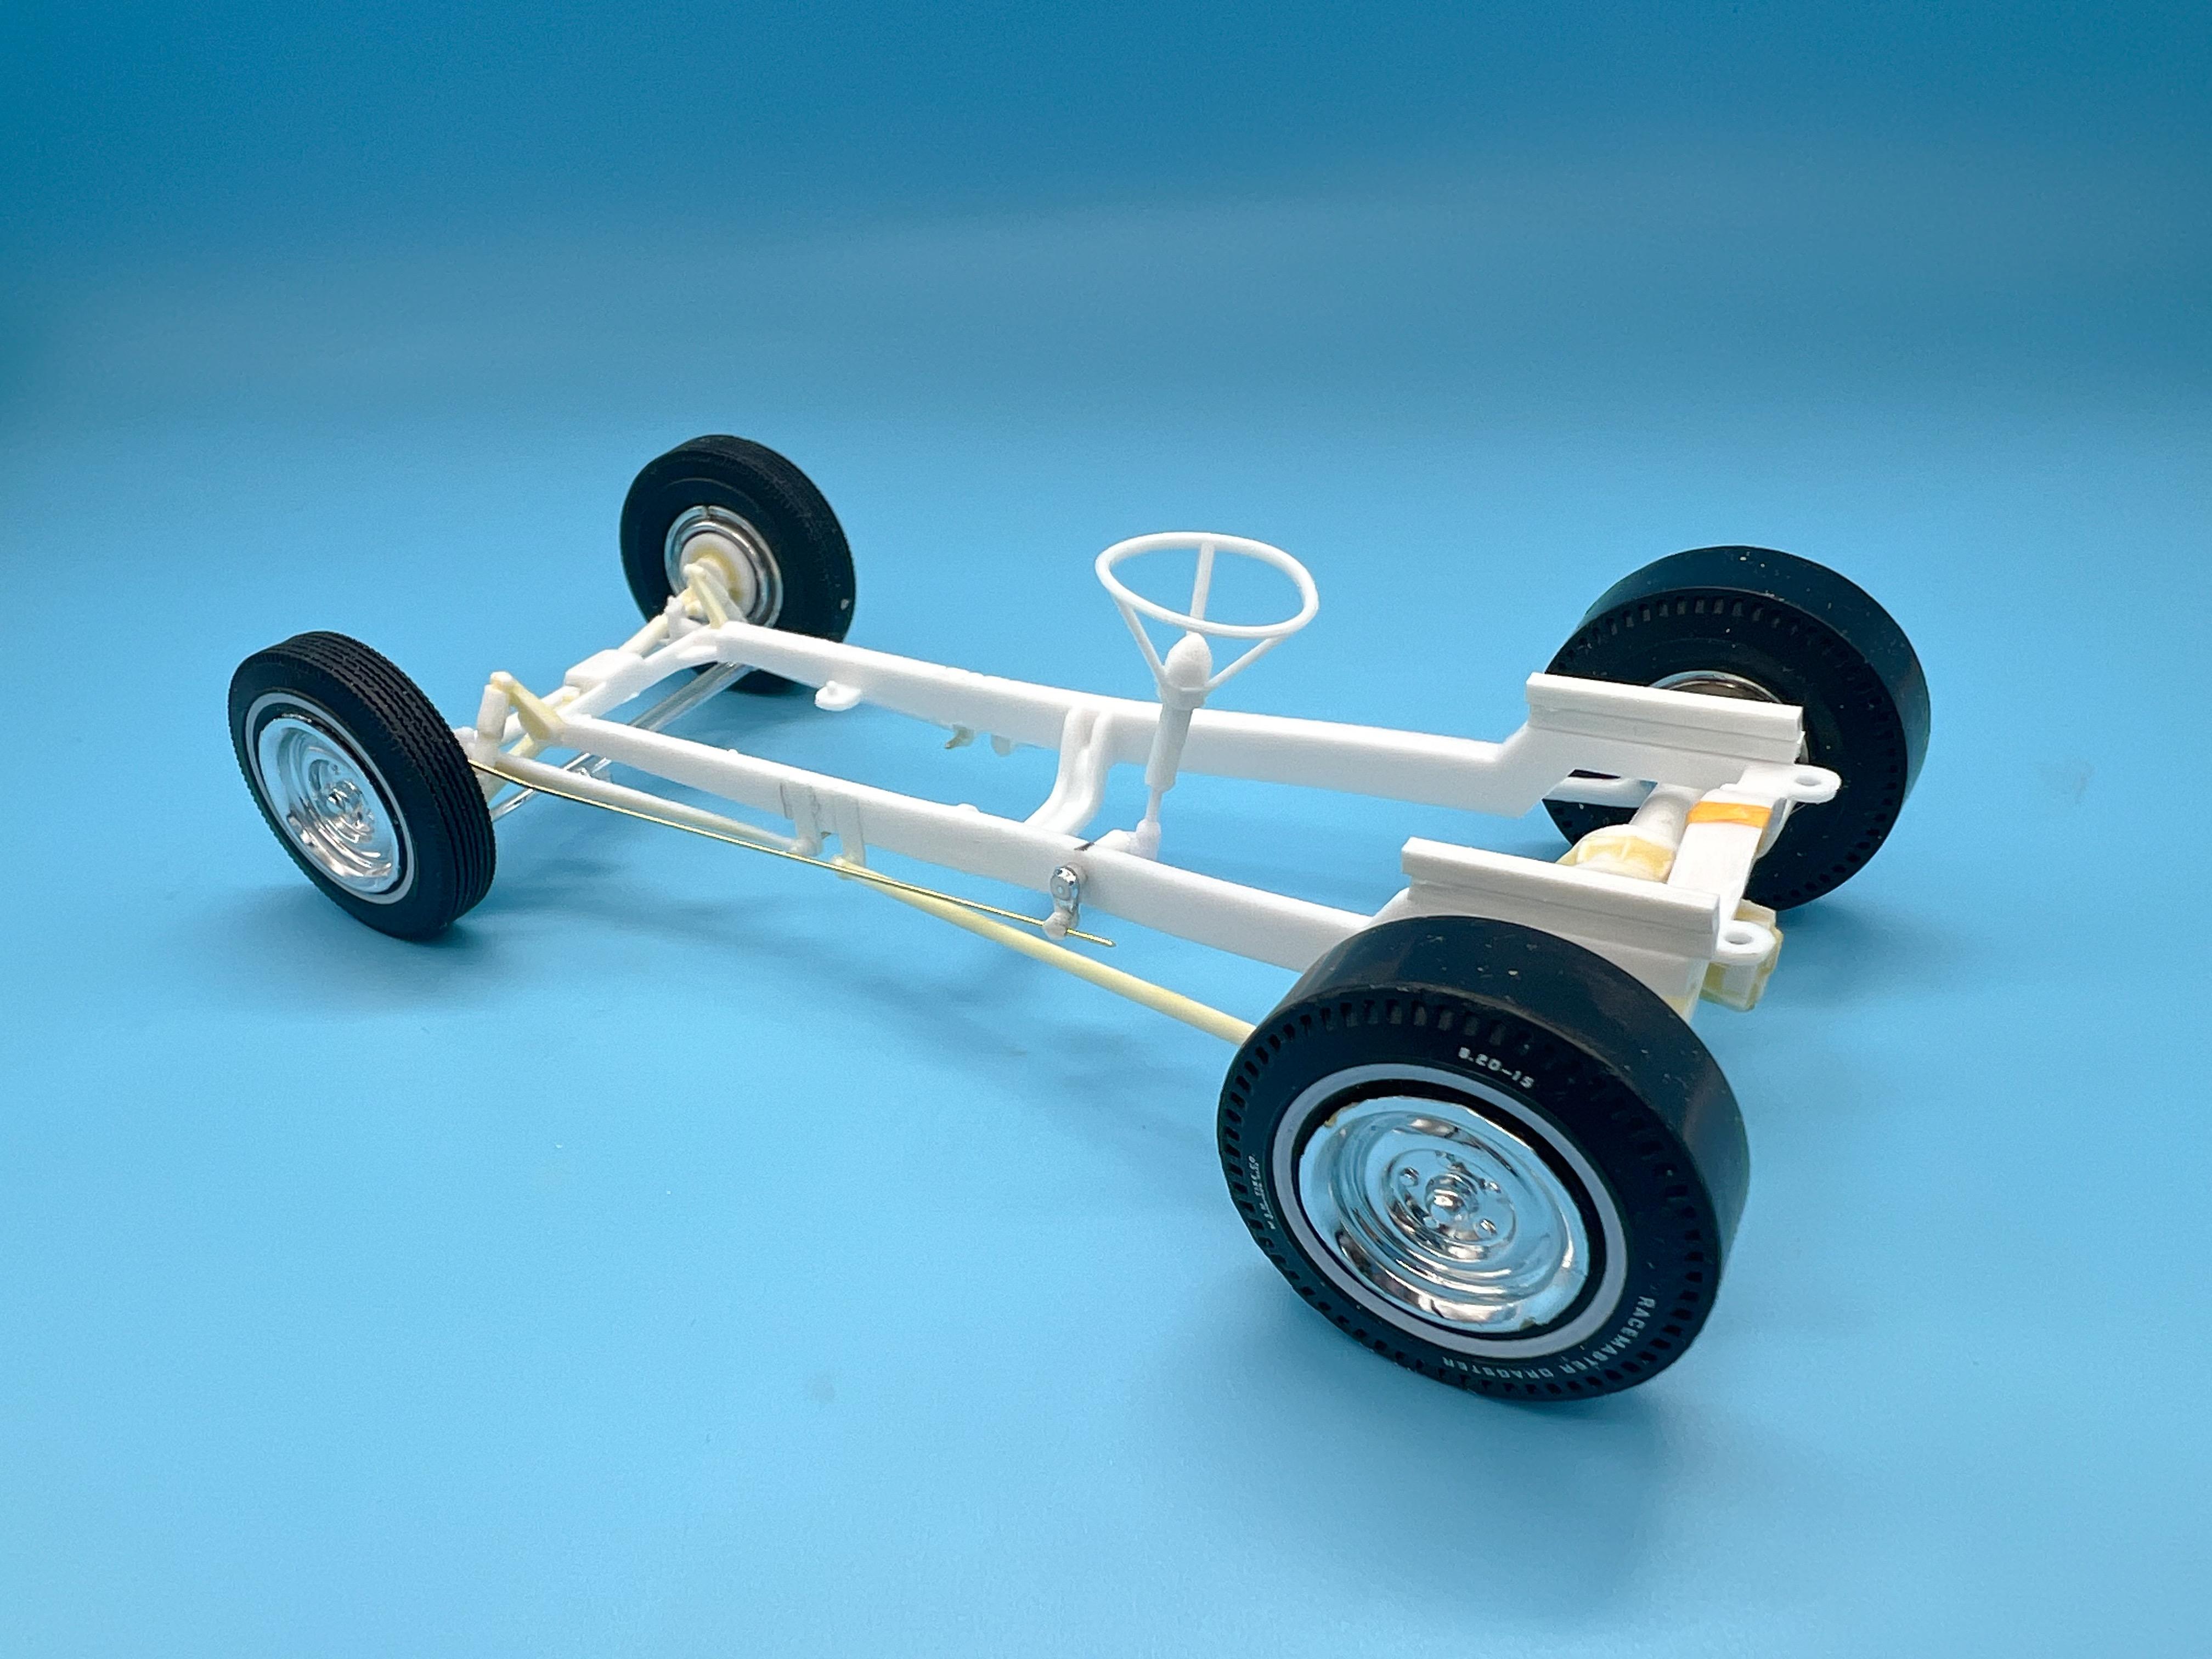
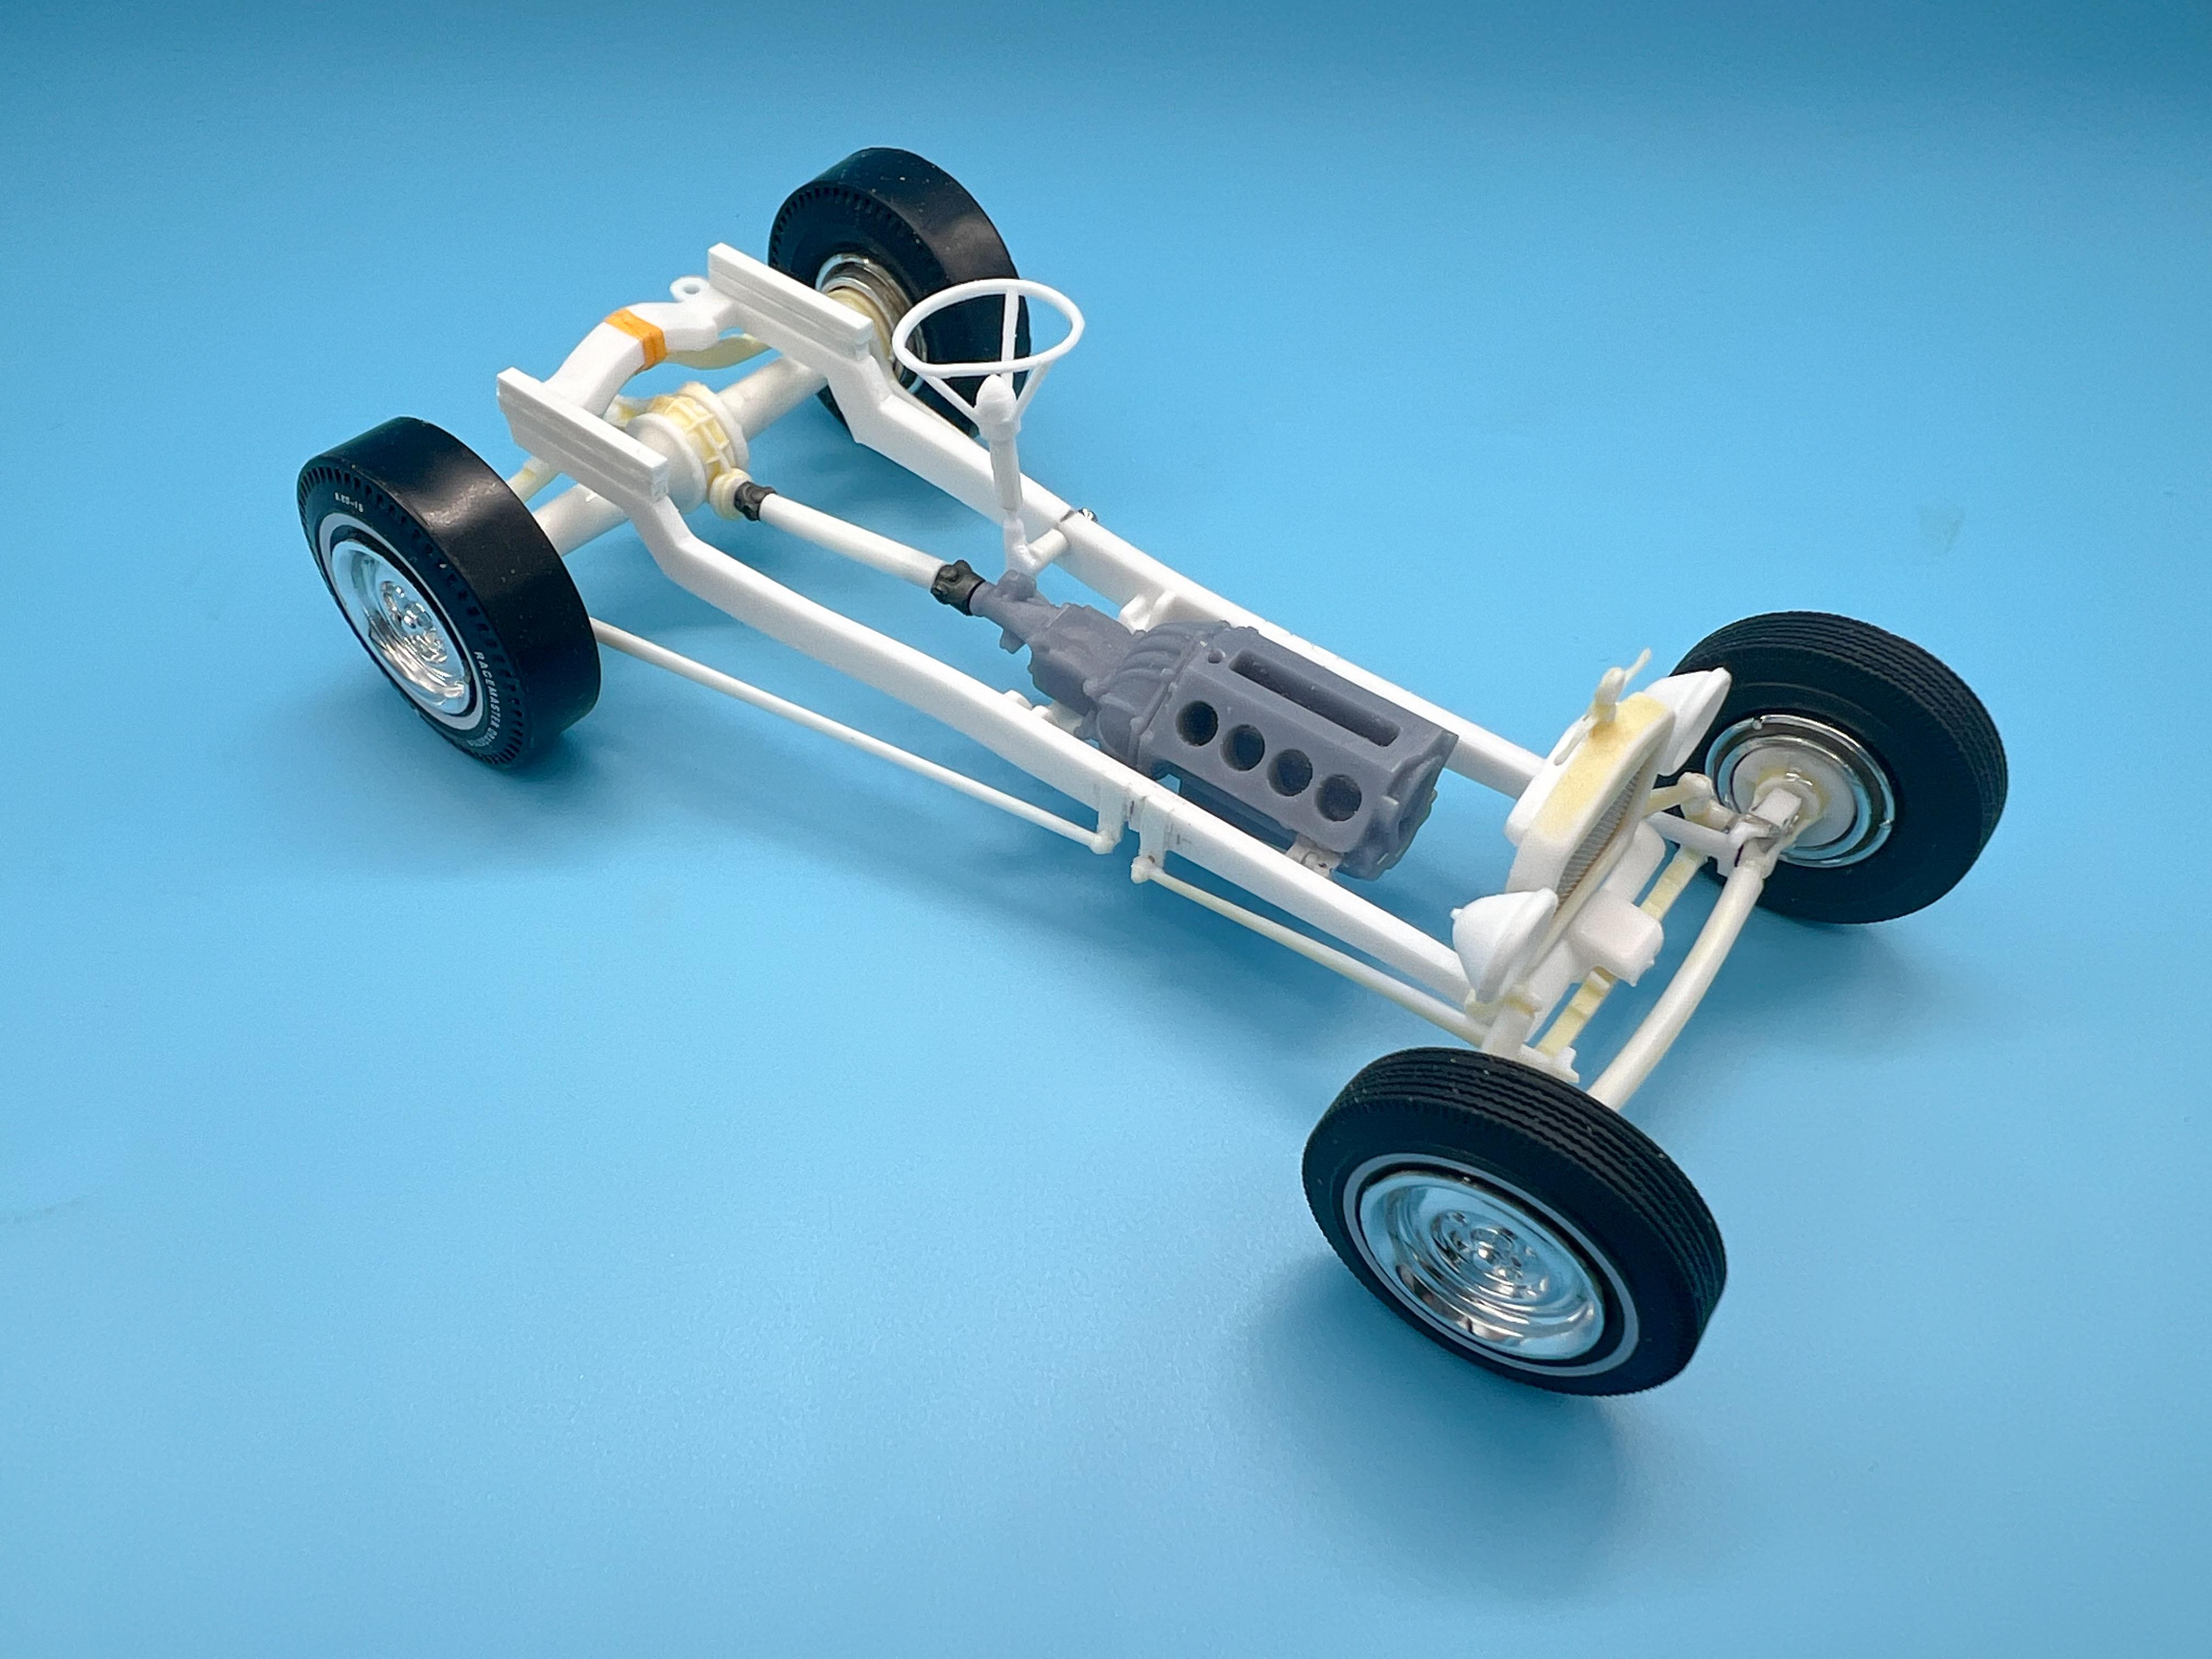
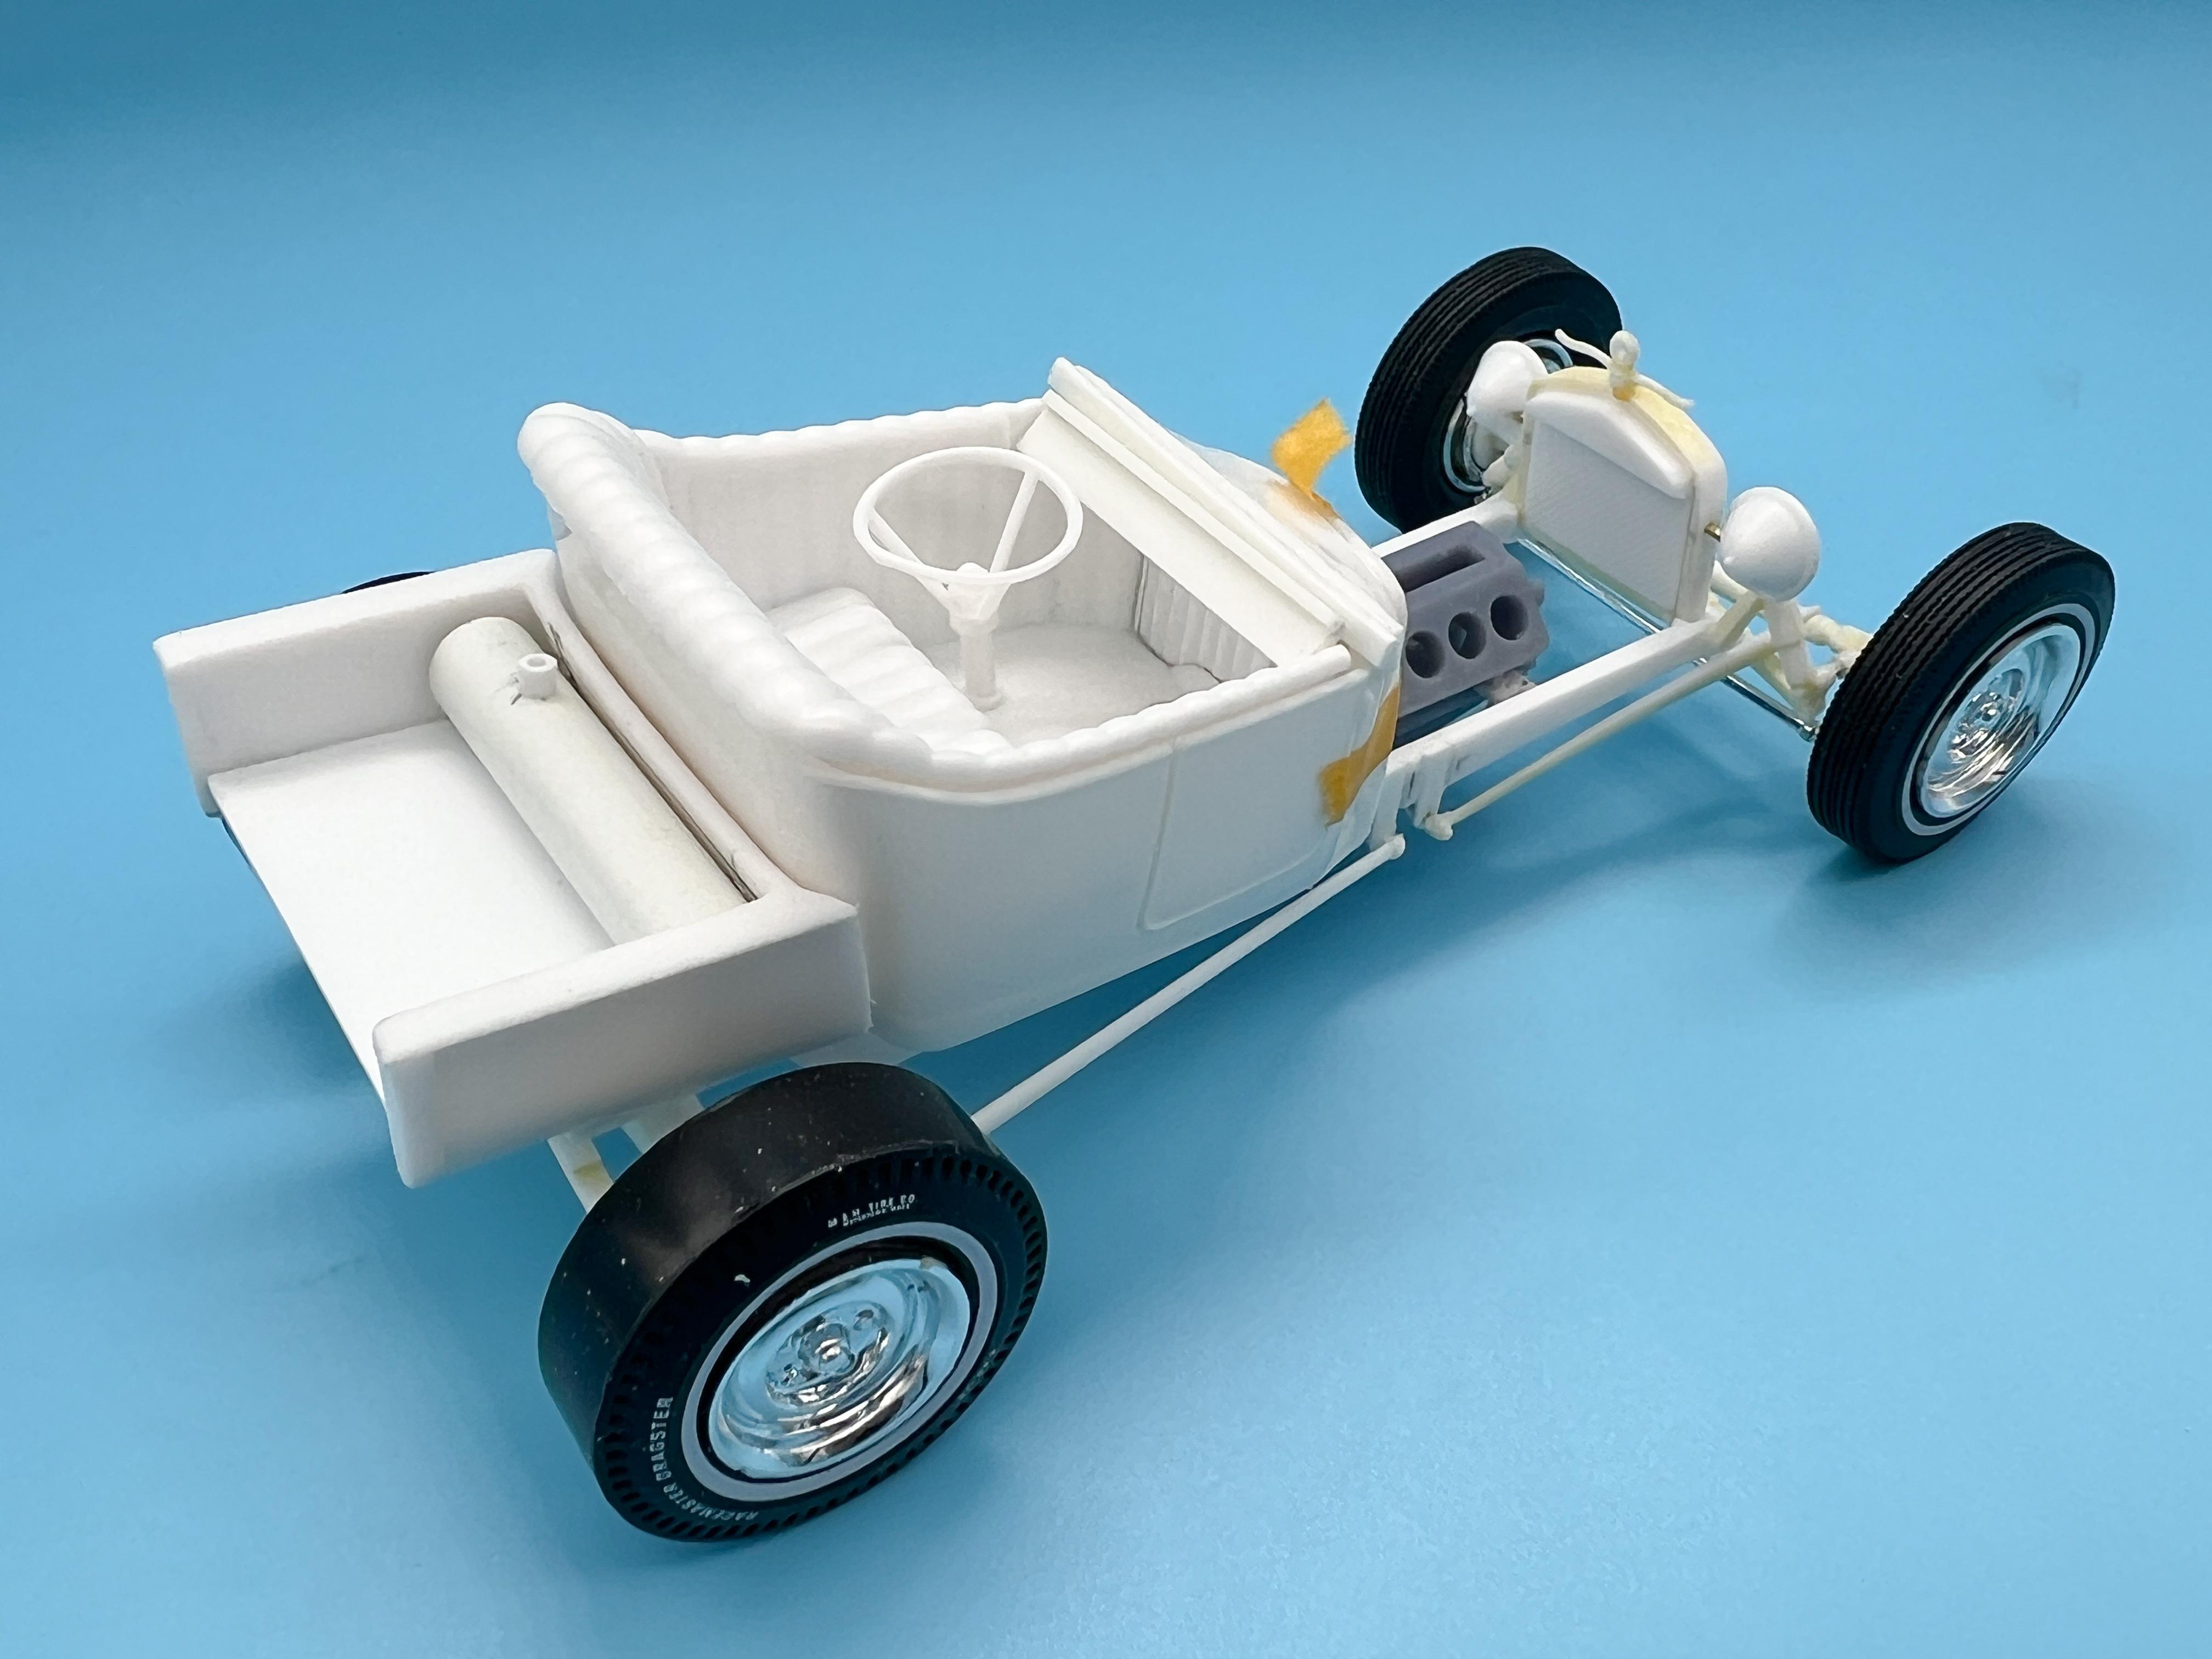
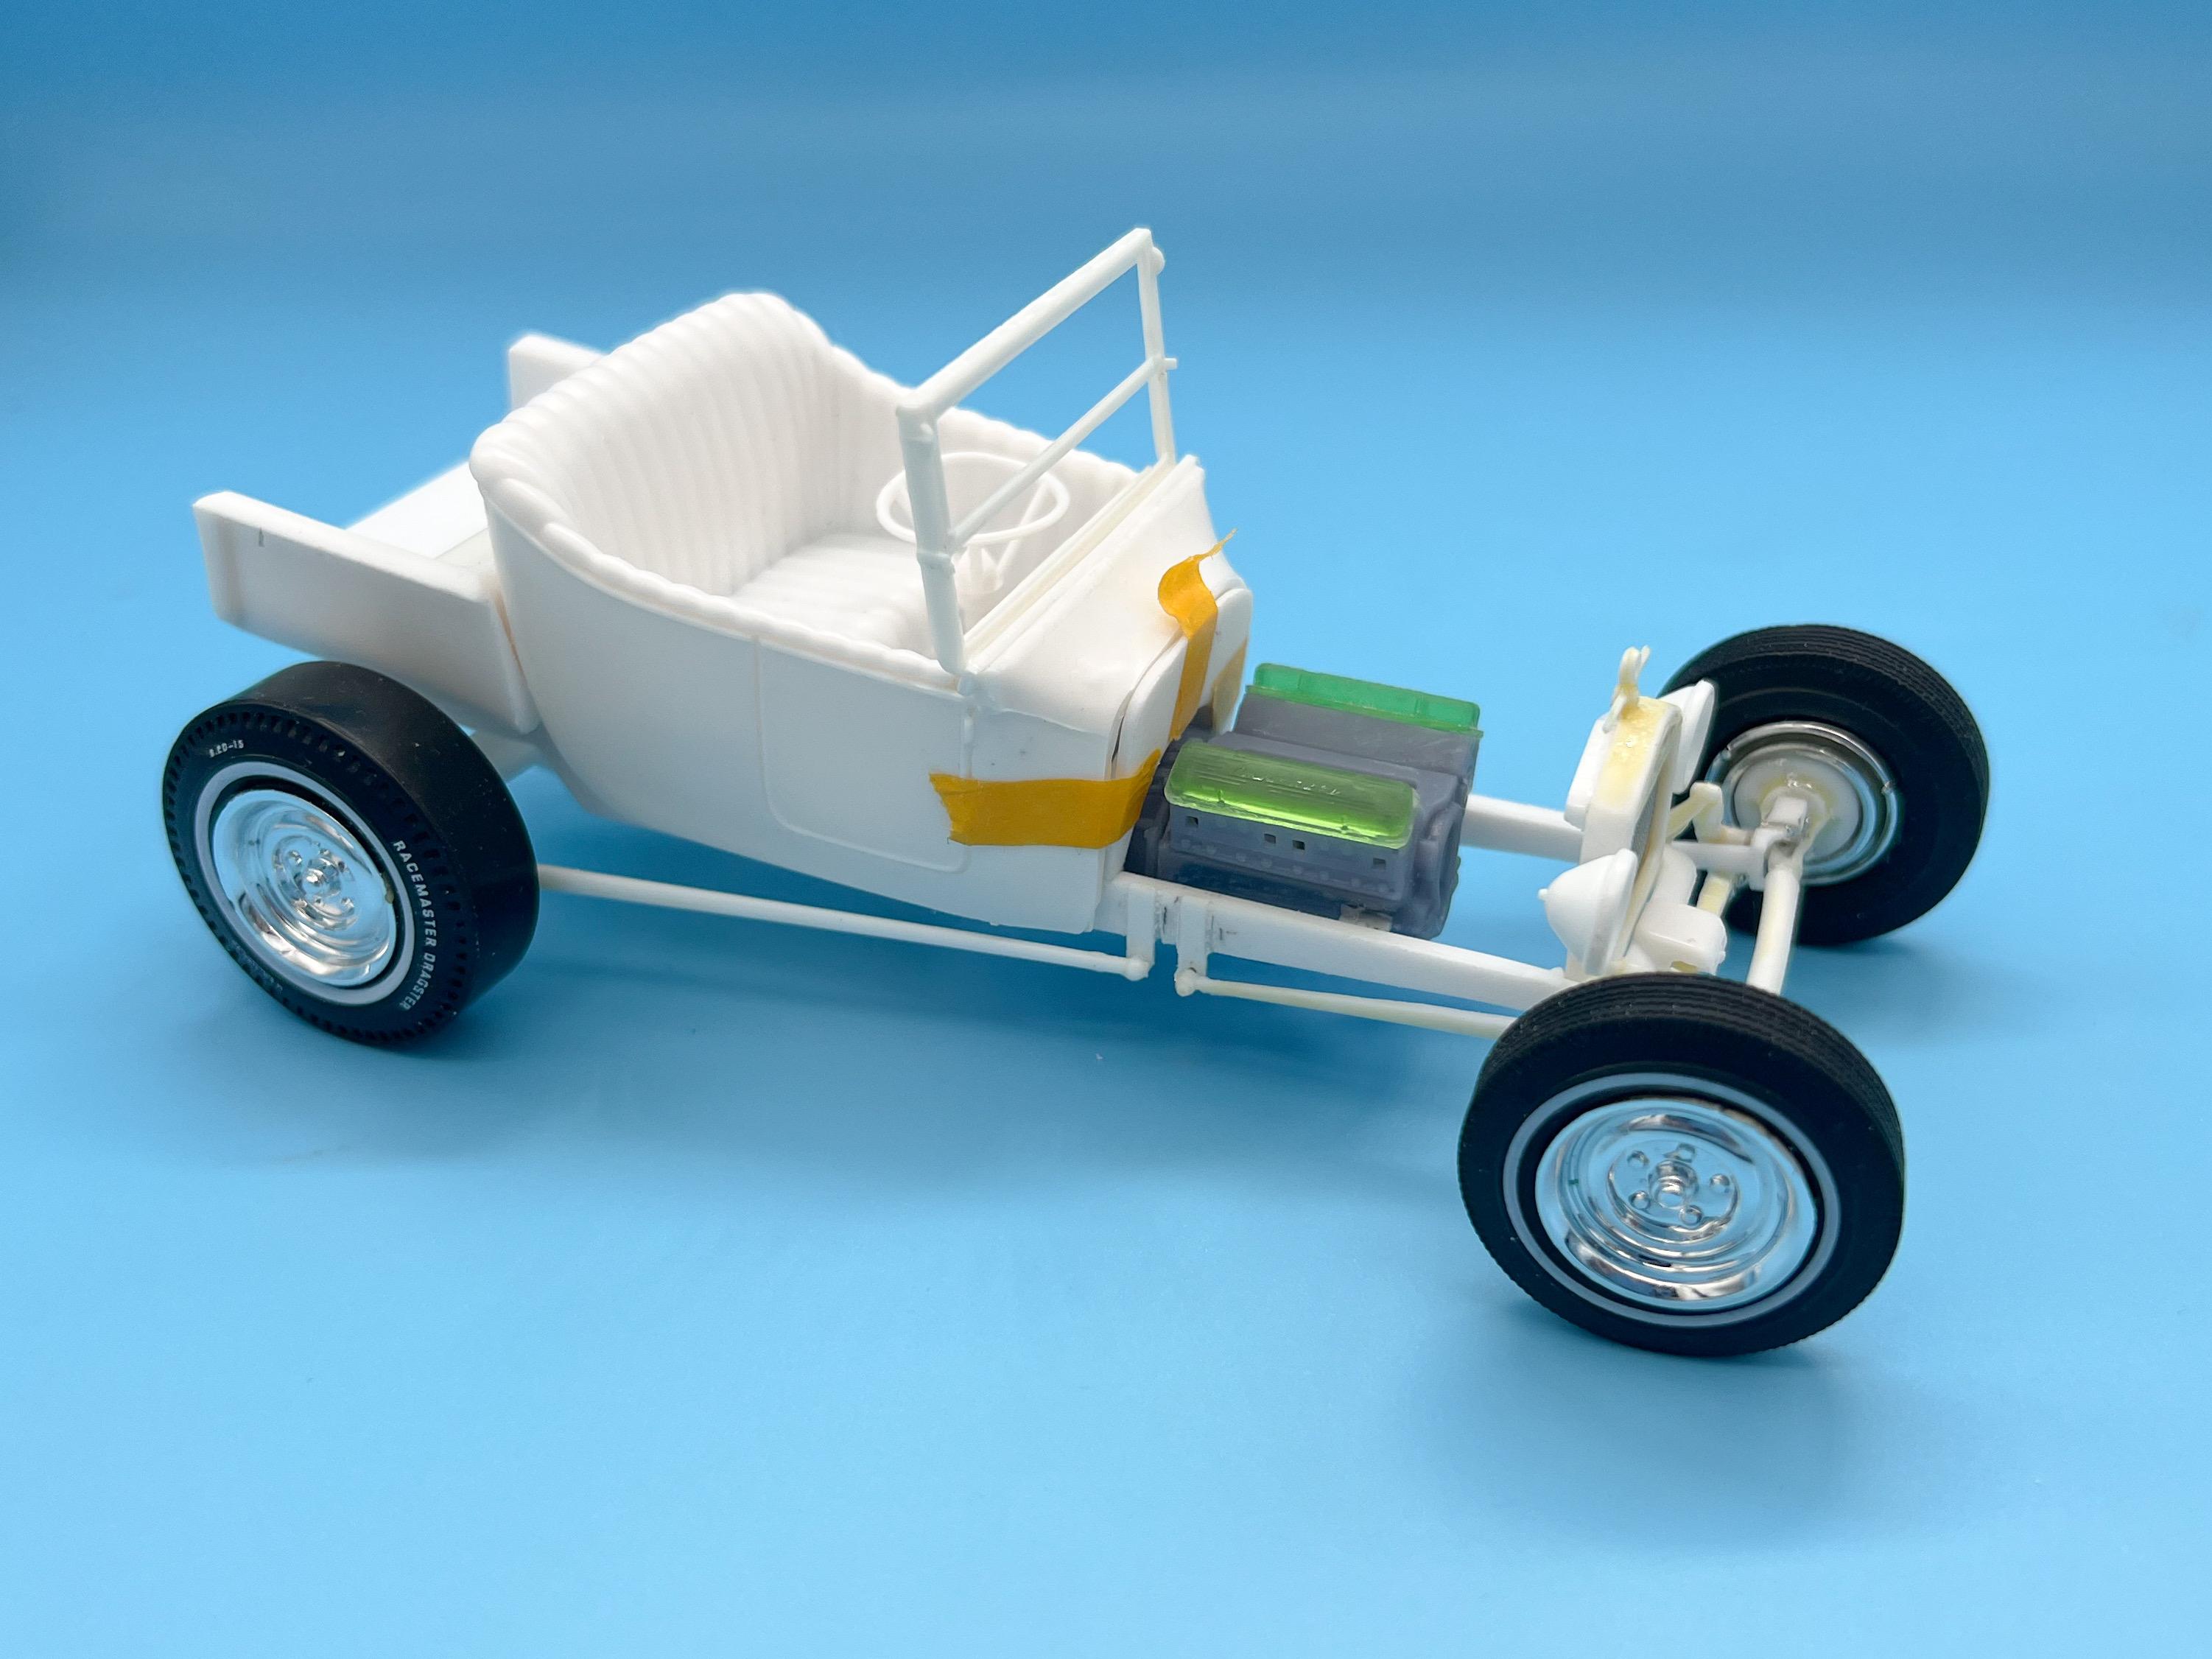
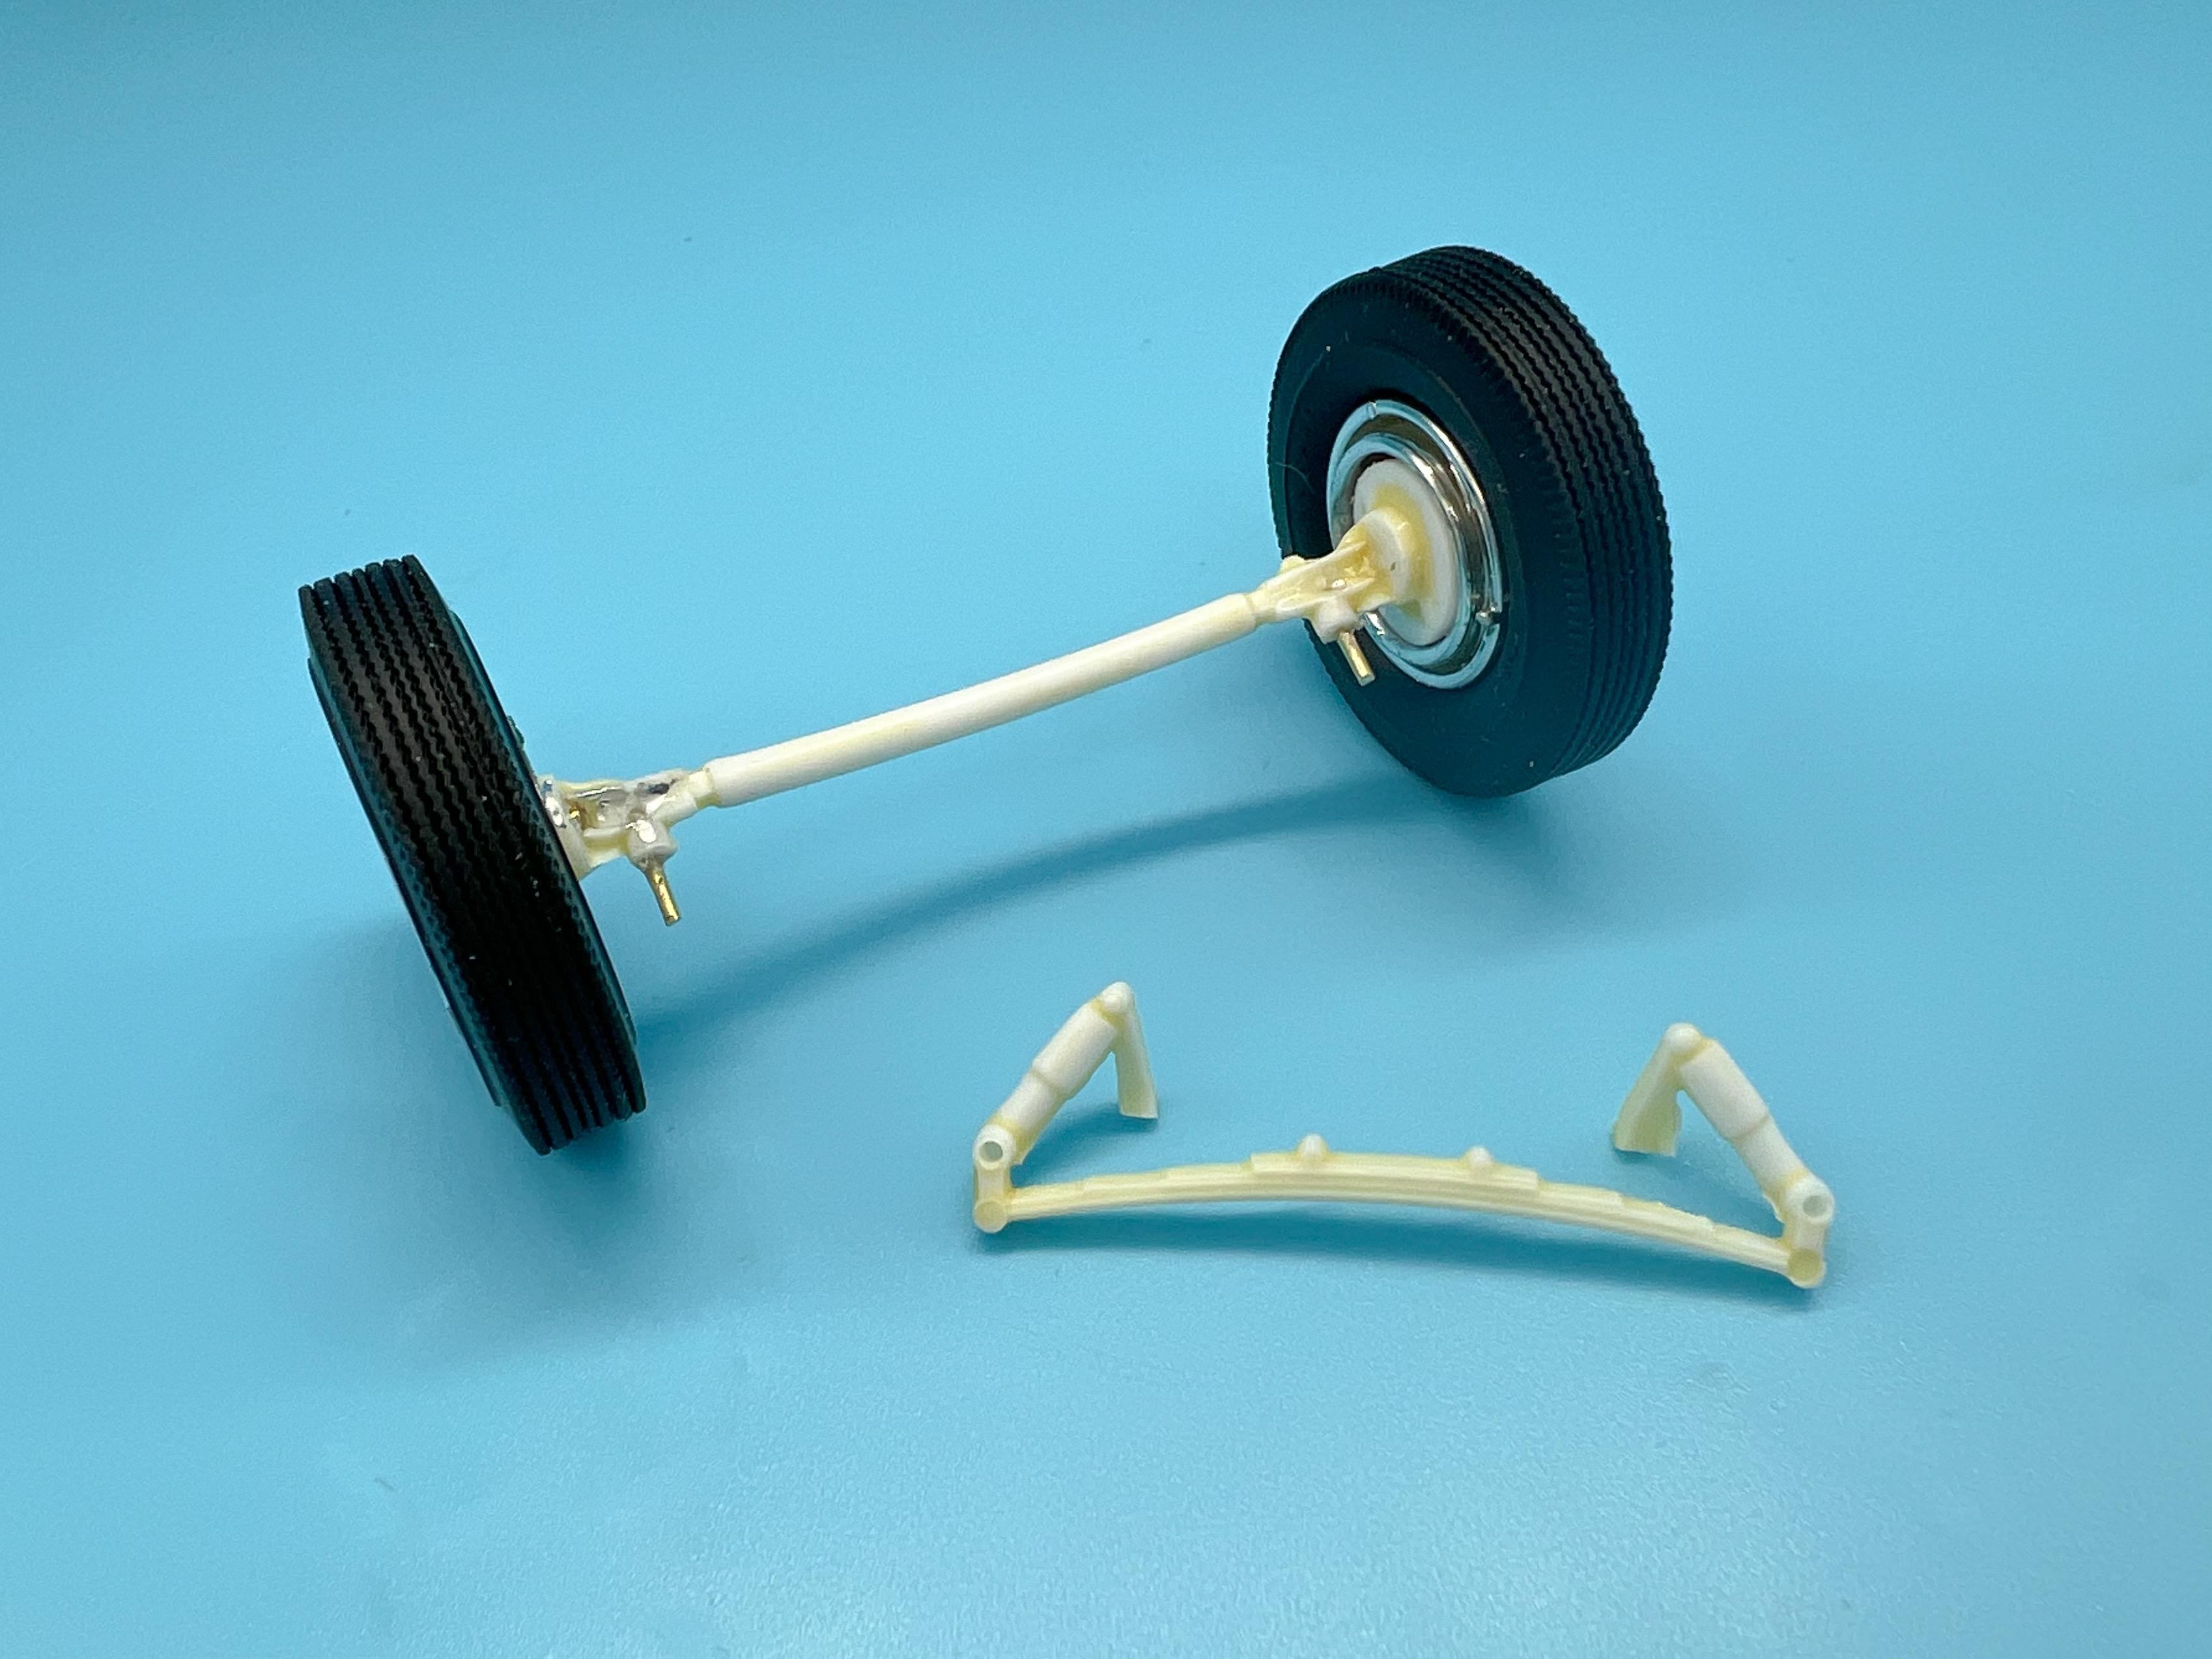
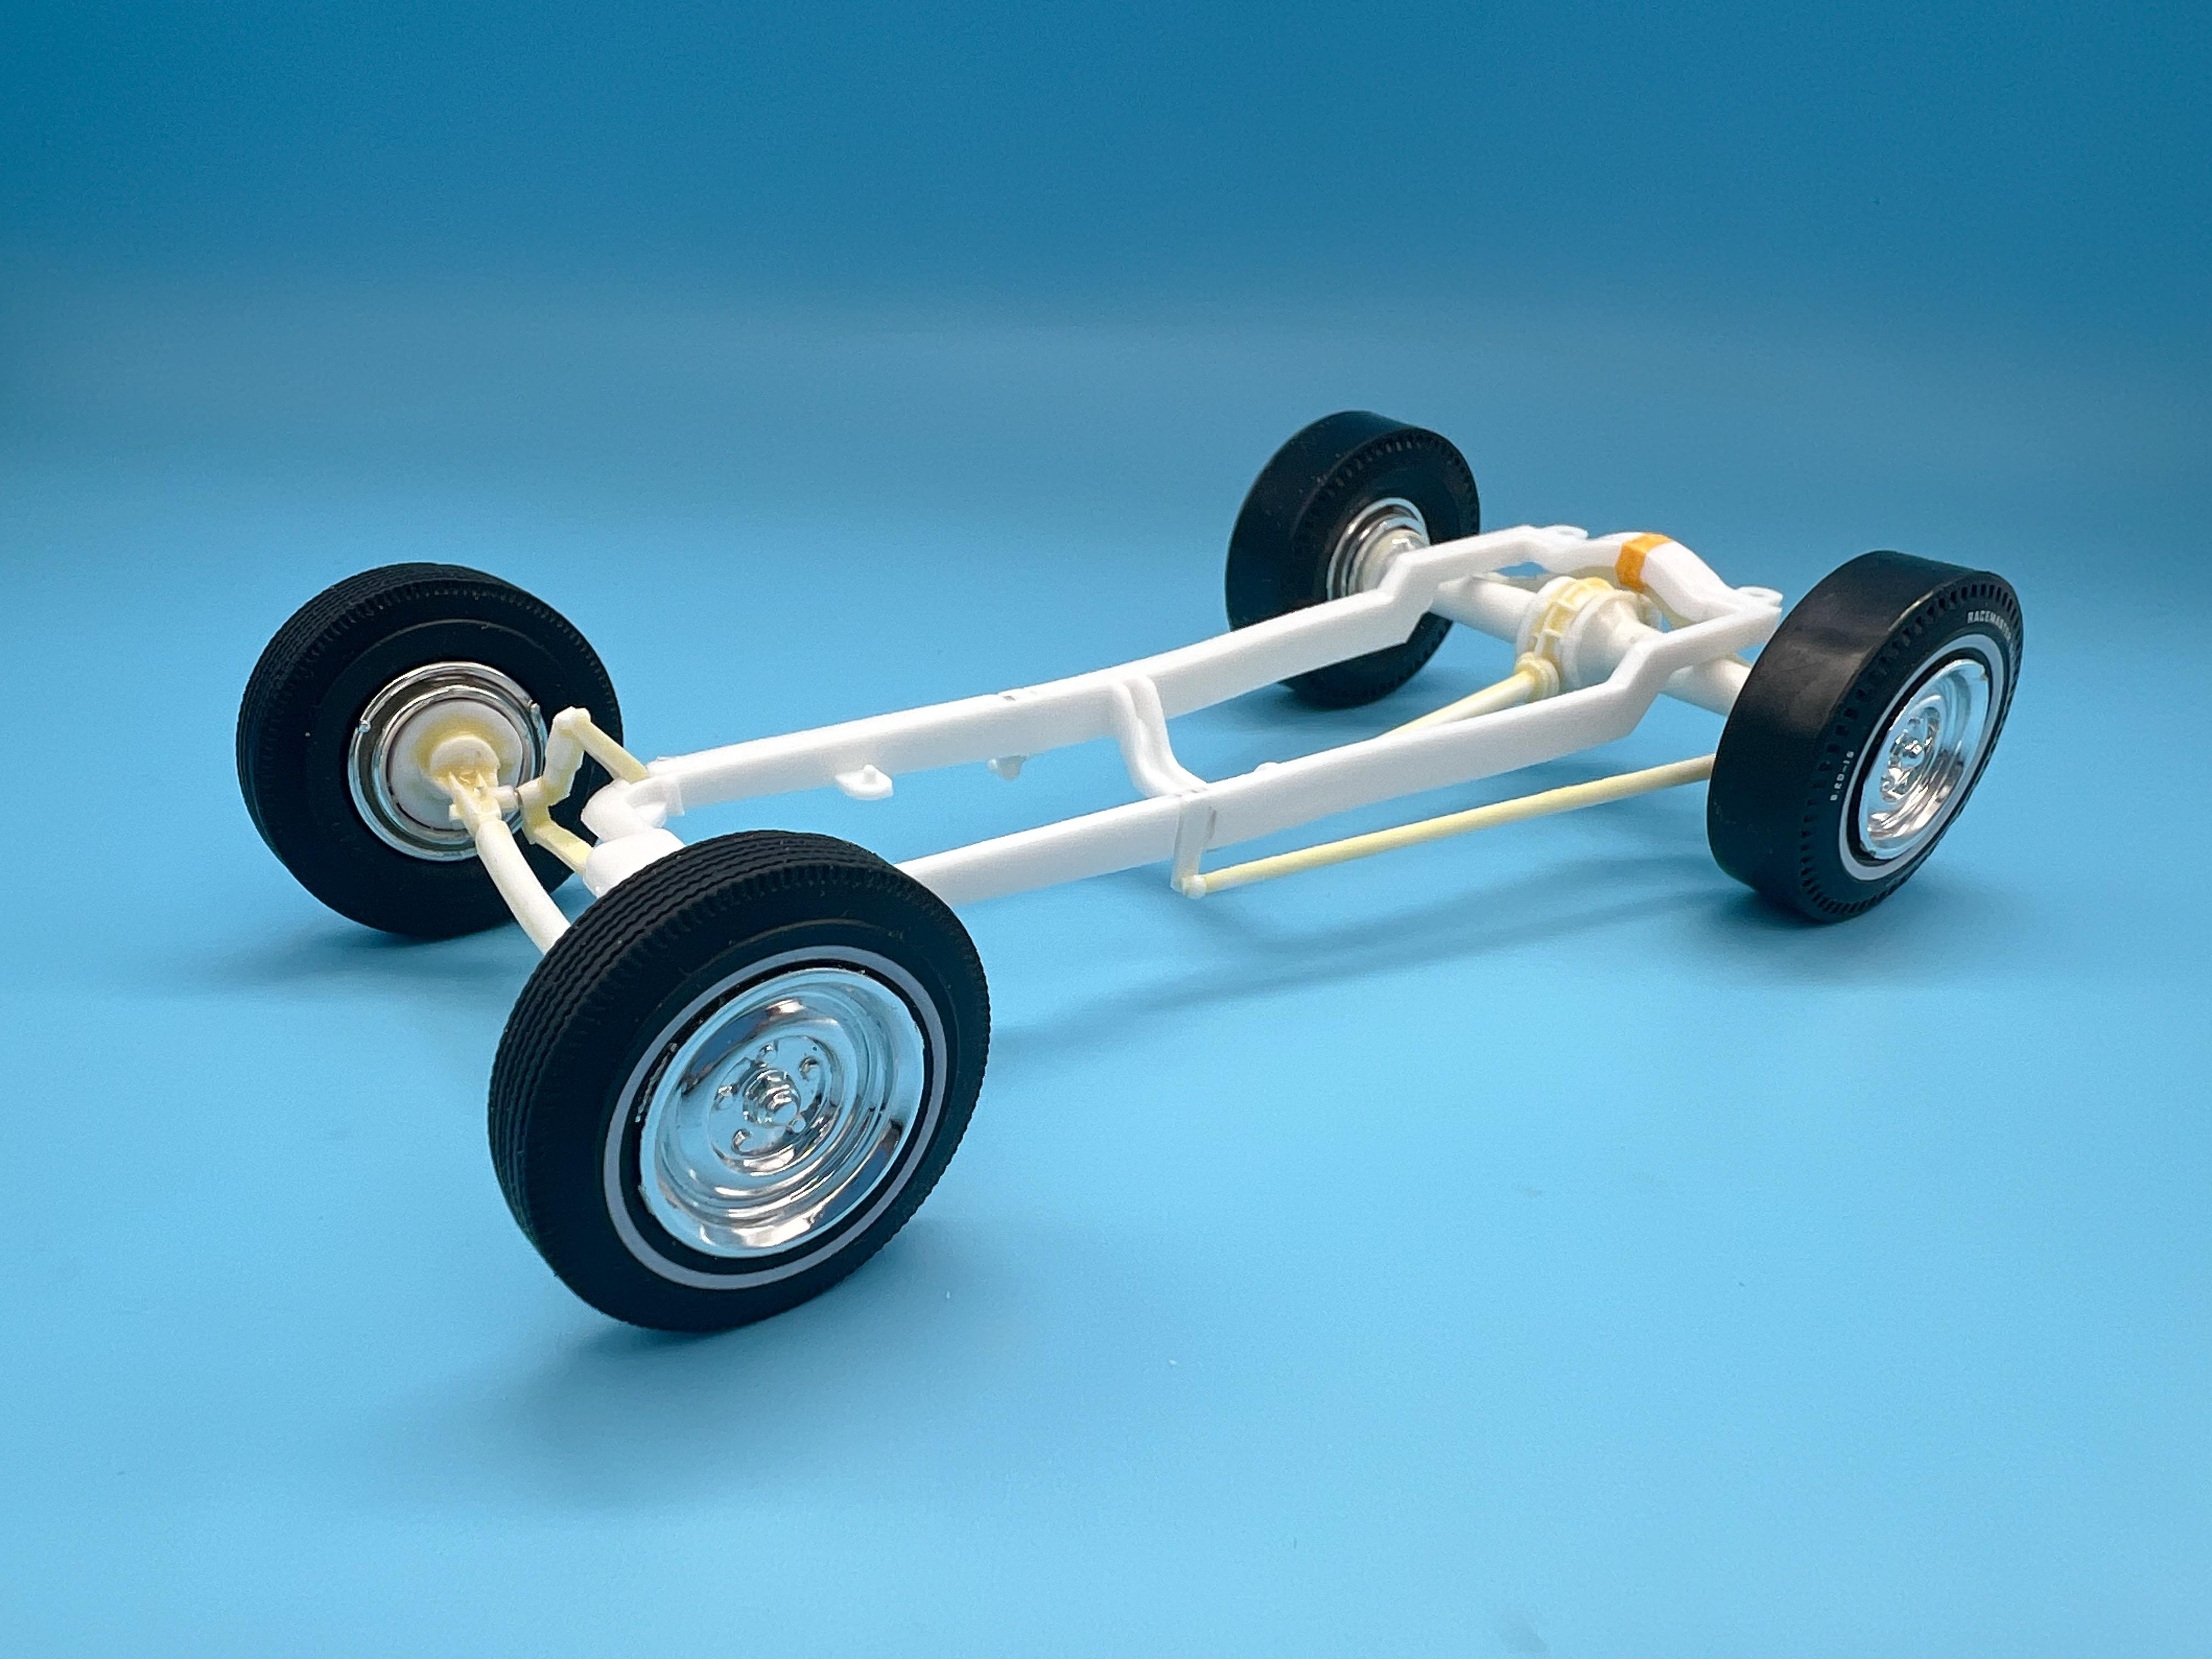
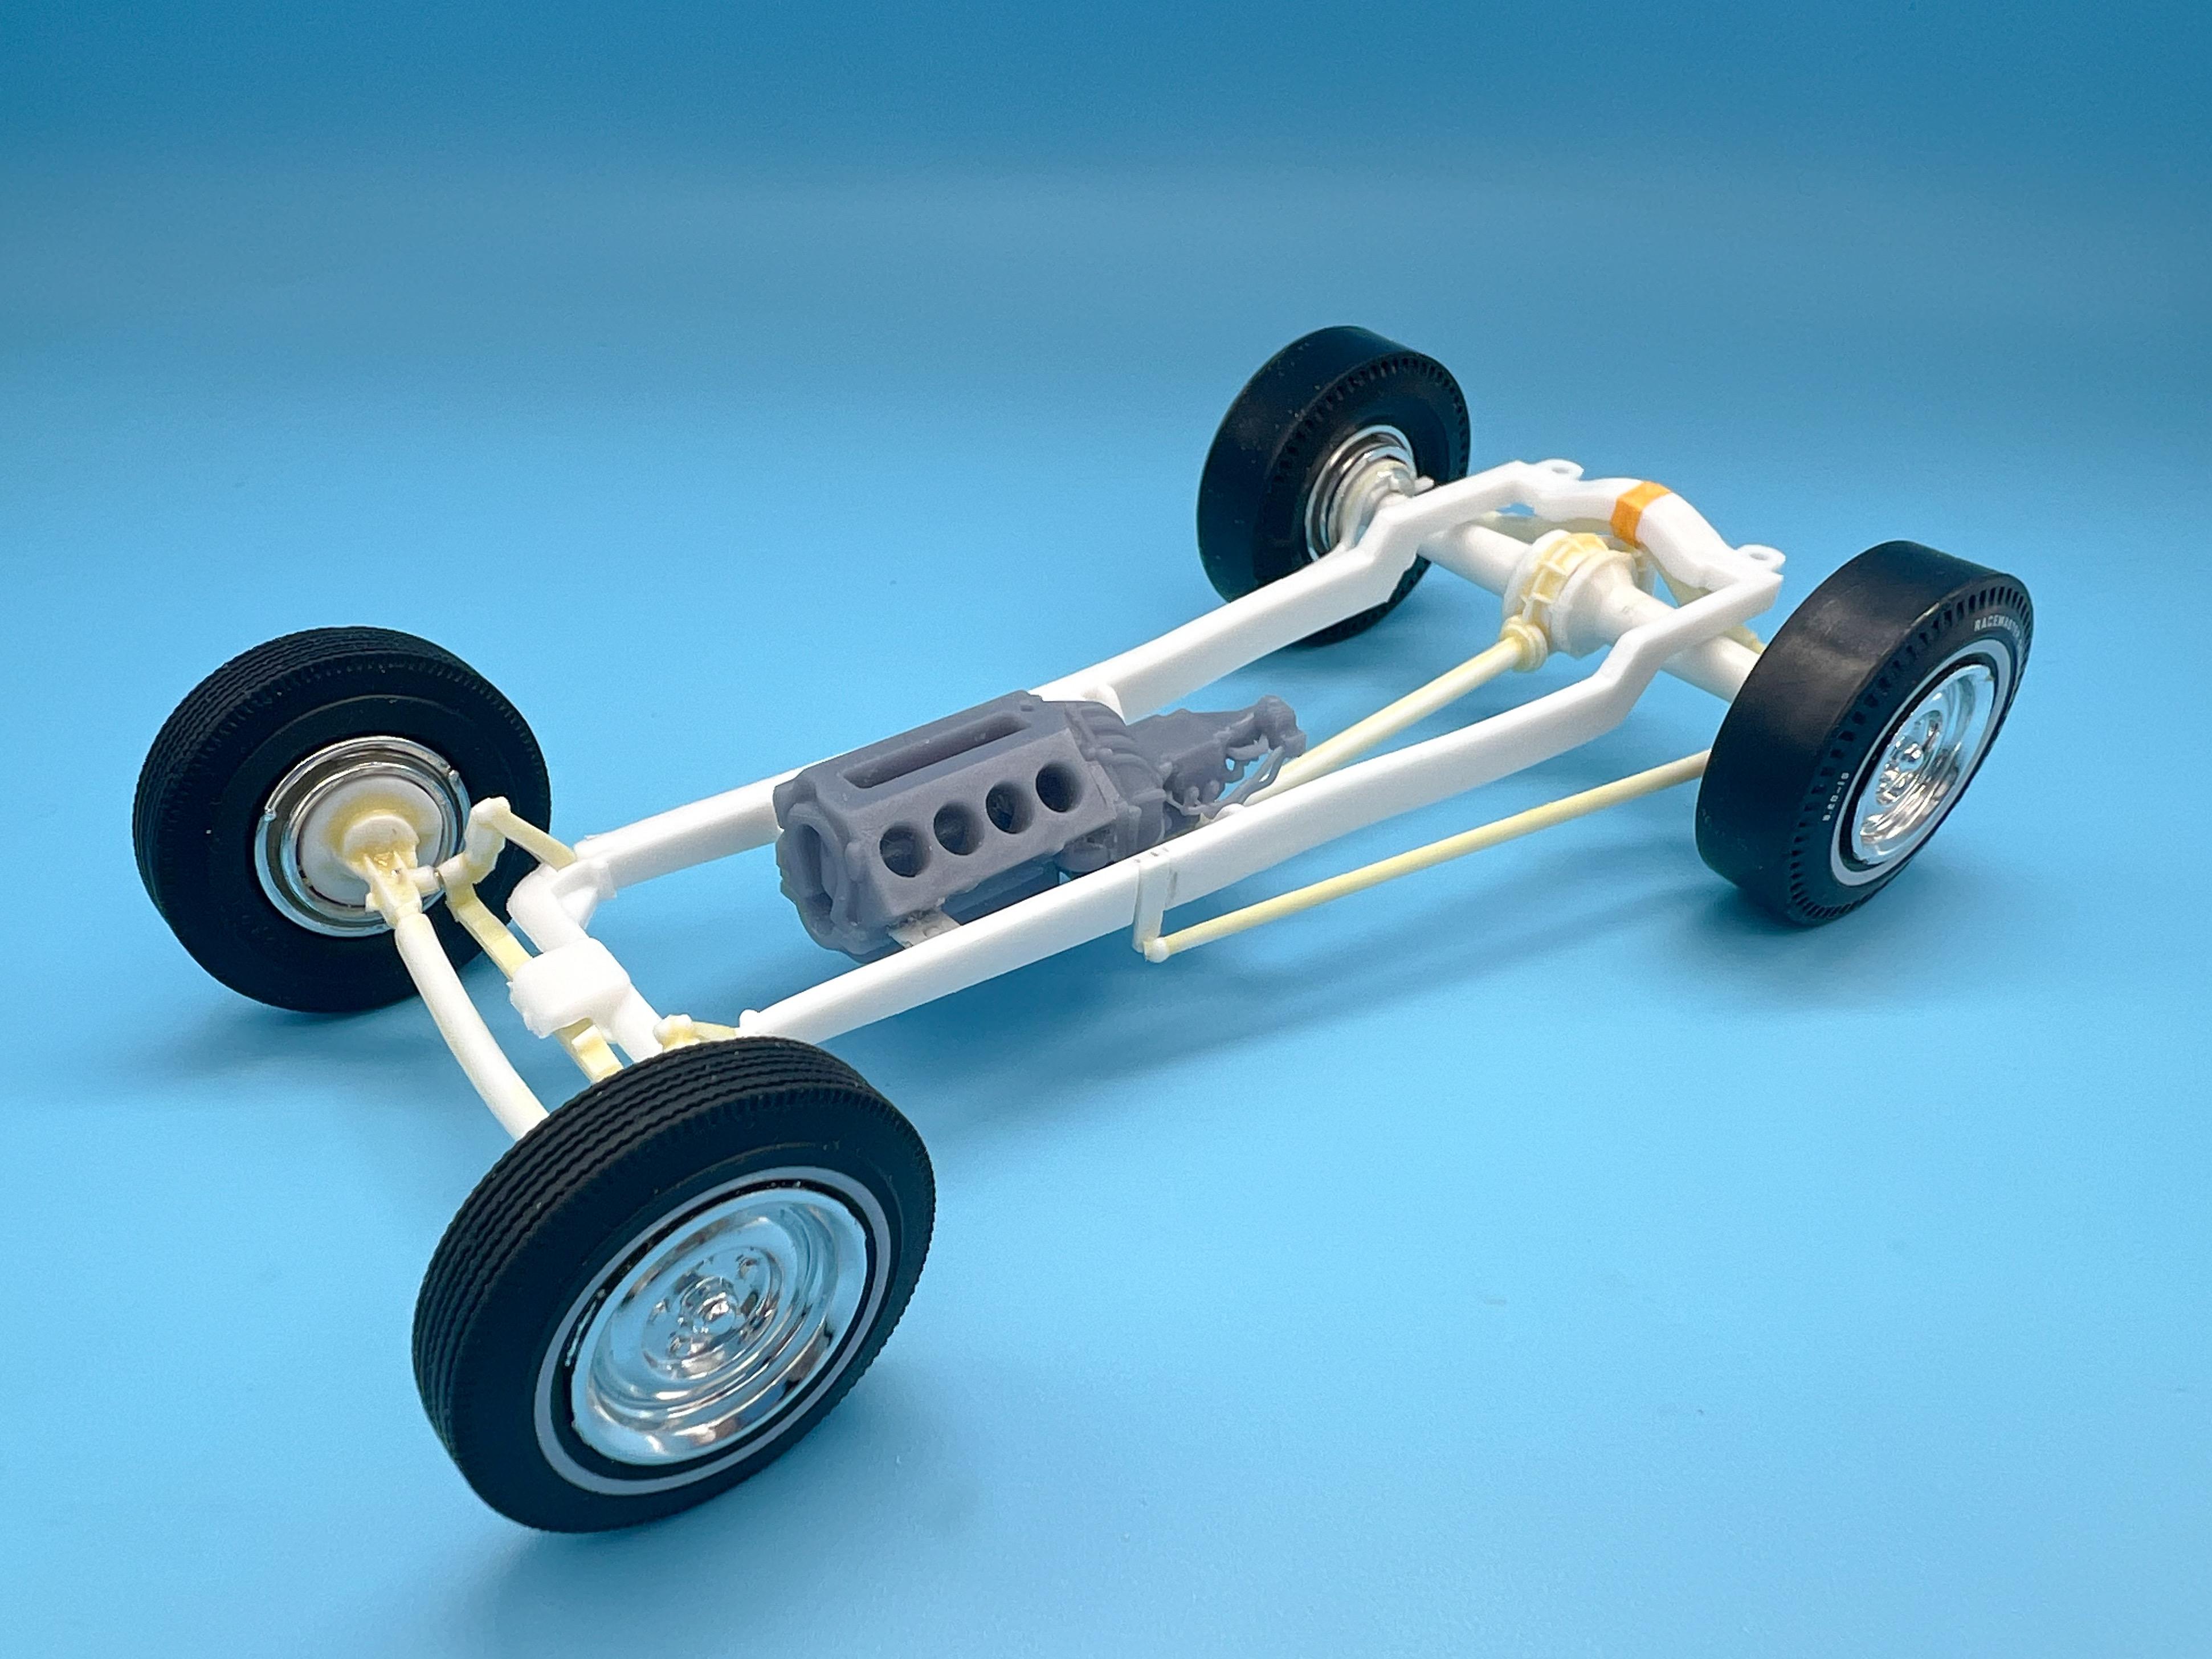
Hey, look at me following the rules and posting this in the right section (even if it is only just barely going to be a pickup). I’m such a rule-abider. Anyhoo, I don’t have the pickup flavor of T-bucket in my collection yet, and I’d like to change that, so here goes… I’m using the AMT 25 T double (triple?) kit for this one because I’ve collected a bunch of them from Hobby Lobby and they fall together pretty easily - plus it has most of the parts I’d want to use all ready to go in the box. I’ll make a few changes tho, just to improve it a little, but I’m TRYING to not remake every little part on this if I can help it… First up, tweaking that nice (ish) V8 60 front axle with some pins to help the fit a little… I’ll be adding some detail to this whole assembly, but I’m trying to get a roller together to start, and pinning helps with that… On the rear end, I’ve found that adding just a 1/32” or so of styrene to the ends of the leaf spring helps SO MUCH with mocking it up - just stops everything falling apart constantly whilst you’re messing with things, so I did that and added some tabs to change the wishbone mounting situation to my liking: I love how quick and easy it is to get some of these older kits to ‘roller’ status… The Lincoln Y-Block that comes in these kits doesn’t look much like a Y-block to me, so I’m swapping in a small block Chevy (*Tim Boyd sighs*): Note: I realize that the geometry on that rear end wouldn’t be that great now that I’ve got a longer trans and a different pivot point for the driveshaft (*Dennis Lacy sighs*) but A- I don’t want to modify every little part B- the suspension travel is pretty minimum and it might not be THAT bad and C- I’ve found more than a few 1:1s (particularly period cars) that have this same imperfect setup so I’m allowing myself some leeway… Still need to figure out how I want the linkages for the front end to look, but the kit ones are pretty lumpy and I’d like to improve the fidelity a little. After all that typing, time to test fit the body and interior to see how my new trans and engine fit… And next job is removing the ‘fabric’ cover from the pickup bed and making a floor for it so I can add some detail later: The kit has it sitting pretty low and I’d like it a little higher - just sitting on the frame it looks like this right now, but I’d like to bump it up some more still: Just doing the ‘sketching’ part of the build right now - broad strokes to get the basics down…more soon, soon as I’ve done more!
- 34 replies
-
- 11
-

-
Michaels getting rid of models?
OldNYJim replied to gbdolfans's topic in General Automotive Talk (Trucks and Cars)
Slim pickin’s at my local store tonight… Had a 40% off coupon tho, so a Deuce kit followed me home even tho I don’t really need it…
-
Glad to see this one back in rotation! Fabbing exhausts is about a -1 on a scale of 1-10 of things I enjoy, but you always do a nice job of that
-
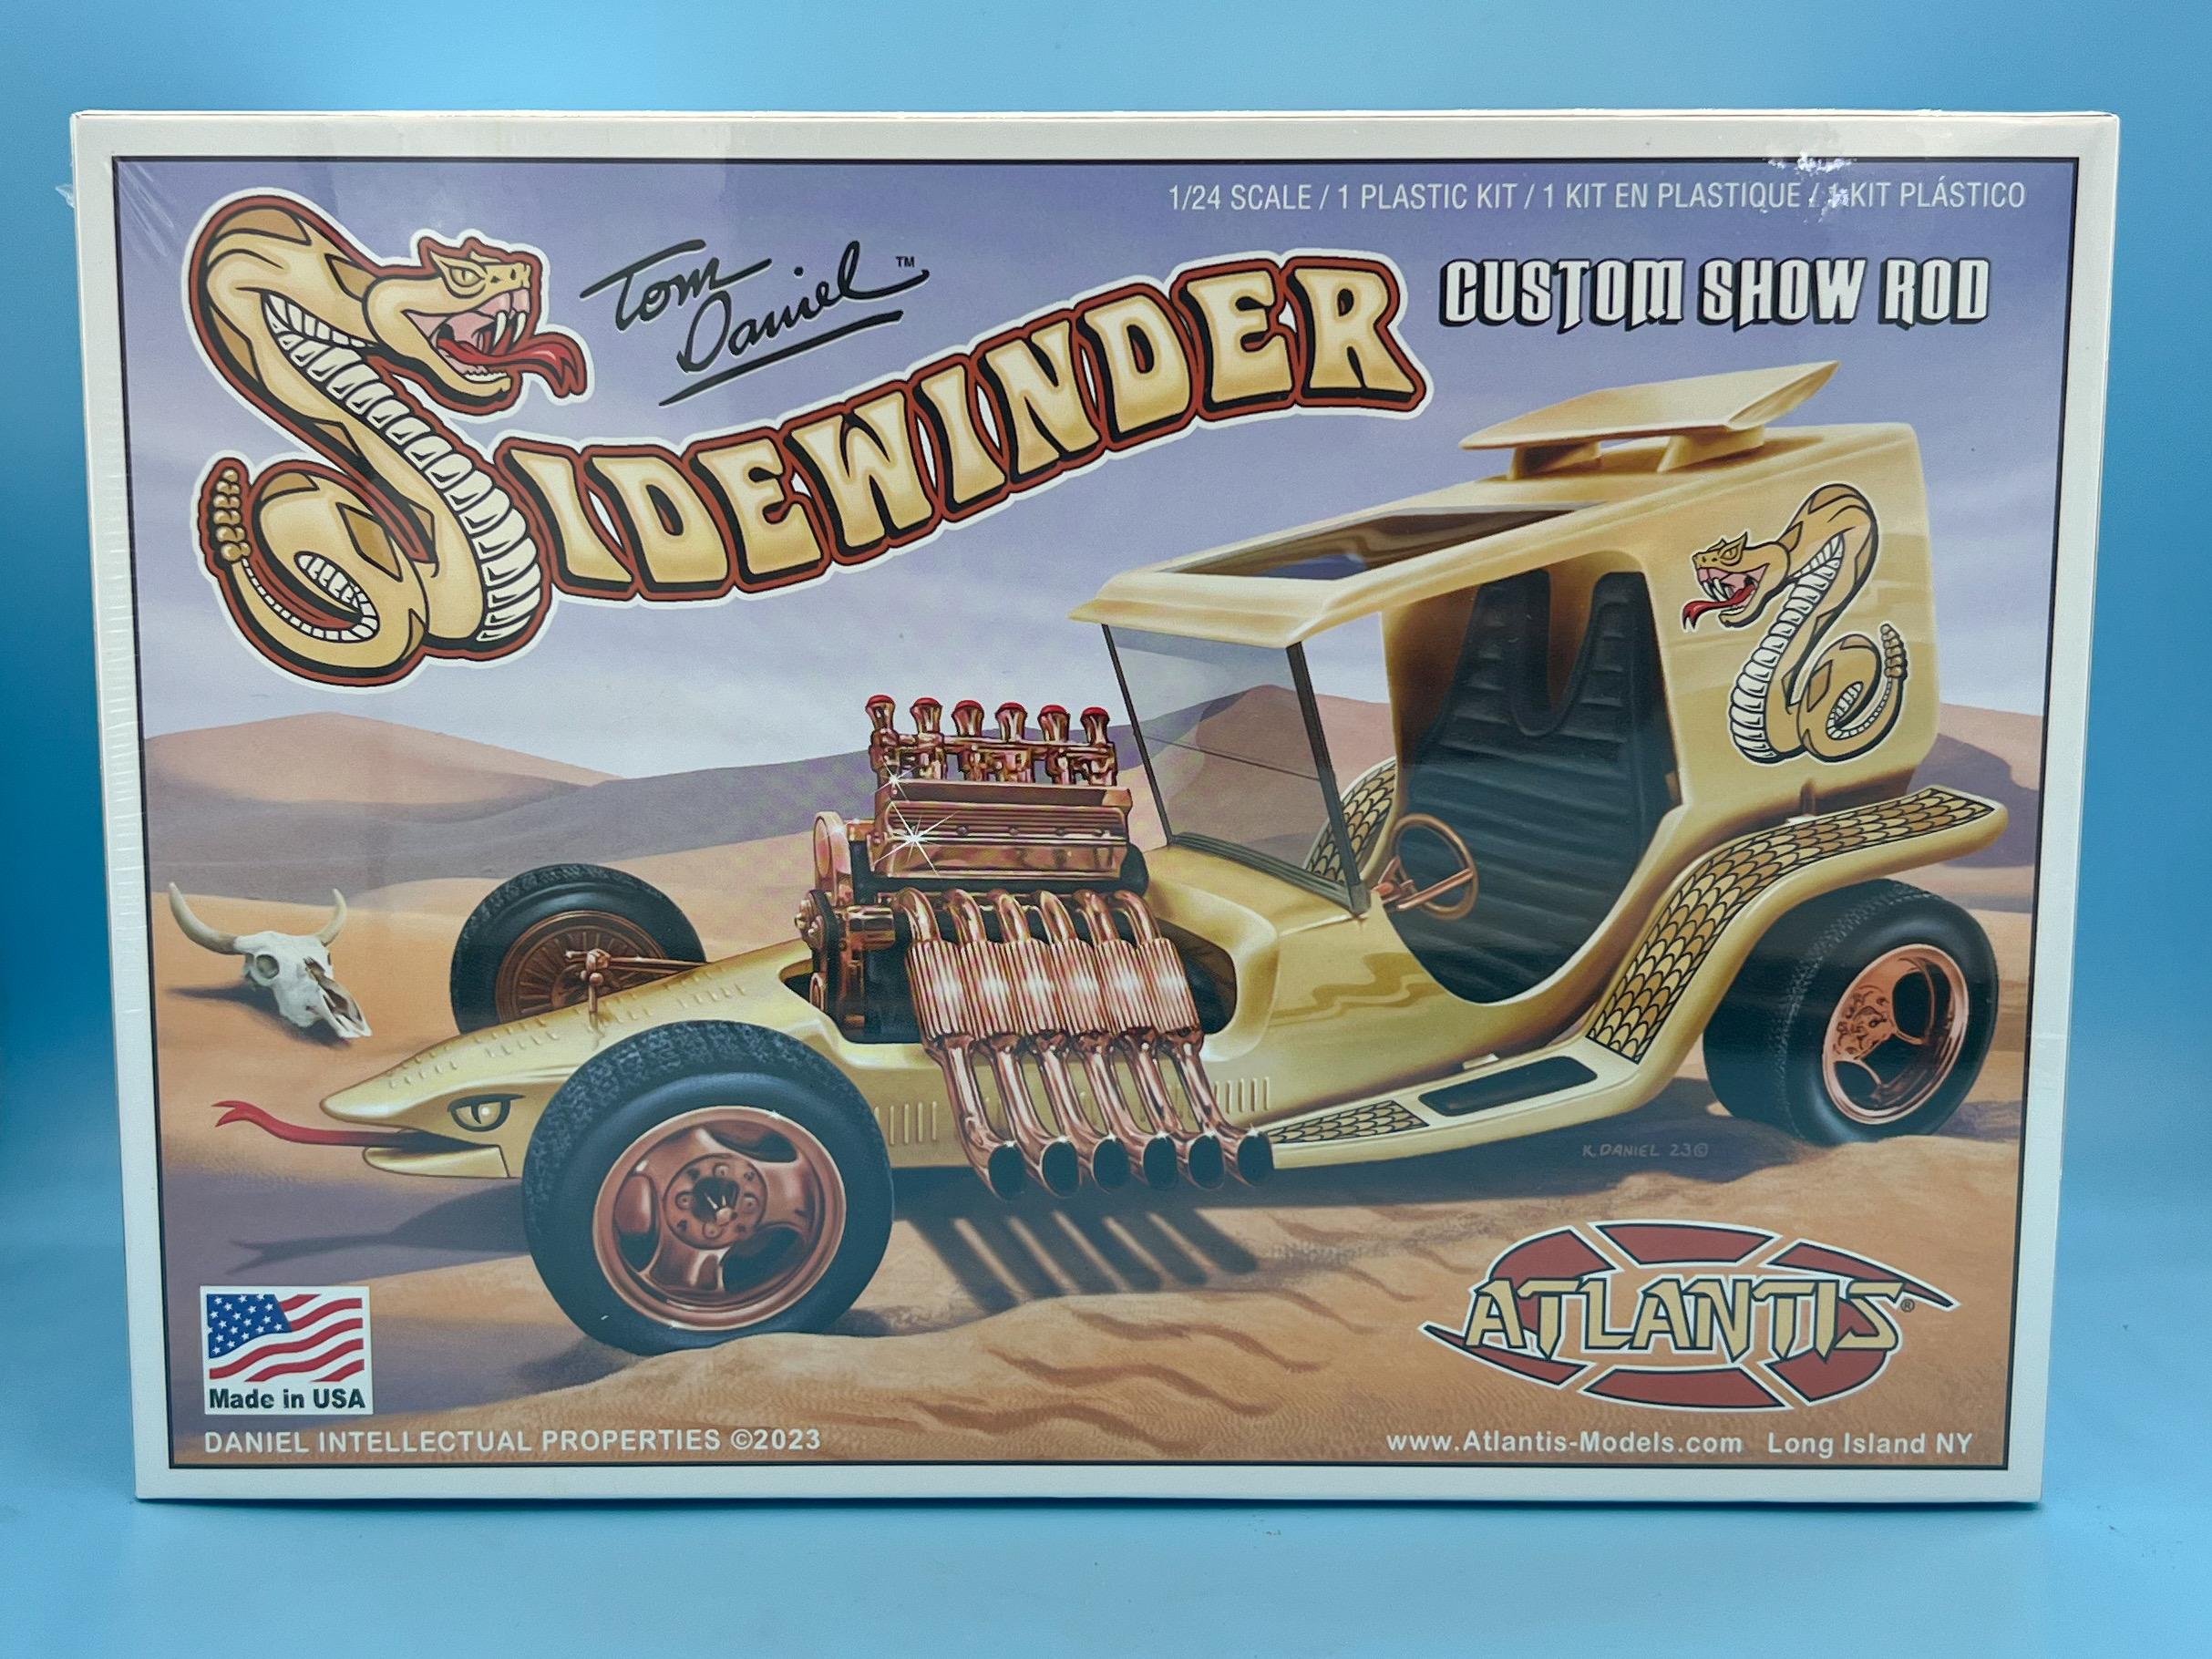
Atlantis Models has bought another lot of tooling/molds.....
OldNYJim replied to Dave Van's topic in Car Kit News & Reviews
Next car kit from Atlantis, presumably…posted on their Instagram today:
-
Convert the ambulance kit back into a surf wagon ? This is looking great David - enjoying this build! Nice work on the little details
-
Winged Sprint Car
OldNYJim replied to ModWrench's topic in WIP: Other Racing: Road Racing, Land Speed Racers
This is coming together nicely! Nice work! -
I never knew those existed - but they’re cool! I need to pick up a set of those…thanks for alerting me to their existence! I assume there’s no detail on the flipside?
-
That looks like a great base for the color!
-
Do You Create A Backstory For Your Builds?
OldNYJim replied to oldcarfan's topic in General Automotive Talk (Trucks and Cars)
Oh man, now I GOTTA build that ? -
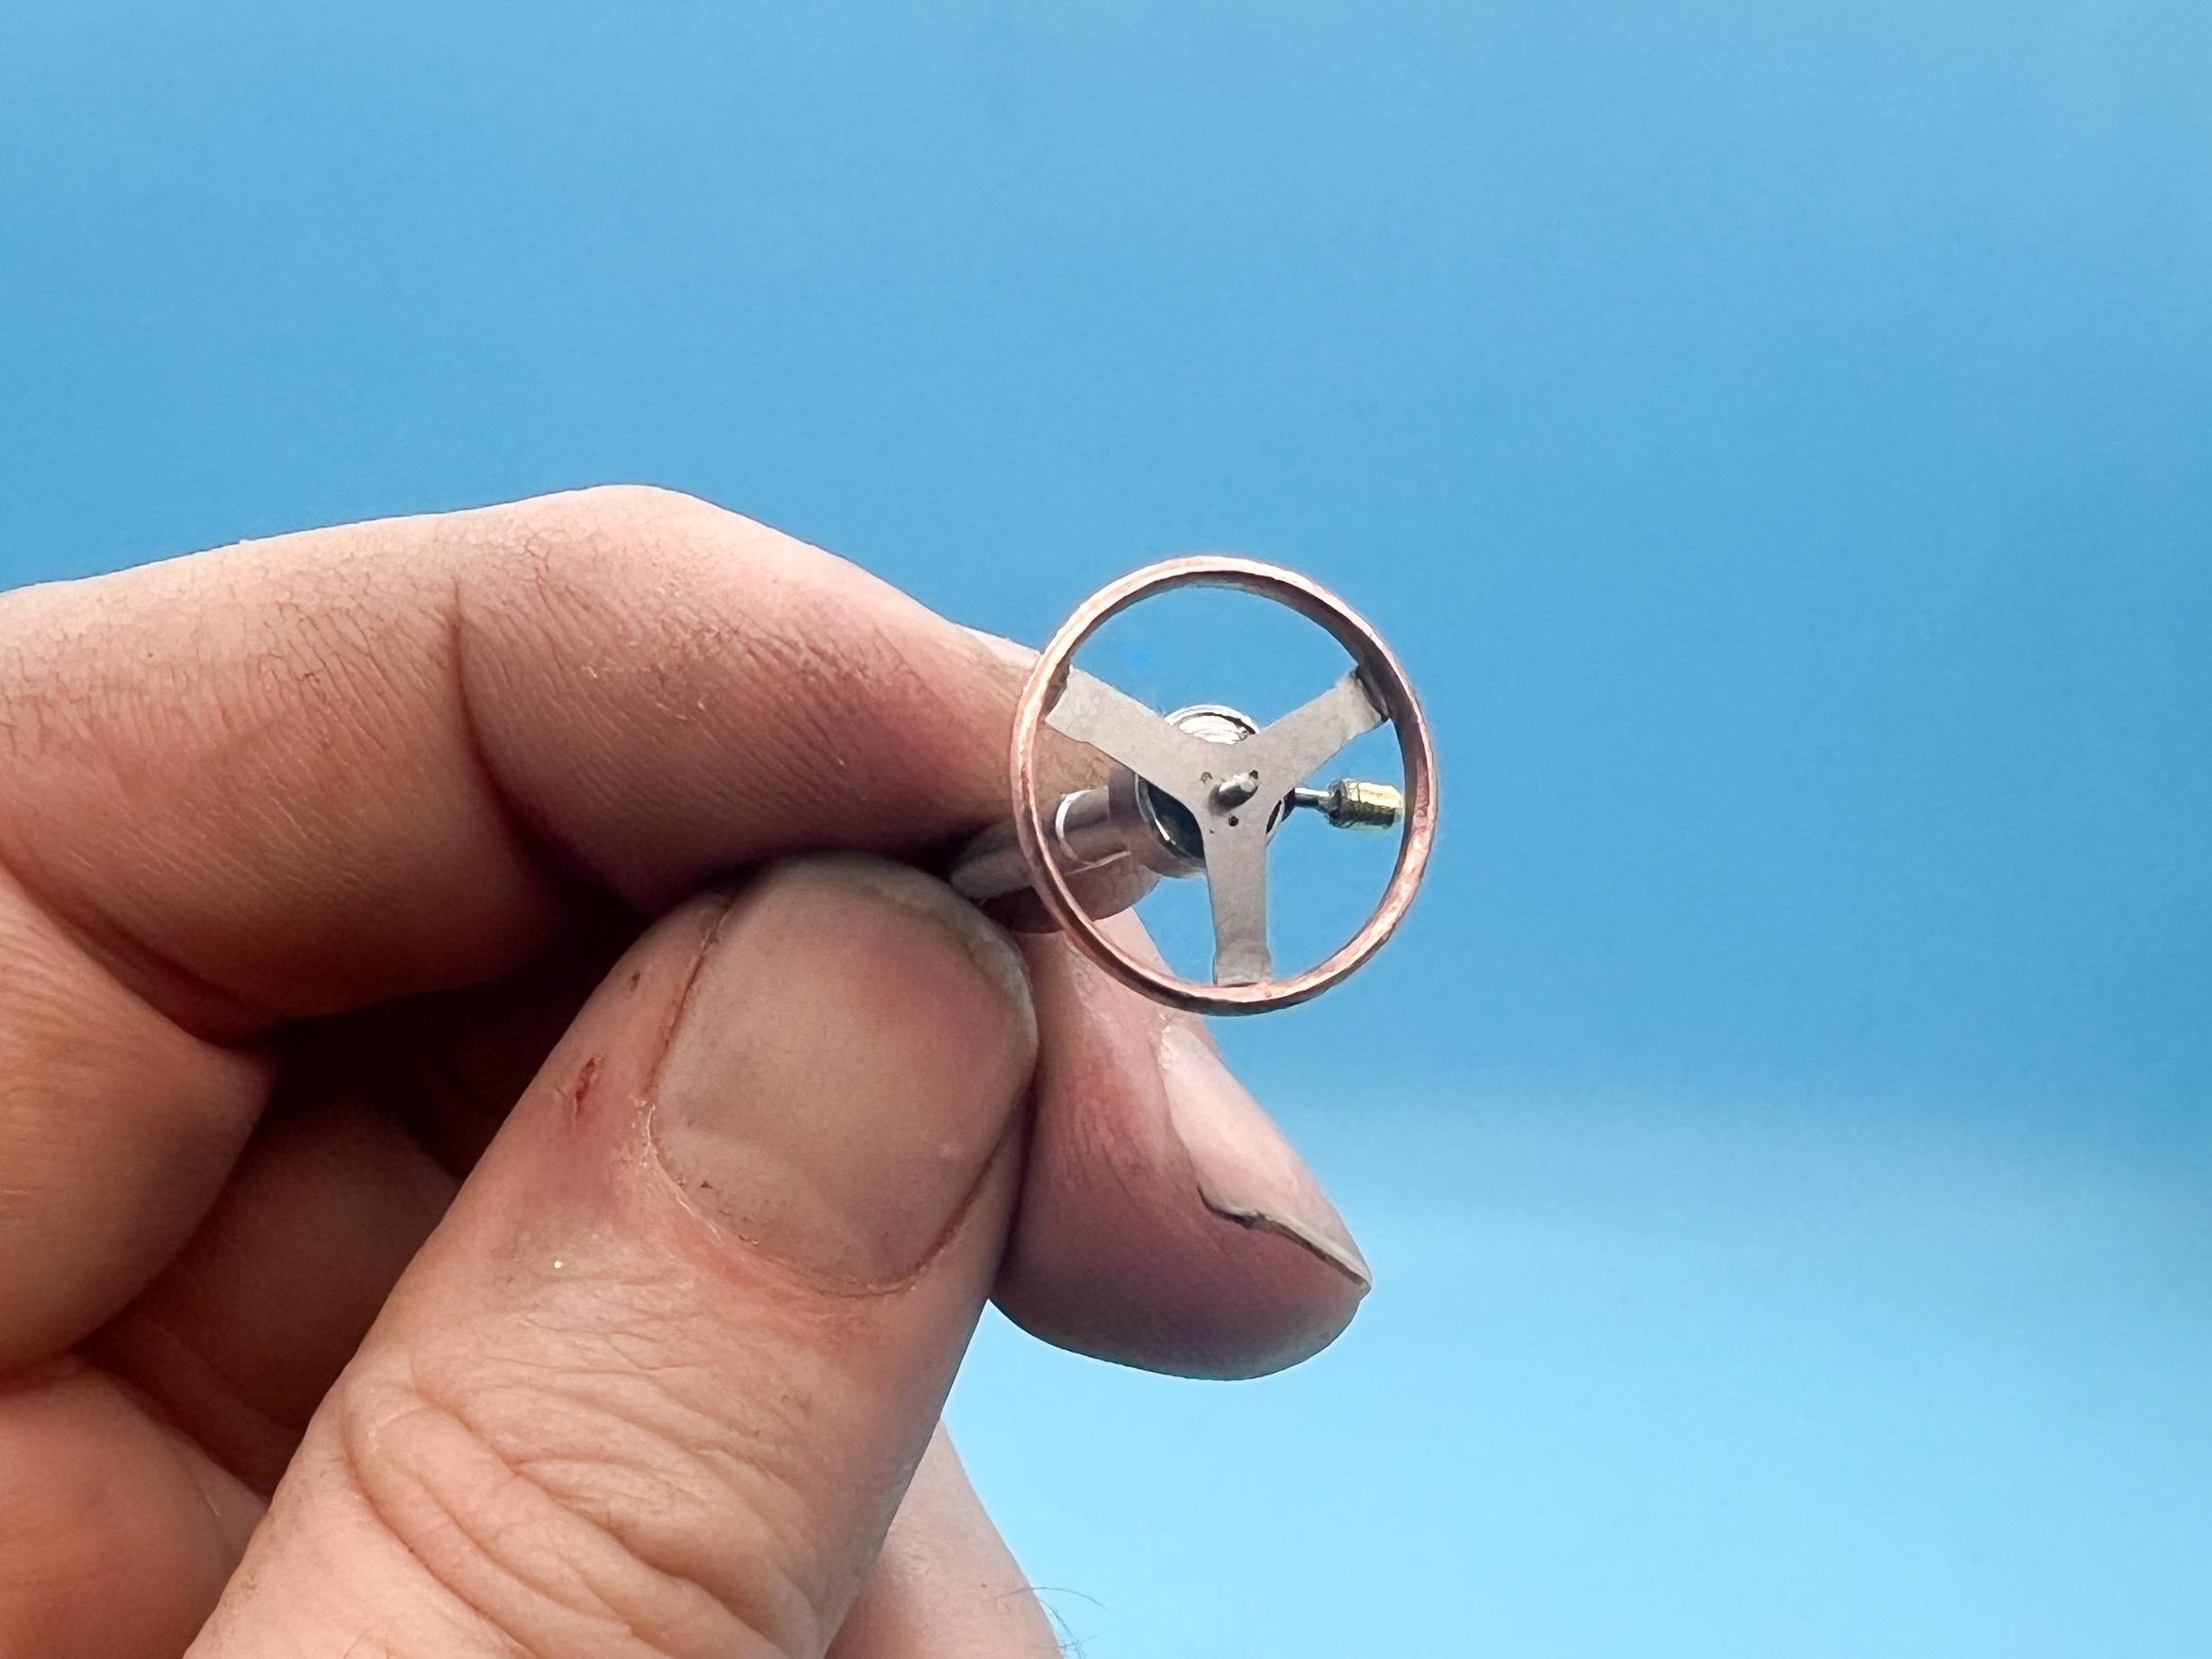
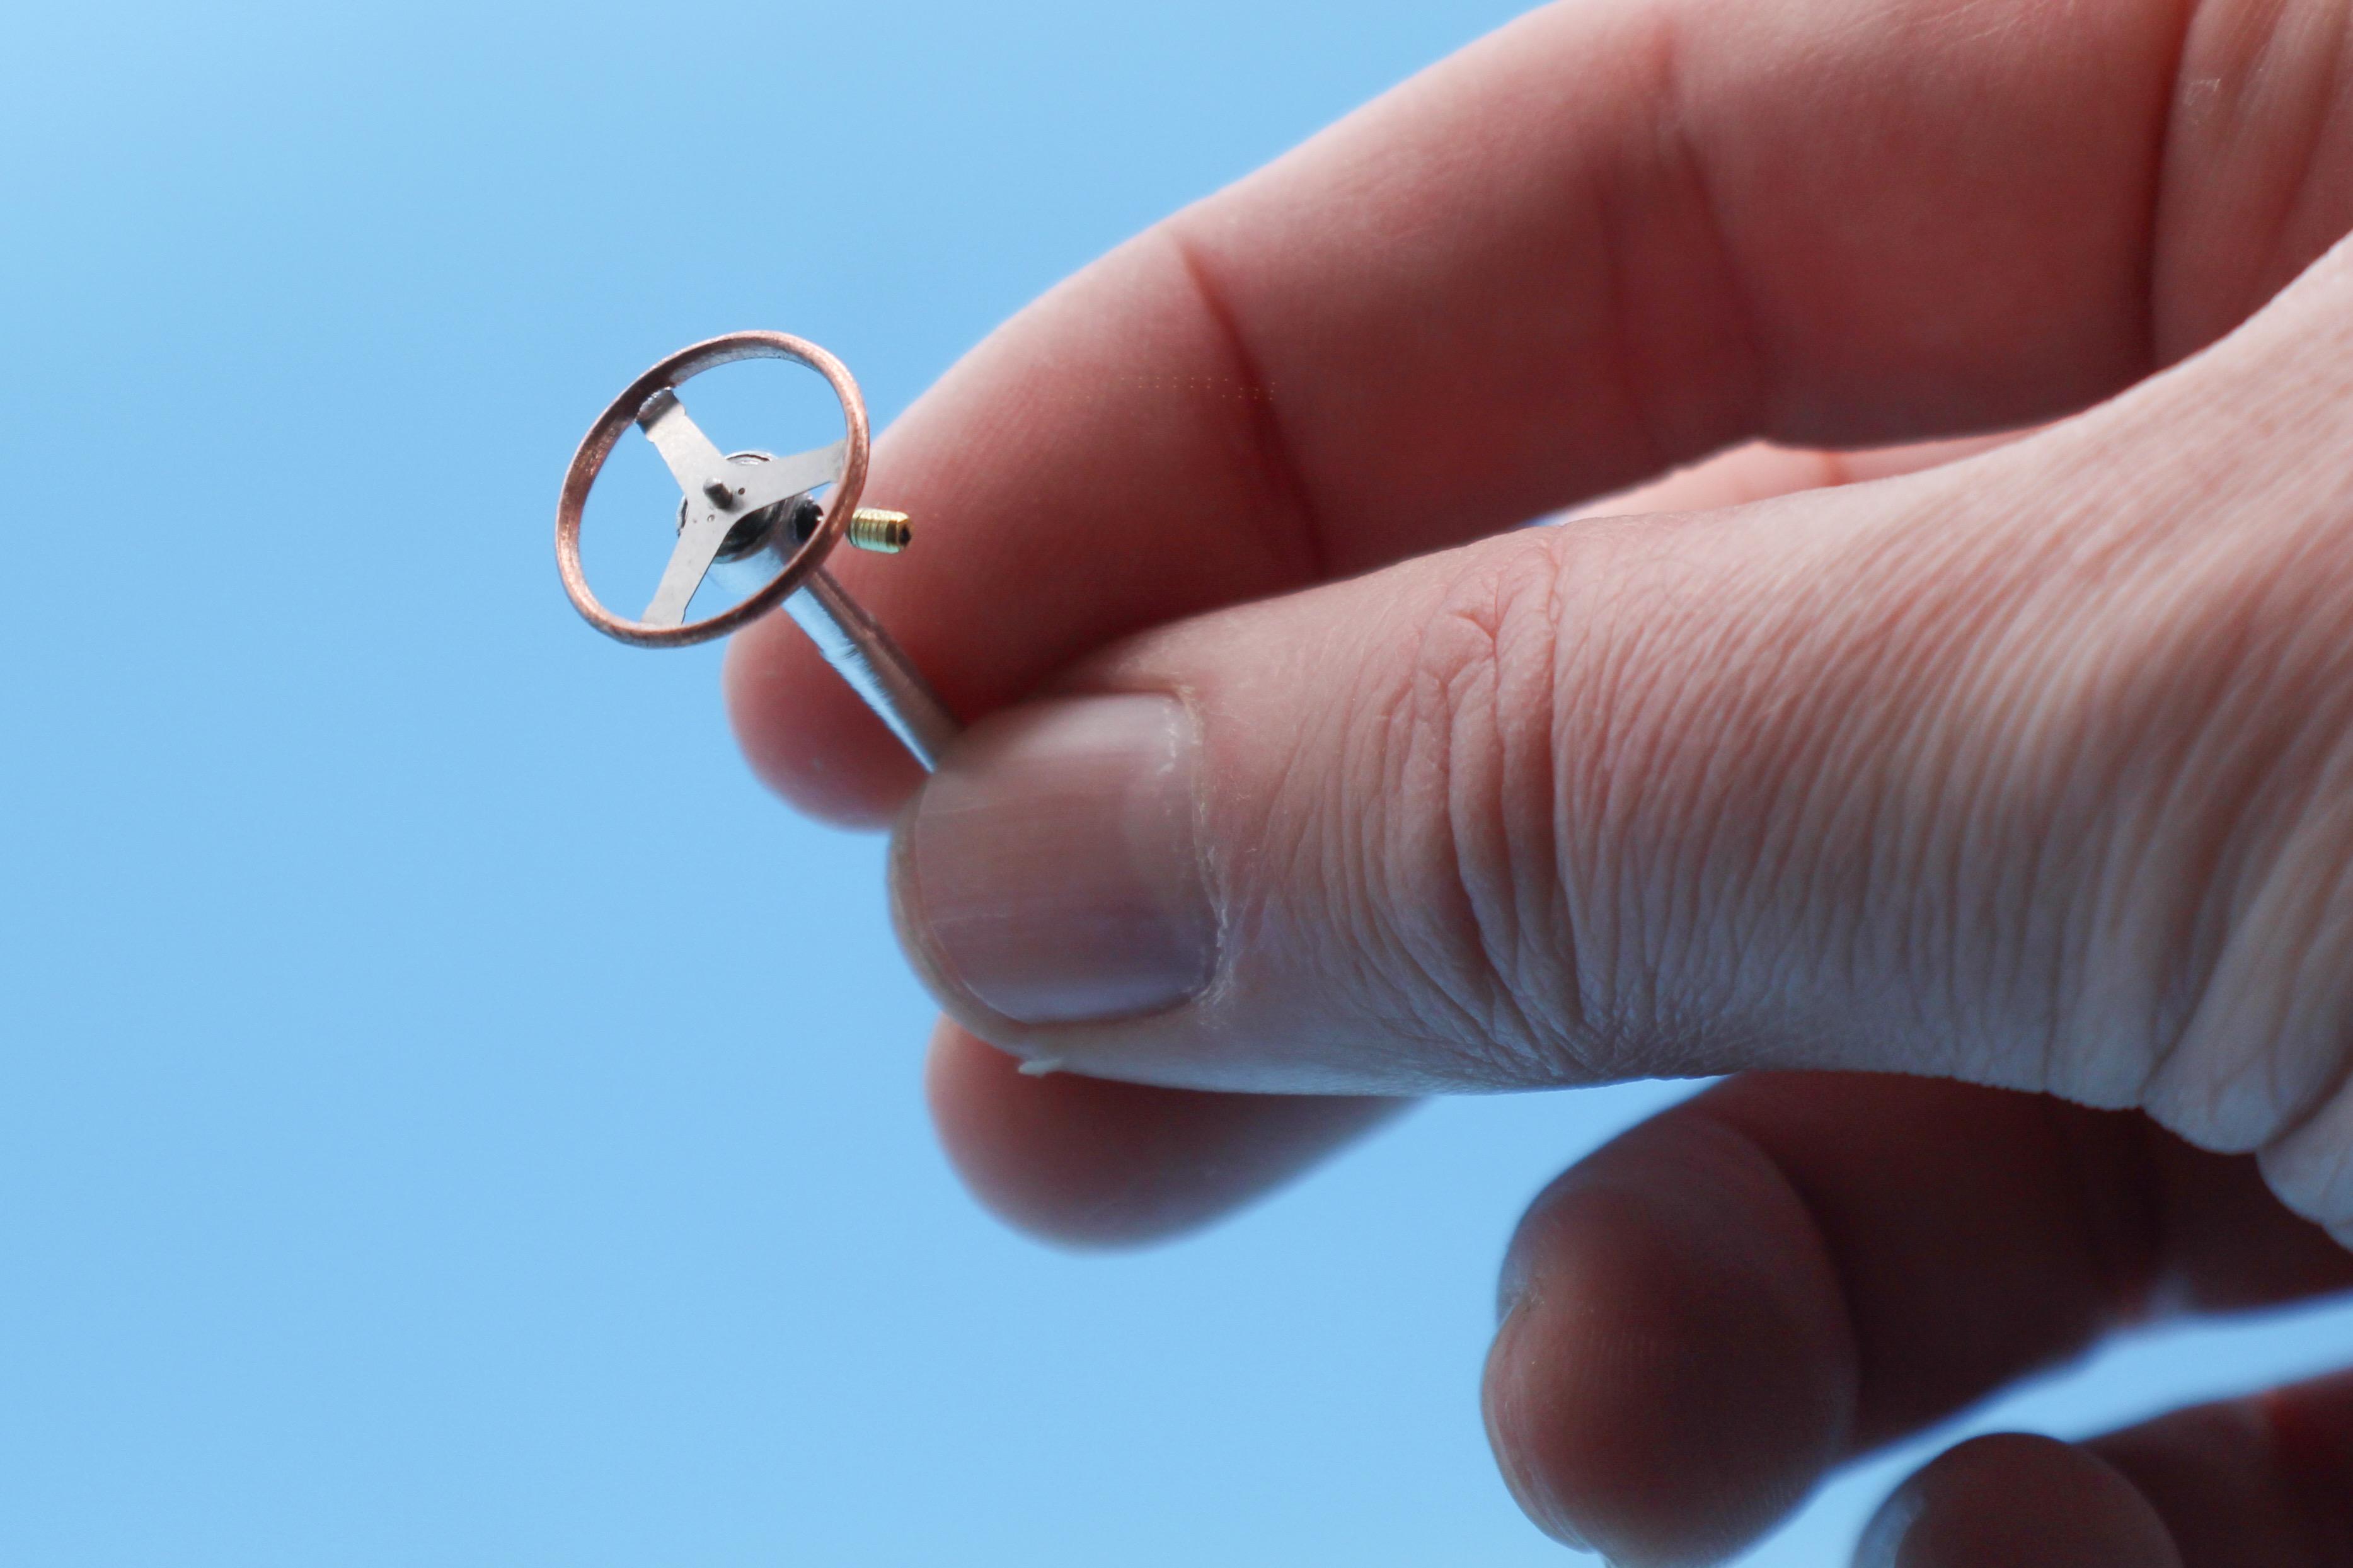
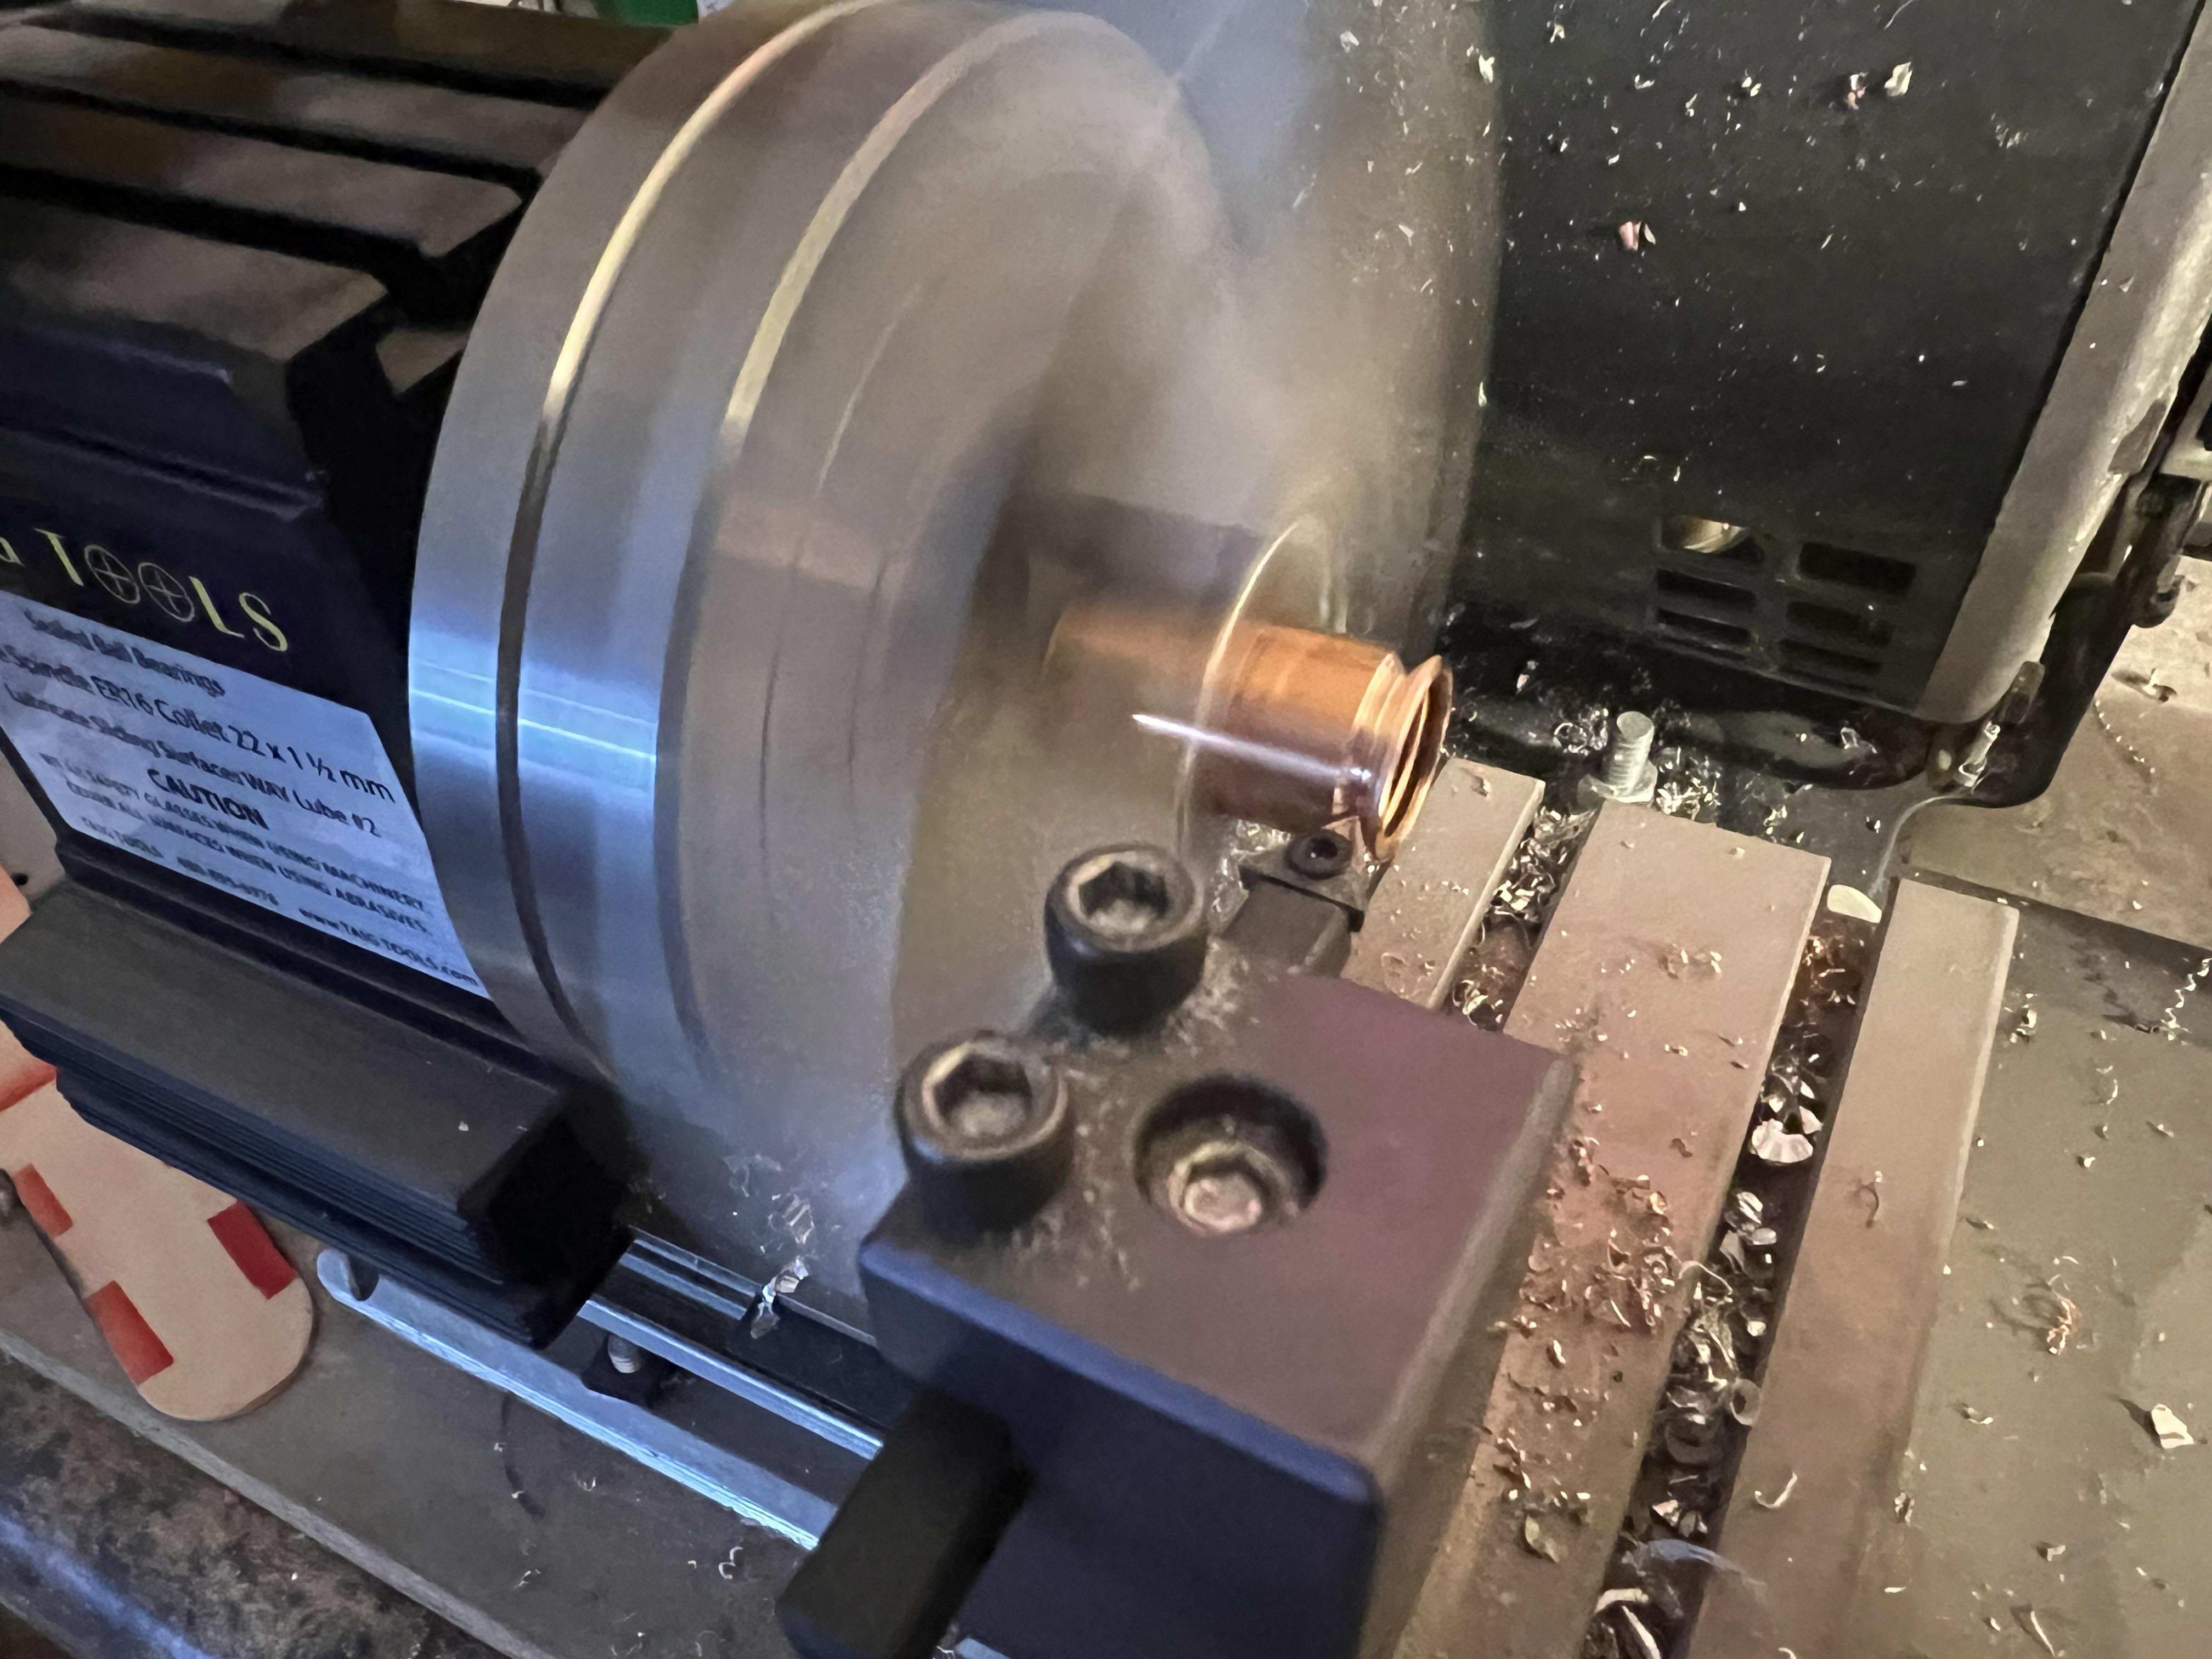
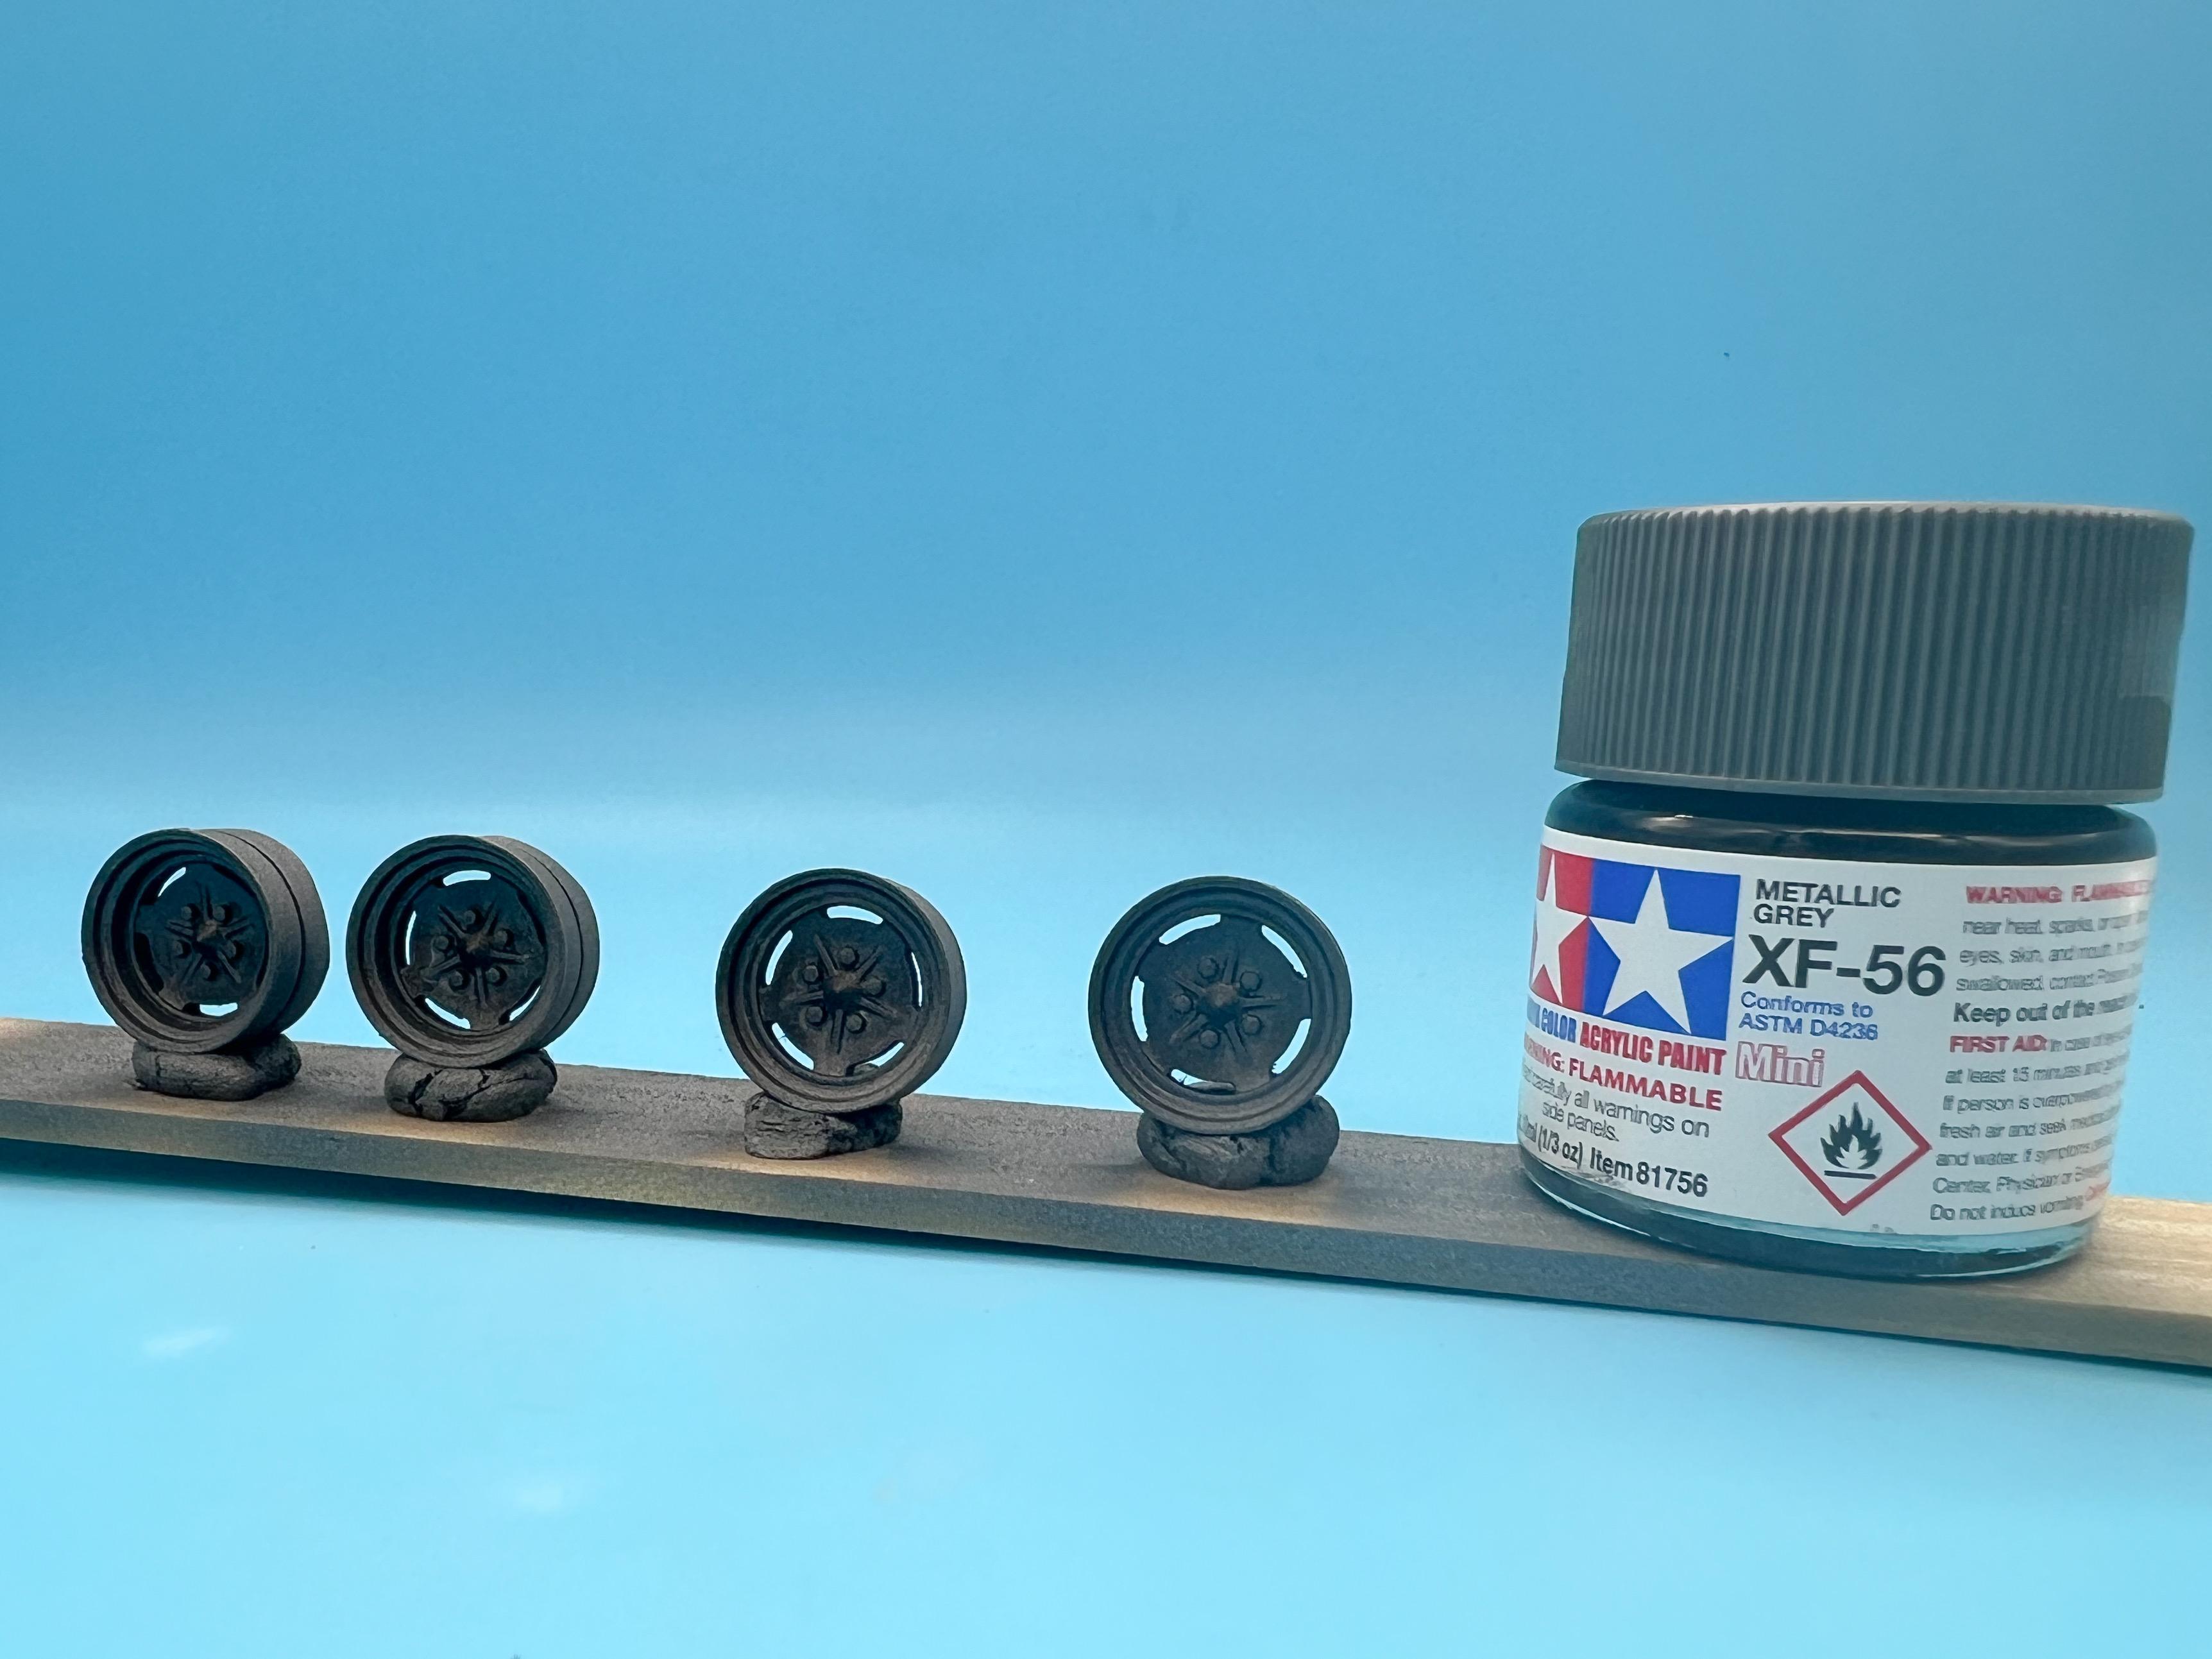
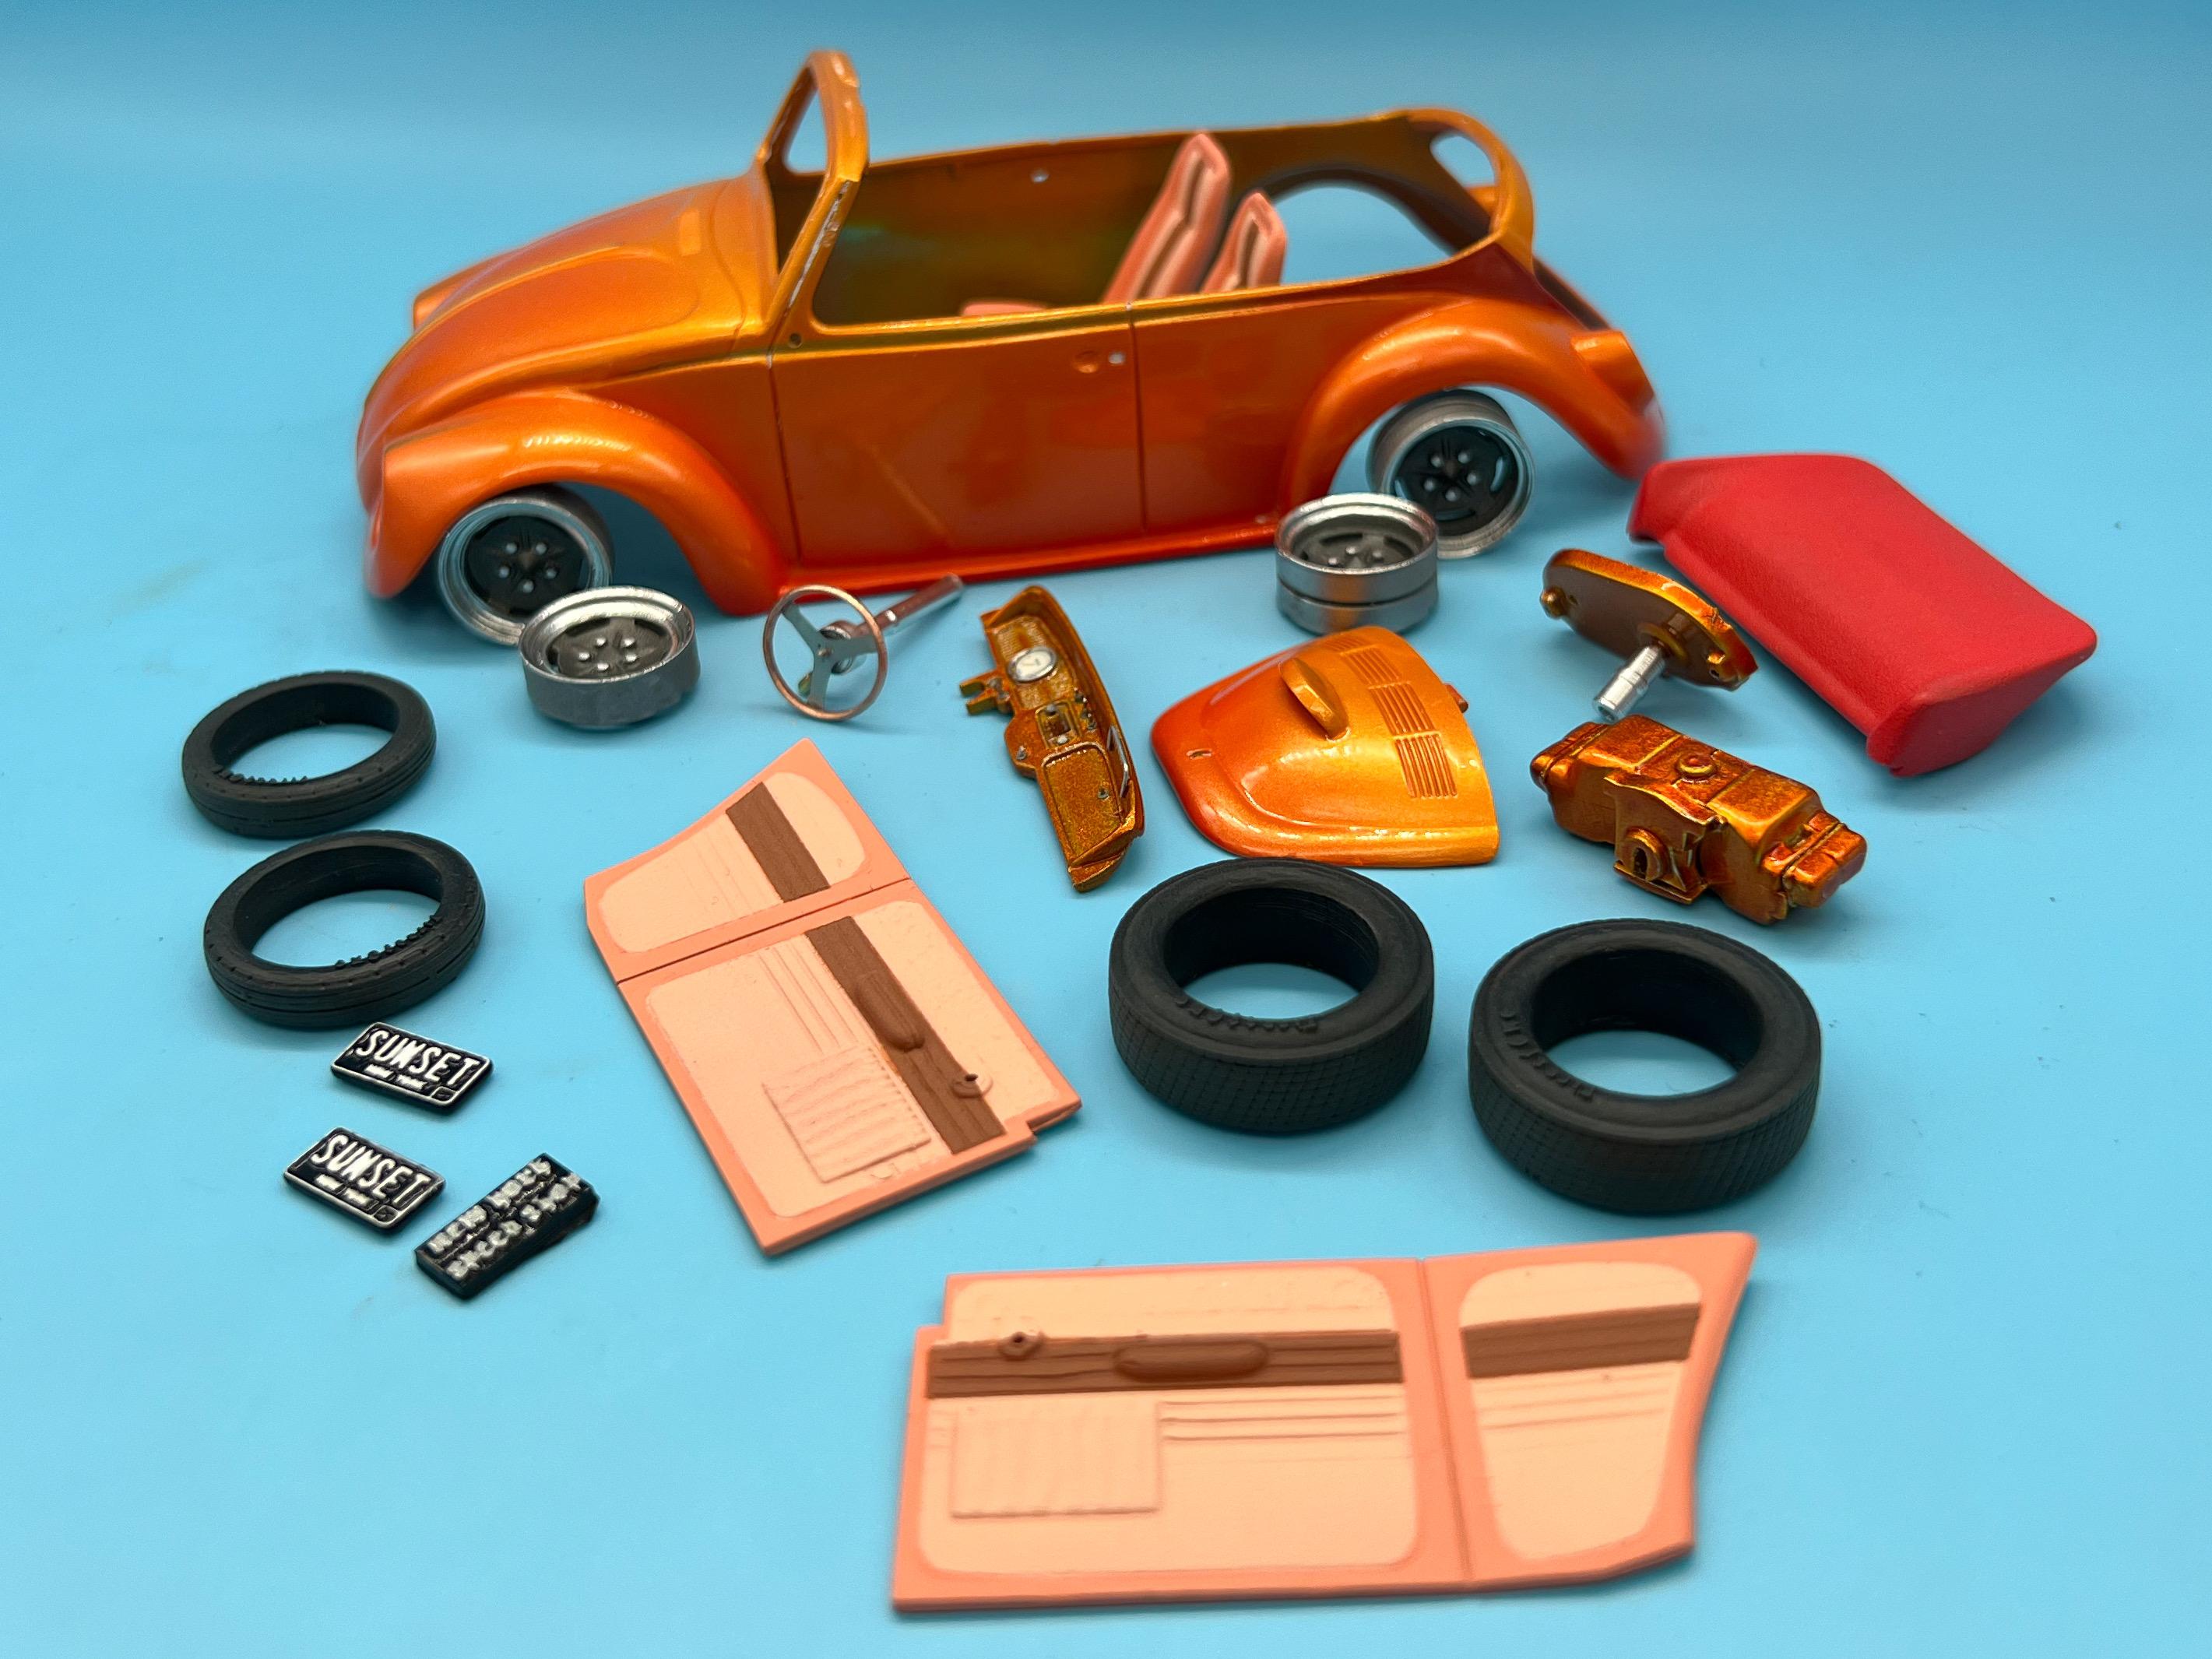
Yessir, there was definitely some flash to deal with. And I’m with you on the ‘cambered look’ - a little on a racecar is cool, but the ‘flattened’ look isn’t my favorite. That said, I’m going with it on this one, because that’s kinda what happens with these things I guess if you really dump them down - the rear in particular, due to the suspension geometry. I did a heavily-lowered Beetle a couple of years back and did it in such a way that the extreme-camber thing DIDN’T happen, then every show I took it too, someone told me I forgot the camber ?. Oh well ?♂️ Thank you sir! A little more progress today… Got the body mostly polished out and waxed: I was determined to use a photoetch center section for the steering wheel, but couldn’t find a spare hoop that would work…decided to fire up the lathe: And just made one… I was planning on painting it, but the color of the copper DOES kinda work well with the theme…need to decide on what to do with the center cap too…right now it’s just a little threaded bar that the wheel spins onto… Speaking of wheels, I wanted a gunmetal center for the wheels with a billet-looking outer, so I shot some Tamiya acrylic… …then a coat of intercoat, then masked with some Silly Putty: Note: if you leave Silly Putty for a few minutes it’ll start to flatten itself out and seals the edges really nicely… Next some Hyperchrome over the satin silver: And some careful de-masking…(and a silver pen for the lugs…) Still some work to do on these, but I shot the 3d-printed tires today too so that I’m ready with those… The pile of ‘finished’ bits is starting to build up now… Pile of unfinished bits is still pretty big tho ?. More soon, soon as I’ve done more, thanks for looking!
-
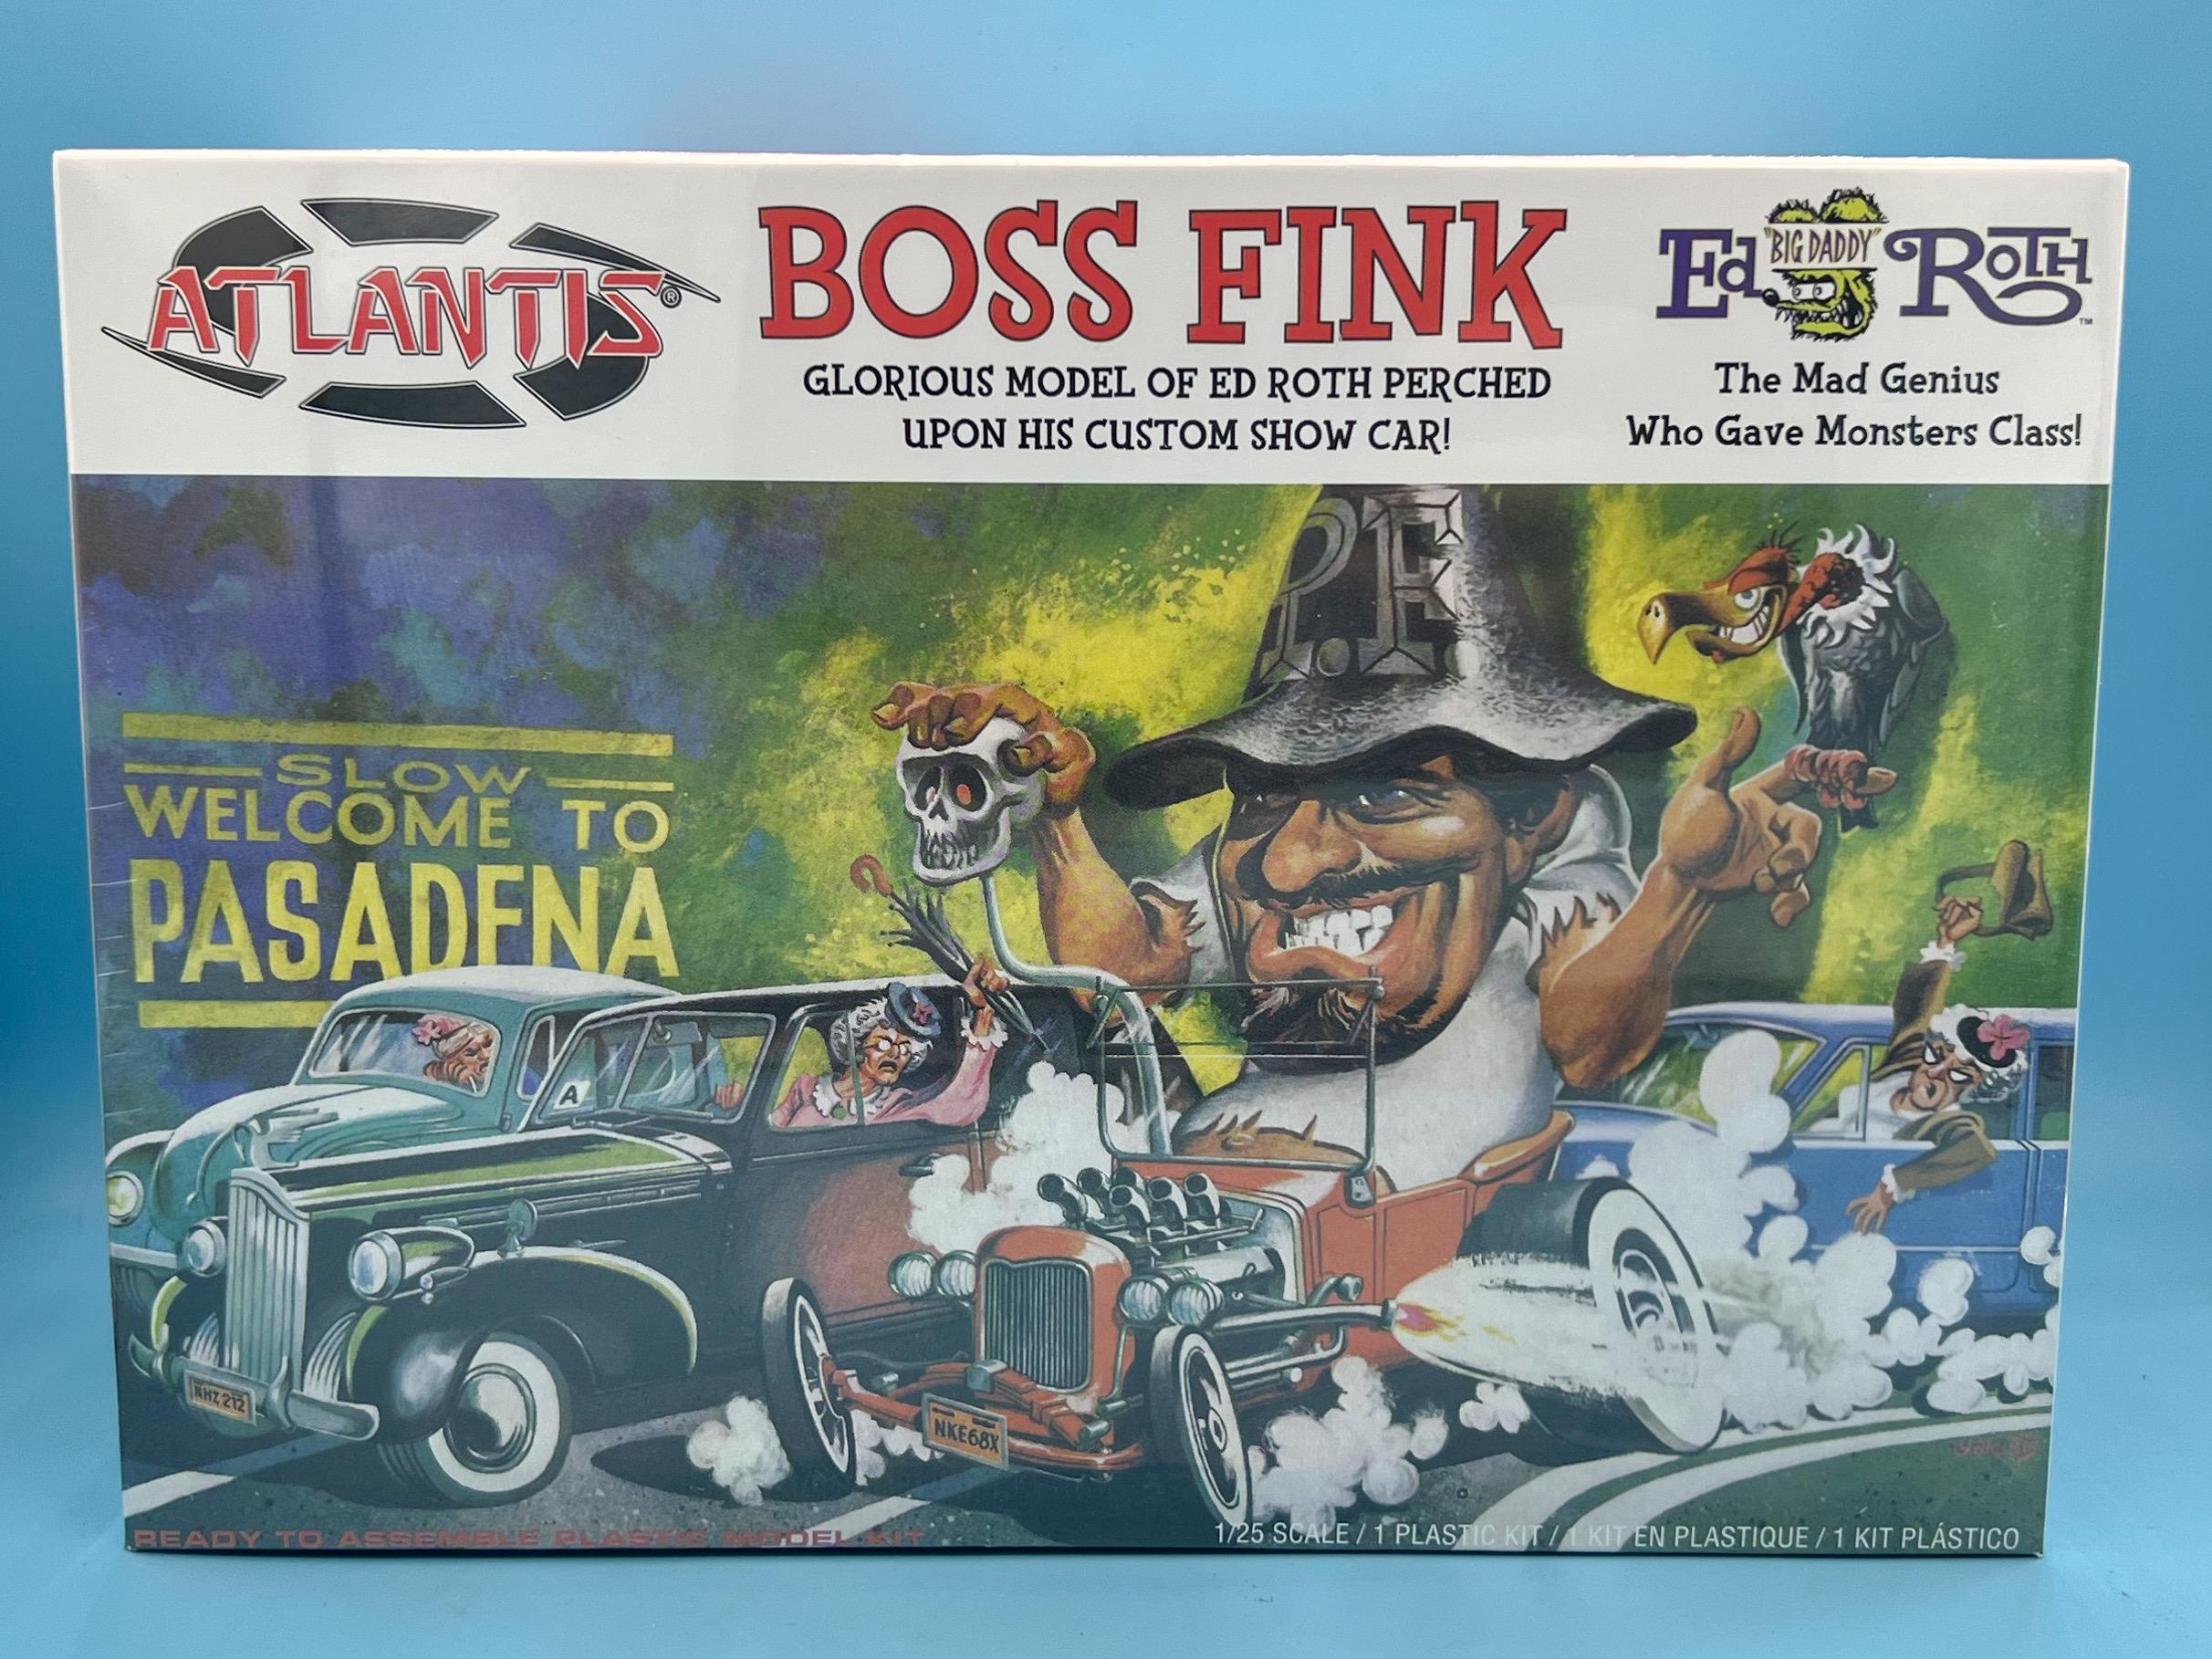
Atlantis had a 20% off sale last weekend, so I took the opportunity to grab some kits I was missing from my collection… And this one only barely fit in the photo booth… I’ve got all their 1:24 / 1:25 kits that they’ve issued to date now…just need to actually build them ?. NOTE: I got the Boss Fink kit because as best I can tell it’s basically the Roth Tweedy Pie minus the wheels and tires but with a big Ed Roth, and I want to build a ‘conventional’ Tweedy Pie replica…
- 38,867 replies
-
- 4
-
-
- johan
- glue bombs
- (and 1 more)
-
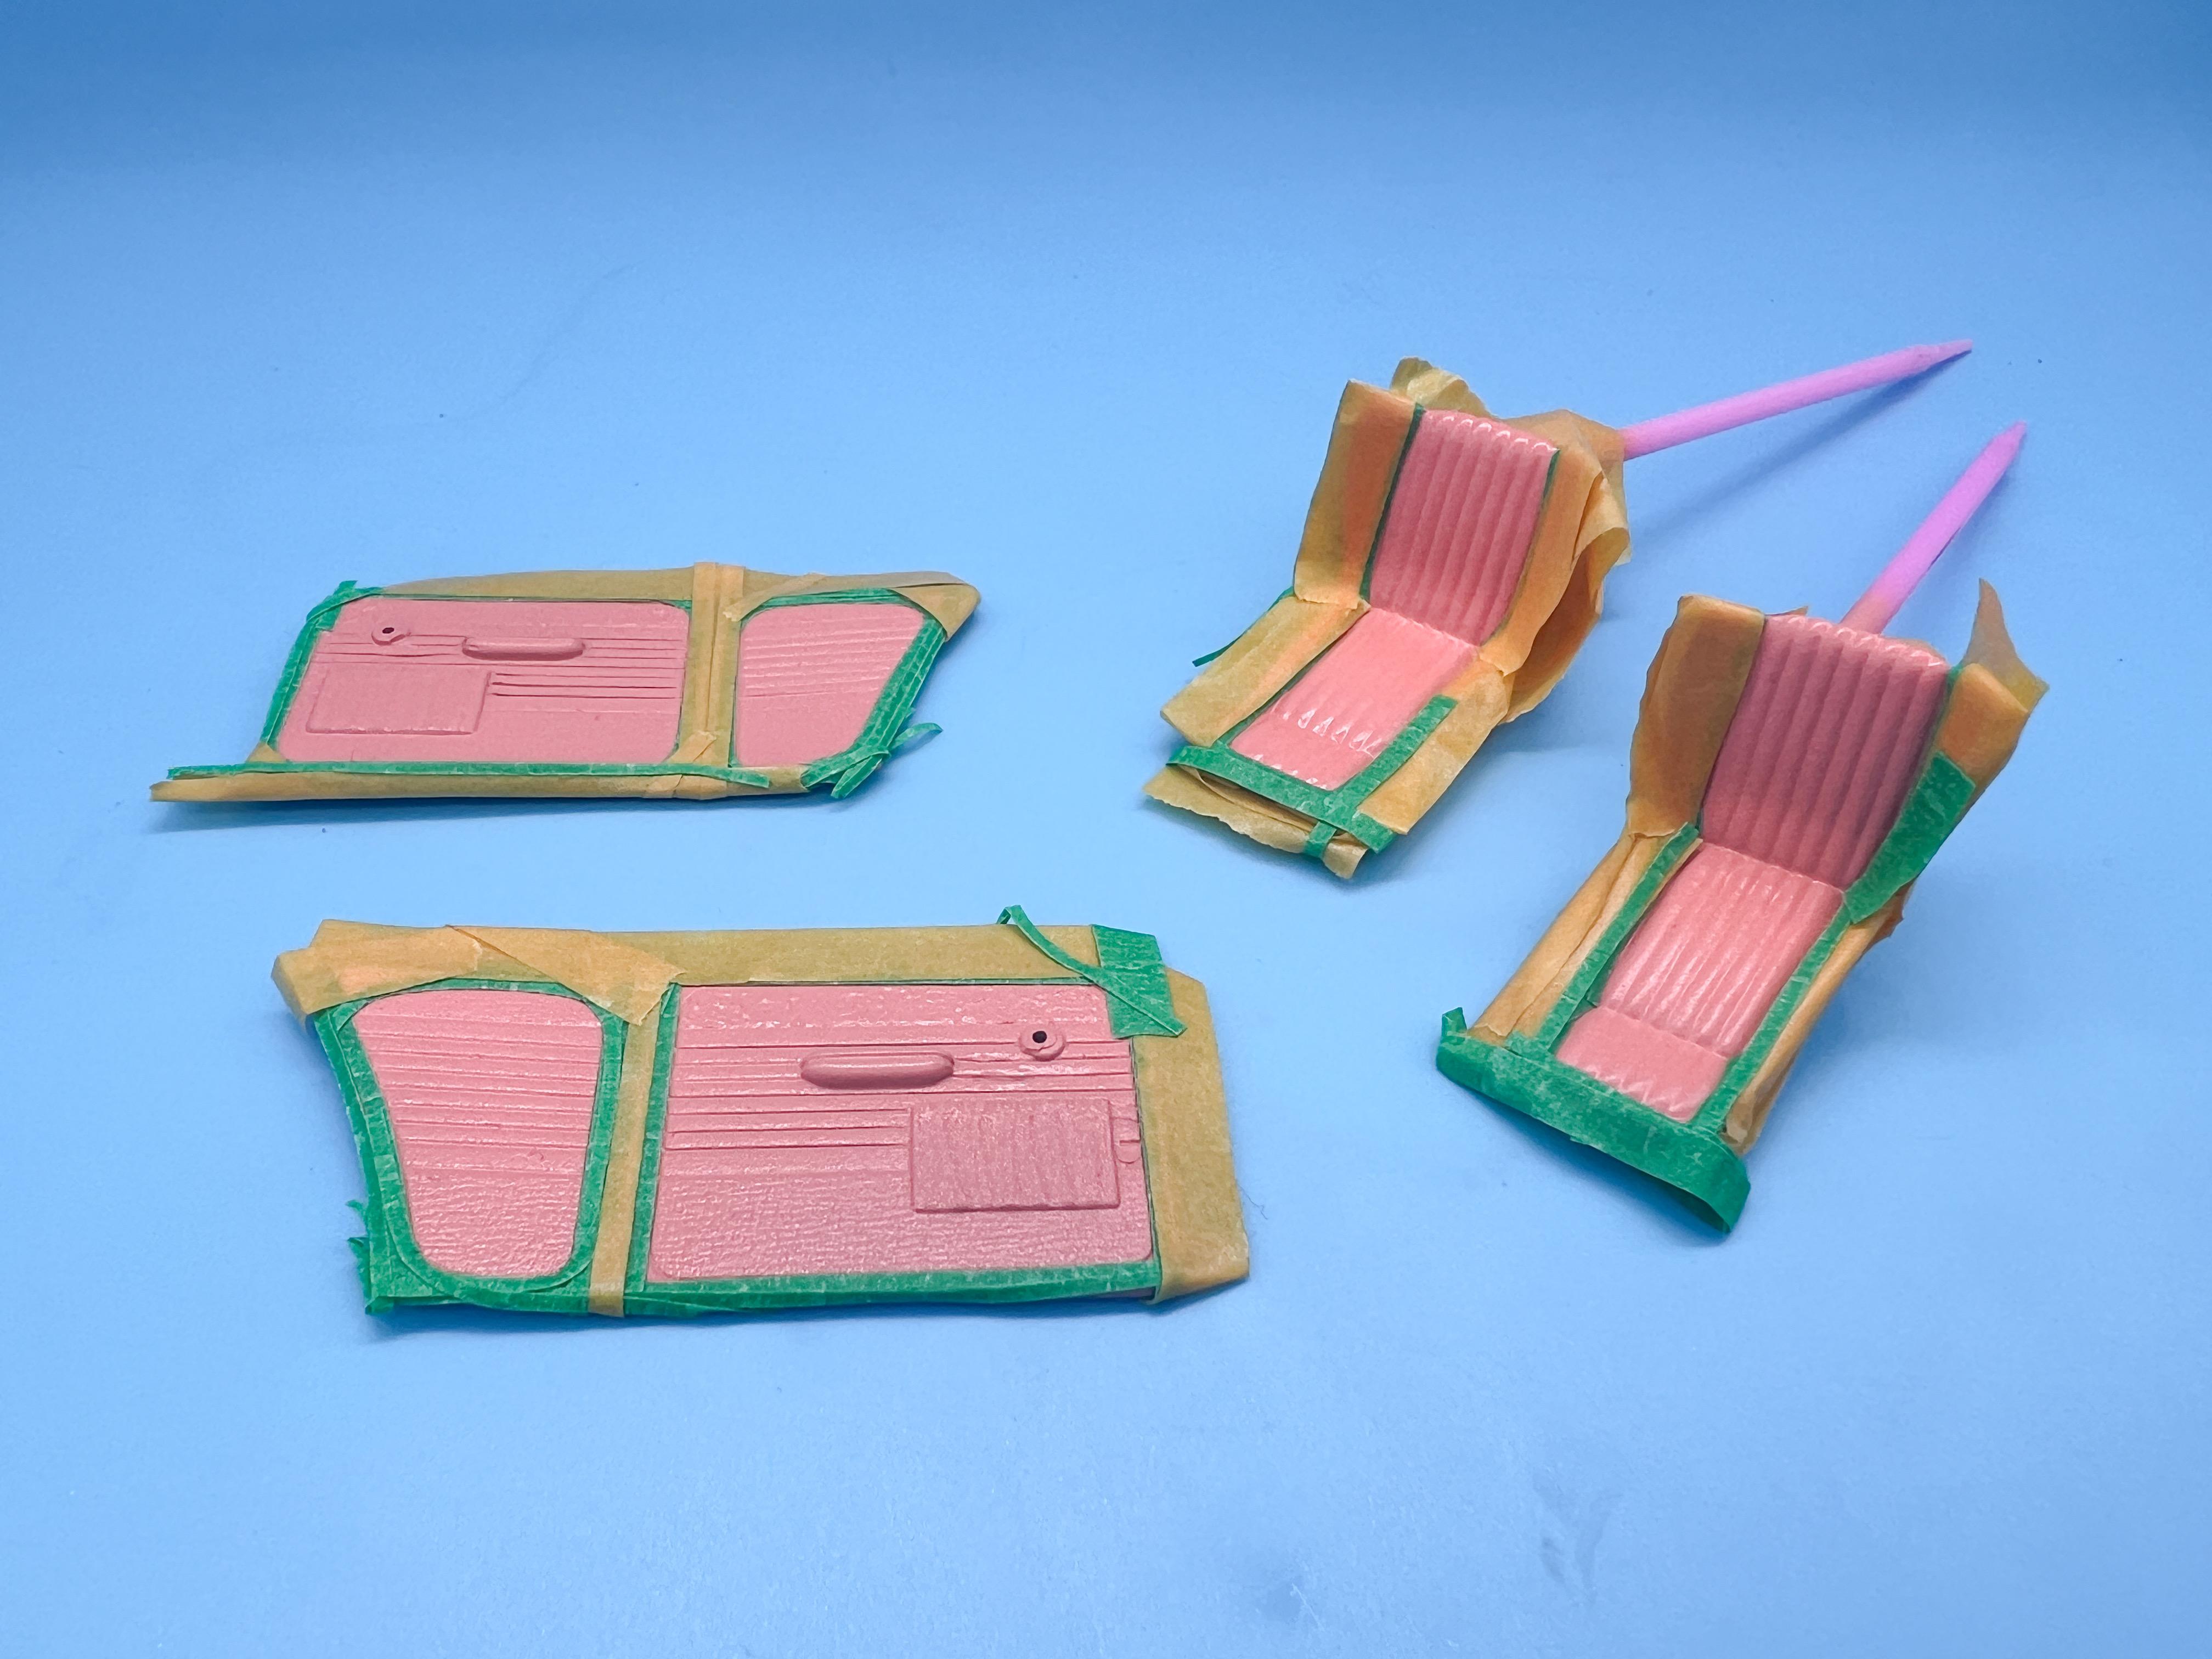
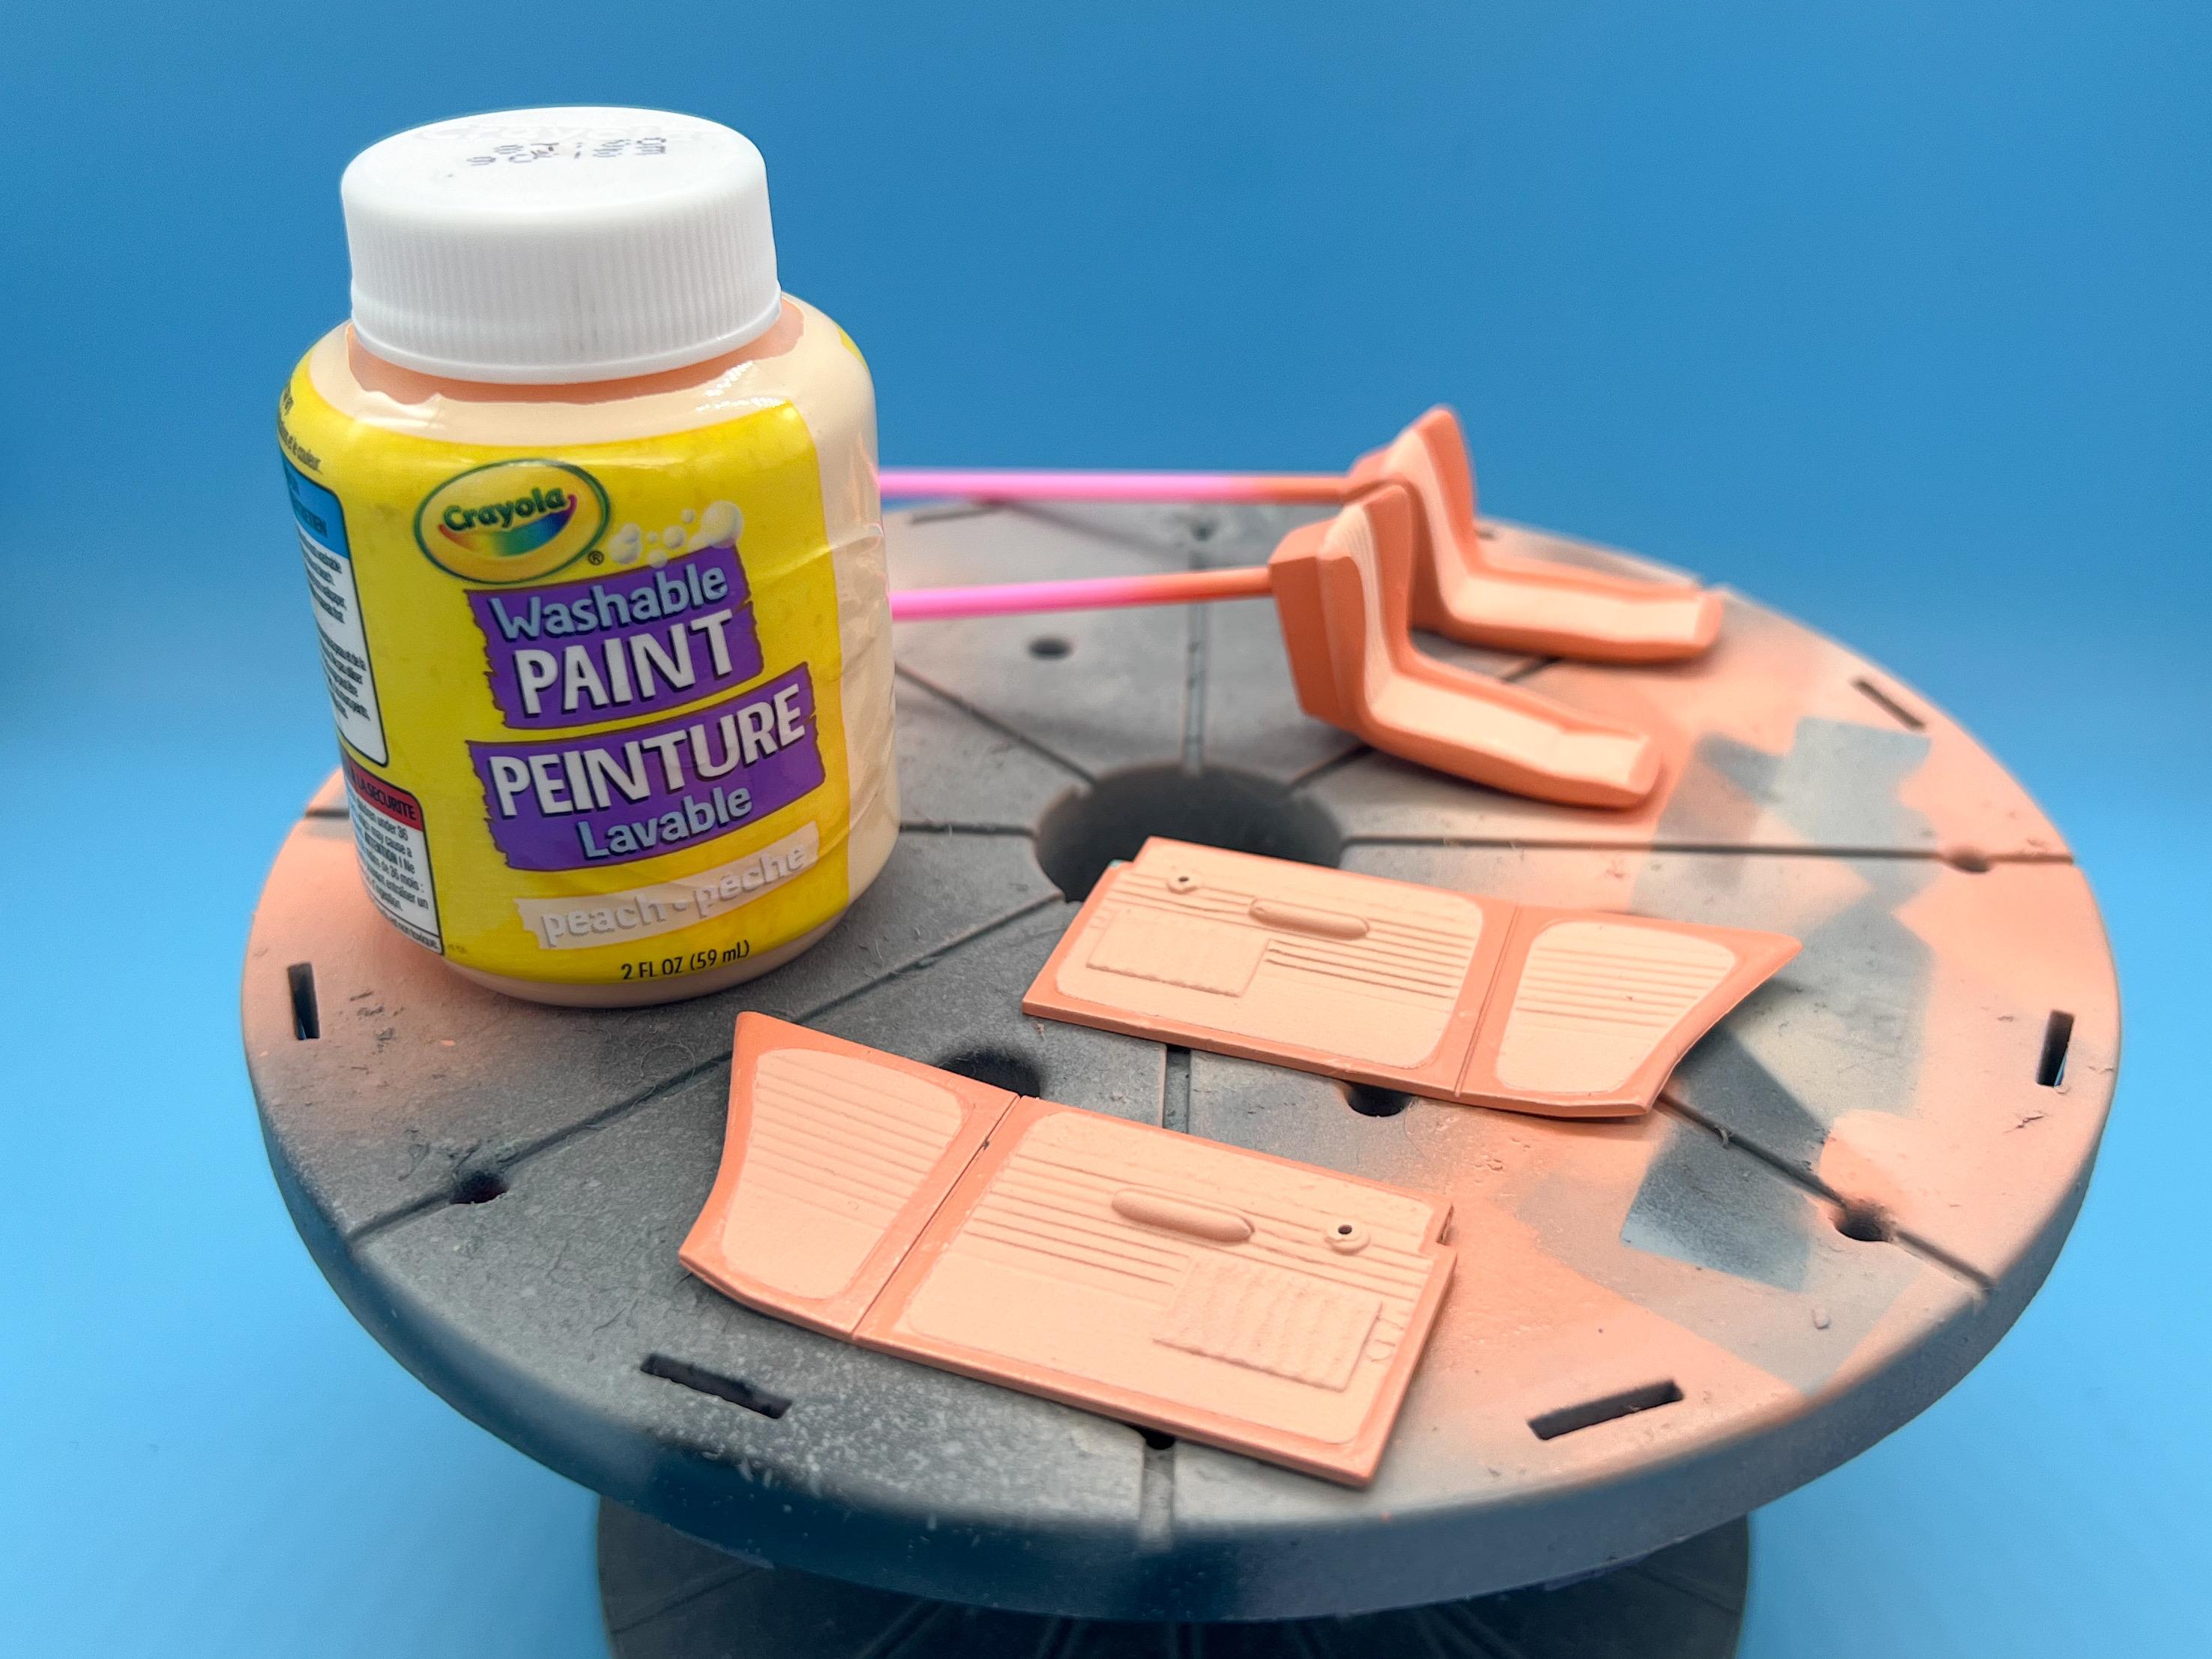
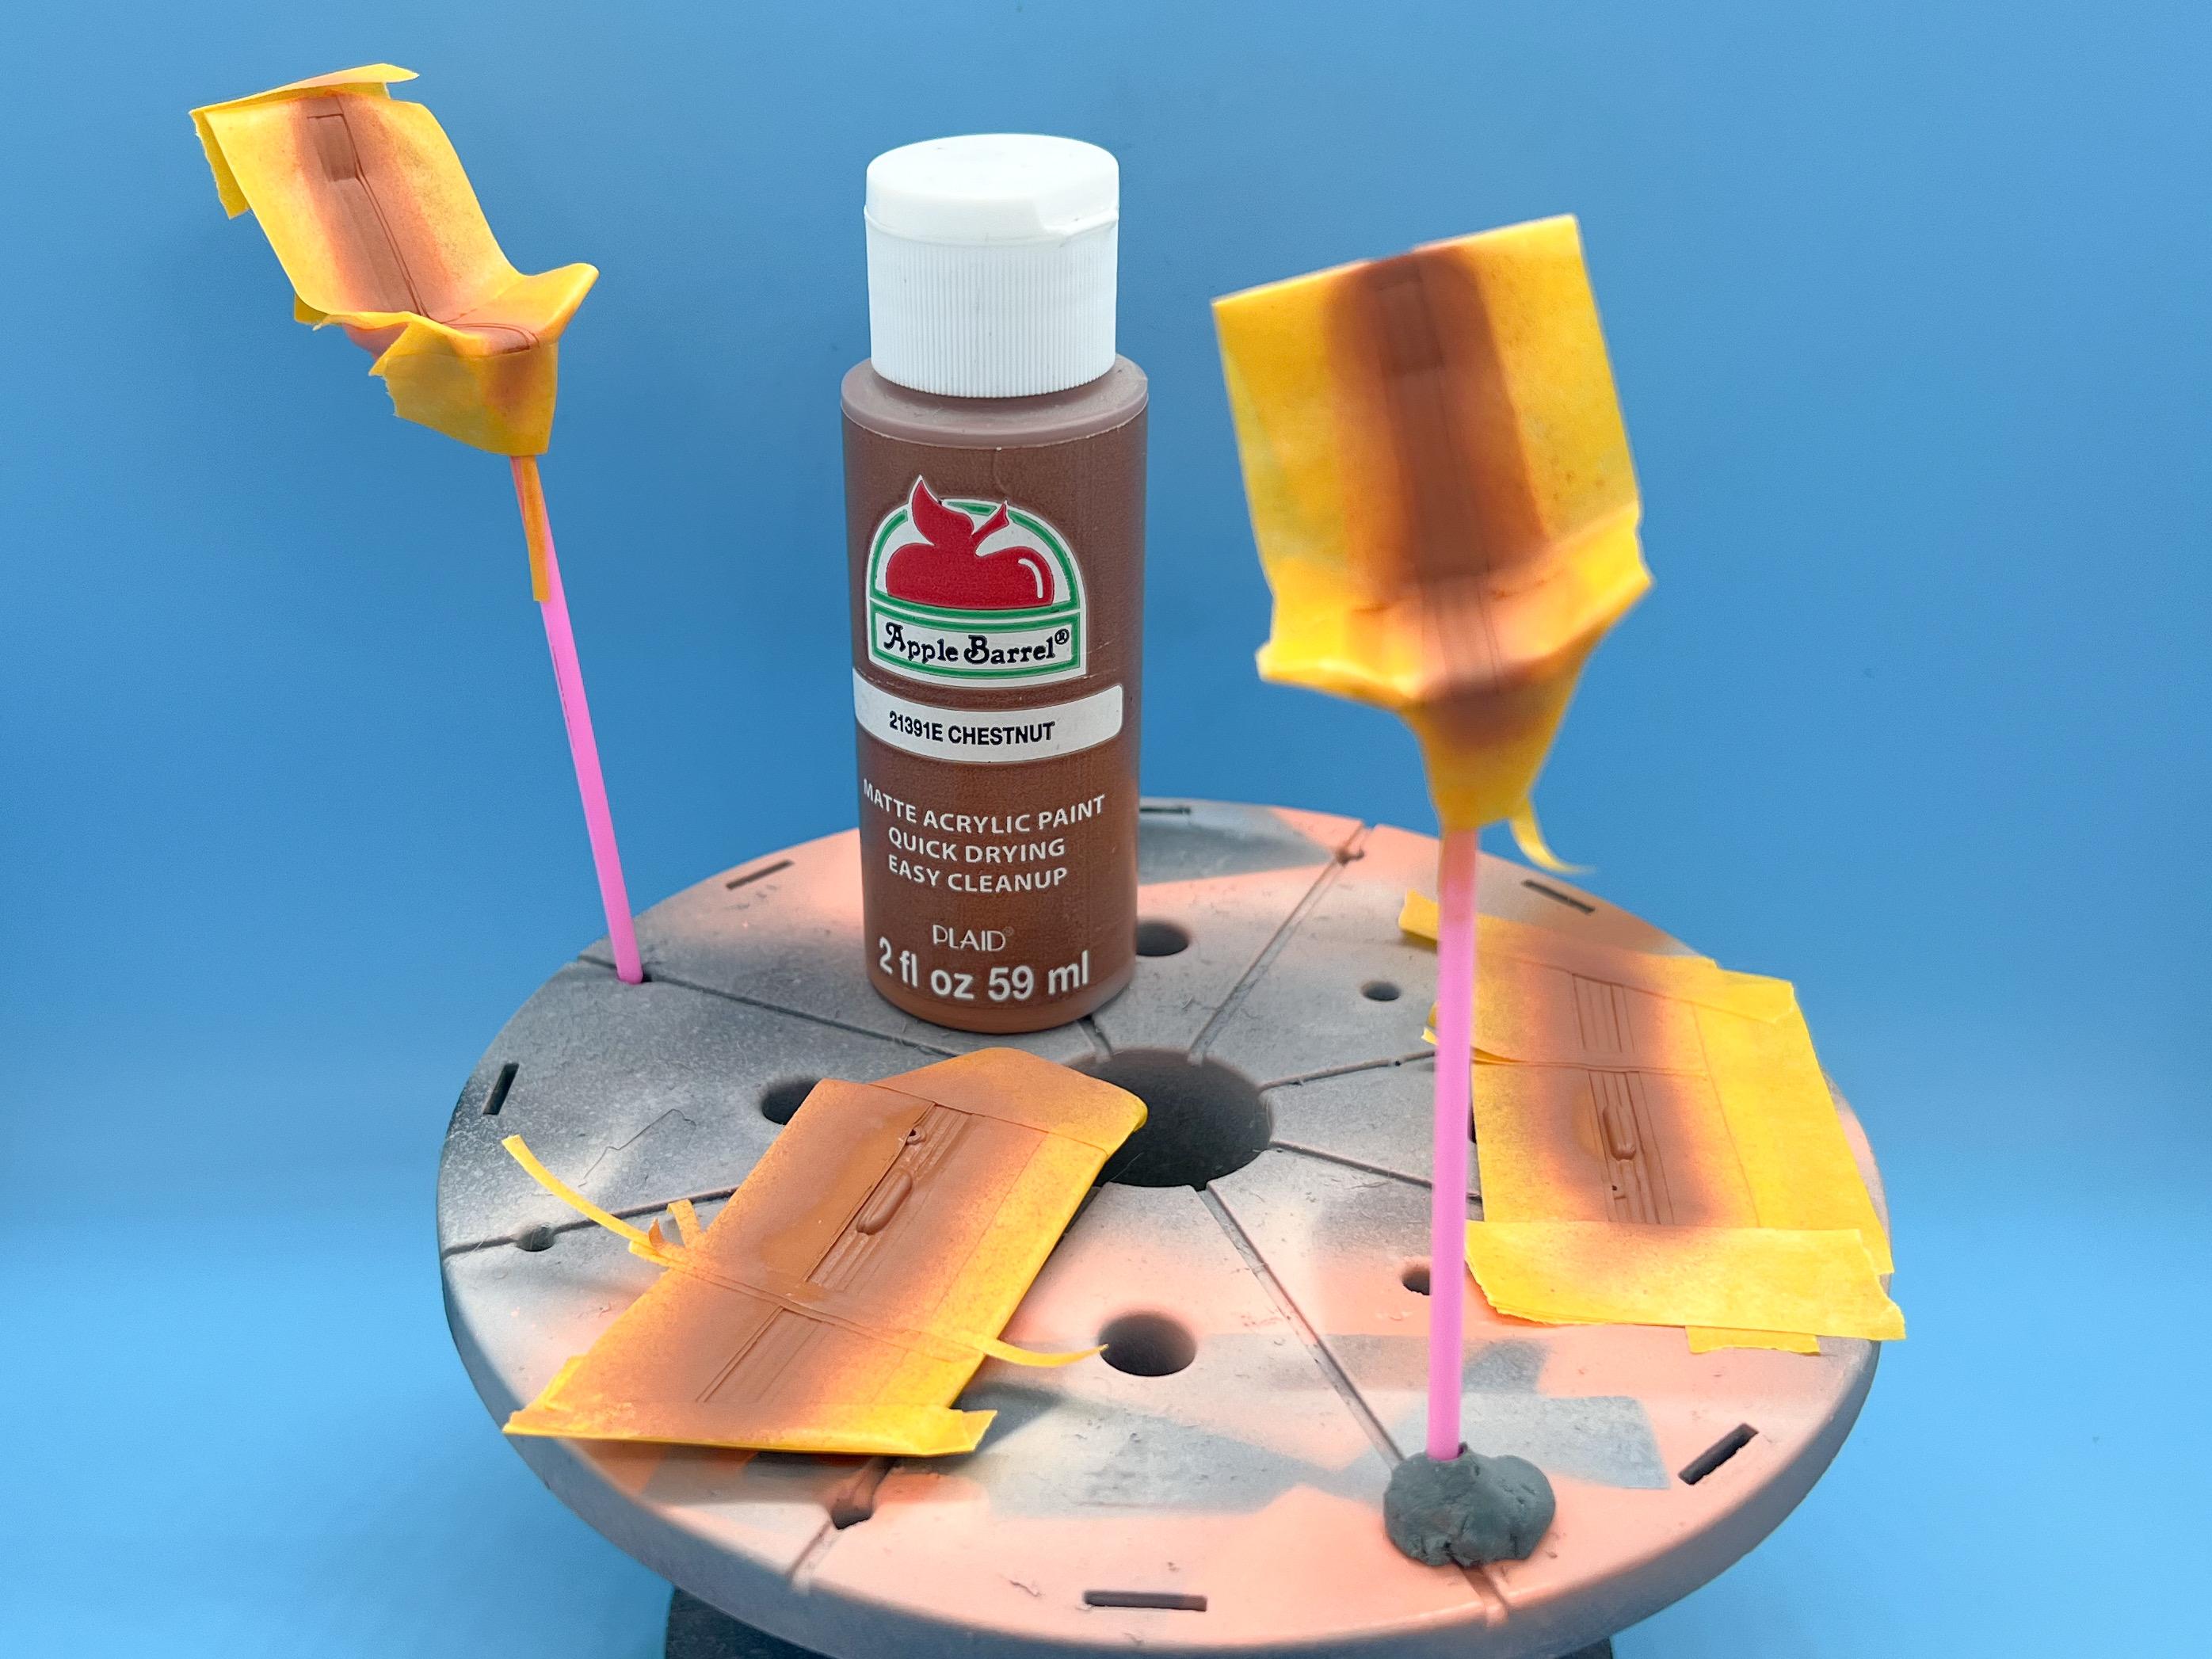
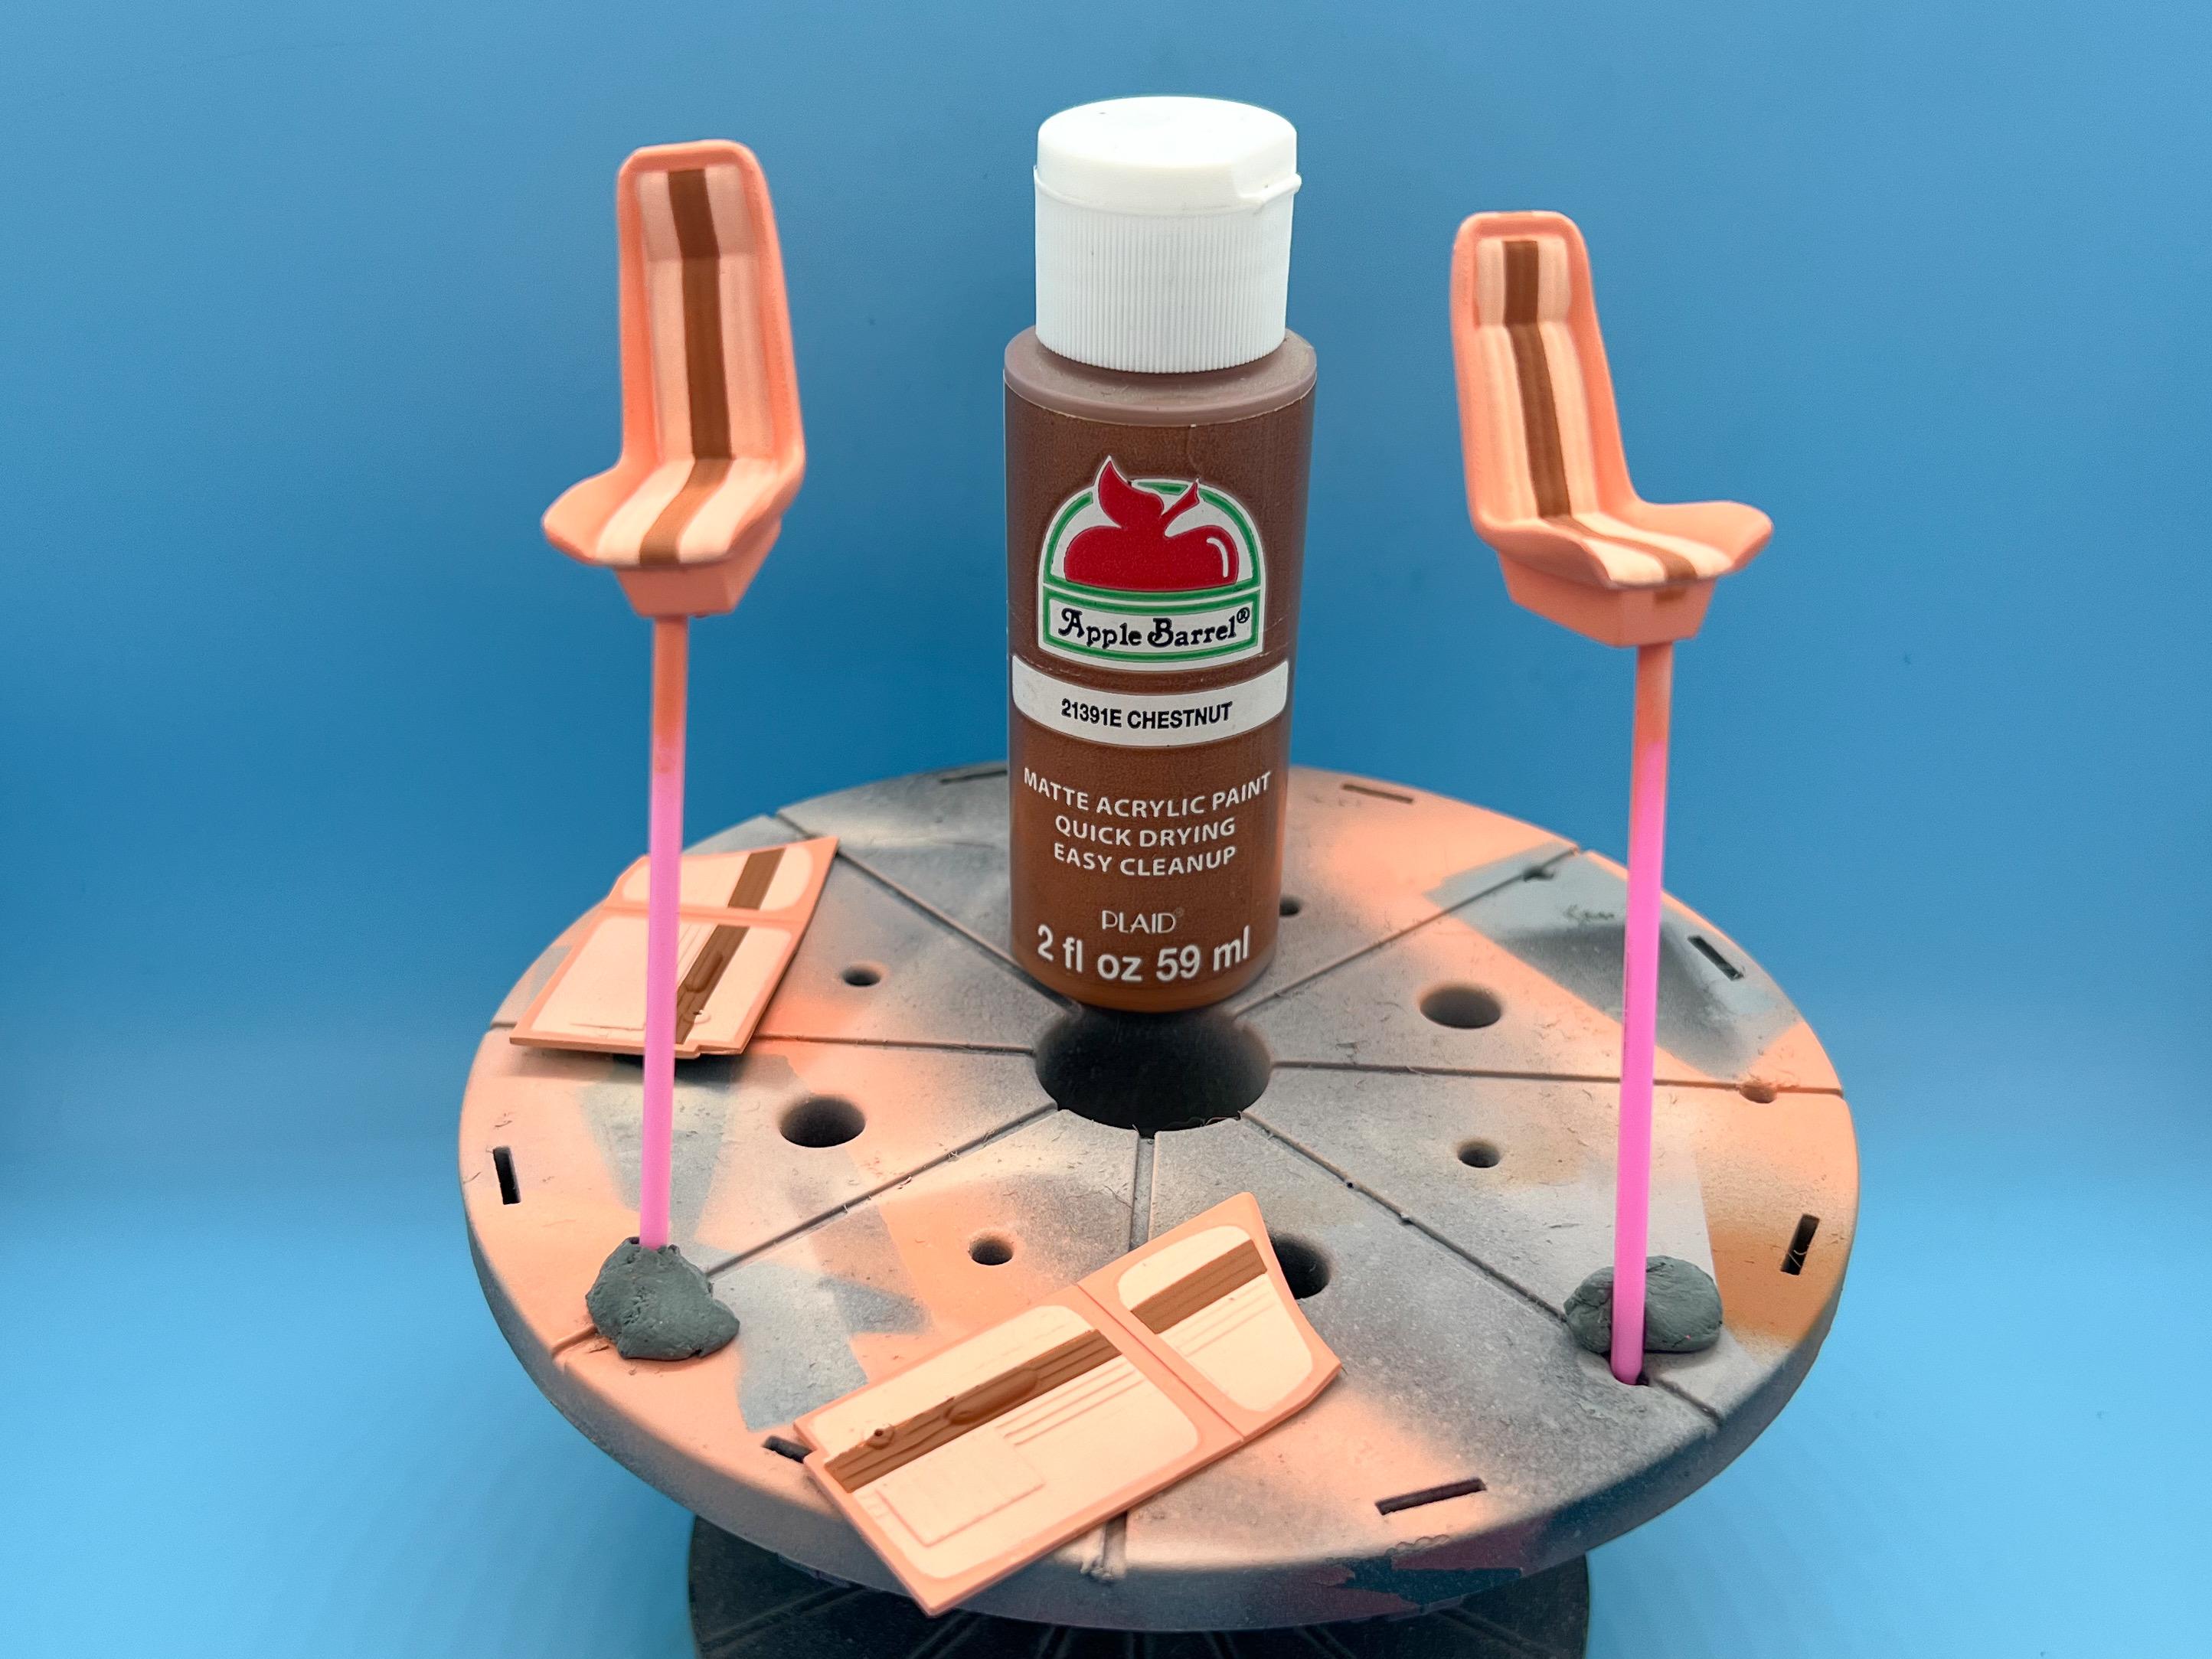
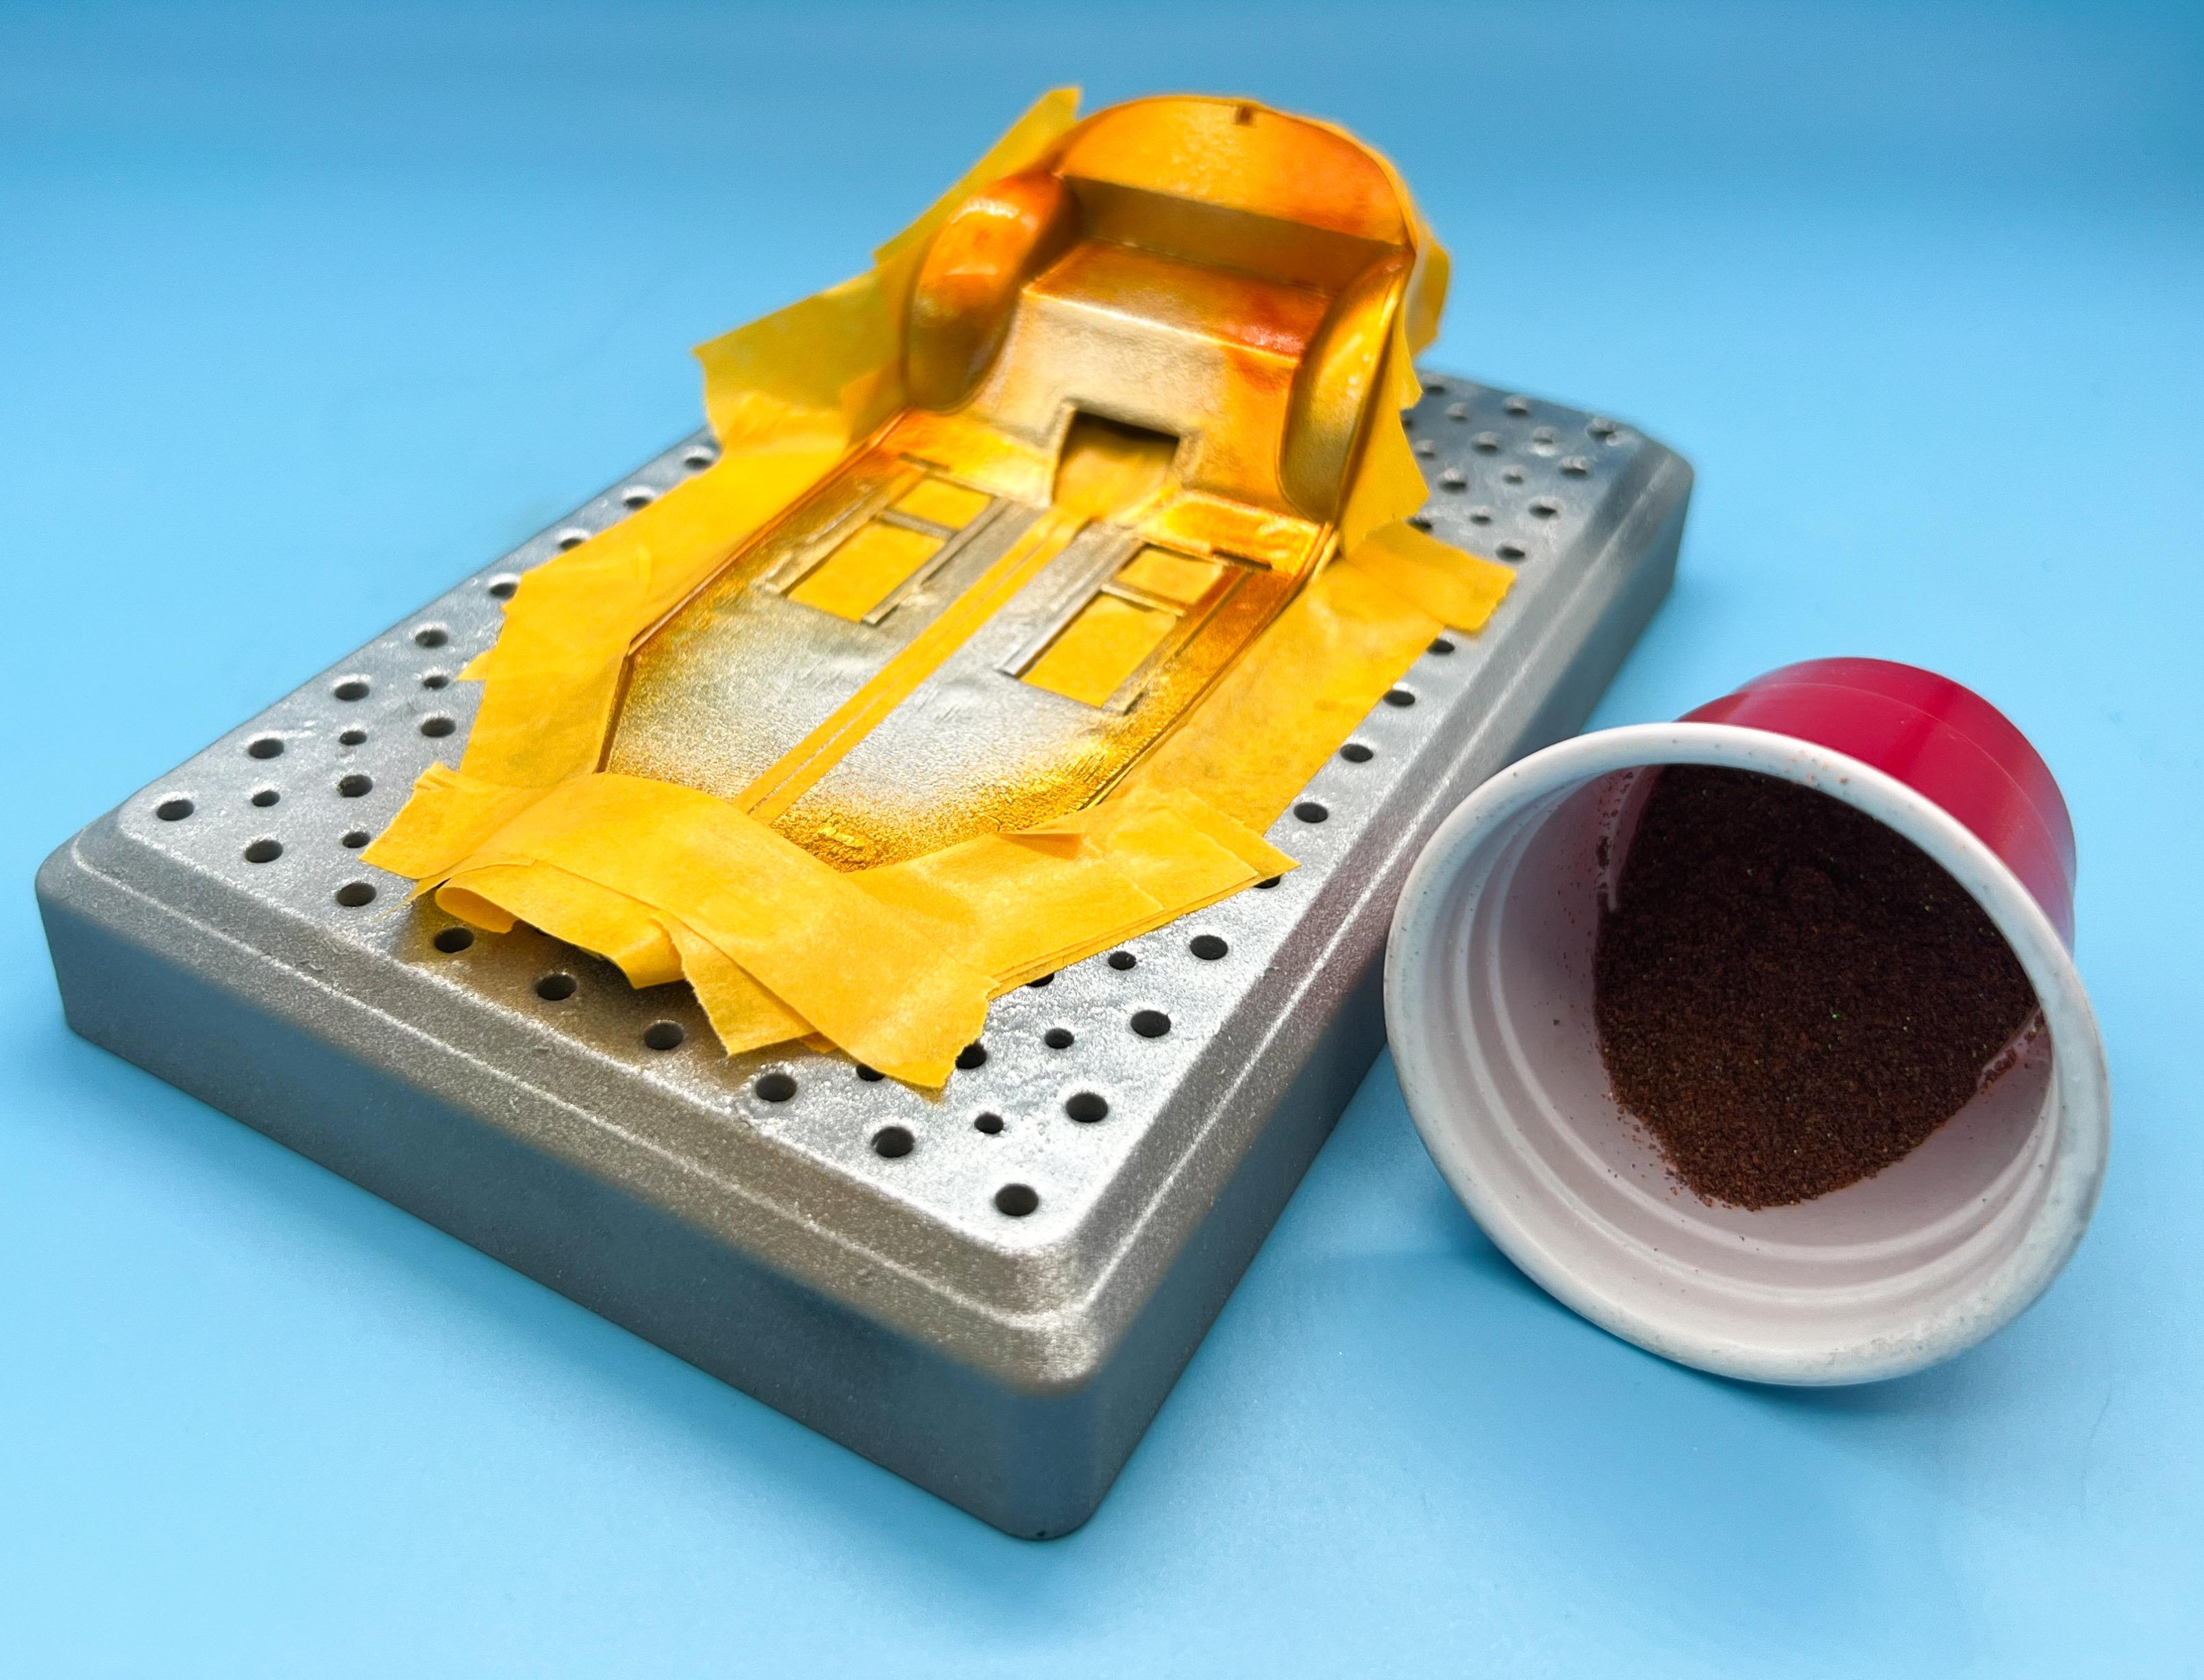
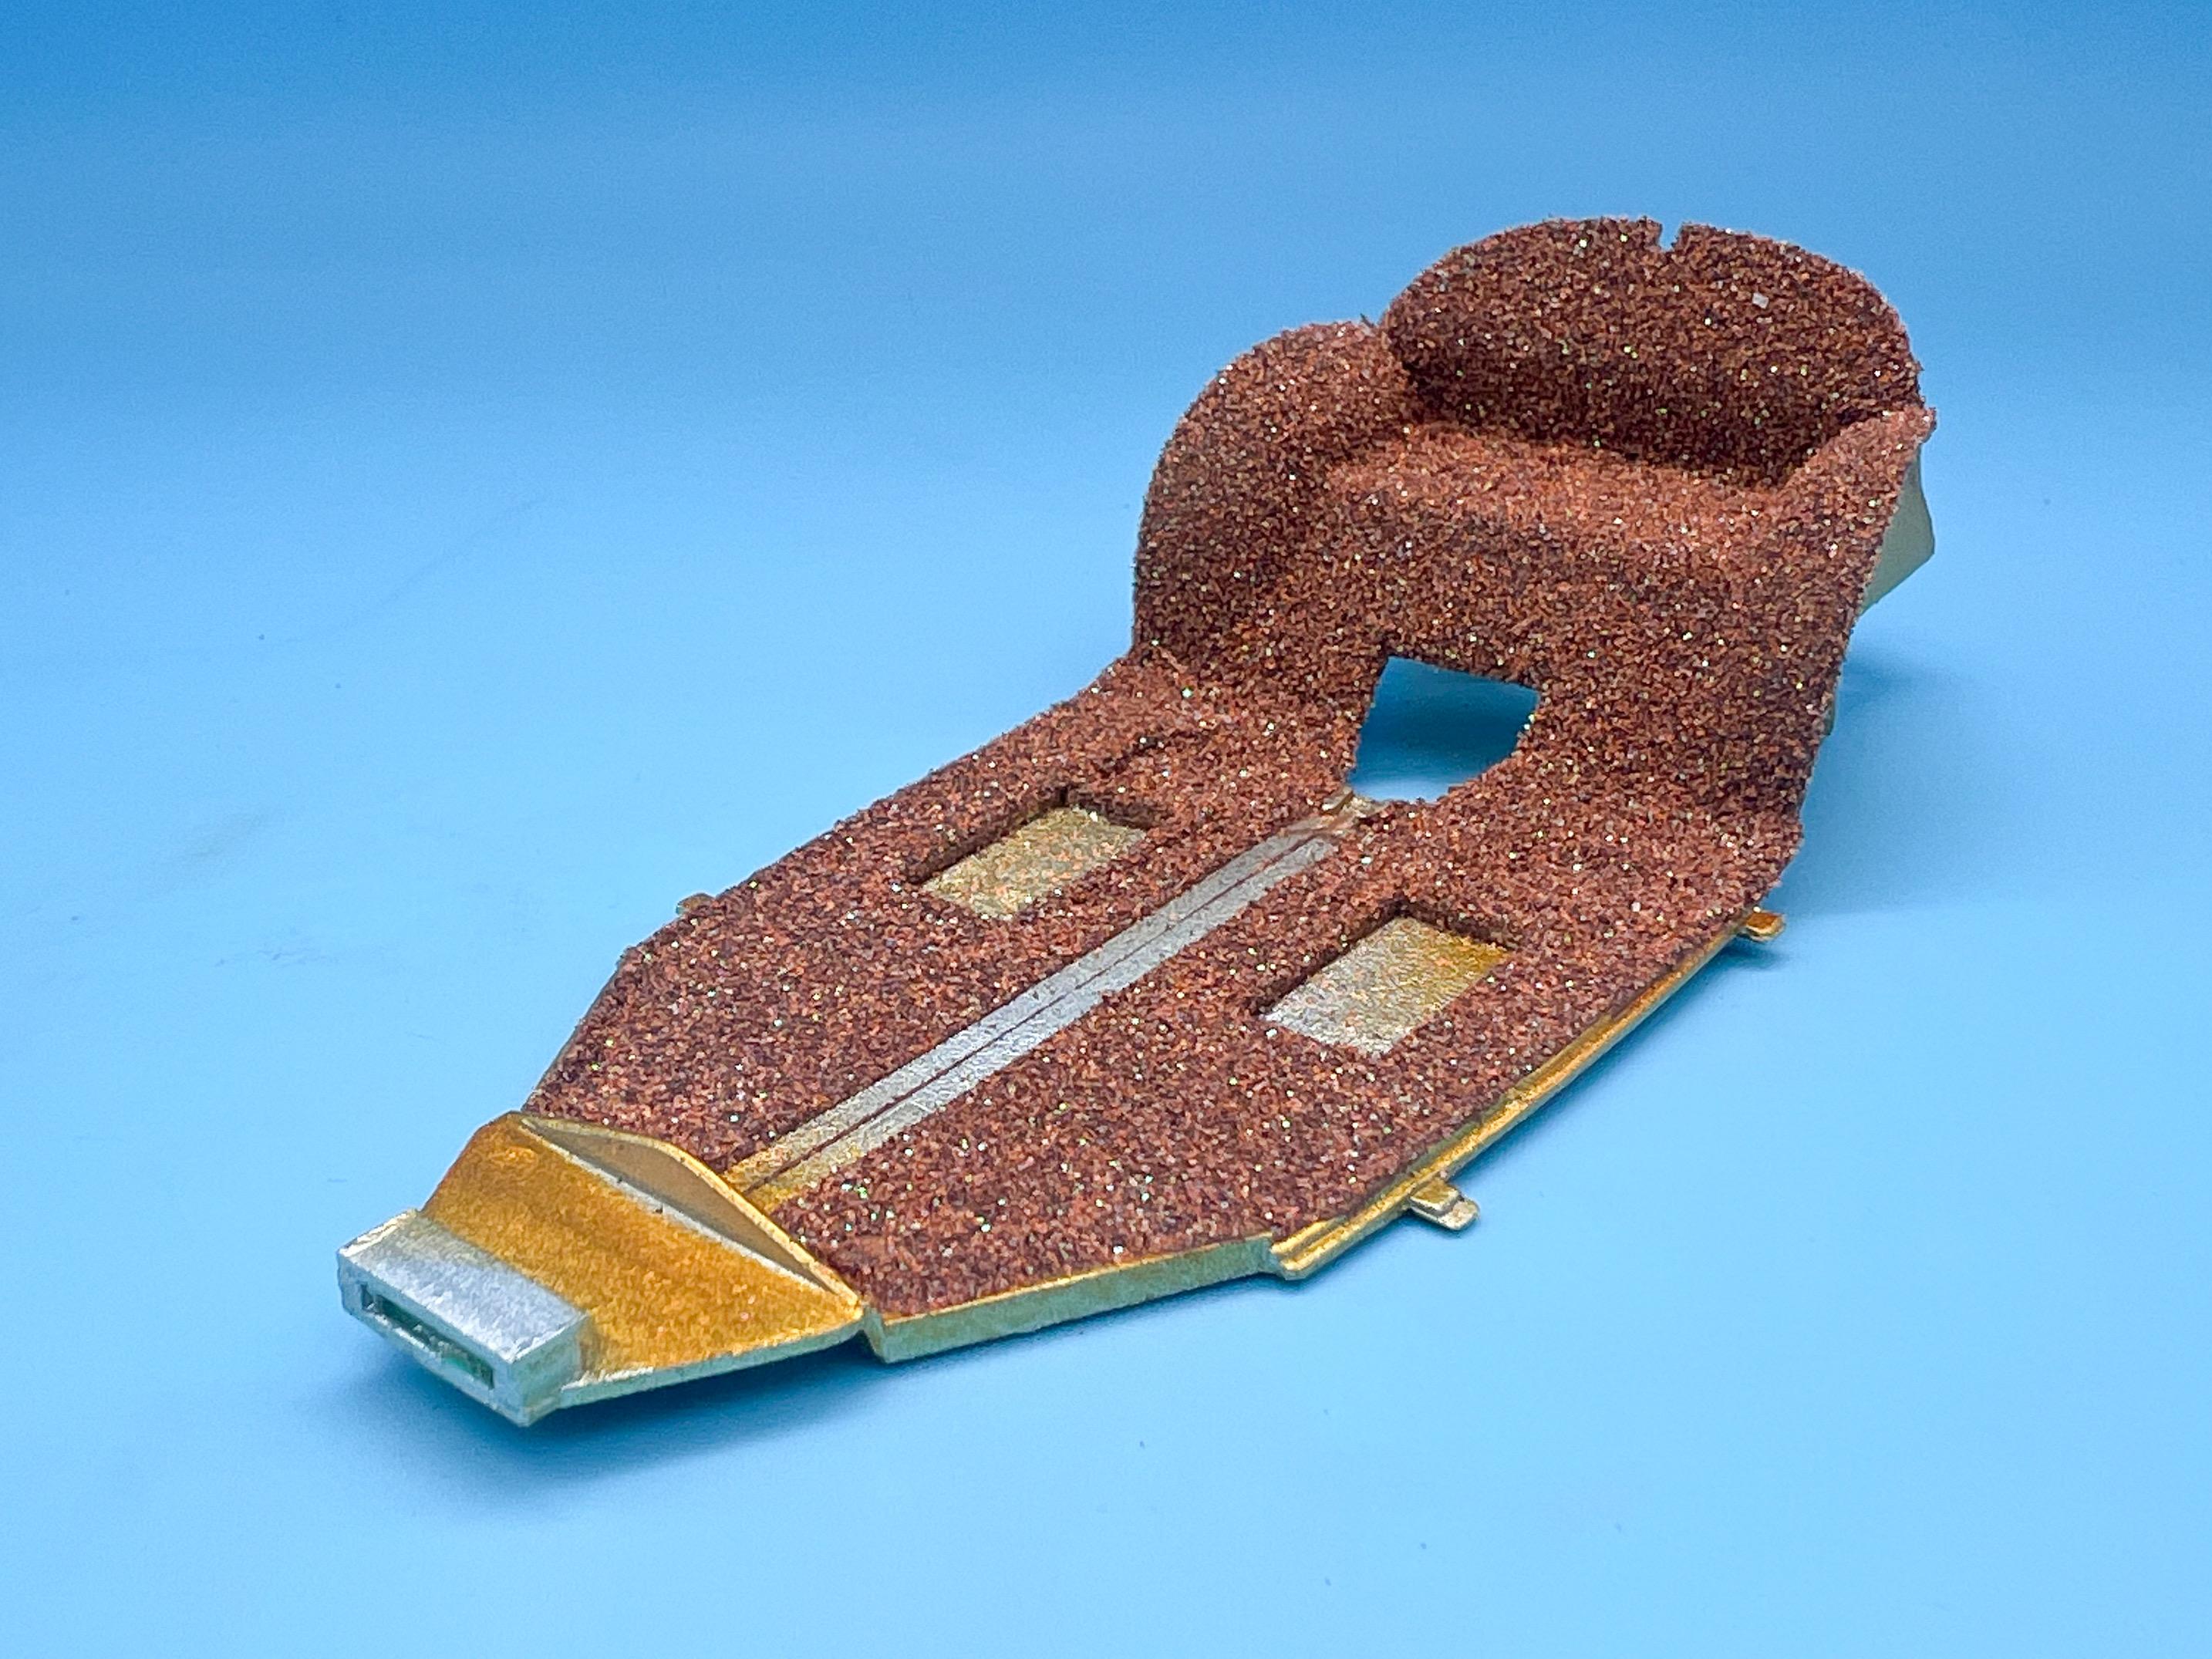
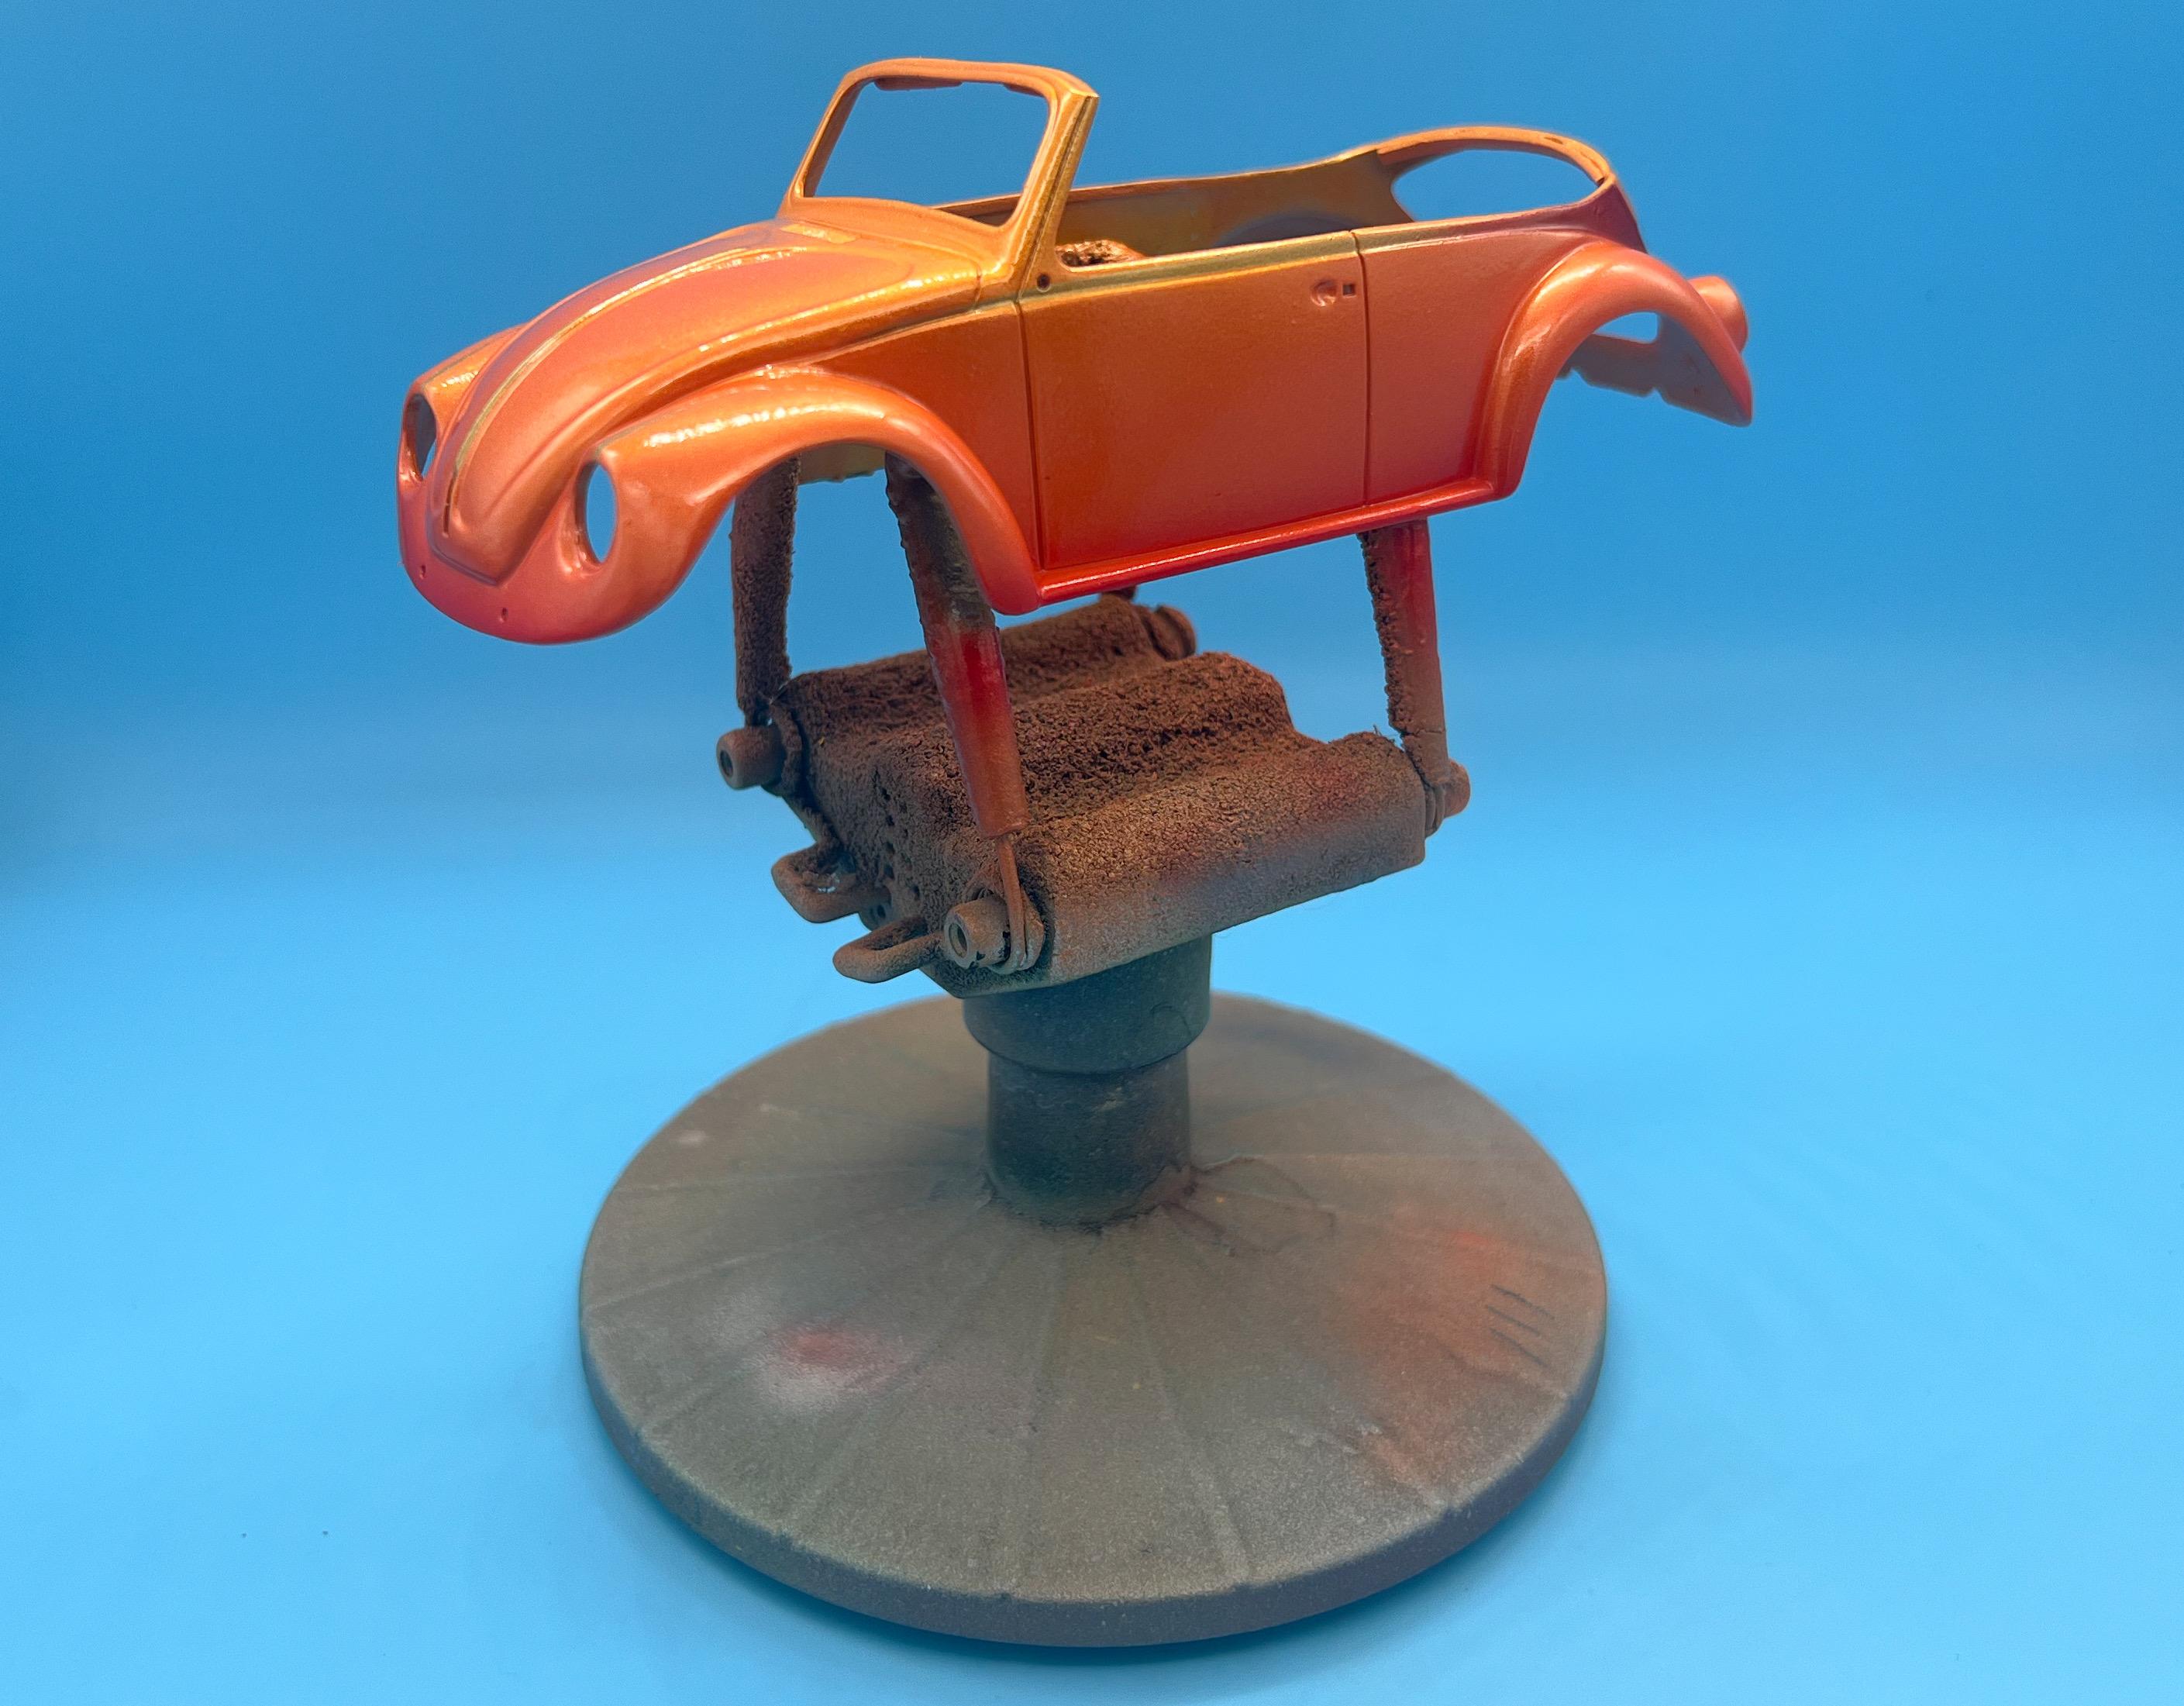
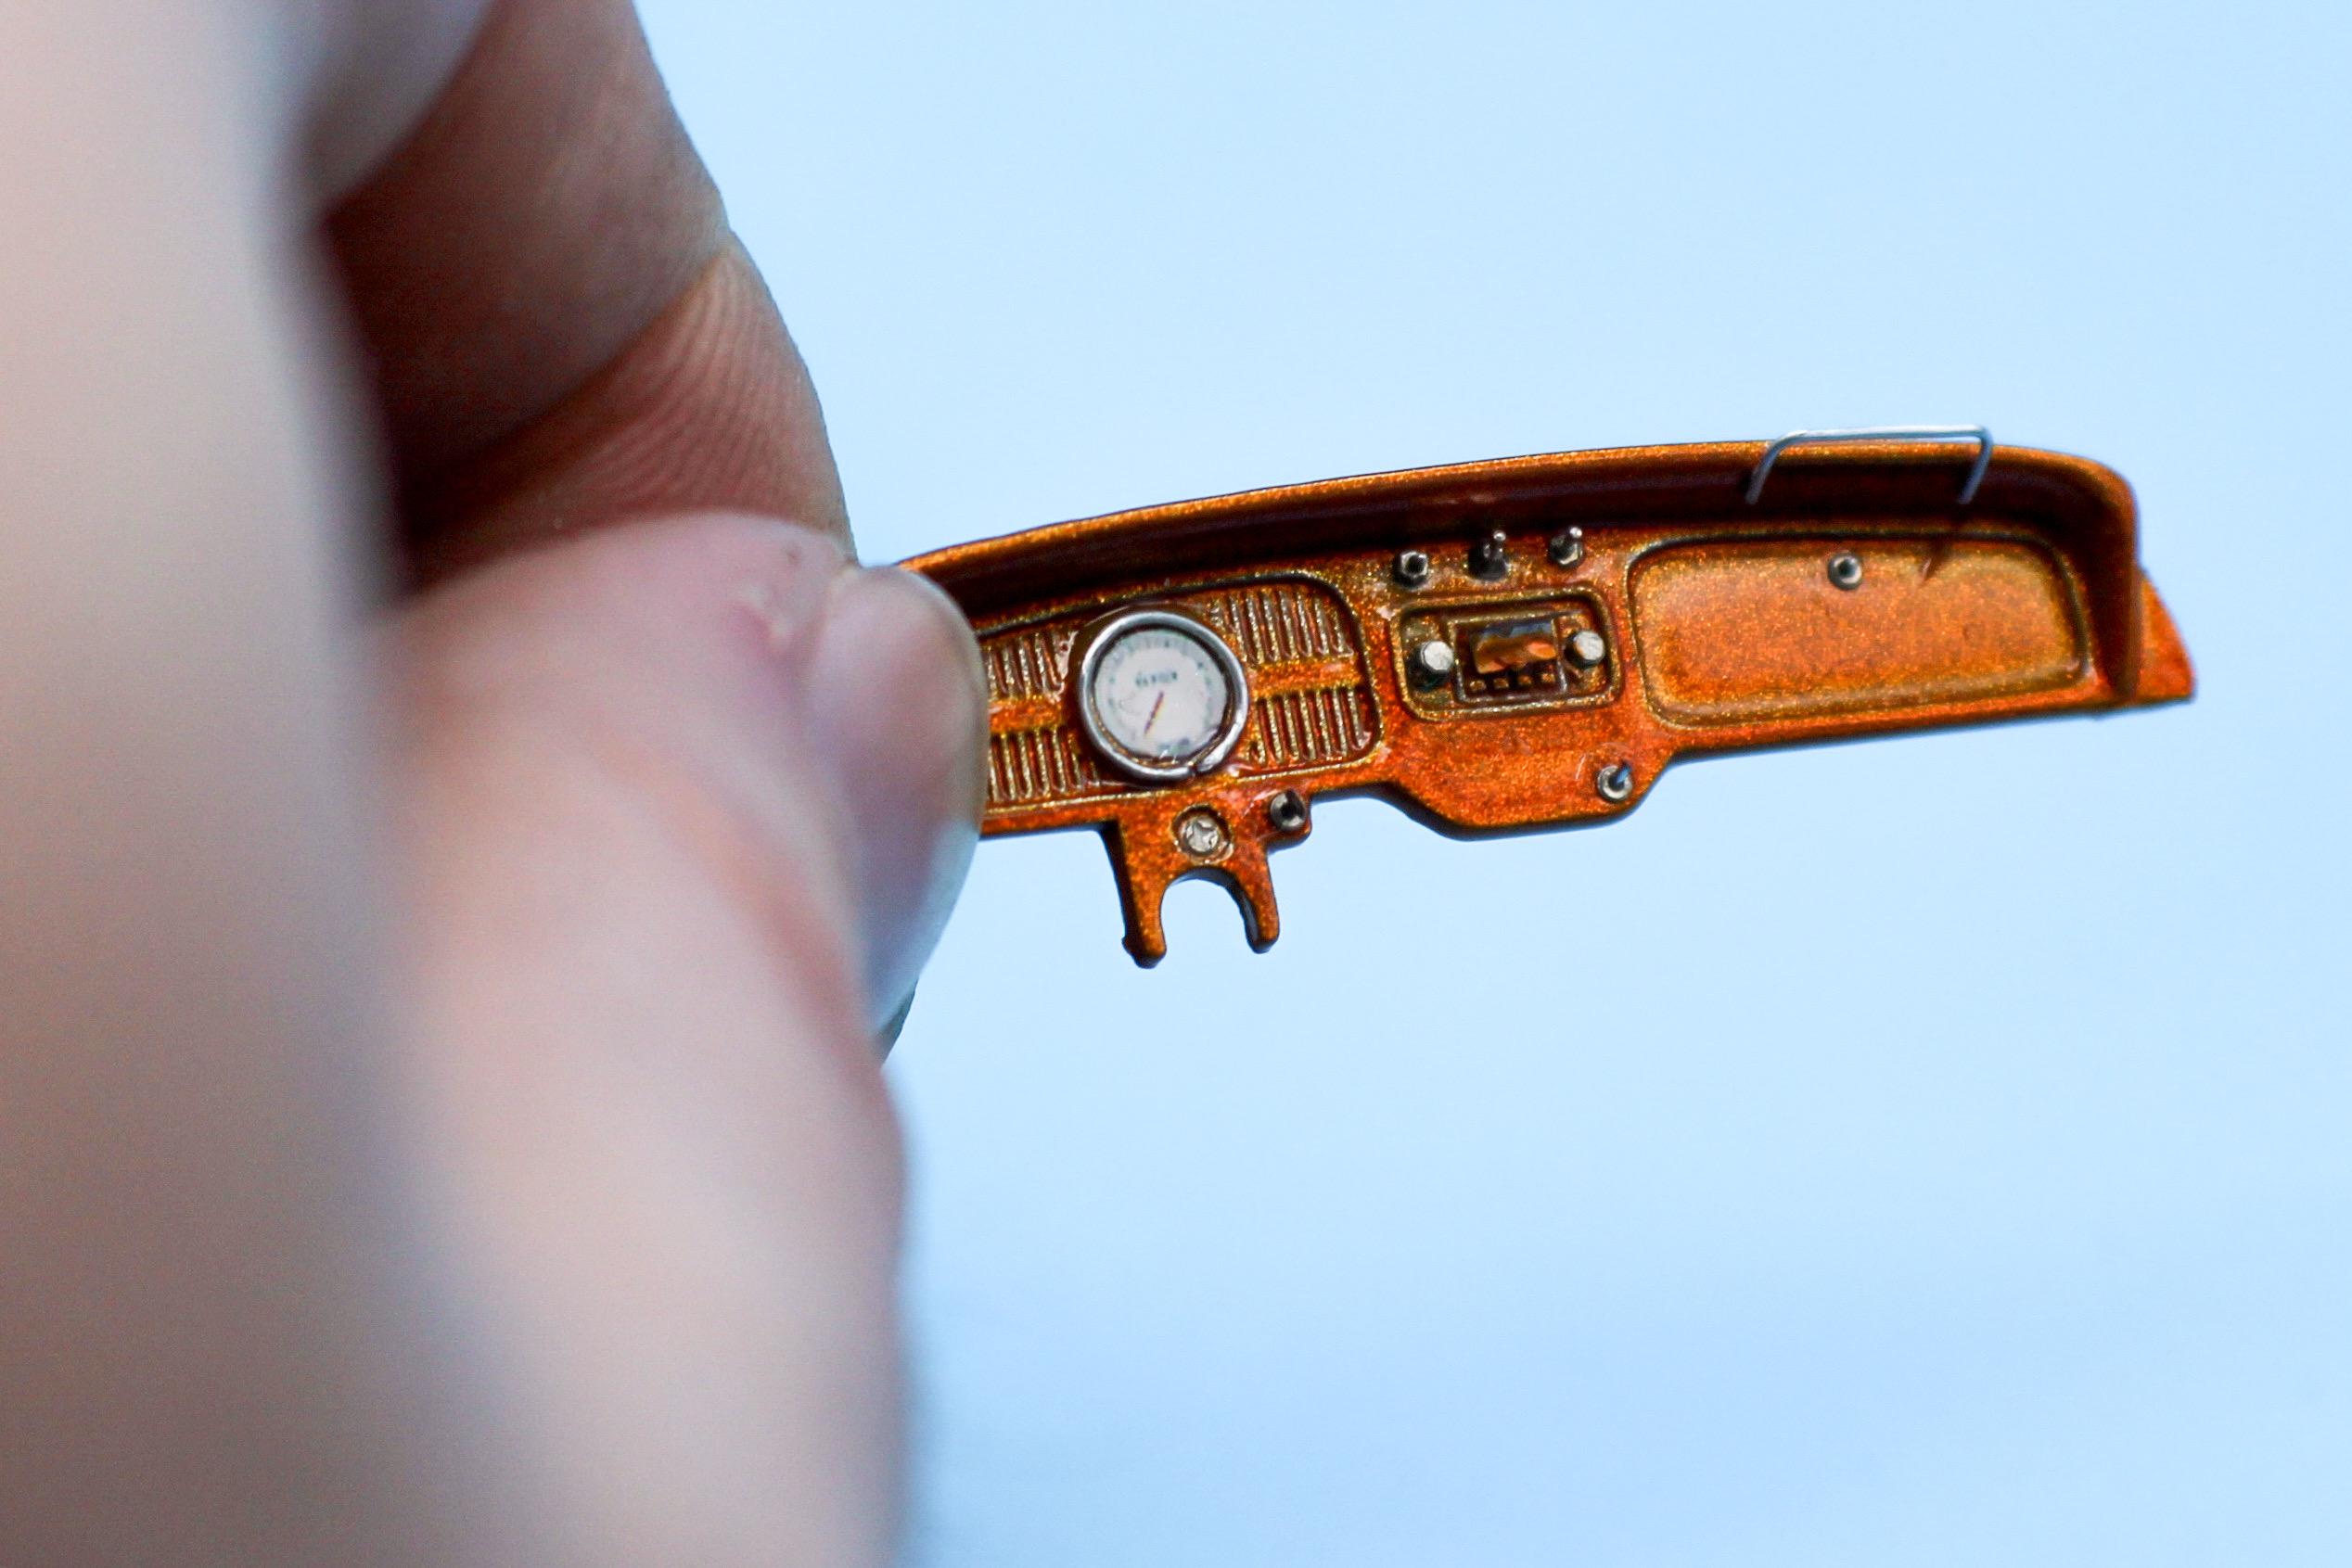
Thanks fellas! Thanks Bob! I didn’t actually paint it yet - need to make sure it fits the body ok… It’s paint week here - working thru tonnes of little parts and prepping them for base colors…did some slightly more fun stuff too tho… Painted the interior panels…they started off peach: Masked them for the second color of the three I had in mind…couldn’t find the exact color I wanted in ‘regular’ paints, but this Crayola paint worked well ? Then, shot a coat of intercoat and then remasked for the third color: Then de-masked: Carpet color will be brown, so that’ll tie together the orange tones and the brown on the interior (hopefully)…masked the chassis for embossing powder: Applied some custom mixed powder over Testors brown enamel: I’m excited to see the interior all together… Meanwhile, have been clearcoating the body - this is coat five of seven: Painted the license plates, first with white, then clear lacquer, then Createx black - you can remove the Createx with an alcohol wipe, leaving the white copy and border visible: Found a gauge face that would work for the dash - it’s not super high resolution, but it’s better than the ‘no gauge face’ the kit comes with… Then went thru the dash and started adding switches, a ring for the speedo and some photoetch…not quite done with this yet, but the little metal switches really catch the eye and add some nice detail when you see it in real life: Still PLENTY to do, and the way this kit assembles doesn’t really encourage building sub-assemblies so it’s touch to get any ‘big stuff’ together, but hopefully that means it’ll come together quickly at the end…thanks for looking - more soon, soon as I’ve done more!
-
I was in Hobby Lobby, trying not to buy any kits but I never built this kit and I always wanted to, so… Plus some copper and aluminum rod, to feed my lathe
- 38,867 replies
-
- 3
-
-
- johan
- glue bombs
- (and 1 more)
-
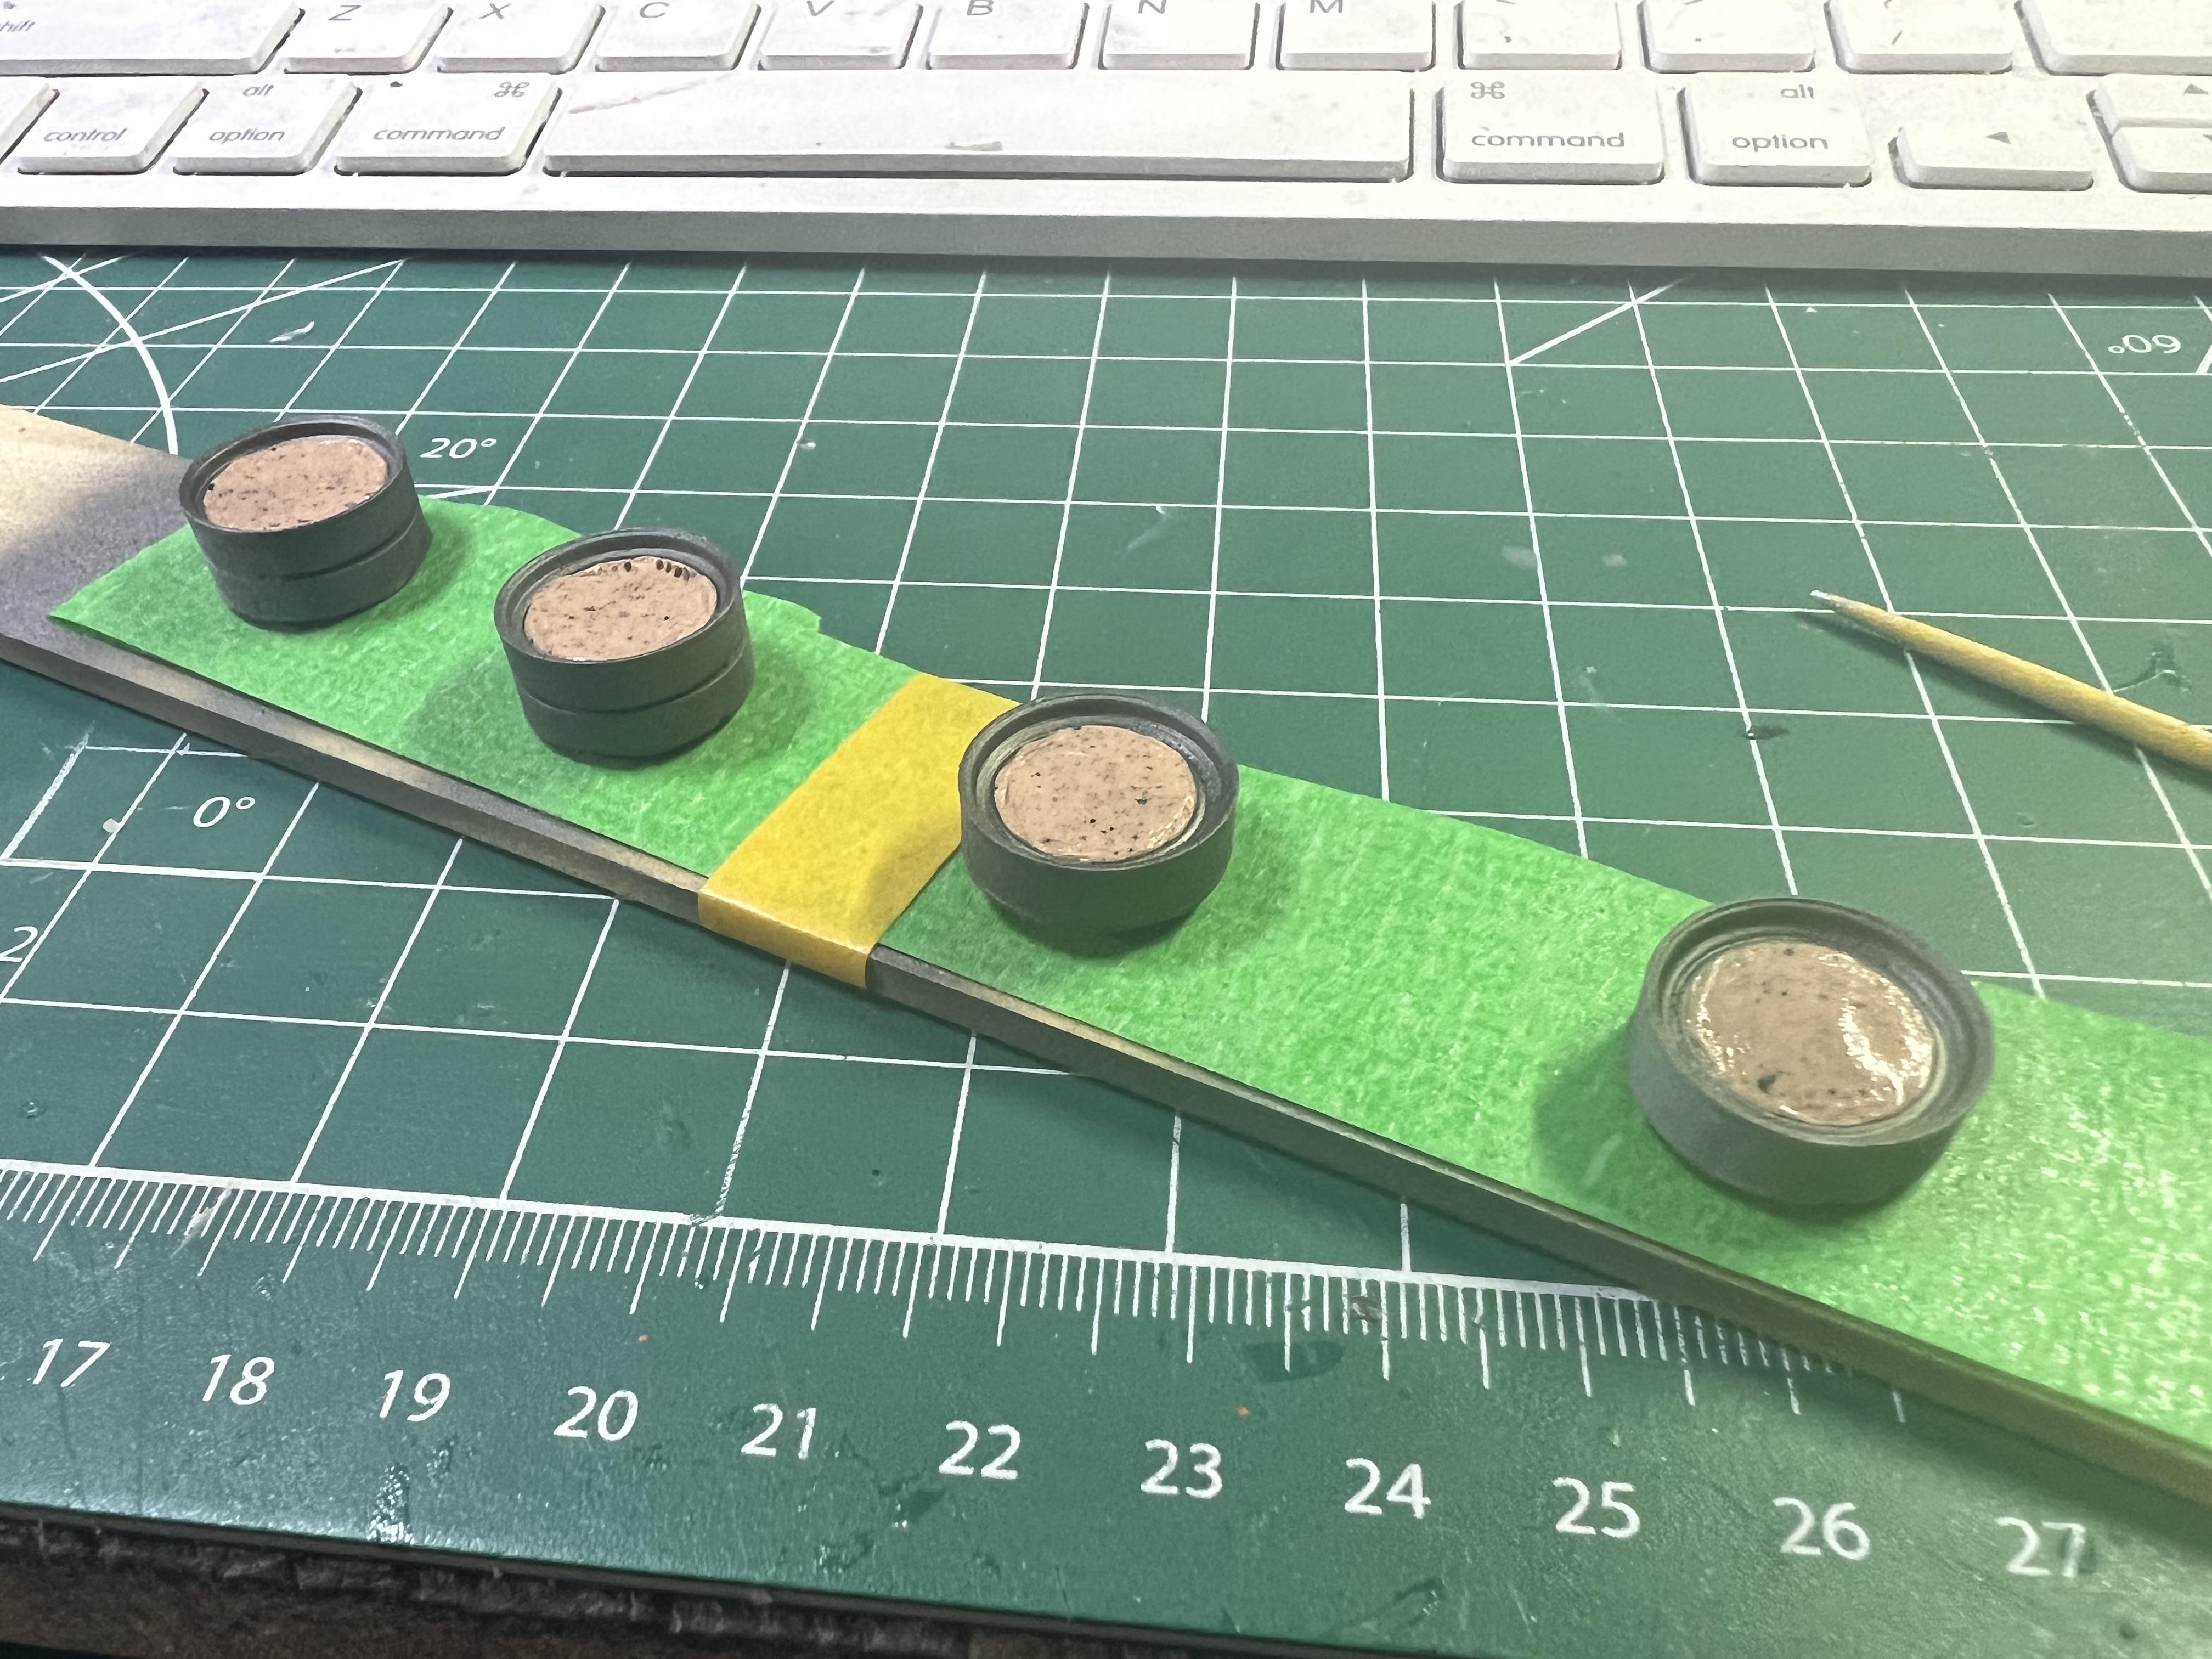
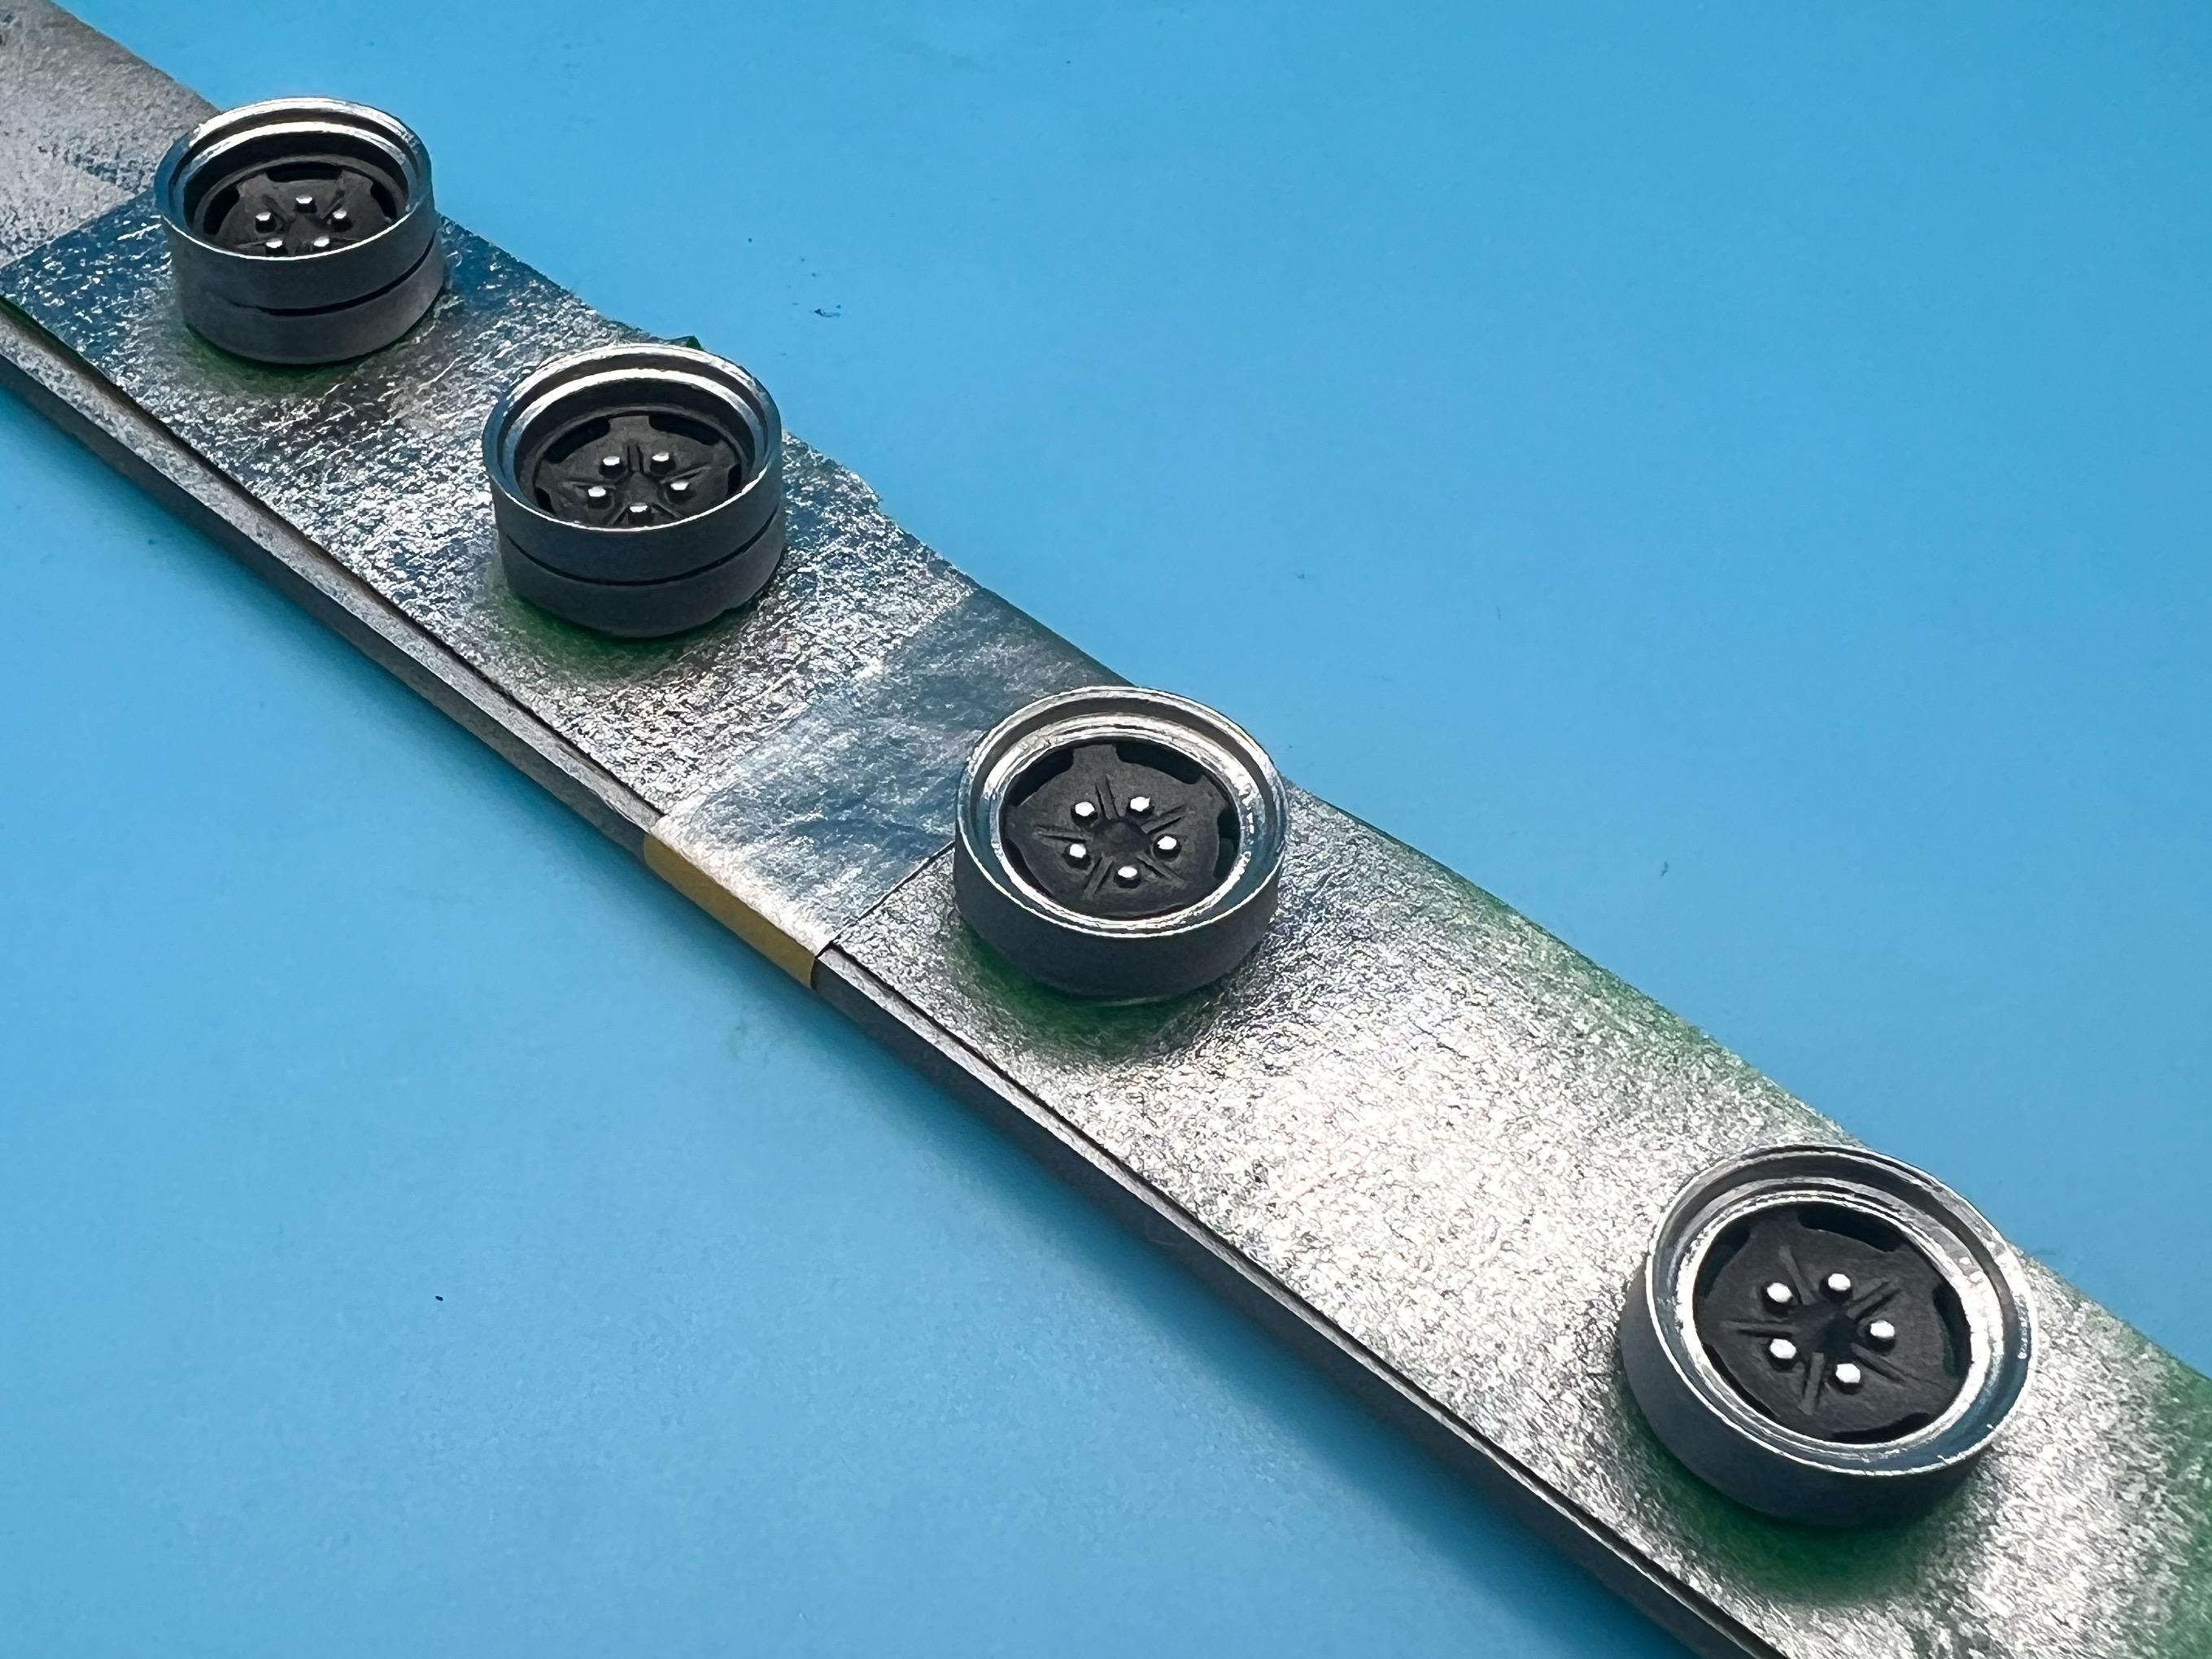
I was constantly looking for something just like this, but really cheap, for mixing up paint, glue, epoxy…any kind of liquid I’d use at my bench. Picked up some tattoo artist’s mixing cups - they’re REALLY cheap, come in a few different sizes and you can pick up handy dandy little stands or racks to hold them if you need such a thing: https://a.co/d/6TBLJdD
-
Speaking of Bare Metal Foil
OldNYJim replied to slownlow's topic in Model Building Questions and Answers
I just got some from Amazon… https://a.co/d/elFey2d An alternate listing: https://a.co/d/fHD2Cvd -
1970 Winnebago D27 Chieftain
OldNYJim replied to Repstock's topic in WIP: Model Trucks: Pickups, Vans, SUVs, Light Commercial
This is absolutely outstanding work - and the weathering you did on the underside is first class. THANK YOU for sharing! -
That’s a GREAT looking build Bob, and you’re so close!!! I’d love to see this one completed - this kit is on my to-do list too…git ‘er done!