Paul Payne
-
Posts
2,134 -
Joined
-
Last visited
Content Type
Profiles
Forums
Events
Gallery
Everything posted by Paul Payne
-
When you start parking, everyone just moves out of the way.......................................
-
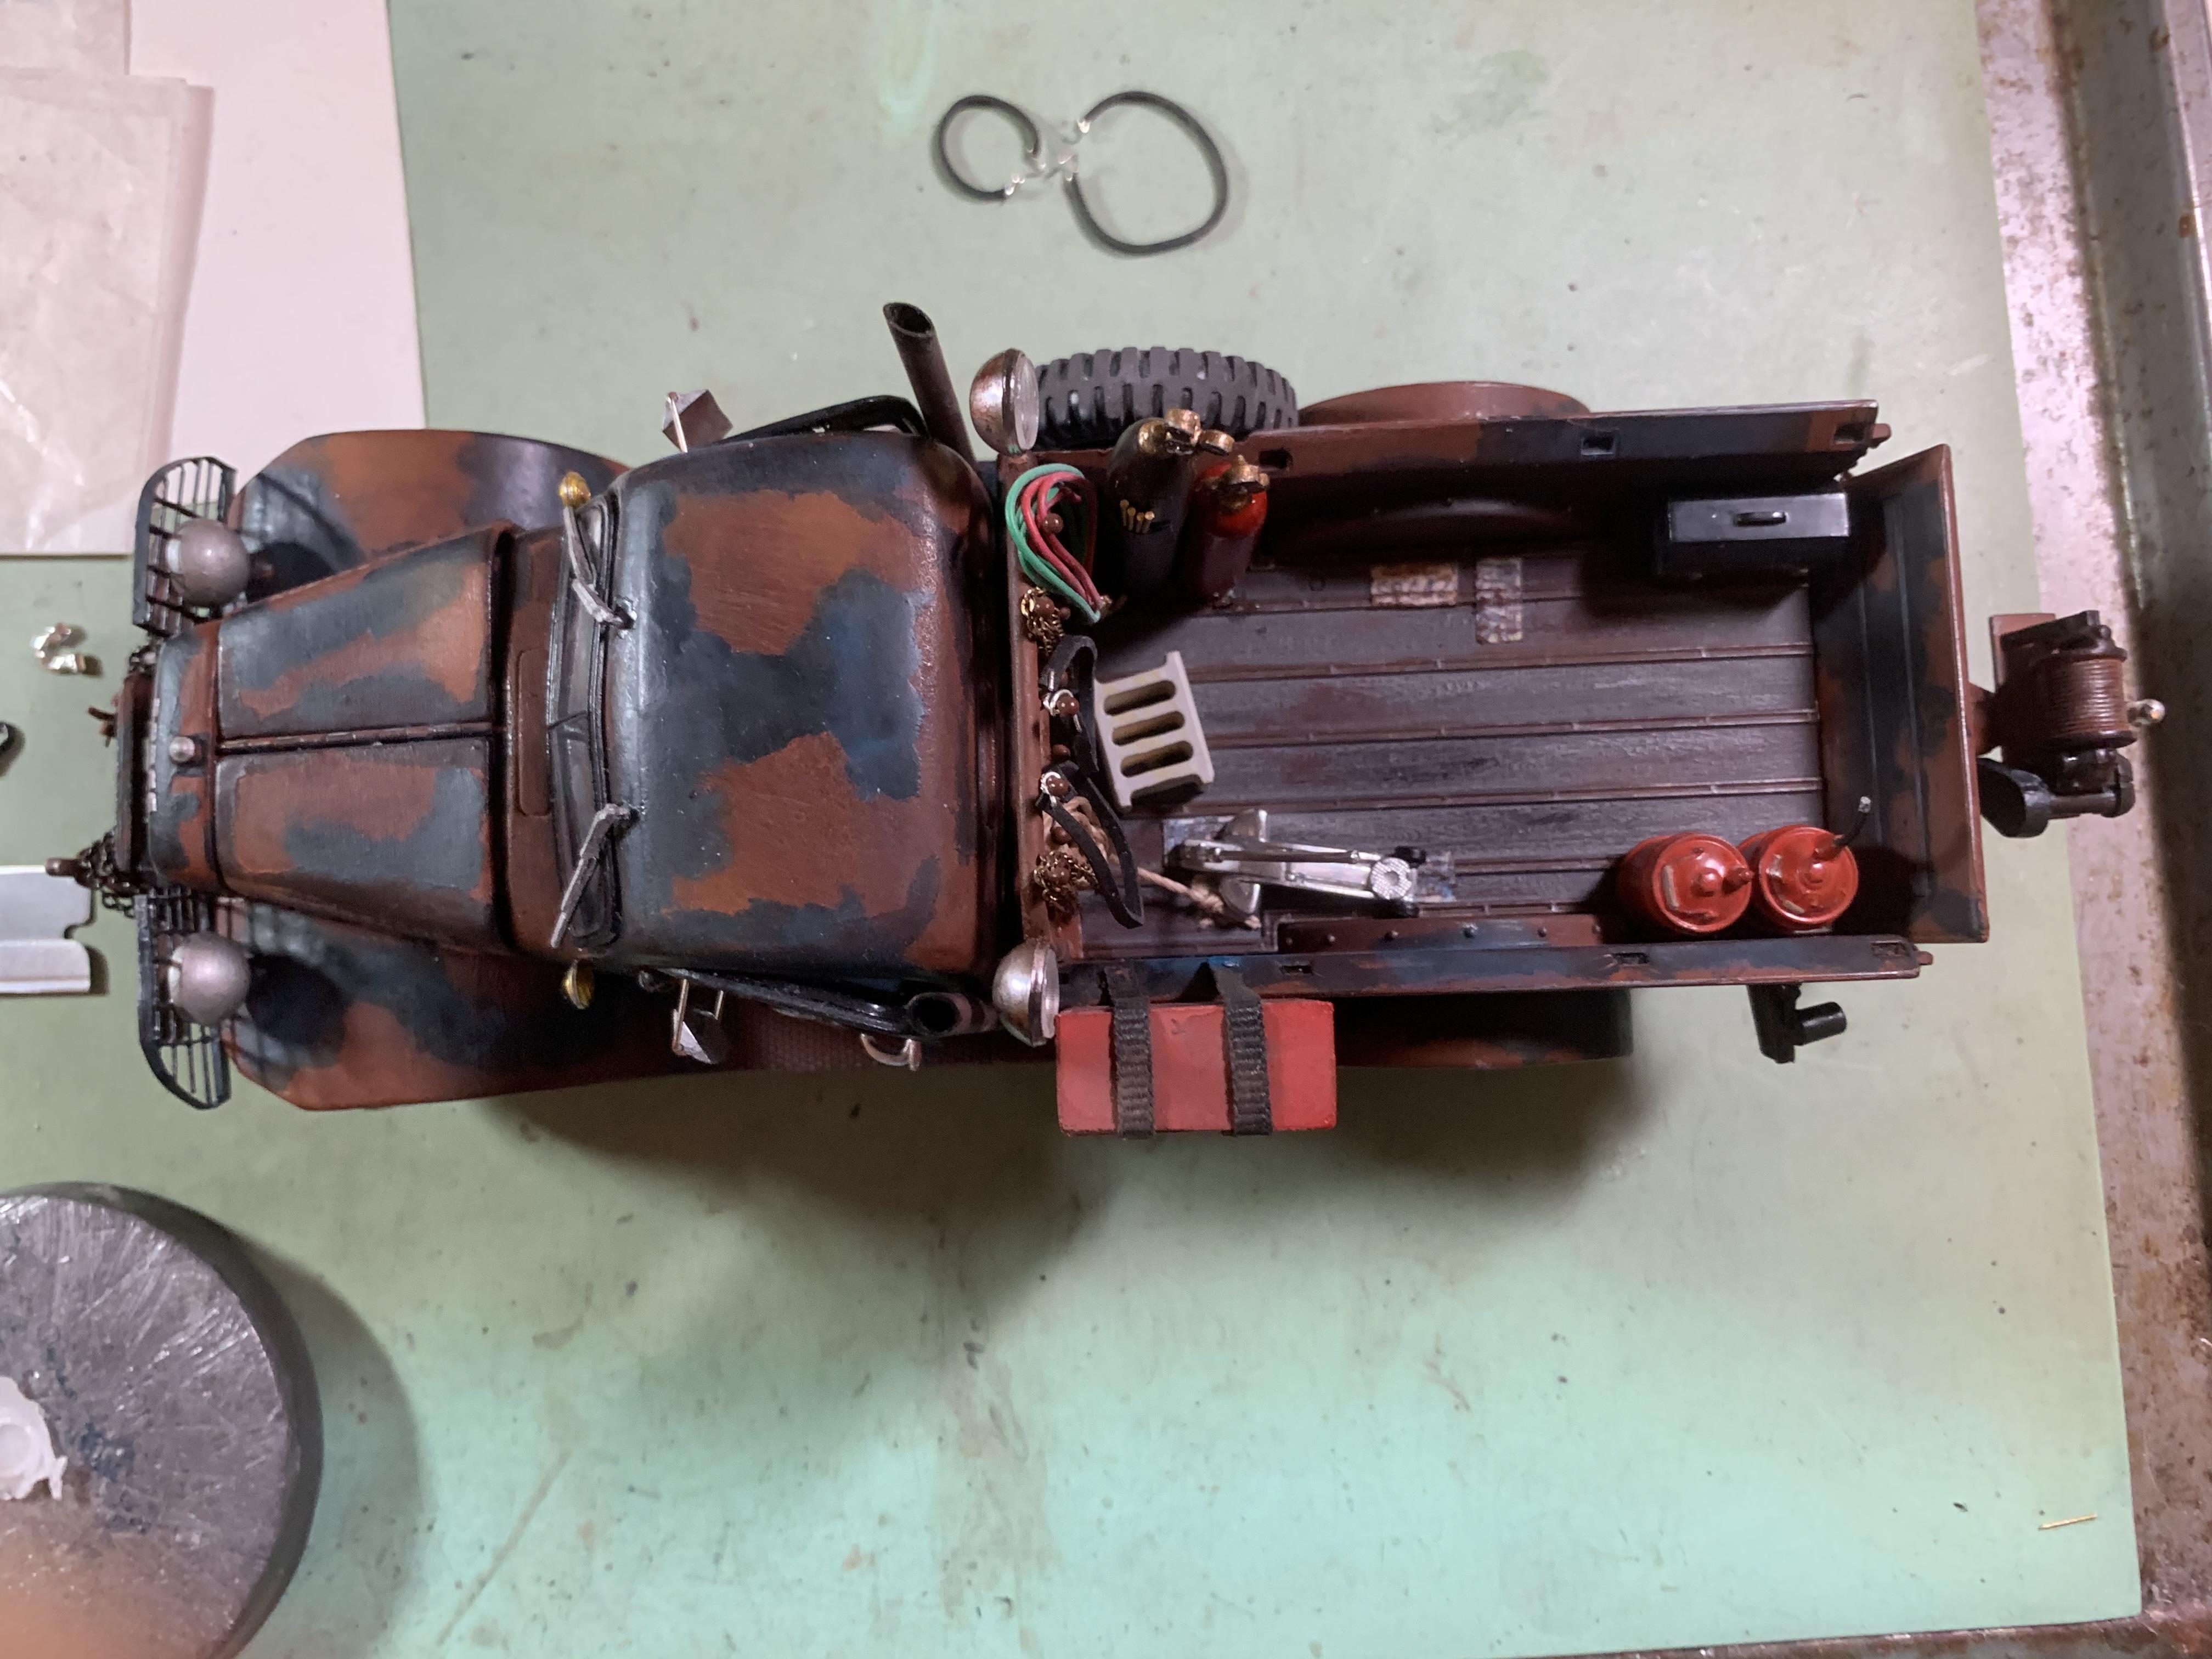
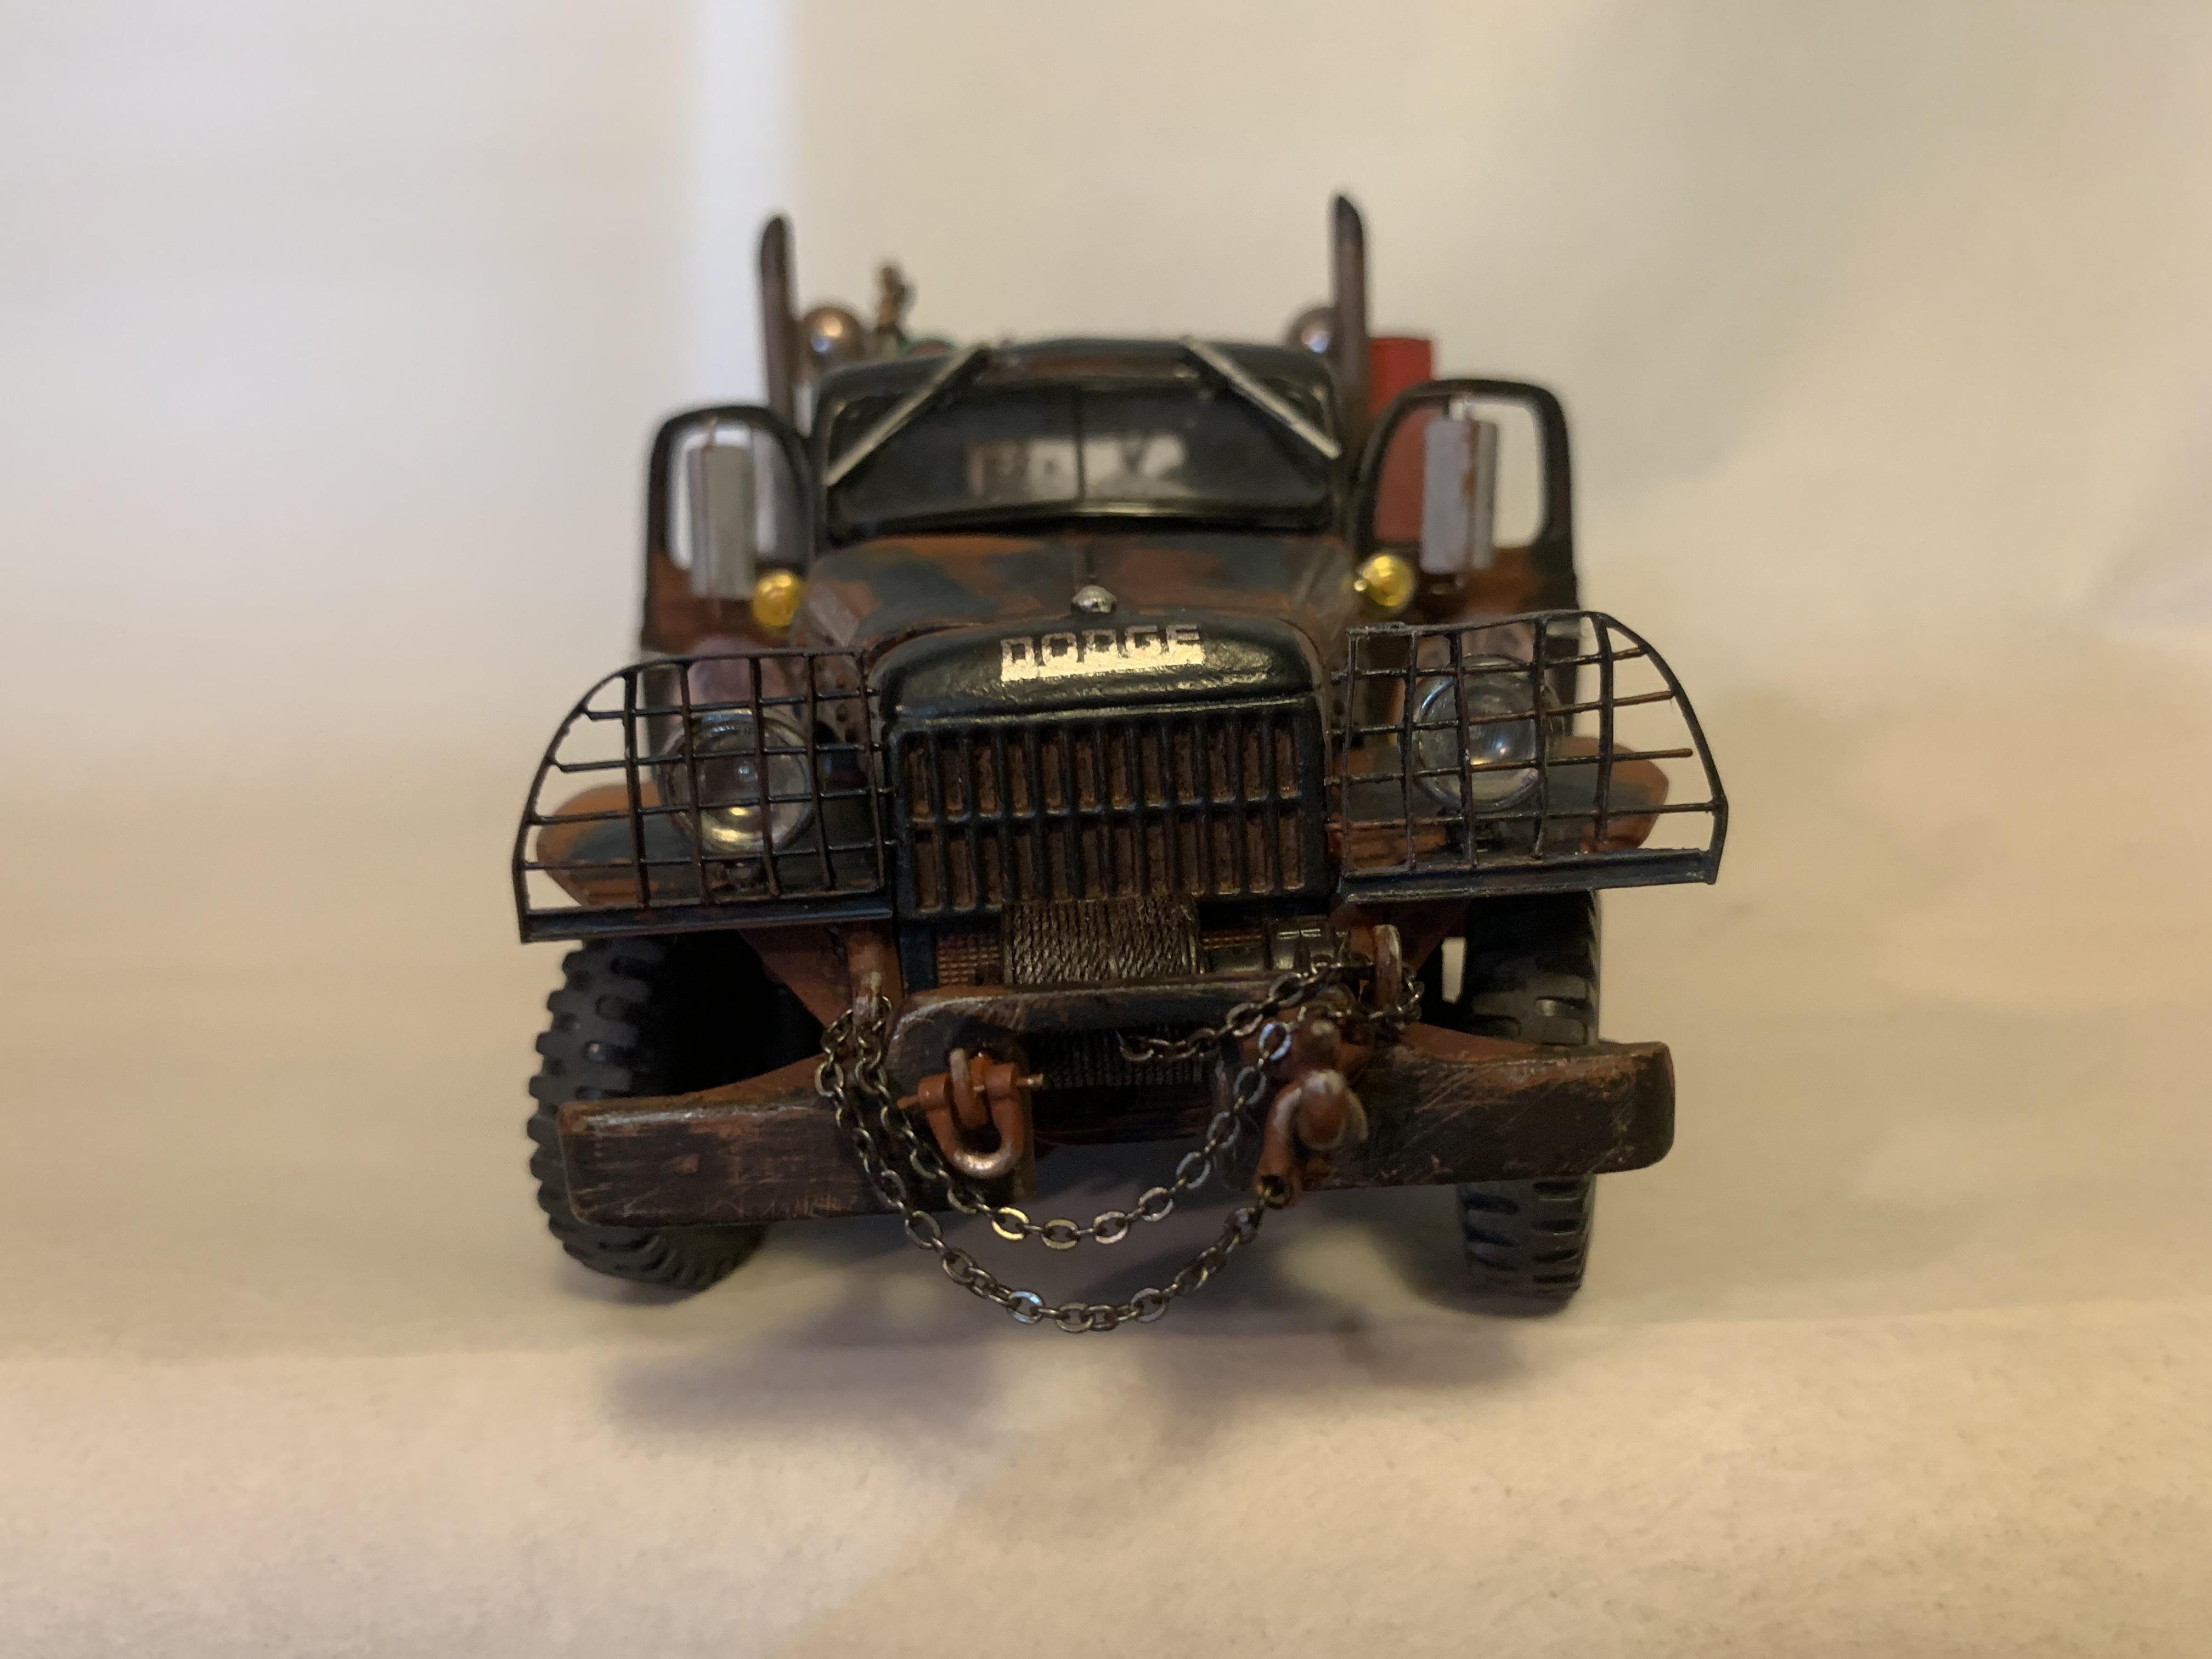
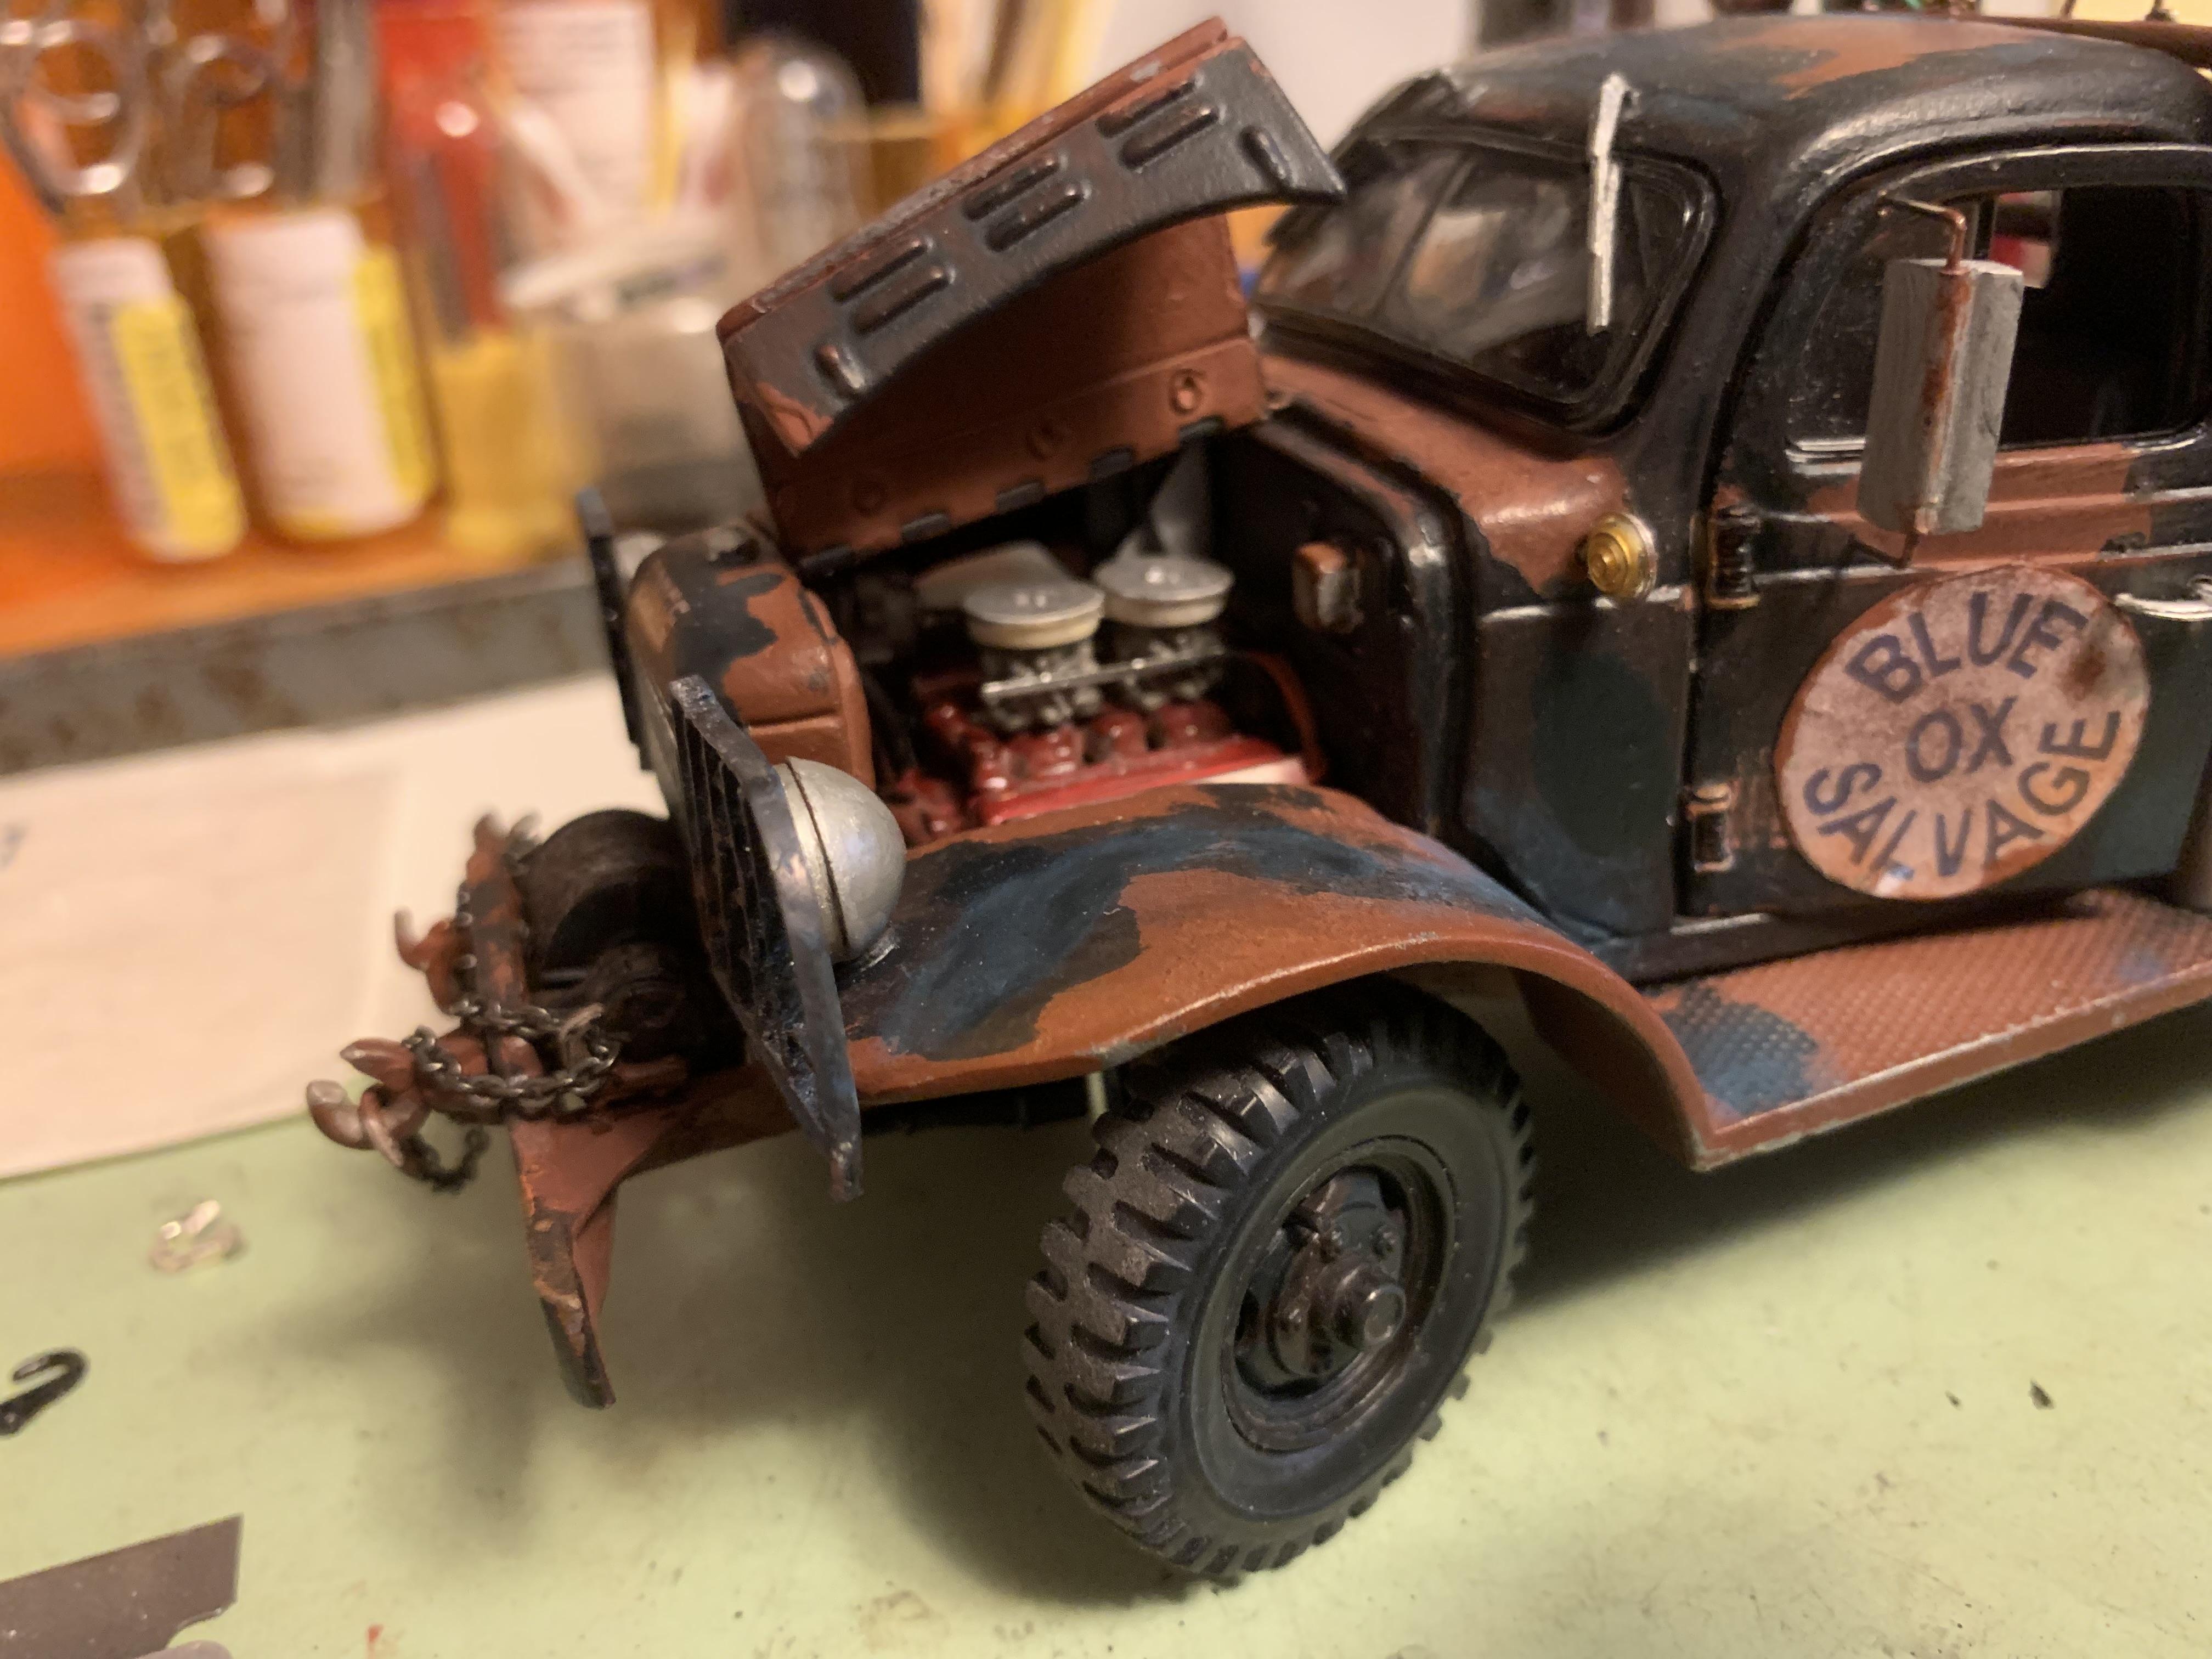
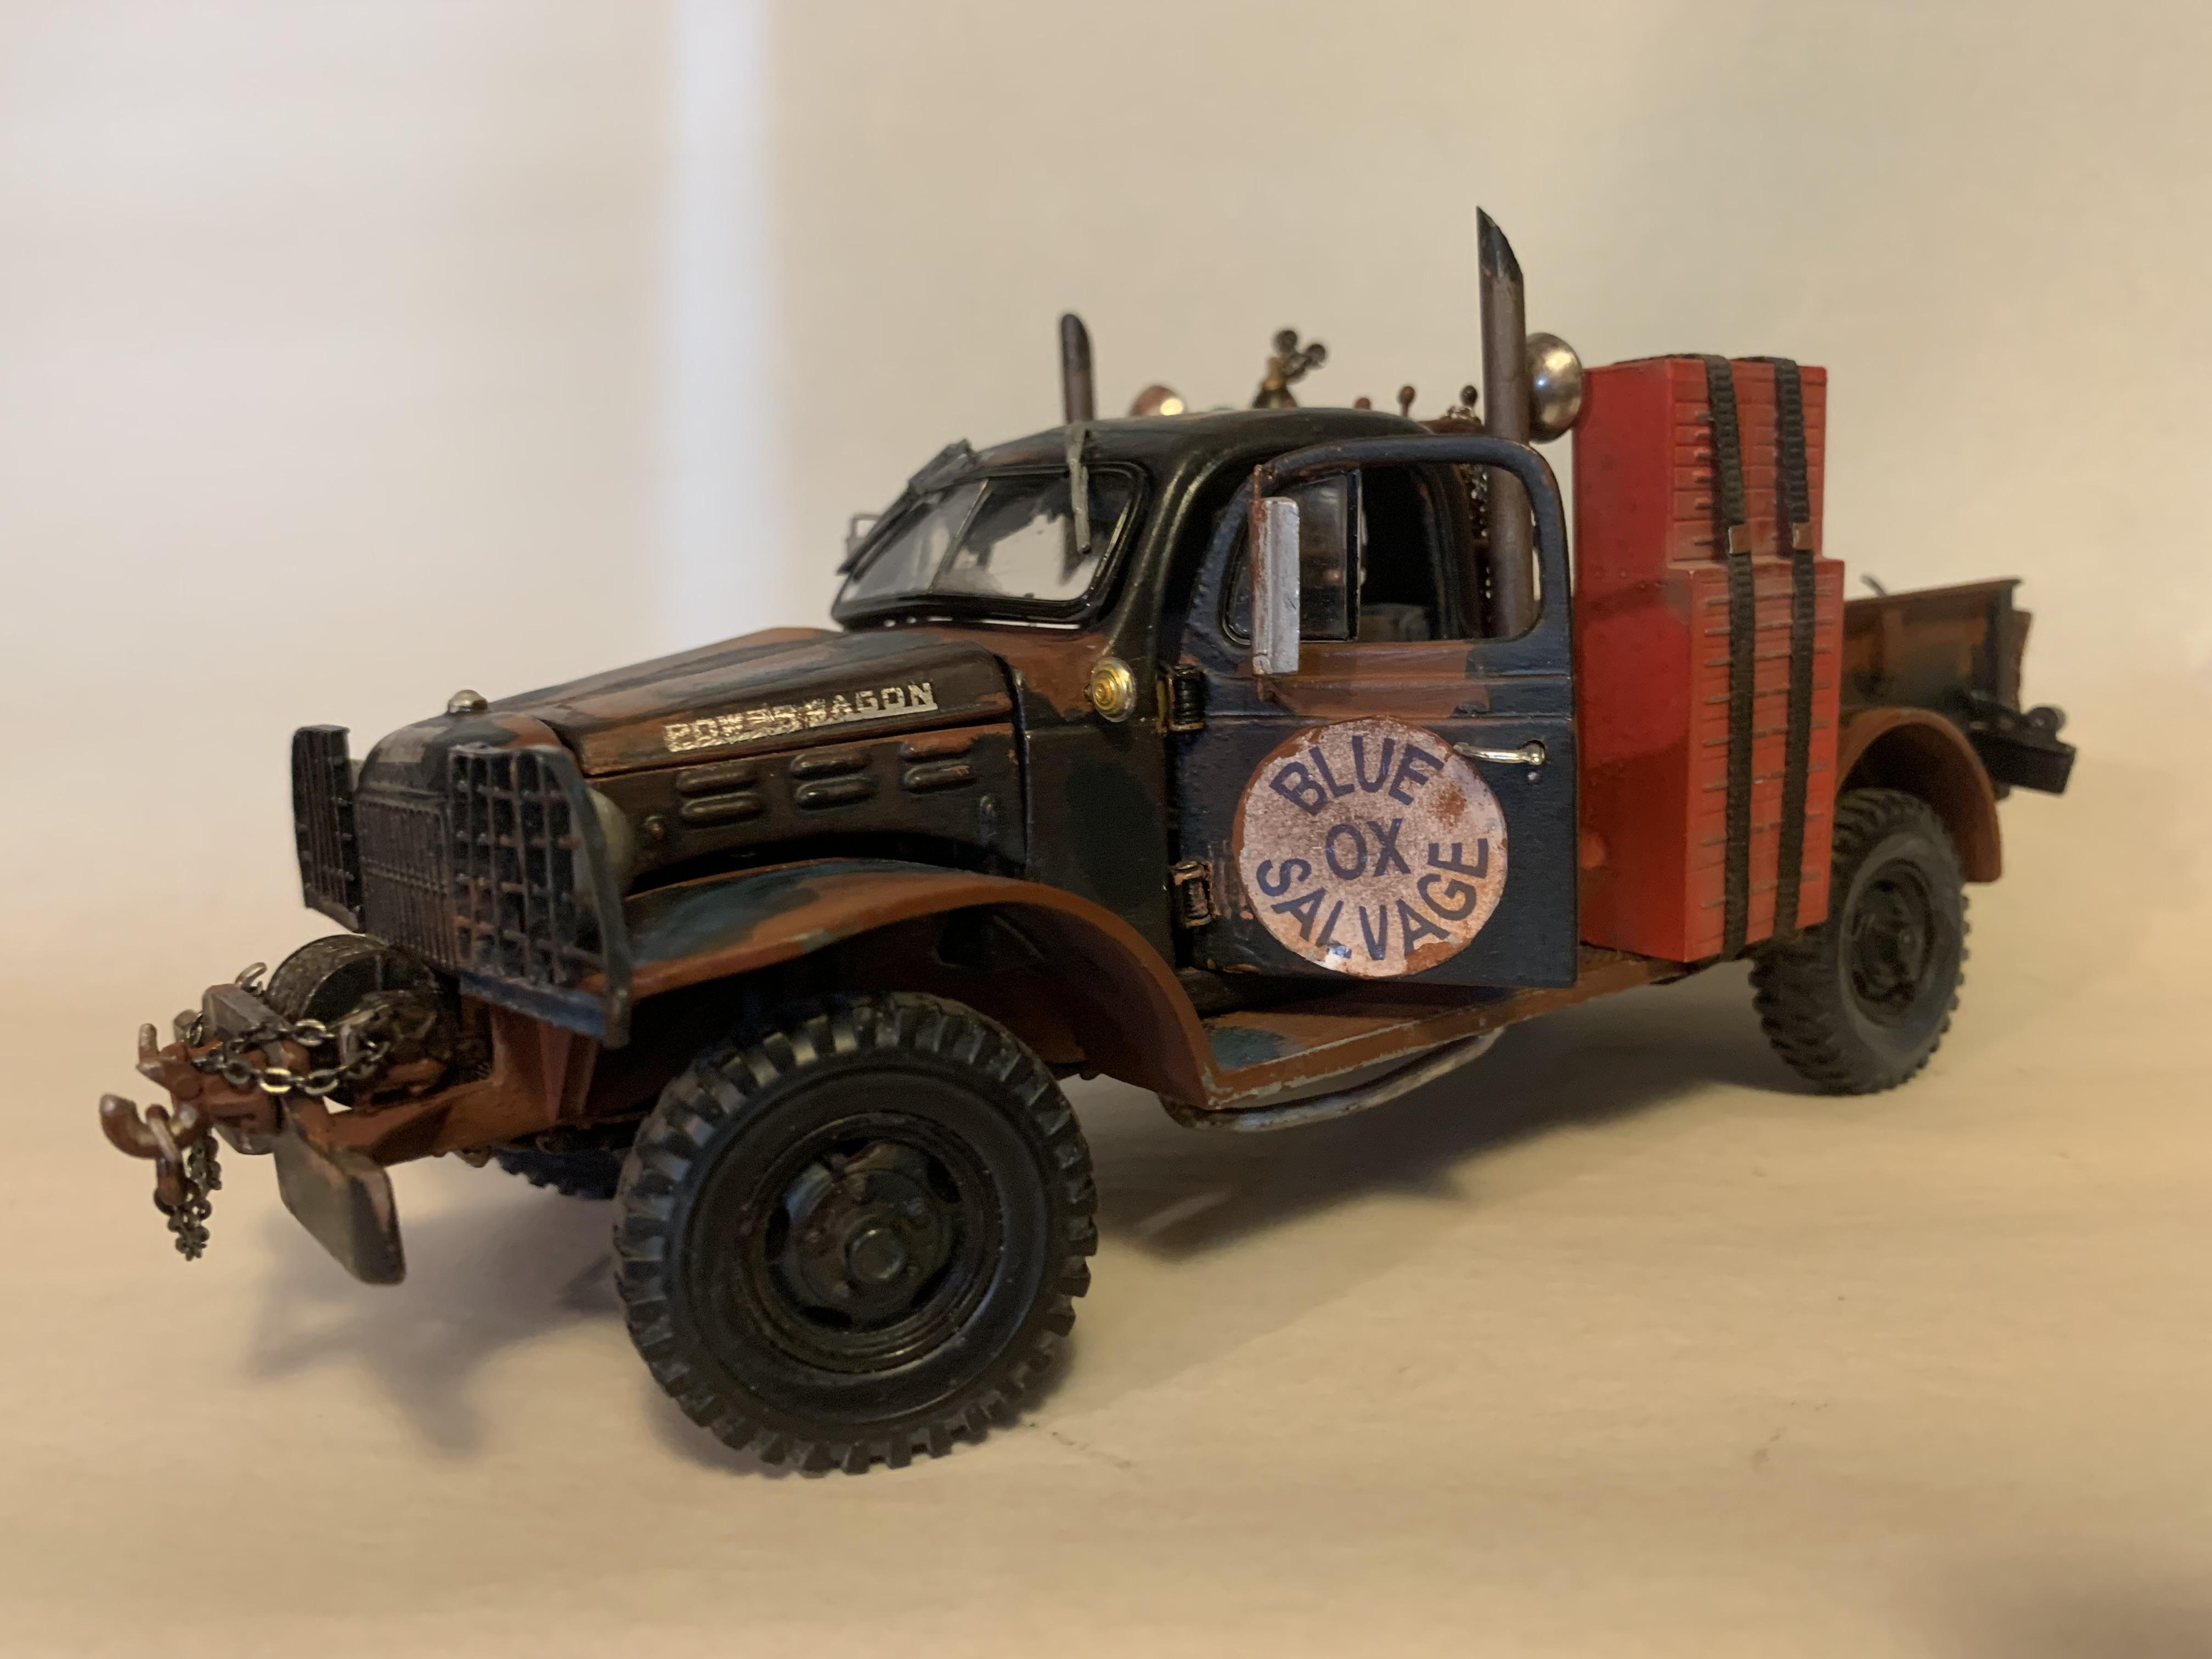
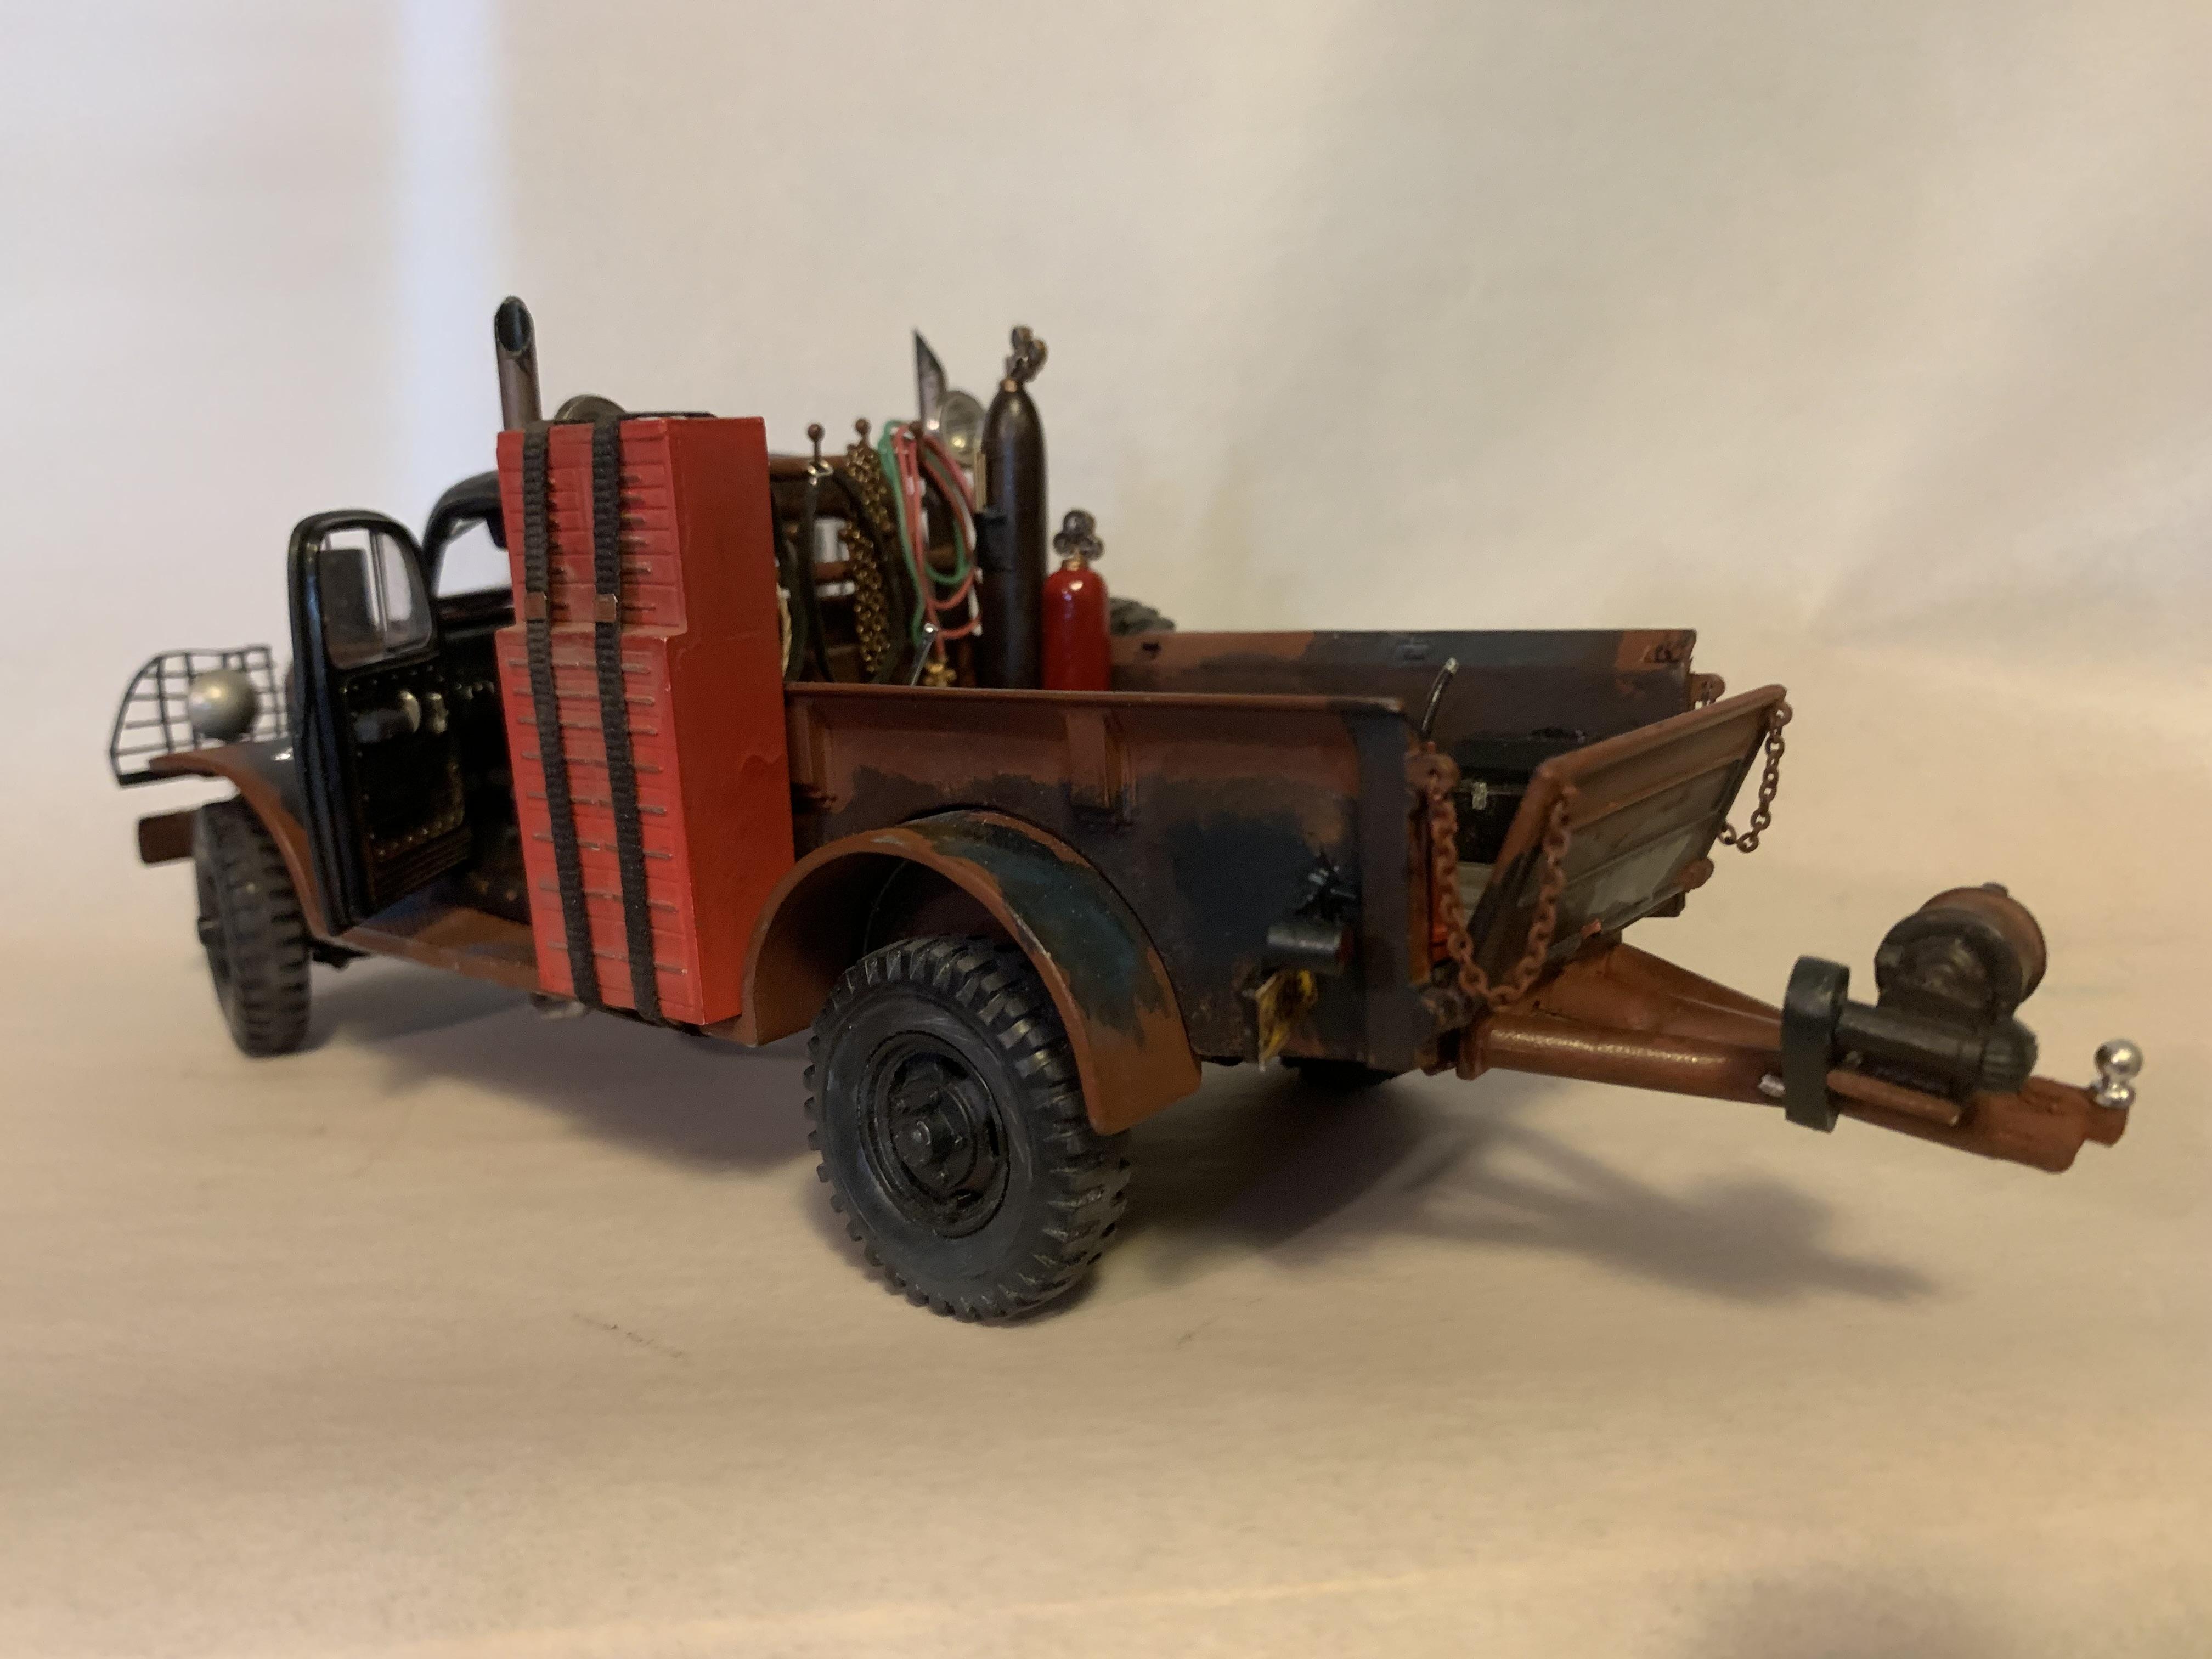
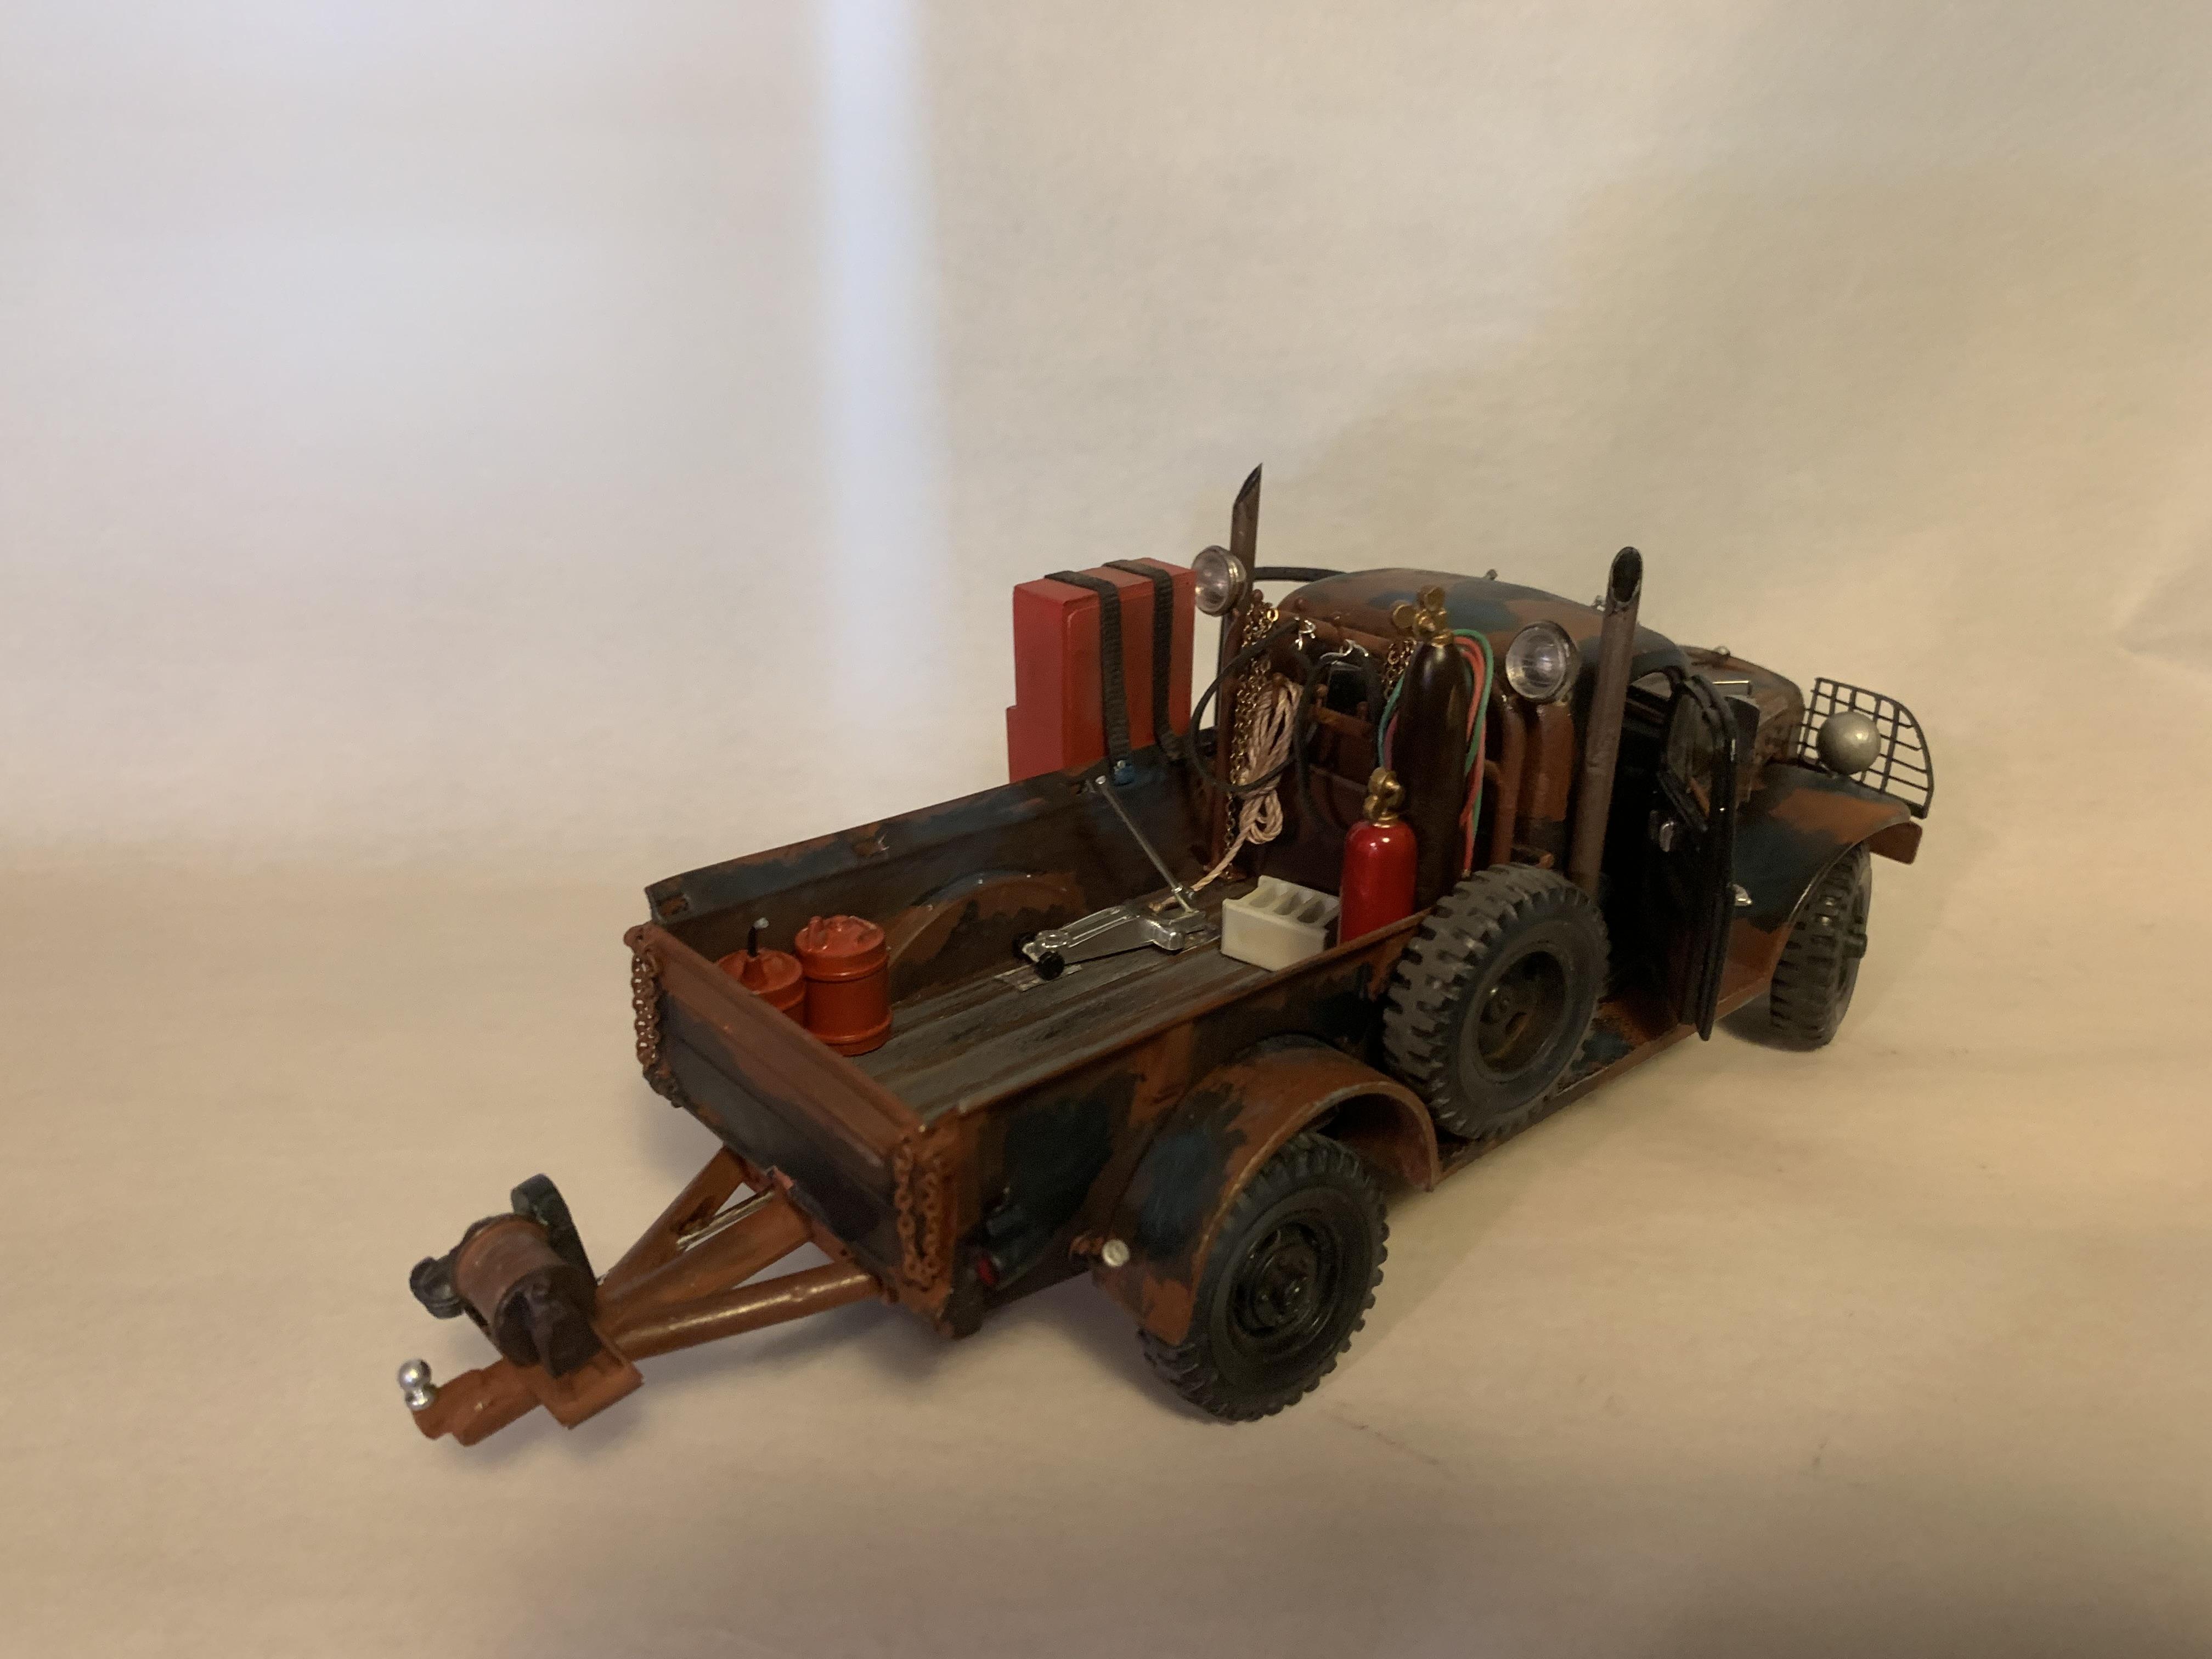
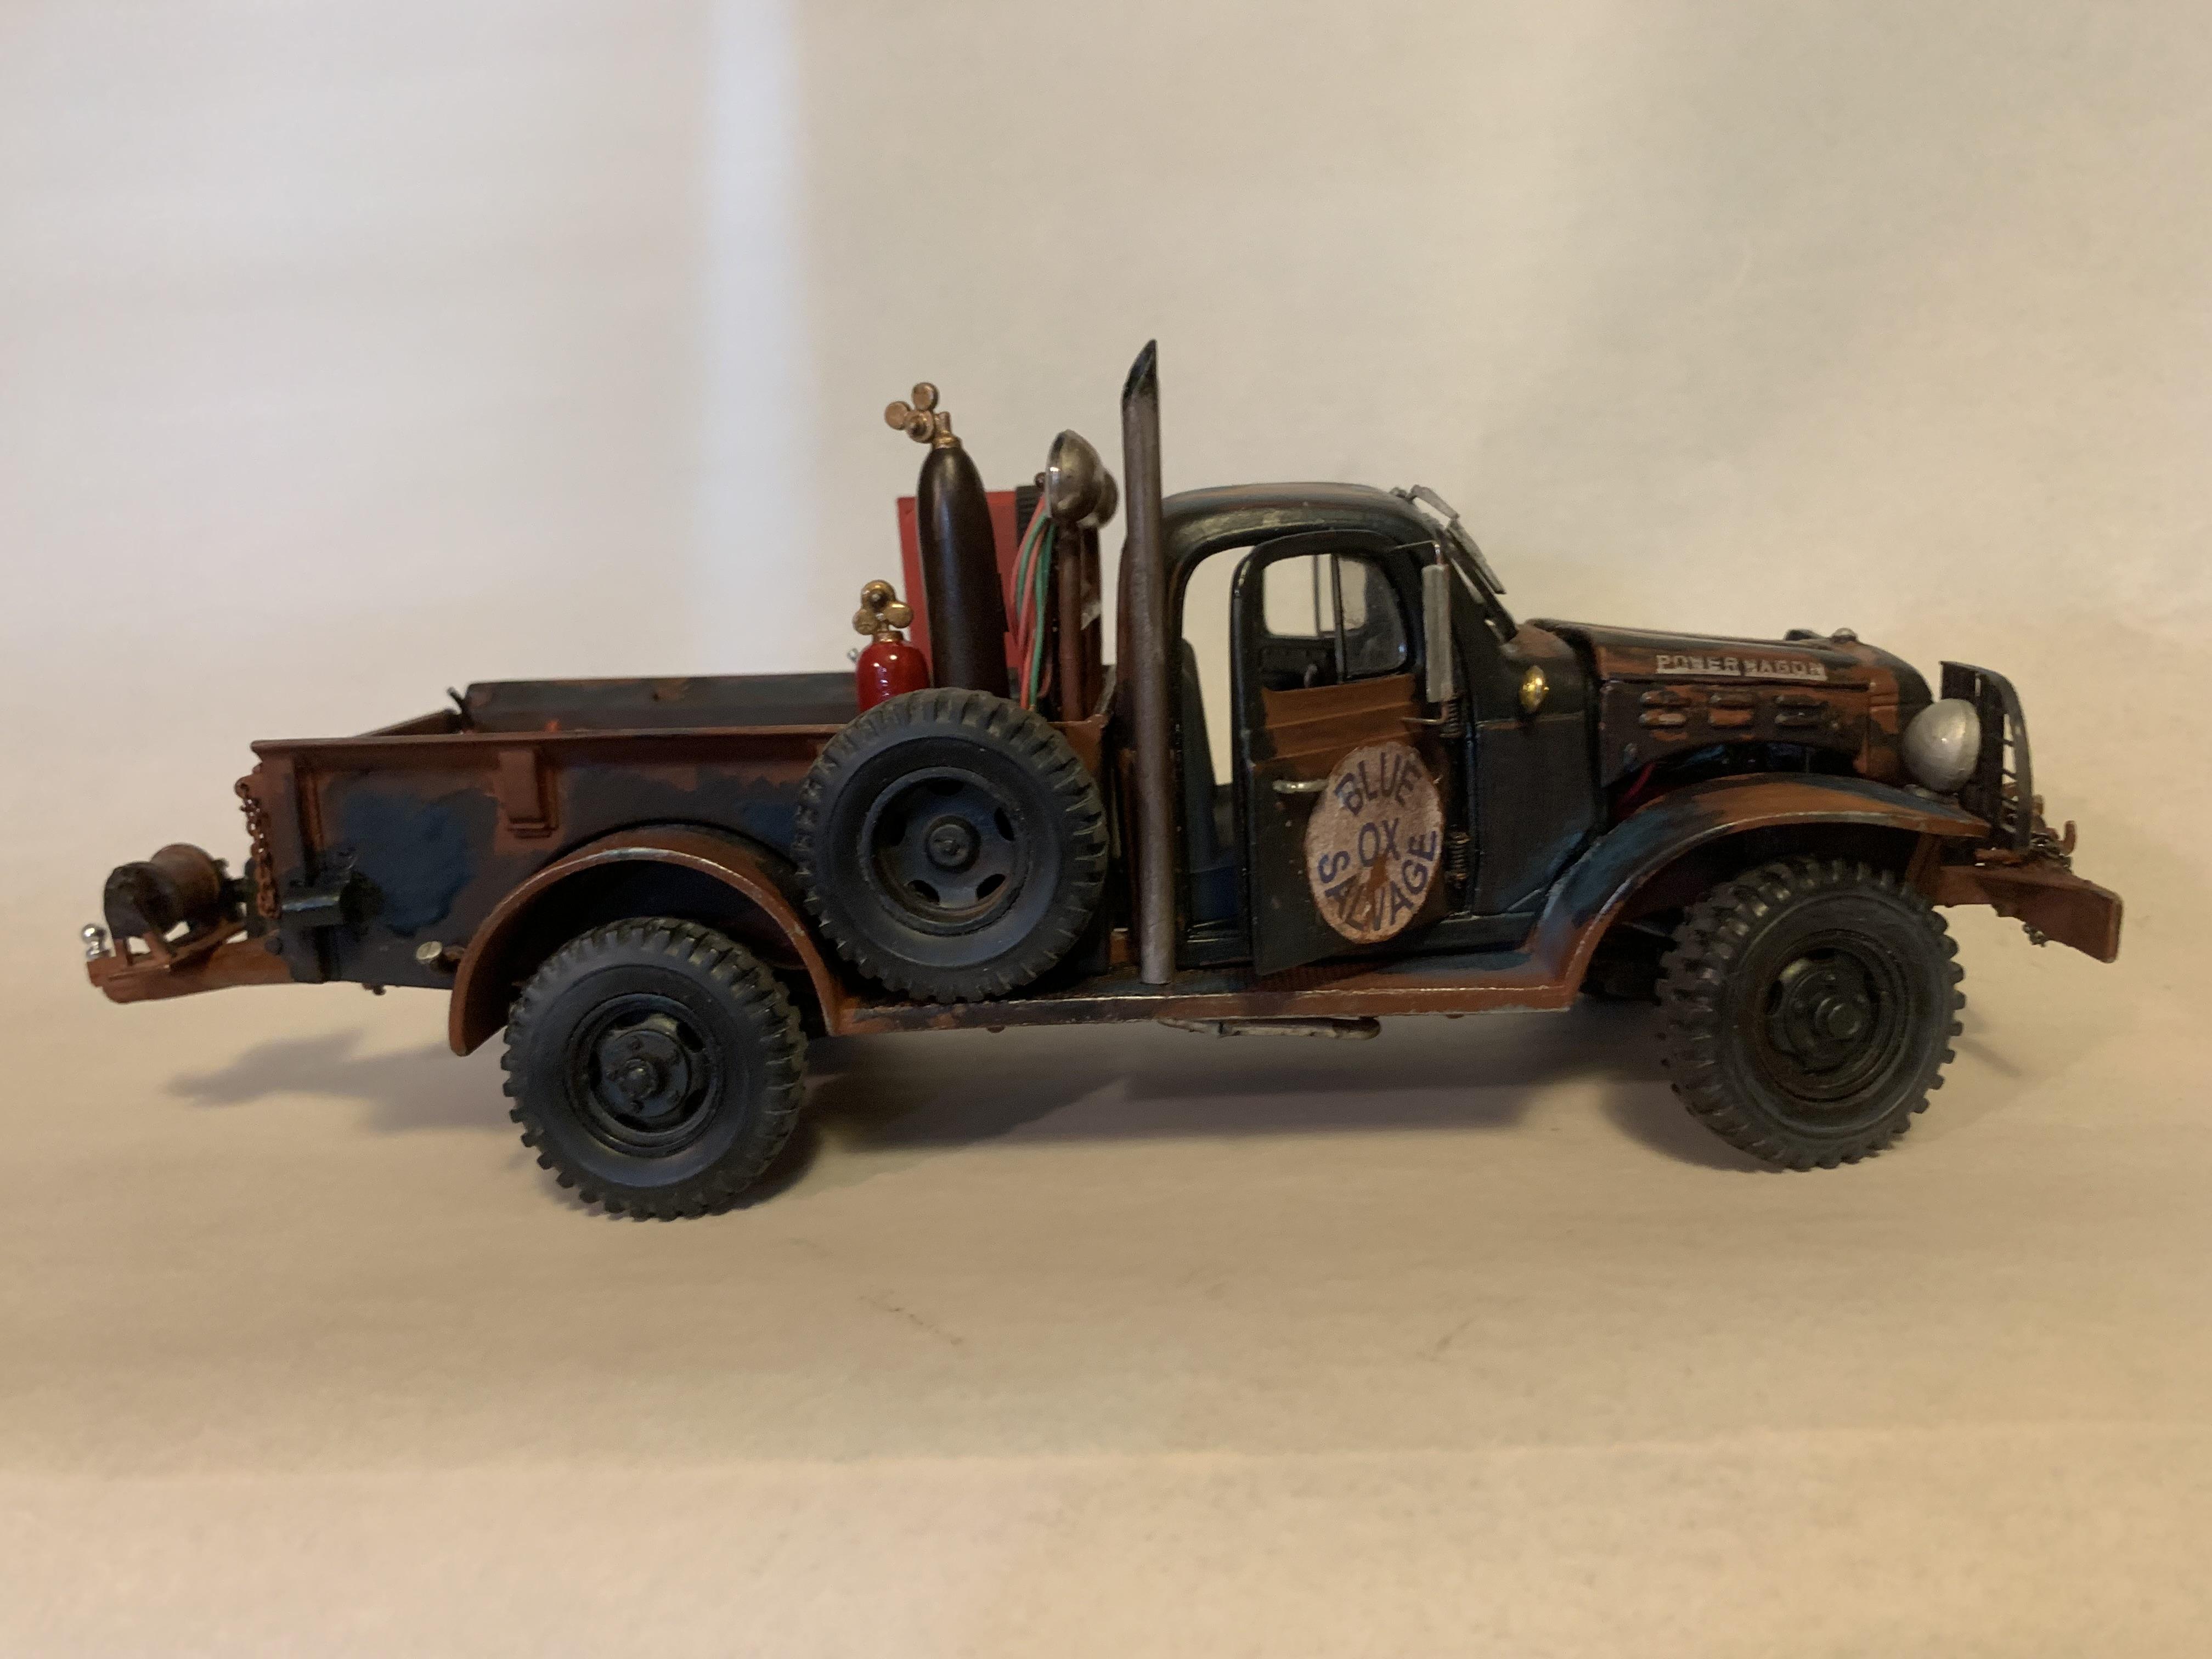
It's done! Enjoy the pix! Blue Ox Salvage, Babe the big blue truck.

-
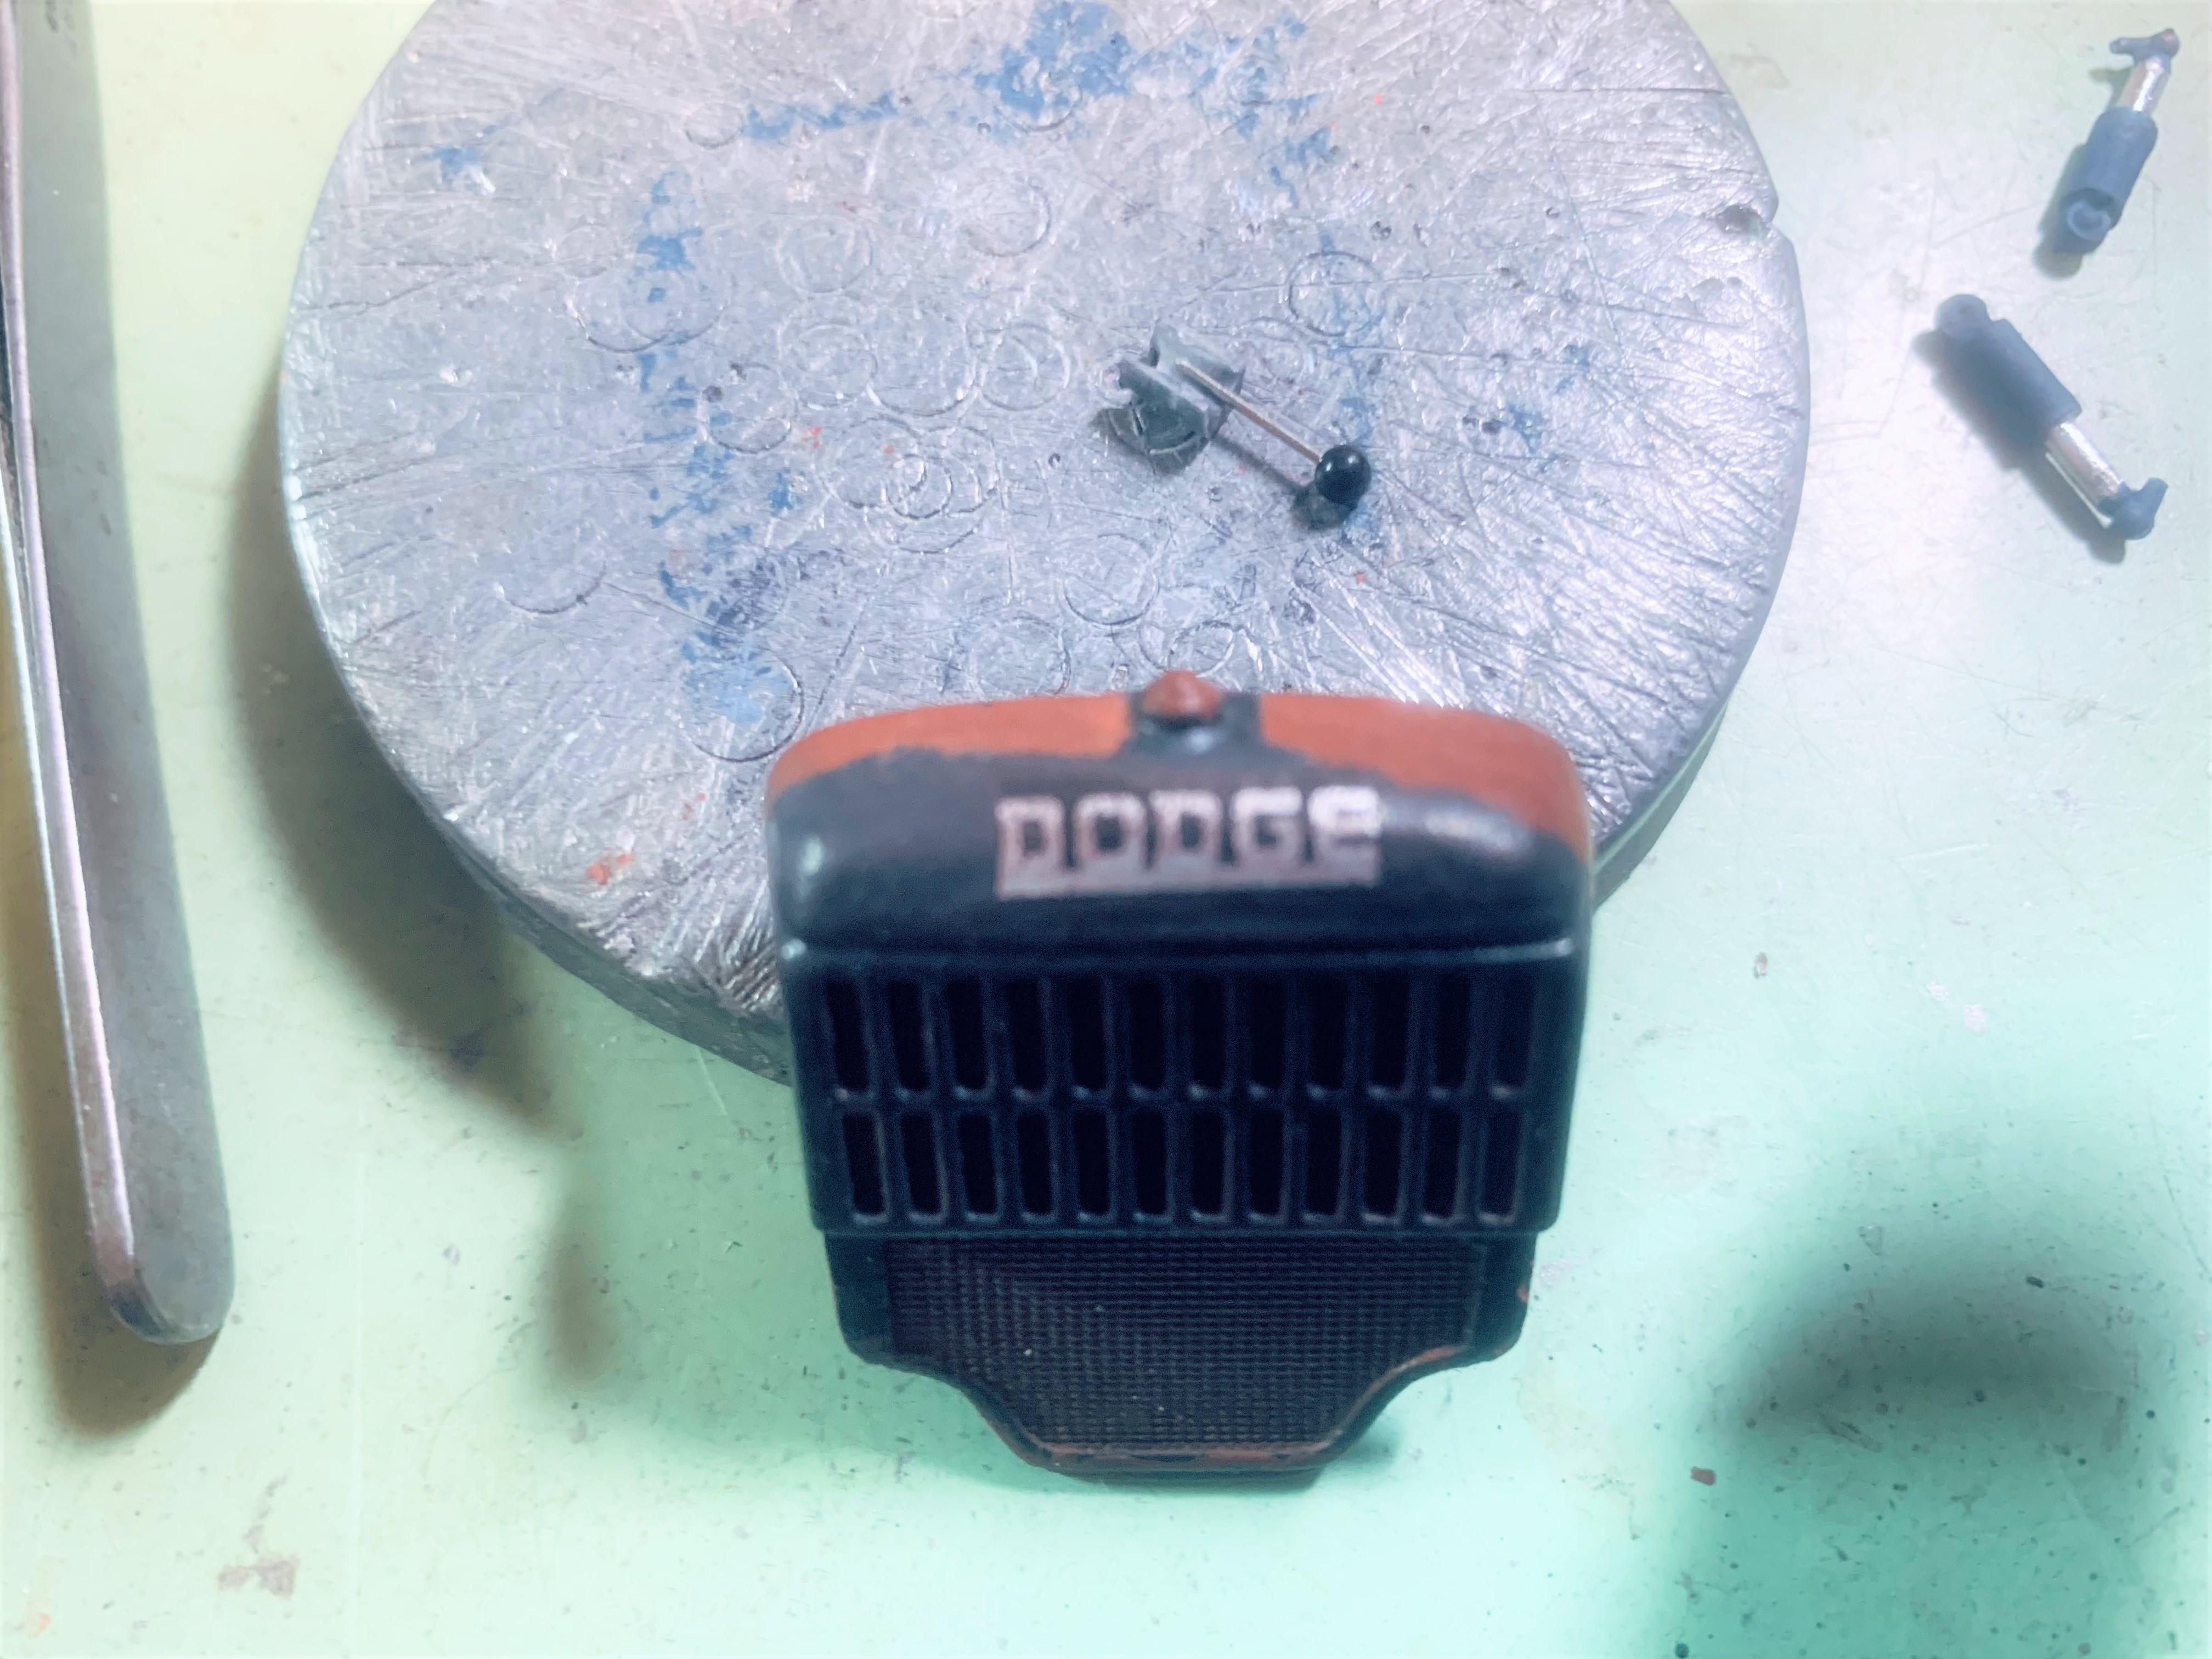
1946 Dodge Power Wagon
Paul Payne replied to Paul Payne's topic in WIP: Model Trucks: Pickups, Vans, SUVs, Light Commercial
Finished! See it in Under Glass! -
The AMT wheels are too small in diameter resulting in a thicker side wall on the tire. AMT has standardized their WHEEL diameters. The AMT Viper tires are unique to this kit. Revell has often done a better job capturing proper wheel diameters on their kits.
-
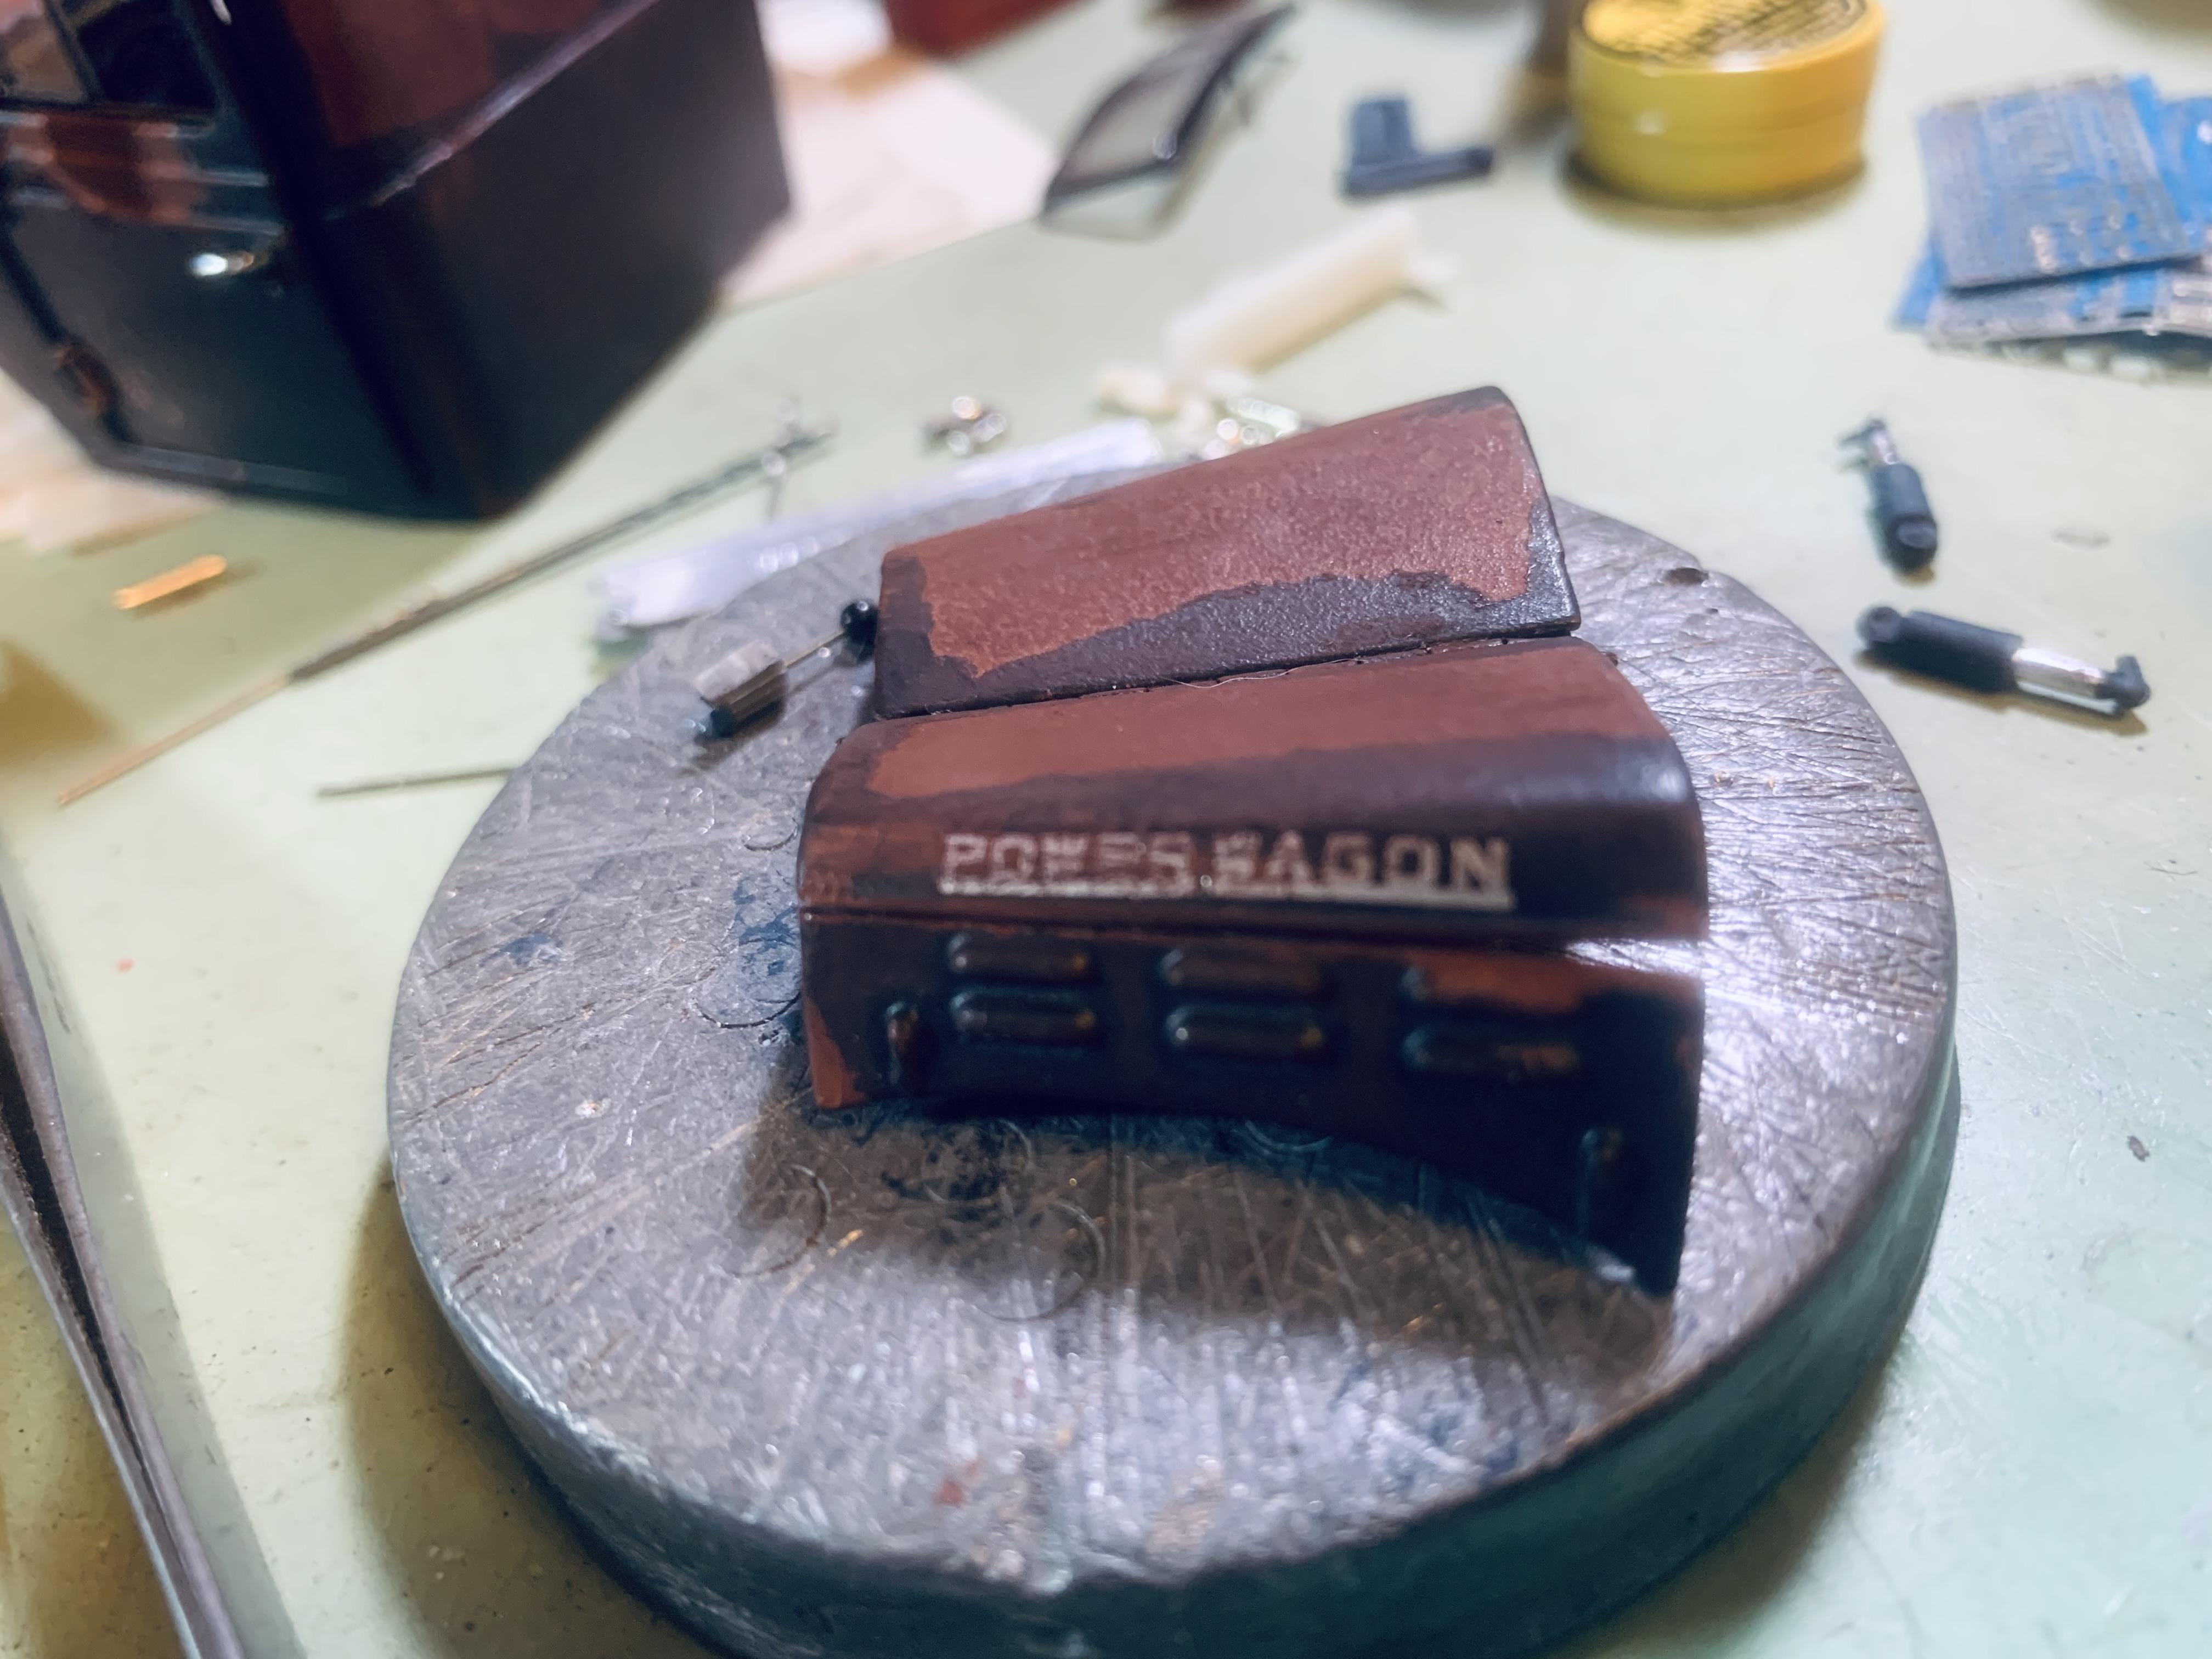
1946 Dodge Power Wagon
Paul Payne replied to Paul Payne's topic in WIP: Model Trucks: Pickups, Vans, SUVs, Light Commercial
Don't worry- it will be counter balanced by the heavy tire and military style wheel as well as oxyacetylene tanks. These trucks could twist like a snake over rough terrain and carry serious heavy loads doing it. -
truck, boat, and trailer
Paul Payne replied to Paul Payne's topic in WIP: Model Trucks: Pickups, Vans, SUVs, Light Commercial
Walt, thanks for sharing! More great reference photos! Thanks also for the comments on the Power Wagon- wait until I post it in Under Glass- it's almost done................... Plan on taking it to the Hoosier Model Club show and flea market. -
1946 Dodge Power Wagon
Paul Payne replied to Paul Payne's topic in WIP: Model Trucks: Pickups, Vans, SUVs, Light Commercial
I'm working on it! -
truck, boat, and trailer
Paul Payne replied to Paul Payne's topic in WIP: Model Trucks: Pickups, Vans, SUVs, Light Commercial
And it will get funner! -
truck, boat, and trailer
Paul Payne replied to Paul Payne's topic in WIP: Model Trucks: Pickups, Vans, SUVs, Light Commercial
Wow, somewhat complex! It appears that additional heavy timber next to the keel and between the ribs is used as an engine mounting bed. The engine is then bolted to these using a mounting pad bolted to the wood and in turn the engine mount plates are bolted to these.
-
truck, boat, and trailer
Paul Payne replied to Paul Payne's topic in WIP: Model Trucks: Pickups, Vans, SUVs, Light Commercial
Sounds like a plan, Tim. I have learned so much from other members sharing ideas and techniques. BTW, I used fishing lure spinner propellers for my 4 blade props, since I could not find props small enough on line. -
truck, boat, and trailer
Paul Payne replied to Paul Payne's topic in WIP: Model Trucks: Pickups, Vans, SUVs, Light Commercial
A very tasty project indeed! I too am figuring out the engine mounting and marine plumbing as I go- I might just wear out the internet looking for reference photos! If I find something useful I can either post it here or pm you. Des that work for you? -
1939 Ford Towtruck
Paul Payne replied to Nosferatu's topic in WIP: Model Trucks: Pickups, Vans, SUVs, Light Commercial
Please replicate the boom in the 1:1 photo! Way cool and makes that rig! -
Great project and great pix of Deuce days Thanks for sharing.
-
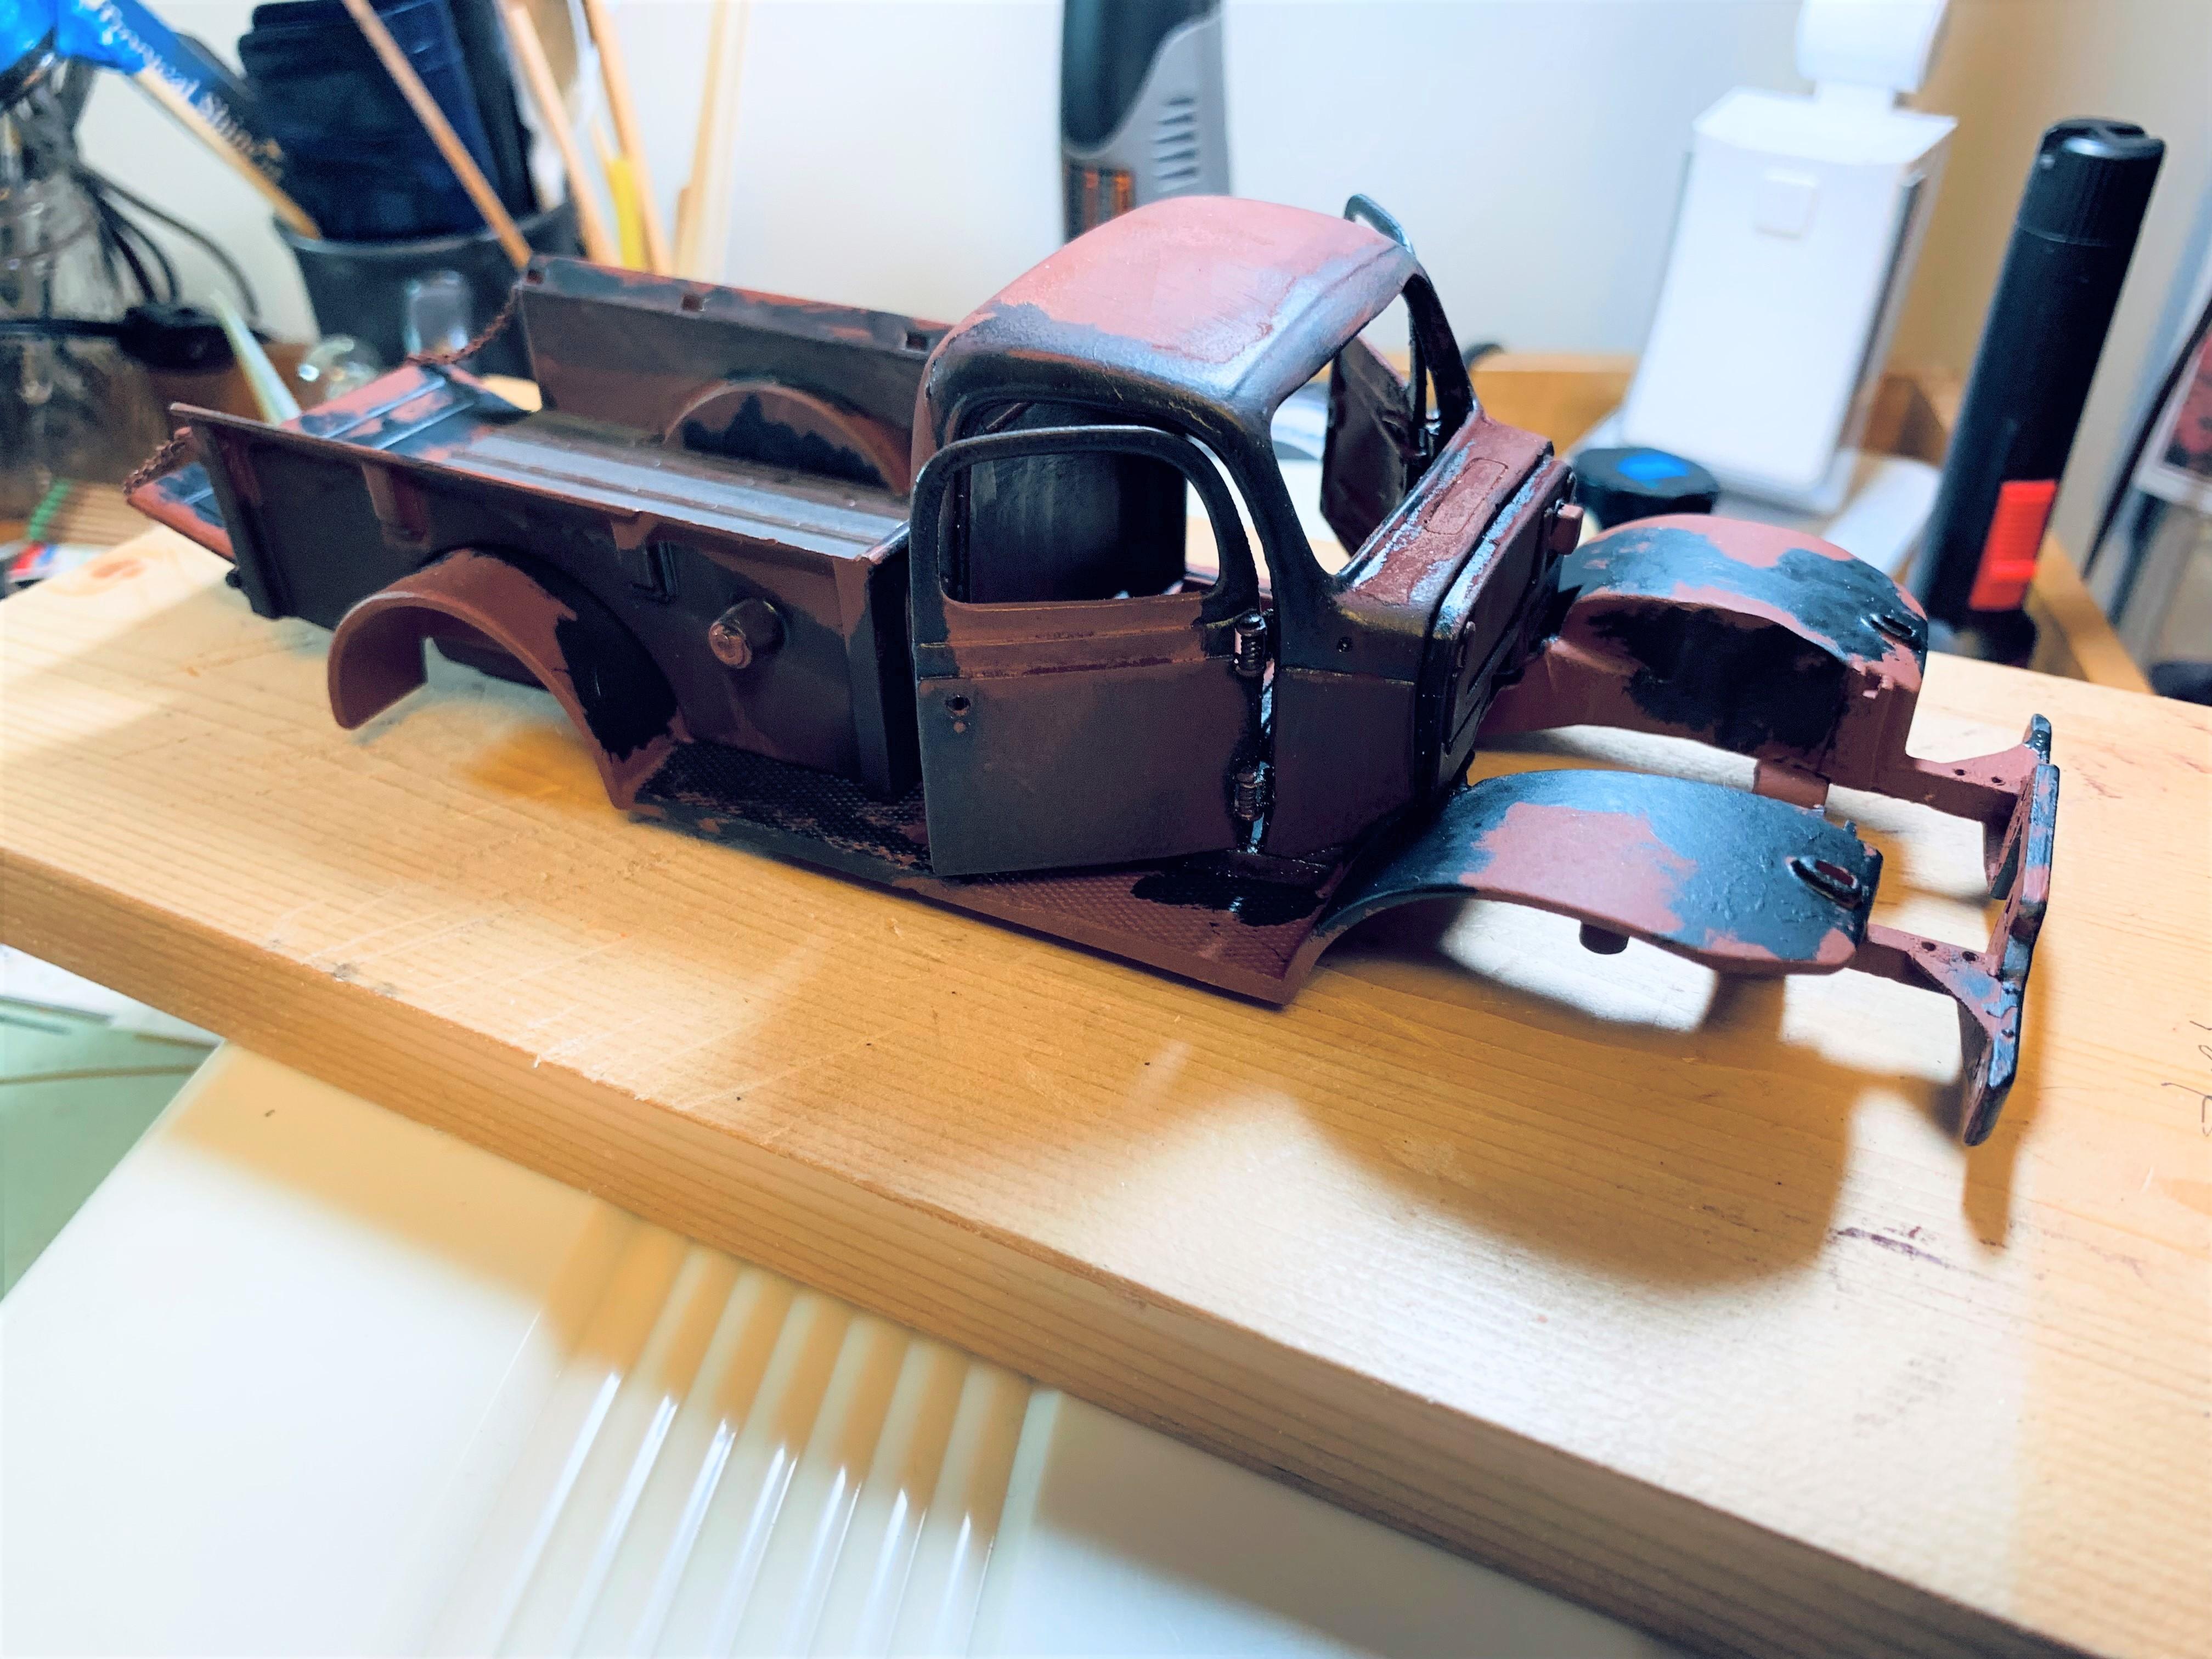
1946 Dodge Power Wagon
Paul Payne replied to Paul Payne's topic in WIP: Model Trucks: Pickups, Vans, SUVs, Light Commercial
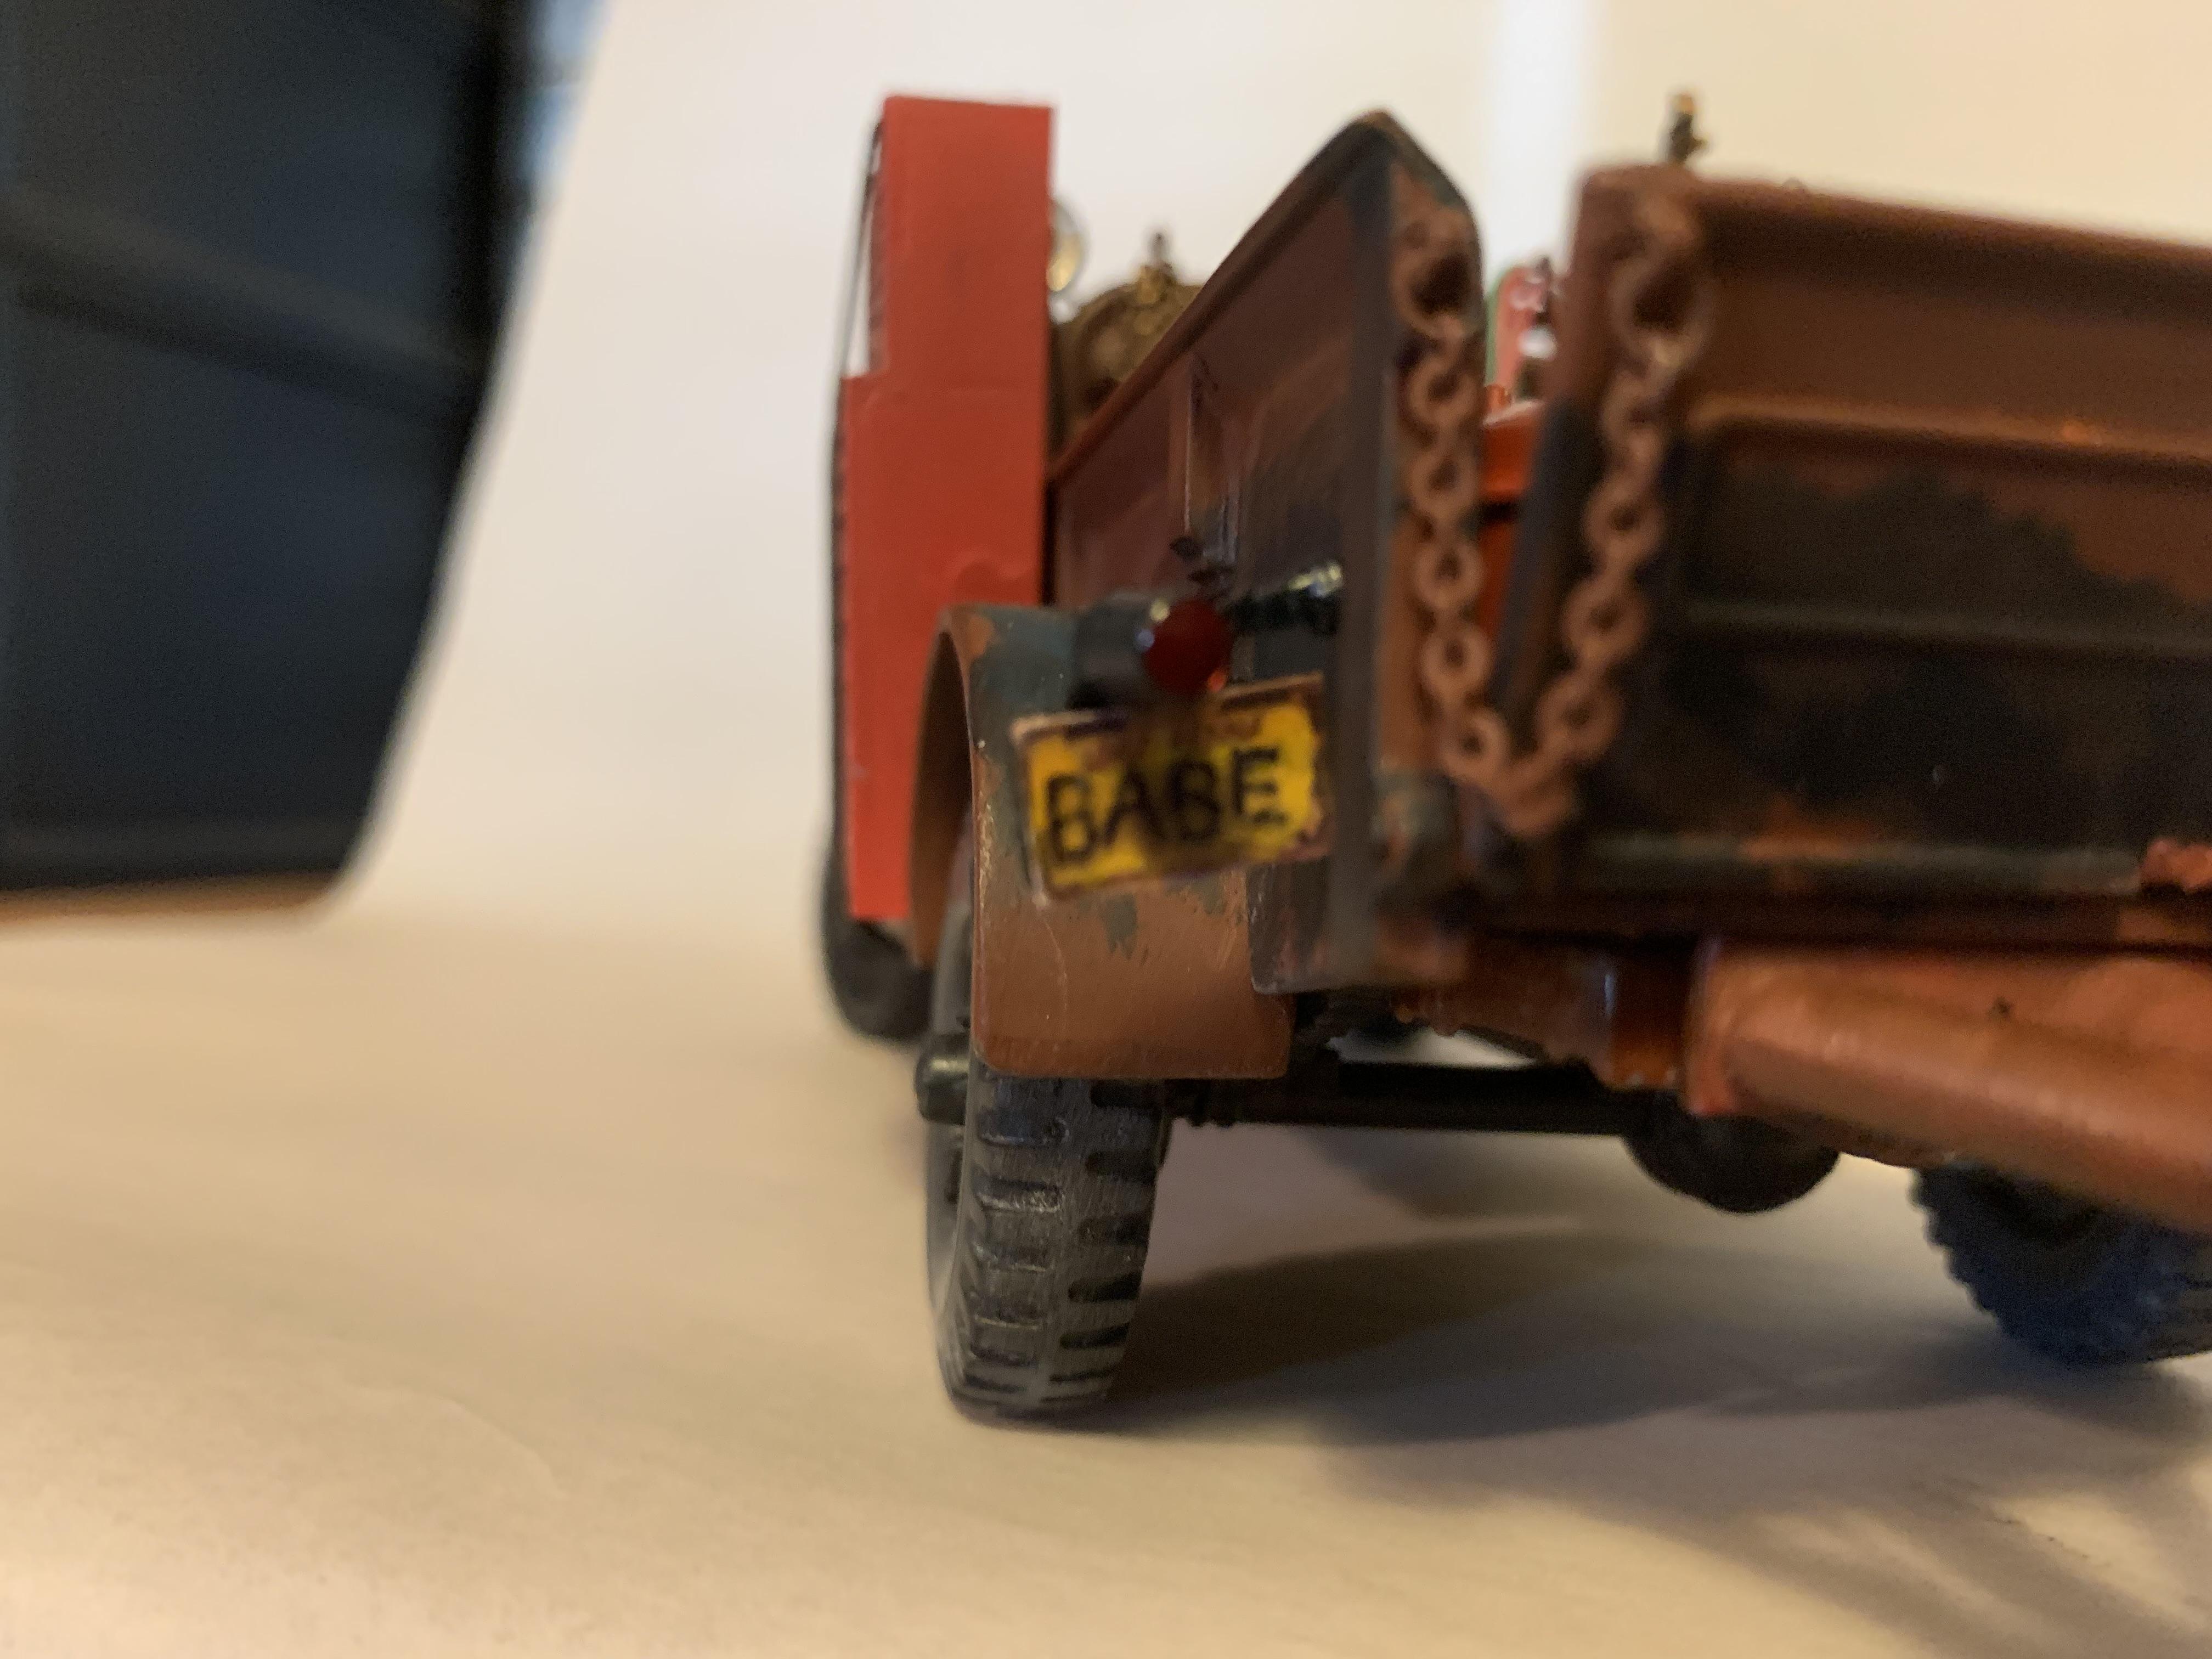
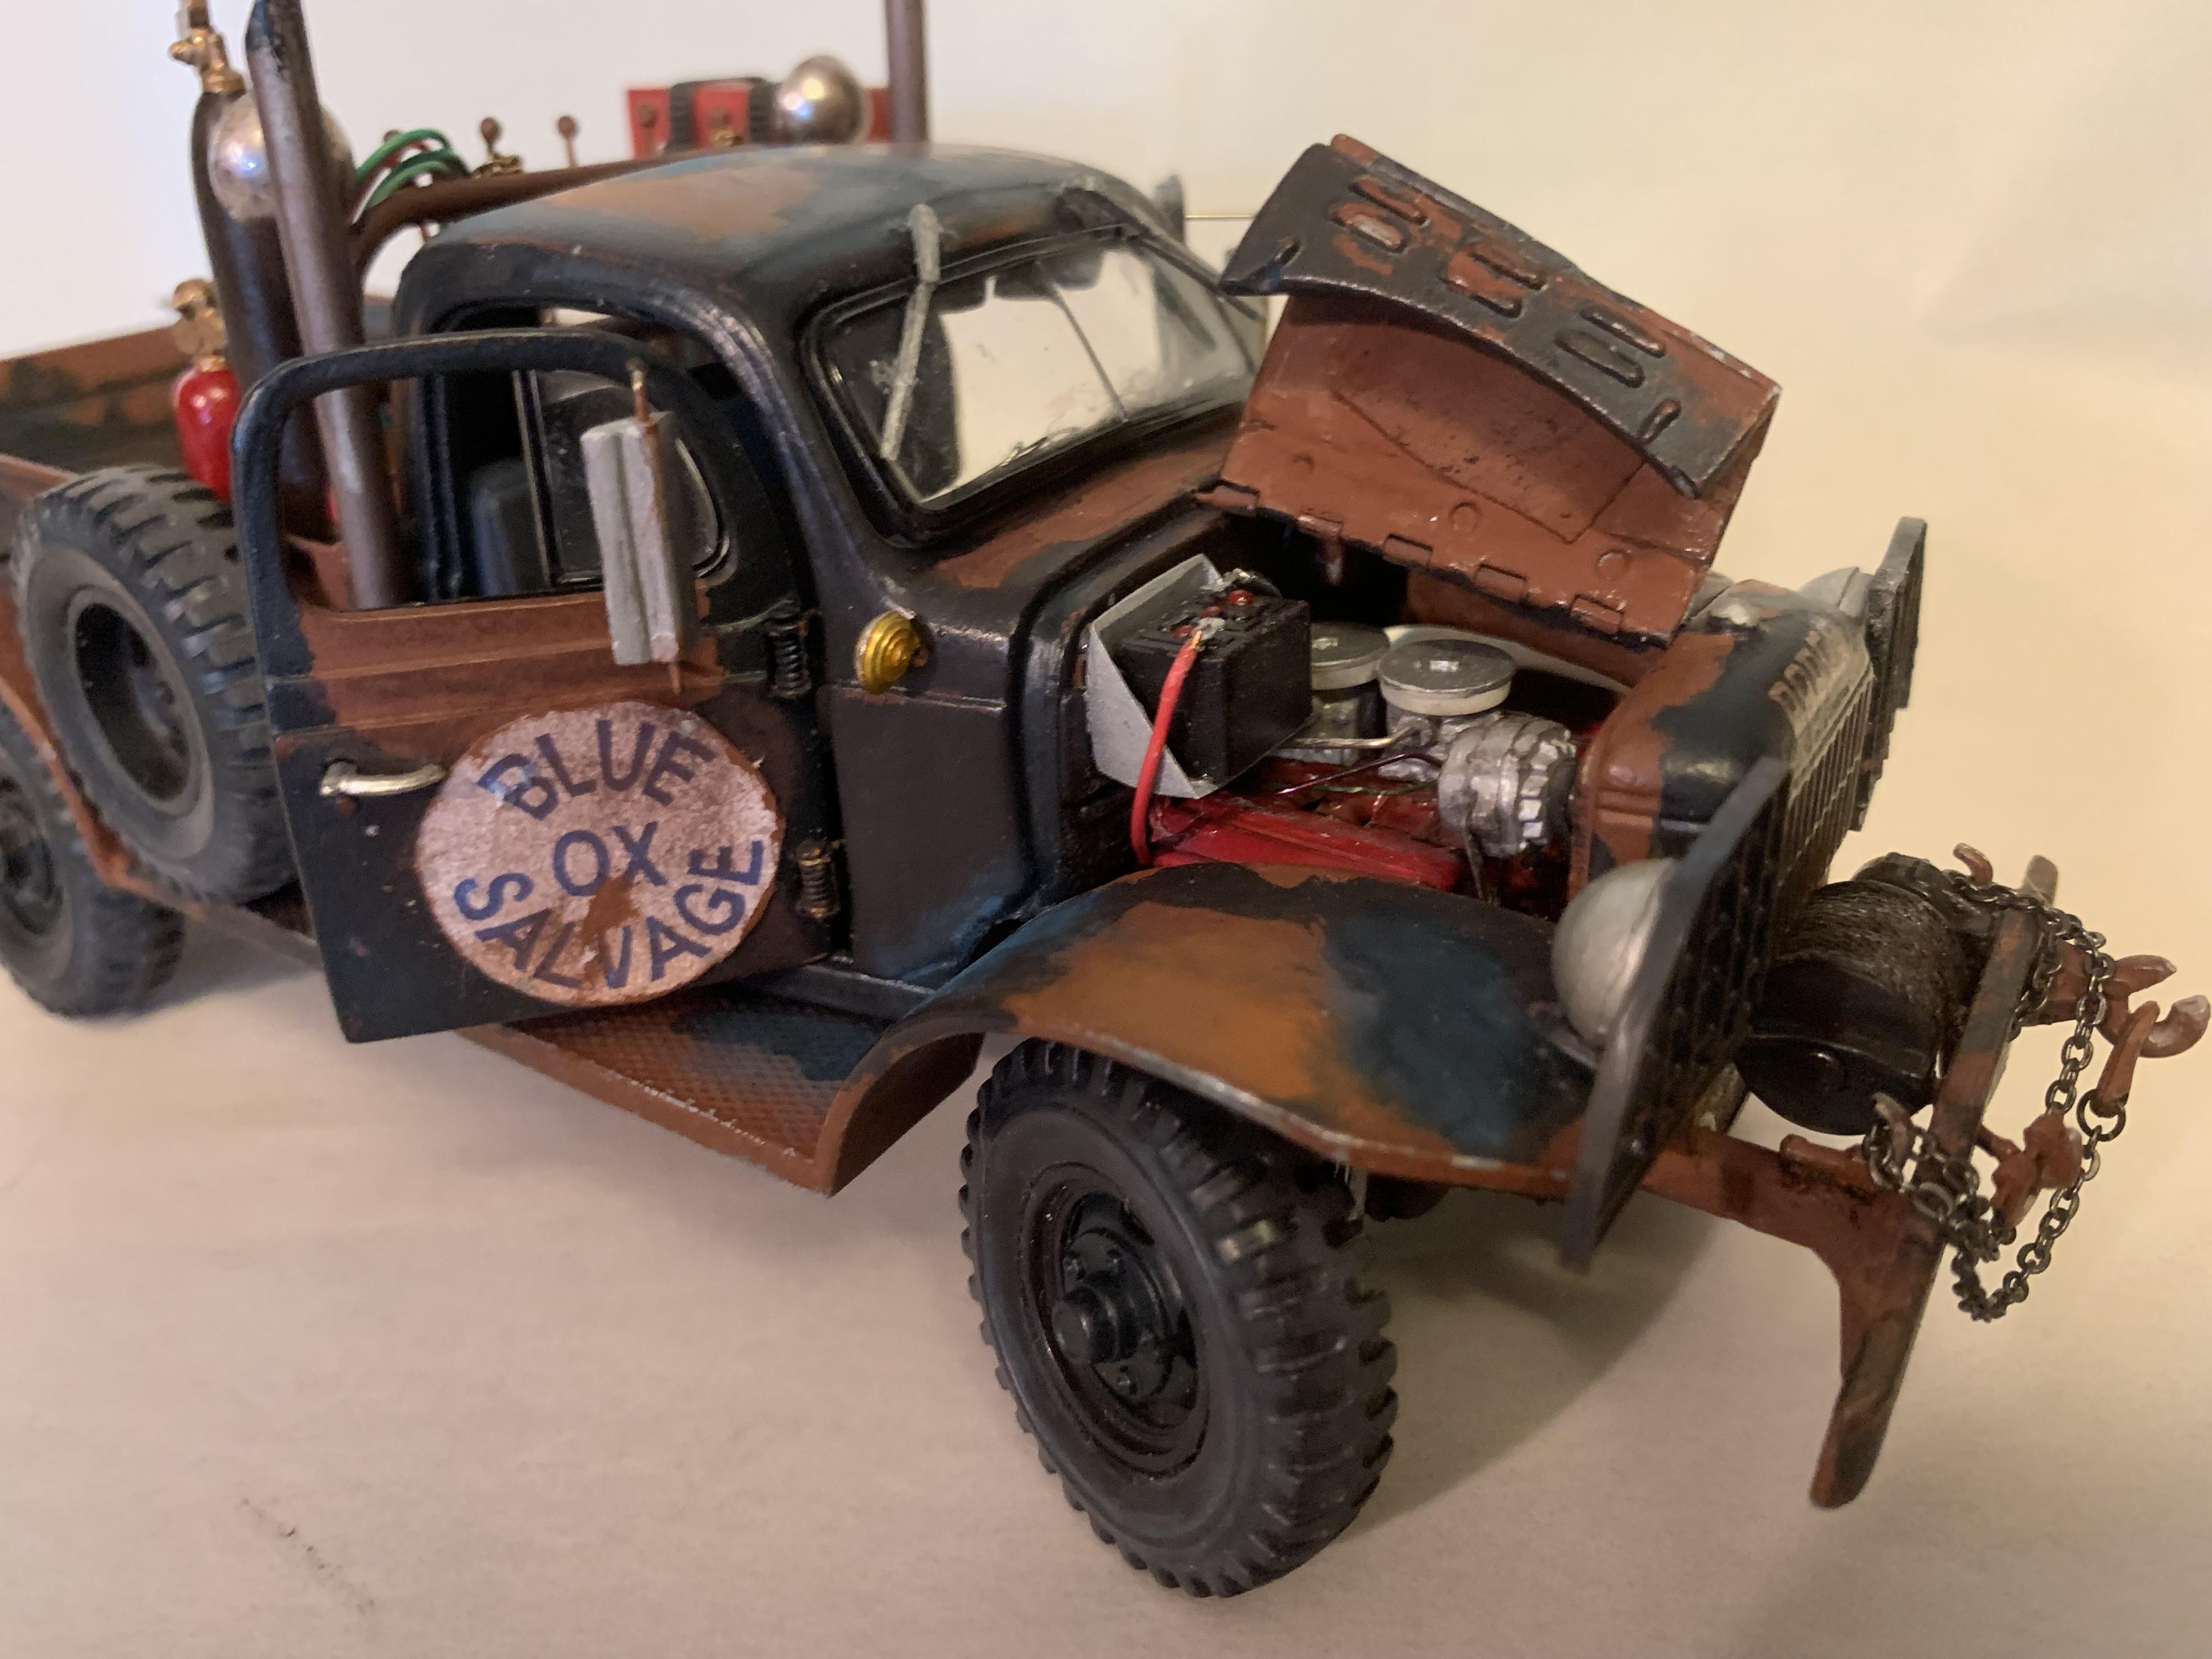
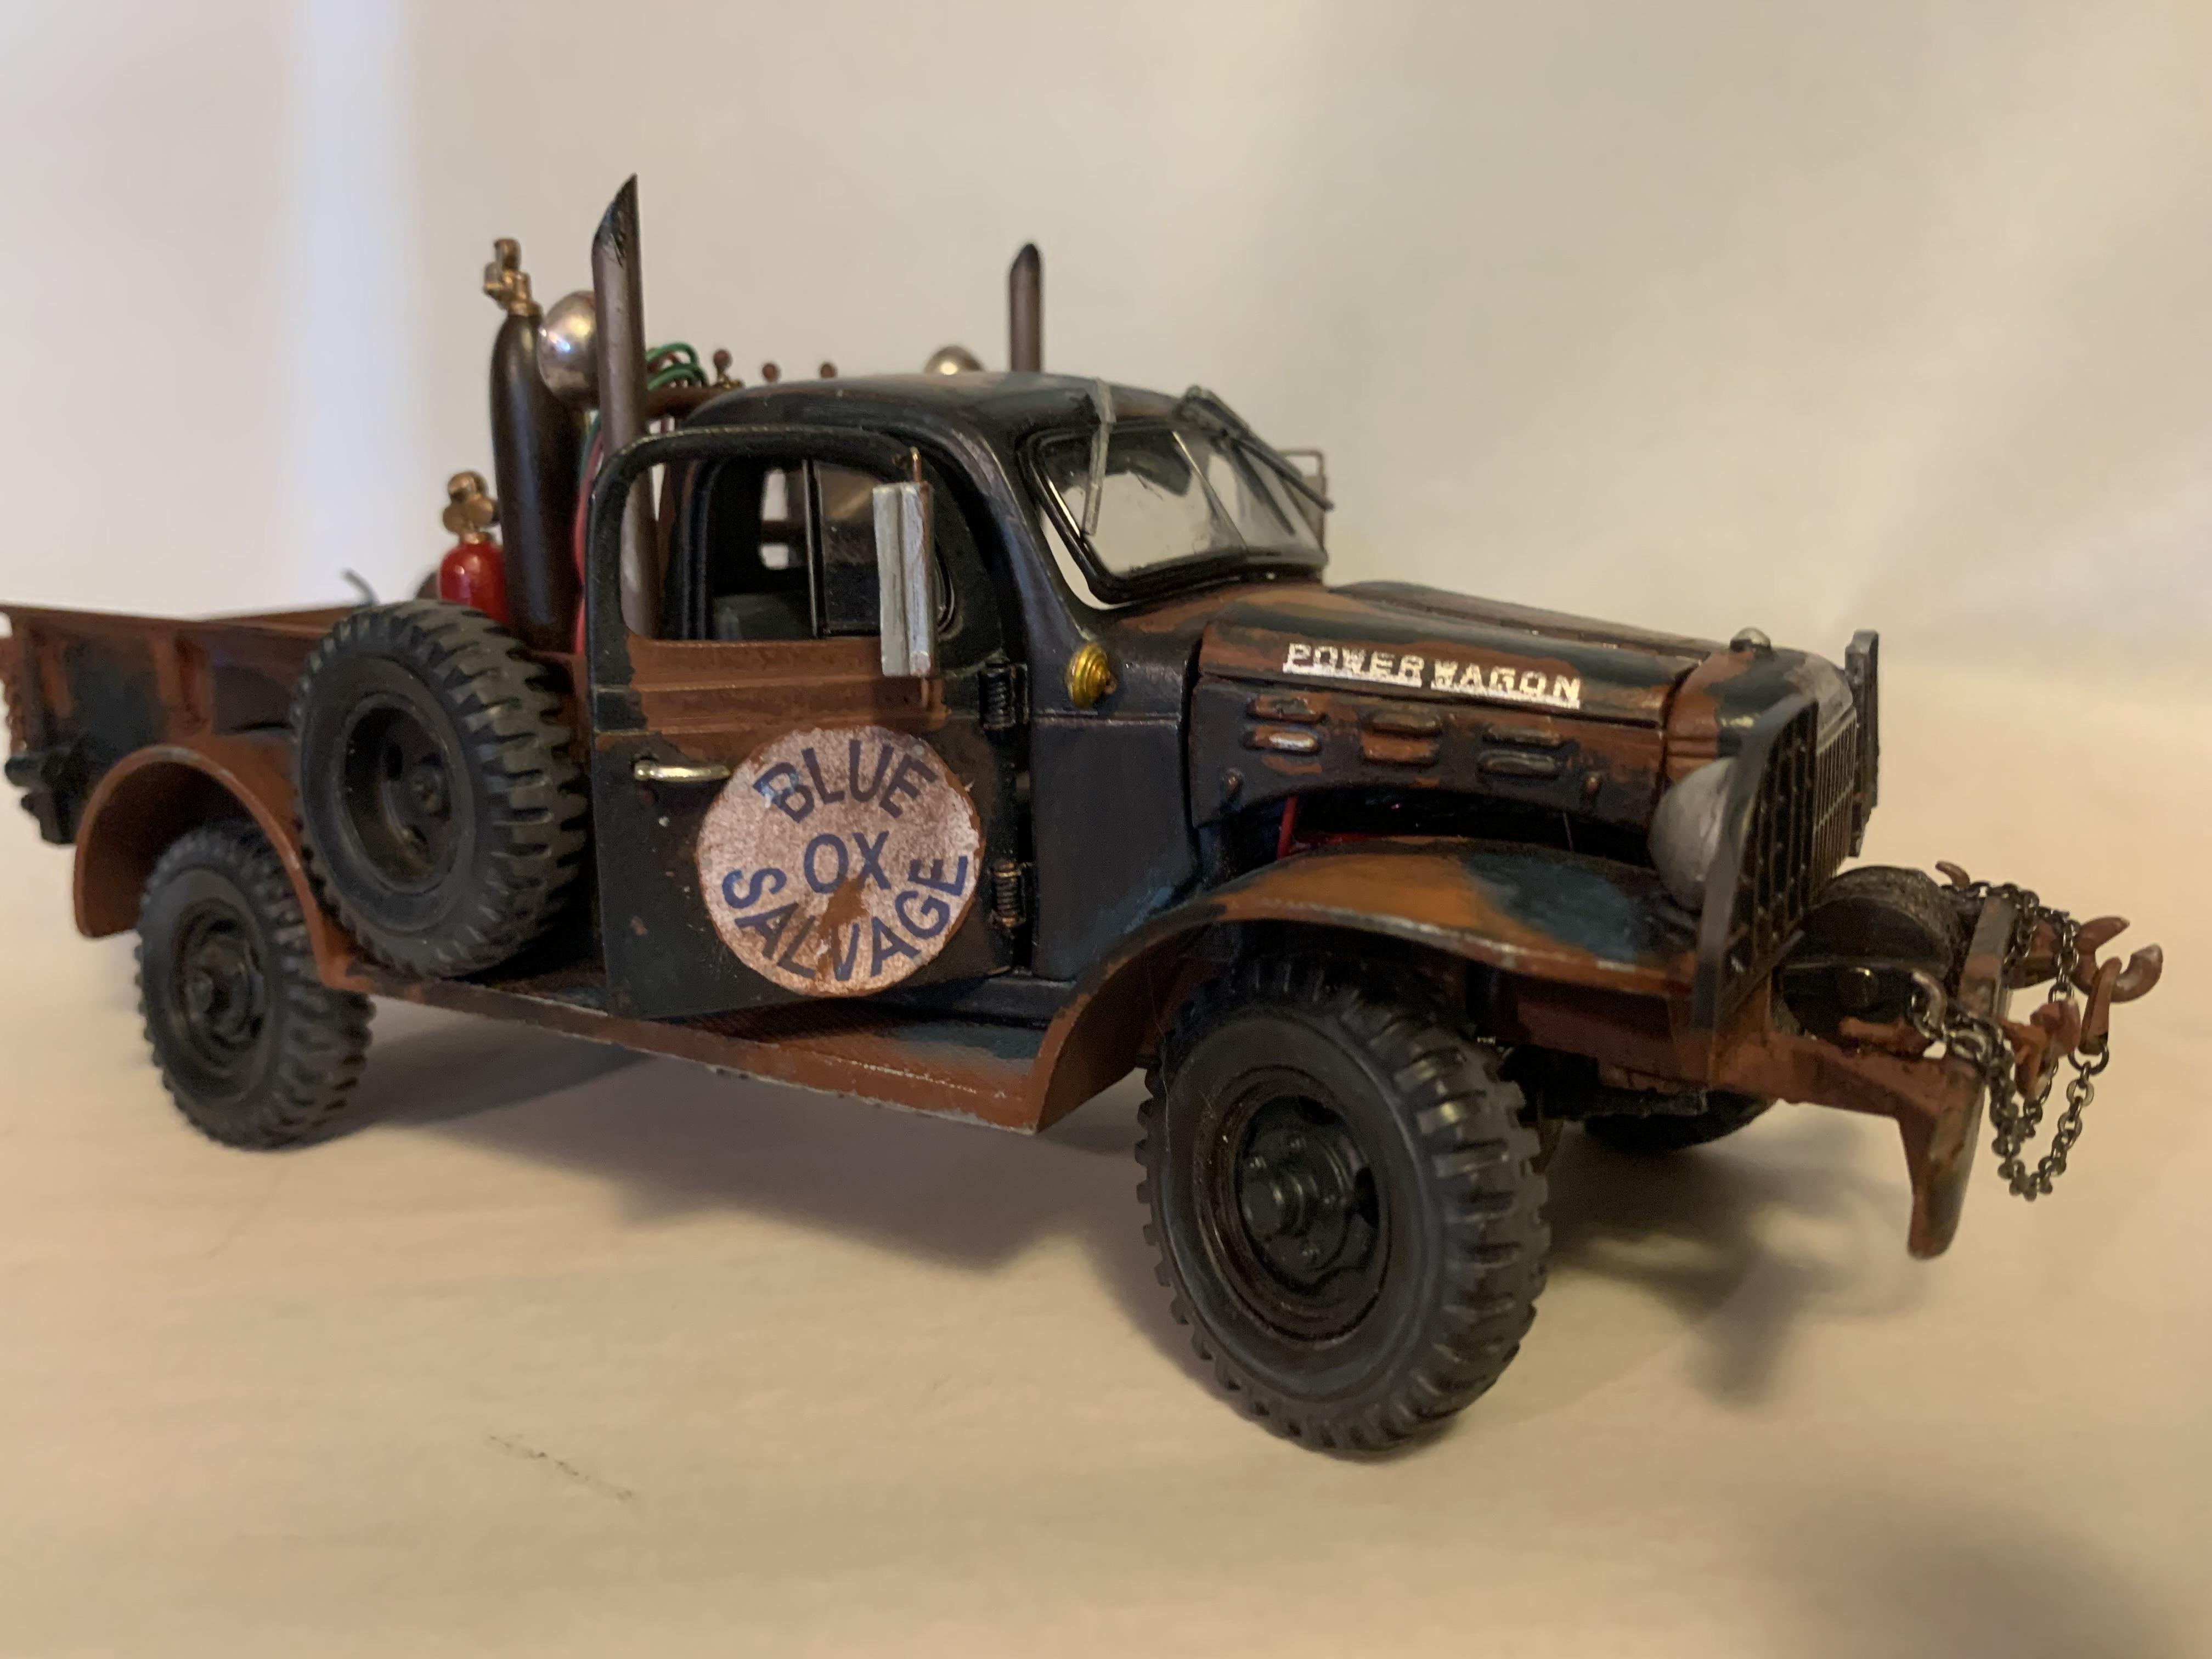
Togetherness is a wonderful thing- the Power Wagon is together! Still needs a lot of additional details and more weathering. Need to fabricate hold down straps for the tool box, stone guards for the head lights, chain attachments for the tow package, cable for the rear winch drum, chains, ropes, and bungee straps for the headache rack. and general mayhem in the bed!
-
1946 Dodge Power Wagon
Paul Payne replied to Paul Payne's topic in WIP: Model Trucks: Pickups, Vans, SUVs, Light Commercial
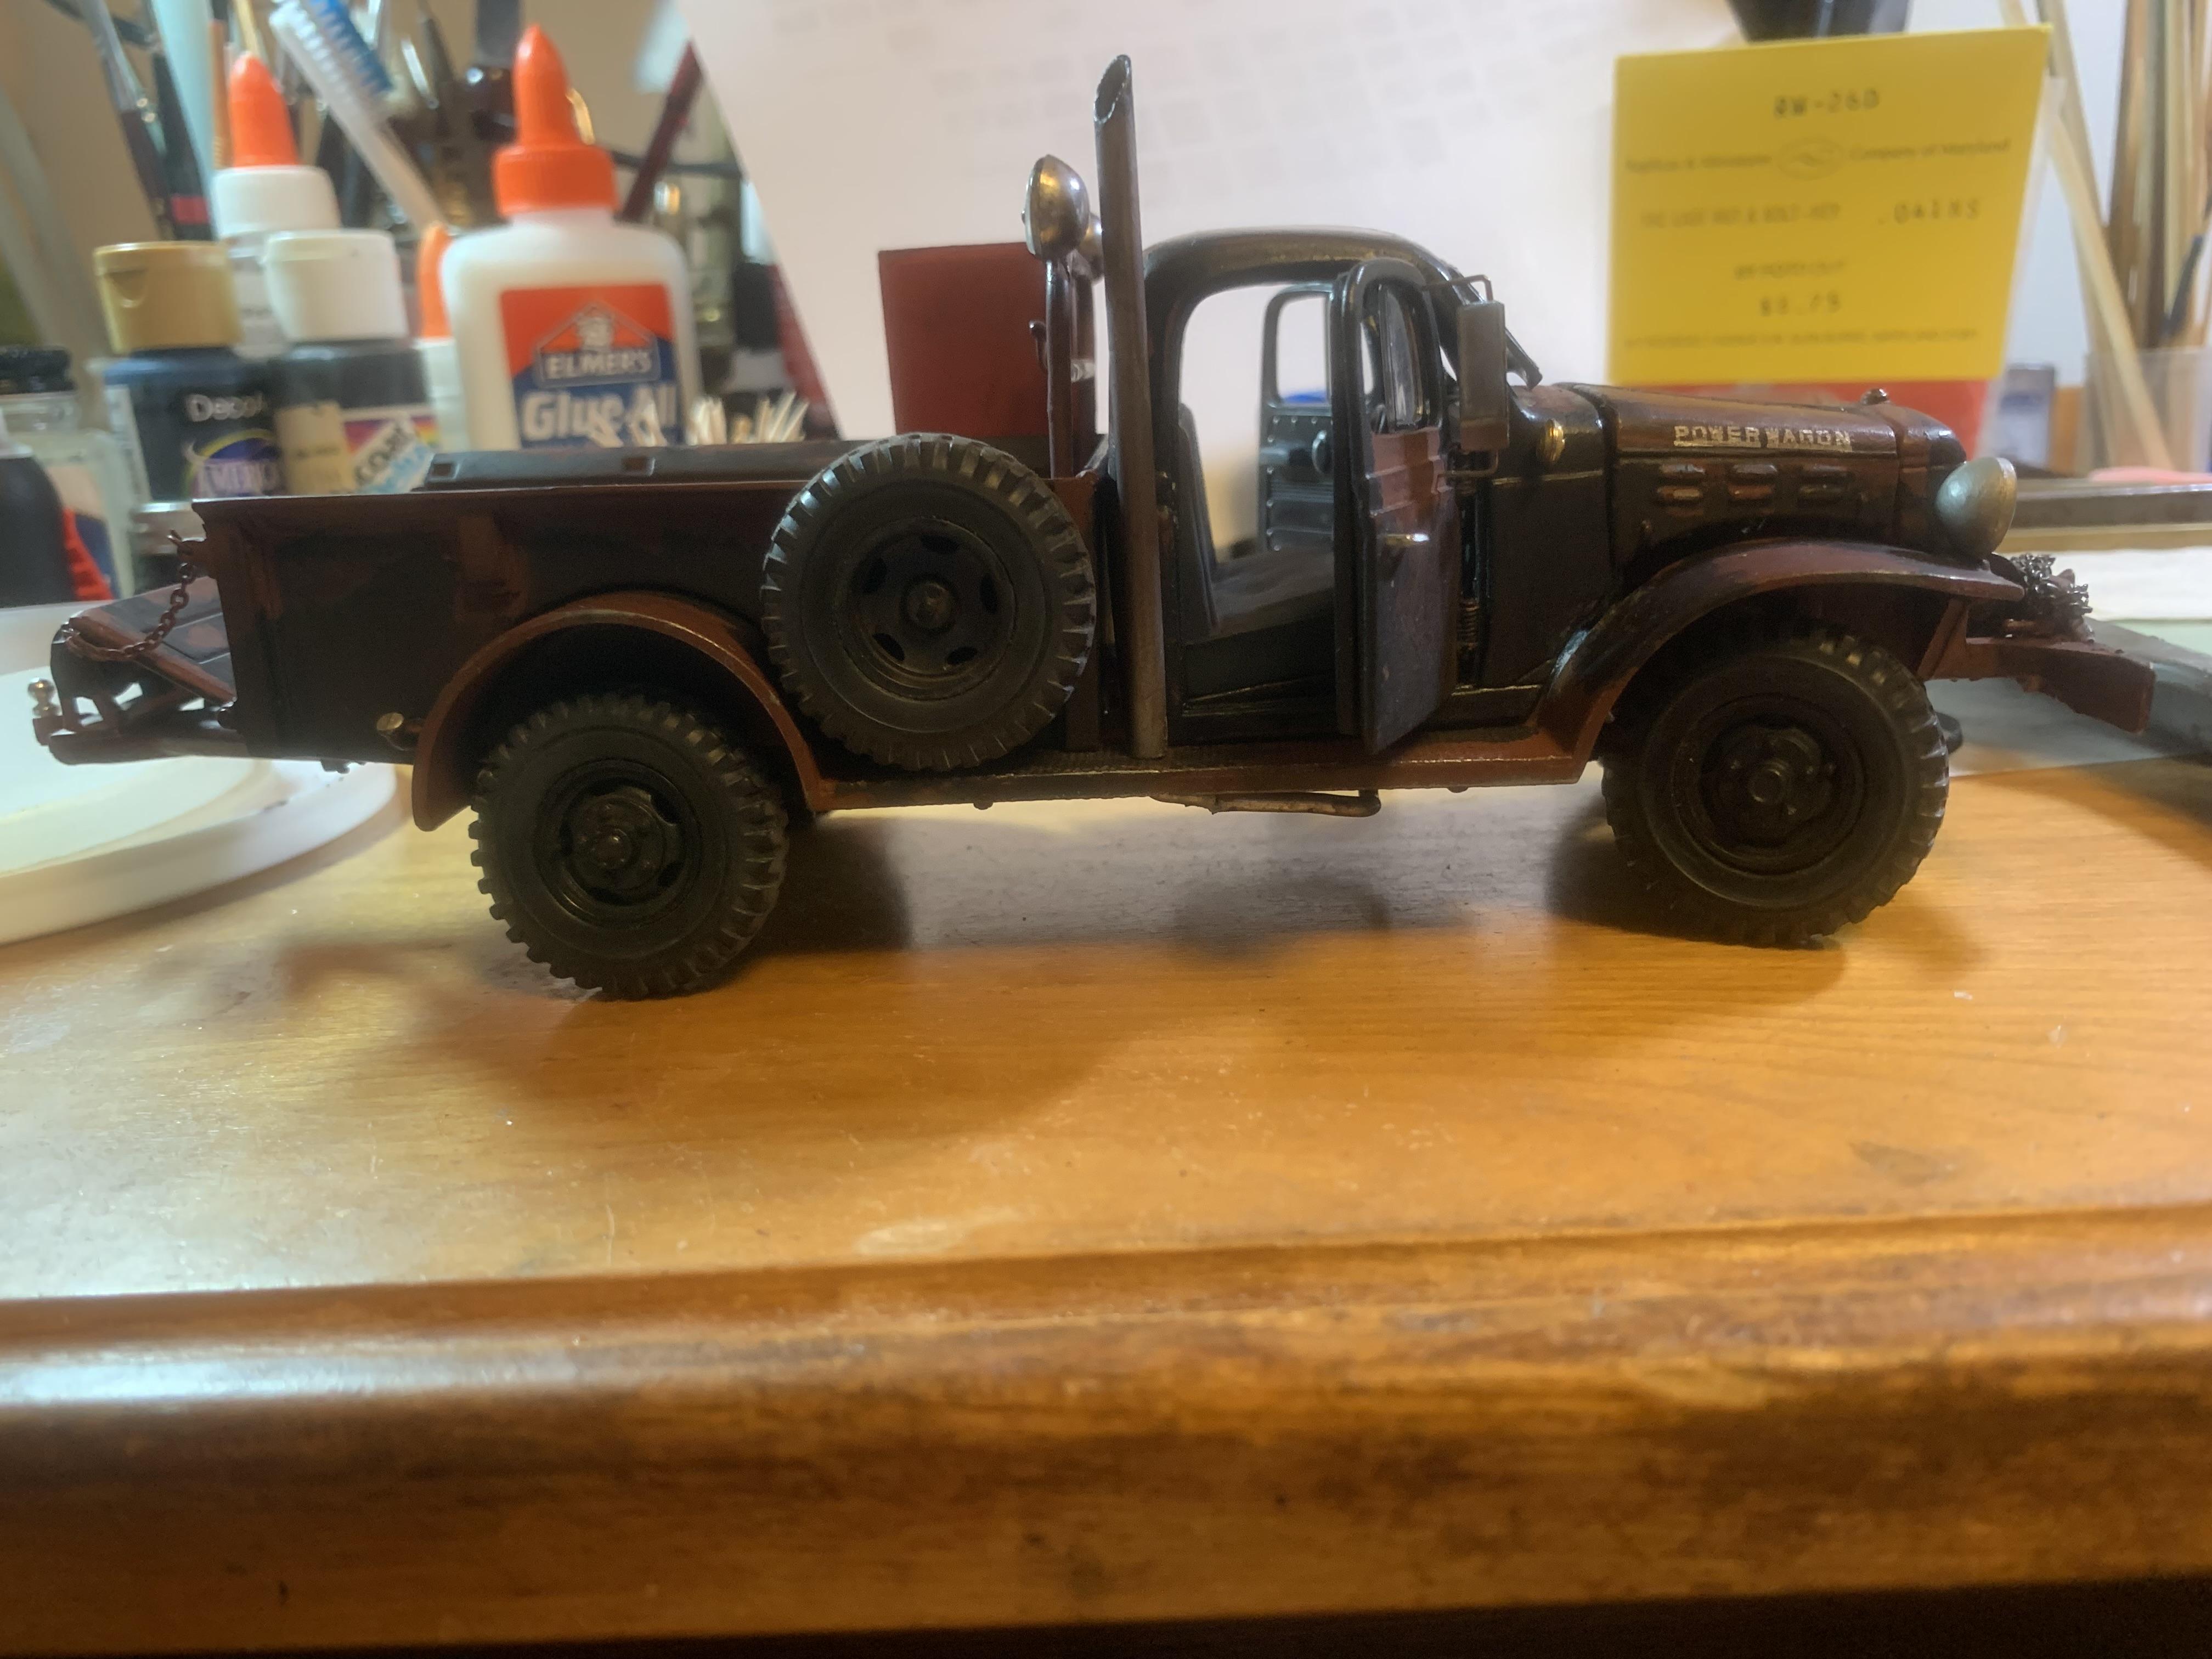
More progress! Beginning the dreaded final assembly! Installed the bed, still having a problem with the drivers side door on the cab. Got up the courage to finally add the Dodge and Power Wagon decals to the grille and hood sides- and then I weathered them! Also finished and installed the power drive for the rear winch mounted on the hitch assembly which of course will tow the trailer for the big boat! Onwards through the fog, forward never straight!
-
Isn't junk wonderful! Extend my thanks to your son who came up with the challenge and the raw materials for it! Definitely want more pix as progress continues!
-
Just a nice clean traditional Deuce Roadster
Paul Payne replied to OldNYJim's topic in WIP: Model Cars
Beautiful engineering of a well thought out plan. This is gonna be great! -
truck, boat, and trailer
Paul Payne replied to Paul Payne's topic in WIP: Model Trucks: Pickups, Vans, SUVs, Light Commercial
Tim, thanks for the kind words- a comparison would be a great idea! We met at the Hoosier model contest and I enjoyed visiting with you. The next step on the boat will be building the visible frames in the engine compartment. I am considering a V-16 Duesenberg engine using parts from the Monogram Duesey but also scratch building a lot. I guess small simple projects just don't exist for me any more........................... -
truck, boat, and trailer
Paul Payne replied to Paul Payne's topic in WIP: Model Trucks: Pickups, Vans, SUVs, Light Commercial
Sometimes it really pays to work with glue bombs and junk, plus its recycling, right? -
Post your truck mockups.
Paul Payne replied to Mike C.'s topic in WIP: Model Trucks: Pickups, Vans, SUVs, Light Commercial
I'll add my Power Wagon.
-
Thanks all, every one a learning curve- like you won't always get a good paint job just because the last one was!
-
Thanks, Cobraman! The Cobra was fun- serious loss of footwell room with that wider engine!
-
Th Revell snap kits have the proper size wheels and tires. AMT elected to use their generic wheel size. The tires are the correct overall size, but the side walls are too wide due to the undersize wheels.
-
1972 Eldorado. Still Confused
Paul Payne replied to Perspect Scale Modelworks's topic in Model Building Questions and Answers
Claude, have fun with your build! I have always thought that the engine (8.2 liters or 500 cu. in.) looked pretty small in comparison to other kitted GM V-8's. Stick in the biggest go power you can and make that land yacht fly (mixed metaphore?) -
Guys, thanks for the kind words. Starting to catch up with photographing all my builds and was surprised at how many were never caught by the digital eye, so decided to share! Jaguar hit a major home run with the XK-120 and that fantastic D.O.H.C. six- and did the same thing with the XK-E! The Porsche speedster is my smallest road car model- I should photograph it next to the Hurricane Typhoon for a size comparison.