Mr. Metallic
-
Posts
2,781 -
Joined
-
Last visited
Content Type
Profiles
Forums
Events
Gallery
Everything posted by Mr. Metallic
-
AMT The Green Hornet Black Beauty Kit
Mr. Metallic replied to martinfan5's topic in Car Kit News & Reviews
Very cool update to an iconic car. If you happen to want to part with the kit wheels let me know -
STEVE SCOTT ,A.KA . [ UNCERTAIN T ]
Mr. Metallic replied to bpletcher55's topic in General Automotive Talk (Trucks and Cars)
Doesn't surprise me being polarizing there. Since that group is mostly a traditional rods and customs community I can see a lot of members absolutely hating the outlandish nature of it's design. -
AMT M&H Racemaster Dragster Slicks & Parts Pack Tires
Mr. Metallic replied to Gregg's topic in Car Kit News & Reviews
Thank you very much for your response Steve. -
AMT M&H Racemaster Dragster Slicks & Parts Pack Tires
Mr. Metallic replied to Gregg's topic in Car Kit News & Reviews
Thank you. Wonder why they removed the side wall detail? Not that it was well defined anyway. Probably a licensing issue as per usual. -
I don't know that I need a phaeton because the monogram kit is quite good and I have several. But if they continue the series into other body styles a true roadster and closed cab pickup would be snapped up by stock builders and hot rodders alike.
-
AMT M&H Racemaster Dragster Slicks & Parts Pack Tires
Mr. Metallic replied to Gregg's topic in Car Kit News & Reviews
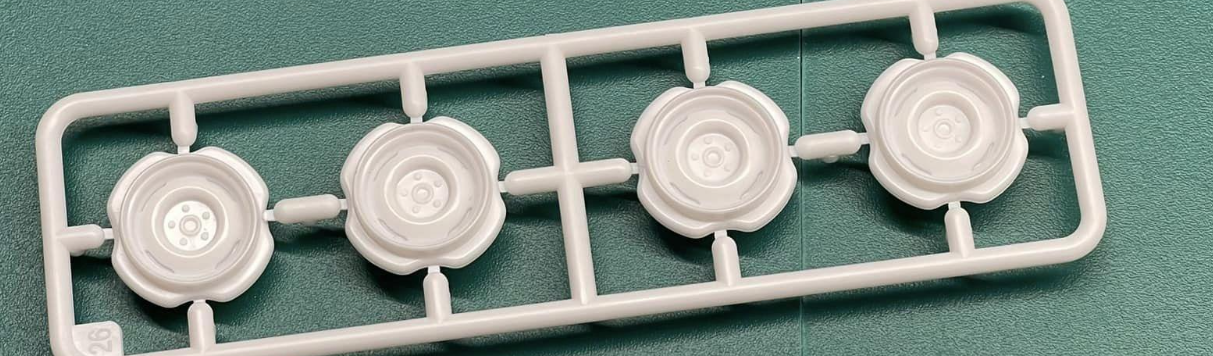
I have a couple questions on AMT PP005. This set is out of production, but I'm looking to find more of these front tires. Were there any other Round 2 kits from the last 10 years that they would be in? I have about 5 other projects I need these for to go with my SweeTee. I have a line on the blue stripe slicks since they came in their own set pack of 8 and are easier to find.
-
Revell Chrome Spray Durability Improvement? Finally got my hands on a can of Revell Chrom spray chrome paint (they spell it Chrom because they are a German company) I know this has been out for awhile and it’s a great finish right out of the can except for some durability concerns. People have tried clear coats with mixed results, Future and Spaz Stiks seeming to yield the best results. However, they do diminish the reflection a bit. So, I set about to do a little experiment in trying to cure the paint a little better using my dehydrator. I performed the rub test with my thumb and moderate pressure, and my hands are really course from doing demolition in my kitchen this week. Here are my results. On the left is an untouched sample, straight out of the can. That is our “control” sample to compare our results to. Sample 2 is a 24 hour cure, just sitting out in the open air. Note mild scuffing. Sample 3 was cured in the dehydrator for 24 hours. Slightly less scuffing than the non- dehydrated sample. And lastly, sample 4 (far right) has been in the dehydrator for 48 hours. Even less scuffing. Molotow chrome ink would be a silver mess by now with this much handling. In conclusion, baking the Revell Chrom in a dehydrator does make a difference in the durability. With moderate handling during assembly it should hold up well. Of course true vacuum plating is superior, but there are fewer and fewer providers of that service available to our hobby. And I will continue to use Molotow with a small brush for detailing small items, but for big pieces I think I’m sold on Revell Chrom! This is an unsolicited review of Revell Chrom and I have not been compensated in any way. Just trying to help out my fellow builders.
-
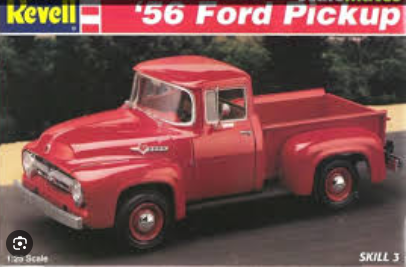
AMT 1960 3-in-1 Ford F-100 Pickup Truck
Mr. Metallic replied to rekcirb13's topic in Truck Kit News & Reviews
Interesting that this kit has the more modern style wheel design used by Moebius with the flanges that fit into the tires. Have other new tools from Round2 used this style?
-
AMT 1960 3-in-1 Ford F-100 Pickup Truck
Mr. Metallic replied to rekcirb13's topic in Truck Kit News & Reviews
Anybody out there that could take a pic of the exhaust manifolds and crossover pipe from this kit? Or better yet, anyone willing to part with them? Has to be this edition as the crossover exhaust is not in any other release of this kit
-
Thank you. The color is the plastic, just polished out. There have been a couple built here over the years, but this is the one that influenced me in my build.
-
My Builds of the Tom Daniels designed "true" hot rods kits
Mr. Metallic replied to Mr. Metallic's topic in WIP: Model Cars
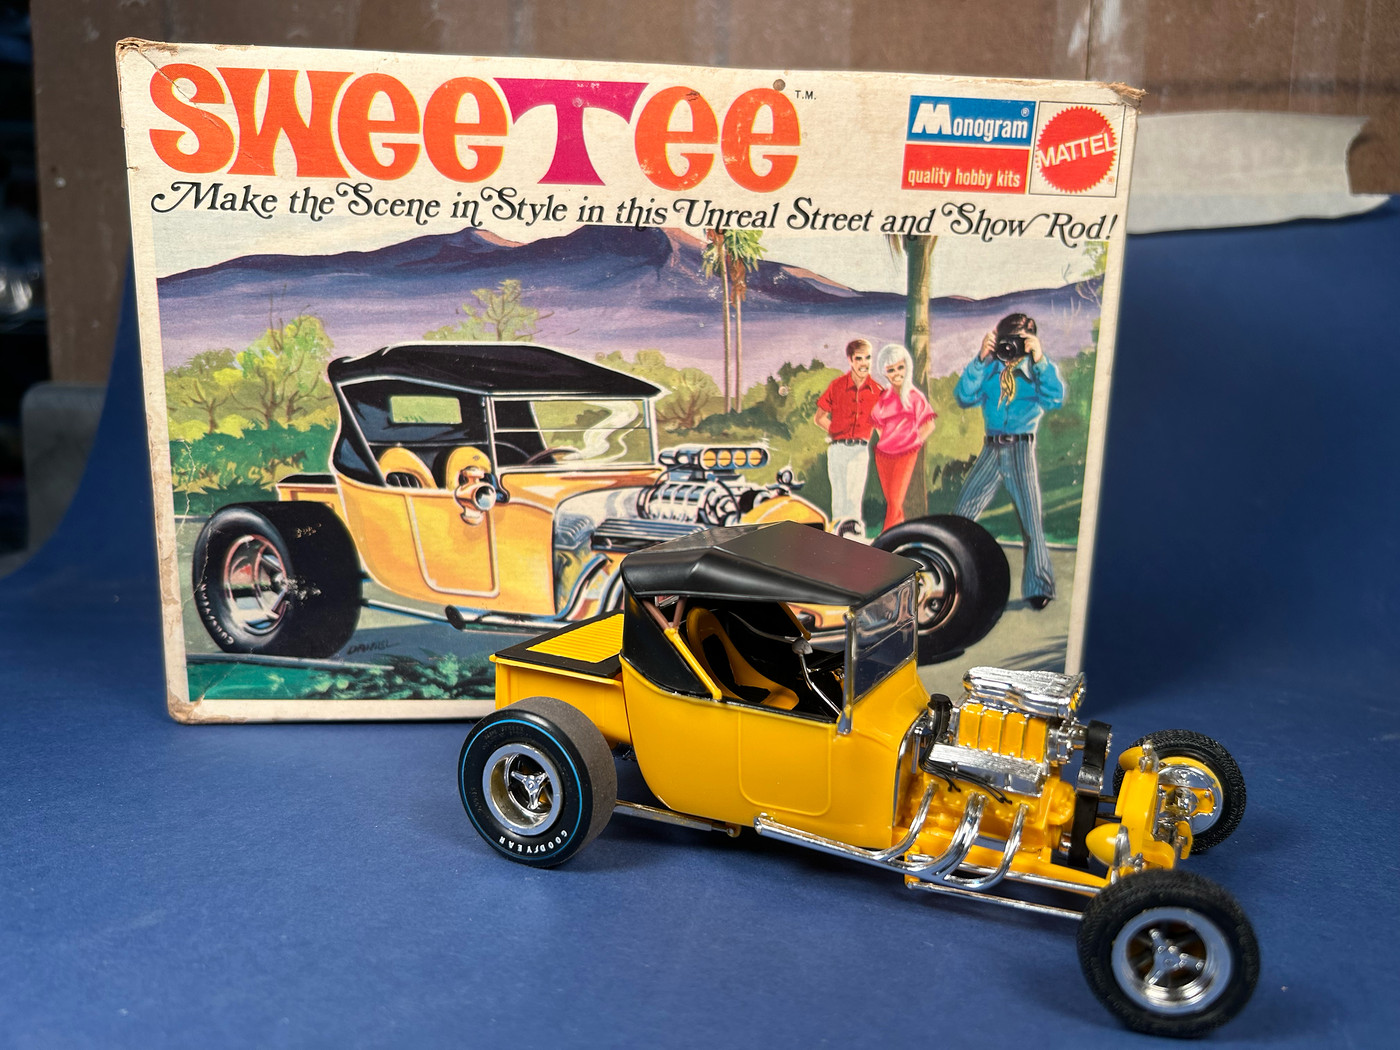
The SweeTee is finished. Below is a link to the Finished thread. Stay tuned for the next build in the series.
-
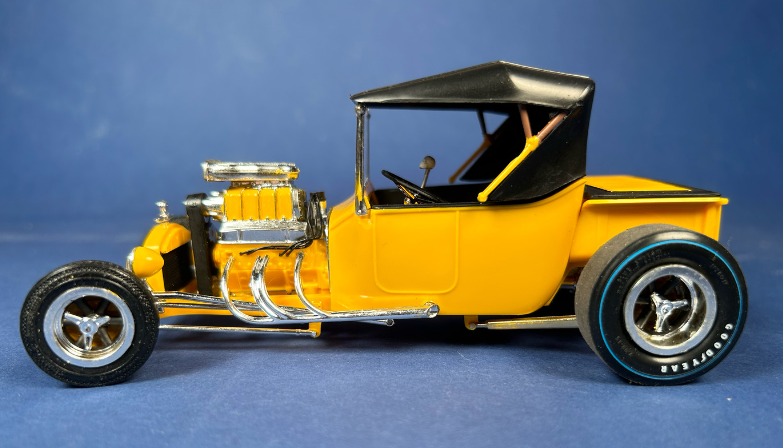
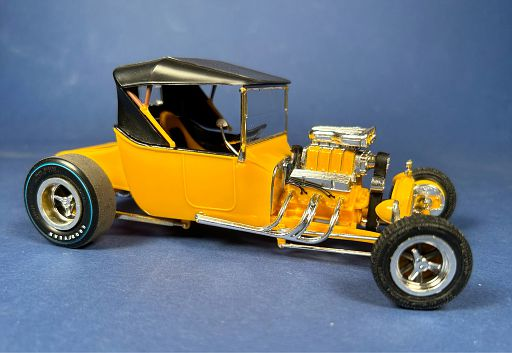
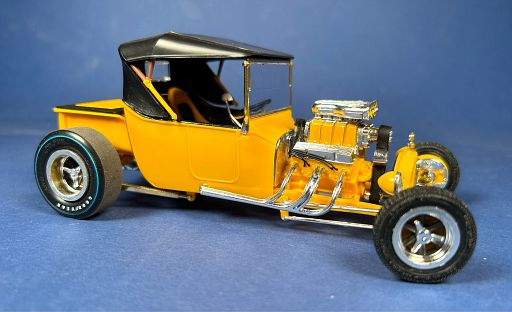
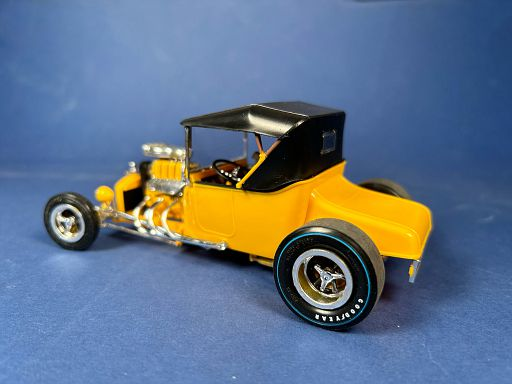
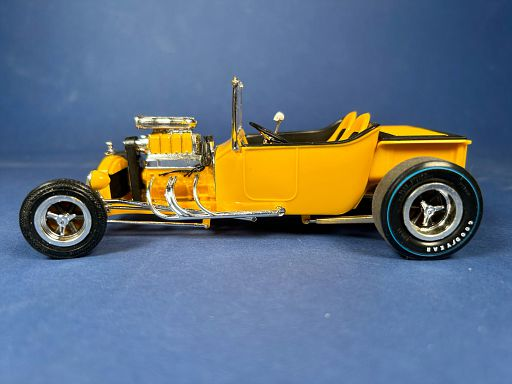
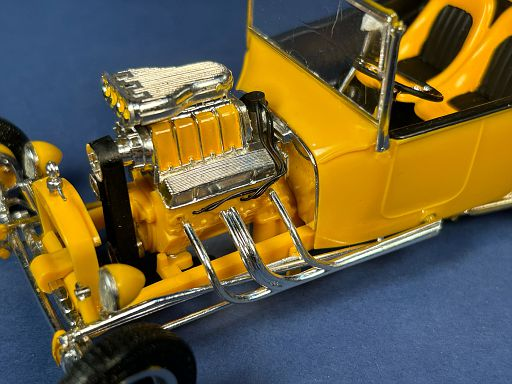
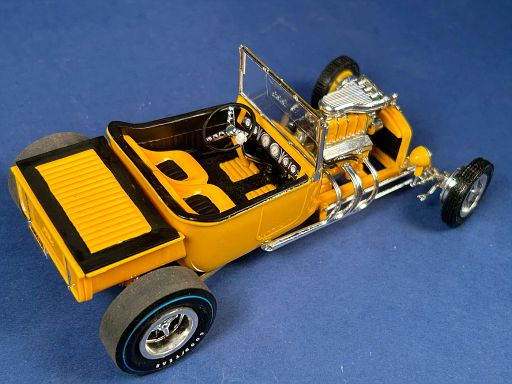
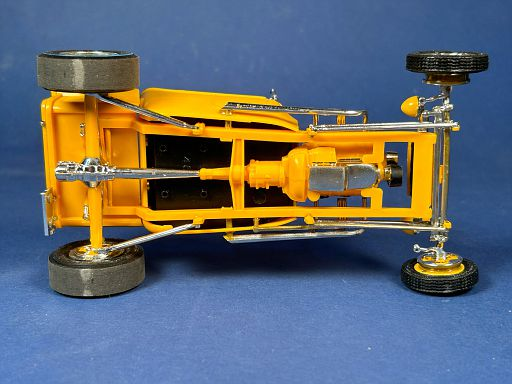
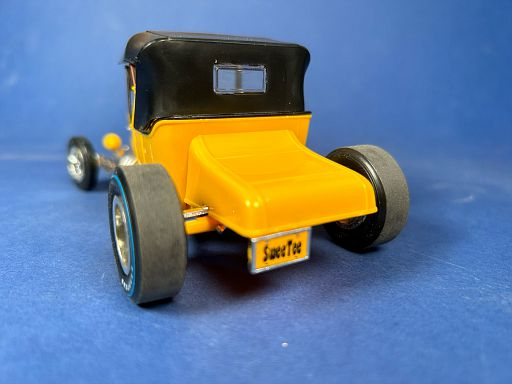
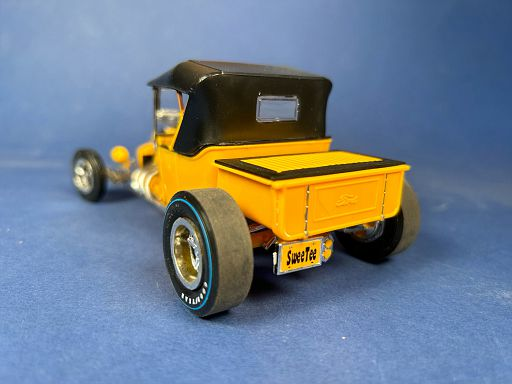
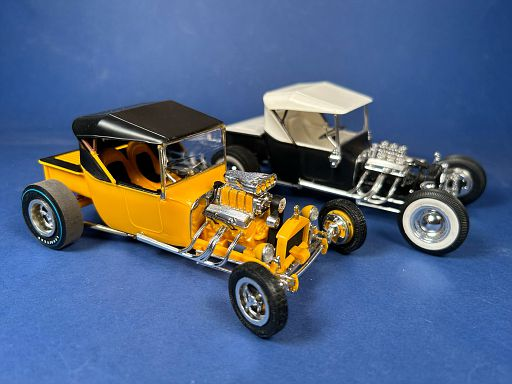
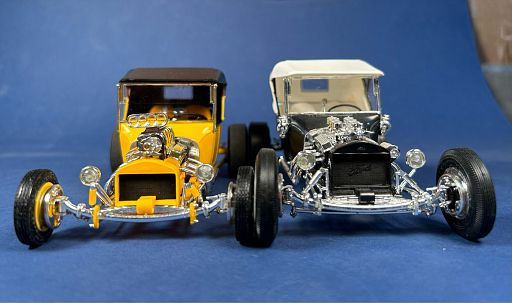
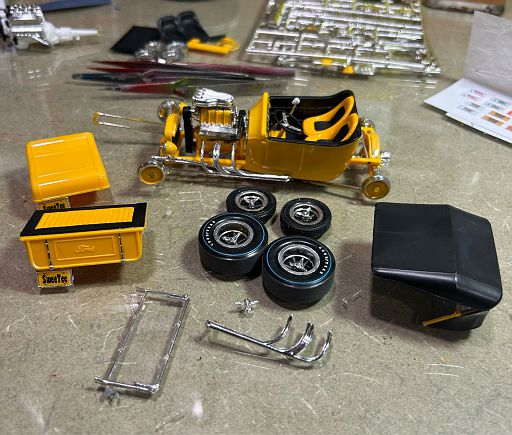
For those of you that didn't follow along on the build thread, this is the first in a personal build series of the Tom Daniel designed "true" hot rod kits. I say true in quotations because these were the only kits that he designed for Monogram that were based on already existing tooling (to my knowledge). The SweeTee, Boss A Bone and Son Of Ford were all based on Monograms tooling of the Little T, Blue Beetle and Little Deuce respectively. I've been on a quest over the last few years to capture buildable versions of these kits, and the SweeTee is the rarest (not that the other two are common by any means) so I was extremely happy when I stumbled onto this mint SweeTee kit on ebay one evening with a reasonable Buy It Now. It sat on my shelf for a couple years, and I thought that this kit would be a perfect return to my bench after a long and protracted build slump. This is the first model I have completed in over a year. Heavily inspired by the upgraded-box-stock builds of Bob Spedding @TooOld I set about to build this nearly box stock with a few upgrades. The upgrades I added I feel maintain the look and feel of the boxart while giving the observer a little something to spark interest. One major thing was that I made the turtle deck and pickup bed interchangeable with the use of strategically placed magnets since i couldn't decide which option I liked better. Now I have both. here's a list of the changes I made Swapped in the tires from an AMT Gasser wheel/tire pack Custom mixed paint color to match the molded plastic Stripped the chrome off some parts to reveal the yellow plastic and then replaced some of the chrome with Molotow (note headlights for example) drilled out the ends of the exhaust headers Morgan Automotive Designs pre-wired magneto Lowered rear suspension Lowered front suspension Flocked interior floor A special thank you to Bob for the inspiration to build this, and supplying the custom SweeTee licence plate. And here it is sitting next to my Little T, just to illustrate the differences between the 2. Also note the dramatic lowering of the front achieved by a combination of lowering the spring perch and the wheel/tire package. Thanks for following along. here's a link to the build thread for those interested in the details and stay tuned for the other builds in the series.
-
Love the design of the Copperhead, and adding bigger wheels and tires makes it even cooler.
-
Pretty sure he is active on social media, seem to recall seeing his name in some groups I'm in. If he send him a message he should get an email notifying him someone is trying to reach him here and maybe he'll come back.
-
Canadian 1961 Pontiac Laurentian conversion
Mr. Metallic replied to TheBEAUMONTGURU's topic in WIP: Model Cars
Very nice conversion work. And I admire your conviction, sacrificing 4 kits to build this one. Bravo! -
My Builds of the Tom Daniels designed "true" hot rods kits
Mr. Metallic replied to Mr. Metallic's topic in WIP: Model Cars
The SweeTee portion of this project is officially done. Just working on clearing off my photo-taking area so I can take decent pics of it. Will post soon. -
Ollie's strike again
Mr. Metallic replied to GLMFAA1's topic in General Automotive Talk (Trucks and Cars)
Went to the first Ollies to open up in our area (Moline IL) with fingers crossed on finding a couple of the Nova AWB kit. Pretty much all that was there were the Monogram Ollies kits. All was not lost because i picked up a couple of the 32 Ford roadster (which I'm always looking for). It's kinda out of the way so I won't be able to get there often. -
My Builds of the Tom Daniels designed "true" hot rods kits
Mr. Metallic replied to Mr. Metallic's topic in WIP: Model Cars
Thank you. Just mounted your specialty plates last night. -
My Builds of the Tom Daniels designed "true" hot rods kits
Mr. Metallic replied to Mr. Metallic's topic in WIP: Model Cars
Ok, I'm in the home stretch. At least I'll have one model finished this year.
-
Squeaky clean build right there. great color choice too.
-
Nice Baby Vette. Clean build.
-
Jo-Han '70 Oldsmobile Toronado
Mr. Metallic replied to Csaba aka felhasznaaloo's topic in Model Cars
Very nice clean build. Nice photography too. -
My Builds of the Tom Daniels designed "true" hot rods kits
Mr. Metallic replied to Mr. Metallic's topic in WIP: Model Cars
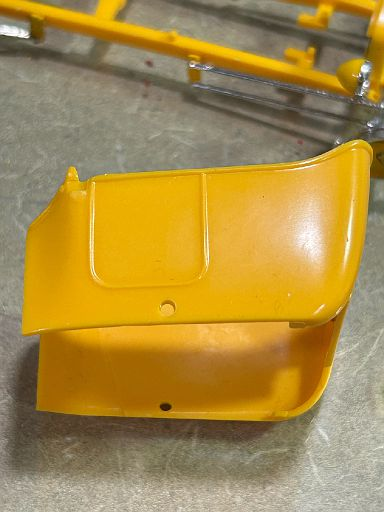
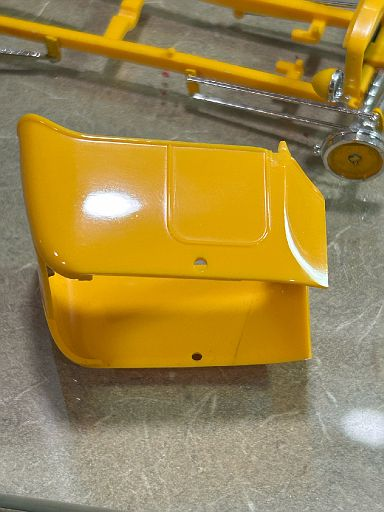
Alright, finally an update. Did a little polishing on the body parts to get them ready for final assembly. Before: And after: I might be happy going this far because I'm not sure I want to lose the fact that it's plastic. This level was achieved with a few minutes of using Meguiars Scratch-X. It was recommended that I could go further by using Novus, so I may test it out, But like i said I think I may be happy with where it is now. Anyway, I'm hoping that this will allow me to get into final assembly very soon.
-
Good news/bad news for me as far as this kit series goes. Bad news first- apparently I sold off the Mustang, Nova and Falcon examples I had of this kit series (all were Model King issues). So the only one I have is the Pontiac, and the Chevelle i just bought. Good news is I was sorting though the built ups I got from my father in law (who passed 4 years ago) to see what i actually got. Among them are 2 Mustangs. They don't appear to be complete, but I plan on restoring them somehow. Once i get my photo area cleaned off I'll snap some pics.
-
Glad you returned and brought this one across the finish line. I know a lot of us were following along. Your execution is awesome.