Codi
-
Posts
2,669 -
Joined
-
Last visited
Content Type
Profiles
Forums
Events
Gallery
Everything posted by Codi
-
The wait was worth it Jason........just glad to see you back on this one and looking forward to your next post. Impressive looking! cheers, tim
-
Well done Tom. You do very clean/crisp work and it shows on this car. cheers, tim
-

’72 Dodge Demon Drag Racer 1/25 scale
Codi replied to AmericanMuscleFan's topic in WIP: Drag Racing Models
Oh Francis.......you might not be getting all of the bench time you'd like but you DO make the most of what you get. Well done as usual sir! cheers, tim -
Hi Daniel, it's been too long since I've visited and checked out everyone's progress. You have moved along with this one.......just to share, it's not the body work I'd dislike it's paint at the end....never been outstanding at that and too many factors can mess up a ton of work and have to start over. Scratch-building is FUN but re-doing something (I know you get it) is frustrating as you near the end. I like your vision for it and can't wait to see it in paint! Good luck......tim
-
1/16th scale California Charger Dragster
Codi replied to Mr.1/16th's topic in WIP: Drag Racing Models
Welcome and thanks for sharing Santiago. I'll be sure to check out your links and other builds and congrats on a nicely done car. cheers, tim -
Thank you Dave and not just for the comments.....woke up this morning and took my daughter to that drag car show you told me about the other day in Lebanon on a whim. It was a solid show BUT the big deal for me was walking in and seeing the Pro Stock Mustang II of Scott Schafiroff. I've been doing my chassis drawings for the Mav based upon a 75' Hardy twin rail, all tube chassis which THIS particular car has... I have no drawings or blueprints so I was going by photos that I found on the web and from period magazines. So I'm on my back taking pics of the bottom of the car to get whatever I could and when I'm done who is standing there but the man that owns the car........well, he must have been shocked when I told him I've been looking for HIM for a long time. We talked for about 10 minutes and I showed him what I'm working on and he kindly said, come down to my shop and I'll take the clip off and put her up on the lift for ya'. I jumped at it to say the least. My drawings were off a little bit but I"m sure after I see the car up close (and with a tape measure in hand) that I'll come away with exactly what I need to make the Mav as accurate as it can be...........I'm stoked, can you tell? So, thank YOU Dave for even mentioning the show in the first place as I had no knowledge of it. I'll update this briefly after my visit to his shop and pics of the car up close. Cheers, Tim
-
Simon, I'm not familiar with the actual 350:1 scale aspect......meaning that a pencil or hand or coin of sorts in one of the pics you've shared to reflect the models actual size would be cool to see. Great looking ship for sure. congrats on her! cheers, tim
-
LIN, fantastic! That's exactly what it looked like. 😀 Seriously though, you brought it to life and I'd be curious to see some of your other builds regardless of the subject matter. You're talented that's for certain. cheers, tim
-
That is NICE Jim.........thanks for sharing. cheers, tim
-
1/12 Brabham BT45 Model Factory Hiro
Codi replied to Chris Smith's topic in Other Racing: Road Racing, Salt Flat Racers
Congratulations Chris on another outstanding build. She presents herself so well and reflects your talents. I loved this car and thread from the beginning and regret only that the she is now completed. What's up next Chris????? cheers, tim -
1/25 vintage go kart, my last 2024 build
Codi replied to eran_k's topic in Other Racing: Road Racing, Salt Flat Racers
That brings back memories. Very well done. cheers, tim -
T41 Bugatti sport coupe
Codi replied to charlie libby's topic in WIP: Other Racing: Road Racing, Land Speed Racers
I have to add that this thread has been a pure "giggle" to watch. Always something to smile and wonder at. The body is sublime and the little details captured (the welds on the driveshaft as but one example) all coming together to make an amazing one of a kind build. Cheers to you Charlie, tim -
I've always been fascinated by those that can paint such as you.......John Teresi always comes to mind as one such person. Thanks for sharing your process and like others have stated, the colors are just fantastic along with the scheme you've chosen. The mix of construction methods, brass, 3D and others make it a truly interesting build. Good luck with her Jim! cheers, tim
-
To one and all, a belated but heartfelt "Merry Christmas"! Cheers, Tim
-
full detail 1/16th Gordie Bonin BubbleUp Trans Am Funnycar
Codi replied to Ian McLaren's topic in WIP: Drag Racing Models
Hi Ian, I too am looking forward towards your next post....you're so close now and I can't wait to see her all together. (as I'm sure you are). cheers, tim -
’72 Dodge Demon Drag Racer 1/25 scale
Codi replied to AmericanMuscleFan's topic in WIP: Drag Racing Models
😏 Mighty fine Francis........got caught up as well on your progress and ALWAYS enjoy the shared insights you provide. You're moving along quite well and the "rust" has obviously been knocked off. cheers, tim -
Morning Daniel, Sorry it's been a while since I posted but I got caught up and it's nice to see the progress.......also the shared thoughts on the hobby and methods you use when fabricating something. I too miss Caboose Hobbies btw.....they were a good source. cheers, tim
-
Marvel's Hydra coupe 1/12 scale full scratch build
Codi replied to François's topic in WIP: Model Cars
Francois, one can only marvel at the talents you're displaying here. It's been fascinating to watch and can't wait to see more. cheers, tim -
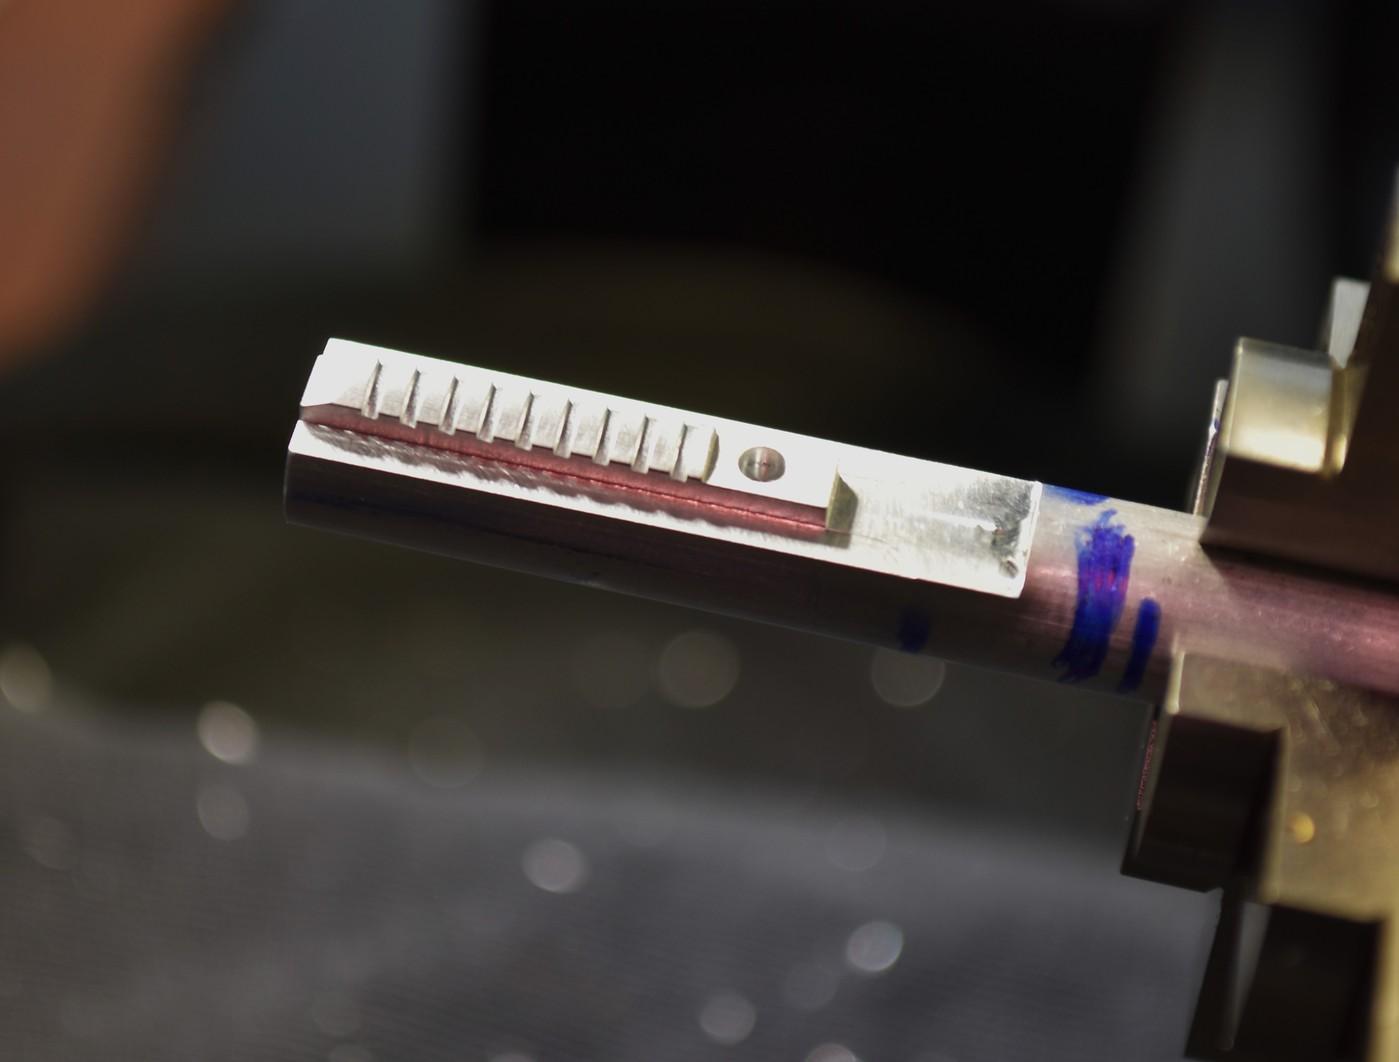
I wanted to respond and also to answer the questions that were asked. Robert, yes, it can be time consuming as you know especially when working worth small end mills etc. I don't mind the time involved to be honest....only when I have to do a part over..... Rich, thanks for the sentiment and for also peeking in on the build. Daniel.....the petcock....I found a thin piece of photo etch in my parts bin that was part of a leaf spring kit or something like that. It had a fold line down the middle of it....I drilled a hole in the center of the fold line....placed a piece of stainless steel tube in it and then folded it slightly to form a V.....put a small drop of loctite thin glue on either side and used my photo etch pliers to squeeze each end as tight as I could up to the the tubing in the center. After I was certain the glue had dried i used my hand piece that spins up to 25k rpm with a jewelers .27mm cutoff disc to carefully shape it to the size desired and cut it off the steel tube. Was simple to do just took me some creativity to find something & method to make it. That's one of reasons I like to scratch-build though. Mike....I wanted to make the top portion as one but after considering many options, the simplest and best was to make it into 2 parts and put them together. Each started as part of an 8.0mm alum. rod that I setup in my rotary vice that was set at 90 degrees. I've included a pic of the set up to give a better idea of what I'm describing. Then following my drawings I cut the pieces using the following end mill: 1/8" - 2.0MM - .8MM & - .6MM and cut them off using a jewelers diamond cut-off wheel (.27mm thin). My mill has the 10k. rpm pulley kit which has proven invaluable when using these tiny end mills and drill bits. I'll spin the teeny ones at 8K+ RPM......still have to go slow though. ------ Radiator cap, took a piece of 1/8" nickel/silver rod and on the rotary I cut in the sides to the angle I drew up and then used a .27MM (.0100) end mill to cut the 2 circular grooves on the top. Parted it off and glued it to the rod that was inserted in the radiator base. That was actually simple & quick to make. Hope this helps.......I really have to get better with more pics along the way like Francis & Charlie to share "how" I make something. I appreciate when others share their methods and I'm a bit lax in that regard.

-
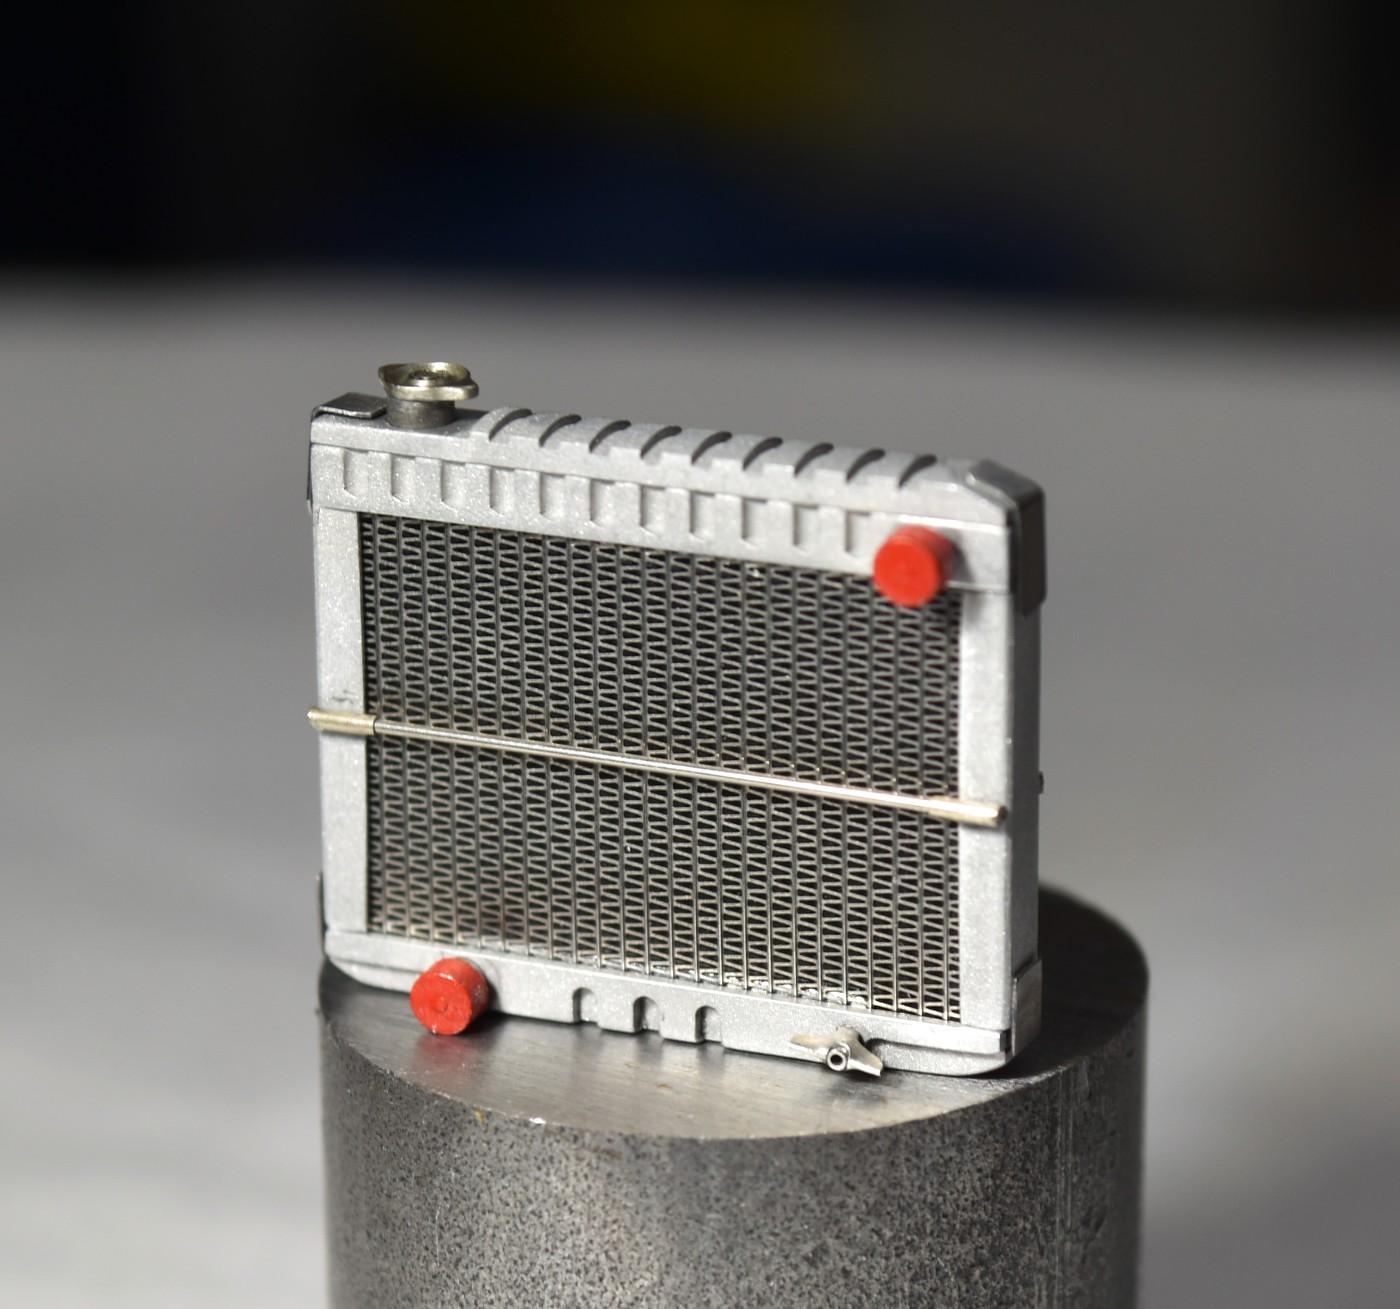
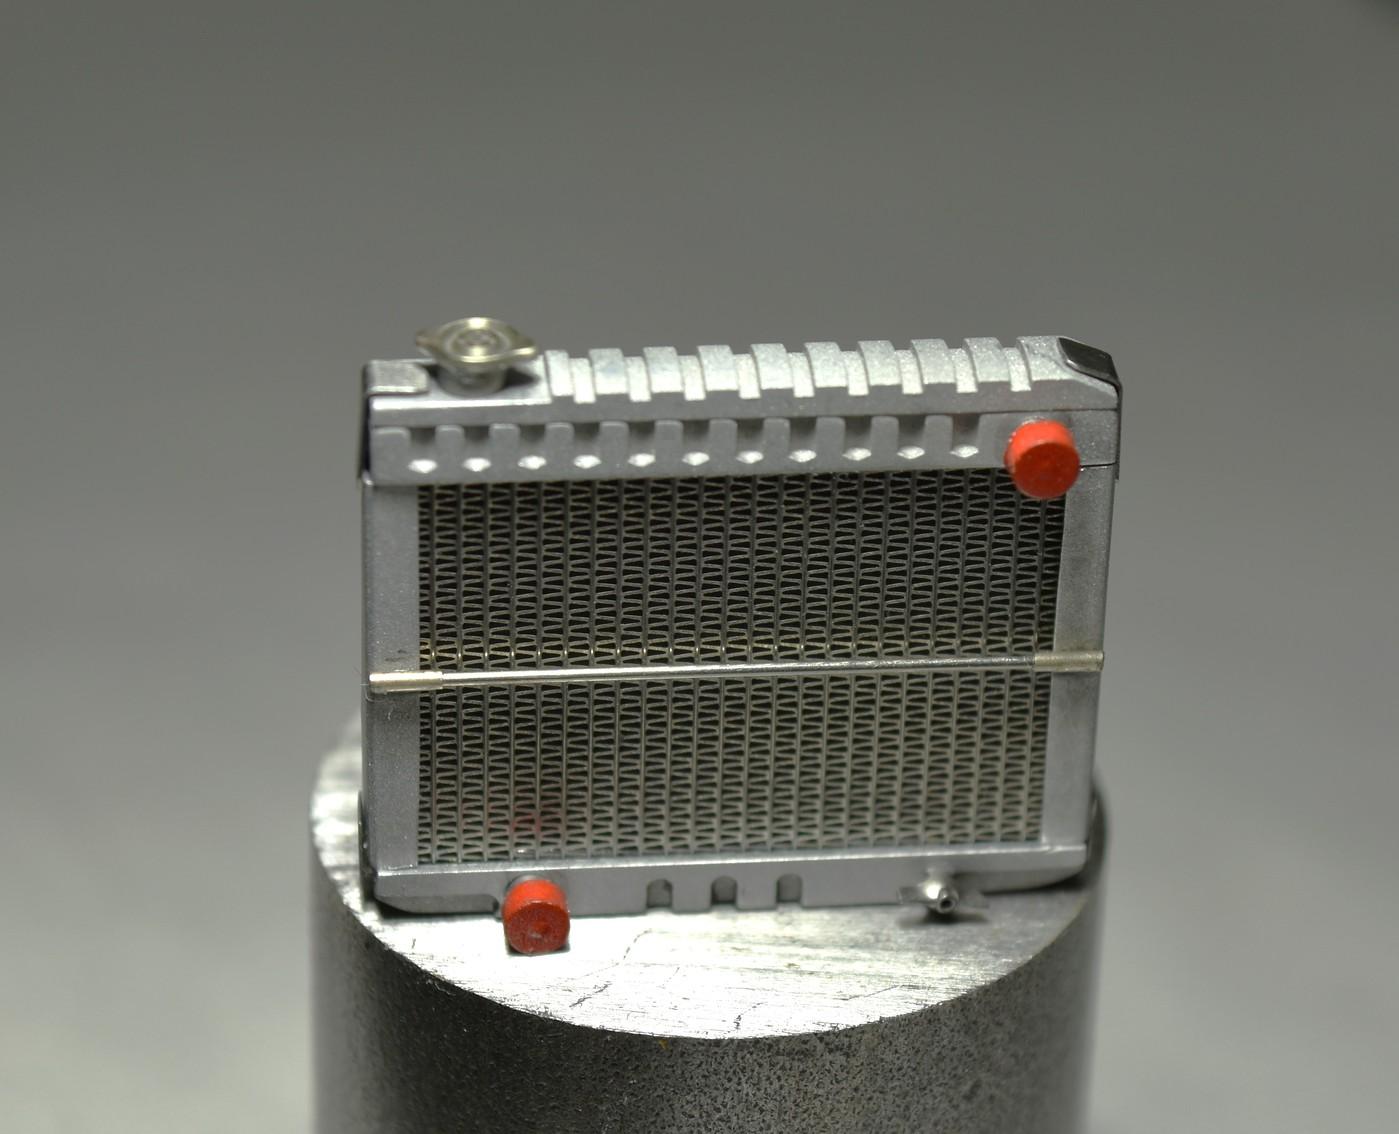
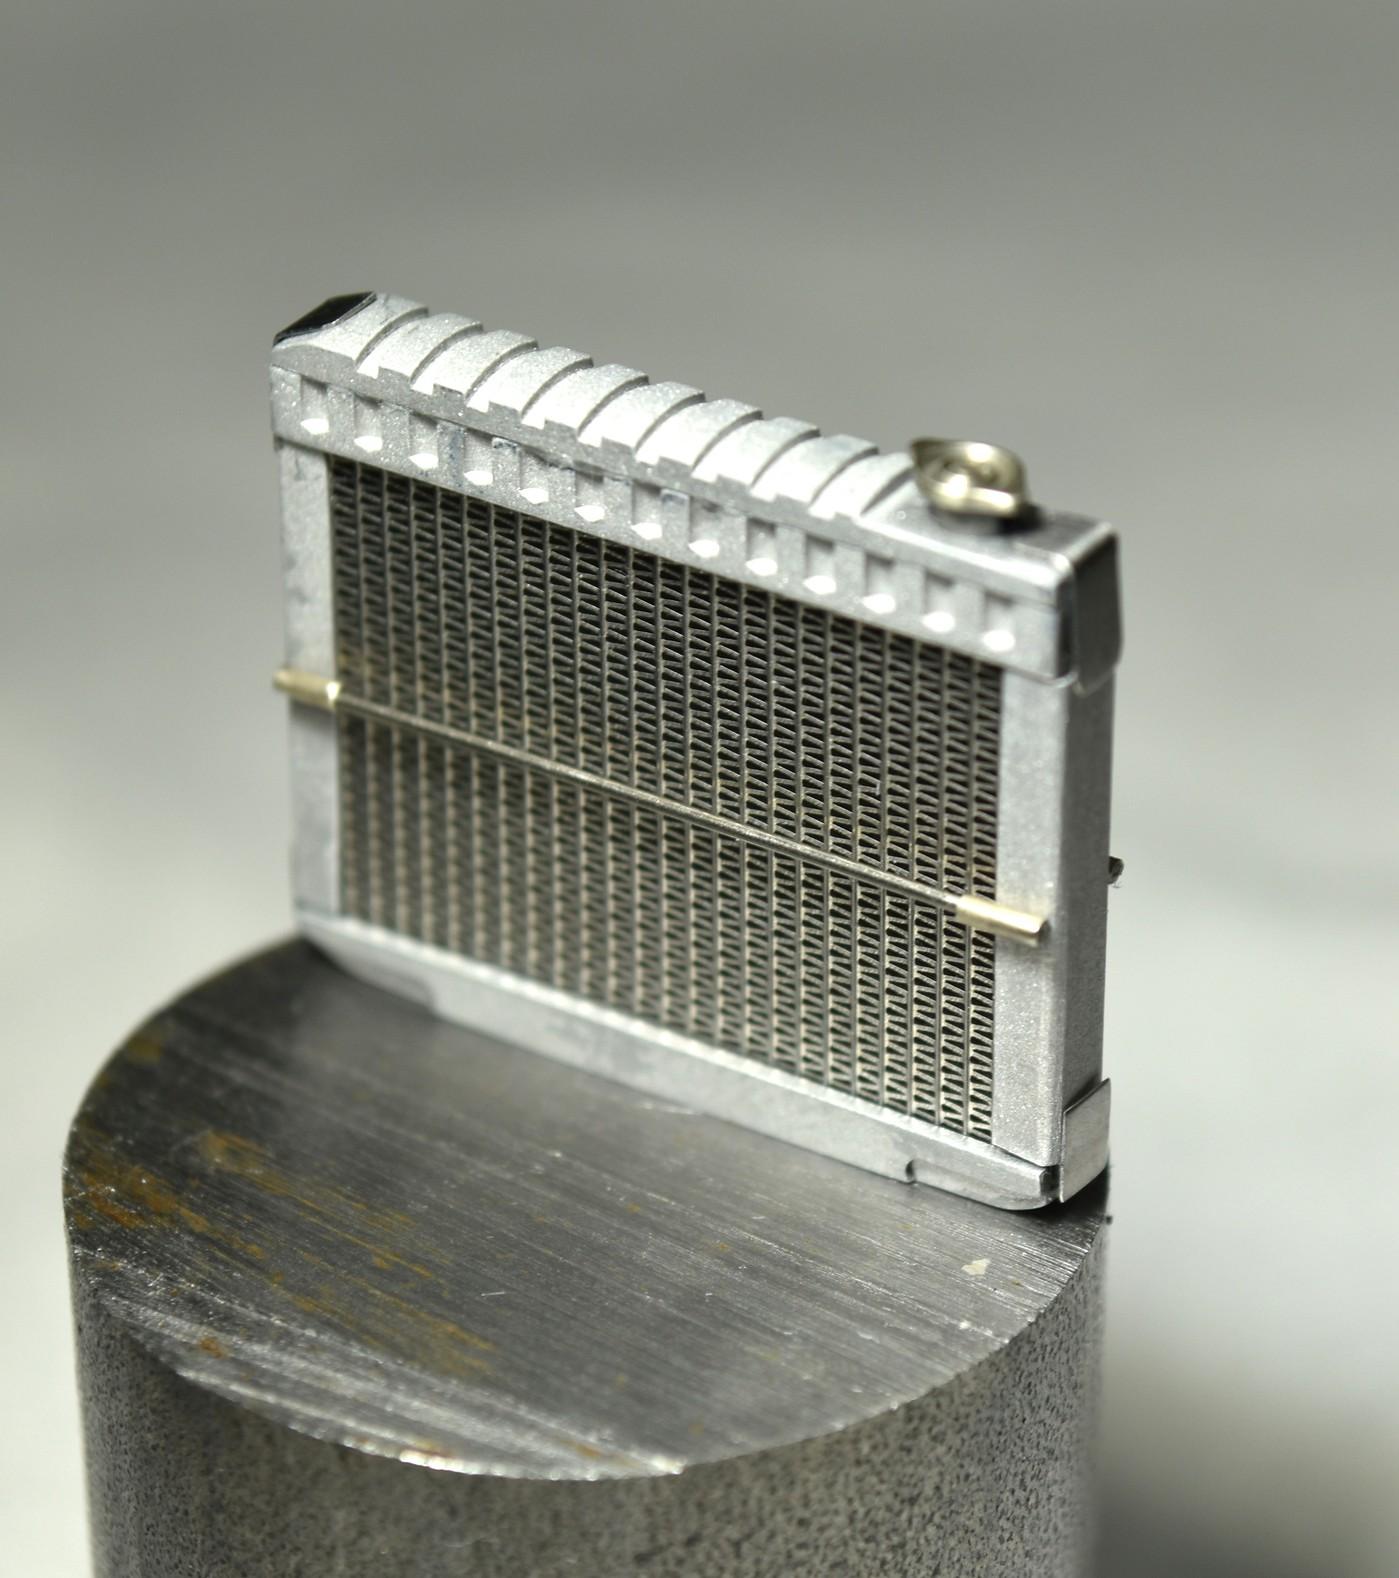
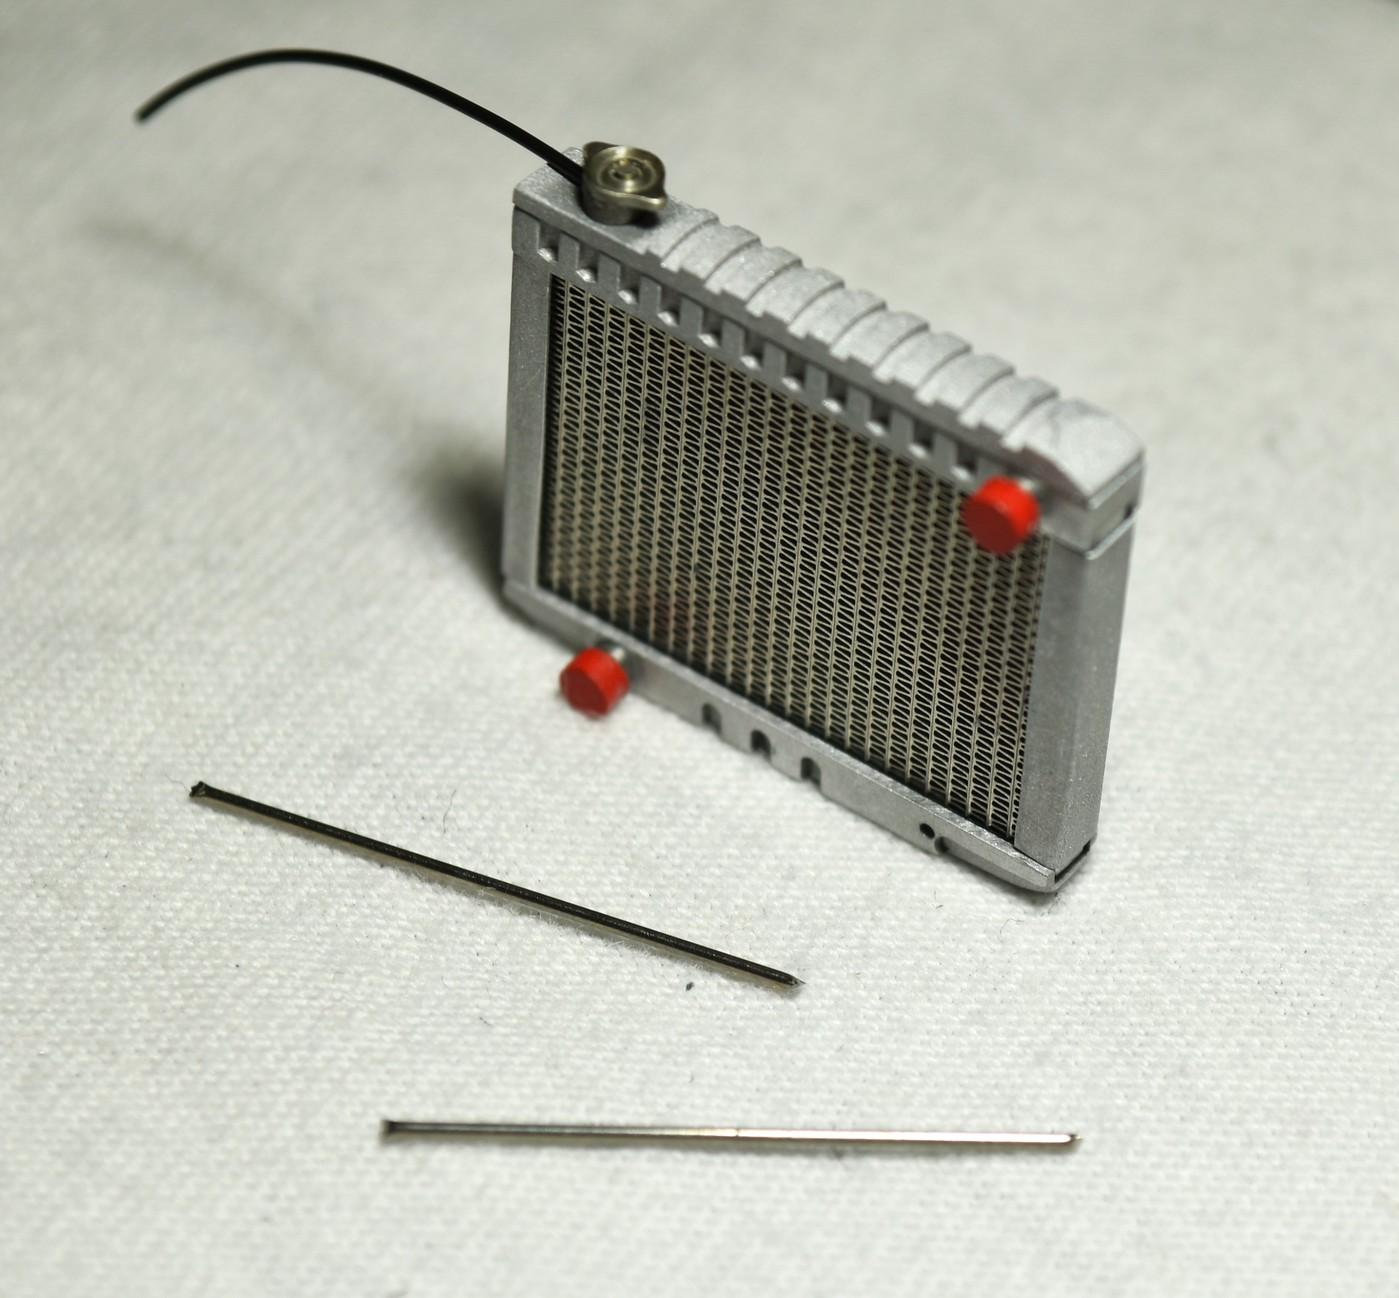
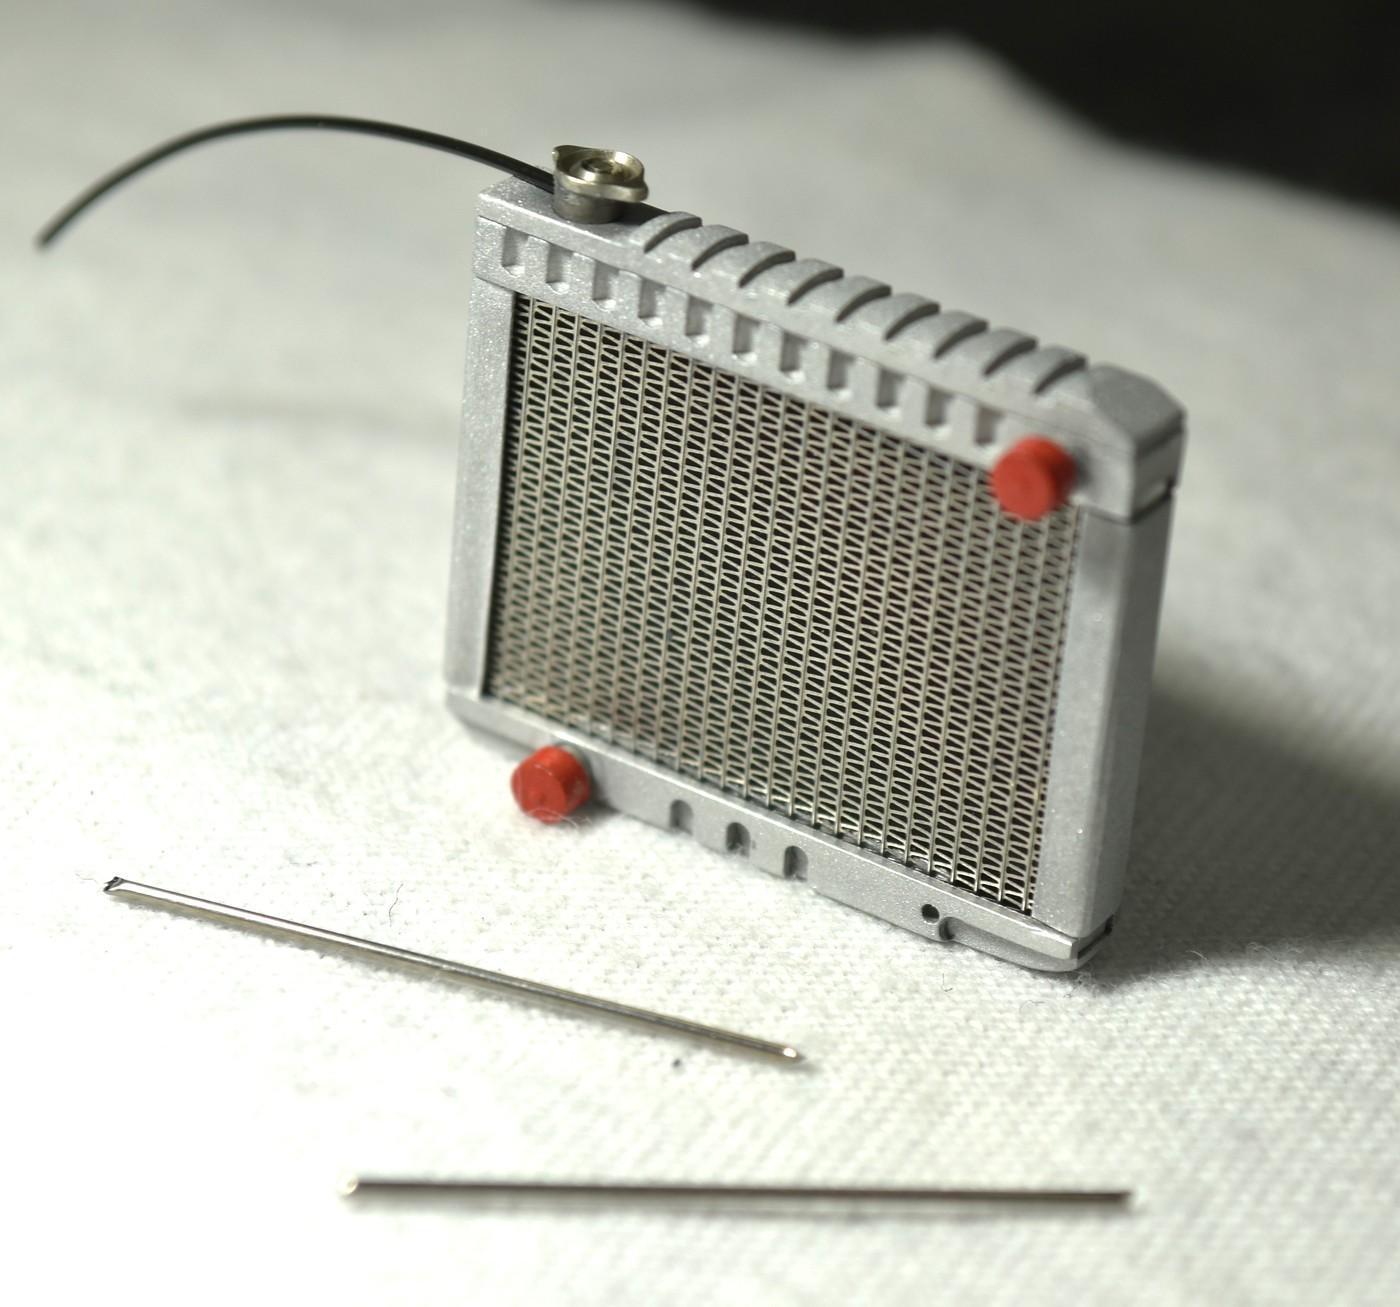
Chris, thank you sir.......can't wait to see your next MFH project btw.....cheers, tim Brian, many little parts went into making it I'll admit. I'm figuring I have about 25 to 30 hours total in machining and fabbing the entire thing. It is done though! yeah Daniel, thank you for the sentiments. My High School 50th ann. reunion is this weekend and I've never made one....this was to be my first but of course I'll miss it now........UGH!! The radiator is finished. I'm going to clean up the shop and bench space and grab all of my notes /pics from the last 3 years in all of my research and begin drawing up the chassis so I can get that started. That's a big task for me but if all goes well I'll have the chassis started / done by Christmas...IF.........3 finished pics, 1 is of the back of it. That darn "petcock" was a bugger to fab but I finally came up with a way of making one. All in all, I'm pleased with it. Cheers everyone and enjoy your weekend! tim
-
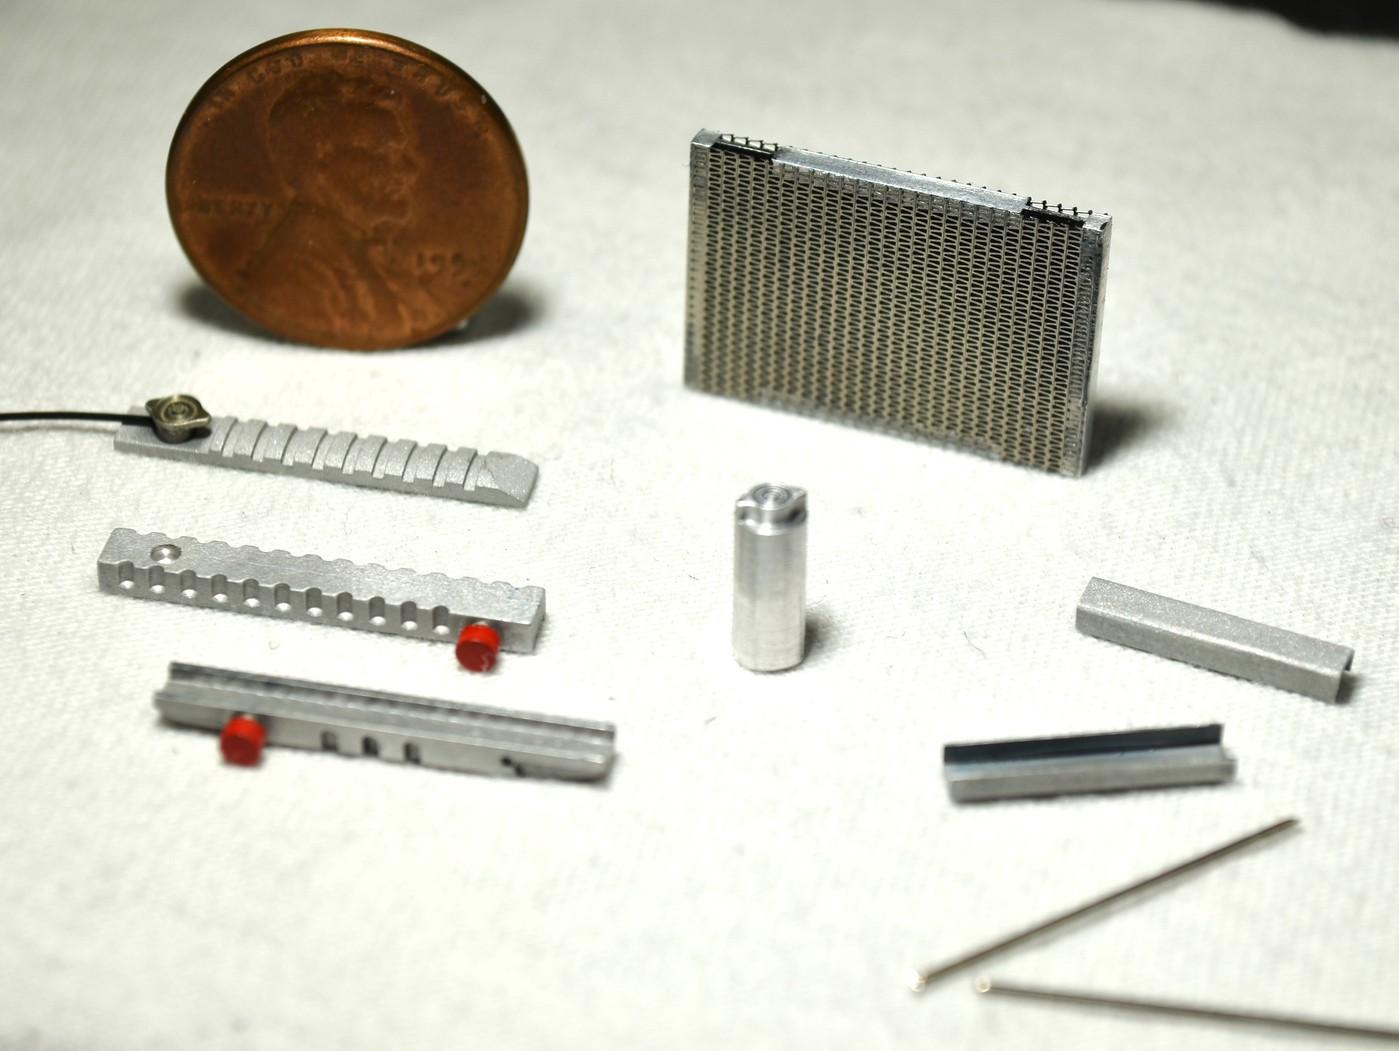
Hi Randy & Jason......so glad to see both your checking it out still. Progress has been steady even though yesterday I tested pos. for covid again...just livin' the dream! After a couple days from the bench I had to drag myself back because I really want to finish the radiator. Pic's today show it basically all fabbed and mocked-up. Pic 1 shows some of the components before assembly. The others give an idea of what she'll look like. I still have to add 2 horizontal braces, a pet-cock for the drain and a couple tiny weld lines and or braces along the sides top and bottom. I did media blast it as the real rad's were stamped & welded alum. but none were shiny per se so I went with this finish to be closer to the actual and the radiator cap I machined out of nickel/silver just for a bit of contrast and because I like the color of the metal. Cheers!! tim
-
full detail 1/16th Gordie Bonin BubbleUp Trans Am Funnycar
Codi replied to Ian McLaren's topic in WIP: Drag Racing Models
Everything looks so good Ian. Even down to the seat belts..they're perfect! Now the fun part when all the goodies you made for her get installed........can't wait! cheers, tim -
Thanks Brian, I still have some patience left even though my daughter my say otherwise. cheers sir, tim Dave, SOOO nice to hear from you! As always your comments are most welcome and appreciated. I've got to give you a call soon and get caught up.....been too long. cheers, tim John, as a wise woman at the pharmacist told me not long ago..."getting old ain't for sissies". Seriously though, the ailments are something we all go through and I'm blessed that mine are not serious. More annoying than anything I suppose. Thank you for the compliment and glad to have you following along. cheers, tim pics coming soon, radiator is taking shape and is almost done!
-
That paint is simply striking how that turned out. That'll put a smile on anyone's face. cheers, tim
-
Now that's imaginative Daniel. I love finding those types of things for a build and putting them to use. Looks really good on the car. cheers, tim