

Ramfins59
-
Posts
5,918 -
Joined
-
Last visited
Content Type
Profiles
Forums
Events
Gallery
Everything posted by Ramfins59
-
Great job Jamie, I'm sure your Dad will be happy with it.
-
That looks really great Manuel. Very original idea and well done.
-
Not really. Just save the scrap clear sprue when you finish a model. I've been saving clear and red sprues for quite some time.
-
Welcome to our plastic playground Ron.
-

1959 Dodge kit, will it happen?
Ramfins59 replied to '70 Grande's topic in Model Building Questions and Answers
The '59 Dodge Coronet was also the very last car to have a flathead engine. It had a straight six flathead. If anyone wanted to replicate that, you'd need to use the flathead six motor from AMY's '41 Plymouth kit, with some modifications. -
1957 Dodge - - Finished - - Class of '57 - Entry #2
Ramfins59 replied to Ramfins59's topic in Model Cars
Thank you very much Charles, Larry and Marty. Your encouraging comments are greatly appreciated. -
Thank you John and Guy. Yes Guy, we are all going to miss Modelhaus's fine products for sure.
-
1959 Dodge kit, will it happen?
Ramfins59 replied to '70 Grande's topic in Model Building Questions and Answers
Last year I had a PM conversation with Dave Metzner of Moebius. I asked him if the proposed '59 Dodge kit would be produced as a full detail kit, or would just be a curbside kit that the promos were. He said that it would most likely just be a curbside kit. No mention was made as to whether or not an interior would be included, and no time line was given as to when the kit could be expected. I really look forward to this kit being produced as I used to own a 1;1 '59 Dodge Coronet about 15 years ago. I made a model replica of the car I used to own using a promo... I knew that down the road I would most definitely be picking up at least a couple of these kits if and when they actually come out, so I had the foresight to get a couple of the Modelhaus '59 Dodge interiors that I have stashed away. I for one am hoping to see this kit show up.
-
SMP '58 Impala ala Larry Watson! Interior Done, Final Assembly!
Ramfins59 replied to John Goschke's topic in WIP: Model Cars
This Impala is looking great so far John. I can't wait to see it finished with all of the chrome in place. -
Your work on this car is looking great so far Geoff.
-
Good job on that venerable old kit Chuck.
-
That's a nice looking model Michael. Looks like the type of thing that our Harry Pristovnik might make.
-
Excellent looking Impala Brandon. Good job.
-
Junkyard Modeling - Resurrecting an AMT '64 Lincoln Sedan
Ramfins59 replied to Ron Hamilton's topic in WIP: Model Cars
Great project Ron. It should look good in green. I've gotta get some of those Molotow pens. -
Thanks again for all the great comments guys. Jeff, there is no spring show this year..!! I heard from the South Hills Automodelers Club that they have been unable to find an affordable place to hold their show this year. They say that they will be back at the Castle Shannon location for next year. I hope all is well with you. Send me a PM if you want to chat. Ferby, I use either some Floquil, flat, water based, model railroad paint that I have left (Floquil paints are not made anymore), or, watered down Elmer's glue to attach my flocking. If I'm using the paints I try to use a color as close to the flocking color as possible. If the glue is used, I first paint the area to be flocked with a paint color that closely matches the color of the flocking. Whichever one I use, I apply a fairly wet coat of paint or glue to the part, doing a section at a time. Not so wet that it runs or drips, but wet enough so it won't dry before the flocking is applied. Then I pour the flocking into a small strainer. I put the part on a paper plate and hold the strainer over the part and tap the side of the strainer so the flocking "snows" down onto the part. I apply about an eighth of an inch thick coat of flocking and let it sit for a moment. Then I gently press down on the flocking with my finger to push it into the paint or glue, I again let it sit for a moment then pick up the part and, holding it over the paper plate, I tap the bottom of the part to knock off the excess flocking. When it's all finished, just fold the paper plate and slide the excess flocking back into its container. Then let the parts sit overnight to let the glue or paint fully dry so you can safely handle the parts. You can then blow on the parts to get rid of whatever flocking might still be loose. You should be good to go at that point. If I'm not totally satisfied with how it came out, since the paint or glue is water based, I'll let the parts sit in warm water for awhile and then scrub them with and old toothbrush under running water to wash everything off, let them dry, and then start over. Fortunately I don't have to do that very often. The same method works for embossing powder except that you don't need to use a strainer. I hope this method works for you.
-
Great looking car Mike. I have one of these kits in my large TO DO pile.
-
Thank you all very much for your very kind words gentlemen. It is very much appreciated.
-
Thanks very much fellas. I really enjoy working on models of 1950's cars that you don't see every day. I've got a lot more lined up to be worked on which should keep me busy for quite a while.
-
Thank you all for your encouraging words.
-
Thanks for all the kind words guys.
-
Thanks very much for the kind comments everyone. Steve, you are absolutely correct...!!! Due to a "senior moment" I mixed up the Caddys in my mind...... It was the '56 Caddy that had the issue with the glass . Sorry about that...
-
Hopefully the pictures will appear now.
-
I don't know why my pictures didn't show up... I'm working on fixing that. Stay tuned.
-
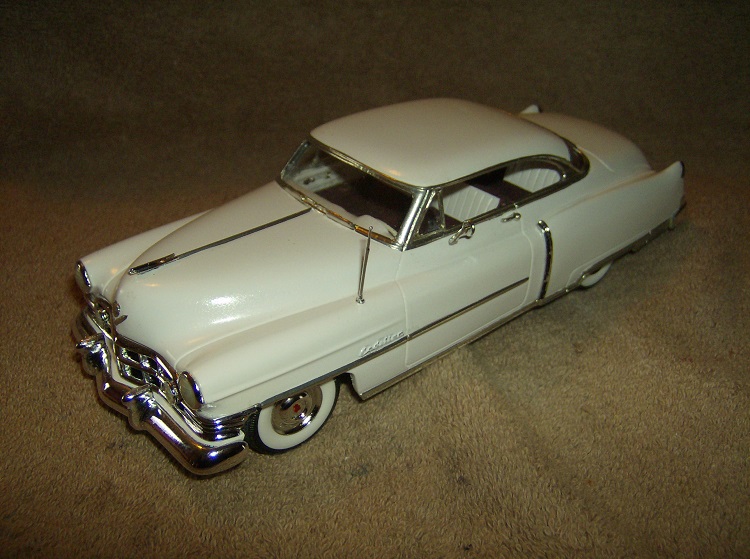
At long last I finally finished this car. I don't know whether it was born under a bad sign or what, but it took forever to get it done. This is a Modelhaus resin kit that I got early last year. I discovered that through some strange error, I received 2 rear bumpers and no front bumper. It took about a month or so to get that corrected. Then when I was installing the glass I got a drop of CA glue smack dab in the center of the vacuformed windshield. No amount of polishing was able to remove the glue mark from the glass. Fortunately Steven Guthmiller came to the rescue. He also had one of these kits that he hadn't built yet. He graciously sent me the glass from his kit and I was able to get a replacement glass from Modelhaus for him before they closed down their website. Then a long period of procrastination and a serious case of the modeling blahs set in and the car sat painted, foiled but unassembled for quite a few months. Today I finally sat my butt down and put the car together. It is painted Tamiya Pure White with Duplicolor clearcoat and I'm calling it my "Great White Whale" for obvious reasons. The interior is done in white primer and Maroon flocking with BMF trim. The dash is body color with BMF and parts box gauges etc. A cut down shirt pin was used for a column shifter and gas & brake pedals were added because there weren't any. Here's "The Great White Whale"...... Any and all comments are welcomed, and thanks for looking in on this. Hopefully the next car won't take quite so long to build.
-
Very nice Paul. The colors are great.
.jpg.6f74b60fb65ec29d12f3ebf337bd2d6a.jpg)


.JPG.1c8e89d3c3eeb73771759b50dee52c0f.JPG)
.JPG.9571aa9d9e3541eeb0fe09d69cf2490f.JPG)
