Ace-Garageguy
-
Posts
39,253 -
Joined
-
Last visited
Content Type
Profiles
Forums
Events
Gallery
Everything posted by Ace-Garageguy
-
With the extreme precision watch parts require, I'm reasonably certain any tendency to chatter has been dealt with. Amazing what you can find on YT...
-
In general, I won't buy from Amazon unless there simply isn't any other choice, and I HAVE to have whatever it is for a client job.
-
And then consider the first watches were made in the very early 1500s, and the first wristwatch was made around 1810.
-
 Man, I love seeing somebody save glooey messes like what you started with. Not only is this kit a rare piece of automotive modeling history, the altered mockup pieced together from bits and scratchbuilt parts is just what real hot-rodding has been about from the beginning. Biggest smiles I've had in weeks seeing these two come together.
 -
They're called "watchmakers lathes". Who wooda thunk? Search the term on google. All the info you could want.

-
And the truly annoying thing there is that the customer clearly stated on the drawing what constituted "close enough", which apparently not one of the shops looked at, comprehended, or bothered to try to comply with (pick one). The phenomenon of getting back substandard work almost every time I had somebody else do something on my own cars (when I was "white collar") was one of the primary drivers of me learning how to do everything myself, and led me into doing it all for a living.
-
Really really really like the concept and features. This is one of the rare models worthy of building in full-scale. Done right, it would be a Riddler winner for sure.
-
Electric NASCAR
Ace-Garageguy replied to CaddyDaddy's topic in General Automotive Talk (Trucks and Cars)
Good points. But a case has been made that because "racing improves the breed"...racing big golf-carts will have a positive effect on production cars. There's no doubt whatsoever race-cars can be built to facilitate fast-swapping of power packs, and that pit crews can learn to do it. And I dearly love my cordless electric tools where I always have a fresh full battery ready to go, and never have to wait for a recharge. Dandy. But how does that scale to normie-cars? Not well, frankly. Component standardization across multiple platforms, much less makes, has never been a strength of the automobile industry, and that goes for battery packs today at least as much as anything in the past. And though proposals have been made that in addition to recharge stations, there could be facilities that quick-swap entire packs in just a few minutes, the idea falls short of reasonable expectations in reality. Just for starters, how many different packs would every swap-shop have to stock, and how many different procedures are the change-chimps going to need to be proficient in? We've already got a lack of universal standardization of charging capability that can make it pretty hard to go very far efficiently. So let's add another layer of complexity to an already marginal situation. -
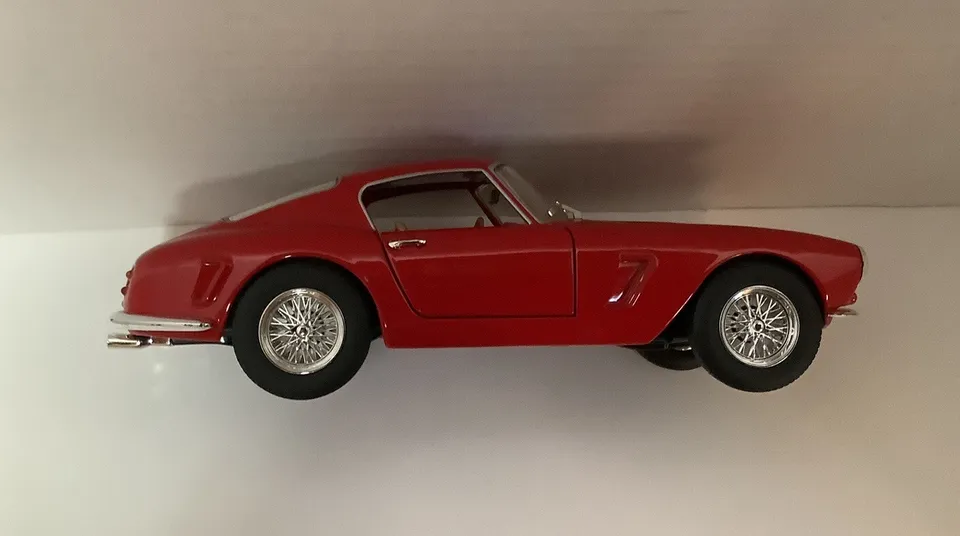
Some photos of a BBurago 1/24 scale model of the car in question appear to show some elements of the shape none of the plastic models got right to be done quite well by Bburago...like the constant downward trend of the top of the front fender line from the base of the windshield. (The low angle the shot was taken from makes the roof look too thin, too.) HOWEVER...photos of the same model from other angles don't appear to be quite so well representative of the real thing, which reinforces the point Matt made about accurately interpreting shapes from photographs.
-
Electric NASCAR
Ace-Garageguy replied to CaddyDaddy's topic in General Automotive Talk (Trucks and Cars)
Interesting choice of words. I don't think "upset" has the slightest thing to do with it. "Bored to death" would be more to the point. Then there's the part where some of us who've actually been involved in racing don't really have much interest in watching people we have no direct connection to do it, especially in glorified golf carts. But I've never been much of a breathless spectator-sport fan anyway. So maybe that's just me. -
More about Unimats...the newer they are, the cheaper they are. Hand-wheels went from being metal to being plastic, for example. And beds went from being one solid piece of cast-iron to being an assemblage of parts, not as rigid. The Austrian-made ones like my tubular-bed DL are superior (in my mind, anyway) to the later Asian-made units. And the Austrian-made units earlier than mine, particularly the early ones with full cast-iron beds, are superior to mine.
-
A big part of that particular truth is that American annuals were directly derived from promos that themselves were scaled from factory blueprints. No "interpretation" involved, and that's why most of them actually look like the real cars. It's also apparent that some early tooling makers had a better grasp of the function of the parts they were representing in scale, and had access to the real things to get their dimensions from. The old Revell "parts-pack" engines are a good example. The old Revell Buick nailhead is better in some critical dimensions than the much more recent nailhead in the '29 roadster and '30 coupe kits.
-
Couple points I didn't make earlier: 1) There are times I kinda wish I'd bought a Sherline instead of the Unimat SL. The Sherline is definitely a more powerful, more capable machine. BUT...because I had full size machines already, I figured that whatever the little Unimat couldn't handle, the big girls could...and that's been the case. 2) The Unimat SL is a jewel though, and I find it's perfectly adequate for anything model-related I've asked it to do. I've also made a couple of real-car parts on it, and though you can't do aggressive cuts (as I mentioned earlier), if you're patient and kind with it, you might be surprised how well it performs. Still, for anything full-scale, the Sherline is the better choice if you only have one lathe. 3) IIRC, Gerald Wingrove relied on a Unimat SL. And when I was a kid. I vividly recall all the old geezers (anybody over 40) making exquisite HO-scale steam engines with them. So there's that.
-
Looking good so far...
-
Only thing irked me today is that it's pretty much over, and due to my own dilly-dallying and hanging out here, I only got a very small part of what I had on my list accomplished. I haven't even had lunch yet.
-
What scale is that one? What year issue? I've seen some BBurago models of that car that look very good at first analysis.
-
Looking for help copying part of a 1/8 scale transaxle
Ace-Garageguy replied to LDO's topic in The Off-Topic Lounge
Yes, particularly if you don't care if the copies are solid resin, not a two-part assembly as is OEM. Any reasonably competent resin caster can easily make a silicone mold with the split-line where it is on your original, and cast as many as you could possibly want from that. -
And some people lack the judgment talent from the git-go...and it can't be taught in most cases. EDIT: And don't y'all jump down my throat. Most people simply don't notice panel misalignments, gaps, sloppy work, or minor color mismatches when their real cars come back from the bodyshop. I've been astounded by the awfulness average people will accept. We've had it demonstrated on this very site that a lot of people just don't see anything wrong with the proportions and lines of some kits, defects and inaccuracies that, frankly, jump out at a few of us, and can't be unseen. It's the way it is, and a good reason 3D scanning of real objects is making inroads into model tooling design. The scanner doesn't lie, or depend on subjective judgment ability that varies from person to person, or misinterpret what it sees, or try to make "artistic" modifications to reality...assuming, of course, it's under the control of a competent operator.
-
Answer in as few words as possible, or you'll trigger the dreaded TLDR effect.
-
Bingo. And these effects form a large part of what's to blame for so many models being so badly "off". Interpreting photos is a black-art, and it takes a considerable amount of experience, along with a finely calibrated eyeball, to make the necessary judgment calls.
-
Model Builder's Warehouse??
Ace-Garageguy replied to 64SS350's topic in Model Building Questions and Answers
Are you the Mad Mike whose beautiful engines Randy was selling? -
Comstock Ford GT40 MKI
Ace-Garageguy replied to Phildaupho's topic in WIP: Other Racing: Road Racing, Land Speed Racers
Many thumbs-up. -
What non-auto model did you get today?
Ace-Garageguy replied to chunkypeanutbutter's topic in The Off-Topic Lounge
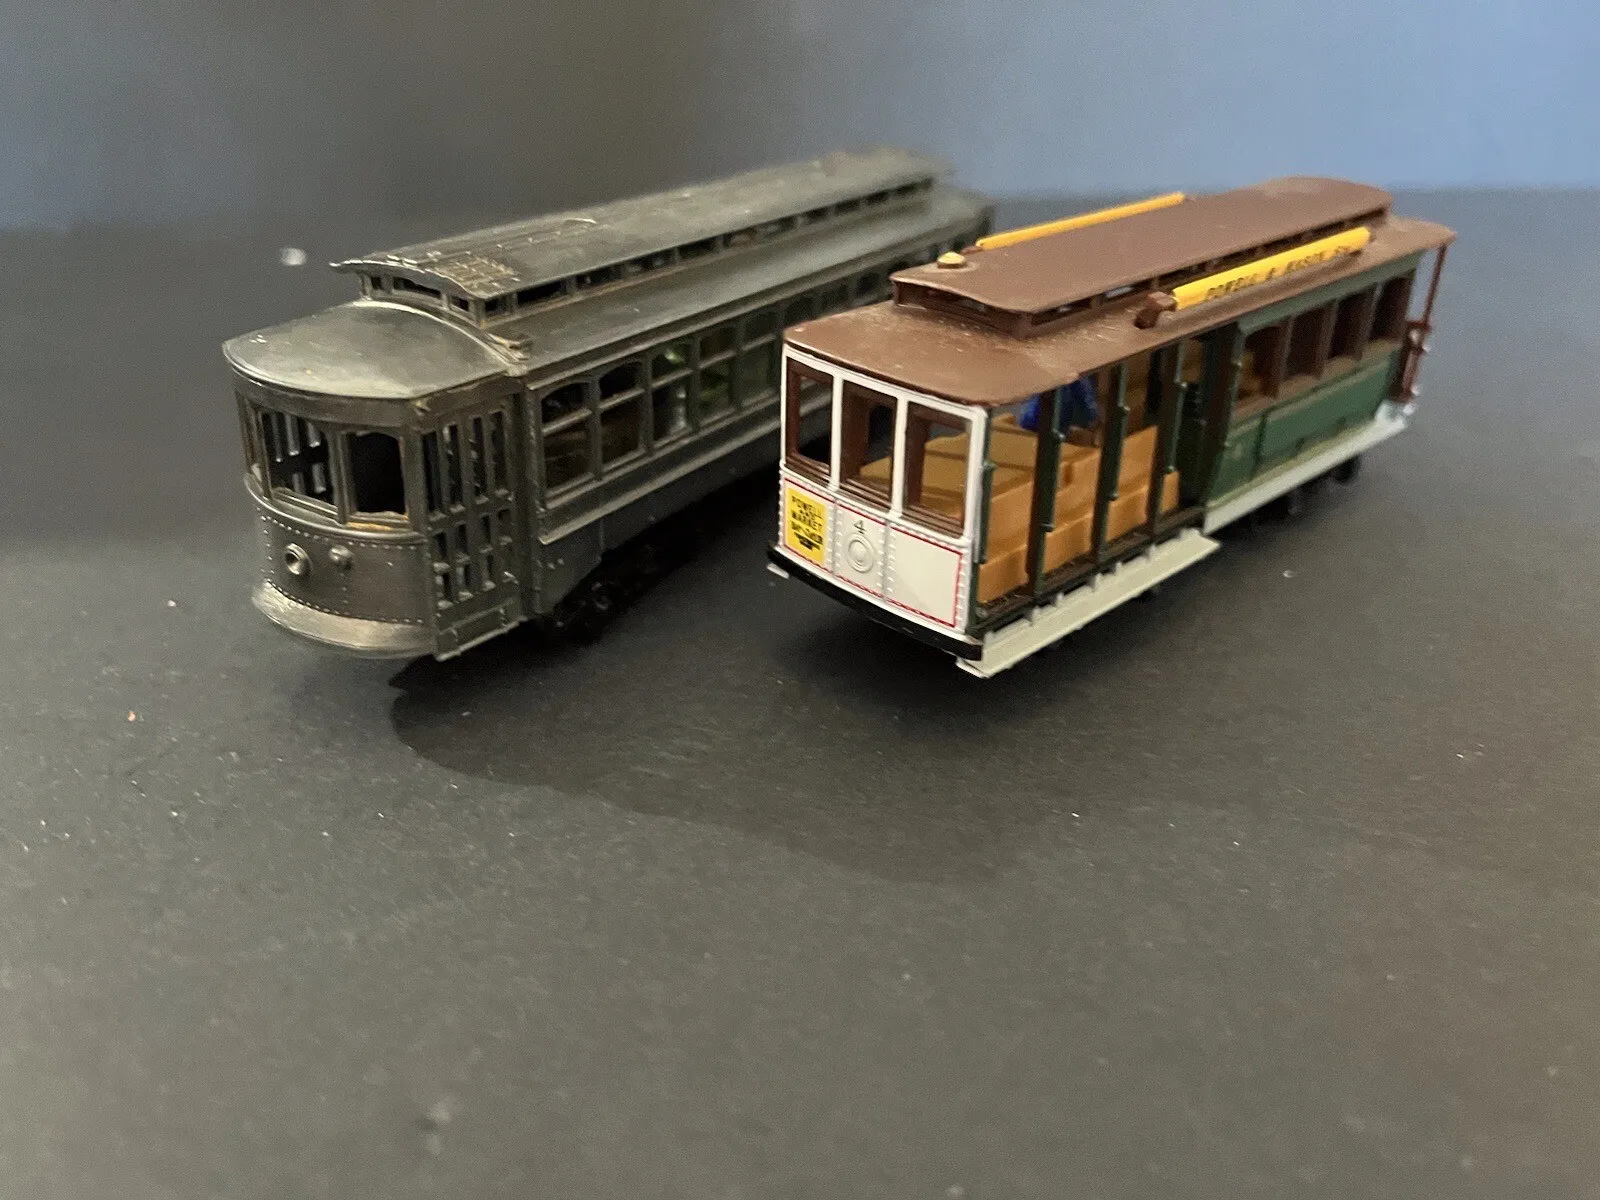
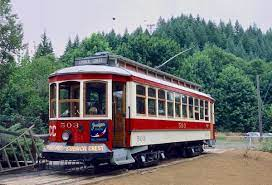
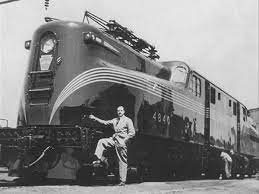
More cool HO stuff, lots of it NOS vintage, and "trash" needing work, and state-of-the-art upgrade parts...but I'll spare y'all most of that for now. Couple of fun things I found cheap were this pair of old-time "trolleys". The painted one is actually a San Francisco cable car, an entirely different animal from a trolley. It's not a bad little model, but it's an inexpensive toy-grade piece. Still, with a little work (like replacing the absolutely incorrect trucks under it), it will make a nice model. Restored cable cars continue to operate on the streets of San Francisco. https://en.wikipedia.org/wiki/San_Francisco_cable_car_system The bare metal one was a roll of the dice, as I didn't know what it was (though I had an idea) and I knew it represented an old Brill electric trolley car. Here's a real one, still operating at a trolley museum in Portland in 1986. The design was introduced in 1902. https://www.midcontinent.org/rollingstock/builders/brill2.htm It turned out to be an early-ish Bowser kit-built powered model, with the heavy diecast chassis and an "open frame" motor driving one truck...and it runs. It's missing both trolley-poles (the electrical pickups that would have in reality worked with an old-school overhead catenary system), and it normally sells for several times what I paid for both of 'em. As one part of the planned layout is to be a "car shop" where railroad equipment is rebuilt, modernized, and restored, I thought it might be kinda fun to have these two heavily weathered and looking like they're waiting for restoration for a new life as museum pieces. Speaking of catenary systems...though it's unlikely I'll ever go to the painstaking trouble to build one, I couldn't pass up this pair of NOS AHM / Rivarossi GG1 electric locomotives...for less than 1/2 the usual price. The GG1s were Pennsylvania RR / Penn Central / Amtrak icons from 1935 when they were introduced, until 1983 when the last of them were retired, and all but 16 were scrapped. As originally geared, they could maintain 100 MPH. Pretty cool for 1934 tech that stayed in service for 48 years. The styling of the real GG1 locomotives was largely the work, again, of Raymond Loewy, the '53 Studebaker and Avanti guy. The operating pantographs on the models can be set up to actually supply power to the models, just like real. This period shot shows the complex overhead suspended "catenary" wiring that was necessary to run the things.
-
Relating to my post immediately above... Something that company management often fails to realize is that a guy who can work old-school from "napkin sketches" can considerably speed the development process from concept to full production in some cases. To be able to efficiently whip out a single prototype for testing or visual evaluation bypasses the need to develop drawings (CAD or otherwise) and write CNC programming. If the first prototype isn't quite right, make another one in much less time than it would take to revise the CAD and CNC work. Then, when you have a prototype part or assembly that works right, you just copy it into your production CAD and CNC work, once, and done. Similar case in point: when Singer was developing the beautiful carbon flares for the tail of one of the earlier 911 refits, they spent a whole LOT of money going back and forth from CAD to CNC-milling full-scale parts, installing them on a car, looking at them from every angle in reality, deciding they needed revisions, over and over several times. One guy who could have sculpted the original shape on a car for visual evaluation and tuning to hit the sweet spot (that production molds could have been taken from directly) could have saved the company many thousands of up-front development dollars. Finding that one guy is the tricky bit. EDIT: That "one guy" doesn't need to do both sides perfectly, either. Get one side dead-on and in today's world, you can scan it, turn it inside-out digitally for the other side, and cut your mirror-image plug to pull your mold from (or cut your stamping dies, whatever). Knowing how to best employ old-school and new-school techniques to complement each other can significantly maximize product-development "throughput", but it takes some hands-on in-shop experience to get the feel for mixing the two...and a lot of management people lack any hands-on experience whatsoever.