Search the Community
Showing results for tags 'aoshima'.
-
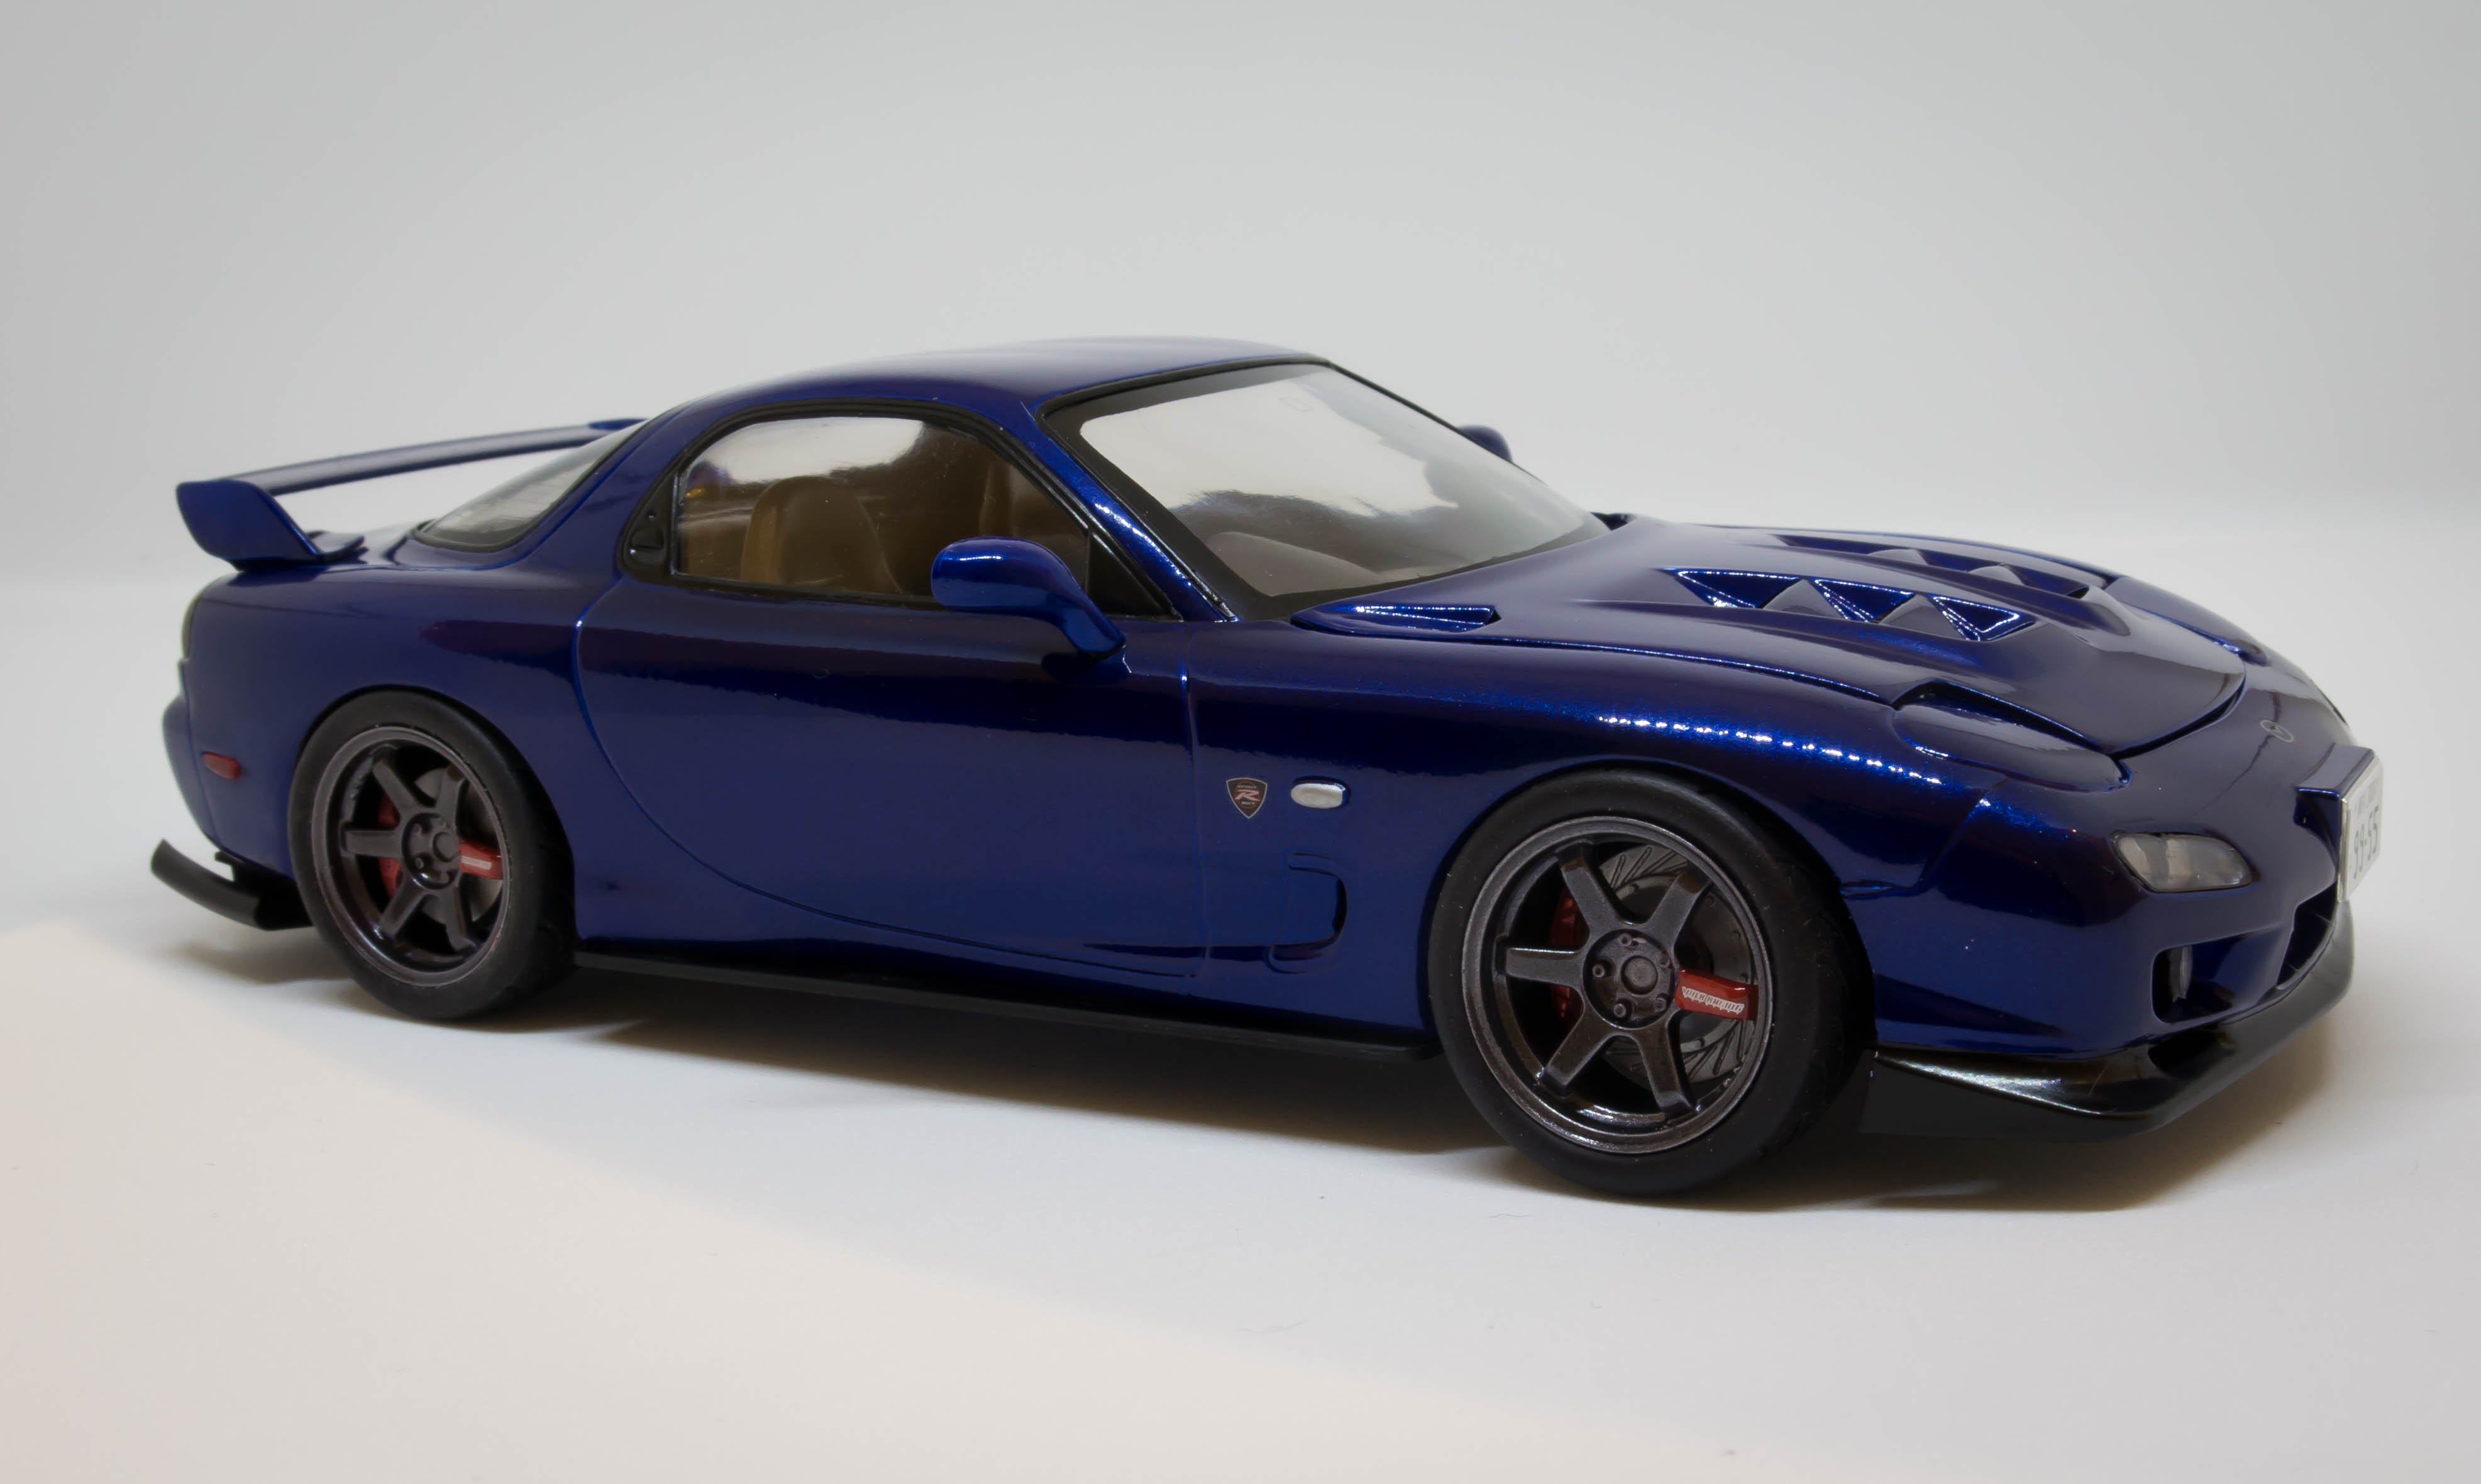
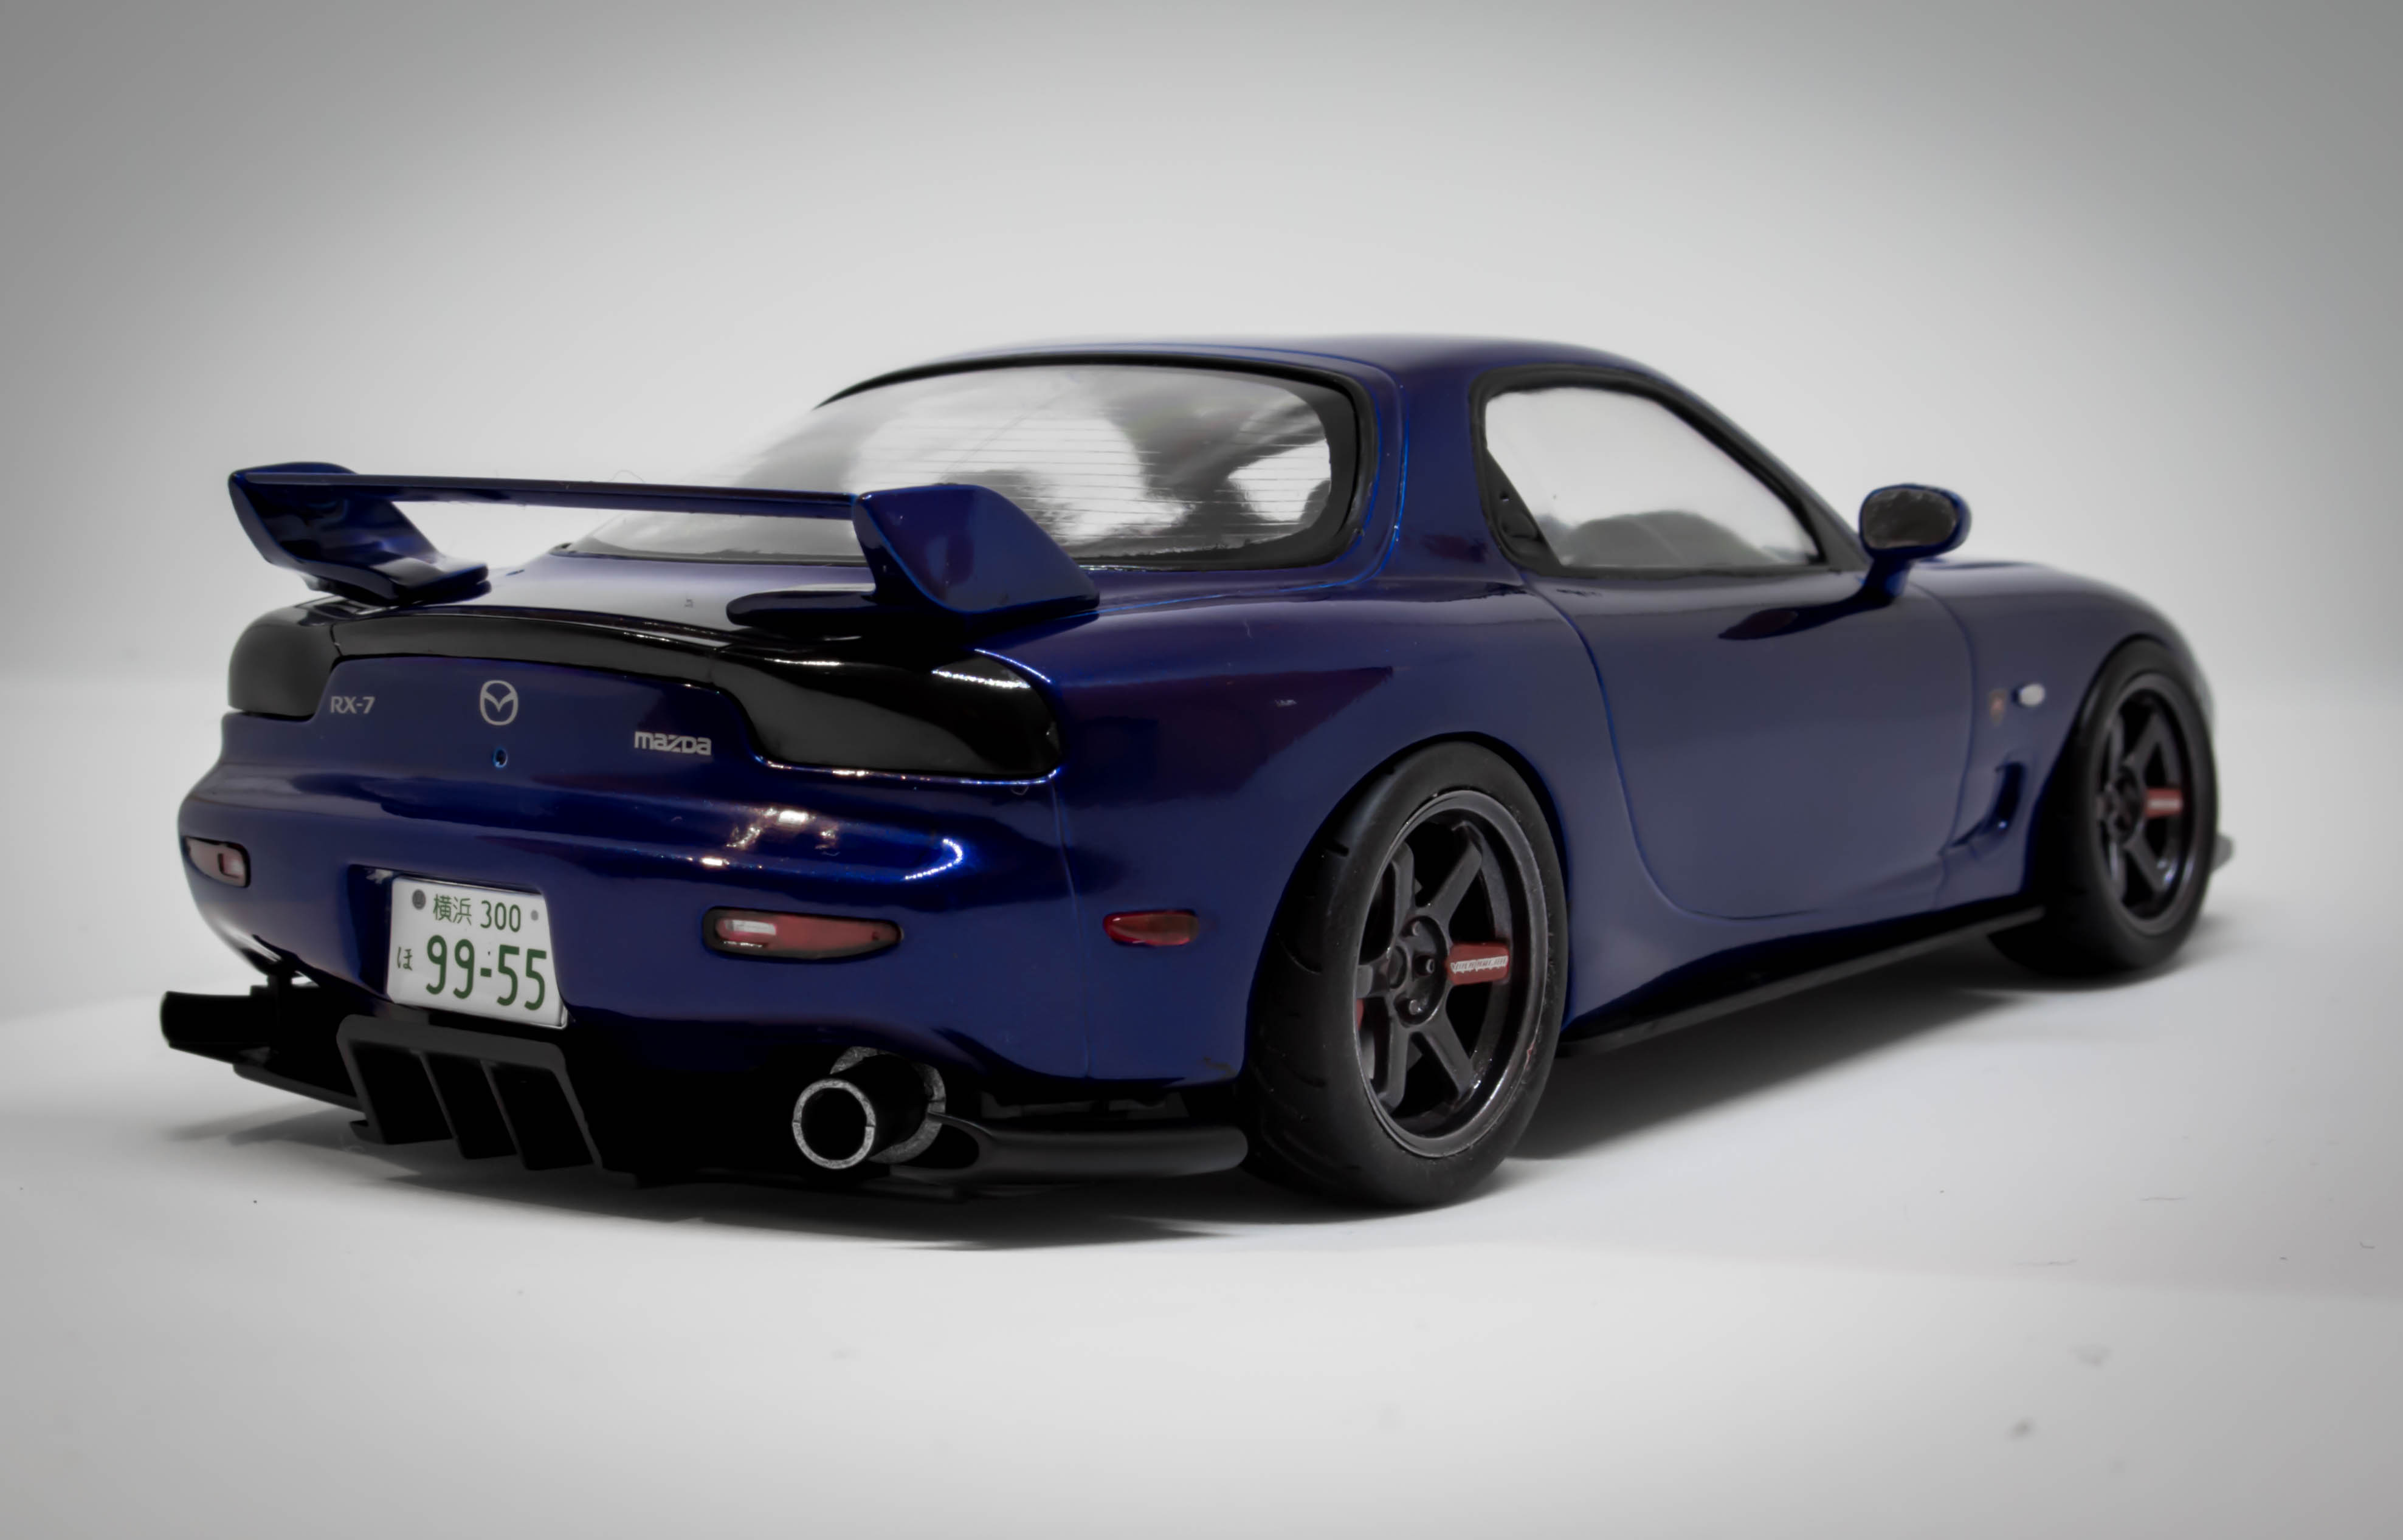
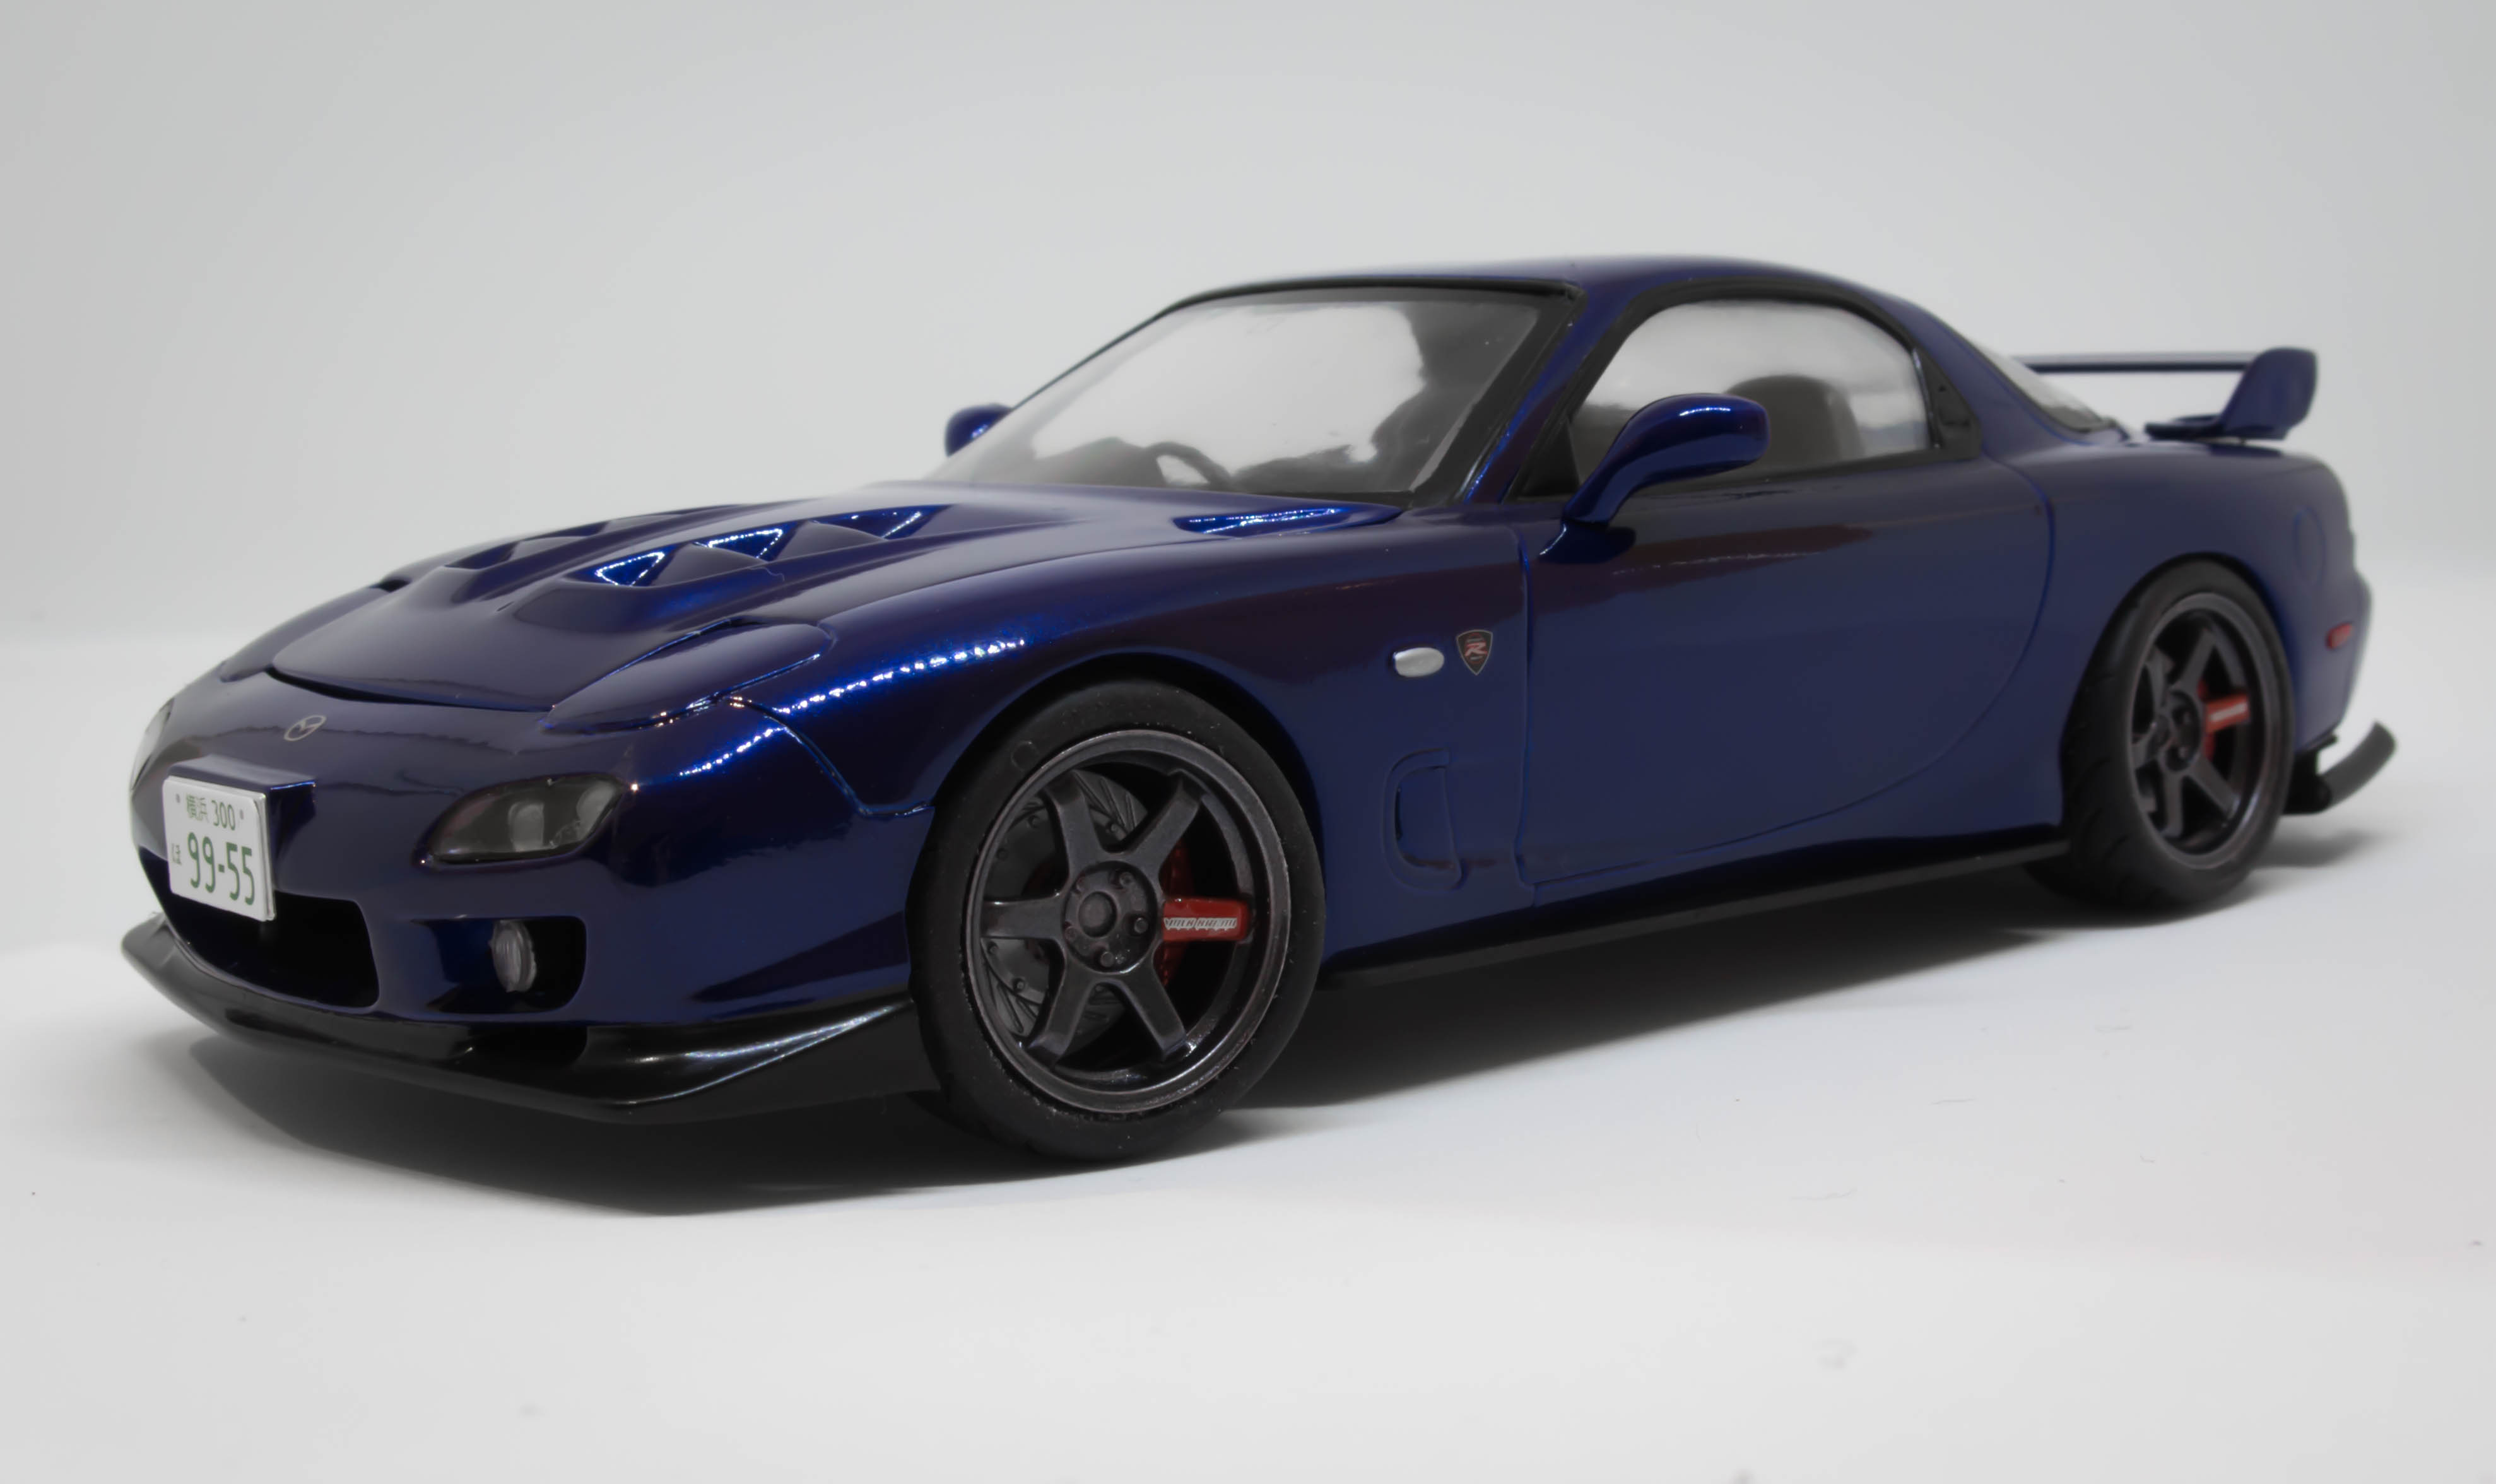
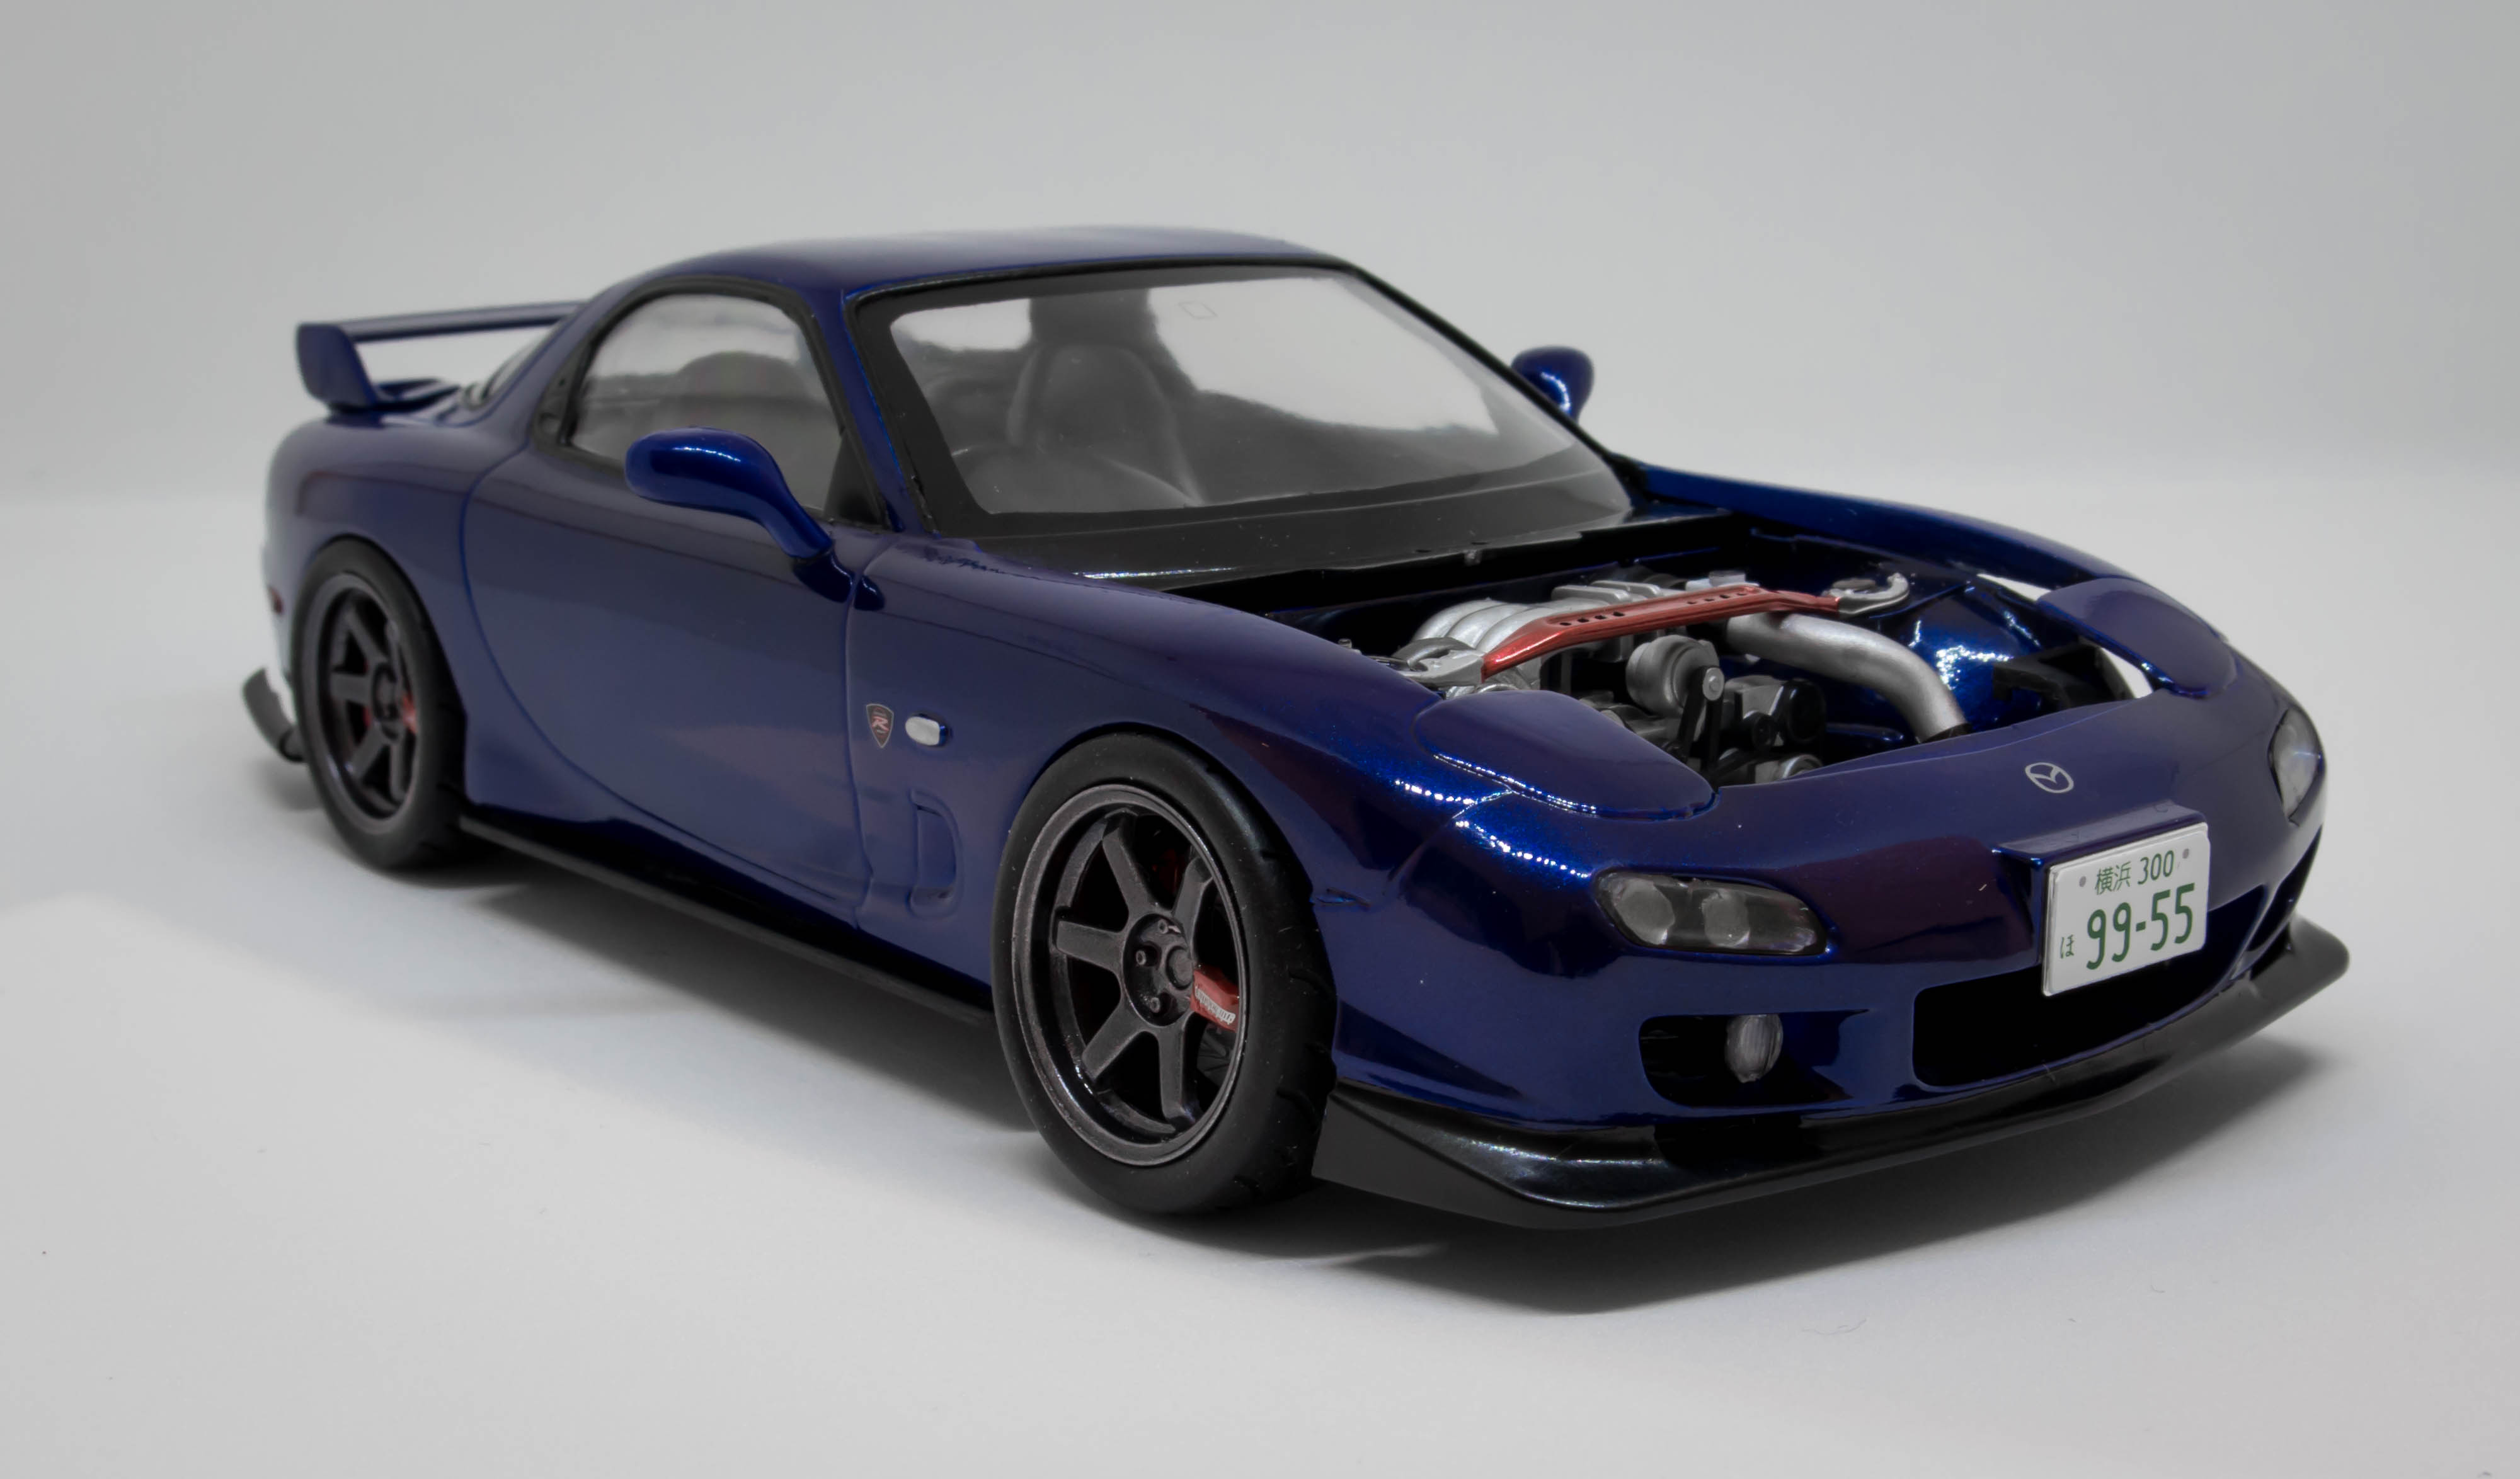
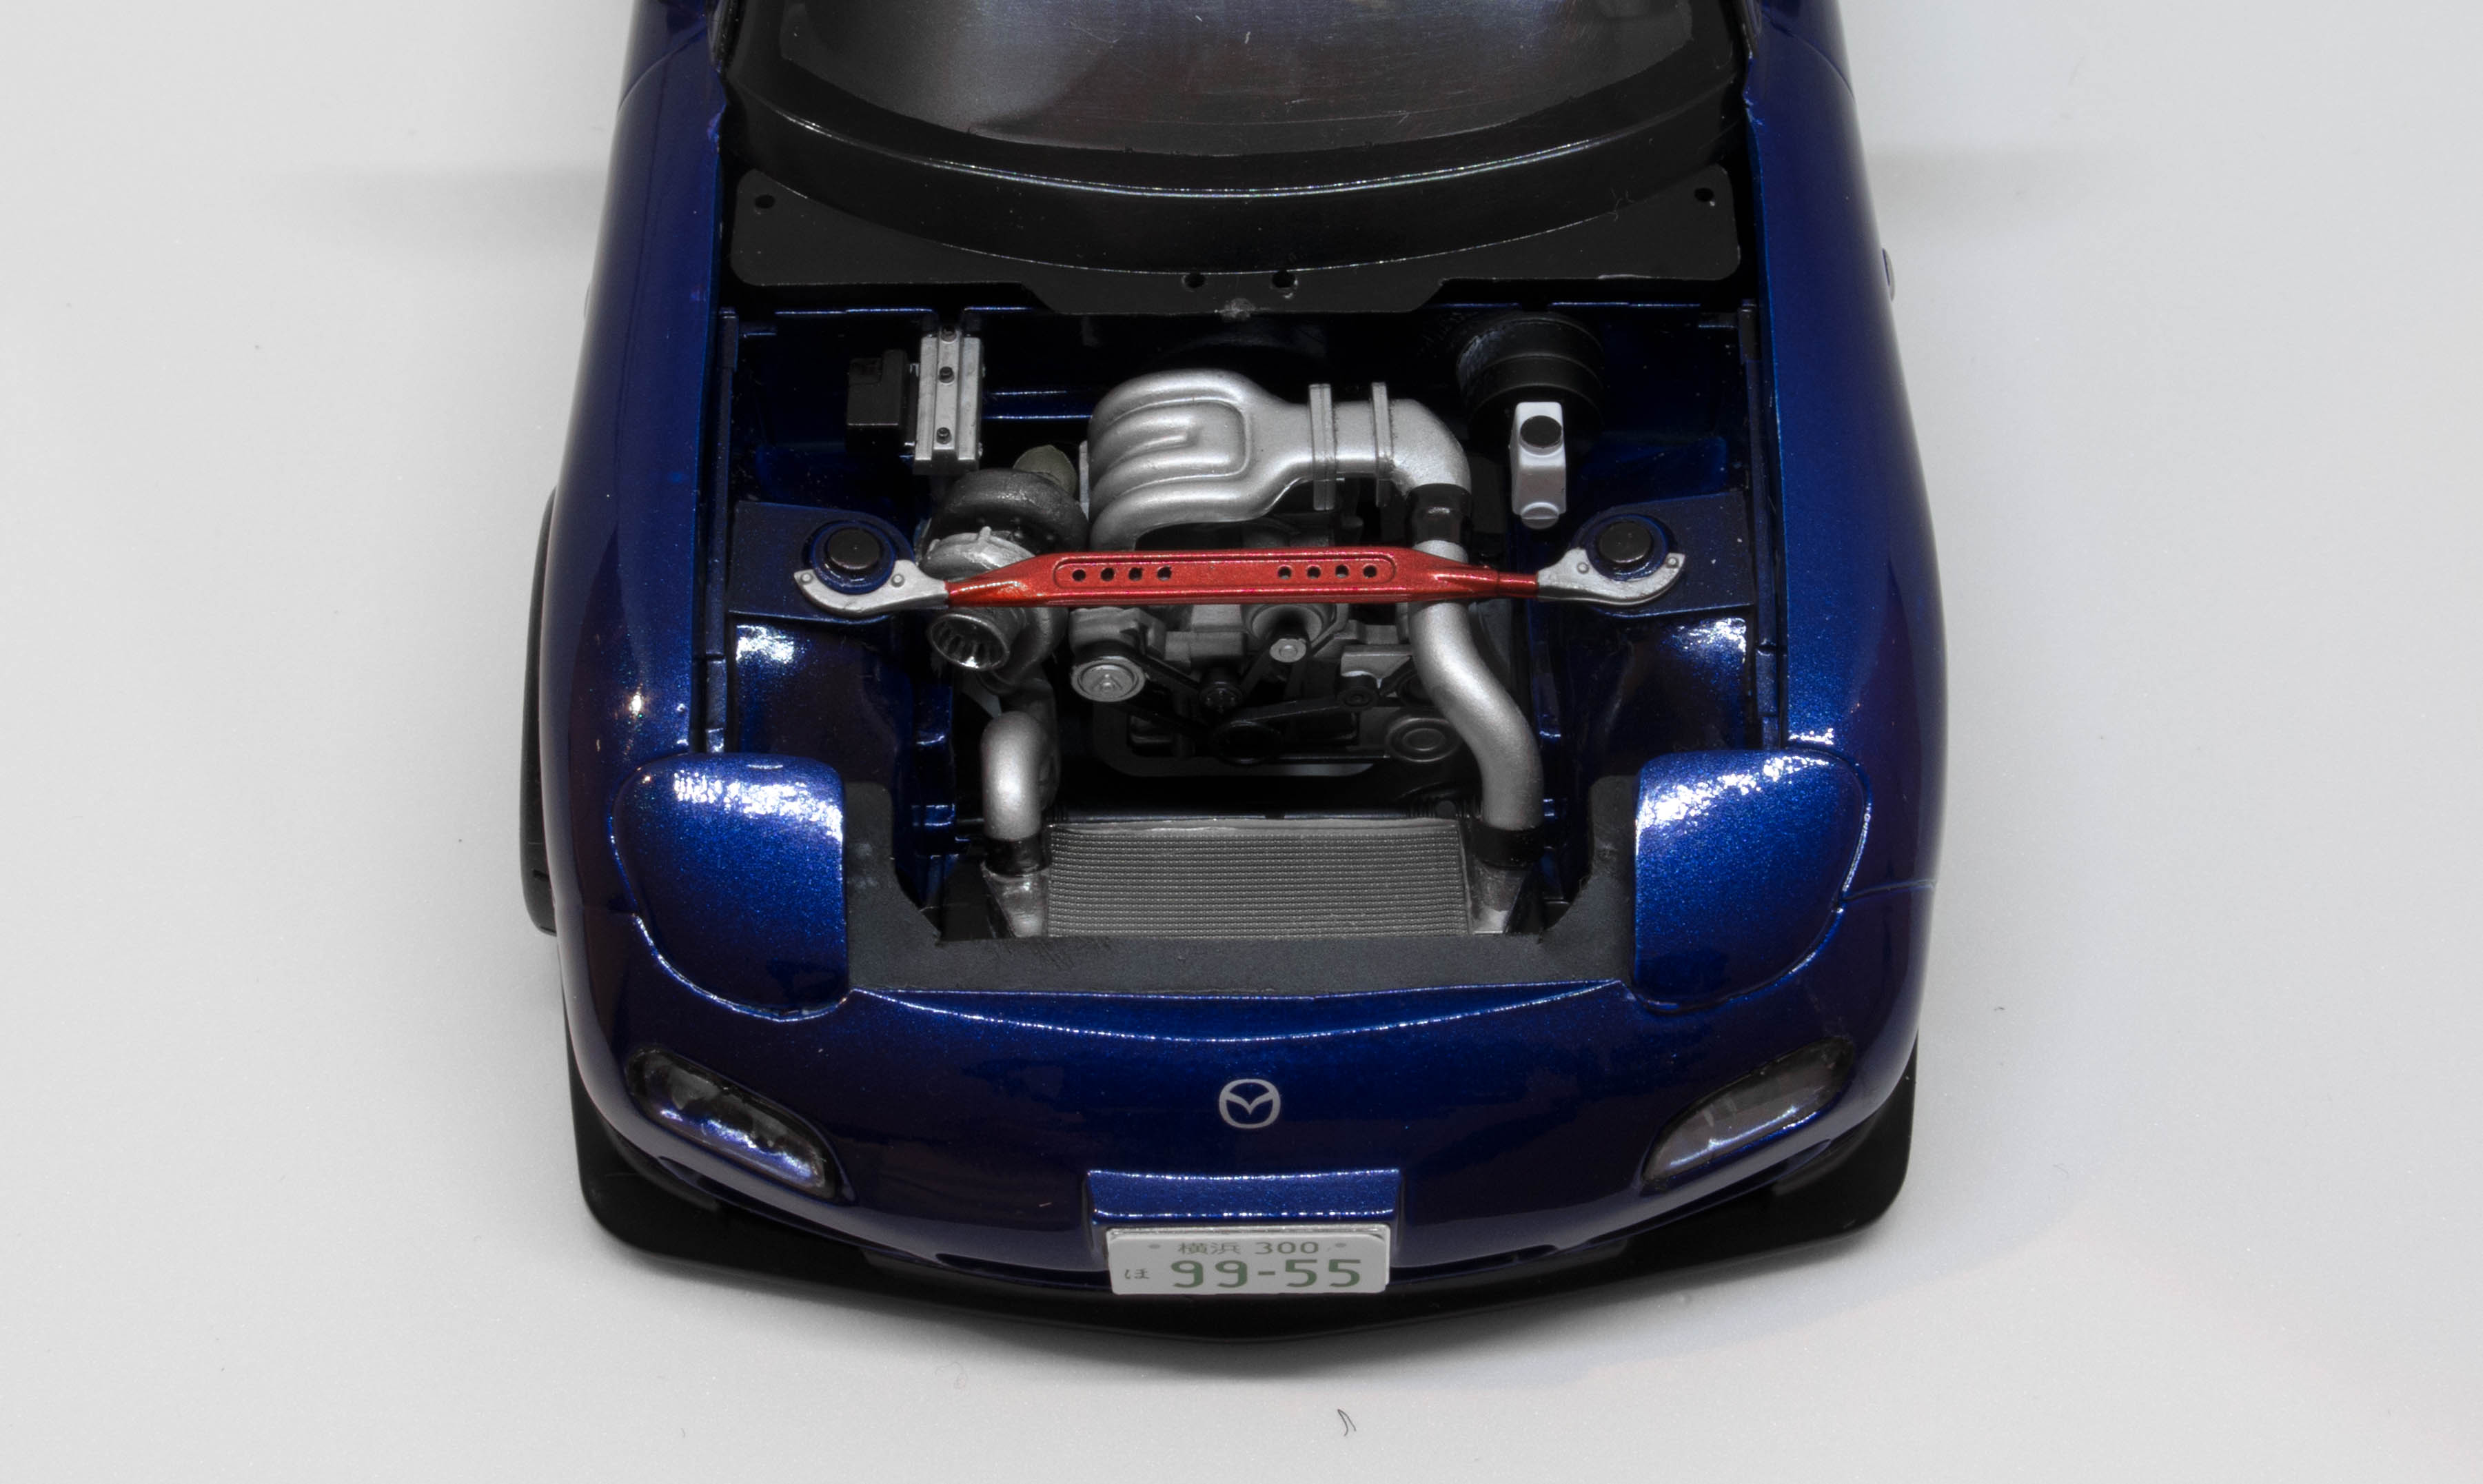
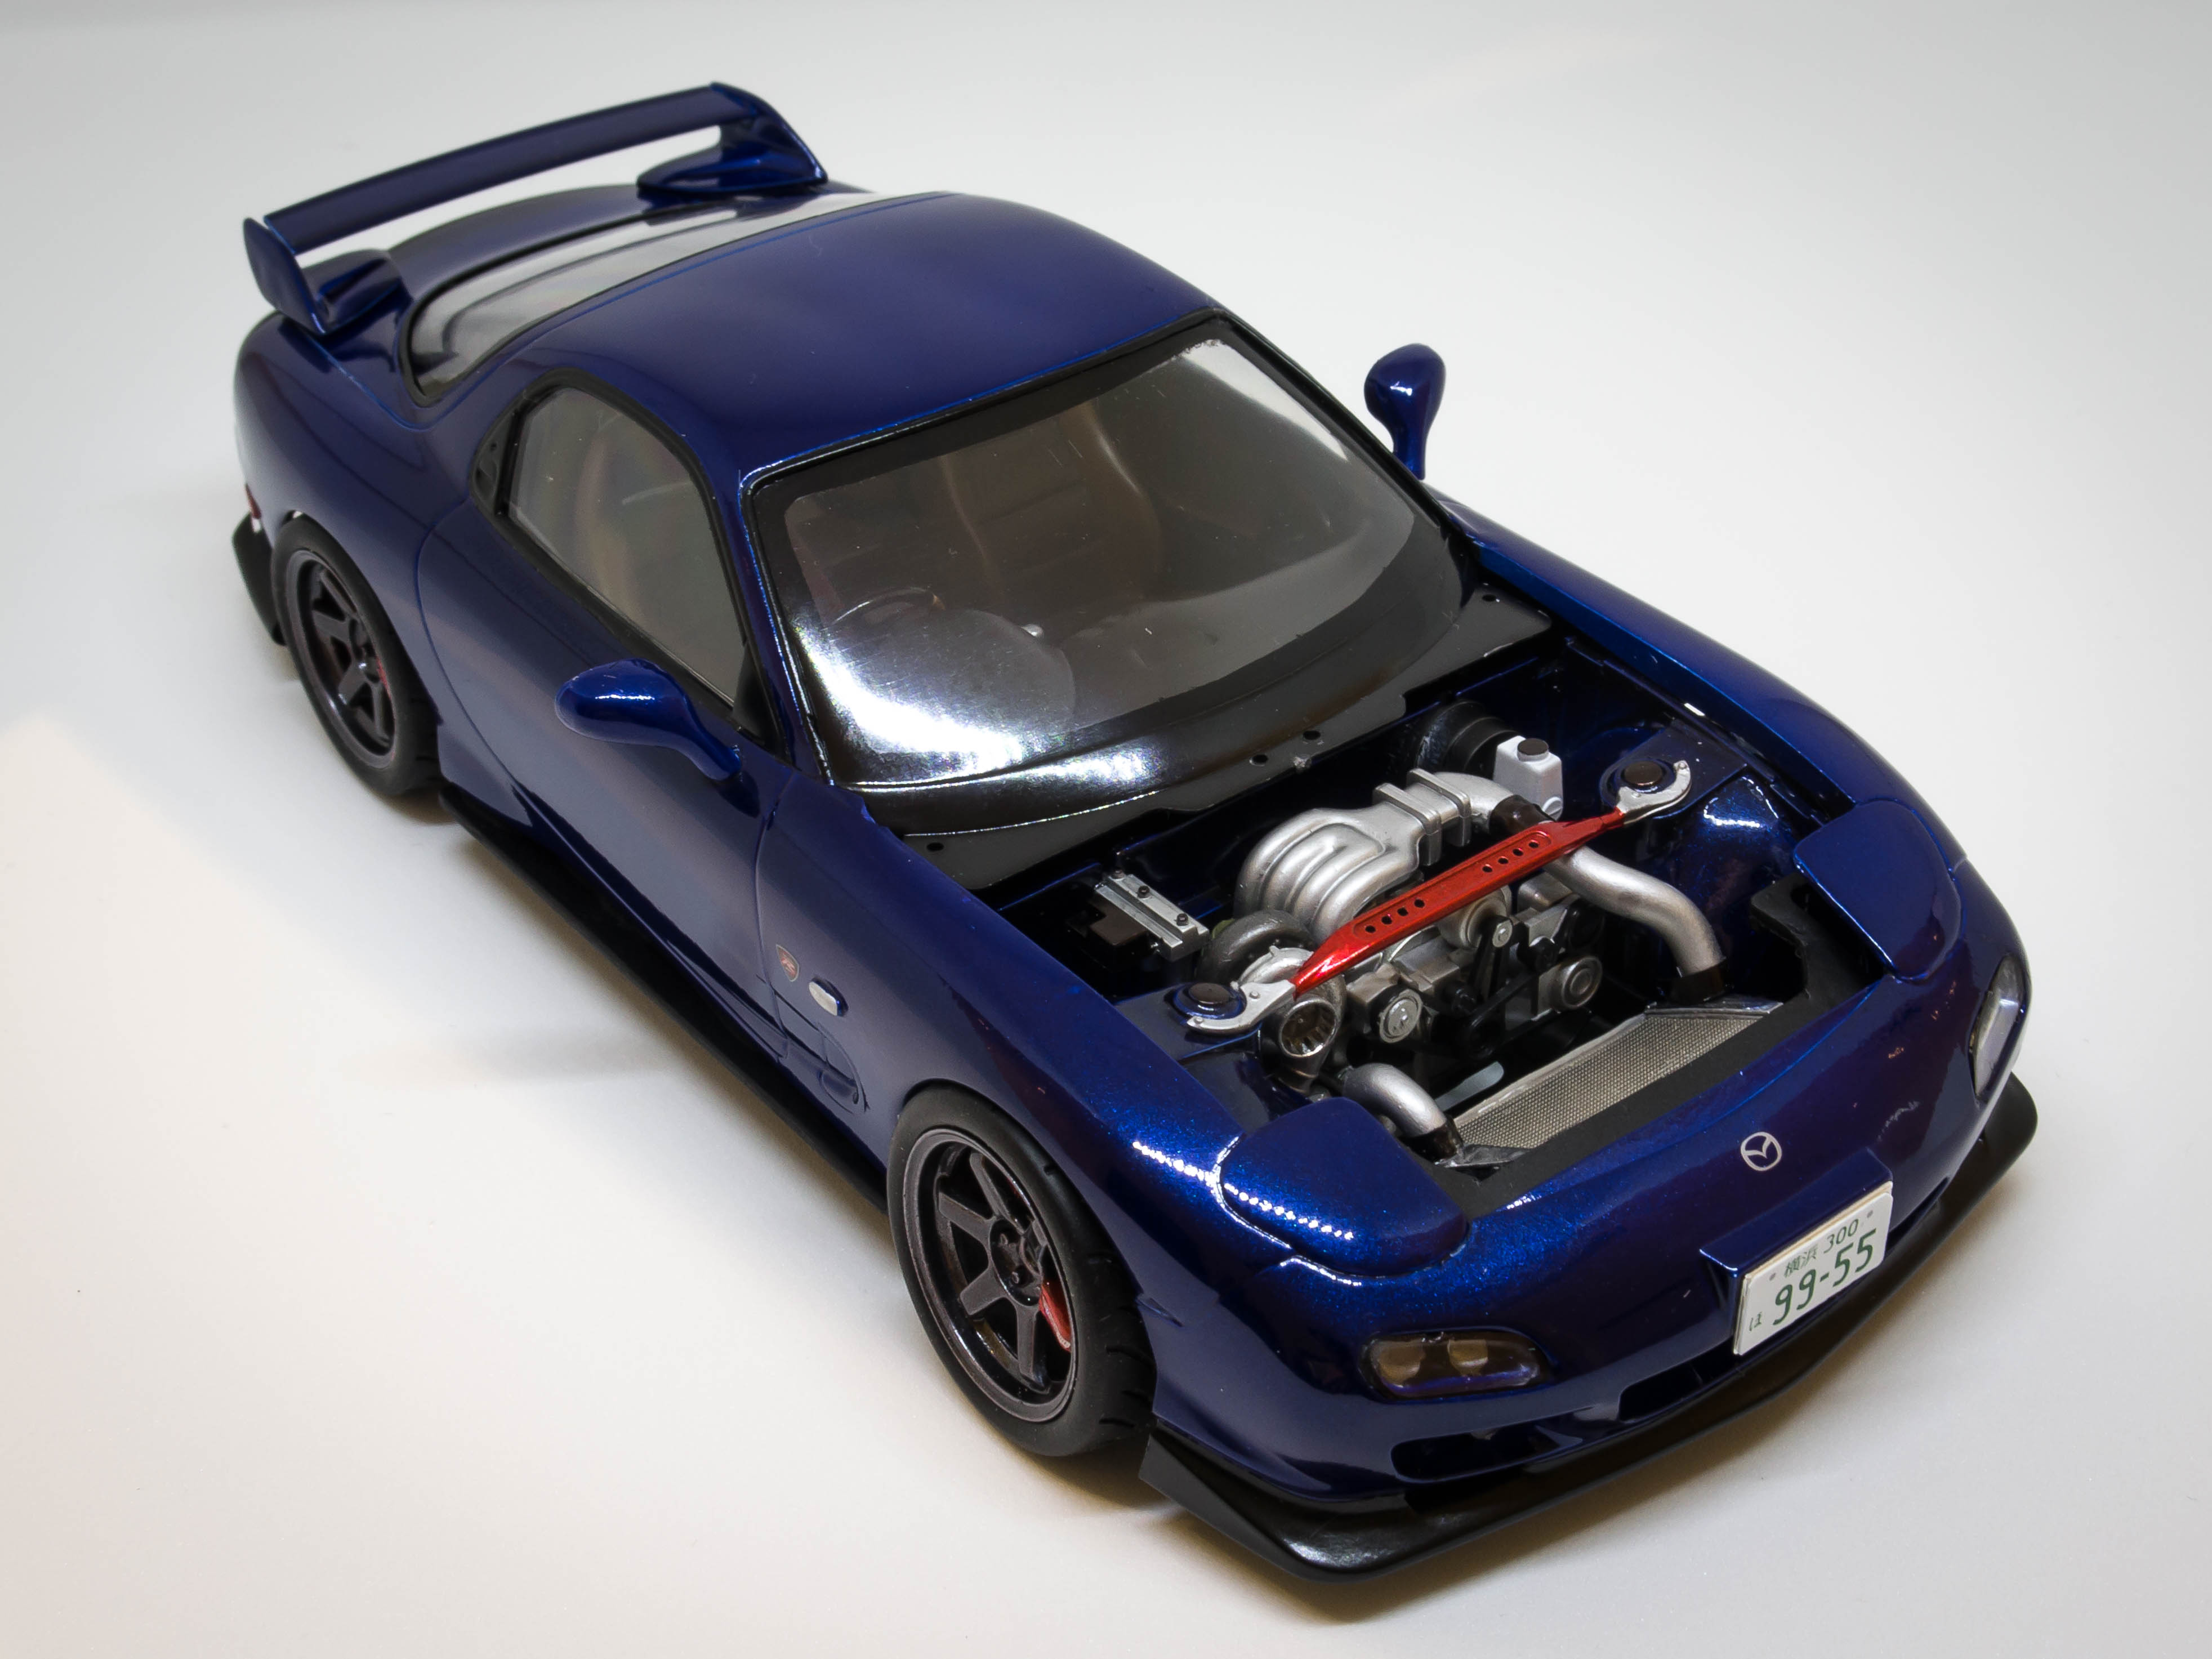
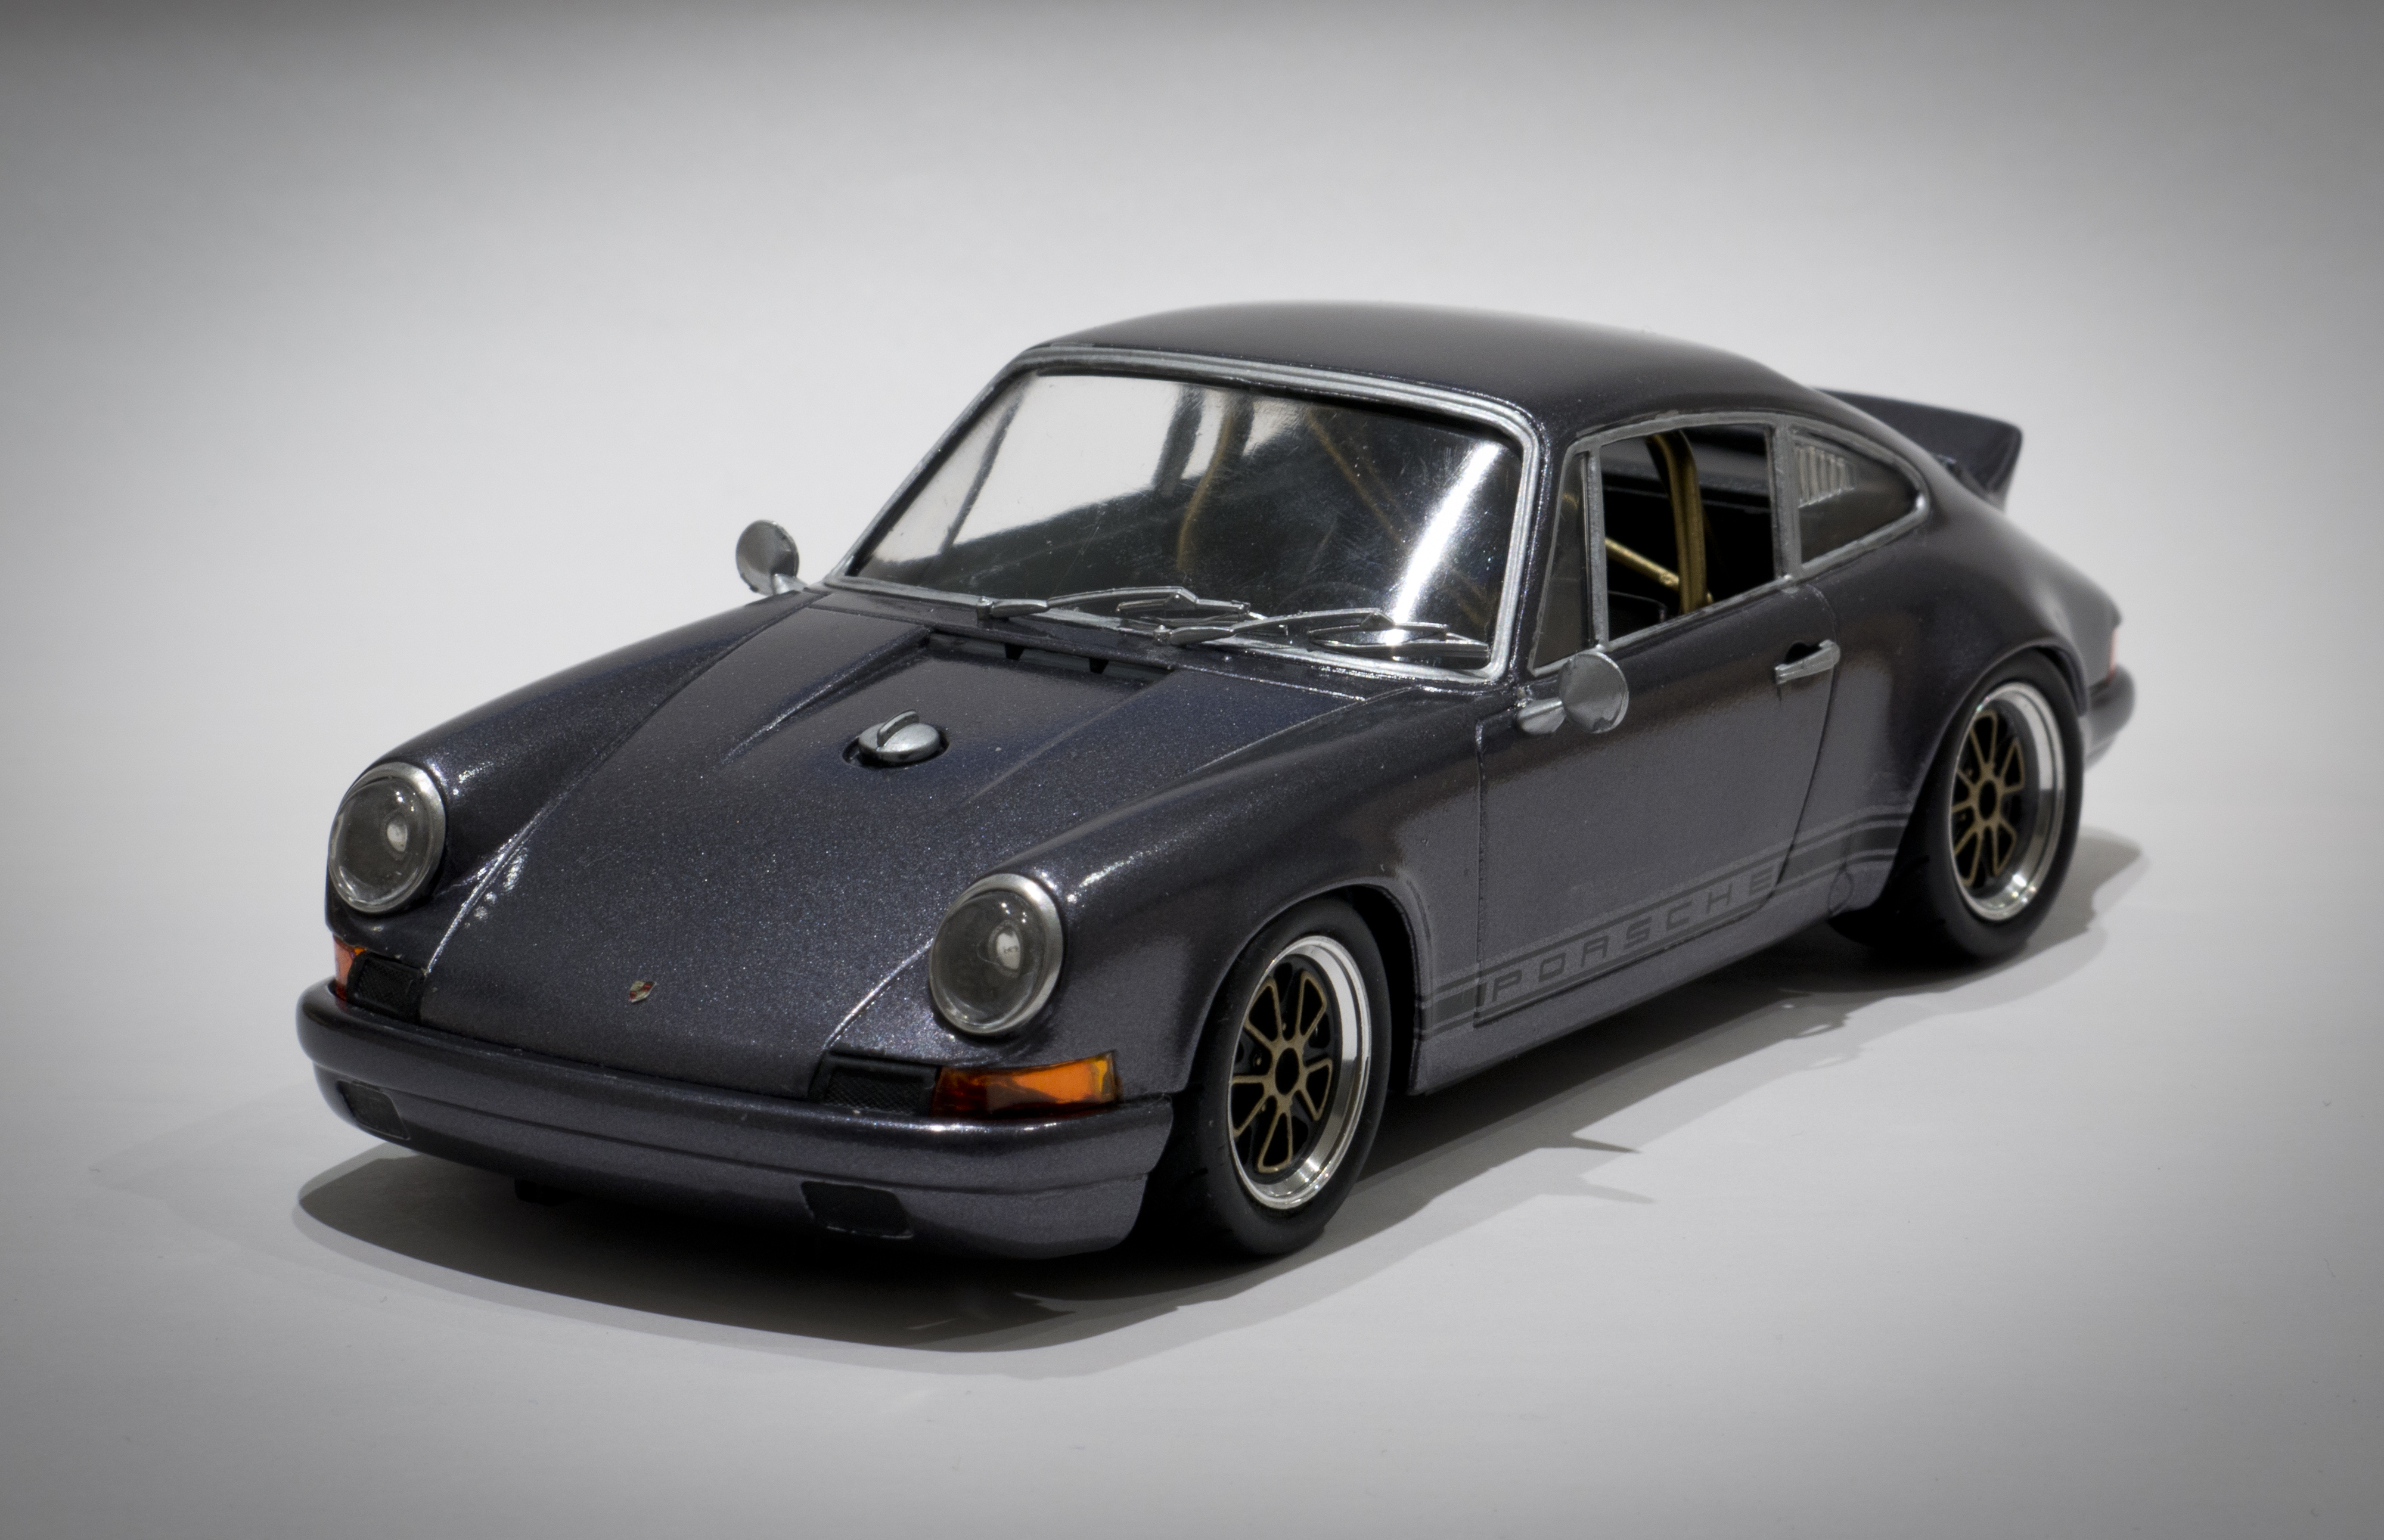
Hi All, I finished this kit over the weekend, after several weeks, of slow progress. I am really pleased with how it came out. The body is from the Aoshima RX7 Spirit R kit, engine and chassis are from the tamiya kit, and the aero bits are from a fujimi kit. I discovered along the way that even though they are all the same car, and scale, each brand has modeled the car slightly differently, and so not all the parts played together all that nicely. A lot of filling and sanding had to happen to the bonnet, and chassis to make it work with the aoshima body. I didnt get around to doing a WIP on this build, Thanks for looking Nathan

-
Hello, everyone!, this is my Aoshima Lamborghini Aventador. I love the "stealthy" look on him, I used 3D decal emblems on the bonnet, steering wheel, and centercaps. I carefully cut the side glass out, since I don't really like them up on my builds, I also left off the taillight lense covers.....I don't really like them on it either. This is Aoshima's "full engine detail" kit which actually translates to; A lot of engine stuff, but not everything....the lower-end is missing. Still, with the outstanding way they designed it, the awesome detail of the parts, and the fact that these kinds of autos have full belly-pans, the engine bay CAN still look realistically complete with the help of wiring, painting, and other detail add-ons! This one is proof of it. This kit is so easy, and fun...….I could just keep buying and building them!!
-
Hi guys.. Here is one of my many projects to show up for you.. Its Aoshima model kit of Nissan Gloria 4 door HT 280E Brougham.. So far i have done it almost out of box, i just added side exhaust pipes, pack of Lucky Strikes on interior and some decals here and there.. all other besides those are out of box, just with little "custom" painting with rusty touch. There is no pictures of chassis, since there is nothing to look, just battery sort of chassis plate painted in black I used closest paints i found from my paint collection to give that Gulf livery look for this fine and elegant Nissan.. Then i started to add some rust, with oil colors, and Tamiya weathering stuff and some Vallejo washes.. oh for painting i used also some hairspray and salt method for chipping that paint.. blah, but since my english is not that good to tell everything i have done, i will let pictures speak.. Realistic or not, i have had a lot of fun with doing this one.. Its my first time doing this type of weathering job
-
Hi guys! Here is my newest finished build.. Its Aoshima Nissan Gloria 4 door hardtop 280E Brougham. Had some serious fitting issues with chassis, dash and door panels but i won that battle.. My first experiement with hairspray and salt techniques in weathering. Also i used some oilcolors for first time.. I think it turned out pretty good.. There is some scratch build parts like that foxtail in antenna, side exhaust pipes and printed japanese Car magazines.. Decals are from here and there from my decal collection.. Gulf livery has always been one of my favourites and this is my first "Gulf car" added on my collection.. Now i will let pictures speak.. Enjoy There is not any photos of chassis, since its battery type curbside chassis just painted in black.. Cheers!
-
So i recently started a new build... the F1GTR Long tail. I bought the kit as a gulf racing livery. However ive decided to give it my own personal touch. The color combo might not be to everyones liking. but i thought its something else for a change... still undecided if i need more purple on the body. Hereby some pix Let me know what you think, and any advice/tips are sure welcome!
-
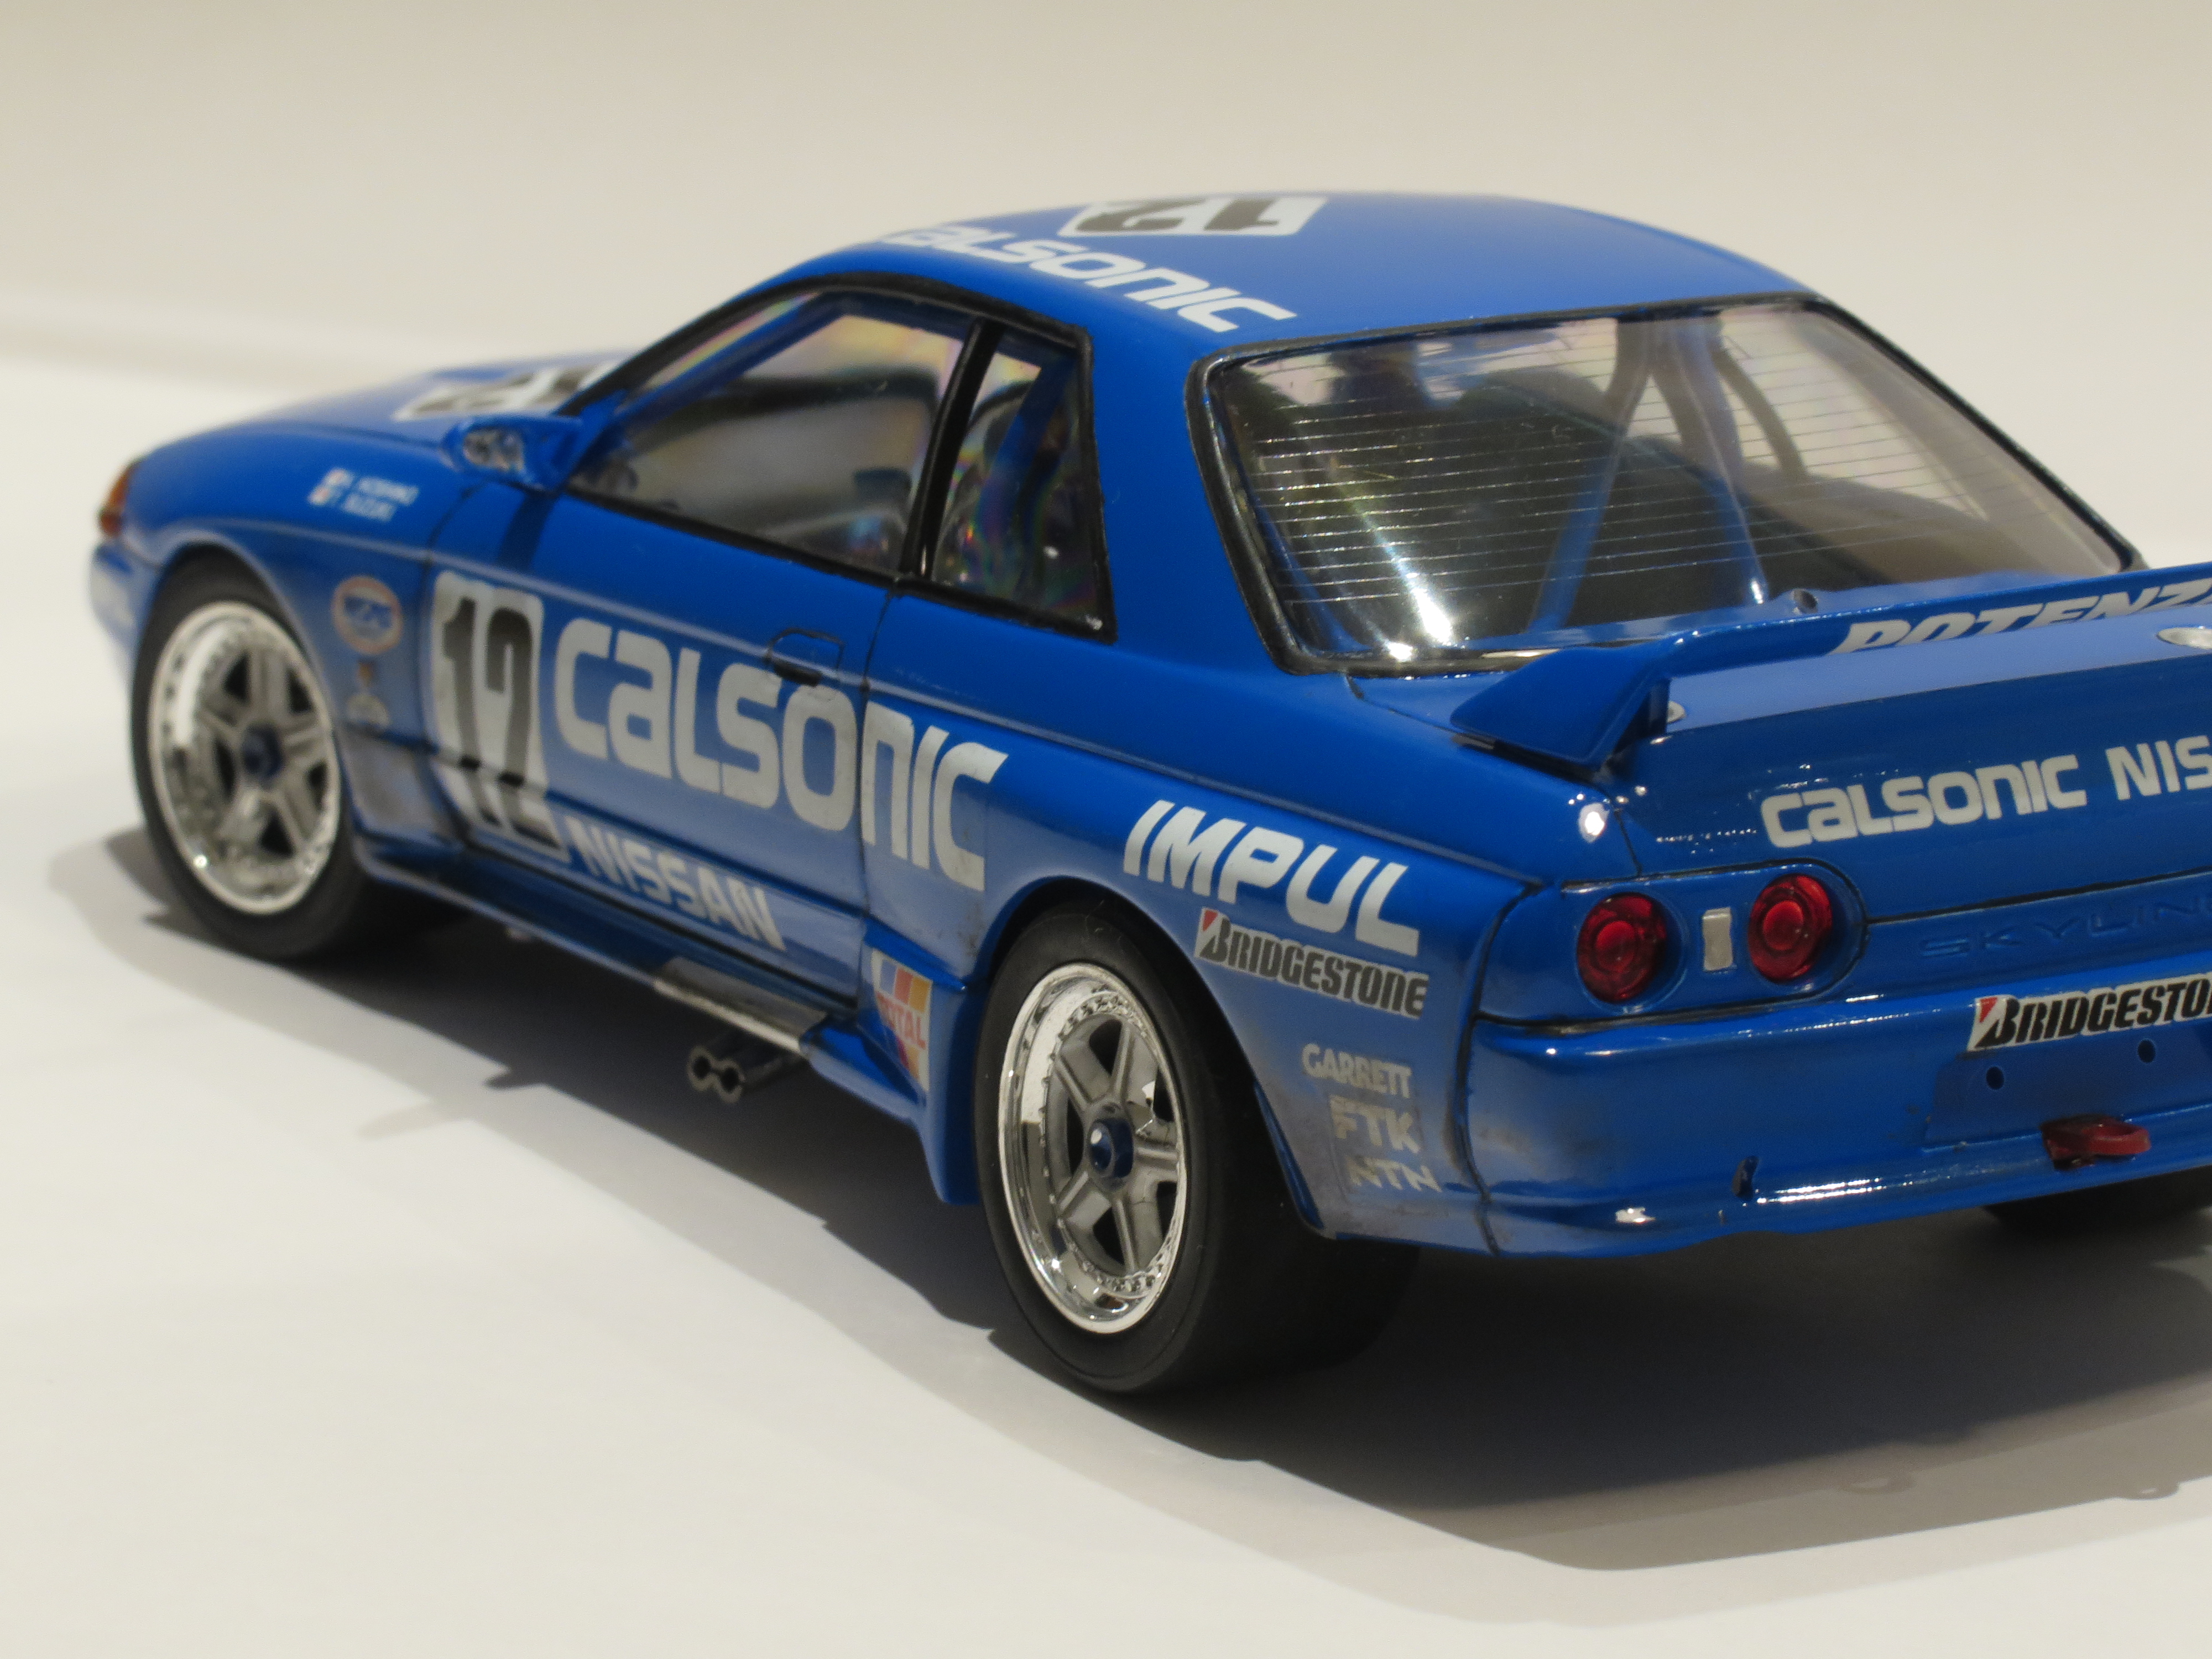
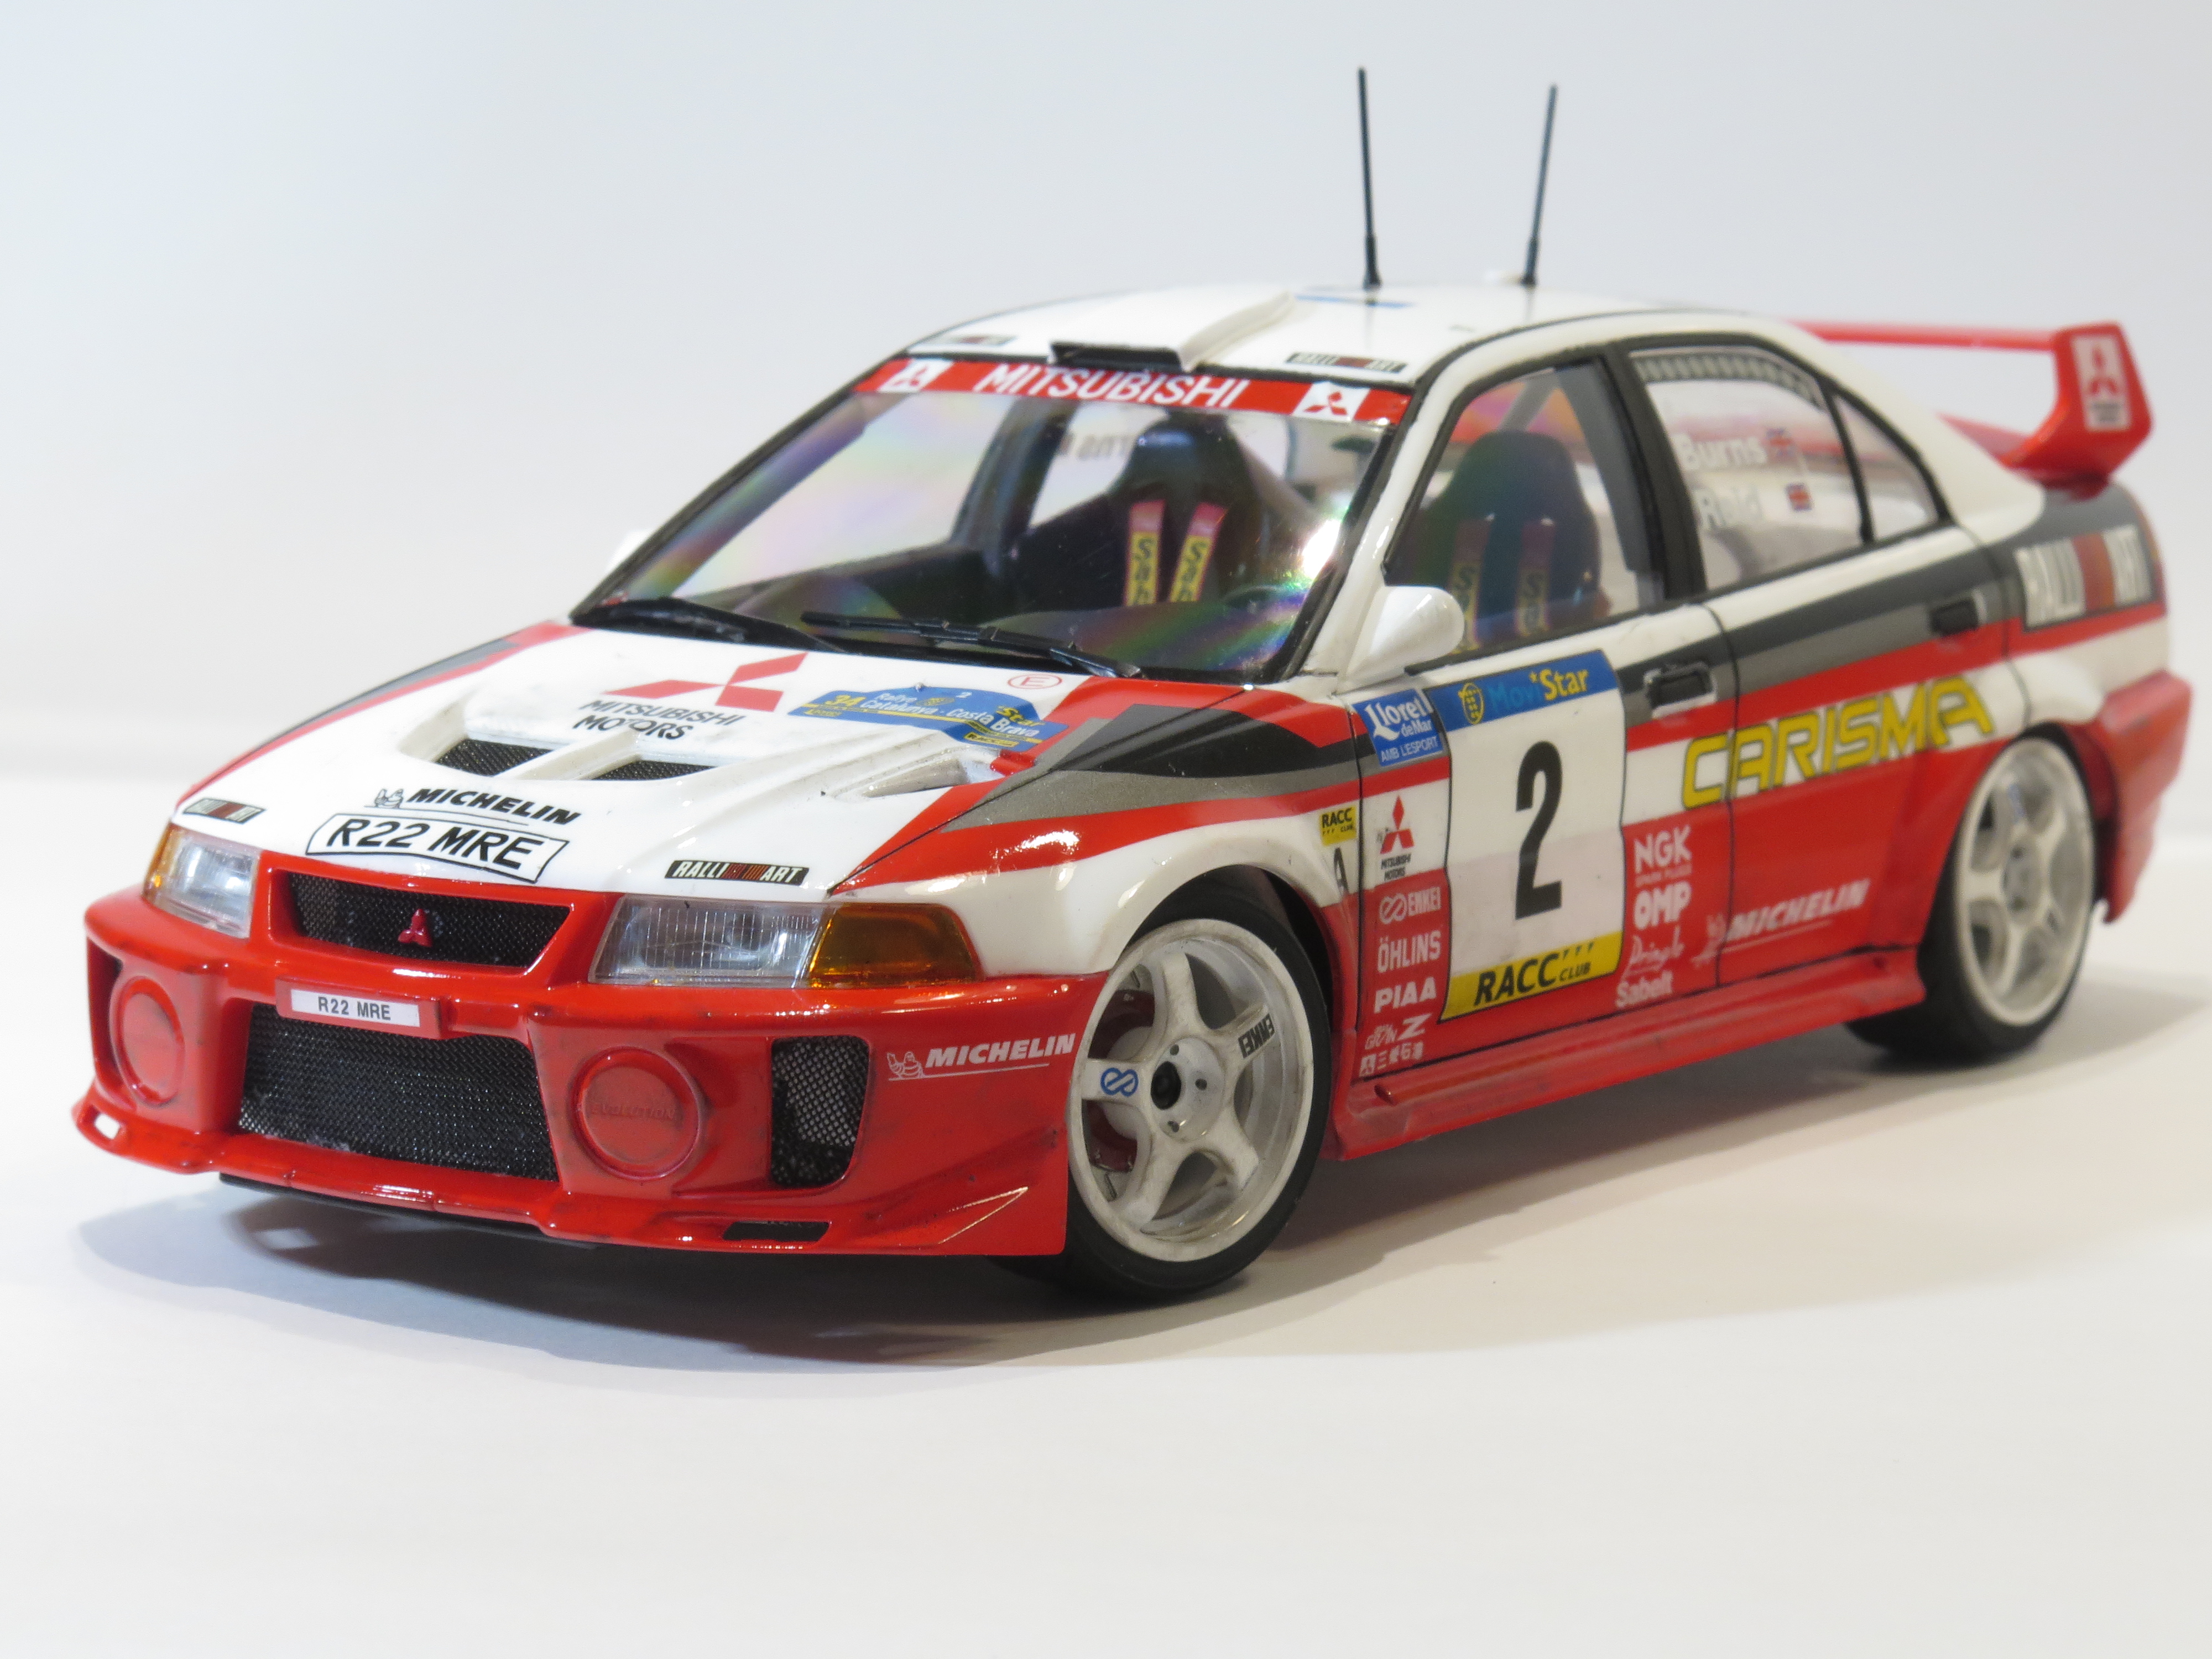
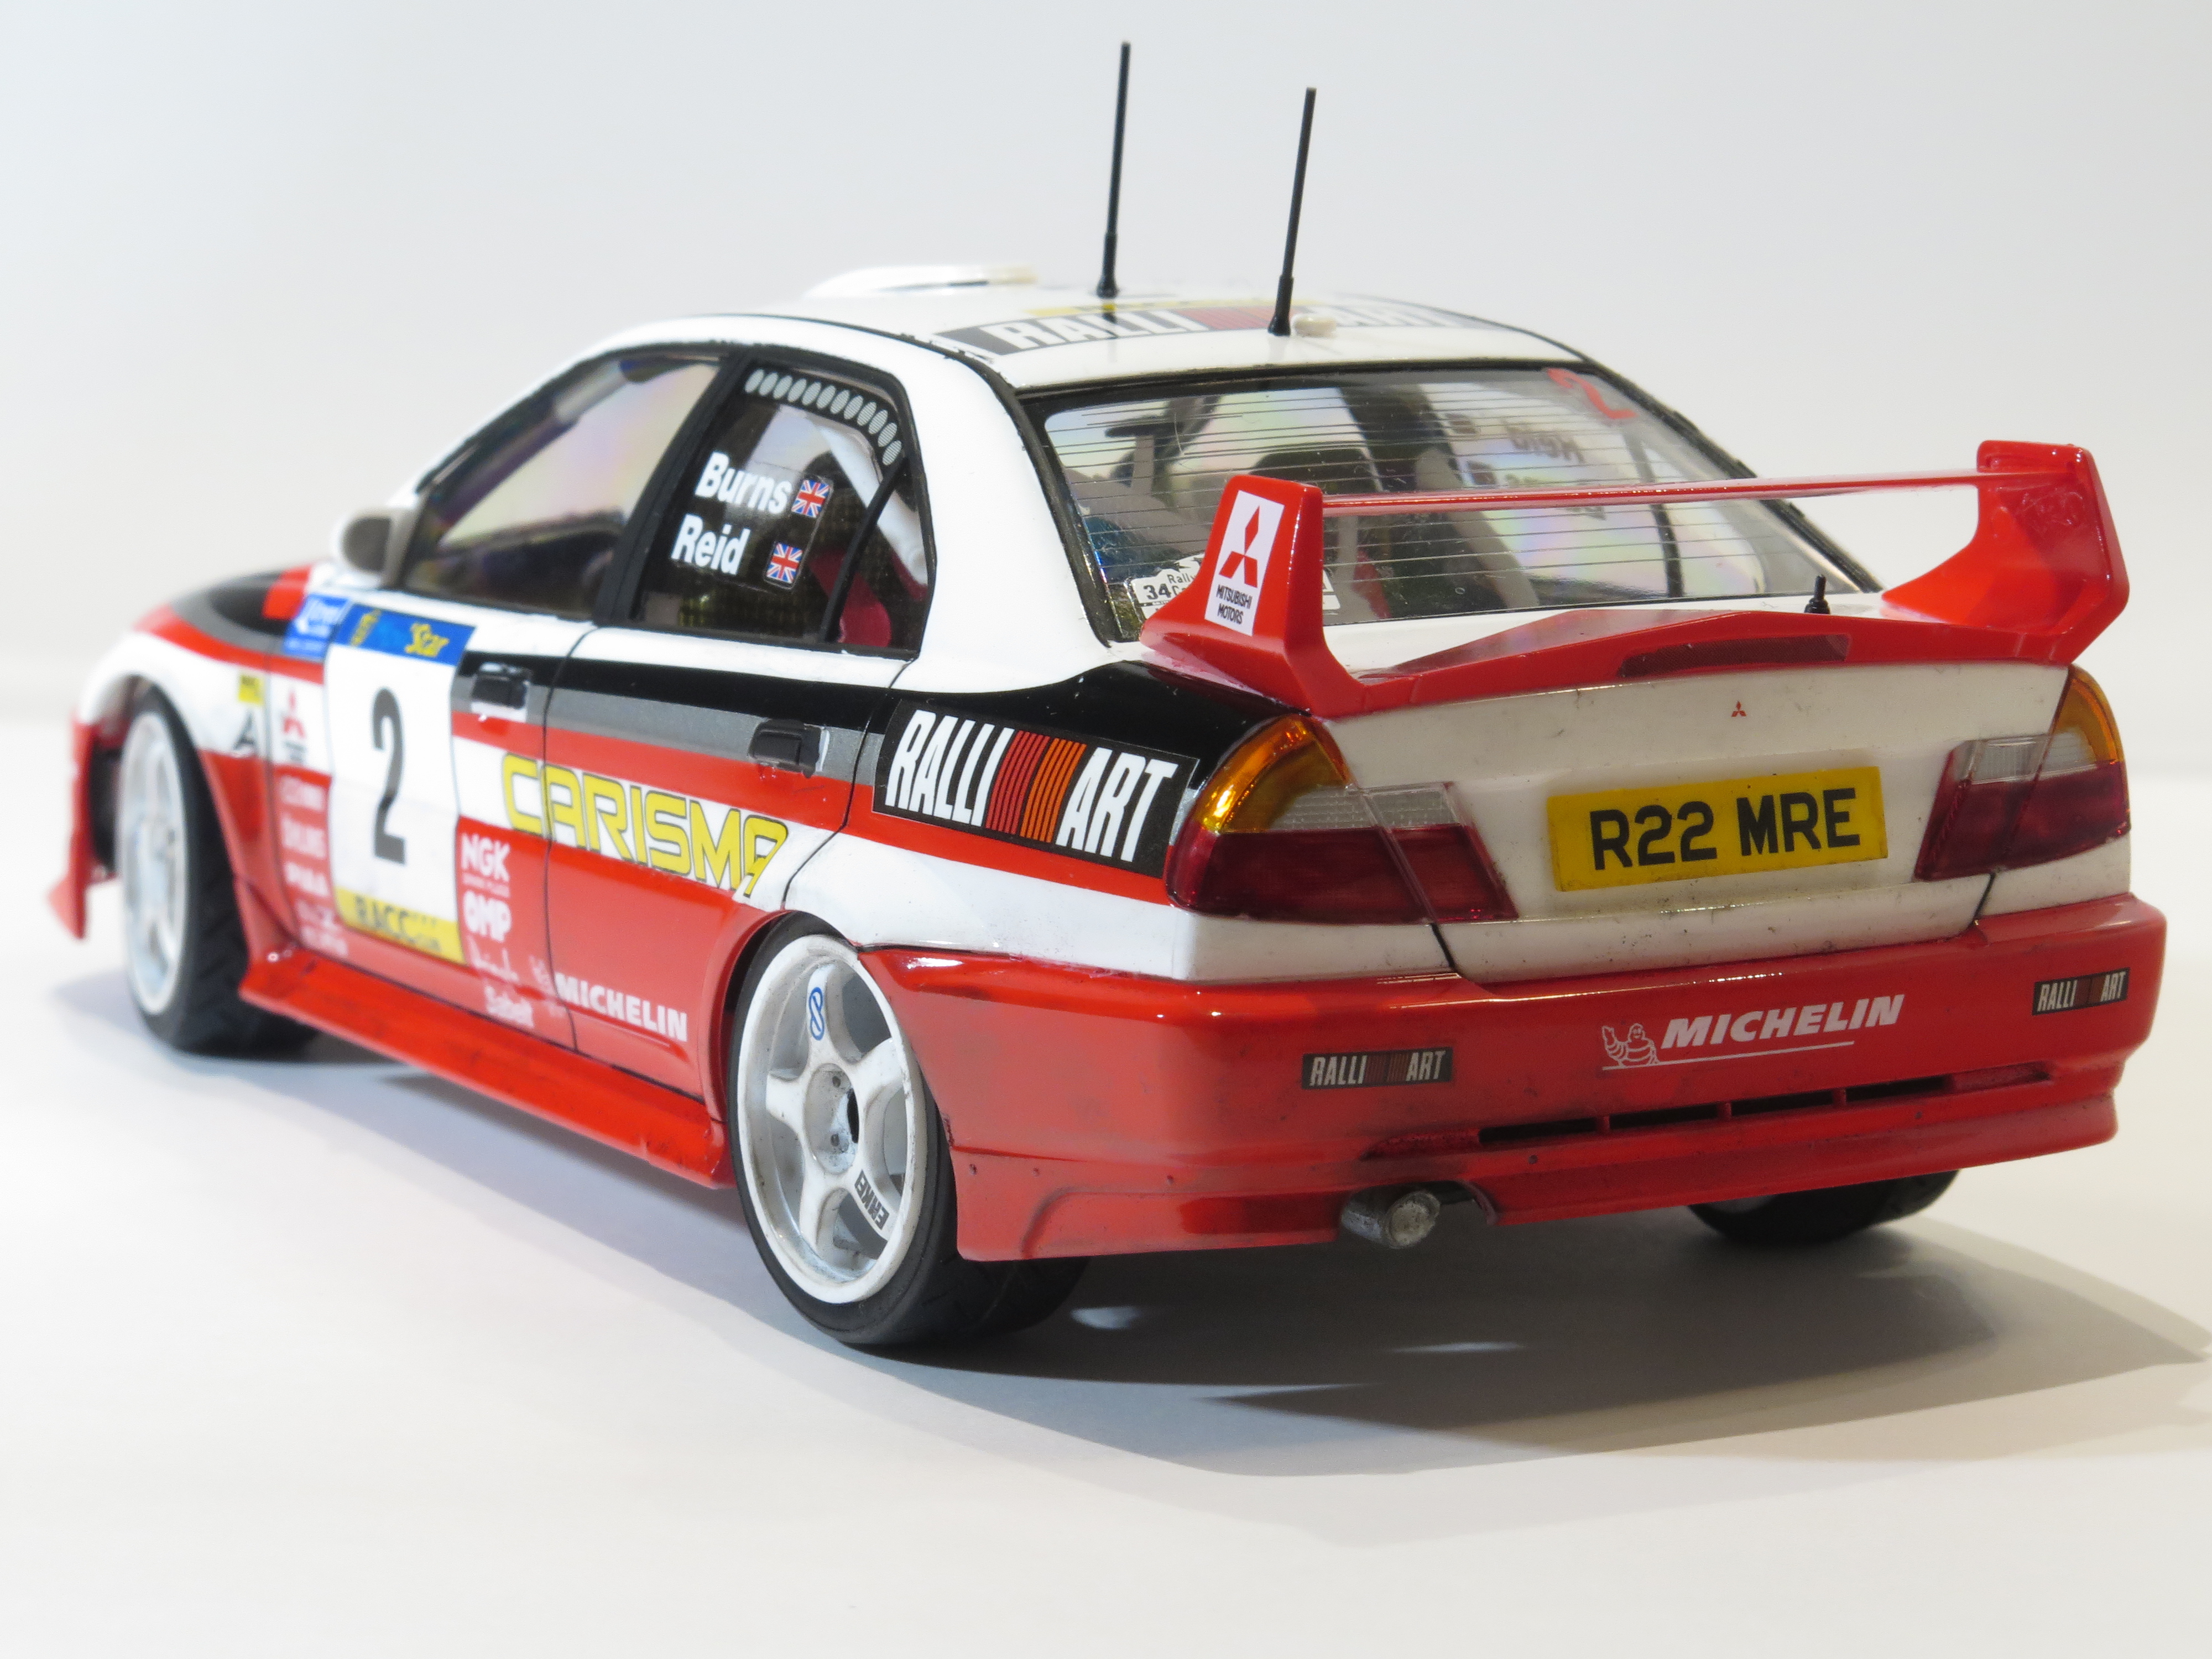
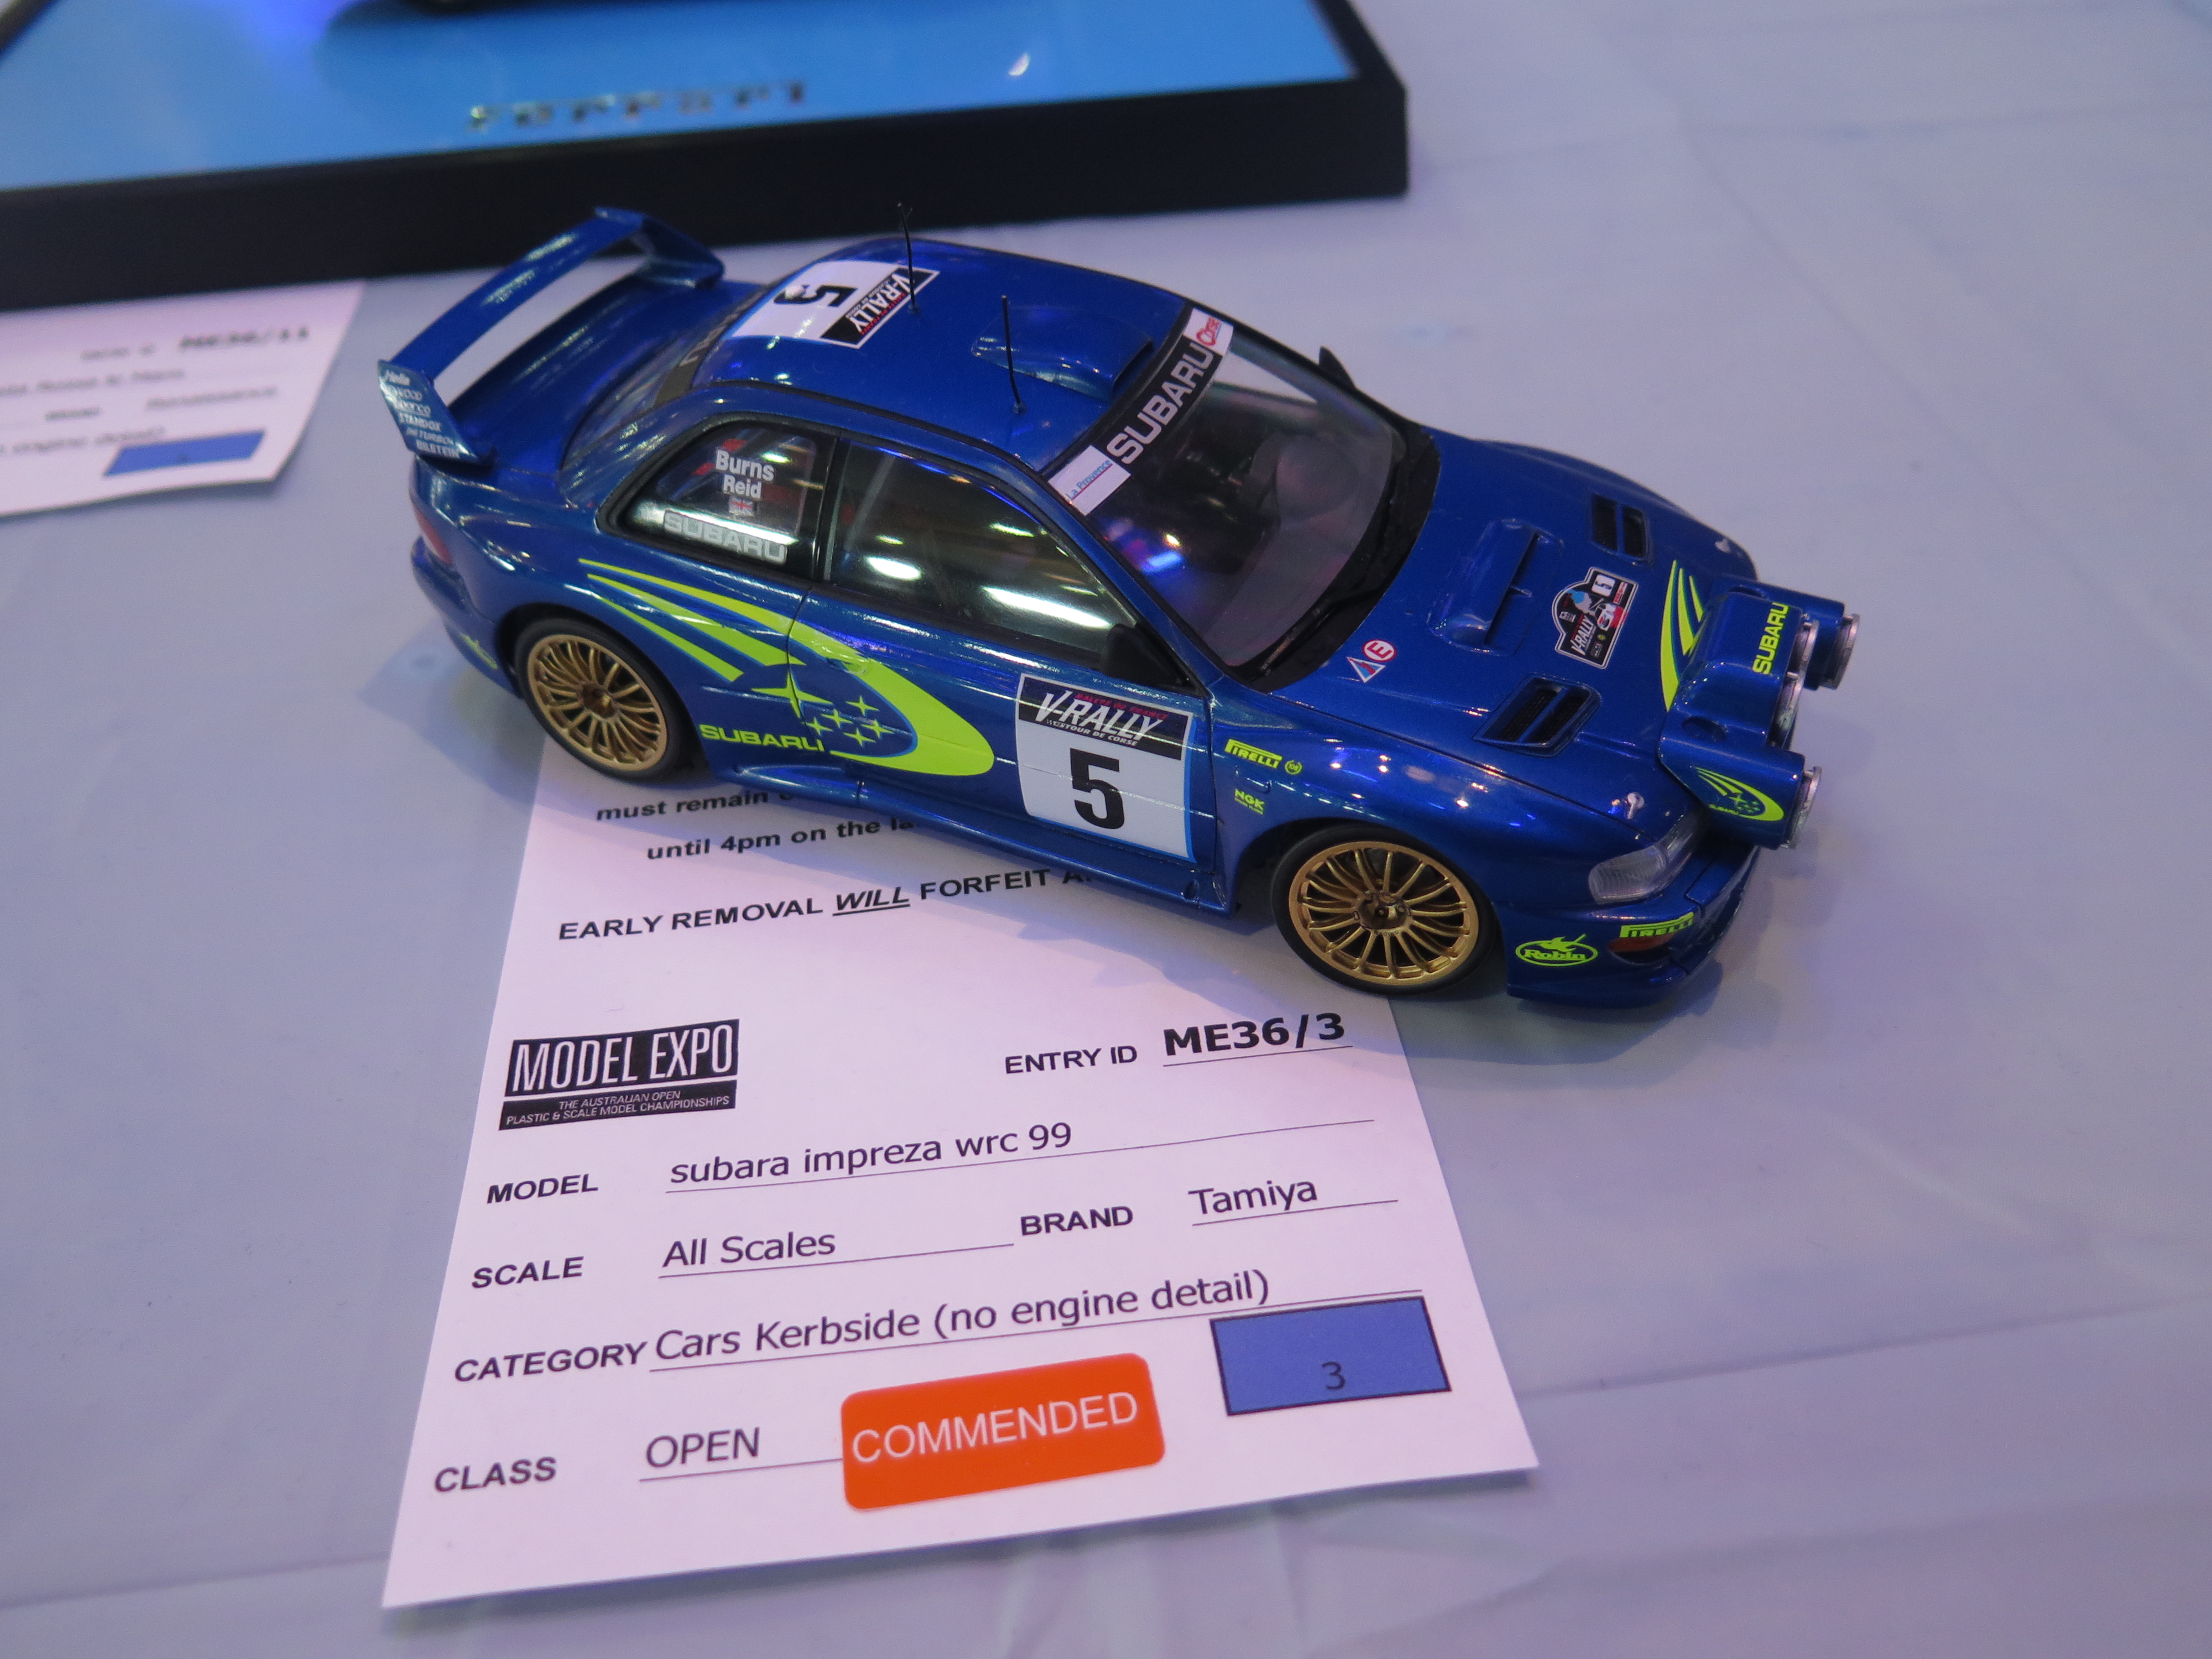
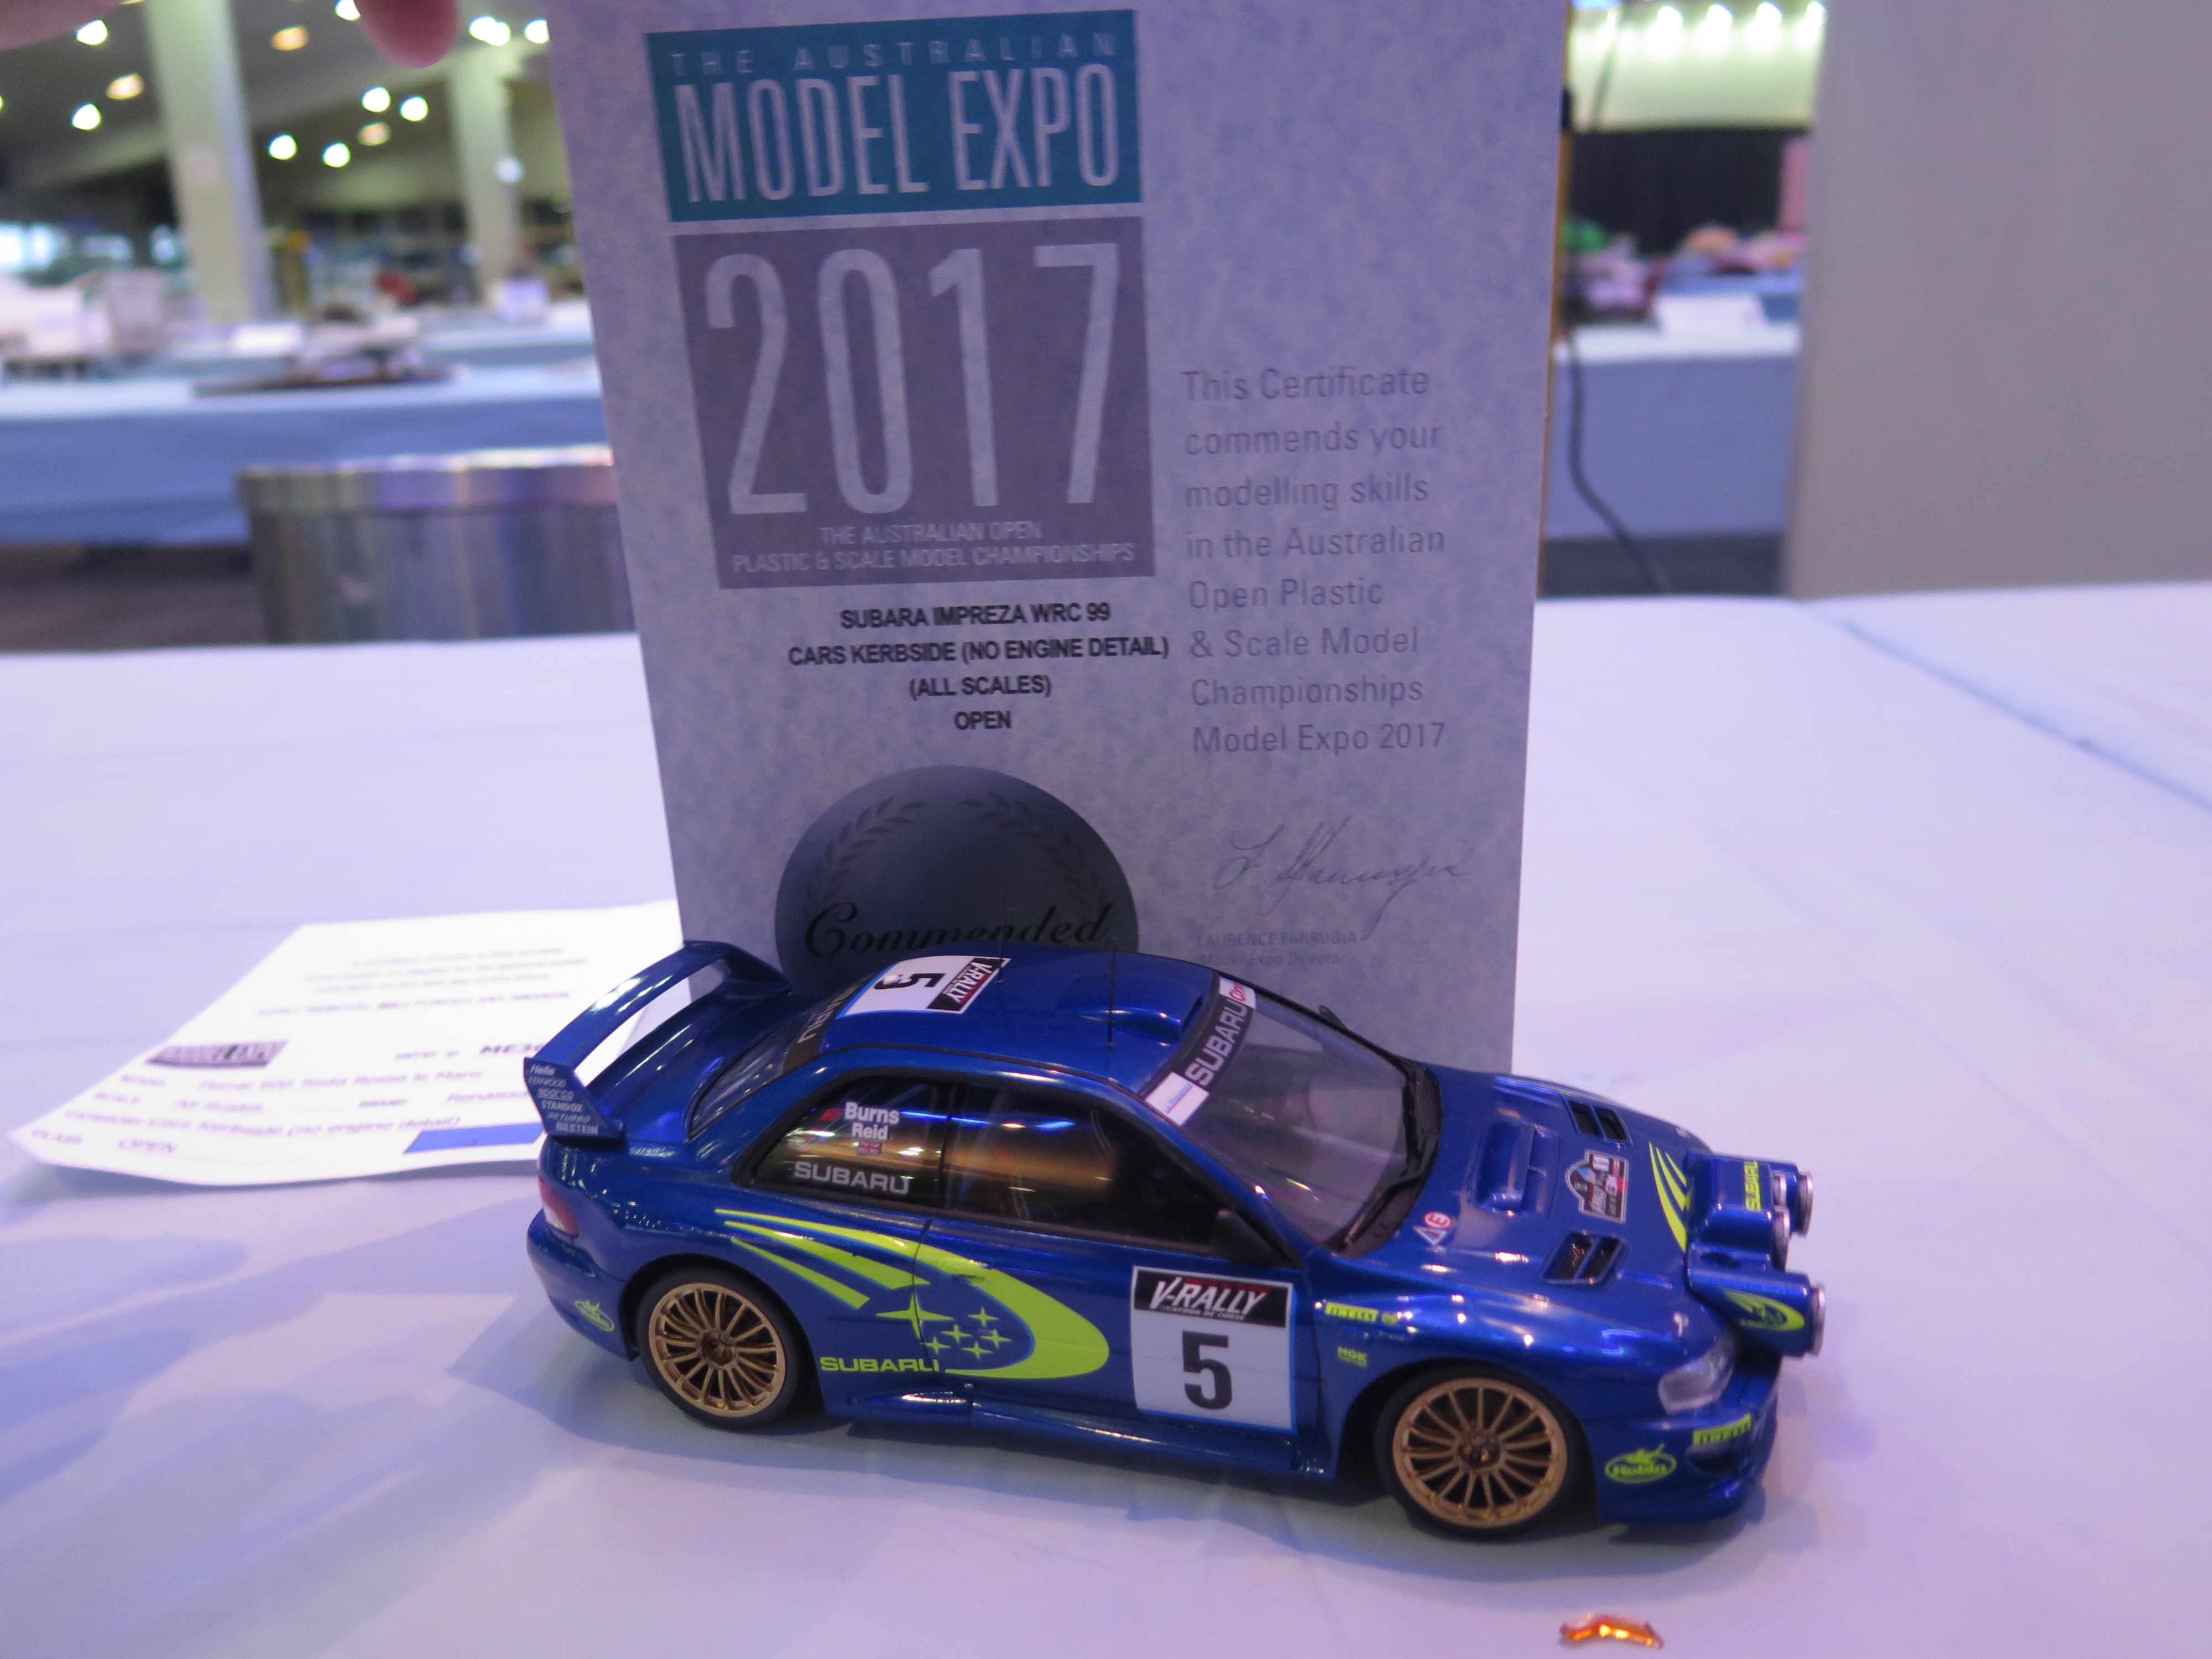
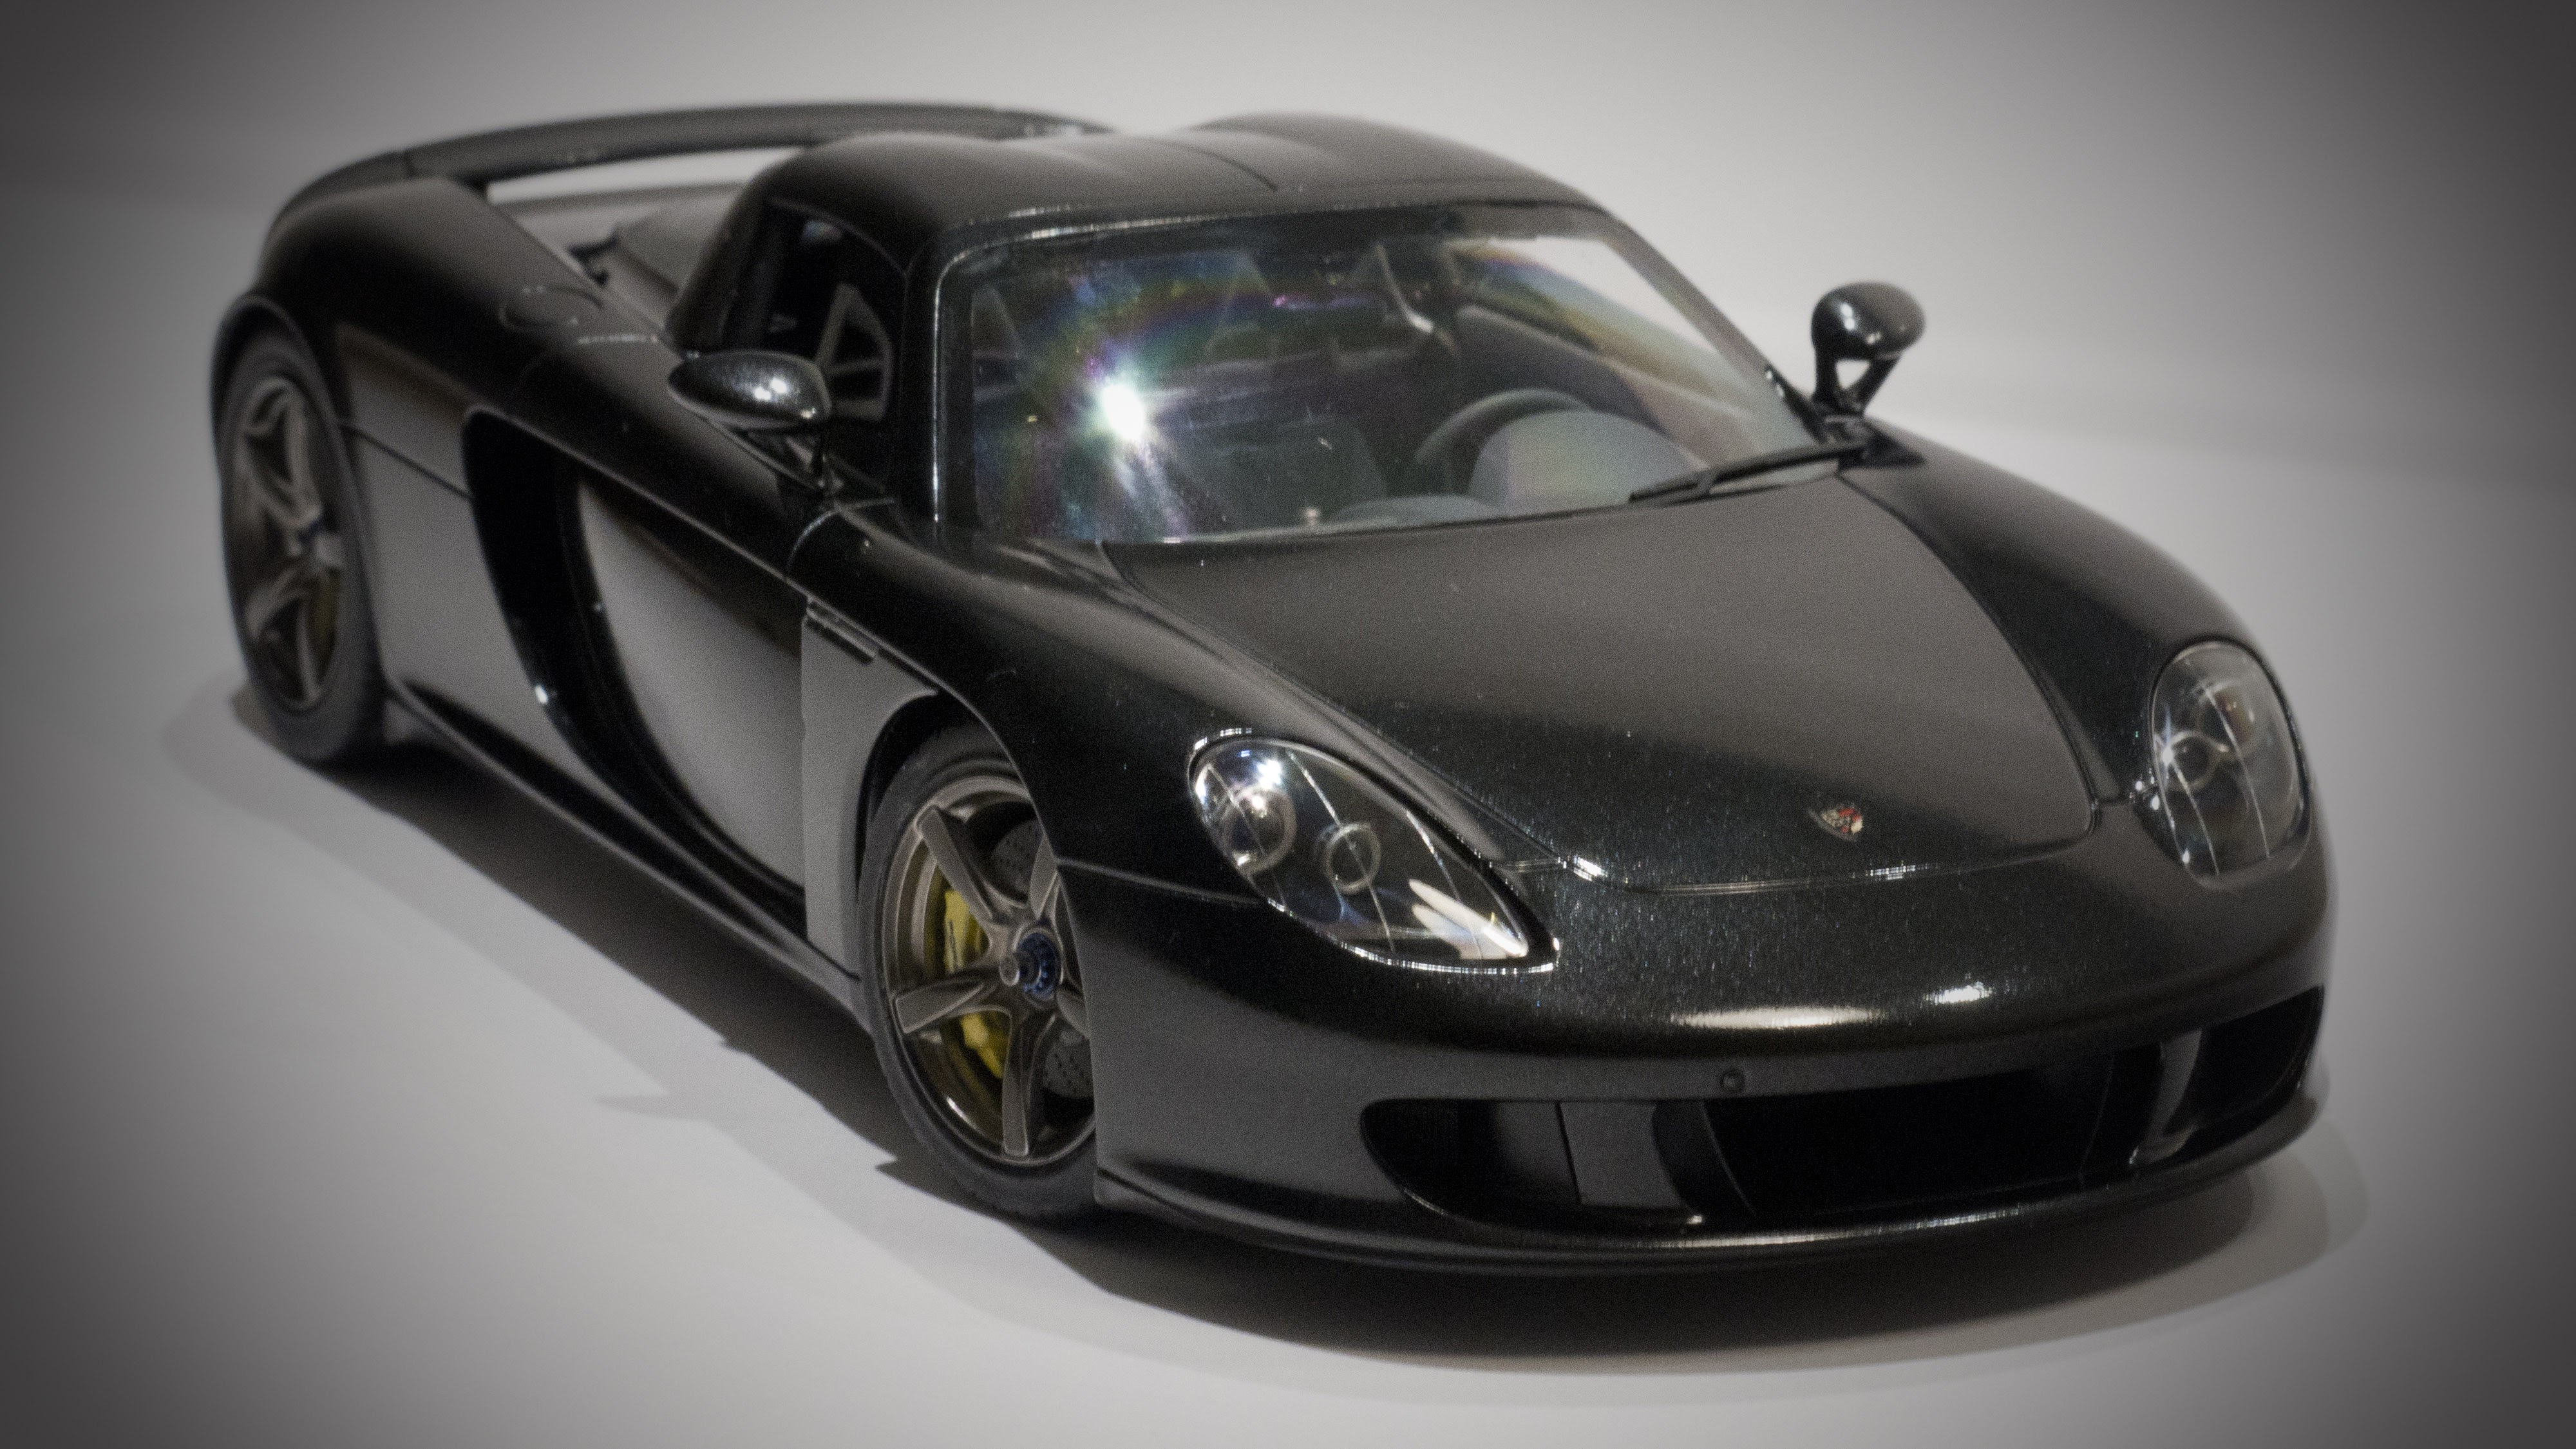
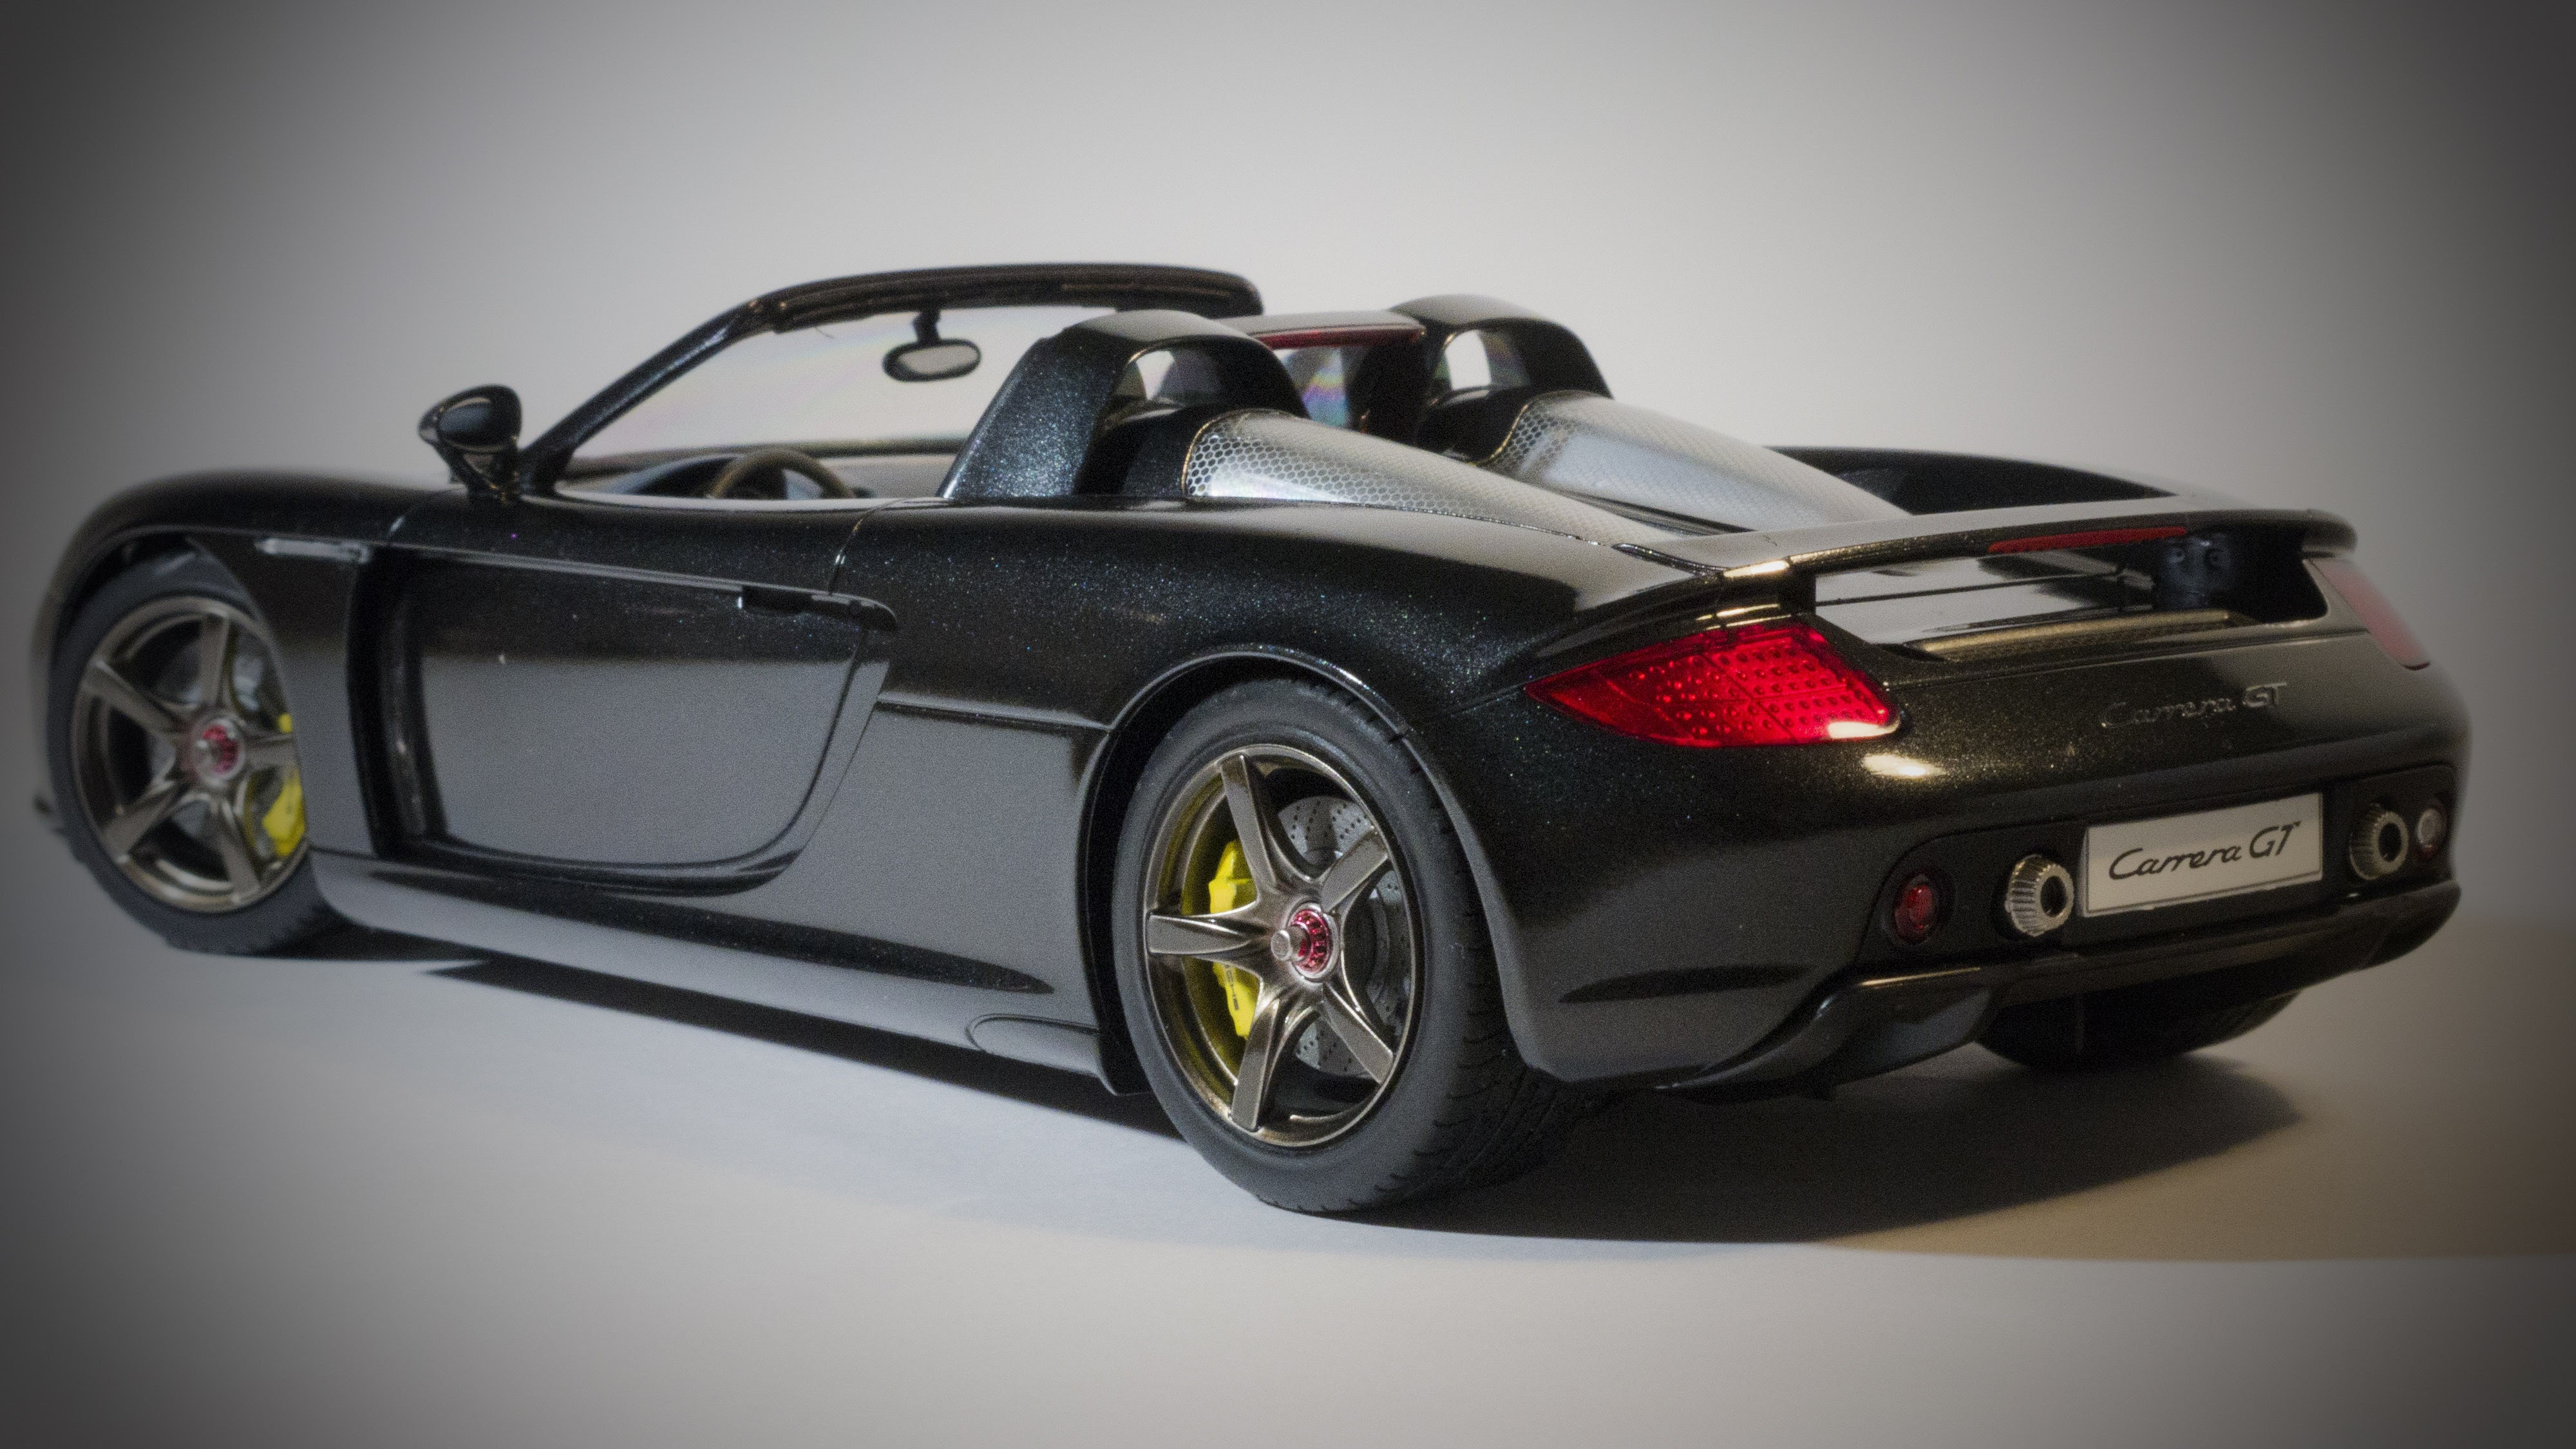
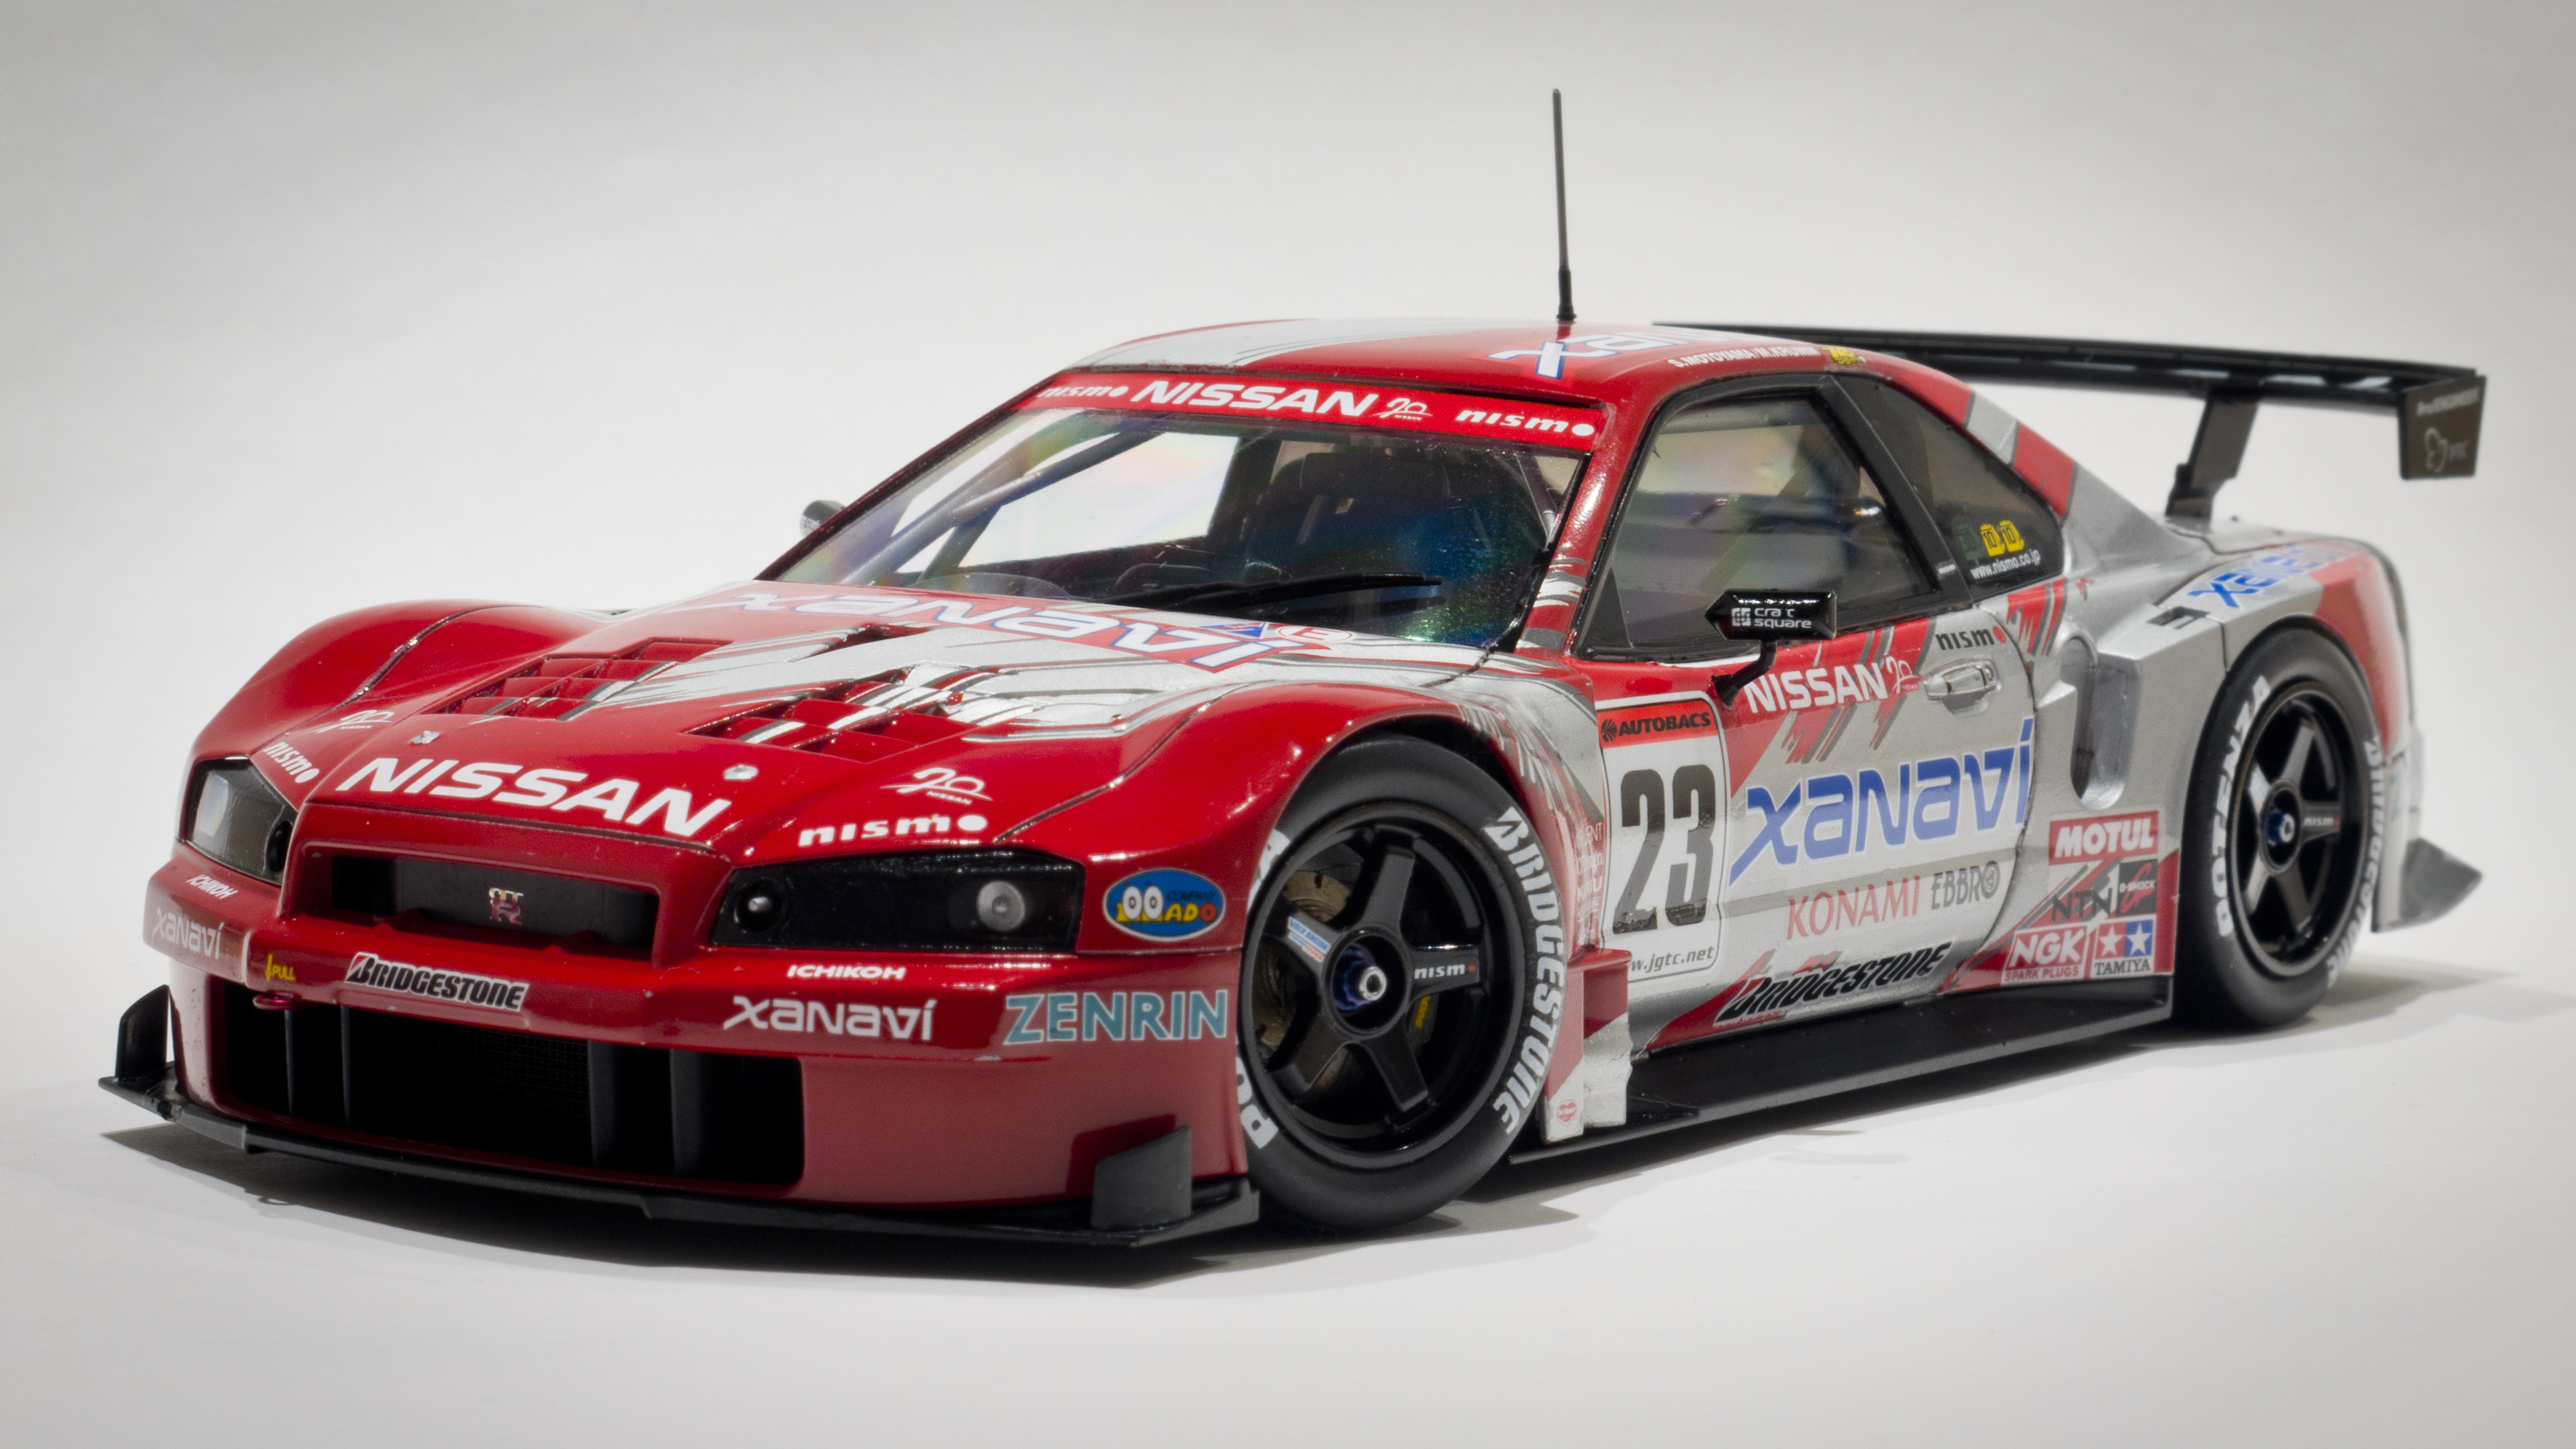
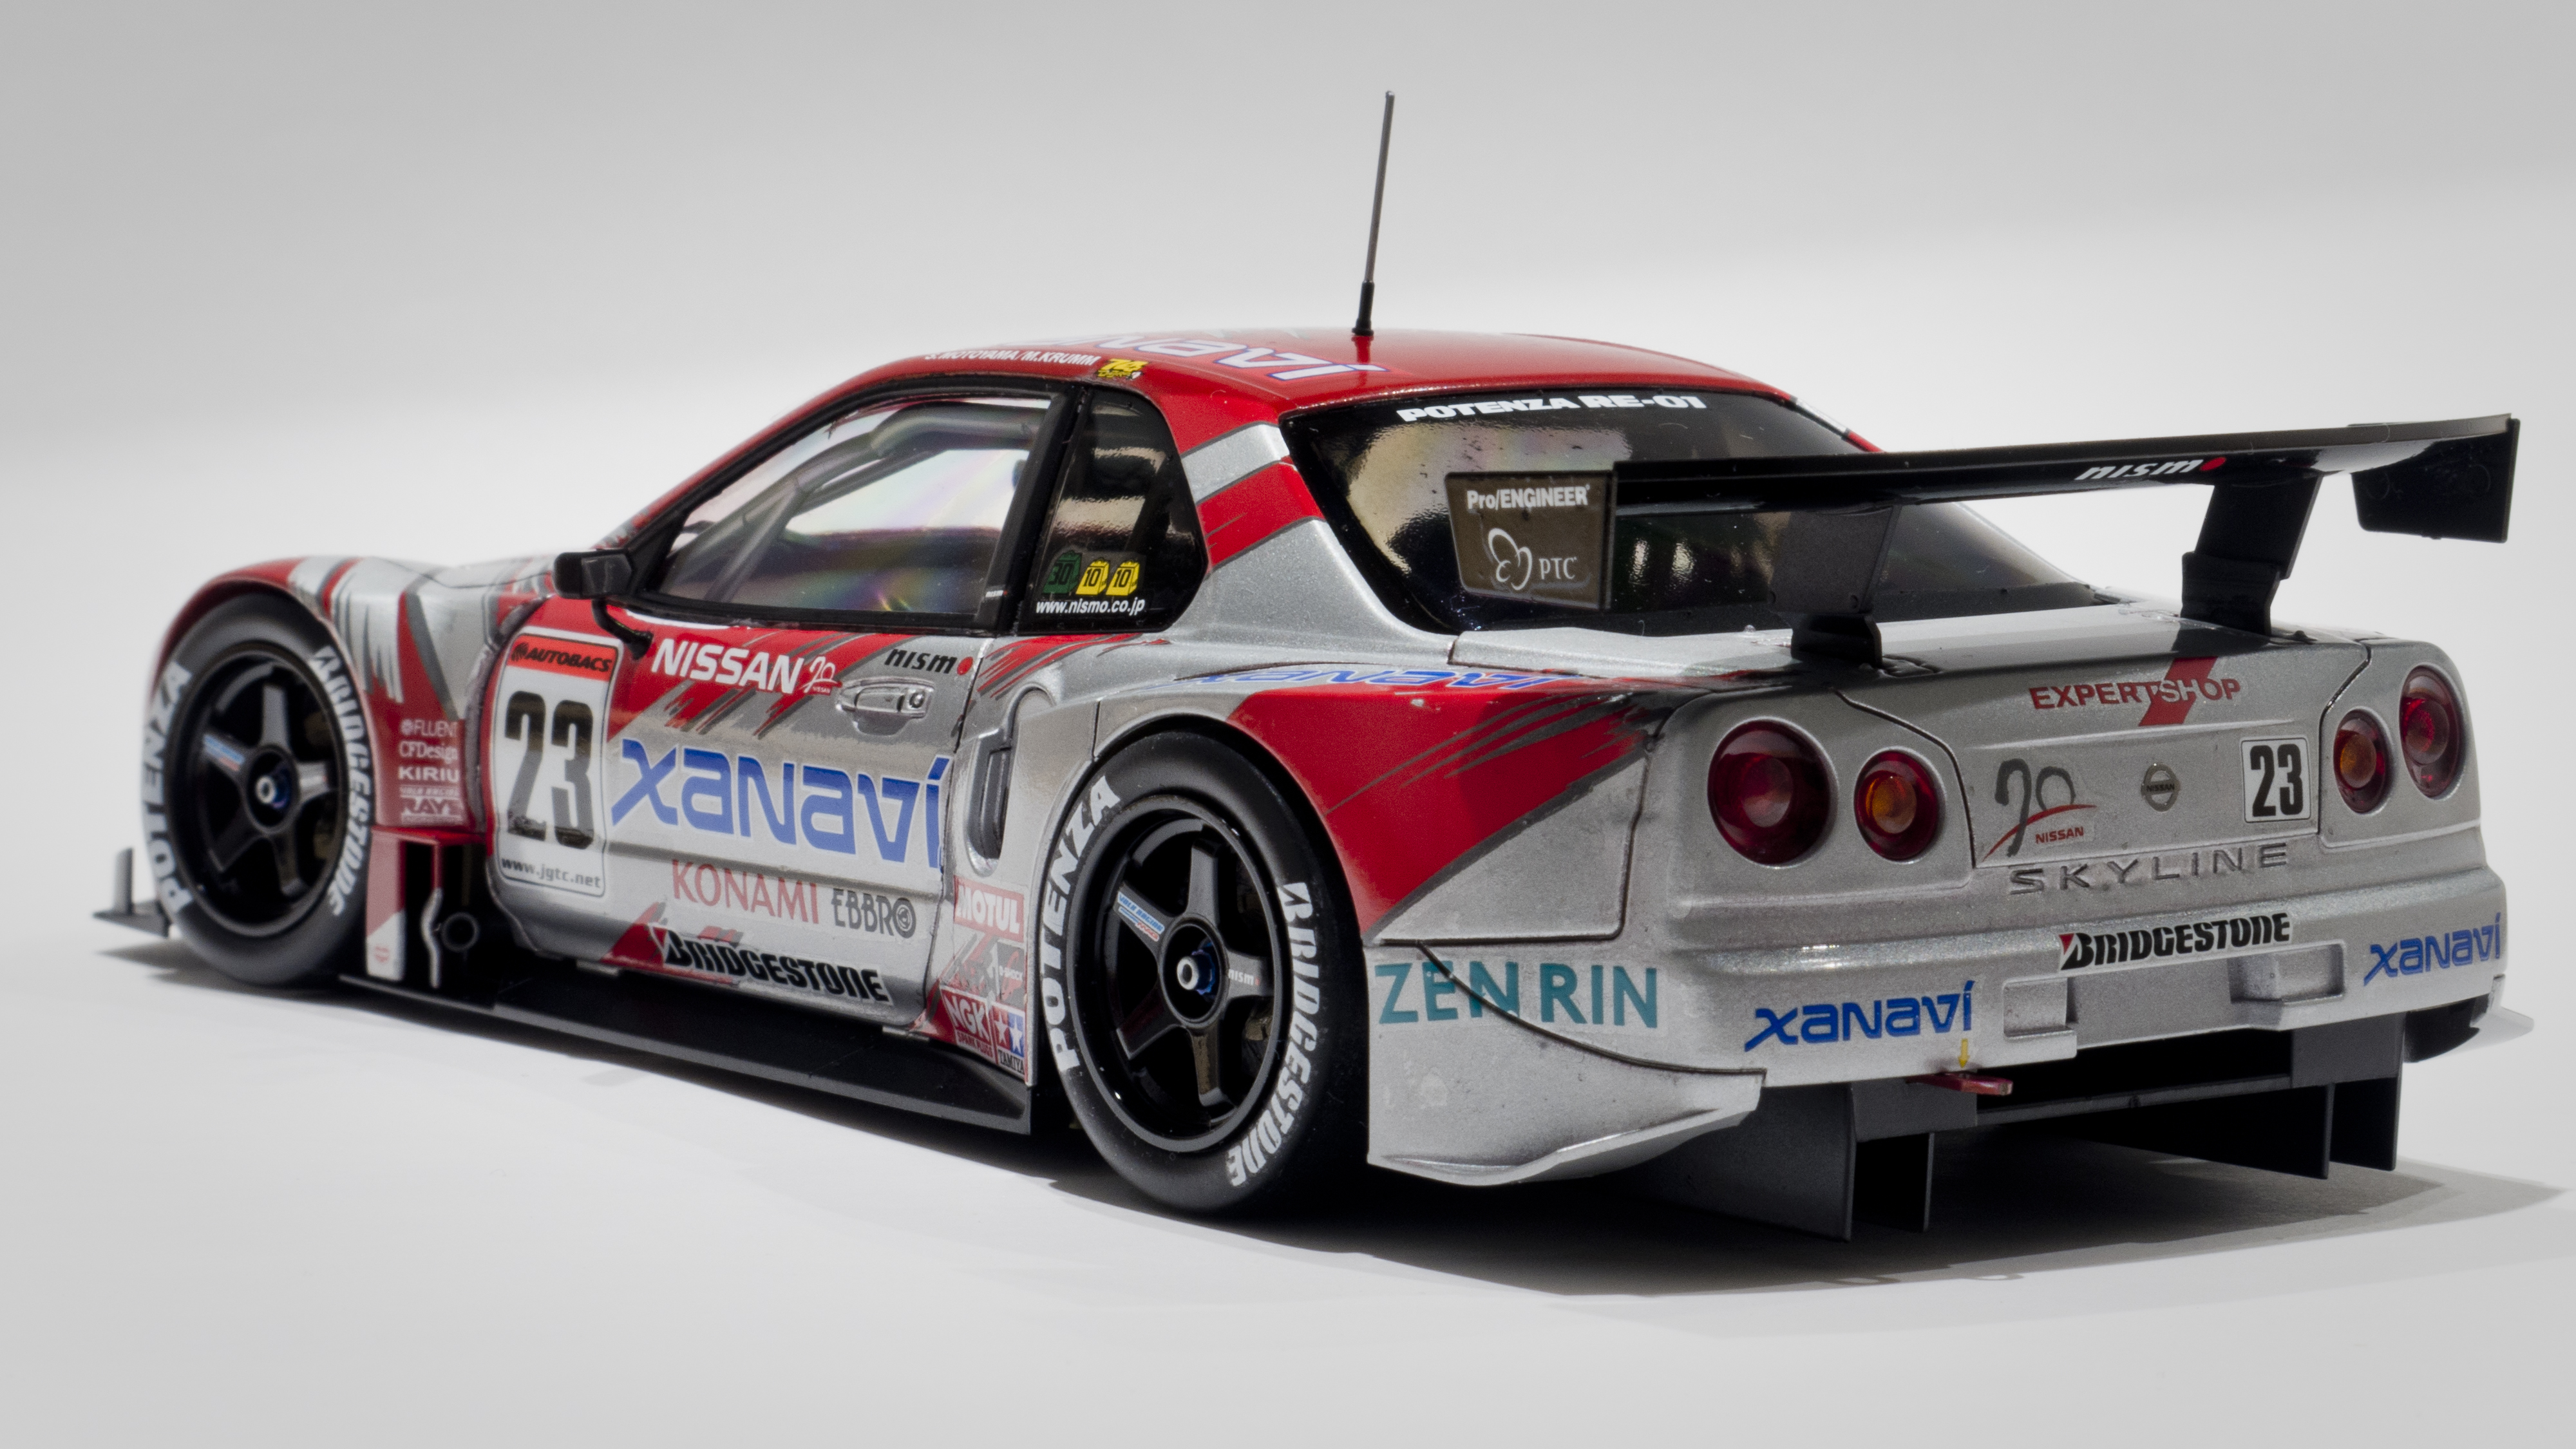
Hi All, I really got back into making models this year, after doing a few last year. I am really pleased with my progress, it always feels good to see how you progress over a year. This year also marked my first competition. I Got a 3rd place for my Carrera GT in the full detail section, and a commendation for my WRX STI Rally car in the curb side section. Below are some of my builds Competed in 2017. There were also a few others that i did this year, but didn't quite turn out as i had hoped. Thanks
-
It has been a long time between builds, and this one shows that as its a little rough around the edges. It was a fun build of something different to the subjects I usually choose. Built from this kit oob, but I built it my way. Paint on the body is Tamiya TS-9 British Green,
-
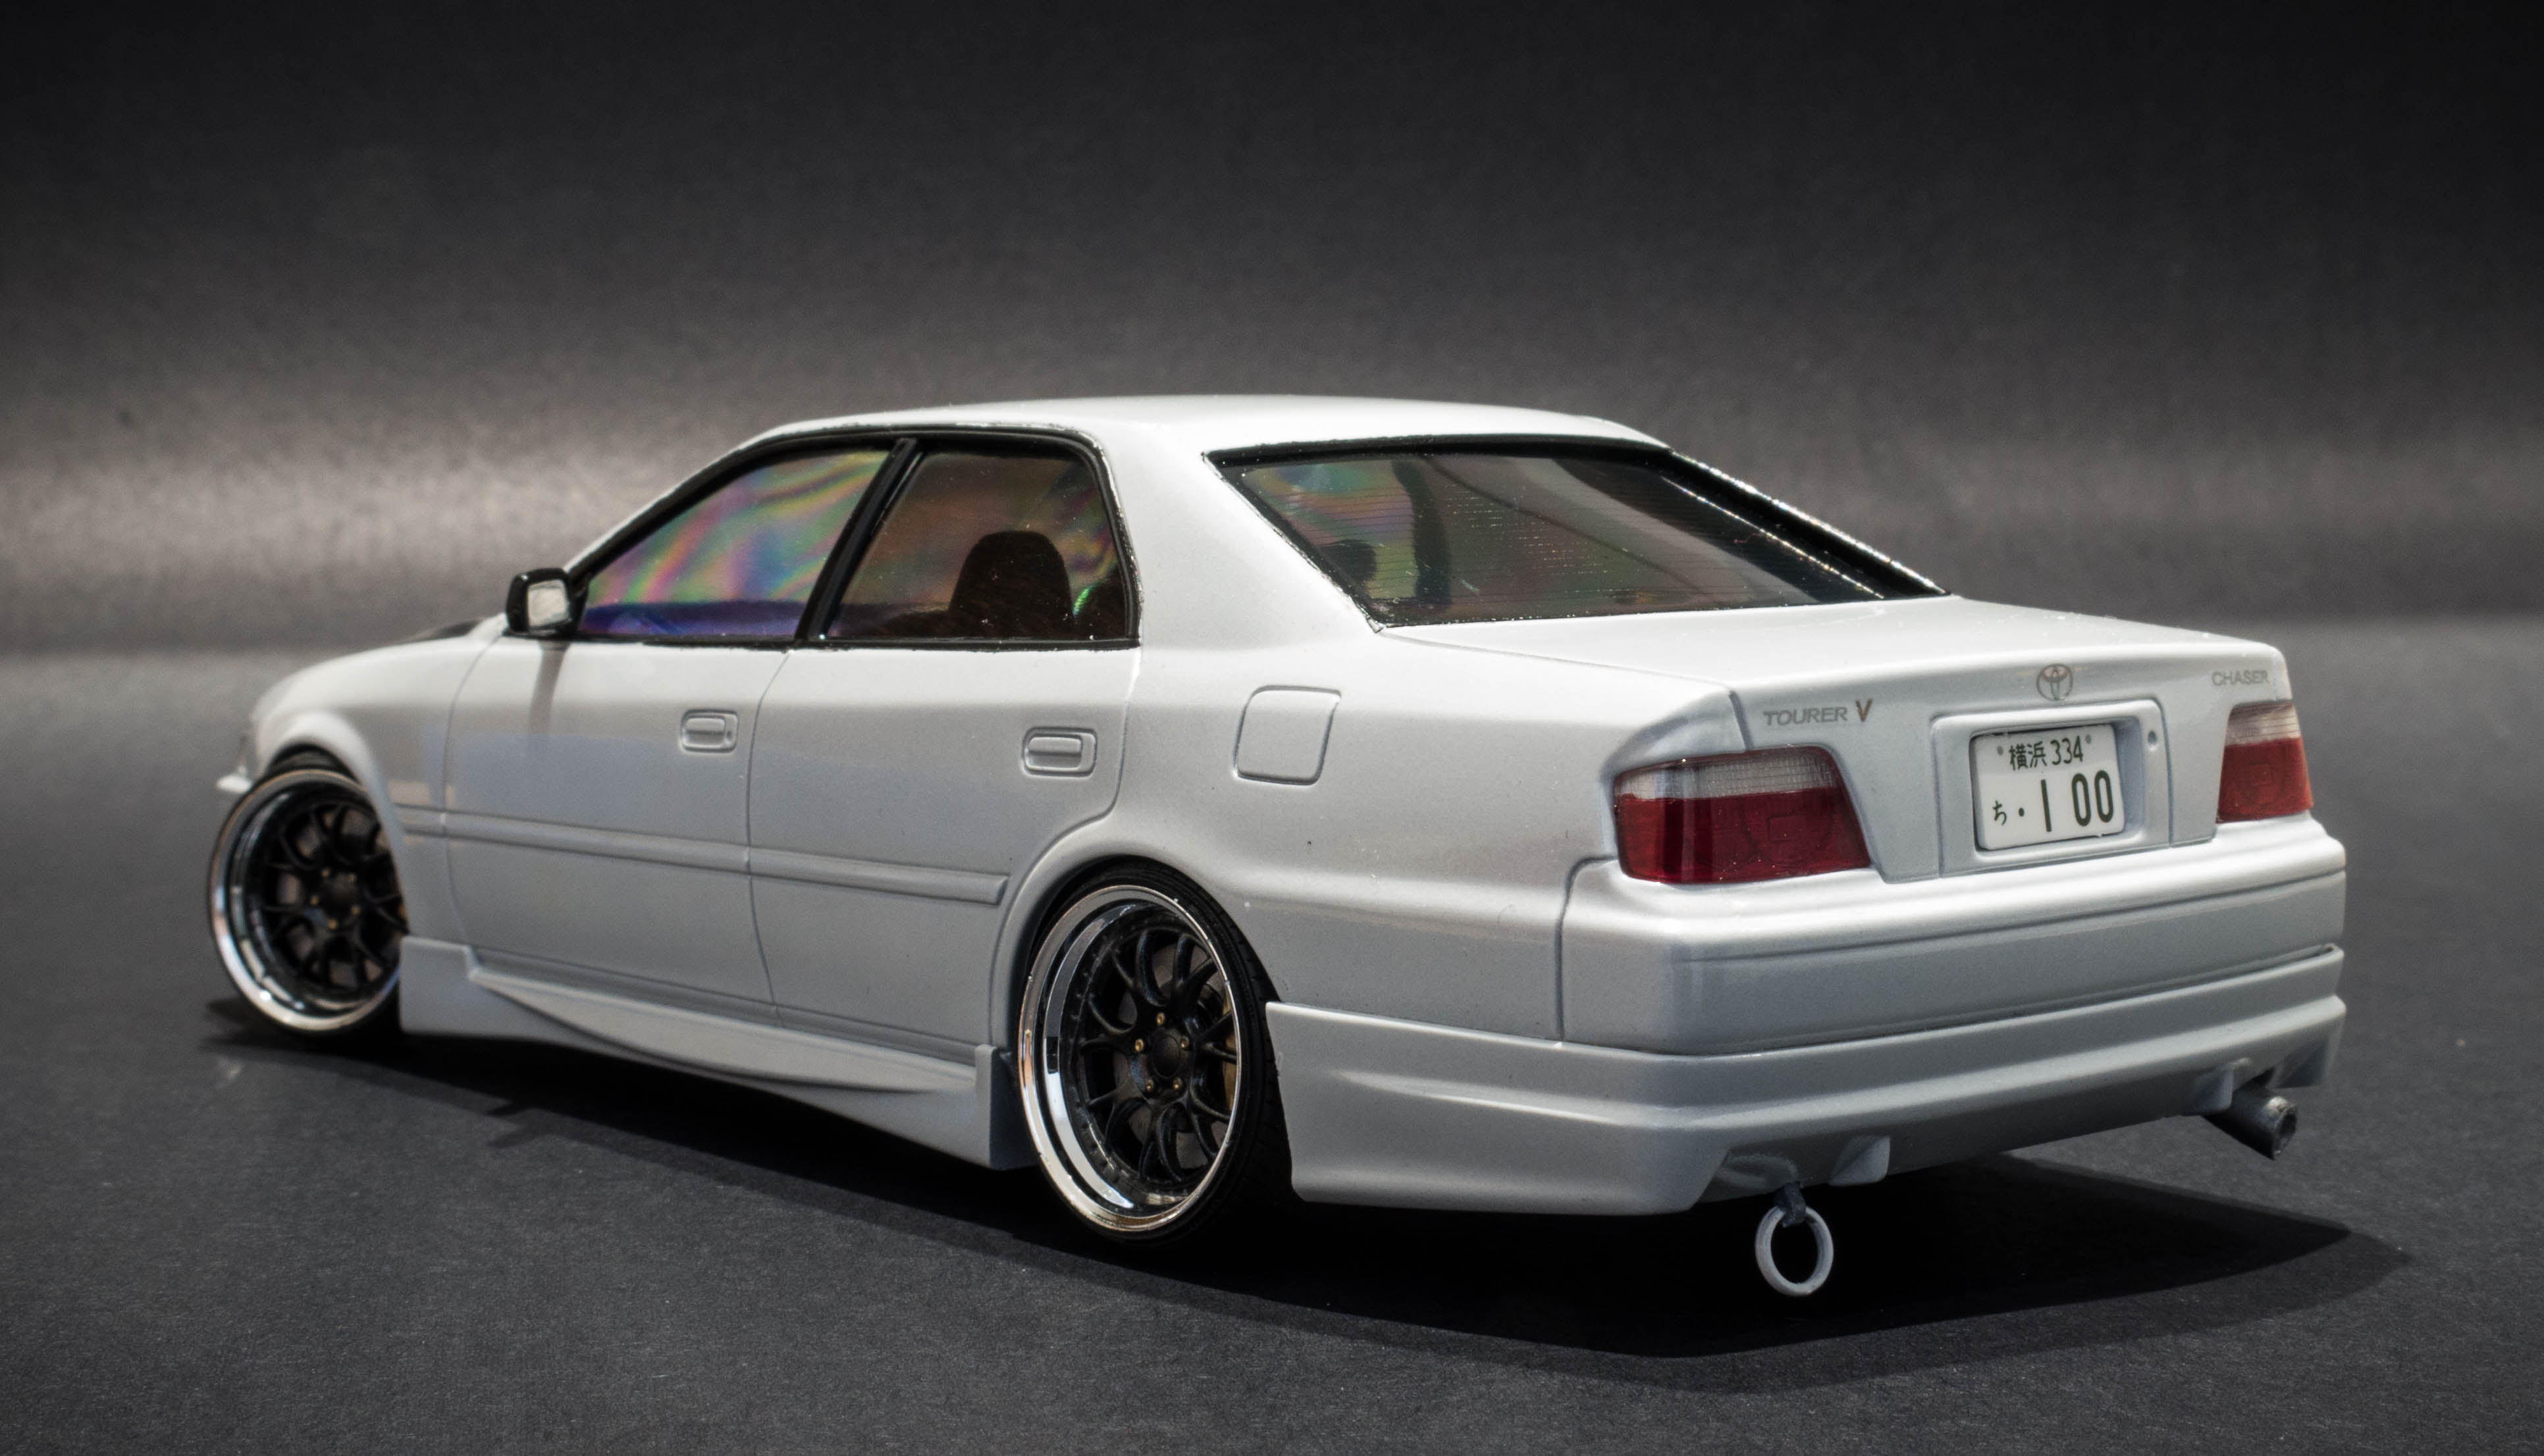
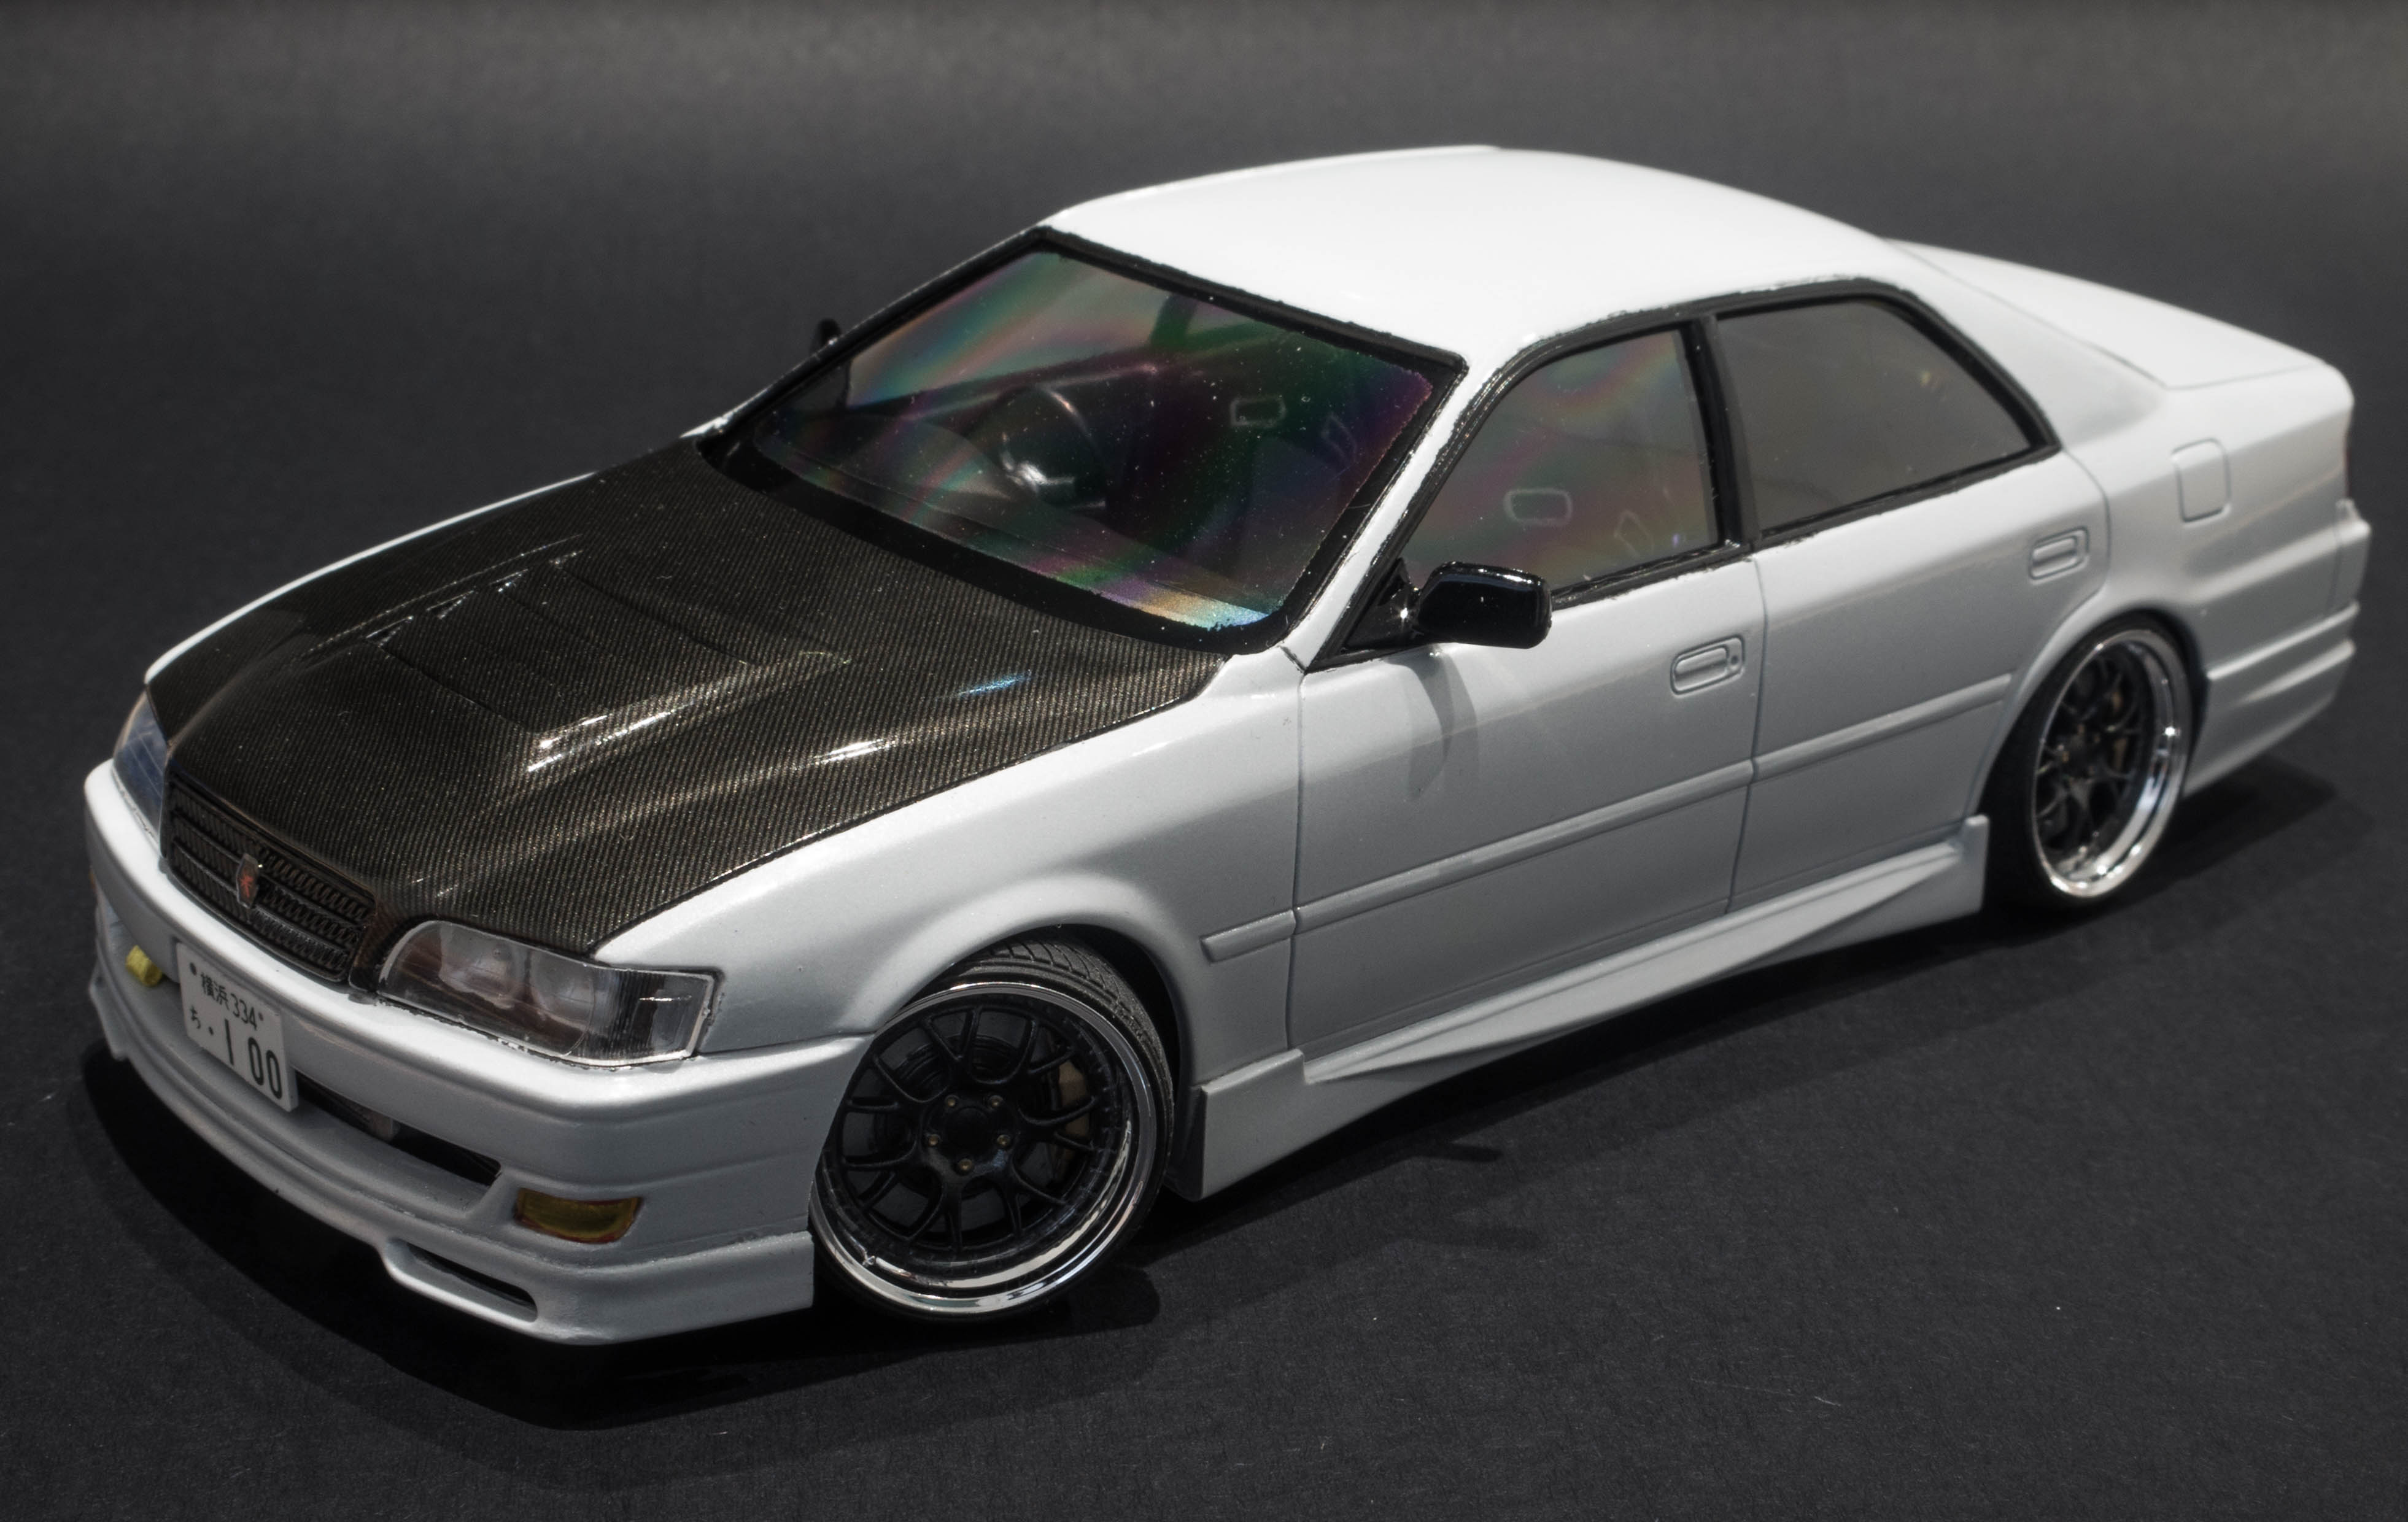
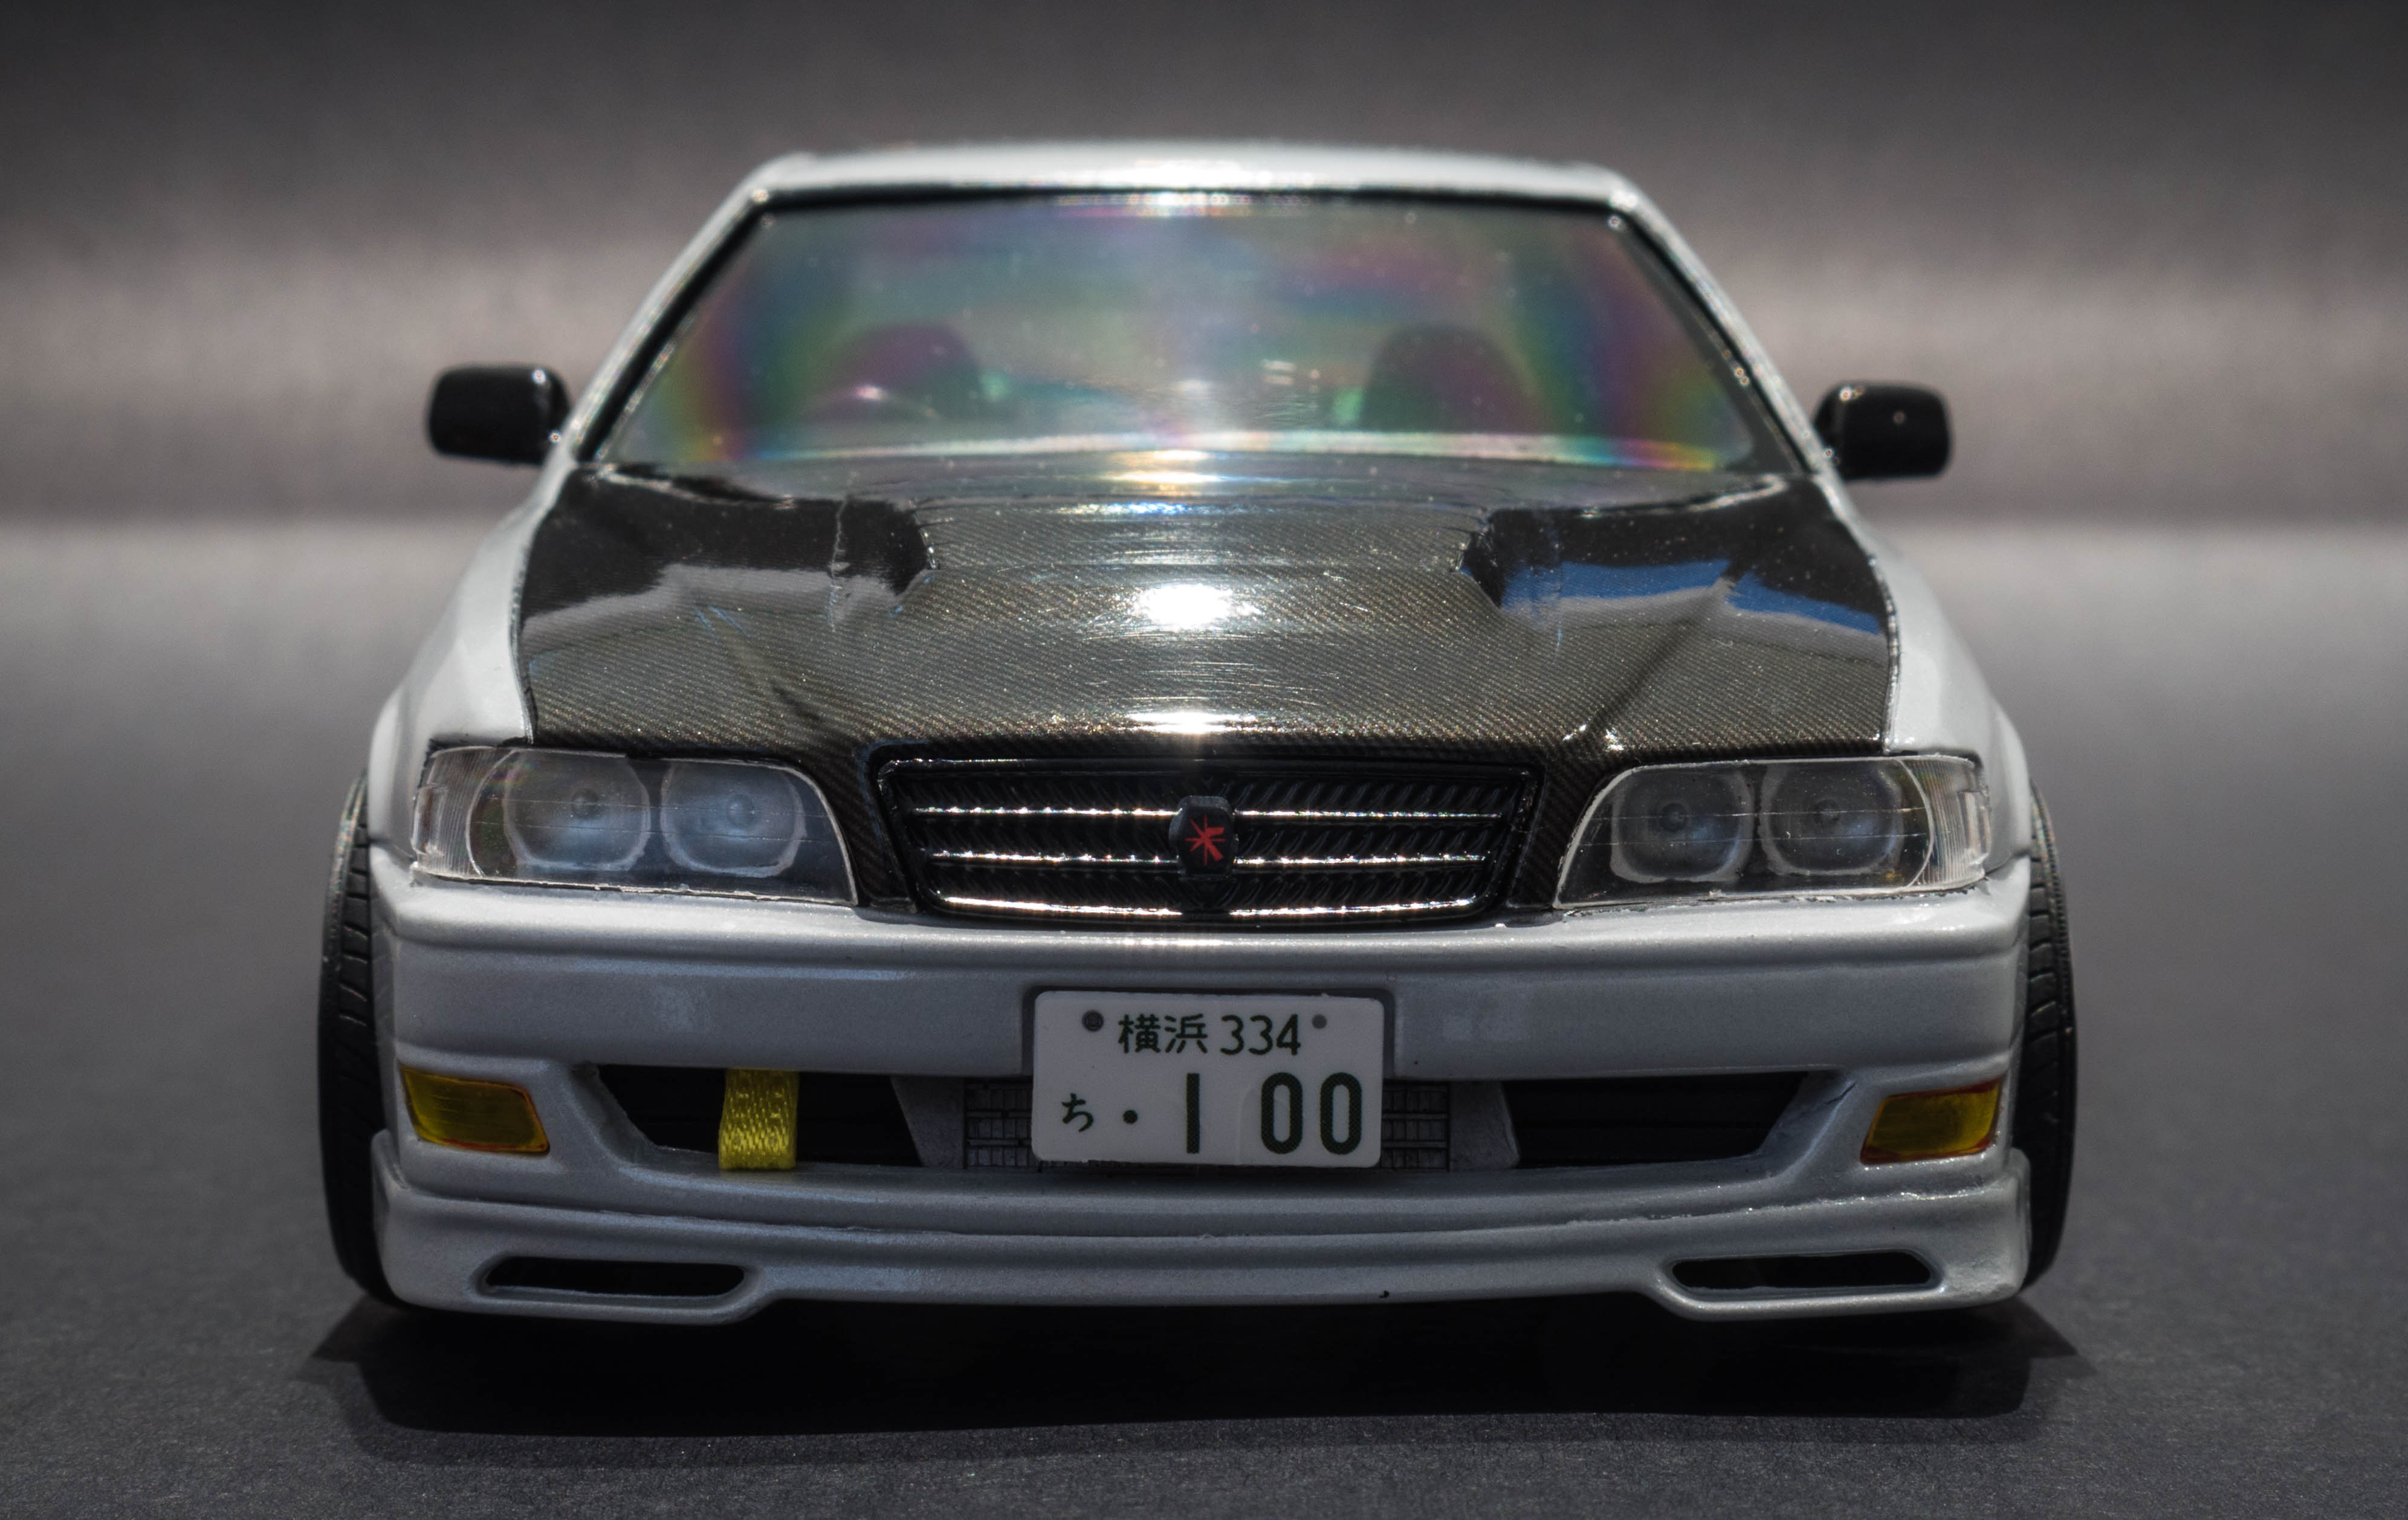
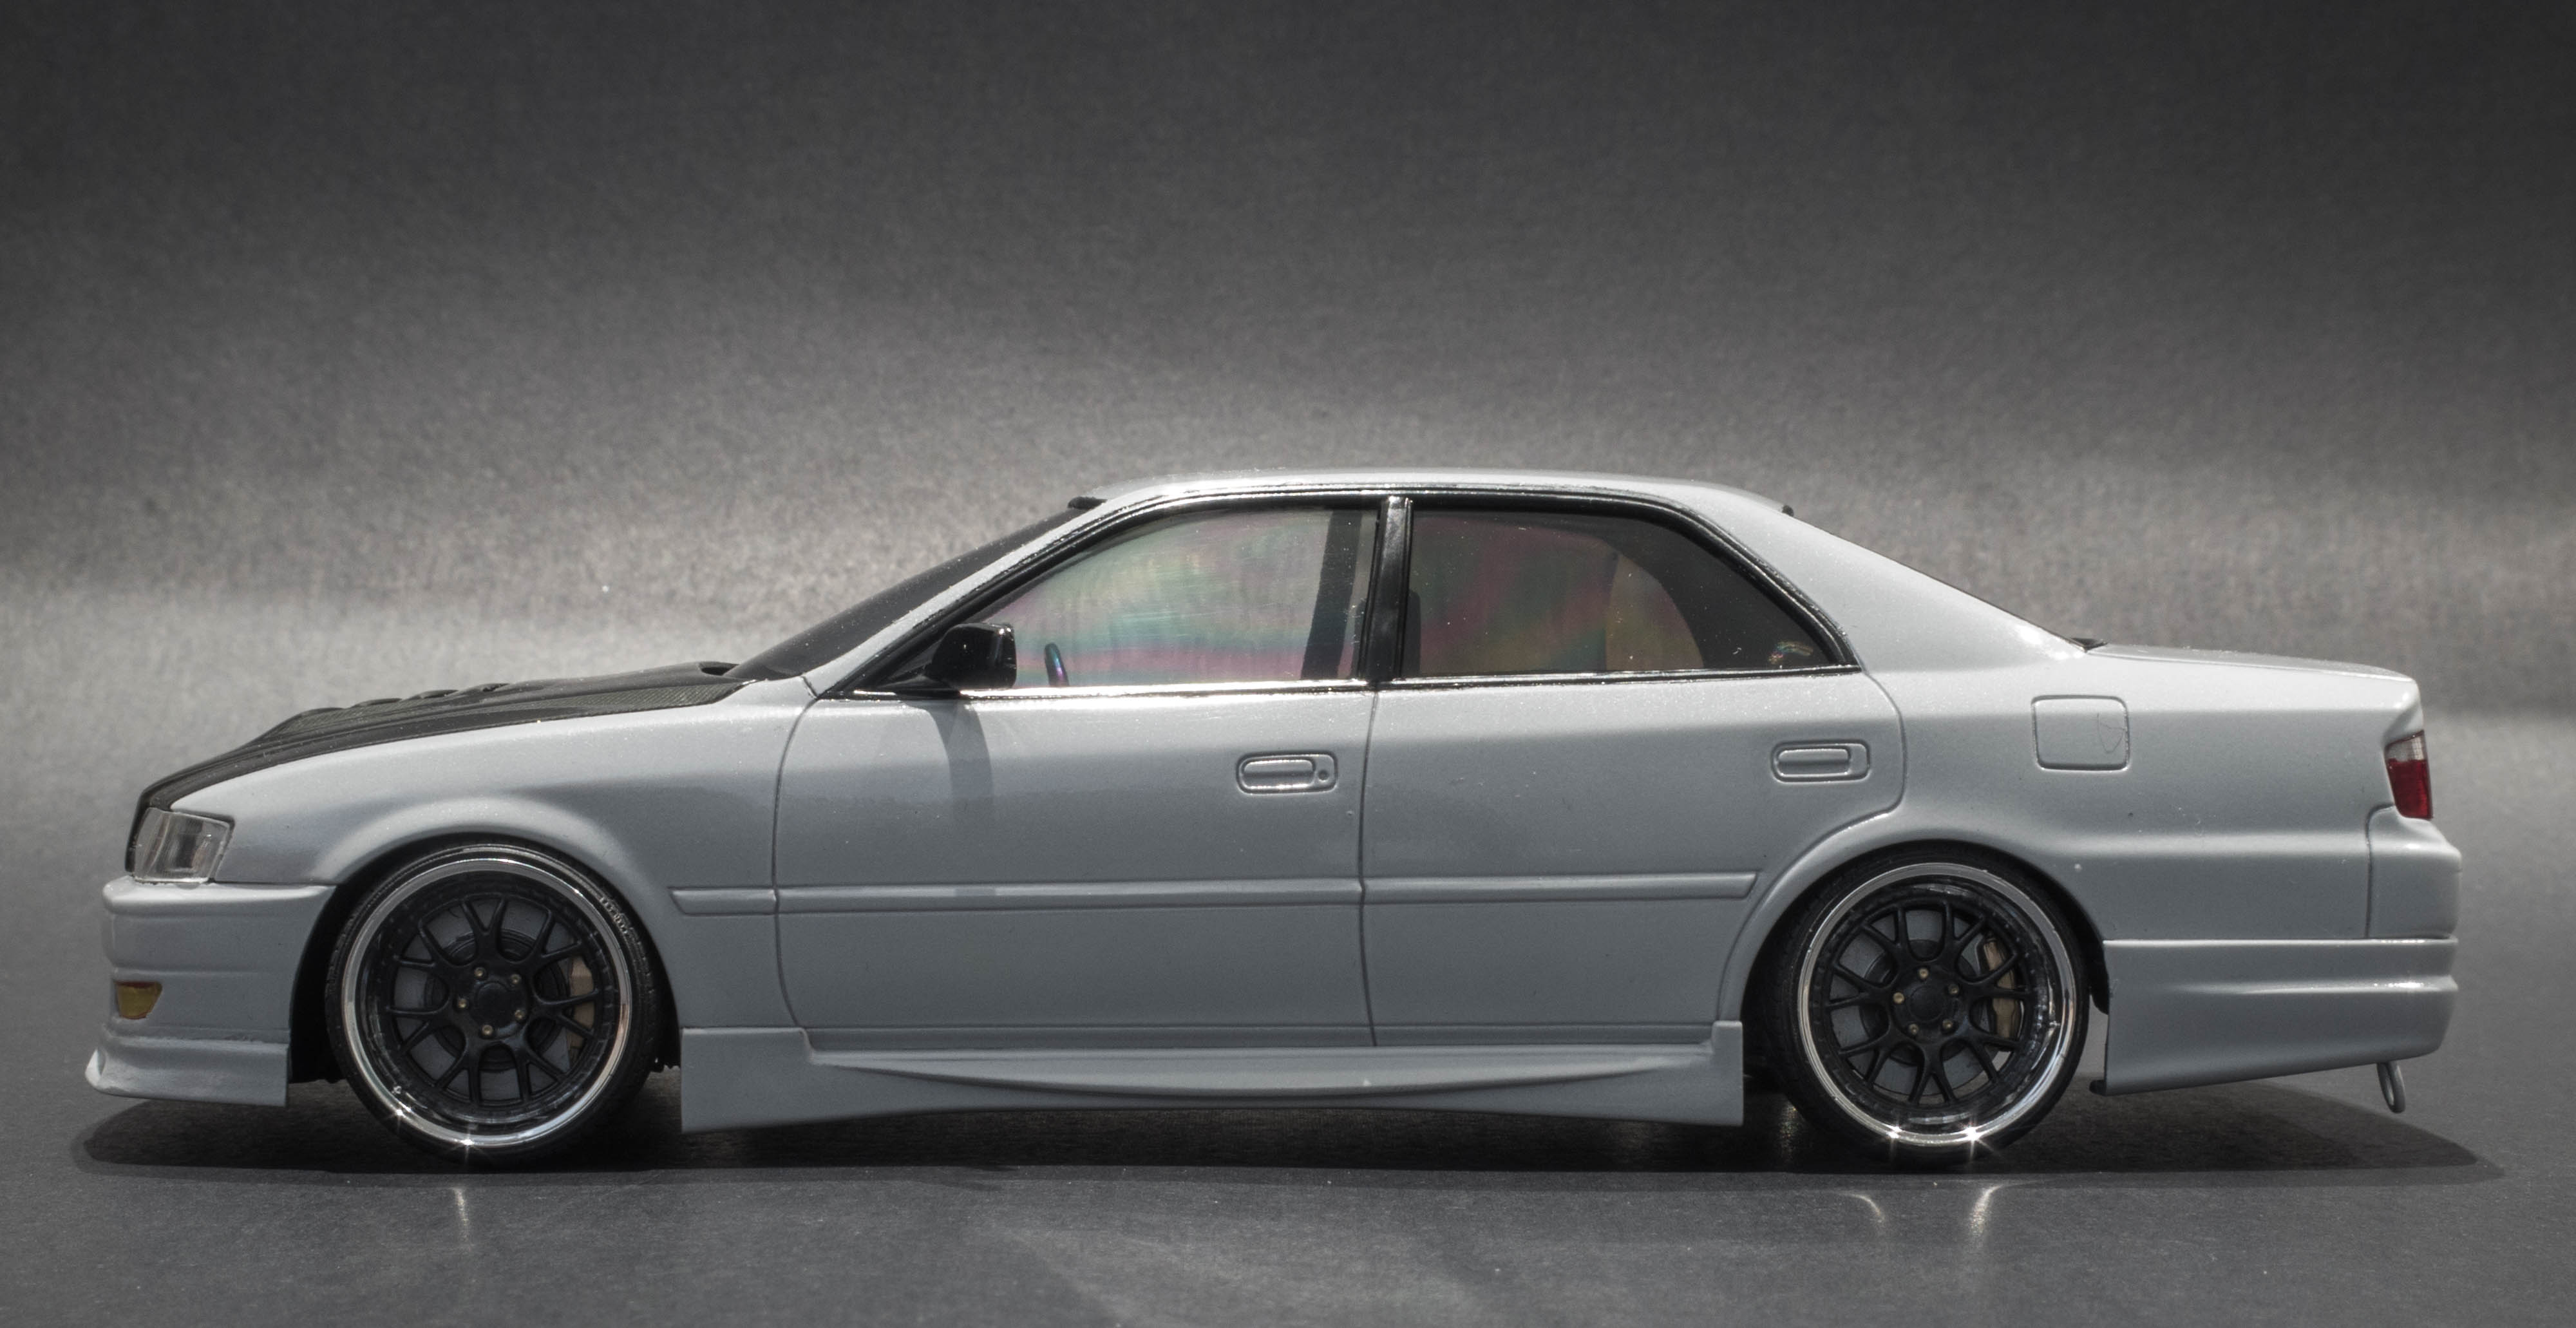
Hi All, I just finished my Aoshima Toyota Chaser. I Started this build on New years eve, and wanted to finish it before i go back to work from my summer break. Anyway, here is a link to my on the workbench thread. Final picks are below Thanks Nathan
-
Hi All, I recently joined this forum to get ideas and inspiration for future builds. Generally i do 1:24 tamiya kits, as i find theyre standard details to be the best, but am also liking the variety of kits that Aoshima and fujimi are putting out. Thanks Nathan
-
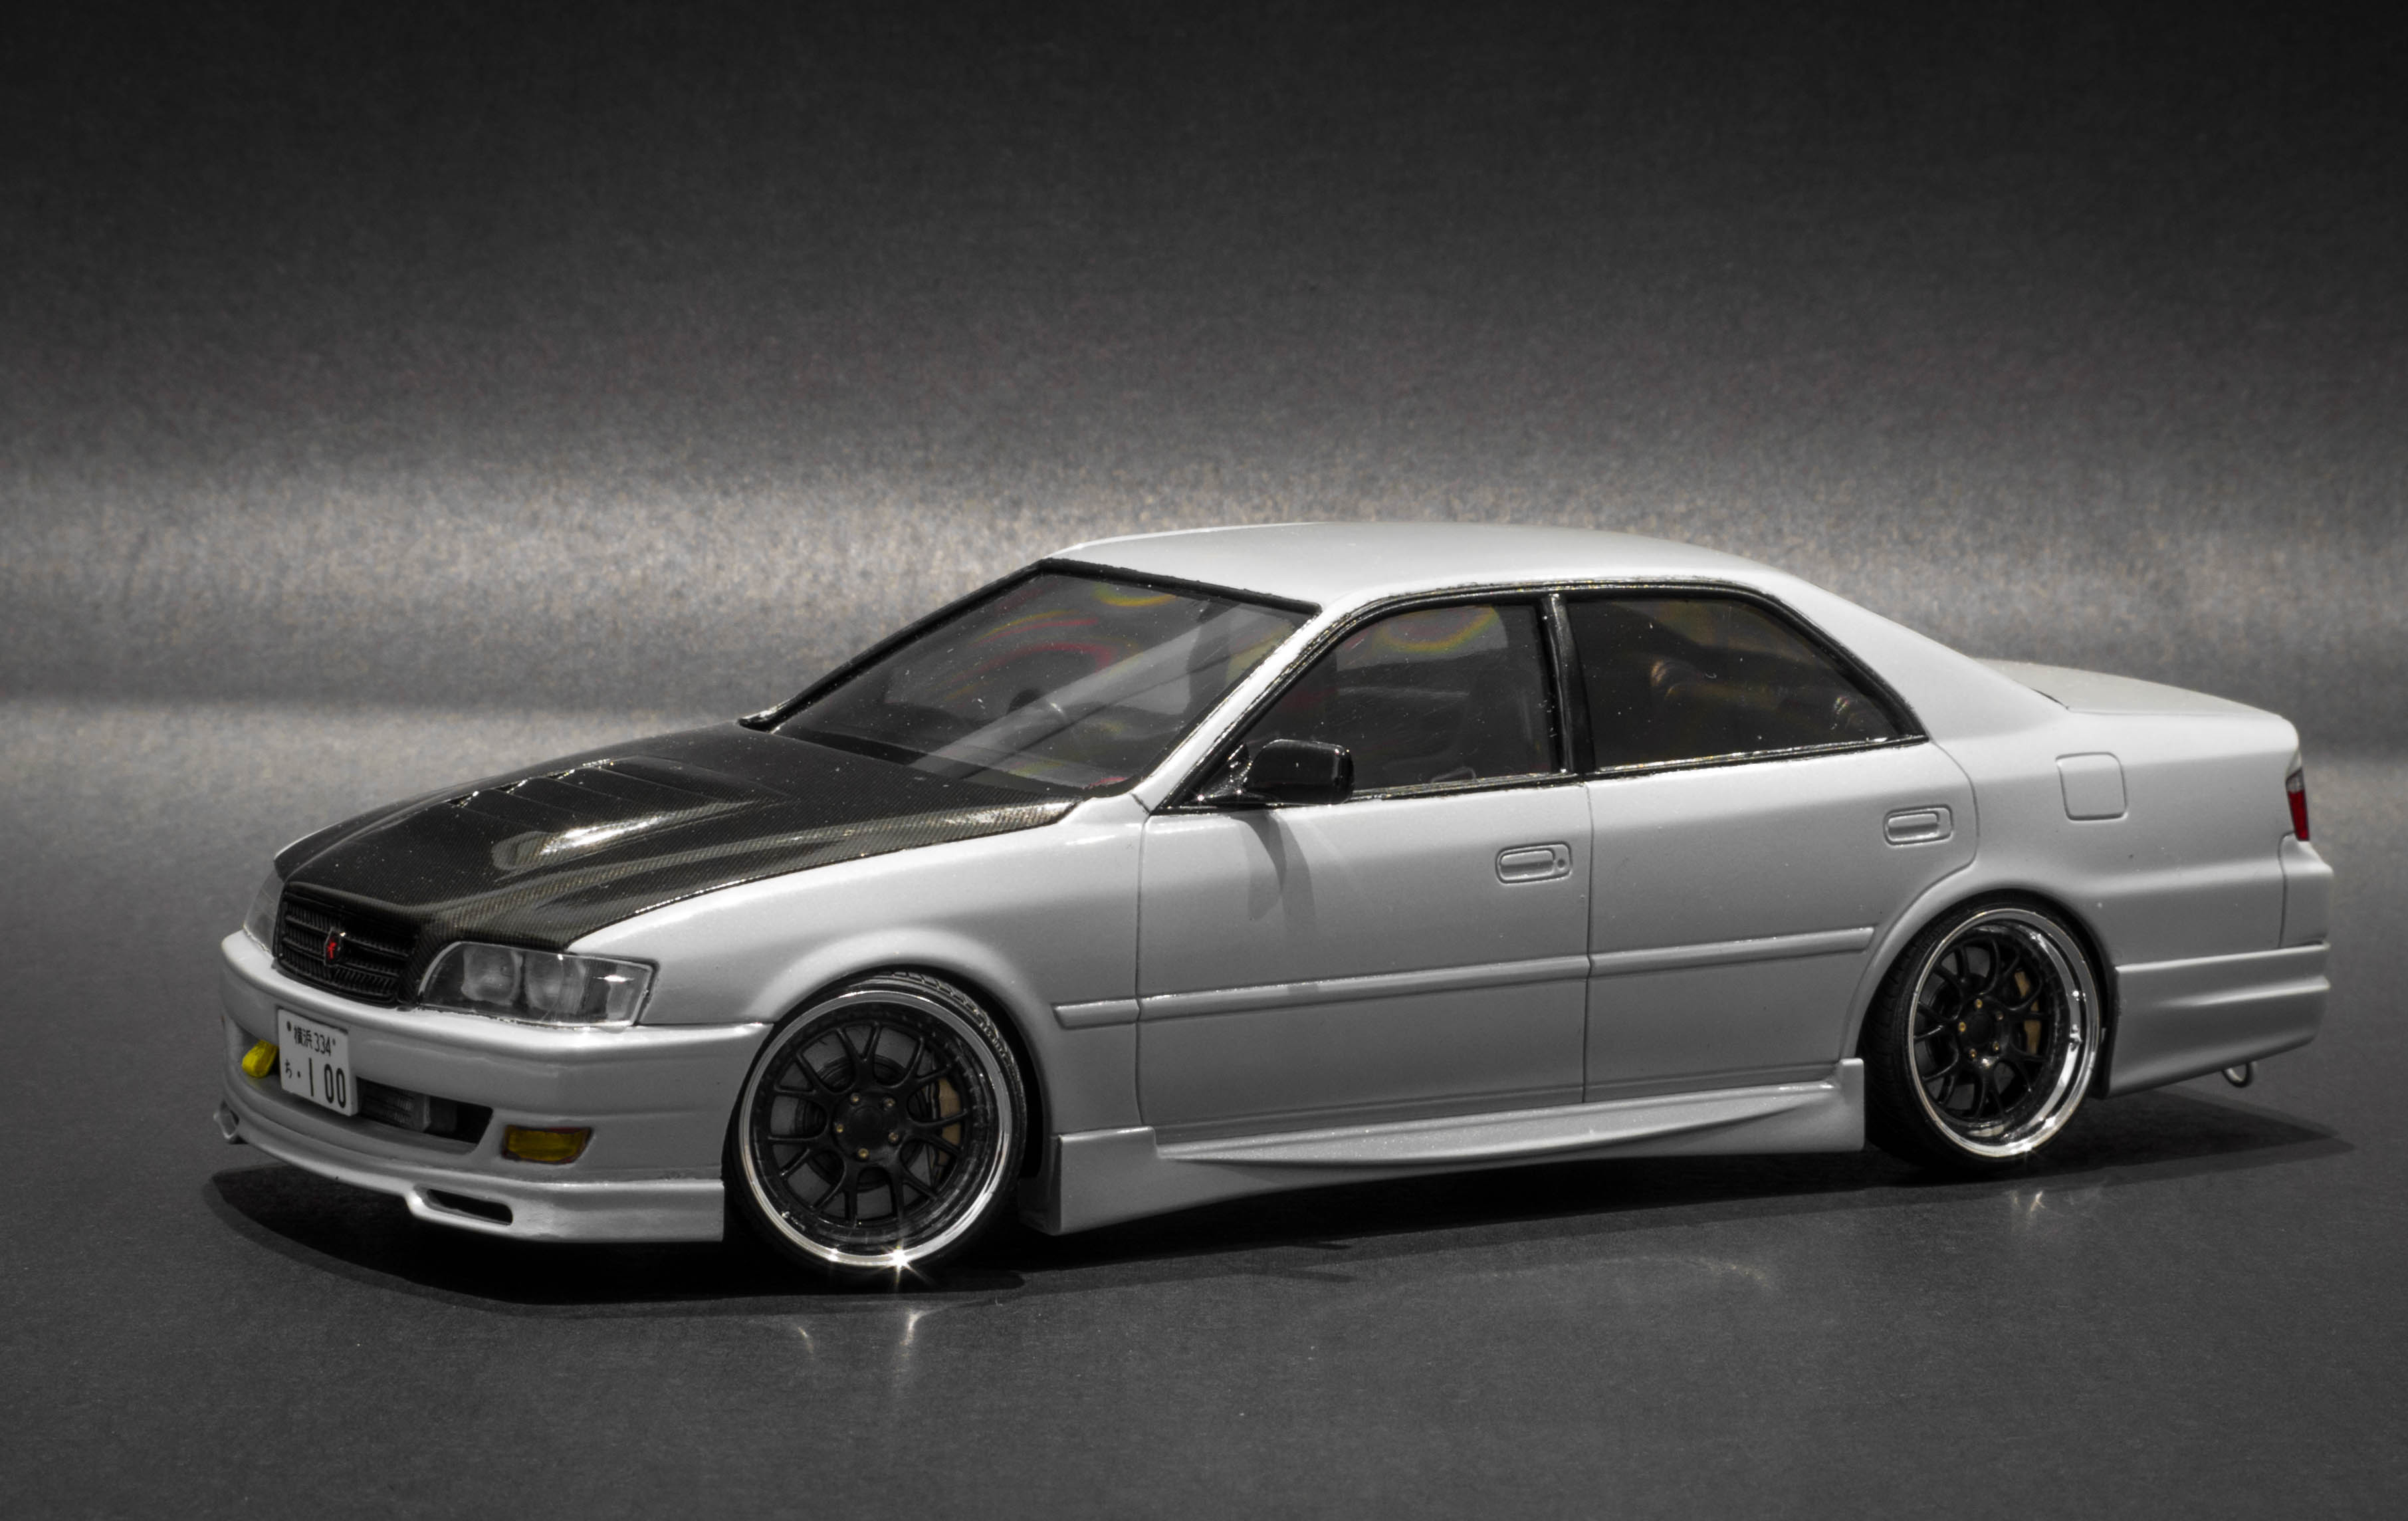
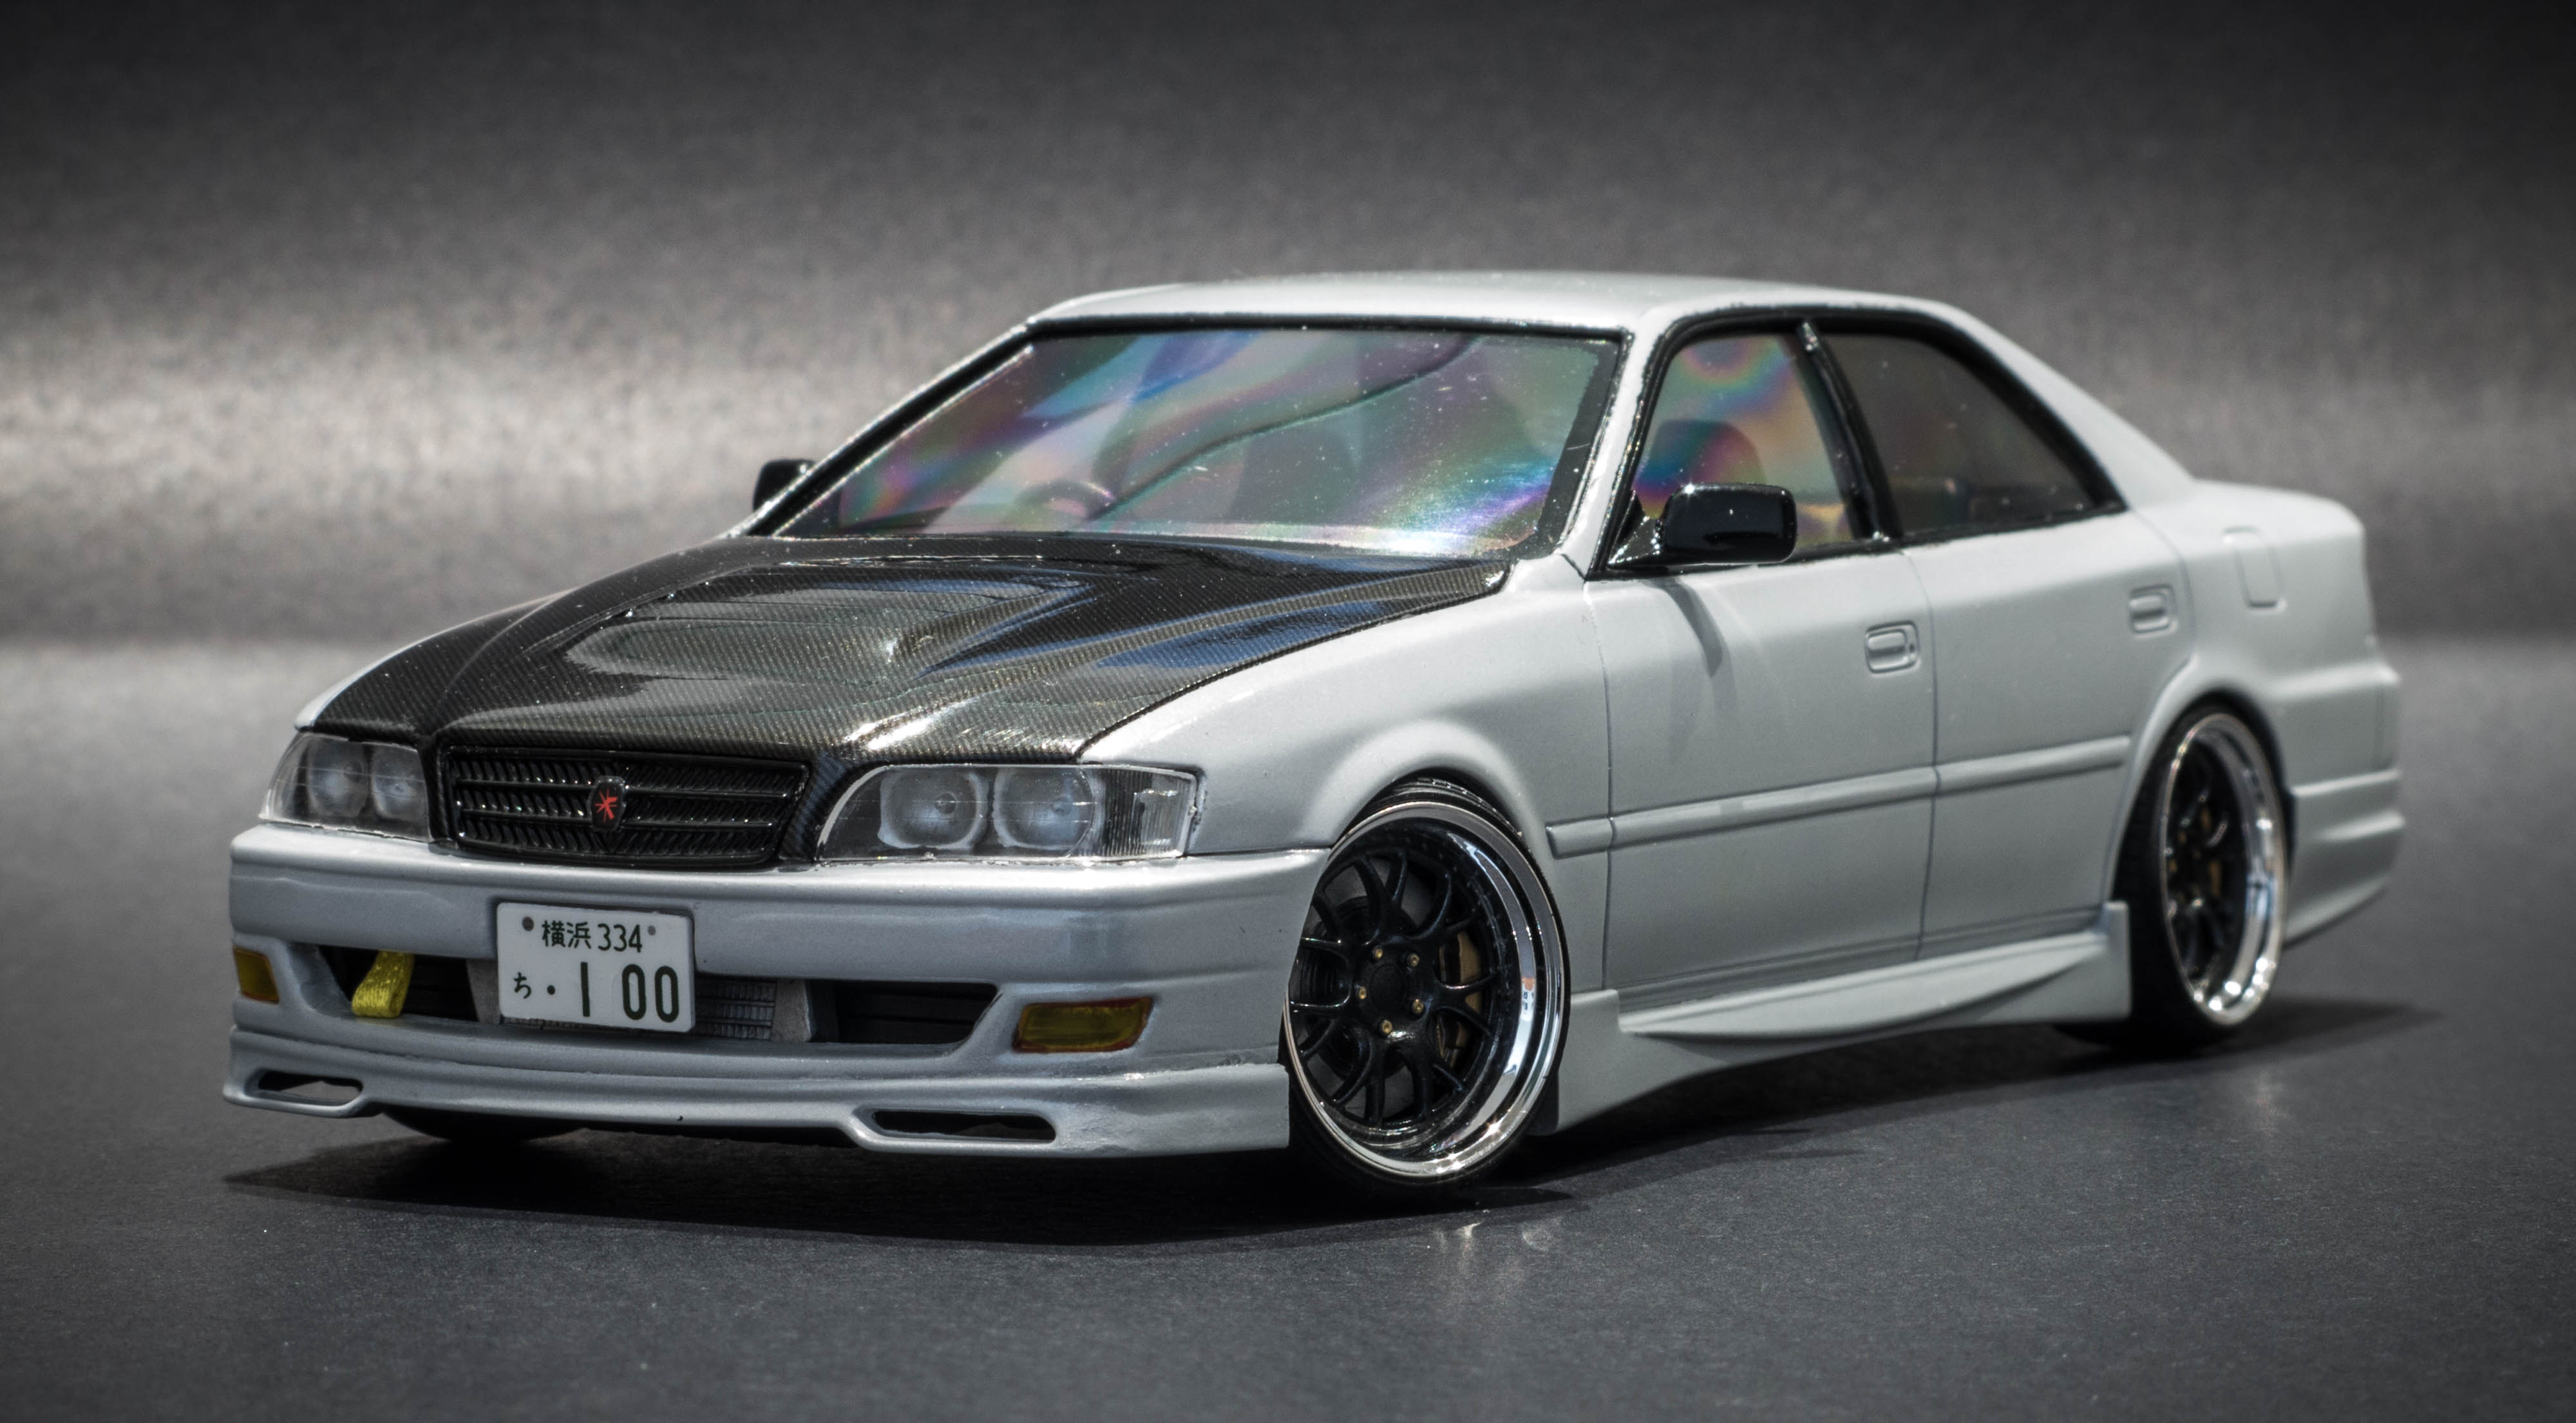
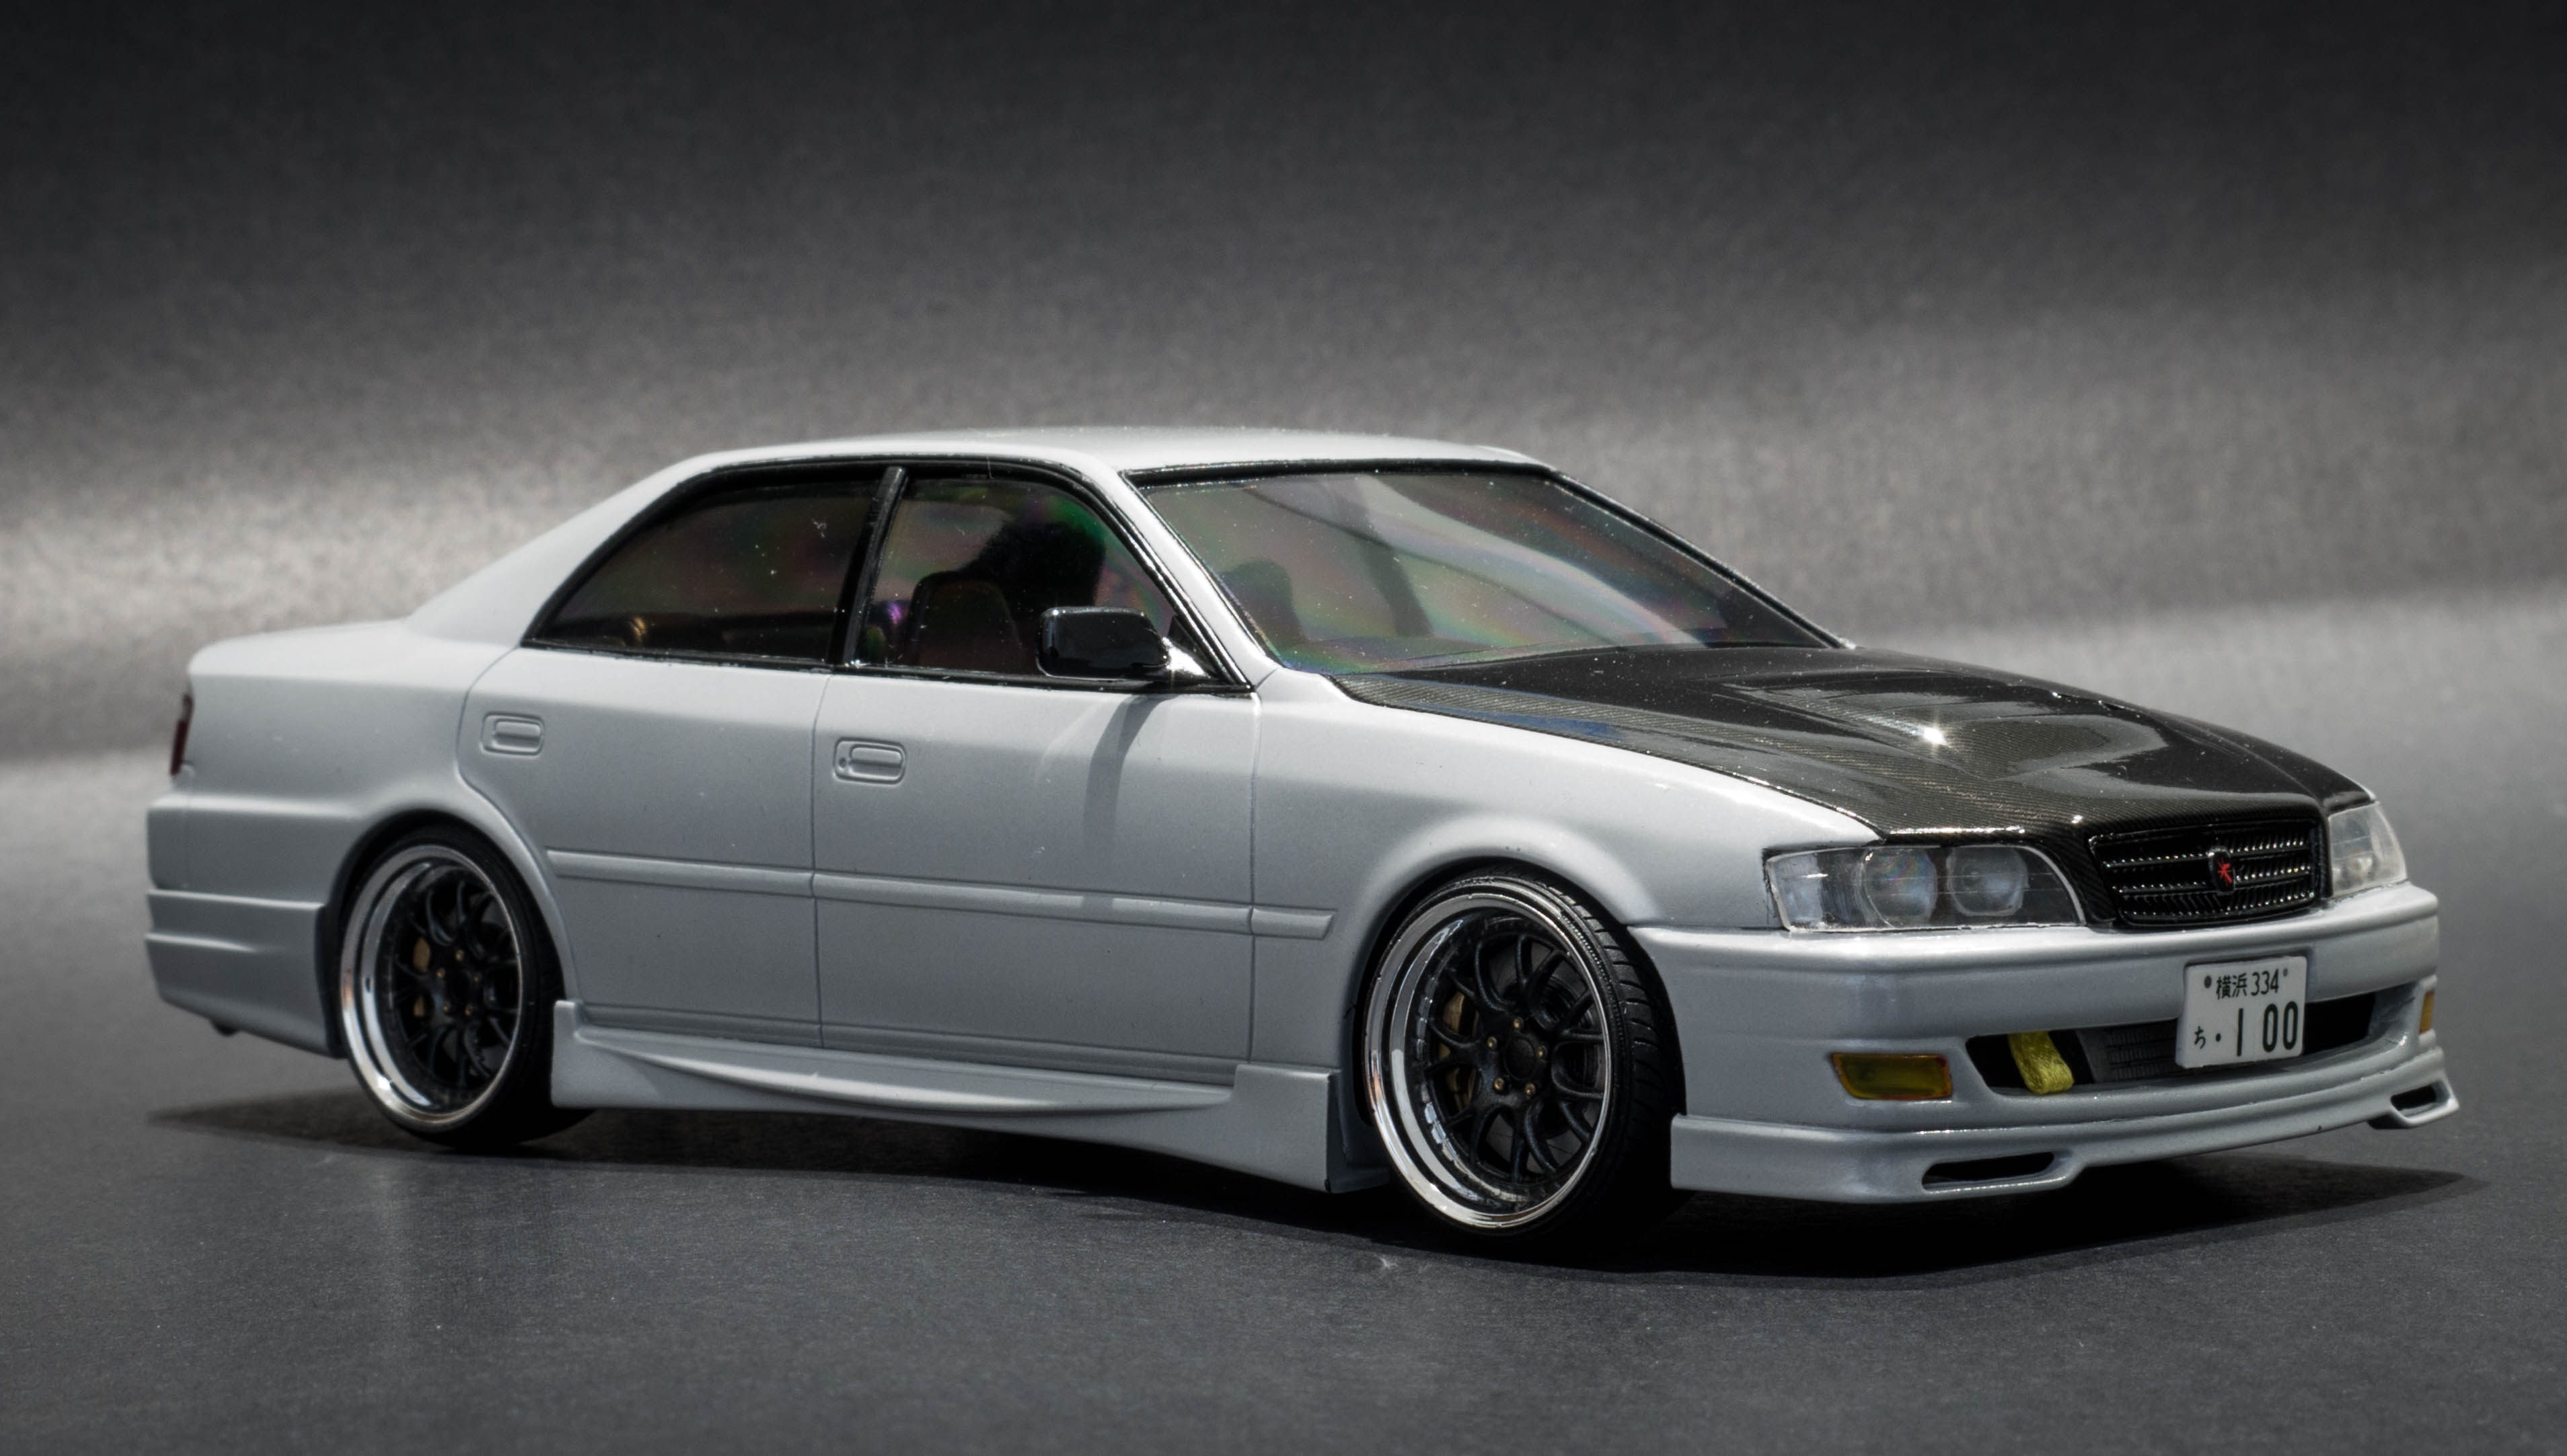
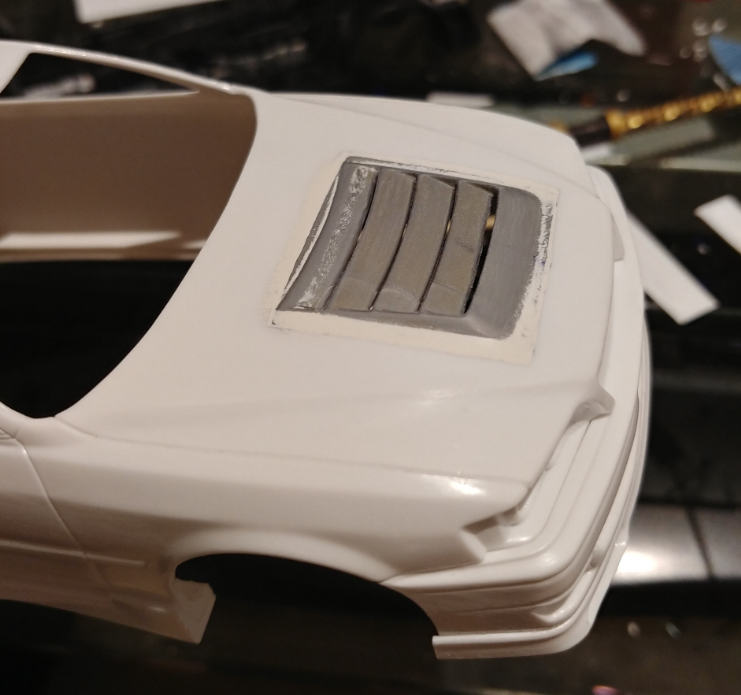
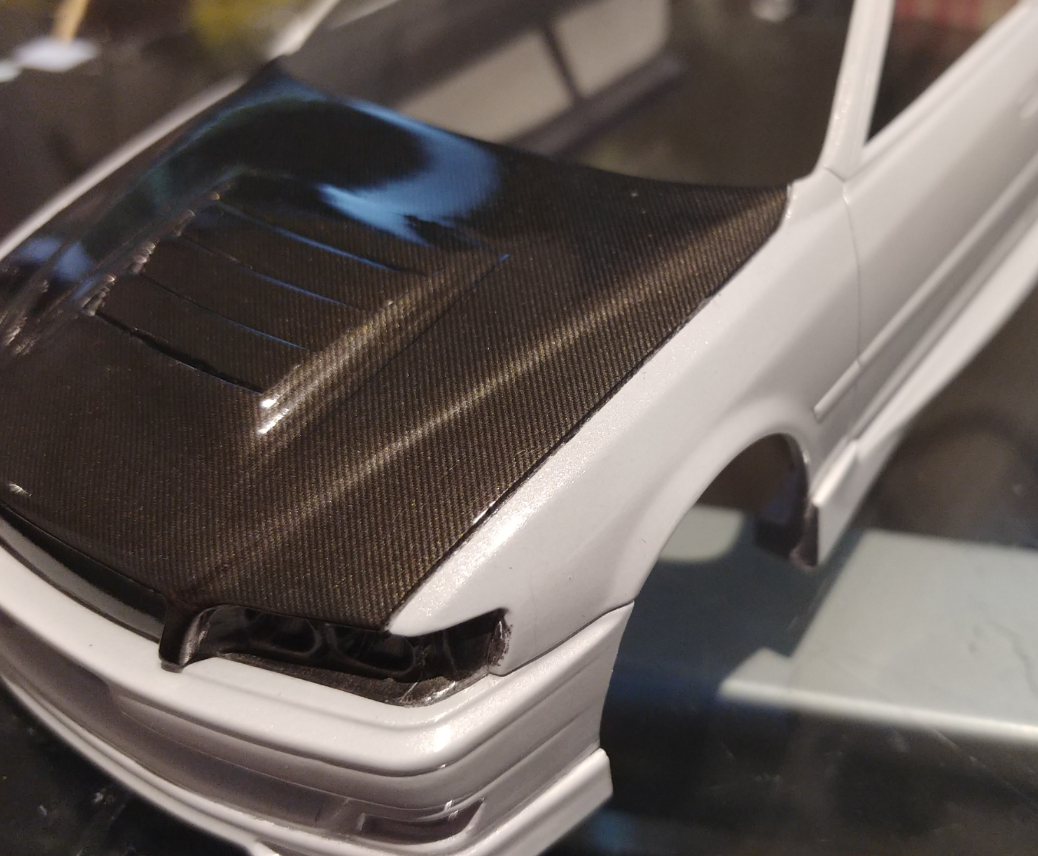
Hi All, I set myself a challenge, to complete a quick build before i go back to work in a weeks time. Below is my progress so far... The Kit in Question is the Aoshima Toyota Chaser. It is just a Curbside Kit, so shouldnt take that long to complete. My vision for this build is to be a JDM VIP car, So slightly modified exterior, and big Chrome wheels. The Wheels i intend on using are the SSR MS3, by Aoshima. First up, i prepped the body. removed any extra mould lines, and went to work on the bonnet. I decided i would make a custom vented bonnet using one from a R34 Ztune skyline that i stuffed up a few years back, but still had lying arround. I dremeld out the vents, and traced the outline onto the chaser. out came the 0.5mm drill to make a few pilot holes so i could get my saw in to cut the hole to match the vented piece. I used a few off-cuts of styrene sheets so i had something to glue it to underneath. Next i used some Tamiya White Putty and started to fill the gaps. Then the sanding process started. First up was some 360 Grit, then 600, then 1000. Next up was pimer. For this i used a Tamiya Grey surface primer can. I let the primer dry for an hour or so, and then sanded it back with some Tamiya sanding sponges up to 3000 grit, (probably not essential, but a few spots needed it. I wanted to paint this model in Tamiya TS45 Pearl White. Seeing as i used a grey primer, i decided to do a silver base coat, just so the white would show over it better. It turns out that the Pearl white, is a very thin colour, so it didnt really turn out white, but instead a light grey pearl. As it turns out i Love the colour better than the straight pear white, It is a very unique colour. I decided that i wanted to make the bonnet carbon fibre to accentuate the JDM style i was going for. I used some scale production carbon fiber sheets for this, and a lot of Micro set to work the decal into the complex shape of the vents. I was able to use one whole sheet for the bonnet, which i wasnt sure i would be able to do. After letting this sit for an hour or two to fully set, i continued onto the clear coat. Again i used some tamiya spray (TS13) I applied 2 light mist coats, followed by 2 heavier coats, then put it aside for around 24 hrs. The clear coat finish straight out of the can is not too bad, but there was a bit of orange peel. so out came the 3000 grit sanding sponge and i got to work levelling out the orange peel (wet sanding of course) I then used some meguires car polish compound to remove the scratches from the sanding, working in small rotating motions, then buff it off. Next step was some Auto Glym car polish to make the colour shine, again working in small circular motions. The final step was some Mothers Carnuba Wax, which helps seal in the polish, and makes the model an ease to remove dust from in the future. This whole paint correction process may seem a bit unnecessary, but the end result is truly fantastic. Tomorrow i will begin work on the chassis and post some progress shots. Thanks Nathan
-
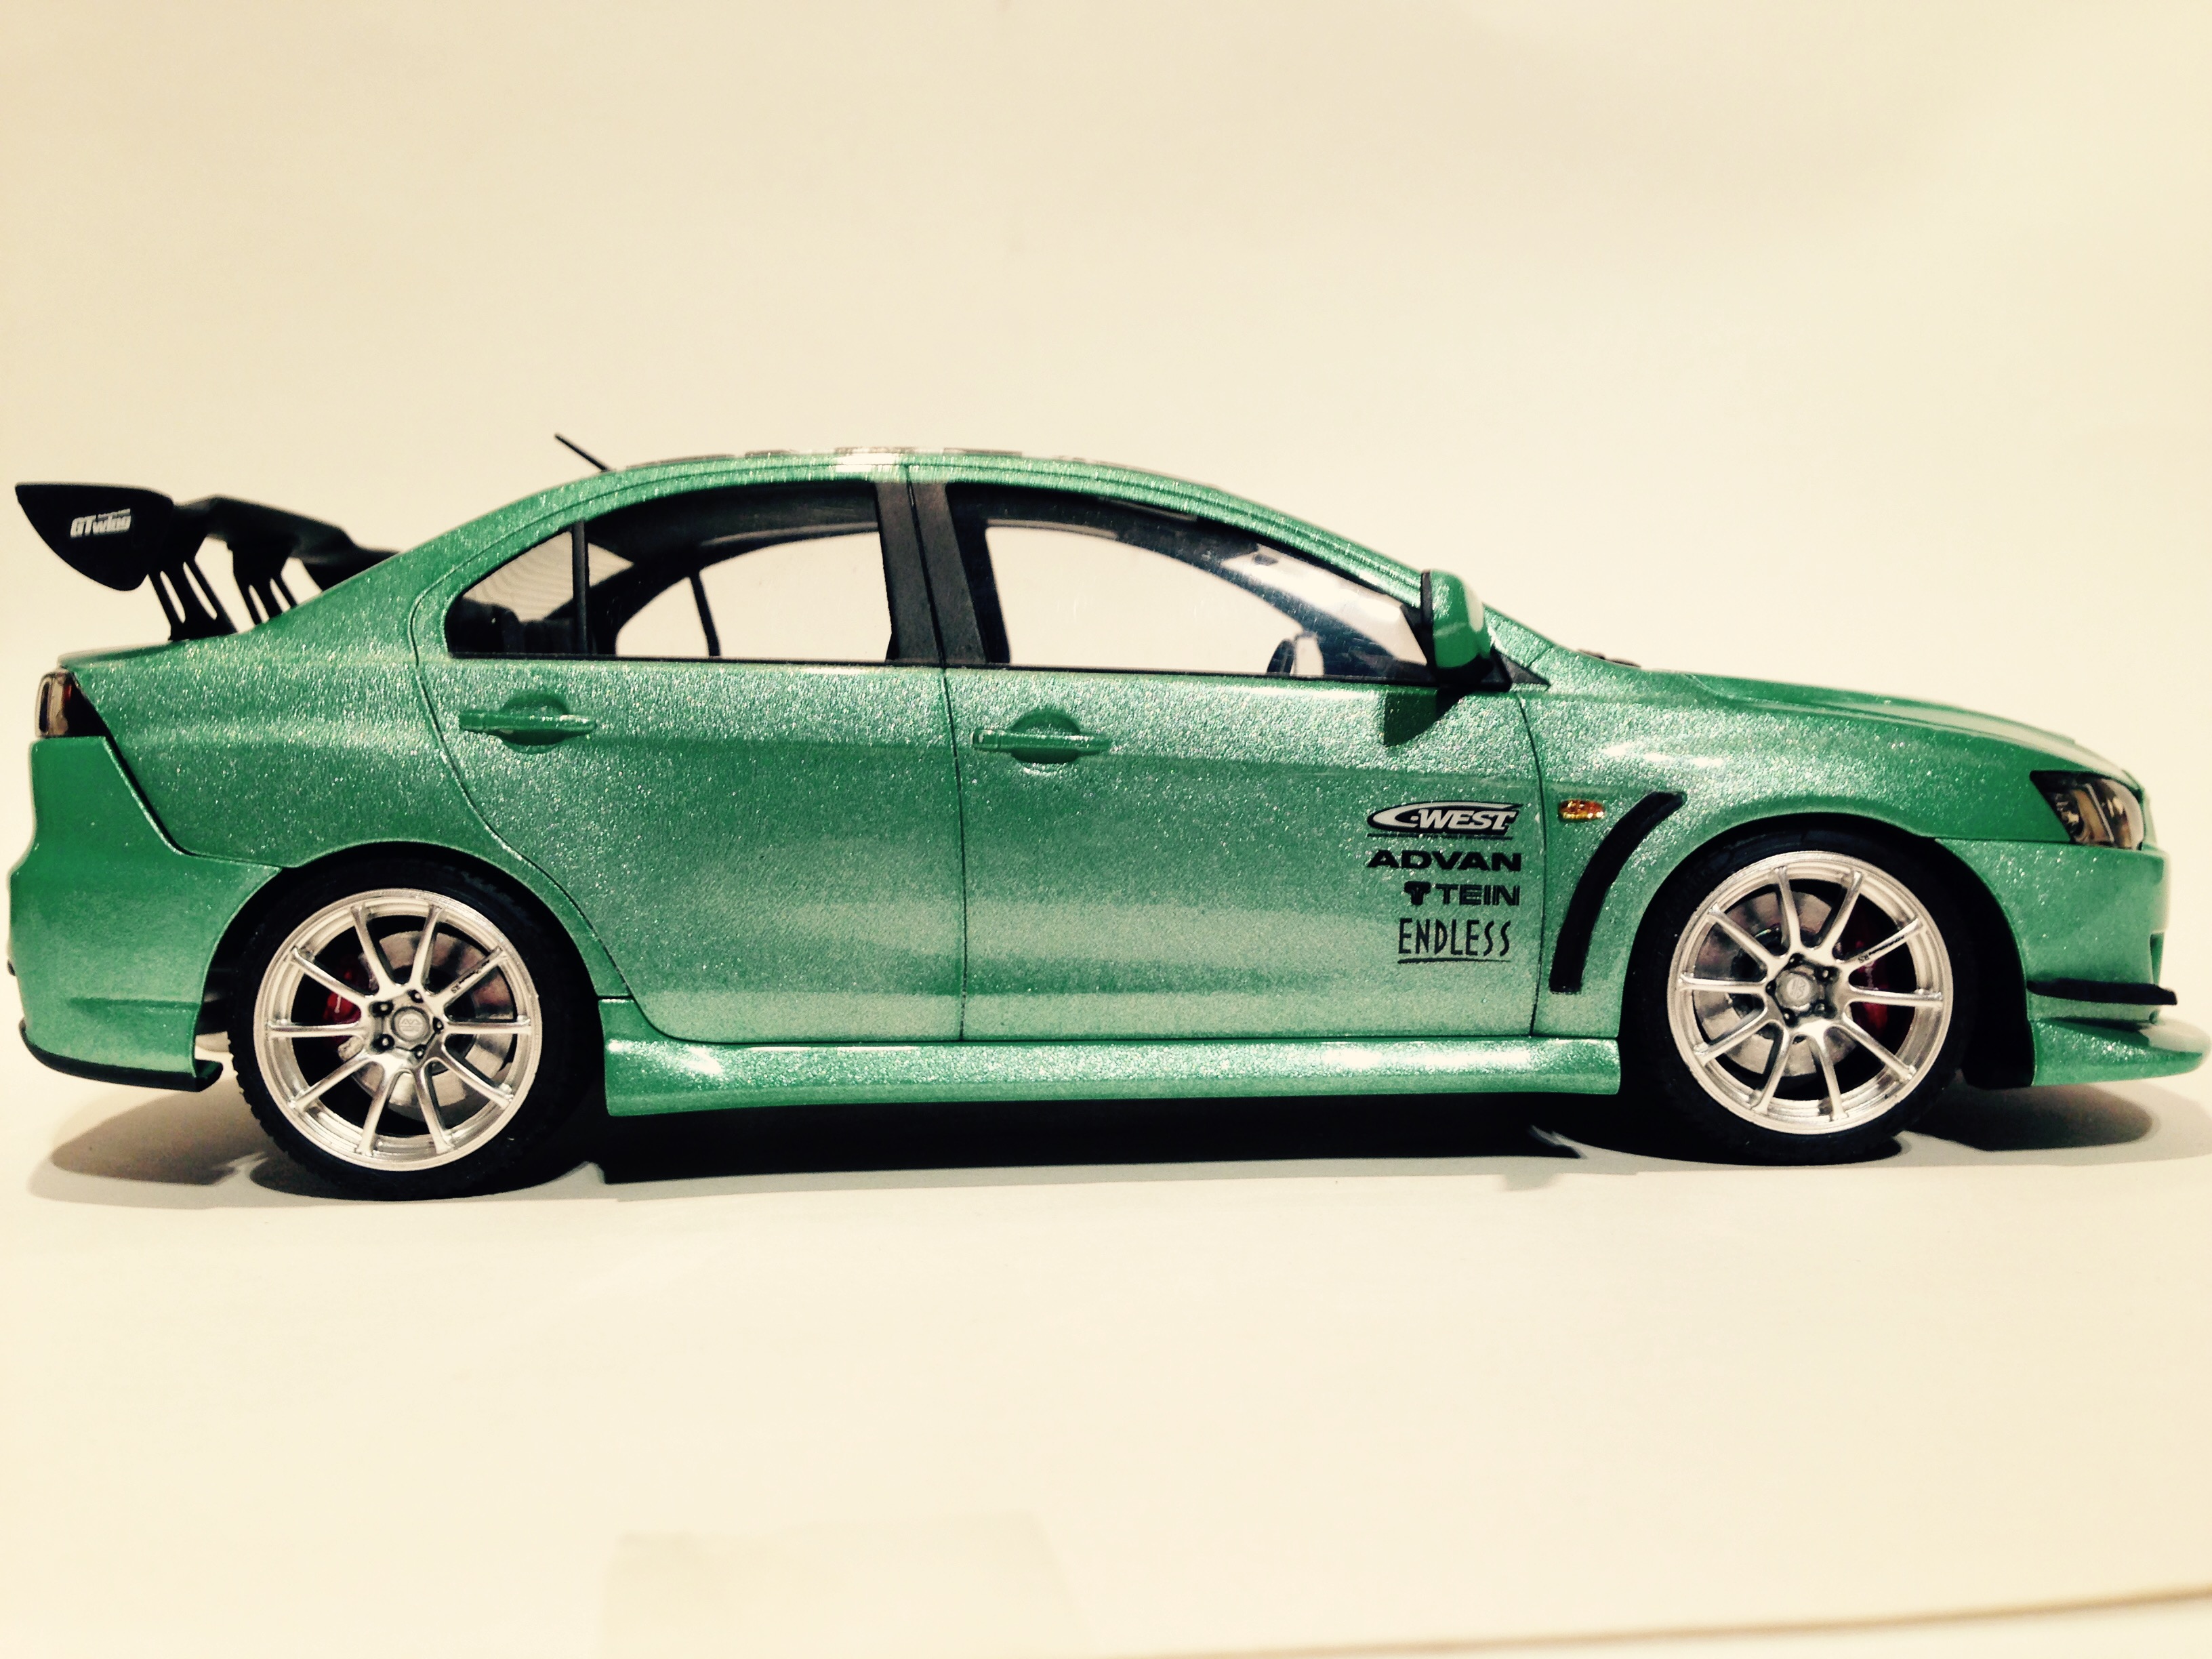
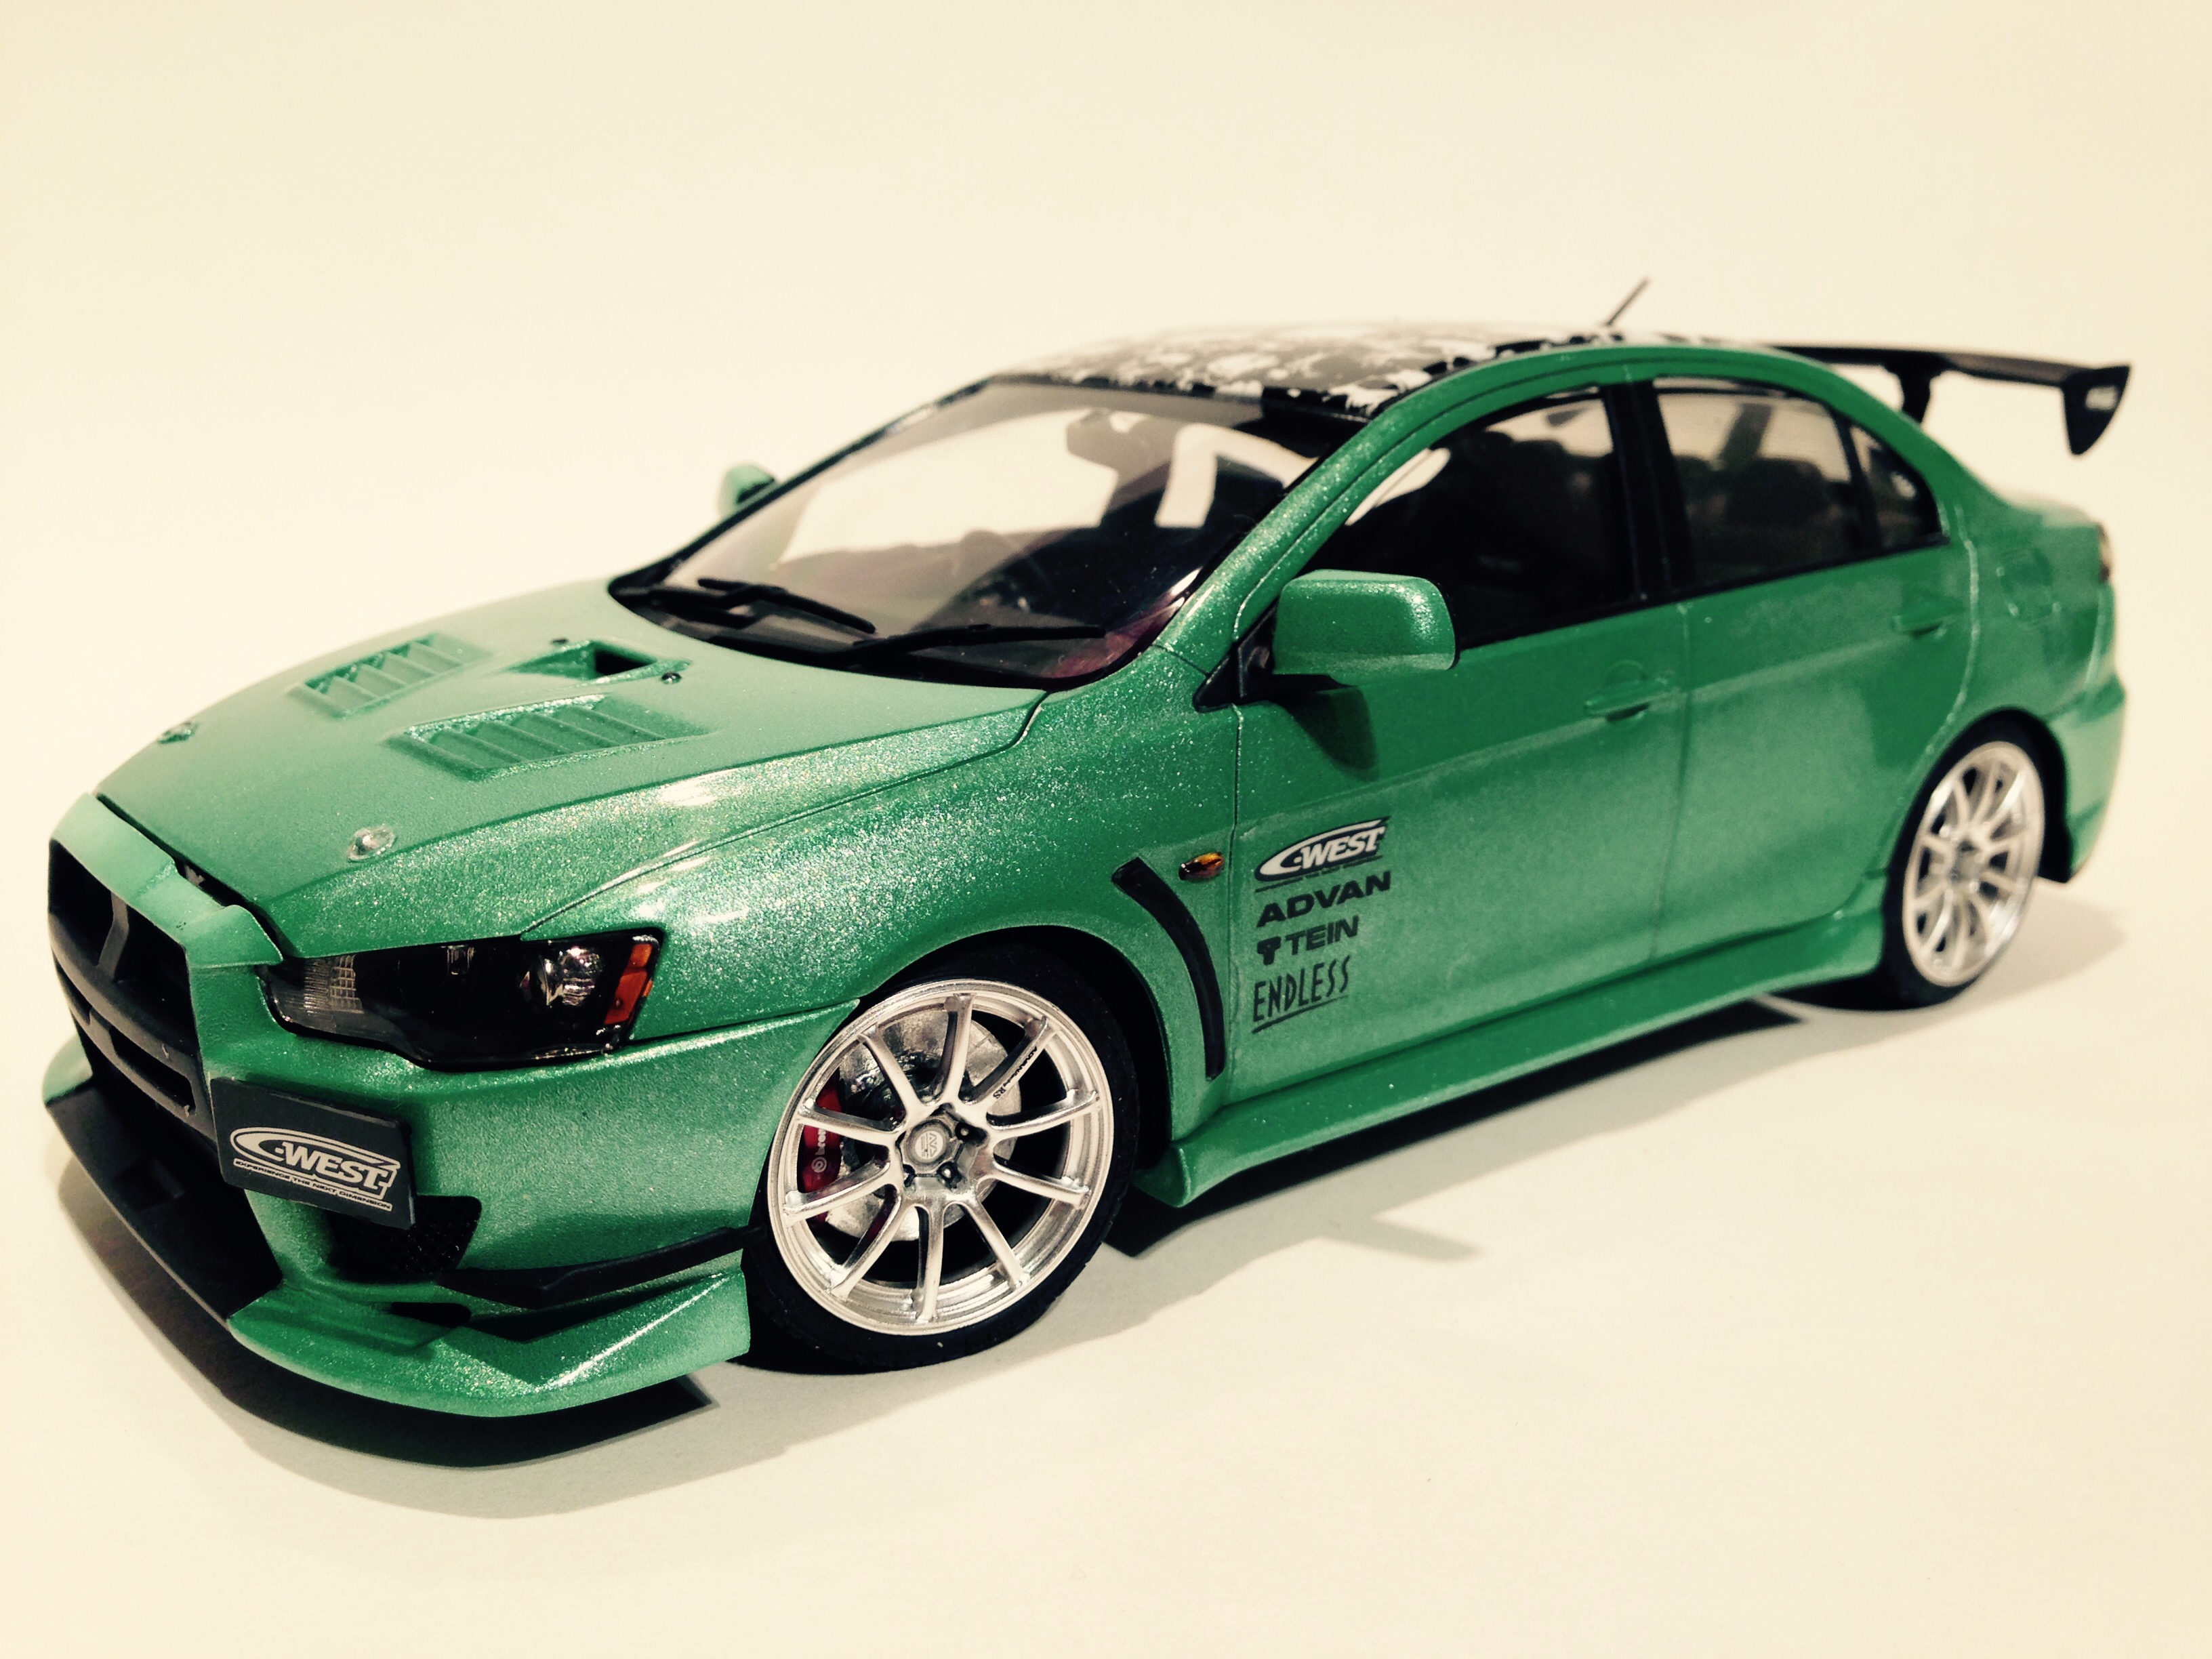
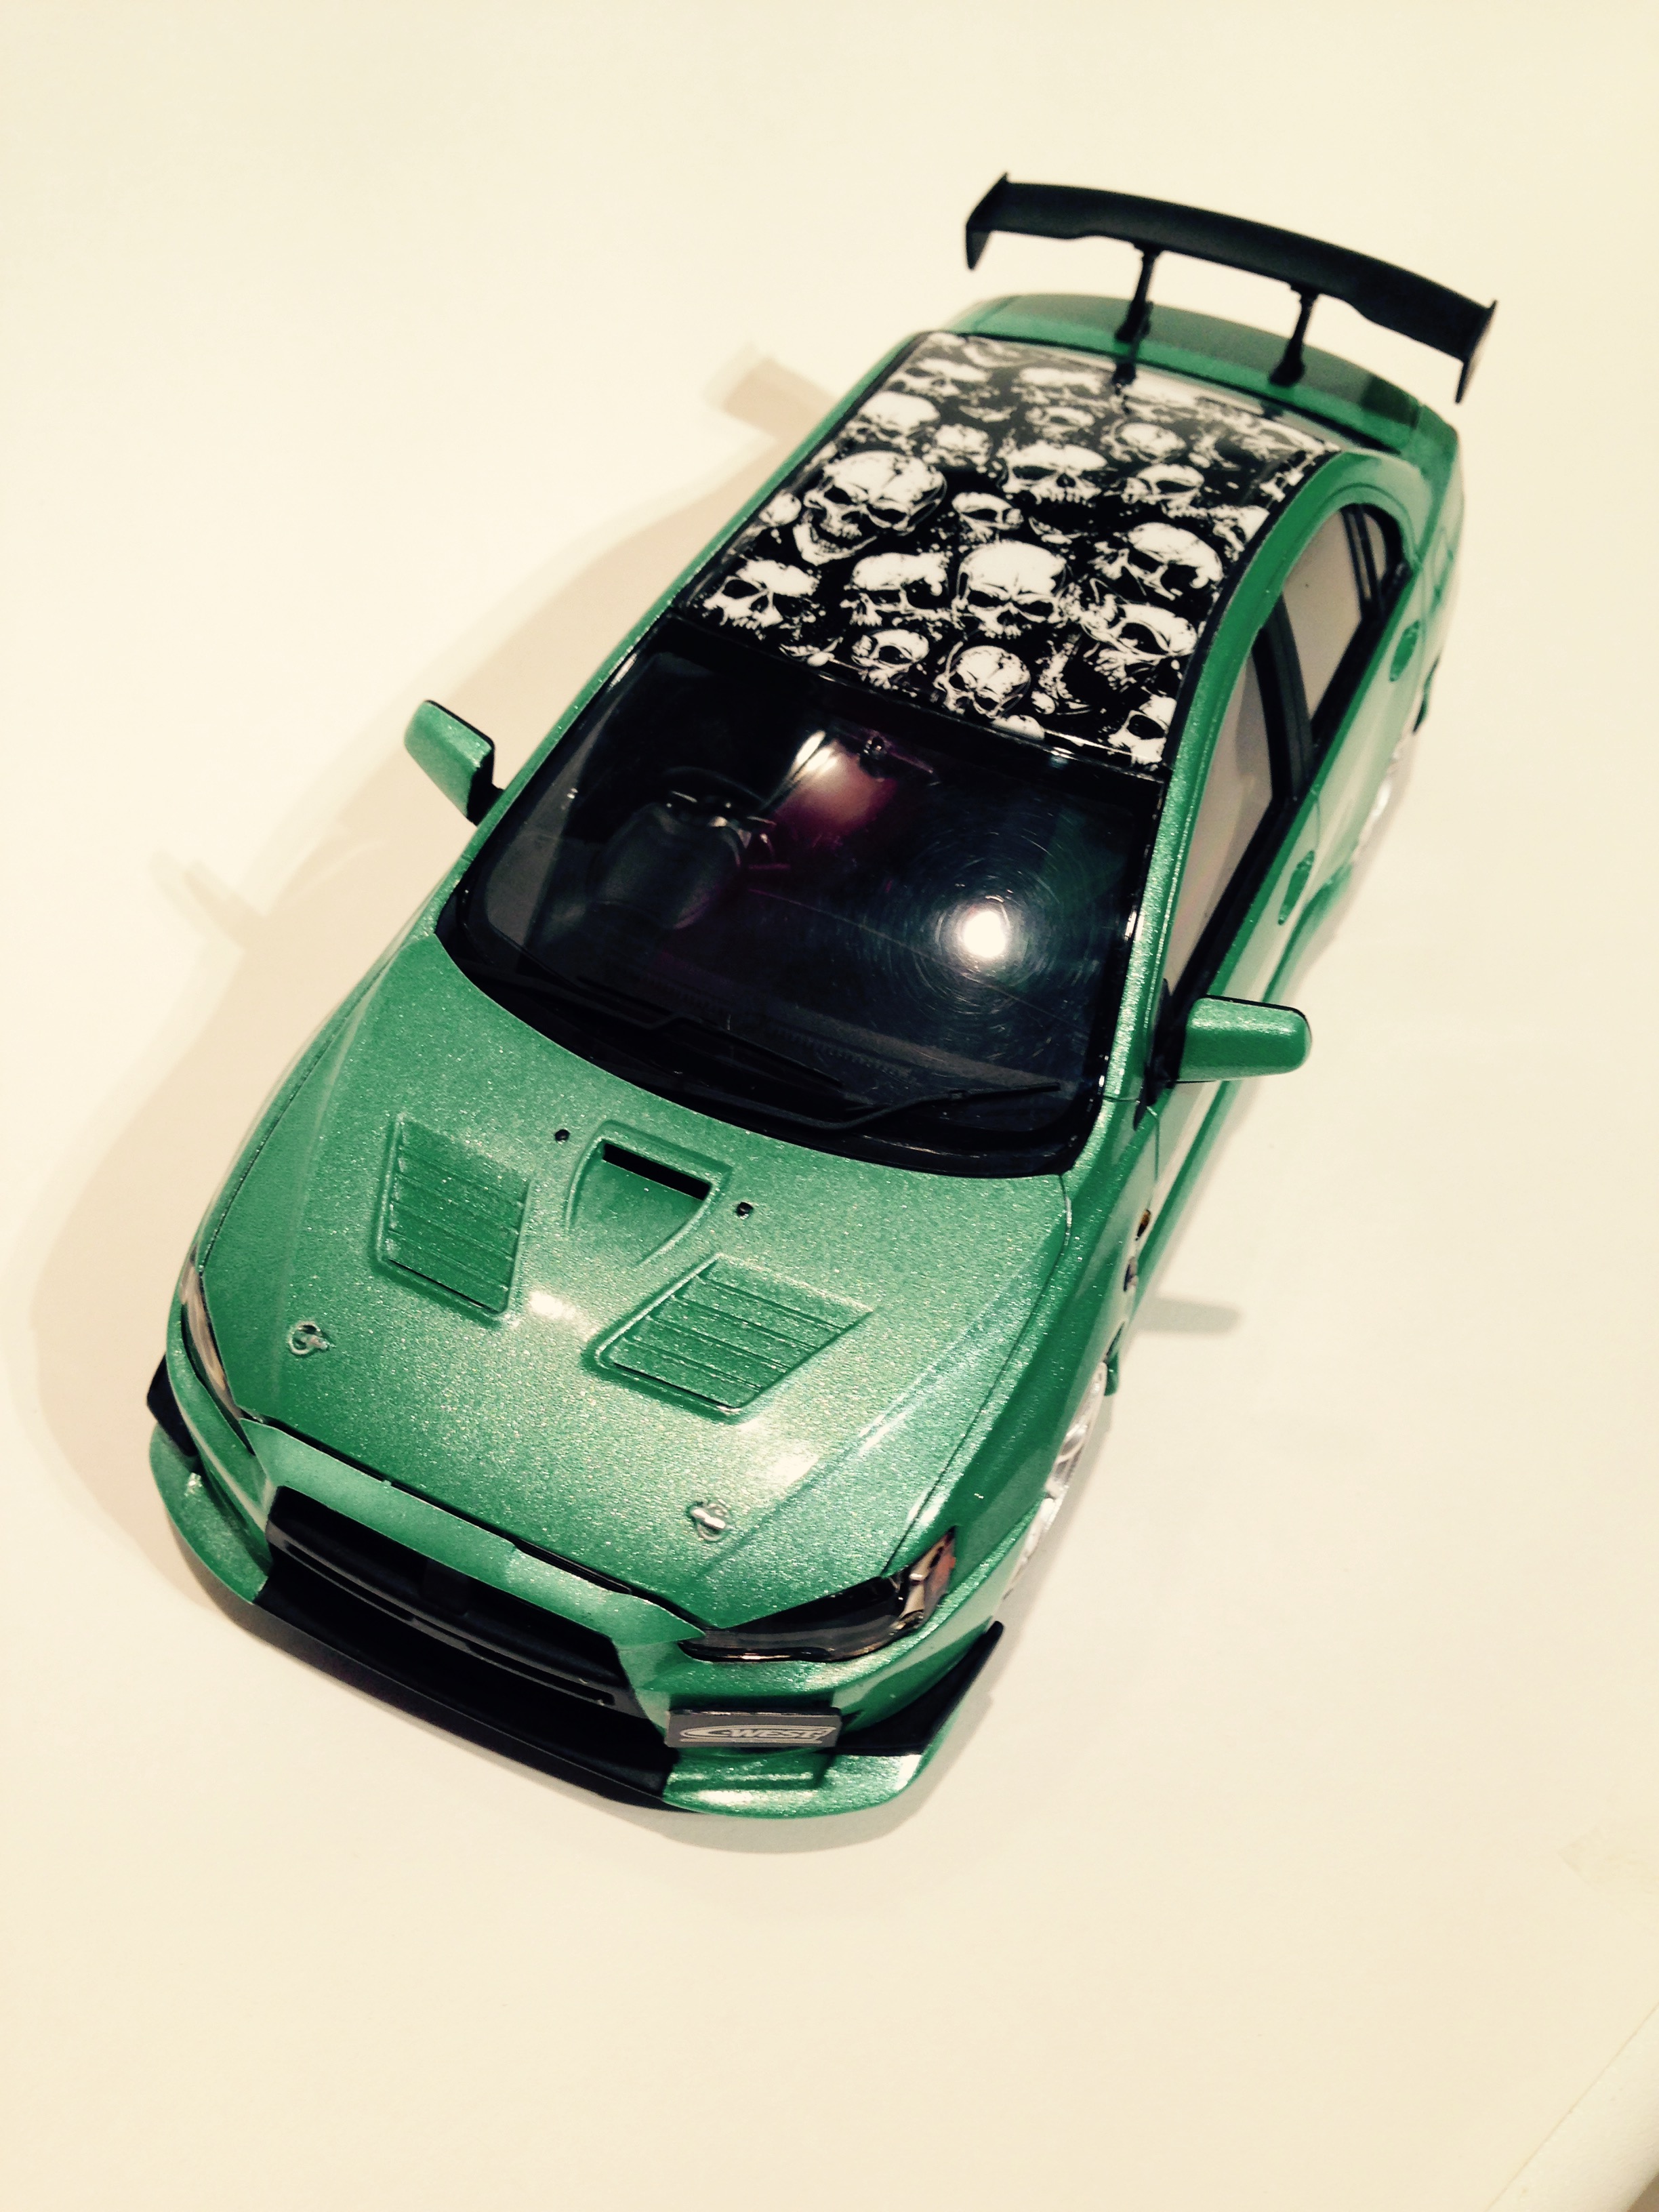
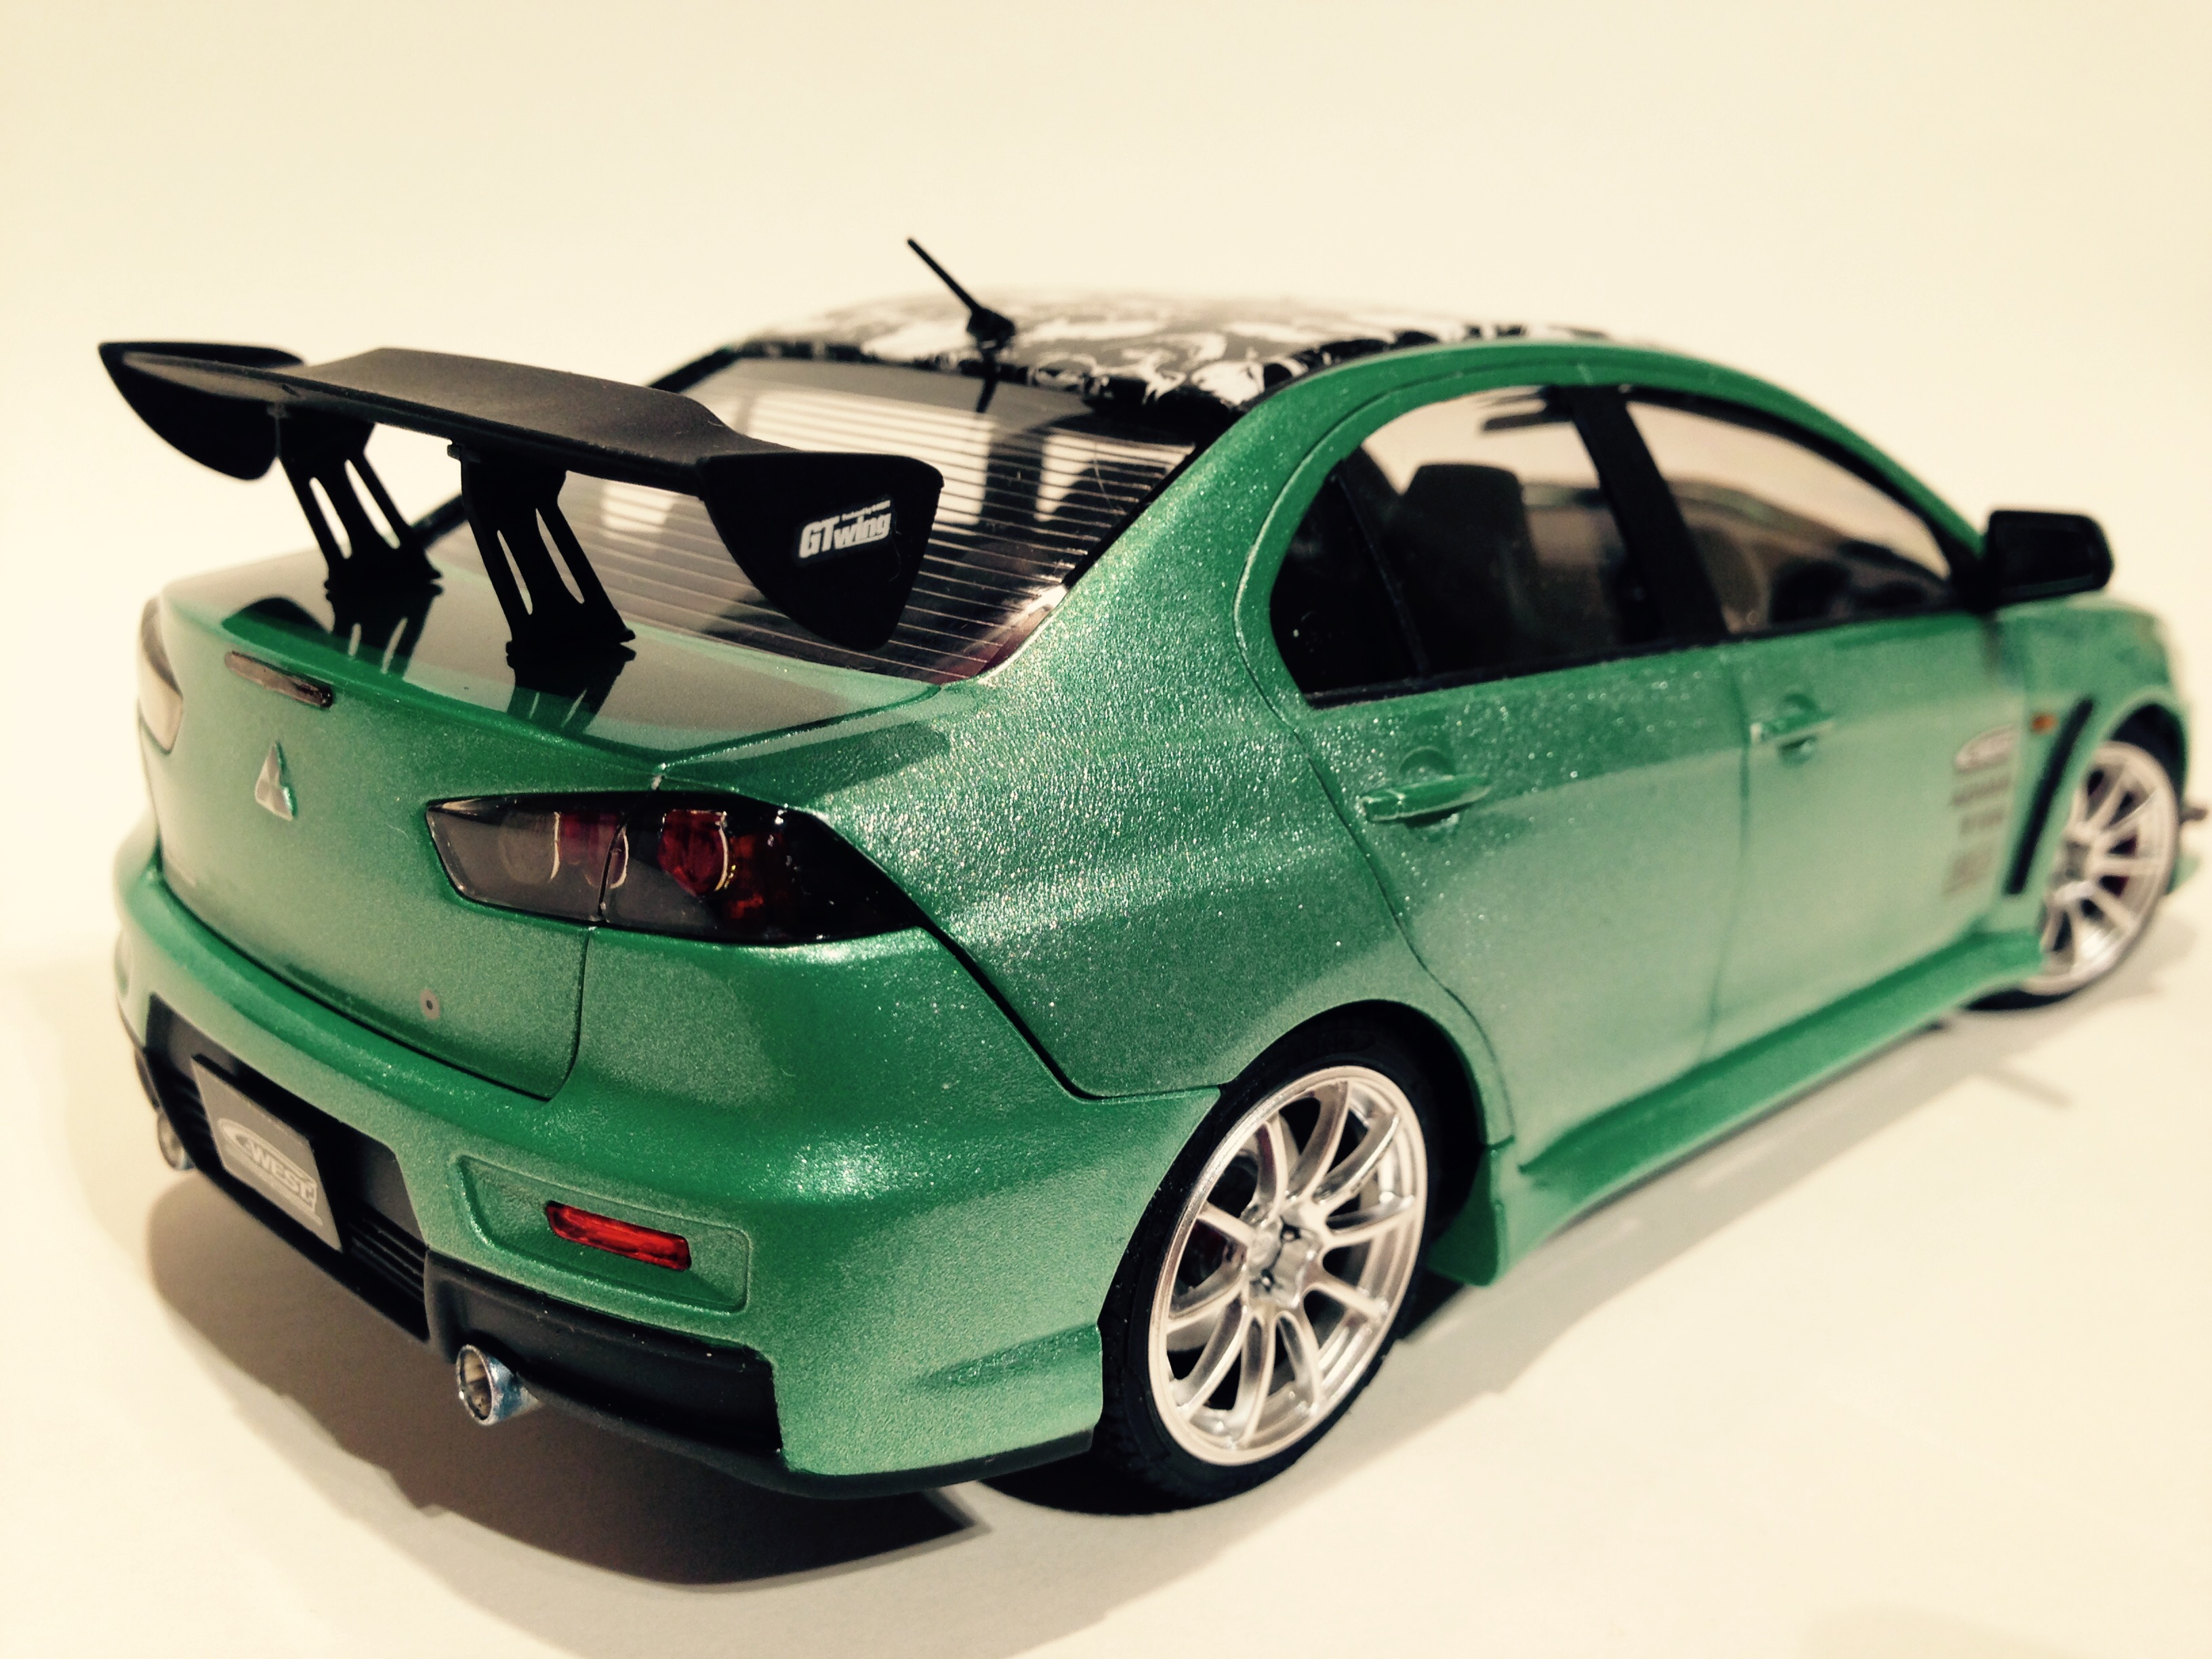
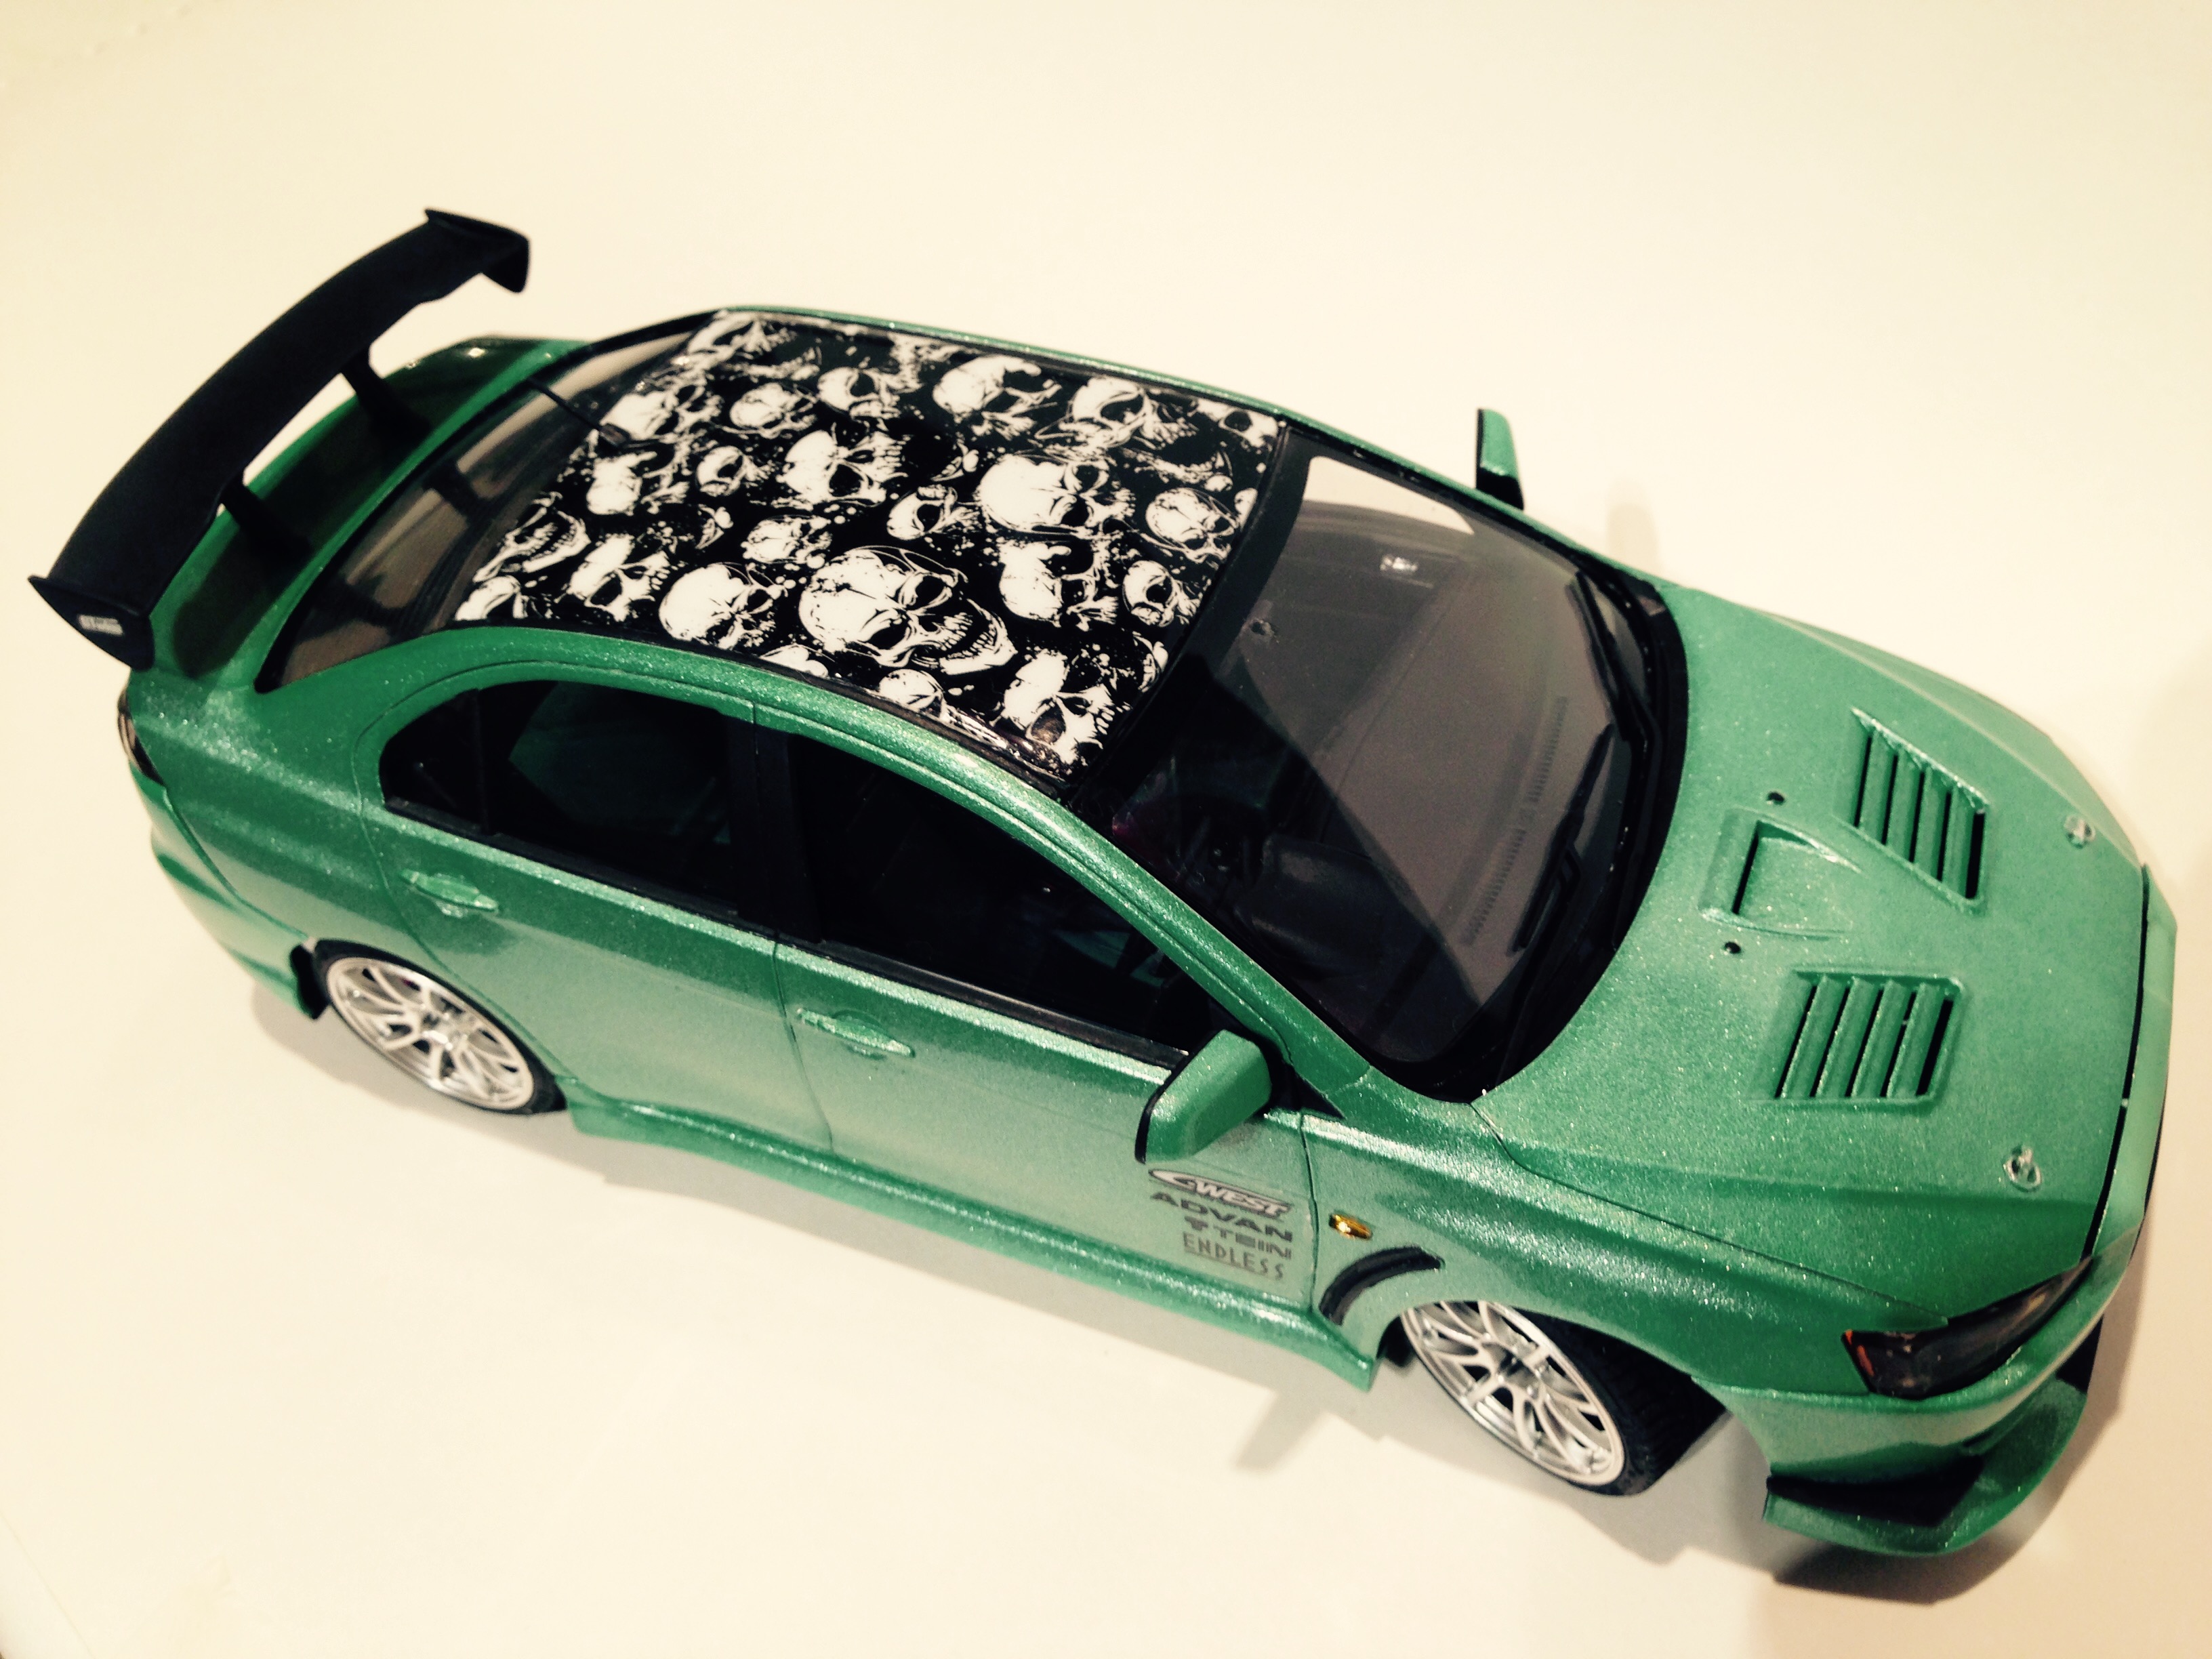
Here's the Aoshima Mitsubishi Evo X, I've been working on for about a month. This is my first airbrush paint job and I wish I'd taken the plunge, sooner. It was a lot easier than I thought it would be. Box stock, except for the seatbelt clasps and roof decal. I know most of you prefer American iron, but it was a good kit to build my airbrush skills. Anyway, I hope you like it all the same. All comments welcome. Thanks for looking.
-
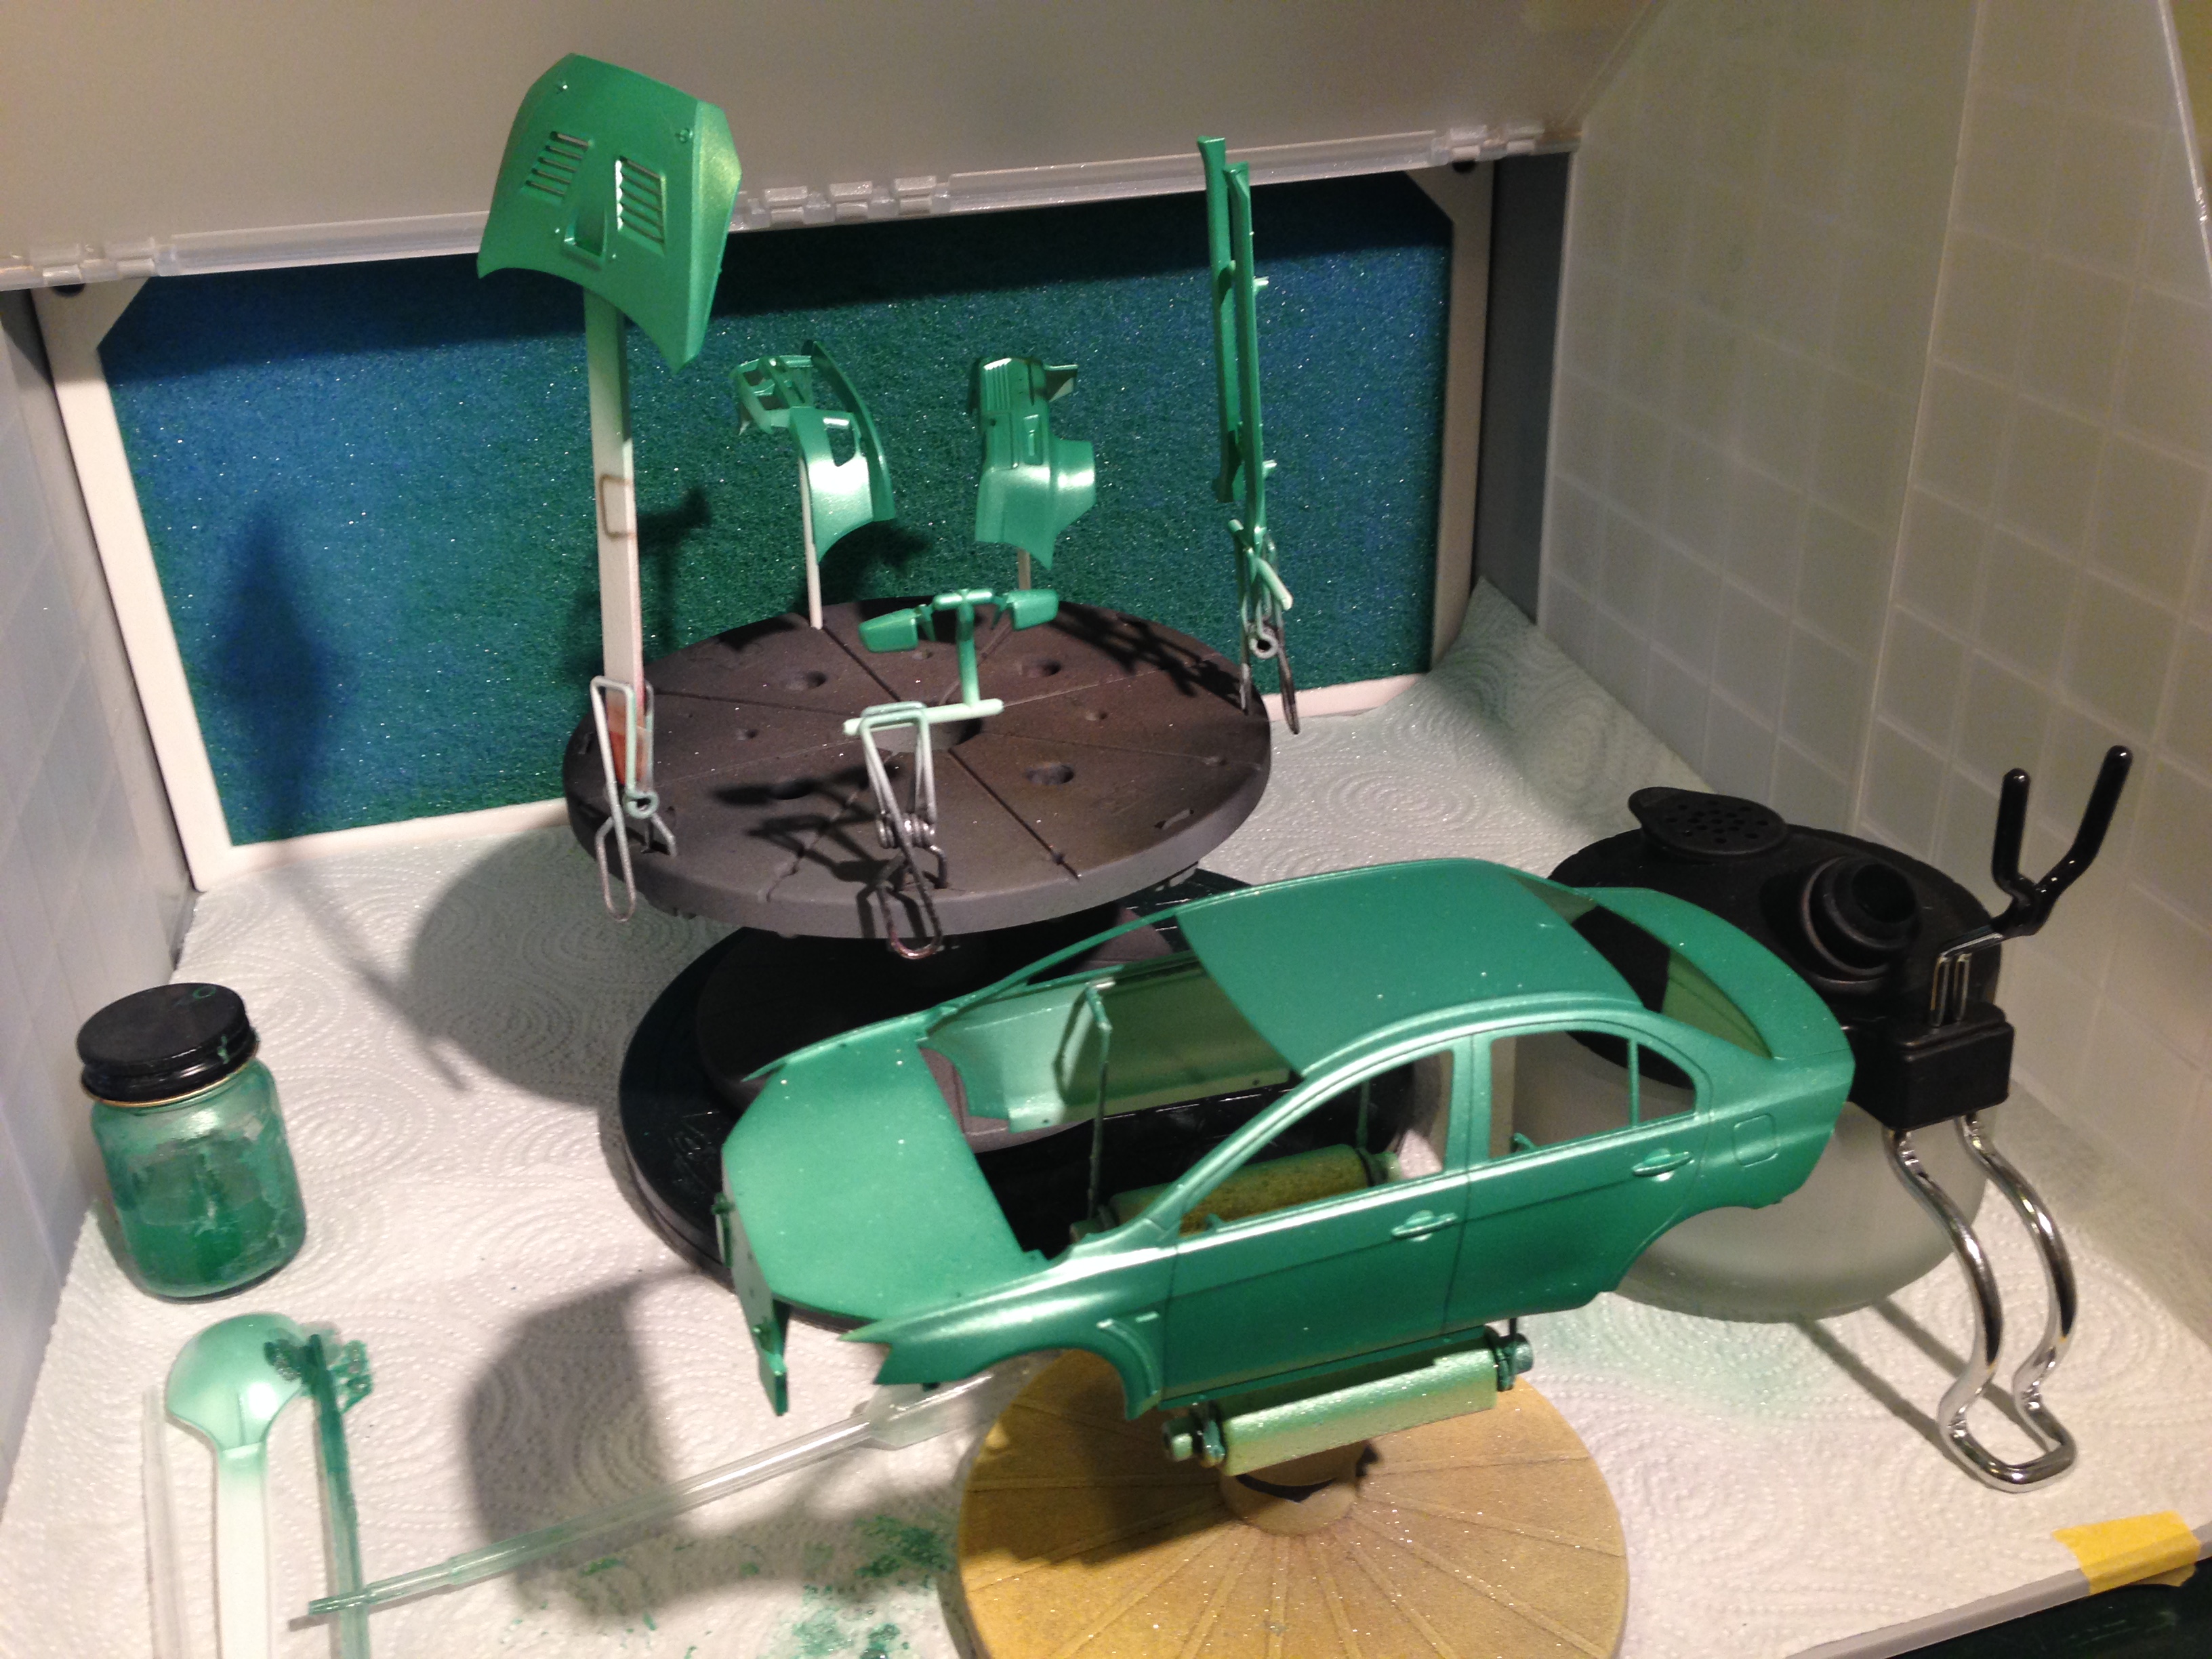
I just bought myself an airbrush, so after years of rattle-can painting, I'm hoping the paint comes out well on this. This is a nice kit. Everything fits and the mould seams on the body are virtually invisible. So, here's the paint on the body. I decanted from a rattle can and got messy doing so. Then I realised that spraying into the can lid, was a better idea than trying to spray into a little bottle! You live n learn... I'm very pleased with the results. Hardly any orange peel!
-
So far, no real info on the kit other than a few 3D renderings, and a "tentative" release date of July 2016 with a price in the 3500 Yen range ( which right now is $32 US) http://www.1999.co.jp/eng/10384122 http://www.hlj.com/product/AOS01376 Whats in the box look
-
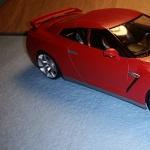
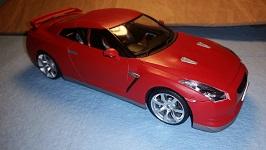
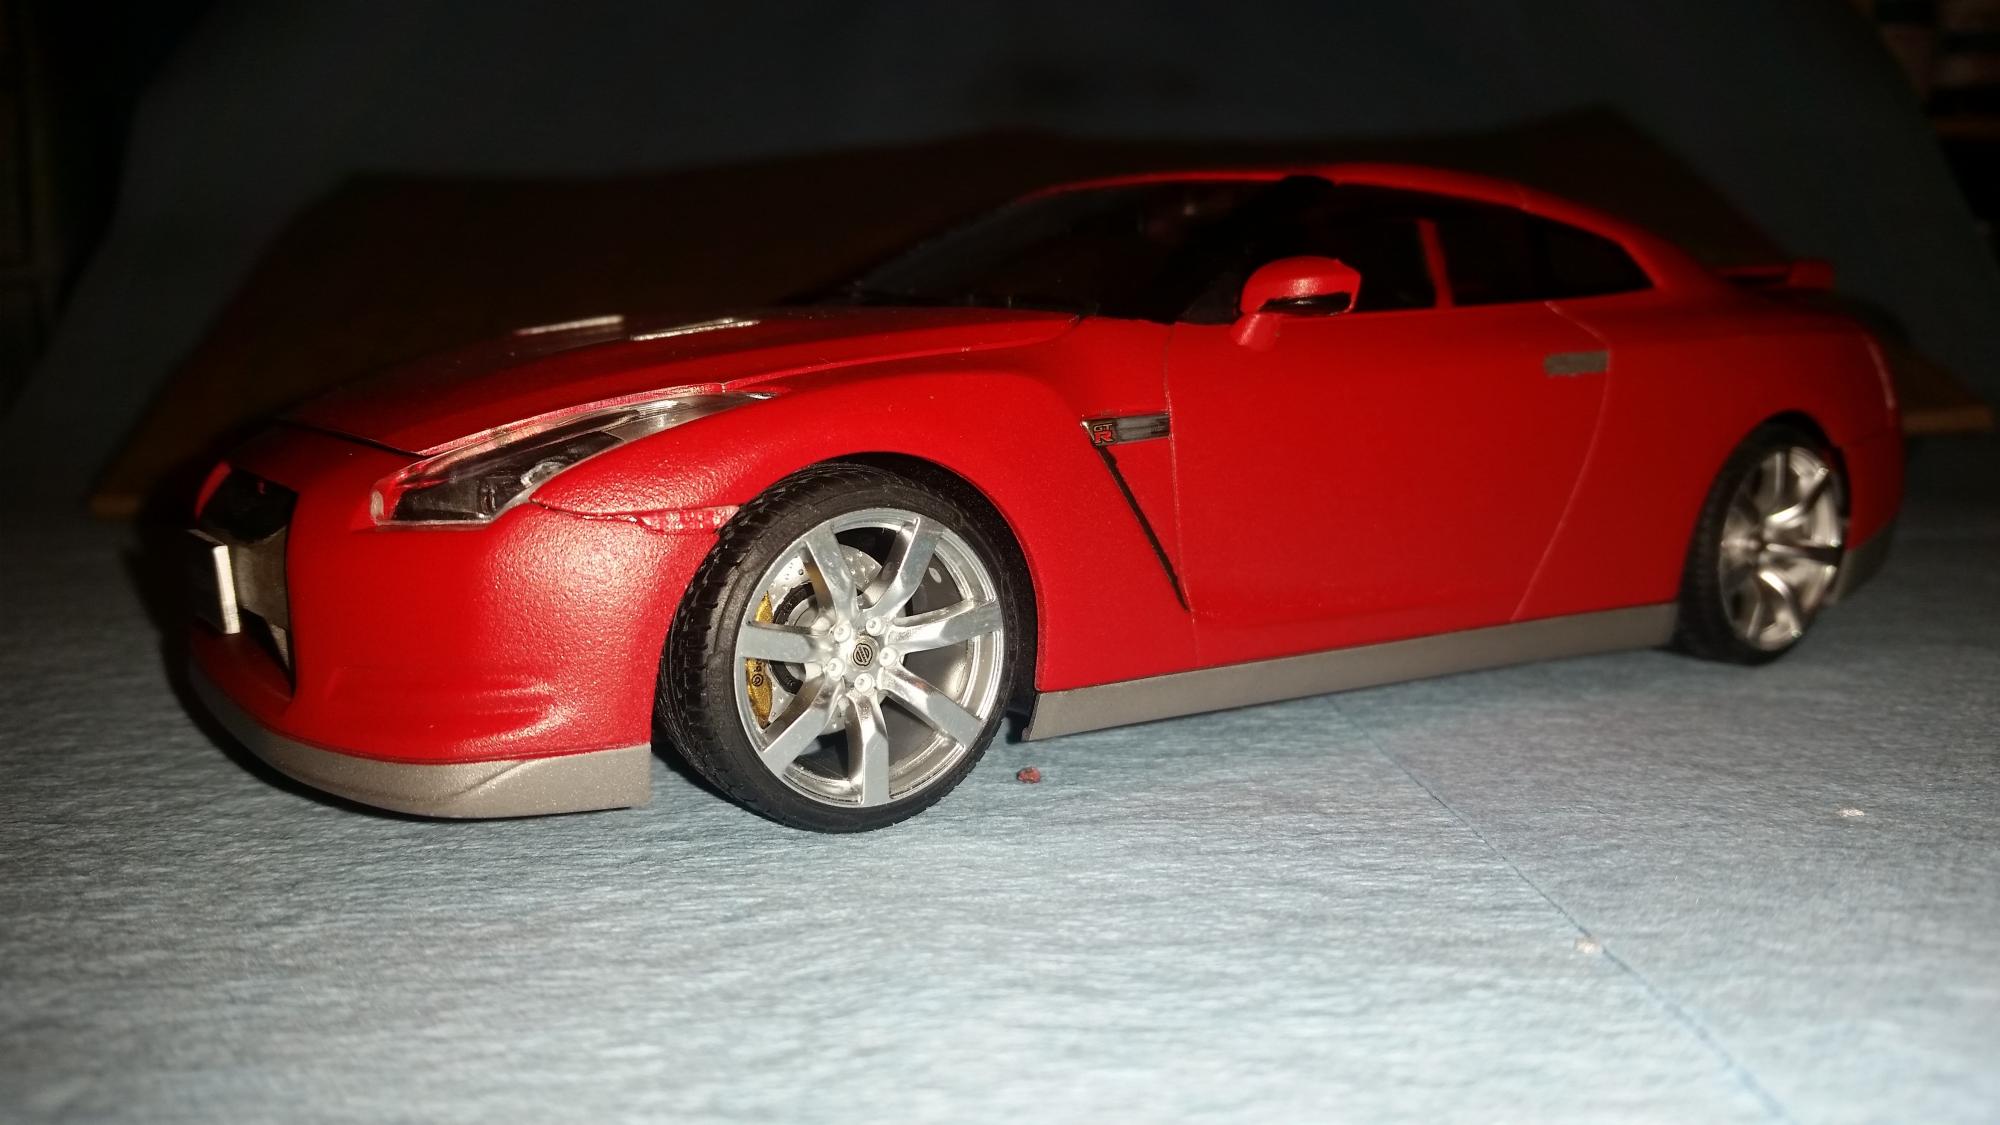
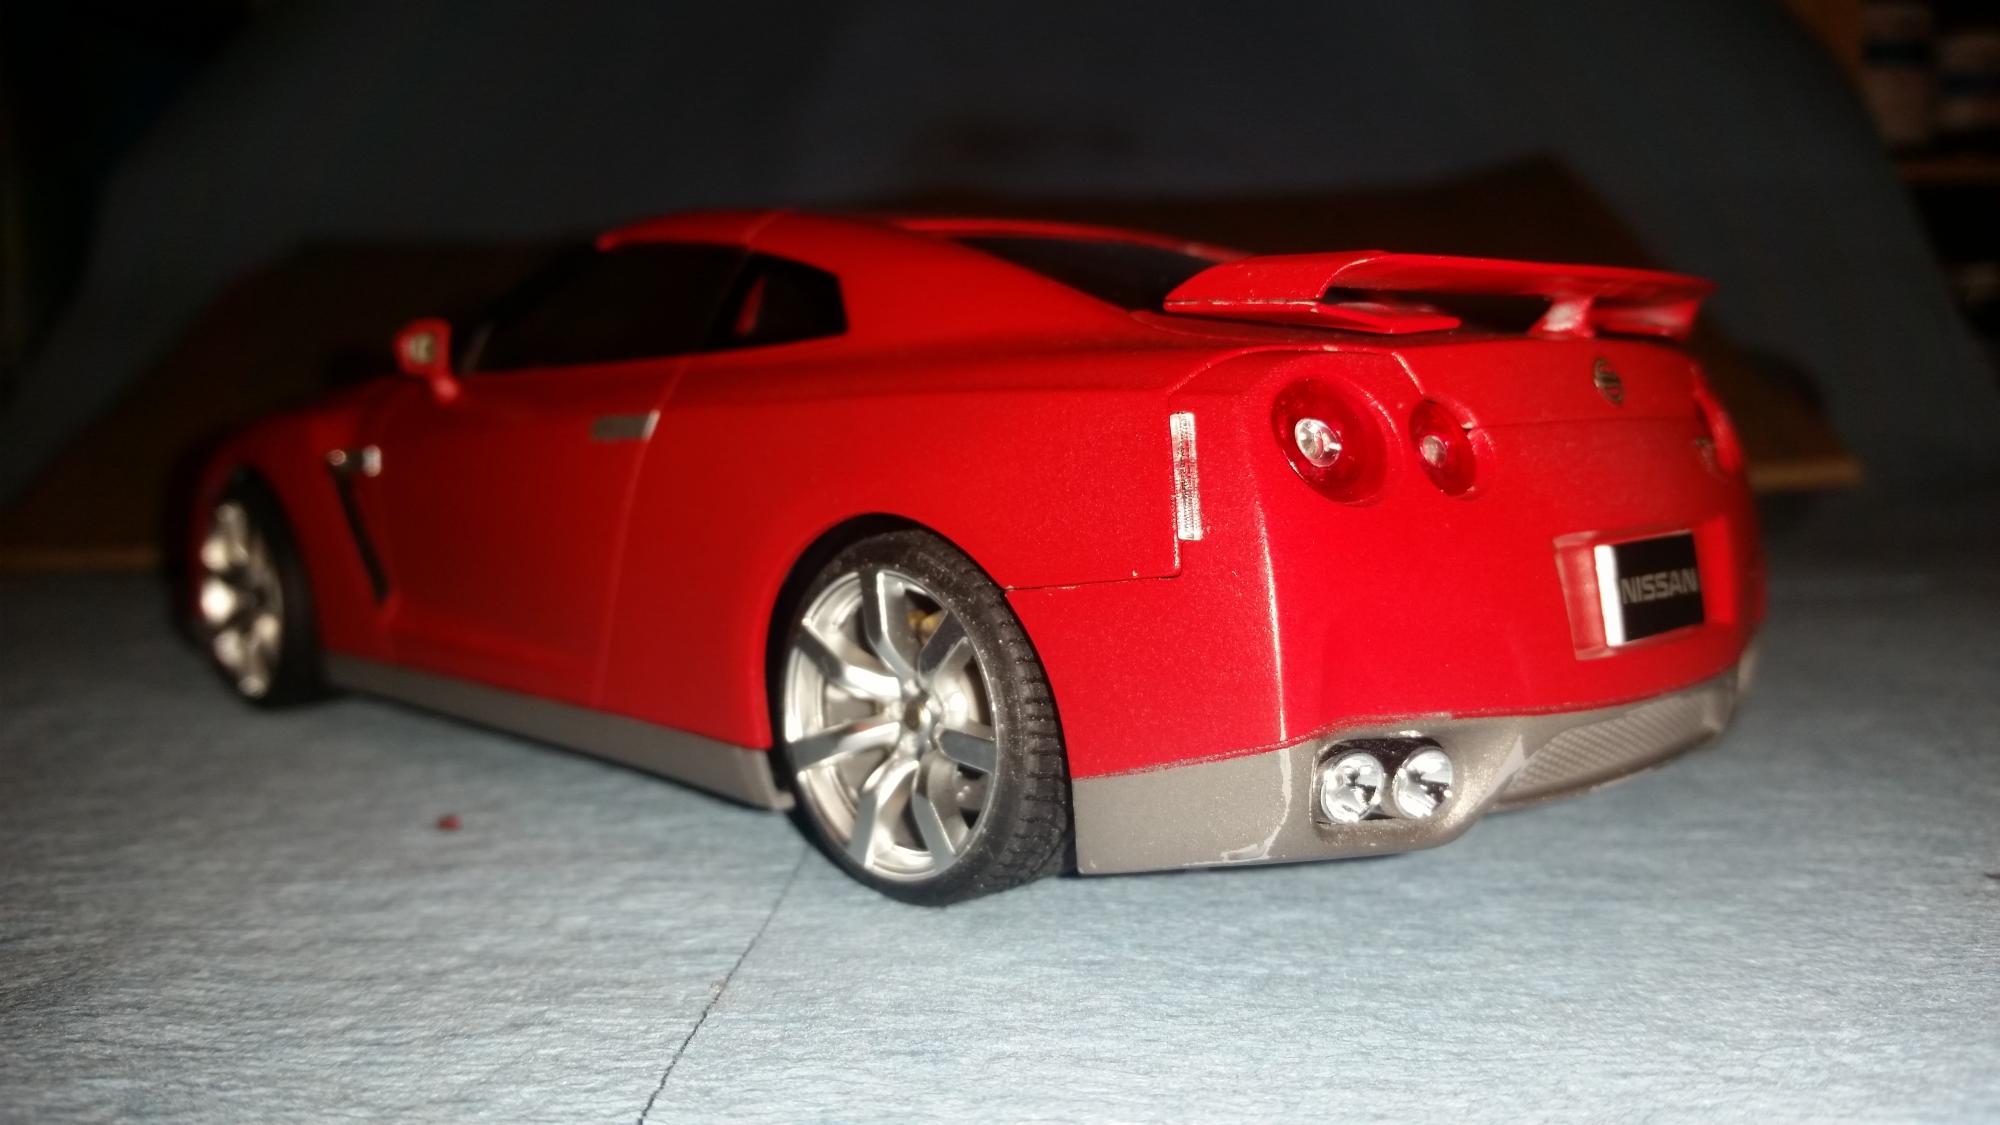
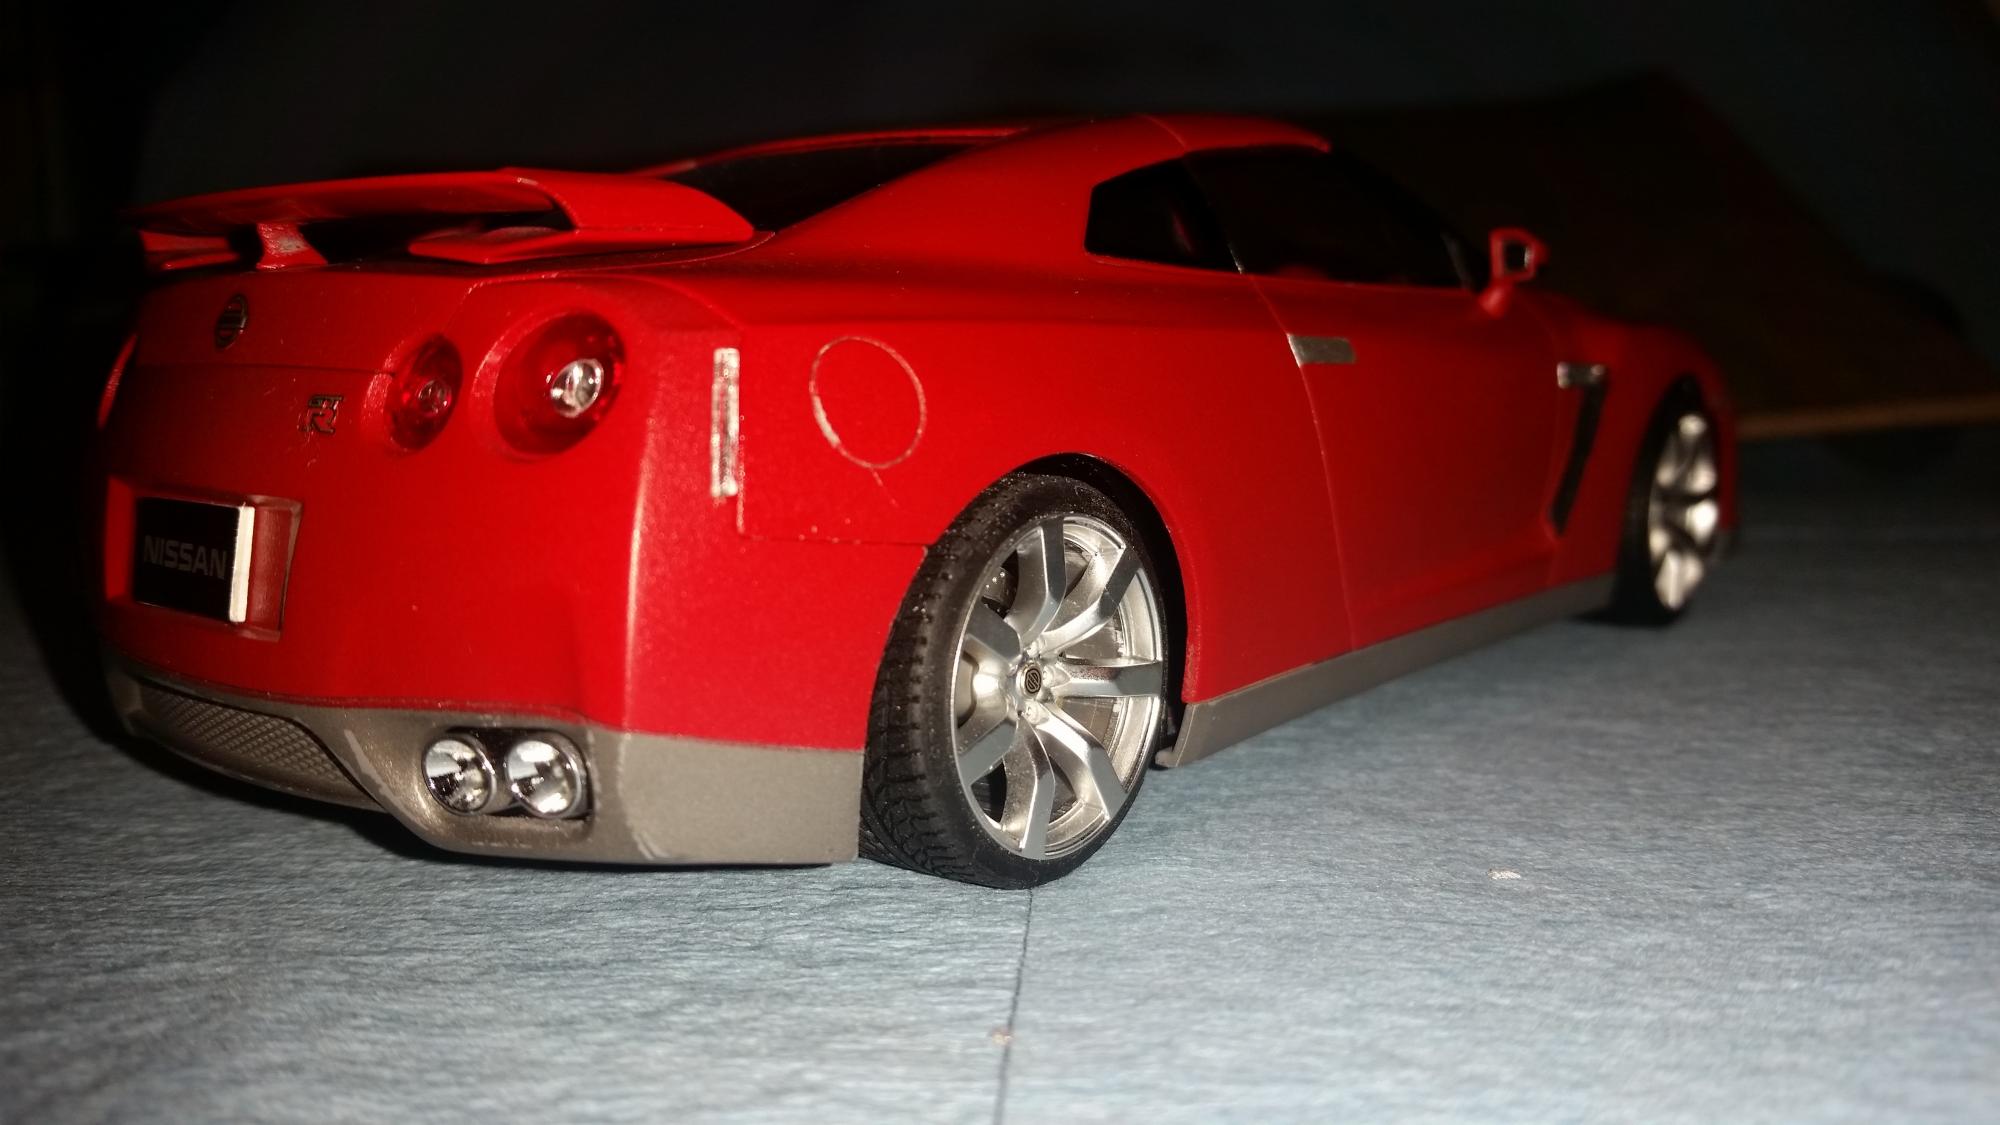
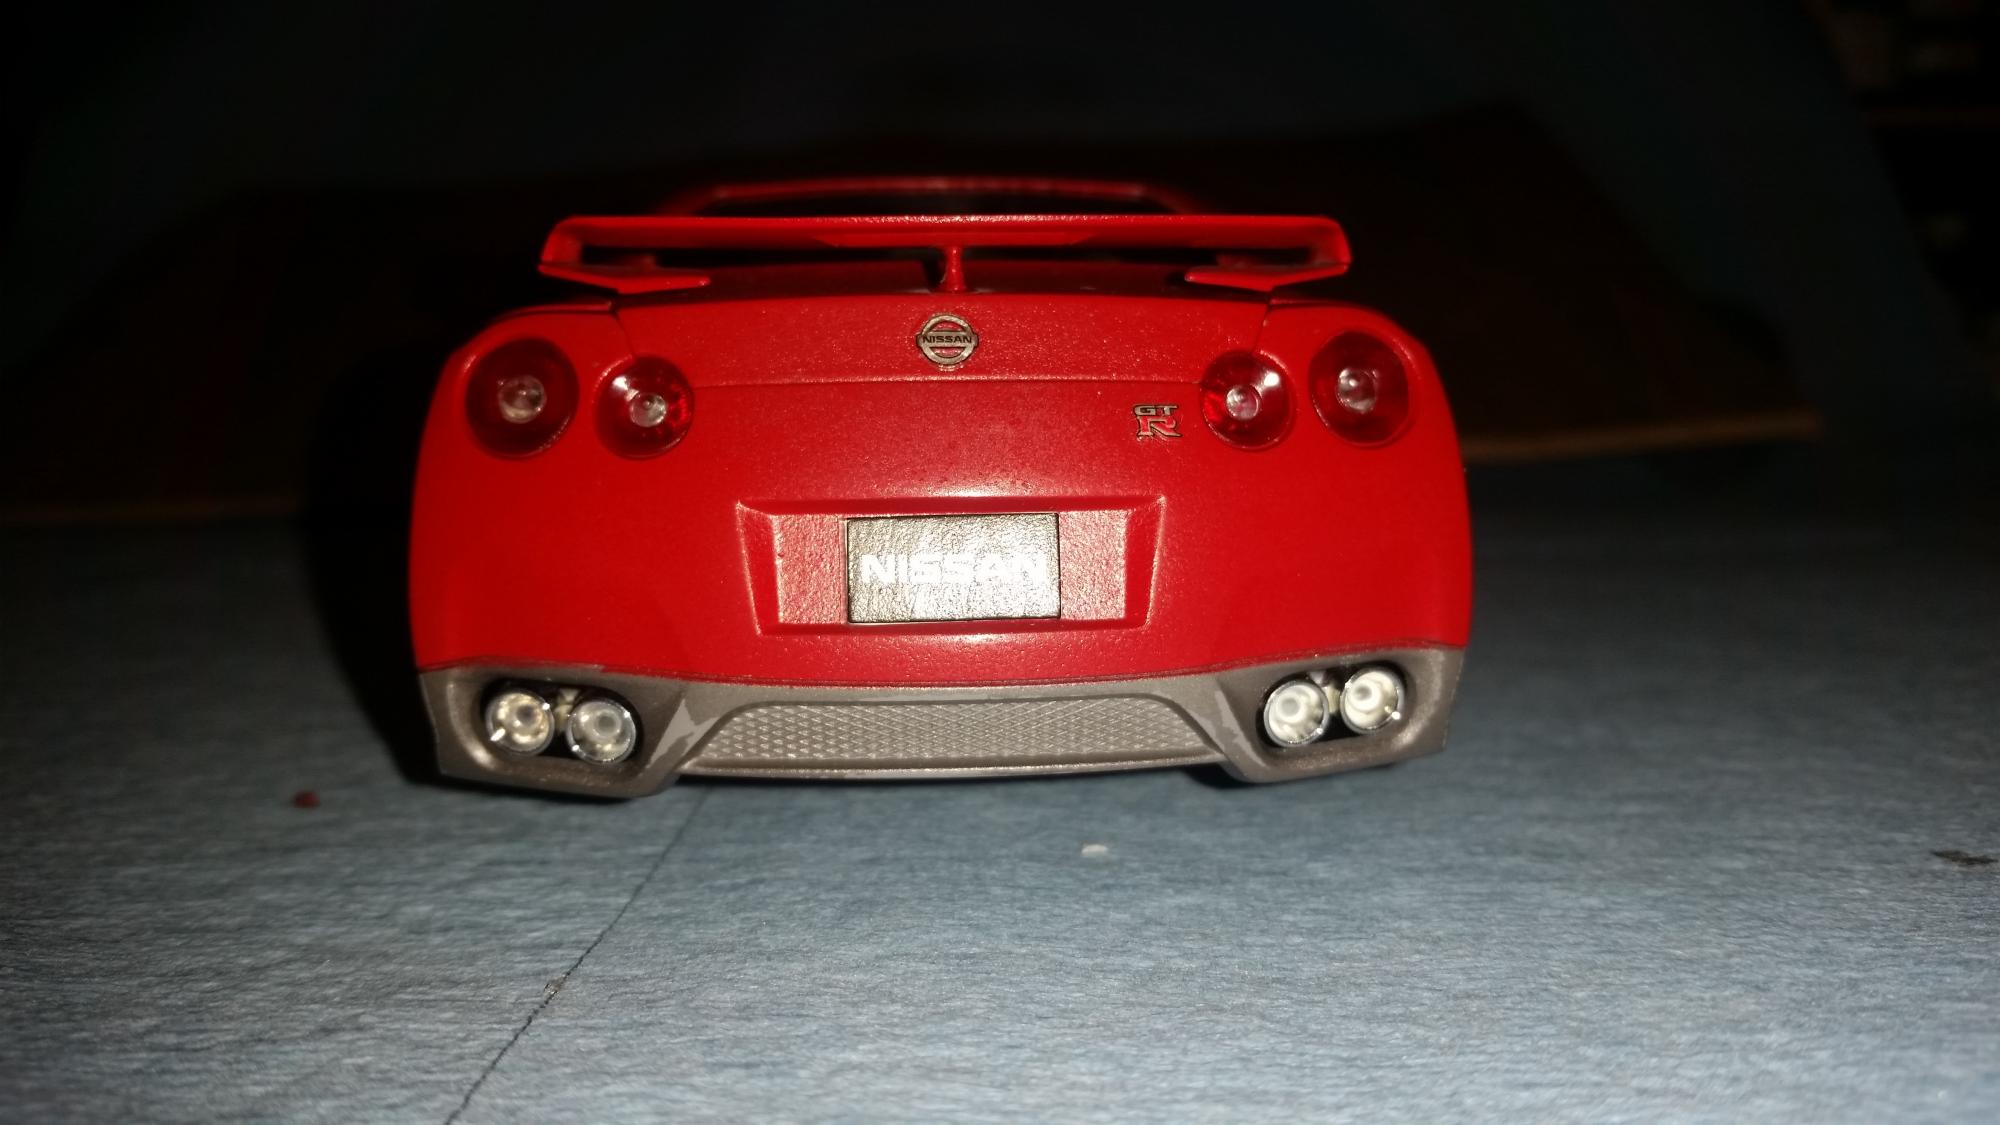
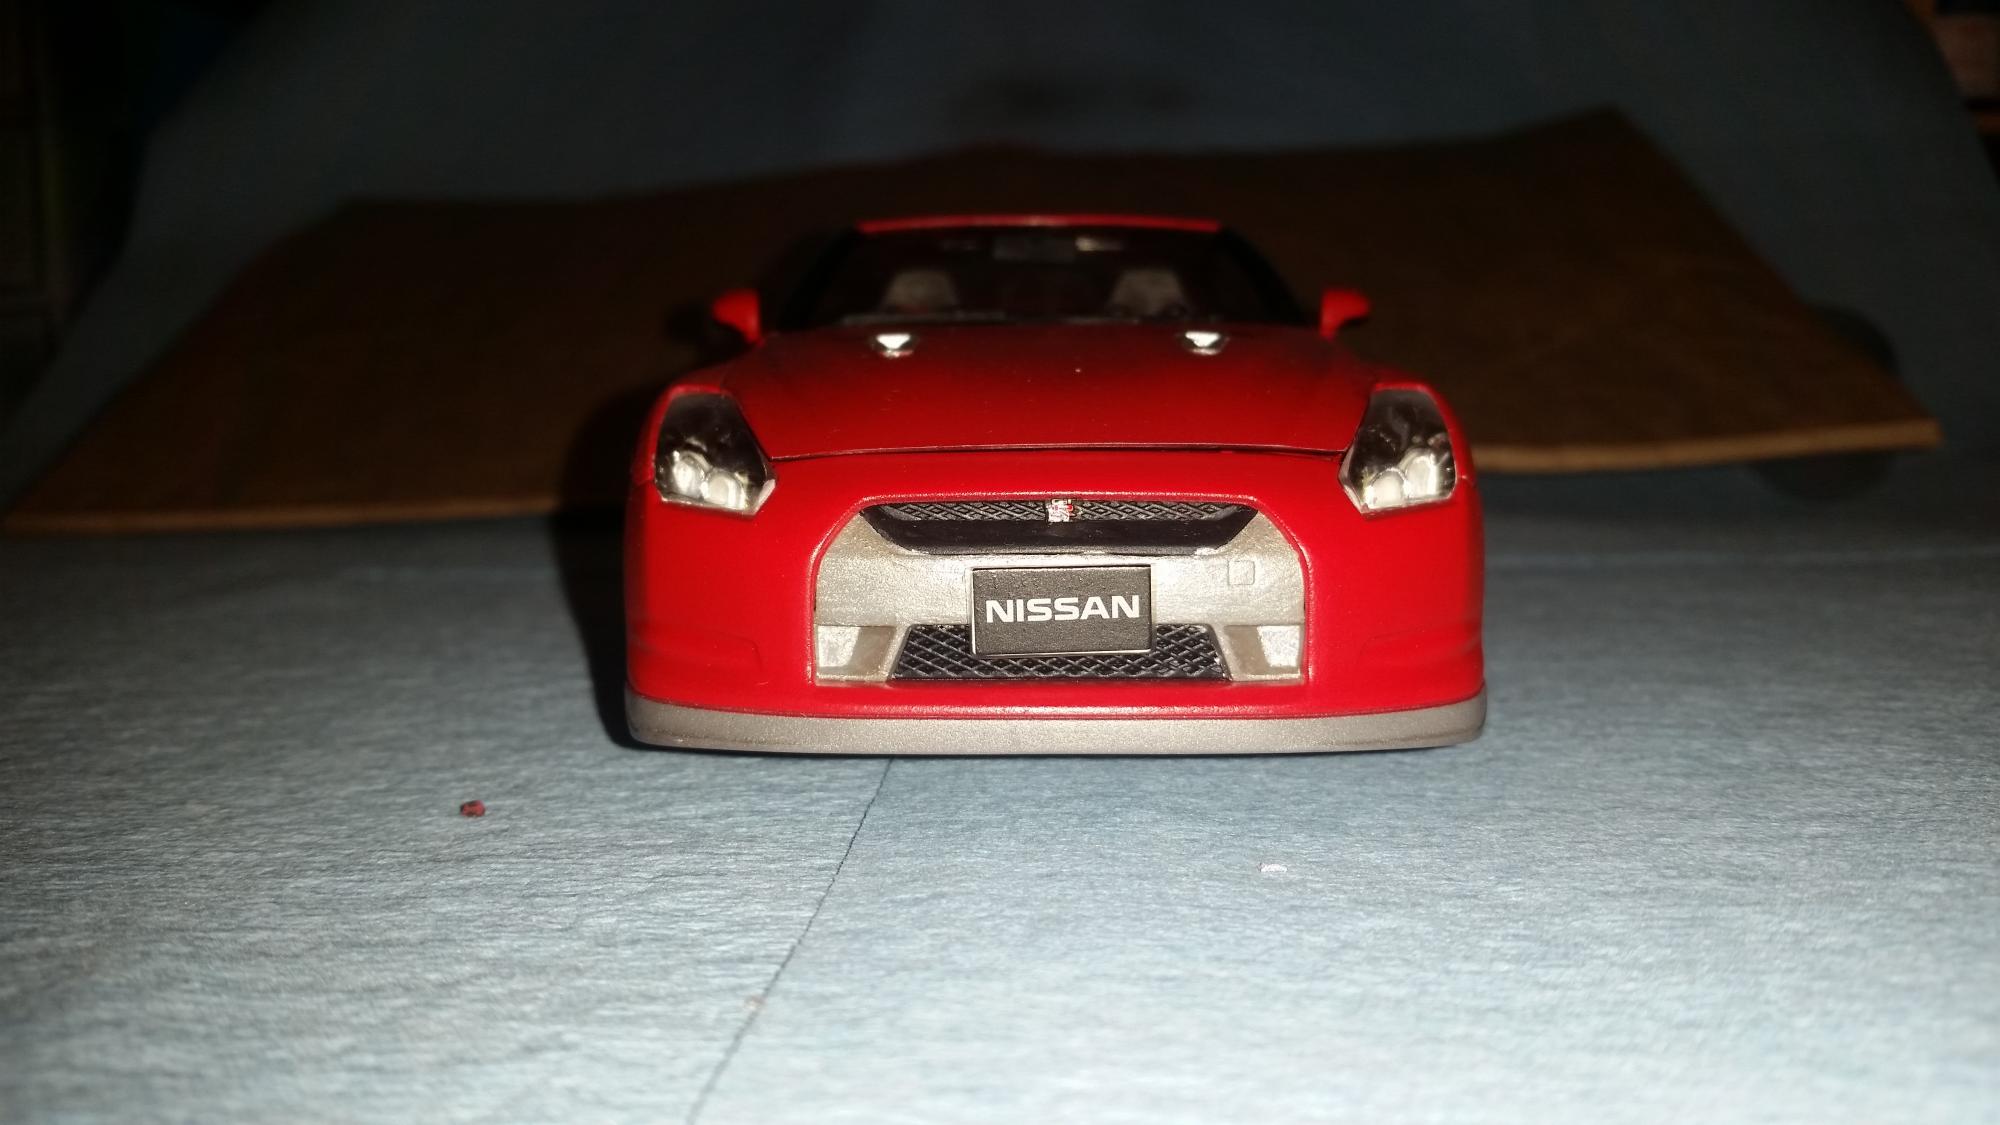
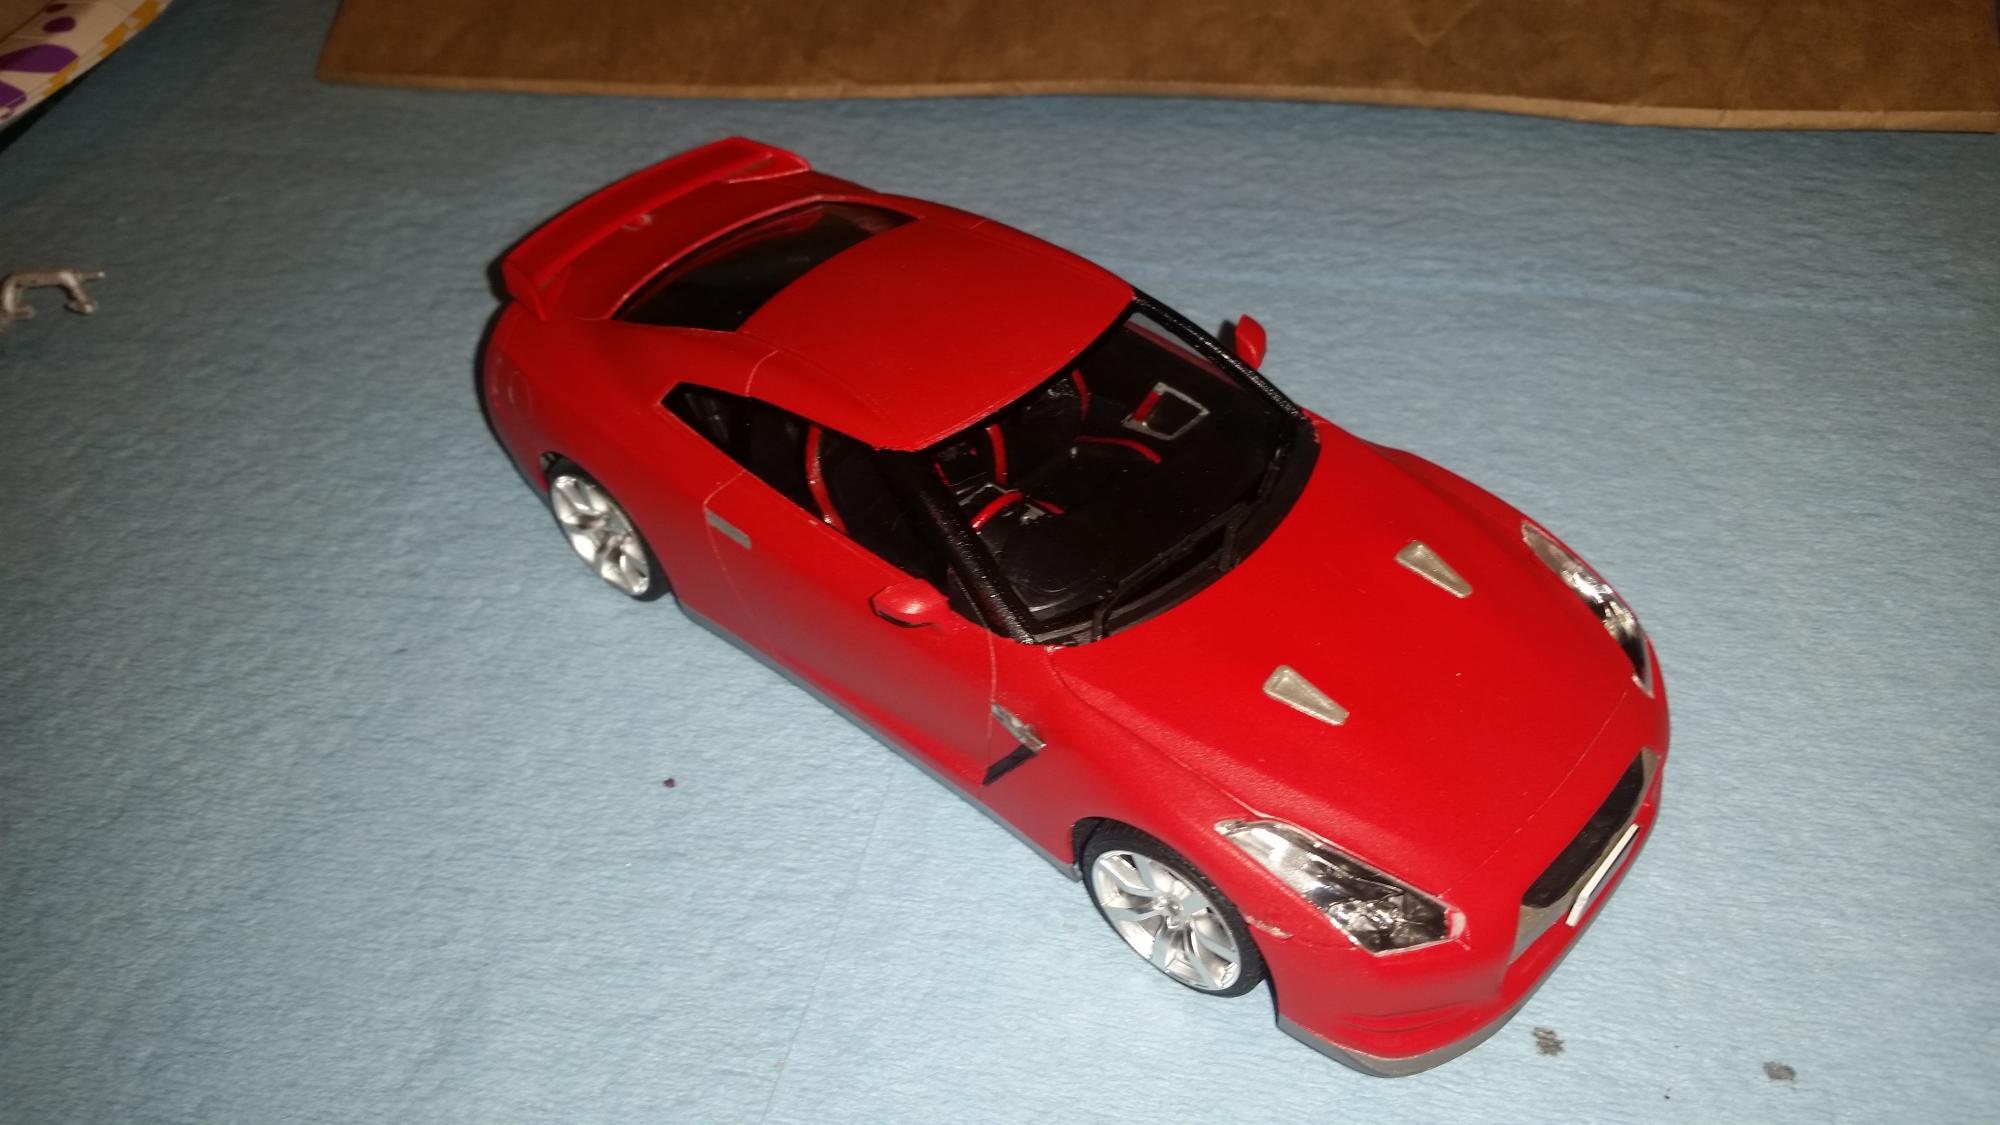
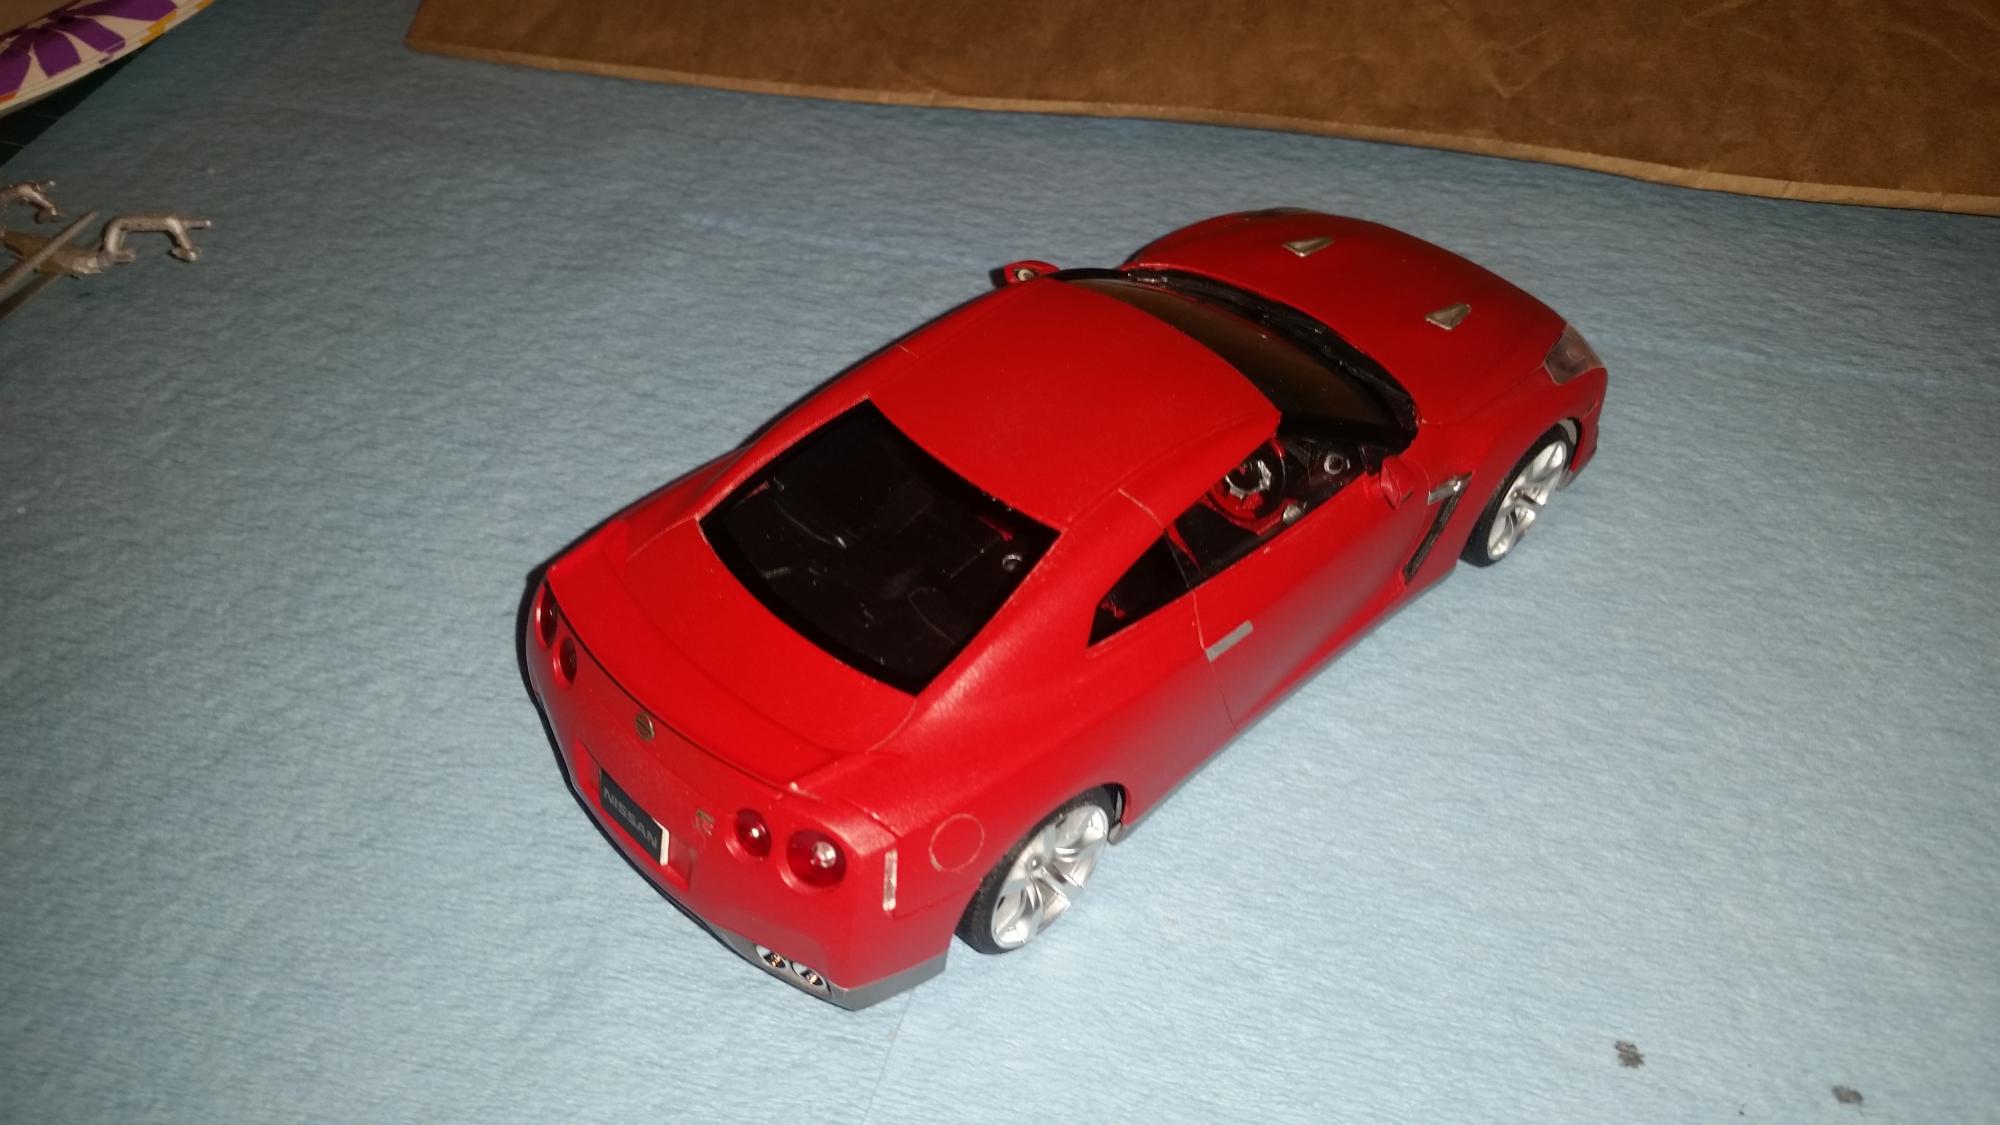
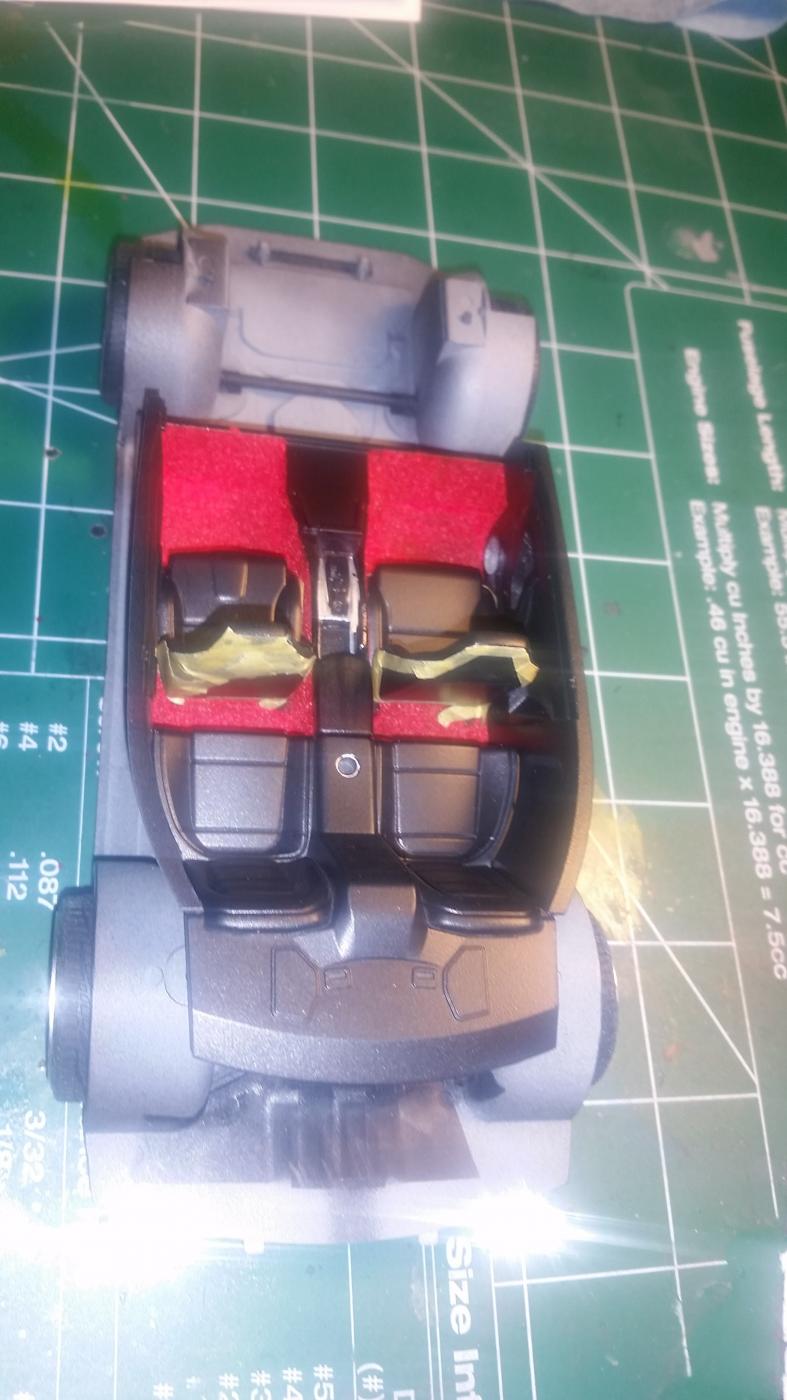
Been using these forums as a resource for about 2 years now and recently joined. Awesome community!! Here's my first under glass post, go easy, haha! A few pics of an Aoshima Nissan GT-R I finished a few months back. First Aoshima kit too. It's a bit orange peely and I burned through the paint on some edges while wet sanding...probably could have used a coat or 2 more of clear but it had been on the bench for a while and I was ready to move onto the next project.
-
Hey, so I'm looking for a scale-modelling forum and decided to settle in this one. So, I'm new to 1/24 scale-modelling. I was into Gunpla and saw a scale-modelling channel in Youtube and suddenly I have the urge to assemble a model cars but I know it won't be easy. Then, decided to grab the Aoshima Fairlady S30 or known as Datsun 240ZG as my first kit. The reasons I took this model is the simplicity of the build (but kinda dissapointed it went way that easy, no engine details ahahaha). I ruined the masking on the fender side... Guess that will be my homework for the next model. I used a local spray-can for the main body (the spray-cans are commonly used for Gunpla here in my place) and for the detail I used Tamiya Enamel Paint and for the finishing, because in my opinions gloss is not that good without compound polishing (I don't have any) so I decided to spray it with flat coating. (yeah, i also messed up the tail lights, and forgot to sand the mold line of the bumper) I'm looking forward for Tamiya's RX-7 Type R, there aren't any Revell's kits here and most of the kits sold here are Tamiya.
-
Taking a look a newest Lambo kit from Aoshima, the Sesto Elemento , or ("Sixth Element" in English), the kit allows you to build either the prototype or the production version. Now, to accurately build this, the entire body needs to be done in carbon fiber , as the body is entirely made from carbon fiber, Scale Motor-sports is I do believe said to be doing a carbon fiber sheet for the body, and I am sure Studio 27 decals will be doing a C/F decal sheet as well.
-
Aoshima is getting more use out the Sambar tooling, this time, its gonna be as a fire engine Release date is set for Dec , with a price of 2380Yen/$19US(Hobby Search) 2240Yen $18US (Hobby Link Japan) http://www.1999.co.jp/eng/10343409 http://www.hlj.com/product/aos01417 - In the world of 1/24 plastic model, Japan's first! Scale model of the fire engine is born. Sambar fire engine is armed with extraordinary maneuverability, drivability of the 4WD, which was based on the RR layout, yet its compact, in a wide range of stage from the city of narrow streets often, until the fire brigade of a large mountainous area of \u200b\u200bunpaved road dominating have. - Kit is a track type of fire engine, Fuji Robin made fire pump and the point of a sword scoop, 3.6m folding ladder, jump opening, gold lever, hose backpack or the like is removable, respectively, rear seats and hose storage, the searchlight diffuser type mars light, such as various types of fittings are also realistic, making it a great fidelity from the density feeling while a small light car.
-
Hey. Aoshima kit, custom-mixed Cobra Colors paint, Aoshima wheels, decals from various sources such as www.detailjunkees.com and my parts box, Scalemotorsport carbon fiber decals on the trunklid and hood, Scale Auto Style photo-etched brake discs, Studio27 safety harnesses and associated hardware, partial roll cage from an Aoshima Skyline. Thanks for looking.
-
Just off the bench. Still waiting on the plates, but otherwise I'm calling it done.Factory correct Ultramarine by ScaleFinishes, this is to replicate my daily driver. This is a great chassis with lots of detail, the body proportions all look right etc, but the final assembly gets fiddly. The side glass does not fit flush like you would want, and the fact that there is no motor is still a mystery to me. (Thanks Jonathan for the replacement decals!)
-
Coming in September of this year(as of now), is the 2014 Nissan R35 GTR , I am going to say at the moment this a modified reissue of the 2012/2013 kit. More info to come later. Pre orders are open from your favorite importer of fine Japanese Model kits.
-
A fantastic kit of a uncompromisingly old school super car: What a beautifully engineered kit, especially around the "working" features. Literally the only place I used filler in the whole build was a small smear to fill the join line UNDERNEATH the black wing mirrors -- a real "because God can see" moment... There's a bit of extra wiring on the engine (the only bits you can see are the four wires from the cylinder heads disapperaing under the airbox, and then only if you look. The OOB engine is pretty good. Interior paint is mostly Vallejo and Citadel, plus Tamiya Rubber Black and NATO black. Exterior is Zero Paints Giallo Orion and Tamiya Rubber Black from a rattle can. The wing has a masked "carbon" texture, not that you'd notice in these pictures! The main thing I learned from this is that if you are spraying a two-layer colour (yellow base overlaid with gold "pearl"), then you need to keep the pieces physically as close together as you can while you spray, to make sure they come out an even colour. If you look carefully, the doors and airscoops are a very slightly darker yellow than the main body. I've distracted as much as possible from it with big black decals etc so it's not too noticeable, but it's a lesson I've hauled on board. bestest, M.
-
Time for a separate thread for this one. Those of you with long memories may recall that I began this back in May, alongside the Tamiya Alfa GTA. Well... this one's finally got back to the bench, after I was distracted by finishing the GTA, the XJ220, moving house etc etc... NIcely detailed parts and good engineering make this a pleasure to build. The engine bay is lined in cigarette foil. I'm not going to town on this one like the XJ220, but I'll busy it up a little. No point in wiring the plugs, though -- they are completely invisible under the inlet manifold. One thing to note, though, if you do decide to wire it, is that the wires come out at 90 degrees to the "obvious" direction... Not many parts in this assembly, but it looks nicely complex. The engine is the chromed kit part, matt varnished and then treated to some Citadel wash. My owner has swapped his shocks for some aftermarket ones in purple and yellow... The body in Giallo Orion. You can see the risks of painting parts separately here: the doors and air scoops are a very lightly different yellow from the body, thanks to different amounts of pearl. It was a lesson learned, hence painting all the XK220 body colour parts as physically close together as possible... bestest, M.
-
I built this as a departure from my usual vintage iron. I picked it up cheap in Singapore after a day-long search of the city for a model shop that sold something other than RC or military kits. My previous build was a 59 Caddy, with tons of chrome, so I thought it was going to be a quick blast, being kerbside. But the carbon fibre decals were a real trial, the kit decals were also some of the most fragile I've ever used. The large decals for the door broke up, despite my extreme care. I had to leave it alone for a few weeks, as I was getting too angry about it... However, apart from the Revell 49 Merc I built a few years ago, this is one of the newest-tooling kits I've built. The fit and condition of the parts was excellent and required minimal cleanup. It has functional steering and suspension. The brake rotors were bright chrome, but a rotational rub with very fine grit polishing cloth gave them a much more realistic appearance. I added red buttons to the steering-wheel (Gran Turismo 5 was quite good source material!) Apart from that, it's totally box stock. The engine and exhaust are moulded-in. I used silly putty to mask the surrounding bodywork while I sprayed on the silver: The tyres are the best I've seen on a kit. I used a 10x lens and could read the size on the tyre wall! Paint is from rattle-cans, polished, buffed and waxed Thanks for looking
-
Hey. I rarely post my projects on forums anymore but I figure I'd give it a shot for old times' sake. These are different versions of Aoshima's Mazda sports car kit. All three are painted with nail polish and cleared with Testors Wet-Look clear decanted and shot unthinned through my {Paasche H with a #3 tip @ 20psi. They will built as a part of a fictional club of street racers. The liveries will all have similarities and hopefully by posting this thread, it will motivate me to focus on finishing them. Thanks for looking. Antonio
-
 Two very different cars, but both a tribute to the best of Italian sports car know-how... The GTA in primer. I'm trying out the technique suggested by "Cruz" in which you wash the shut lines with black while the car is in primer, before painting. He suggests rescribing the lines first, but I thought that the GTA had crisp and deep enough lines out of the box to test the technique without needing to scribe them. The Murcielago in primer. I wanted to get as many parts of the body together as possible to avoid having to match the colours, and glue clear-coated pieces together. In practice, this means the extreme nose, skirts and lower edges of the extreme rear can be attached. Doors and one intake (which has a segment of body colour inside) have to remain separate... The Murcielago will be Giallo Orion -- a pearl yellow colour -- with lots of black/grey carbon trim. This is, once again, the ever reliable Zero Paints system of ground coat, base coat and clear coat. Whereas the Giulia Sprint GTA is in a colour scheme inspired by some of the racers I've seen at Donington over the years. More Zero Paints, this time Alfa Rosso Corse and Lamborghini Powder Blue (a Miura colour which eventually lost out to the lime green when I built mine, but I may still do another in this colour, because it looks so cool...) And now with the clear coat on. You can see how much it changes the apparent colour of the base coat, especially on the Lambo. I think the change is even more intense with the pearl finish because it reduces the scattering of light by the pearl layer, and lets you "see through" to the base coat more directly. I also tried using clear over a decal for the first time, (the Alfa "snake" on the bonnet) which has worked very well. There are the odd spot imperfections here and there, but once again the Zero 2K clear has done its job and settled into a smooth, glossy finish all over. These will now go away into plastic boxes for a week or so to fully cure before polishing out those spots. It's good to be back at the bench! bestest, M.