Csaba aka felhasznaaloo Posted February 28, 2023 Posted February 28, 2023 This is from the Aoshima BTTF (part 1) kit. Conversion done using lots of cursing,? paper parts, printing and cutout of online pictures of the engine cover and louvers. The chassis is mainly from a soda can. Wheels in this kit can turned upwards, well... that needed to be fixed. Some steering will be possible. Paintjob did not come out very good but got tired of repainting it now. It is a maybe 3:2 mix of Tamiya bare metal silver and titan gold. 3
khier Posted February 28, 2023 Posted February 28, 2023 This back to normal conversion is a very interesting accomplishment that deserves a detailed WIP. 1
Bugatti Fan Posted February 28, 2023 Posted February 28, 2023 Certainly took on a lot of hard work with this 'Back To The Present' conversion. I wish you well and will be following this thread. It is a pity that Aoshima did not design the kit so a standard car could also be made from it.
Csaba aka felhasznaaloo Posted February 28, 2023 Author Posted February 28, 2023 (edited) 7 minutes ago, Bugatti Fan said: It is a pity that Aoshima did not design the kit so a standard car could also be made from it. It sure is!!! Not just the missing parts, but the molded-on cables all over the fenders... I was debating to clean the "belt" rubber strip off and re-do that as a separate piece, as the ends (at either side of all 4 fender lips) needed to be sculpted out of the removed cable material. Edited February 28, 2023 by Csaba aka felhasznaaloo Text edit
David G. Posted February 28, 2023 Posted February 28, 2023 Nicely Done! It's a shame that there is no factory stock version of this historic vehicle. Is there any chance that we may see a WIP on your conversion? David G. 1
iamsuperdan Posted February 28, 2023 Posted February 28, 2023 Nicely done! It's always surprised me that no one has done a stock version of the Delorean. 1 1
Csaba aka felhasznaaloo Posted February 28, 2023 Author Posted February 28, 2023 5 hours ago, David G. said: Is there any chance that we may see a WIP on your conversion? David G. Thank you. I haven't been taking many pictures during modeling for a while now. Had to concentrate on not dropping parts and not cutting fingers.?? Here is a few shots though. Thanks for checking in. 2
Csaba aka felhasznaaloo Posted February 28, 2023 Author Posted February 28, 2023 2 hours ago, iamsuperdan said: It's always surprised me that no one has done a stock version of the Delorean. Thanks. So my 2 favorite "non-muscle" cars are probably the DMC-12 and the Jeep Cherokee XJ. (I own an XJ in 1:1 scale.) Neither is available in 1:24-1:25 scale. There's no justice in the world right??
jaymcminn Posted February 28, 2023 Posted February 28, 2023 I can't understand why Aoshima tooled up 3 BTTF DeLoreans and never got around to a factory stock version. Yours really shows off the clean lines of that Giugiaro design. 1
Csaba aka felhasznaaloo Posted February 28, 2023 Author Posted February 28, 2023 34 minutes ago, jaymcminn said: I can't understand why Aoshima tooled up 3 BTTF DeLoreans and never got around to a factory stock version. Yours really shows off the clean lines of that Giugiaro design. It must be a JDM thing...? https://en.m.wikipedia.org/wiki/Japanese_domestic_market
Rob Hall Posted February 28, 2023 Posted February 28, 2023 37 minutes ago, jaymcminn said: I can't understand why Aoshima tooled up 3 BTTF DeLoreans and never got around to a factory stock version. Yours really shows off the clean lines of that Giugiaro design. Because the BTTF kits probably sold 10x what a stock one would sell. Without the movies, the DeLorean would have been forgotten long ago…
beeRS Posted March 2, 2023 Posted March 2, 2023 It would have been great if Aoshima offered a factory stock DMC. I looked at the BTTF kit and felt it was too tricky (too much work) to 'unmodify' it. I am pleased to see someone else was braver than me. Nice job. It really does look good as a standard car. 1
vamach1 Posted March 2, 2023 Posted March 2, 2023 4 hours ago, beeRS said: It would have been great if Aoshima offered a factory stock DMC. I looked at the BTTF kit and felt it was too tricky (too much work) to 'unmodify' it. I am pleased to see someone else was braver than me. Nice job. It really does look good as a standard car. Sounds like a good candidate for a 3D printed version.
David G. Posted March 3, 2023 Posted March 3, 2023 Thanks for posting the photos Csaba. I was wondering how you did the dashboard conversion. On the Aoshima version, it looks like most of the factory gauges were cast in place and the time equipment was a separate part. On the Polar Lights version I built, the time equipment is all cast into the dash and would be difficult to remove and replace with the proper gauges and features. Even as it was, the Polar Lights version I built had a rather simple interior and I felt the need to make some improvements to add a little visual interest. Yours came out great! David G.
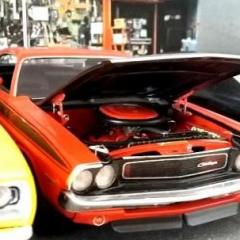
Csaba aka felhasznaaloo Posted March 5, 2023 Author Posted March 5, 2023 On 3/3/2023 at 1:18 PM, David G. said: I was wondering how you did the dashboard conversion. On the Aoshima version, it looks like most of the factory gauges were cast in place and the time equipment was a separate part. On the Polar Lights version I built, the time equipment is all cast into the dash and would be difficult to remove and replace with the proper gauges and features. Thank you. The top of the glovebox area needed to be filled in after I removed the time machinery from there, plus the air vent outlets, radio, and HVAC controls needed to be scratchbuilt for the center console, per photo above.
Csaba aka felhasznaaloo Posted March 19, 2023 Author Posted March 19, 2023 Finished this one. Added exhaust pipes coming out of muffler, made an "axis hinge" for the louvers from AWG30 wrapping wire. About 0.2 inch from the ends of the piece of wire, I carefully cut the insulation but left the 2 insulation pieces on, so they can turn on the wire core. Glued the long center section of the wire to the body, and the 2 "loose" insulation sections to the louver panel. This way I can lift it to see the engine cover, which is also a photo printed on thick photo paper (just like the louver panel). Was a nice experiment, but due to paint not coming out very good, this will end up in the back row of the display cabinet.? Just noticed I forgot to paint the front indicator lights. Thanks for looking. 1
David G. Posted March 26, 2023 Posted March 26, 2023 That turned out great! I think it's very clever how you mocked-in the engine details. From a visual standpoint, it looks like it works very well. David G.
Csaba aka felhasznaaloo Posted March 28, 2023 Author Posted March 28, 2023 On 3/26/2023 at 2:19 PM, David G. said: That turned out great! I think it's very clever how you mocked-in the engine details. From a visual standpoint, it looks like it works very well. David G. Thank you!
Recommended Posts
Create an account or sign in to comment
You need to be a member in order to leave a comment
Create an account
Sign up for a new account in our community. It's easy!
Register a new accountSign in
Already have an account? Sign in here.
Sign In Now