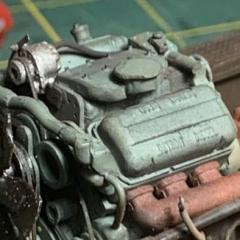
DRIPTROIT 71 Posted May 12, 2019 Share Posted May 12, 2019 I picked up a pair of resin cabs off of Ebay a while back that were just terrible. They're the same cab that Dave sells, but they were cast in a strange colored resin. This was the best of the two and it is pretty bad. The resin was very swirly like it wasn't mixed well. It seemed good and solid unlike the other cab, but seems to be reacting with the paint in one spot and not allowing the paint to dry well. The cab was full of deformations as well. So here's the plan (if I can get paint to completely dry in one spot), This is going to be a fertilizer spreader truck used on a farm, maybe even built by the farmer himself. A little banged up from a life of hard work. The front tires will be 48" and the rears 66". This will be a curbside, but I will cut down an 8v-71 to replicate at least the bottom side of a 6v-53. I plan to build this out of mostly junk parts considering that's what the cab is. I have a salvaged IH 4200 frame that it will sit on. The bed will be scratch built. Here's my reference: Notice these truck are two wheel drive. Quote Link to comment Share on other sites More sharing options...
landman Posted May 12, 2019 Share Posted May 12, 2019 I love the salvage spirit. It’ll wind up being a masterpiece. Quote Link to comment Share on other sites More sharing options...
Sam I Am Posted May 12, 2019 Share Posted May 12, 2019 Awesome! Quote Link to comment Share on other sites More sharing options...
Warren D Posted May 12, 2019 Share Posted May 12, 2019 The spreader body looks like a recycled salt shaker. Quote Link to comment Share on other sites More sharing options...
Jim B Posted May 13, 2019 Share Posted May 13, 2019 Can almost smell it from here. Looking nice. Quote Link to comment Share on other sites More sharing options...
redneckrigger Posted May 13, 2019 Share Posted May 13, 2019 Very cool. The rubber will ship out on Tuesday! Quote Link to comment Share on other sites More sharing options...
afx Posted May 13, 2019 Share Posted May 13, 2019 Not quite as fragrant as a manure spreader. Looks like a great project. Quote Link to comment Share on other sites More sharing options...
gotnitro? Posted May 13, 2019 Share Posted May 13, 2019 Another fantastic build in the works ! Farm fabrication at its finest, make whatever ya have work like my father in law always did . Quote Link to comment Share on other sites More sharing options...
Oldmopars Posted May 13, 2019 Share Posted May 13, 2019 I love this idea. I grew up in farm country and these things were all over the place. Also ones with tanks for spraying. Cool idea, look froward to seeing it progress. Quote Link to comment Share on other sites More sharing options...
Rusty92 Posted May 13, 2019 Share Posted May 13, 2019 I agree with Oldmpars, I see these all the time still. Cool project! Quote Link to comment Share on other sites More sharing options...
DRIPTROIT 71 Posted May 13, 2019 Author Share Posted May 13, 2019 Thanks guys! I'm having some real trouble with this cab. I knew that it looked rough, but I never expected it to react with the paint. Lacquer that normal dries in minutes doesn't dry in days on two ares of this cab. I repainted with enamel today thinking maybe that a paint that wasn't as hot may not react the same with the resin. I have it sitting in the sun now and everything is dry to the touch except for my problem areas. The other cab had really bad curing problems causing large bubble all over the place. When you cut open the bubbles it is slightly soft underneath. I'm thinking maybe there was a curing problem with this cab as well. I'm sure something wasn't mixed well as it was very swirly. I'll give it more time to see if it dries. I may have to call Dave and get a new one. I'm really wanting to do this project now! Quote Link to comment Share on other sites More sharing options...
gotnitro? Posted May 13, 2019 Share Posted May 13, 2019 My 2 cents sounds like youd be further ahead getting another cab . Dave will definitely help ya out , I've needed parts I boogered up and hes hooked me up Quote Link to comment Share on other sites More sharing options...
DrKerry Posted May 14, 2019 Share Posted May 14, 2019 Oh yeah!! Super kool!! Quote Link to comment Share on other sites More sharing options...
DRIPTROIT 71 Posted May 14, 2019 Author Share Posted May 14, 2019 1 hour ago, gotnitro? said: My 2 cents sounds like youd be further ahead getting another cab . Dave will definitely help ya out , I've needed parts I boogered up and hes hooked me up I may have to do that I was trying to save a couple of dollars. I'm going to give this paint a couple of days and see what happens. Quote Link to comment Share on other sites More sharing options...
DRIPTROIT 71 Posted May 14, 2019 Author Share Posted May 14, 2019 (edited) Thanks for all the comments! This is its newest form. The body is still rough, but shiny. It is closer to being dry than it ever has been after sitting in the sun all day with enamel paint. I set it in the sun for 4 hours with the lacquer paint that was two days old but it was still sticky. I hate to buy a new cab. I really liked the idea of a junkyard build. We'll see what happens. Here is the other cab. Every spot that you see was a bubble. Edited May 14, 2019 by DRIPTROIT 71 Quote Link to comment Share on other sites More sharing options...
Sam I Am Posted May 14, 2019 Share Posted May 14, 2019 ...ouch... Quote Link to comment Share on other sites More sharing options...
Pete68 Posted May 14, 2019 Share Posted May 14, 2019 Brian looking very good with what you got to working with. There’s one of these Jimmys by my house if you need some reference pics. I would be more that happy to go take some for you. Quote Link to comment Share on other sites More sharing options...
gotnitro? Posted May 14, 2019 Share Posted May 14, 2019 Very nice build like the built hopper too I've been collecting photos of the local cement plants stone slinger aka multi cat..it has a Similar hopper Quote Link to comment Share on other sites More sharing options...
signguy2108 Posted May 15, 2019 Share Posted May 15, 2019 Oh, the things we build....sorry to hear of the paint problems, when u get it rite should be a fun build. ive been kicking this around for a yr or so with a topkick, local farm supply has a couple of em. But went another direction. Hope it turns out, look forward to the finish. Quote Link to comment Share on other sites More sharing options...
DRIPTROIT 71 Posted May 15, 2019 Author Share Posted May 15, 2019 Thanks everyone!! I think I've gotten the paint to dry and even some dullcoat. I also worked on the other cab too. I soaked all the soft craters with super glue and let it dry. I use Tamiya putty to do body work. It turned out better than I expected, although it developed a hairline crack in the body work on the nose after the paint dried. The yellow cab is the green cab pictured before that was full of craters. Quote Link to comment Share on other sites More sharing options...
DrKerry Posted May 15, 2019 Share Posted May 15, 2019 Looks putty good ta me!! Quote Link to comment Share on other sites More sharing options...
Sam I Am Posted May 15, 2019 Share Posted May 15, 2019 2 hours ago, DrKerry said: Looks putty good ta me!! ? Quote Link to comment Share on other sites More sharing options...
DRIPTROIT 71 Posted May 17, 2019 Author Share Posted May 17, 2019 Well I'm pretty much at the end of my rope with these cabs. I don't think that I'm going to be happy with neither. The red one was dry, but the swirl marks began to "ghost" in the problem area which was mostly the driver's door. After it began to ghost it got soft again. I scraped to the paint off of the door to find the resin soft and flaking off. I think that the putty in the other cab will continue to crack because it is pretty thick as you can see in the crater pictures. These cabs are currently unavailable from Dave right now until he can make new molds. So here you can see the swirly green resin after the paint came off. Notice the lower part of the door is fine with the primer still bonded. In other news the spreader bed is coming together. So whatever kind of cab that I have to use, I'm planning to make a spreader. If anyone has a spare GMC 9500 cab or even a C70 cab that they're willing to part with, let me know. Thanks, Brian Quote Link to comment Share on other sites More sharing options...
Sam I Am Posted May 17, 2019 Share Posted May 17, 2019 Ouch! I feel for ya! Quote Link to comment Share on other sites More sharing options...
PacificEd Posted May 17, 2019 Share Posted May 17, 2019 Are those cabs the original MTFA Co. cabs before AITM took over? Quote Link to comment Share on other sites More sharing options...
Recommended Posts
Join the conversation
You can post now and register later. If you have an account, sign in now to post with your account.
Note: Your post will require moderator approval before it will be visible.