hedotwo
-
Posts
1,551 -
Joined
-
Last visited
Content Type
Profiles
Forums
Events
Gallery
Everything posted by hedotwo
-
Welcome Riley! You'll find a ton of great info on this site... I'd be lost without it. Be sure to share your builds!
-
I try and stop at Model Empire when we visit our daughters in Menomonee Falls, but I've yet to go to their open house. What's it like? Are there other vendors like a swap meet? I've also started stopping at Hiawatha Hobbies in Waukesha... mostly train stuff but they have a super selection of tools/paints/supplies.
-
What I do is to make sure I do all my pre-fitting of bumpers after body painting and before the Molotow gets laid. That can eliminate alot of handling and the risk of dulling. It definitely pays to leave the pieces air dry as long as your patience allows. I have a pile of tight, soft cotton gloves that help too. Molotow might not fit everyone's needs and that's fine. I know from experience that a refill bottle lasts a long time and that's good for my retired income ?
-
I go to this site occasionally as it has the Waukesha link to the Milwaukee Miniature show that I try and make twice a year. Closest show to me even though it's a 4 hour drive. Really miss shows ? Thanks Casey
-
Thanks
-
Looking for a show/swap meet to go to this fall in the states listed. Anything? I'm aware of the annual (except for covid) Miniature Motors show in Waukesha this December as I always try and make that one. Anything else coming up?
-
Nice build of a cool Corvair ?. Love the color!
-
First pic is the two spoons after air drying for maybe a week, with no clear. Second is one spoon before brushing on Gauzy. Third is after the Gauzy had dried. Fourth is the second spoon before brushing on S-02 and the last pic is after the S-02. Sorry for the confusing post.
-
I did a test a while back with airbrushing Molotow, letting dry extensively, then using brushed on Gauzy Intermediate and both airbrushed and brushed on S-02. My experience showed that the Gauzy went on extremely smooth and leveled nicely but dulled the nice Molotow shine. I tried airbrushing the S-02 on a number of test spoons but just couldn't get it to lay nicely even after varying psi and light/med/heavy coats. Finally I brushed on the S-02 and it came out acceptable in my opinion but still lost shine. So... seems the S-02 will retain more shine than the Gauzy if you can get it to lay smoothly. I'm still going to try another airbrush test with the S-02 however. As you can see by the before pics of the Molotow spoons (taken maybe a week after spraying) outside there's no denying that it can give a pretty nice shine. I've also added before and after pics of the Gauzy and S-02 test spoons.

-
Pontiac Bonneville Convertible 1970 in "Aqua Mist Metallic"
hedotwo replied to Tommy124's topic in Model Cars
Great build of a cool vert! Made for parades.... I can just picture a congressman or beauty queen waving from the back seat ? -
I call this a 50' foil job. Looks great from a distance but up close I wasn't as happy as I'd hoped. I fought with this pack of BMF, an unfortunately frequent thing lately. Thanks for the comment though Bob ?
-
Great build Steve!
-
Beautiful build Al! Love it ?
-
Thanks!
-
Began as a decent builder that needed only a bit of body TLC and to restore the front suspension pieces. Scalefinishes Massachusetts Blue cleared with Tamiya and a craft acrylic Ivory and Deep Midnight Blue interior.
-
I generally let the pieces that I've sprayed Molotow on air dry for maybe 8 hours before putting in the dehydrator. I haven't noticed any less shine before or after the dehydrator. In my experience it seems like clears don't like to be put in a dehydrator too soon.
-
65 through 70 Cad DeVille front suspension
hedotwo replied to hedotwo's topic in Model Building Questions and Answers
So a little update on saving the suspension pieces I had with this builder. One spindle was good to go but the other had to be massaged and holes drilled/rod installed, and the same for the brake drums. The tie rod ends were ok but the assembly was broken. Kinda fiddly, but I ended up with an acceptable (for me) assembly and the wheels are level and straight. Now, I know the angle of the tie rod isn't kosher and it's orientation isn't correct but I chose to reverse it so I could use the lowered stance per the instruction sheet. Happy I didn't need to scrounge up the pieces. Lord knows I have enough pieces to look for my many other builders. Took a bit, but worth it.
-
The '66 Buicks... the "Tuned Cars". Love your build Tom, good job!
-
Finished these two after a long (nearly 30 year) layoff...
hedotwo replied to olddude55's topic in Model Cars
Great build George! -
I've been doing alot of Molotow chroming lately (airbrushed) and have also found the S-02 to be the best at retaining as much of the Molotow's shine, however I can't seem to get it to lay smoothly when airbrushing. I've experimented with Gauzy Intermediate as well and found it to lay much better than the S-02 but I lose a fair amount of shine. So, I've had good luck with plain old brushing the S-02 and so far, so good. I may experiment with airbrushing a wet coat of S-02 on a junk bumper to see how that works. I know one thing for sure is that you need to let the Molotow dry for quite some time. I use my dehydrator and keep them in for around 24 hours. Not sure if that's overkill or not, but maybe more of a feel-good
-
Nice clean build James!
-
Great job!
-
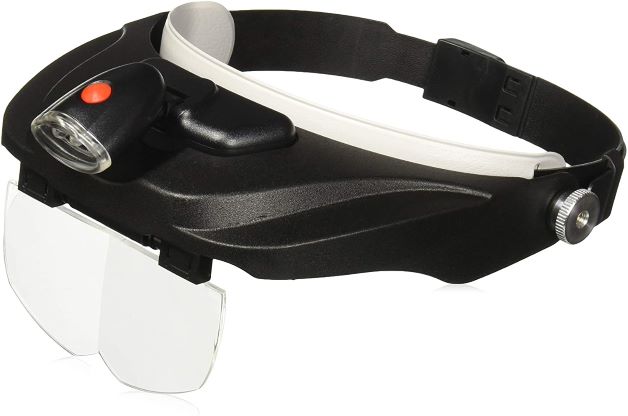
I've always used flip ups because the tunnel vision with the optivisor style (like the Carson model that Zippi got) really bothers me. Lots of people love them but I just couldn't get used to them. The flip ups (Tamiya or the Carson I have) work much better for my eyes as I can see peripherally. Everyone is different and that's why there are many styles to choose from.
-
Great job! Love it... P.S... your mention of Steve's help are my feelings as well. He's helped me with good advice on my attempts at stock builds in the past as well.
-
I used Tamiya's flip up "glasses" until I found a tip on these Carson flip ups. I like these as much as the Tamiya's except they're much more comfortable because they're not the clamp type but rather a headband type. The Tamiya's are pretty tight. The optics on these Carson's are every bit as good too. I got them on Amazon a few months ago.
.JPG.e4c8b1f587f881eca91cc5d32ce3f5bf.JPG)
.JPG.b6b87c9974c04febb937bda6910fcde5.JPG)
.JPG.e31cb063c1fba5f597e4c3f33803b88b.JPG)
.JPG.145da658434f90b4484ecba06d8f28c8.JPG)
.JPG.2acf0cf2a53d231891eddf080a9fb44f.JPG)
.JPG.e0c510d042b8e87f7514689ab17d6296.JPG)
.JPG.dbda2407896c6f7683d2c261612d2a73.JPG)
.JPG.8c0fdc71aeb6946f94b4cd257b54997e.JPG)
.JPG.e2f894ed8ab7e52a7f453012076b6ab6.JPG)
.JPG.faa888fd1d27d3fcd626c3f06f1c5684.JPG)
.JPG.34b339402ba22002eeca41faa6727a51.JPG)
.JPG.9382aec757b06bf20daed6c479e95cdc.JPG)

.JPG.5057109b03b911097bbce73ef1ce5bec.JPG)
.JPG.21e45d1731f6b146bb2a76560fc17d3f.JPG)
.JPG.452afca049fd80605d4df4d0008cb20e.JPG)
.JPG.be62907fe8da25b132d83d2db5bfa69b.JPG)
.JPG.f81d57cba199449d9b843c1f40cc15f2.JPG)