Funkychiken
-
Posts
2,662 -
Joined
-
Last visited
Content Type
Profiles
Forums
Events
Gallery
Everything posted by Funkychiken
-
Time to start a new build! A classic Range Rover Will be sprayed in a mustardy yellow. I think this is a 90's car, but thecolour is from the previous generation version - like an 80's car.
-
Tamiya Ford Focus WRC 2001
Funkychiken replied to galaxyg's topic in Other Racing: Road Racing, Salt Flat Racers
Really wanted an RS as a riad car, your build of this rally car is amazing. Love it! -
Tis a beautiful build, and even better photos!
-
1965 Shelby GT350R
Funkychiken replied to Phildaupho's topic in Other Racing: Road Racing, Salt Flat Racers
Very sharp build of a racing stang! -
Cool build! Very sharp inside and out
-
Sweet build!
-
Cyberpunk Toyota MR2
Funkychiken replied to StokeModels's topic in Other Racing: Road Racing, Salt Flat Racers
This is an amazingly creative build, love it! -
I am partial to a capri! Cool build
-
Toot your horn all you like! It's an excellent build!
-
Stunning so far and the paint is gorgeous
-
Aoshima 2024 New Tool Back to the Future DeLorean Time Machine
Funkychiken replied to spencer1984's topic in WIP: Model Cars
Very sharp build! -
Lovely even red base coat, rest of the build is cool! Really like this kit!
-
Agree, amazing build so far, and the paint is perfect!
-
Thanks Spike!
-
It's an absolute stunner! Looks like you've put a lot of work in here, and it's paid off.
-
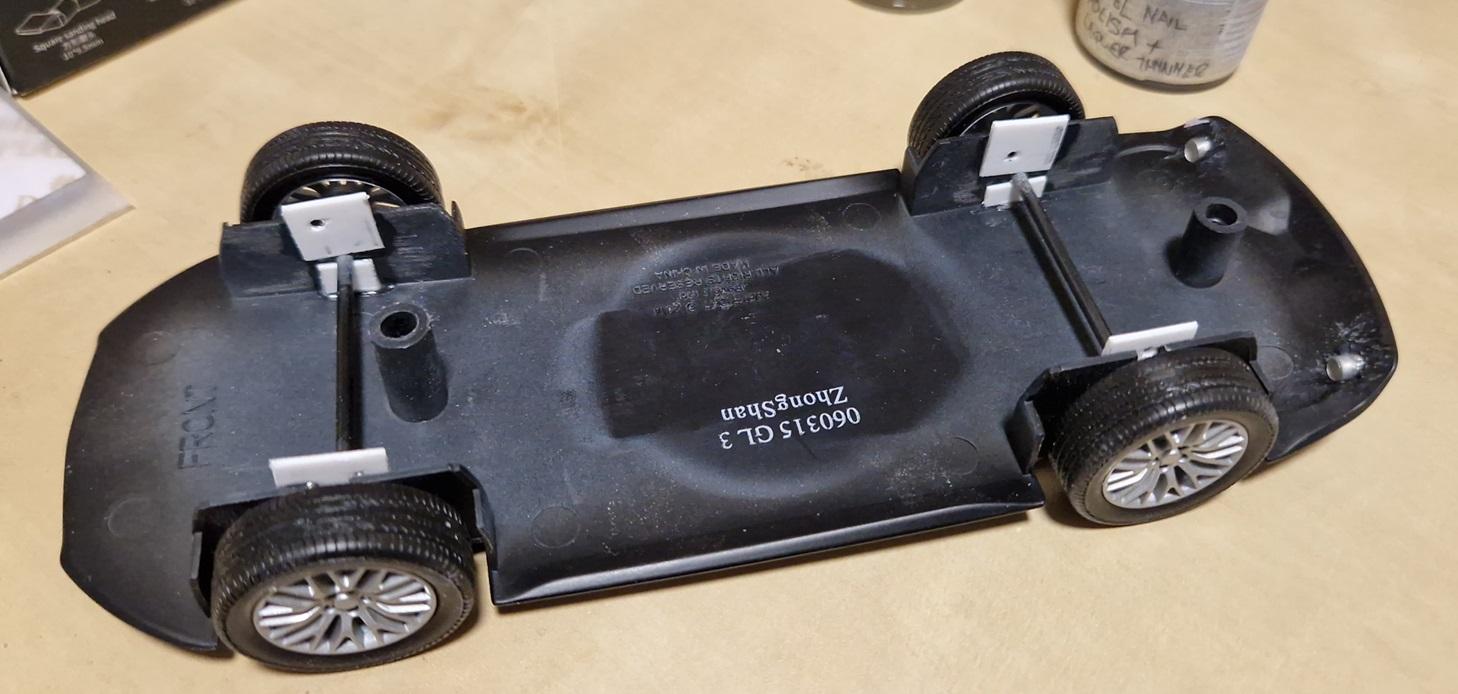
TO adjust the ride height, I added some olasticard to raise the axle bar by 3mm at the front and 2mm at the back, thenadded some blocks under the interior tb to stick to the chassis, as it was leaving a gap. TO my mind, the ride height has been corrected, and it looks a lot better as a GT then as an SUV... Next up will post ome finished pictures!

-
Final touches are now done! I made an exhaust tip with large diamter alu tube - I did thin-down the end as much as possible, and then put the wing and diffuser in place. I'm calling this done now, I do need to take some proper pictures and post in finished models! Really happy how it turned out for a kit that cost less than £20!
-
Sharp build, the body paint came out perfectly
-
Stunning build mr Cruz!
-
The wheels on this are a strange assembly and required fettling to fit, but they are in now. Engine in & interior fitted. During a mock up, the exhausts were not quite centered, so I've had to cut off the bottom end of the left hand side support, but this has made the engine slightly wonky, I'm sure this will be OK in the end. As shown before, the engine bay lid is wonky, so I've spent most of my time getting the magnets in place and some supports for them, that required me to cut out the engine cowl.
-
Started this a few months ago, I'll share some progress! Its a car that spent a lot of time on posters on my walls as a kid. I'd never actually want to own one, it'd be a money pit, but I still love its style. Box art: Body was twisted heavily at the front, I use this technique whereby you over-twist in the opposing direction & leave in a hot area - like over a radiator. It doesn't always work, but on this one it did, but took about a month with increasing twist every time... in the mock up, there were two issues, firstly, the bonnet was wider by a noticable amount, maybe 0.75mm, which ive corrected by sanding down with a rotary tool & then finishing by hand through sand paper grades. the 2nd issue is that the car sits really high, probably about 3mm too high, its not going to be an easy fix, but I'm going to have a go. finally, whilst sorting out the body issues, I;ve painted th engine bits, ready for assembly.
-
The final piece to paint is the tail light I've painted the black, but want to clear coat it, so waiting for that...
-
Cool build!
-
NuNu BMW M6 GT3 "Jägermeister"
Funkychiken replied to galaxyg's topic in Other Racing: Road Racing, Salt Flat Racers
Pretty cool build Mr G! -
Maserati A6GCS Chassis #2076
Funkychiken replied to Dave B's topic in Other Racing: Road Racing, Salt Flat Racers
It's a beautiful subject and build!