

10thumbs
-
Posts
2,983 -
Joined
-
Last visited
Content Type
Profiles
Forums
Events
Gallery
Everything posted by 10thumbs
-
Hi Brent, amazing what a bit of hardware does to improve a model. Looking good!
-
Slicks Size Comparison Charts?
10thumbs replied to 10thumbs's topic in Model Building Questions and Answers
I'll give this topic one more try. This is not about converting inches to millimeters. But many thanks for all of the wonderful information about how to do it. It's about sizes of slicks that are in kits and those available from resin dealers. I'm interested in making a chart that lists the different sizes available. I have for instance 3 Revell 70's F/C kits, each with somewhat different sized slicks. Anyone interested? Anyone willing to add to the list? Don't worry if in inches. We can now convert the measurements if needed. Anyone? -
Slicks Size Comparison Charts?
10thumbs replied to 10thumbs's topic in Model Building Questions and Answers
I do. Doesn't everyone? Dial calipers are available under $30, and are an indispensable modeling tool. Hmmm. No. I must be the only one that doesn't. Does your caliper show for instance what 1 1/32" equals to? I'm just trying to get some sizing of different slicks for future reference. @Dennis, that's a wonderful tool, thanks for showing! So, back to topic. Guys, I think perhaps I haven't come across very well. I'll try again. Now that I know how to convert inch to metric, what about a chart for sizes of slicks available? Is anyone willing to show a few sizes of good slicks they have used? -
Slicks Size Comparison Charts?
10thumbs replied to 10thumbs's topic in Model Building Questions and Answers
Thanks John, I'm familiar with how to do it. I'm more interested in a chart showing the various sized slicks available for our 1:25 cars. I just looked for instance at a renowned site and saw a nice slick at 1.31" diameter. Do you guys have a caliper that shows 1.31 "? -
Hi guys, I like to scratch build drag racing cars from the 60's and 70's. Since no specific kits are involved I need to use slicks from different kits, or from parts dealers. Often the sizes are in inches, and fractions of inches in scale 1:25 is about impossible for me to decipher to the metric system. I'm American, and I can relate to silly millimeters and centimeters much easier than imho silly inch fractions. The metric system is so easy and useful. I'm interested in starting a comparison chart for different slick sizes, but in metric system. For instance, I have this so far in millimeters; Slicks Height Tread Width Comment Resin, unknown 31 11,5 Great gasser slick, wider than usual AMT Gasser Slicks Pack 29,3 10,7 Fits under fender cars, good normal slick AMT Tall Dragster Pack 33,9 12,1 tall tire, 15" wheel, not too wide AMT Bantam Blast 32,3 16,5 low tire, way too wide Revell 70's F/C 30 - 31 12 - 14 nice tire, not over-sized, 15" wheel Revell Mongoose FC 32,3 14,9 nice tire, good proportions, 15" wheel Revell modern FC 36 17,5 big tire!, 2 pc, lousy fit, 16" wheel Would something like this be of interest? Or is anyone willing to measure slick sizes in millimeters of the kits you've already built, or from dealers? Michael
-
Hi TJ, I just saw this topic, sorry for not being around any earlier. i have a couple of things for you. I wouldn't glue the stand yet as you still have lots of manipulation to do with the model. I like a flat piece of wood, for a plastic model about a half inch think. The with 2 fine and soft wooden strips, nail one to the board, place the keel right up along the 1st strip, then attach the 2nd strip along the other side of the keel. Cut some wooden triangles and glue them to the board, snug against the hull to keep all things square. This will give you great support and there will be no risk of the stand breaking off countless times. Lots of guys do the primary rigging for the yardarms before mount the masts. This gets tedious and it's much easier to handle this way. You can even drill a hole in a piece of wood and "mount" it like this for the rigging. Much easier than already mounted to the deck. Just a few tips, hope you don't mind. Michael
-
CHARLIE ALLEN Dart F/C - Looking Like Something - 8/2/15
10thumbs replied to Nytrozilla's topic in WIP: Drag Racing Models
You've done well for yourself. Good that benefits are finally benefited. The garage is for me a sanctuary. A back room with a view and lots of room for my hobbies that are occasionally loud and smelly and dusty as well. Neighbors? None. Good luck getting all things squared and fitted. -
CHARLIE ALLEN Dart F/C - Looking Like Something - 8/2/15
10thumbs replied to Nytrozilla's topic in WIP: Drag Racing Models
"I think I see space for another model or two" Yep, wall space is available. Not as much on the shelving though. I see some room for a bigger (wider and deeper) bench too. Vice, compressor, sandblaster, paint cabin. Maybe a fridge for a secret-type stash. Cheers. So, we have the pool, bunch of the new hobby room, and the front facade. How about the kitchen? The garage is important too. Got A/C in there? Did you move or what? -
41 plymouth gasser small update 0616/17
10thumbs replied to vc273's topic in WIP: Drag Racing Models
Hi Steve, Well I think this is a real cool number. I like it. The steelies out back seem to look better imho. This car should remain within it's time era, again imho. Maybe the late 50's? About the fitment of the rear wheels, look here. Real photo from back in the day. The Gentleman's 1st new car. He was not quite 20 yrs.; Steve, a good job and very interesting and well built. Michael -
AMT '40 Ford Coupe Review (1983 Re-issue)
10thumbs replied to Duntov's topic in Car Kit News & Reviews
I built that model as a kid. I don't remember the mold color though. It came out as my best brush paint job. Dark blue. I'd love to have that kit again. I remember my dad telling me a few of his personal experiences with this car back in the day. -
Hi Ray, There is probably a powder-type additive you could add to the molten metal to reduce impurities just before pouring. You'll see the "junk" float to the top of the molten metal, so when you pour it stays away from the more pure batch. I don't know anything about aluminum, but I've seen it done on documentaries, plus I use it for some non precious metals being melted in a ceramic crucible. Right now I'm thinking, maybe the steel crucible might cause extra impurities with the melted aluminum. Was there much adhesion of aluminum to the steel crucible? This is exciting stuff, I like! Michael
-
Can I Use Micro Chisels With Brass?
10thumbs replied to Quick GMC's topic in Model Building Questions and Answers
I like this, thanks for the infos. -
Duh! I caught it. A browser problem from the wifes' Notebook. Fixed...and now I'll Log Off.
-
I hate it when forums change things, I guess it's just modernization. We have to log on, but I can't log off. Where's the log off button?
-
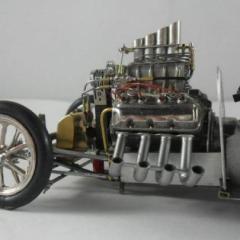
Hi guys, I like the Cadillac Motor. It's different than the usual flavors and it fit perfectly in a Revell 32 Ford; This was from the Revell Parts Pack though. The Pontiac motor is nice too. I think they make nice motors for hotrods and customs. Recently I had the Miss Deal Hemi on the bench and I thought it was excellent too. Michael
-
Static Charge Attracts Dust - Pics added Wed.15th
10thumbs replied to peekay's topic in Model Building Questions and Answers
Hi Peter, The surface is positive charged after manipulation, or depending on the environment, positive charged from just sitting around. This simple solution neutralizes the object, so nothing ( I mean no junk!) gets on the surface except paint. This works. It's easy and cheap and foolproof. Do it just prior to painting. Your paint dust problems disappear. Michael -
Frank, I've done some experimenting with red paint on different colored backgrounds. White, gray, silver, pink, gold, copper, rust colored and black. They are all different. No yellow yet. I have a real old Humbrol enamel that is just gorgeous. I'm talking decades old. Still good and it's a beauty. Looks real good on a white underground. Reminds me of the Ruby Red on brother's new 64 Sport Fury. That was a killer red! Michael
-
Static Charge Attracts Dust - Pics added Wed.15th
10thumbs replied to peekay's topic in Model Building Questions and Answers
I used to have big problems with really hardcore small dust particles in paint. The only thing I do now is wet the sanded surface with a thick soft brush using a distilled water / alcohol solution, 1 part alcohol, 9 parts clean water. Dry it off with compressed air. No more problems! I have a sandblaster in the room, an open door with sometimes windy conditions coming in (I live on a hill with a big view), there's metal dust in the air, so on and so forth. No more problems! Guaranteed. Michael -
Ha! There was a puke can right in front of my nose and I didn't recognize it! The Mike Sullivan Fiat; Now I have it. Michael
-
Thanks Häkan! In the meantime I finally found a collector can. This is at least something I could use on my current project. Michael
-
Luis, this is a pretty slick idea, I haven't seen it done yet and it's looking good. Good idea with the refreshments being safe. We don't want any mishaps on Saturday Nights. Michael
-
Hi Phil, The model looks excellent. I've never seen this model finished. I bought the kit when it came out, way beck when. It was, if I remember correctly, the first Revell kit that I'd seen that was so beautifully detailed. It was over my head back then, I remember the super long and thin chrome parts, I broke them trying to get them off the trees. I don't think I even finished it, too difficult. I think just a bit later too, Don Garlits' Windjammer came out, with a clear plastic body tat I was wise enough to brush paint underneath, so it had a great shine to it. Those were the days. Your car looks very good and I'm even thinking about trying it again. Good job! Michael
-
Good photos Hakan, many thanks. They look quite heavy duty! In the meantime I could imagine there being a tube within the frame tube for handling this duty of evacuation. The tanks are much larger than I suspected, now I have a specific look to watch out for when searching. By the way, those are some fat slicks on the first photo! Amazing to think the power available to make them smoke during a run. Thanks Hakan, and greetings to you crazy Scandinavian car nuts. The 1st pic is maybe of a car from the midsummer cruise night? Guys, those fellows way up north are wild! They close streets downtown so they can race! Michael
-
Oh yeah! Down and dirty! I'm liking the stance. I'm not a fan of modern wheels and big tire sizes, but I do like them on a 36 and 37 Ford, the body style goes good with the modern setup, my opinion. 40 Ford is cool too with these, I'd like to build one too. Have fun painting Luis, this is a cool car. Michael
-
Hi Steve, Thanks for the links, I'll weed through those for sure. Piece by piece things are coming together, here a pic and there some info, it's good stuff. I'm kind of hooked now on wanting to get the details right for my next project. I've seen now and then evac hoses but never really gave much thought to them as they were on motors that I wasn't interested in building. Things are different now, and here's a look at a simple setup that can easily be made for our models; This has proven to be an interesting search, lots of good articles to read and I'll continue searching. Michael