

10thumbs
-
Posts
2,983 -
Joined
-
Last visited
Content Type
Profiles
Forums
Events
Gallery
Everything posted by 10thumbs
-
Hi Dale, do you have a name for the paint, or did you mix up some secret concoction? I really like the colors for custom hot rods that go in the direction of burnt tangerine with reddish/brownish notes added. Could you give some insight? Again, your painting prowess shows! Just magnificent. Michael
-
Mike, the 1st one is a point and is probably too hard since it can be used for ceramics. Better you look for points and wheels for finishing of gold, as they're softer. Usually lighter red or rust in color, white also. Points are not good for smoothing tube ends, they're used for joints and crevices, not flat surfaces. The 2nd link shows the proper size and shape and the proper mandrel, but probably too hard also, hence not so good for brass. Look here, all of the joints and ends were done with only one type of rubber wheel, or point, depending on the area (flat surface or rounded joints). This is a soldered brass tube frame; Soft rubber points and wheels. Quite soft. Michael
-
Hi Mike, I'd have to look up which rubber type wheel should or could be used best in the US. Basically, this would be a 7/8" softer type rubber wheel that's mounted on a mandril for a Dremel handpiece. Maybe 10K rpm's. All of my stuff is from the jeweler/goldsmith and dental branches. The rubber material should be a bit softer than the metal or else you can't get a smooth surface without taking too much material away. These rubber compounds have lots of silicone material in them, so they are not too hard. Hope this helps. Michael
-
Henry J Twin Turbo - Didn't see that coming..........
10thumbs replied to Codi's topic in WIP: Drag Racing Models
Hi Tim, 6 hours. The piece is already built, but not mounted. I think this gives good insight into what is involved when you build a model without kit instructions. Compliments. Michael -
That is a cool looking tool up above! To chop off tubing I use super thin separating disks in a Dremel-type handpiece, then dress the end(s) with a soft rubber wheel. I cut sheet metal this way too. Just a habit. Michael
-
Hi Mickael, About the only time I get frustrated is when it comes down to final assembly and I goof up with silly glue application mistakes. This happens often too, but I don't let it bother me. It's just the way it is. I have far too much pleasure with the rest to let small flaws stop me from continuing. The things still make me happy when on the shelf. Maybe the next one will be better. Who cares? It's fun, pretty cheap, and doesn't take up much room. Michael
-
Hi Michael, I recommend a super small size tip, like 0.2mm, or else the stuff runs out the through the tip! It's very fine and thin. Michael (also).
-
Henry J Twin Turbo - Didn't see that coming..........
10thumbs replied to Codi's topic in WIP: Drag Racing Models
Excellent Tim! What I really like viewing is the cleanliness of your work, and the piece itself. This is always an incentive for me and these things have helped me personally quite a bit. Lots to be learned while just looking, and I do enjoy it. Michael -
Hi Luis, I really like the attention you show for the paint preparation. Very good info and incentive here, thanks for showing. Since you've shaved the running boards I'll bet this cool old sled will be sitting in the weeds when it's done. Real low and cool. Michael
-
Looking good Brad! Super clean and perfectly scale looking. Great update.
-
1/16 Scale Army Vega Funny Car - Finished 10/14/2018
10thumbs replied to Mooneyzs's topic in WIP: Drag Racing Models
Hi Chris, this is good stuff you have going here! It's fun to check out the updates and to see how things are done in 1:1, and then applied to modelling. I'll bet that Joe is even thinking about one of them millin' mo-sheens for the hobby room in his new house. Michael -
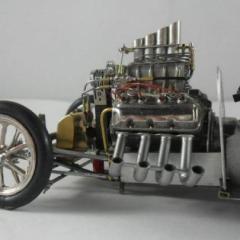
Hi Dale, What a beauty! The paint is just simply beautiful, I'm crazy about the custom color! The motor is killer, what a pipe orgy. The model is just insane. You did good! Michael
-
Hi Frank, this is the same problem I had too. Sure, the tub fits nicely on the frame by itself. Once the tub is in the body, then it didn't fit properly on the frame. I had to remove material from the bottom of the tub, and the top of the frame, where the tub sits. It seems lots of guys have had assembly problems with this kit. I got my signals crossed as to what exactly the problems were when I built the model Jon Haigwood stated too what I was unable to convey in the beginning. So, if you can mount the tub, you're doing fine. You'll just have to find a way to see where the tub hits the frame too early, and grind the plastic away. I used thin contact paper which marked where the high spots were. Read, lots of grinding was necessary on my car. Hope this helps. Michael
-
Mike, you looked huh? Yep, that's the one. I was proud too to get the inners to fit so well, and cemented the heck out of them. Man were they a pita to get rid of, lol. Like Rob stated, that deal was a slap in the face, a real wake up call. I decided to learn to mock things up shortly thereafter. Wait a minute! As I'm writing this I remember too, the silly things were already painted! Then I go and glue the suckers to an already painted flawless body, only to have to remove them later. The paint didn't suffer. Sheesh, i think I got it right now. Is Frank around? I'll bet this may be the problem. Michael
-
Mike, of course you're right. I forgot about the exact problem. I cemented the inner fenders for painting. Now I remember what the deal was. I didn't need the inner fender parts. Yes, I'm inexperienced.
-
Hi Curt, nice work on a real cool car. I really like these outrageous cars, and I'm happy you show your model. Good stuff! Also, again I have to write how cool this forum is. We have former pilots and owners of these cars here, and Bill Corbett comes out as the present owner of a drag racing icon! Plus he builds models. Now how good is that? Fantastic stuff! Michael
-
Frank, one more thing. After the body did fit on the frame, I noticed the body rocked on the frame, front to back. I had to remove the high spots on the frame floorboards, about the area at the back of the door. It was quite a bit too. I also removed material on the bottom of the interior tub at the back. A good idea is to be able to mark the area if it doesn't sit flat and square. Michael
-
Hi Frank, I built this model last year, and I made the mistake of attaching the inner rear fender before final assembly. It did not fit properly! I cemented it too early because of painting. Not good. Have you attached the inner fender yet? Michael
-
Are these "Swamp Coolers"?
10thumbs replied to Deano's topic in Model Building Questions and Answers
This is the first I've ever heard about these things. -
Congratulations!
-
Hi Bernard, I really like this car, the stance and look is just awesome in my book. I'll admit though I'm a big fan of injected race cars. I like FE dragsters. Very cool, and an excellent choice for building and well carried out. Michael
-
Hi Brad, Those are some fine looking parts, the wheels do look great, tank too. Good that you're back at it. "Bacon brownies"....lol. Michael
-
Looking good, Luis! Smooth and flawless. Also, the attention you paid on getting the motor parts smooth and shaped up will make for a beauty.
-
Hi Bernard, Very good find, and choice for the front wheels. The dragster is taking shape good to see this coming along. Thanks too for posting the package info, I think I need some of these wire wheels. Bernard, do you know of a link to check out other products too from R & M? I checked the Directory here and only an email appears to be available. Michael
-
Bill, thanks for the link, that's info that will have to be really studied. Paul, I can't see adapting all of that to a 1:25 motor, wow! I think I'll fake it.