Straightliner59
-
Posts
5,808 -
Joined
-
Last visited
Content Type
Profiles
Forums
Events
Gallery
Everything posted by Straightliner59
-

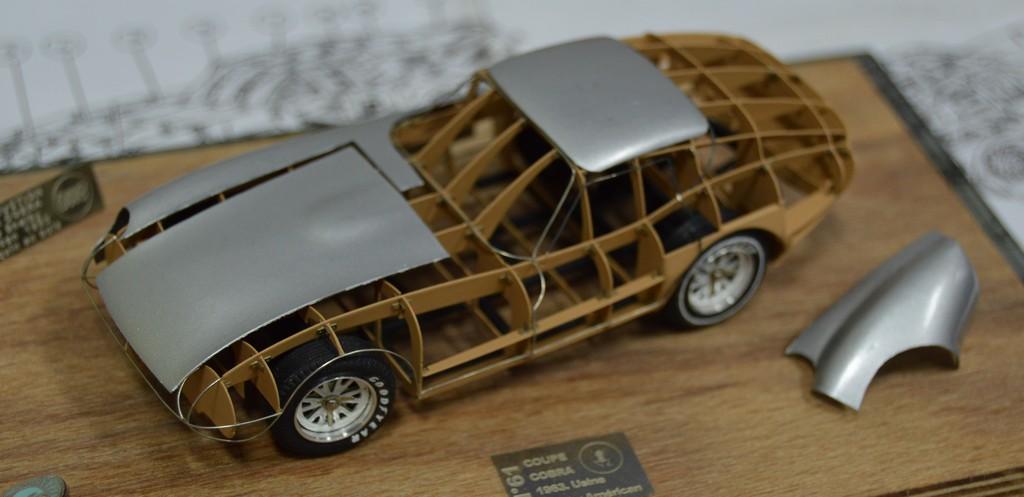
1/43 Cobra Coupe Seen Today
Straightliner59 replied to Straightliner59's topic in General Automotive Talk (Trucks and Cars)
This has got me interested in trying something, even if it's of my own design, just to play with the technique! Something like an aluminum streamliner comes most-readily to mind. -
Testor's is No More
Straightliner59 replied to DoctorLarry's topic in Model Building Questions and Answers
Yes, this was an overreaction to Testors announcing the discontinuance of the Model Master line. -
1/24 Scale Seat Belt Buckles?
Straightliner59 replied to Noah H.'s topic in Model Building Questions and Answers
The ribbon is way too heavily-textured, as well. I have been using wine bottle foil, for about thirty years, now. I really like that I can "pose" it. It's a little thicker than paper, but, it will fit! -
1/24 Scale Seat Belt Buckles?
Straightliner59 replied to Noah H.'s topic in Model Building Questions and Answers
Gofer Racing makes some generic stock-type buckles. Some interior detail sets have them, specific to a car/brand. For domestic cars, one of the companies that would likely have them would be Model Car Garage, in some of his detail sets. -
1/43 Cobra Coupe Seen Today
Straightliner59 replied to Straightliner59's topic in General Automotive Talk (Trucks and Cars)
You're most welcome. I just figured that you'd appreciate what it was! It might be fun to actually scratchbuild something like that! -
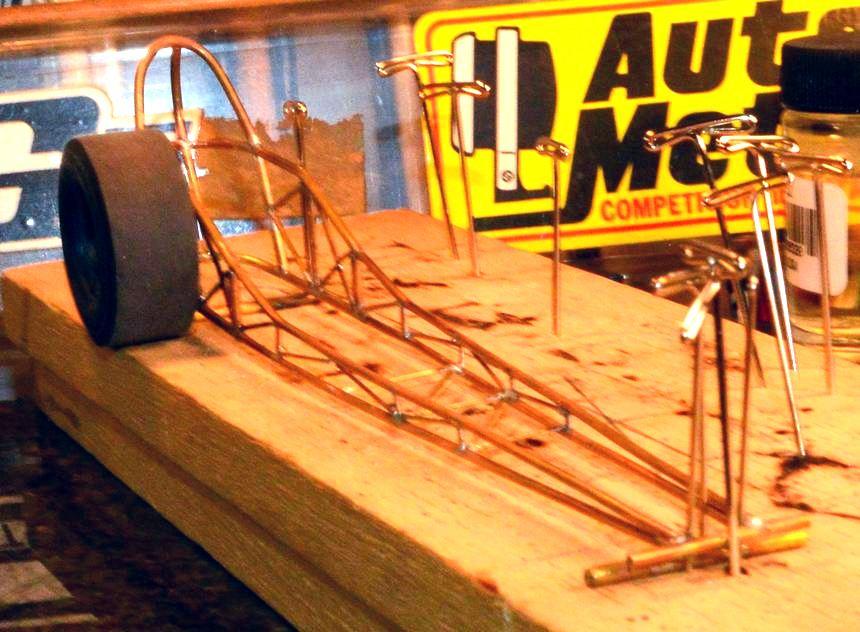
1964, Brissette FED. 1:16, brass, scale build.
Straightliner59 replied to Mike Williams's topic in Drag Racing
It's somewhat similar, but the Junior Fueler is built with a Ramchargers chassis. I've never been able to figure out what MPC was thinking, with that kit, making it a "legs under" chassis. The 1:1 Ramchargers car was a Don Long chassis! I think I have everything I'll need collected, so I'm pretty much ready to go! -
The wire is another excellent idea! Going to try to remember that, next time I need it!

-
1/43 Cobra Coupe Seen Today
Straightliner59 replied to Straightliner59's topic in General Automotive Talk (Trucks and Cars)
I thought this was scratchbuilt, but it says "box stock" right above "not a Metal Earth kit". I didn't even notice the former, until I just now looked again at the photos!? -
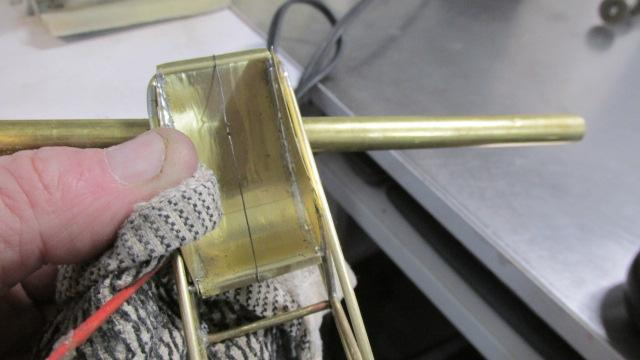
@Ace-GarageguyThis was at a show i attended, today. I thought it was really cool, but, definitely thought of you, almost immediately. It's scratchbuilt, and really, really cool! Sorry for the quality of the photos, contest tables are never the best, for shooting.
-
That would be cool, if it happened! Max Webster is one of my favorite bands, ever! Kim Mitchell is a criminally underrated guitar player, I think. I've always heard that he's a great guy, too. "Paint by Max" definitely would be easier to sign!
-
Your brass work is beautiful! I saw the seat on FB. It's killer, Ian. Loving this project!
-
1964, Brissette FED. 1:16, brass, scale build.
Straightliner59 replied to Mike Williams's topic in Drag Racing
I mean, why wouldn't I want this?! Just one of the most badass dragsters, ever!
-
1964, Brissette FED. 1:16, brass, scale build.
Straightliner59 replied to Mike Williams's topic in Drag Racing
I appreciate your kind words, Mike. If this "quick and easy" project (It's been neither) doesn't grab me, soon, I probably will re-commence with the Surfers' car. It's one of those that I really feel like i need to do. -
I agree with Bill. There's a ton of products to use for moldmaking that are made specifically for that. Very readily available, too. Most Hobby Lobby stores carry everything you need! Back in the '80s, it was a different story. Here, in Denver, we had to go to a plastics wholesaler, and walk up to the City Counter!
-
FED, 1:16, full brass body, scratch, 1970
Straightliner59 replied to Mike Williams's topic in Drag Racing
Simply gorgeous, Mike! -
1964, Brissette FED. 1:16, brass, scale build.
Straightliner59 replied to Mike Williams's topic in Drag Racing
When I started building my Surfers' chassis, based on Roger's advice regarding a tubing diameter, I took my spring-micrometer to a craft store, and measured every spool of brass jewelry wire, until I found .055"! Eventually, I met his approval, but it took about three rebuilds. Truth is, Roger lee is likely the only guy who would ever notice that a chassis tube is a few thousandths off. But, like you say--that's important, to us! I'll get this thing back out, before too awful long...
-
Powerglide Tail Section
Straightliner59 replied to Straightliner59's topic in Model Building Questions and Answers
It's for an altered, so I'd guess aluminum. I don't really guess it matters, and as soon as I asked, I thought--"It's really just a glorified curbside you didn't cut the molded-in exhaust out of. Does it matter?!" I think I found something I can use from an old MPC Small Block Chevy. Thanks, Mark! Your knowledge of this stuff is a great asset, here! -
Congratulations!
-
Anybody have an idea what kit might have a decent tail section for a Powerglide? I just need the area/part with the mounting boss.
-
The wheels look great! They need to, in order to match your fantastic work, Pierre. Excellent job on the weathering!
-
That is very kind of you to say, Ian. I appreciate it! If I don't feel like I'm starting to make some progress on the Badman, that may be sooner, rather than later!?
-
These are both cool! I have a couple of the Mongoose dragsters from the last issue, and a couple of SR XXXs, from way back, but, it'll be good to have them, again! Over the last few years, I've picked up three of the Vettes, at decent prices. Two of those are rebuilders--one of which I just put in a Ziploc of Super Clean, earlier today. Of course, what I considered reasonable would go by the wayside, if they are able to re-release it. I think the Mongoose dragster, or the old Snake kit would be interesting to build OOB, given their molded vinyl details!
-
I'll take your word for it! You definitely know a lot more about this stuff than I. I just though it looked a little different than the PP dragster.
-
The Slingster is the white dragster, above the yellow one in the case, which is, I believe, a caricature dragster (maybe a Tom Daniel deal?). The box art for the Slingster looks to be the red dragster in the photo with the time, and the word "Reel", on it. Also interesting to see the California Street Vette boxes.