Straightliner59
-
Posts
5,809 -
Joined
-
Last visited
Content Type
Profiles
Forums
Events
Gallery
Everything posted by Straightliner59
-
Nice artwork, Jim!
-
I appreciate that, Michael. Thank you. I've always thought the NTF cars were way cool! Thank you, Pierre. That is very kind of you to say! It's also helped to know some folks over the years who are nitro racers, who've helped, immensely, with their knowledge. Thank you, Hakan! Thanks! Thanks, Walt! I really am happy with it. The reception it's received has been humbling and thrilling, at the same time. Thanks, sir!
-

Testor's Model Master Metalizers
Straightliner59 replied to landman's topic in Model Building Questions and Answers
I've had a 100G for over 30 years. I absolutely love it! So much so, that I sold all my other airbrushes. The times I miss a siphon tube are virtually non-existent! -
Testor's Model Master Metalizers
Straightliner59 replied to landman's topic in Model Building Questions and Answers
That would be excellent! We should get right on that!? All kidding aside, Testors metalizers are sorely missed. My sprays are thinning out. Fortunately, I have 2-1/2 cans of aluminum left, and probably at least part of two bottles. I have most of a bottle of the old SNJ buffing aluminum, as well. I thought I heard, way back when, that Testors bought their formulas, but, I can't say, for certain. -
Kudos to you, for the paint! Brushing silver has to be absolutely harrowing!?
-
Unless you prefer the Fujimi branding, I've found Testors boxings to be more reasonably priced, frequently.
-
Beautiful work, my friend! That stance, with those wheels...
-
Right?! Then again, I still see guys recommending thread, for plug wires, so, it takes all kinds!
-
Revell Road Agent.
Straightliner59 replied to JPolli's topic in Model Building Questions and Answers
You could use the original to make a mold, then pour that solid, with resin, and use that as a buck to vacuform or thermoform a new one. I would probably try thermoforming one over the original, first. I've had decent luck, doing that with windshields. -
Thank you, Ulf. I appreciate that! Thanks, Hanjo. I'll consider this an extra-complimentary post. It's much appreciated! Thank you, Bob! It really is almost how I envisioned it, way back when! I'm very happy with it! Thanks, Christopher!
- 61 replies
-
- 1
-

-
- scratchbuilt
- brass
- (and 1 more)
-
’72 Dodge Demon Drag Racer 1/25 scale
Straightliner59 replied to AmericanMuscleFan's topic in WIP: Drag Racing Models
Of that, there is no question! Great work, my friend! -
I finally got some better photos, so I created an "Under Glass" thread, here: I appreciate everyone who followed along, here, and lent your words of support and encouragement. I am happy that some of you have been able to garner some useful information from this!

-
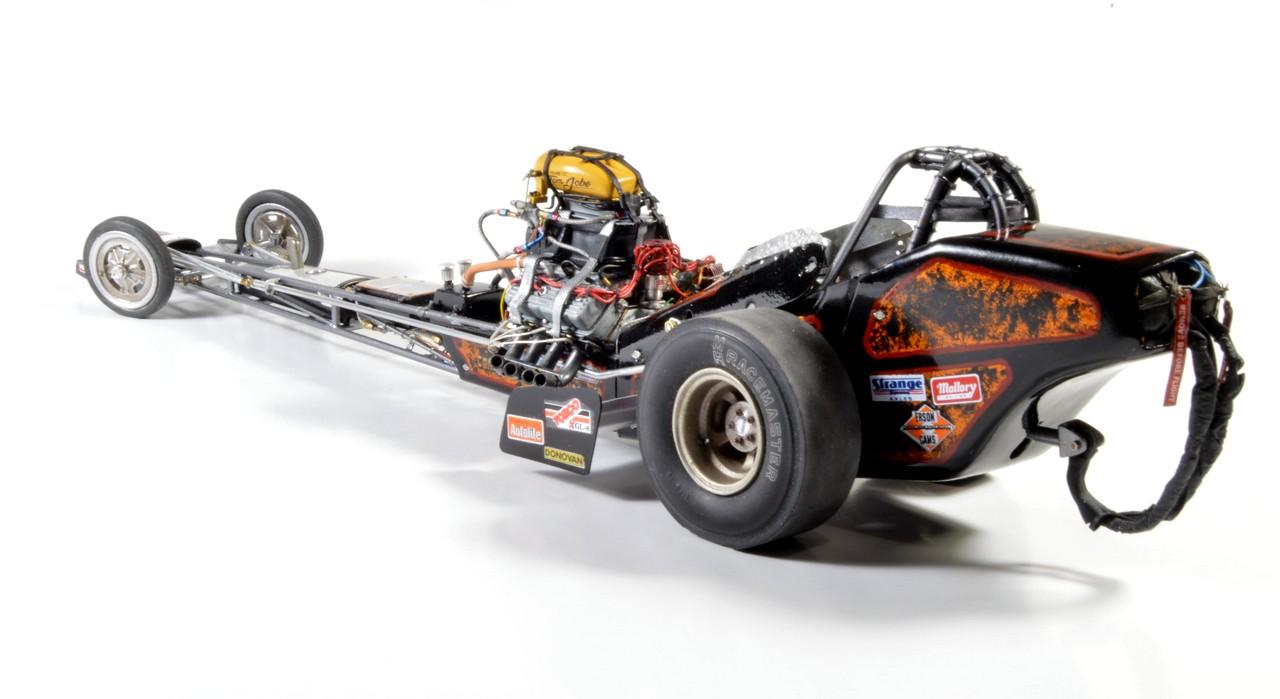
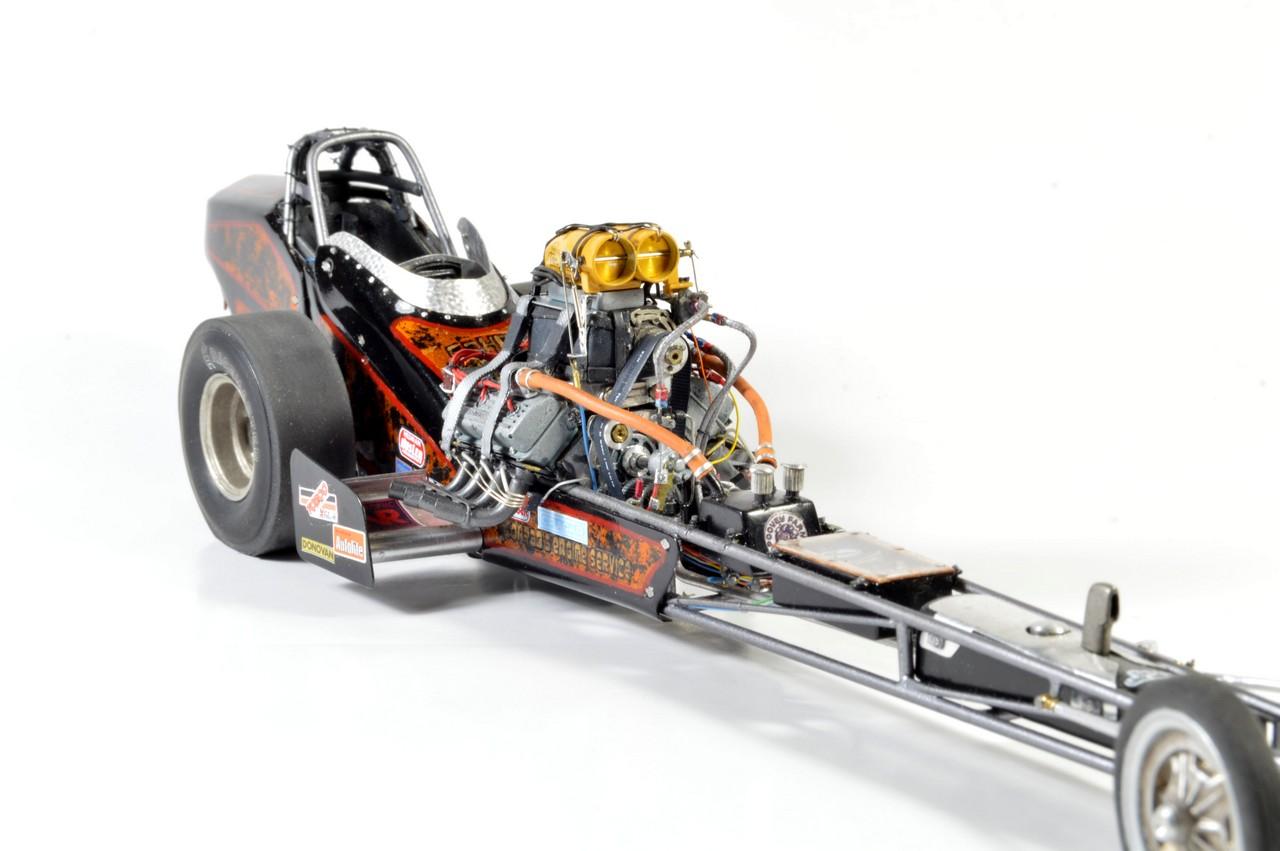
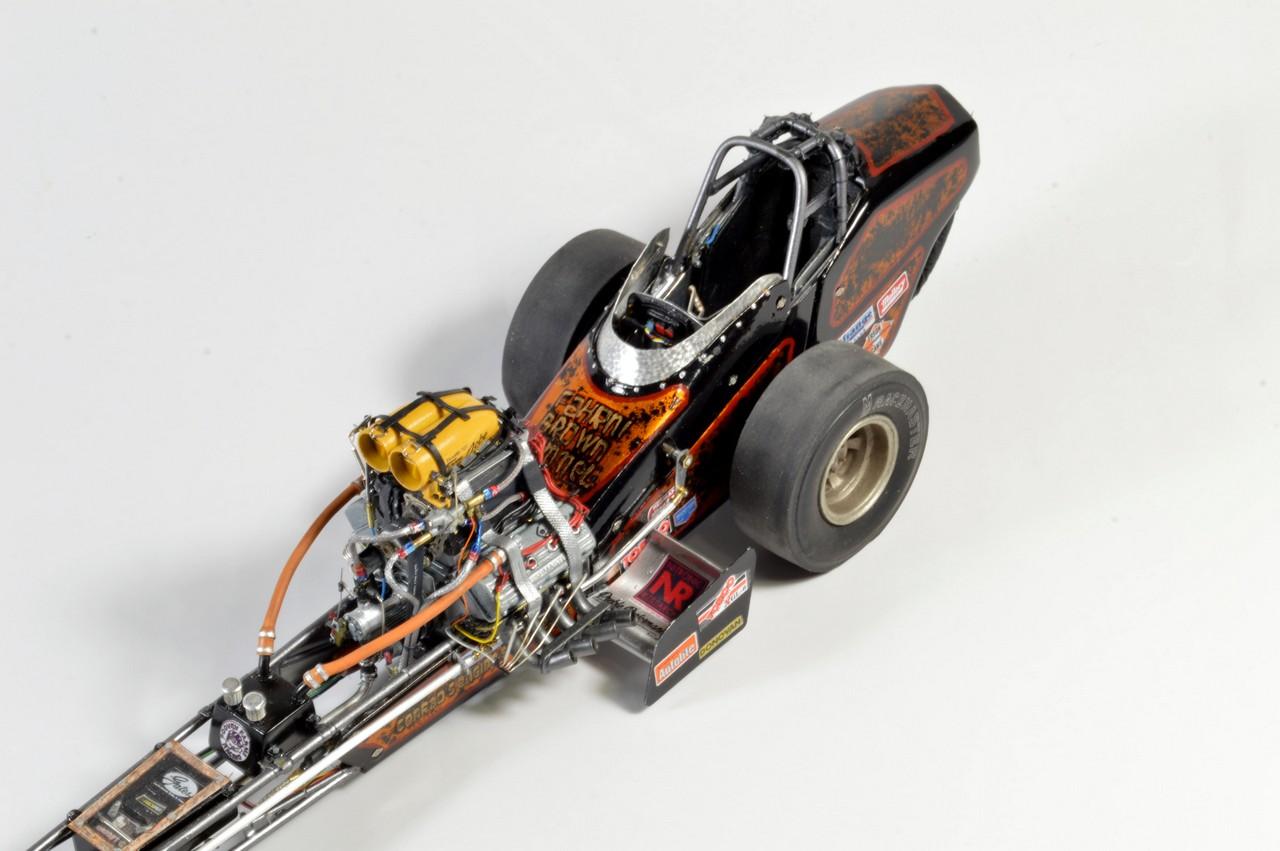
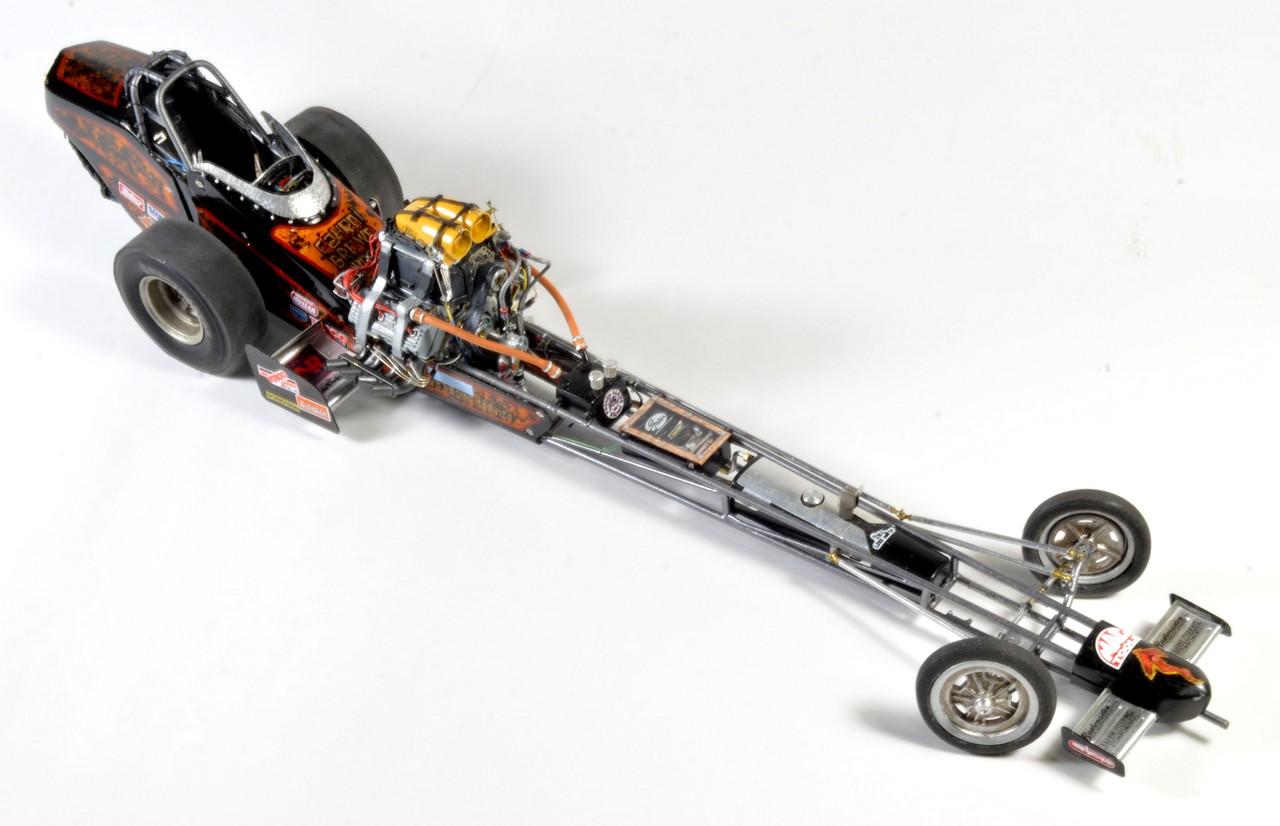
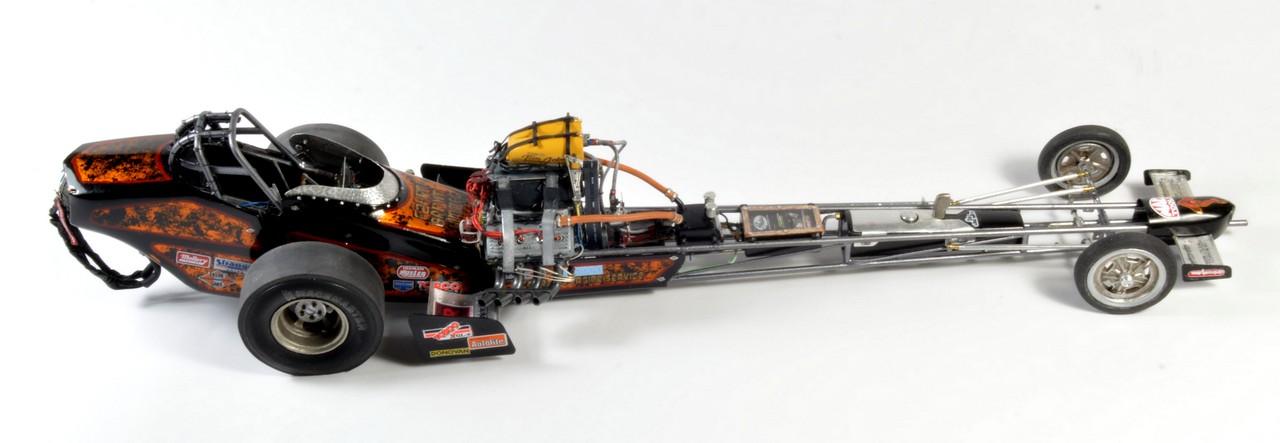
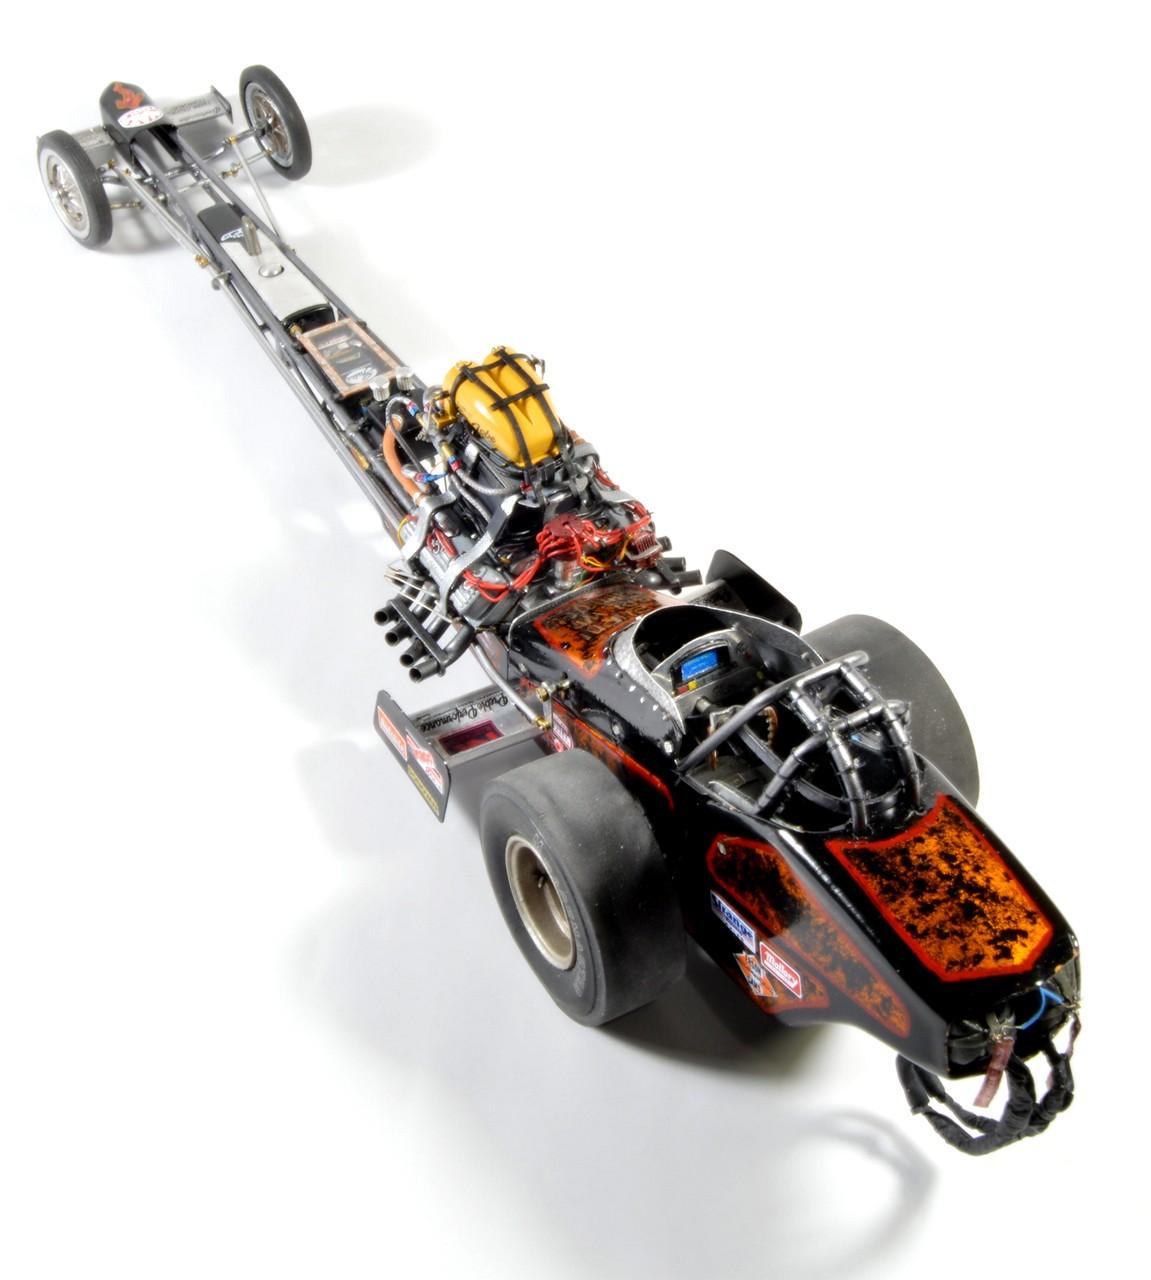
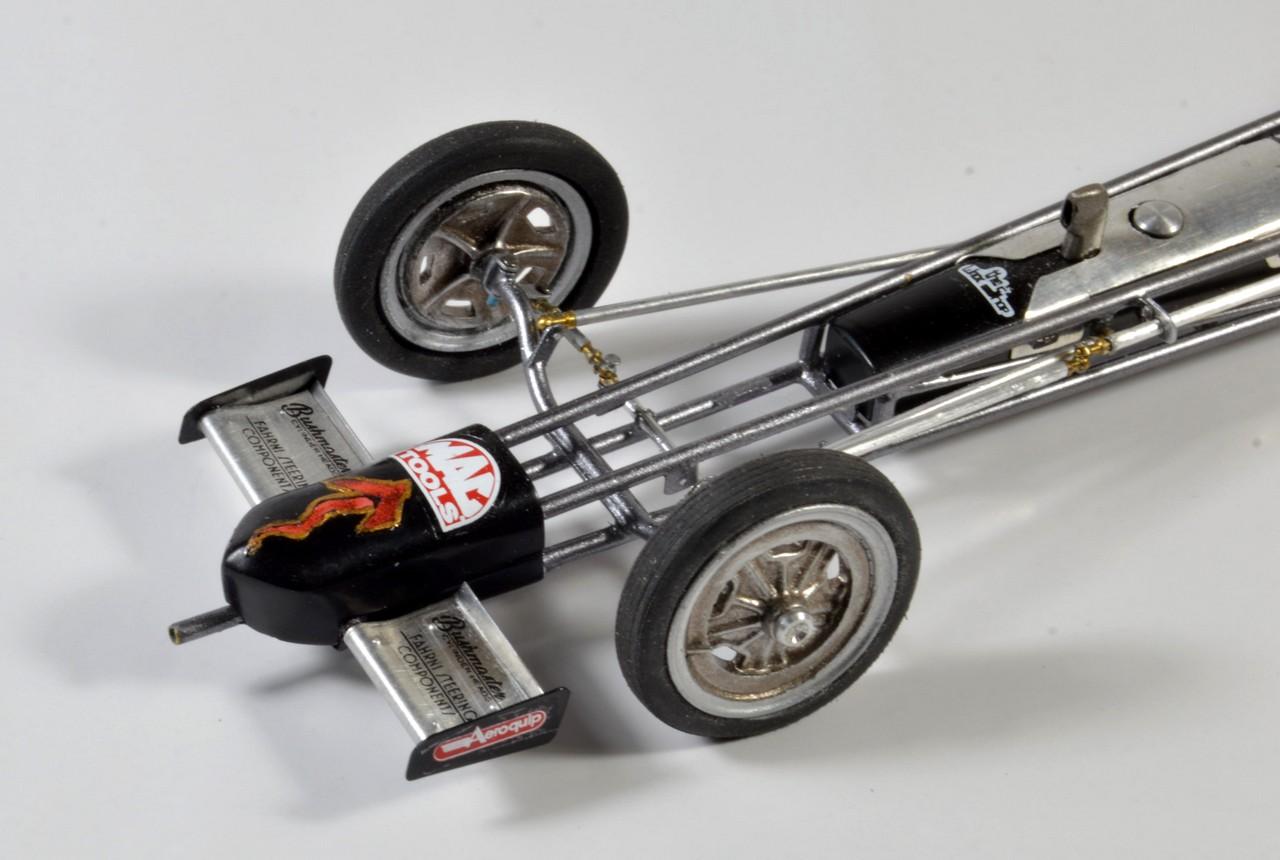
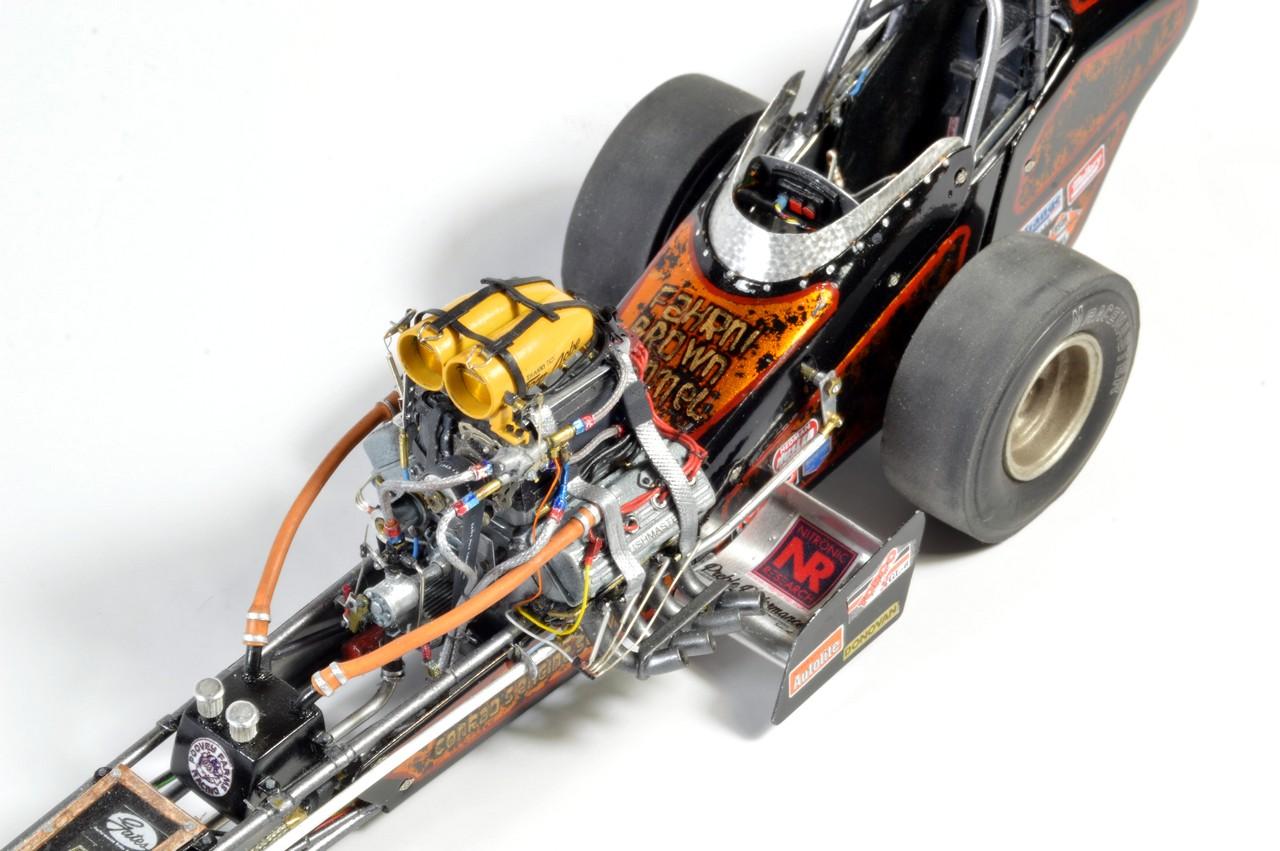
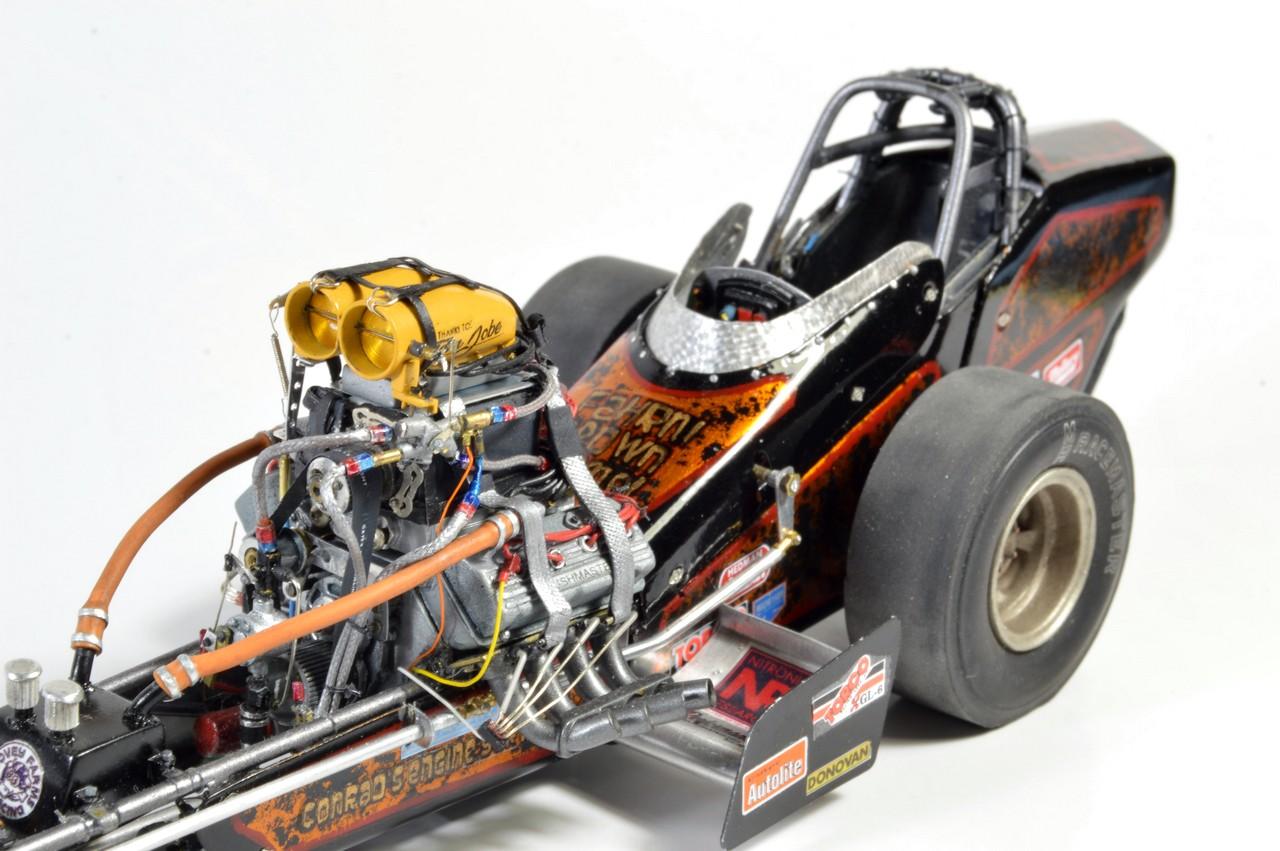
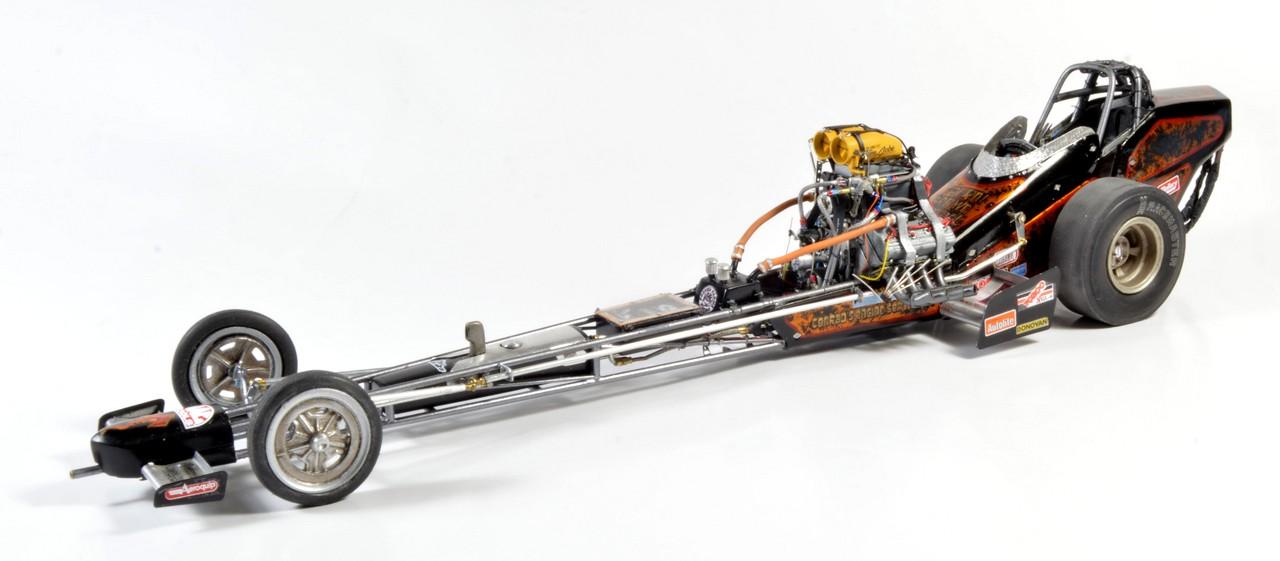
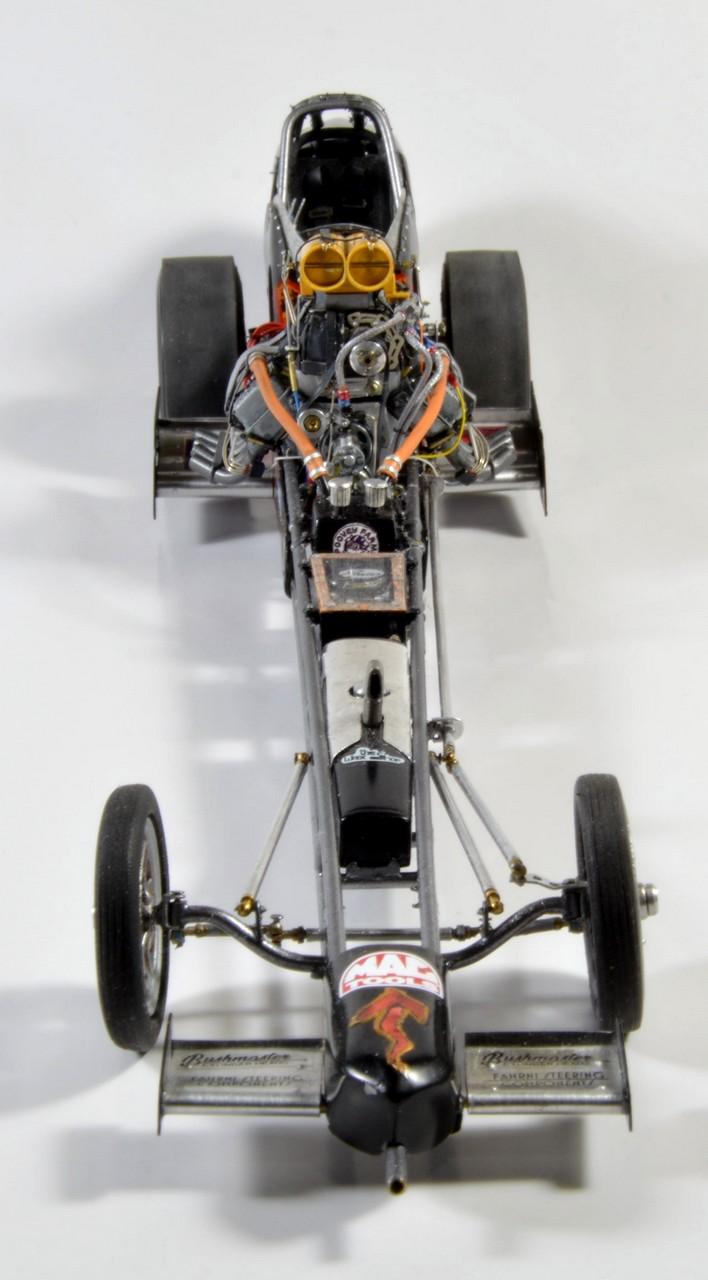
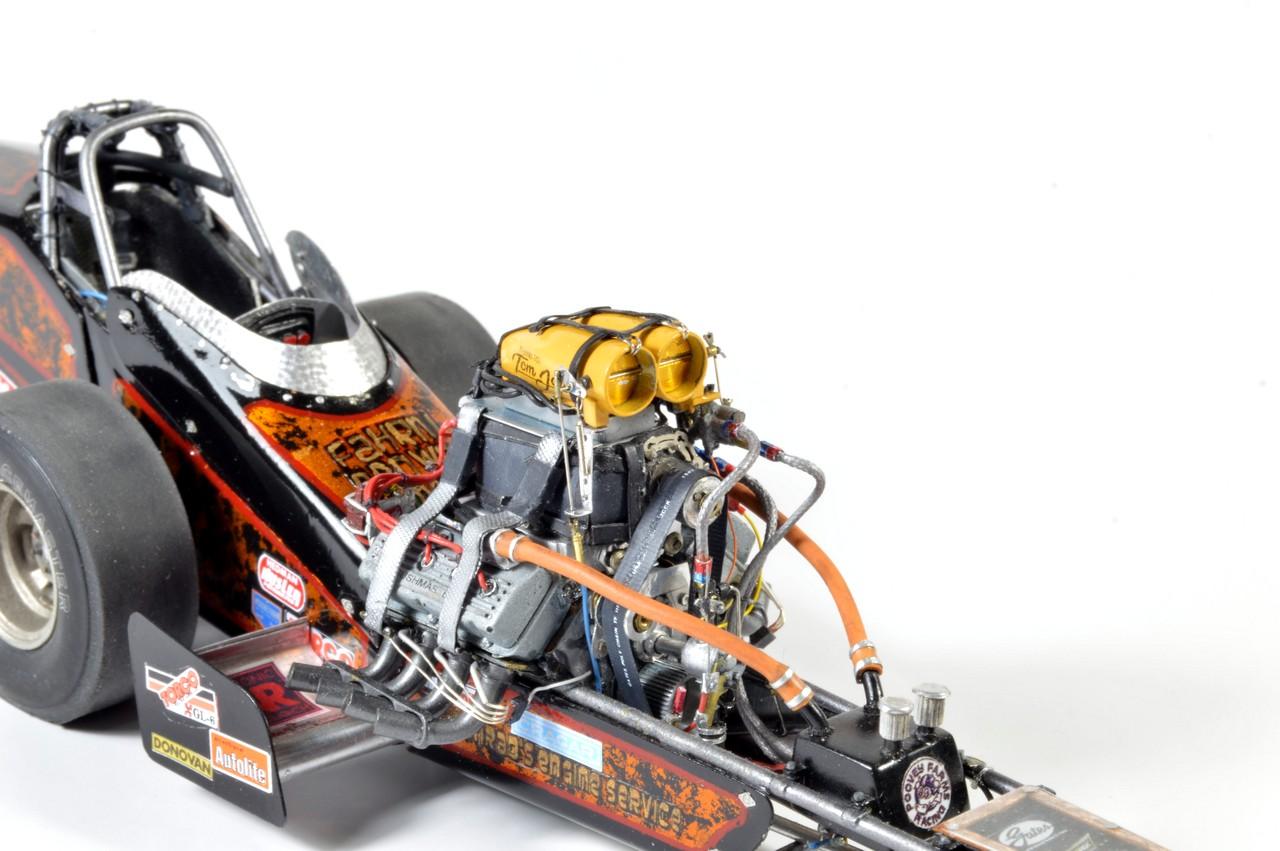
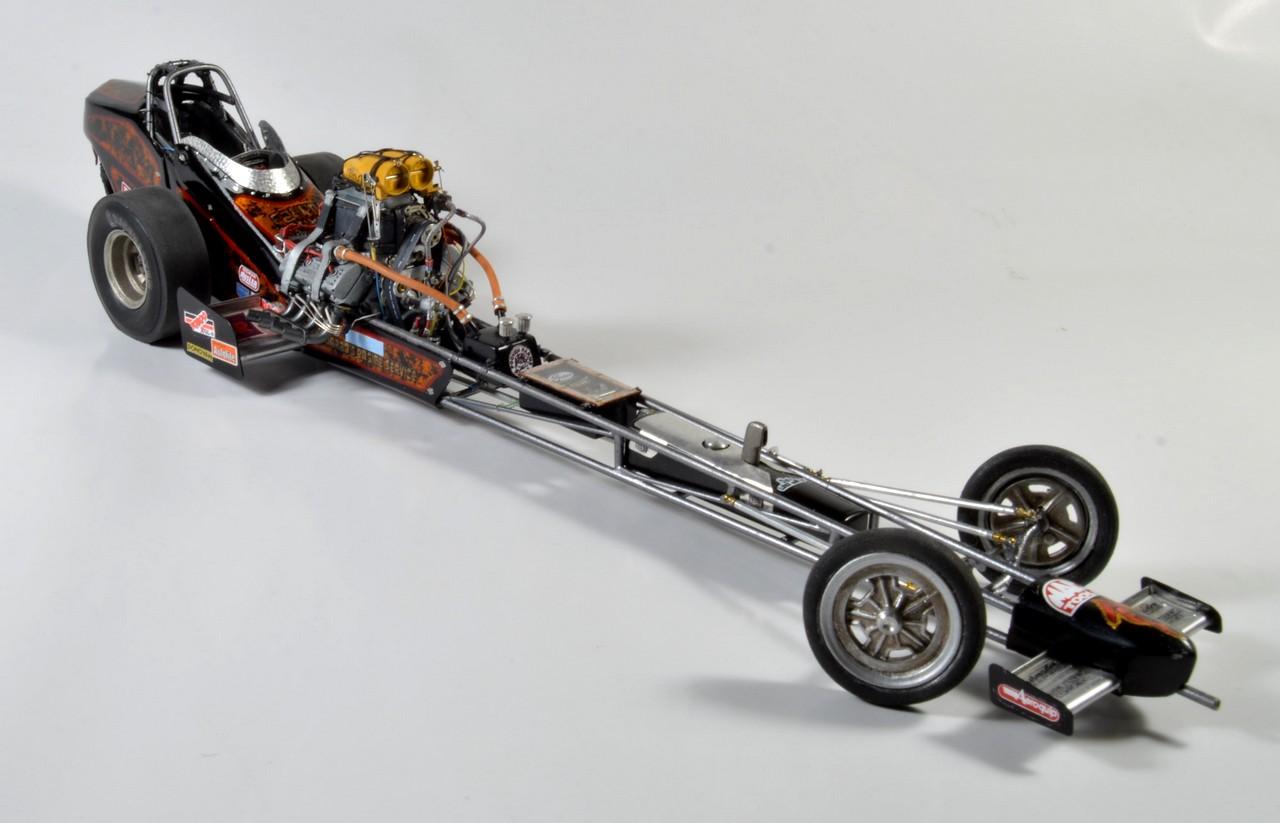
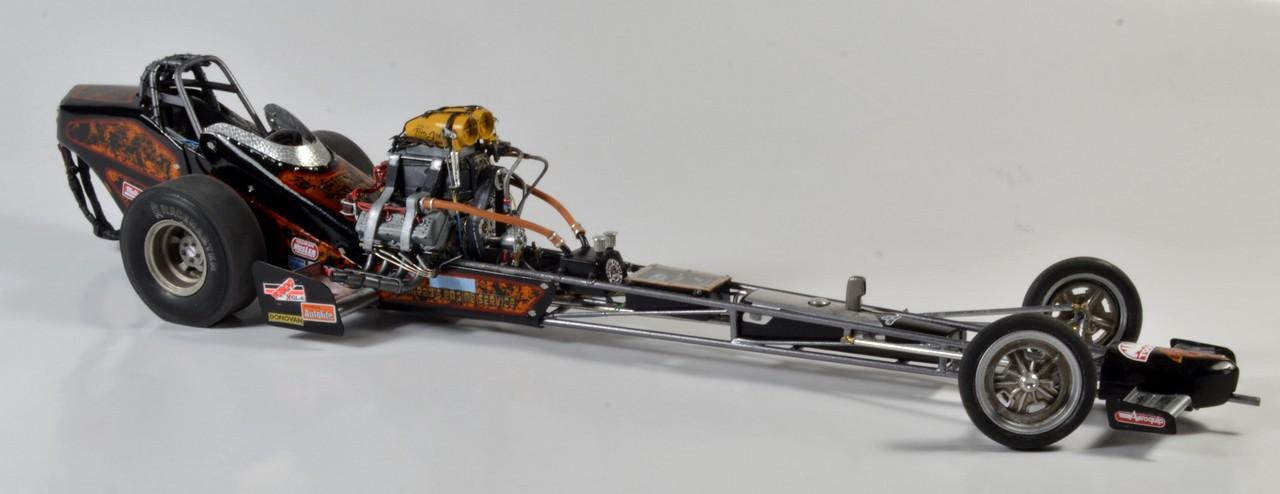
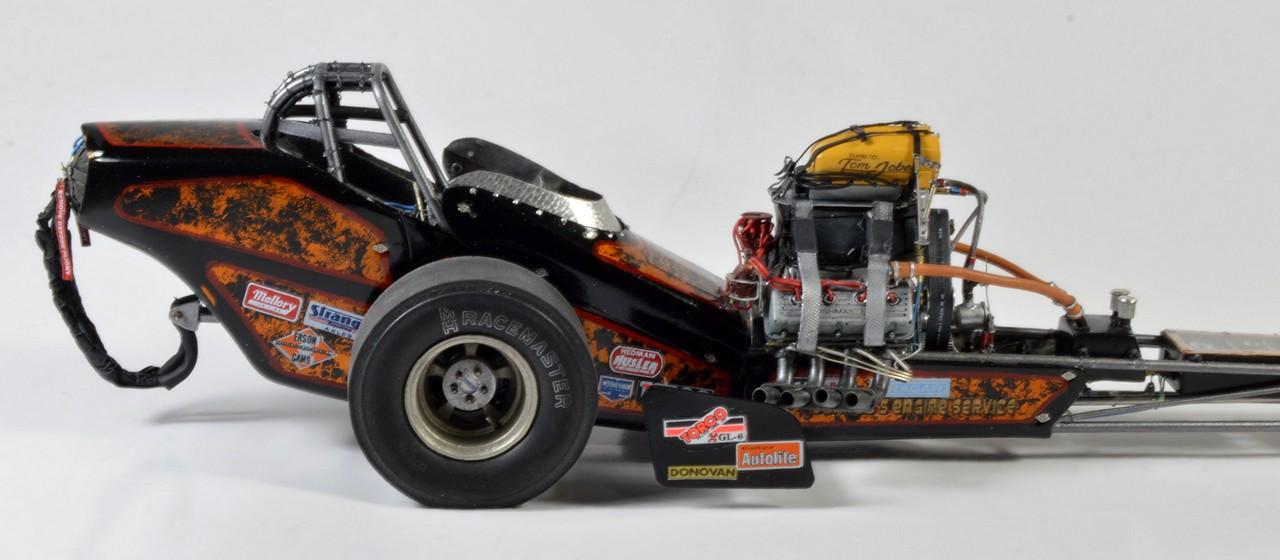
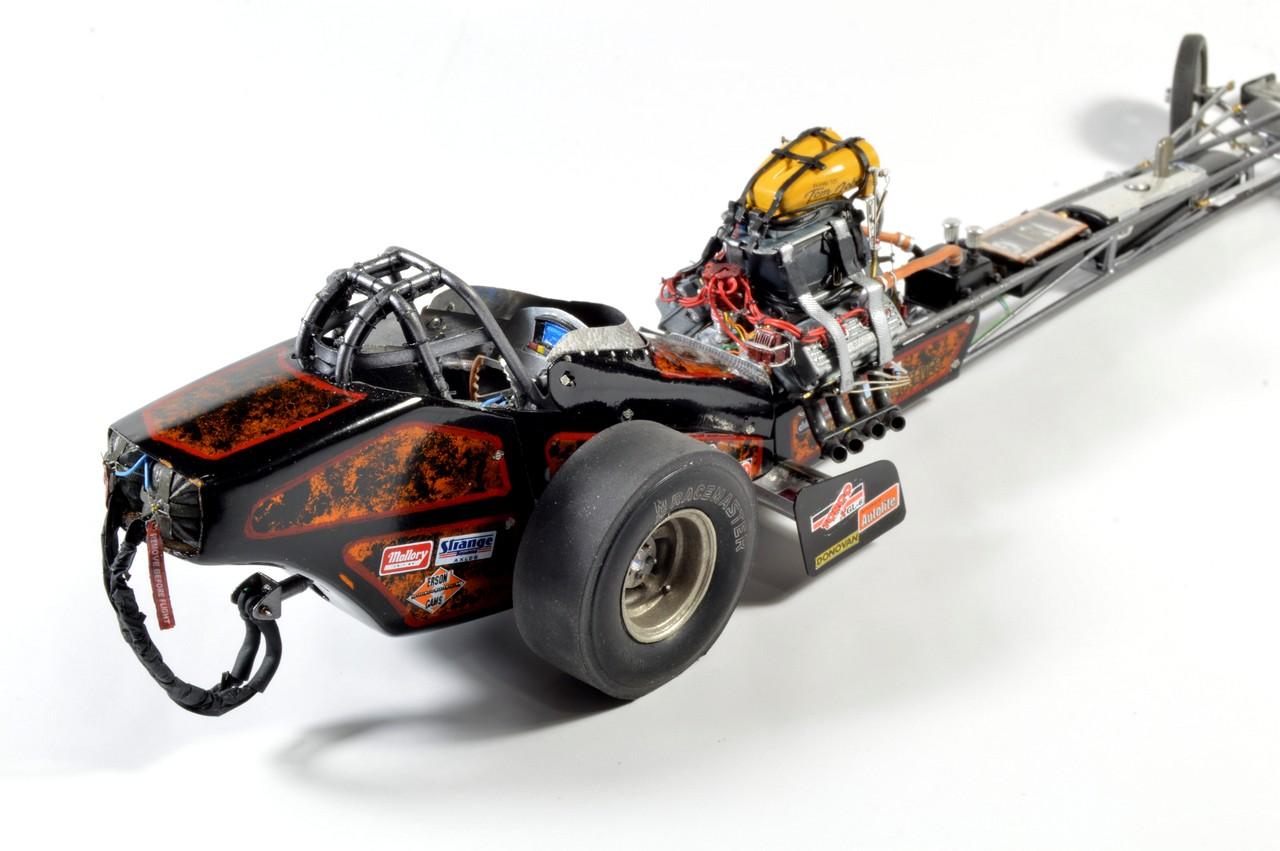
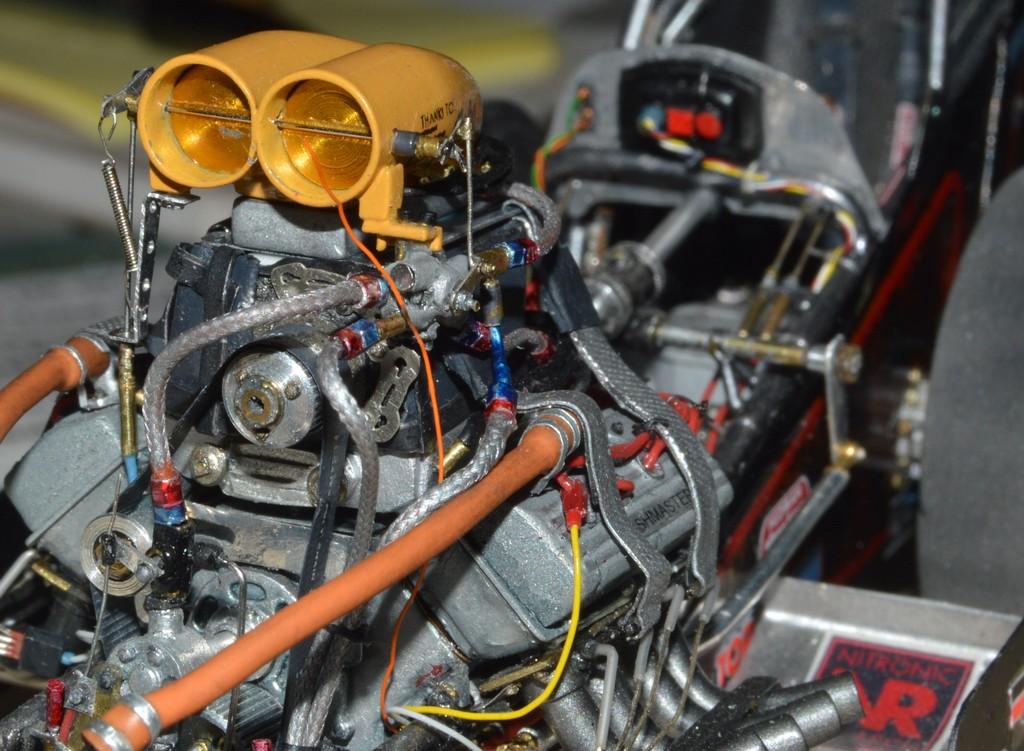
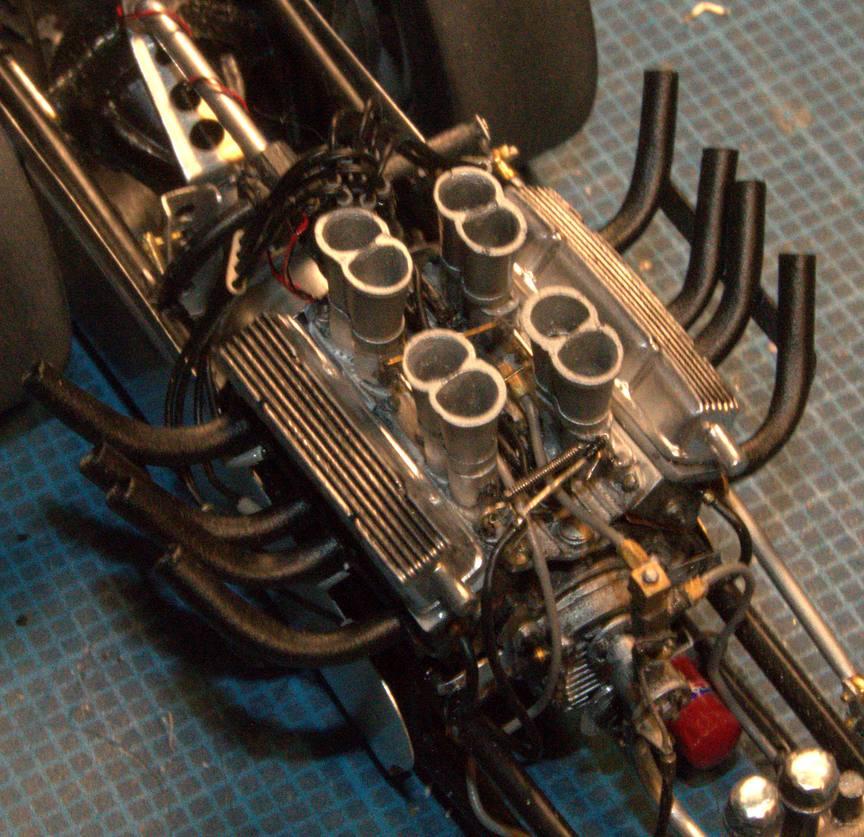
I completed this last Monday, but I was unsatisfied with the "glamour" shots I took at the time. I spent several days trying to find the posters I use for a backdrop to shoot on. I couldn't imagine what I'd done with them. This apartment is small, and I had looked everywhere those things could possibly have been! Except one. I looked there, earlier this evening, and shot a huge batch of photos. These are somewhat better than the previous session's results, so, here she is, in all her glory. I am very happy with this model! The result, here, is pretty true to the vision I had, for it, back in 1997, when I first began work on it. I got it fairly along--the chassis was built, the first body was built; I had begun work on the cockpit and driveline details, when I began to doubt my confidence in being able to complete it. I likely had the skills to do it, I just didn't believe that I had those skills, so it got shelved, until November of 2022. At that time, I knew it was time. Roughly 14 months later, I submit these photos of my proudest achievement, to date. Thanks to everyone who followed along on the construction thread: And, thanks for looking!
- 61 replies
-
- 8
-
-
- scratchbuilt
- brass
- (and 1 more)
-
Testor's Model Master Metalizers
Straightliner59 replied to landman's topic in Model Building Questions and Answers
Mr. Color and Mr. Metal Color are decent alternatives. I also like Humbrol Metal Coat, but the selection is limited, it seems; at least locally. I bought a lot of Model Master Metalizer once it had been announced they were discontinuing it. I didn't see having a decent stock as reason to stop looking for alternatives. -
I appreciate that, Randy! Thanks for your kind words, my friend. There were definitely a lot of things I redid, because they just didn't "feel" right. I like to say that, a lot of what makes a good modeler, is simply a willingness to "do it over". It was good meeting you! I'm glad you got to see this, and I am happy that I was able to truly appreciate that beautiful Maserati. The 'Runner is sitting right above my bench, reminding me, every day that my display case needs a road racer! I took a couple of days planning my 24 Hour project, and am currently on that for another 11 hours, or so. The Chaparral is getting the heavy lean, for sure. Thanks again. It's good hearing from you!
-
I really enjoy following your projects, because you're not afraid to just try stuff! I love doing that. Get an idea, try it; if it seems feasible, refine it. I appreciate you putting new ideas into my head!? It's kinda' like science! I'm running low on wine bottle foil, because I haven't been inclined to drink any, in several years, now. I found several sources on Ebay, in fly-tying supplies. Semperfli is the brand name. It's .2 mm thick. I bought a small sheet, but haven't tried it, yet. Glen Moray Scotch might have it, but, I haven't had any of that in a long time, either! I think I saw some other small sheets that said they were .010" thick. Lead foil is more expensive than I expected.
-
Prewired 8cyl distributor install
Straightliner59 replied to CA Whitecloud's topic in Model Building Questions and Answers
I defy anyone to come up with any logical reason not to! Hey, it's not lazy, it's smart! -
Prewired 8cyl distributor install
Straightliner59 replied to CA Whitecloud's topic in Model Building Questions and Answers
Yep. Why not? If you slip the boots on, before inserting the wire, you can push it to the proper length, slide the boots down to the "plug", and cement it. Nobody but you, will ever know!? -
I truly appreciate that, Ian. I don't think anyone could hope for more than to help and to inspire their fellows. I'm still a little amazed that it's actually done!? It was certainly an ambitious undertaking--a little too much, back when I originally started it. Since I first started building, I've been fortunate enough to have other modelers share with me, and I am always happy to share--especially when it's beneficial to others, as well. Thank you for your encouragement, throughout the resurrection, my friend--it's been appreciated! @absmiamiThank you, Andy! I consider these a badge of honor, whenever you bestow me with one.
-
I absolutely love metal for belts! I have been using wine bottle "lead" foil, for many years, now. I really like that it can be "posed". I agree with your assessment of the other materials, as well. Good thinking!
-
Even Walmart. Do a search for stuff like Vevor hobby machine stuff, and one of the sellers will be Walmart. some things were a lot better, when everybody wasn't trying to be everything to everybody!
-
1/16th Scale Top Fuel Dragster Eddie Hill 4:99
Straightliner59 replied to Ian McLaren's topic in WIP: Drag Racing Models
Great job with the engine, my friend! -
67 Camaro B&R Performance C/SM
Straightliner59 replied to Nitro330's topic in WIP: Drag Racing Models
Some of them are quite small, too! I had somebody tell me that guitar strings were too big to use for throttle return springs. I showed him, otherwise!
-
67 Camaro B&R Performance C/SM
Straightliner59 replied to Nitro330's topic in WIP: Drag Racing Models
It is a bit stouter, for sure. Cheaper, too!