StevenGuthmiller
-
Posts
15,071 -
Joined
-
Last visited
Content Type
Profiles
Forums
Events
Gallery
Everything posted by StevenGuthmiller
-

Who doesn't love a mock-up? Let's see yours!
StevenGuthmiller replied to Belairconvertable's topic in WIP: Model Cars
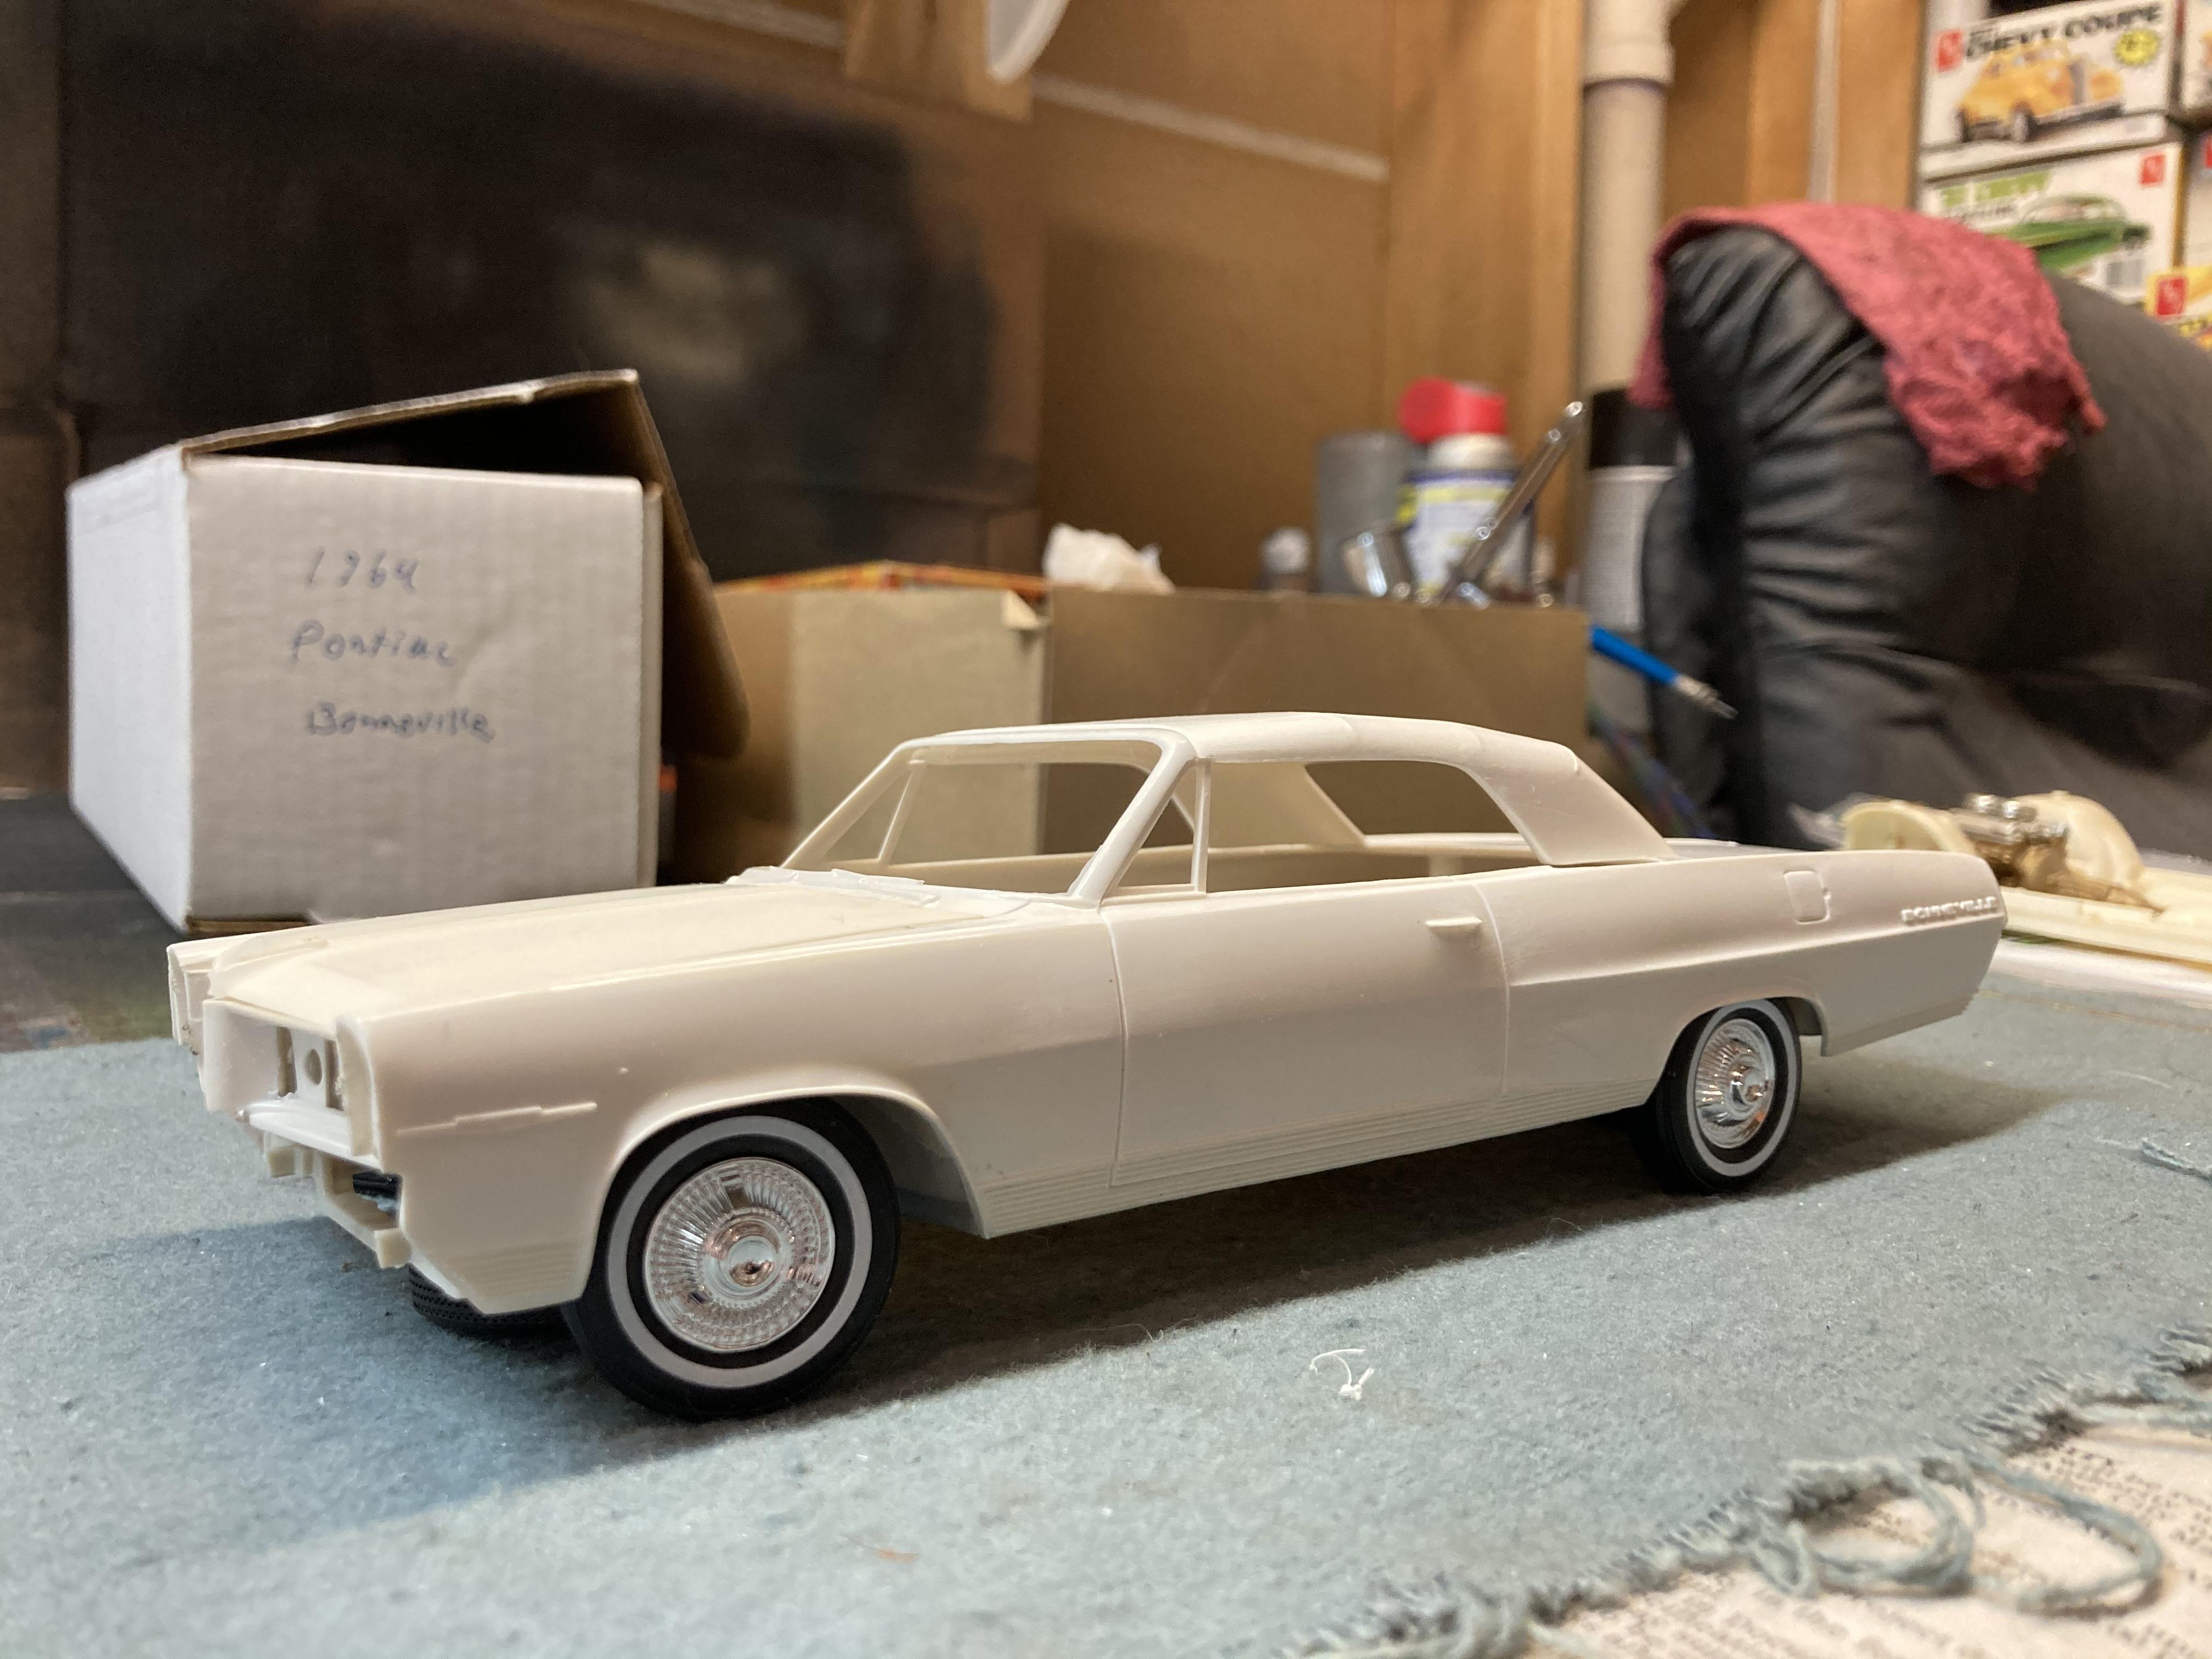
1964 Pontiac Bonneville convertible. Steve
-
Nope. Steve
-
Lacquer thinner. Been using lacquer thinner to clean my Badger airbrush for probably 25 years. Hasn't hurt it at all. Never replaced a single part. Works as it did when I bought it. Steve
-
I appreciate that Bill, but as is pretty much universal in this hobby, nobody is perfect. I still have my problems. But I've used many different materials and techniques over my 50+ years of building, so when I stumbled upon my current regimen, and have since been able to maintain a great deal of consistency with it, with a very low percentage of purple pond usage, I figure that there's no sense in reinventing the wheel. Just as everybody else would say, "this is what works for me". Steve
-
I can't say that I know too much about any of that. All that I know is that MCW lacquer shot right out of the jar, cleared with Duplicolor clear and polished, gives me great results. I can't remember the last time that I displayed one of my models at a show, or online for that matter, when I didn't get a dozen "how do you get such an authentic and shiny finish?" That's all that I need to hear to assure me that I'm doing something right. Steve
-
Putting it that way, no, I really haven't witnessed any such phenomenon. At least not to any significant degree. Steve
-
I agree with this as well. I generally only use Duplicolor paints when using solid colors, such as black, white or bright red. For all of my metallic paint jobs I use MCW, or Scale Finishes. Steve
-
I think you misunderstand his point Ace. I did at first. I believe he’s just stating that Duplicolor fan spray nozzles work better than small hobby cans for painting larger scale kits, but I don’t believe he’s insinuating that they aren’t great for smaller scale as well. There’s no question in my mind that Duplicolor nozzles are some of the best out there. Certainly miles ahead of Testors, and considerably better that Tamiya also. Steve
-
Exactly. Any of the Duplicolor lacquer primers will be very helpful if you need to strip the paint. I use mostly Duplicolor “Primer/Sealer” myself. Steve
-
I agree with this completely! Black is no more difficult than any other color in my opinion. It just shows flaws more readily. That's not the fault of the paint, but rather a prep issue. Steve
-
I'm not sure what you mean by "reducing down", but I use multiple thin coats, (as many as 5 or 6) and once it's cured and polished, I haven't noticed any changes over the years. Steve
-
You're going to get a hundred different answers for this question, but my two cents is that I would just Duplicolor from start to finish. Duplicolor primer, and "Perfect Match" Universal Black and clear, all in rattle cans, followed by some cutting and polishing, will yield a very fine black finish. Steve
-
I've only used it a couple of times and was not particularly fond of it. It seems to work okay, but I find I have better results just using the "perfect match" clear in the rattle cans. The Paint Shop clear seems to go on thicker, and I find that I like the control of the thinner coats that I seem to be able to achieve with the spray can, believe it or not. The Perfect Match clear generally requires some polishing to achieve a really nice finish, at least in my experience, which is okay with me as I always polish my paint anyway. Steve
-
Reccomended clear over enamel
StevenGuthmiller replied to hgbben's topic in Model Building Questions and Answers
Regardless of what you intend on using, be absolutely certain that the color coats are completely cured before spraying anything over it. With Testors enamel, that could take weeks! That said, I agree with Carl. Testors clear lacquer is completely benign and won't harm the enamel. Just use light coats. A little polishing in the end might be required as well, or at least beneficial. Steve -
Yes, but even there it has been a pretty recent development. I don’t recall if they had a few Tamiya paints before or not, but their paint line has changed considerably in the past year or so since Testors hit the skids. They now carry a lot of Tamiya and Mr Hobby paints as well as some others, including some MCW enamels. Steve
-
Woof, woof. Steve
-
I mask the paint edges with Tamiya tape first. Then I use the masking paper to to cover as much of the remainder of the body as possible. Finally, I tape the edges of the paper down with blue painter’s tape and regular masking tape, but I do my best to do it in a way so that there is as little of those tapes touching the painted surface as possible. I do this to avoid any of the problems that can occur with garden variety masking tapes, such as pulling up paint or leaving adhesive or tape imprints behind. I use masking paper not because I want to save money on tape, but because I’ve had way too many bad outcomes with using it on my painted surfaces and I want as little tape touching the paint as possible. Steve
-
Just lurking. Came across this post using some photos of one of my projects, so I thought the OP might want my 2 cents. Steve
-
I would think that plastics could possibly be a problem as well. Maybe I’m wrong but I would be a little reluctant to spray a hot lacquer over a thin plastic bag. It would be just my luck to wind up with plastic goo stuck down all over my treasured model body. I think I’ll stick with paper. By the way, it’s been many years ago, but I have had the experience of news print transferred onto a paint job. Steve
-
The paper pictured is painters "Masking Paper" available in the paint section of any home improvement or hardware store, or online of course. It comes in all different widths and lengths, but a standard size roll of 9" x 180 feet will cost you somewhere in the neighborhood of $2.00 or $3.00. Very inexpensive, and enough to last you a very long time. Steve
-
|- Another Adhesive BMF Amphiviate -|
StevenGuthmiller replied to 1972coronet's topic in Tips, Tricks, and Tutorials
I don’t have any problem with these sort of “new product” videos that some of these guys do. They serve a useful purpose. But I don’t think it’s helpful in the least when they make these sort of blanket statements about a product that they obviously don’t have much real long term experience with. A quarter of a windshield frame thrown in a box for four years is not exactly an objective assessment of the product’s long term viability. Steve -
|- Another Adhesive BMF Amphiviate -|
StevenGuthmiller replied to 1972coronet's topic in Tips, Tricks, and Tutorials
Sorry, but I had to stop watching at the point when he said that BMF "doesn't really withstand the test of time". That right there tells me that he doesn't know what he's talking about. He should probably stick to what he knows best.......whatever that is, and leave the building to the people that know what they're doing. Steve -
vintagemodelcarparts on eBay
StevenGuthmiller replied to afx's topic in Model Building Questions and Answers
I've been seeing a lot of buzz about this guy on Facebook lately........None of it good. Good luck. Steve -
Hmmm, I was just contemplating whether or not my decision to keep my distance from this board was the right decision or not. The moderators are right. There are other places online that embrace differing opinions, no matter the topic. I even came across a modeling group on Facebook for adults, where individuals are treated as such. There’s not even any language police! I was shocked! Steve
-
Thanks Everyone! I appreciate the kind comments. Steve