Snake45
-
Posts
22,539 -
Joined
-
Last visited
Content Type
Profiles
Forums
Events
Gallery
Everything posted by Snake45
-
Dennis, I really like those! Different and therefore interesting, and all VERY well built!
-
 Thanks, I appreciate it!
 -
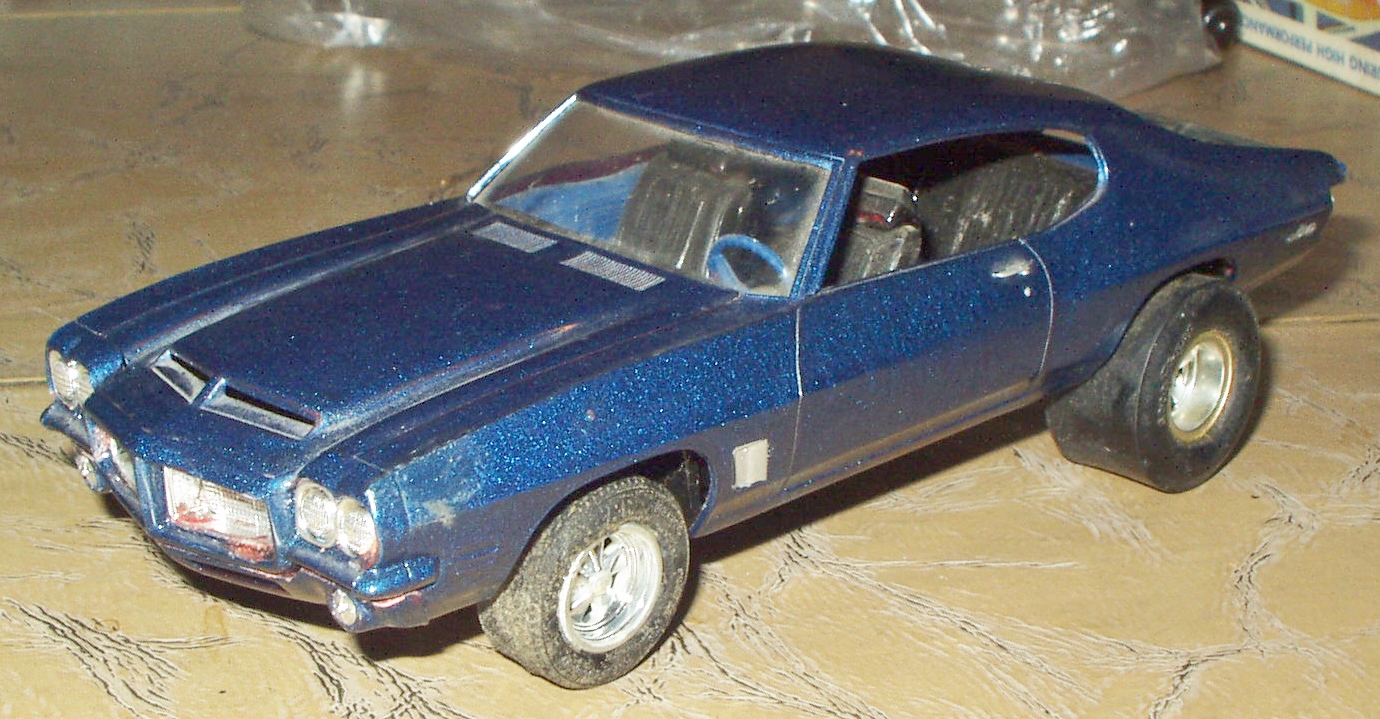
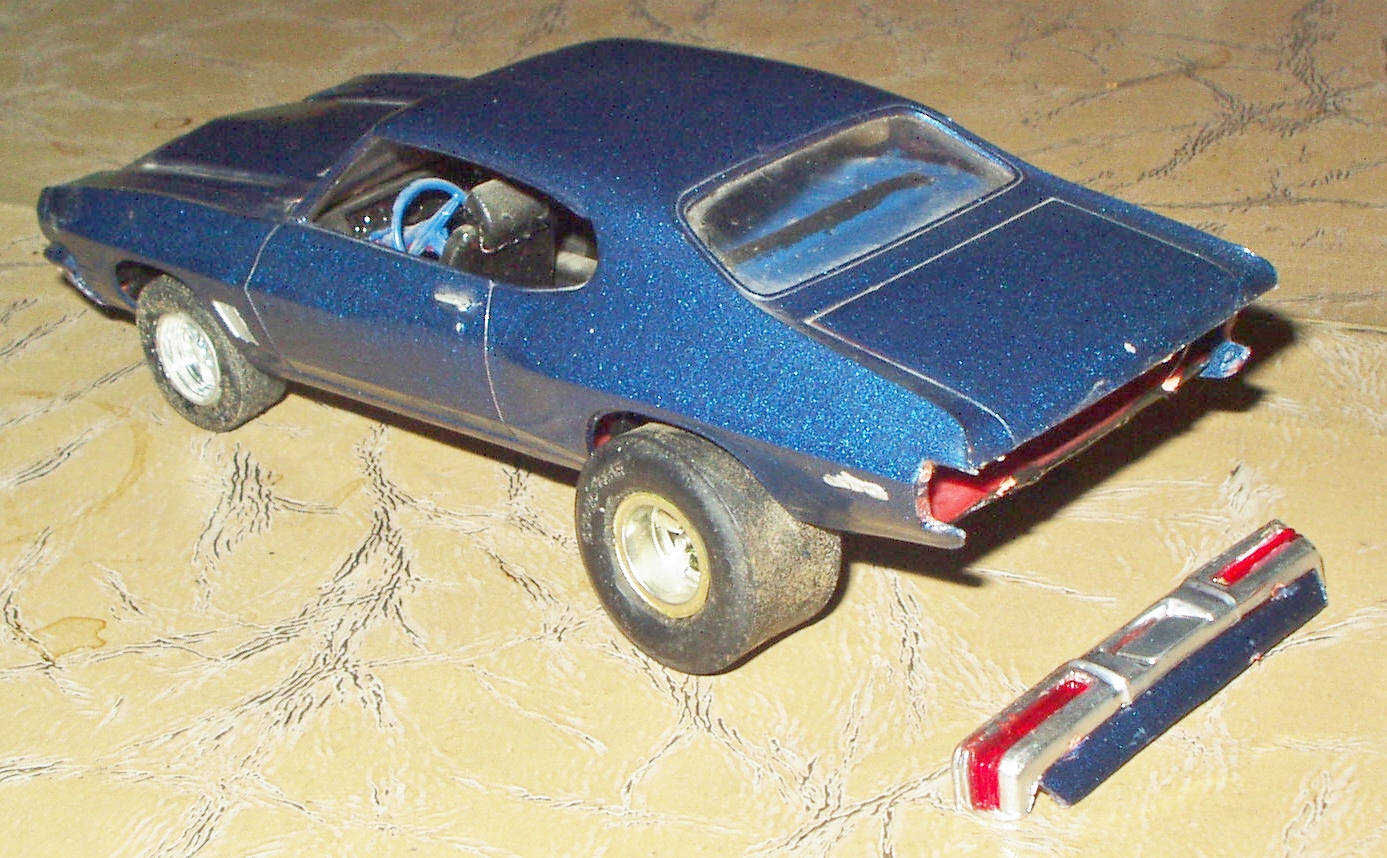
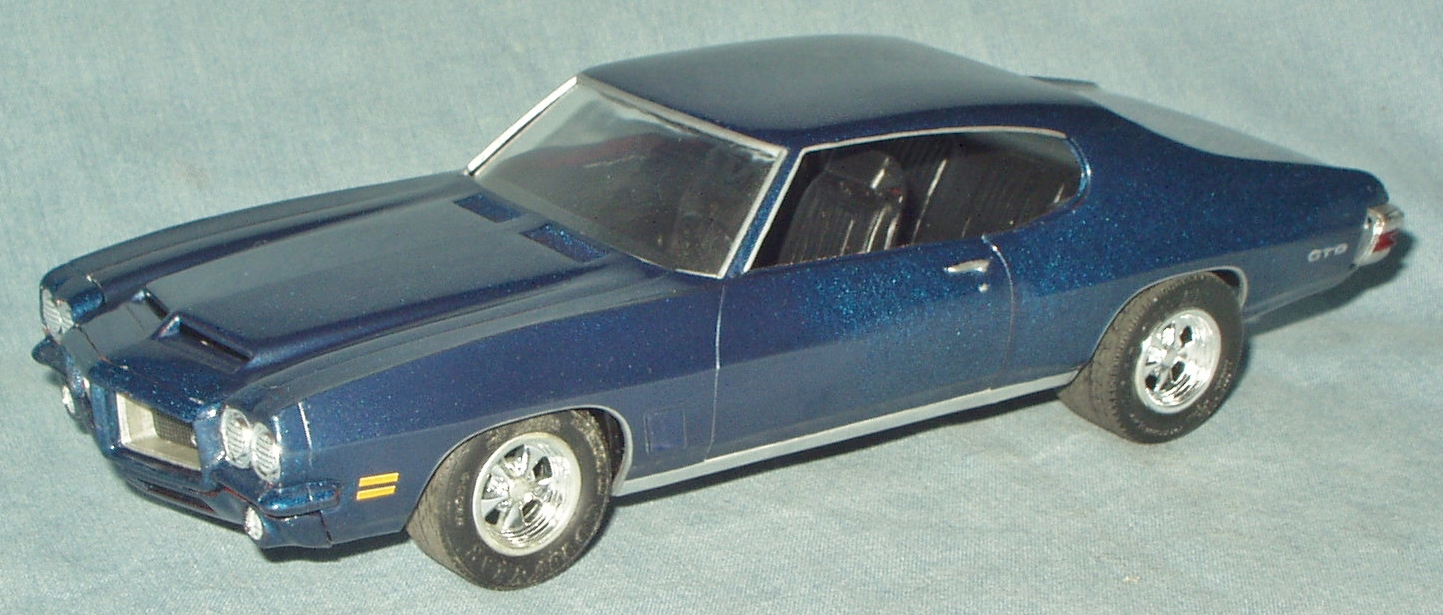
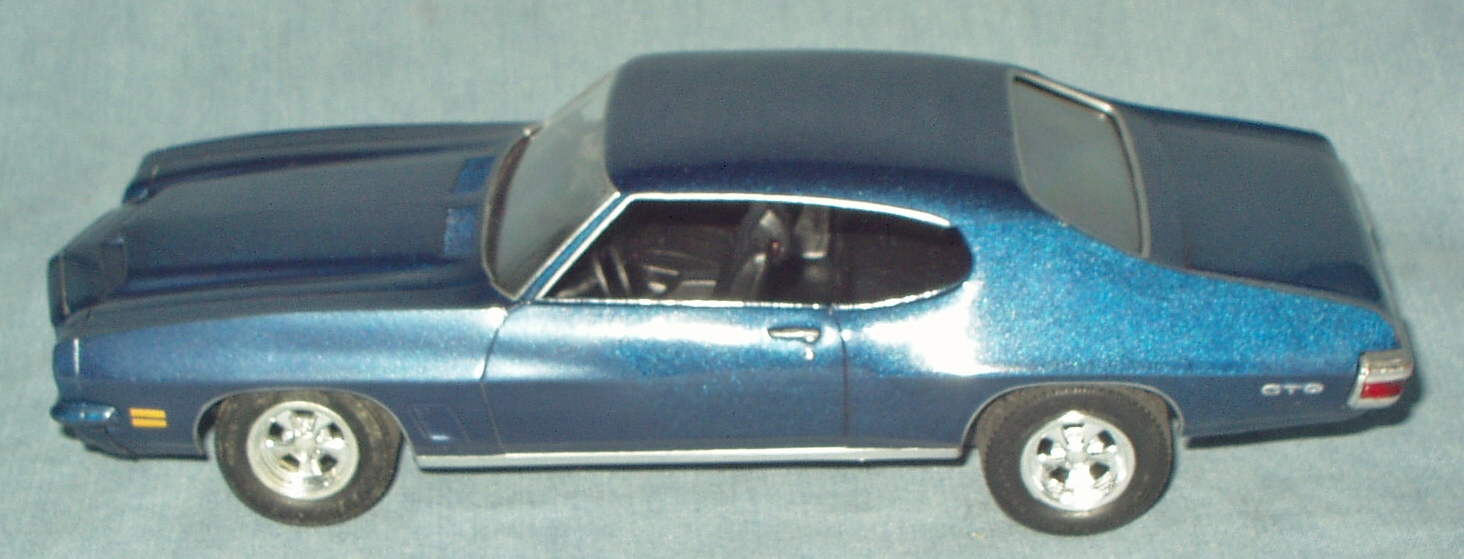
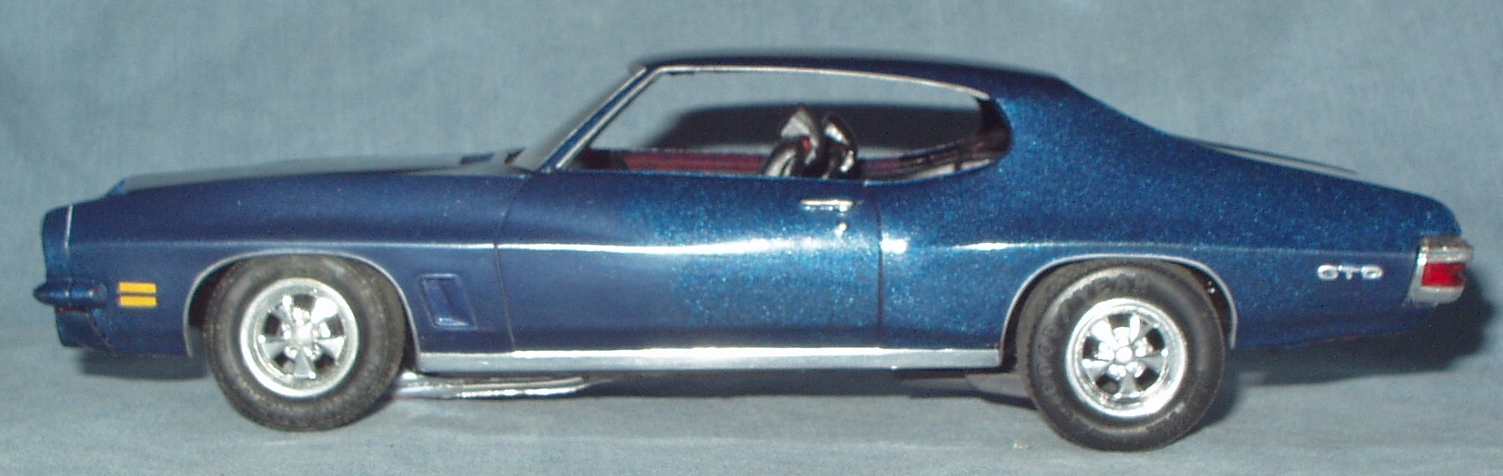
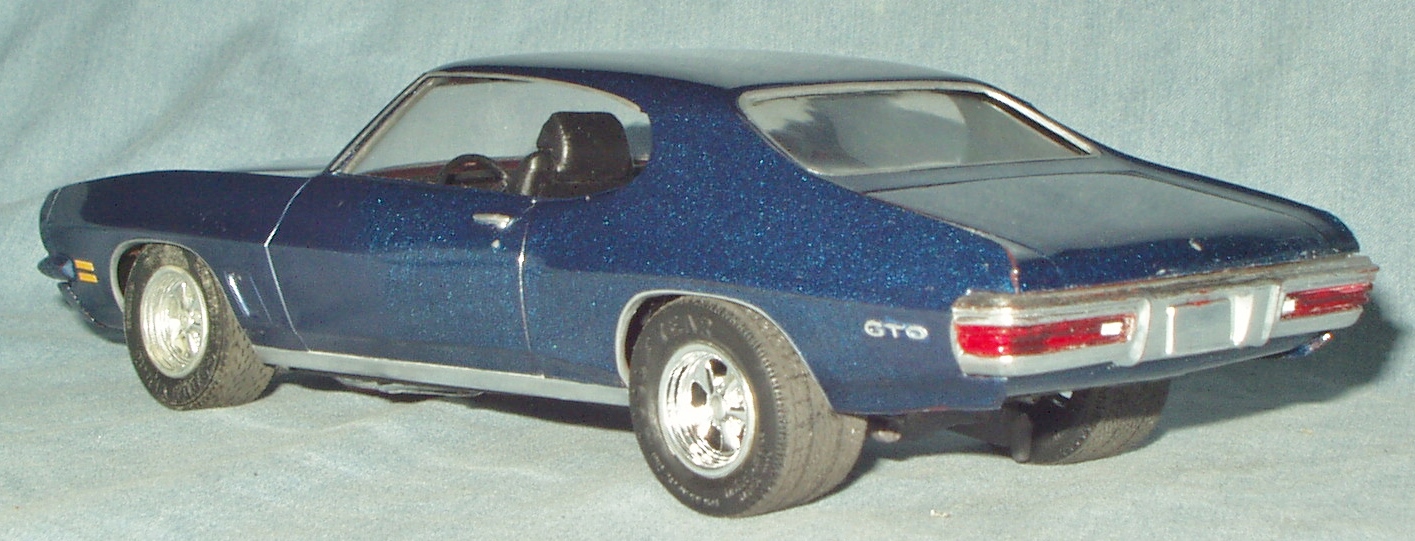
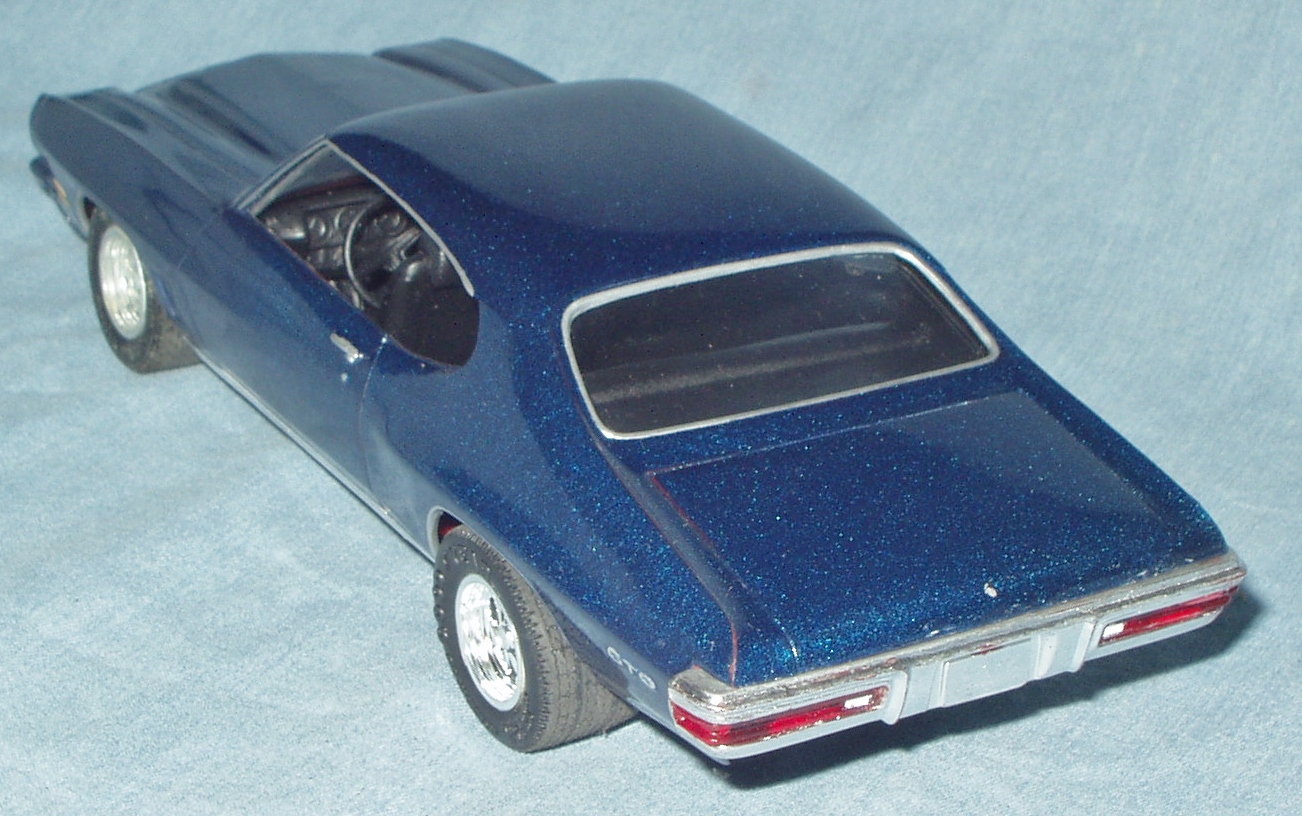
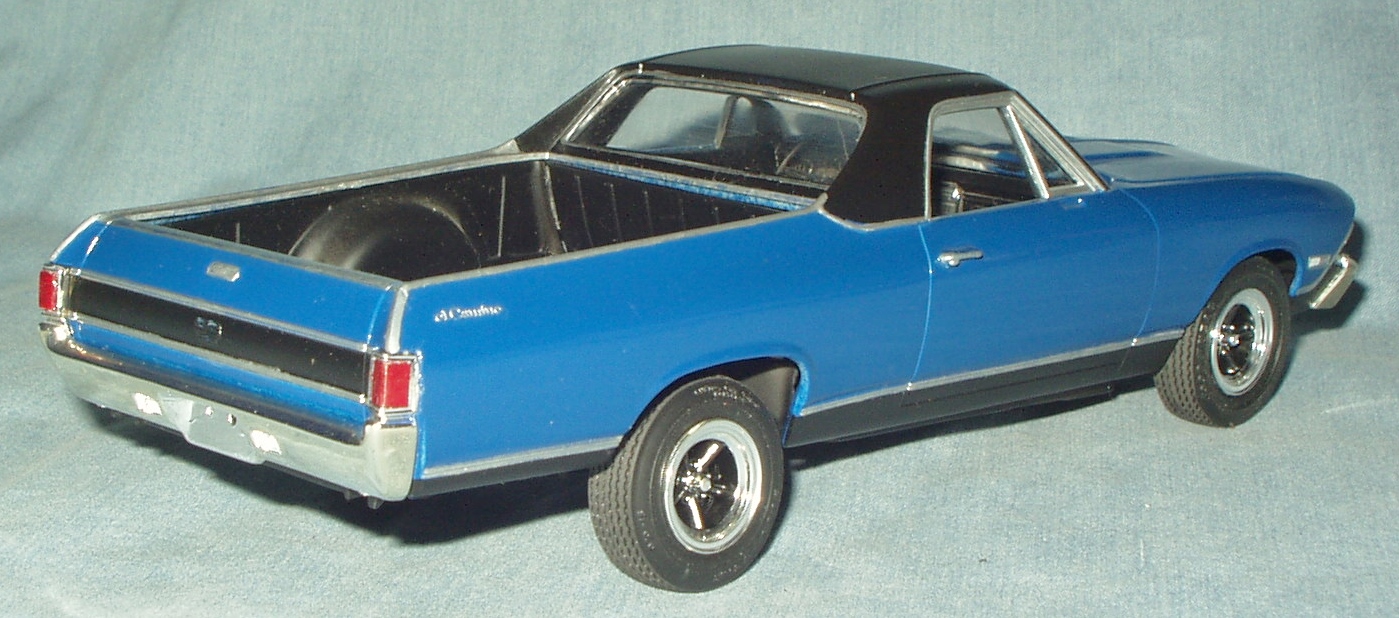
Finished this one up a couple months ago, but just got the pics taken yesterday. Bought this '72 GTO cheap at the local toy show about six months ago. It looked good (for a quickie “rescue” project) at the time, but when I got it home, the paint turned out to have a few runs and other flaws. I wet-sanded and polished them out but burned through in several places. Model Master Arctic Blue seemed to be a near-perfect match (or I'd have just thrown the thing back in the box at this point), and it seemed like an excellent chance to try out my new fine-tip DA airbrush, which cost me all of $20 at Walmart (Chinese knockoff of a Badger 150). So I airbrushed only the burned-through and thin spots, then polished the touchup spots and tried to blend them with the old paint. About 75-80% of the original paint is still seen on the finished model. It's not perfect, but it looks kinda like home garage (or high school shop?) accident or rust repair work. If you're interested, you can see the paint damage and touchup work detailed here: The paint sorted out (it looks better in real life--in the pics, the original paint looks much sparklier than it really is, for some reason), everything else was pretty much first degree Snake-Fu. The interior, which was painted blue and black, got a squirt of Krylon Satin Black—no further detailing (just not worth the time or effort on a project like this). I used everything from the original glue bomb except the rear wheels and tires. I decided I liked the fat front tires (on Cragars) that it came with, so I matched them up with deep Cragars from the AMT '72 on the rear shod with some wide treaded tires (I think from an AMT '69 Cobra) instead of my normal street bomber slicks, and lowered the comically jacked rear end to a more reasonable angle. So the thing has more of a NASCAR/road racer/GT vibe than my standard drag-inspired street goon. It still fits nicely into my imaginary late '70s-early '80s phantom car club, “The Retrobates.” Someday I'll build a “nice” '72 GTO. Until then, this one fills the slot on my shelf. As always, comments welcome.

-
I'm still getting a 404 Page Not Found when I try to post quoting Mr. Obsessive's remarks on the '69 Firebird.
-
What he said! Very nice, very clean build. Well done and model on!
-
Were all the '78 Anniversary interiors silver? I have a promo to restore and am not looking forward to doing a silver interior. Was black also available?
-
Dan, what's the thickness of those razor saws?
-
AMT 57 Chevy Bel Air Review Needed
Snake45 replied to CEKPETHO BCE's topic in Car Kit News & Reviews
I saw this version at Hobby Lobby this morning and noticed it was priced at only $19.99 (vs their usual price of $29.00). The pic on the box top looked liked the "old" body with the kinked side trim, but one of the pics on the side looked like it might have been the newer, better one. So what's in the box, the old kit with only stock parts? -
Great work so far! Your last pic reminded me a lot of one I took at about the same stage of my own dragwagon I built a few years ago. Hope you don't mind me posting it, I apologize in advance.
-
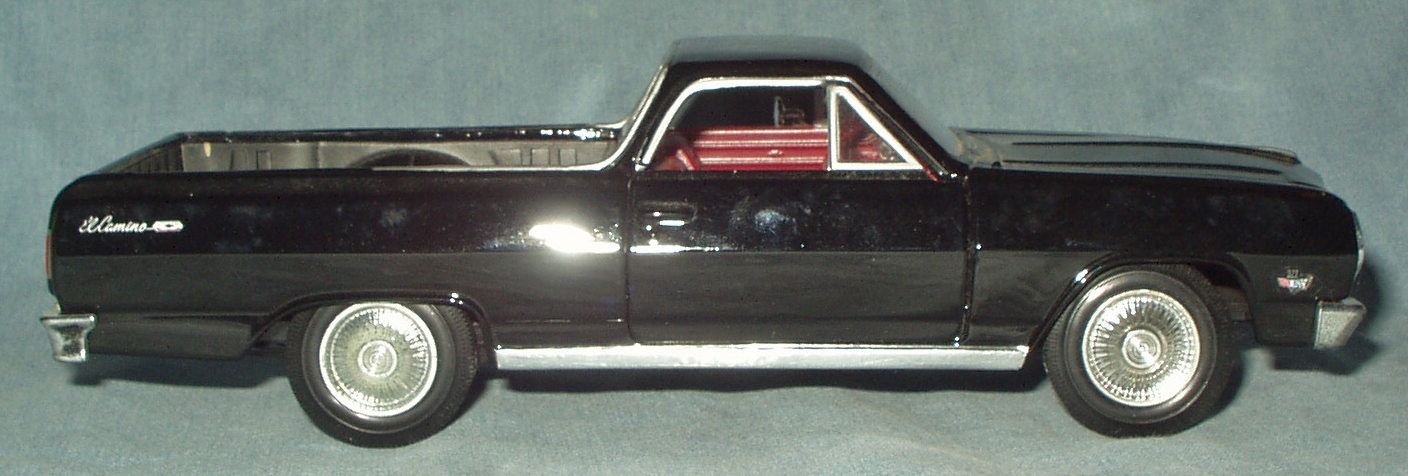
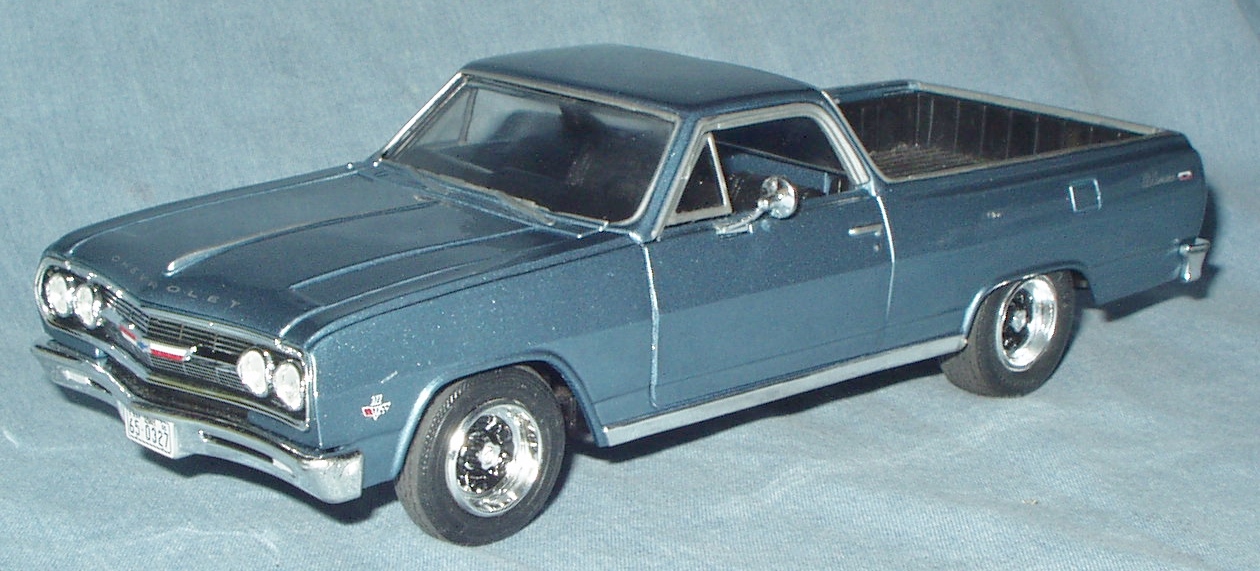
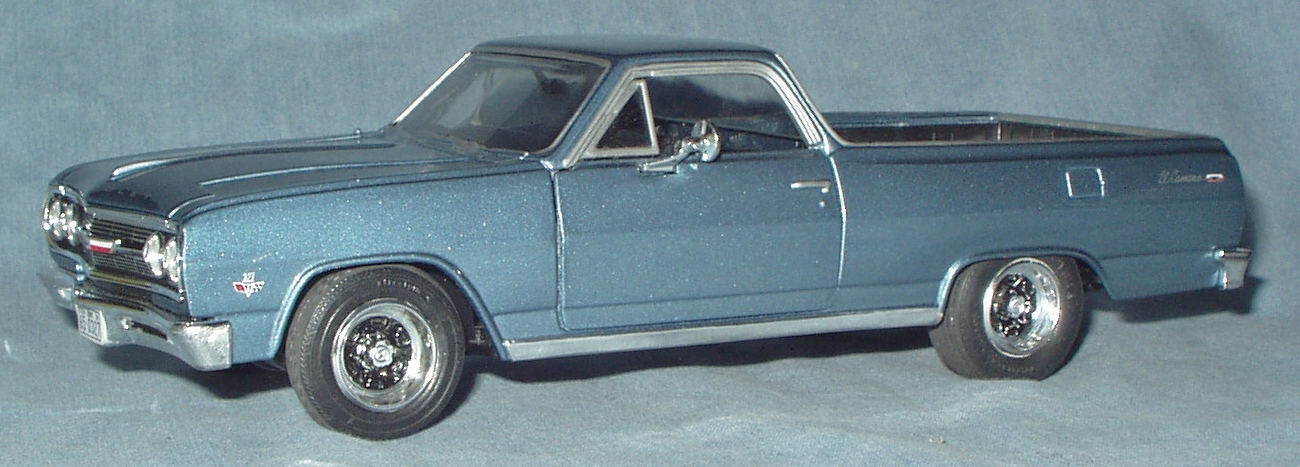
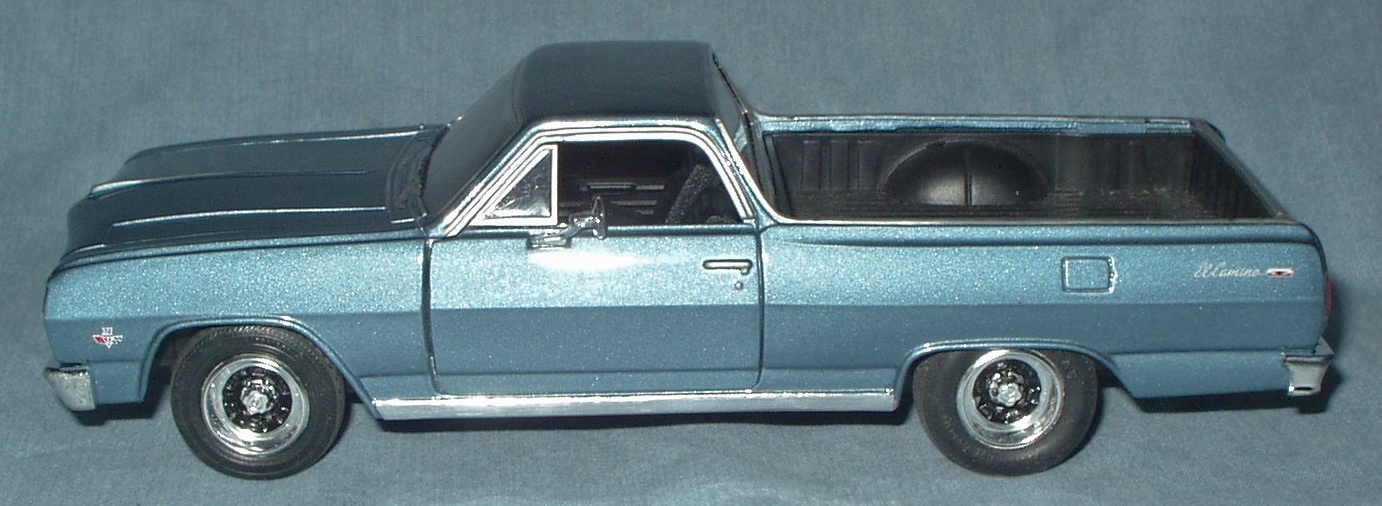
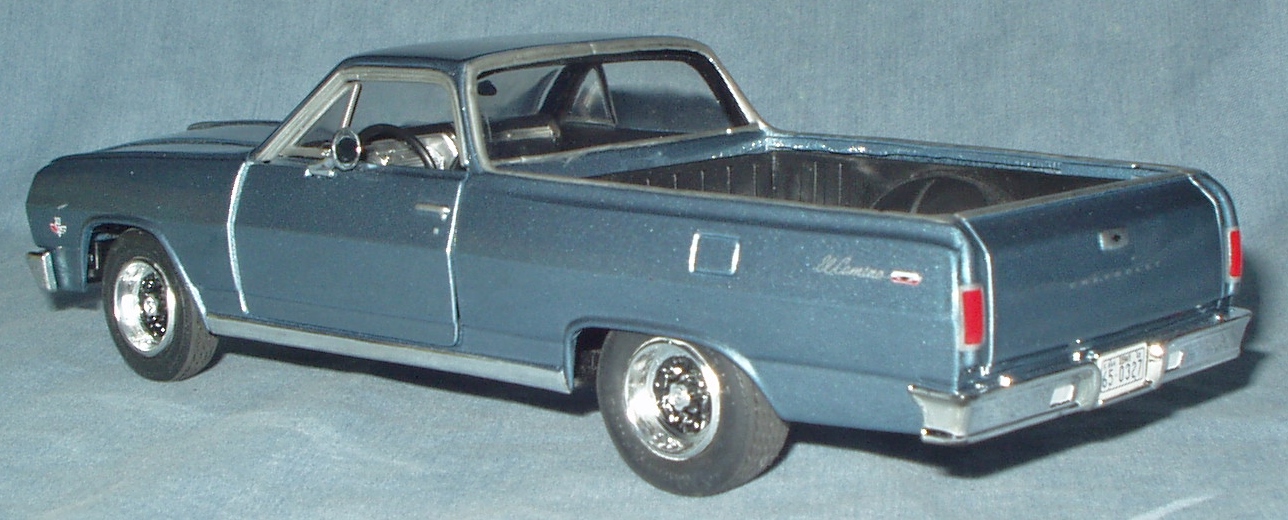
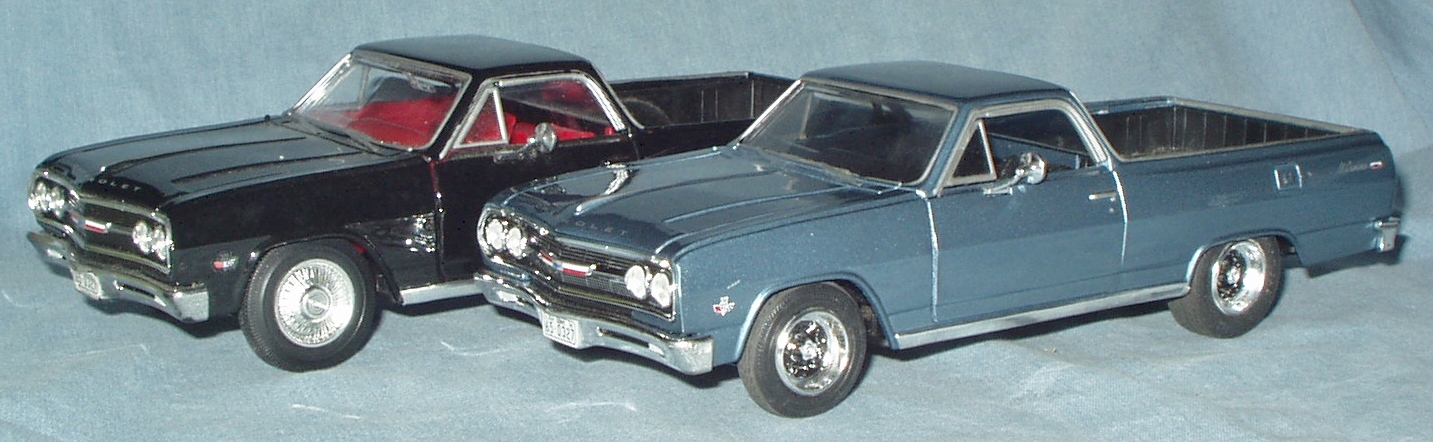
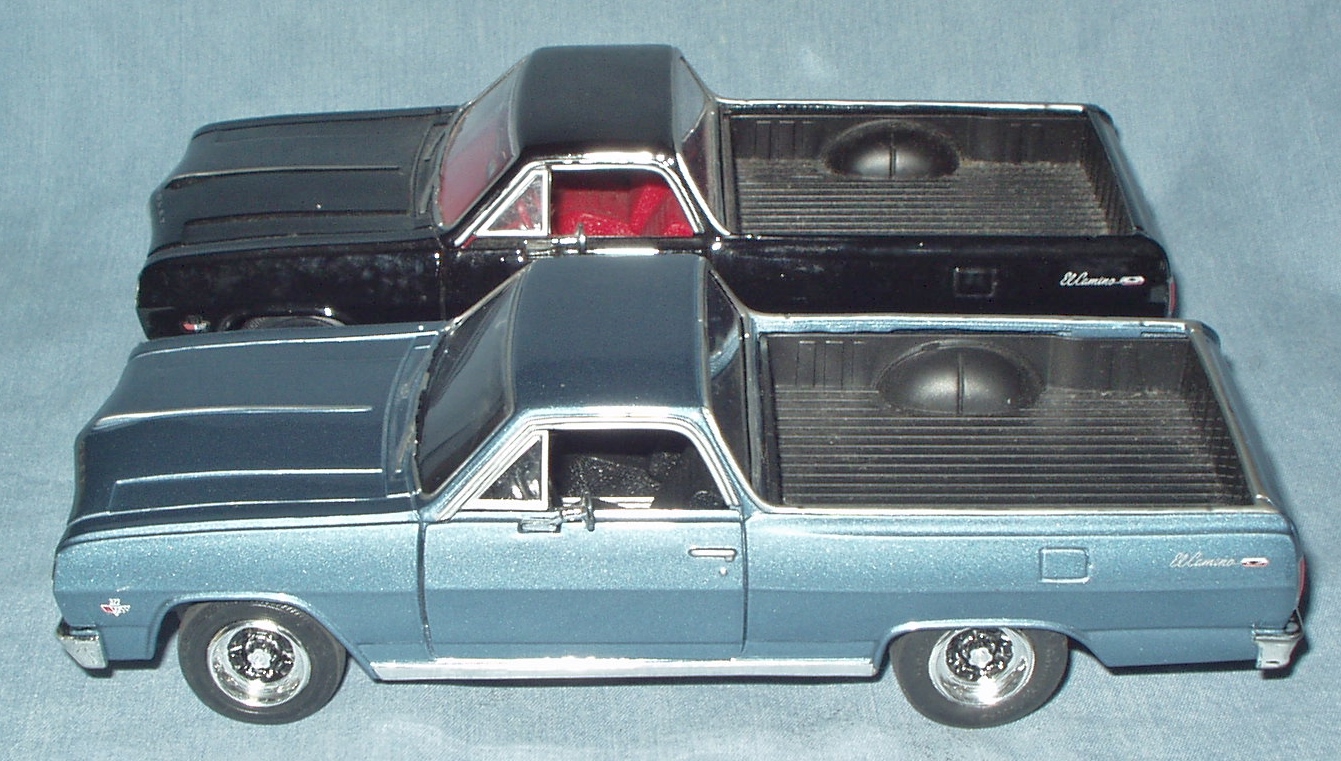
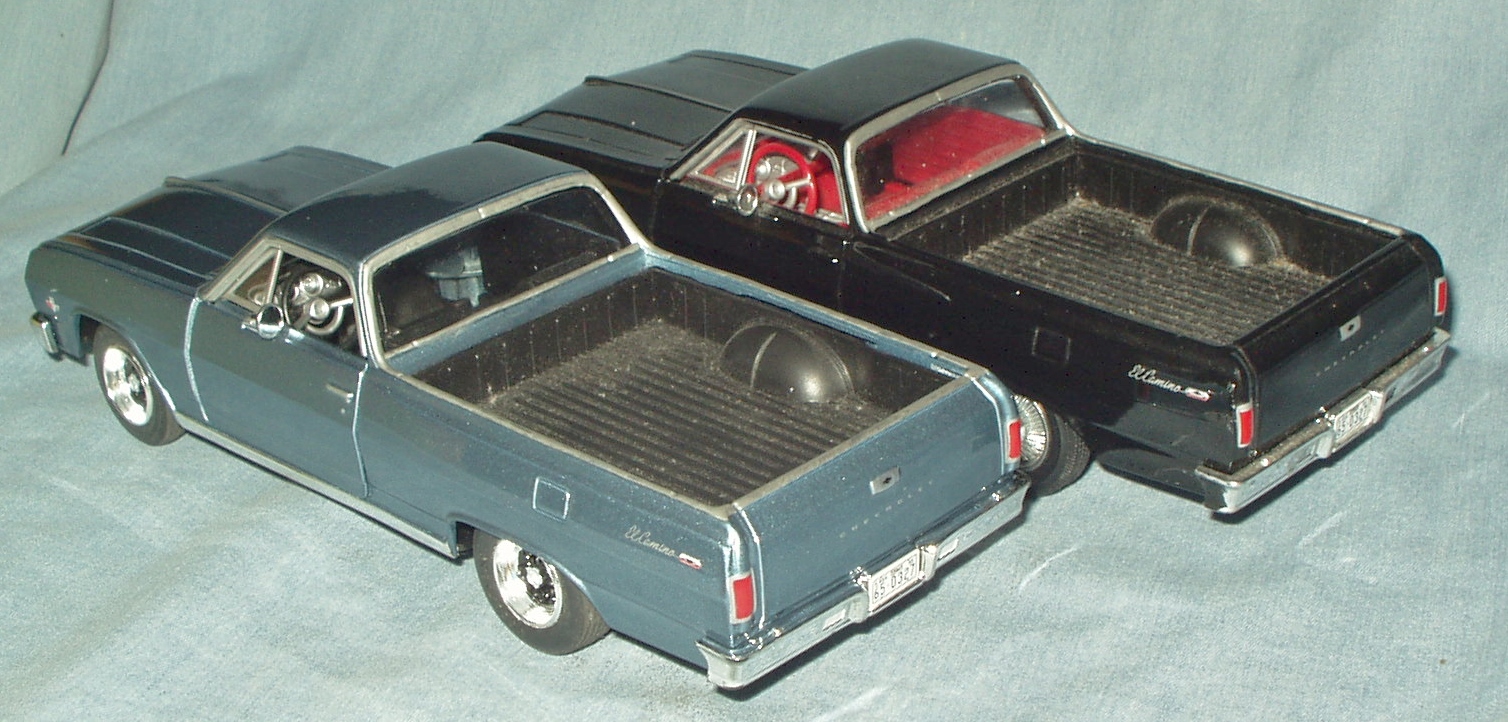
This pic of the unmodified black one shows what I'm talking about re the door window frame. Looks awful with that gap and there's no easy fix. So what I did was, cut a strip of .030” styrene, bend it to the right angle, fit it in very carefully, and superglue it into the body. Then I silver Sharpied the whole window frame This of course required filing/trimming back the front edge of the vent window frame on the door. Fortunately the doors on this one are VERY easy to remove, being held in place only by a leaf spring under the hood. This thing fought me every step of the way. When gluing in the left door frame strip, I dropped it and got superglue on the inside of the windshield. If it were the other side it wouldn't have been so bad, I could have polished it out in-place, but this was over the steering wheel which prevented access. So I had to remove the dashboard, which required grinding out two rivets holding it in place. As long as I had the grinder out, I went ahead and ground off the rivet holding the glass in place and took it out to polish the superglue off the inside. Then I silver Sharpied the bed trim and other trim and ran a black wash in the grille and painted the turn signals and backup lights white. I decided I didn't like the stock wheel covers, so replaced them with 6-hole Rally Wheels from an AMT '72 Nova and big and little AMT hollow vinyl tires. It turned out to be IMPOSSIBLE to remove the model wheels from their axles and I ended up having to cut the wire axles with a cutoff wheel in a Dremel—right in the middle, the only place I could get to it. I ended up with 10 or 12 hours in the thing. But it all turned out pretty much okay, more or less. I have a '65 Elky on my shelf for $15 and about a fourth of the time it would have taken me to build and paint and polish out the AMT kit. I still want to build one someday, but in the meantime, this one fills that slot on the shelf. Here's how my modded one looks compared to the unmodified black stocker. As always, comments welcome.
-
Not a fan of those wheels, but otherwise, Hella Cool! What's the paint? It looks very close to '69 Camaro Rally Green and you got a nice finish on it too. Well done and model on!
-
And is that color '61-'62 Chevy Honduras Maroon? Cool!
-
"Bring Out Your Dead" Completion Build--ROUND 2 Is On!
Snake45 replied to Snake45's topic in WIP: Model Cars
Okay, thought it might be a good idea to post a quick roundup of where we are. 14 in so far--great participation! Richard Bartrop: '29 Ford Disconovaman: '55 Nomad 89AKurt: '50 Chevy truck Jantrix: '37 Ford (?) rod Snake45: Get Smart Sunbeam Alpine and '40 Ford coupe Lordmodelbuilder: '64 Chevy Blazer Eric Macleod: Deusenberg Scale Asylum: '64 Dodge 330 Junkyard Jeff: '41 Chevy truck FordF-100: '67 LeMans Vintageford: '49 Ford Magicmustang: Tommy Ivo double Buick rail. FIRST COMPLETION! GOTTER DONE! Foxer: AA/Comp rail GerN: '32 Ford I'll be very pleased and proud if even half of these projects get done by the end of the year (including my own). Okay, fellas, let's GITTER DONE! -
INSPIRED THINKING- Cheap Tips for Frugal Modelers
Snake45 replied to 62rebel's topic in Tips, Tricks, and Tutorials
On this recent glue bomb rescue, it was missing the right taillight. I made a replacement by cutting clear plastic from a (Walmart) blueberry package, folding it to the correct angle, then coloring it inside and out with a red Sharpie. With VERY careful measuring and cutting, mine actually fits better than the left side kit part! Total time for the fabrication was maybe an hour. Improvise! Adapt! Overcome!
-
That was exactly my guess, based on the wheels and tires shown.
-
I hear ya on the C-pillars. Spent an hour or so on those last night and still didn't get 'em completely cleaned up. Onward.... And yes, the HUG used a V-drive, not the arrangement on this kit, which as I mentioned seems to be based more on the McEwen (et al) funny. That's why I'm not worried about finishing it as HUG, just going my own way with it just because I hate wasting anything, especially anything 50+ years old. I HOPE you'll get motivated to drive on, too!
-
You talked me into it, you Silver-Tongued Devil! I just bought another one. I can use the Appliance wheels on the custom '67 Camaro I'm doing, as they also came in the original AMT '67 Camaro annual. And Pat, digging, your build. Any progress to report?
-
"Bring Out Your Dead" Completion Build--ROUND 2 Is On!
Snake45 replied to Snake45's topic in WIP: Model Cars
GerN, you're in! GITTER DONE! And yes, that does look like ET's skull, but it's not as weird as a real one I saw last night on Ancient Aliens. -
Having trouble replying to this thread. Let's see if I can do it without the quotes...
-
That is one GREAT looking '37 Chev! Any idea what year that pic is from?
-
"Bring Out Your Dead" Completion Build--ROUND 2 Is On!
Snake45 replied to Snake45's topic in WIP: Model Cars
Foxer, you're officially in. Cool project! GITTER DONE! -
"Bring Out Your Dead" Completion Build--ROUND 2 Is On!
Snake45 replied to Snake45's topic in WIP: Model Cars
MagicMustang, well done! You're our first official Finisher! GOTTER DONE! Model on! -
Oh I heard THAT! Looks like you did a pretty good job of it, though.
-
And?
-
Yes, beautiful!