Snake45
-
Posts
22,539 -
Joined
-
Last visited
Content Type
Profiles
Forums
Events
Gallery
Everything posted by Snake45
-
I don't think Batman could fit in a Cobra (especially with cape, belt, and boots). Maybe it were center-steer, and he sat right in the middle straddling the drive hump....
-
 If you have no further use for the JoHan Torino's taillights, I know someone who's been looking for a set of them.
 -
I think I have one of these in the stash, though I think it might be a different boxing. It always looked a bit small to me, though not as small as 1/32. This listing calls it 1/28, which might be about right. I bought it cheap off a Squadron Shop "odds and ends" sale table at some point, IIRC. https://www.worthpoint.com/worthopedia/24-otaki-motorized-ford-mercury-capri-1824457325
-
Welly does a 1/24 diecast, but it's the Euro version with rectangular headlights. I've seen it in 3D and it looks pretty good. https://www.diecastmodelswholesale.com/1969-ford-capri-red-1-24-1-27-diecast-model-car-by-welly/
-
I could swear I've seen the box, either in hobby shops back in the day or on the Net, but I carefully googled for it today and could find neither a kit box nor any mention of a kit. So I guess you and I must both be "misremembering" such a thing.
-
Very clean build, very nice! Well done and model on!
-
Try hot running water (tapwater hot) and a thumbnail. I hesitate to suggest any sort of chemical, as chemicals as mild as rubbing alcohol and Windex (ammonia) can damage or remove some acrylics.
-
Shiny!
-
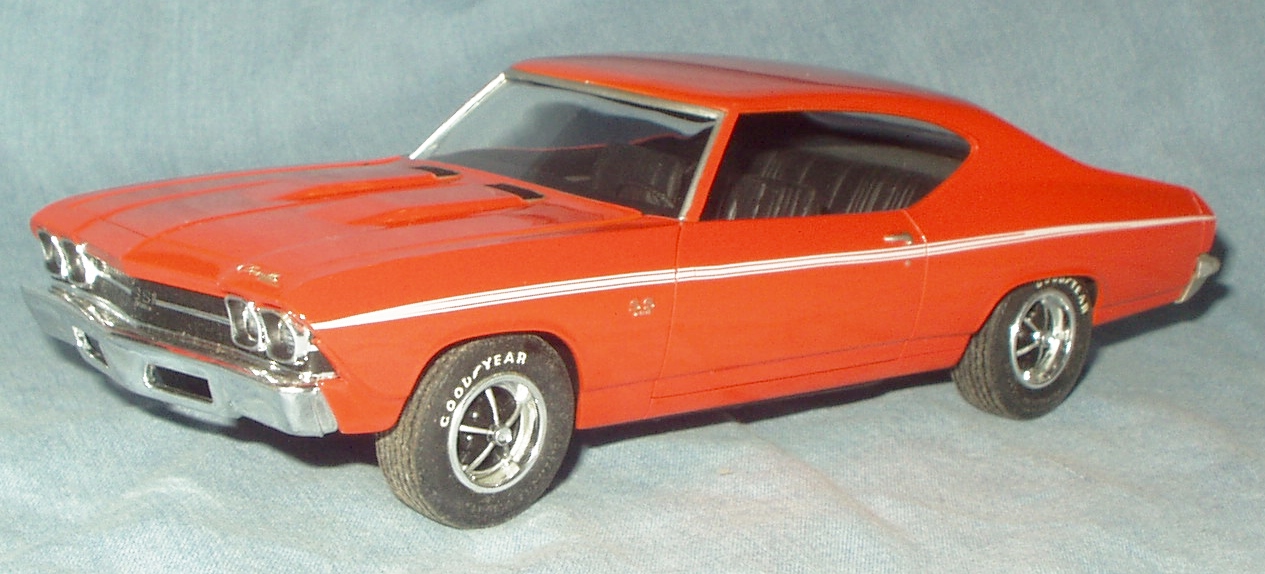
Thanks, but I don't think it's been waiting that long. Looks like a '90s or 2000s reissue (molded in gray, and had the SS stripe decal). But here's the one I really DID build 50 years ago, and restored in 2014--a true restoration, just cleaned it up and touched up and repaired a few minor things, the paint goes back to 1968 or '69. Notice that I too put the big slicks on the stock SS (Magnum 500 wheels), so didn't feel too bad about leaving that combo on this "rescue." This one, of course, has the original, GOOD taillights...and its hood scoop ended up on the Rescue.

-
Just realized, I do all my airbrushing sitting, but all my rattlecanning standing. And I simply can't imagine doing either the other way.
-
That looks like something Pyro would have kitted back in the day. Kind of a pretty green color, though.
-
If your Pontiacs are truly "early" '60s, a generic light blue should work, such as Testor #8. Pontiac didn't start using the iconic light metallic blue until 1966.
-
Very nice! They ALL look great!
-
´62 Buick Electra - Roger Trawick´s Electracutioner
Snake45 replied to Koellefornia Kid's topic in Model Cars
I'd say you nailed it. I like your purple better than the real one. Well done and model on! -
I try to avoid stanfding whenever possible. I've gotten pretty good at it. In fact, it's possible I have NEVER stoofd.
-
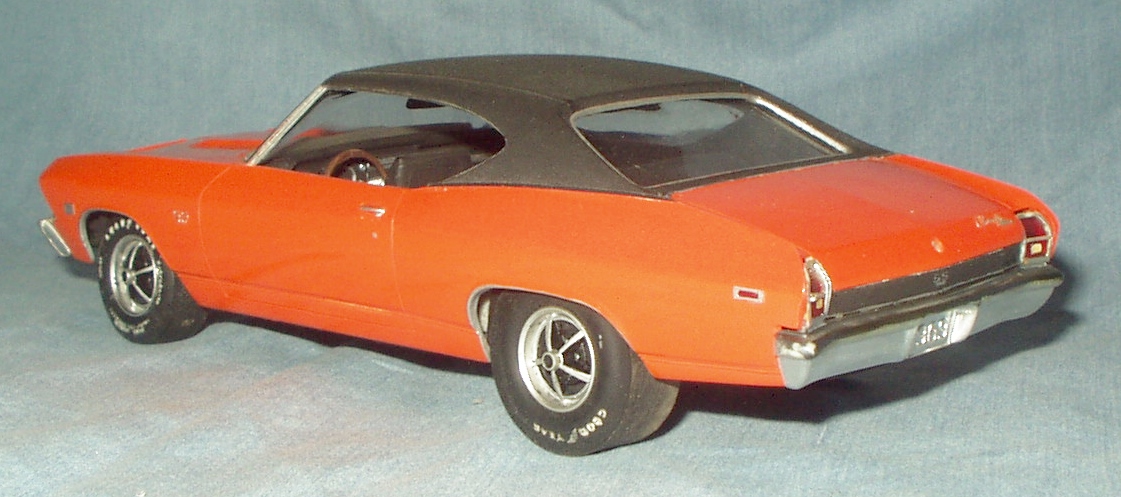
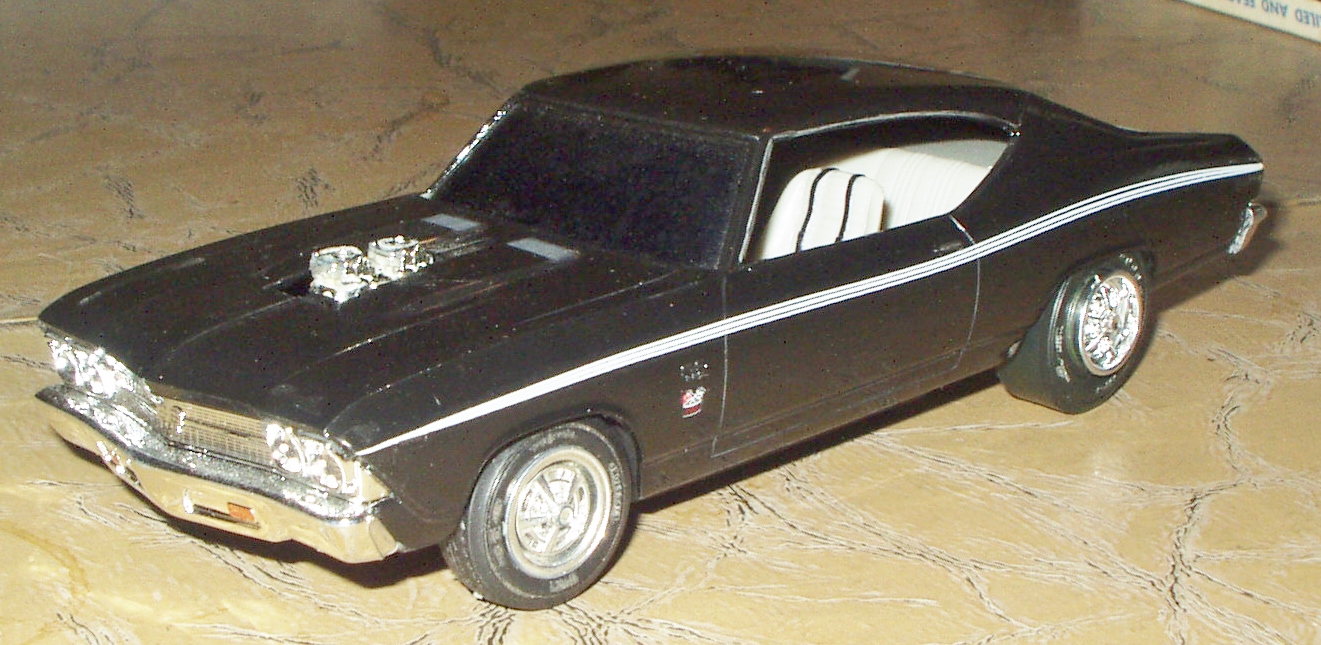
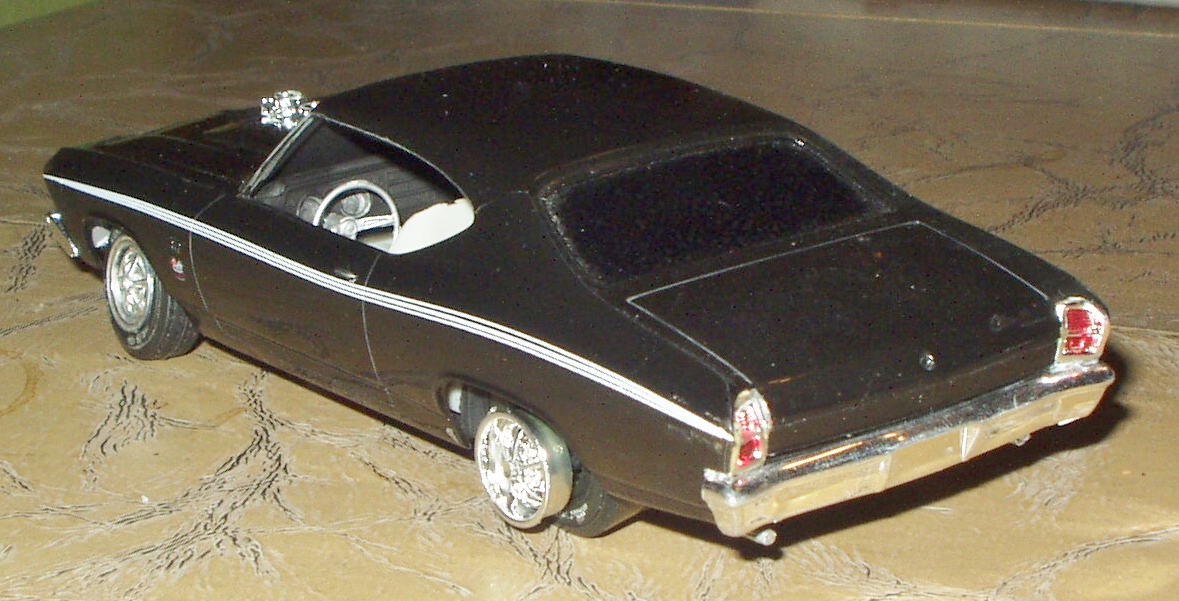
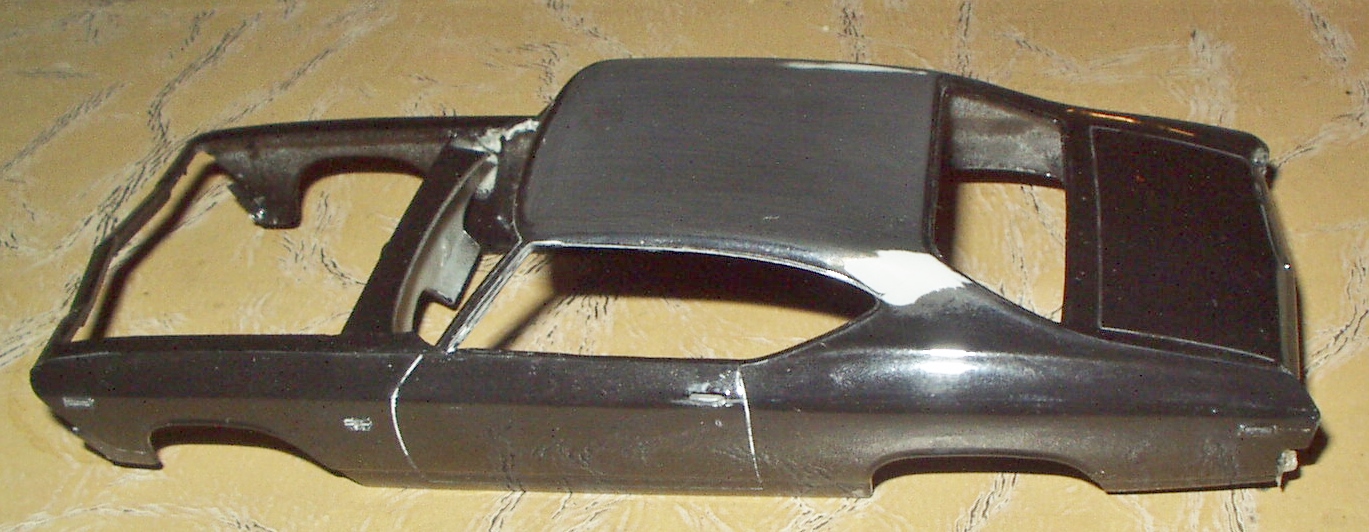
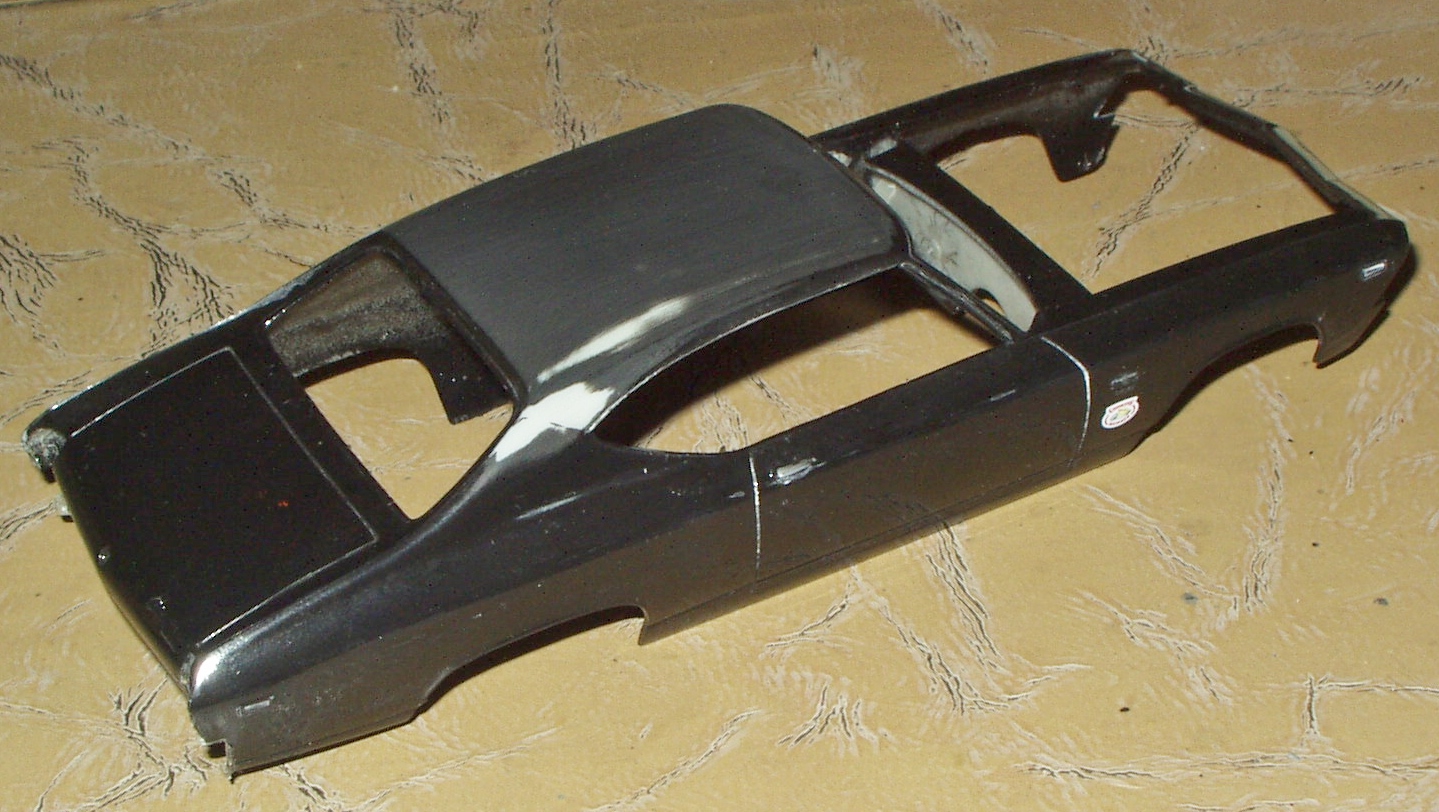
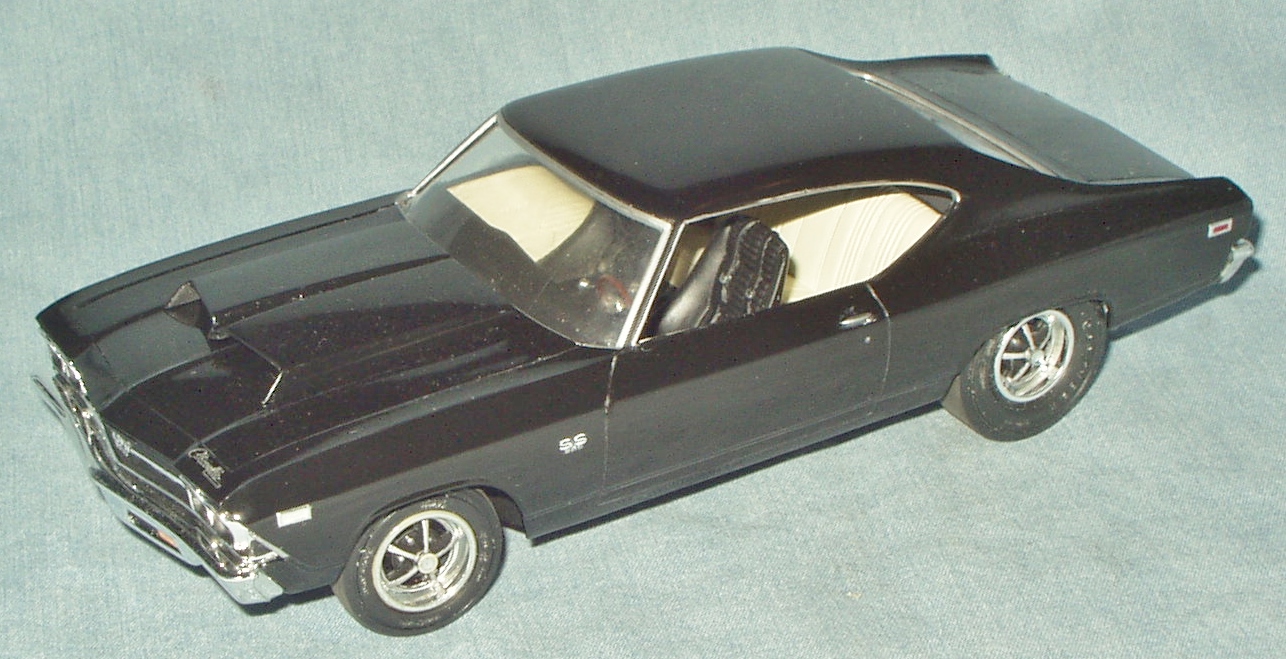
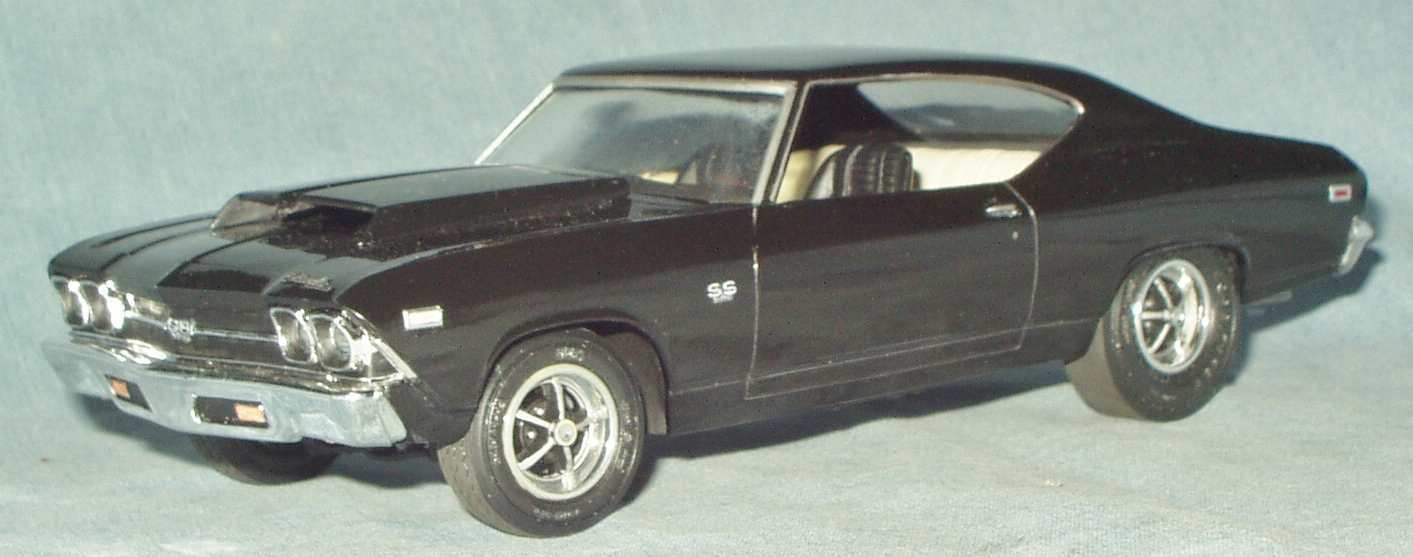
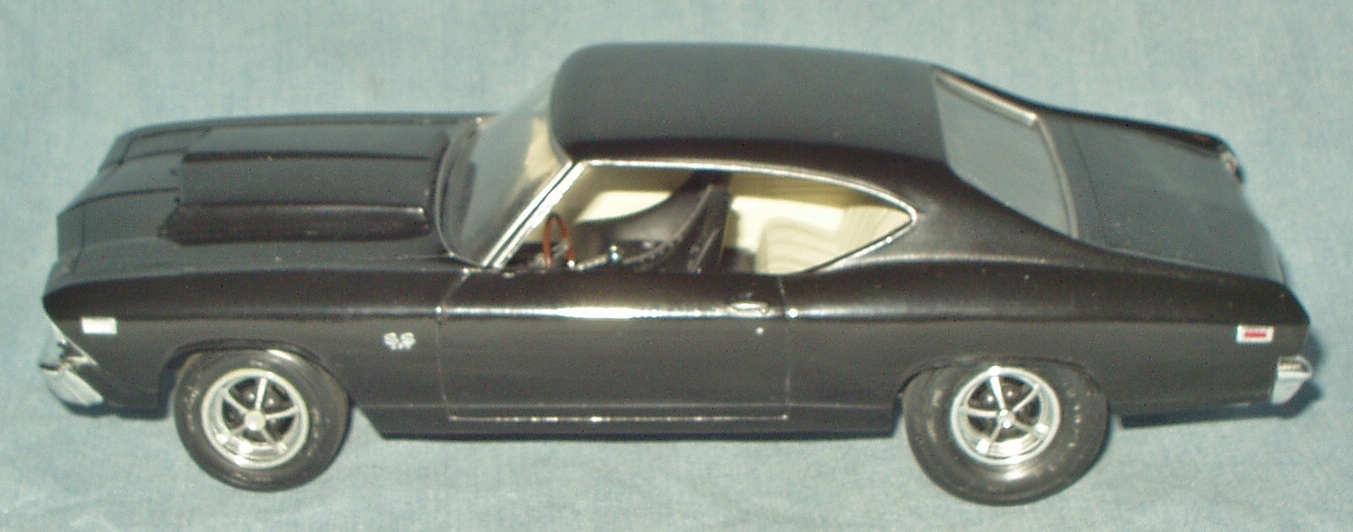
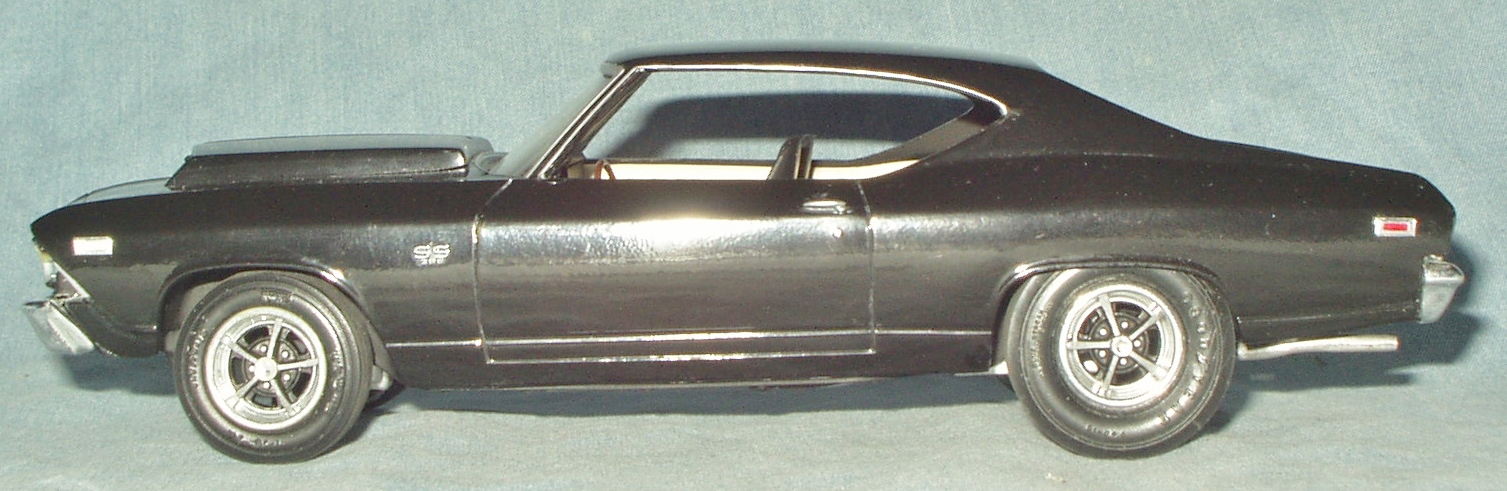
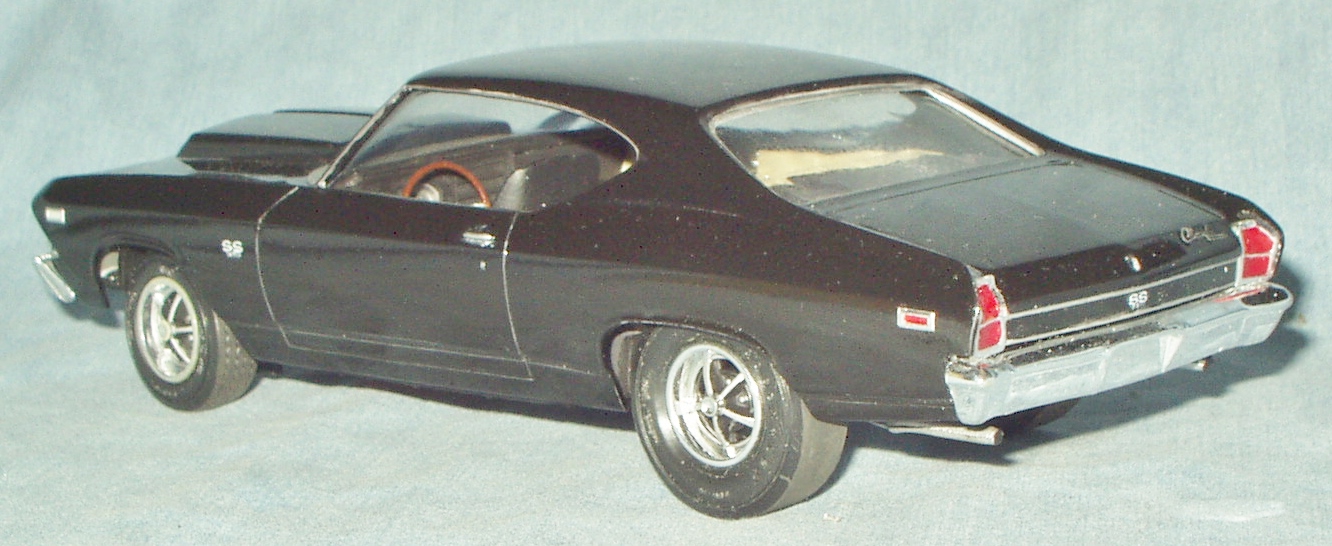
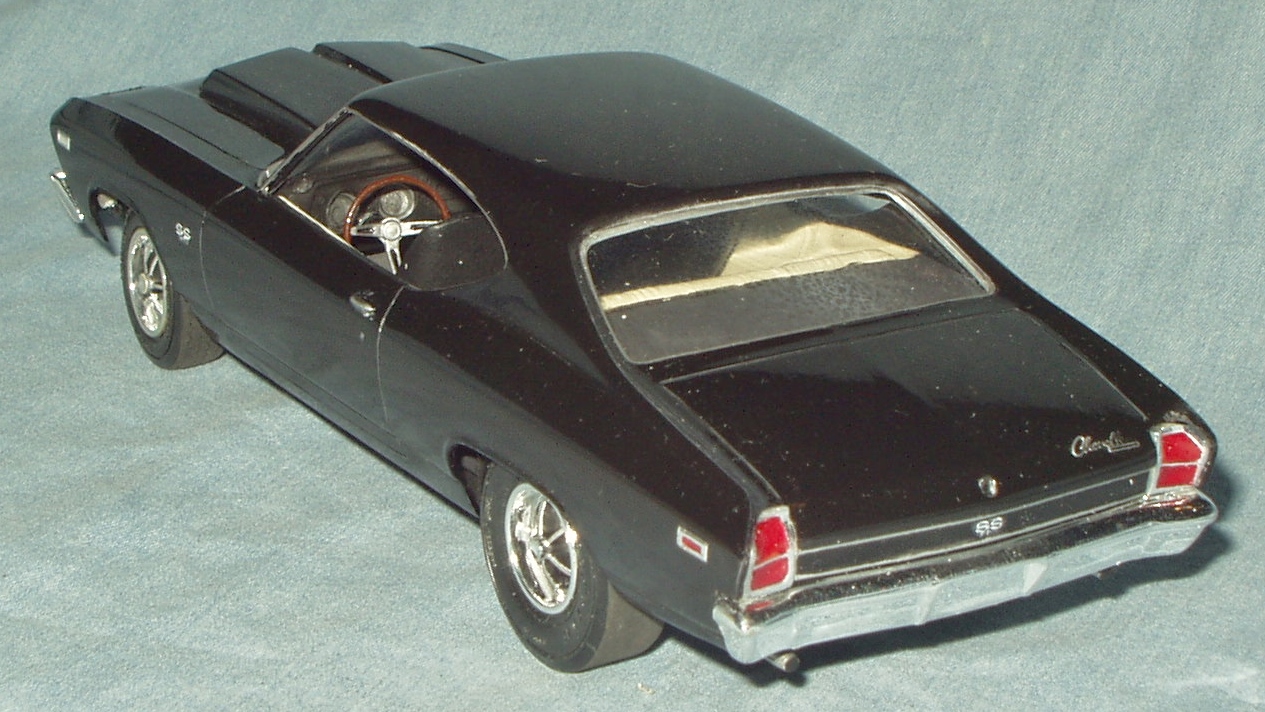
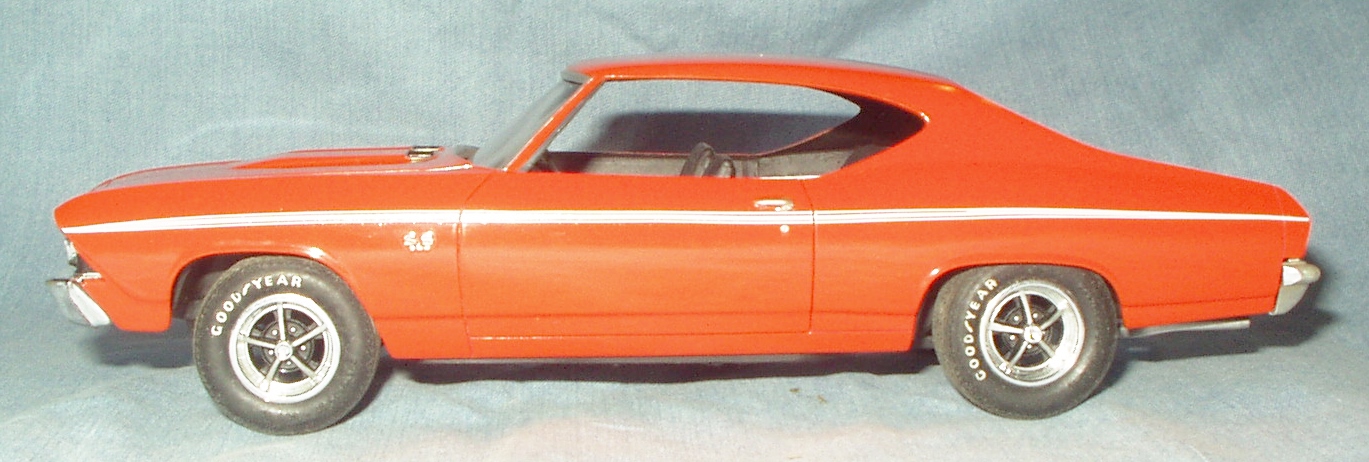
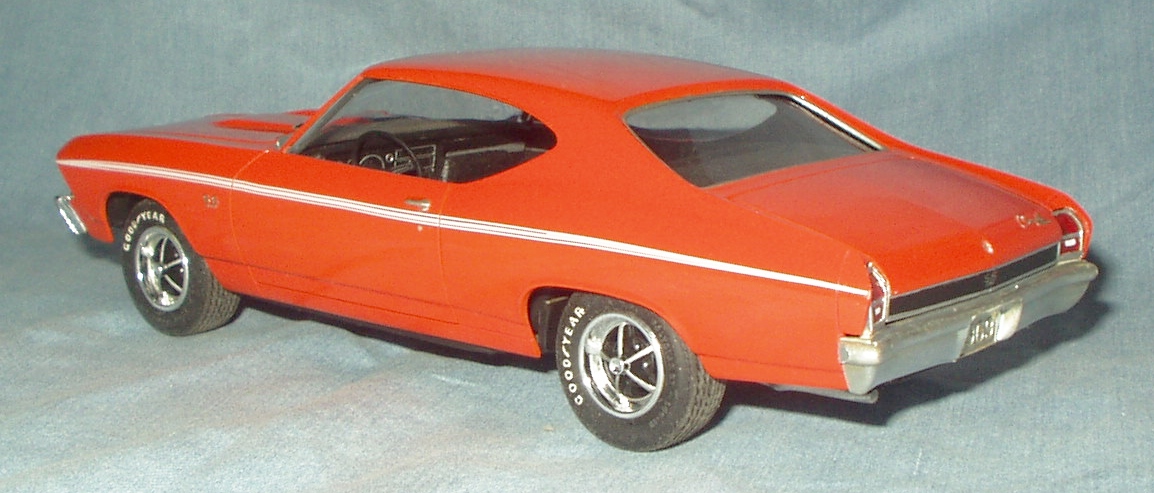
Another local toy show purchase, cheap. It was complete and the paint looked pretty good so it followed me home. I couldn't live with the molding lines running across the C-pillars, but my first thought was to give it a vinyl top, then paint the body lowers matt black and foil the chome strips that shouldn't be running down the lower body sides on a '69 SS and do it up as one of the made-from-a-Malibu fake SS396s you'd see running around 20 or 30 years ago. Then I realized, black is black, it shouldn't be any big deal to iron out those mold marks and repaint and blend it all in. So that's what I did. While I was at it, I sanded the whole top smooth, as it had a lot of dimpled orange peel (much worse than the rest of the car). Whatever this black paint was, it was TOUGH! I did the level-sanding with #400 sandpaper, which is much grittier than I would normally use for color-sanding of this kind. The touchup paint and blend-in polish worked out pretty well. I removed the decals, as they weren't especially well applied (and having done it, I can tell you they're NOT easy to apply on this kit). The next major problem was the hole in the hood. I didn't object to the dual fours poking through the hood for my planned late '70s street goon, but the O.B had cut the hole for them where the factory put the marks, to match the oddball Crower blower scoop, which was just weird looking. Ordinarily I'd have either found or fabricated some kind of homemade-looking “Grumpy lump” to cover the carbs, but the raised bulges on the Chevelle hood make this very involved—would have taken a LOT more work than I wanted to put into the thing to countour the lower edges of the lump to cleanly fit the hood. So I dug up the Mopar-ish looking scoop from an original annual '69 Chevelle kit—the very one I'd built about 50 years ago! It was already contoured to drop right on. I thinned the forward edges a little, then squirted it black. Not necessarily my favorite arrangement, but it's okay, and better yet, it's DONE! O.B. had left the interior in gray plastic. I kinda liked the look but it's a factory interior (except for the seats) and gray wasn't a factory color, so I shot the sidewalls and back seat in Walmart white primer and then some kind of Krylon satin off-white. The dash, floors and package tray got squirted black. It came with custom, not-stock bucket seats. I thought those would probably look better in black “vinyl” so they got squirted in Krylon satin black too. O.B. had painted the windows solid black. I stripped them with Easy-Off and polished them clear again. The taillights in the reissues of this kit are notoriously horrible. I filled in the lenses with Elmer's Sandable Wood Glue, about six thin applications, and when they were flush with the surrounding chrome trim, I painted them Stop Light Red metallic. Not a perfect solution but they now look 100% better than the kit parts. I didn't bother to paint the white backup light lenses, though I could have. I re-used the wheels and tires it came with. Yah, slicks on factory SS wheels (Magnum 500s) are a bit strange, but oddly enough, that's exactly the way I built my first copy of this kit back in 1969. Finished up with silver Sharpie on the window frames and trim, and detail-painted the grille. I ended up just leaving the incorrect lower body moldings painted black. They're not all that noticeable, and I might someday go back to my idea of chroming them, painting flat black below, and making the model a fake SS cloned from a common malibu. So, another toy show glue bomb rescue DONE with just a few hours work and virtually no expense at all. Yup, it looks very much like something I'd have been proud to put on my shelf back in 1968 or 1969. In fact, it looks kinda similar to one that I actually did! As always, comments welcome.
-
1969 Chevelle molding removal AMT
Snake45 replied to drodg's topic in Model Building Questions and Answers
I wouldn't do it with sandpaper either. I've done two of them with files, and another one by cutting it, either with a razor saw or Xacto, I don't remember each. In either case, I cut the top line at a slight downward angle, and the bottom edge of the thing upward, until the two cuts met and the molding fell off. Here's how it looks when done.
-
I miked a common Xacto razor saw and it's .010", except right at the teeth the "set" broadens the width to .014". I think I'll get me some of those .009 blades.
-
More diecasts?
-
Cheap Tip- Scribing For Added Realism
Snake45 replied to Casey's topic in Tips, Tricks, and Tutorials
I flow black paint into the (scribed) door lines BEFORE any priming or painting, and I don't do another thing with them until I clean the final polishing residue out with toothbrush and warm running water. This has worked well for me. -
Should have been one of the Renwal Revivals!
-
List your reasons why model building beats relationships (funny)
Snake45 replied to olsbooks's topic in The Off-Topic Lounge
All is explained here, a real blast from the past: http://www.bundyology.com/nomaam.html -
It looks great! You're inspiring me to build one myself! Well done and model on!
-
Yes, it looks magnificent! Drive on!
-
Look over at the right on that thread listing. You'll see the name of the last poster, and below the name will be a time when they last posted--could be minutes, could be hours. Click on that TIME and it will take you DIRECTLY to the very last post most rikki-tik. If you want to see posts before that one, just scroll up.