SfanGoch
-
Posts
5,248 -
Joined
-
Last visited
Content Type
Profiles
Forums
Events
Gallery
Everything posted by SfanGoch
-

has anyone built the kit form services ratching...
SfanGoch replied to oldr-n-drt's topic in Tips, Tricks, and Tutorials
From KFS, natch. -
Old Hobby Shop Photos
SfanGoch replied to Daddyfink's topic in General Automotive Talk (Trucks and Cars)
Well, if you're ever in the area and do visit Rudy's, you can go to The Beer Garden at Bohemian Hall, located a couple blocks away on 29th St. & 24th Ave. Don't be fooled by the small frontage. This is the hall This is the beer garden in back -
It's nothing like that, Mike. The security guys do their jobs; plus, they're all good friends of mine. They watch out for me and wouldn't let the bikes walk. Not that the could; they're Kryptonite Locked to the racks and each other. It's just a nosy S.O.B. thinking he hit paydirt and an even nosier yenta encouraging him to take what doesn't belong to him in the first place. They were stupid enough to discuss this on the building FB page, which makes it easy to press charges against one or both in the unlikely event that something occurs. I left a PM for the jerk telling him if he's that interested in the bikes,which he knows are rare, he can have both for $4,000. If that's too expensive for his pocket, forget you ever saw them and don't let me catch you anywhere near them. I am that kind of guy.
-
אַלטער קאַקער in this building really need to mind their own business.
-
Nix-nix with the styrene/glue mix. It takes a long time for the solvents to evaporate, the remaining styrene never hardens back as in its original state, the aforementioned solvents will soften the plastic where it;s applied and will result in filled in area to be very visible on the top part of the hood, causing more headaches. Use Milliput, Apoxie or Magic-Sculpt to fill in the lines.
-
Old Hobby Shop Photos
SfanGoch replied to Daddyfink's topic in General Automotive Talk (Trucks and Cars)
Wow, Jesse! Two of me old favorite joints. And, both in Queens! Top photo is (was) 105 Hobbies on Jamaica Avenue in the Richmond Hill section of Queens. Unfortunately, it closed earlier this year. They mostly catered to the RC crowd; but, they had an excellent model section which took up the entire right side and left front of the store. This was the only hobby shop I can recall where guys and kids could hang out and talk hobby. They had Saturday afternoon RC classes in the backyard . Prior to 1995, it was known as Wilson Hobby Shop and was a neighborhood fixture for decades. Wilson was a major authorized retailer of Tyco trains and slot car stuff. The bottom photo is Rudy's Hobby & Art Shop on 30th Ave. in the Astoria section of Queens. For years, Rudy ran an ice cream parlor/coffee shop from this spot. He then decided to open a hobby/religious articles shop. Rudy is one helluva nice guy. The entire place is stuffed with plastic and balsa kits and model train goodies in addition to the Virgin Mary statues. The shop is still going strong, open Wednesday-Saturday. -
First, access to this building is restricted to tenants and their guests and entry is controlled by a keycard and by the front desk security. The area where the bike racks are locked up is not visible, nor accessible, to the general public. It's on the seventh floor. If it were possible, I would keep them in the apartment. The only problem is that we live in apartment. They'd block the TV. Secondly, I never post pics or info about the bikes on FB. The schmuck who saw the bikes mentioned them but didn't post any pics either. Now that I think of it, why was he scoping out what bikes were up there in the first place?!?
-
My pleasure, Jim. It ain't the Coney of my youth; but, it still has that wonderful, grimy feel to it. The Steel Pier is still going strong, Pete.
-
I happened to check the FB group page for my building.The first new post I see if from some schmuck who was admiring my son's two Schwinn Grey Ghost 5 Speed Krate bikes which look like this He posted that he'd seen them for the past three years and wants to restore them. (They're in like new condition. What the hell is he talking about?) To top it off, some well known yenta in the building tells him to wait a while to see if they're moved from the rack on the 7th floor terrace. If not, she happily suggested that he help himself to them. How friggin' generous of her! I screen captured the page in case something happens to either, or both, of the bikes. Man, talk about having a big set of brass 'nads.
-
Alfa Romeo 8C 2300 / Brass Build
SfanGoch replied to Dougritt's topic in WIP: Other Racing: Road Racing, Land Speed Racers
I gotta plead guilty to what Bill said. I'm sorry I didn't check out this thread earlier. That is magnificent workmanship, Doug. Jaw-droppingly magnificent. This is the best reengineered Pocher kit I've ever seen. -
Thanks, Bruce. Wesco Enterprises manufactures the stuff. I don't believe that Michaels carries it. It seems that Canadian art supply stores only carry Apoxie Epoxy Clay which, although somewhat similar, isn't as good as Magic-Sculpt. You can order Magic-Sculpt from The Compleat Sculptor , located here in NYC. There are other art supplies that sell it; but, they sell colors other than gray and white, which are available in 1 lb. sets for around 20 bucks, in 1/2 lb. sets for the same price. Ripoff, brother. Compleat Sculptor sells all available colors as 1 lb. sets for $18.99.
-
The UPS guy wouldn't have a clue as to what happened. That's not his pay grade to know. He loads up at the terminal and makes his delivery/pickup rounds. Contact UPS customer service and listen to the canned music while you're on hold for the next hour or so.
-
Thanks, Bill. I know Steve at Star Models offers a resin '52 Ford Club Coupe. I just wanted to see for myself how hard it would be to convert the Lindberg body into one. So far, much easier than I expected. A '49 Ford NYPD RMP is going to be a breeze. The AMT '49 Ford straight OOB nails it. I was looking over pics of a '35 Ford 5 window Coupe and the AMT '36 kit would work with a backdated grille. Anybody know if a resin '35 Ford grille is available? I'm also on the prowl for an R&R Resin '50 Plymouth 2 Dr Sedan. With a bit of roof surgery, it can be converted into a Plymouth Concord Business Coupe.The rub here is that R&R closed shop when the owner died four years ago and no other casters have purchased the masters and molds. This kit, like every other R&R item, is just about impossible to find on ebay, or anywhere else. That's a shame because R&R produced some very obscure and interesting subjects which are still ignored by other resin casters. Take that as more than a hint, resin dudes. BTW, if anyone has this tucked away and doesn't intend to build it, PM me. Perhaps we can work out something.
-
So how come why saying upstairs above? No engine, full kit not so much. Yes.
-
Thanks Carl. I try to explain my approach as concisely as possible. That way, people won't think I'm making stuff up.
-
detail Pet peeve of mine!
SfanGoch replied to Mercuryman54's topic in General Automotive Talk (Trucks and Cars)
What is The Law? Not say problem we see! What is the penalty for breaking The Law! Go to House of Pain! -
No prob, Chris. I'm happy that it will work with minimum agita.
-
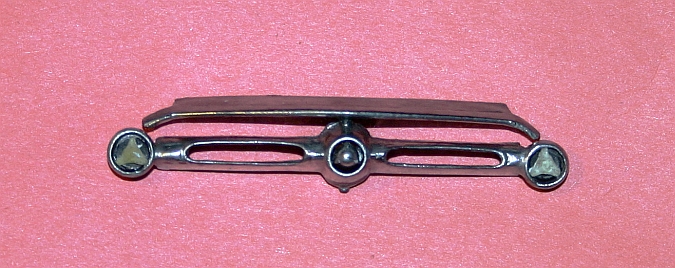
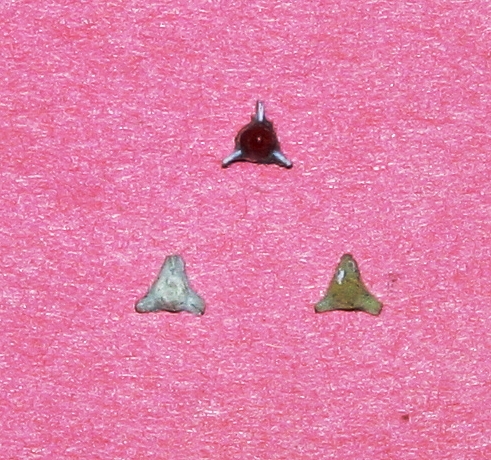
Hokay, I didn't have any spinners to use as bases for the parking lamp lenses, per Steve's suggestion. Sooooooo, I had to go through the tedious process of making one and casting a pair. I used a '58 Impala tail light lens and glued the stem into a 3/32" OD aluminum tube. I then cut the mess down to measure 3 mm (don't you hate it when some stronzo uses both standard and metric measurements interchangeably? If I were me, I'd pop me right in the wazoo, but good, and I'm just the guy to do it.) and CA'ed three styrene fins to the tube. Using Magic-Sculpt (No, I'm not a compensated spokesman shilling for the company. This is really great stuff!) I made a mold and used fiberglass resin to make the copies. Lemme tell you, they are small! This is the grille with the lenses temporarily installed. I coated the grille with Model Master Semi Gloss Black followed with Metalizer Stainless Steel applied with a cotton swab. I don't bother with the airbrush (too much of a hassle, maaaaaaan!) because this is done to check the overall look and to highlight any imperfections I might have missed. The deal on using the swab is to dip the tip of the swab directly into the Metalizer and let the solvent evaporate completely. When it is completely dry, lightly rub the swab on the part. You'll see a gradual buildup of Metalizer on the surface. The more you rub, the brighter it gets. A trick I learned years ago is to follow up the Metalizer application by buffing the part with powdered graphite, which really imparts a realistic chrome look.

-
I find "up" an offensive, microaggressive term. Someone once called me illiterate. Of course, I smugly informed him that me ma and pa were married.
-
I just received an important message from the Big Stupid Bullyman word monitoring group. Every word in your reply has been added to the banned list.
-
Hobbico - BANKRUPT!
SfanGoch replied to niteowl7710's topic in General Automotive Talk (Trucks and Cars)
As primarily an armor modeler, RoG's current selection of armor kits sucks big time. Ditto with cars, planes, etc. -
The way RoG's parts replacement service is currently set up, if you don't live in the EU, you're SOL.
-
Hobbico - BANKRUPT!
SfanGoch replied to niteowl7710's topic in General Automotive Talk (Trucks and Cars)
Checking out the meager selection of kits of any genre available on the RoG website, we be in some deep poop if they maintain the status quo regarding their inventory. -
I was looking at the MCW '60 Catalina/Ventura HT and, aside from the roof and hood spear, the Trumpeter body compares favorably. The MCG '60 Bonneville PE set will correct any other shortcomings in the Trumpeter kit. MCW '60 Catalina Trumpeter '60 Bonneville. Notice the difference between hood spears on these two models. What a coincidence that I happened to post pics of two different versions of the same car with identical paint jobs. It makes more sense for me to pay fifty bucks for a complete resin car kit and copy the hood than $60+ for a builder/junkyard special. I'll also add MCW's '59 Catalina HT, the '63 and '64 Catalina and Grand Prix HT's and SMH's Johan recasts of early '60s Mopars to my "gotta get'em" list. All of those bodies/models combined will cost less than a single, unbuilt AMT '63 Bonneville. I need the extra dough I'd save to get parts for a modulated light beam powered optical telephone I want to build.
-
It's not a matter of availability, Bill. It comes down to two things. Most of the AMT '60 Bonnevilles I've checked out on ebay (I have it on saved search) are, for the most part, pretty ratty. To call any of them builders would be a stretch. I can't justify the cost, nor the amount of work involved to rebuild, to make one presentable. Then, there's the problem of missing chrome, tail lights, etc. which, at chop shop prices, ends up jacking the total to over a hundred bucks to restore a junk model. I would rather invest the time in correcting the faults in what is already a pretty decent kit. If I can find a junk AMT body at what I consider a reasonable price, I'll grab it so I can make fiberglass copies of the hood. That weird looking hood spear on the Trumpeter kit annoys the living hell out of me. That hood spear is a deal breaker if it it's missing from any AMT Bonny I see.