atomicholiday
-
Posts
2,281 -
Joined
-
Last visited
Content Type
Profiles
Forums
Events
Gallery
Everything posted by atomicholiday
-
Ferrari 333SP 1/12
atomicholiday replied to 2whl's topic in Other Racing: Road Racing, Salt Flat Racers
Really cool. Finish looks great, and I really like the decals. -
That is just cool. Love it!
-
Nice build! Looks like death on four wheels though!?
-
Of course, you might not care at that point.? Weed eater. Heck I can’t even hold a glass in one hand without spilling it all over after trimming the yard.??
-
Does this only apply to older kits? Meaning, it’s not a problem for newer tires is it?
-
Perfection! Great craftsmanship here. I like your photography too.
-
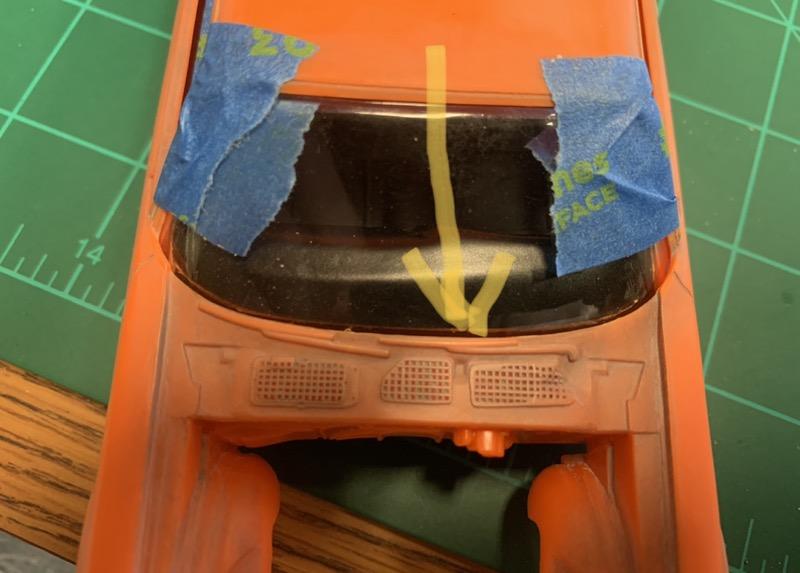
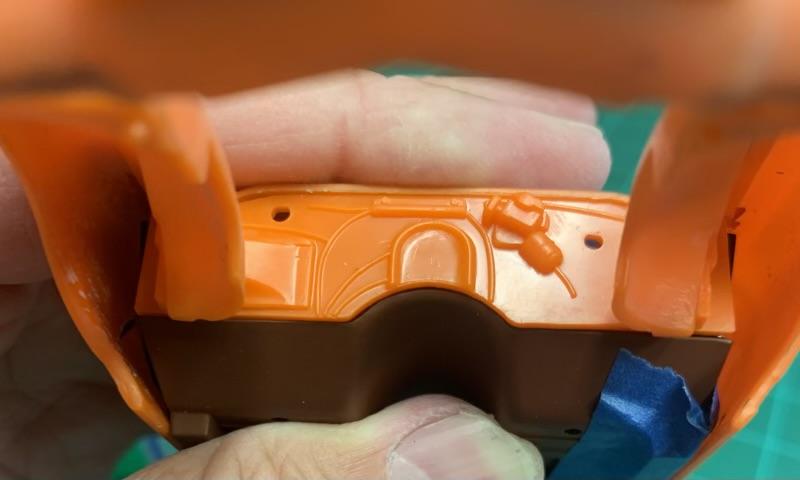
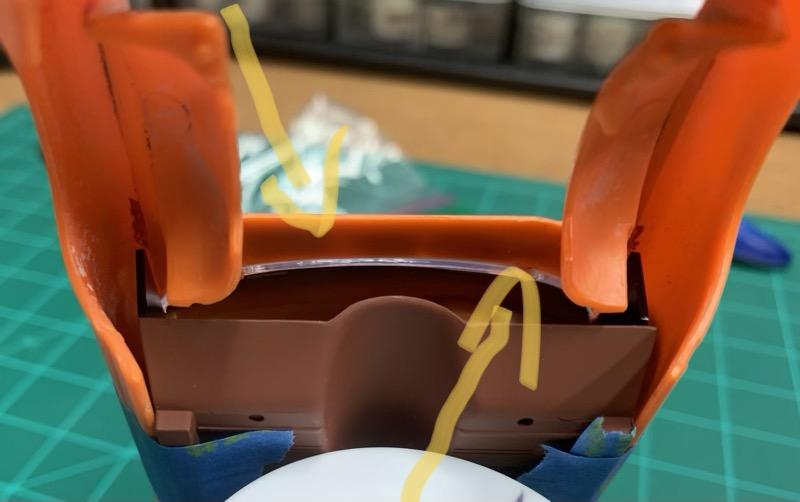
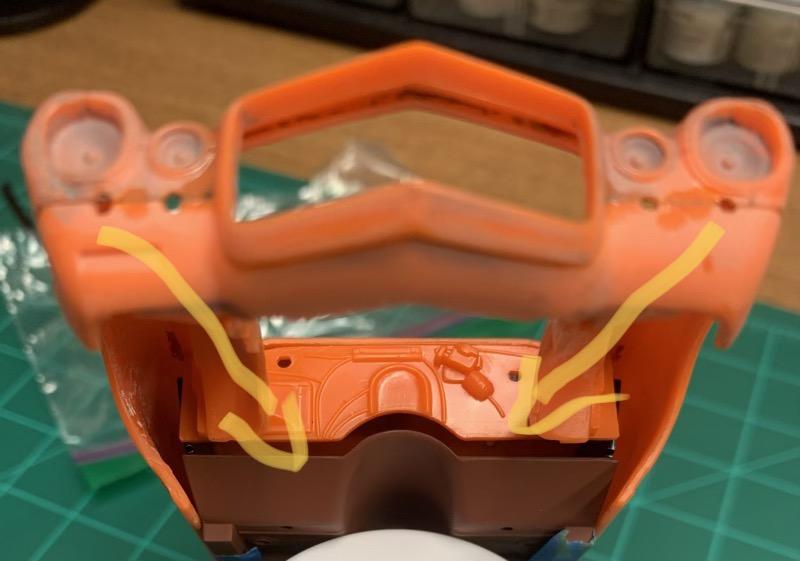
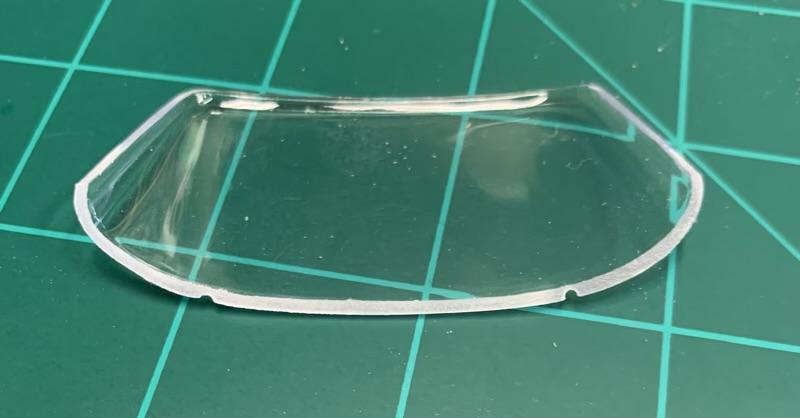
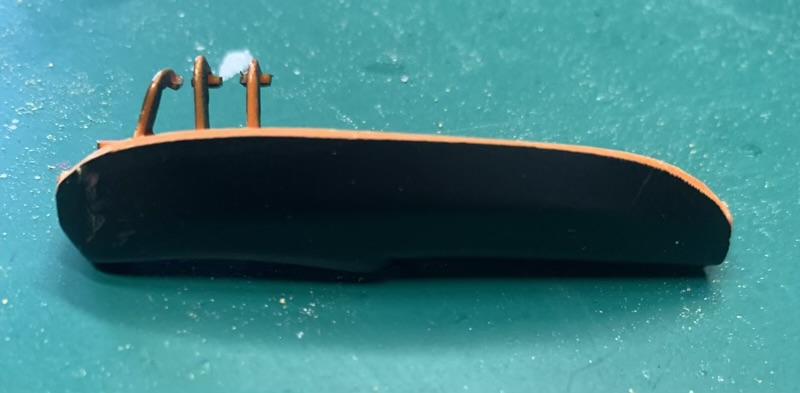
Just finishing work on the firewall gap. I referenced the thread mentioned above (thanks very much!) plus another one I found, for this fix. I know it’s all been done and documented before but I’ll post it here to in case maybe it will be of use to someone down the road. If you’re unaware of this problem, here’s what it looks like when you start. Notice the huge gap where the firewall meets the floor pan. Here’s a shot of the root cause. Interference between the windshield and dashboard. The first thing I did was file the lower edge of the windshield even with the inside of the body. It sticks down just enough to interfere with the door panels. I think you could get away with just removing material at the corners, but I leveled the whole windshield in hopes of resolving the entire issue. But that by itself didn’t do the trick. The dashboard will still interfere. Next, I filed off the offending edge of the dashboard. Note the missing gas pedal and bent e-brake? Looks like I have some repair work to do. If you go this route, I recommend going slow and test fitting frequently. I kept at it until the gap at the firewall/floor pan was closed. Hardest part about it was the test fitting. Squeezing that floor pan into the body repeatedly gets old quick. I highly recommend doing this before you paint anything, especially the body. Here is what it should look like when you finish this step. Question for those that have built this kit before. One thing I noticed after all this. Looking through the windshield down at the back edge of the dashboard, there’s a visible gap now. Not sure how I could have avoided this and still close the gap. Did you guys have that too? I don’t think it will be noticeable after some touch up, but still…? As always, questions, comments, & criticism are welcome.

-
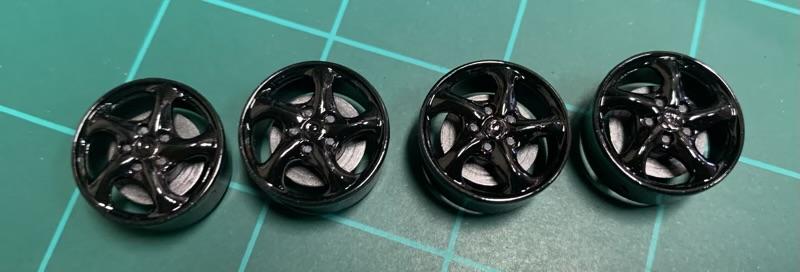
Yesterday I put the finishing touches on these Porsche wheels.
-
Tape attacked lacquer. Thoughts?
atomicholiday replied to atomicholiday's topic in Model Building Questions and Answers
Yup. De-tacked both types. Almost has to be a reaction between the adhesive and the uncured paint. Anyway. I'm going to set it aside and come back to it after a few weeks. Then, as suggested, wet sand and probably reshoot the black. Guarantee I won't do that again... -
What was your first model car?
atomicholiday replied to Kit Karson's topic in General Automotive Talk (Trucks and Cars)
Screwdrivers? Bloody Mary?? -
What was your first model car?
atomicholiday replied to Kit Karson's topic in General Automotive Talk (Trucks and Cars)
Great topic!? This is an easy one. Monogram Corvette SS Hatchback. I can clearly remember building the whole thing in one evening. I had glue and silver paint all over my hands!?
-
That's pretty stunning. Not sure you could ask for better results than that.
-
Looking really good so far.? That paint job is sharp!
-
LOVE these old monogram kits! About a year ago I found an unpainted builit up too. It was put together with regular white glue. Basically fell apart in my hands and the glue flakes right off.
- 39,125 replies
-
- 2
-

-
- johan
- glue bombs
- (and 1 more)
-
Tape attacked lacquer. Thoughts?
atomicholiday replied to atomicholiday's topic in Model Building Questions and Answers
The black is Testors extreme lacquer. My bad. I’m new to lacquer and thought I’d read somewhere that it cured much faster than apparently it actually does. Lesson learned. I’ve actually used blue tape many times in the past and never had issues, except for one time that I left it on for about a week. But in this case, I don’t think the tape was the problem, because the Tamiya tape did it too. Just a case of uncured paint. I’m going to set it aside for about a week and then try wet sanding/reshooting the black. Worst case, it gets stripped. Not a huge deal, but it’s a shame. This was turning out to be my best paint job yet. Absolutely NO orange peel! Thanks for your input gentlemen. Trying a two-tone paint job is probably a little past my skill level, but as I see it, no guts no glory. You’ll never improve if you don’t push yourself to your limits. Not every attempt is a success, but sometimes it works out and you surprise yourself. And even the failures offer the benefit of a learning experience. -
I’m really hoping there’s an easy fix here. Here’s the deal. Yesterday I shot the hood (trunk lid in this case) Testors extreme lacquer blazing black. Today I taped it off and shot the rest of the body Tamiya TS-26 pure white. I let the white cure for about three hours, then pulled the tape off. I pulled it slowly, and at angles away from the tape line. Two types of tape were used. Tamiya was used for all the separation lines and regular Scotch blue painters tape was used to cover the rest. Doesn’t seem to matter though. As you can see from the picture, the glue on both types of tape appear to have attacked the Testors paint. I’m guessing it should have cured longer before taping. It still feels very smooth, and it’s not glue residue. I tried washing it with dawn dish soap and it’s definitely in the finish. Since it’s smooth, do you think the lines will disappear if I just shoot gloss over the whole thing? Or maybe I should lightly wet sand it first? I’m open to suggestions, but I’d prefer not to strip and start over if possible. Sucks, because the black was flawless.?
-
That's my problem too. Picking a new project is never really my issue. Sticking with it? Now that's where the real trouble starts. I have four main projects going right now and it's taking all my willpower not to start another. That doesn't answer your question though. Usually I find inspiration in whatever my most recent purchase is. Nothing helps me forget the last one quite like the next one. That's not always the case, but it definitely happens a lot.
-
AMT 1968 GTO with aftermarket open headlight grille.
atomicholiday replied to RandyB.'s topic in Model Cars
Nice! I like your photography with the Pontiac logo too. Makes it look like a brochure picture. Very cool.? -
Regarding the hood. I have a Camaro hood that was giving me trouble. I used a hair dryer. What I did was to slightly over-bend it, past the point where you want it to be. Then, while it’s still warm from the hair dryer, put it in cold water to “shock” it. I don’t know the science behind it, but it seems to hold position better that way, vs letting it cool slowly. You may need to repeat the process a few times, but it should eventually stay. I’ve used this technique many times. Works good for warped chassis too. One word of warning. Keep the heat from the hair dryer moving. You don’t want to hold it in one place for too long. Full disclosure- the Camaro hood was laying perfectly for a few months. Then when I painted it, it warped slightly back. Not as much as originally thought. Might have been the solvents in the paint. It was automotive lacquer.
-
´63 Studebaker Avanti stock build
atomicholiday replied to Andy Oldenburg's topic in WIP: Model Cars
That engine looks terrific! My dad tells stories about one of these from back in the day too. He says street racing was big in Fort Wayne, and this was one of the cars he’d see around. Said it was black and had “South Bend Shaker” painted on it. I’ve heard this story from him so many times. I’d LOVE to see that car. Good luck with your build. Bet it will look terrific when completed!? -
Looking great so far.
-
Awesome. Thanks much for the link. I’ll check it out and hopefully head off any issues before they arise.?
-
In between other projects, I got this one in primer today. I don’t see any issues, so I’m calling it ready for paint. Also, I think I have a plan for it now. I have this old original red-line Hot Wheels that was given to me when I was a kid. Red-lines were a little before my time, but a friend of my mom’s, had a grocery bag full of originals, still in the packaging. She gave me three or four, which I immediately took out and played with. Hey I was just a kid. Give me a break!? So I think this will become sort of a nod to that old Hot Wheels. Not a full replica. I’m not going with front engine (although I hope one of you guys does just that sometime!). For those not familiar with this car, here’s a pic. Not mine. I swiped this image from google. Mine is buried under a pile of boxes here somewhere.
-
That’ is awesome weathering. Wow. Very cool.
-
What did you use for a wash? You might be able to clean it up with a cotton swab and something like isopropyl alcohol. But that depends on your wash. Don’t saturate the swab. Just get it damp. Be careful using this technique on the chrome. I’ve had issues there before. Don’t “scrub” it. Just wipe over it lightly a time or two. edit- meant to say isopropyl alcohol. Not denatured.