aurfalien
-
Posts
3,119 -
Joined
-
Last visited
Content Type
Profiles
Forums
Events
Gallery
Everything posted by aurfalien
-

Looking for wheel tutorial
aurfalien replied to The dood's topic in Model Building Questions and Answers
You mean this one; -
how to make black interiors nice
aurfalien replied to youpey's topic in General Automotive Talk (Trucks and Cars)
Wow, the work displayed on this thread is amazing! Thanks for starting it youpey. -
Yes this is an absolutely killer build!
-
how to replicate bare metal surface
aurfalien replied to misterNNL's topic in Tips, Tricks, and Tutorials
Wow, a true master for sure! This is total experiance and knowledge. The very complex work flows and methodologies are amazing. Its almost like a different language. Monsignor Engwer, may you live long and prosper! -
Adding fender flares; to graft or to widen
aurfalien replied to aurfalien's topic in Model Building Questions and Answers
Oh wow cool. Thanks for the reply, über appreciate it. -
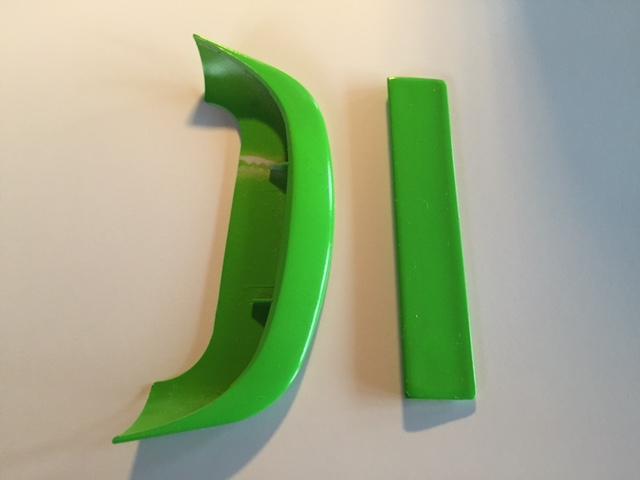
Hi, While I wait for another Dino 206 for its body to replace my warped one, I started work on my long term project. I'm at a cross roads and am wondering how the community would widen quarter panels. Would you make several cuts in parallel and widen each only a small amount? Or would you simply graft a quarter panel while doing mass amounts of putty to smoothen out? I had tride the first while only making 1 cut, trying to widen it alone and cracked the plastic during the widening attempt. So I though instead to make several cuts in parallel and widen each cut only slightly. I'me looking to widen by about *1/4 over original. Thanks in advance. * Correction, 1/4 and not 1/3.
-
Well I don't think you are serious, but if you are here it is; http://www.michaels.com/search?q=americana ® Its the Finisher, Gloss Item# 10254975 It really is very very very shiny. I may keep experimenting with it as its got potential. PS Doh, just noticed its water proof so I don't think its water based.
-
Well, attached is this stuff I got at Michaels. Its one coat shot over some test fromage I have. Its very very shiny but perhaps you can explain why it sorta started to peel like dead skin. Perhaps because it was over bare plastic? Anyways its water based clear coat.

-
Late noticing imperfections
aurfalien replied to aurfalien's topic in Model Building Questions and Answers
Great explanation, thank you very much. BTW, a very recent thread asked how you got that finish? Is it Metalizer by chance? -
Late noticing imperfections
aurfalien replied to aurfalien's topic in Model Building Questions and Answers
Thanks alot Ace, I really apprecite it. How come? I'm on on long term project that calls for a decent amount of body work. The 1 part stuff is über practical. -
Late noticing imperfections
aurfalien replied to aurfalien's topic in Model Building Questions and Answers
Thanks man! Thats a good idea, I have a huge cookie tin that I can use for this. Its 2' x 2'. Gets nice and warm in there I noticed, could be a good way to sort of bake the model slowly. -
Late noticing imperfections
aurfalien replied to aurfalien's topic in Model Building Questions and Answers
Ok lookin pretty good, good enough anyways. A piece of dust landed on the wing (part on right, lower portion) so I'll see if buffing will fix. Other then that I'm happy. I'm sorta pissed about that dust particle. And many thanks to those who responded, your advise was golden.
-
Hi, Was in my LHS; Evetts yesterday and Gene, one the the guys who works there was showing me his client builds as he is frequantly comissioned to build models for patrons etc... Anyways I was blown away by his work, here is his Dragula he did for some one; One of his cars made the front cover of MCM last issue #193. It was the green car in the upper left. Man he is a serious craftsman and very very cool.
-
Late noticing imperfections
aurfalien replied to aurfalien's topic in Model Building Questions and Answers
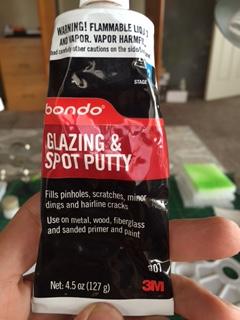
Hi Sppedfreak, Mine is 1 piece as I don't have to mix it. Its great stuff, better the Tamiya Putty which i find having to thin with their lacquer thinner. It dries nice and super easy and smooth and sand.
-
Vallejo woes yet again!
aurfalien replied to aurfalien's topic in Model Building Questions and Answers
No probs Twokids. I think most of my issues are simply not being faimiar with how to paint models. I'm used to a more traditional style on canvis/paper were you doodle with the subject. With models, it seems you gotta do a single quick stroke and wait for them to dry, then layer another until full coverage/effect is achieved. I just have to adapt, its hard for me as my mind still wants to doodle and play with the color/brush. I'm starting to like and enjoy the yellow now that i am learning how to paint models. I would say that the Vallejo self levels better then Tamiya for sure. Although I like my Tamiyas for certain things. -
Vallejo woes yet again!
aurfalien replied to aurfalien's topic in Model Building Questions and Answers
I found that to be true in my experience. I did a 3:1, water to yellow, doing several thin coats and got a deep rich yellow in the end. Although some tutorials say 3;1 yellow to water. -
Want to see EXCESSIVE?
aurfalien replied to jbwelda's topic in General Automotive Talk (Trucks and Cars)
Actually the reason I won't use sniper warez is because it takes the fun out of it. I like sitting there, during the final seconds anticipating wether some one snipe or in person wants this more then I. I only loose on those occasions were I simply wasn't willing to really play ball. I bid during the final 3-5 seconds of the auction. Sometimes I'll do it during the last minute just to see whose out there and to say hello. -
Want to see EXCESSIVE?
aurfalien replied to jbwelda's topic in General Automotive Talk (Trucks and Cars)
Well its a good thing I don't snipe as I was bidding on 1/24 Resilient Resins Honker Can Am Slot Car body plus donor kit and parts. But my heart wasn't into it and I'm glad to have lost. I'll leave scratch builds like that for a much later time as I already have a few that I'm not yet ready for. -
Late noticing imperfections
aurfalien replied to aurfalien's topic in Model Building Questions and Answers
Hey, I actually have that stuff, it sands better then Tamiya Putty. Thanks for the tips, much appreciated. -
Vallejo woes yet again!
aurfalien replied to aurfalien's topic in Model Building Questions and Answers
Well, in your case I would; 1) Place a small bearing in the bottle to promote mixing. 2) Use a drop or 3 of the Crackle Medium. Problem is the Vallejo dries quick so I am learing to do quick brush strokes. It does cover well though and I am getting there retardeer as well. Funny, I got Vallejo to ease workflow and for some it does. For me, its as much work as Tamiya. You should fill out there web form for help to hear direct from them. I'm a total novice, a bit incompetent modeler as well. But I am learning. -
Late noticing imperfections
aurfalien replied to aurfalien's topic in Model Building Questions and Answers
Cool deal, thanks SfanGoch. -
Late noticing imperfections
aurfalien replied to aurfalien's topic in Model Building Questions and Answers
Yes thats its, ZapaGap is what I have as well. Cool, ok time to get bizzy, thanks again man. -
Late noticing imperfections
aurfalien replied to aurfalien's topic in Model Building Questions and Answers
Ah, got ya AC, many thanks. In terms of filler, do you mean putty or like that thick super glue filler stuff? I've both and am leaning toward sthe latter, forgot the brand but it's used as a filler for our hobby. ** I used white primer which is very hard to notice things like this. I'll use grey from now on and only white as a second coat depending on final color. -
Oh come on man, thats soo not true. I'm being very serious. I would never post something mean and sarcastic like that.
-
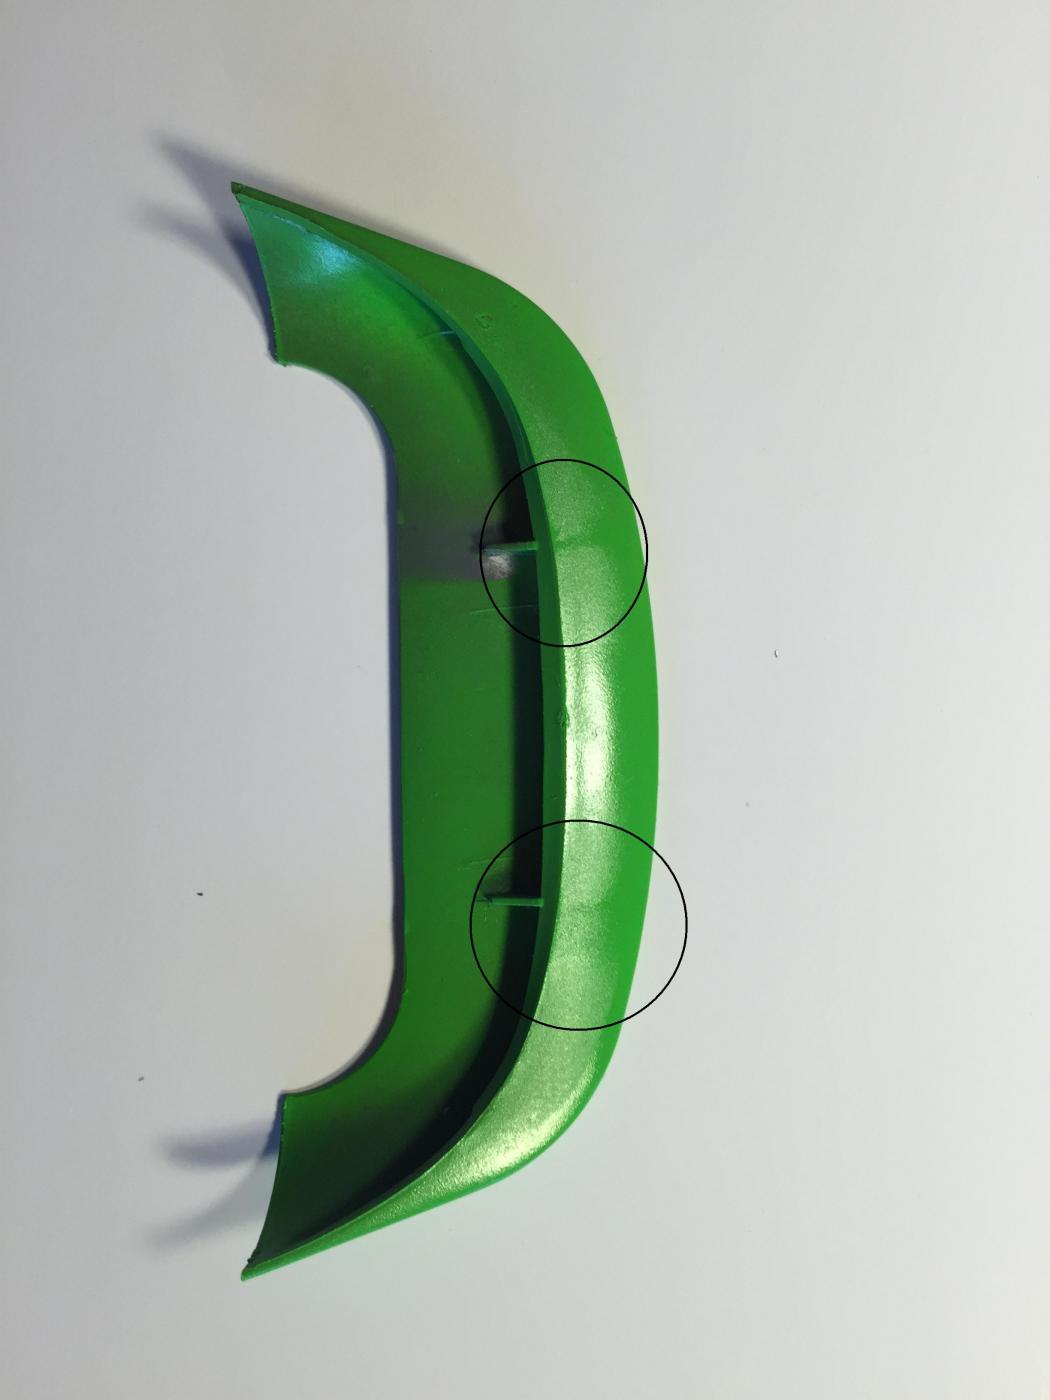
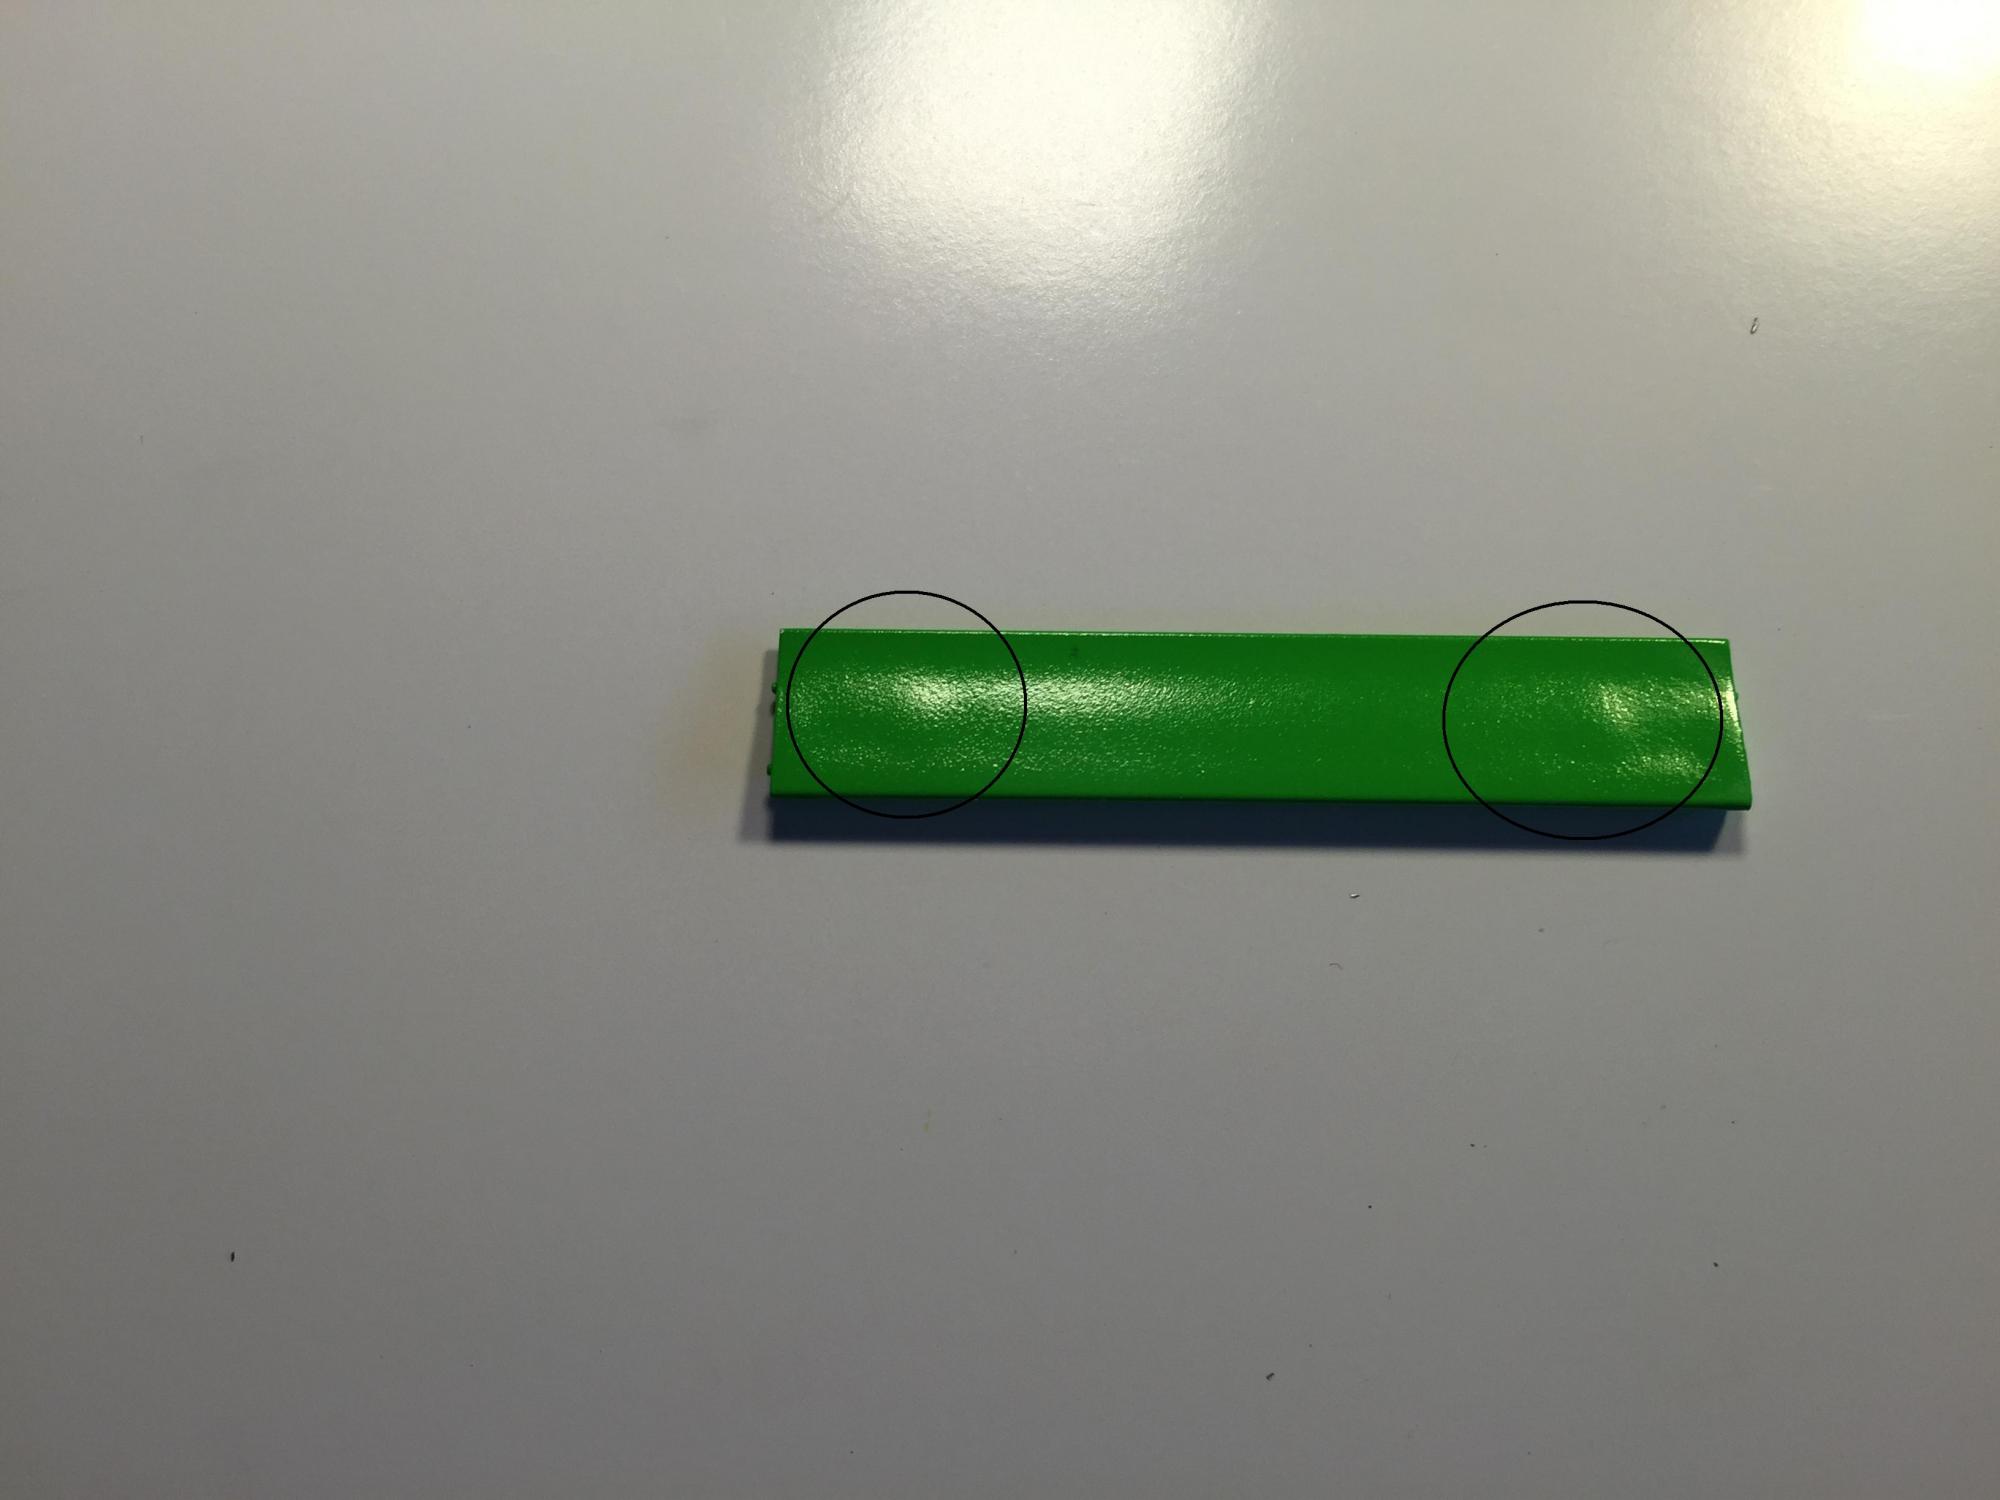
Hi, Wondering what the community thinks of how to fix the imperfections I just noticed. The images are extreme close up and I havn't done a final coat of paint yet. Within the black cirlces are dimples. How should I approach fixing these? Strip and wet sand?