BigTallDad
-
Posts
1,526 -
Joined
-
Last visited
Content Type
Profiles
Forums
Events
Gallery
Everything posted by BigTallDad
-
Thanks, I was on another model car forum and my post might have been considered hi-jacking a thread.
-

Cutting Rubber Tires Cleanly
BigTallDad replied to Chris1992's topic in Model Building Questions and Answers
Thank you sir; I was getting ready to do the same screen-shot approach myself, but you saved me the effort. BTW, the photos are again showing in my original post...go figure! -
Quite often gun patches leave lint behind.
-
Very nice; I especially like the floor in the bed. Is that real wood?
-
Cutting Rubber Tires Cleanly
BigTallDad replied to Chris1992's topic in Model Building Questions and Answers
I could see them yesterday, and apparently Ace-Garageguy was able to view them. Today I'm seeing the same Photobucket nag to upgrade the account that you are. I took a closer look, and PB has changed the extension to some bogus version of JPG. After re-naming the file, I can see it, but it's only thumbnail size...enlarging that image results in a very fuzzy photo. Nice going, Photobucket! -
Car Repair Ripoffs 1: Dealerships
BigTallDad replied to Ace-Garageguy's topic in General Automotive Talk (Trucks and Cars)
I have one of those too...I get my parts at cost and labor is free. How did I find this ace mechanic? When he was very young, I used to change his diapers. -
Most AWB racers used a shorter wheelbase...the 64 Impala (I used to have one 1:1) just doesn't seem right.
-
Cutting Rubber Tires Cleanly
BigTallDad replied to Chris1992's topic in Model Building Questions and Answers
As a follow-up on Ace-Garageguy's approach, here's a drill cradle I made; it allows hands-free operation of a variable speed drill. I find the Dremel sanding drum to be an almost-perfect size for mounting the tire. Also, consider taping two fresh #11 Xacto blades together (use a scrap styrene strip to widen the gap, if necessary); that approach will give you a consistent amount of material being removed on all of the tires. Lastly, make the cuts near the edge of the tread pattern, not in the center; mount the edge that was cut on the inside of the chassis area. For sanding, toss the tire in the freezer for an hour or so. Remove the tire and, working quickly, sand it with 600 grit sandpaper. -
Made a huge mistake!!!
BigTallDad replied to Jeff31293's topic in General Automotive Talk (Trucks and Cars)
Kinda late for this, but if I'm working over the kitchen sink, I put a strainer (screen) in. They are readily available in hardware or grocery stores. -
Very nicely done, especially the top. Was the plastic textured? If not, what did you do to simulate the vinyl?
-
Absolutely dazzling. You nailed it! I remember those dual antennae...both of them functioned. Depending on the radio station location and the direction you were traveling, the signal (and volume) would vary if the car changed direction, such as in a curvy road.
-
Best pickup kits for crewcab
BigTallDad replied to olschoolkid's topic in General Automotive Talk (Trucks and Cars)
The Dodge Dakota from Lindberg might be the way to go. While it's a Snap Tite; this is one of the best Snap Tites I've seen. -
Full size replica Model T hot rod
BigTallDad replied to Hammerdown's topic in General Automotive Talk (Trucks and Cars)
Huh? A full size replica is not a model, or am I missing something? -
To build or not to build a collectible kit
BigTallDad replied to 89AKurt's topic in Model Building Questions and Answers
Why buy a kit if you're not going to build it? Do you only look at boxes? Do you buy a car/truck/etc. and not drive it? -
Well done! It's nice to see the proper paint job on the grille (trailing edges match the body color); that must be an absolute nightmare to mask.
-
A vacuum cleaner helps to find lost parts.
BigTallDad replied to Jon Cole's topic in Tips, Tricks, and Tutorials
I generally stuff the pantyhose into the opening about 4" then put a rubber band around the outside. The stuffed-in pantyhose forms a small bag which holds the parts better, especially after you turn the vacuum off. -
Show quality finishes
BigTallDad replied to Greg Busby's topic in Model Building Questions and Answers
There's a very old joke that applies here... A lady is lost in Manhattan; when she asks a man "How do I get to Carnegie Hall?" he replies "Practice, practice, practice." The man's advice applies to painting also. -
Tutorial on using a mold made from another car
BigTallDad replied to 59 Impala's topic in Tips, Tricks, and Tutorials
On the other hand, the swelling might be useful, requiring less material/fewer coats. Obviously this should be done before painting commences. What's the texture of the swollen filler? Fairly porous? -
Without trying not to stray too far from the original denim topic, this approach could work for carbon-fiber hoods etc.
-
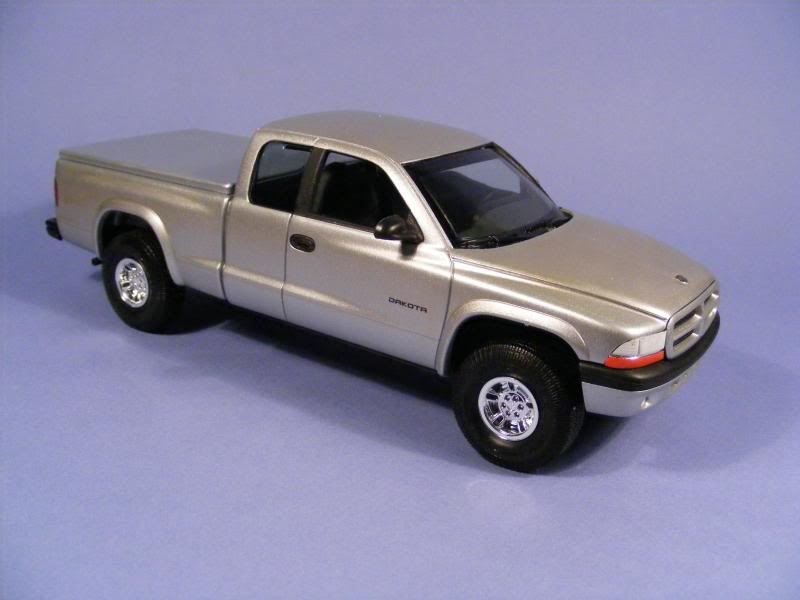
Clear part help
BigTallDad replied to Dann Tier's topic in General Automotive Talk (Trucks and Cars)
Instead of painting the flat black, try using a black magic marker. That's what I used on this Dakota.
-
Ditto! If you look closely, you can see the firing order (in raised numbers) on the exhaust manifold.
-
Tutorial on using a mold made from another car
BigTallDad replied to 59 Impala's topic in Tips, Tricks, and Tutorials
Your excellent tutorial addresses pretty much straight-line repairs. How "fluid" is the fingernail resin? Can you do curved areas with it in a minimal number of steps, or does it require a build up of numerous coats? -
Nice job on the Mad Maxing! Did you originally plan on putting a roll bar/cage in it?
-
Tutorial on using a mold made from another car
BigTallDad replied to 59 Impala's topic in Tips, Tricks, and Tutorials
Great tutorial, especially using non-traditional model supplies (the mold, fingernail resin). Thank you! -
Downloads will probably be available (almost everything else is) for a price Back to the original topic, that is some absolutely stellar work!