Kmb0319
-
Posts
468 -
Joined
-
Last visited
Content Type
Profiles
Forums
Events
Gallery
Everything posted by Kmb0319
-
Beautiful work again! But, I hope you have suitably reinforced your shelf.... all these builds of big American land yachts is going to collapse it if you’re not careful. ?
-

Duplicolor Perfect Match Spray Paint Chart
Kmb0319 replied to Jordan White's topic in Tips, Tricks, and Tutorials
I will add to the list of thank yous... especially for the samples of each color, as they don’t always match the cap. Rat-T, for a color like that, go to automotivetouchup.com. You put in the make and year, and it will give you every color available. Twelve ounce spray cans are $19.99 each, and their clearcoat is $10 a can. FANTASTIC paint. I bought some Verdoro Green from them and some 1954 Mercedes B396 Blue for my 300SL build. -
Revell '70 Pontiac Firebird 2'n1 1/24
Kmb0319 replied to KT EASTMAN's topic in Car Kit News & Reviews
Question: in the Revell 2019 thread, it said this kit now had pad-printed Firestone Wide Ovals. At the start of this thread, it says the tires are unmarked. As I’m planning what to do with it when I purchase it, which is it? Thanks! -
ABSOLUTELY STUNNING and it looks like it could be driven right out of the photographs. Just amazing work. You need to do a tutorial on your painting process and how you fill in the vents, etc.
-
Thank you all! I’m just getting started on the Revell 69 Boss... that one has stripes and spoilers and Magnums, so it made sense for this one to be plain but purposeful.
-
This looks like a museum piece... just phenomenal!!!
-
Thank you, Michelle!
-
I built the Revell 68 Mustang GT kit a couple years ago. Other than a few strange assembly methods (screw through the gas tank) that harken back to it’s origin as a die cast, it’s not a bad kit. For me, it was a weird build. It was one of those where everything went right all the way to final assembly, when a multitude of things went spectacularly wrong and left me with a highly flawed mess of a final product. At the same time, some of the things that were so right up until the end kept me from just starting over. I changed the wheels and tires multiple times and kept trying to make myself happy with it, but finally took it apart and decided to redo it. The engine, chassis and interior were left alone, as all my issues were on the outside and cosmetic. It was originally painted Acapulco Blue with the two-tone blue interior and white GT stripes. My finish was nearly perfect, but strange things happened at the end... something caused large gouges in the roof, my chrome trim kept smearing, and I still have no idea why waxing the same paint/clear I’ve used 20 times with the same wax I’ve used for years suddenly caused crazing in the hood and trunk. This time, I wanted to go less pretty and more mean. Since my interior was blue, it limited my options for color, so I went basic and painted it white. After stripping the old finish, sanding the body down and puttying the spot in the roof, I laid down a couple coats of Krylon Painter’s Touch White. I sanded and polished, and then added two coats of Duplicolor clear and polished/waxed it. For wheels, I went with the steelies that were in the Revell 69 Daytona for the “NASCAR” version. ( they don’t really look like Holman-Moody wheels anyway) I painted them white to match the body. Tires are from the parts box as well. I didn’t want to use any stripes on this one. It’s still not great, but I am happier with it now. It’s good enough to move on. Thanks for looking!

-
Man that color is beautiful!!!! Loving this build and thanks for posting this on the newly released kit.
-
Funny you mention that, Steve. Burnt Orange Metallic has been my plan for the AAR since I heard it was coming out. Haven’t picked it up yet, but I will soon.
-
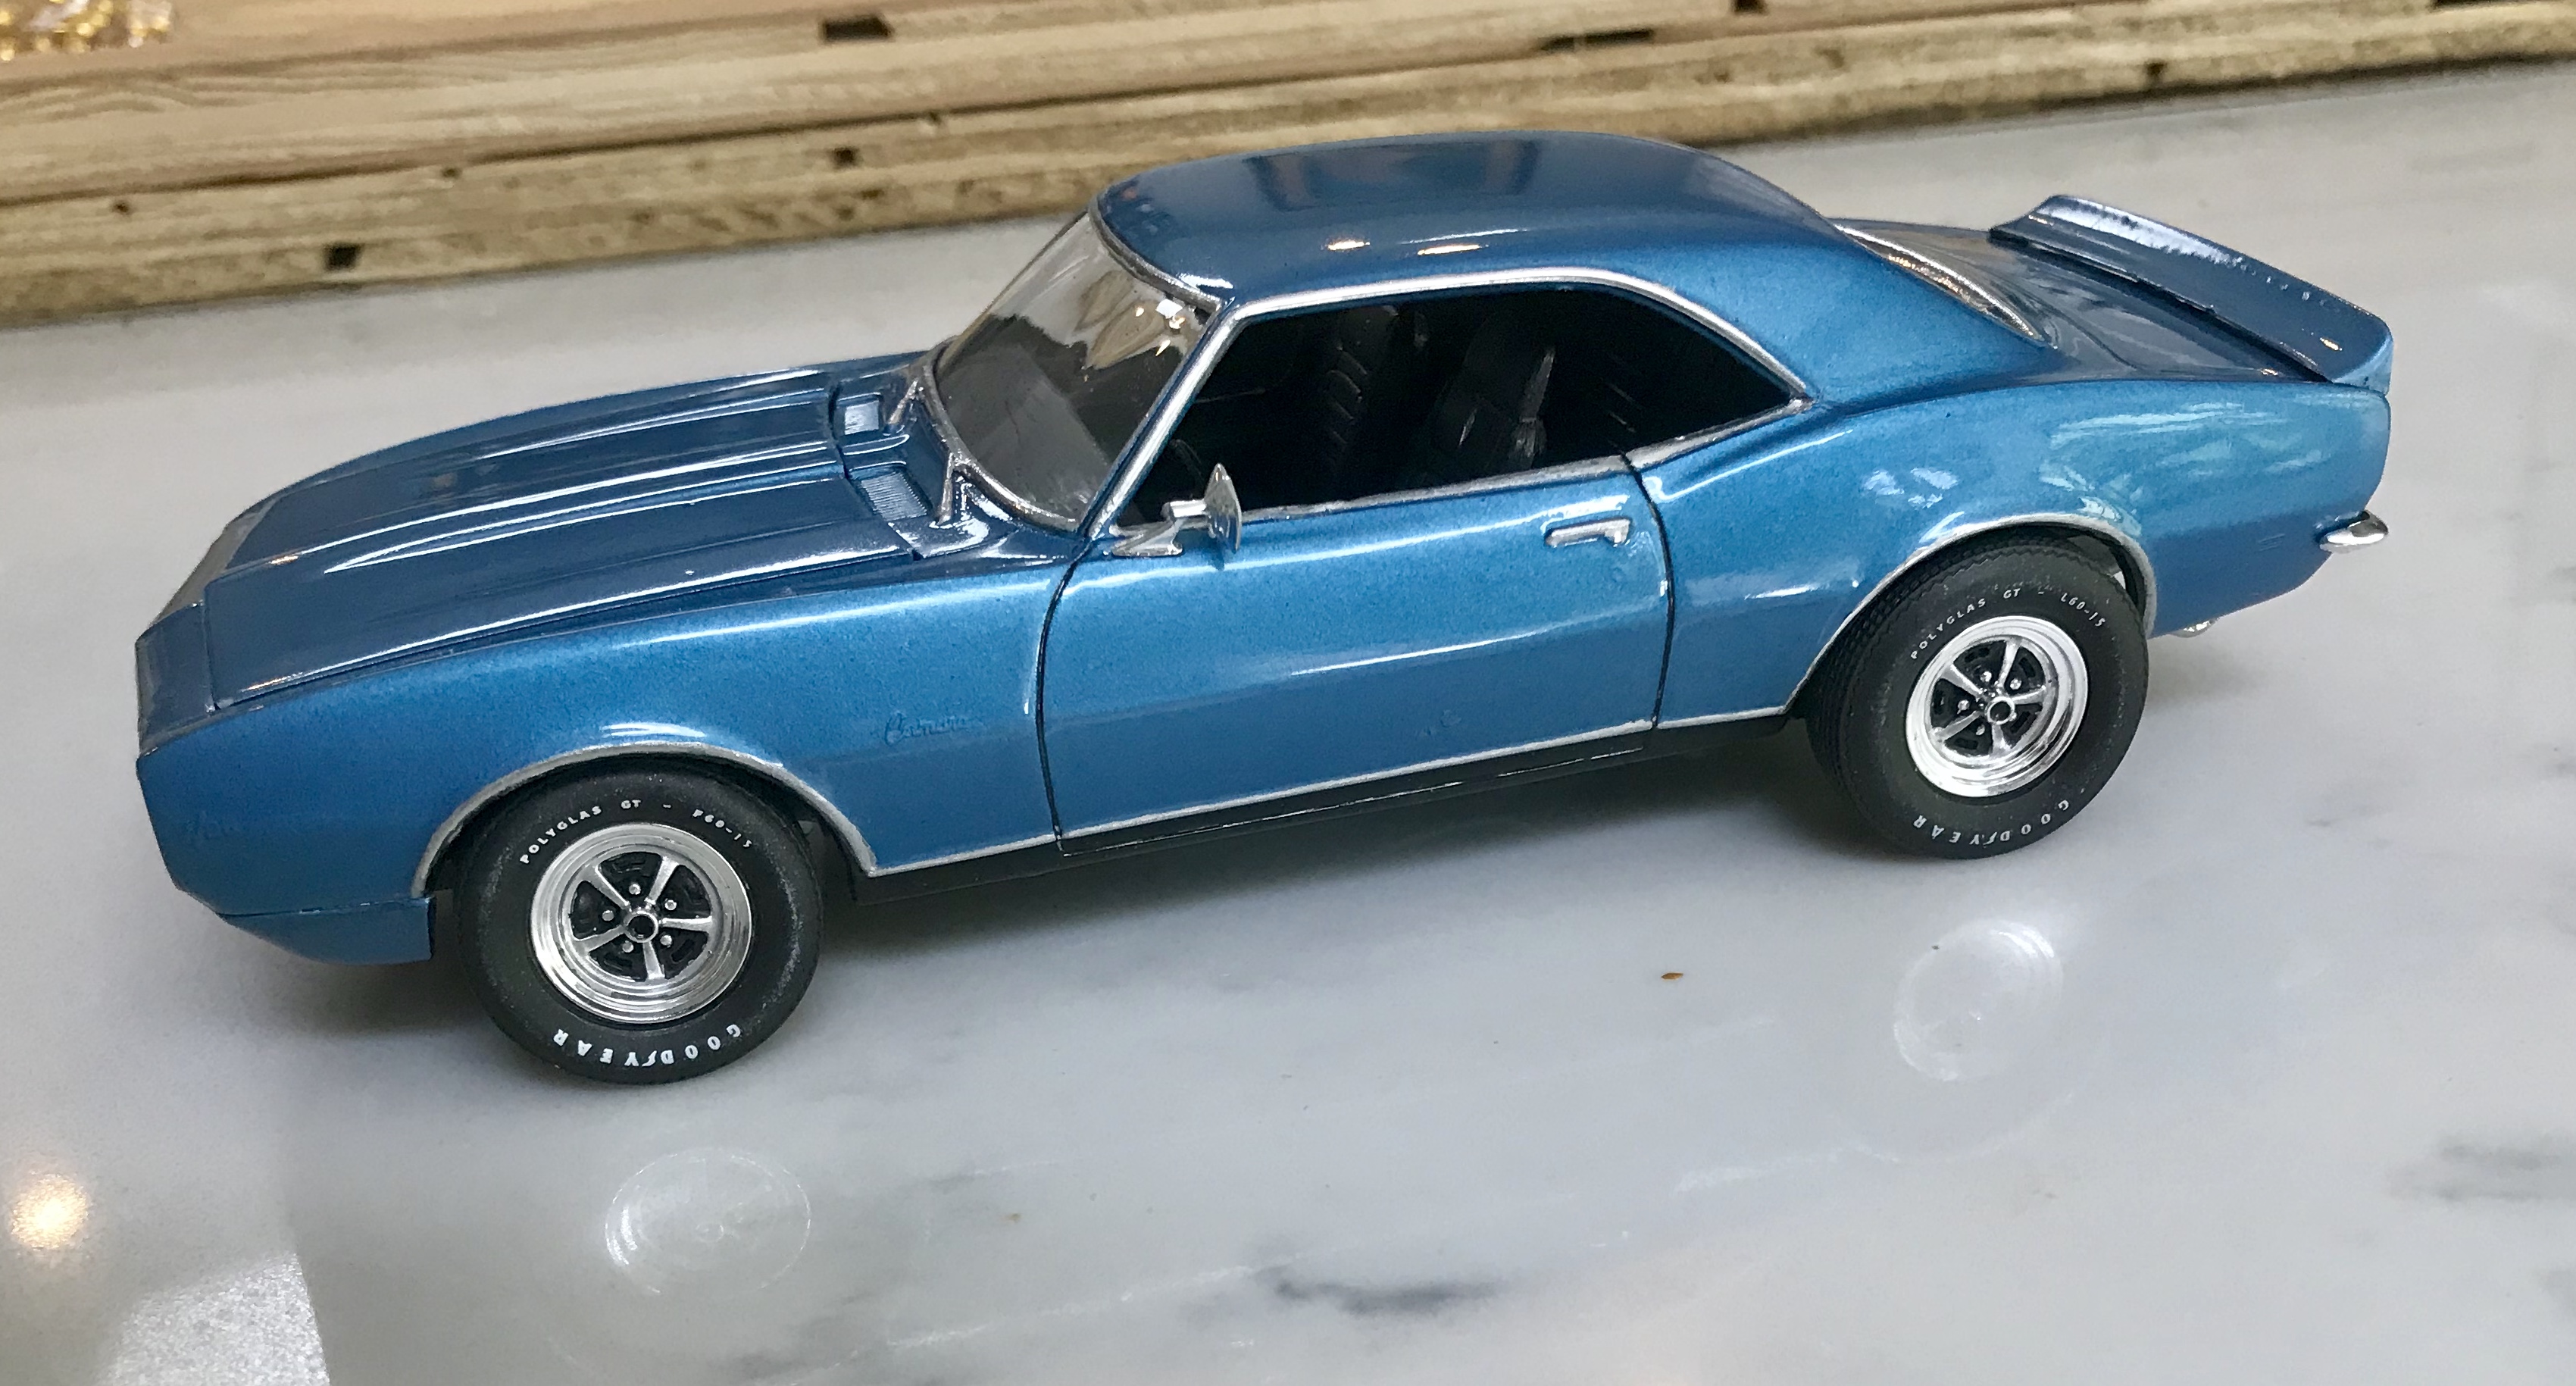
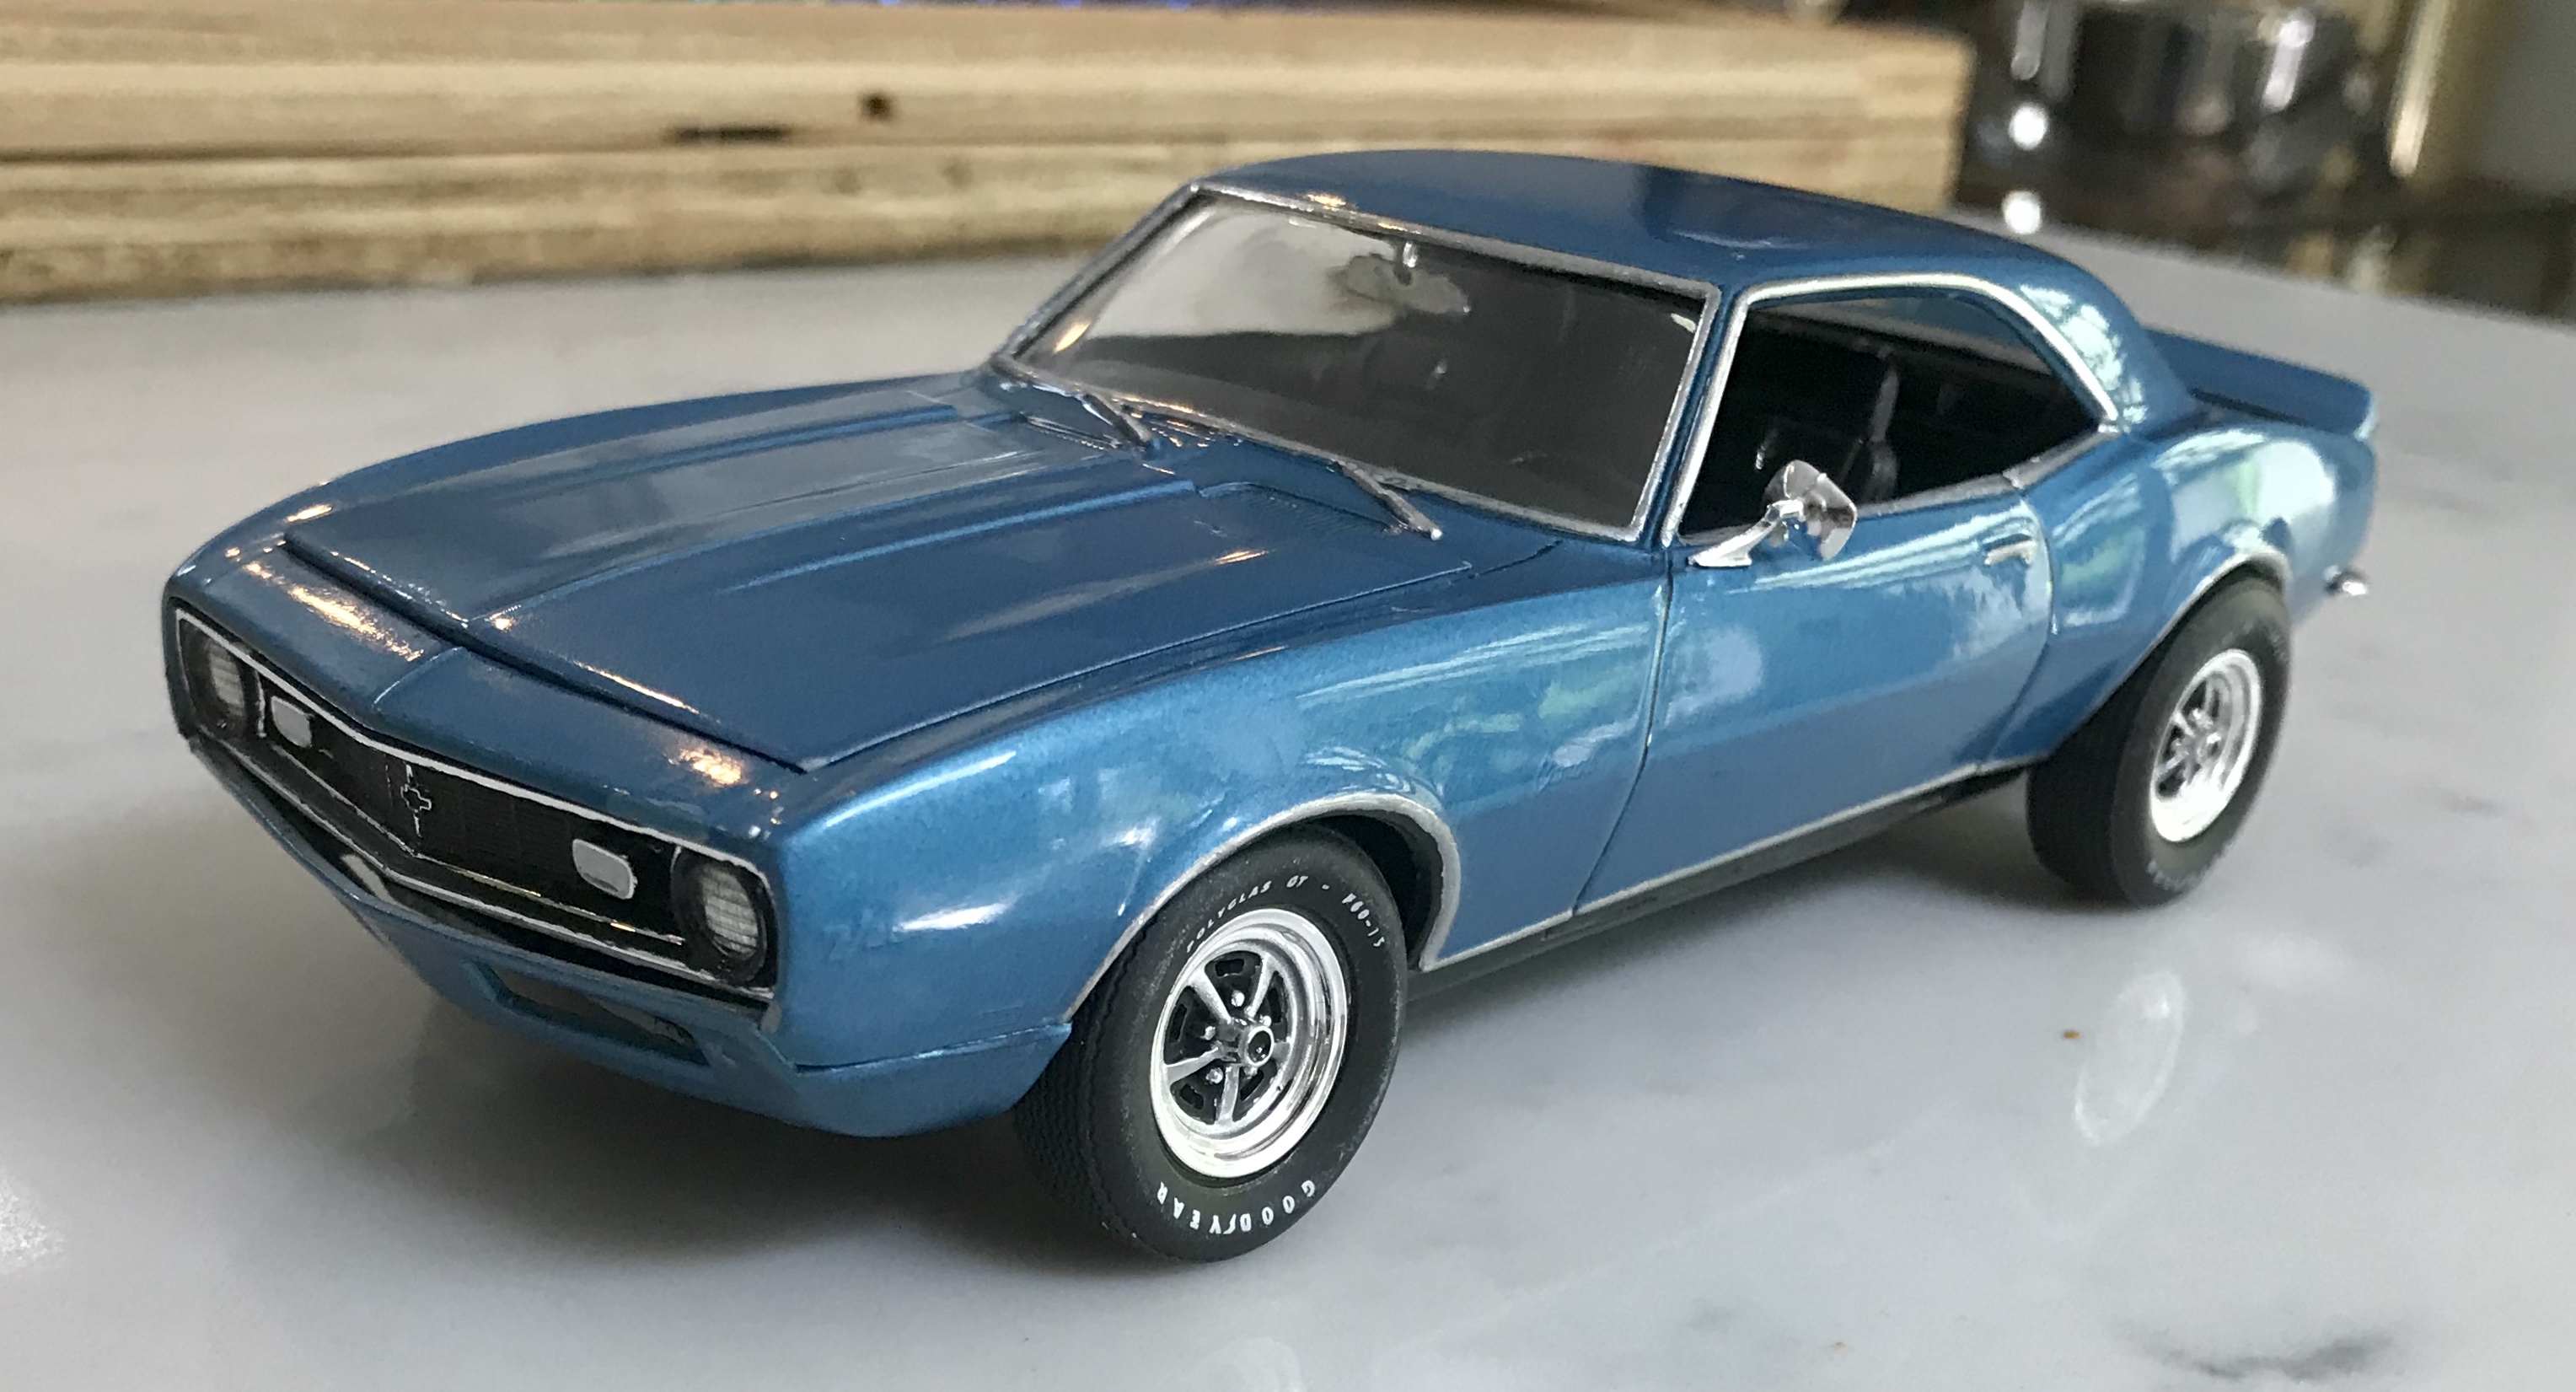
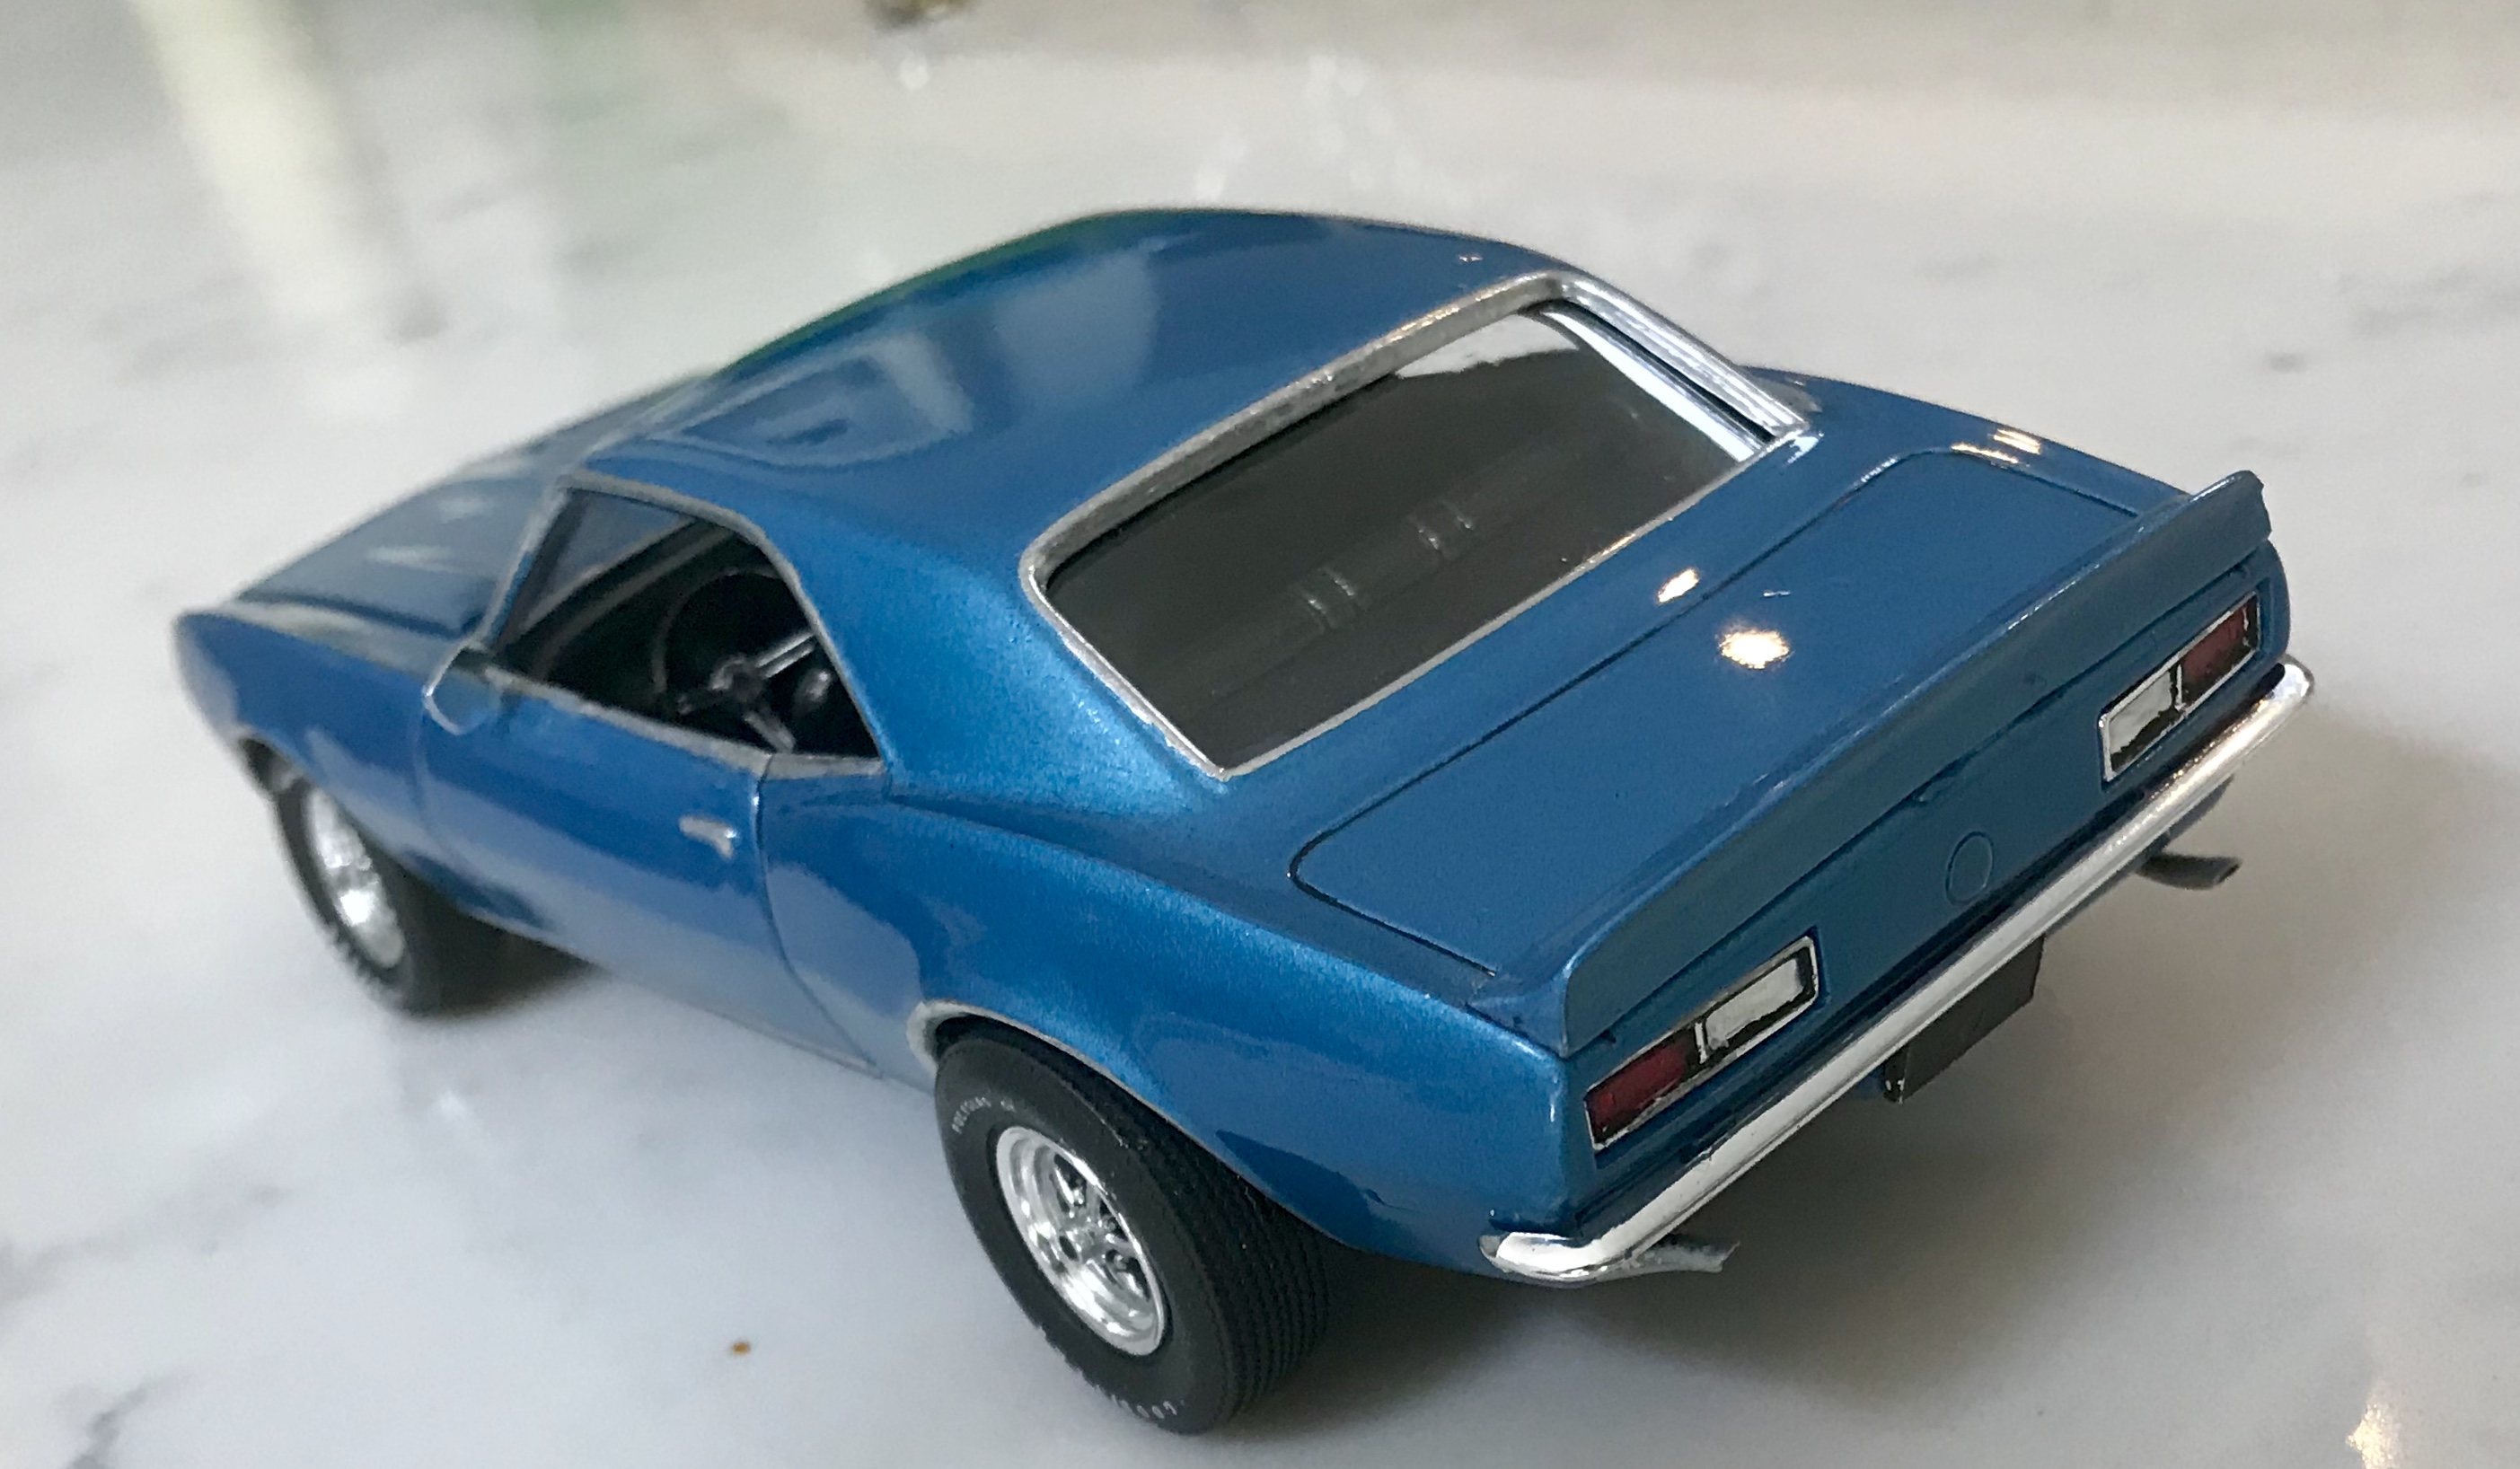
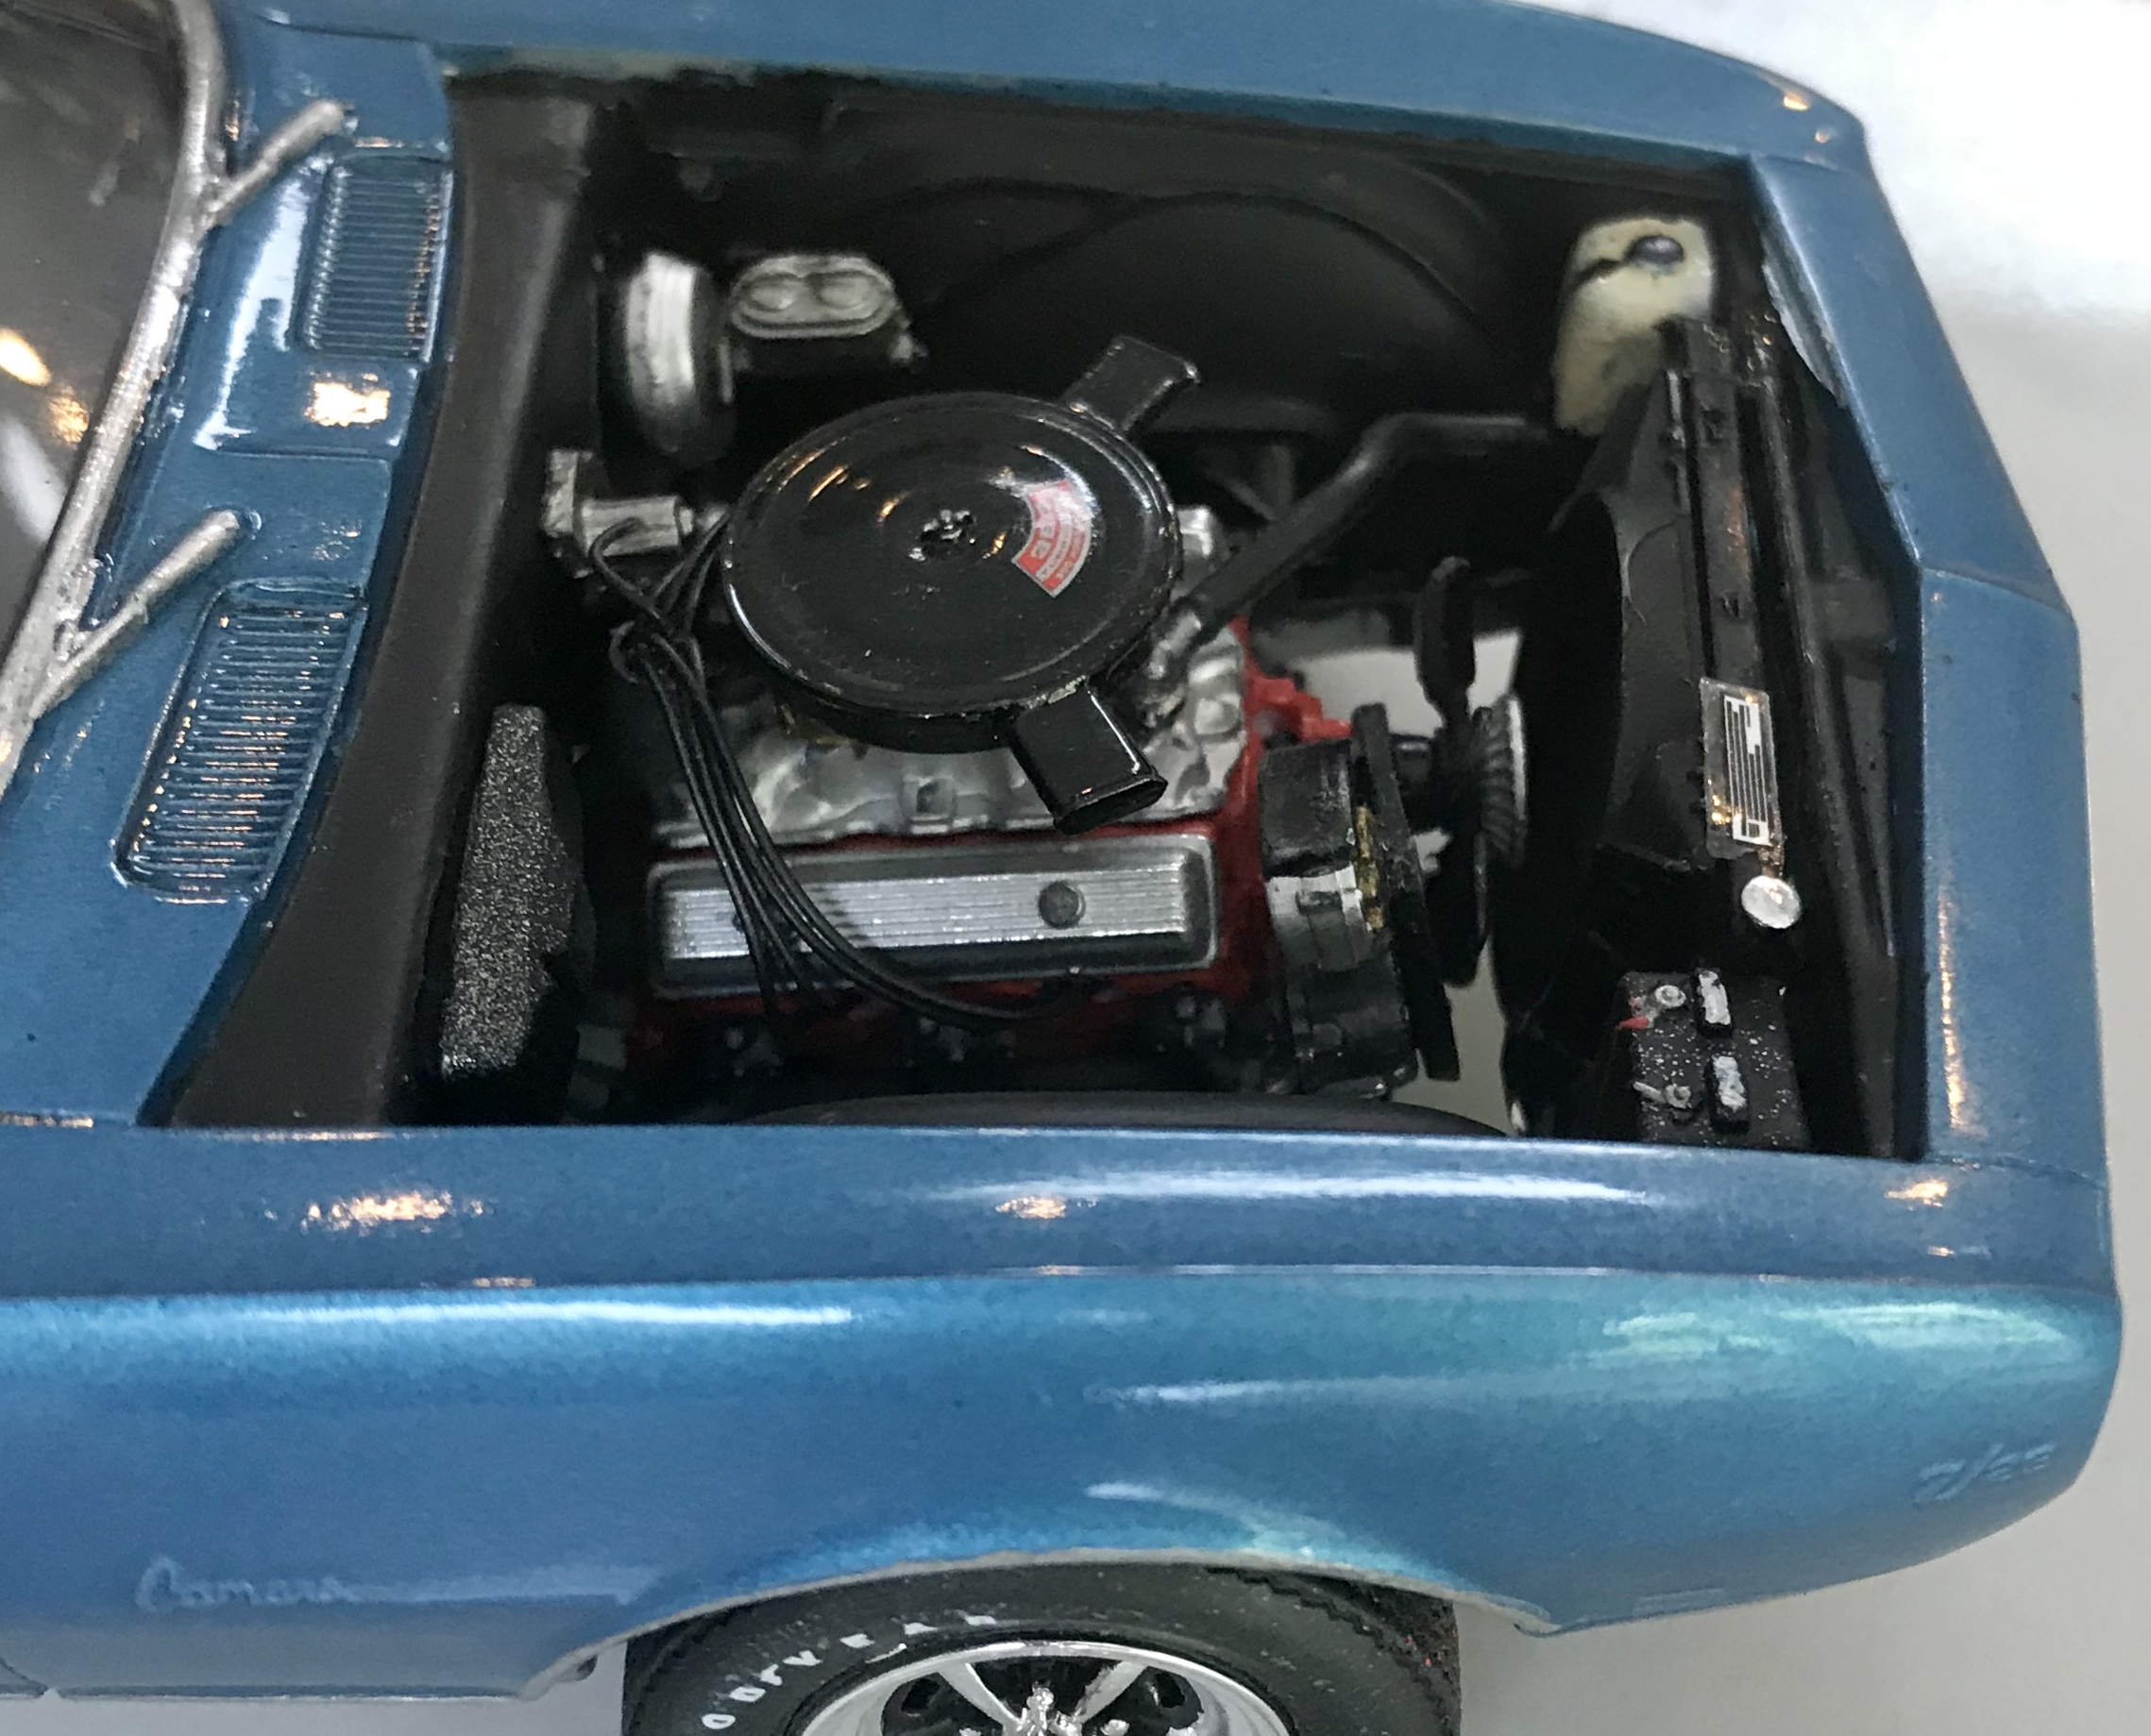
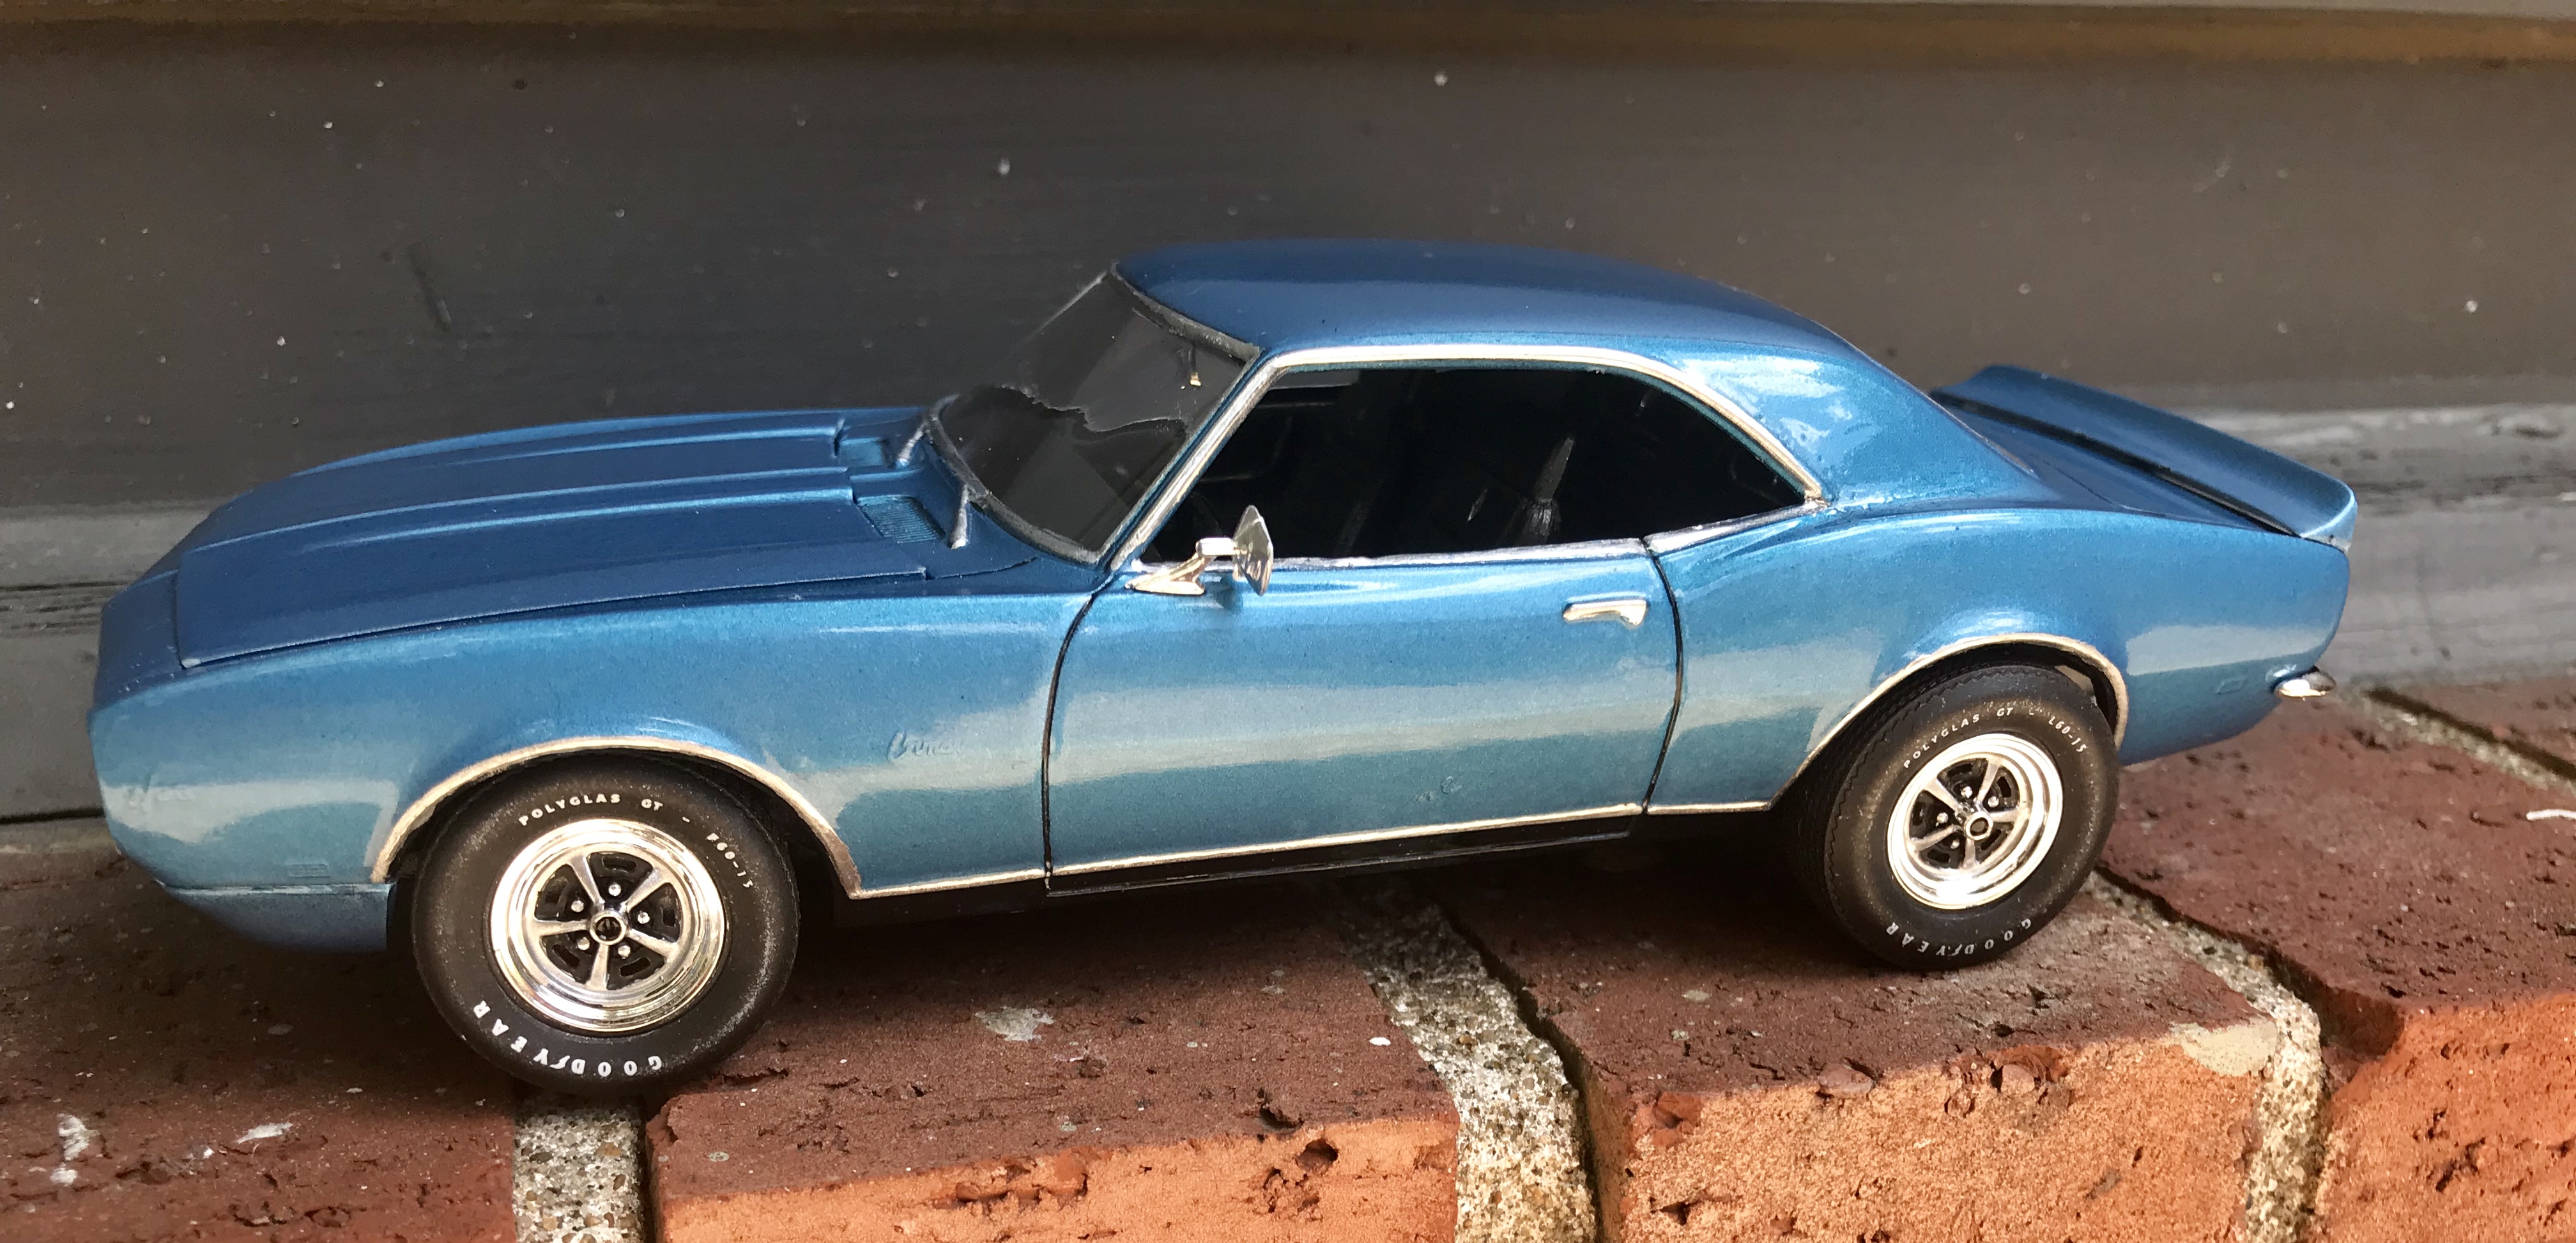
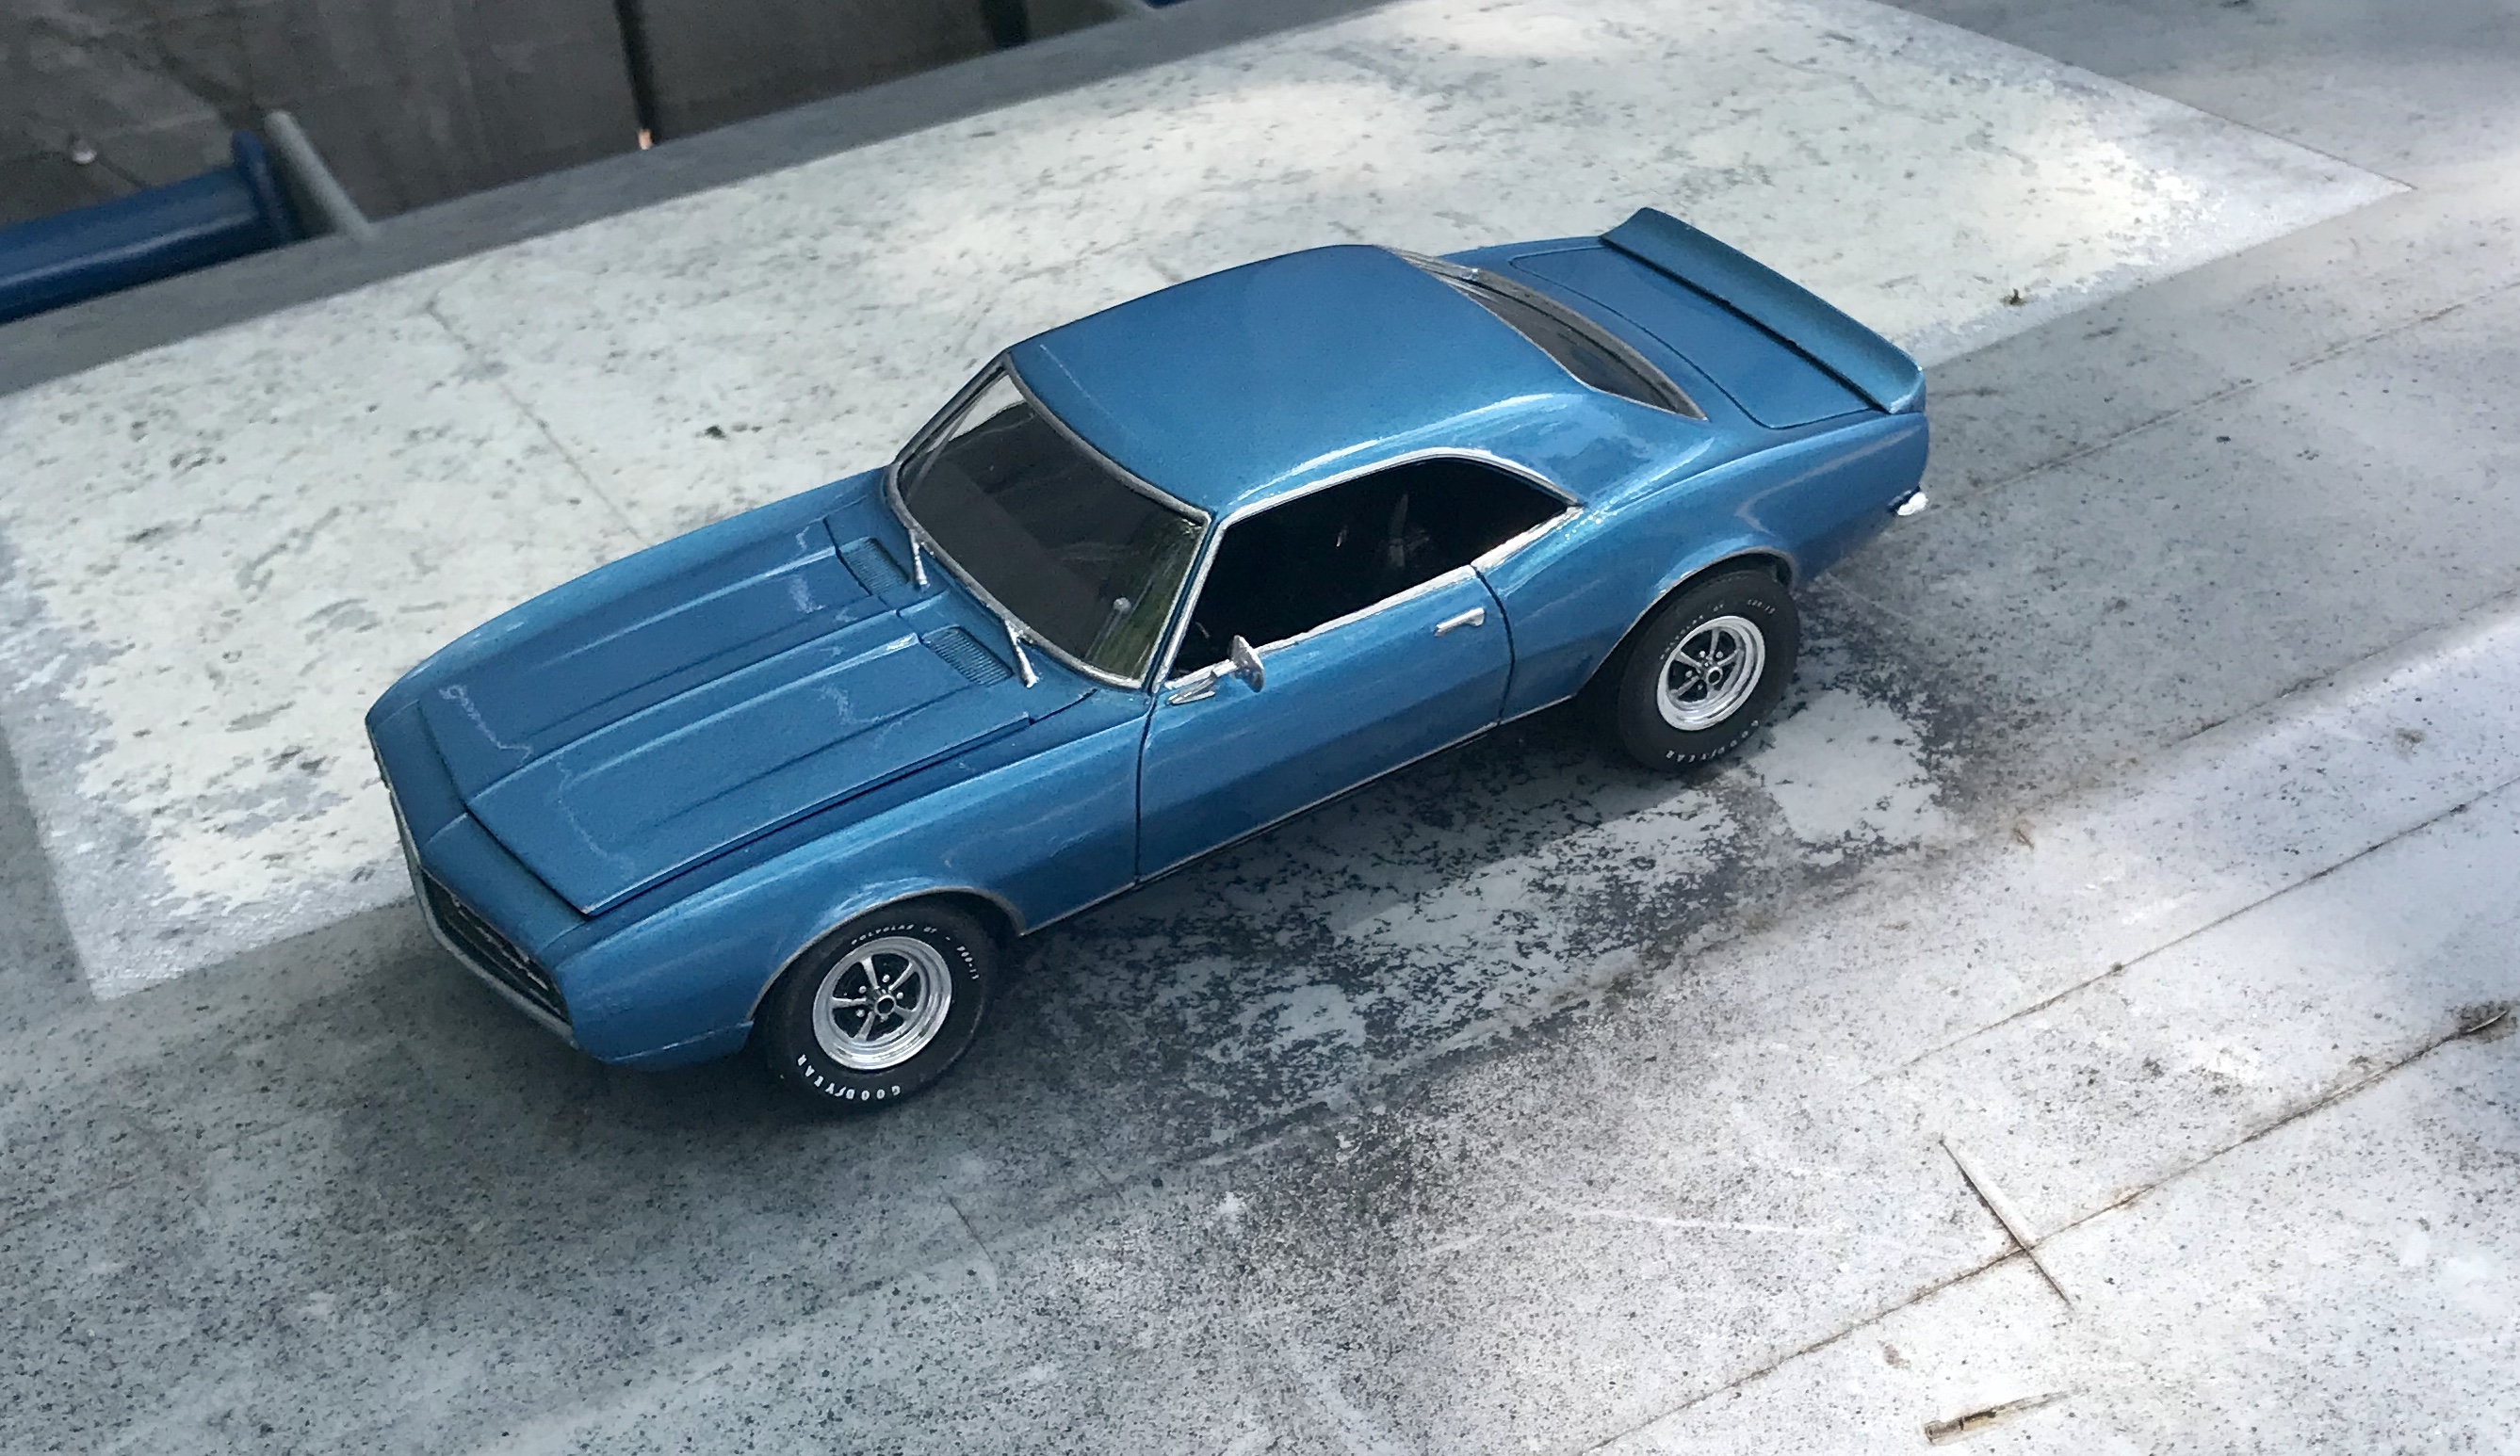
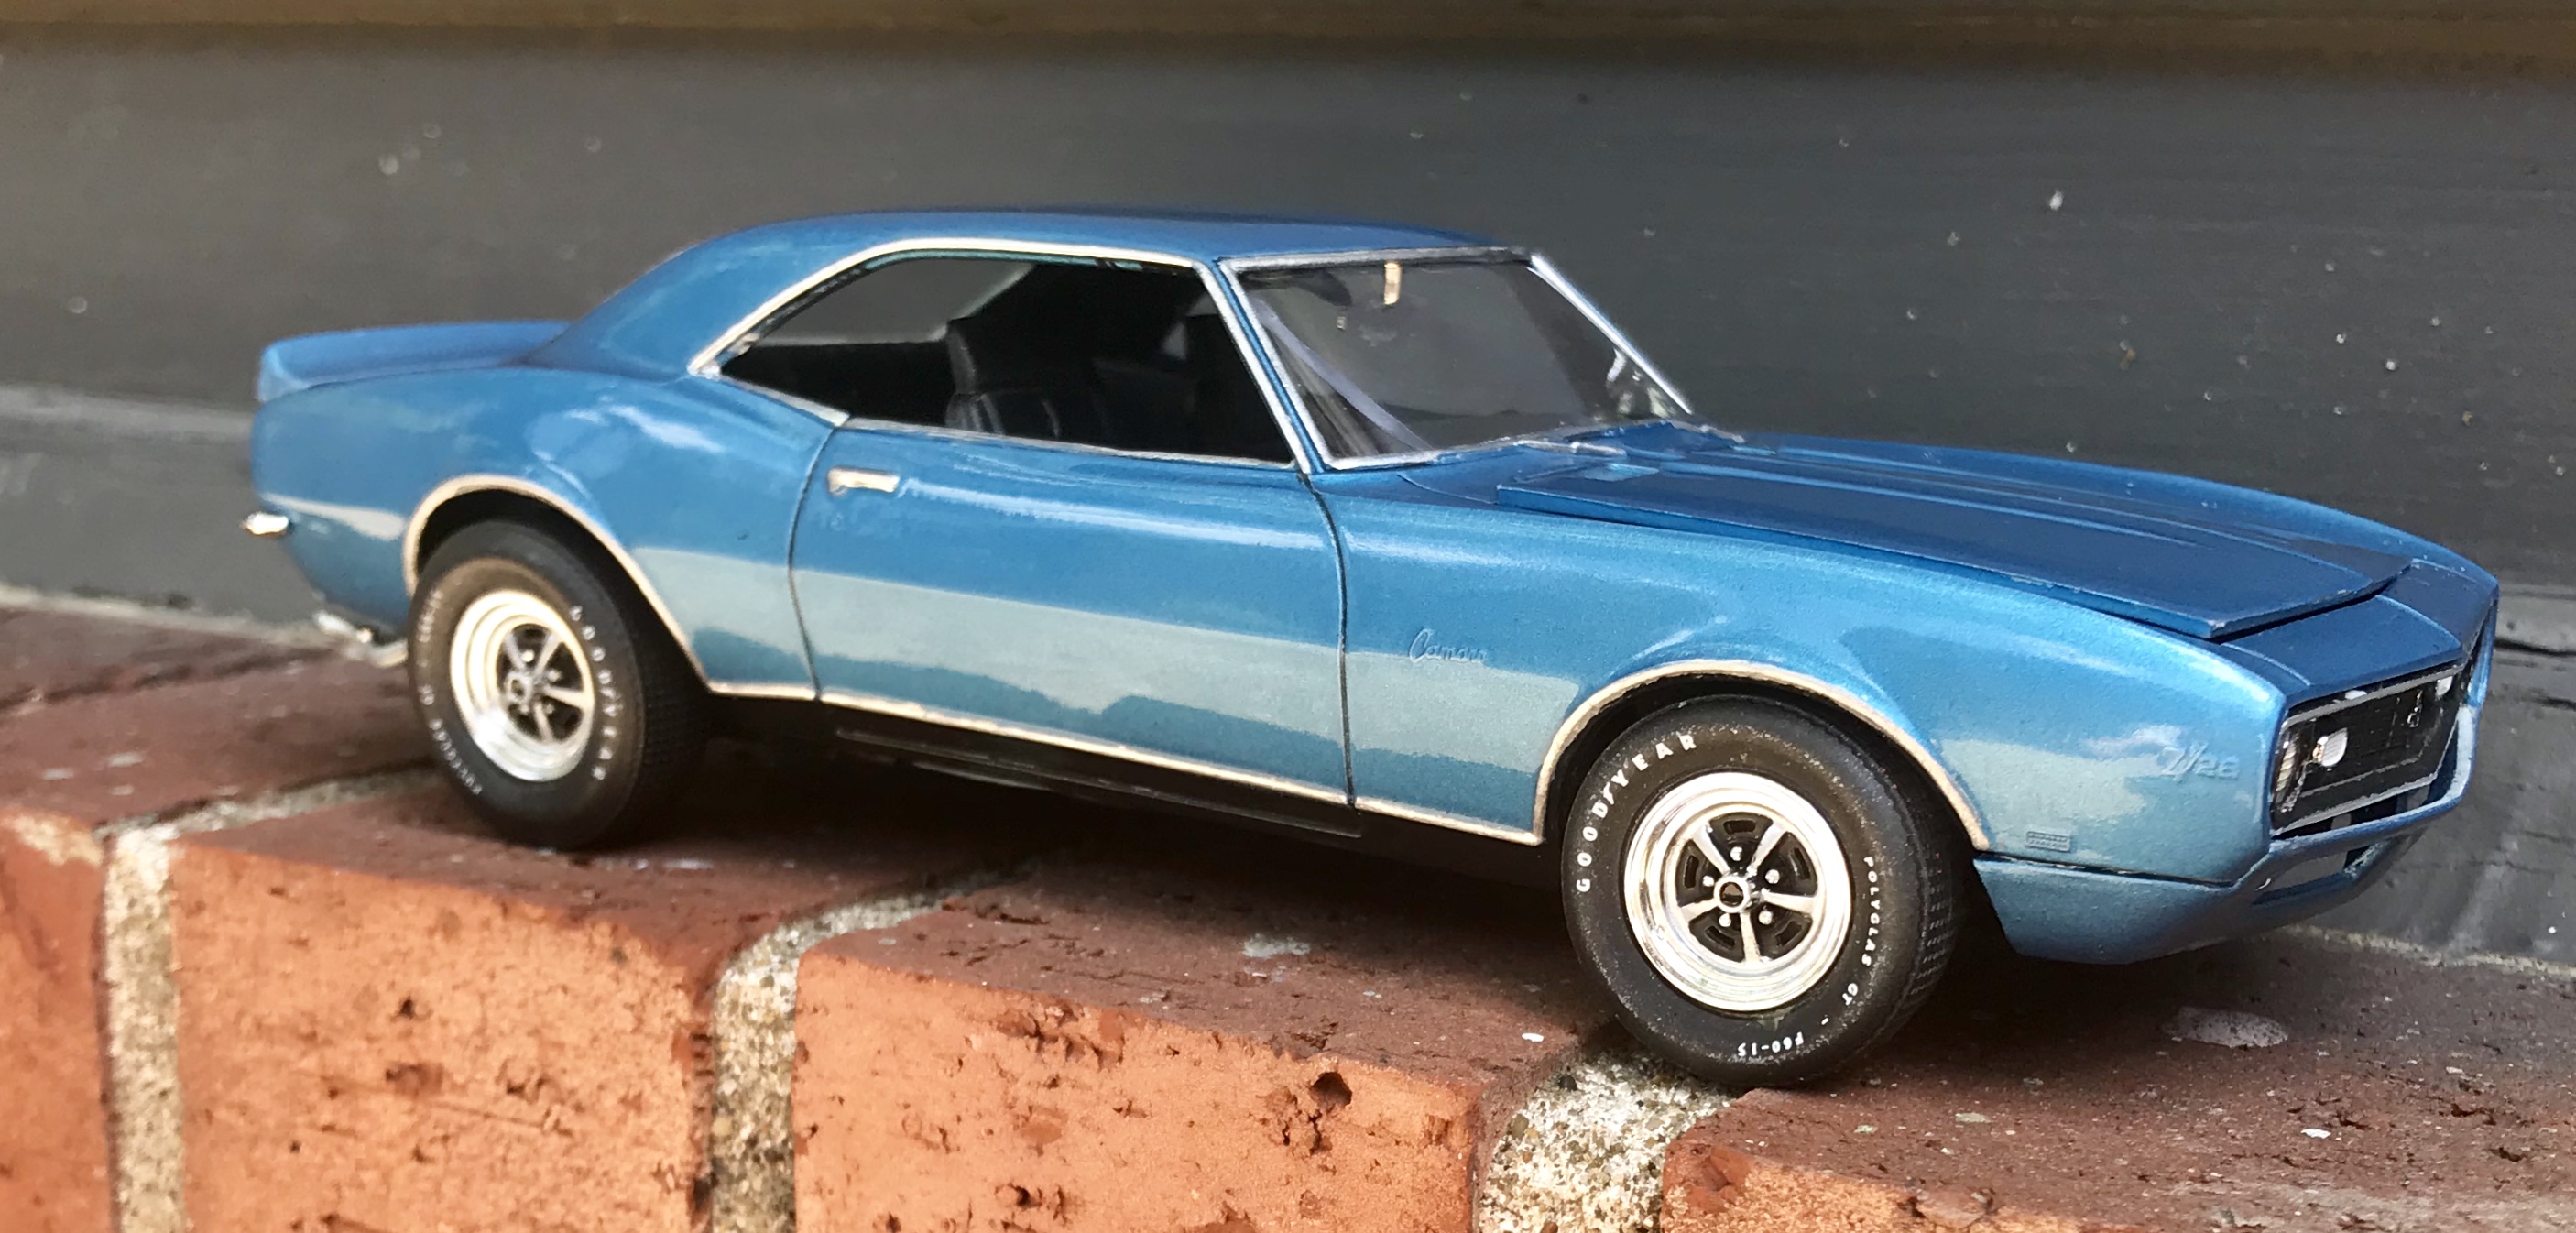
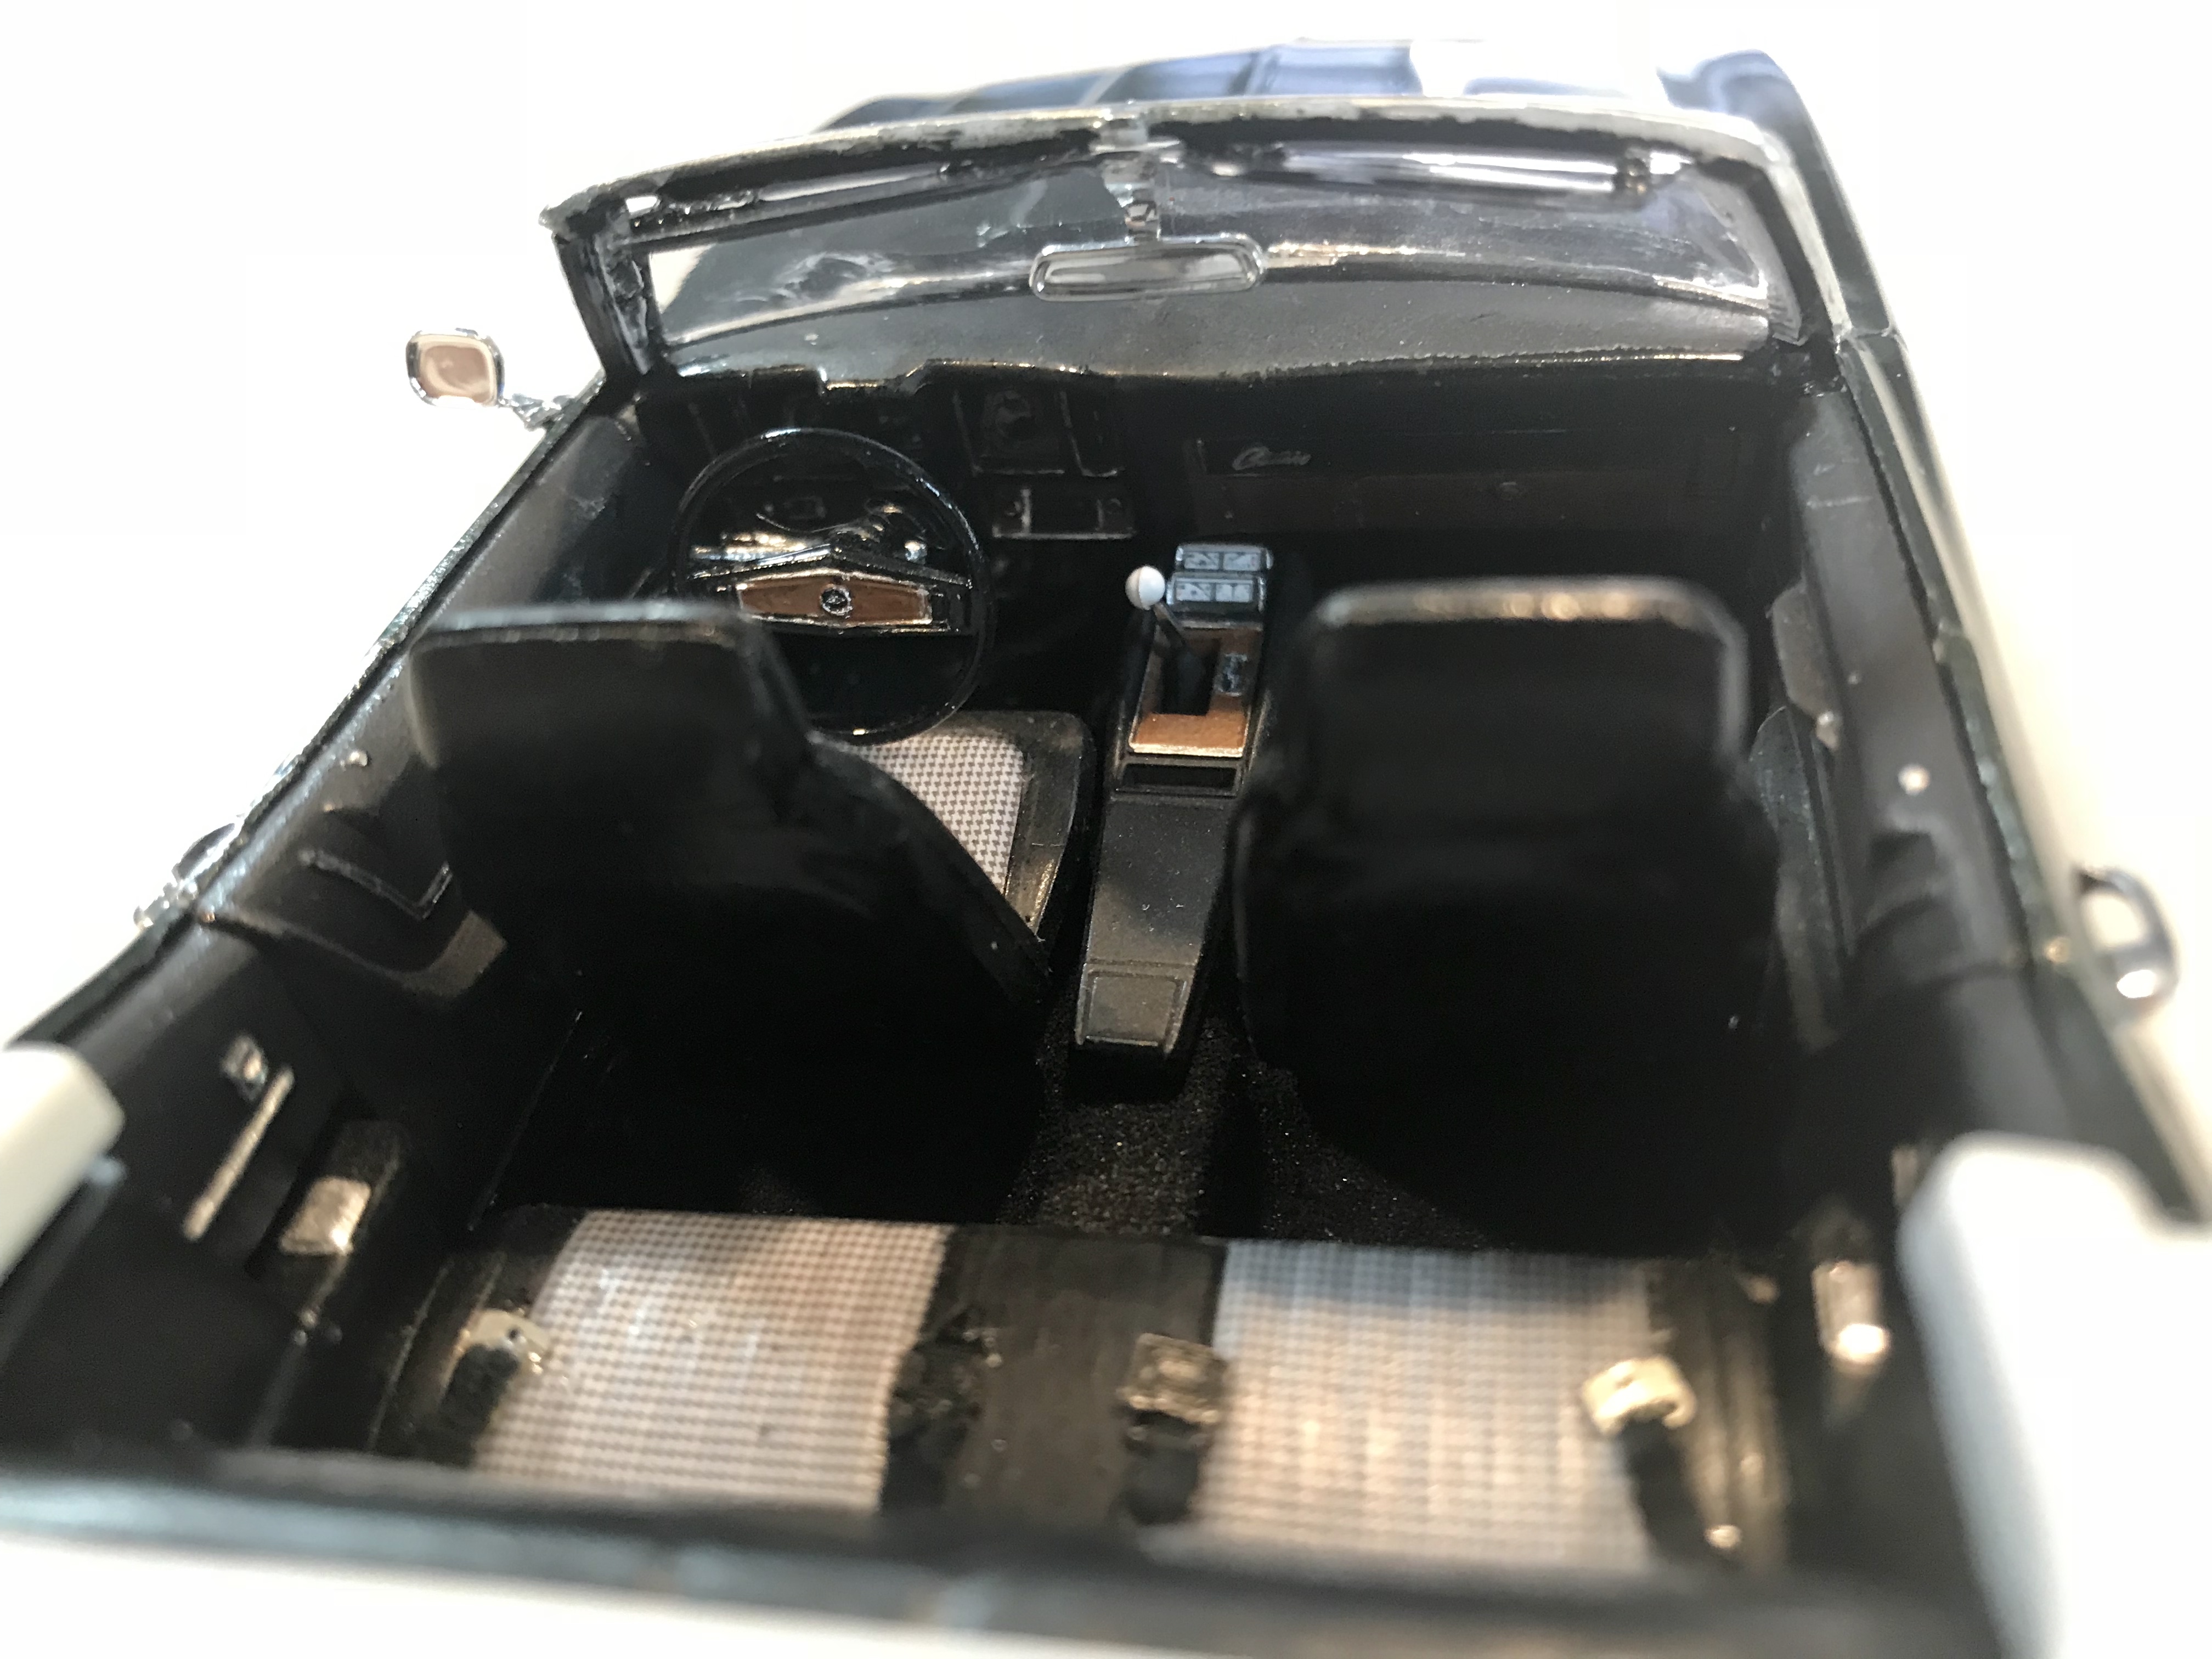
I have two Revell 67 Camaros, and 3 different Revell 69s, so I had a hole in my first generation Camaros that only AMT could fill. (Also have one AMT 70) This is not a great kit...it’s lacking details and realism... it’s more like building a toy than a replica, but I wanted to fill out the lineup. I decided to do a few things to improve the kit, but not go overboard. This is a shelf model. I didn’t want to build it as a Z28, using the toy-like engine. I had a Chevy 350 laying around from my Nova SS kit that died, so I put that to use here. I also used the radiator from a Revell Camaro, as it looked far better than the piece that was in the kit. The radiator hose doesn’t quite make it all the way, but it’s still better than what was provided... I can add some material to extend it. Also, the hood doesn’t quite fit correctly... I sanded it down a little, but it isn’t the size as much as it’s warped. The wheels are from the Revell 68 Chevelle, as the kit rallys are terrible... the slots are too big and the center hubs are cone shaped... and i wanted to use something different on this build. Paint is Testors Nassau Blue. Finally, I decided to leave the front bumper off... the 68s just look mean without them. All in all, its OK... a decent shelf model. I’ll extend the radiator hose, and I realized I still need to put the Chrome on the lock cylinders and find my spare Camaro decals for the fender emblems, but it will have its place to complete my 67-70 Camaro cycle. Thanks for looking.
-
-
Nice! Like the two-tone paint and he Revell rally wheels look much better than the original ones in this kit. I’m working on this right now, too.
-
WOW.... what an incredible finish!!!! I’ve never had paint that nice.
-
Daisy Dukes '74 Road Runner Has Been Released!
Kmb0319 replied to Custom Hearse's topic in Car Kit News & Reviews
OH YEAH!!!! I’ve been waiting five years hoping to see this re-released. This was my high school and first three years of college car. I actually don’t know if I’ll build an exact replica of mine or just go with the best looking version I like when checking research pics, but this one is a must! I’ll definitely kitbash the 71 Charger, too. -
This is just spectacular!!! It looks like it’s ready to cruise down the boulevard. Really incredible work.
-
69 COPO Nova in “Primer Pearl?” PICS FINALLY LOADED
Kmb0319 replied to Kmb0319's topic in Model Cars
I wanted to use a piece of guitar string, but it got all bent up and couldn’t be used. This is the only other thing I had laying around and I had already drilled the hole. Next time I change strings in my guitar, I’ll swap a new piece in there instead of the styrene. -
69 COPO Nova in “Primer Pearl?” PICS FINALLY LOADED
Kmb0319 replied to Kmb0319's topic in Model Cars
I used Testors Flame Red. It’s a gloss paint, but comes out semi-gloss without clear coat. I used a little Testors flat cherry to make the center seam. The red embossing powder is a little lighter than the paint color, but I like the contrast. -
69 COPO Nova in “Primer Pearl?” PICS FINALLY LOADED
Kmb0319 replied to Kmb0319's topic in Model Cars
The Revell COPO kit -
69 COPO Nova in “Primer Pearl?” PICS FINALLY LOADED
Kmb0319 replied to Kmb0319's topic in Model Cars
FINALLY.... I took new pictures and these loaded.... my interior pic was taken before the body and chassis were joined, so I couldn’t get a good new pic of it. And, sitting with my other 69 dog dish bow tie...
-
69 COPO Nova in “Primer Pearl?” PICS FINALLY LOADED
Kmb0319 replied to Kmb0319's topic in Model Cars
Nope, that didn’t work, either. I’ll try taking all new pictures later. -
69 COPO Nova in “Primer Pearl?” PICS FINALLY LOADED
Kmb0319 replied to Kmb0319's topic in Model Cars
Trying a copy/paste method... -
69 COPO Nova in “Primer Pearl?” PICS FINALLY LOADED
Kmb0319 replied to Kmb0319's topic in Model Cars
The pictures won’t load... I’ve tried multiple times and every single pic gives me the pop up message download failed. I’ll keep trying -
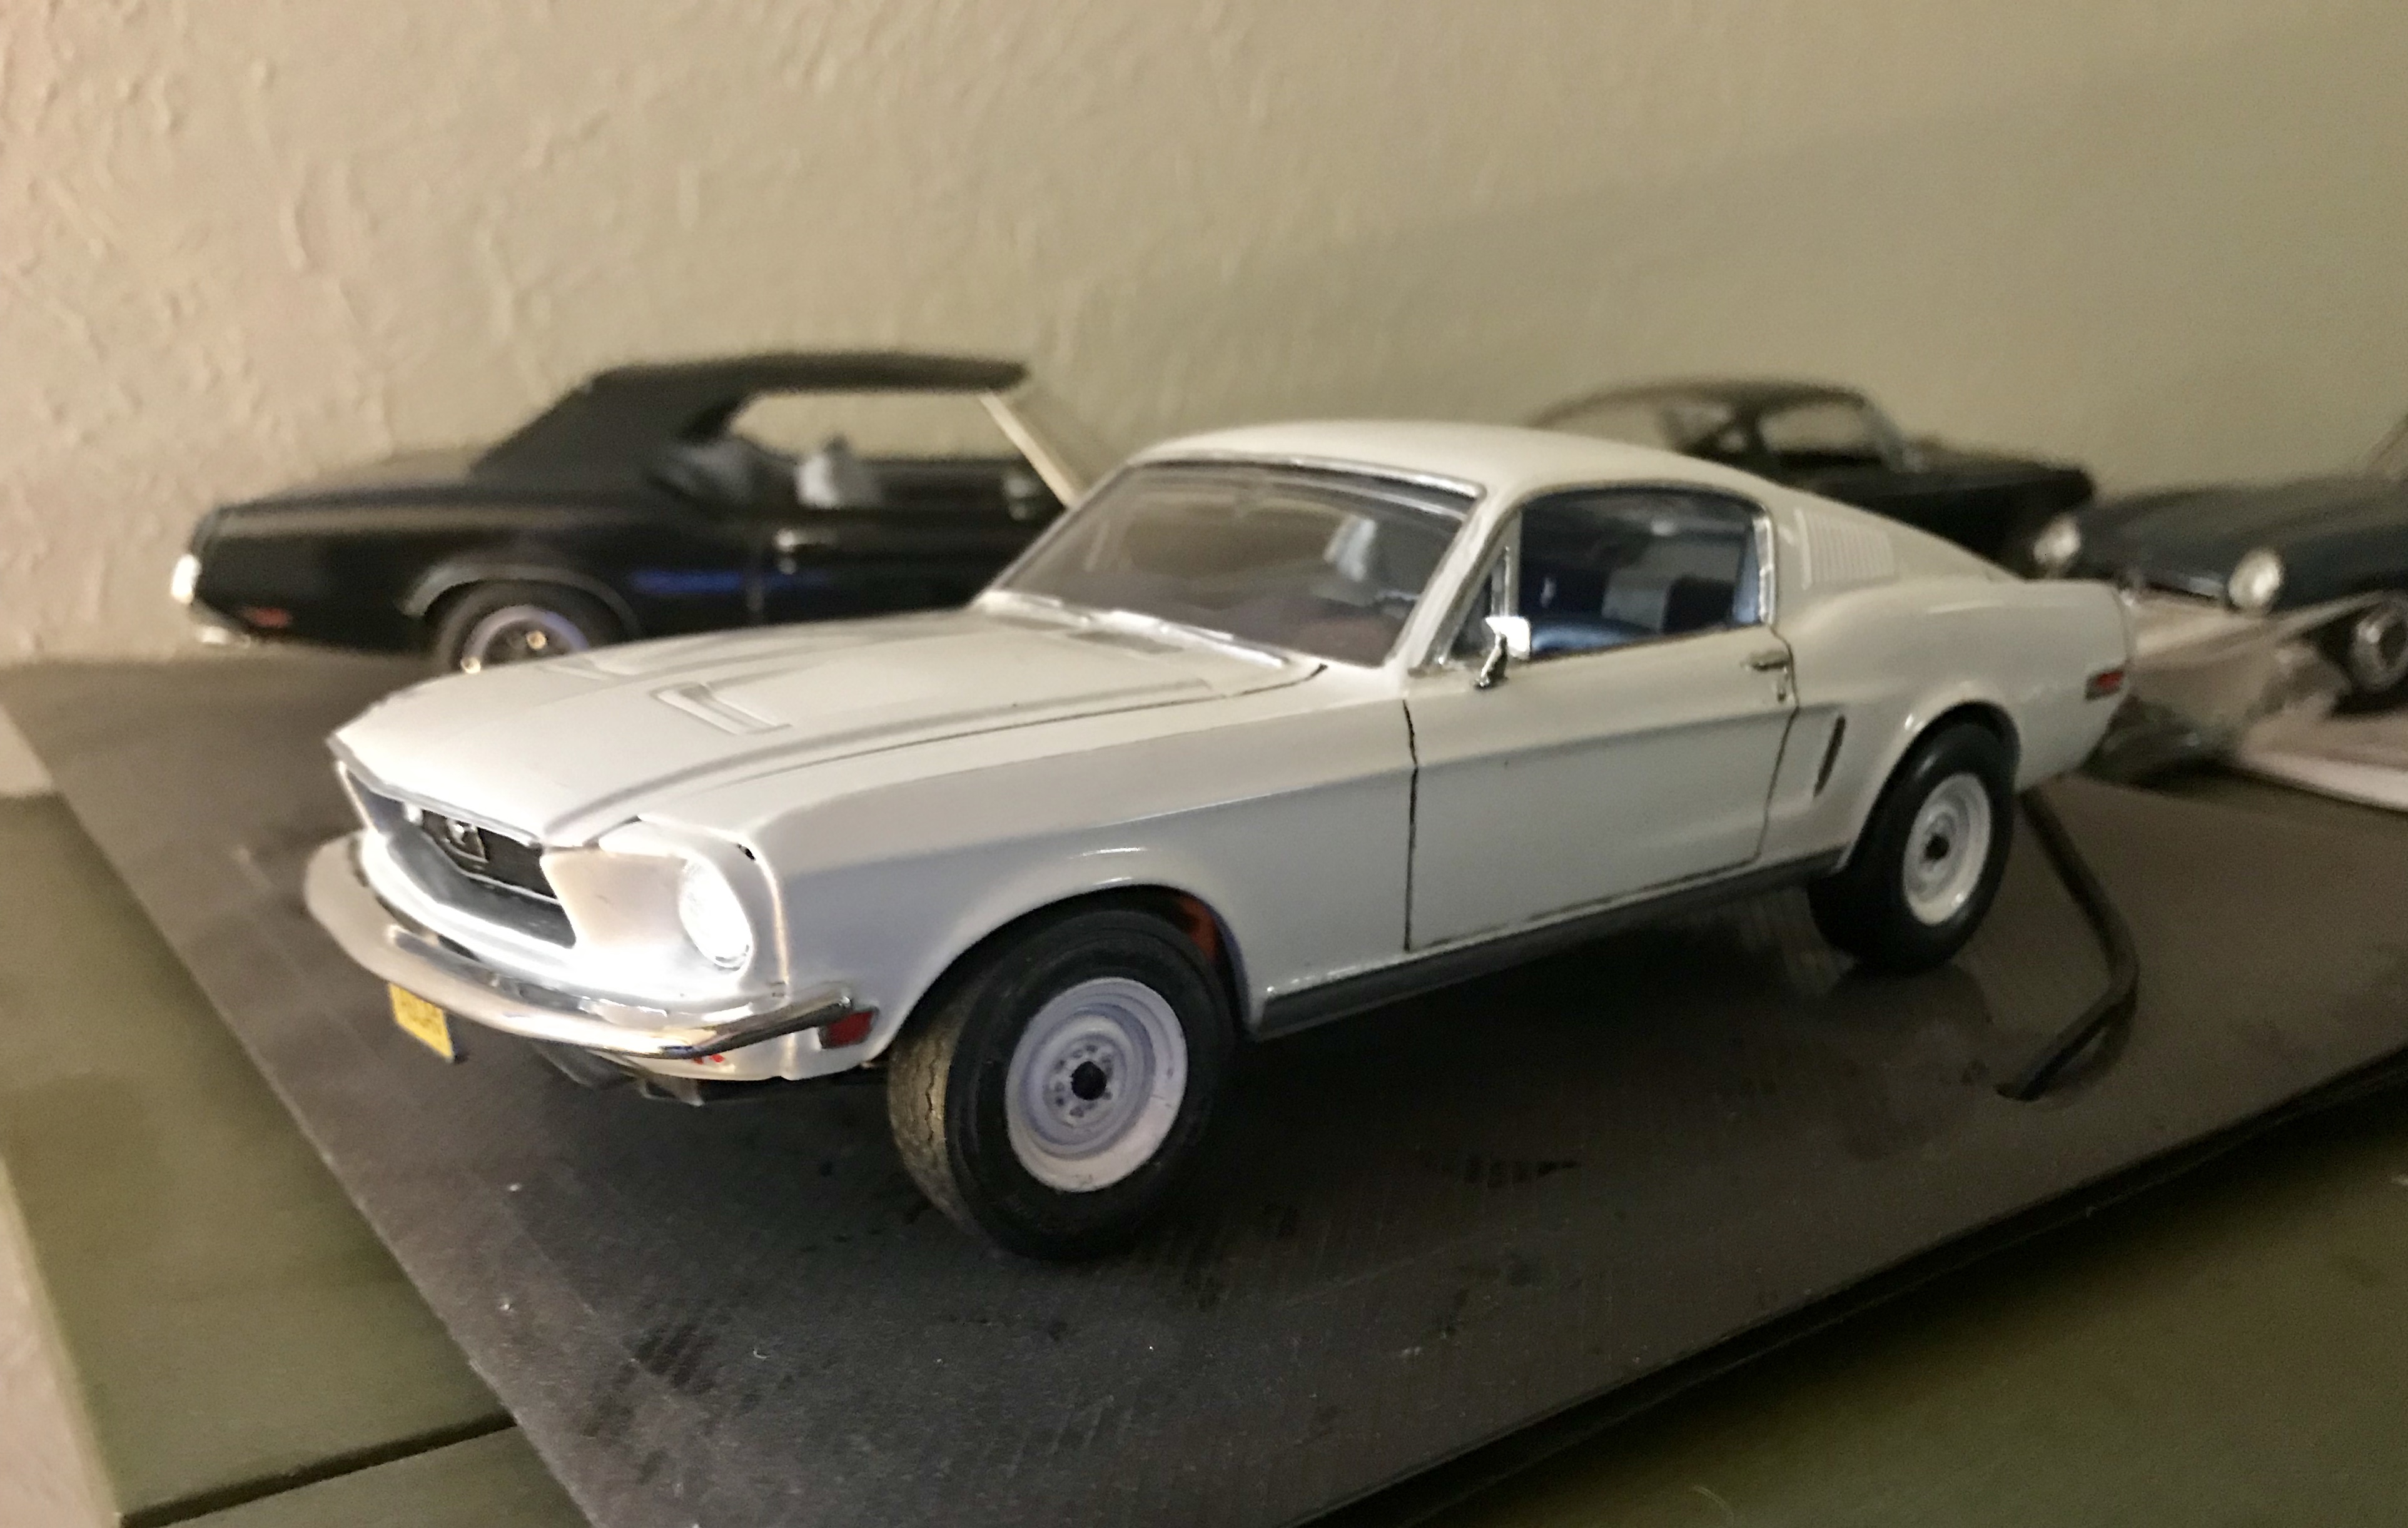
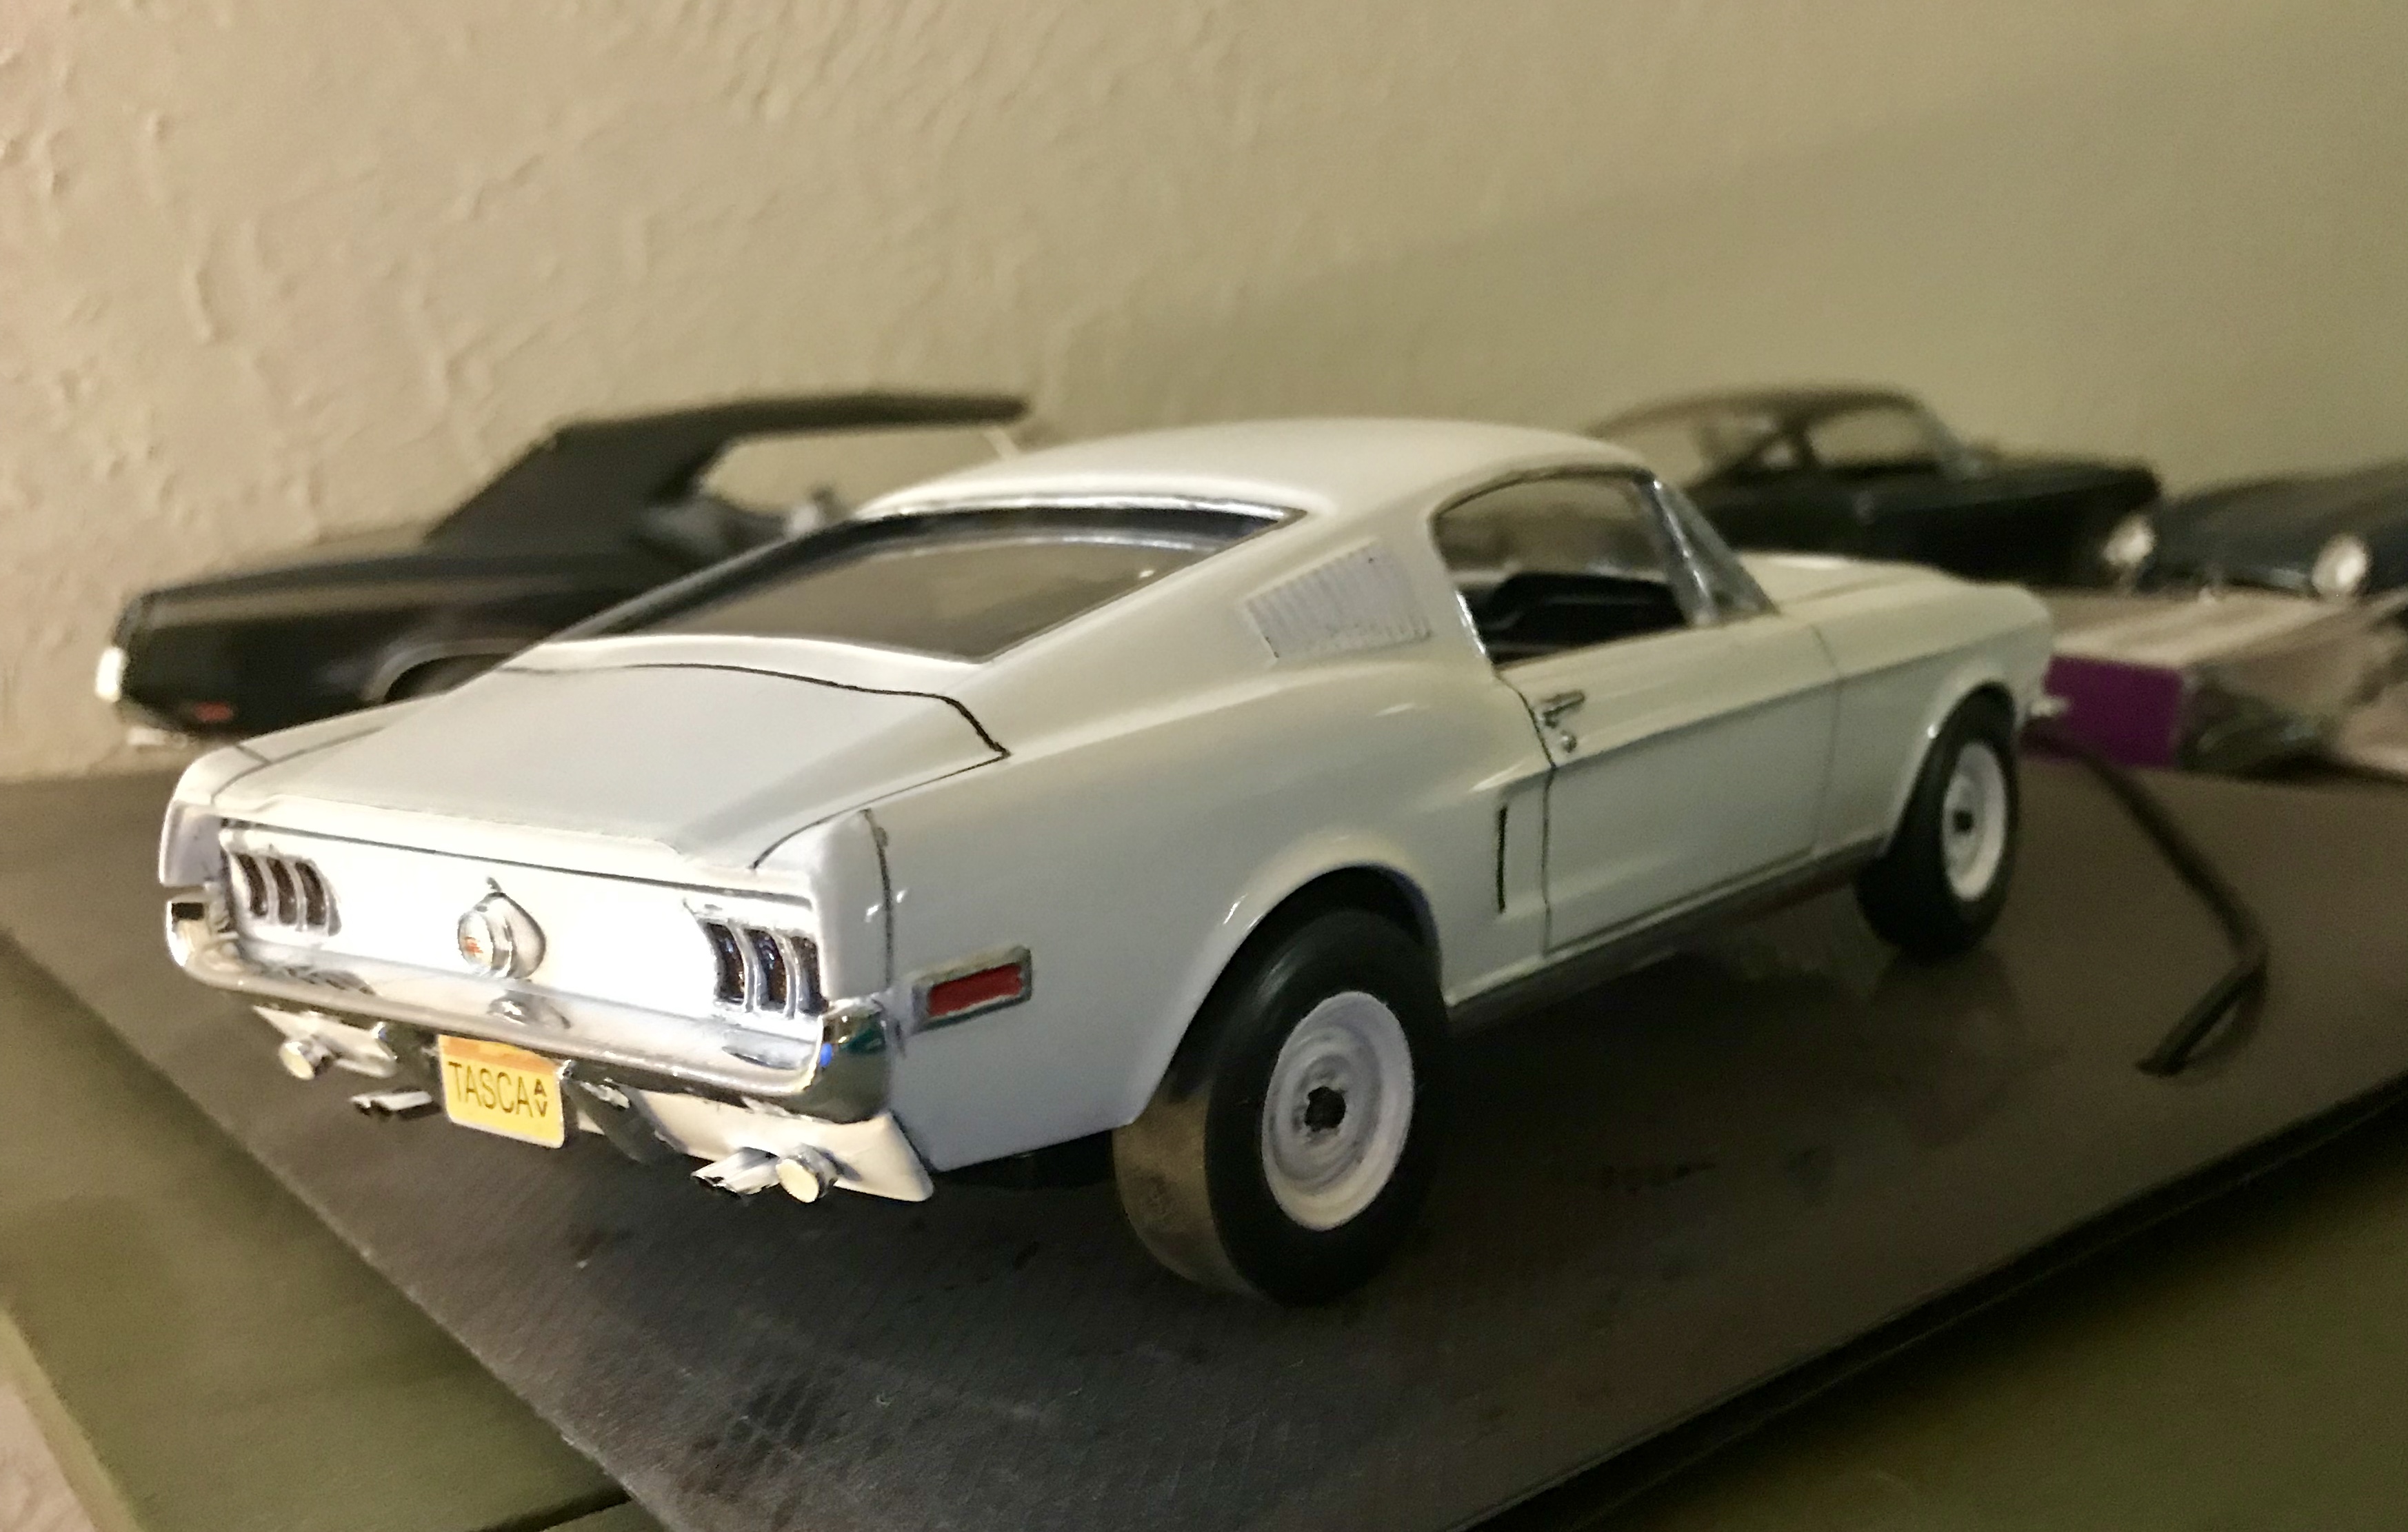
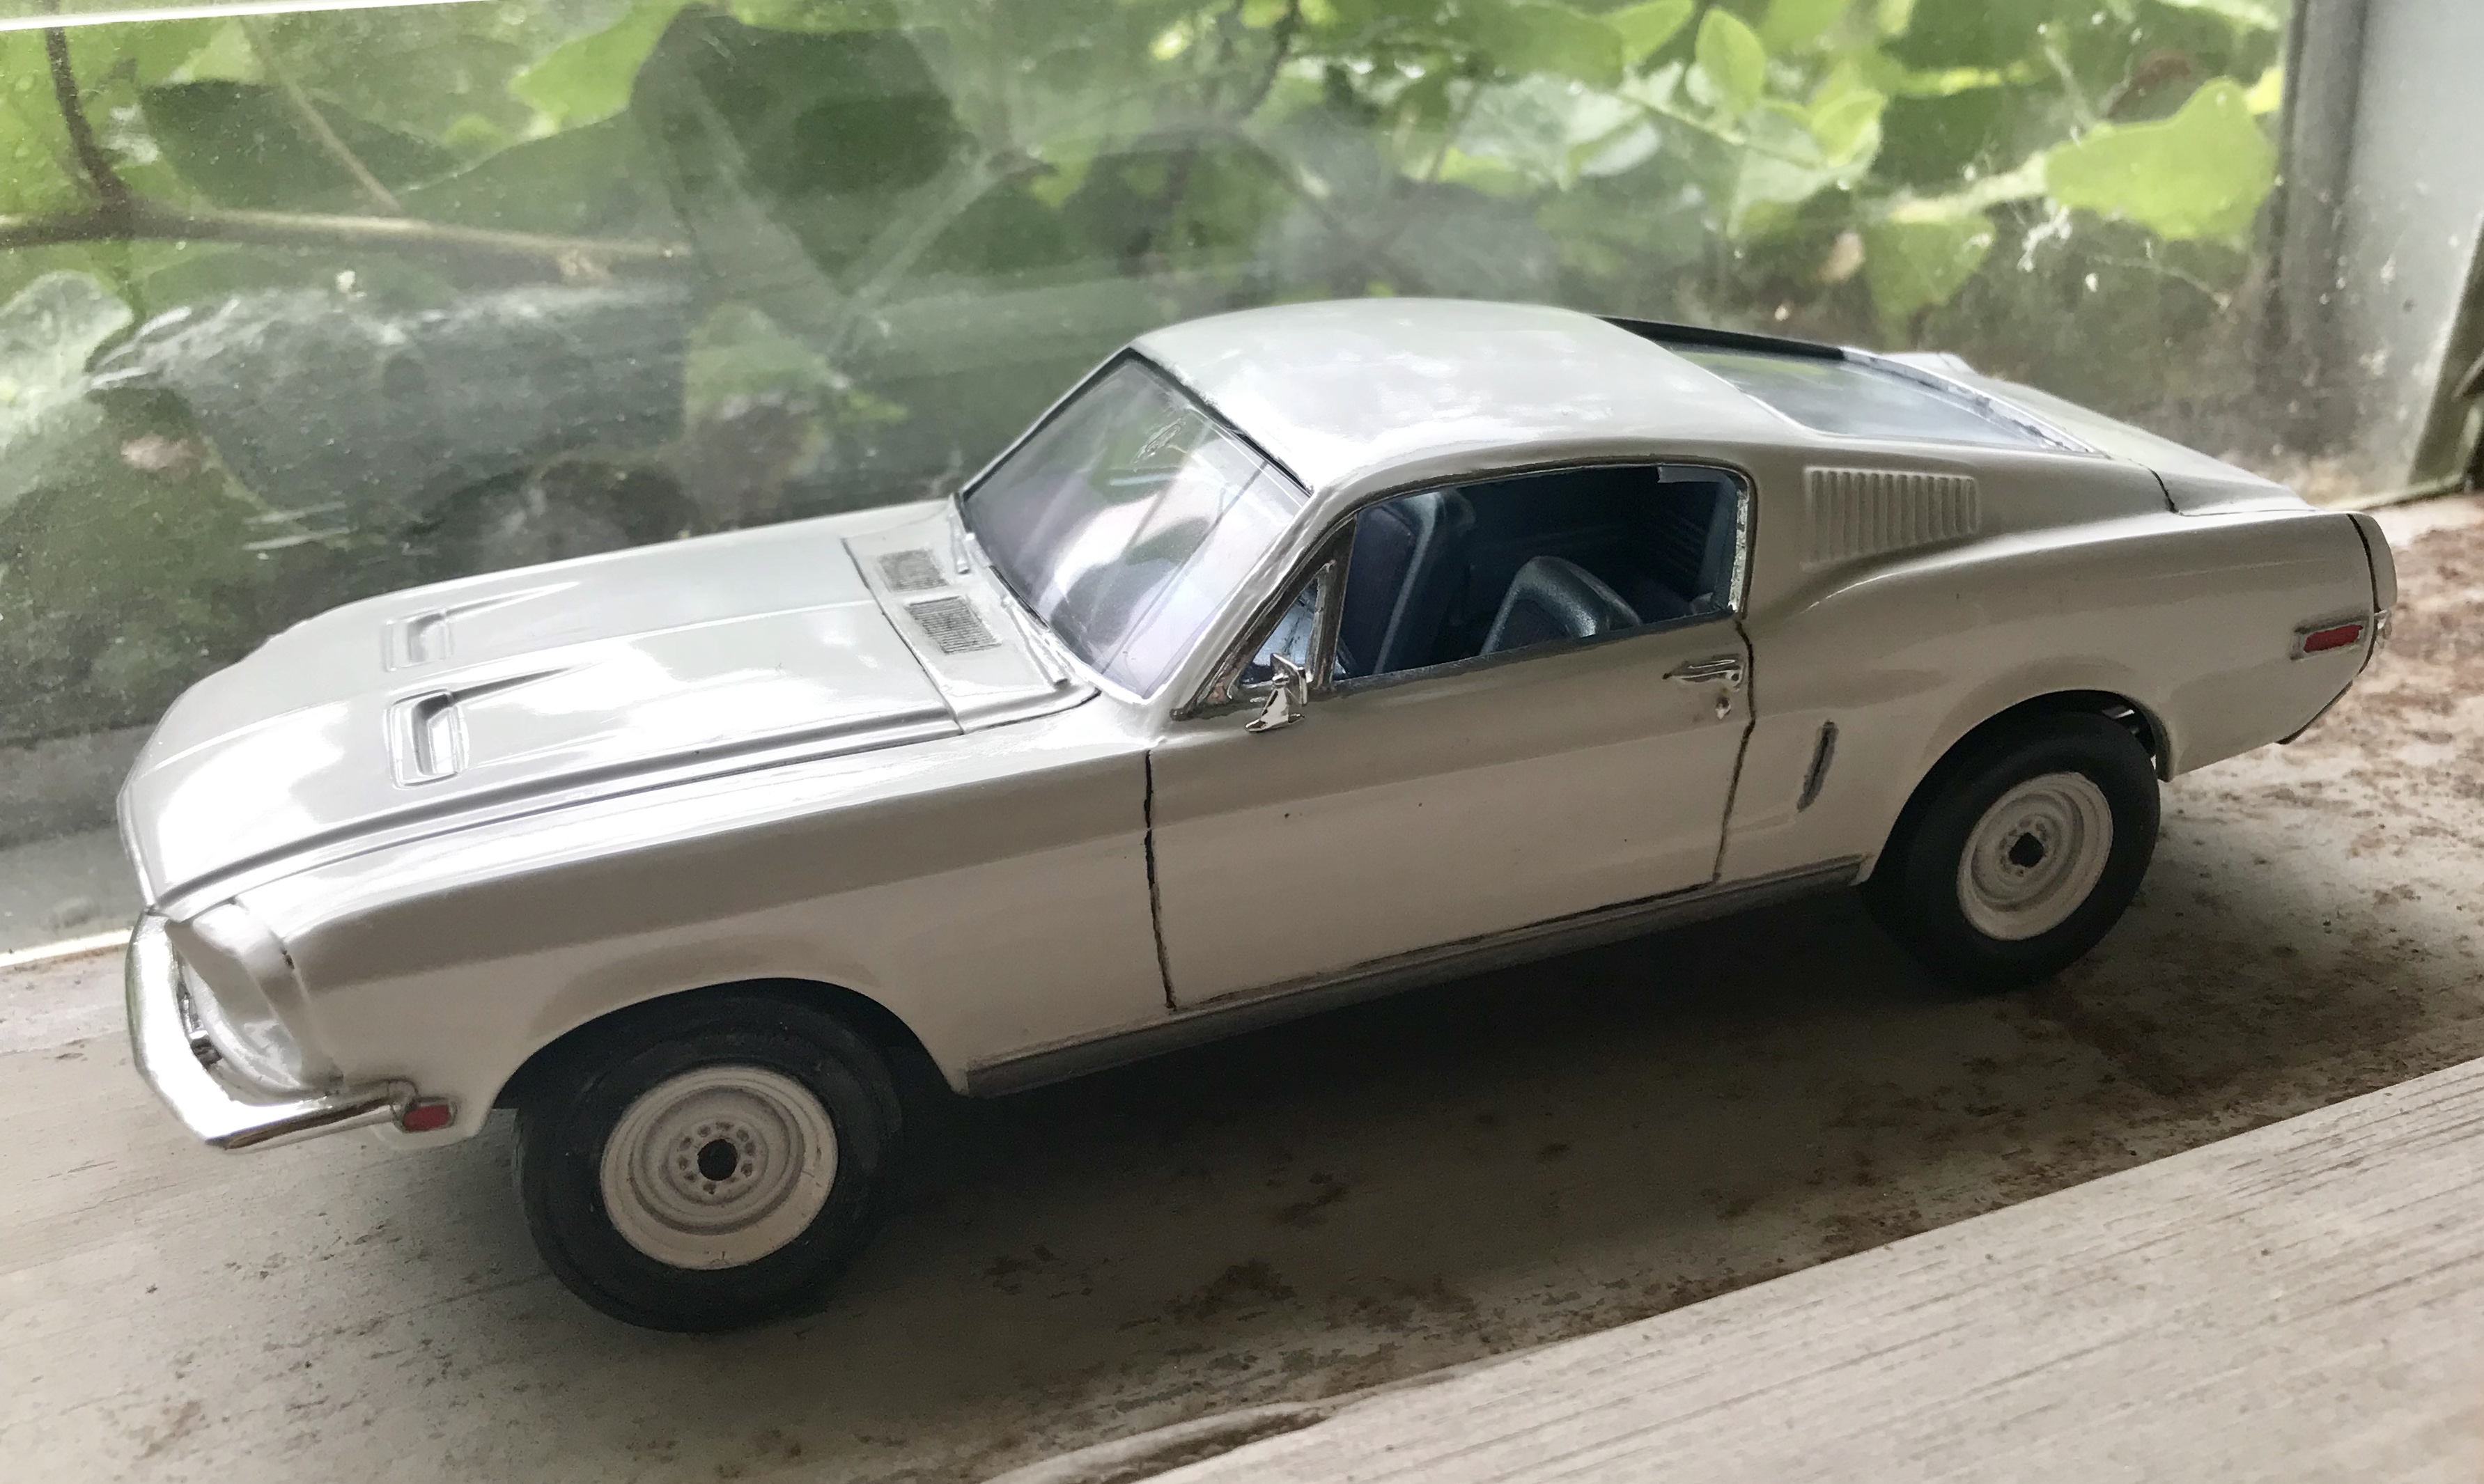
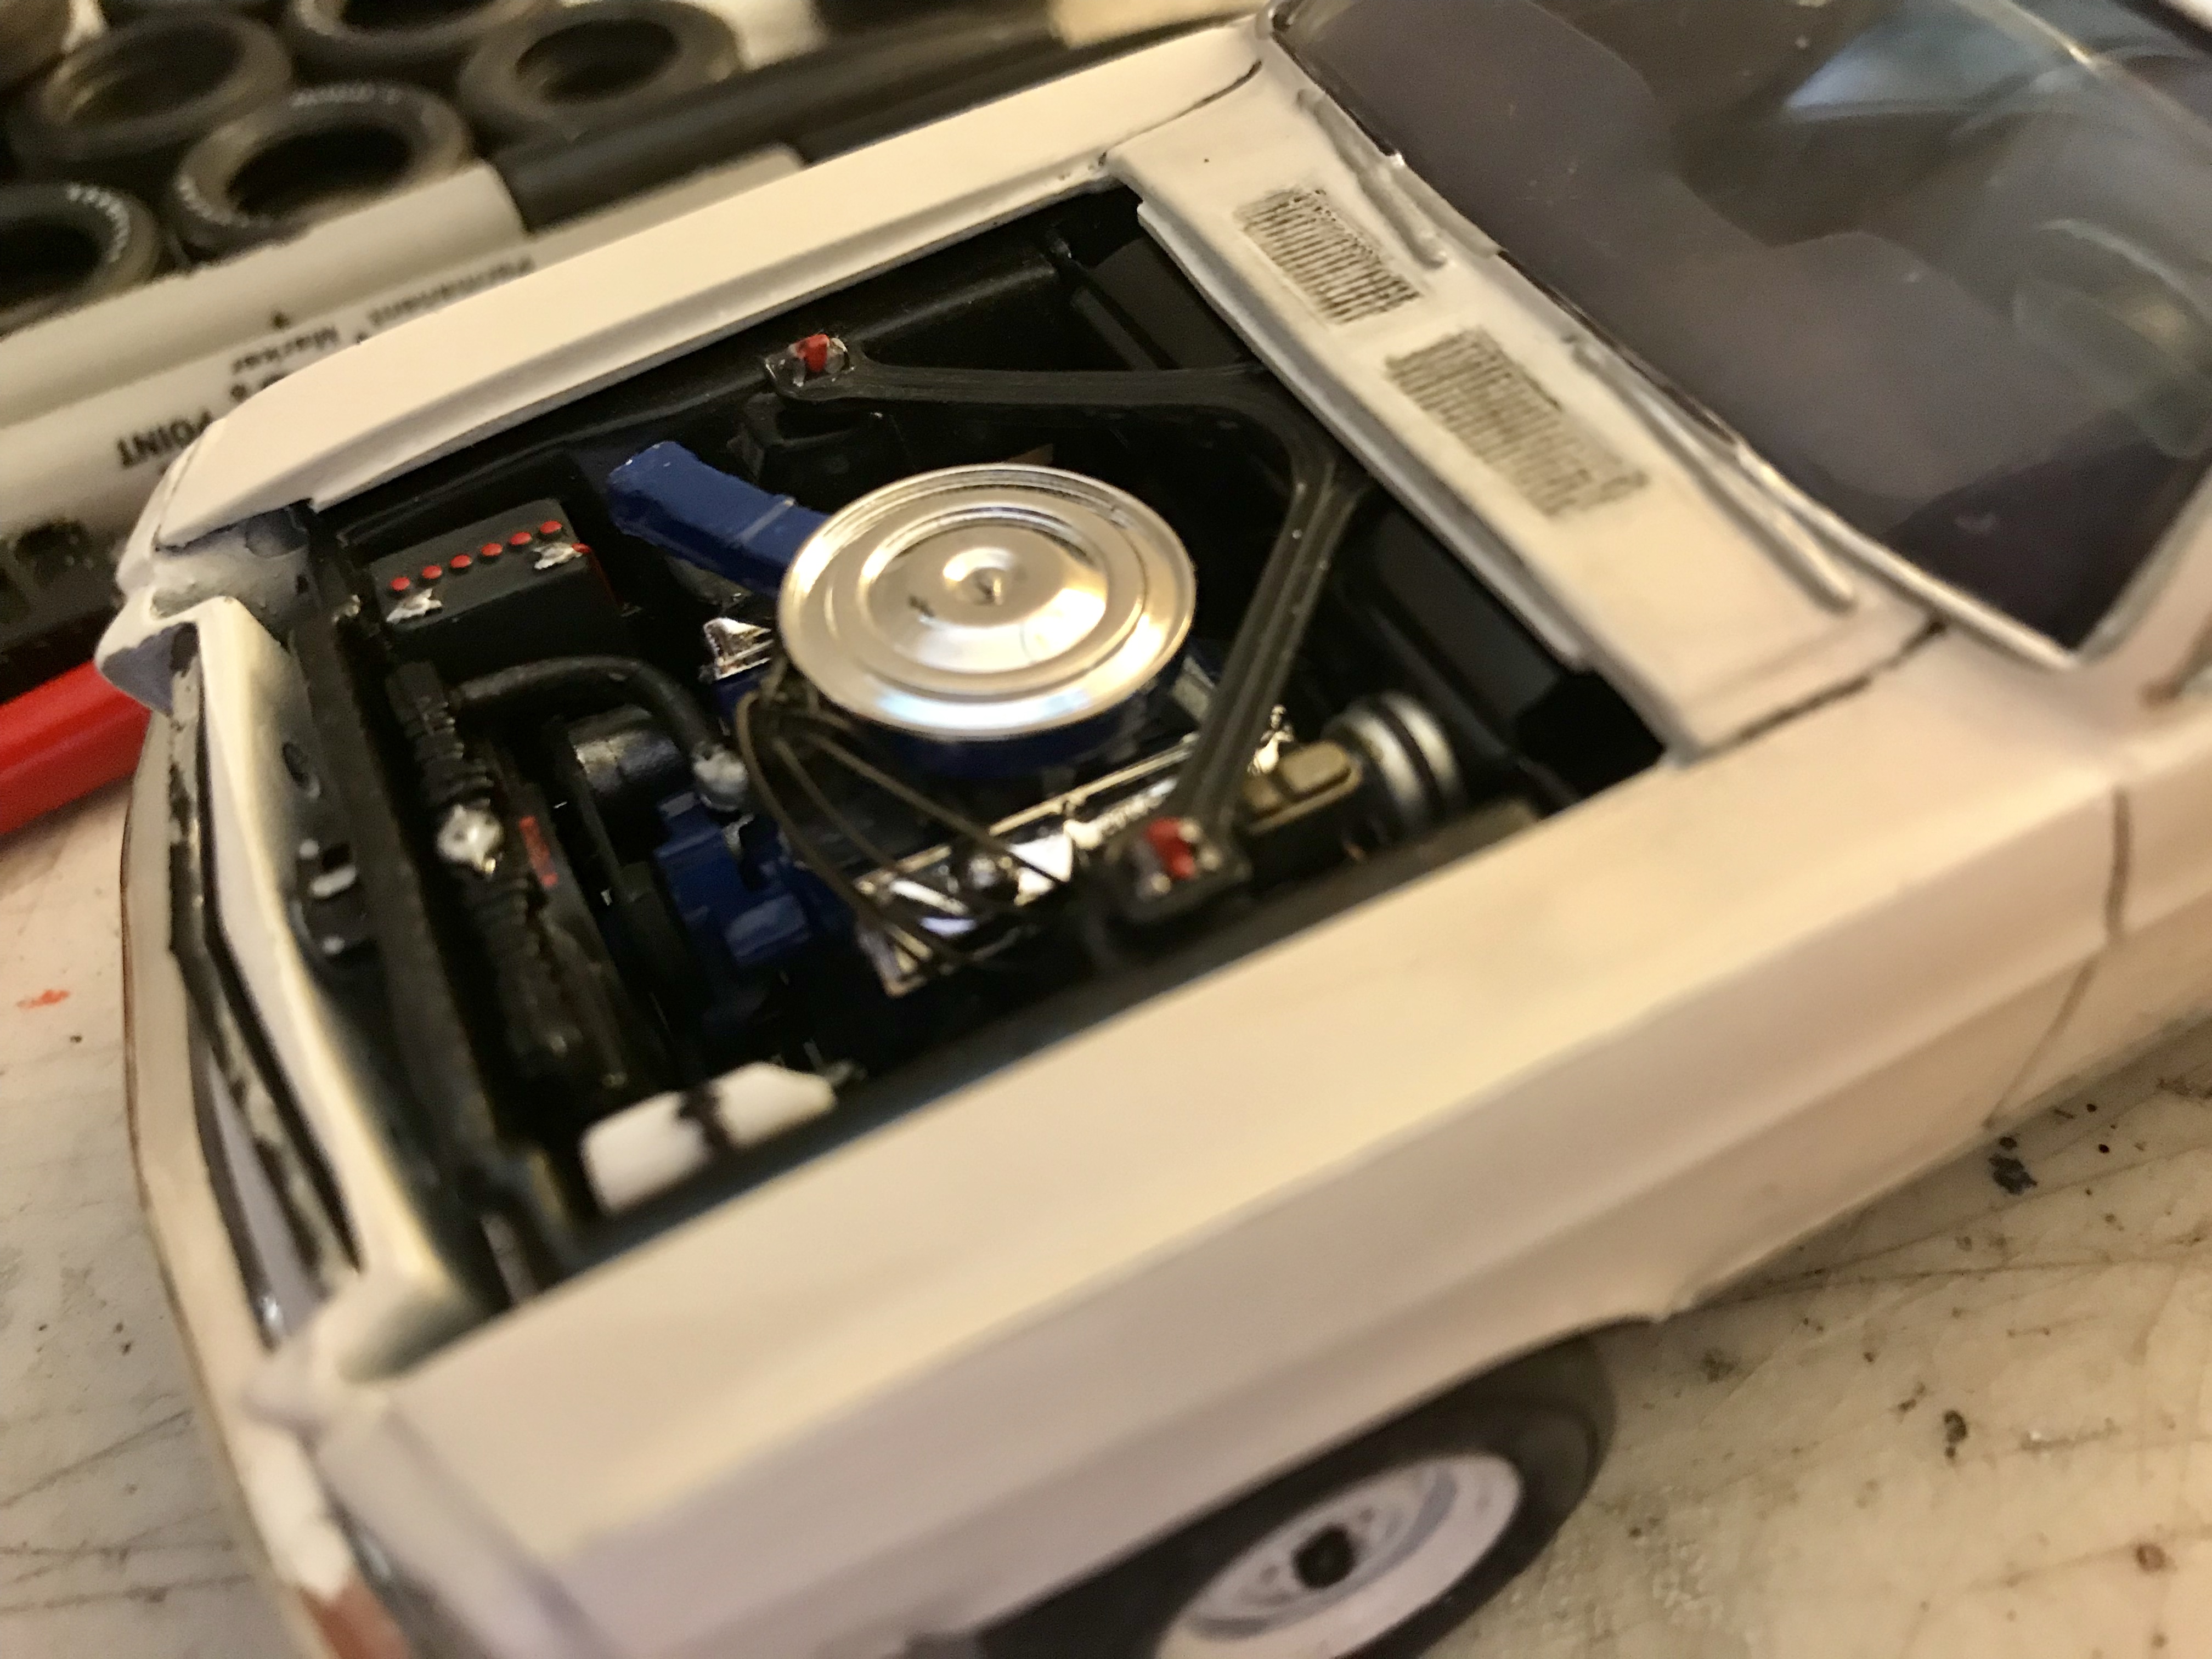
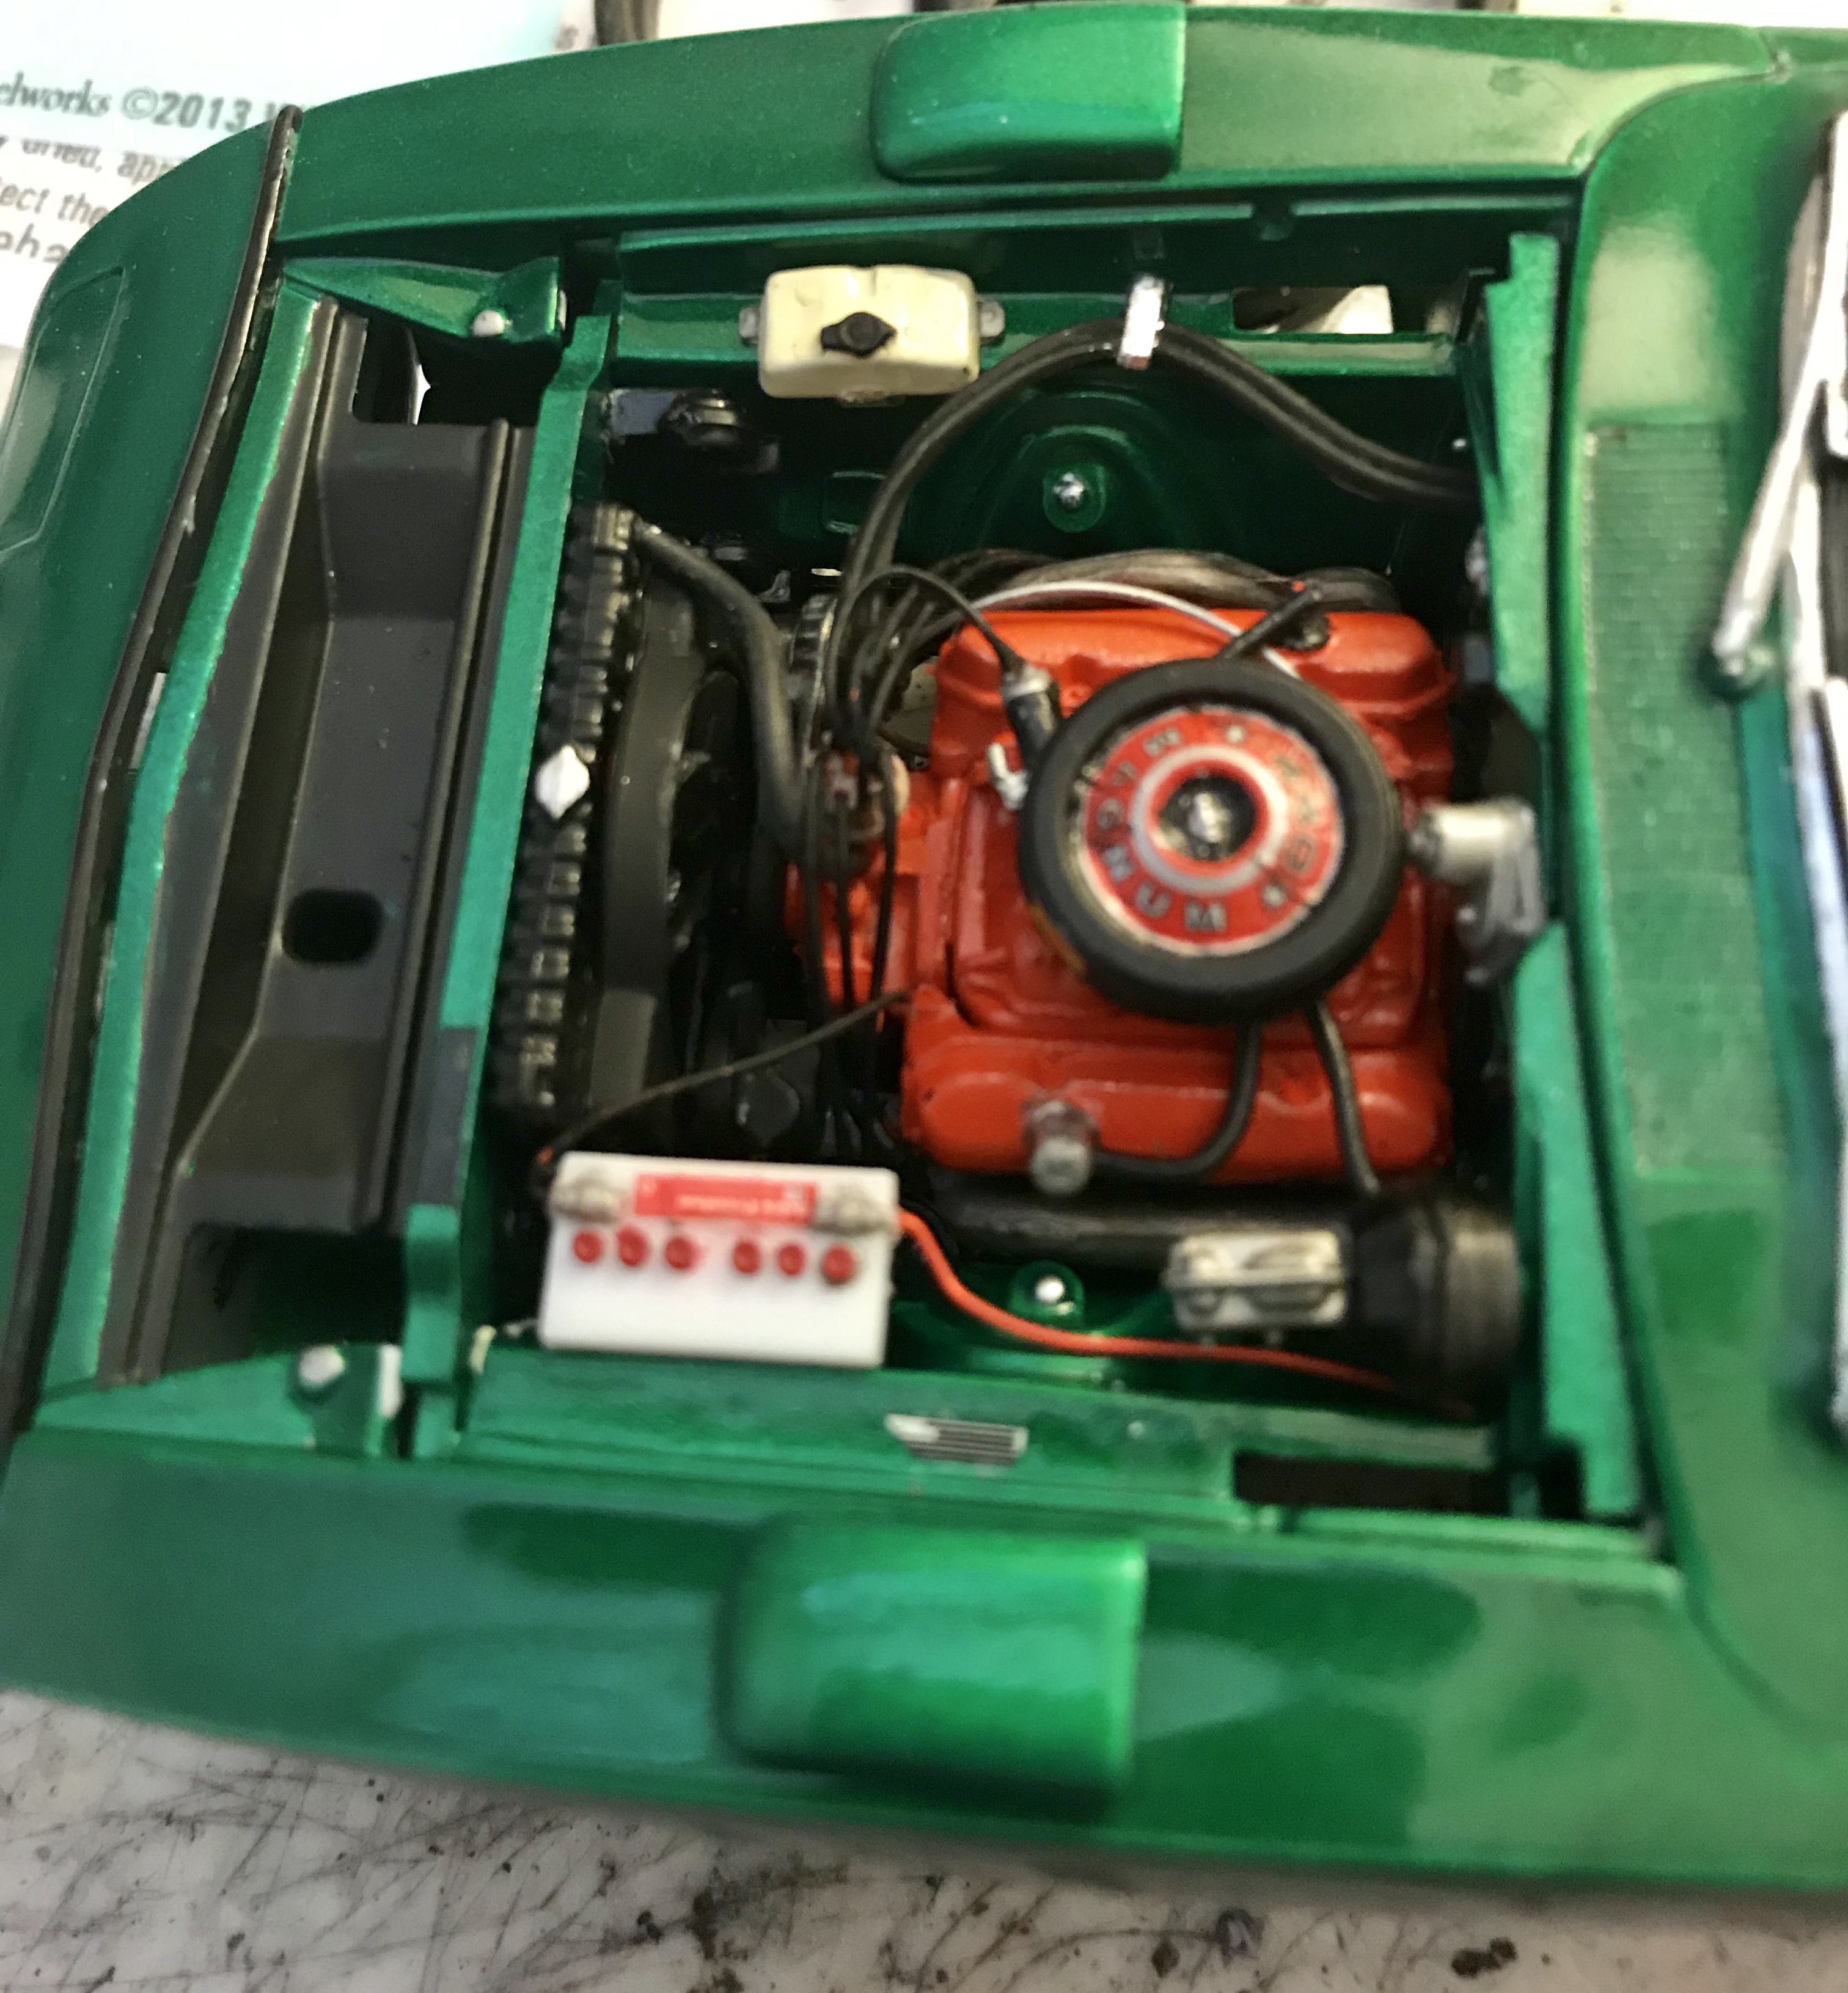
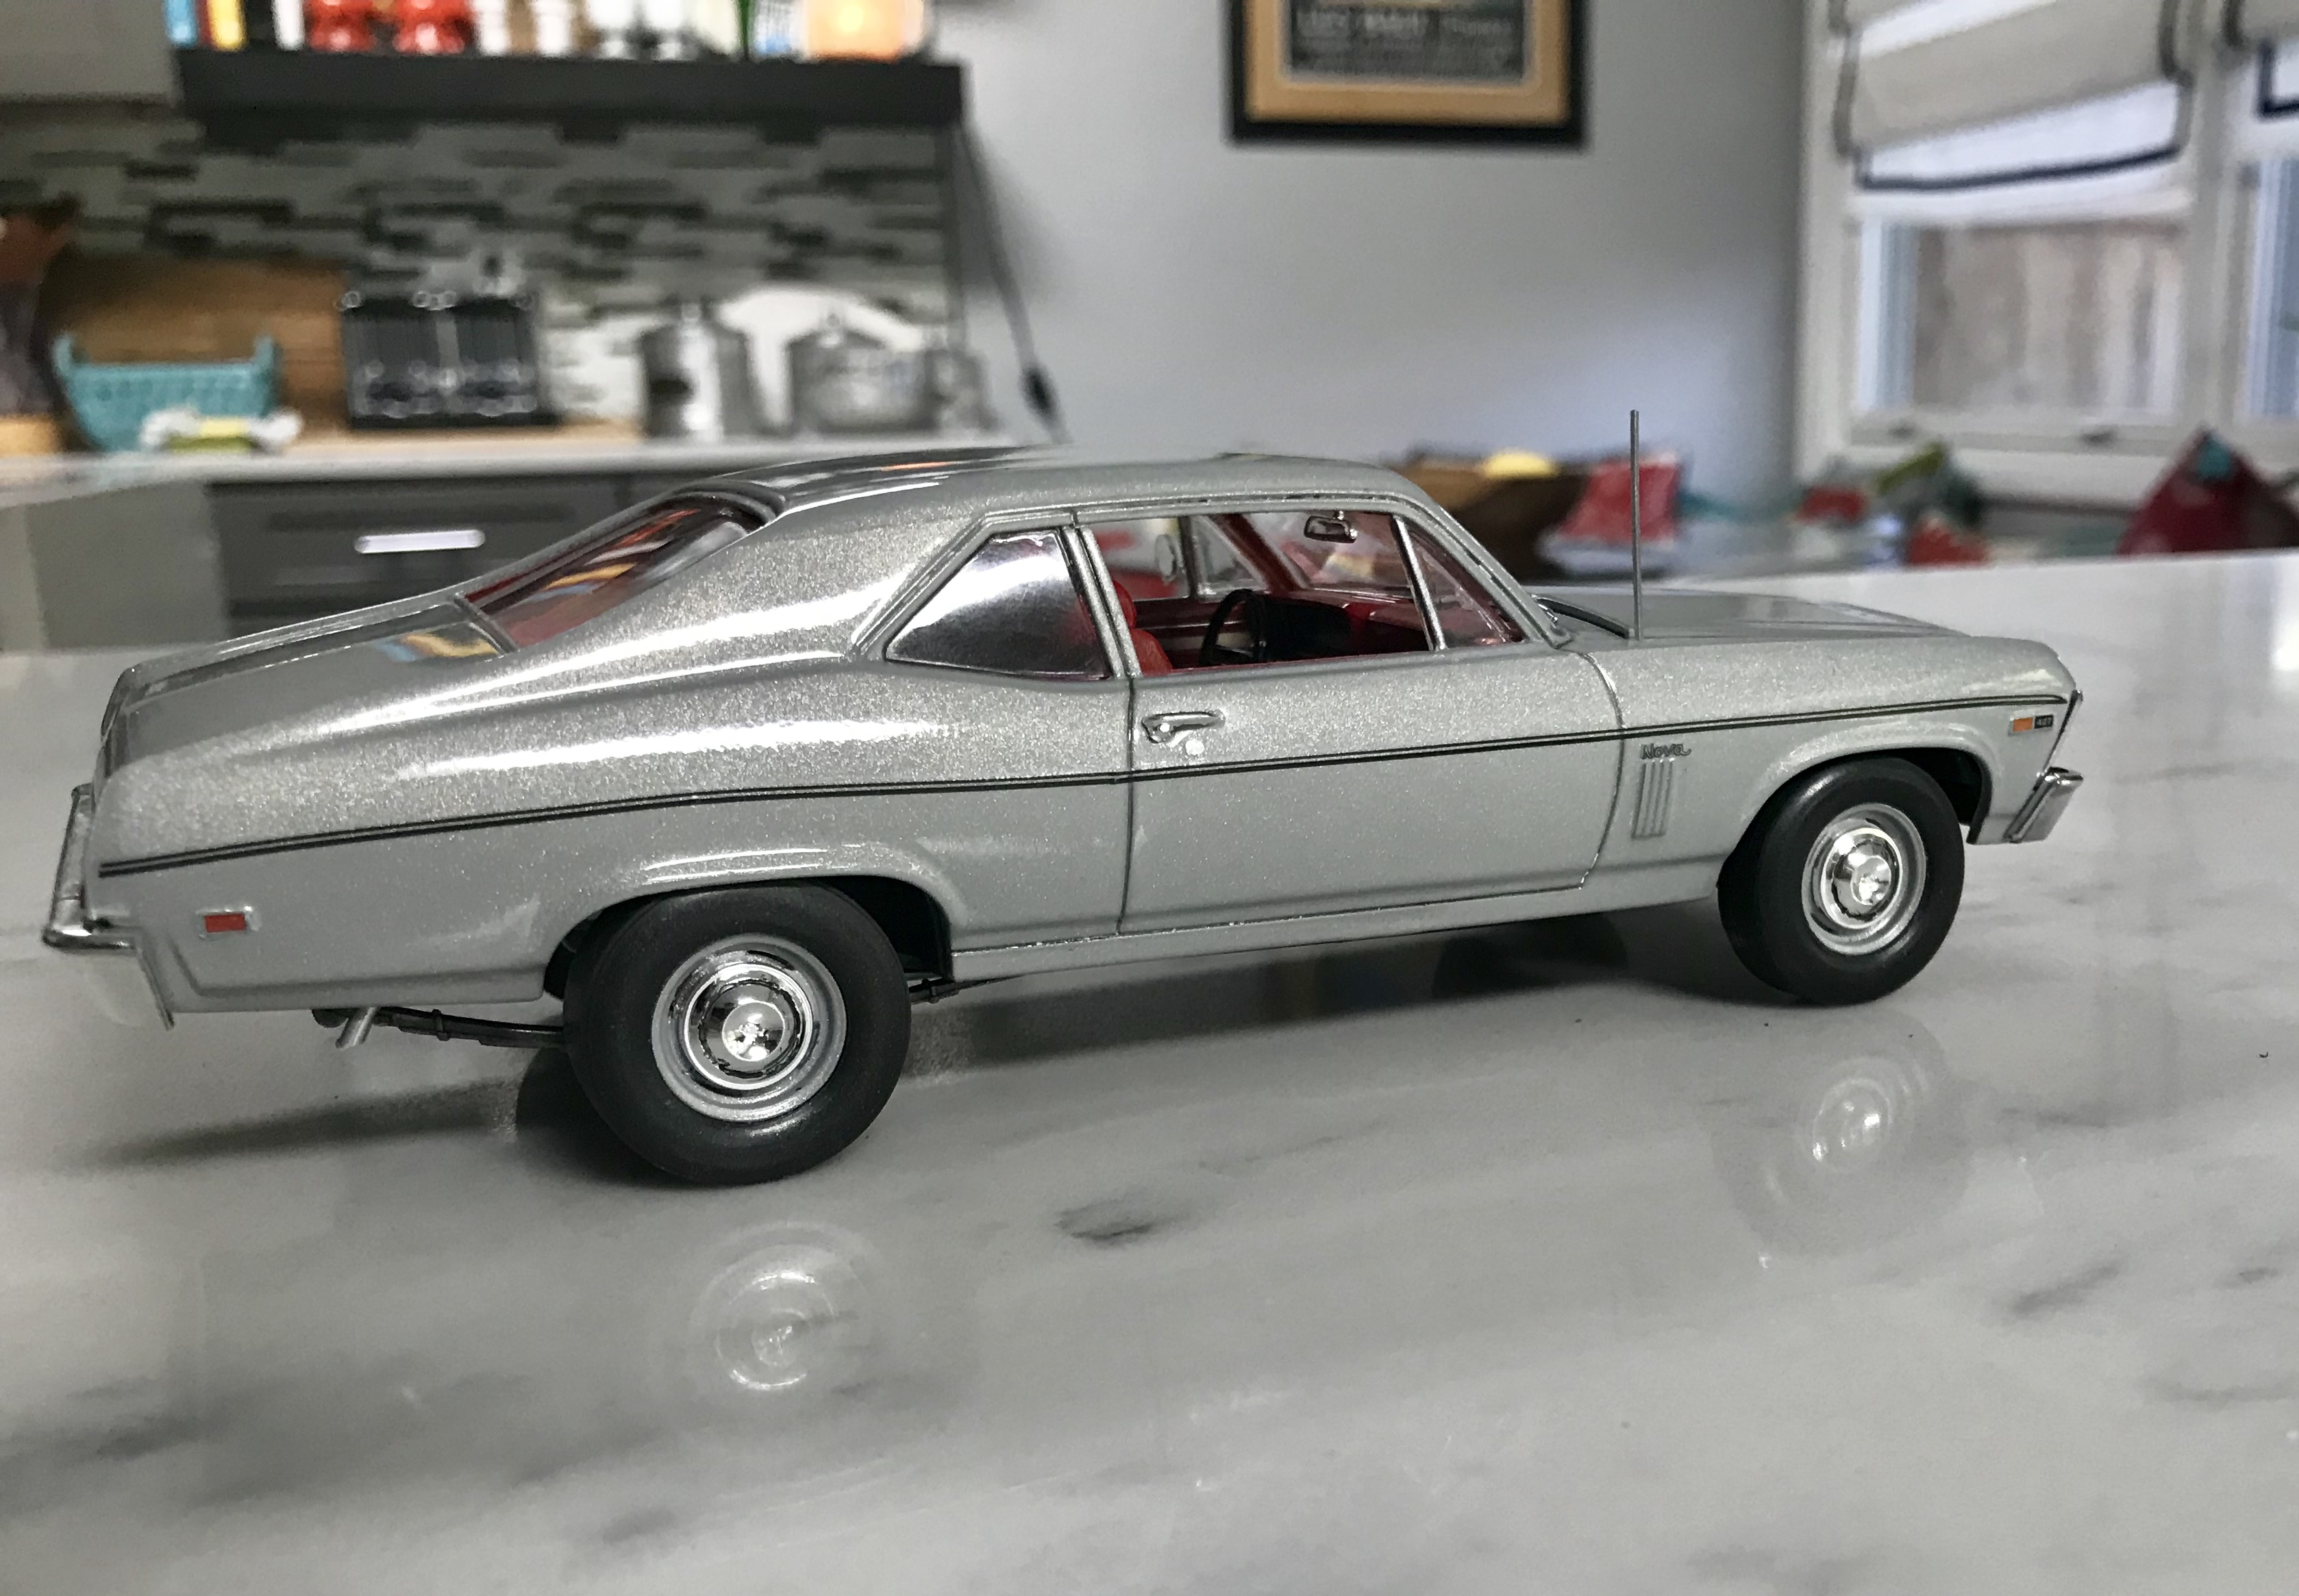
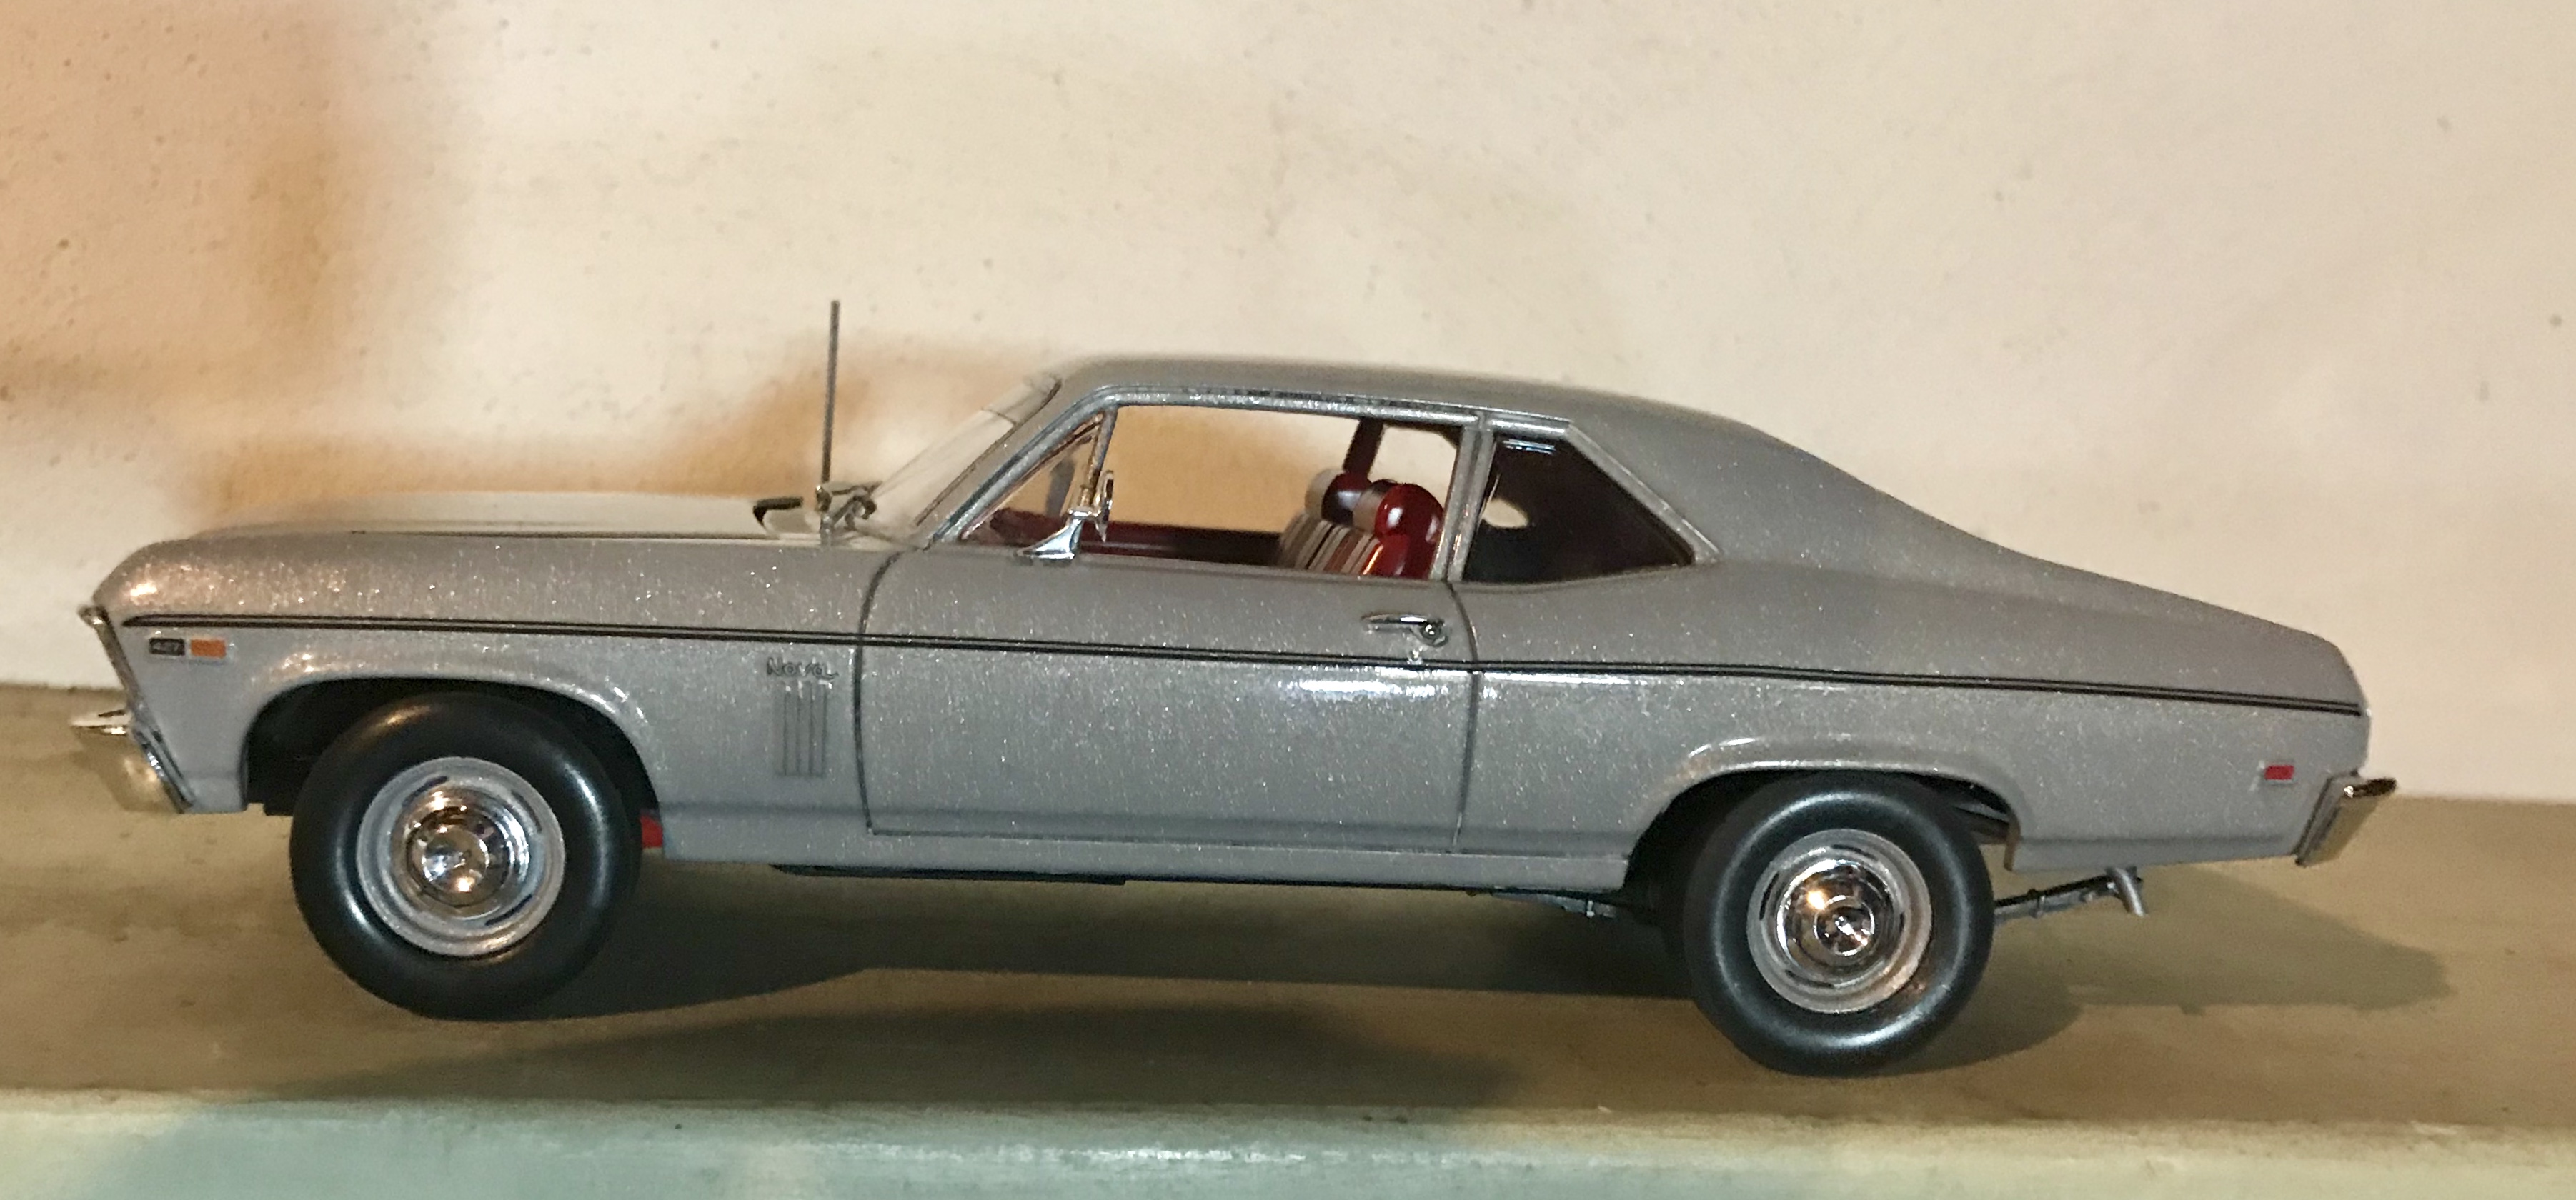
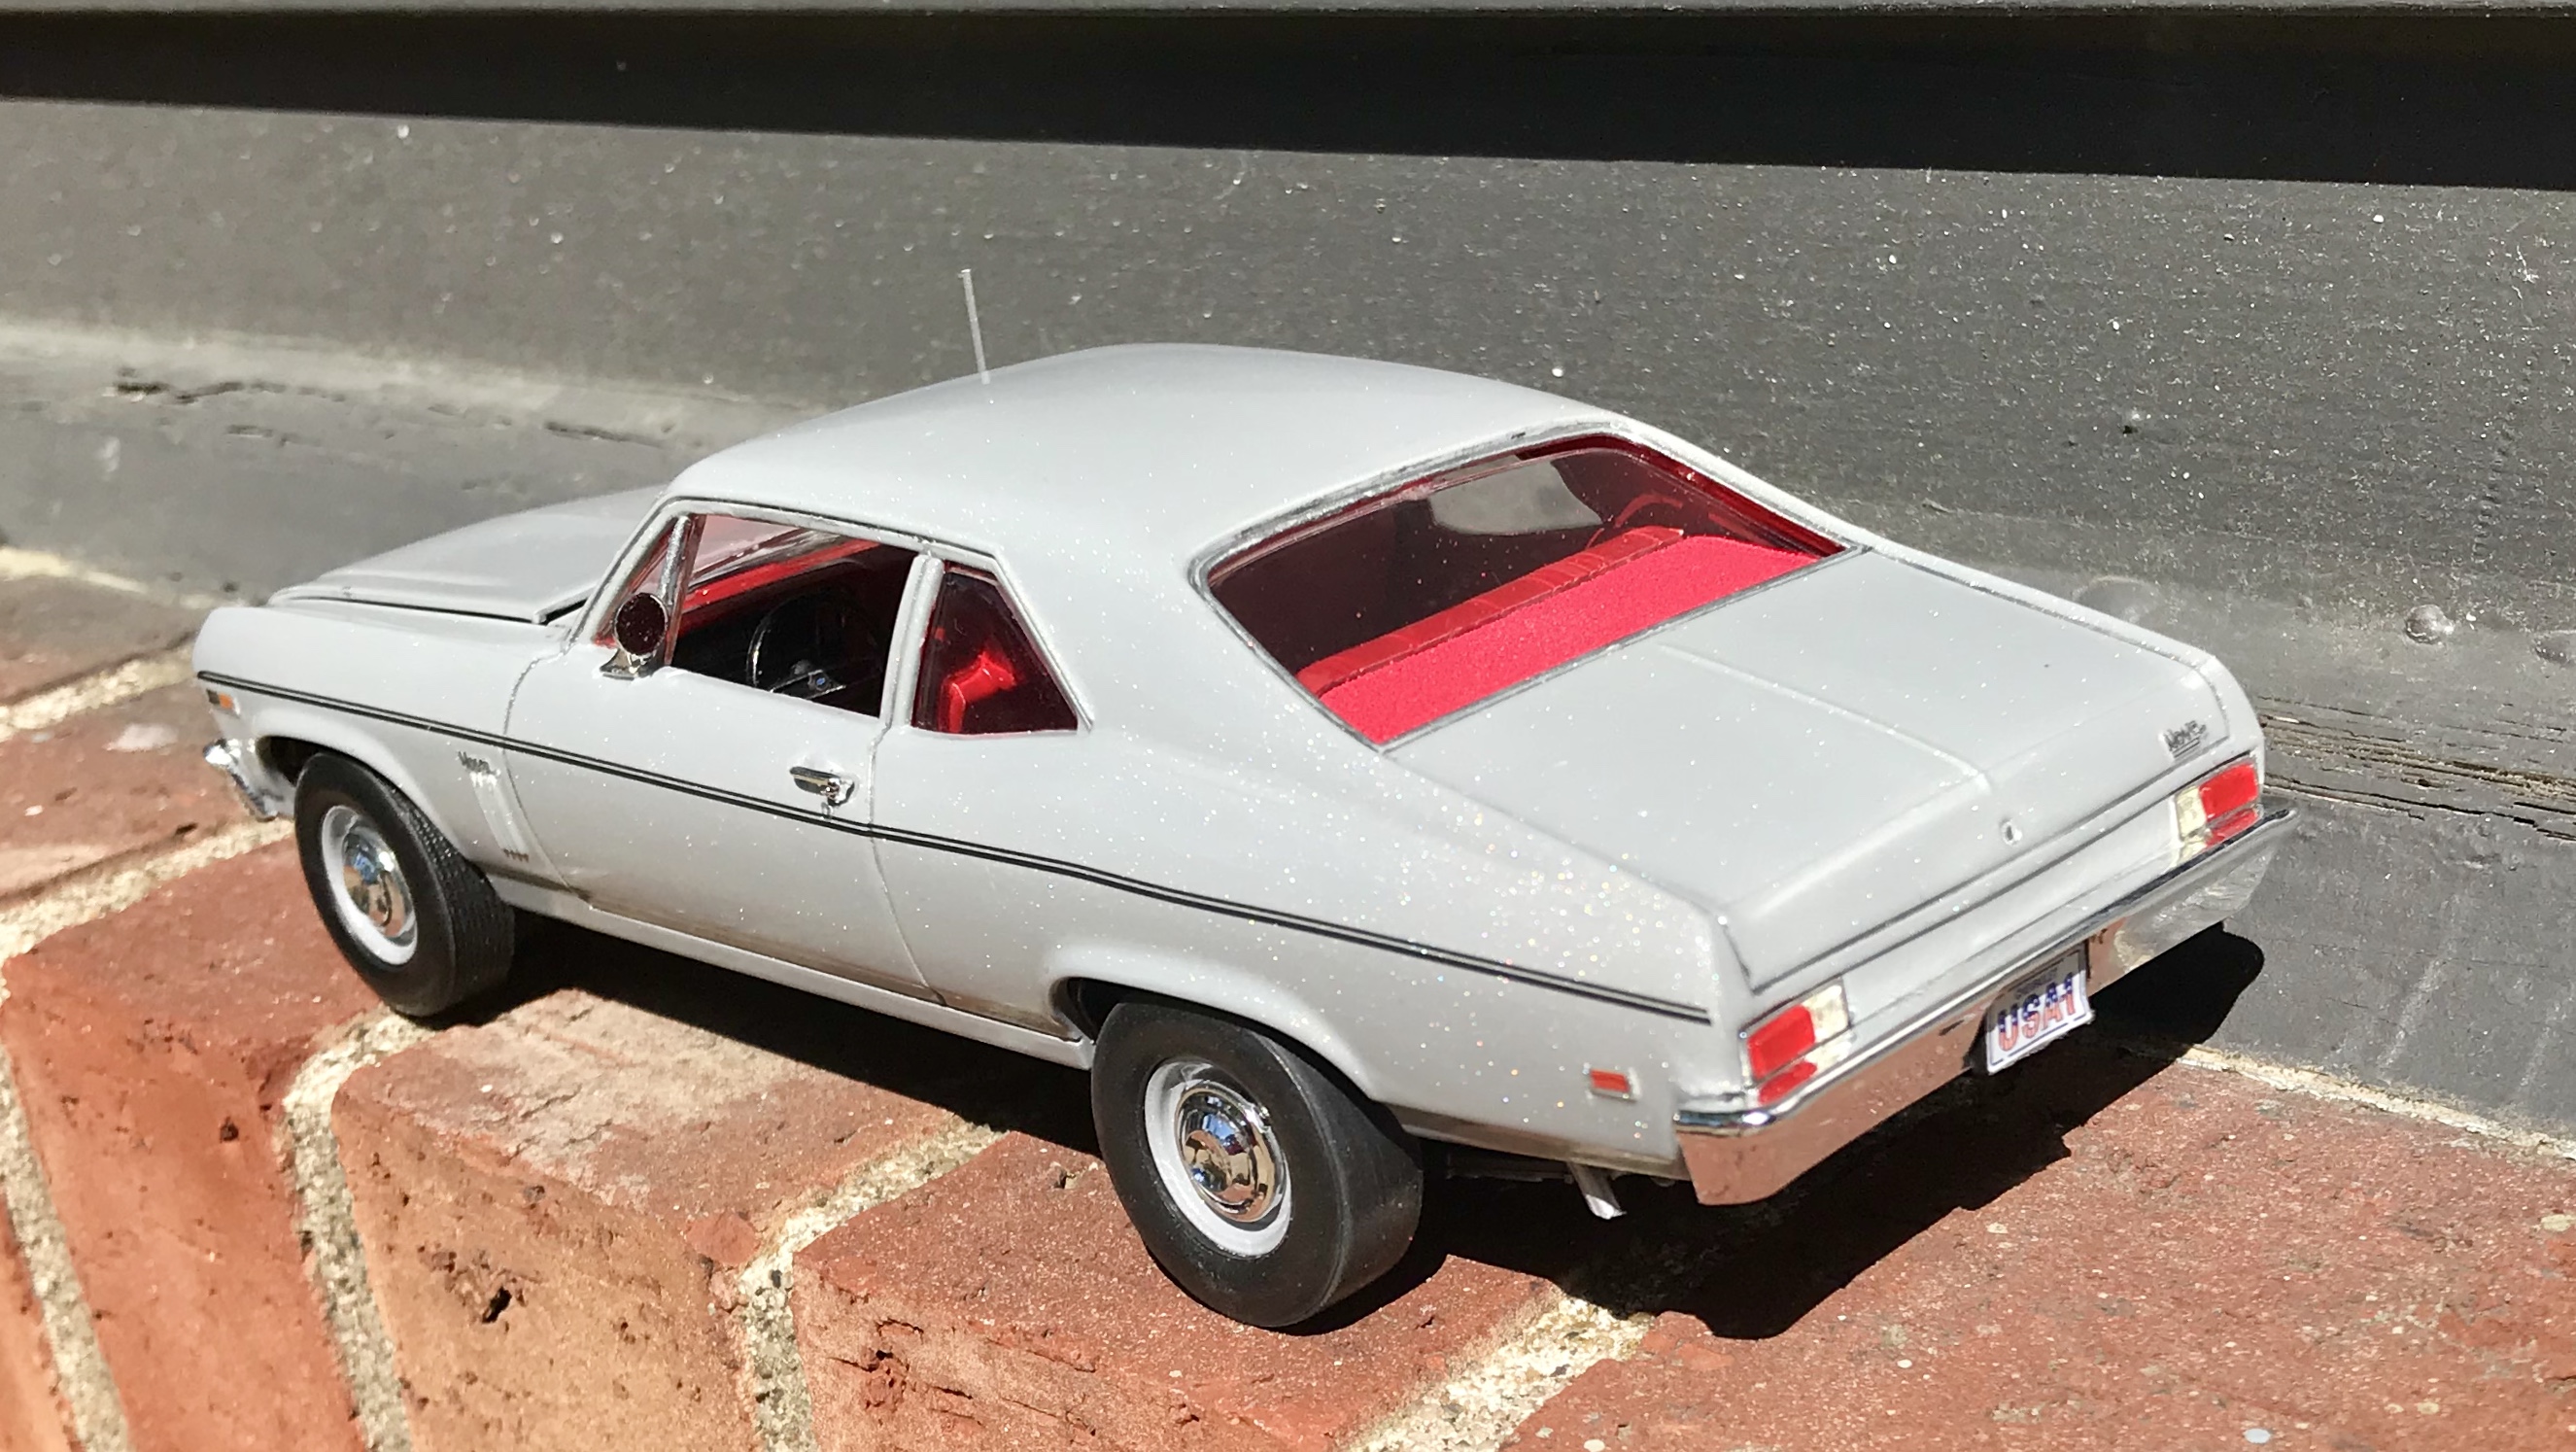
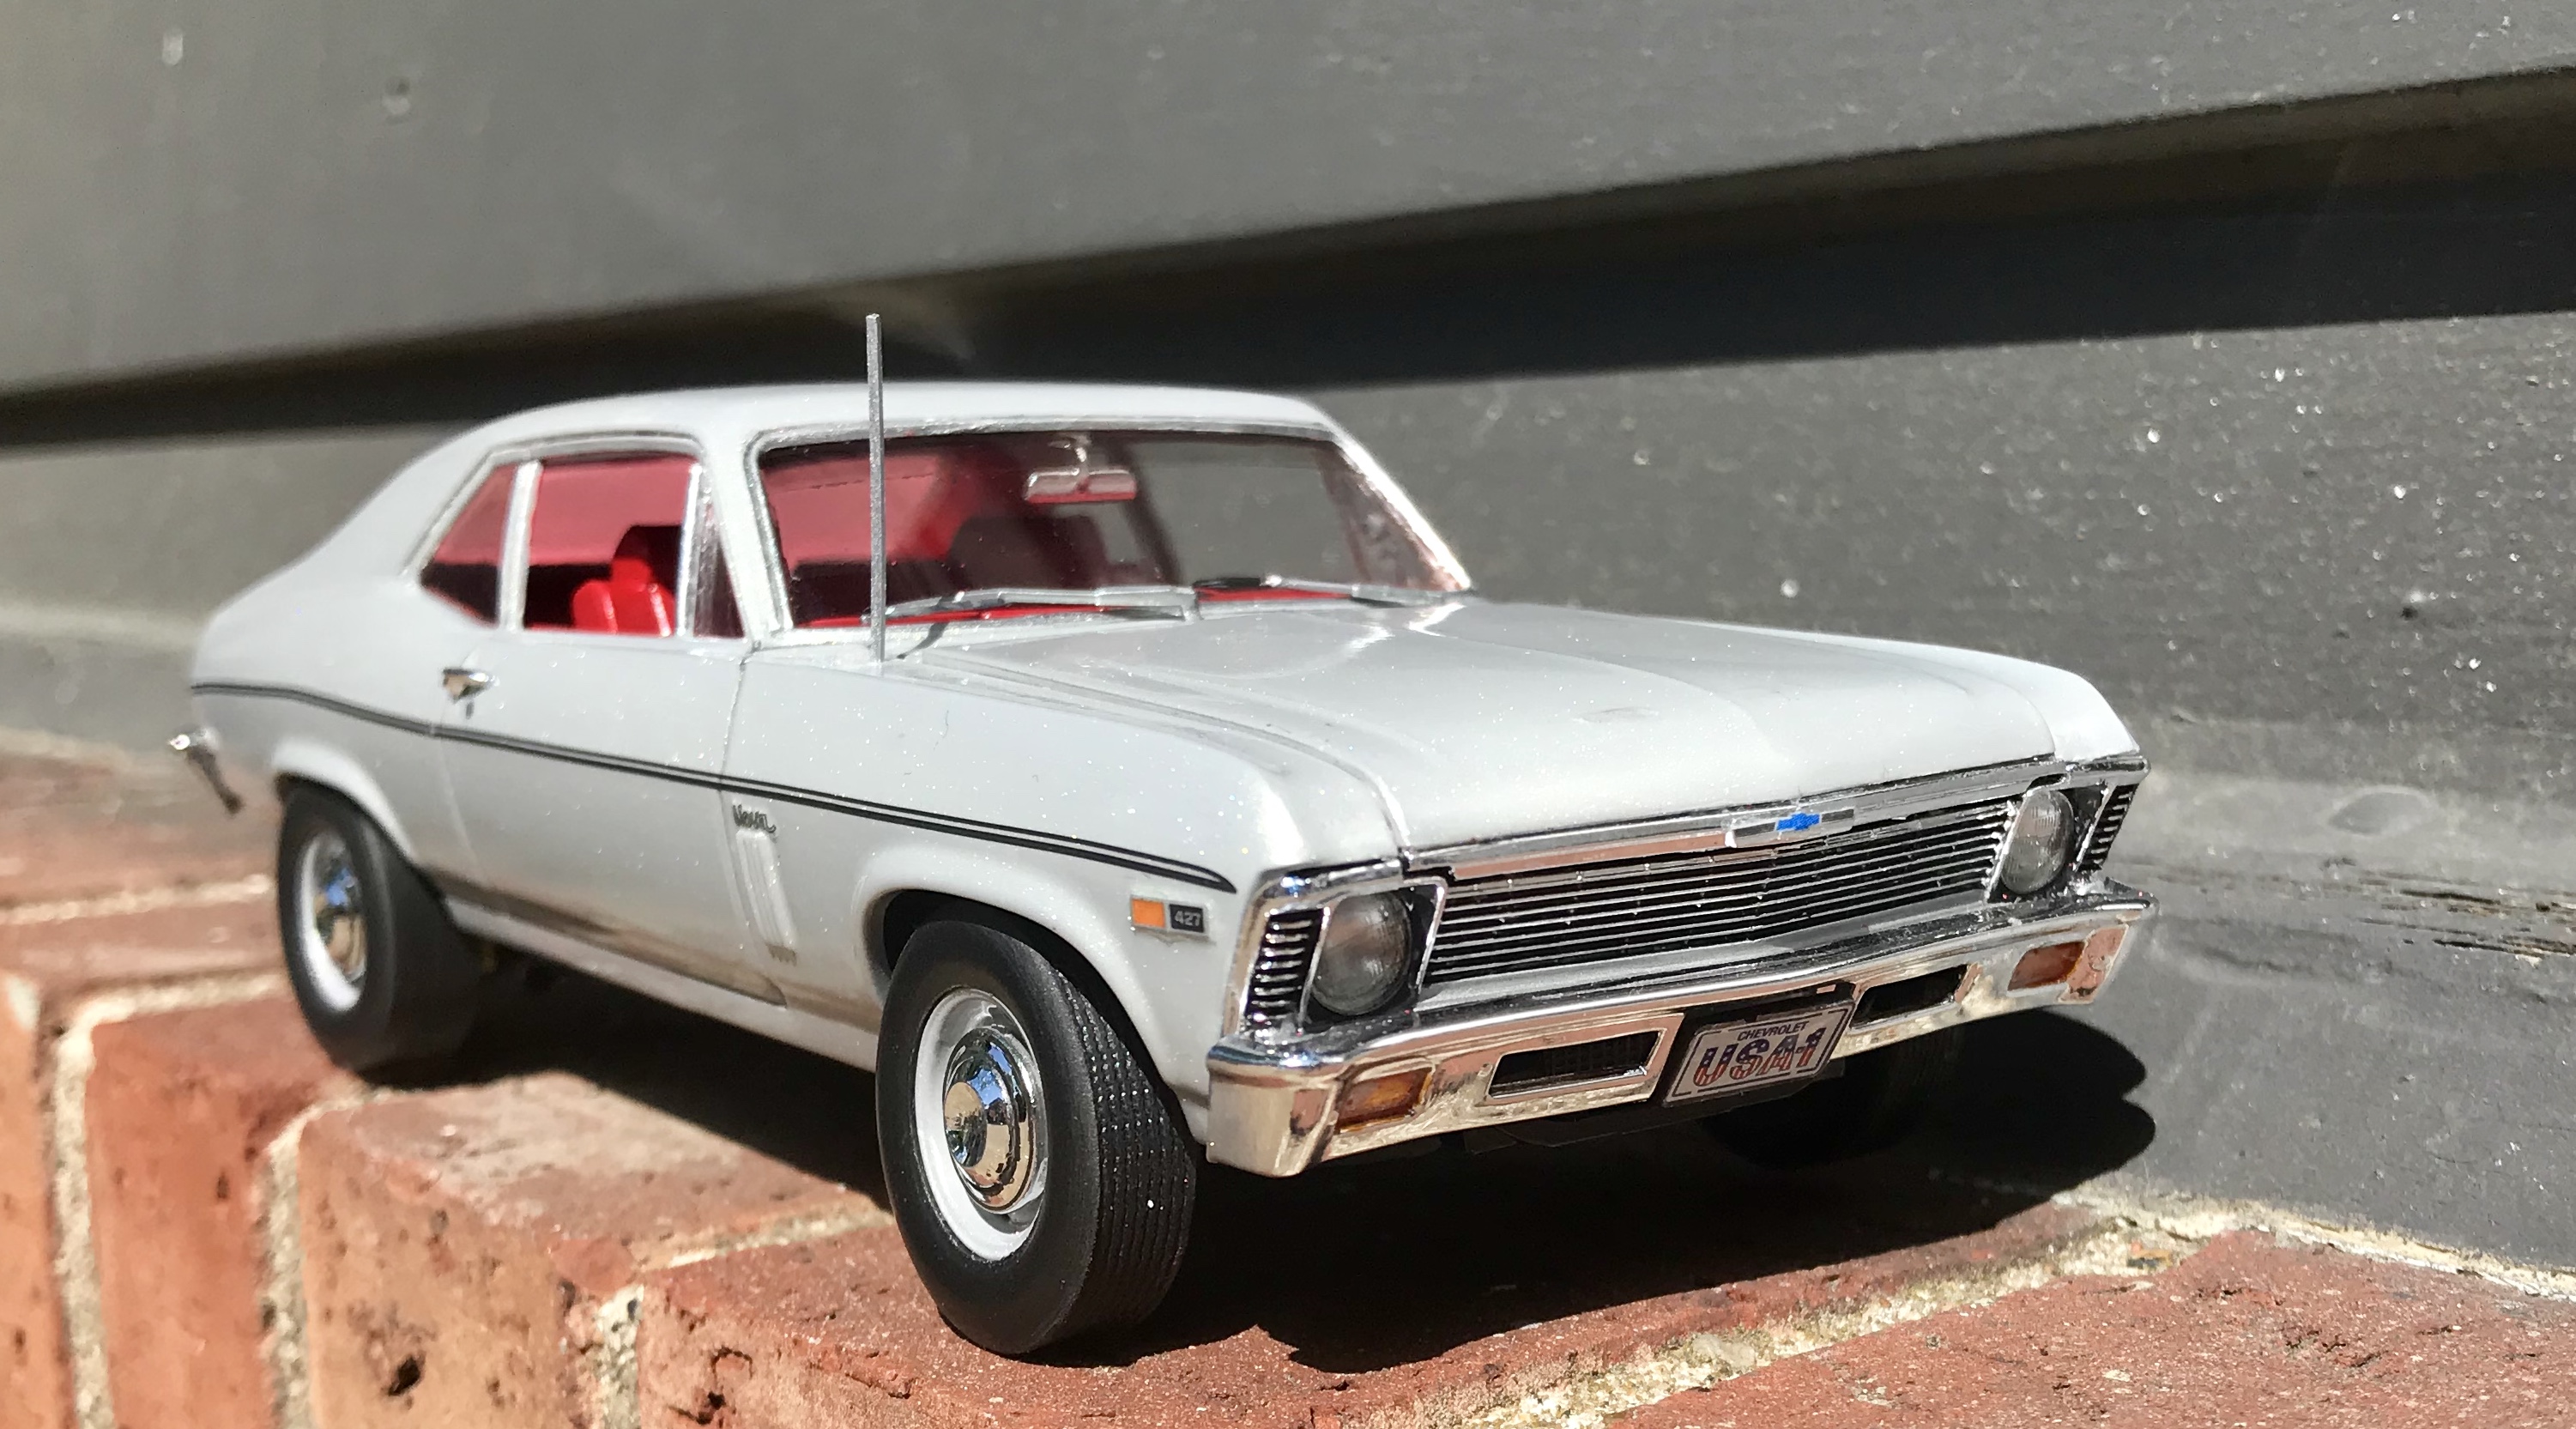
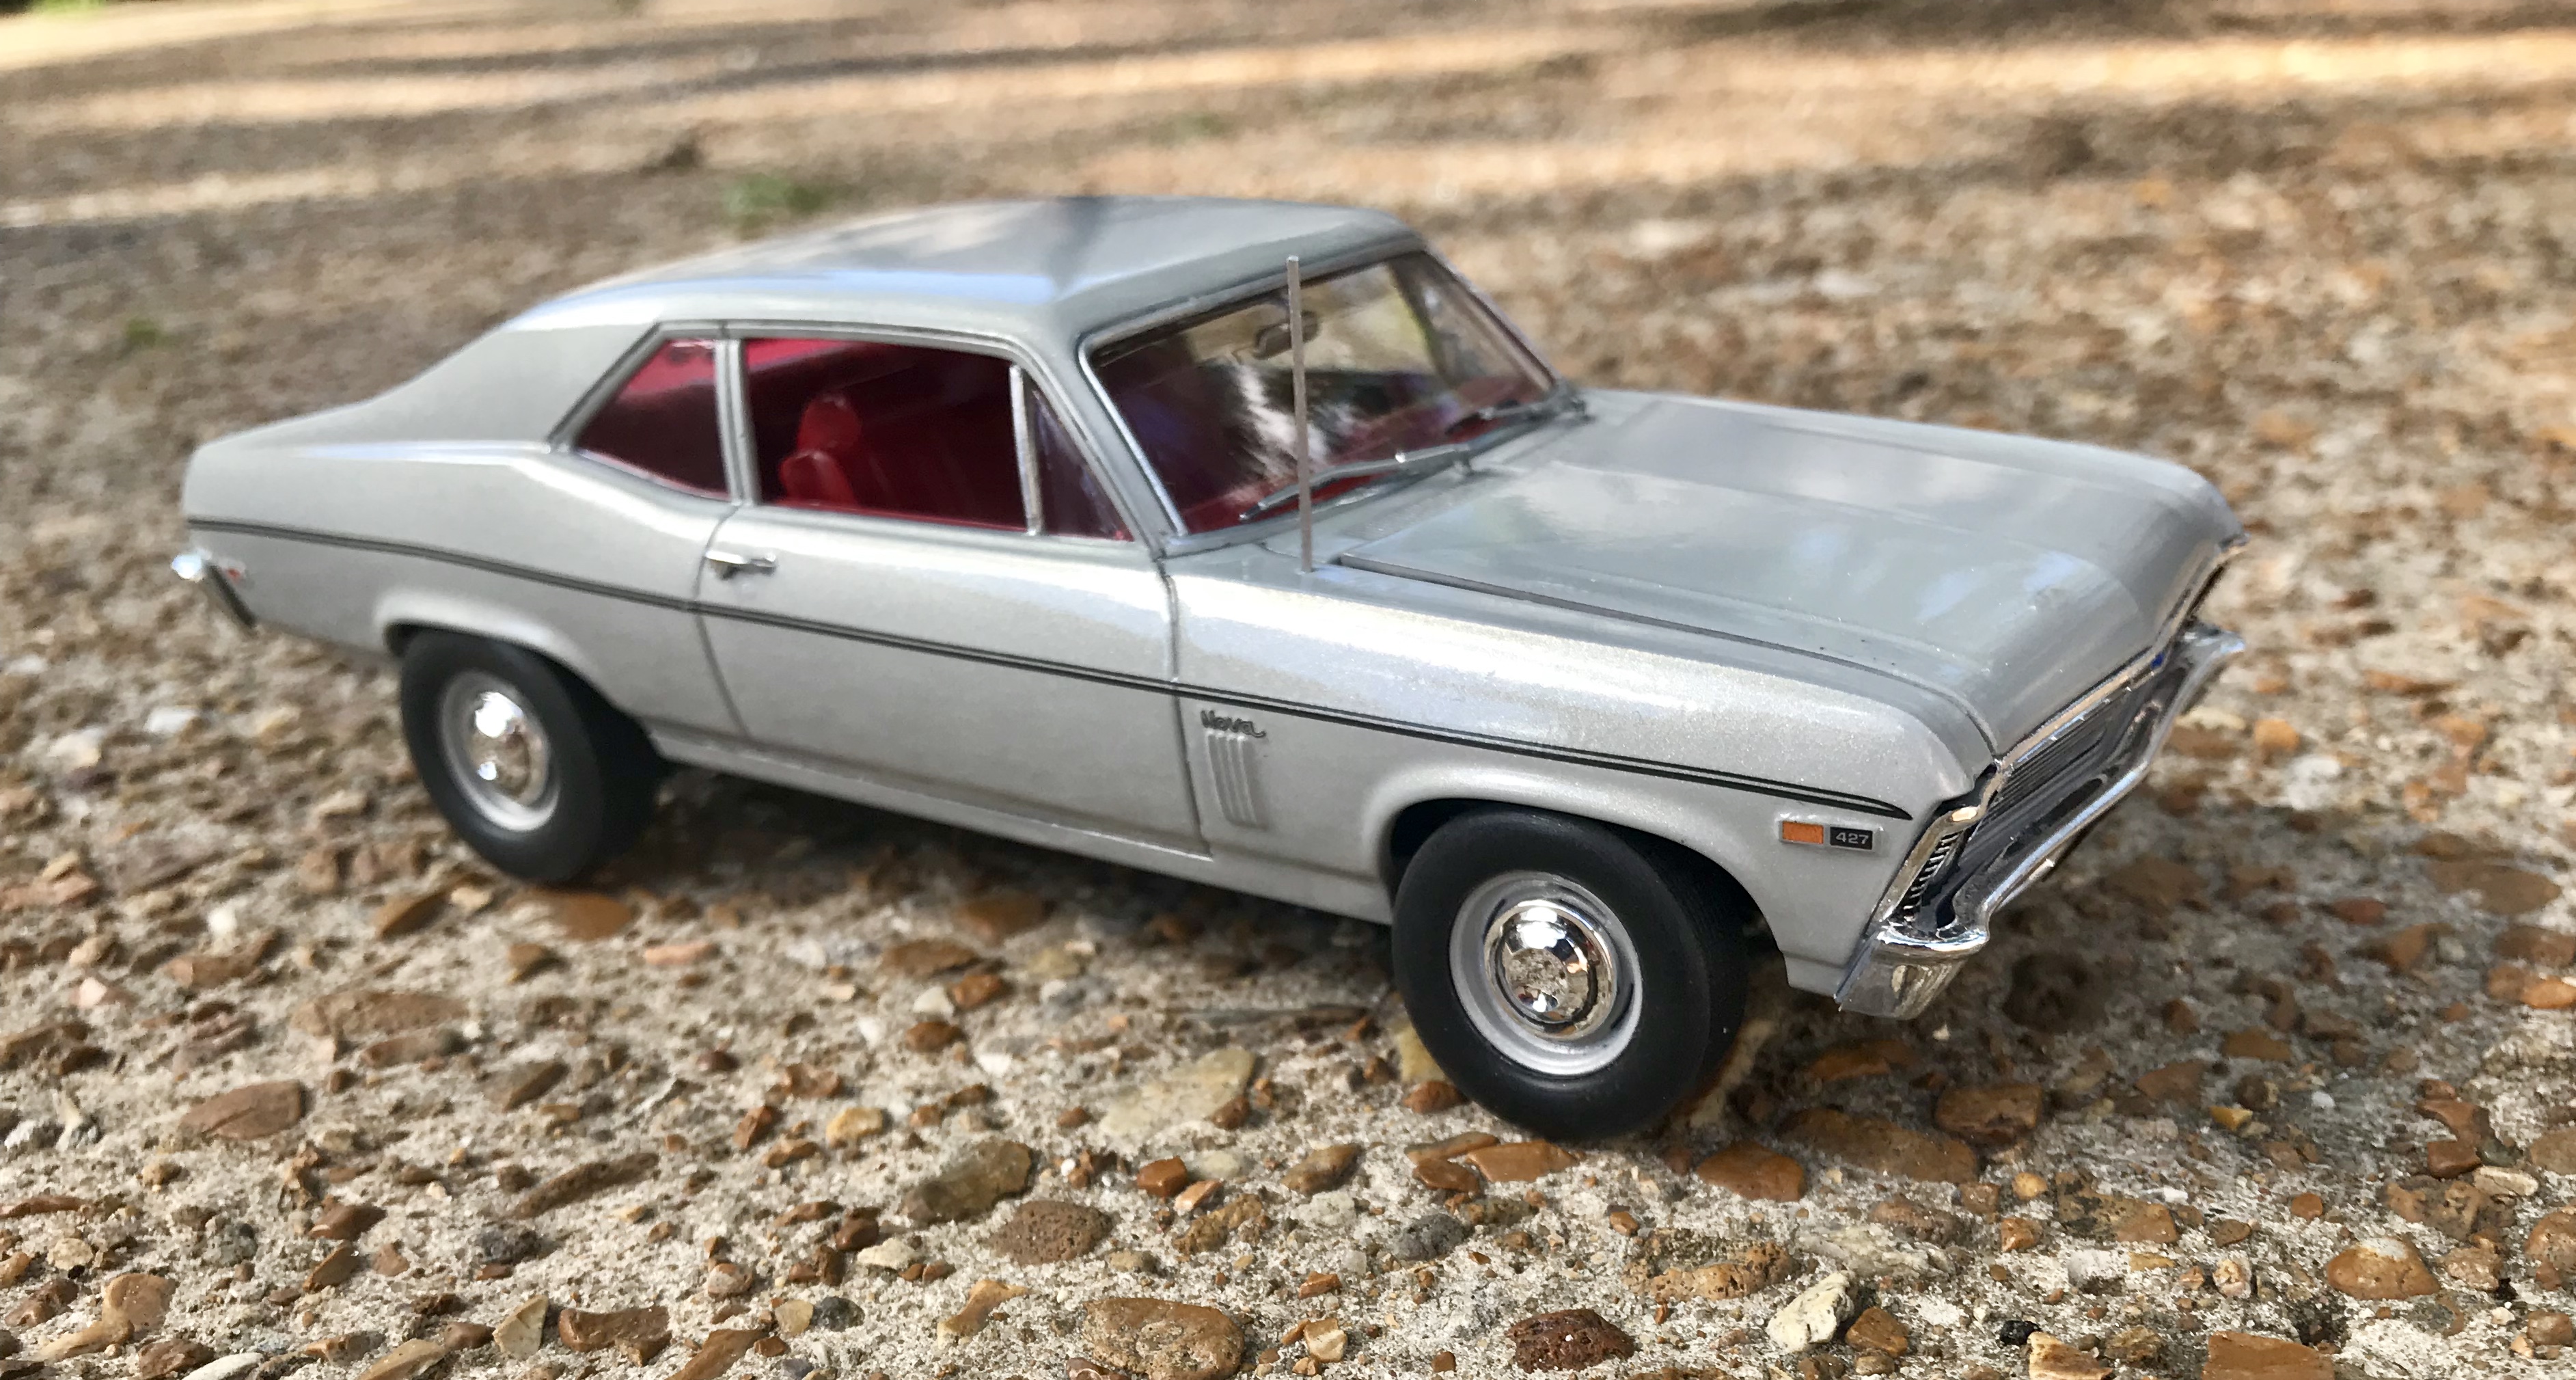
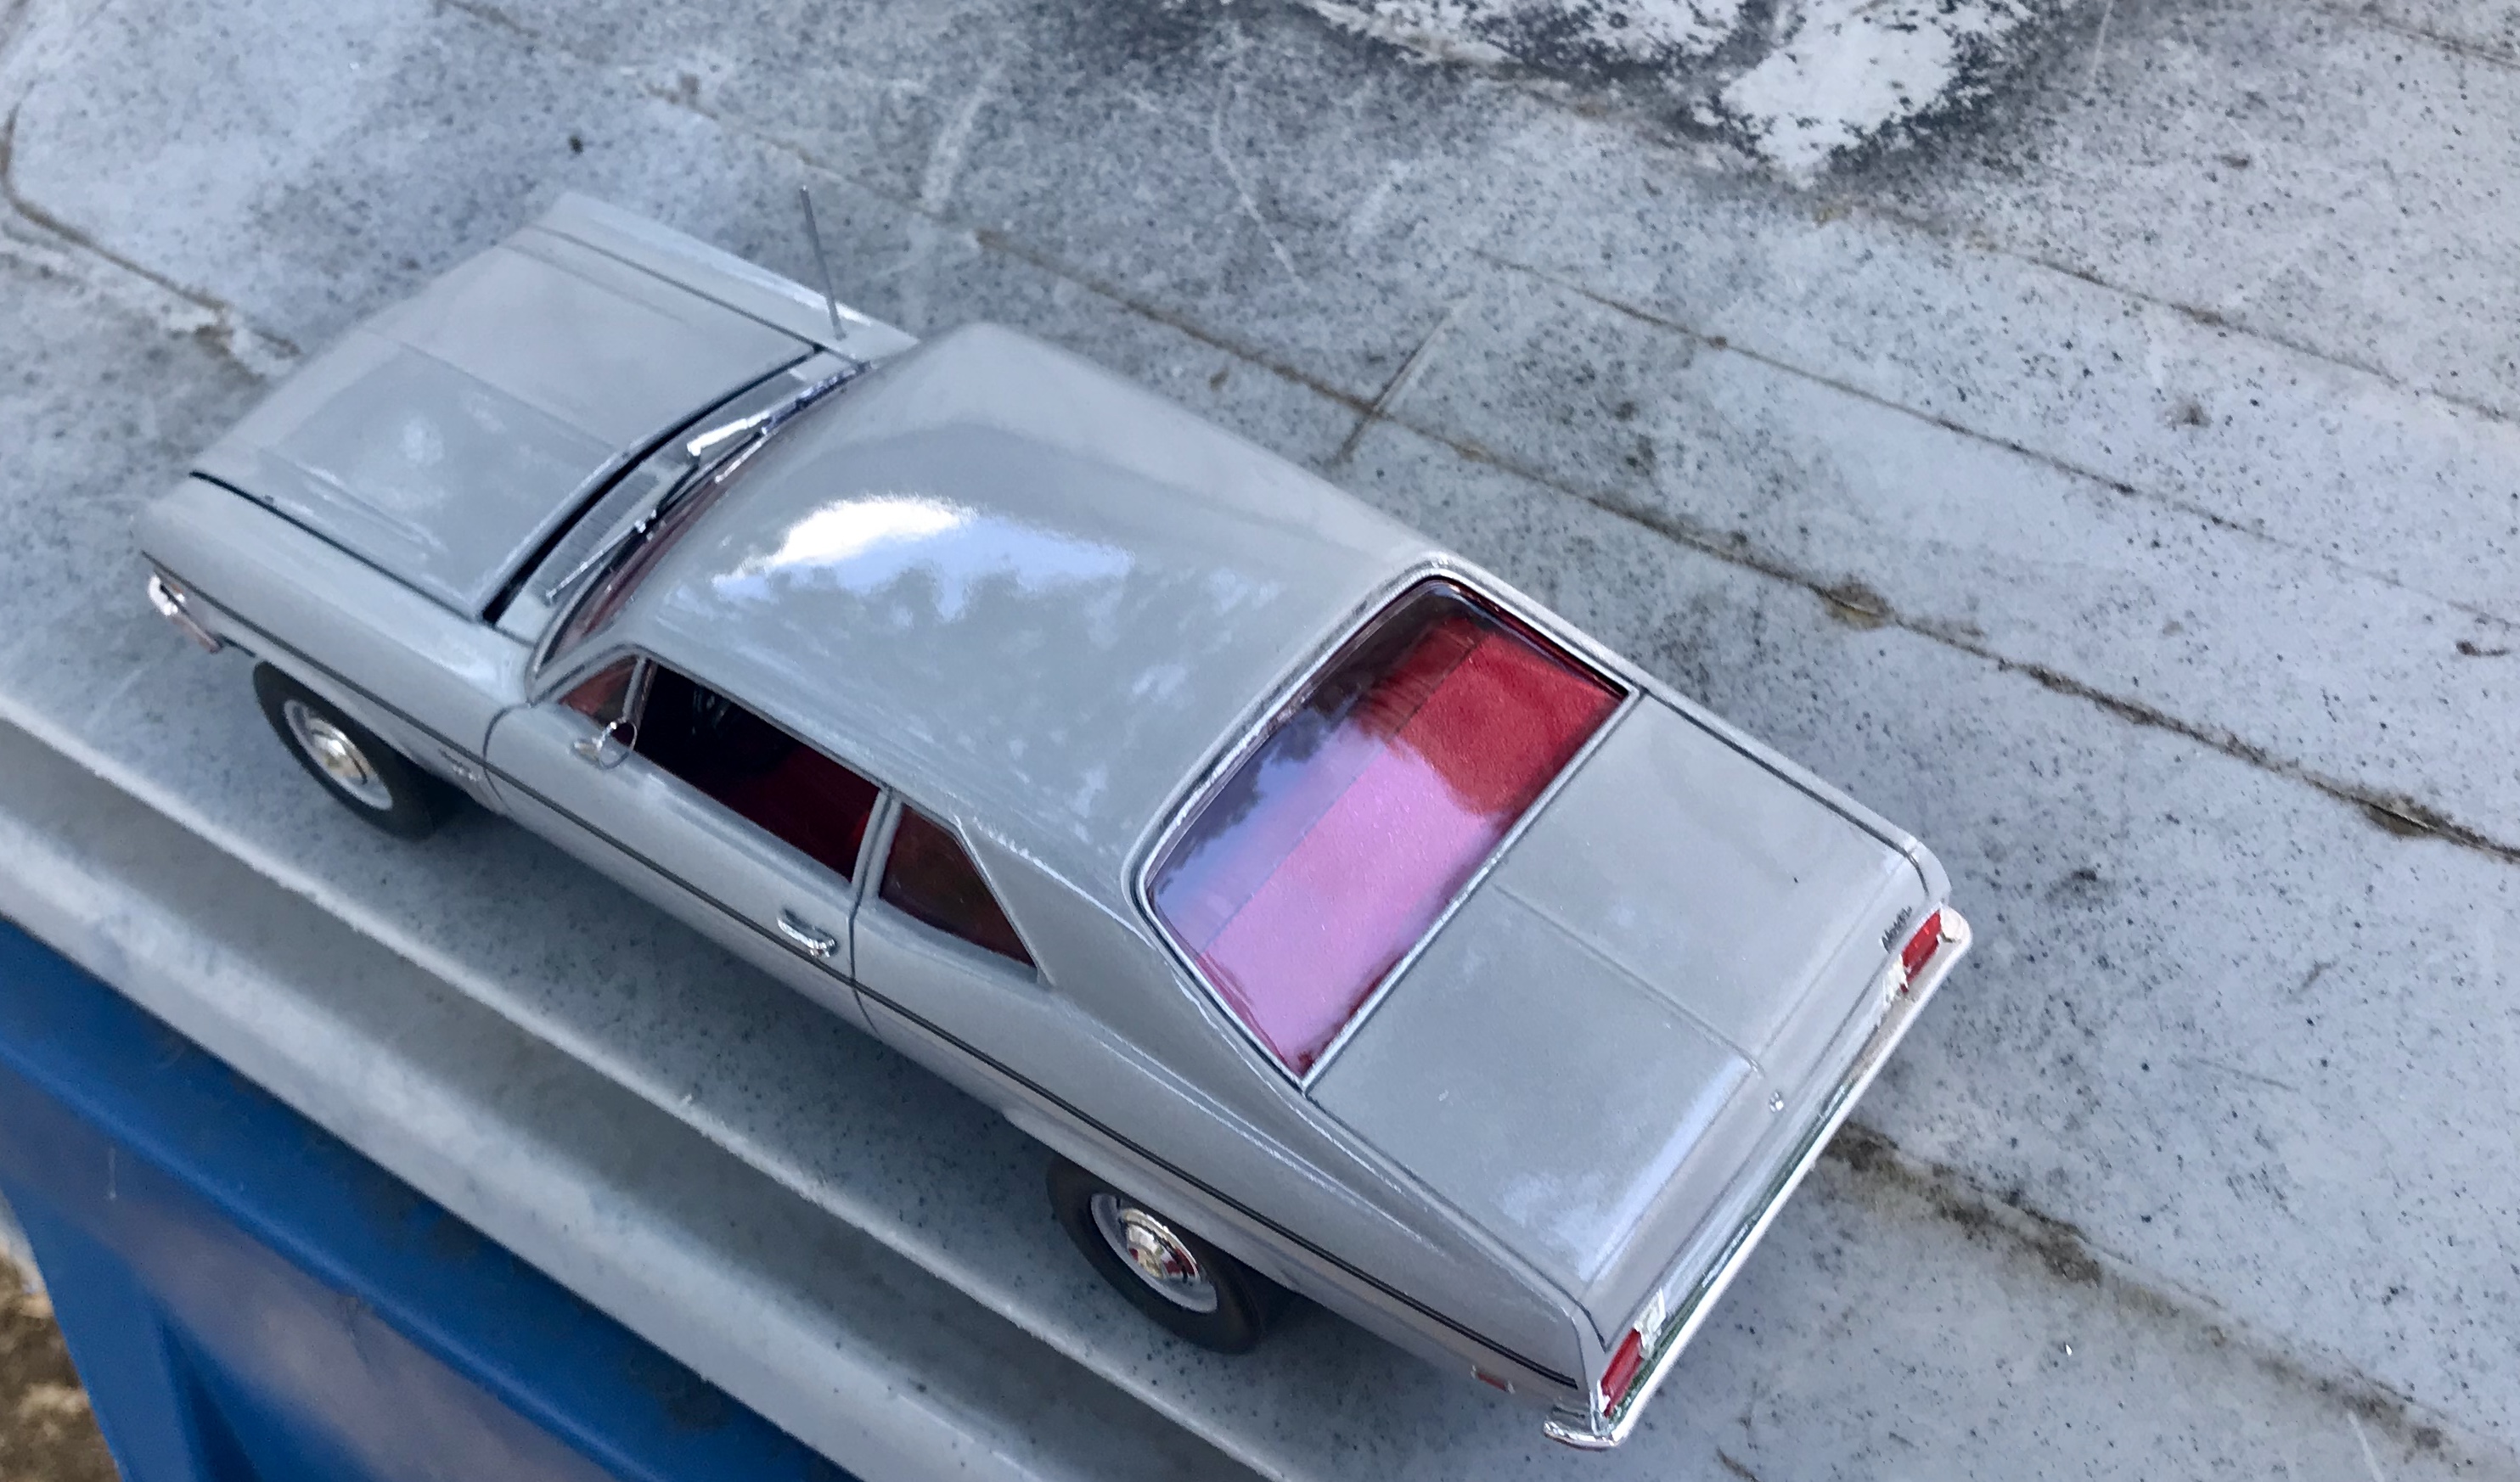
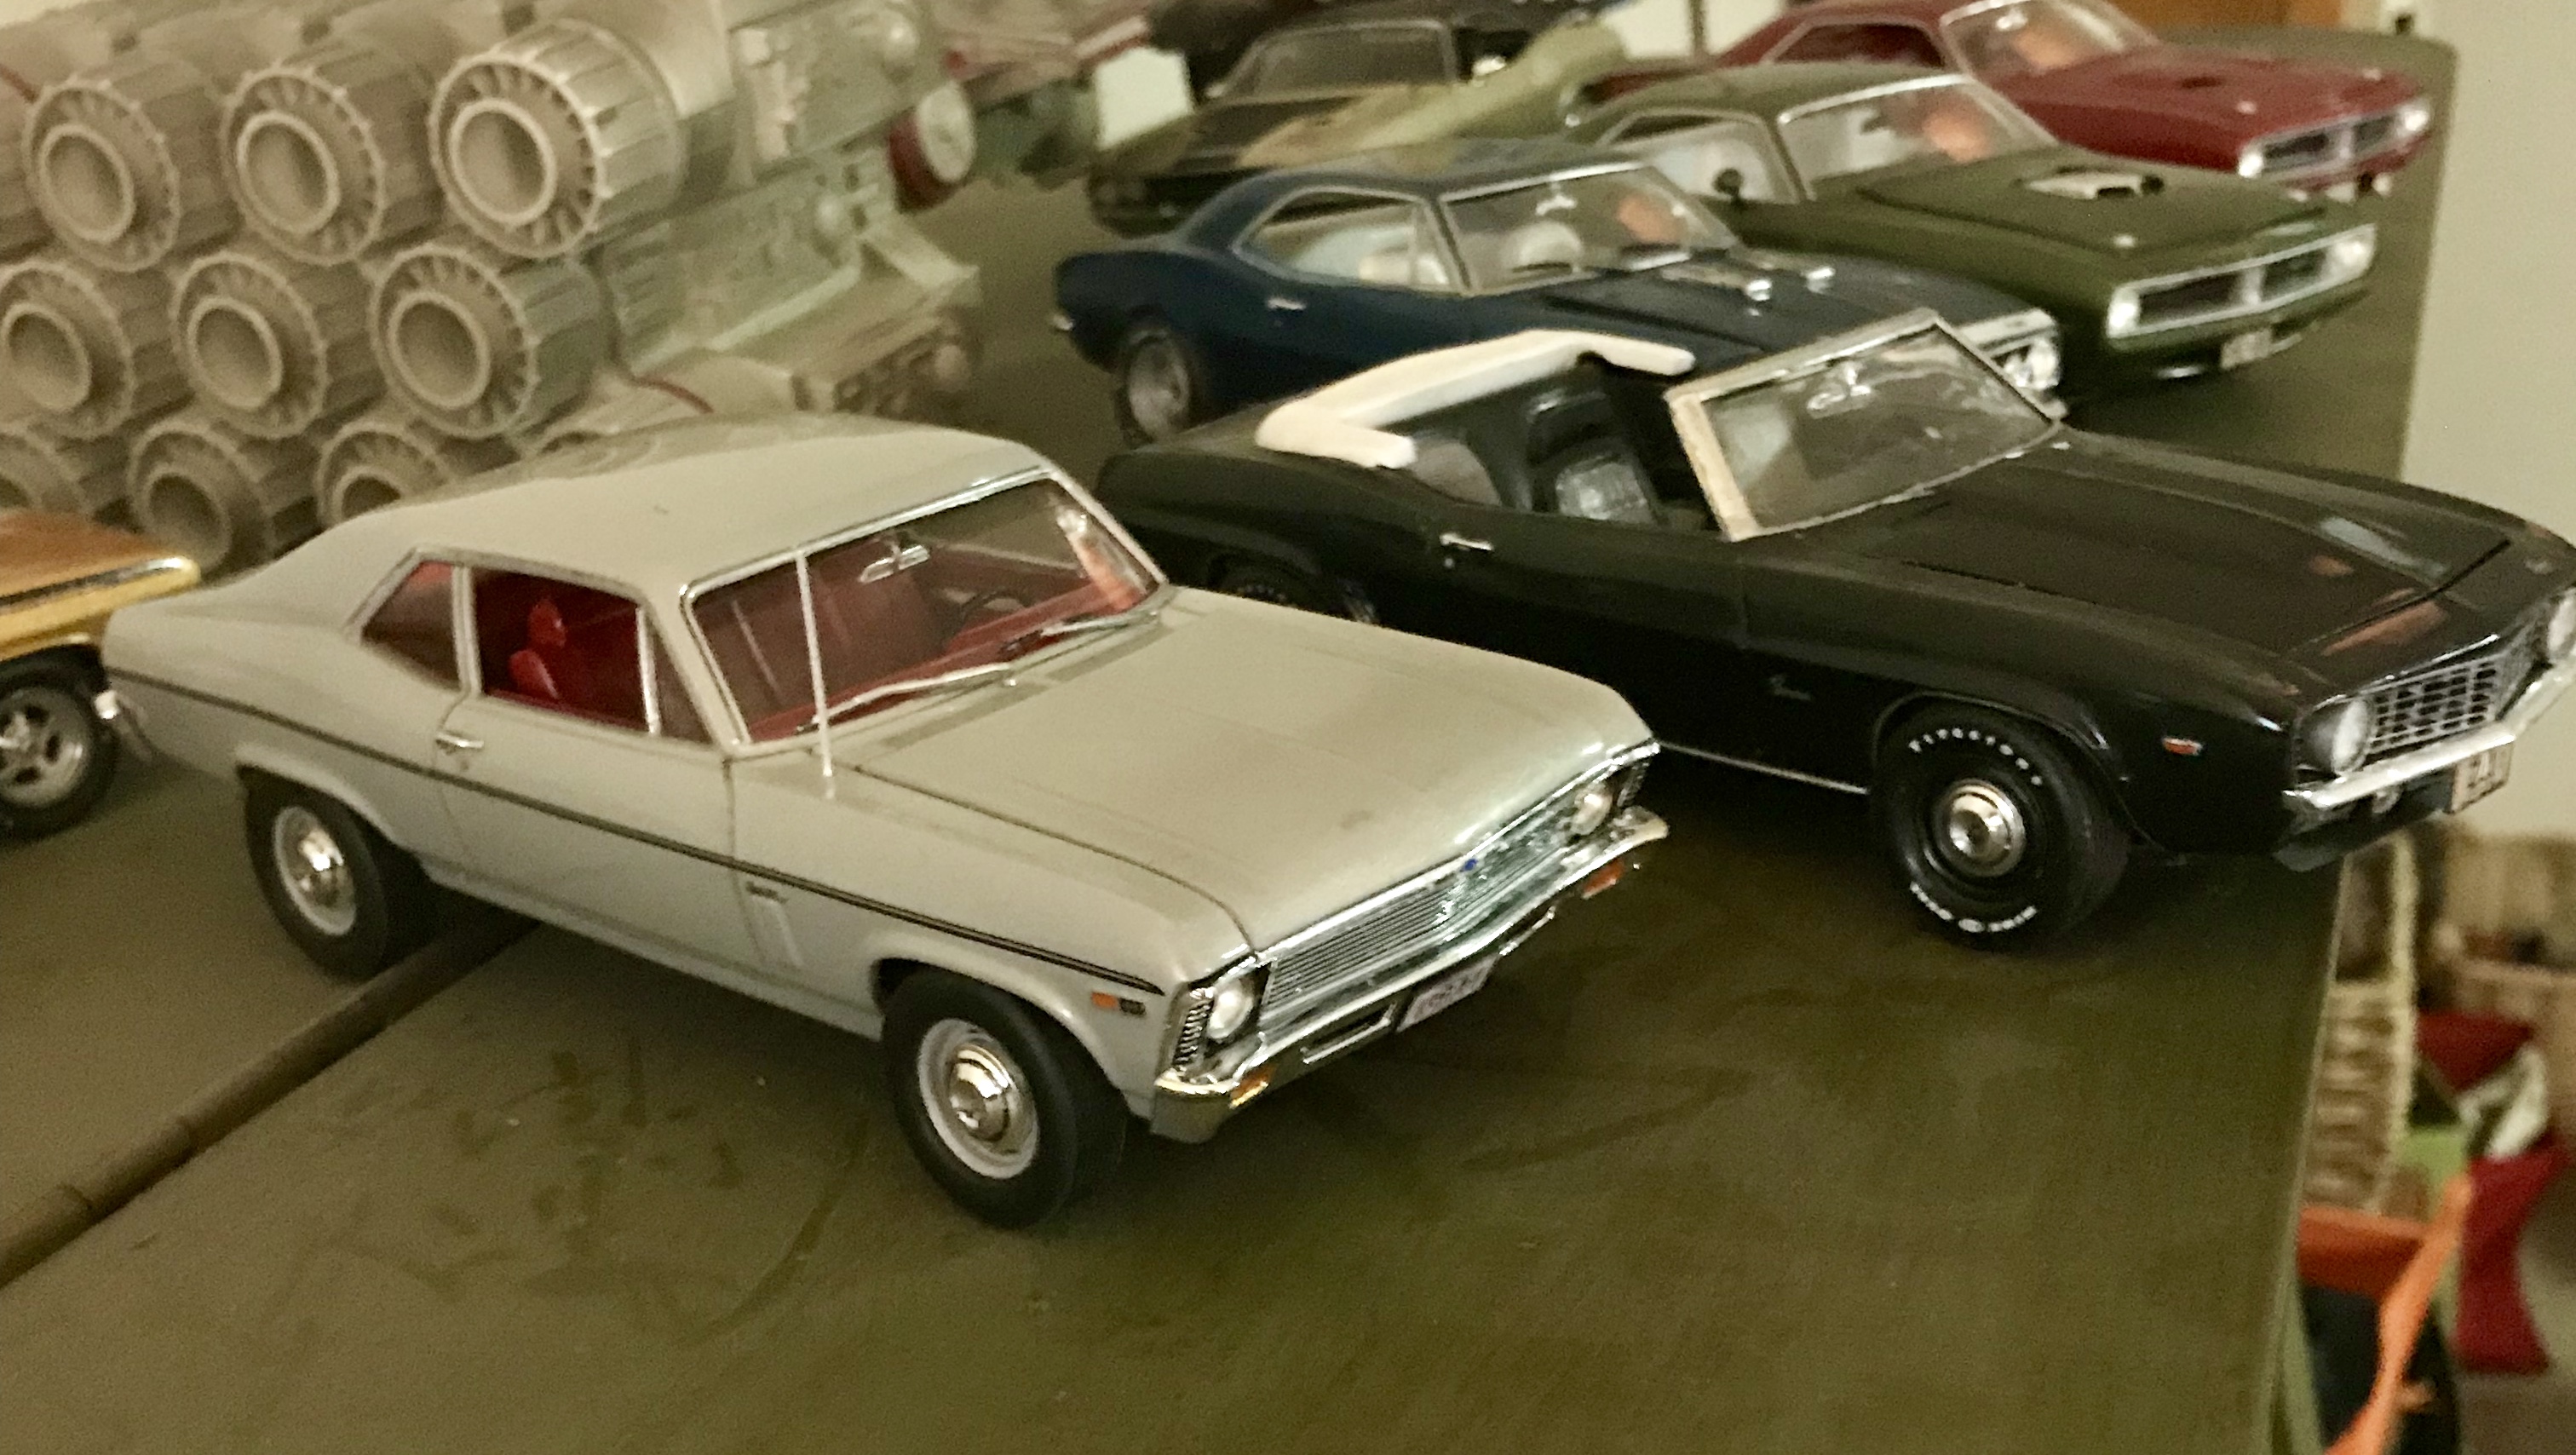
I built the 69 Nova SS a couple years ago, and loved the kit, but was never happy with my results. I repainted it twice, changed wheels and tires 8-10 times, but never was satisfied. In the last stripping process, the body was damaged, so it was time to replace it. (I have another project for the sweet 350, though) This time, I bought the COPO kit, as I wanted the dog dish caps, plain rear panel and bench seat. I wanted my Nova to look like grandma’s car, but with just a little serious edge to it... like the COPO was, it should be a real sleeper. After researching, I chose Cortez Silver as my color, but had to experiment to get a good version. After multiple spoon tests the best match was the simplest: a can of Infiniti Pearl Midcoat paint sprayed directly over Tamiya gray primer, then cleared. I didn’t want a black interior, so I went with red, which was an available option in 1969. I wired my engine, and created vacuum hoses, a throttle cable and heater hoses along with battery cables. I also used a little scrap of styrene to make a radio antenna. I raised my rear end slightly, and used the slightly larger tires that were for the NASCAR version of the 69 Charger Daytona I recently completed on the rear. That gave it the stance I wanted. I did have to hold back one temptation: I LOVE a muscle car to have dog dish caps and white letter tires, but to keep this as inconspicuous as possible, I kept them as blackwalls. I also added the side stripes: I think the car looks better without them, but they do make it look more “grandma-ish.” Thanks for looking... hope you like it! Interior: The rest: My 427: Two of my three dog dish Bow ties:
-
'71 Plymouth Satellite - restoration WIP images added!
Kmb0319 replied to Tommy124's topic in Model Cars
I’m gonna go with one word here.... WOW!!