Chariots of Fire
-
Posts
2,783 -
Joined
-
Last visited
Content Type
Profiles
Forums
Events
Gallery
Everything posted by Chariots of Fire
-

ERTL IH Paystar 5000 dumper
Chariots of Fire replied to TruckerAL's topic in Model Trucks: Big Rigs and Heavy Equipment
Fine piece of work! Love the color! -
CCKW 353 is complete
Chariots of Fire replied to Chariots of Fire's topic in Model Trucks: Big Rigs and Heavy Equipment
Now it is done for sure. Palette full of K rations in the front behind the gas for Patton's tanks.
-
CCKW 353 is complete
Chariots of Fire replied to Chariots of Fire's topic in Model Trucks: Big Rigs and Heavy Equipment
I know what you mean. I've slept in command tents, 16x16 wall tents and a small 4x6 canvas tent. They all smell the same!! -
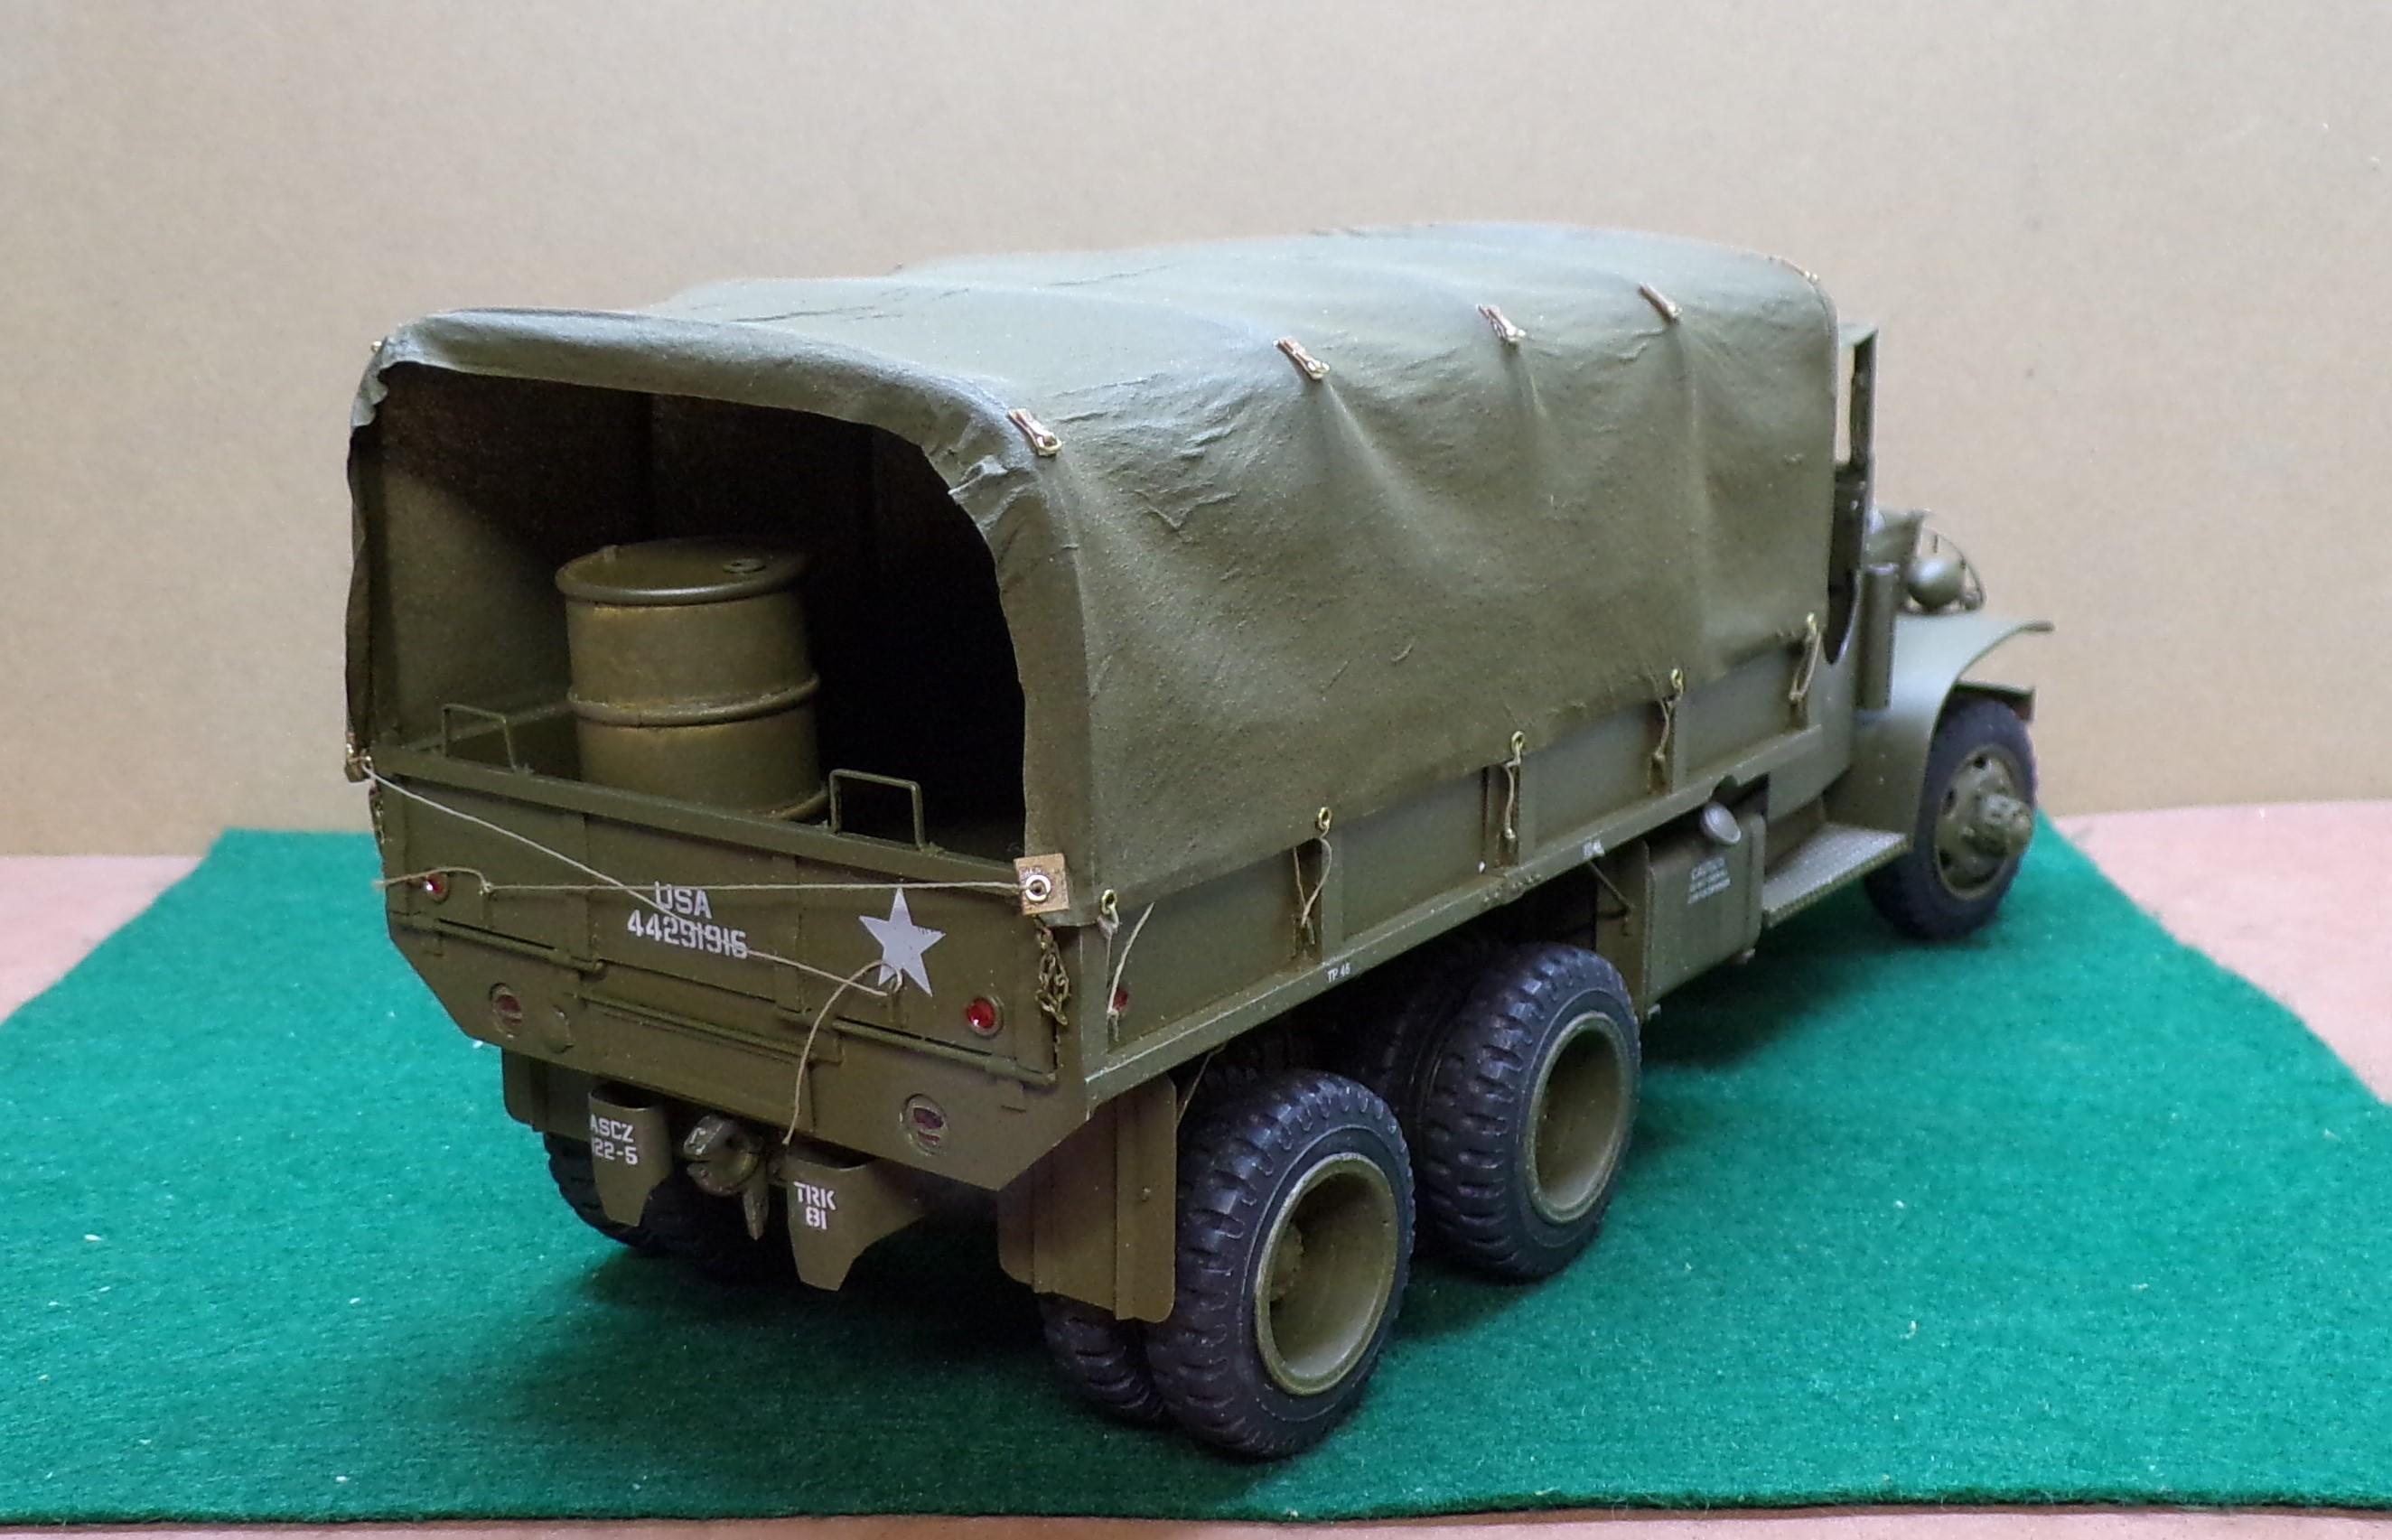
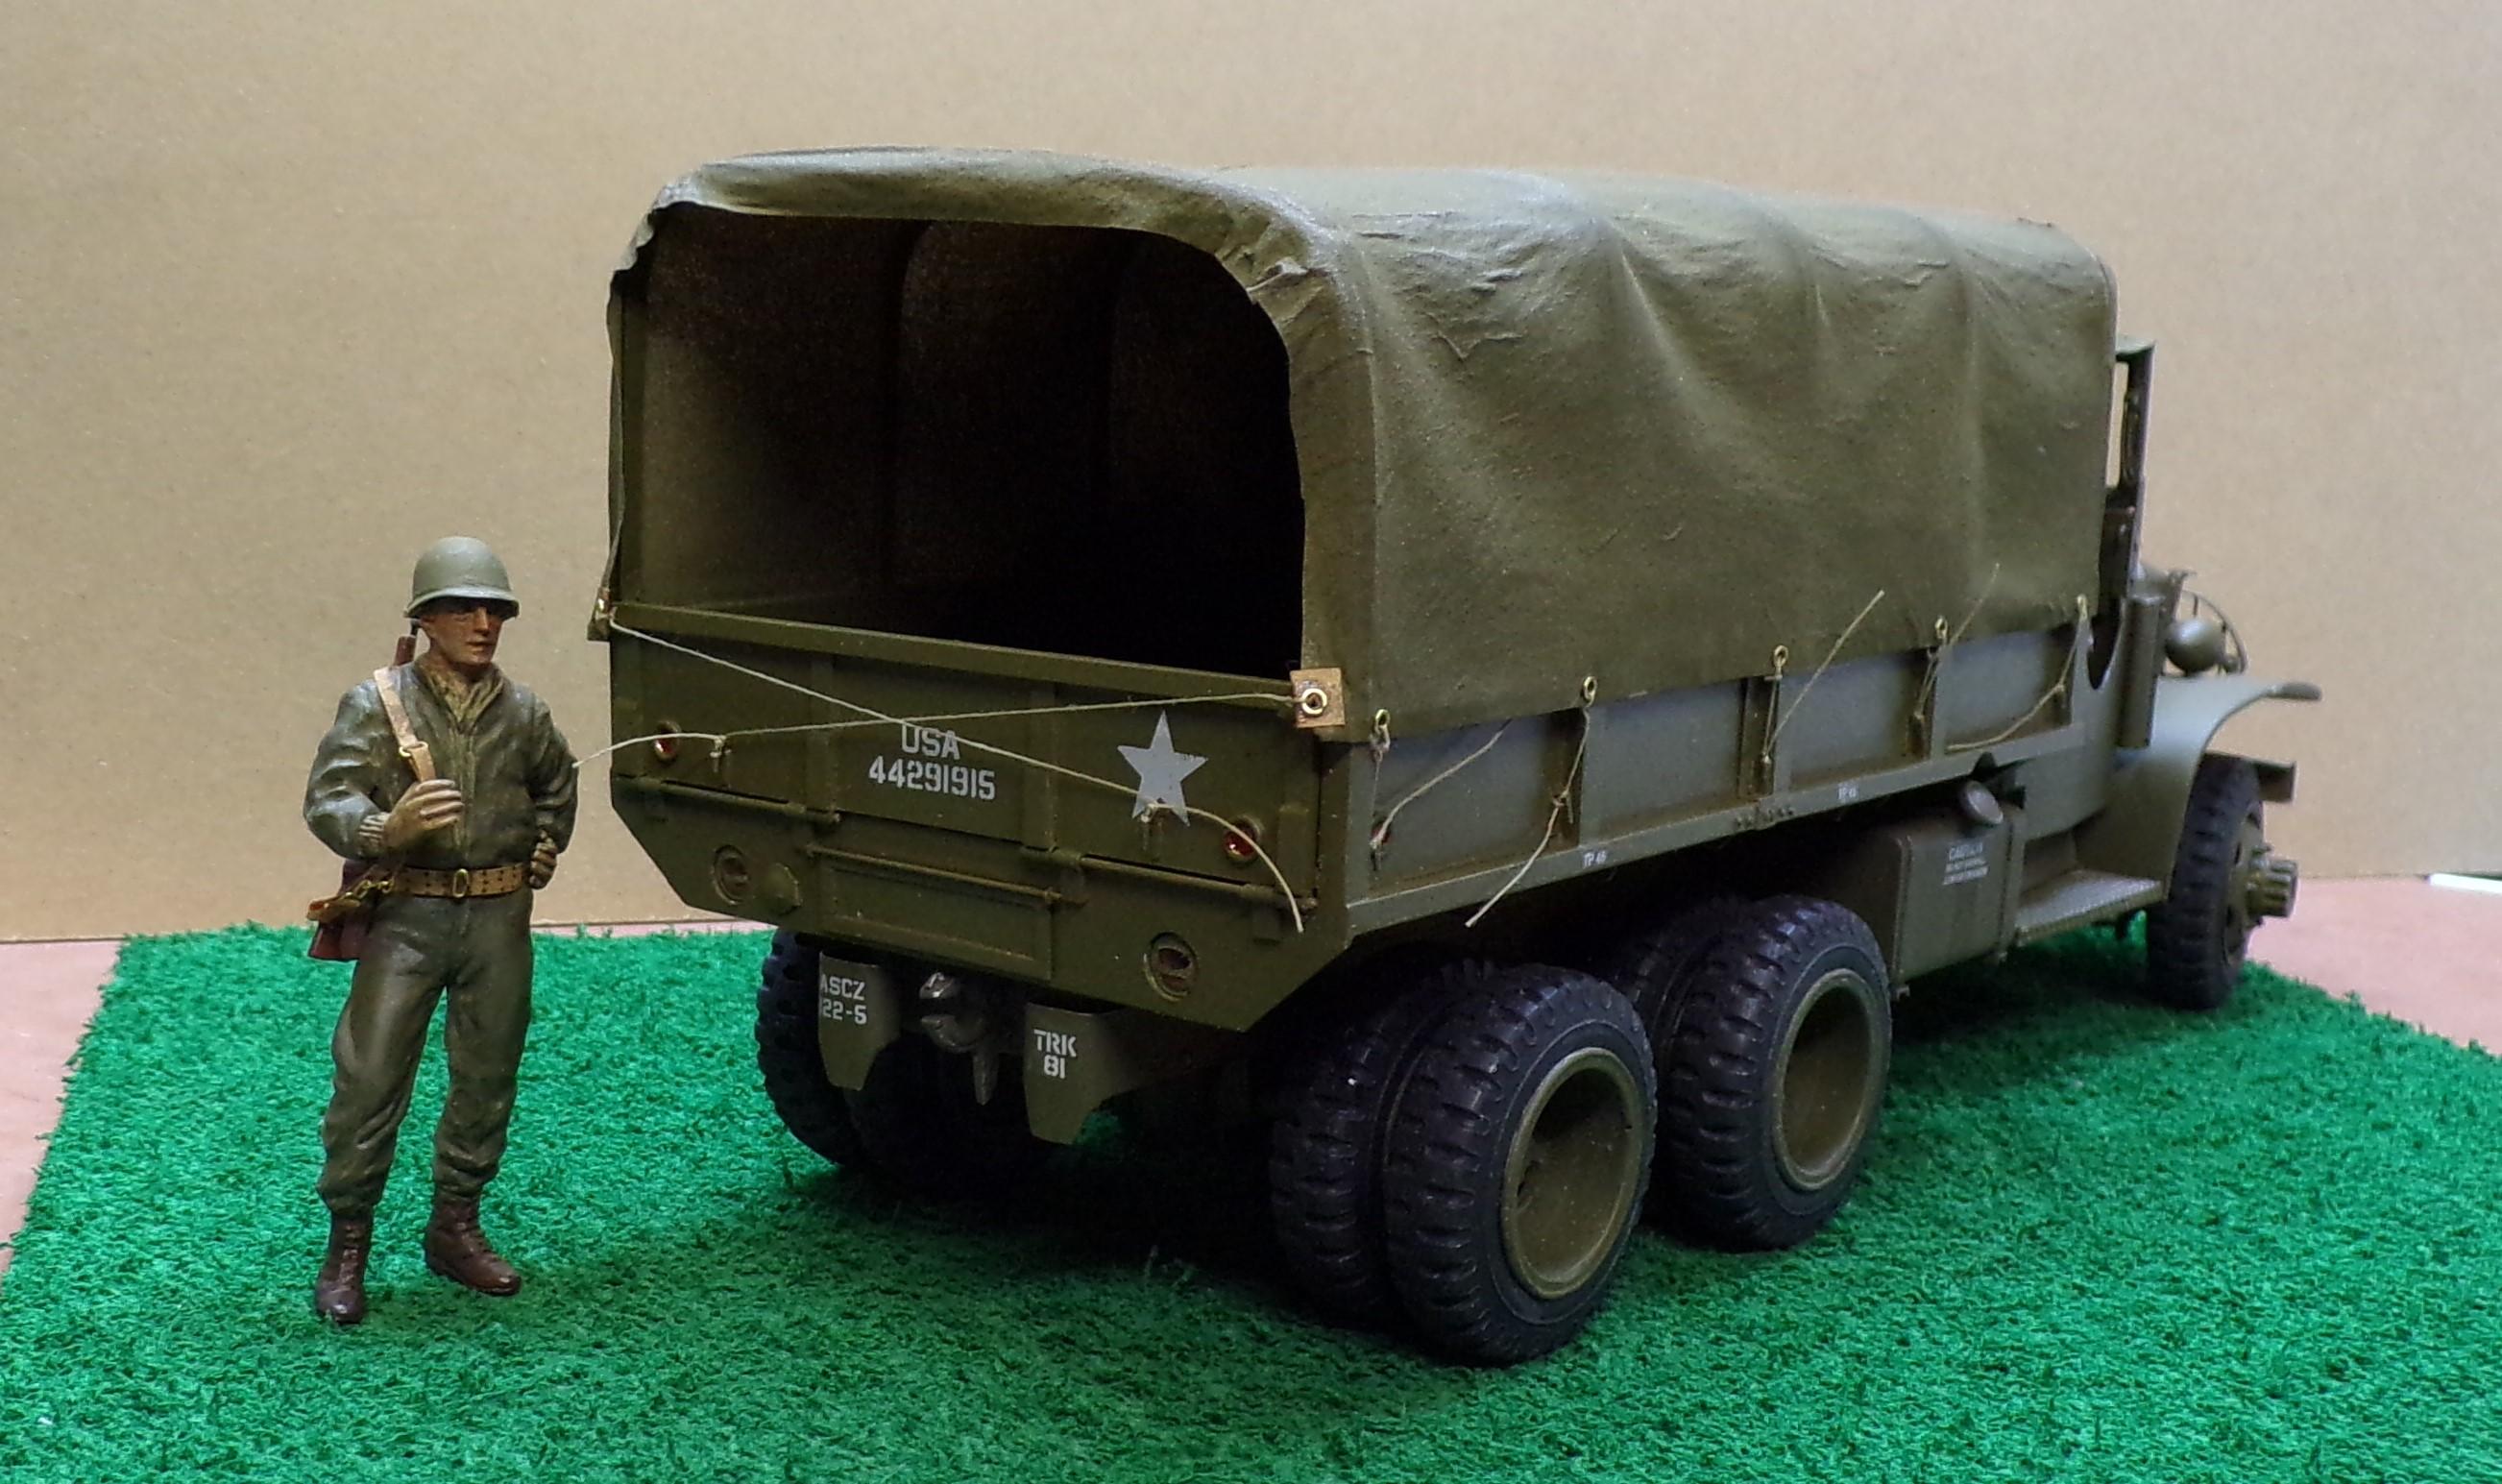
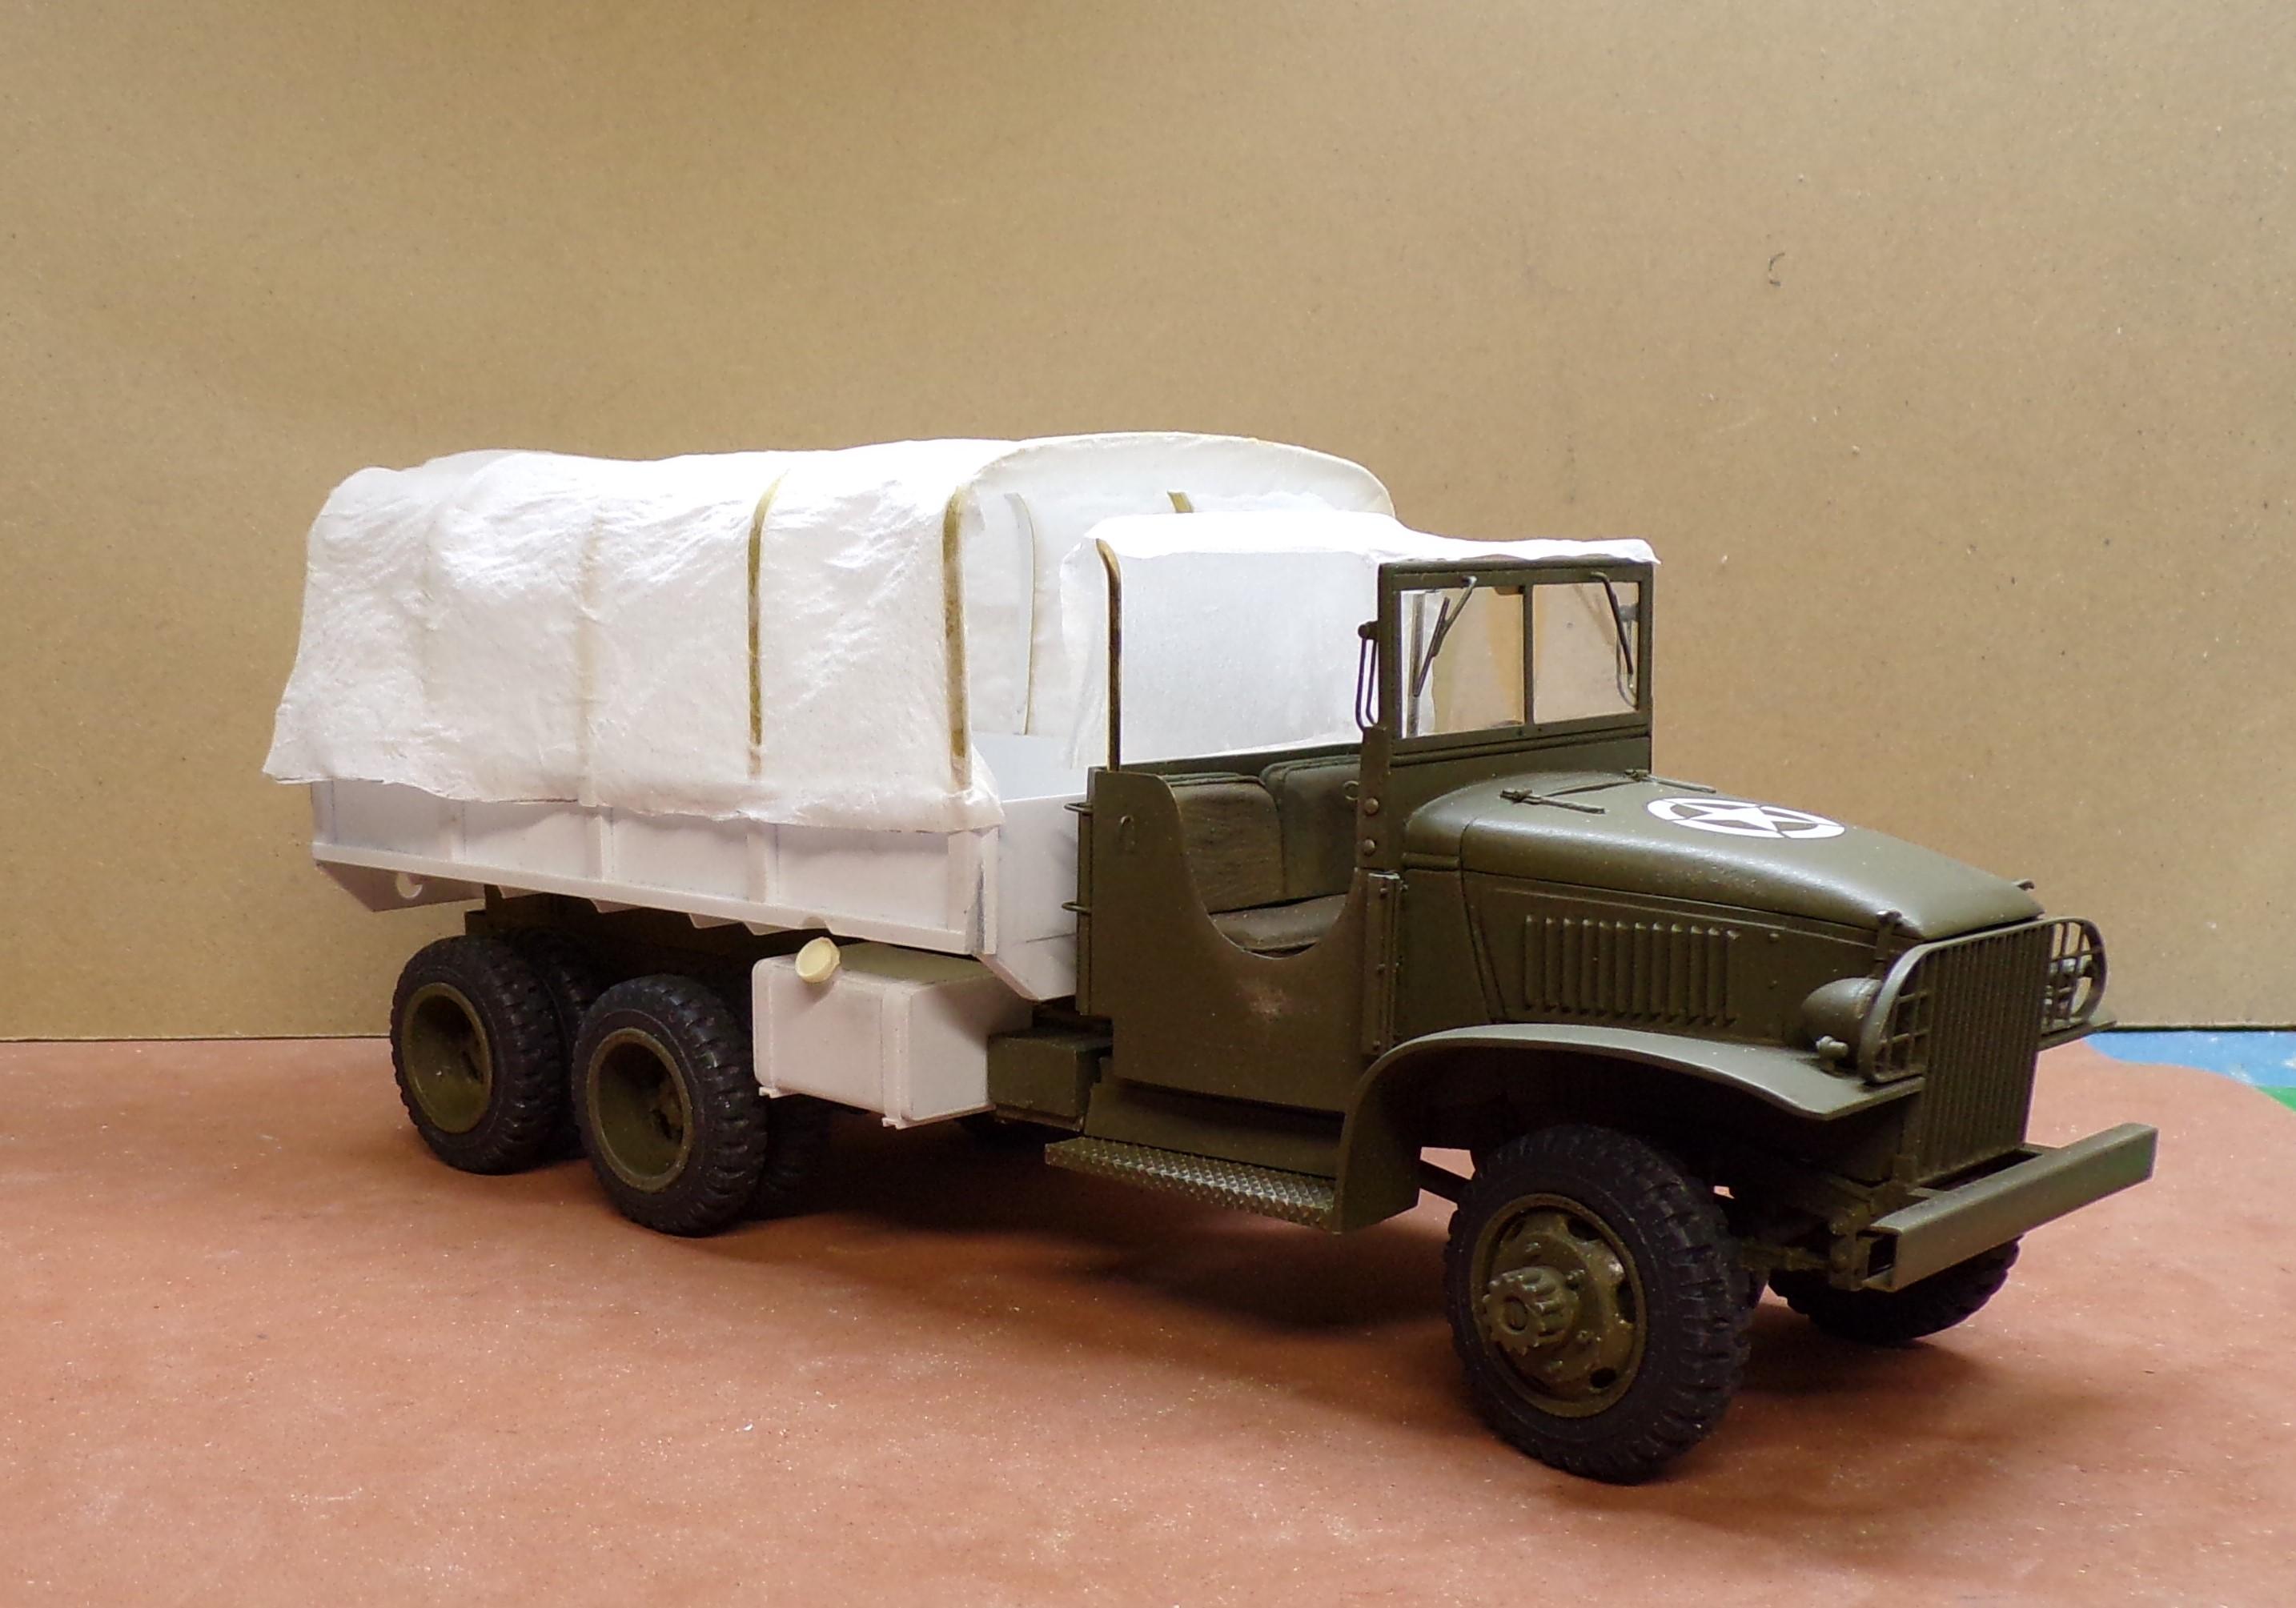
This project can now take its place on the shelf. Work is completed with the final details on the tailboard and tarp. The M1 next to the MP is in its scabbard. The load for the back will be a separate project by itself. Willard battery next to the gas tank. Engine is complete and wired. The barrel in the back is a piece of 1" PVC pipe with 0.060 half round for the ribs. The truck is assigned to the Red Ball Express for hauling supplies to Patton's front lines.
-
Happens to all of us. I noticed tonite that I have the forward mud flaps on backwards on the CCKW. Vertical bracing should be outside the wheels, not inside. Read the photo wrong when I did it. NOT CHANGING IT NOW!!?
-
Changing Gears
Chariots of Fire replied to J.B. Customs's topic in WIP: Model Trucks: Big Rigs and Heavy Equipment
And the eyelet above the ladder is the pike pole holder. The front holder is an upright U shape. They drop the end of the pike pole in the U and secure it with a cotter pin. -
CCKW
Chariots of Fire replied to Chariots of Fire's topic in WIP: Model Trucks: Big Rigs and Heavy Equipment
Some updates with decals done and the tarp tied down. Still a few body details left to do.
-
Changing Gears
Chariots of Fire replied to J.B. Customs's topic in WIP: Model Trucks: Big Rigs and Heavy Equipment
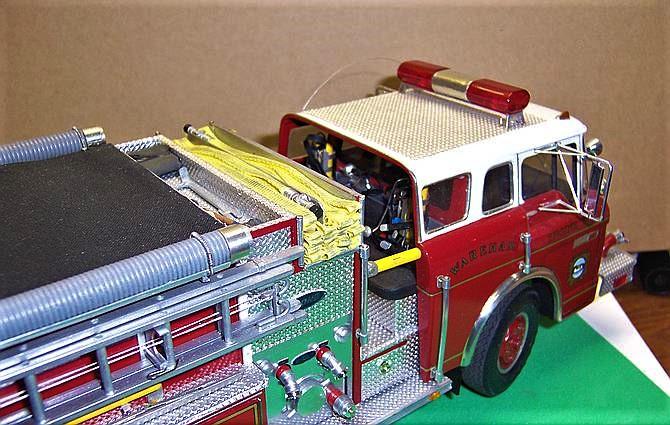
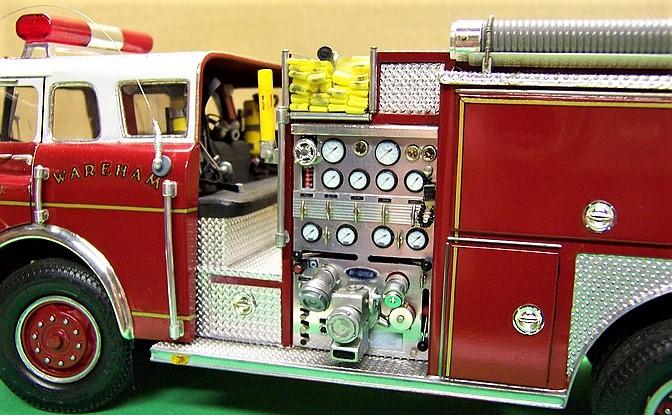
That last photo is interesting. There was a giveaway hint on the closeup of the pump panel as well. The main pump is a centrifugal pump meaning it cannot pump air. In order to prime the pump and get water into it the main pump needs some assistance from another small rotary gear pump to expel the air so that water can enter. Once primed, the centrifugal pump will do ok. The priming pump is lubricated with oil and each time it is used a certain amount of oil would be discharged to the ground. That is the reason for the oil reservoir shown on the photo. An alert crew would check it from time to time to be sure that the reservoir was full. The other interesting feature is that the crosslay was only accessible from the pump panel side of the truck. Most can be reached from either side but would need each side to be open and not hindered by the ladder. -
CCKW
Chariots of Fire replied to Chariots of Fire's topic in WIP: Model Trucks: Big Rigs and Heavy Equipment
The tarp is very fragile but does allow for some careful handling. Once all is said and done it won't be played with any.? -
CCKW
Chariots of Fire replied to Chariots of Fire's topic in WIP: Model Trucks: Big Rigs and Heavy Equipment
Here's where we are to date. The tarp is done and ready to tie down. Still lots of detailing left to do on the body before it can be glued permanently to the frame. Then there are the final decals to make it part of the Red Ball Express. I'm thinking a mixed load going to supply Patton and the 3rd Army will be added to the bed. Got a GI to dress up to look like the MP in the photo supplied by Greg above. Maybe make a copy of the poster as well.
-
Changing Gears
Chariots of Fire replied to J.B. Customs's topic in WIP: Model Trucks: Big Rigs and Heavy Equipment
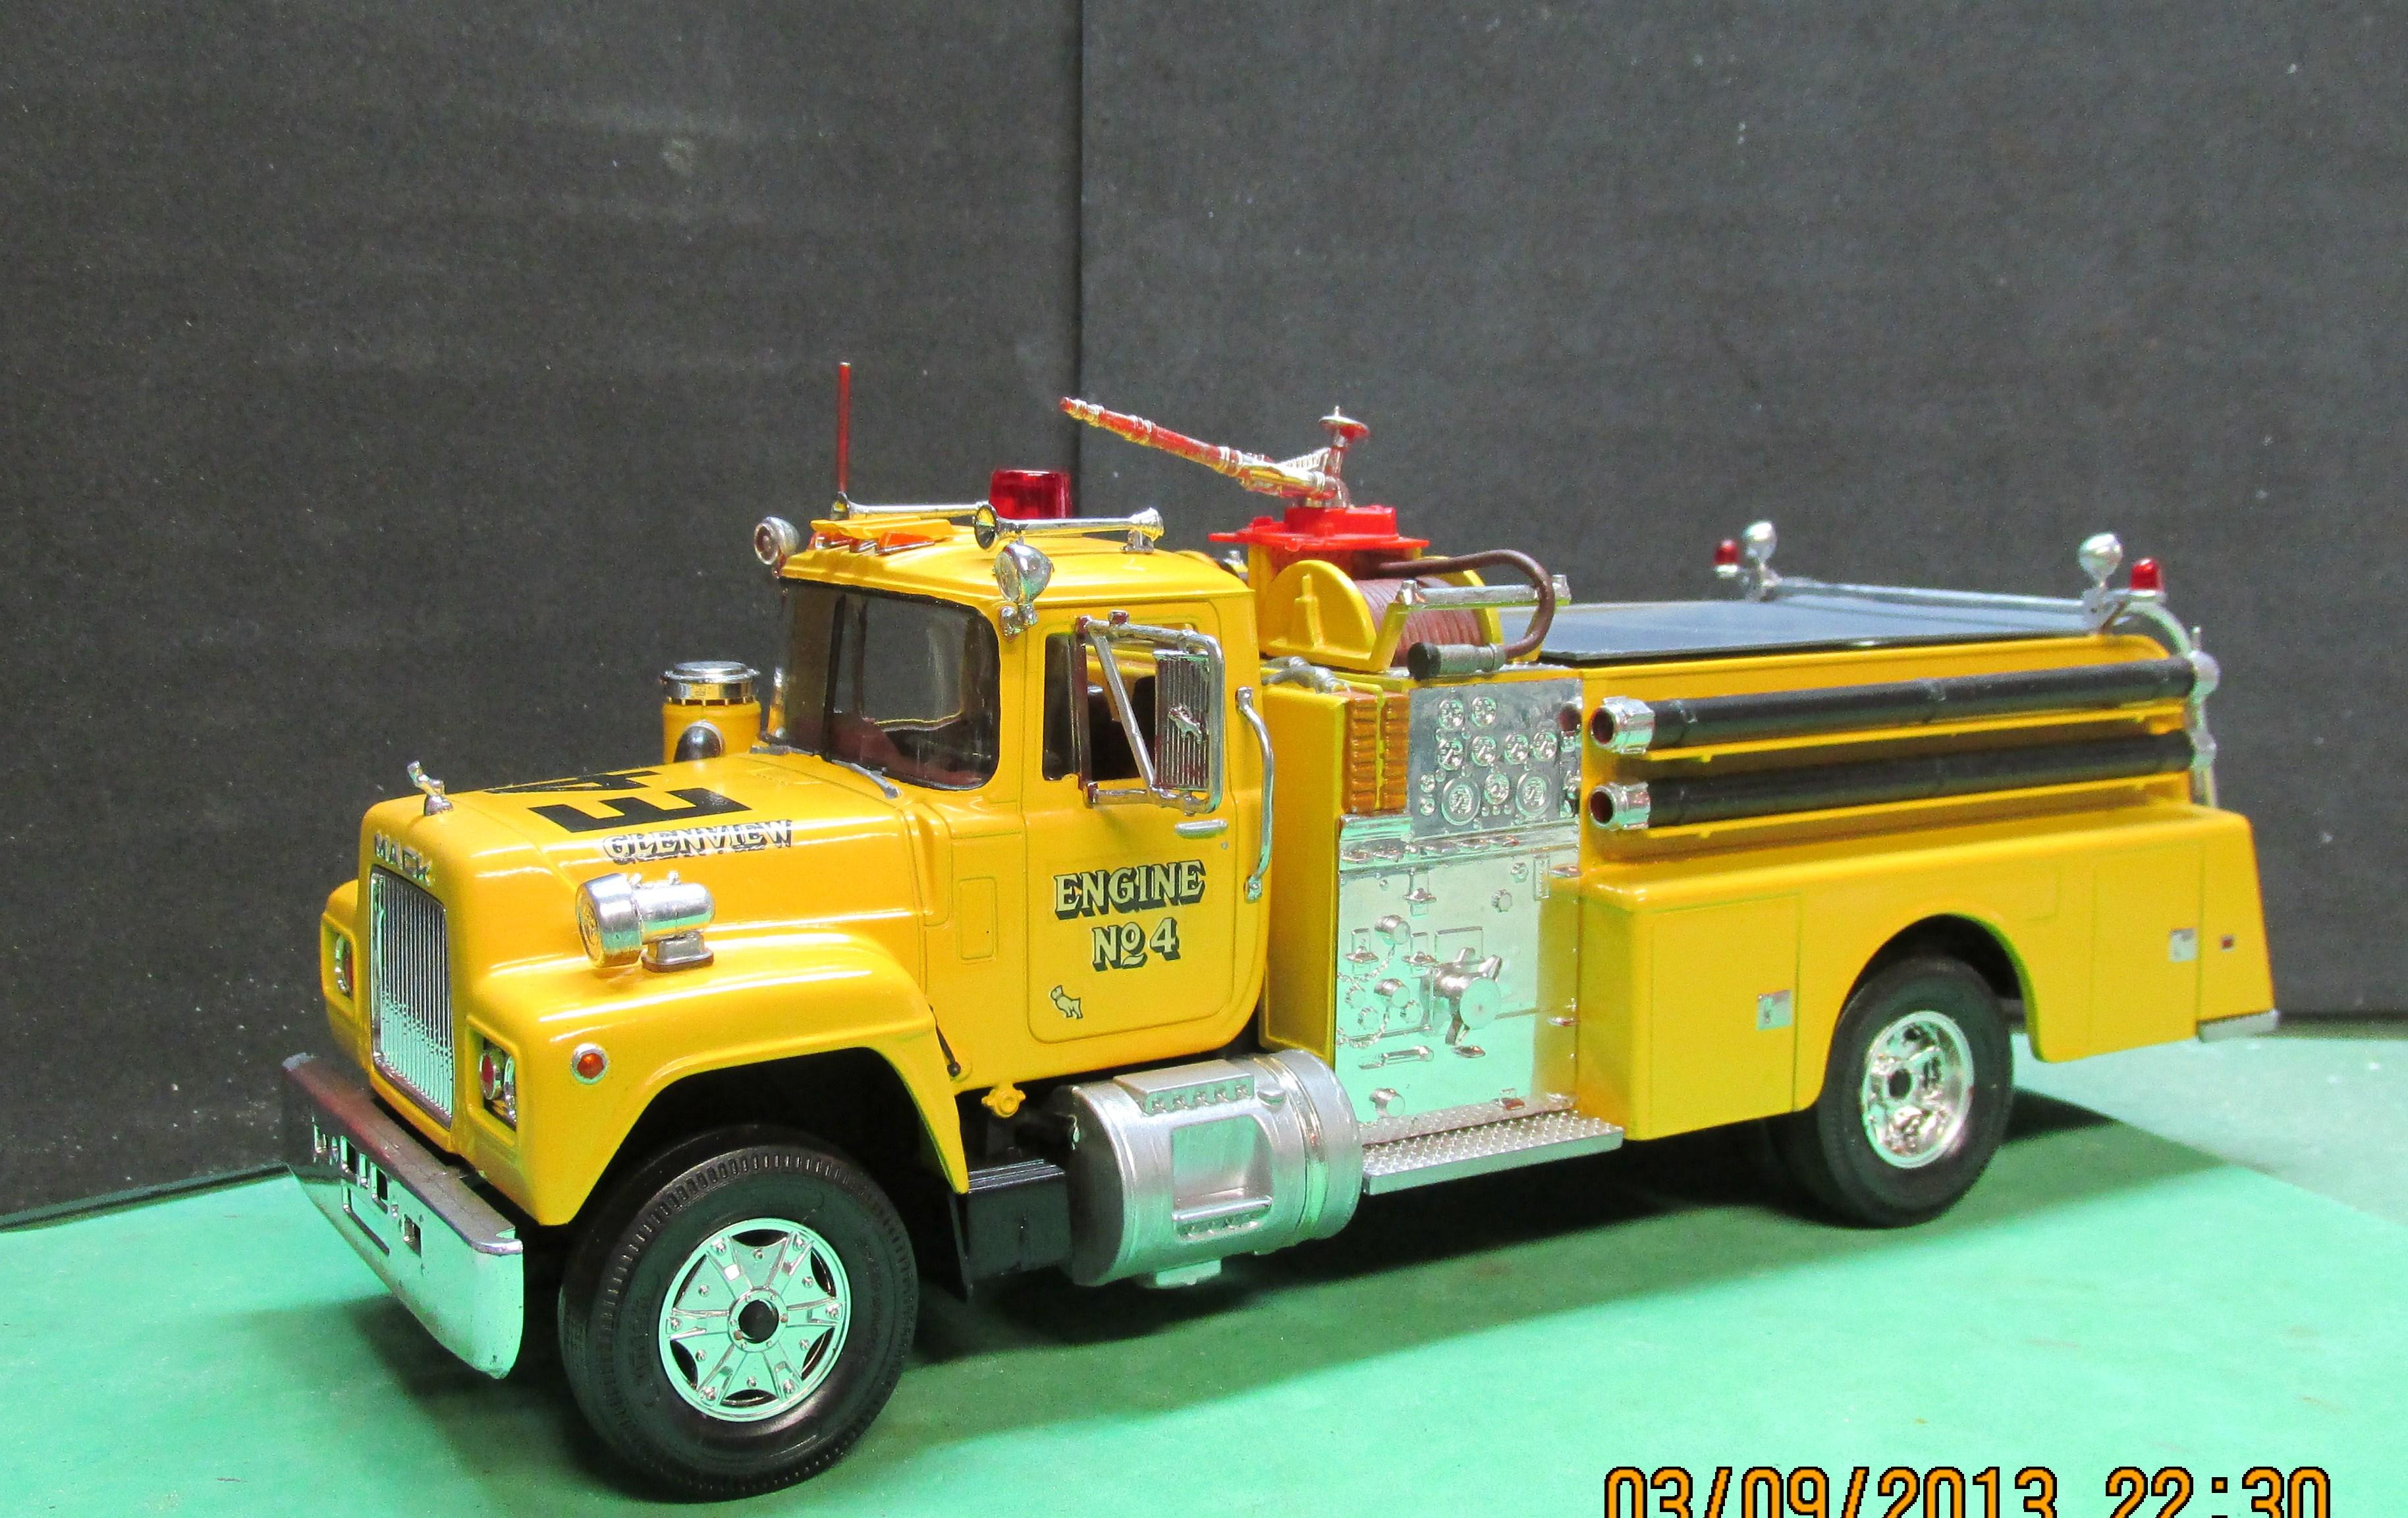
Number of discharges determine the size of the pump generally; 250 gpm for each discharge. Two per side would make it a 1000 gpm pump, a standard size for most Hale pumps of the day. With regard to the main pump suction (that big cap thingy in the middle of the pump): The AMT caps are way too big. Consider making a round cap about 7 mm in diameter, cut off the ears from the AMT cap and glue them on the smaller cap. Much more in scale as most intakes would be 5" inside diameter. Smaller pumps had 4-1/2" suctions. You should be able to get an acceptable chrome finish on the cap using the 2mm Molotow chrome pen or Alclad. For some nice grab rails try some 1/16" diameter aluminum tubing. Polish it up ahead of time. Use some common pins for stanchions and drill small holes for the stanchions to fit into. Check out the E-One pumper with the extended cab above. It has aluminum tubing grab bars. -
Changing Gears
Chariots of Fire replied to J.B. Customs's topic in WIP: Model Trucks: Big Rigs and Heavy Equipment
One little detail that sometimes gets overlooked and that is that on the AMT kits the wheels sometimes extend beyond the body sides. It can be fixed by snipping off a piece of the steel wire they include for the axle. -
CCKW
Chariots of Fire replied to Chariots of Fire's topic in WIP: Model Trucks: Big Rigs and Heavy Equipment
You mean like in pieces??☺️ Nah. This is the last of the military rigs for a while. Going back to fire apparatus. I have a '60's Chevy resin cast cab that I want to turn into a commercial style pumper/tanker. -
CCKW
Chariots of Fire replied to Chariots of Fire's topic in WIP: Model Trucks: Big Rigs and Heavy Equipment
Just regular size. Cut the 3 ply down to 2 though. -
CCKW
Chariots of Fire replied to Chariots of Fire's topic in WIP: Model Trucks: Big Rigs and Heavy Equipment
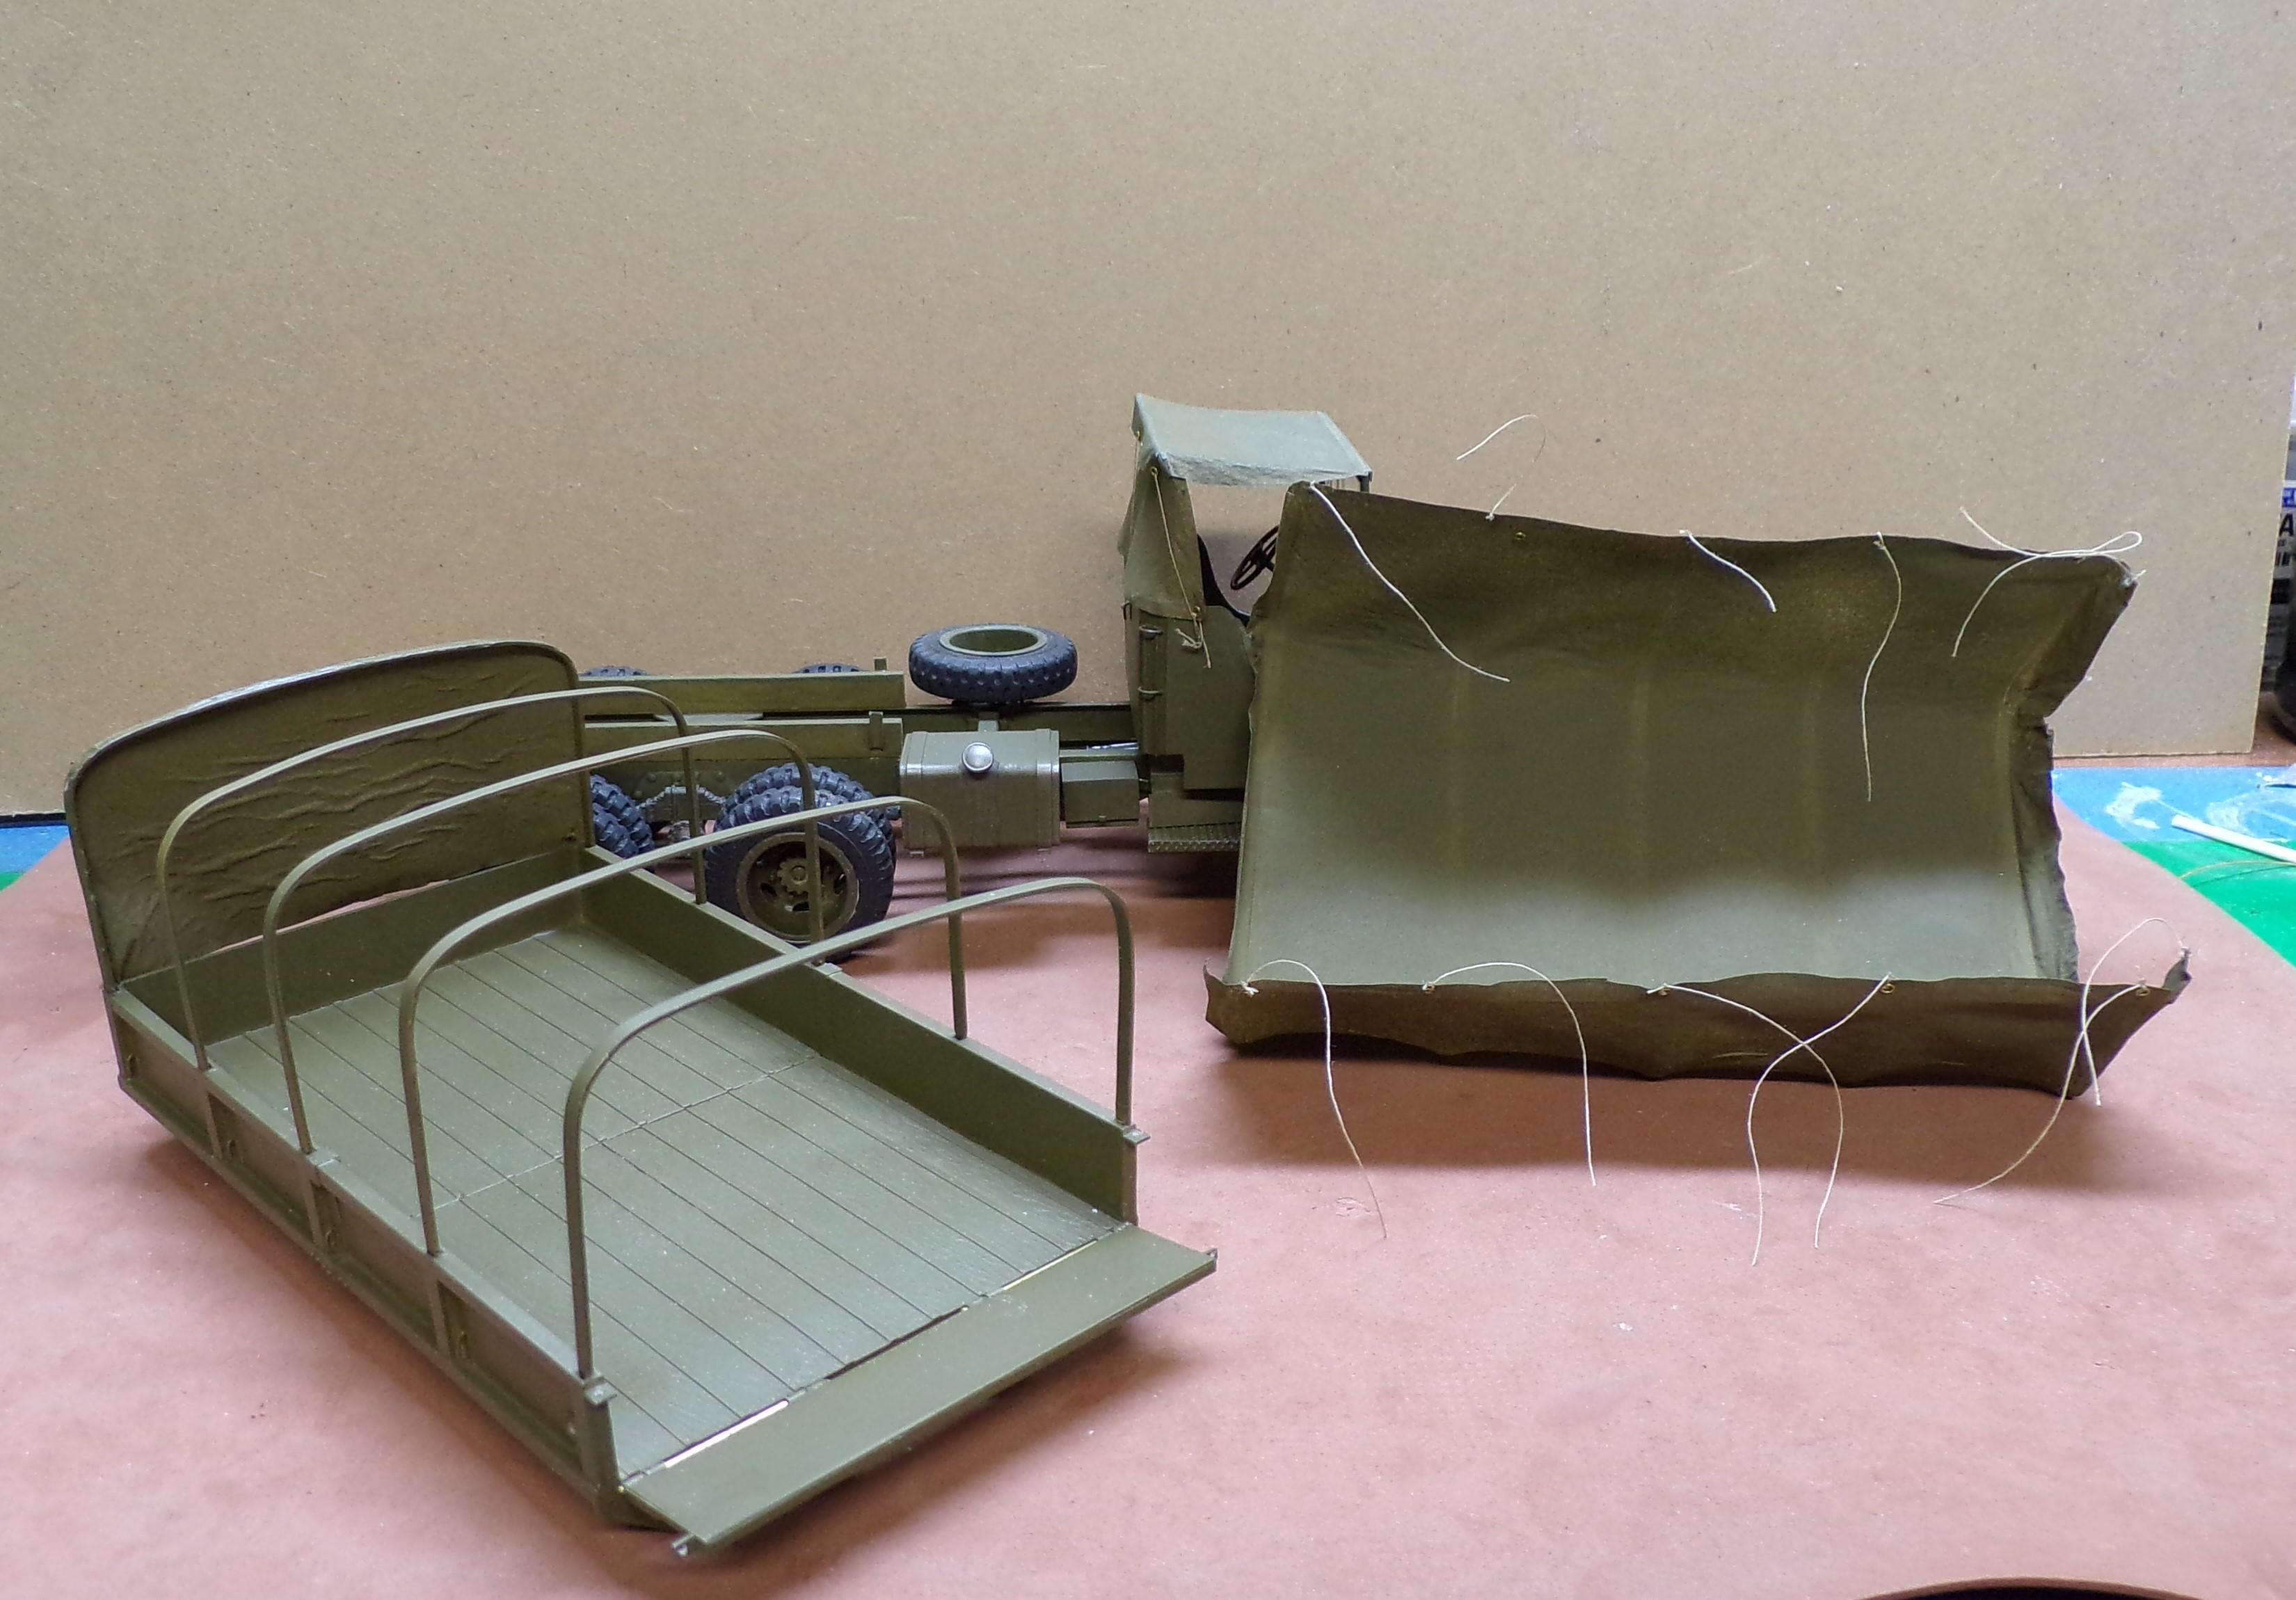
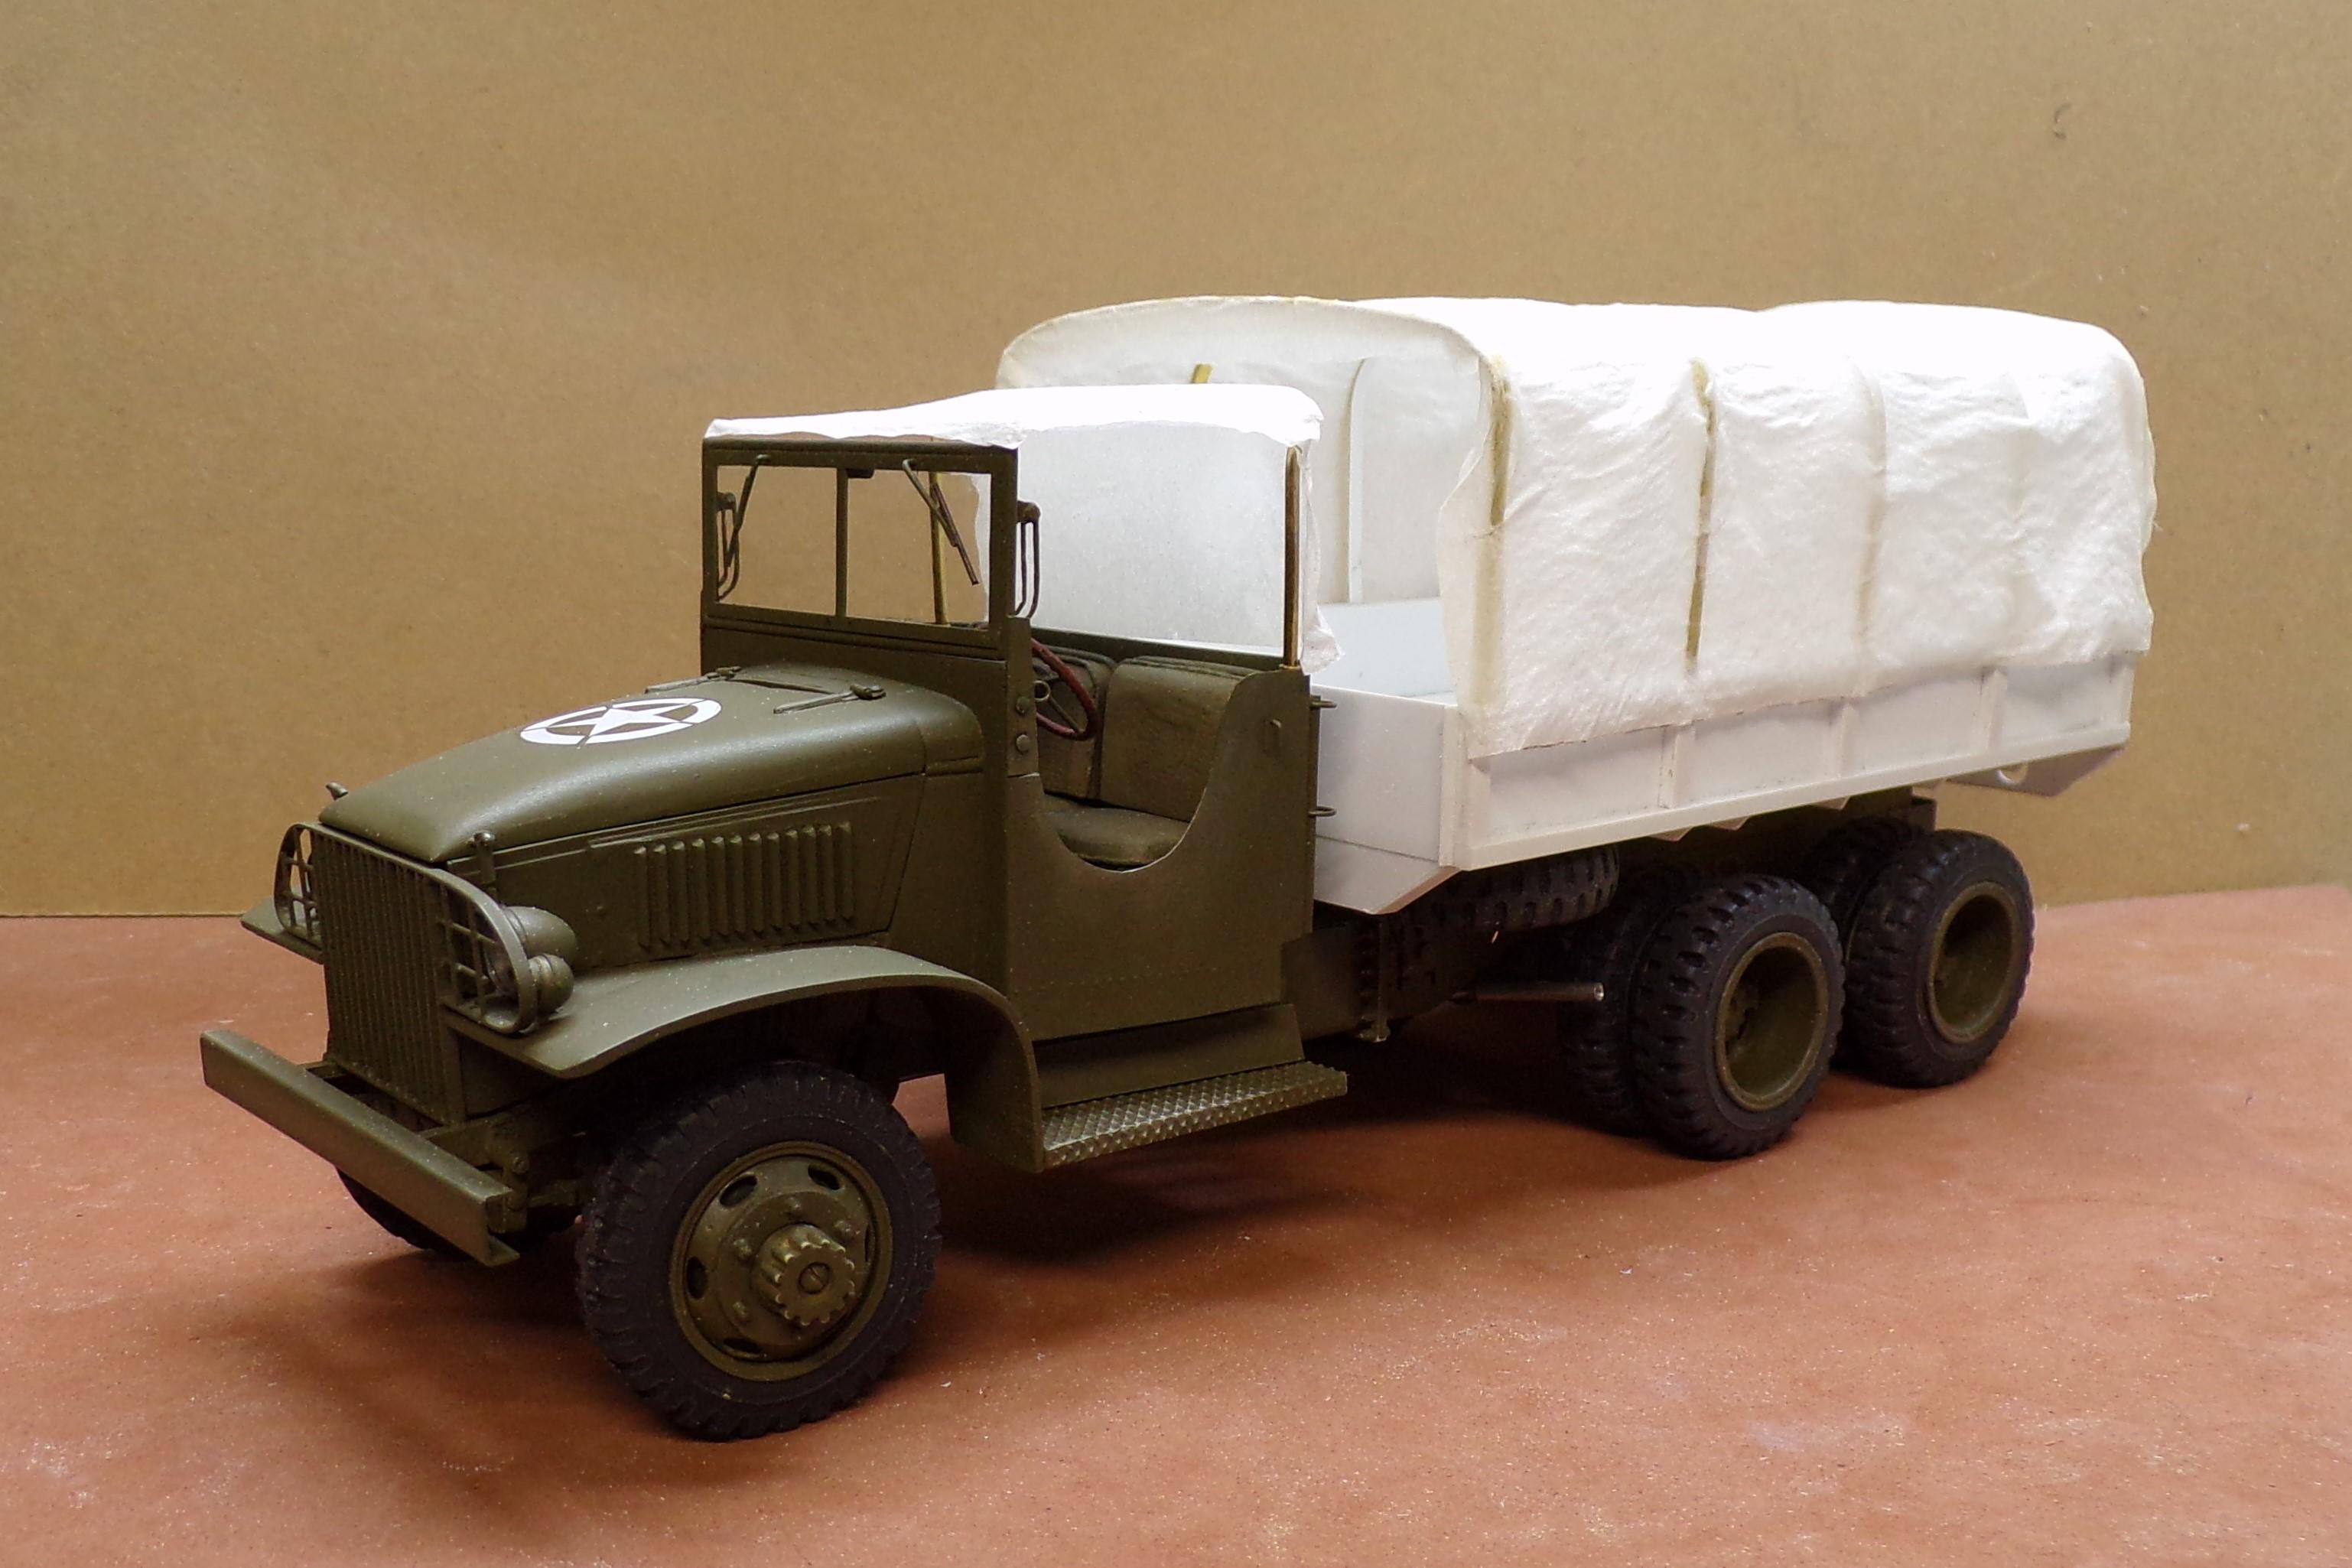
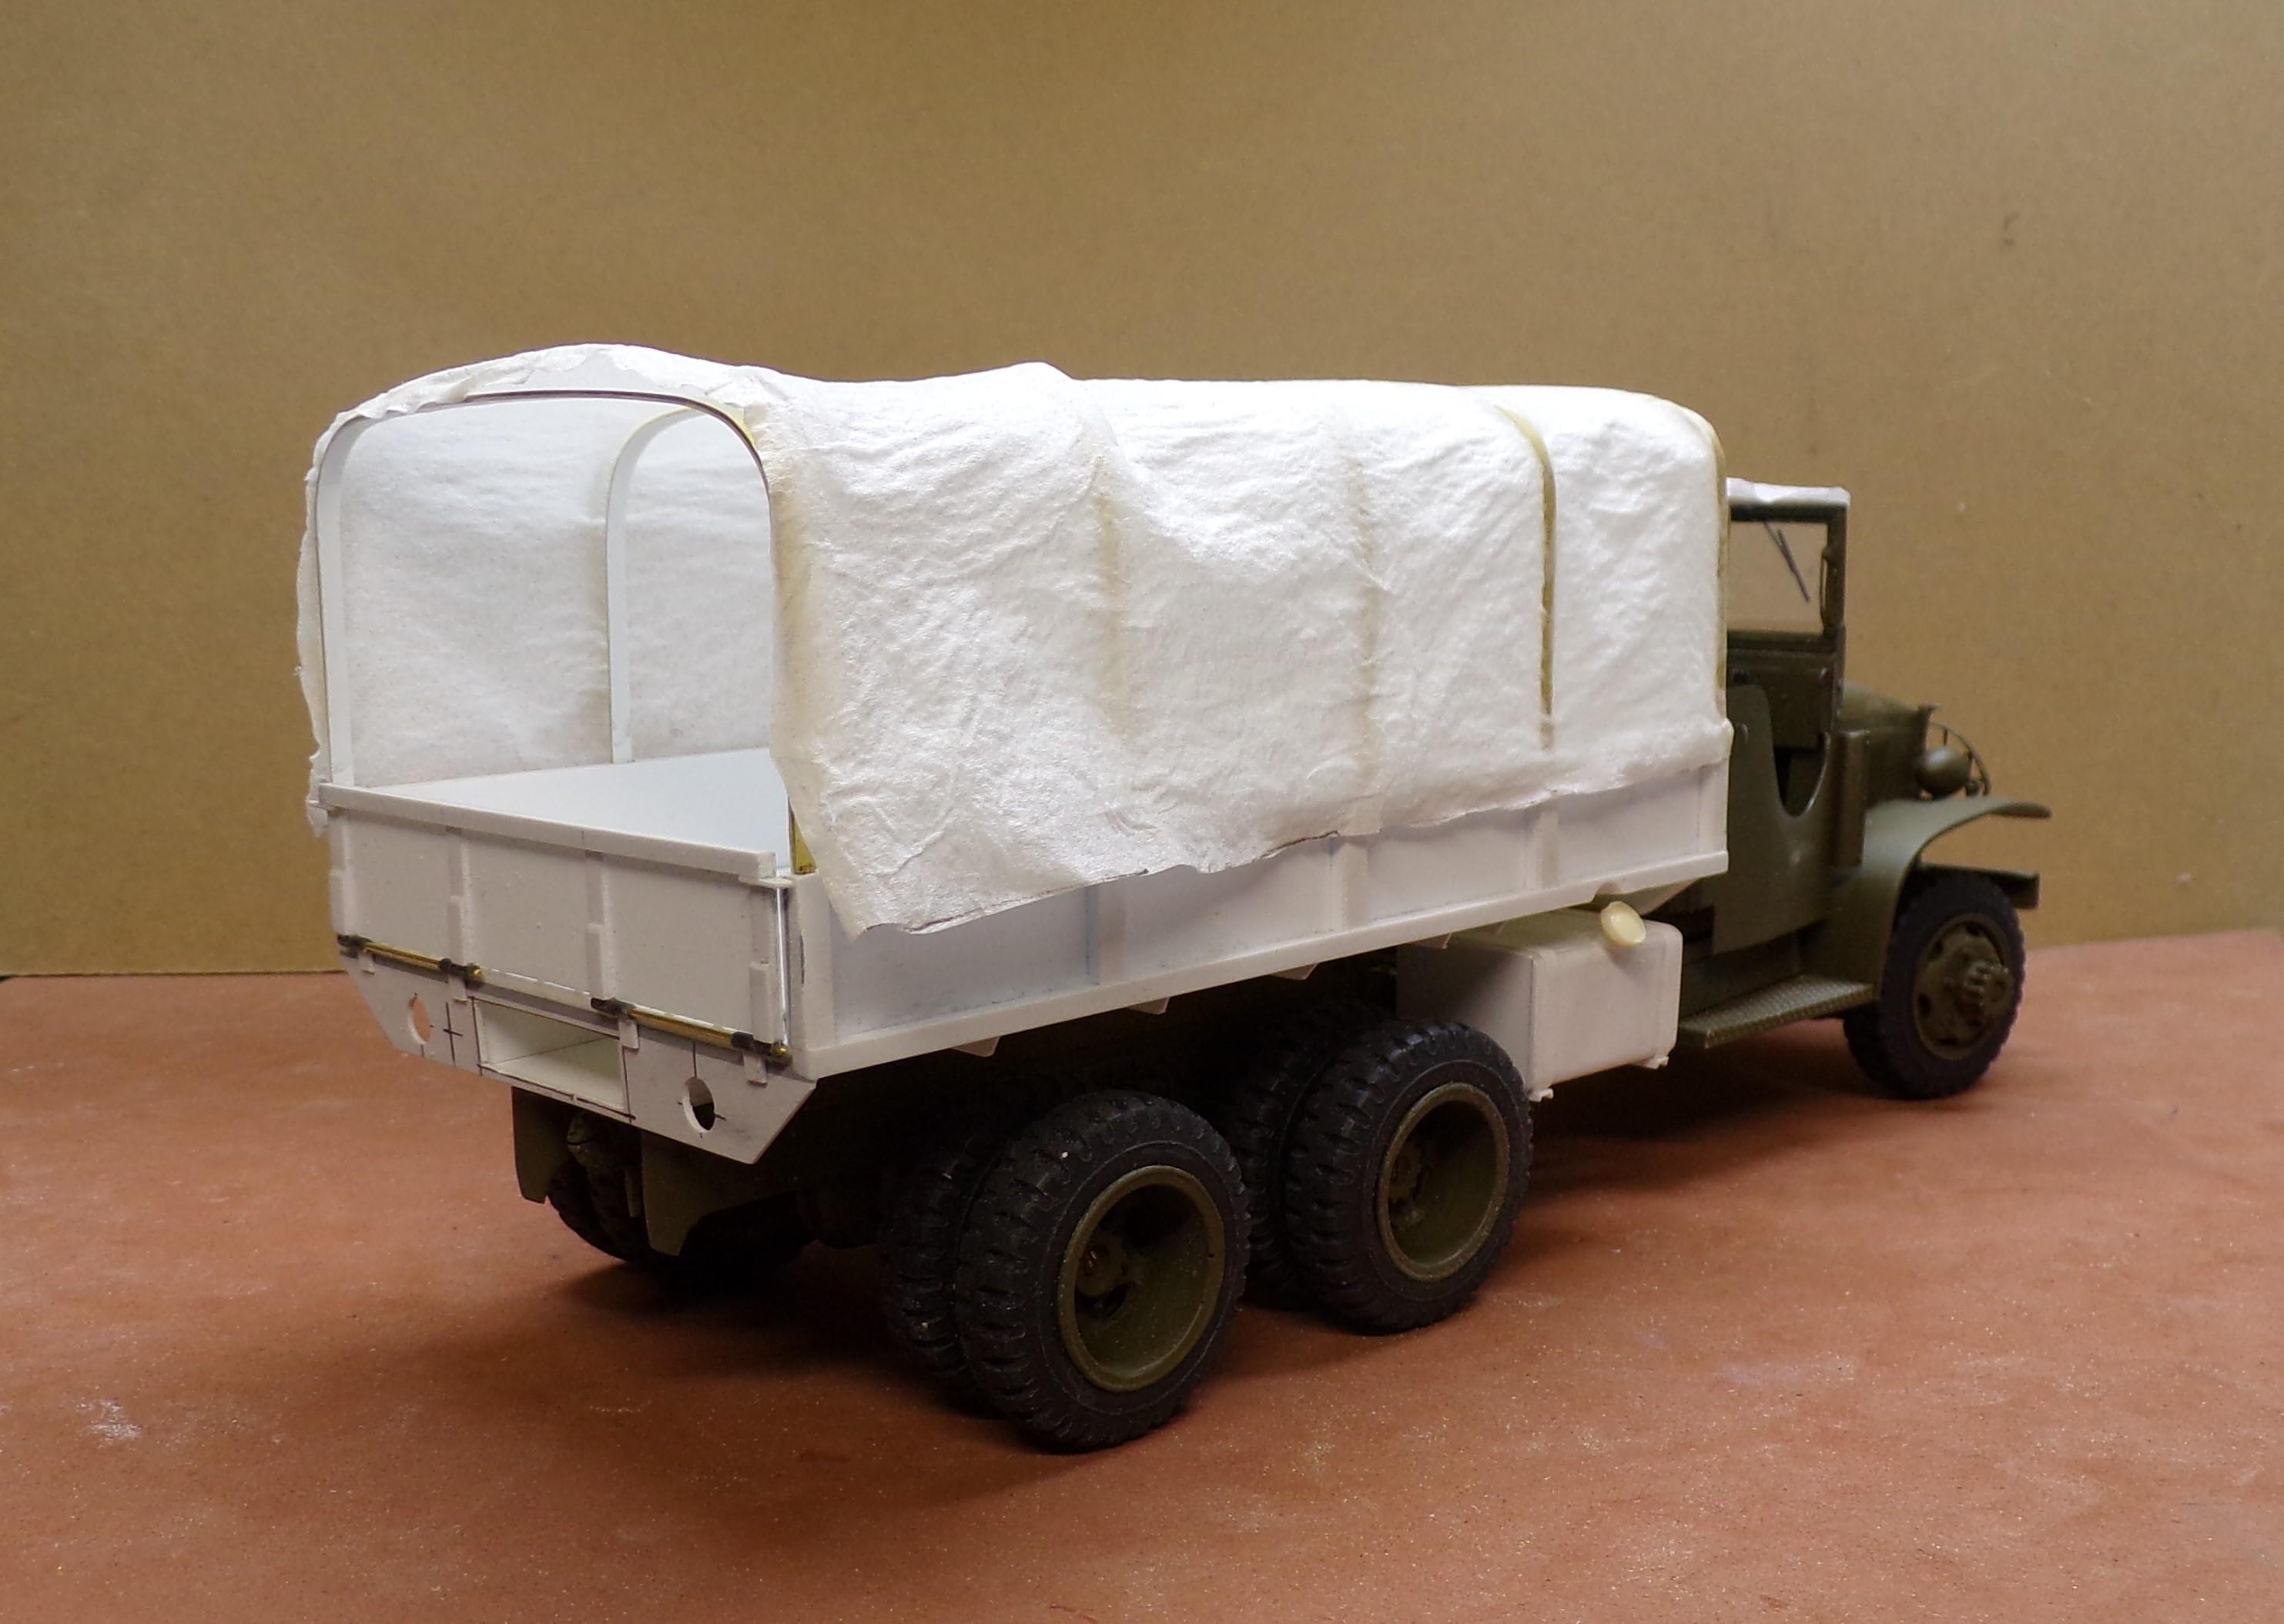
Worked some on the tarp to cover the body and cab. Got some issues to work out with the body tarp like getting it to look like the sewn in cords are pulling the tarp tight front and rear. Don't know quite yet how that will be accomplished. There also needs to be a front and rear piece that is separate from the top. The body is now in good shape with detailing next in order. The gas tank is done and awaiting paint. Things are beginning to come together.
-
Vacuum forming windshield using PETG
Chariots of Fire replied to Len Woodruff's topic in Model Building Questions and Answers
One of the most frustrating things about it, for sure. I wasted more pieces of PETG that I wish to count! -
Vacuum forming windshield using PETG
Chariots of Fire replied to Len Woodruff's topic in Model Building Questions and Answers
I'm going to try the swipes next time to see if that improves the quality of the plastic. I have the same machine as Bill Geary and have had the same trouble with bubbles. I was not aware it was moisture that was causing it. I found if the plastic sheet gets too hot too quickly that is when the bubbles start. I try and put the sheet a little lower than the top setting that is next to the heat source so the plastic melts a bit more slowly. Still not an easy process to get nice clean results. -
Changing Gears
Chariots of Fire replied to J.B. Customs's topic in WIP: Model Trucks: Big Rigs and Heavy Equipment
Here's one that did have the cab extension. A template was made of the side of the C cab and then plastic sheet stock was blended in. It still has the original bulkhead behind the front seat.
-
Changing Gears
Chariots of Fire replied to J.B. Customs's topic in WIP: Model Trucks: Big Rigs and Heavy Equipment
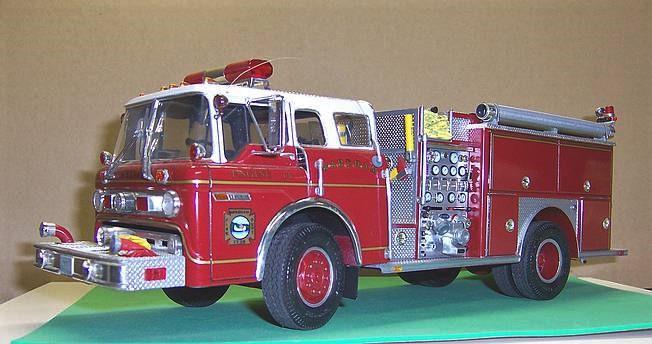
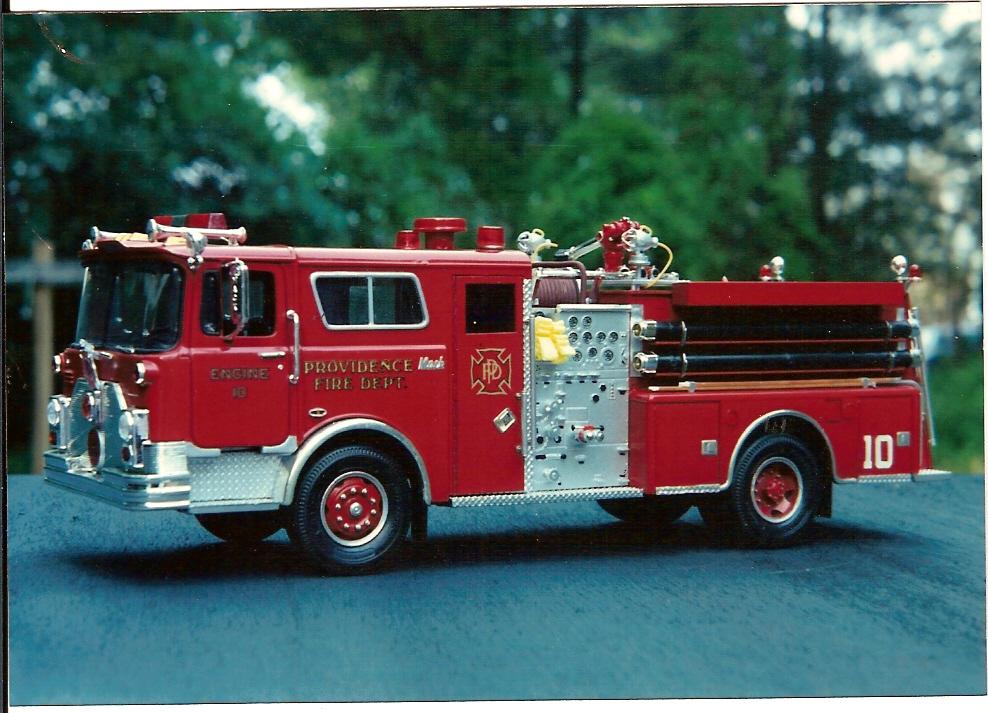
I wish the old Monogram CF Mack snap kits were 1/25 scale but they are not. Anyway, there is a lot of possibility with those kits. With a few adjustments and changes a decent rig can result. Here are some that date back a few years using the Monogram kits. R model Mack linked with the CF body. Two CF cabs and three CF bodies make this rear mount aerial. Closed cab CF in Providence, RI livery. Standard CF just gussied up a bit.
-
CCKW
Chariots of Fire replied to Chariots of Fire's topic in WIP: Model Trucks: Big Rigs and Heavy Equipment
Been doing some body work. The floor is a resin casting of a wood floor. During the latter stages of WW II the bodies were a combination of steel and wood, the all steel or all wood bodies having been done away with in the newest construction. The canvas top ribs are strip brass with the last three being stiffened up with some plastic strip stock. I ran out of 1/32 x 3/32 strip stock and wanted to get the ribs done. Once painted and under canvas, no one will be the wiser. The tailgate is finished with the exception of the brackets and chains to lock it in the closed position. A door has to be made for the tool box in the center rear. The fuel tank and battery box need to be made for the right side of the chassis just back of the cab.
-
Changing Gears
Chariots of Fire replied to J.B. Customs's topic in WIP: Model Trucks: Big Rigs and Heavy Equipment
Here's a look at how to save on the amount of elastic used to create a full hose load. First build a box of card stock or plastic stock that fills most of the hose bed. Leave enough of the sides showing something like in the photo below. Cut small lengths of sewing elastic, glue and double them over to look like the ends of the folded hose. That's a 1/32 scale Monogram fire body in the photo and I'm using 1/8" elastic that has been stained to look like cotton jacket hose. When the short sections fill the back of the bed even with the box, begin to lay full sections of elastic over the whole thing in a couple of layers. I'd advise painting the top of the box the same color as the elastic so that the white doesn't show through. You'll notice that there are brass couplings on the hose. They are made using brass tubing with the grooves made with an SK tubing cutter. When the bed is full it will look something like this. This is a different rig than the Monogram Mack but the same principle was used to create a full hose load. The LDH is 3M tape folded in 3rd's to simulate synthetic hose. There is also some sewing piping used for the red hose. Don't forget to dirty it up a bit. Even when cleaned, the hose will retain some of the black staining and dirt left from operating in a fire situation.
-
You might want to check on the overall size and heaviness of the materials. A lighter design would (IMHO) make it look like it fits the truck better.?
-
Changing Gears
Chariots of Fire replied to J.B. Customs's topic in WIP: Model Trucks: Big Rigs and Heavy Equipment
Those are all great suggestions. Don't forget those little vents right behind the door handles. They can be made using a fine black marker. Also use 1/8" sewing elastic for the cross lays and 1/4" sewing elastic for the 2-1/2" supply and heavy working lines in the hose bed. I'll post a tutorial on how to make the interior of the hose bed that will save a lot of that sewing elastic. -
Now that's a method I would not have guessed! Looks like it is really going to work well!
-
Hi, Paul. Is the pencil sketch of the wrecker boom to the scale you intend?