Anglia105E
-
Posts
3,487 -
Joined
-
Last visited
Content Type
Profiles
Forums
Events
Gallery
Everything posted by Anglia105E
-

The current Otto Ray Sing Classic Car Center
Anglia105E replied to The Modeling Hermit's topic in Dioramas
Lots of interesting detail, Douglas........ This is an excellent diorama that you have created, and it all works so well. Nicely planned and laid out. David -
Minicraft Models Discontinued?
Anglia105E replied to Anglia105E's topic in Welcome! Introduce Yourself
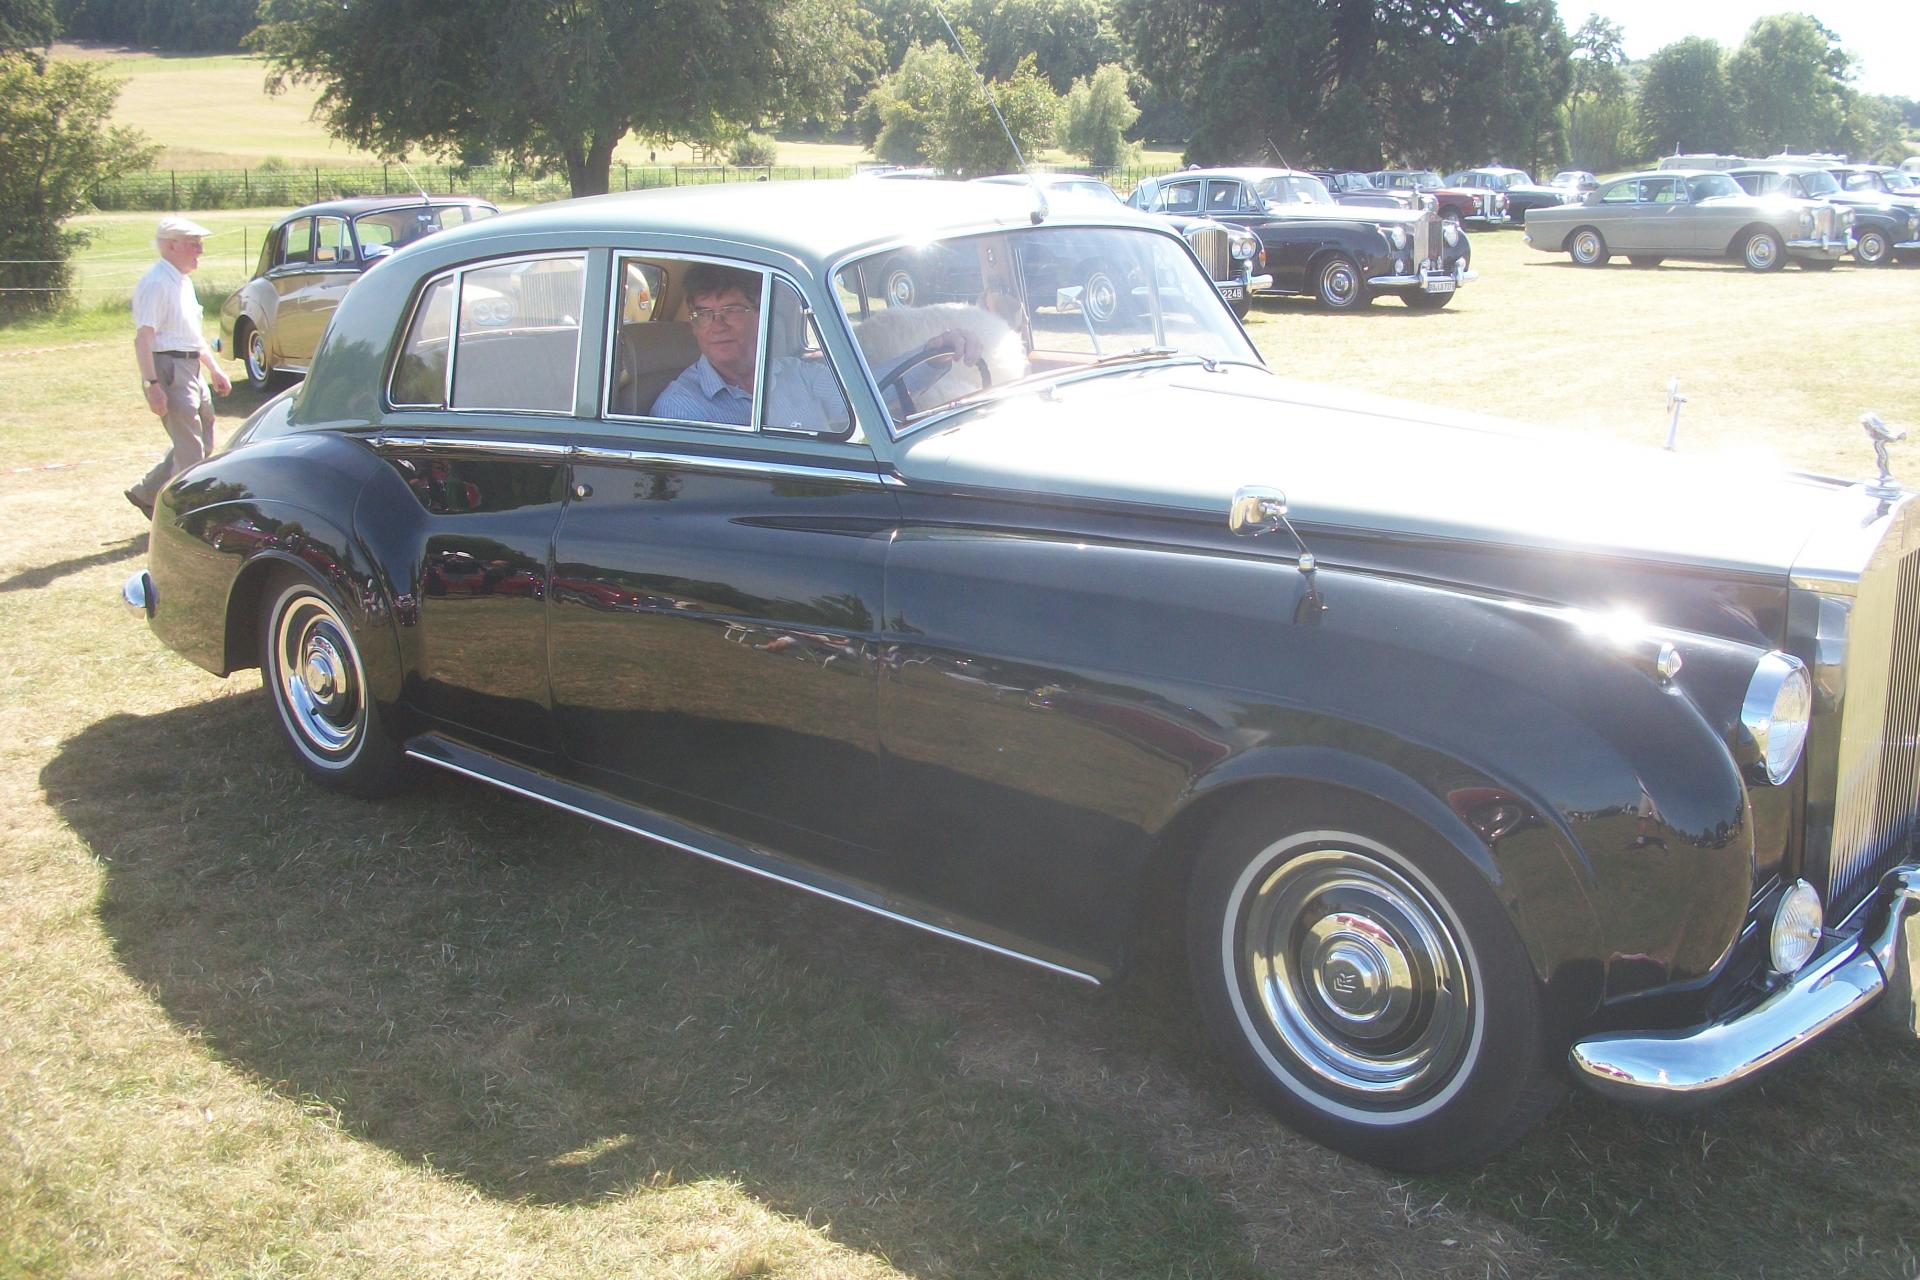
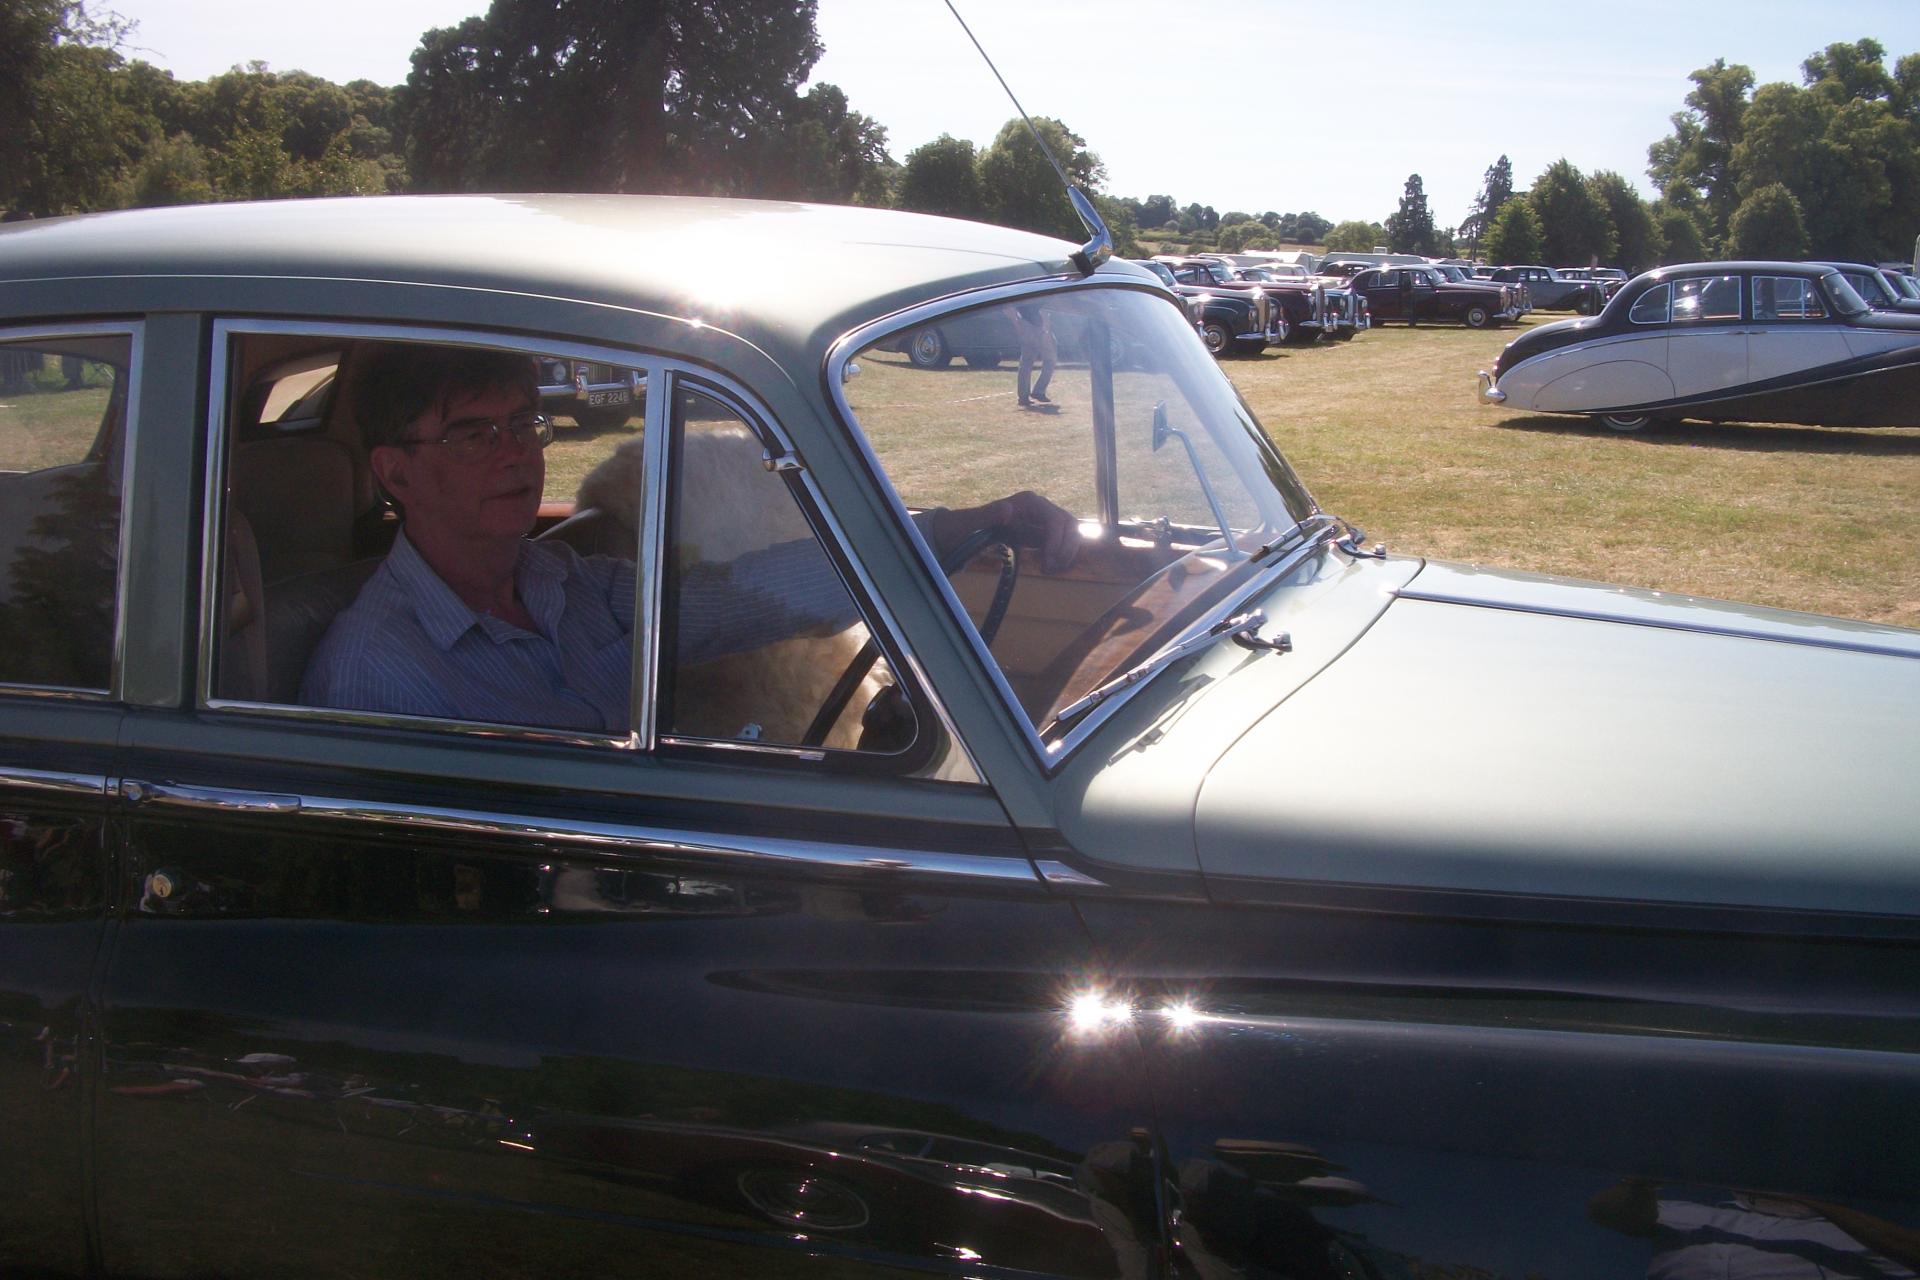
Well Charles, what perfect timing....... Following a period of 4 years, during which I have built many Rolls-Royce Silver Cloud's and lots of other model cars. I have just today decided to build another Silver Cloud...... How strange that I should receive your post on this forum ! In order to build this car I need to go through all the boxes in my loft / workshop, and dig out any Minicraft and Revell kits that contain all the parts needed. As well as the two bonnet panels that I shall be using, I am happy to send you one of these parts in the post, if this would help you out ? At the moment, I have a Silver Cloud bodyshell on my bench, as well as the chassis, and these are ready for spray primer. I just need to find the bonnet panels and the boot lid before the primer stage. Way back in 2017, there was a guy in Canada whose business is called Full Circle Hobbies, and he sent me a box of kits which included several Silver Cloud kits by Minicraft, and also several Phantom II kits by Italeri. The box arrived by sea, and took 2 months to reach England ! The reason that I feel the need to build another version of this wonderful motor car is that I did have one for each year of production, so 1955, 1956, 1957, 1958 and 1959...... but I sold the 1957 model car to a gentleman who owns the real Silver Cloud, and in return he very kindly allowed me to drive his car. So the plan is, to build NDP 600 ( chassis number SDD 312 ), only this time I can do a much better job, thanks to 4 years experience of model building and painting. The car is finished in Sage Green over Velvet Green, and I am sure that I can produce a much higher quality paint finish this time around. Also very strange, is that the model company in Canada is called ' Full Circle Hobbies ' and in fact I have come ' Full Circle ' to build what was the first model car that I had built in 50 years ! From being being a boy of 13 years of age, until the ripe old age of 63, I did not build any model cars. I see on the Full Circle website that the guy has no stock of either the Silver Cloud or the Phantom II kits, and here is the link for you.... https://www.fullcirclehobbies.com/products/minicraft-1-24-1962-rolls-royce-silver-cloud-2 So, before I ramble on any further....... if you can PM me your postal address, Charles, I can send off the bonnet part in the post by Royal Mail...... and I understand it is the right hand side panel as you look from the front of the model, which is the left-hand or nearside panel as we say in England...... most of my Silver Cloud models have been converted from LHD to RHD, apart from two cars that are LHD. Photos attached as follows. David
-
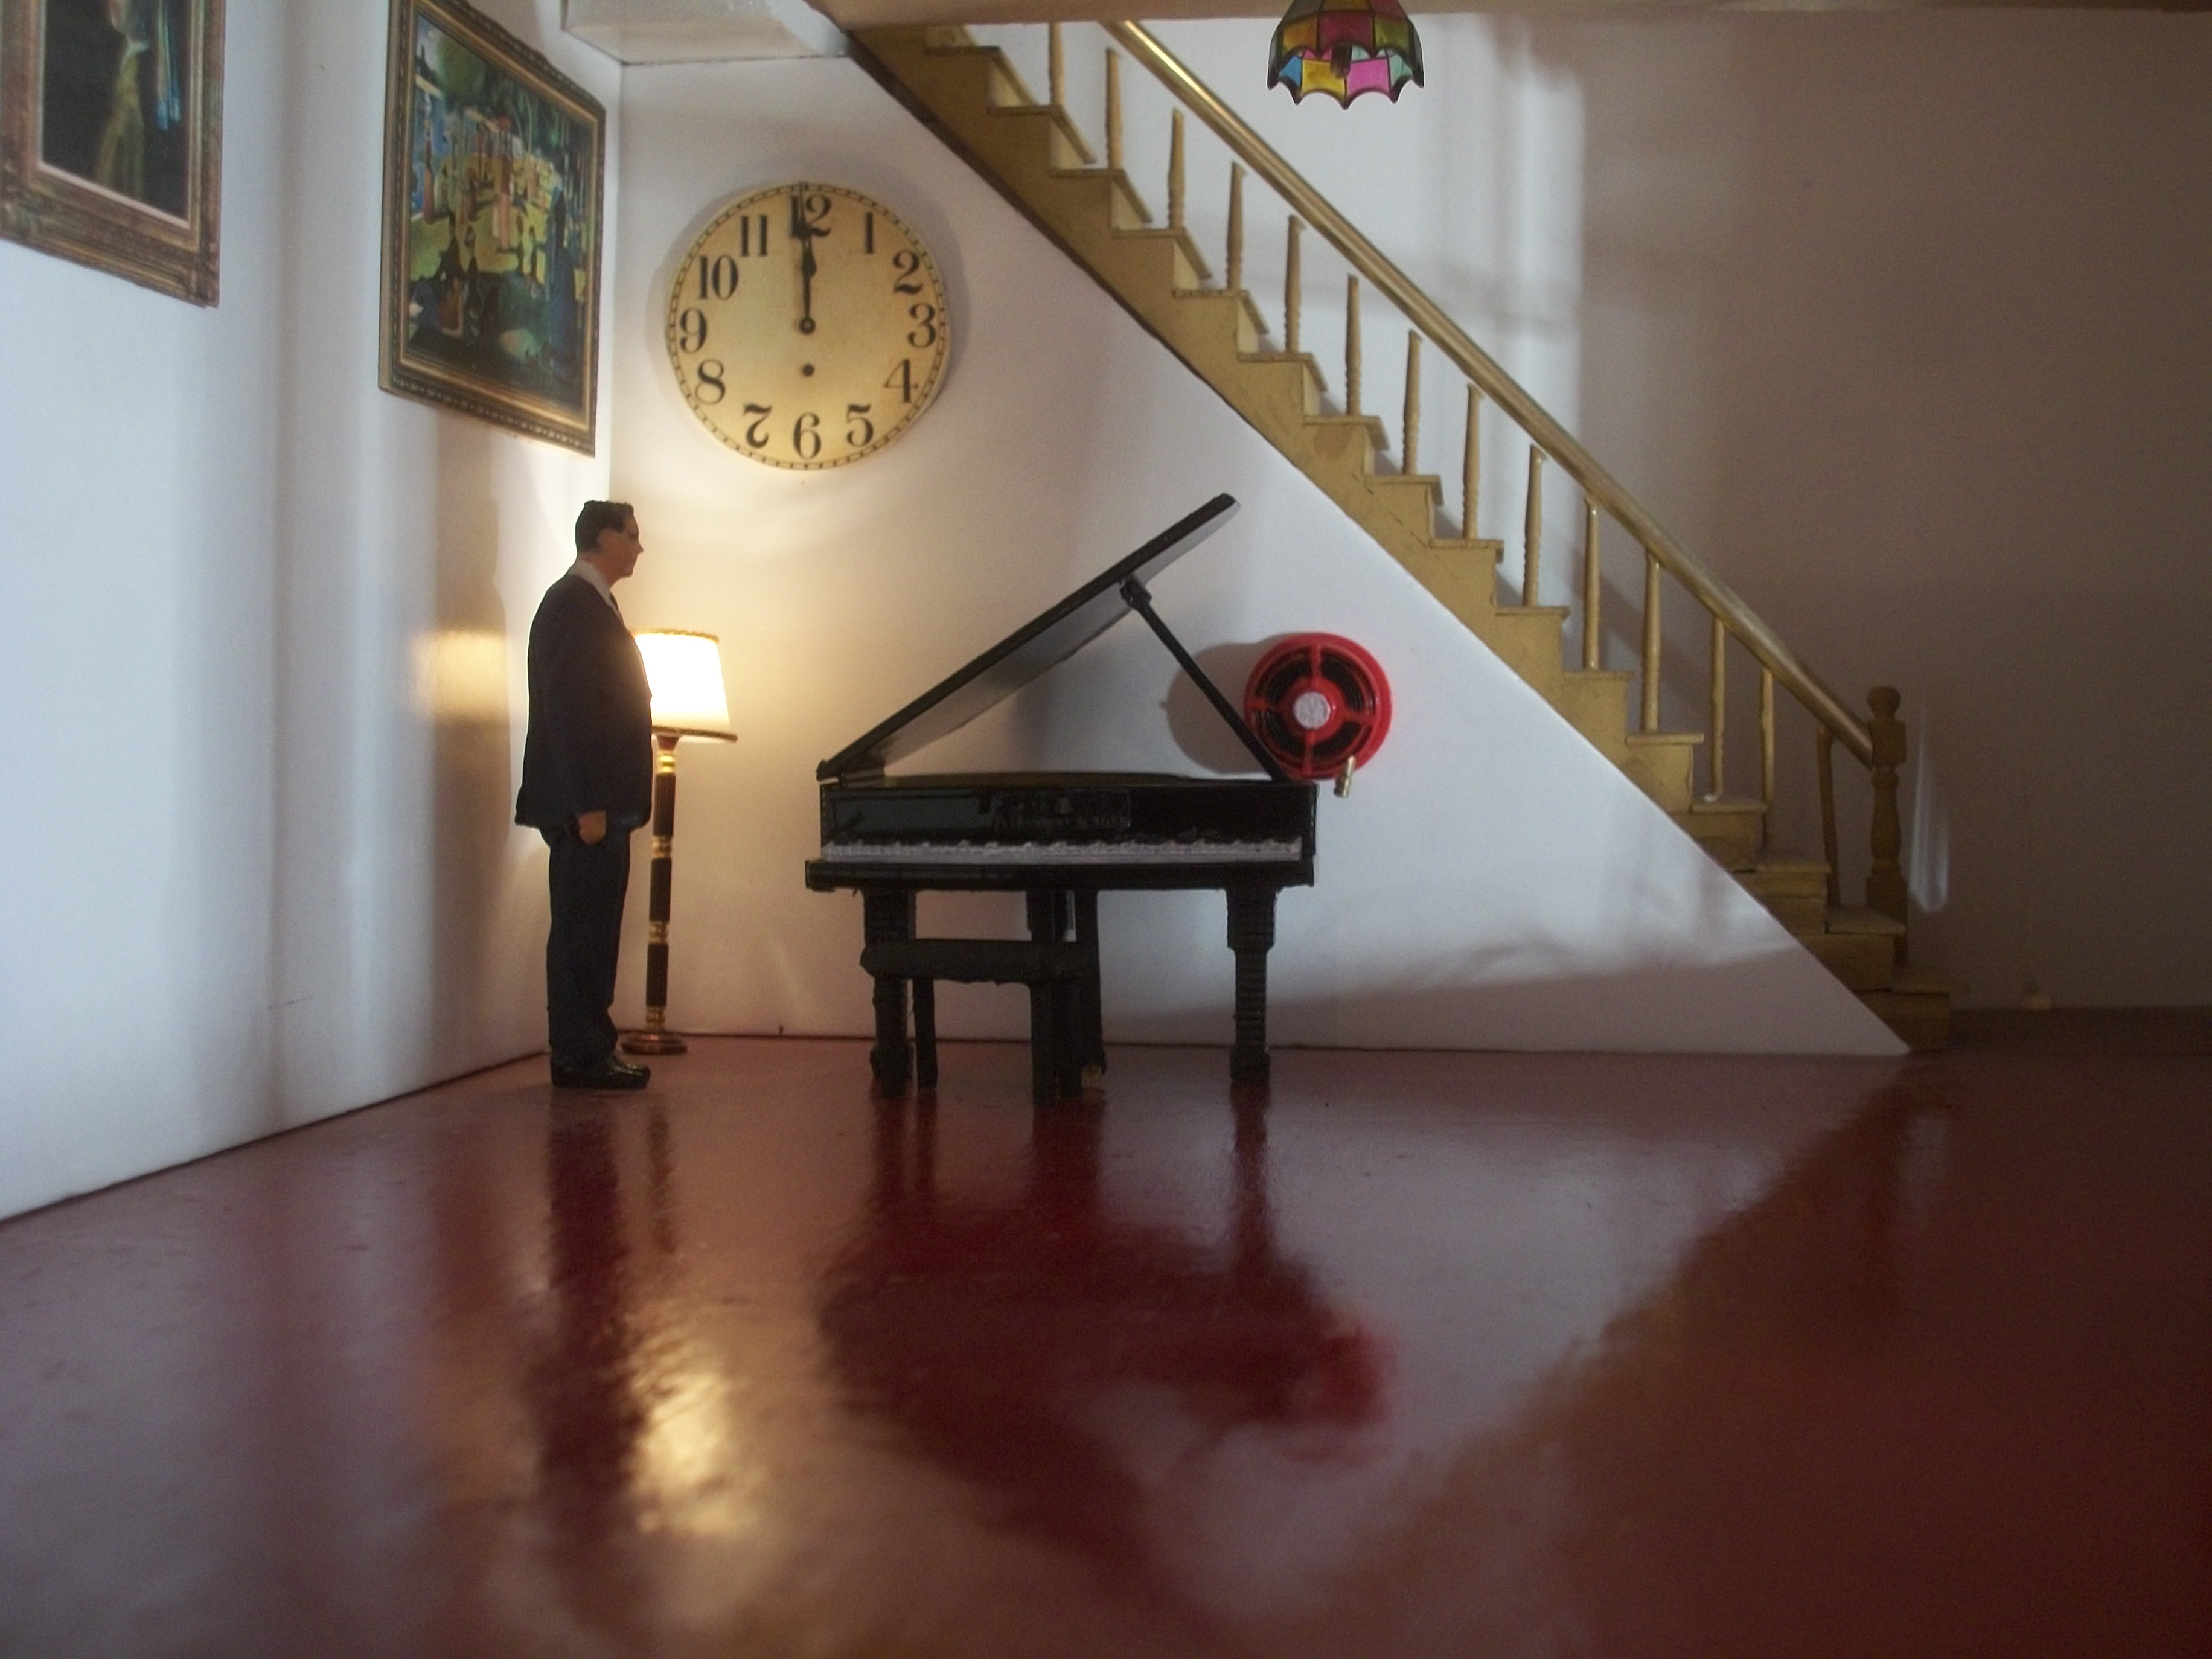
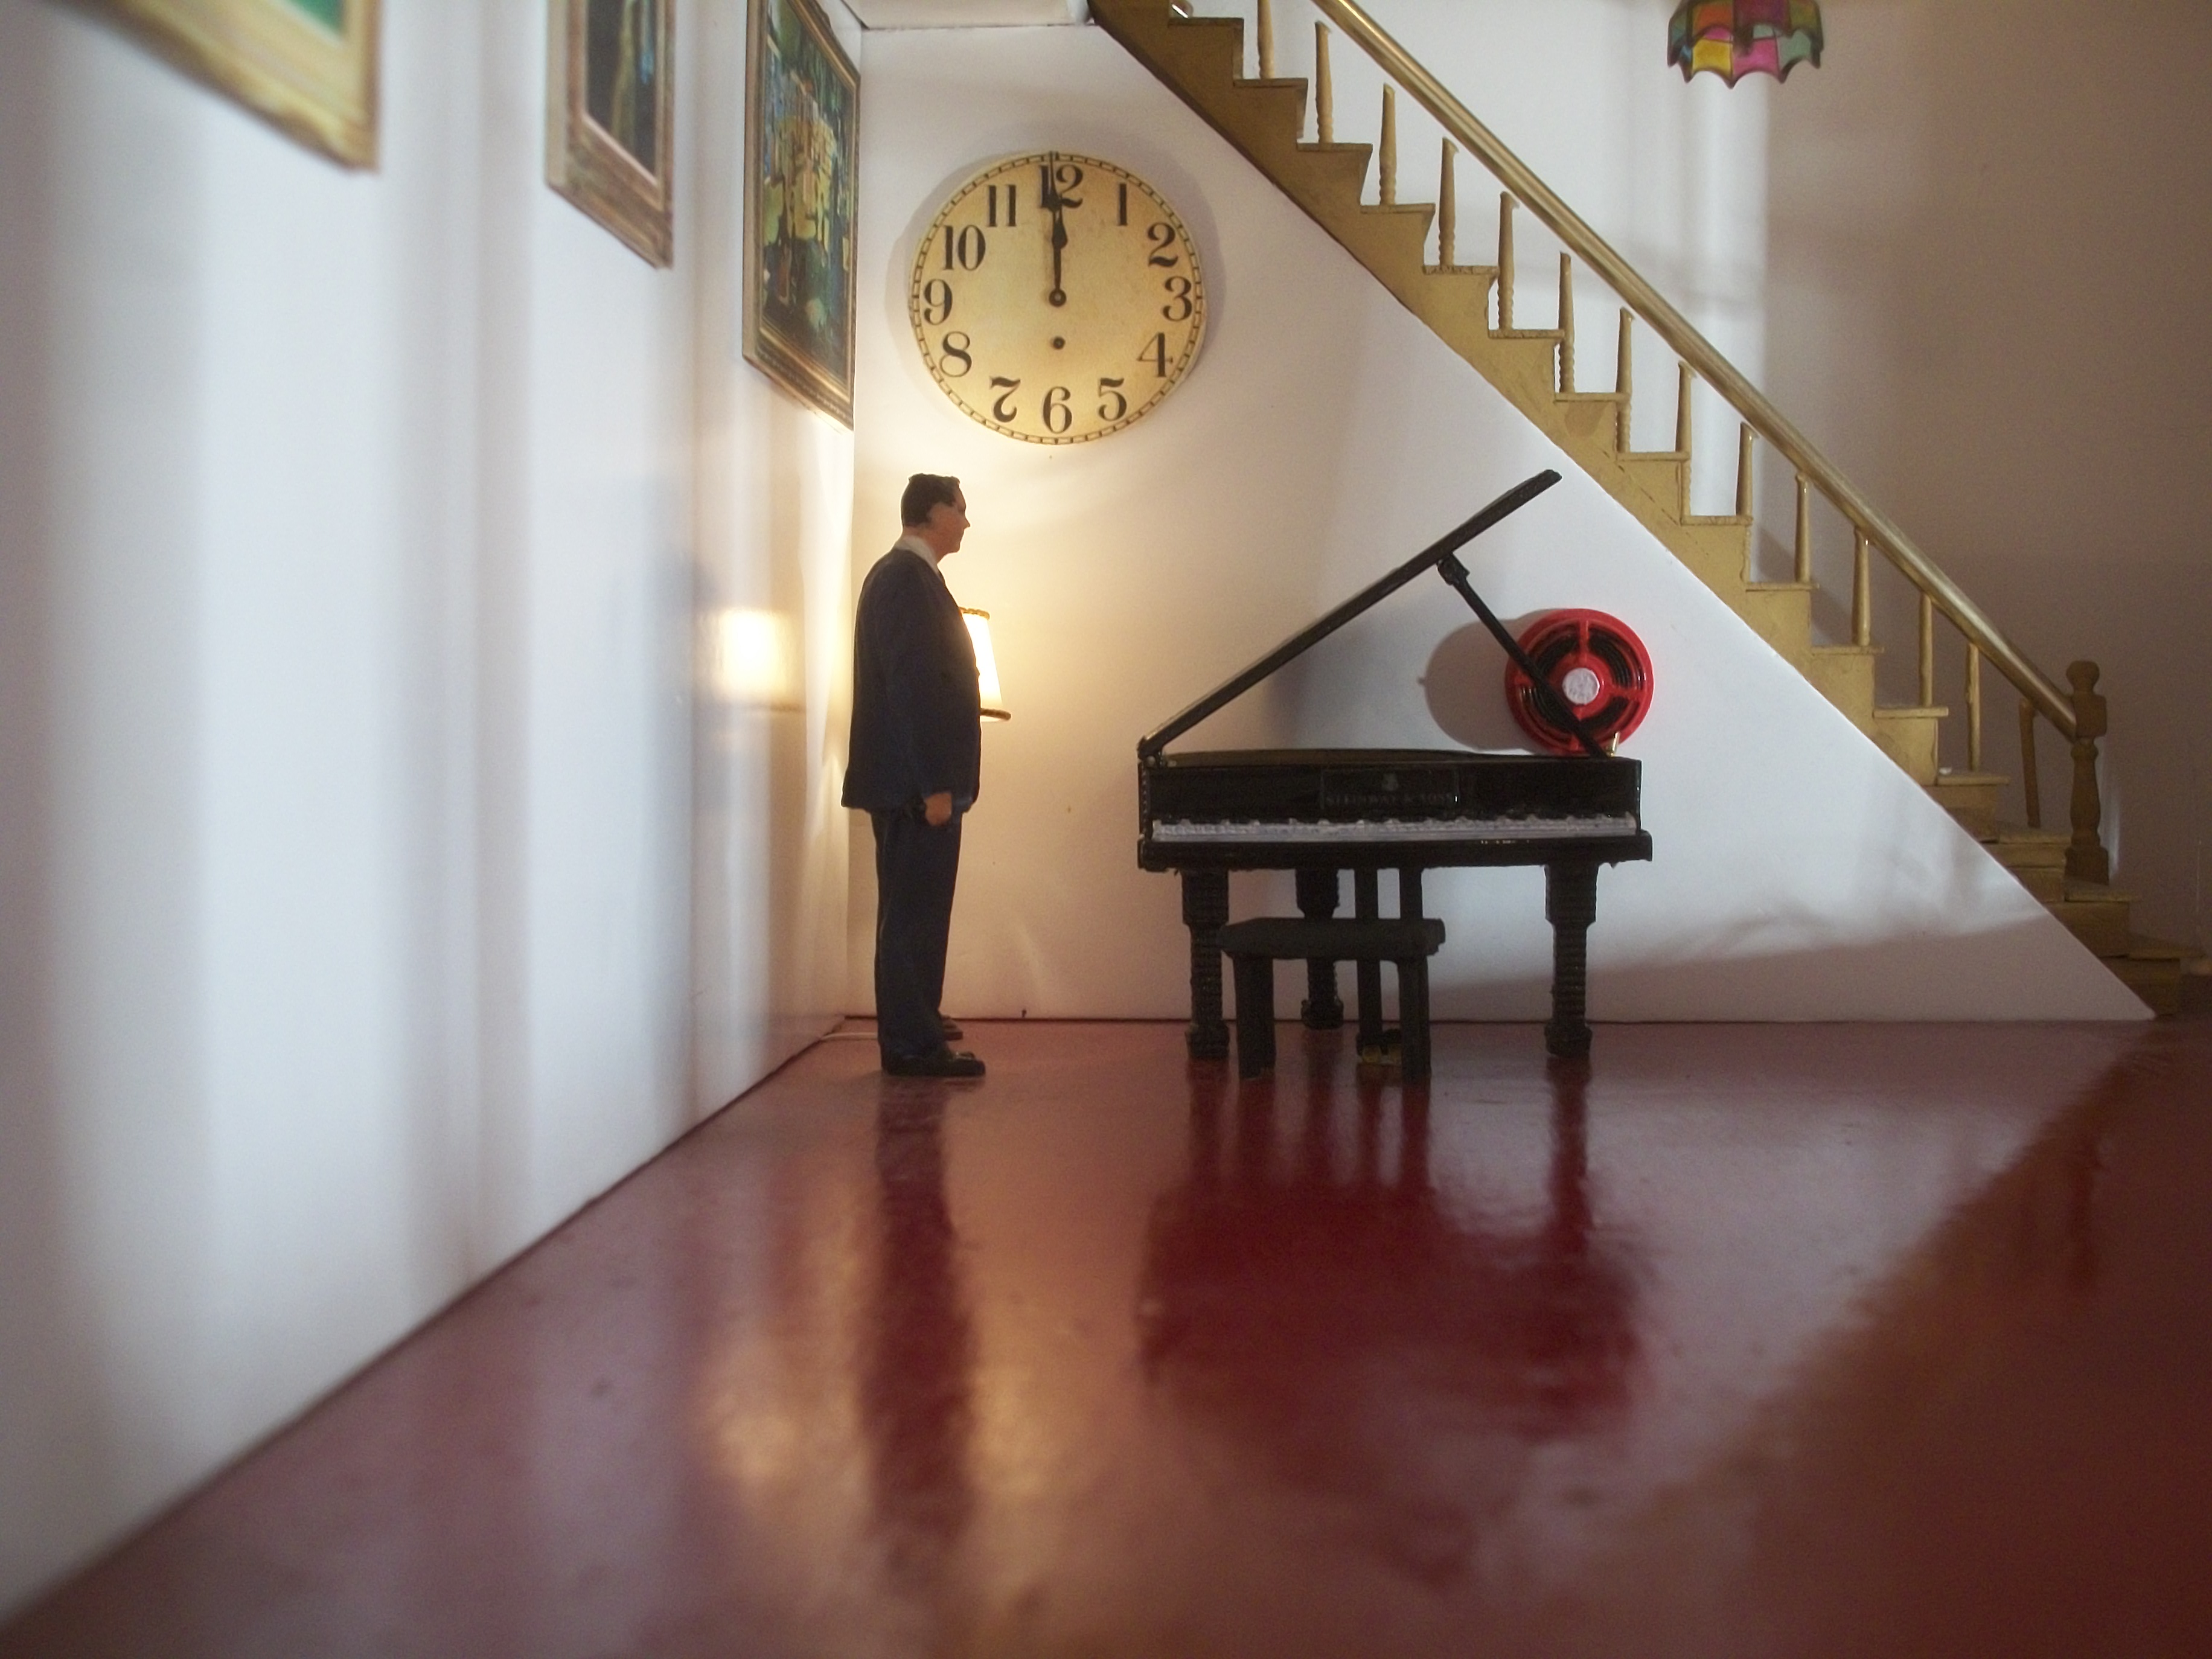
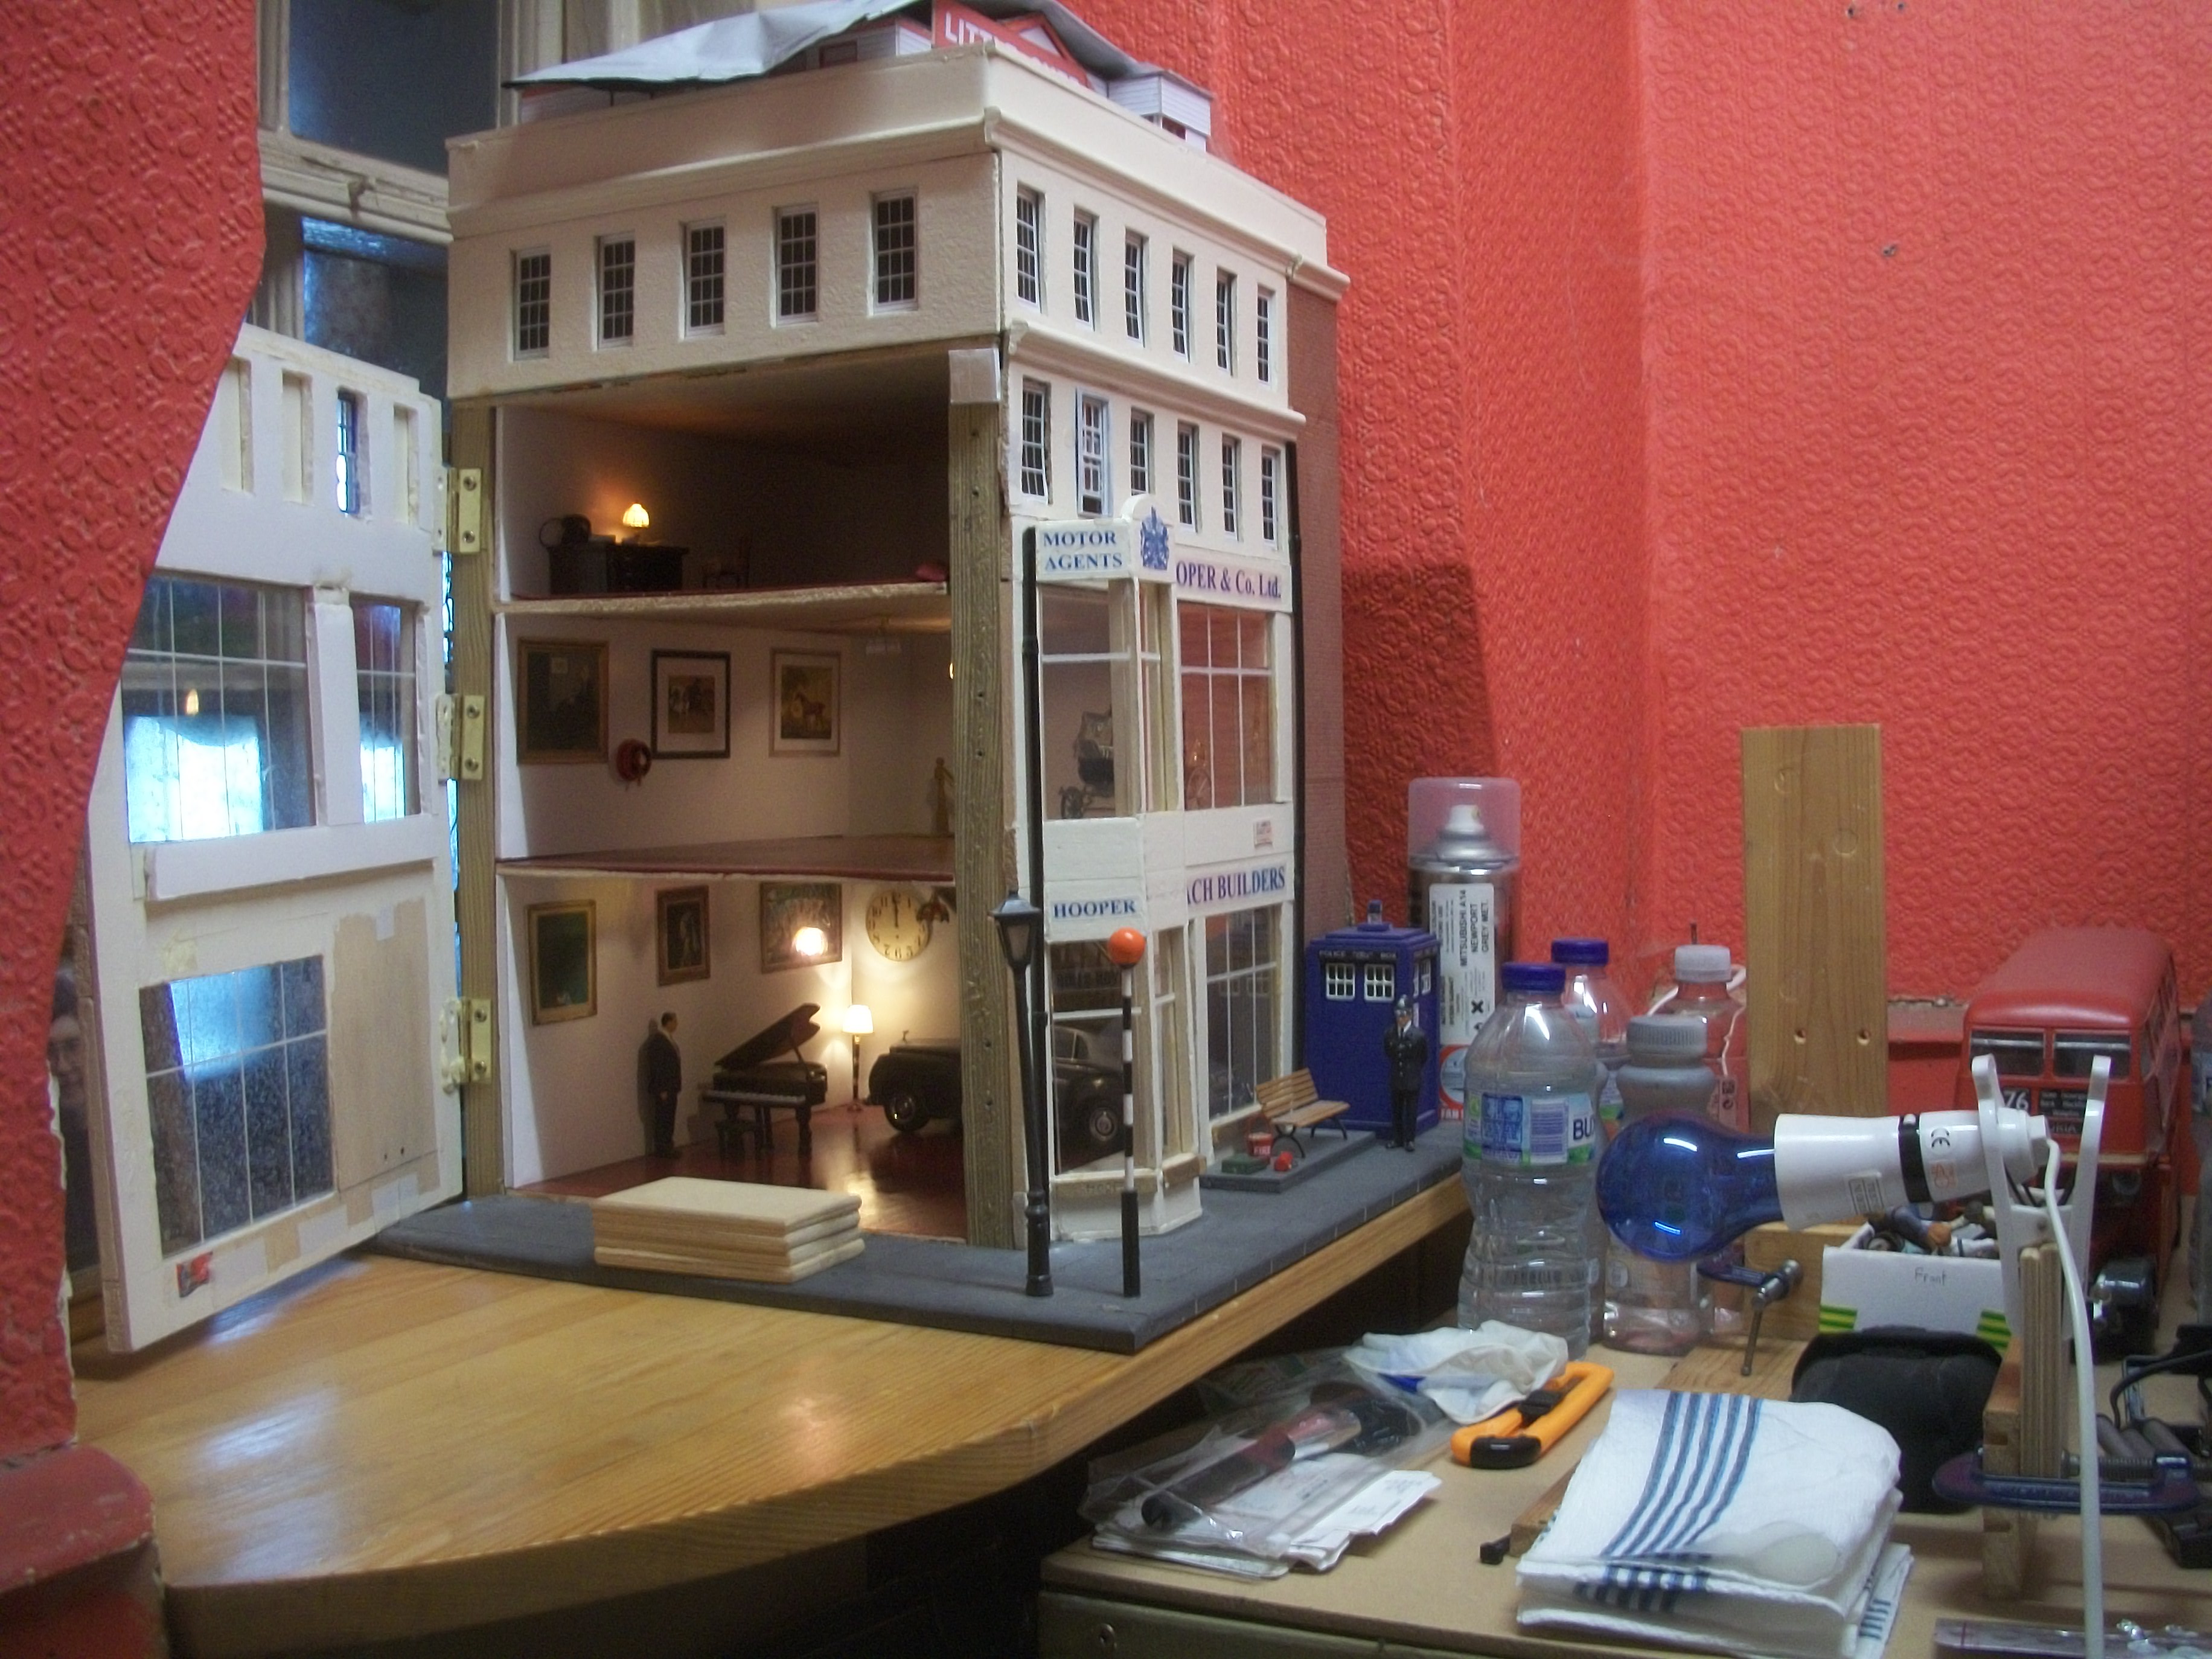
The Steinway & Sons grand piano has been delivered to Hooper & Co. this morning, and Osmond Rivers as the manager is casting an appreciative eye over this fine instrument. He is deciding where to place the piano, in relation to the Rolls-Royce cars that will occupy the floor space of the ground floor showroom. David
-
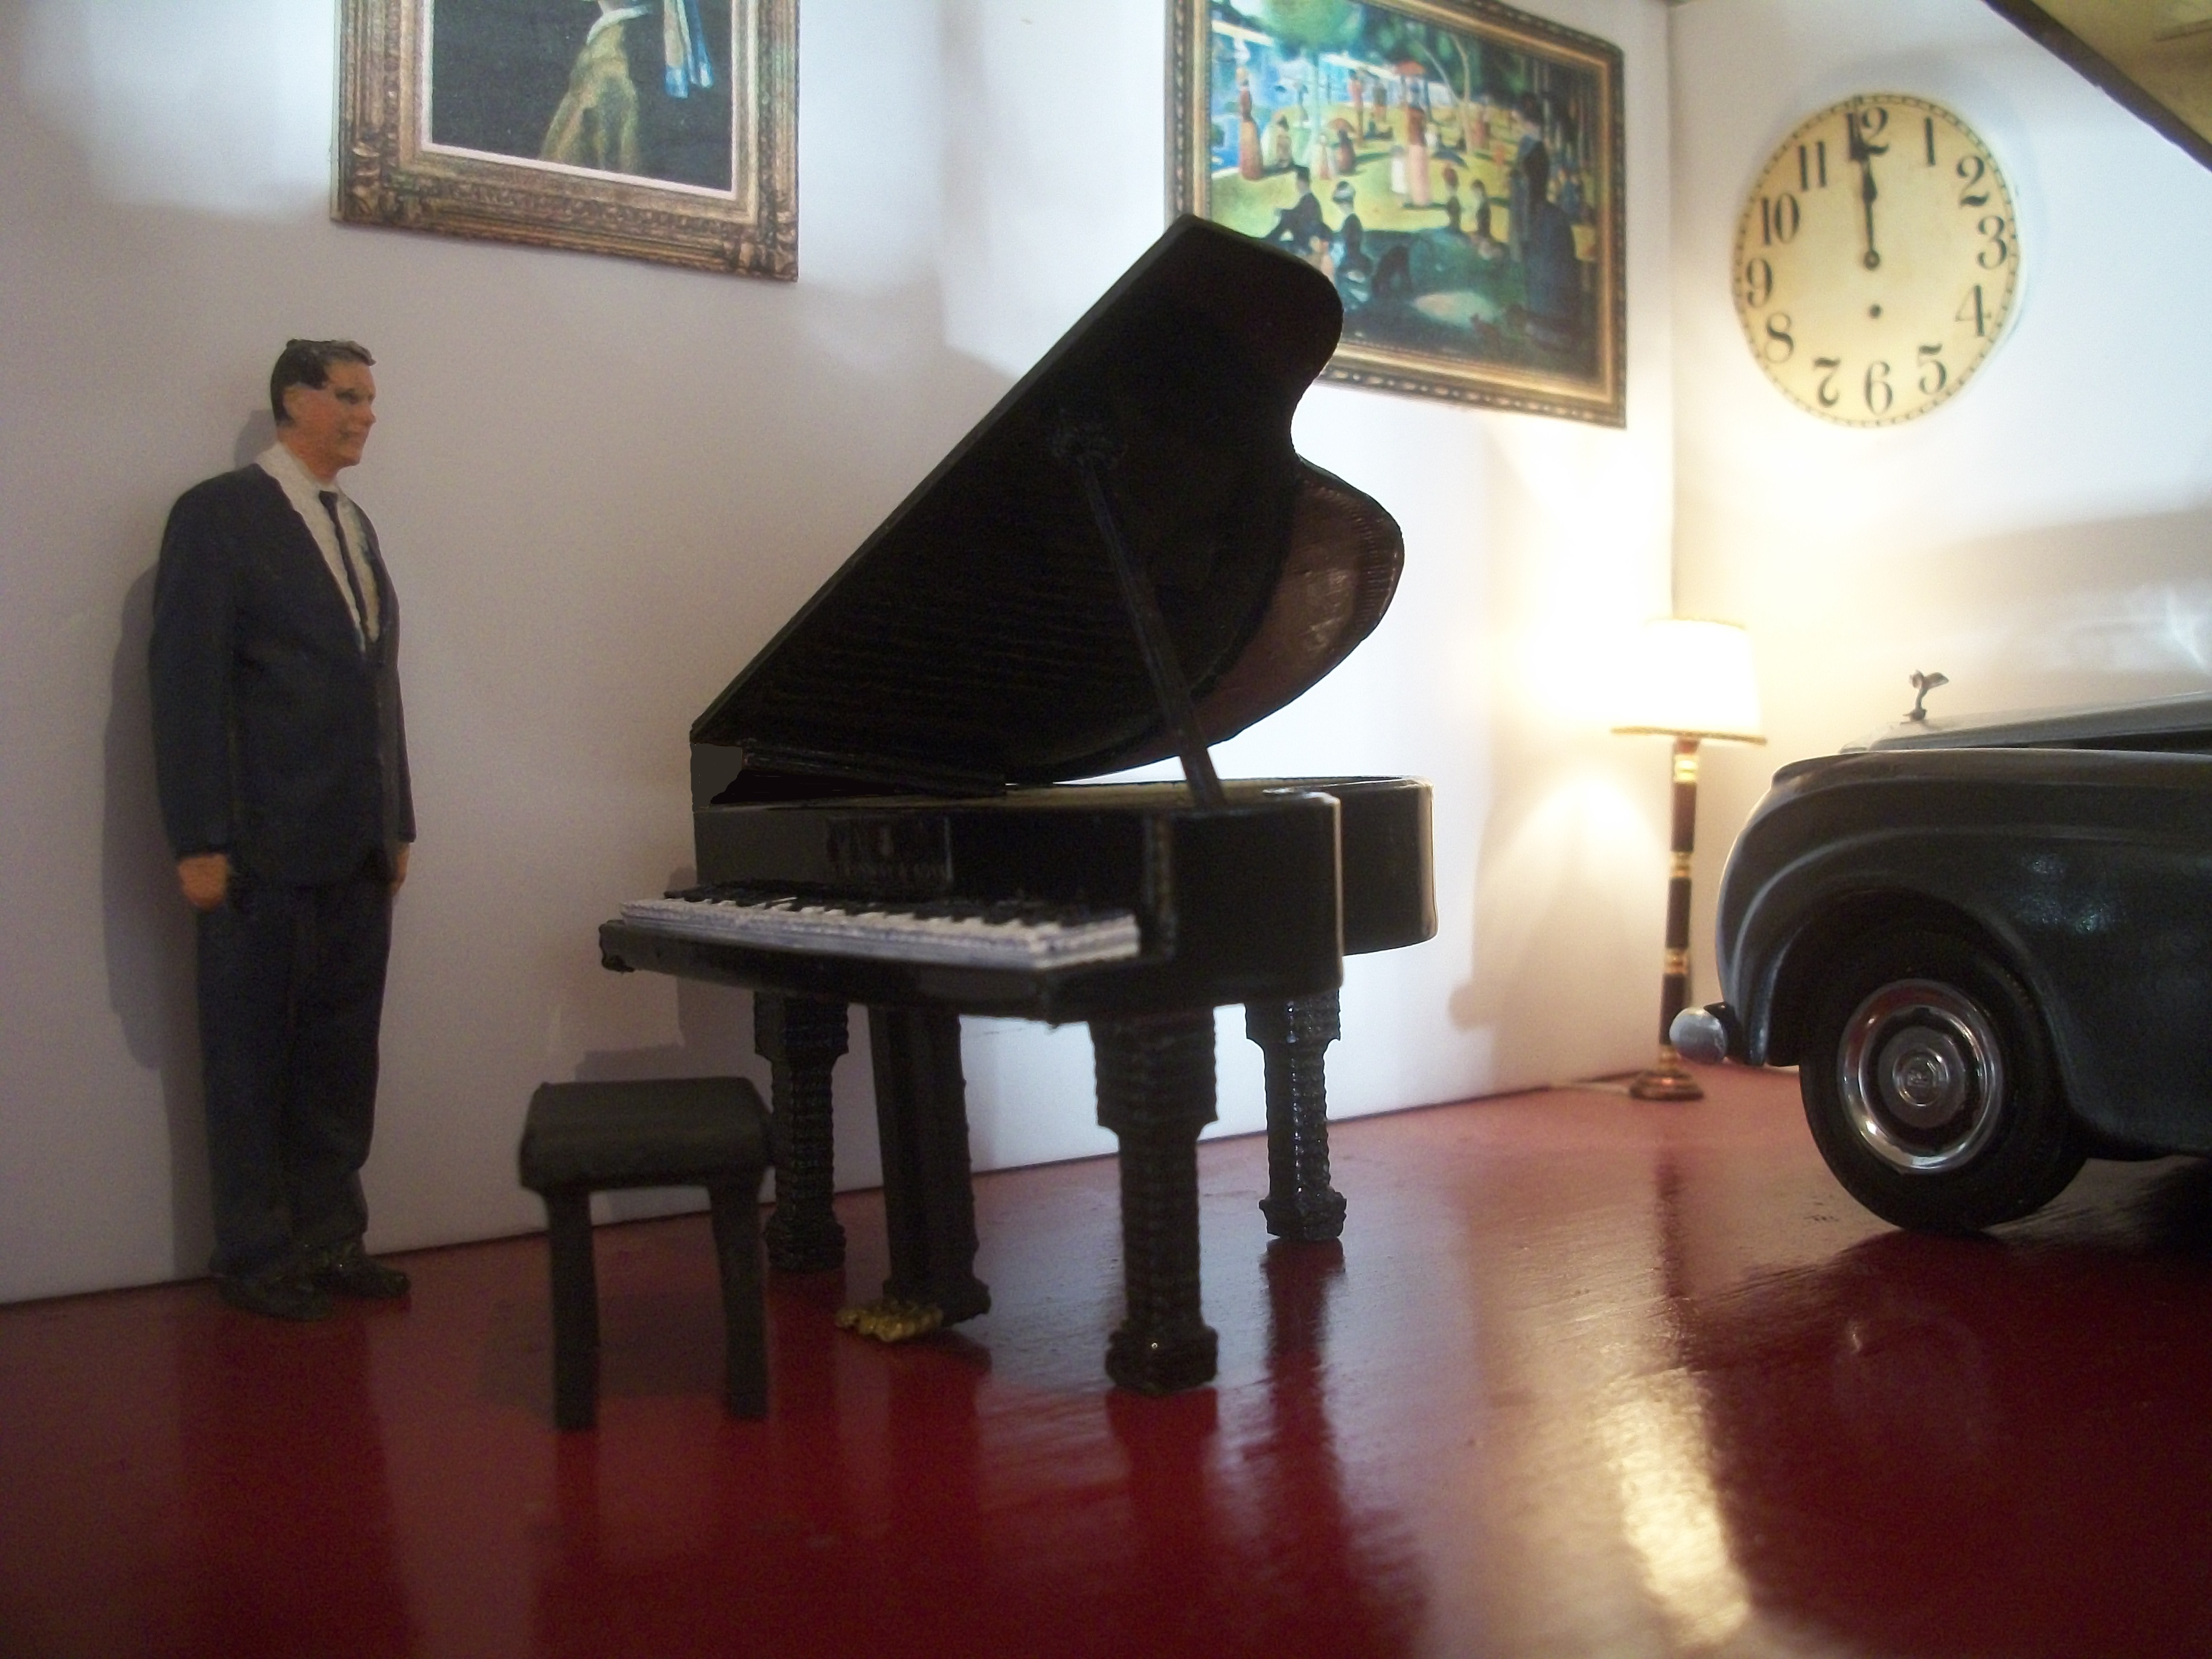
Here are a few attached photos of the 1:24 scale grand piano that I have just finished building. Some of the parts are 3D printed, while some parts are made from sheet styrene, and bits of wood. Mainly spray painted from aerosols, with some brush painting also. I used orange automotive filler primer spray, with a topcoat of Halfords gloss black enamel. The piano body has a final coating of yacht varnish to give it that high gloss shine. I printed the gold lettering for the ' STEINWAY & SONS ' just above the keyboard, after scaling down to size. Covered the piano stool seat with real leather and painted it with Vallejo black acrylic, once it was glued in place. David
-
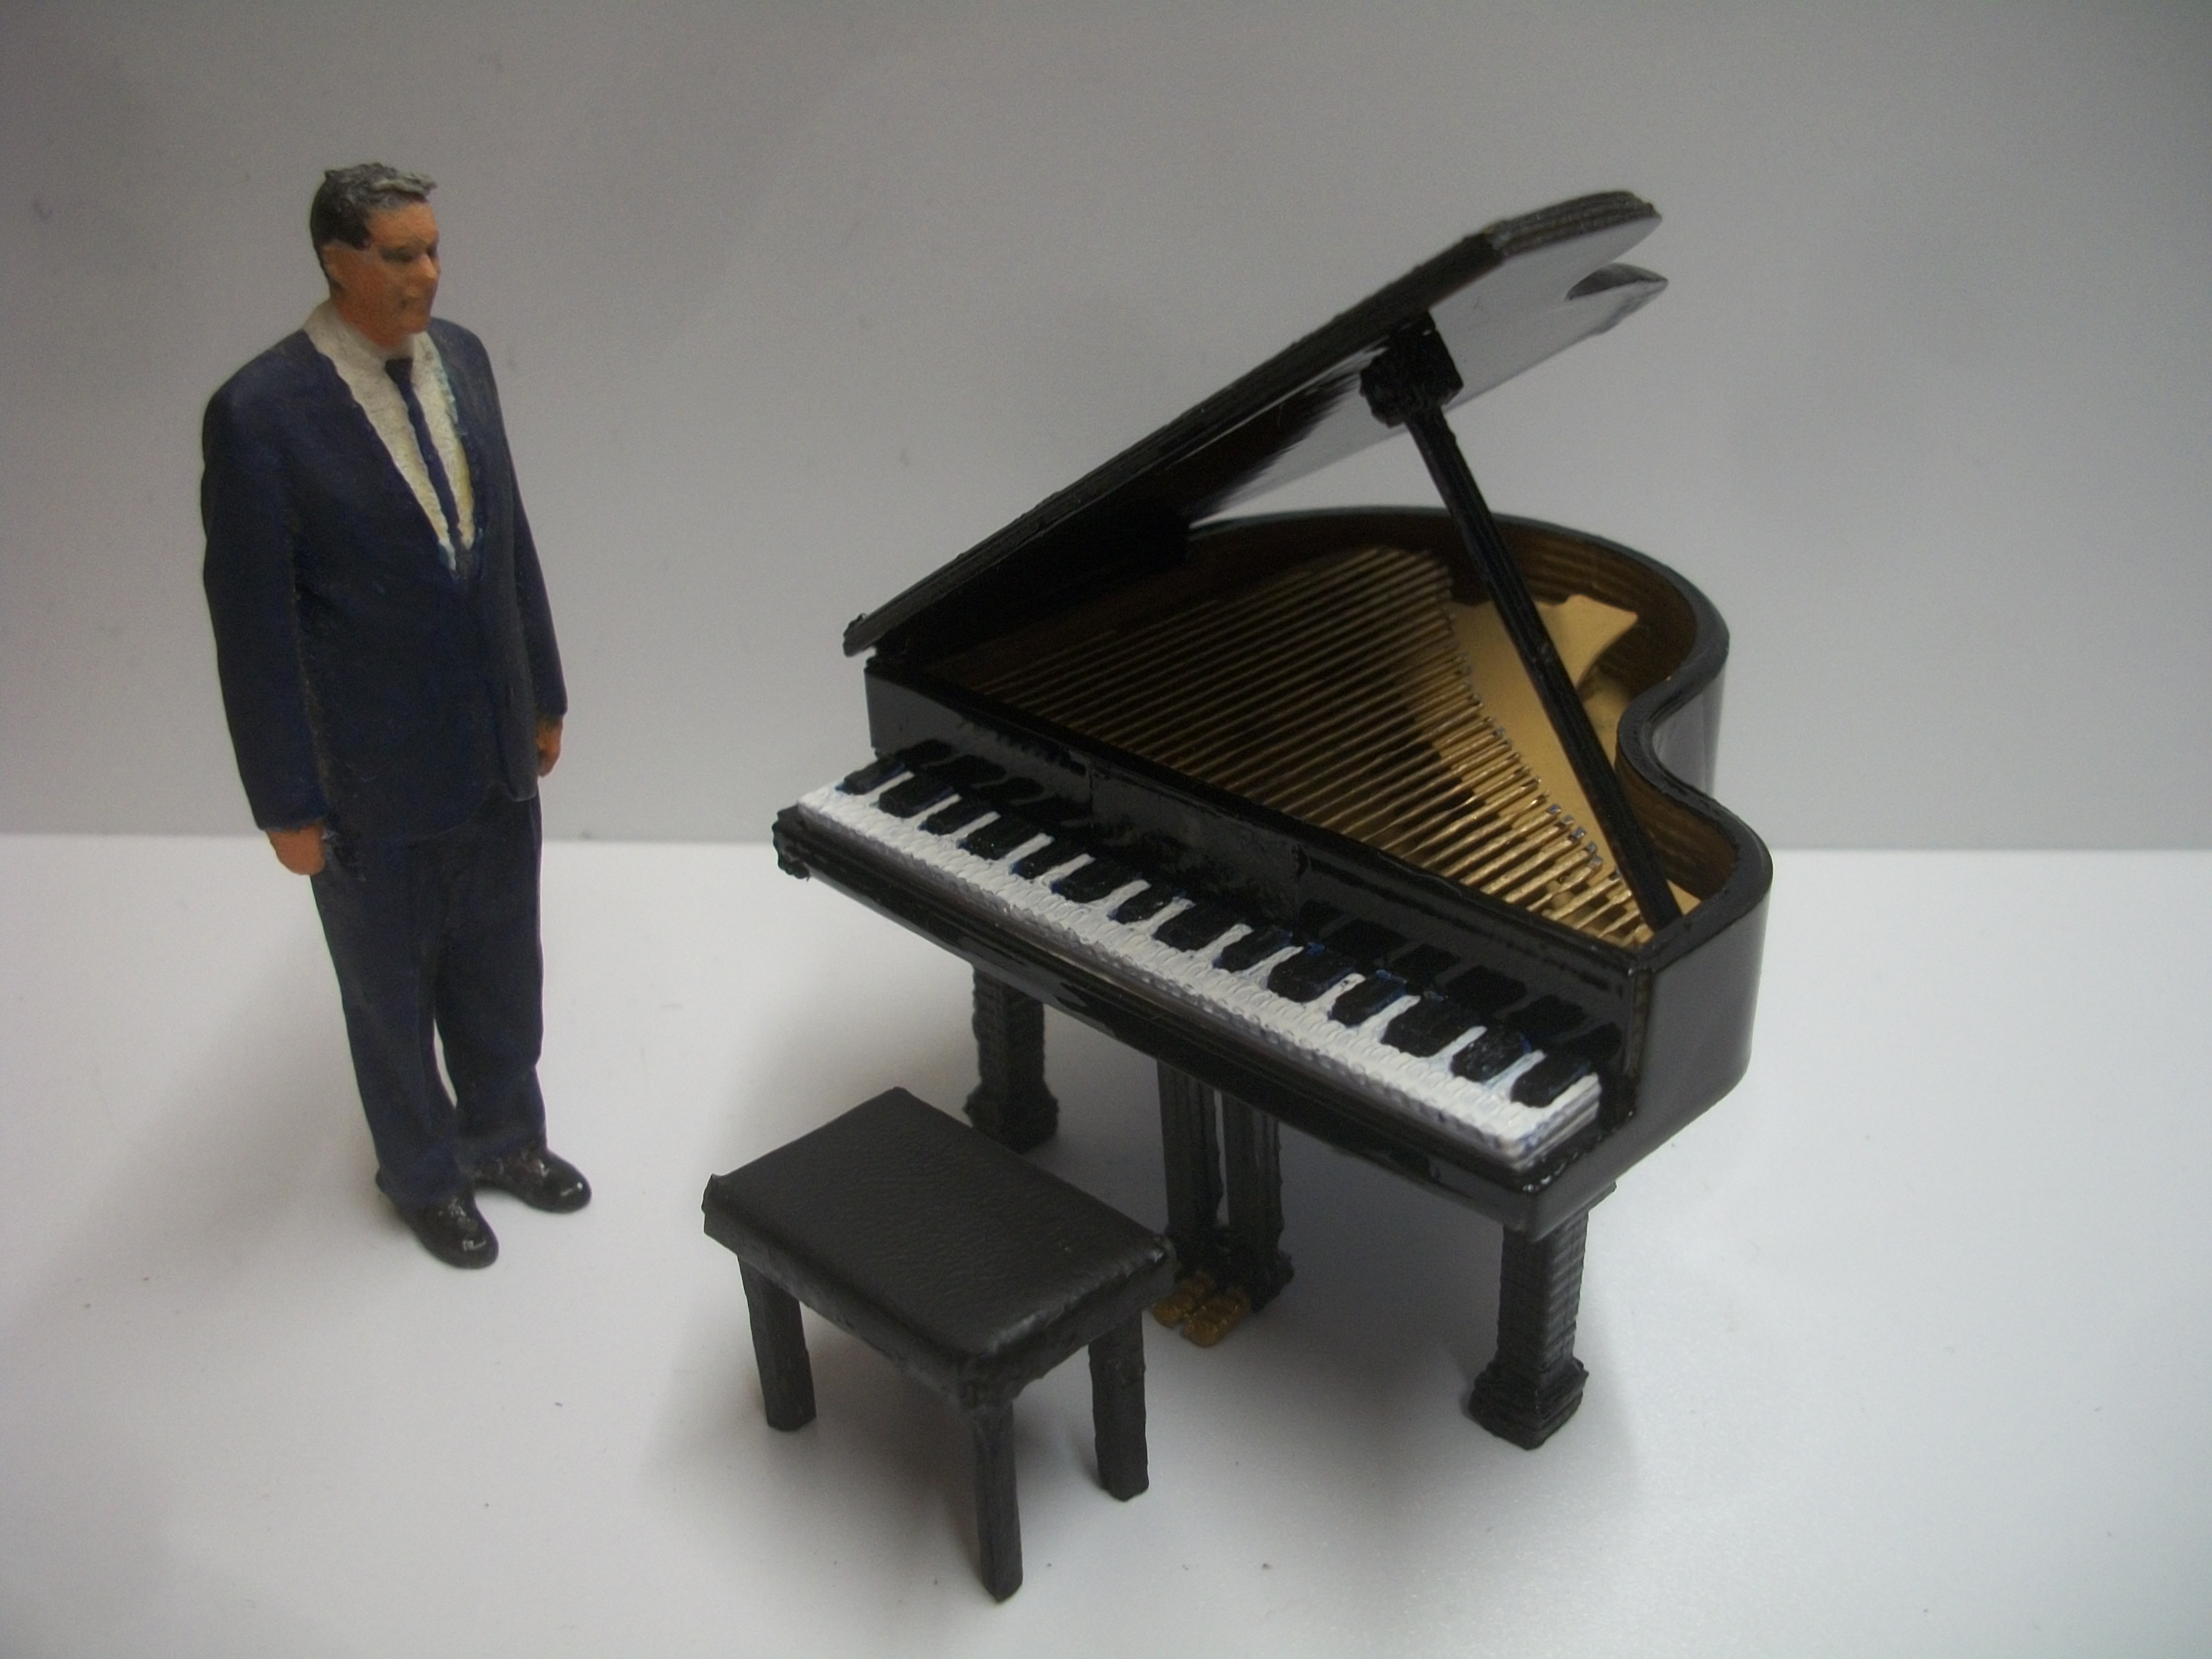
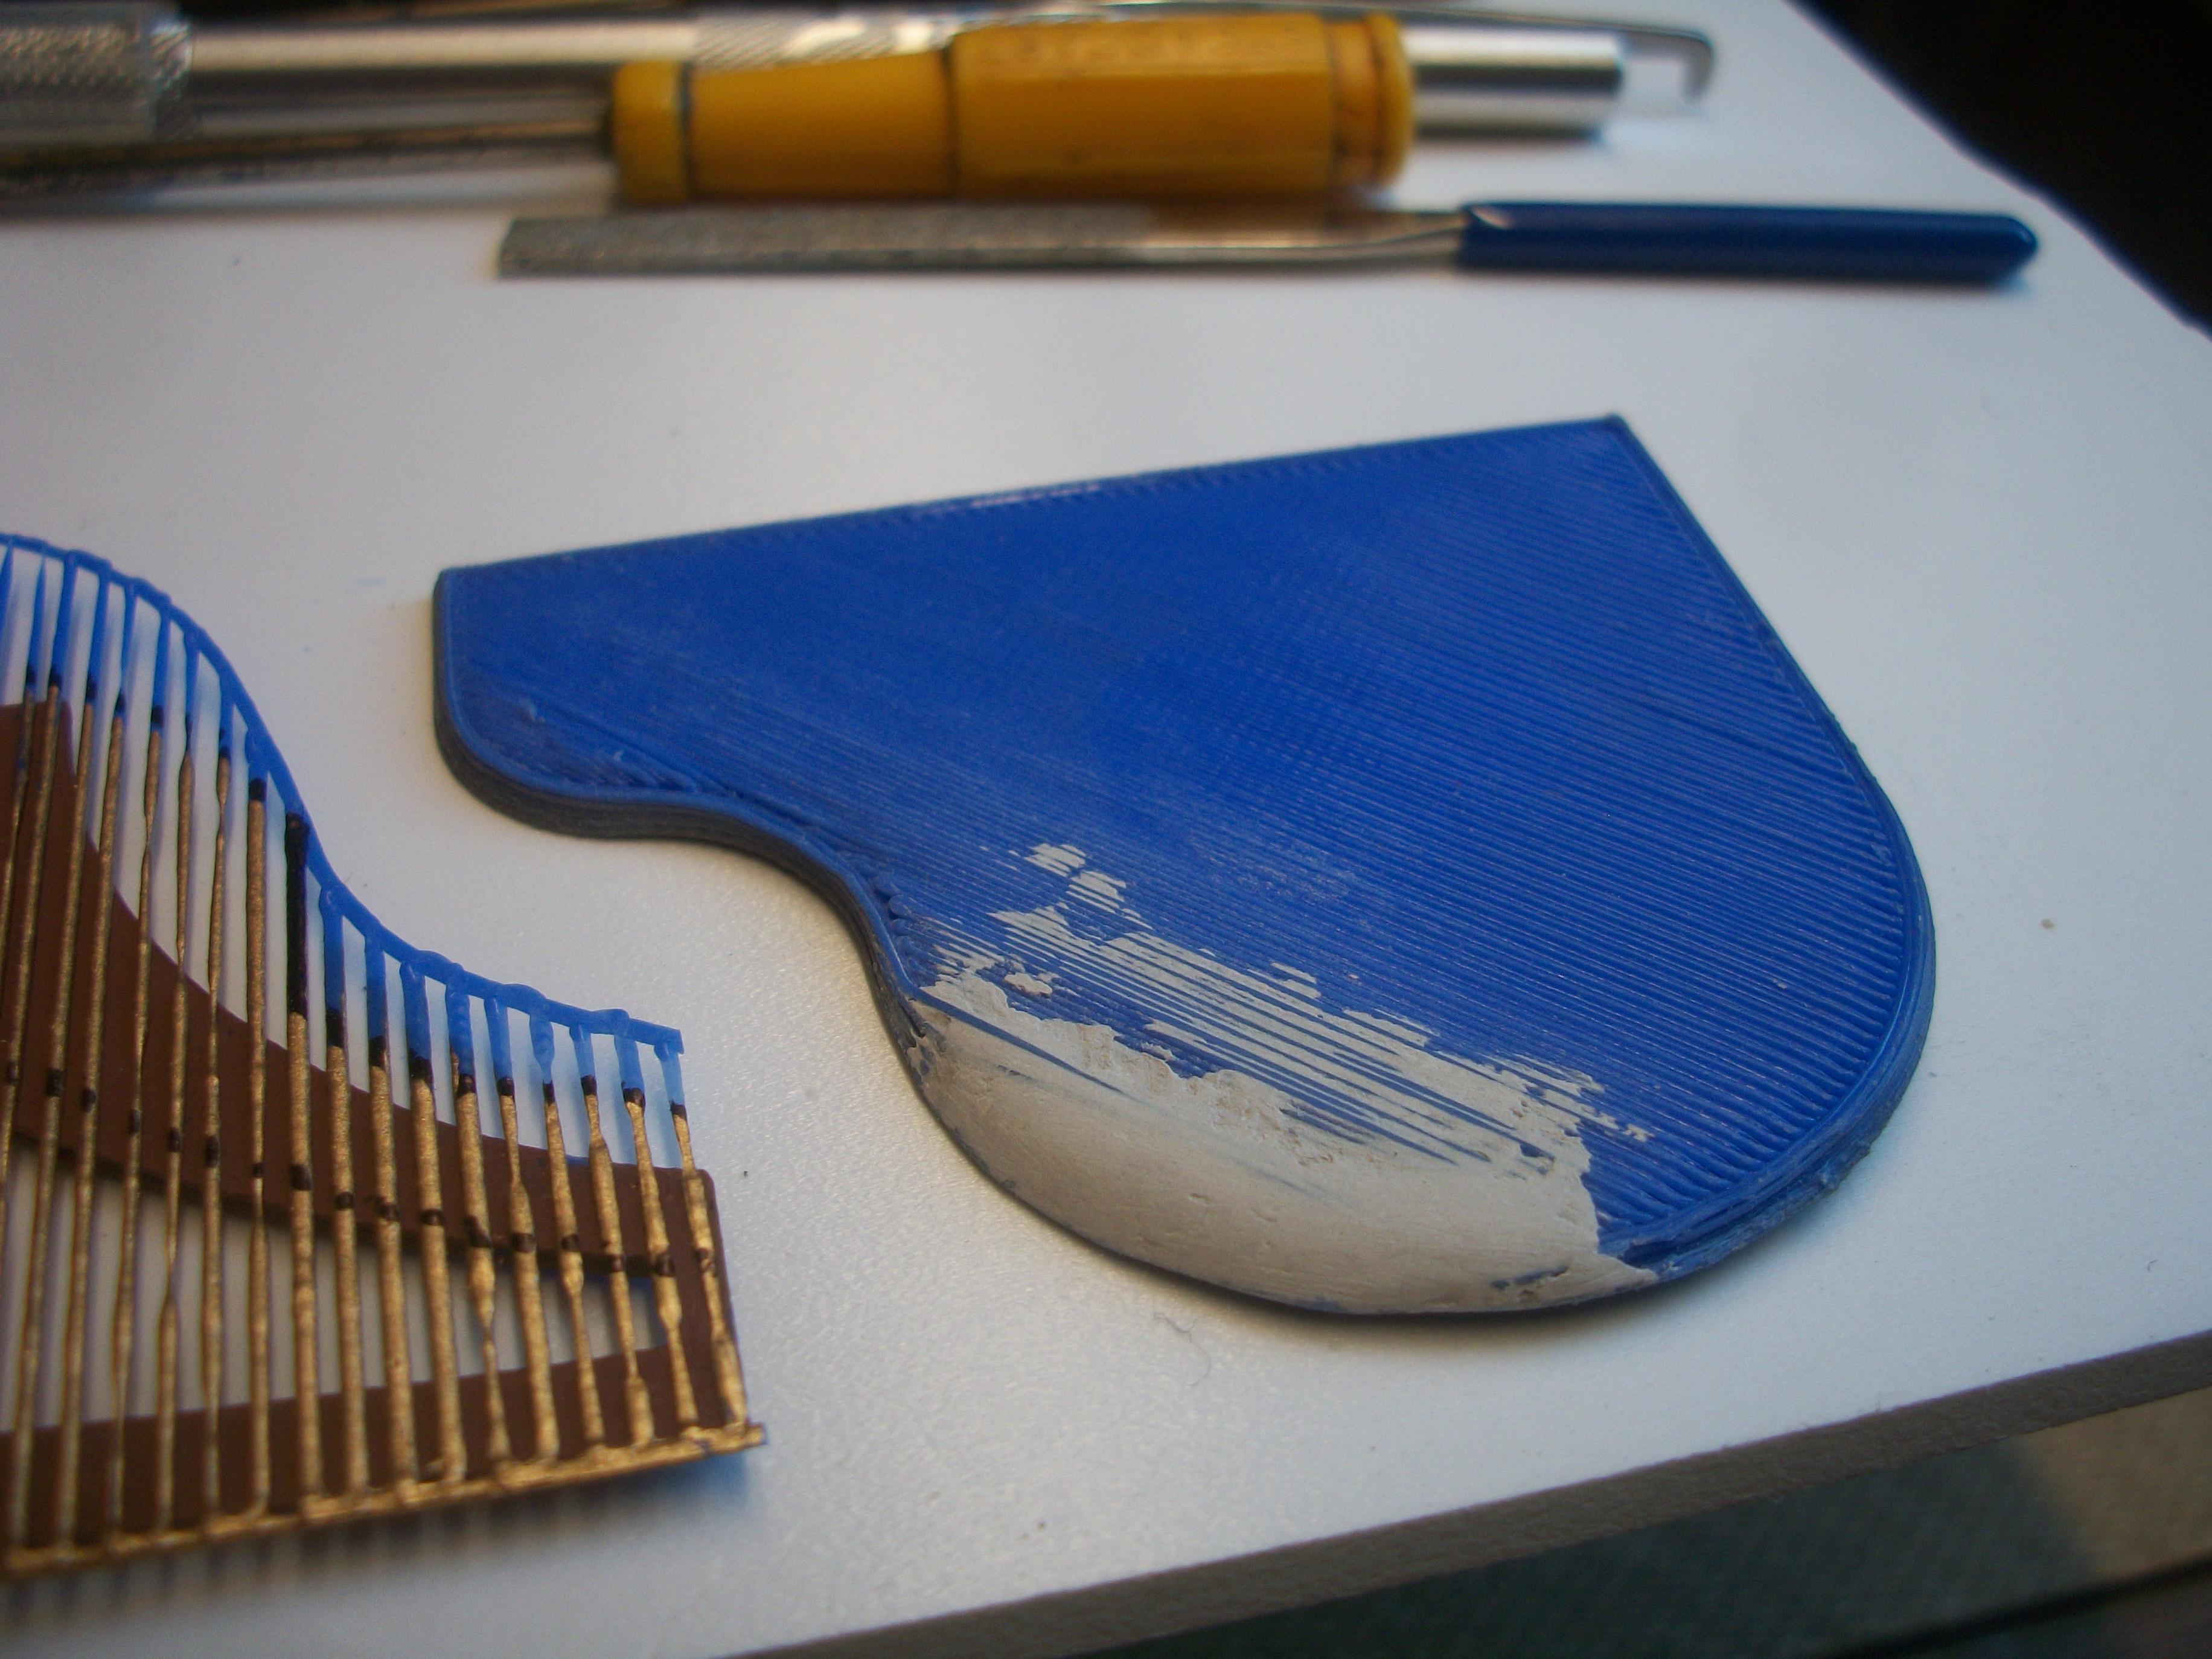
The 3D printer has now been upgraded with several replacement parts, and I was able to print all the nine parts of the 1:24 scale grand piano. One of the following photos shows the mock-up of the assembled piano model in blue PLA, before paint and glue are applied. Using a failed 3D print of a raft for the first attempt at printing the piano body, I found this to be perfect for the strings. These have been painted gold, and will be glued on top of the wood frame later. This brings the total number of parts to ten, and there are five further parts that make up the piano stool and seat. Already, a base coat of grey primer has been applied, and over this will go a coat of black gloss, followed by a final coat of yacht varnish. Two separate parts make up the keyboard, one painted white and one painted black. There is a piano lid support and three legs. This piano build has been most enjoyable, and I am sure the model will photograph really well within the Hooper & Co. showroom. David
-
That is an excellent idea, Greg..... and I could well be using such a hinge design on my 1:24 scale Grand Piano ( 4 photos following ). Many thanks, David
-
Many thanks, Pat......... As soon as I can get the 3D printer repaired, there will be a 1:24 scale grand piano printed, painted and assembled, ready to go into the ground floor showroom at Hooper & Co. David
-
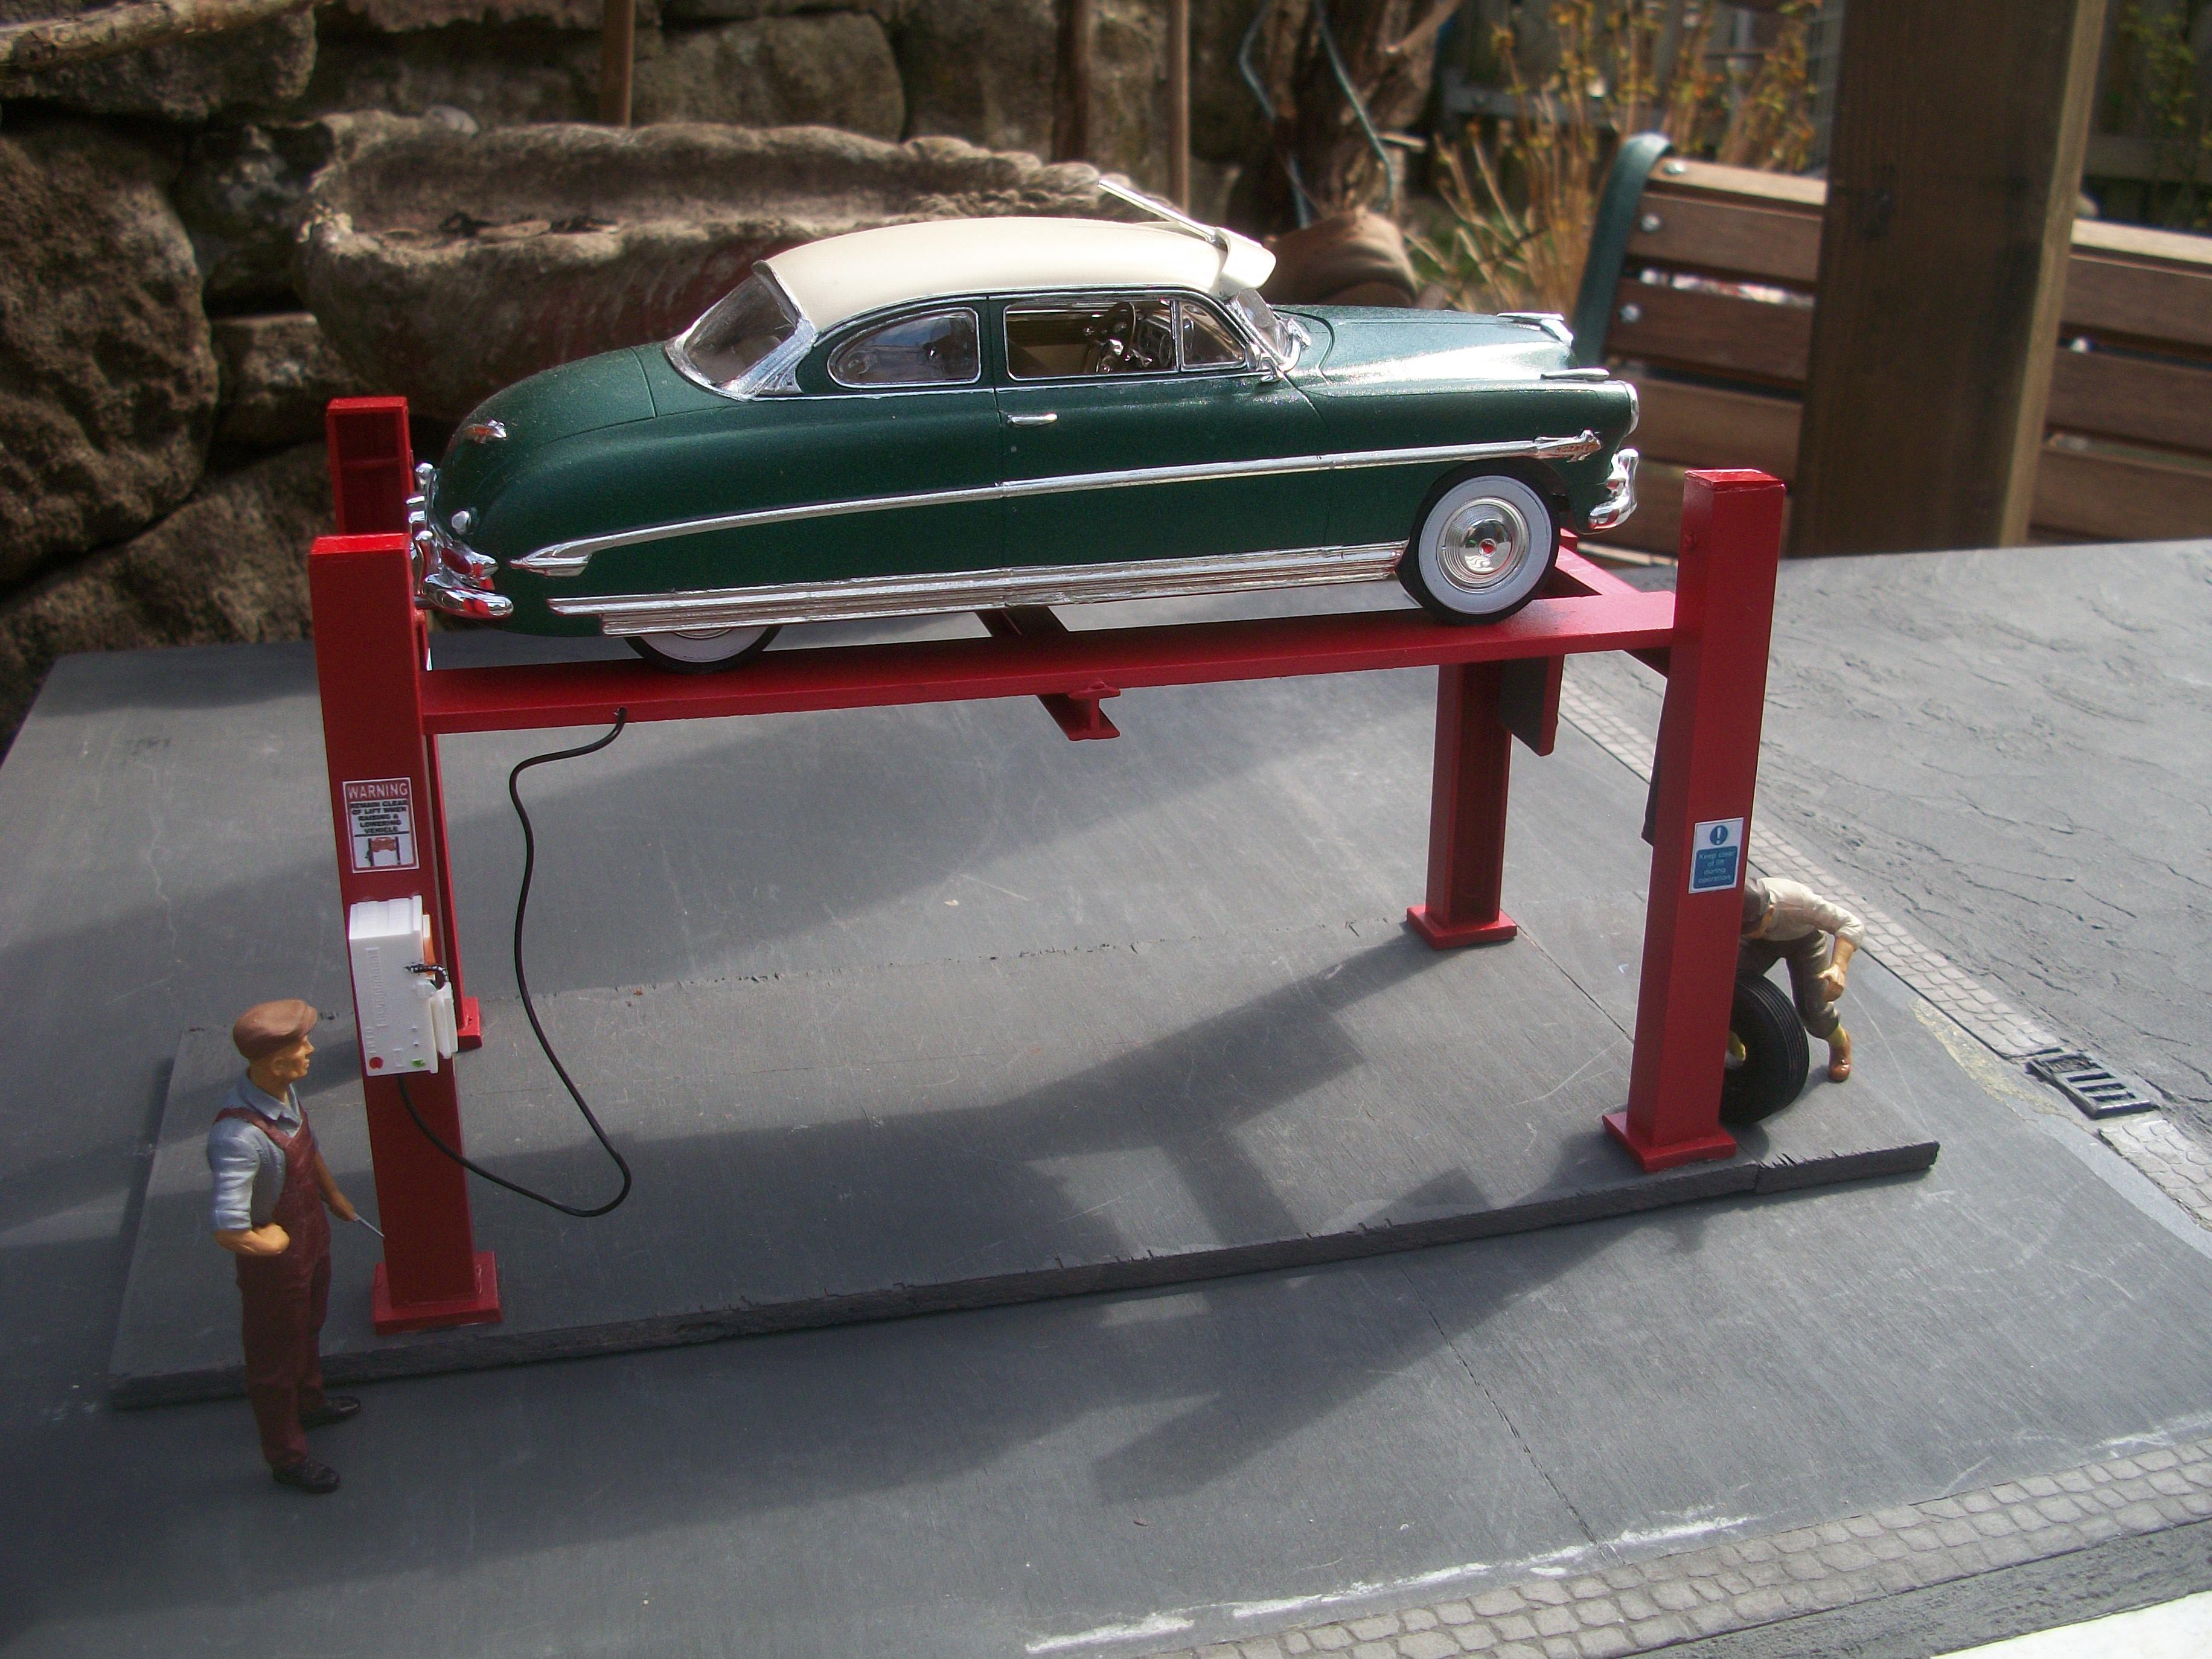
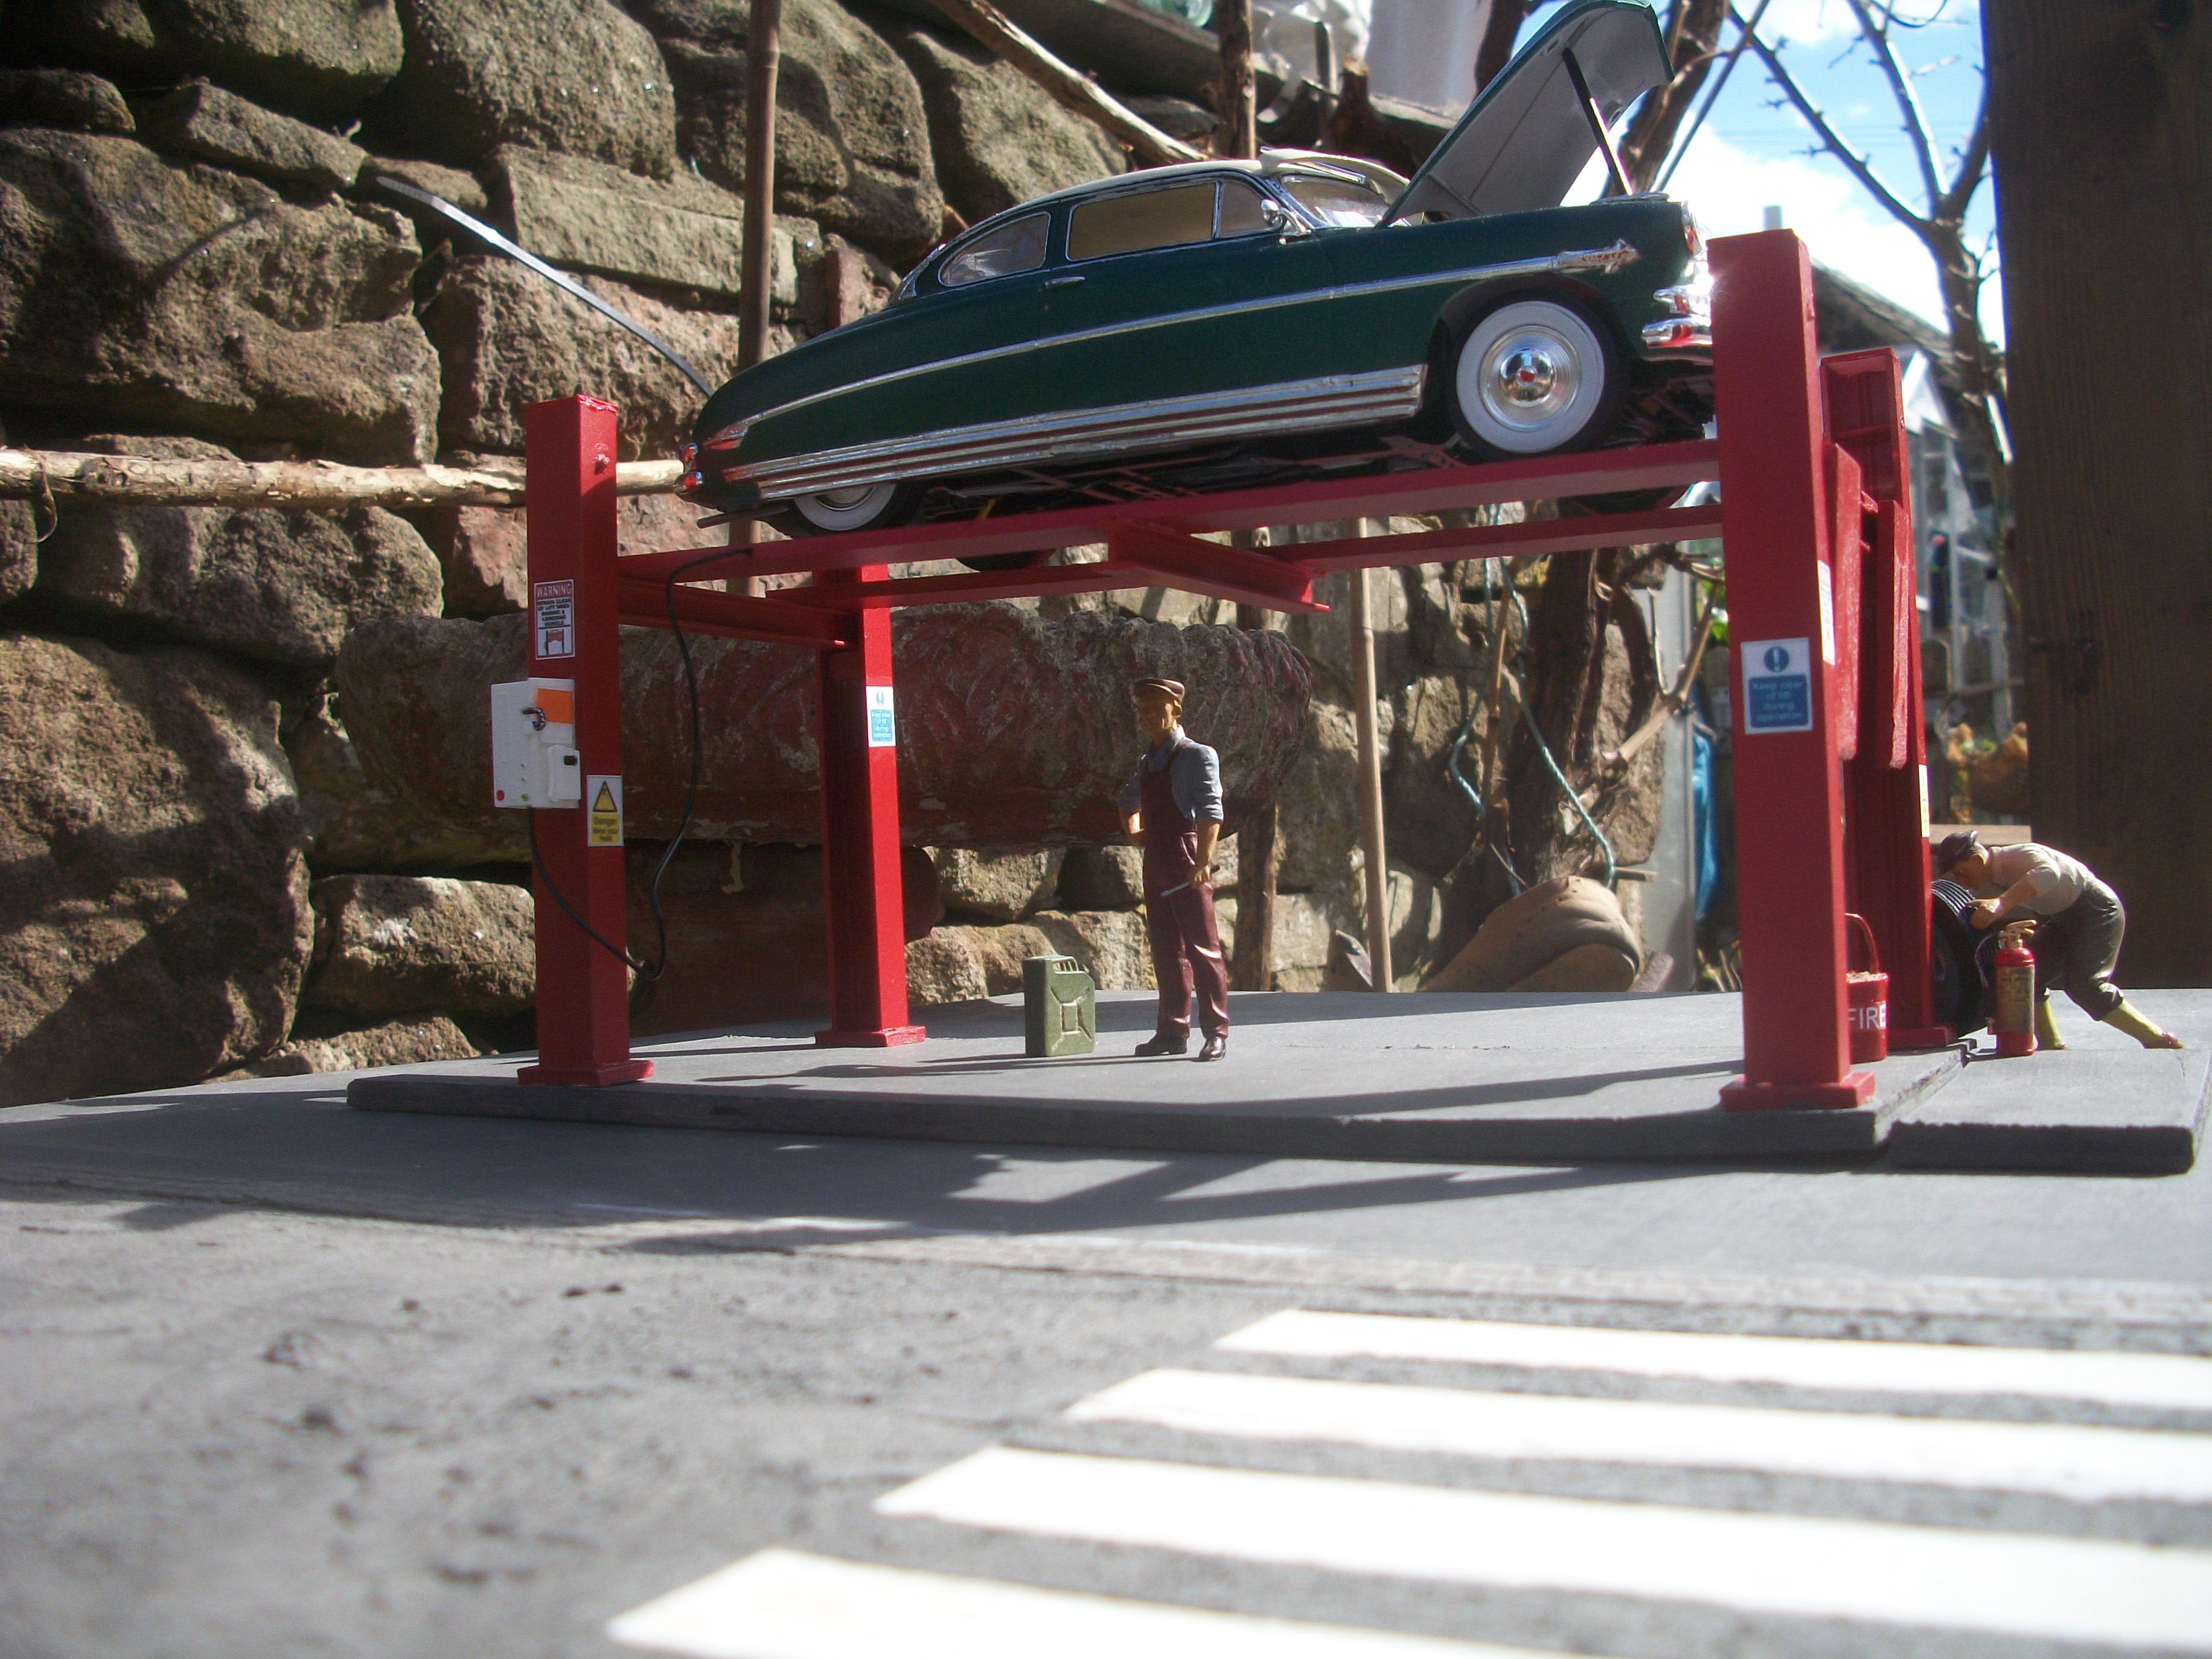
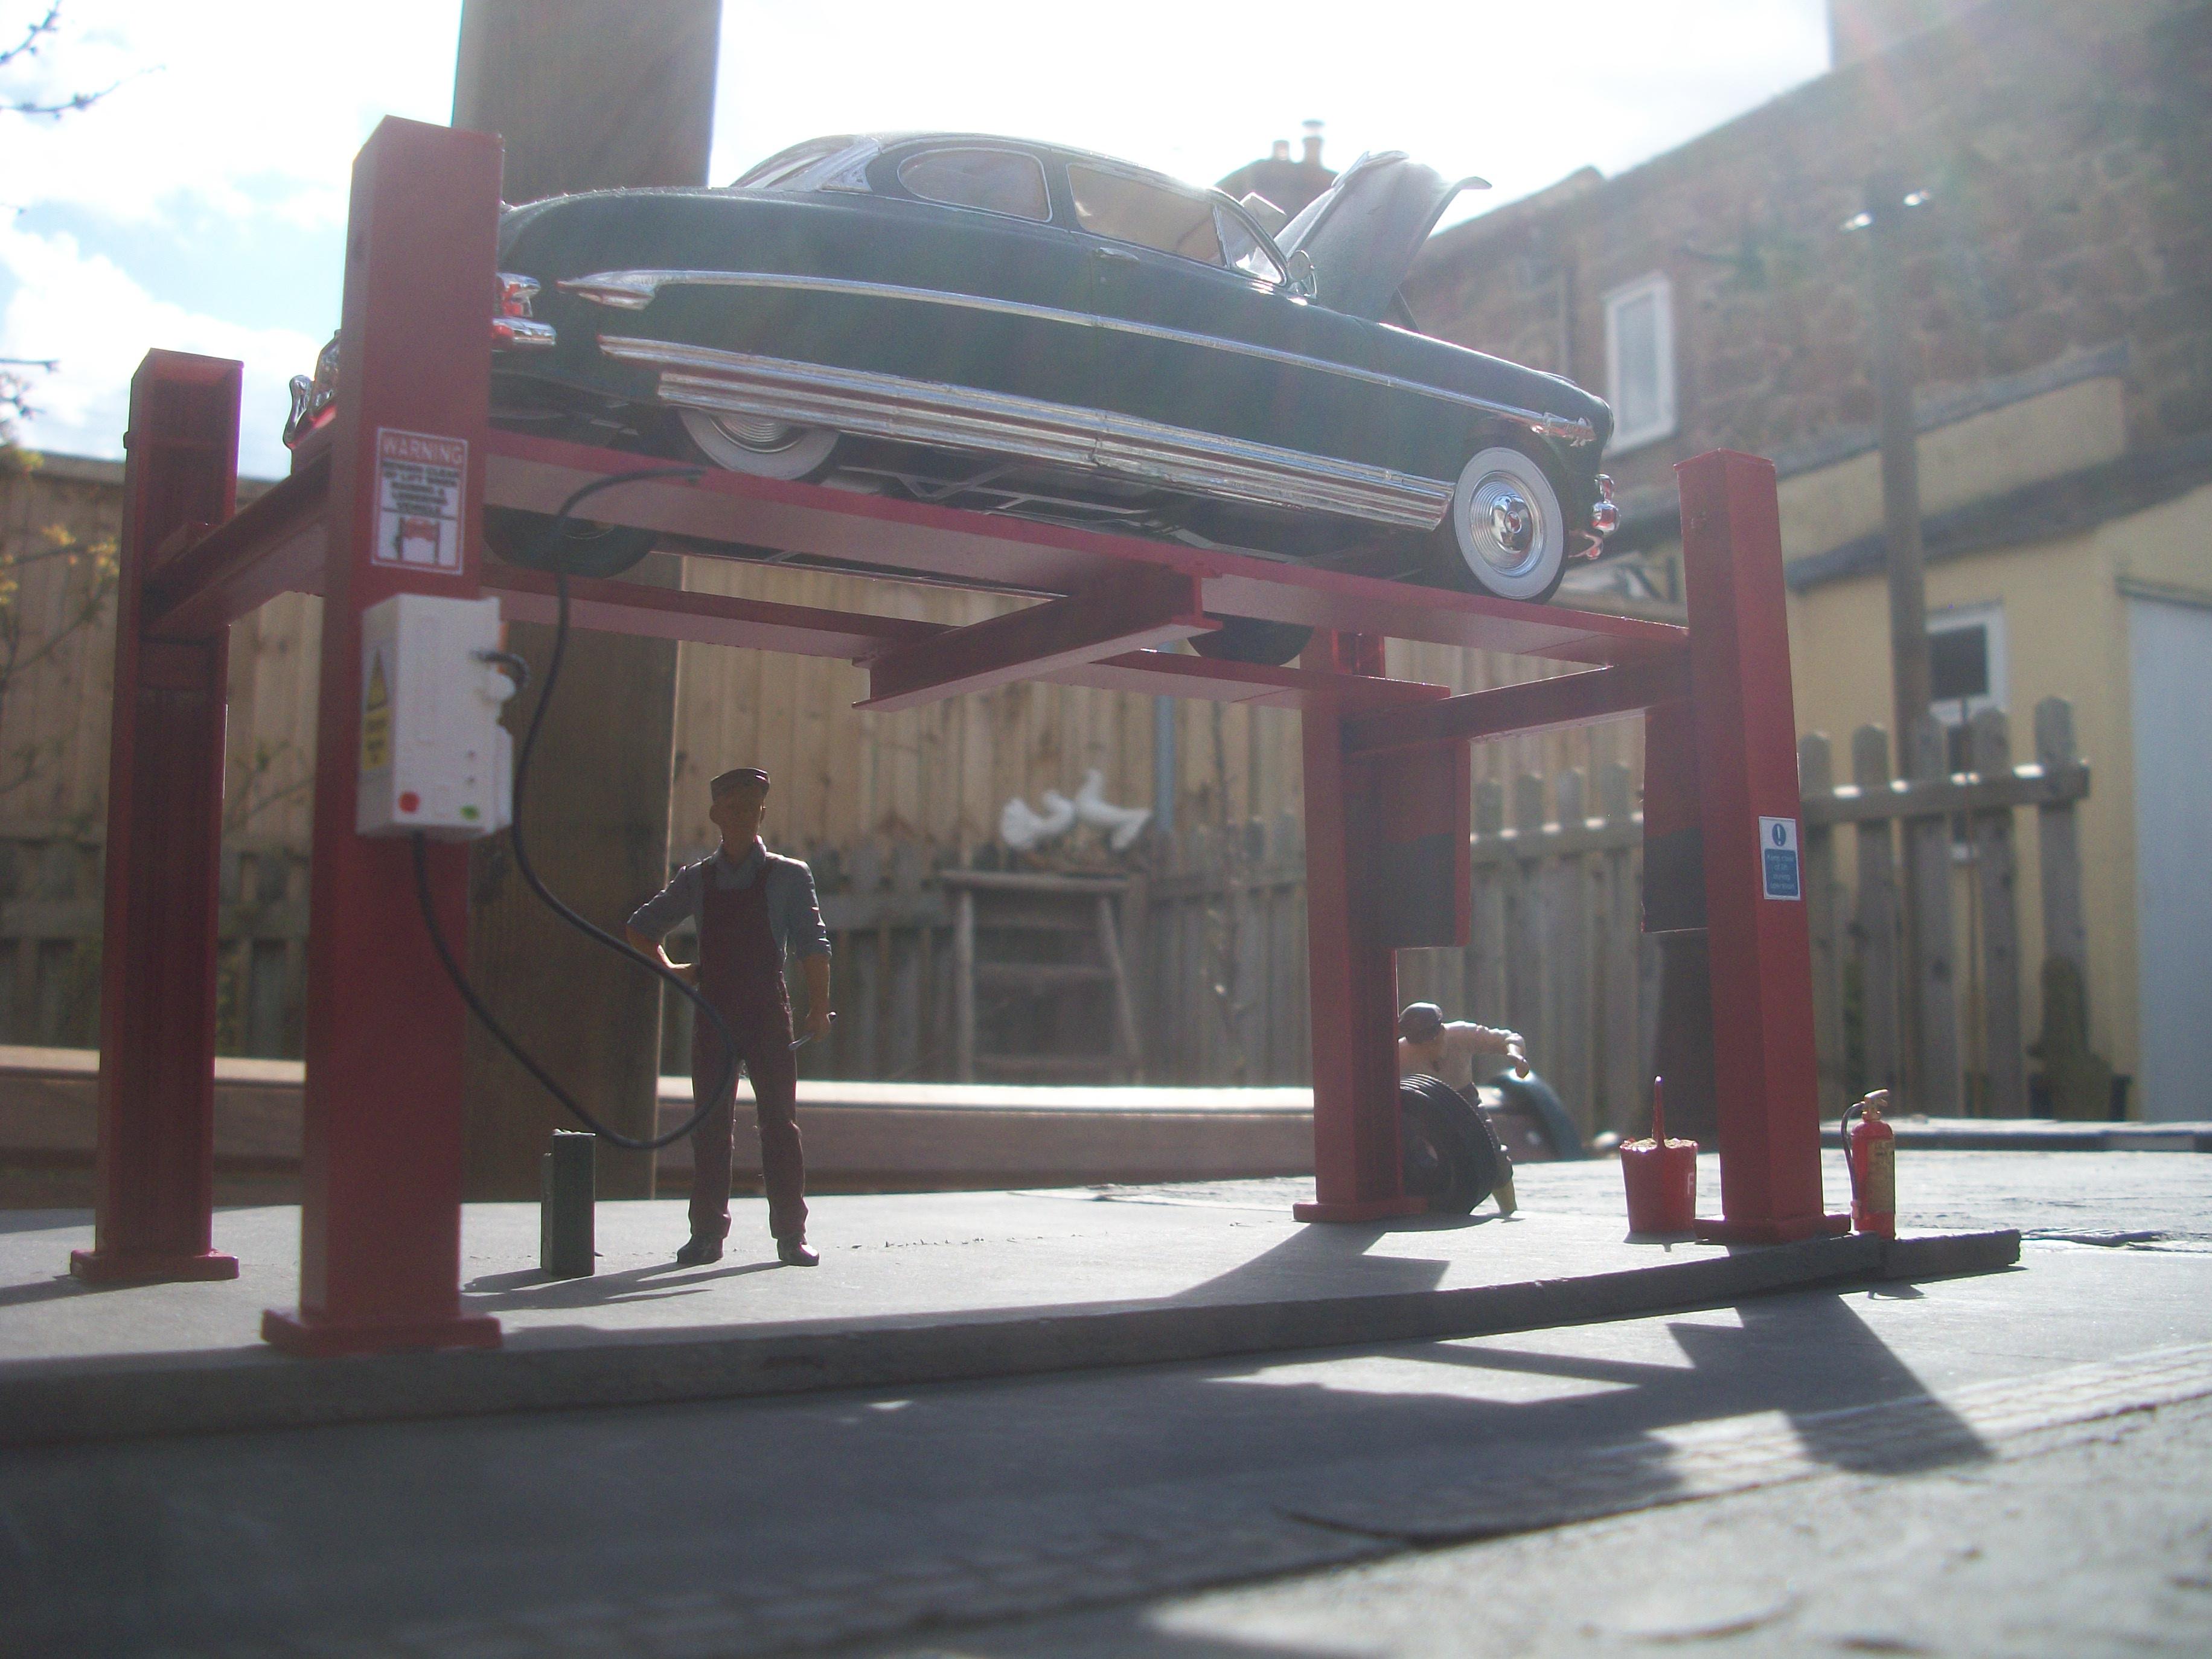
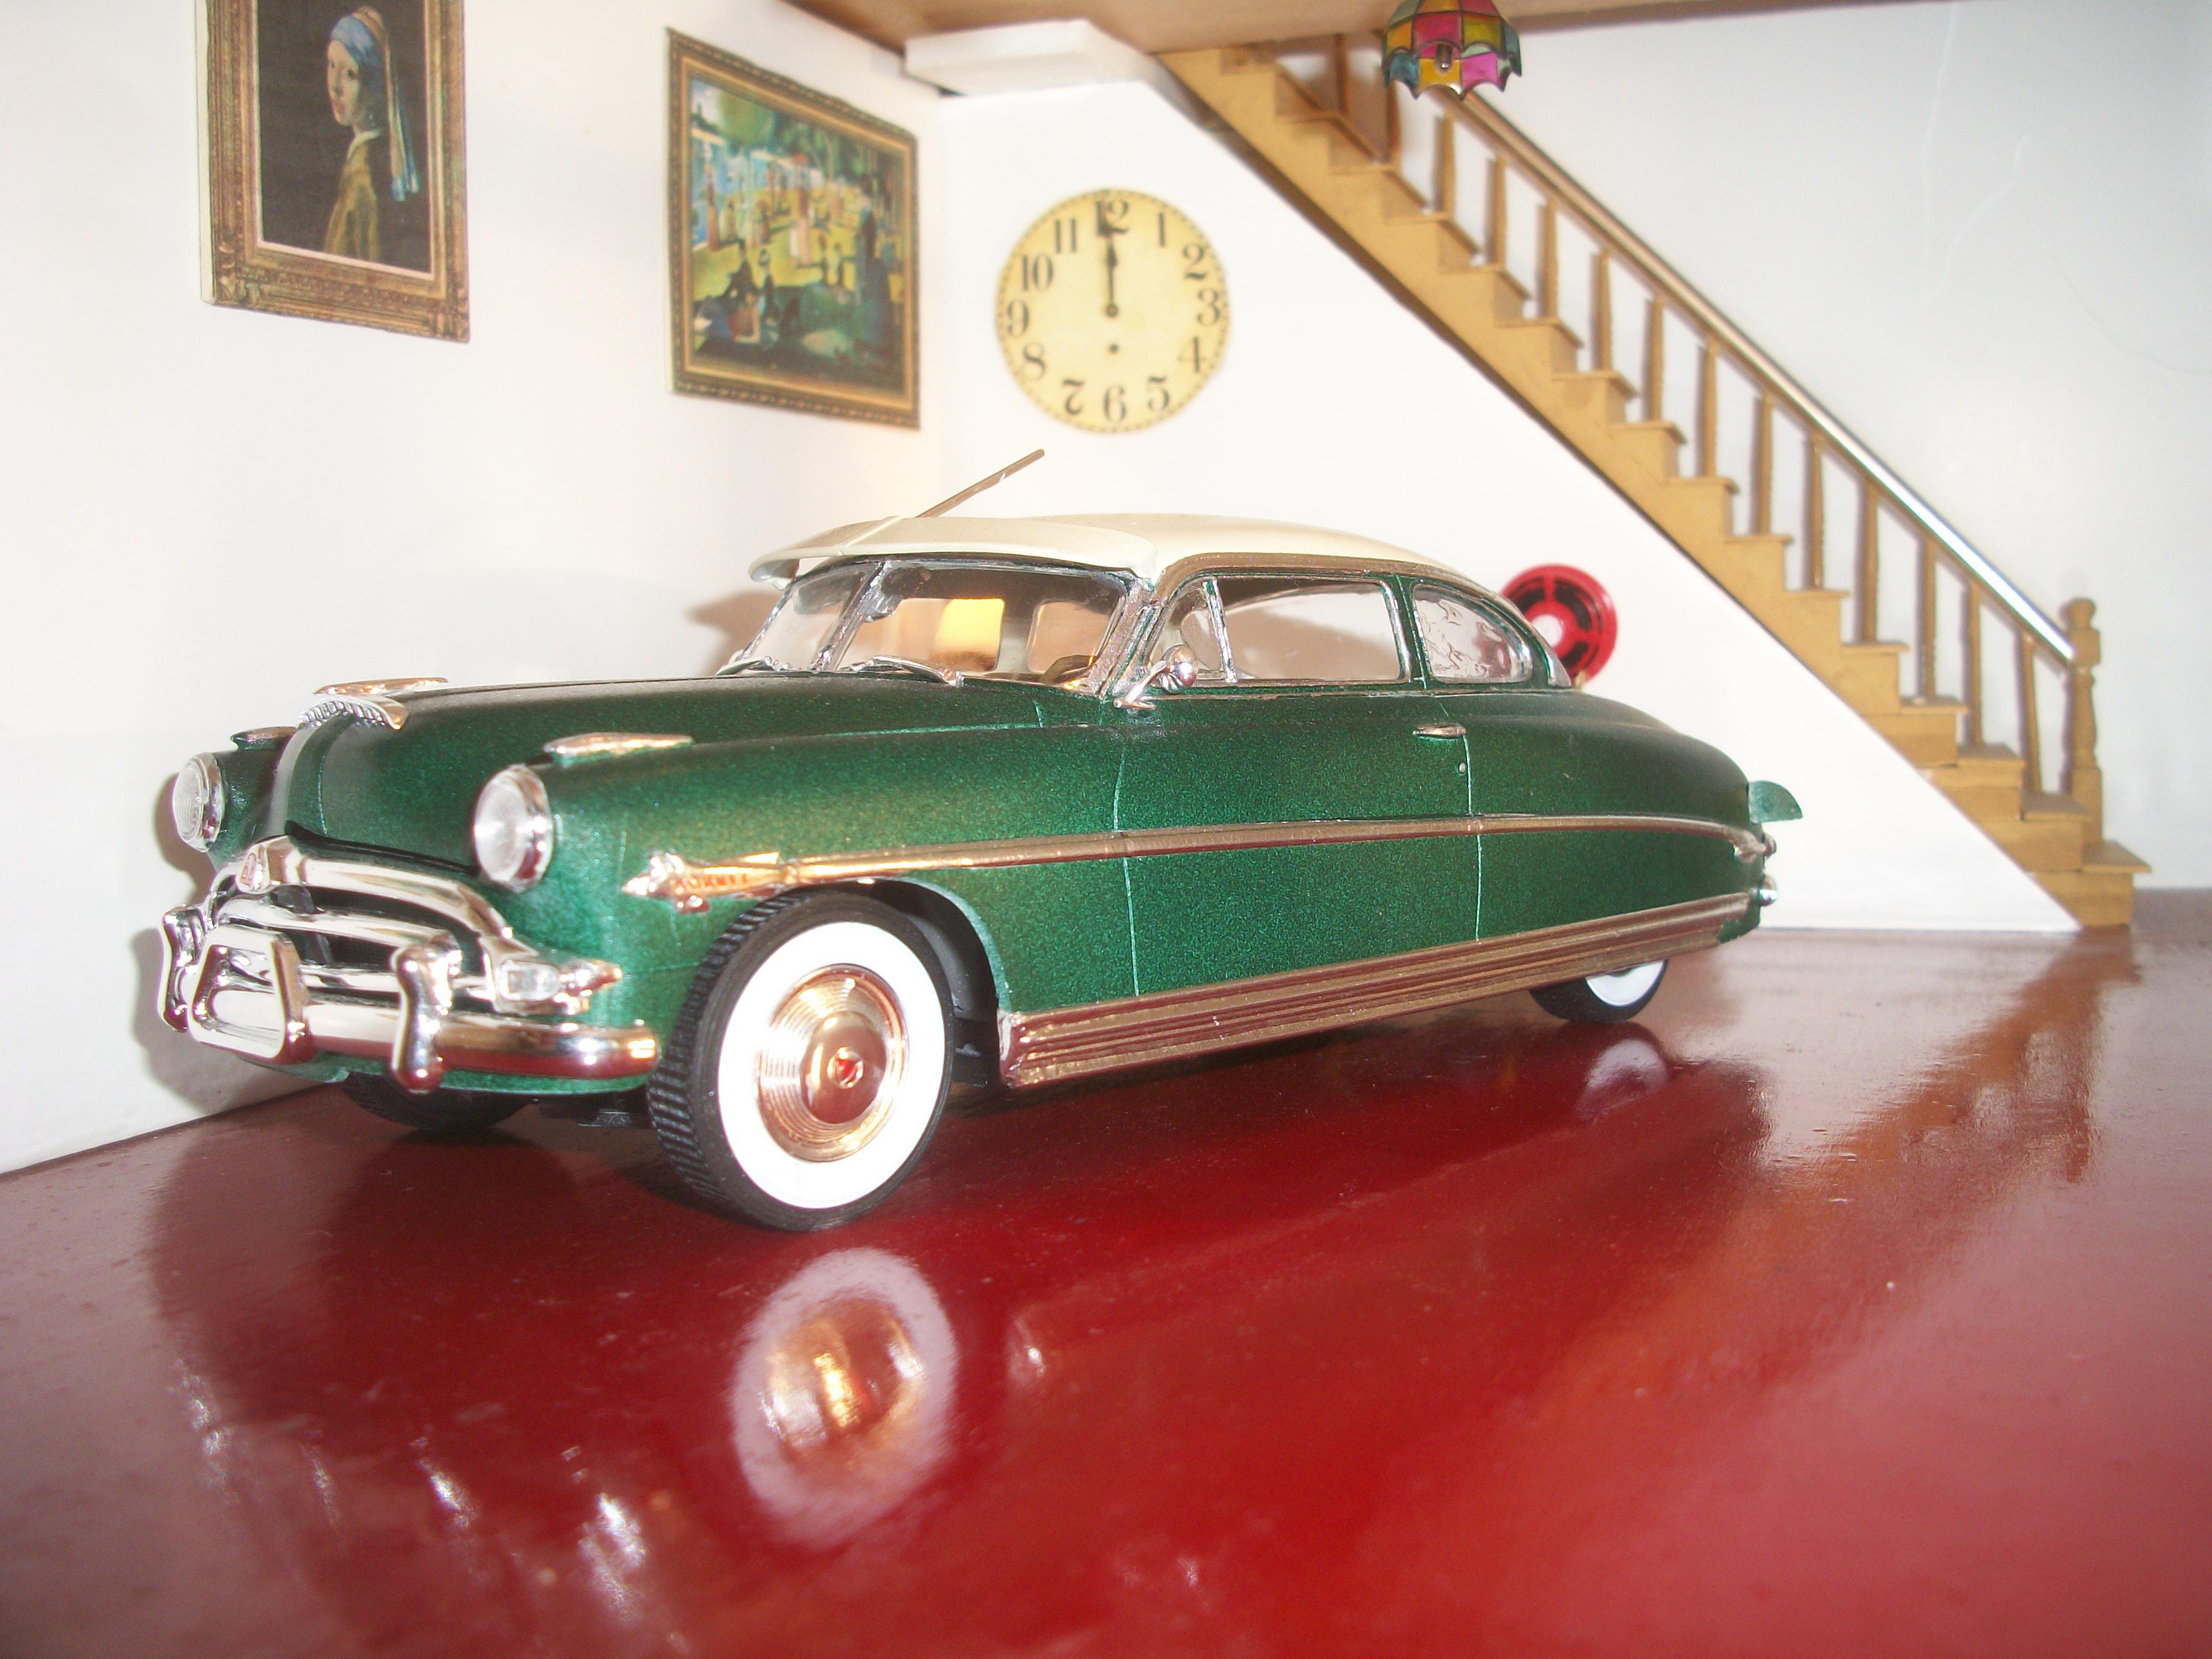
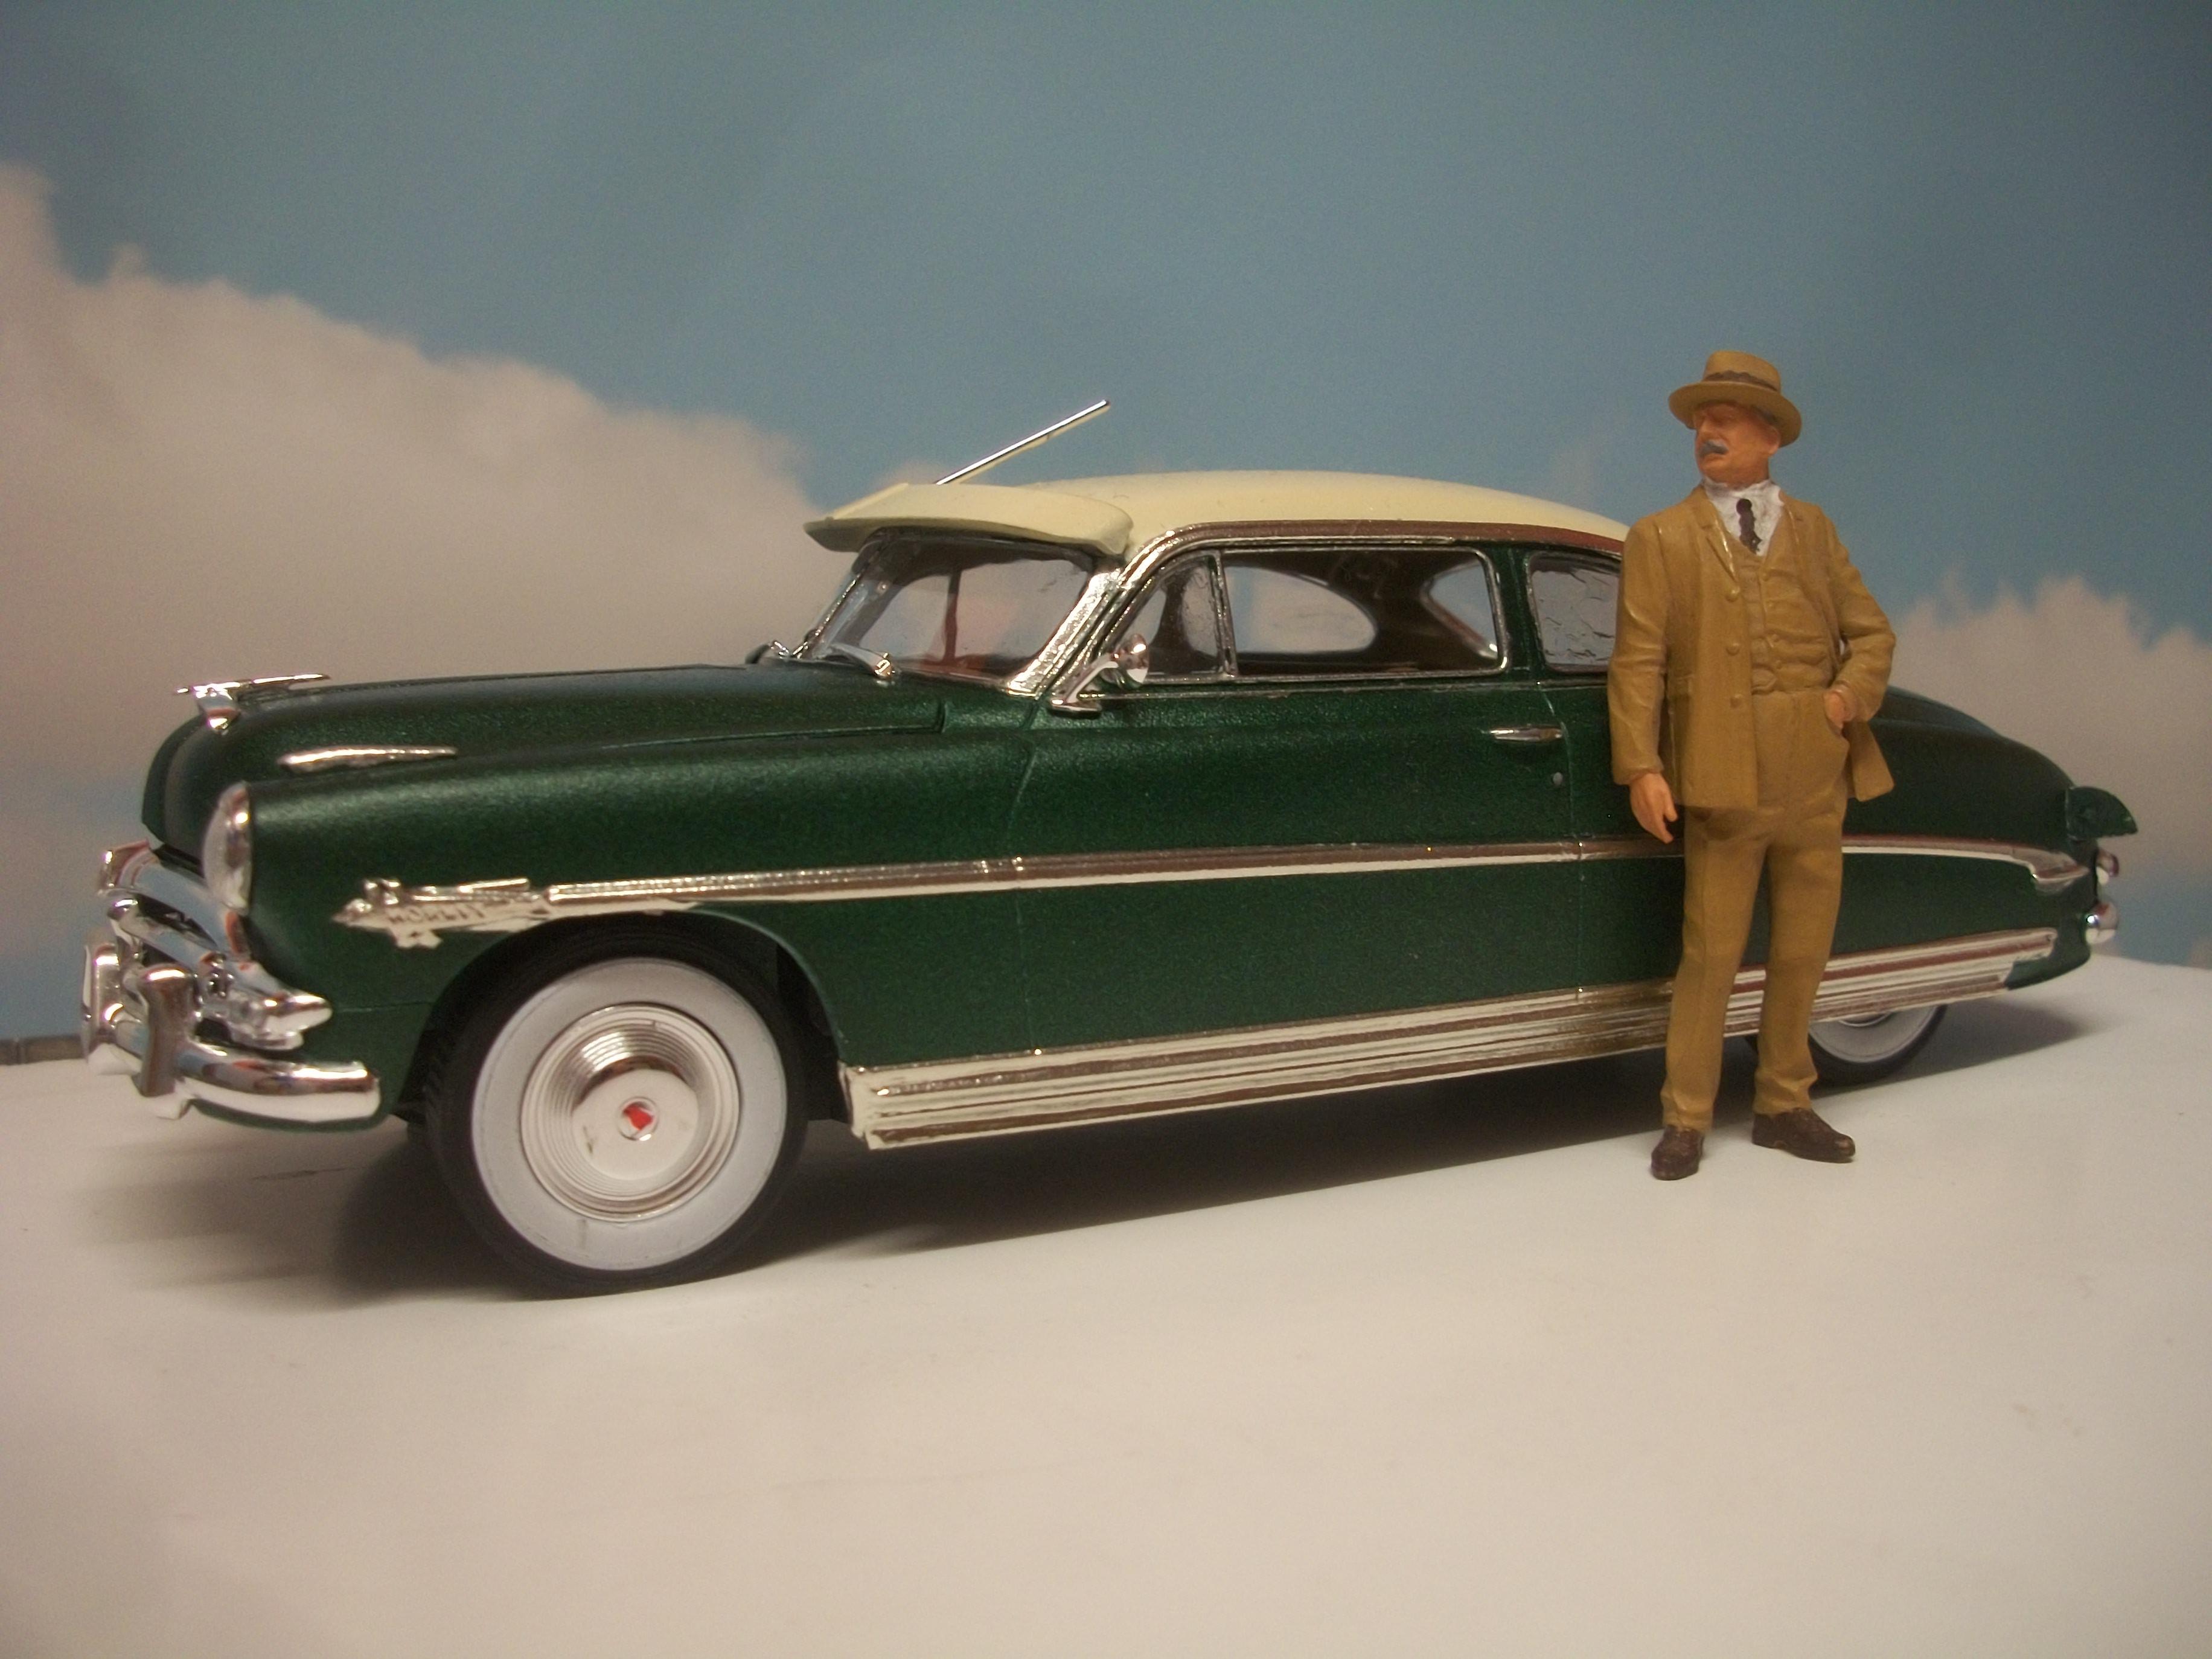
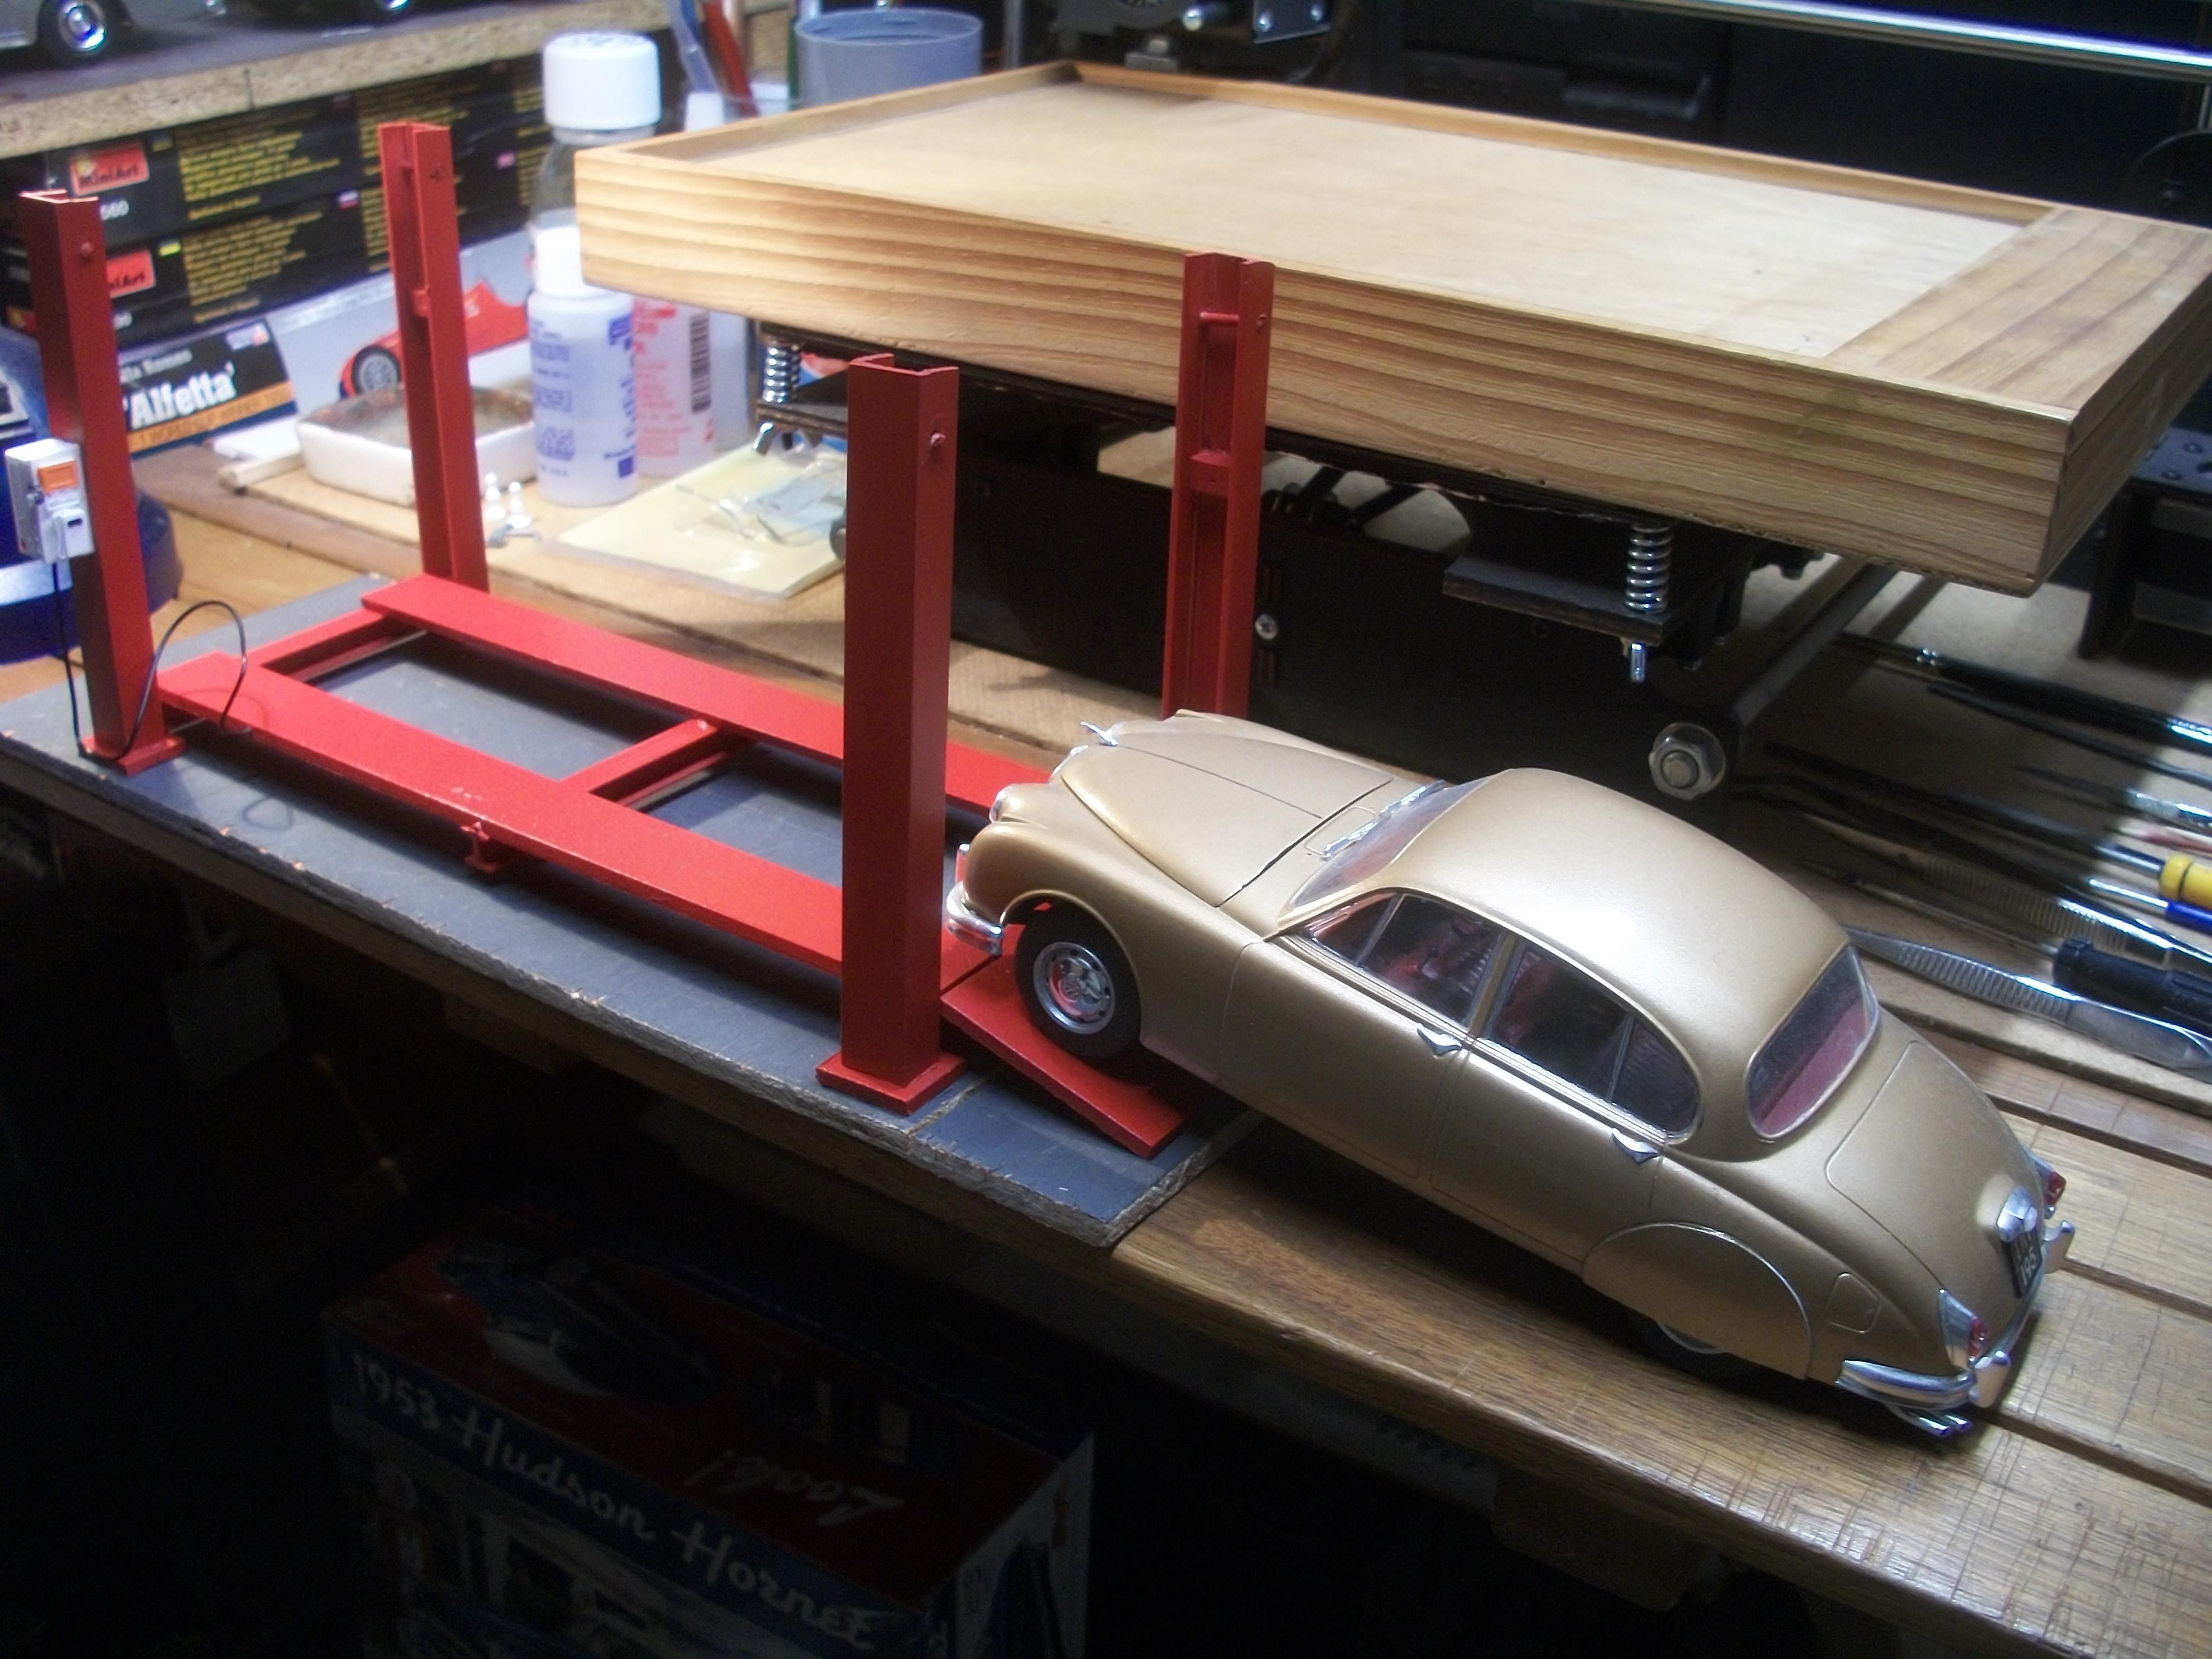
Here are the results of two photo shoots......... The first batch of photos was taken outdoors, featuring the Hudson Hornet on the raised 4 post lift. The second batch of photos was taken indoors, featuring the Hudson Hornet inside the ground floor showroom of the Hooper & Co. building. Twin ' H ' could mean ' Hudson ' and ' Hooper ' ? David
-
What a find, Chris...... Who would have thought salt and pepper shakers? ( and so close to 1:25 scale too ). David
-
You have a very impressive collection there, Jean Claude...... and the American city diner diorama is really good. I can see that you have put many hours of hard work into making these models, and your hard work has now brought you to this result....... Liking your diorama very much ! The lighting is so effective also. David
-
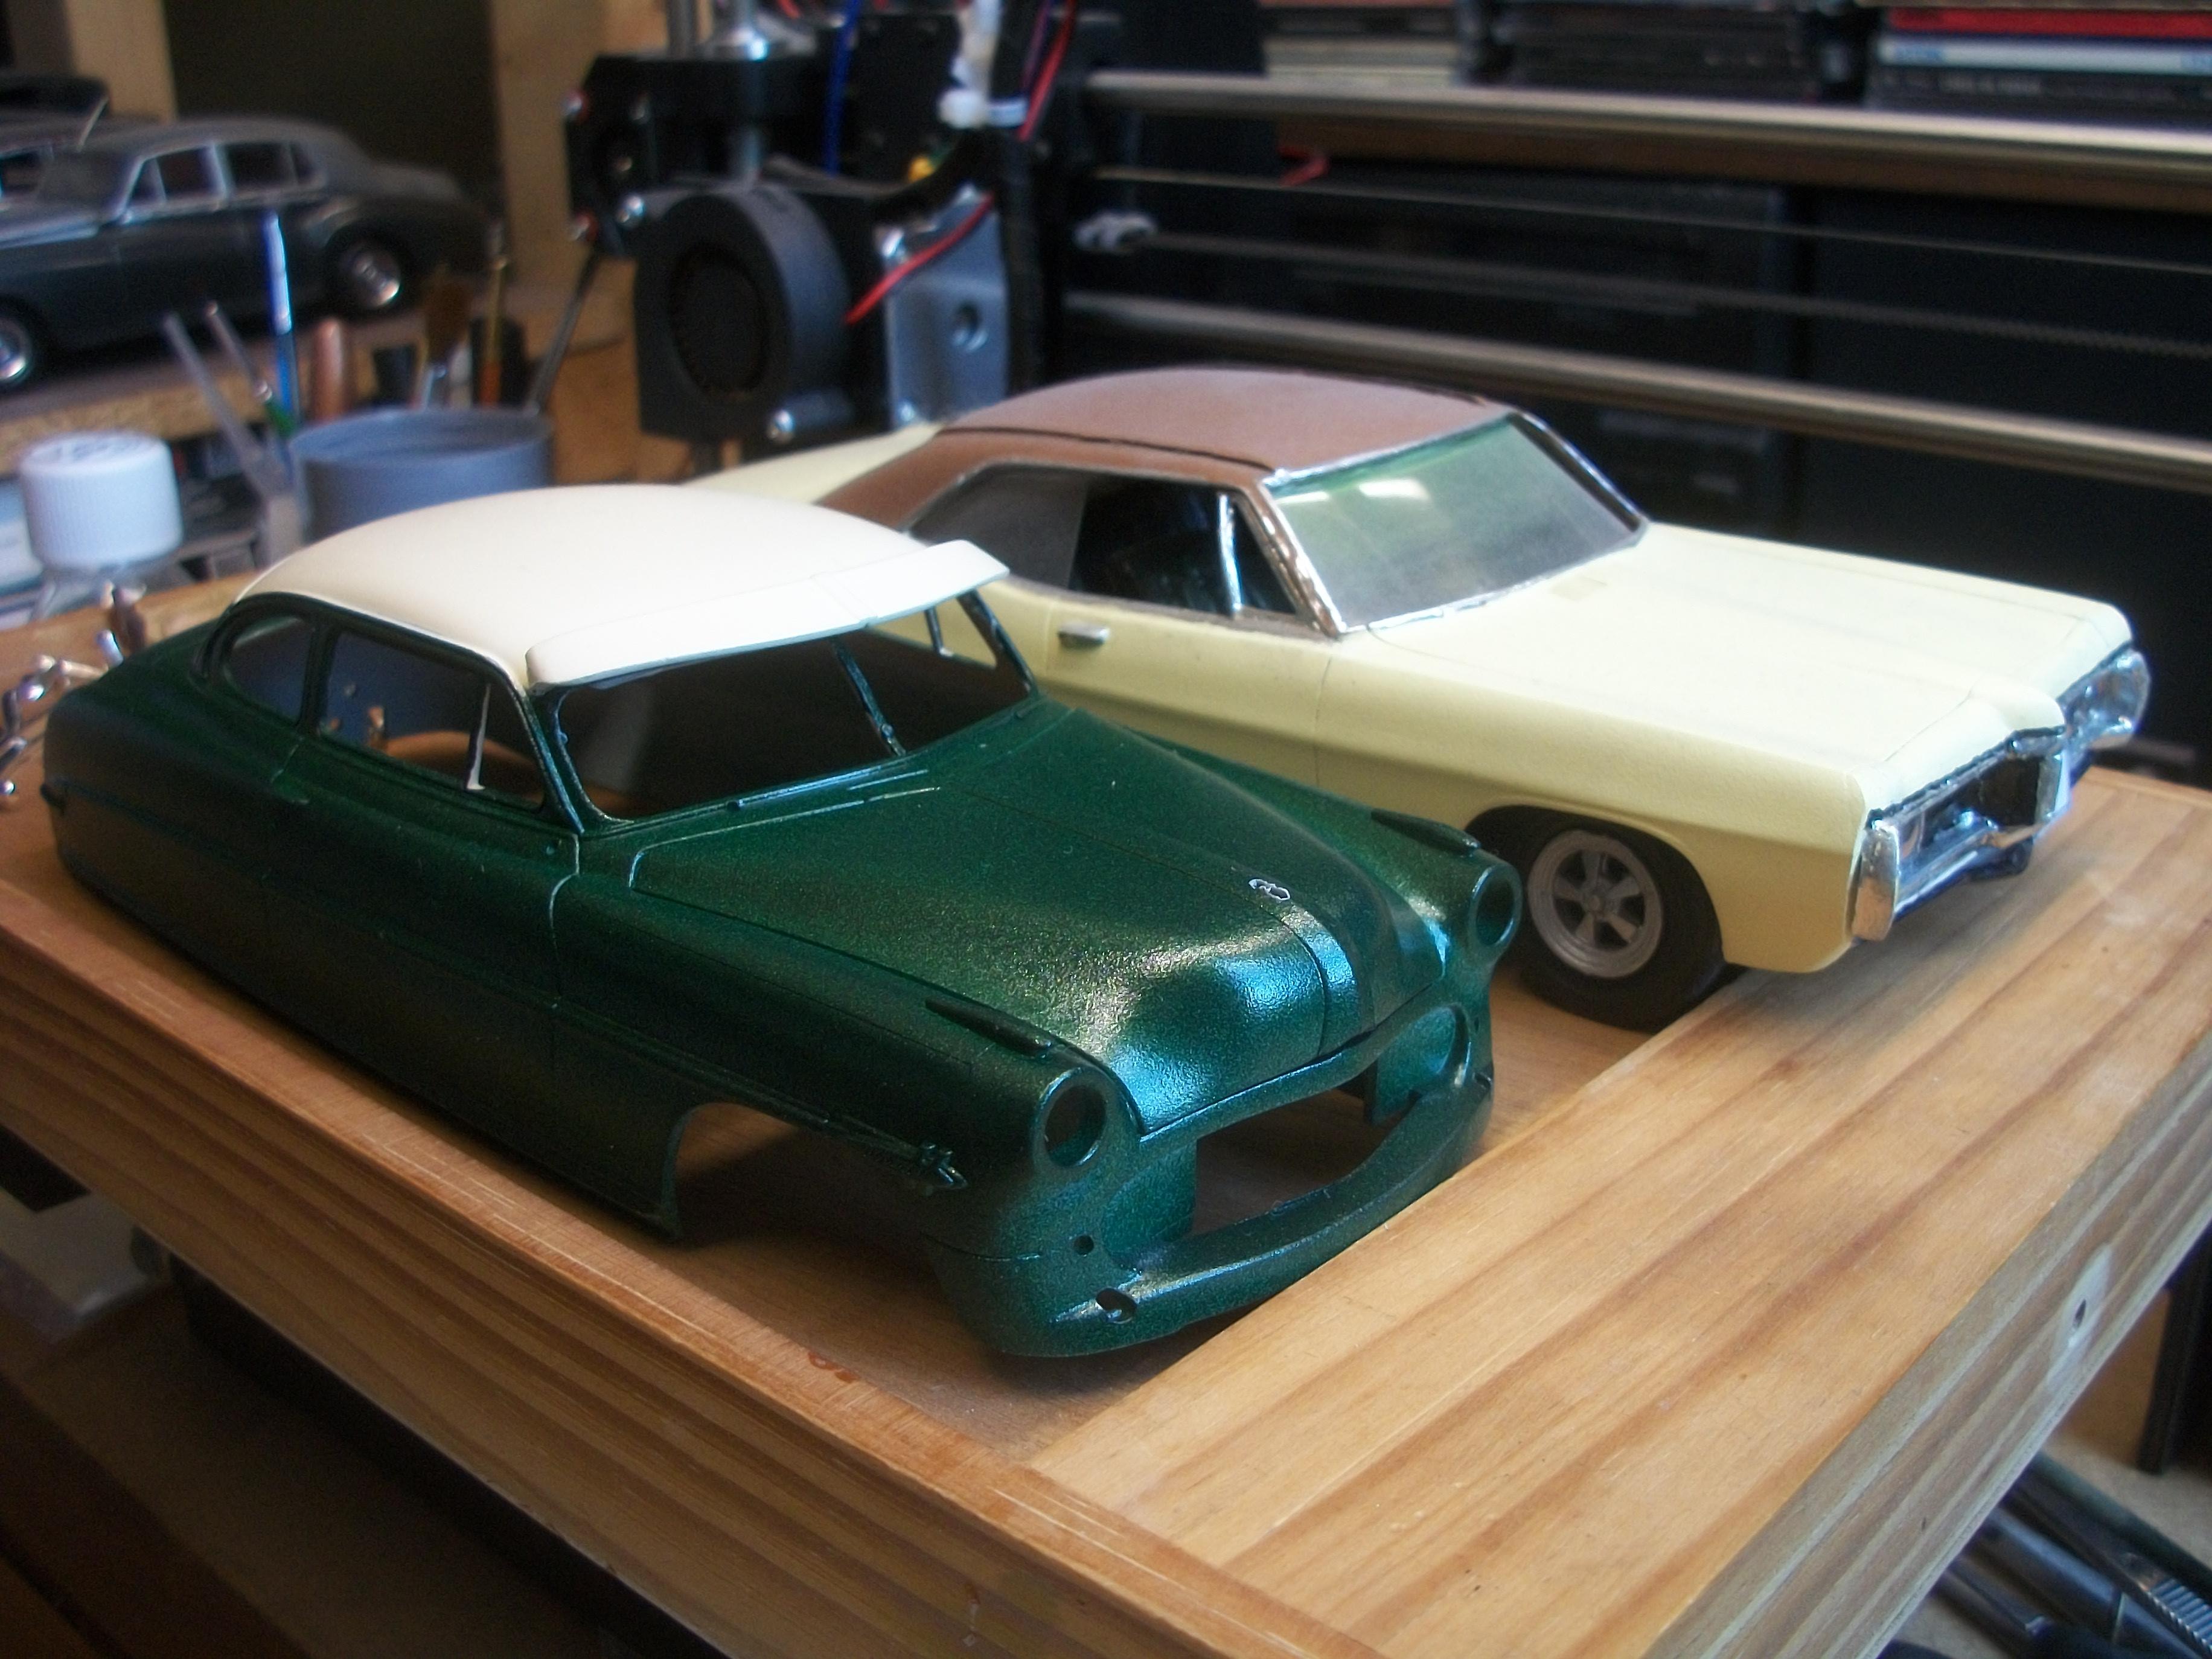
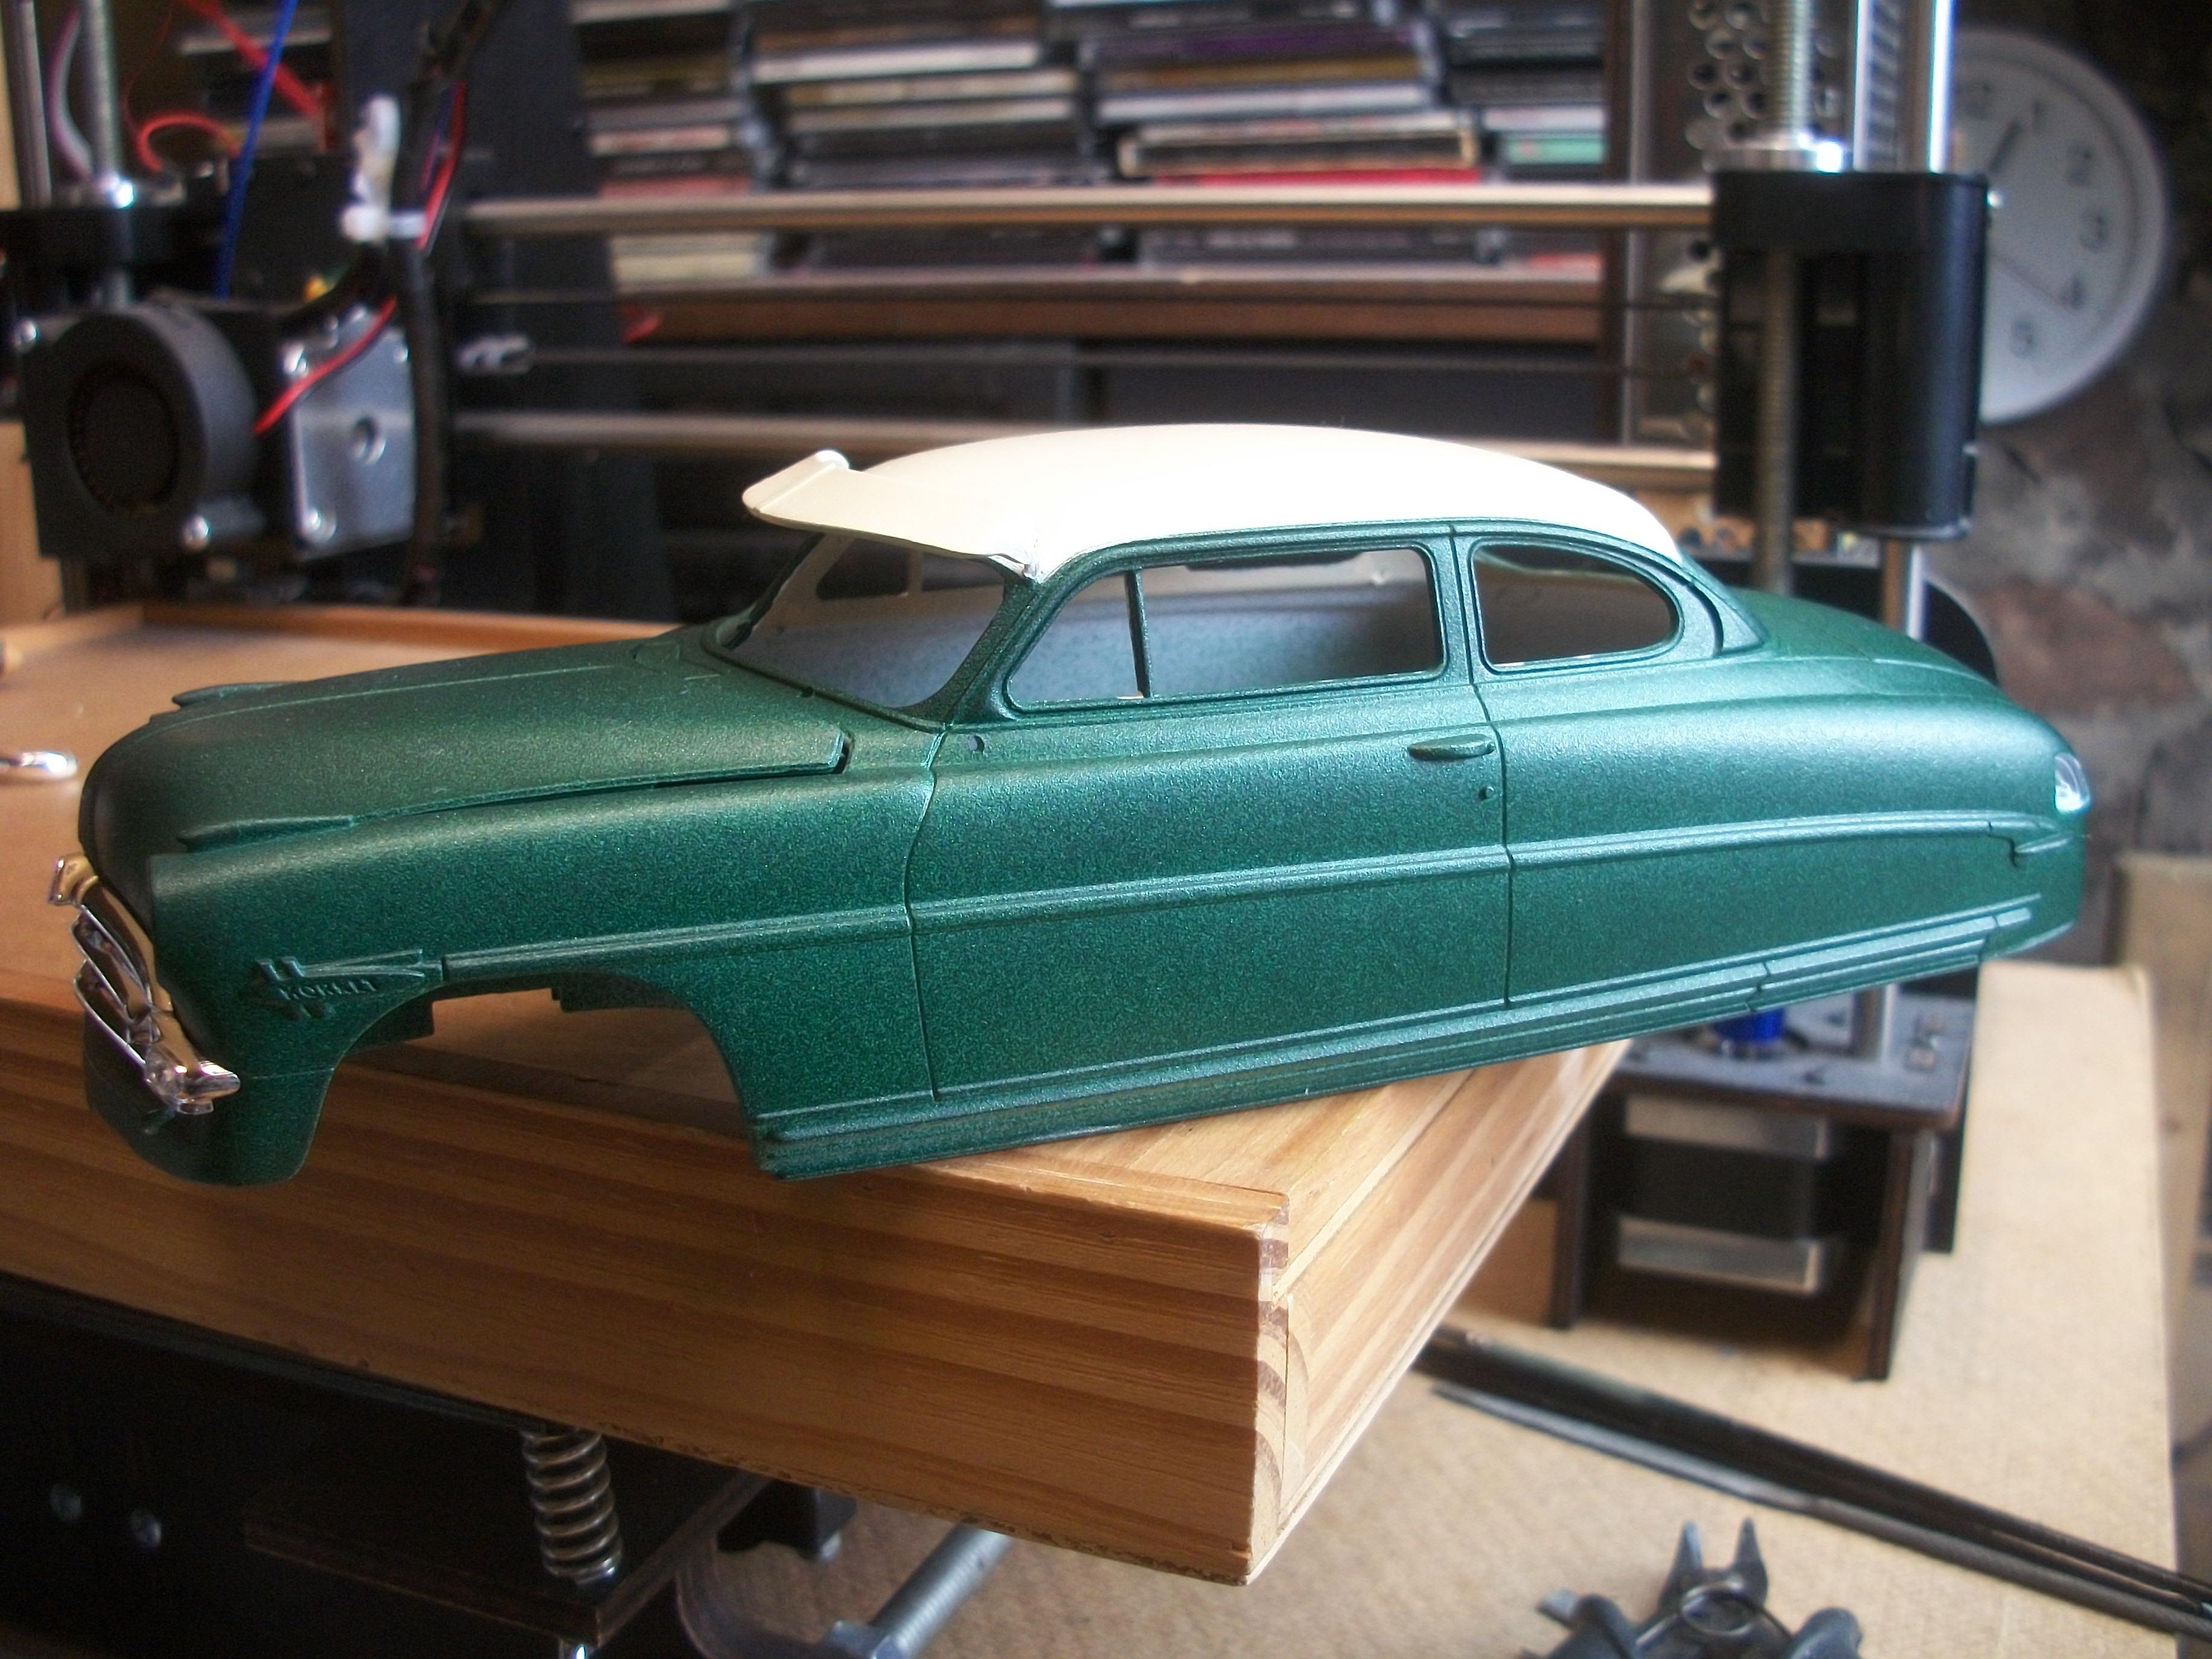
Thank you, Gary...... and I did try to get the actual Hudson colours, in Meadow Green (Opalescent) and Honey Cream, but they were simply not available in England...... The Rolls-Royce Balmoral Green (Metallic) and Rustoleum Antique White have turned out to be reasonably close, I think. David
-
The 1:25 scale Moebius 1953 Hudson Hornet build is completed, which has taken 6 weeks and 4 days in the making. Here is a photograph of this fine motor car, along with it's proud new owner. This has been a most enjoyable build, I must say........ I am extremely impressed with the build quality of the Moebius kit, and I do have a second Hudson, should I get the urge to build another pretty soon! As soon as weather conditions improve outside, I shall be taking some photos of this Hudson up on the 4 post hydraulic lift, as a standalone diorama. David
-
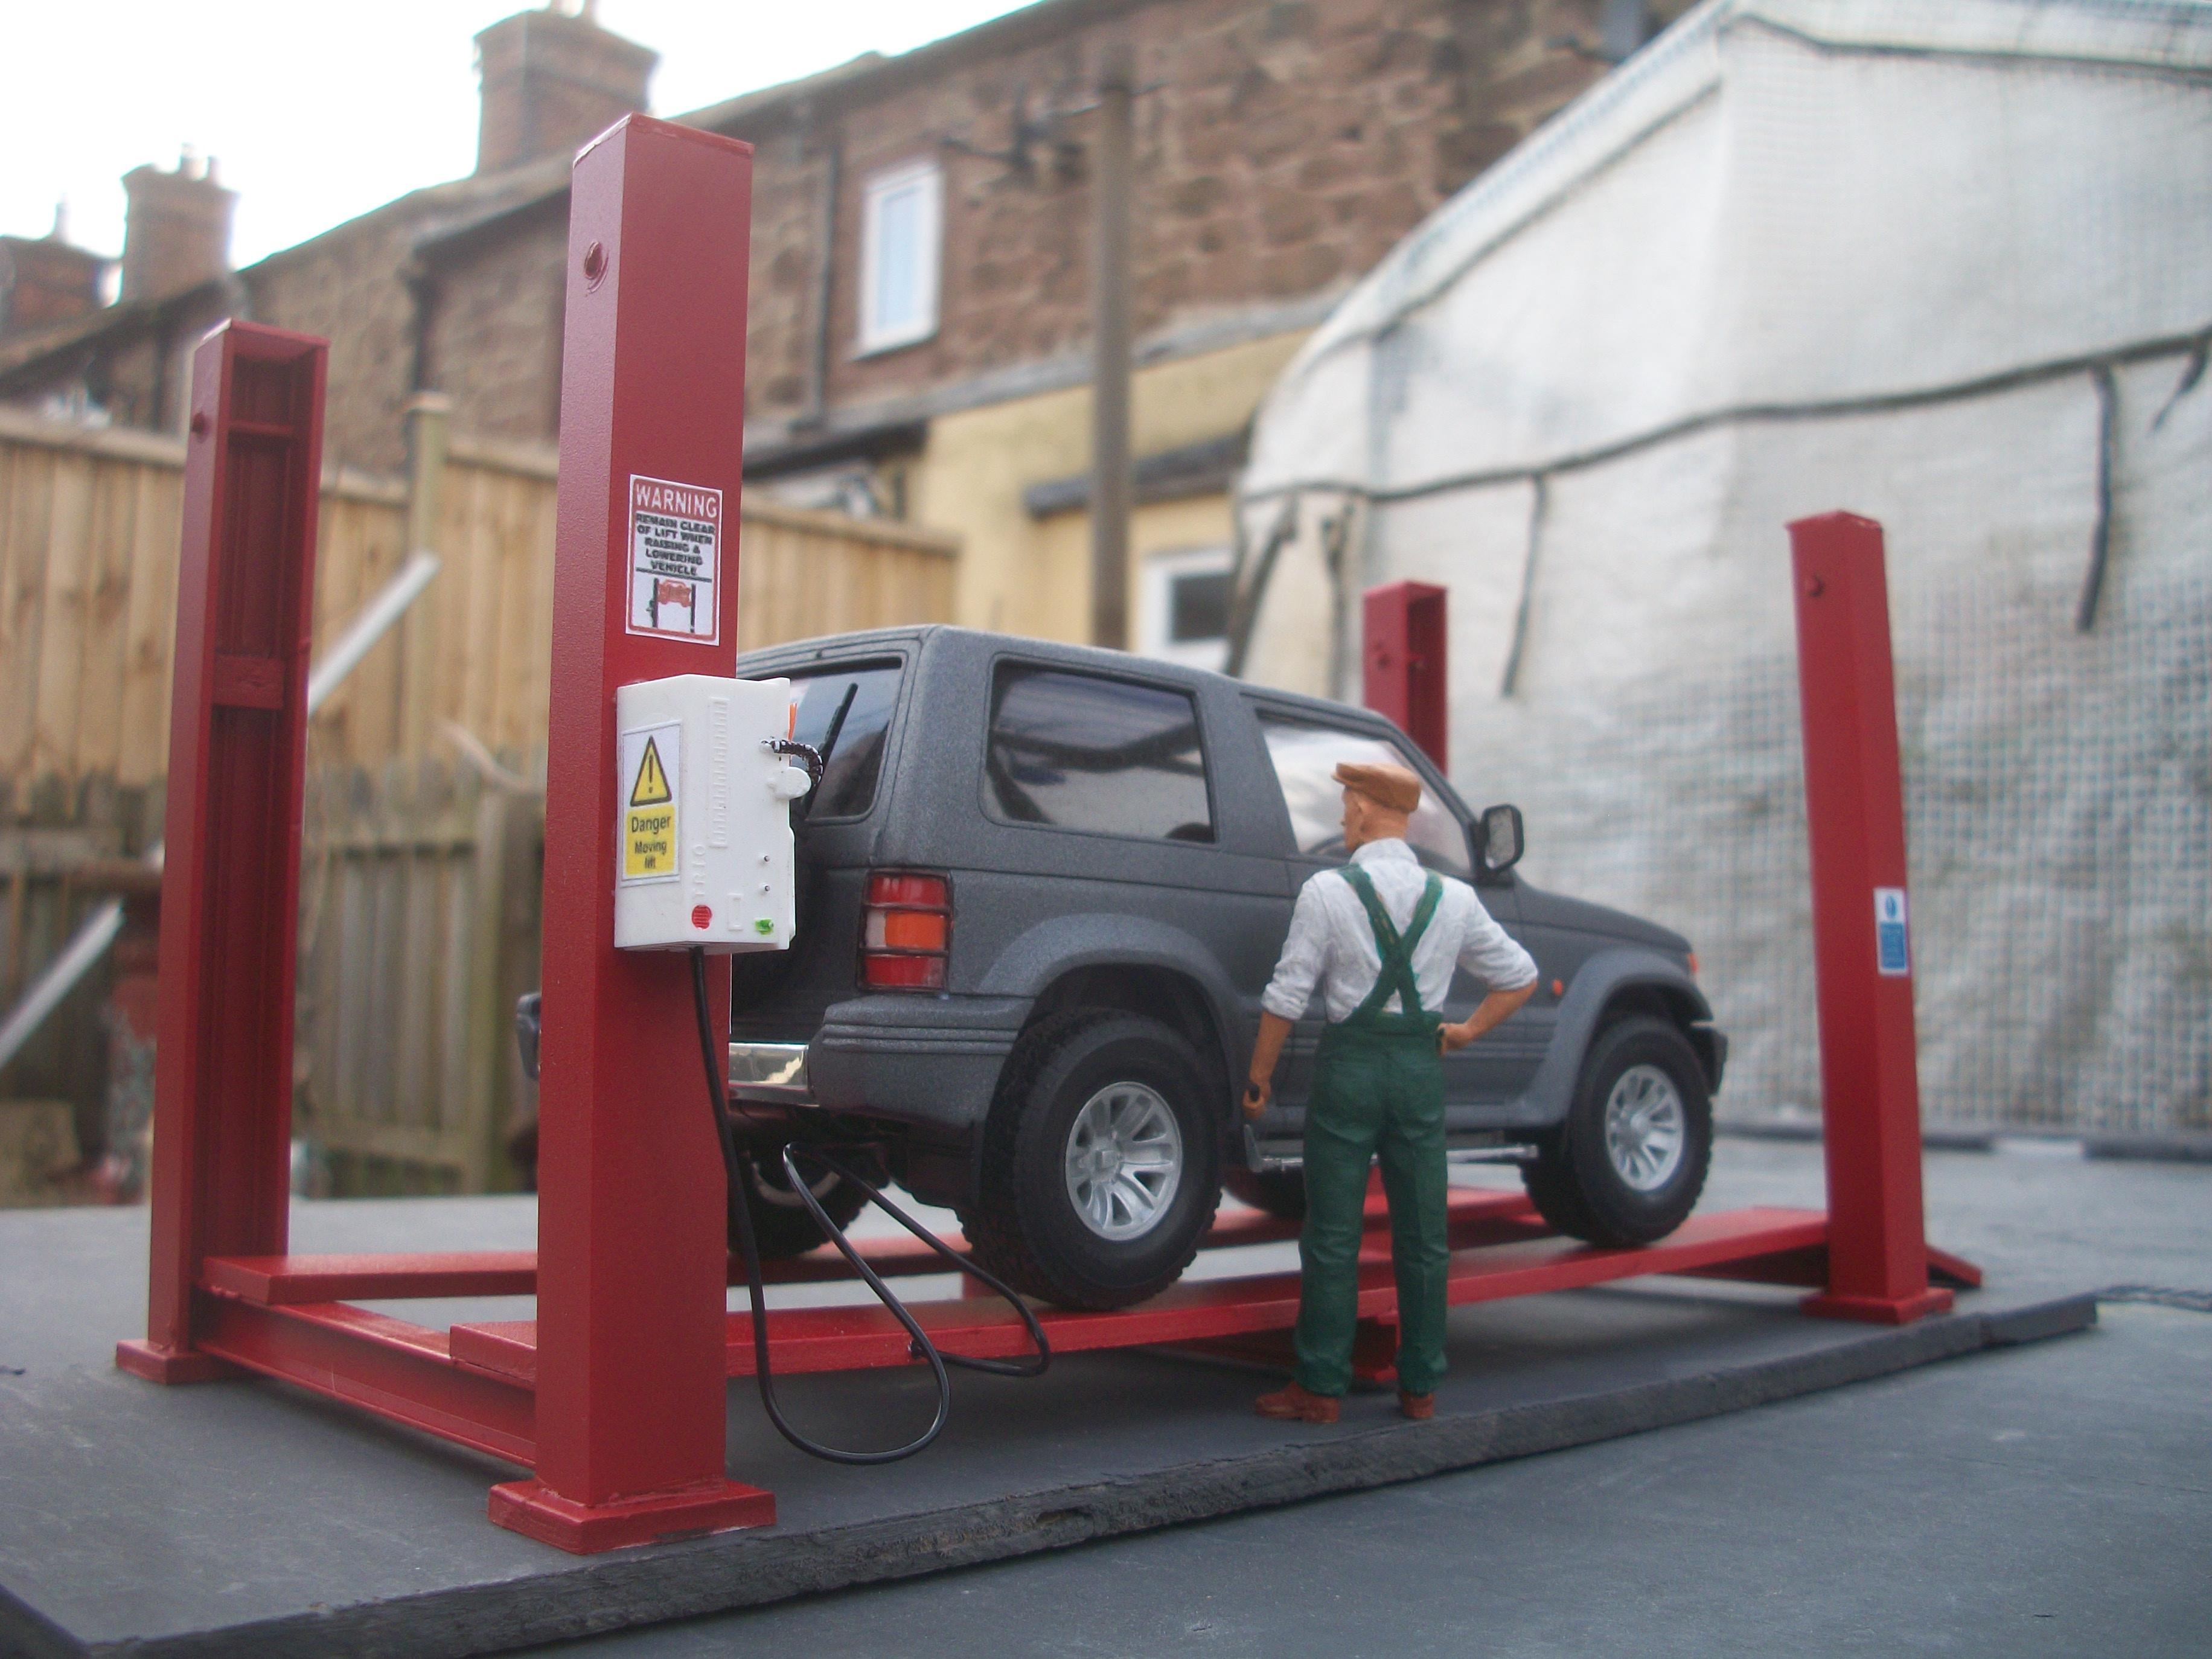
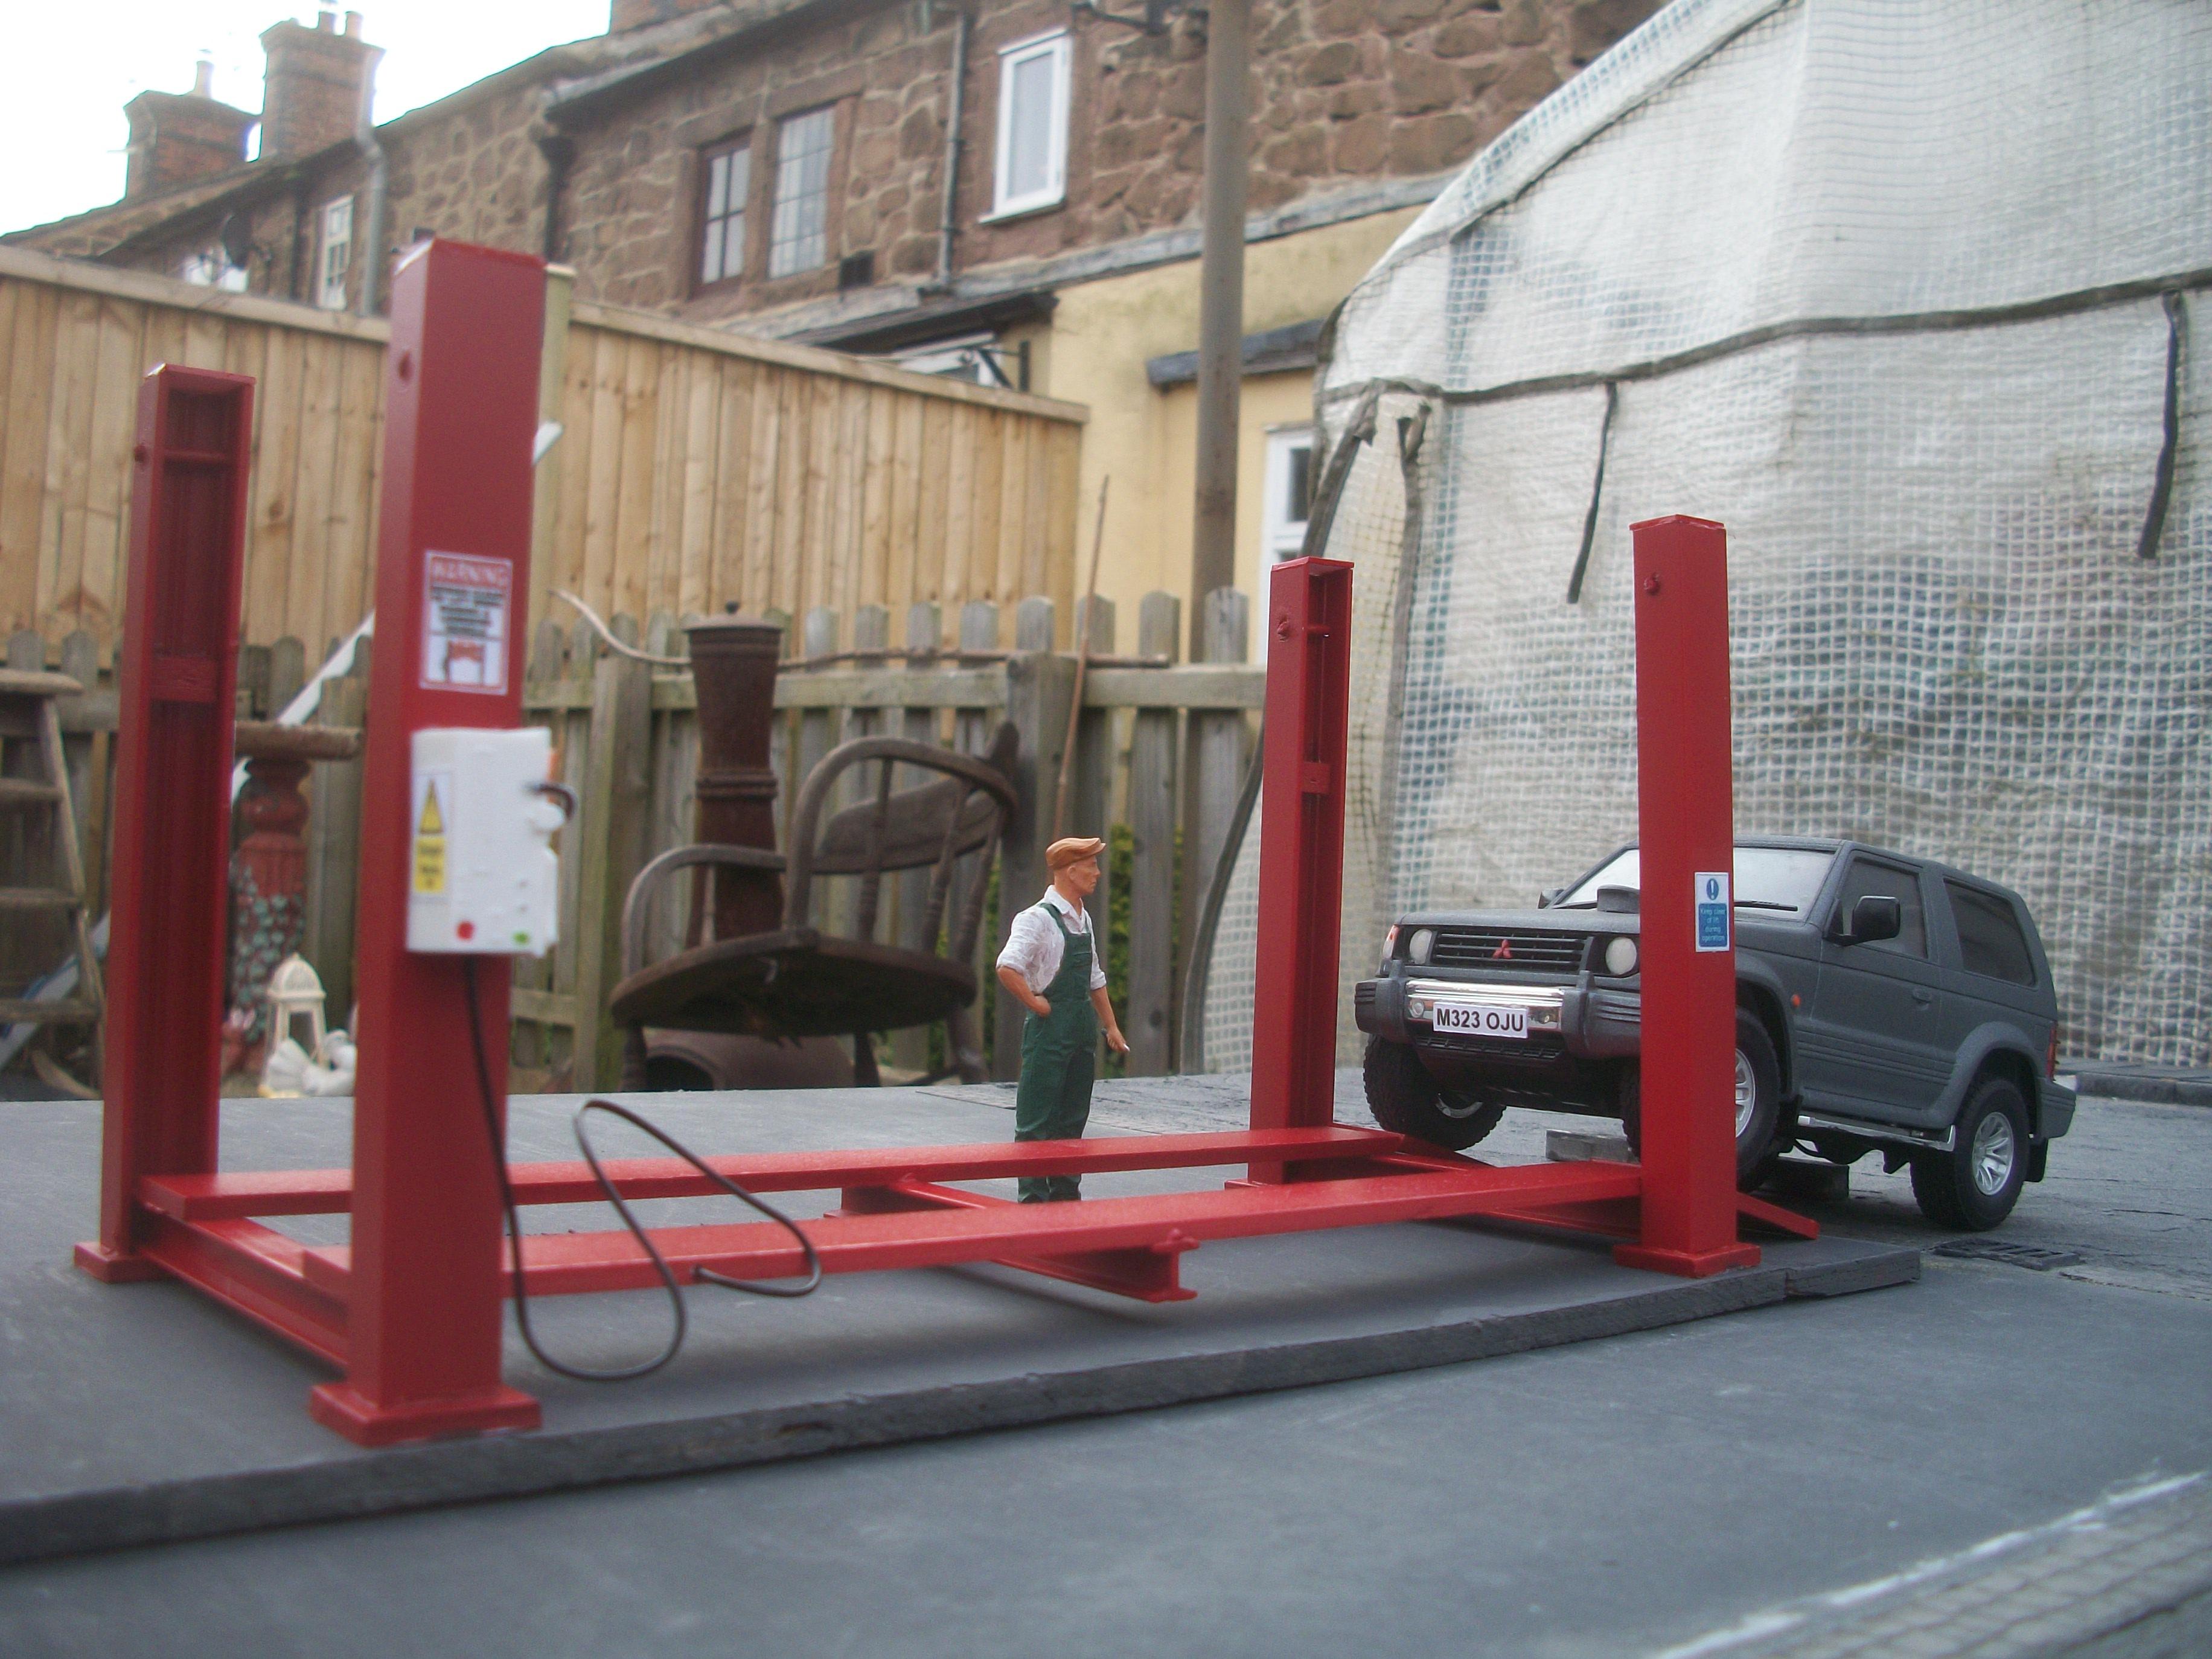
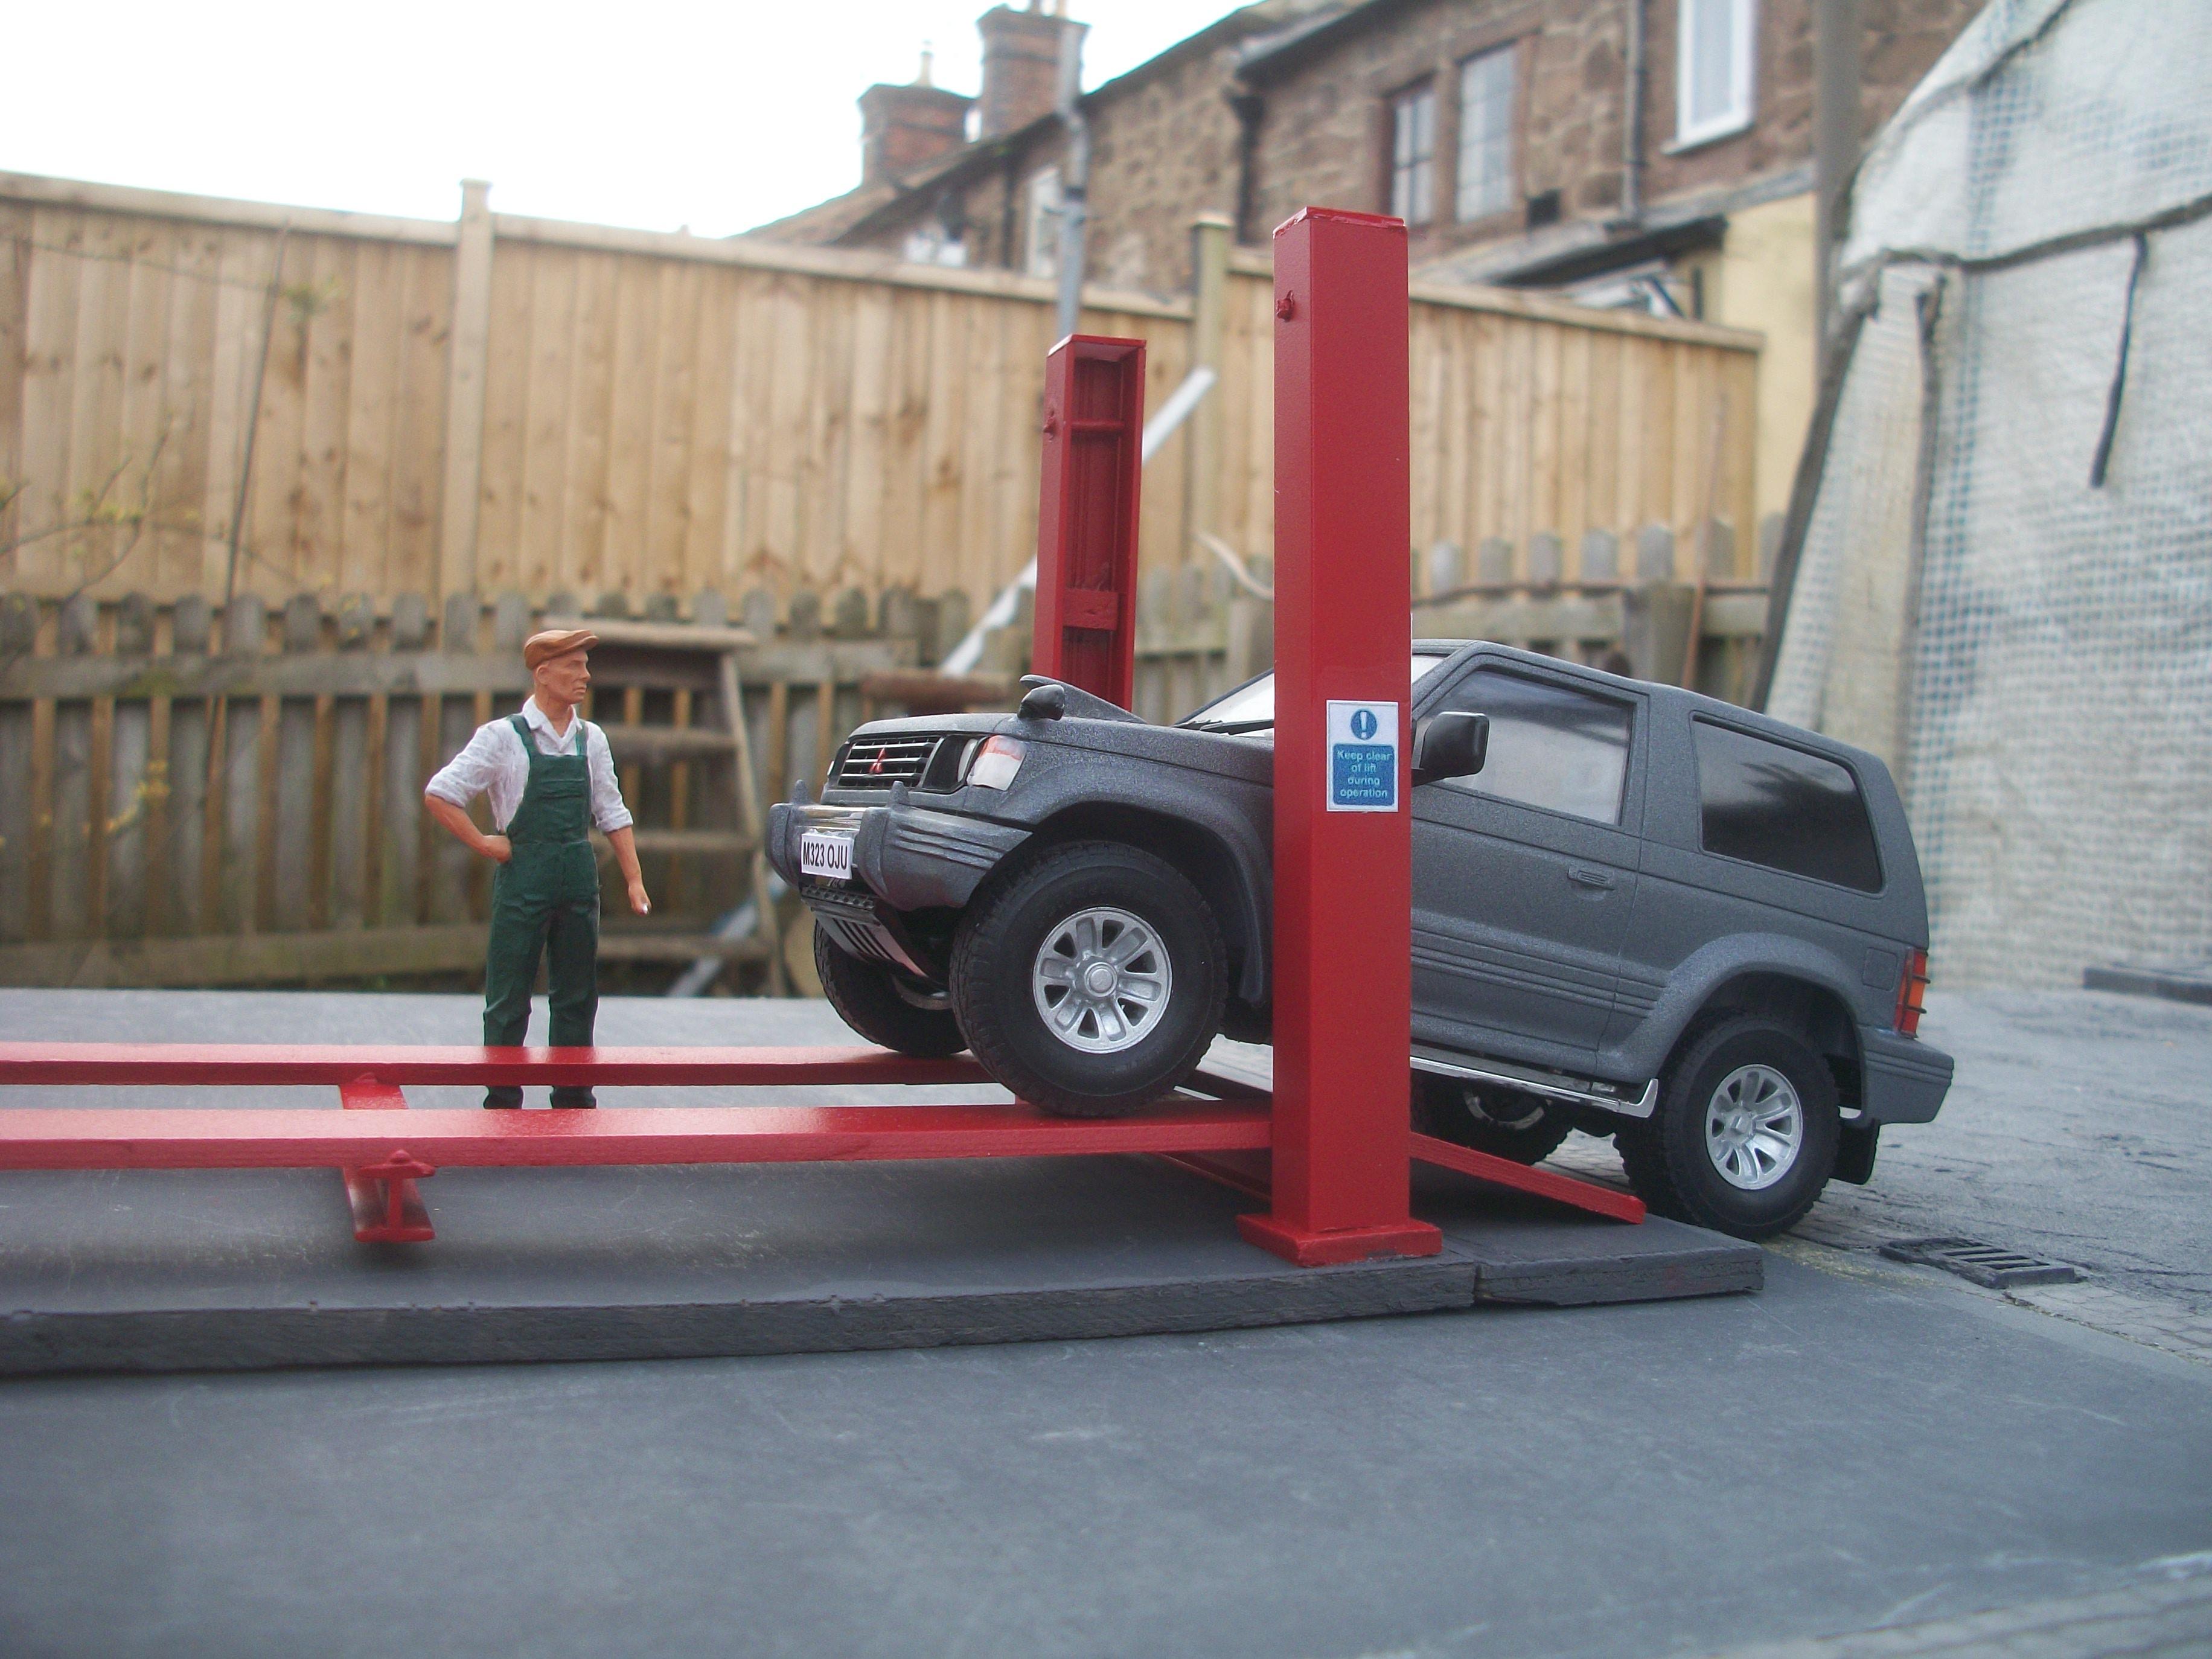
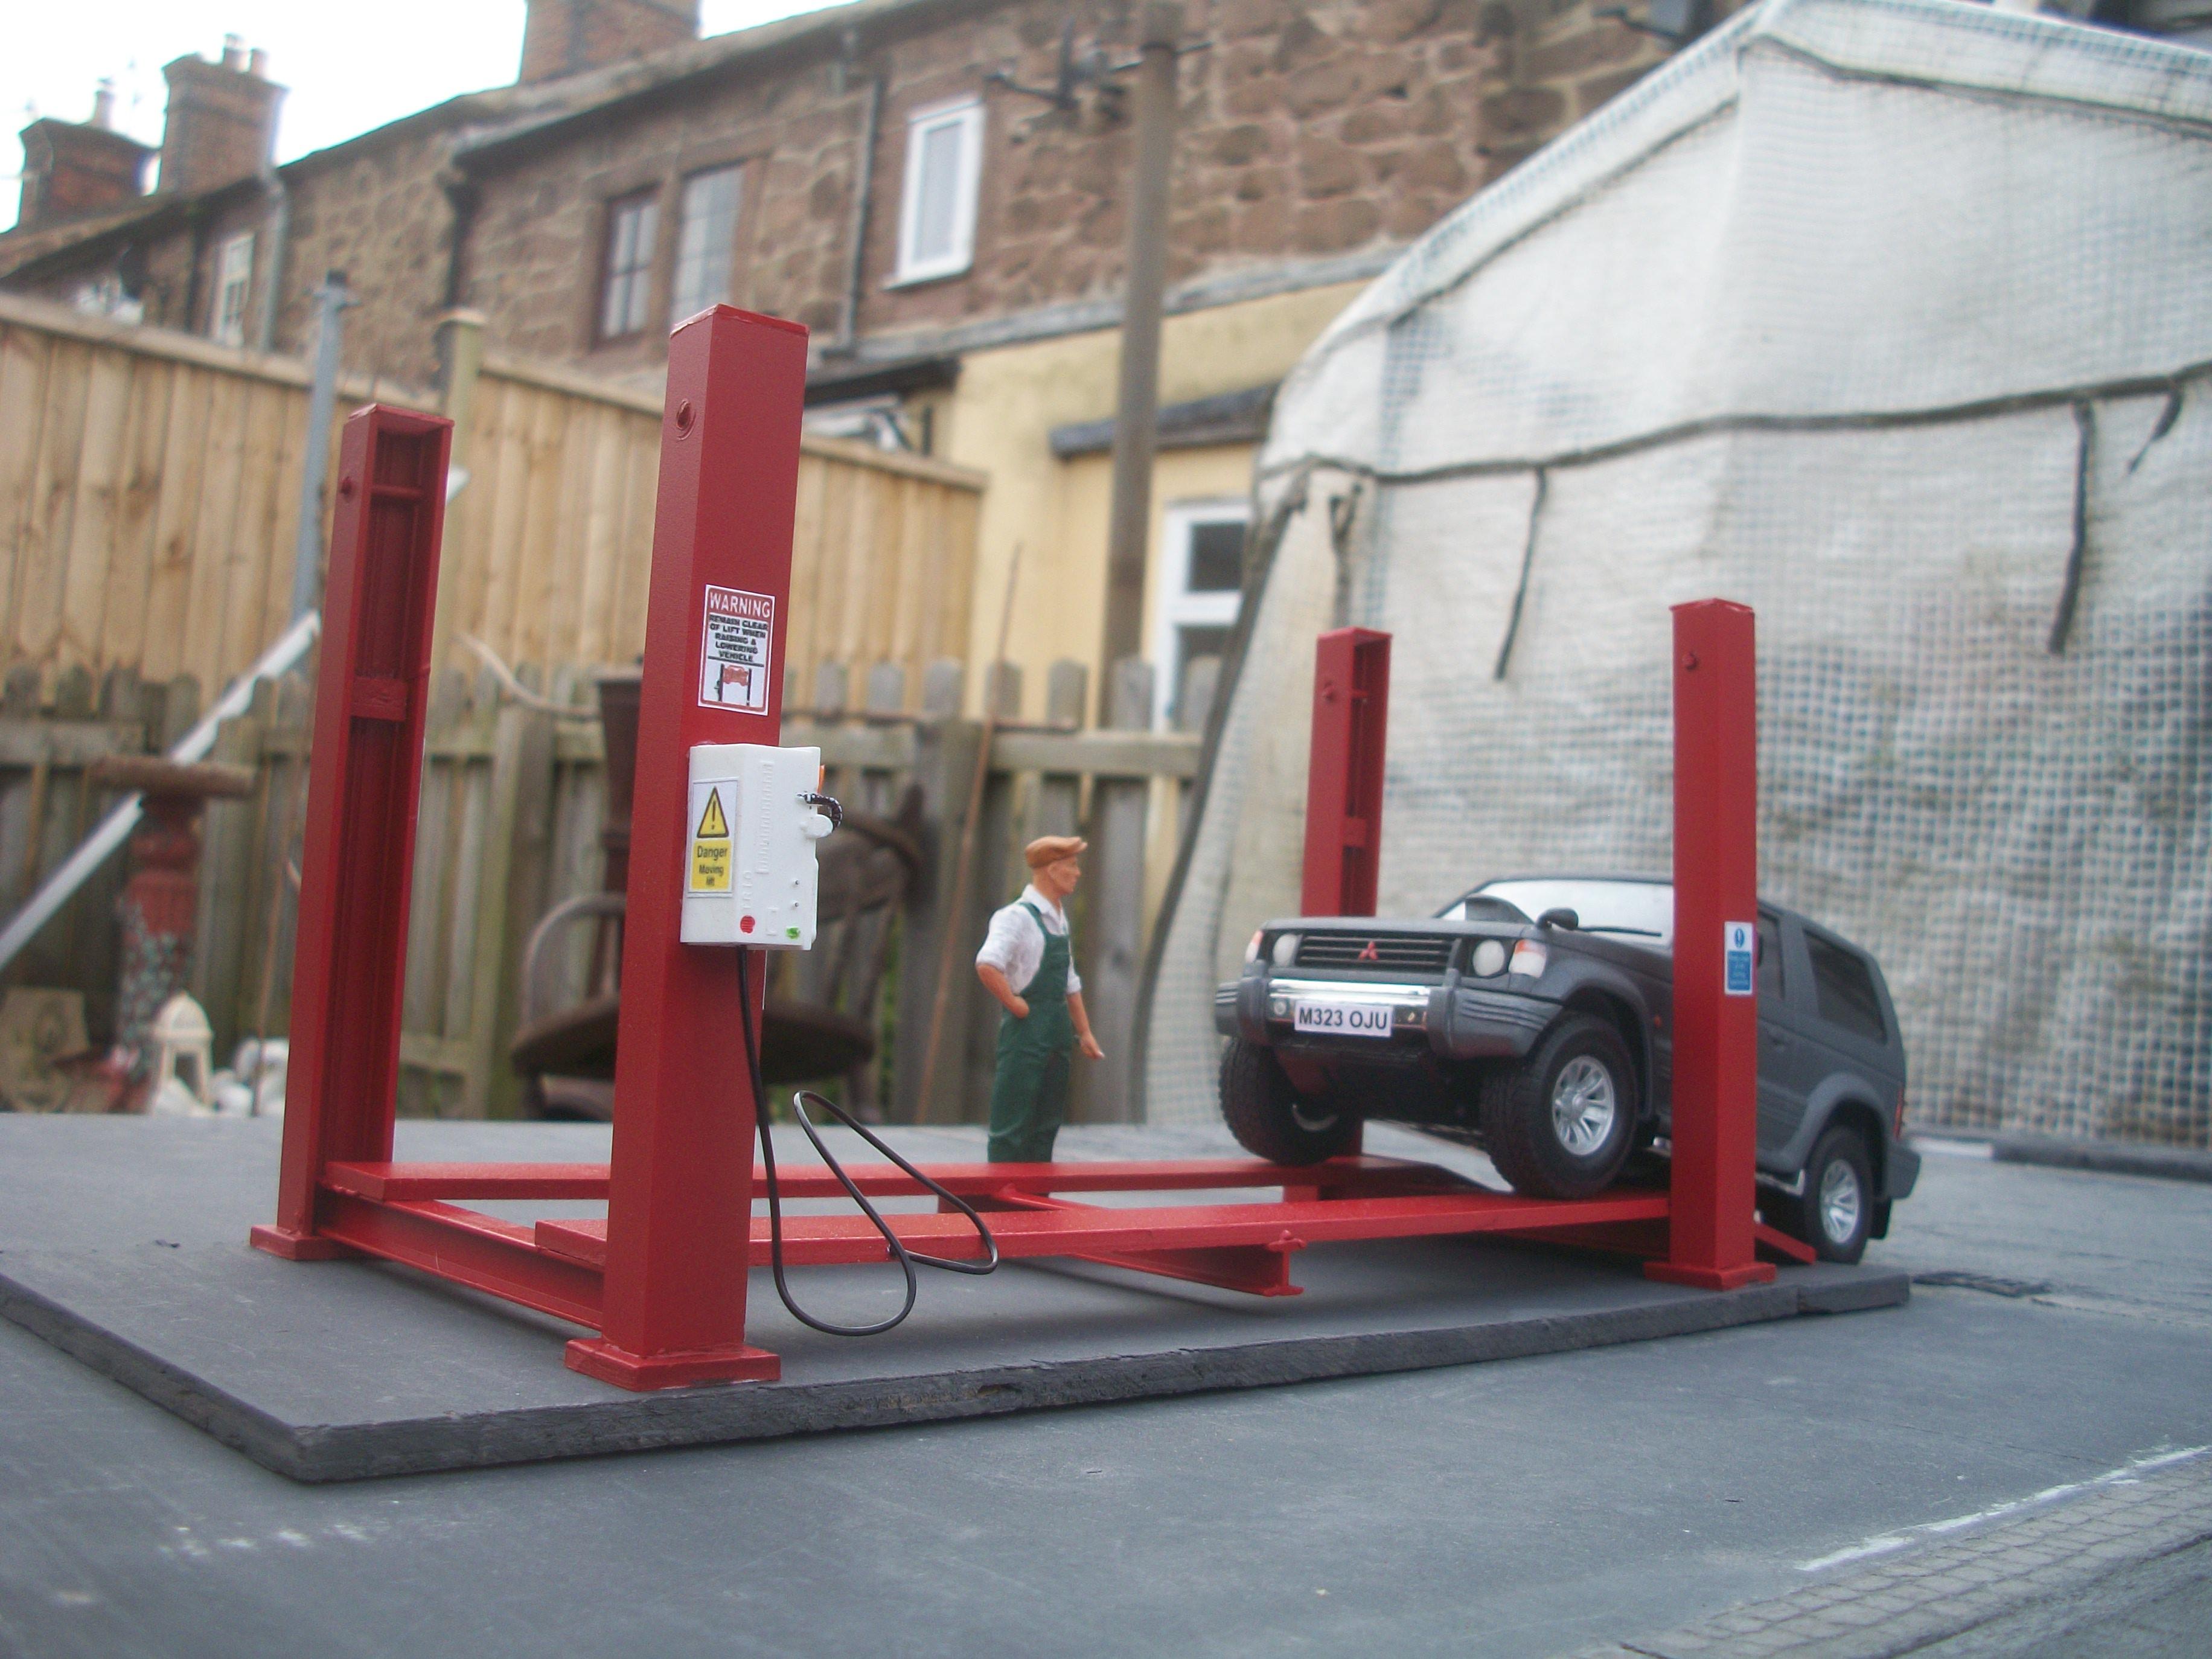
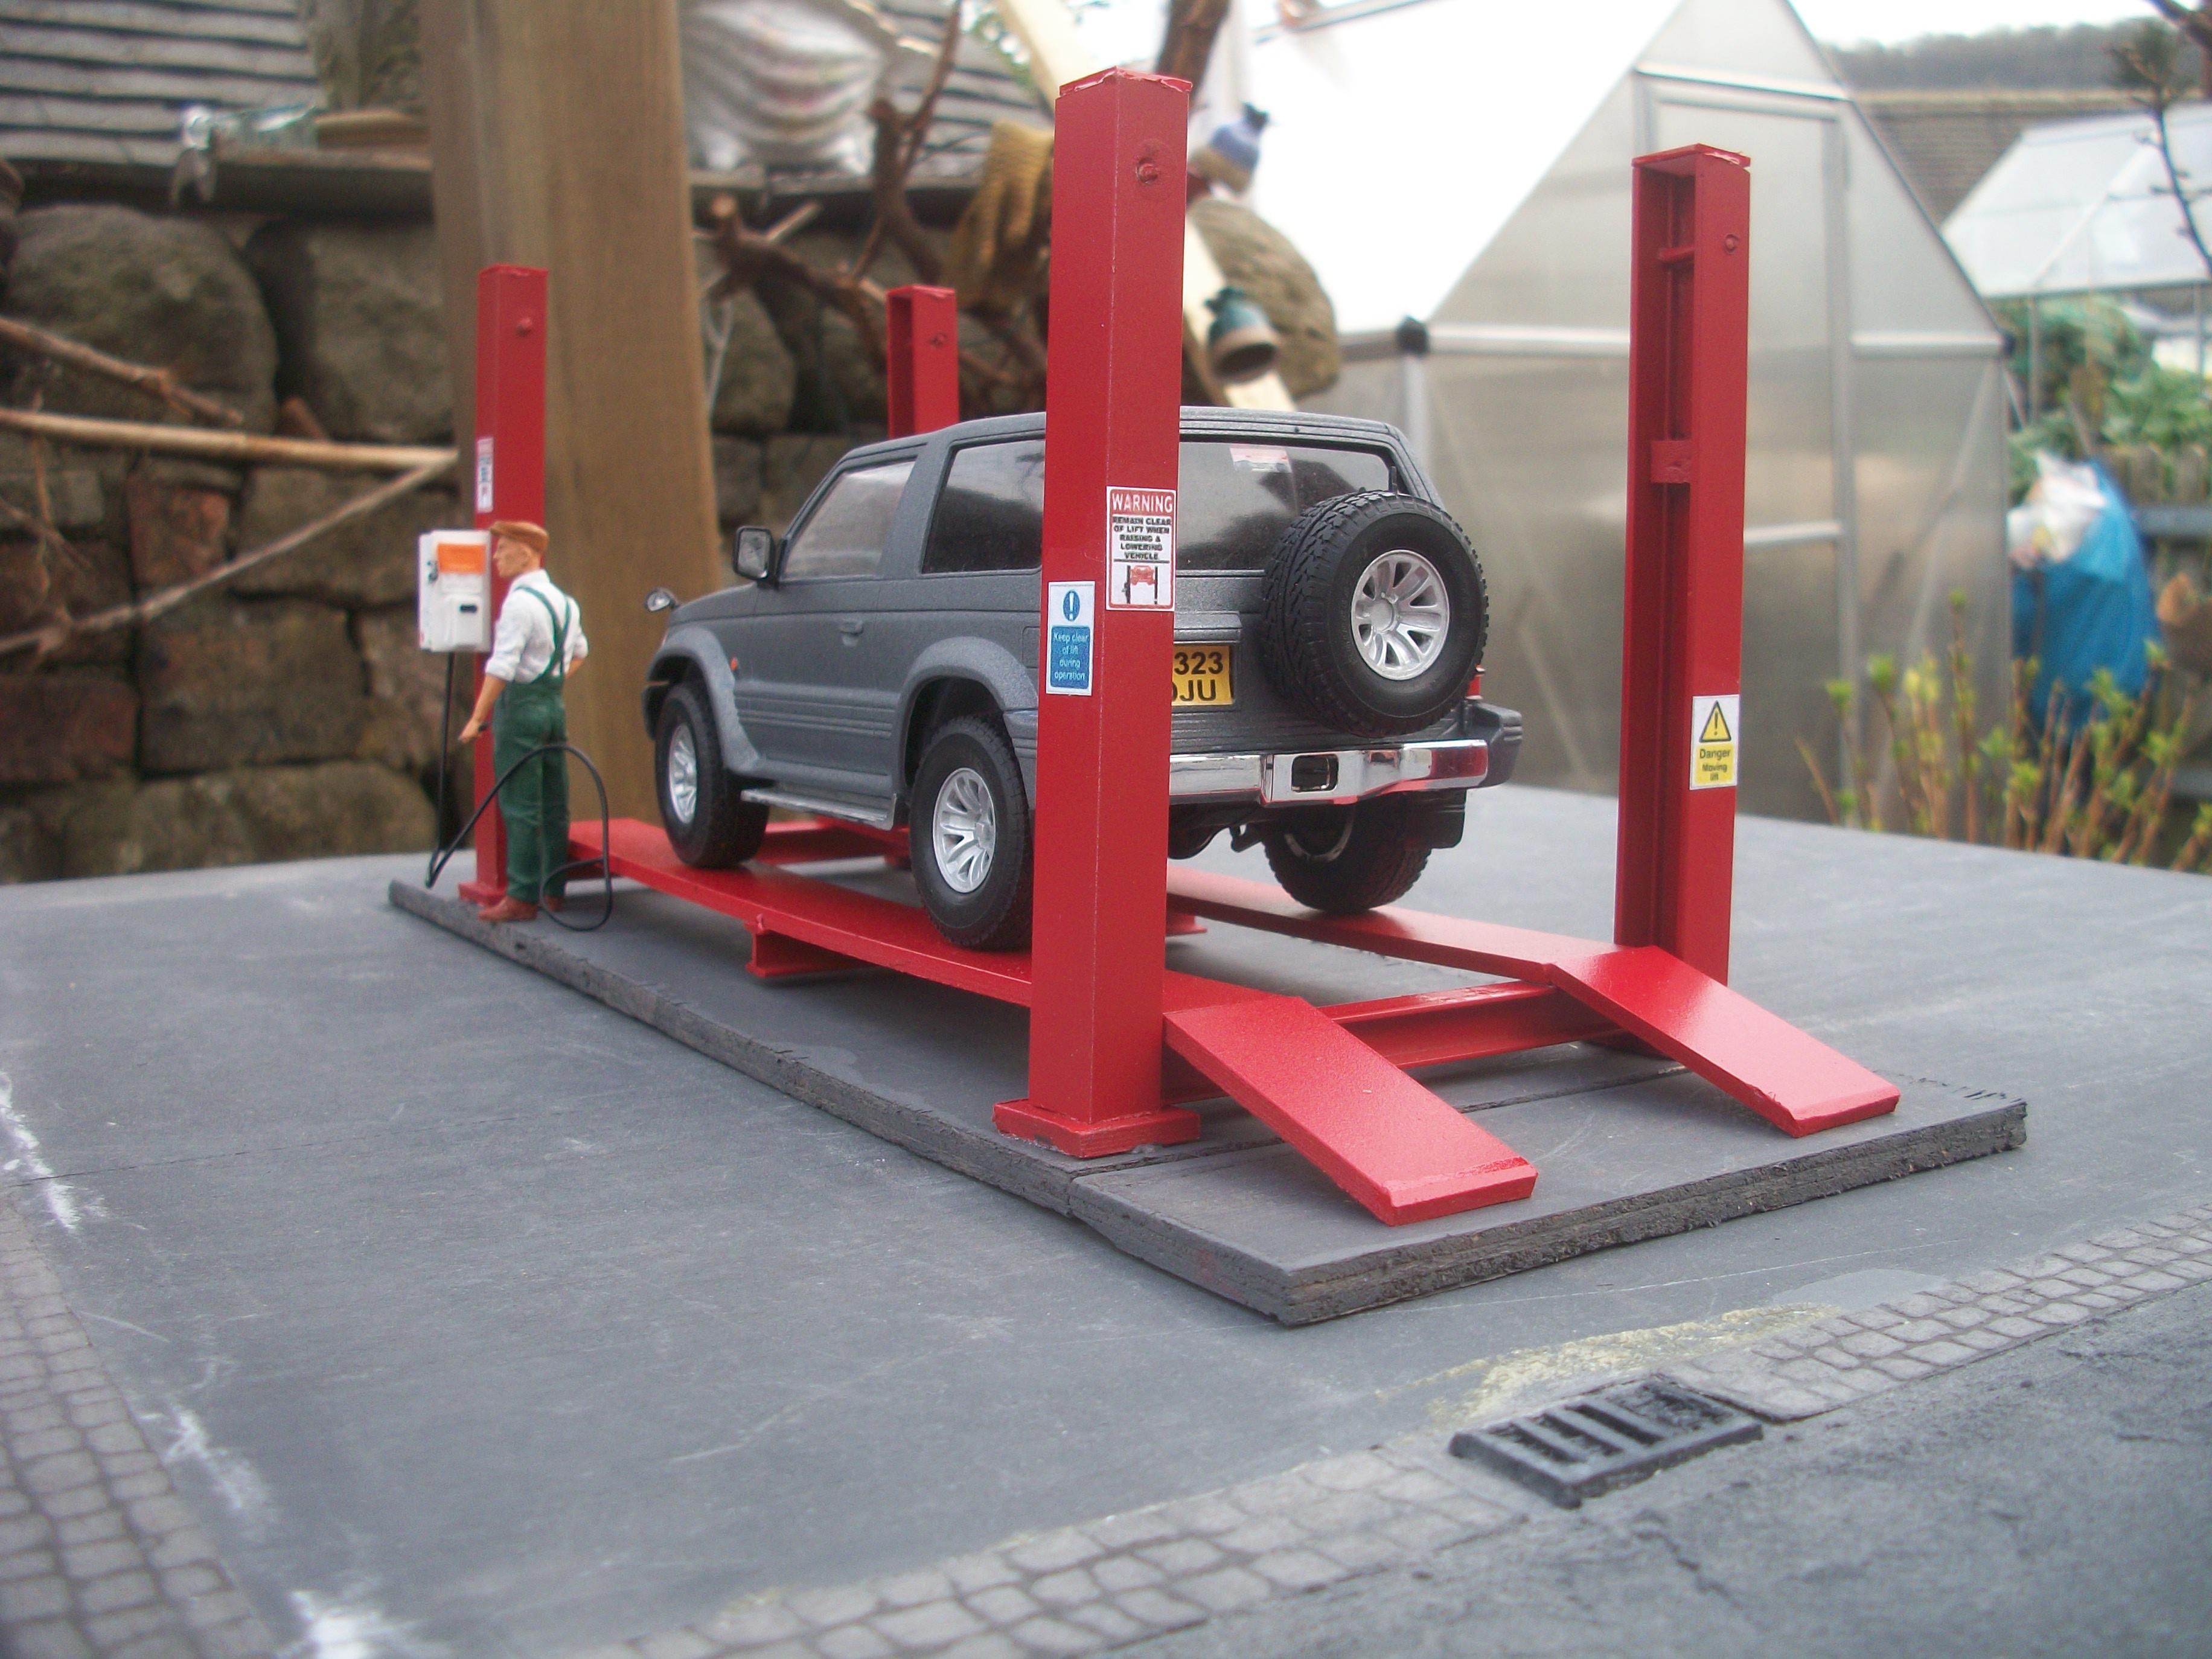
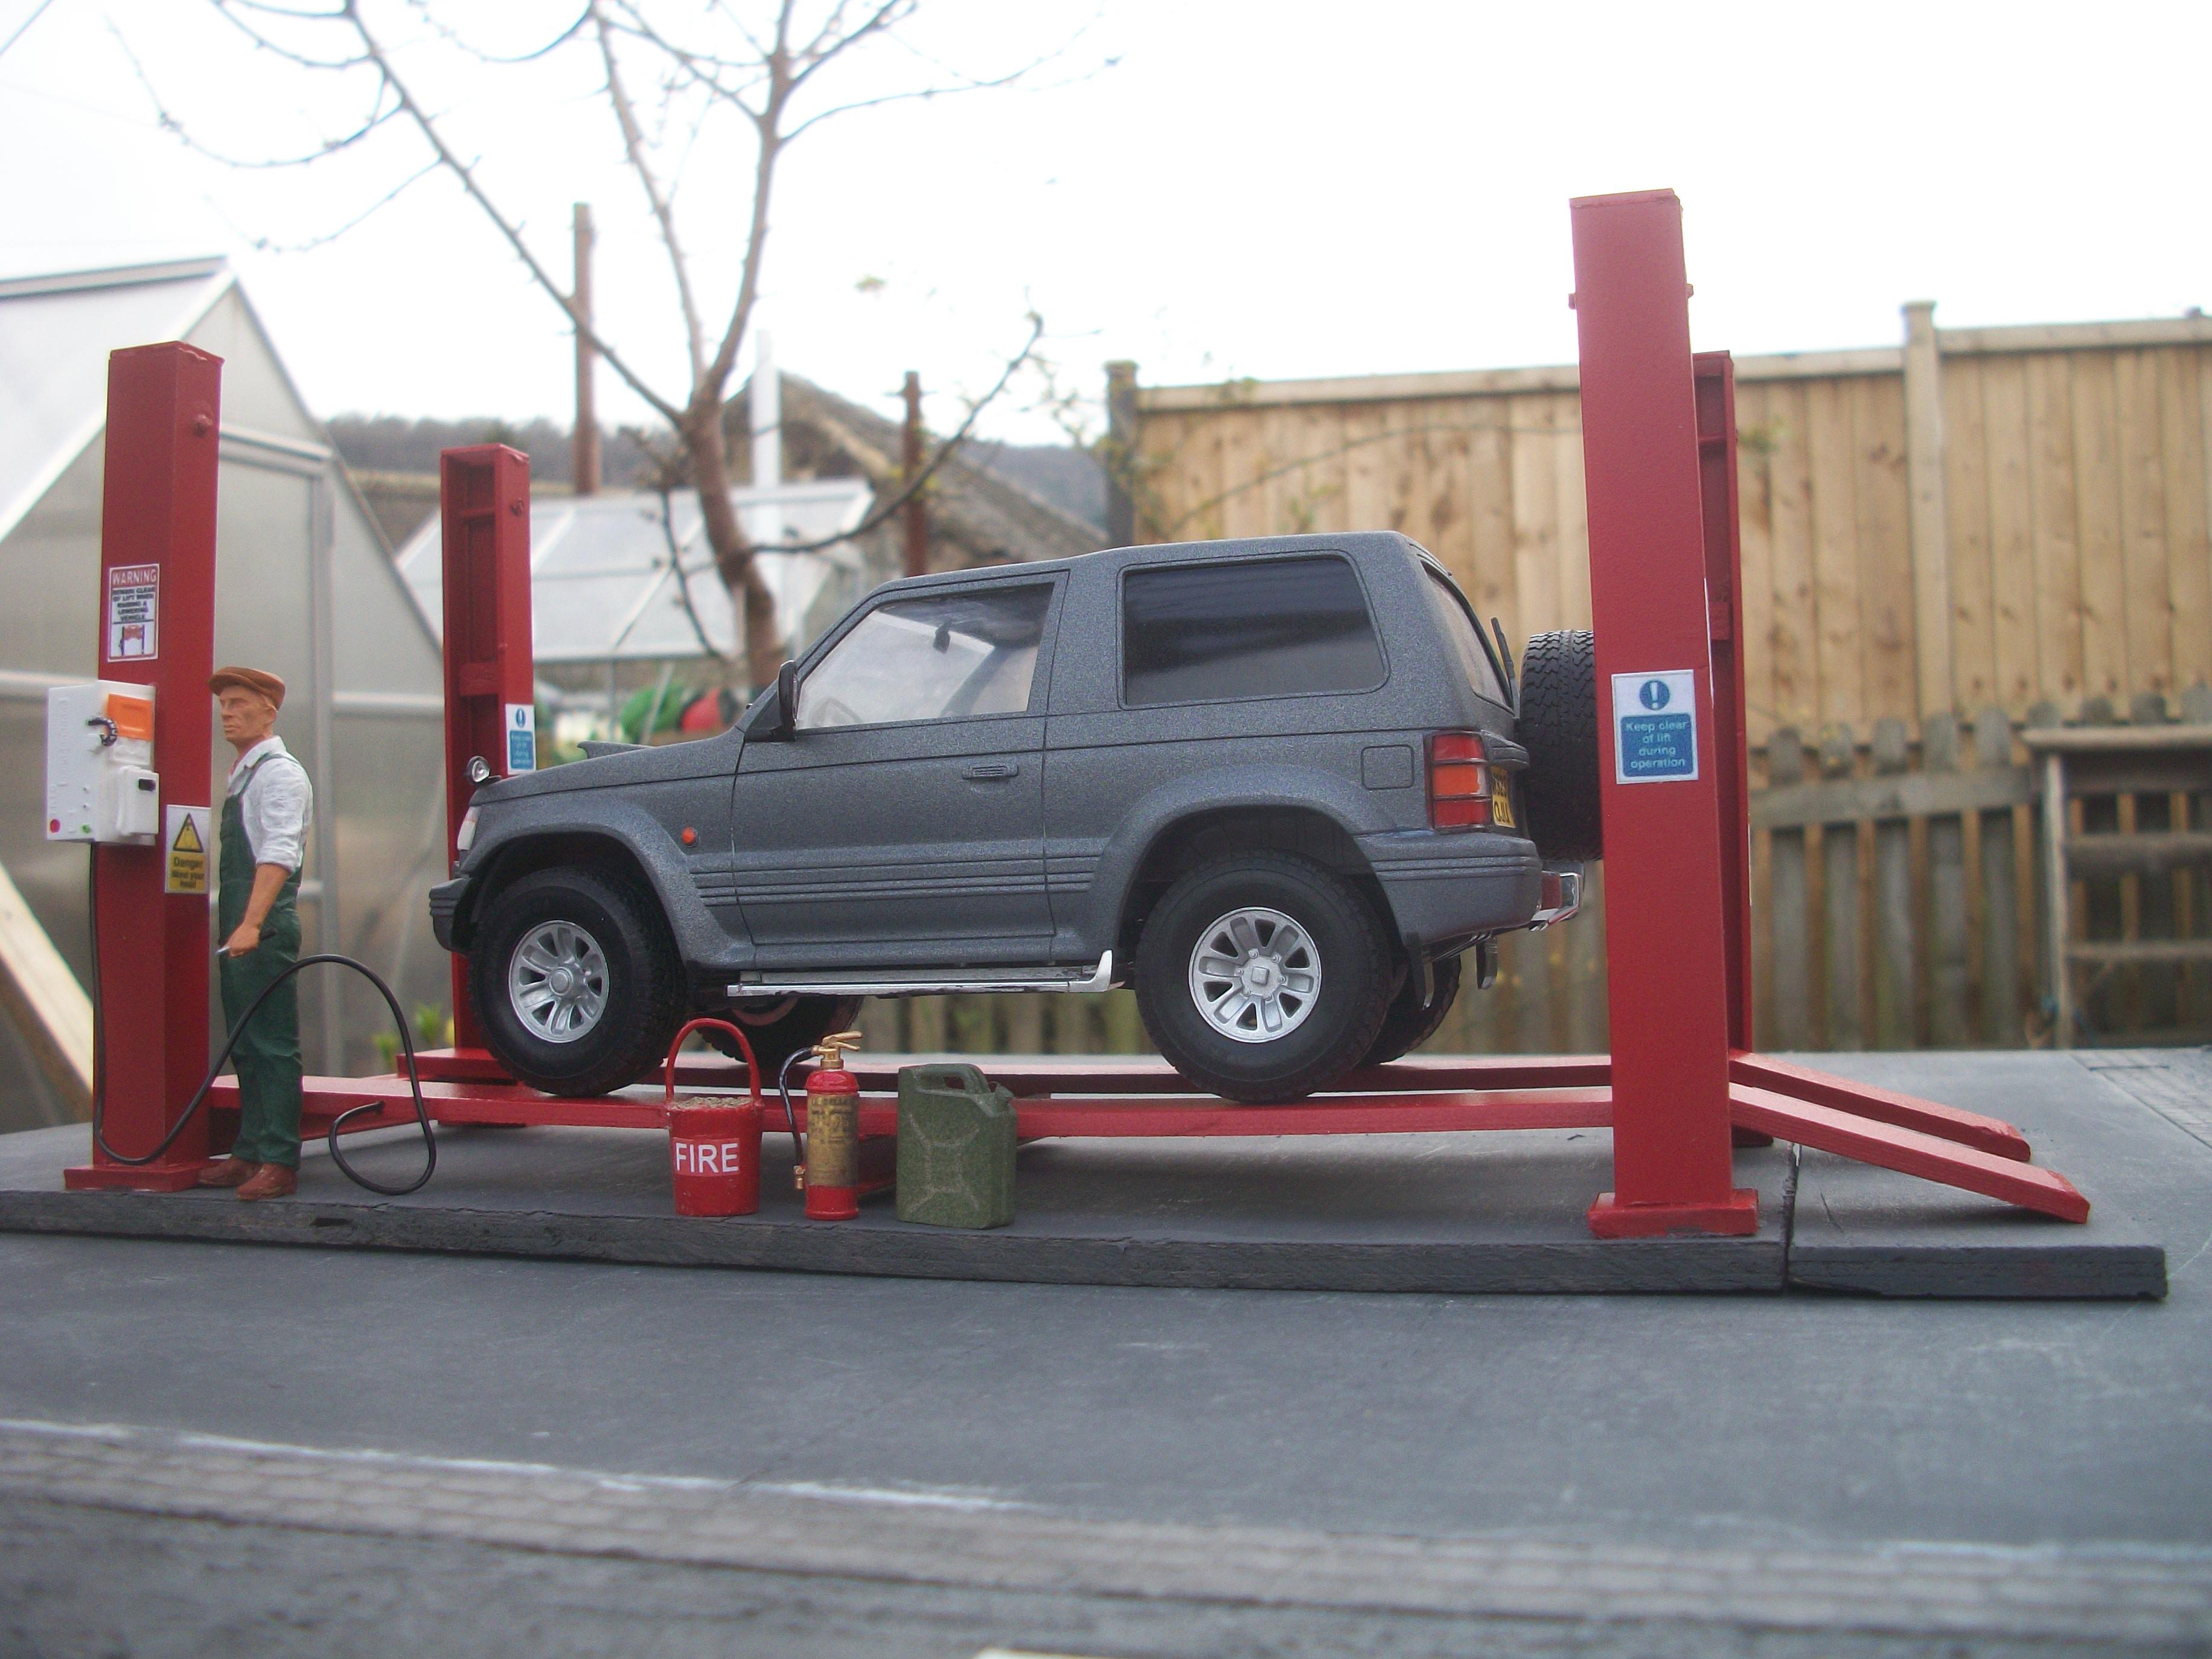
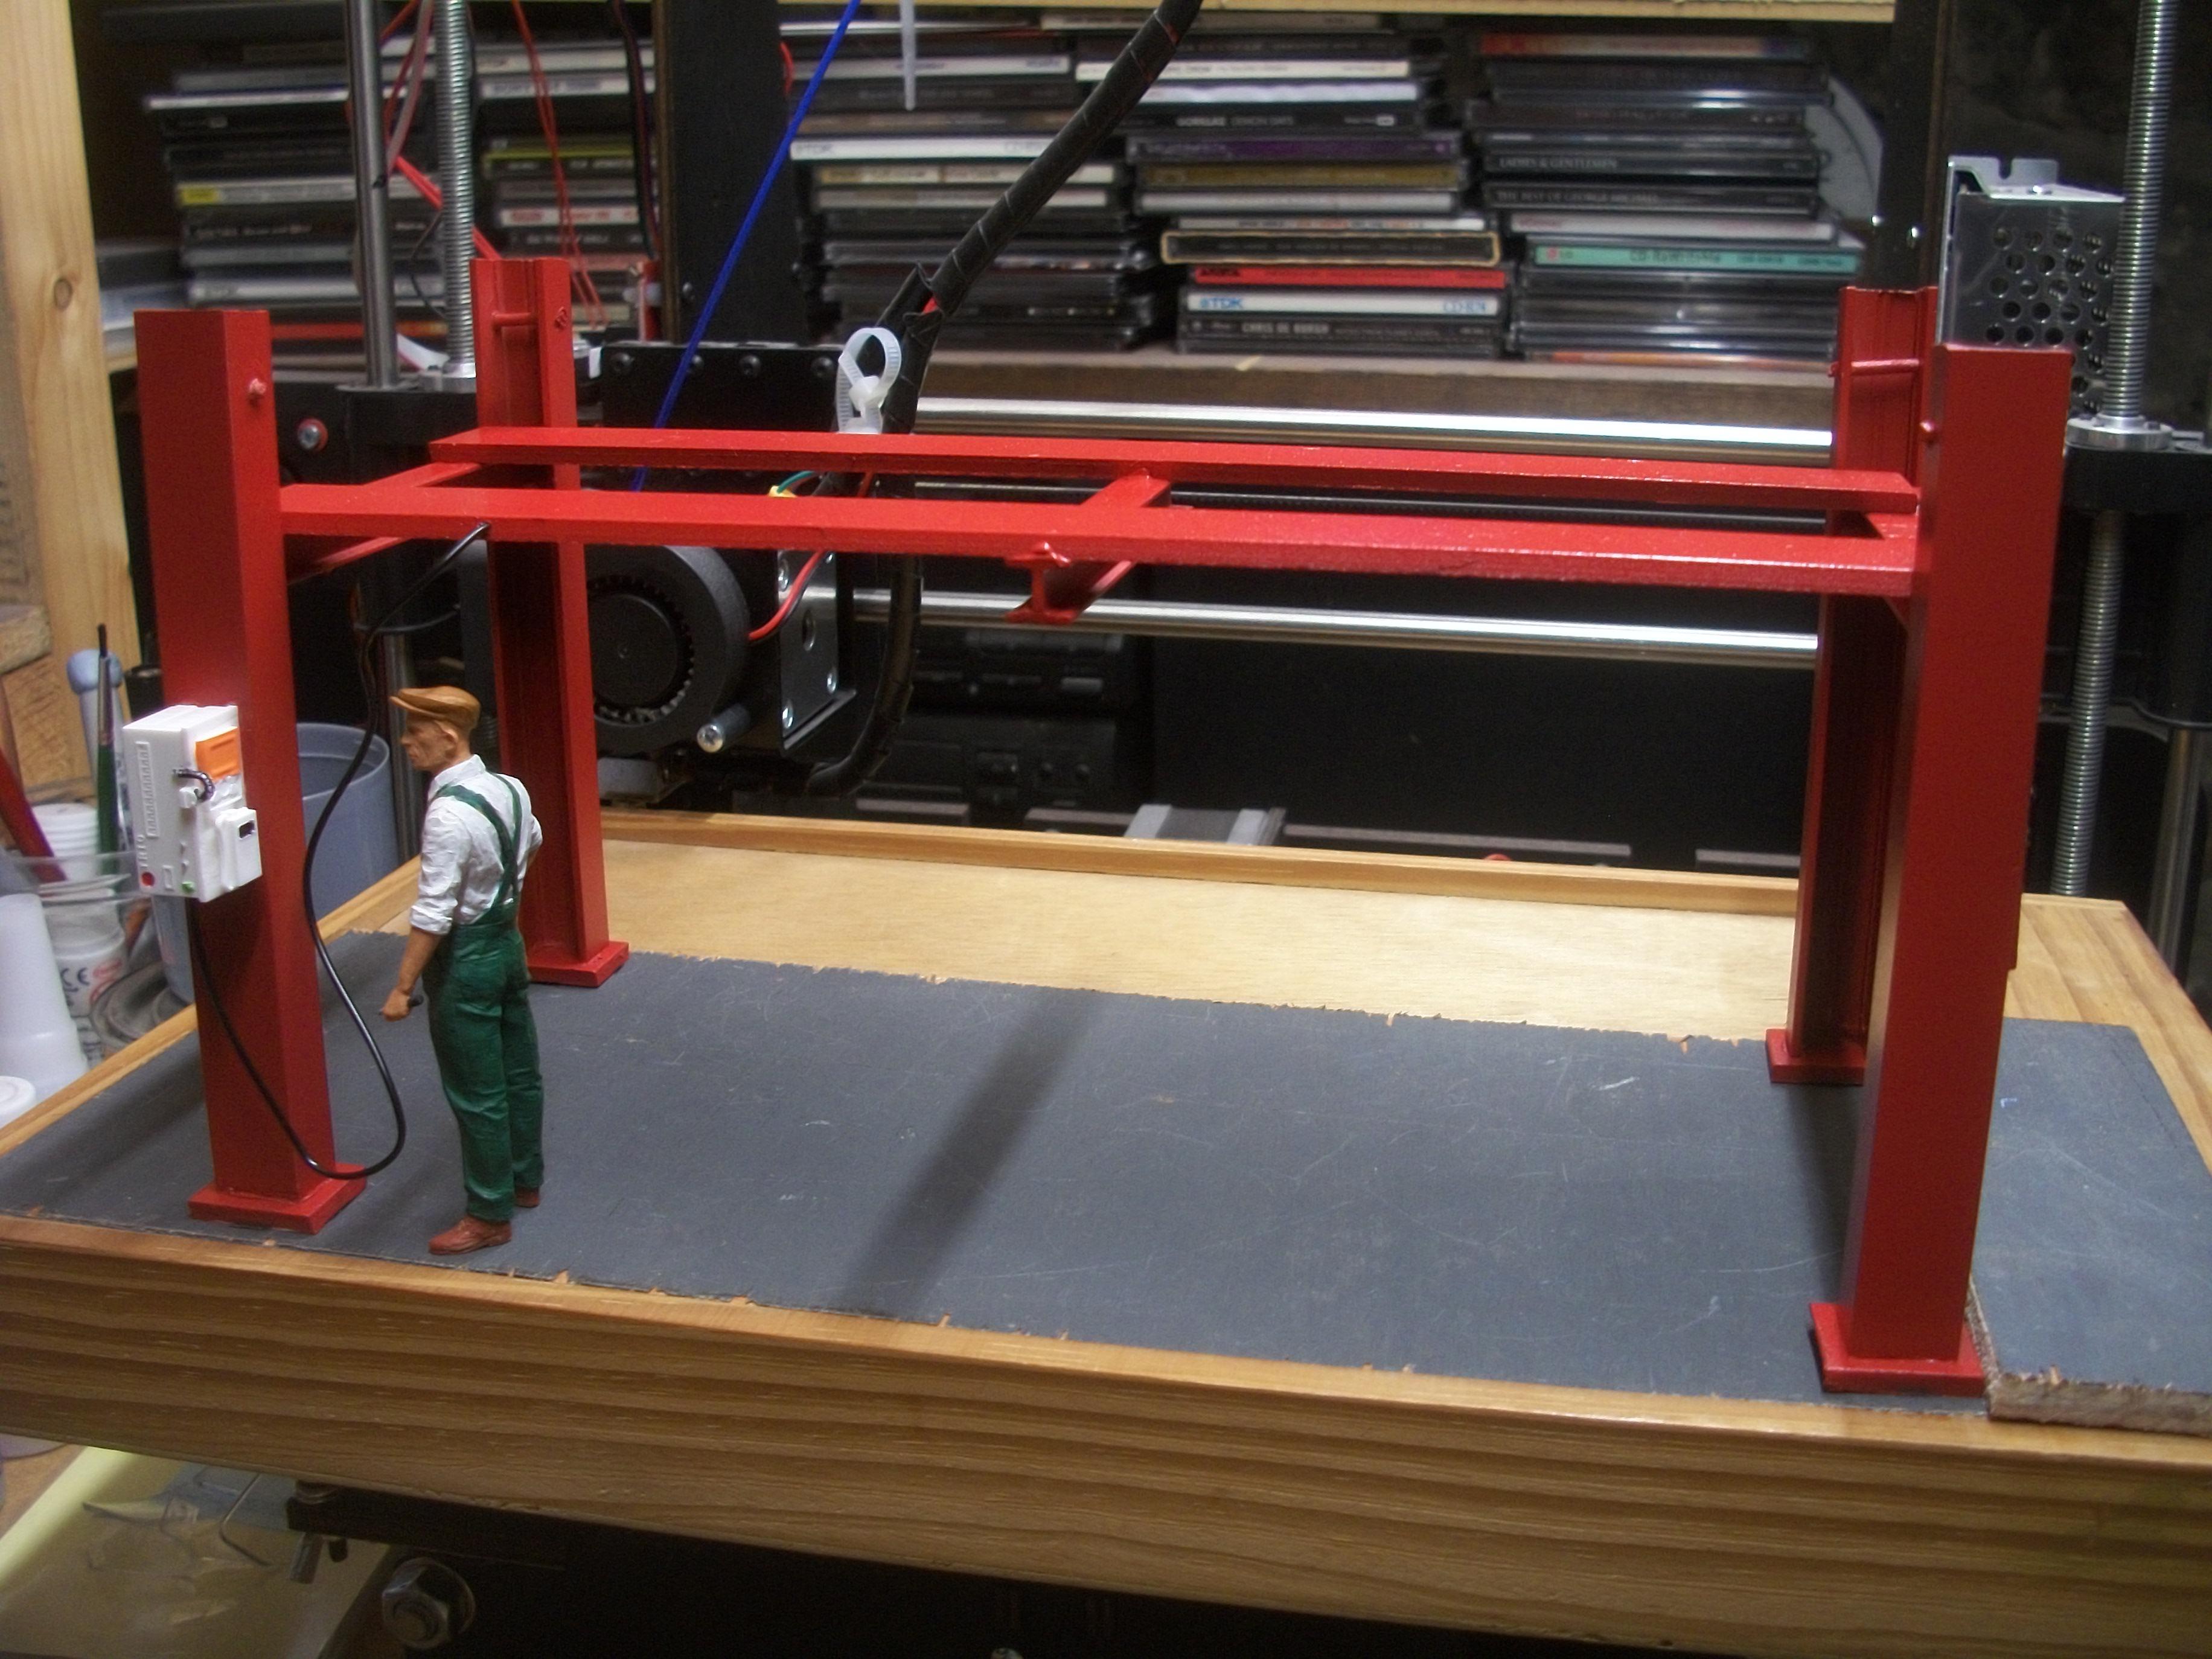
Now that the 4 post hydraulic car lift in 1:25 scale is completed, I decided to take some outdoor photos. For this I used the Hooper & Co. grey baseboard, which has a drainage grate for added interest, and the vehicle is a 1994 Mitsubishi Pajero 2.8 SWB...... The 4 post lift and small baseboard is a mini diorama as a standalone model. This Pajero model is from an Aoshima 1:24 scale kit. Forgot to show the ramps in the raised position, as time was limited. Thanks for looking, guys ! David
-
I particularly like the rusted chain in the metal tray, on the red / white fork lift....... and also the yellow bucket loader on the pallet..... plastic that looks like METAL. The scratched red paint along the top edges of the tray, which is how it would be, with the chain being dragged in and out of that tray. David
-
Minicraft Models Discontinued?
Anglia105E replied to Anglia105E's topic in Welcome! Introduce Yourself
Thanks for the message, Charles....... and I do have a great deal of experience with these Rolls-Royce Silver Cloud kits. The Hubley promo model in blue plastic was the first, then came the Minicraft kit of 26 parts, and to be fair to Minicraft, they did get the body right. The body does have some moulding issues, as you say, but in terms of accuracy and proportions it is good. Then you have the Entex and Revell versions of the Silver Cloud, and also the Masterkit version from Brazil, these three versions using the same tooling as the Minicraft version. The quality of these kits is almost ' toy ' like, and consequently you do have to go to considerable lengths to build a half decent model. All Silver Cloud kits were discontinued many years ago of course, and they are becoming less available worldwide. Oddly enough Charles, this is the only kit of the 'Best Car in the World' that has ever been produced........ I cannot imagine why? I have also 3D printed a 6 cylinder inline engine in 1:24 scale, that I designed using FreeCAD software. The engine is still listed on the Shapeways of Holland site. David -
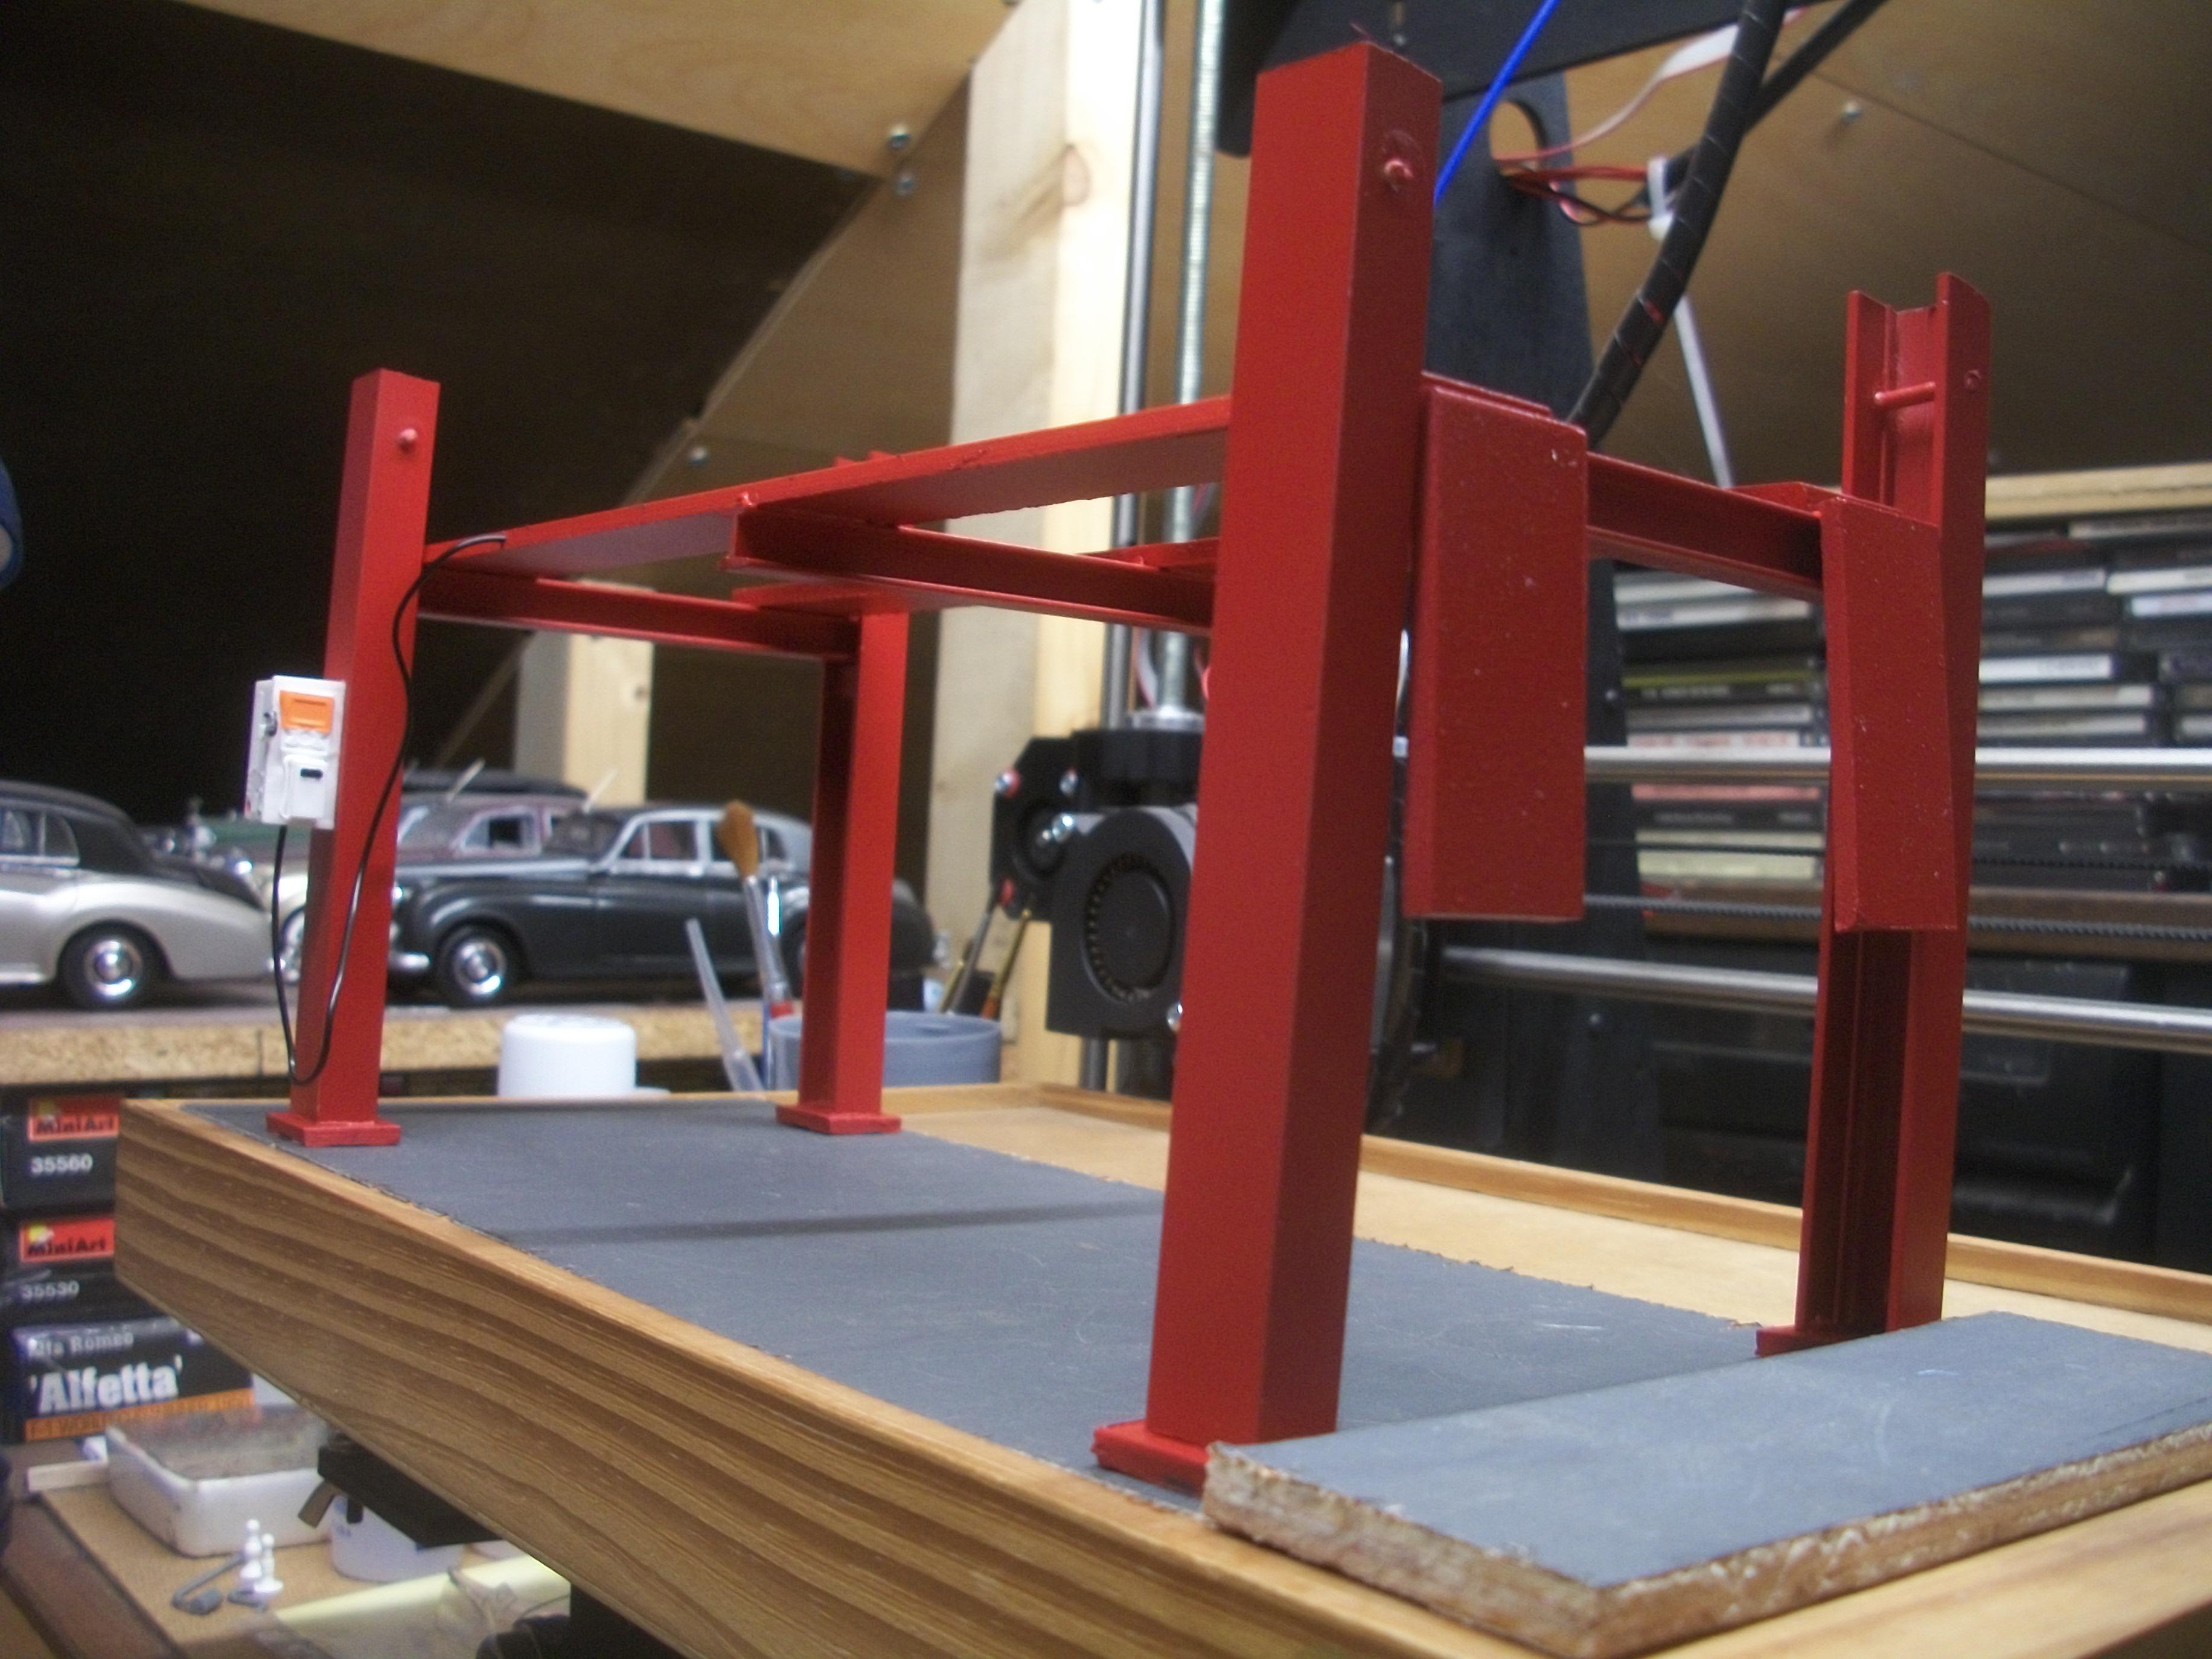
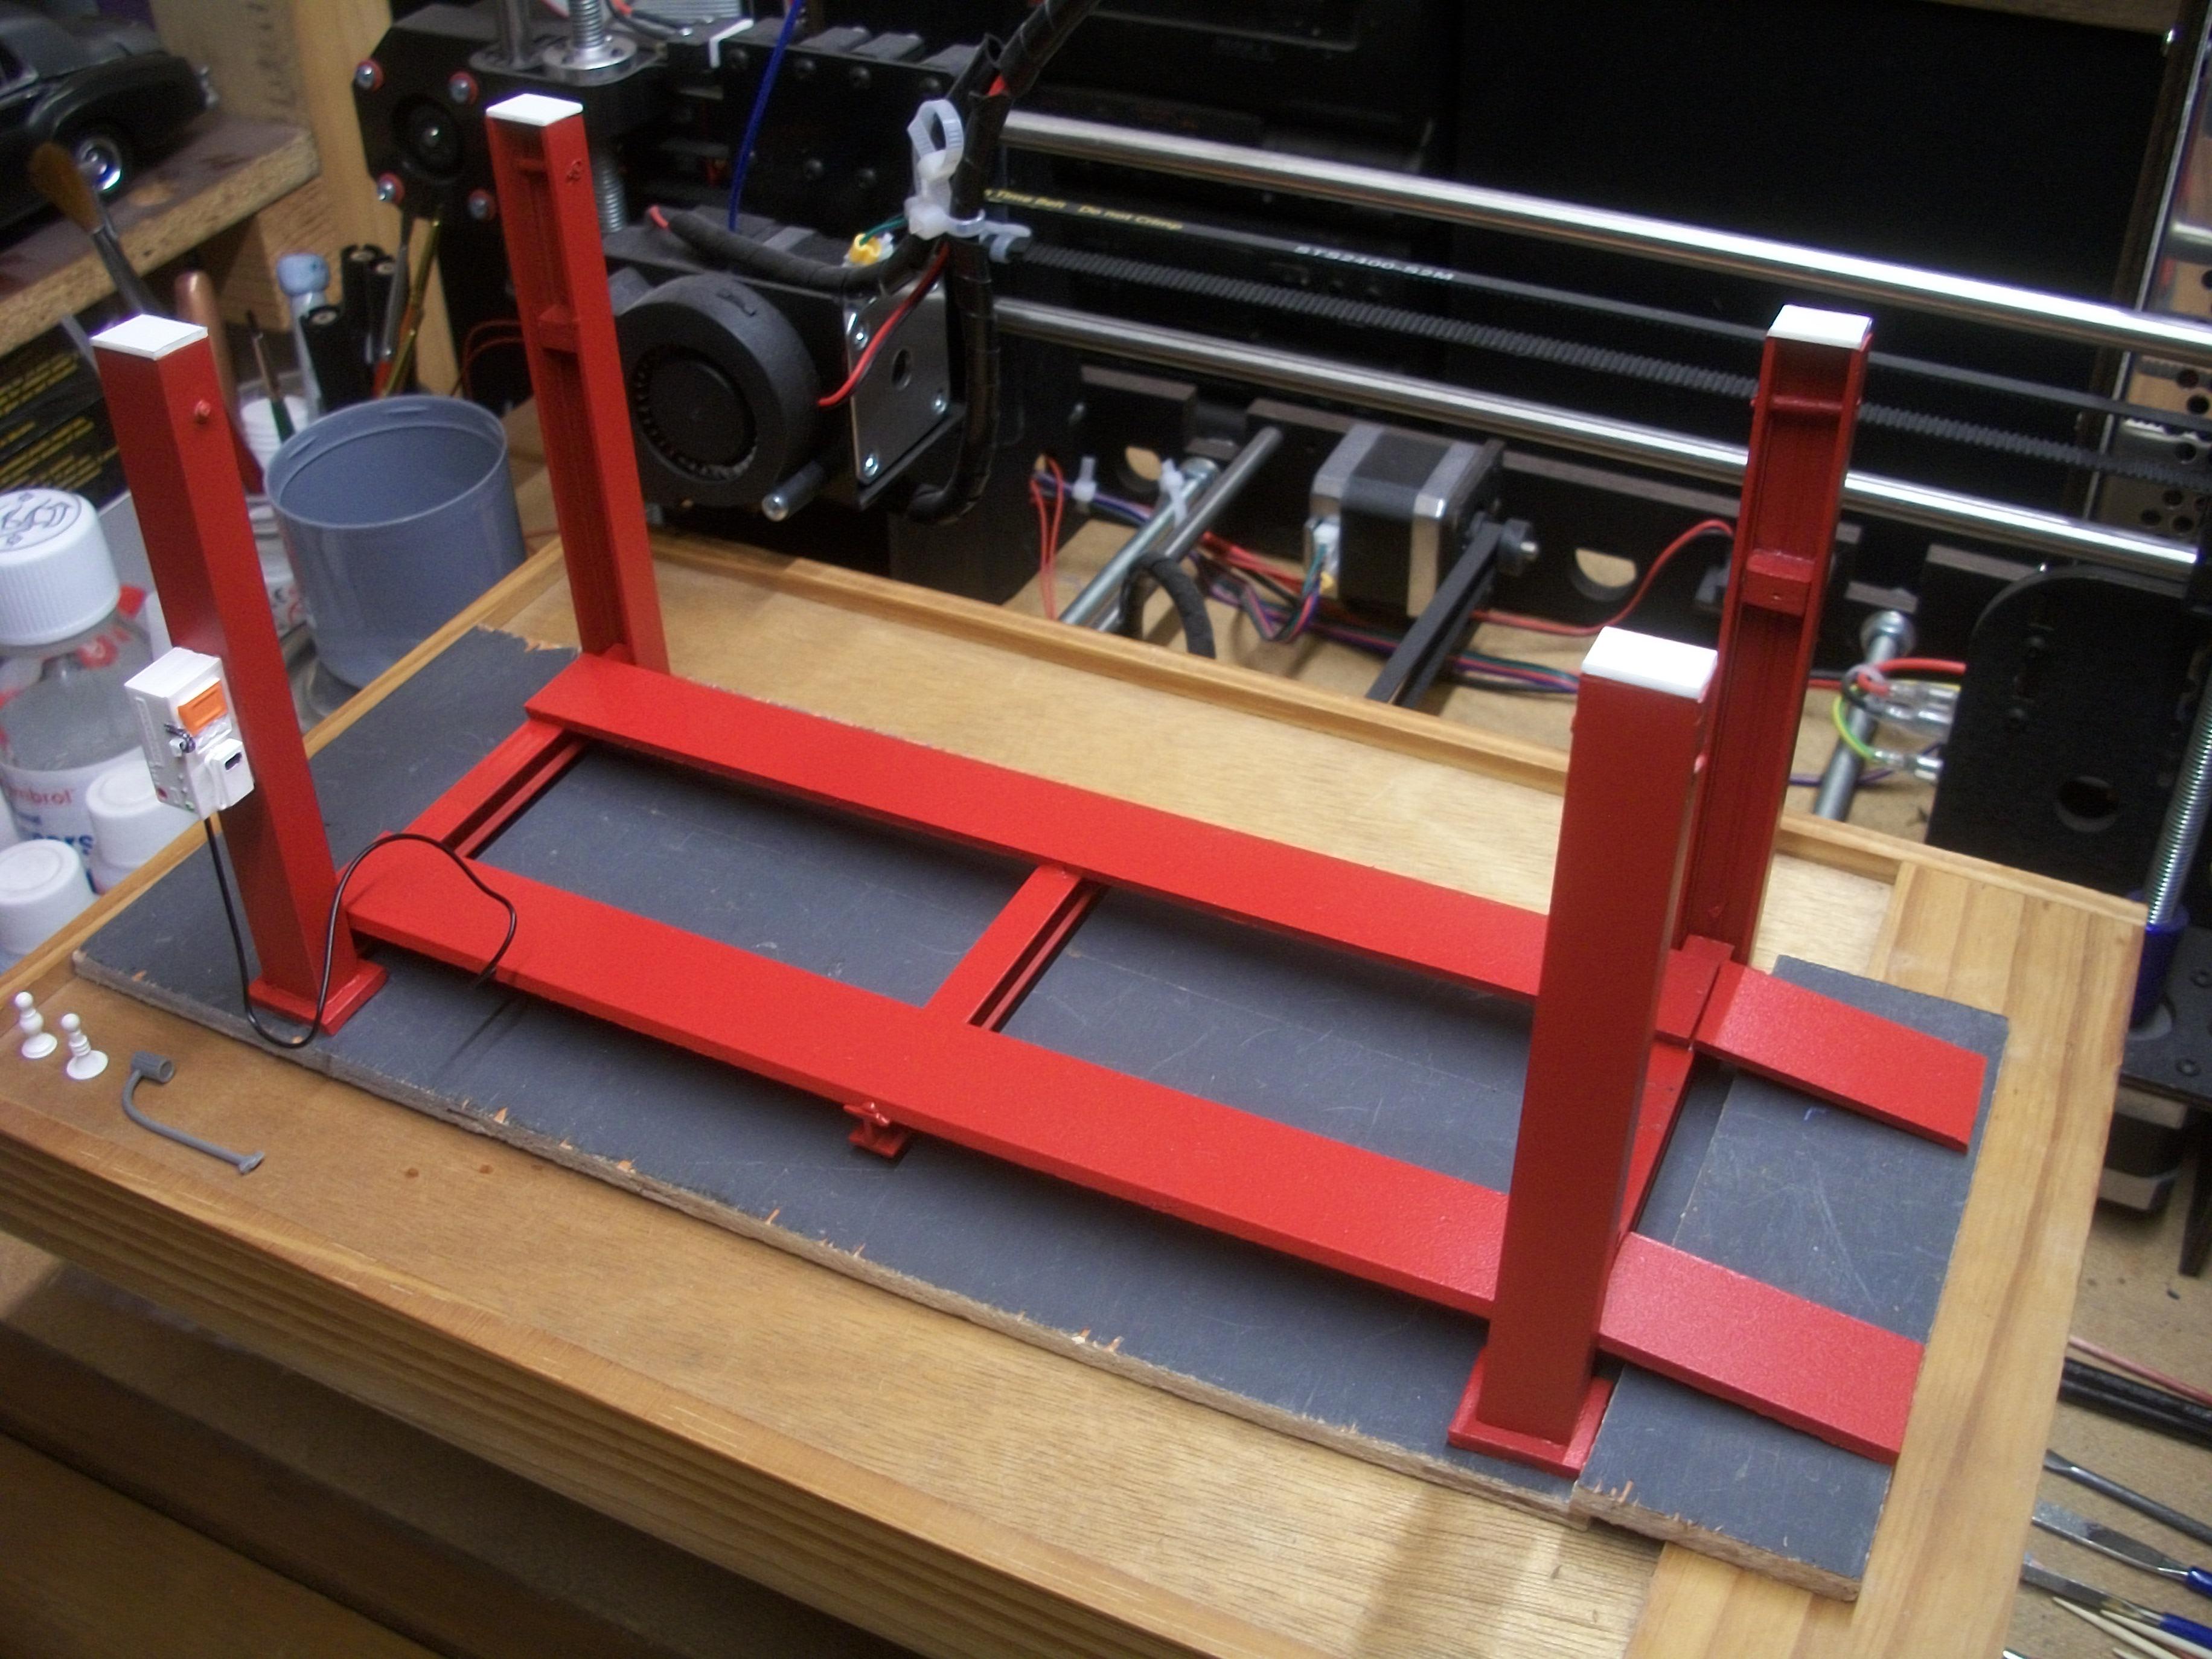
I did look at the two post lift, but decided that a four post lift would display better, particularly for the larger cars like the Pontiac and the Rolls-Royce Silver Cloud. Also, the lift has to look right for the 1950's in my case. Certainly, I have enjoyed putting this lift model together, and I learned quite a bit about car lifts from researching YouTube videos and photos of the real thing. This is just one more of the interesting aspects of our hobby. David
-
Thank you, Pat ! David
-
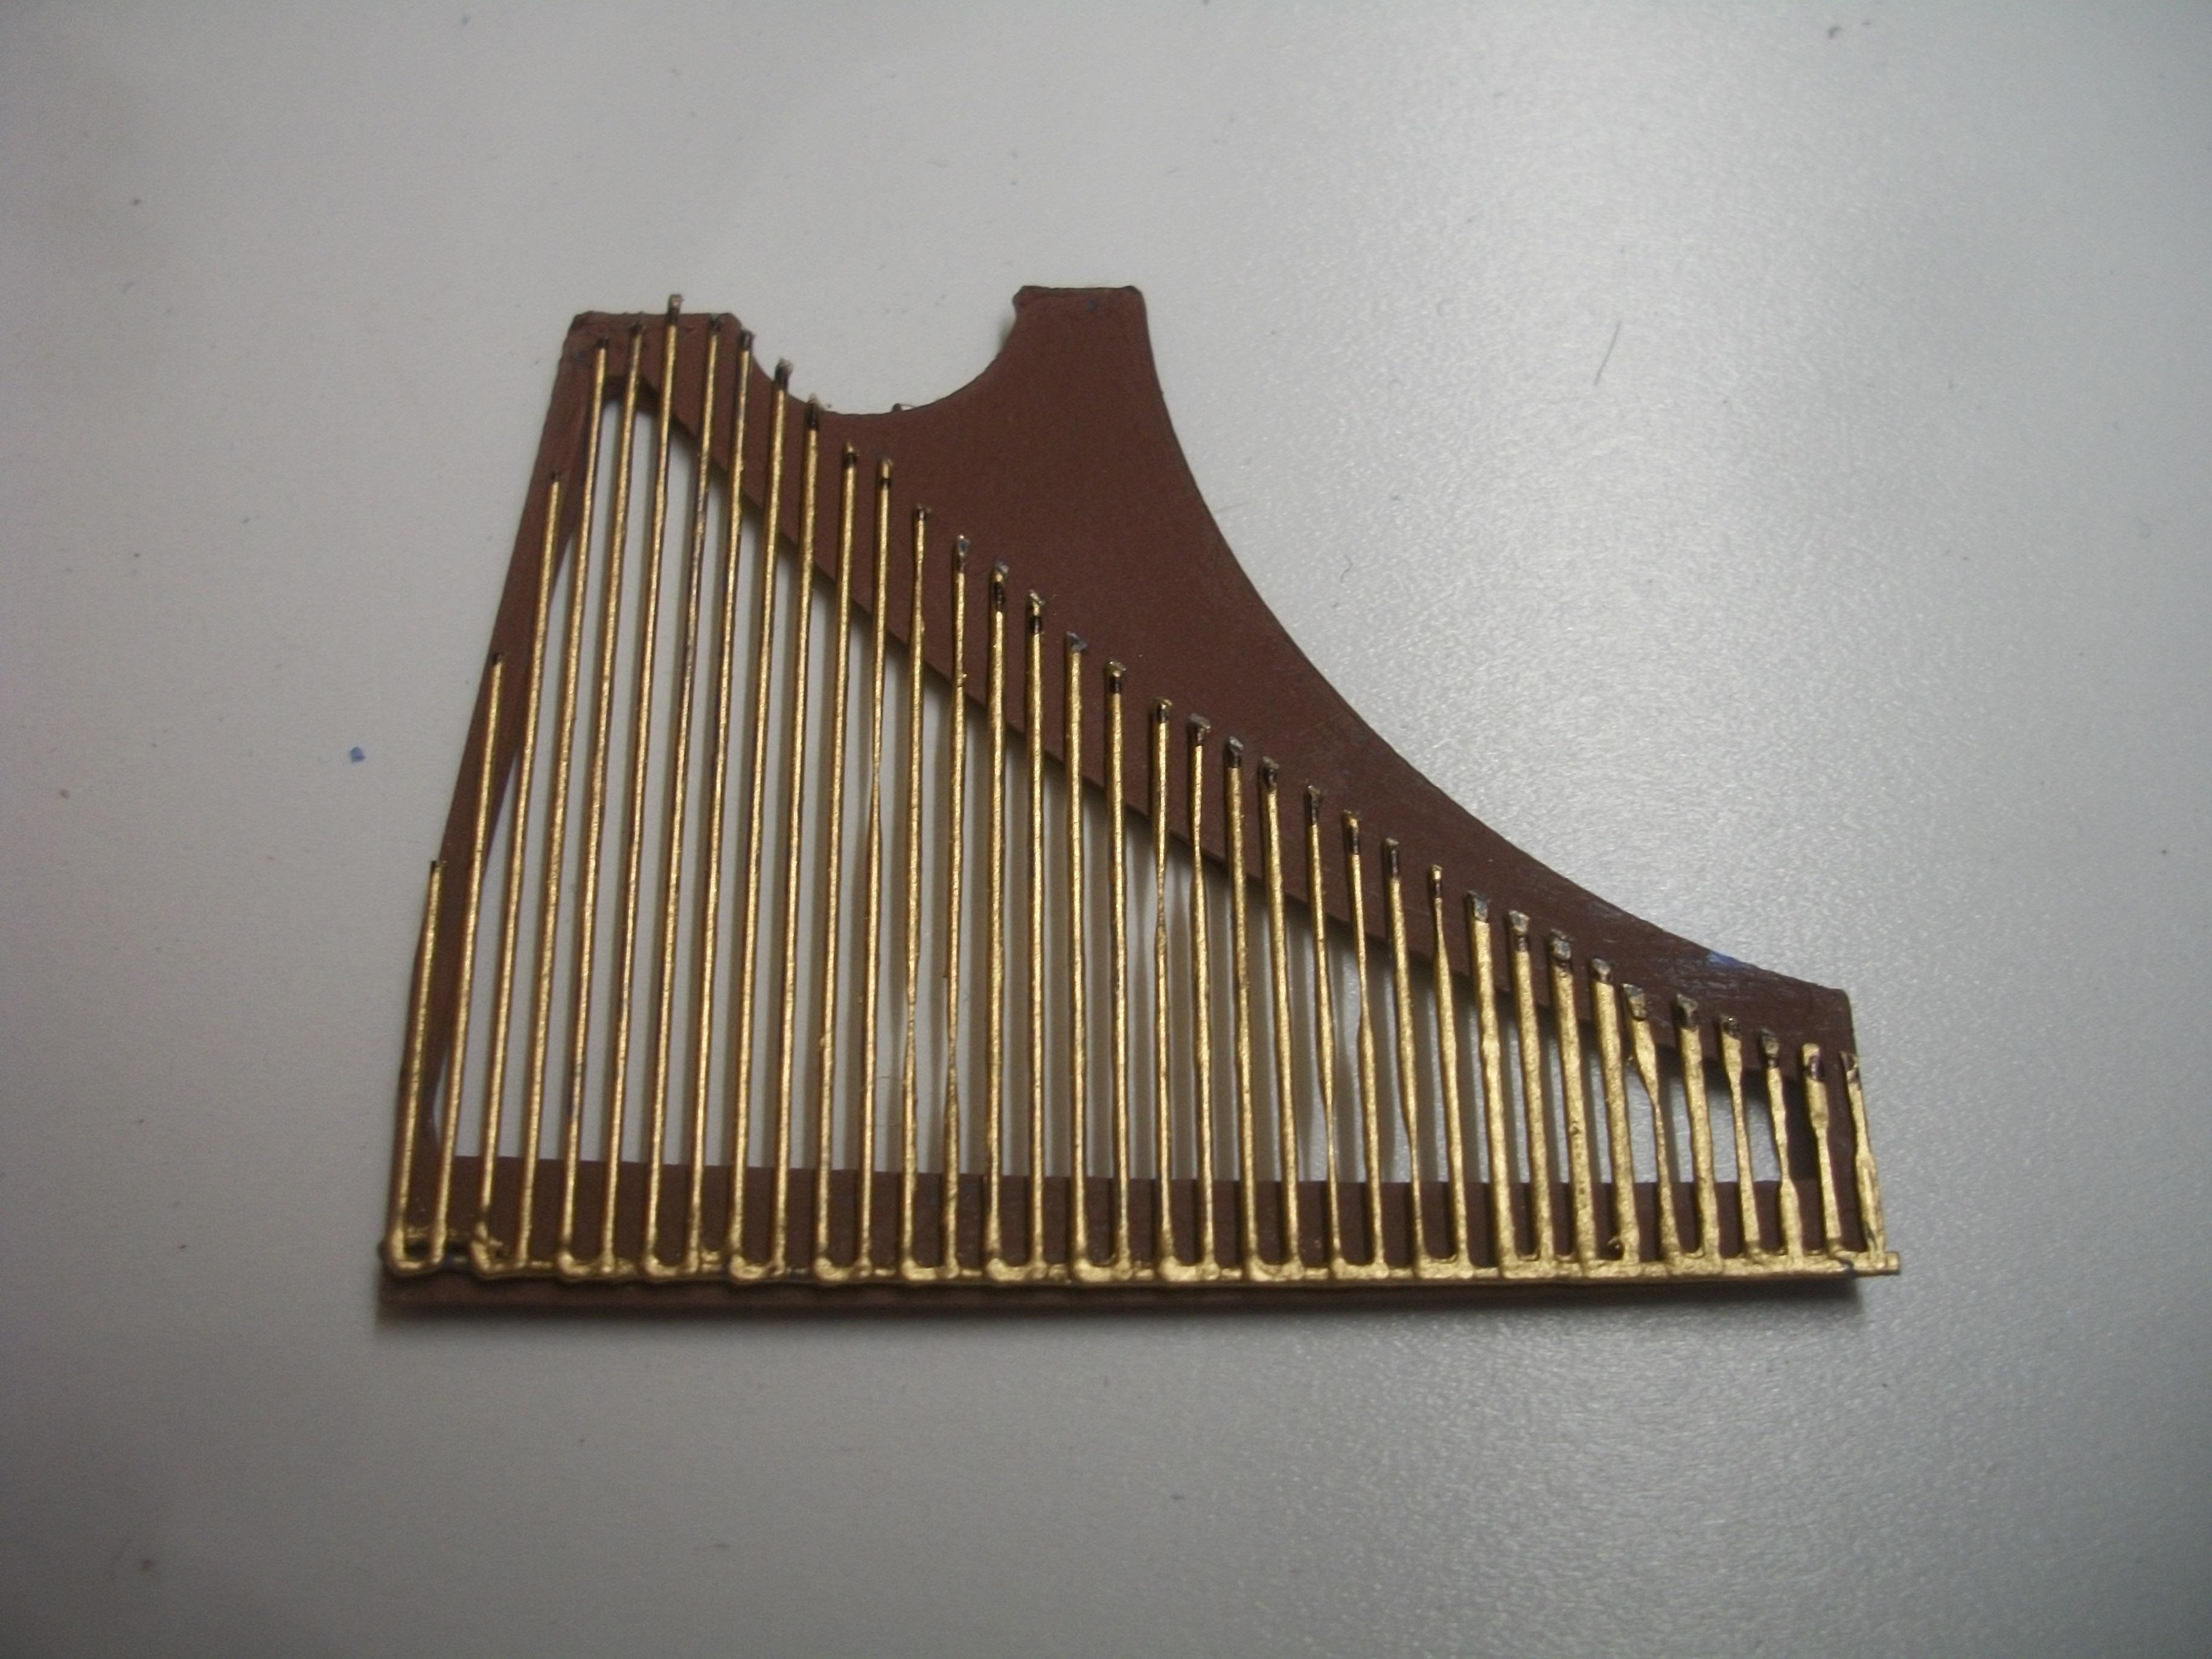
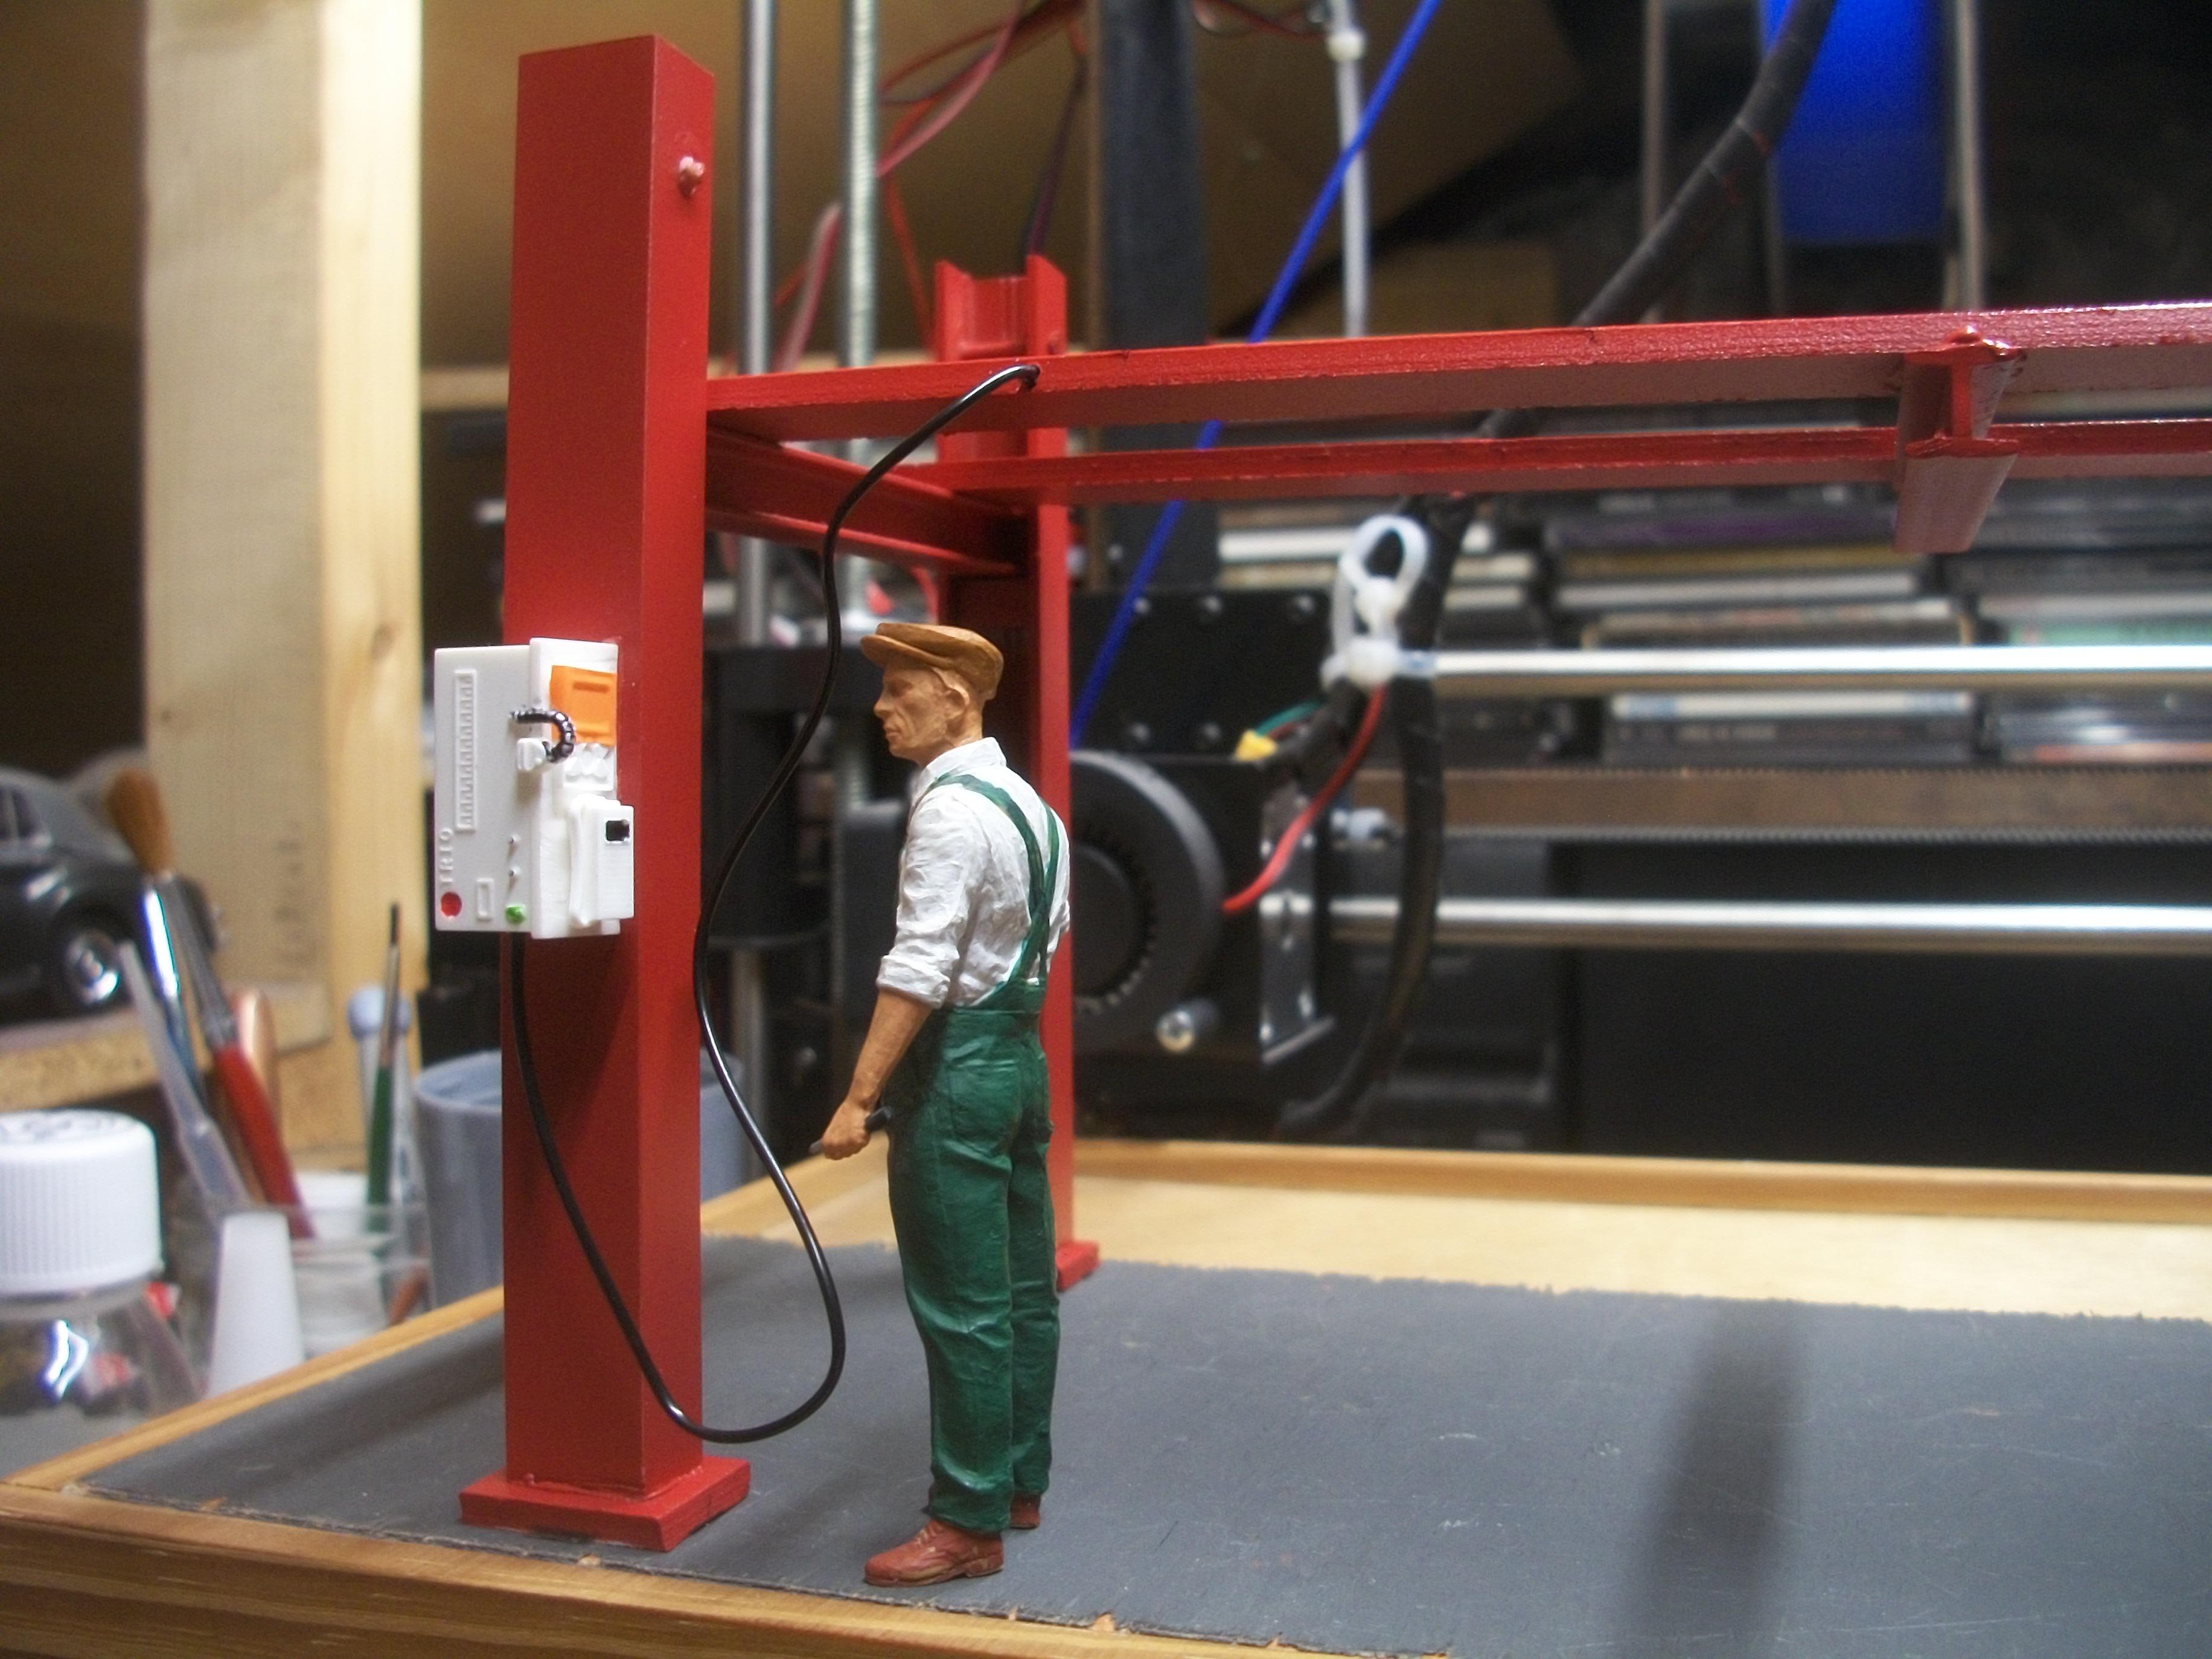
The 4 - post hydraulic car lift is nearly done........ The lift is entirely scratch built, and I used lengths of aluminium channel for the corner posts. After coating all parts with red primer, the lift has a final coat of Humbrol Acrylic spray, in red gloss. The two ramp extensions at the front of the lift are freely hinged. I scratch built a control unit for the left-hand rear post, and ran a black hydraulic pipe from the control box to the ramp. Here are a few photos of the almost completed model. David
-
Nicely done, Walter...... and not an easy model to do on a 3D printer. David
-
An idea came to me yesterday, quite out of nowhere really....... Maybe if I constructed a 4-post Lift on which to display the Hudson Hornet, this would allow me to photograph the underside of the car, which has lots of interesting detail and carefully painted parts. The 4 post lift would be entirely scratch built, from pieces of styrene and foamex. I did have a look at the idea to 3D-print the lift, but when a 1:64 scale lift comprising 8 parts is scaled up to 1:25 the model is too big to fit onto the build platform of my A8 3D printer. As well as displaying or photographing the Hudson Hornet on this 4 post lift, it would be nice to do the same for any other model cars that I have in my collection, in both 1:25 and 1:24 scales. The 1968 Pontiac Parisienne 4-door would be the largest car to position on the lift, and the 1955 - 1959 Rolls-Royce Silver Clouds are not much shorter. There are 4 post lifts in kit form available on Ebay, but they don't look all that realistic, and in any case they would be too short for the 1:25 Hudson and Pontiac cars. The 4 post lift model should not be difficult to build, as it is a fairly simple structure when broken down into component parts. David
-
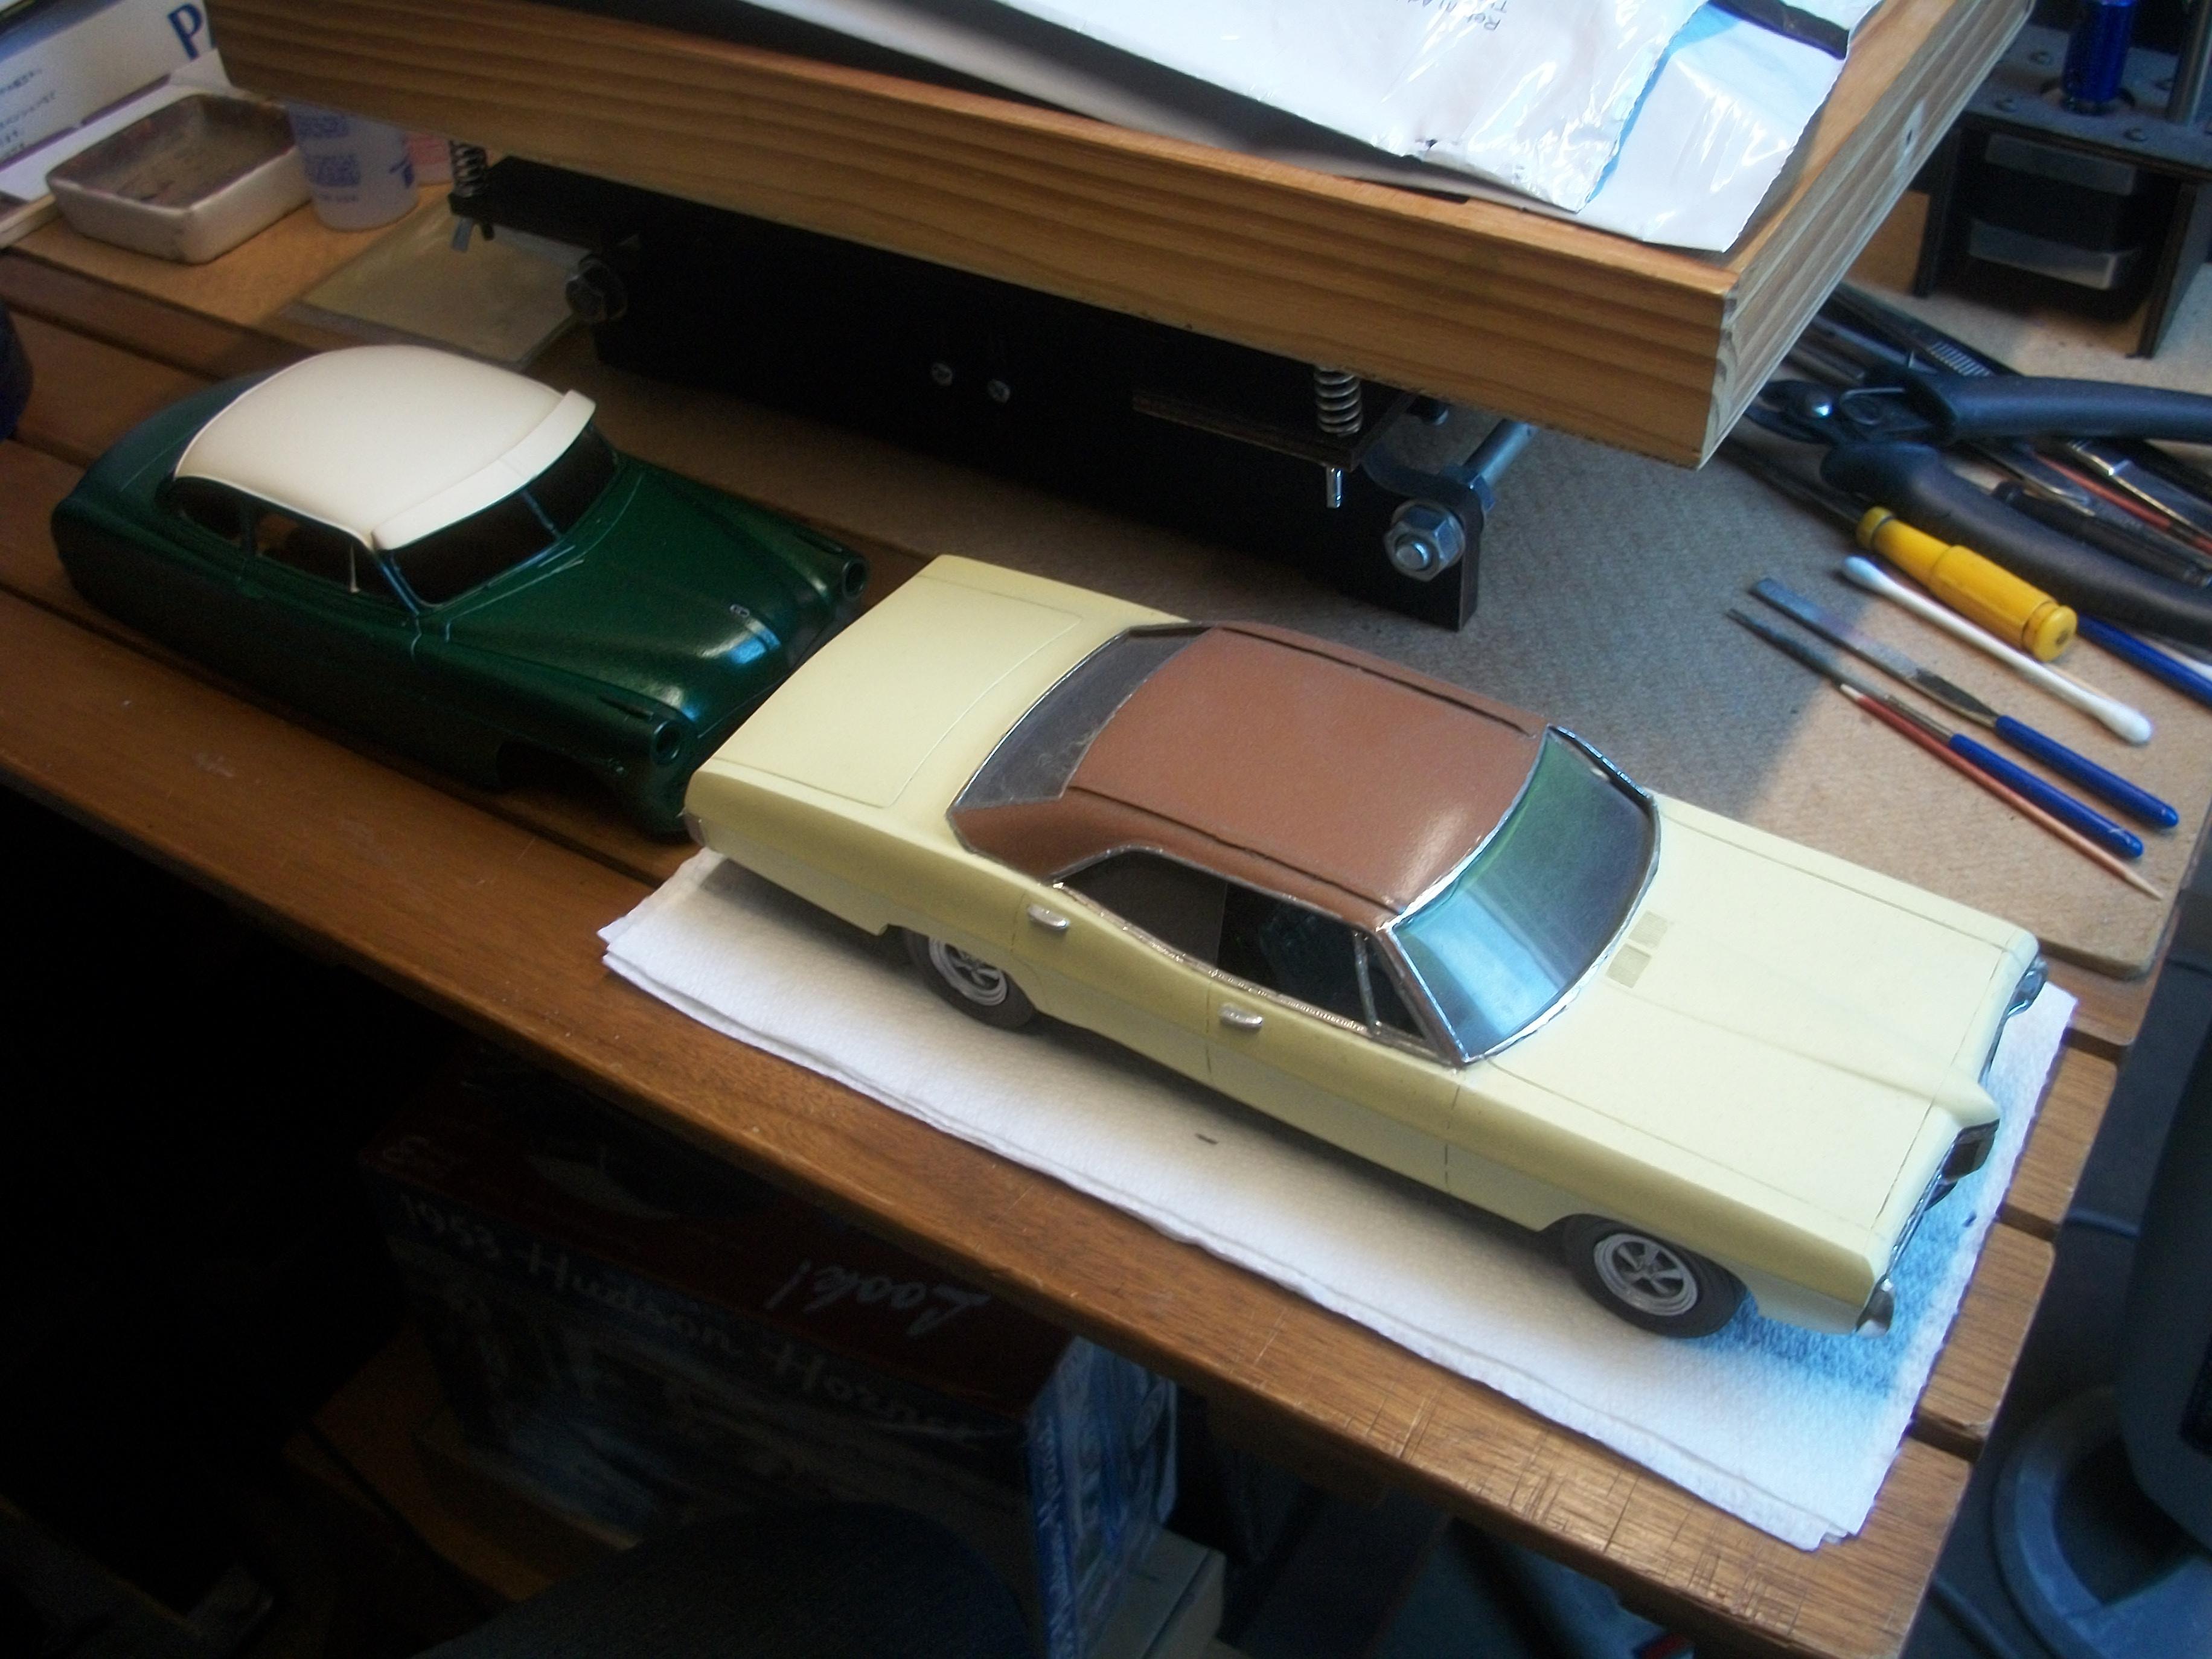
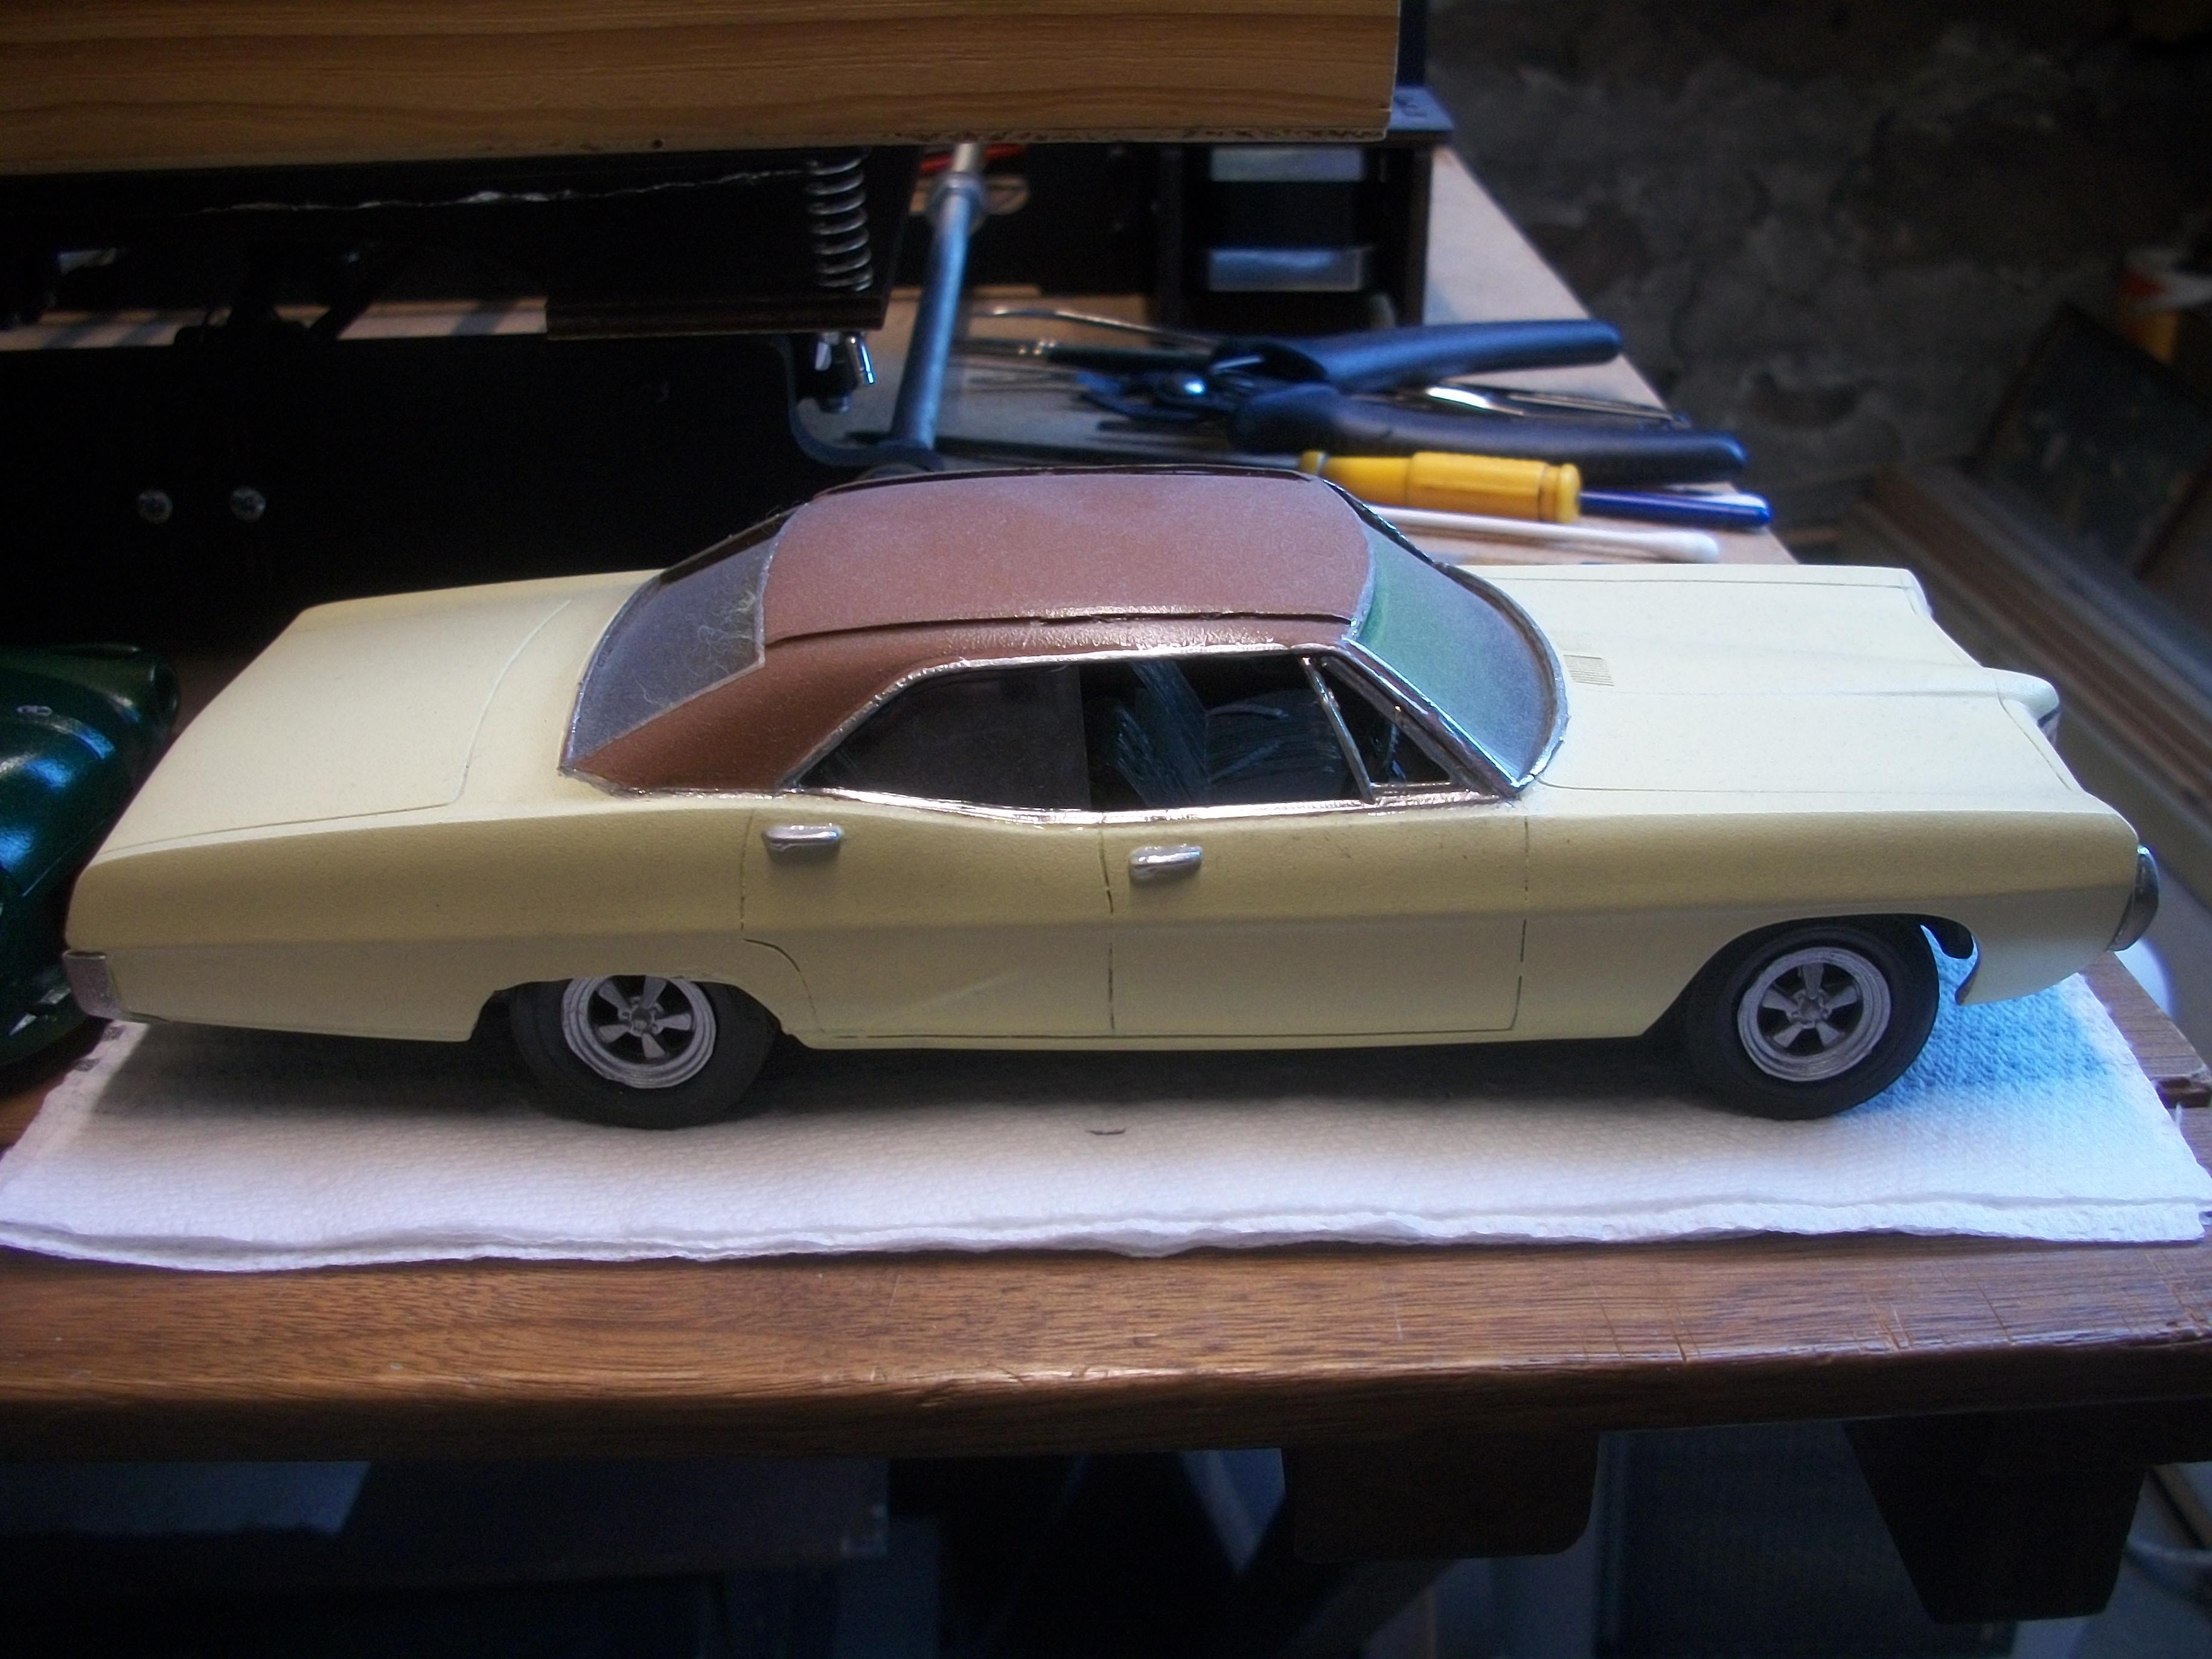
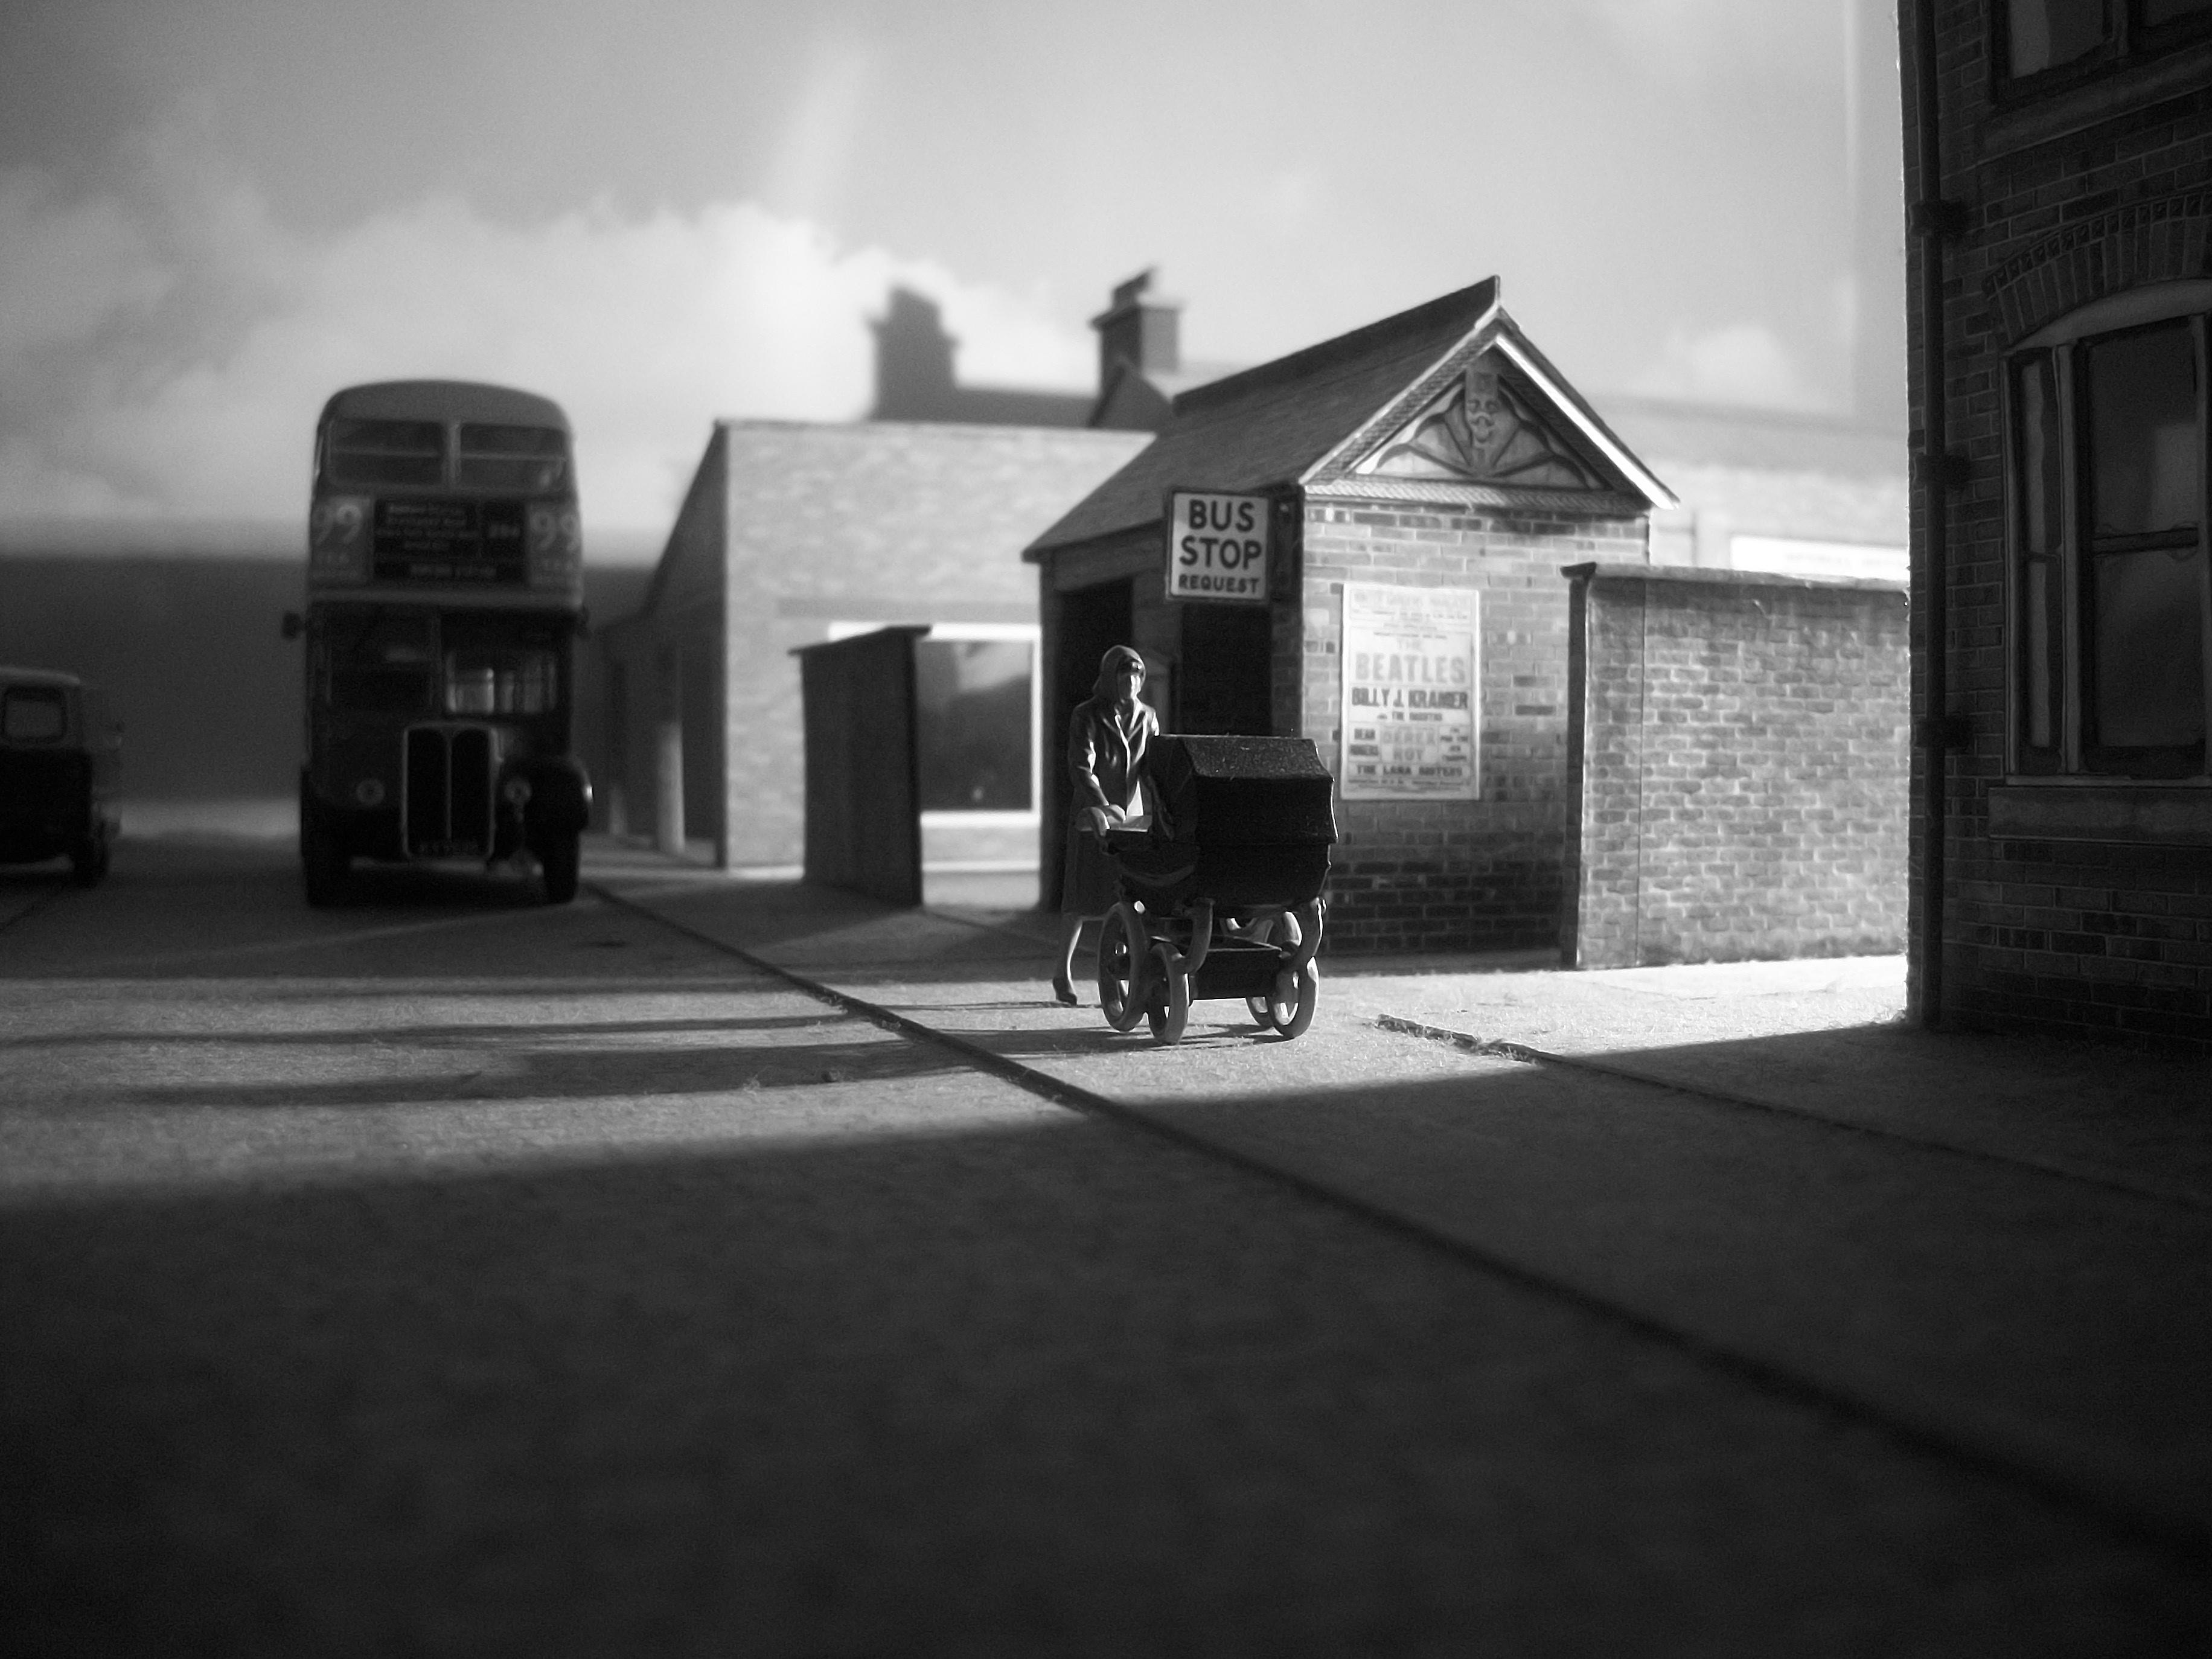
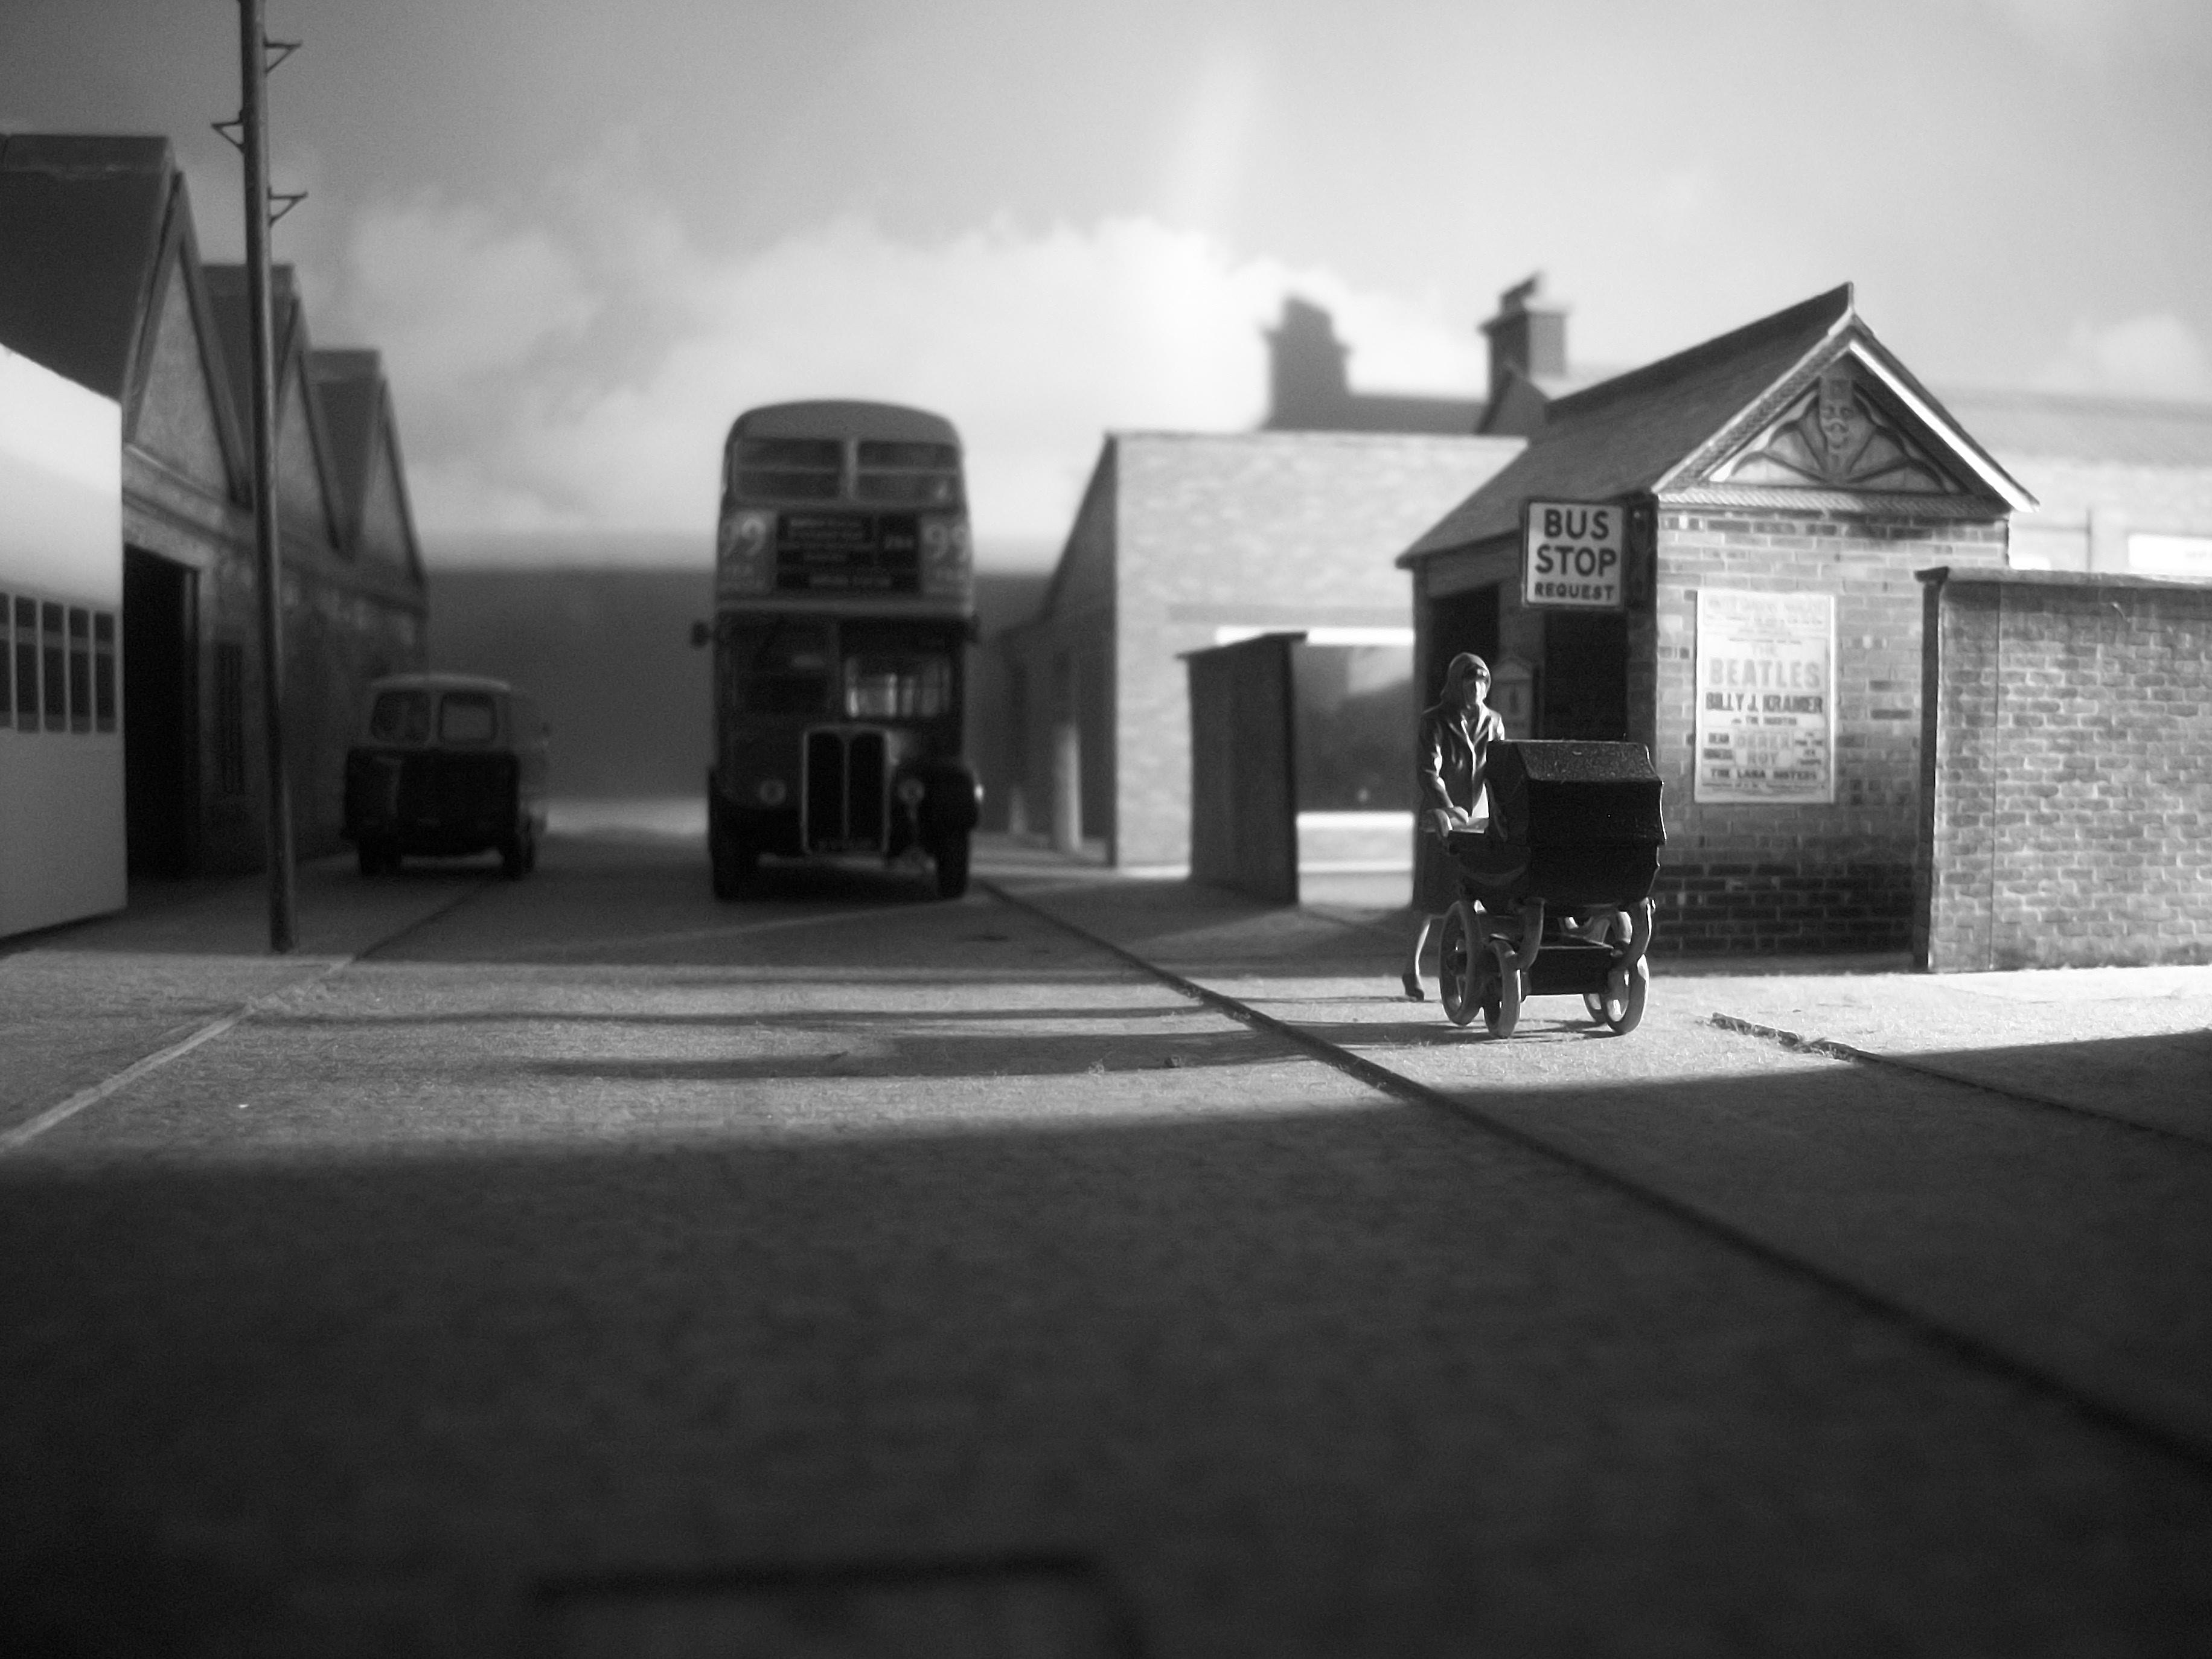
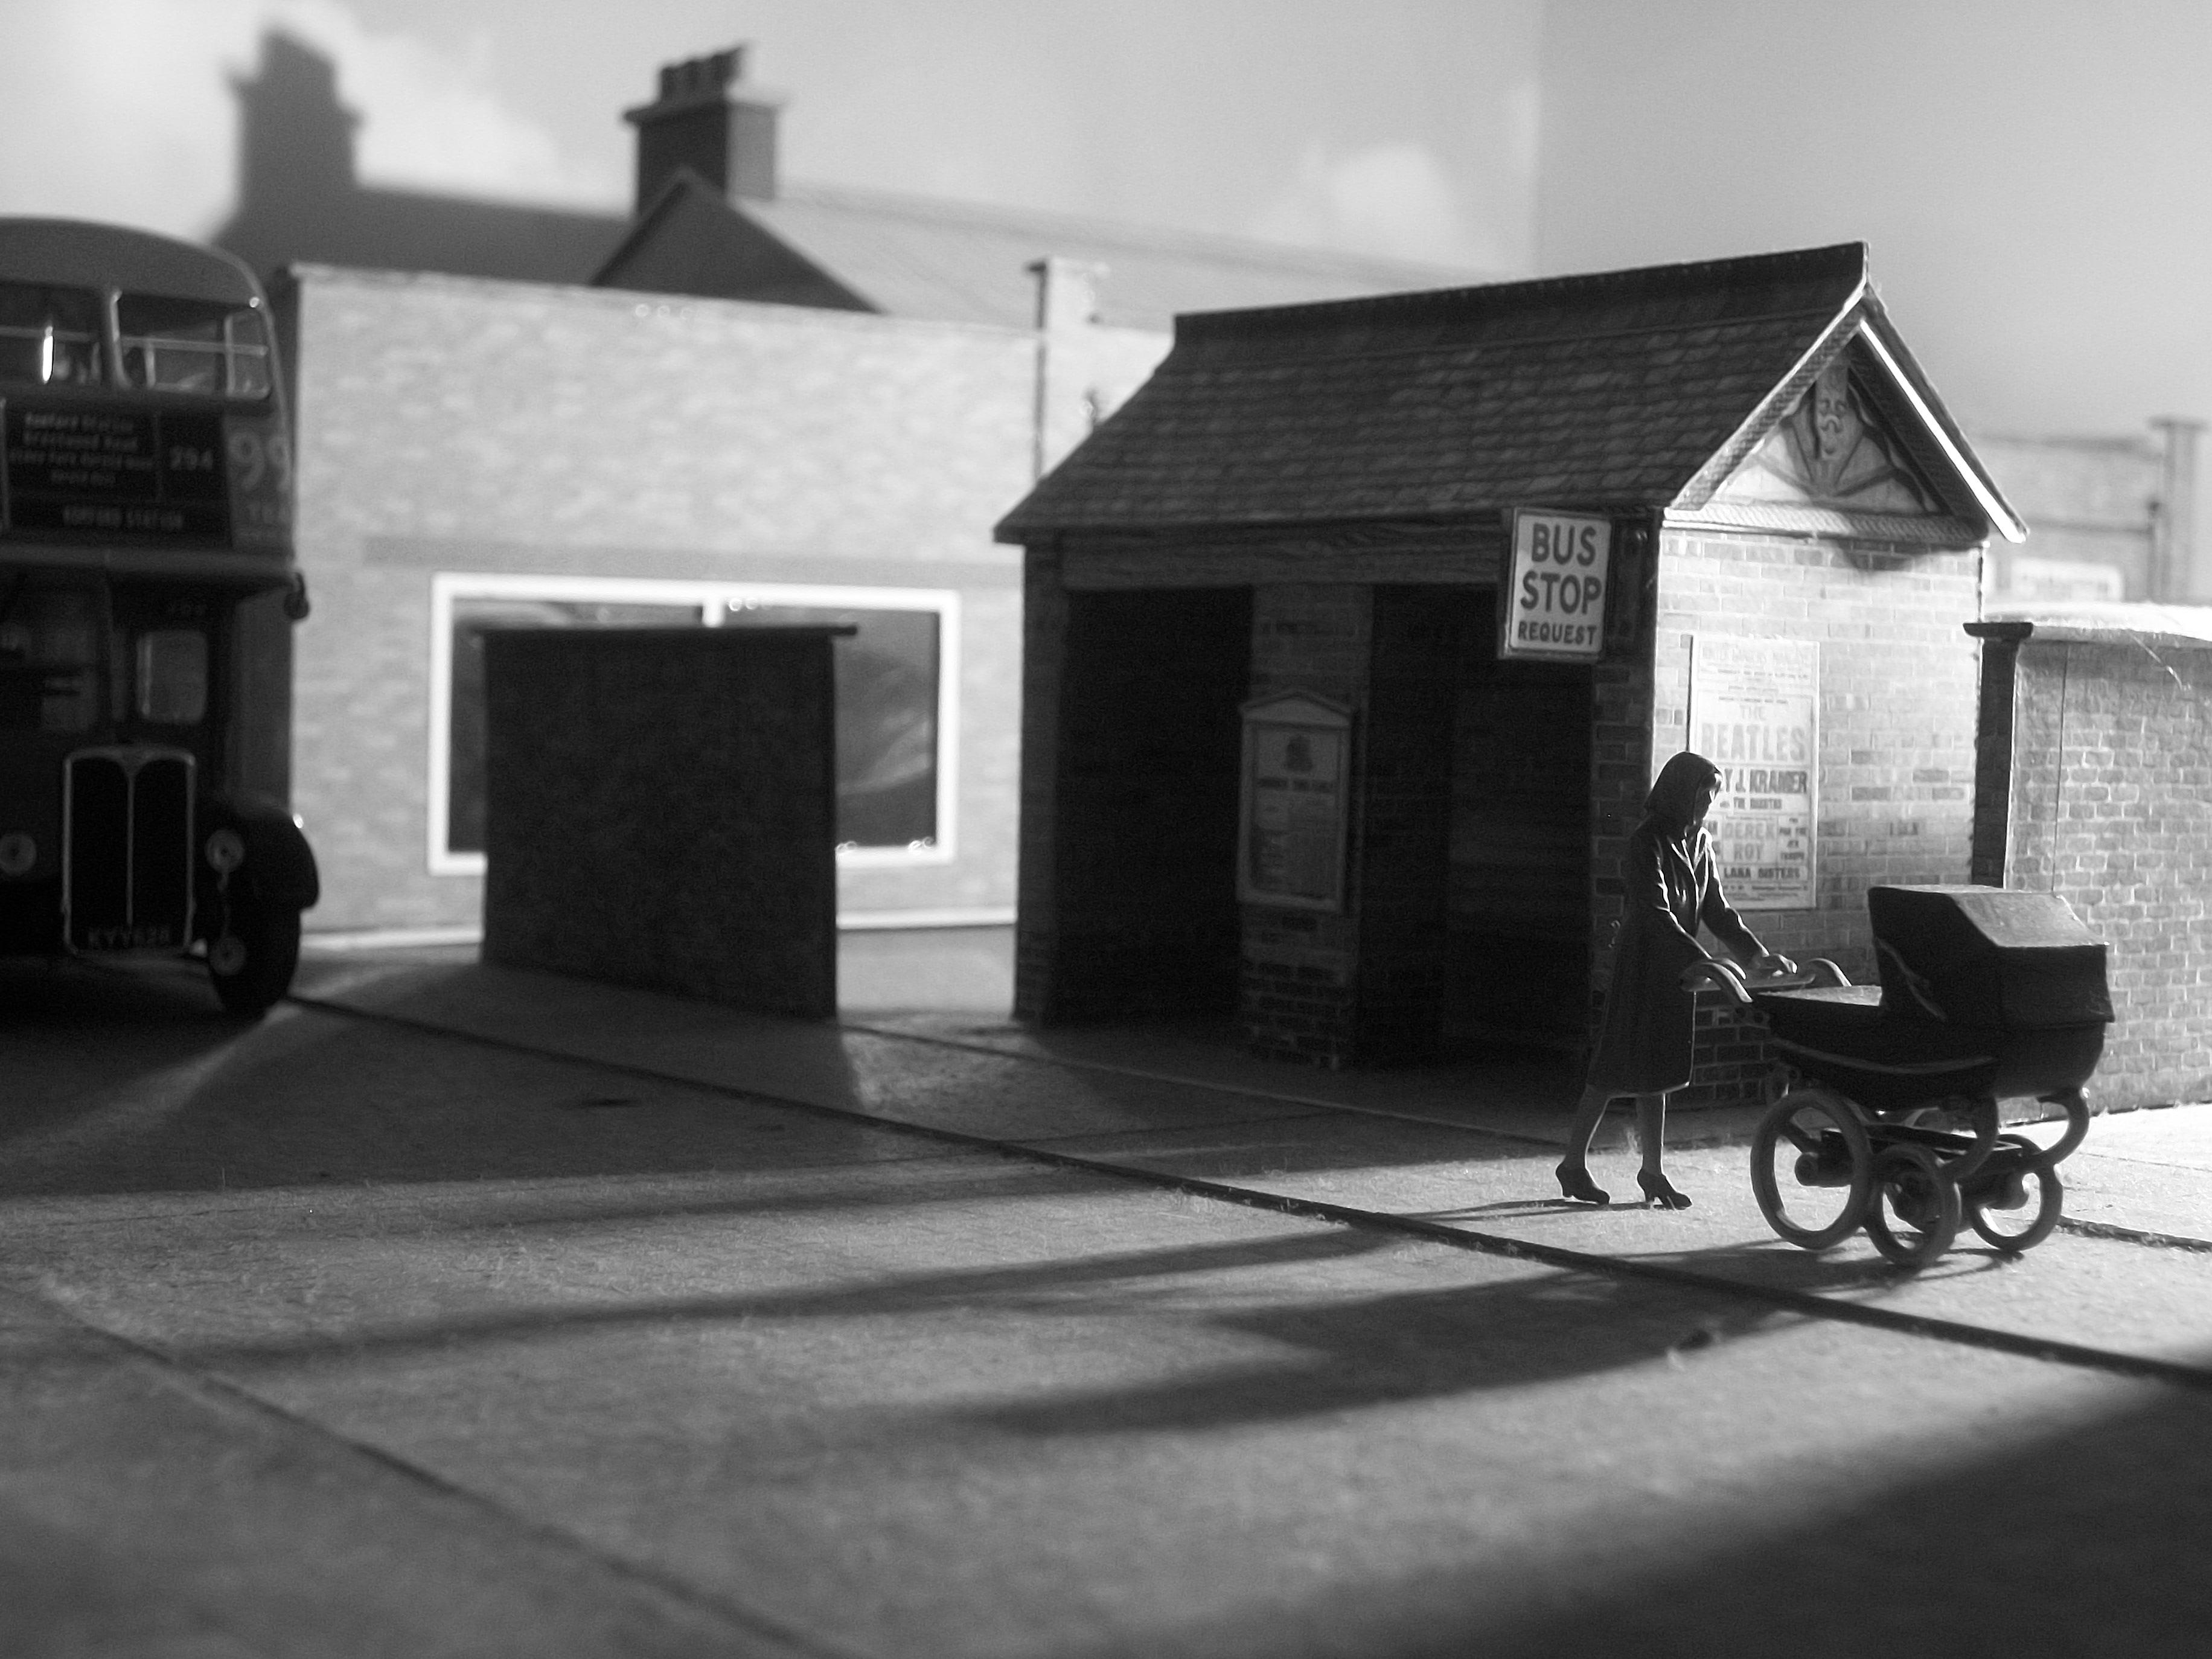
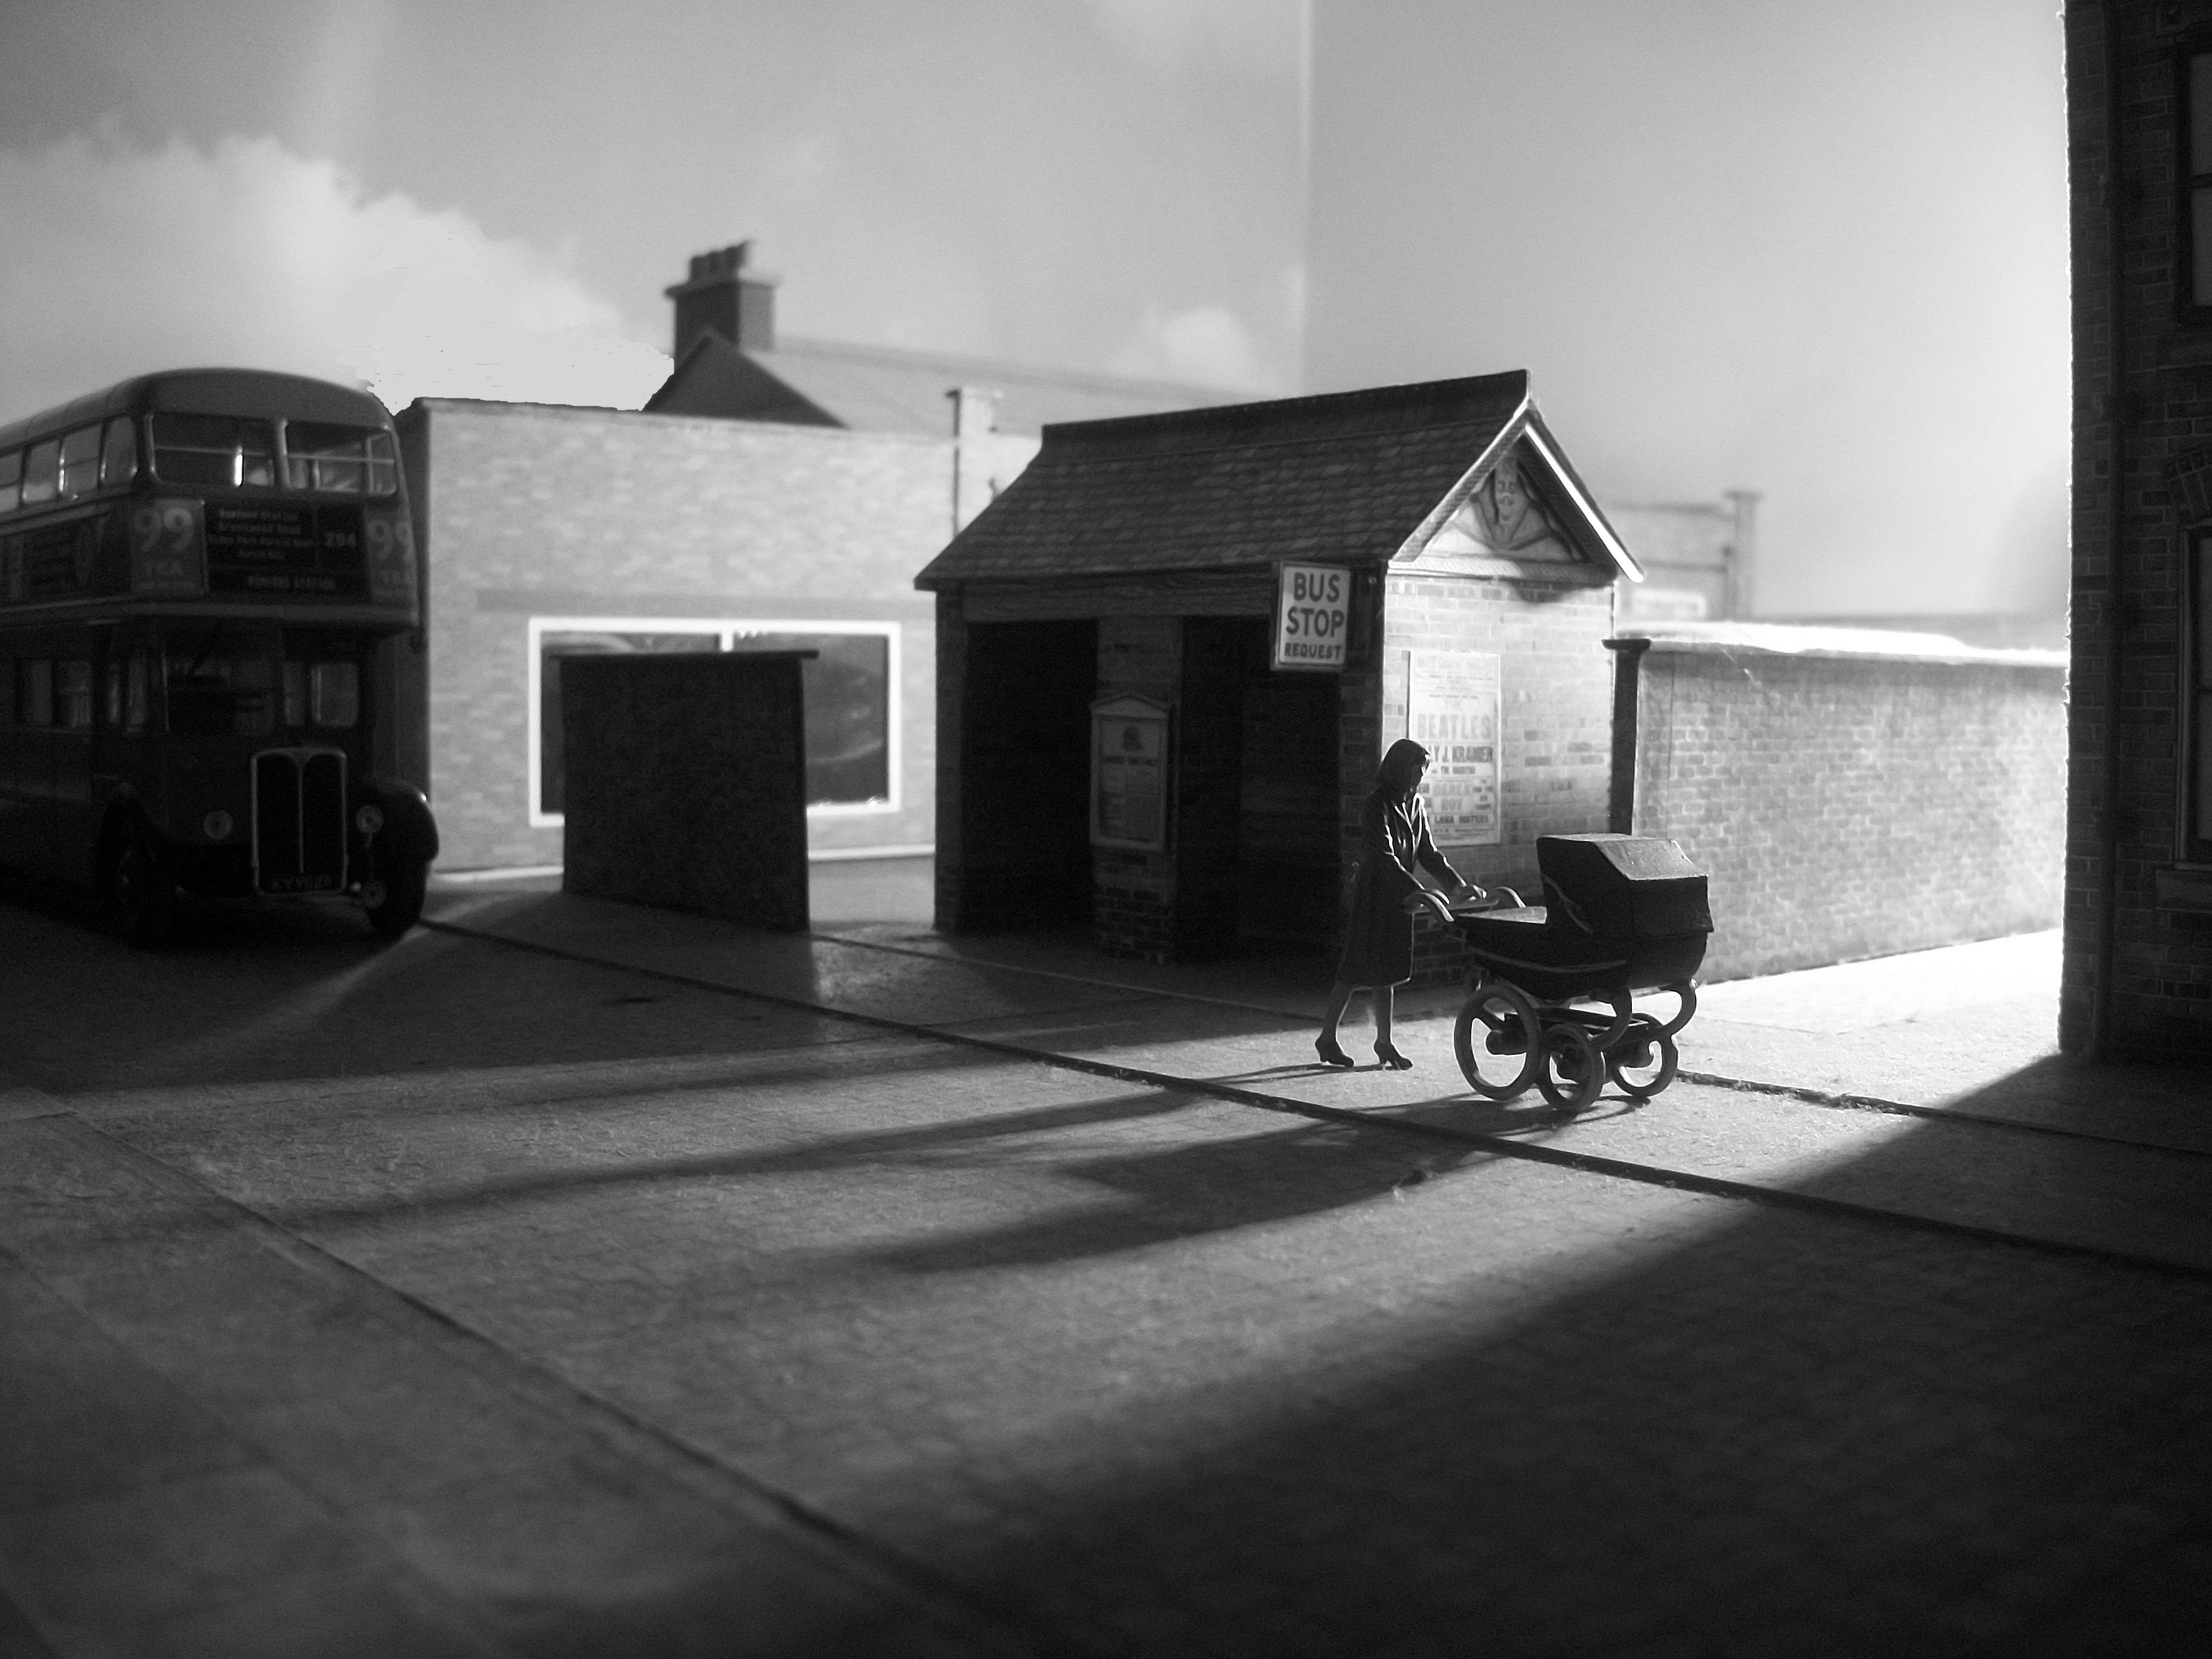
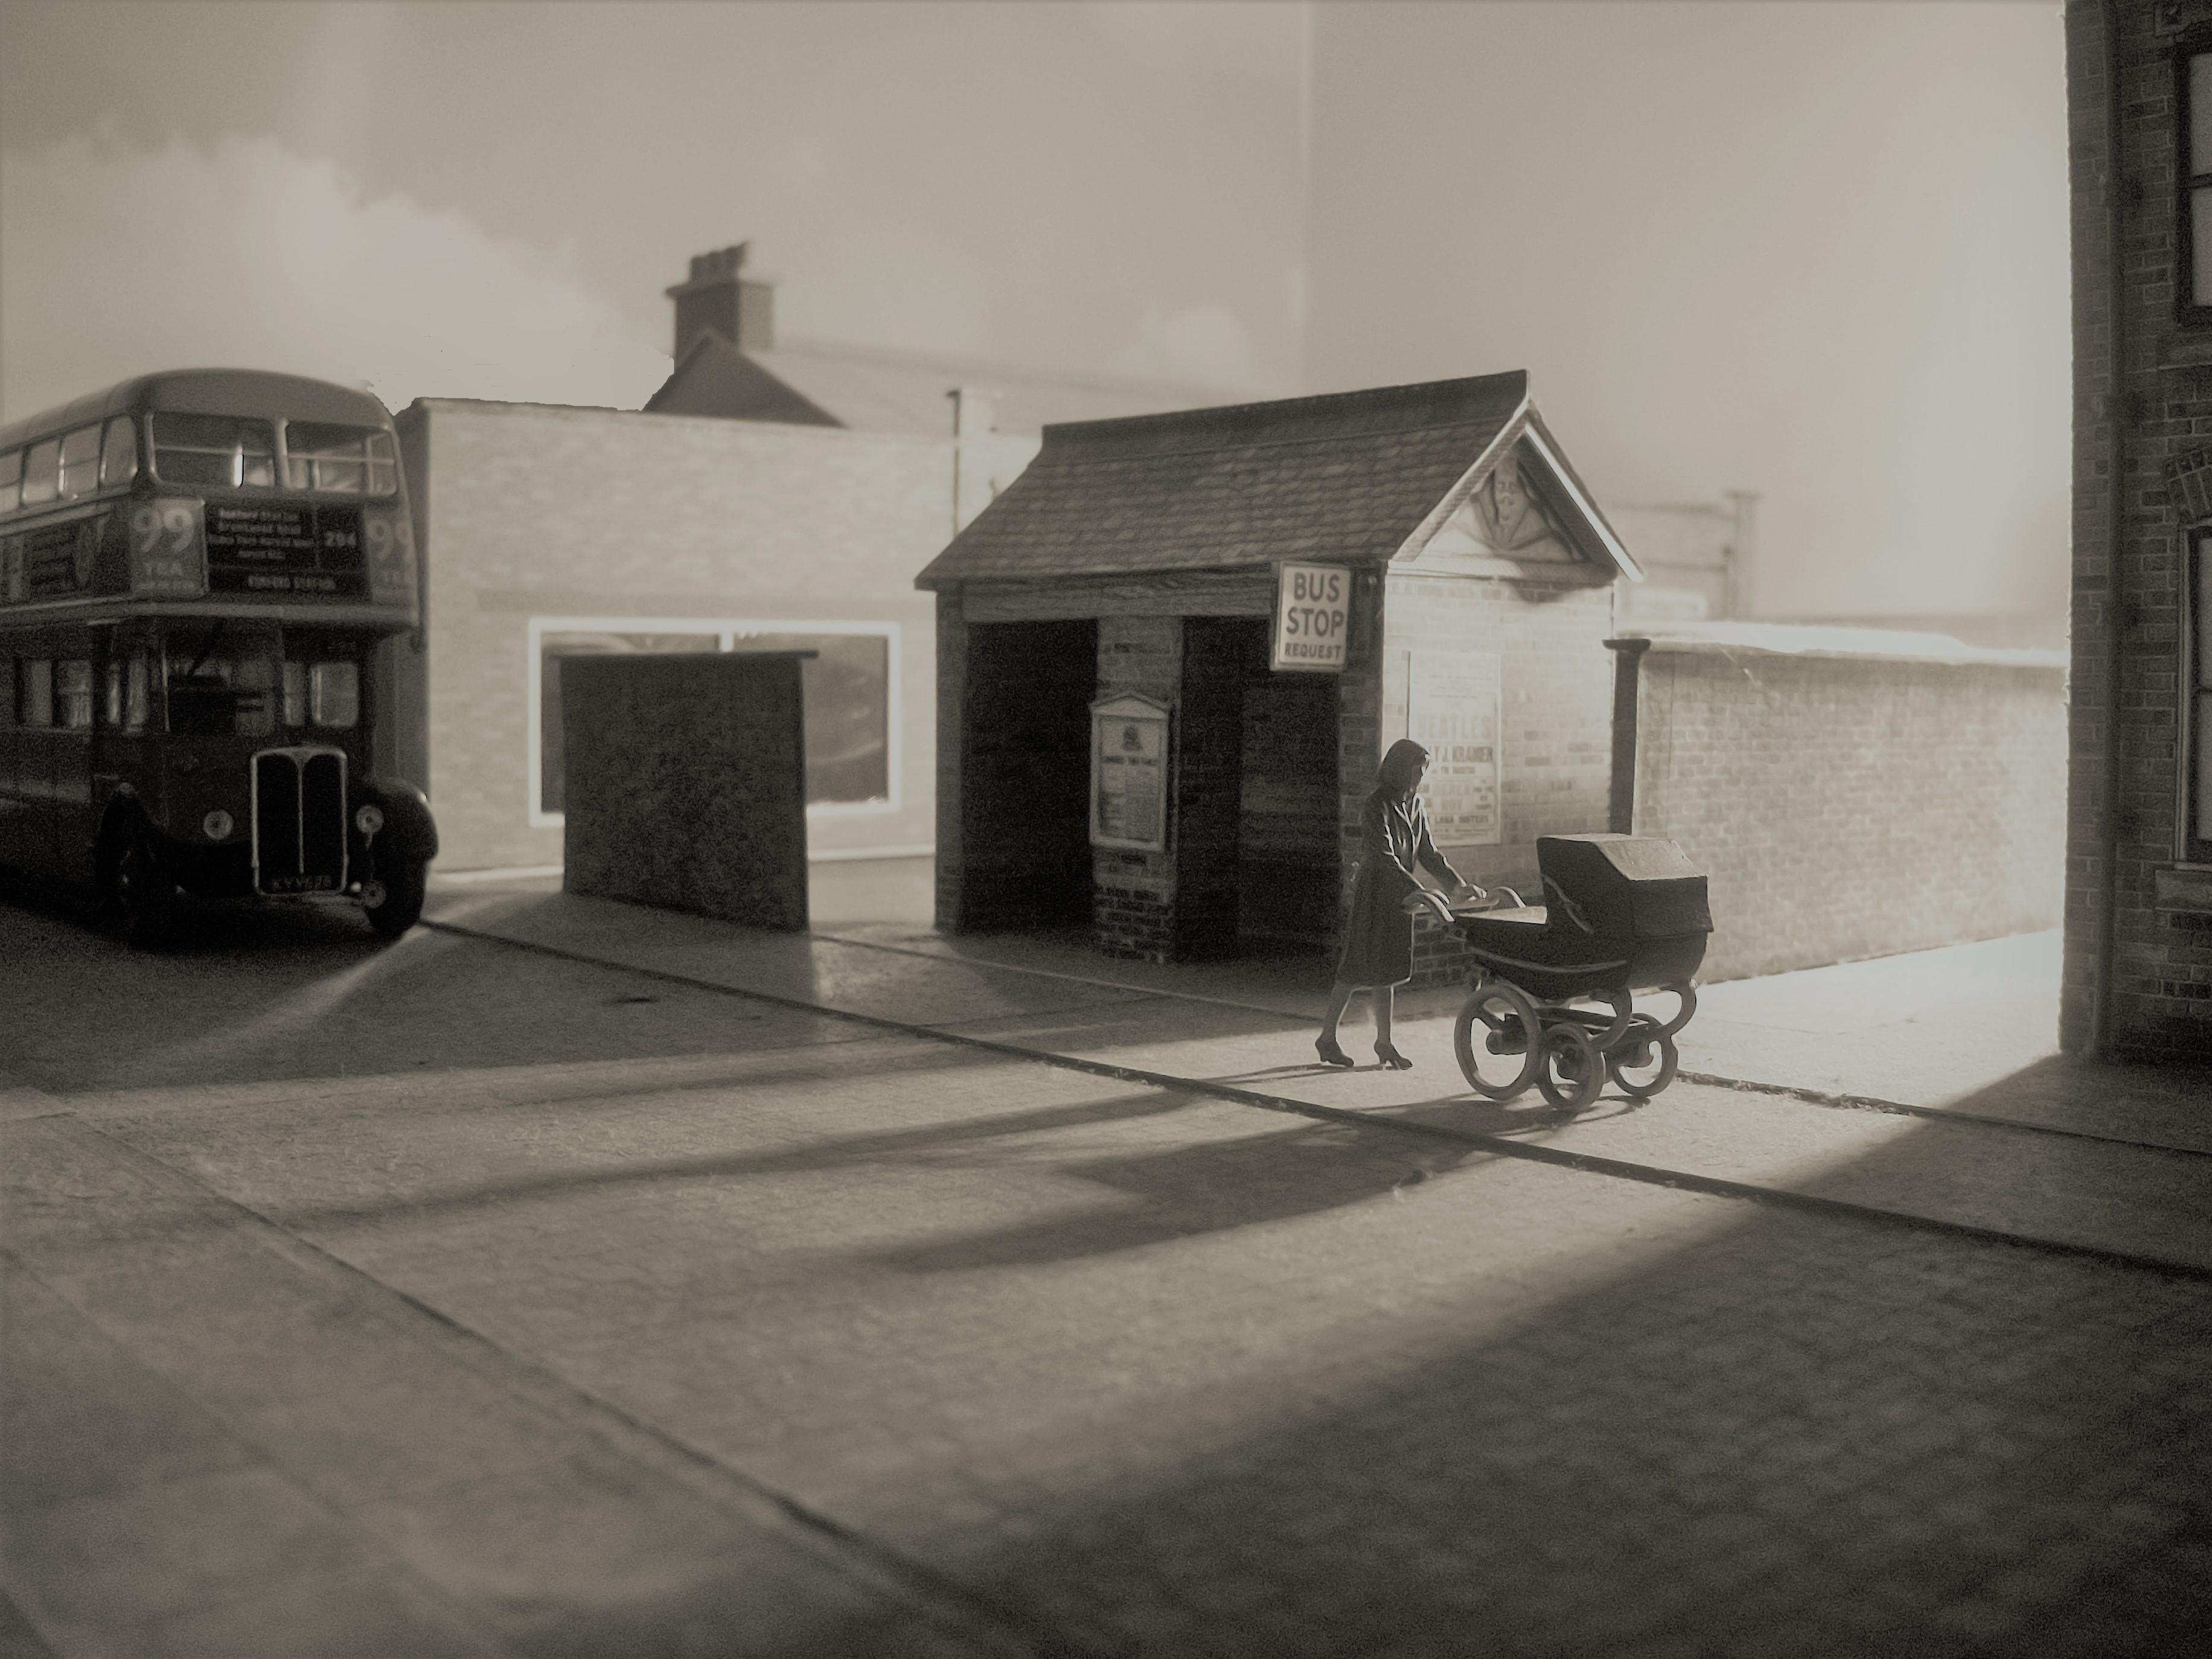
Today I decided to go ahead with the Rustoleum Crystal Clear gloss coat for the Hudson body, and the BMF work will be done over the clear coat. This is a change of plan. For the application of the clear coat, the hood was dry fitted, along with the sun shade and the gas filler flap. Also, while I am waiting for the clear coat to dry and cure over the next four days, I set up a short photo shoot, using the 1:43 scale diorama as a setting. This features the bus stop and the lady pushing the pram. Some of the shots are in B&W and some in colour. Lighting source is one daylight bulb of 100 watts, from a low down position. David
-
Having placed an order for some Bare Metal Foil from an Ebay seller in Germany, I am now waiting for the paintwork on this Hudson to cure. This Ebay seller is the same one that sold me both Hudson kits previously. Most probably, I shall use the BMF for the long chrome strips along the sides of the car, and maybe the Liquid Chrome Pen for the window surround mouldings. The Crystal Clear coat will not be applied until the chrome work is all done. In the meantime, I have drilled two holes up through the roof, from inside the car as indicated in the Moebius assembly instructions. These two holes are for the locating pins on the external sun shade. Applied some decals to the engine bay, painted the headlining inside the roof and drilled out the locating hole in the hood, which is for the hood ornament. David
-
Also in Canada, there were Hudsons...... Pat..... Canada Canadian assembly of Hudson vehicles commenced in 1932 by Hudson Motors of Canada in Tilbury, Ontario. The factory building was owned by Canadian Top & Body Co. which built the motor bodies for the vehicles. The first models assembled were a series of Hudson Eights. World War II interrupted operations and production ceased in 1941. Post-war operations resumed in 1950, with Hudsons being assembled by CHATCO Steel Products in Tilbury, Ontario. Operations ceased in 1954 following the Nash-Hudson merger that led to the formation of American Motors Corporation. Toronto-based Nash Motors of Canada Ltd. became American Motors (Canada) Ltd. and all subsequent AMC operations continued in Toronto until its closure in 1957. Local production of Ramblers resumed after AMC's Brampton, Ontario plant opened in December 1960. David
-
I discovered some interesting information while researching ' Hudson in England ' this morning....... In 1922 Hudson-Essex Motors of Great Britain Limited was formed, with new premises on Dordrecht Road, in Acton Vale. Over 100 agents were appointed to sell the vehicles resulting in 2,000 sales in the next 12 months. In 1926 a factory was built on 4½ acres of ground on the recently opened Great West Road in Brentford. The plant opened in 1927 and a year later a three-story building was built as a service department for Hudson and Essex vehicles. The factory assembled the vehicle chassis locally but the bodies were imported as complete units from Detroit. From 1932, the bodies came over from the United States in sections to be assembled at the Great West Road factory. After the Essex marque was retired in 1932 the British company was renamed Hudson Motors Ltd. Because of the Hudson-Essex factory, the Chiswick roundabout (the junction of Chiswick High Road, North Circular Road, South Circular Road and the Great West Road) became known as "Hudson's Corner." The Acton Vale area of England, and also the Great Western Road, is very close to where Hooper & Co. had their factory on Western Road in Acton, so this is the link that I was looking for between Hudson and Rolls-Royce. David
-
Yes, I know, Don....... it would have been most unlikely to have seen a Hudson Hornet parked outside the showroom at 54 St James's Street around 1958, and you can imagine the reaction of such people...... Only this morning I received a magazine from the Rolls-Royce Enthusiasts Club in the post, of which I am a paid-up member, and there was a photograph of a 1950's pink Cadillac that used to be parked on a Luton roadside. The comment from the RREC editor was " Vulgar doesn't do it justice ". David