Anglia105E
-
Posts
3,487 -
Joined
-
Last visited
Content Type
Profiles
Forums
Events
Gallery
Everything posted by Anglia105E
-
All scratch built, and fitted into the base of an old tin can........ You must be very proud of what your Uncle Dan has created here, Tom. David
-
As other members on here are saying, the level of realism that you have achieved with this particular diorama is exceptional, and I am even more impressed than usual, having viewed all of your previous diorama work. I do have one question, Charles...... Do you have any issues with foamboard warping badly ? Previously I have had display boards made from foamboard warping terribly, inside a humid marquee during a June exhibition of scale model dioramas, and just this past week, I have a 1:32 scale baseboard that is now warping excessively. The layer of foamboard is attached to a Foamex board underneath with strong, wide double-sided tape, like a laminate, but now that emulsion paint has been applied the baseboard is curling upwards. What are your thoughts on this issue, please? (the paving is balsa wood). Thanks, David

-
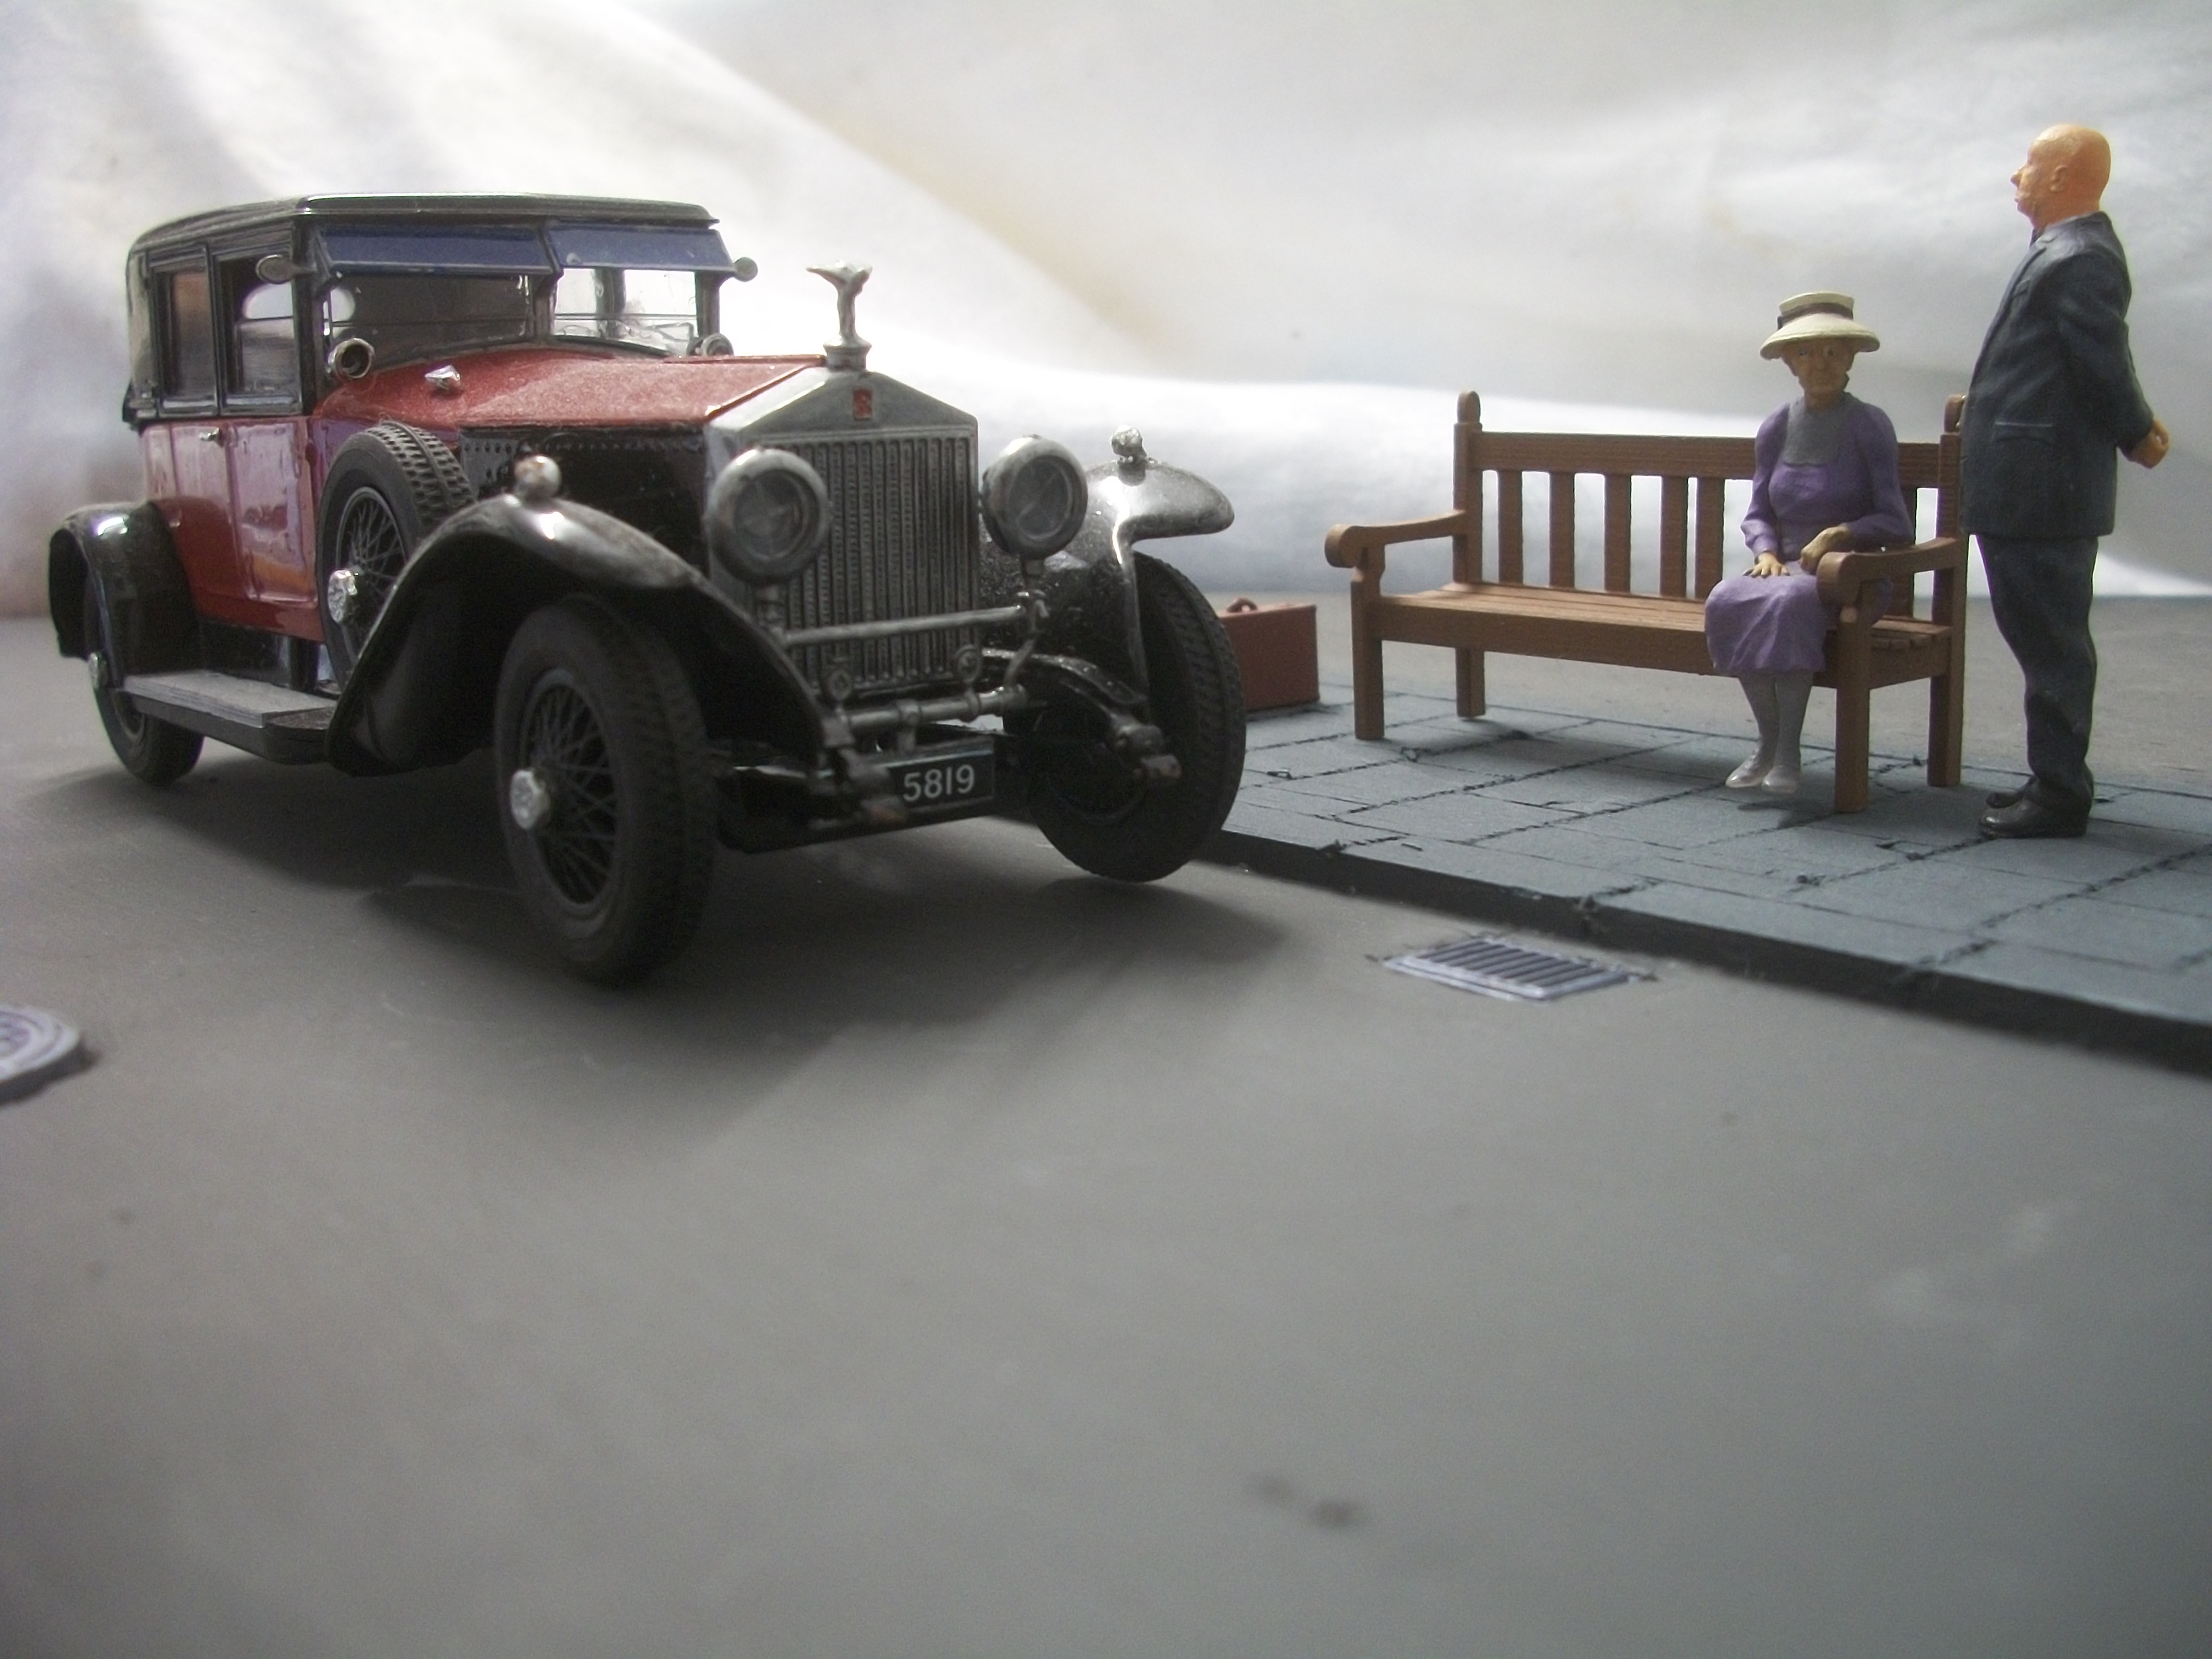
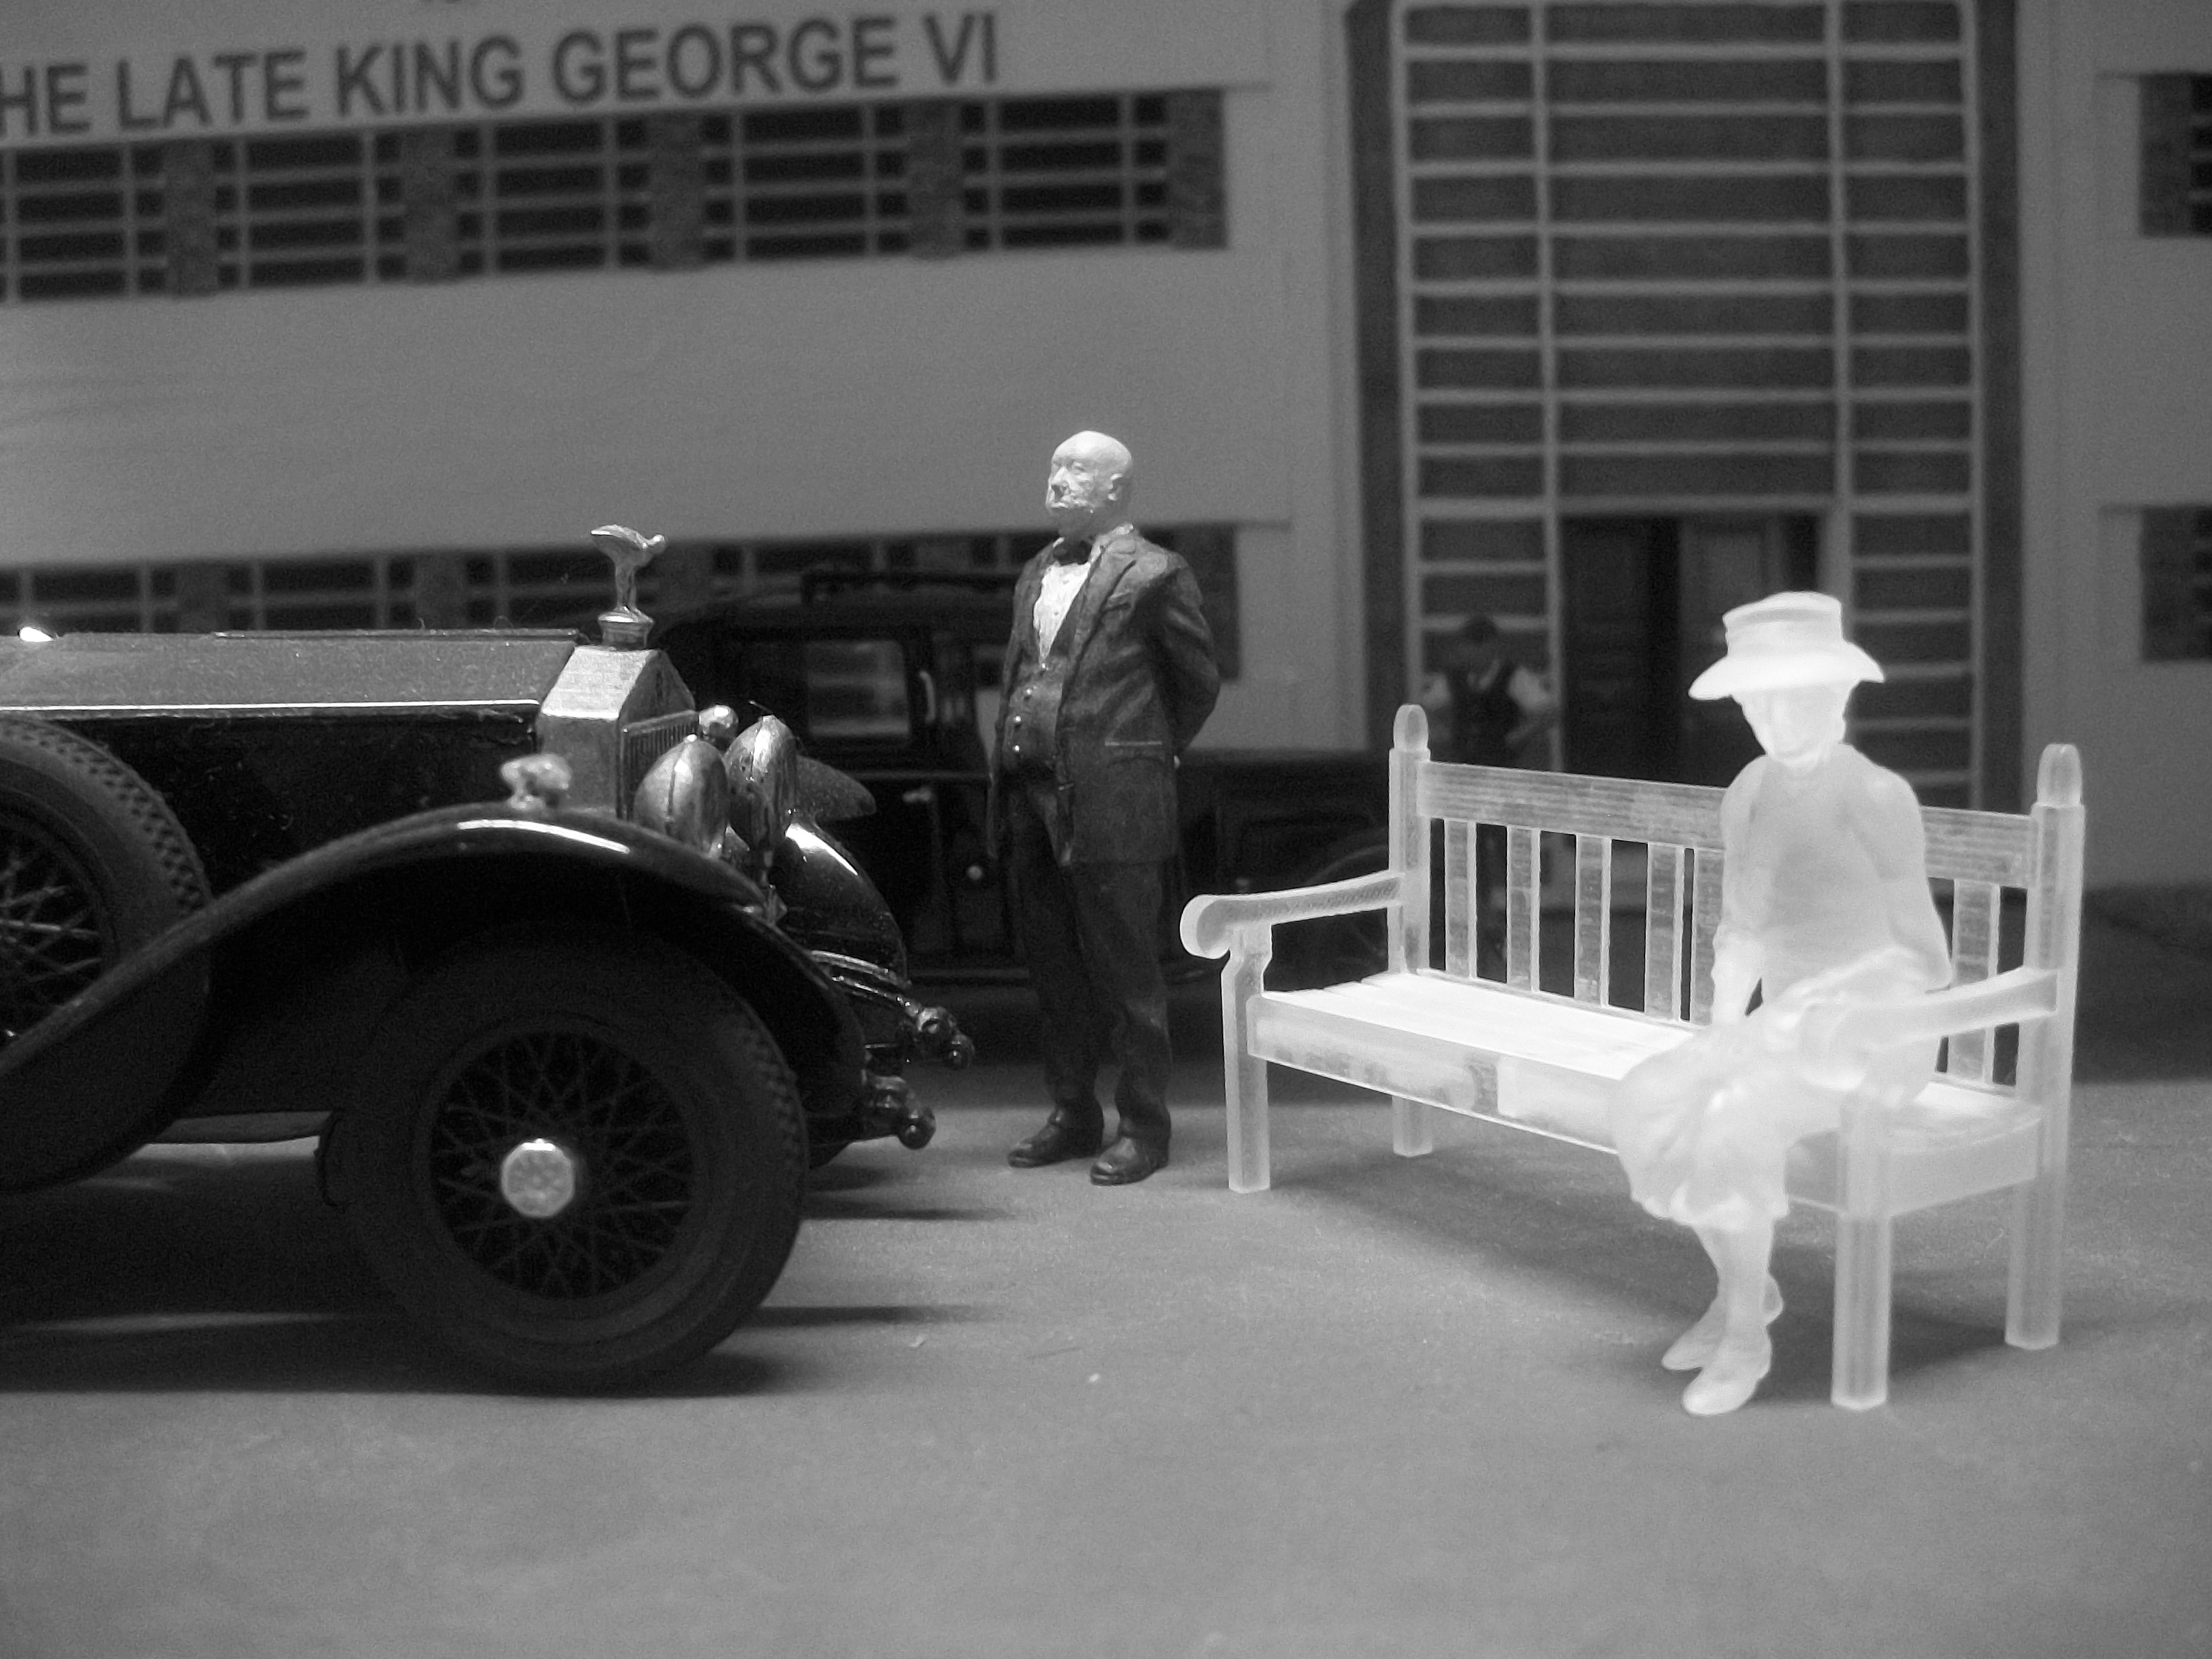
The ' Black Diamond ' diorama is coming together nicely now, and the lady seated on the bench is almost fully painted. These following photos are taken with fluorescent tube lighting only, whereas later I shall use 100 watt daylight bulb lighting, and maybe try some outdoor natural daylight also. David
-

WIP: Early 1980s campsite with bronco and wheeler
Anglia105E replied to youpey's topic in WIP: Dioramas
Yes, that's what I do, Miles...... Anything that I haven't done before, as regards diorama building, I just watch a few YouTube videos that show the process clearly and then proceed with more confidence. David -
WIP: Early 1980s campsite with bronco and wheeler
Anglia105E replied to youpey's topic in WIP: Dioramas
Hope you manage to include the lake, well part of the lake anyway ! You only need a small corner of the lake to suggest a larger expanse of water, so you can work within the confines of your diorama baseboard. David -
You have some nice engines there, Pat..... My younger brother works for a Detroit Diesel service company here in England, where he has worked for many years in the parts department, 44 years he told me this morning ! David
-
WIP: Early 1980s campsite with bronco and wheeler
Anglia105E replied to youpey's topic in WIP: Dioramas
Yeah, I guess that is too long ! -
WIP: Early 1980s campsite with bronco and wheeler
Anglia105E replied to youpey's topic in WIP: Dioramas
That is a coincidence, because I had the Tamiya Campus Friends kit in mind when you mentioned camping figures. My most recent order from Shapeways was 3 days, which included printing and shipping across the North Sea by UPS, so this was their fastest service yet ! David -
WIP: Early 1980s campsite with bronco and wheeler
Anglia105E replied to youpey's topic in WIP: Dioramas
You are off to a good start, Miles, and I can see that you have given a great deal of thought to the elements of the composition for this diorama. Maybe the trailer will be okay, but it does take up a fair amount of space. This is the fun part about putting a diorama idea together, when you are working out the layout and how everything is positioned in relation to all the other vehicles and figures, also structures ( the tent ). I think you should be able to find some figures out there in the USA, either 1:25 or 1:24 scale, whereas we are limited as to what we can use here in UK. I tend to use Shapeways 3D printed figures for my dioramas, but they are not cheap. I get them shipped over from Holland and the shipping cost is high too. David -
Massy Fergusson 20 Farm Tractor - 'Renovation time'
Anglia105E replied to tiking's topic in Dioramas
Well Charles..... Yet again you have managed to make plastic look like rusted metal, which is pure genius. The two large wheels and tyres, the Valvoline oil drum...... and more ! Tiking the Rust Master........ David -
BIG thank you to Dave and the moderators, and indeed anyone else who is involved in maintaining and improving this wonderful Forum. Without a doubt, this is the BEST model cars forum in the World ( and beyond )............ I am proud to be a member of MCM Forums, and I have the greatest respect for you all....... especially Mr Ambrose...... he is the man ! David
-
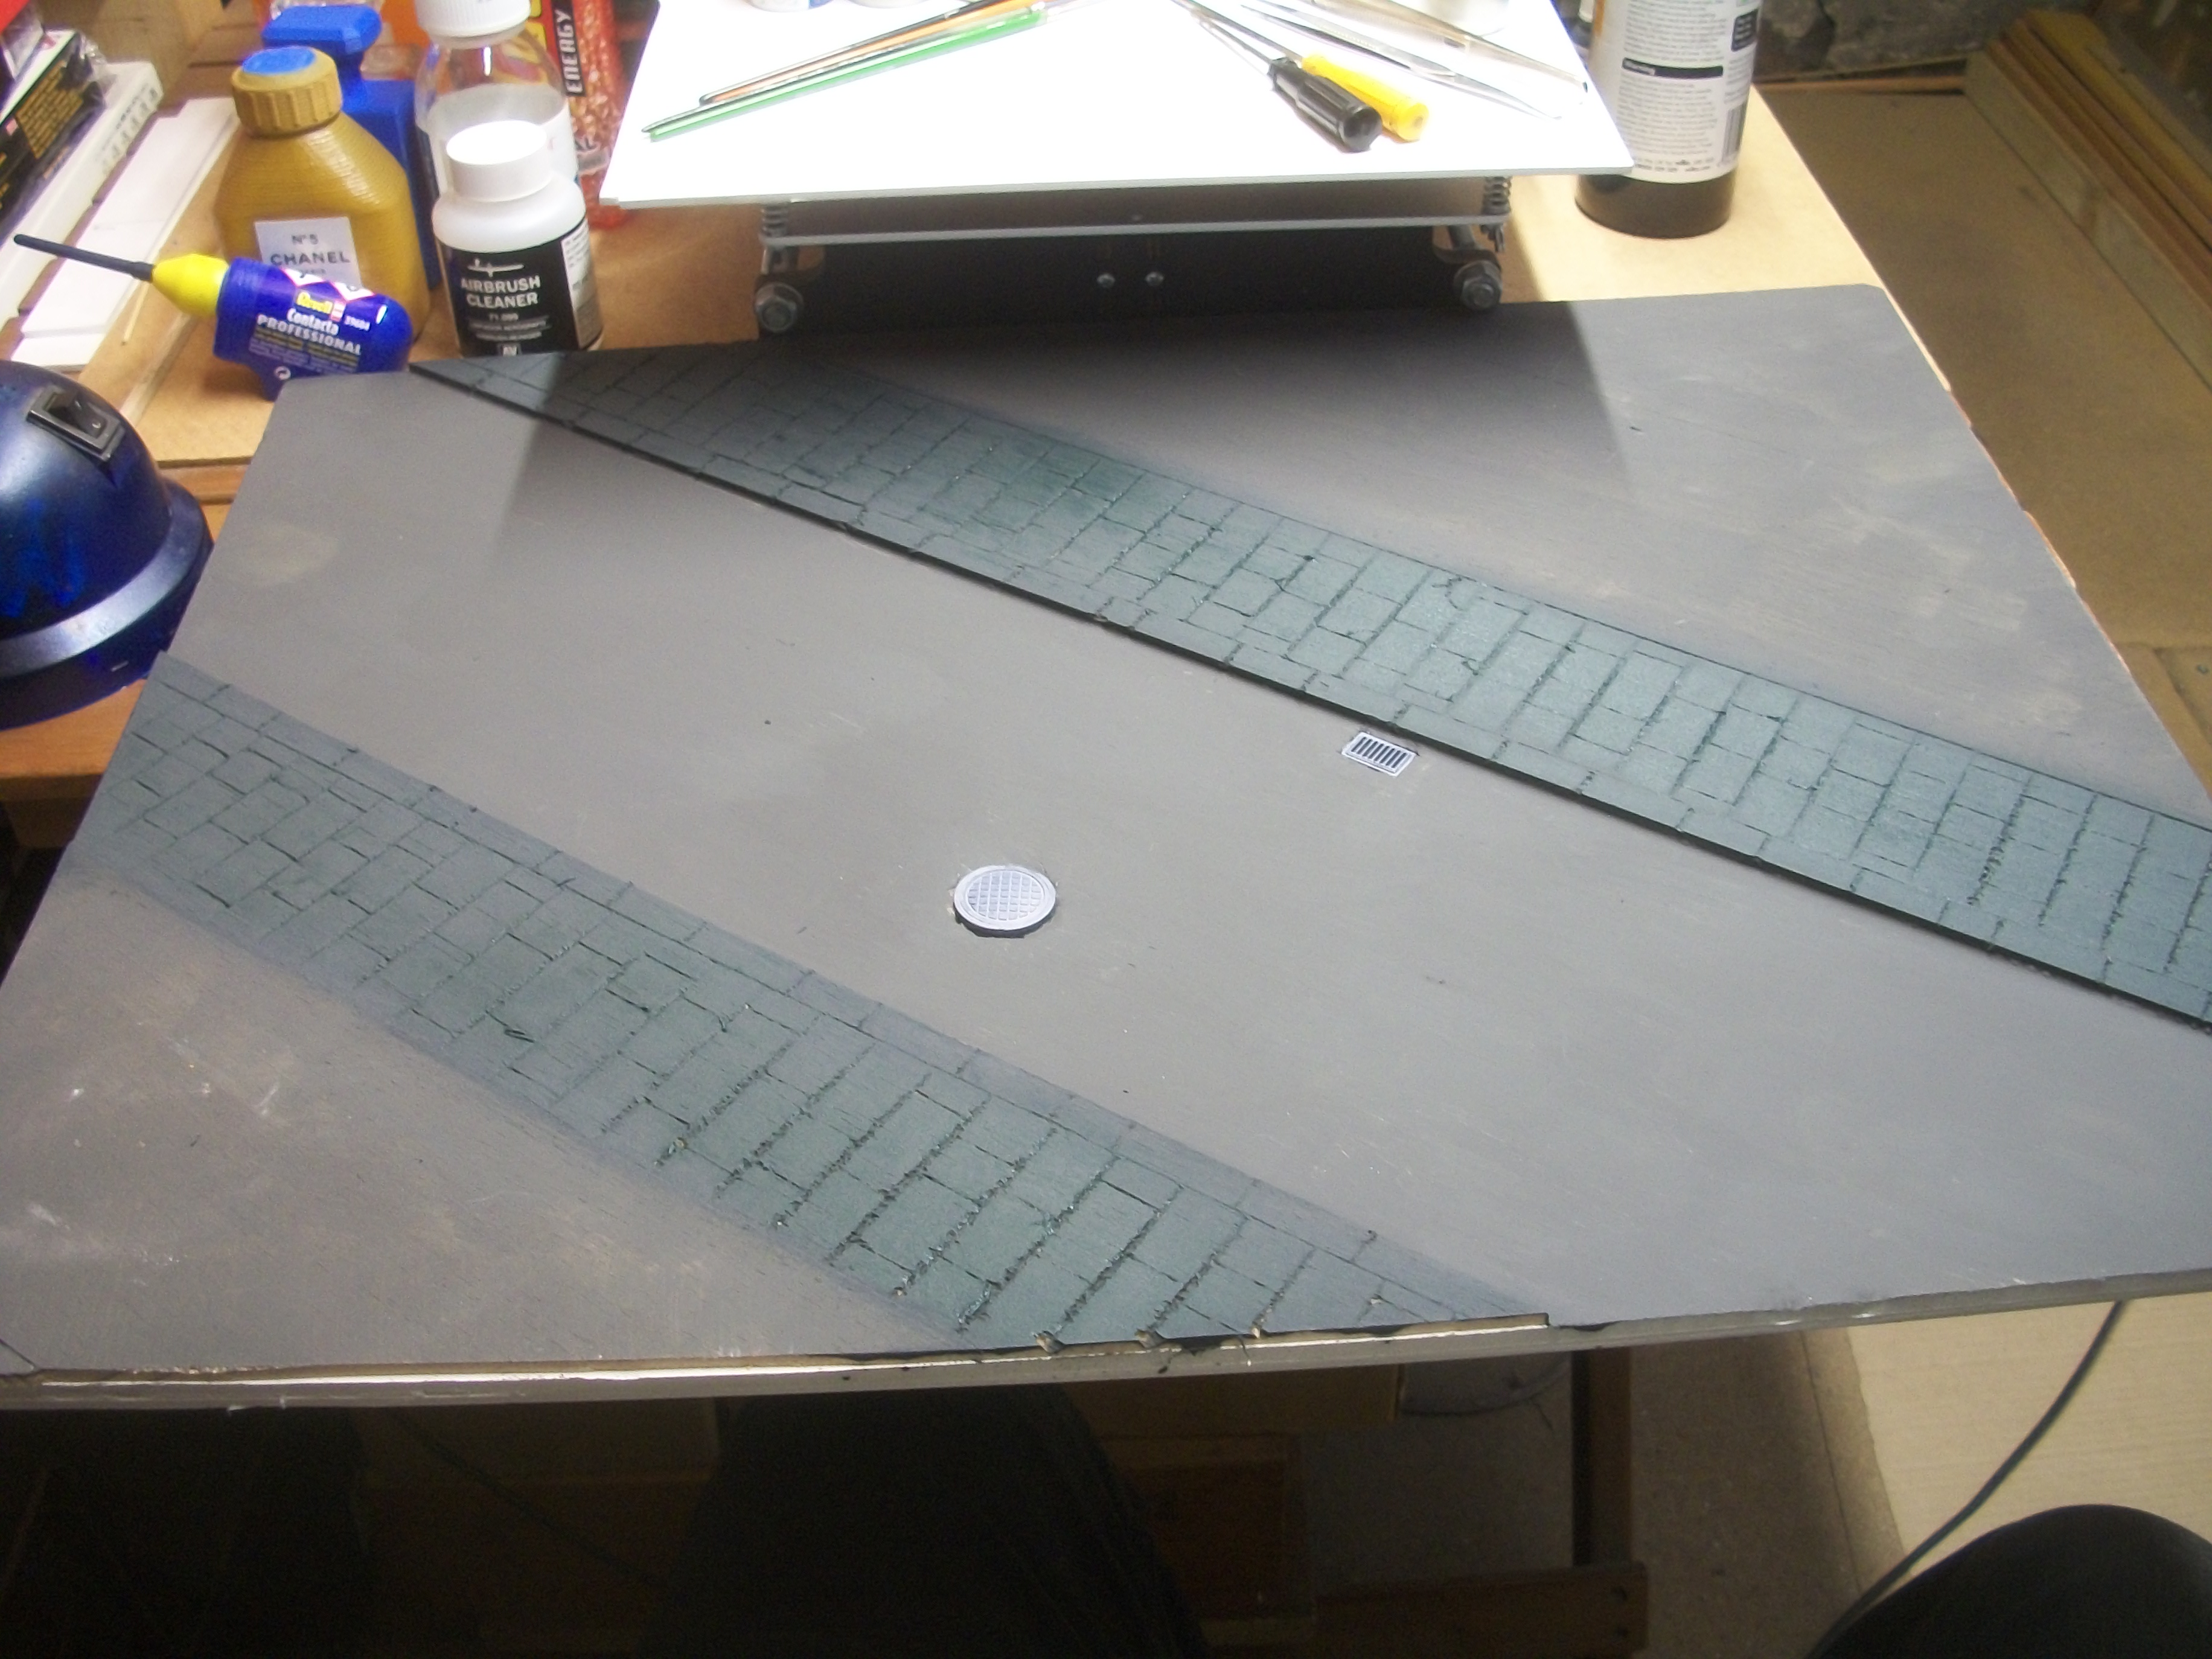
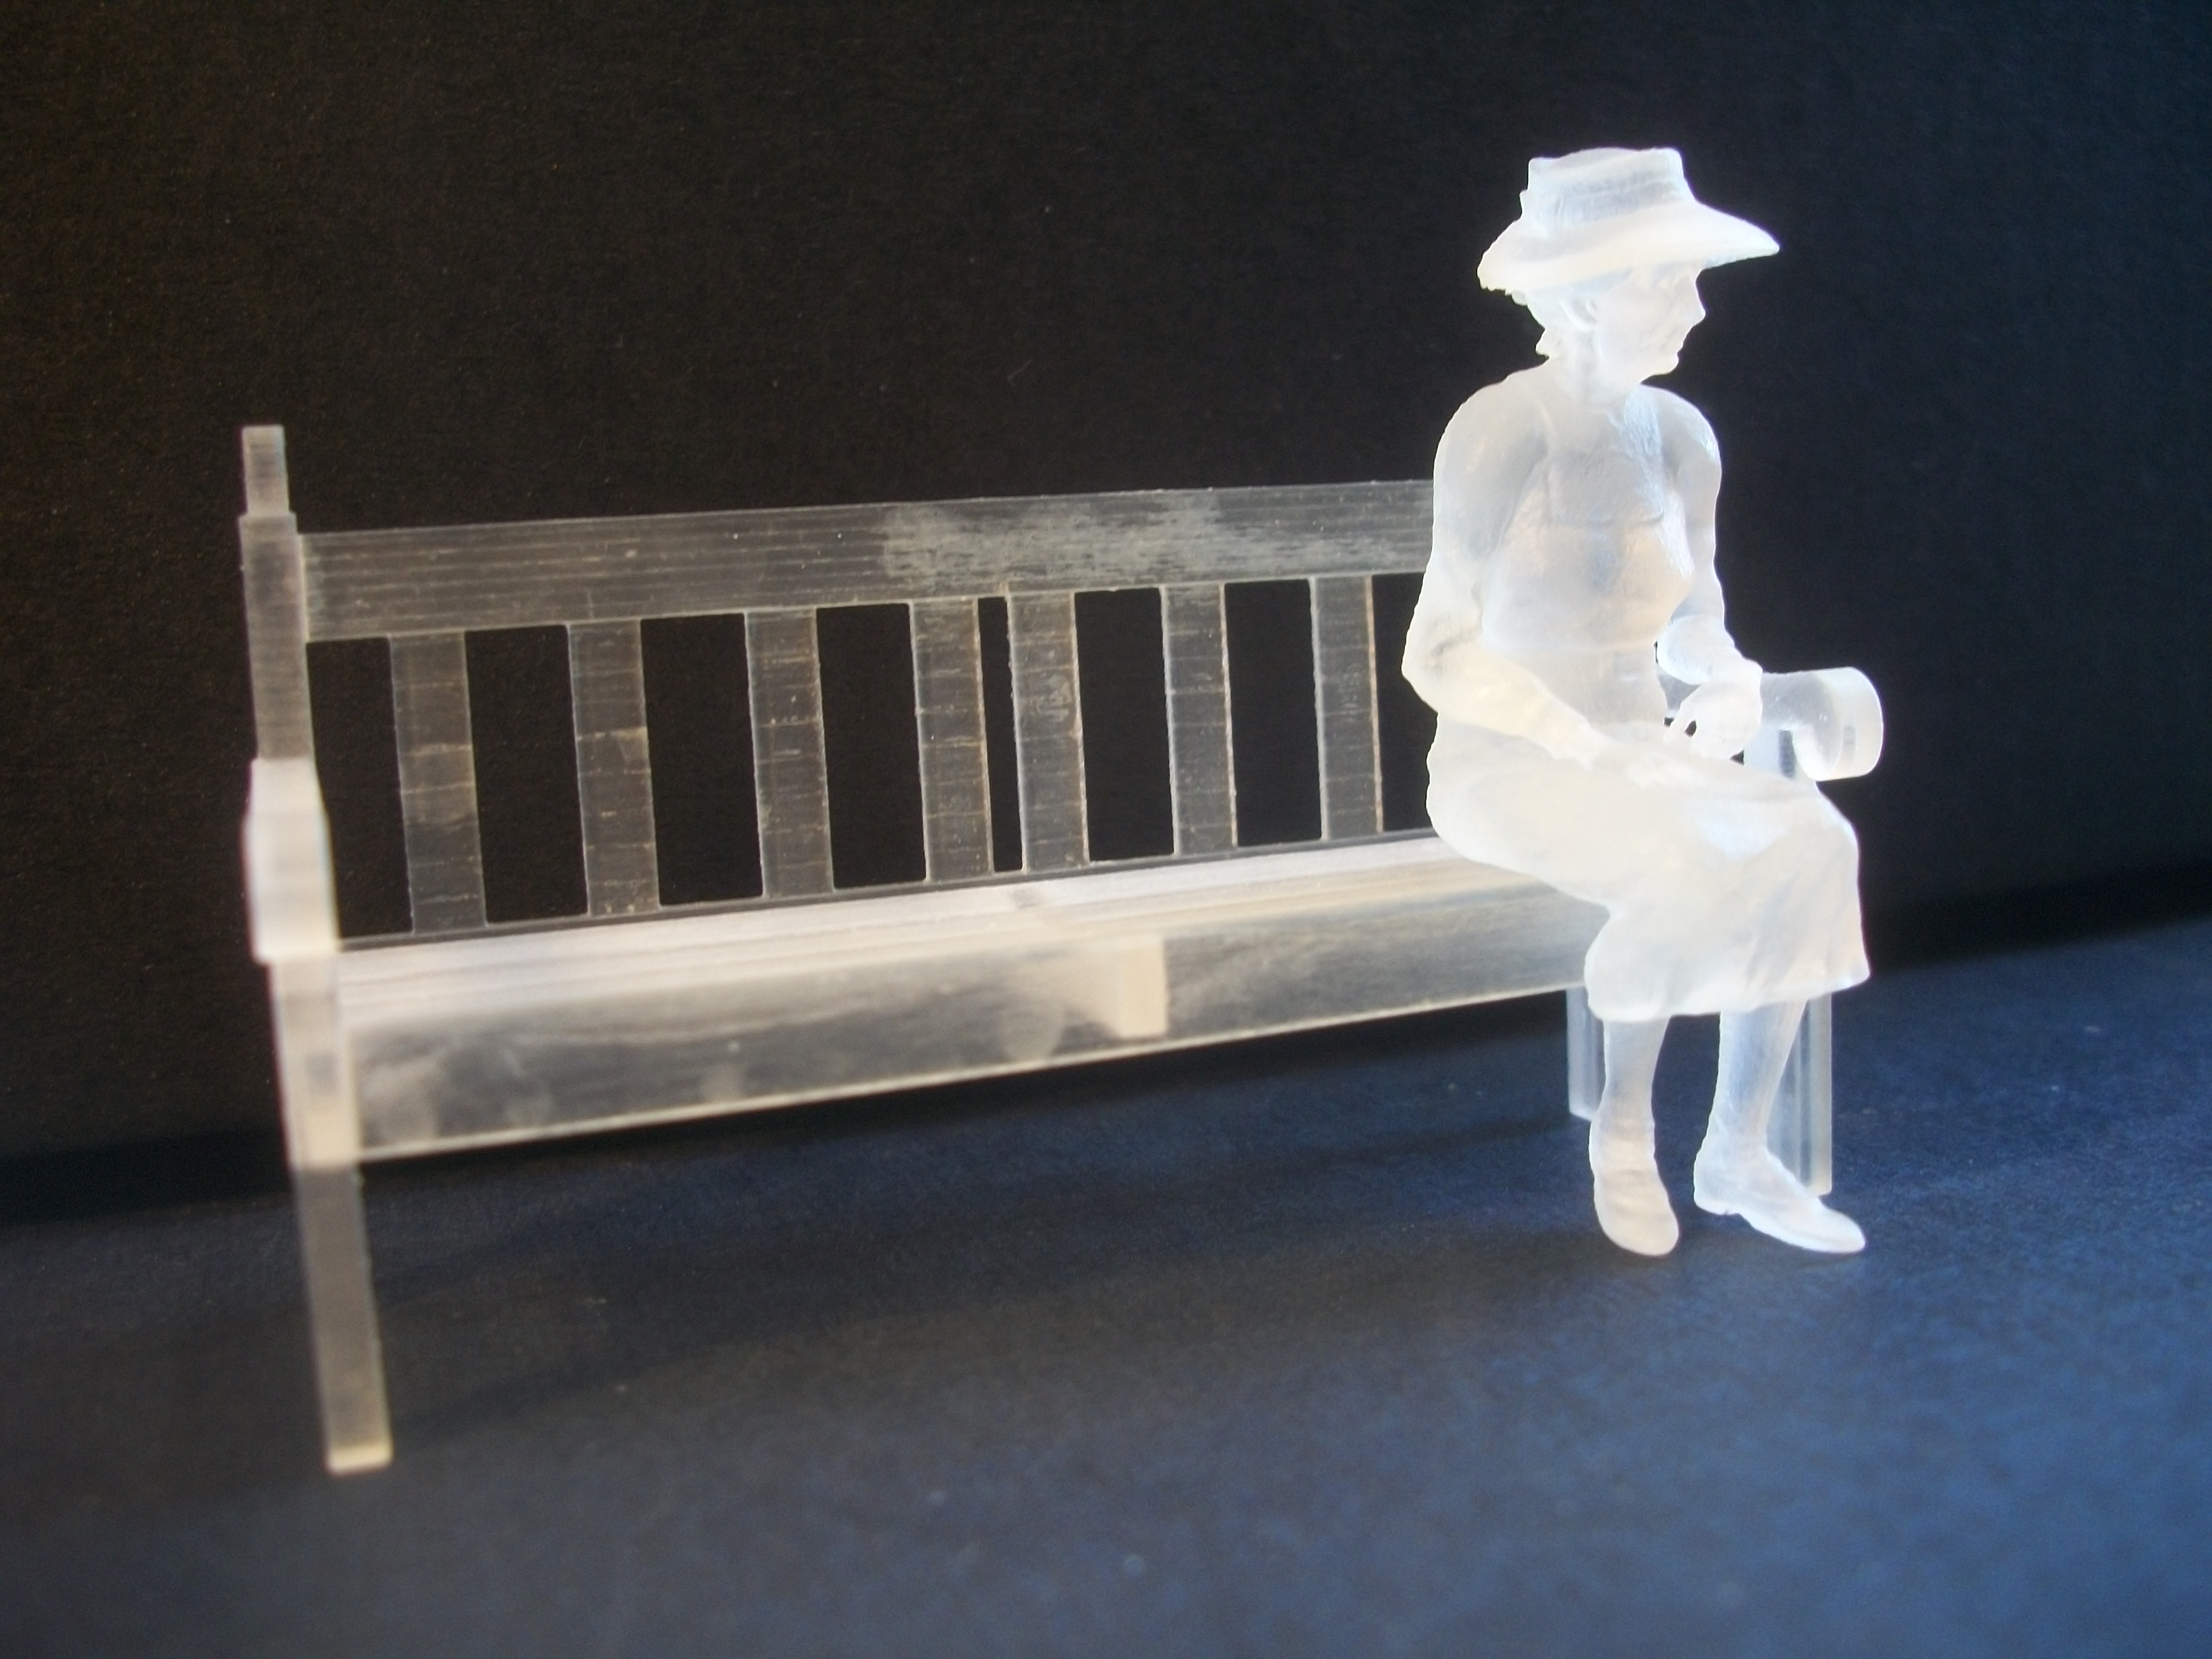
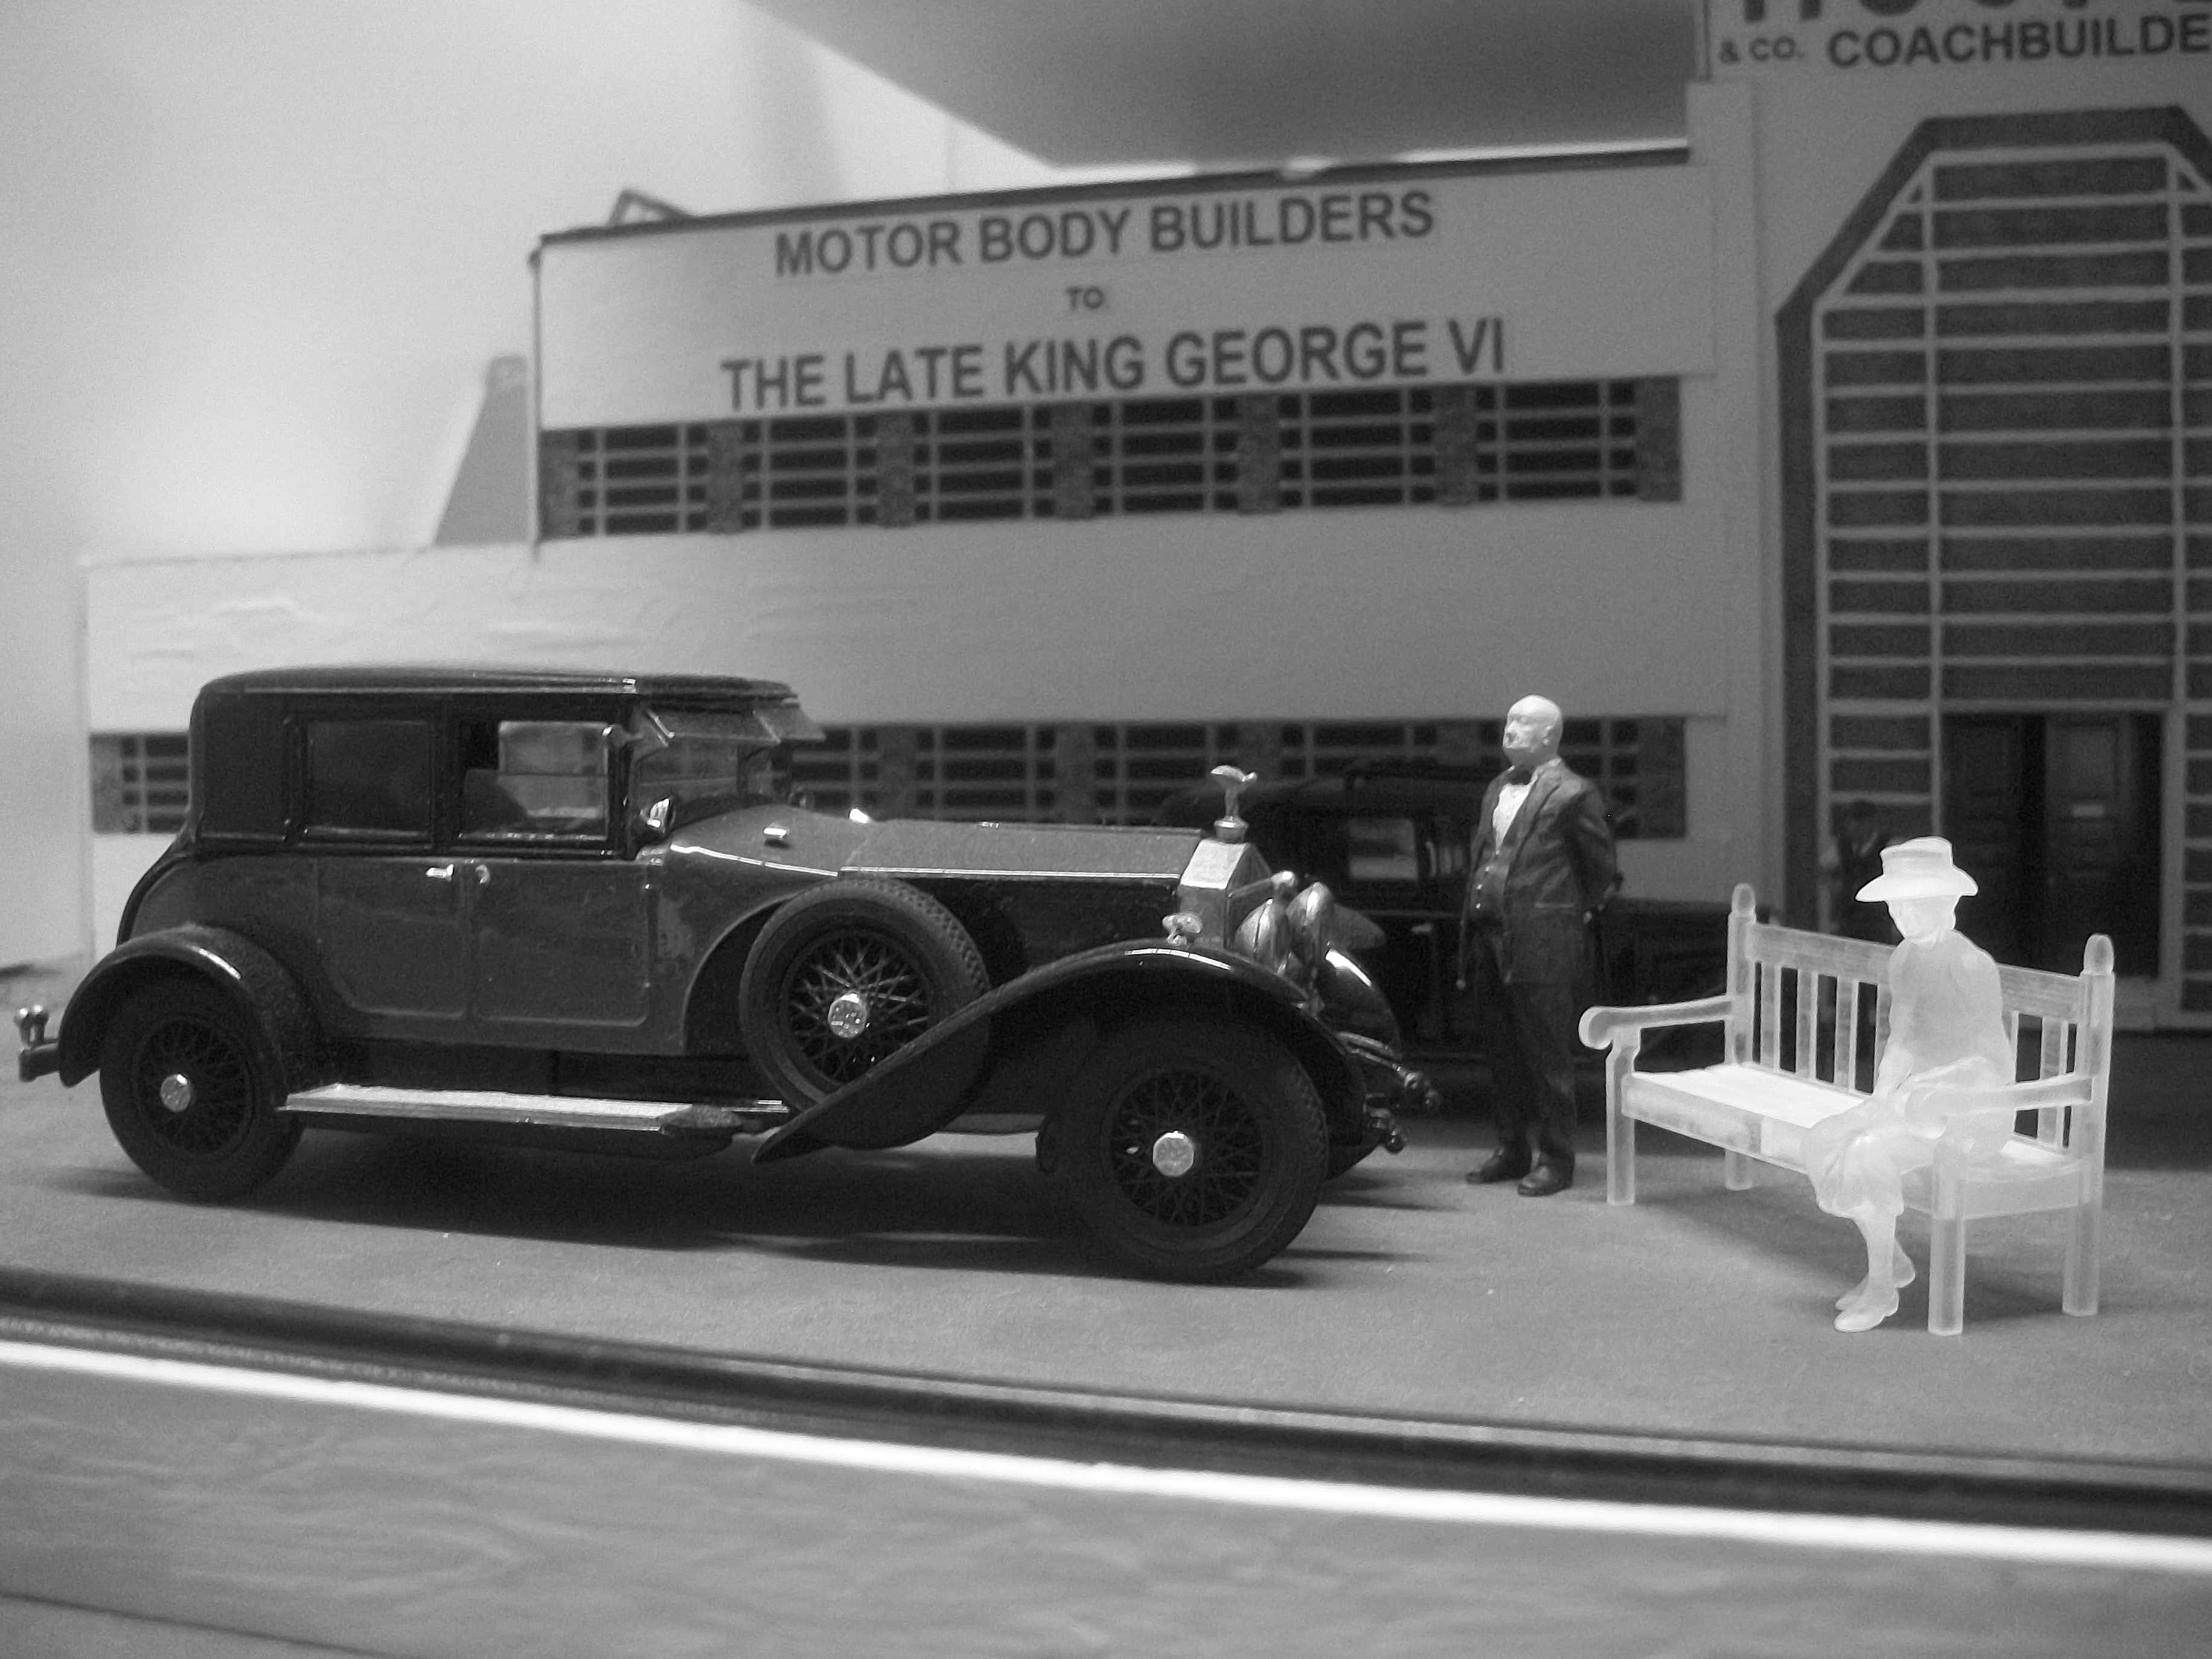
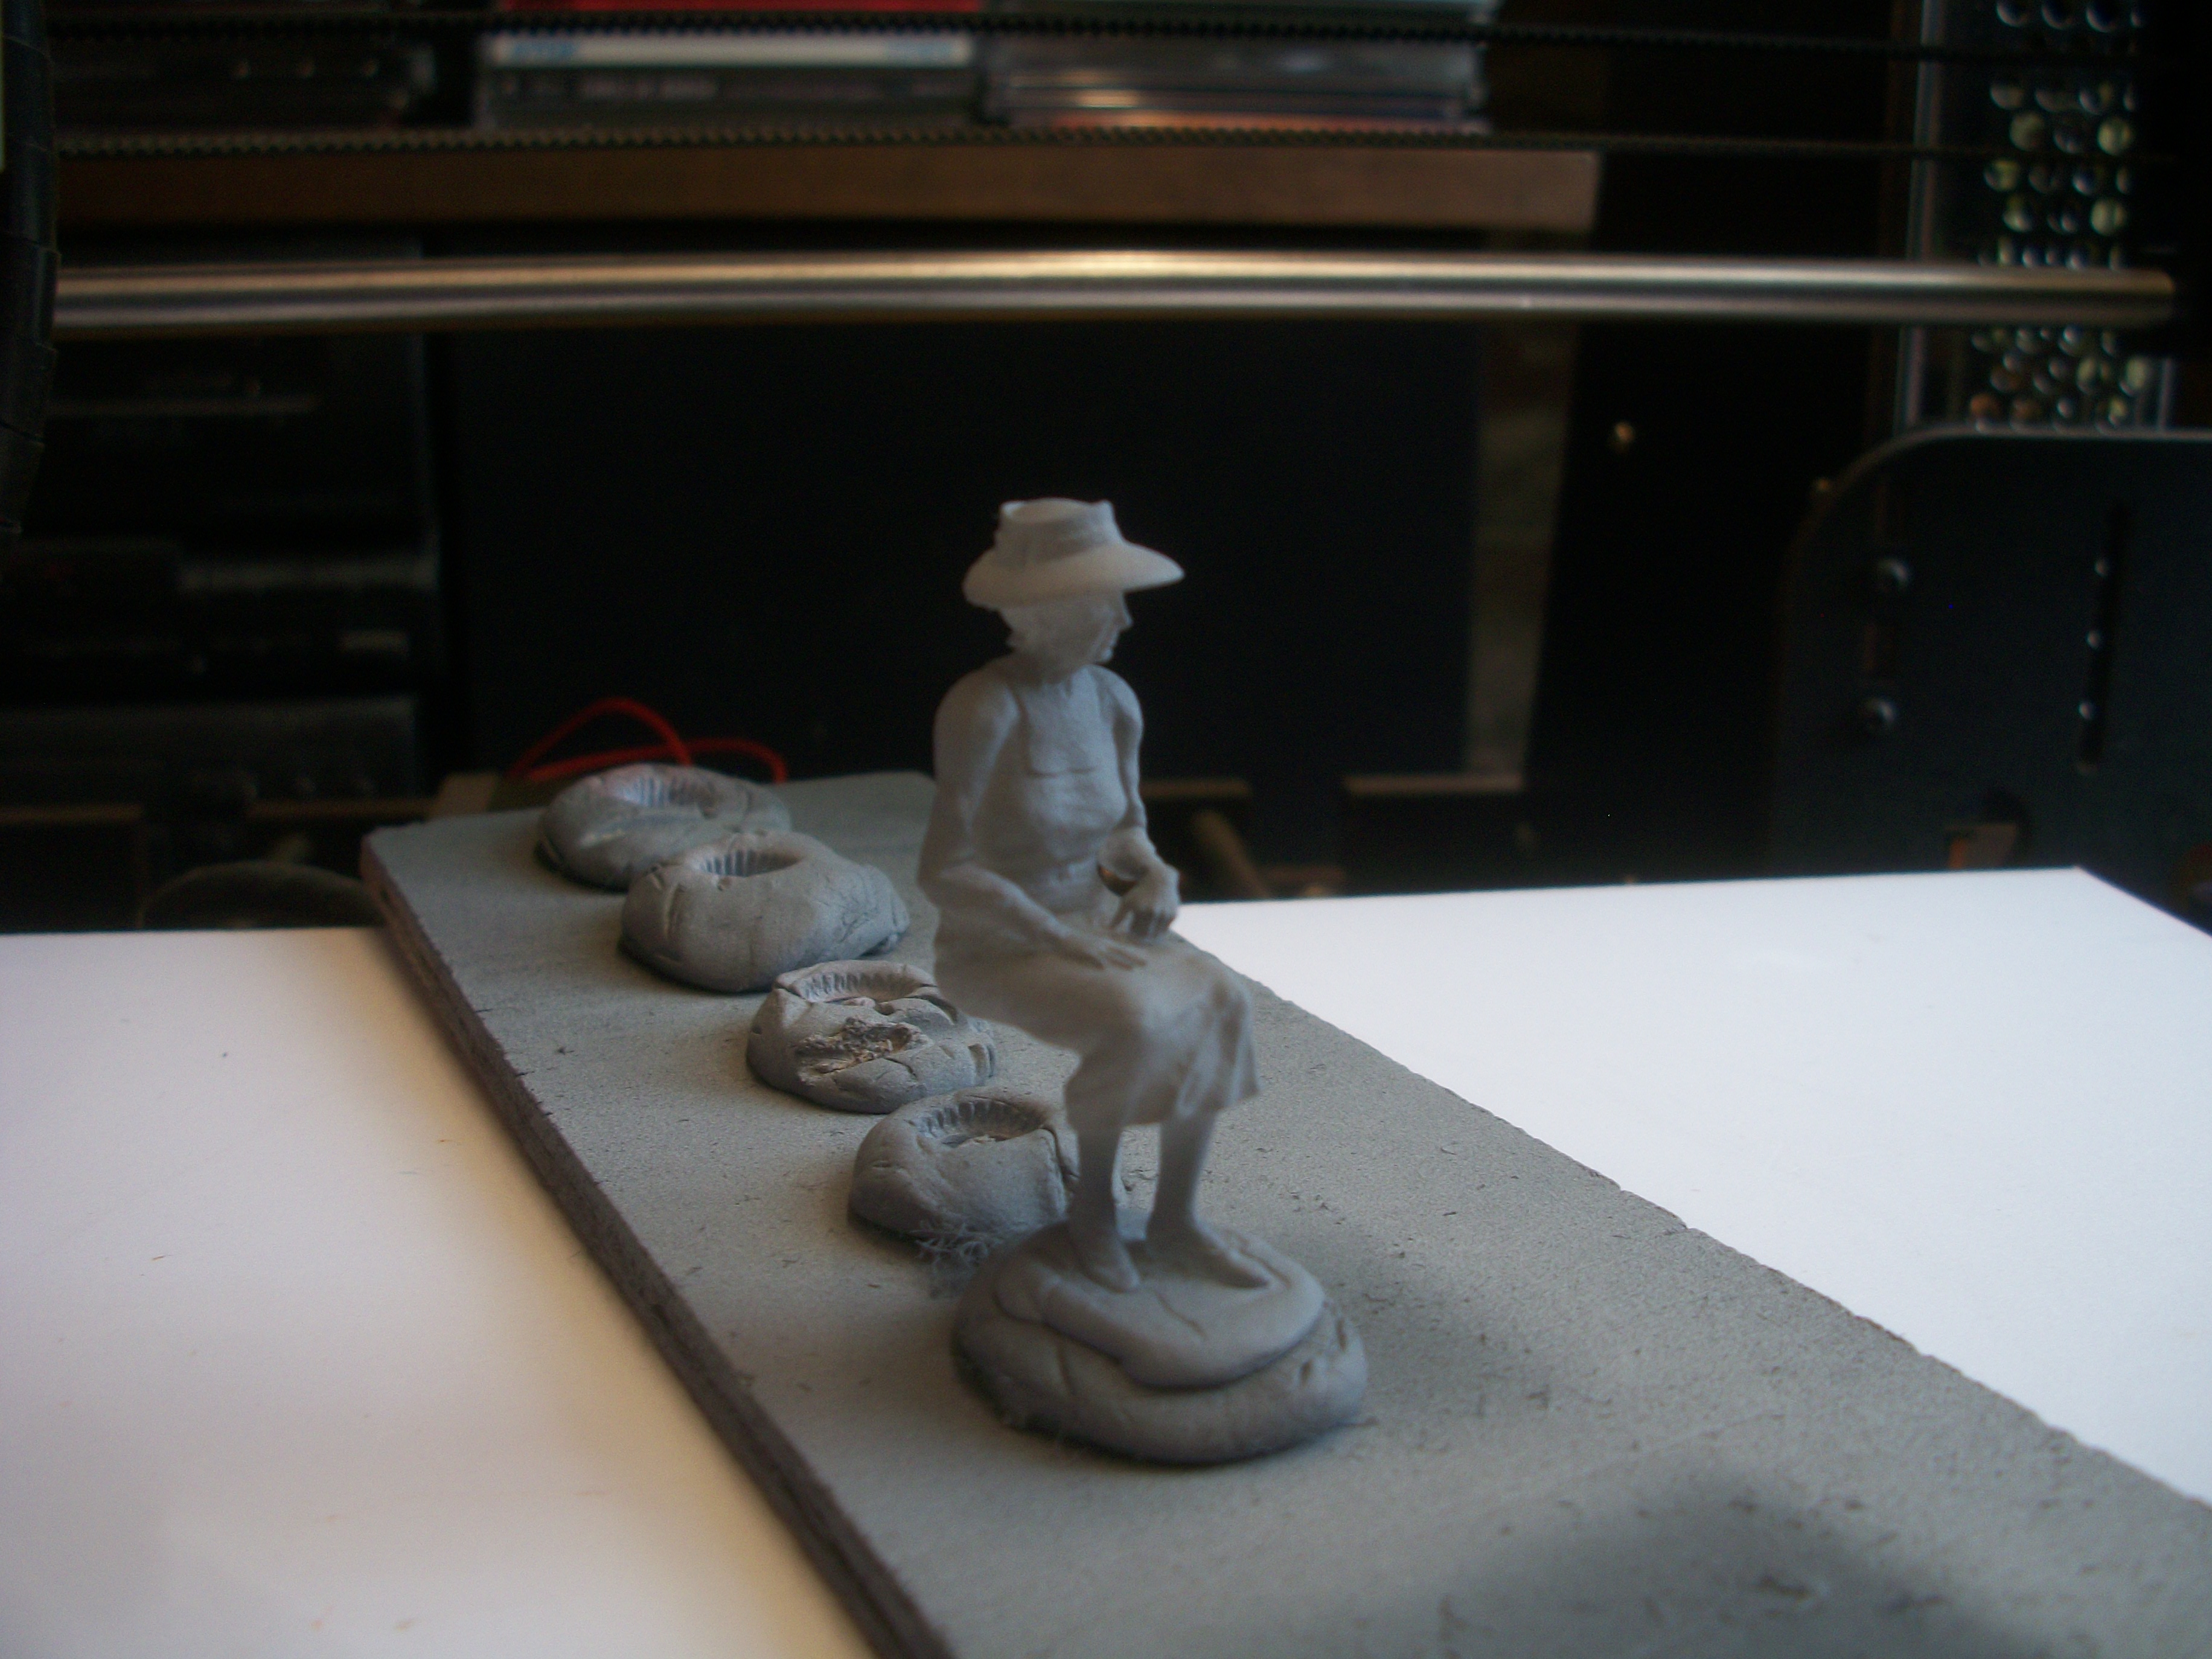
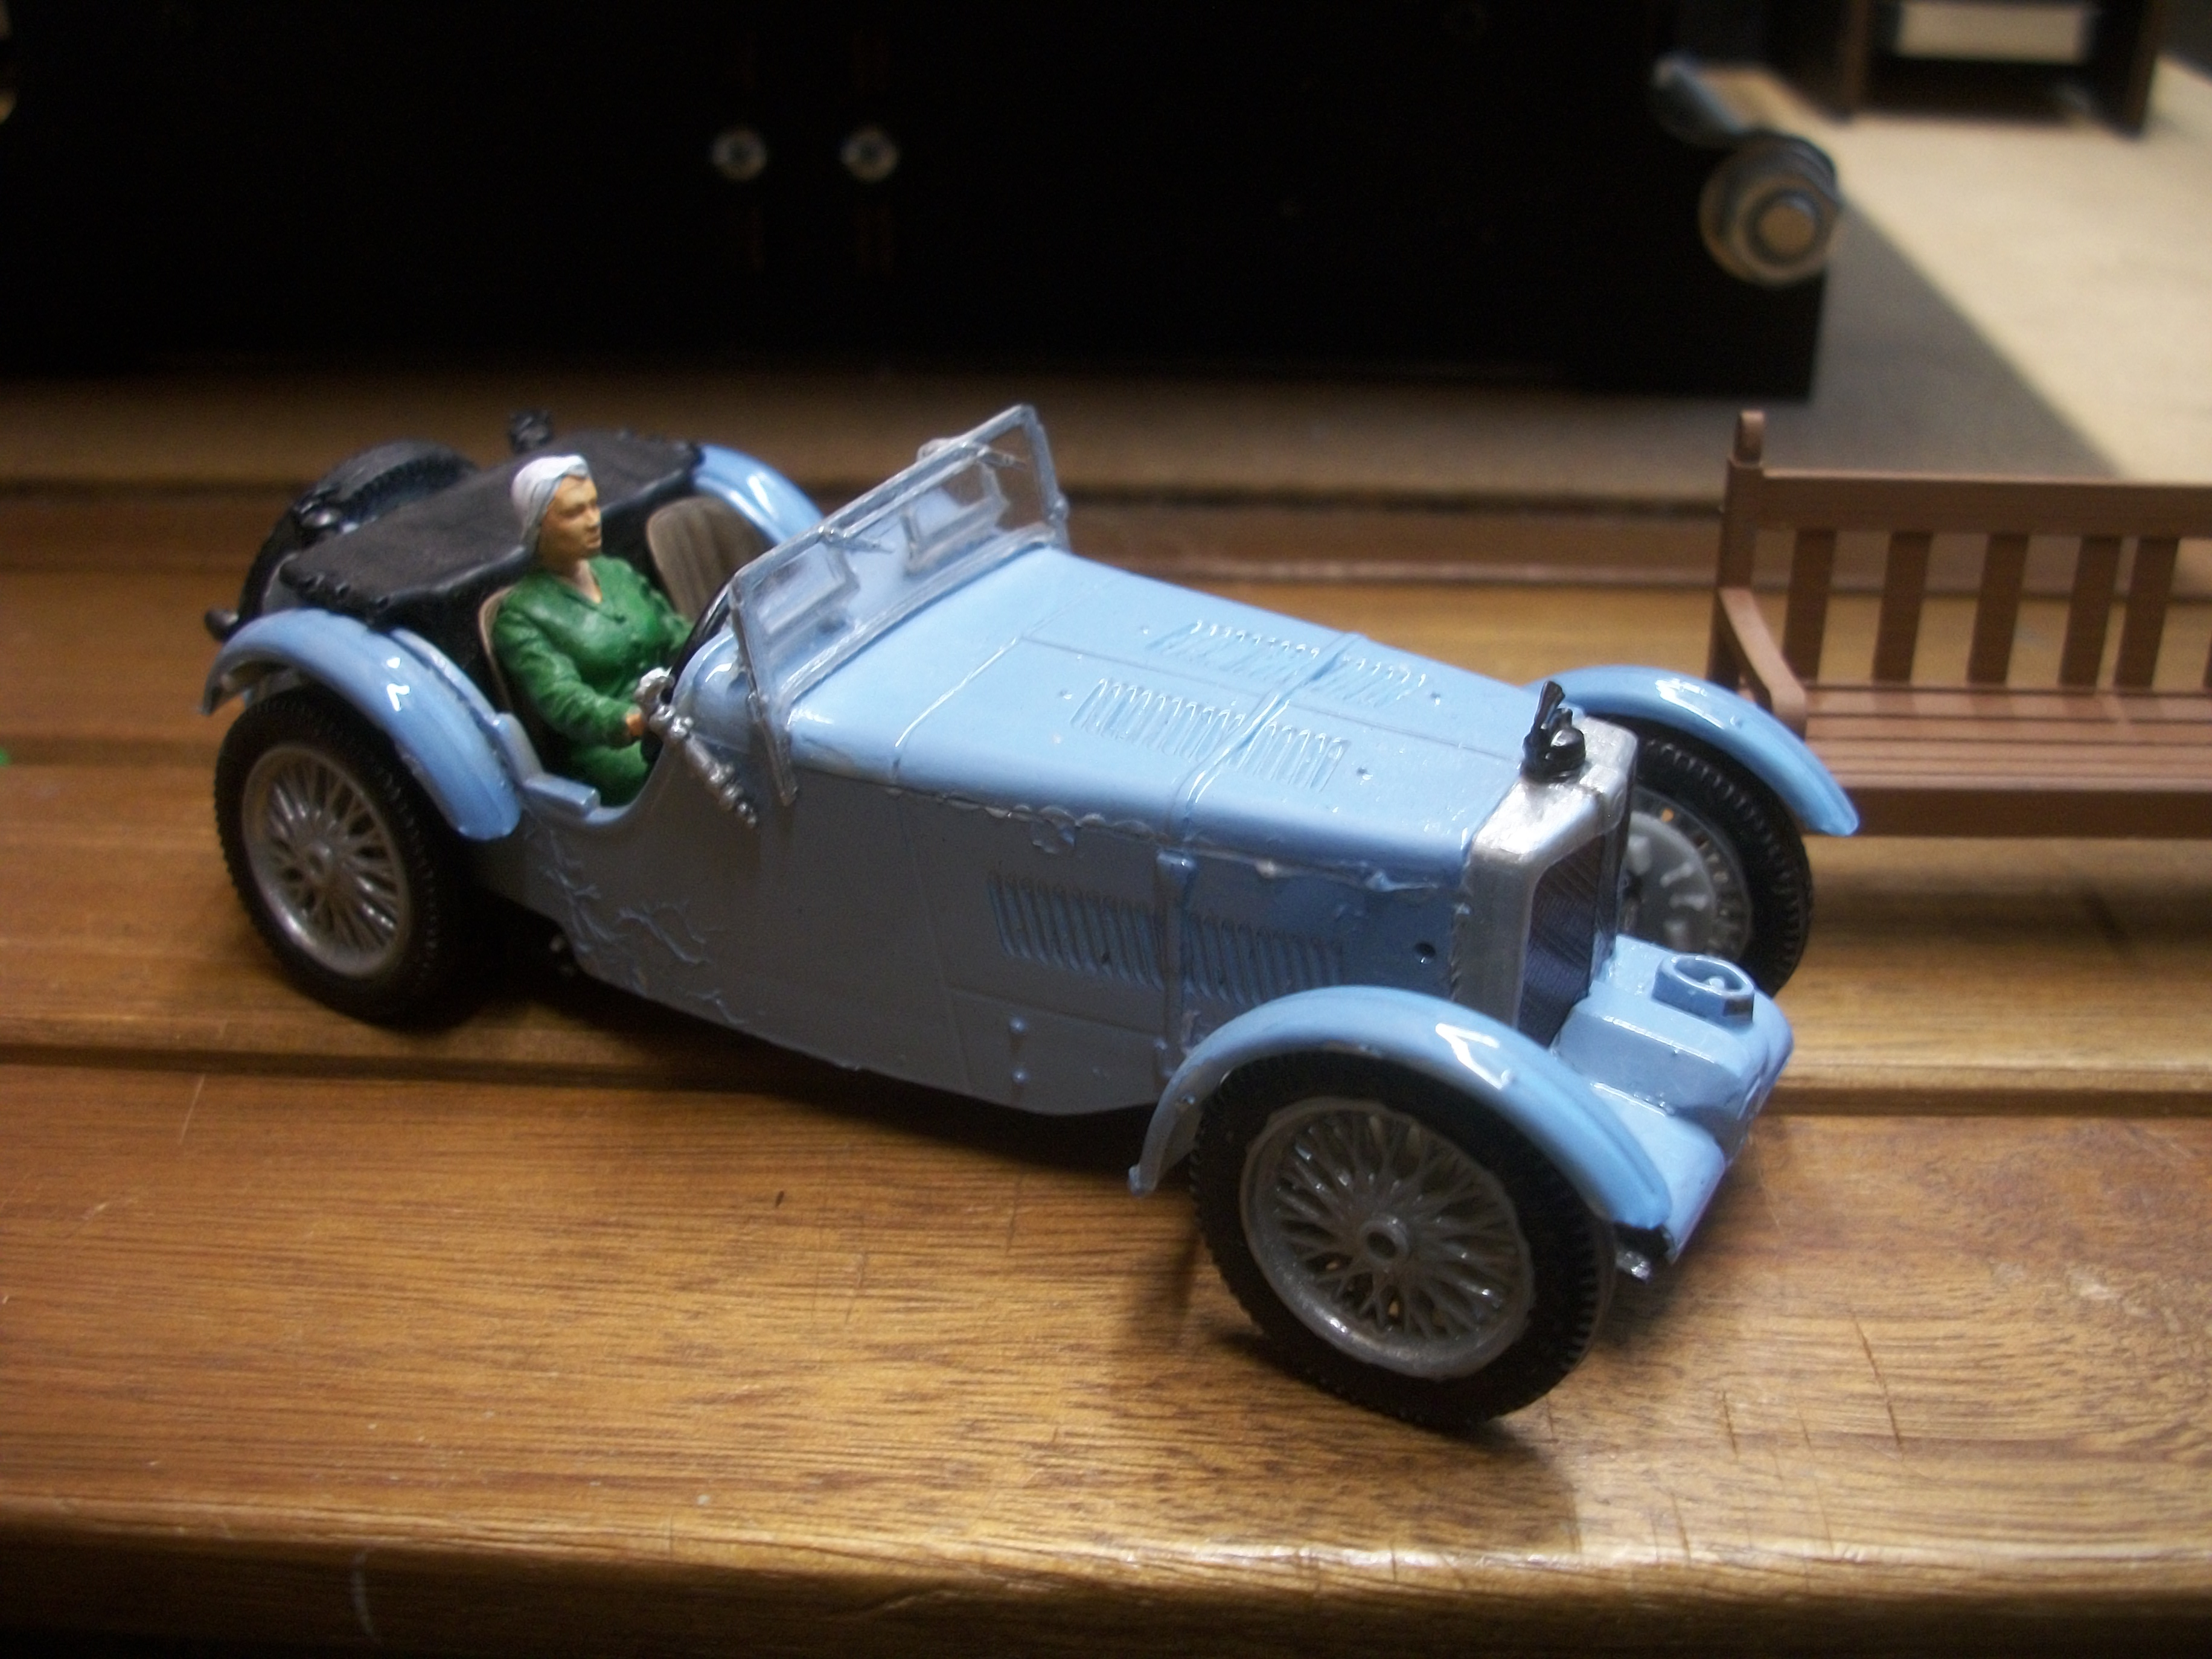
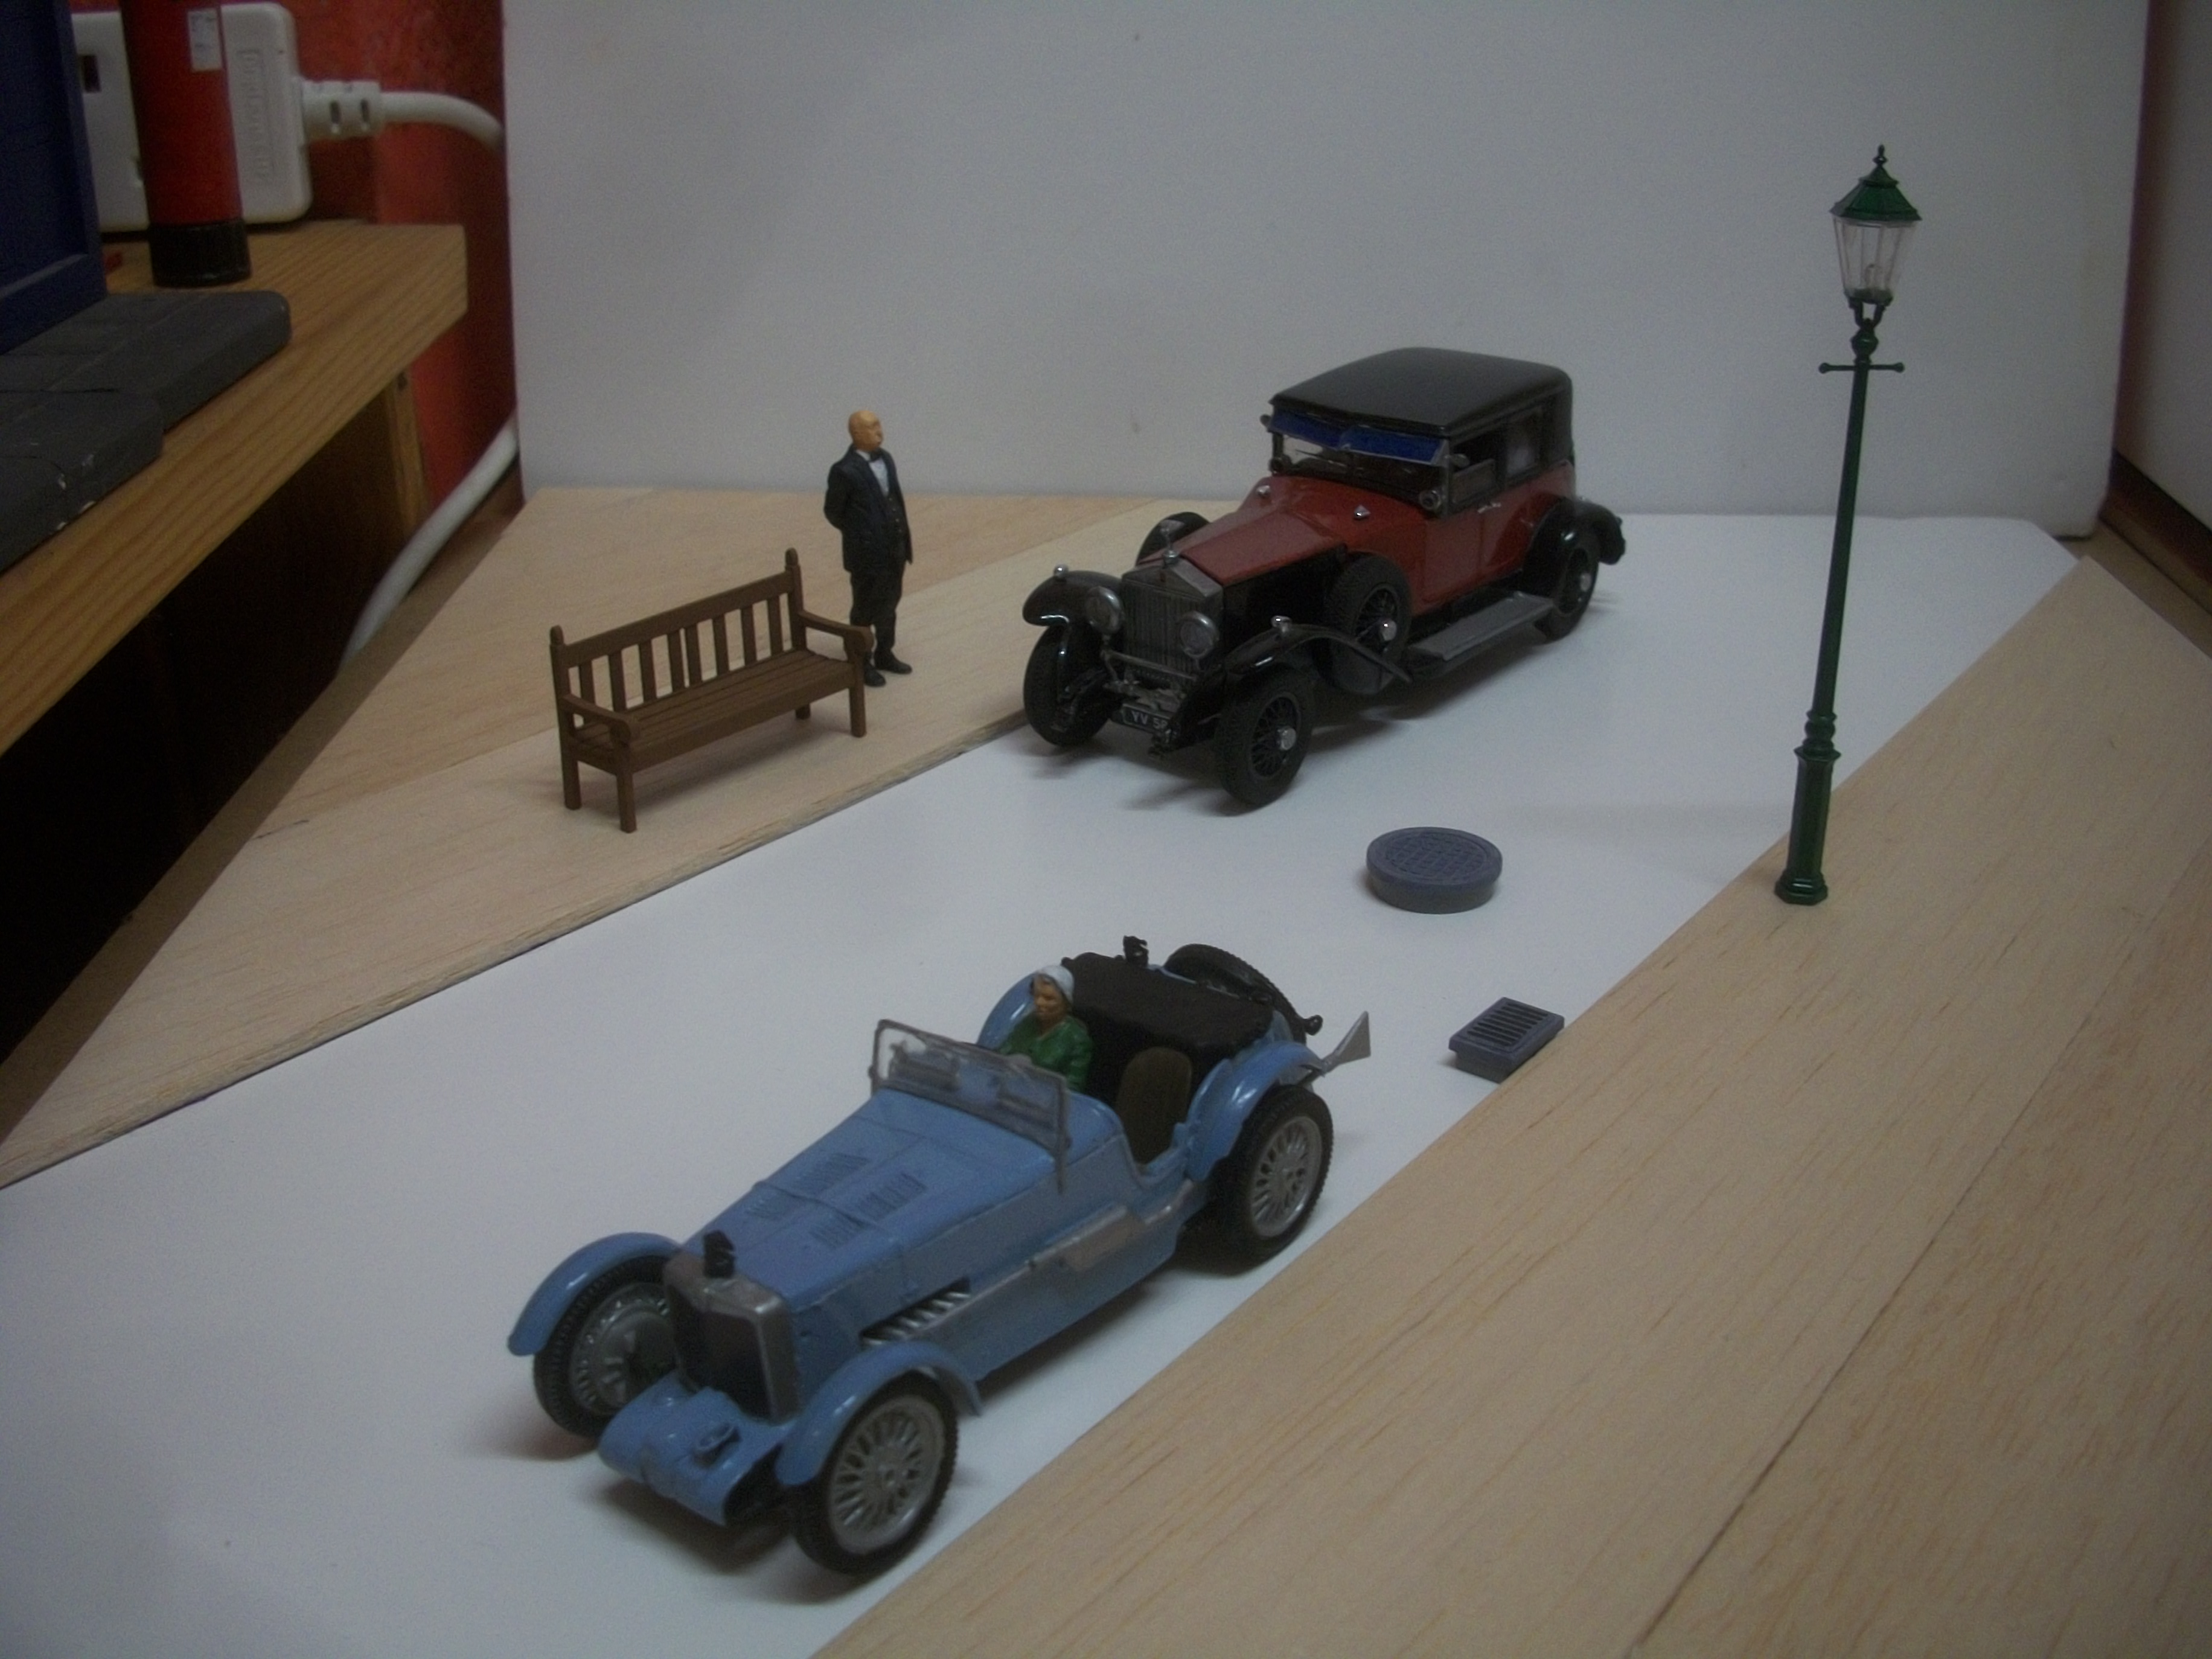
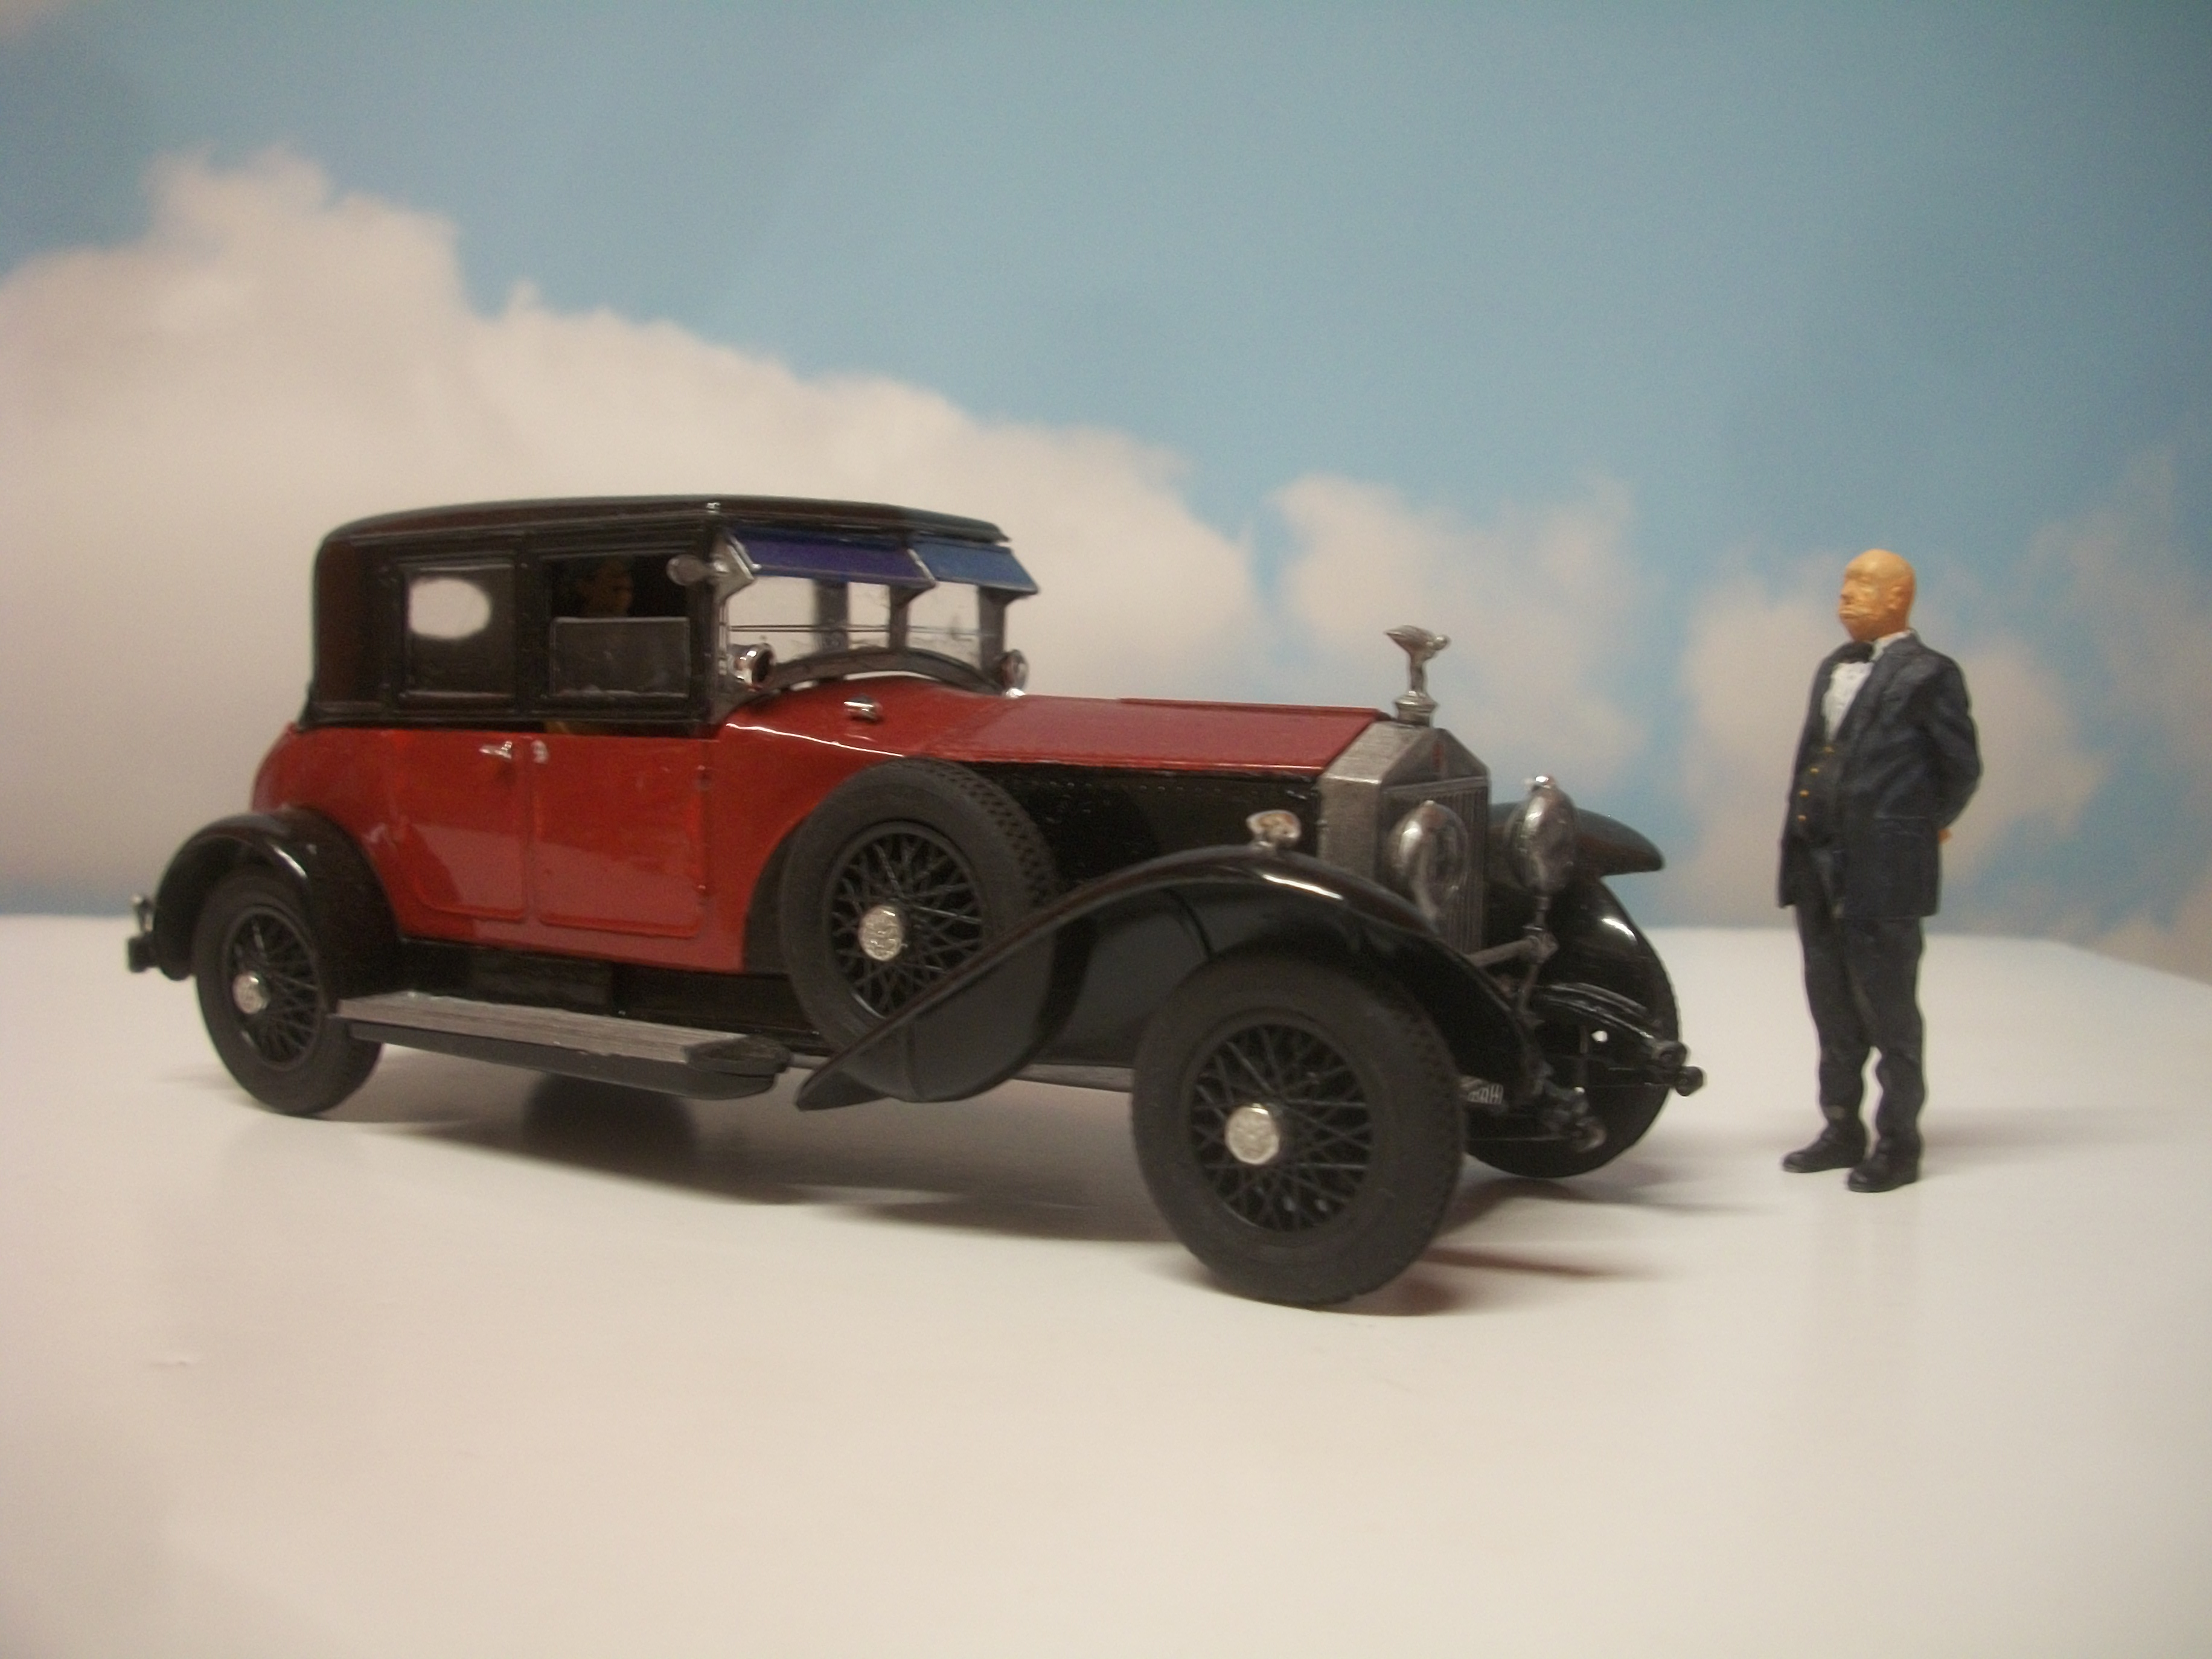
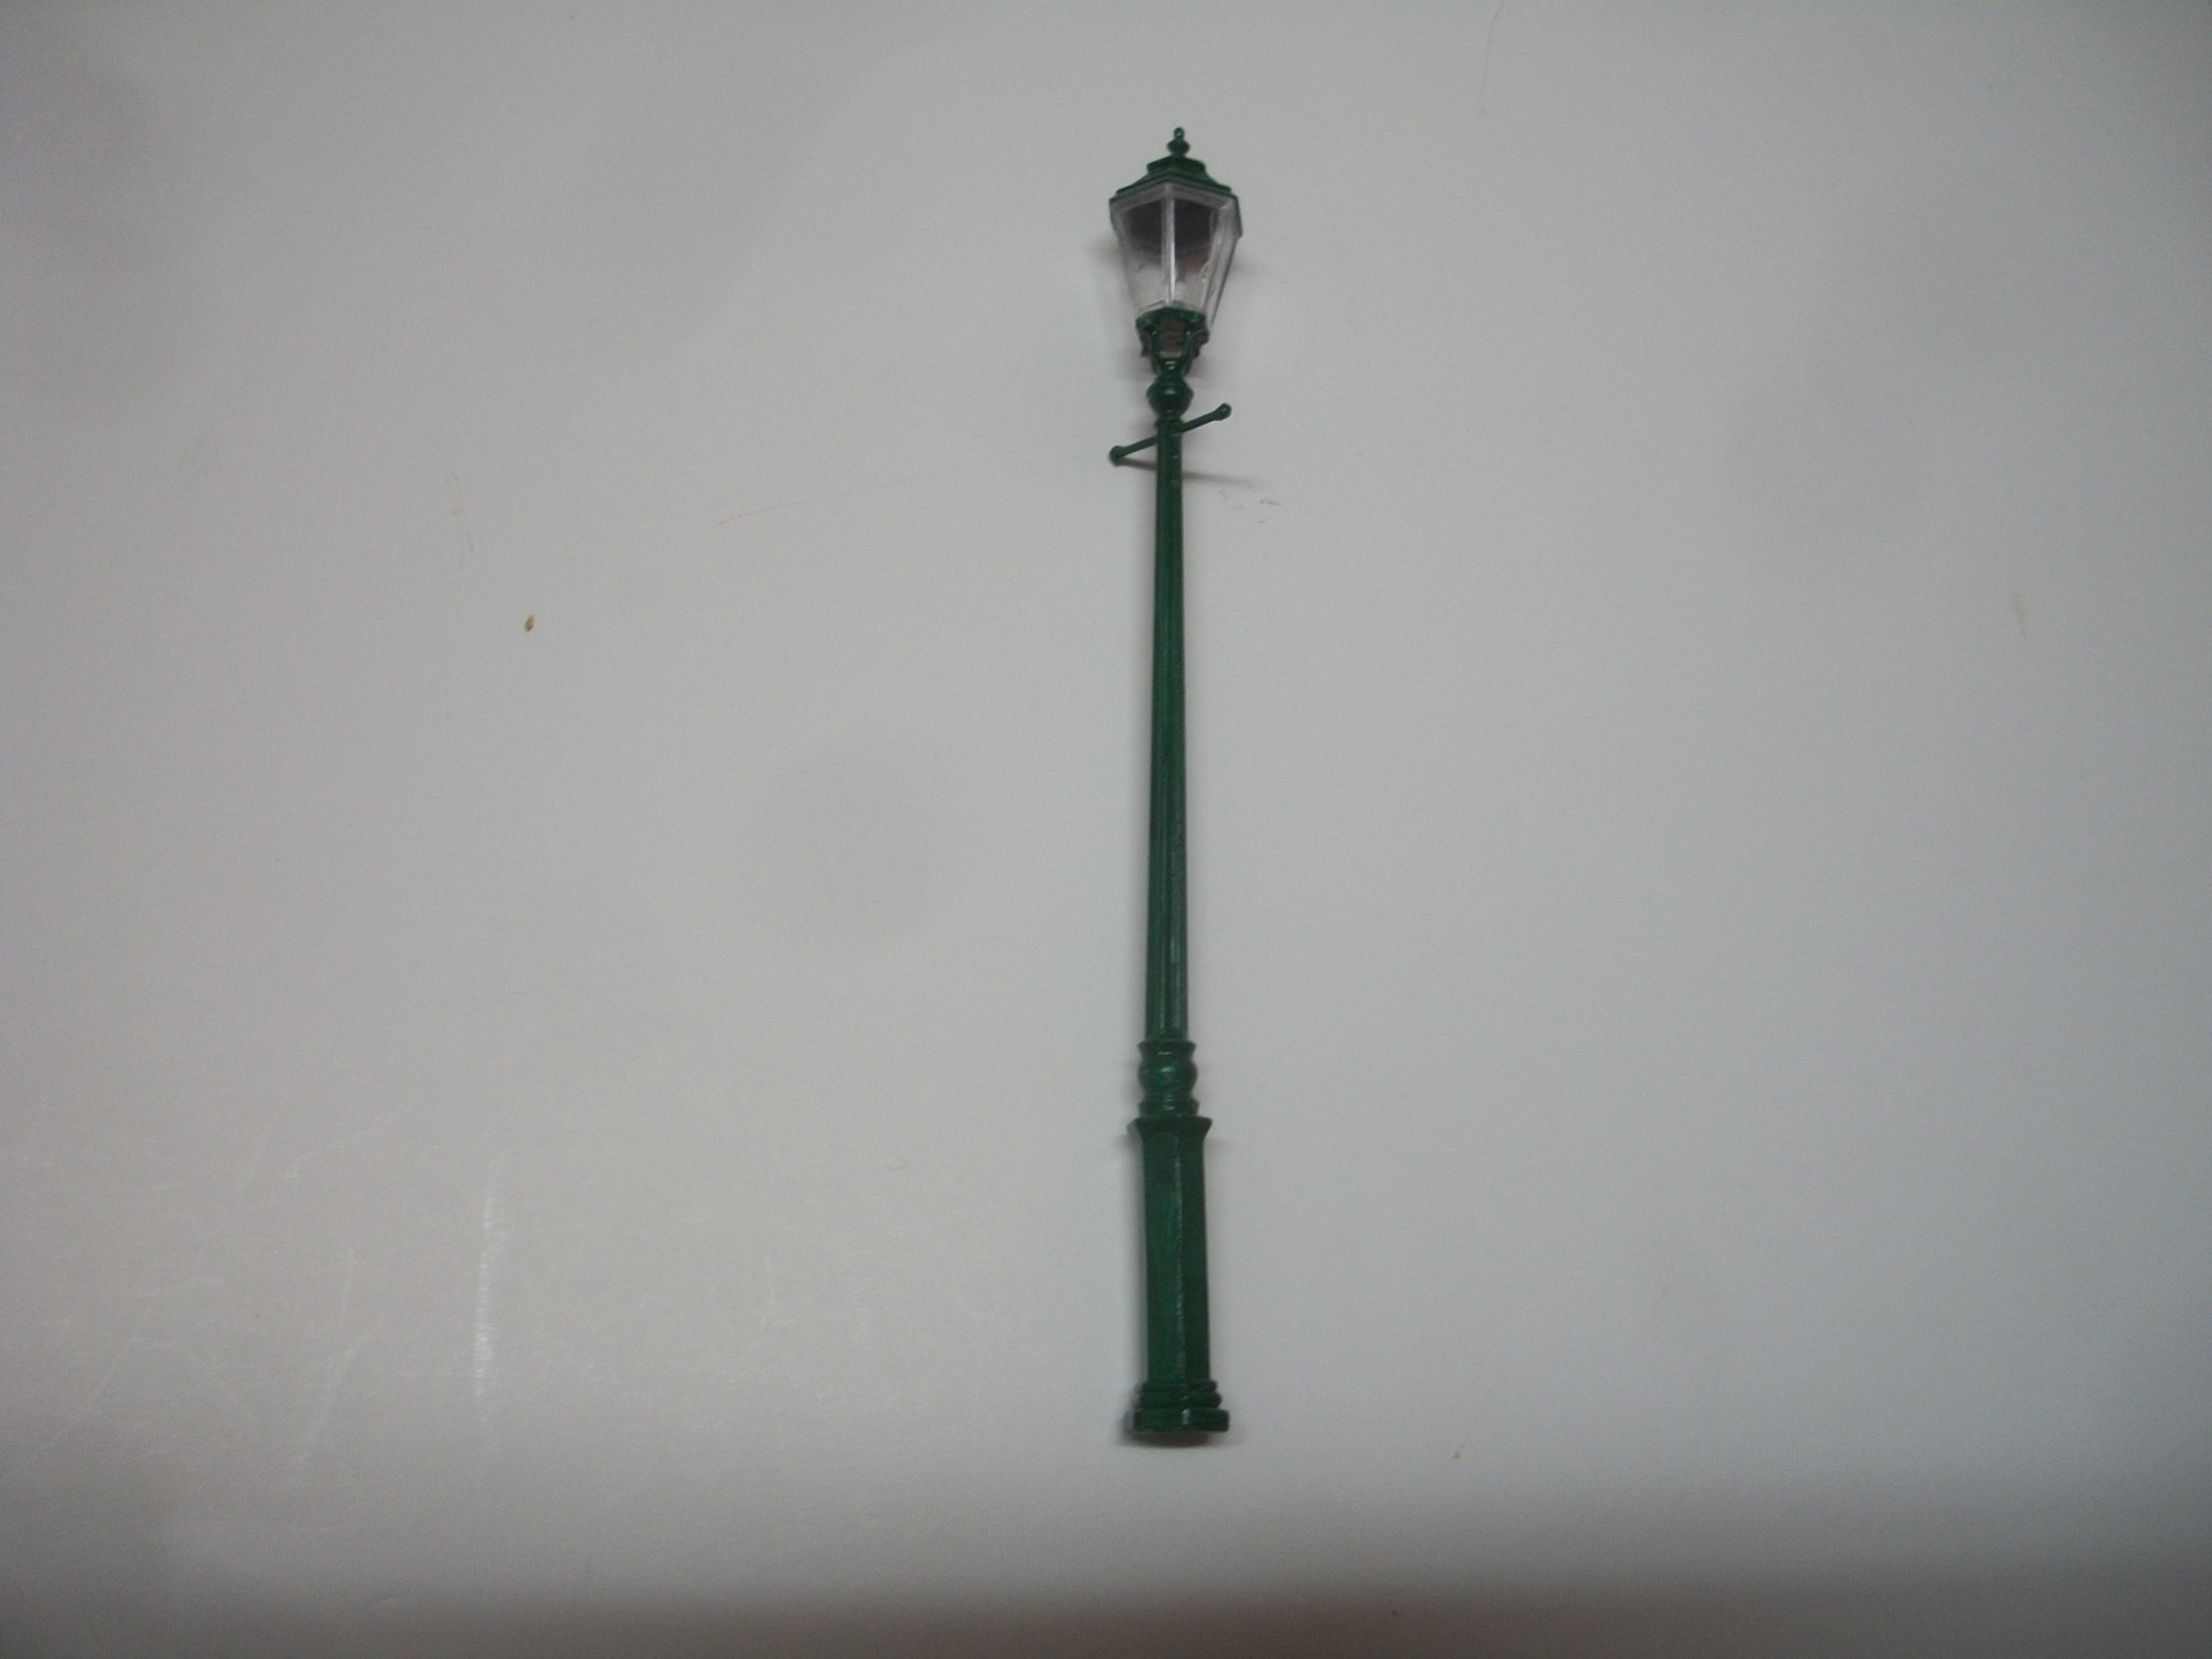
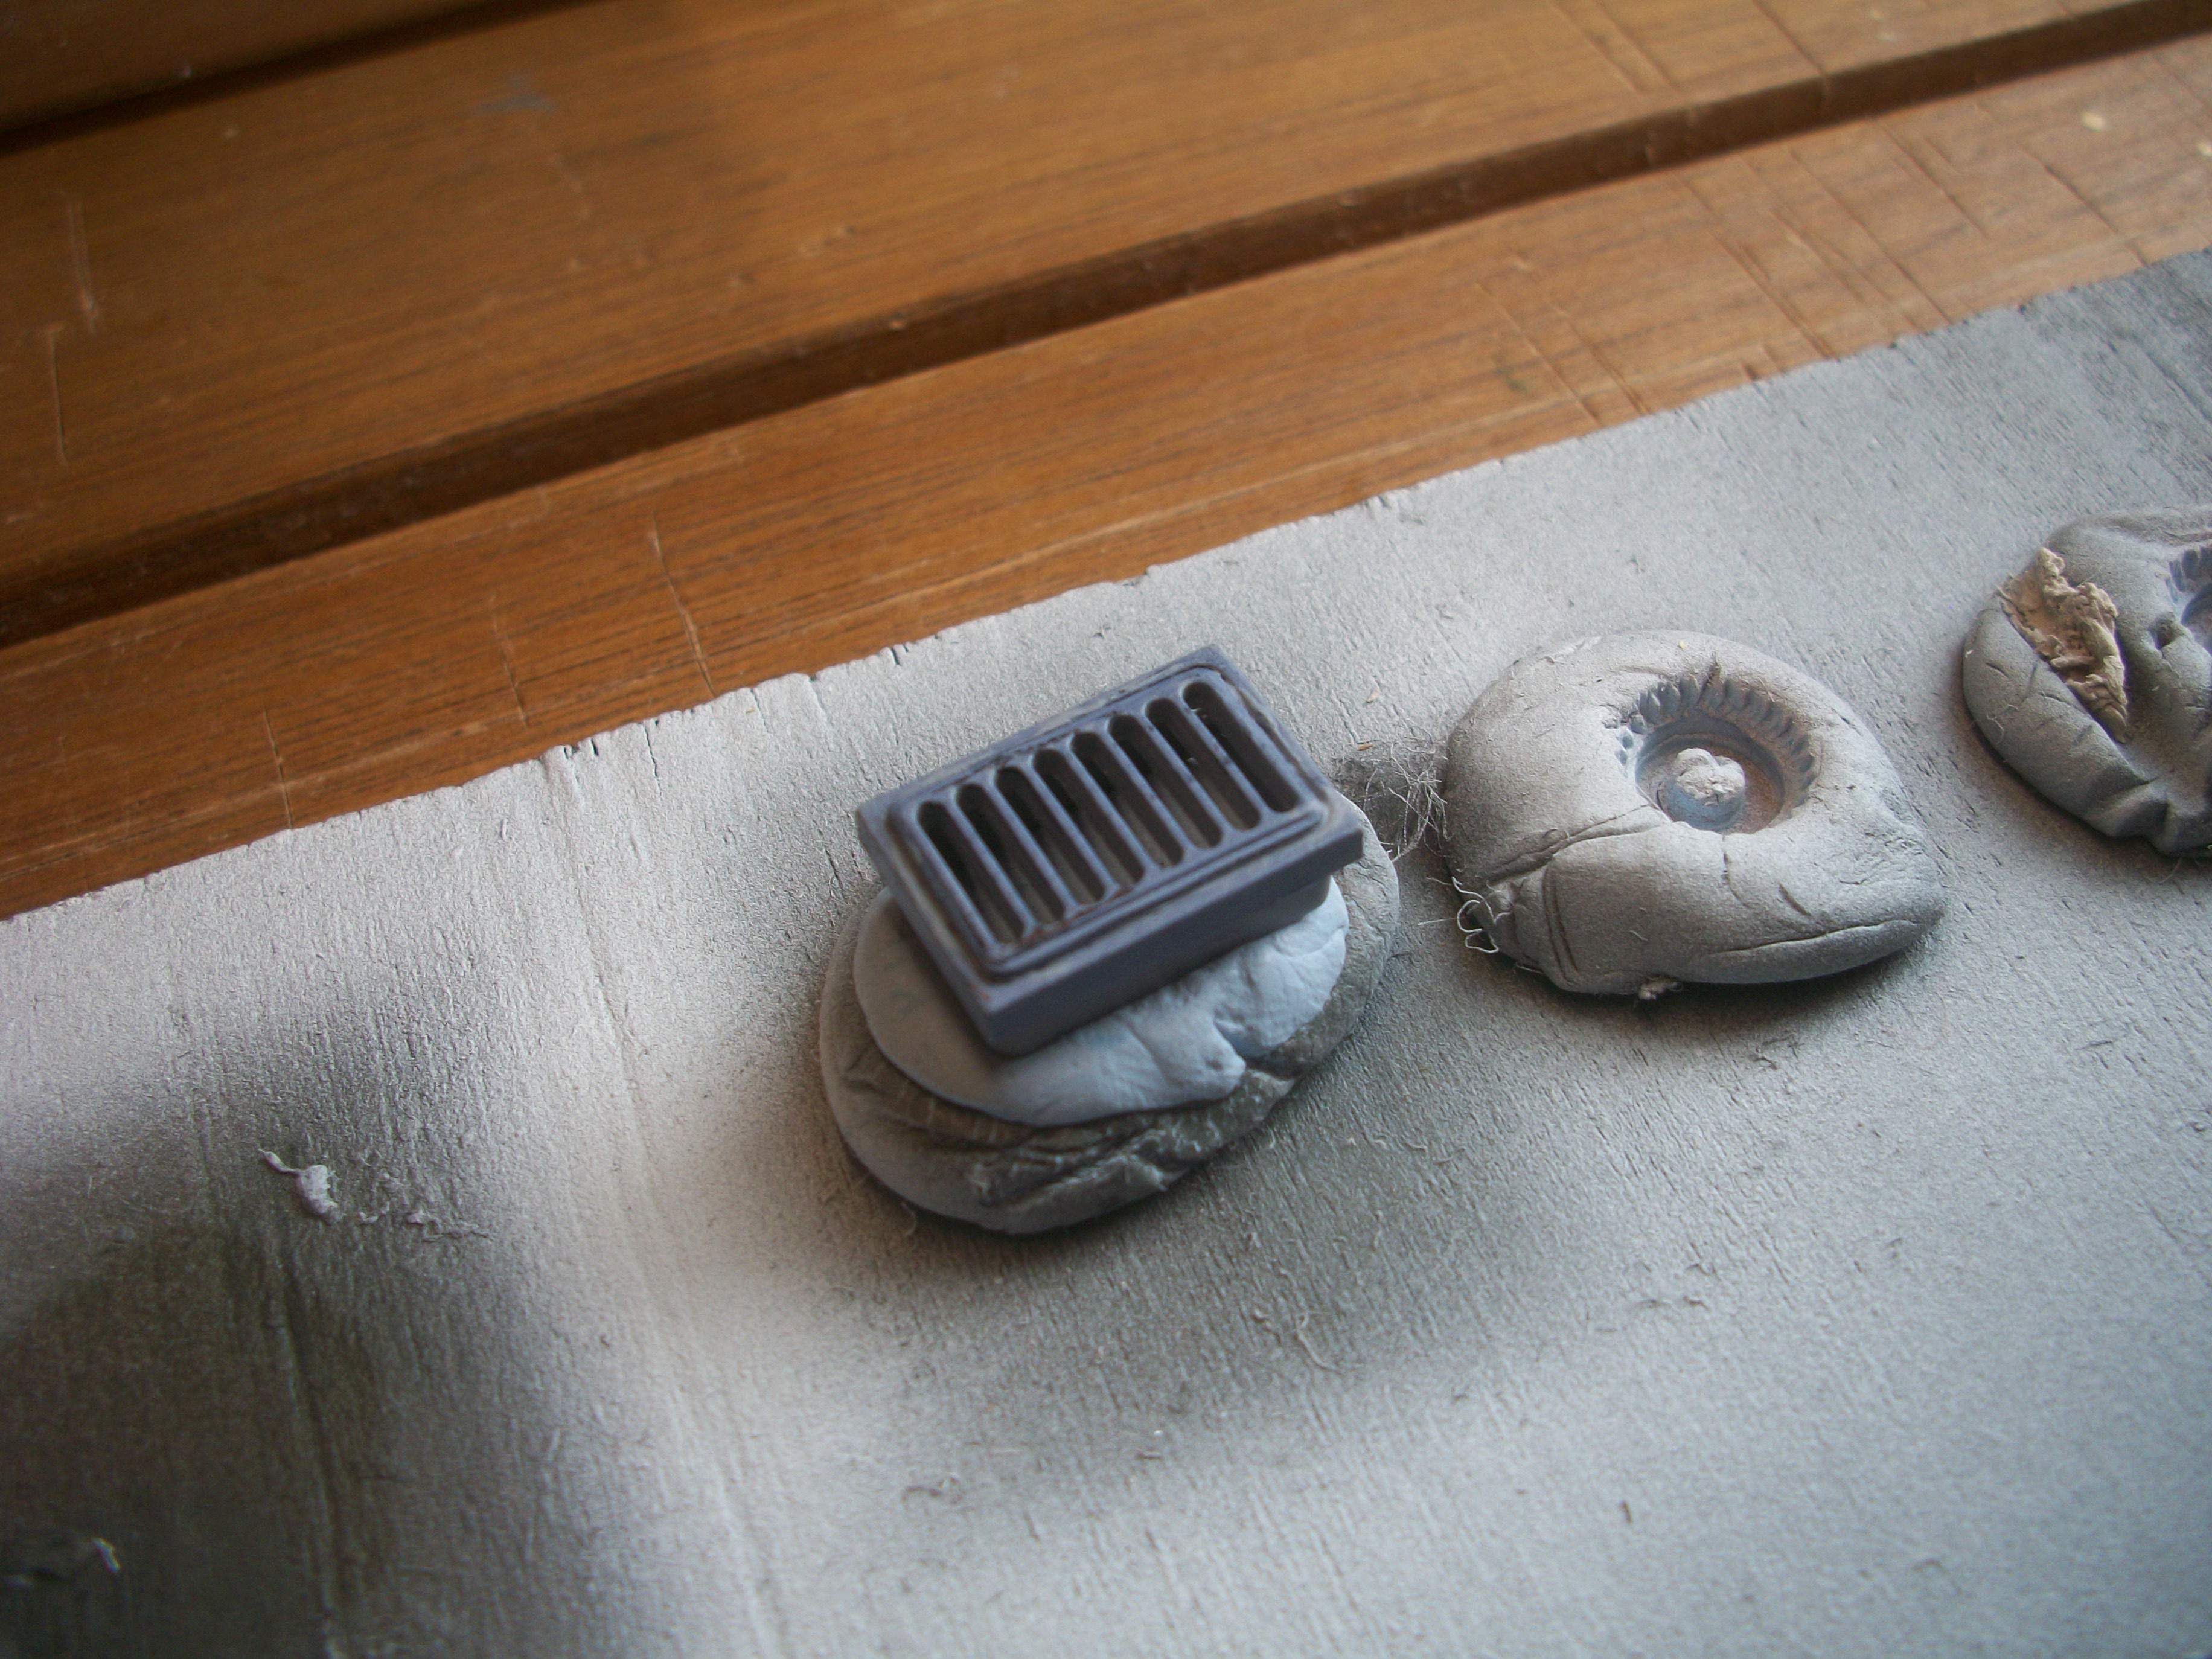
The baseboard for the ' Black Diamond ' diorama in 1:32 scale has been coated with grey emulsion paint, while the paving and kerbs were scored prior to the painting........ These following photos show the basic elements of the composition, and you can see the white card template that represents the footprint of the building that will be positioned alongside the road. The building is a 1:35 scale laser cut MDF kit that needs to be assembled and painted. There is a 1:35 scale lamp post, also a manhole cover and drainage grate in 1:35 scale. The Hyde Park bench is 3D printed in 1:32 scale. As well as the 1928 Rolls-Royce motor car, there will be the 1933 MG motor car, and at the wheel of the MG there is Kitty Brunell as a 1:35 scale figure. Alfred Hitchcock is in 1:32 scale, standing by the Rolls-Royce........ Still to be detail painted is the 1:32 figure of Miss Marple, which is 3D printed and looks very ' ghost ' like without any paint....... The bench and Miss Marple have been given a light coating of grey primer. David
-
This project of yours will be very interesting, and I shall certainly follow your progress....... I am right there with you when you mentioned 1940's, and our happy little world ! Thanks for posting. David
-
Thanks Douglas, but I cannot claim credit for those figures....... Although I have to paint the figures very carefully in a small scale, they have been designed by someone else, so not me, and then printed by Shapeways in the Netherlands....... I can 3D print figures, but I cannot design them unfortunately. David
-
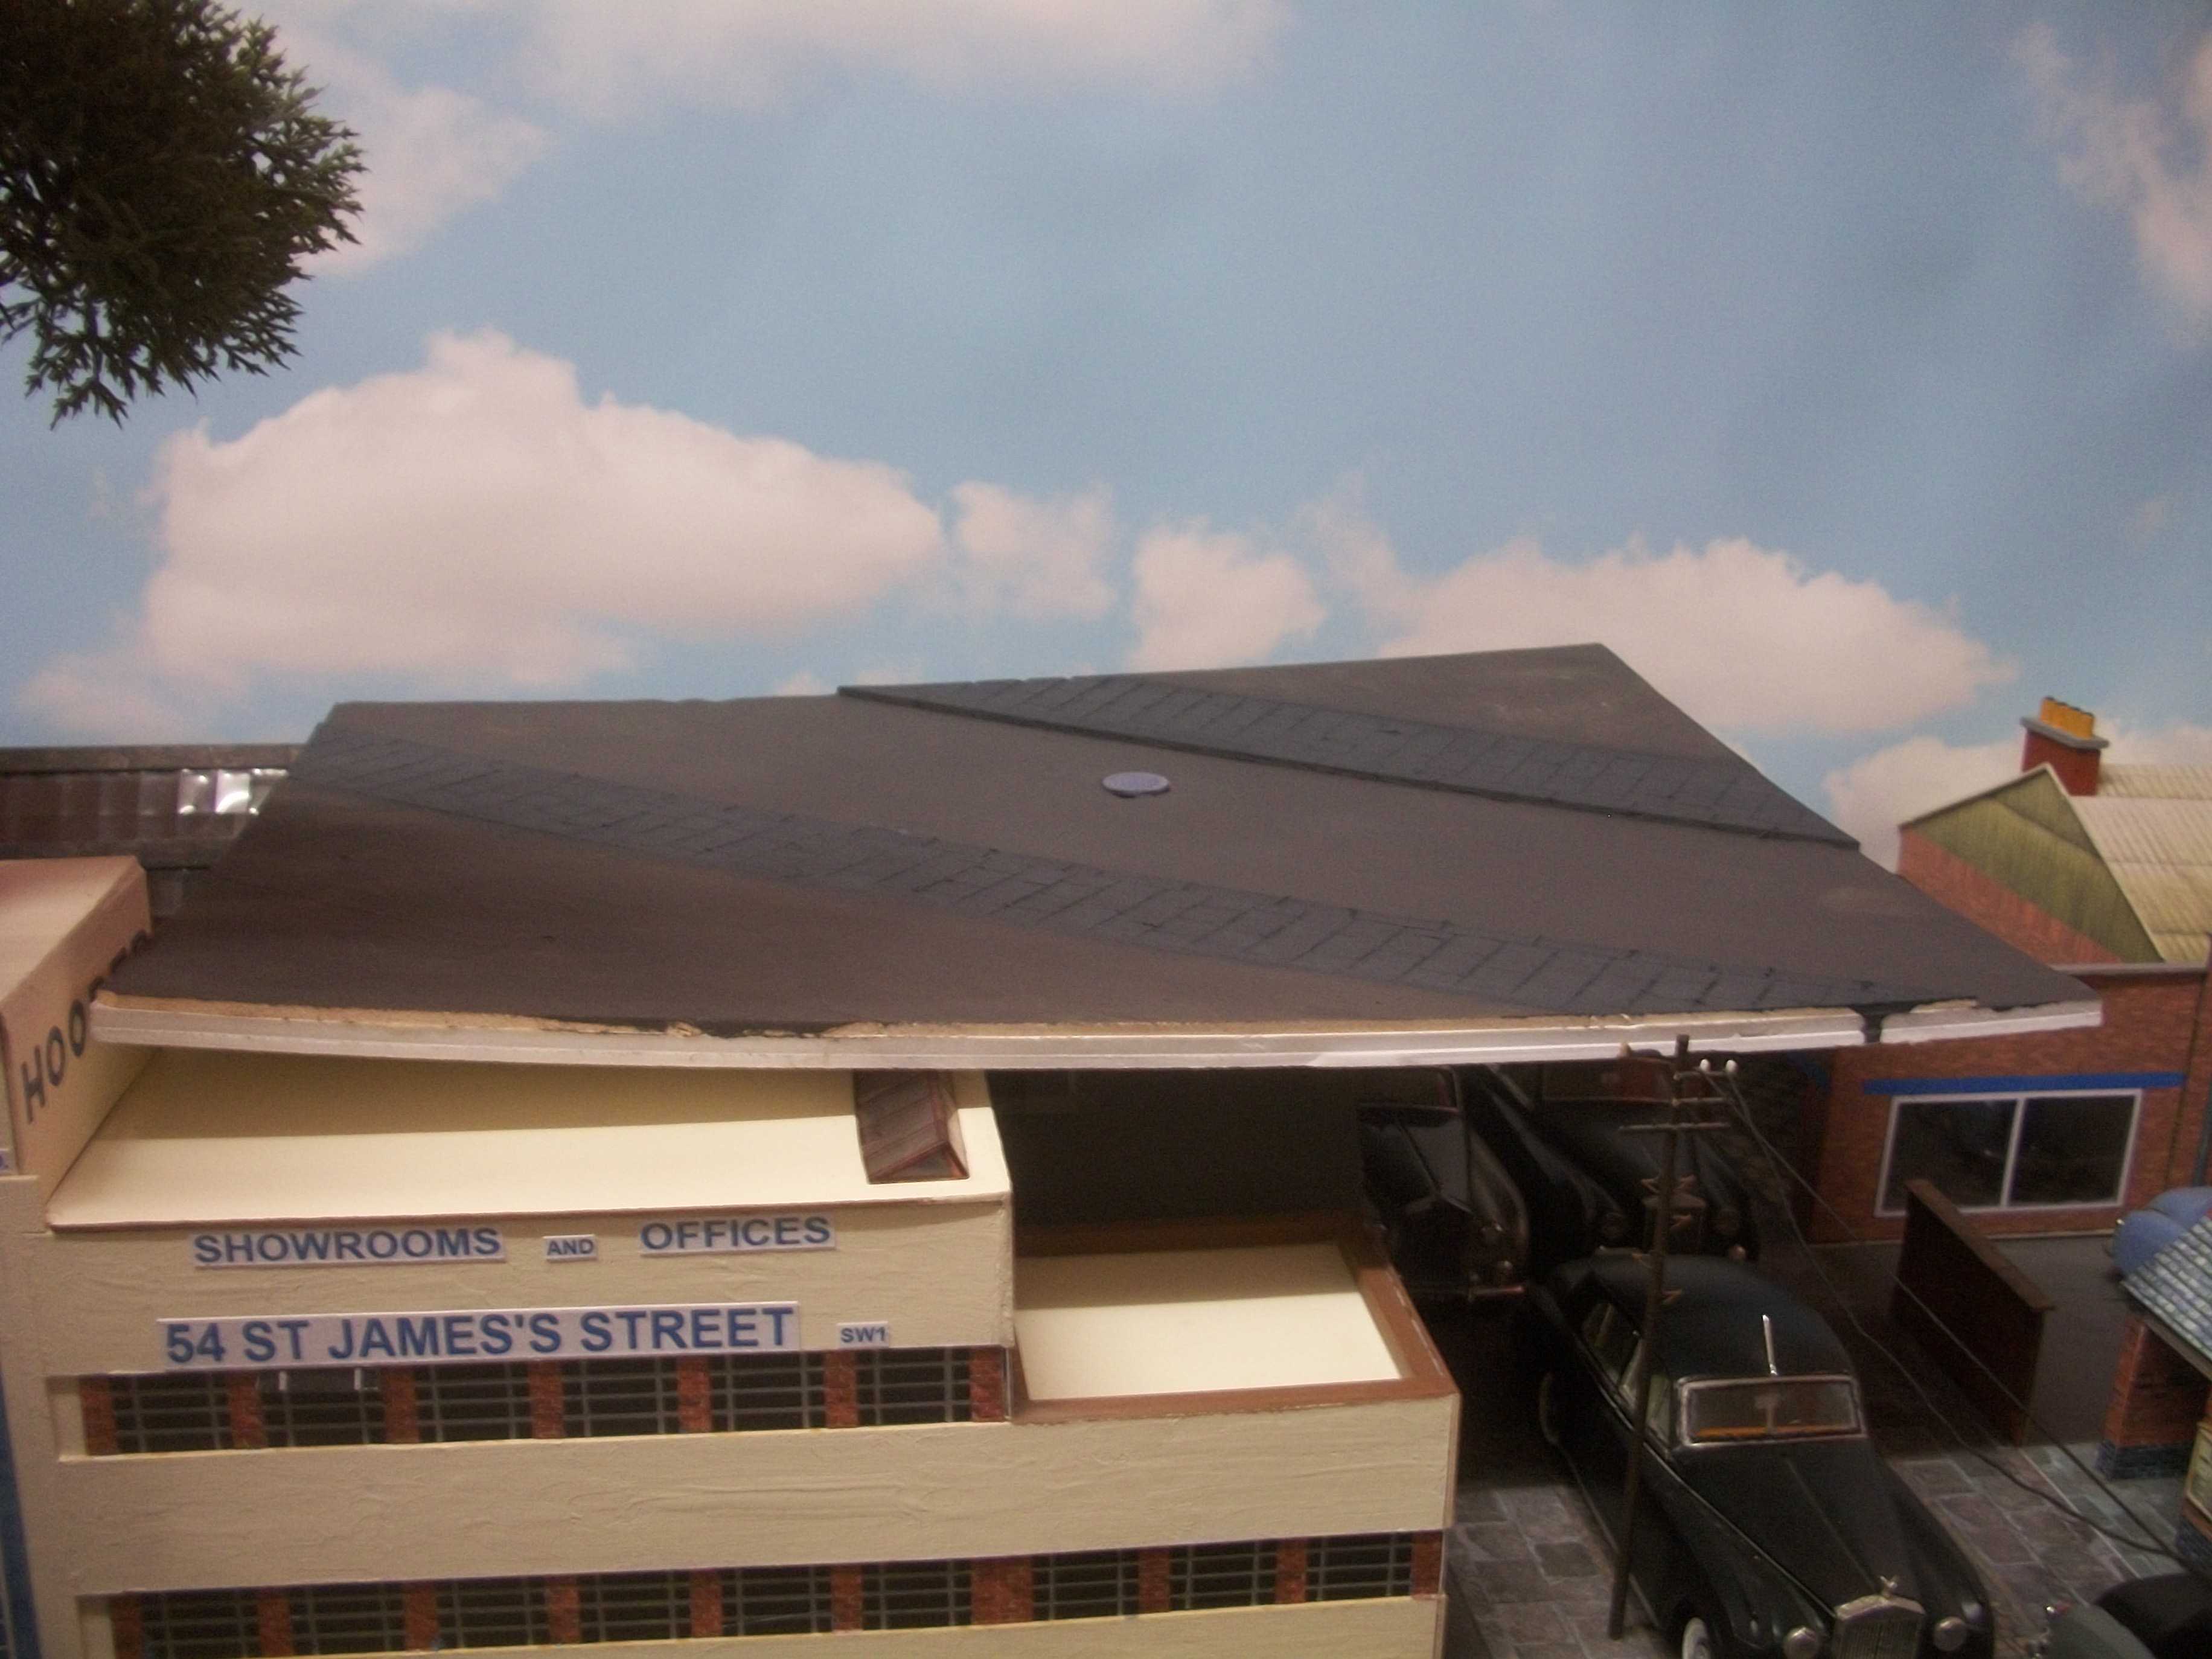
Working alongside the 1:24 scale diorama, and also the 1:43 scale diorama, I am now assembling a 1:32 scale diorama........ This one is an extension of the Hooper & Co. theme, and will be called ' Black Diamond '. The central component of the setting will be the 1:32 Rolls-Royce Phantom I by Matchbox and Revell, built and painted from a kit of this 1928 motor car and it was a Hooper bodied car. There will be several further elements making up the diorama, and three of these will be figures. All three figures are 3D printed by Shapeways..... one is Alfred Hitchcock, the second figure is a Belgian gentleman who looks very much like Hercule Poirot, and the third is a distinguished elderly lady who could be Miss Marple, so both Agatha Christie fictional characters. As well as the car and the figures, I shall include a Victorian street lamp by MiniArt, a 3D printed Hyde Park bench also by Shapeways, a drainage grate and a manhole cover by MiniArt........ The baseboard is a laminate of Foamex and foamboard, which will coated with charcoal grey emulsion paint. For the grate and the manhole cover, I have used light grey Vallejo acrylic over black Sharpie. This is quite a small diorama by my standards, with the dimensions being 51 cm x 39 cm, so around 20 inches by 15 inches. My intention is to produce some interesting photography from this setting, which lends itself to a variety of compositions. David
-
Looking good, Pat....... but you have quite a bit of work to do there. It's all quality time of course, and so satisfying ! David
-
Experimenting With Leather
Anglia105E replied to Straightliner59's topic in Tips, Tricks, and Tutorials
The very thin material that you are using, is probably more ' scale ' accurate than the thicker stuff that I used, which is a little on the thick side I found. David -
Experimenting With Leather
Anglia105E replied to Straightliner59's topic in Tips, Tricks, and Tutorials
Couple of years ago, Daniel, I also picked some thin crimson leather sheets on Ebay and cut out individual pieces for the seats of my 1:24 scale Rolls-Royce Silver Cloud by Revell / Minicraft....... I scored the lines in the leather, and also polished the leather with shoe polish. The result was quite pleasing. Your brass strip and ball-peen hammer technique seems to work well for you. David -
Automotive Restoration and Machine Shop
Anglia105E replied to The Modeling Hermit's topic in WIP: Dioramas
I like the views looking into the office, Douglas, which give the viewer a good impression of the two figures at work. You have got the lighting just right inside the elevated office, and the piles of papers are exactly how you would expect to see them in a workshop office setting..... Excellent ! David -
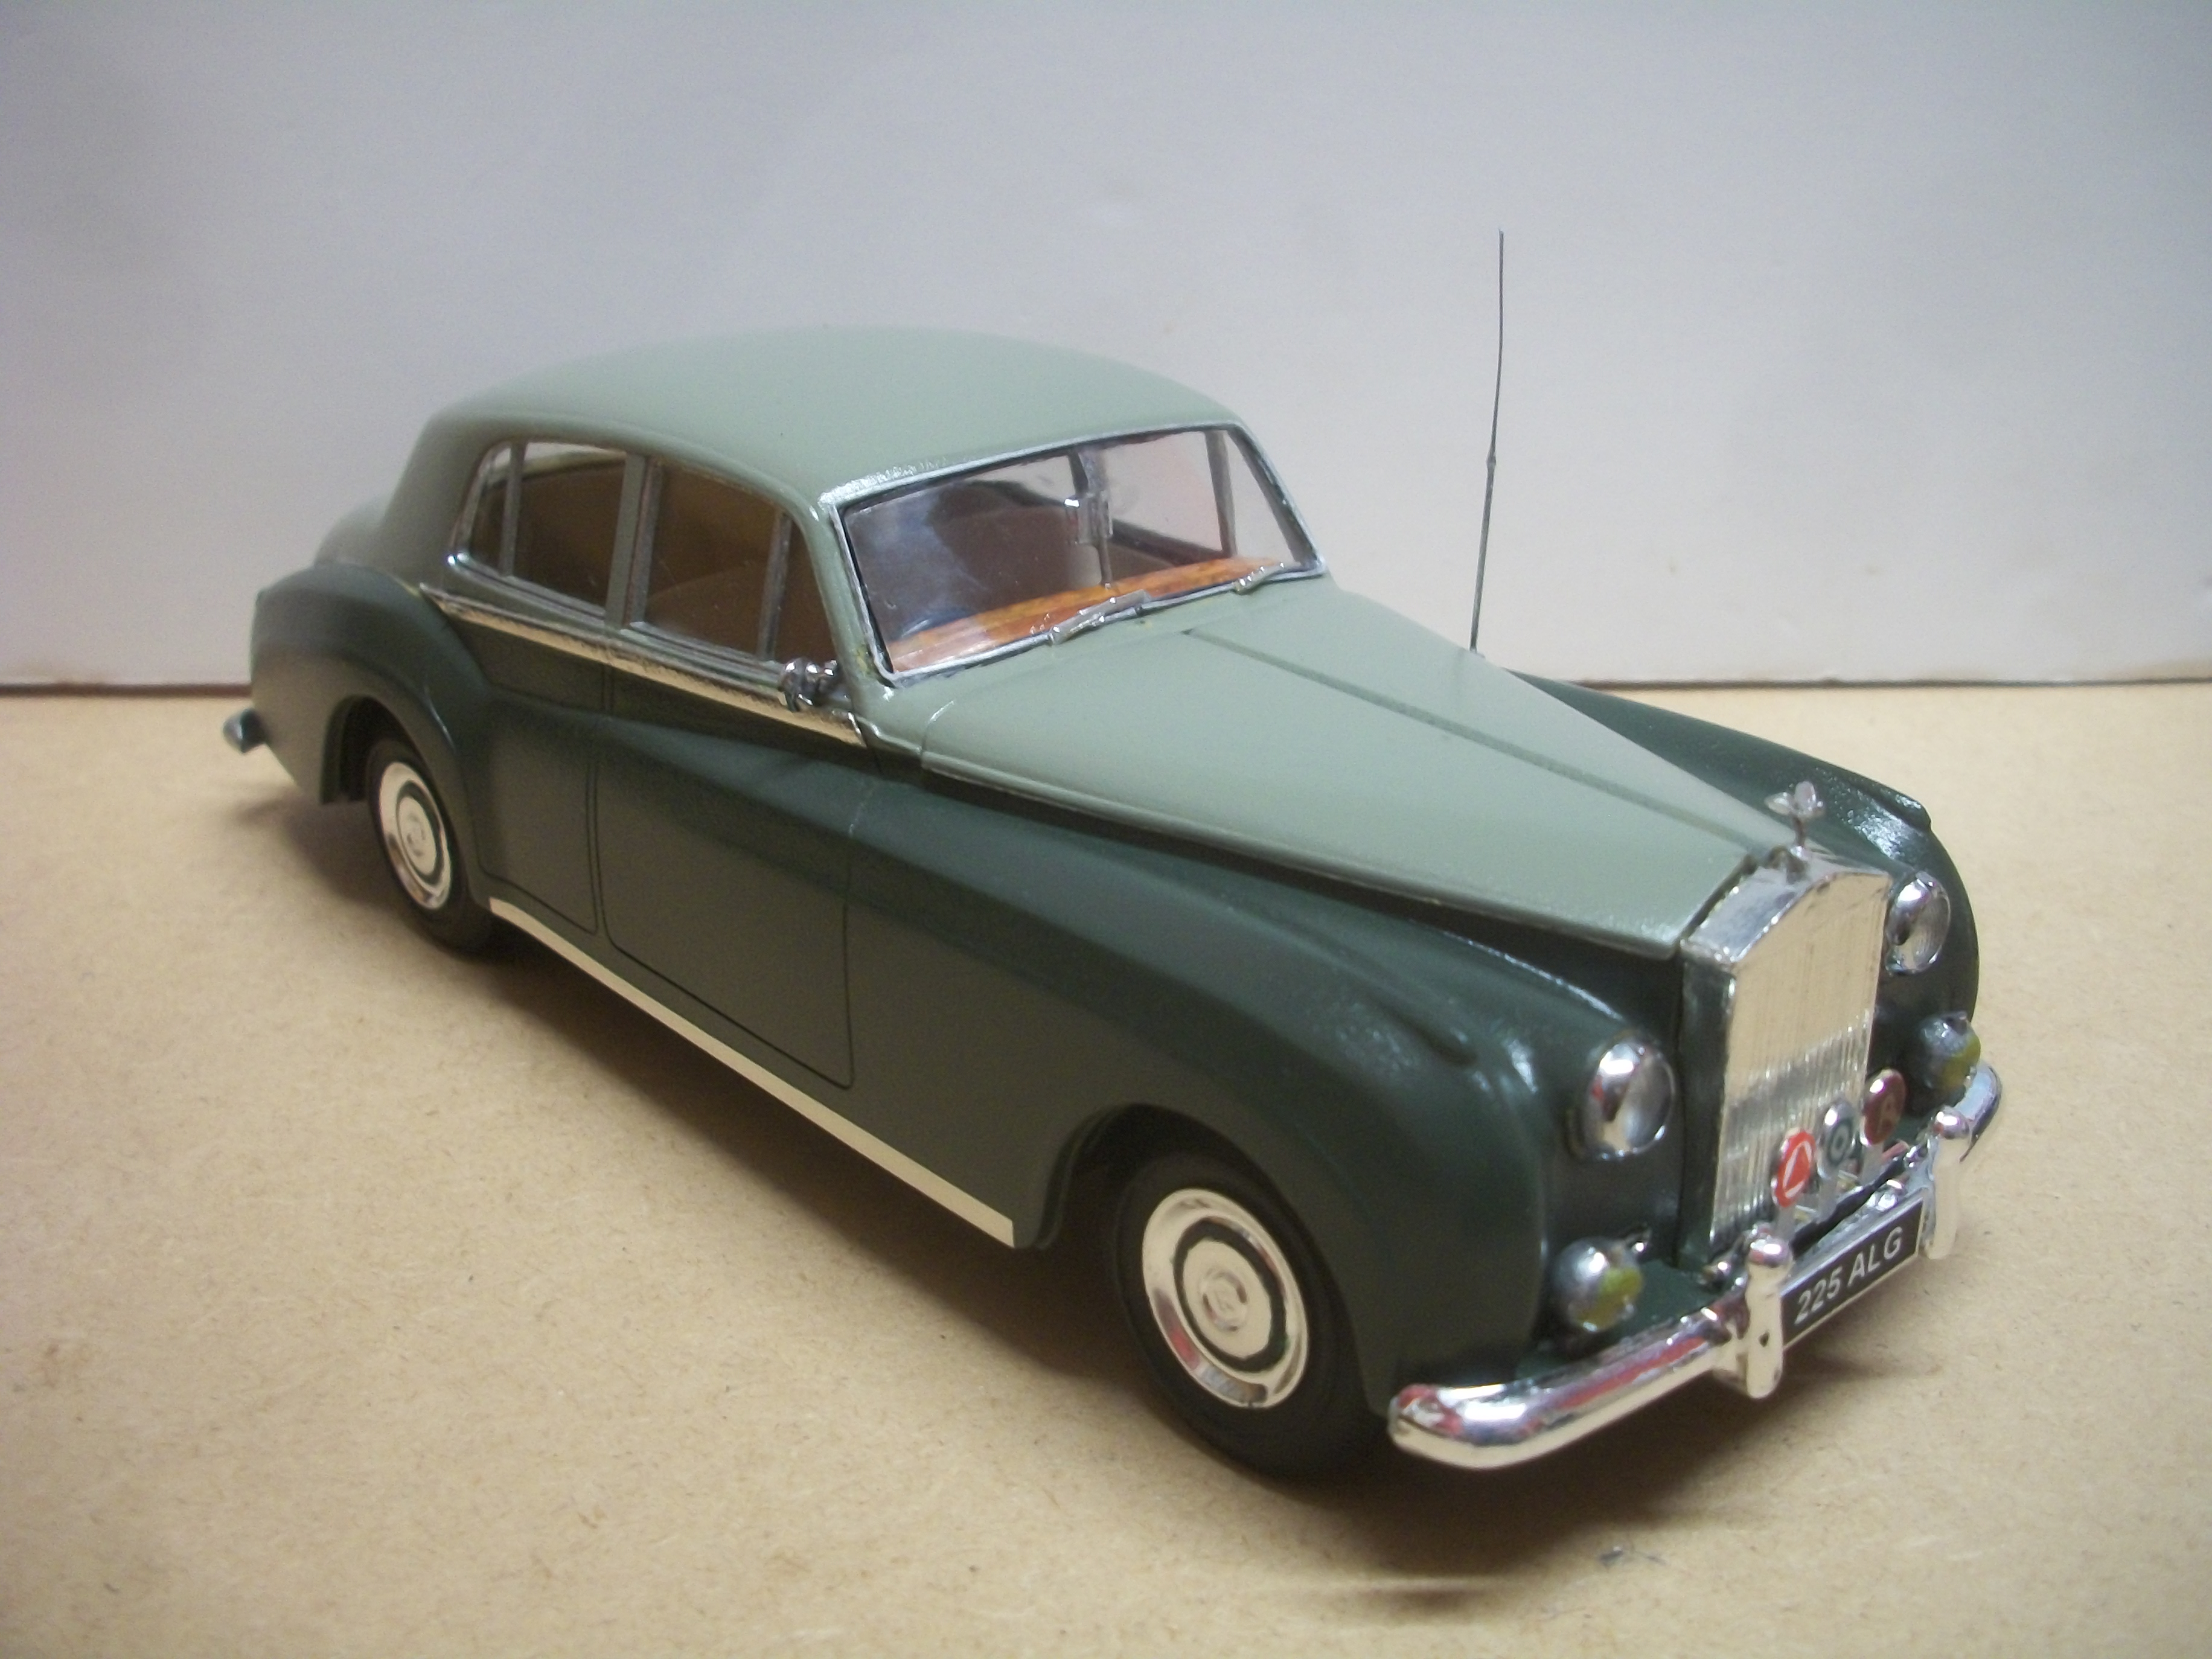
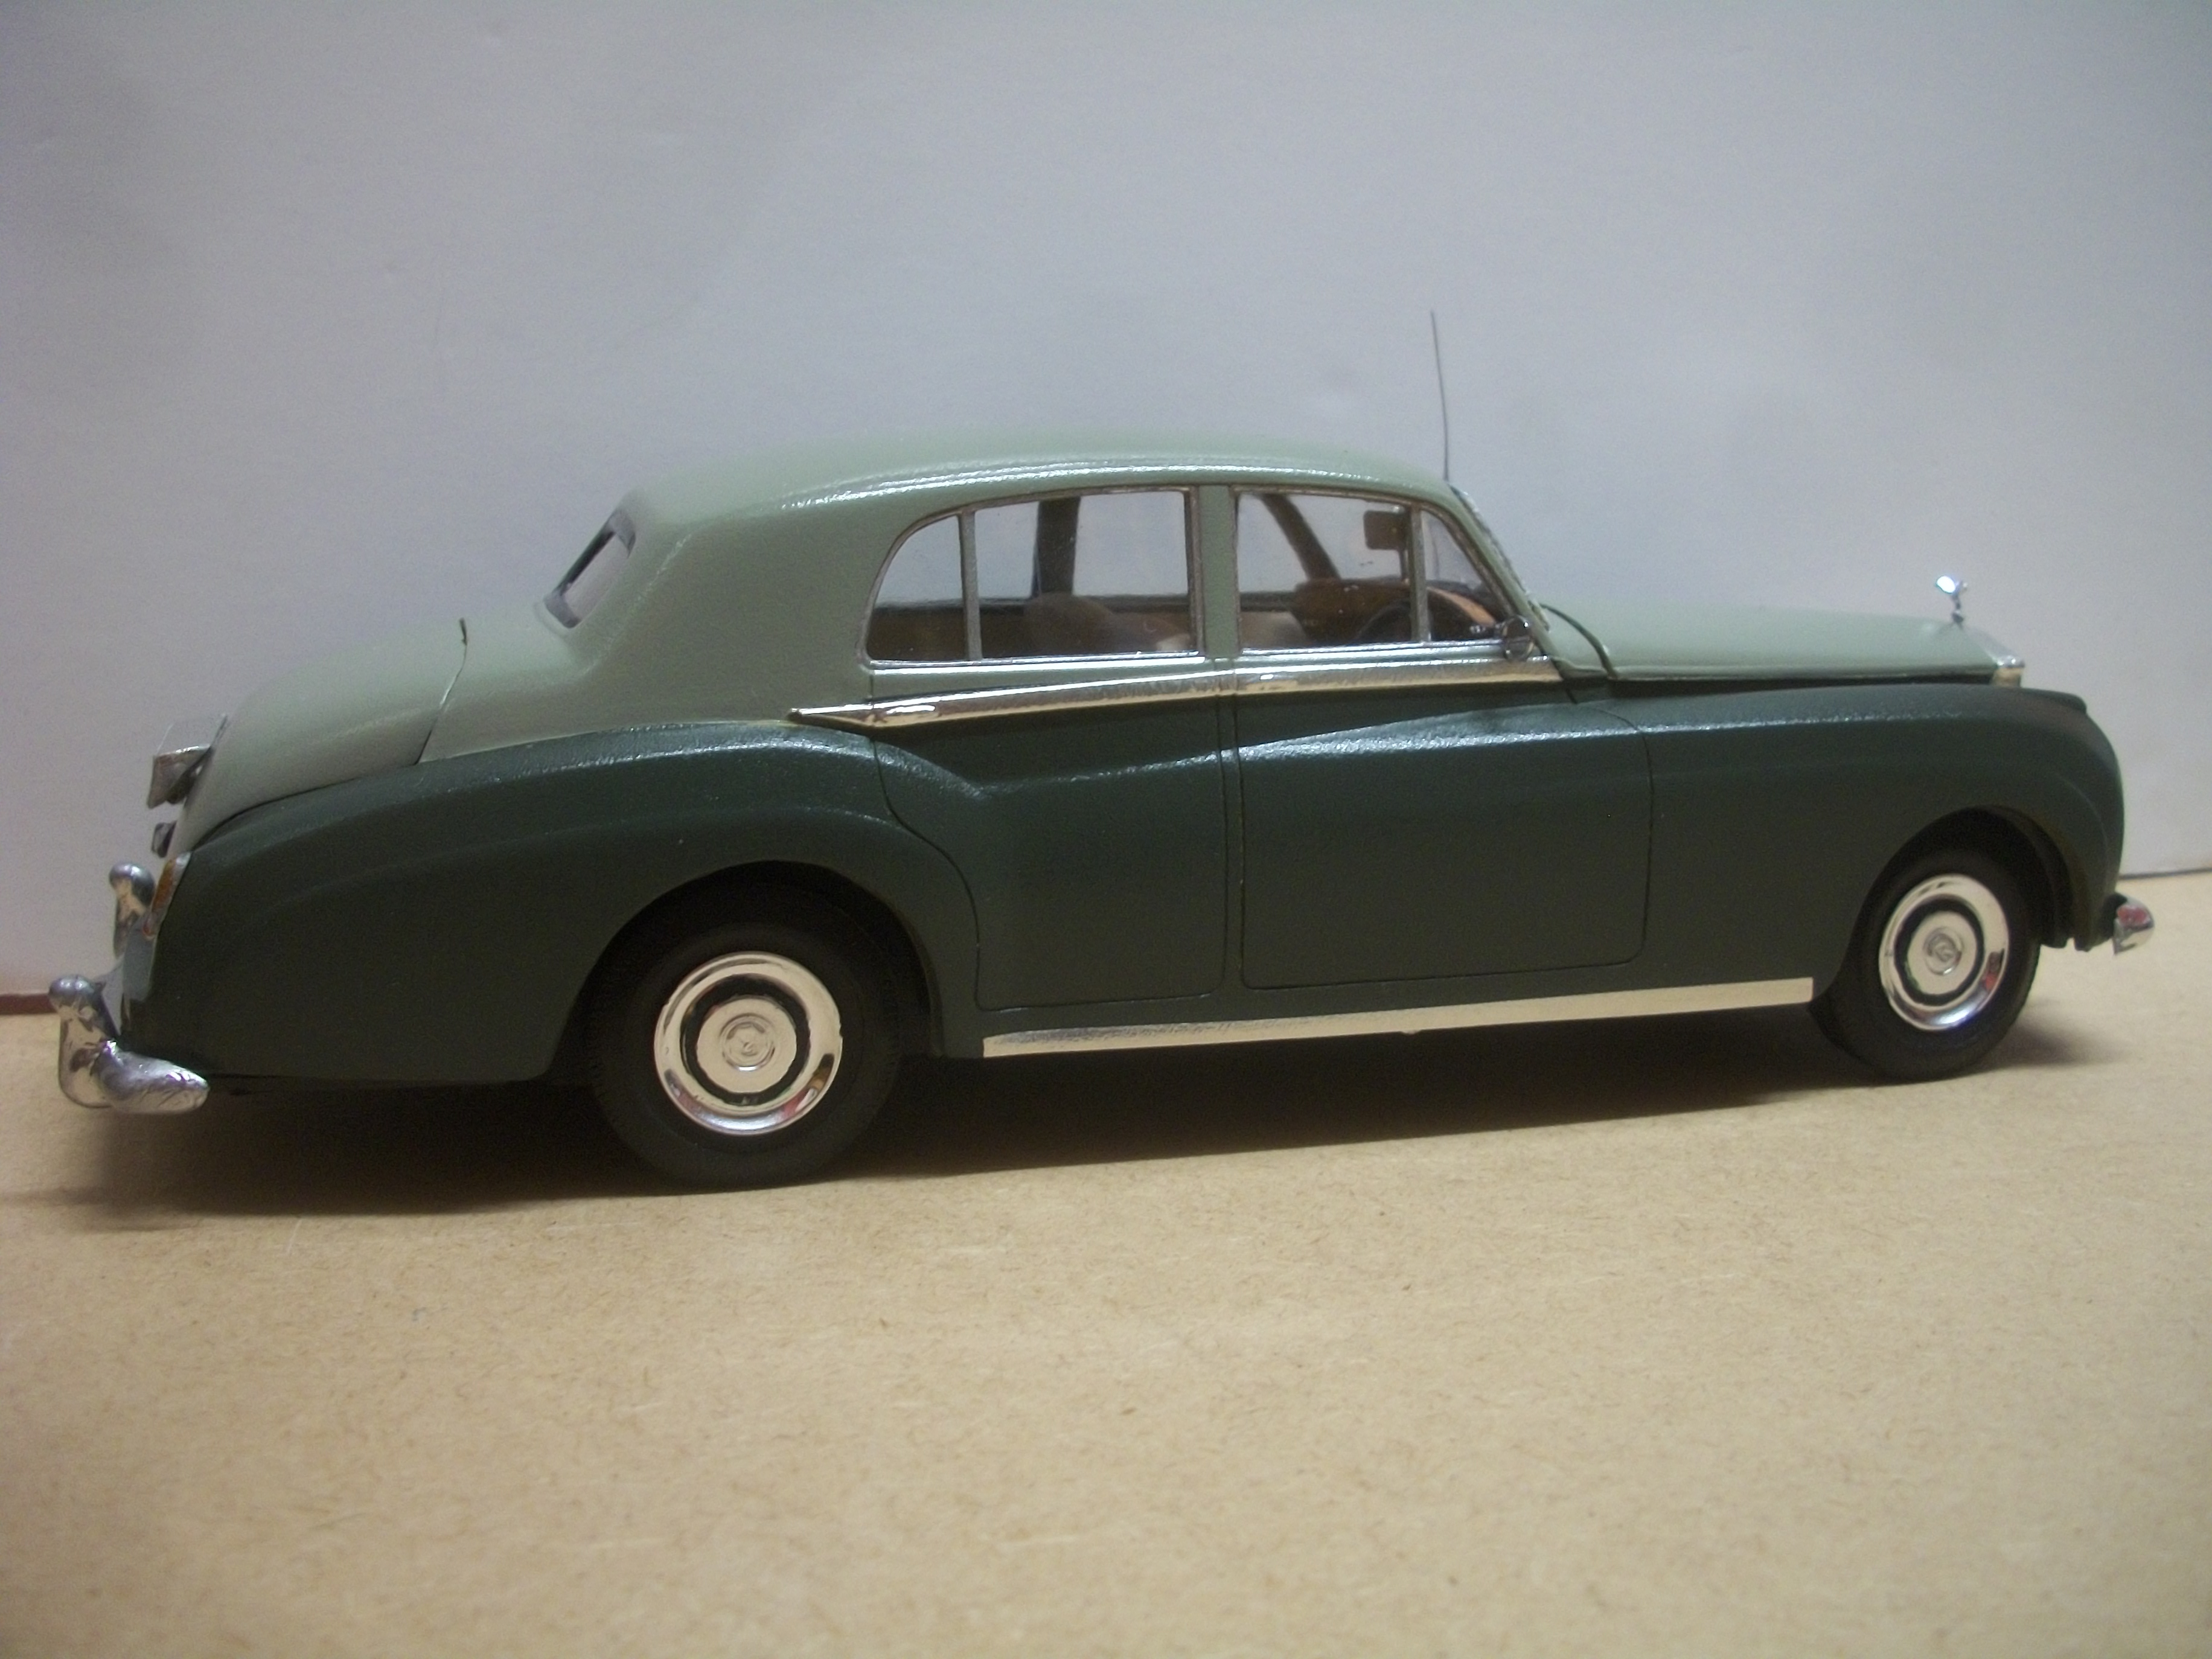
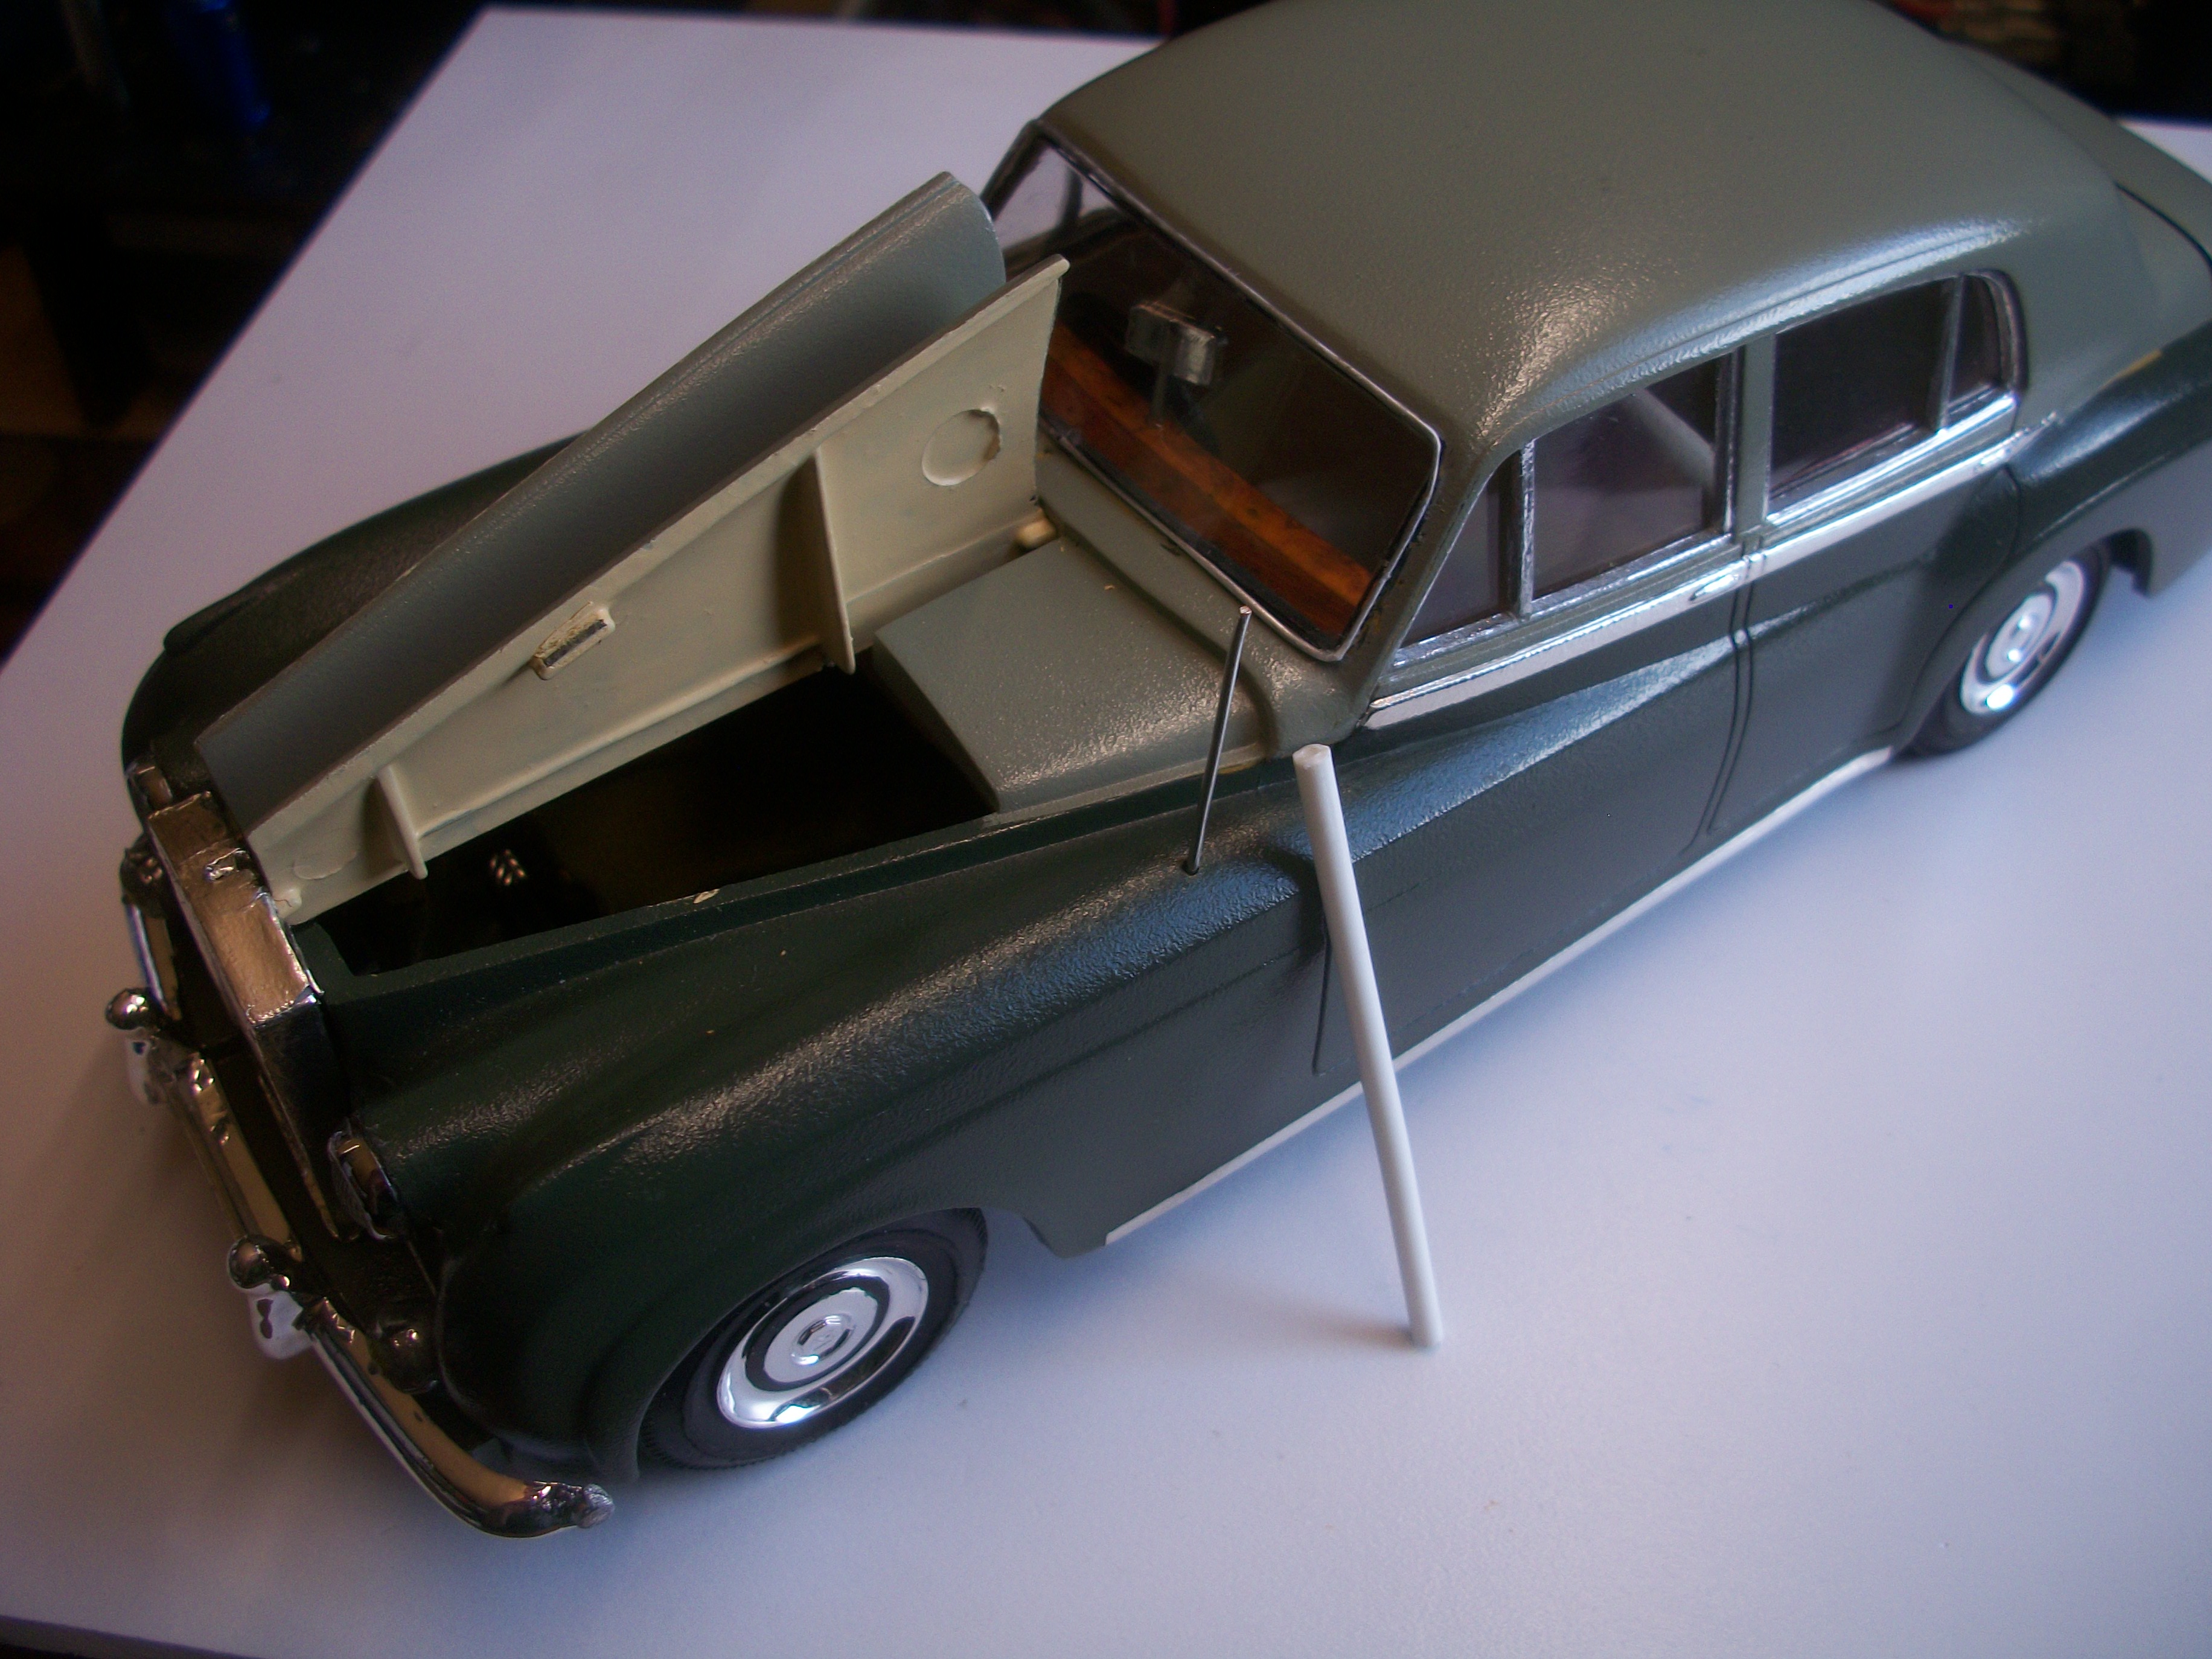
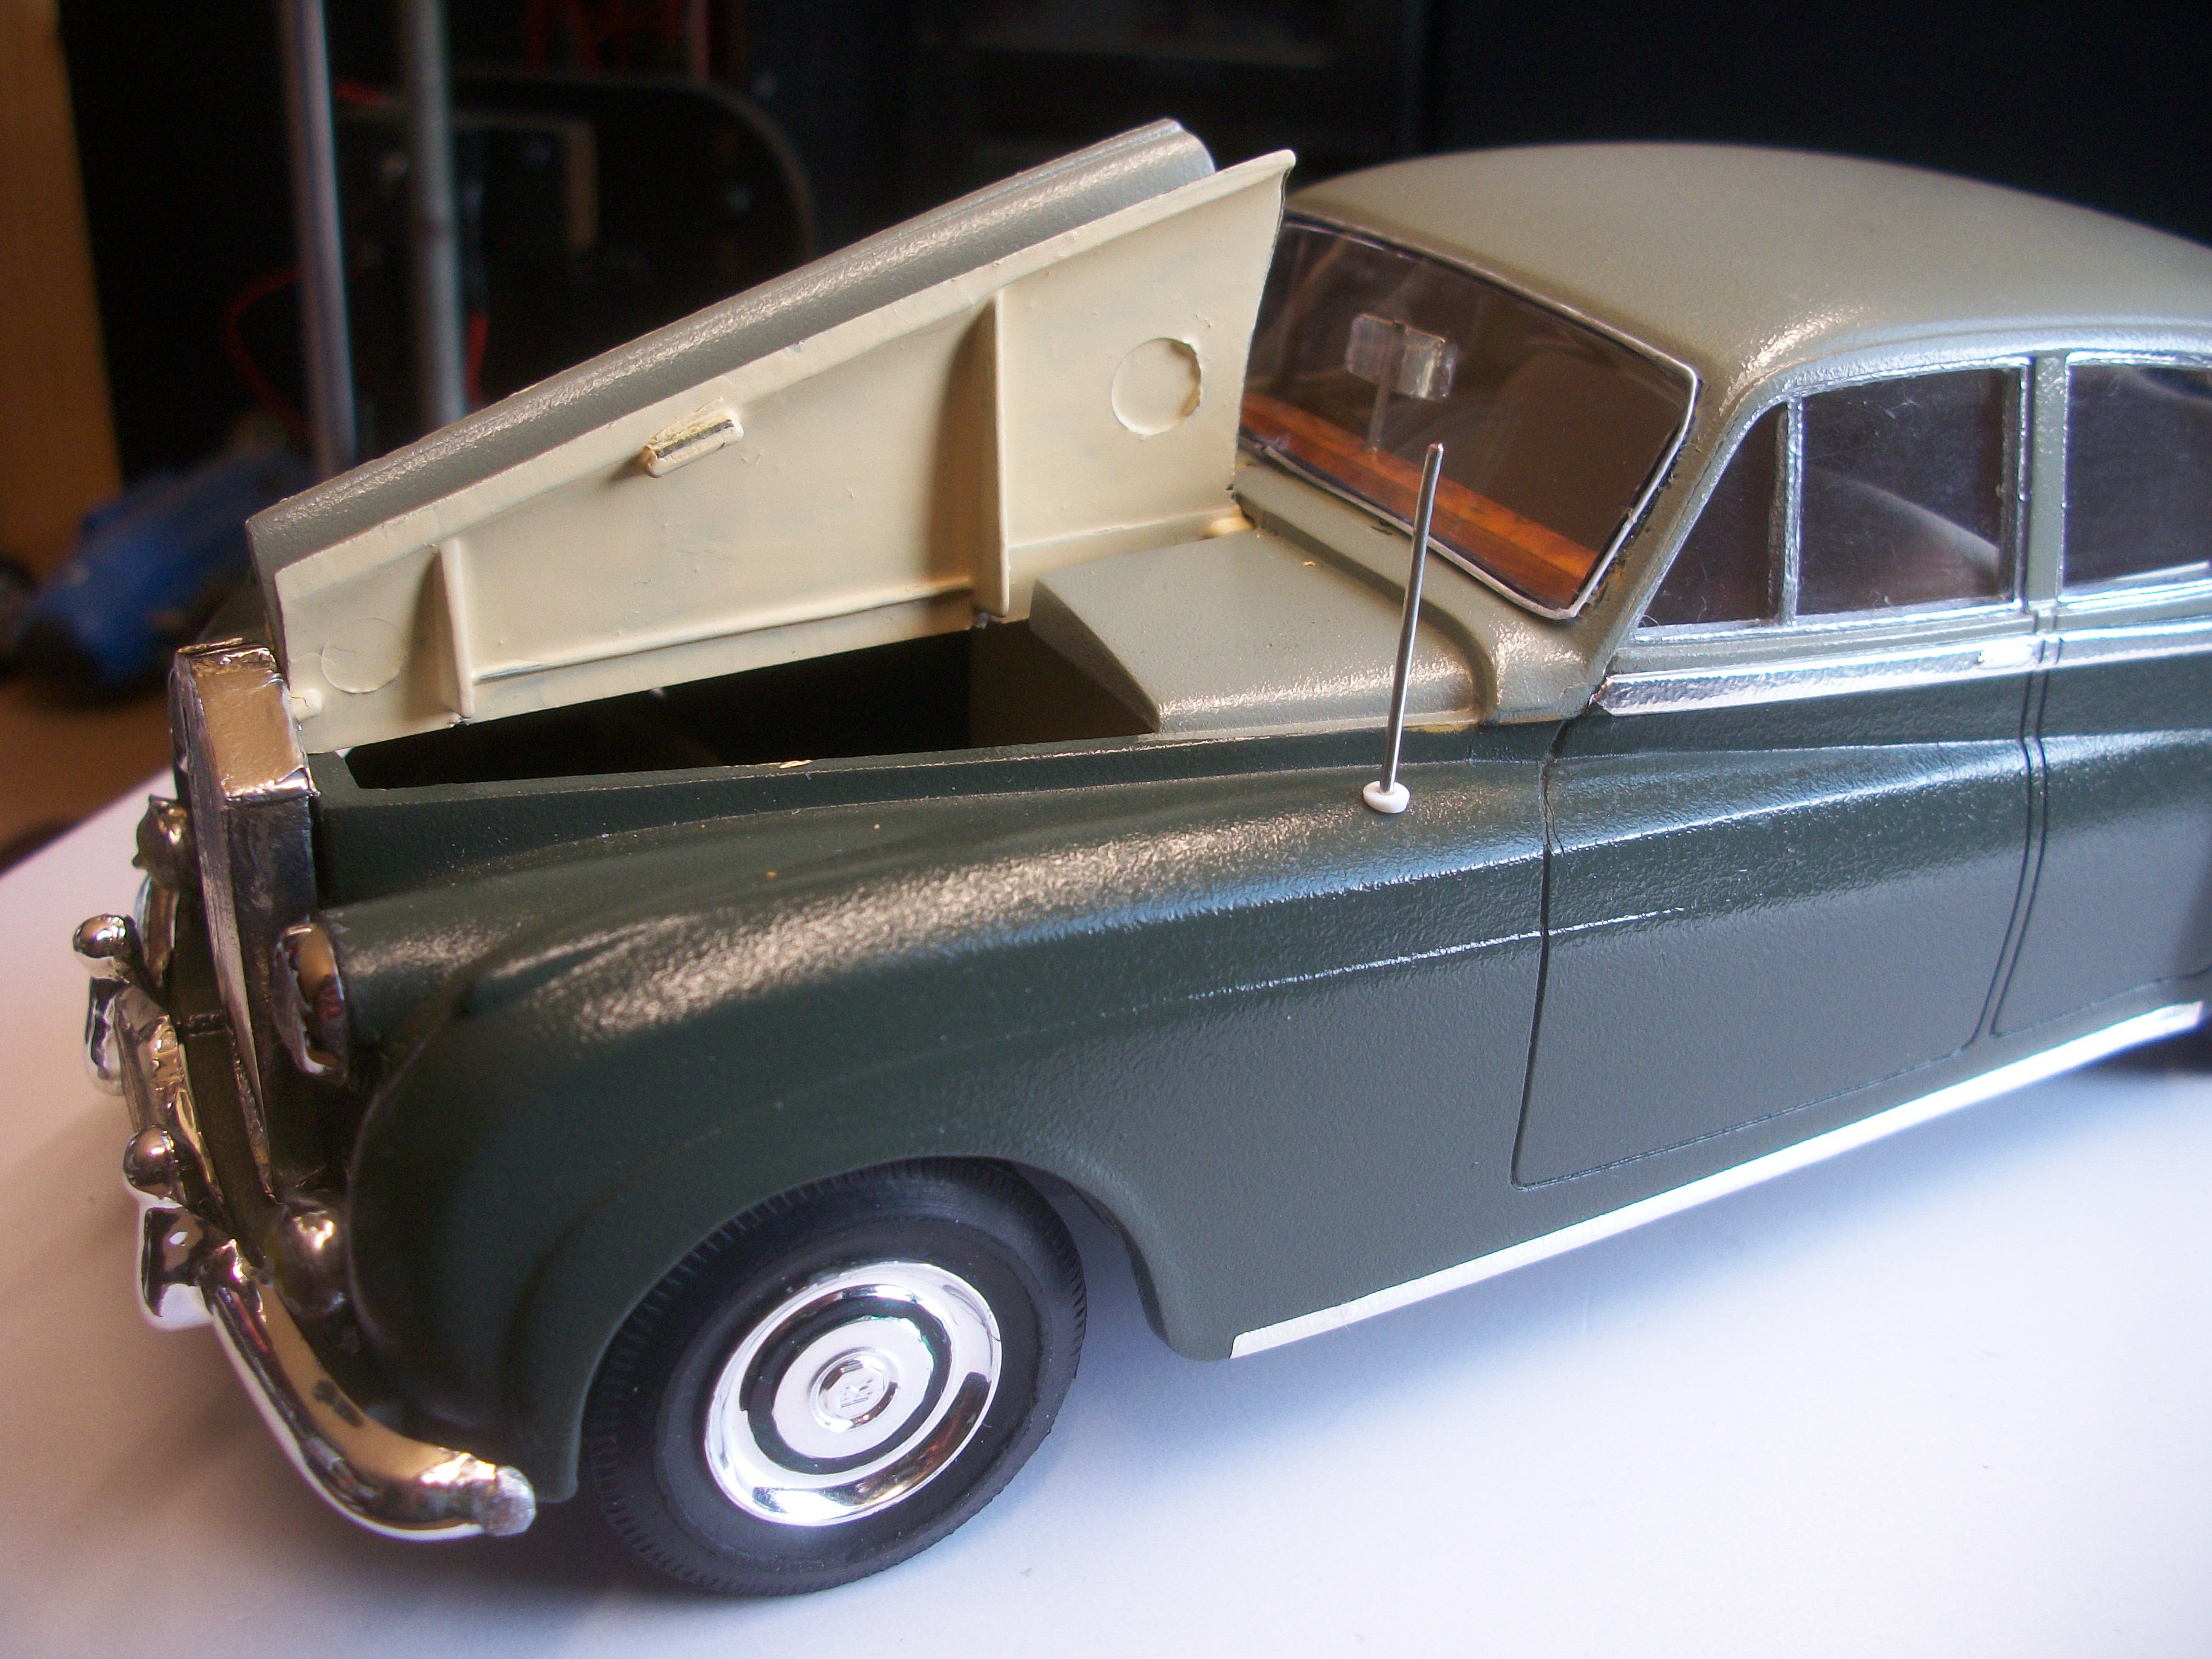
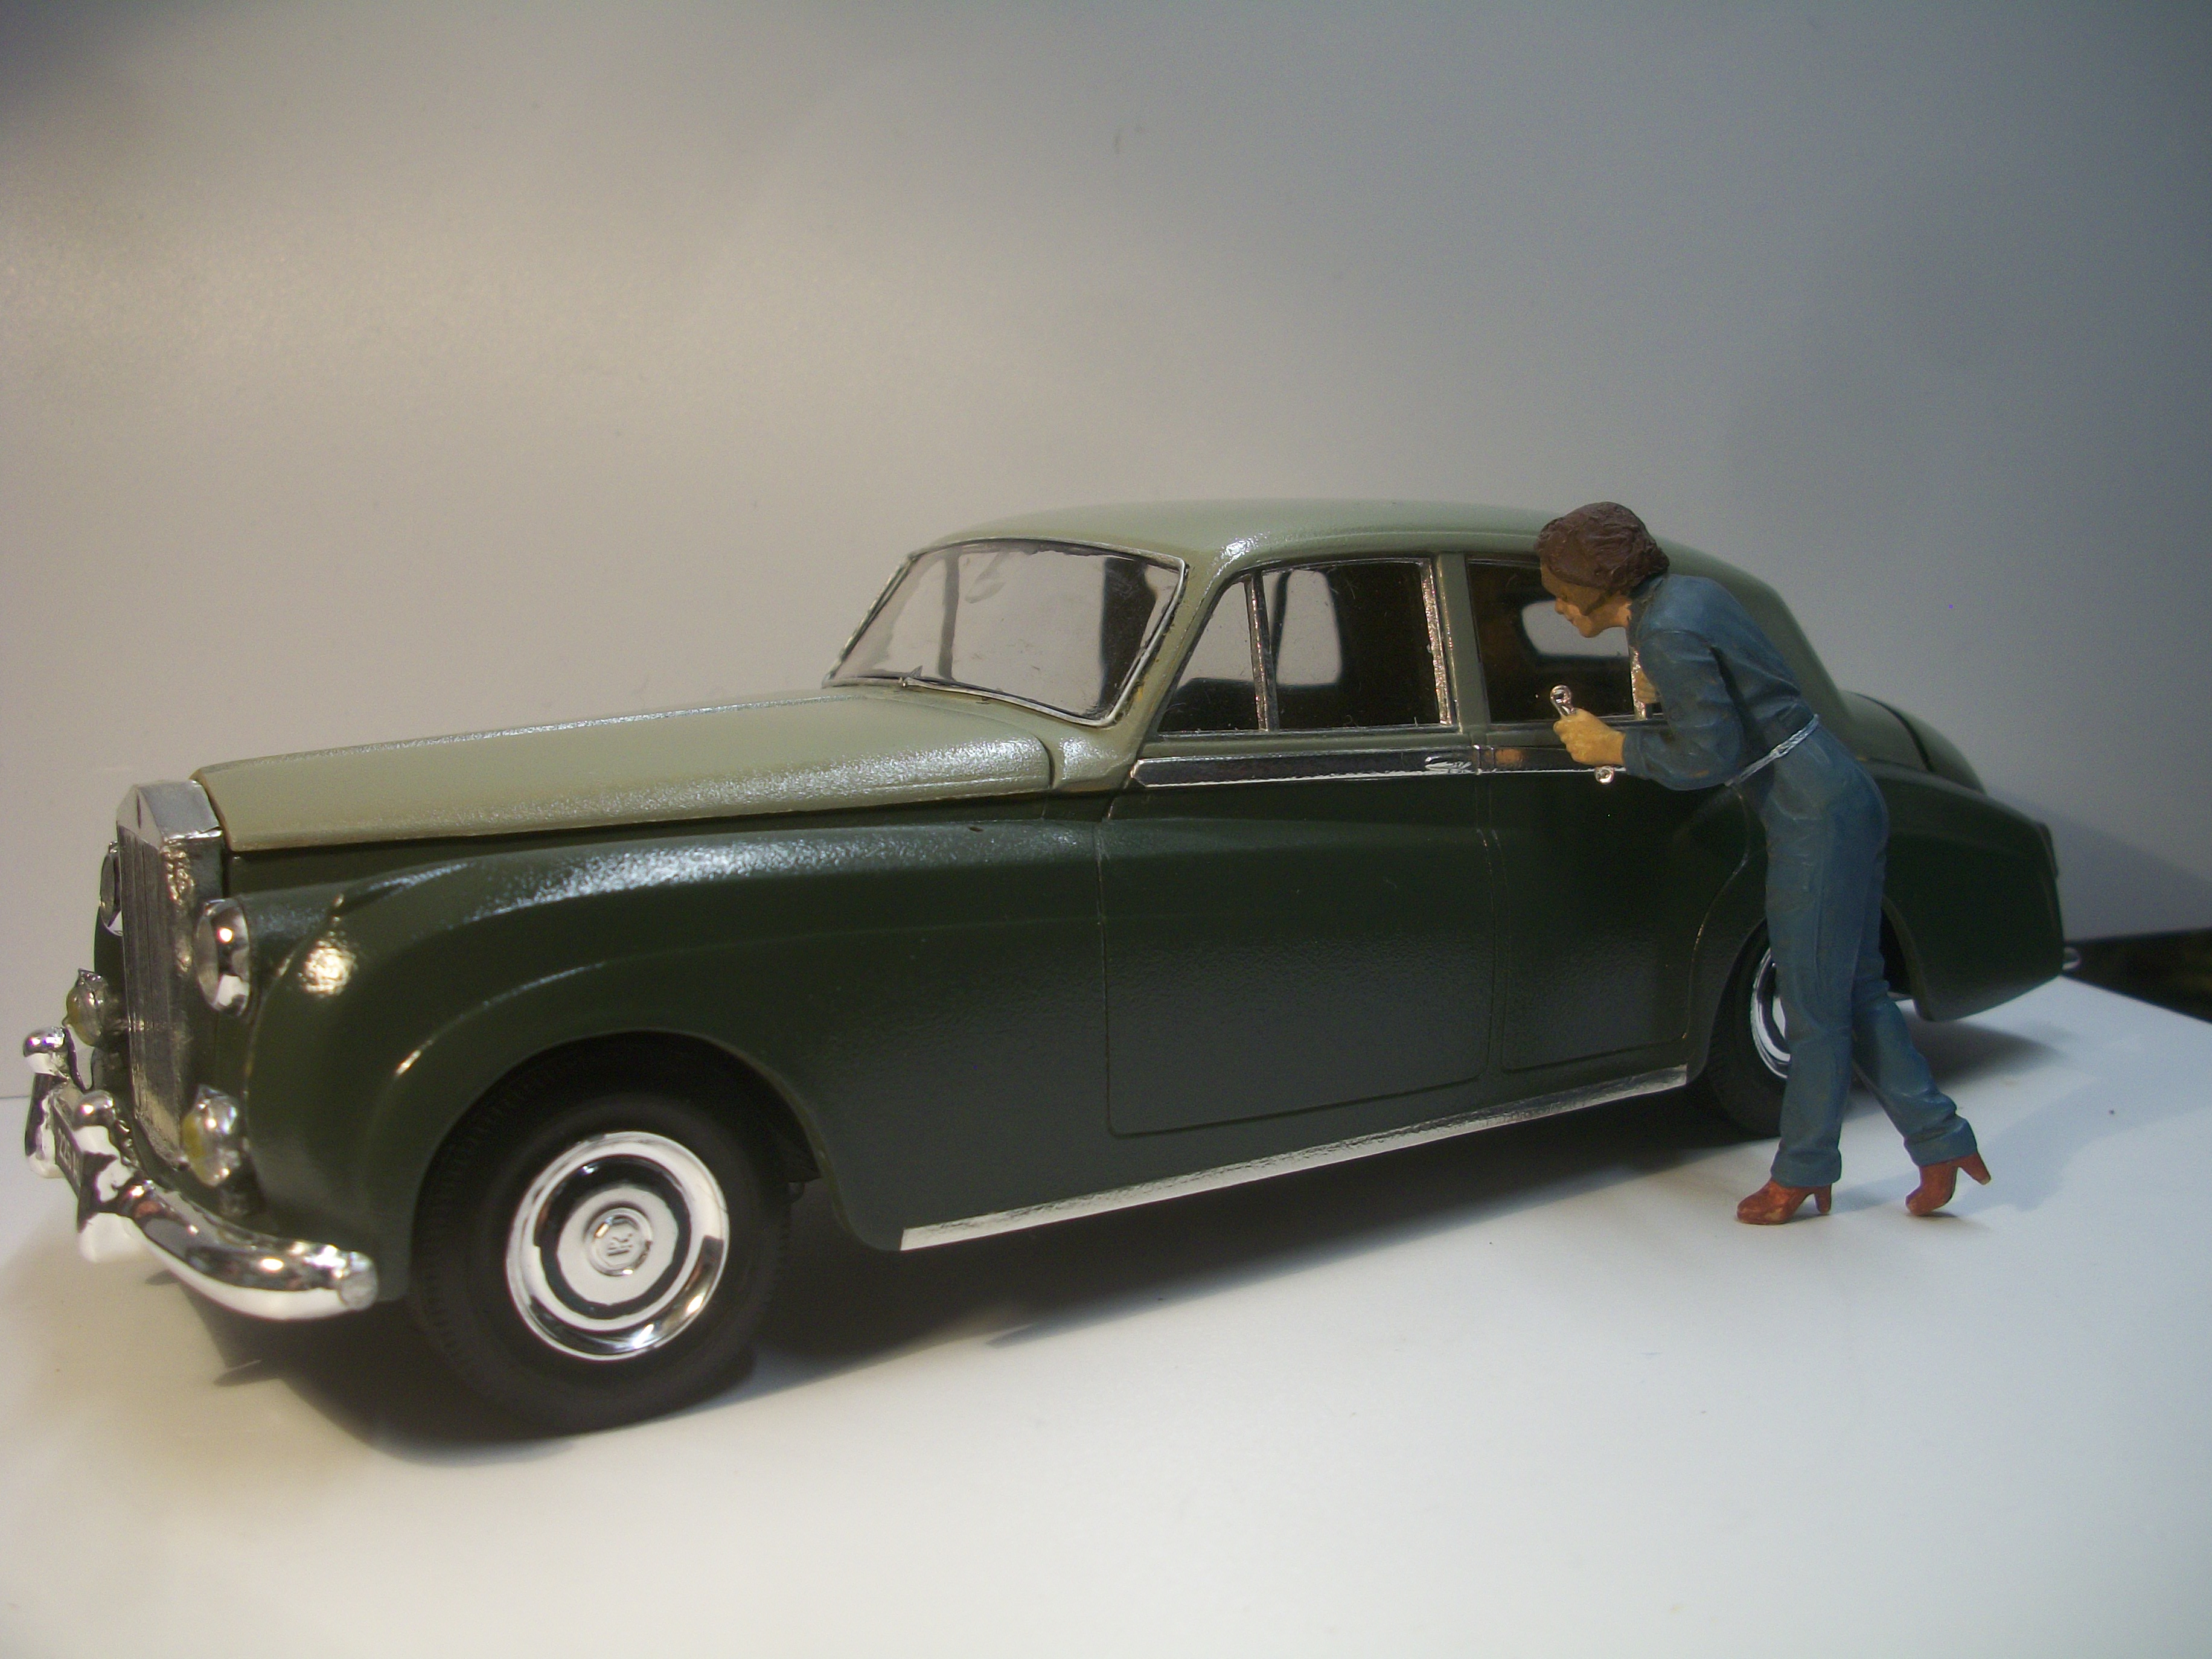
The build of the 1:24 scale Rolls-Royce Silver Cloud is just about completed, having taken 5 weeks of painstaking construction and painting. There are a few minor details that require some attention, but otherwise this model is more or less done. The car seems to photograph quite well, and generally I would say that I am pleased with this one. The most recent additions were the scratch built badge bar and three badges, the radio aerial antenna, the door mirror and the wipers. Usually, a Silver Cloud would have screen wiper arms and wiper blades that park on the driver's side, in this case to the left as you look from the front of the car when it is right hand drive, but this experimental Silver Cloud had wipers that parked to the passenger side, so over to the right hand side. These wipers are parts cut from a chrome windscreen frame that was from one of my Italeri Rolls-Royce Phantom II kits. Shortly, there will be some further photographs that show this Rolls-Royce model car in a diorama setting, and these will be taken inside the showroom of the Hooper & Co. building at 54 St James's Street in London. David
-
Automotive Restoration and Machine Shop
Anglia105E replied to The Modeling Hermit's topic in WIP: Dioramas
These photos are stunning, Douglas...... They are very atmospheric, and I particularly like the shots taken upstairs. I like the way your camera walks you round the inside of the workshop areas, as though you were a 1:24 scale person ( or 1:25 scale ). This project of yours interests me because that is exactly the way I like to build and photograph my dioramas, by getting right inside the building. David -
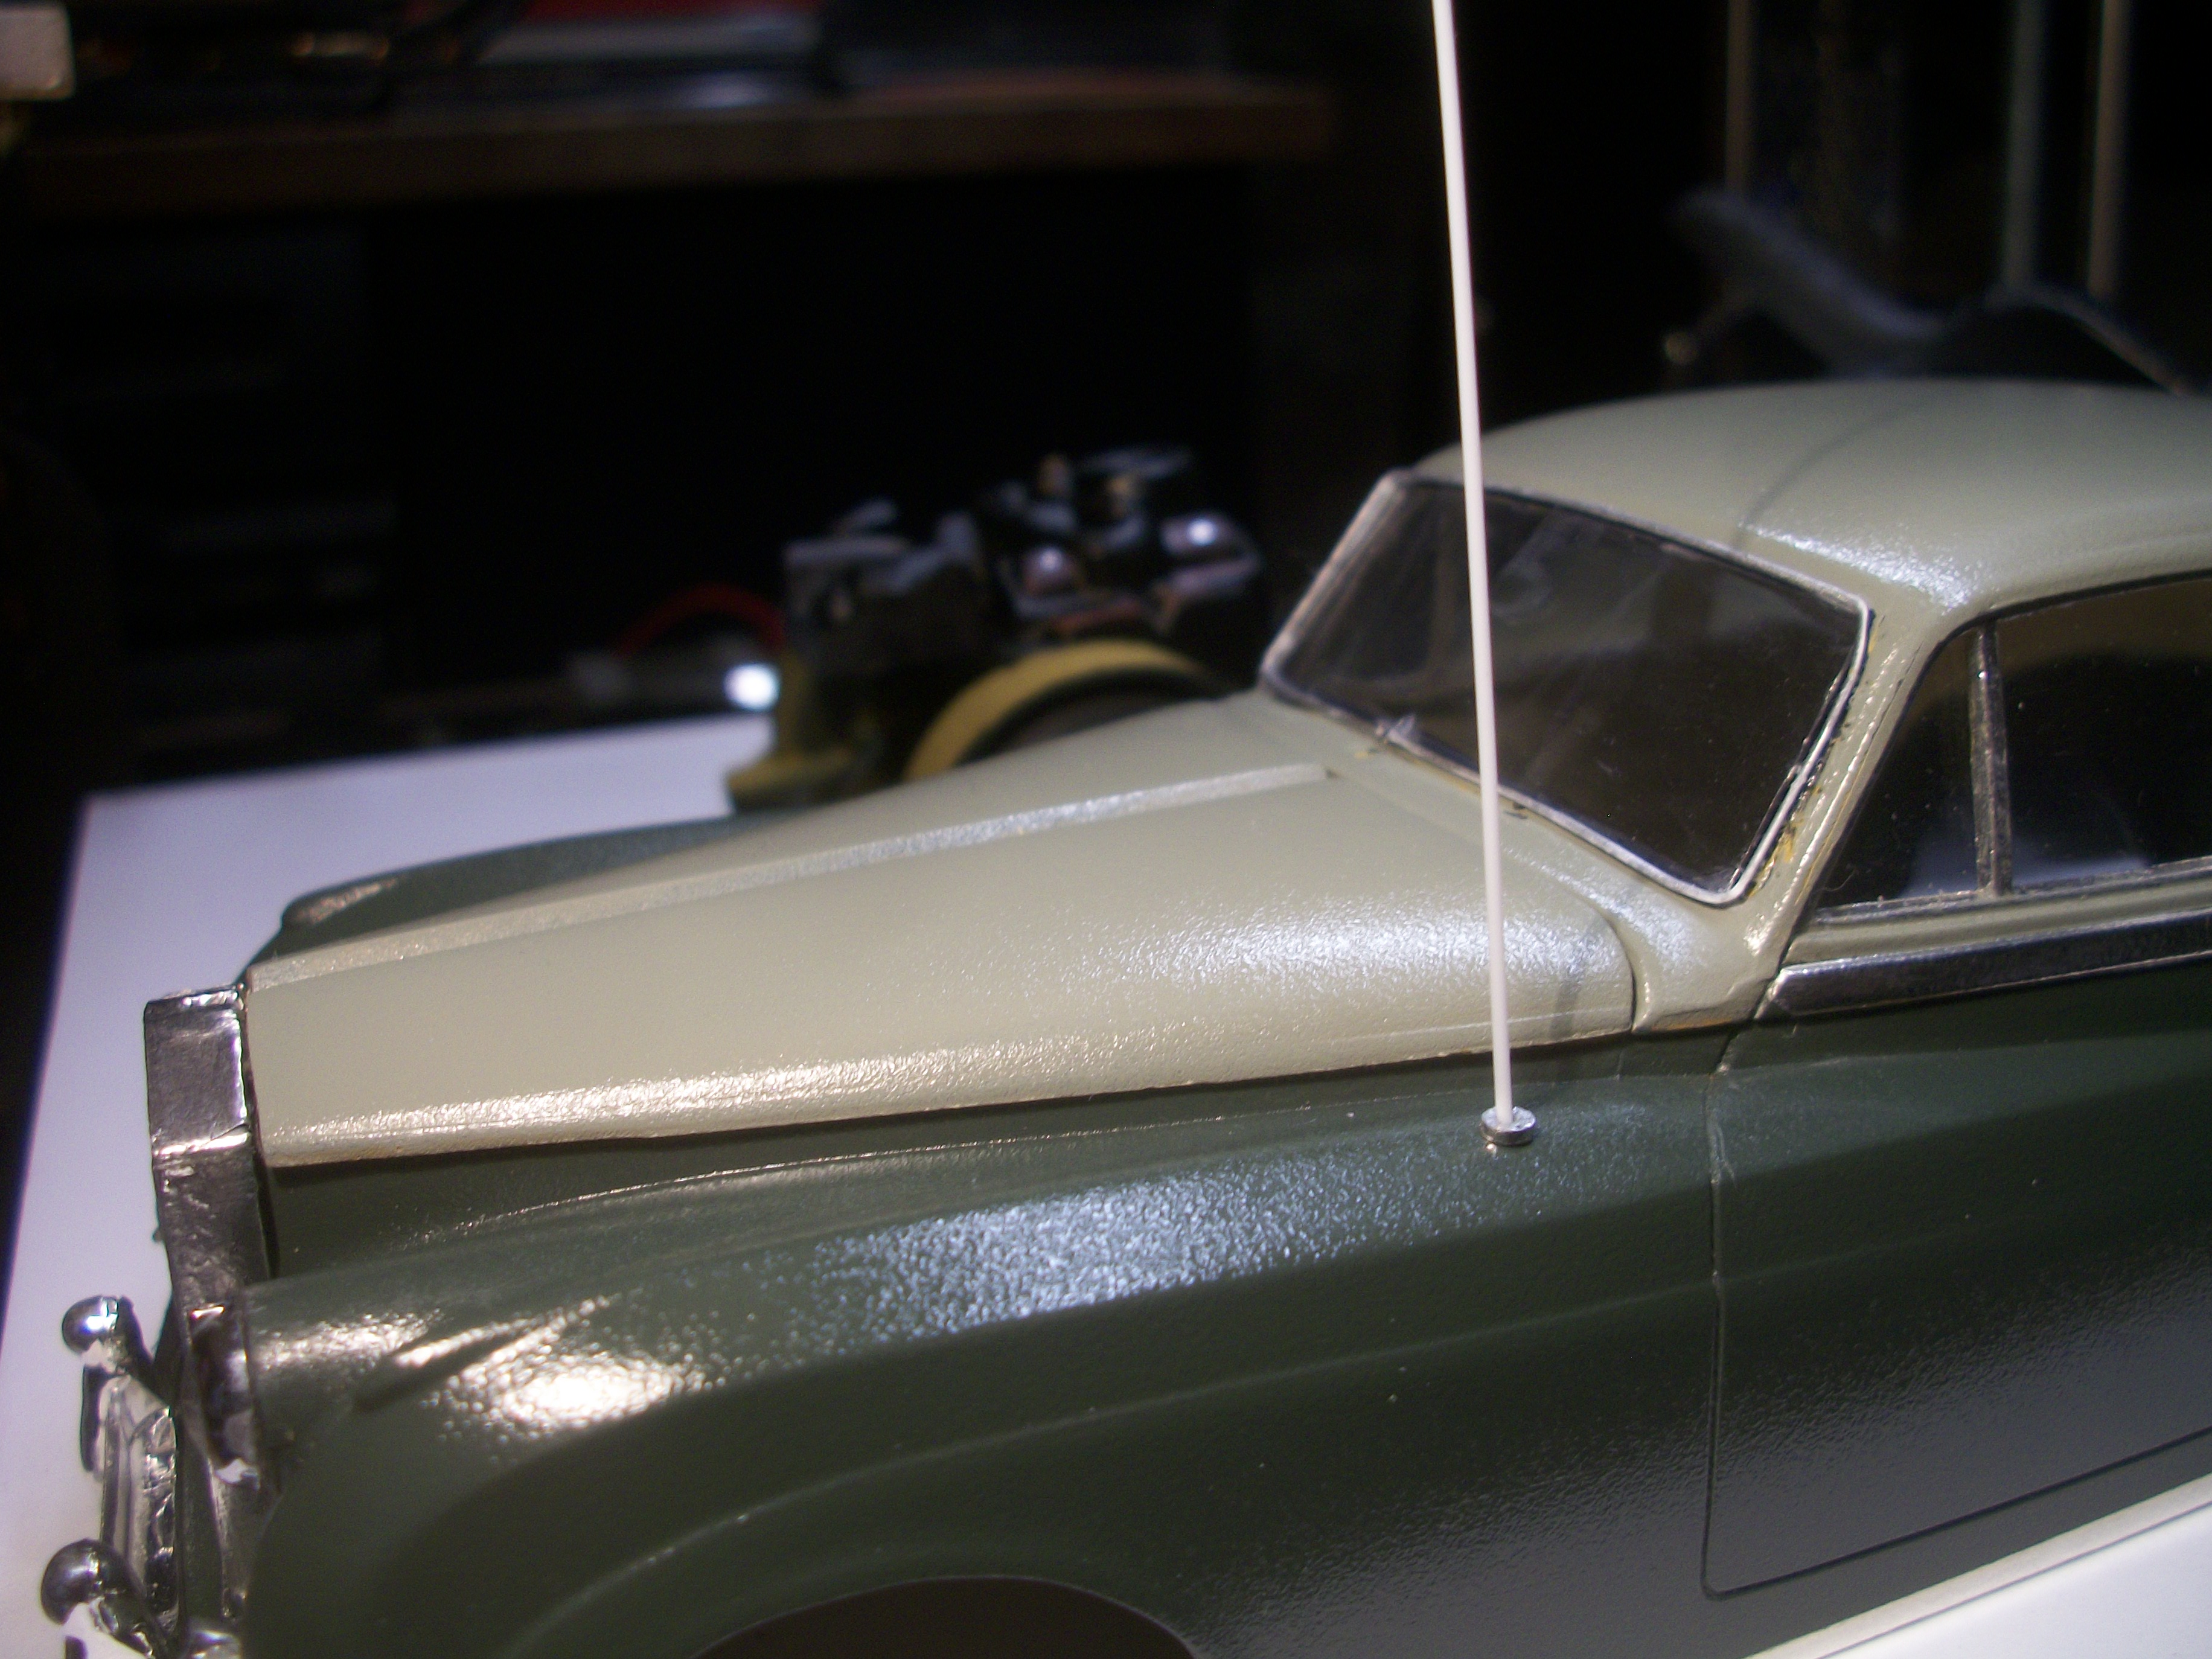
Further efforts to produce a radio aerial for the nearside front wing of the Rolls-Royce Silver Cloud......... I did try to super glue a short length of 30A fuse wire to a short length of 15A fuse wire, but that did not work. Taking the advice of a model builder friend locally, I selected a length of 0.025 inch Evergreen polystyrene rod, heated the upper half and stretched the rod until it was thinner. I am happy with the result, and the aerial is 2 cm for the lower half, also 2 cm for the upper half and it has a nice join between the two halves. I have applied liquid chrome pen to the styrene rod, and left overnight to dry before fitting tomorrow. David
-
Yes, Douglas..... those ICM figure kits in 1:24 scale are very well done, and I have also the Henry Ford figures, the Gasoline Loaders and the women mechanics. The kits are so cheap to buy, and easy enough to assemble from only a few parts. The detail is good, and once painted carefully they fit into my diorama setting quite nicely. Although these figures are intended for 1920's - 1930's, they still seem to work for the 1950's...... They do stand up alongside the 3D printed Shapeways figures, and they do so for probably around half the price ! David
-
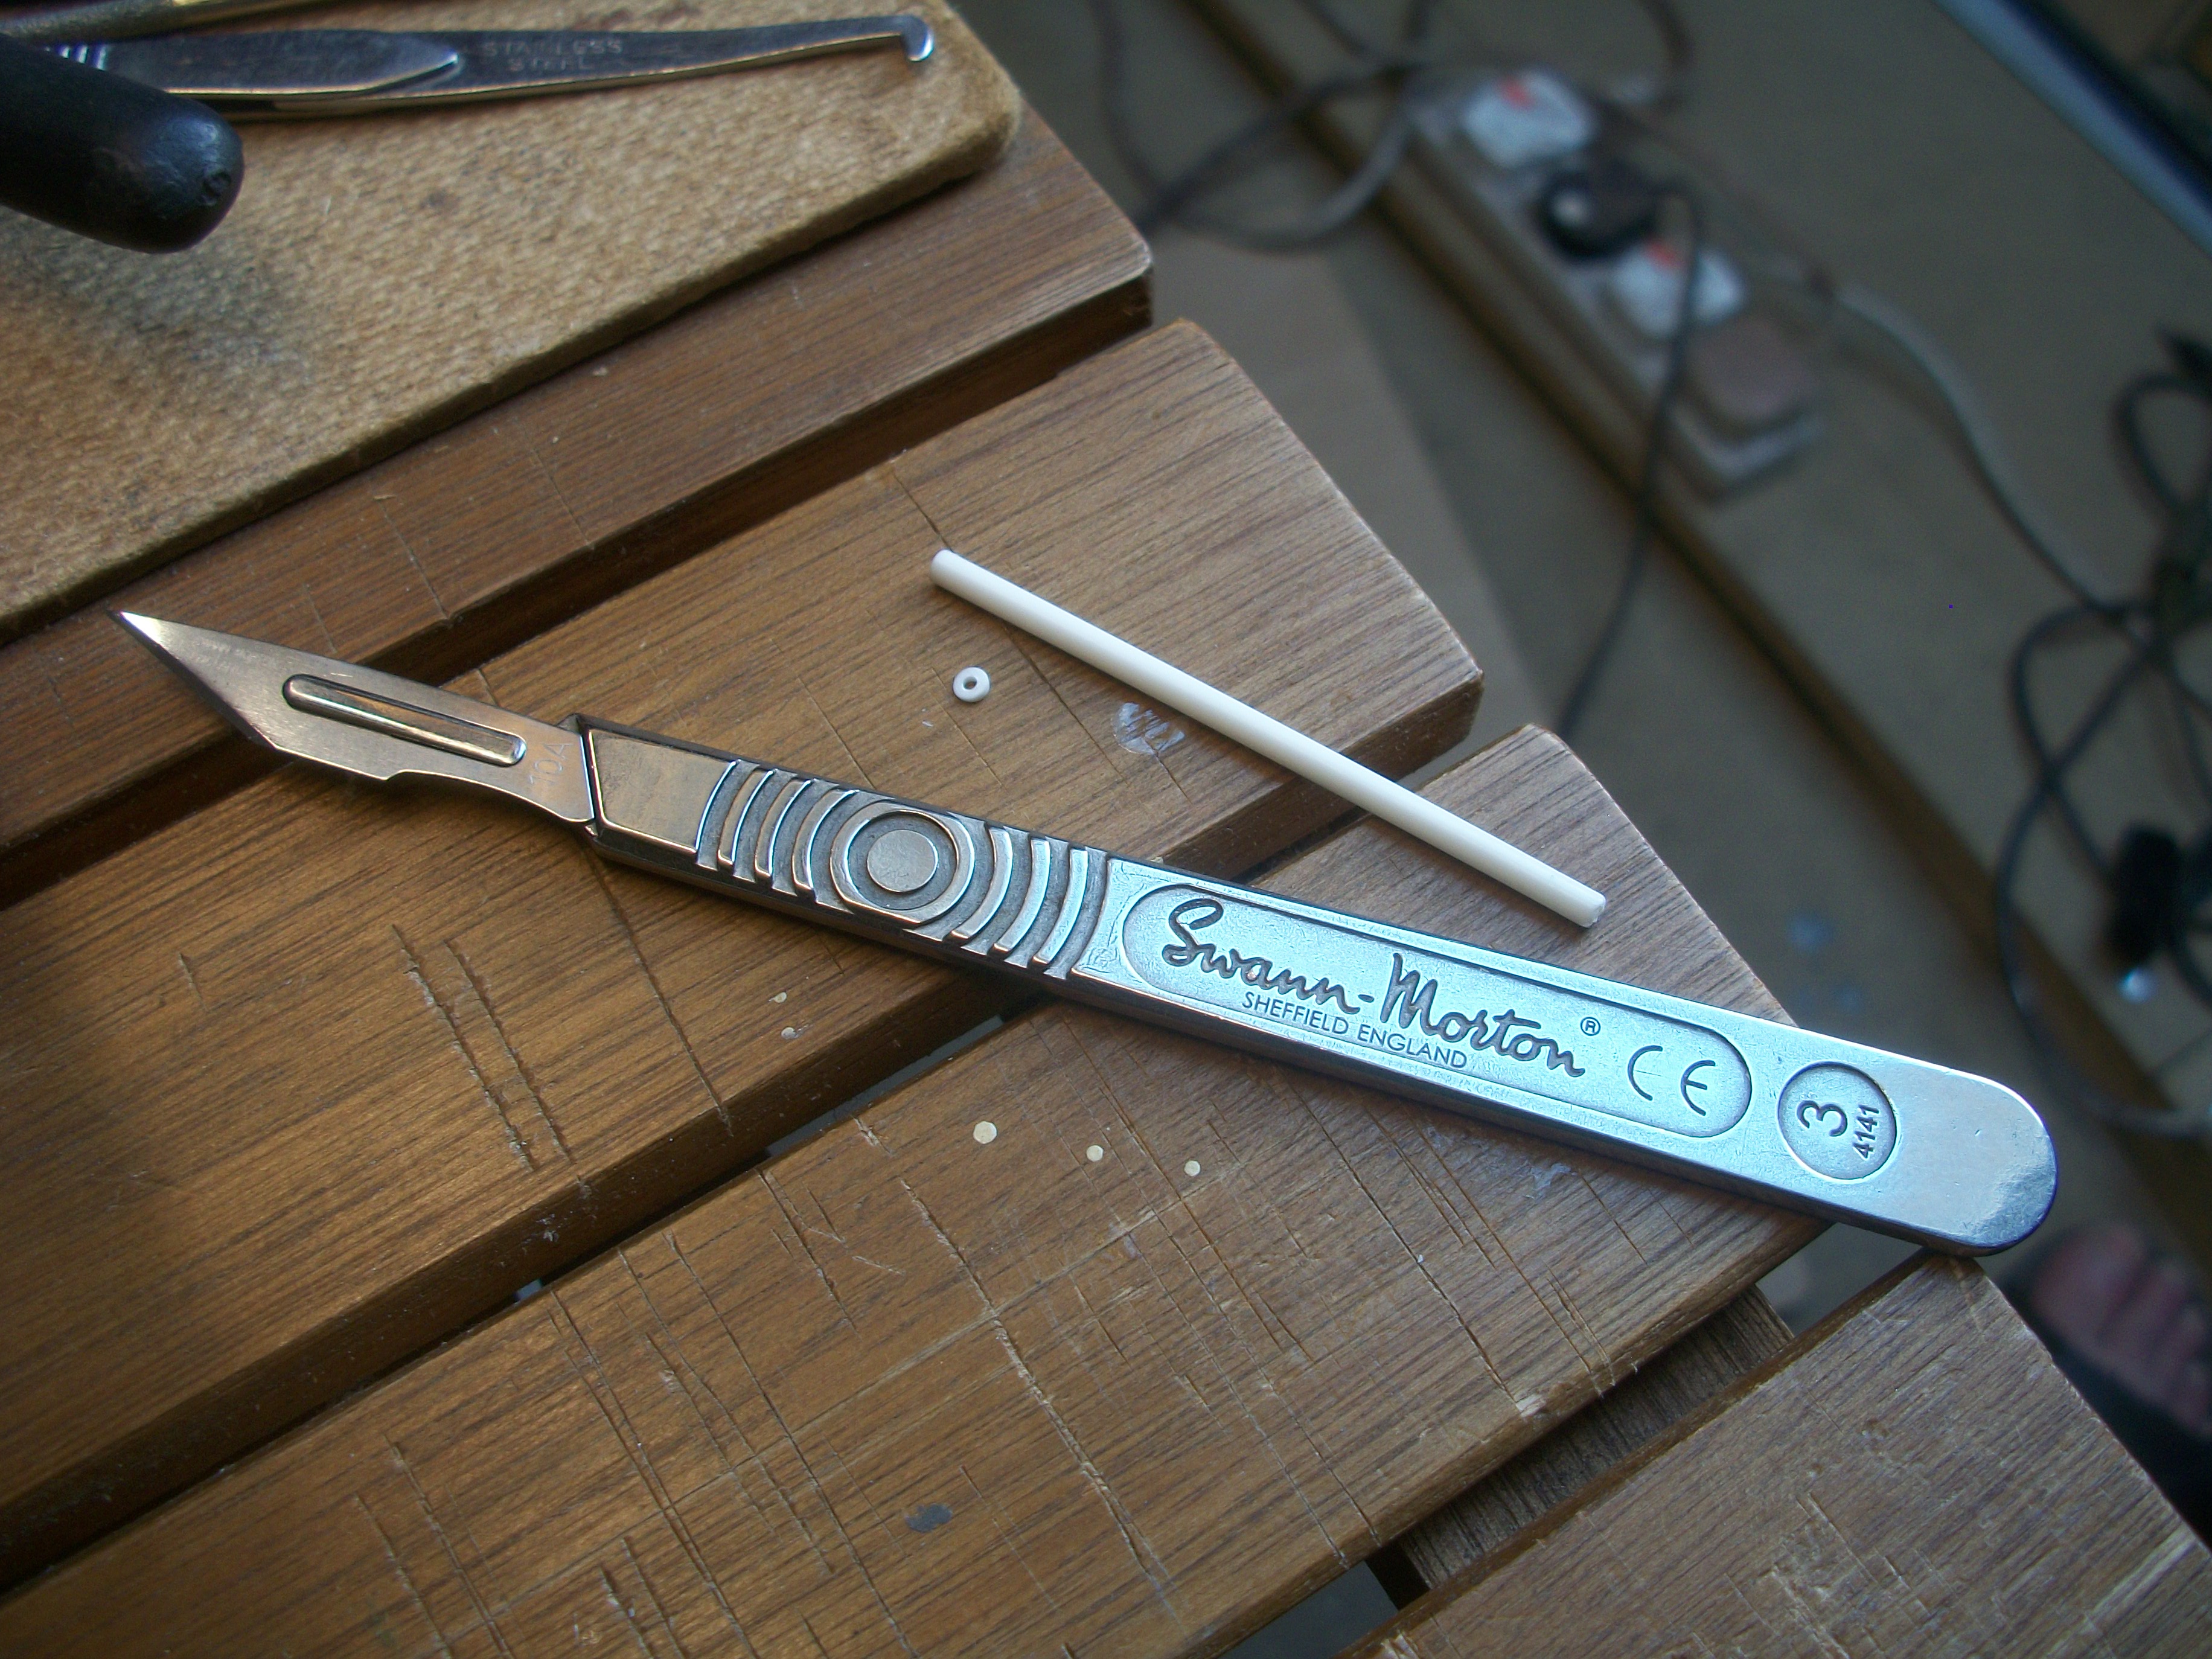
From the following photos, you can see that I am scratch building the radio aerial that is located on the nearside front wing of the Rolls-Royce. Usually, there would be a roof mounted aerial on a Silver Cloud, but this experimental car has the aerial on the wing. The aerial is 30 amp fuse wire, and the collar at the base of the aerial is a thin sliver of cotton bud stalk that I cut off with the scalpel knife. This collar has been given a coat of liquid chrome. There is a hole drilled into the top of the wing, ready for the aerial to be glued into. I am toying with the idea of having a short length of thinner fuse wire, that would be the upper section of the aerial. The bonnet panels open and close nice and tightly, and the body panels are being polished with Meguiar's Carnauba Wax........ The numerals on the license plates need to be larger, I think ? I feel that this model is starting to come to life now, especially as each detail is added. David
-
Alan's suggestion to use a 1:25 scale figure in order to estimate heights is an excellent idea ! The word I was going to give you Mattias, was " Rack ", but Alan's word " Pegboard " is even better ! David