89AKurt
-
Posts
8,429 -
Joined
-
Last visited
Content Type
Profiles
Forums
Events
Gallery
Everything posted by 89AKurt
-
I've thought about getting what I've done before copied, I didn't know where to start.
-
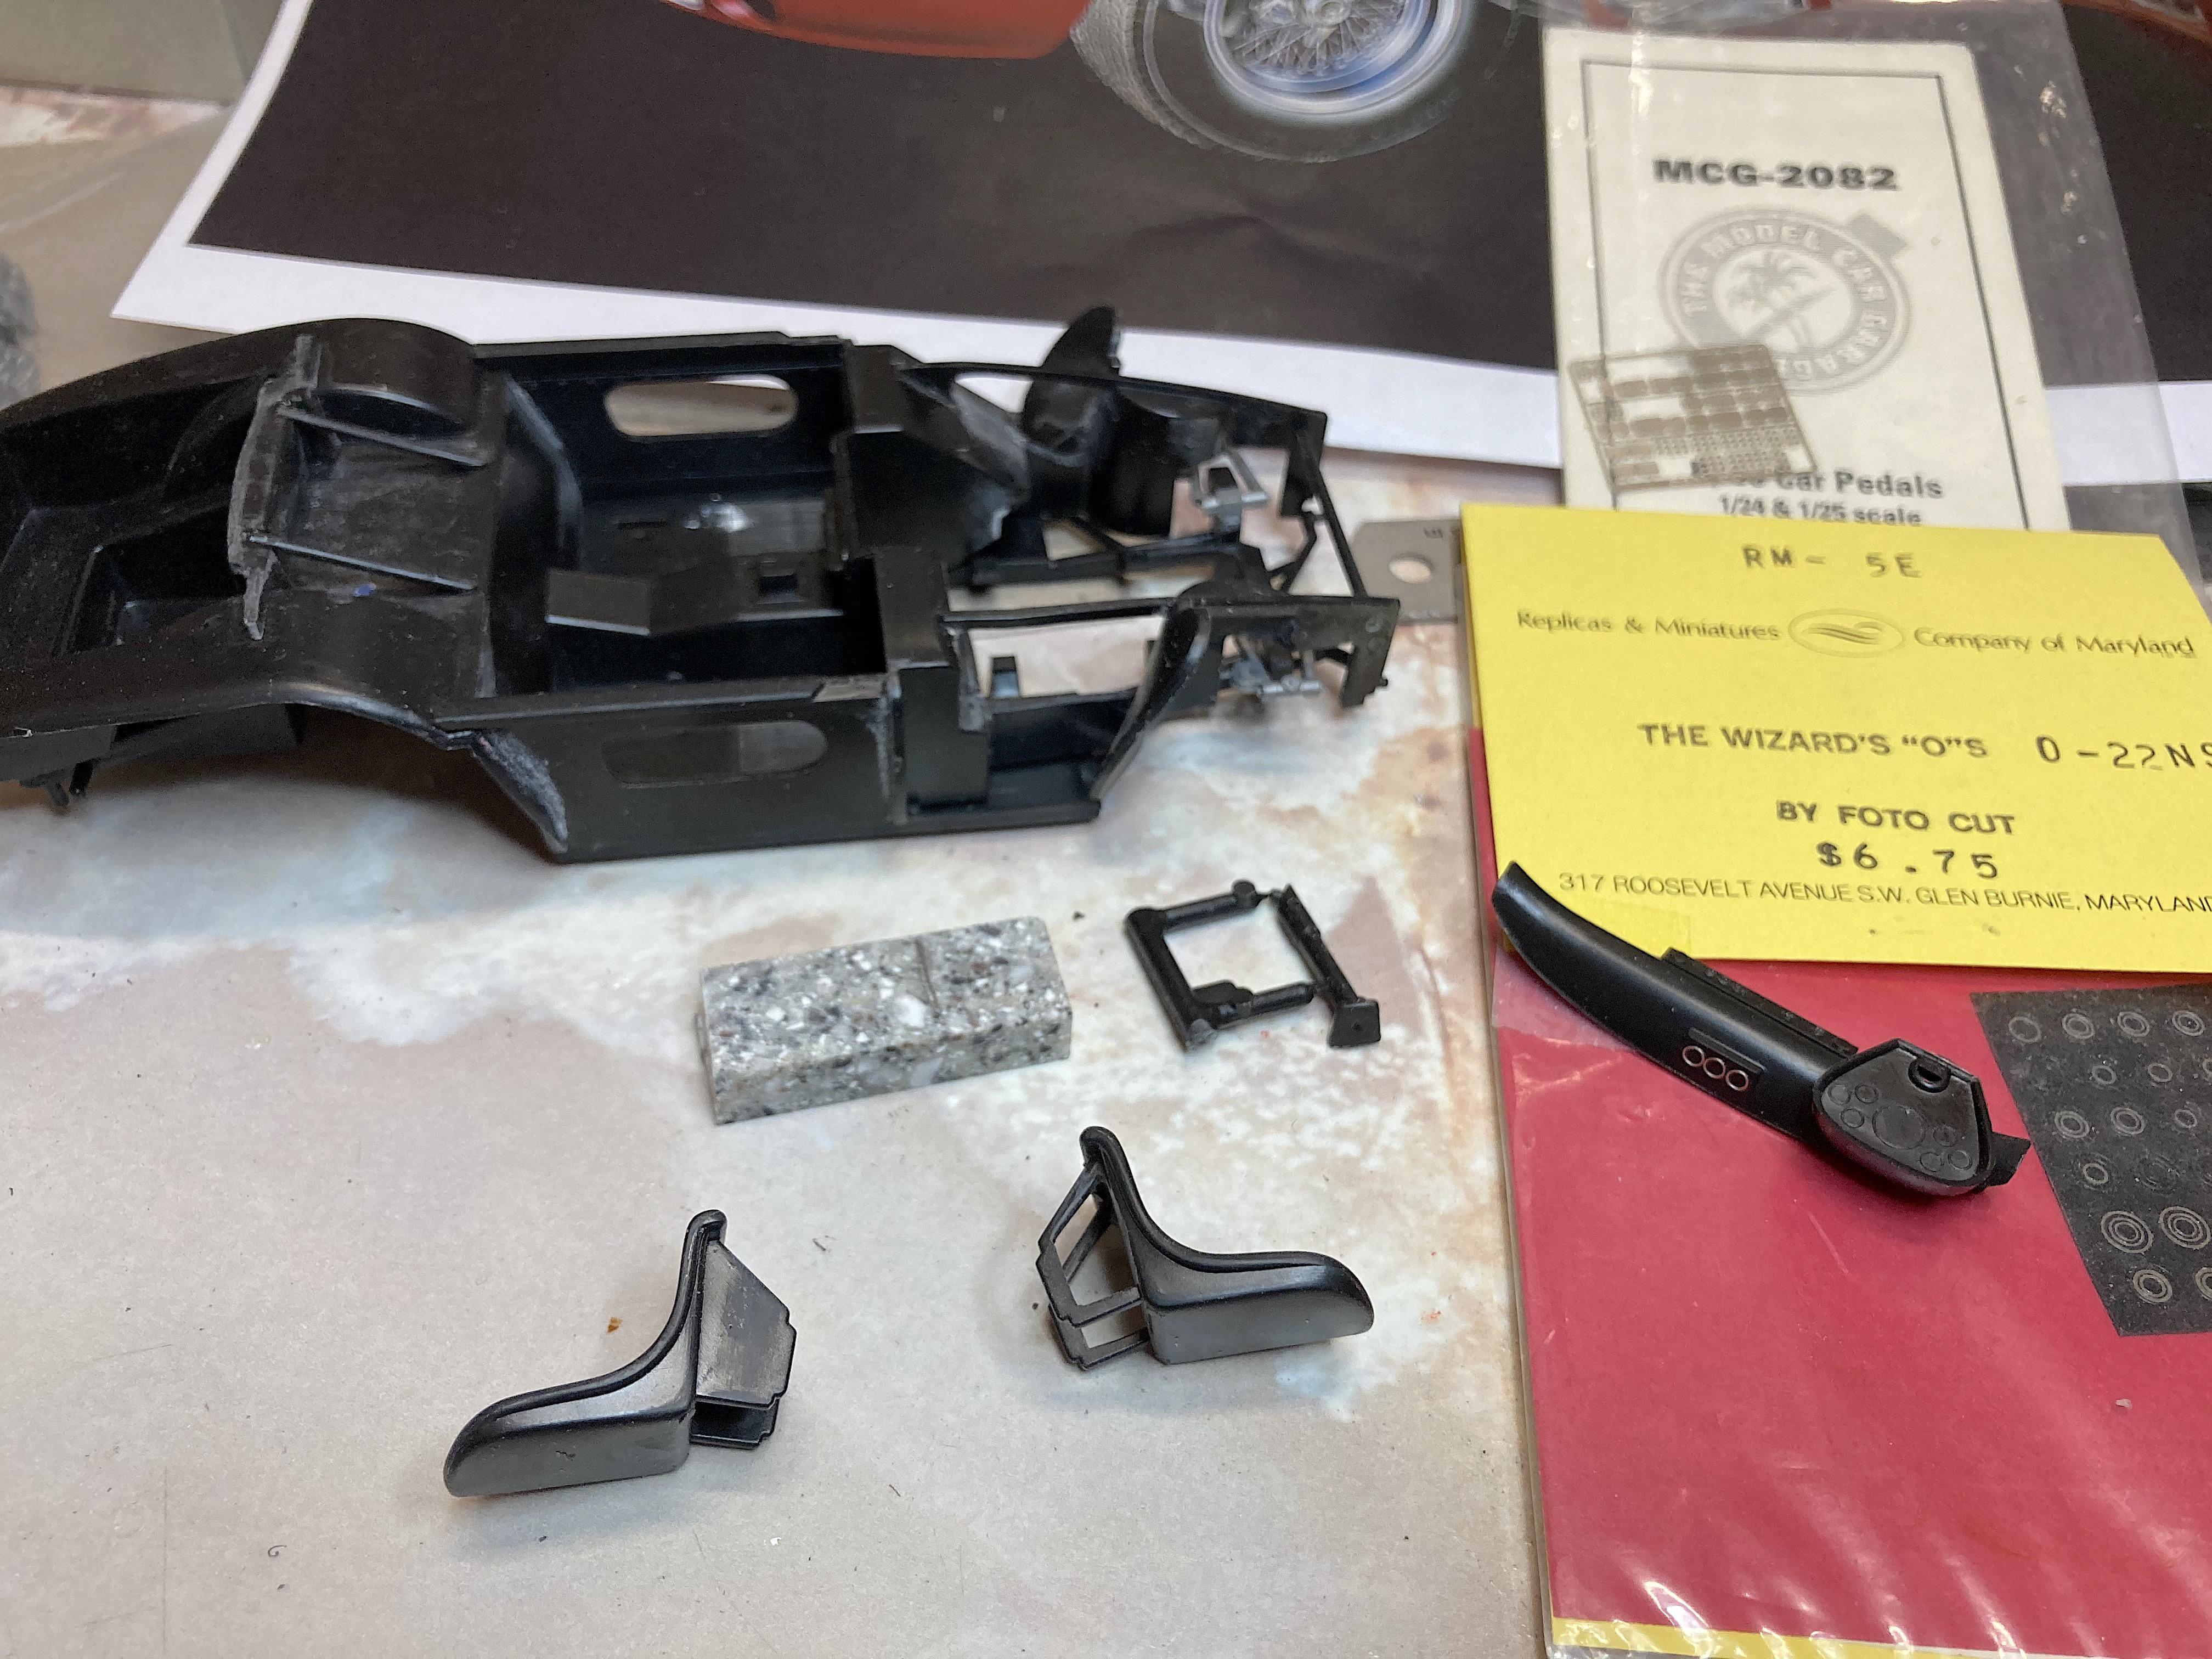
*Had to* get the front springs done tonight. Getting this assembly together is tricky, not perfect but good enough. The dash will get toggle switches, drilled the holes. In my research of interiors tonight, it's really obvious each of the real cars is different, shape of the tunnel, paint colors or diamond padding, dash on one is missing the top part, etc. I was looking at the center vents, most have tubes sticking up, some have nothing at all. I faked in the tube vents with Replicas & Miniatures of MD Wizzard-of-Os. The kit has molded on pedals, another pet peeve, but when everything is flat black, they might not be seen very well anyway. Thinking of just sticking on photo-etch pedals for eye candy. The seat pedestals needed something, so I used the Dremel to open them up. The GTO has an oil sump, behind the passenger seat, with a fill tube going to the B-pillar. The car I'm sort of duplicating does not seem to have a filler on the deck, so I assume the base car did not have a dry sump. On my N.A.R.T. which has a dry sump, I fabricated a tank from Corian®, *have to* do a similar tank since there is the space behind the front wheel.

-
 I was looking at the decals for the '29 Model A Hot Rod, there are rust spots on it, for the patina look. A bike would be cool, I have the Fujimi one that comes with the Thule cargo boxes, worth it just for the photo-etch spokes.
 -
Scratch Building - OMG, I lost my dizzy
89AKurt replied to Alyn's topic in Tips, Tricks, and Tutorials
LMAO -
Thanks. Now that is amazing eye straining work! ?
-
Scratch Building - OMG, I lost my dizzy
89AKurt replied to Alyn's topic in Tips, Tricks, and Tutorials
You actually *build* models Danno? ? This technique could apply to other things beside distributors. What is the aluminum finned thing? It would be nice to have graduated groove sizes, I might just make such a jig from wood on the table saw. -
Ambitious project! You given thought to "camouflage", such as a rusty patina, and maybe a firewood "load"? The carbon Corvette valve covers are sexy.
-
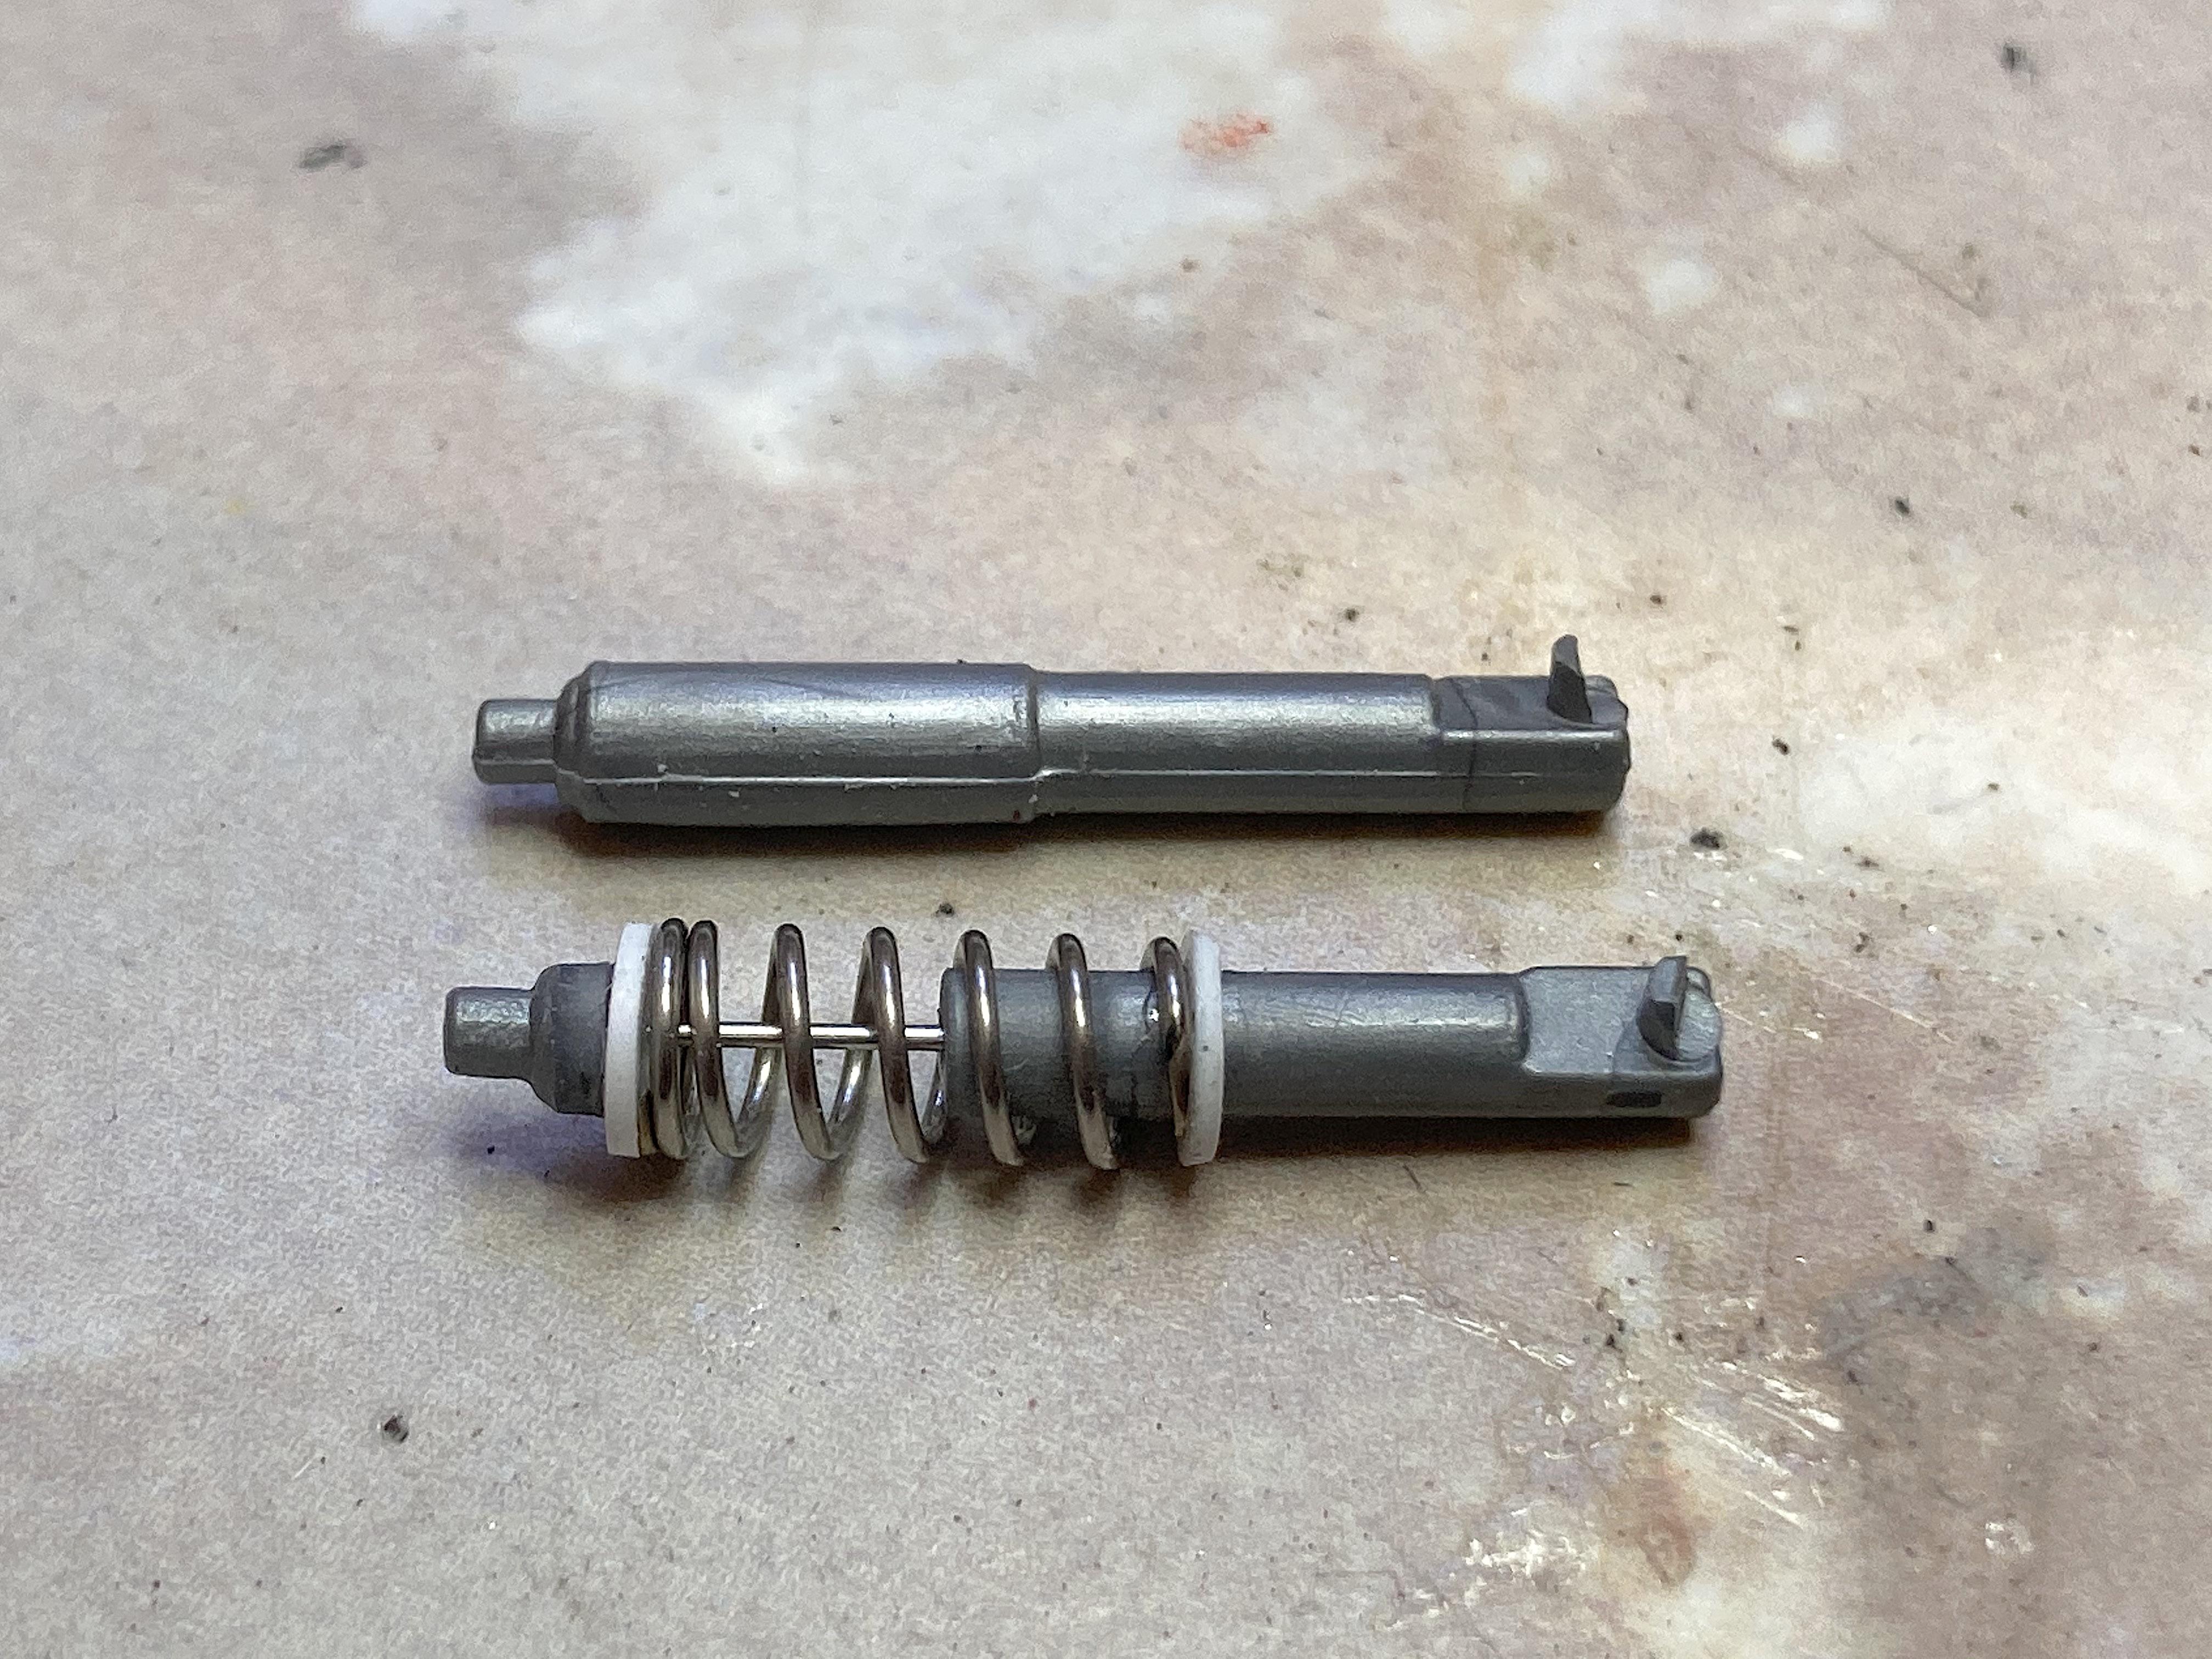
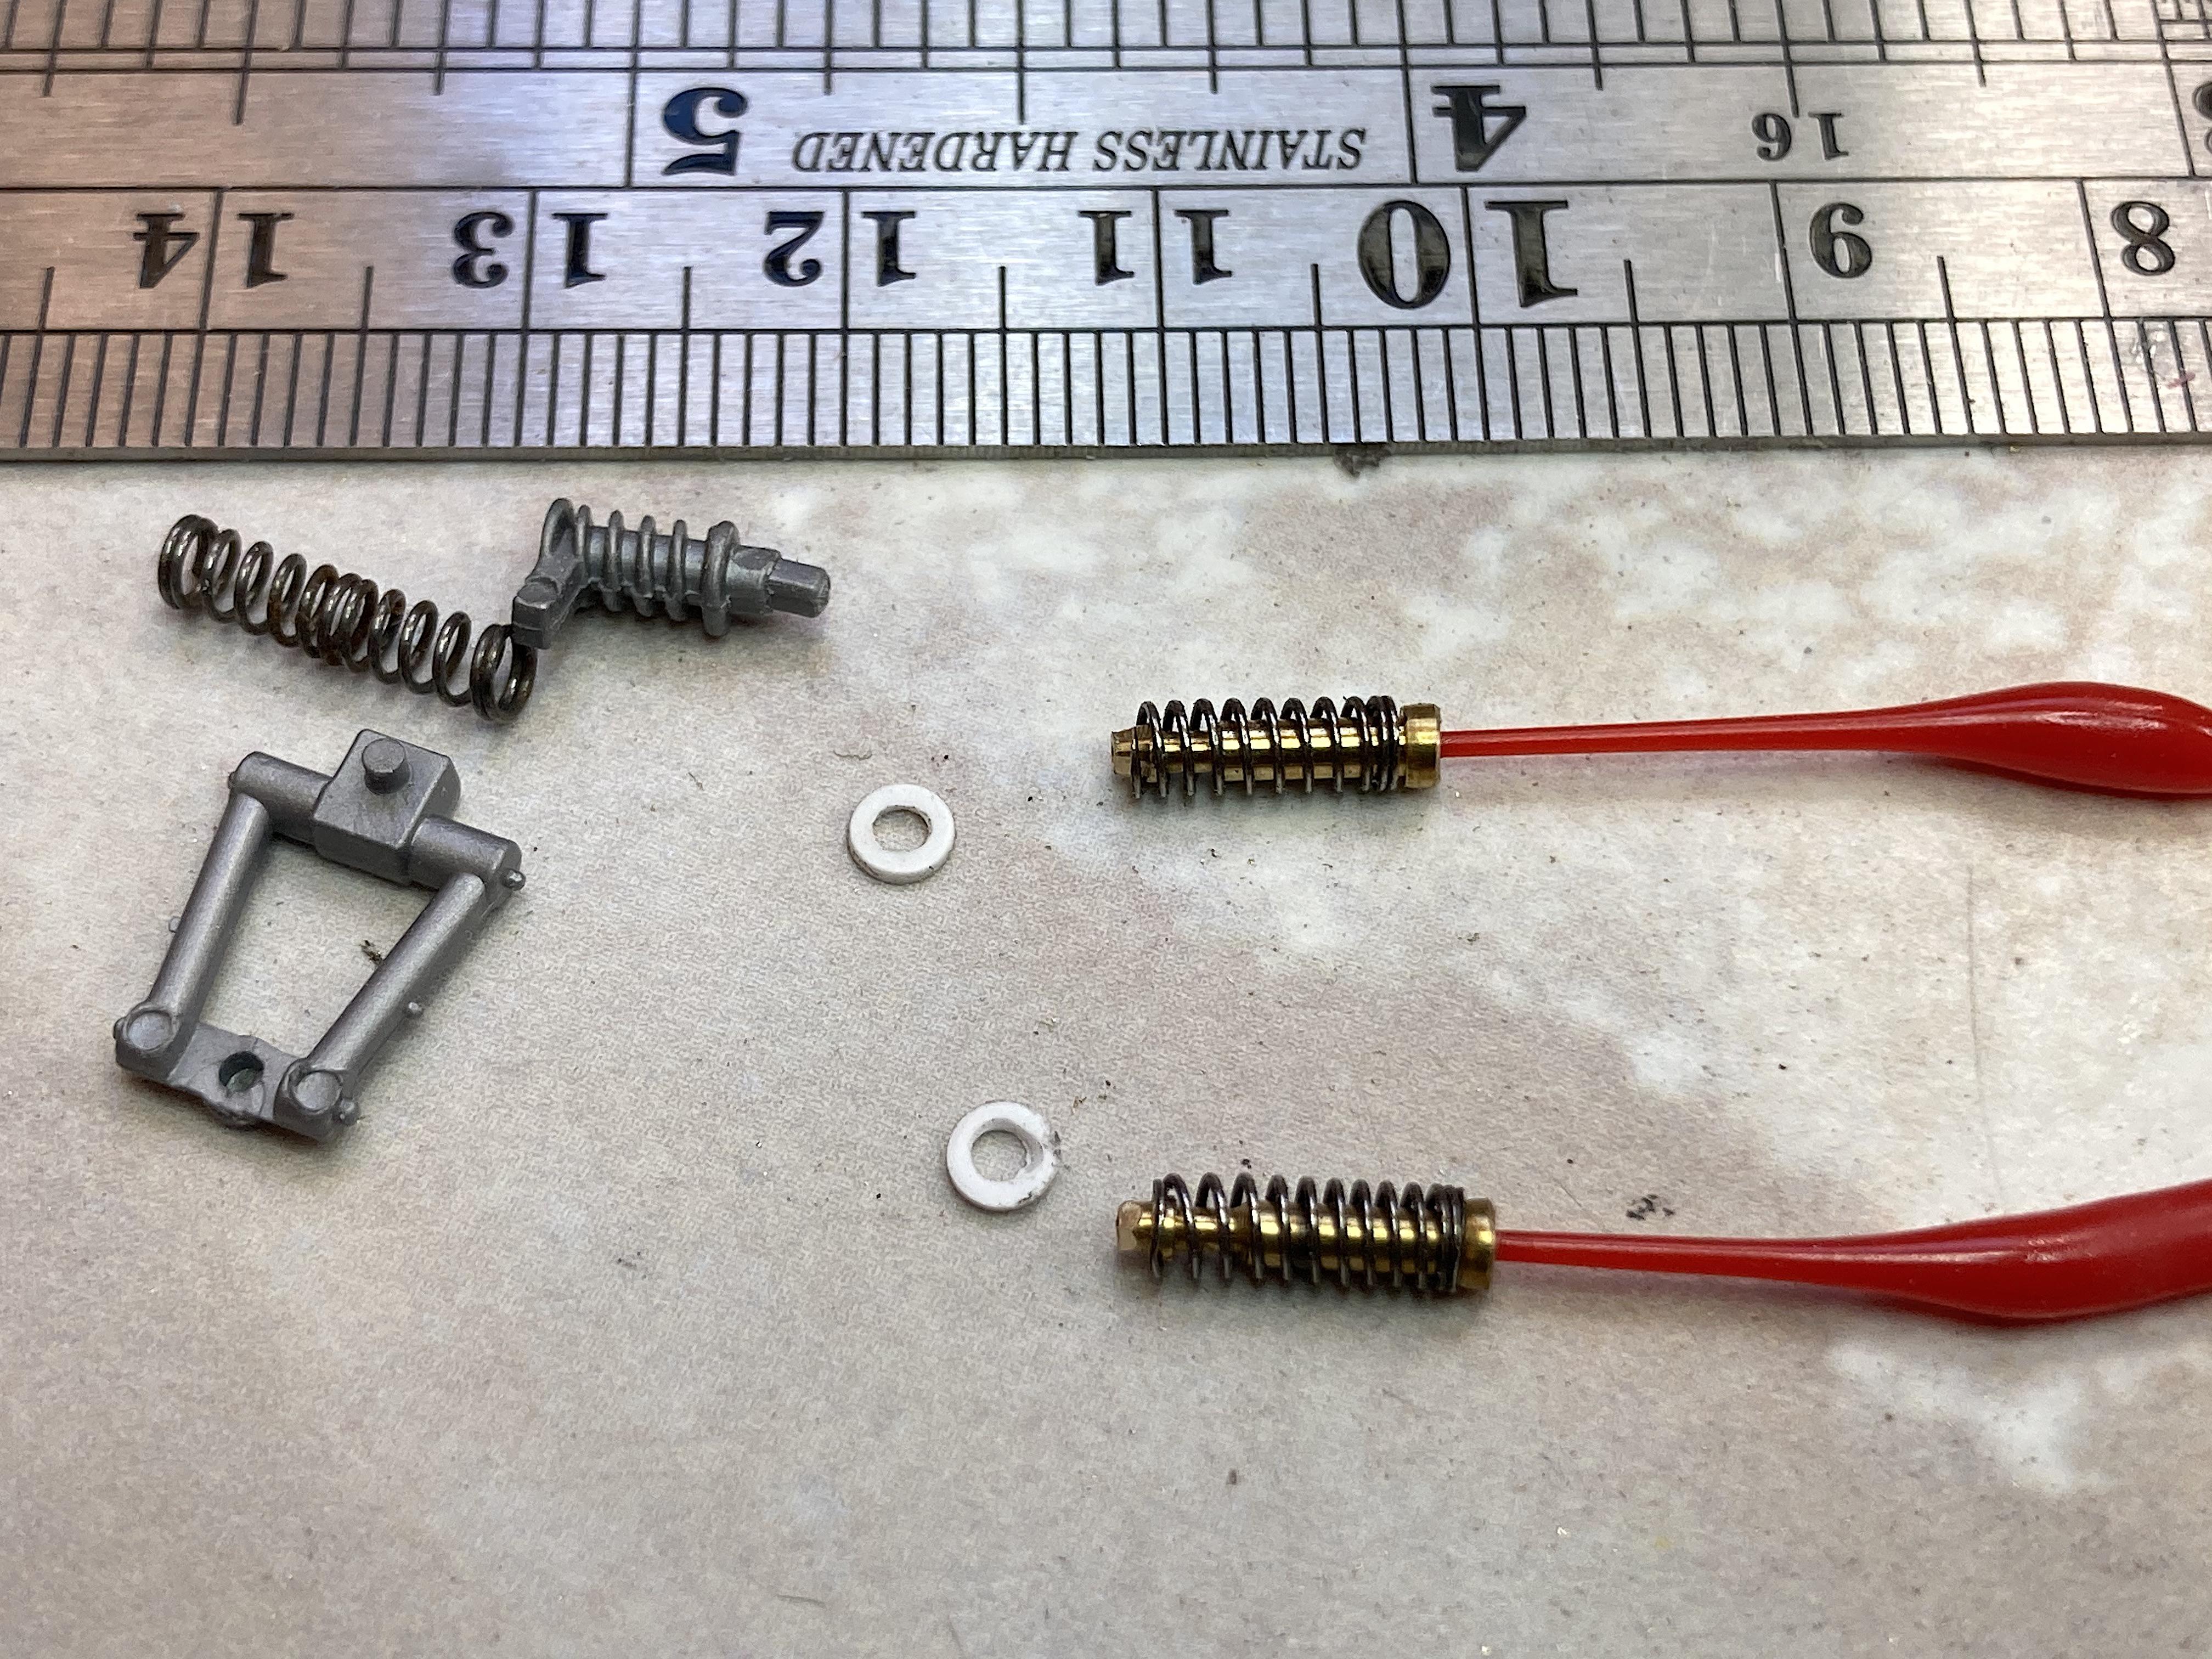
I dislike painting springs on coilover shocks so much, that I do this. No wonder I don't get many models done. ?
-
when really desperate! ?
-
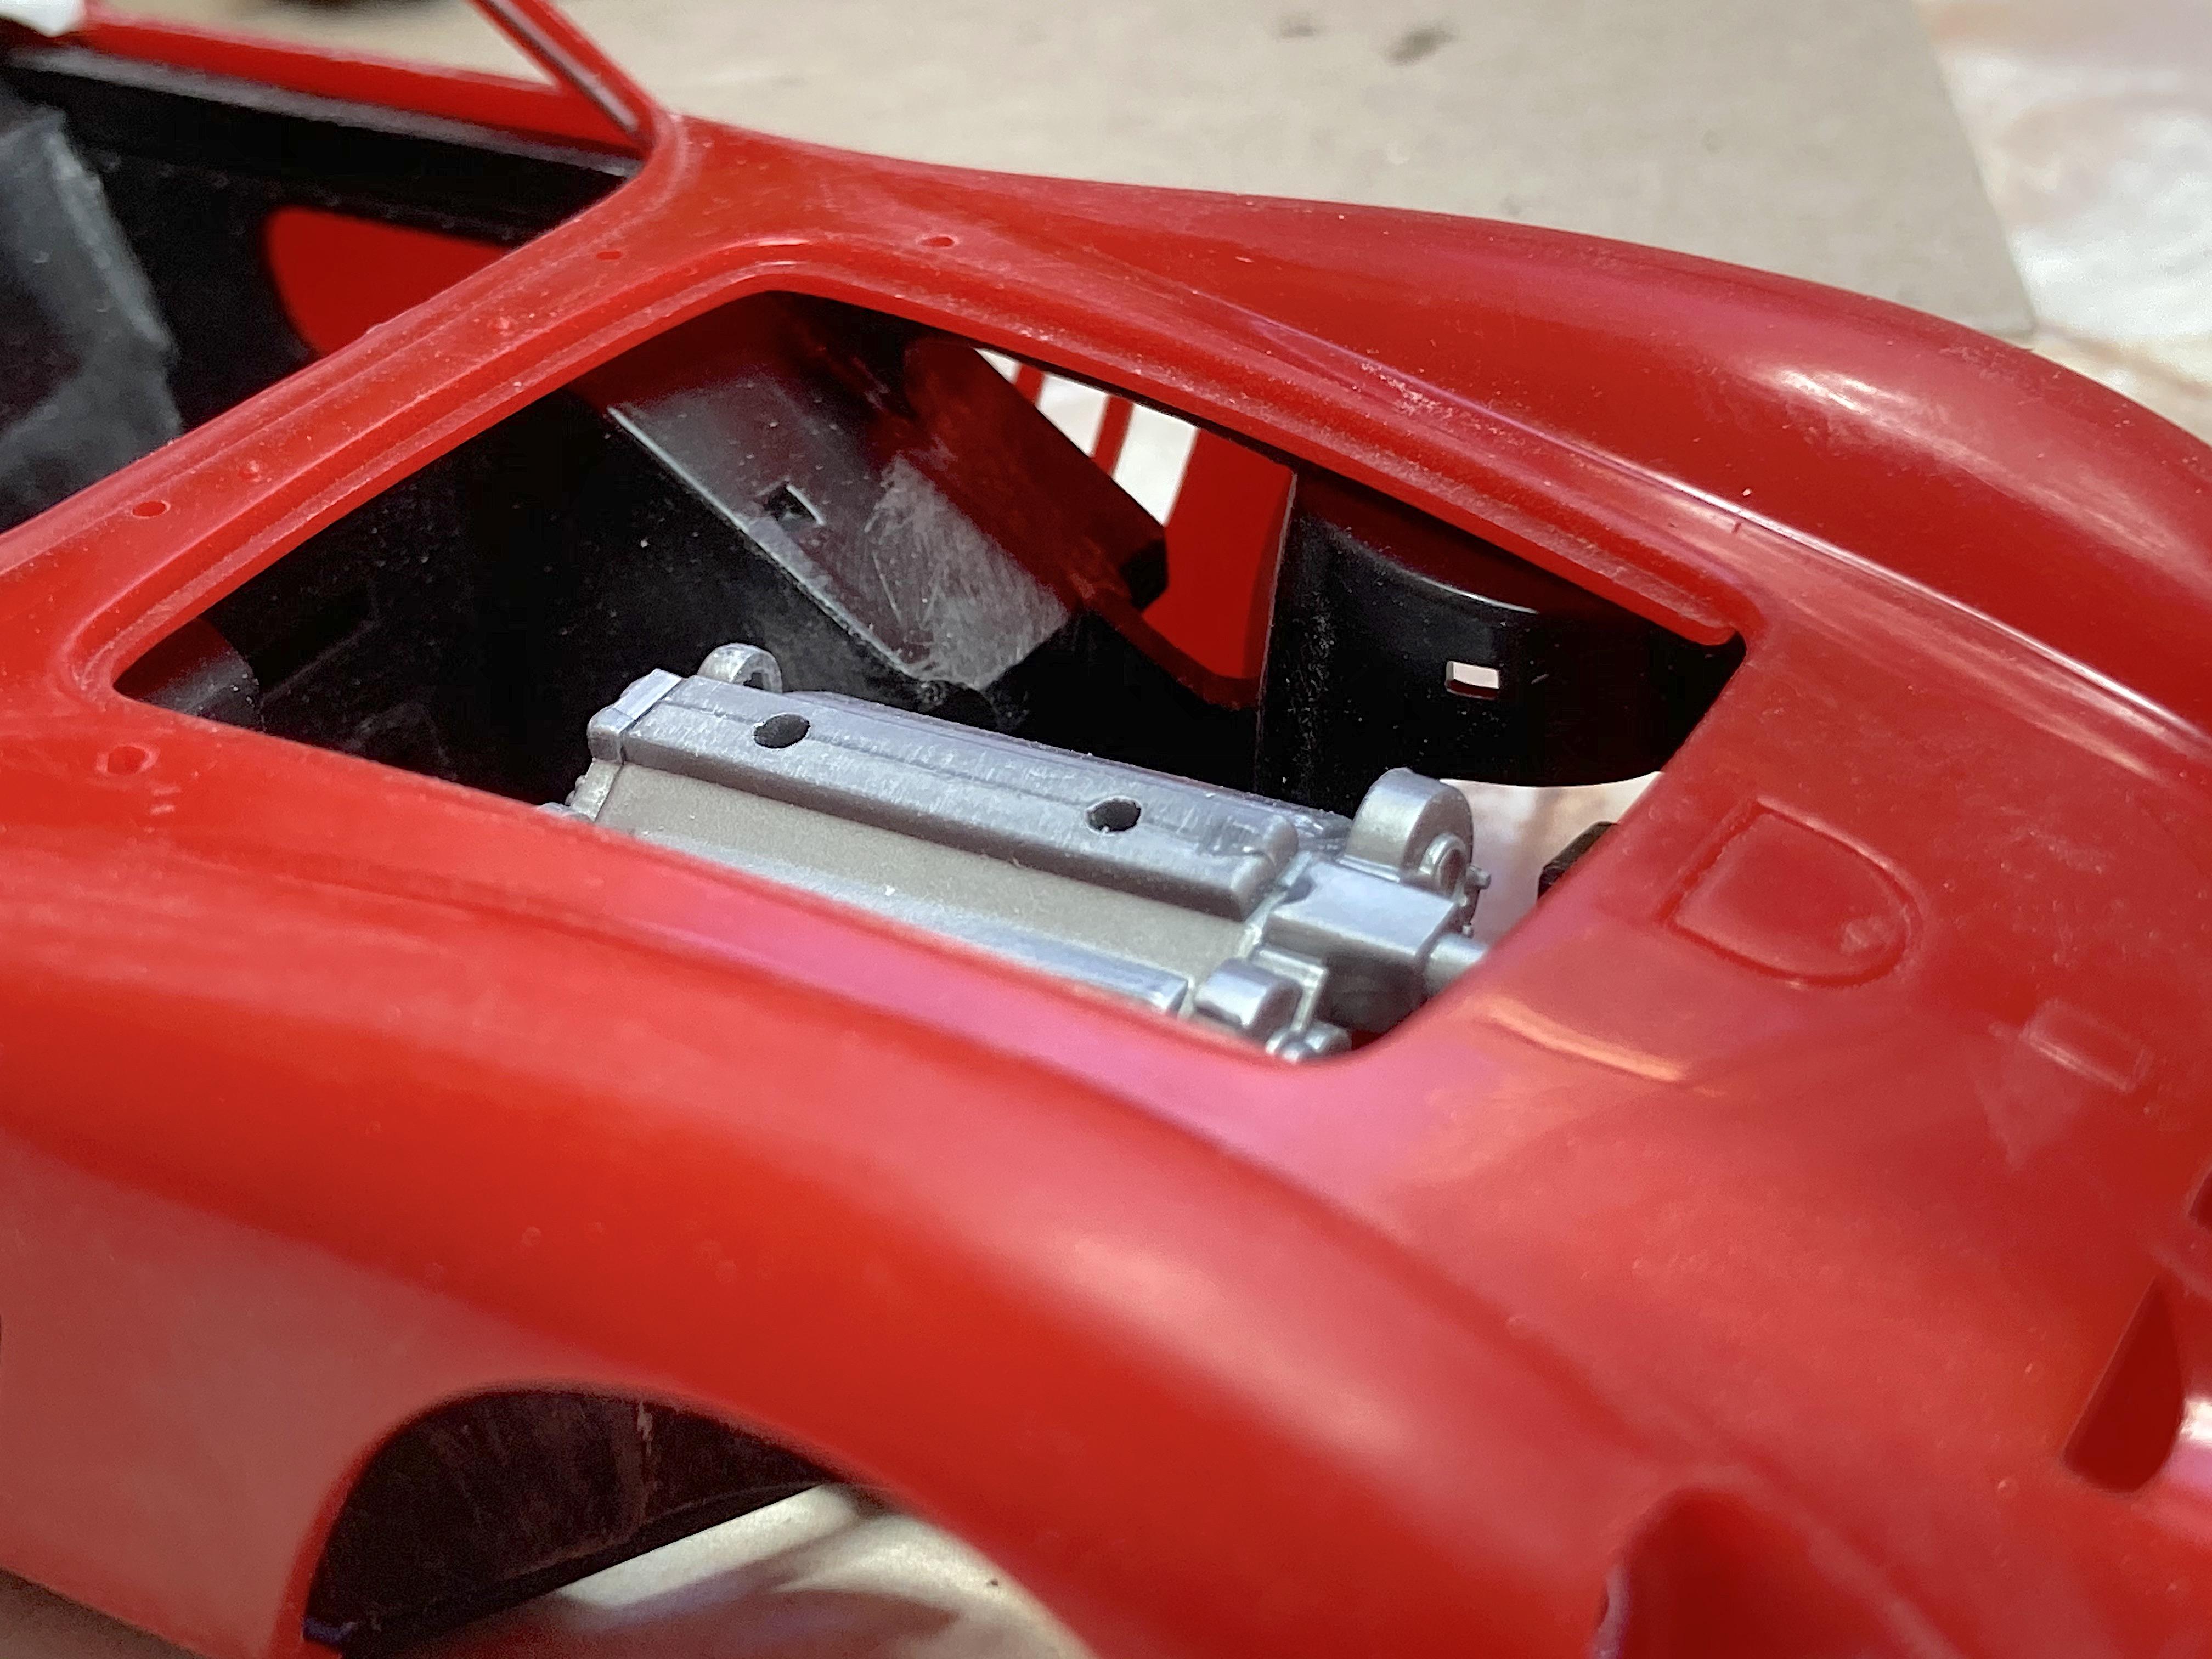
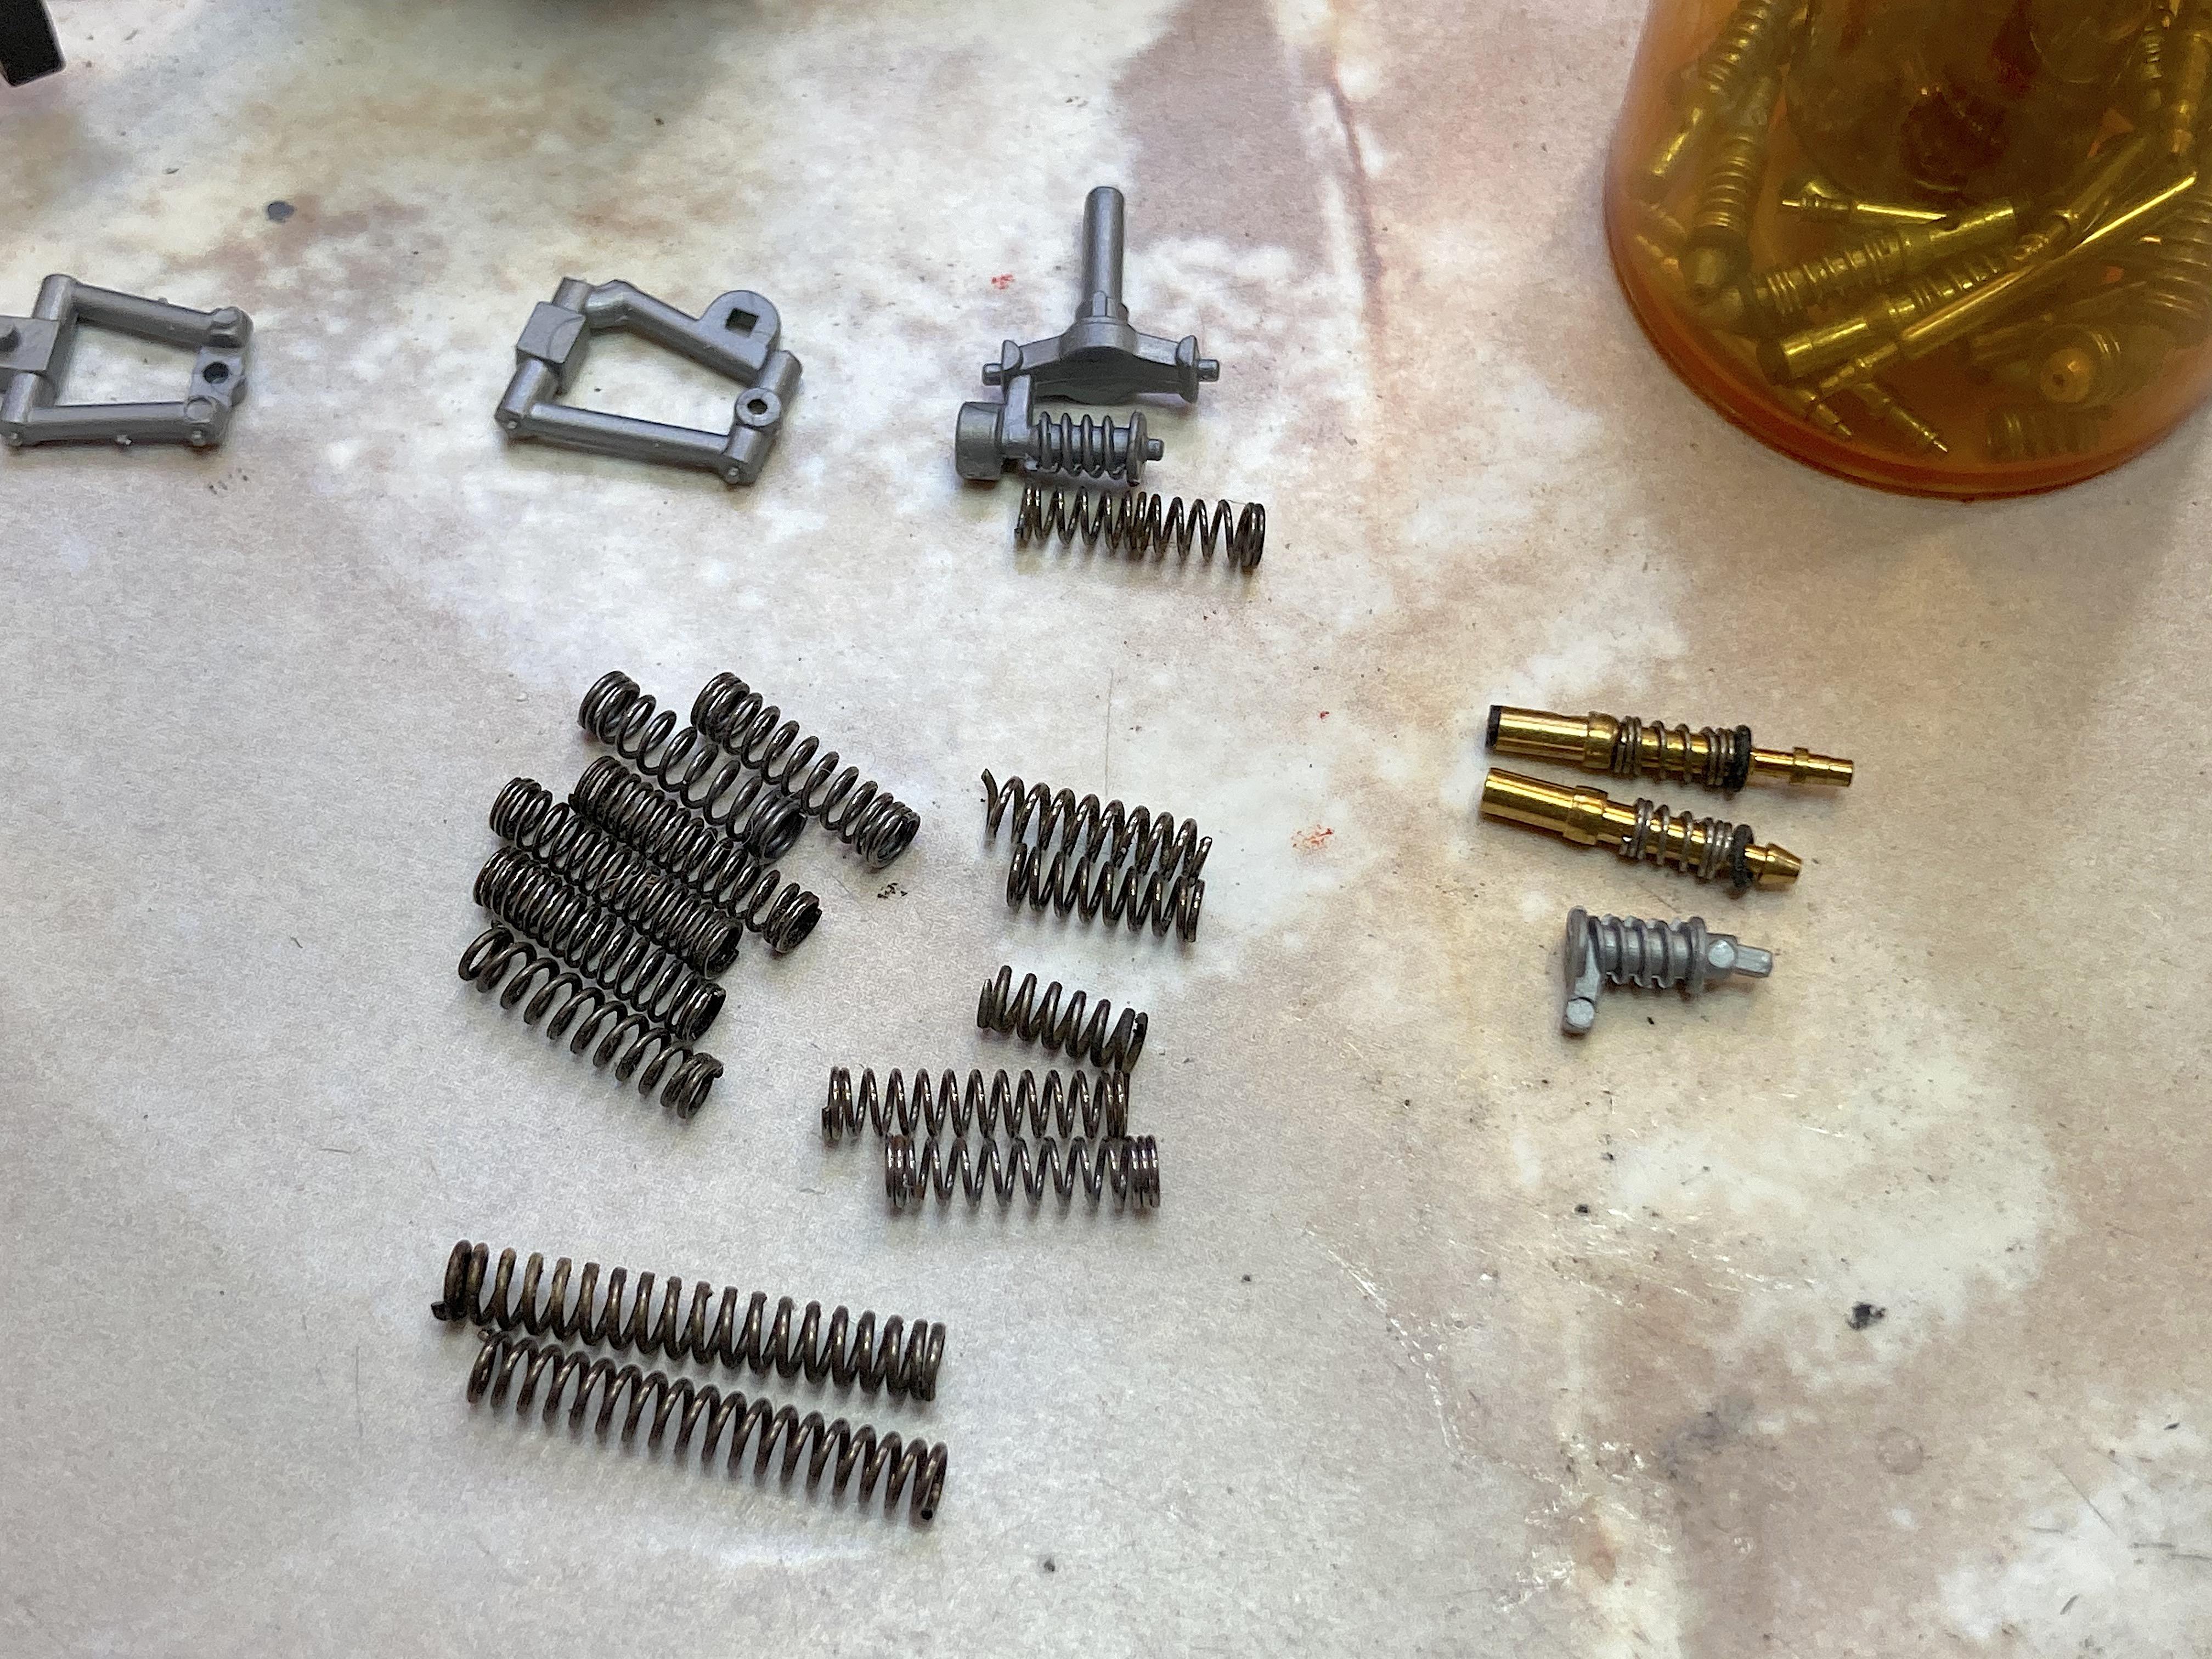
Appreciate it! Even though I don't have conclusive evidence with pictures, and the cutaway does not show it, I know there is not a solid wall between the engine and fender louvers. Used the Dremel to open up, and of course file and sanding sticks to refine. Had a resin battery to use, surprised that is missing. Pet peeve is painting springs on shocks. The cutaway shows a coil spring shock, so this is what I did. Someone on Fakebook posted a picture of their workbench, saying it was messy. Yea right, I said didn't see a problem. For these tiny coilover shocks, it took a bunch of tools, such as the Waldron punch. My spring stash, about 30 years worth of scavenging dead electronics and whatever else is mechanical. But it really sucks when a part goes flying. ? A favorite thing to scavenge springs from are cigarette lighters, the cheap ones (not Bic) that are clear colored, with adjustable flame. They make nice coilovers, in this case the short springs are switched out for longer ones. I don't think the spring in the A-arms has a shock, so that should look better as just a spring. I had glued the other vac-formed panel underneath, after cutting out the fuel filler opening. Just a little more refining the windshield frame, and some other stuff, and I should start painting! Tried to delete this duplicate, but it keeps showing up! ?
-
is new normal
-
I have that kit, and the regular flavor version too. ? Think I have that brand decal (need to look later), not a convincing look, more like a camouflage appearance. The "forged carbon fiber" is a challenging paint technique, looks good from here. The most important thing, IT'S DONE!
-
57 bug with working suspension & teardrop trailer
89AKurt replied to stitchdup's topic in WIP: Model Cars
I have that conversion body. I've also been tempted to do the working suspension too. What will you use for the torsion bars? -
just long enough
-
Something I noticed was the air ducts are just holes. Pictures and the cutaway drawing show a tube going back a distance, I guessed it would end at the chin of the body. Scavenged a transistor radio antenna. The kit hood hinge might have been okay, but I like to use wire. Will have to be careful when opening, edge does hit the nose.
-
I've rented Jeeps in Ouray CO and Moab Utah, was very impressed. Resisted temptation to get a kit, so many cool accessories to scratch-build. Fireball Motorworks has a good selection of tires, and wheels, and LED light bars, and farm jacks, and winches, and ....... When I saw these wheels on eBay, had to think about it, looked around and saw it's not readily available, then showed up just before the end of the quiet bidding war, and sent my bid 20 seconds before it ended. Already had the kit and photo-etch parts, so someday I'll open that kit.
-
just enough to
-
Airtrax 1/24 Ferrari 330 GTC - The Beauty and the Beast
89AKurt replied to Italianhorses's topic in WIP: Model Cars
Looks like a when #e77 freezes over moment! Glad to see you on this again. I noticed there are louvers for the hood, which seem to be optional, you have any idea what that is about? -
Porsche Outlaws & Hot Rods
89AKurt replied to afx's topic in General Automotive Talk (Trucks and Cars)
-
The paper disk is something I'll have to try! My favorite tool is a hot-wire, intended for cutting foam insulation for train layouts. For cutting straight lines, I go against a steel ruler. I do a sawing motion. There are times keeping the cut edges looks like welds. Has it's limitations, but that's when I determine if keeping the offcut is important.
-
mitigation training courses
-
Fuji water, skipping
-
On other planets.
-
Kitbashing,,,
89AKurt replied to thomascoffey1959@gmail.com's topic in General Automotive Talk (Trucks and Cars)
If you expected any help with this affliction, you are SOL. It can get really bad. For me, it's so bad that I can't do a Box Stock without doing something to fix the kit.
-
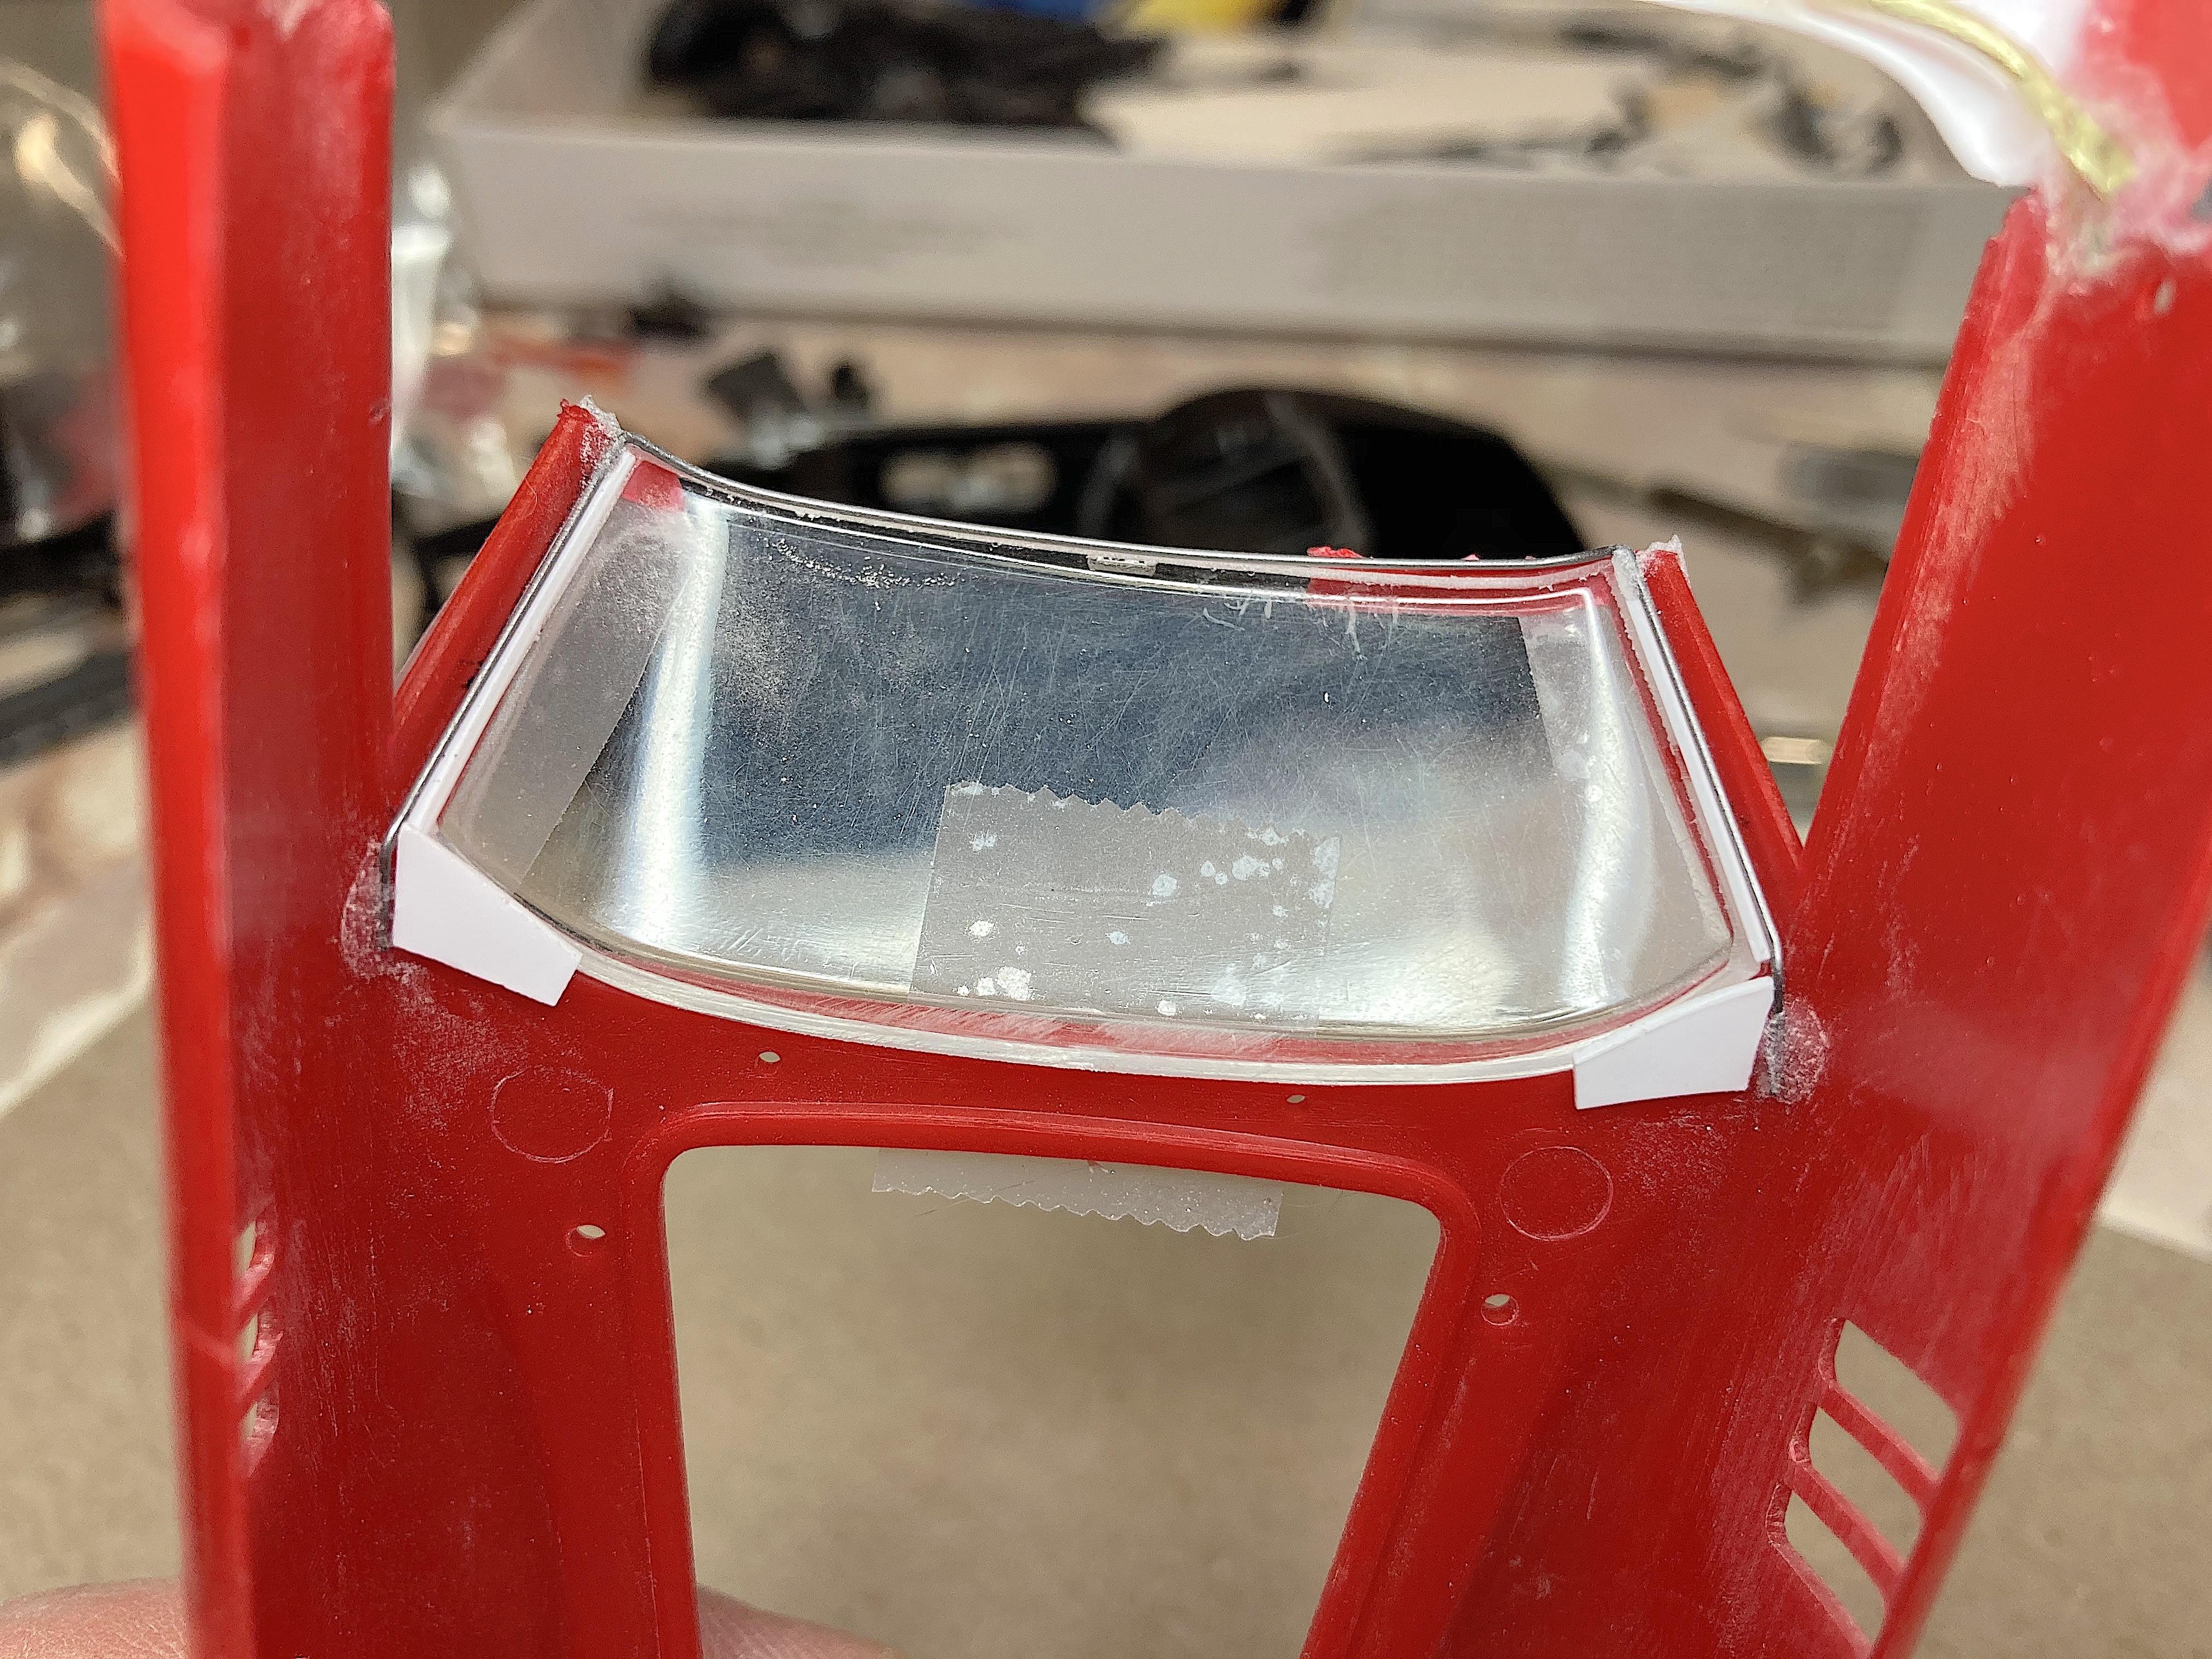
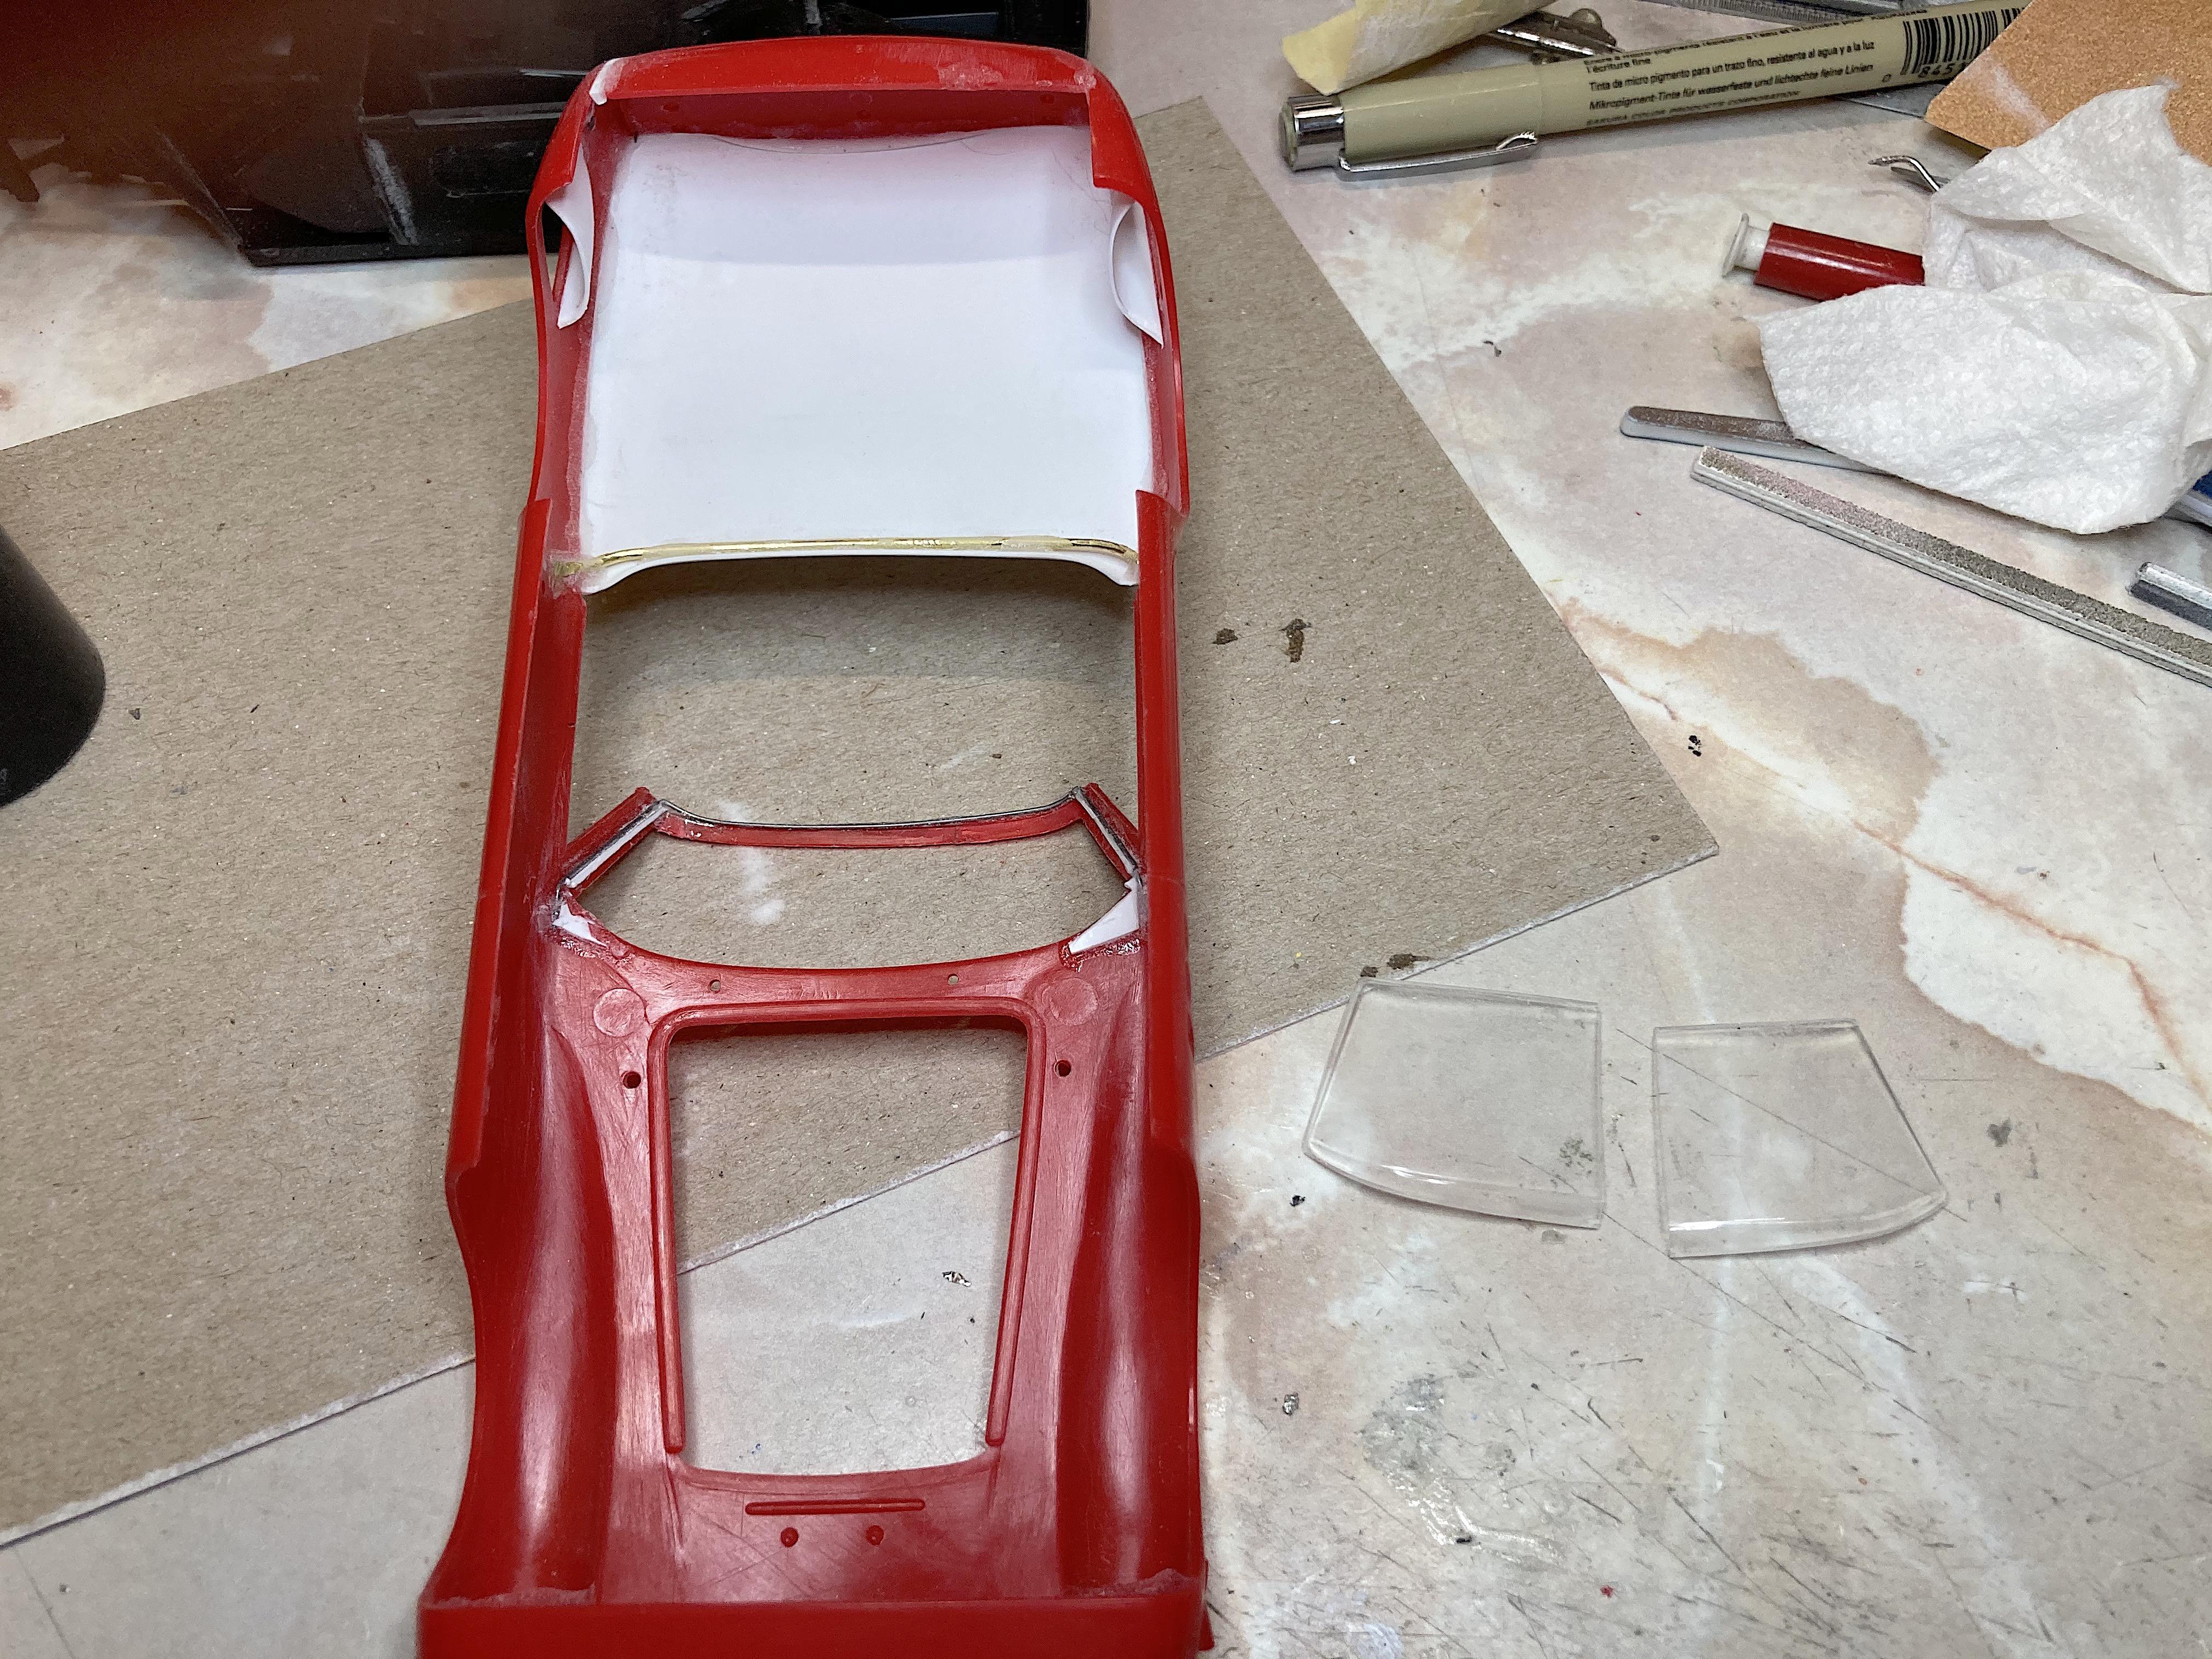
Interesting discussion. Not convincing me to change what works for me. Looked at older projects that I've used this technique on, no evidence. Maybe it's because I use grass-fed GMO-free "sustainable" 100% baking soda from the health food store. ? I will let this one sit in water for awhile, just to make sure. To be clear, I apply the glue with a dental pick, which bonds the parts first, then sprinkle on the baking soda. Can't imagine mixing other stuff together and gooping it on. Tackled the screwed up windshield header. Started with bending a K&S #5499 .020" steel wire to fit around the "glass". Tacked in styrene on the A-pillars that fit against the "glass", and tabs at the base. Then removed the "glass" and really glued on the styrene, then put the "glass" back in, wire glued at the ends and little drops at the upper corners, removed "glass" again. Applied Bare Metal Foil along the top of the "glass", put back in. Tacked in the broken part and let it set before continuing. Clamped with the cute Hobby Lobby clothes pins, then really glued the wire and plastic header. Managed to get the "glass" out intact, but when I was wiping off the residue from the BMF, it snapped. ????️ Time for bed...... I didn't like the distortion of the thick "glass" anyway, so this is Murphy's Law #89 that veered me into using thin and better plastic for the "glass". I'll do what was done on my VW Beetle: I'm also debating on the rear fender vents. The pictures of the real car appear to be separate panels, but this restoration shows a blending.