Steamboat
-
Posts
826 -
Joined
-
Last visited
Content Type
Profiles
Forums
Events
Gallery
Everything posted by Steamboat
-
Looks great. Very nice attention to detail.
-
Looks good. When I started this project 10 years ago I would have been thrilled to find those headers. 3d printing has really opened a new door for me.
-
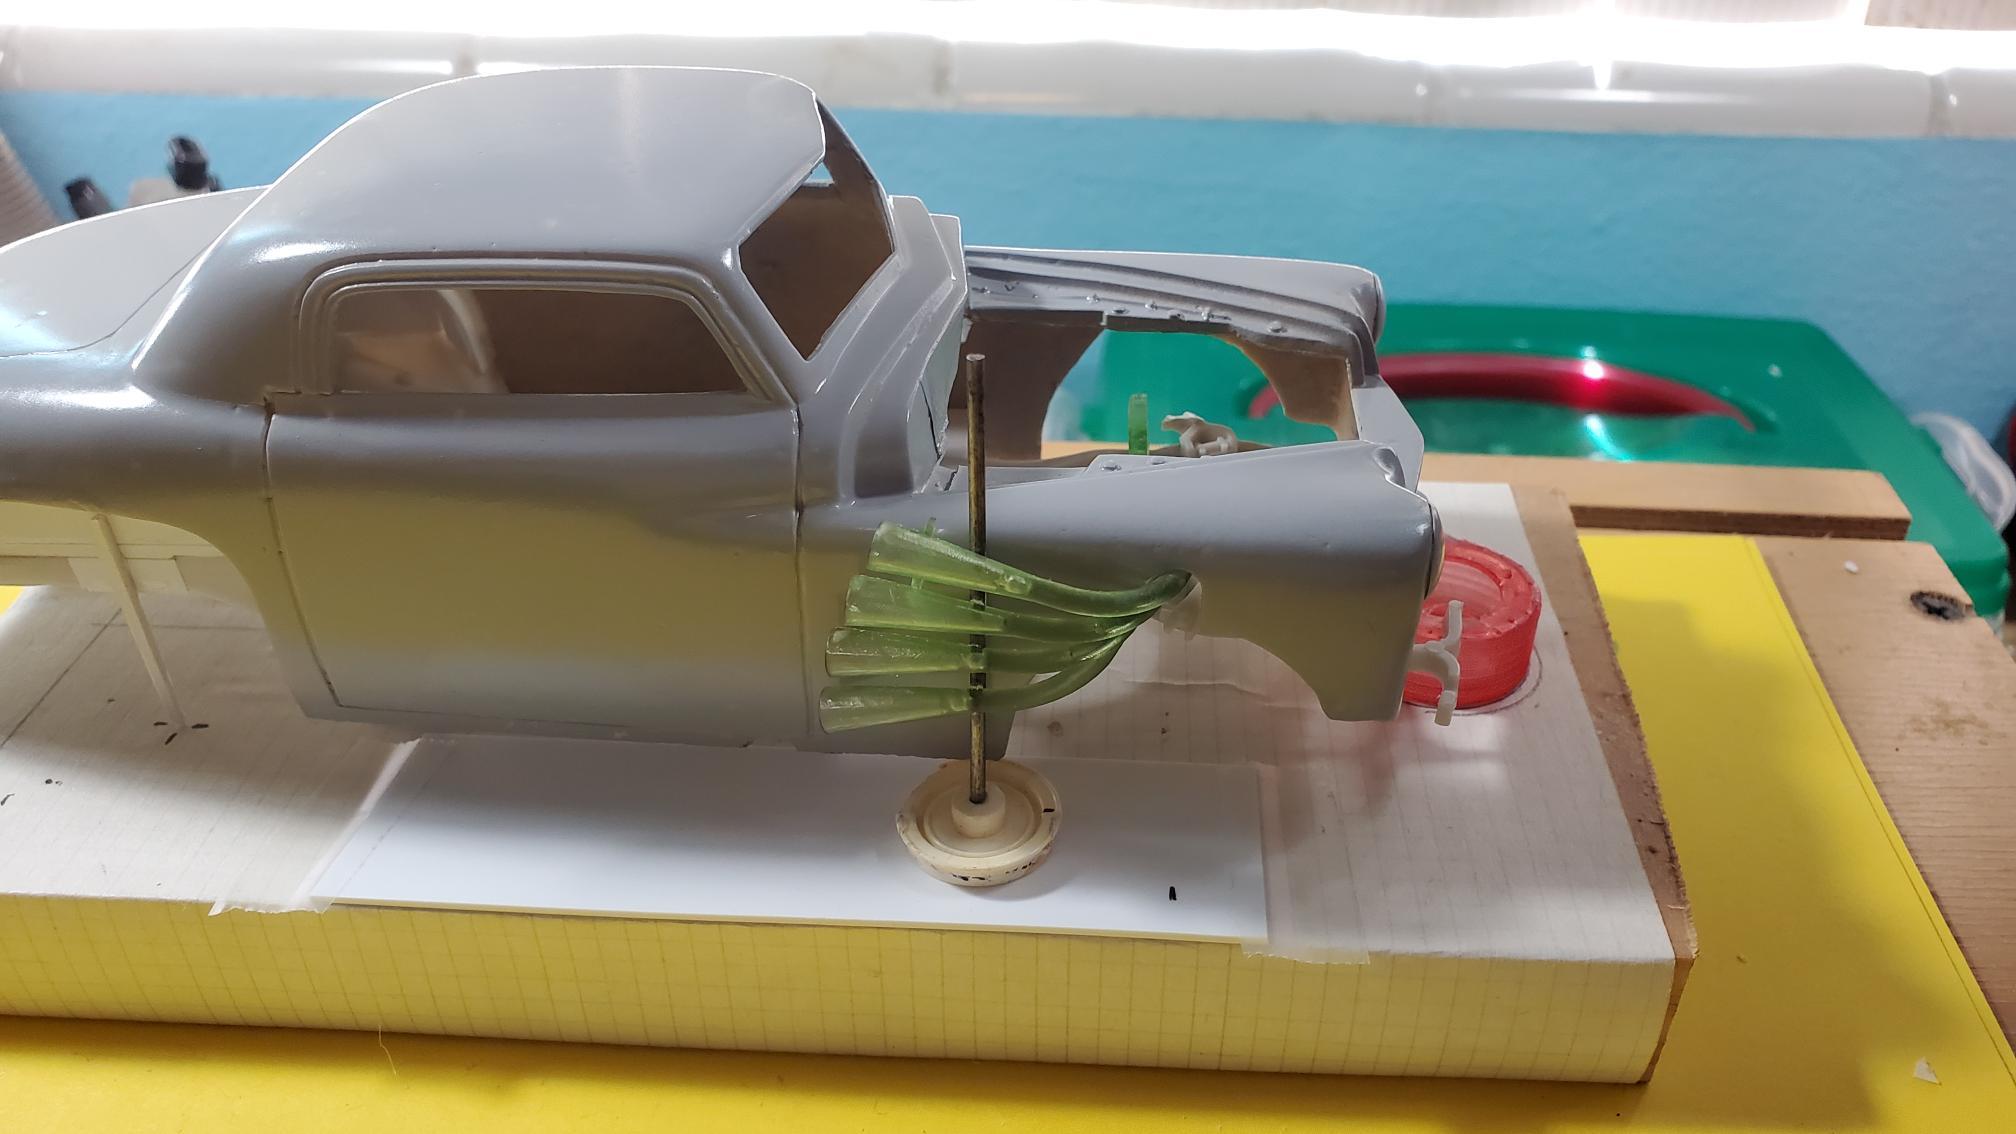
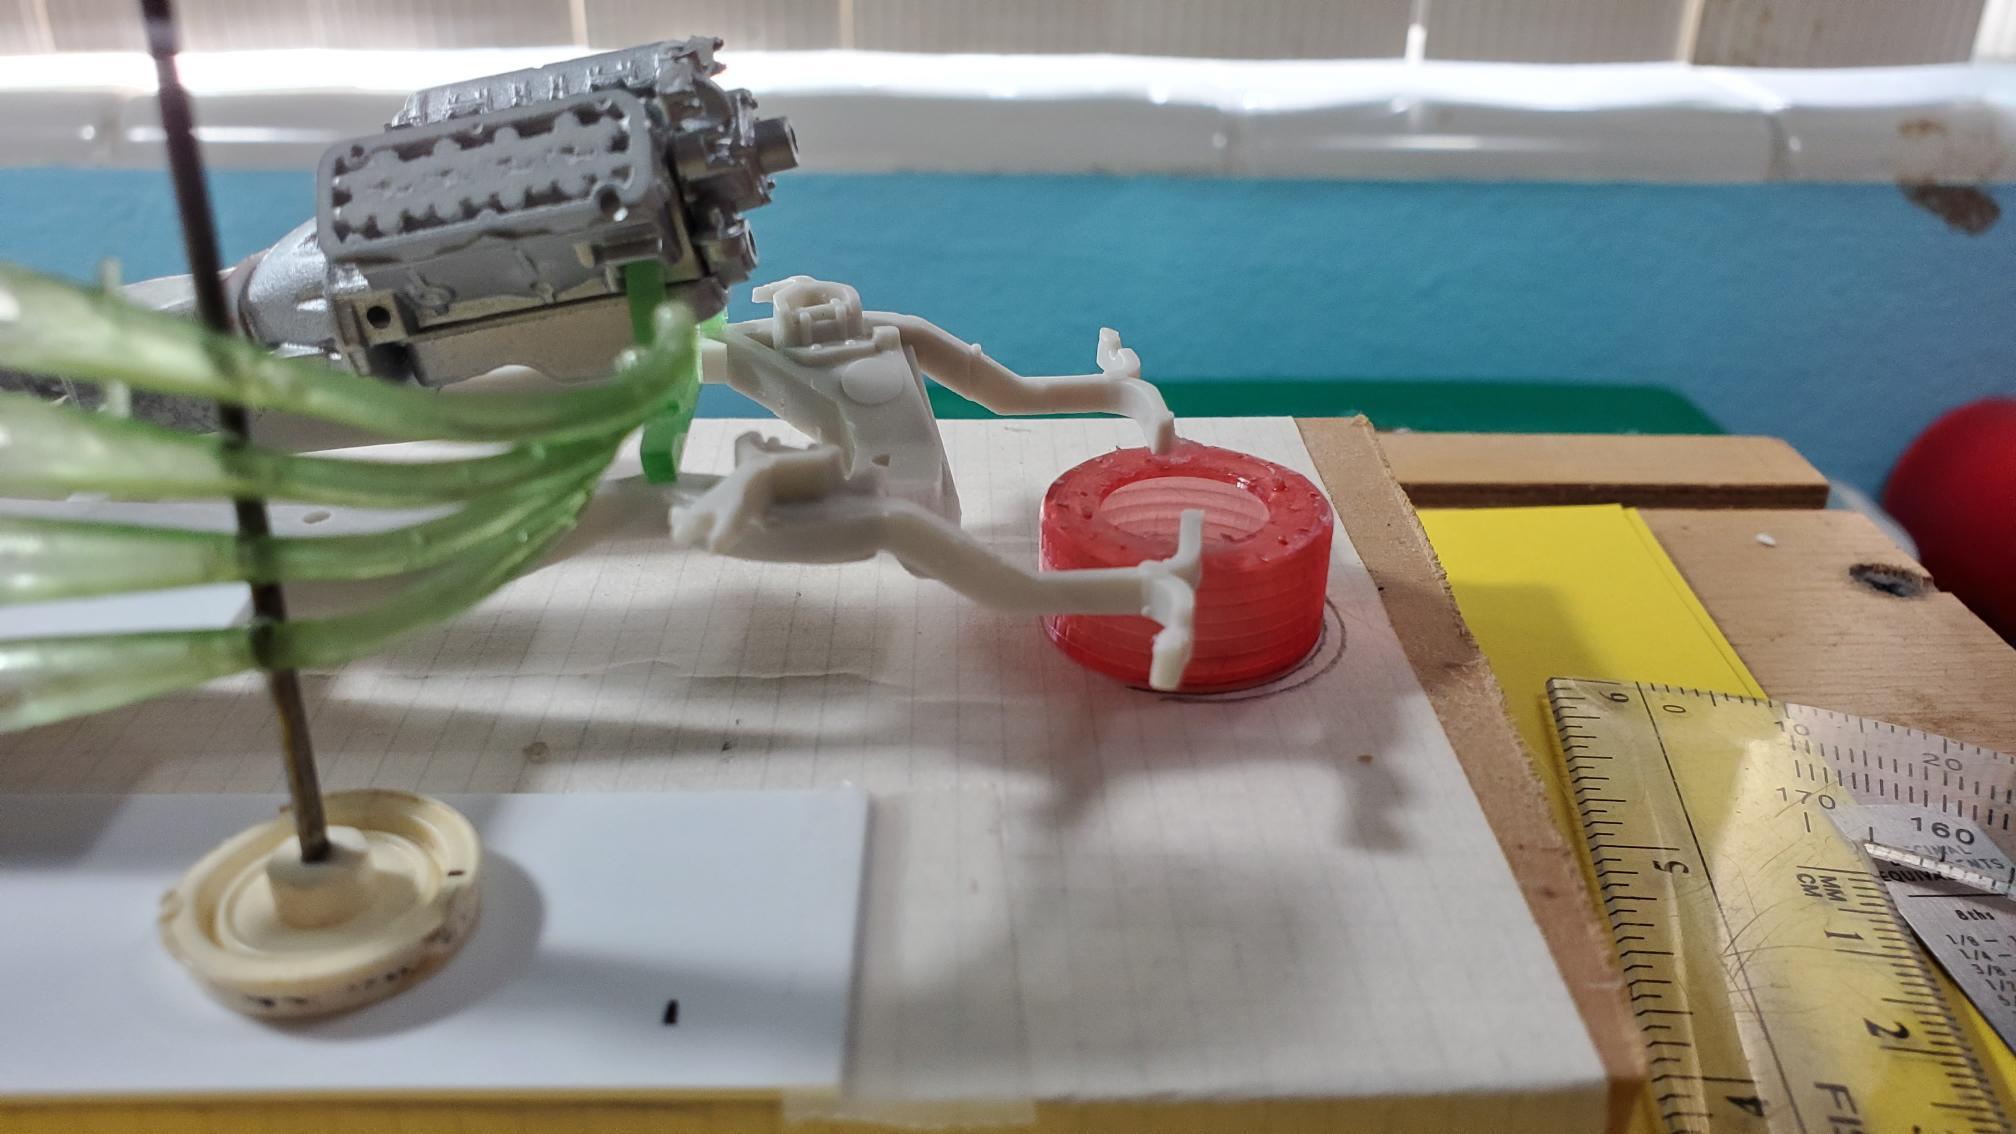
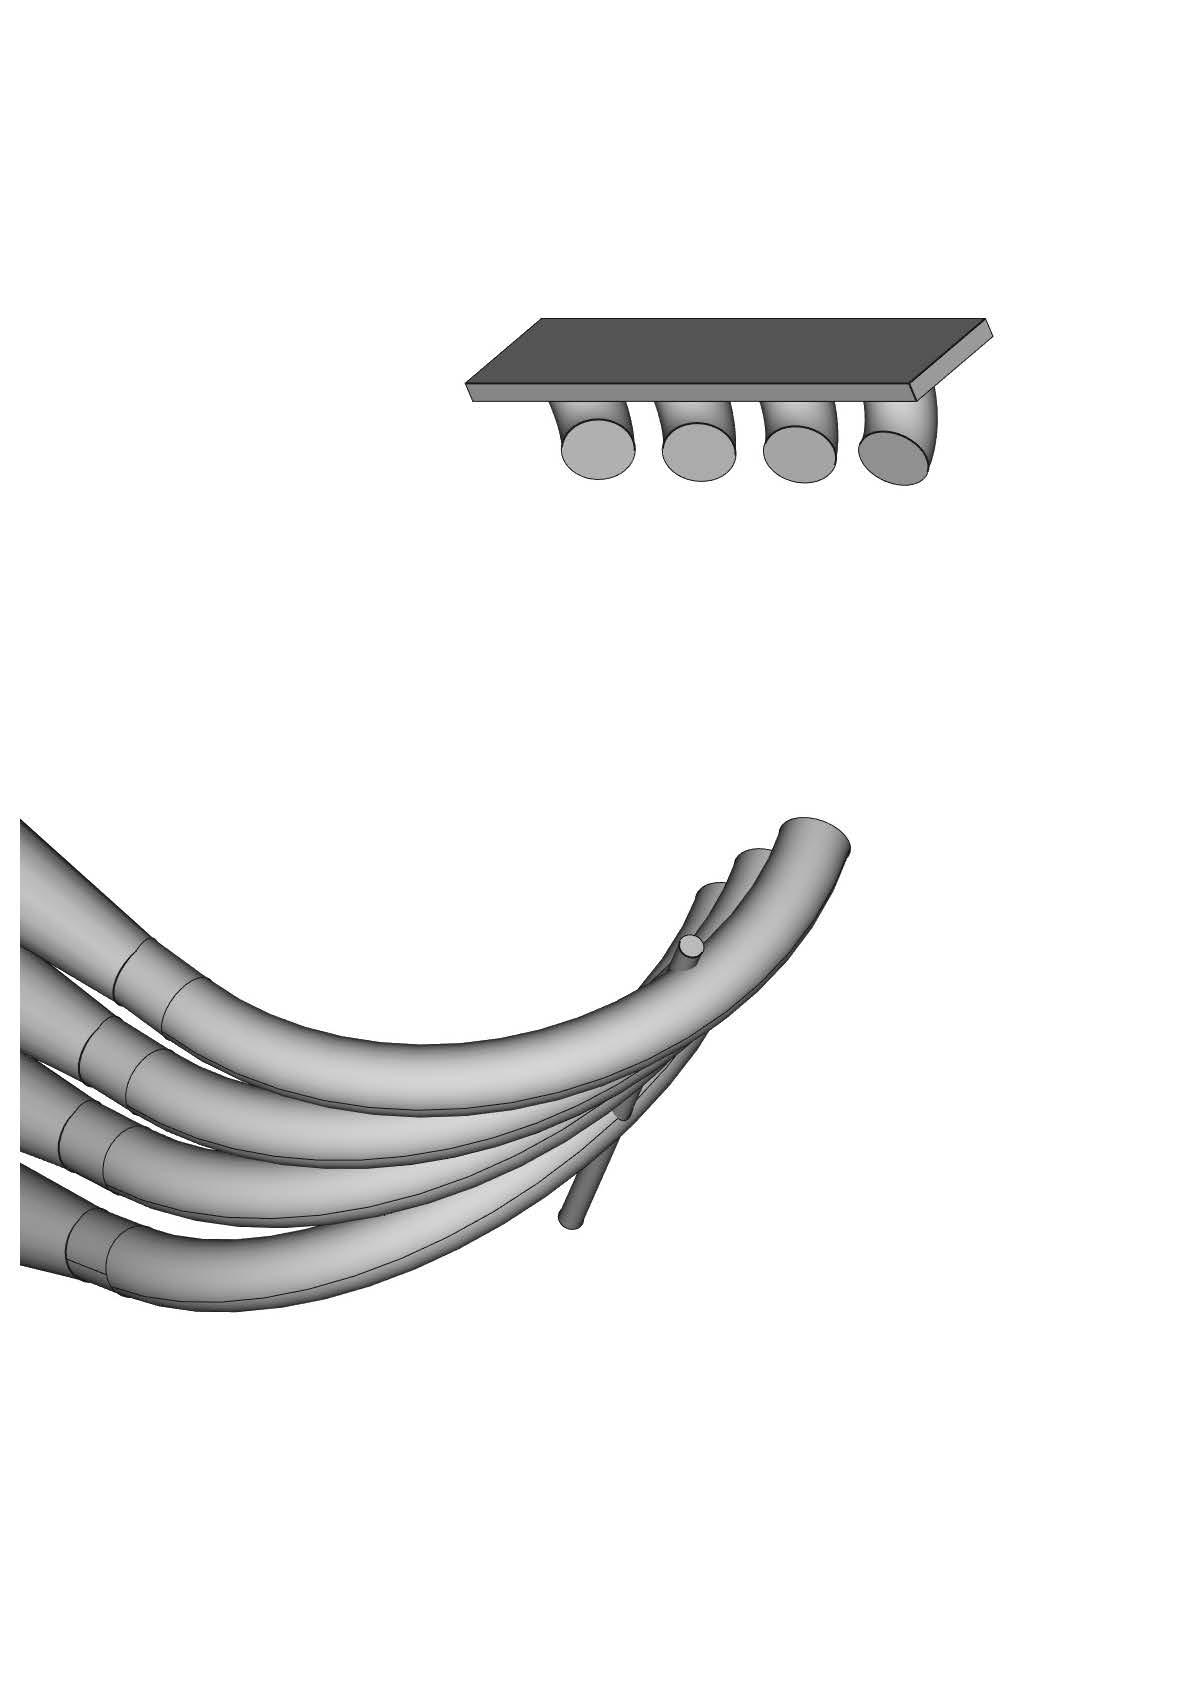
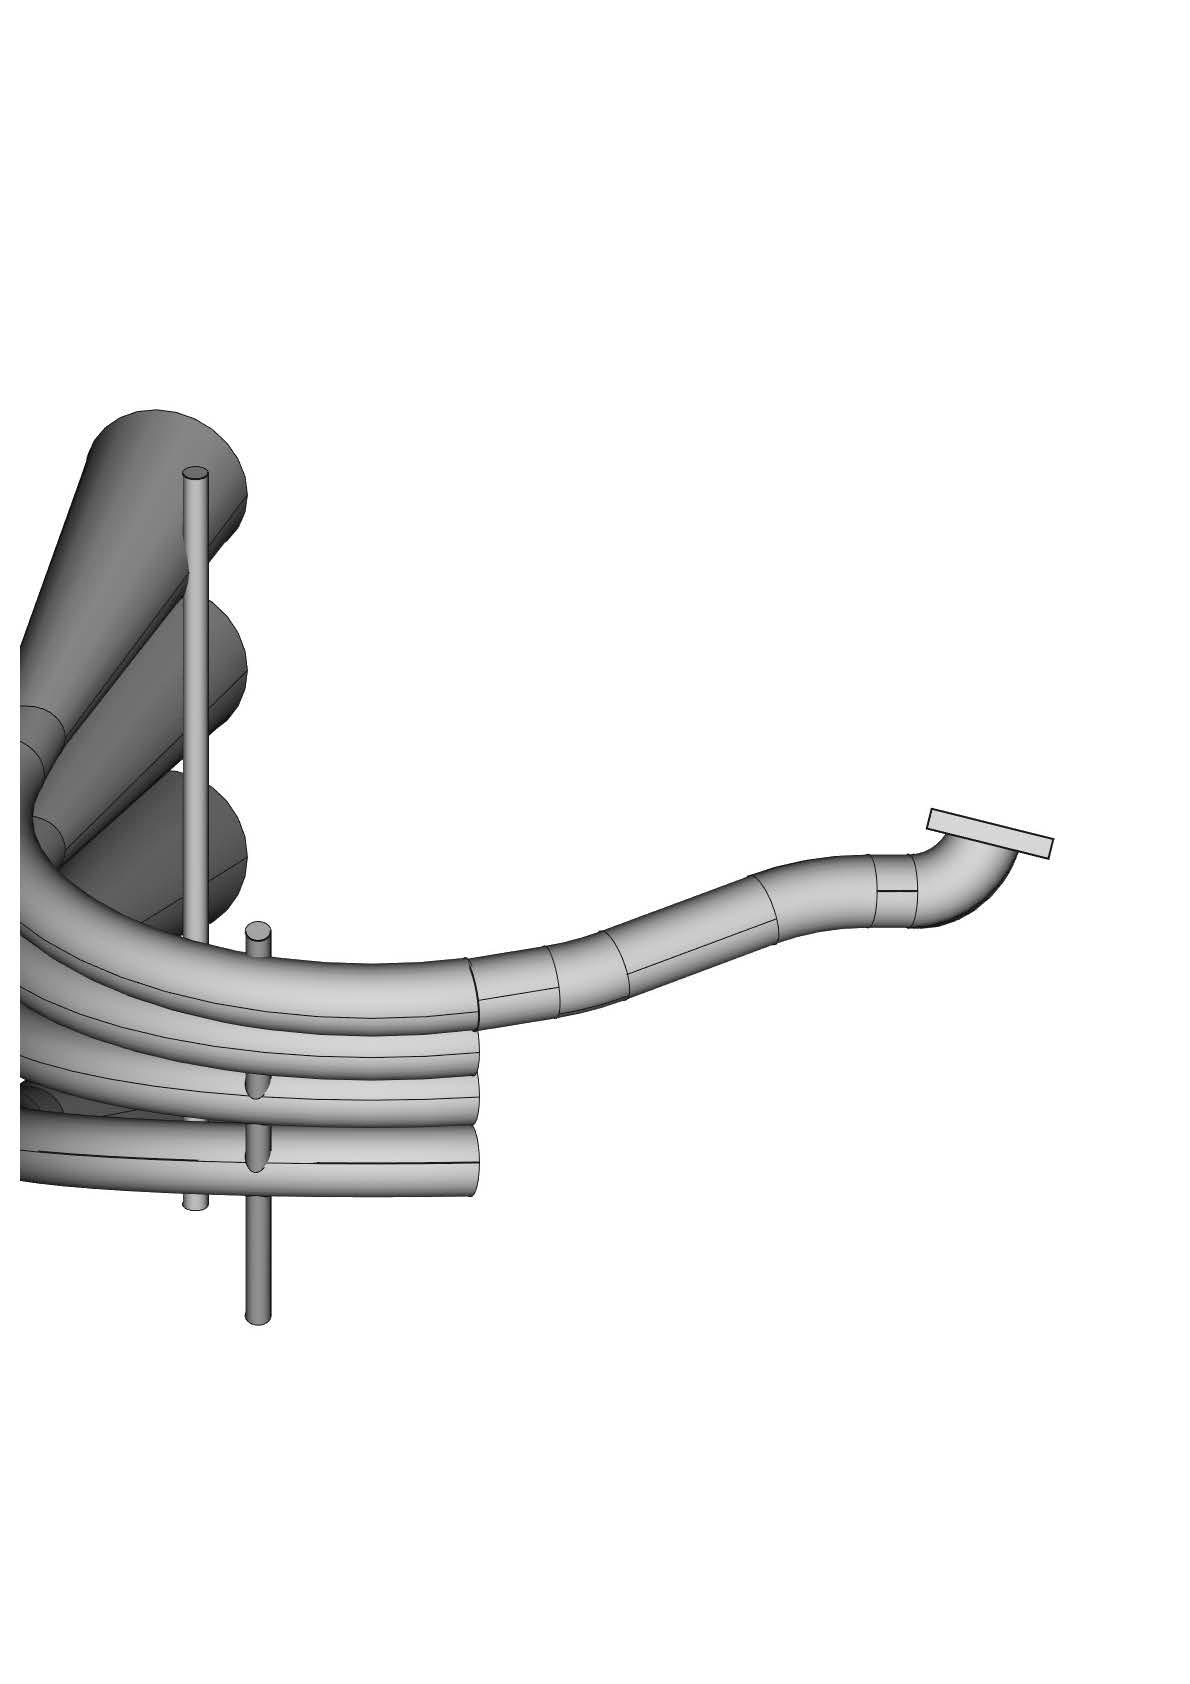
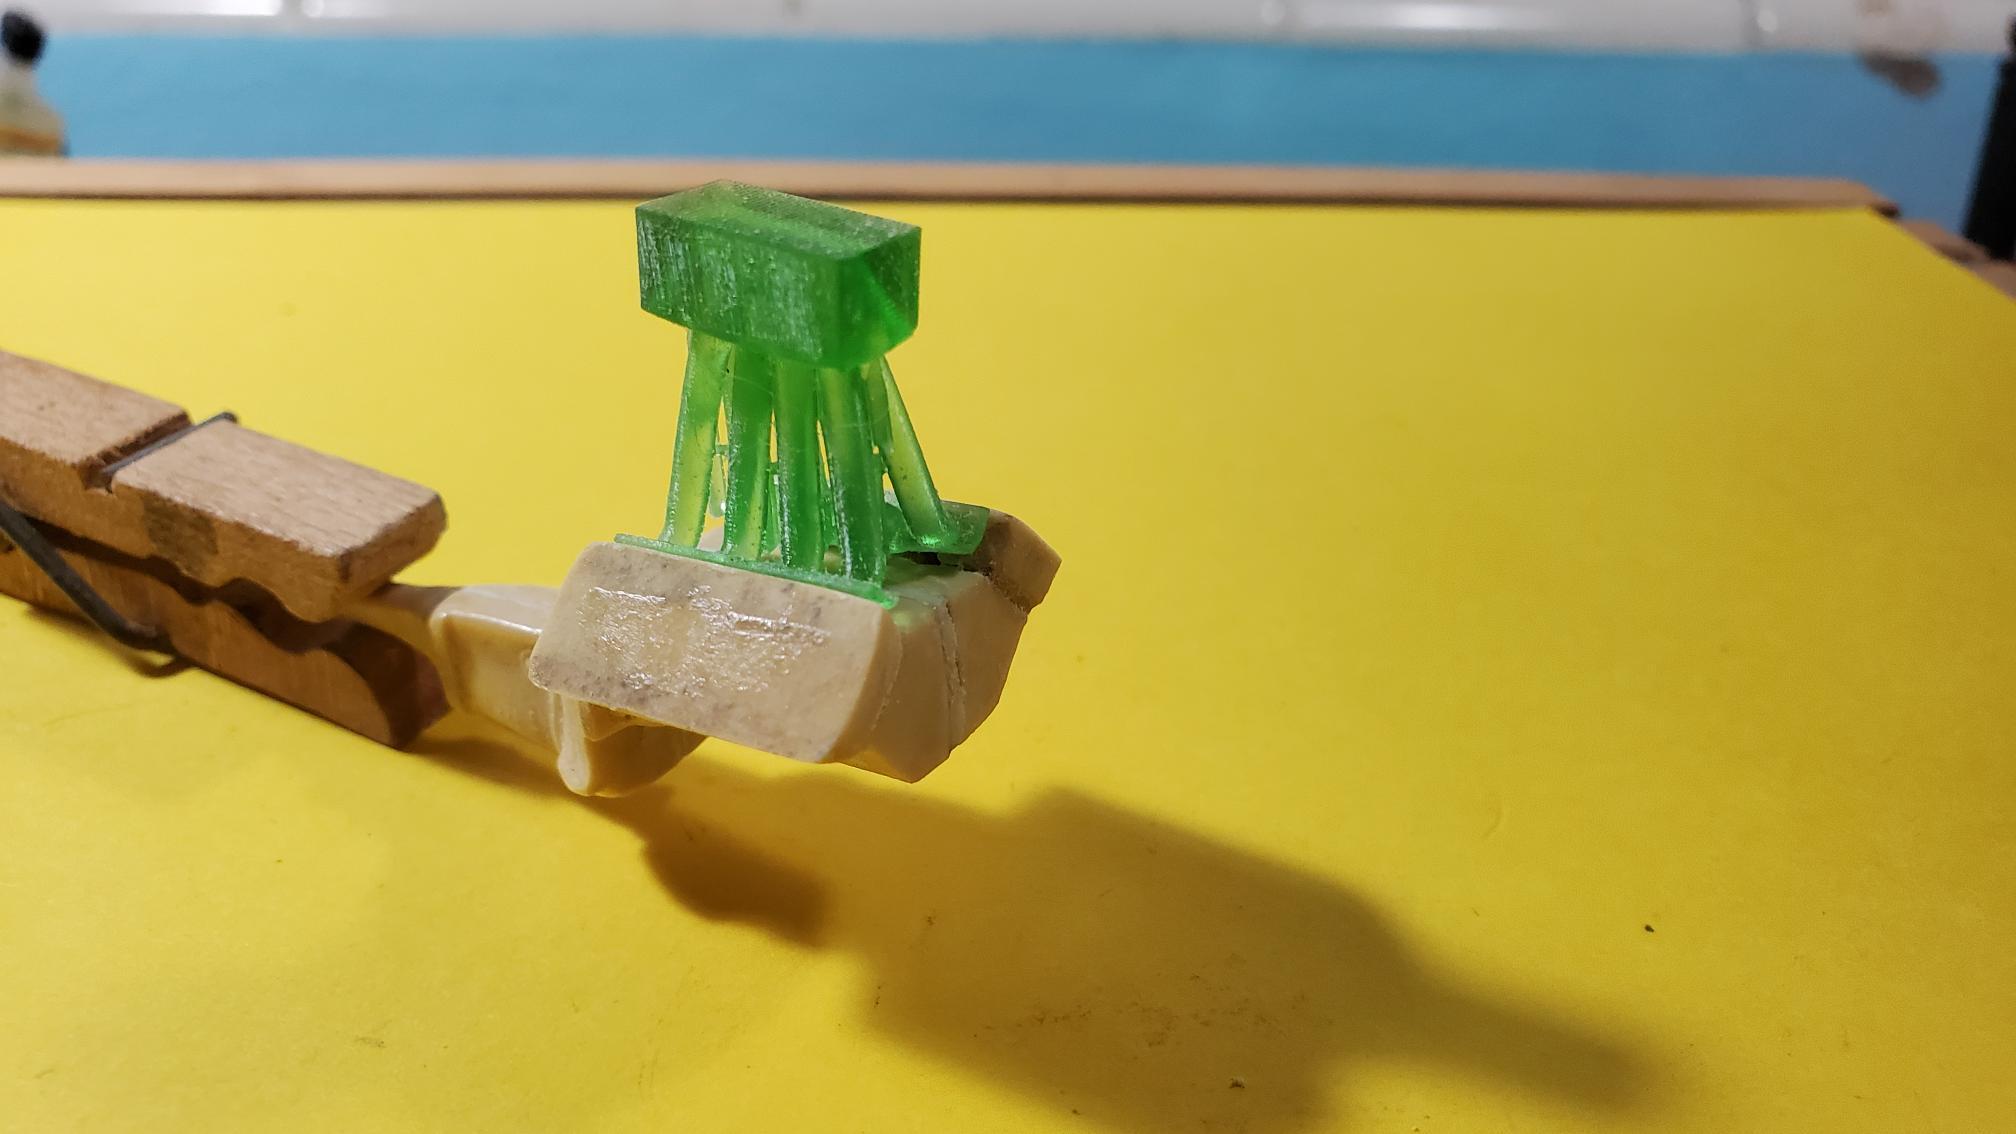
Headers - The iconic headers at first are daunting, but analyzing them piece by piece they are not so bad. Looking at the photos, I realized that all of the tubes appear to have the same curvature. With a little experimentation I found a pretty close radius at 9" and the trumpet length of 15". So I drew them up in CAD and printed a set for the passenger side. I made a jig for them as shown and mocked up the fit with the body and chassis. Then I removed the body and replaced the chassis in the same position, allowing me to measure the relative position of the engine and headers. Going back into CAD, I was able to position the header flange in relation to the tubes. Then it was just a "simple" LOL matter of connecting the flange to the outlet pipe by building a tube in 3d. Not simple at all, it took about 2 hours to draw the first tube, but now I've got a process and the rest should be pretty straightforward. This is the #2 tube as drawn. I just printed the flange with the #2 tube. I'll test fit it, make corrections and then try it with #2 and #4.

-
Nice and shiny! Did you use lacquer or enamel?
-
Not Liberty next, but definitely another VGG car. '72 Chevelles are hard to come by, and I'm already doing another one for a "cars I've owned" collection. Monte Borrow would be fun, or maybe Vanishing Paint or Betty White. So many to choose from.
-
Awesome job. The interior photos are amazing. How were you able to get them with the car assembled?
-
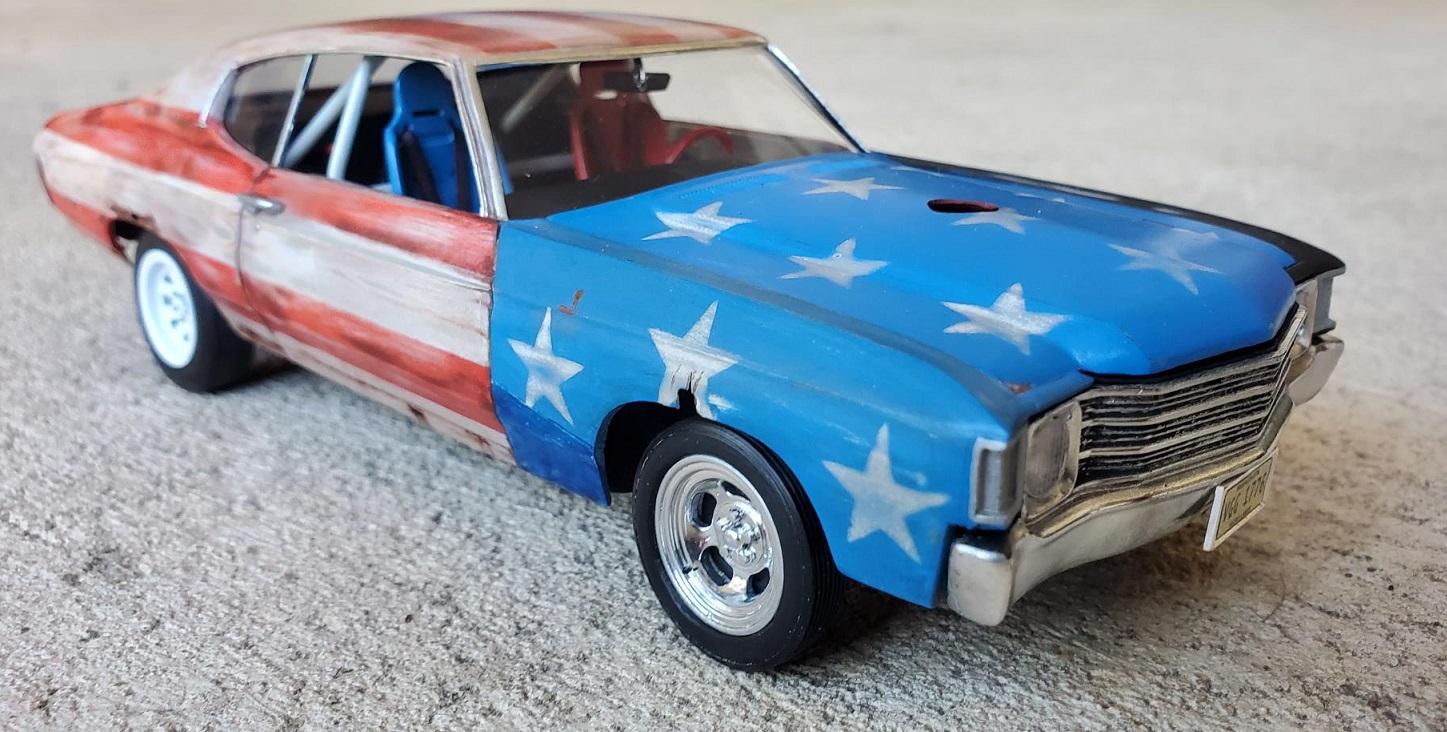
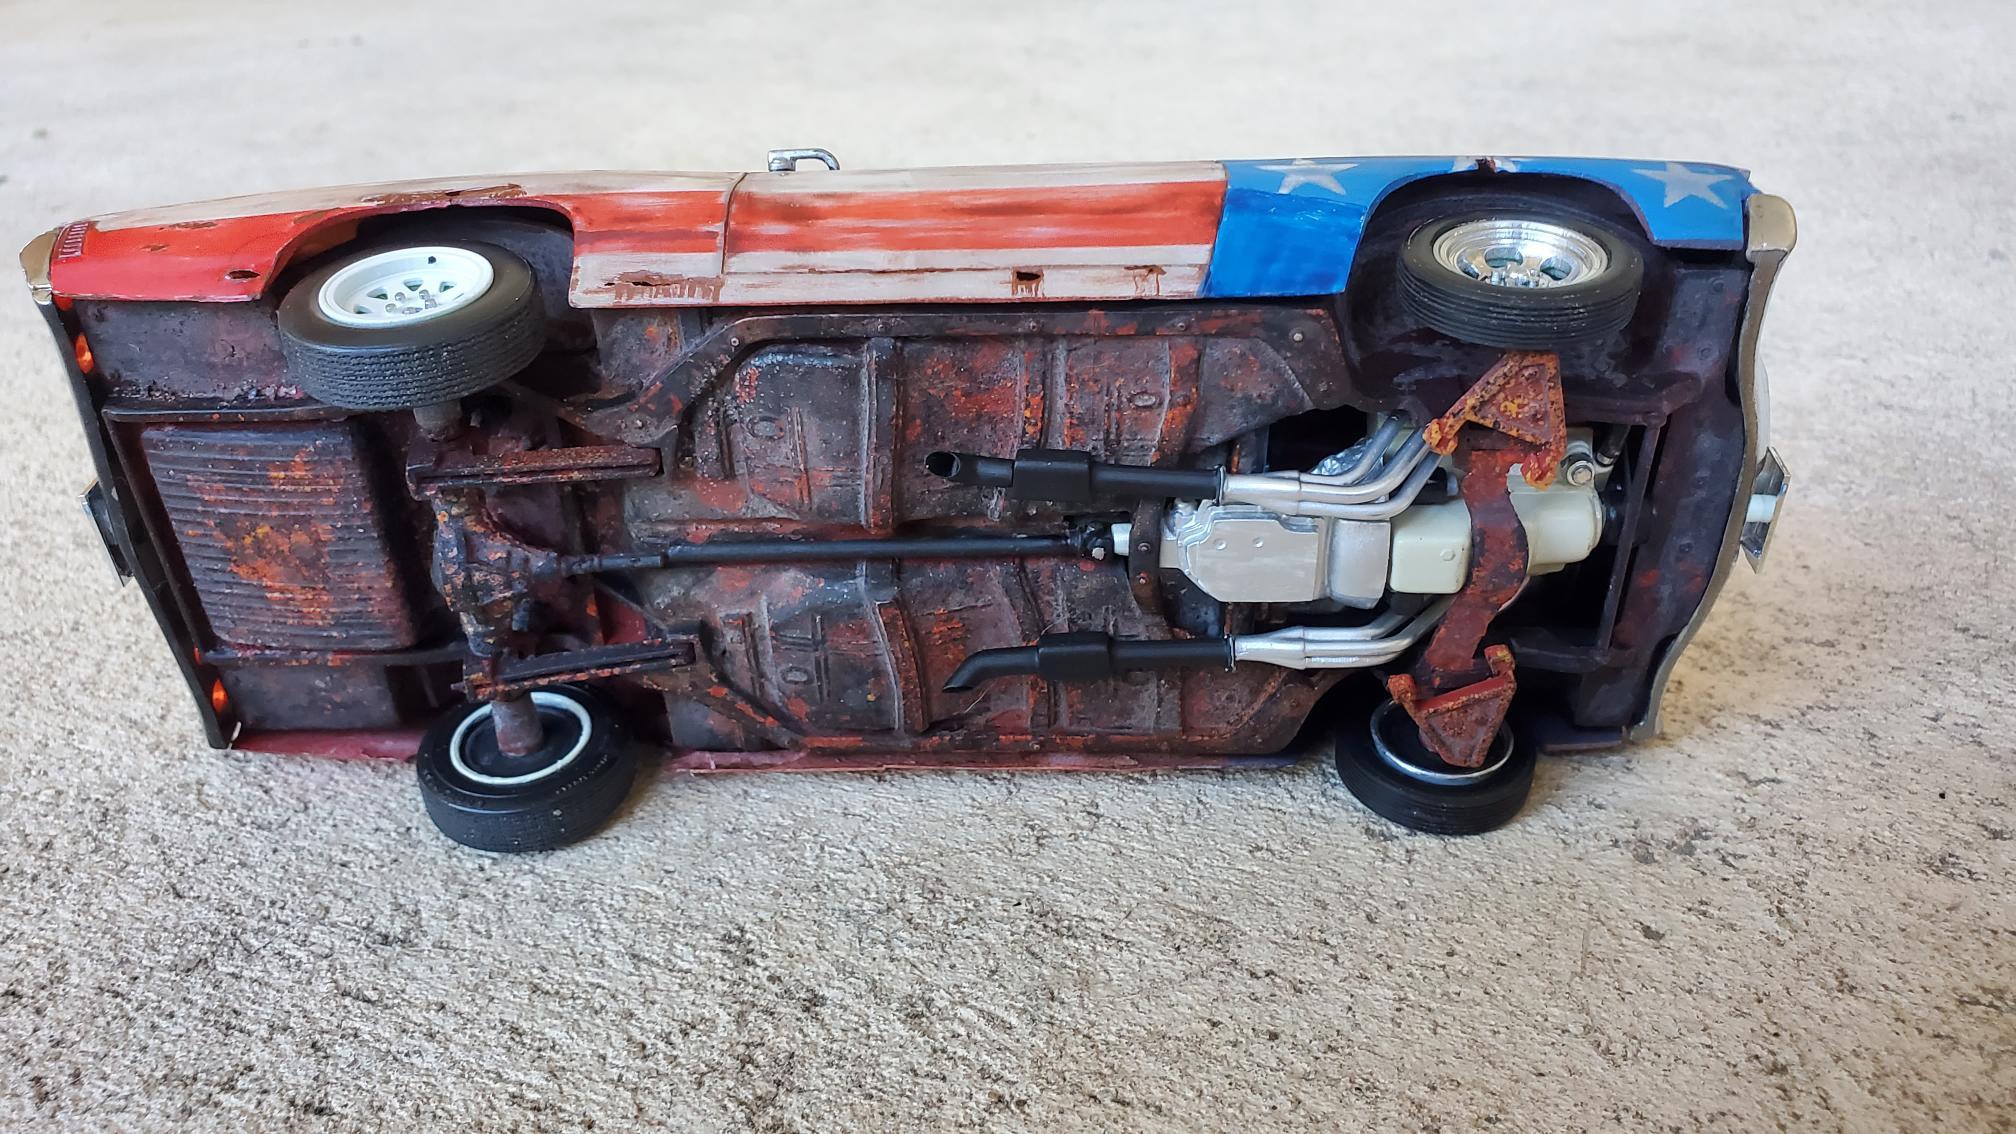
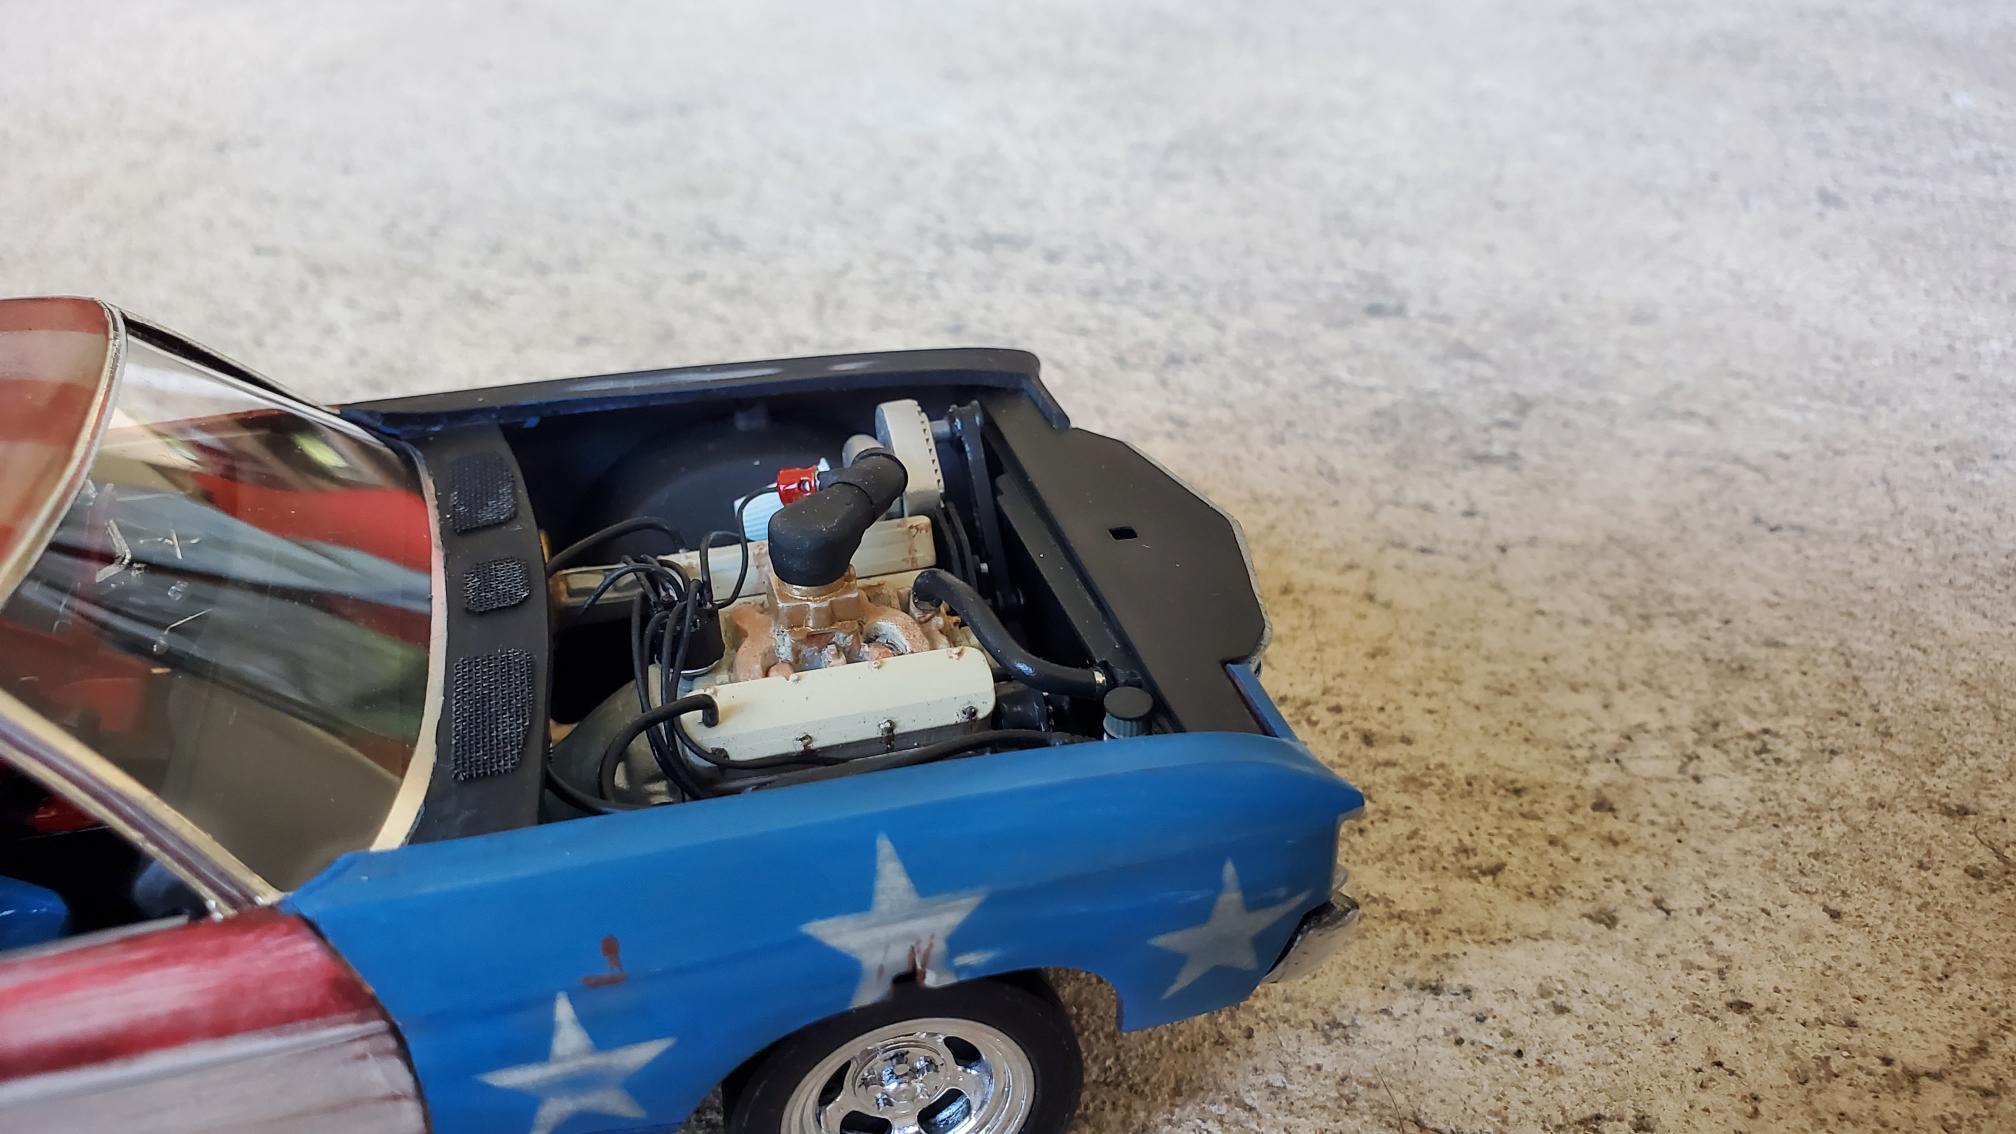
This is a model of the Vice Grip Garage Independence Chevelle from YouTube. If you are not familiar with the channel, check it out, it very cool. The car was rescued from the dead and turned into a high horsepower burnout car. The color scheme was on the car when he bought it, and he tried to preserve it as much as he could. I started with an AMT '72 Chevelle. Most of the engine is either resin or 3d printed. The seats, steering wheel, interior door skins, shifter, e-brake mechanism, and wheels are also 3d printed. Paint is mostly craft paint, weathered with pastel chalks. Enjoy!
-
I just noticed those huge ejection marks on the front crossmember. It's amazing what a photo will show that you don't notice while doing the build!
-
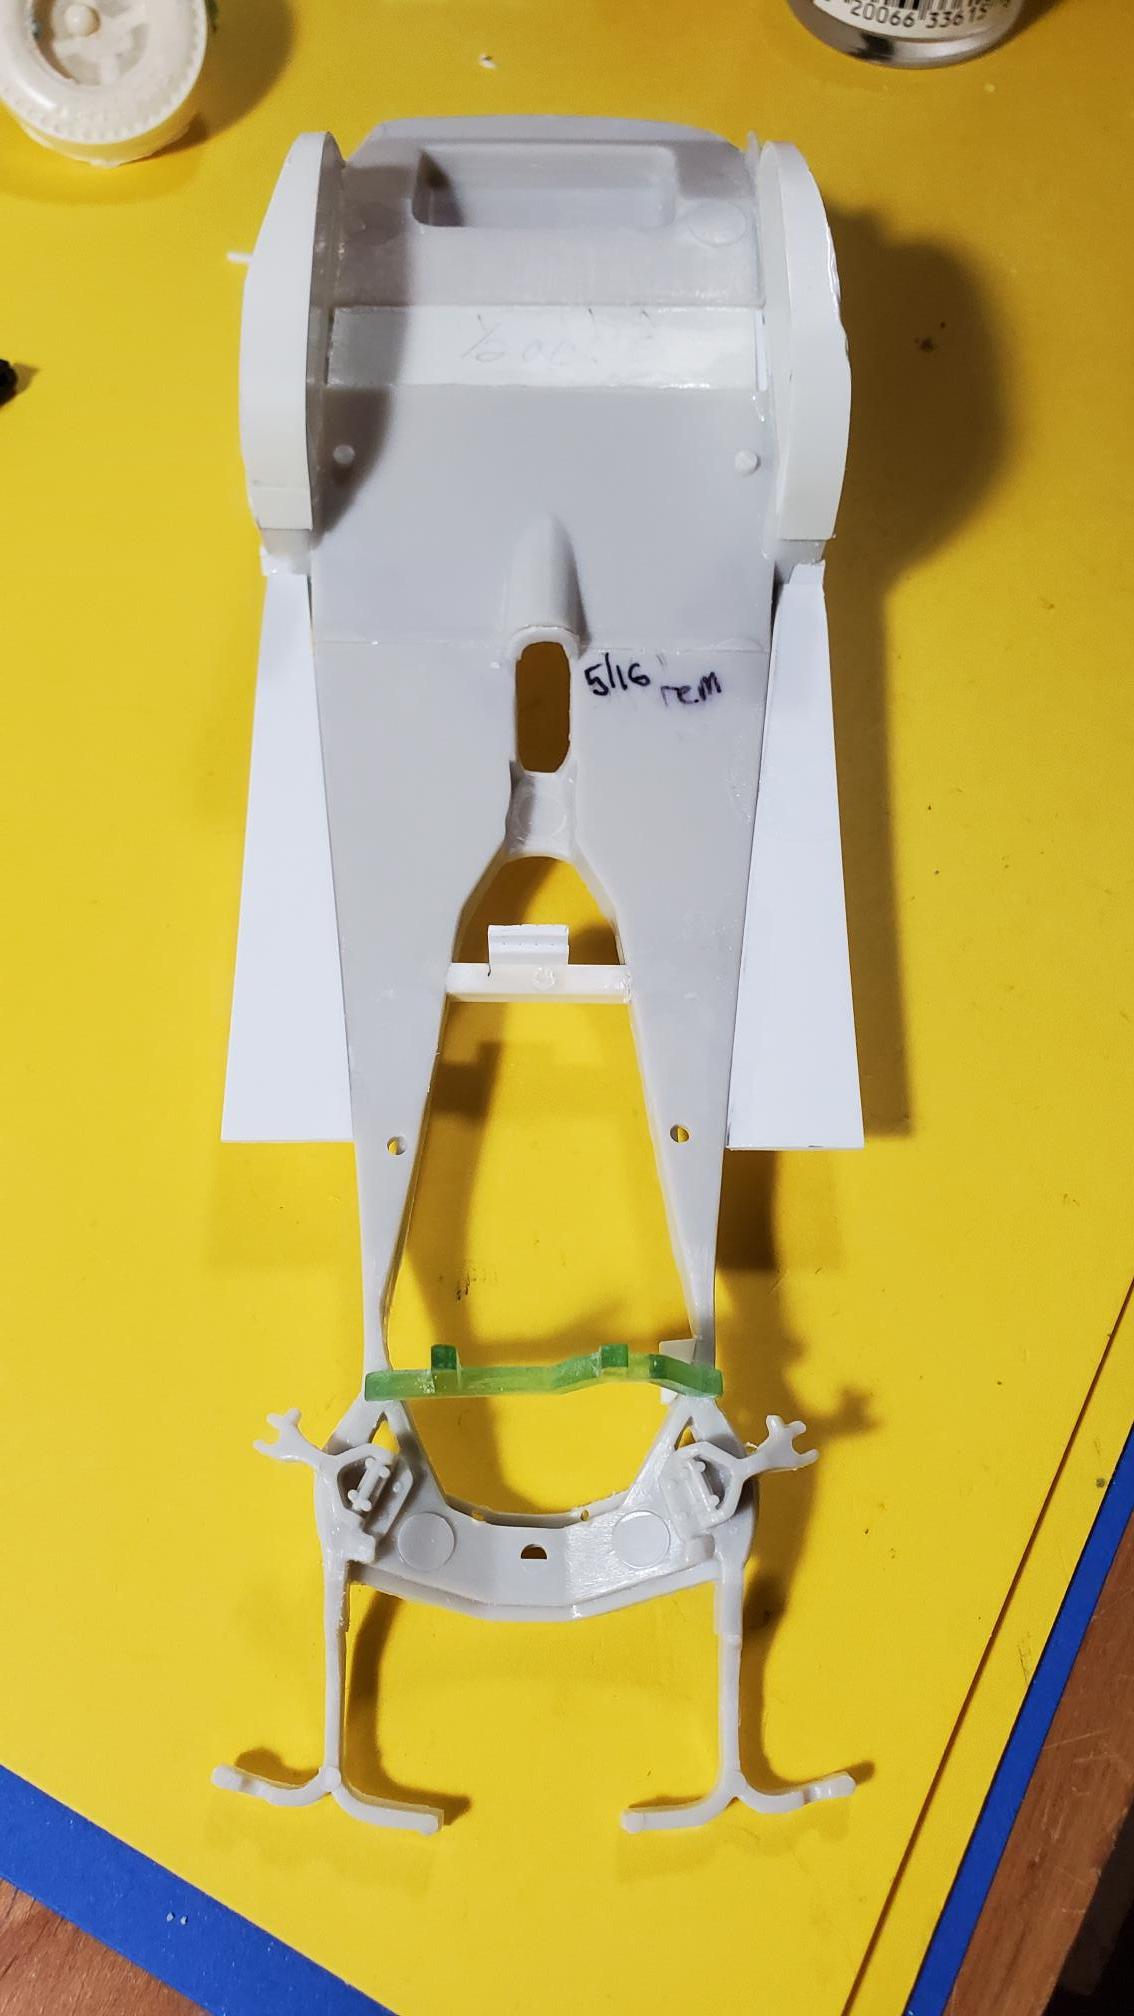
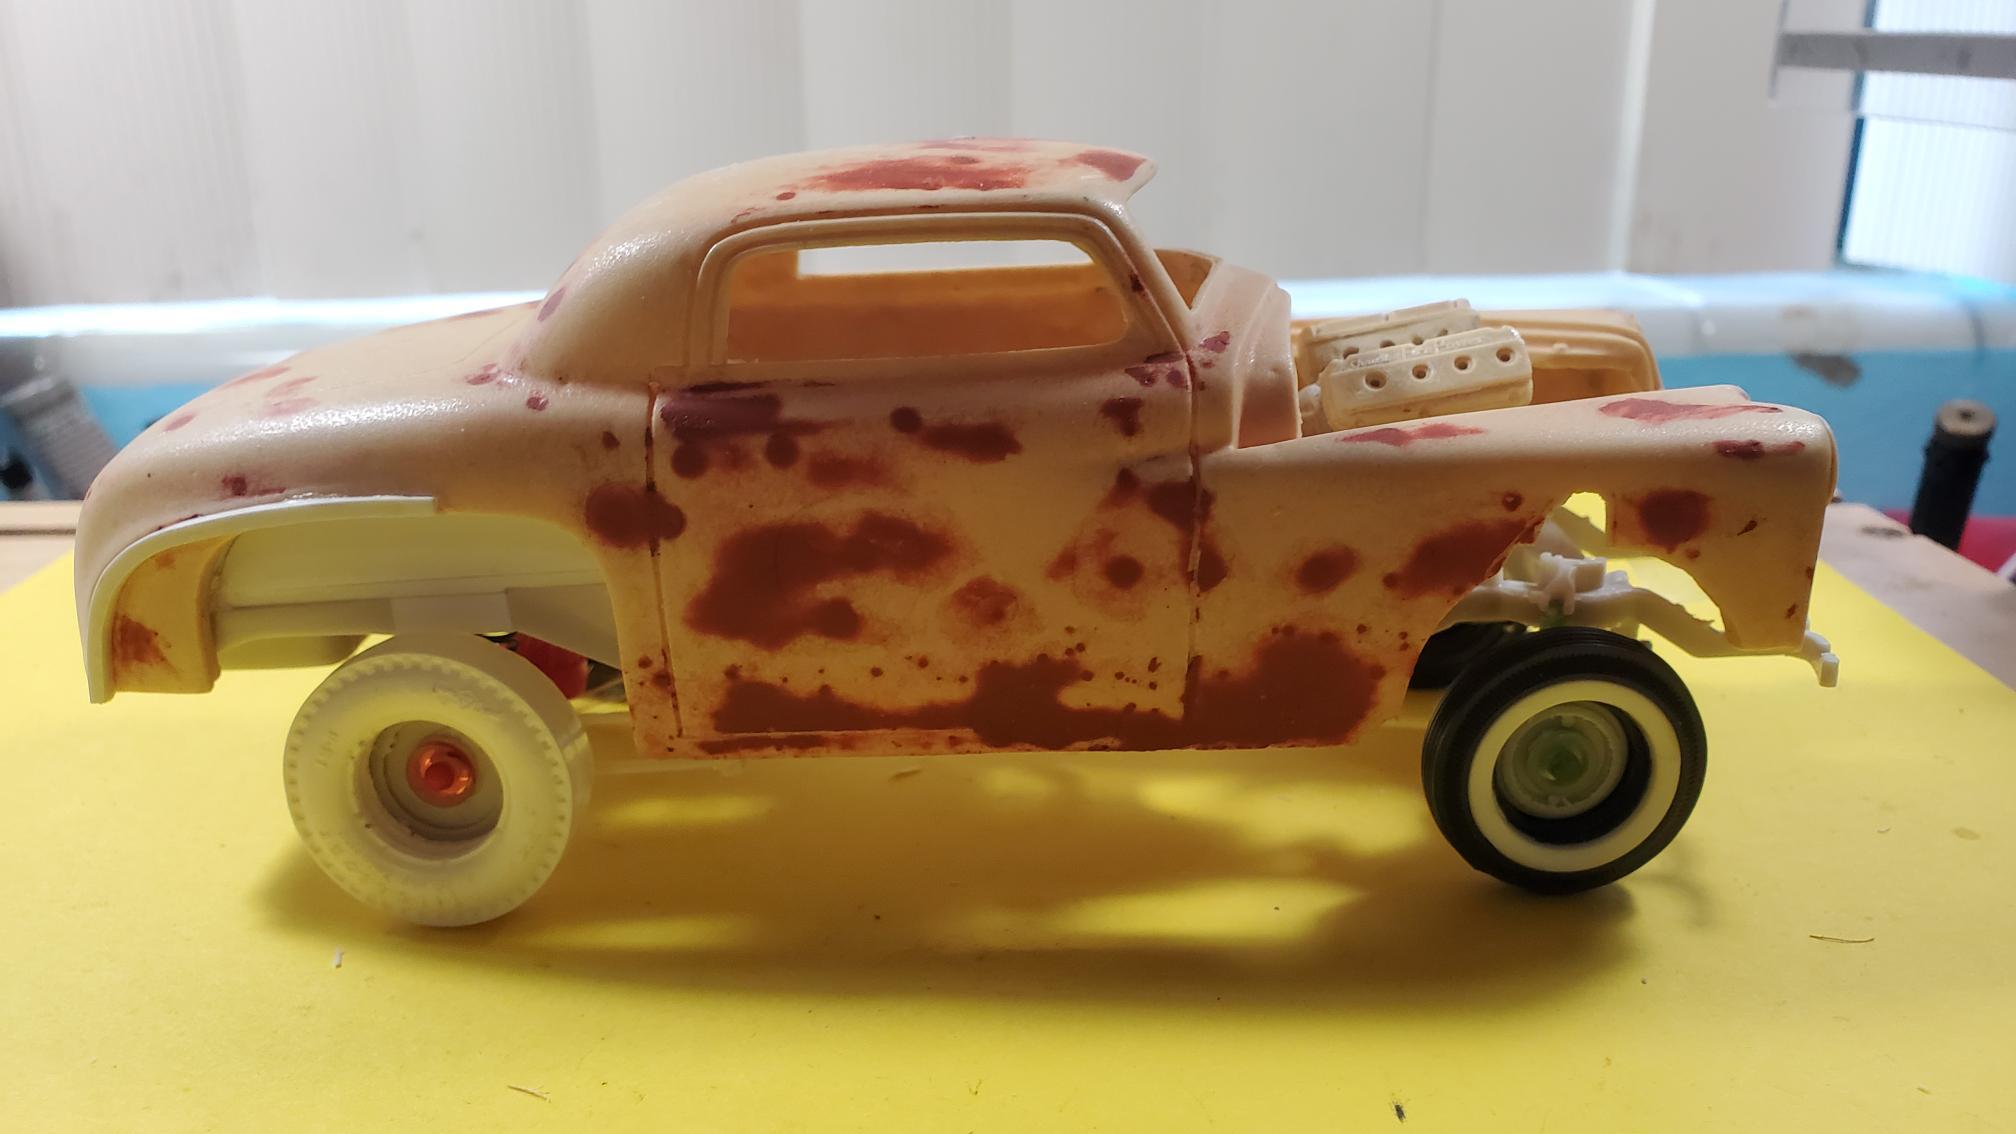
I've been doing some work on the AMT '41 Plymouth chassis, filling gaps and adding floor pans. Here you can see where I cut 5/16" out of the floor pan, and added 1/2" above the rear axle. The inner fender wells were scratch built. The motor mount is 3d printed. The transmission mount will go away, it's just for mock-up use right now. Apparently the Ramchargers used a truck bellhousing, because it also has the 2 mounts on the bellhousing. I'm making another crossover for that now. Also, the front bumper extensions will go away after everything is fixed in place.
-
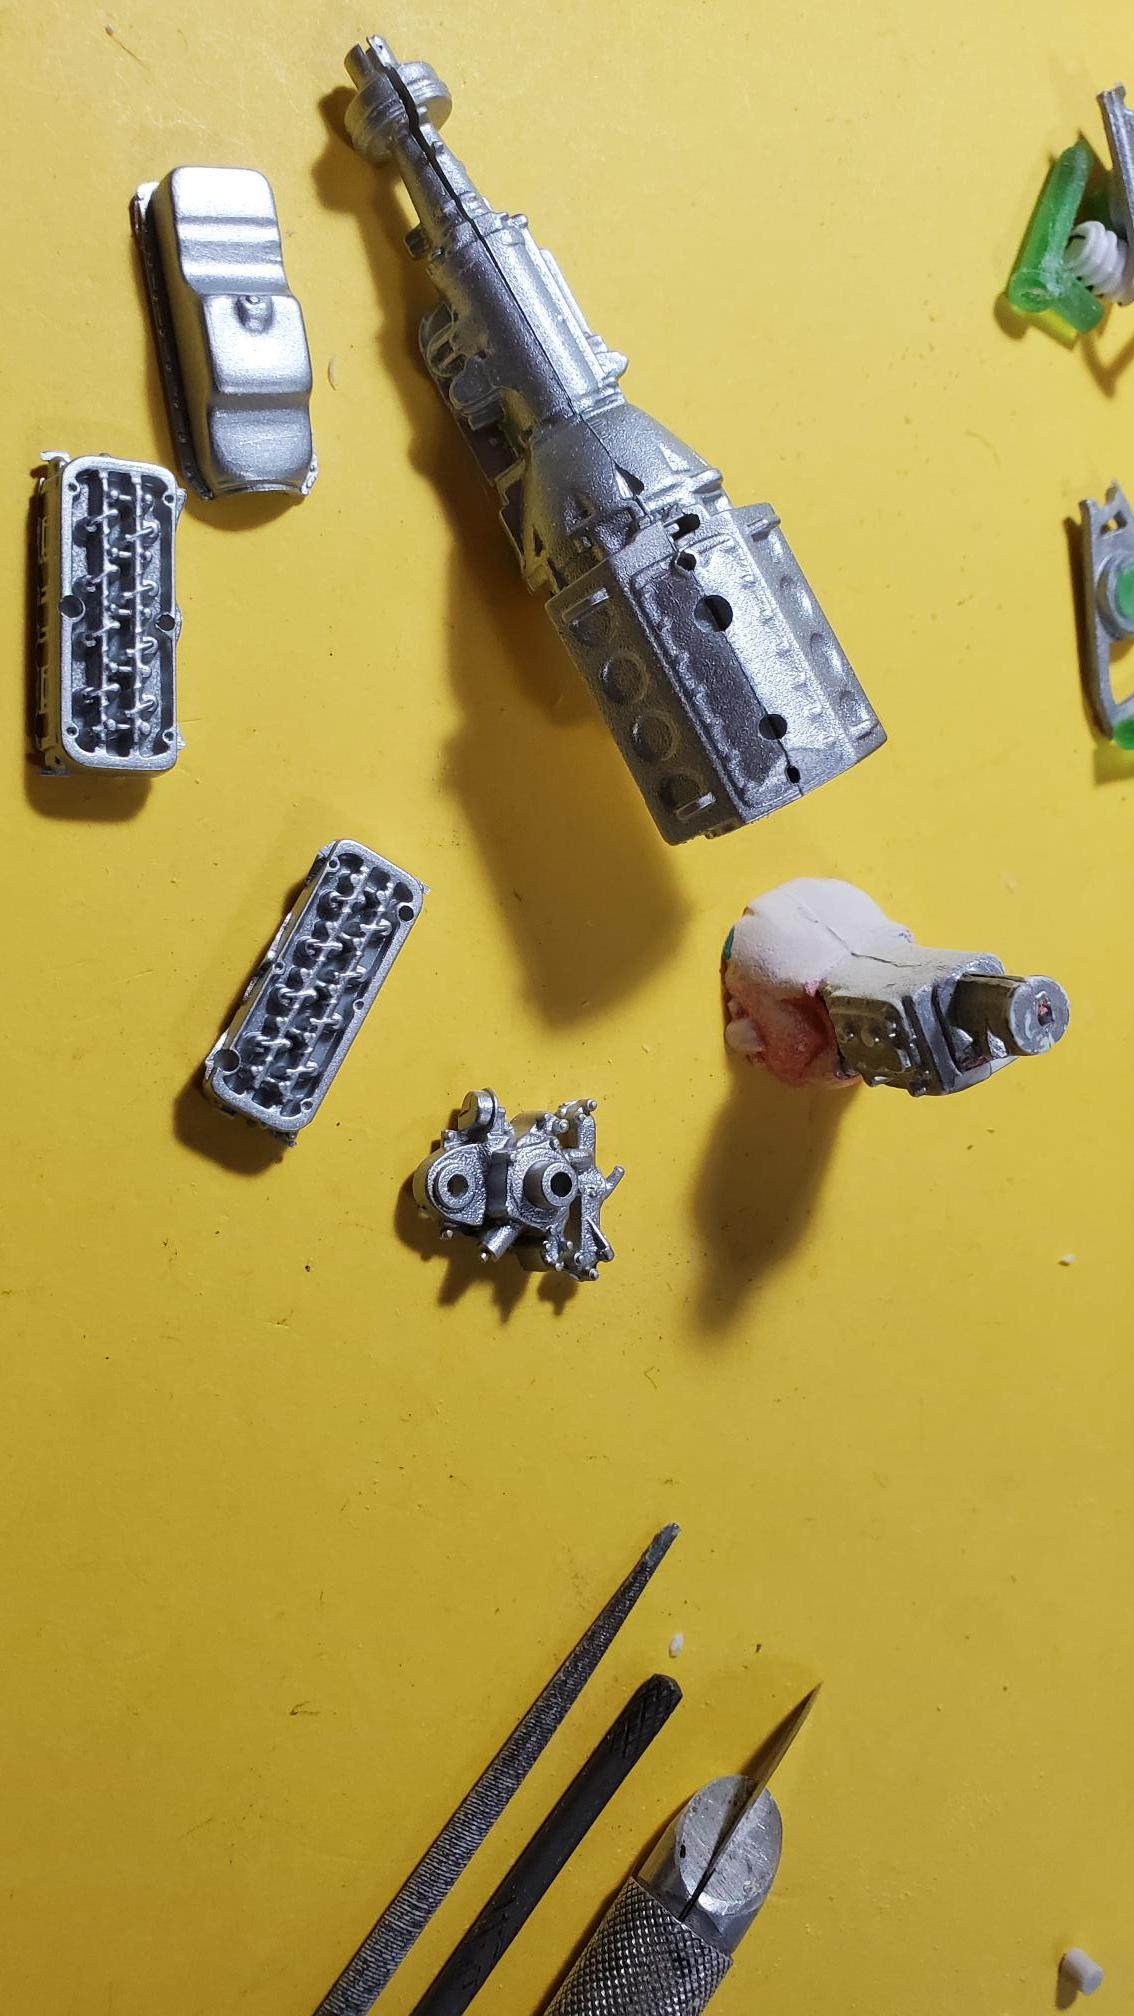
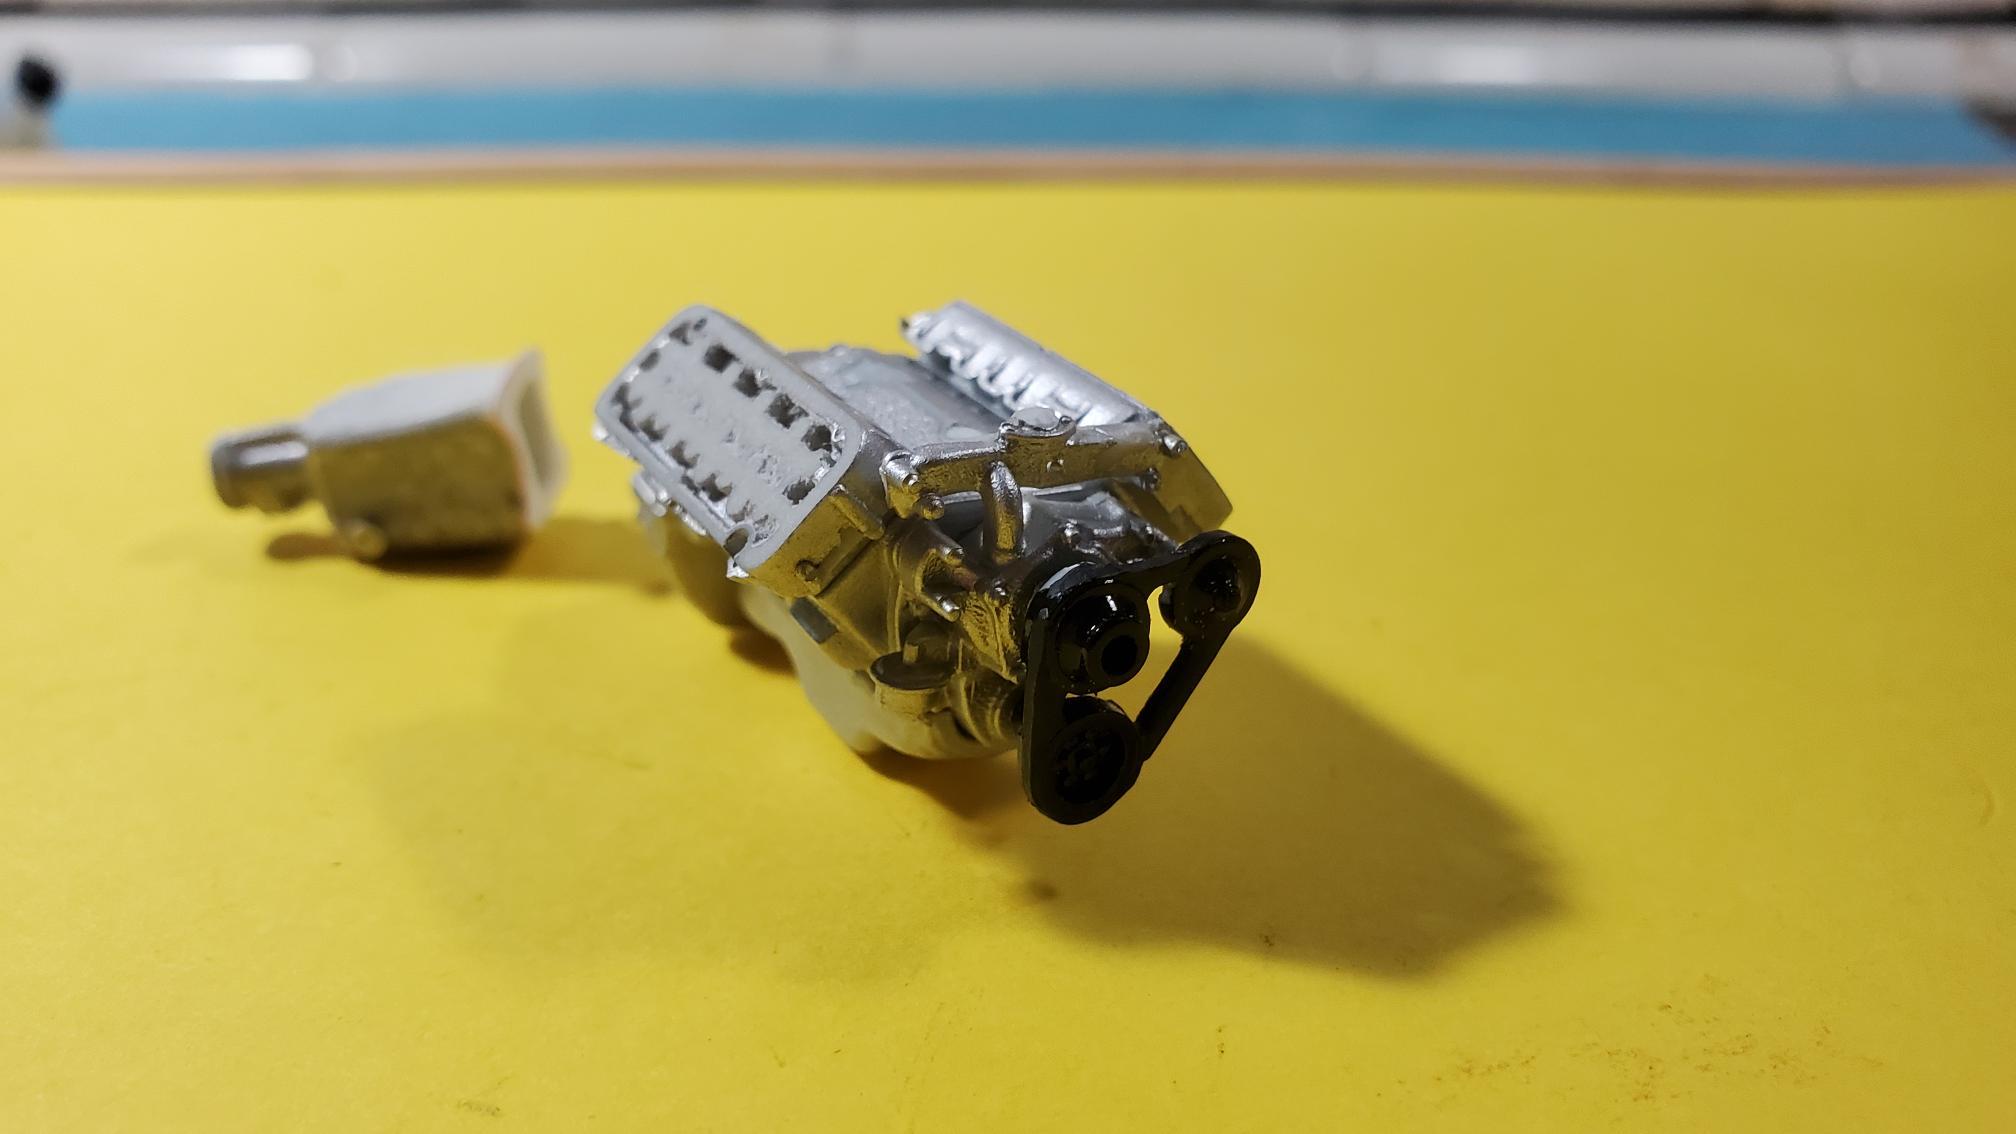
Minor detour.. I was having a hard time getting my 3d printed intake runners and plenum to look right. The resulting intake is just too narrow and tall. Part of the problem was the mish mash of parts I was using for an engine - Revell Hemi Hydro heads and an LA 318 block from who knows where. The whole engine was too narrow. Then I remembered that I had an engine from the AMT '57 Chrysler (prepainted kit) in my stash. IMO it's the best stock 1st generation hemi ever kitted. The detail is superb. It's an automatic, but I also had a correct looking manual trans in my parts box. Last pic is the engine partially assembled, with generator delete courtesy of Bill's previous reply. It hurt me to sand off all of that rocker arm detail, but the alternative would have been to hollow out the valve covers - a lot of work for something that will never be seen.
-
I noticed that they were using a magneto in one of the photos so the battery would only have been needed for starting
-
Good call! Generator delete in progress!
-
-
That has to be the most uncomfortable seat I have ever seen!
-
If I did another casting of the body would there be a market for it? I'm retiring from my paying job at the end of March!
-
Great photos! That is going to be a huge help. I was wondering what to do with the dash. I guess "instrument delete" will be the operative term!
-
Racing Champions Lee Petty '49 Plymouth. I still have it if you're interested. I don't have much use for it any more. I think I still have the latex mold, but I'm pulling my hair out trying to remember where I put it. The body that I'm working with was the last one from the mold and by far the worst copy. I only got 3 clones from the mold before it started to rip internally. And I gave the first 2 to some modeling buddies! I can't believe the 3d printed one would be much better unless it was scanned from a 1:1 car. There's just too much that's open to interpretation.
-
First mockup with wheels and tires. I'm building this for a Shelf of Doom theme build in my club. It's been on the shelf for at least 10 years, primarily stalled because almost all parts had to be scratch built. Now with 3d printing, I think I can finish it. The body is my own resin clone of a diecast. I'm using a heavily sectioned '41 Plymouth chassis with Monogram wheels. Don't know where I got the pie crust tire, but I only had one, so I made a resin cast for the other rear tire. Rear coil springs are actual metal springs I got from the hardware store. It looks like I will need to lower the engine about 1/4" to get to the scale 36" above the pavement that was used on the 1:1 car, and lower the front about 1/8" as well. Time to blow it apart and make some changes!
-
That's a beauty!
-
How do you mask body side moldings?
Steamboat posted a topic in Model Building Questions and Answers
I'm trying to replicate a 1:1 car I owned which had white body side moldings. What would you use to mask them before painting? I have tried using BMF before, but it seems to come off in tiny pieces. I could also paint the whole model and then scrape the moldings but that seems too labor intensive and has potential for disaster. Any suggestions? -
Mike, It came out great! Model on!
-
Identify this grille
Steamboat replied to Maindrian Pace's topic in Model Building Questions and Answers
First generation Chevy S-10? -
Tamiya Paint: To Strip or Not to Strip?
Steamboat replied to av405's topic in Model Building Questions and Answers
It's worth a try, and would save having to reshoot the primer and black paint. I normally use 3200 or 3600 grit before top coat. My concern would be getting all of the residual wax from the polishing compound removed before the next coat of paint goes on. If you don't it's likely to have fish eyes. I would try to find out what the body shops use as a wax remover before paint. -
I gave up on the marker after it got old and produced the results you described. I broke it open and poured the ink into a paint bottle. I either paint it on or for larger parts I airbrush it, both with good results.
-
Nicely done. Great looking paint!