

Rich Chernosky
-
Posts
2,104 -
Joined
-
Last visited
Content Type
Profiles
Forums
Events
Gallery
Everything posted by Rich Chernosky
-
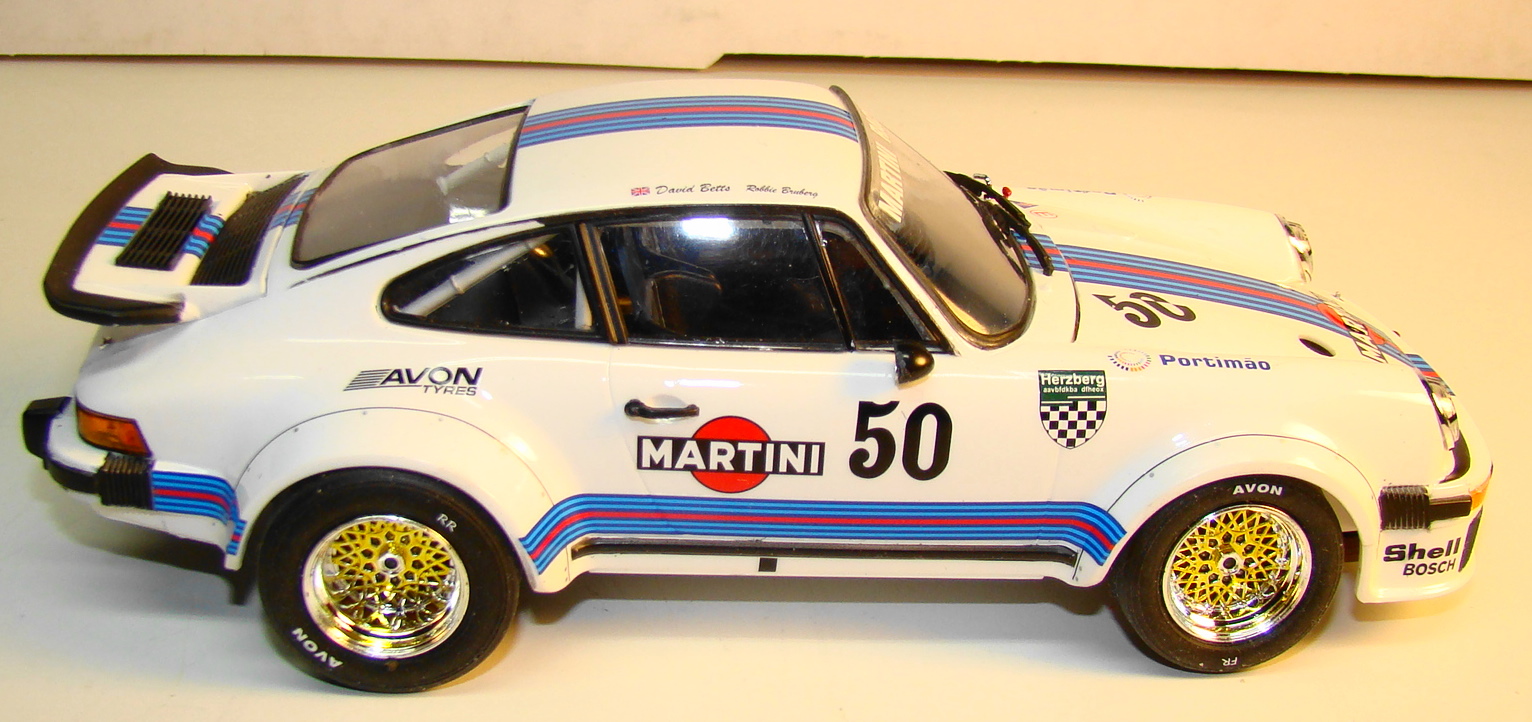
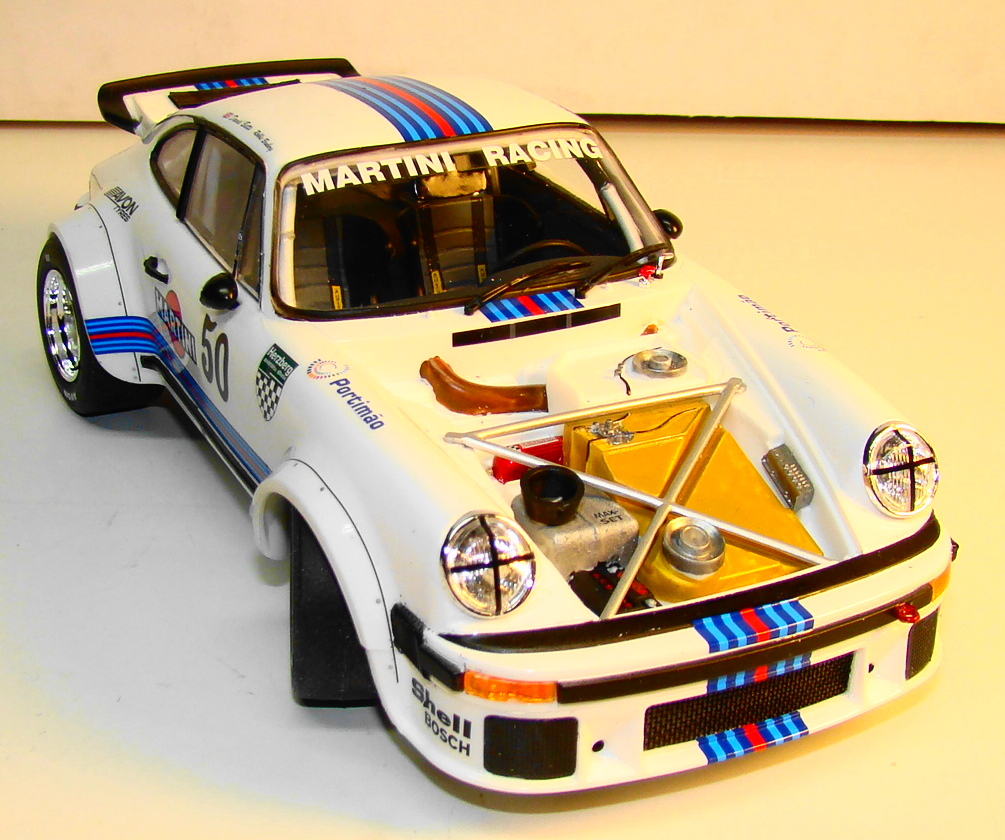
Needed to get something done during my recuperation from Covid. So I did this one mostly box stock except for lowering the suspension byt about 3cm. This is a 1/24 Revell and is a Martini Porsche 934. Paint is Tamiya TS-26 white over white plastic. Kit went together fairly straight forward with only a few fit problems. While the quality is not top notch I would say it was fairly good. Revell is getting better and better. The decals in particular were outstanding and fit nice and tight. See captions under the pictures for more details. Thanks for looking. Once the suspension was lowered it looked more like a race car and not an off road vehicle. The chassis removes from the body quite easliy and this was done when the car was almost complete. Rear view, engine cover had to be modified quite a bit to work properly. It still fit nice. Lots of detail back here. Engine detail was very nice and it fit well. I could have gone to greater detail if I had been feeling better. This side view gives a a good idea of the stance when the suspension was lowered. Front veiw, note how nicely that Martini strip conformed to the body. I did add screen to the inlet. Front cover off, lots of detail painting here.

-
Ray...you did a great job on a tough little kit. I find it interesting that I swore off 1/43 kits about the same time as I did mine. I have very few 1/43 in my collection but this one was a Cobra and as you know....it was a ...gotta have.
-
If you start with a fine piece of marble you will get a nice statue. Of course, you have to be an artist to make it a masterpiece and, that you are Bruce.
-
Le Mans Ferrari 275P
Rich Chernosky replied to Bodnarus's topic in Other Racing: Road Racing, Salt Flat Racers
Very nicely built -
Justin....that is a wonderful little kit and you have done a great job with it.
-
You are quite right when you say Revival kits are not for the feint of heart. I have done most of their line (except this one) and can attest to that. This is a very nice build and you have done a great job.
-
I just bought this kit, your work is inspiring.
-
It takes some real talent to bring those early molds to life as a decent model. You did a great job,
-
1966 Ford J Car Prototype
Rich Chernosky replied to Gramps46's topic in WIP: Other Racing: Road Racing, Land Speed Racers
Gary...this is a great project. You show great bravery when it comes to grinding plastic with a moto-tool. Will be very interested to see how this turns out. I have the MPC clear kit and an odd-ball Japanese "j" car to finish. This is good incentive. -
Helmut....I will...we talk to him on a weekly basis....he is "almost" family.
-
Tim....that is one great looking model and the diorama is just sooooo cool. Good job and thanks for sharing.
-
Dave, that is a great model of an iconic Shadow racer. No kit...no problem for you. You did a great job. I'll tell Pete you liked his book. He gets a big kick out of that.
-
1966 Ford GT40MKII Sebring Winner
Rich Chernosky replied to Gramps46's topic in Other Racing: Road Racing, Salt Flat Racers
Gary....a stellar job on this model. The history lesson was great too. Always good to know and it just enchances the build experience. -
1967 Ford GTMKIV Le Mans Winner
Rich Chernosky replied to Gramps46's topic in Other Racing: Road Racing, Salt Flat Racers
Gary....this is nothing short of awesome...thanks for posting. -
Tamiya AMG GT3
Rich Chernosky replied to lghtngyello03's topic in Other Racing: Road Racing, Salt Flat Racers
Scott......I really enjoyed building this kit and you did a fabulous job on yours. Especially with the interior detailing. I have had bouts of tendonitis in my right hand (I'm right handed) and it makes it very difficult to model. So you have my admiration for doing such a great job with only one hand. -
A magnificent piece of work Kurt. Followed this in WIP. Really appreciate the attention to detail. Well done.
-
Alfa Romeo 155 V6 Ti Martini
Rich Chernosky replied to Rich Chernosky's topic in Other Racing: Road Racing, Salt Flat Racers
Dann...as a military veteran myself I understand "outstanding" is the highest compliment you can receive. Thank you very much. If you decide to get one (there are plenty available) I have lots of extras since I have done two of them. Thanks again. -
IMC CHAPARRAL 2-E
Rich Chernosky replied to Hooked on Chaparral's topic in Other Racing: Road Racing, Salt Flat Racers
I did this kit when it first came out back in the 60's. Then I re-visited it a couple years back. It was great fun getting it right the second time so I am well aware of what you went through. You did a fabulous job. Congrats -
Fujimi 1981 Ayrton Senna Kart
Rich Chernosky replied to IanH's topic in WIP: Other Racing: Road Racing, Land Speed Racers
Ian...found one of these kits and couldn't wait to start it. I really liked your idea about the tie rod but as you can see I took it a step further. One of my pet peeves on models is non steering wheels. If it can be done I will do it. I am going to leave all the parts in brass. Not prototypical but I like to show off my handiwork. How is yours coming ?? Cheers Rich
-
Ford vs Ferrari
Rich Chernosky replied to Reeves Racing's topic in Other Racing: Road Racing, Salt Flat Racers
Nicer group of cars...well done. -
Thank you Gary, racing solo for 7yrs was a lot of fun and I made a lot of friends. Thank you Carl Thanks Kurt..much appreciated. Its not really a replica but how I would want it to be now if I still owned it. Thanks Thank you Robt....yes it was much loved for the 85'000 mi I owned it. Good luck with your projects.
-
Cool project Trevor.....wish you well on it...and nice to see you back building.
-
Shadow Mk11
Rich Chernosky replied to Dave B's topic in WIP: Other Racing: Road Racing, Land Speed Racers
Thanks for the update Dave...your project is moving along quite nicely now. Can't wait to see it finished. -
Thank you Me too....... Thanks Brett...did you ever get a ride in it. Thanks Thanks Ray, it was fun to do. Thank you very much, had to add some extras to get it there. You got that right,...we had a lot of adventures in the 9yrs I owned it.
-
Welcome to the forum John. Glad to see you have decided on a rewarding and satisfying hobby. On the subject of airbrushes you will get as many opinions as there are members here. The best one is the one that works for you. I have been fortunate to be able to try many airbrushes. There are two types....external mix and internal mix. Both have advantages. External mix is the simpliest and I would recommend starting there. Easy to clean, easy to use. Someone here recommended Paasche H and that is my go to. There are other things to consider also. Airsource and a place to spray. Spray booth with ventilation highly recommended. But in my experience the most important thing is learning how to clean it. I own 7 airbrushes but have only ever bought one. Most of what I have were given to me because they were clogged after a few uses and they didn't know how to properly clean them. That should tell you something.


.JPG.6b5c55110e05faed37a1fb0d83ed6ec0.JPG)