Rich Chernosky
-
Posts
2,141 -
Joined
-
Last visited
Content Type
Profiles
Forums
Events
Gallery
Everything posted by Rich Chernosky
-
Its looking real good, thanks for the information on the paint. Fitting the front will really help me on mine.
-
Beautiful job on a tough to build kit.. Excellent....like the body color.
-
Than you Dan....some of your interior work inspired me to go full kamakazi on this one.
-
Bruce...what did you use for the red ? . Sure is bright. I have this kit in an original and the re-issue. I was going to use Tamiya TS36 but it only gets that bright over red and not over primer. The clear looks awesome too.
-
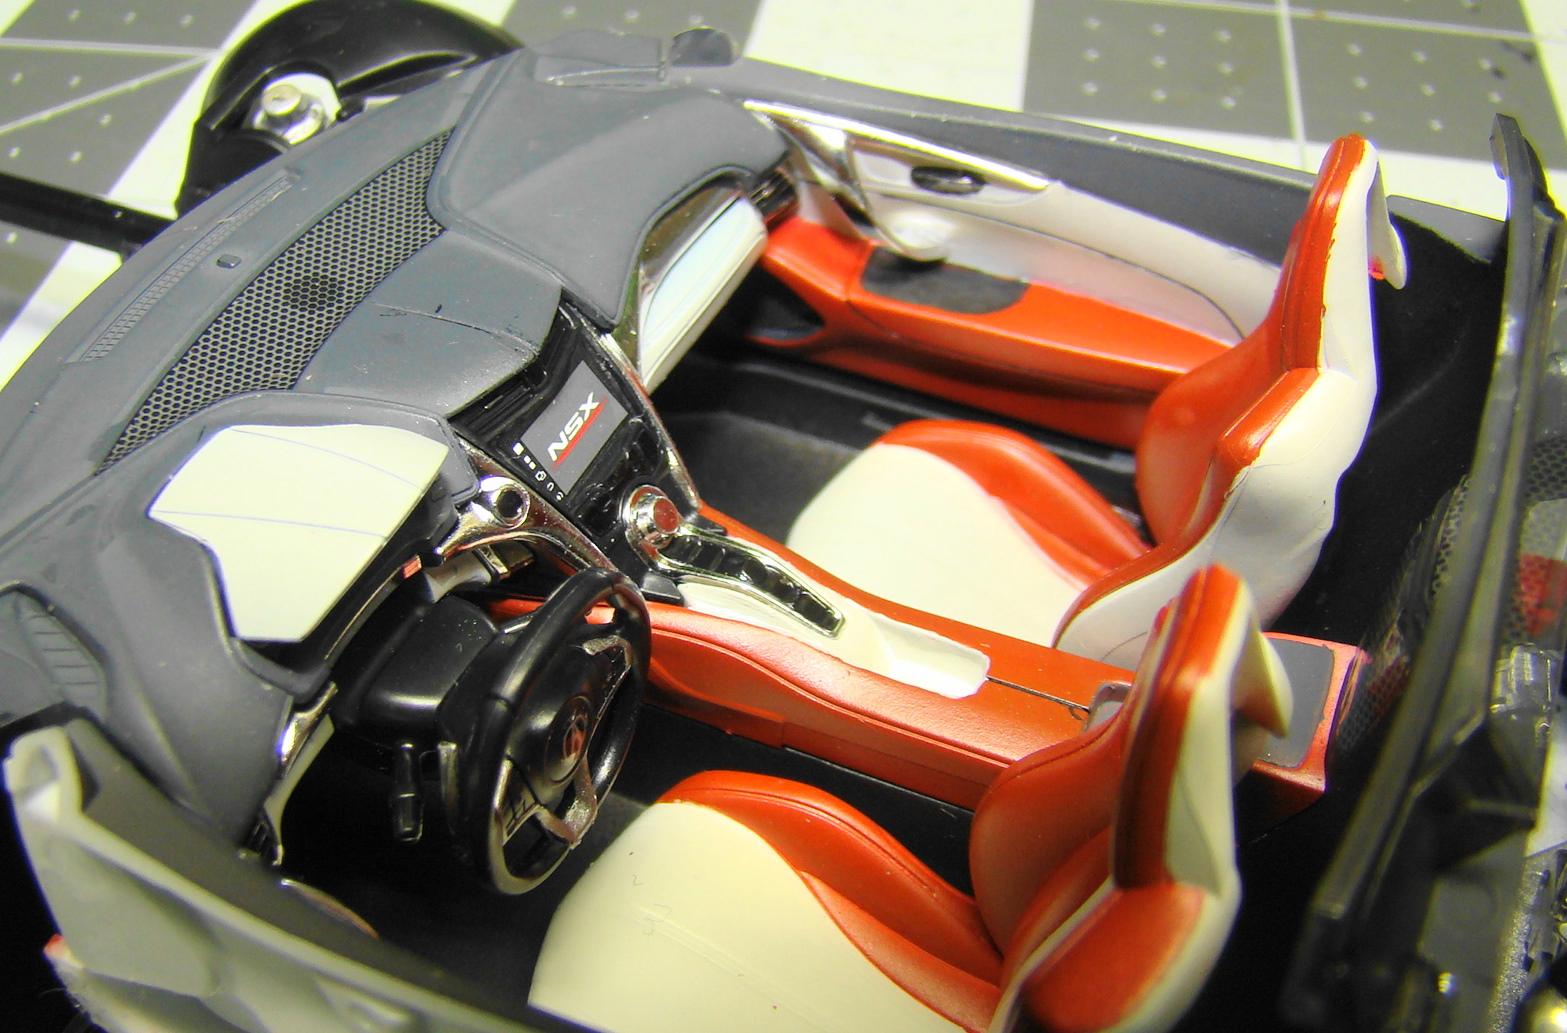
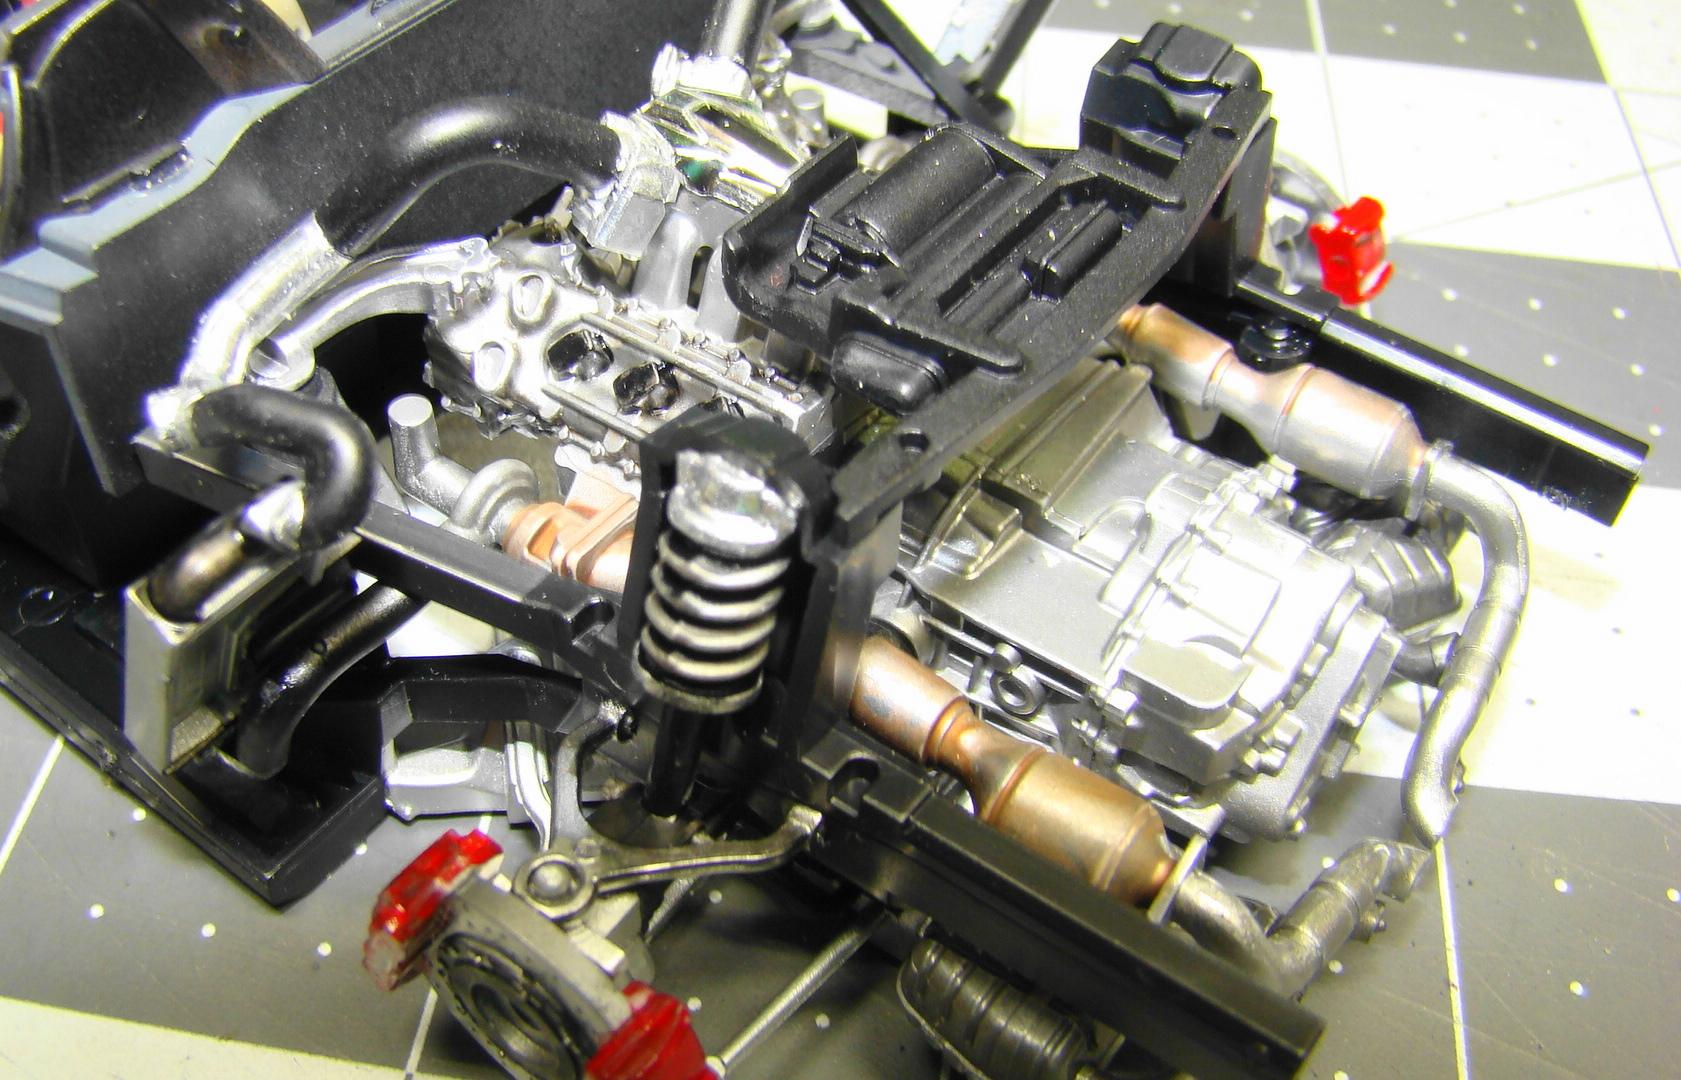
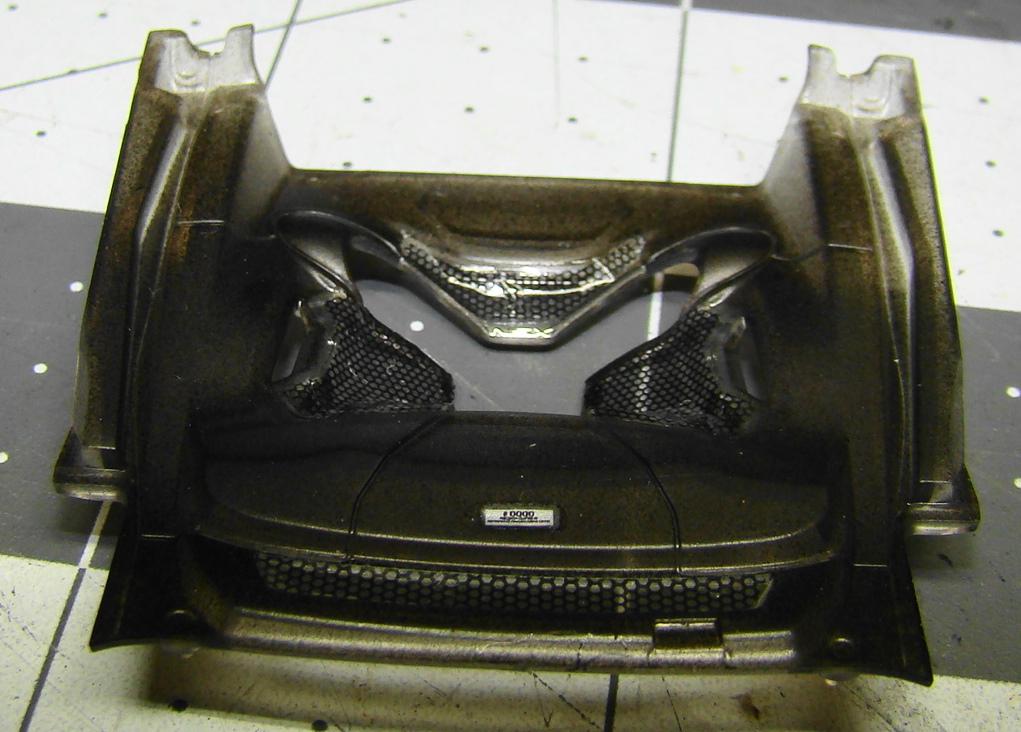
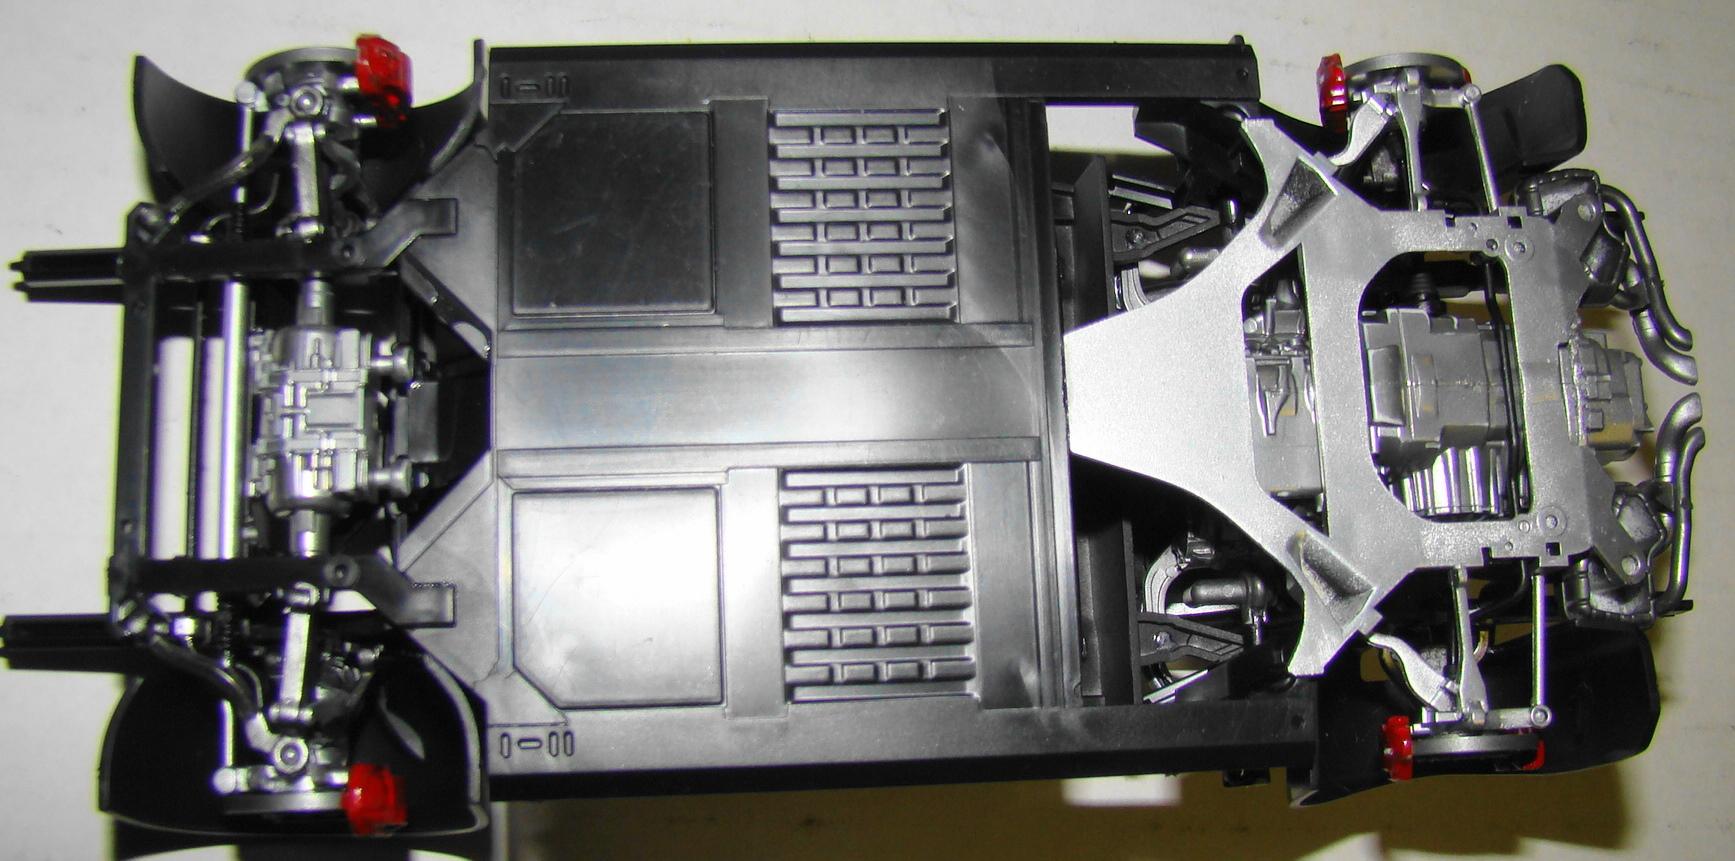
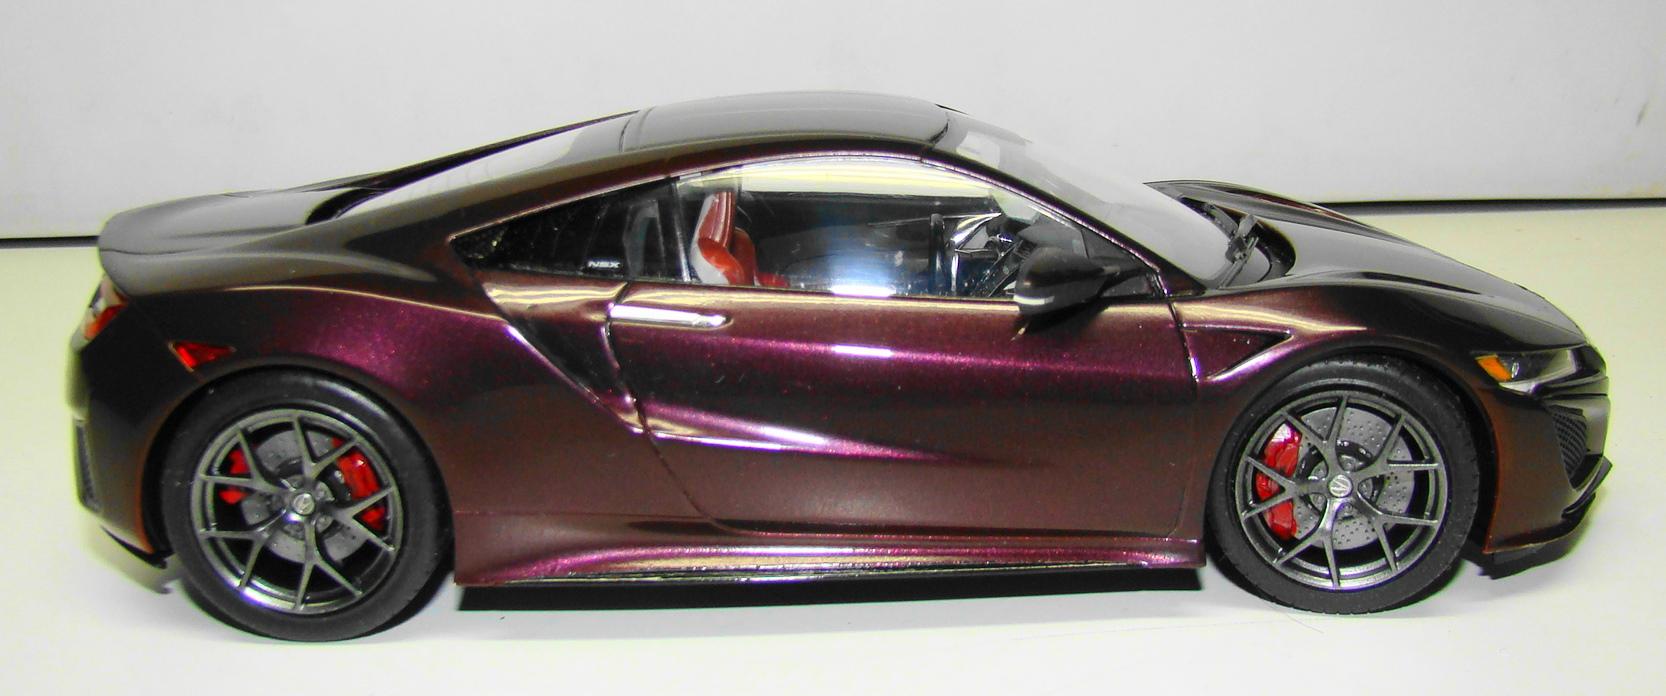
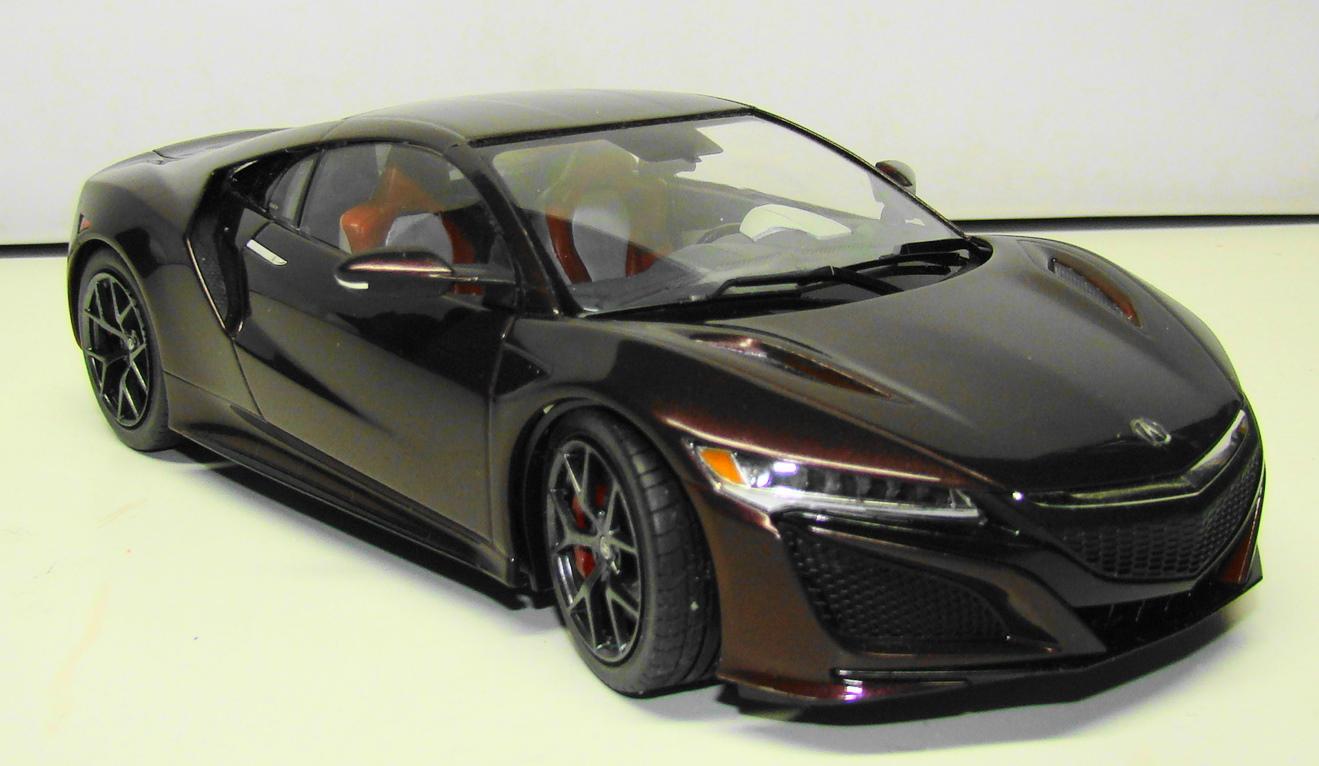
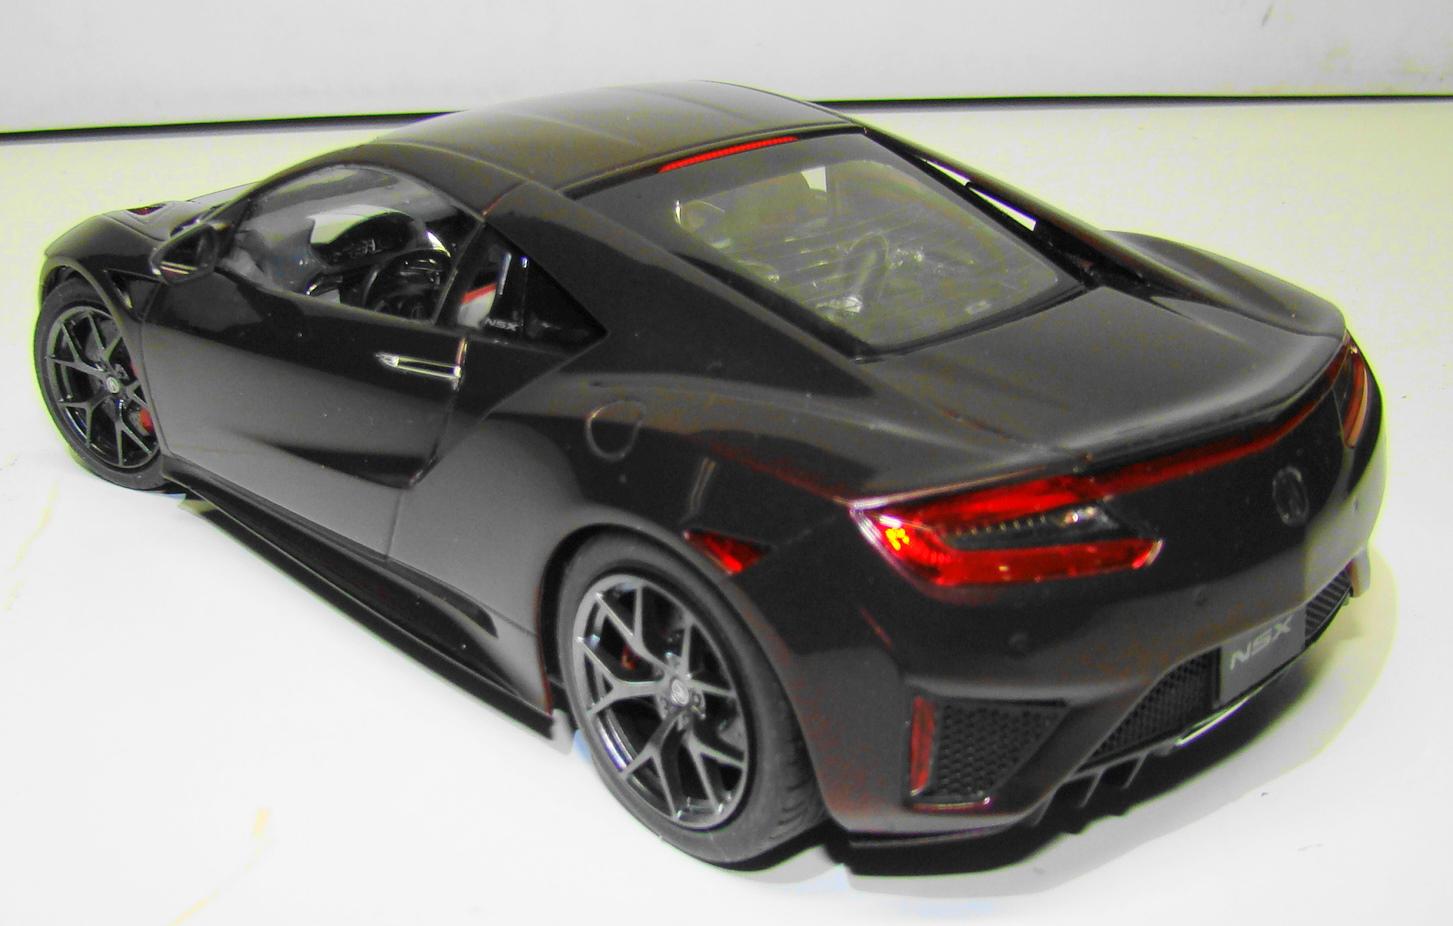
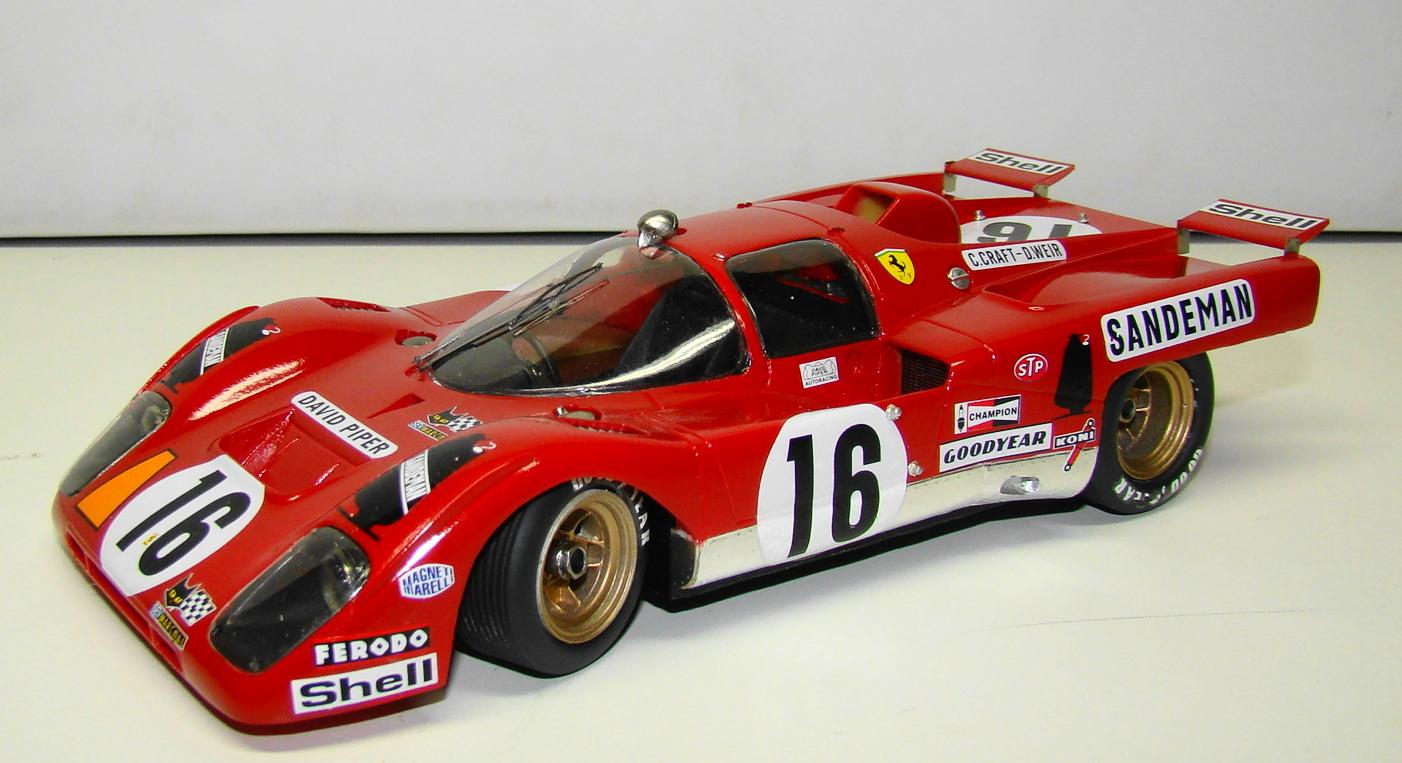
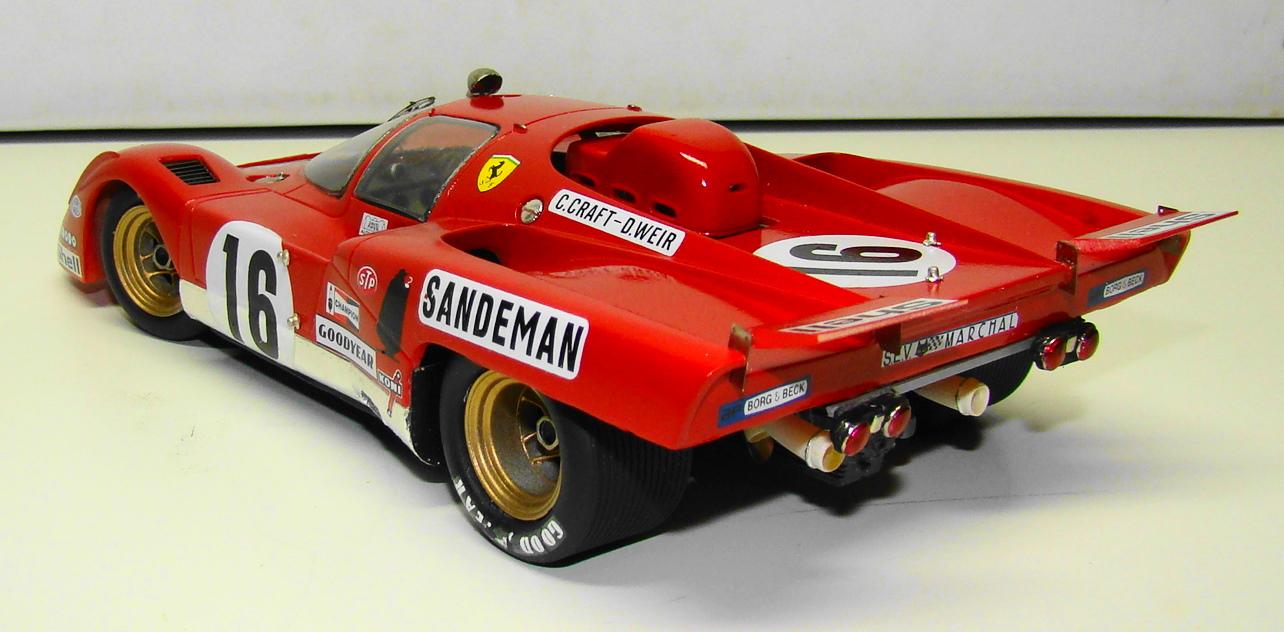
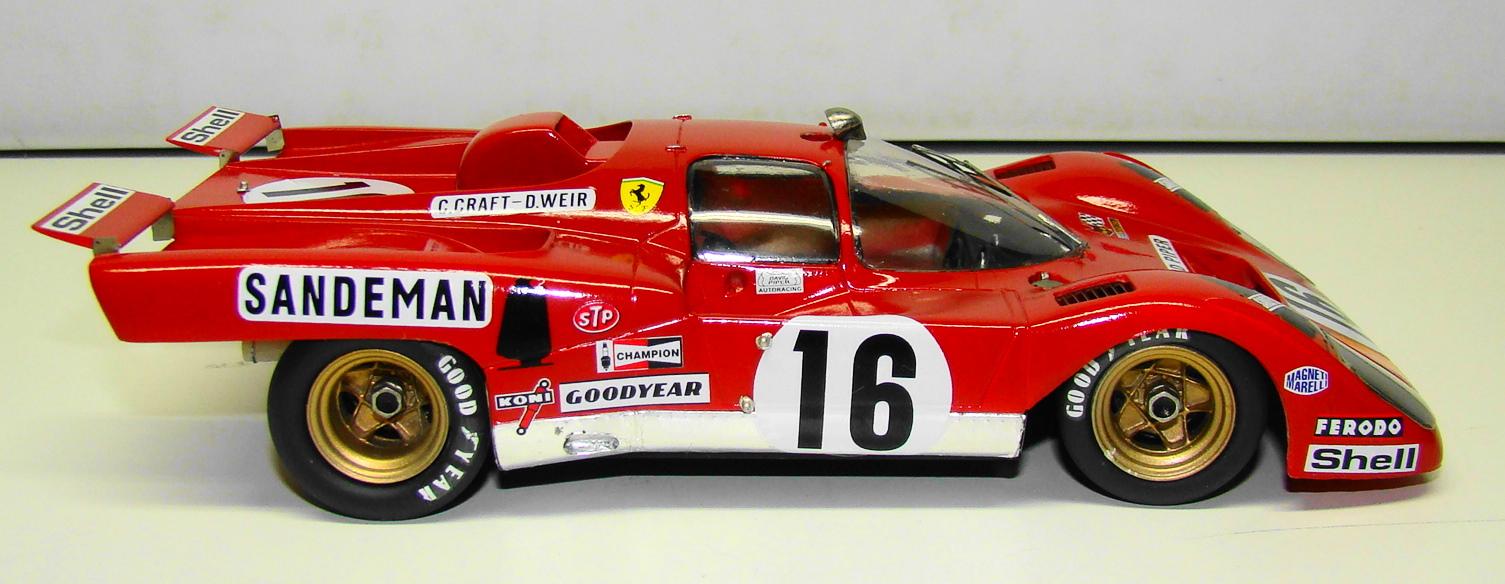
Got this one done once I decided on a color I liked. this was stripped several times before I was happy. Color is Testors Laquer Wild Cherry Pearl #28113. Clear coat was with their Wet Look clear which was sanded and polished. Kit featured steering wheels , very detailed interior and engine, drivetrain and suspension . This kit went together very smoothly with only a few minor problems, some of which were my own doing. Rear tailights were 3 pieces each and you had to wait for the glue to dry on each one. Chrome reflector didn't fit as good as it could have (looks great from the outside) and eventually had to be reinforced with epoxy. As a whole this is one of Tamiya's finer kits. The fit and finish of all the parts made this a joy to do. See the photos for some extra info and thanks for looking. I really fussed over this interior. Lots of masking ans spraying. The red is a custom mix of Mr, Color semi gloss's This s twin turbo charged v-6. The fit of all the pipes was unbelievable. Car is a hybrid and there are 3 electric motors as well as this one. This is the engine cover and it was clear. I sprayed it a very light coat of semi black so some of the engine would show through. Note the tiny Honda emblem. It was almost microscopic and it went on right the first time...whew. Don't usually take a picture of the underside but it was too pretty to hide. The finished car has these covered in underpanels. See the two electric motors at the front to make this car an all wheel drive. This turned ouot to be the best photo of the car to show the true nature of the color. It really shines. Now you get an idea of the fussy tail lights. But they look good on the outside and that is what counts. There were many exterior details to take care of. Only thing I really didin't care for were the Honda emblems on the nose. At least i can peel them off if I want to. . They were not the usual metal stickers Tamiya uses. These had to be trimmed very close to the pattern and stuck on. Not the turn signal lights on the mirrors....chrome tape I put on.

-
Porsche 911 GT2 Taisan Starcard JGTC Race Car
Rich Chernosky replied to Terminator-Fox's topic in Model Cars
I luved this kit, yours turned out spectacular. -
Nice job Bruce, colour looks good. I mask and airbrush the black trim with Tamiya X-18. Its a lot more work but the lines come out nice and clean. Tamiya kits rule.
-
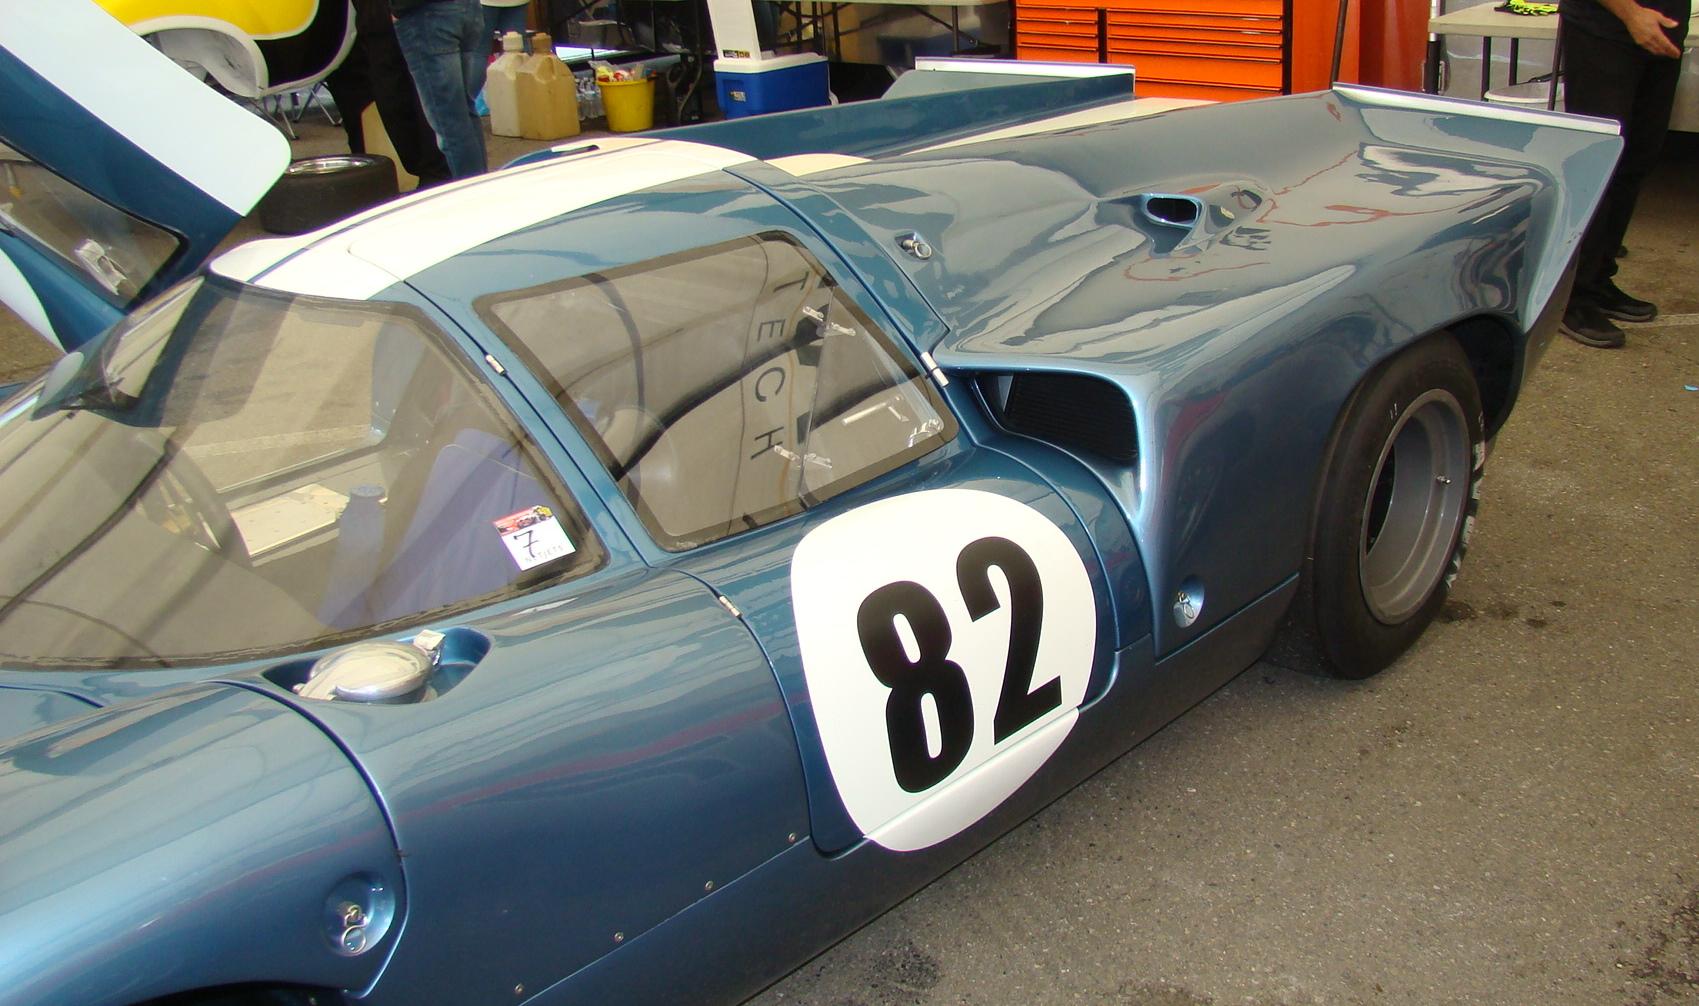
Mark...lookit what I was up close and personal with today. This was taken at the Watkins Glen Vintage Gran Prix. Can send you the rest to your PM. This one is a MKIIB so it is a little different than the one you are modeling.
-
I would drop this in any one of my Ford Gt models...no problem....real nice work.
-
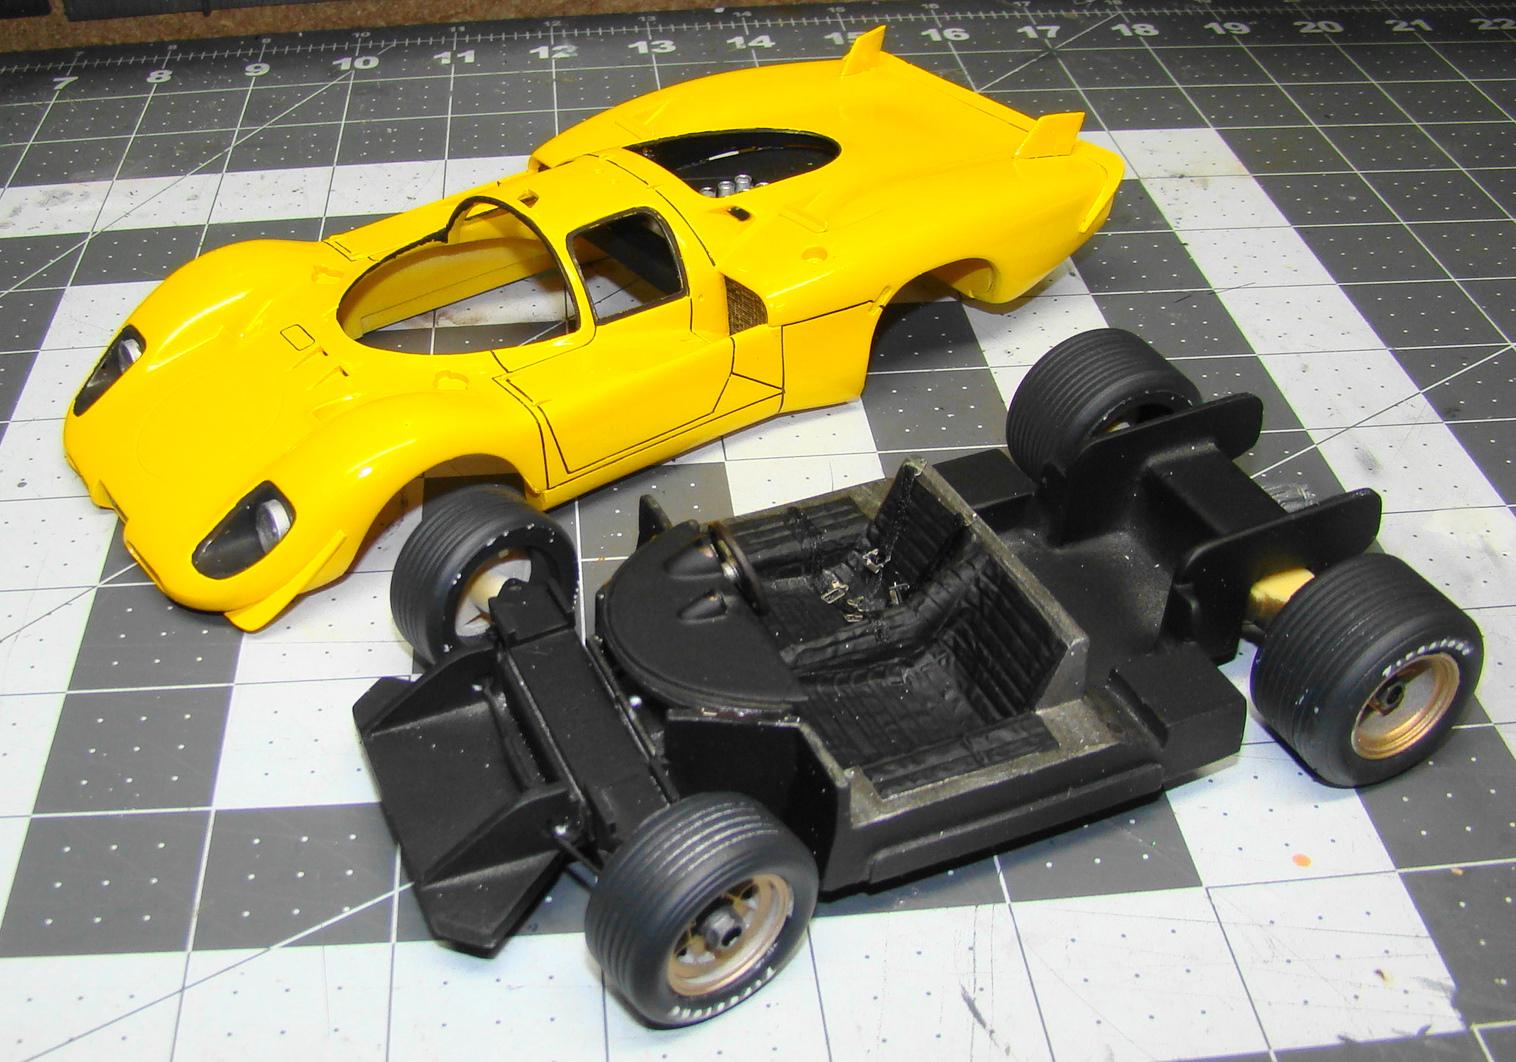
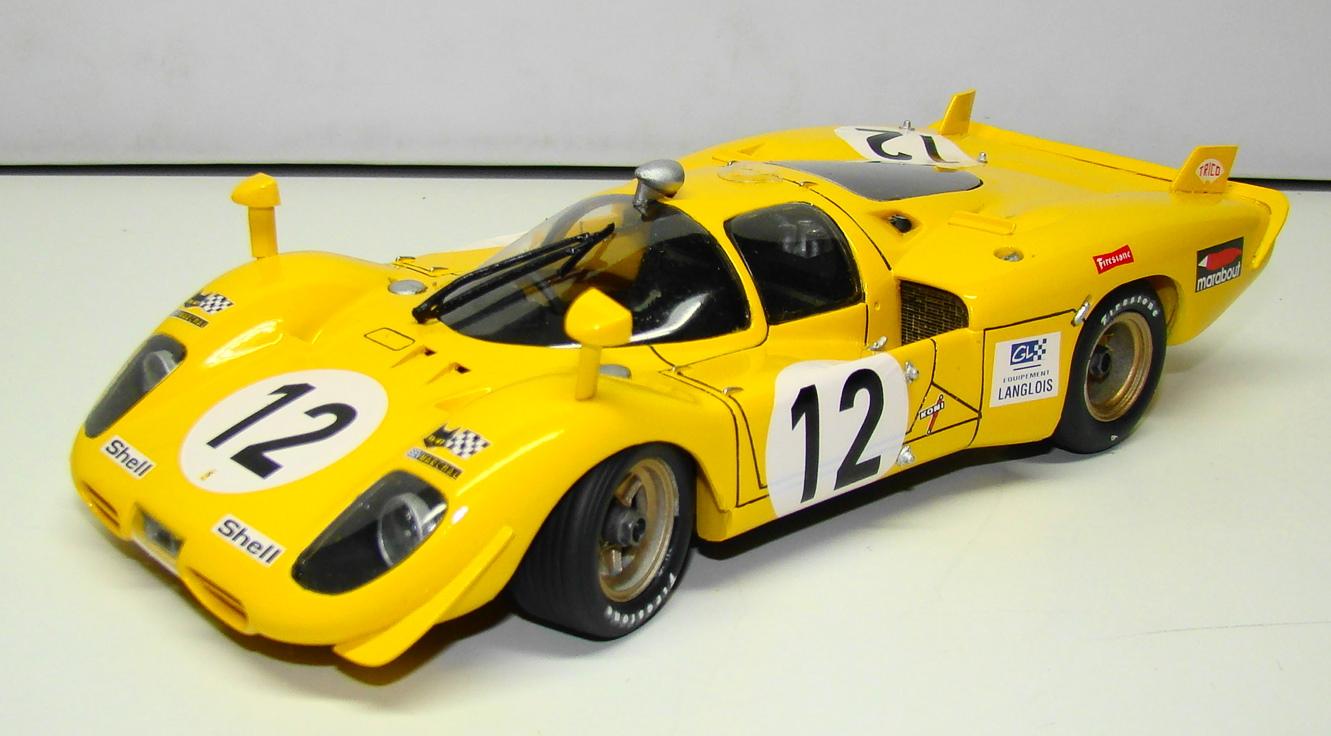
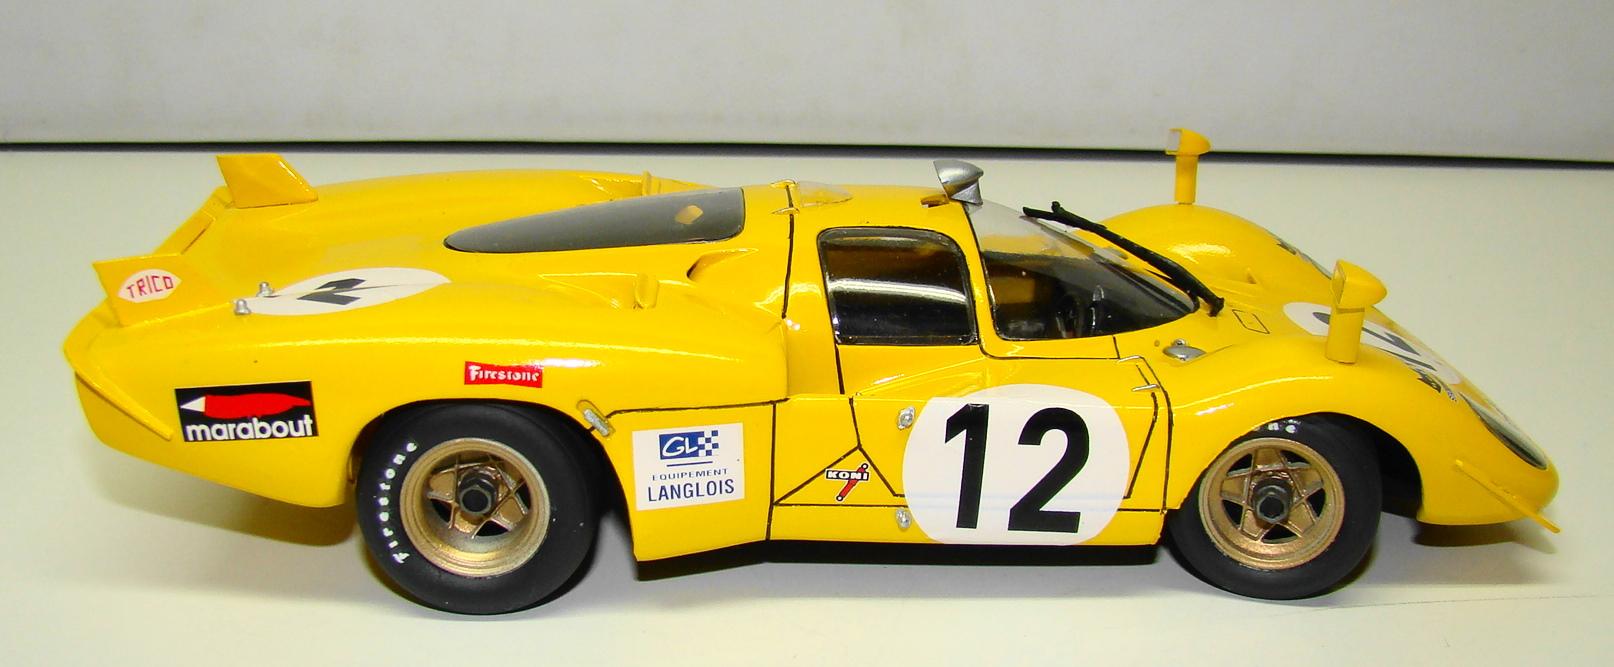
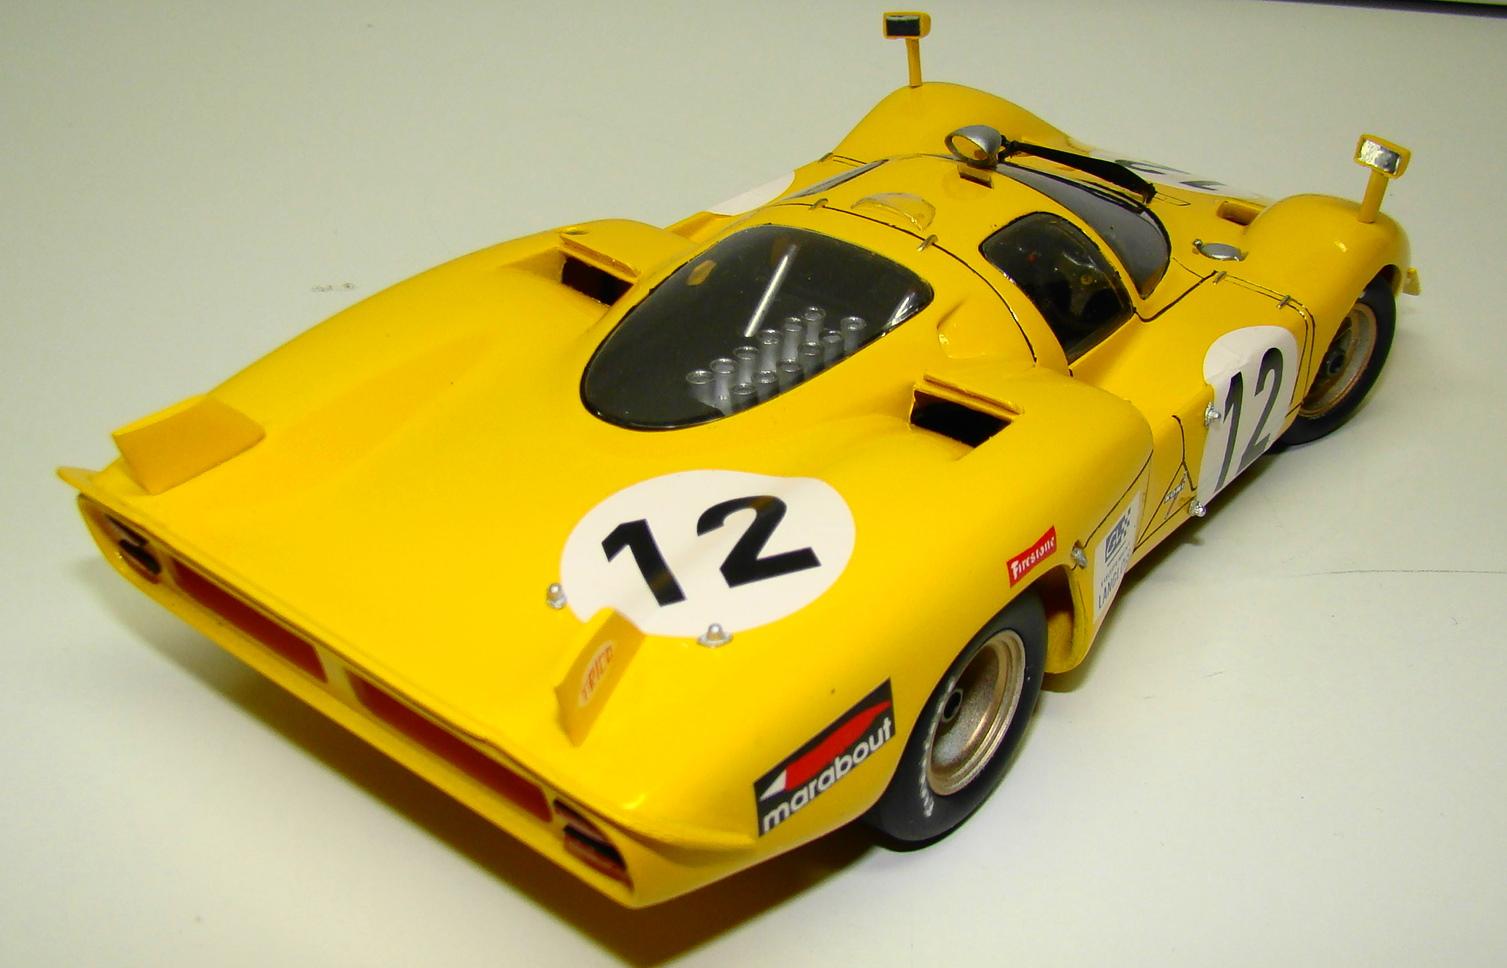
Fisher 1/24 Ferrari 512S yellow longtail 1970
Rich Chernosky replied to Rich Chernosky's topic in Model Cars
There is a hole in the roof that you can see from the 3/4 rear veiw. Last photo. Yes...the wheels steer, Ya know I just can't stand for that not to happen. See the 1rst photo. -
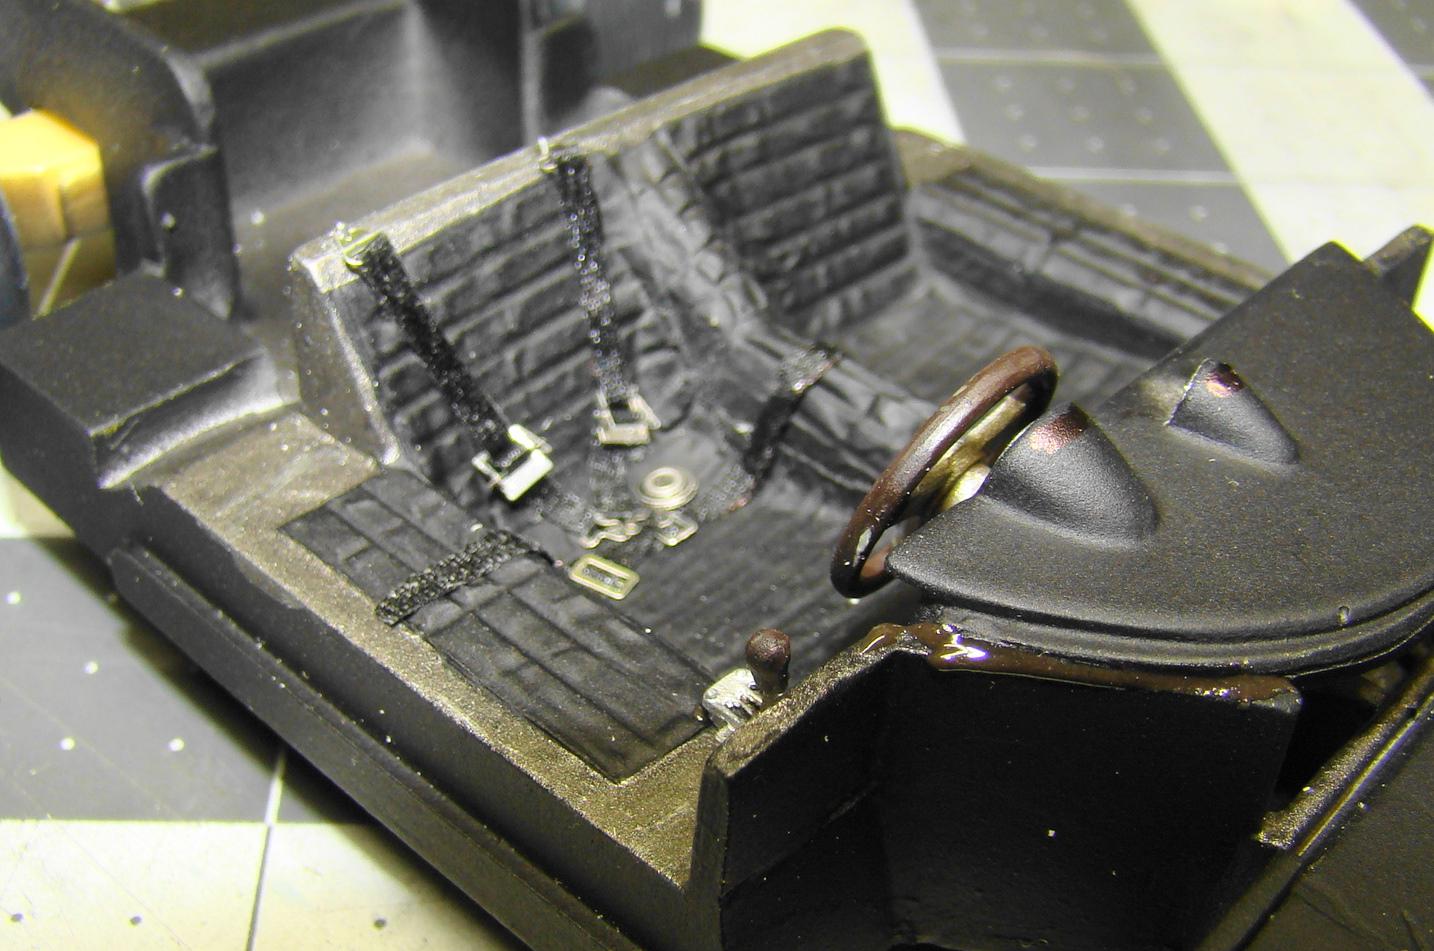
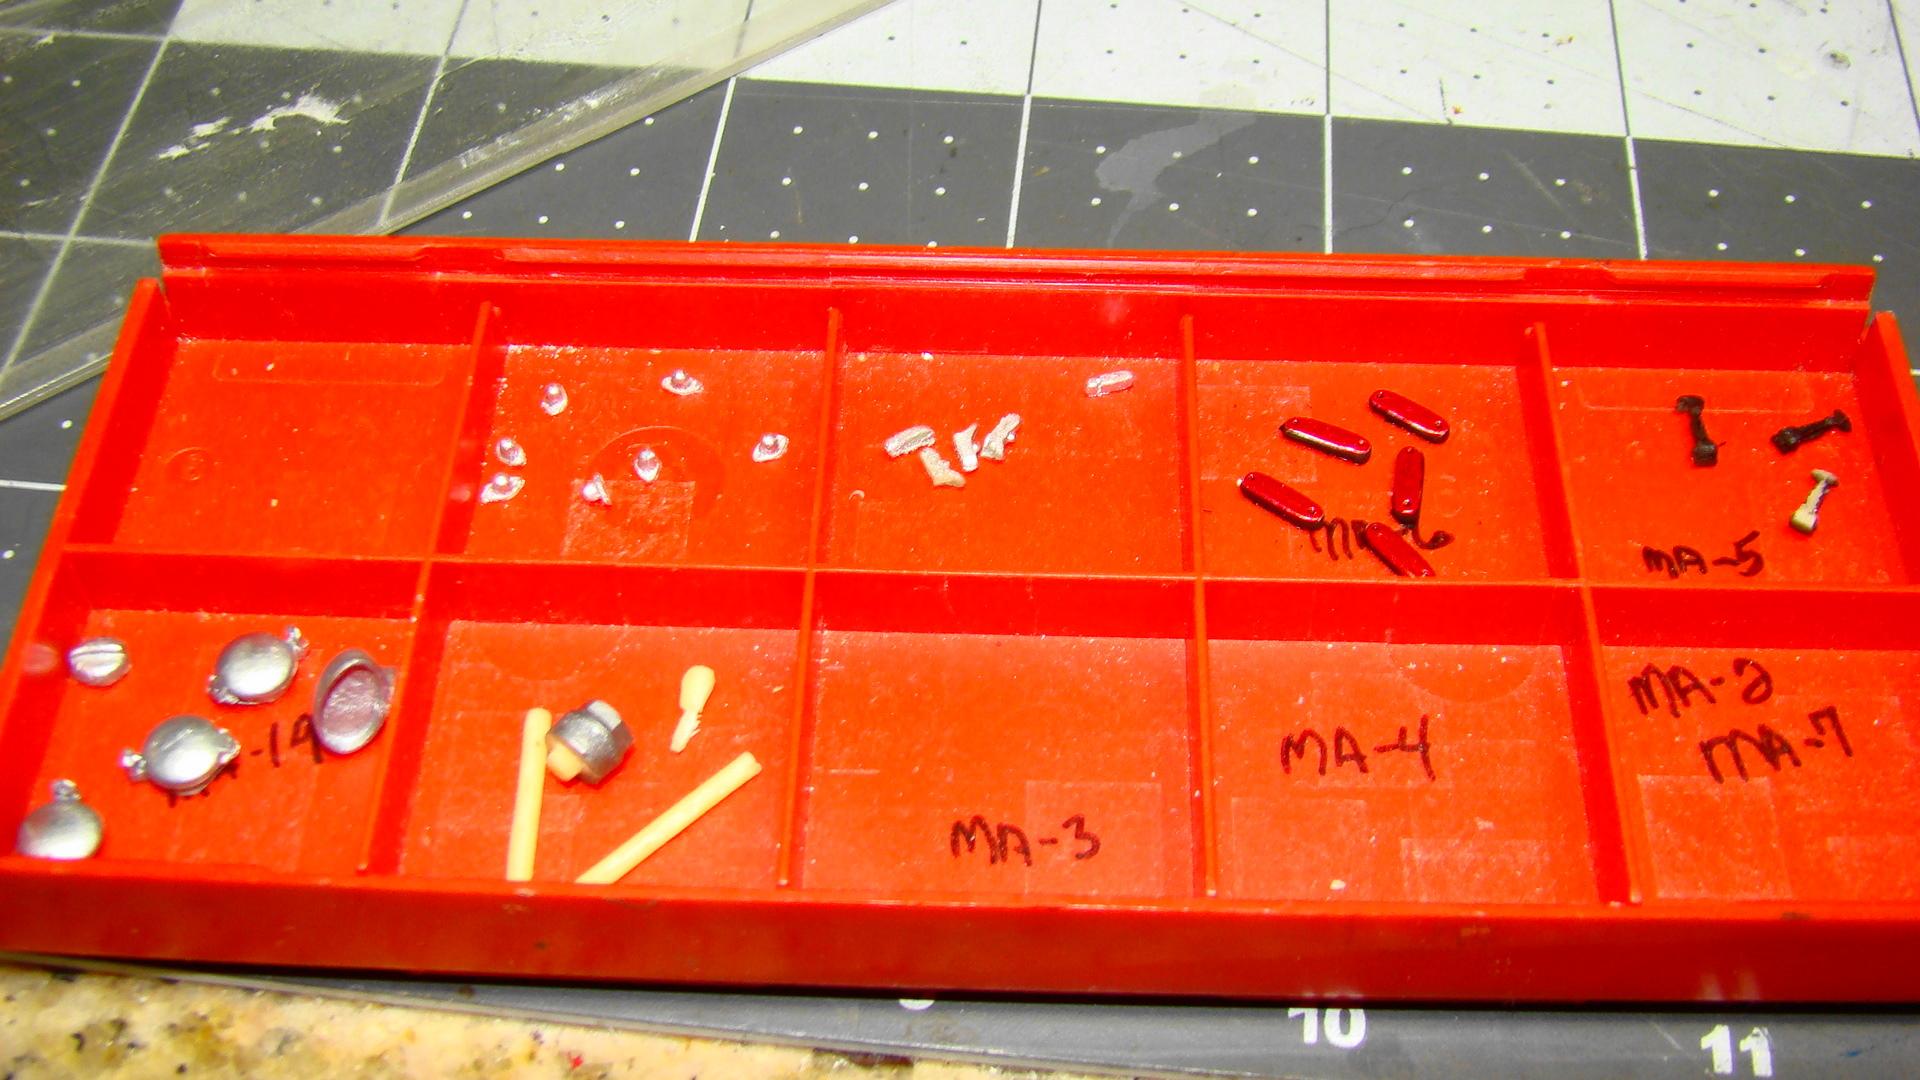
Another resin off the bench. This is a Fisher 1/24 Ferrari 512S that was campained by the Belgian team Ecurie Francoshamps. This kit was built in conjunction with my 512M posted a week ago. Some of the work was similar so I did both at the same time. Colour is Tamiya TS-16 (80%) and TS-34 Camel Yellow (20%). Extra features include steering wheels, seatbelts, and long stalk mirrors. The mirrors and seatbelts were missing from my kit so I had to scratchbuild them. Build went very smoothly. Chassis ready to be mated to the body Note the nice text ure on the seats, way different than the 512MLots of tiney parts all prepared and painted ready for final assembly. Not all of them were used but it was nice to have the extras. Panel lines were done with a nib pen and India ink. Firestone decals from the parts boxI like the angle of this photo, not the handmade roll bars from aluminium tube.
-
Very Nice build, that was a great kit.
-
Very nice, especially like the Dino prototype. Who's kit was it BTW ?
-
Mark...this build brings back fond memories of this kit. It was 1970 and I was home on leave from the military. On a field trip to Auto World in Scranton Pa I bought this kit from Oscar himself. It was built shortly after I returned to my duty station. I still have it and a replacement as well. At the time it was state of the art and i never paid much attention to the fit problems that you have. I will follow this build closely as I want to do my extra kit as a spyder. Don't know of anybody making a resin rear deck...do you? As a tip you might want to consider inflating your tires with urethane foam. Gorilla glue mixed with water will do it. They tend to flatten with time. We have a mutual friend who has sent me pictures of some of your incredible builds. They are awe inspiring. Now I get to see the methods of your talent. Thanks for sharing.
-
Mike...this one and the next I am working on, a 512S, were only purchased recently. They are still out there and at reasonable prices.
-
Rick Mears Penske 1988
Rich Chernosky replied to Lizard Racing's topic in Other Racing: Road Racing, Salt Flat Racers
Rick Mears was one of my heros too. Nice to see his car on this forum. thanks for posting. -
This one is mine. It was built in April 2010. A superb kit then. One of the reasons I bought this one.
-
If its a Ferrari...I like it.
-
Nice job...interesting color that's for sure.
-
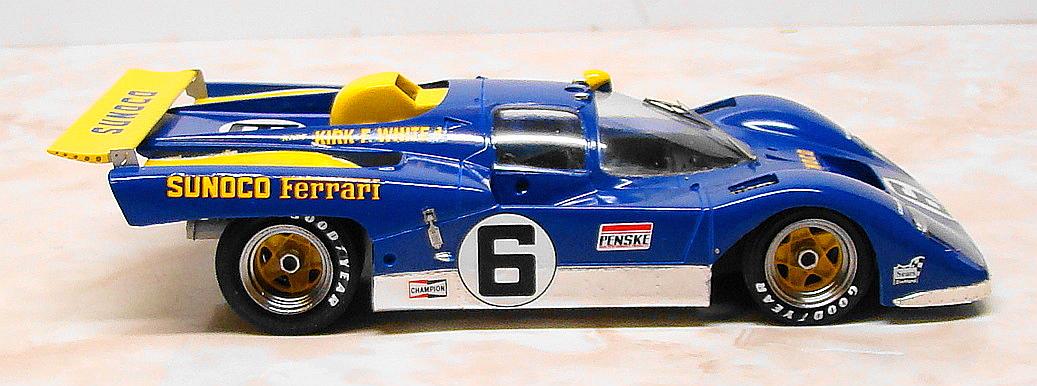
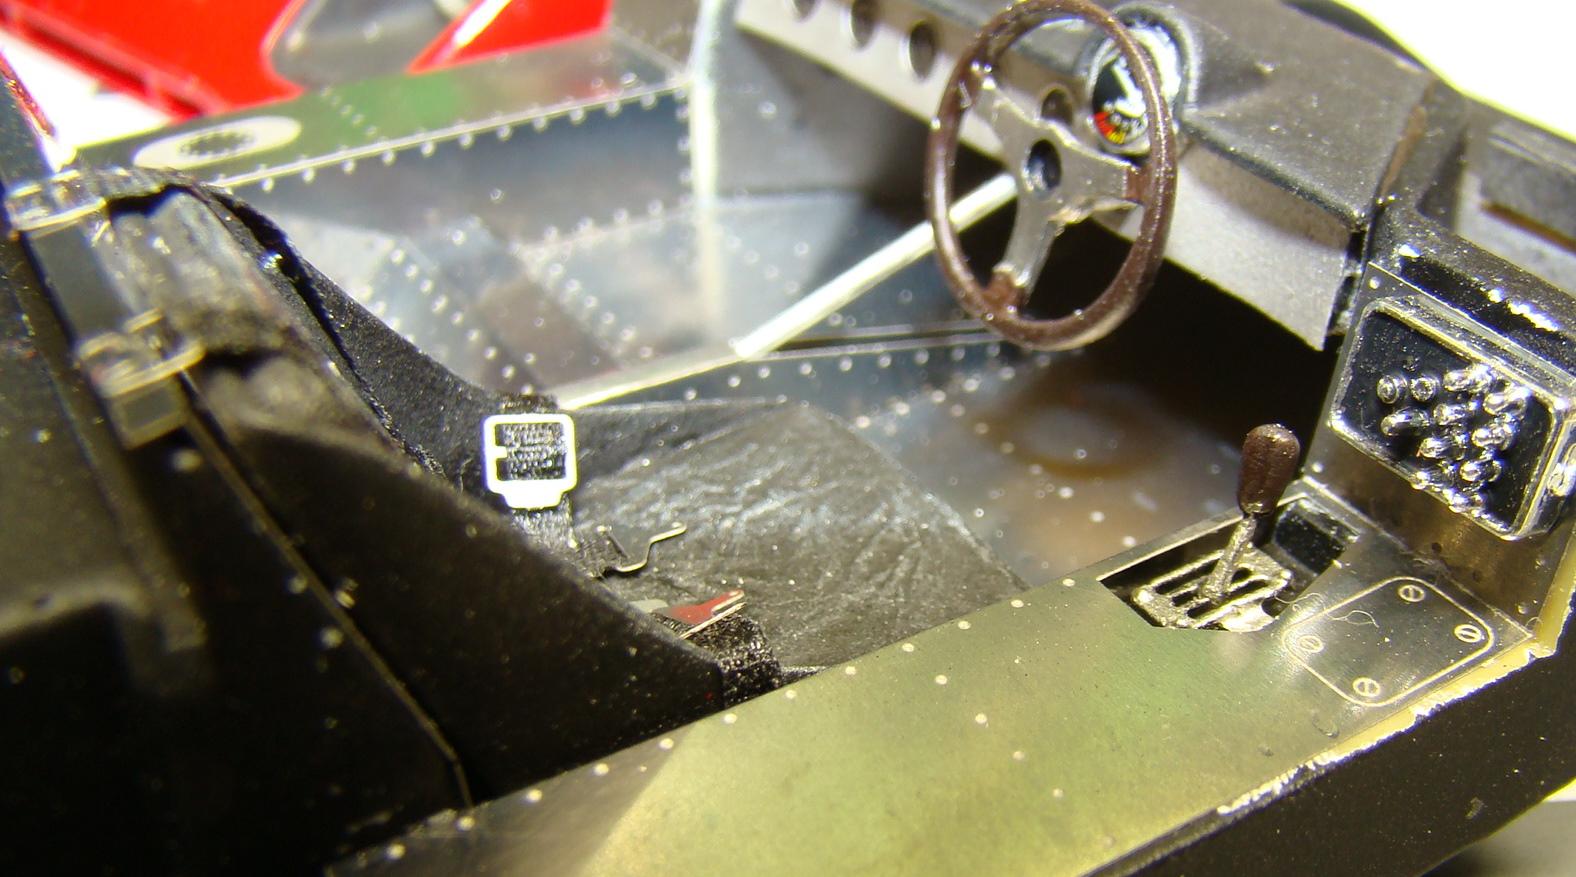
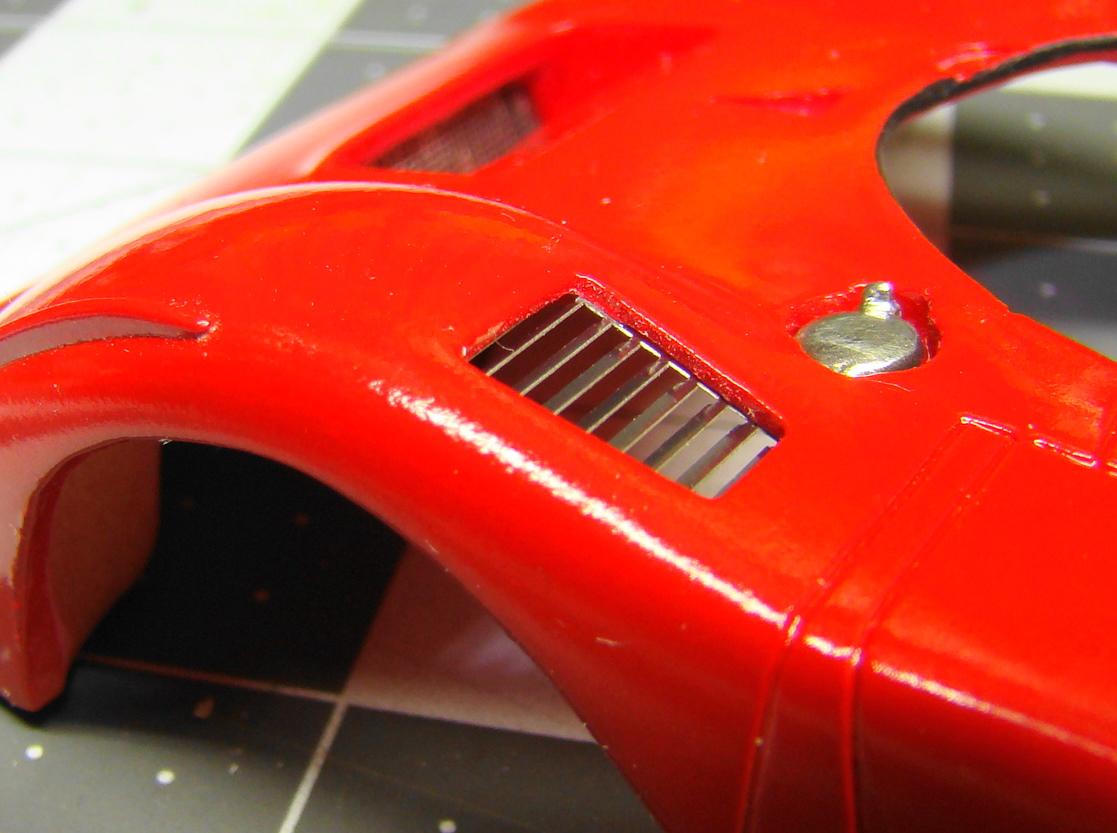
Another resin kit under my belt. This one a Fisher Ferari 512M cmapaigned by David Piper. Colour is Mr Color #327 red. Features include steering wheels, seatbelts, handmade rear deck and tailight support and extra parts from the parts box. Kit went together very well as i am geting used to the engineering on these kits. Once you are aware of what it takes, each job becomes easier. This car looks good next to the Sunoco Ferrari 512M I did several years ago. Note the texture on the seat and the silk ribbon seat belts. Guages behind the PE dash had to be backed with foil to be seen A Attaching these was no easy task These vents had to be bent upwards. Guess who got them bent the wrong way. Fiing it was a delicate proposition. Fixing photo etch windshield wipers is an artform all to itself and one I have not quite mastered. Wheels are painted a special mixture of silver, gold, copper and red to match the alloy Campagnolo used for Ferrari wheels. Special care was taken not to fill in the rivet detail on the tub. Bare Metal foil aluminium made them stand out.
-
Welcome Joe. Painting and the selection of materials is 80% of the artwork in modeling in my opinion. Always do a practice sample before commiting. Having a desiginated spray area, like an inside paint booth, will be a huge benefit to your hobby,. Stick with it.
-
Interior work is outstanding and a nice job photographing it.
-
A great save. These kits were tough to build to begin with and you did a good job. I have mine from when it was built in 1965 and just might do what you have done. Mine has long since yellowed. I have re-visited an IMC kit (Chaparral 2E) and they can be made into a decent model with new paints and techniques. Yours is proof of that.
-
Autokits Lotus and Ferrari Trading Places ...
Rich Chernosky replied to absmiami's topic in WIP: Model Cars
I am fortunate to own a lathe. Not as proficient at it as i would like but use it just the same. -
Autokits Lotus and Ferrari Trading Places ...
Rich Chernosky replied to absmiami's topic in WIP: Model Cars
Kit exhausts will probably have to be replaced, I have a set of turned aluminium wheels with PE inserts and the correct tires. The kit pictured above is a Revival 1/20. I have seen the CMC but have never seen an Exoto. I do appreciate the insights and will take them into account. There will be a lot more research than just my built kit. Don't have the scale drawings BTW.