Pierre Rivard
-
Posts
2,579 -
Joined
-
Last visited
Content Type
Profiles
Forums
Events
Gallery
Everything posted by Pierre Rivard
-
’72 Dodge Demon Drag Racer 1/25 scale
Pierre Rivard replied to AmericanMuscleFan's topic in WIP: Drag Racing Models
Very convincing, looks the way a real car structure would be fabricated. You might want to extend the engine compartment upper tubes through the dash & Ip and connect to the front roll cage posts -
Dan Gurney's '61 Impala 1:25
Pierre Rivard replied to Belugawrx's topic in WIP: Other Racing: Road Racing, Land Speed Racers
That is a very delicate foiling and masking operation. Anxious moments for sure. I admire your skills there, not something I am capable of doing... not even close! -
You'l need HEAVY HEAVY DUTY torsion bars for this baby 😁
-
Dan Gurney's '61 Impala 1:25
Pierre Rivard replied to Belugawrx's topic in WIP: Other Racing: Road Racing, Land Speed Racers
Off to a fast start. Having such a nice built & painted 409 sitting in a box helps! 😁 -
Back in the day, the idea of putting a fixed roof over a classic roadster was not well received. I'd love to have one of these now.

-
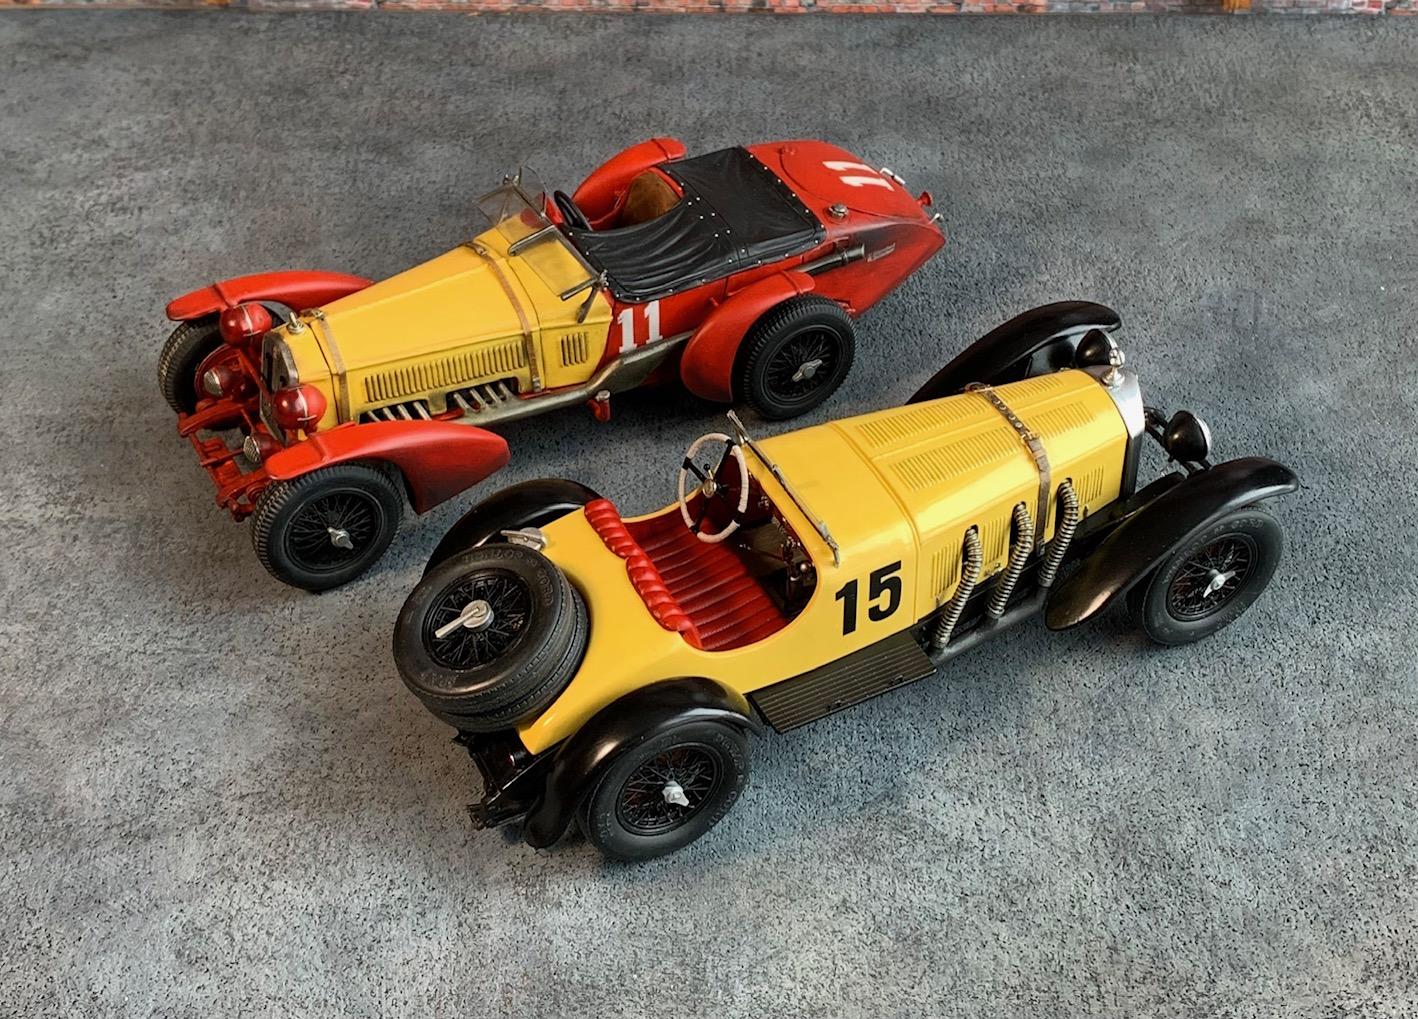
1928-31 Mercedes Benz SSK
Pierre Rivard replied to Pierre Rivard's topic in Other Racing: Road Racing, Salt Flat Racers
Thank you Alan. I appreciate so much that you took time to follow and comment on the WIP. Thank you Rich. I don't know if it was good choices for mods or just luck but this one proceeded without issues despite all the modifications. Compared to the recent 300SLR and BMW 3.5csl builds this one just came together. I am very happy with the results. -
1928-31 Mercedes Benz SSK
Pierre Rivard replied to Pierre Rivard's topic in Other Racing: Road Racing, Salt Flat Racers
Thank you Larry! -
1988 Mclaren MP4/4 F-1.
Pierre Rivard replied to Rich Chernosky's topic in Other Racing: Road Racing, Salt Flat Racers
Nobody can build a beauty like this one as efficiently as you can Rich. A wonderful rendition of a historic race car. The Senna-Prost battle was as epic as it gets. Thank god for that as there was absolutely no opposition to this car. If I remember right they were so dominant they lapped the whole field. -
Looks very sharp Mario. Details are crisp, paint is excellent and your presentation diorama always complements your builds so well. Feels like the real car sitting in a Montreal alley. Cool!
-
3rd gen Camaro
Pierre Rivard replied to MarkJ's topic in WIP: Other Racing: Road Racing, Land Speed Racers
Just like that on primer it looks really really good. Can't wait to see it with color sprayed on. Almost there! -
Superb work Jim. Starting with a vintage kit and then adding styrene, brass, resin and printed component fabrication makes for beautiful scale modeling for us to follow. What you do is special. Have you considered Milliput for making the seat and other leather parts. Feels a bit like plasticine and pretty of tine to shape and texture surfaces before it starts hardening.
-
Alfa 33 TT12
Pierre Rivard replied to Dave B's topic in WIP: Other Racing: Road Racing, Land Speed Racers
Taking pictures along the way helps a lot as a snapshot picks up irregularities we can sometimes miss. A few more passes will be needed but no doubt your expert body shop will take care of business! -
Amazing, who needs a transkit right?
-
Great application of weathering pigments. The pictures of the engine compartment, interior and rear bay/fuel cell all show the effect of racing in the desert. Very realistic. What a great project!
-
1928-31 Mercedes Benz SSK
Pierre Rivard replied to Pierre Rivard's topic in Other Racing: Road Racing, Salt Flat Racers
Thank you my friend. Your praise humbles me. As you can see I work mostly from styrene and putty, but doing the research and breaking it down to small steps allows me to actually do more than I thought I could. Obi-Wan I am not but with persistence I find little ways to improve with each build. Thank you Dave. I am quite happy with it but it was a challenge and I need to recharge. For sure one more before I close shop for the start of golf season Merci! You are too kind Francis. The photos are the test. If the model comes out with a reasonable dose of realism mission accomplished. Sometimes they come out not quite as good as we wish, sometimes better. I did not bang my head too much on this one and I really like the way it came out. Thanks again for the advice about the steering wheel. -
I love alu duct tape. Put to good use here. The tail lamps are a little scale model by themselves. Eye candy!
-
T41 Bugatti sport coupe
Pierre Rivard replied to charlie libby's topic in WIP: Other Racing: Road Racing, Land Speed Racers
I feel sad about your injury and hope you will recover 100% The black and red theme looks very promising. Patiently waiting for you to feel good enough to resume this extraordinary build. -
Early '50s Bonneville Streamliner
Pierre Rivard replied to W-409's topic in WIP: Other Racing: Road Racing, Land Speed Racers
Oh yes Niko, my kind of project! Stay focused and go for what you have imagined this would be. Caution, I don't want to derail you from your vision but...I'm just curious here, is the plan to keep the driver ahead or set it up more traditional with him in the back? -
1928-31 Mercedes Benz SSK
Pierre Rivard replied to Pierre Rivard's topic in Other Racing: Road Racing, Salt Flat Racers
Bonus shot, the old lion and the challenger
-
1928-31 Mercedes Benz SSK
Pierre Rivard replied to Pierre Rivard's topic in Other Racing: Road Racing, Salt Flat Racers
Happy you appreciated the WIP. I am happy with the results as I tried a few new techniques on this one Thank you Noel. Any Bugatti kits out there I should try. I'd love to build the tank Thanks Niko. I use mainly Vallejo Aluminium and occasionally Chrome (more a bright all than chrome look) and oiled earth washes to bring up features Thank you Thomas. Yes it is 1/24 Thanks Chris It looks good built as designed but it is fun to add more details. -
1928-31 Mercedes Benz SSK
Pierre Rivard replied to Pierre Rivard's topic in Other Racing: Road Racing, Salt Flat Racers
Thanks John. I did not plan to do so many changes to start with but not hitting road blocks encouraged me to add more along the way. The design of these pre-war cars provide enough room to do these detailing jobs. The kit is basic but cast with good quality and reasonable dimensions. A good foundation. Thank you sir Thanks Roger. All paint finishes are brush painted using Vallejo acrylics. -
1928-31 Mercedes Benz SSK
Pierre Rivard replied to Pierre Rivard's topic in Other Racing: Road Racing, Salt Flat Racers
Thanks Jim, it is 1/24 scale Thank you my friend. I too tend to prefer post-war race cars but the pre-war cars are very interesting to work on, they are really growing on me. The kit is basic but the chassis, engine and body components are well cast and provide a good foundation to start with. For 1966 tooling this is a very good kit. Thank you Bruce, this project went in a surprisingly smooth way. -
Amazing on how a set of lines can result in a pretty car (X/19) and placed a little differently ending up as the hard to look at Rainbow. So many beautiful cars never got kitted yet this atrocity was kitted twice.
-
’72 Dodge Demon Drag Racer 1/25 scale
Pierre Rivard replied to AmericanMuscleFan's topic in WIP: Drag Racing Models
Wow, beautiful fabrication, you even thought of plumbing connections for in tank TOC. Leaving no stone un-turned here. Can you share on the maker/supplier for the PE radiator mesh. It makes such a statement. -
‘59 Bugeye Sprite
Pierre Rivard replied to gbtr6's topic in WIP: Other Racing: Road Racing, Land Speed Racers
The way you have made these doors functional and with a perfect fit is superb. Dashboards are fun to make and a key visual element on a roadster. Very interesting build to follow.