Pierre Rivard
-
Posts
2,579 -
Joined
-
Last visited
Content Type
Profiles
Forums
Events
Gallery
Everything posted by Pierre Rivard
-
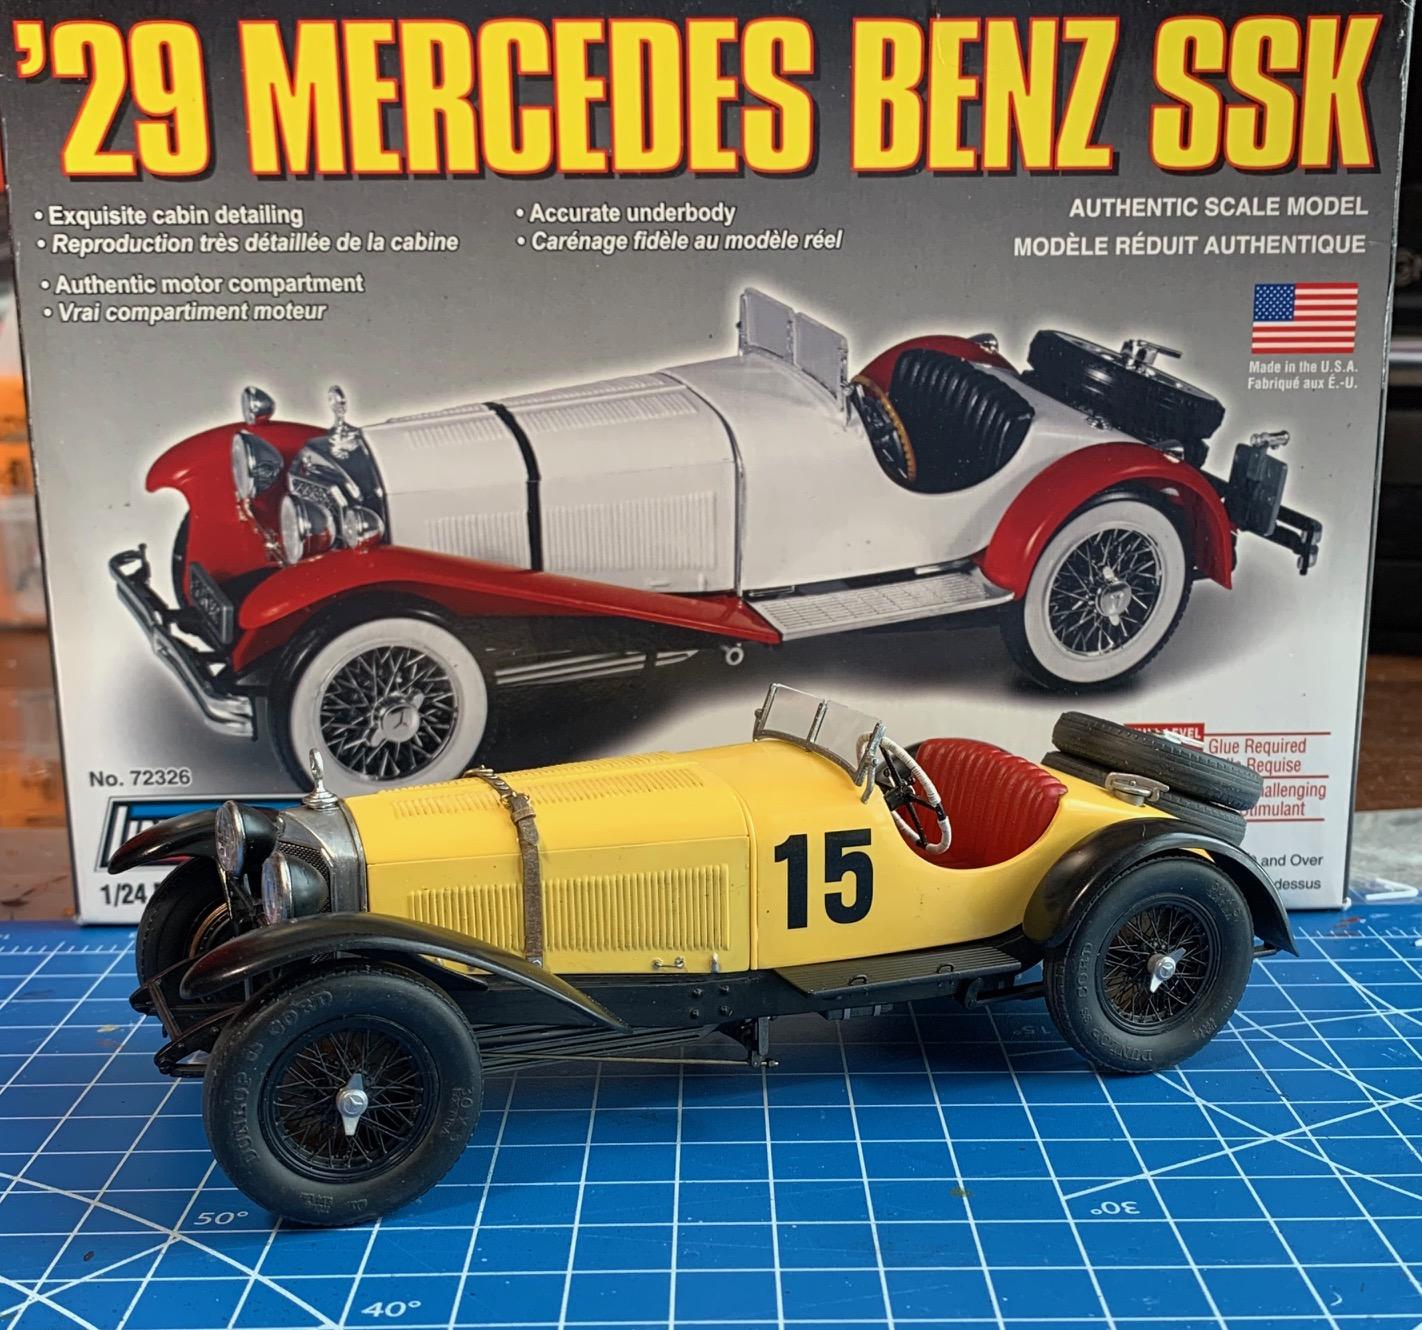
Mercedes Benz SSK
Pierre Rivard replied to Pierre Rivard's topic in WIP: Other Racing: Road Racing, Land Speed Racers
Thank you all for the support and interest. Link to the finished build under glass -
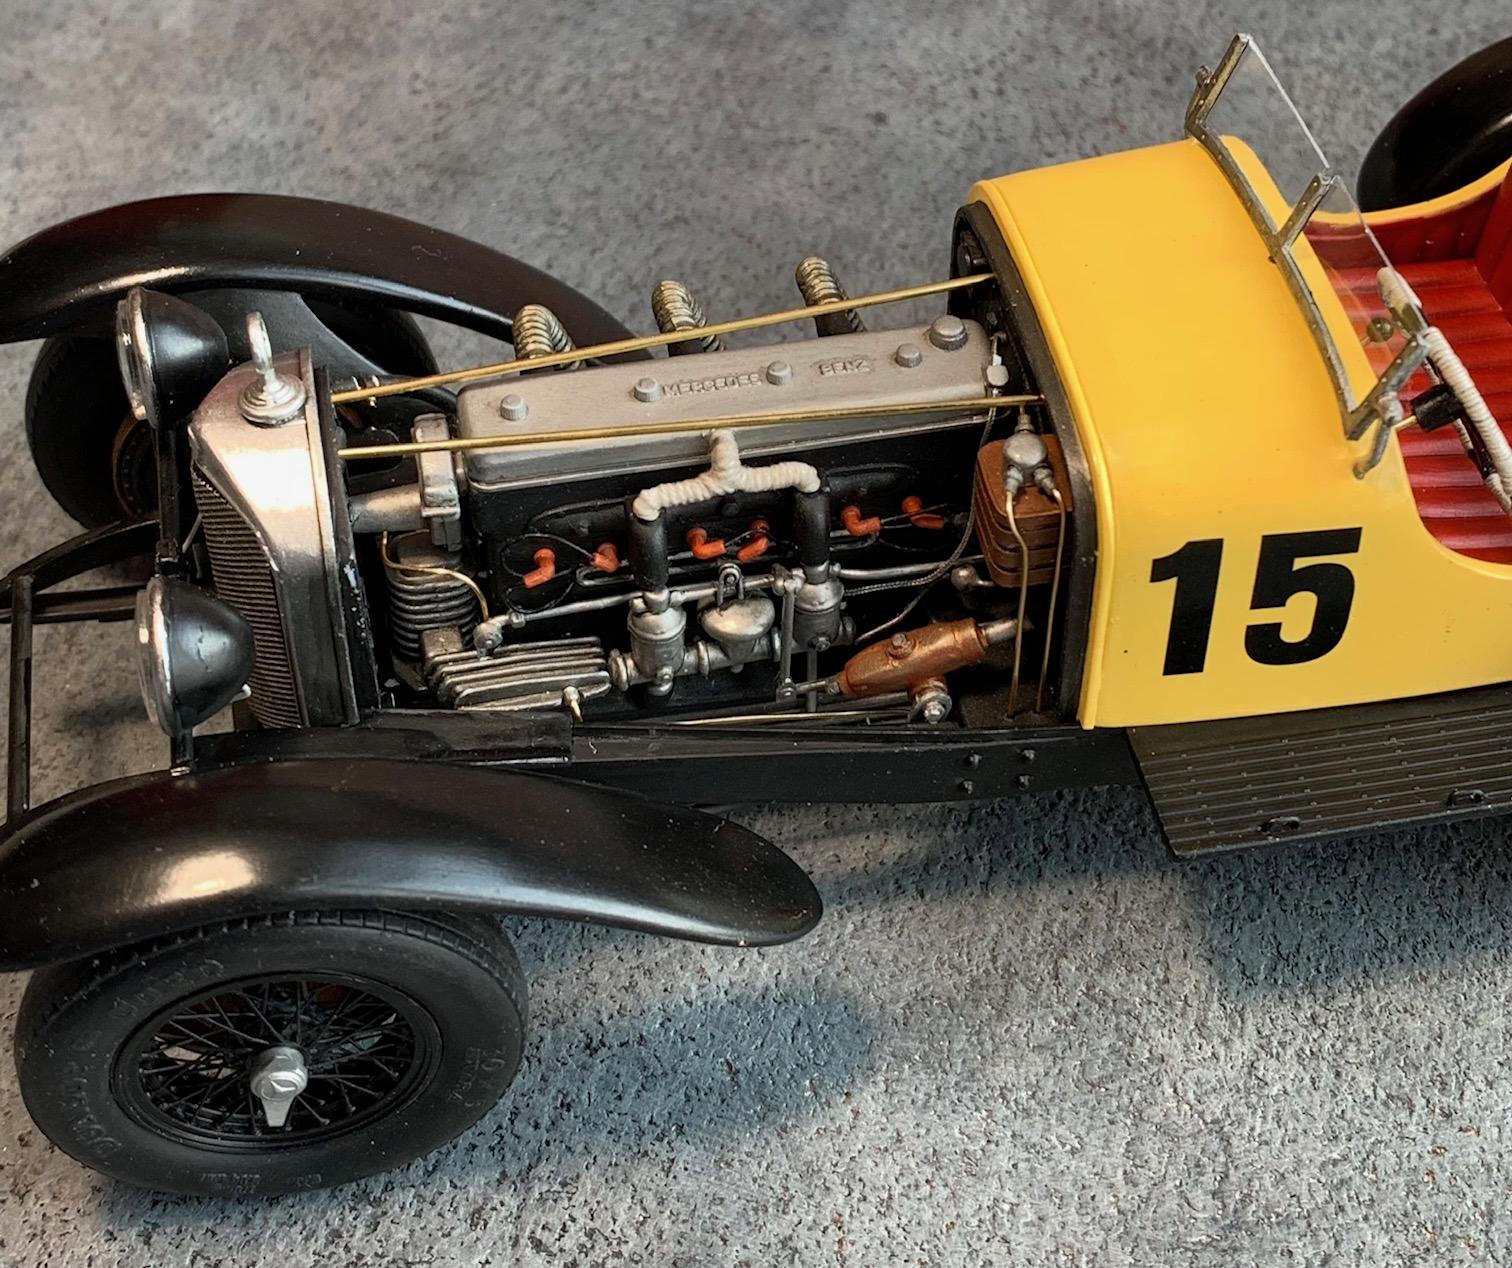
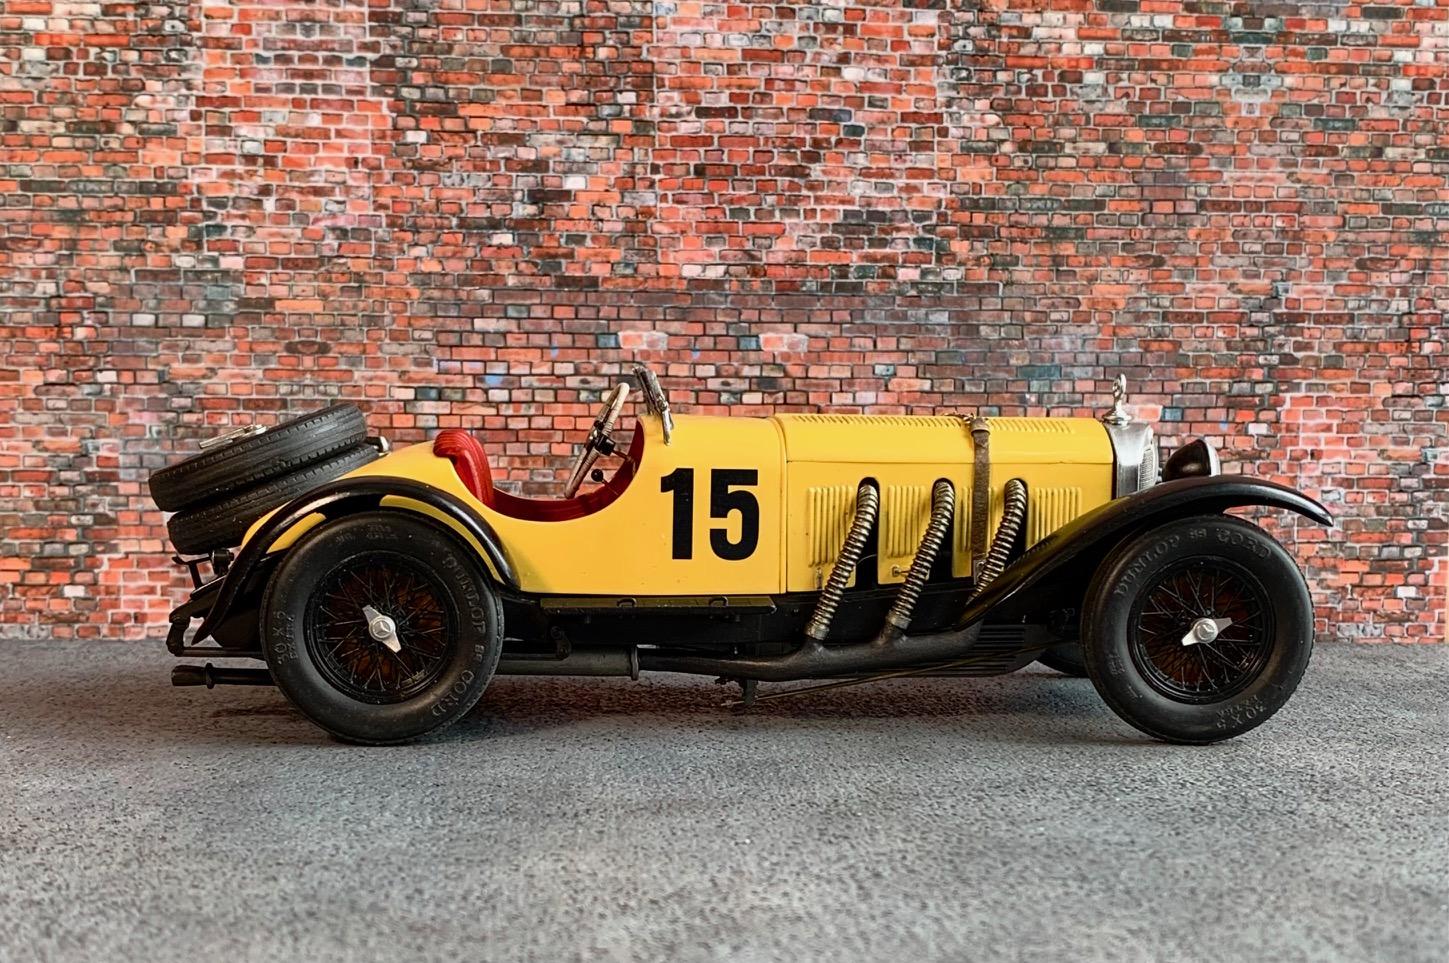
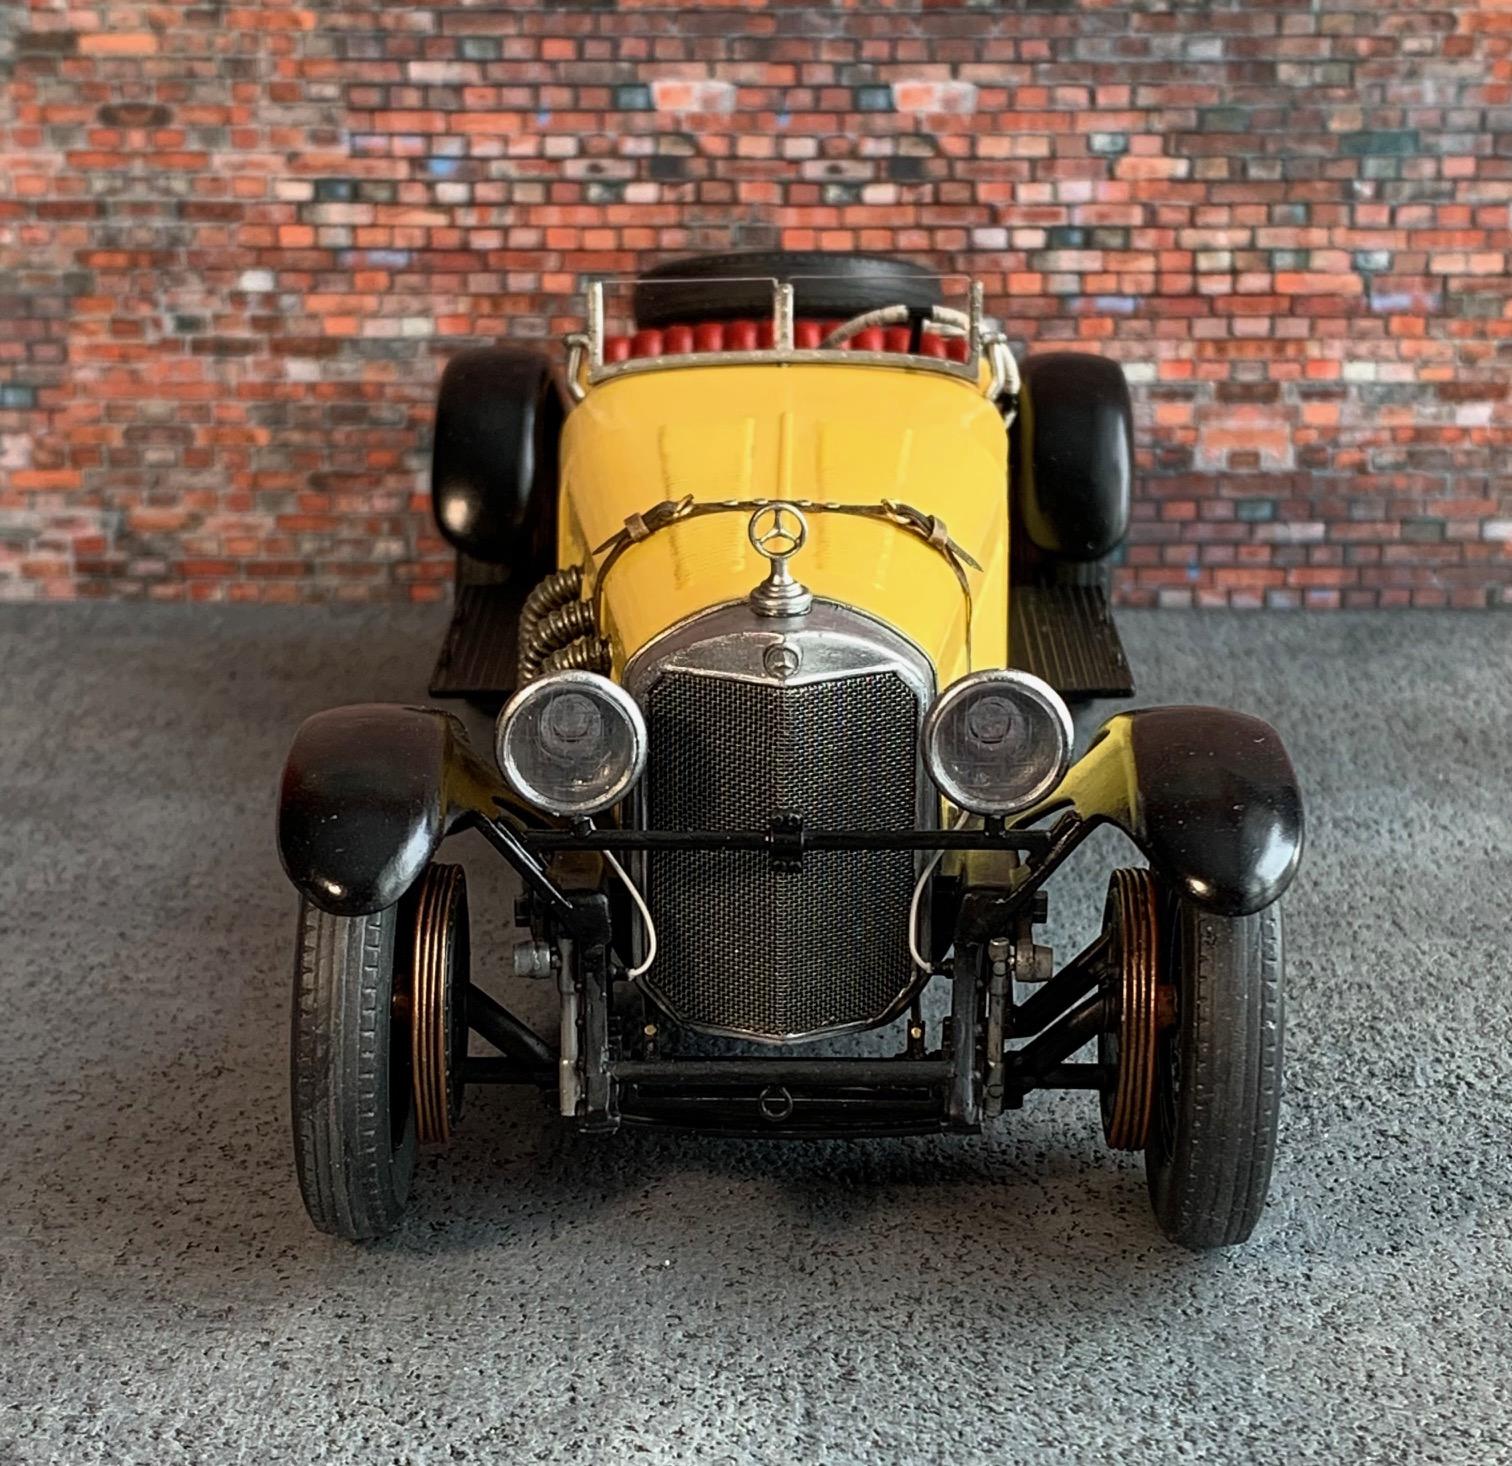
The last car engineered by Ferdinand Porsche before leaving Mercedes to start his own shop. The SSK was a shorter chassis evolved from the S line and only 33 were built. Some wore the Touring bodywork but most were outfitted or converted to the Sport body and intended for a racing life. Wit it's brutish 7.1 ohv supercharged engine producing up to 300 hp and 500 lb.ft of torque, the car could reach 193 km/hr but stopping was a challenging task with mechanically actuated drum brakes. A second brake pedal was added to the mechanic's side to help the driver slow down the beast. This formidable racing machine had a short but dominant racing career before leaving the stage to the lighter more advanced Alfa Rome 8C. This build started out with a Lindberg kit (tooling circa 1966) which depicted the car as a luxury coupe with whitewall tires. I took on the task of transforming it into the racer it was always meant to be. Pretty much everything was changed, modified or upgraded. This is not in criticism of this nice but simple vintage kit but more about the vision I had for this build. A WIP was produced explaining all the steps of the transformation.

- 35 replies
-
- 13
-

-
Ken, I found a workaround for avoiding commercial use classification. Just start a print and give program. I volunteer to receive one...😁
-
Mercedes Benz SSK
Pierre Rivard replied to Pierre Rivard's topic in WIP: Other Racing: Road Racing, Land Speed Racers
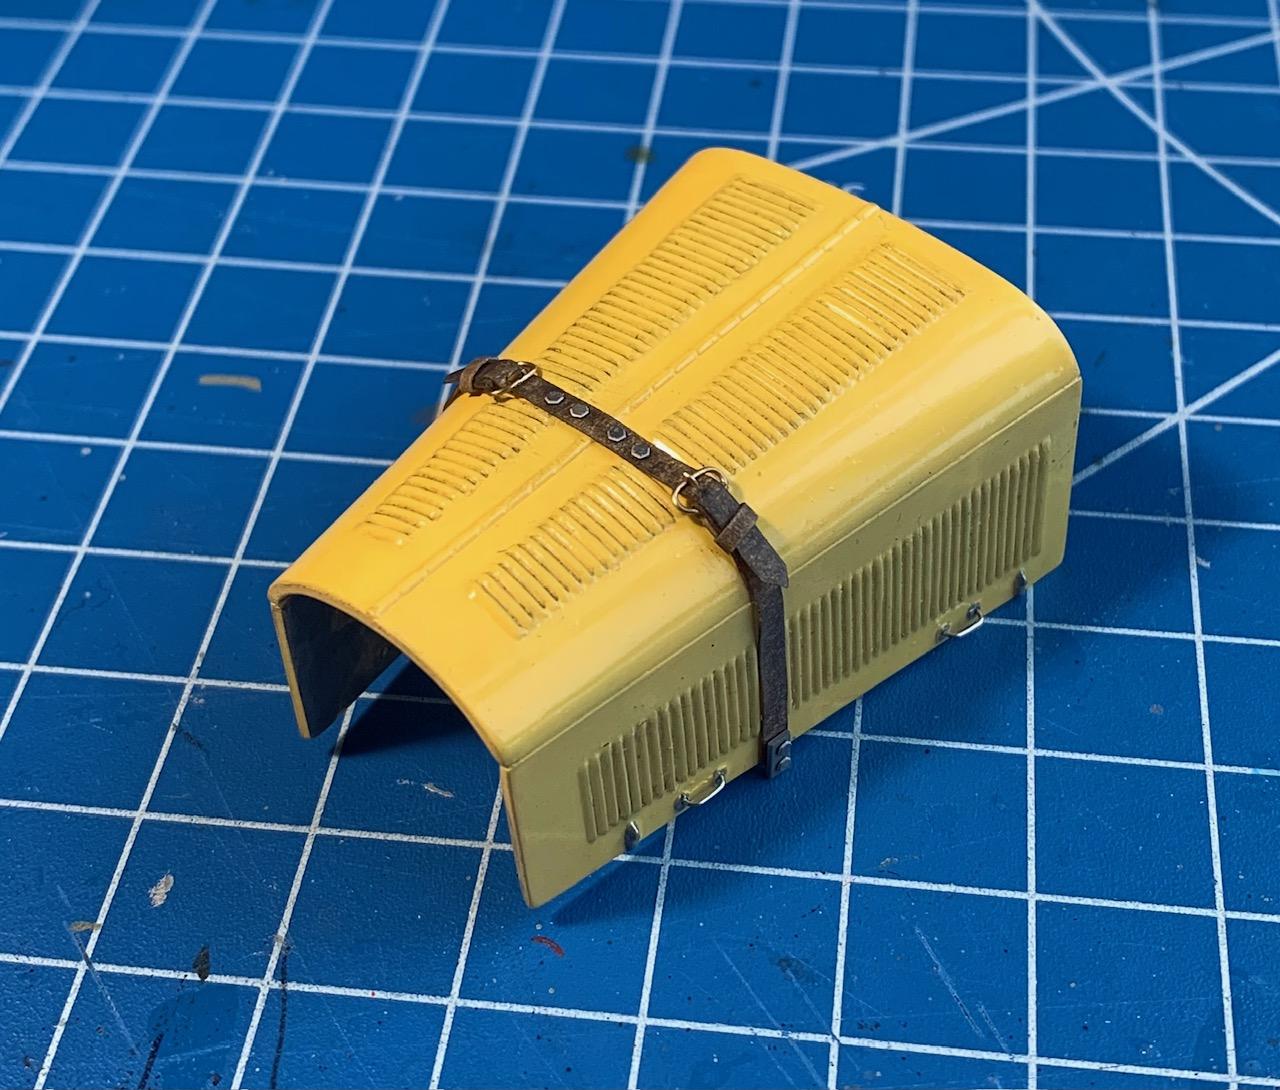
This is it, the last of this build. I thinned as much as possible the windshield frame and replaced the kit glass with 0.5 mm clear Evergreen. Makes the glass look more in scale. Finally the hood strap made from masking tape and Tamiya weathering paste to replicate leather. This one is done. Full set of photos under glass later today.
-
Mercedes Benz SSK
Pierre Rivard replied to Pierre Rivard's topic in WIP: Other Racing: Road Racing, Land Speed Racers
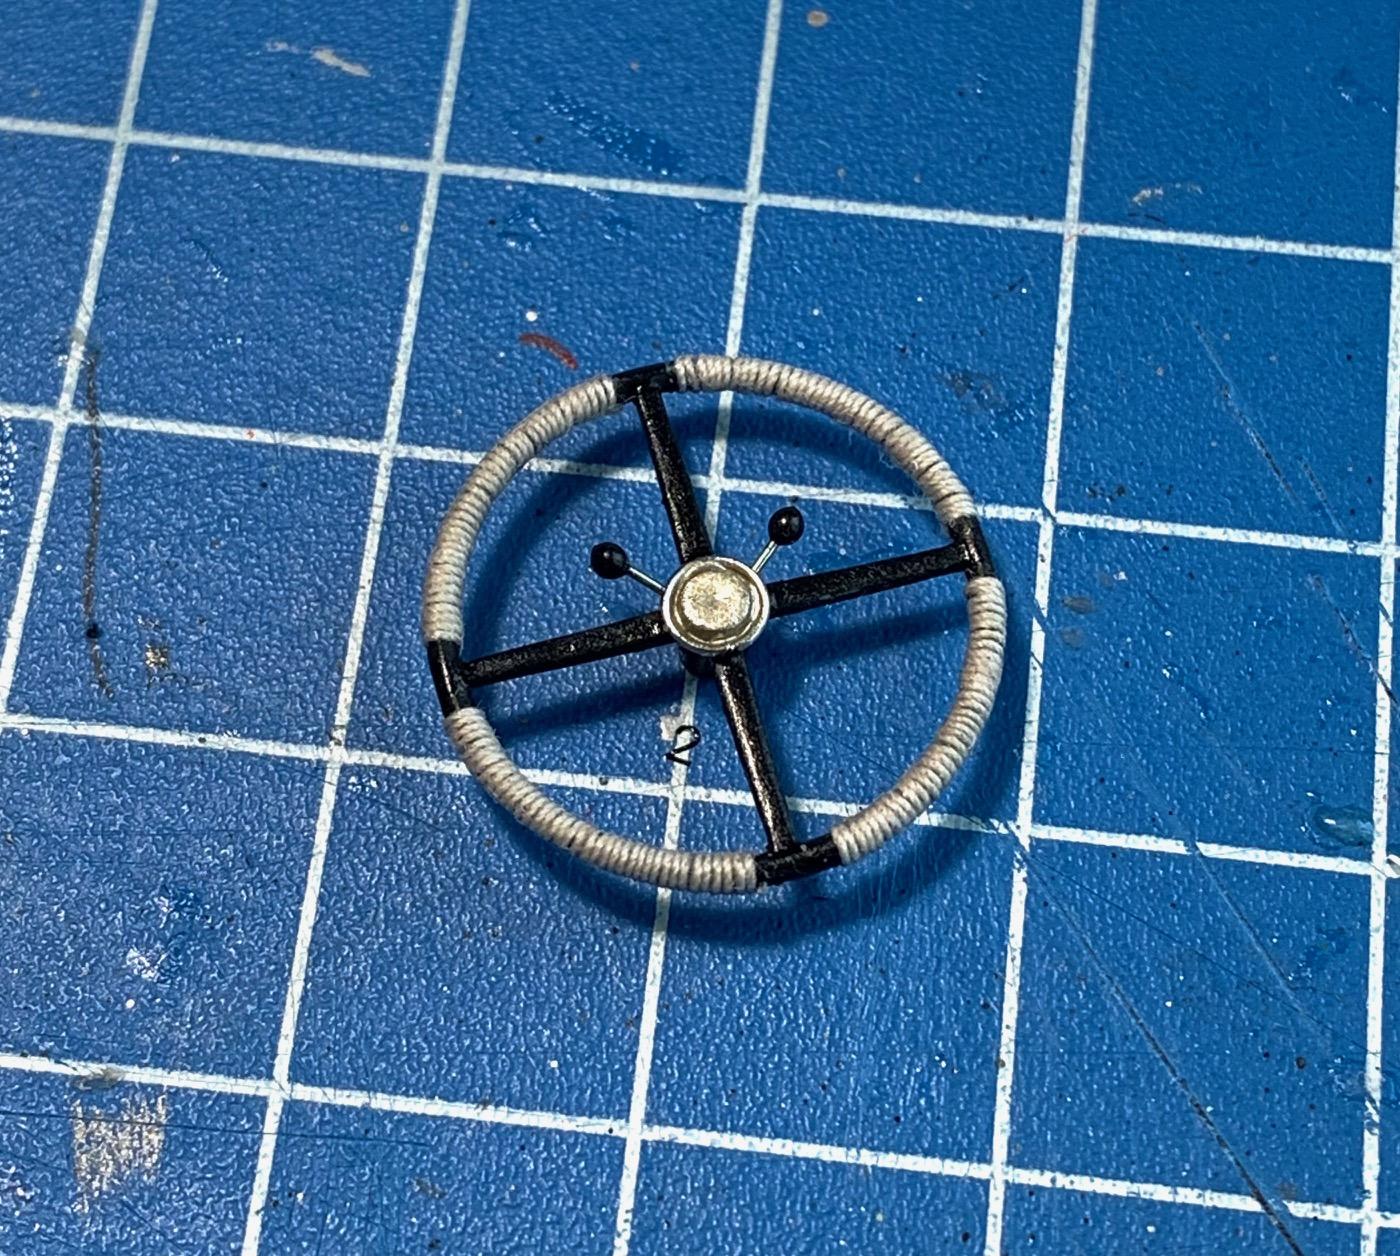
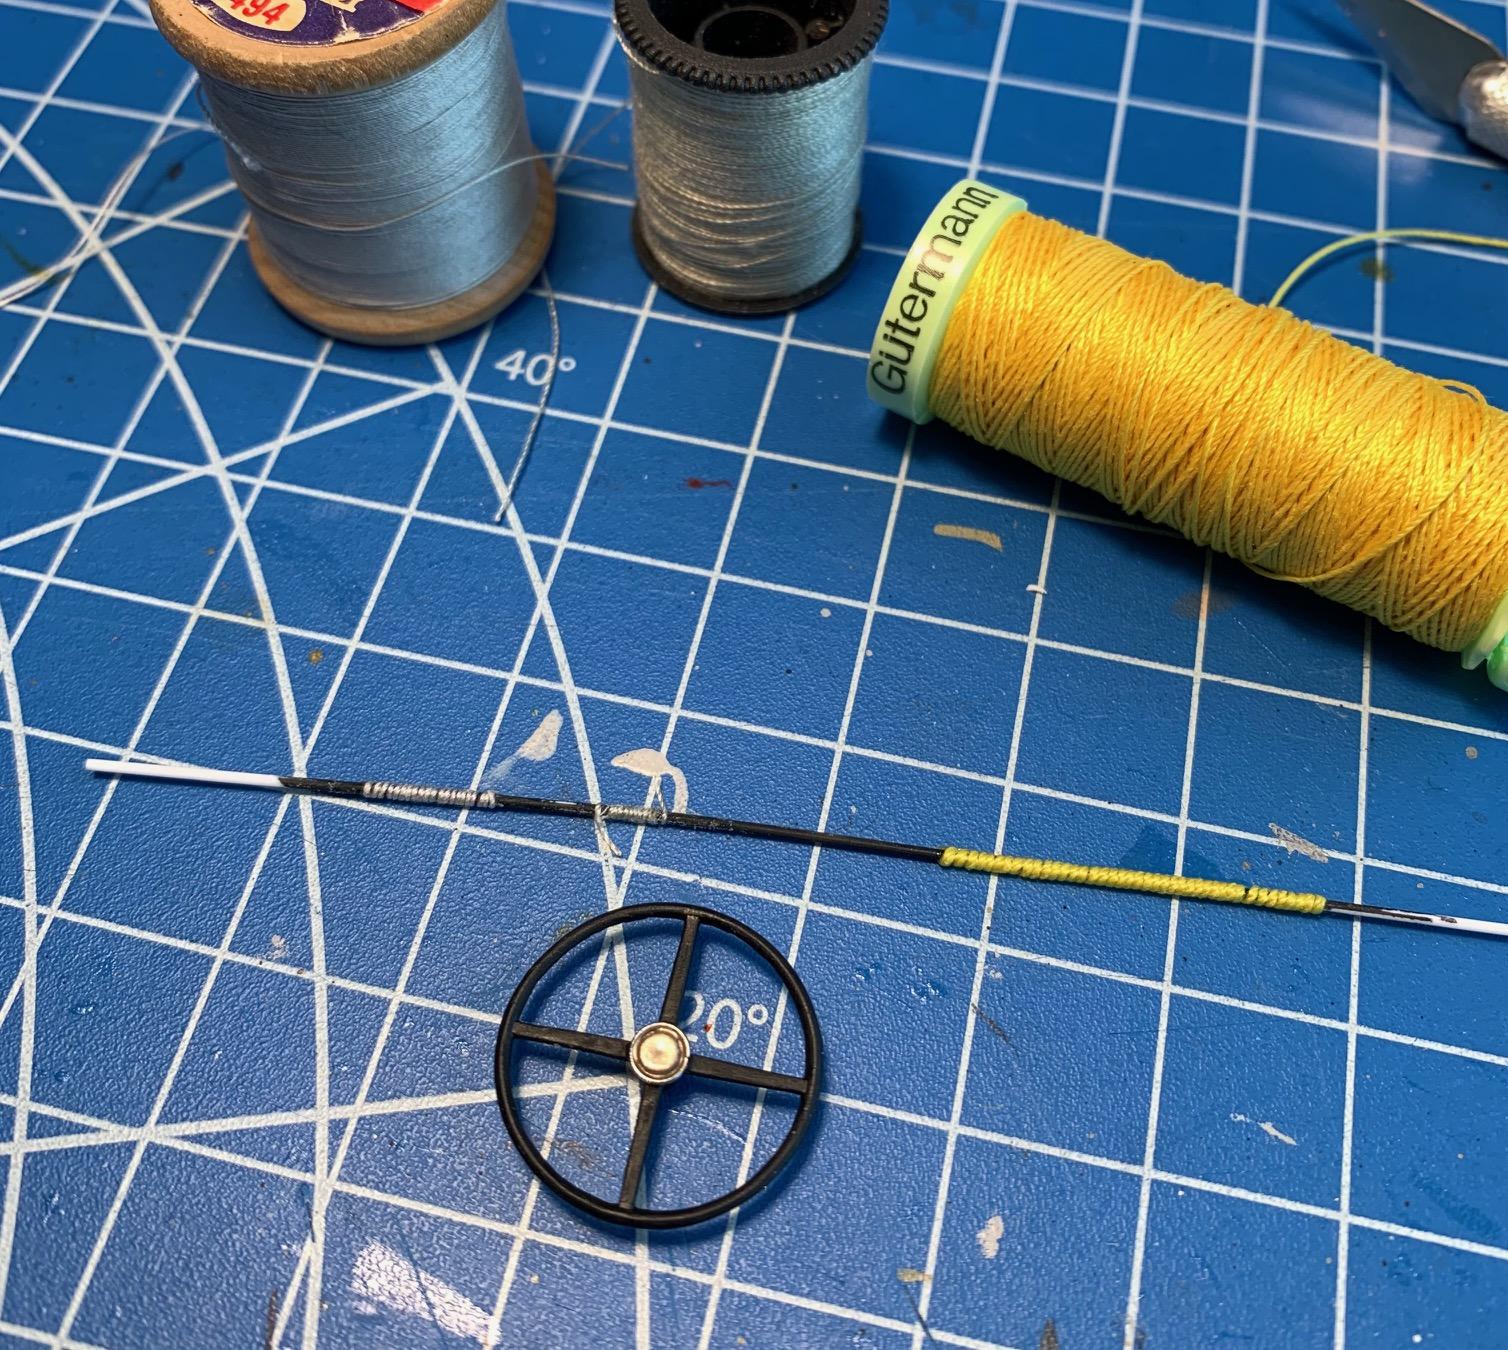
Ken's advice made a big difference. Pictures may not show it well but it now looks like scaled down rope. Thank you Brian. Lot's of work went into that one. I'm happy I started with the engine. I doubt I would have had the patience to do it on the back end of the build. Thank you John. I've learned a lot by following builds from you and other masters. This is the highest possible compliment. If I could achieve 10% of what Gerald Wimgrove created I would be very very happy! Thank you so much Niko. This has been a really fun build. The following update will be the last. I just finished this one. -
Blue dot tail lights, nice touch and well fabricated. Like many other elements you have incorporated you are sweating the details. Beautiful stuff!
-
Mercedes Benz SSK
Pierre Rivard replied to Pierre Rivard's topic in WIP: Other Racing: Road Racing, Land Speed Racers
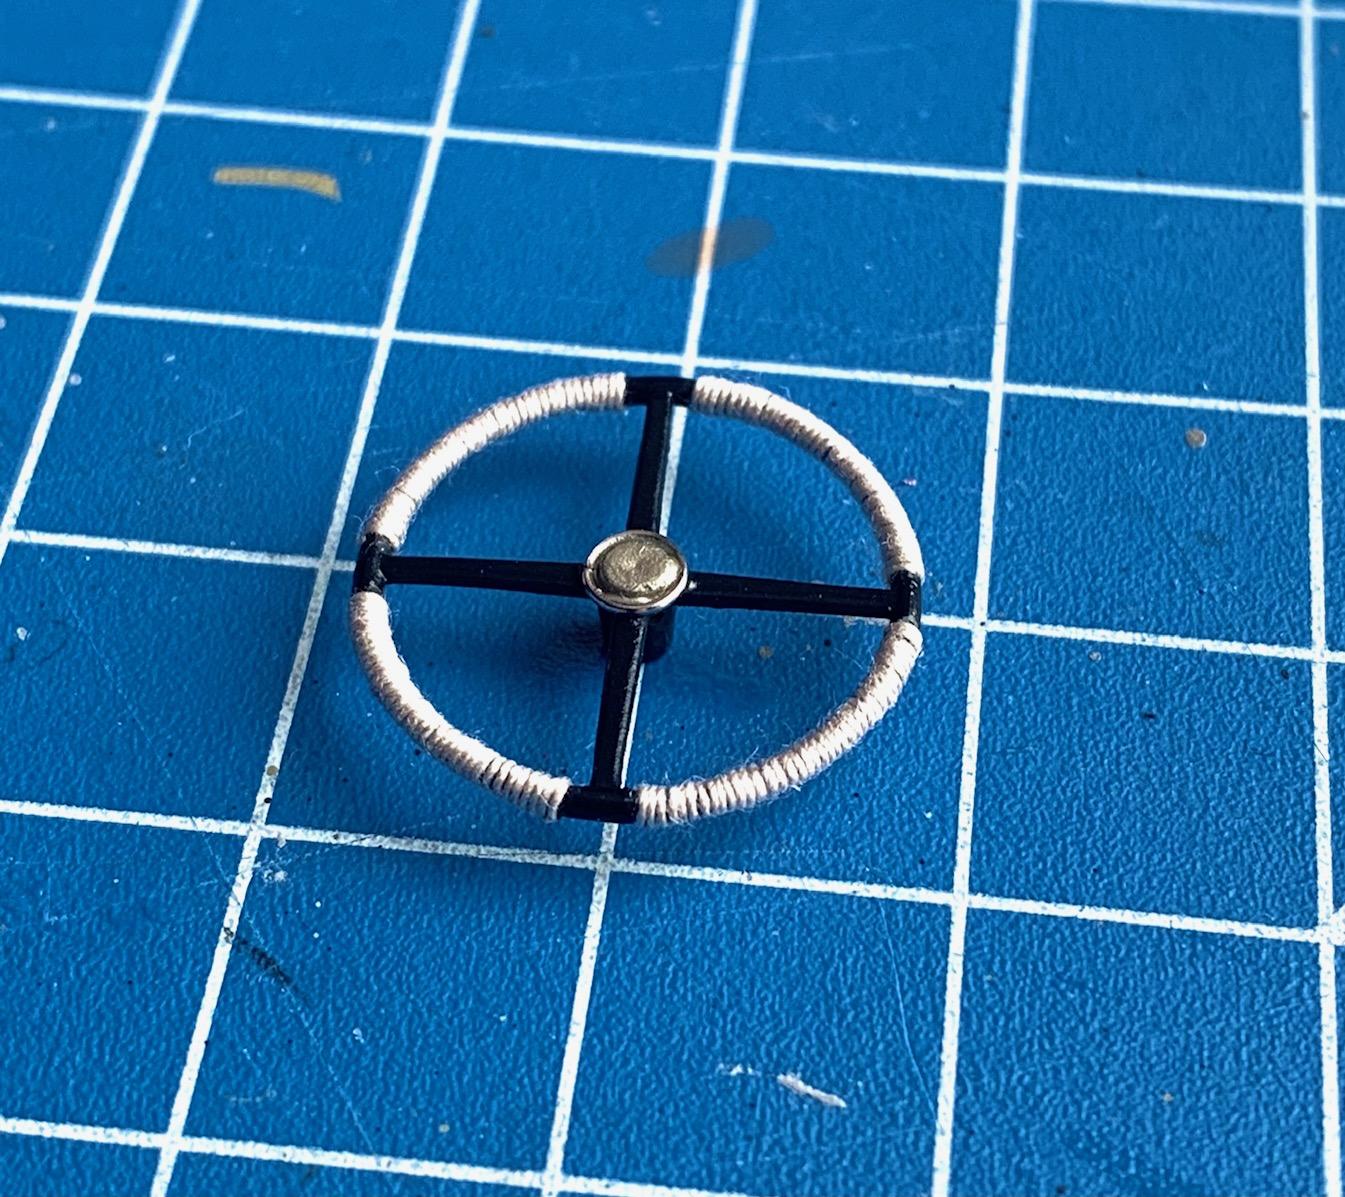
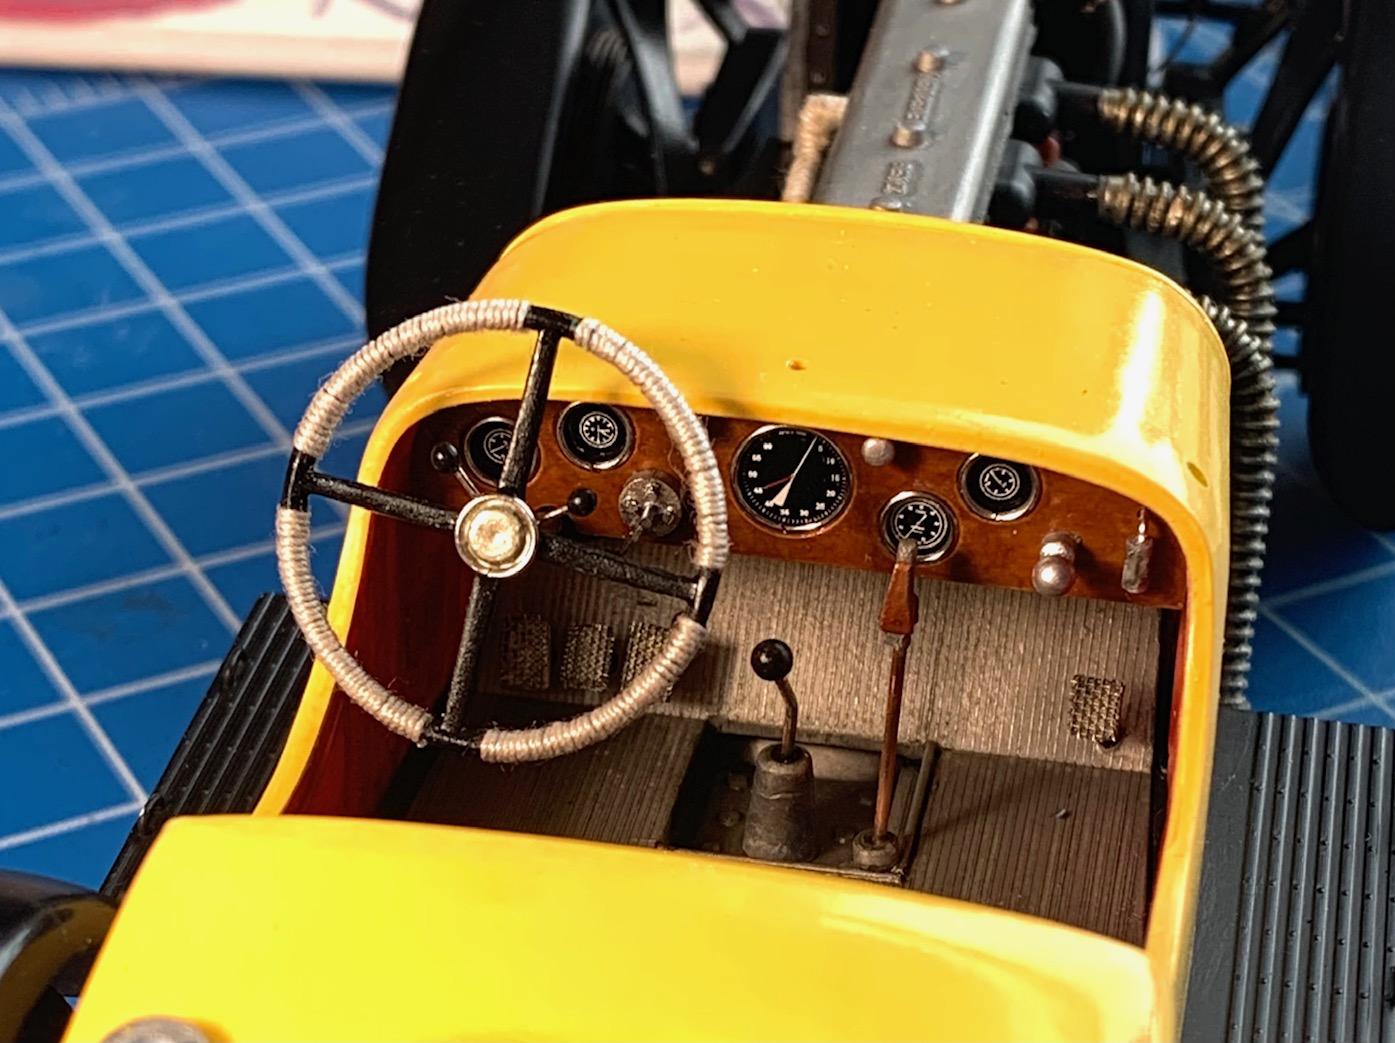
Thanks Bruce. The whole interior has come together well and for a rare occasion without any hurdles. Pretty much the way I was hoping for. It is. I did not really plan for everything on this build, making some decisions as I went but the idea of wrapping the wheel I had right from the start. It just took a while to develop a way of doing it. Superb suggestion Ken. I applied the mix slowly with a small brush over the roped areas. Fuzzies gone. Thank you for pointing me in the right direction here.
-
That engine bay looks really really good. The tires on this baby look so convincing the way you painted and weathered them. Super build in the making.
-
Peter, you log in with your e-mail and password, but we still see you as peteski, just like you like it. I don't know what the fuss is all about... Thank you Mr Ambrose for your support ant patience.
-
Mercedes Benz SSK
Pierre Rivard replied to Pierre Rivard's topic in WIP: Other Racing: Road Racing, Land Speed Racers
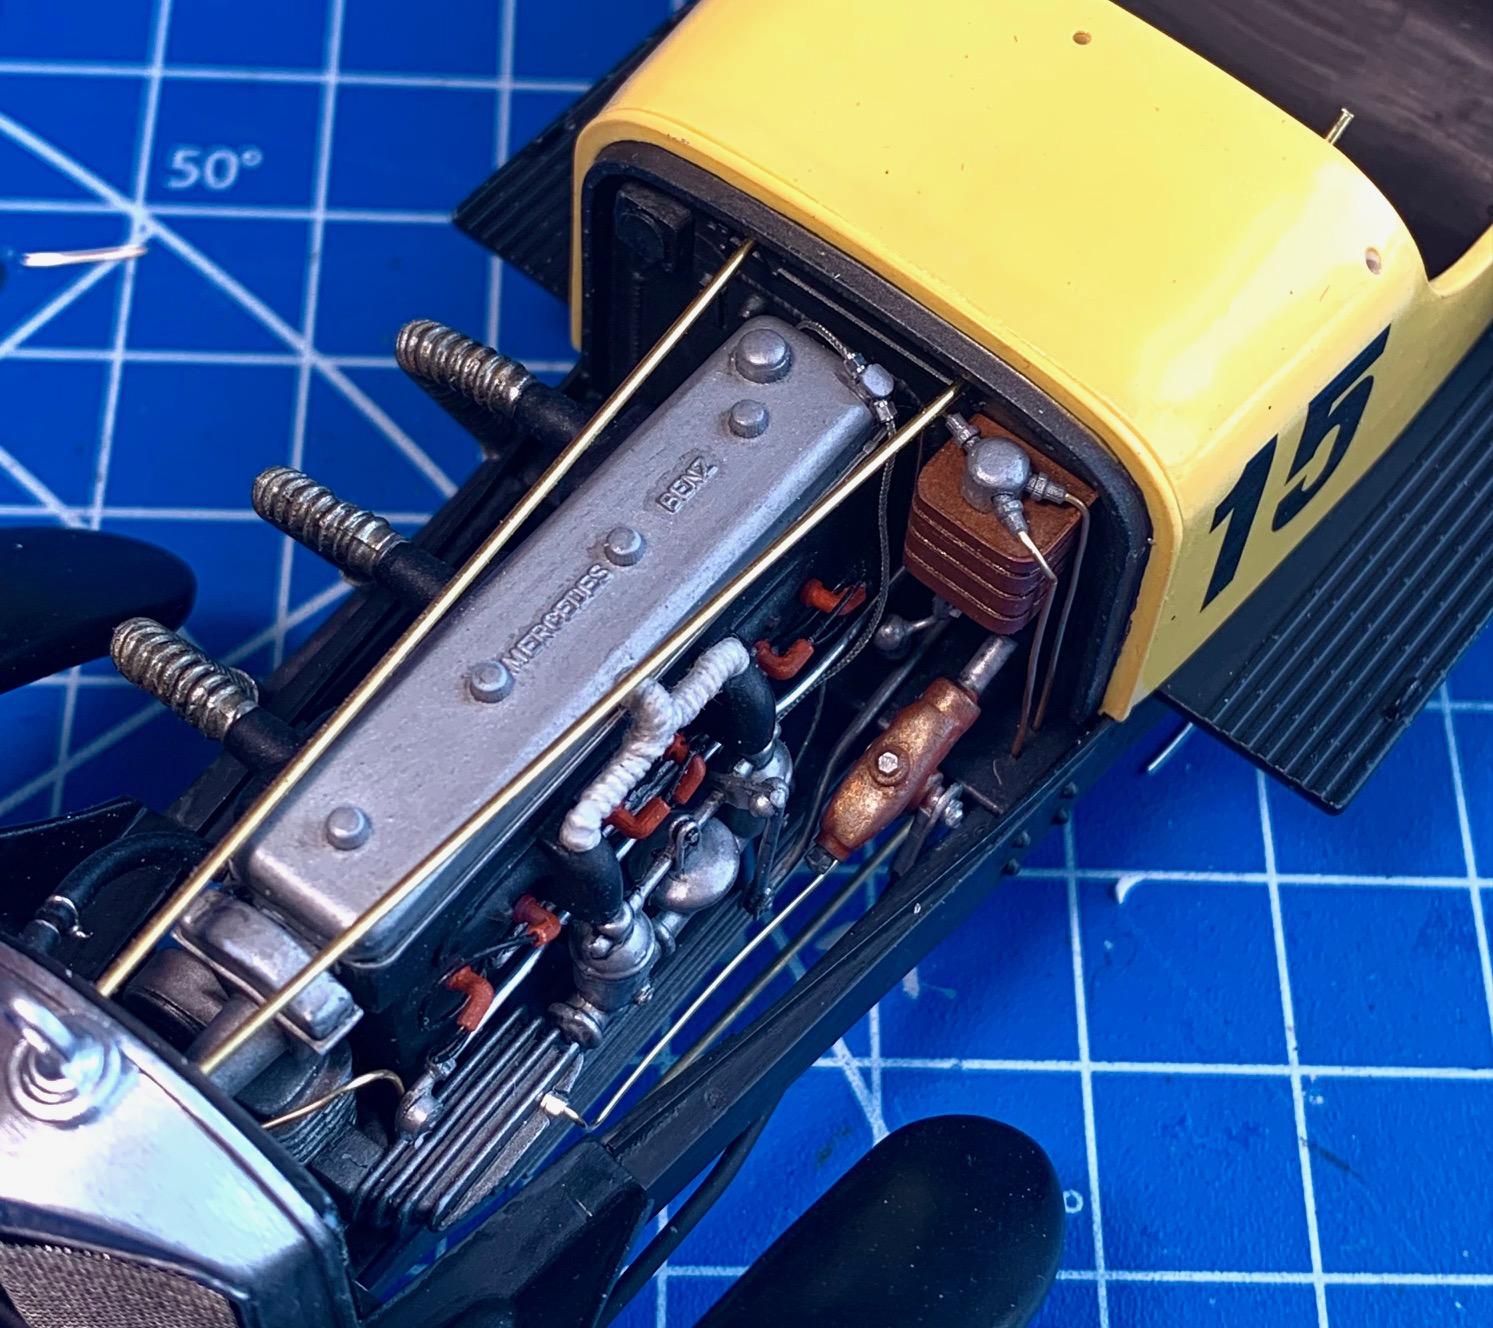
Final bits of the engine compartment could be done after the body was finally glued to the chassis. The fuel gravity tank I made a while back has been installed and the last to plumbing lines to it. I also added the two support rods (0.75mm brass) between the radiator support and the main body (runs over the engine valve cover). The engine compartment is now 100%
-
Mercedes Benz SSK
Pierre Rivard replied to Pierre Rivard's topic in WIP: Other Racing: Road Racing, Land Speed Racers
Doing experiments with a few sewing threads, finally picking one for wrapping the wheel rim. I added the steering column, made from 0.75mm brass rod and 1.19 Brass tube Used a small drop of epoxy at the end of a 0.4mm wire to make the little ignition adjustment levers, then got them trimmed and glued to the steering
-
Mercedes Benz SSK
Pierre Rivard replied to Pierre Rivard's topic in WIP: Other Racing: Road Racing, Land Speed Racers
I enjoy it so much when others share what they do so I try to do the same. It is through these exchanges that I try new things on every build. Thank you Andreas, comments much appreciated -
Tamiya Sauber Mercedes C9
Pierre Rivard replied to galaxyg's topic in Other Racing: Road Racing, Salt Flat Racers
Wow, such an amazing build Michael. The bodywork is exceptional in finish and the amount of detailing around the engine reveals your exceptional talent. Bravo! -
I really like the color scheme you are planning for this beauty. Do these kits have any sort of woodgrain decals or is this something you will have to achieve with paint effects?
-
If you're in a hurry, enamel will test your patience. 😉
-
Mercedes Benz SSK
Pierre Rivard replied to Pierre Rivard's topic in WIP: Other Racing: Road Racing, Land Speed Racers
One more for Andy.
-
Mercedes Benz SSK
Pierre Rivard replied to Pierre Rivard's topic in WIP: Other Racing: Road Racing, Land Speed Racers
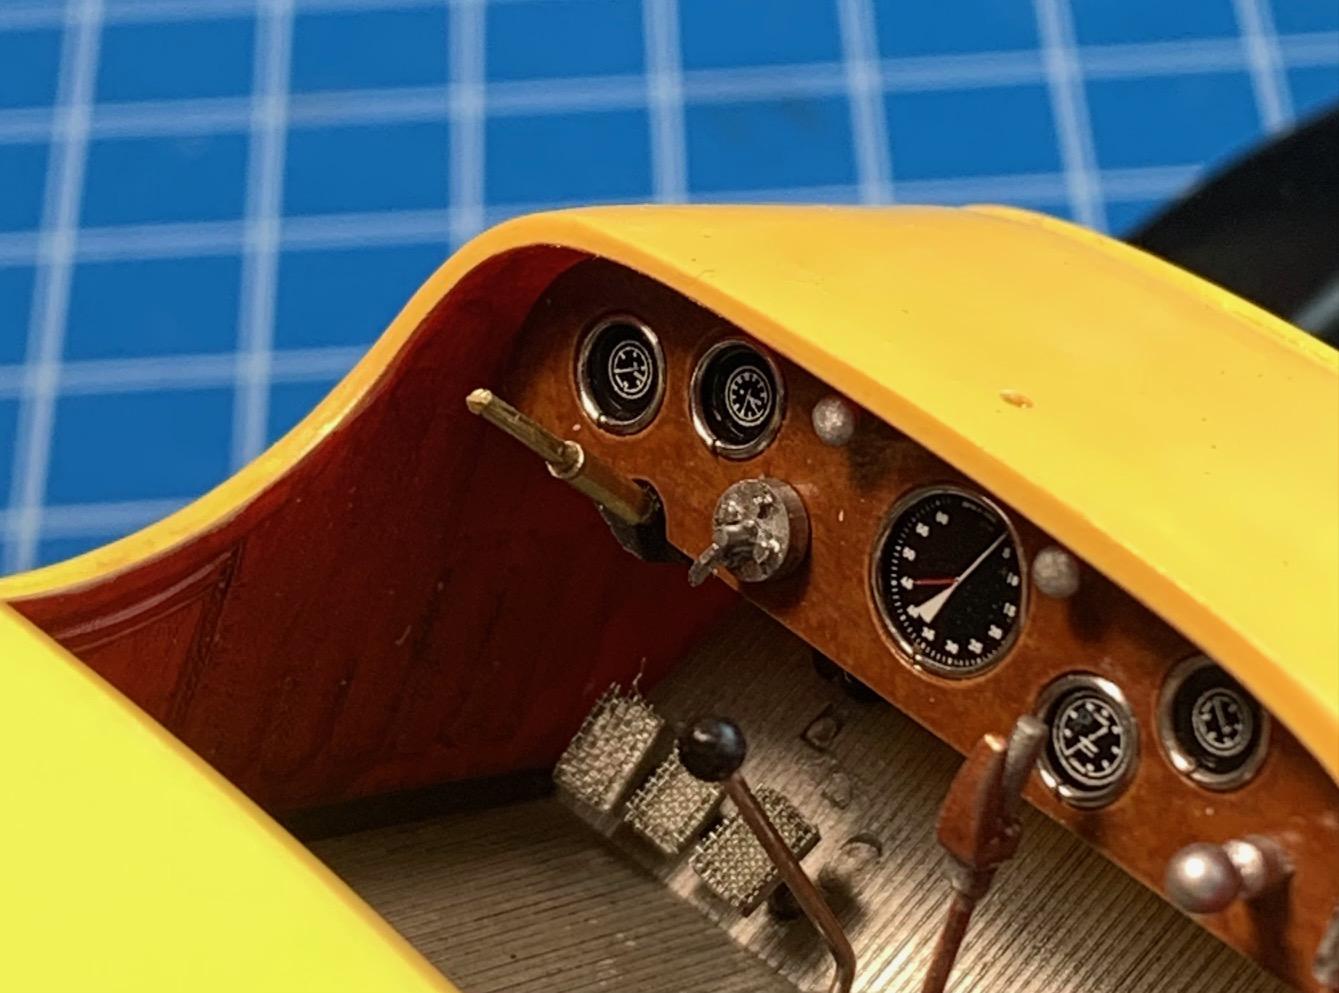
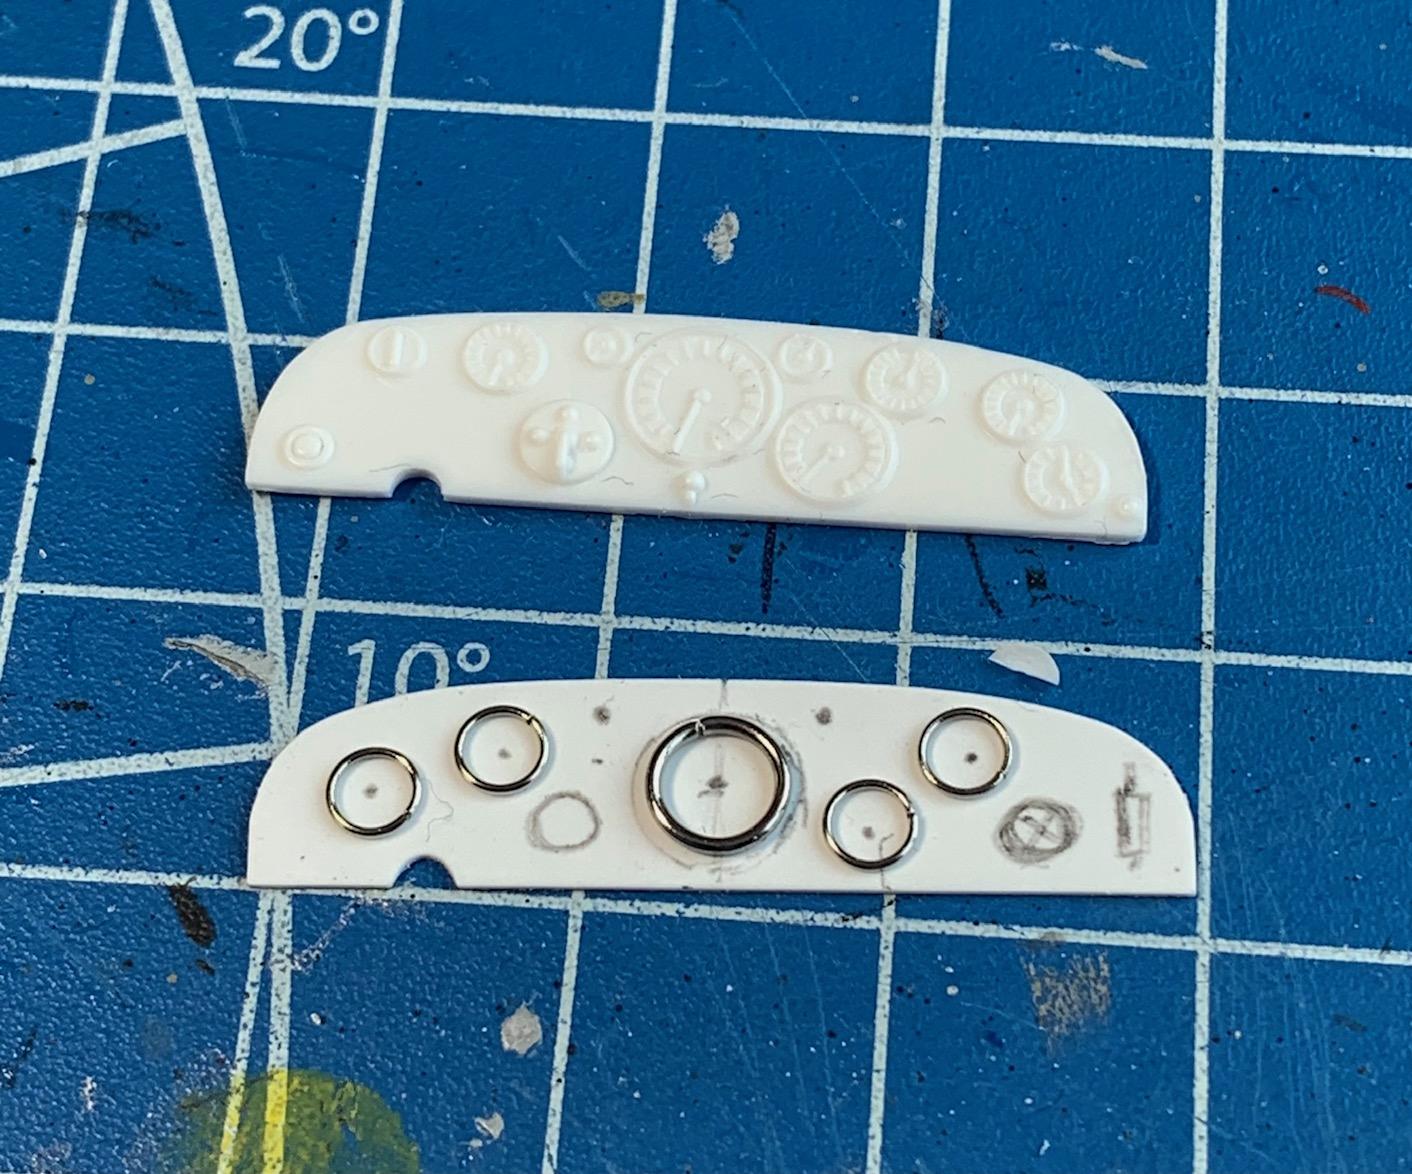
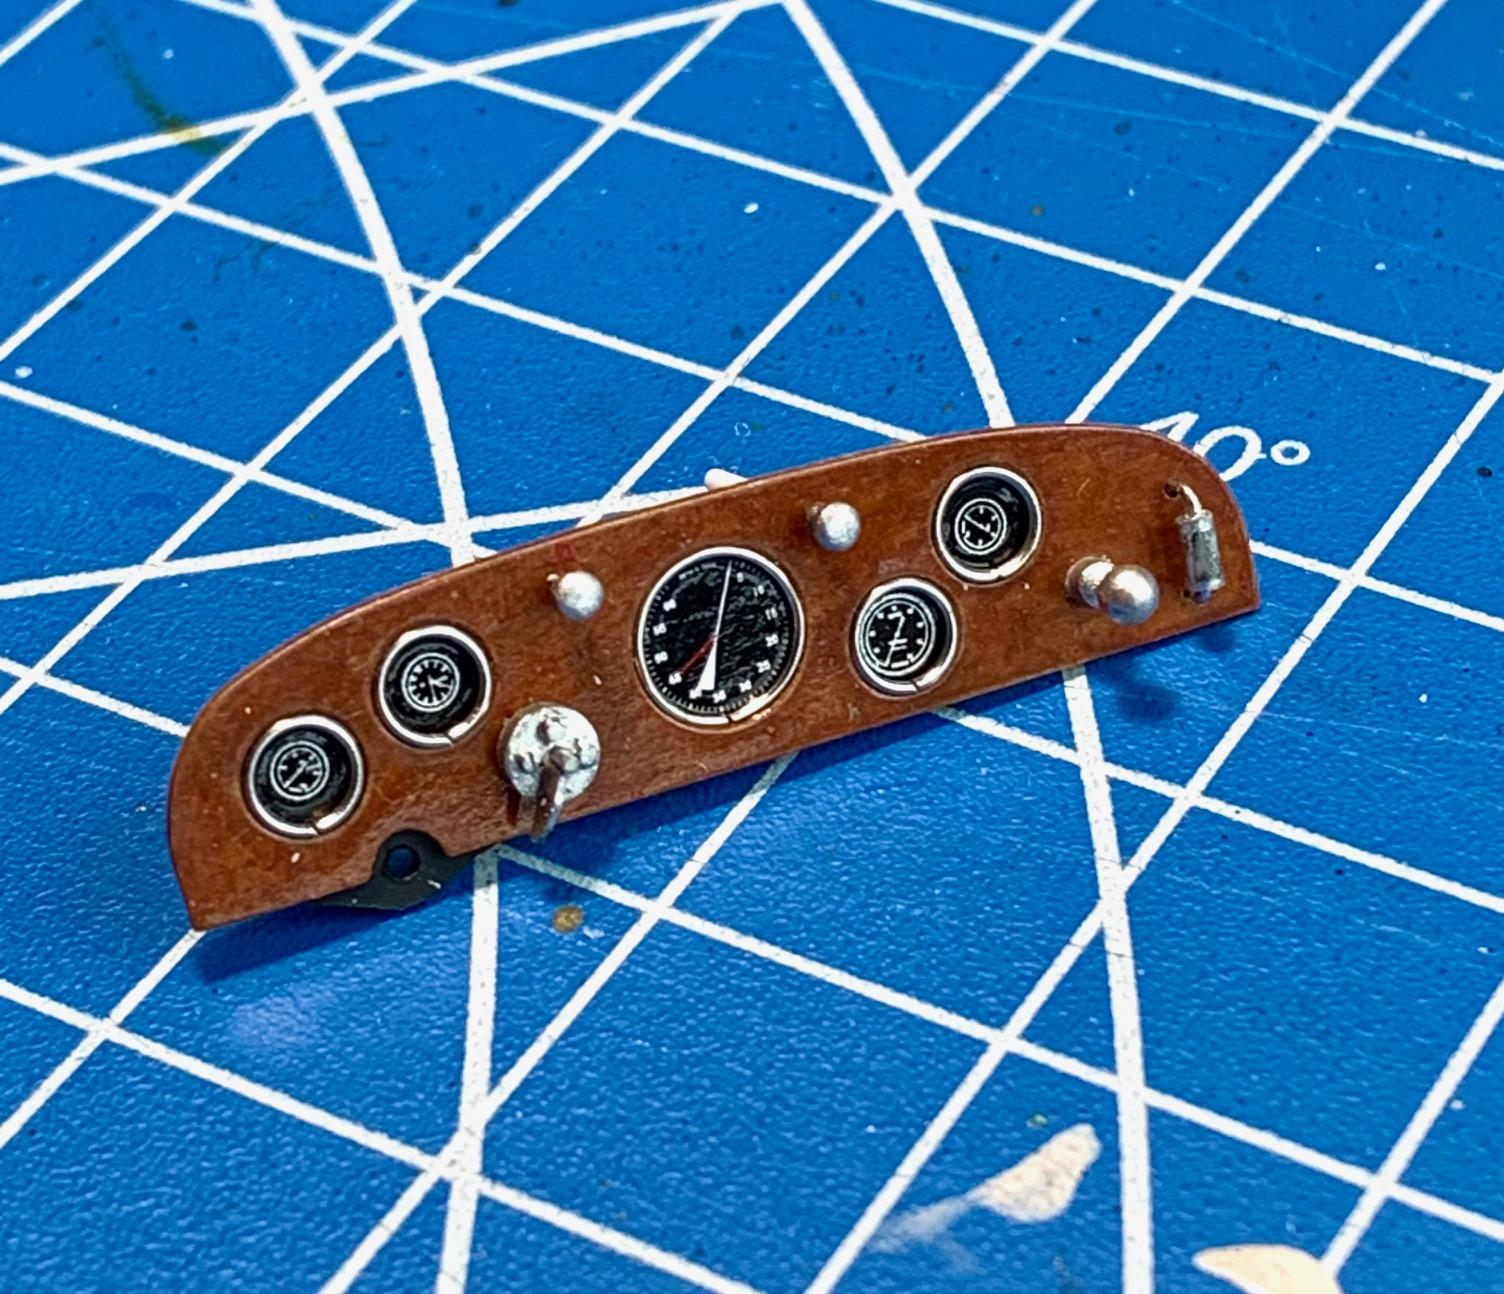
Thank you Helmut. I am very happy with the result and it is worth the effort considering this dash will be in full view in the completed build. Much appreciated Mark. I don't have punches so this was a drill, expand with 11 blade, files and sand paper. Took some time to make them round and the right size for a nice snug fit of the jumper rings. Happy you like it Brian. It is watching each other's builds that helps us all get tips on how to do things Thank you very much Ken. This layer style fabrication takes a bit of time but I really like the result. -
Mercedes Benz SSK
Pierre Rivard replied to Pierre Rivard's topic in WIP: Other Racing: Road Racing, Land Speed Racers
Mystery solved Cliff, your research has produced a very plausible explanation. I still can't make sense of all the plumbing around this thing but at this point what's done is done. Thanks again for taking time to follow this build and for top notch research help. -
Alfa Romeo 158/59
Pierre Rivard replied to Chris Smith's topic in WIP: Other Racing: Road Racing, Land Speed Racers
Incredible work as always Chris. Tell me the thousand rivets were molded into the tanks, not individually added? You are a master of paint finishes, which adds so much to the appearance and realism of a replica. All the subtle metal hues and fine weathering are a feast for the eyes. I'm sure everybody would want to learn more about the materials and techniques you use to achieve such amazing metal finishes. -
Absolutely formidable replica of this iconic race car, with one of the all time greats behind the wheel. Your attention to details and finesse of execution are second to none. I built this exact car the 1/24 scale (Fernando's kit), thought it was very good but really looks very ordinary next to your's. Congratulations Thomas, your builds are always the pinnacle of scale modeling.
-
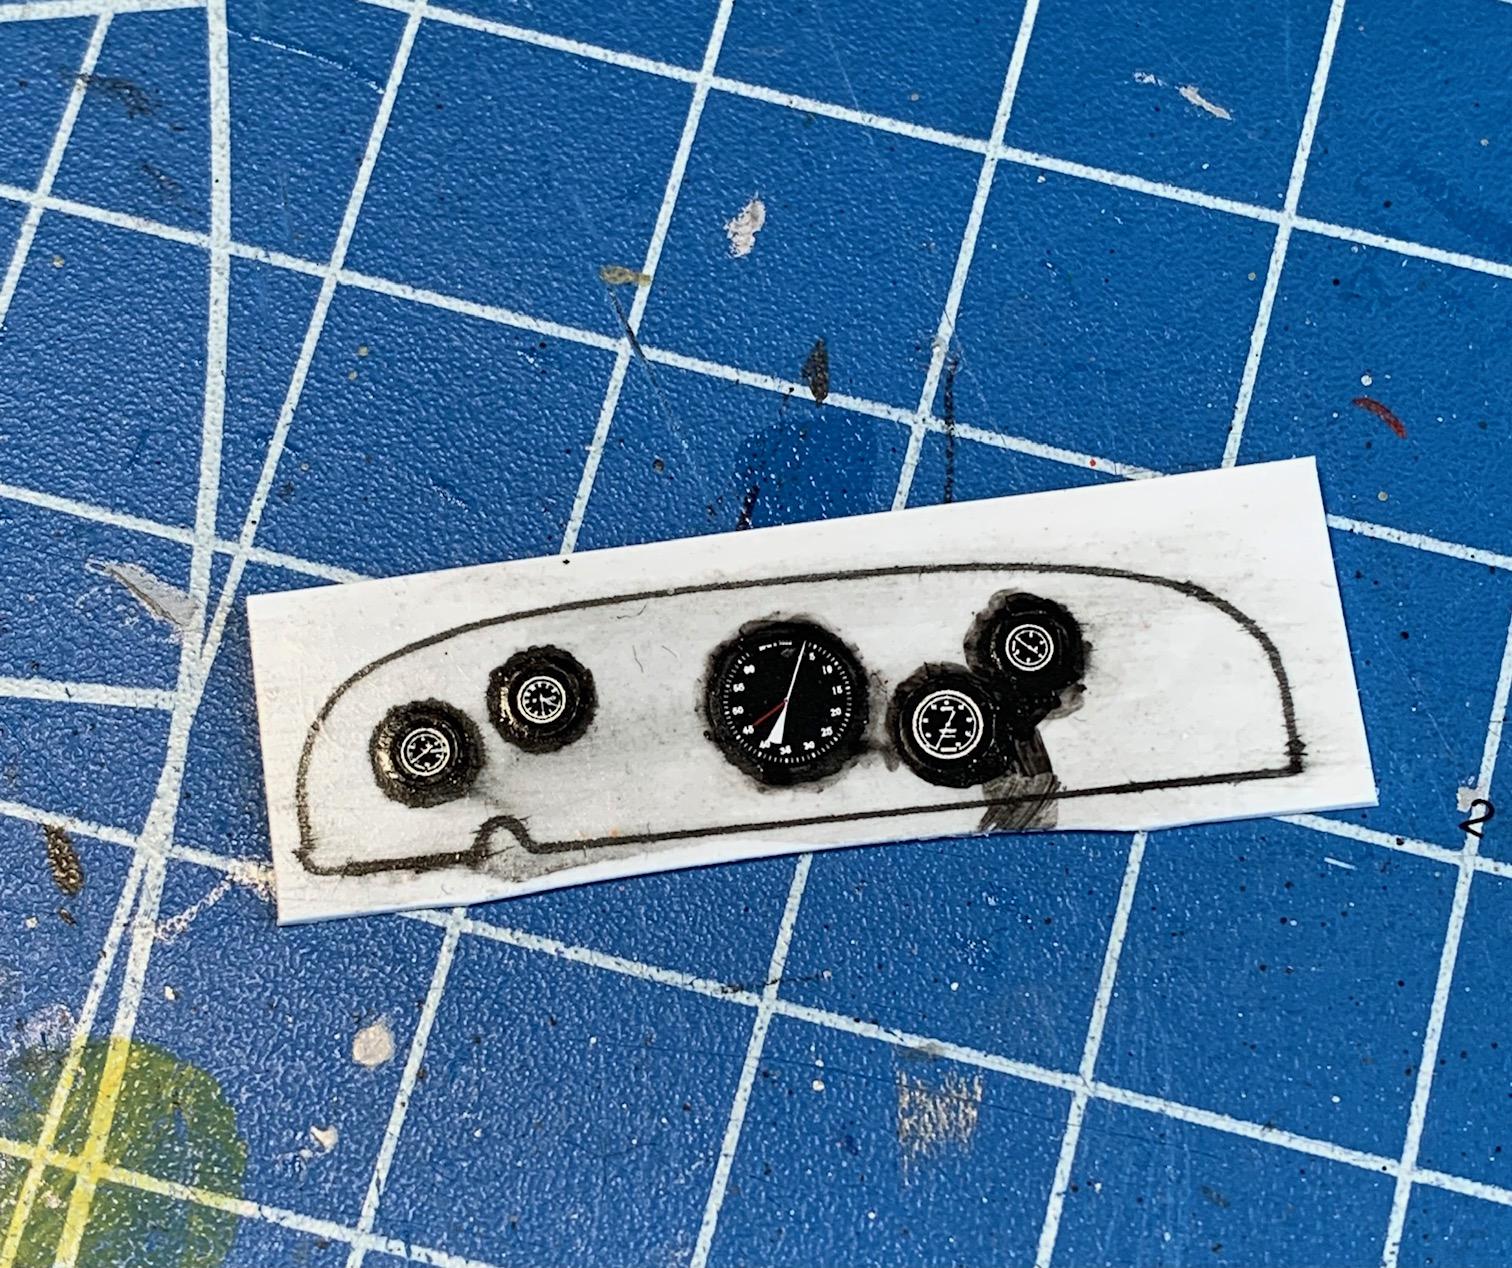
The snow won't stop here in Montreal, so I stayed in and finished scratch building a dash for my Mercedes SSK
-
Mercedes Benz SSK
Pierre Rivard replied to Pierre Rivard's topic in WIP: Other Racing: Road Racing, Land Speed Racers
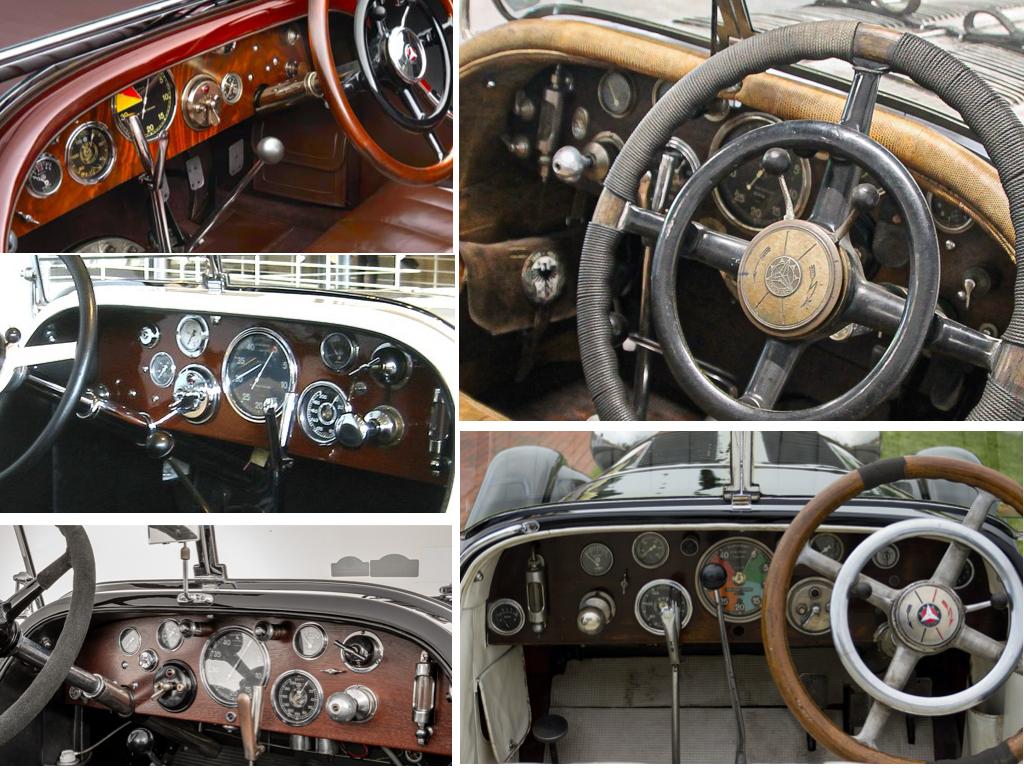
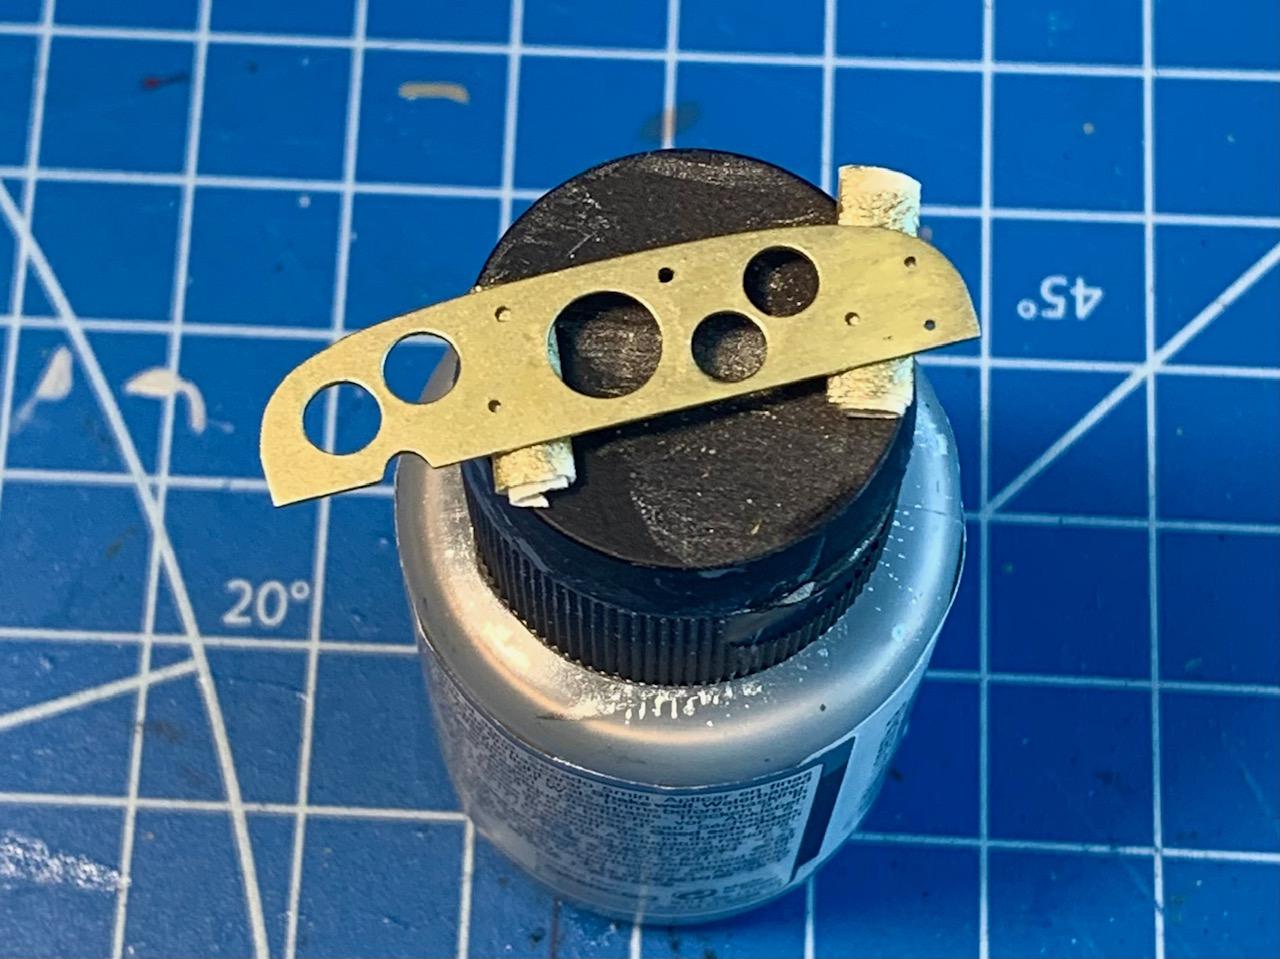
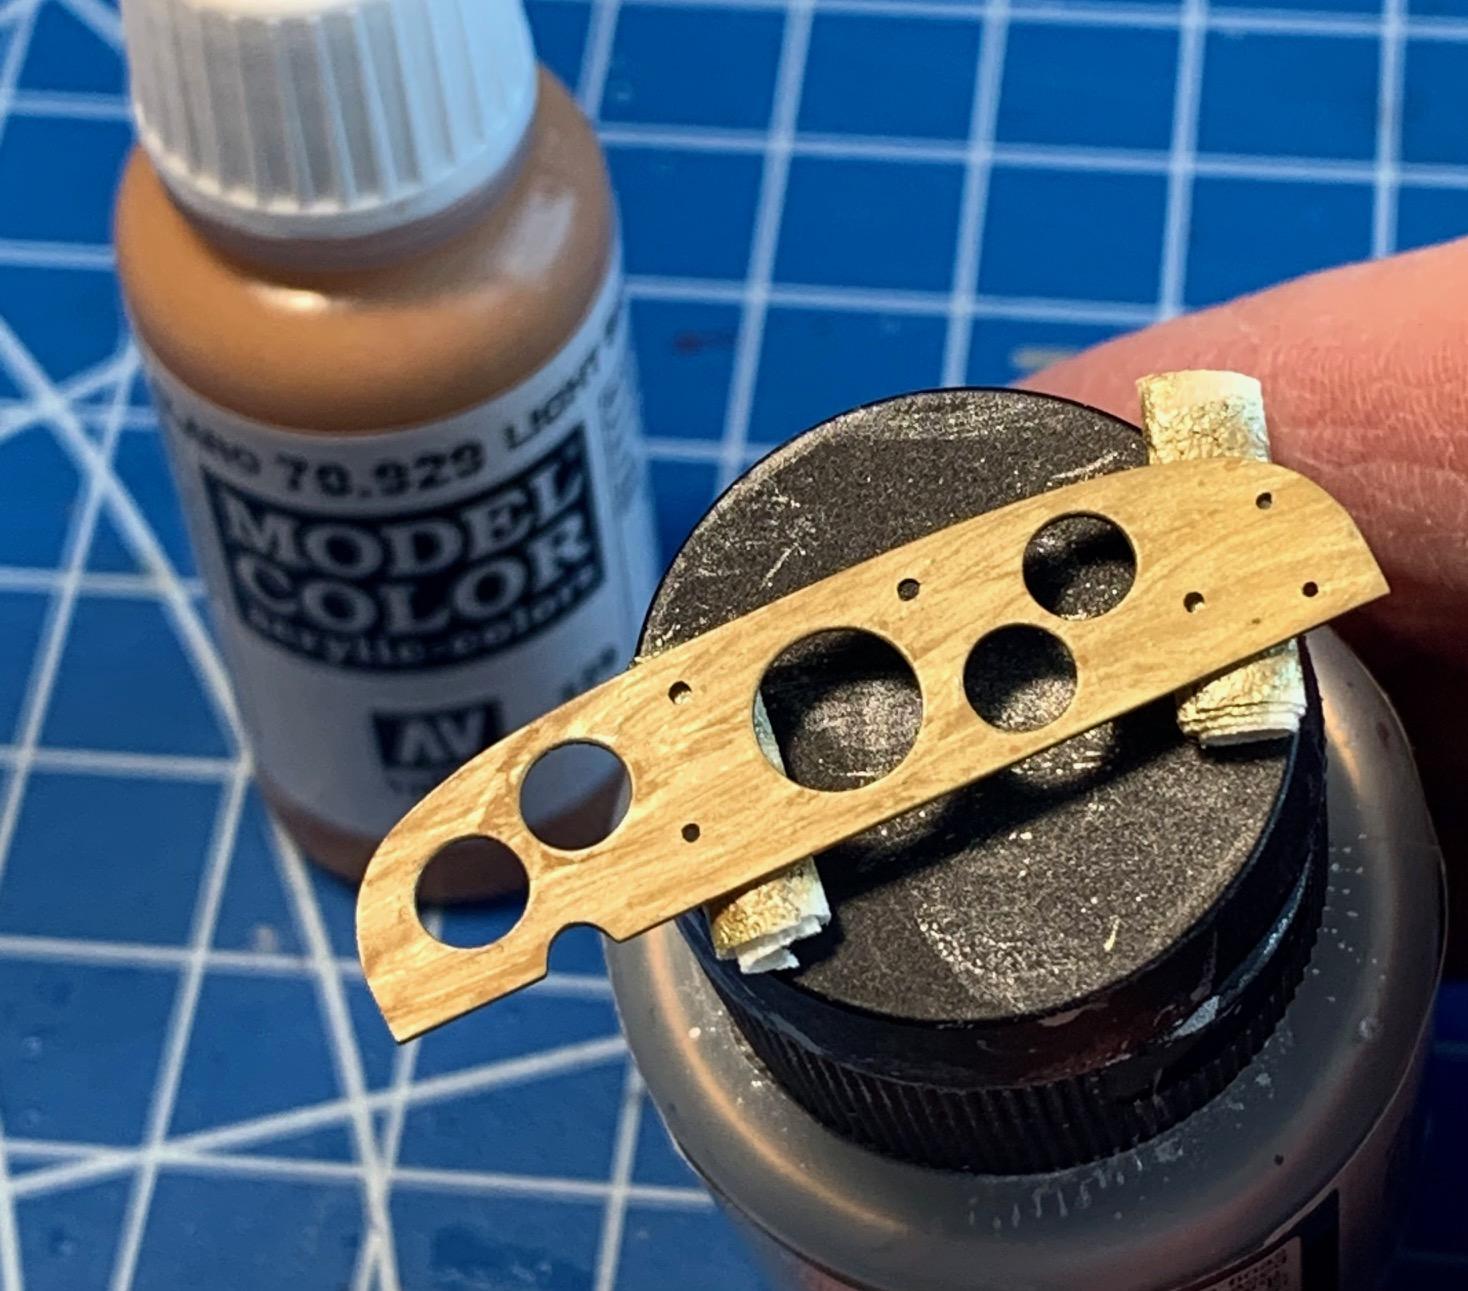
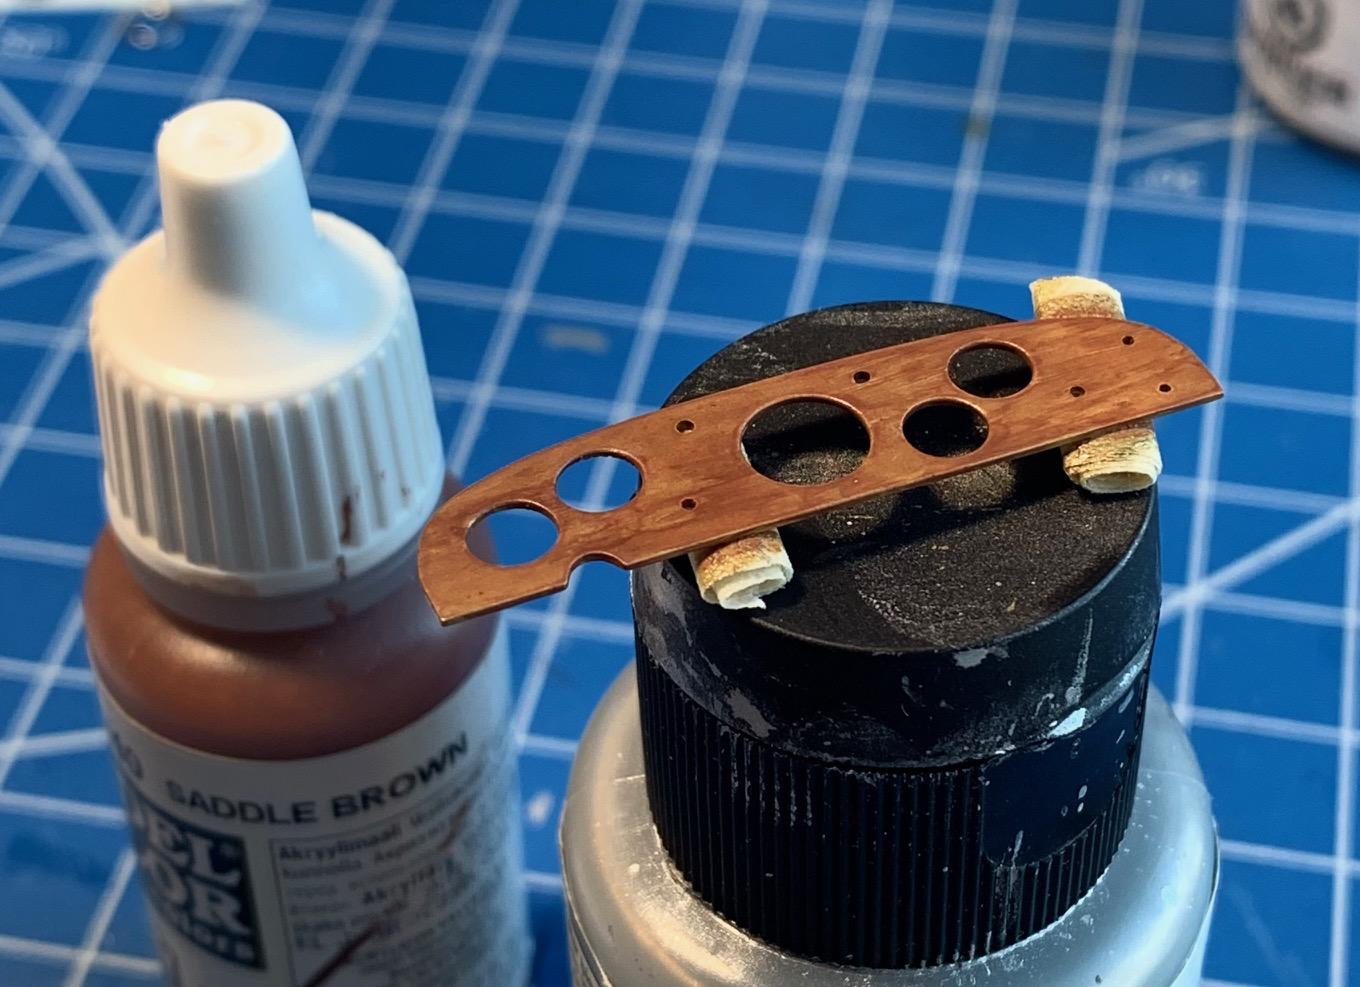
Last few days spent on dashboard fabrication. Reference picture below shows general layout of the SS/SSK family with some variability from car to car. The kit part (shown) will not be used as I decided to scratch build the unit. Decals are from the stash are a very approximate reflection of era gauges but that should be not shockingly visible as the complete dash is only 38mm long. At the last minute I replaced the jumper ring on the bigger dial with one I made myself from thinner gauge copper wire. I scratch built the various knobs from Evergreen, pins or small copper wire. I created the wood effect with alternate layers of gold, tan, brown and orange clear.
-
How to Simulate tonneau snaps?
Pierre Rivard replied to Vince311's topic in Model Building Questions and Answers
Yes, sorry guys, I meant to say solder balls...
-
How to Simulate tonneau snaps?
Pierre Rivard replied to Vince311's topic in Model Building Questions and Answers
Hi Vince, for this model I used weld balls, in this case 0.6mm. I drilled very shallow 0.5mm holes, a mini drop of canopy glue and then the ball. Hope it helps.
-
Another winner Matt. I am amazed how much you can squeeze out of these basic kits. Well well done sir!