Pierre Rivard
-
Posts
2,579 -
Joined
-
Last visited
Content Type
Profiles
Forums
Events
Gallery
Everything posted by Pierre Rivard
-
There's always a part of a build that we like less or not comfortable with. For me definitely engines and sometimes bail out to a curbside. No such luck for you my friend, gotta have a body on this build. Break down the tasks, just like an engine build, one little victory at a time. Perhaps not your favorite part of the build but no doubt with your talent and resilience that body will turn out great. Decal day (my favorite) is not far away!
-
Formidable historic car. I built Tazio's 1933 Le mans winner and would love to do a P3 some day, so I'll be following your journey with great pleasure.
-
Mercedes Benz SSK
Pierre Rivard replied to Pierre Rivard's topic in WIP: Other Racing: Road Racing, Land Speed Racers
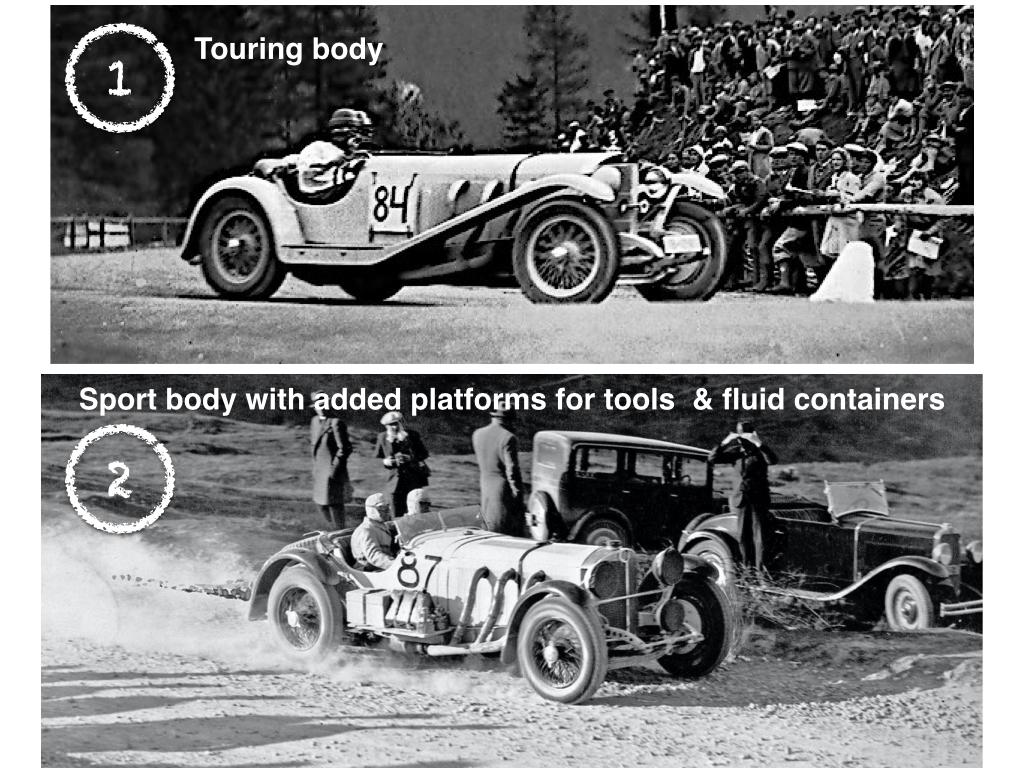
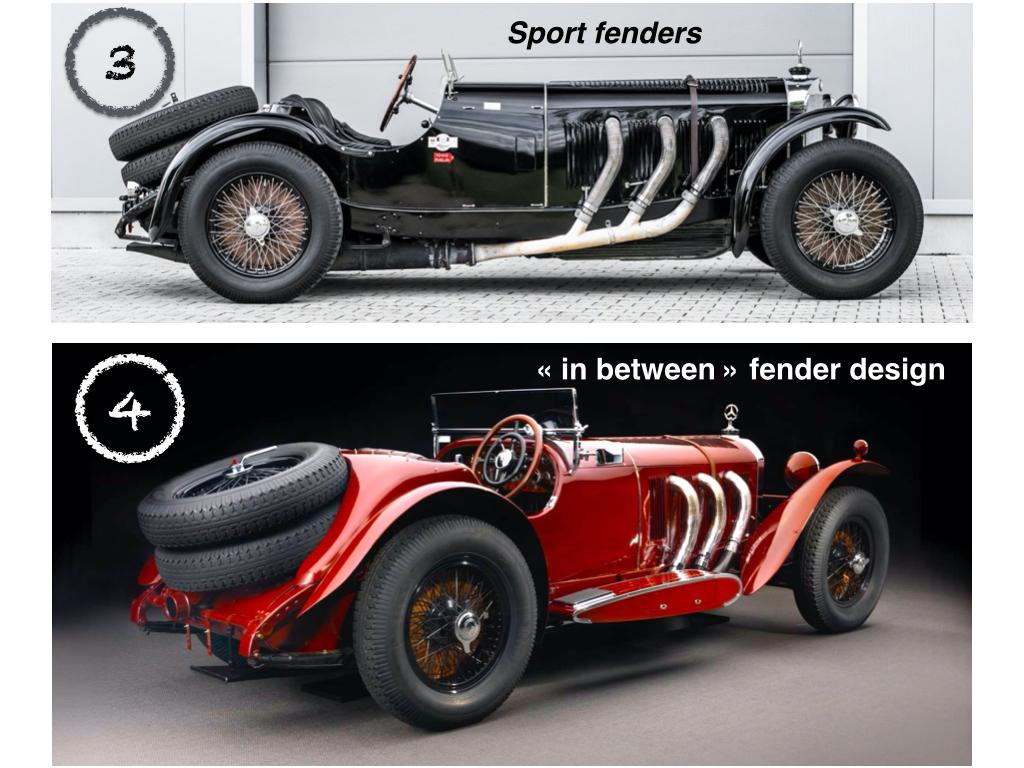
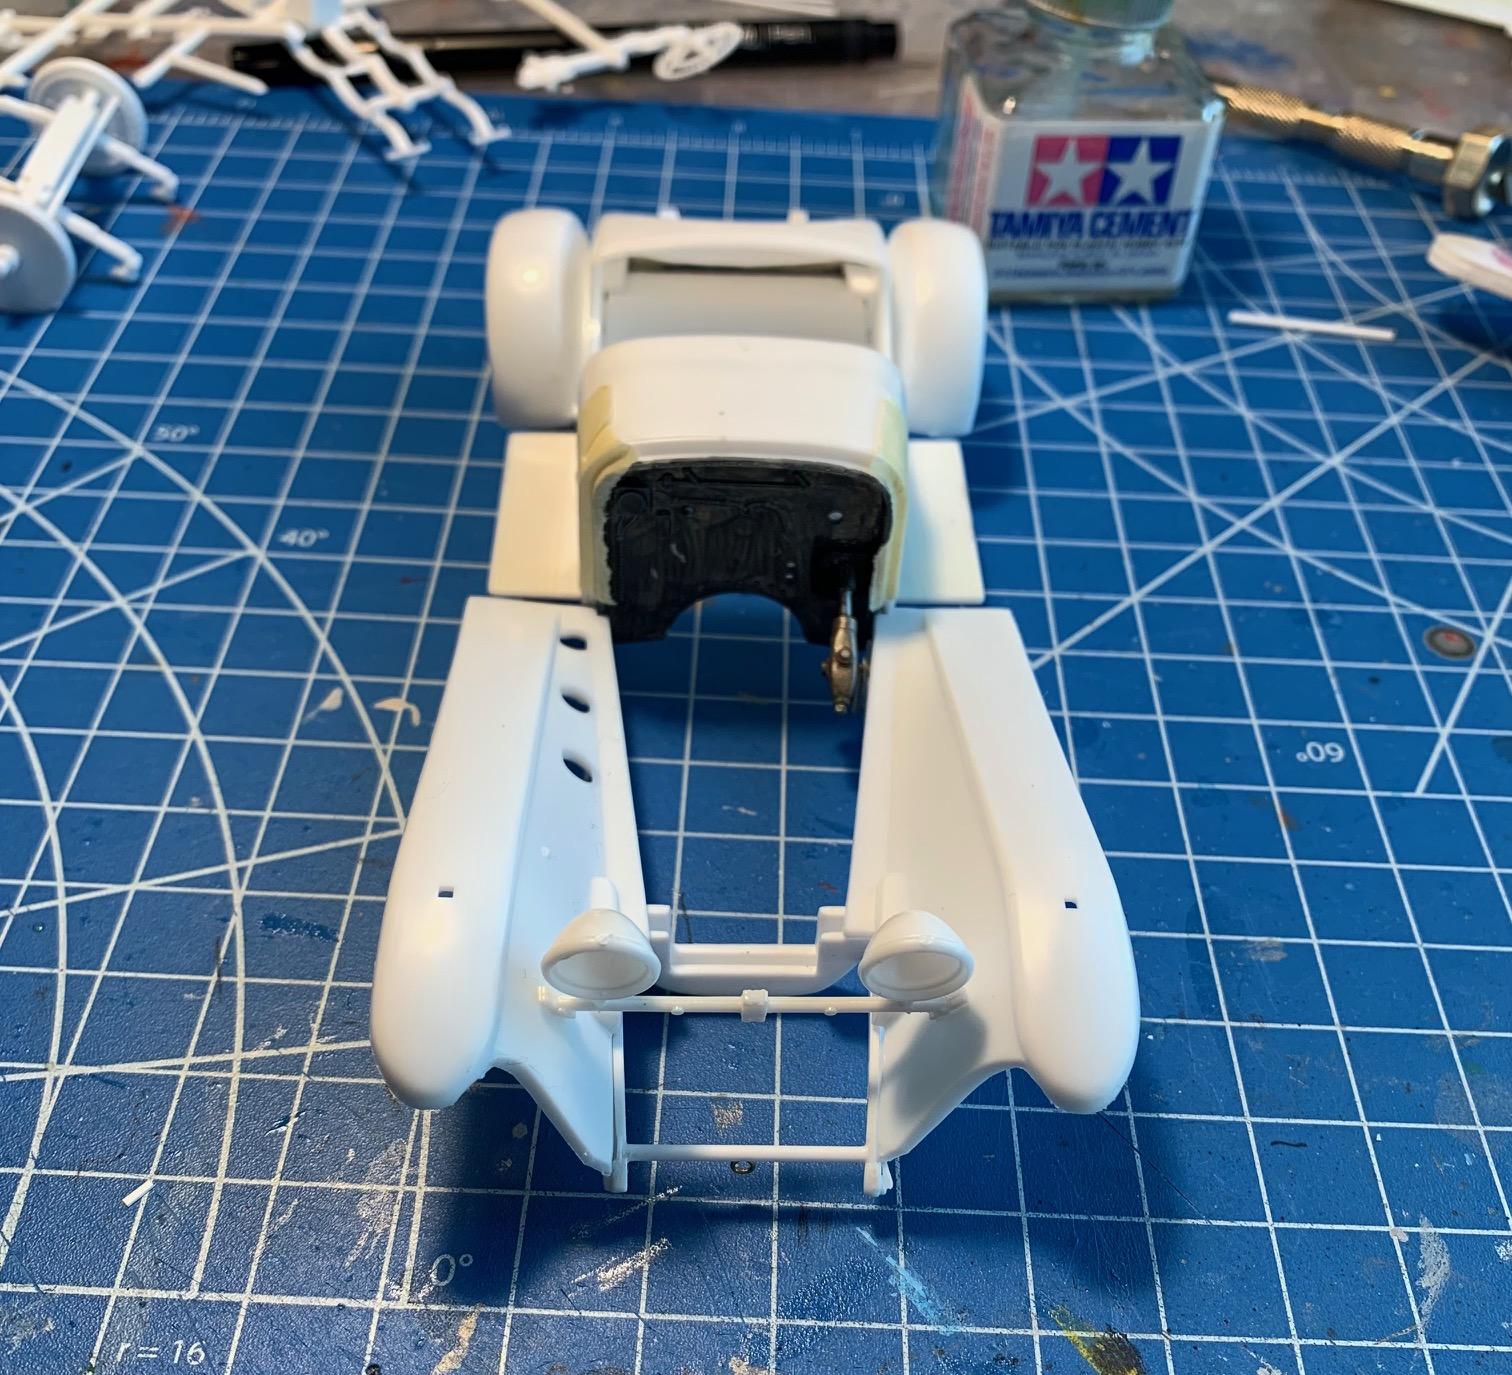
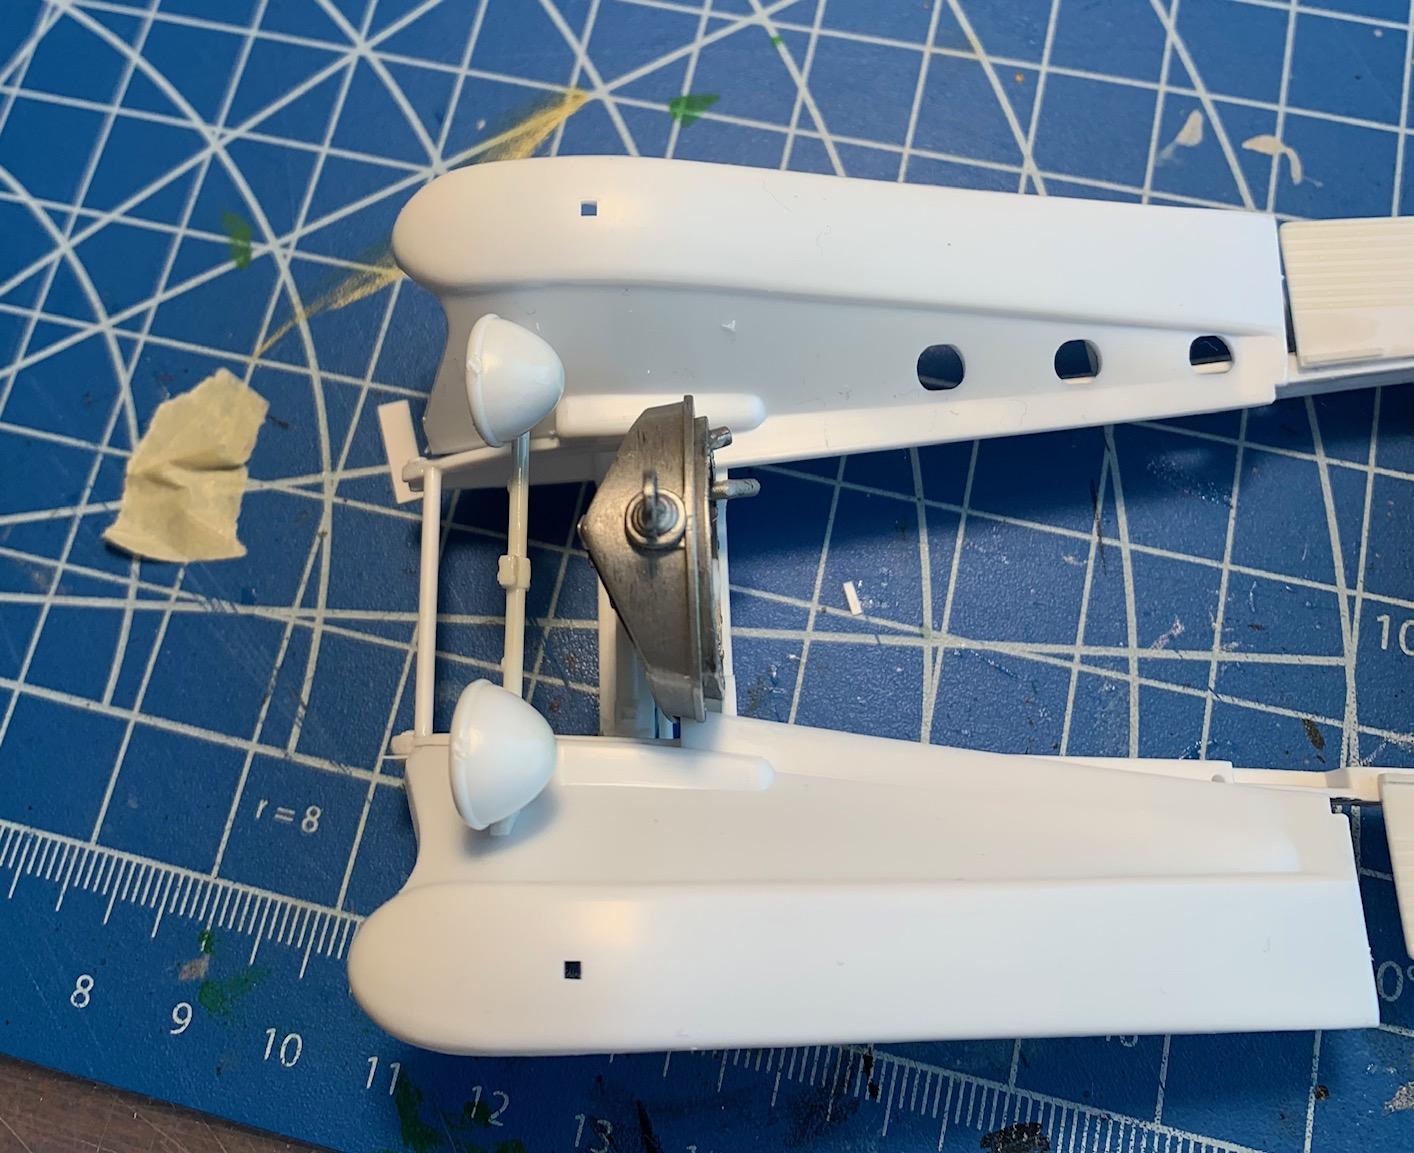
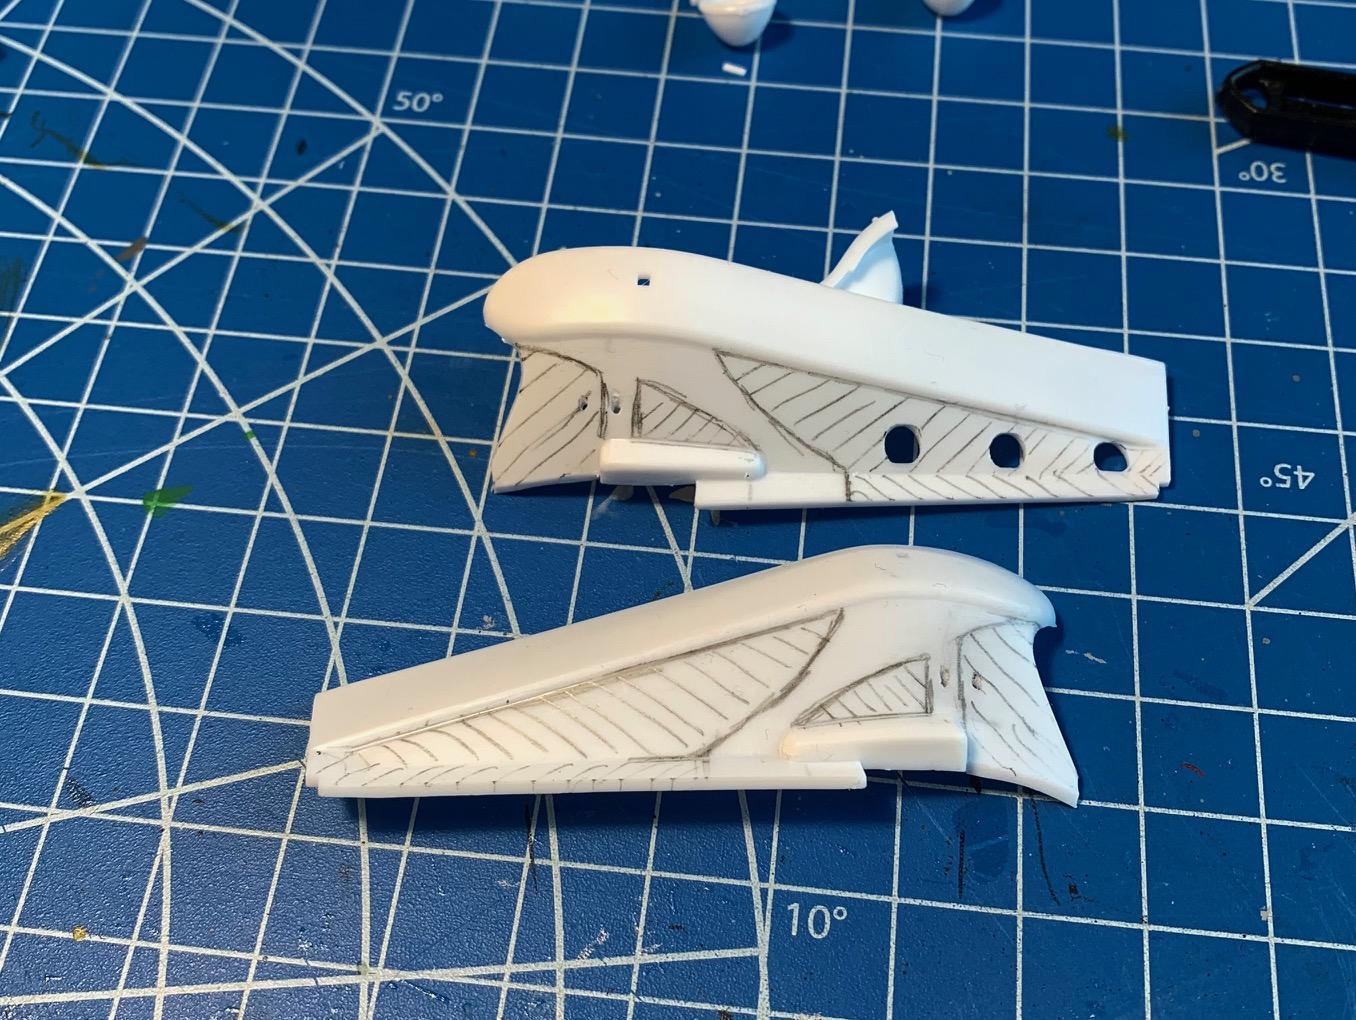
The kit as tooled portrays the touring body (pretty accurate) but then added chrome bumpers and whitewall tires, both of which I doubt were ever seen on these cars. The touring body was raced at times (see ref picture 1) but the sport bodies (ref 2-3) were usually used for racing. I very muck like the Dorothy Page SSK at REV's with it's variation on the sport body with more flowing fenders. The plan is to go for something like that but maintain the small steps/platforms for the tool box & fluid containers. First task is the step, basically downsizing and repositioning them. Done. Front fenders are big and close in completely on the wheel back side. First I moved back the headlamp assembly about 2 mm, which sets up where one of my fender attachments will need to be, then moved on with the task of opening up the back of the fenders. I then re-contoured the fenders to drop faster at the back and then cut off and reshaped the trailing edge. I also sanded the top inboard & outboard edges to remove a bit of the flat top surface appearance. Rear fenders are an easier task. Again opening up the back side, shortening the front and reshaping the rear so that they flow away from the tires
-
1963 Alfa Romeo Giulia Tubolare Zagato (“TZ“) Road Car
Pierre Rivard replied to Plastheniker's topic in Model Cars
What a beautiful replica of... a beautiful car. Just the instrument panel and the wood steering wheel are enough to make my day! Thank you for sharing this with the whole gang! -
Mercedes Benz SSK
Pierre Rivard replied to Pierre Rivard's topic in WIP: Other Racing: Road Racing, Land Speed Racers
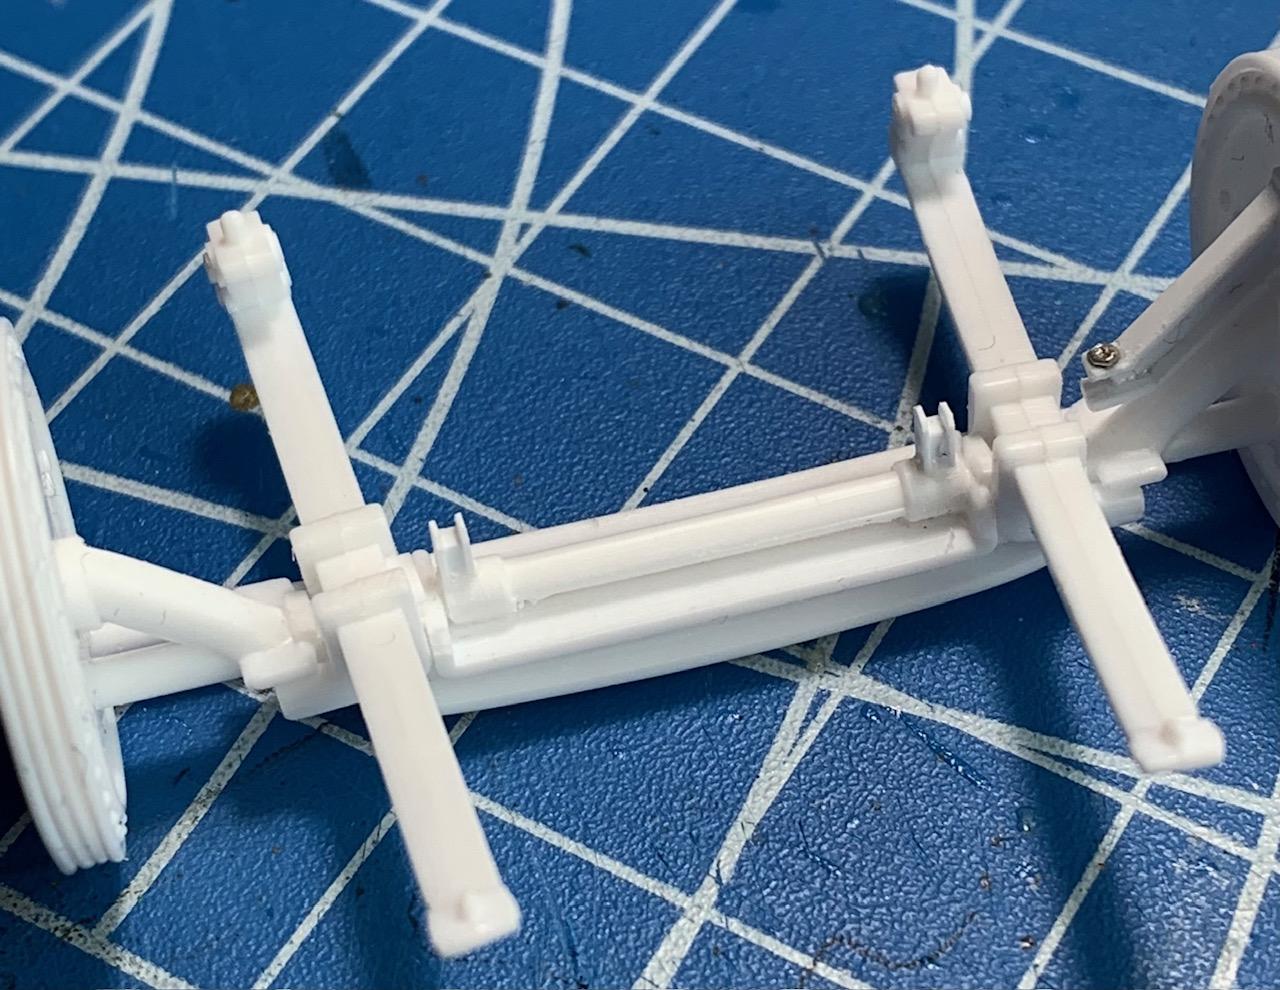
Starting some body fabrication at the rear. The kit's rear chassis cross bar has lead off for bumpers, which these cars never had. I replaced it with 1.5mm Evergreen. The small body panel covering the rear of the chassis has been shortened to expose that bar. I then added the fuel cell attachment straps to this bar (0.25x1.0 & 0.25x1.5 strips), and then attached to the bar the fabricated legs and shoes to support the rear part of the spare wheels. All these components were lacking in the rudimentary kit design.
-
Mercedes Benz SSK
Pierre Rivard replied to Pierre Rivard's topic in WIP: Other Racing: Road Racing, Land Speed Racers
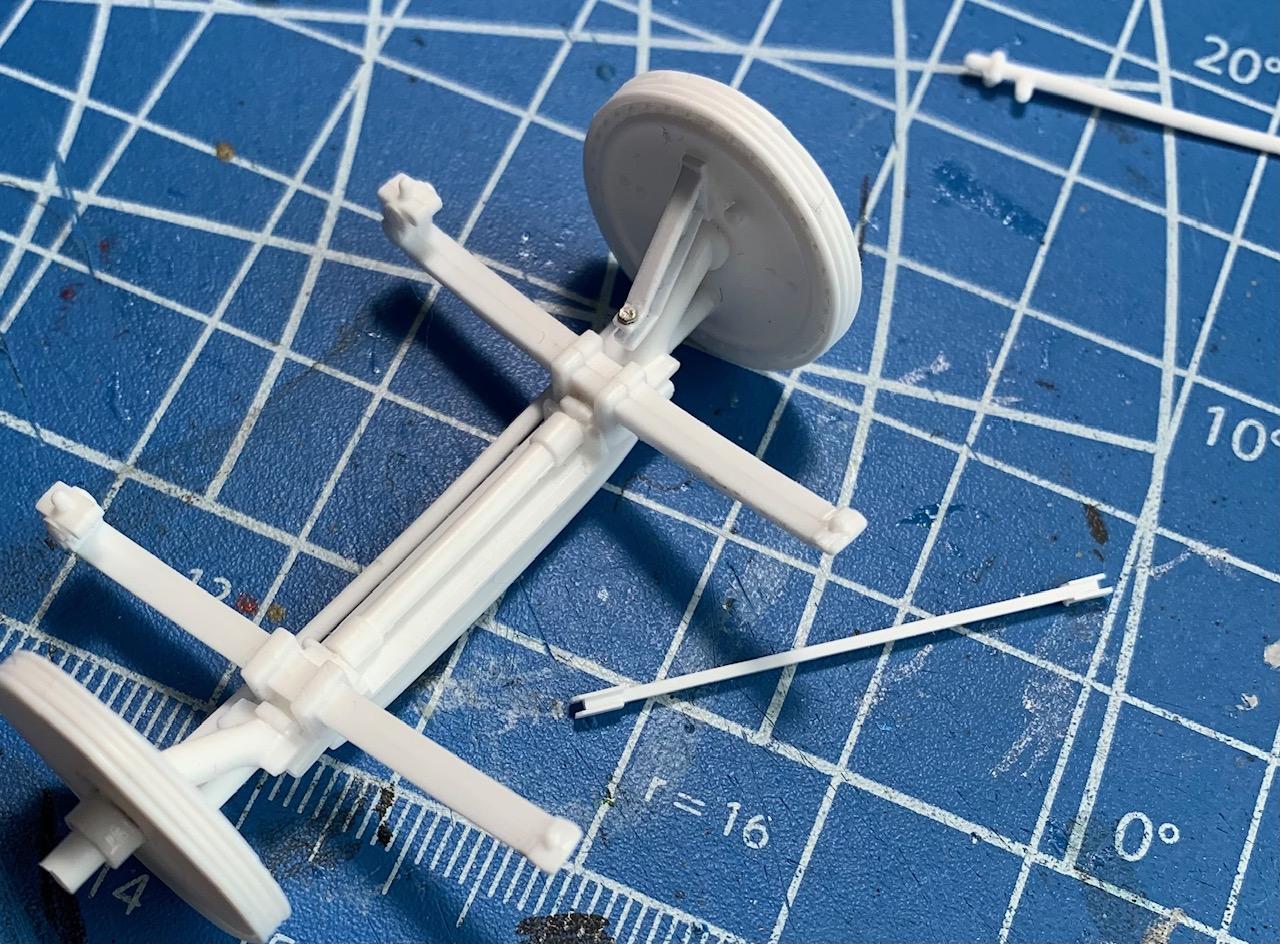
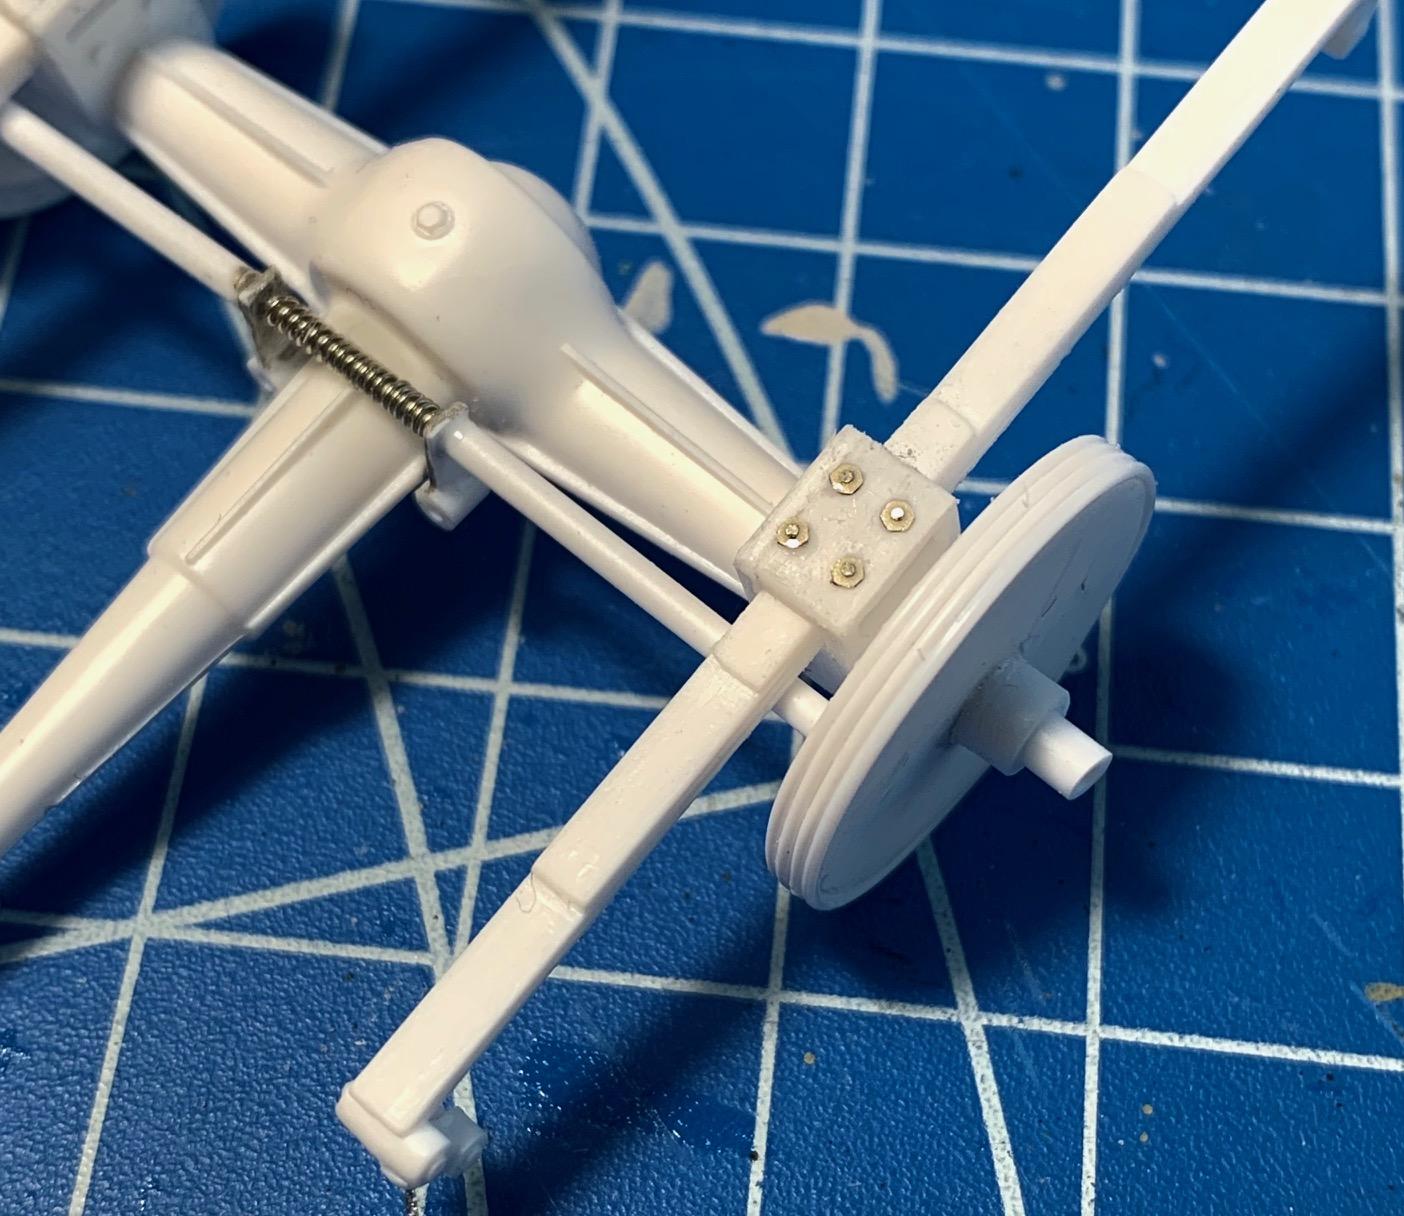
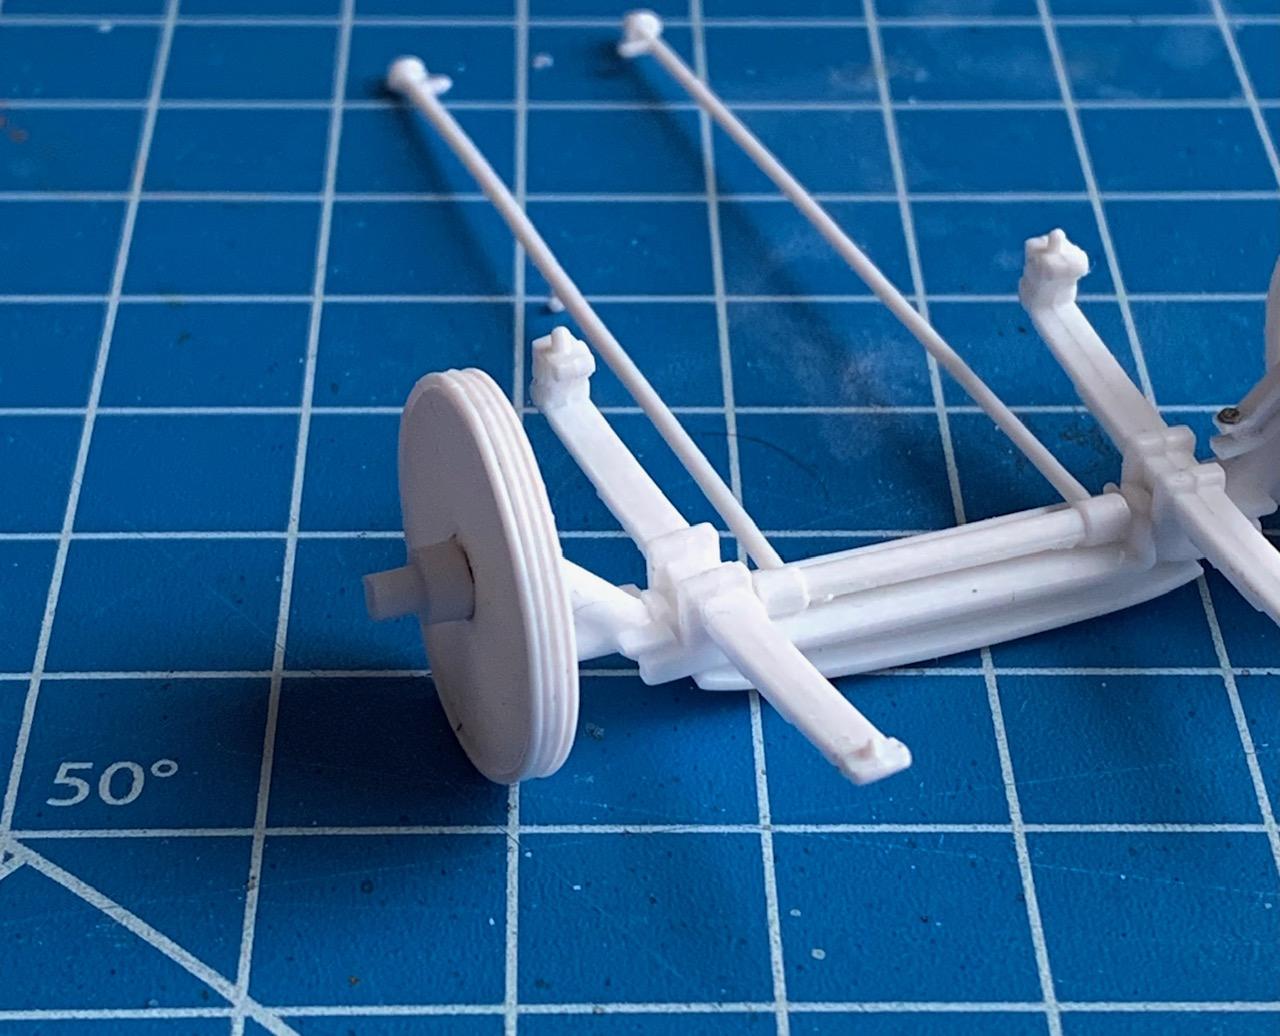
Working the front axle part of the braking actuators and a quick fabrication of the 4 pull rods with 0.75 mm brass. Braking system is 95% done.
-
Mercedes Benz SSK
Pierre Rivard replied to Pierre Rivard's topic in WIP: Other Racing: Road Racing, Land Speed Racers
Thank you sir. This kit is very basic and with many inaccuracies, but worth upgrading because I love this old race car. -
I can see you are planning for a very detailed engine compartment with lots of added components and substitutions for race use. Look forward to it. About the windshield line. Glad you think it's fine, otherwise you're committing to major surgery. Revell uses a shorter convertible windshield on the coupe and the front part of the roof dips down to reach it. Picture is worth a thousand words they say...
-
The weathering is mighty impressive and super realistic. Well done sir!
-
Lovely fabrication Andrew. Fair to assume the top cover of the body and nose cone will be removable to show these finely crafted elements?
-
Mercedes Benz SSK
Pierre Rivard replied to Pierre Rivard's topic in WIP: Other Racing: Road Racing, Land Speed Racers
Added the U bolt fasteners (PE) on the spring/axle clamp and then moved on to the center part of the braking system, the central cross axle on which the brake pedal and pull rod levers are attached
-
Mercedes Benz SSK
Pierre Rivard replied to Pierre Rivard's topic in WIP: Other Racing: Road Racing, Land Speed Racers
Sketching the general layout helps me plan the fab & assembly. Information may be only 50% accurate based on bits and pieces of learnings from multiple sources but offers a reasonable replica for this type of braking system. Thanks Alan, It's a foray to unknown territory but quite enjoyable Fun stuff, I'm planning to add brass rods. encroaching on the rules of the plastic/glue/putty builder's club. That was sort of the idea with the spring. They lack detail but at least they are there... -
Love that driver figure. Wish they were more available to customers. 99% out of stock...
-
Mercedes Benz SSK
Pierre Rivard replied to Pierre Rivard's topic in WIP: Other Racing: Road Racing, Land Speed Racers
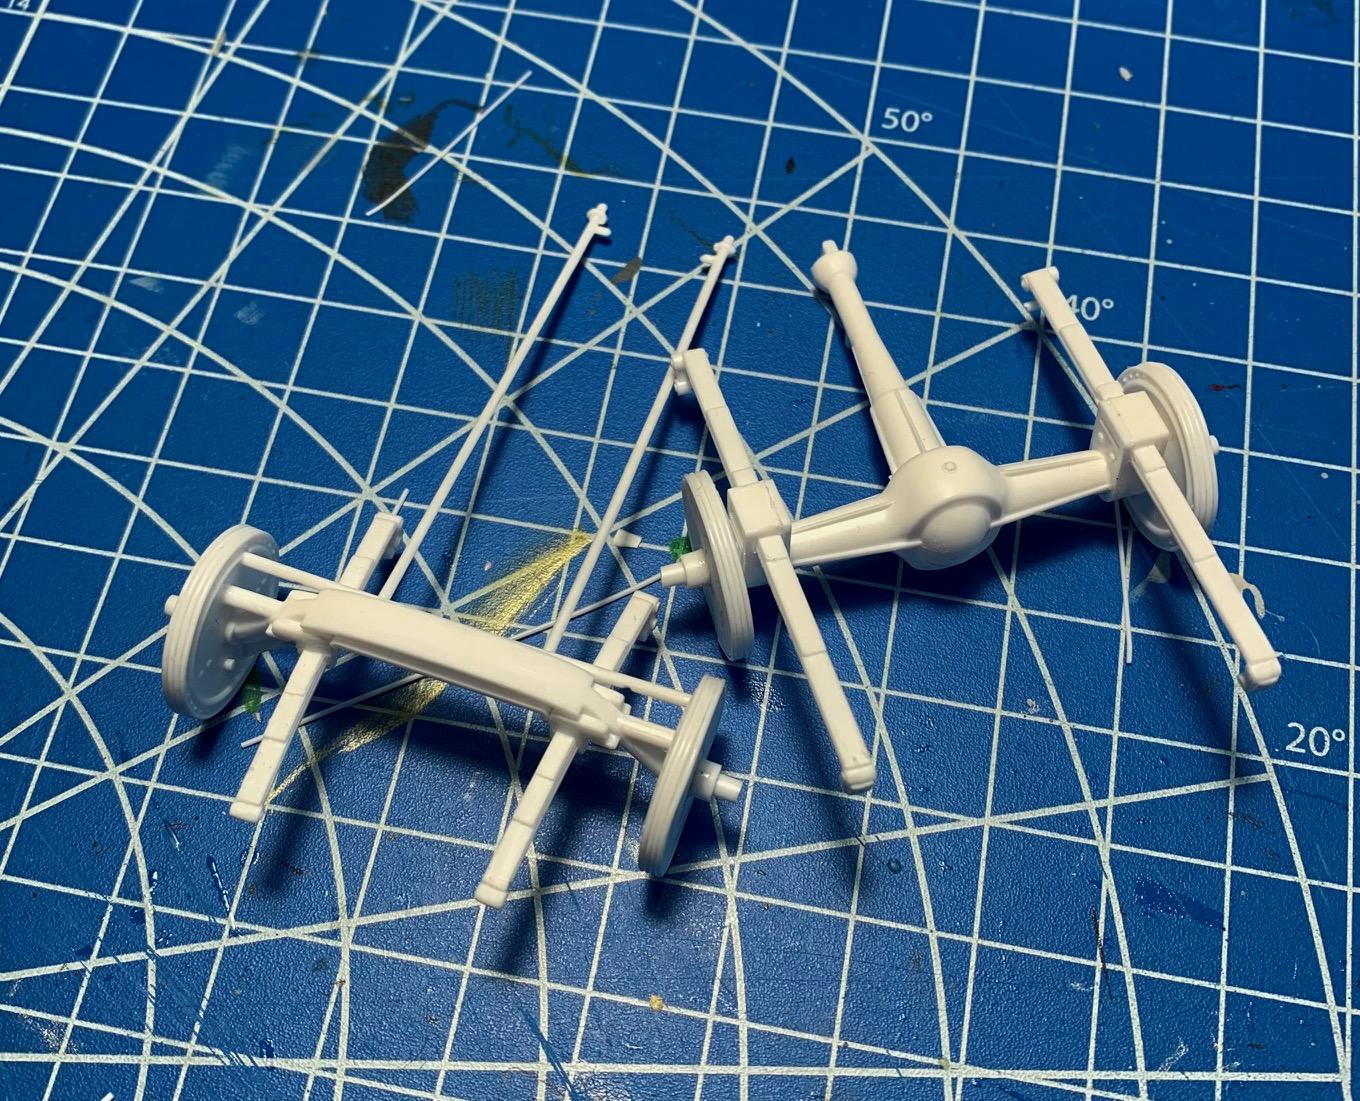
This will take a few days as I try to figure out what can be done to replicate the visible components. So far I have done the rear axle piece of the system.
-
Mercedes Benz SSK
Pierre Rivard replied to Pierre Rivard's topic in WIP: Other Racing: Road Racing, Land Speed Racers
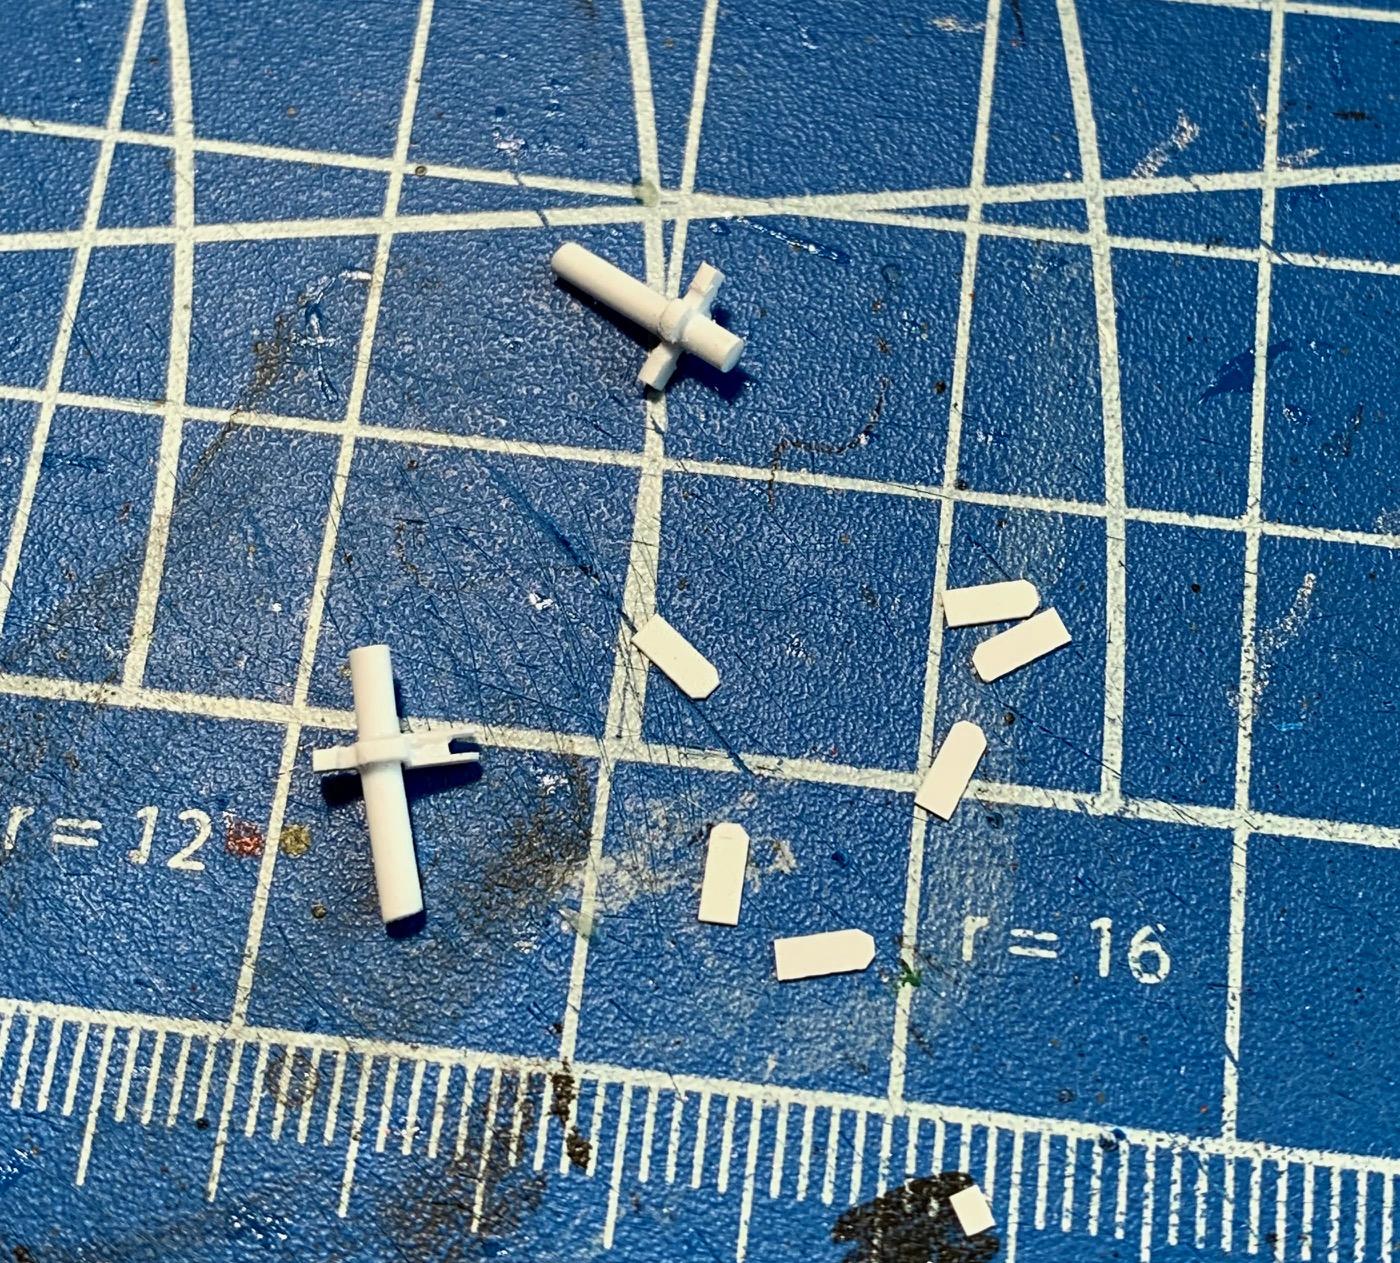
Taking on the braking system. First picture shows the parts as supplied with the kit (not really useable) and second is my home made schematics of my understanding of the system functionality and I will try to replicate the most visible components. These mechanical brakes use rods that enter into the drums and pivot to move the shoe with some sort of cam device (inside the drums). These rods that run side to side front and rear pivot through a lever and pull rods. These rods are pulled from small arms connected to a pivot axle that runs through the lower part of the trans case. The brake pedal and arm transfers foot movement to pivot the axle that pulls on the rods etc. There is a second brake pedal for the riding mechanic that also connects to that axle, and a hand brake that also connects to one of the rods.
-
That roll bar was VERY secure.... for a Lotus. 🧩 Don't feel like you have to glue everything in place... it's a Lotus
-
3rd gen Camaro
Pierre Rivard replied to MarkJ's topic in WIP: Other Racing: Road Racing, Land Speed Racers
Do I know the feeling friend, there's always something we forgot. Hang in there! -
Mercedes Benz SSK
Pierre Rivard replied to Pierre Rivard's topic in WIP: Other Racing: Road Racing, Land Speed Racers
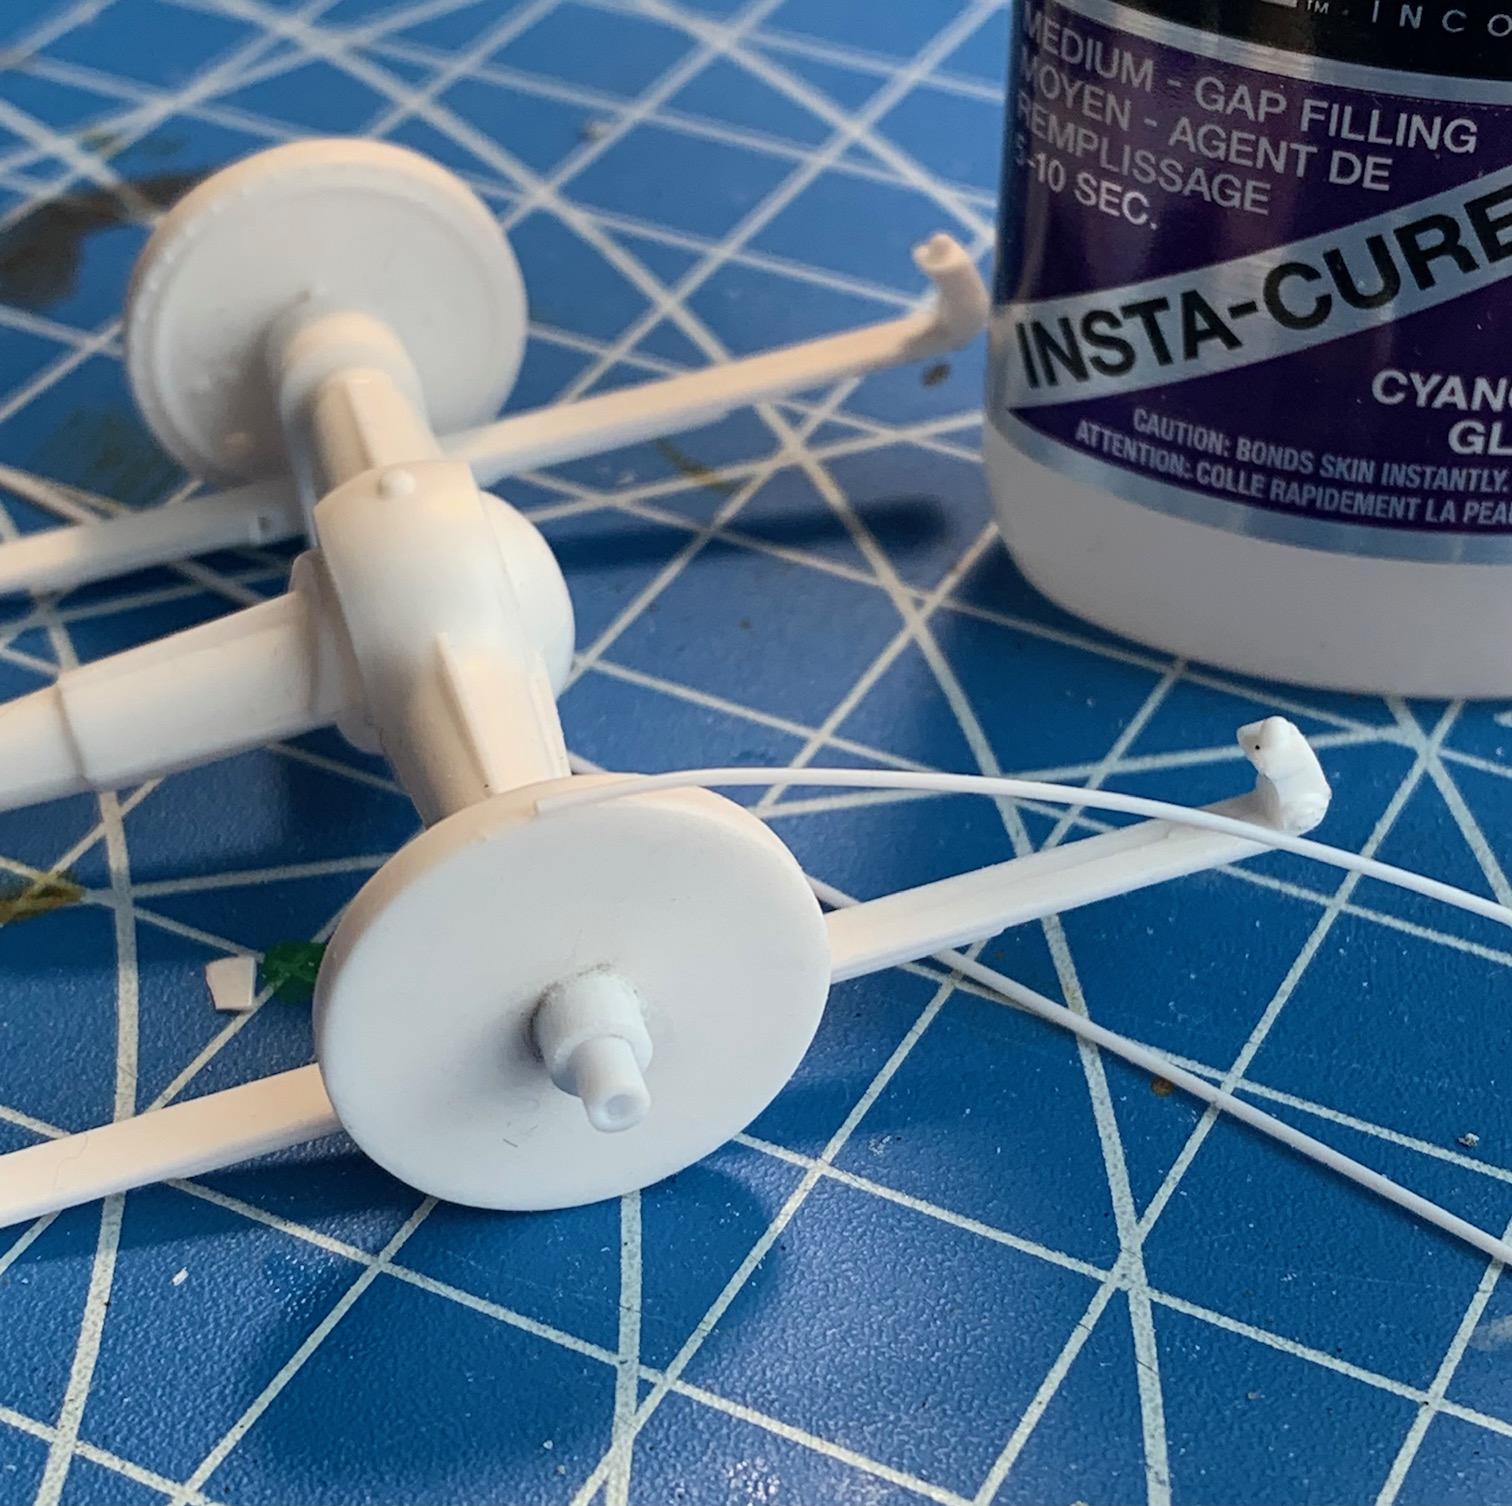
The brake drum casings were ribbed on the SSK, something that could not be done with the tool orientation of the kit's casting process. Short of having a lathe or 3D printing capability I will try to mimic these with 0.5mm Evergreen and CA glue. We don't do fancy here, this is a plastic/glue/putty shop! 😃
-
Gorgeous models Bob. You definitely had a smiling good year. My favorite is the Daytona, it manages to look fearsome and fast standing still. Simply gorgeous. The woody looks like real wood. It is real wood...right?
-
Mercedes Benz SSK
Pierre Rivard replied to Pierre Rivard's topic in WIP: Other Racing: Road Racing, Land Speed Racers
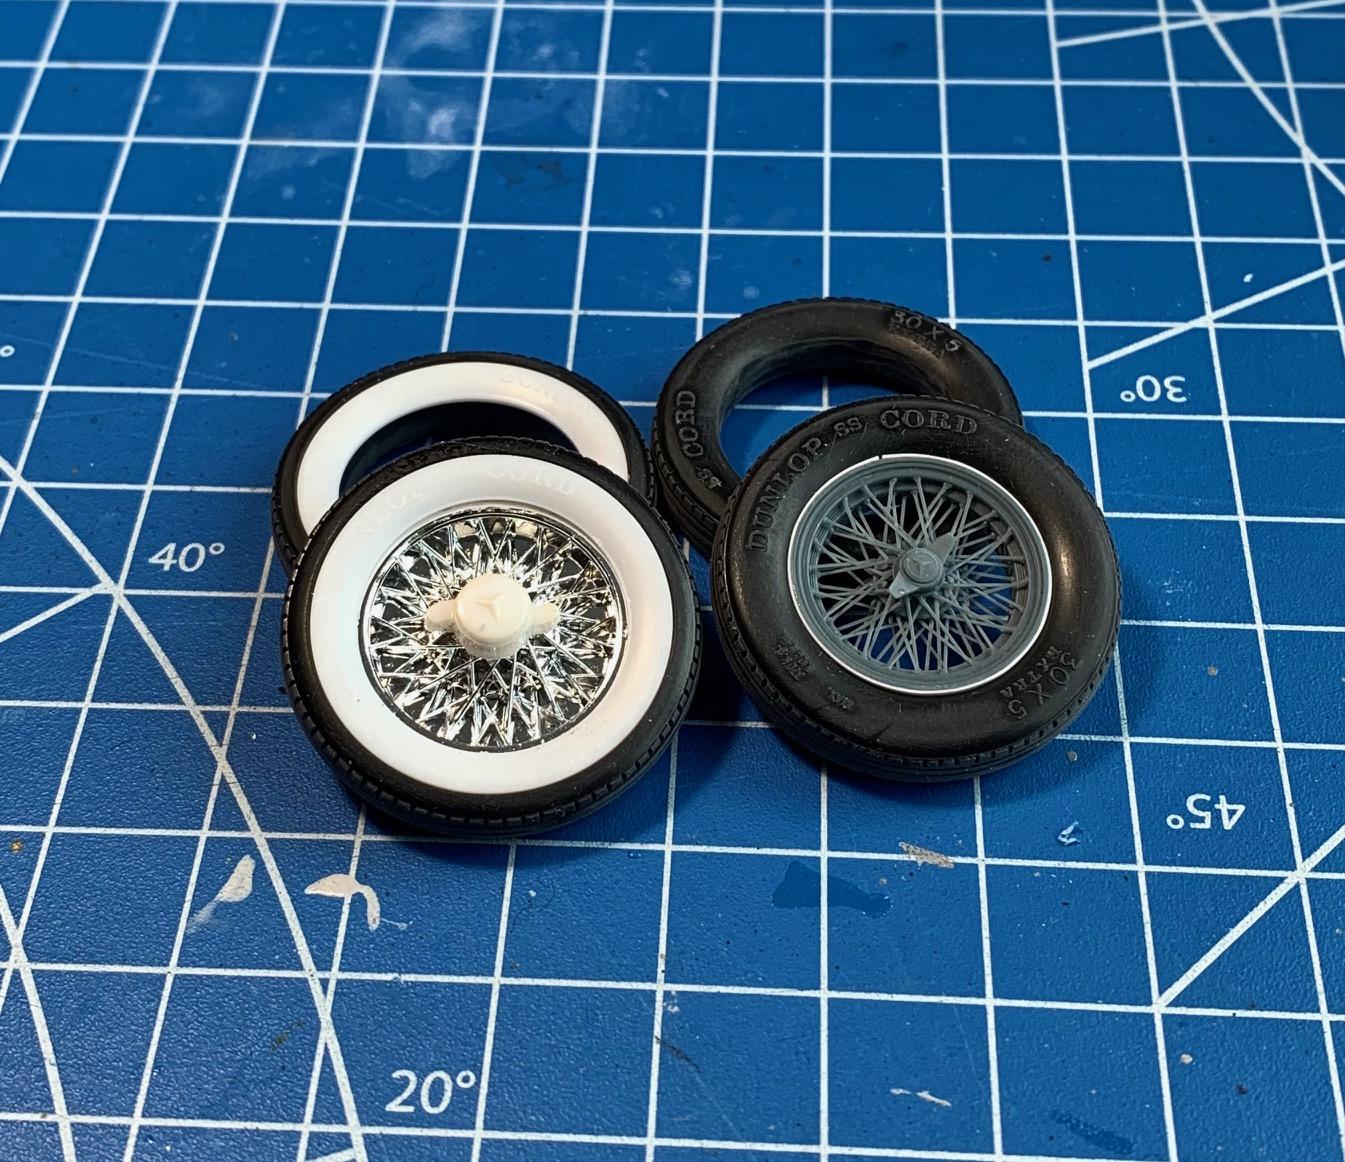
Agree, not completely accurate but a lot more realistic looking than the kit wheels, which by the way also have an incorrect wire pattern for a 1920's car. I believe the Johan kit depicts the 500K with a straight 8 engine? So much potential. PLEASE build it.... or ship it to Montreal! 😃 Thank you Ricky. Super satisfied with the engine. Focus is now on finding a solution for the fenders. I want to find a way to make it look like a race car while the kit was designed more as a touring car. Perhaps too high expectations, but I will try my best but mostly focus on enjoying the journey whatever the end result -
’72 Dodge Demon Drag Racer 1/25 scale
Pierre Rivard replied to AmericanMuscleFan's topic in WIP: Drag Racing Models
Is it me? something wrong here.... yes that dime is really really BIG! Superlative fabrication. Next, next level stuff. -
The engine looks wonderful. All the detailing looks very much a scaled down version of the real thing. I love the bright colors on the injector stacks and the tennis balls, giving such a cool go-go sixties vibe to the model. Perhaps a touch of gay glo yellow to the balls to make them pop more, if it's not too late? Looks like the chassis and engine are all done, so time to apply your magic to the body!
-
Mercedes Benz SSK
Pierre Rivard replied to Pierre Rivard's topic in WIP: Other Racing: Road Racing, Land Speed Racers
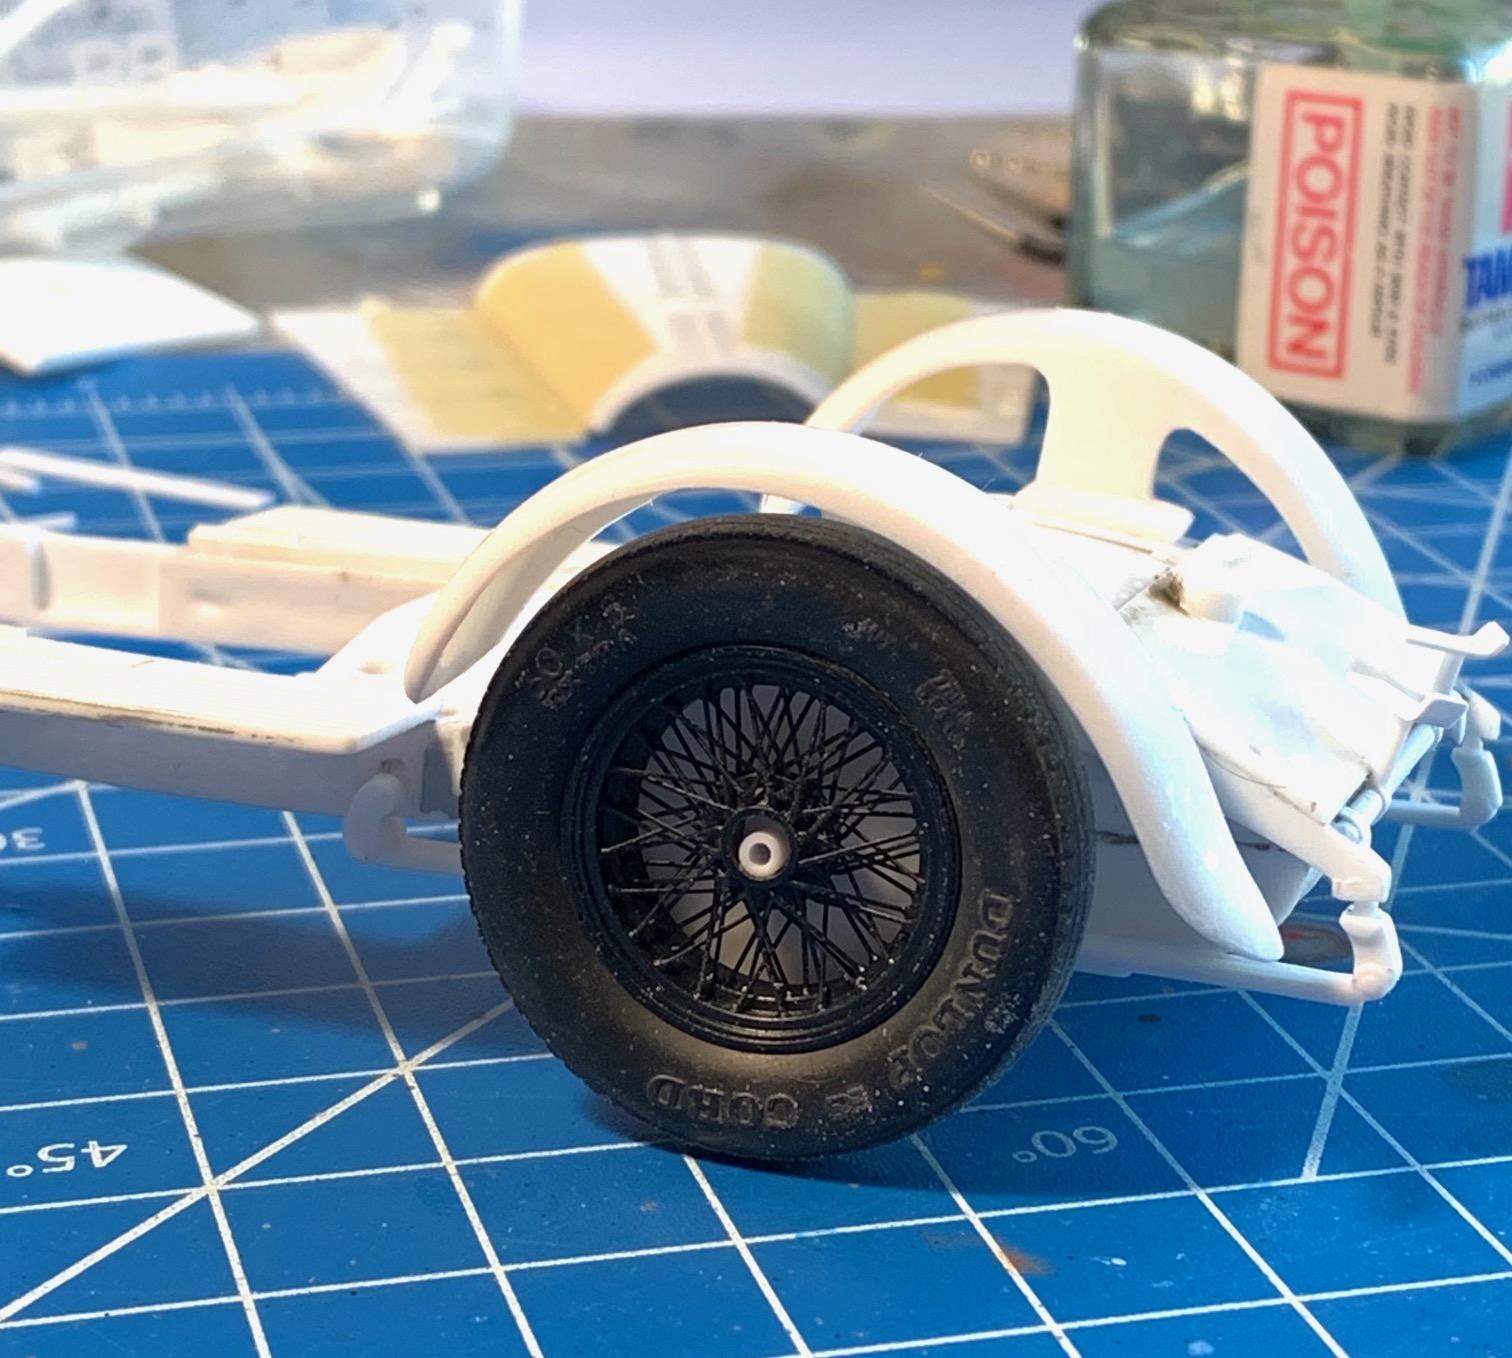
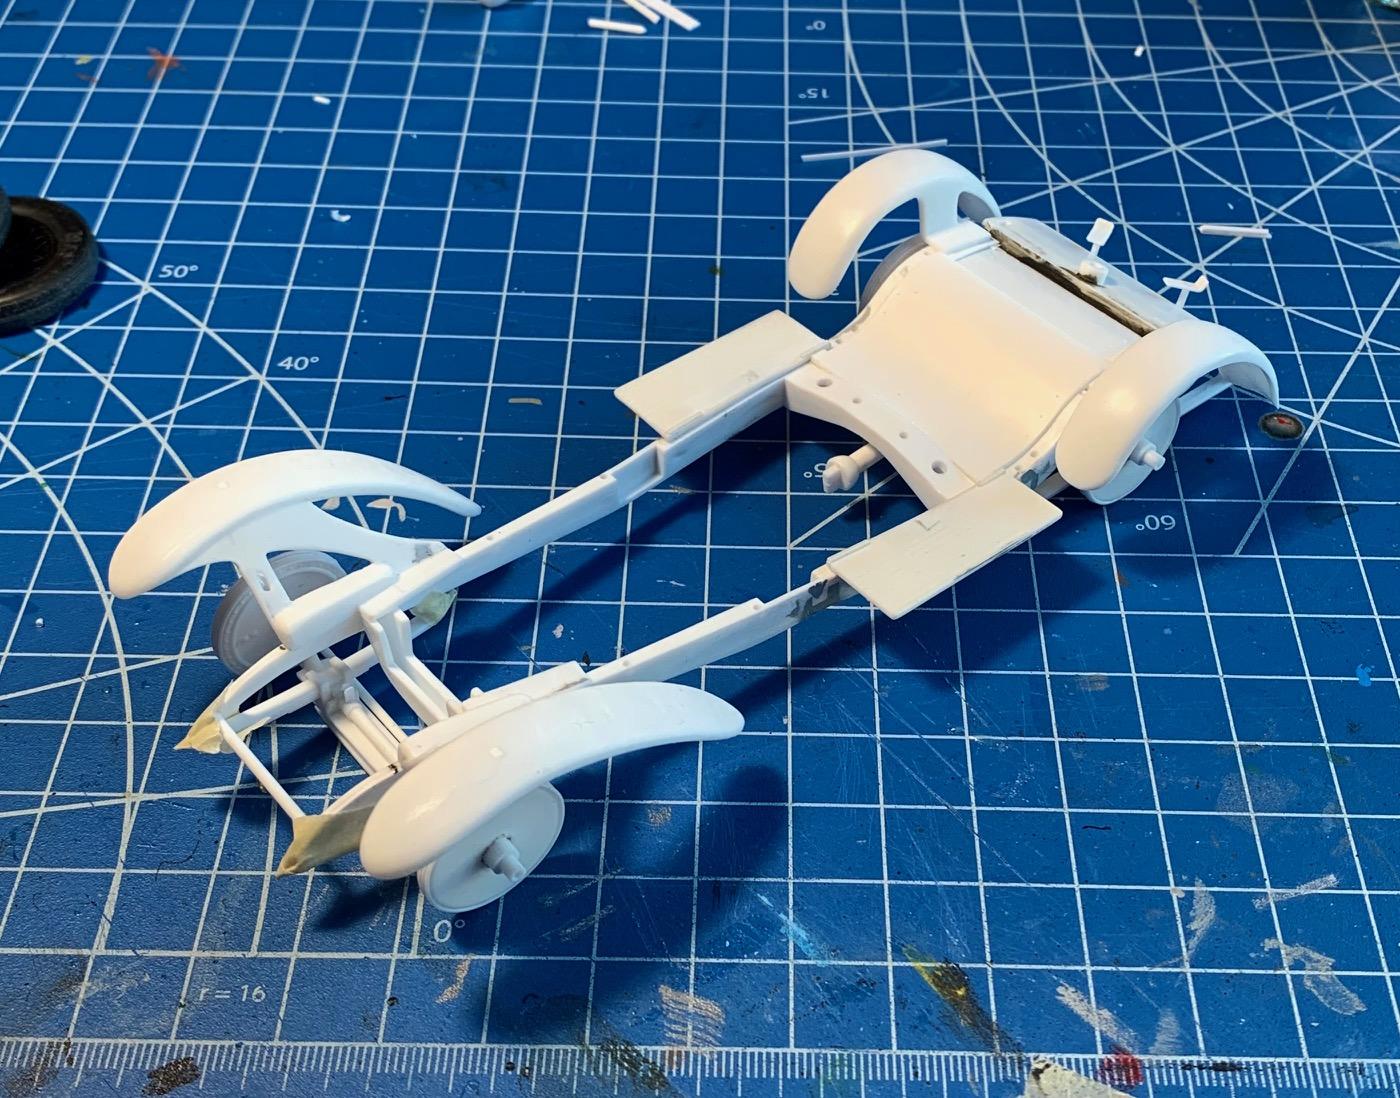
A lot of head scratching withe the assembly sequence as I am still pondering on the final body configuration I want to go with. While this is happening I finalized my wheel & tire solution, which must precede the body as I'll need a set tire location to locate the fenders properly. I definitely wanted to upgrade from the cast wheels and got Jason Hupin to print wire wheels in 22 mm diameter. I did not ask him to design an exact reproduction of period wire wheels due to the limited business opportunity for him (who else but me will build this car?) so used an existing design we worked on previously and asked him to produce a 22mm version. Discerning eyes will spot what is not correct about these but I consider them to be "goodenuf" for my project. I am reusing the kit tires and massaging them as best I can. Of course no whitewalls for this customer. I had to add 0.25 mm thick bands around the rims to get a better fit. Then getting the chassis attachment sorted out and finally a bit of paint (that feels good)
-
My Single 2024 Build
Pierre Rivard replied to Misha's topic in Other Racing: Road Racing, Salt Flat Racers
Hope all will be good with your health going forward. I very much enjoyed following your build for Sebring 60th and look forward to what comes next -
Looks just like the full size mag. Excellent replica. This build keeps adding more eye candy.