

hct728(Bob)
-
Posts
586 -
Joined
-
Last visited
Content Type
Profiles
Forums
Events
Gallery
Everything posted by hct728(Bob)
-
 Just happened to come across an old Model Cars Mag article where you used brass, looked great but a lot of work as you say. Nice to see it again in print, thank you for your past articles demonstrating these techniques, as now!
 -
Such a neat job done on that body! Love the chains and hinge detail. Fenders look good too, ready for casting. Wondering if the brass ones could be formed over a wooden buck and then duplicated, never worked with brass sheet before though. Think it would be cool to use the TV show fender shaping techniques on a model!
-
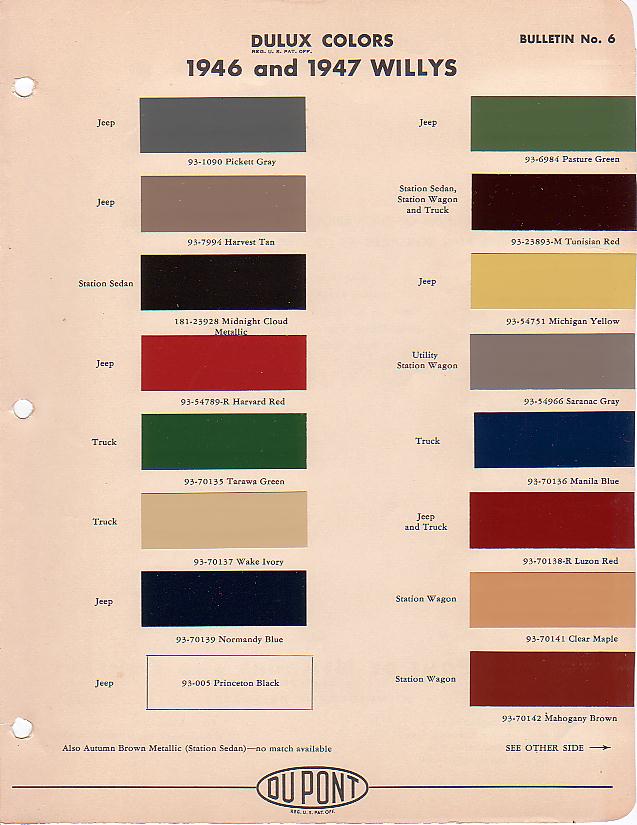
Nice work! One can really pick out the chassis and suspension details, and just enough weathering on the exhaust and engine to add realism, nice! As for the spray cans, a local autobody supply shop should be able to mix up a custom spray can for you, I've had it done. I like the one in this picture, "Pasture Green" as an example

-
Love it! What people really drive, very popular around here. Debated buying the kit, kinda pricey for a curbside but boy it sure looks good properly painted and assembled like yours!
-
My Moebius Pickup Kit Summary, all 11 of them!
hct728(Bob) replied to hct728(Bob)'s topic in Truck Kit News & Reviews
So there's the '68! I dont see different wheels in the picture, but I think I'll just wait for the ramp truck and buy two! -
Wow, looks great! Nicely photographed too, looks great from every angle!
-
That’s the model? You’ve gotta be kidding, the molding is not even two inches wide! Fabulous!
-
Forgot to ask, shouldn’t the Ford battery have six caps in 1967, instead of the two rectangular caps molded on the kit piece?
-
Garage diorama for auto restoration & machine shop 'completed'
hct728(Bob) replied to The Modeling Hermit's topic in Dioramas
Wow, impressive work, looks so real! Come a long way from the Otto Ray Sing vignettes that I remember from many years ago! They were so very clever, postcards from the North, I guess! I’ll have to track down your references now, lots of inspiration here if you know where to look -
Currently installing the windows, and boy that windshield is a tight fit, I thought it was going to snap, but I put on my thin cotton gloves to keep it clean, held my breath and snapped it into place. Top and bottom fit okay, it’s the two side edges that fix it in place. Helps to do the black trim first, and some BMF on the inside edge of the black if you’re doing an upscale model. Now on to the rear window, which needed filing to fit in the hole, unless you test fit it before paint and enlarge the hole. After filing the flange looks wider so that should be shaved , and there is also a wide flange at the top that seems excessive so off it goes. Love the quality of the molding on these clear parts!
-
Ha, even you need a little nudge to push the envelope, LOL! Great job, another neat little detail. I had to look up which way an engine turns, seems CCW is most common, now scratching my head and trying to figure out which way the blades should be oriented to pull air thru the rad - my head is starting to hurt! Things are really coming together for you, great progress, thanks for sharing!
-
Saw that, you did a great job on that, neatly done!
-
Wow, seems like Facebook has become the place to go for modeling, lots of info there if you do a search! Check out the link if you are a member… https://www.facebook.com/groups/340799519321223/search/?q=container
-
Great job on the old Ford, Tom! Perfect replica, sad as it looks! Someone's escape to the country - once had a foreman who drove a similar camper to work, you just knew where he was headed Friday night!
-
Wow, that's about as good as it can be! Love the sunroof, I did an open one on my 1980 Honda Accord model, but you did it both open and closed, kudos! So nice to see a difficult kit get some love!
-
Forgot to include Tim Ahlborn's inspirational builds of this kit, done two ways: https://public.fotki.com/mackinac359/trailers-and-bodies/amt-container-trailer/
-
Looking for tips on making the recent AMT reissue of the Italeri Container Trailer into something more resembling what we see on the roads here in North America, I came across a topic that has since been moved, as some of us seem to have hijacked the original subject: Some great instructions from past magazines are posted there and worth a look. Anyways my progress so far: (1)Shortening the the spread-axle Euro dolly by joining the front and rear springs: (2) Revising the tail end, while keeping the kit parts. 'Before' on the left and 'after' on the right,' might do more though: More to come, debating swapping out the wheels for some Daytons from the junk parts box BTW, there is a prototype for the Euro version, at: https://www.mascus.de/lkw-transport/containerauflieger/other-deutsche-fruehauf-container-chassis-40ft-full-s/bje9i94h.html with some neat weathering ideas too:
-
Wow, nice job on the engine! I love all the brass and aluminum details, they sure bring the resin to life, shame you have to paint them!
-
https://www.wickedlocal.com/story/courier-sentinel/2021/04/25/wareham-firefighters-break-new-brush-breaker/7369967002/
-
Quite the conversion project! Saw a video of if, is Chief Matt Rowley a relative?
-
Yours looks like this one, so it’s prototypical too! https://public.fotki.com/modeltrucks25thscale/model_magazine_articles/car_modeller/cm41_jan_1997_conve/cm_1997_01_jan_02.html#media
-
I’m using Alumilite “Amazing Casting Resin” I bought at Michaels using their 50% off coupon. I don’t do enough casting to get the good stuff, it would go bad. Temperature should actually be 150 not 100F and I don’t want to stink up the house so outdoors I go! Will be doing several pieces, mainly a Volvo semi dash and a grille(!), and an engine maybe, I made a mold of my little Cummins as a test. Good to have extra molds handy in case I mix too much for the main project, I find it hard to tell how much will be needed. Thanks for the how-to and inspiration!
-
Great job! Your fabricated parts look better than the production diecast model engine! So good to see them being cast too. Reninds of some casting I have to do, got the molds done but was waiting for a hot day, as the instructions say the resin is supposed to be at 100 degrees to cure properly. Never seen that before. Nice to see such progress with yours!
-
Not sure you will like to see this, but I found another option for this mod


.jpg.692d3b70933e0116e3a75c5c93a804d5.jpg)
(30).jpg.52baf45791bd3158d389f44f9ea5ecfe.jpg)