OldNYJim
-
Posts
250 -
Joined
-
Last visited
Content Type
Profiles
Forums
Events
Gallery
Everything posted by OldNYJim
-
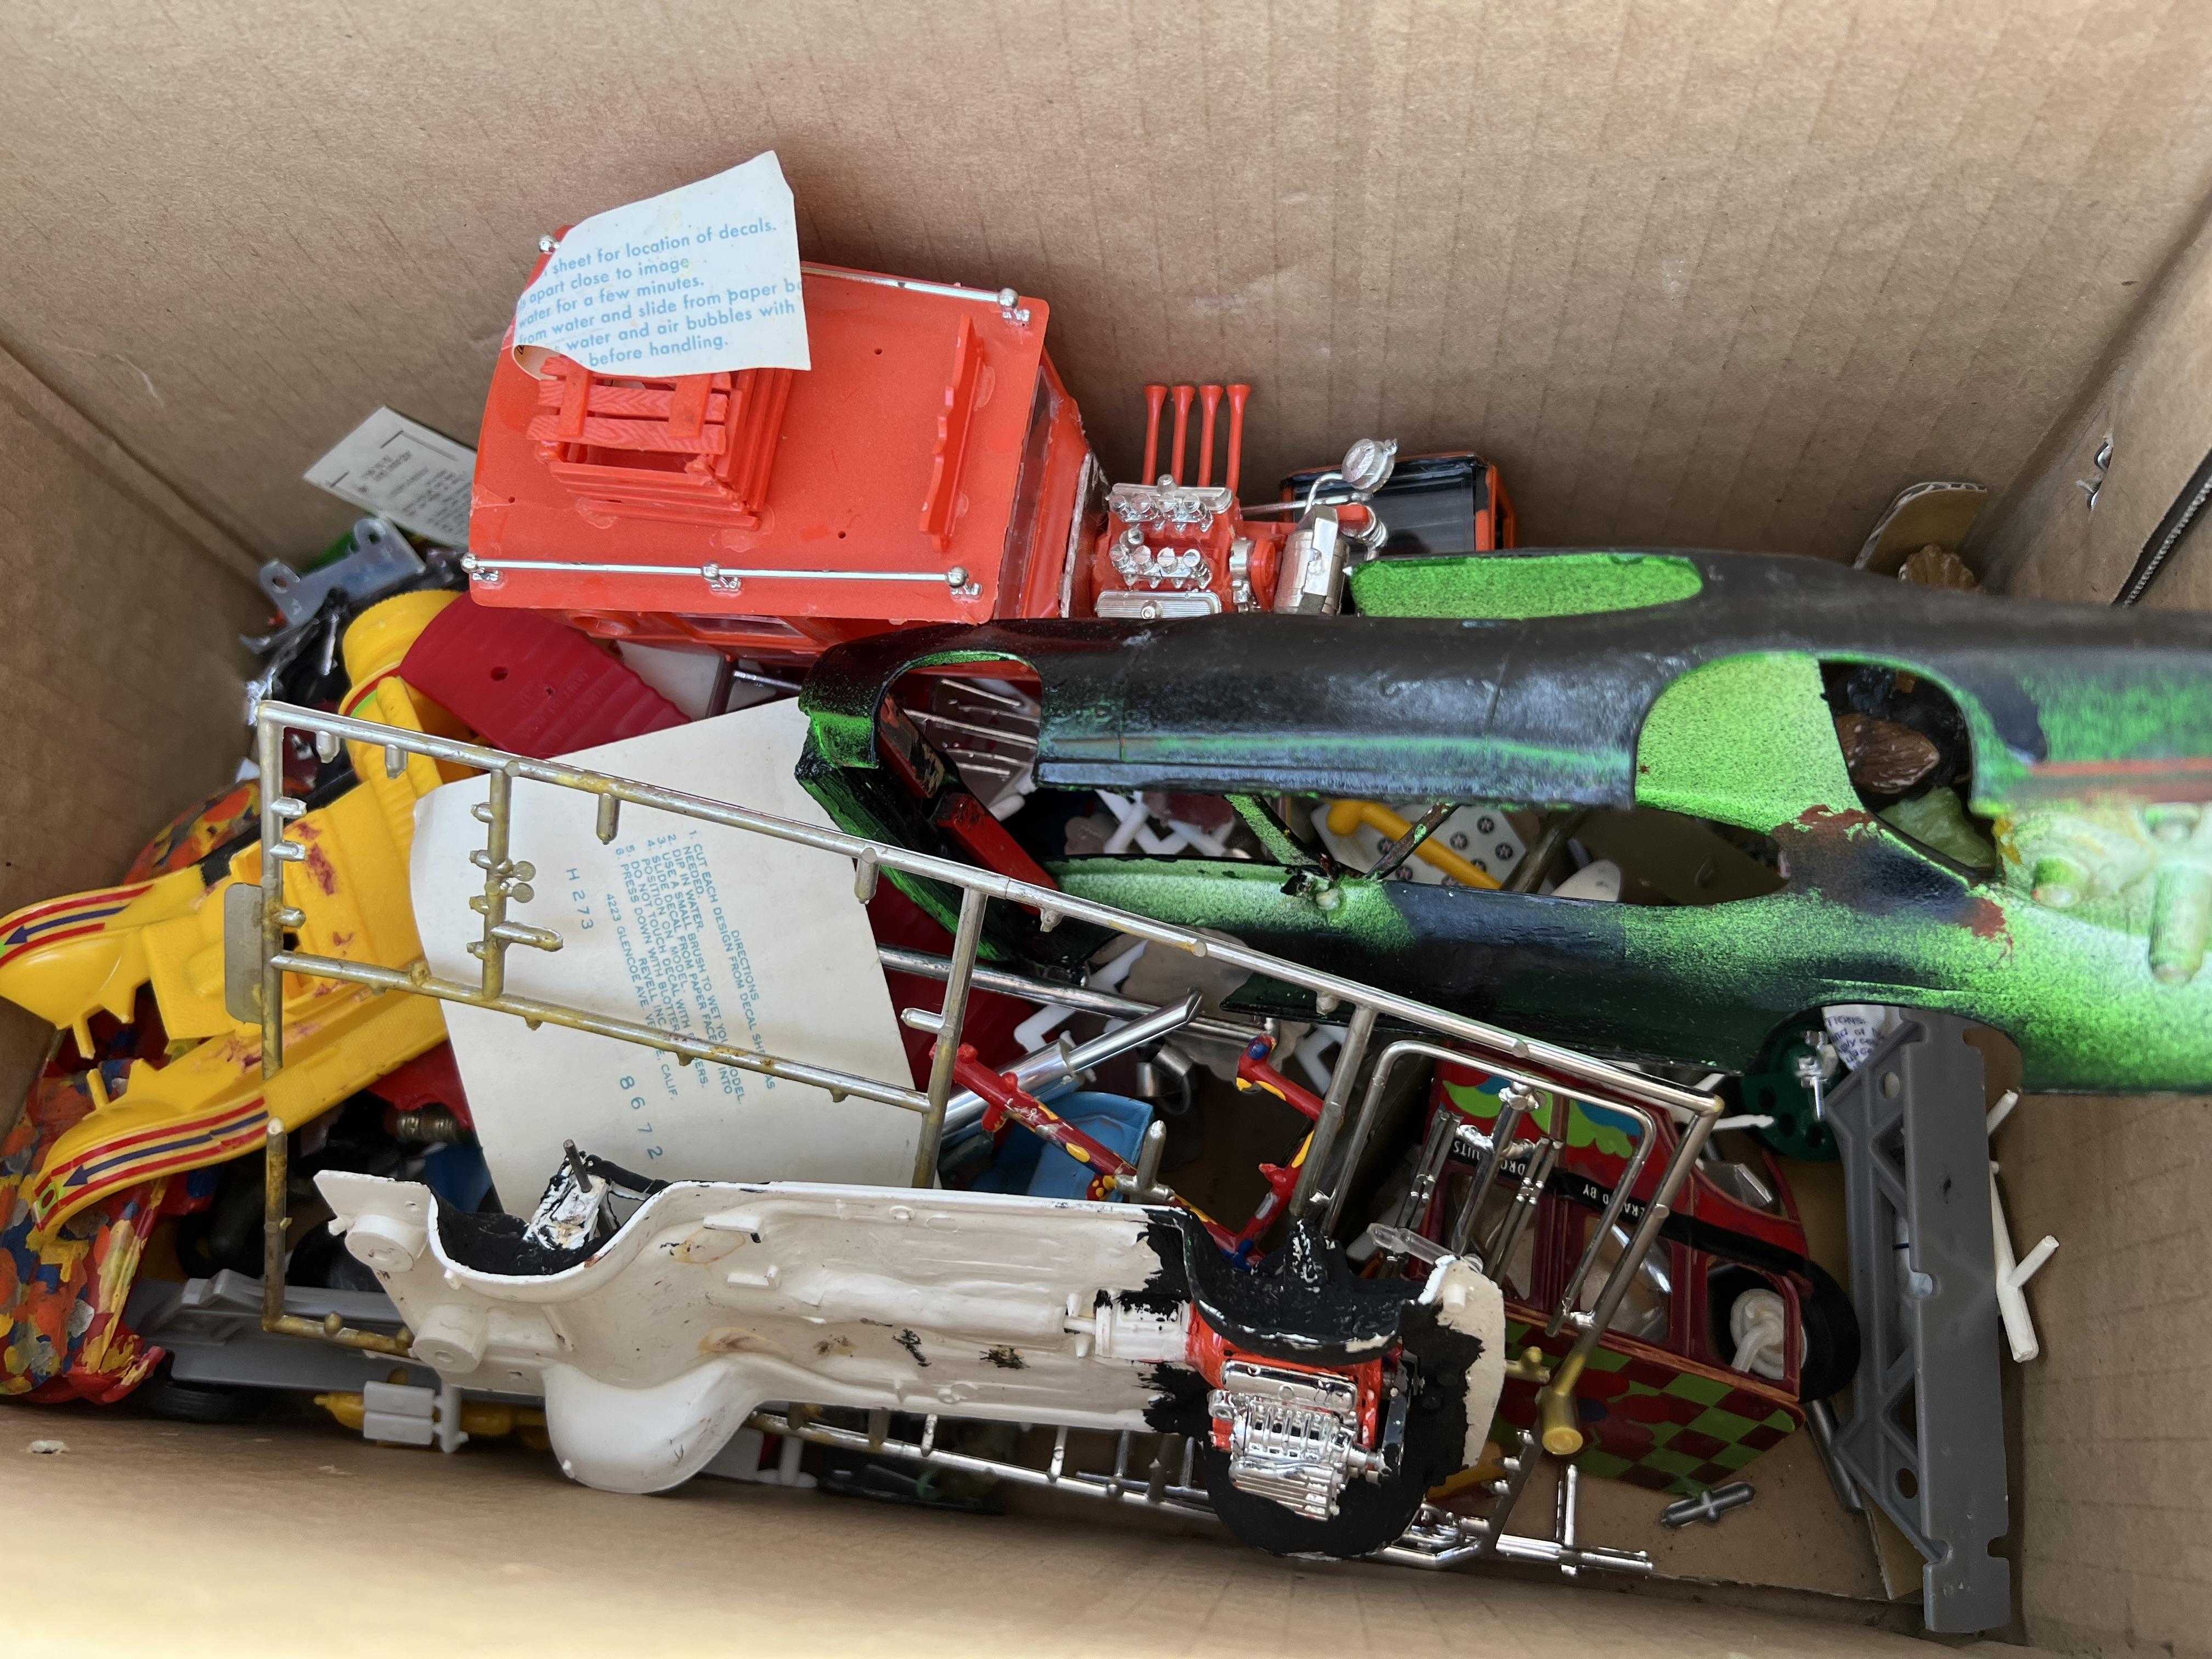
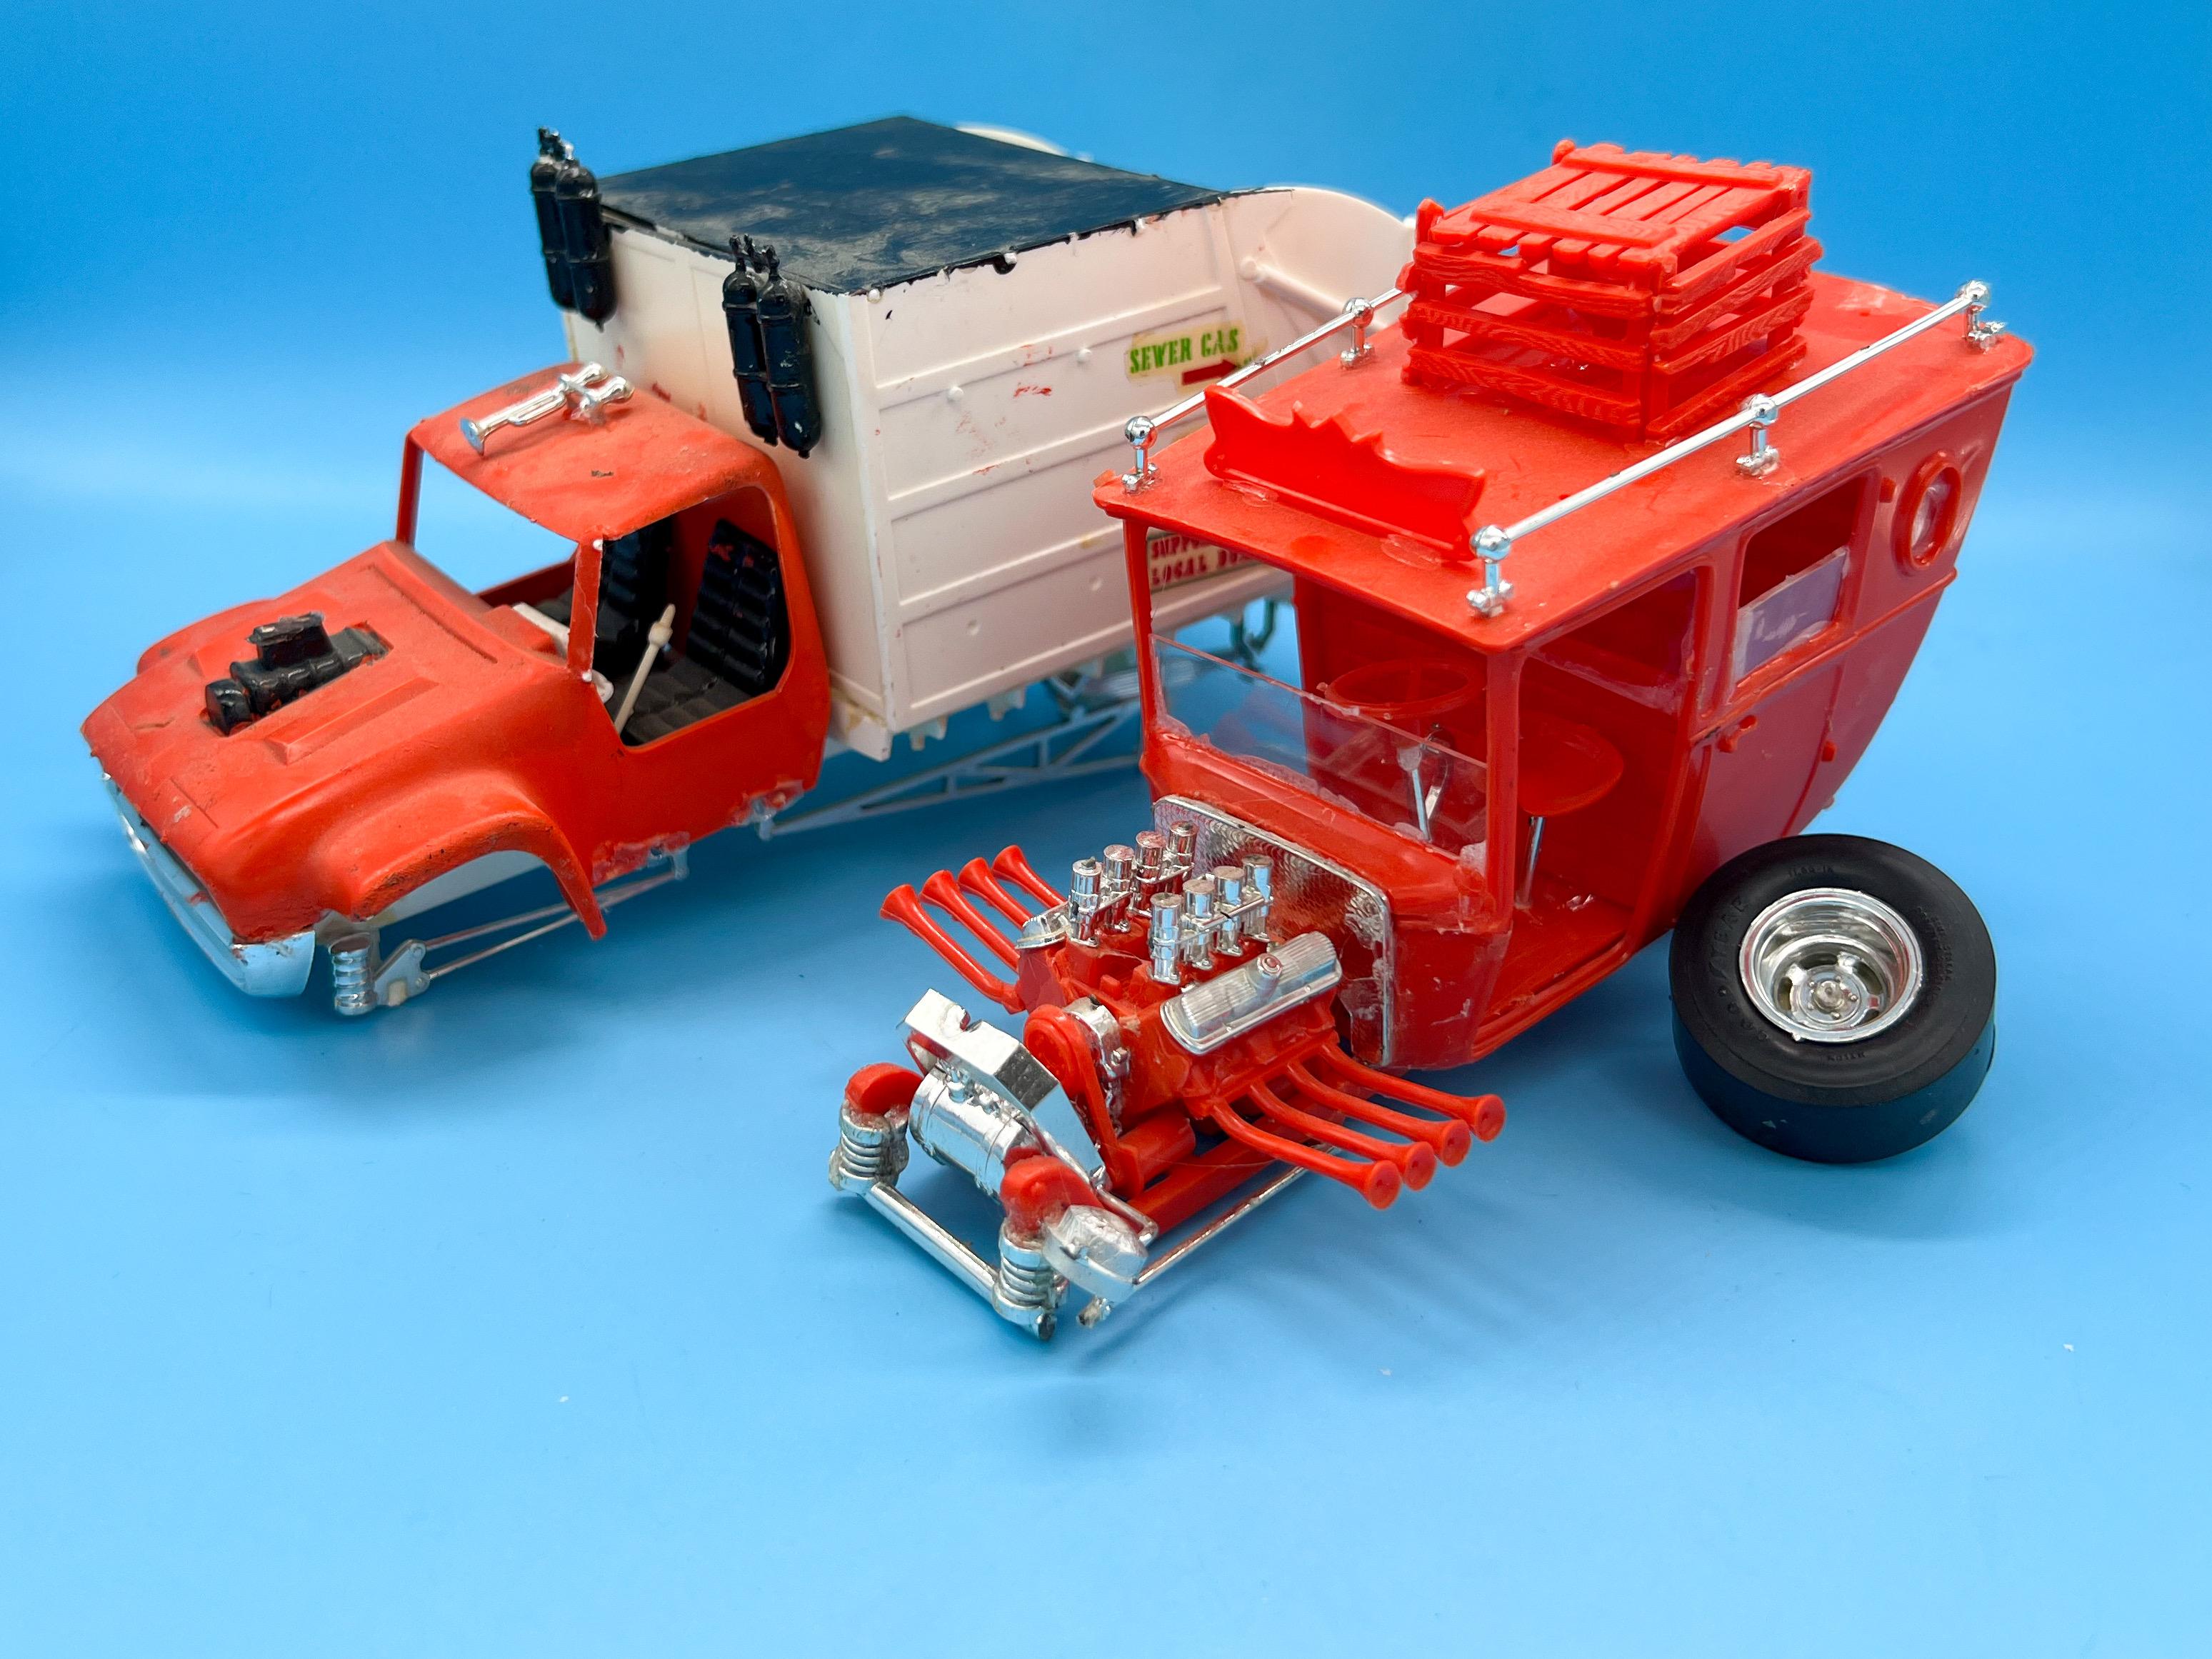
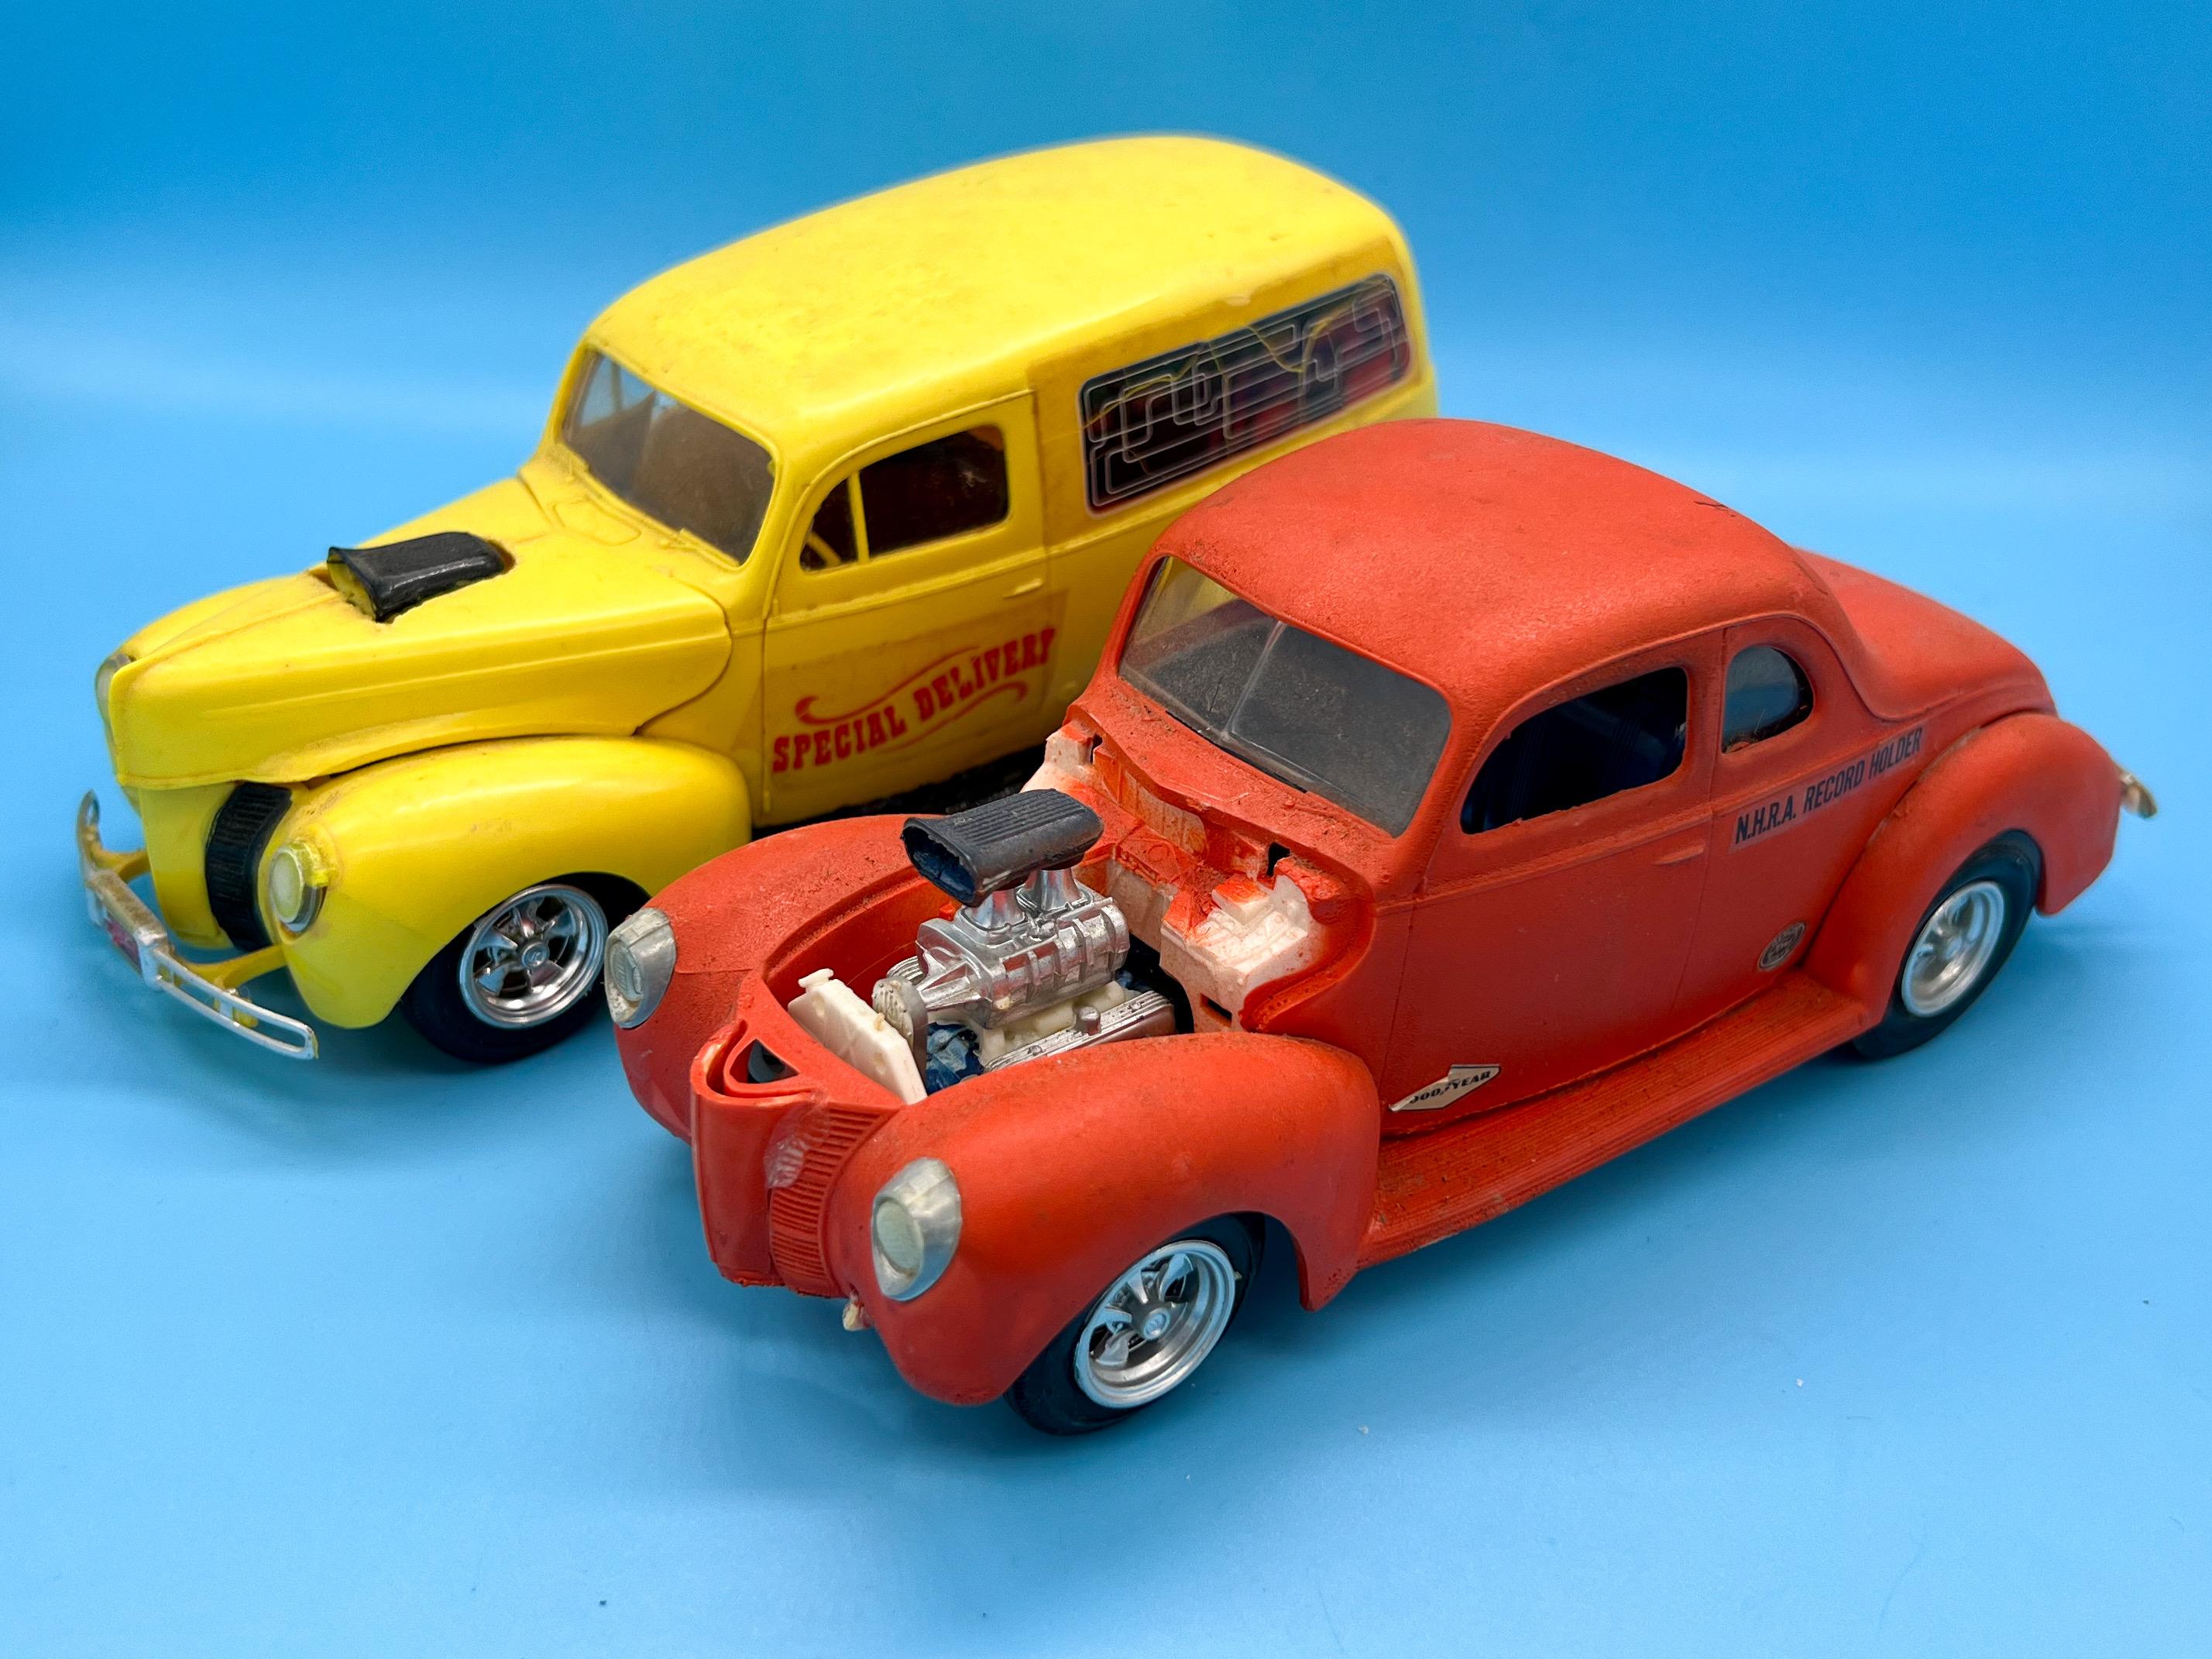
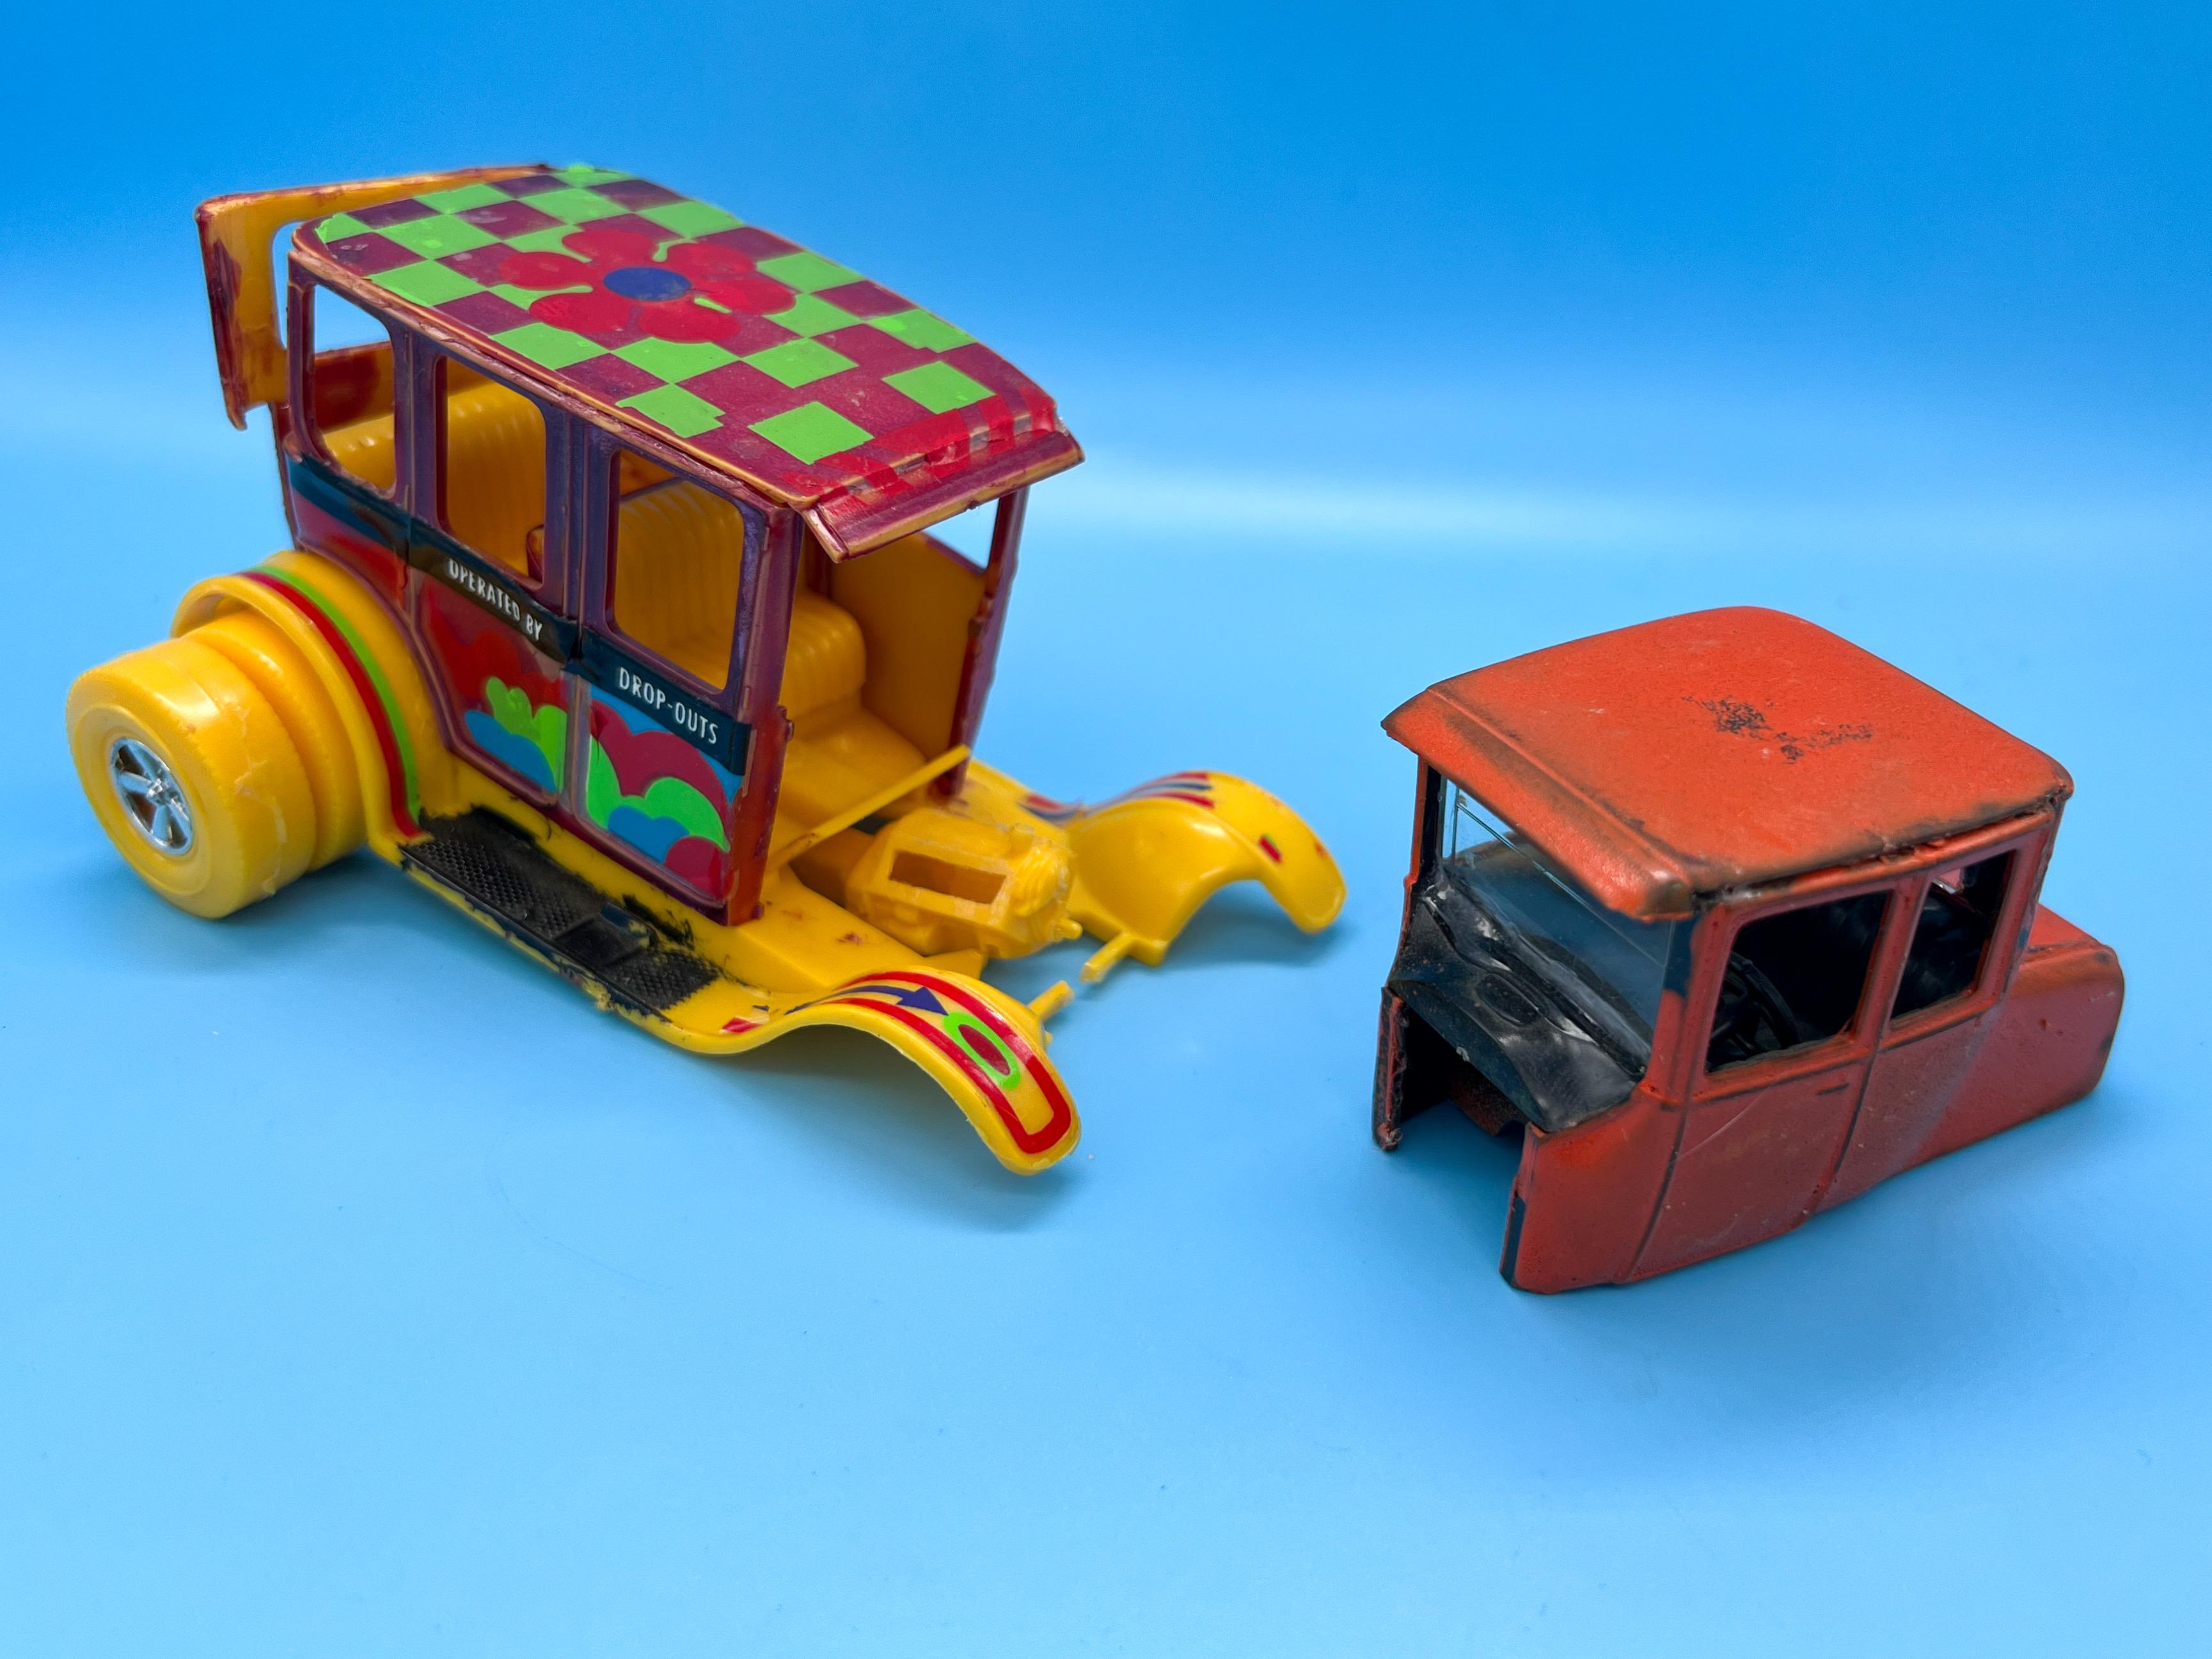
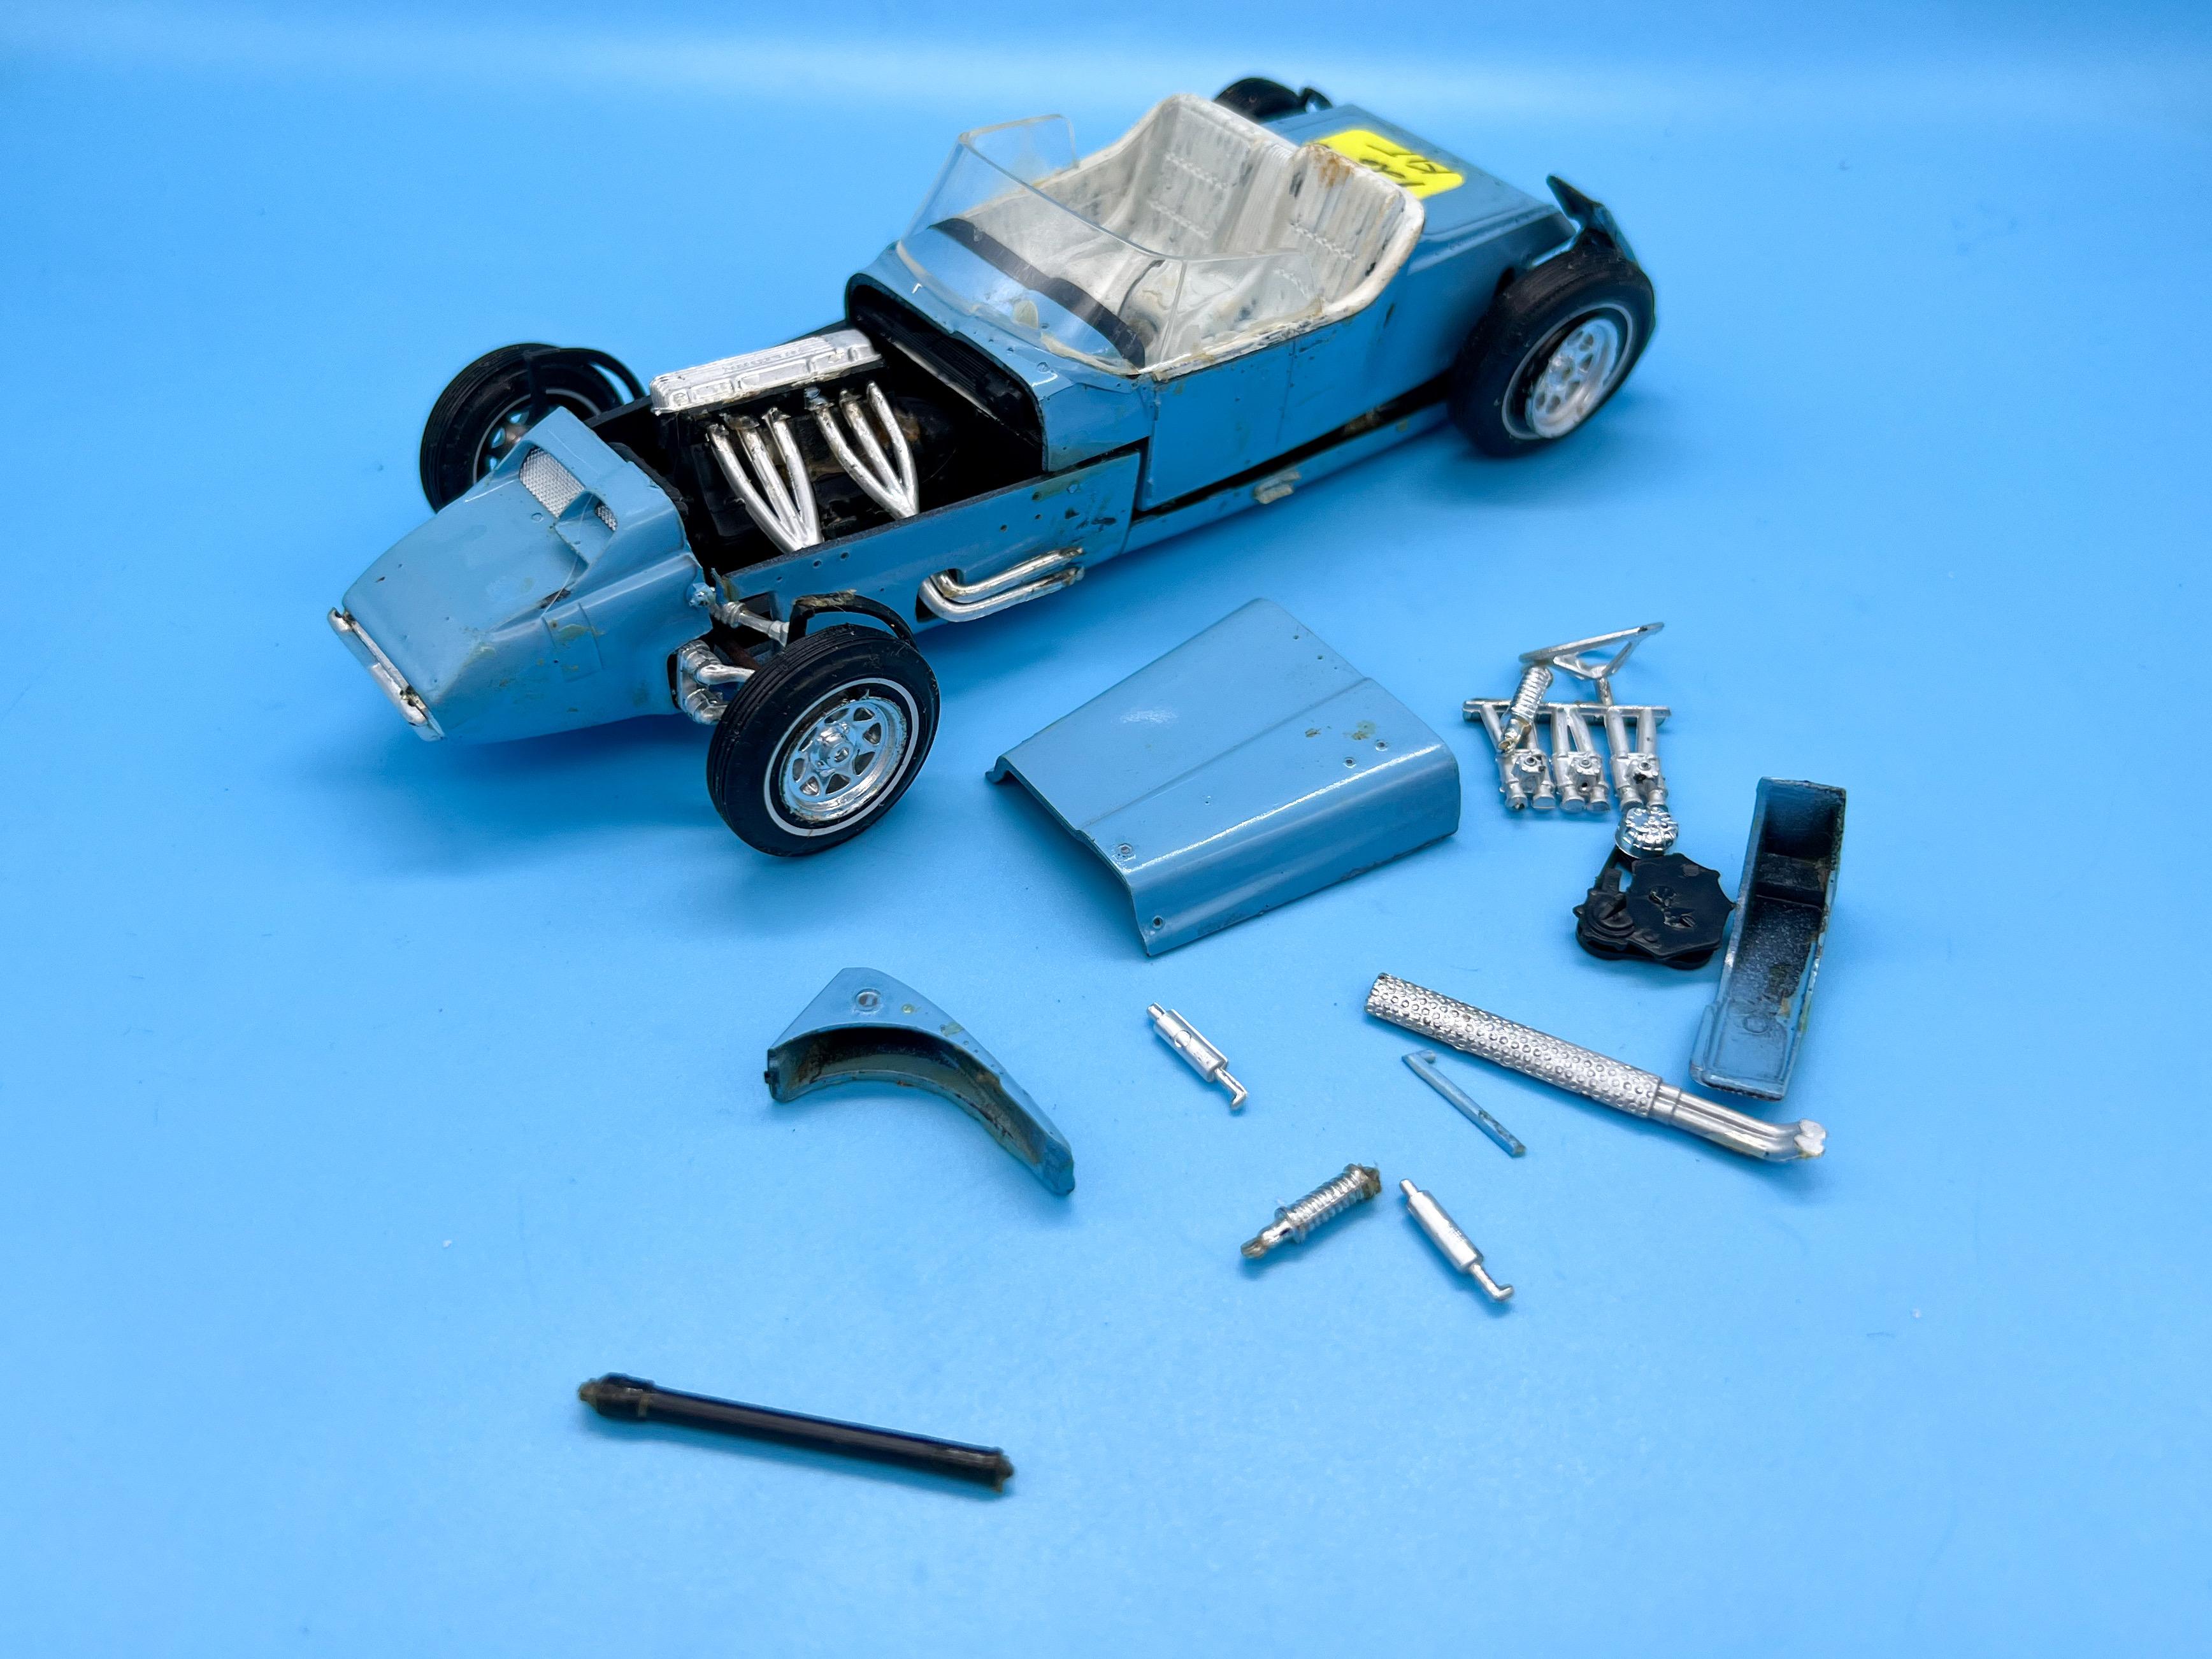
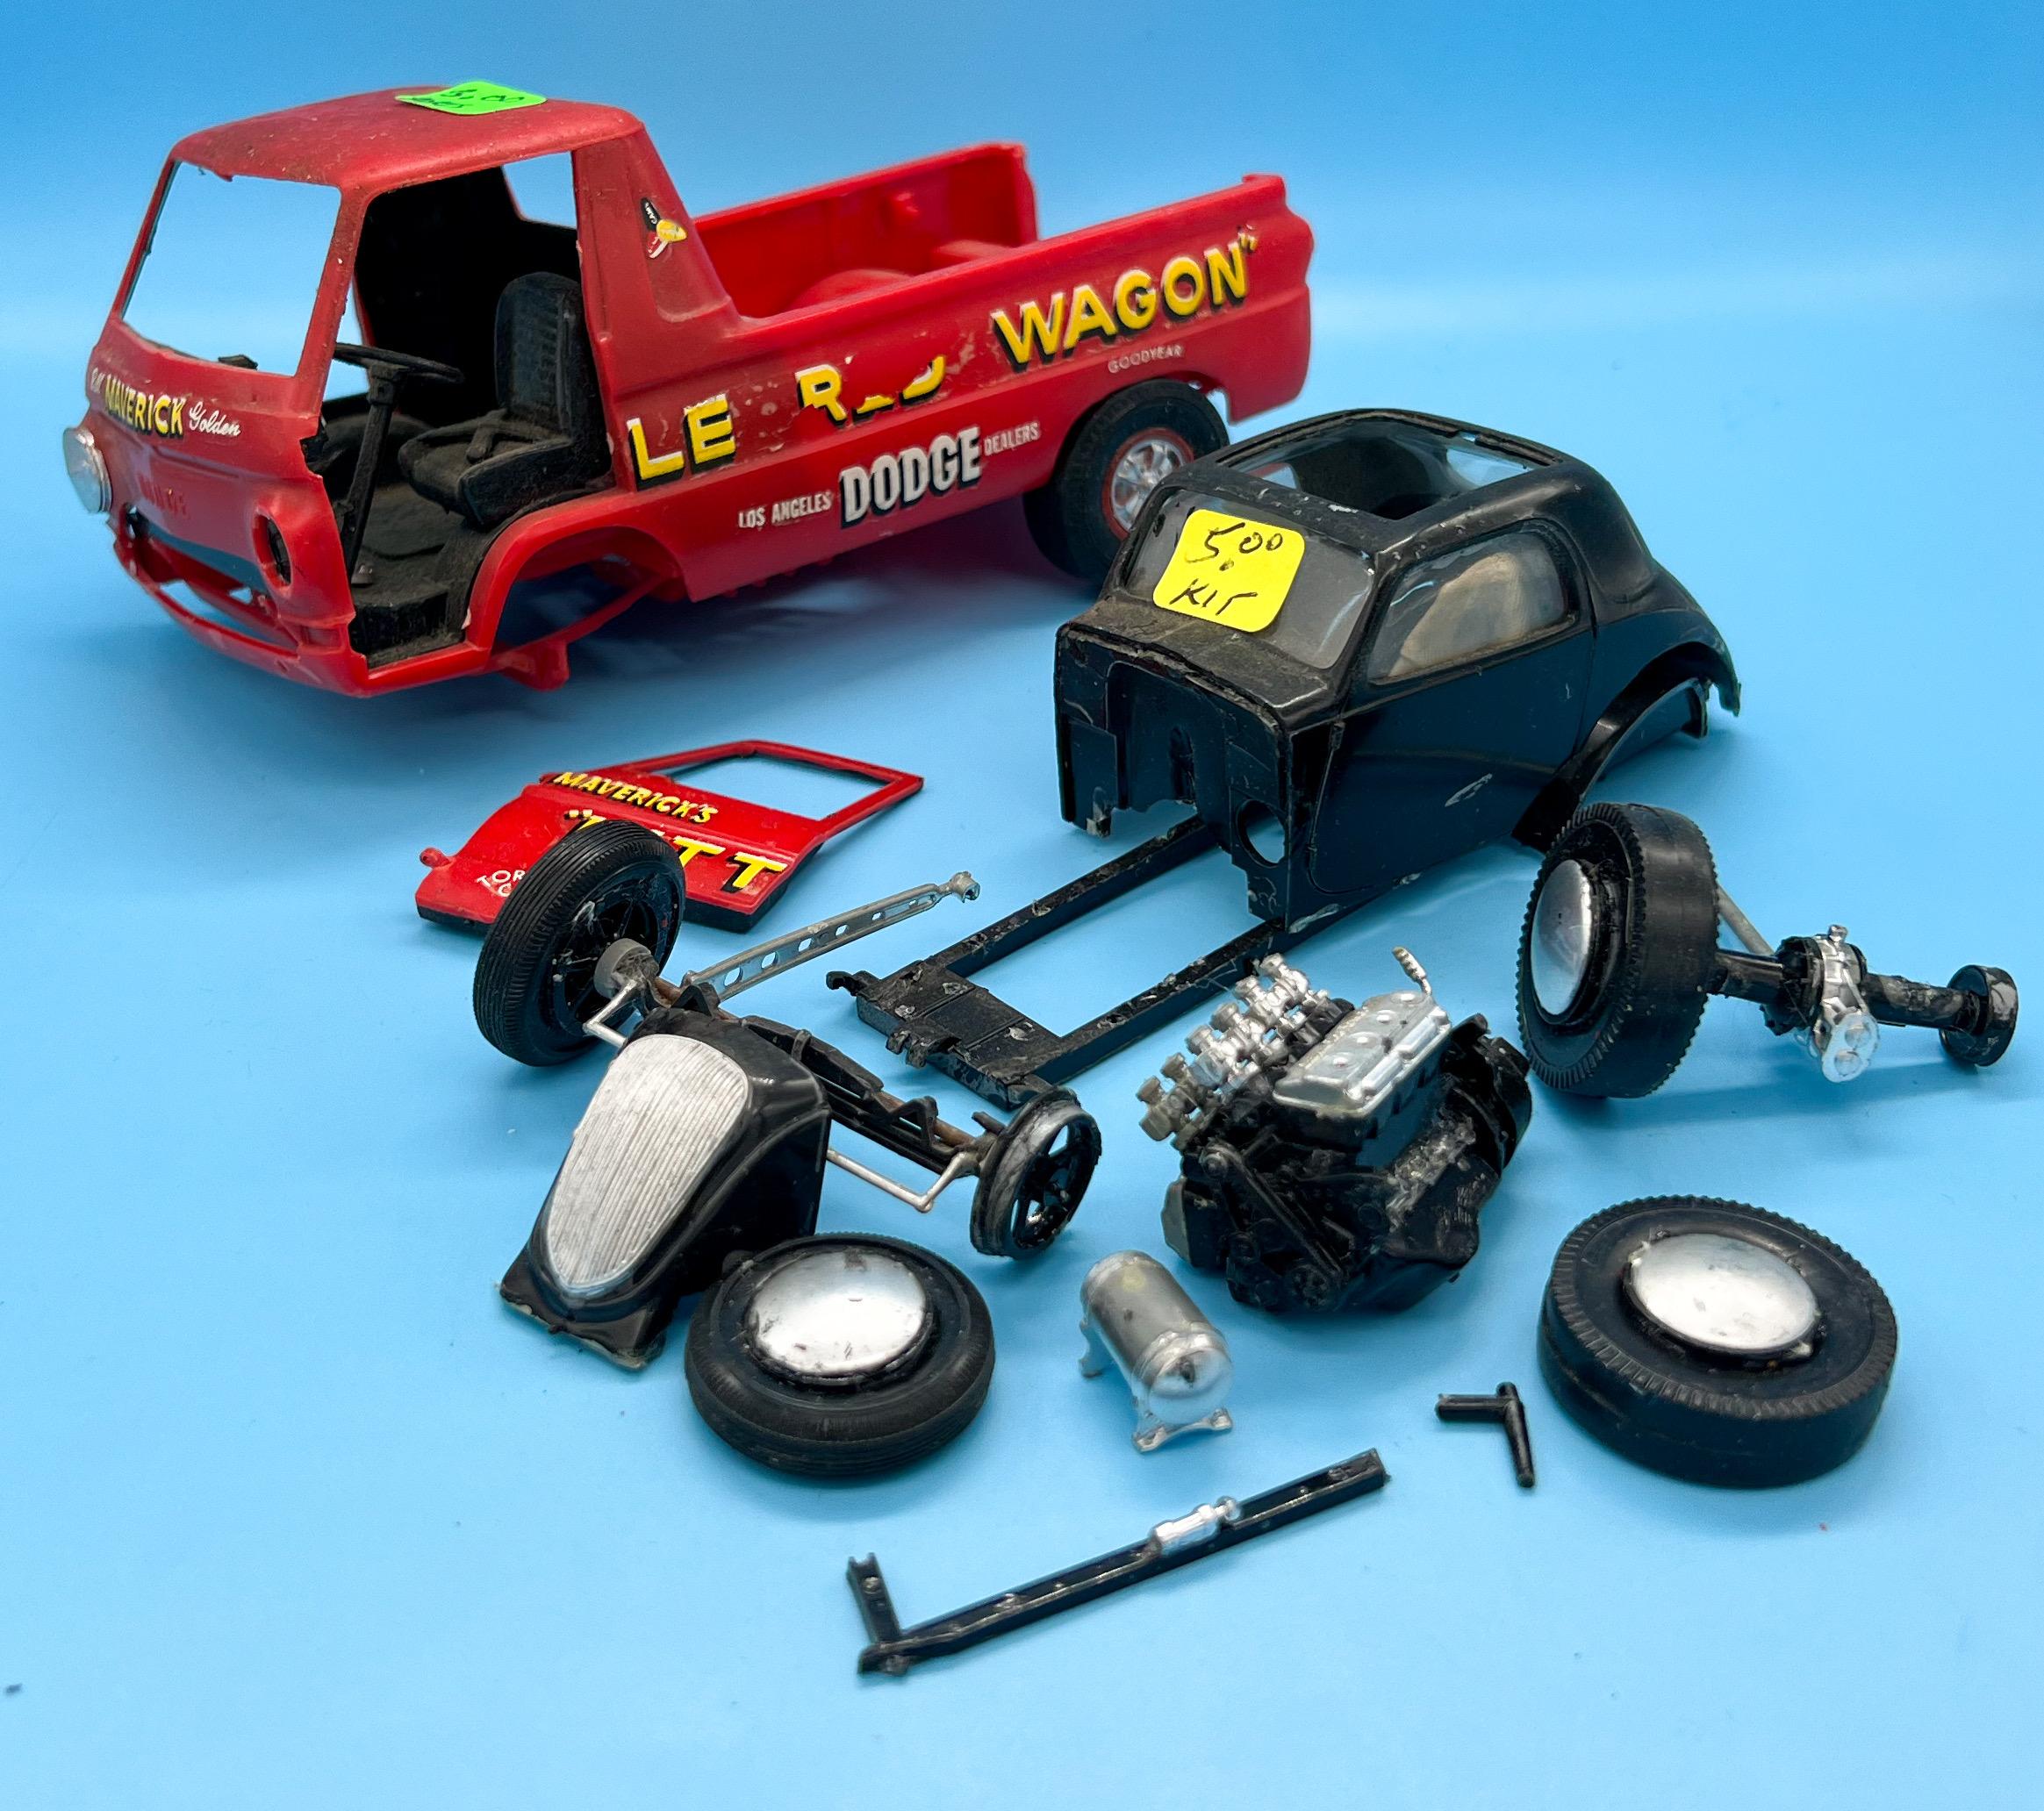
 Hit a local swap meet today - they had a decent number of kits (mostly at standard eBay / retail prices), but I spotted a box of ‘junk’ at one table: Right away I knew I wanted the Tijuana taxi…guy told me it was a George Barris kit…then pulled out some more boxes of ‘junk’…told me he wanted a buck a car “with as many of the pieces as you can find”…ended up with half a Tijuana Taxi and a TD Garbage Truck: A couple of salvageable 40s: And a lot of an Aurora Drop Out bus, plus a T body that he didn’t charge me for: Plus, I found one of my grail kits (but not such a grail that I would’ve paid eBay prices for one right now) - the old AMT XR6 (complete, I think, and $12) And I dropped another eight on these two: Plus found a bunch of late-80s early 90s Scale Auto Enthusiast mags for 50 cents a piece…pretty decent haul of old junk that I dragged home!
- 38,881 replies
-
- 3
-

-
- johan
- glue bombs
- (and 1 more)
-
What Lower Radiator Hose?
OldNYJim replied to shoopdog's topic in Model Building Questions and Answers
I built a couple of Beetles, and they didn’t even include any radiator hoses in the kit! -
Ohh - I have a few of their products but never tried this one…thanks for the heads up!!
-
Looks like a good start to me! I’ve heard those bodies are really well molded
-
Help with Creality Harlot one printer
OldNYJim replied to V8tiger's topic in General Automotive Talk (Trucks and Cars)
I had an issue like this with my new printer - I had plenty of supports but incomplete prints. When you say "Yachee", do you mean "Lychee"? The slicer app? If so, the solution to my issue was gradually increasing the light-on time in the resin settings in Lychee - I think the issue was that the resin wasn't curing properly on my new machine (although the identical settings had worked great on the machine before). So, my light-on time was I think 1 second, and I ended up at 4 before I started getting normal prints...not sure if that will fix YOUR issue but it helped with mine... -
This is a KILLER build - really well done! @JET. - one thing I was really impressed with was the perfect scale flake on that Mooneyes steering wheel - what base did you use on that? It looks great! Awesome build! ??
-
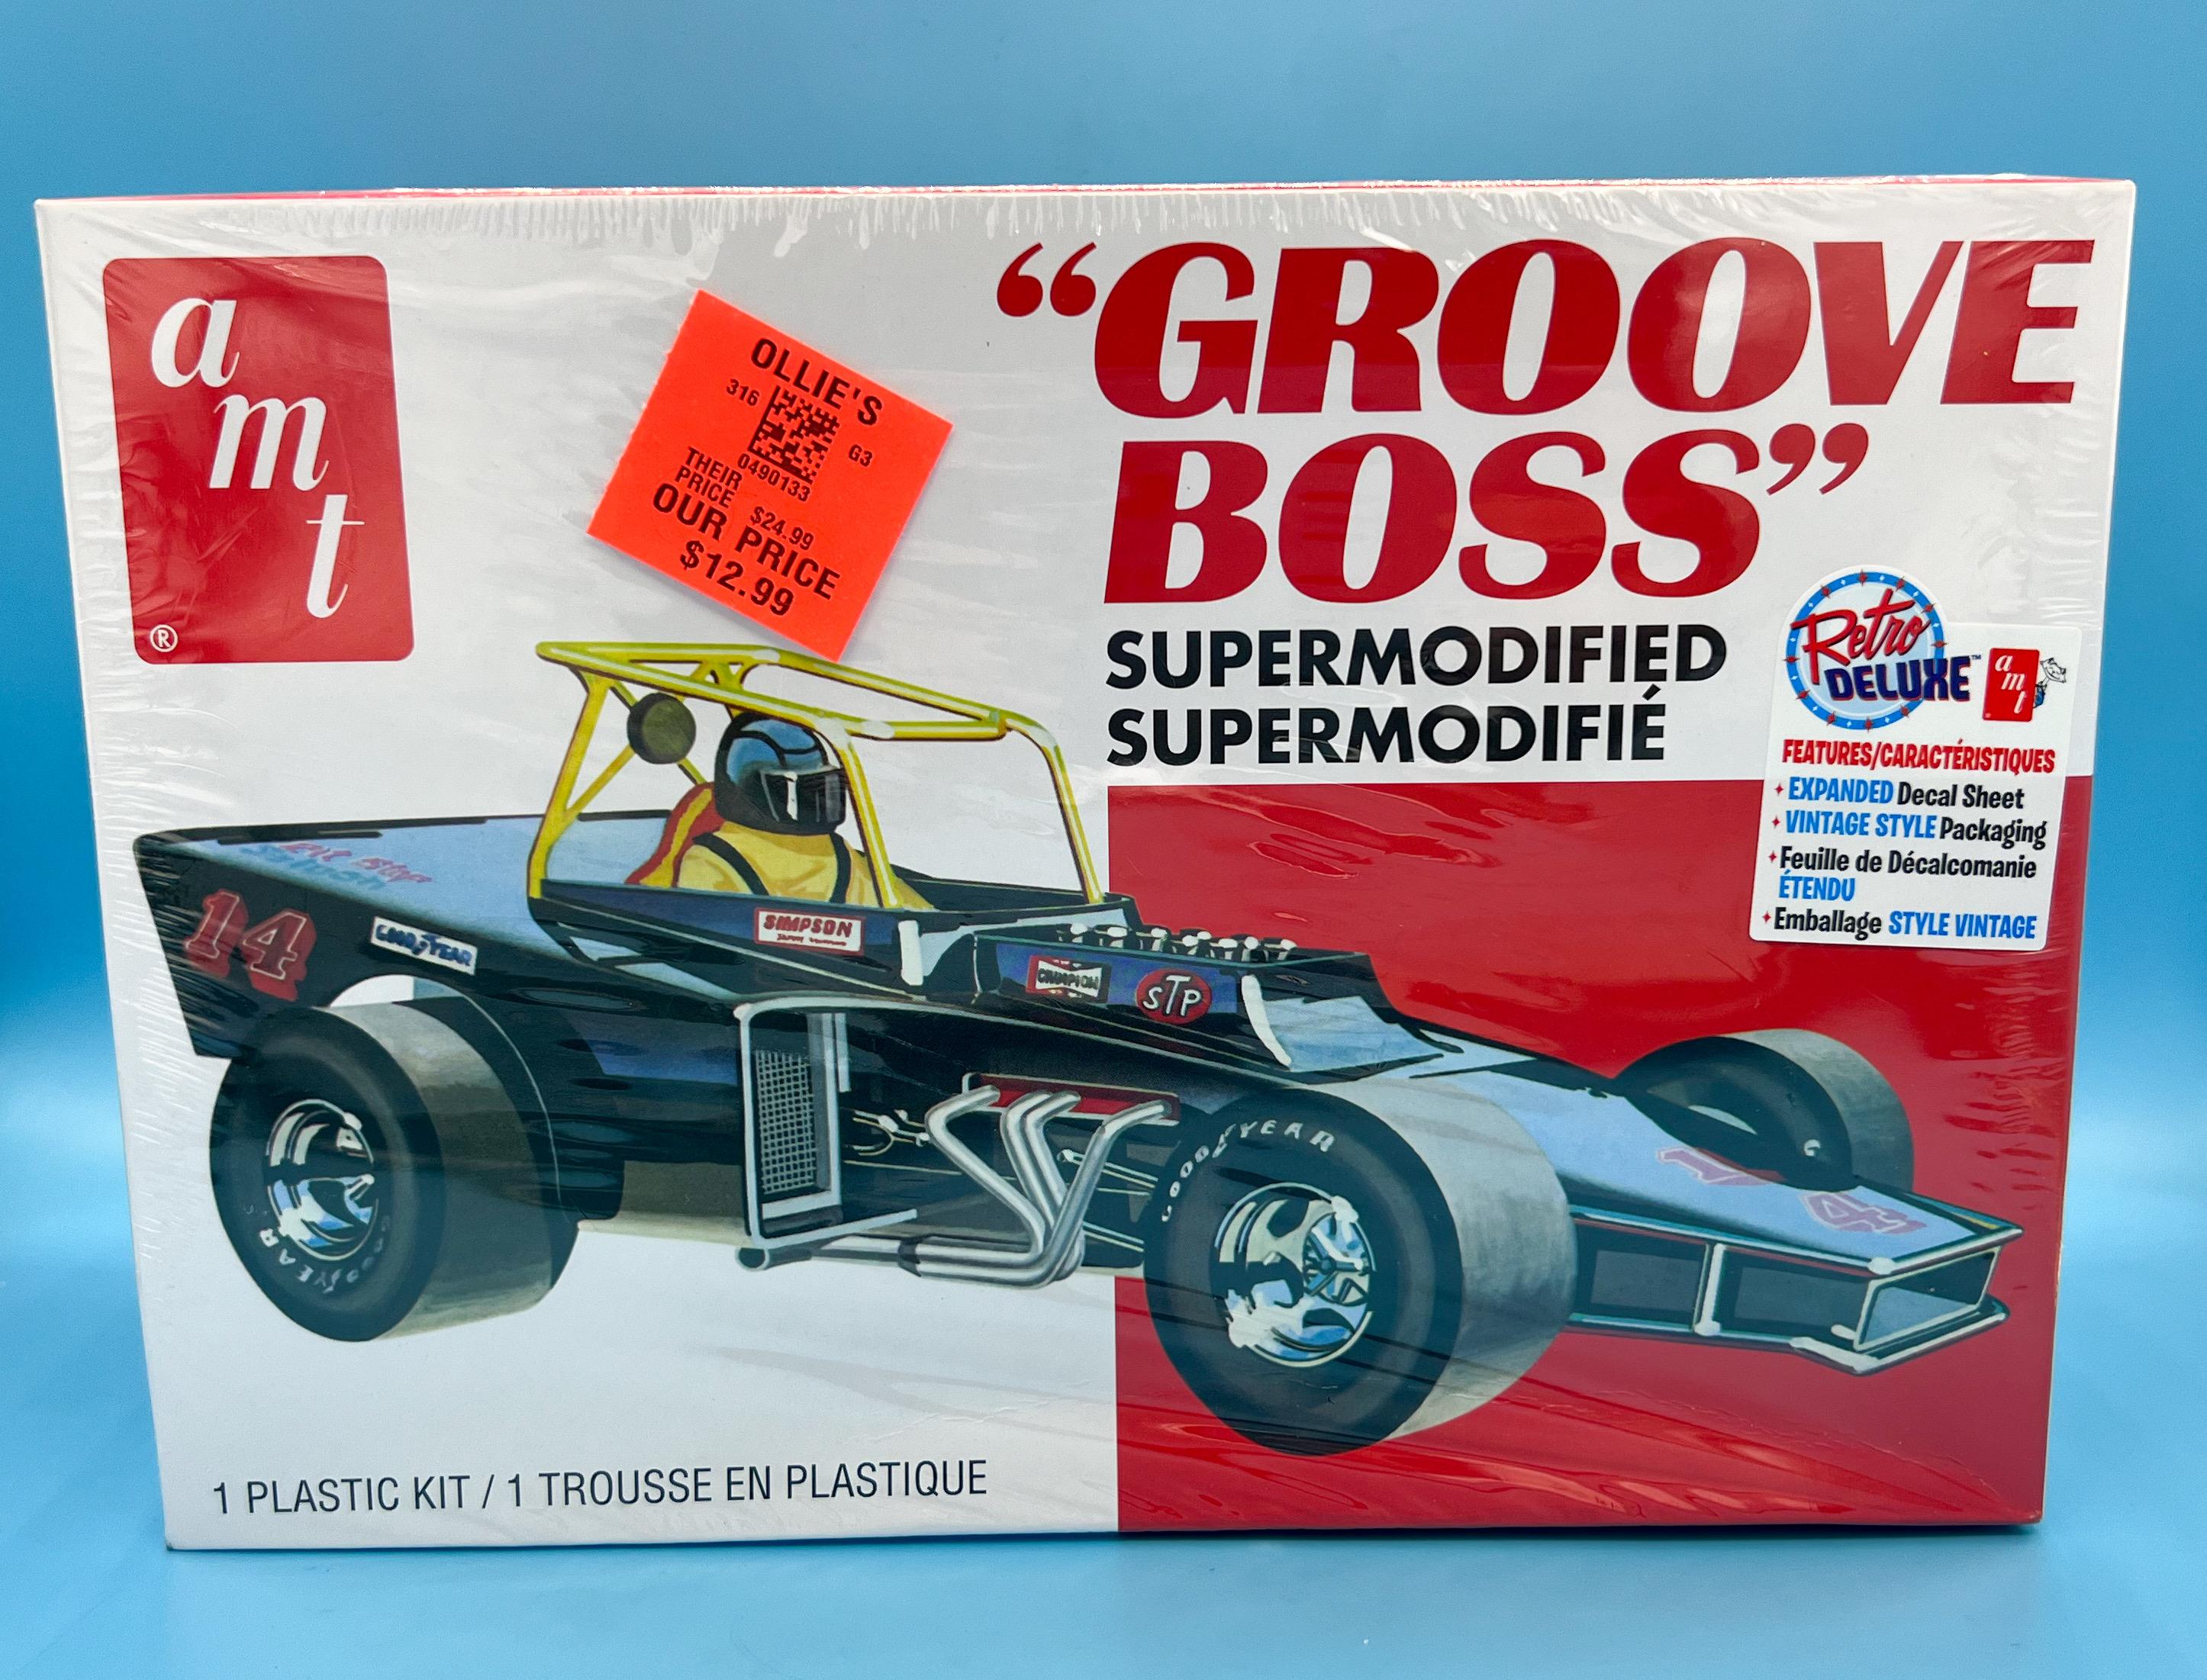
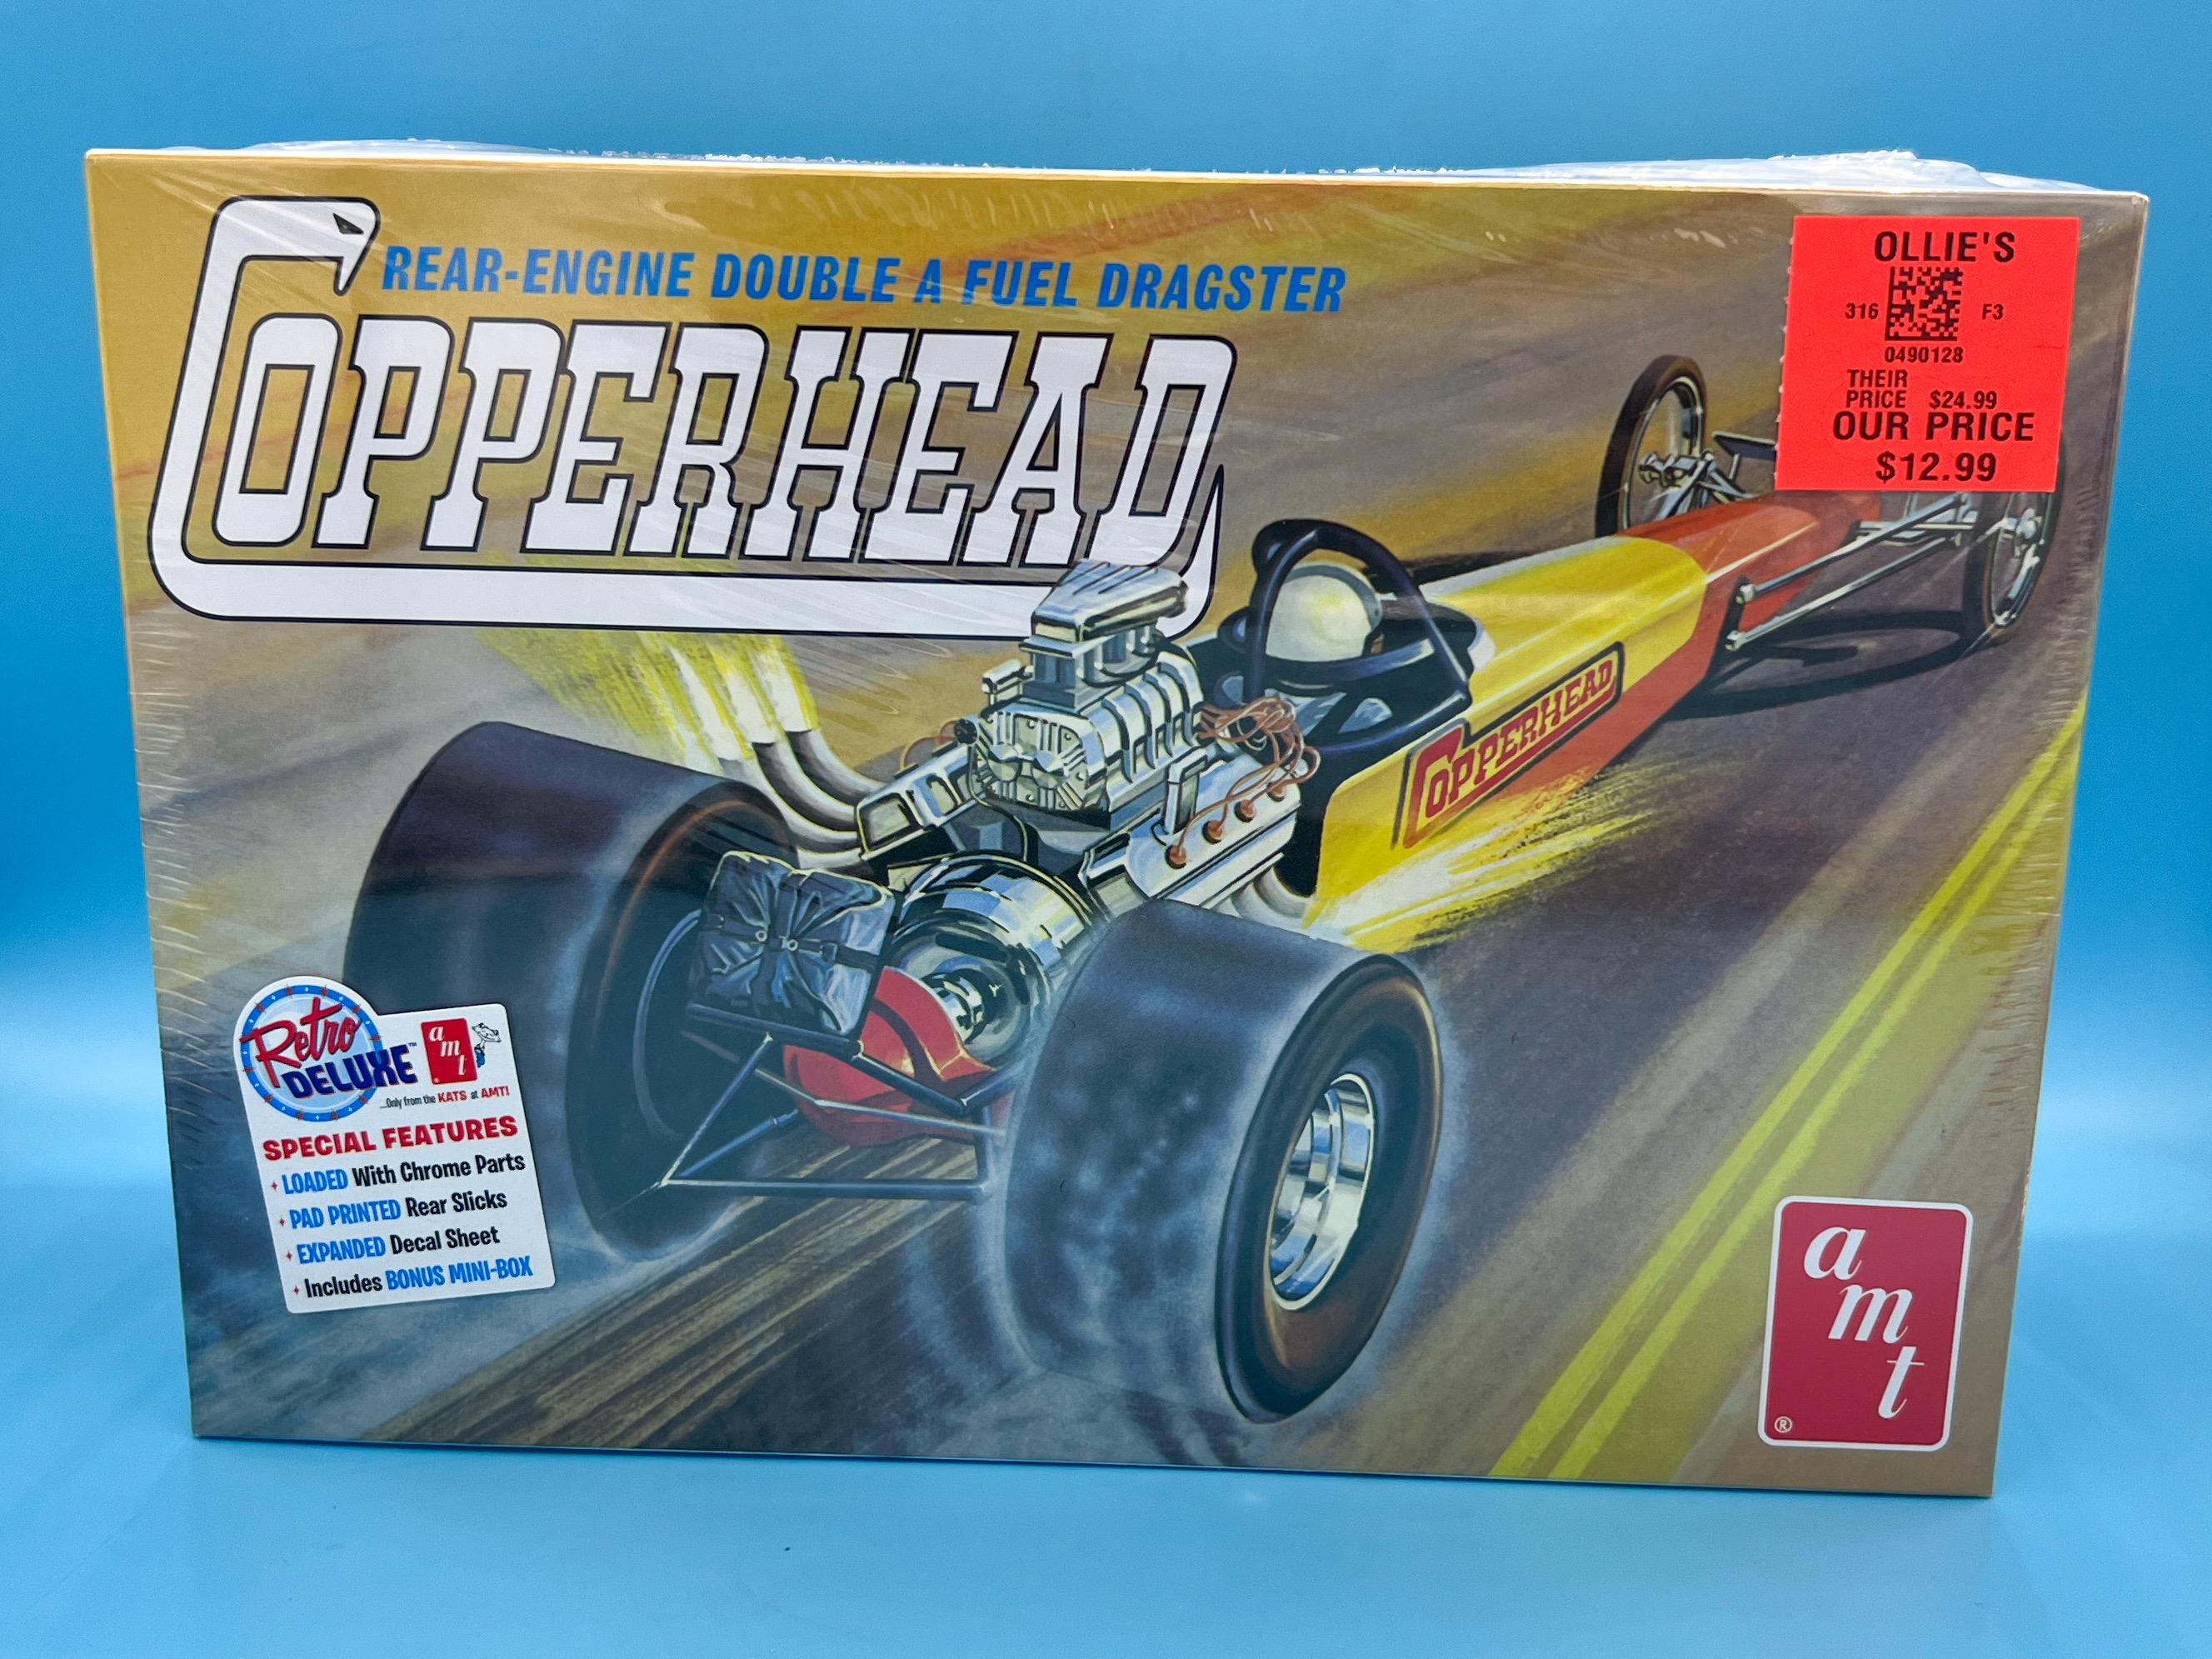
Ollie's strike again
OldNYJim replied to GLMFAA1's topic in General Automotive Talk (Trucks and Cars)
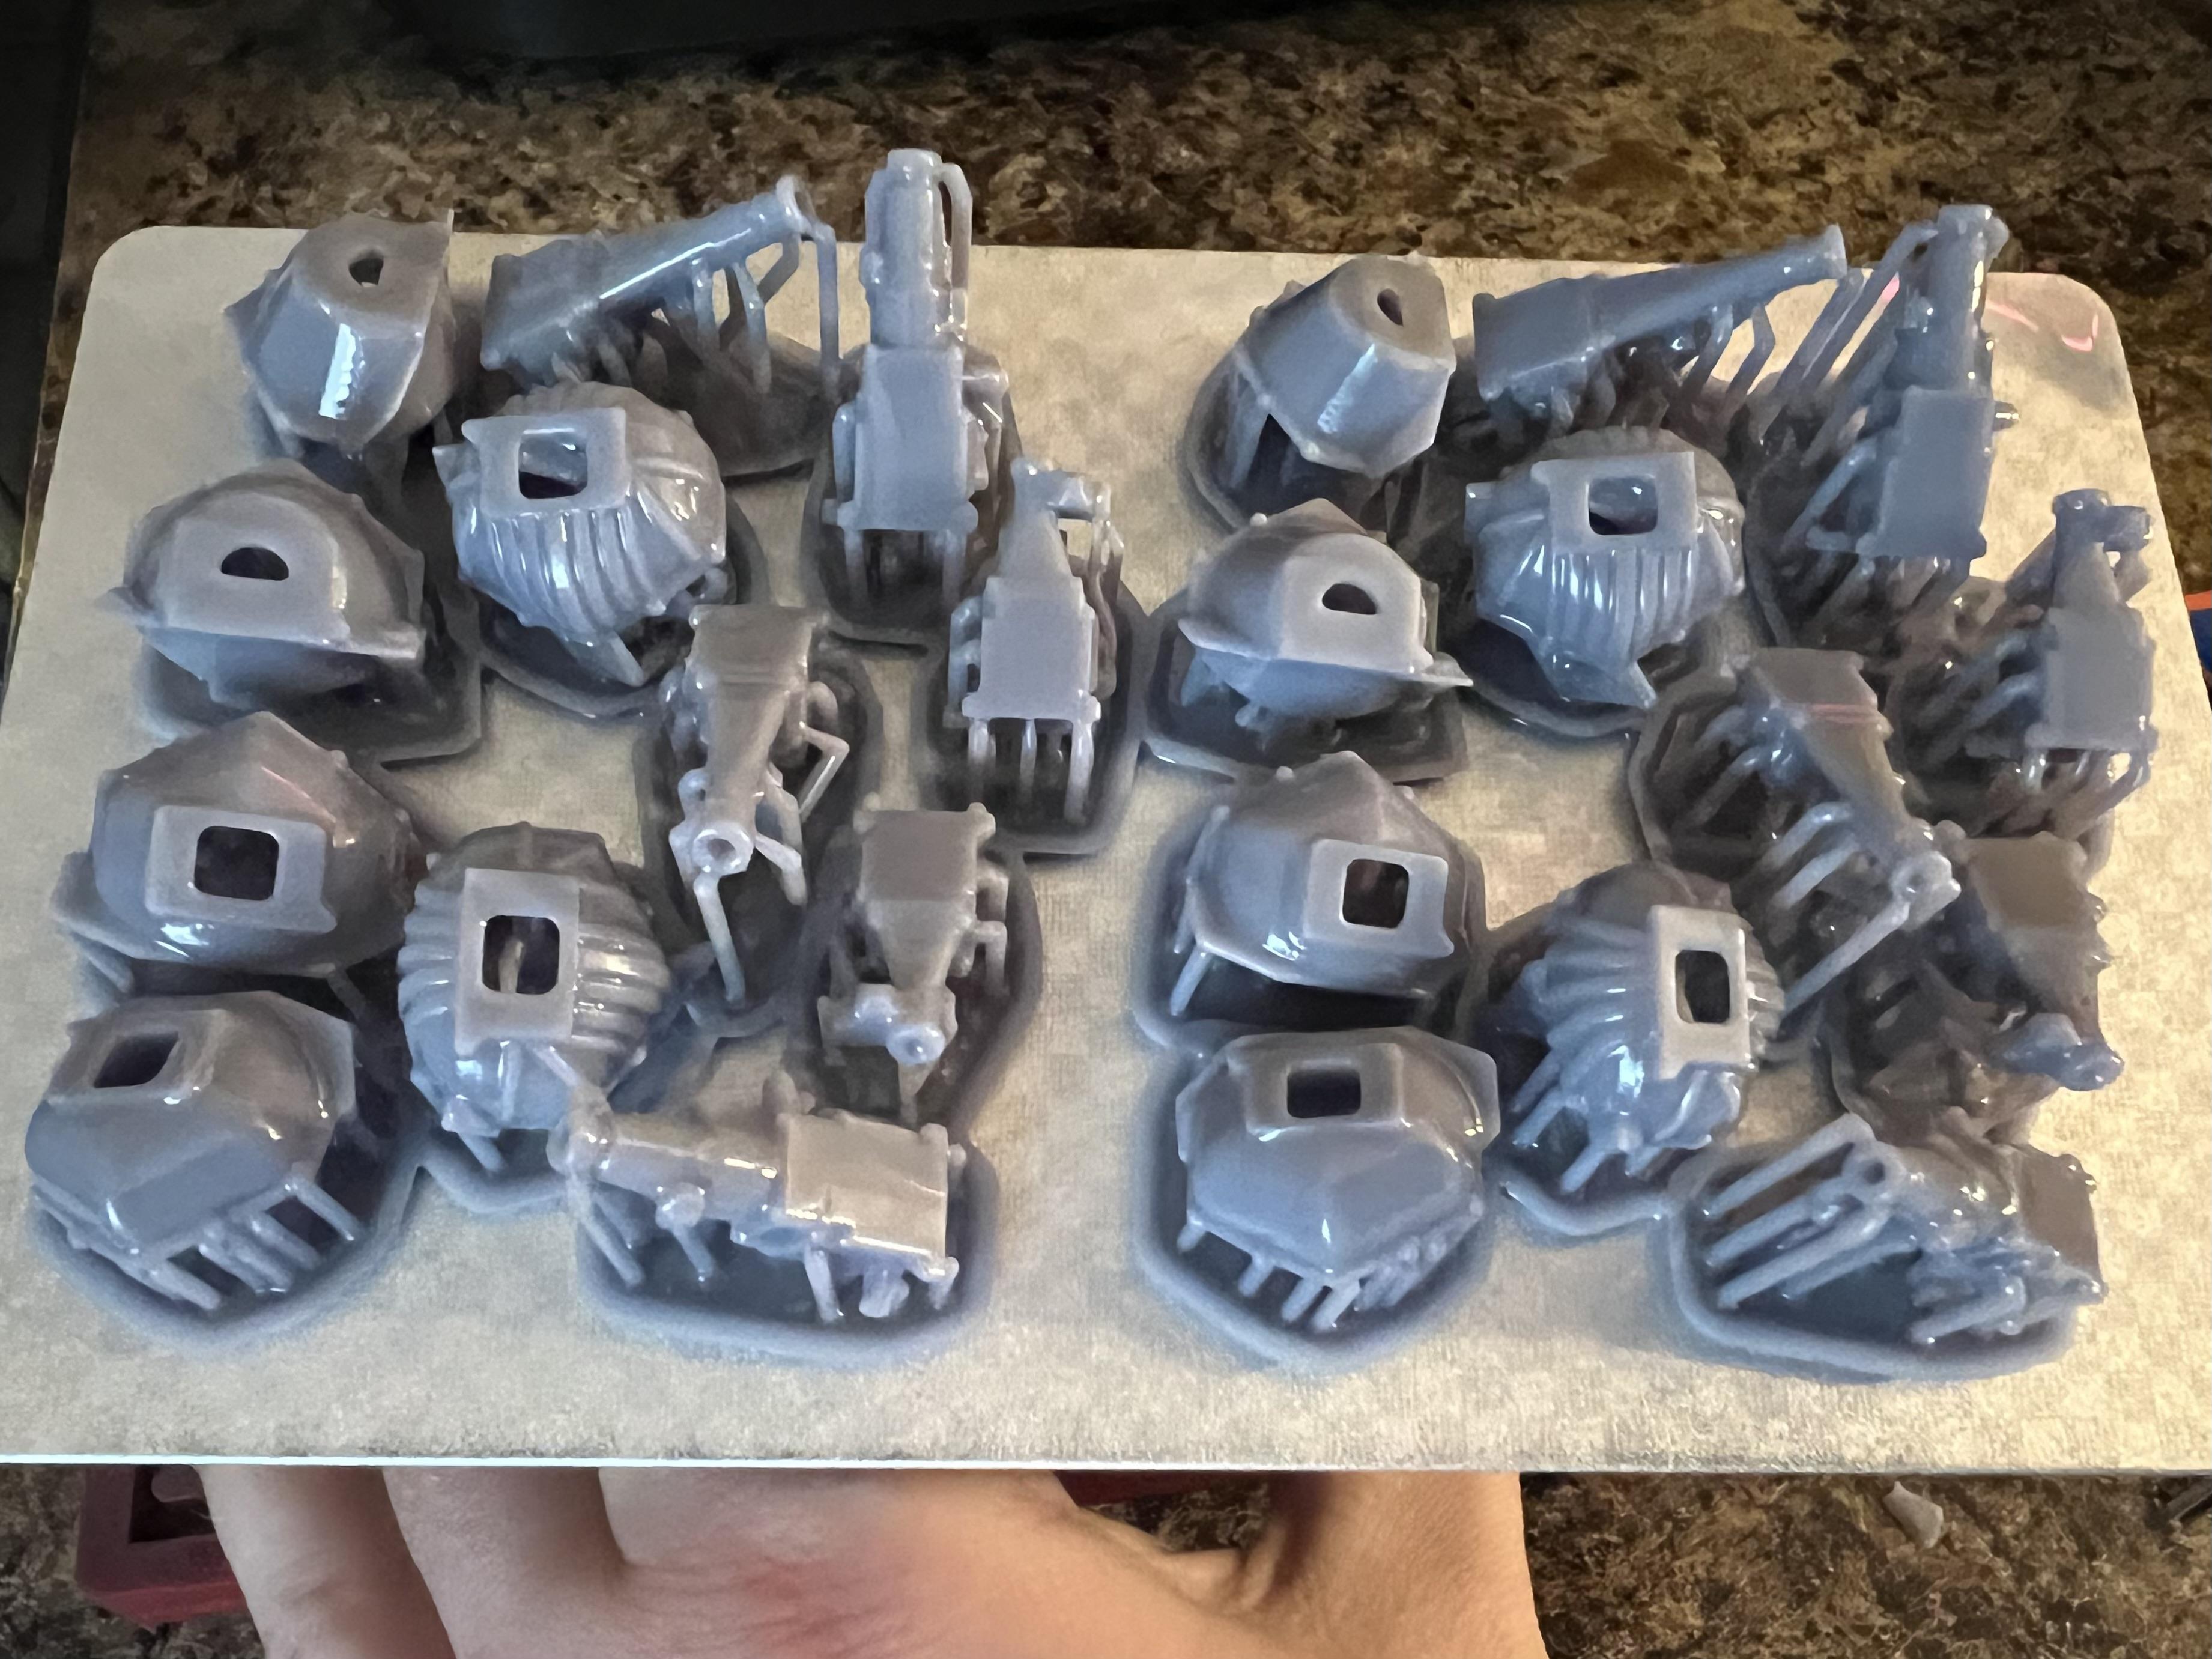
I hit my local Ollie’s (Merrillville Indiana) to see what they had…bunch of T Depot Hacks, a few Rat Fink trailers, some kinda Wacky Racers kit, the Galaxy kit, a bunch of Hot Wheels Camaros plus one Groove Boss and one Copperhead (both of which followed me home: I was really hoping to find a second Groove Boss, but their kits were scattered all over the store in different places and my wife didn’t have the patience for me to make a second lap…
-
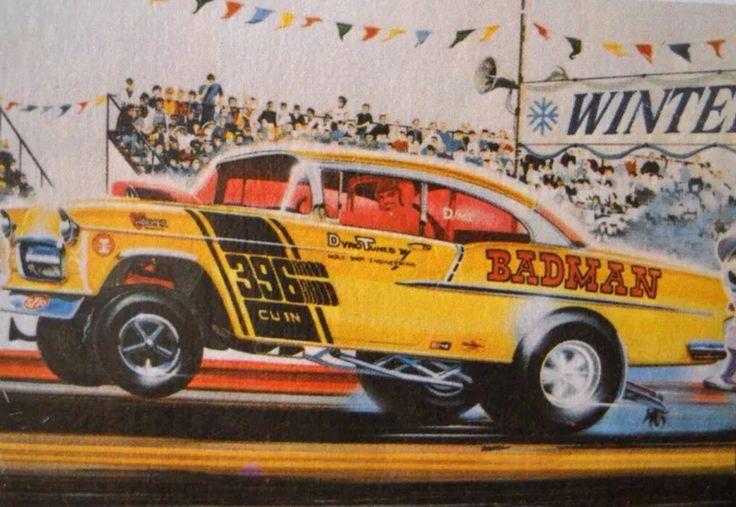
My take on the most famous ‘55 gasser street machine’…
OldNYJim replied to OldNYJim's topic in WIP: Model Cars
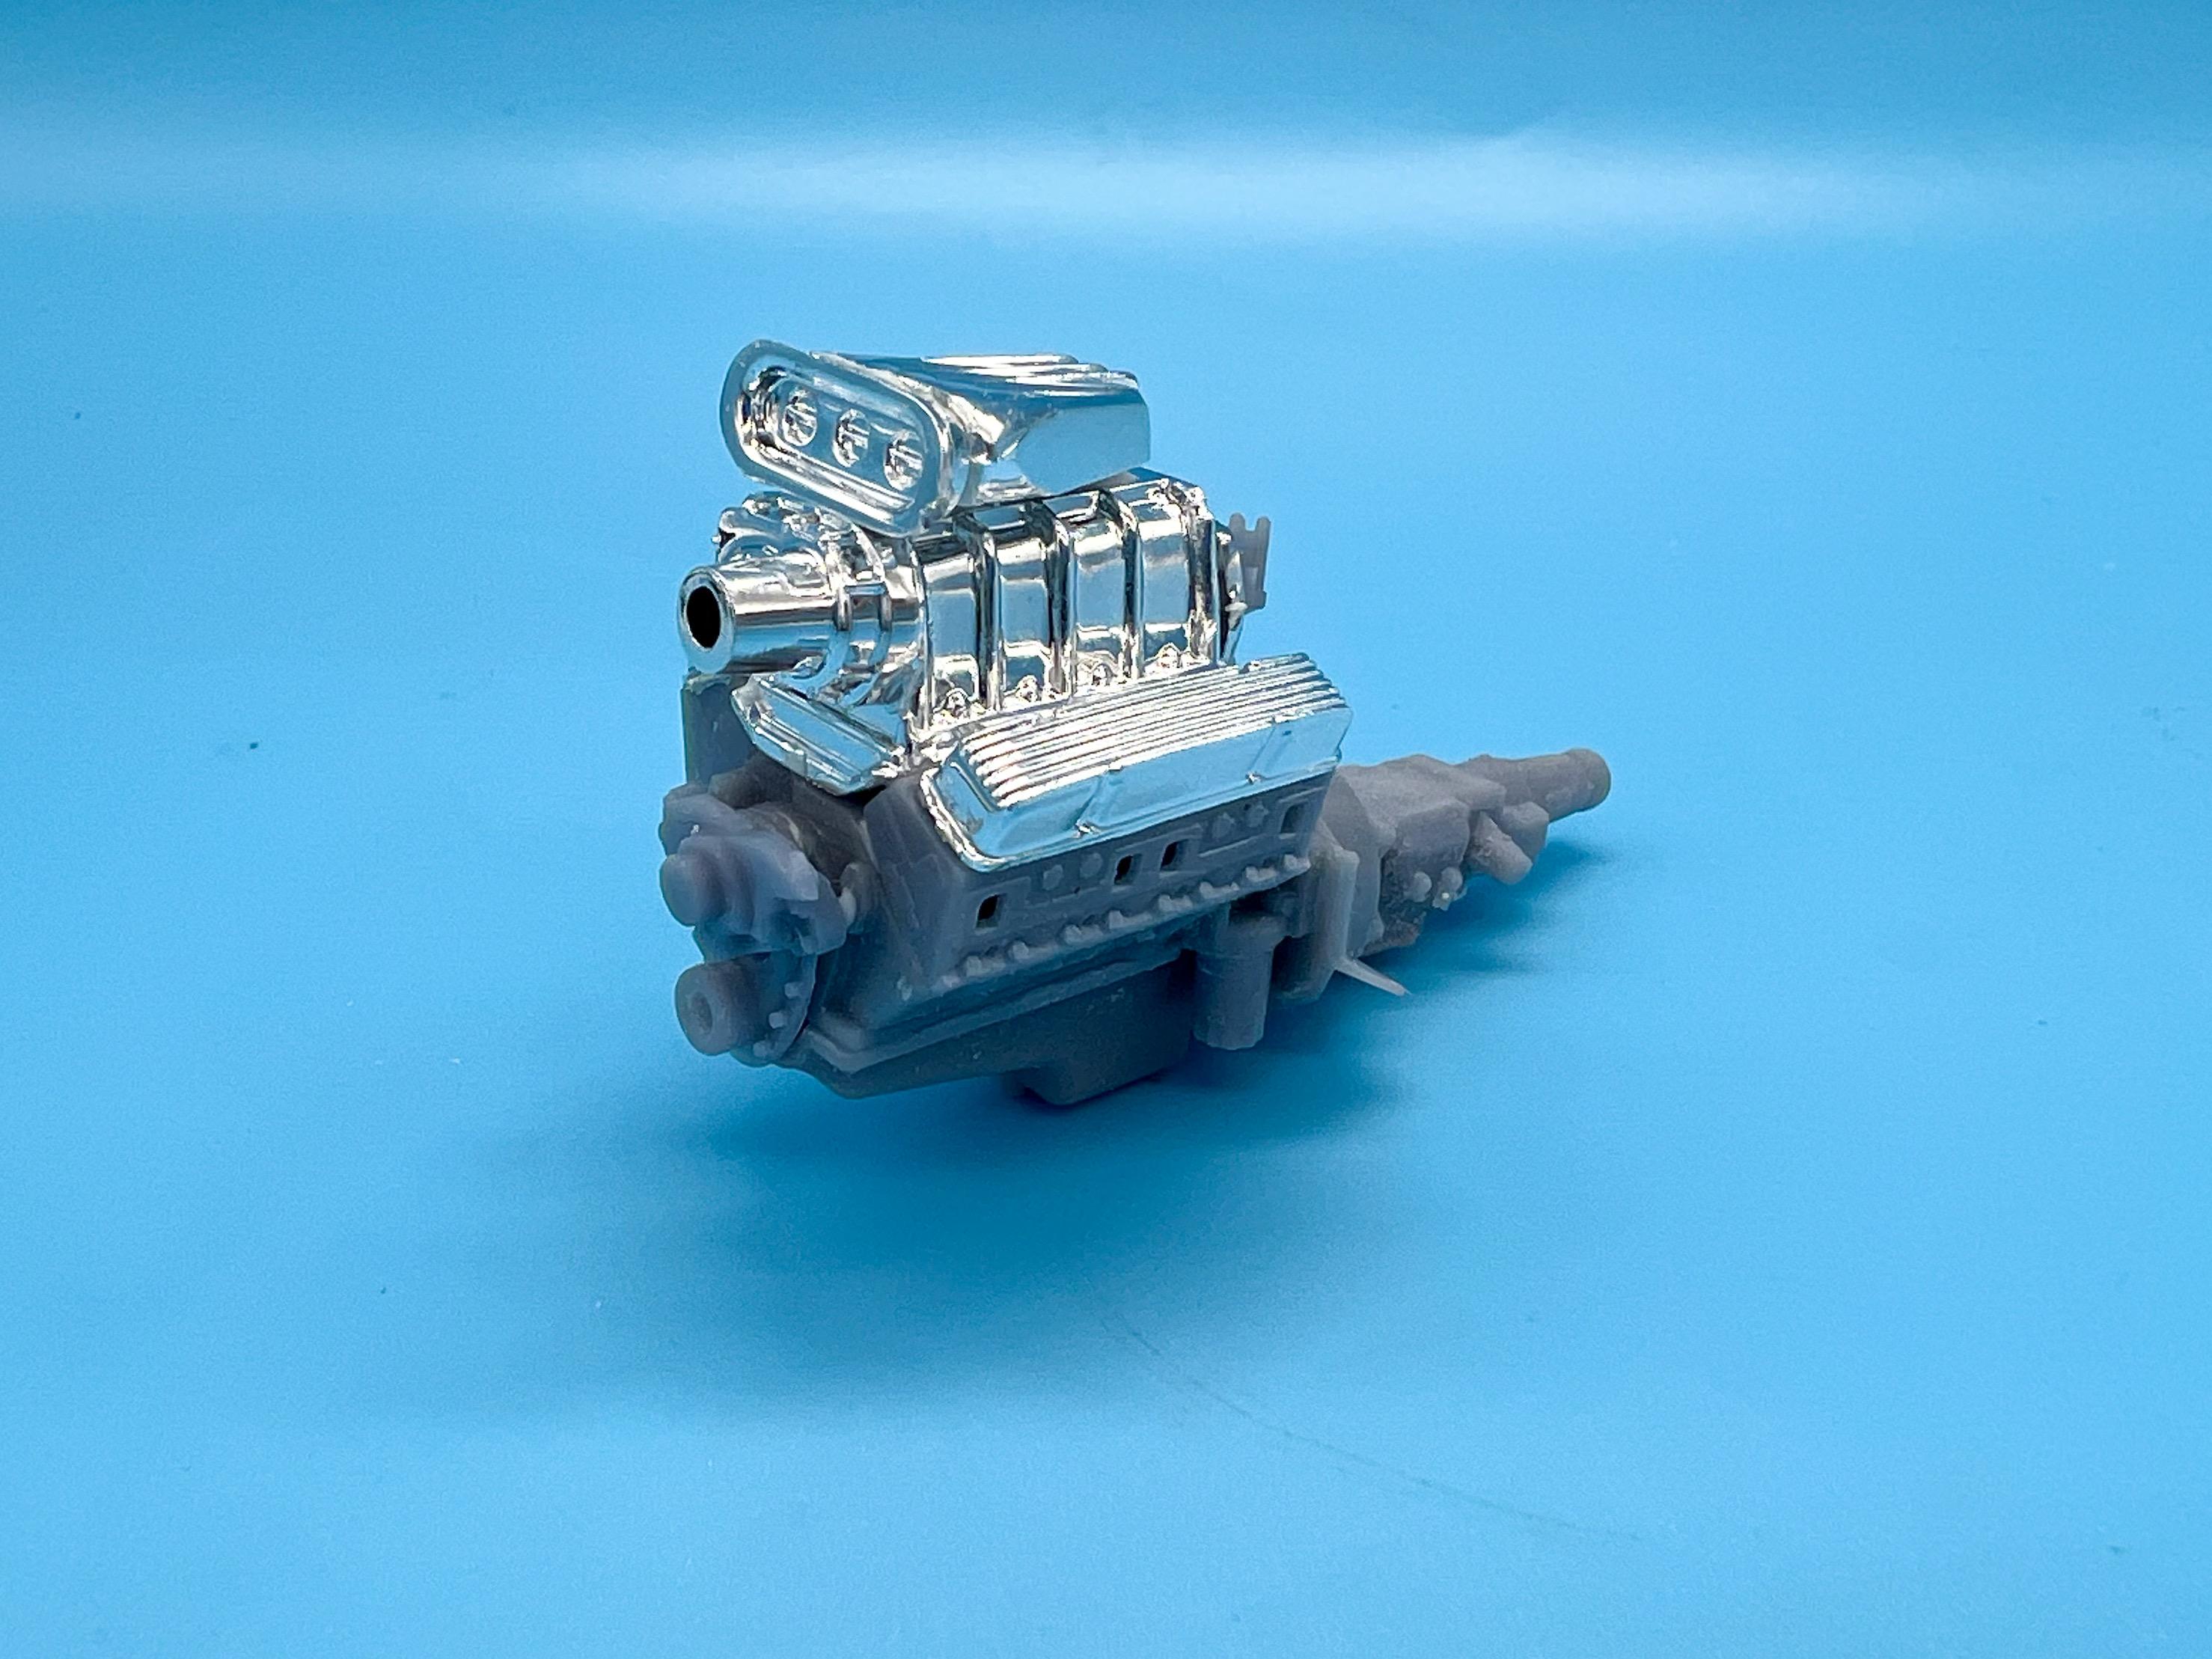
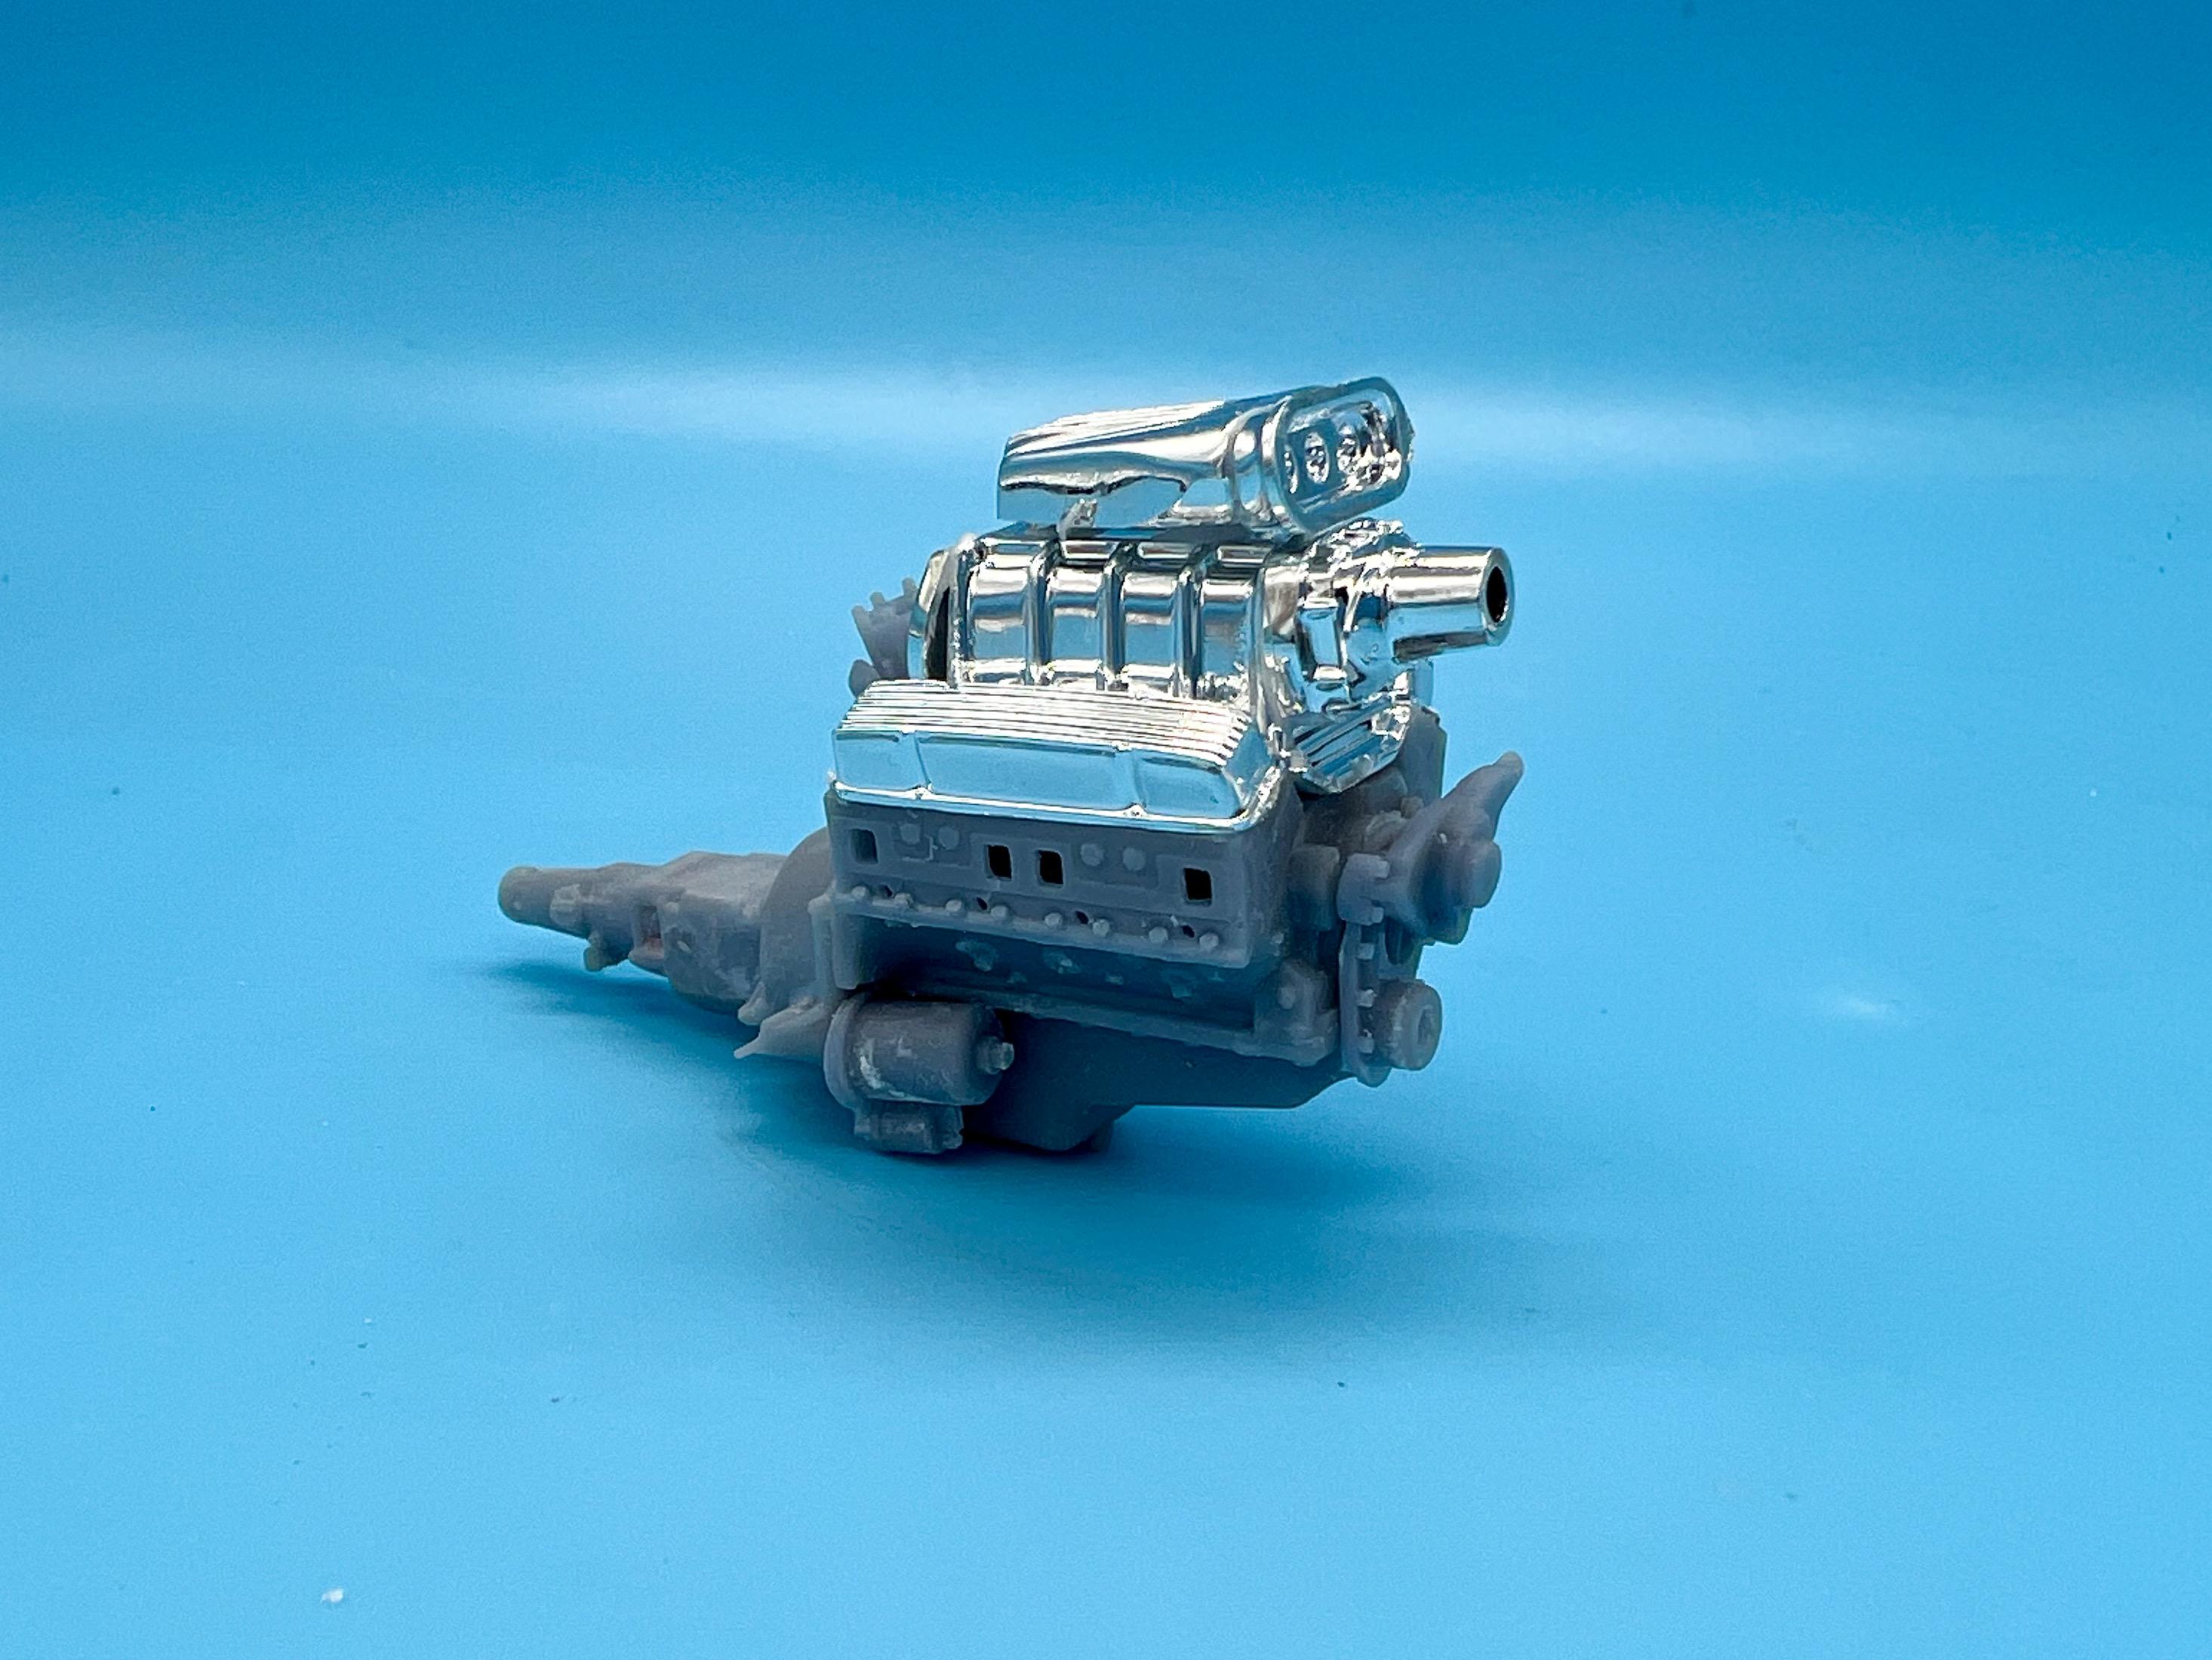
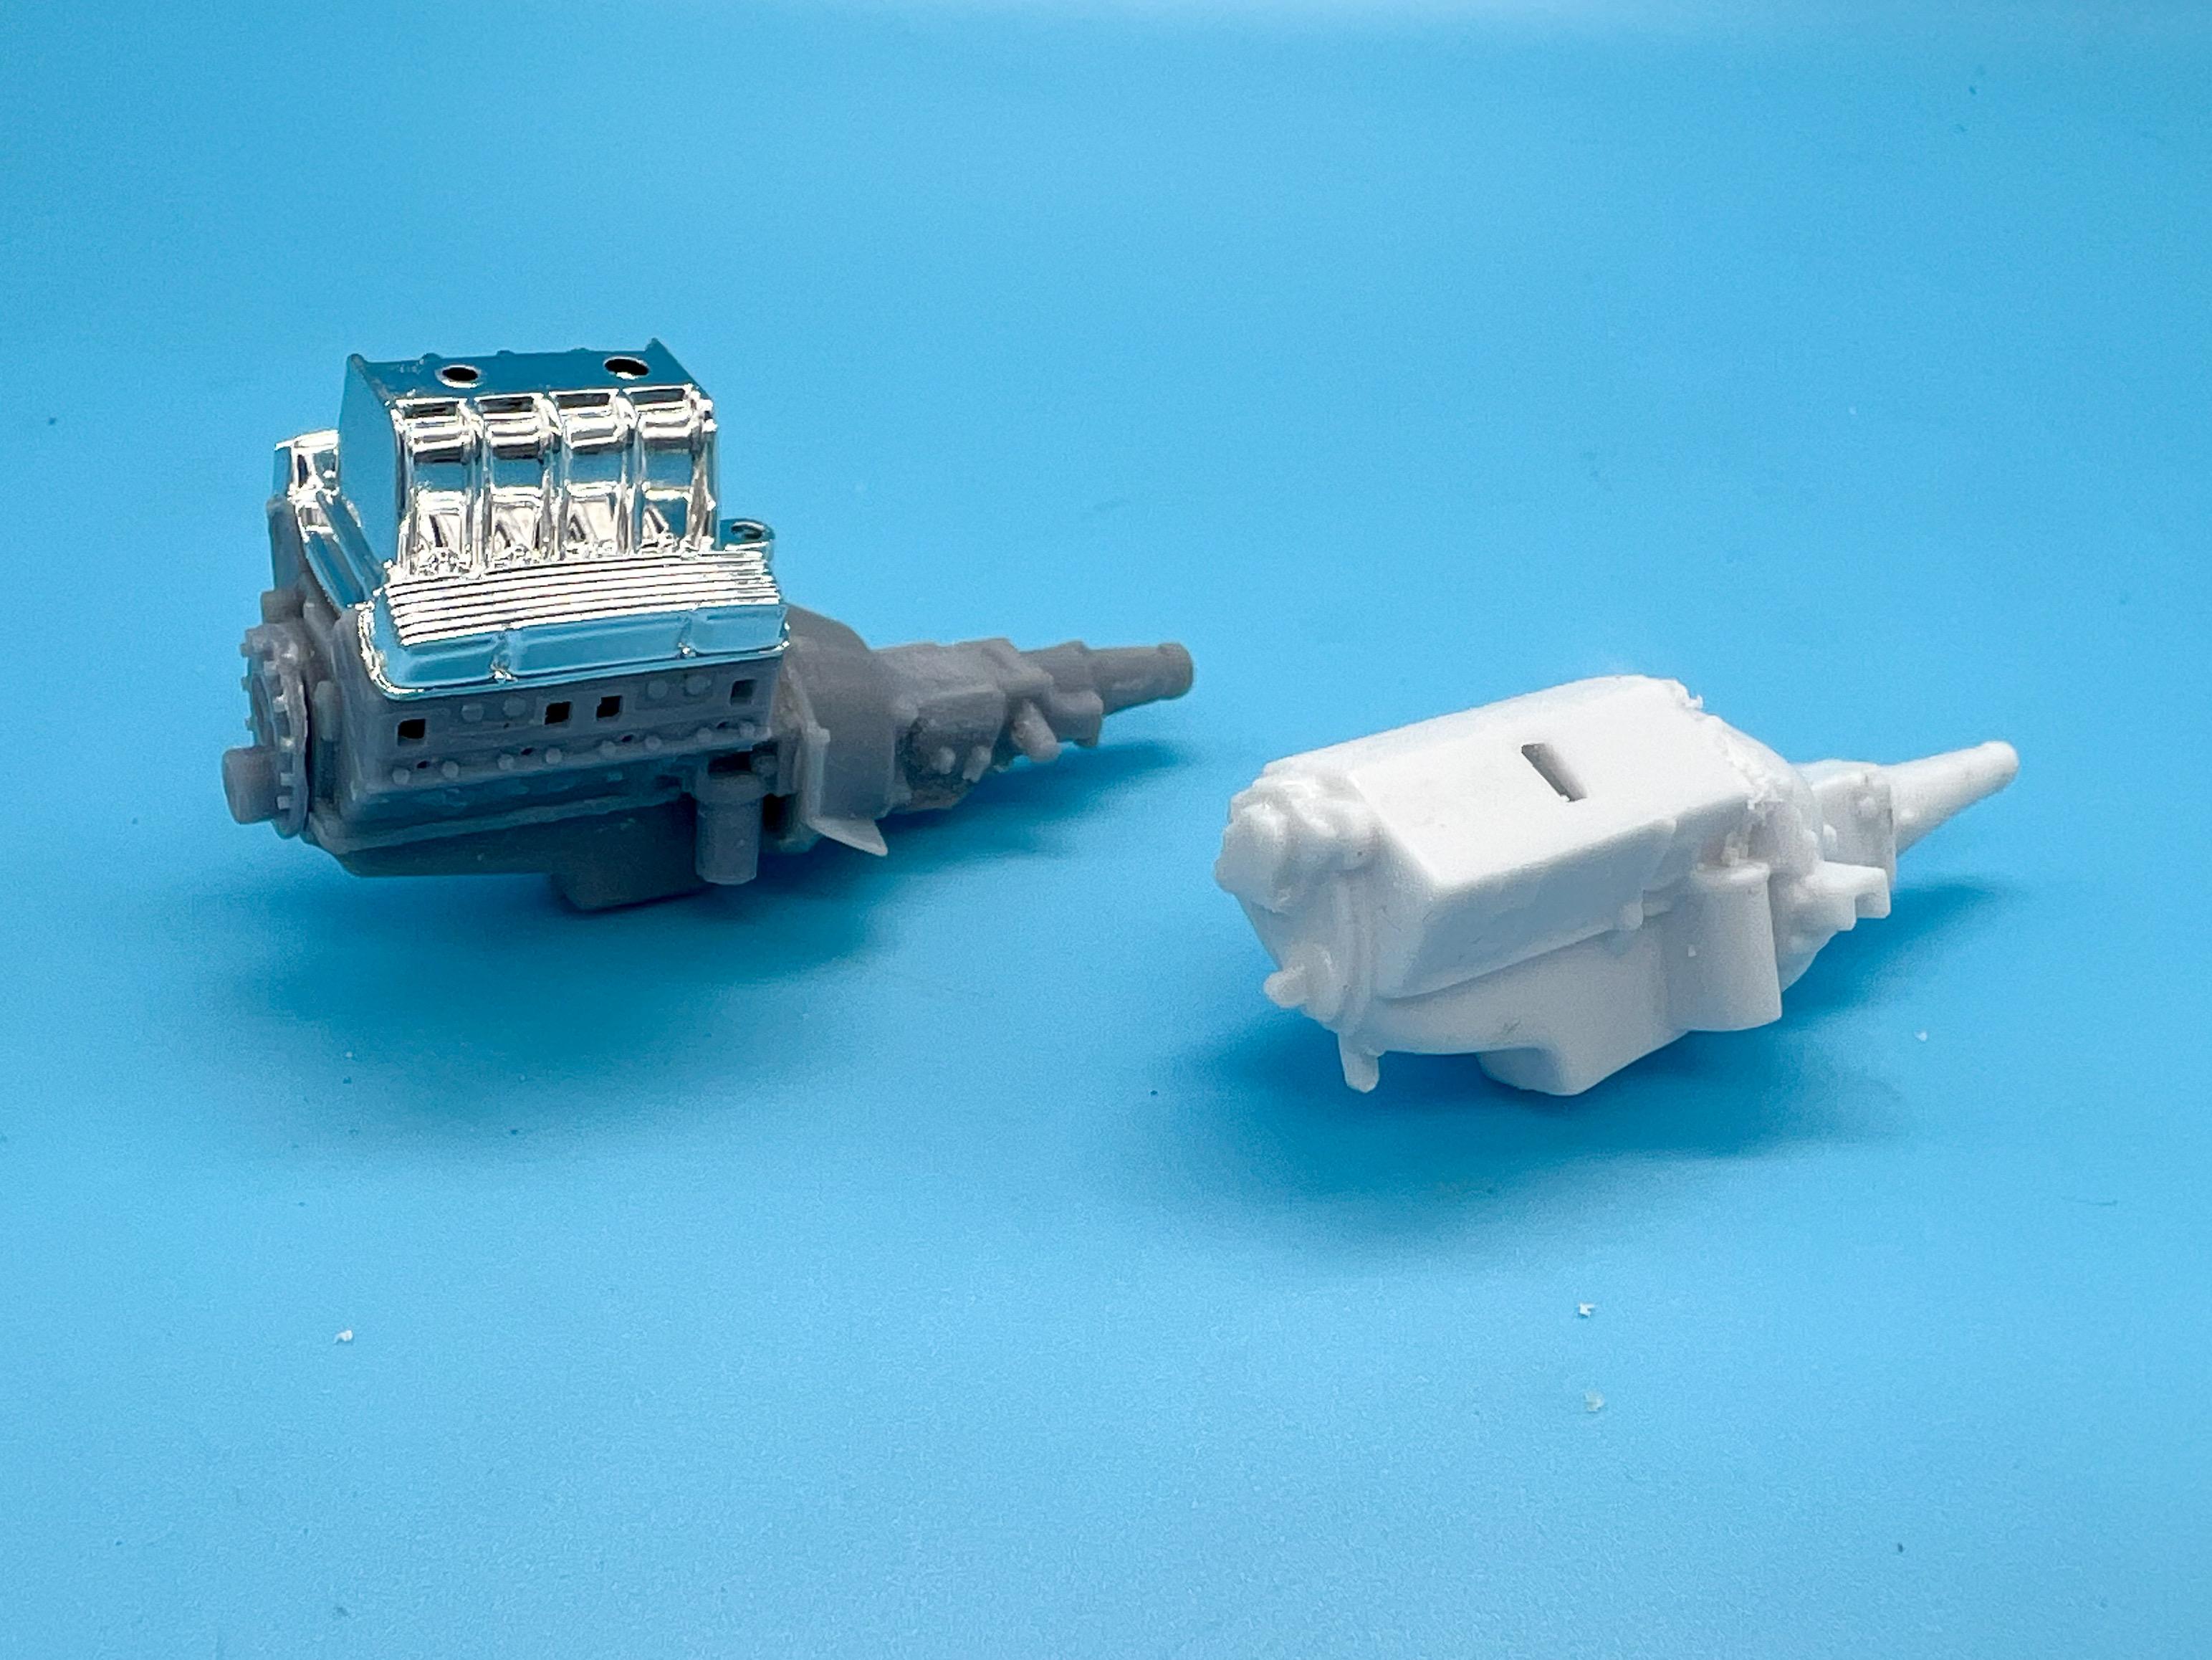
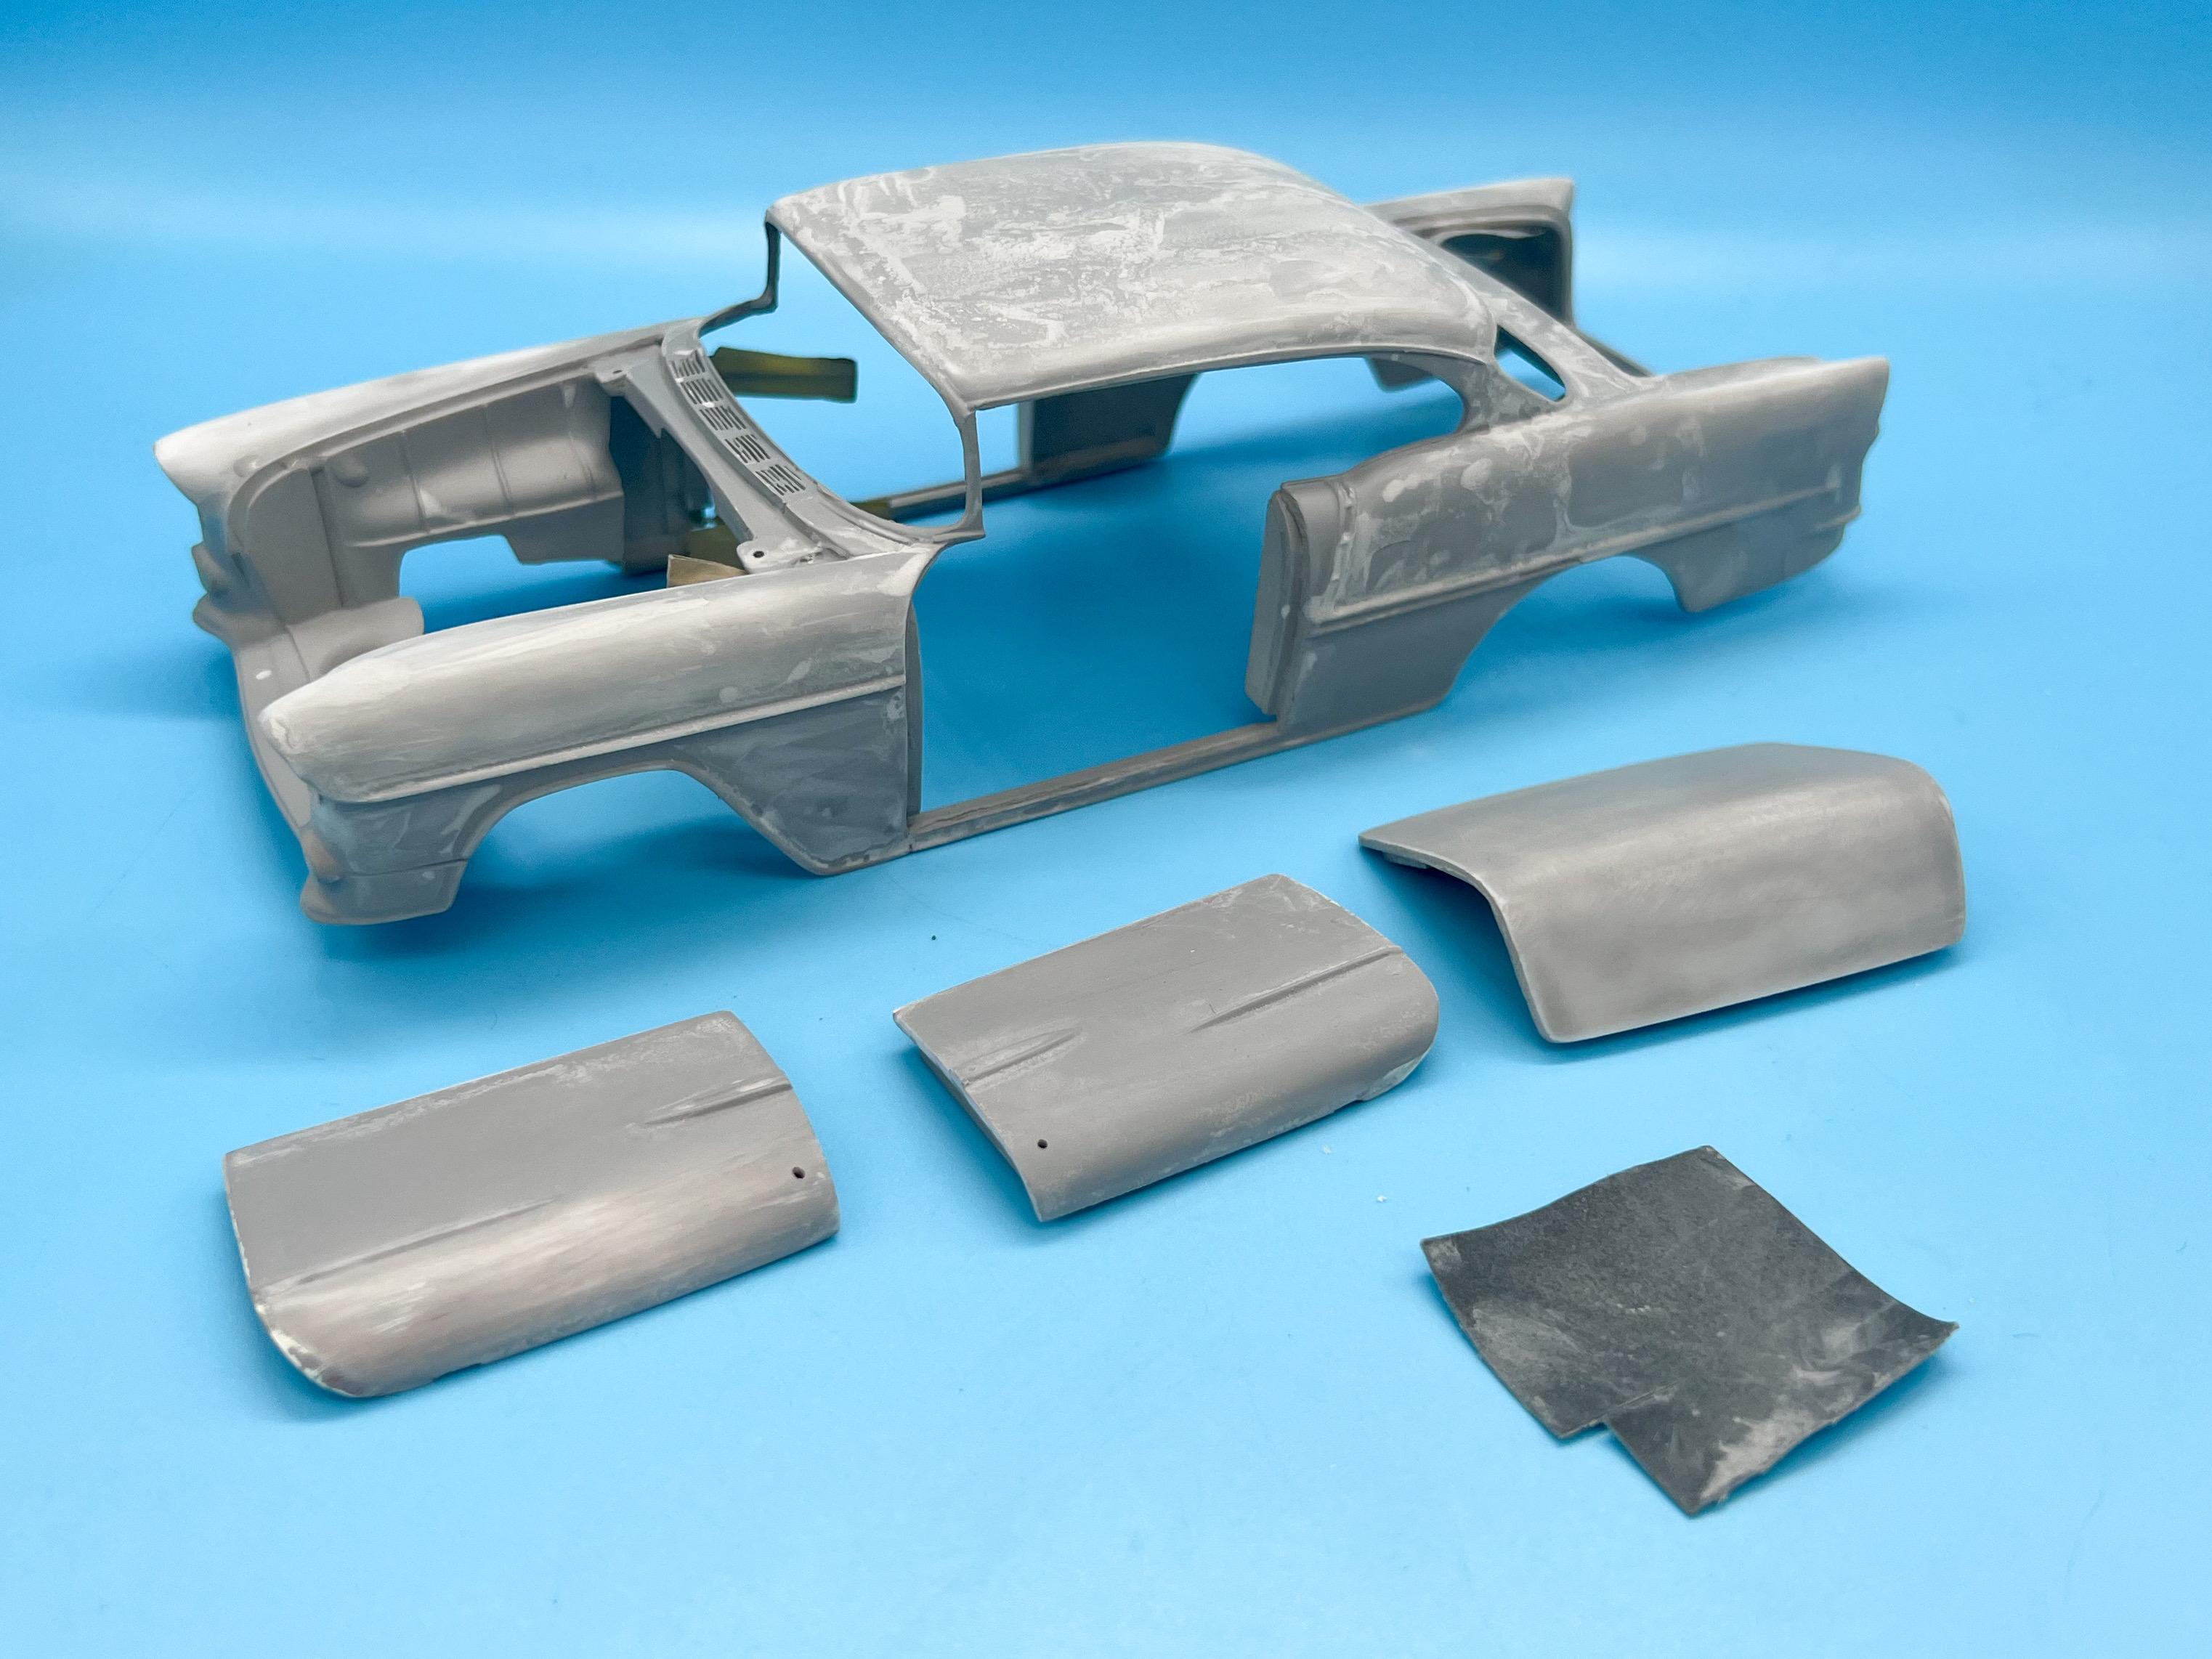
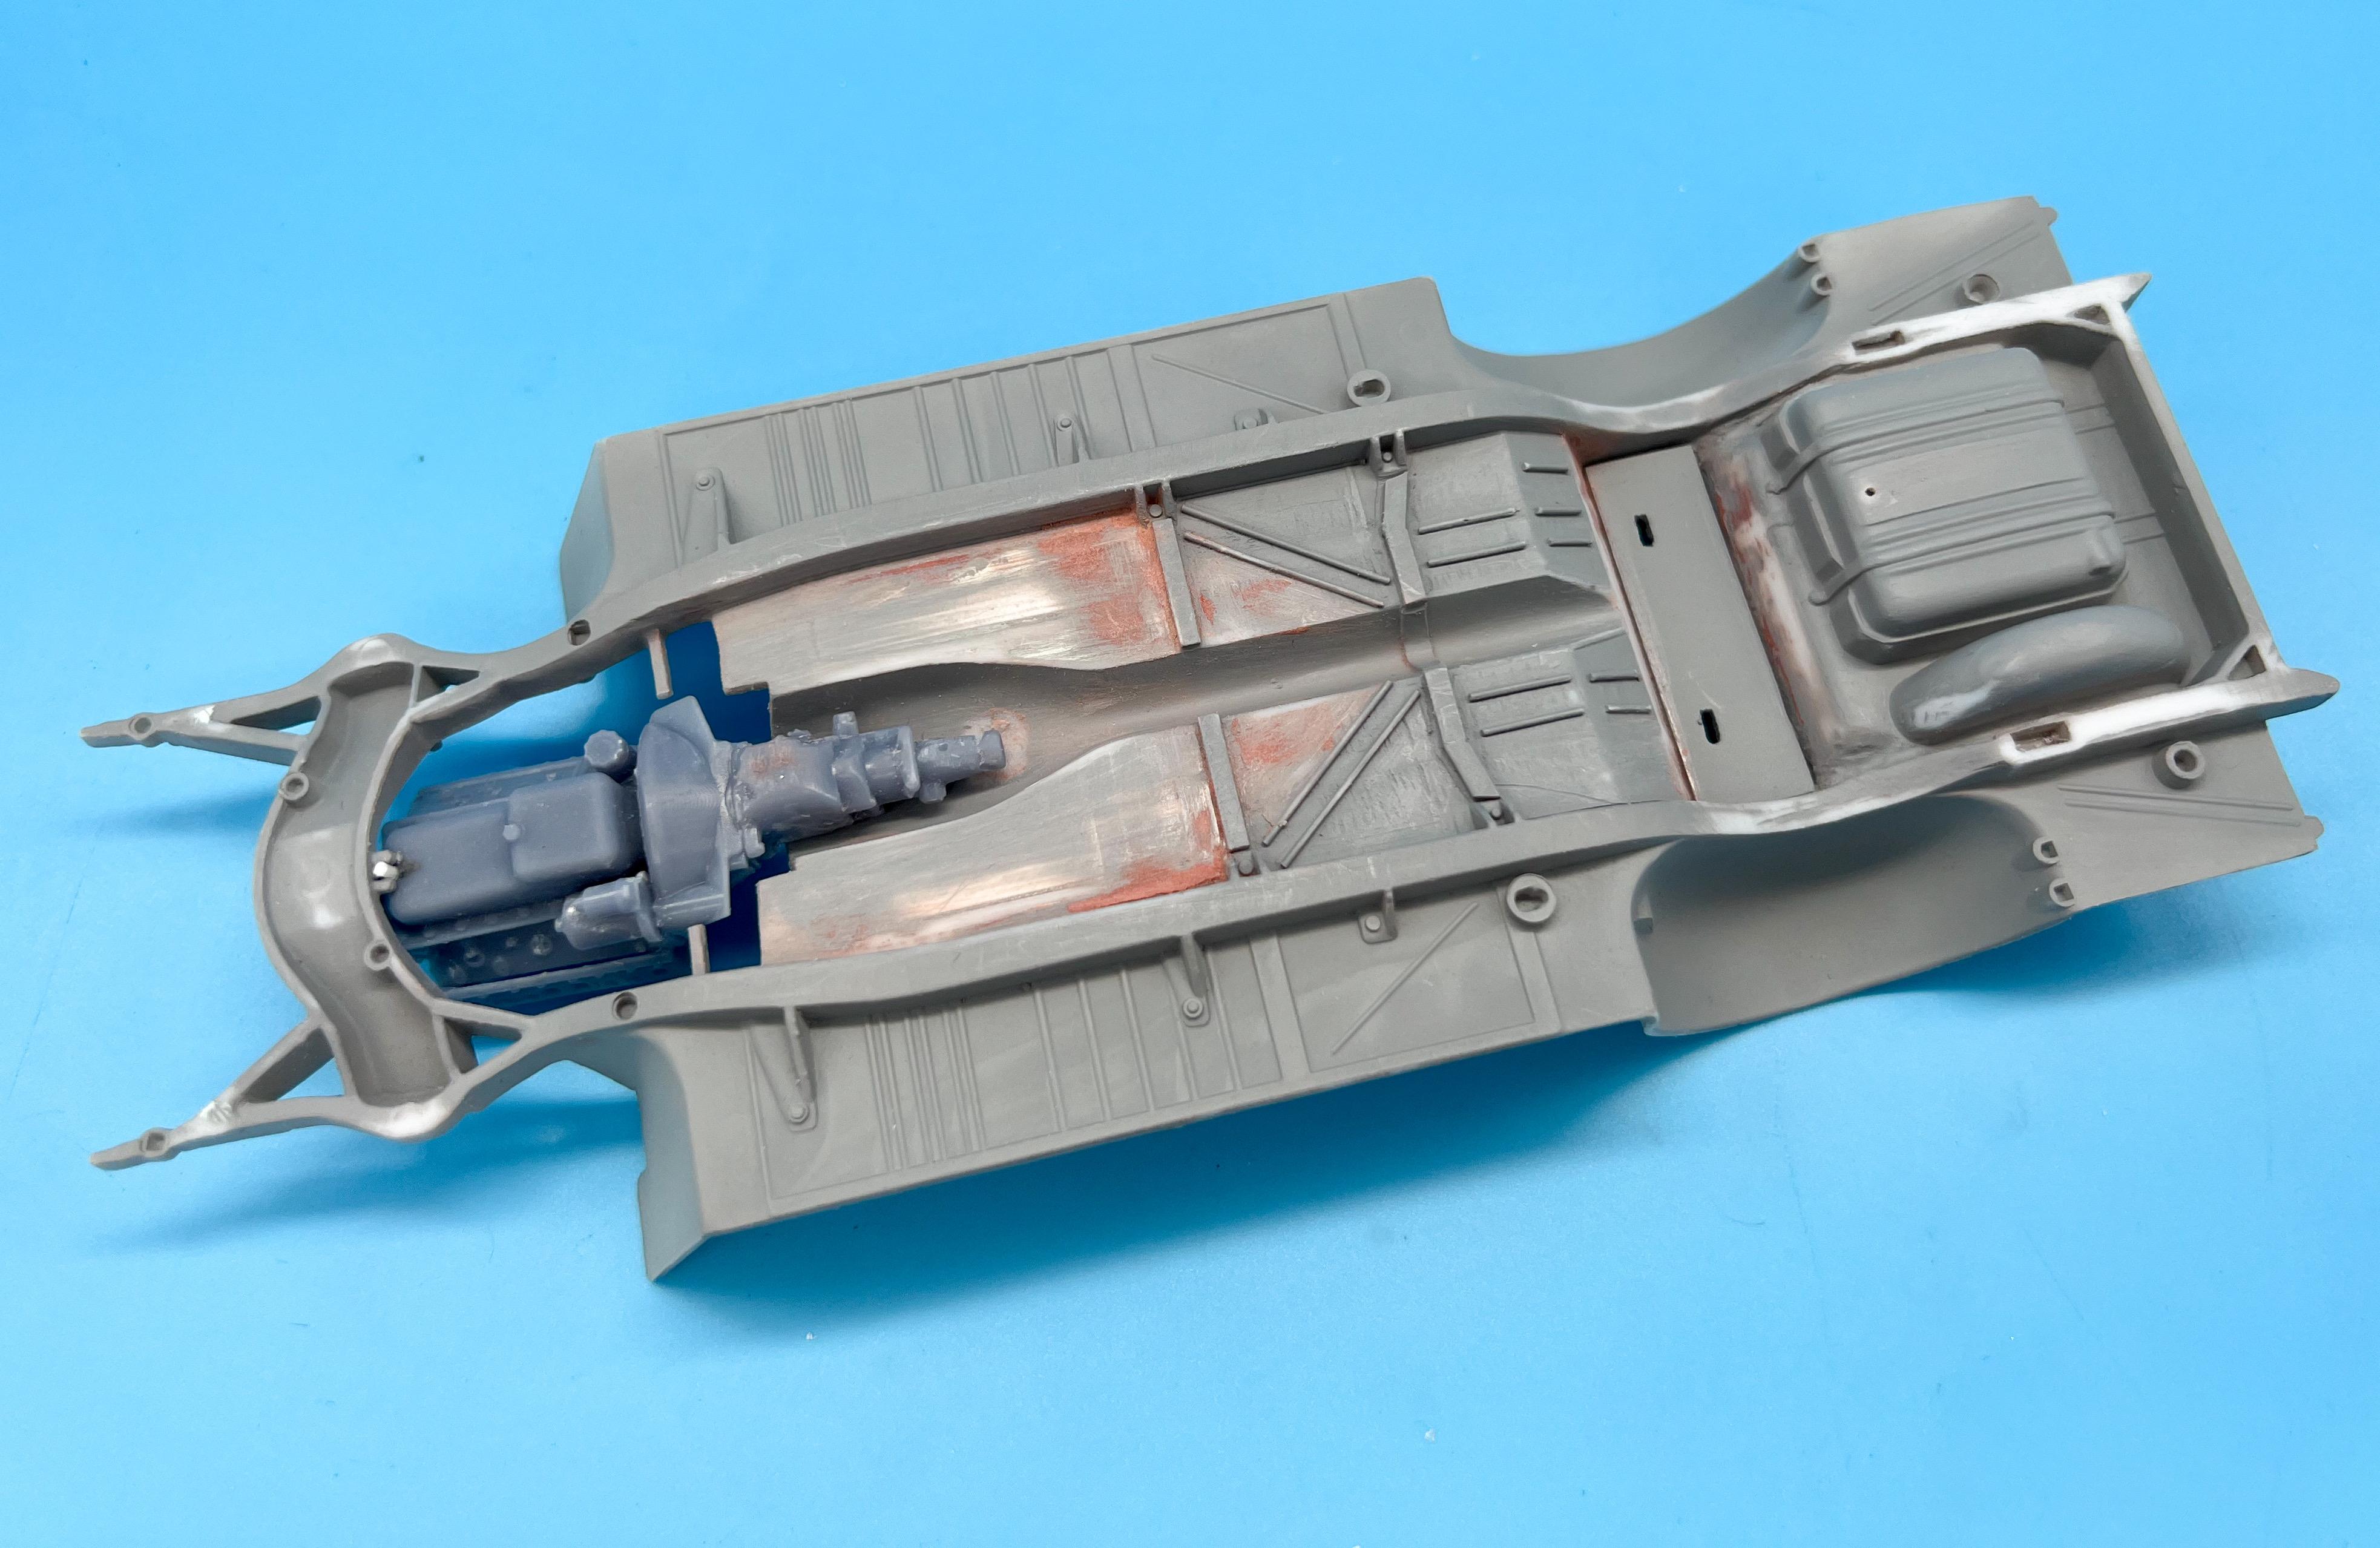
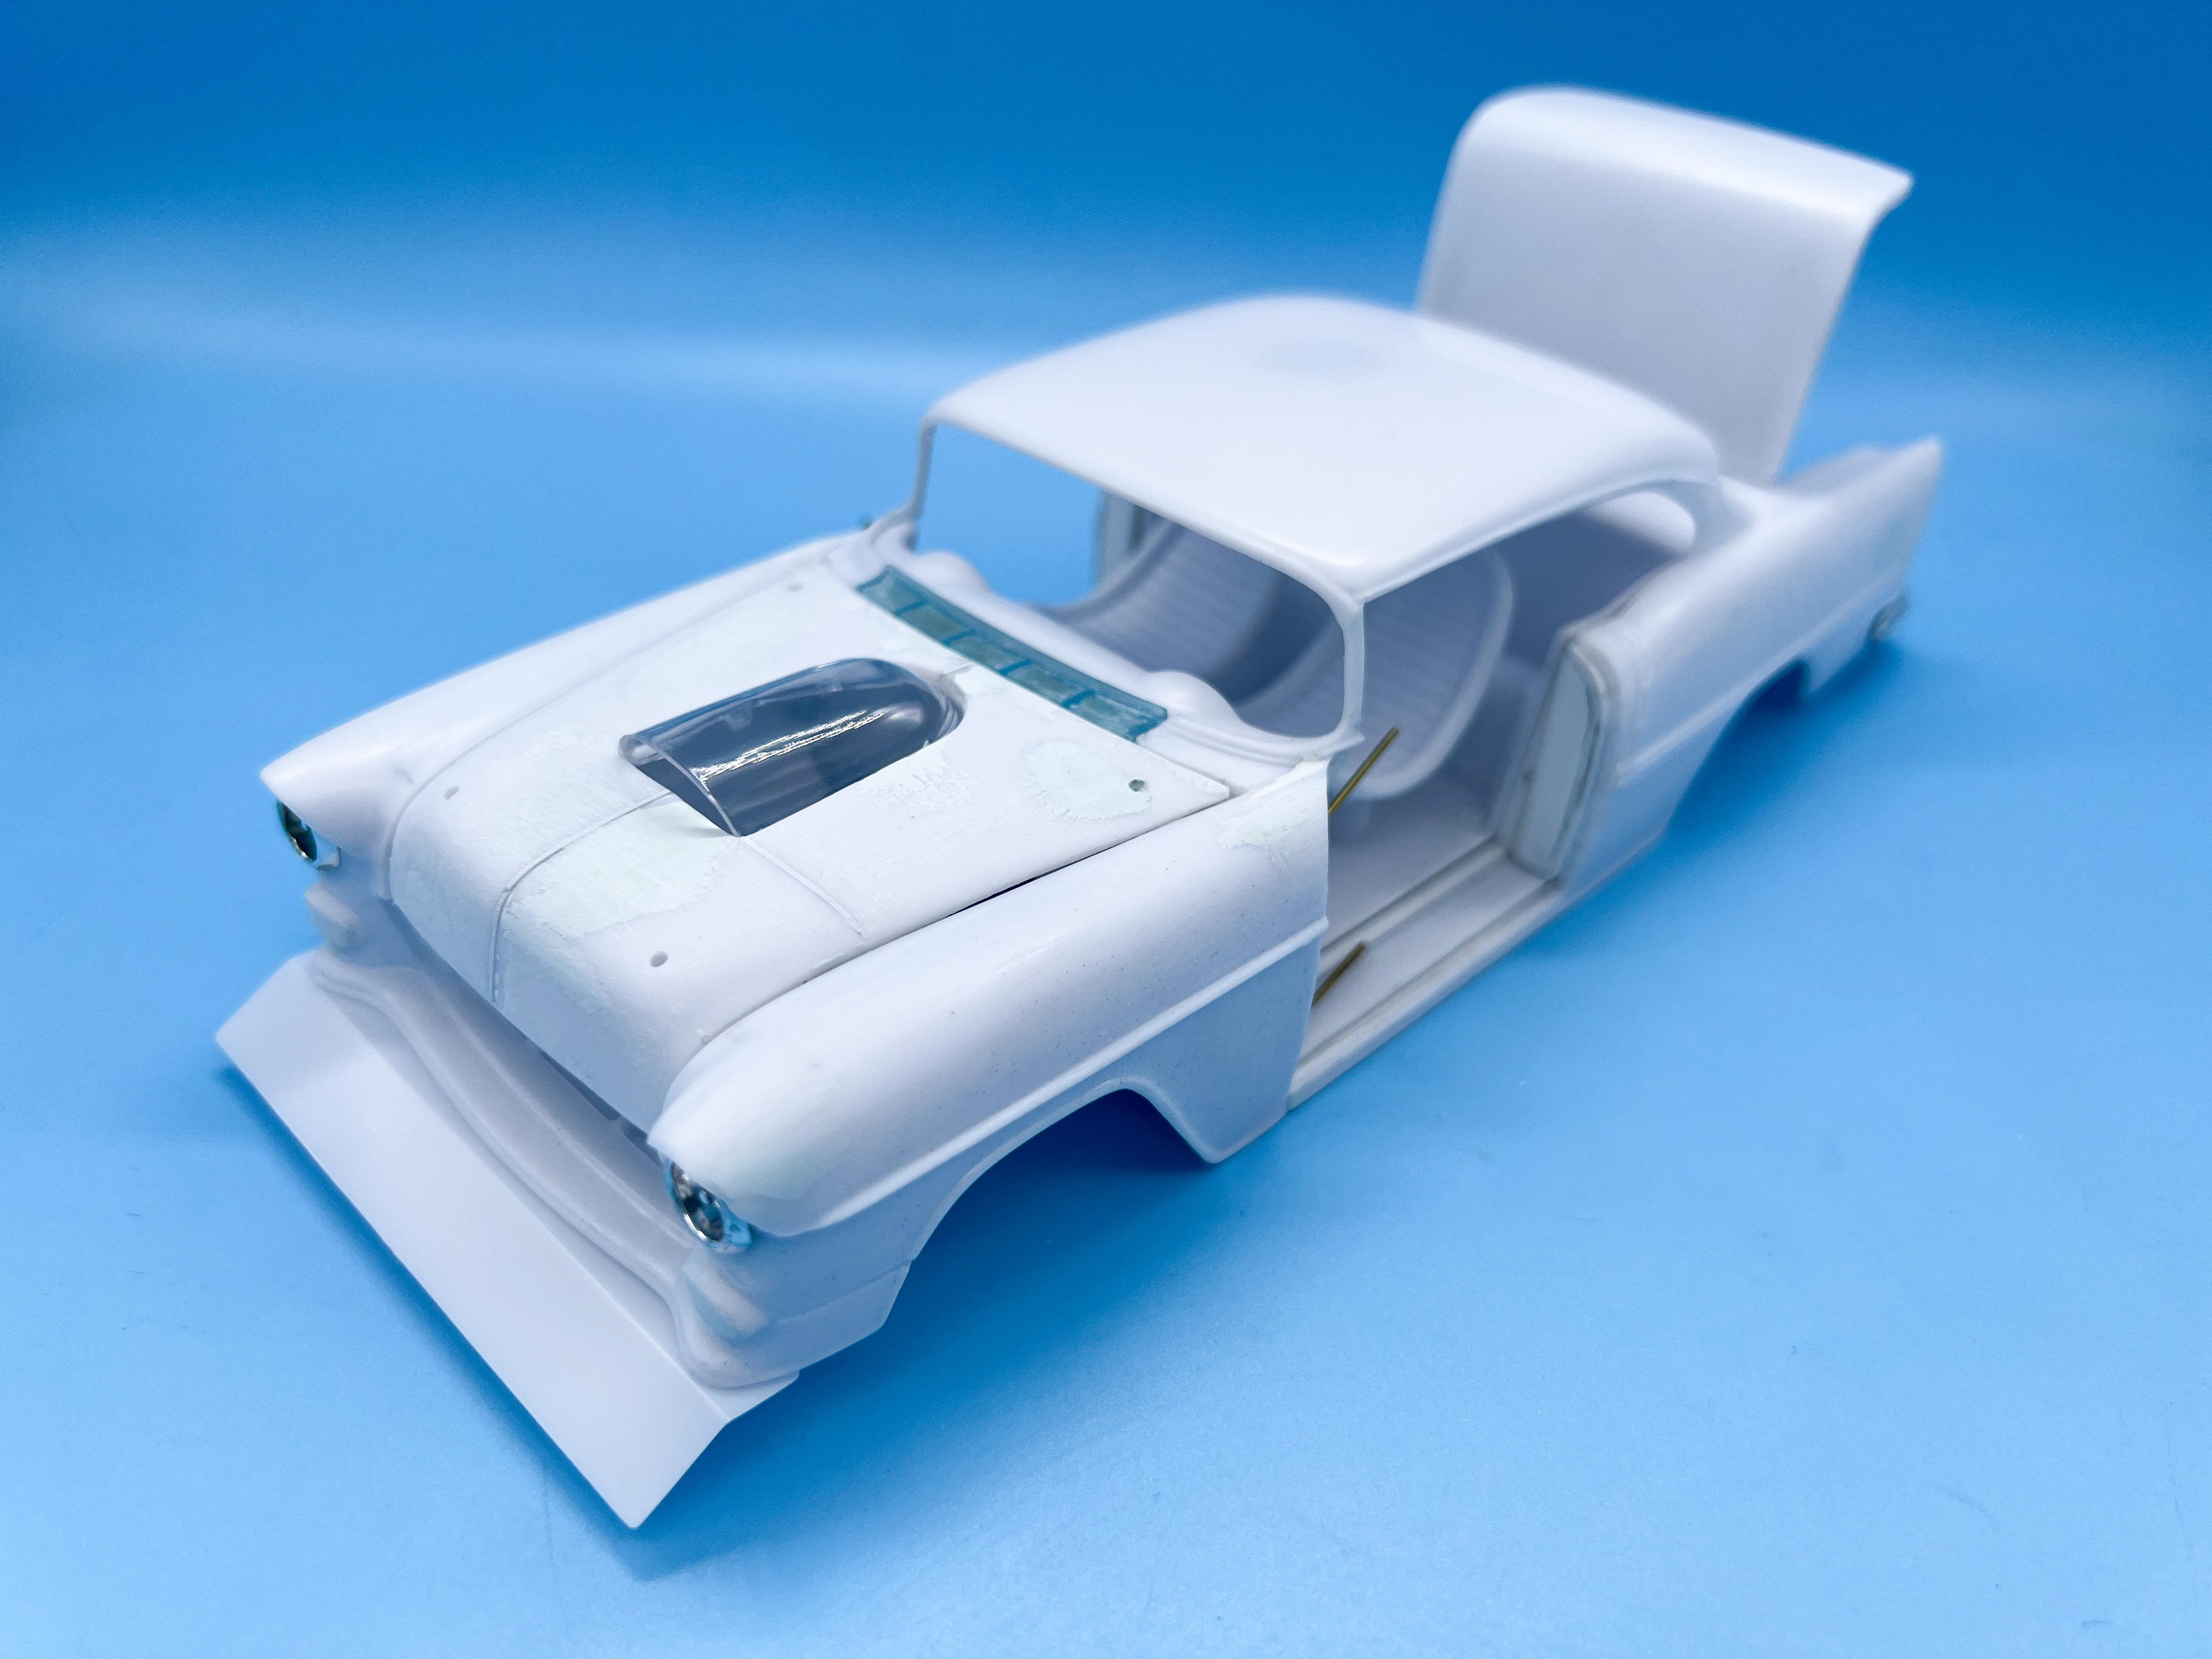
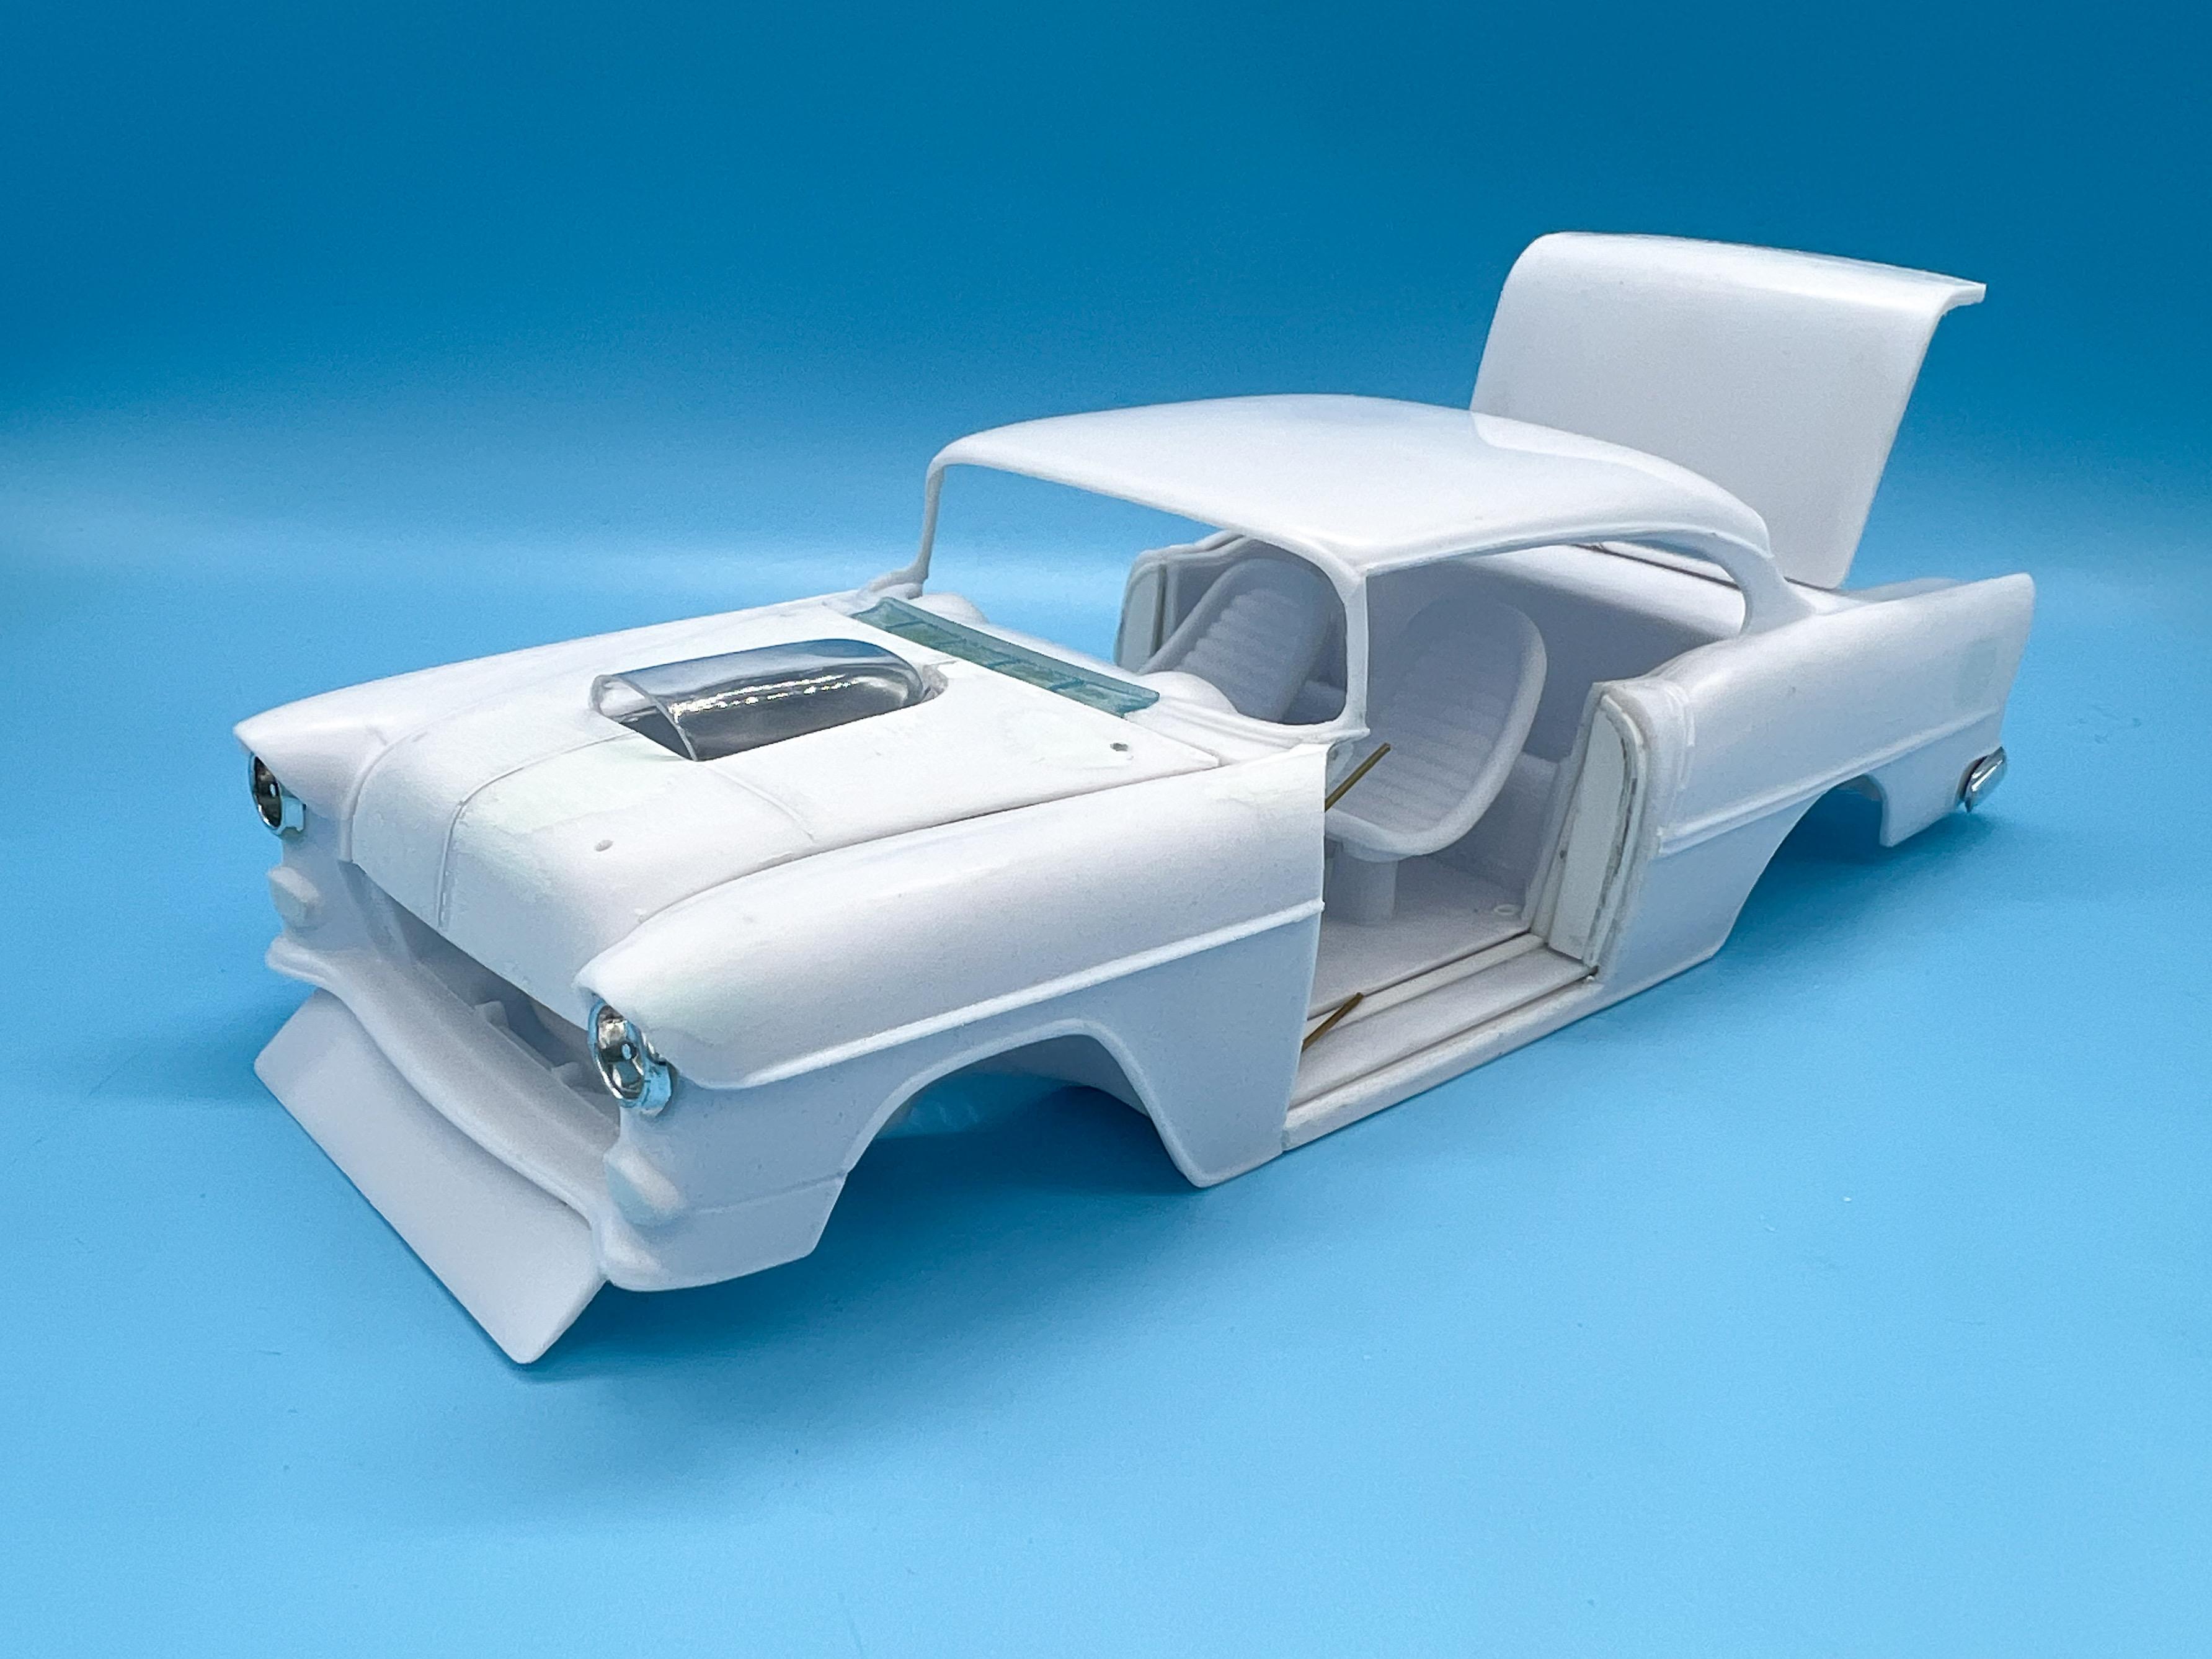
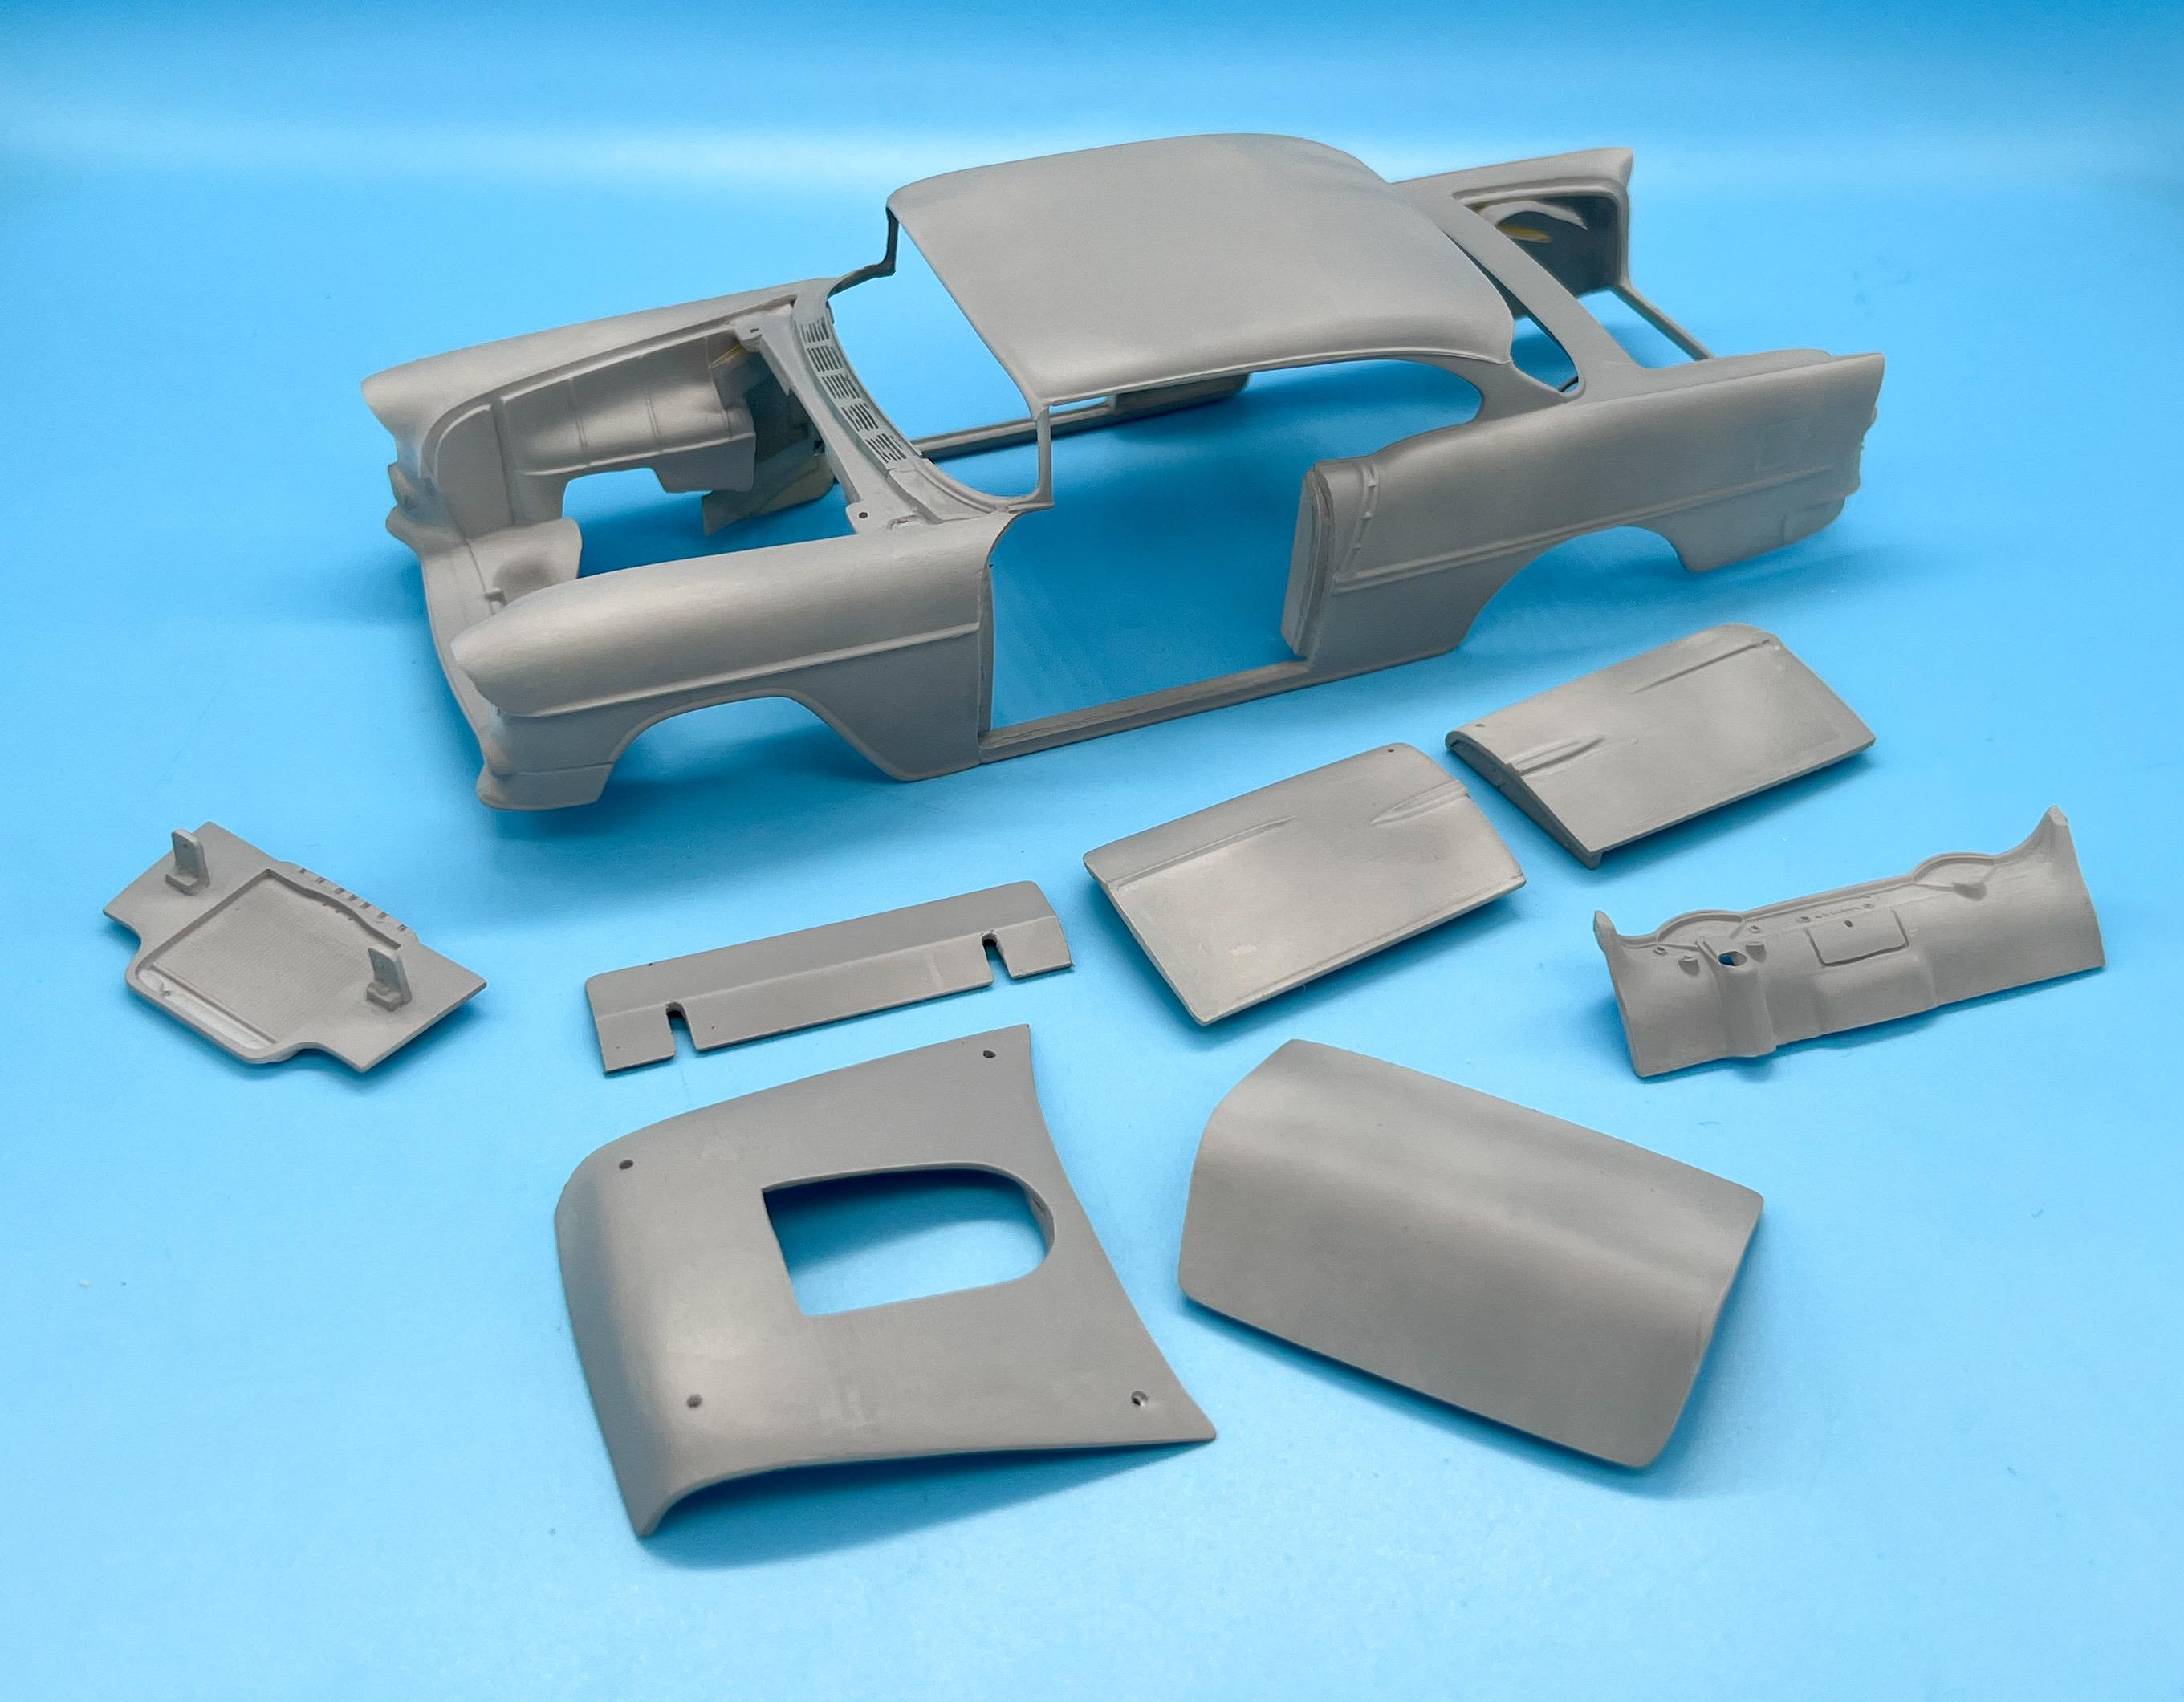
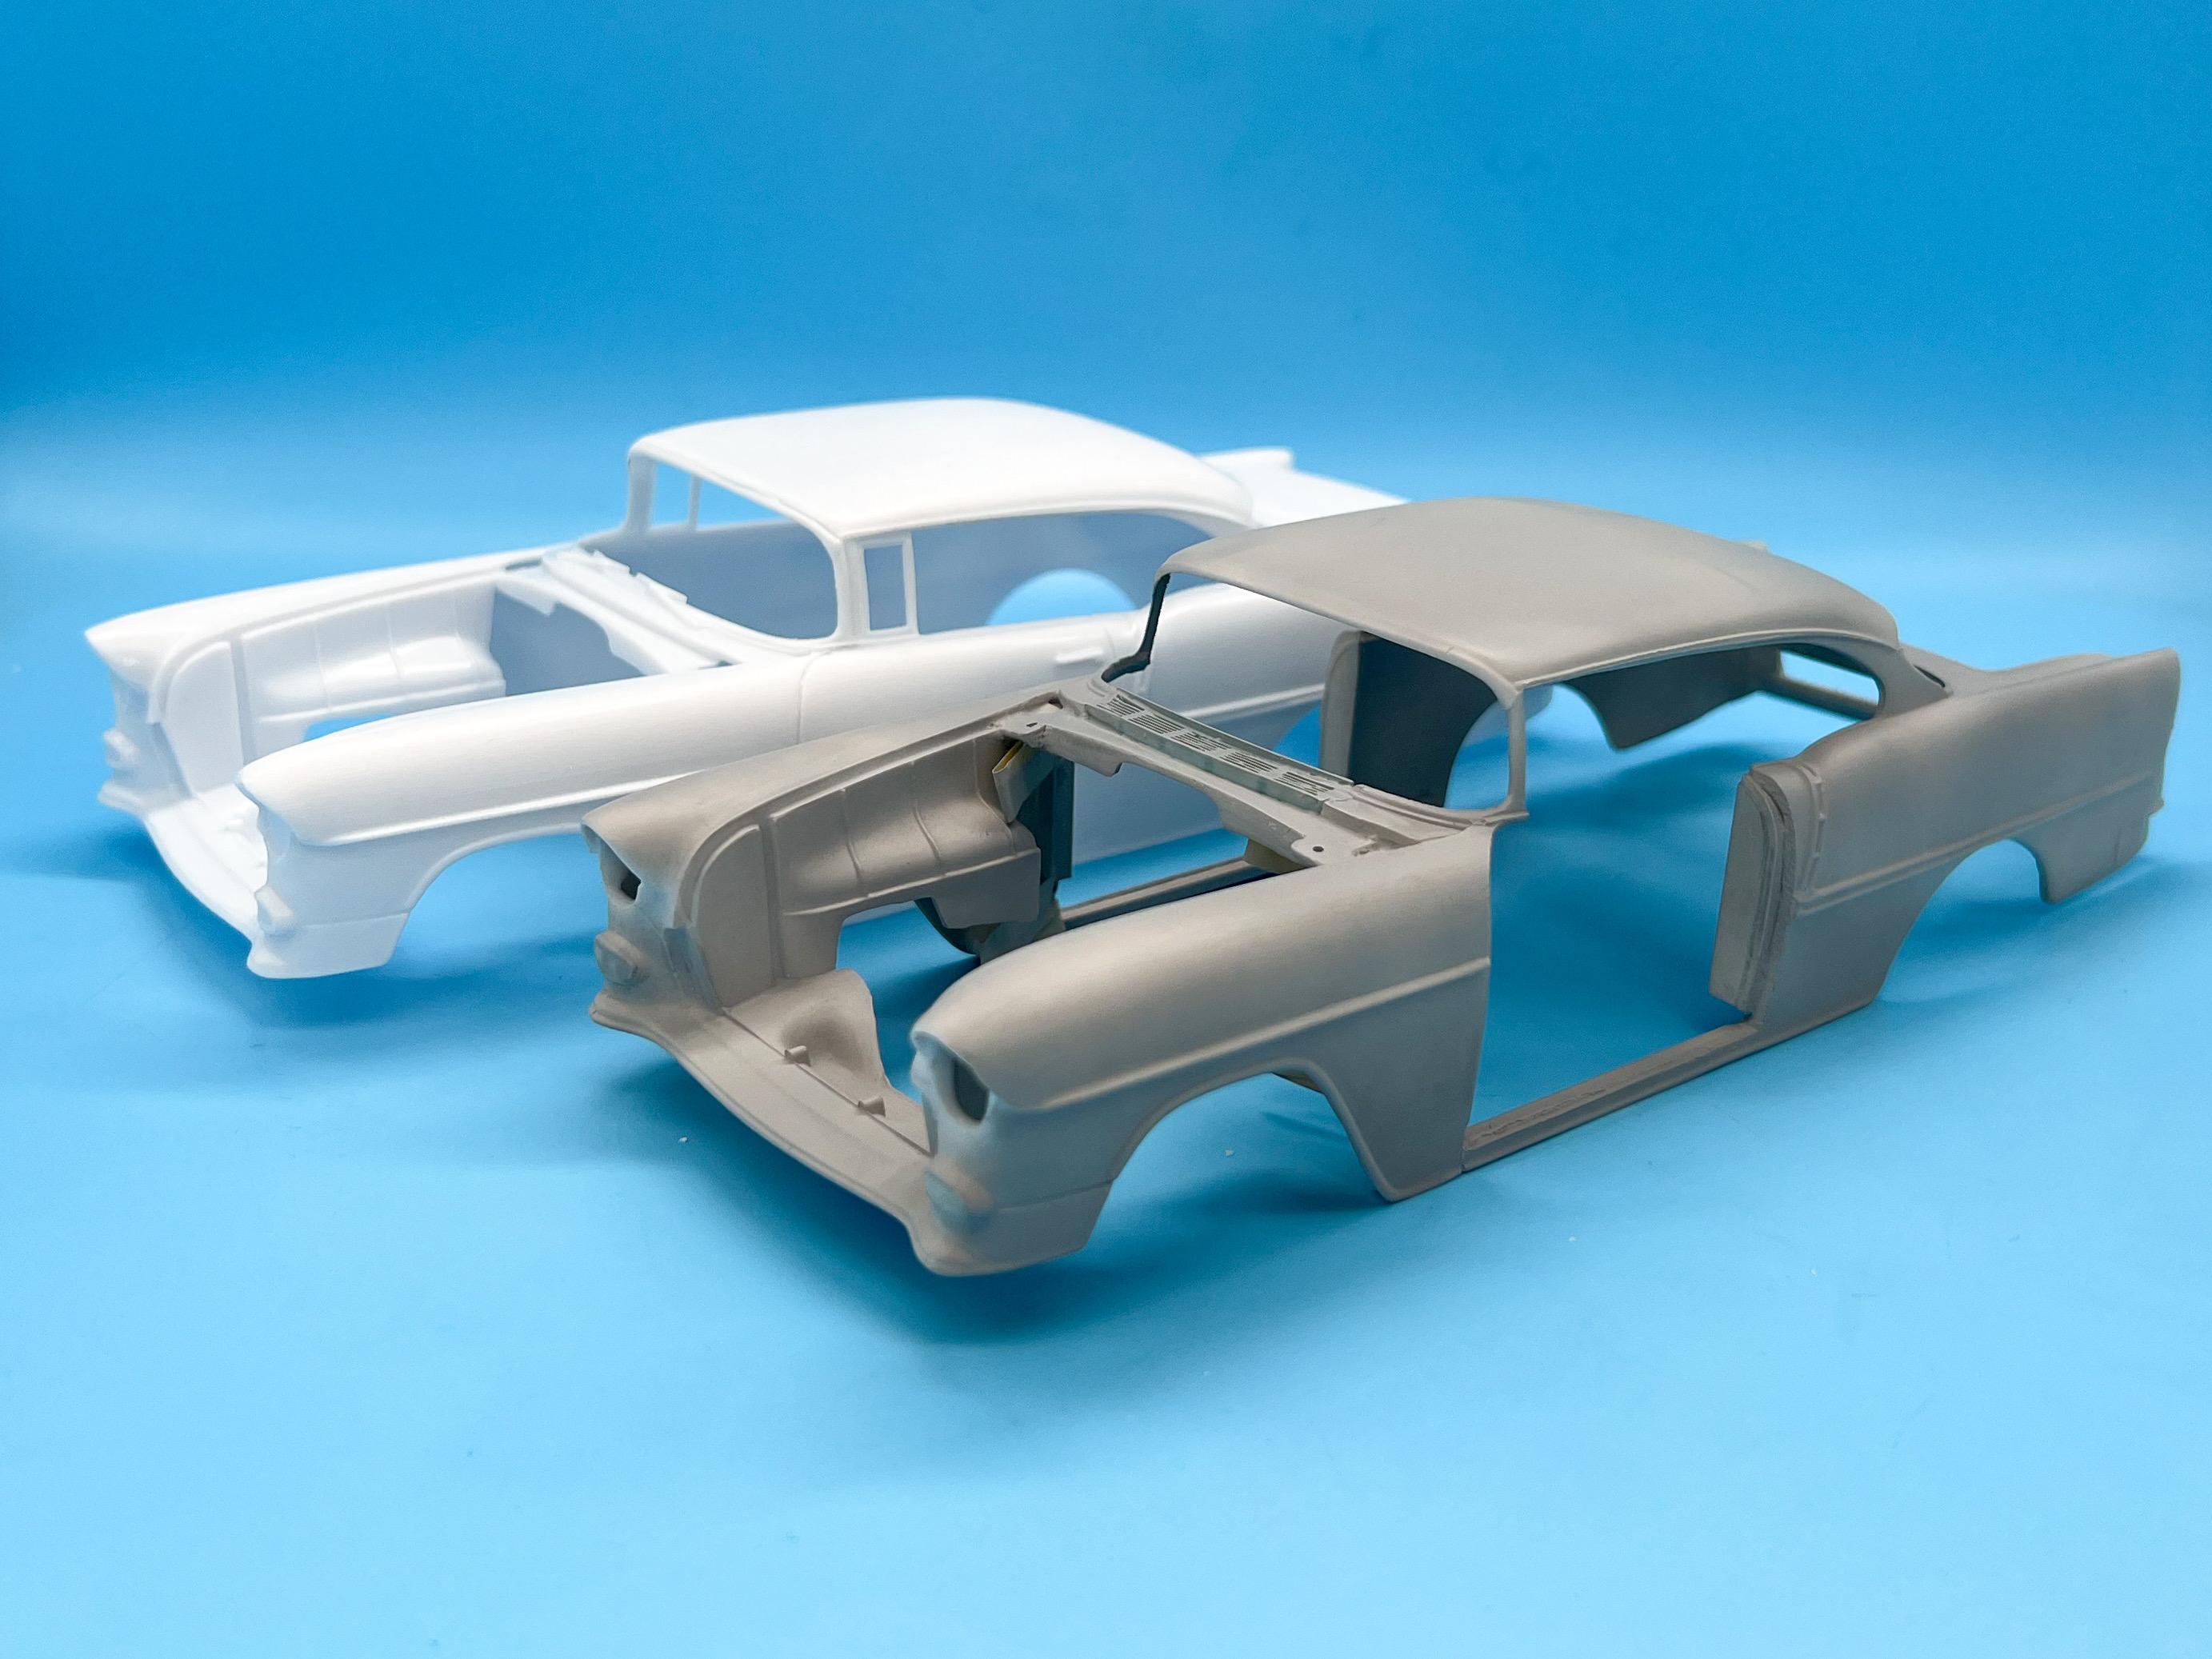
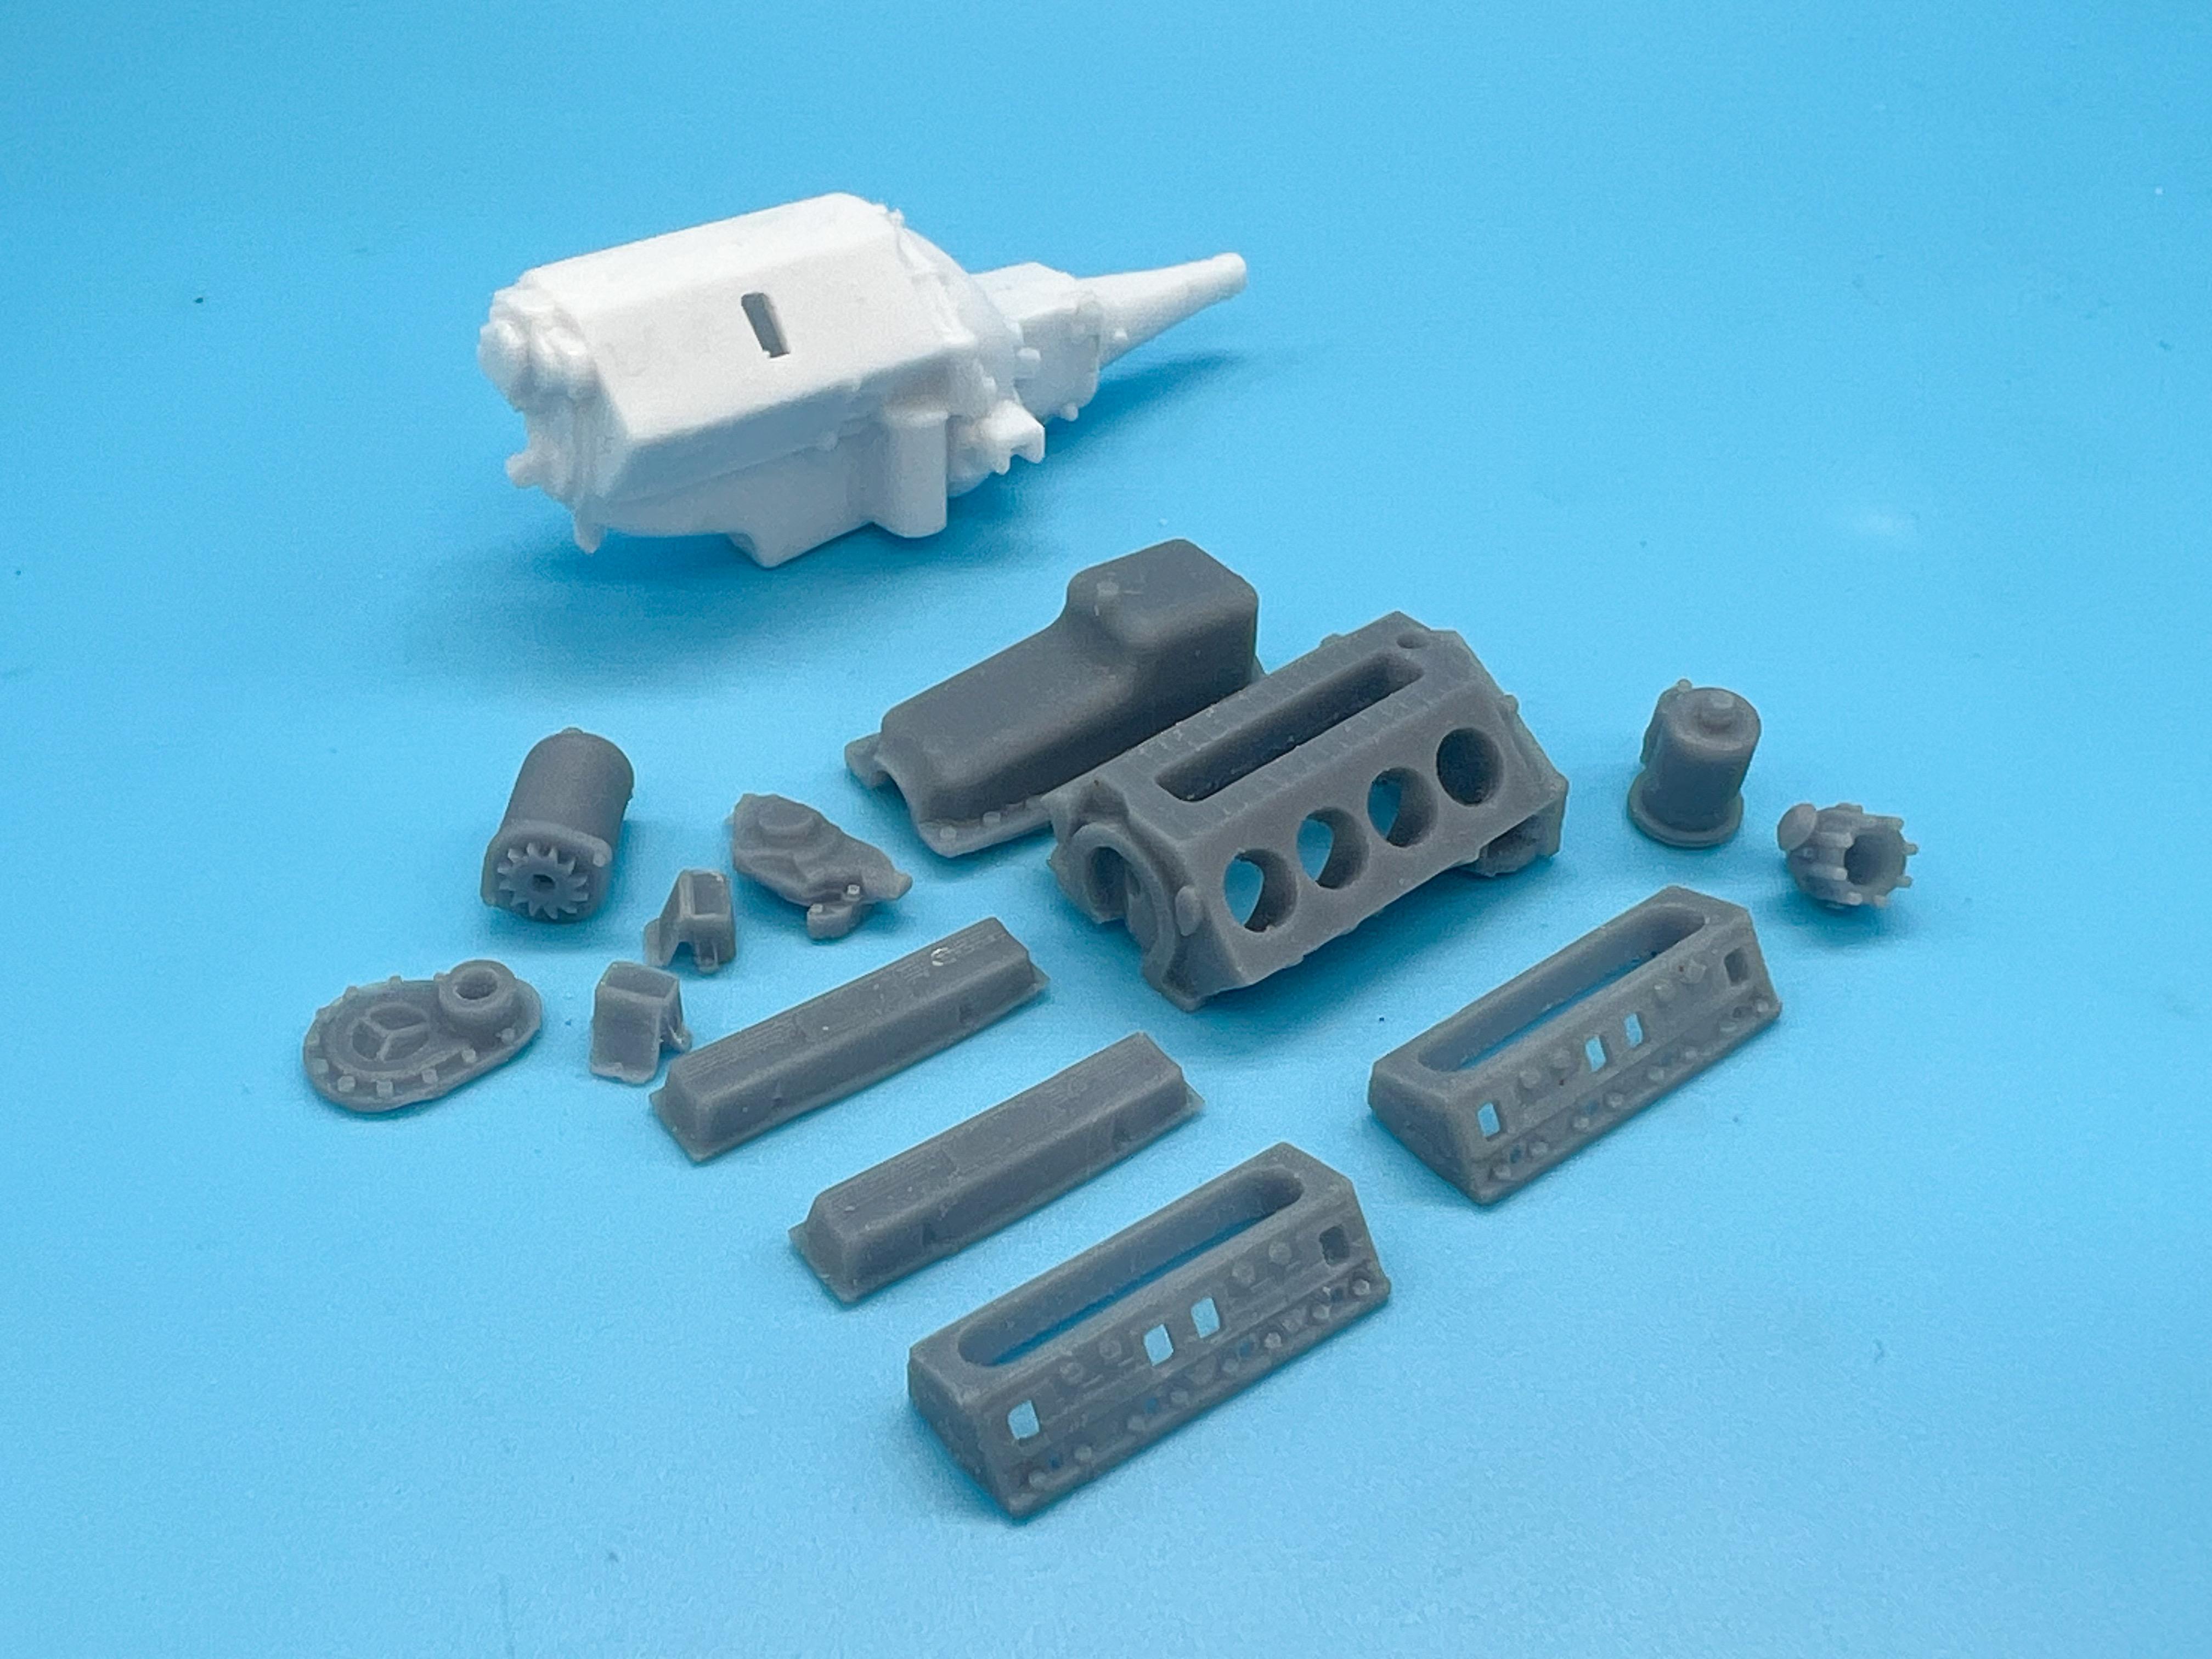
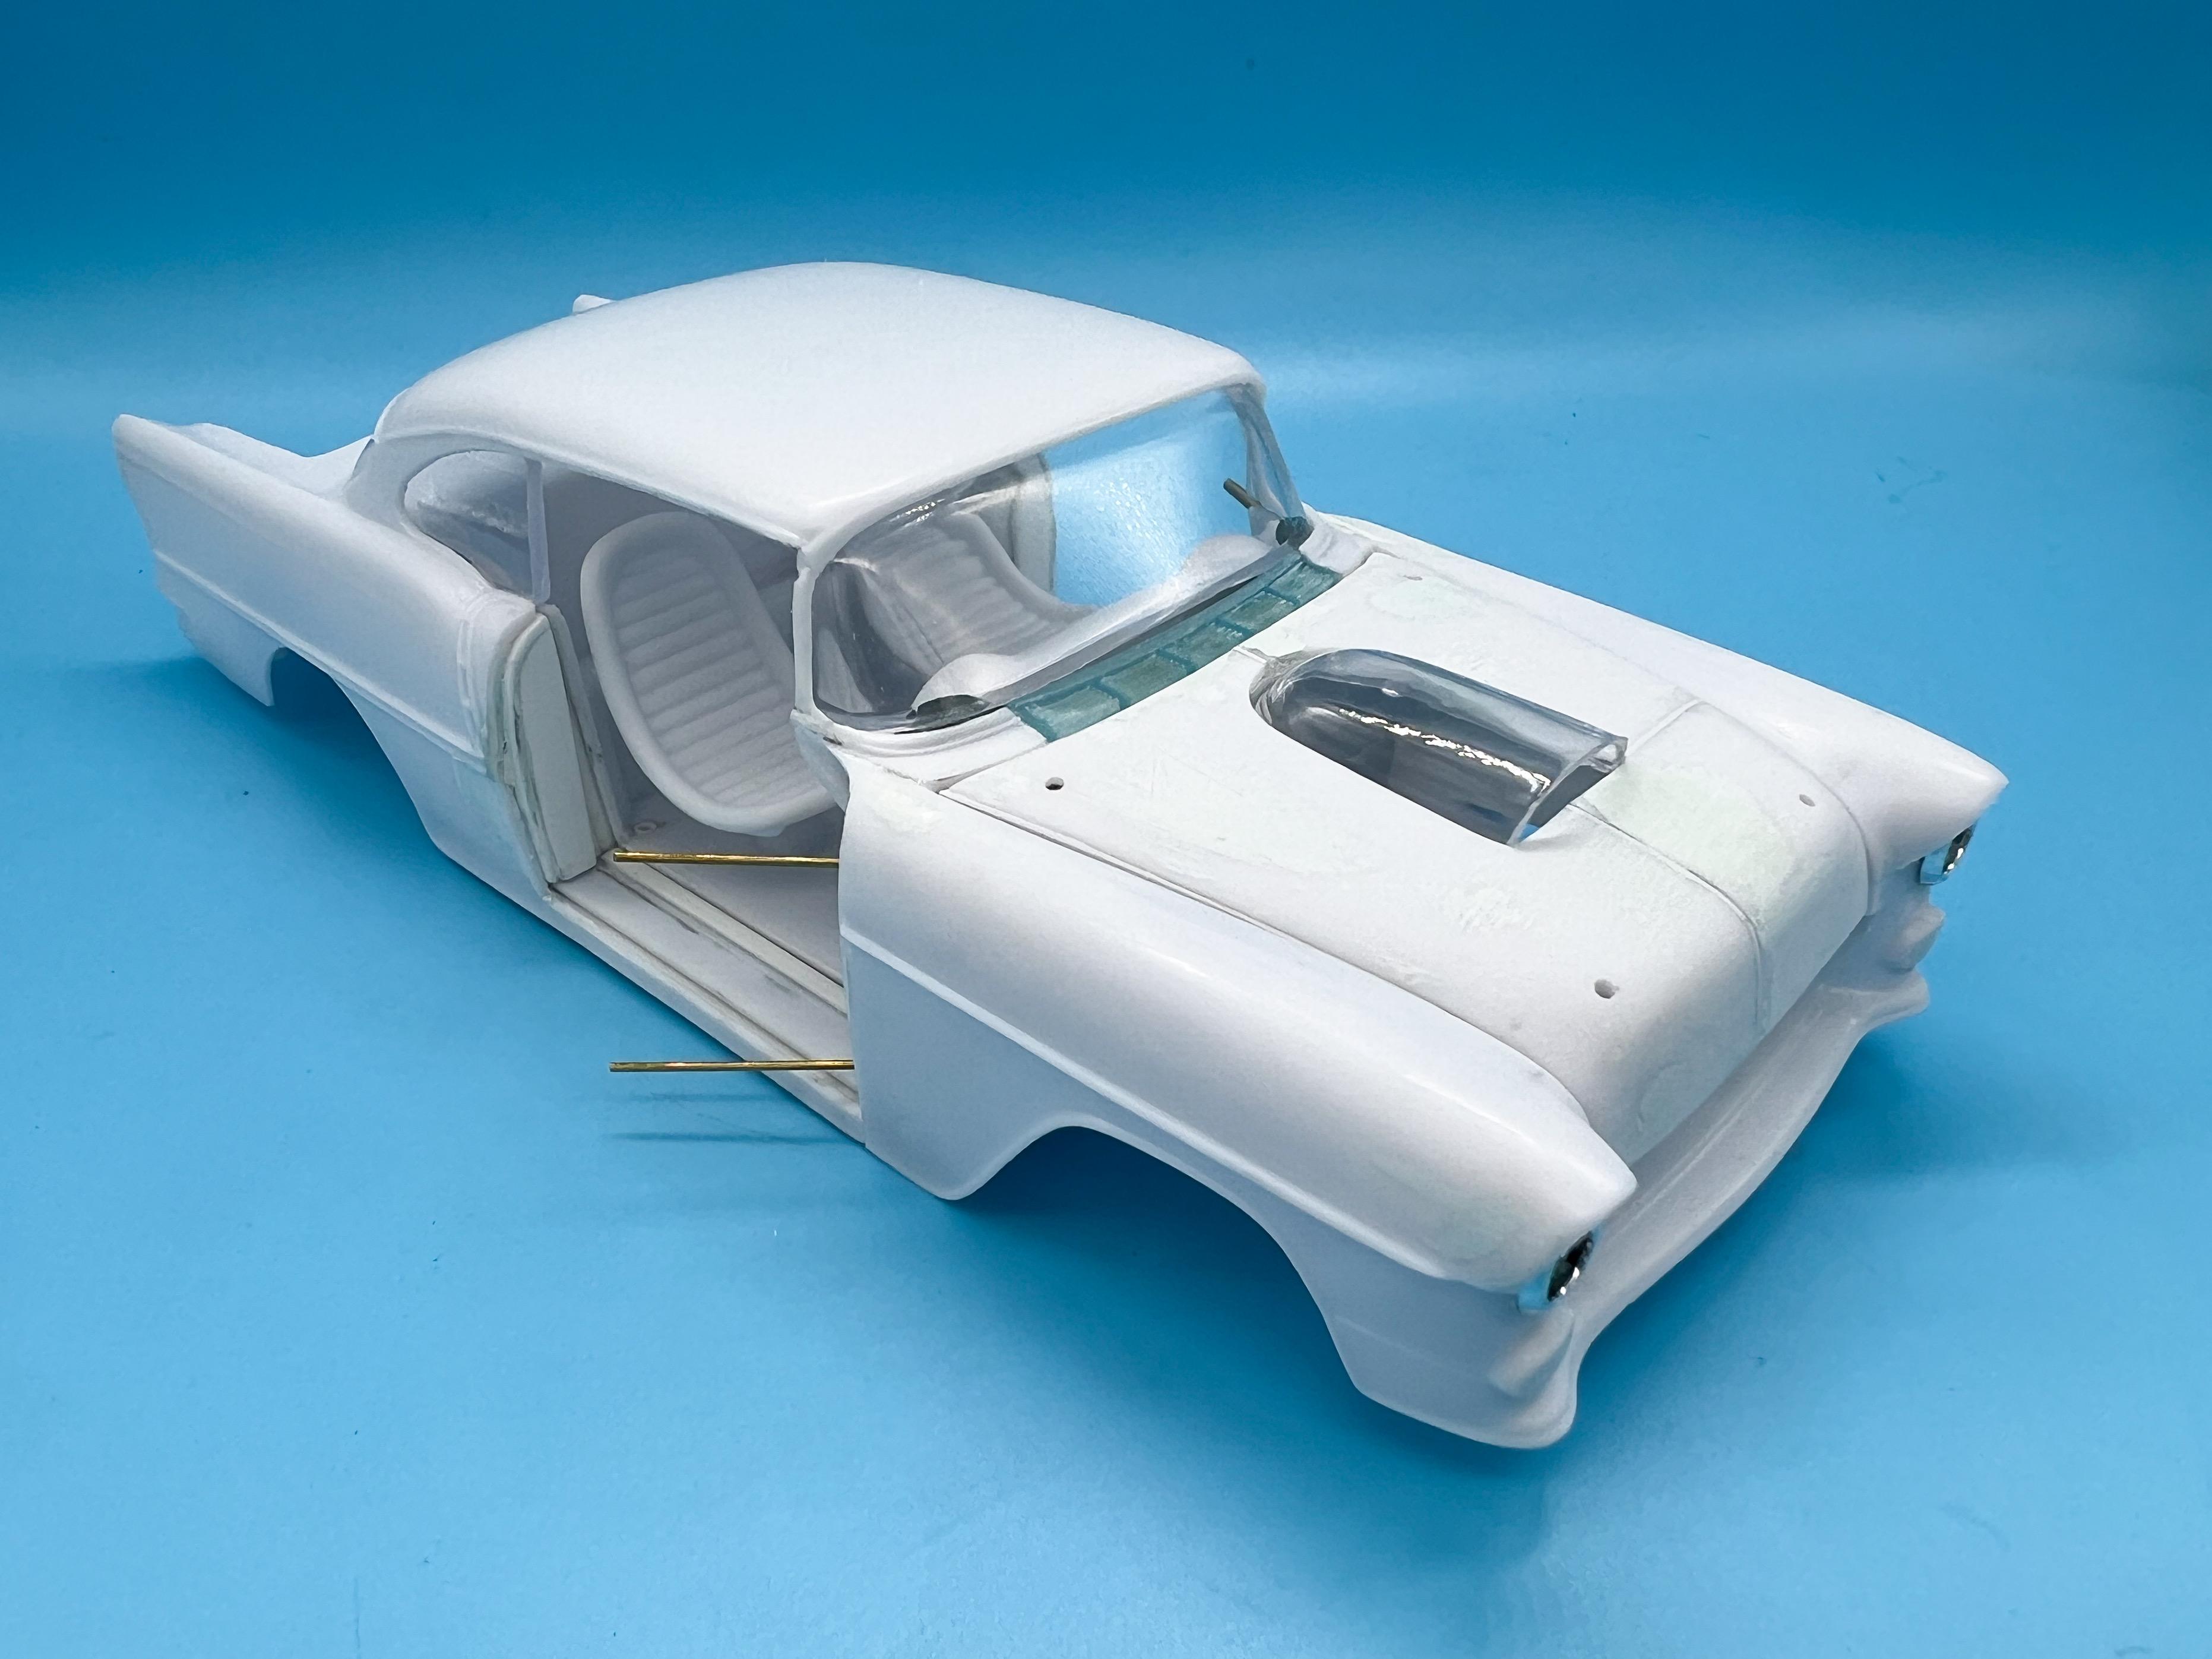
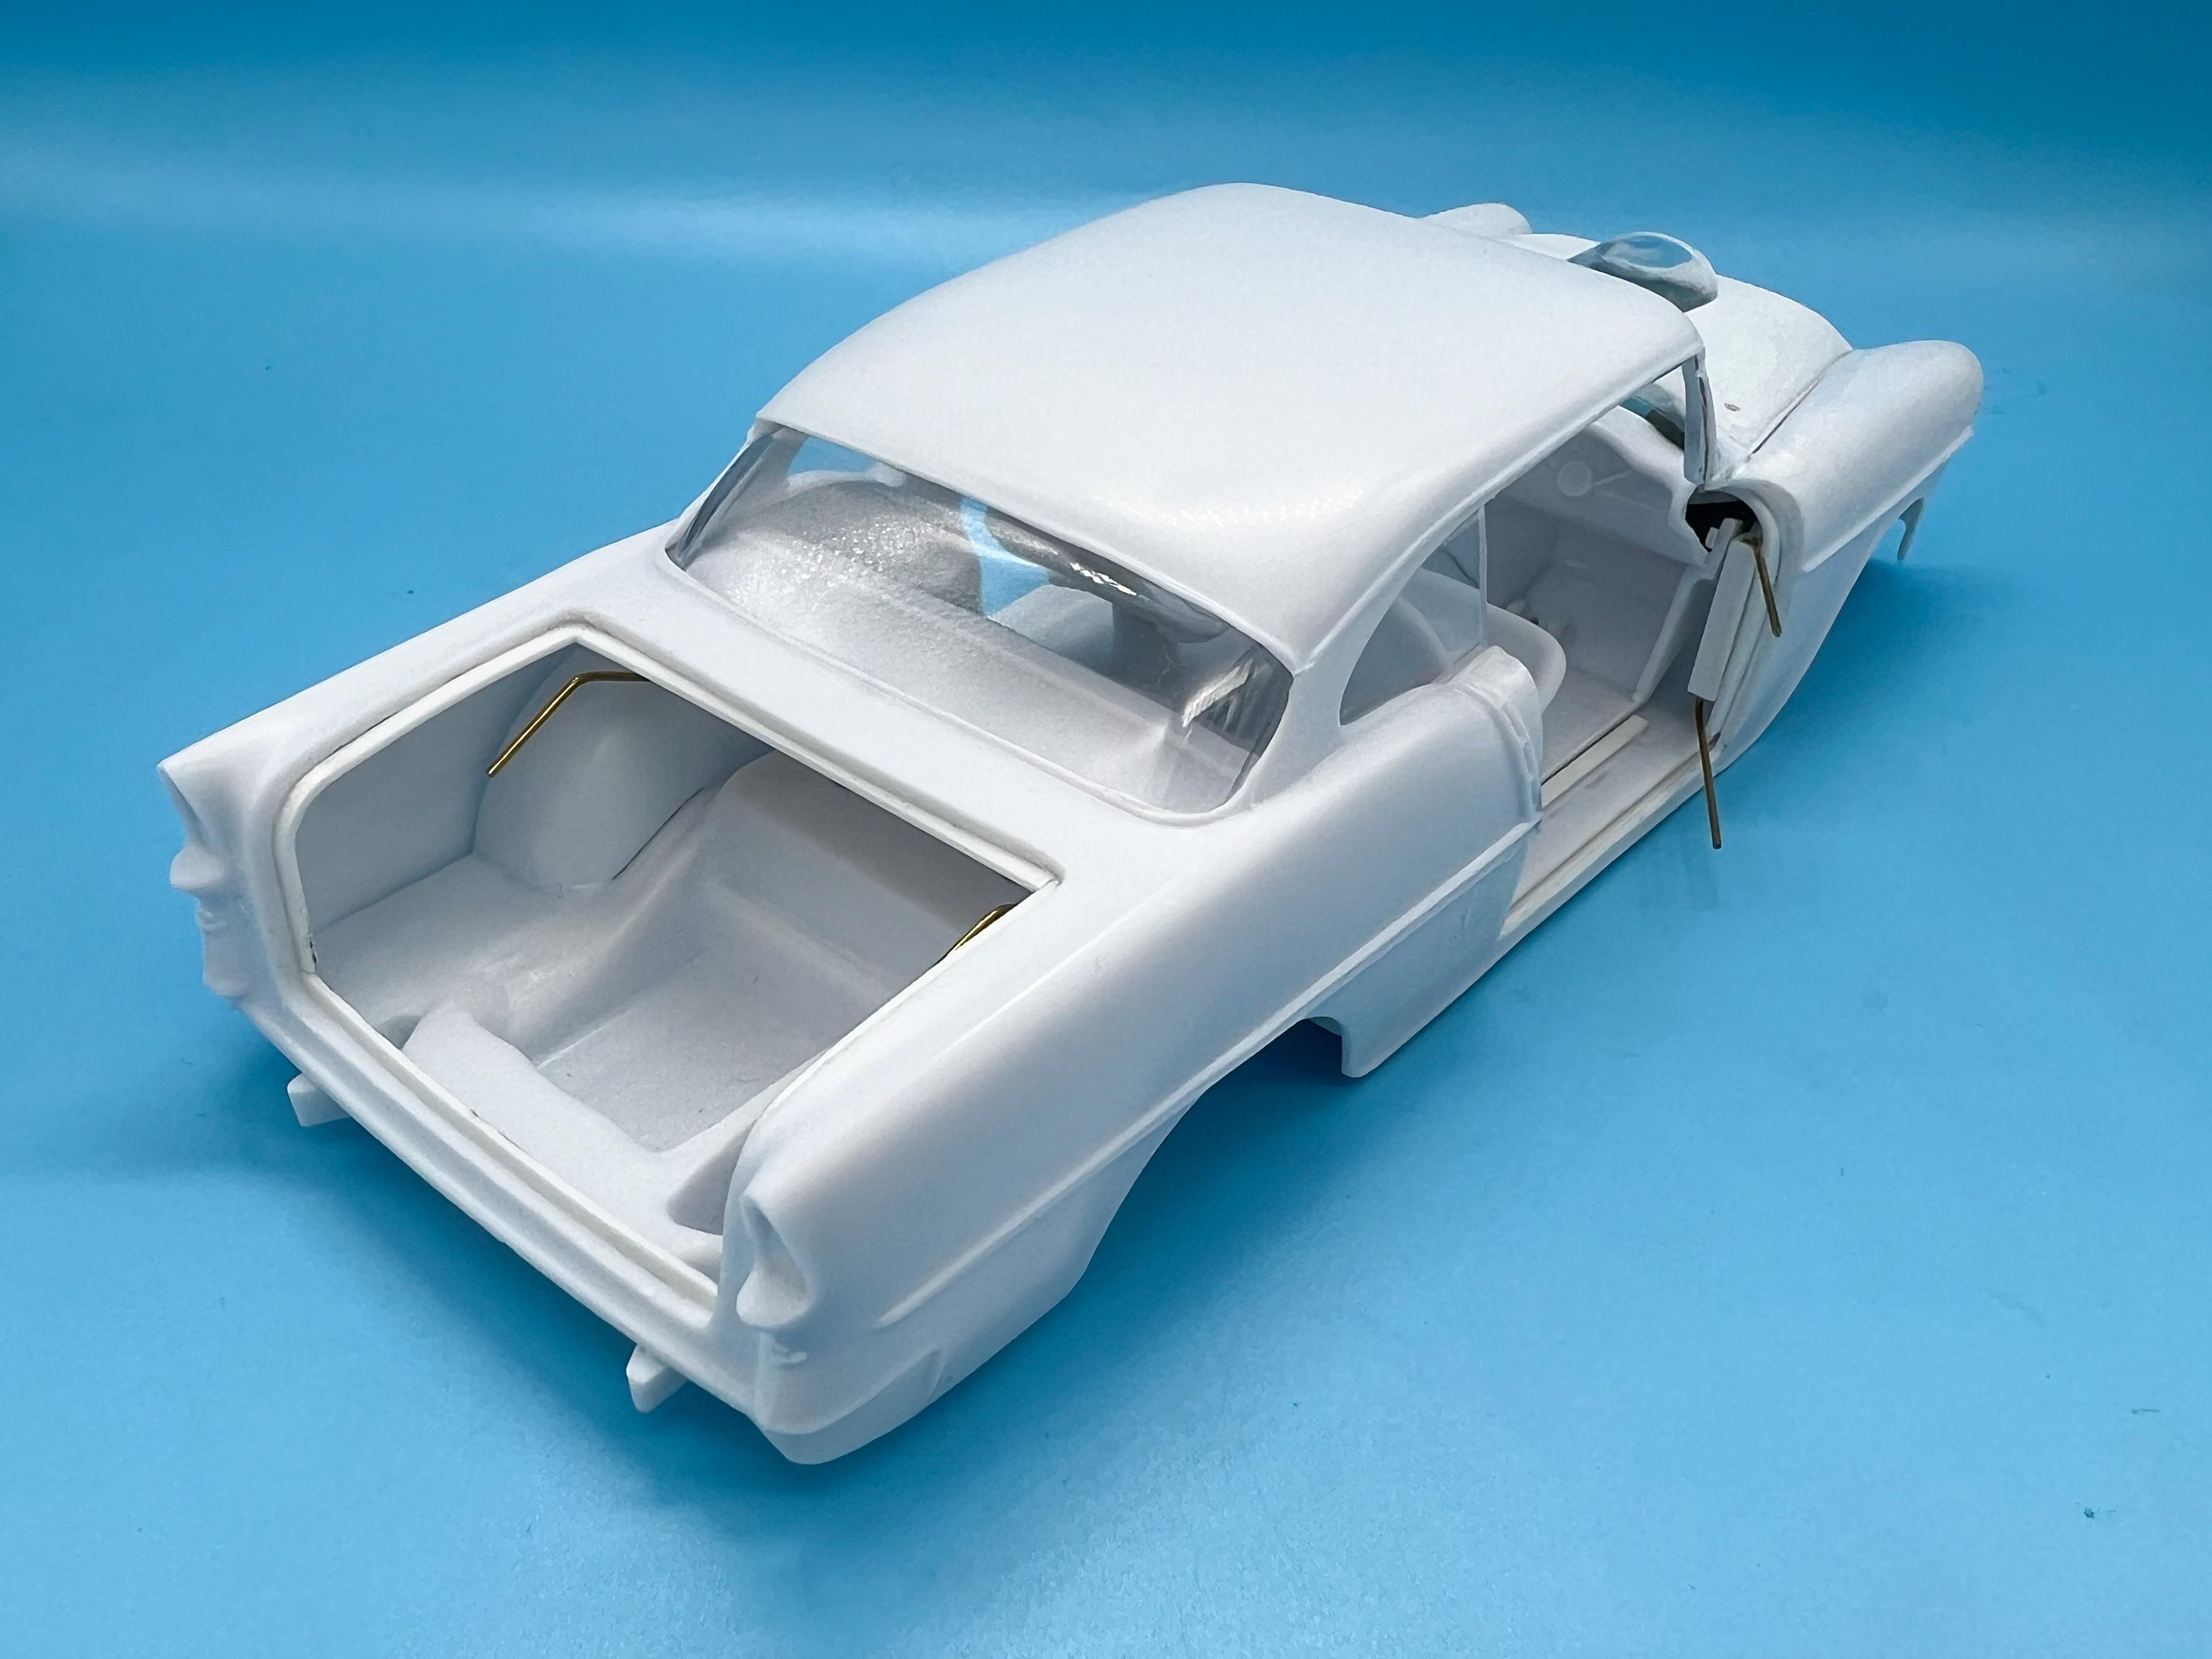
Thanks for the nice comments everybody! And yeah, I’m a sucker for styrene supplies too - can never have enough raw materials for building stuff! Small update…found a good print file for Chevy bellhousings and 3-speed transmissions…not sure how long those stock parts would last on an overbored blown engine on sticky drag slicks…but that’s how the kit is, and I’m trying to build a detailed-up version of it so there we are… Batch of bellhousings and transmissions fresh off the printer: I printed a few variations for future use, but I was always going with the most stock version. Once I had those bits, I could mock up the new engine…my plan is to use a few of the kit parts (hence scaling the engine to match the kit block) - although there’s definitely plenty of potential to add more detail here: And a quick comparison with the kit part… Meanwhile on the body, I’ve done a couple of coats of primer now, and I’m about far enough along to start wetsanding it to make sure I have a good straight base for the final primer coat and then hopefully some color: I’m mostly finding small imperfections now rather than big ones (although I’m going to give it another round of sanding tomorrow to see where we’re at…) and I want to tweak the cowl a little more but it’s getting closer - not the nightmare it could’ve been after all that cutting and slicing… And finally, the underside is getting the same treatment…I THINK it would be cool to shoot it in body color rather than just plain old black, but I haven’t totally decided yet, but I want it straight and perfect as can be anyway: And that’s all folks for today…got some more parts to work out on the engine so that’ll be next, and then I need to try and find a better stock-Tri 5 rear axle to replace the hollowed out blobby kit piece. More soon, soon as I’ve done more!
-
Johan ‘70 Cadillac ElDorado pro touring (low and aggressive)
OldNYJim replied to Steve H's topic in WIP: Model Cars
This is coming together really nicely Steve - I like the interior colors you picked especially -
So, question for people who know better than me - what IS the transmission meant to be in this kit? Is it a stock ‘55 trans, carried over from the earlier versions of this kit?
-
My take on the most famous ‘55 gasser street machine’…
OldNYJim replied to OldNYJim's topic in WIP: Model Cars
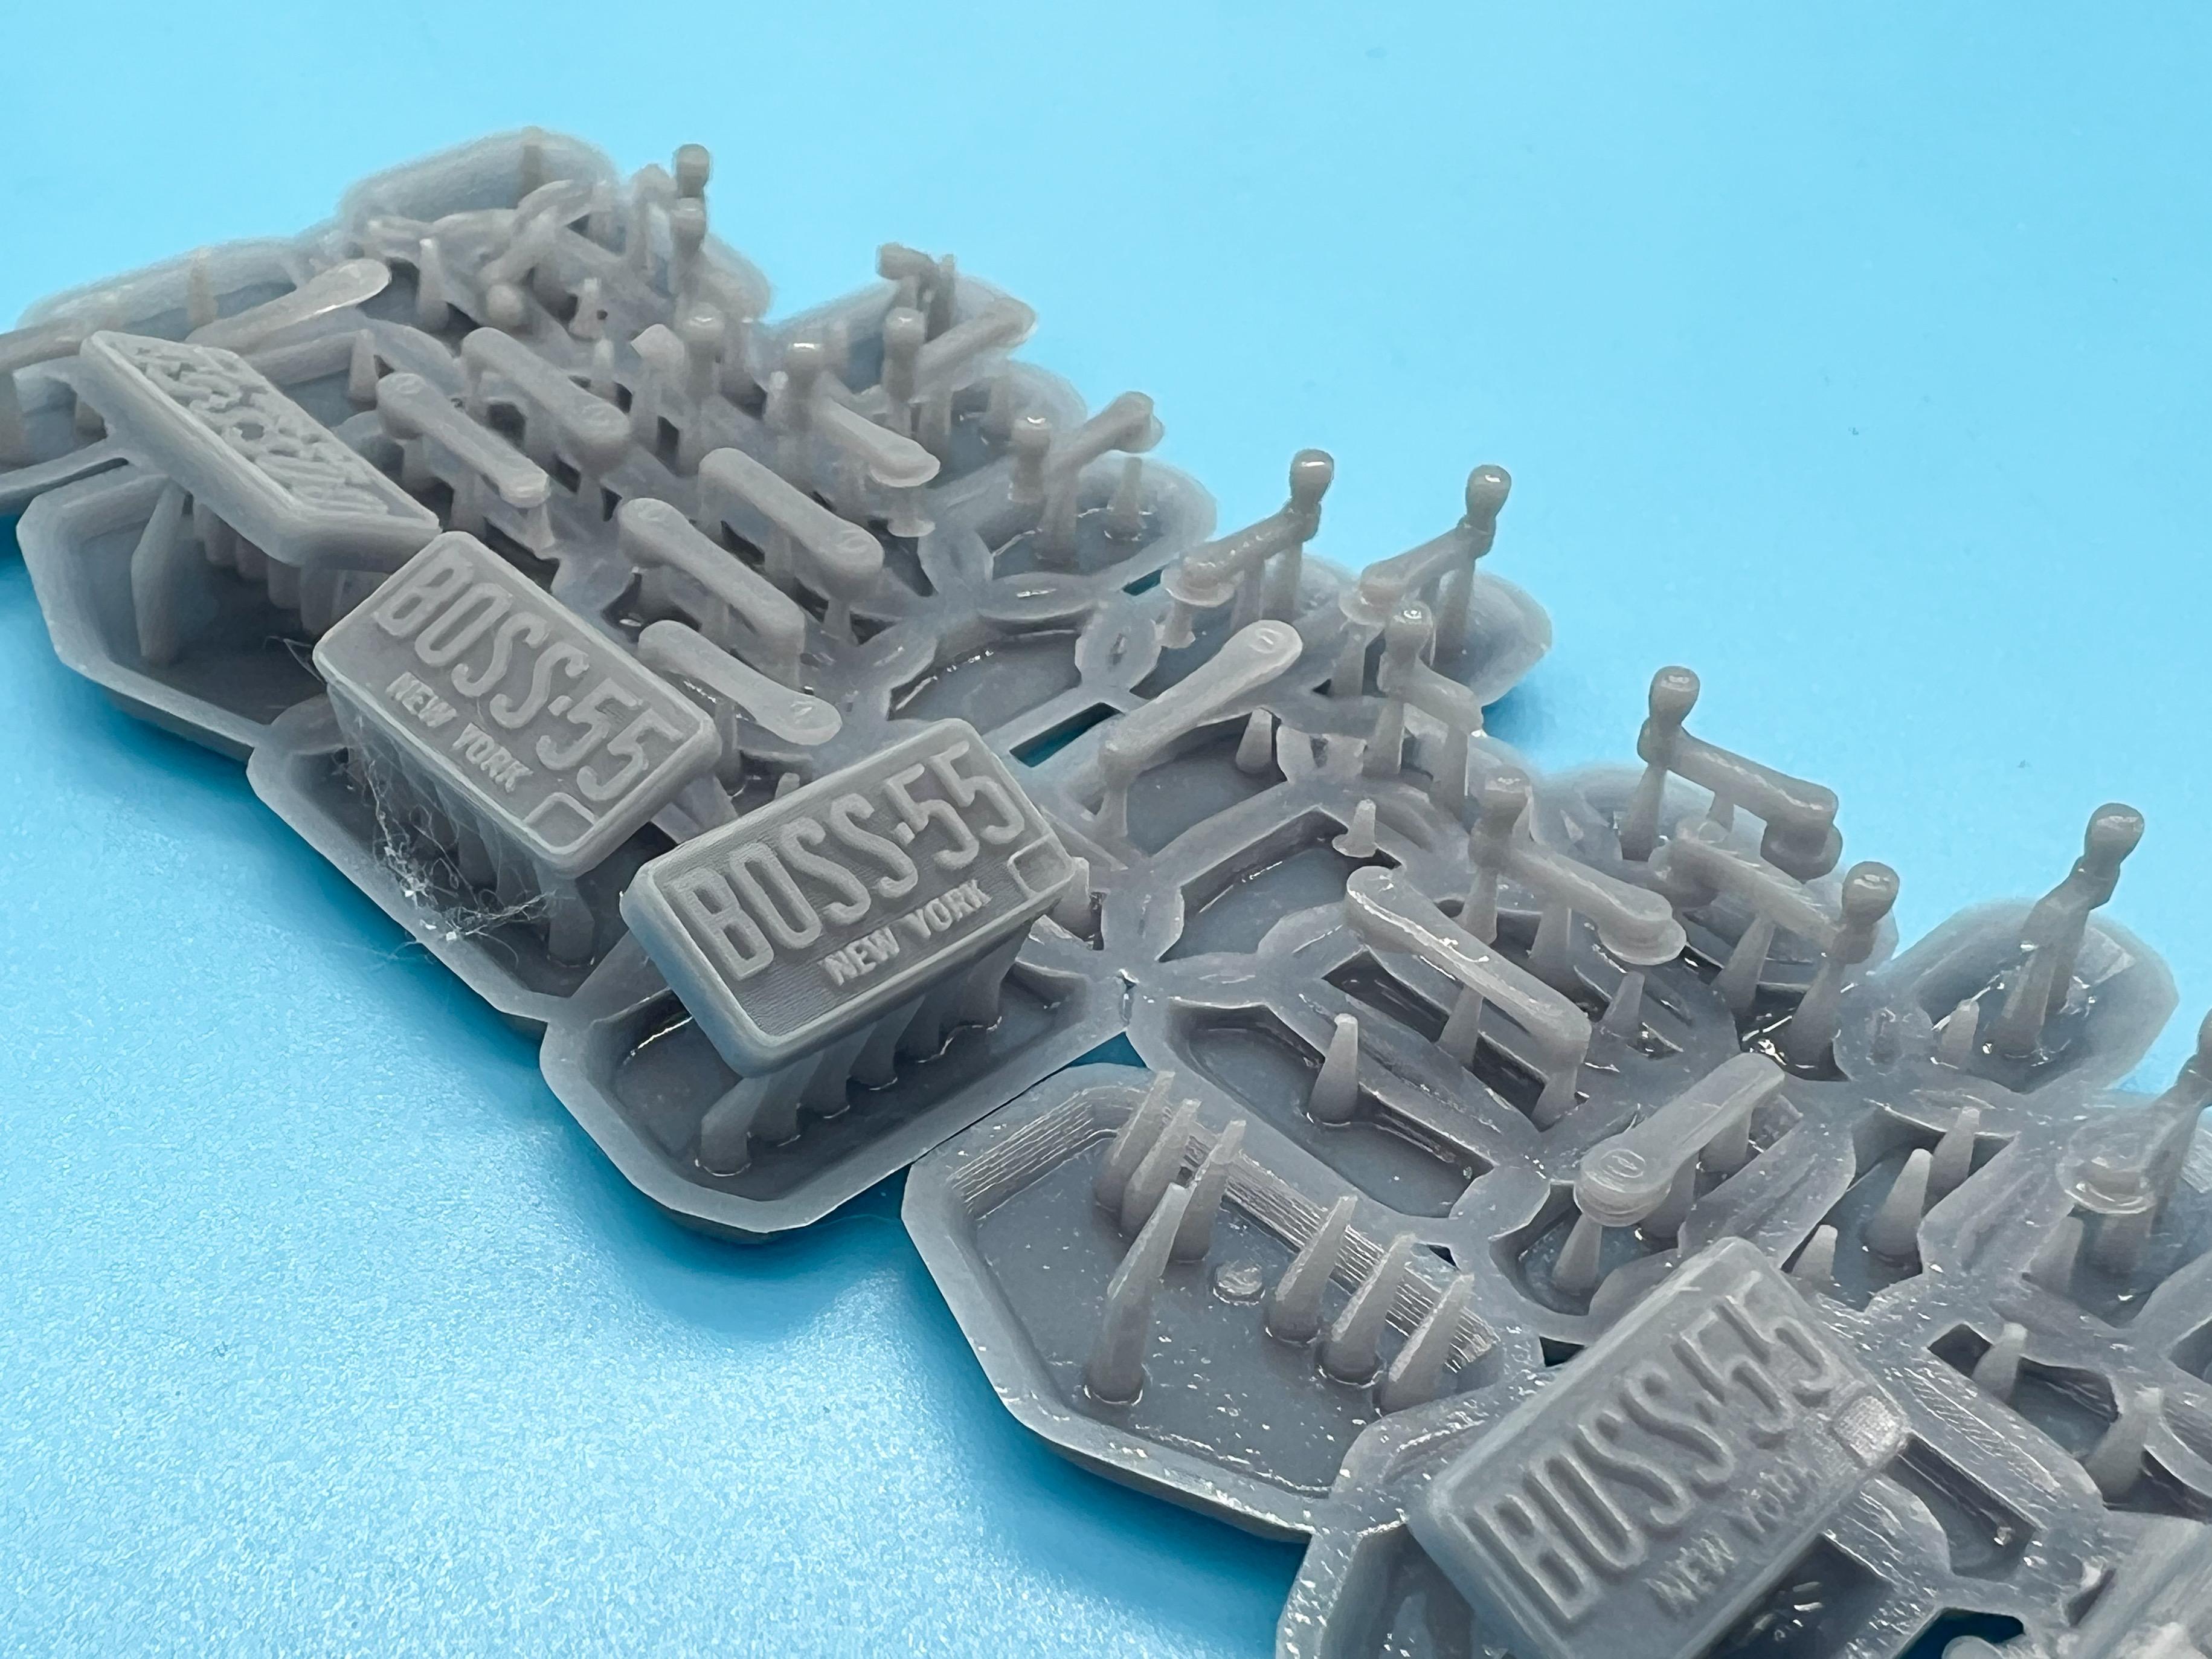
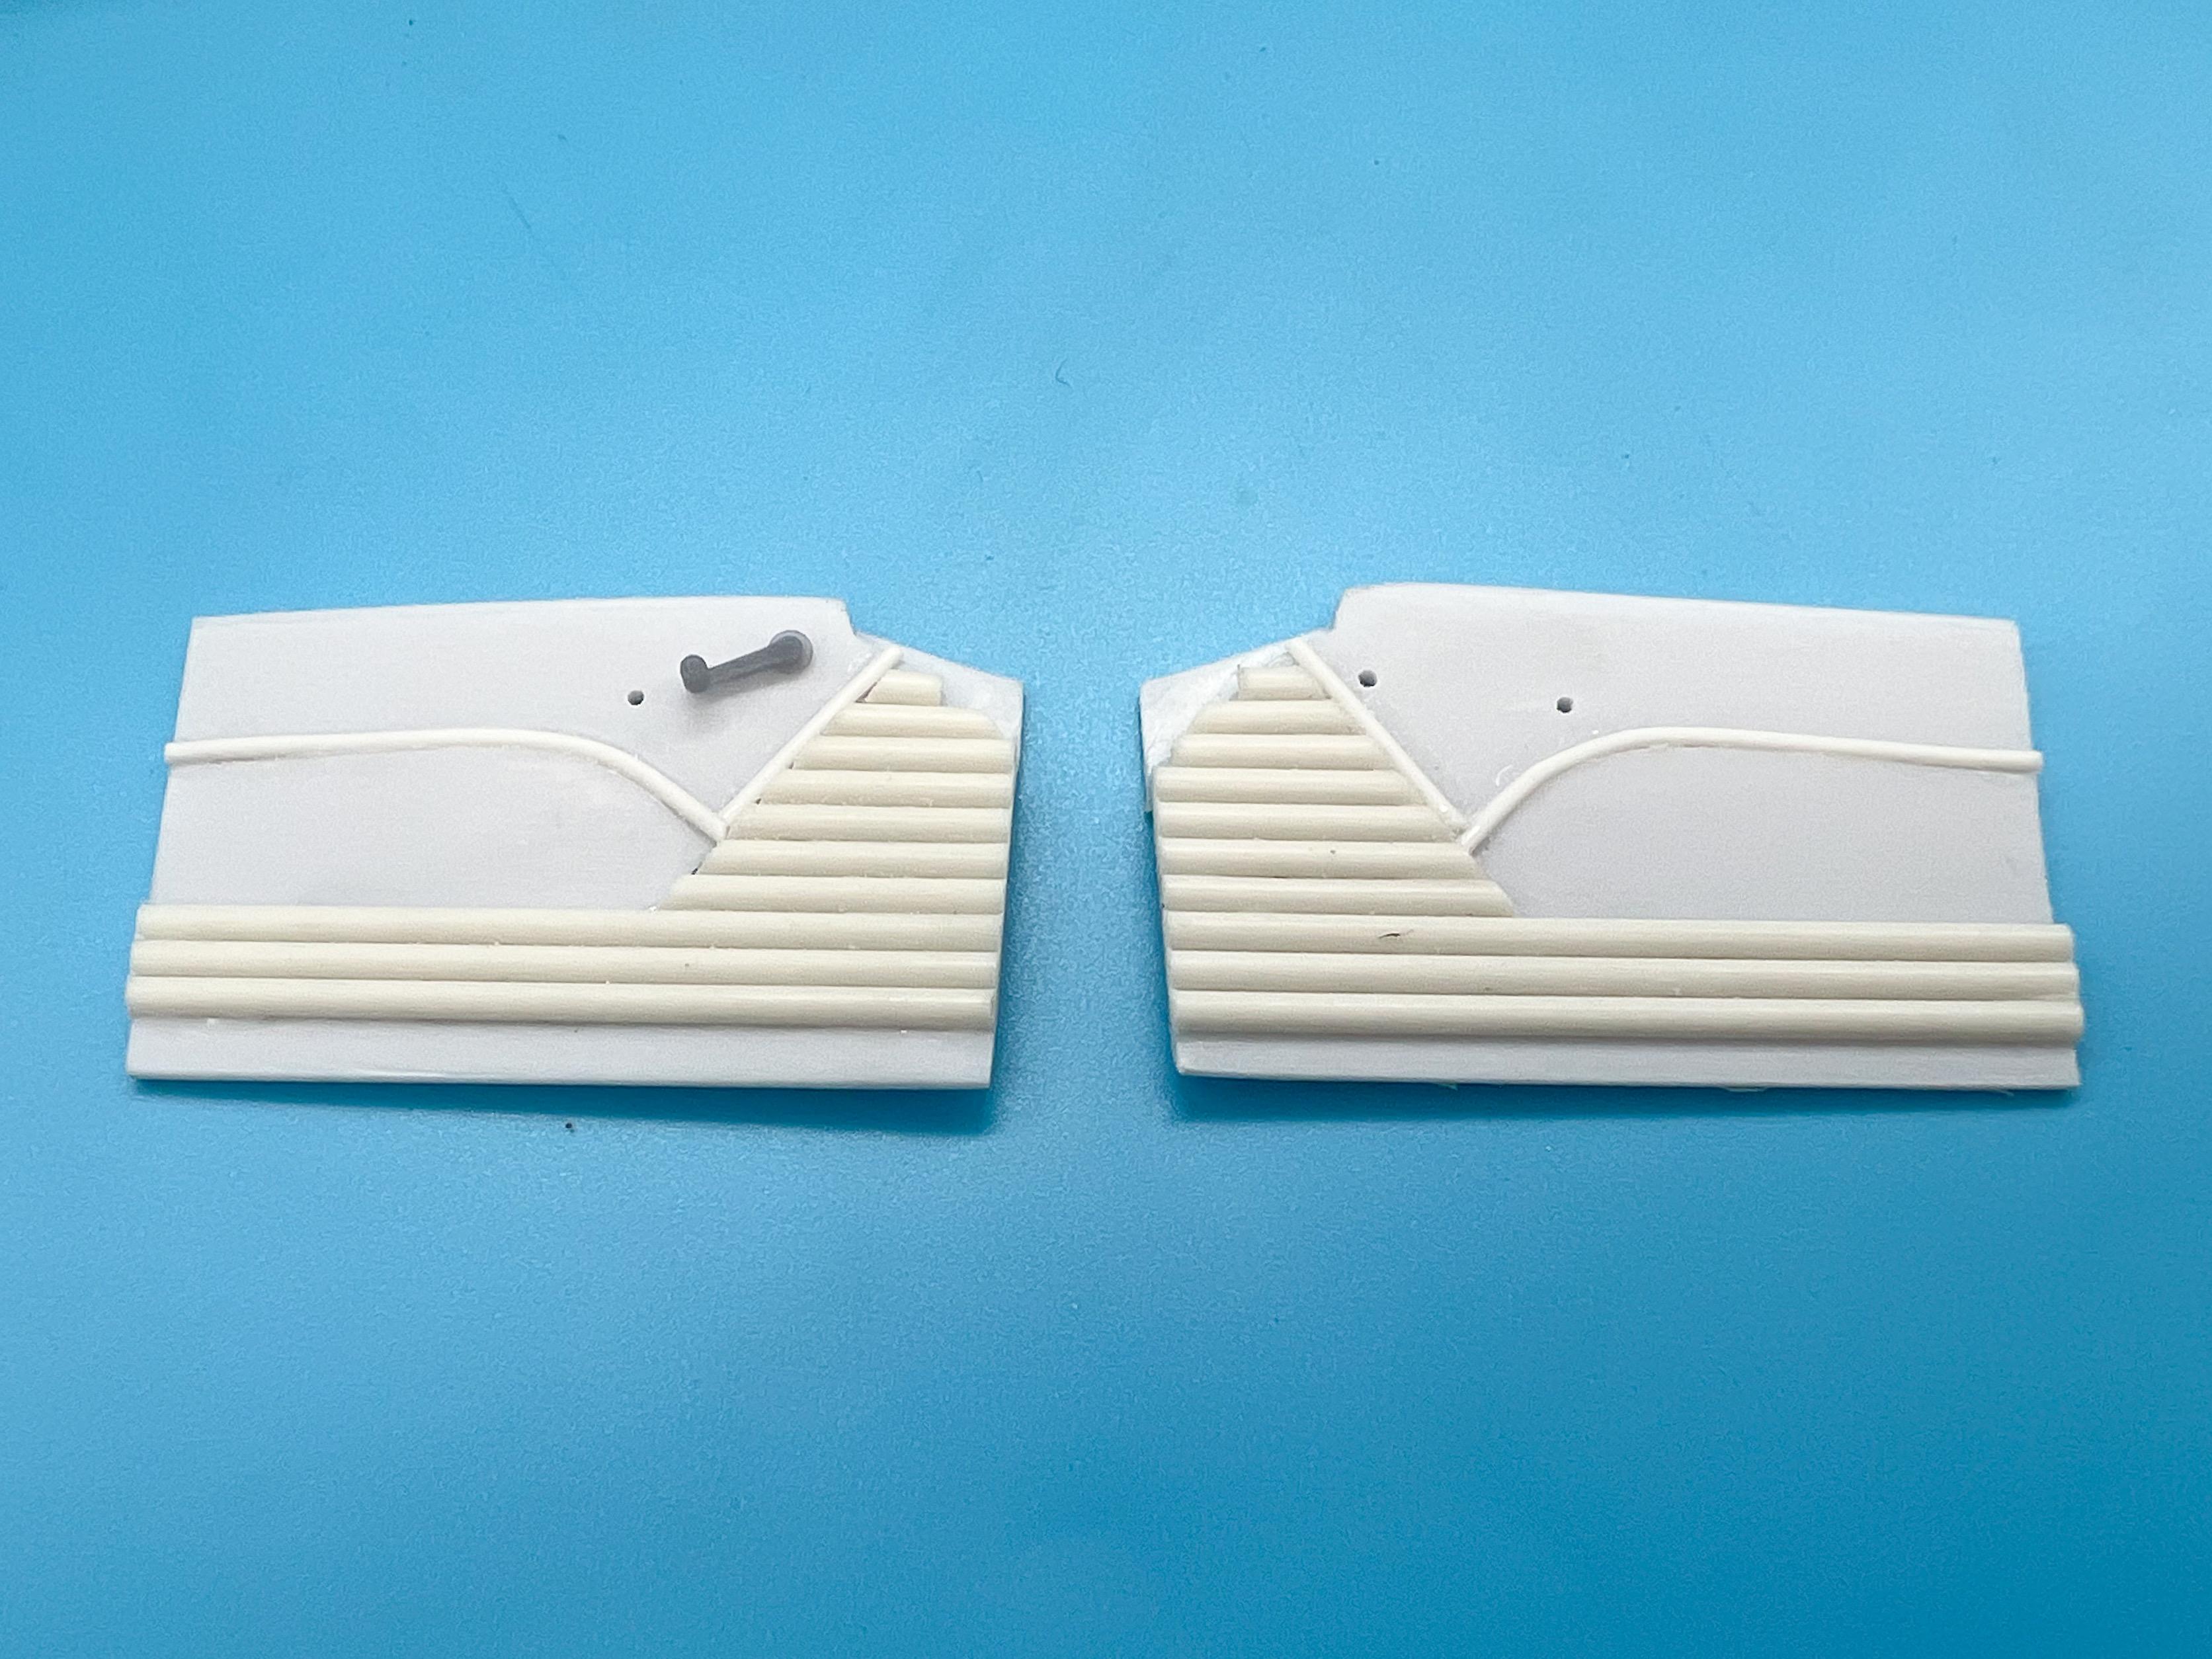
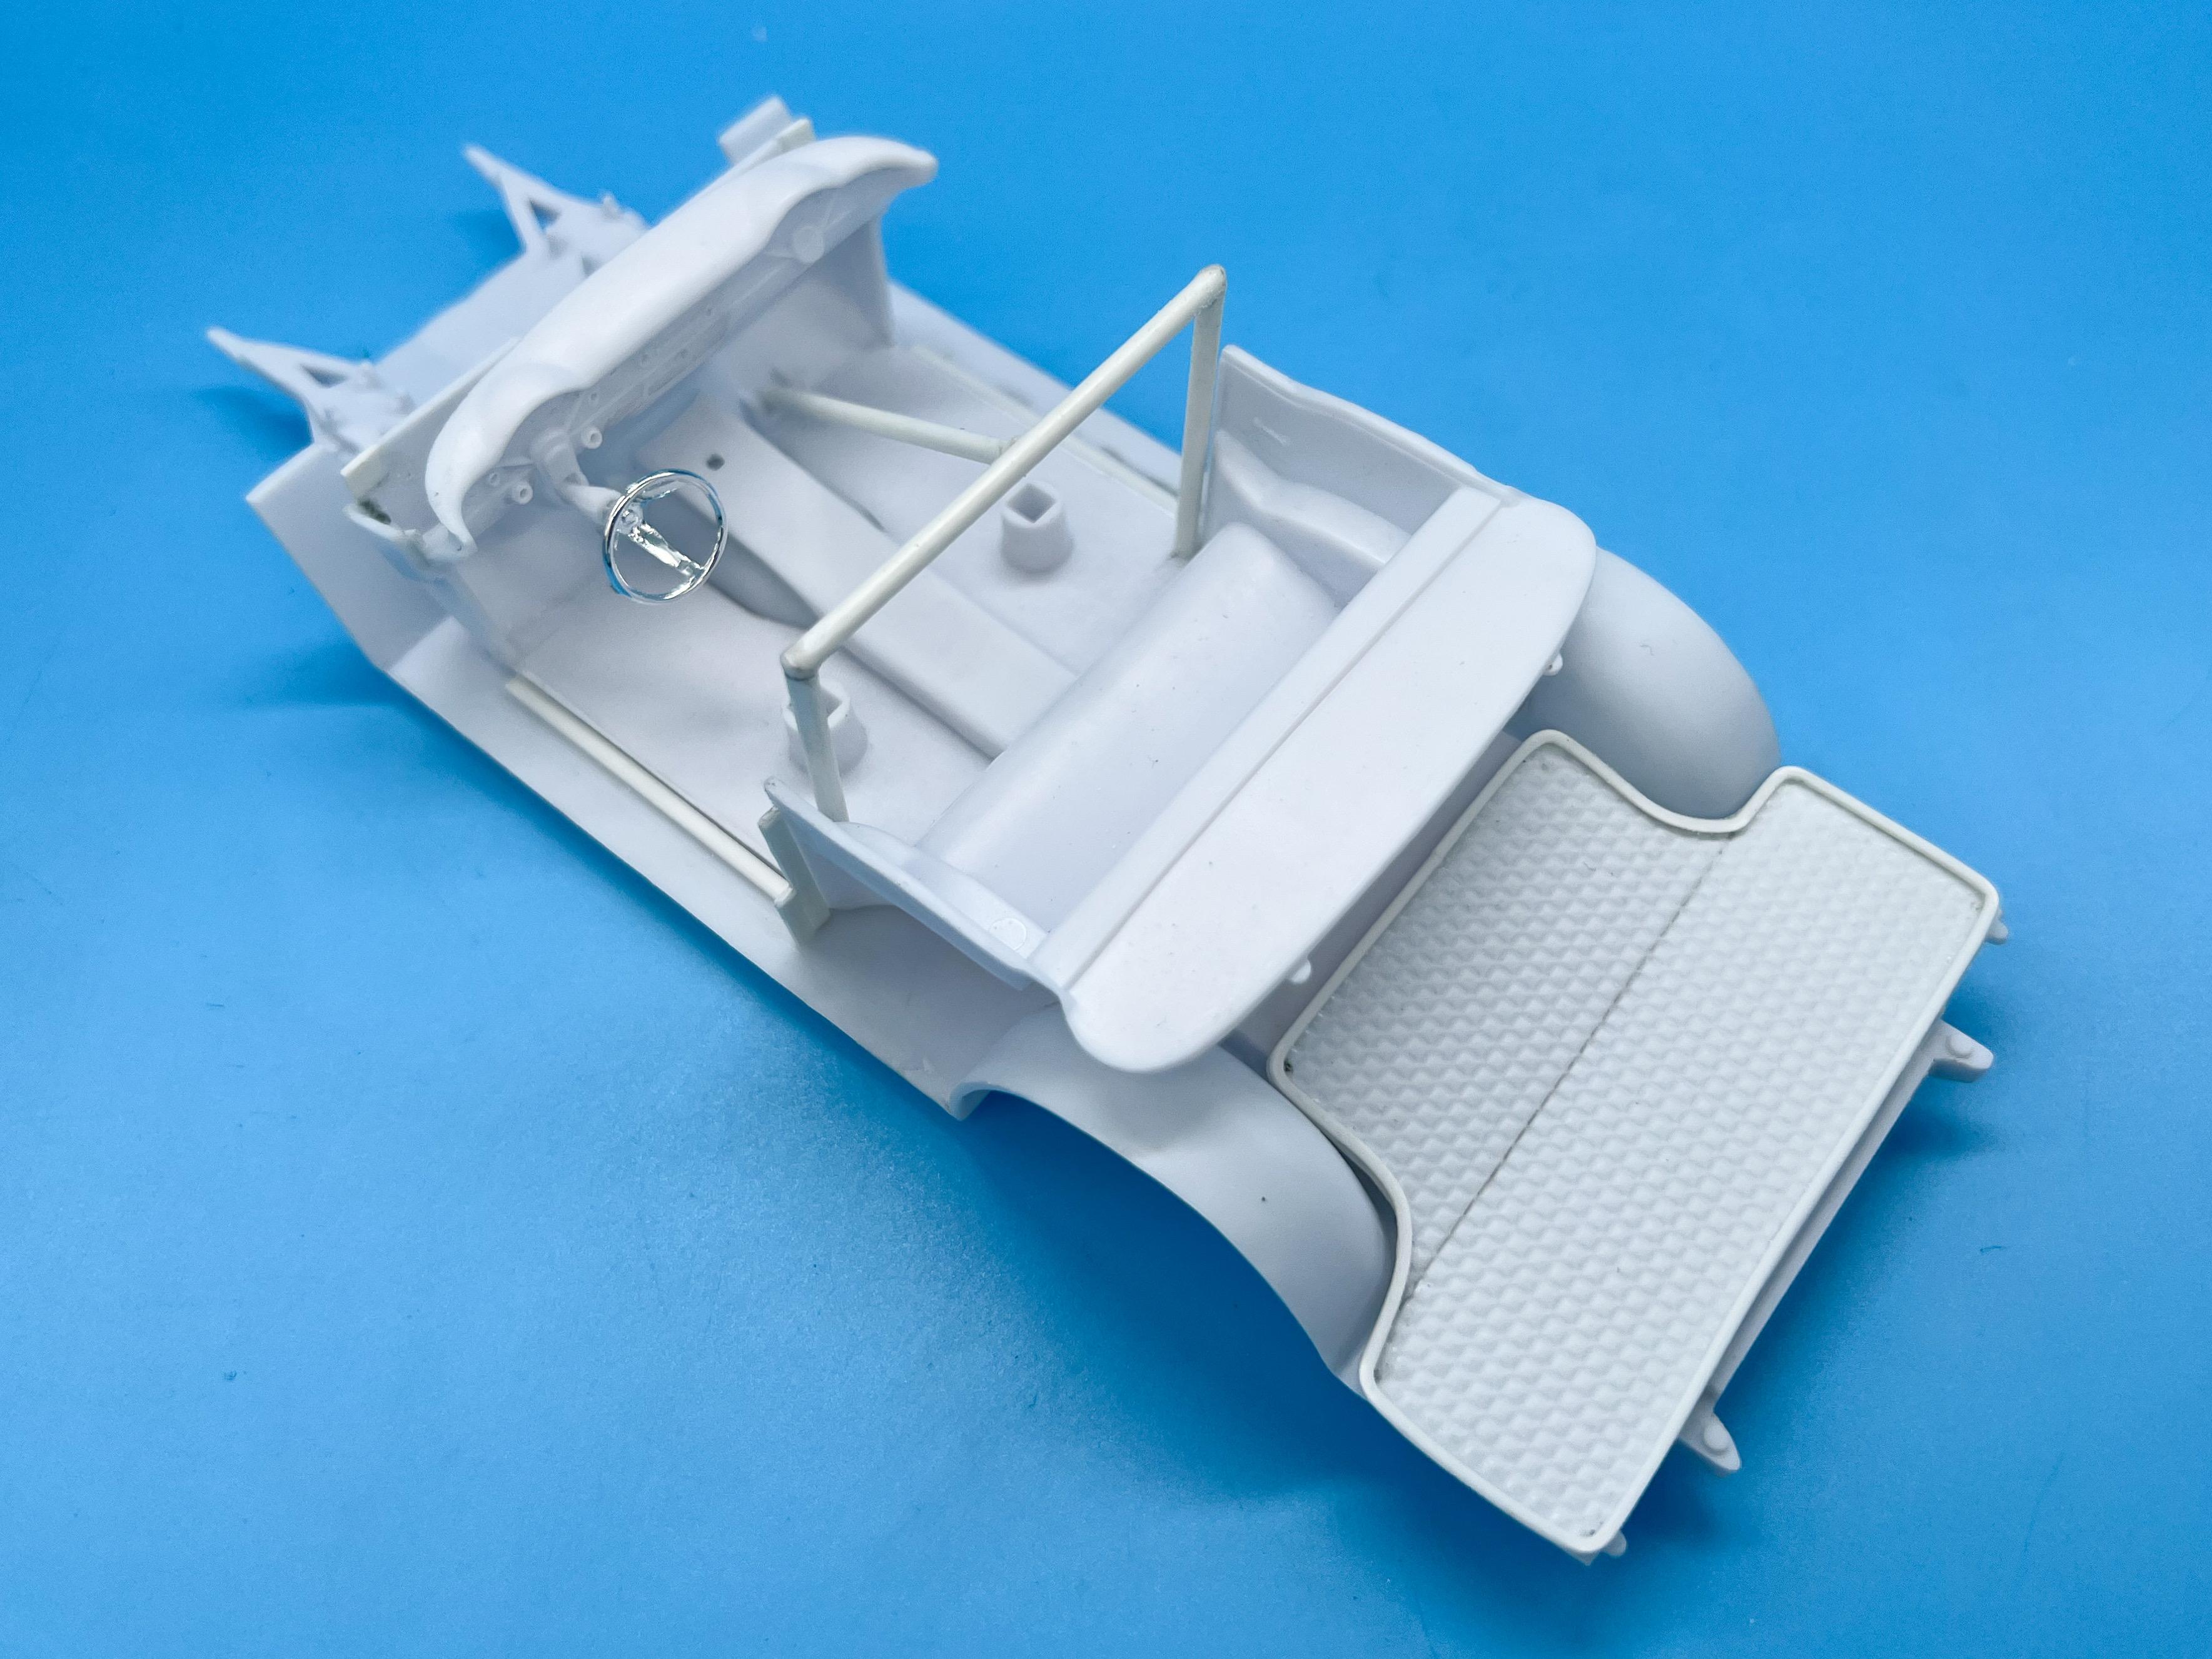
Thanks Joe! A little more progress… Printed up some license plates, plus some door handles and window winders: My old printer had died and this was first test with the new one - figured I may as well print something I can use. Still getting it dialed in as you can see from some of the failed parts, but I’m getting there with it… I need those window cranks and door handles because I’m adding some detail to the door cards - they’re pretty flat and unexciting as they come out of the box, which is ok unless you’re dumb and you make the doors open ? I’m not done with these yet, but I added some half-round bar to somewhat match the doors on a 1:1 ‘55, although I went with a much larger size bar than would actually be correct because I want them to match the look of the kit bucket seats which have pretty large pleats: Next think I wanted to tackle is the airdamn on the front…the box art looks like this: But the kit piece looks like this: A little chopping and reshaping got me this (standard kit part, top): Which, when installed, looks like this: Way better! I’m pretty much at the point now where I can start painting some stuff, or at least getting the body ready for paint…shot a little primer tonight so I can see how much more work I need to do before I can start laying down some yellow: It’s not terrible, at first glances, but not ready for color by a long-shot…but considering how much I’ve messed with this body I’m pretty pleased…sure did take a lot of work to get from an out of the box body to one that looks the same but has open doors ? Next project, besides lots more sanding and priming will be the engine…the kit small-block is pretty blobular, but I found a decent 3D file and scaled it to match the kit engine: If nothing else, this’ll be WAY easier to paint…need to figure out the trans though still… Thanks for looking - more soon, soon as I’ve done more!
-
Porsche Outlaws & Hot Rods
OldNYJim replied to afx's topic in General Automotive Talk (Trucks and Cars)
I guess this would qualify… https://www.instagram.com/reel/CvpUaZtA3ts/?igshid=MzRlODBiNWFlZA== -
@TimKustom
-
In good news (hopefully), I saw it posted on Donn's Youtube channel that someone had spoken to his nephew and he's still with us. Not sure who this 'RW" person is who seems to be so misinformed though. And that obituary thing is just creepy...
-
Your screen flickered and it turned out to be the memory stick? I didn't try a different one, but I ran the screen test and it flickered repeatedly then WITHOUT a memory stick plugged in, so I was pretty confident it was just the screen had outlived it's useful life...
-
1940's Sprint car - from scratch
OldNYJim replied to skipstitch's topic in WIP: Other Racing: Road Racing, Land Speed Racers
What a cool project! And nice work on the files! Do you have them for sale anywhere? -
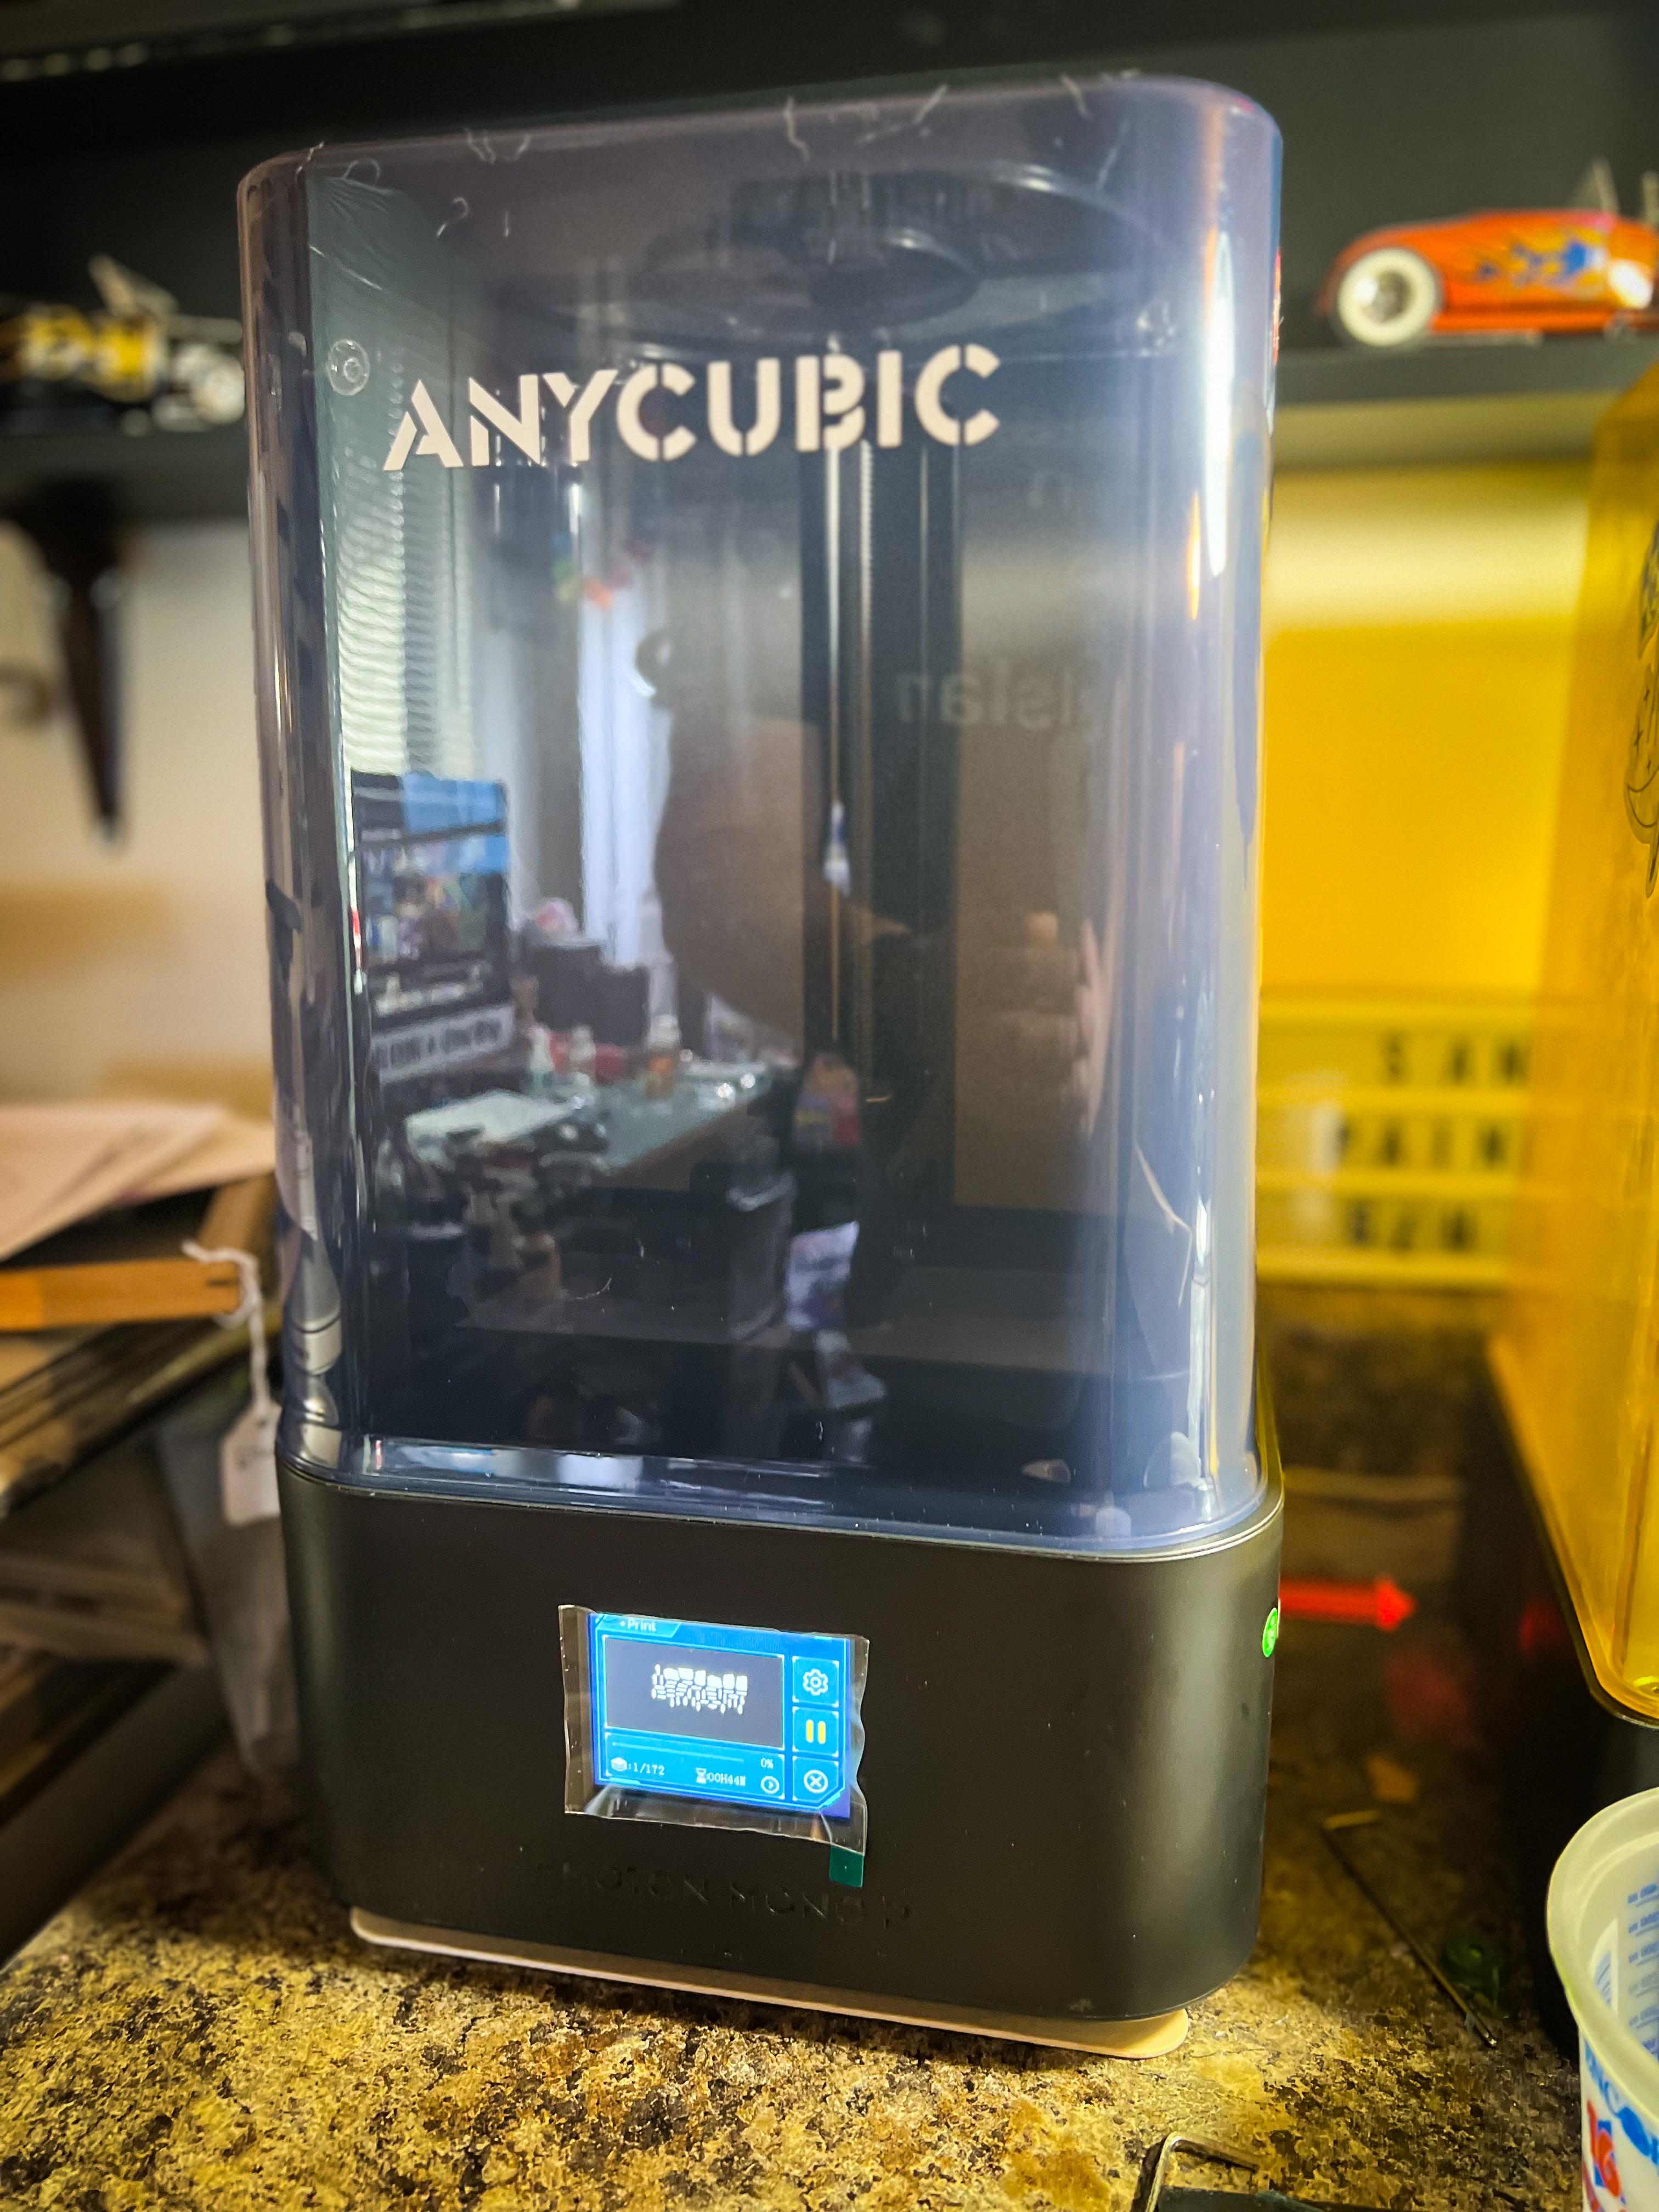
The screen on mine started flickering and I was getting partial prints, extra stuff printing on the plate that shouldn’t have been there…Anycubic said it was the screen, which was $70, and with some Amazon credits they gave me lately it was only $40 more to just replace the whole thing. I’m sure the old one is fixable, and I probably will, but I didn’t mind the idea of having a second machine anyway…
-
I wore the old one out…so I got a new one:
-
I have never used Tamiya leaf, but it’s a really convincing finish! Is this the rattlecan version or something airbrushed? I really enjoy your projects, and this one’s no exception - clean, methodical building and plenty to learn from your work ??
-
Nostalgia Fuel Dragster--Blower Manifold (01/28/23)
OldNYJim replied to Straightliner59's topic in WIP: Drag Racing Models
This is such a great thread - I’ve picked up so many tips, and the craftsmanship demonstrated here is really inspirational. Im excited to see that paintjob come together too! -
That’s a great start - one of my favorite altereds! I’ll be following along!
-
My take on the most famous ‘55 gasser street machine’…
OldNYJim replied to OldNYJim's topic in WIP: Model Cars
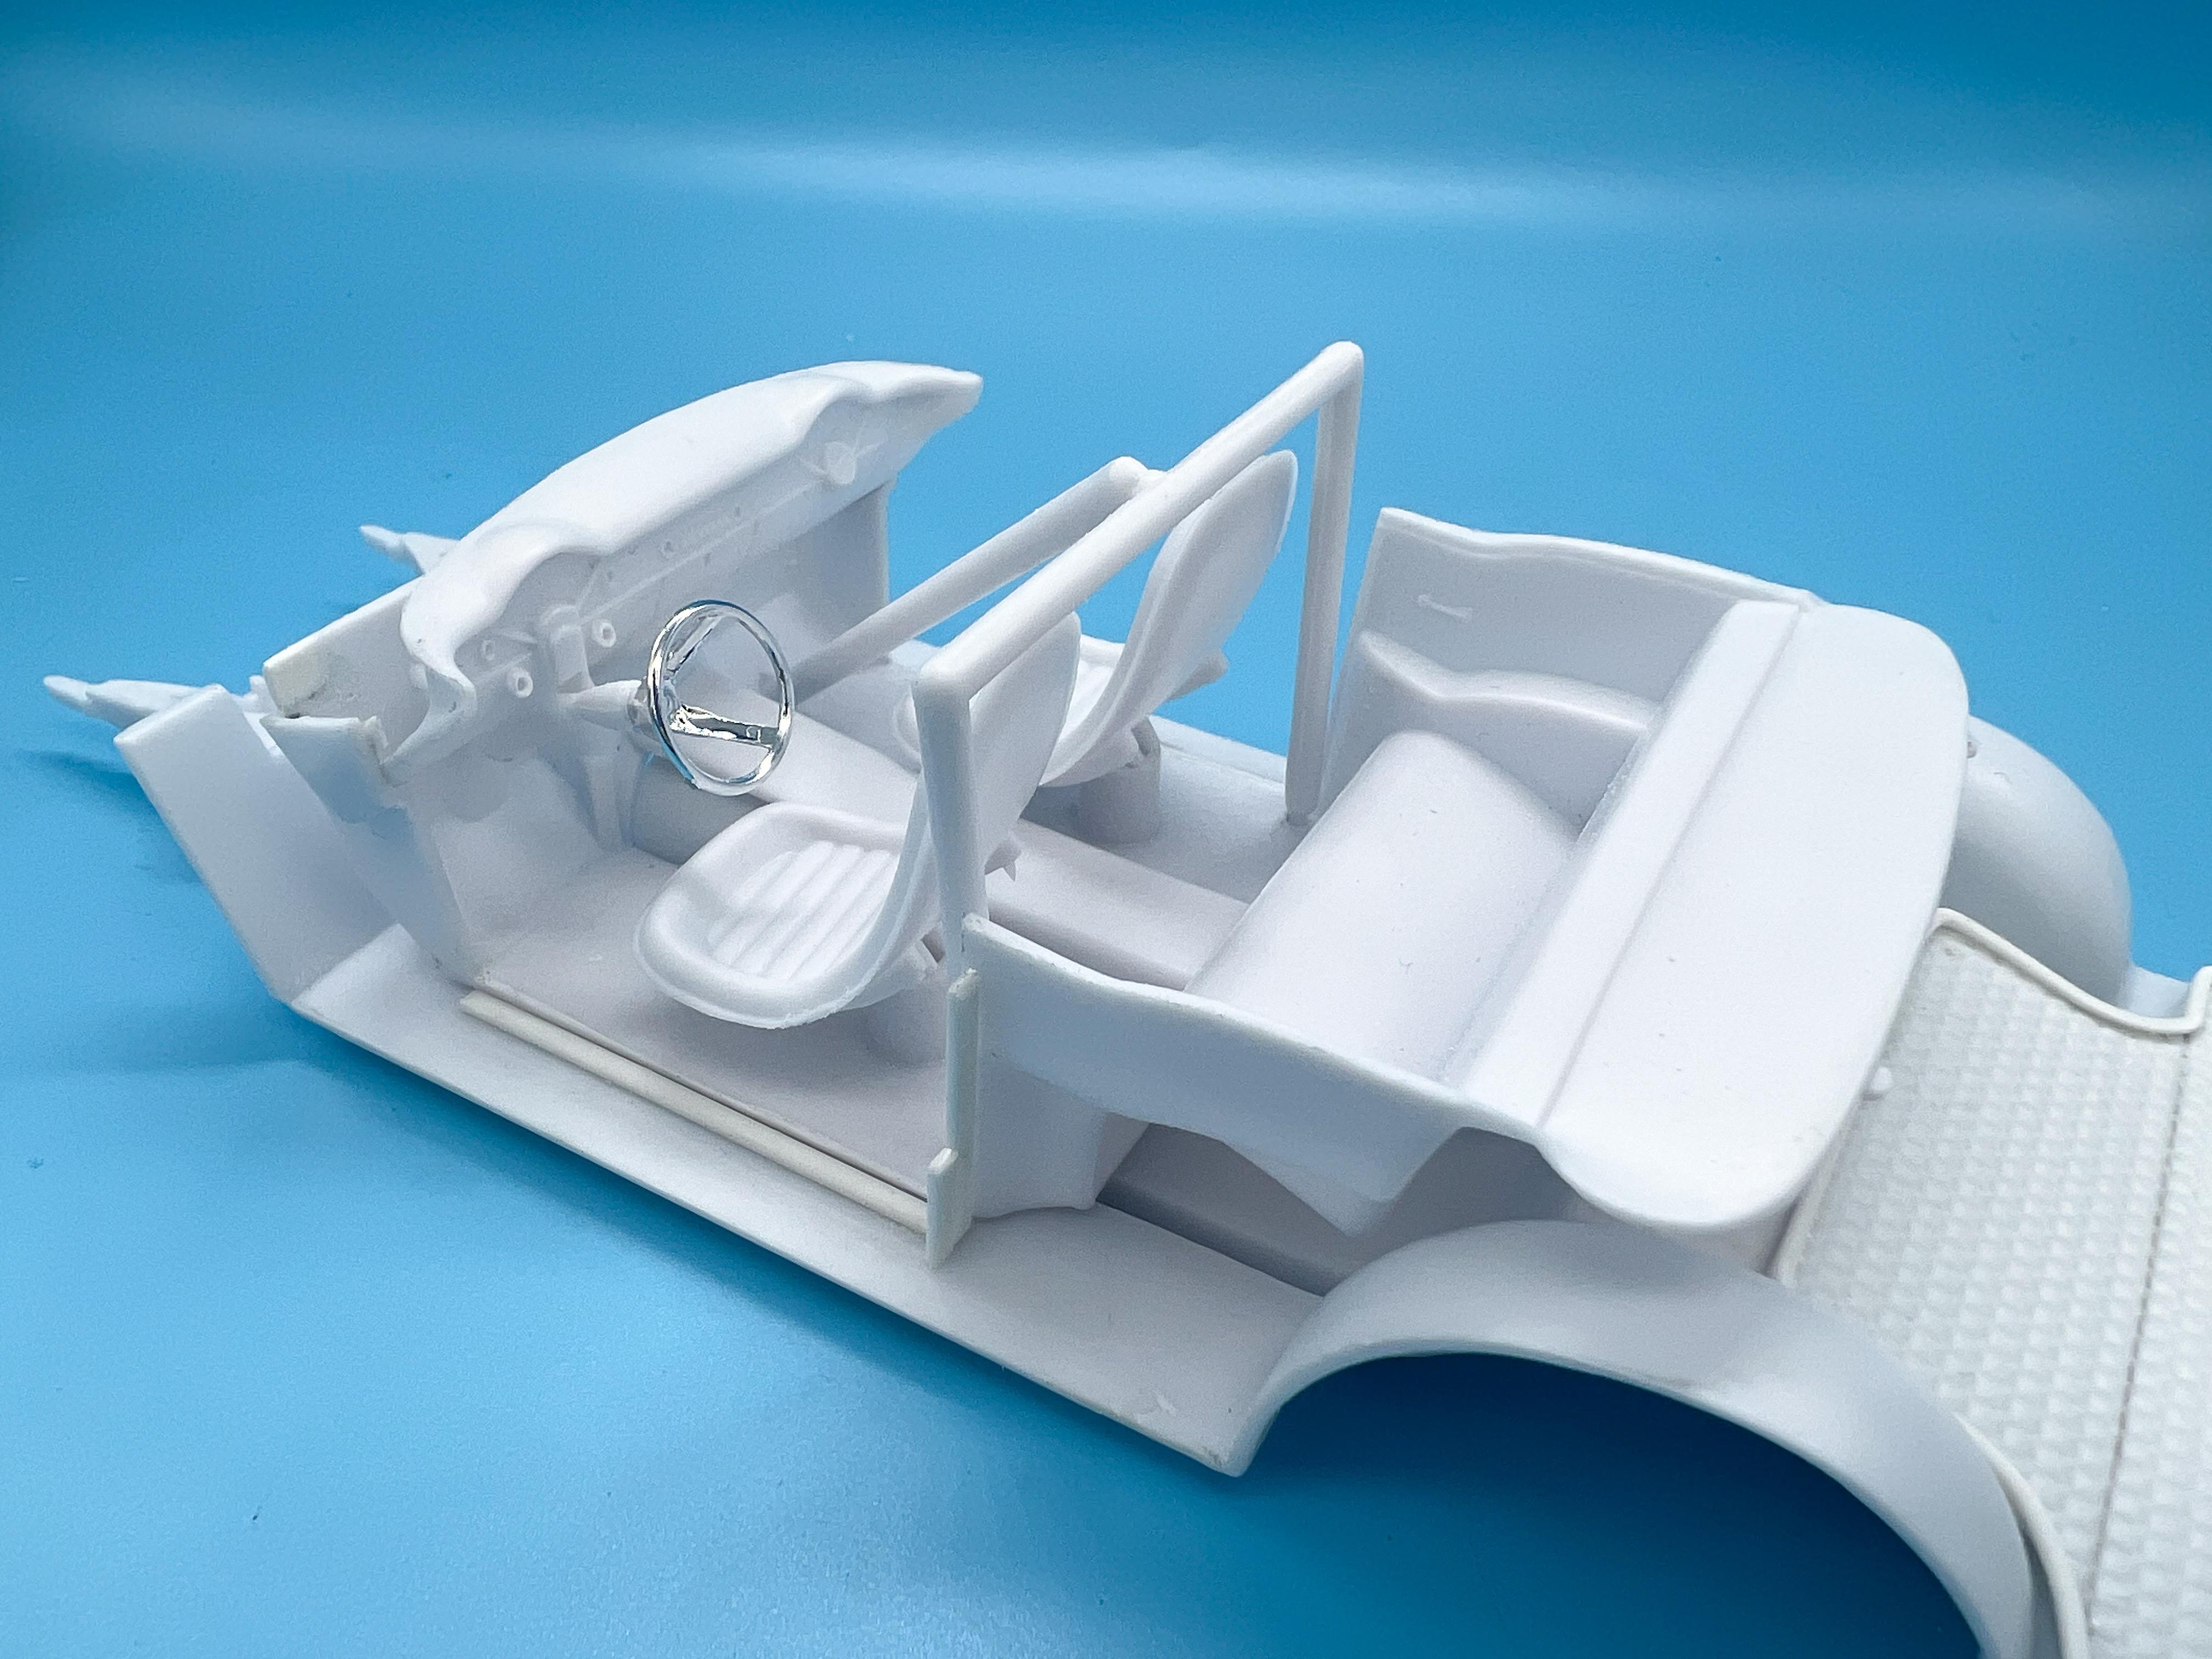
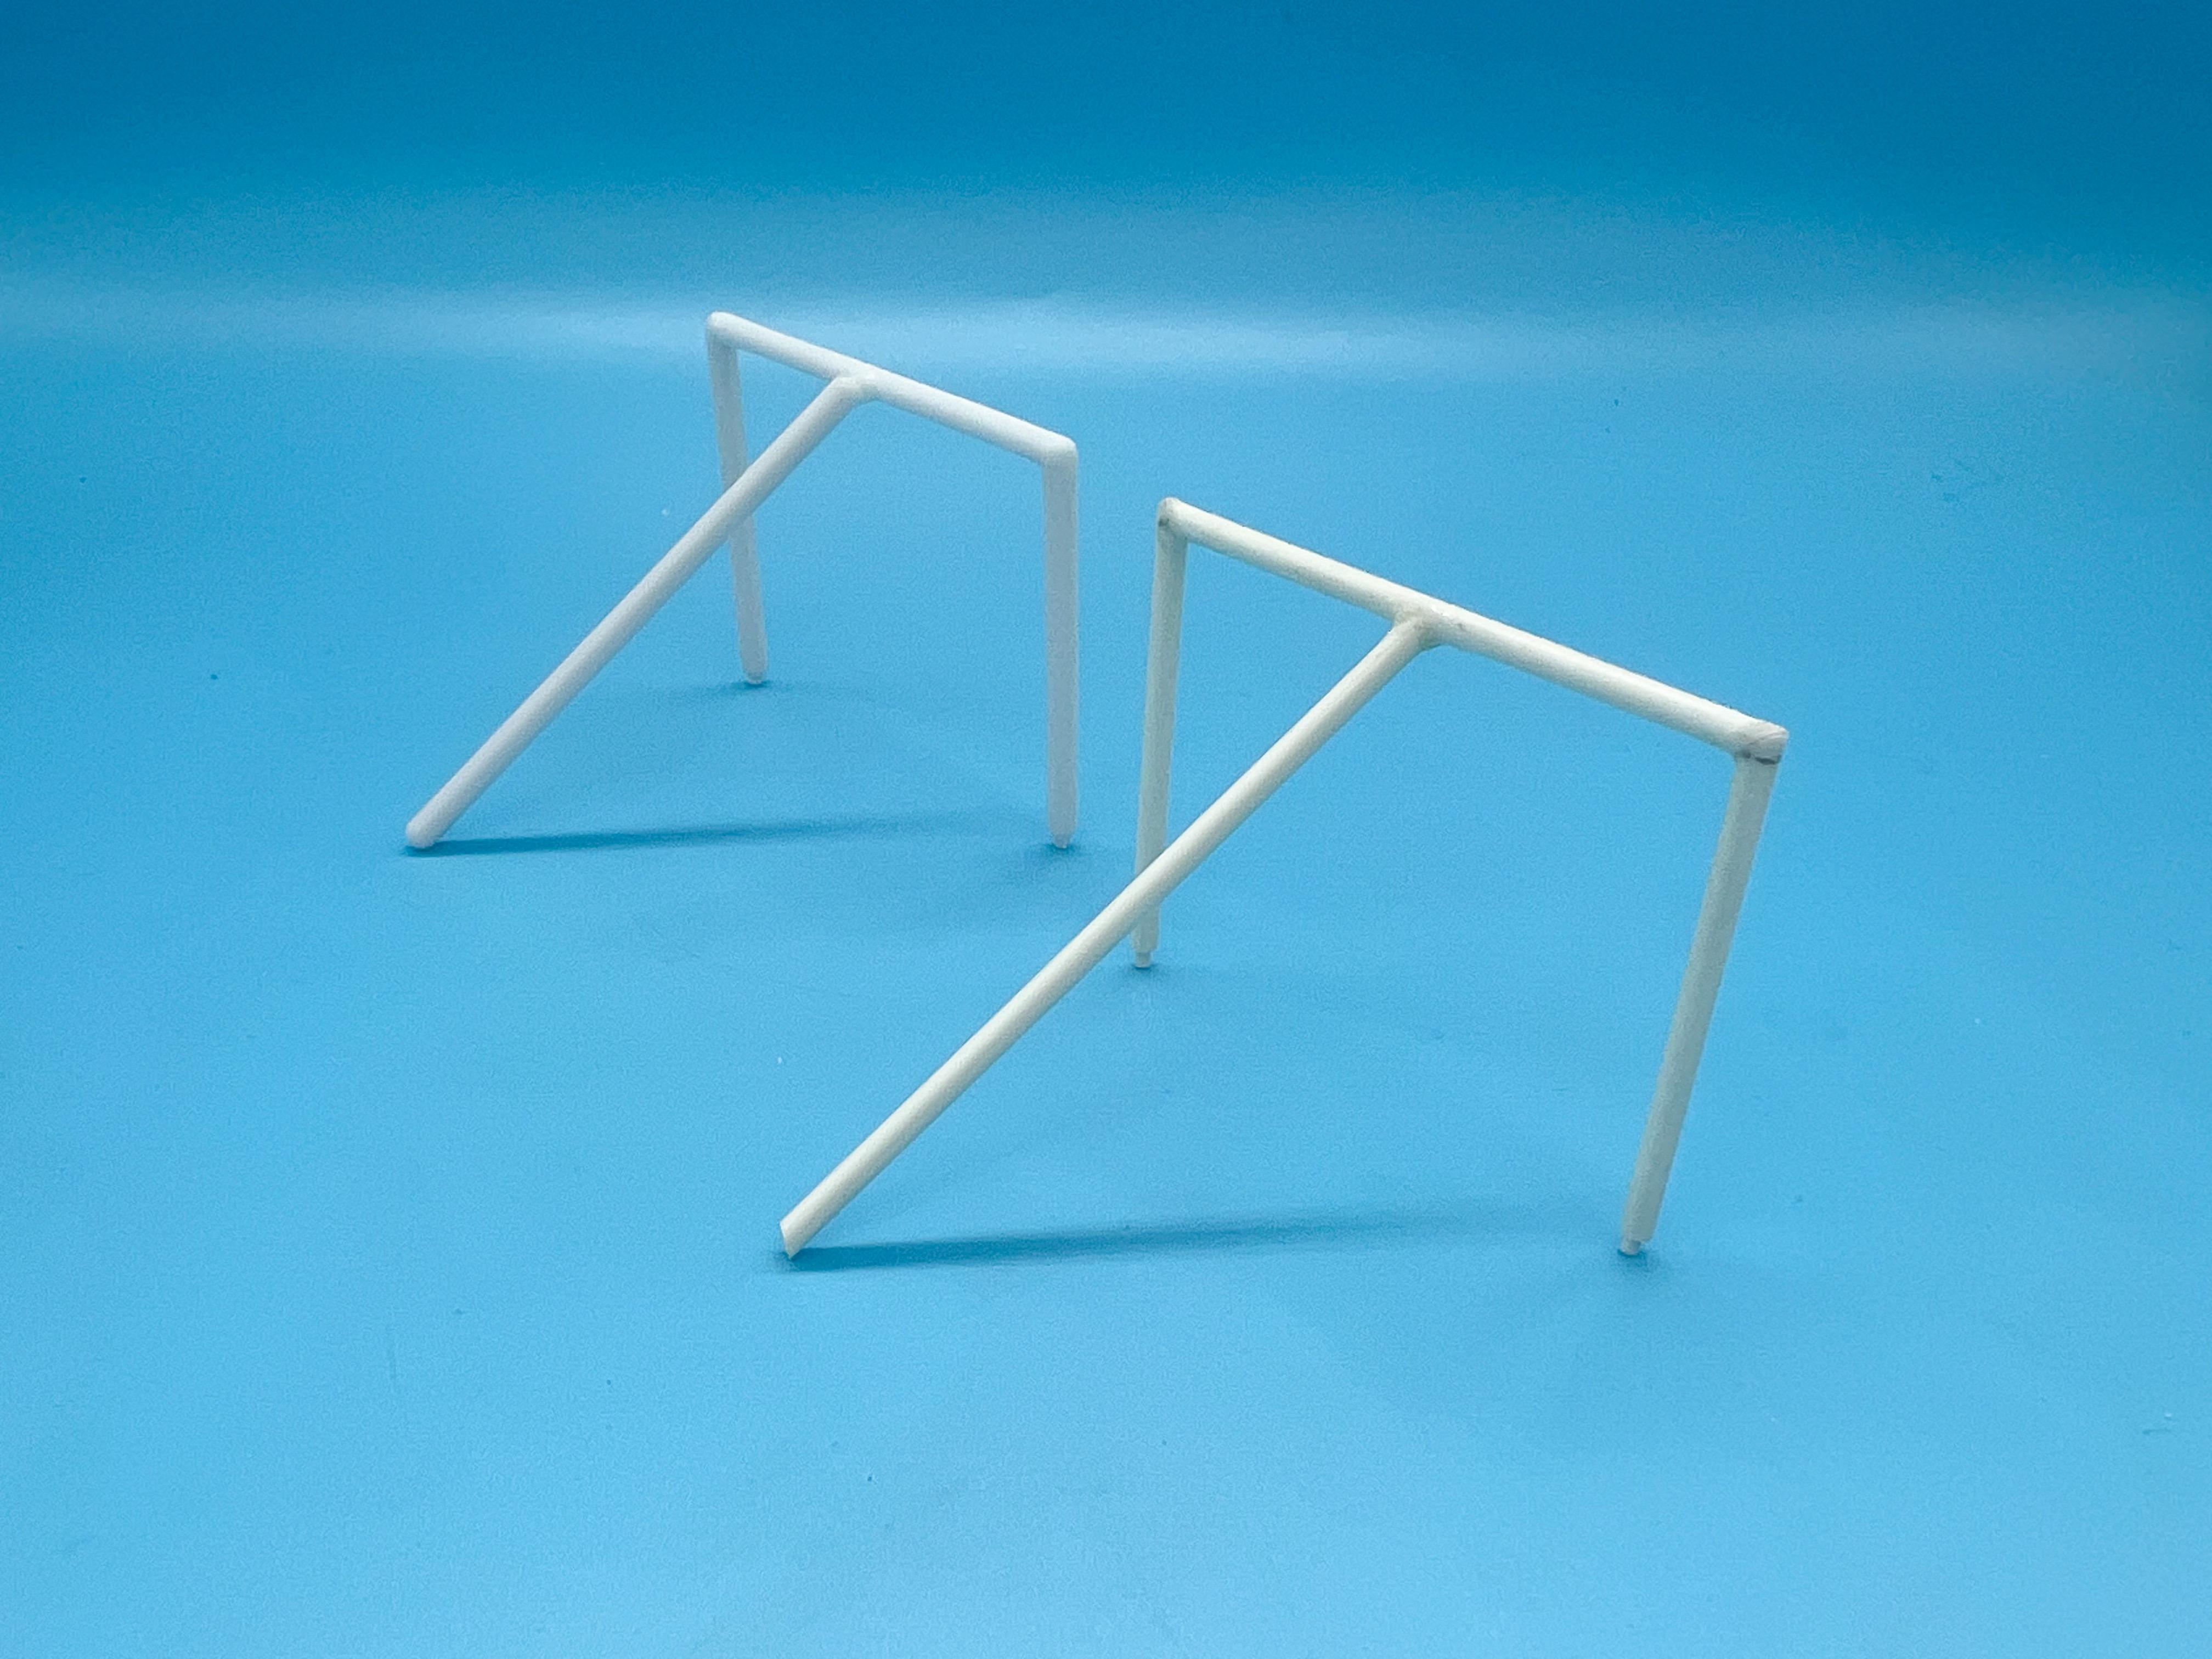
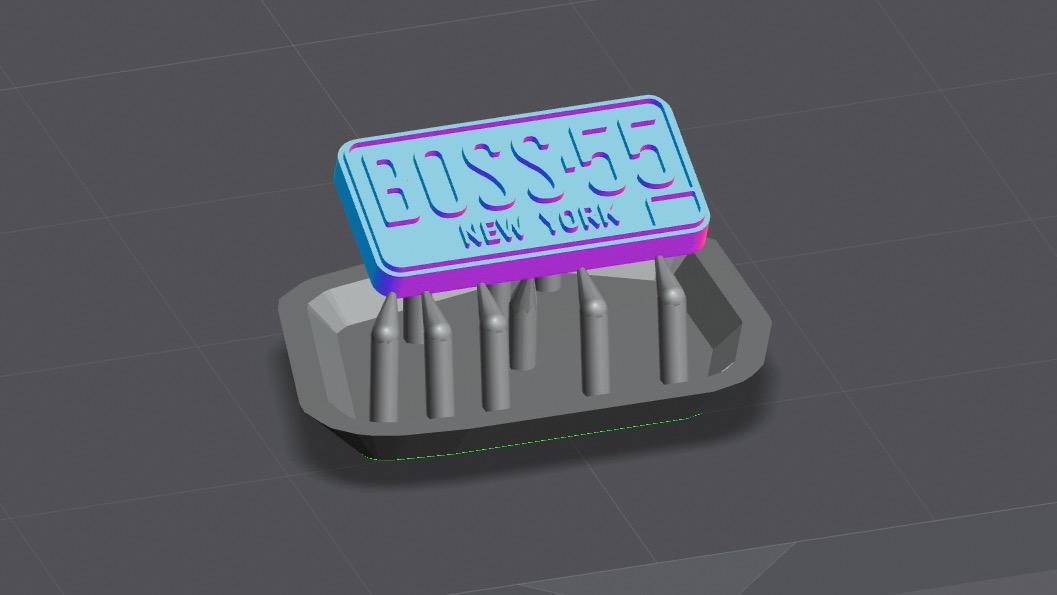
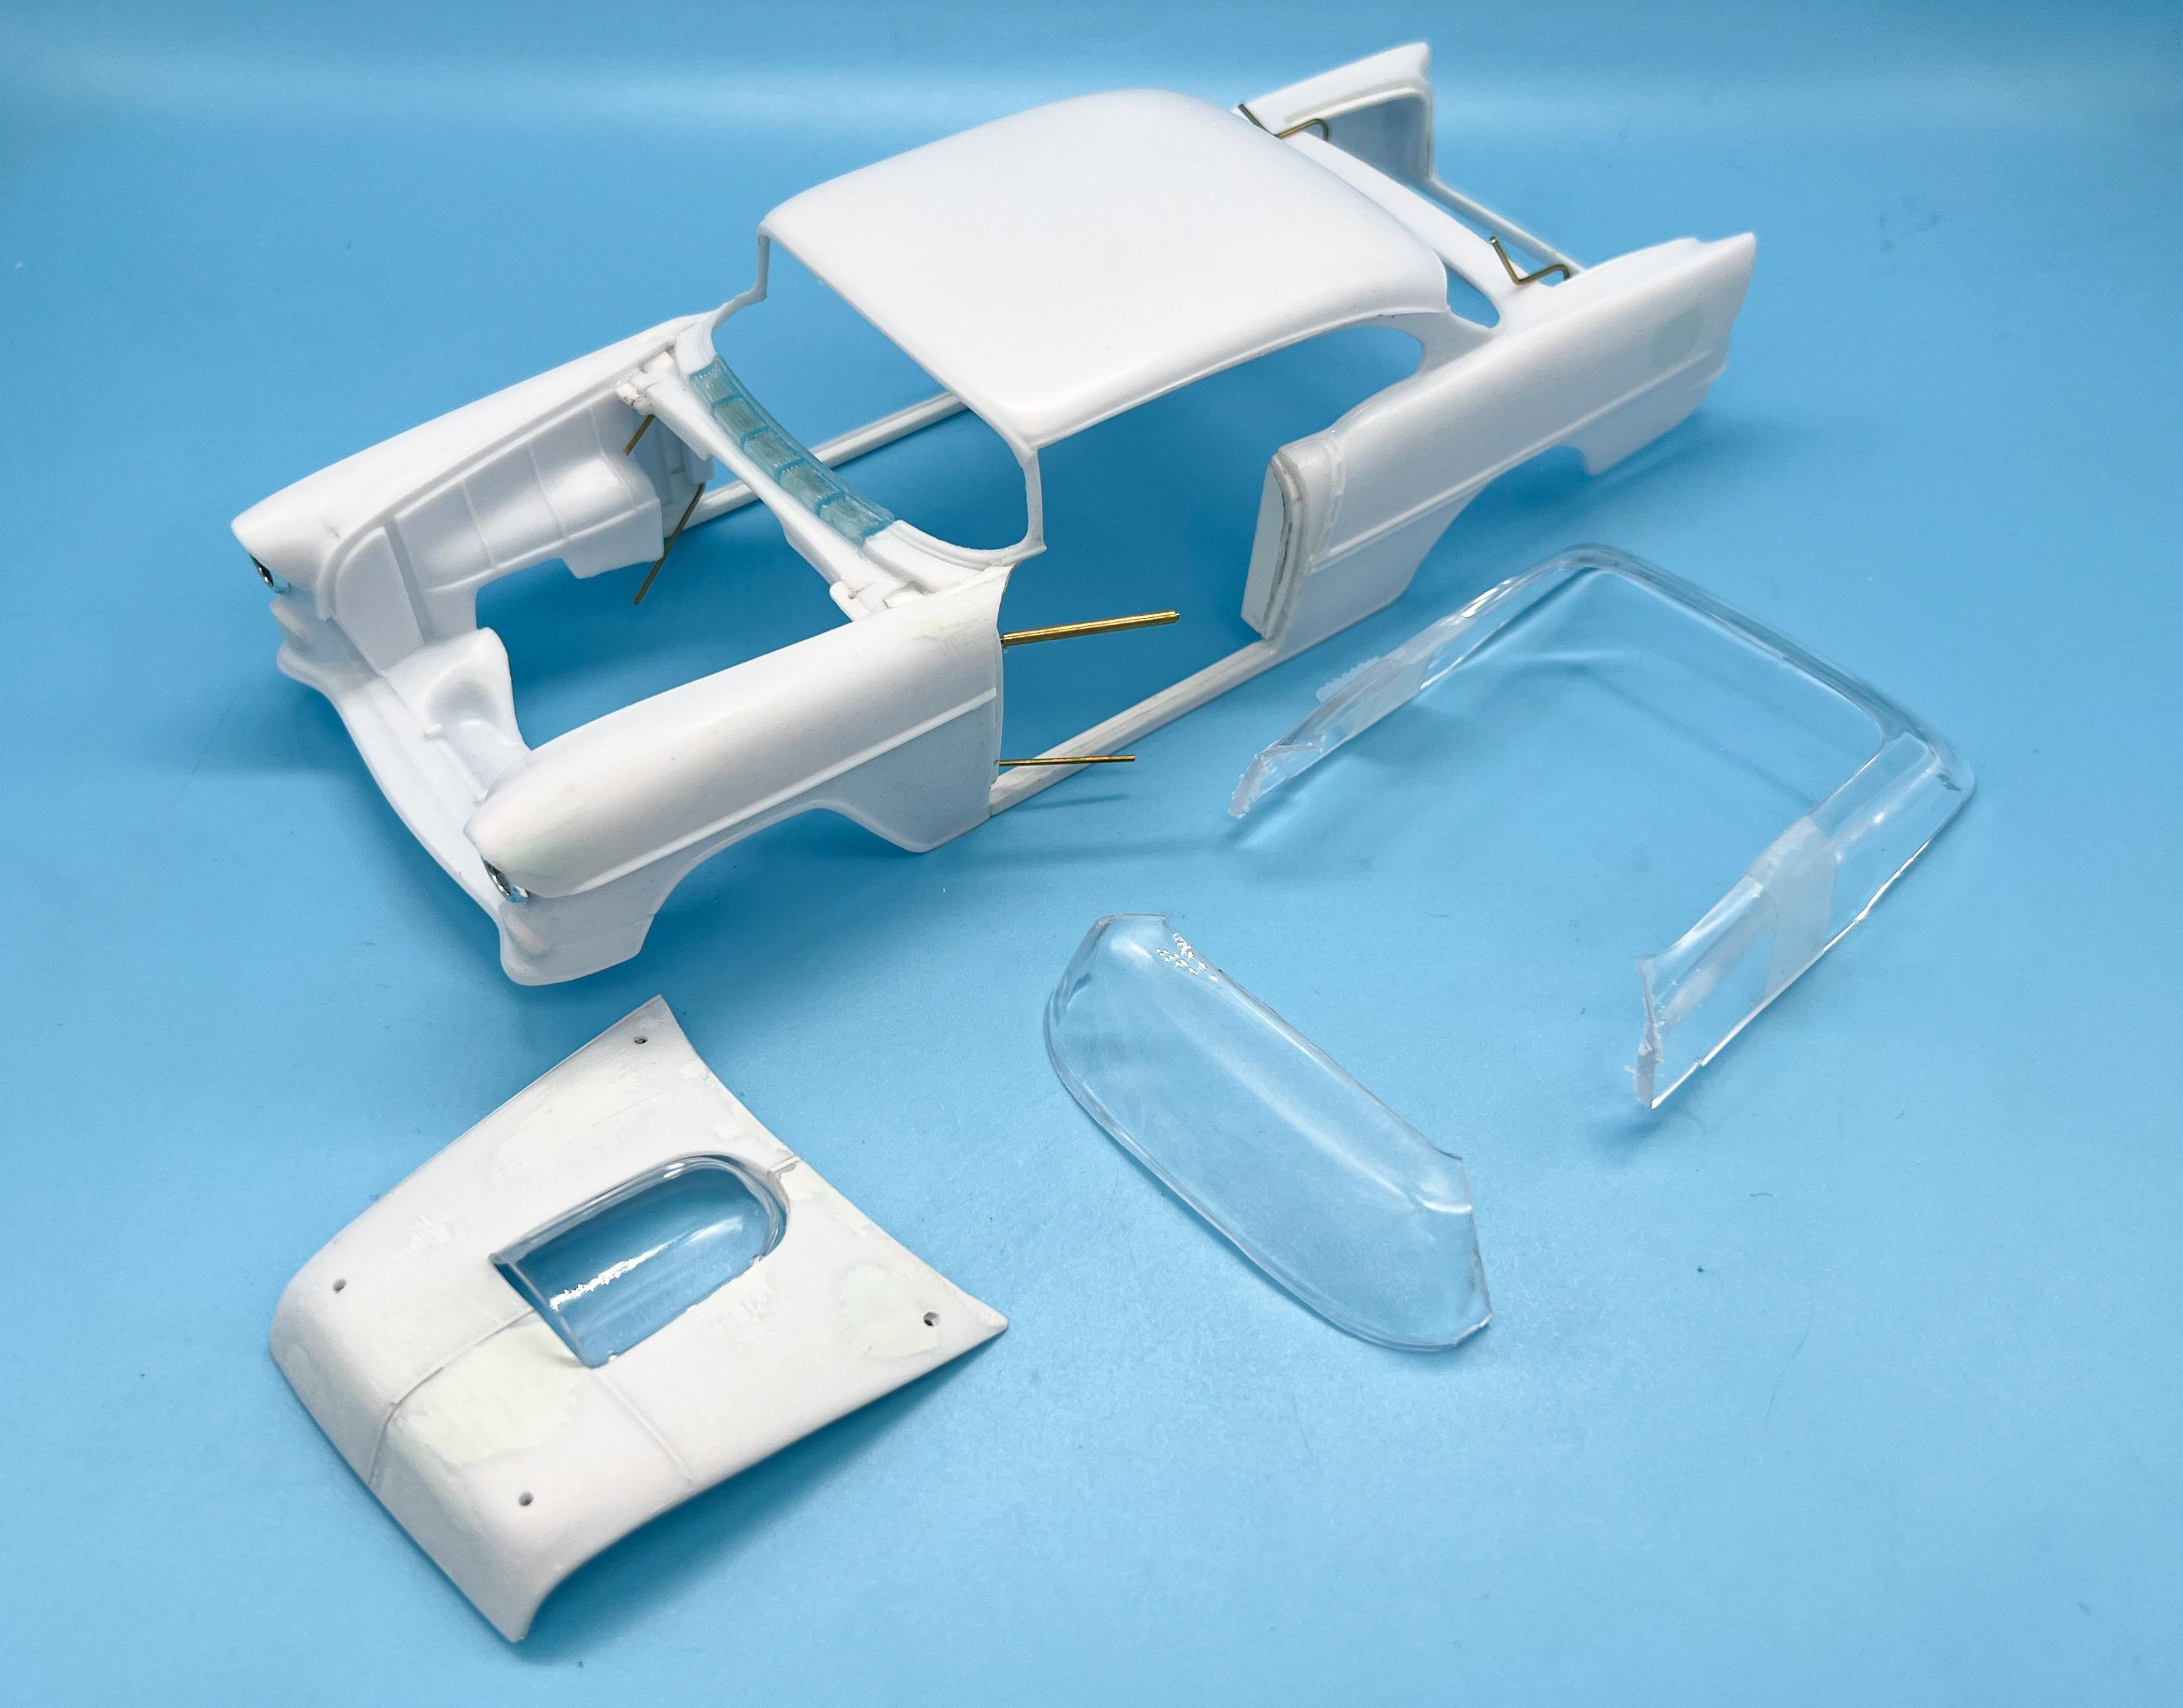
Thanks Daniel! I’ve been enjoying seeing your work! A little more progress…mocked up the interior, complete with the kit roll cage: Aside from the weird way the seats attach (or don’t, very well) the bar thickness on that cage bothered me, so I made one out of a thinner diameter styrene rod: Thanks to perspective, it’s not immediately obvious that the new one (front) is much better than the kit part, but I think it looks more in-scale with it in place: I also cut the mounts off the kit bucket seats and replaced them with some plain old styrene square bar for easier installation when it comes time to put this together… In other projects, drew up a license plate in CAD - the number is the same as the one on the Badman box art: I worked my 3D printer to death so I didn’t get chance to print one yet…but I have a new one coming… Next job on the body is to figure out the glass situation…the kit glass still snaps right into the body and fits, despite all my cutting and gluing I’ve been doing, so that’s reassuring. Obviously, with the opening doors, I need to open up the one piece glass too…started with the windshield: I inserted a little styrene bar into the roof for the glass to snap into, and it’s a pretty good fit right out of the gate: Same trick with the rear glass - cut away the portions I didn’t need and added some styrene for it to snap into to aid in assembly after all the paint is done: That kit glass is REALLY thick, but the windshield especially has got some curves to it that I wouldn’t be able to reproduce with acetate sheet, so I’m kinda committed to using this…I’m gonna sand out some ripples in it and thin the edges as best I can…hopefully when it’s tinted and installed I’ll be able to make it look acceptable… Thanks for looking - just a mini update before I forgot what I’d done…more soon!
-
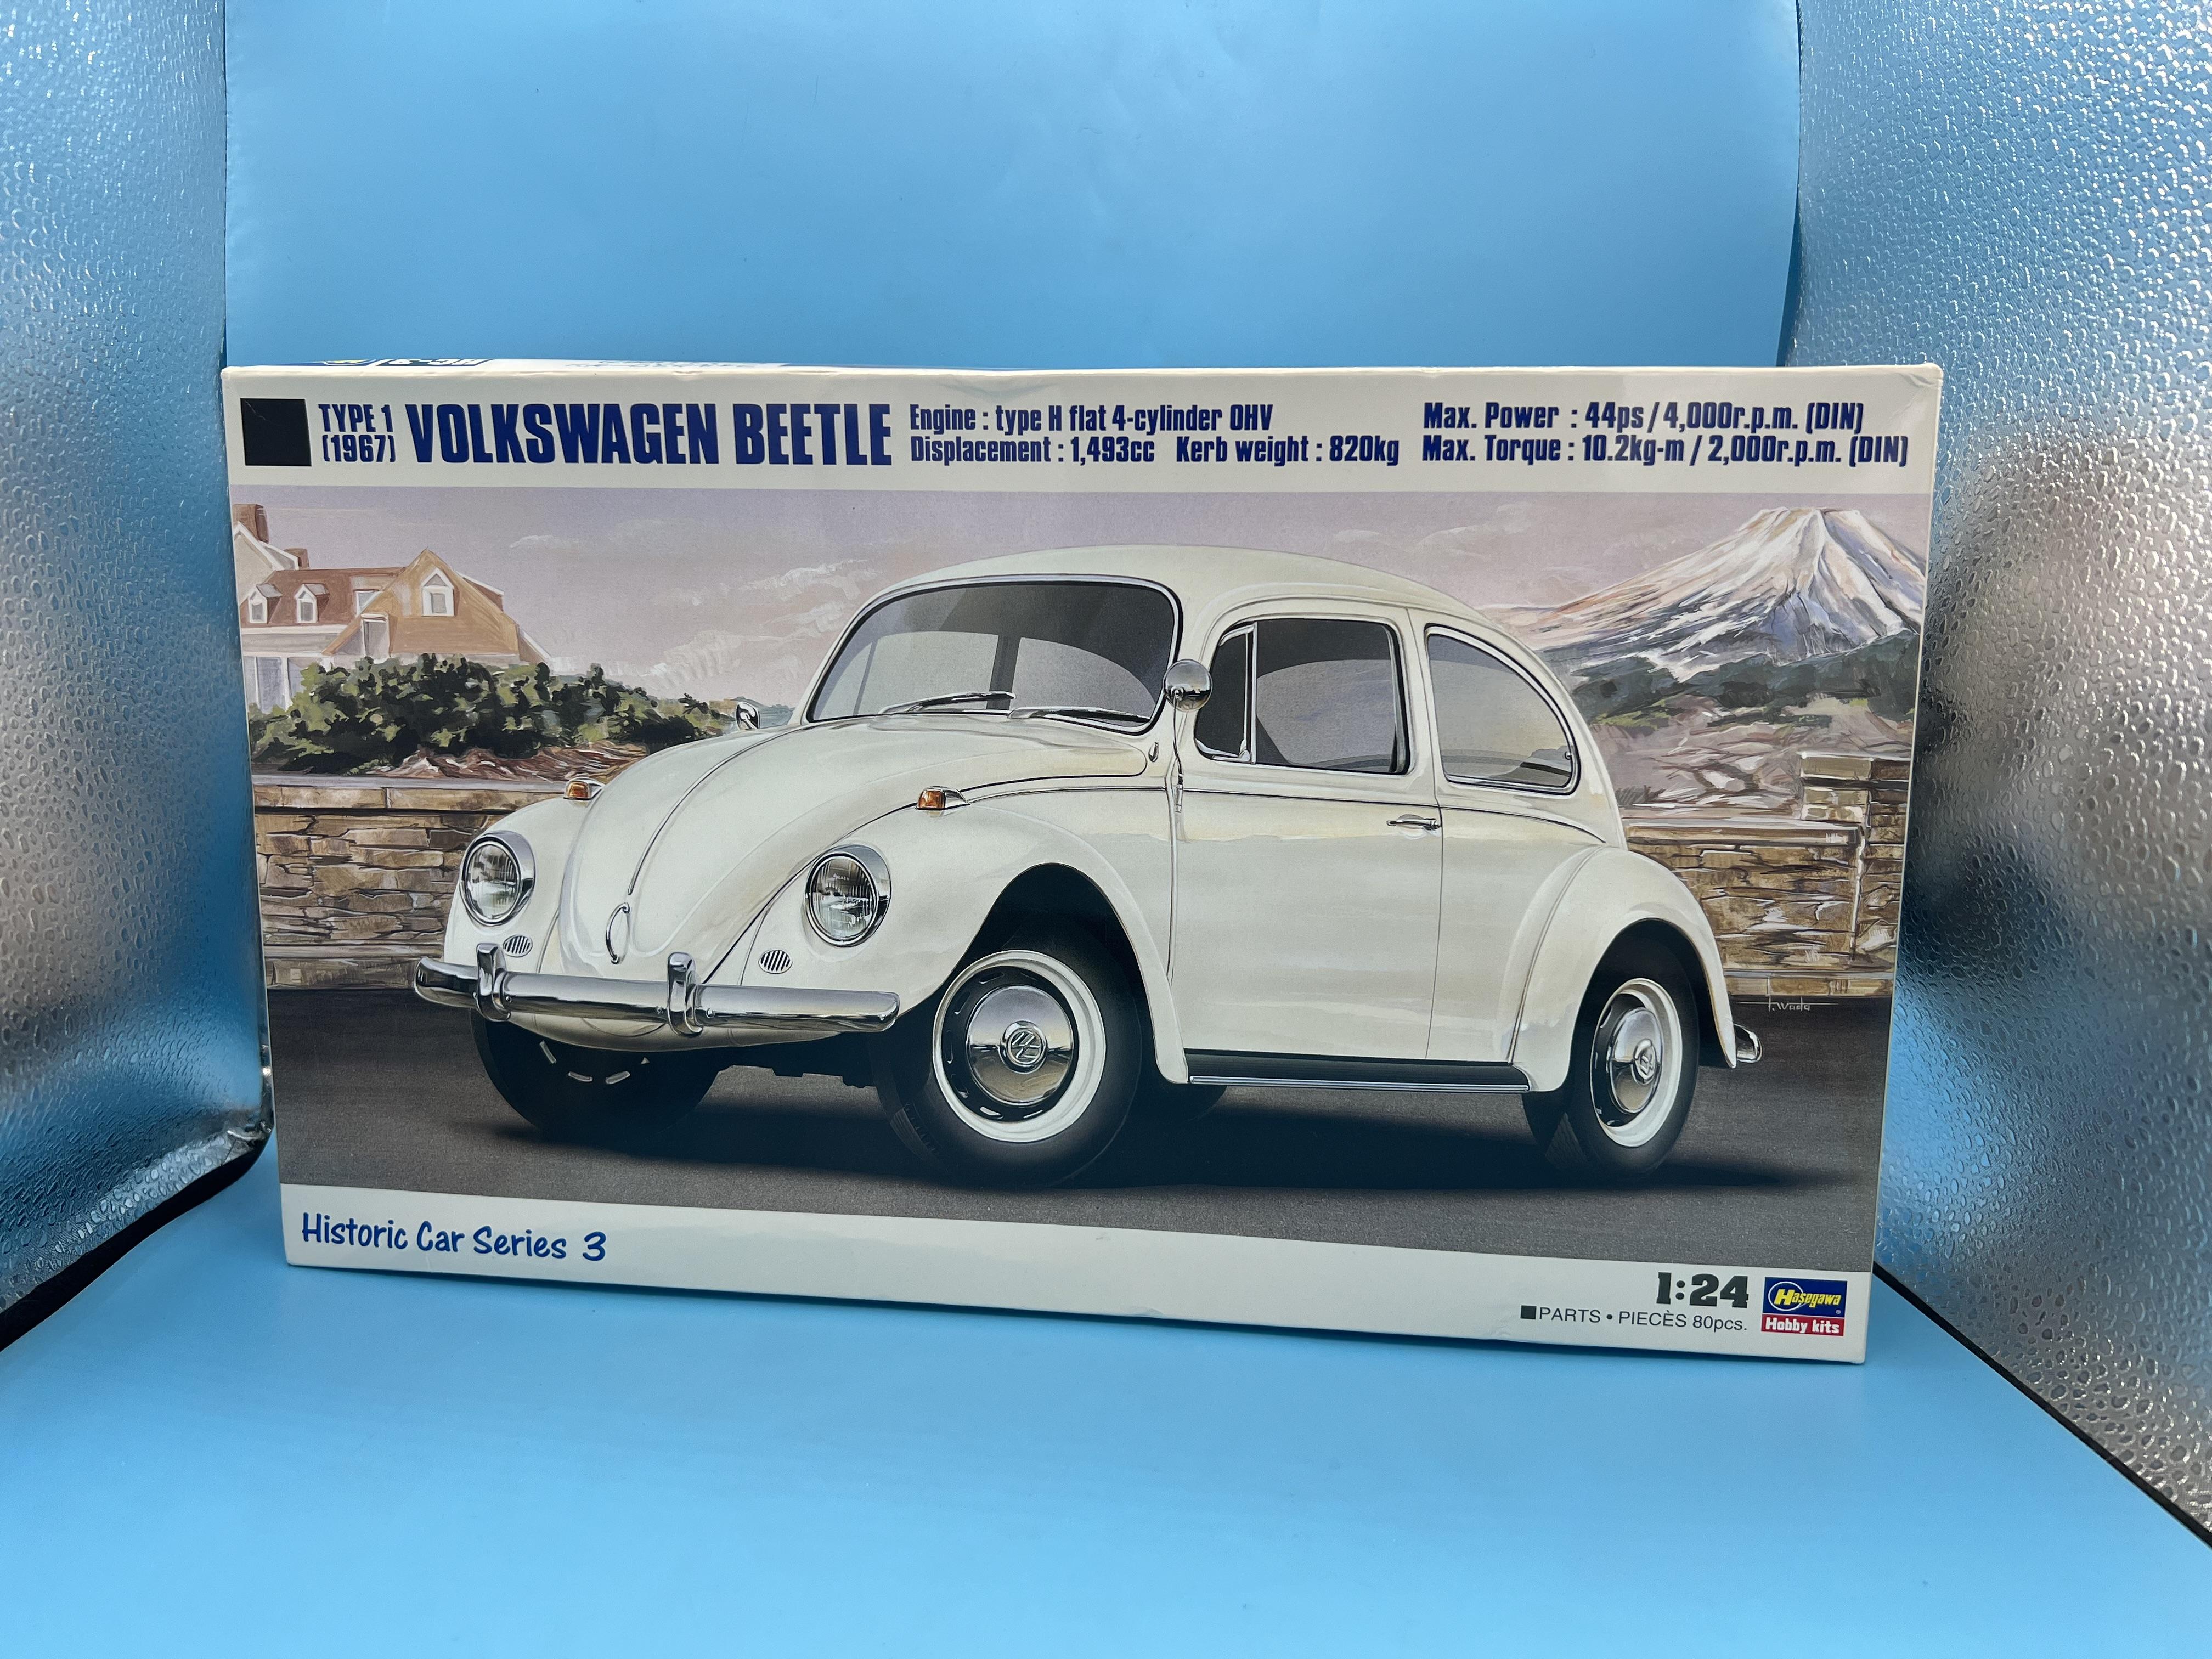
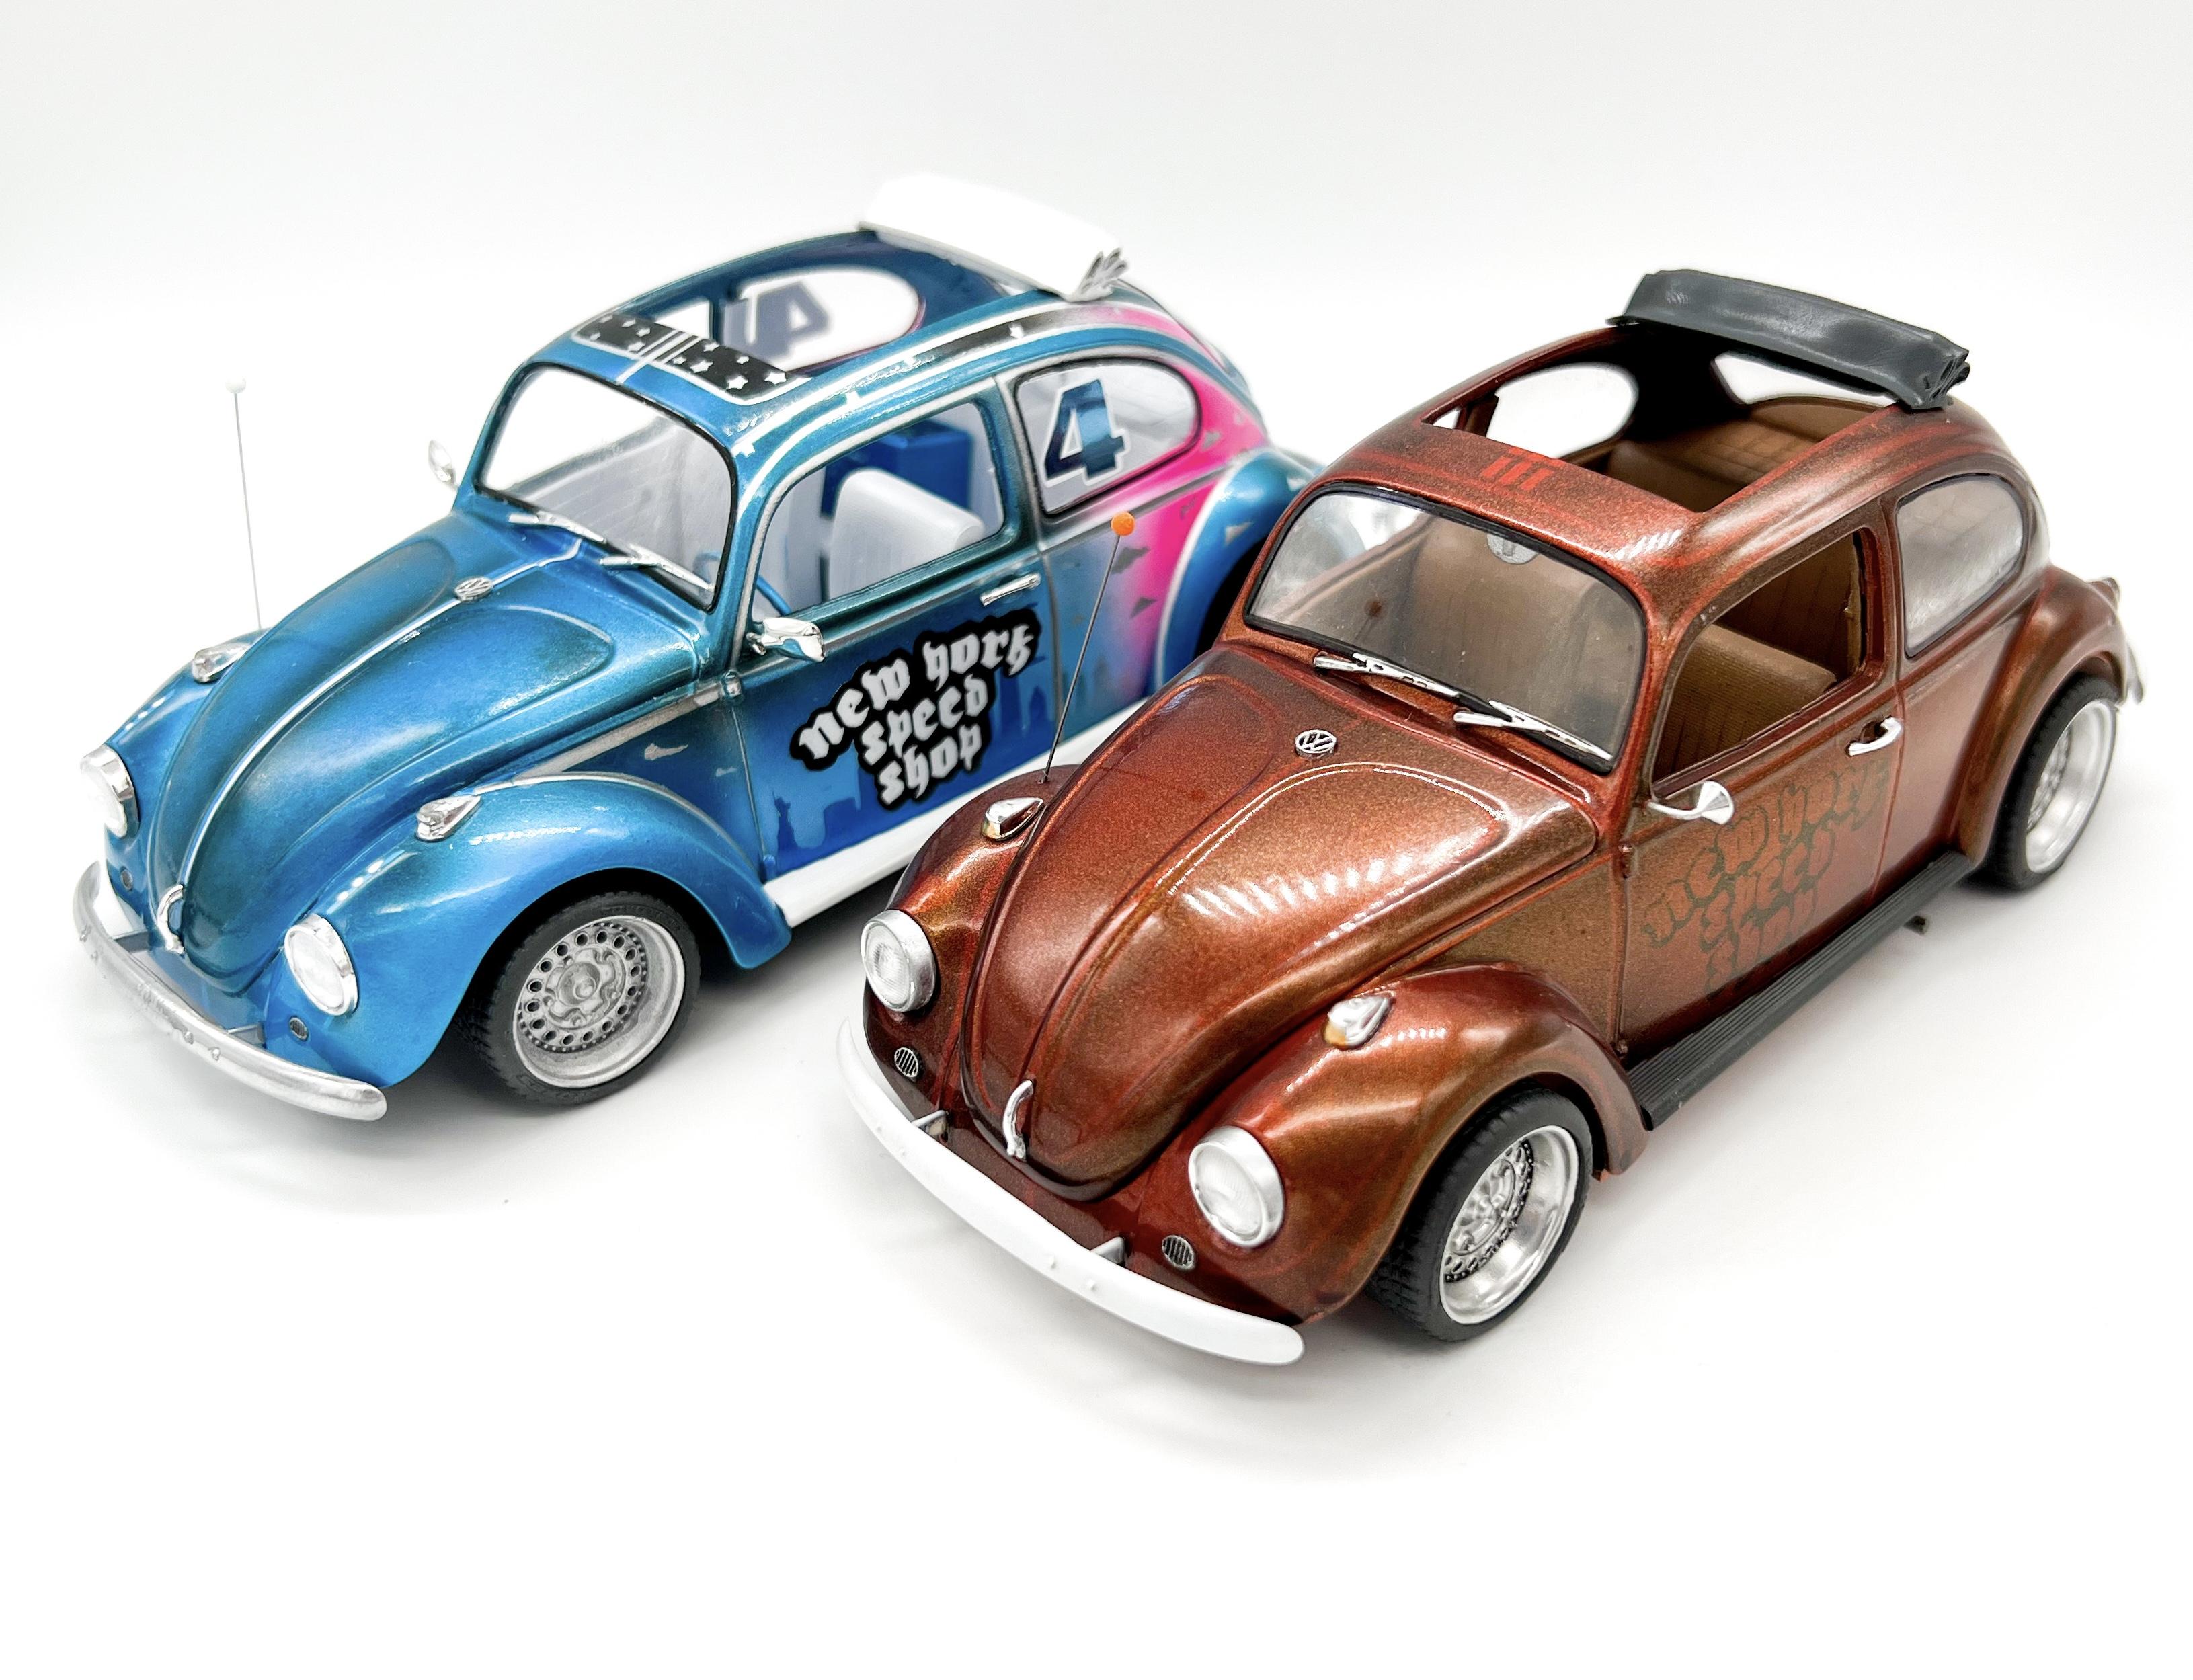
Another one for my VW collection…I didn’t have a Hasegawa bug yet, and this one ended up being free after Amazon offered me a refund AND to keep the kit after screwing up delivery…
- 38,881 replies
-
- 1
-
-
- johan
- glue bombs
- (and 1 more)
-
That's a great choice too - I have one of those also, and the tank means you don't have to listen to it chug chug chugging away constantly as you work, like the tank-less version. The one without the tank fits under my little bench better though, so that's what I use 99% of the time ?
-
I use that same airbrush, and I like them. I can get decent quality finishes with mine, I think: I would buy that same airbrush with a better compressor, like this: https://www.amazon.com/Timbertech-Airbrush-Compressor-AS18-2-Decoration/dp/B07VSFZVRH/ref=sr_1_5?crid=EDZFMAKJPLSQ&keywords=airbrush+compressor&qid=1692043091&sprefix=airbrush+compressor%2Caps%2C140&sr=8-5 In fact, that's exactly what I bought, and it works well for the majority of my projects...not the fanciest setup, but user friendly and not super expensive