OldNYJim
-
Posts
250 -
Joined
-
Last visited
Content Type
Profiles
Forums
Events
Gallery
Everything posted by OldNYJim
-

Atlantis Models has bought another lot of tooling/molds.....
OldNYJim replied to Dave Van's topic in Car Kit News & Reviews
That’s a good tip - thanks Dave! I’ve never stepped foot inside one, but there is one nearby to us…will be worth a visit if they have a decent selection of Atlantis stuff… -
Atlantis Models has bought another lot of tooling/molds.....
OldNYJim replied to Dave Van's topic in Car Kit News & Reviews
I’ve got their other Mack truck (the log hauler, compete with HUGE styrene logs), but I’m sure I’ll end up with this one too… -
Atlantis Models has bought another lot of tooling/molds.....
OldNYJim replied to Dave Van's topic in Car Kit News & Reviews
And the next one coming down the pipe:
-
I’ve wanted one of these, for the truck mainly, for months and months. I don’t know what it is about that truck, but I really want one on my shelf…
- 38,881 replies
-
- 2
-

-
- johan
- glue bombs
- (and 1 more)
-
My take on the most famous ‘55 gasser street machine’…
OldNYJim replied to OldNYJim's topic in WIP: Model Cars
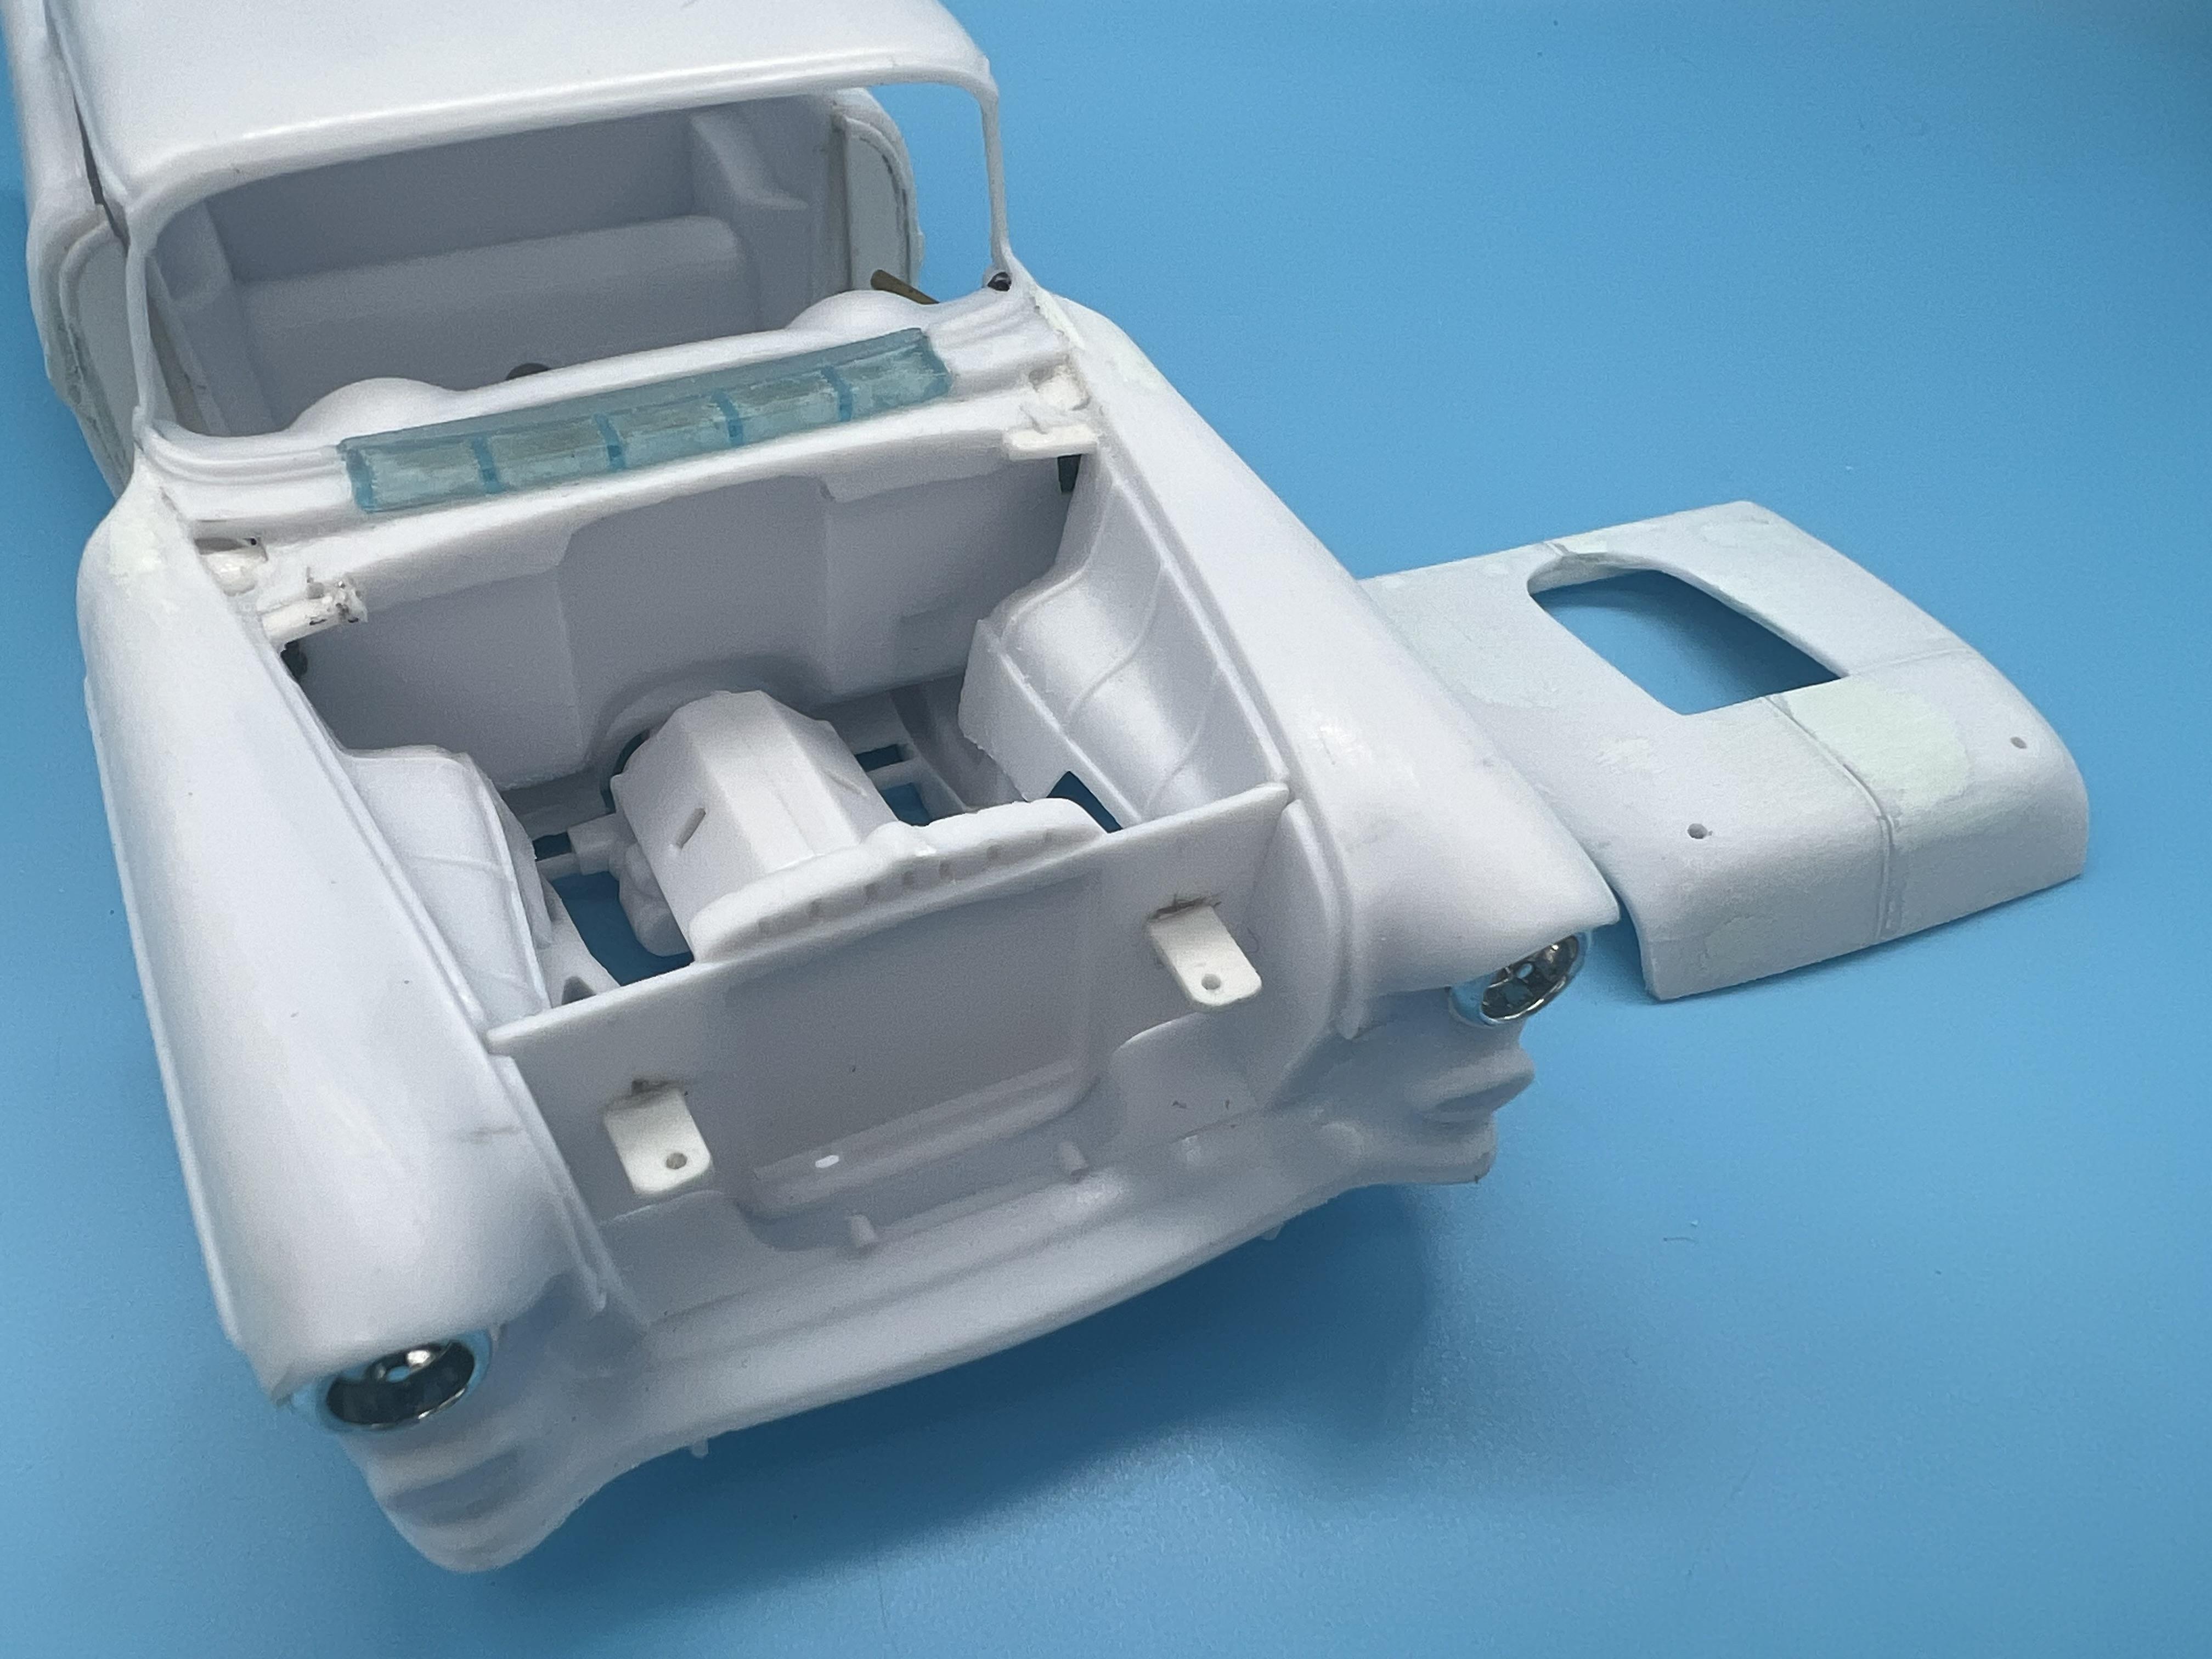
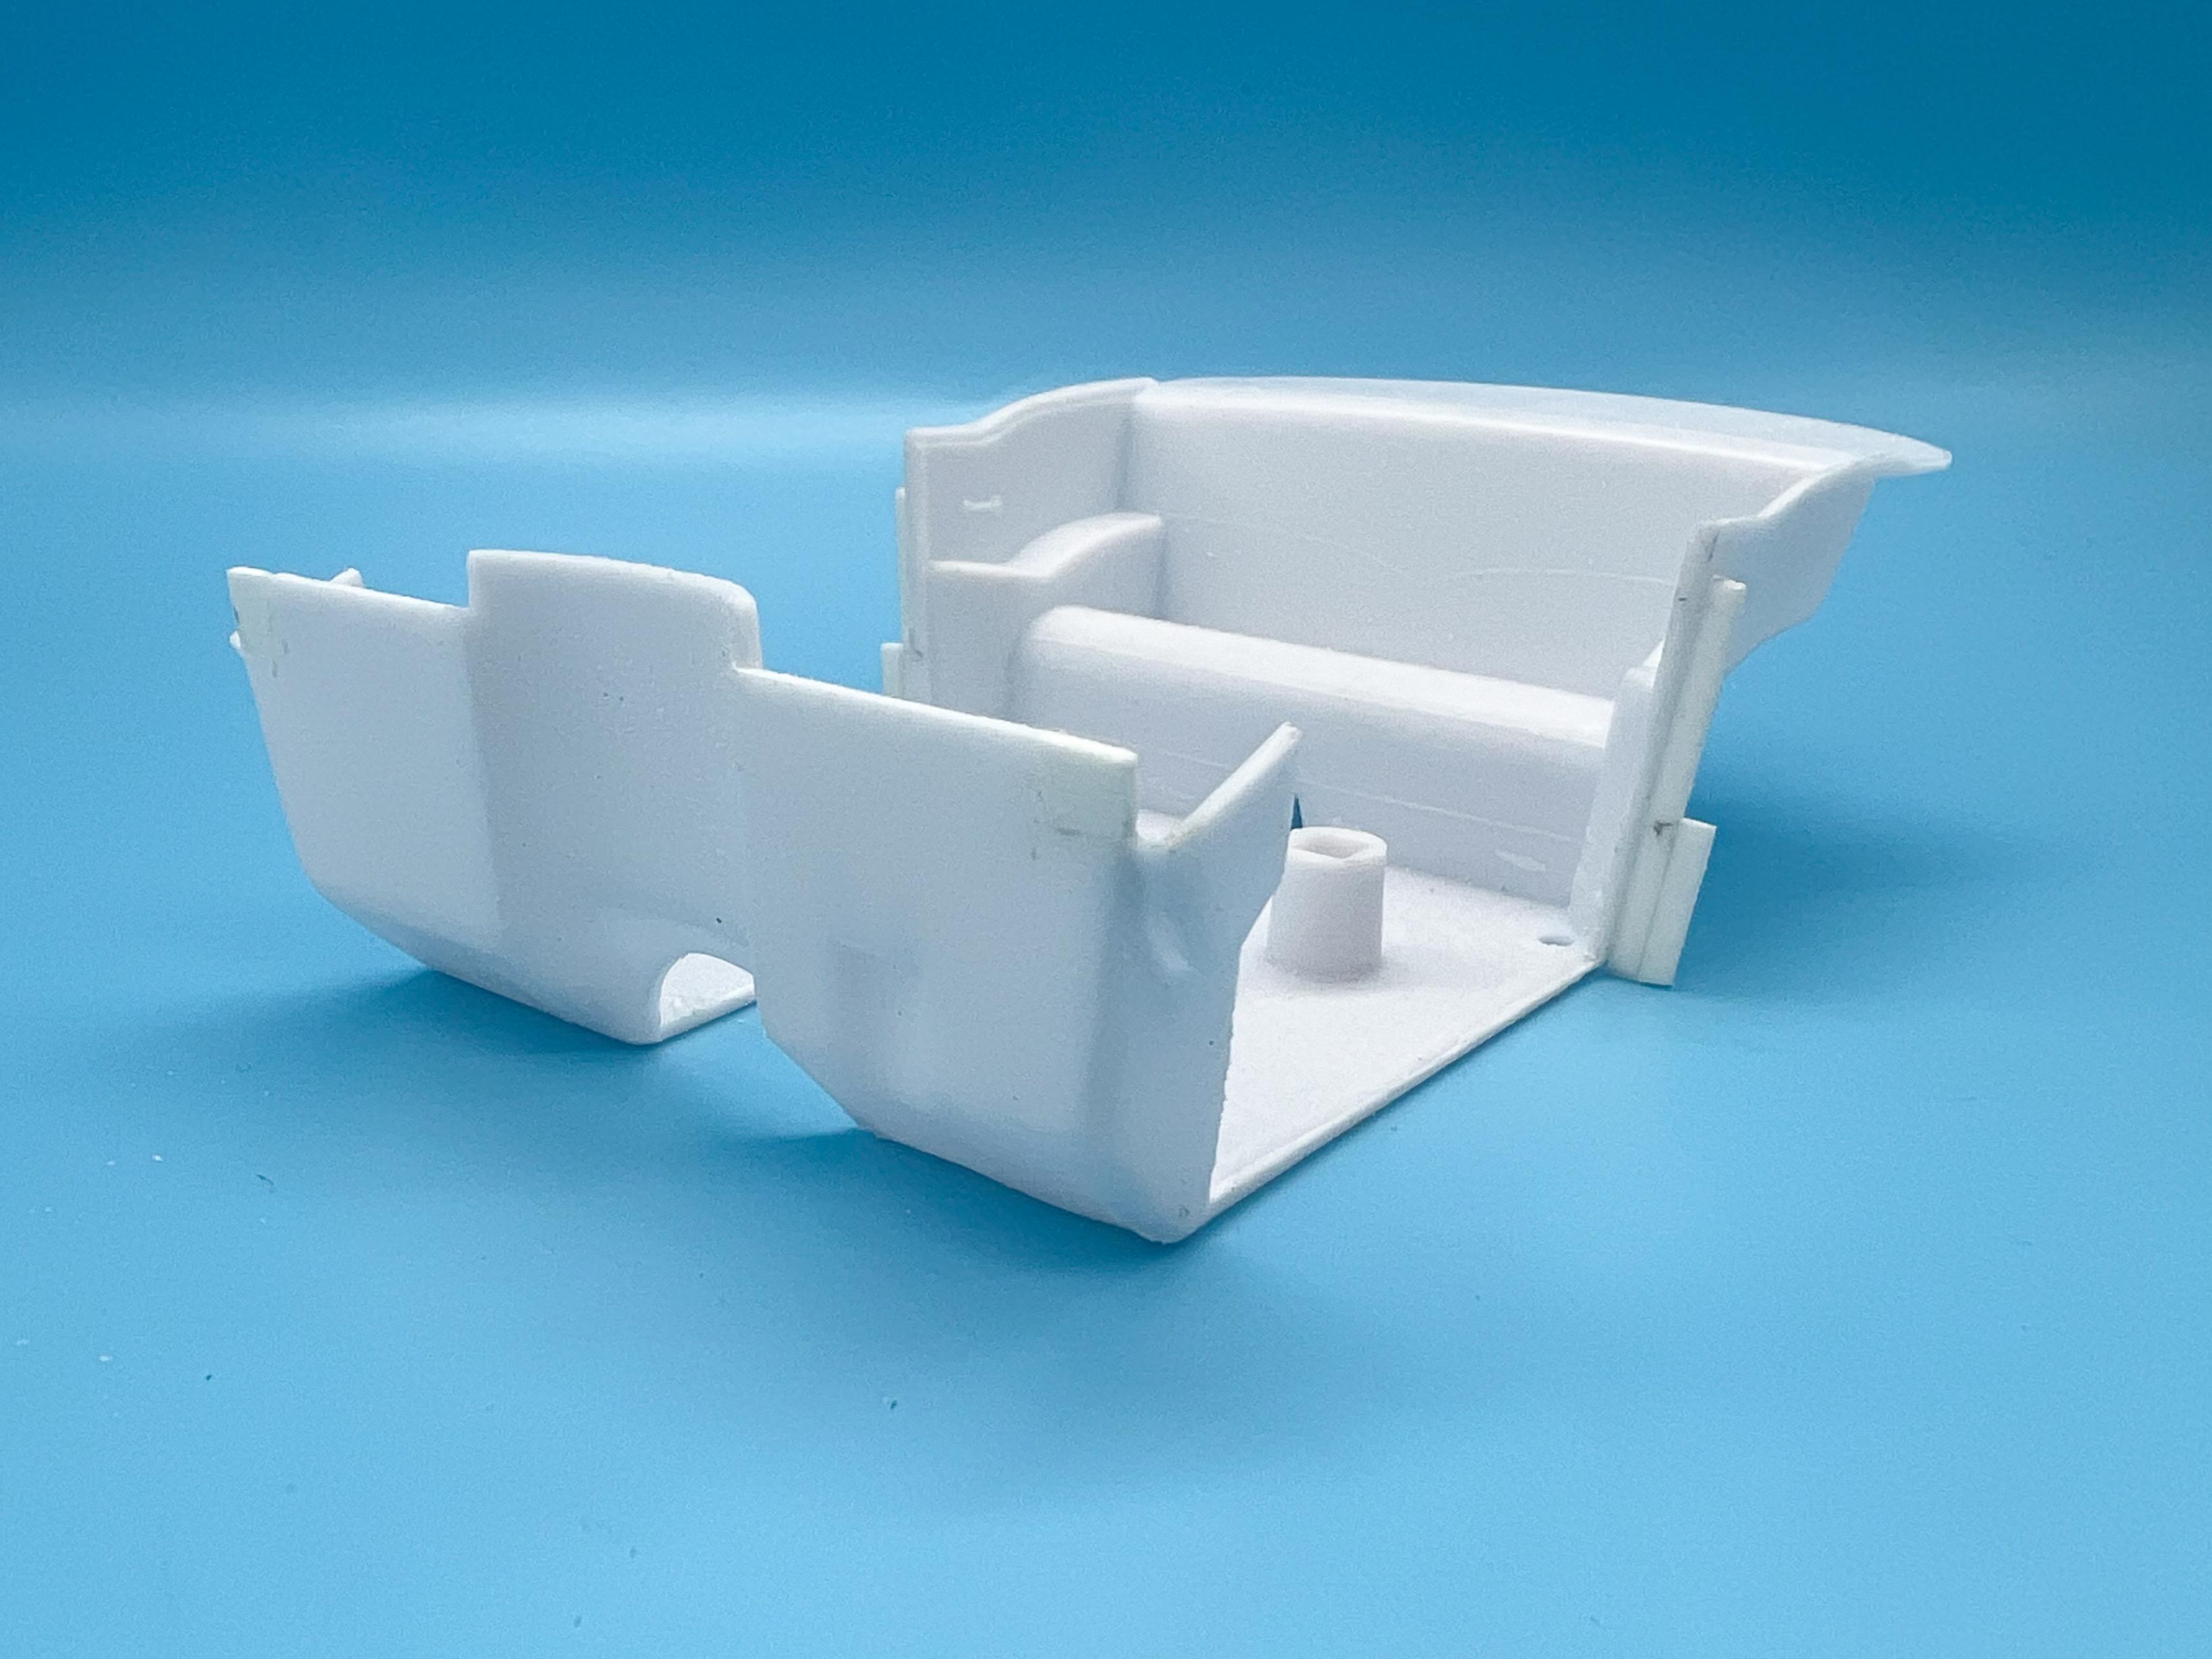
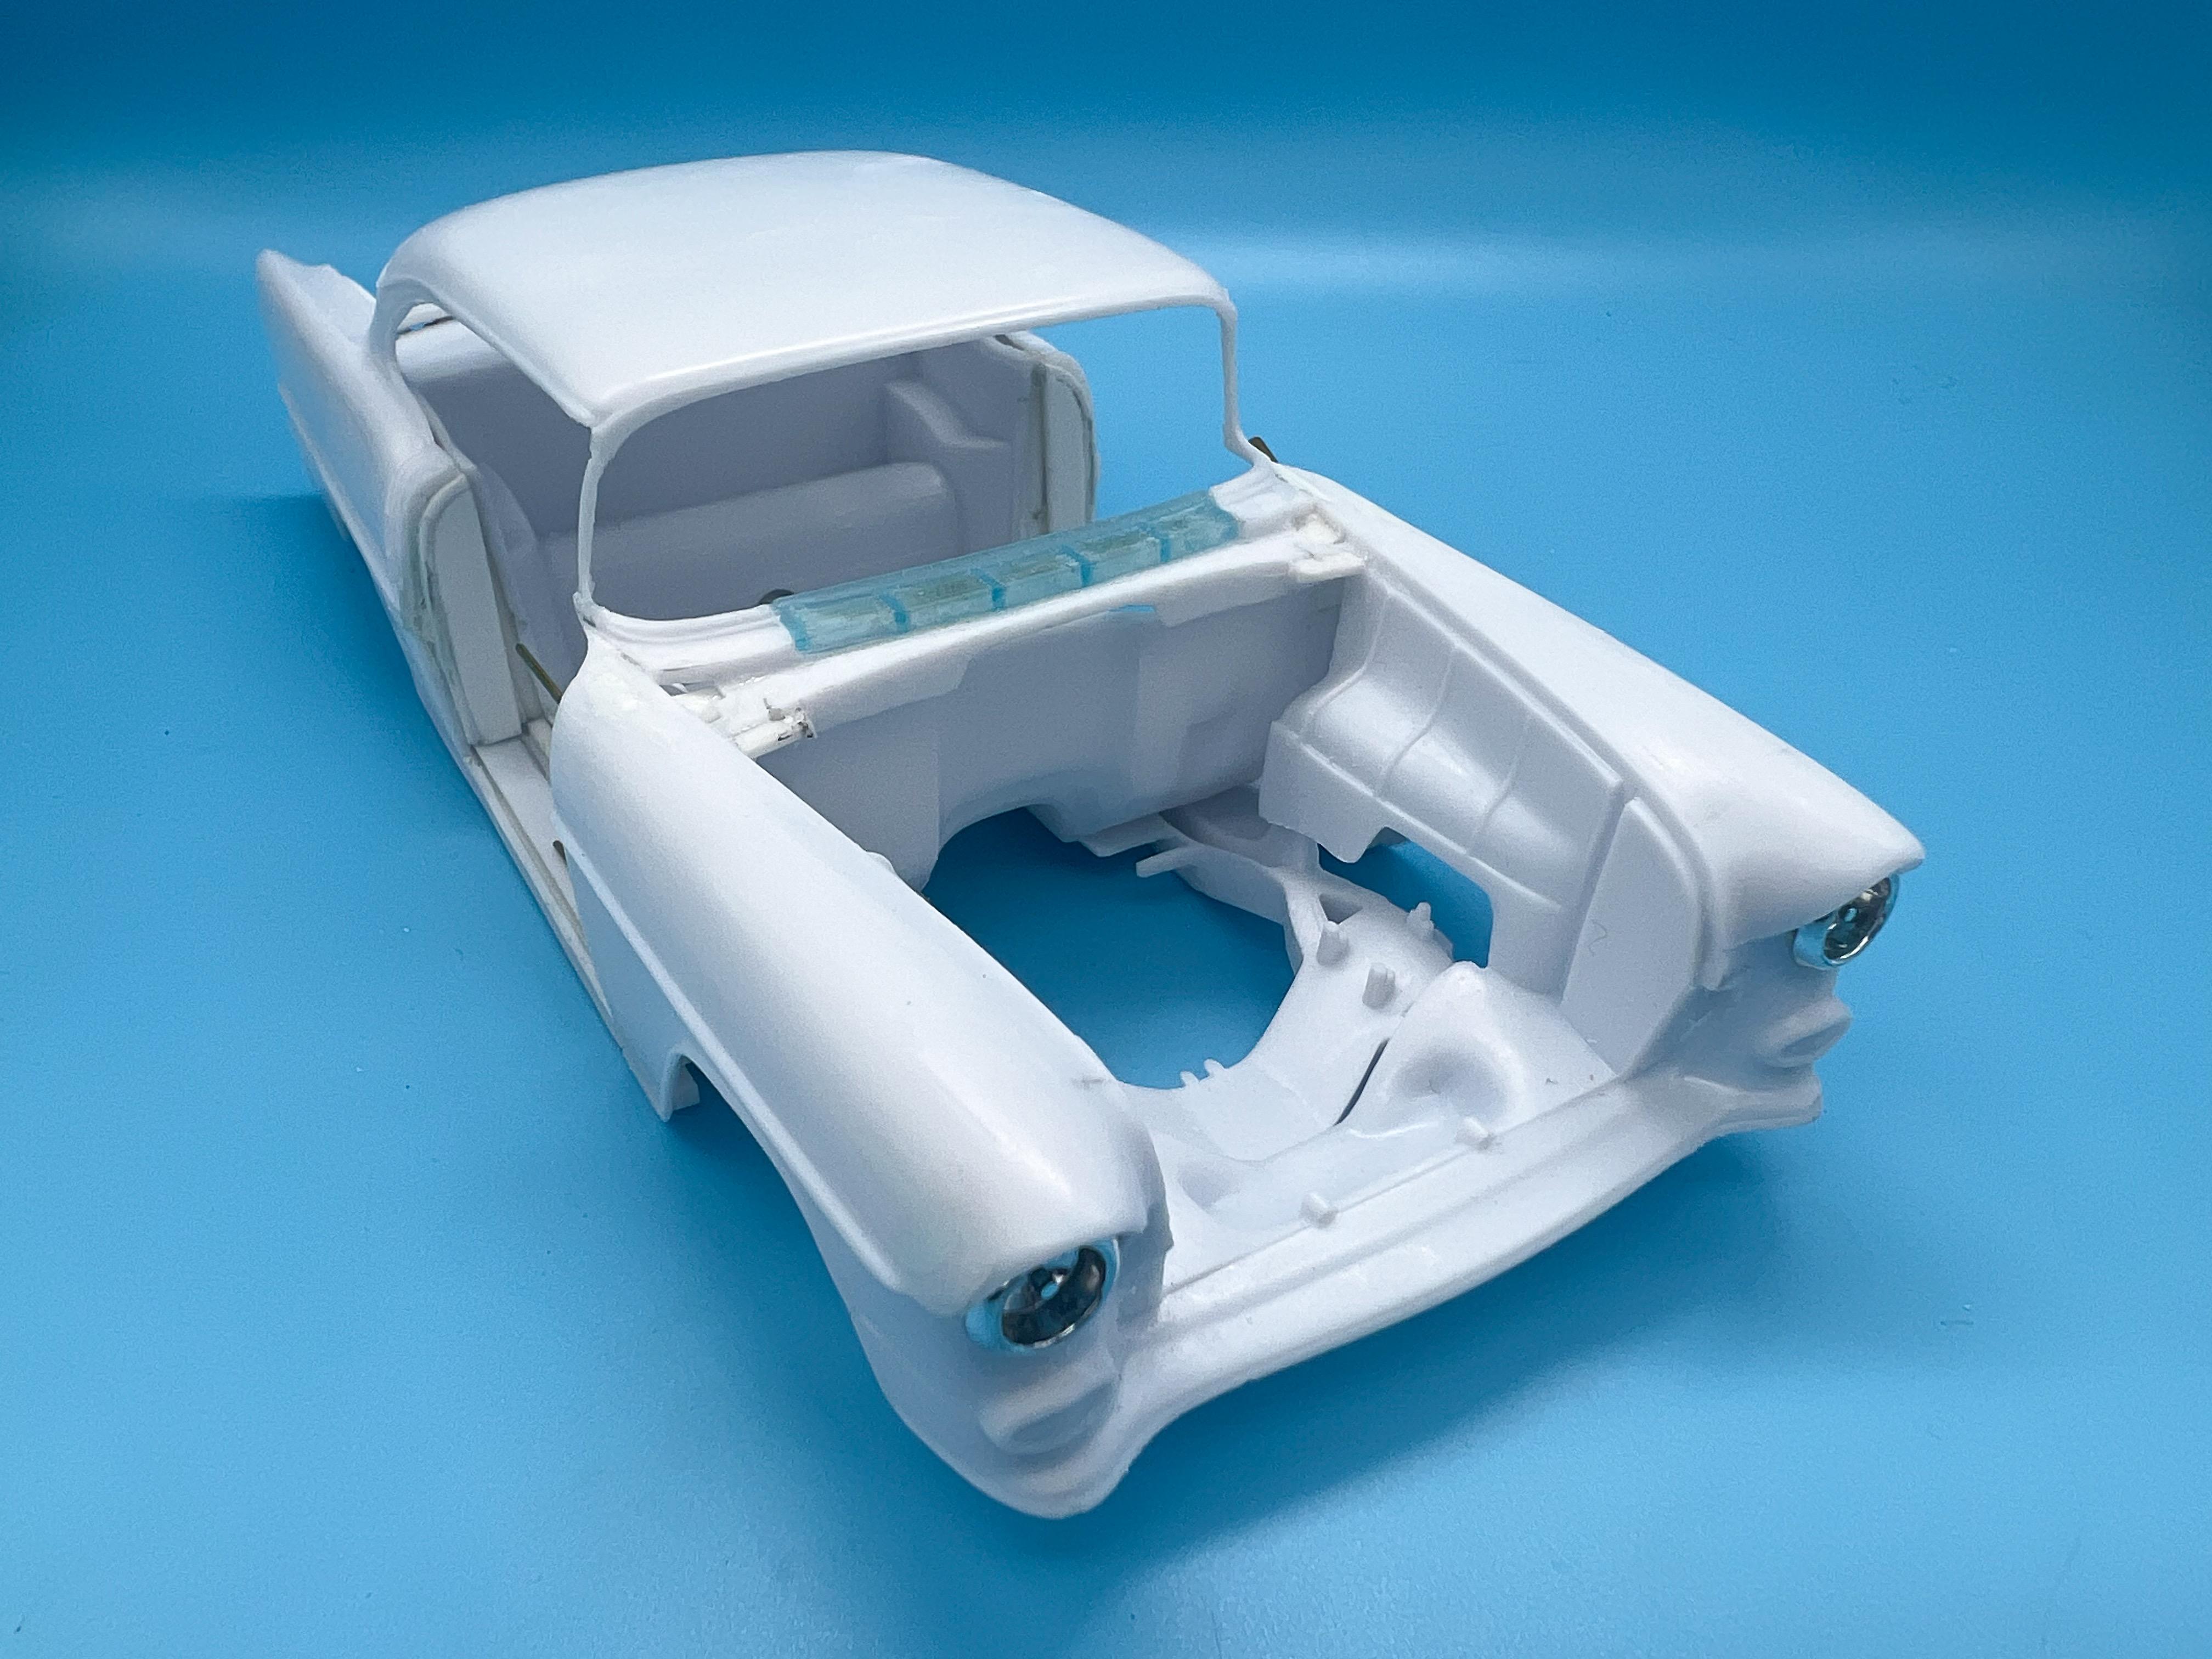
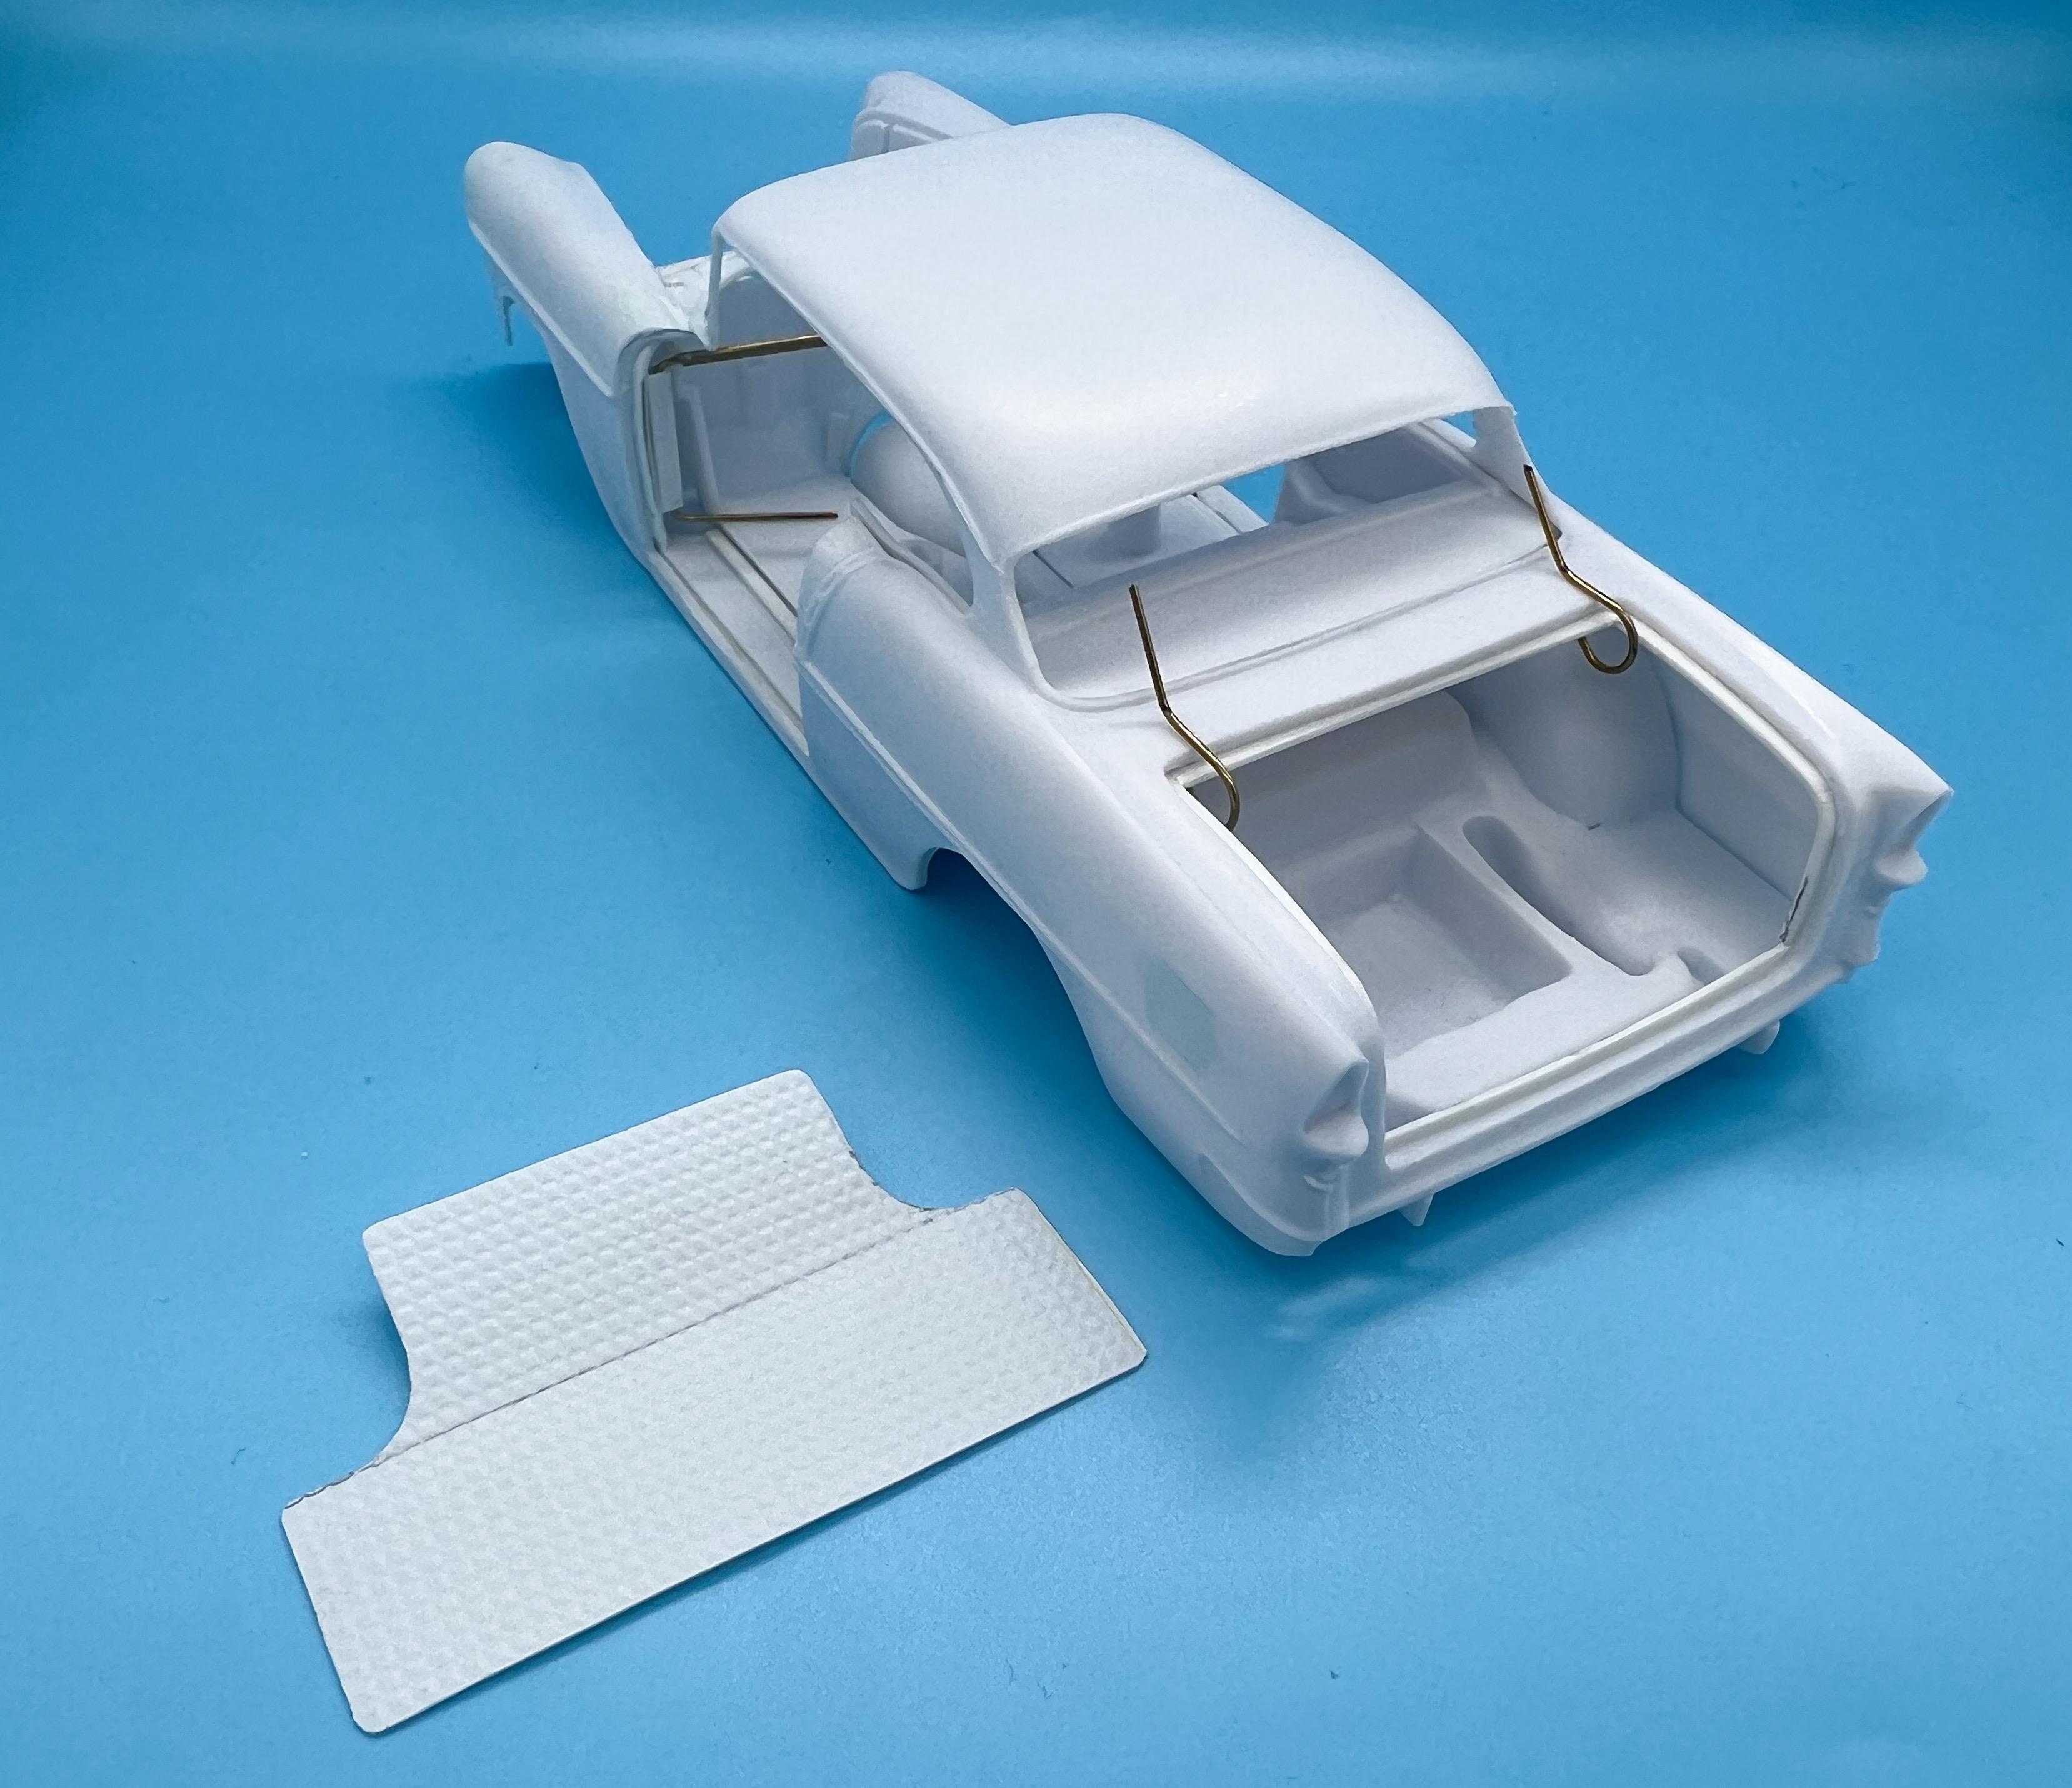
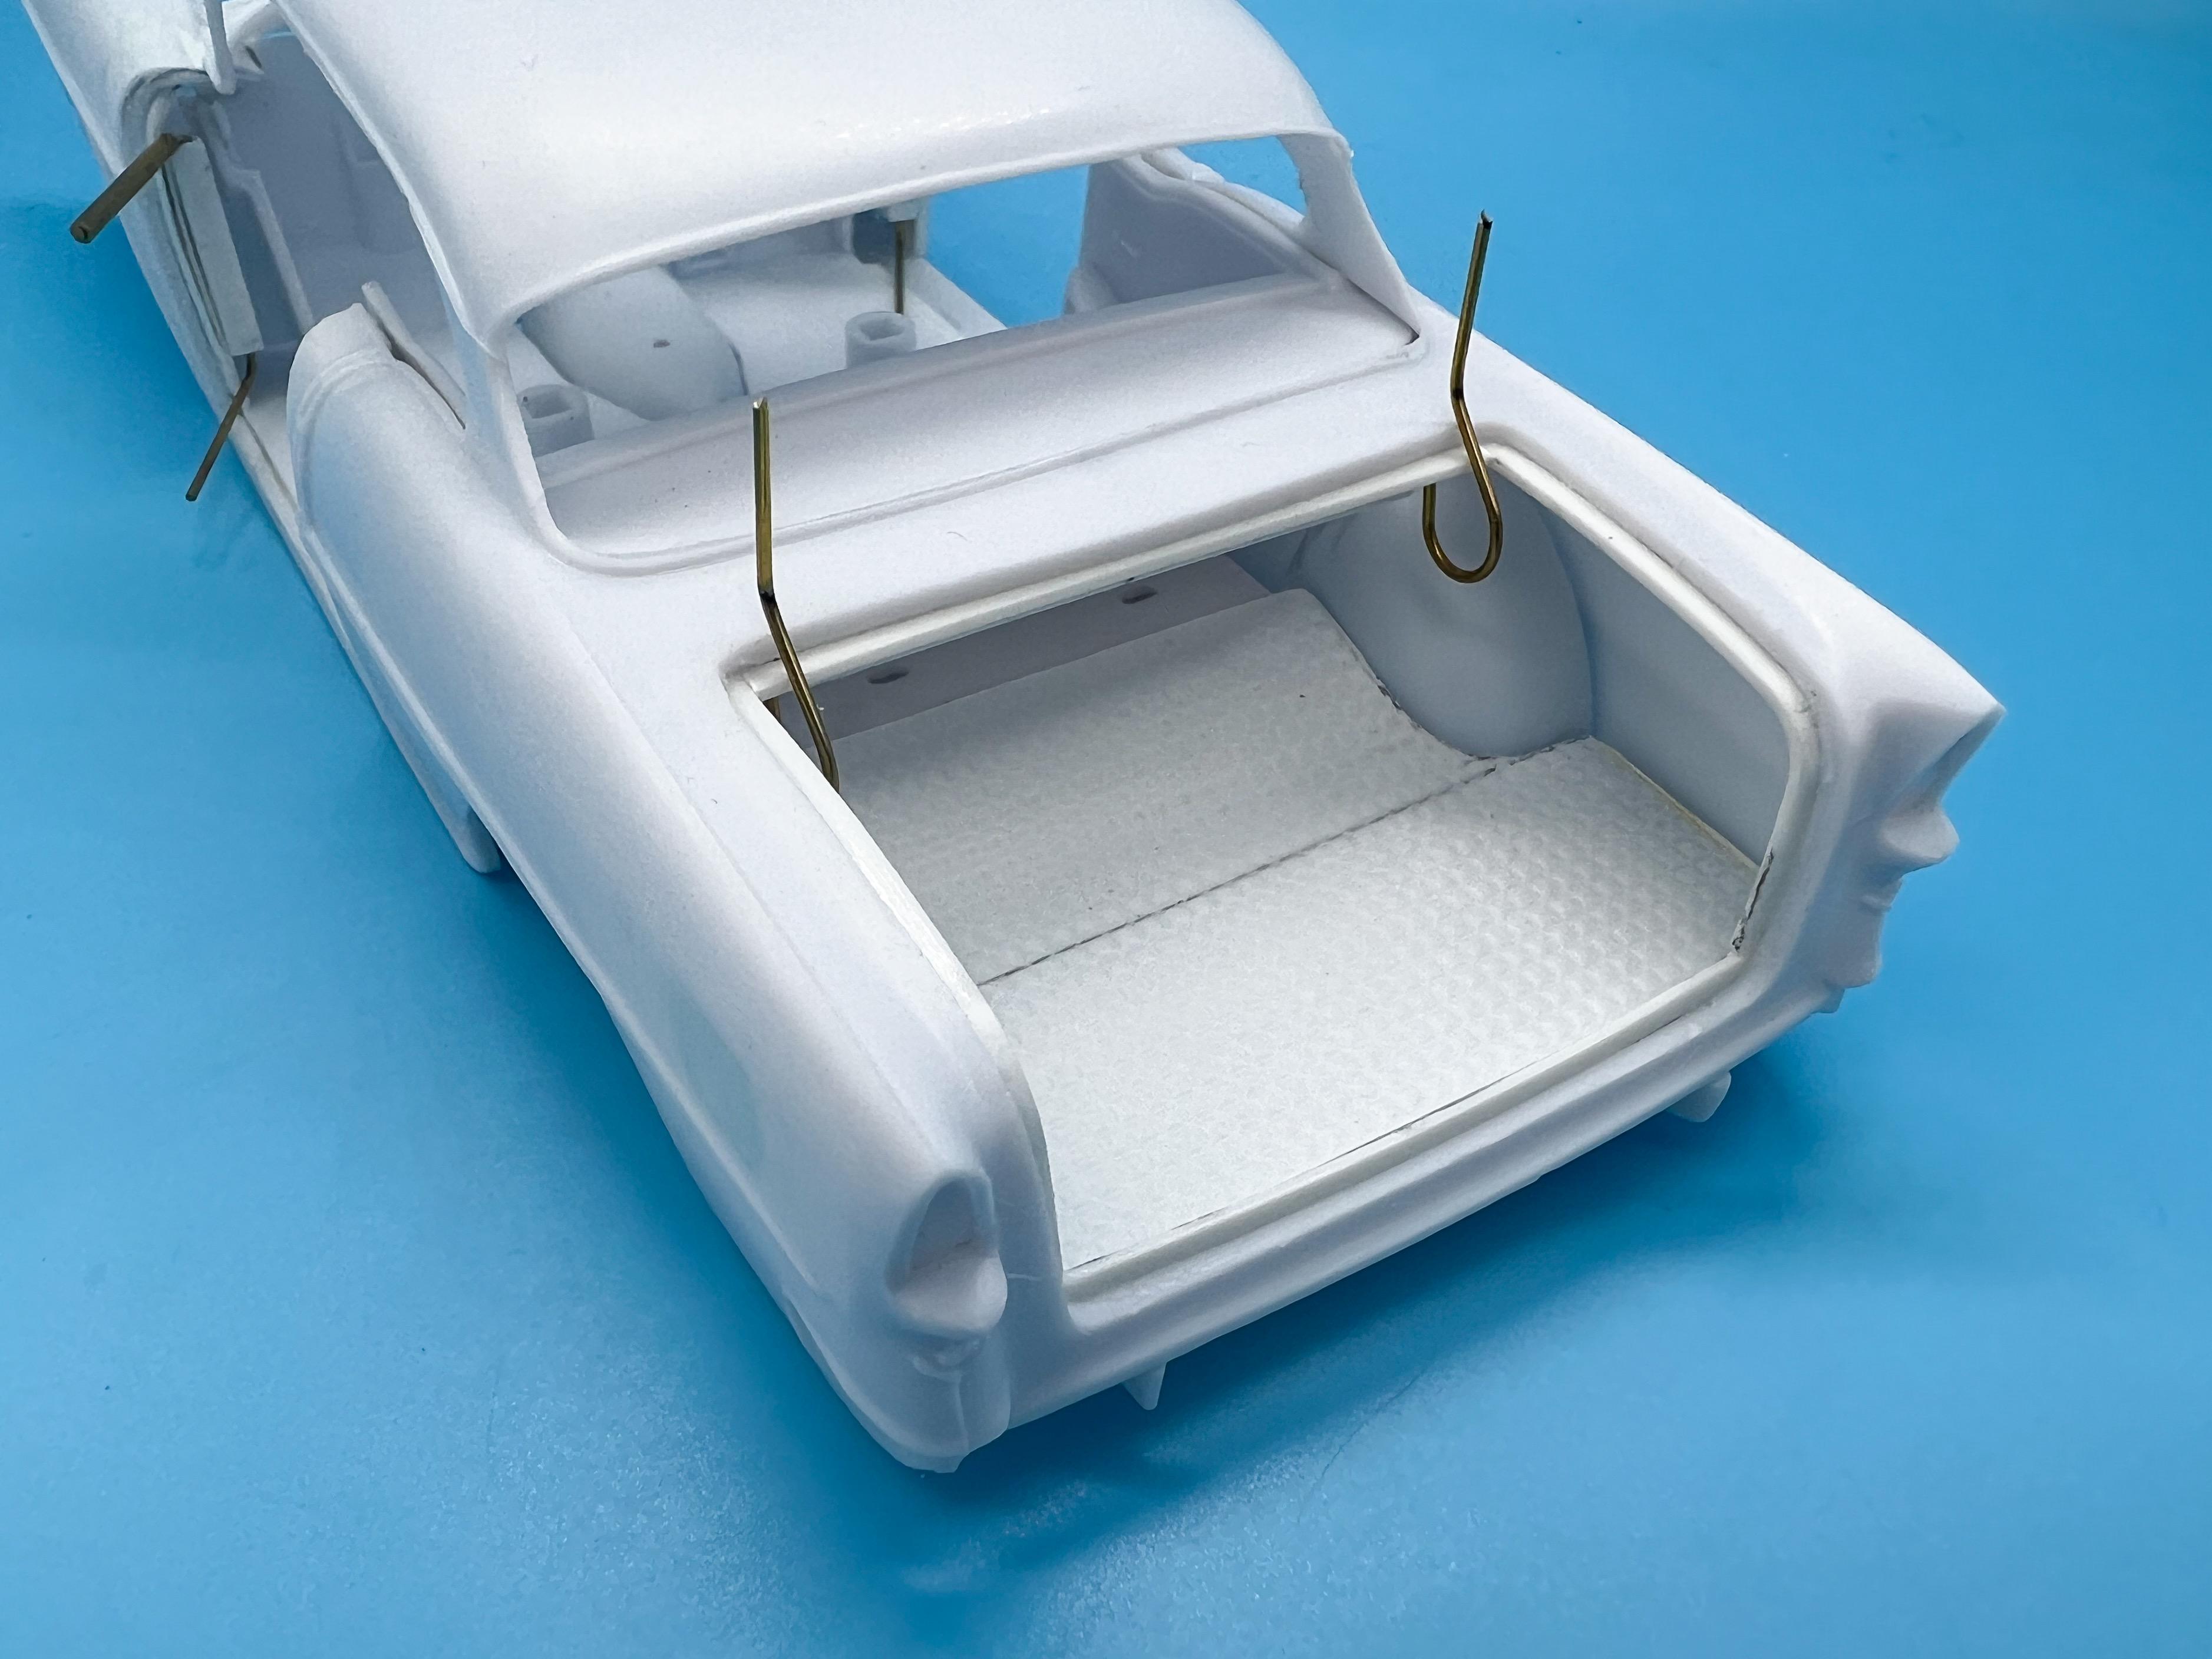
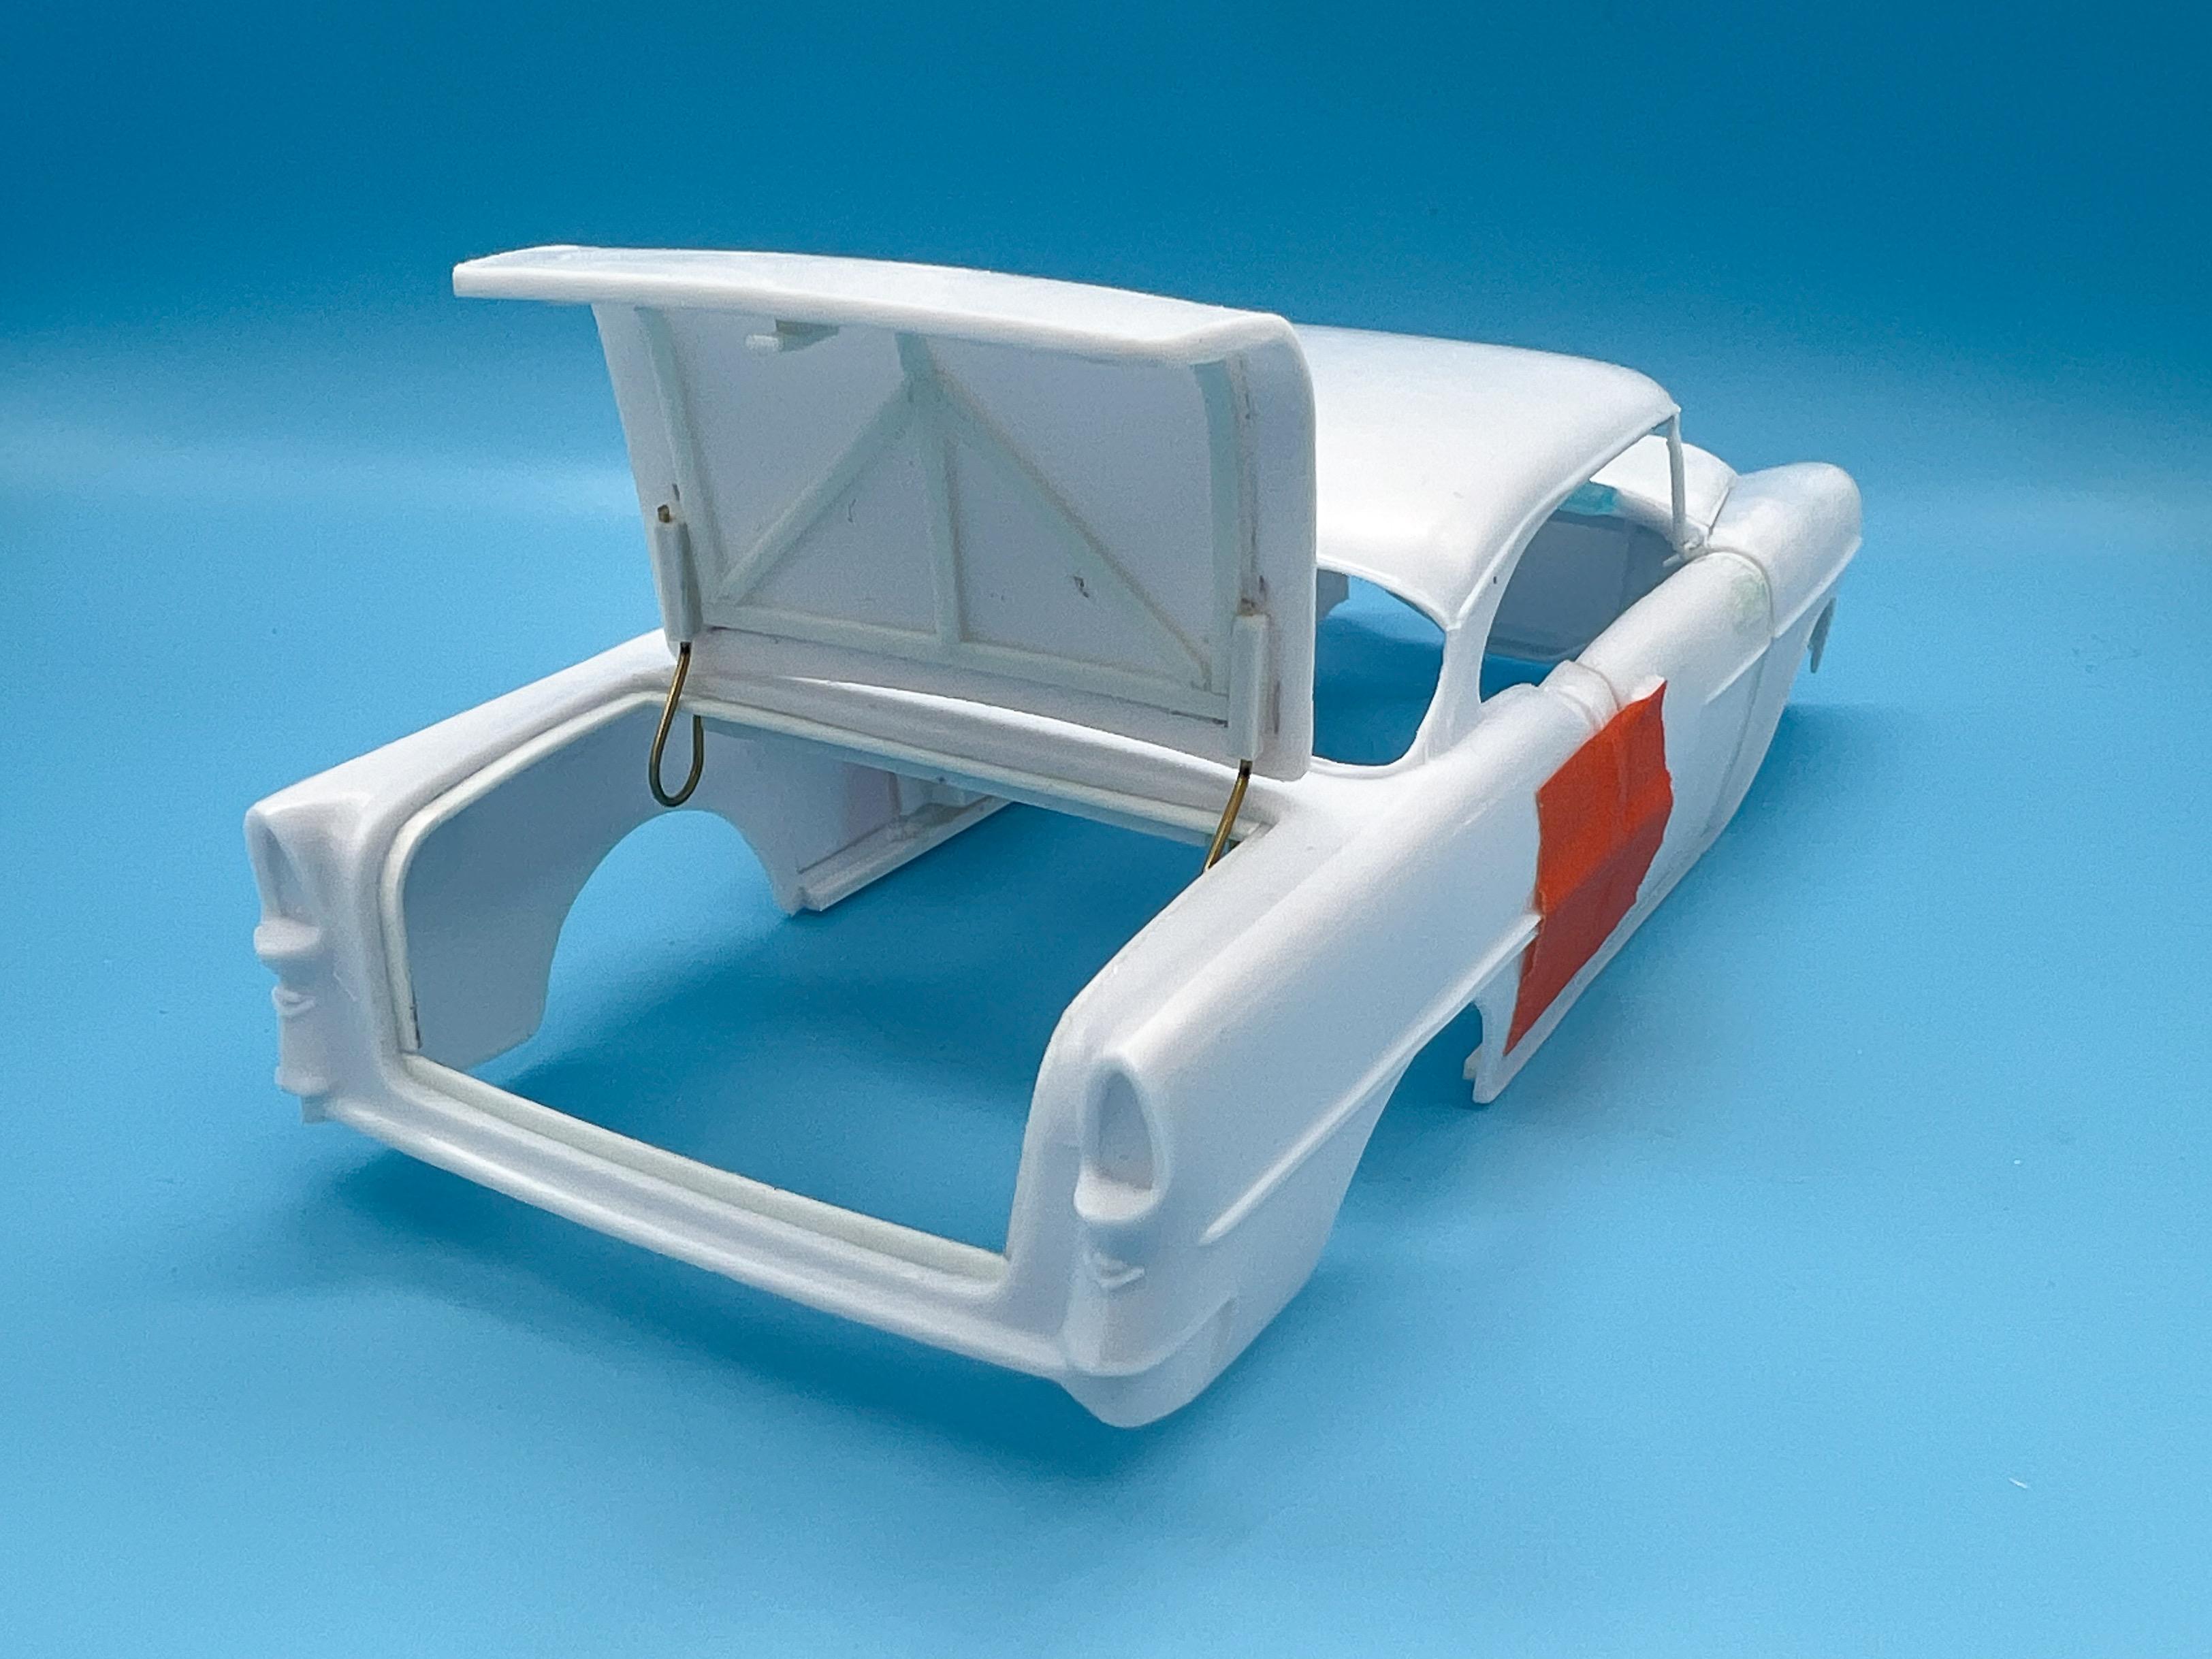
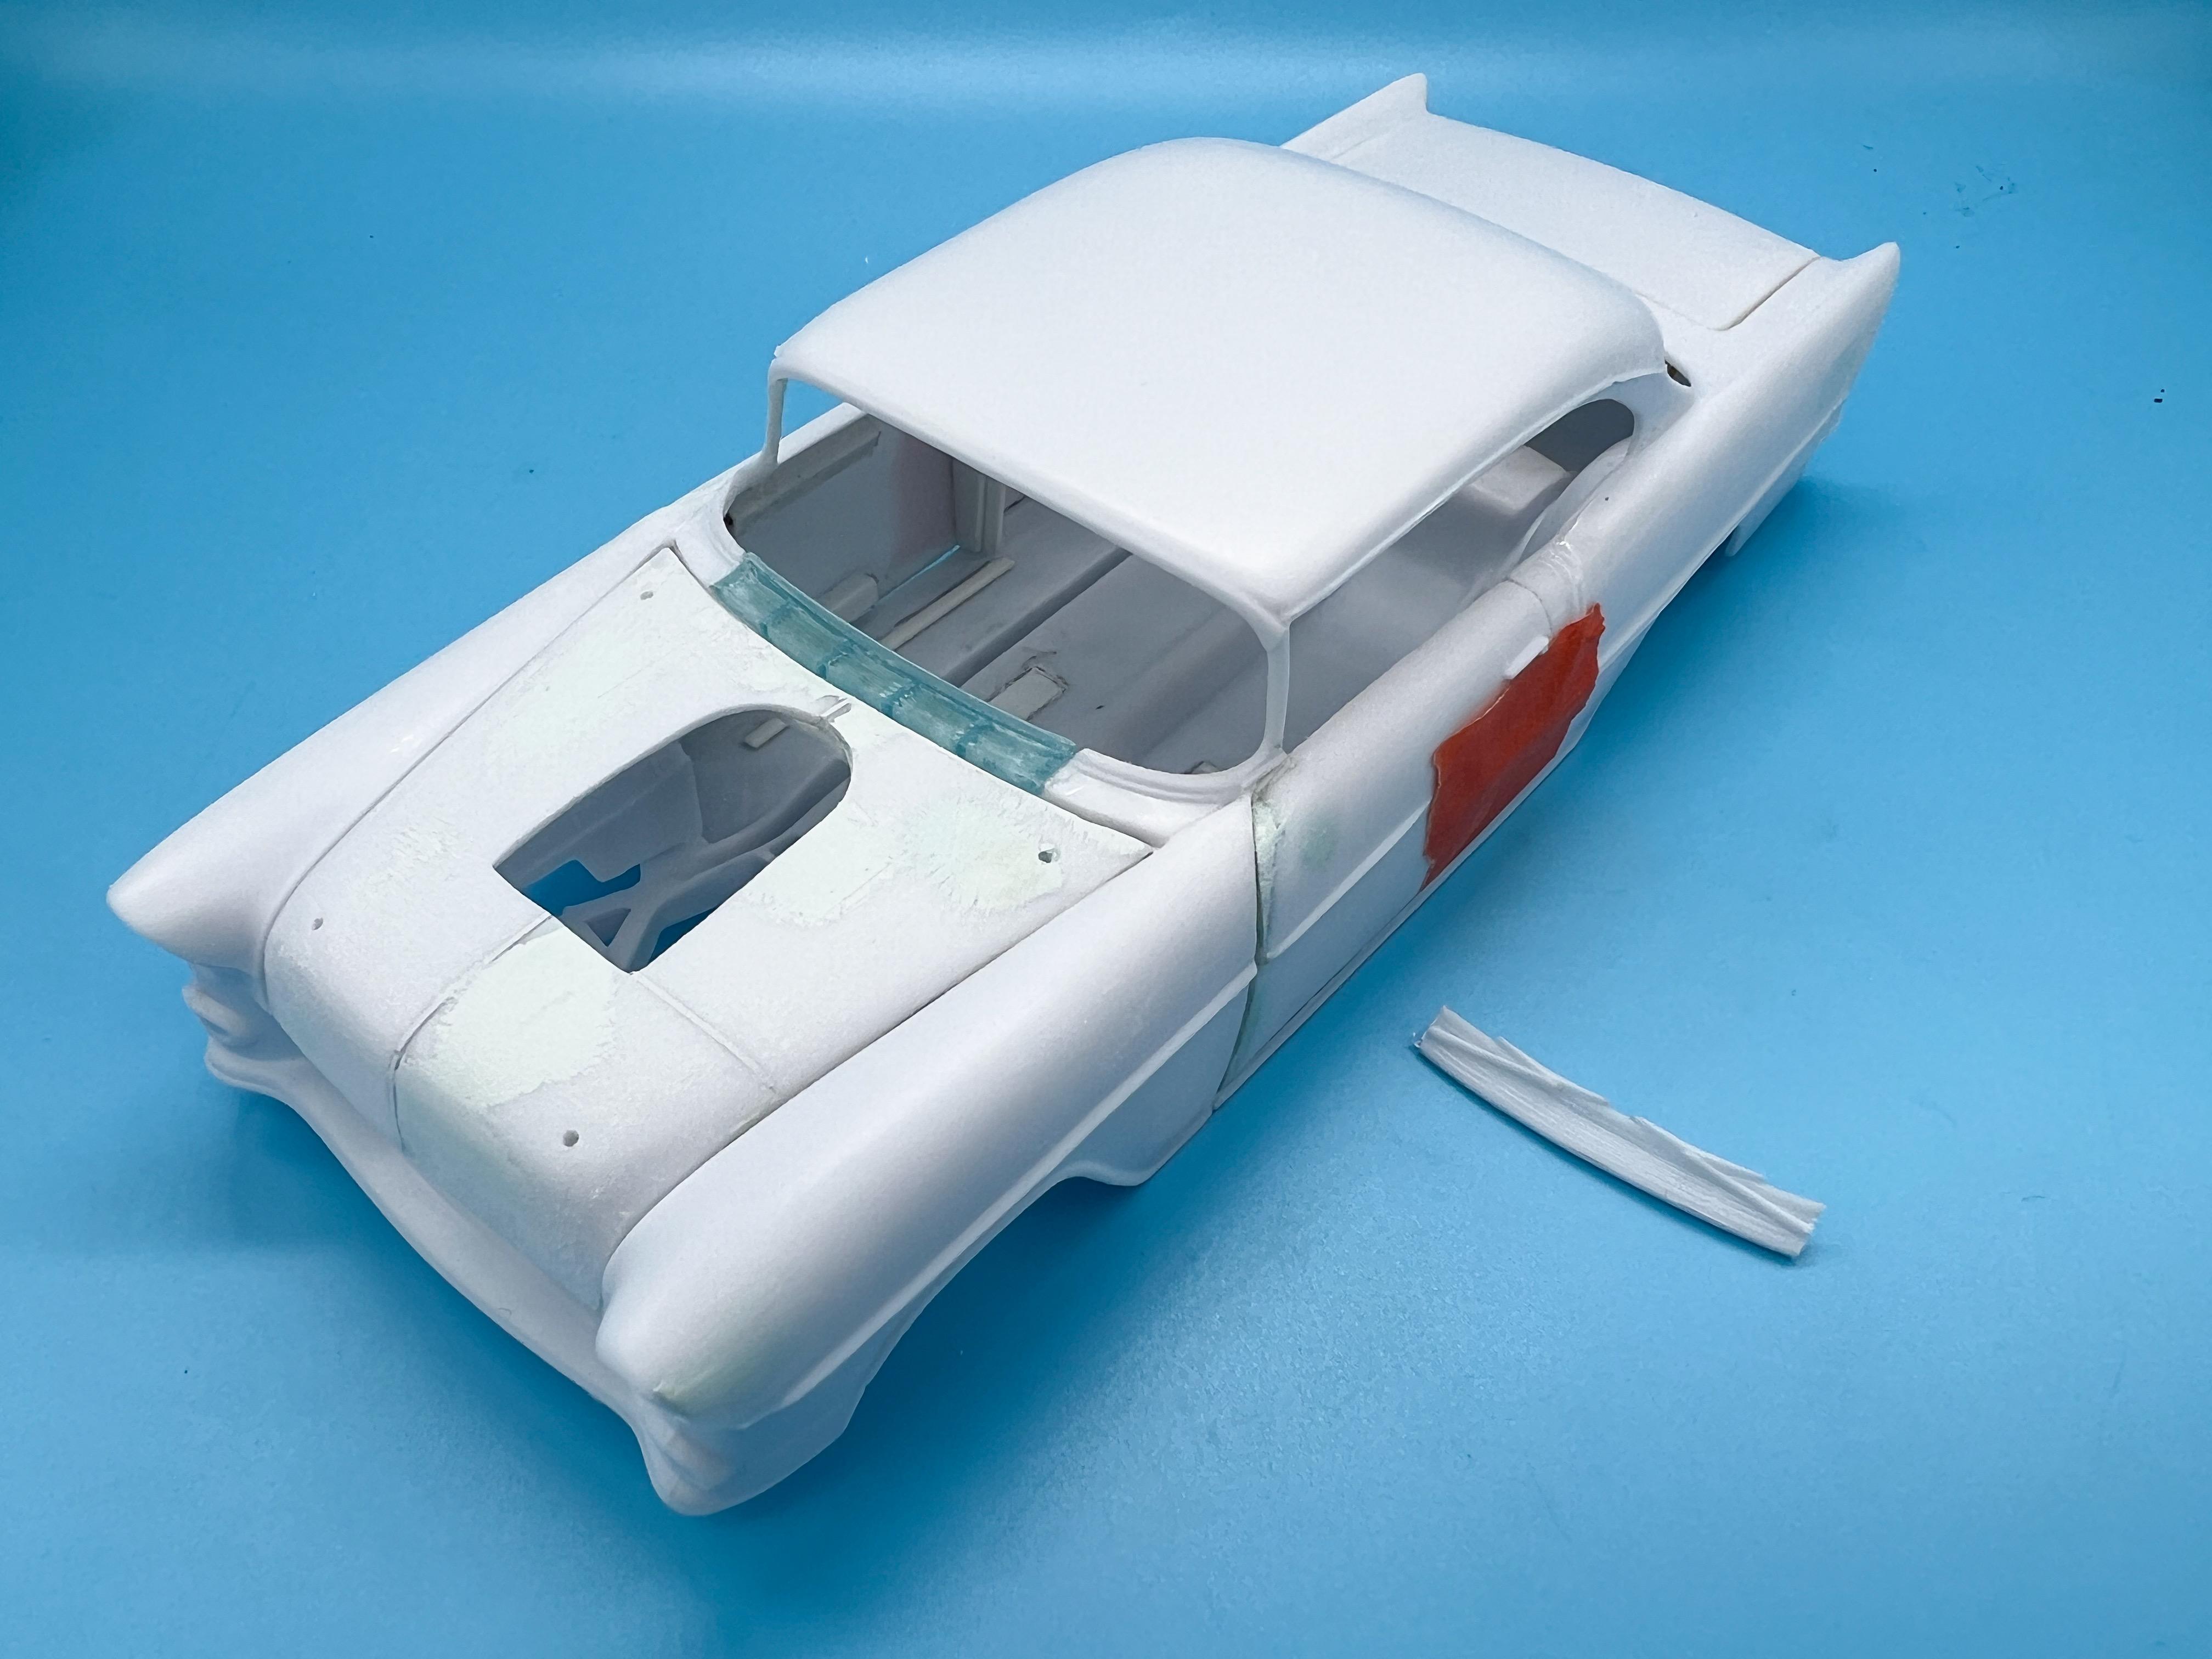
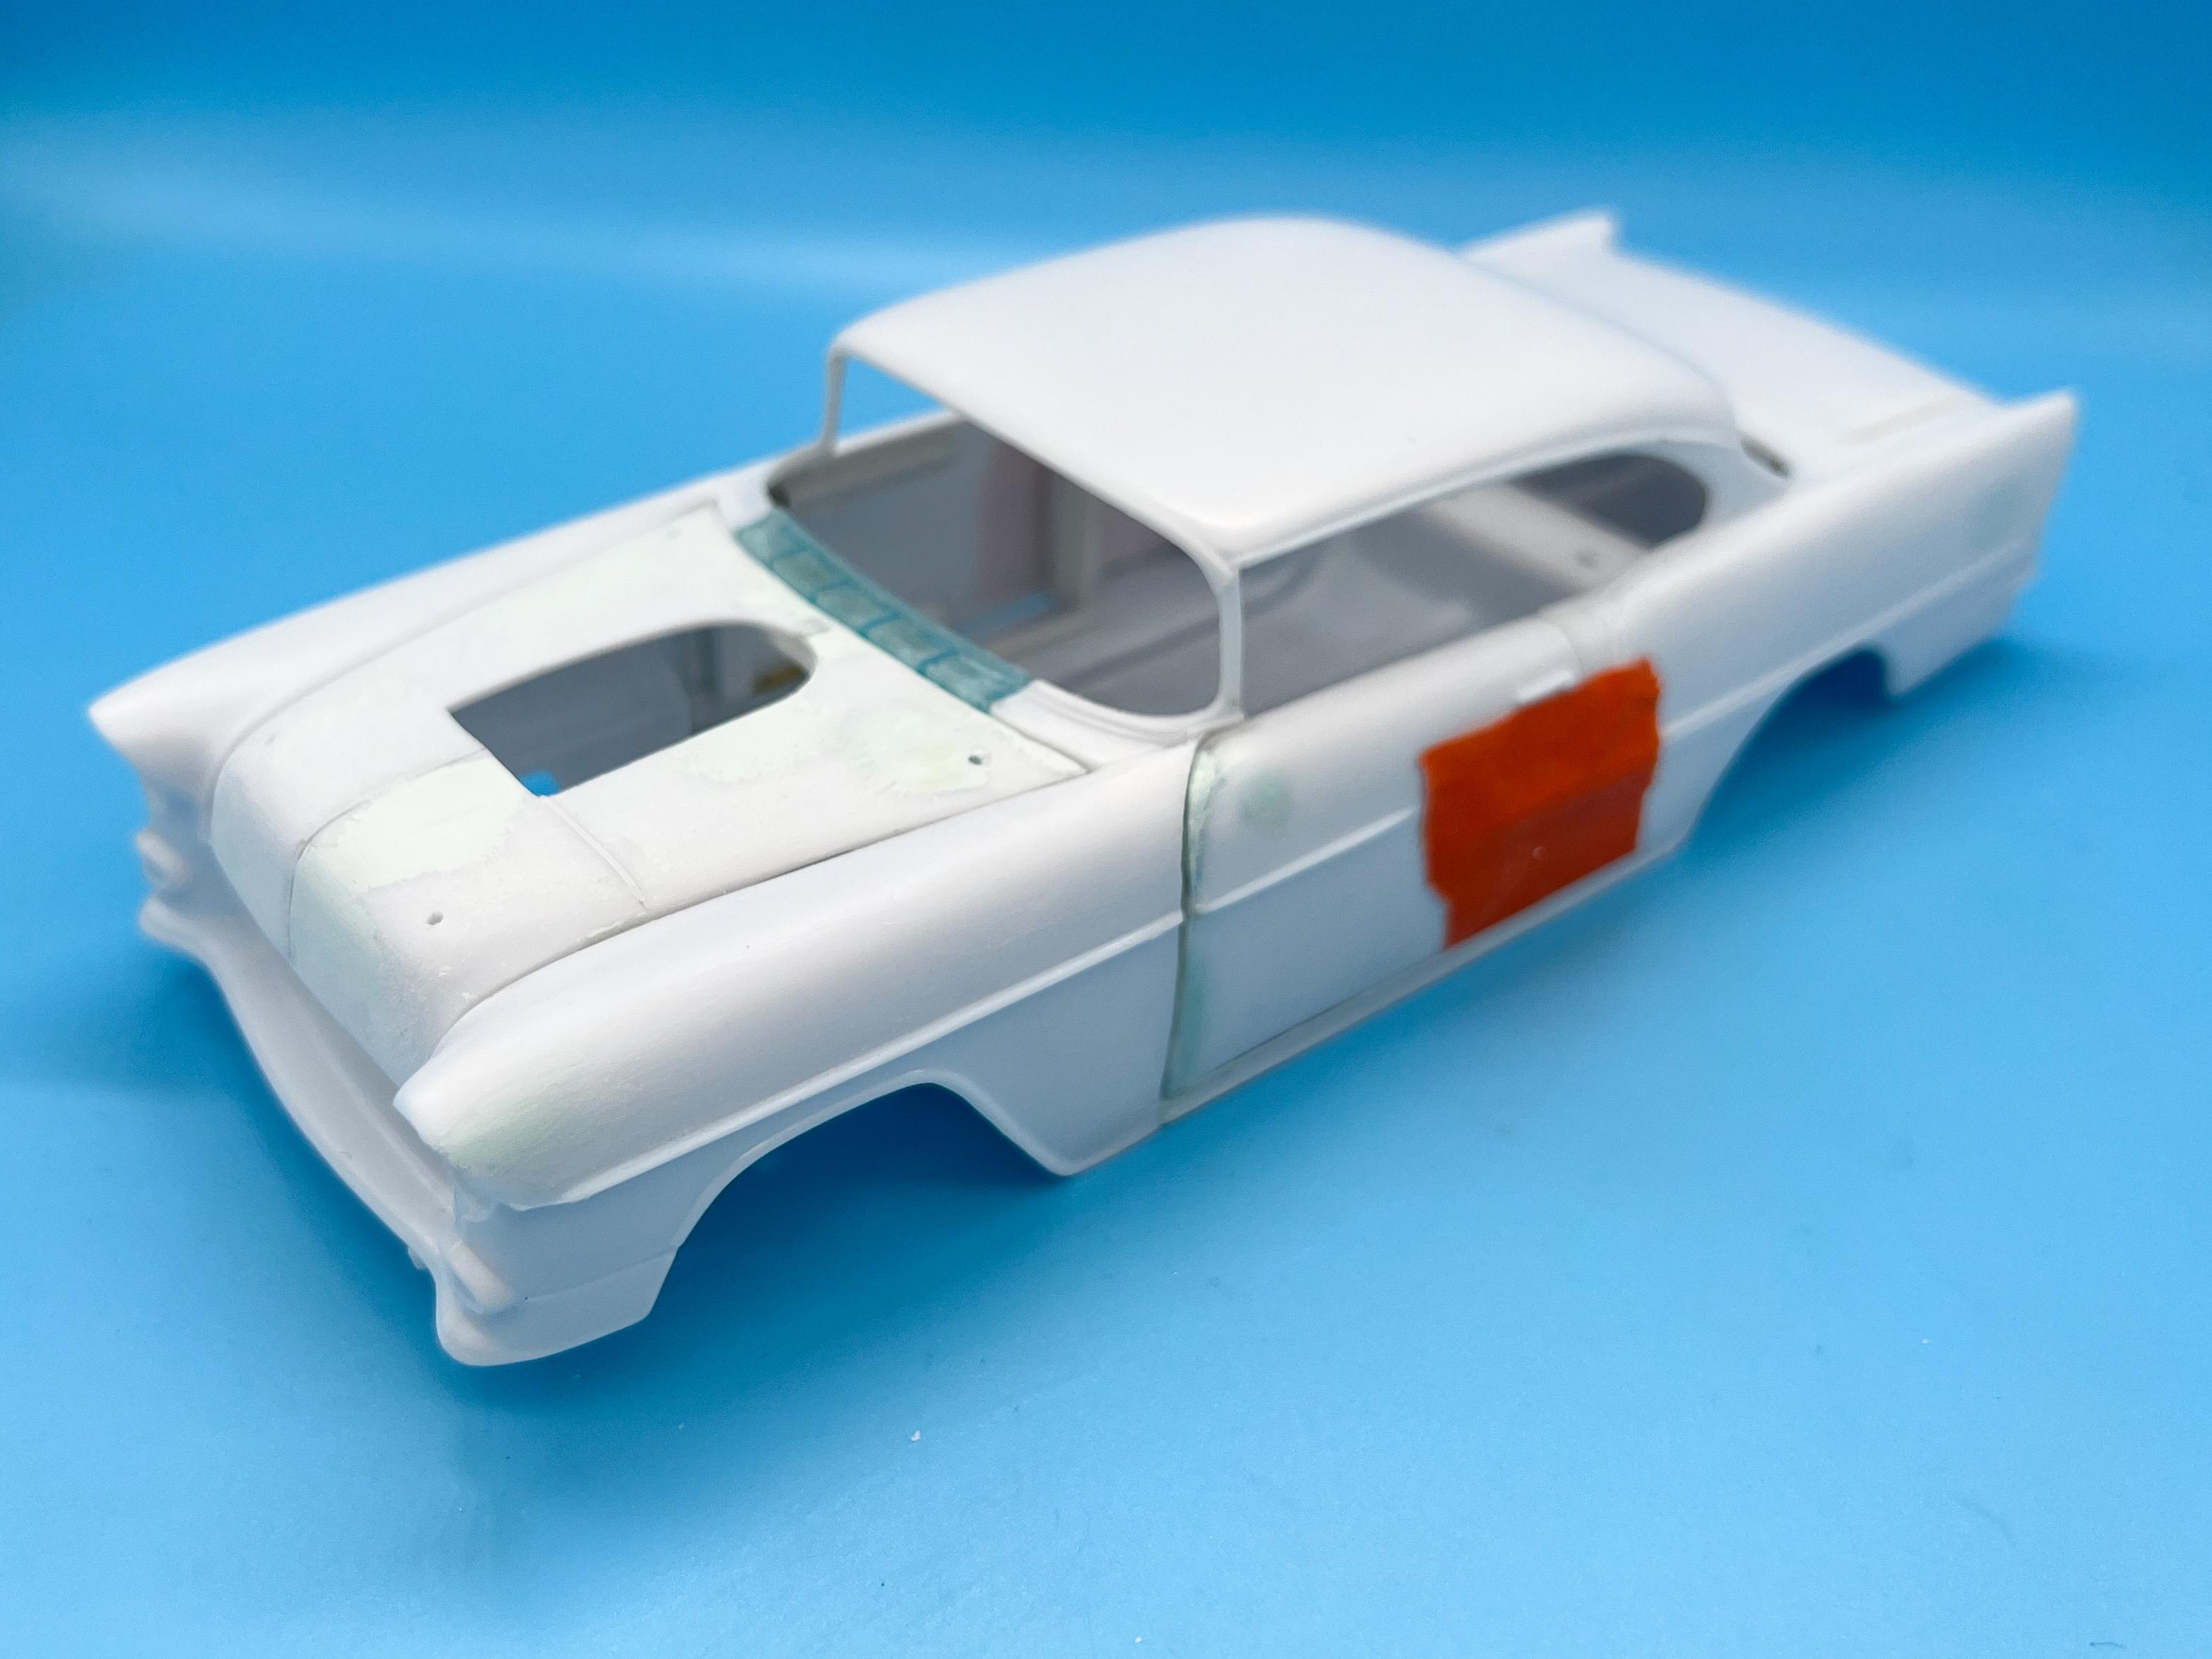
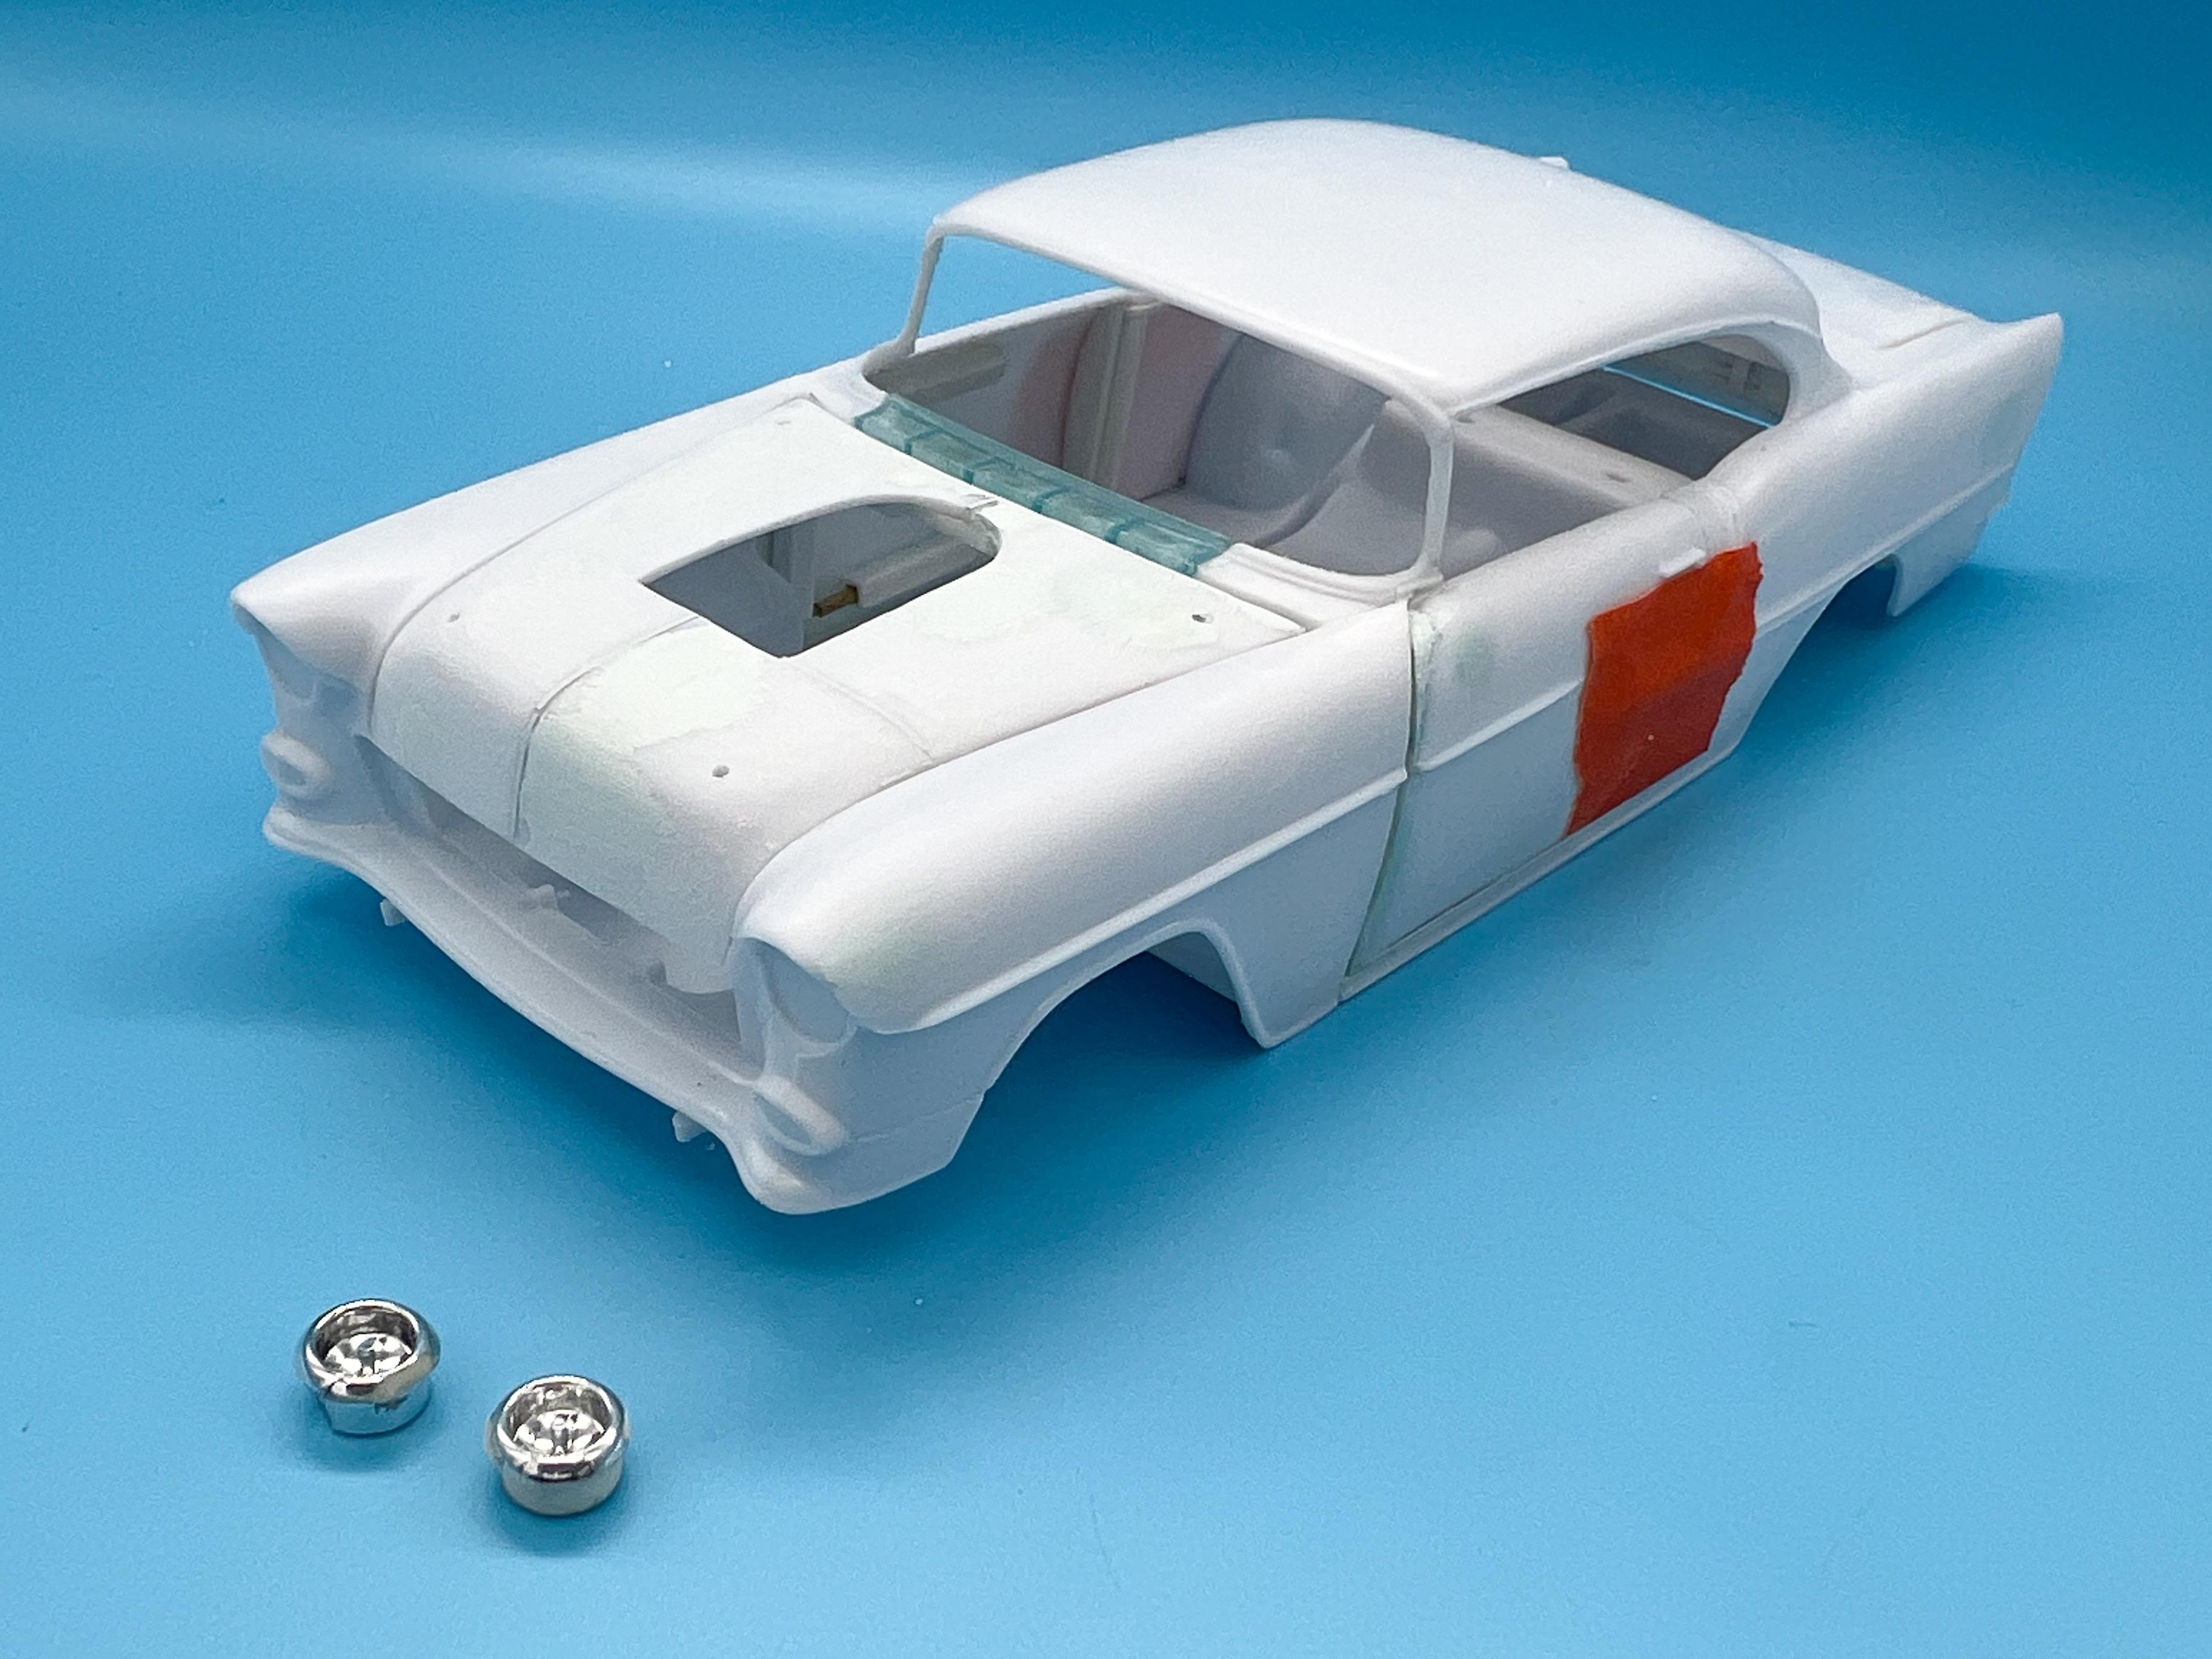
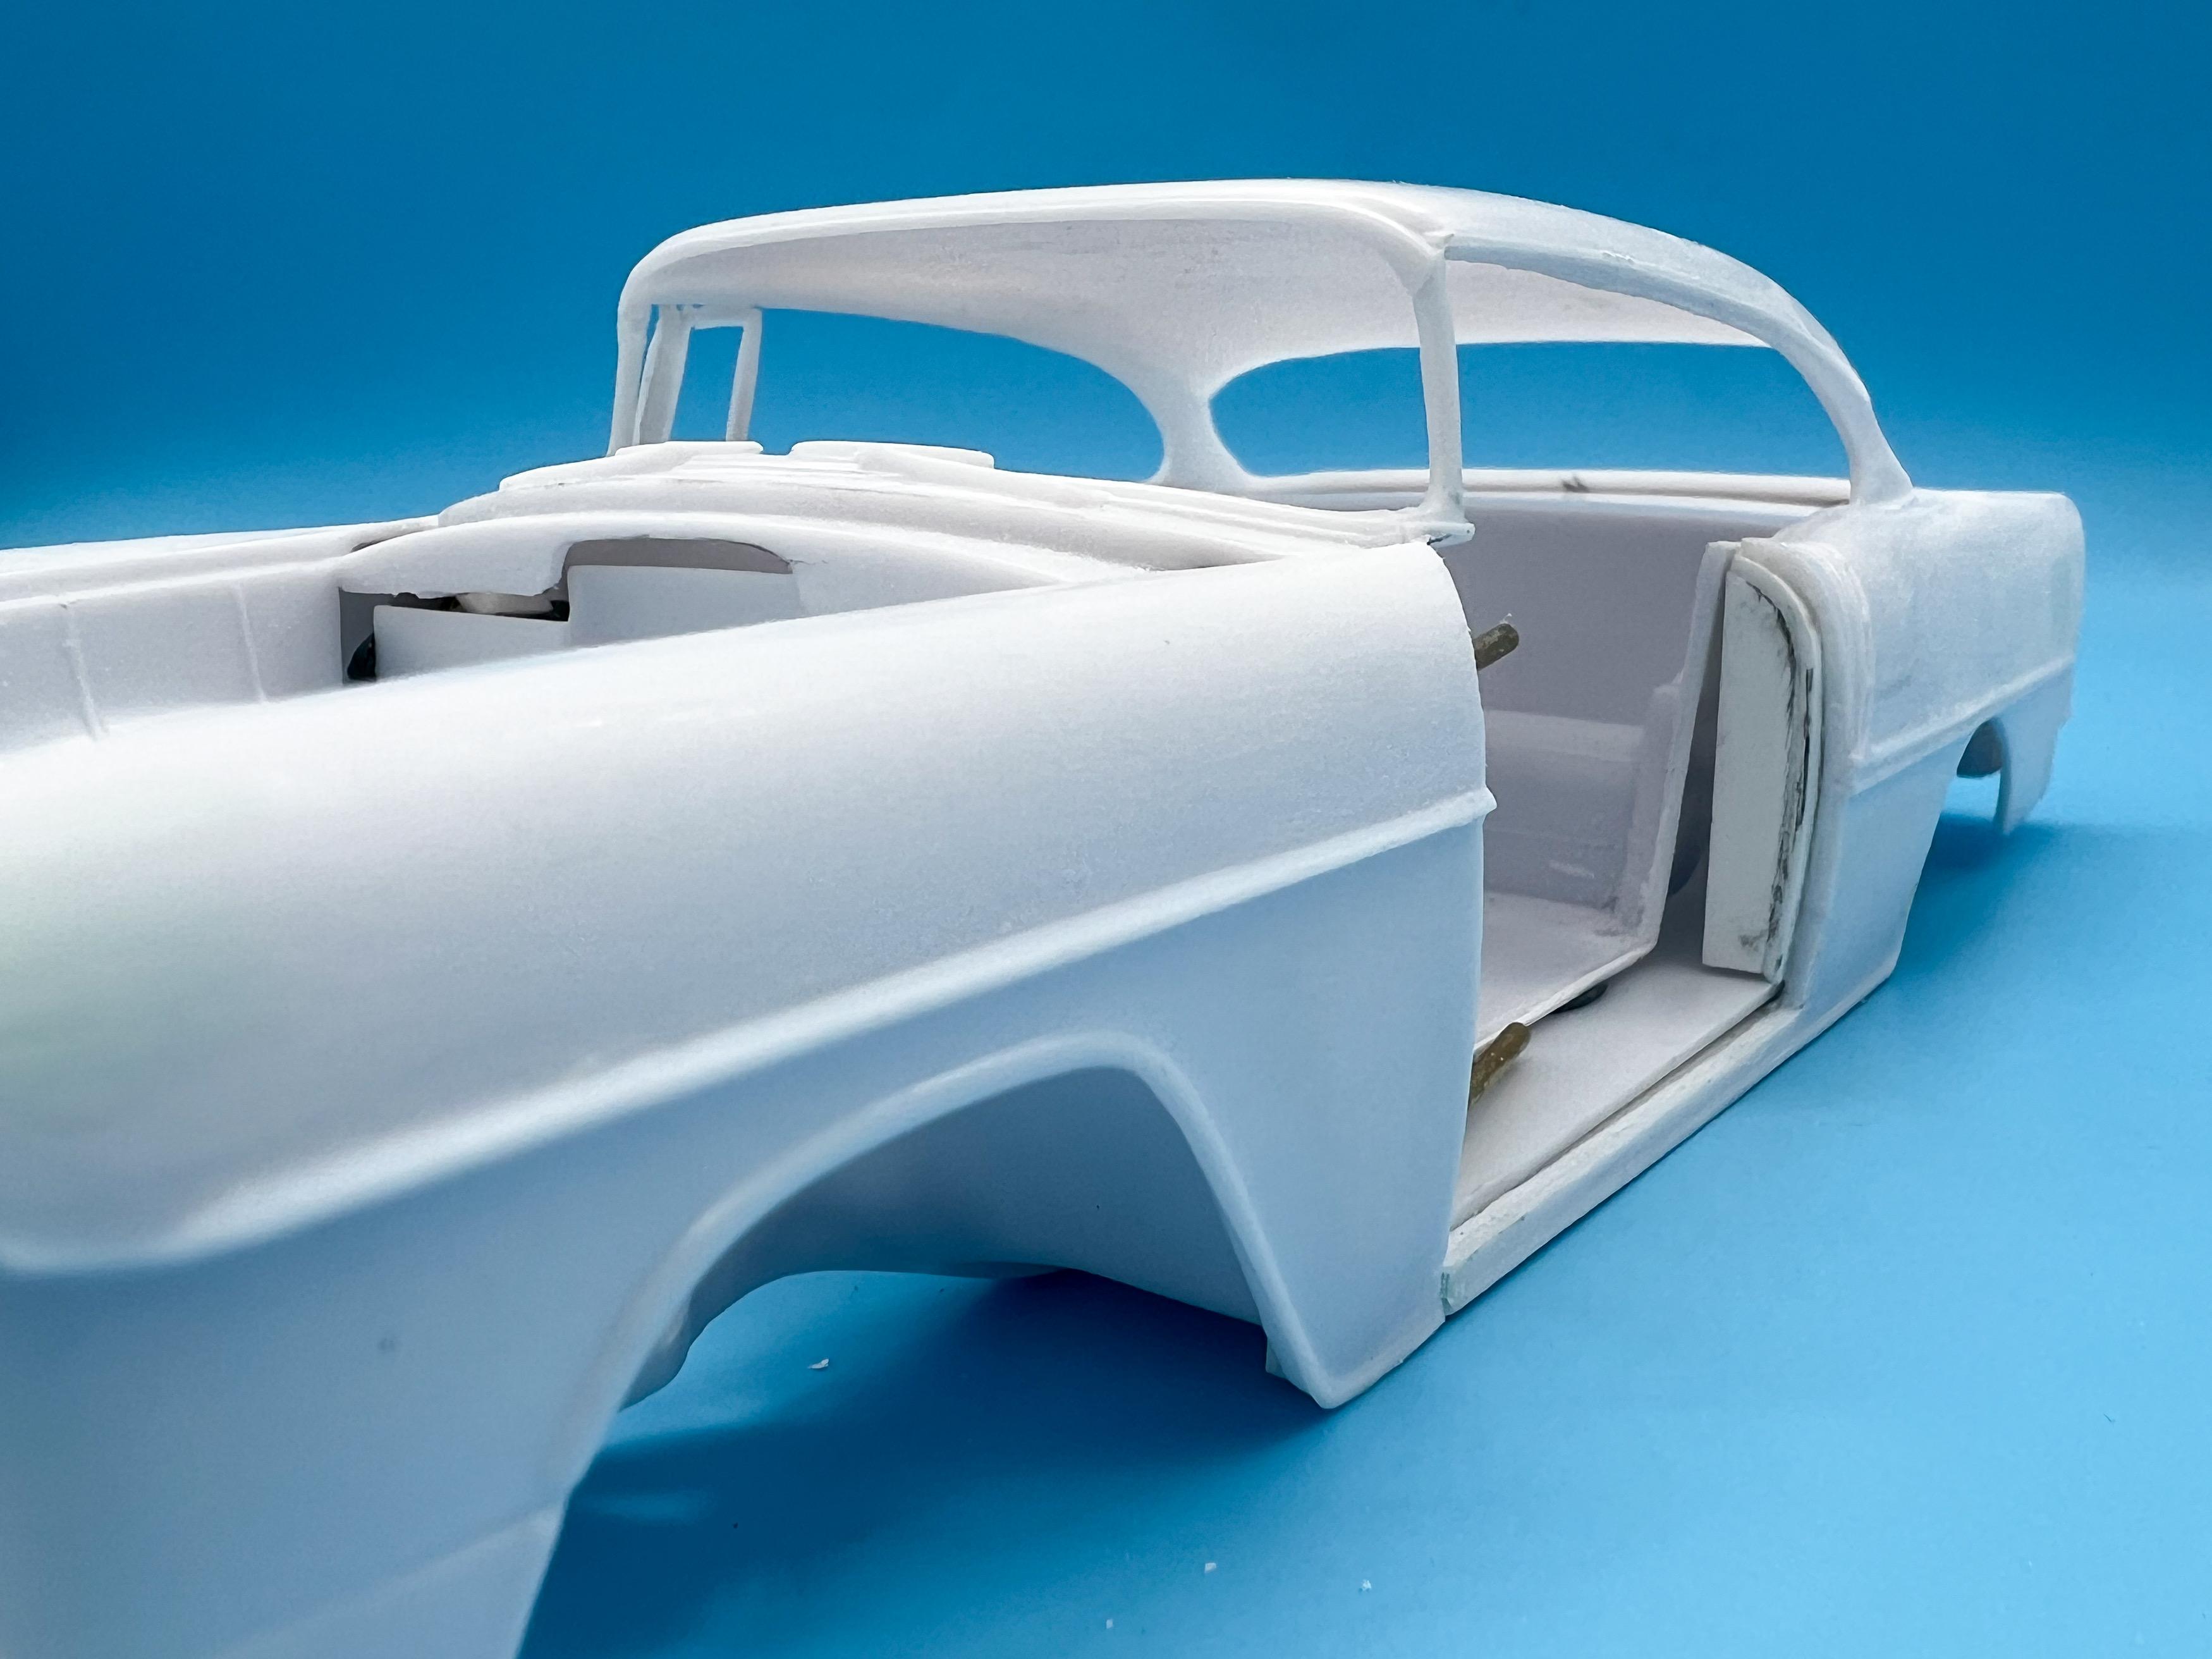
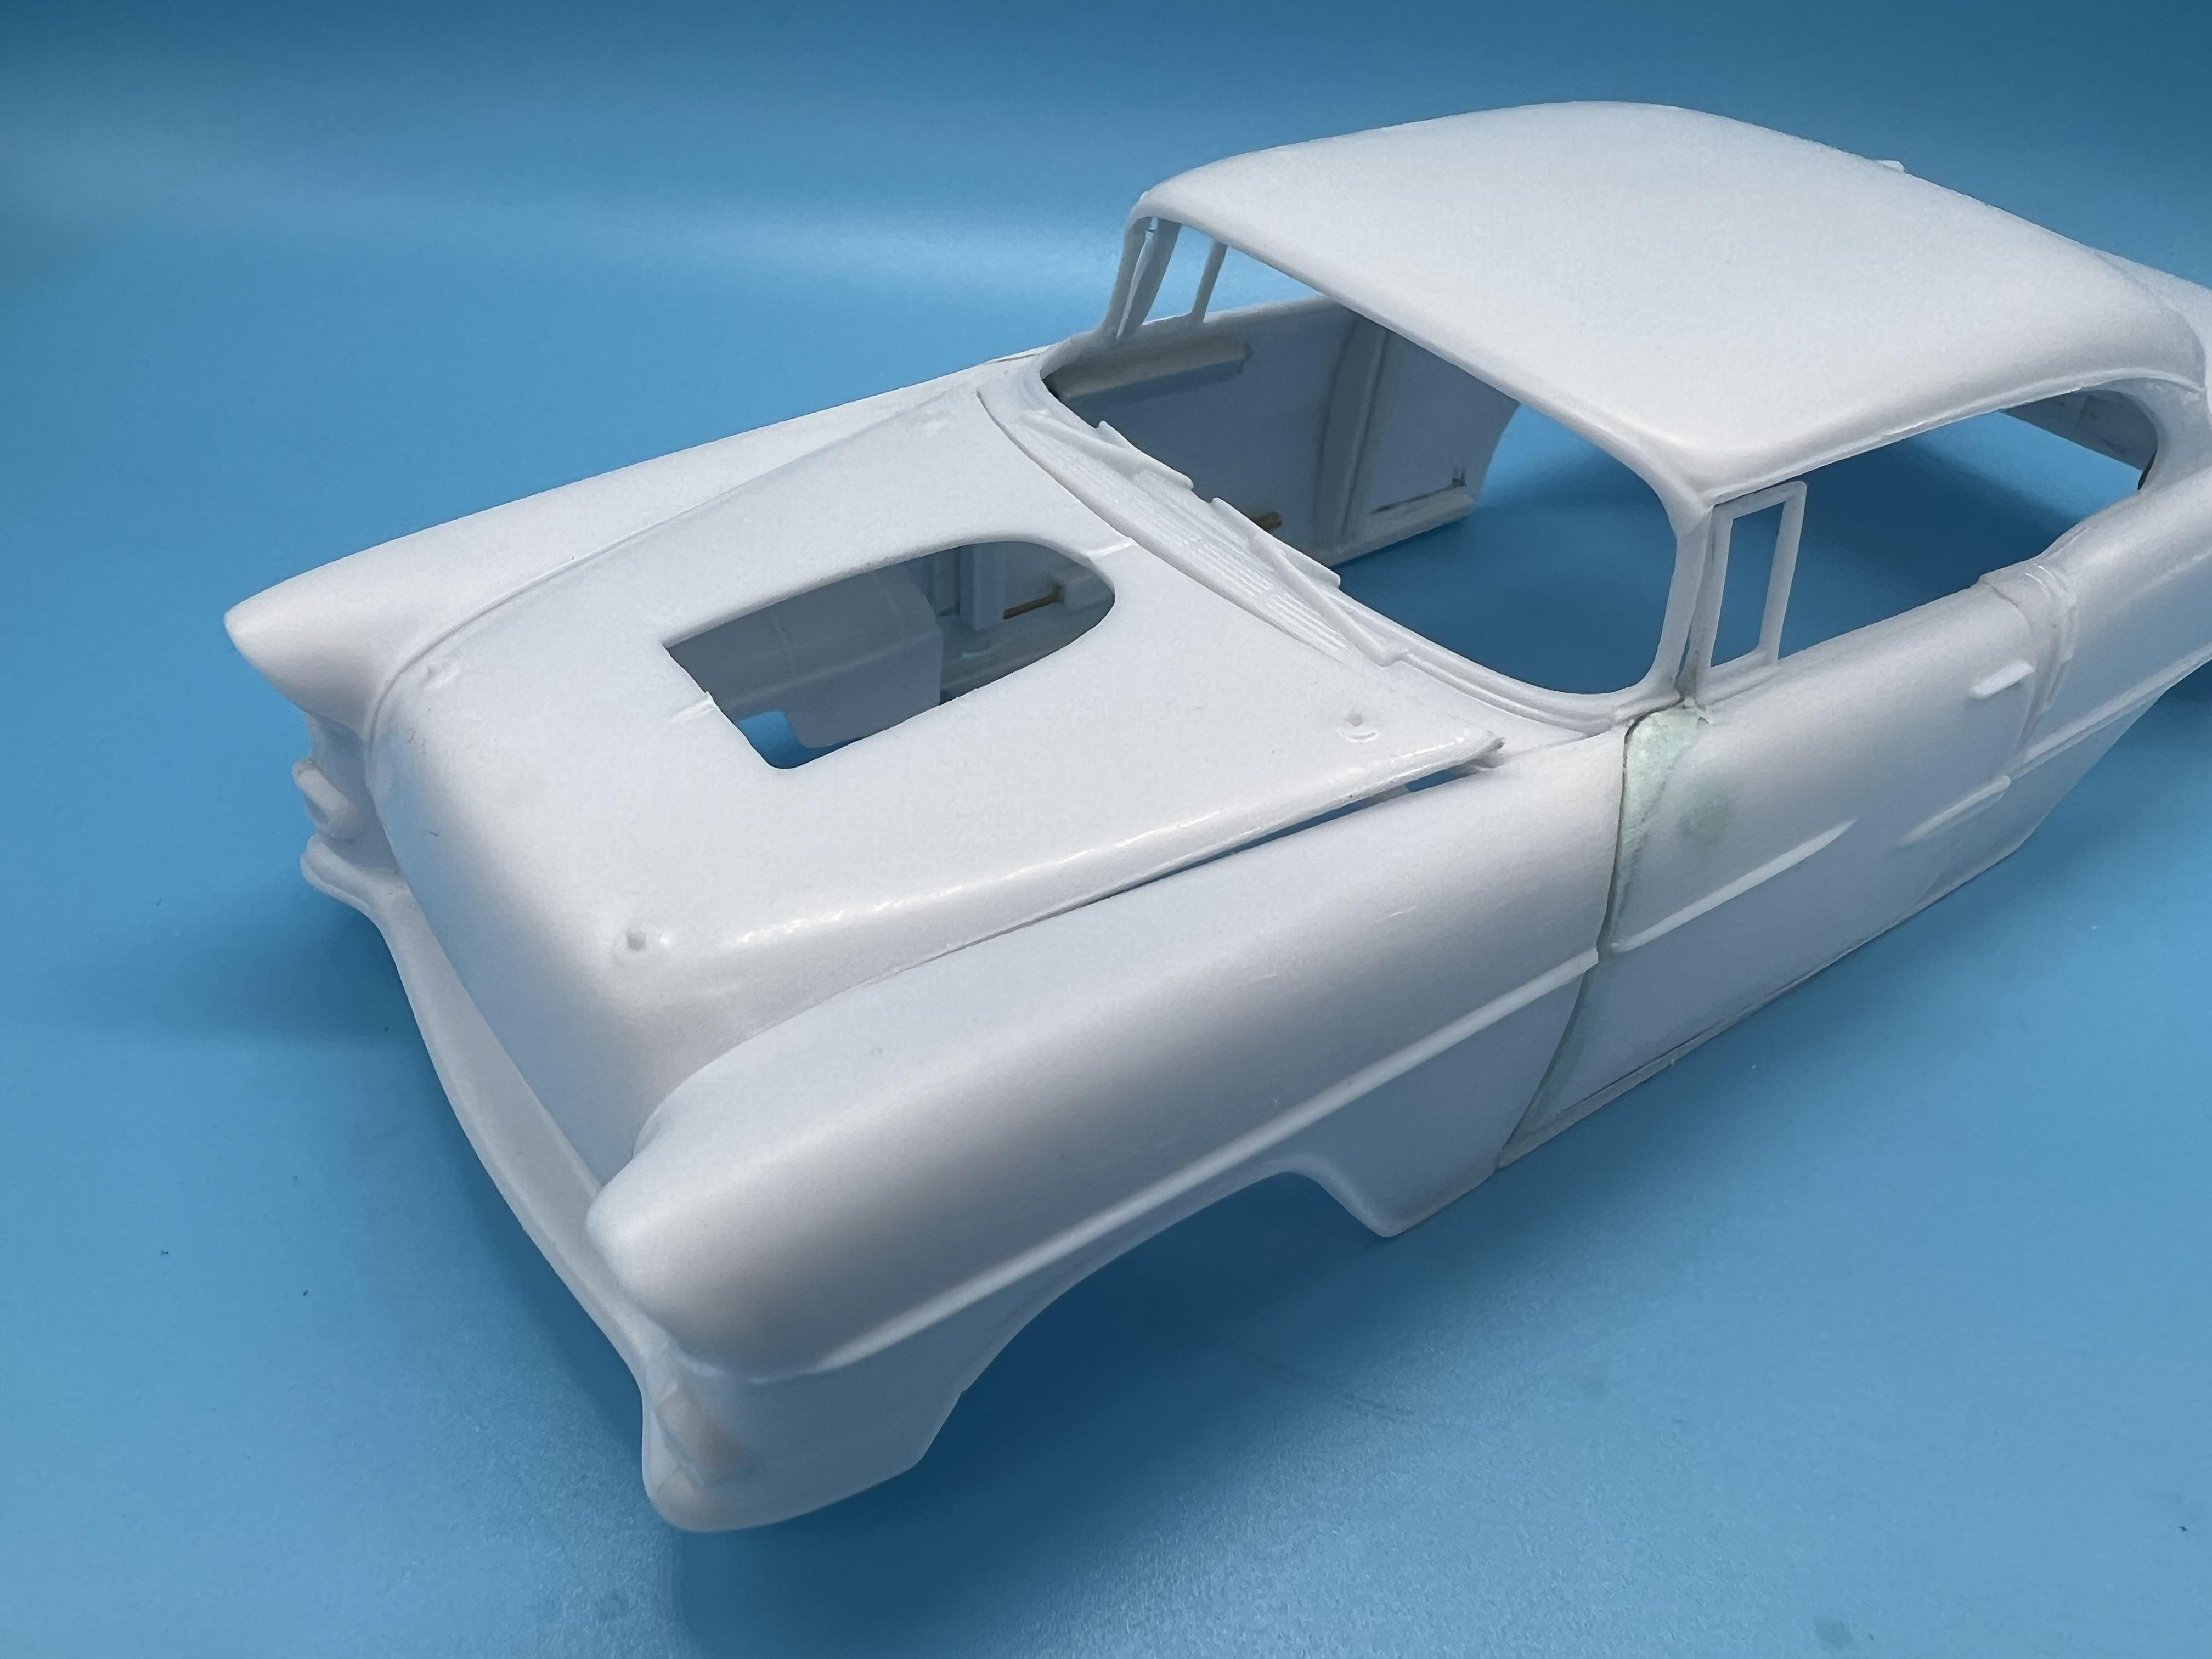
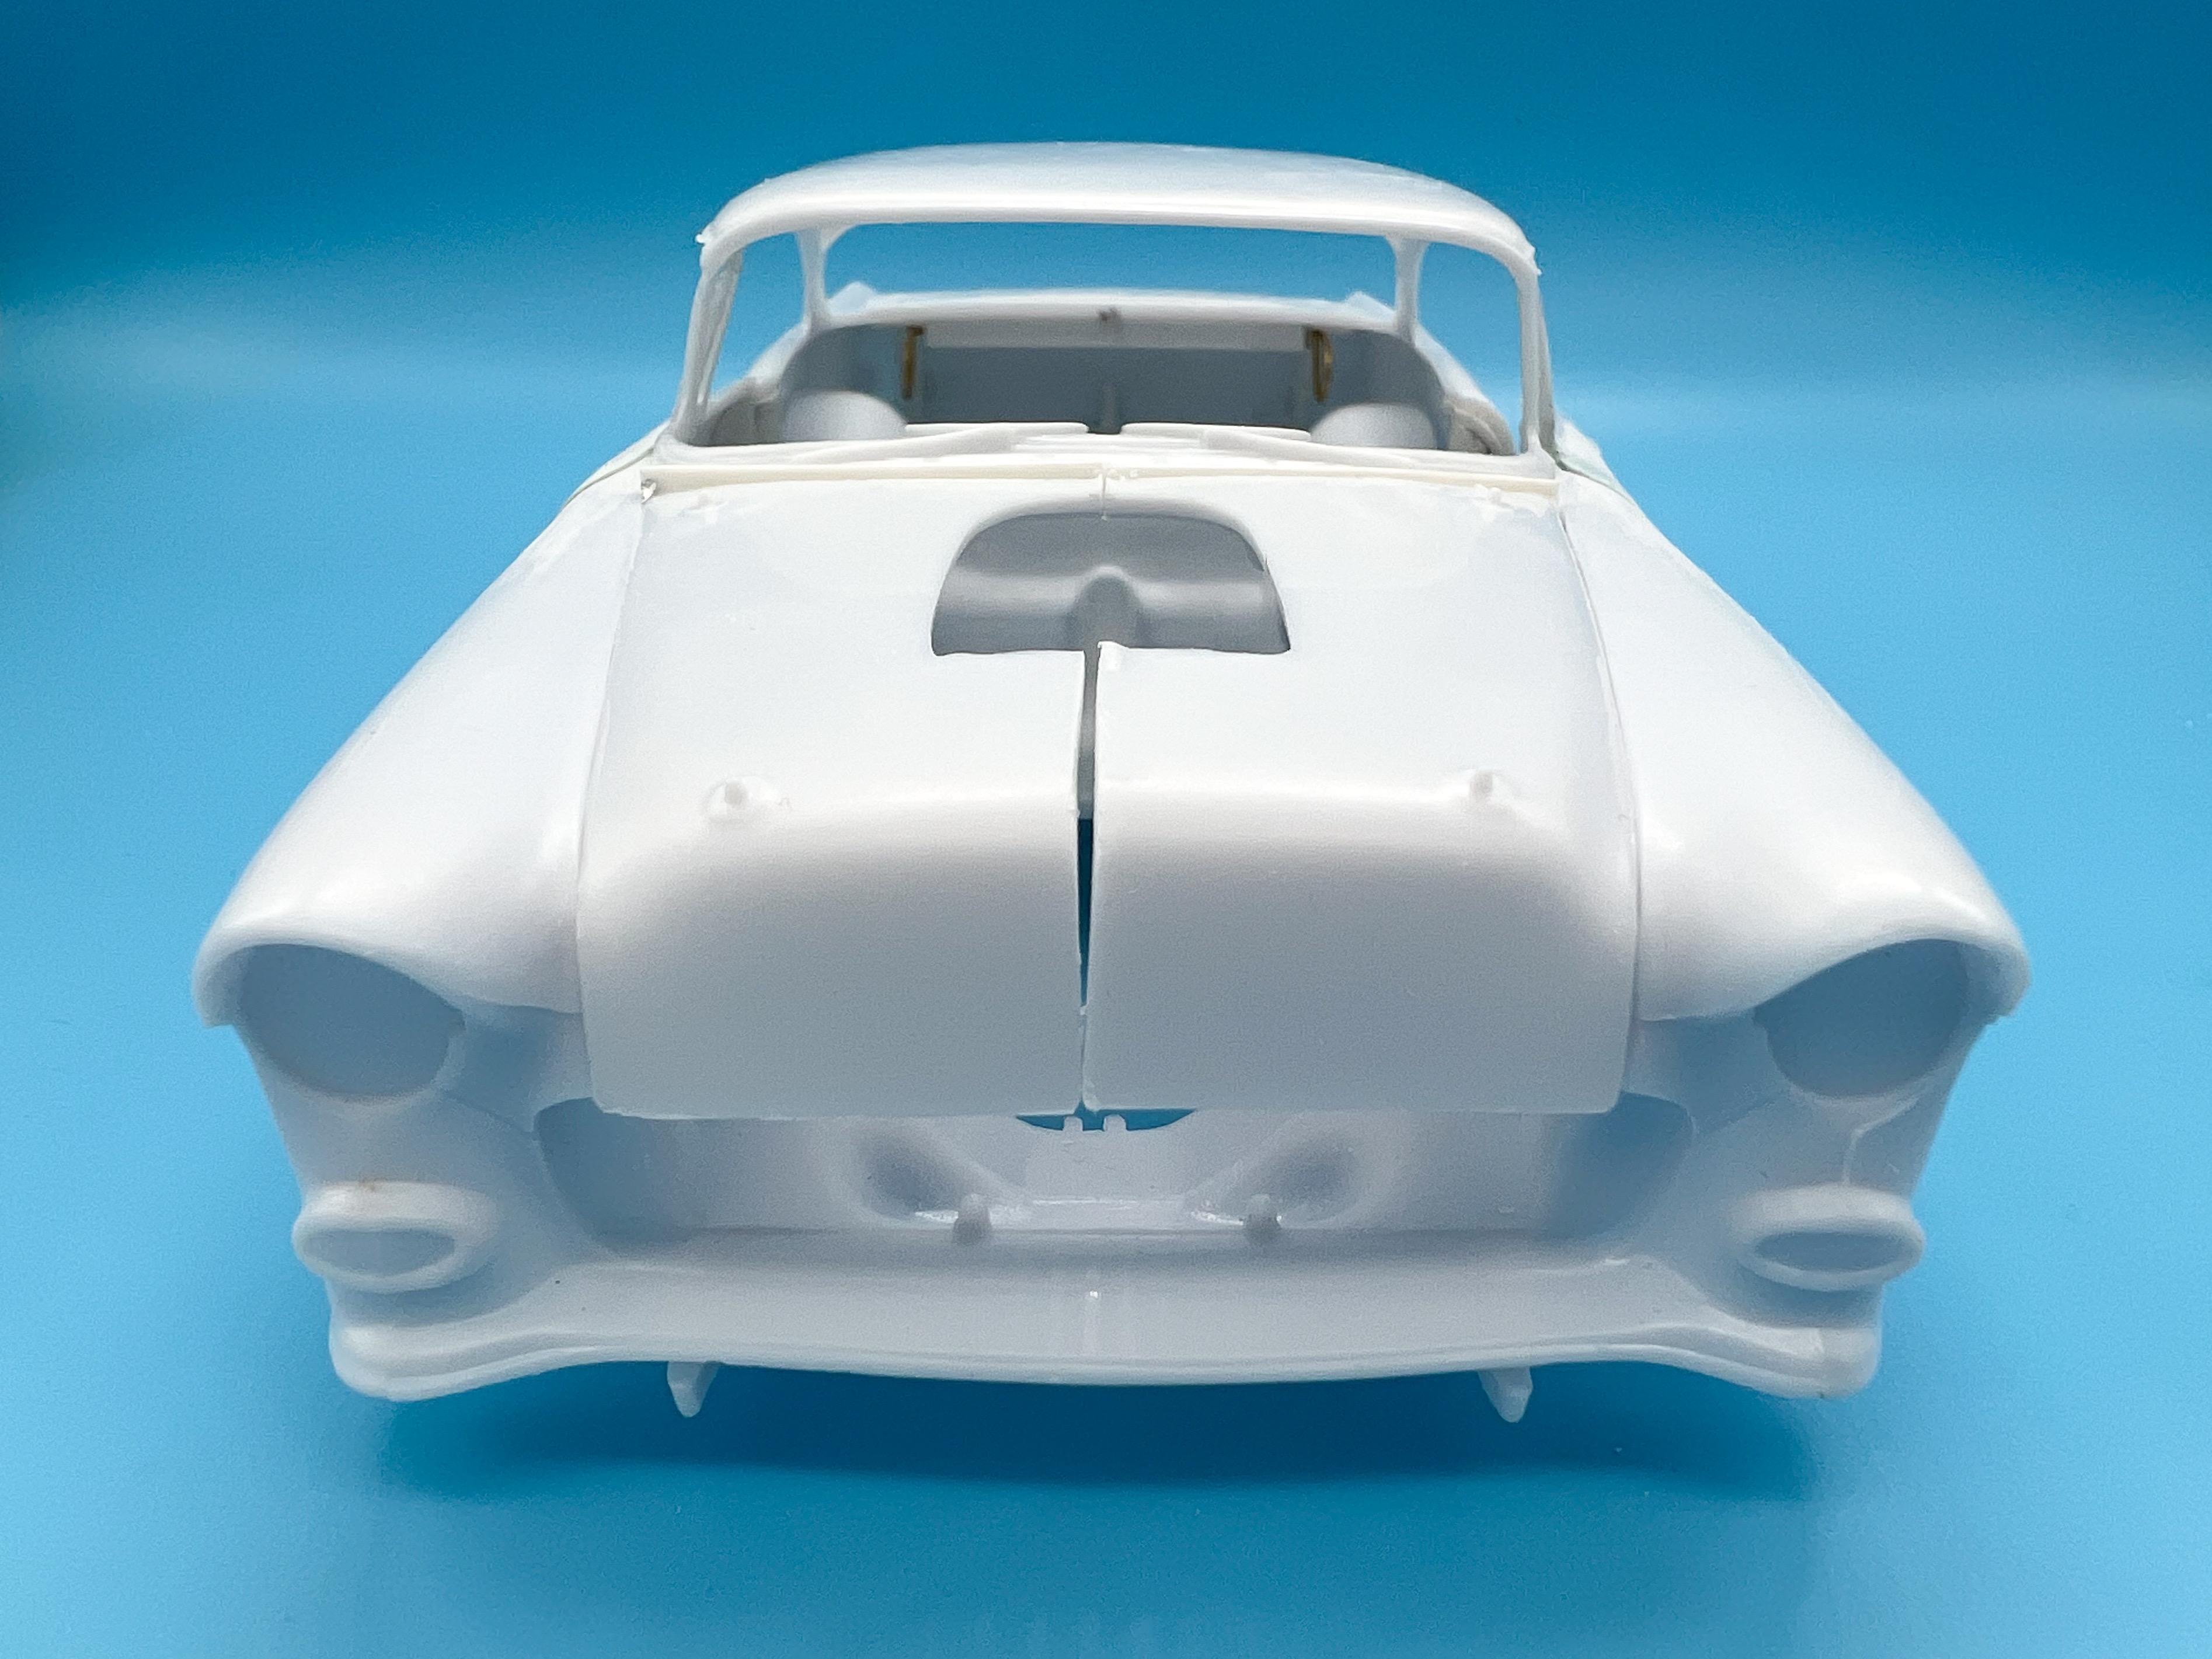
A little more progress…there’s so much bodywork to do on this before I can start getting to the primer stage but it’s gotta be done (and all of my own doing…) First job this weekend was making vent windows. Luckily, the 1:1 parts are pretty simple, but they’re small enough that I didn’t want to use styrene in case they moved or got damaged too easily…used some brass strip and round bar and got a start on them today: I bent that lip on the bottom edge of each of them to fit the curve of the upper part of the door, so I have a nice secure gluing surface…I got lucky with the sizes and they fit pretty well right out of the gate: And hopefully, they’ll be tough enough to not fall apart or get ripped off too easily: I can add some additional detail to these too, now that I’ve got a solid base to work with…plus I’ll need to get some windows in there, obviously… @TransAmMike had raised the point of the firewall being a poor fit, so I checked mine…guess I got lucky again because mine fits ok, although I don’t like those holes you can see on either side: A little styrene strip and some sanding fixed that little issue tho: Way better: Speaking of holes, now I opened the trunk, you can see a bunch of negative spaces that should’ve be seen, so I made a ‘floor mat’ from some patterned styrene sheet: Looks like this, in place: A lot of these gassers would run a big heavy truck battery in the trunk, apparently, to help put more weight over the rear wheels, so that might be a nice detail to add back there - plus seeing as there’s a stock fuel tank in there, but no filler on the rear fender anymore, adding a filler neck would be smart. The box art shows a Moon tank out front, which mine will have too, but for actual street cruisability I think having the rear tank functional too would be a good move. I’m trying to focus on getting everything related to the body handled before moving onto the next steps…I did start a related side-project though to display with this build…back to removing molded-in exhausts! Oh, and I added some bracing to the inside of the trunk lid…not super accurate to a stock 1:1 trunklid, but it looks like the aluminum bracing on some aftermarket fibreglass pieces that I found online so that’s what this one is now… Thanks for looking…more soon, soon as I’ve done more!
-
Carvana offered to buy my car I wonder if I could maybe get $560 out of them?
-
Ollie's strike again
OldNYJim replied to GLMFAA1's topic in General Automotive Talk (Trucks and Cars)
Yep, I got that too:
-
My take on the most famous ‘55 gasser street machine’…
OldNYJim replied to OldNYJim's topic in WIP: Model Cars
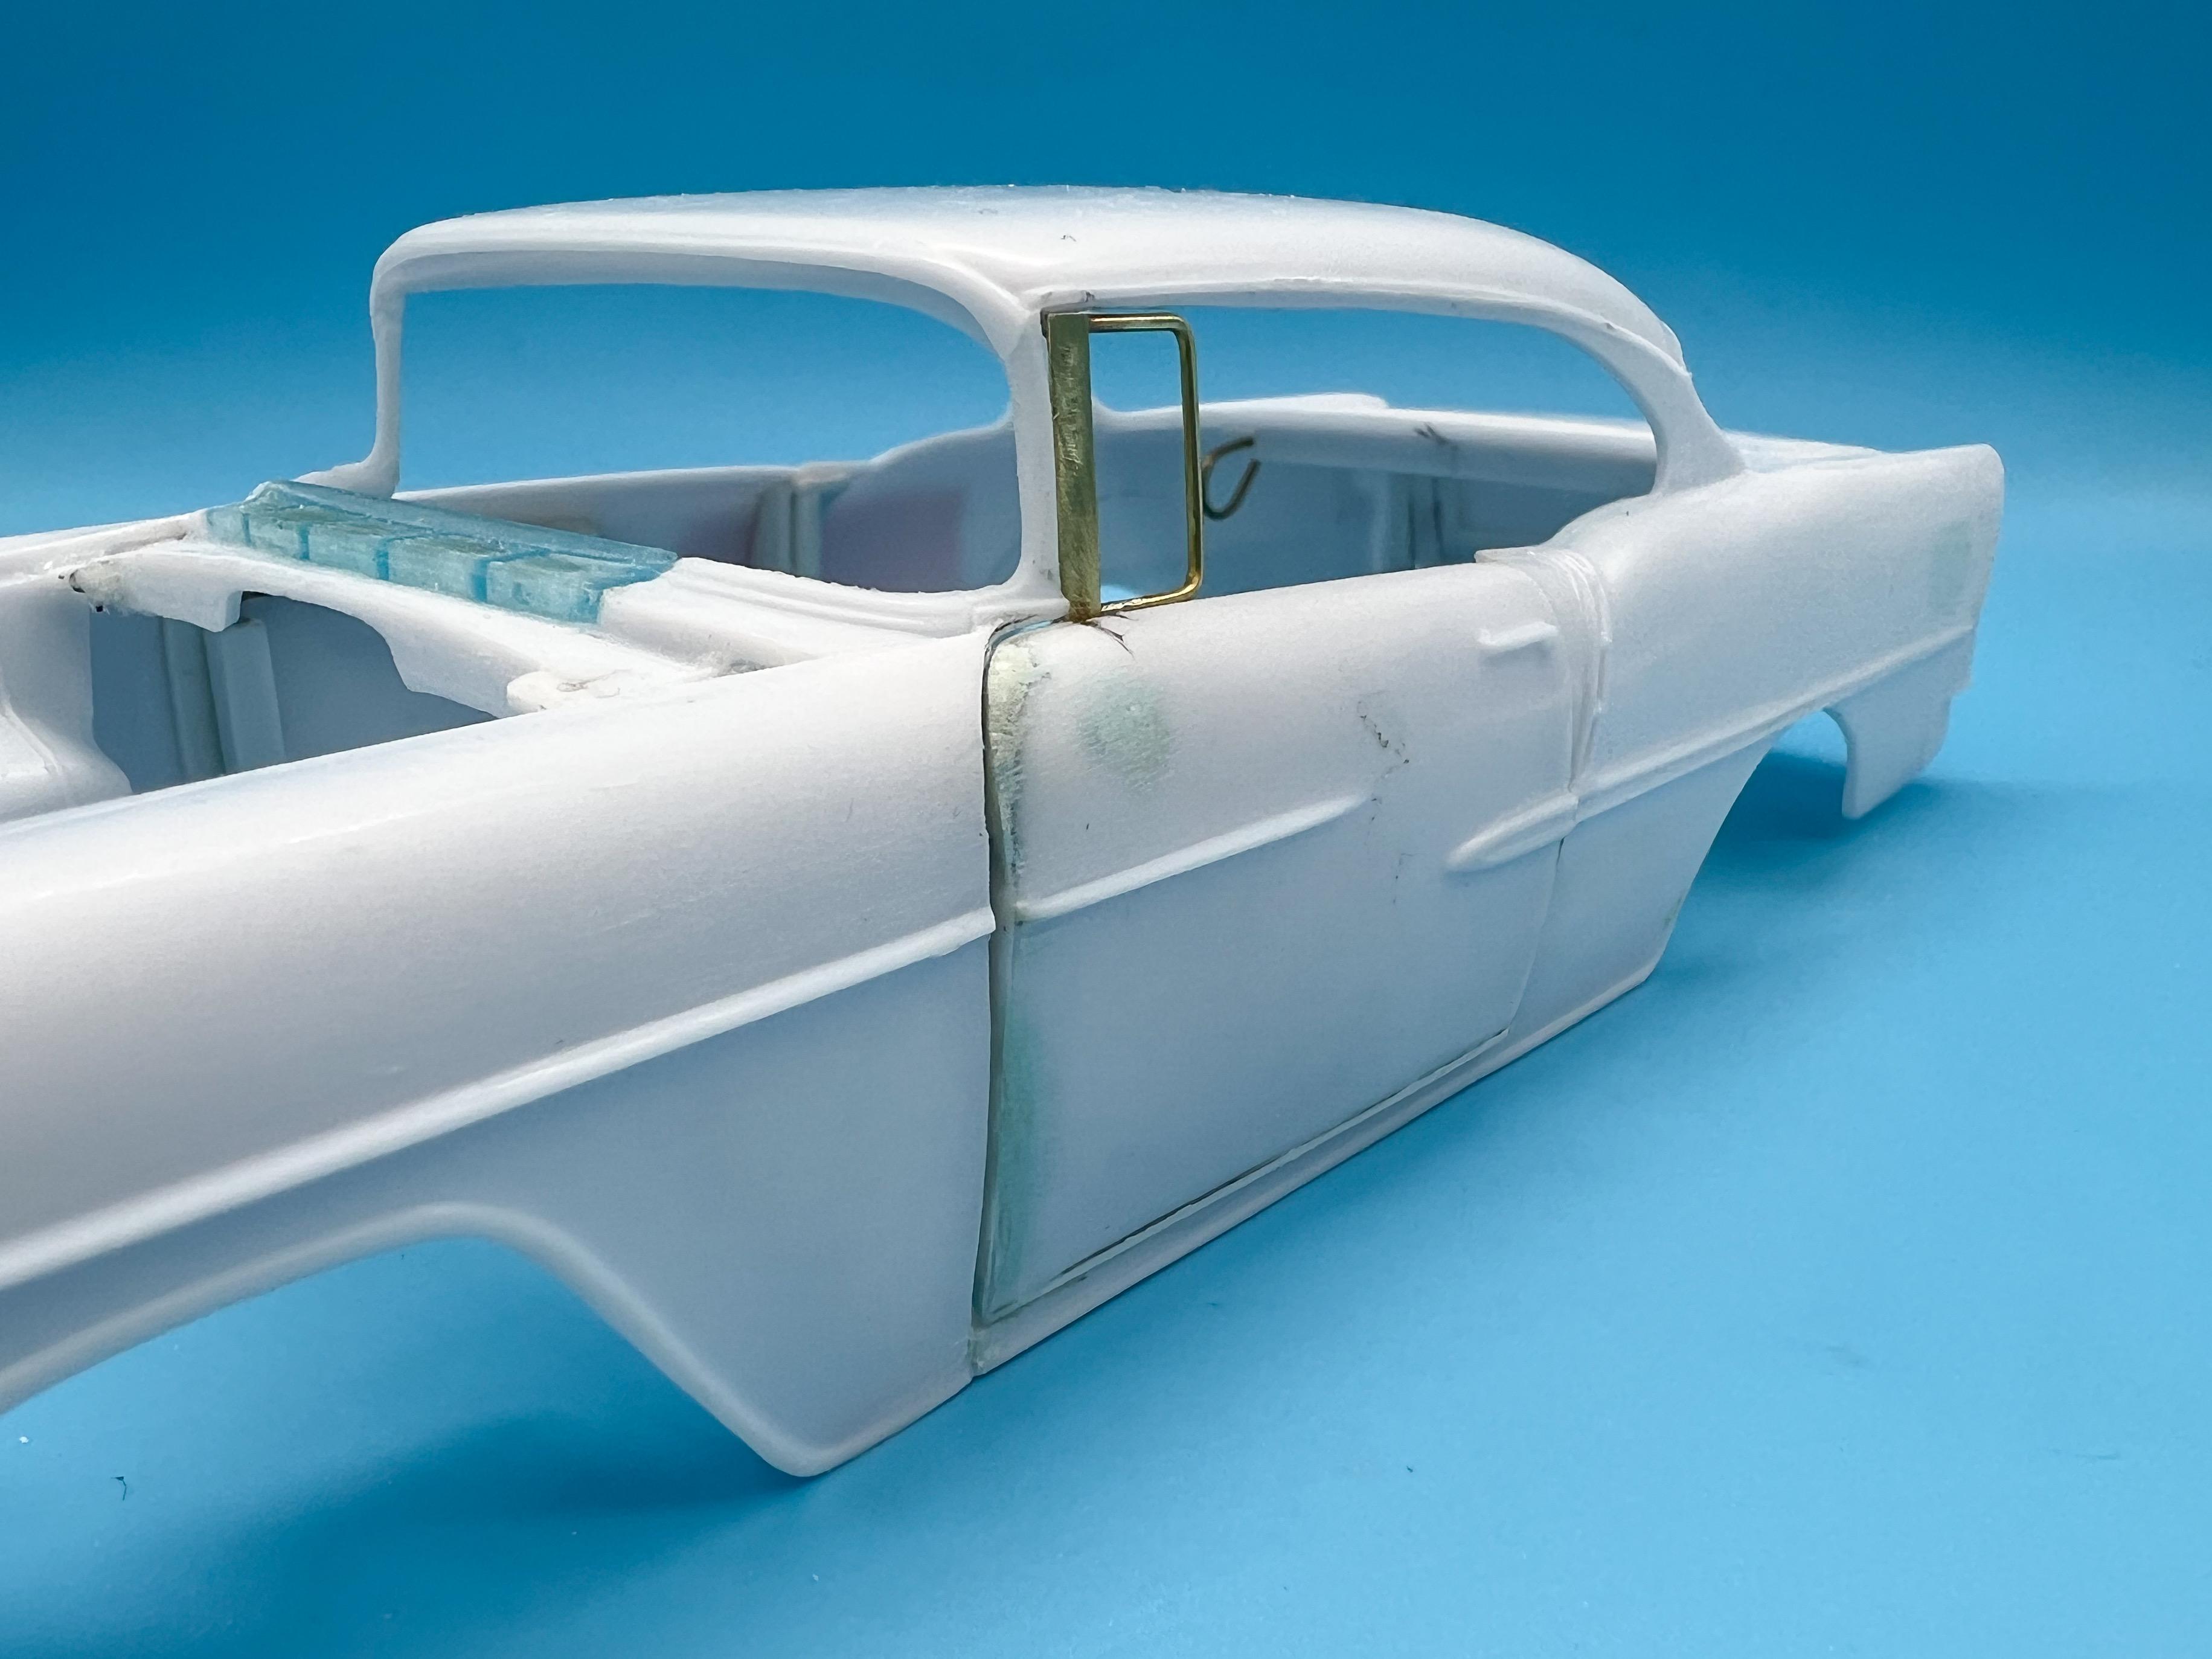
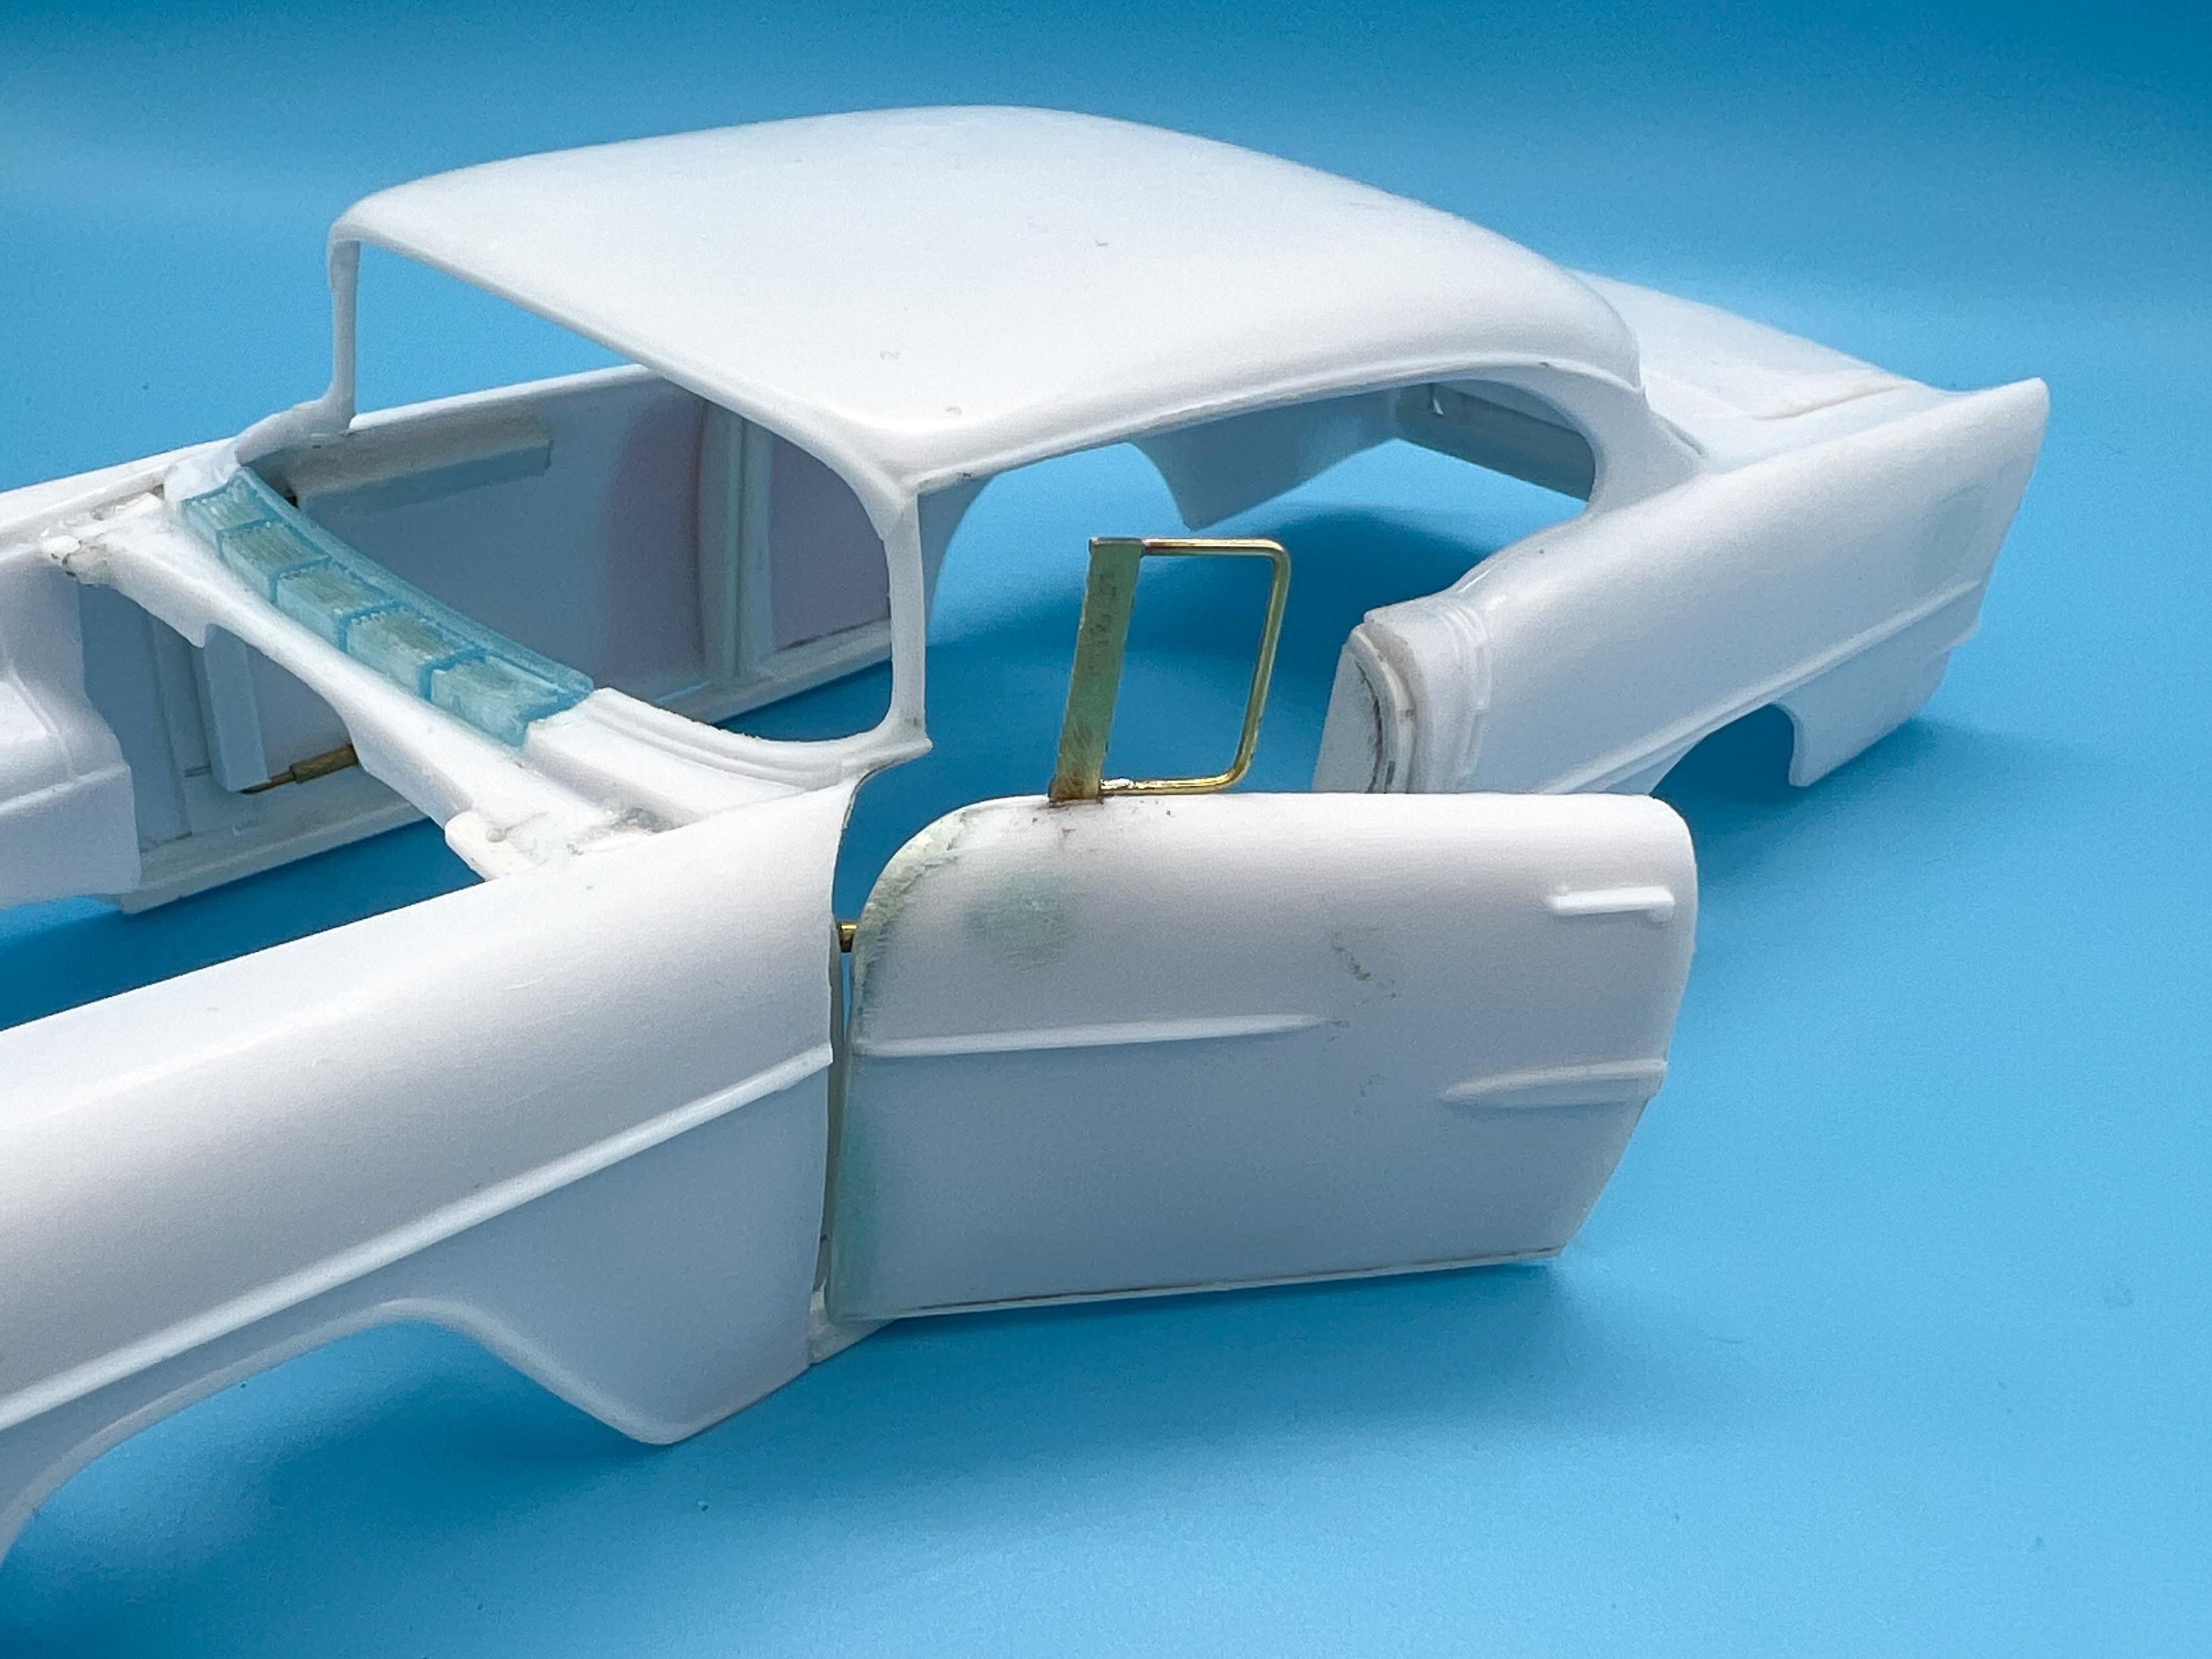
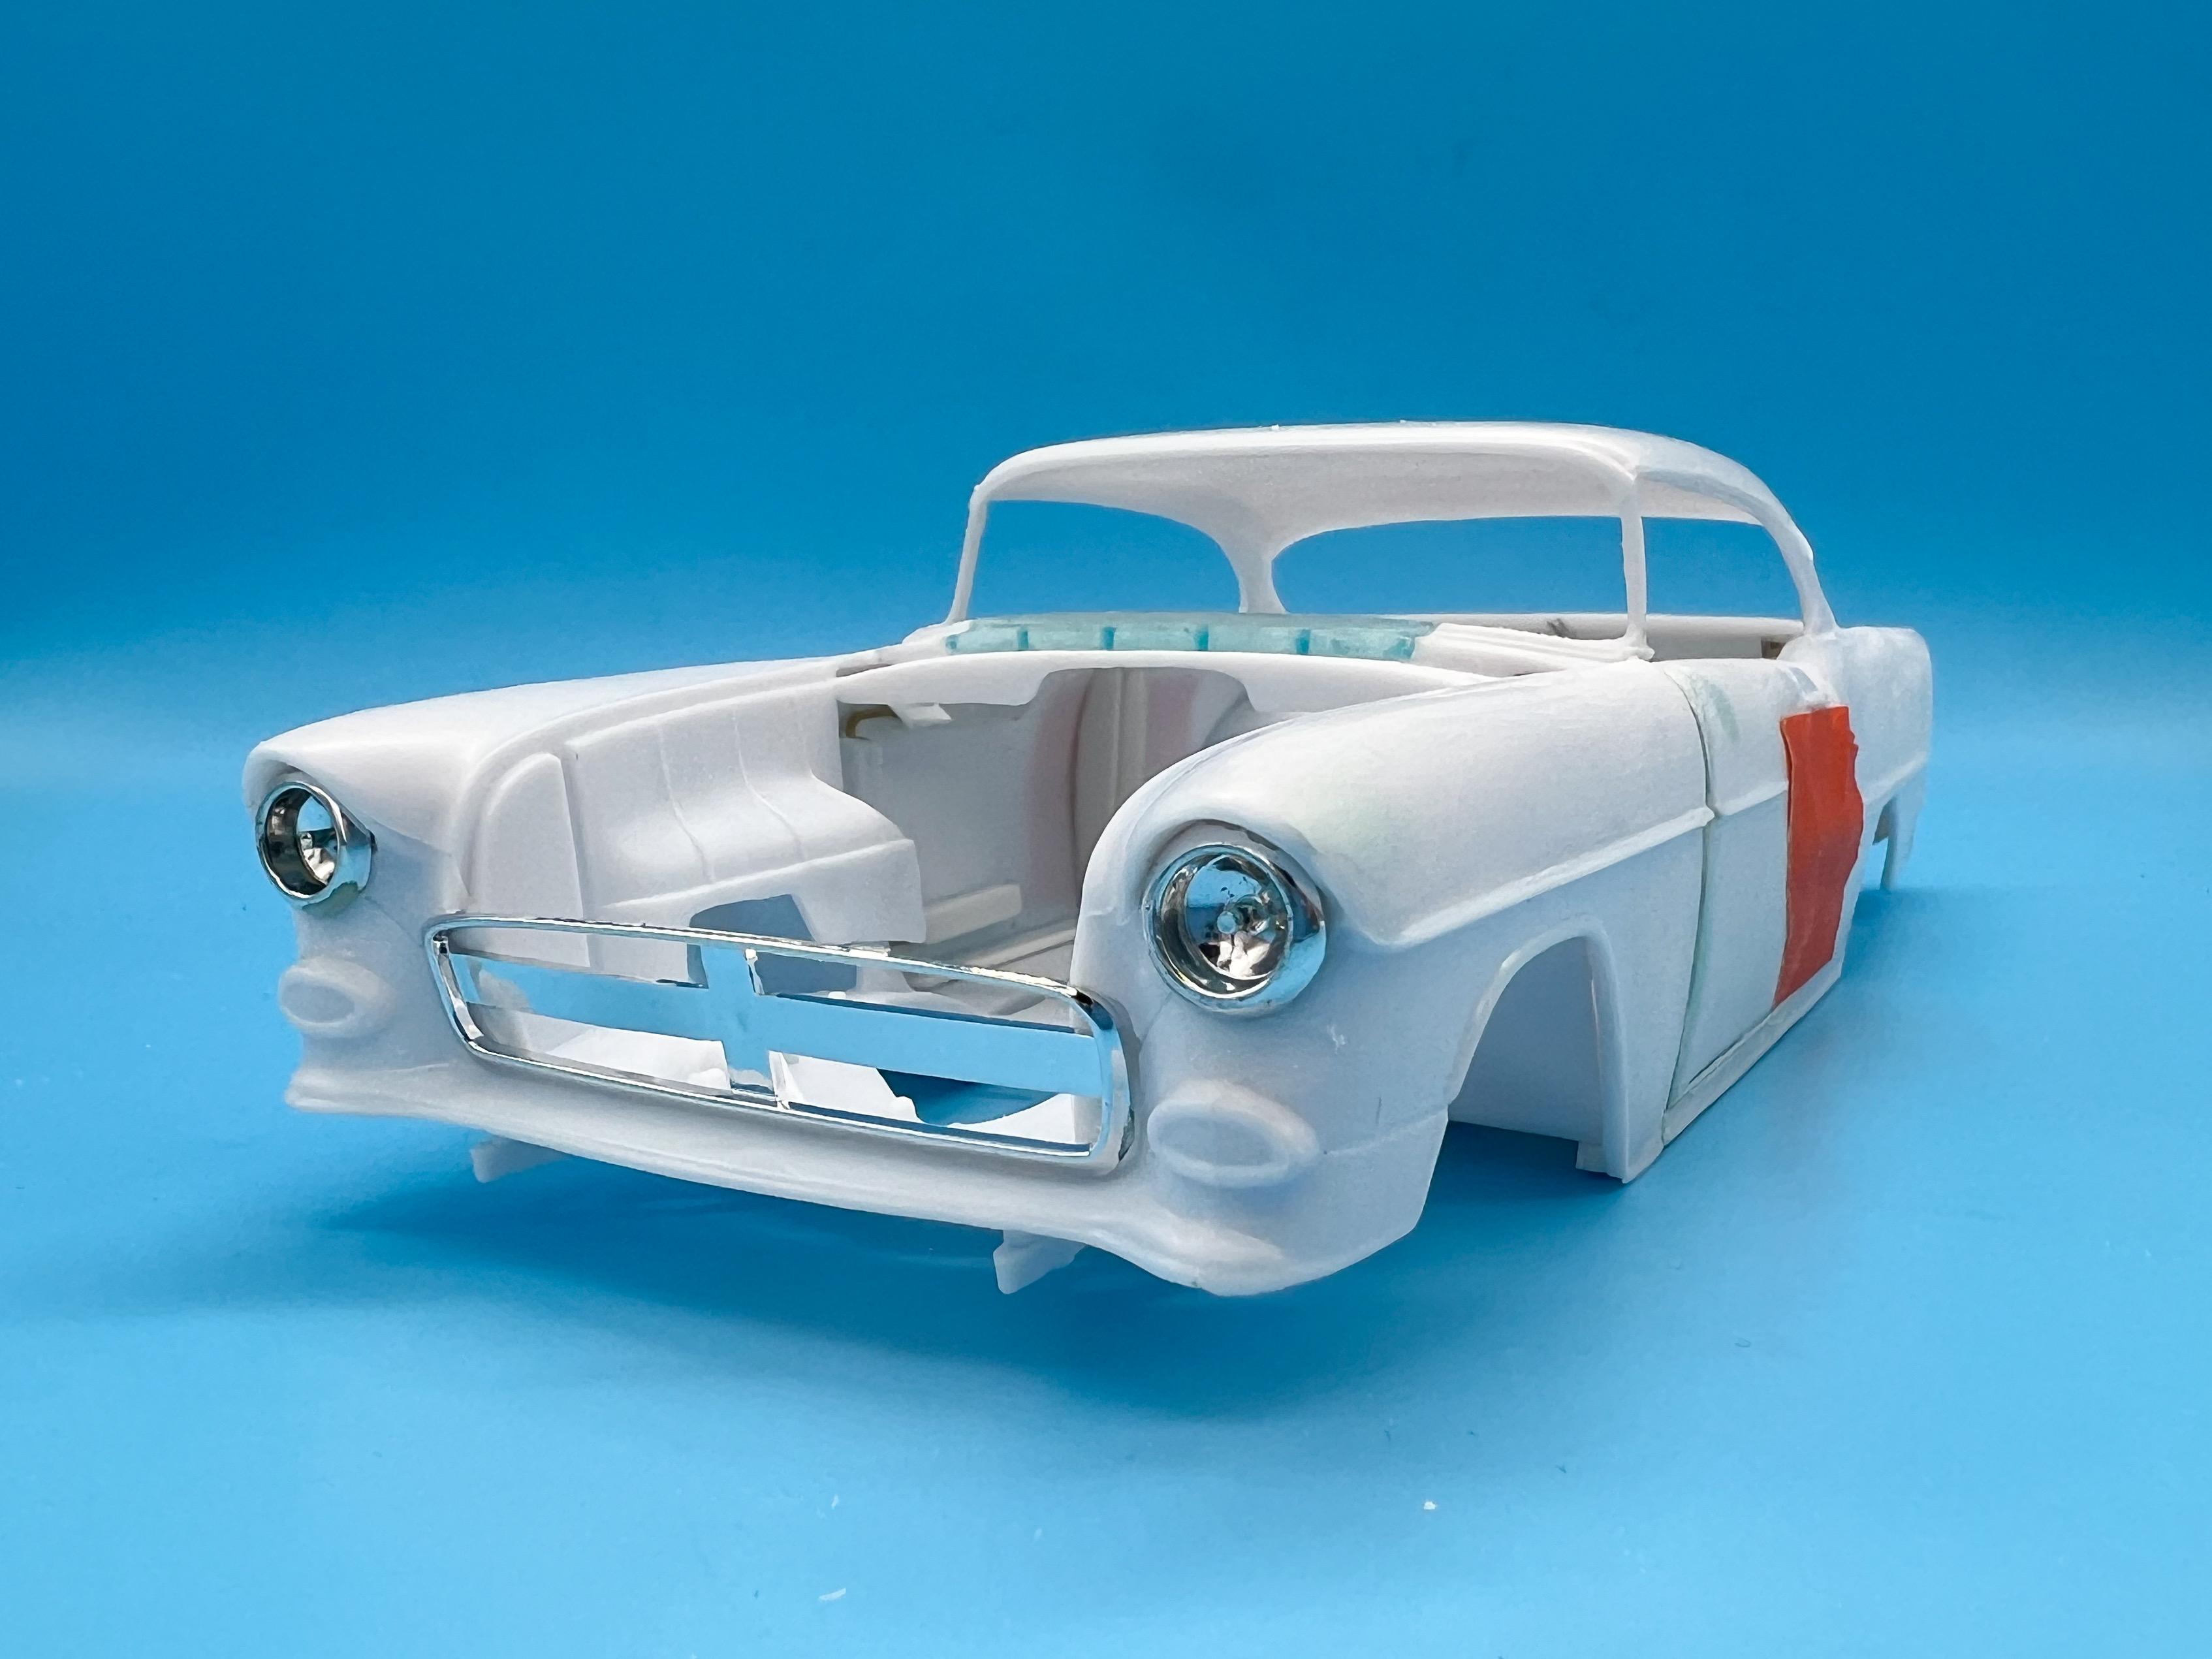
Thank you so much fellas - appreciate the kind words! I have a plan…kinda ?. Need to figure that firewall out soon, I guess… Tiny midweek update… Removed the kit cowl vent and the molded in wipers, and installed my opened-up 3D printed version: I printed it a little ‘deeper’ than it needed to be so I could carefully shape the upper arc of it to match the body - it’s pretty close I think (but all those vents need cleaning out again ??) This kit comes with chromed headlamps, but I want real ones…found some suitable substitutes in the parts box: Opened up the body to receive them…looks WAY better I think! And I wanted to figure out placement for the hood pins…the kit has them molded in, so I drilled through where they should go when I was messing with the hood and then discovered they don’t align with ANYTHING under the hood whatsoever, just fresh air. Made some mounts for the pins to attach to: I would’ve preferred the front ones to be WAY further back and to mount to the back of the core support, but that’s not where they are in the kit hood, so…. Those oversize brass tubes are just there for helping me locate the holes…need to make some hood pin posts somehow I guess…they’re going to be a little awkward to make in scale I think but I’ll figure something out. Just a quickie update - thanks for looking y’all! And if anyone has a lead on 1/32” brass square tube or rod, I’d love to hear about it… More soon!
-
Scale Auto used to only allow 3 pics per post, even if using your own hosting (which I think was the only option anyway). I once had a project where I was trying to describe a particular process, and needed a 4th image for it to make sense, so I just photoshopped 2 images into one individual .jpg, reduced the size to maybe 800 x 600, and did the same for images 3 and 4. When I hosted the images on Fotki, obviously they were two images with two unique links but in a way that allowed me to display 4 images for my how-to post without any additional drain on their bandwidth, the way I figured it. I got banned for 30 days for attempting that bit of clever thinking for "circumventing the rules". Of course, I could've posted two separate posts with the information spread across two posts and been just fine and dandy, but that seemed inefficient... Say all that to say, I'm thankful for the easy and flexible hosting options this site offers! I LOVE being able to just click and upload my stuff, and know it won't (hopefully) disappear at some point like all those Photobucket images did a few years back.
-
Tamiya 1/12 FW14B
OldNYJim replied to primabaleron's topic in Other Racing: Road Racing, Salt Flat Racers
This is a really stunning build Tomasz! I've got one of these on my t-build list, and if mine approaches yours when it's done, I'll be pleased. I remember watching 'Red 5' growing up, in both F1 and his short-lived foray into Indy with the Newman/Haas and this is a fine tribute to the driver the tifosi named 'The Lion'. I love all the little details - one that jumped out to me was the temperature gauge decals on the brakes, but there's hundreds of little details to spot. GREAT build! -
Noticed Ace-Garageguy hasn't been on site since 7/22
OldNYJim replied to bobthehobbyguy's topic in Where's Waldo?
I really enjoy Bill’s take on things, and his extensive knowledge that he will altruistically share with anyone that asks for help. He’s taught me a bunch without ever having met him, so I selfishly hope he returns soon -
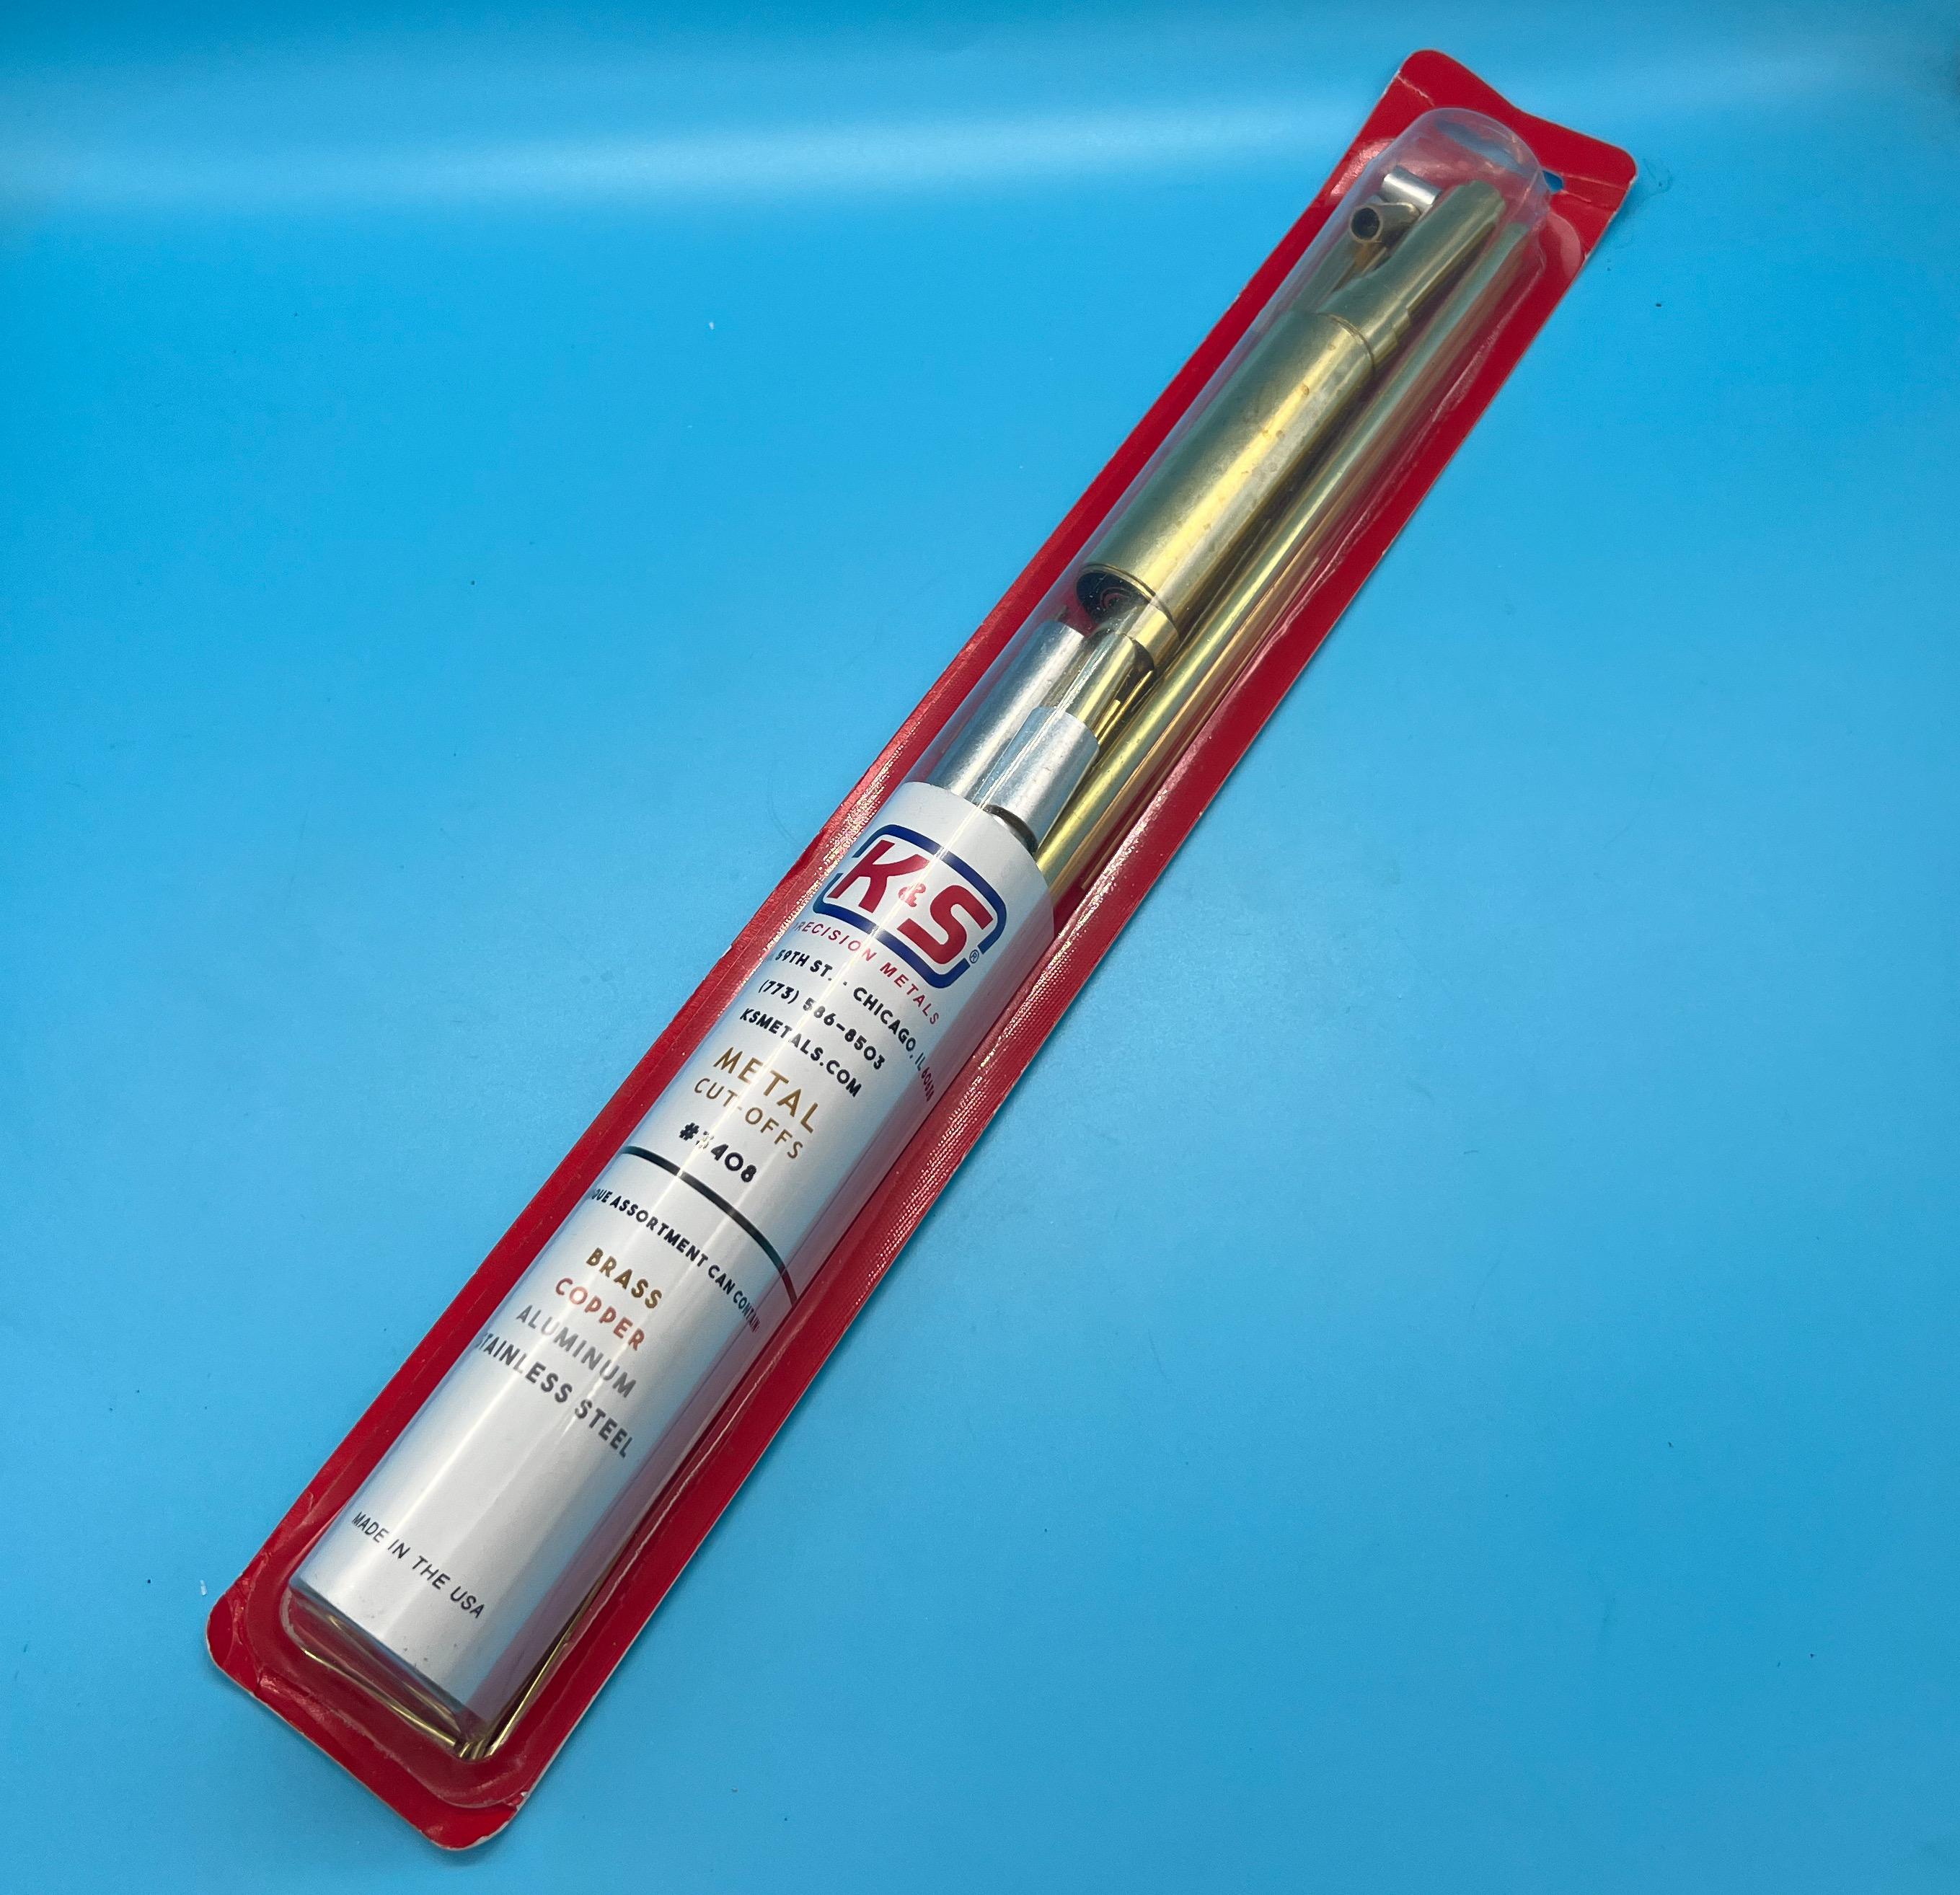
This came up when I was looking for something else, and I figured ‘meh, why not, might be something useful in there’ It actually has a BUNCH of great little bits of scratchbuilding material in there…large diameter tube, some full length sticks of some thinner rod and tube, some useful little interesting shapes, some large diameter stuff that looks perfect for making metal wheel rims…definitely pleased with the random selection I got!
-
GREAT idea! That’ll be a nice build (and also some good evidence to people who don’t believe that the color from red plastic can leach out, unless you are using an orange sharpie or something on that hood…)
-
My take on the most famous ‘55 gasser street machine’…
OldNYJim replied to OldNYJim's topic in WIP: Model Cars
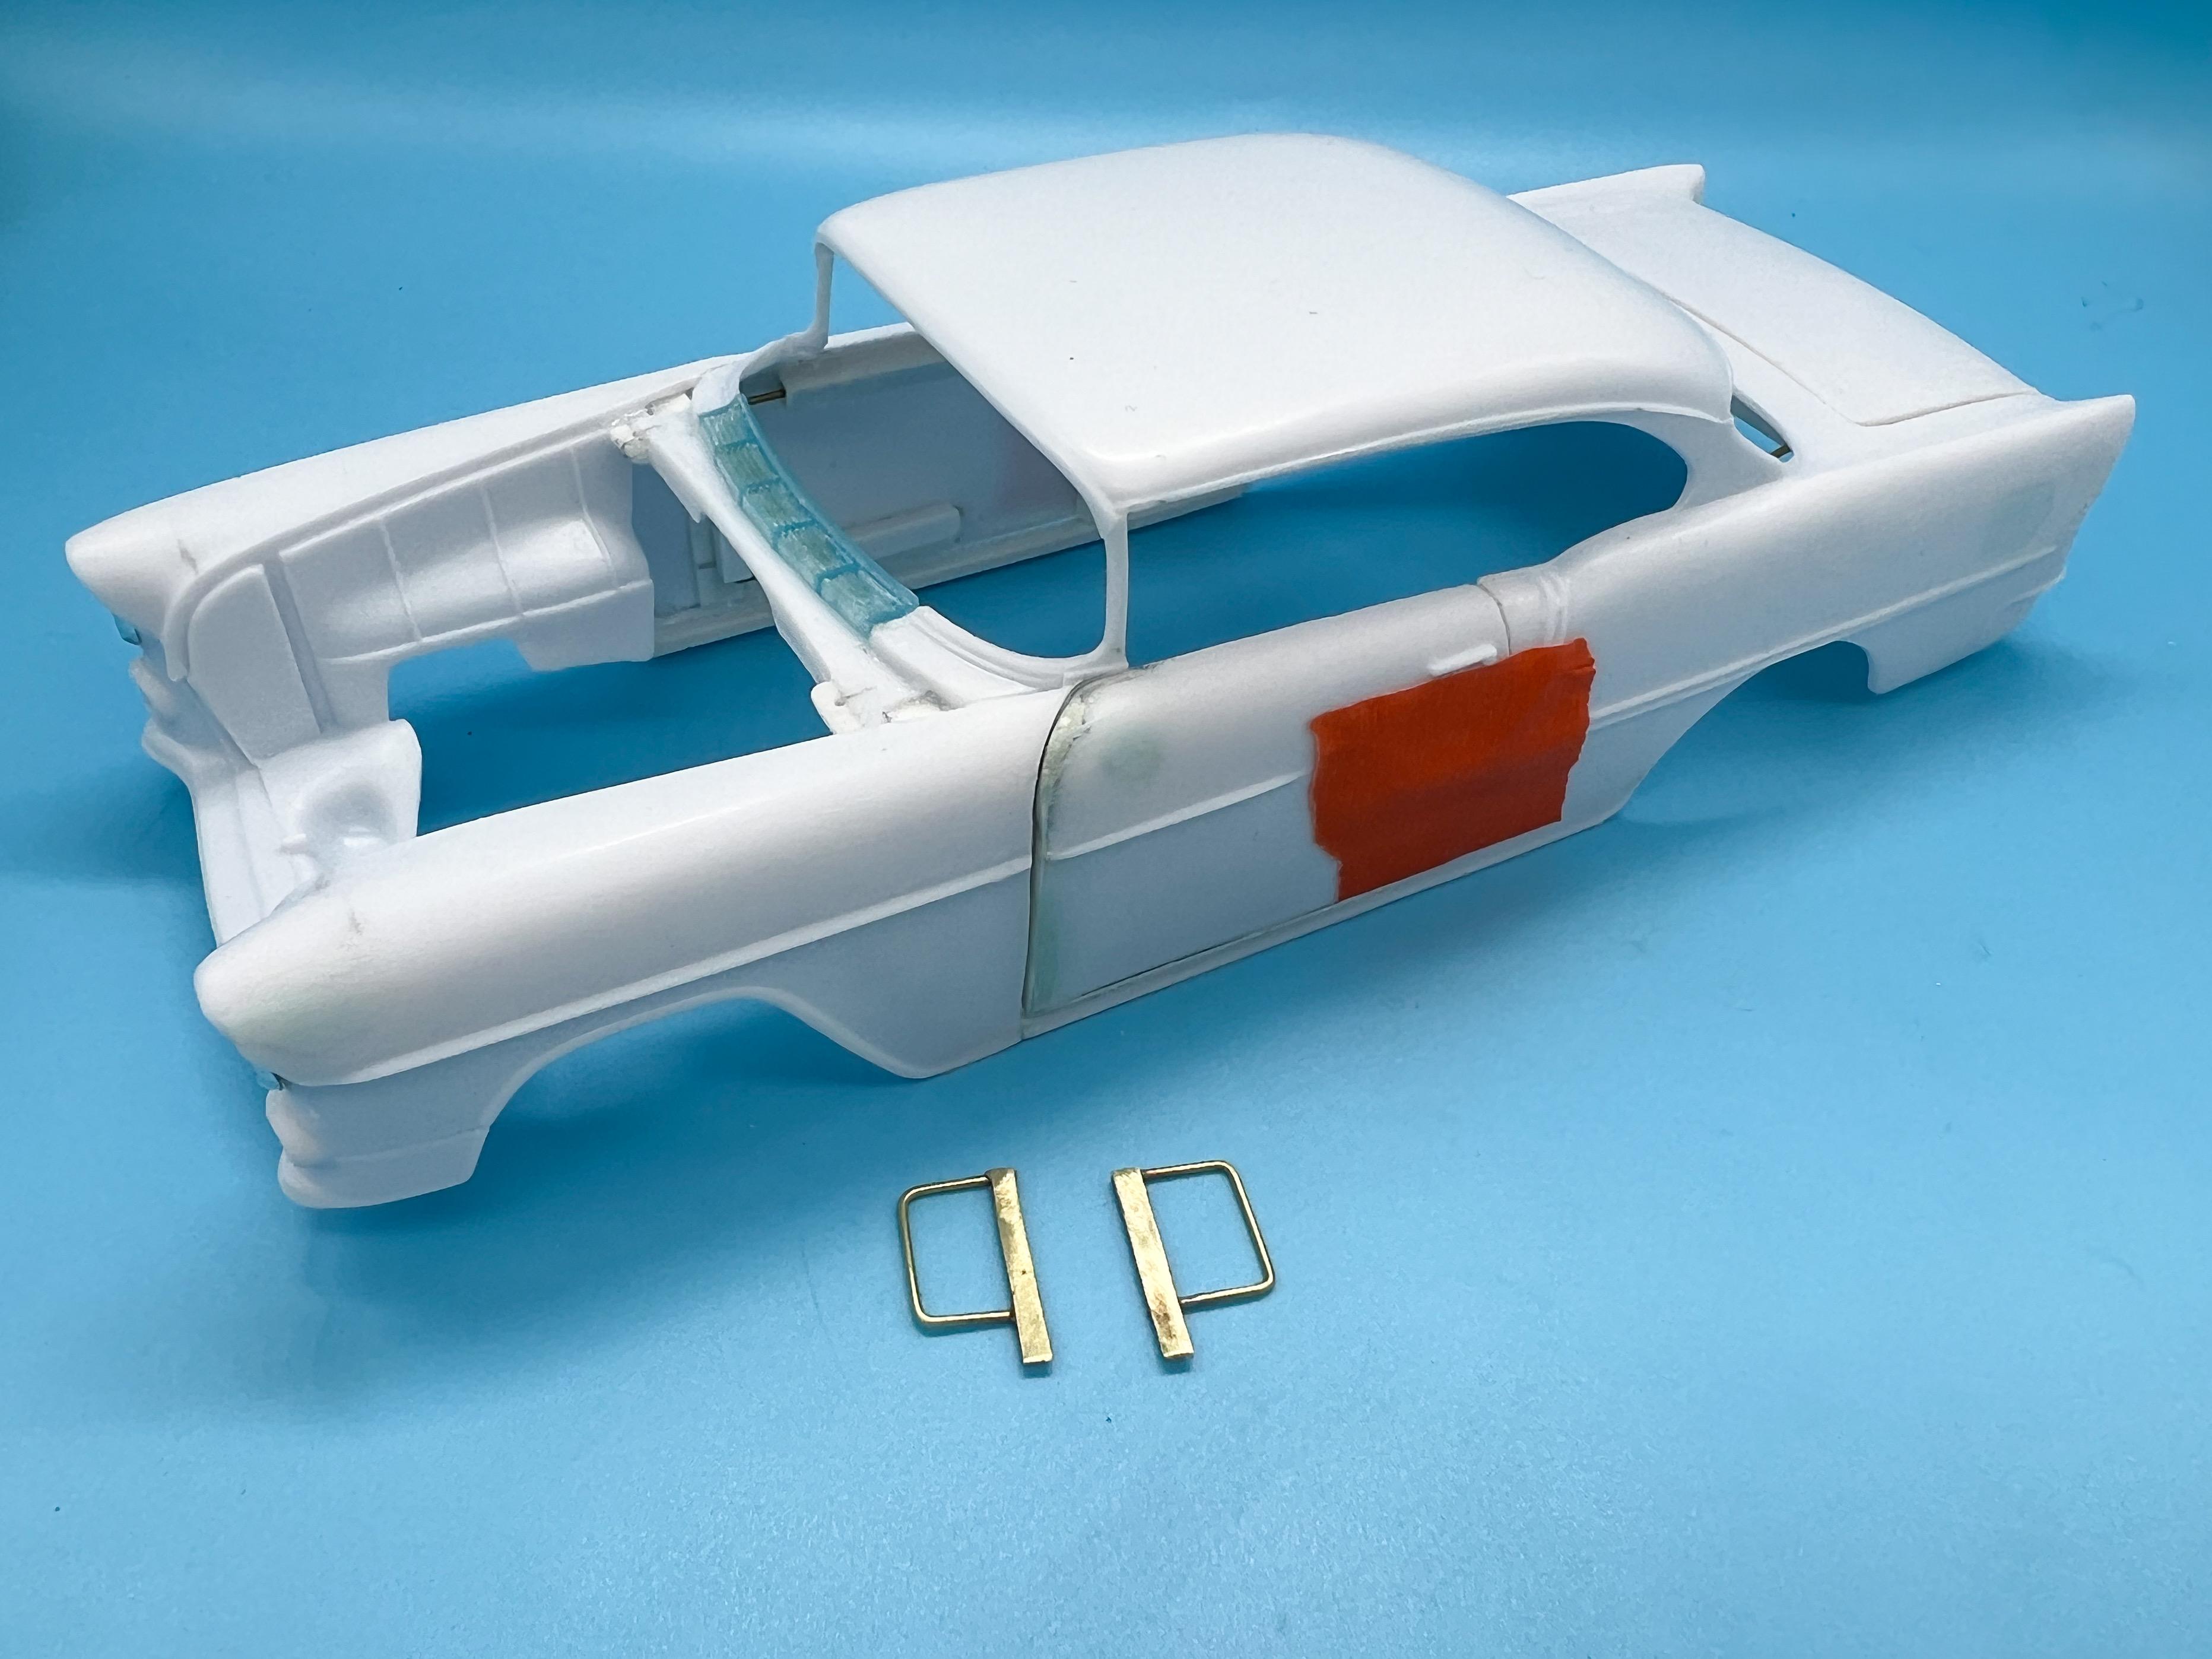
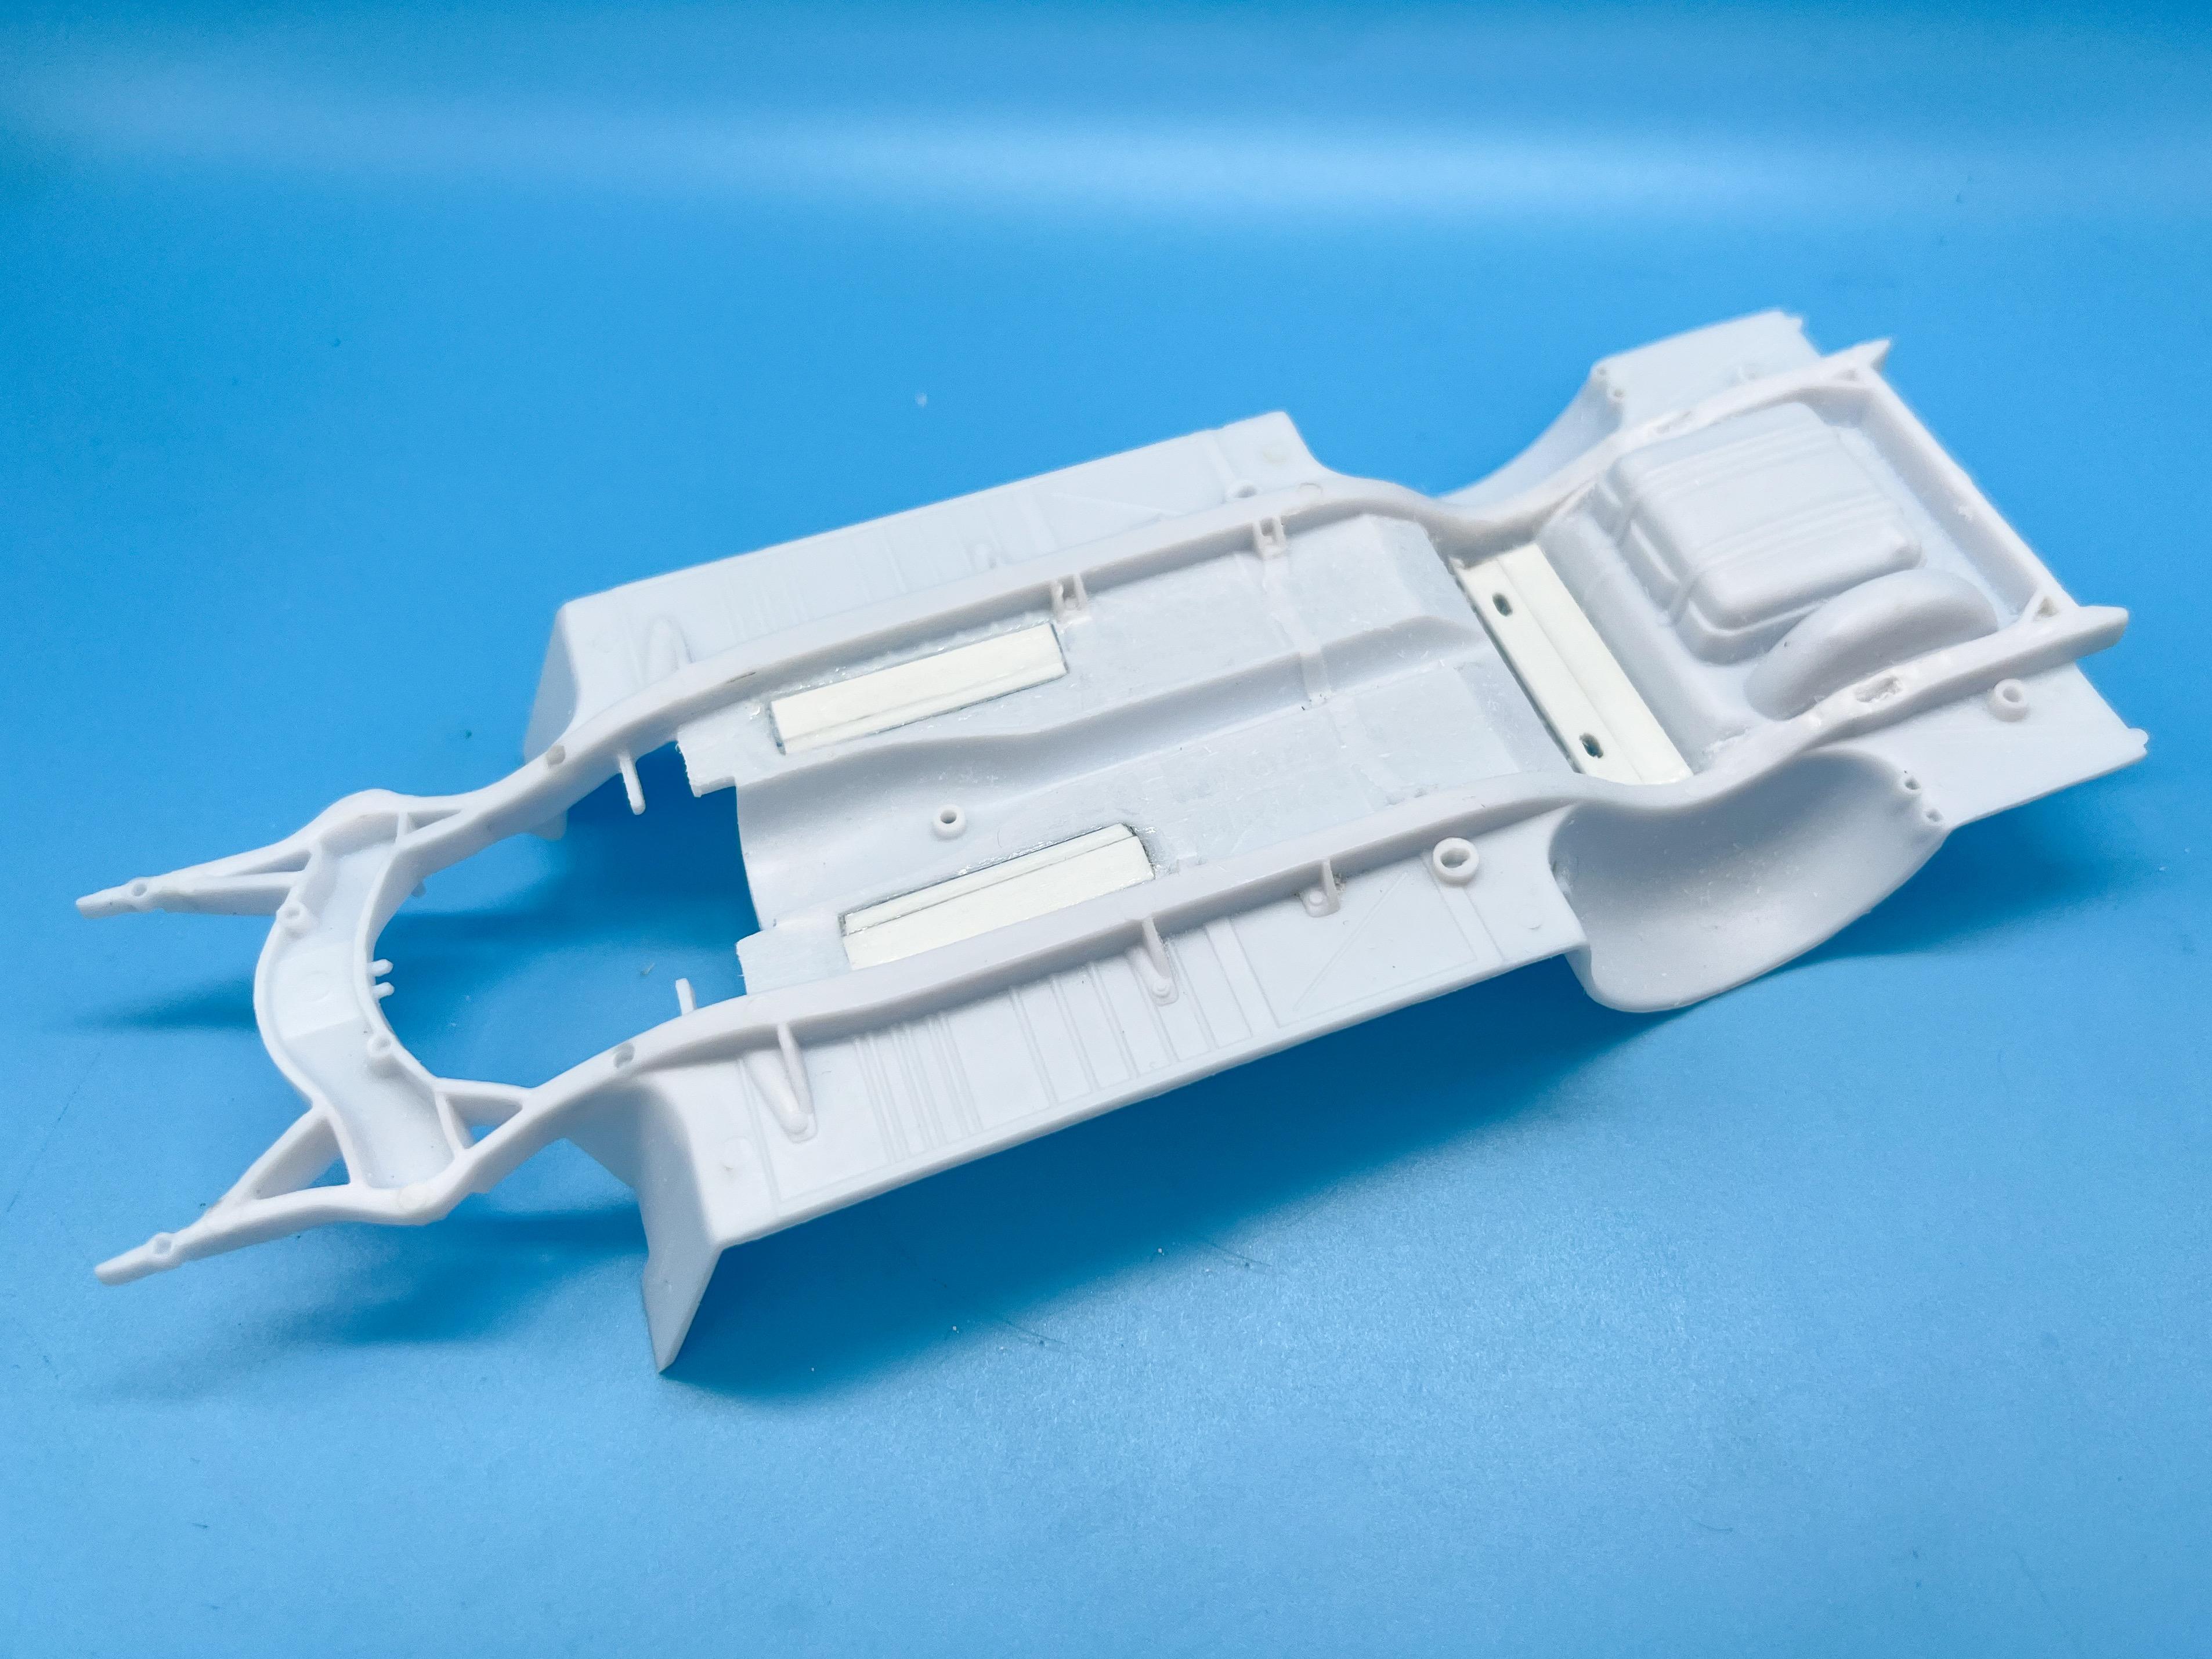
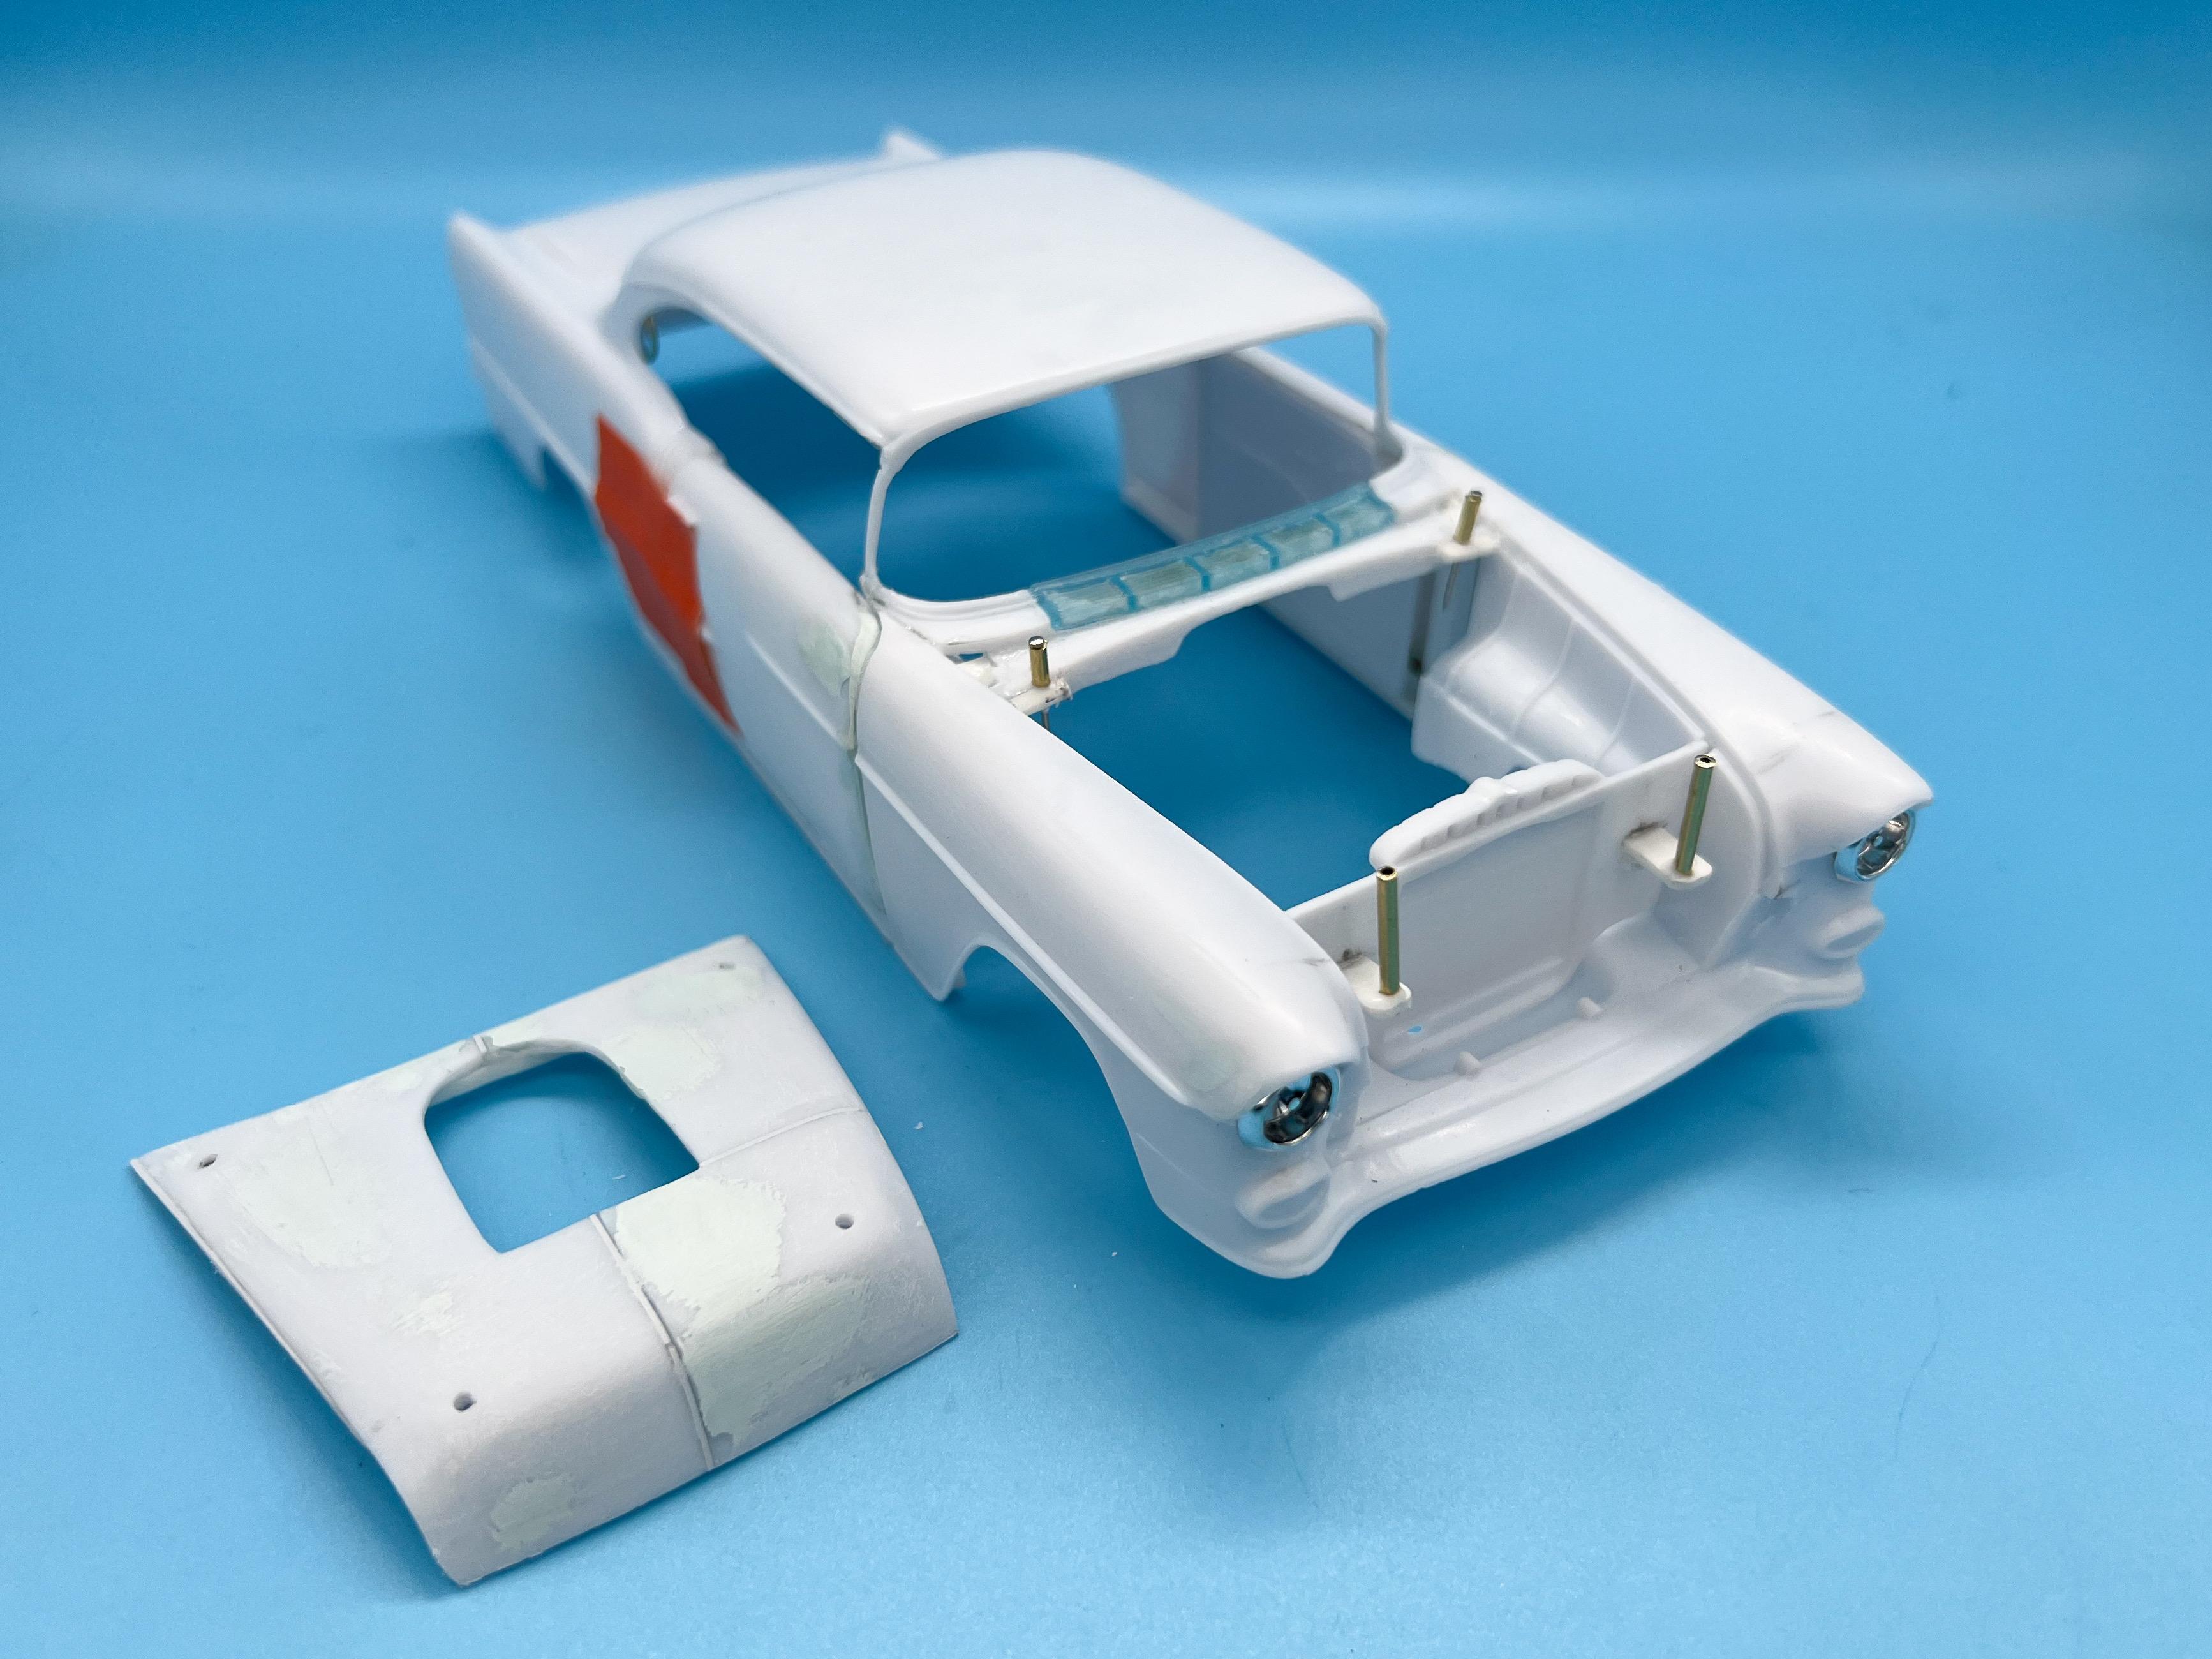
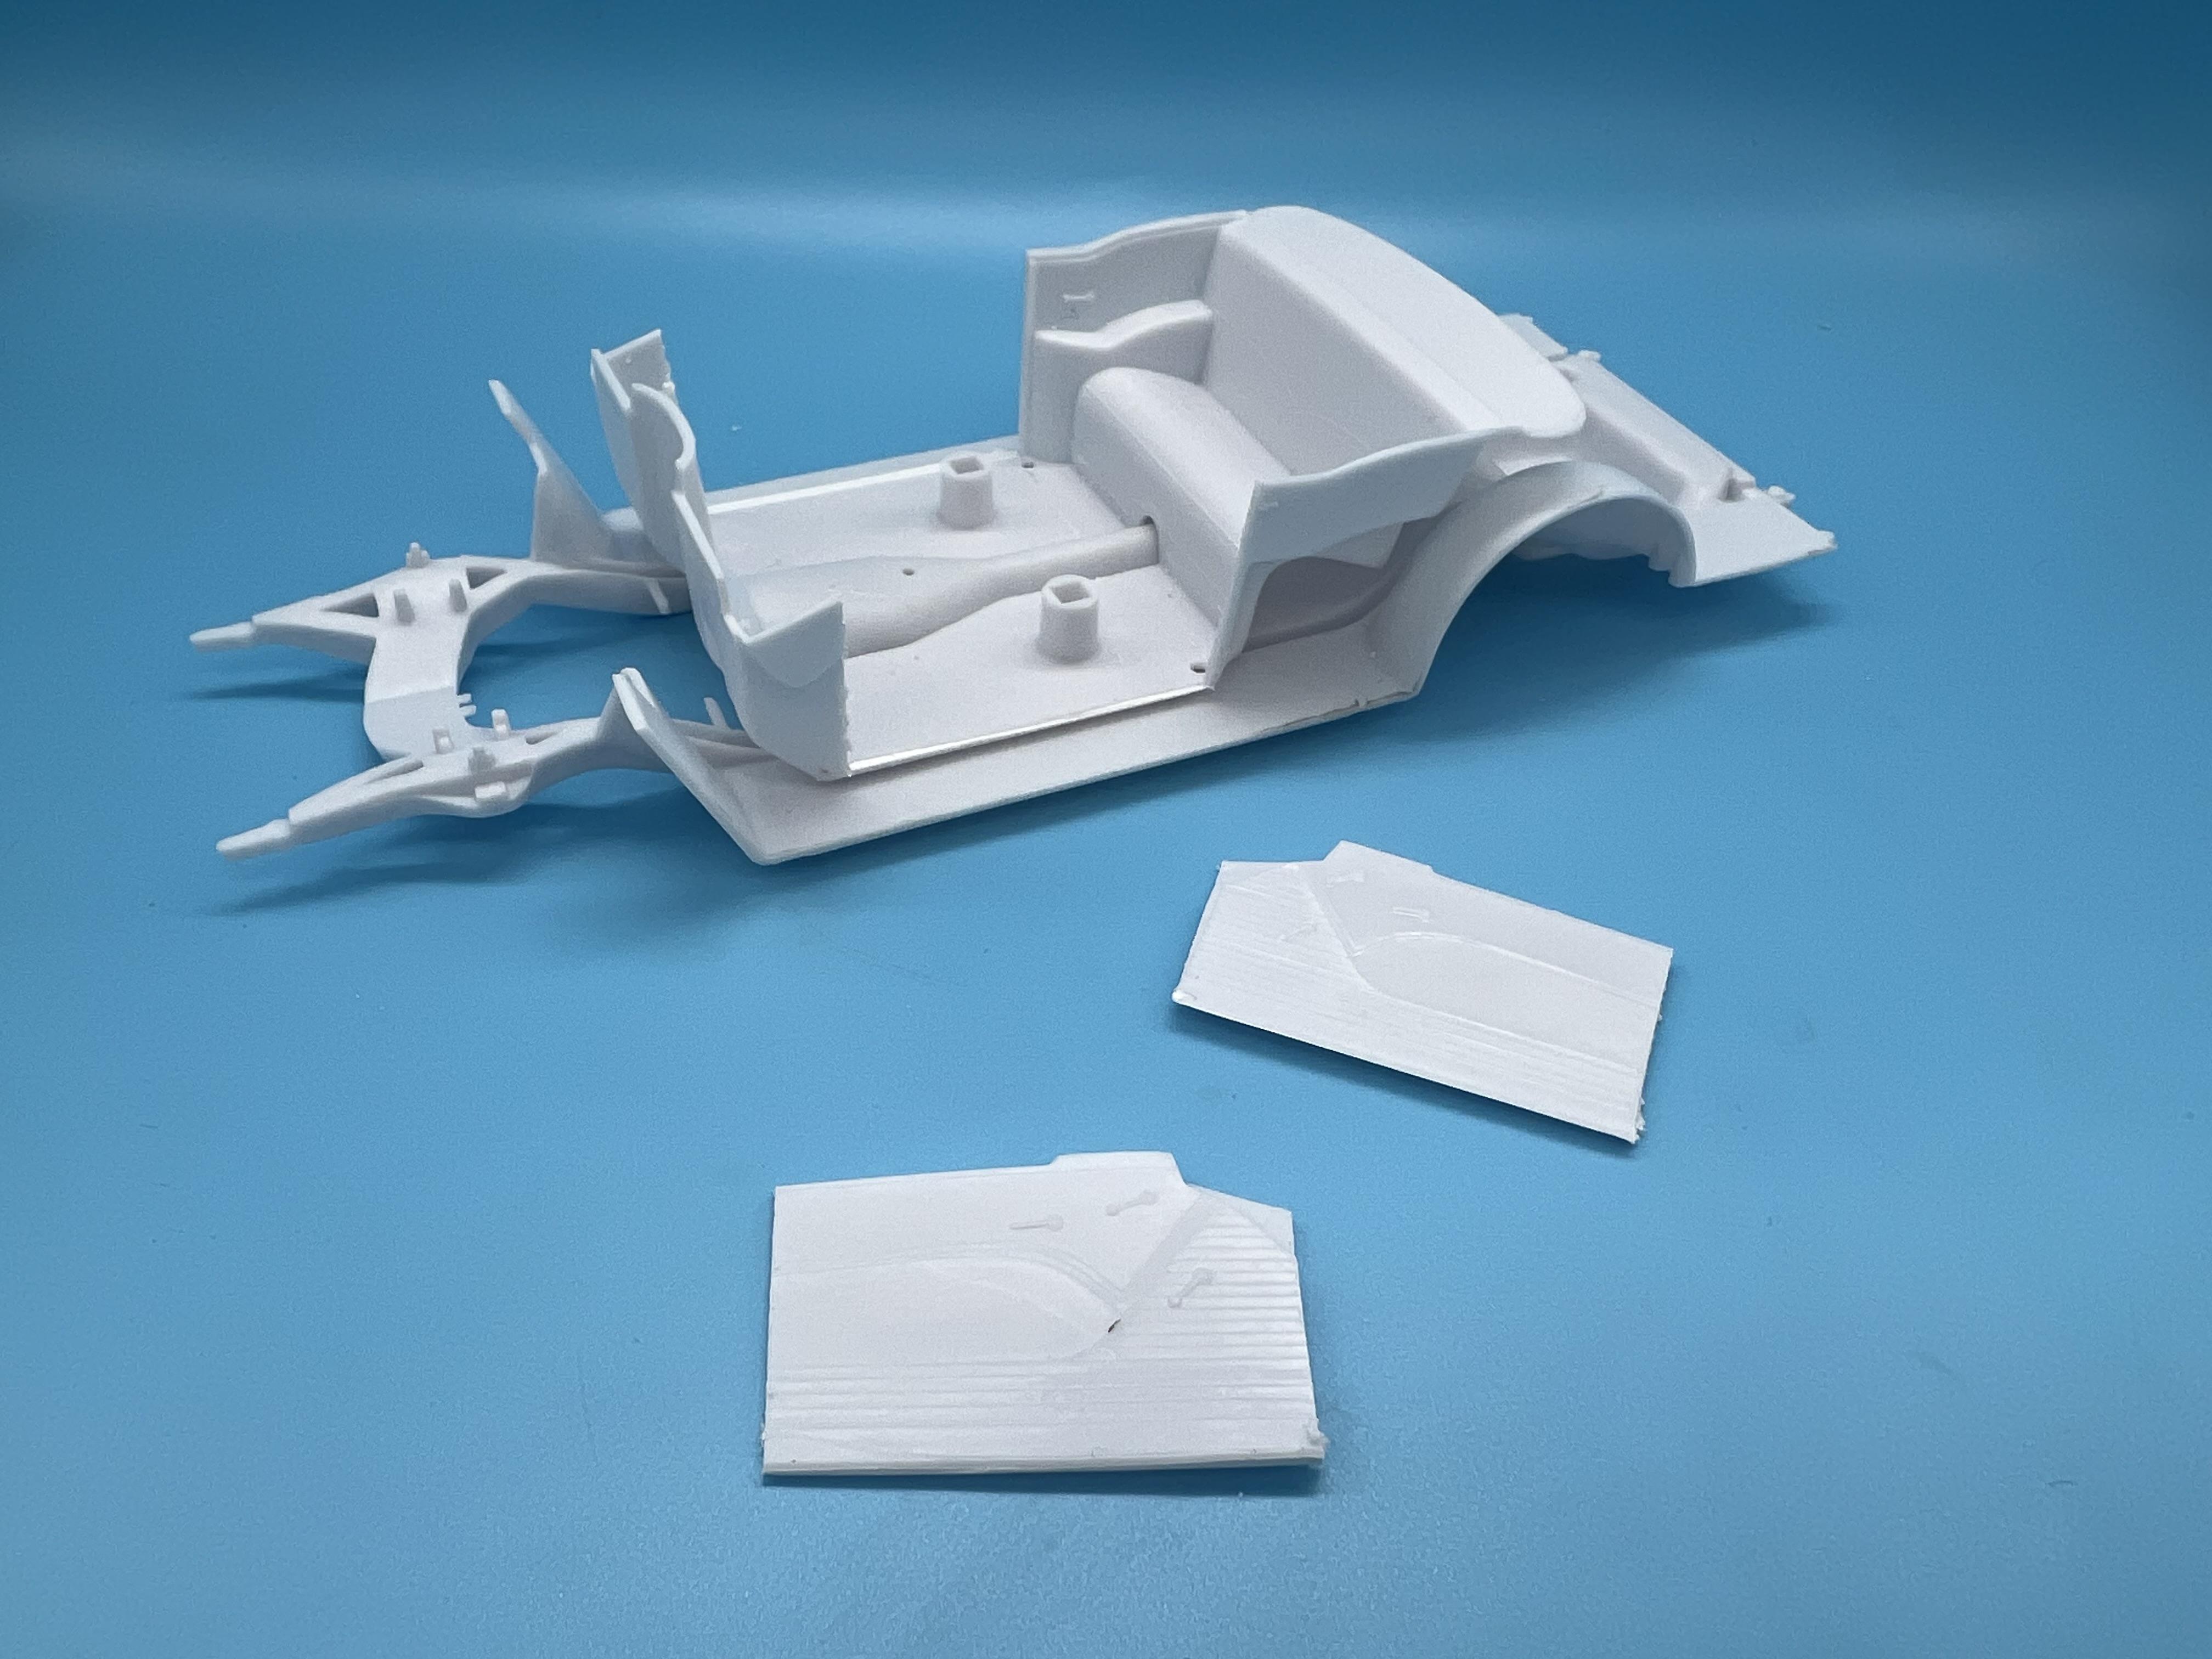
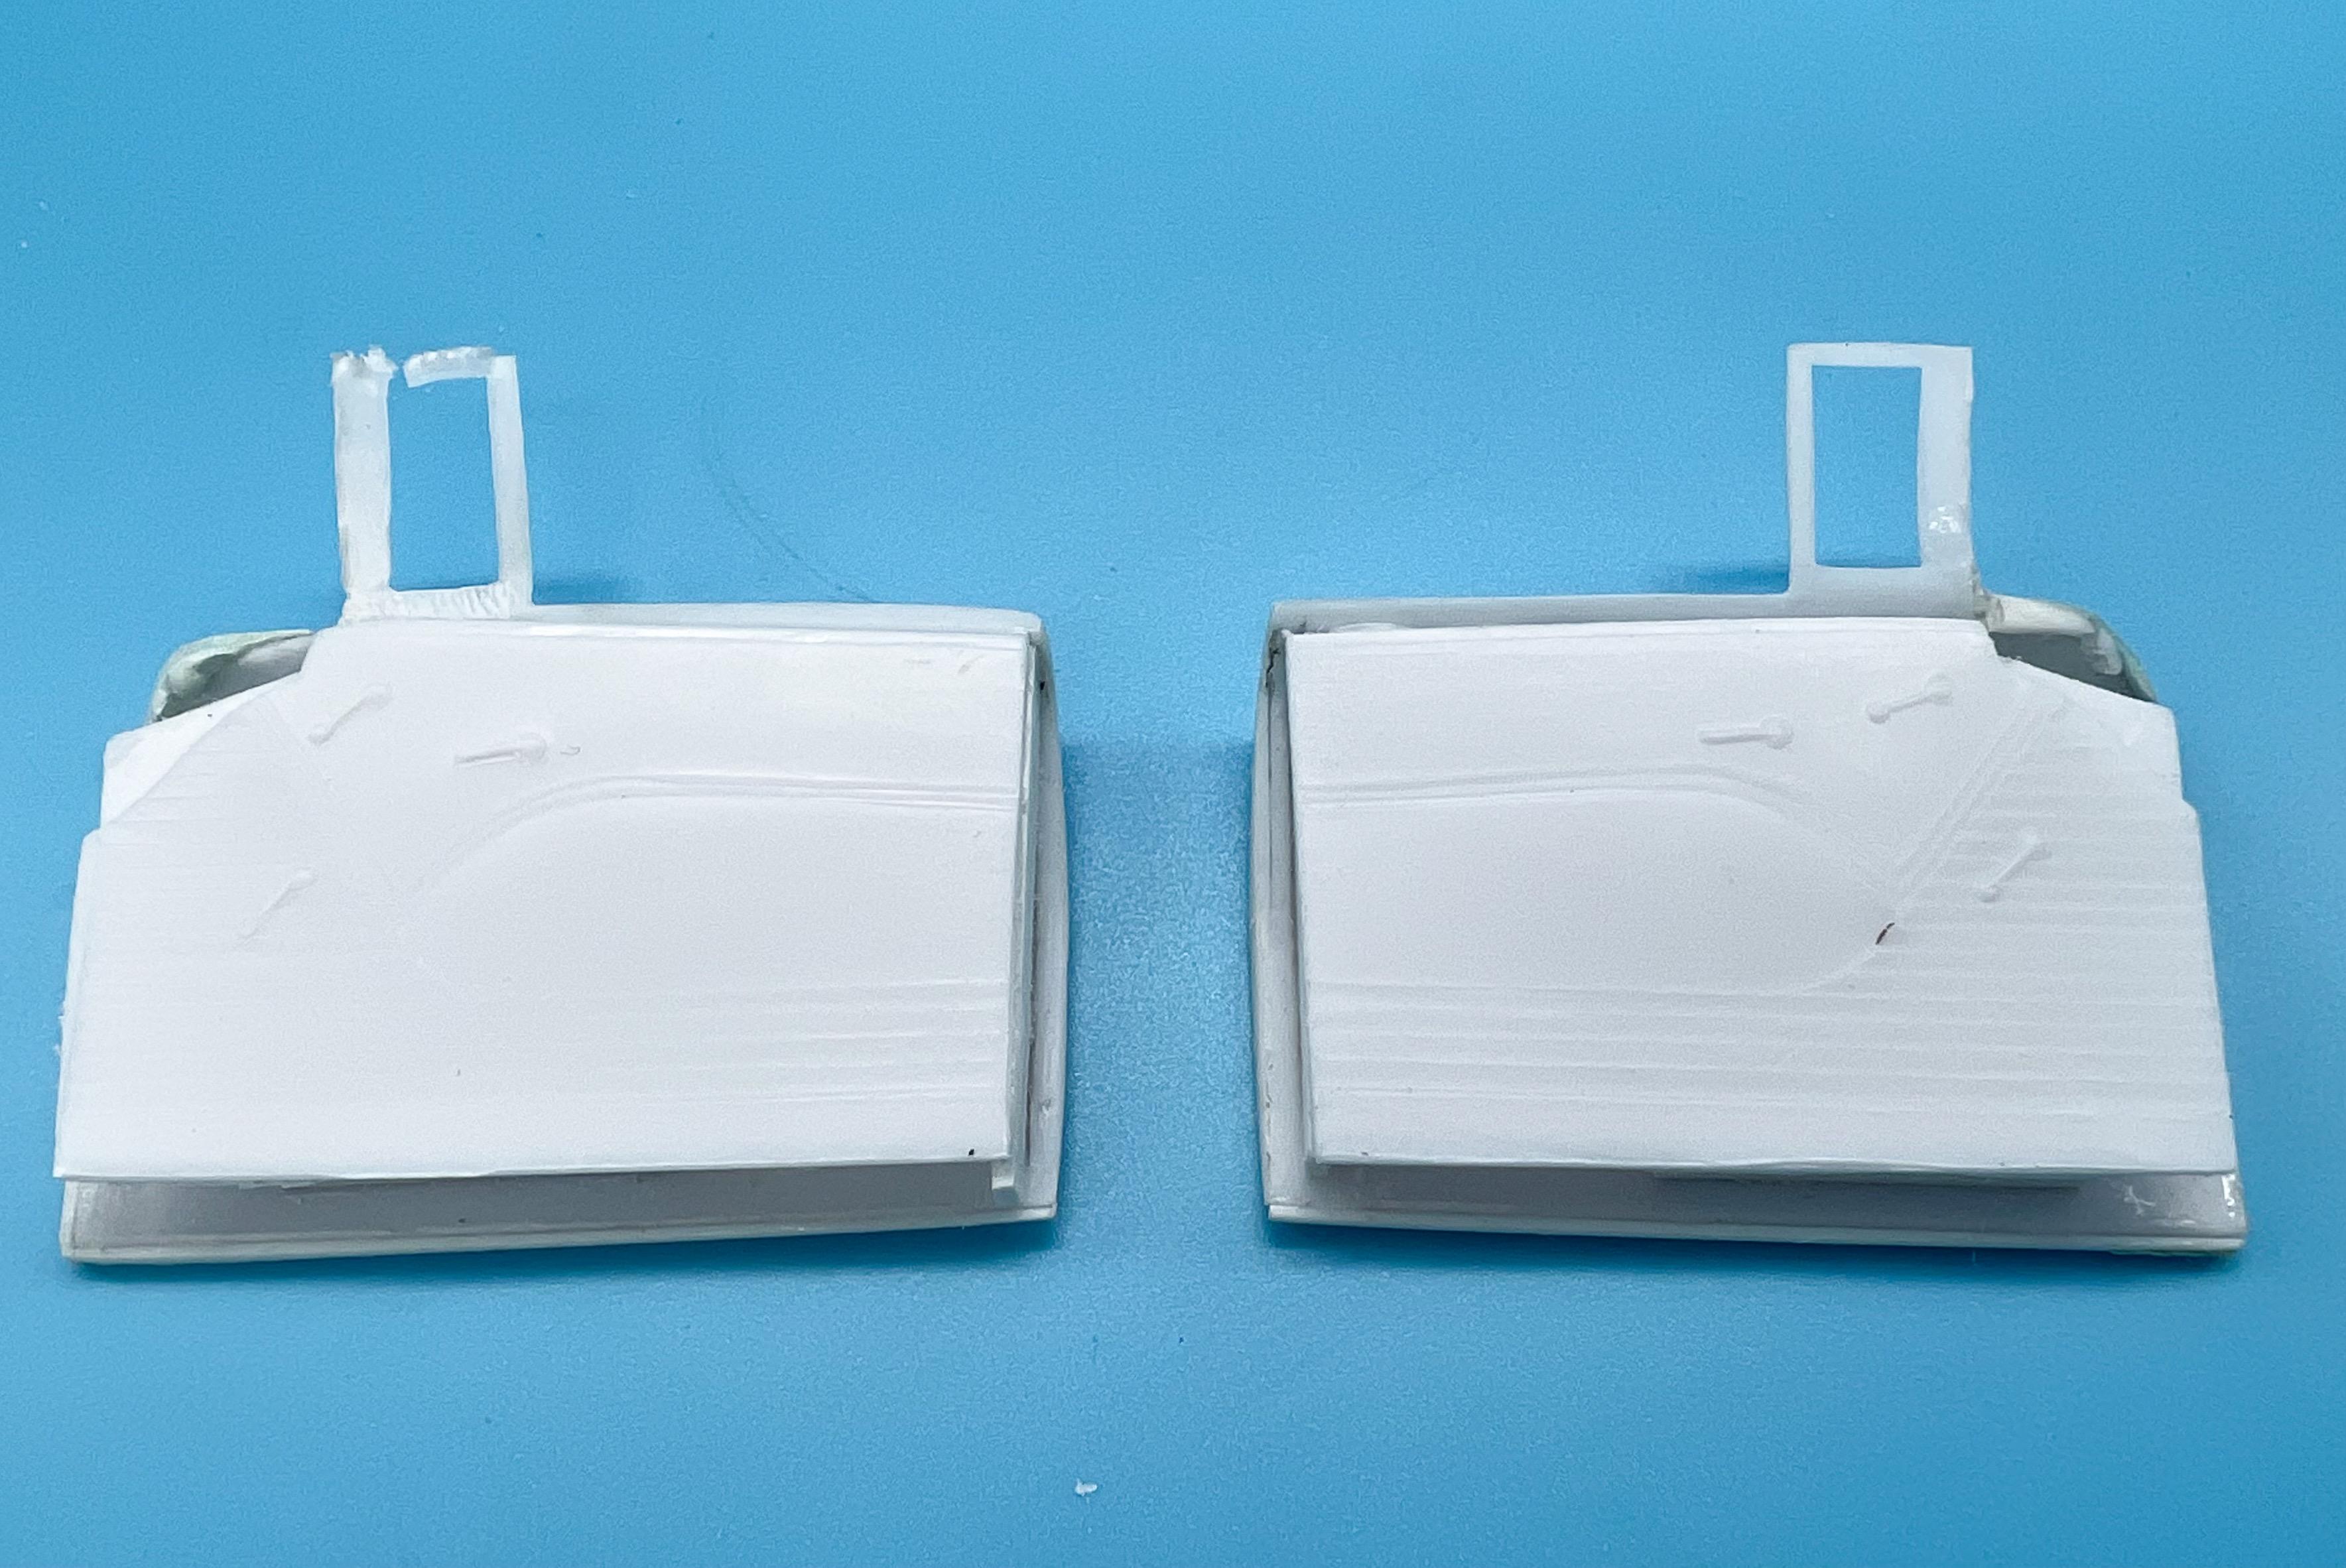
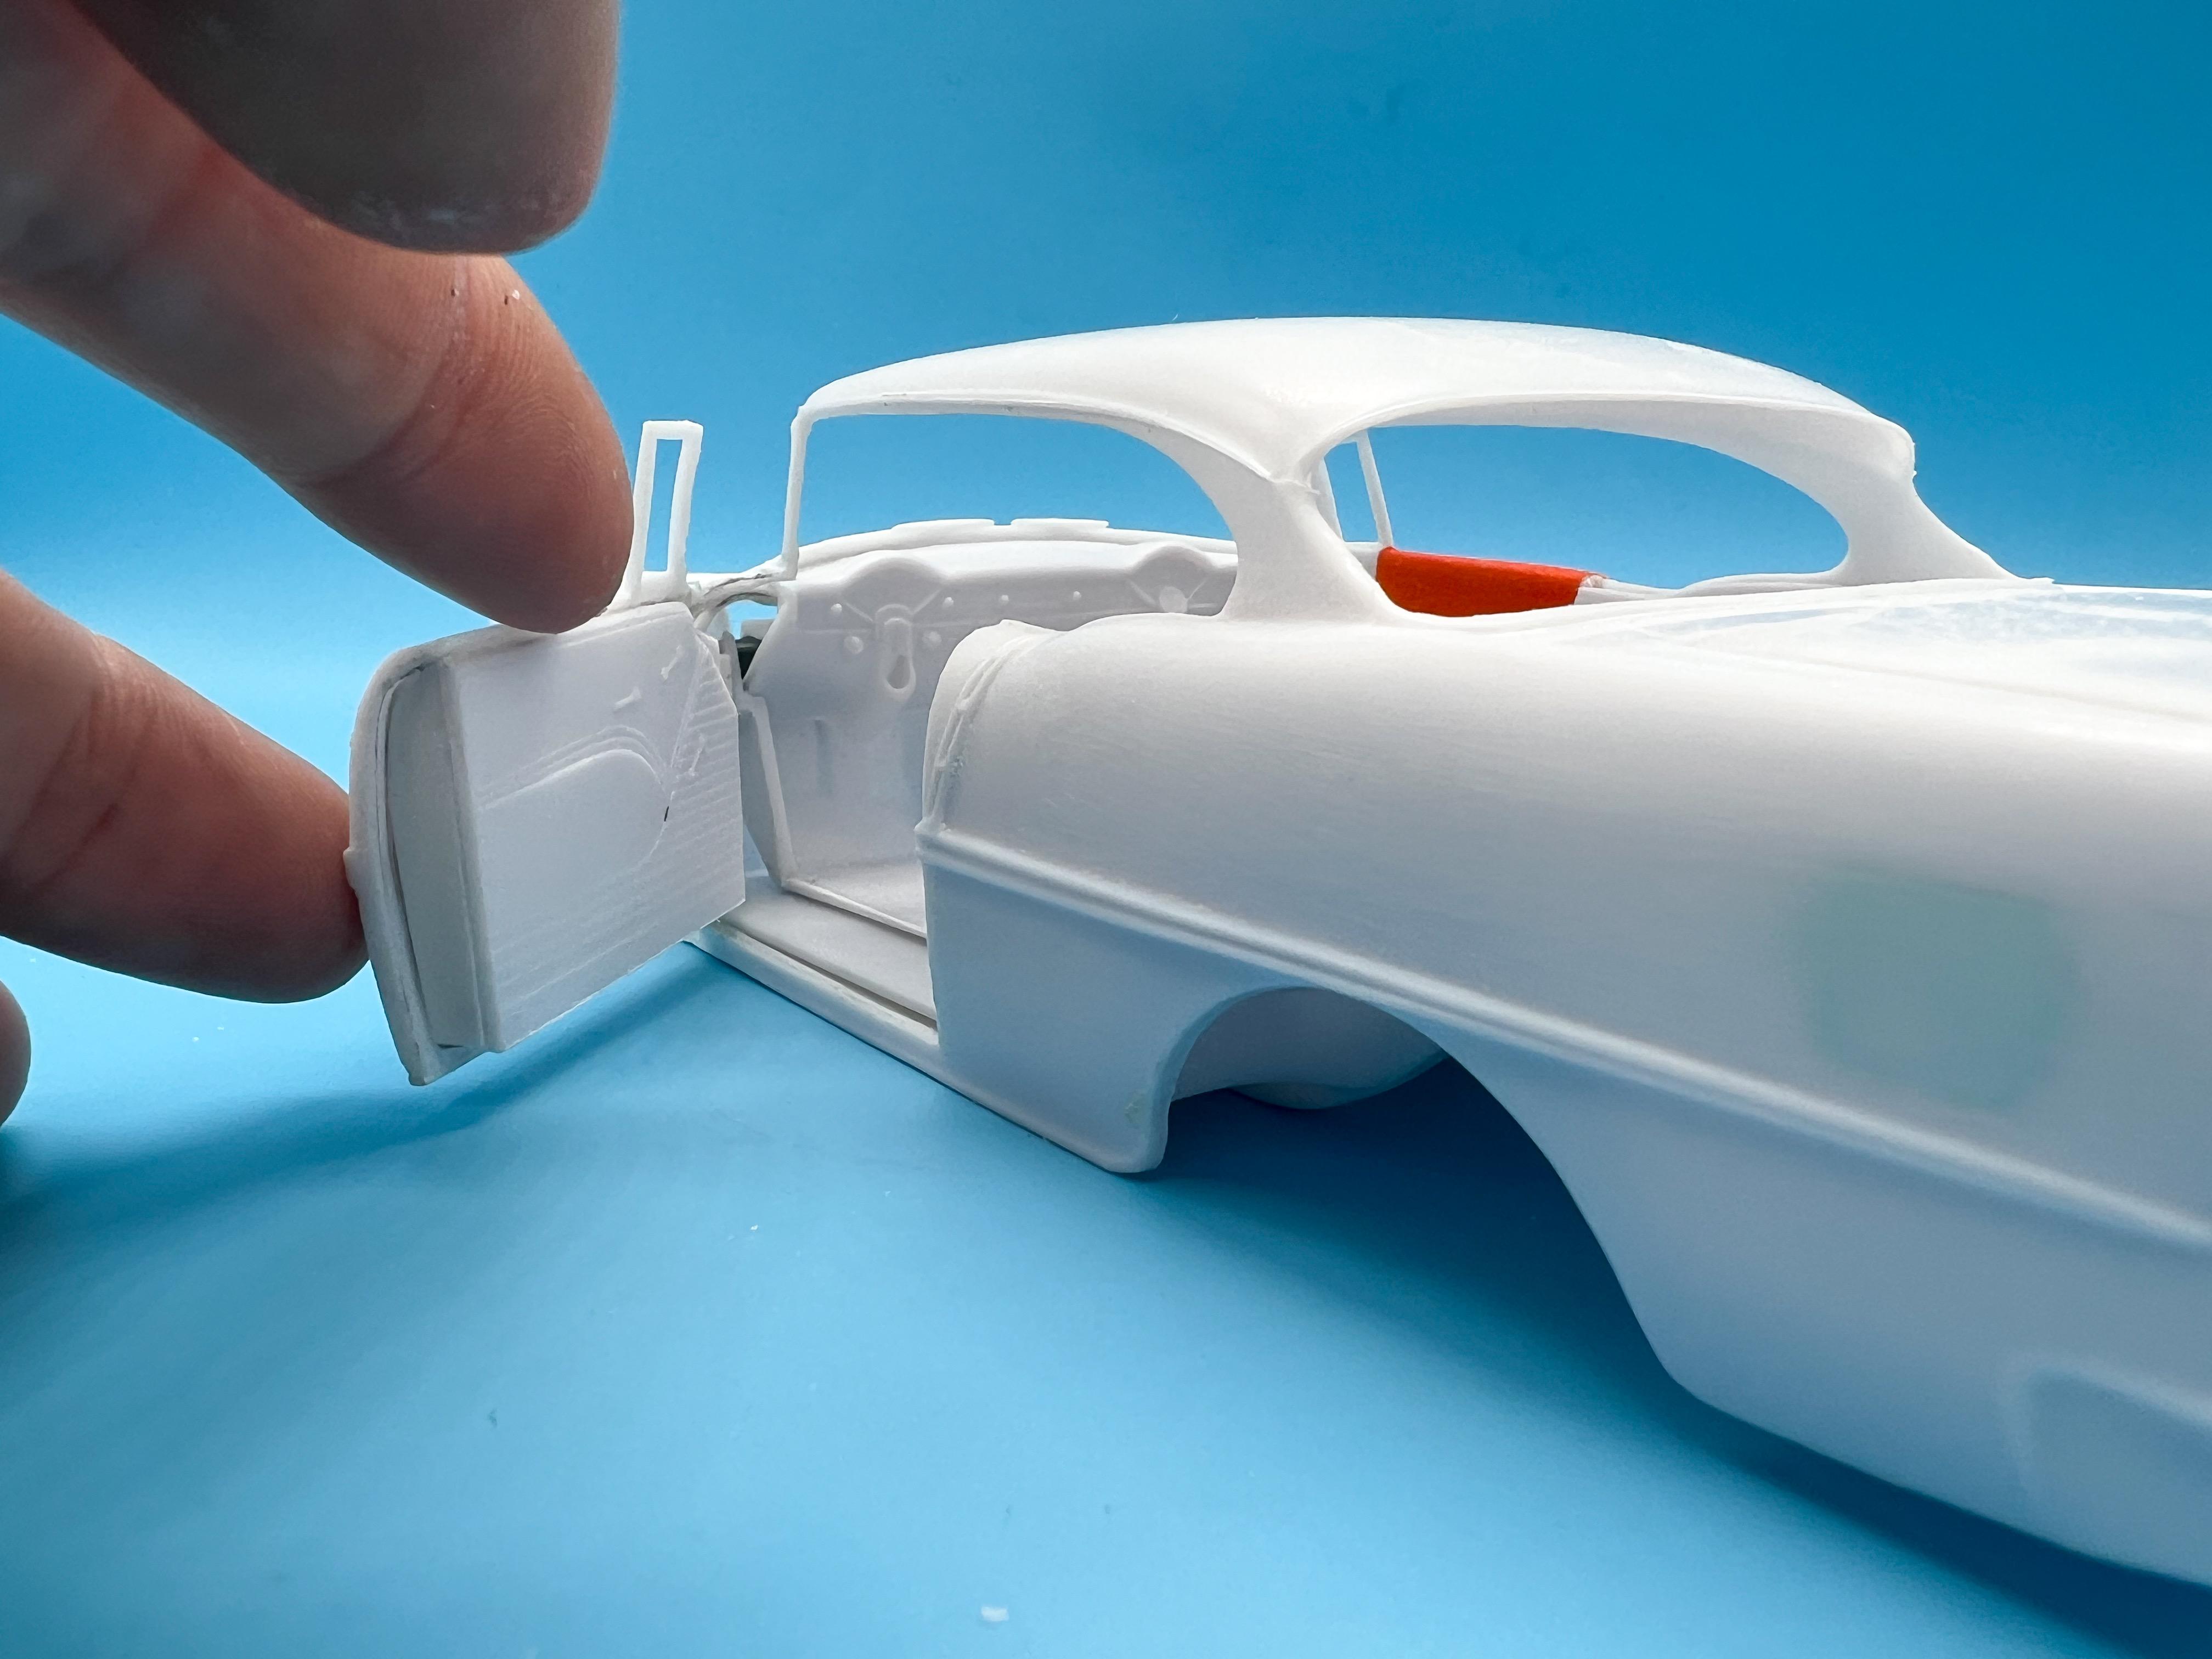
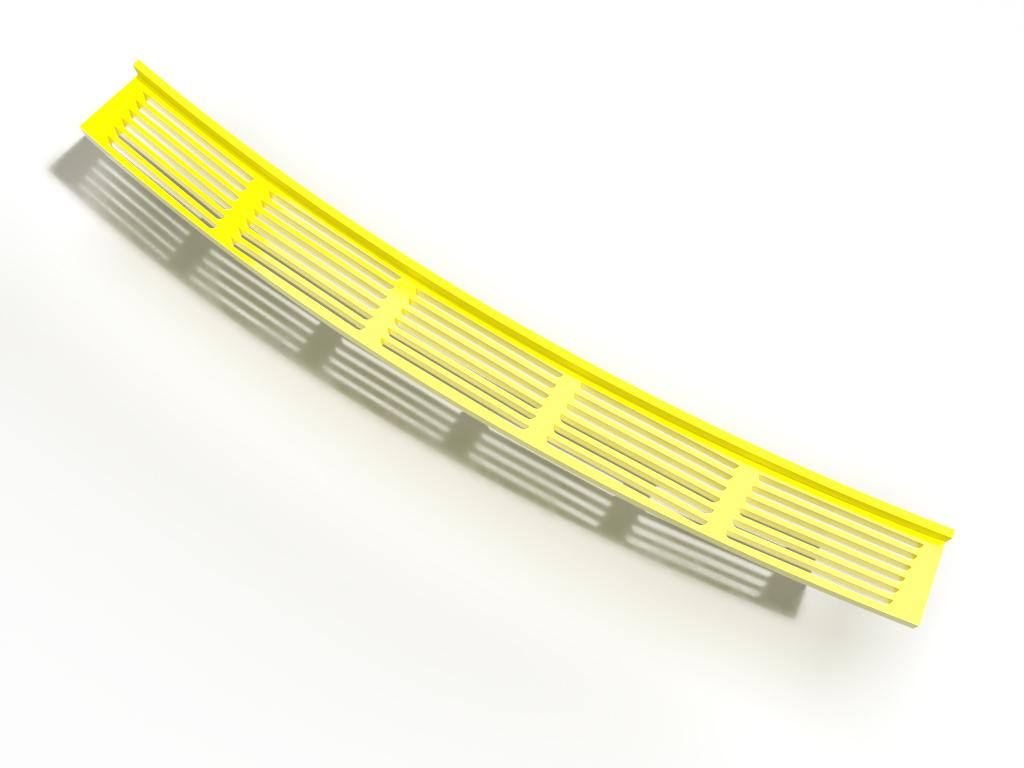
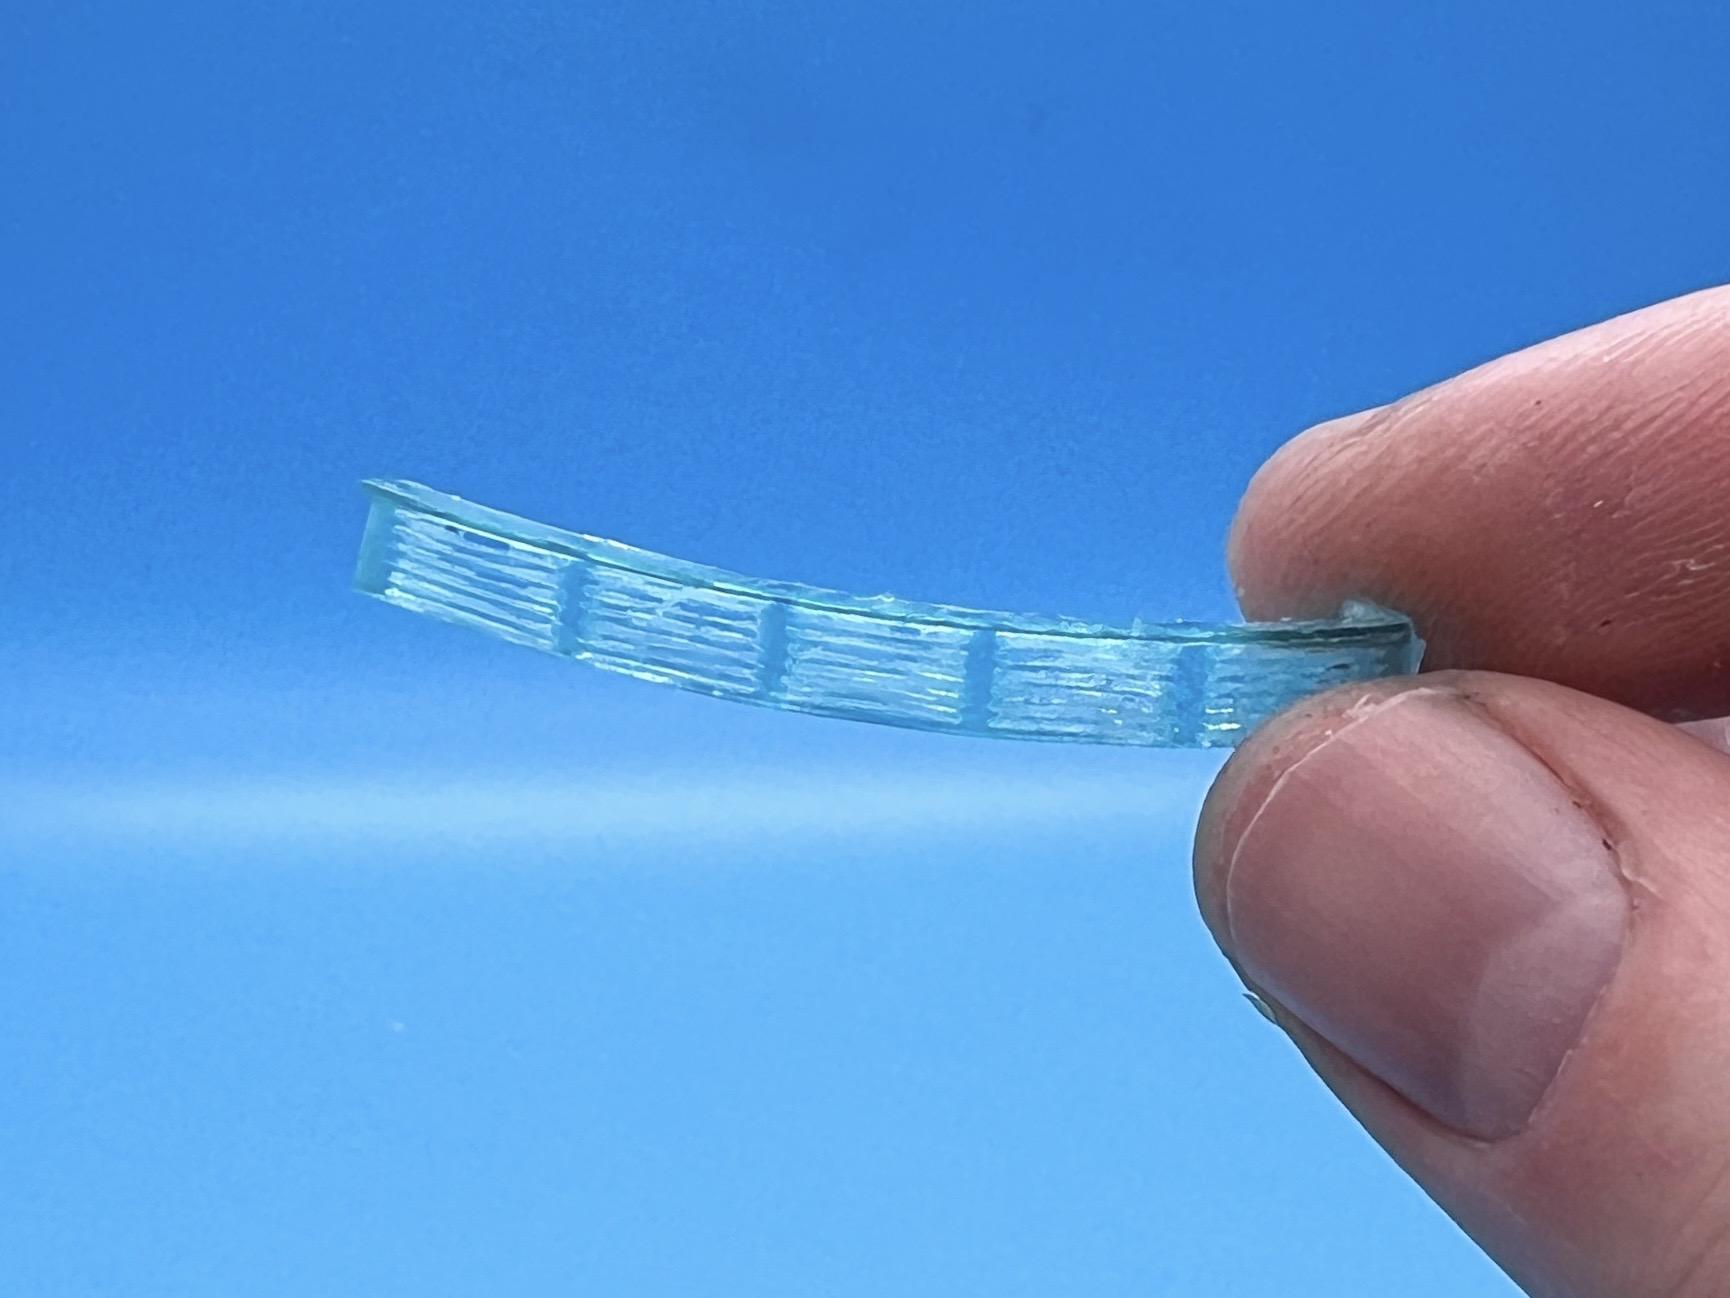
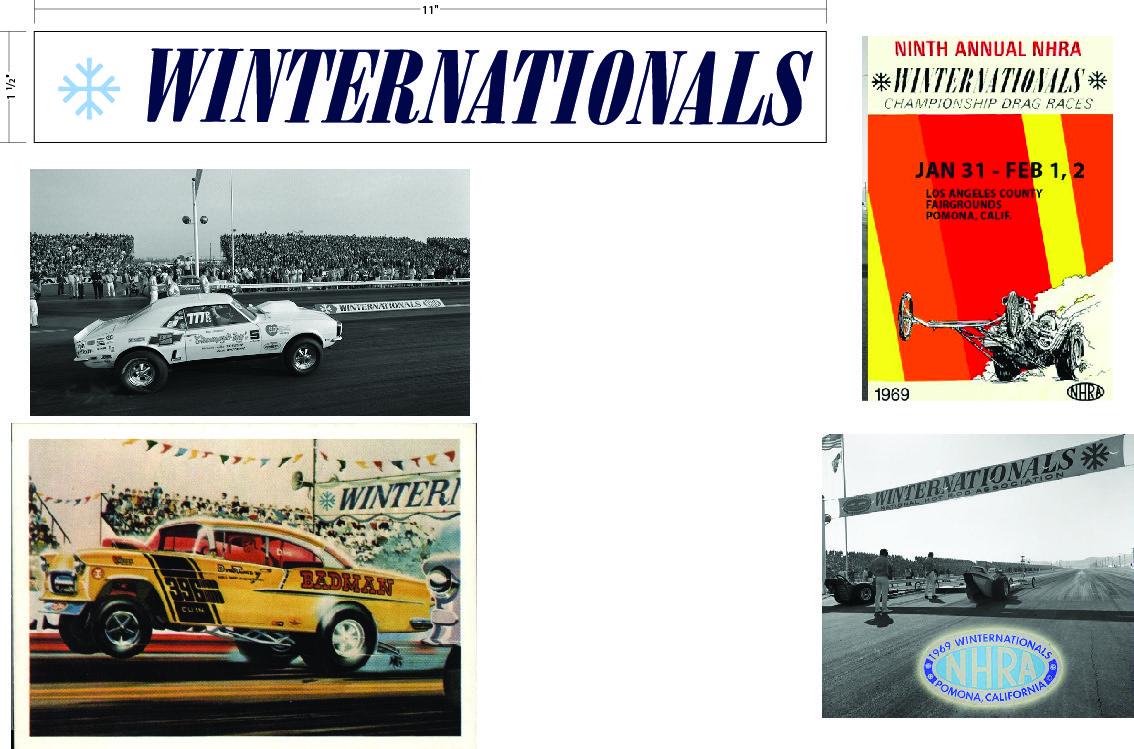
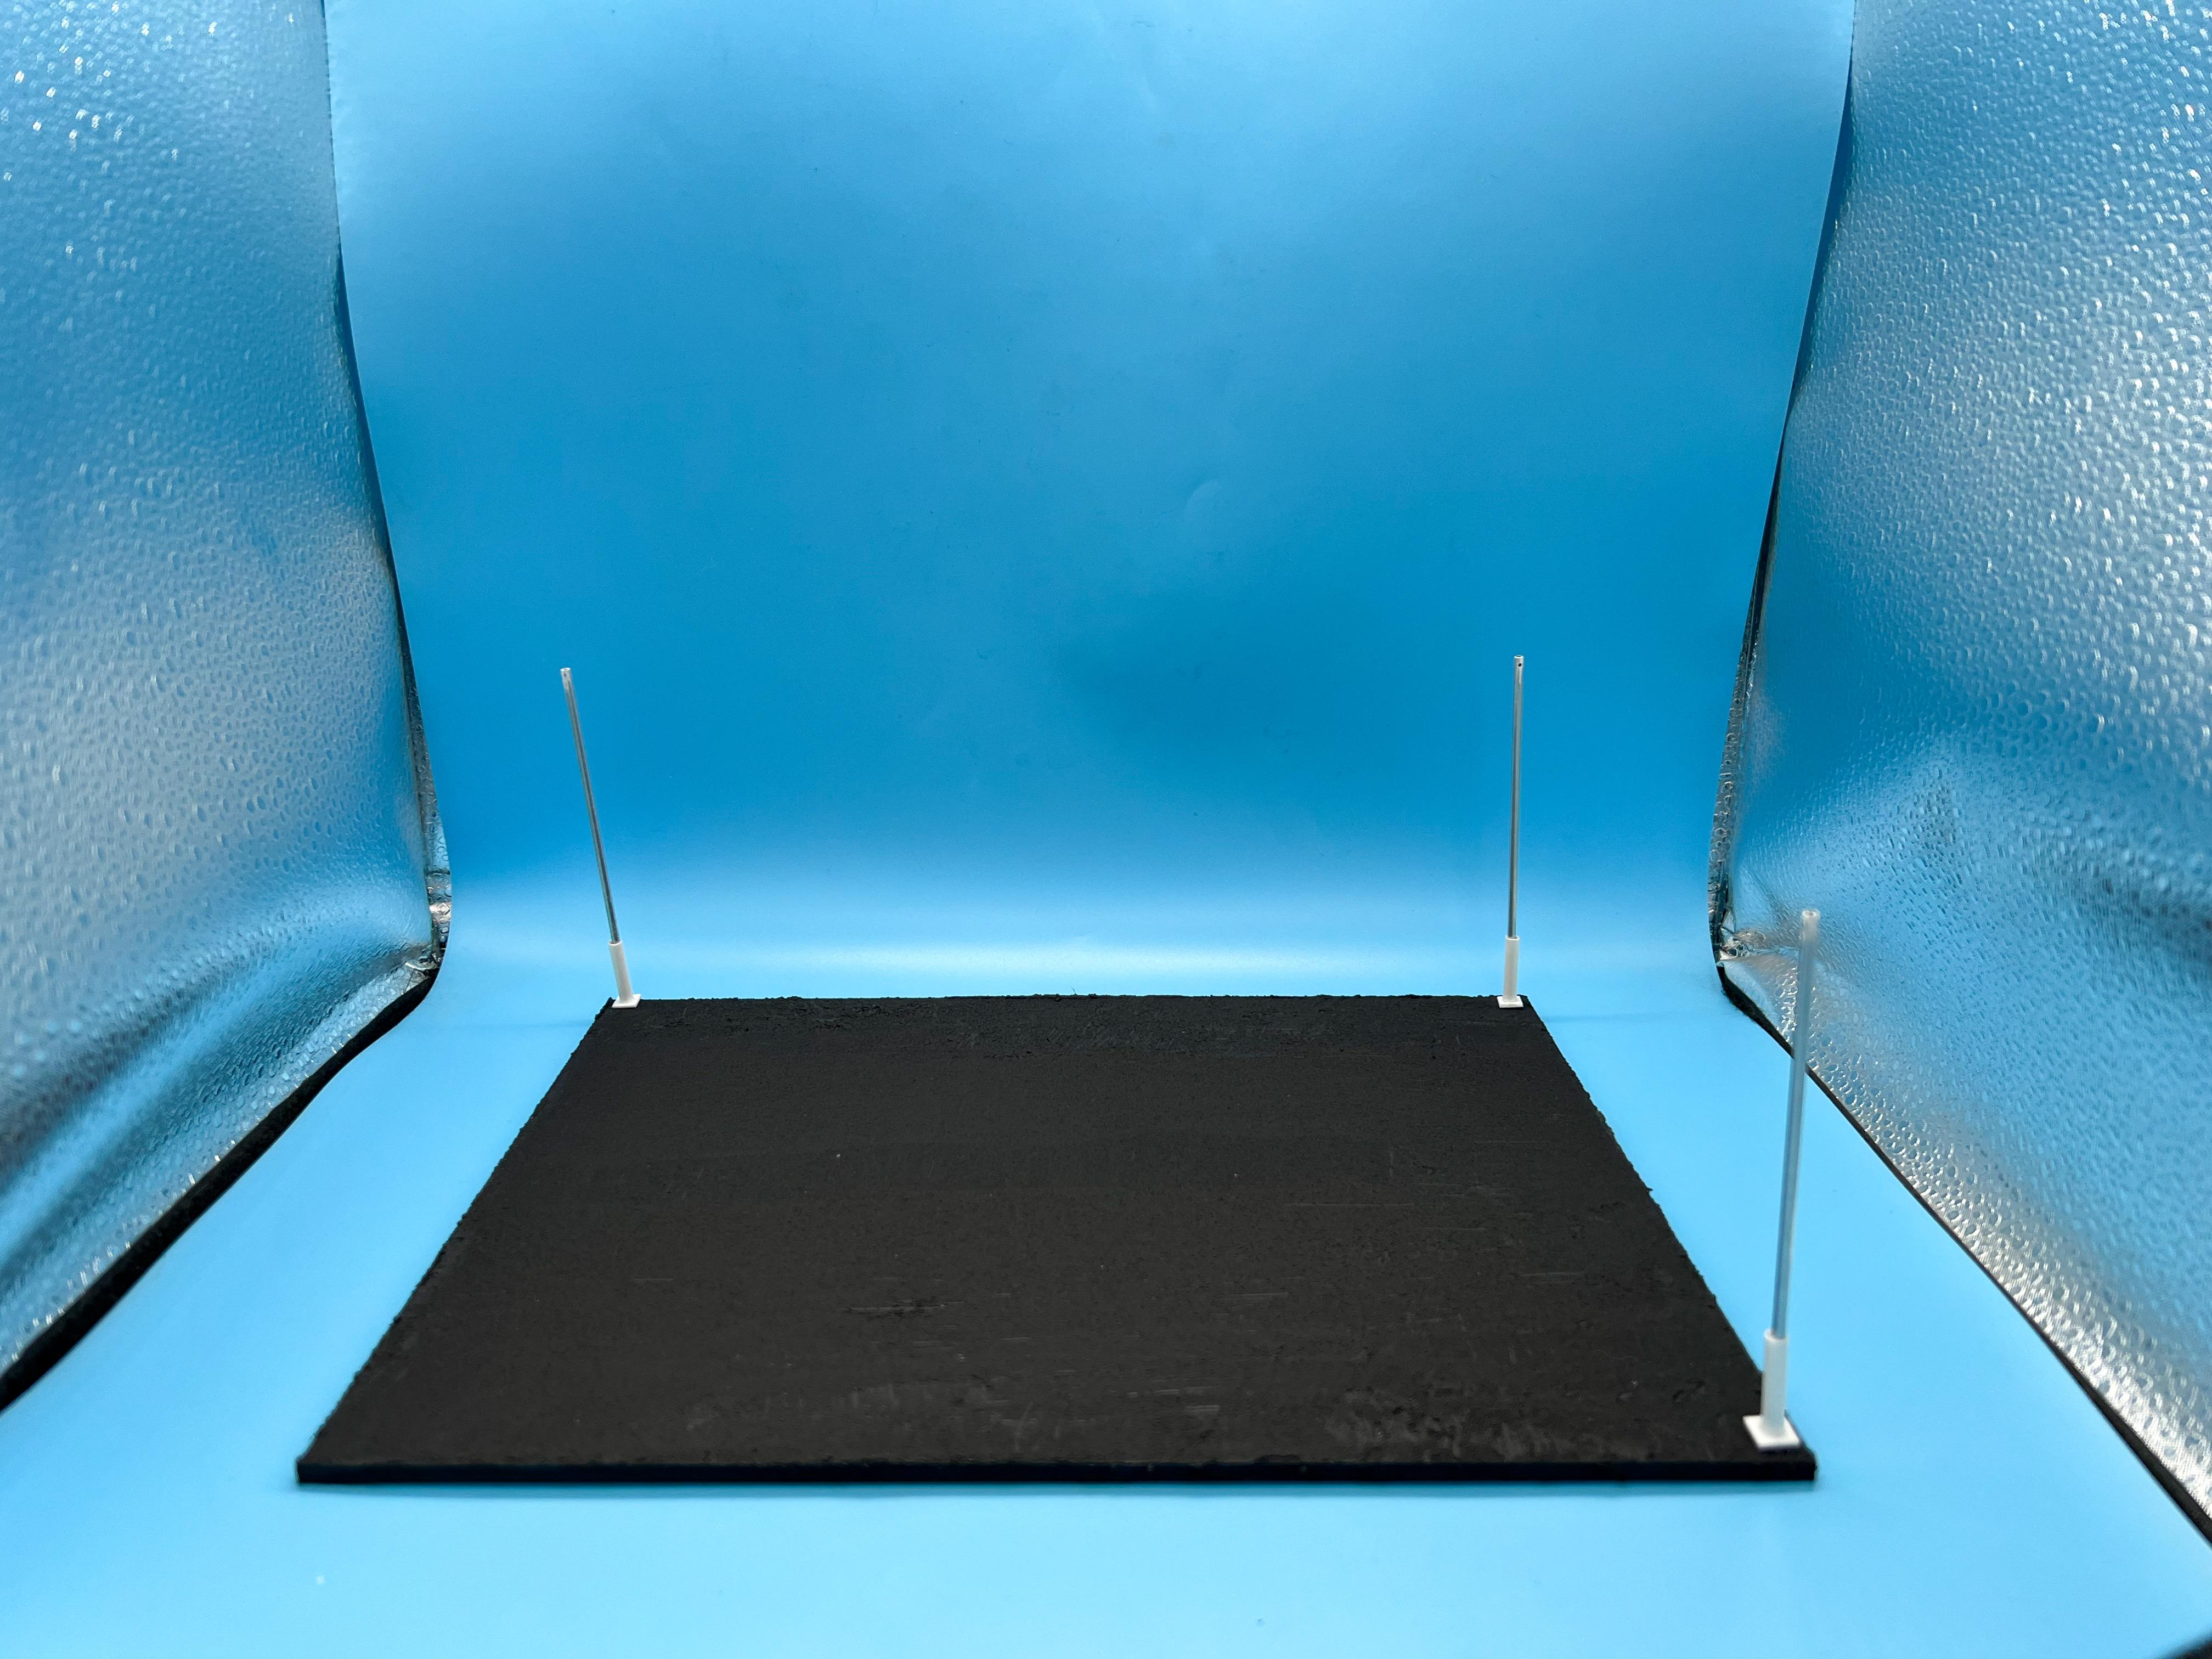
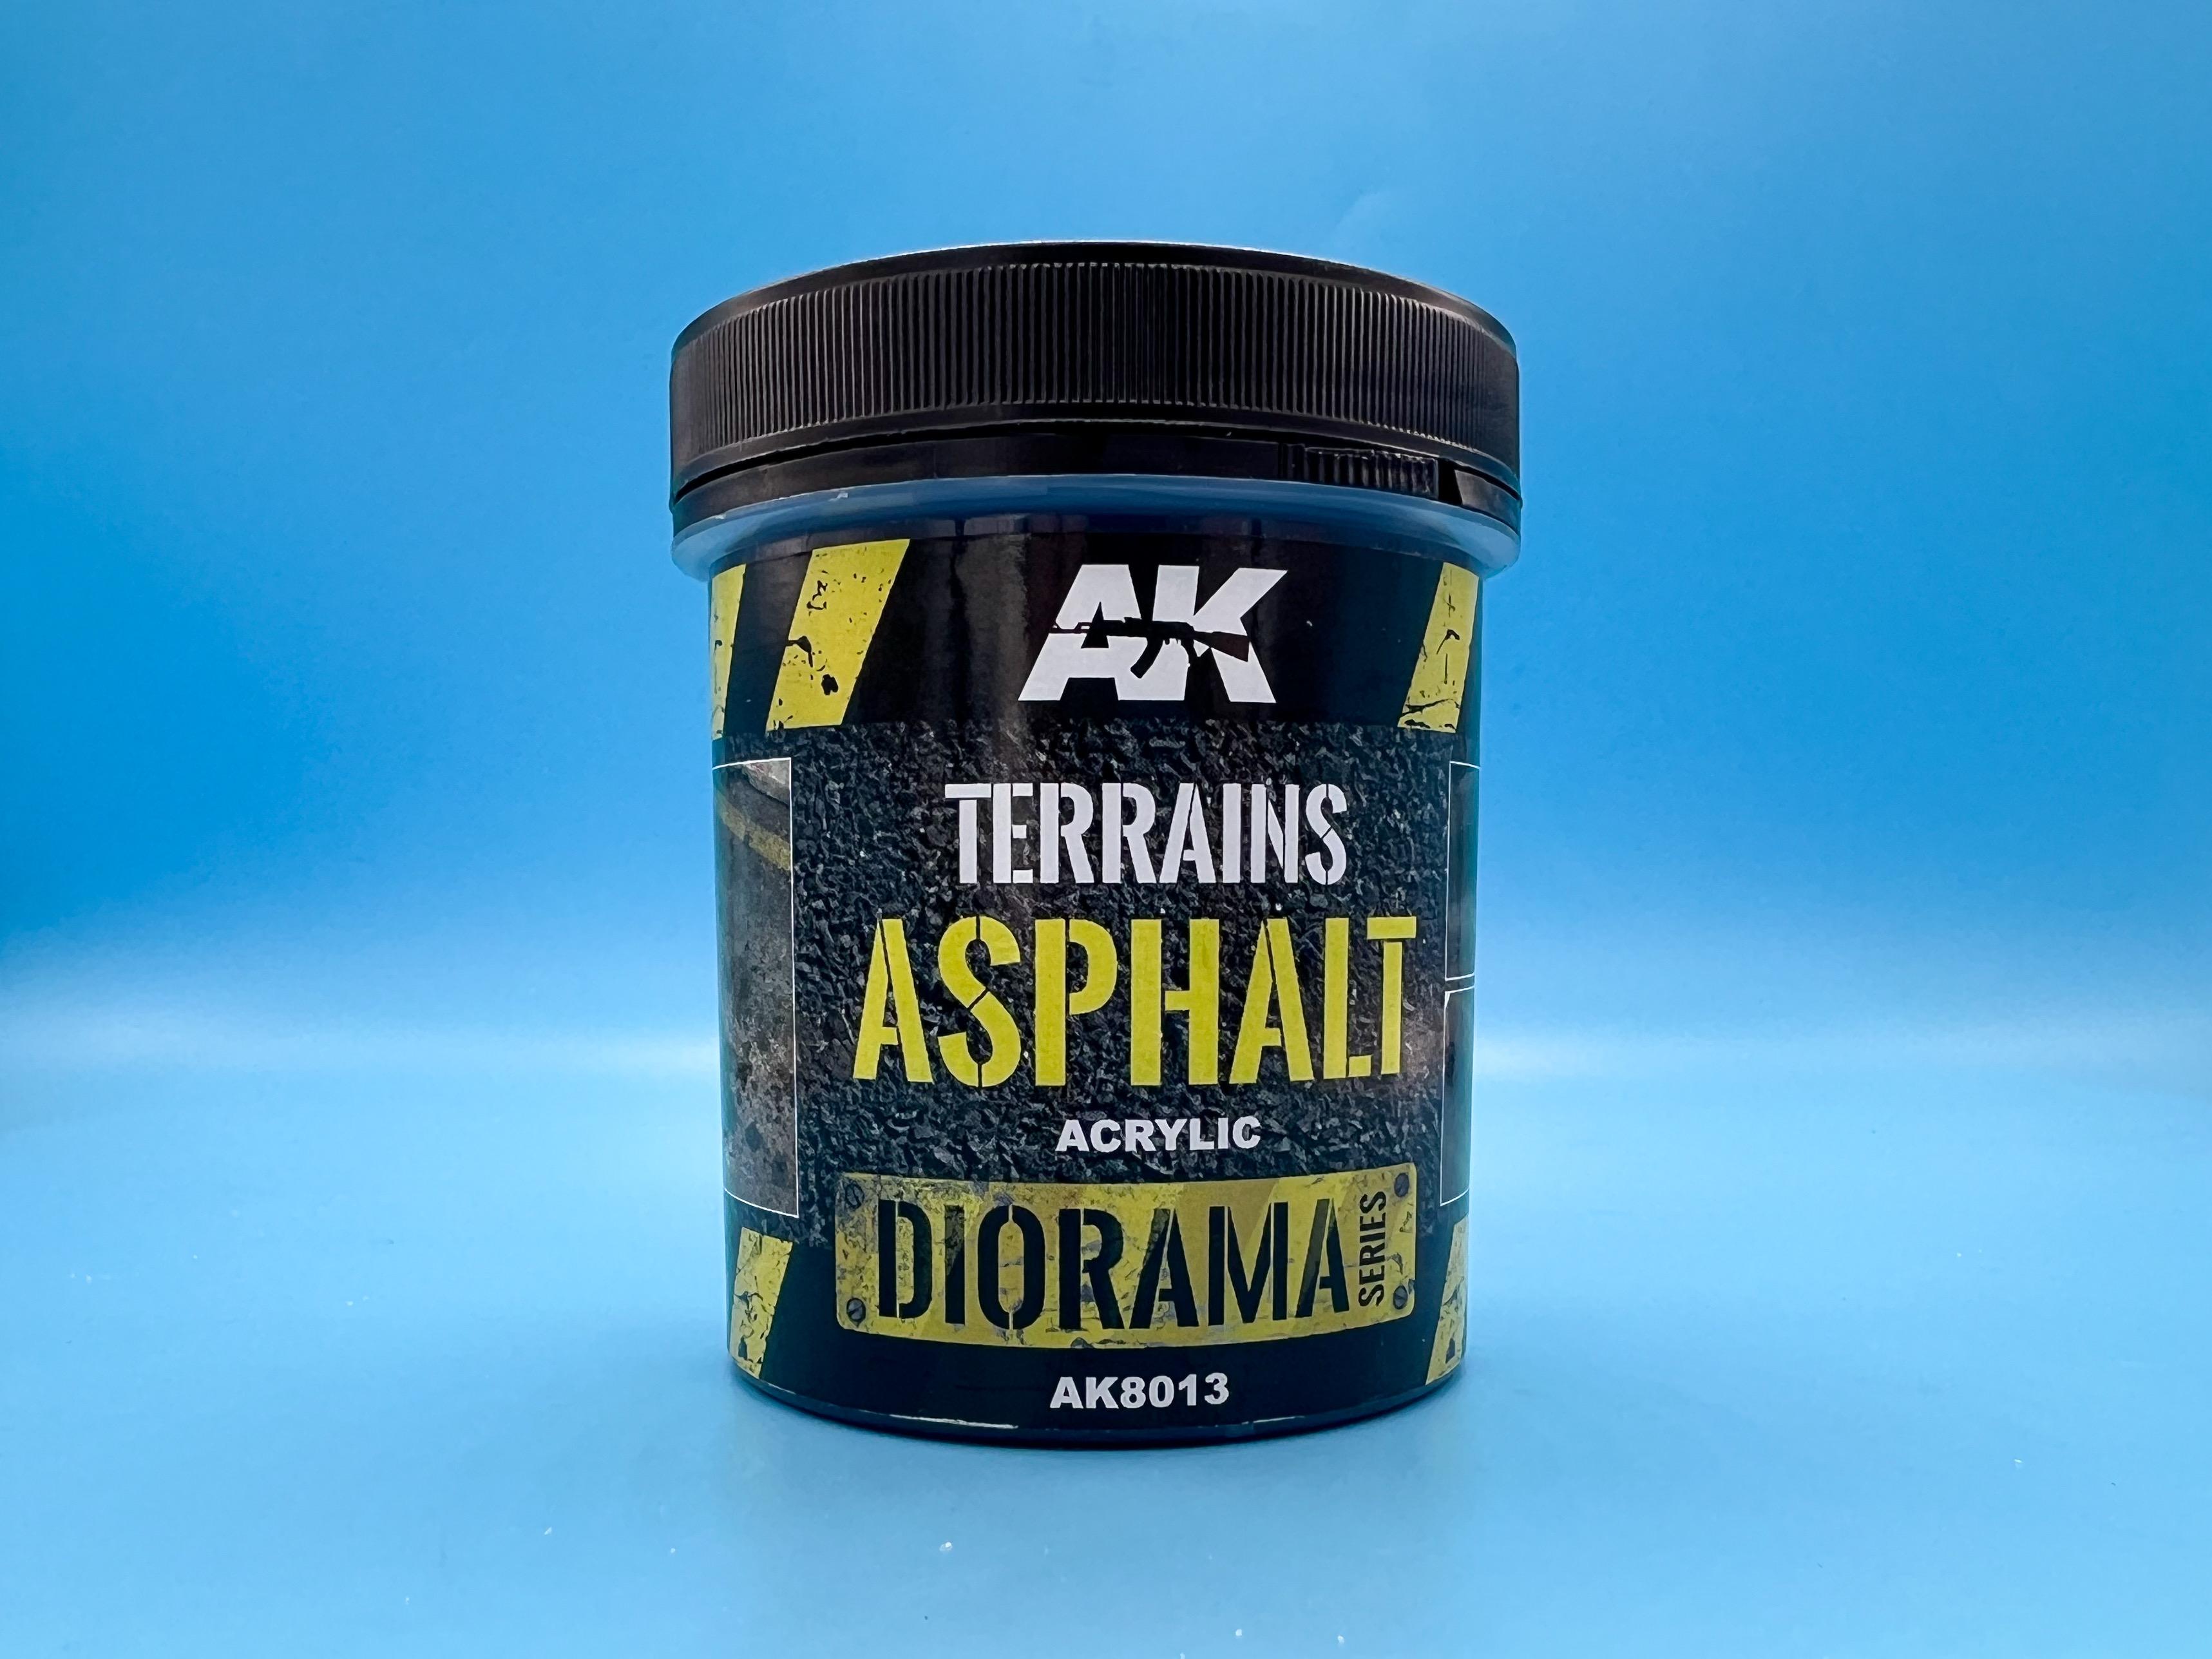
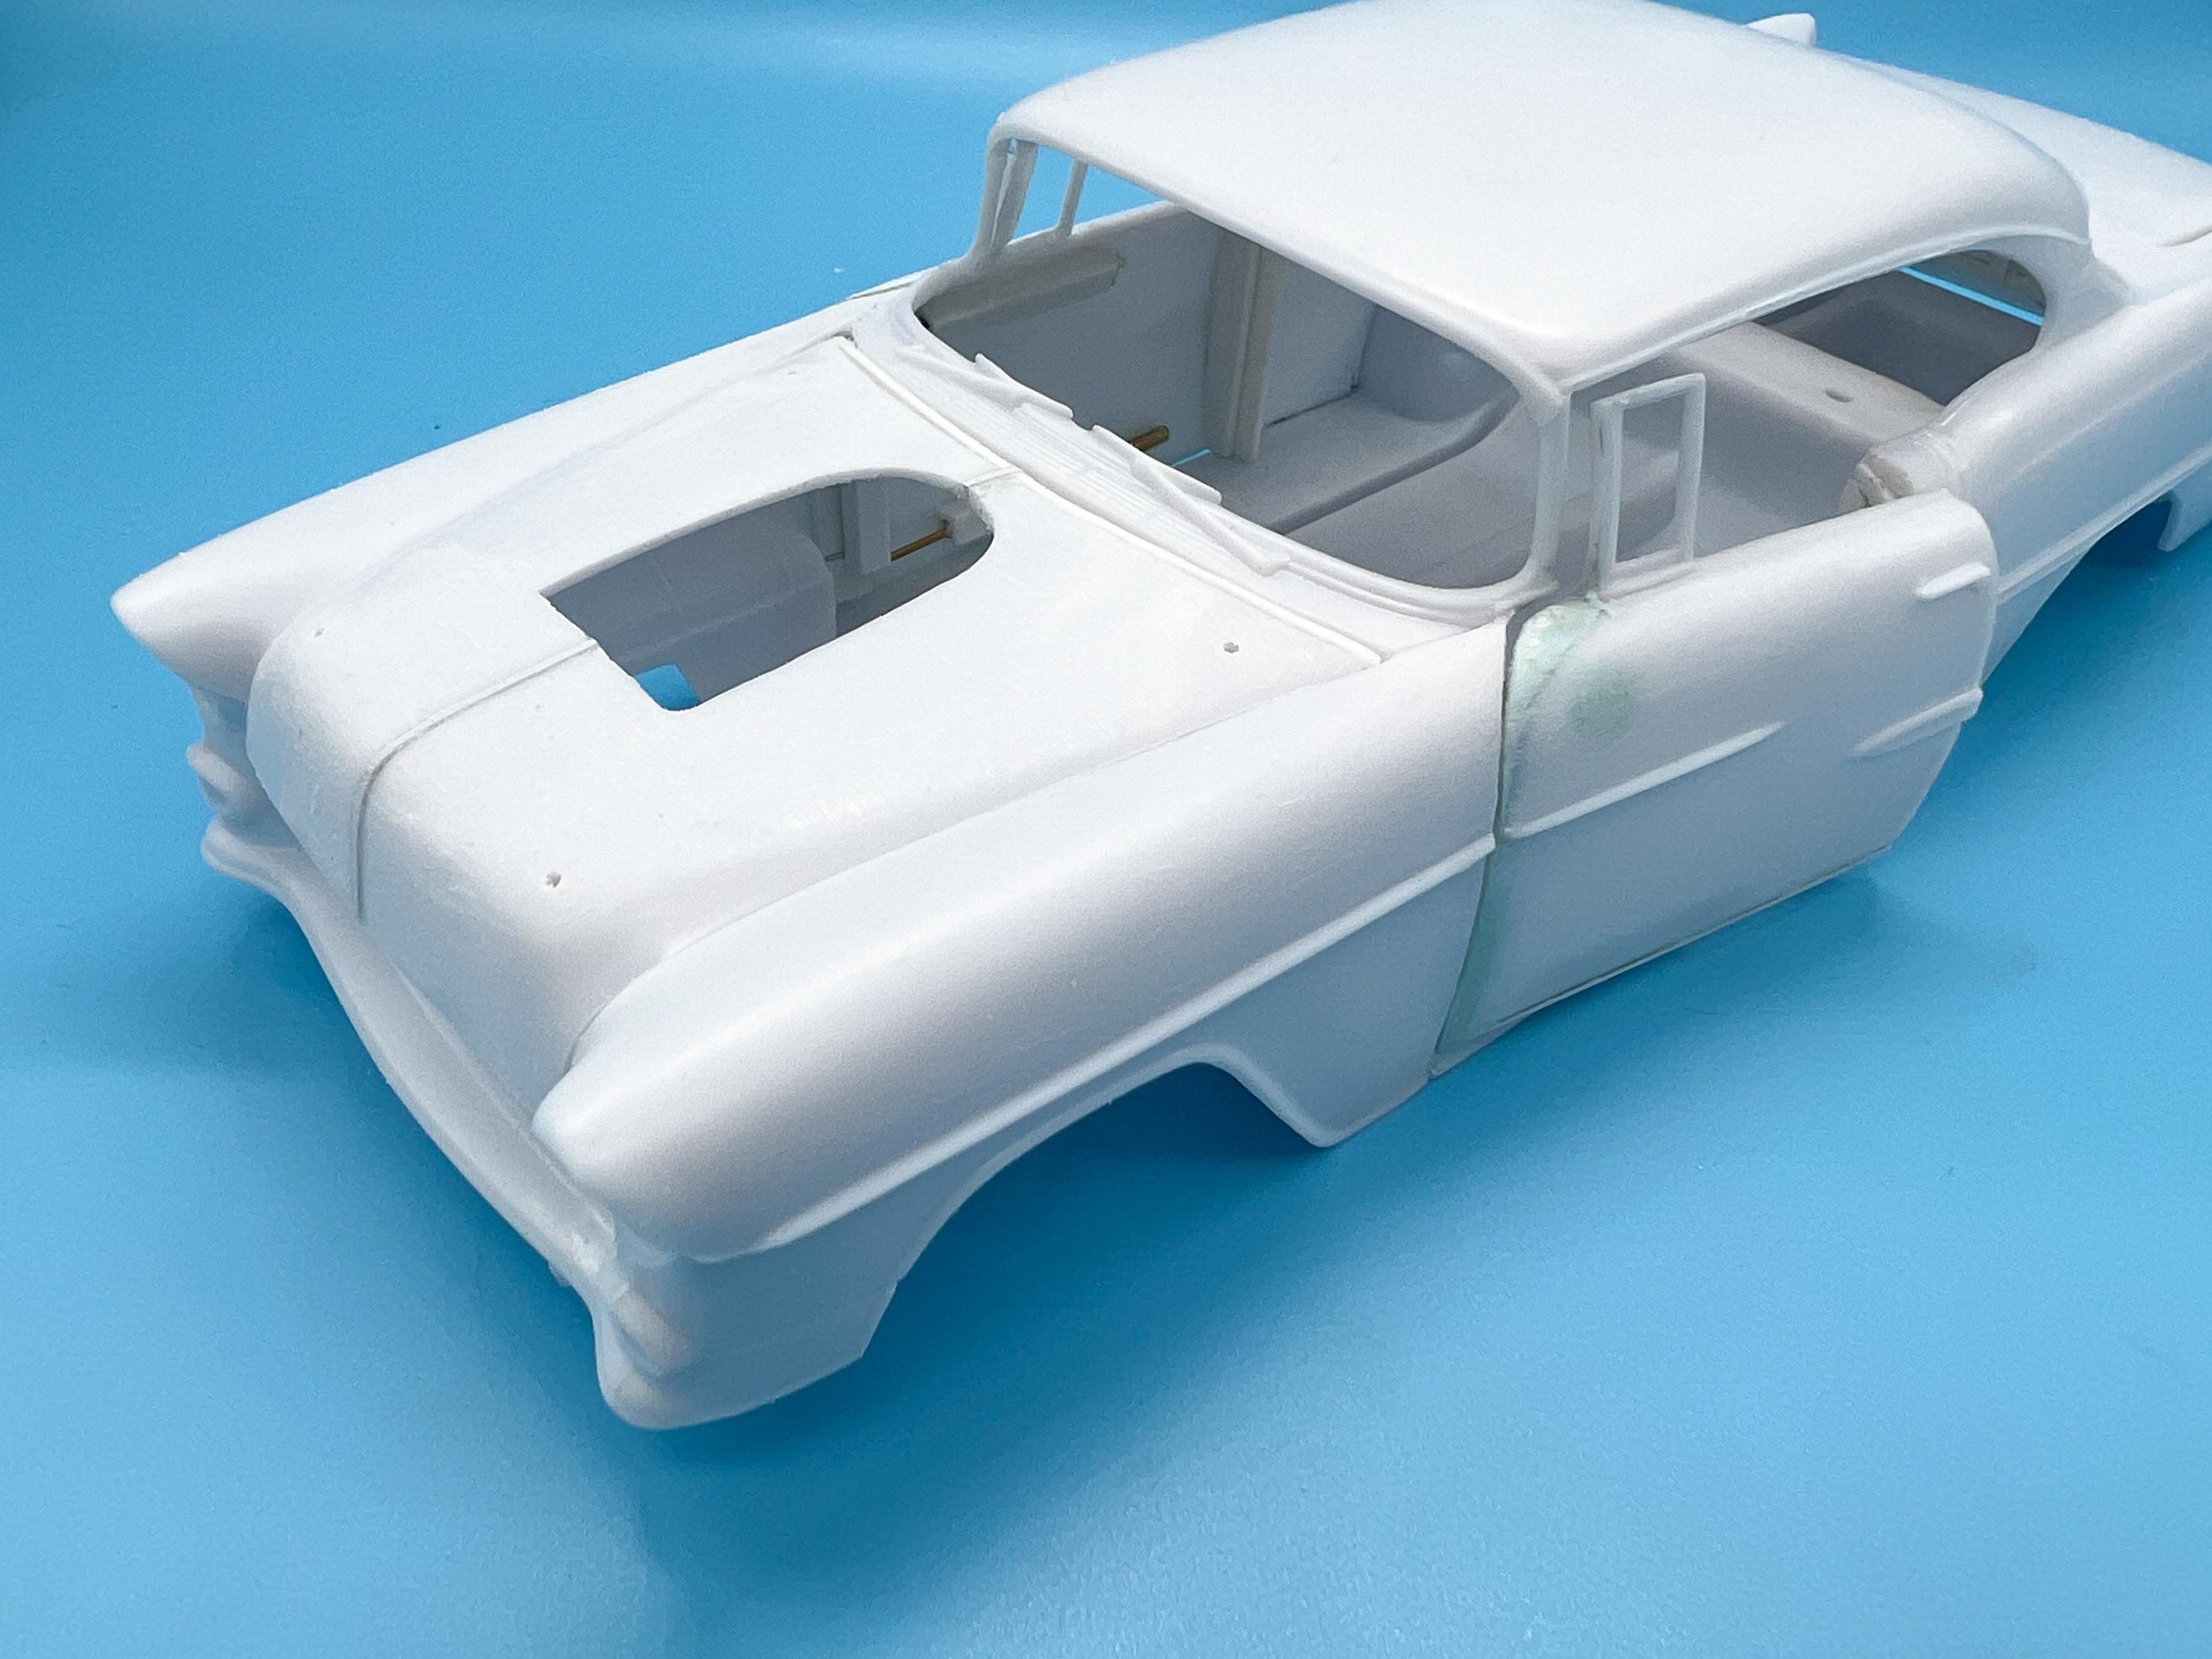
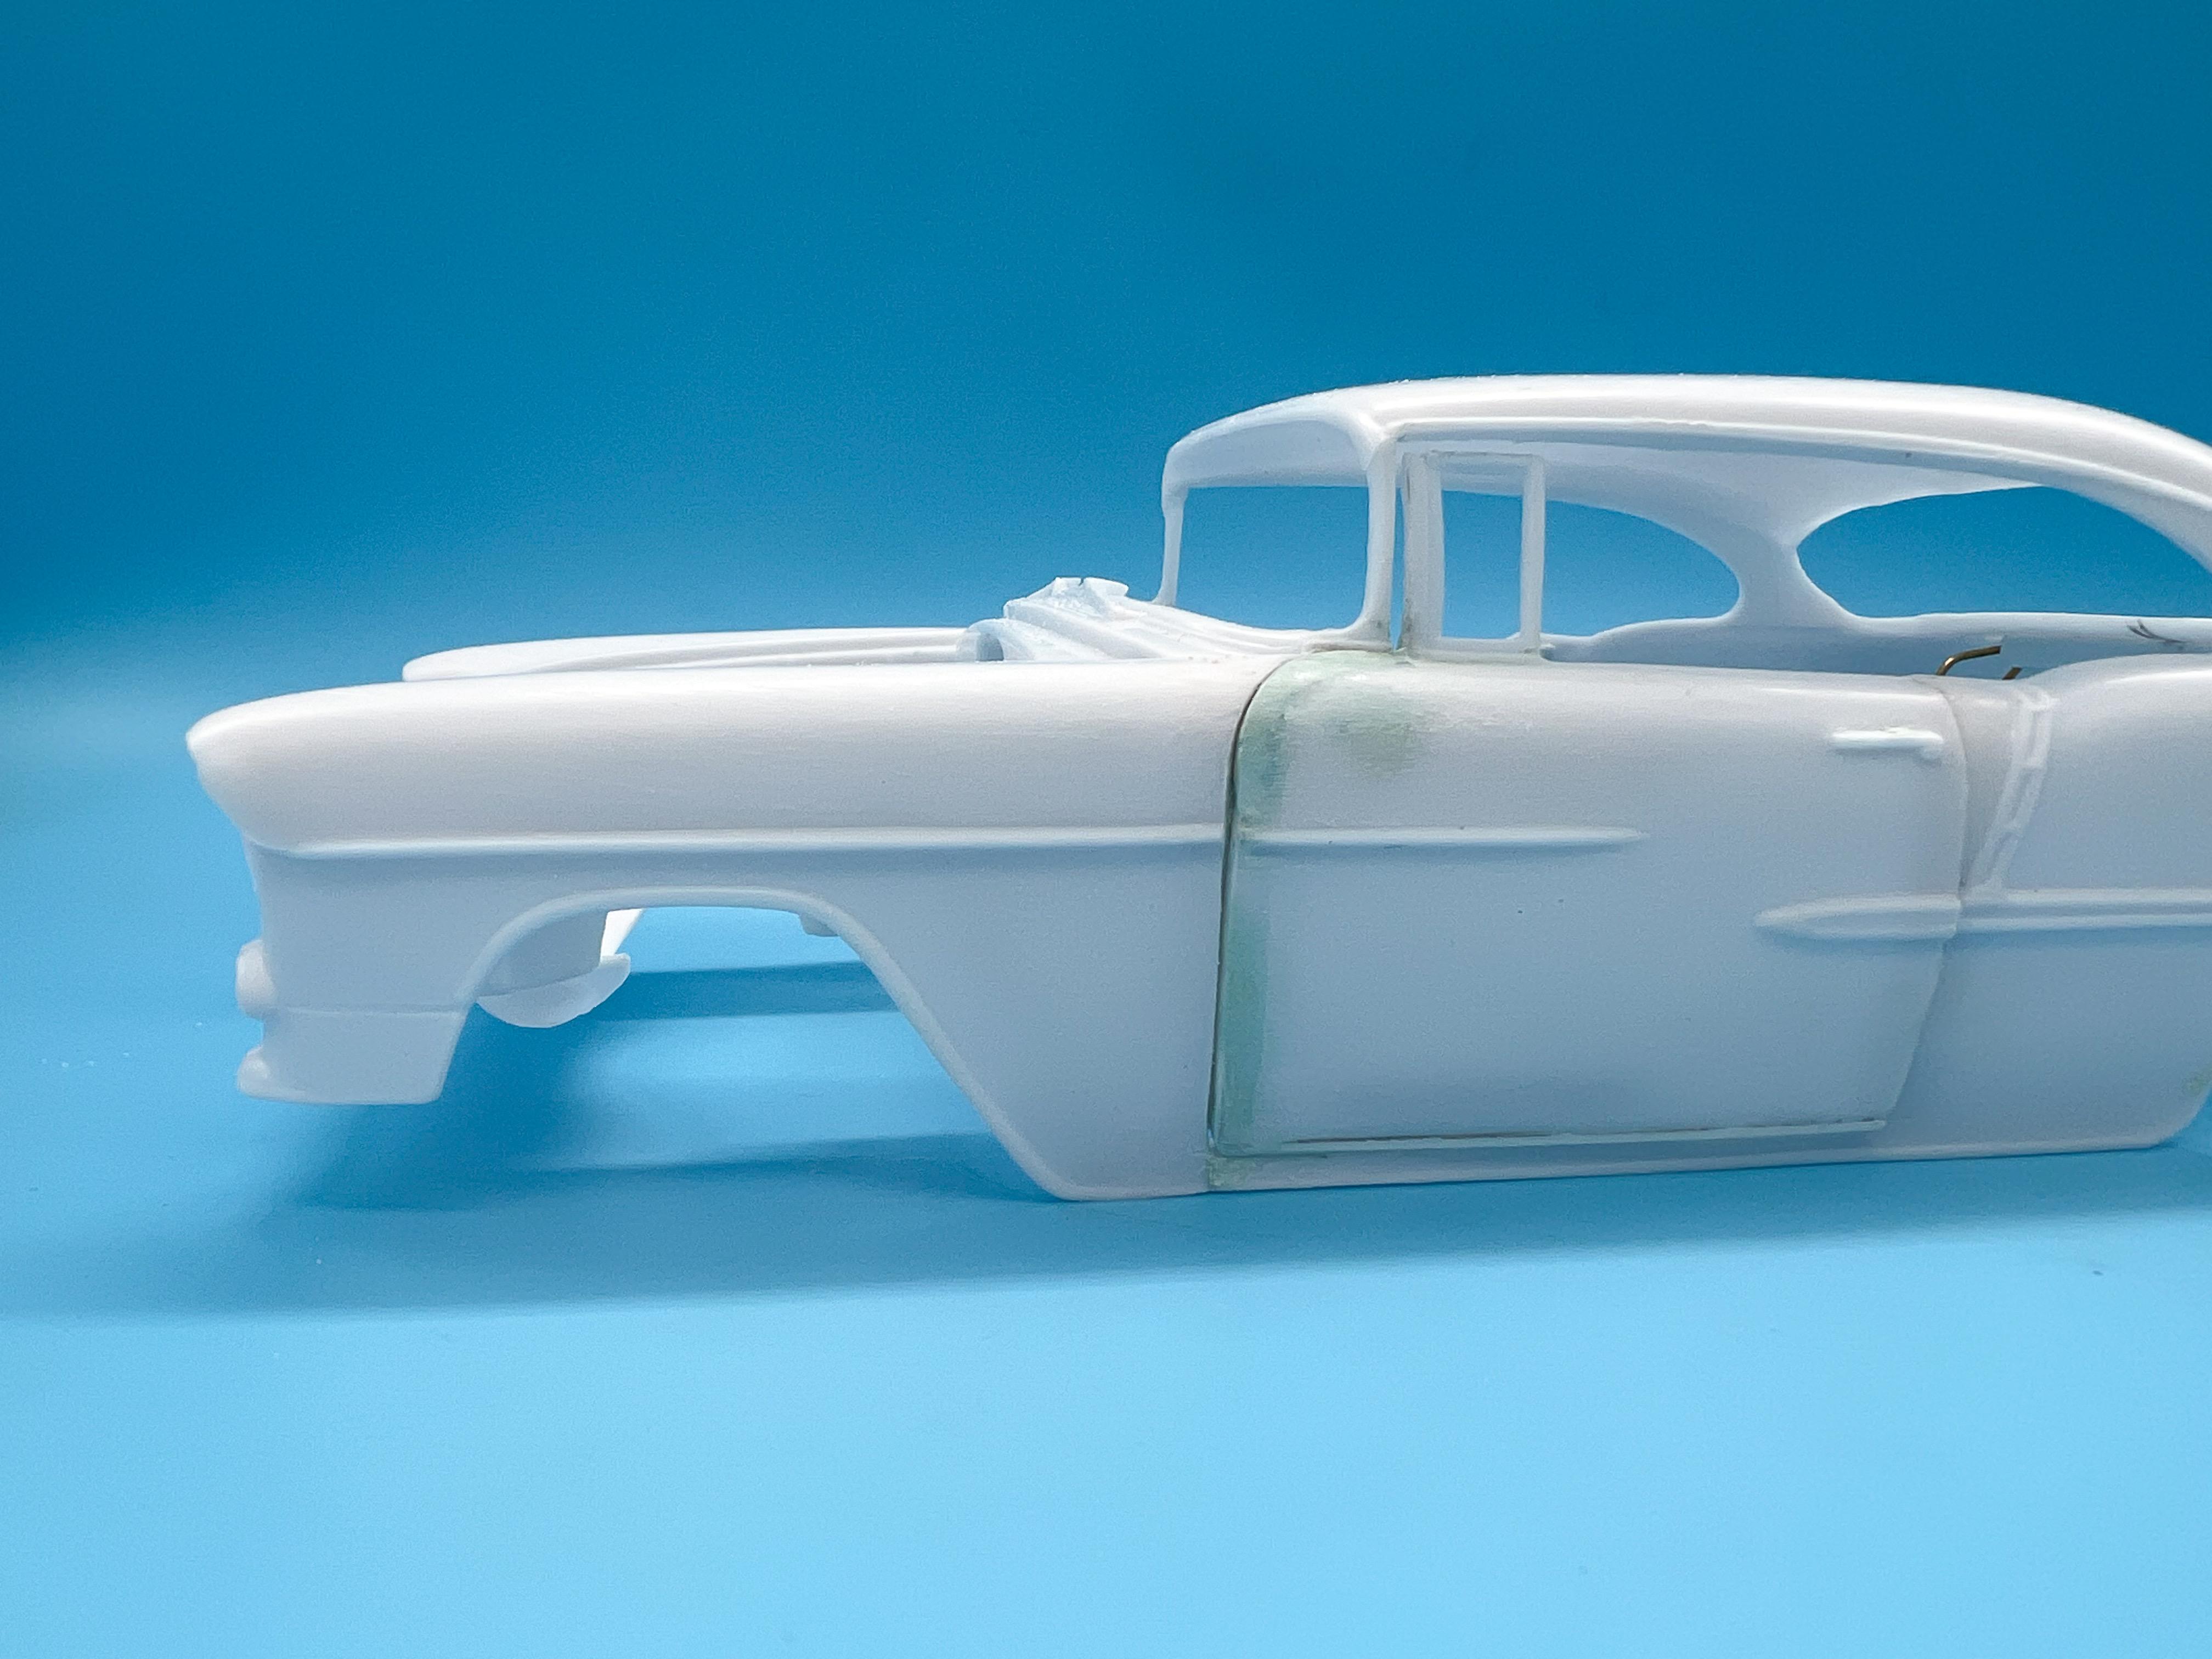
Thanks Jim! A little more progress - and if it seems like I’m going slowly on this, that would probably be accurate…lots of fitting and refitting and reassembling to do once you start cutting stuff open…but it’s coming along ok… Next thing to handle, was how the interior tub will interface with the body and those opening panels…hopefully if I did my measurements ok then we’ll be good. Cut open the inner doors so I can re-attach them (with some upgrades, of course, now that they’ll be more visible) to the doors: Test fit of the door cards to the doors: (ignore those vent windows, they’re going away anyway…) And a test fit…the doors still close as they should and (importantly) open too: Success! Of course, the interior tub, when installed, doesn’t mate up to my door jambs…got a nasty gap to fill: No biggie, some more styrene strip fixed that: I had this idea to open the fuel filler up too, but when I looked at the original TD art, there is no filler, so I guess that saved me from myself…Bondo to the rescue! In other dumb ideas I probably shouldn’t try, I was trying to think of how I could open the cowl vents…they’re way too small and shallow to sand the inside of the cowl to open them, but I did draw up a 3D model of a replacement piece I could install in there: This part proved near impossible to print - the vents are really thin and it’s tough to print them without them warping, sagging or getting clogged with resin but after a dozen tries and tweaks I got a part that is CLOSE: It needs a few more rounds in my ultrasonic cleaner to clean out the vents as best I can before curing it, but it MIGHT be usable… And, whilst I was waiting for stuff to dry and print and whatnot I did some research on the ‘69 Winternationals, which I think was the inspiration for TD’s artwork. I found a good square-on image with the copy on that banner so that I can make a little scene for the car to sit on: I’ll make a little version of that banner to go on this base that I started fabricating (it’s too big to fit nicely in my photobooth without the insides showing…sorry about that): The asphalt is an AK Interactive product that I picked up to play with…I’m not very good at using it yet but it has a nice realistic texture and it dried pretty quick: And, that’s about my progress this past few days…will eventually run out of stuff to do on the body and move onto something more fun…more soon, thanks for looking!
-
Do you also have 1:1 project cars?
OldNYJim replied to ctruss53's topic in General Automotive Talk (Trucks and Cars)
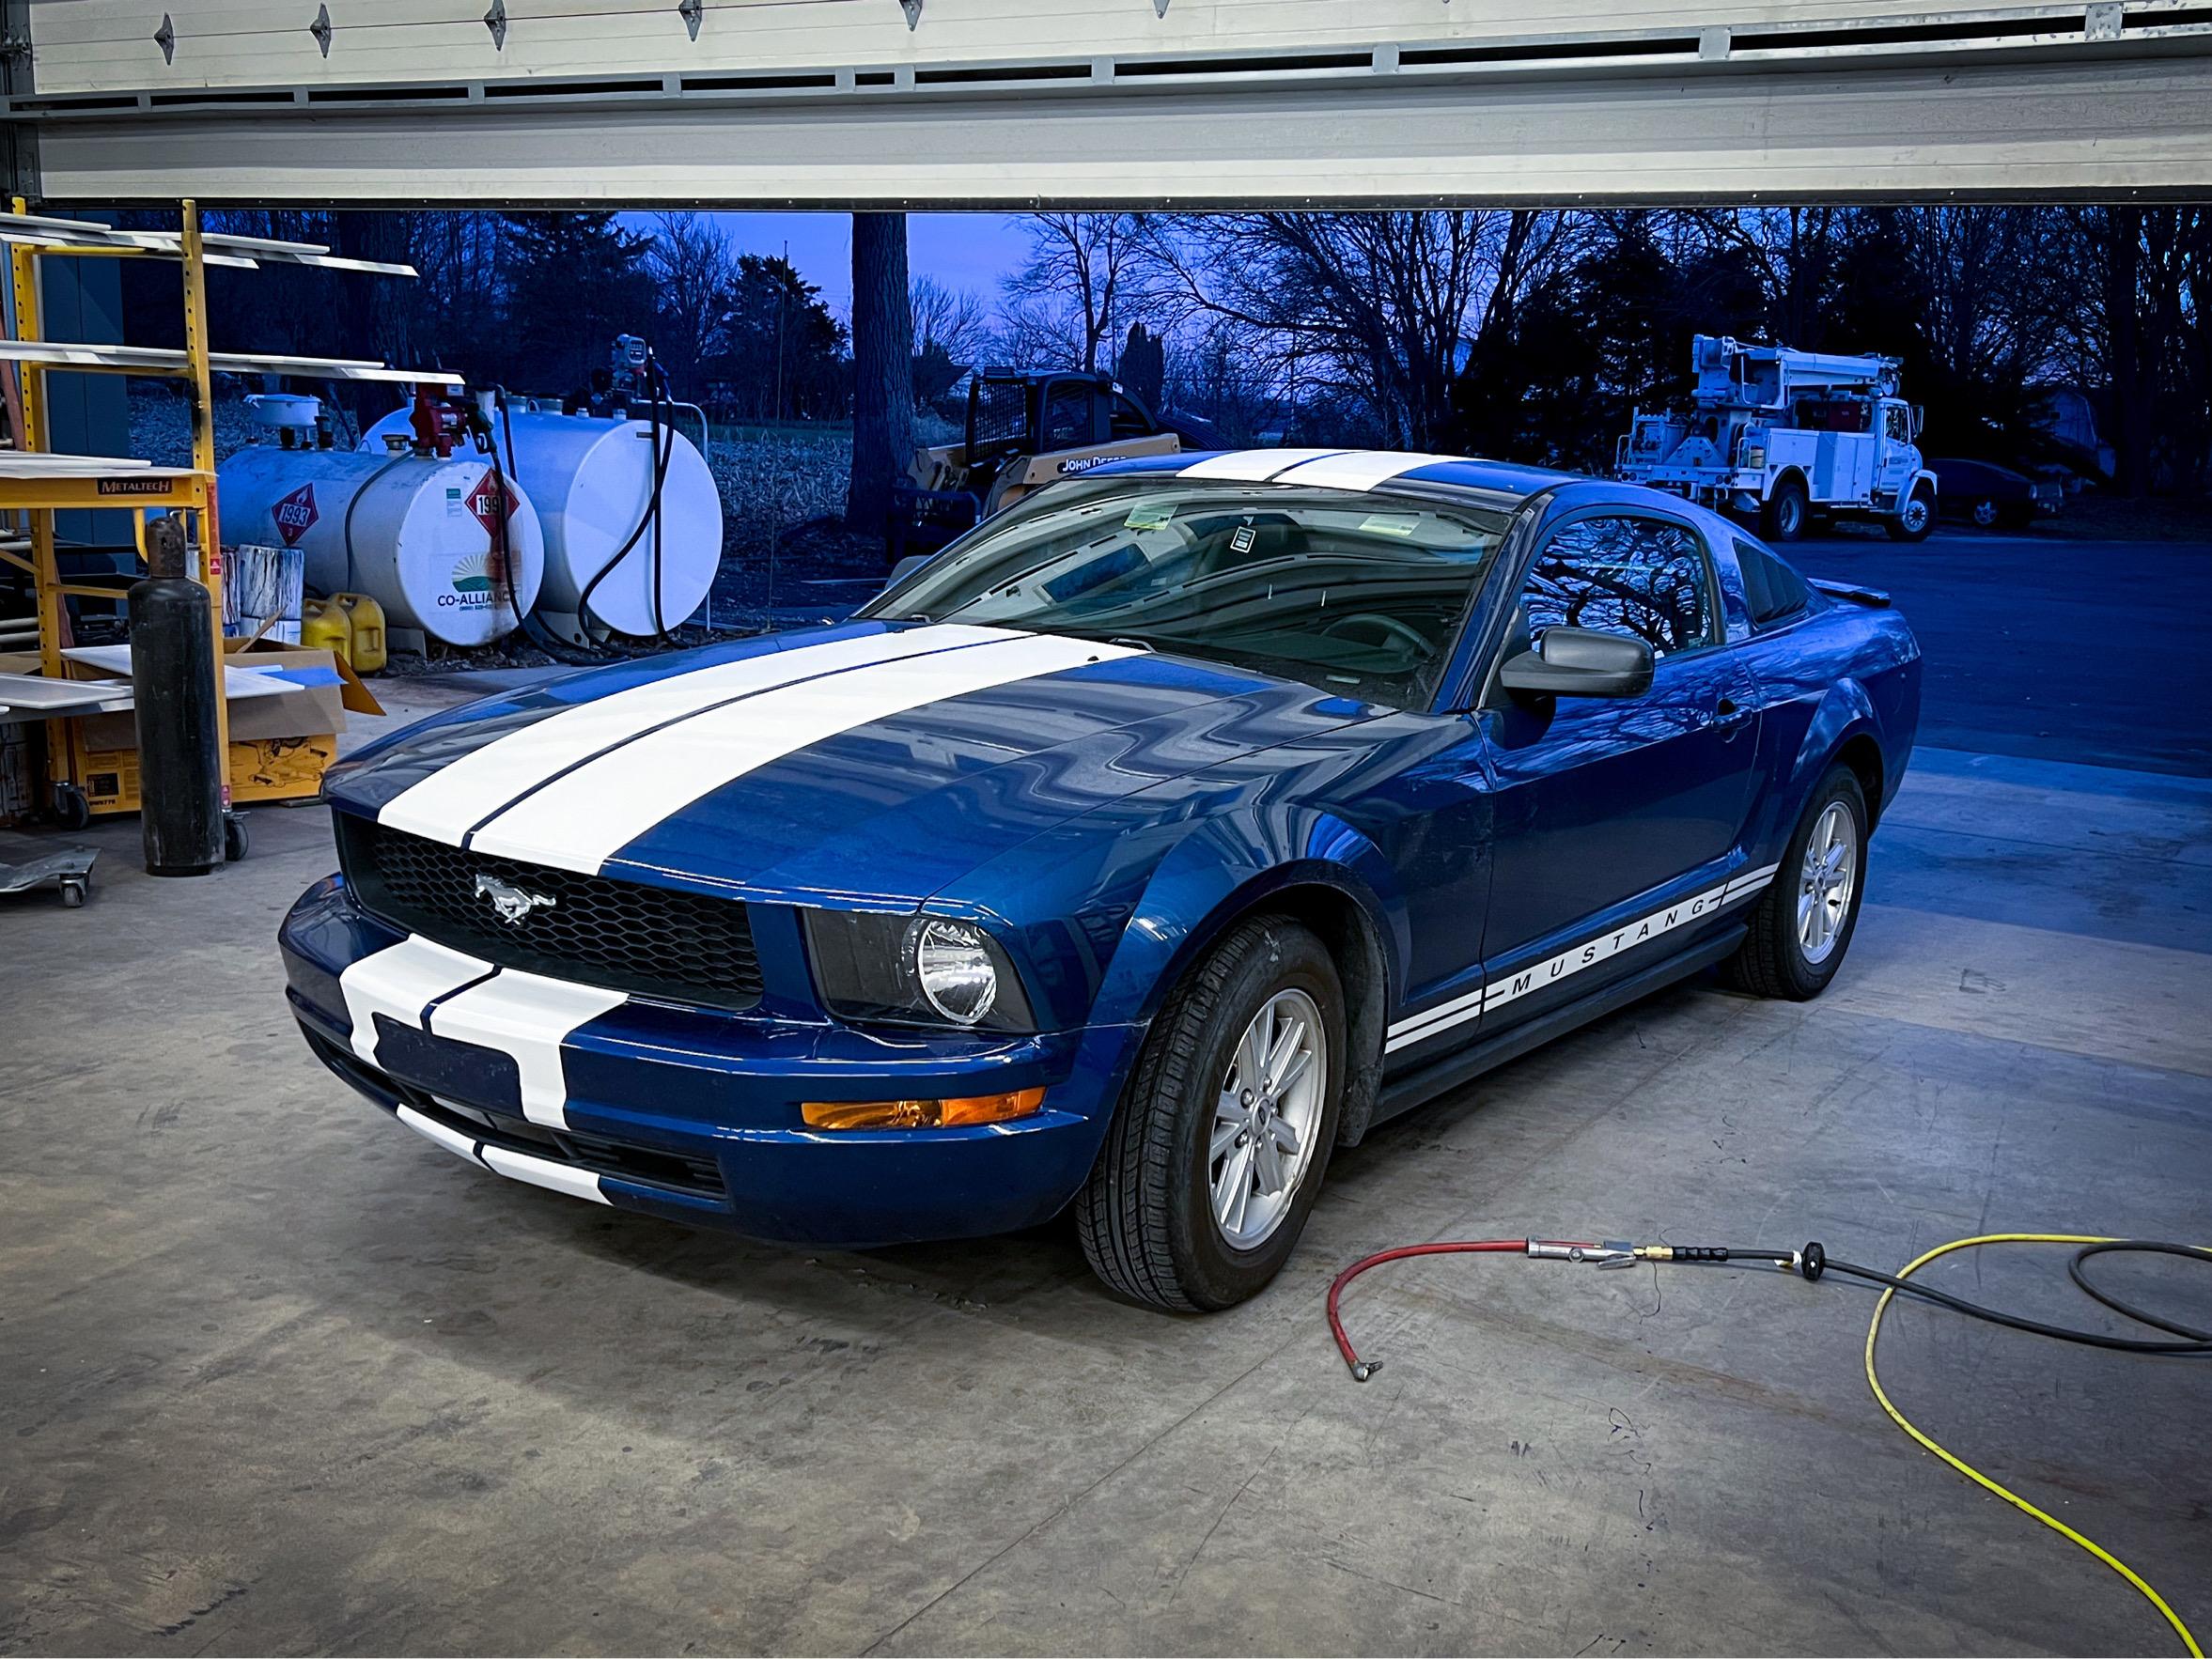
I had a Miata in that color, if it's the one I I think it is...looks great! -
We had Xfinity home internet and cable, $130 a month, and switched to T-Mobile internet for $50 a month and freed up $80 a month for some streaming options. My wife picked Disney, I picked Peacock (for the live NY news, mostly) and Discovery, and we already had Amazon Prime video...still making a saving and we pick and choose which service we want and never run out of something to watch. Don't miss cable AT ALL
-
Remember back in the mid 2000s or so when it seemed like about every hot rod was black primer, gray primer or possibly red oxide primer? With red wheels and possibly a Mexican blanket interior? I kinda liked that trend…I didn’t care for the skulls and cobwebs (just a random thought I had, that wasn’t worth a new thread of it’s own)
-
What did you see on the road today?
OldNYJim replied to Harry P.'s topic in General Automotive Talk (Trucks and Cars)
I suspect this little truck is pretty well ventilated - in addition to the floor gaps, it doesn’t have any windows whatsoever I still wanna drive it when I get a chance tho… -
Mustang wagon did exist...
OldNYJim replied to BlackSheep214's topic in General Automotive Talk (Trucks and Cars)
I had a Little Red Wagon -
My take on the most famous ‘55 gasser street machine’…
OldNYJim replied to OldNYJim's topic in WIP: Model Cars
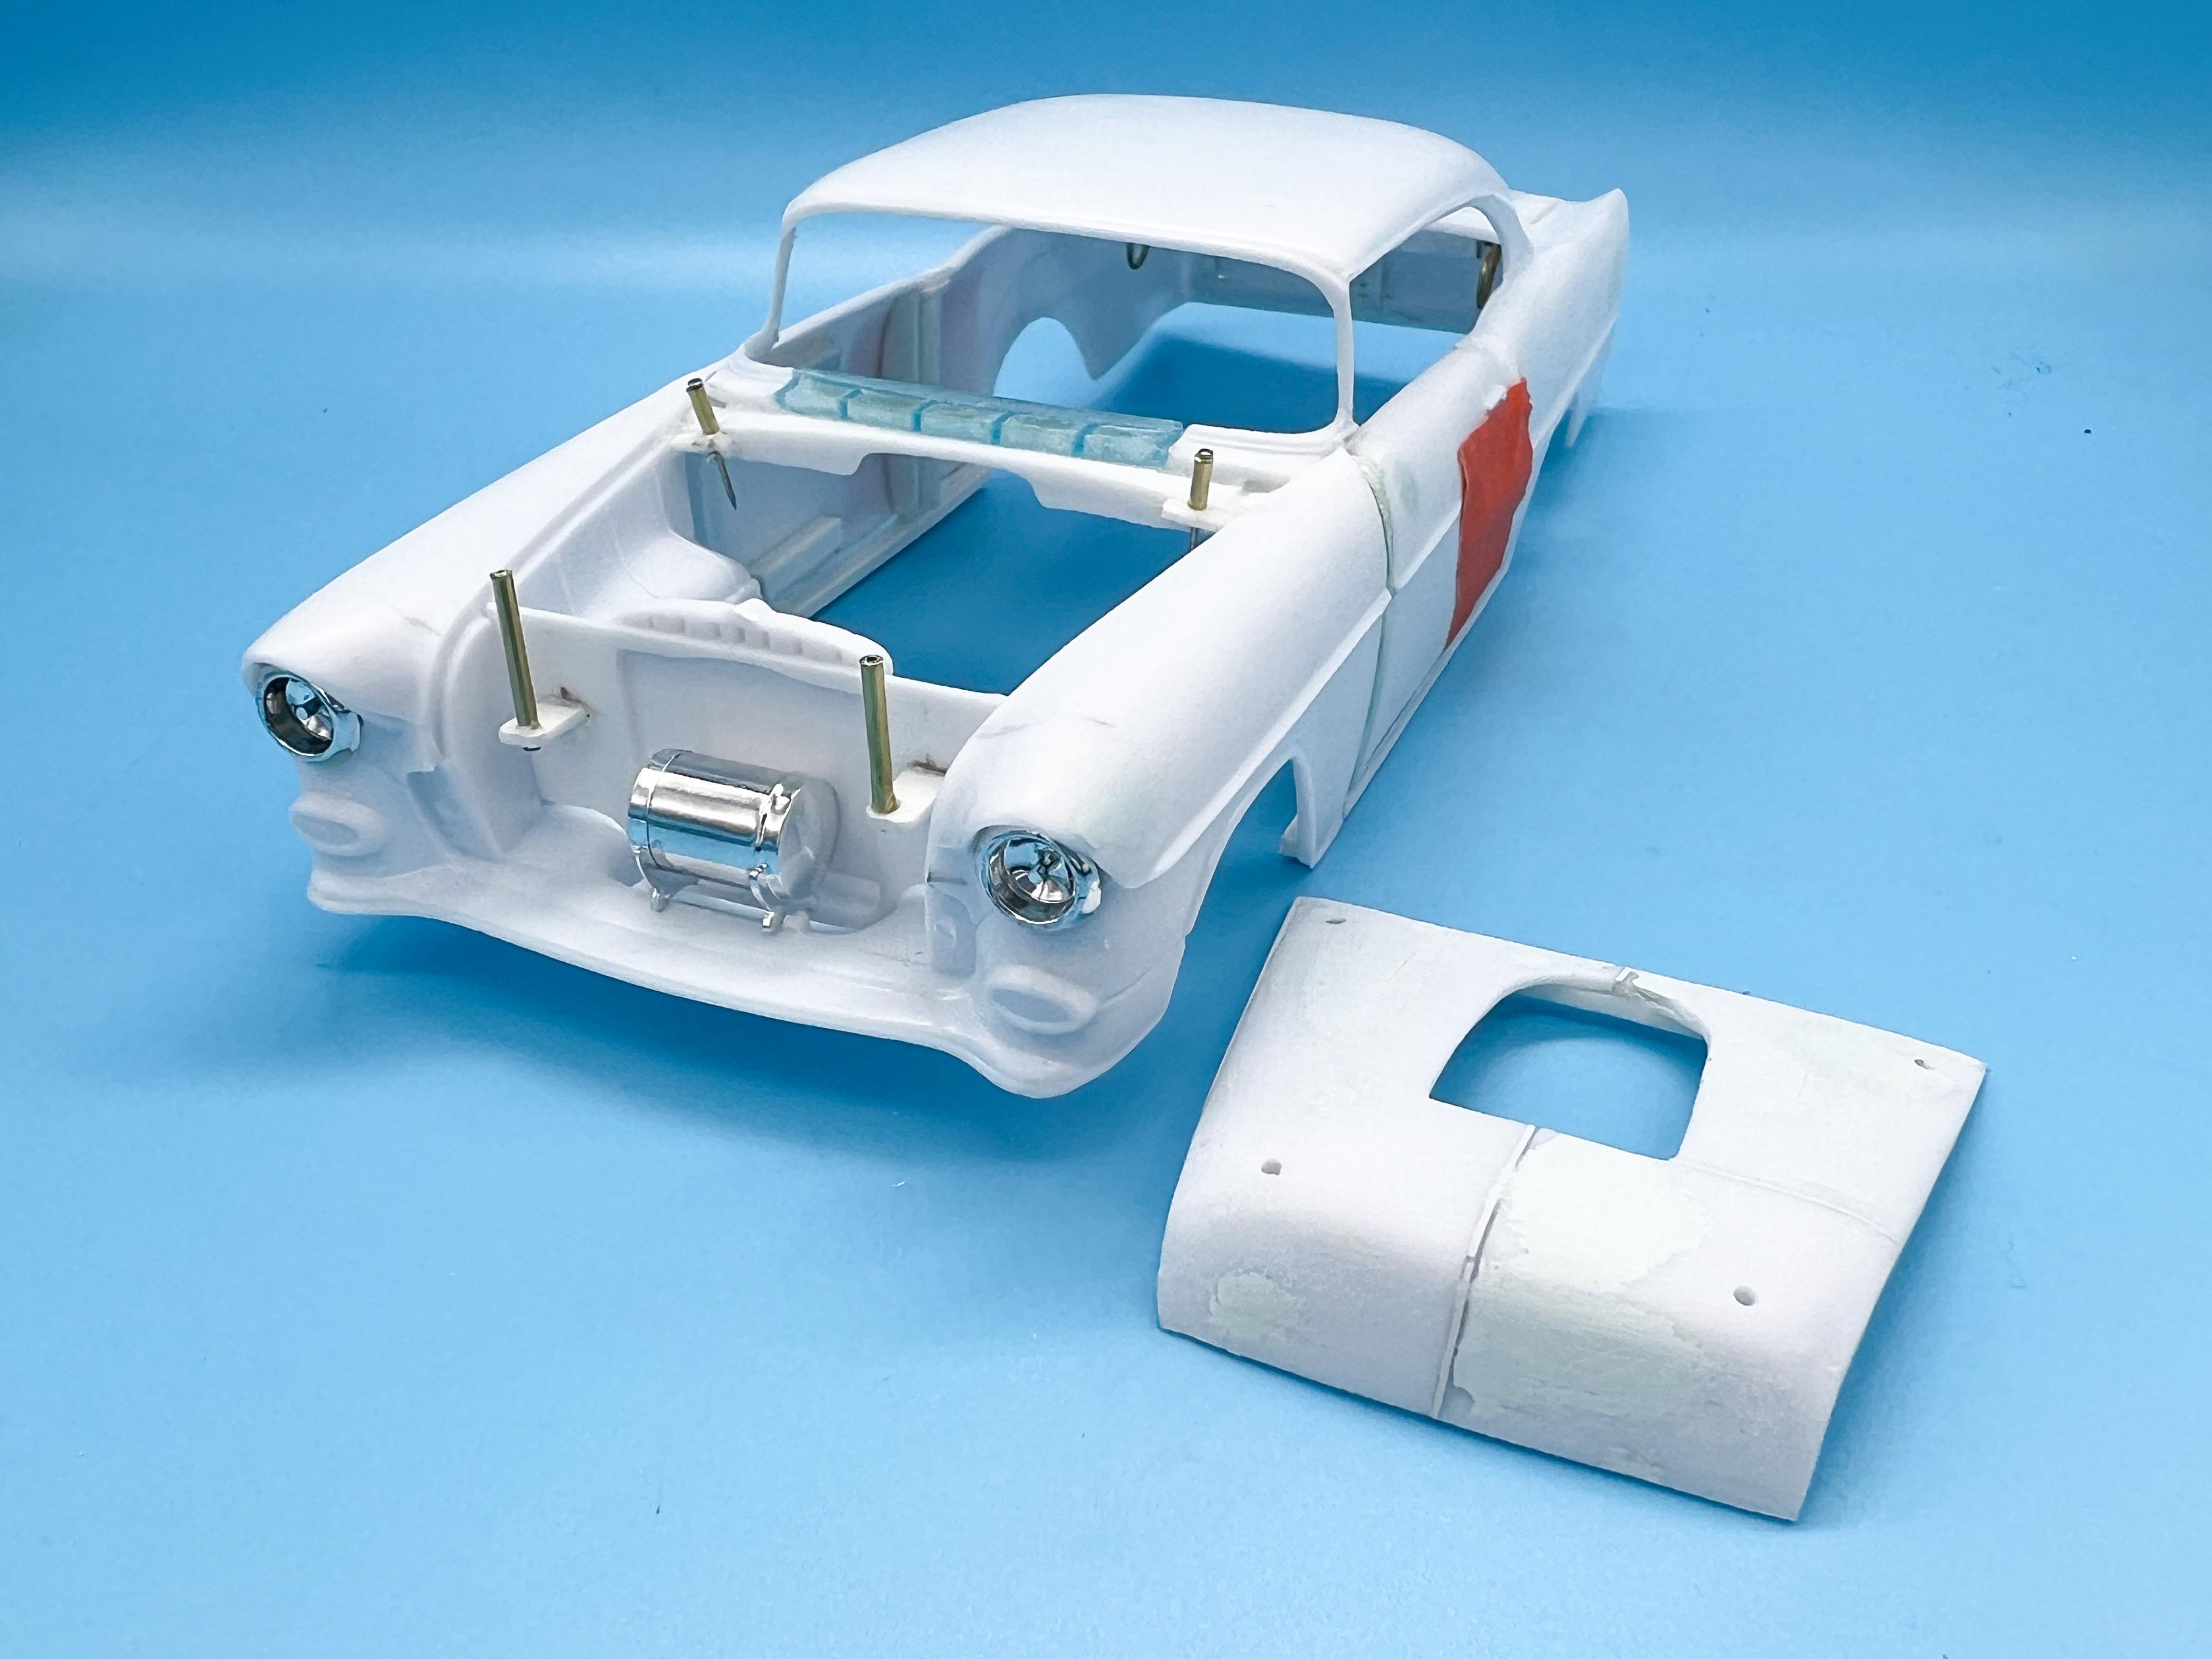
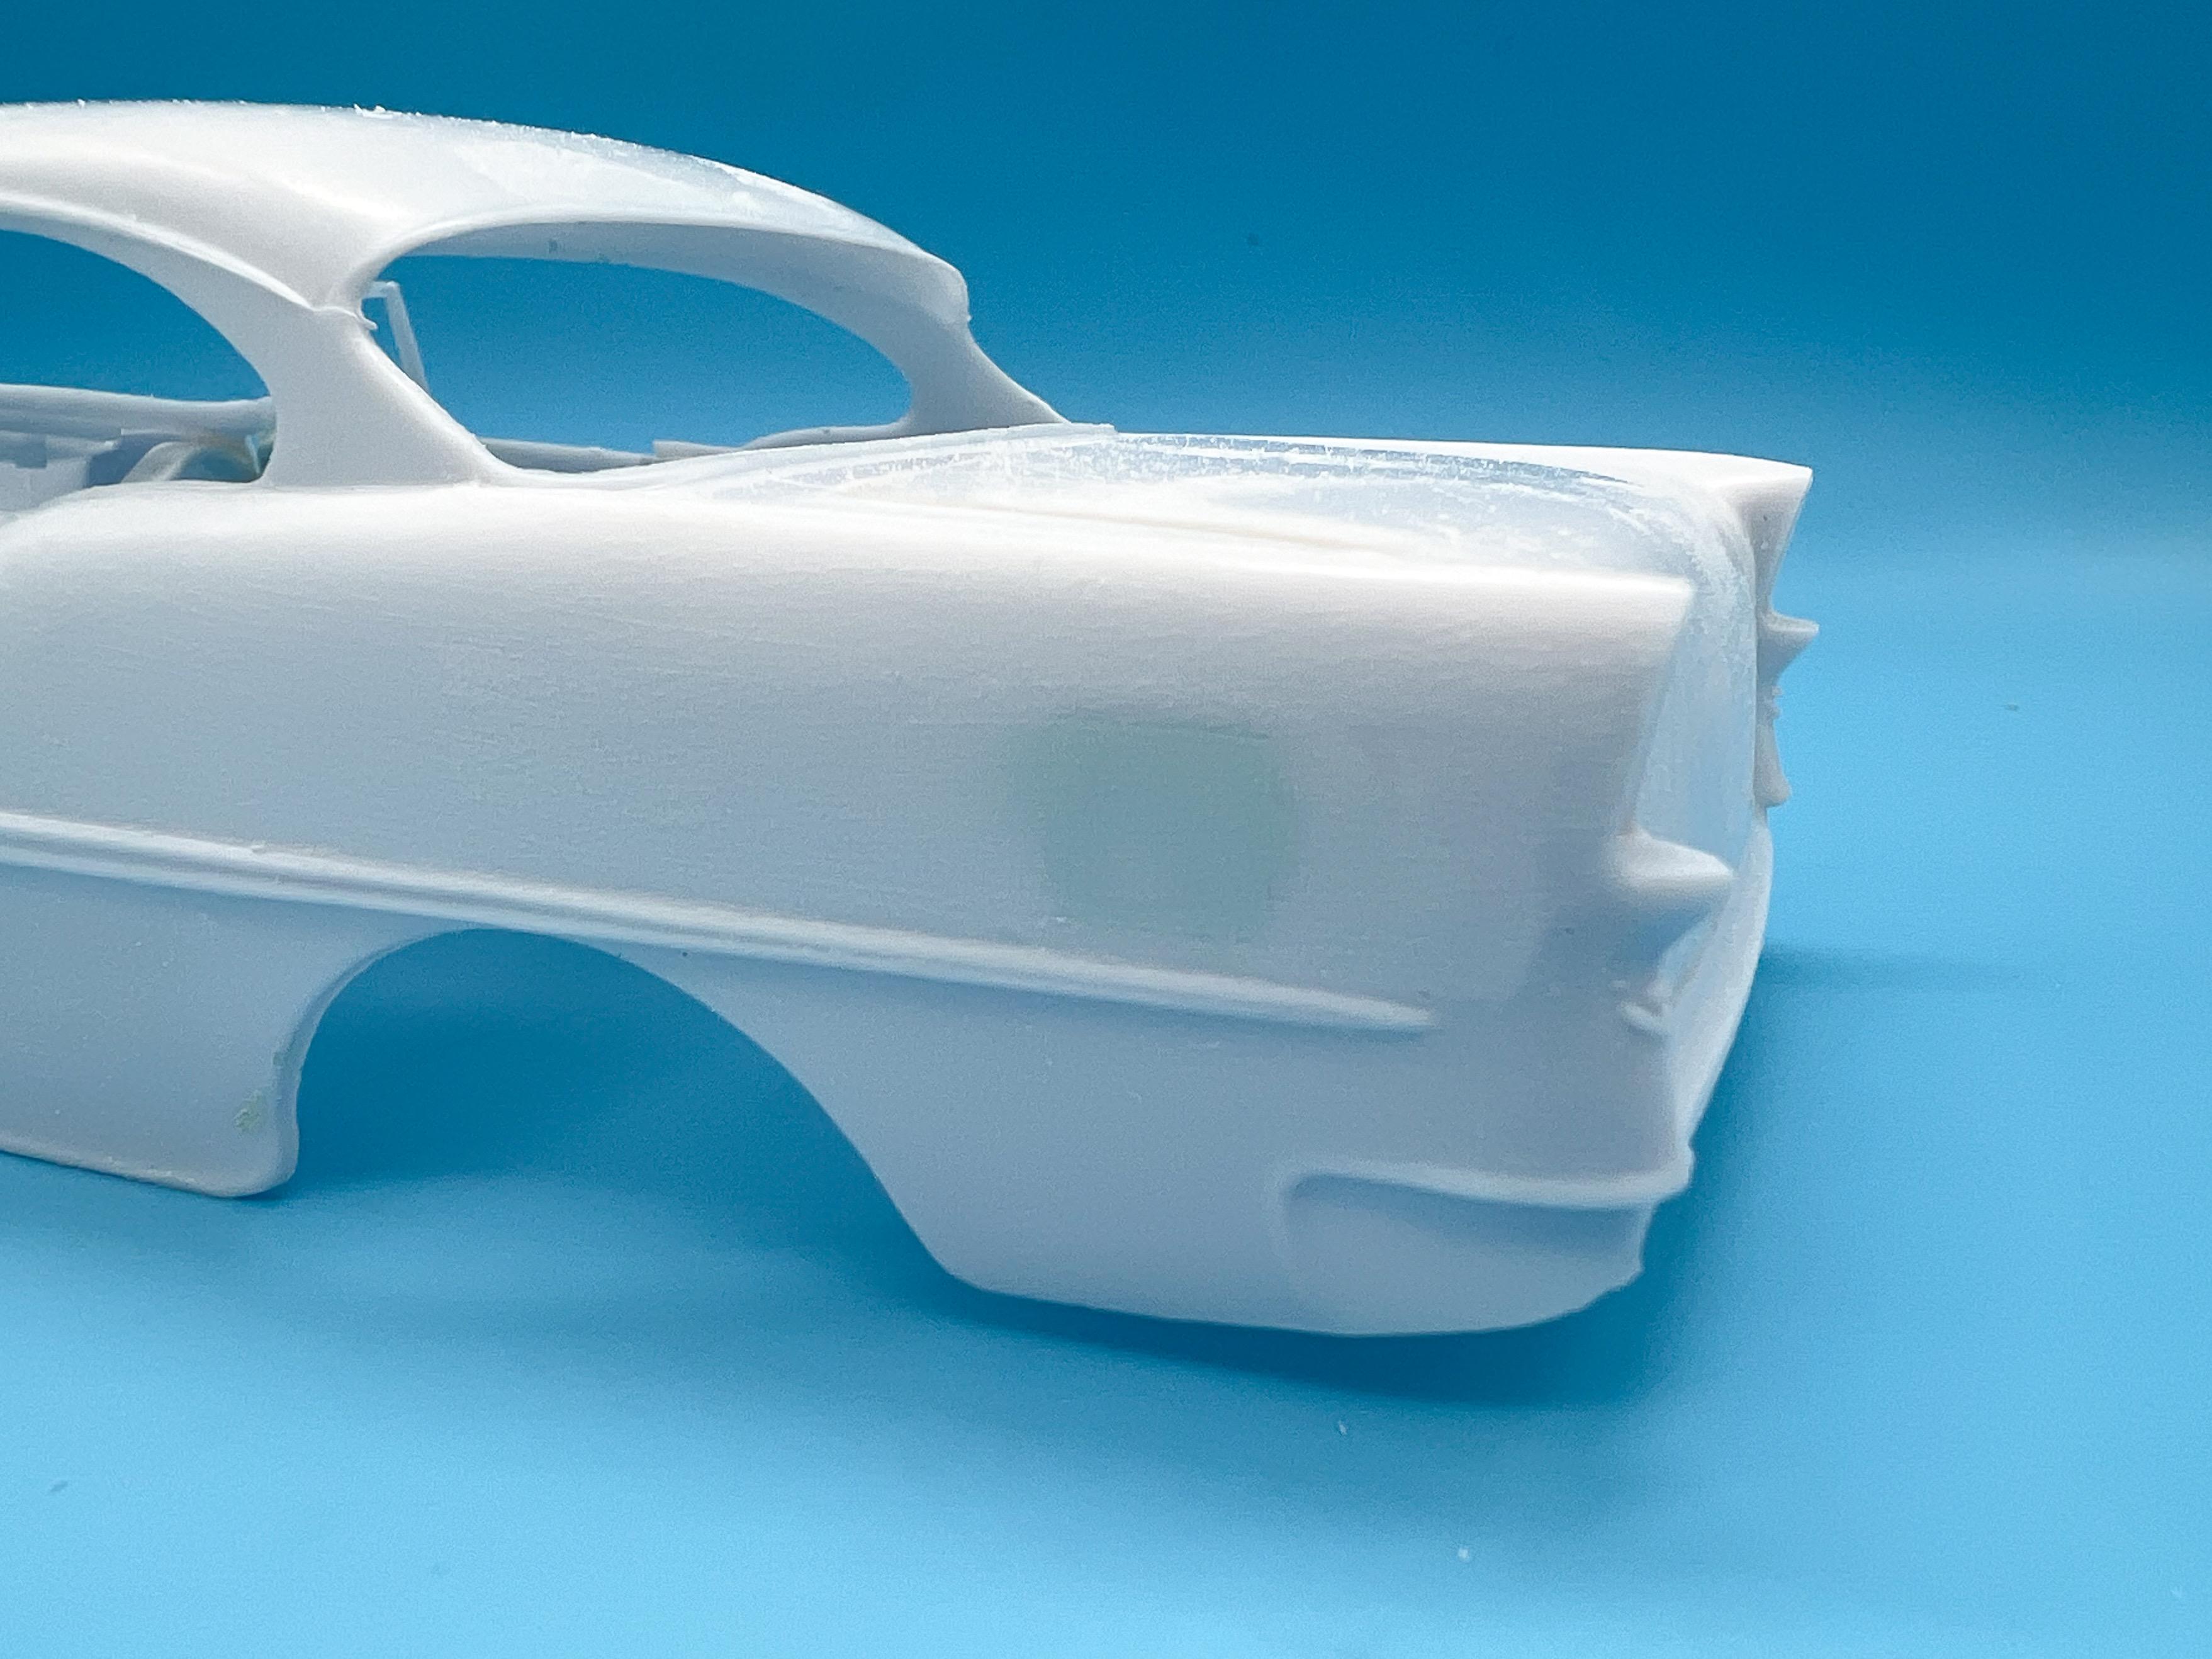
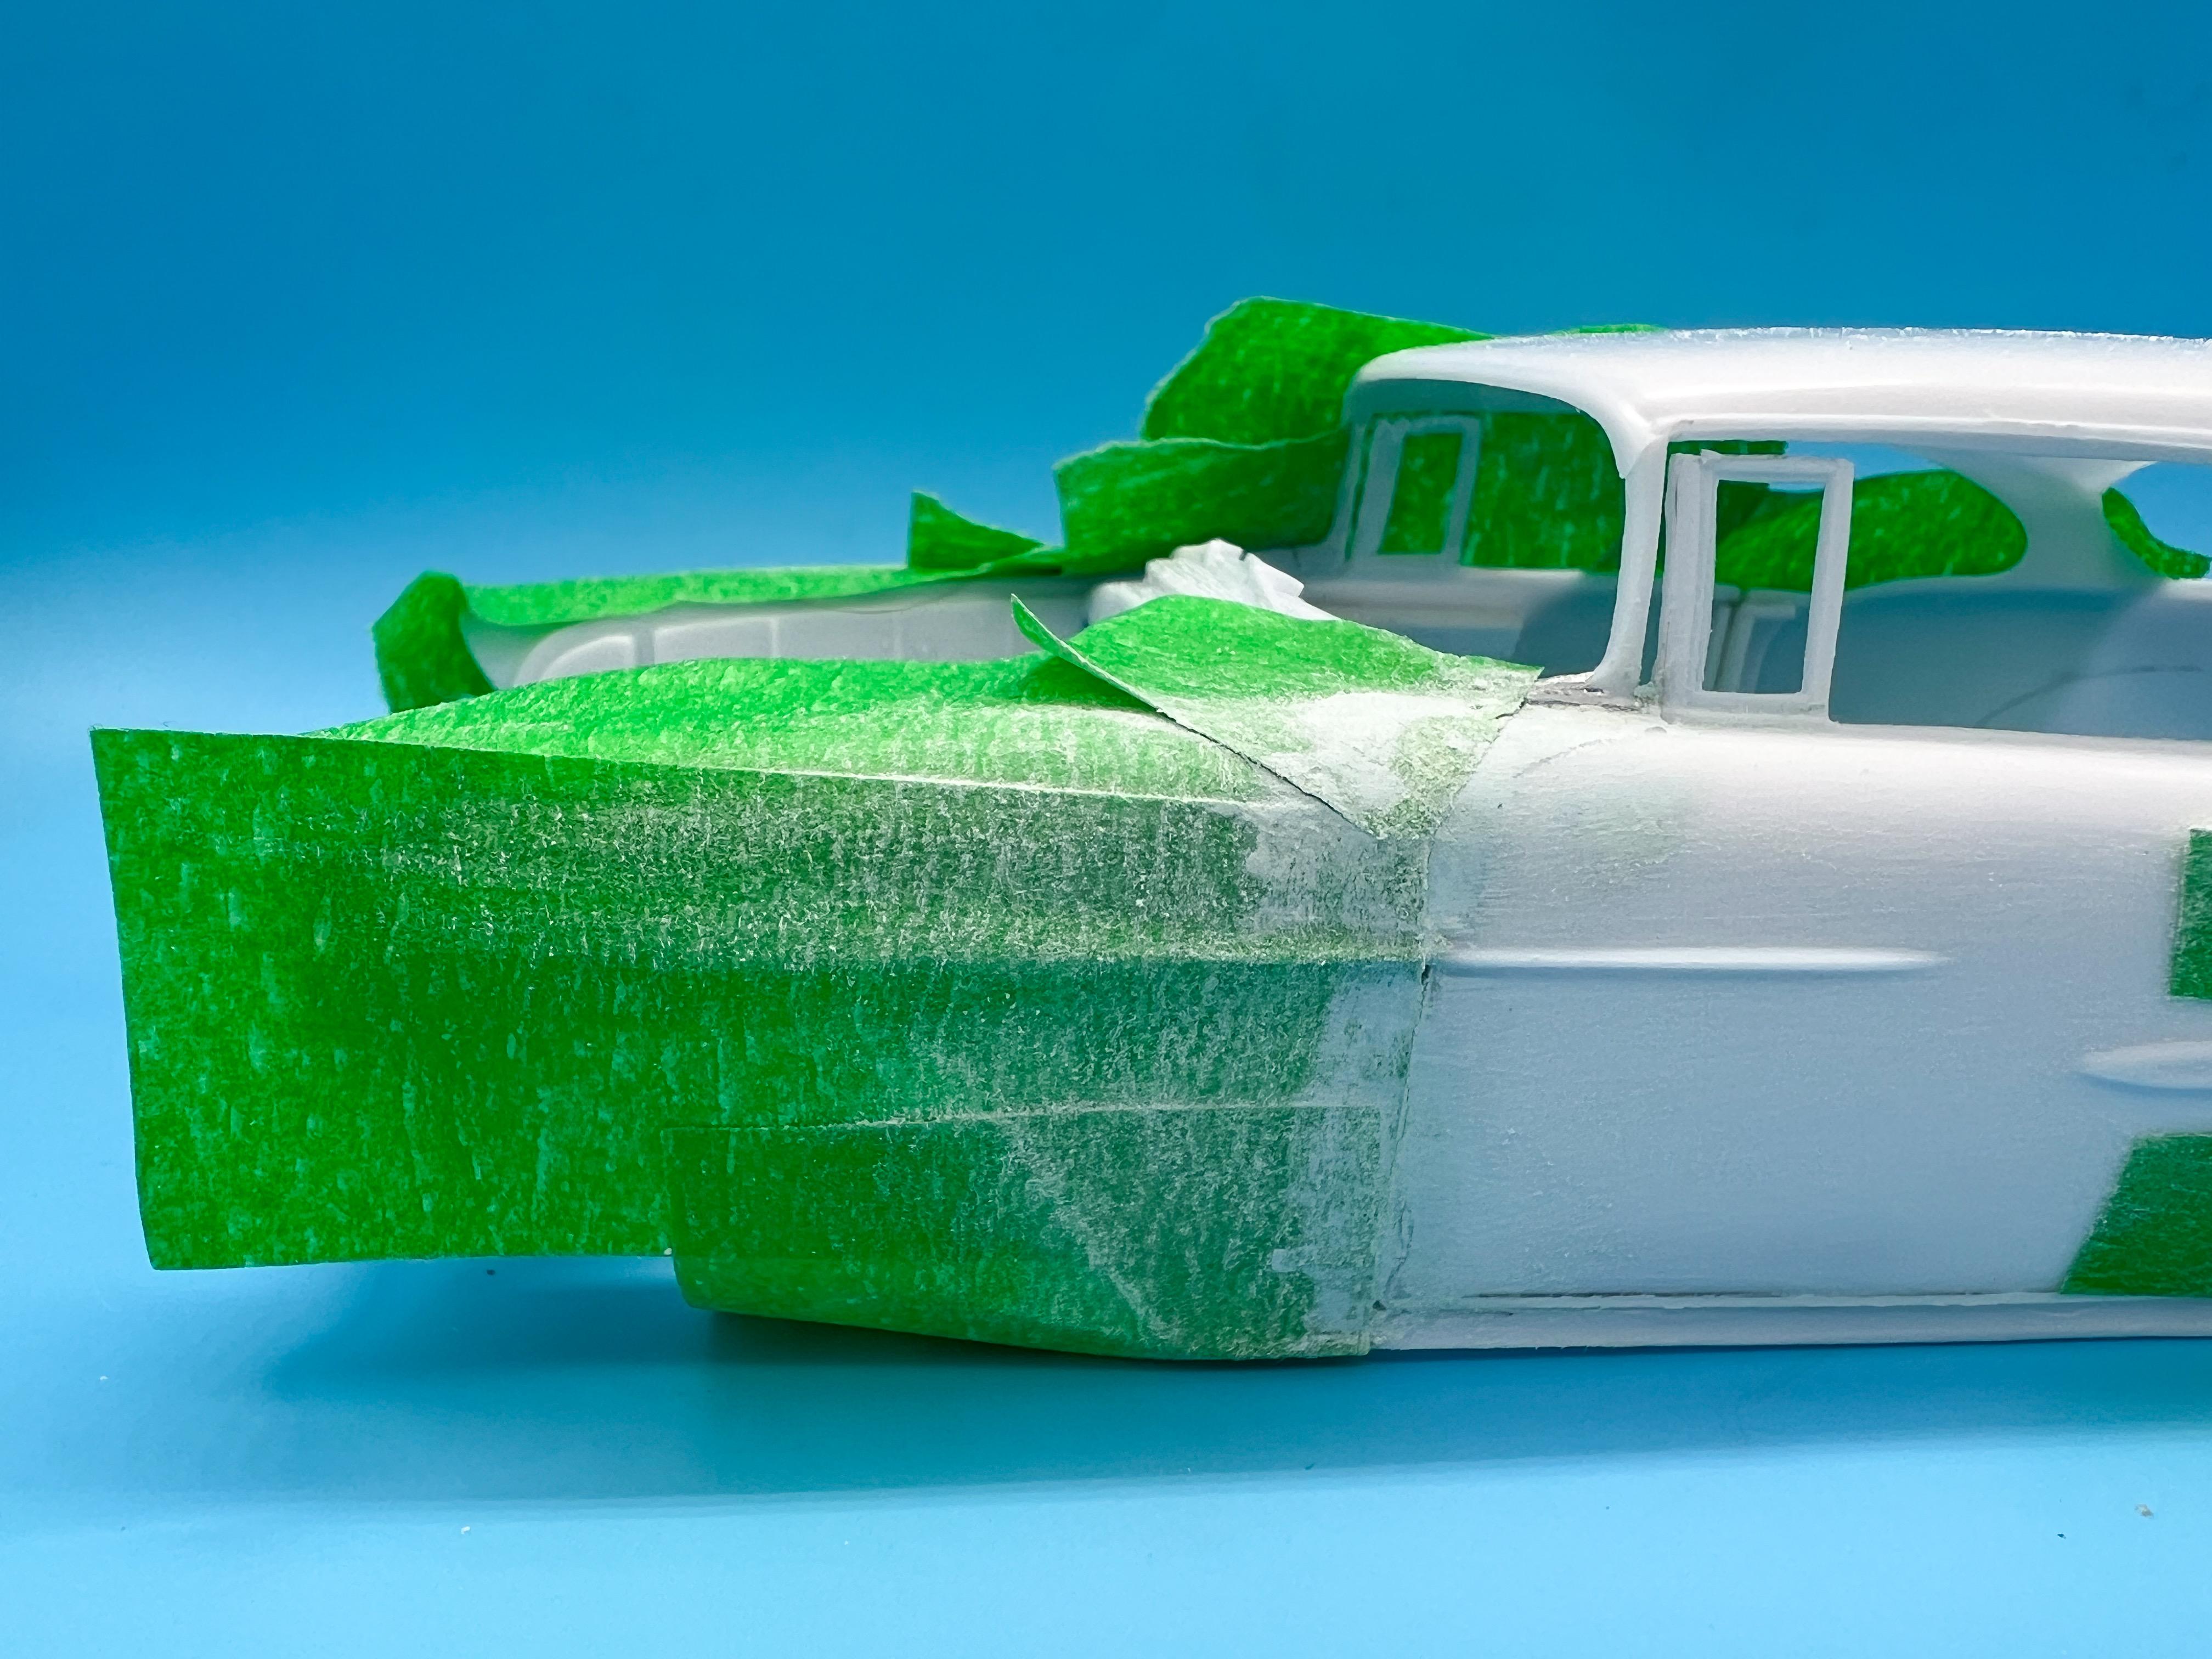
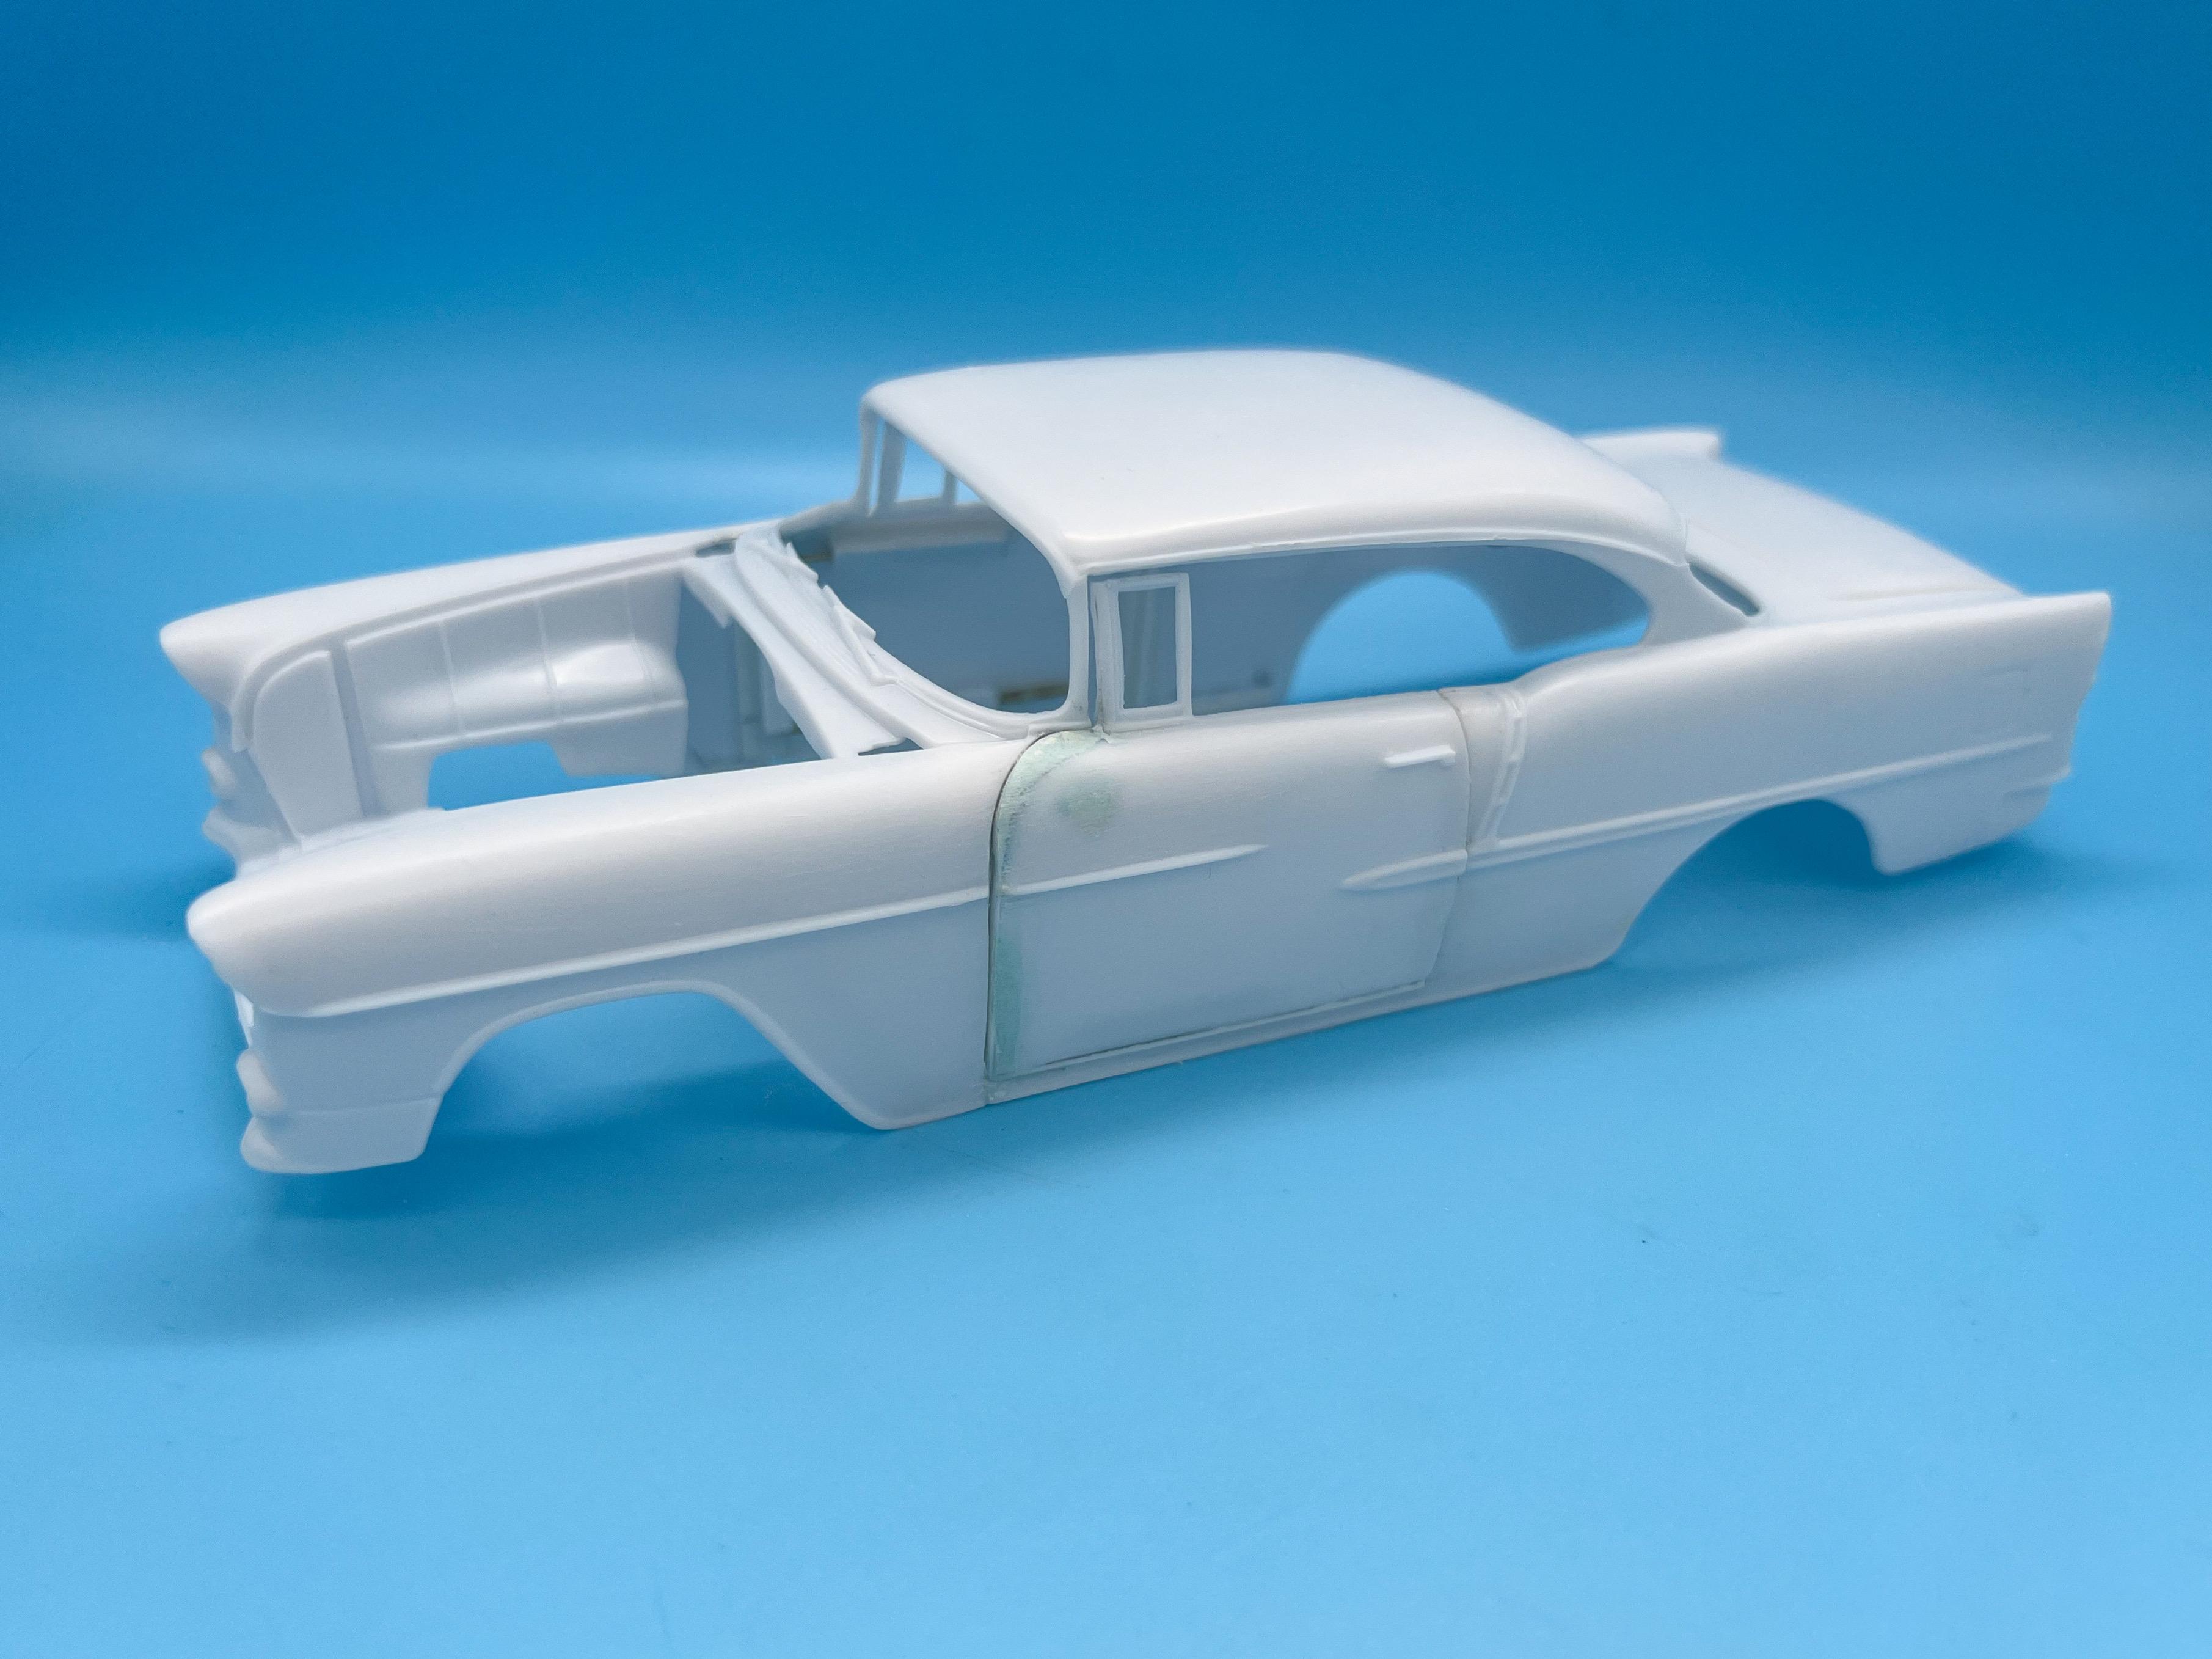
Thank you fellas! The tube I’m using on this one is by Evergreen - most Hobby Lobbys carry it, or a decent hobby store. Brass square tube would work just as well if that’s easier to find. Tiny update - I didn’t have a bunch of bench time today but I thought I’d try and tackle that hood: A lot of people like using heat for this kind of job, but I never quite trust that the plastic won’t eventually just go back to it’s original shape over time, or reset when it’s hit with the solvents in whatever paint I end up using. So…I split it down the center: And with it split in two, it sits perfectly! Just need to fill those gaps. A little styrene strip, tacked lightly in place first so I had some tweak-ability, then given an additional coat of a thin superglue, test fitting as I went, followed by a little more on the underside: And some sanding later…WAY better! A skim coat of filler should get it pretty close to perfect - as you can see I added a little strip of styrene to the rear of the hood too so I have some material to work with to shape it nicely to the opening. No hinge required here, because it’s intended to be mounted with hood pins; I drilled out the molded-in ones ready for some real ones further down the line. Just a mini update…more soon, soon as I’ve done more!
- 103 replies
-
- 10
-
-
Sounds like you need this guy:
-
Atlantis Models has bought another lot of tooling/molds.....
OldNYJim replied to Dave Van's topic in Car Kit News & Reviews
Some new box art, in progress:
-
Mustang wagon did exist...
OldNYJim replied to BlackSheep214's topic in General Automotive Talk (Trucks and Cars)
Shooting NEIGHHHH-ke -
1953 Ford shield shaped blue dot tail light
OldNYJim replied to mark 23's topic in Model Building Questions and Answers
Replicas and Miniatures sells a little pack of blue dots - just drill out the lens and drop one in there! Or, what Peteski said ?? -
My take on the most famous ‘55 gasser street machine’…
OldNYJim replied to OldNYJim's topic in WIP: Model Cars
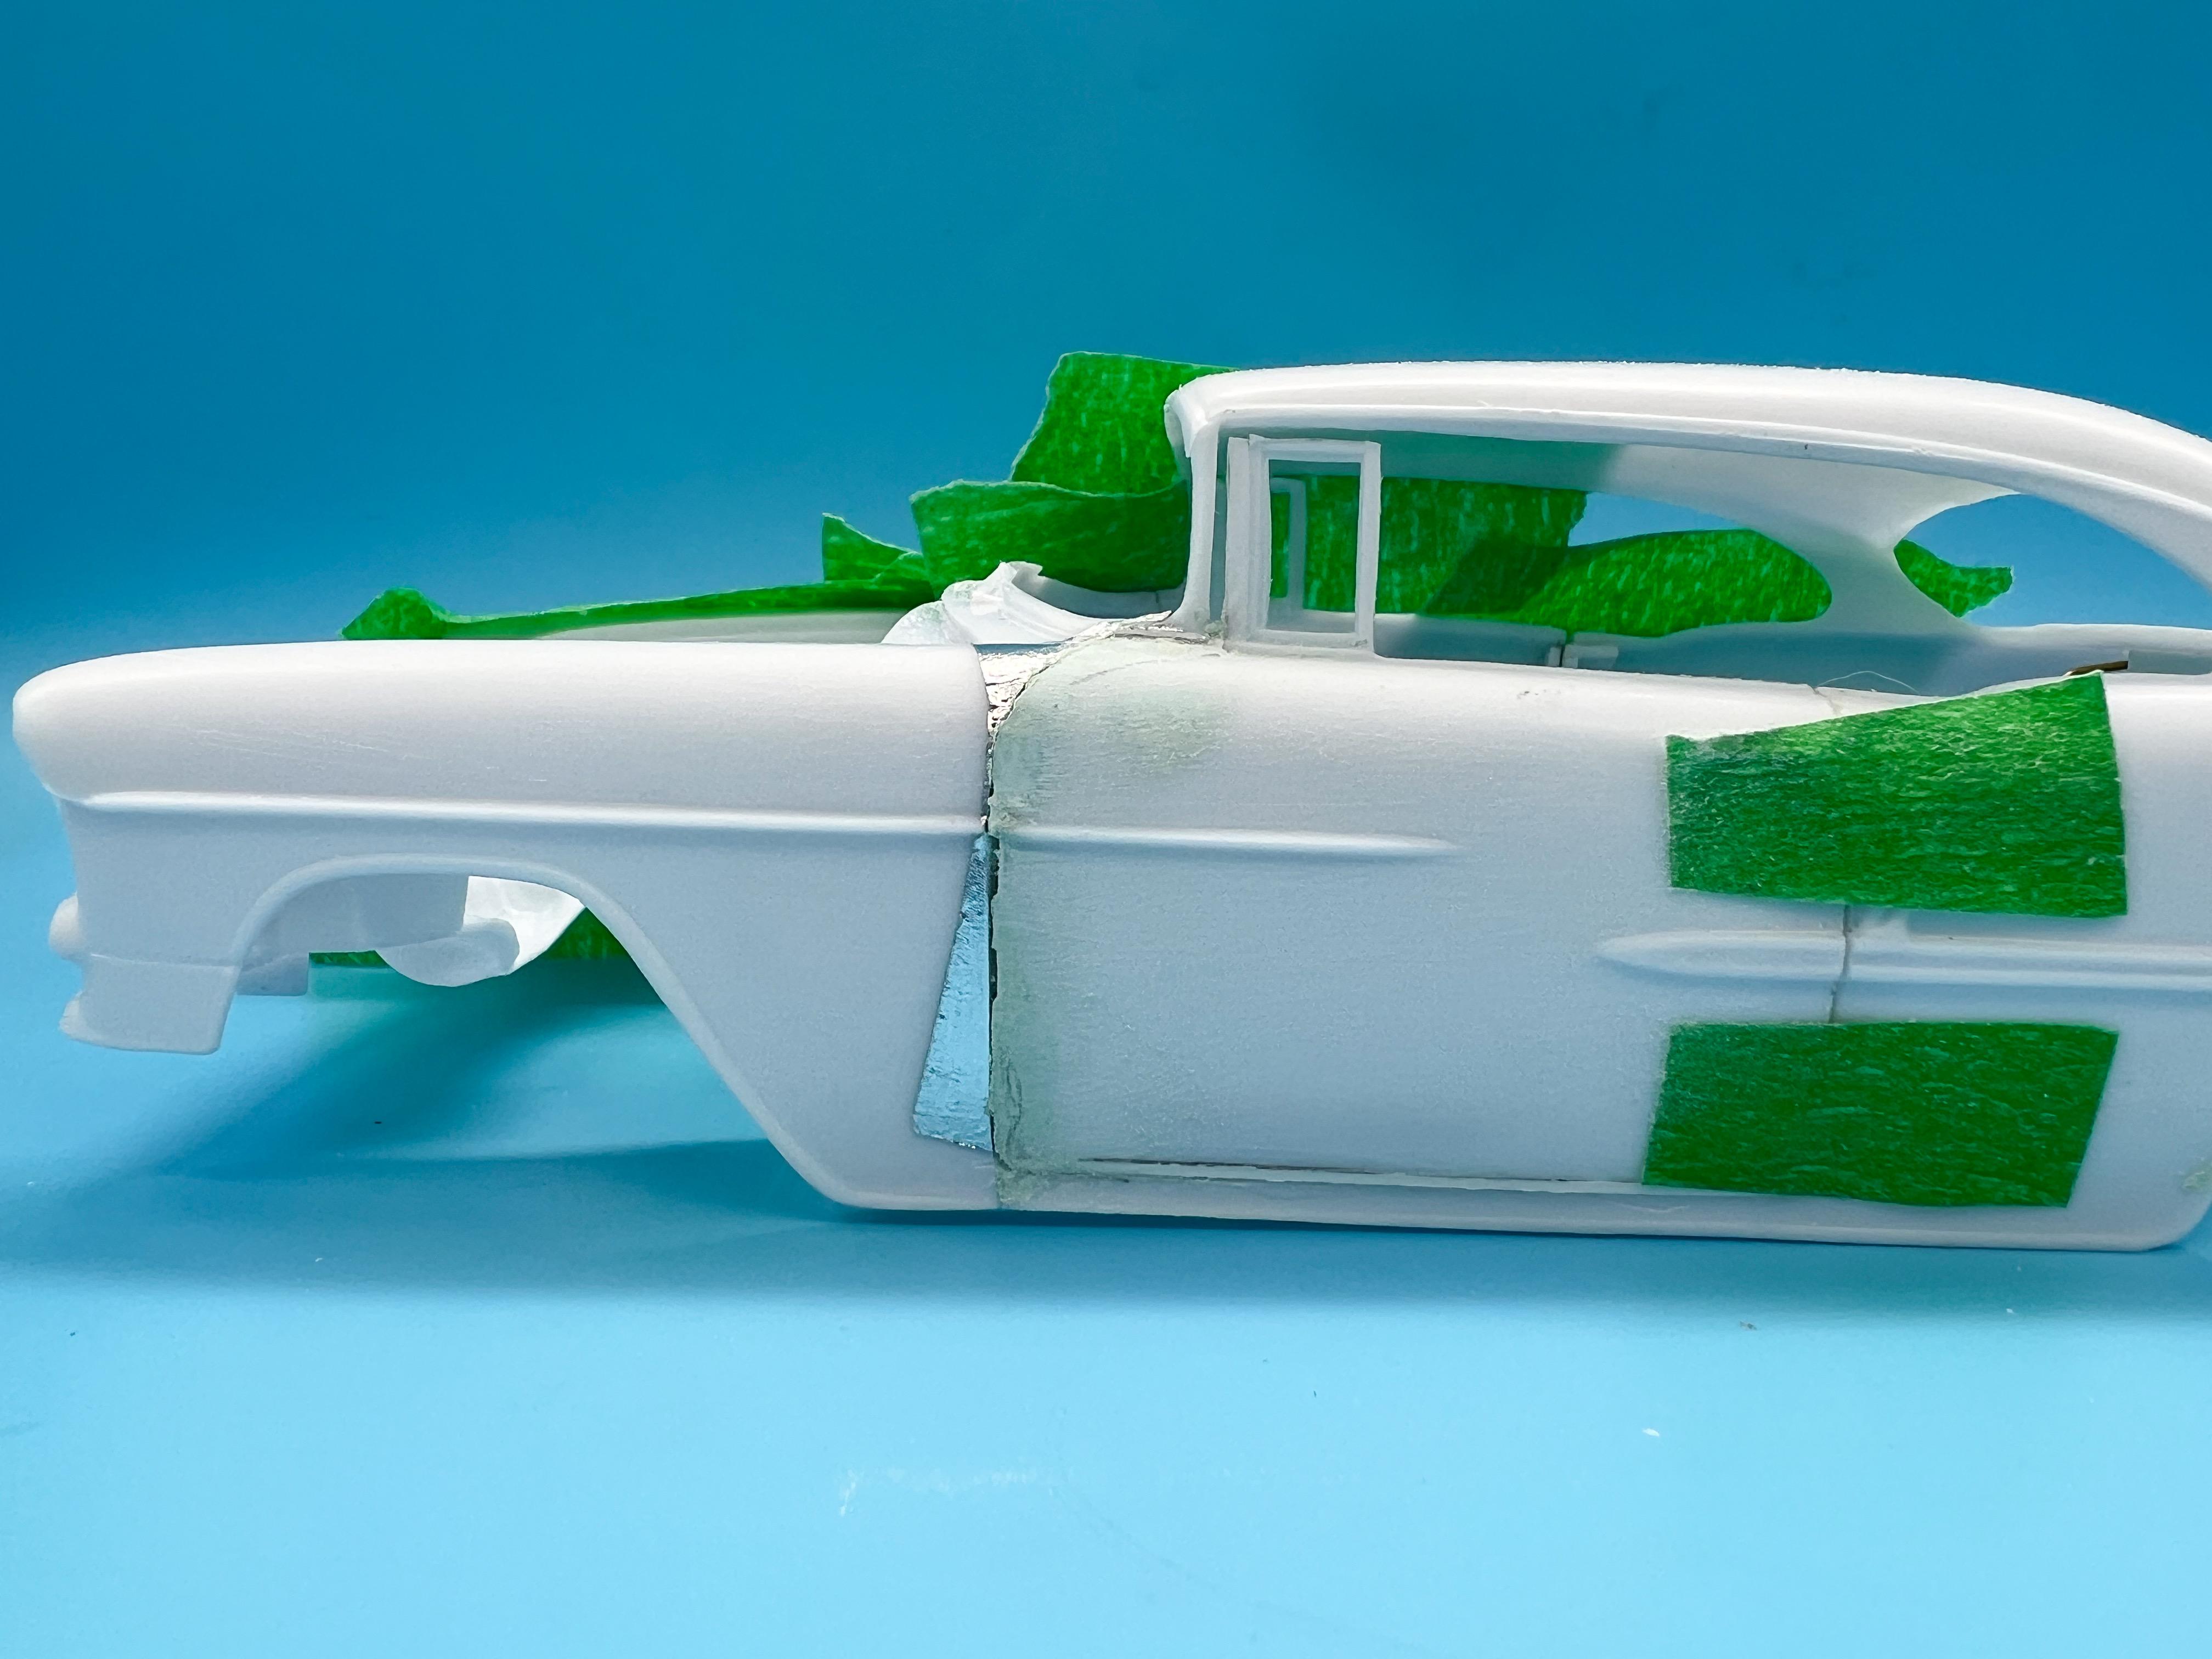
Thanks for all the nice comments fellas! It’s no big deal - jump in and try it! It’s only plastic, and each step of the process is pretty easy (although I’m still practicing it myself here, so whadda I know?! ?) Yes!!! Great tip (and one I accidentally discovered myself on a previous build!). It really helps! Slow progress this week so far, but I’m just messing with those doors… Got rearmost door jambs made: And the last couple of nights I’ve been playing with the fit of the front most edges of the doors to get them as nice as I can. I used some BMF to cover the openings on the body itself so that I could lay some Bondo around the edges once I’d got them as close as I could with styrene strips to close the gaps up, then laid down a little masking tape to make sure I didn’t get any filler where I didn’t want it: After letting it set up overnight - here you can see some of the BMF peeking through: What I like to do with Bondo when it’s on an edge is brush on a little thin superglue, which penetrates the filler a little and toughens it up to stop it cracking so easily…plus you can work it a little more aggressively to get it shaped how you want…not totally done here, but getting closer! Once I get that squared away I’ll need to mess with the hood…the fit isn’t the best, right now: I have the germ of an idea for a plan on those vent windows too, but that might be a job for the weekend… Just a small update (but a few hours work, behind the scenes…)…thanks for looking - more soon!