OldNYJim
-
Posts
250 -
Joined
-
Last visited
Content Type
Profiles
Forums
Events
Gallery
Everything posted by OldNYJim
-
No thanks

-

At the risk of getting myself into trouble....
OldNYJim replied to Biggu's topic in General Automotive Talk (Trucks and Cars)
I read the producer Rick Rubin’s book on creativity this week, and a paragraph in that book made me think about my own building habits: I could definitely relate to that…I want to do my best work all the time, and not rush, but it’s easy to start to slow down (and sometimes stop) if the process starts taking too long. I’m working on my build-process to help me work in a smarter way to try and finish more builds (but without sacrificing quality…)
-
That color is GREAT! I need to try that paint! And you’re right - great kit - the way the engine assembles is a little weird to me, and it feels like they sit a little high right out of the box, but there’s a bunch of nice detail and they basically fall together!
-
Who doesn't love a mock-up? Let's see yours!
OldNYJim replied to Belairconvertable's topic in WIP: Model Cars
It looks great! I bet it was no walk in the park to print either - but well worth the effort! That's awesome! -
Who doesn't love a mock-up? Let's see yours!
OldNYJim replied to Belairconvertable's topic in WIP: Model Cars
Oh wow, that grille! -
Building a New York taxi from the Revell Caprice Snap Kit
OldNYJim replied to OldNYJim's topic in WIP: Model Cars
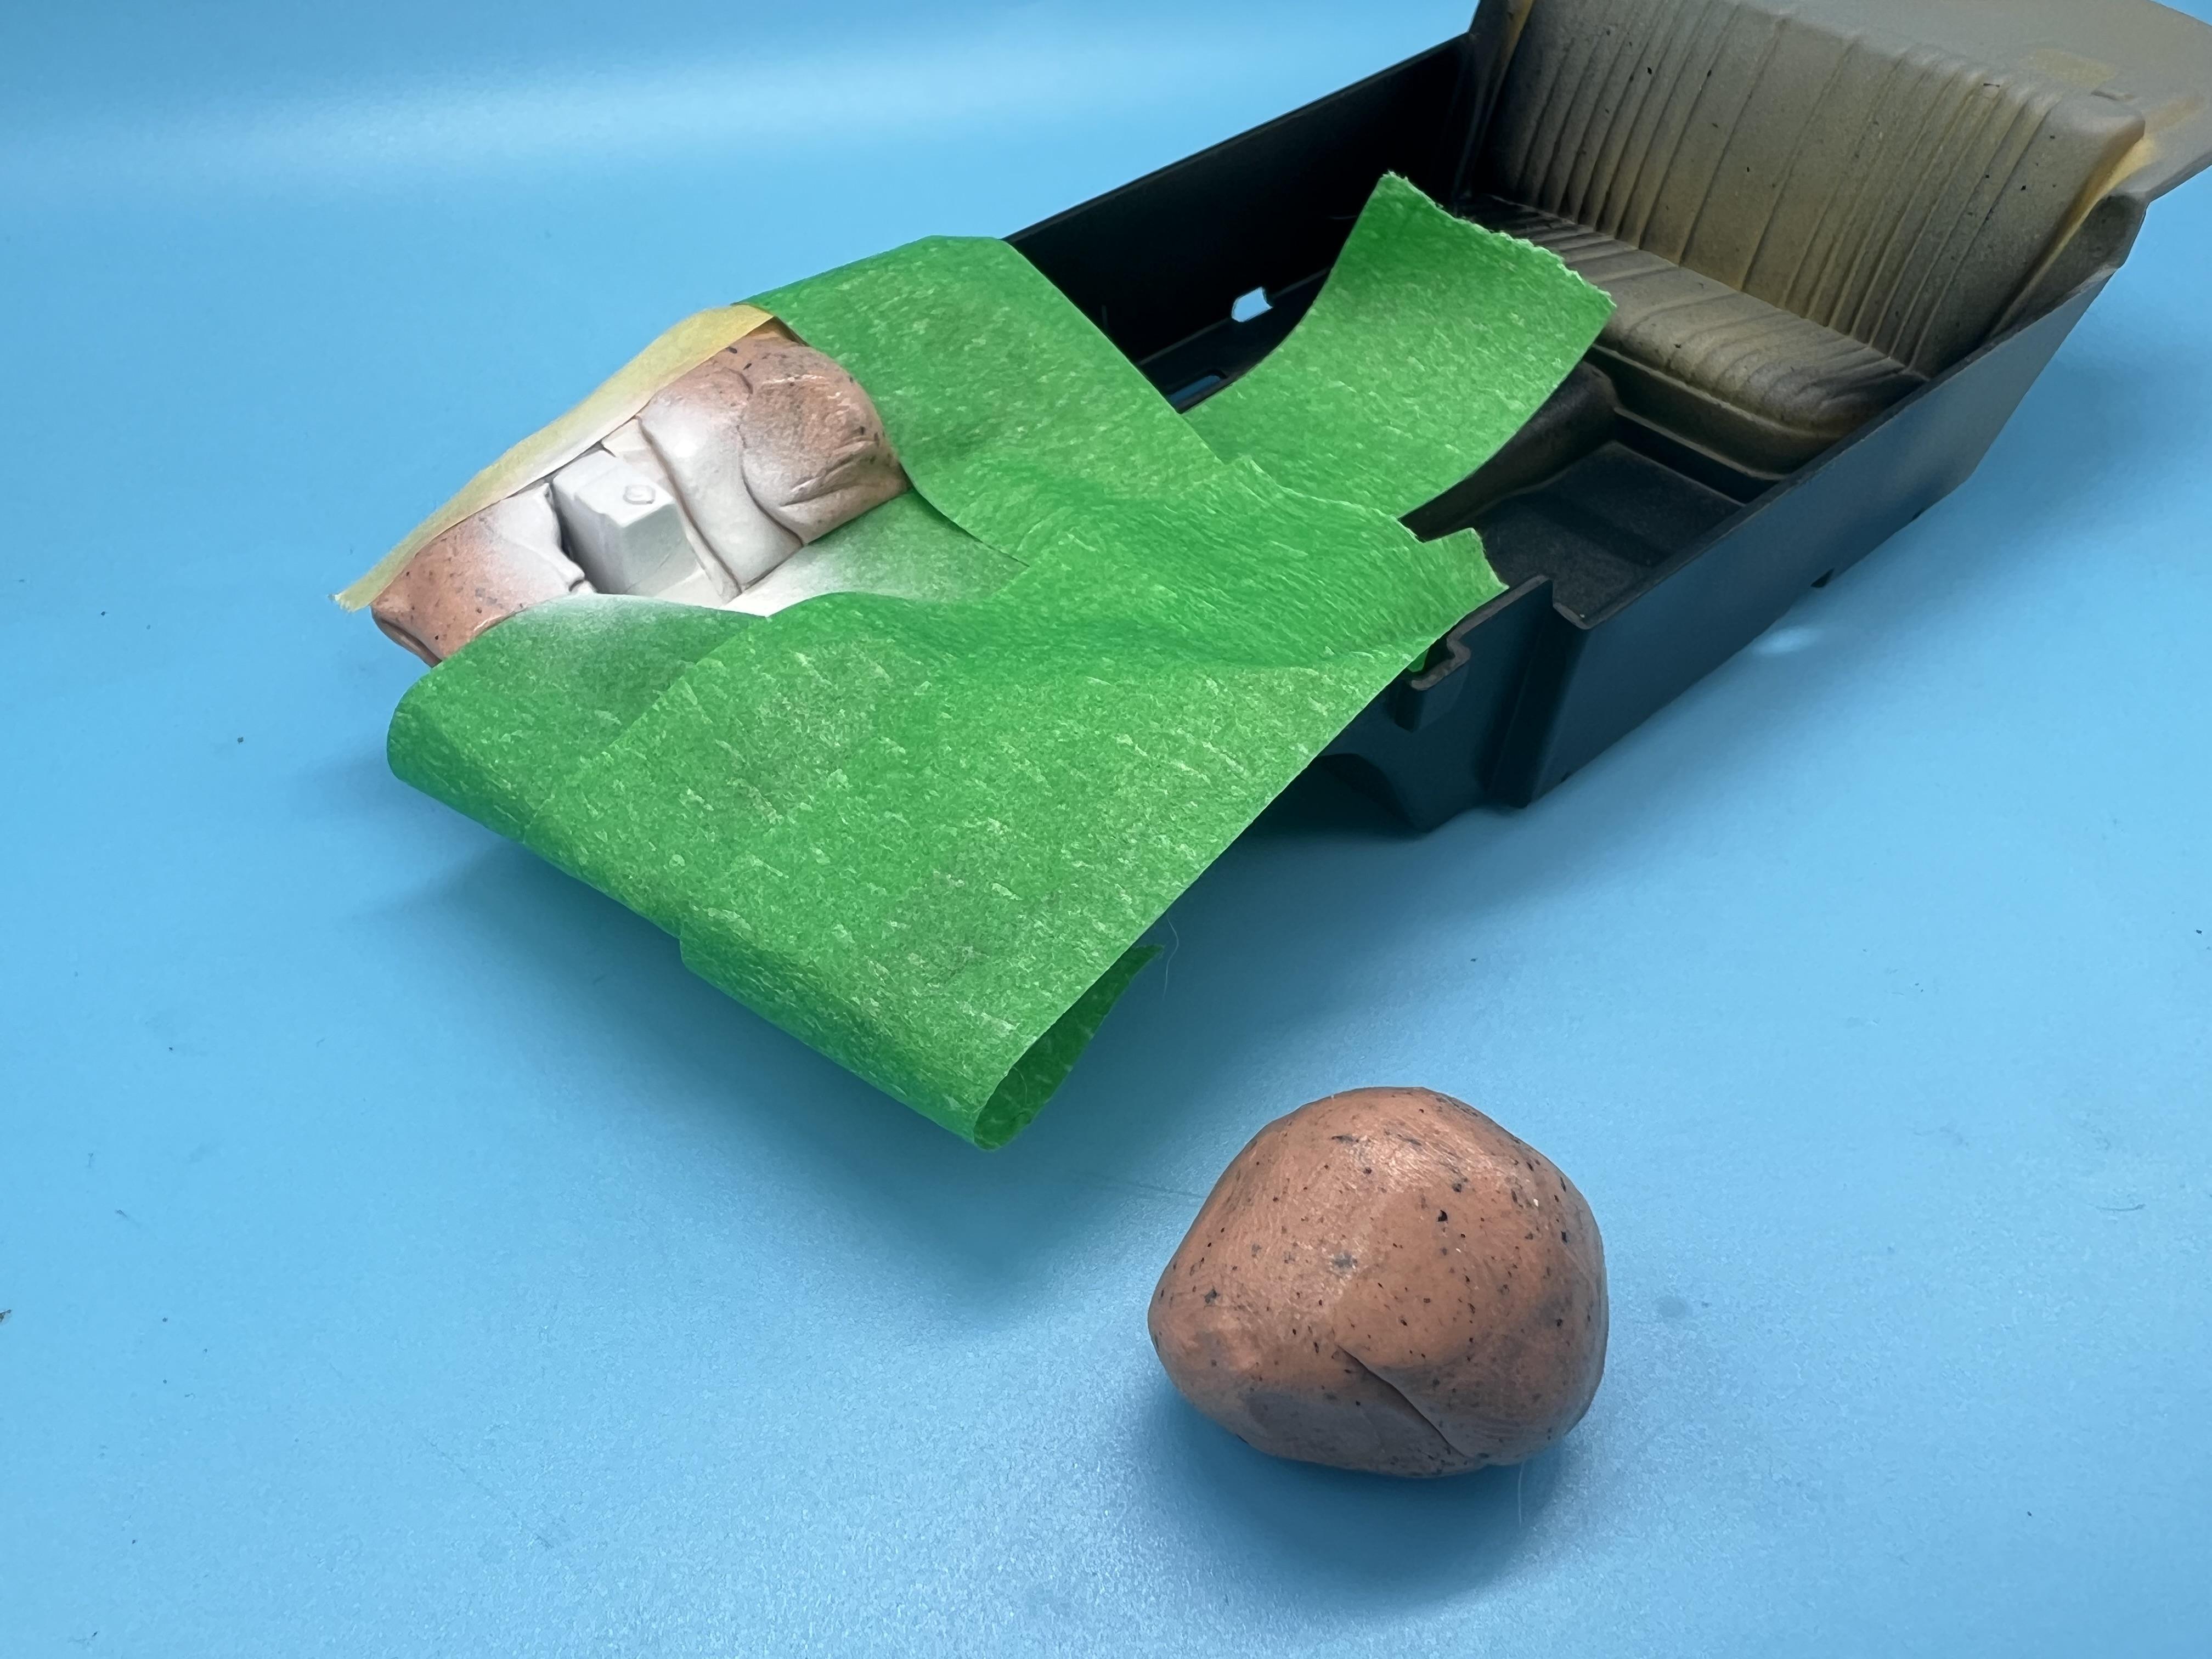
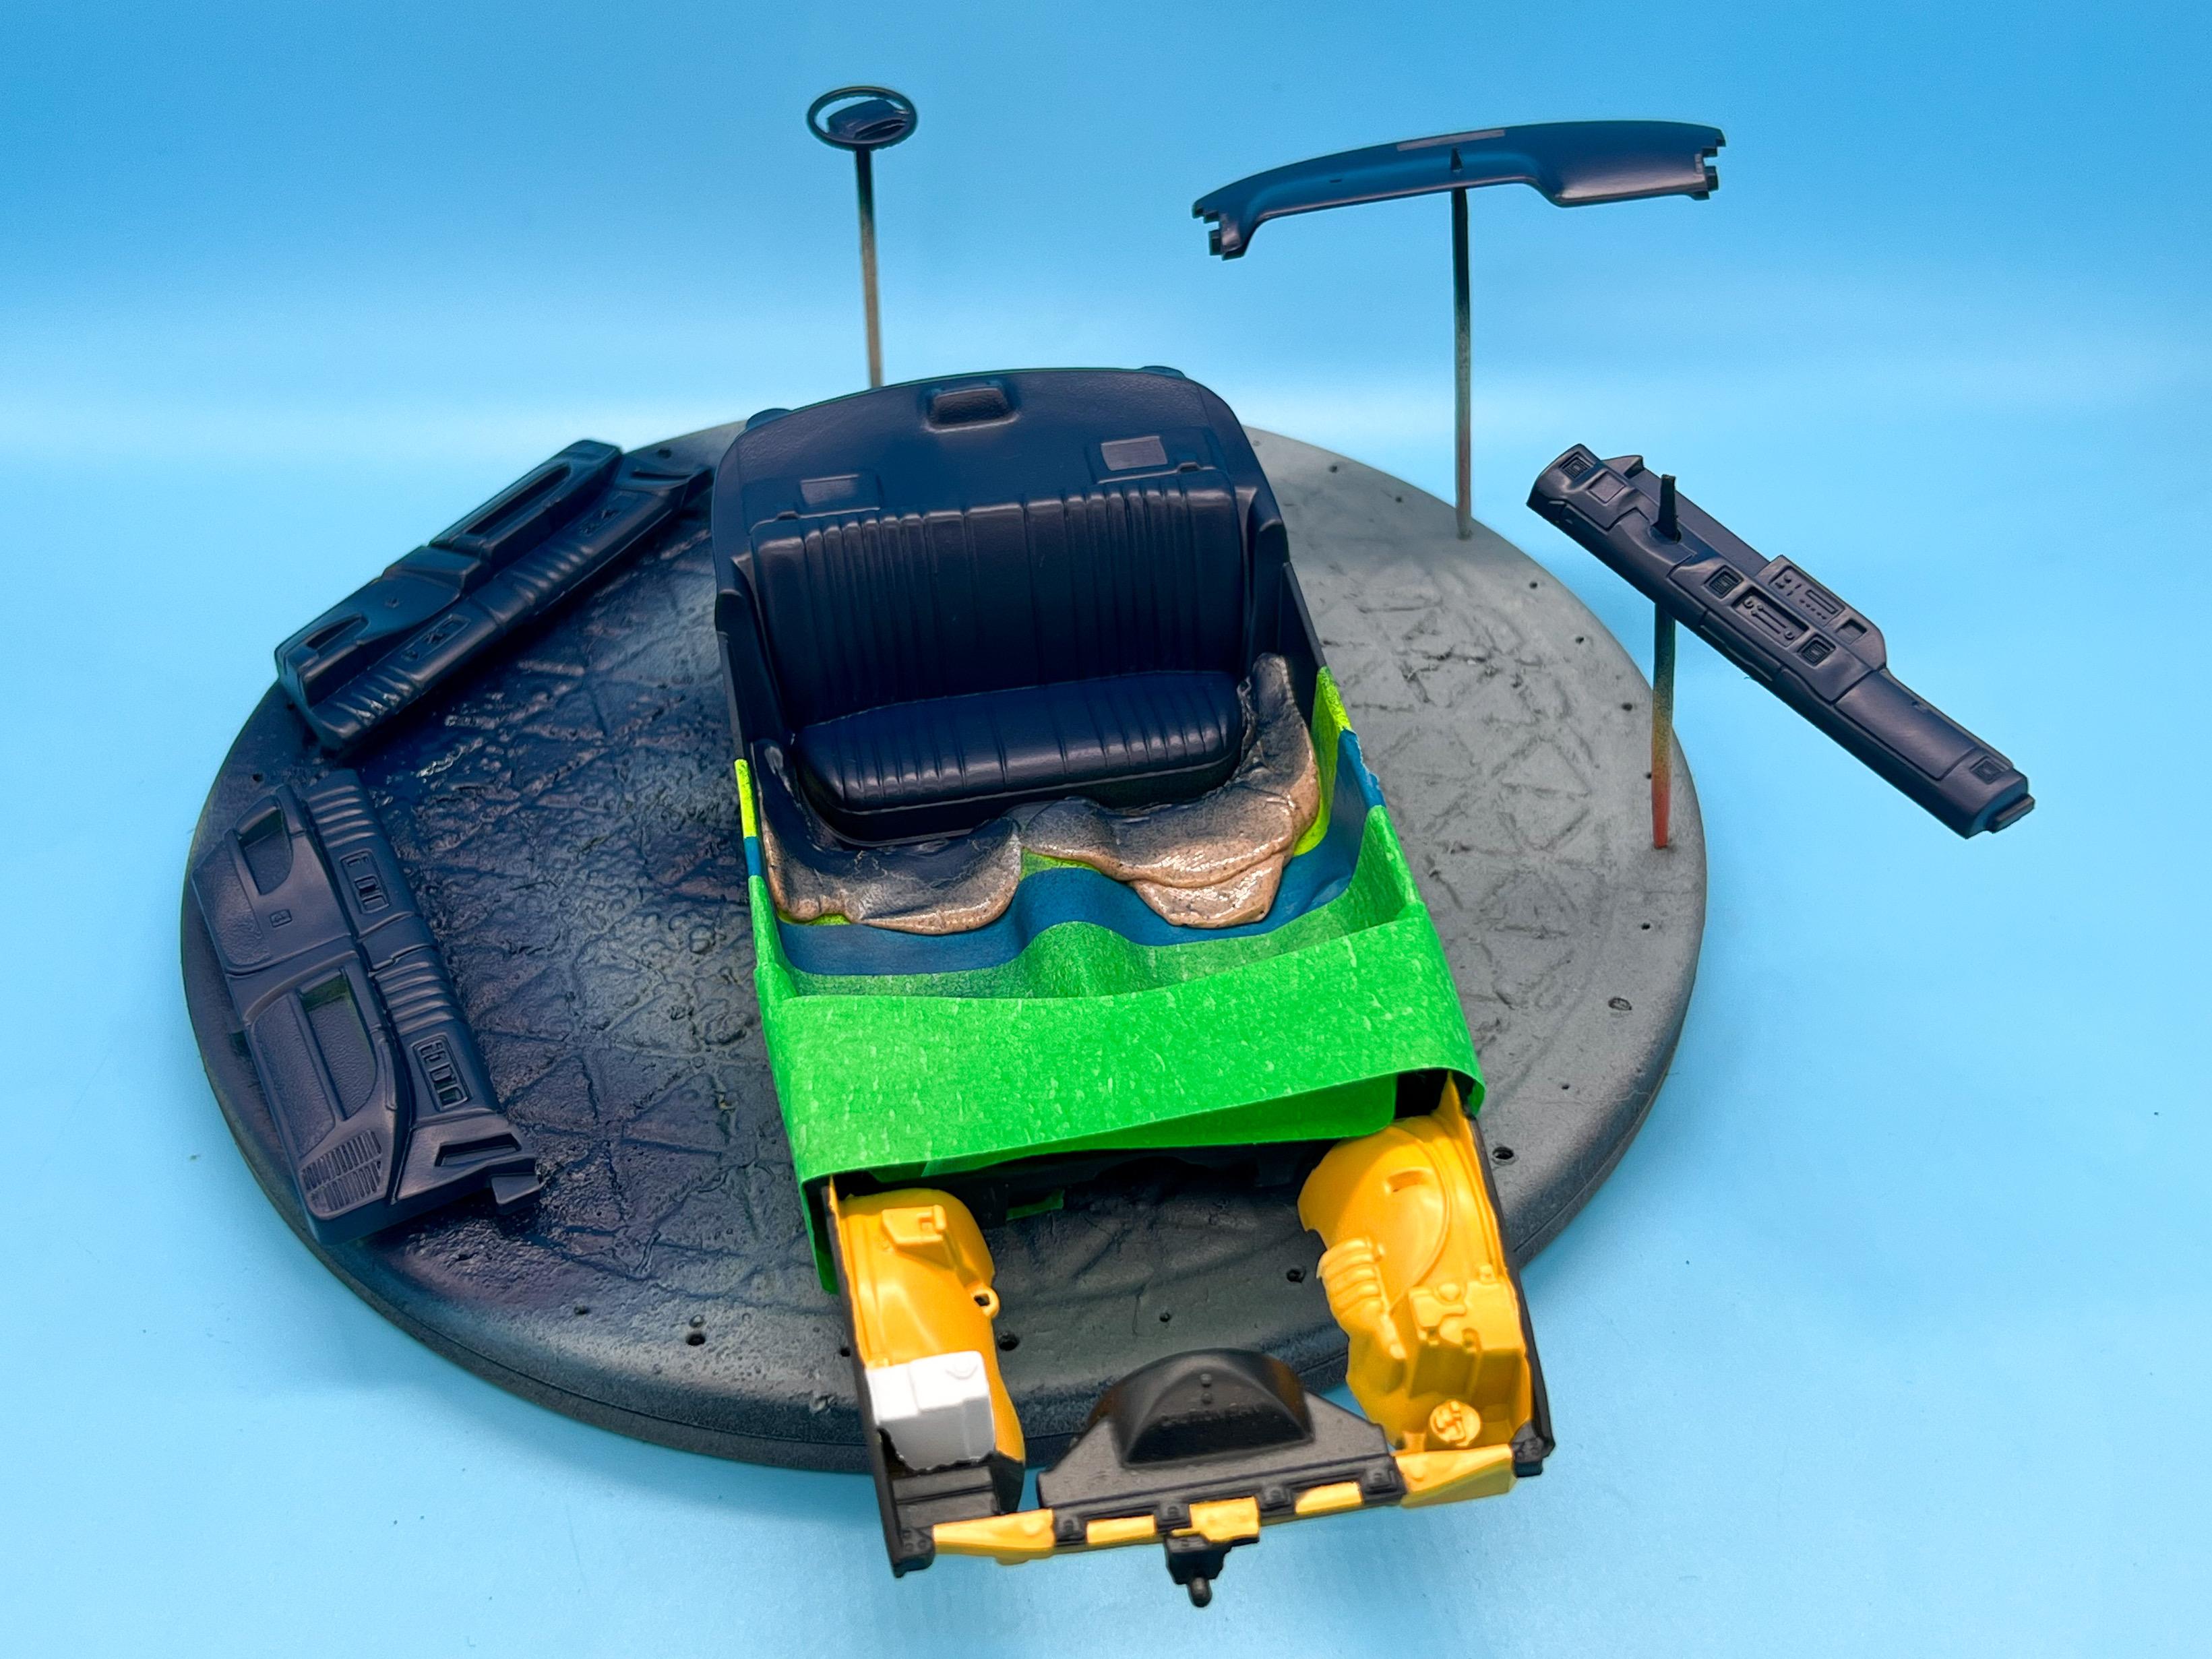
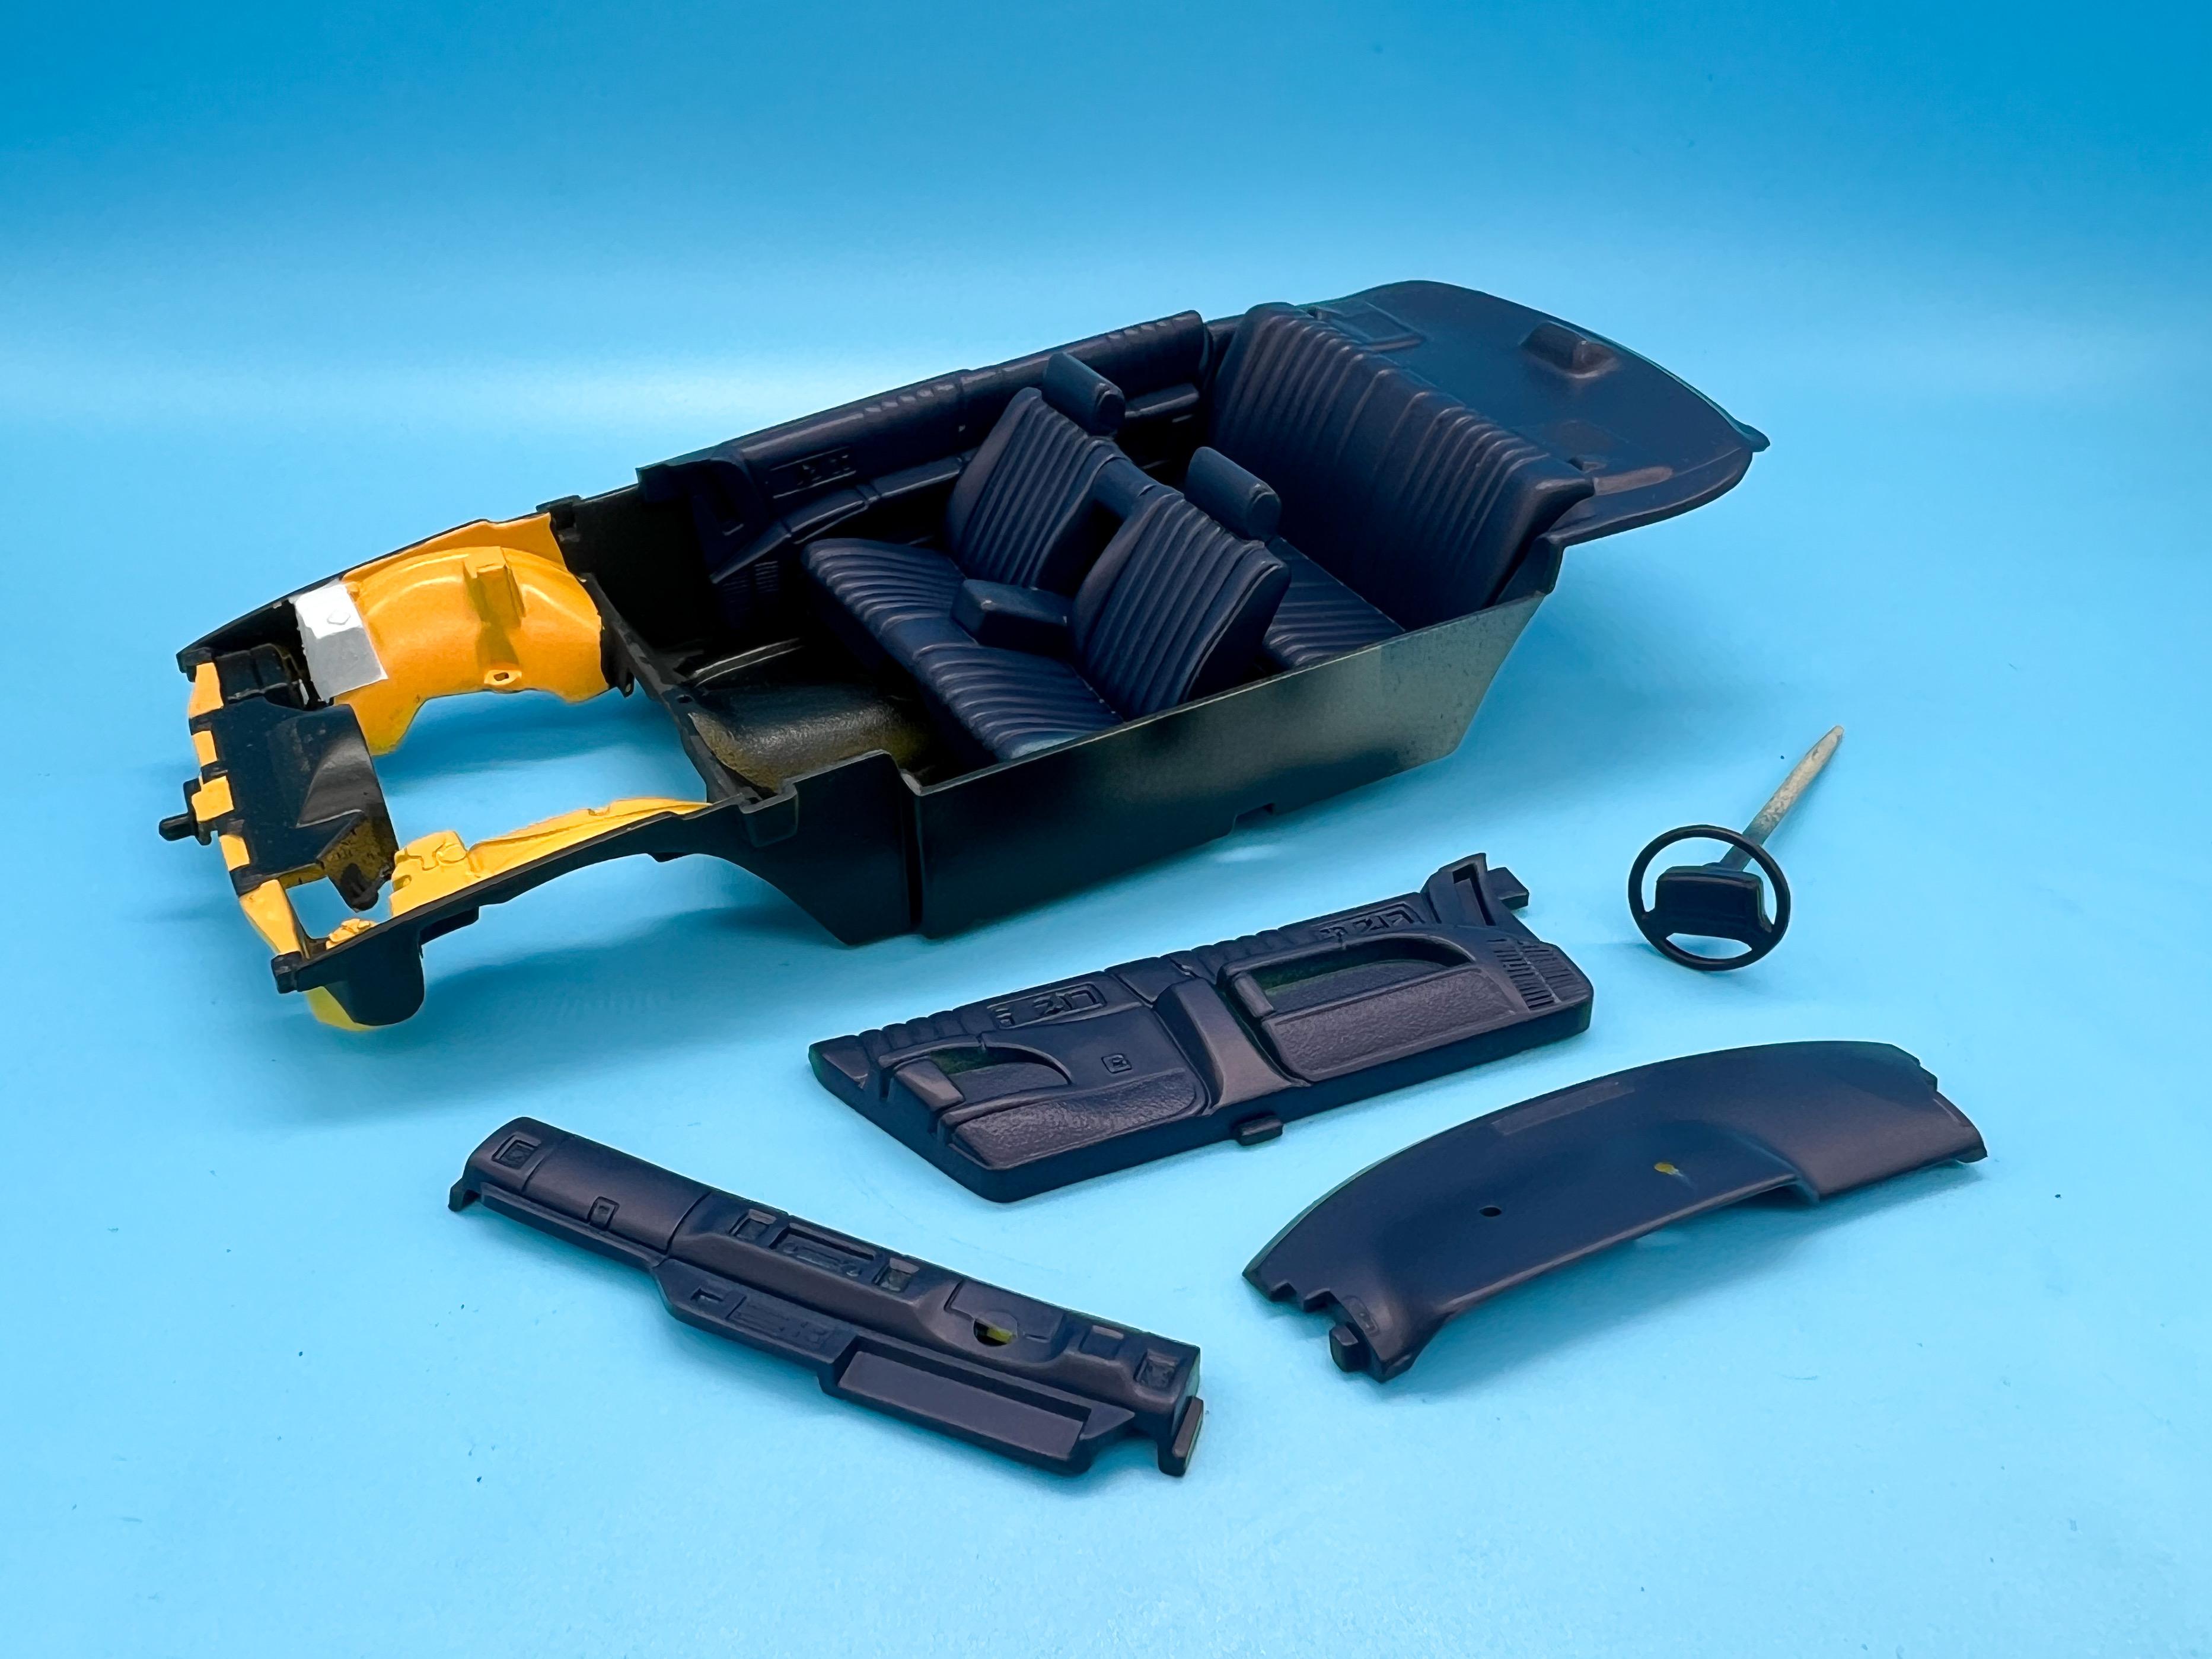
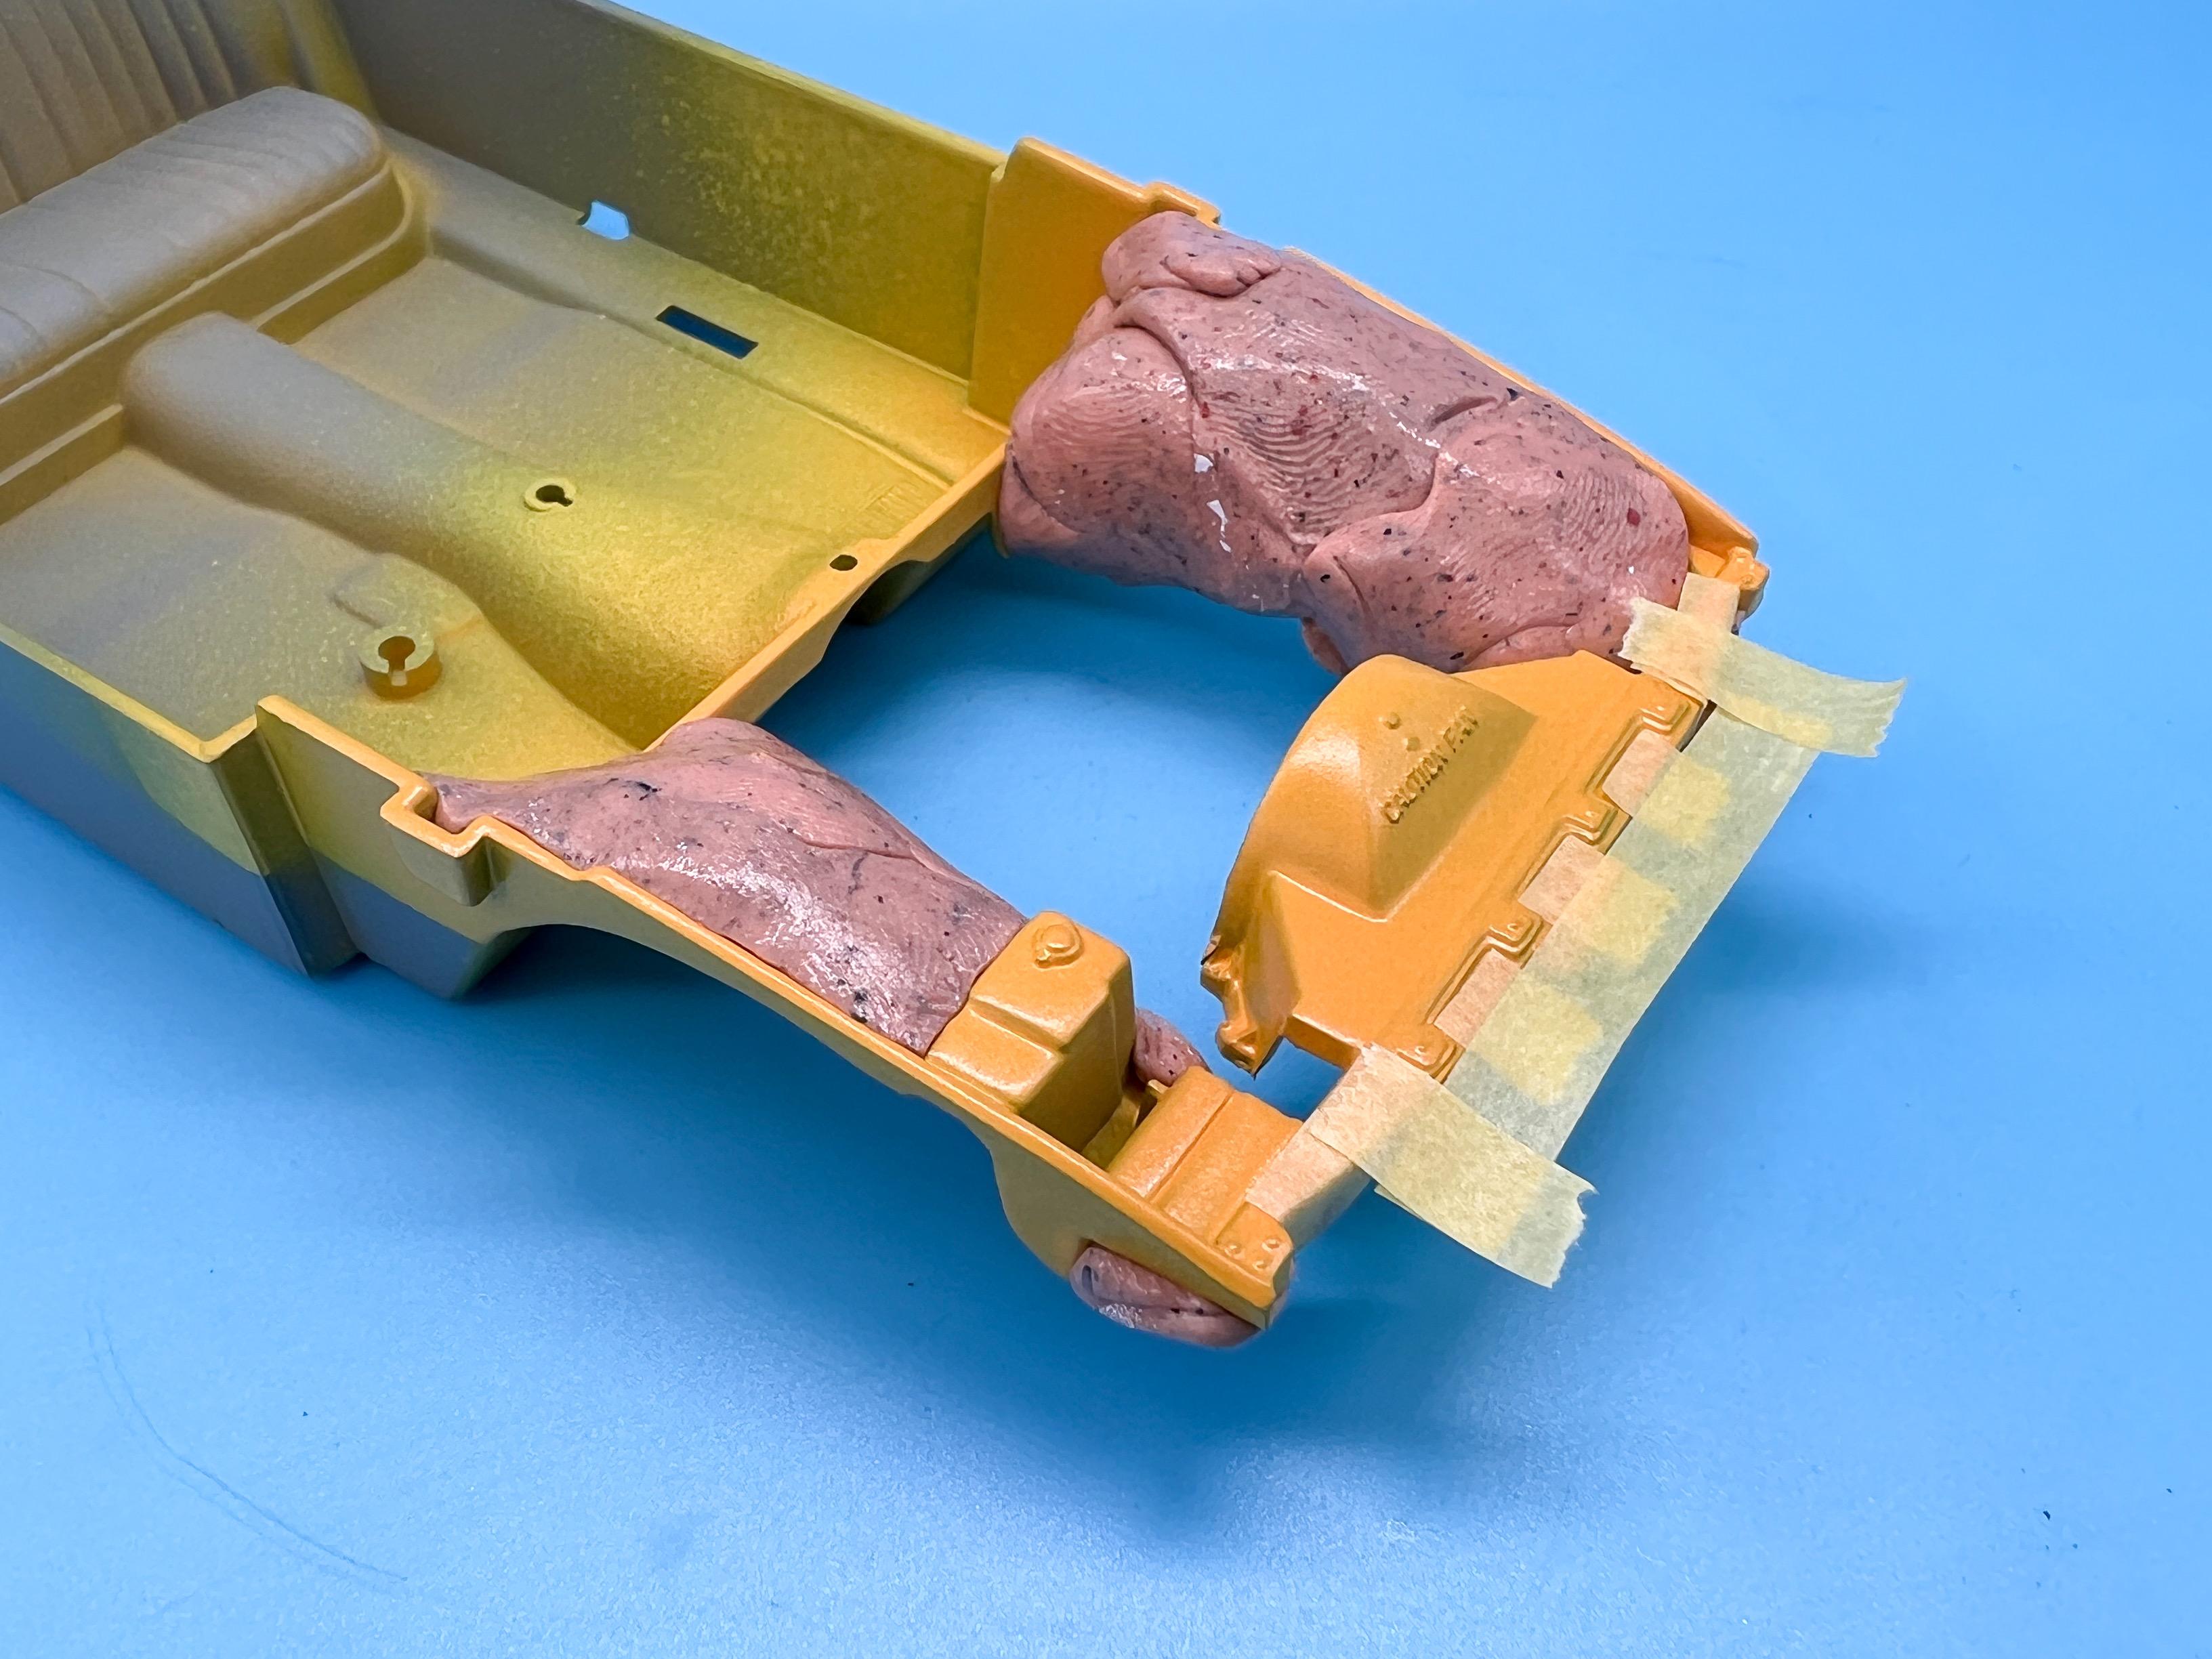
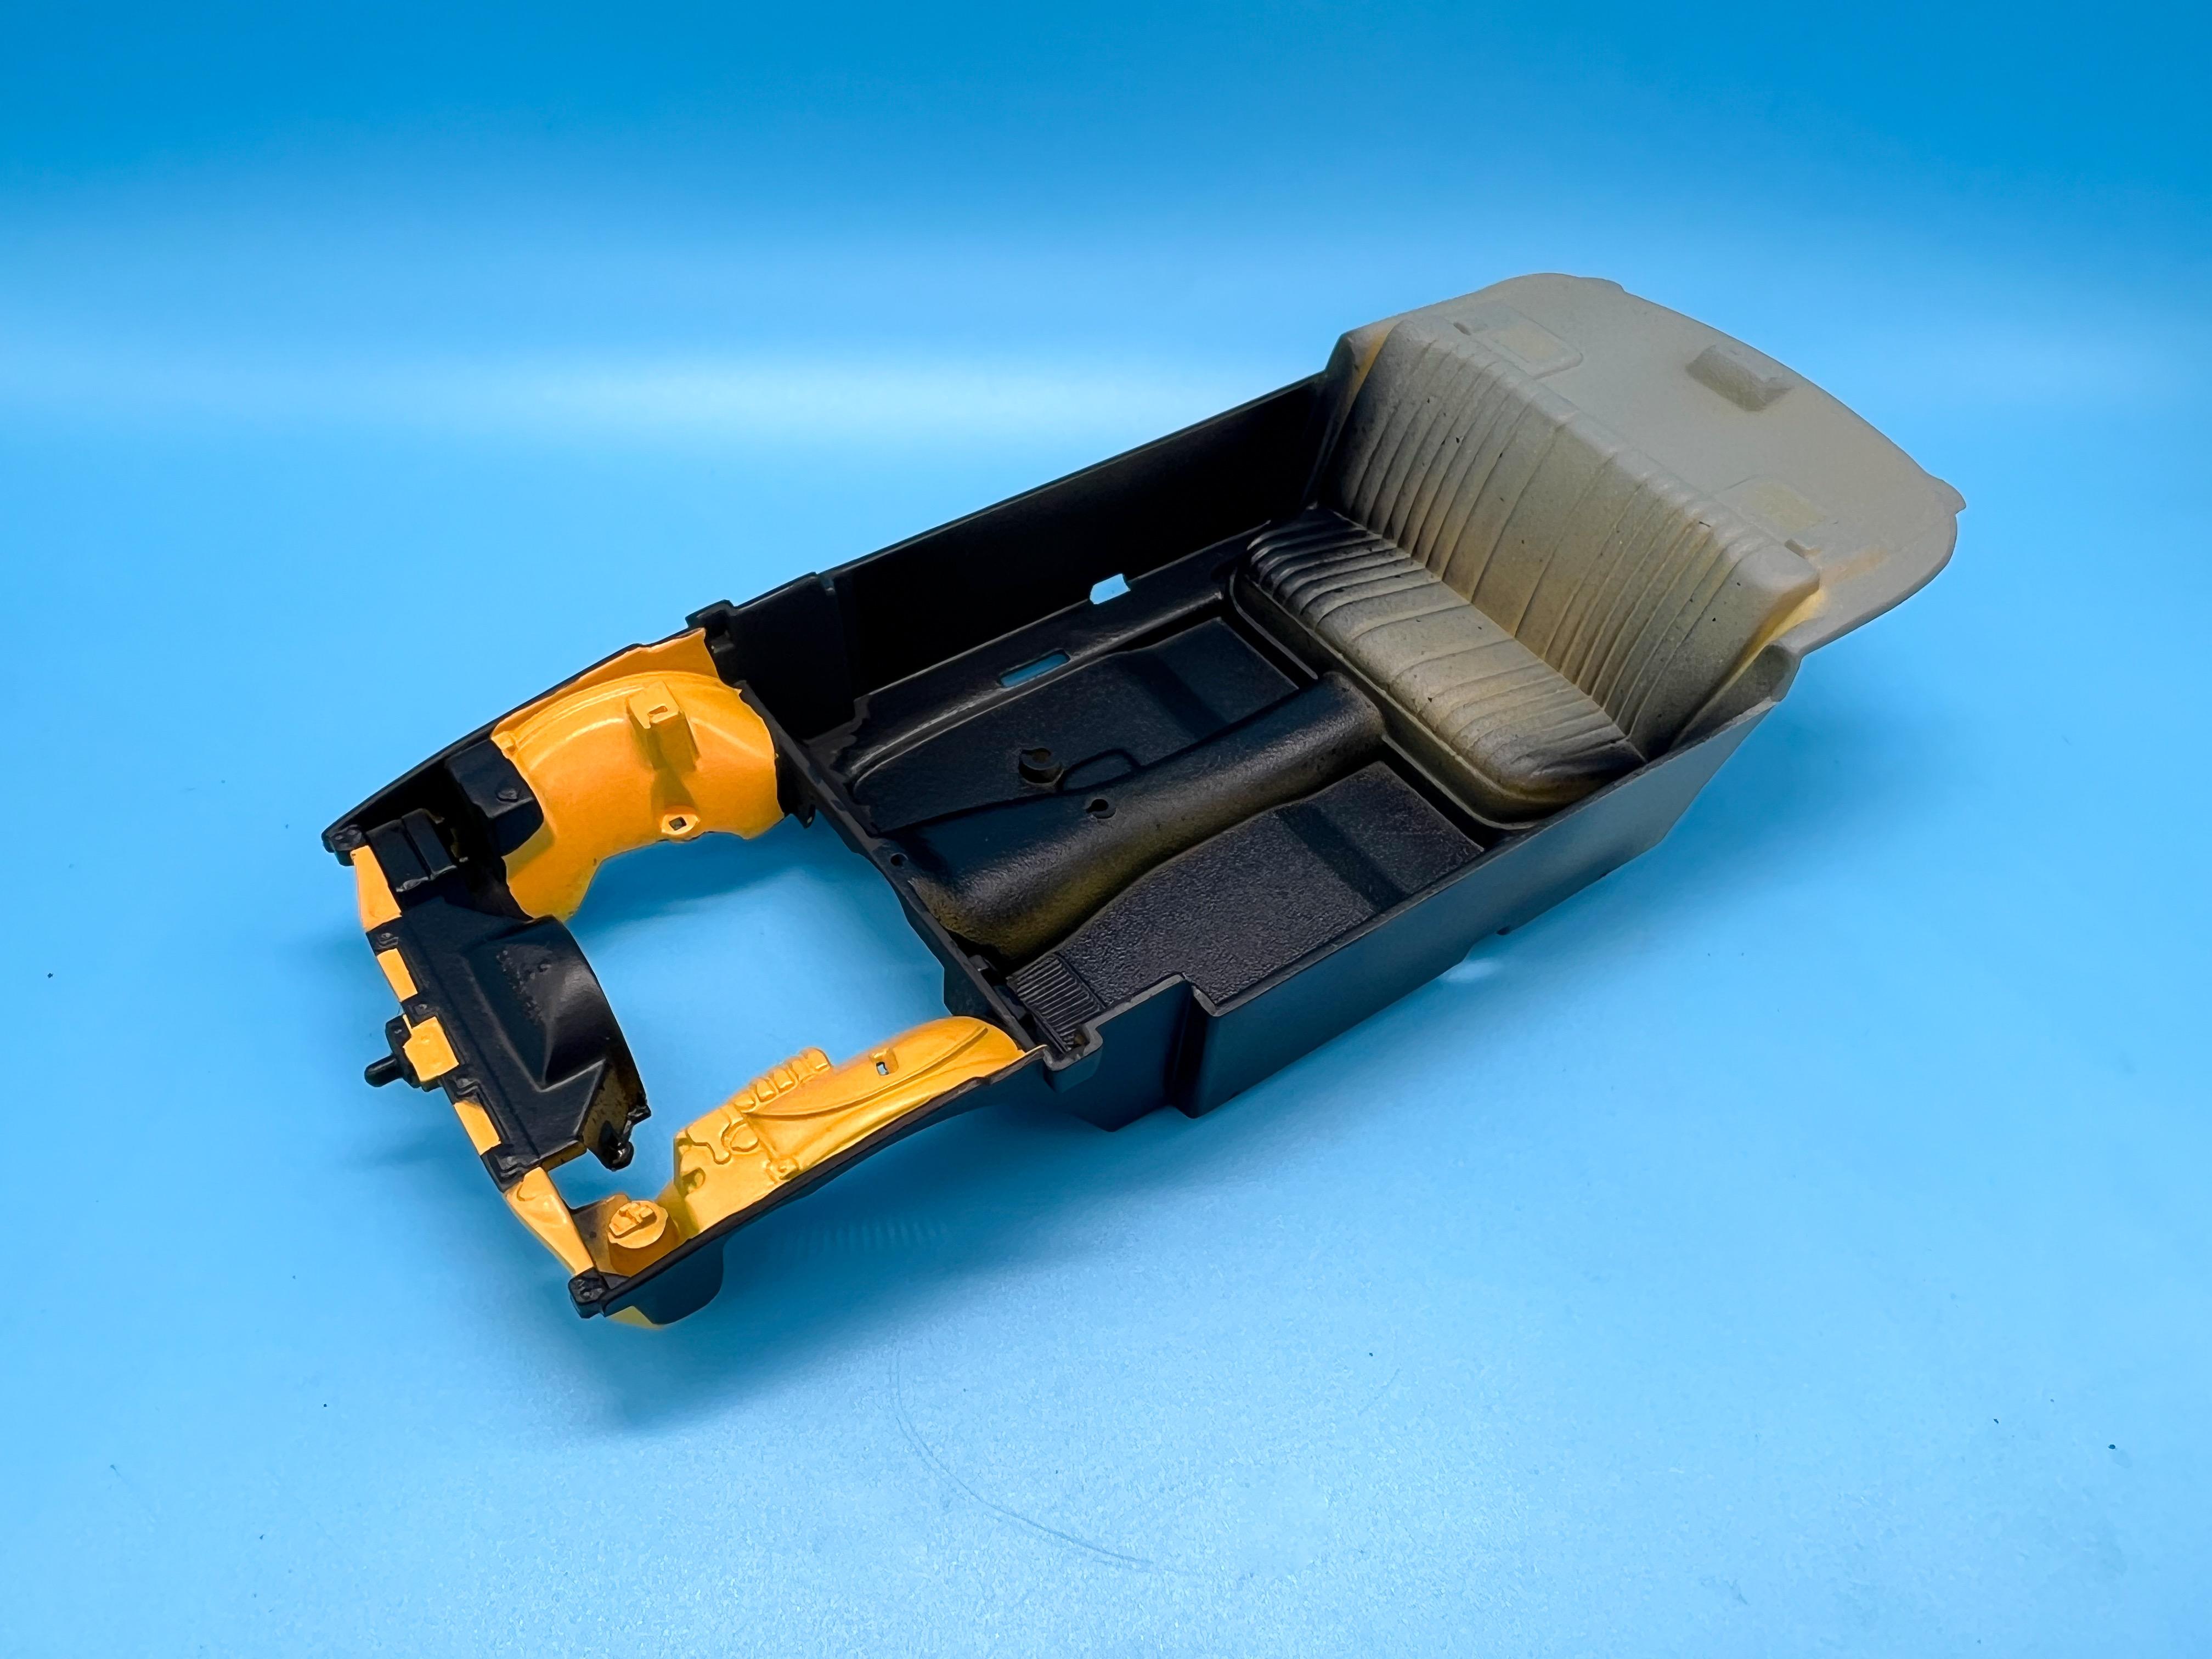
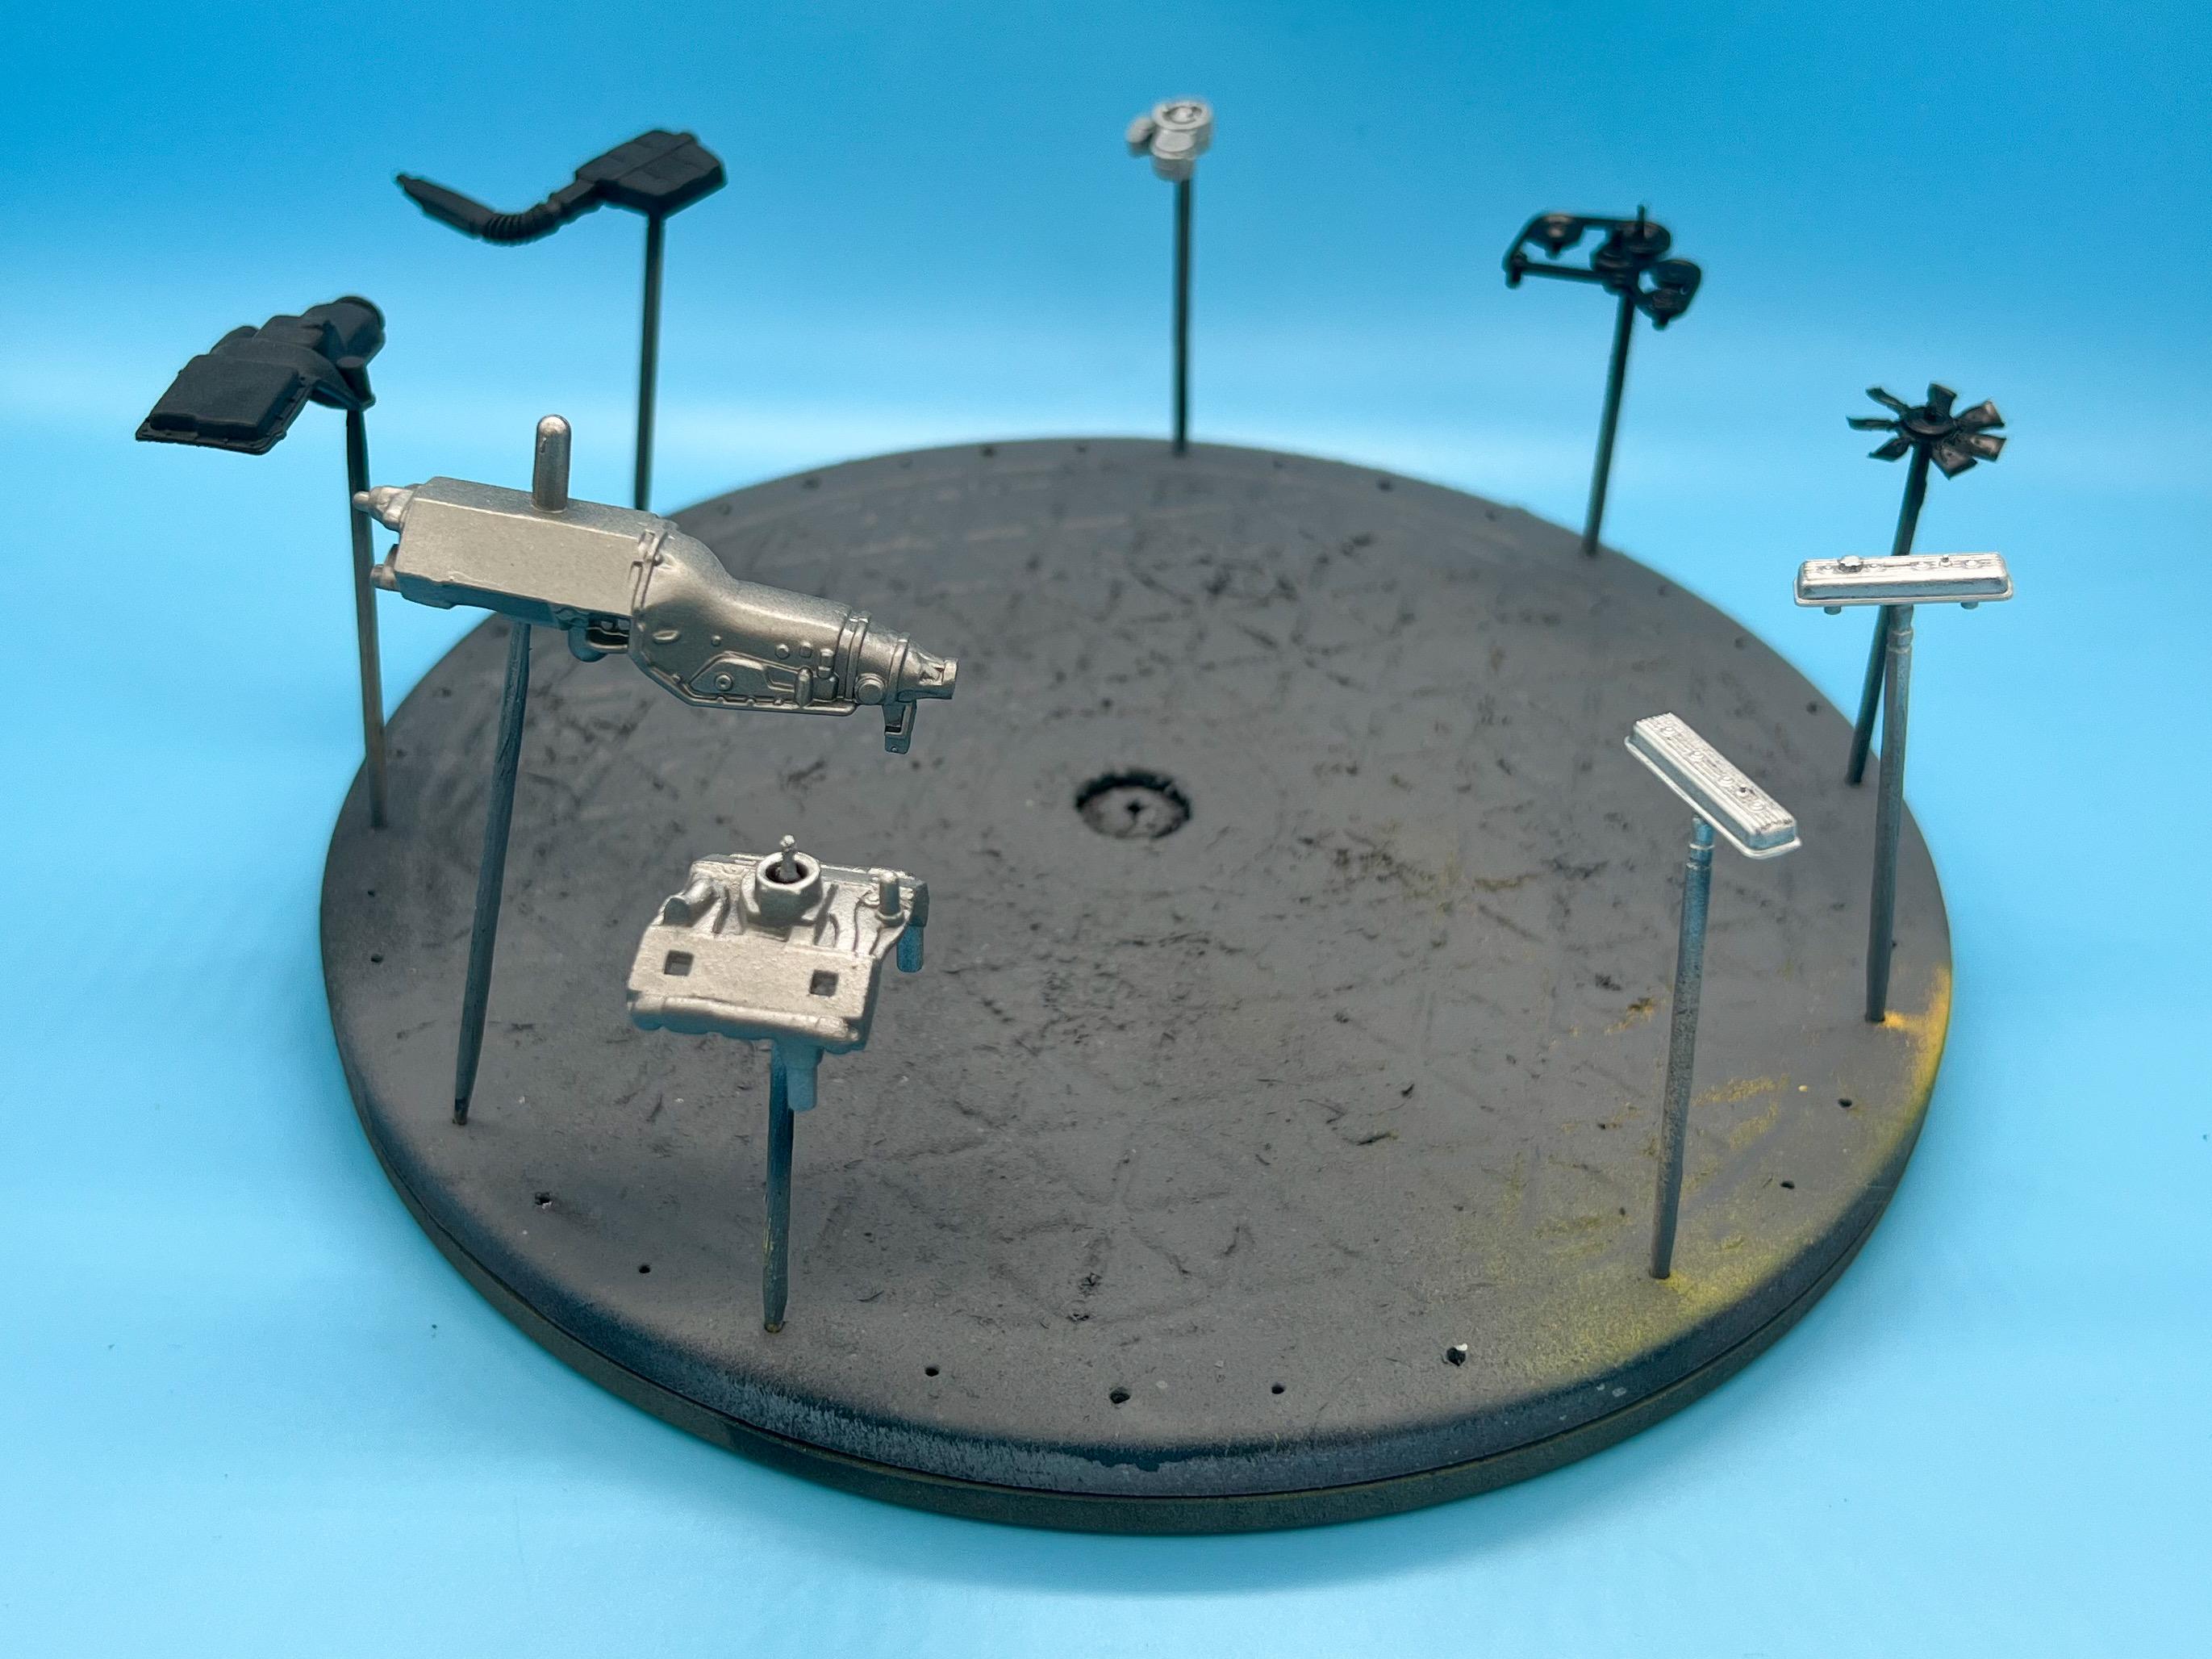
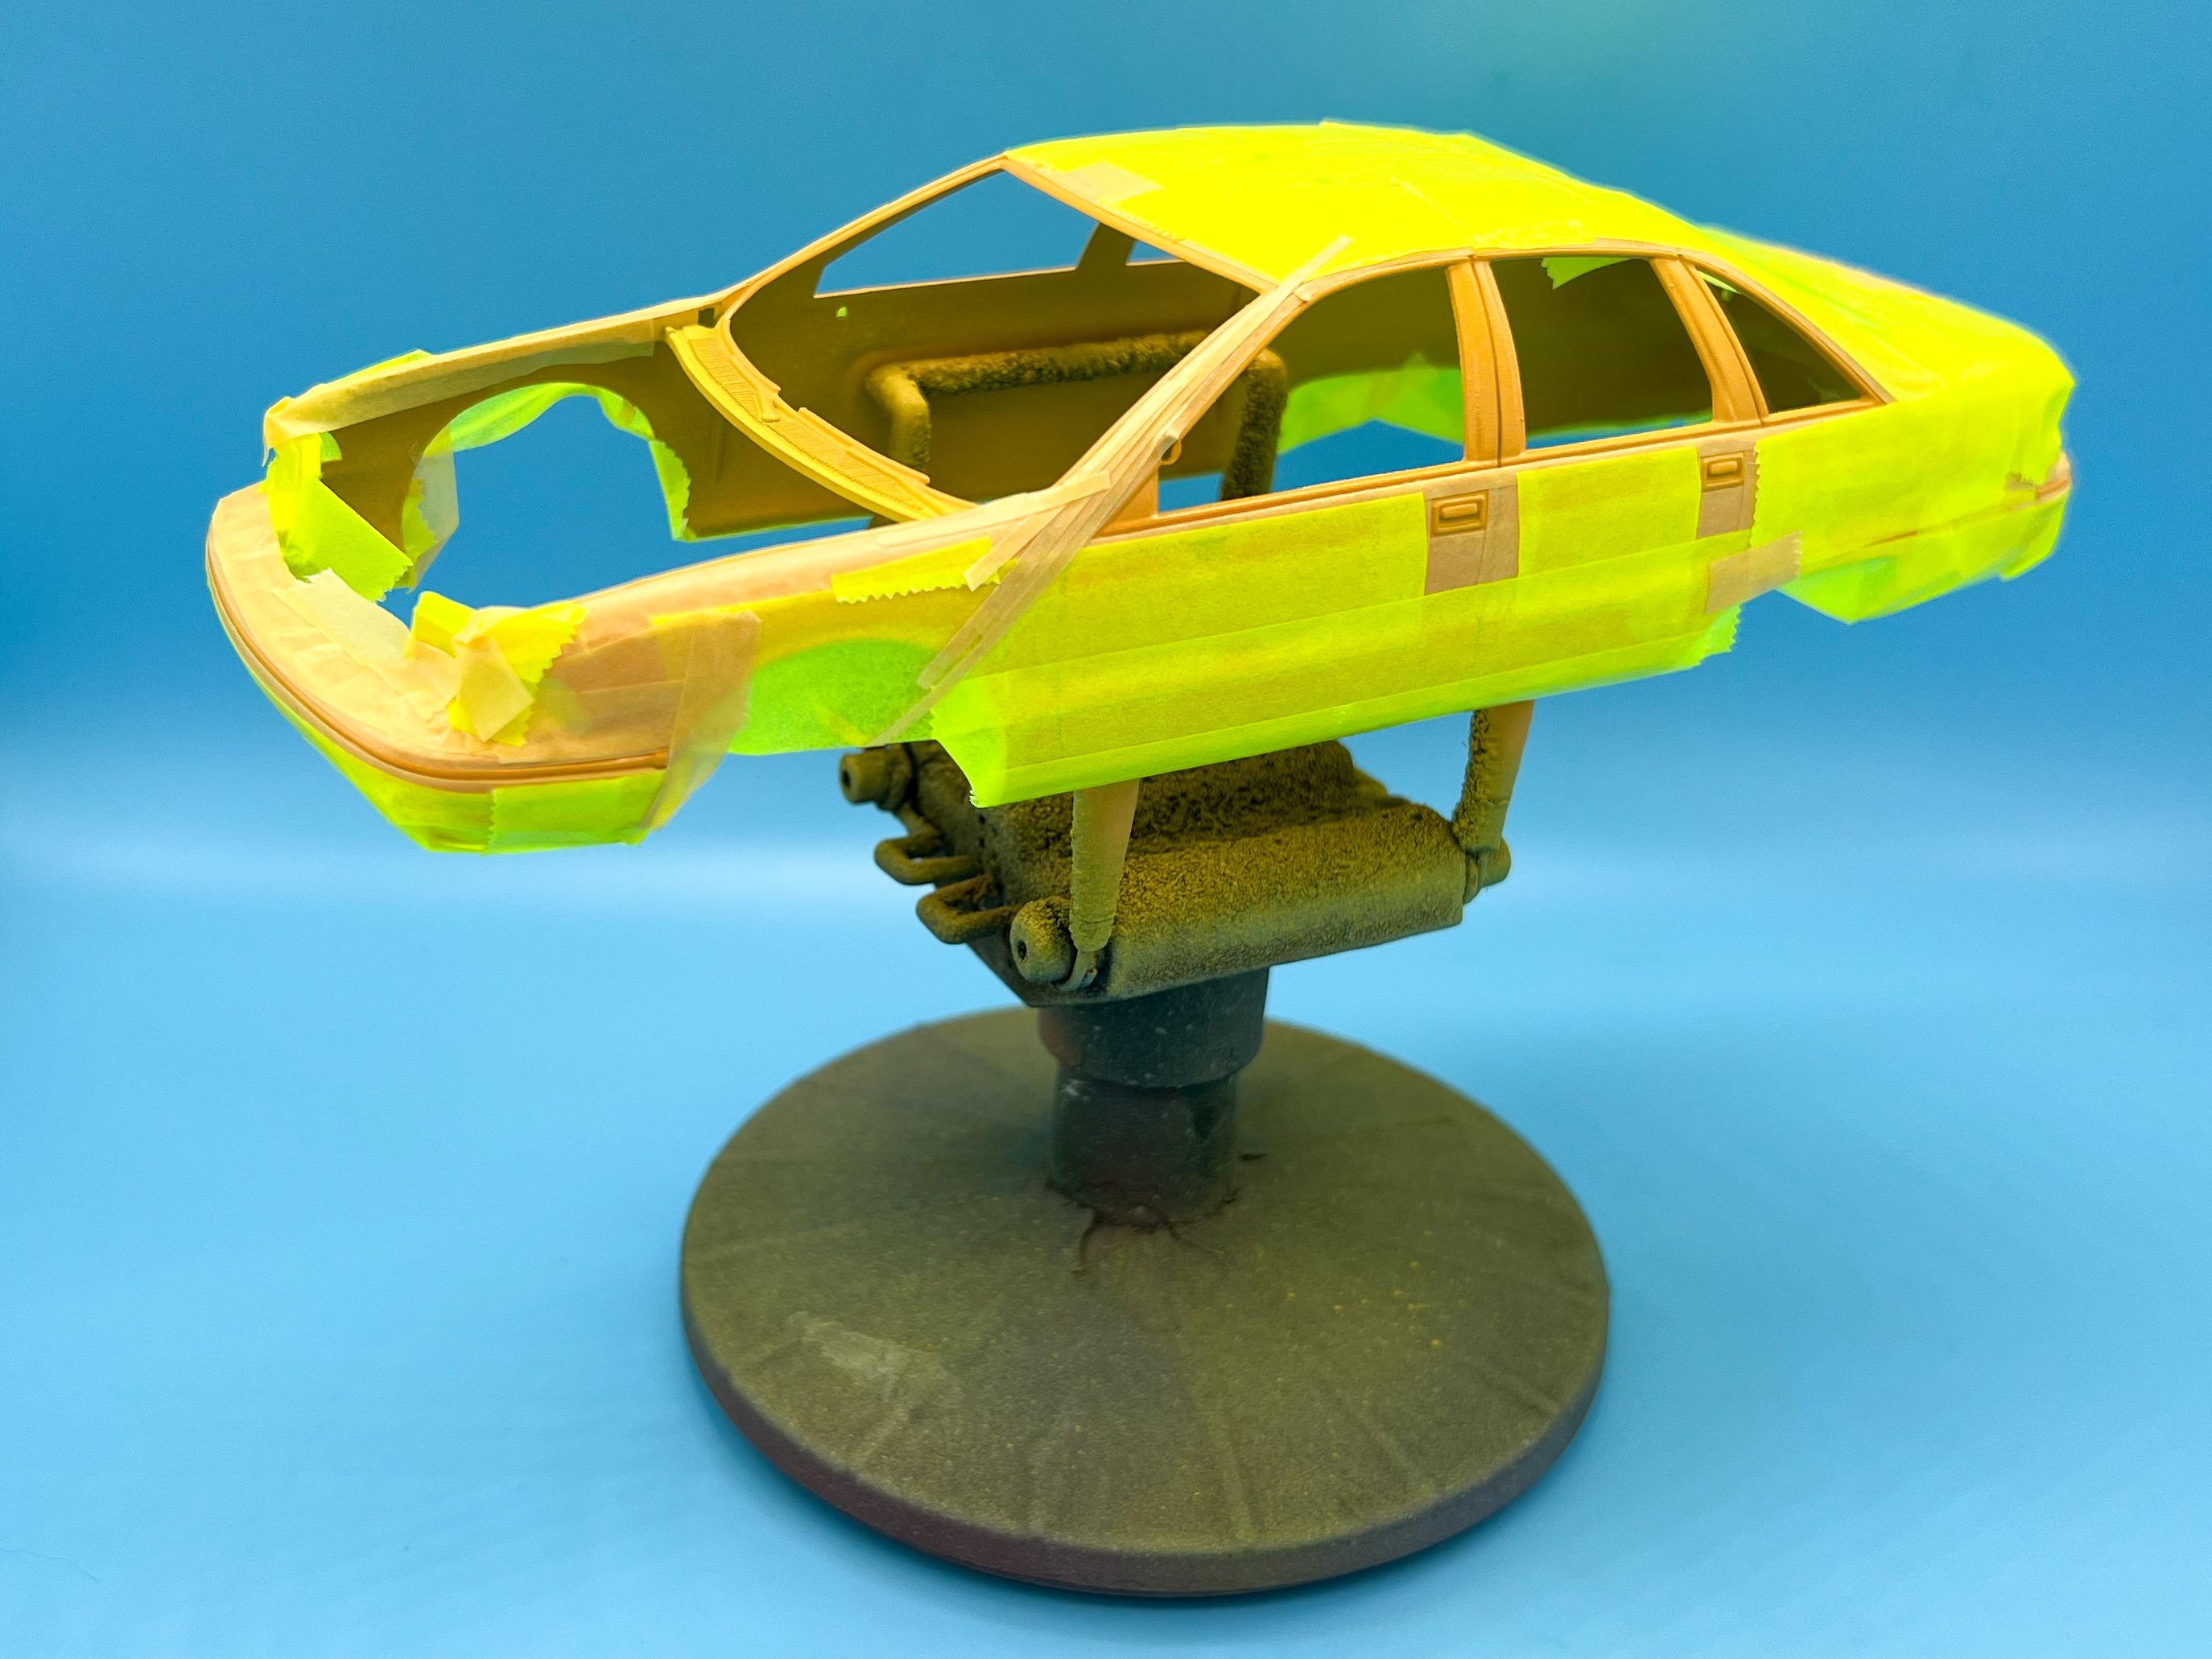
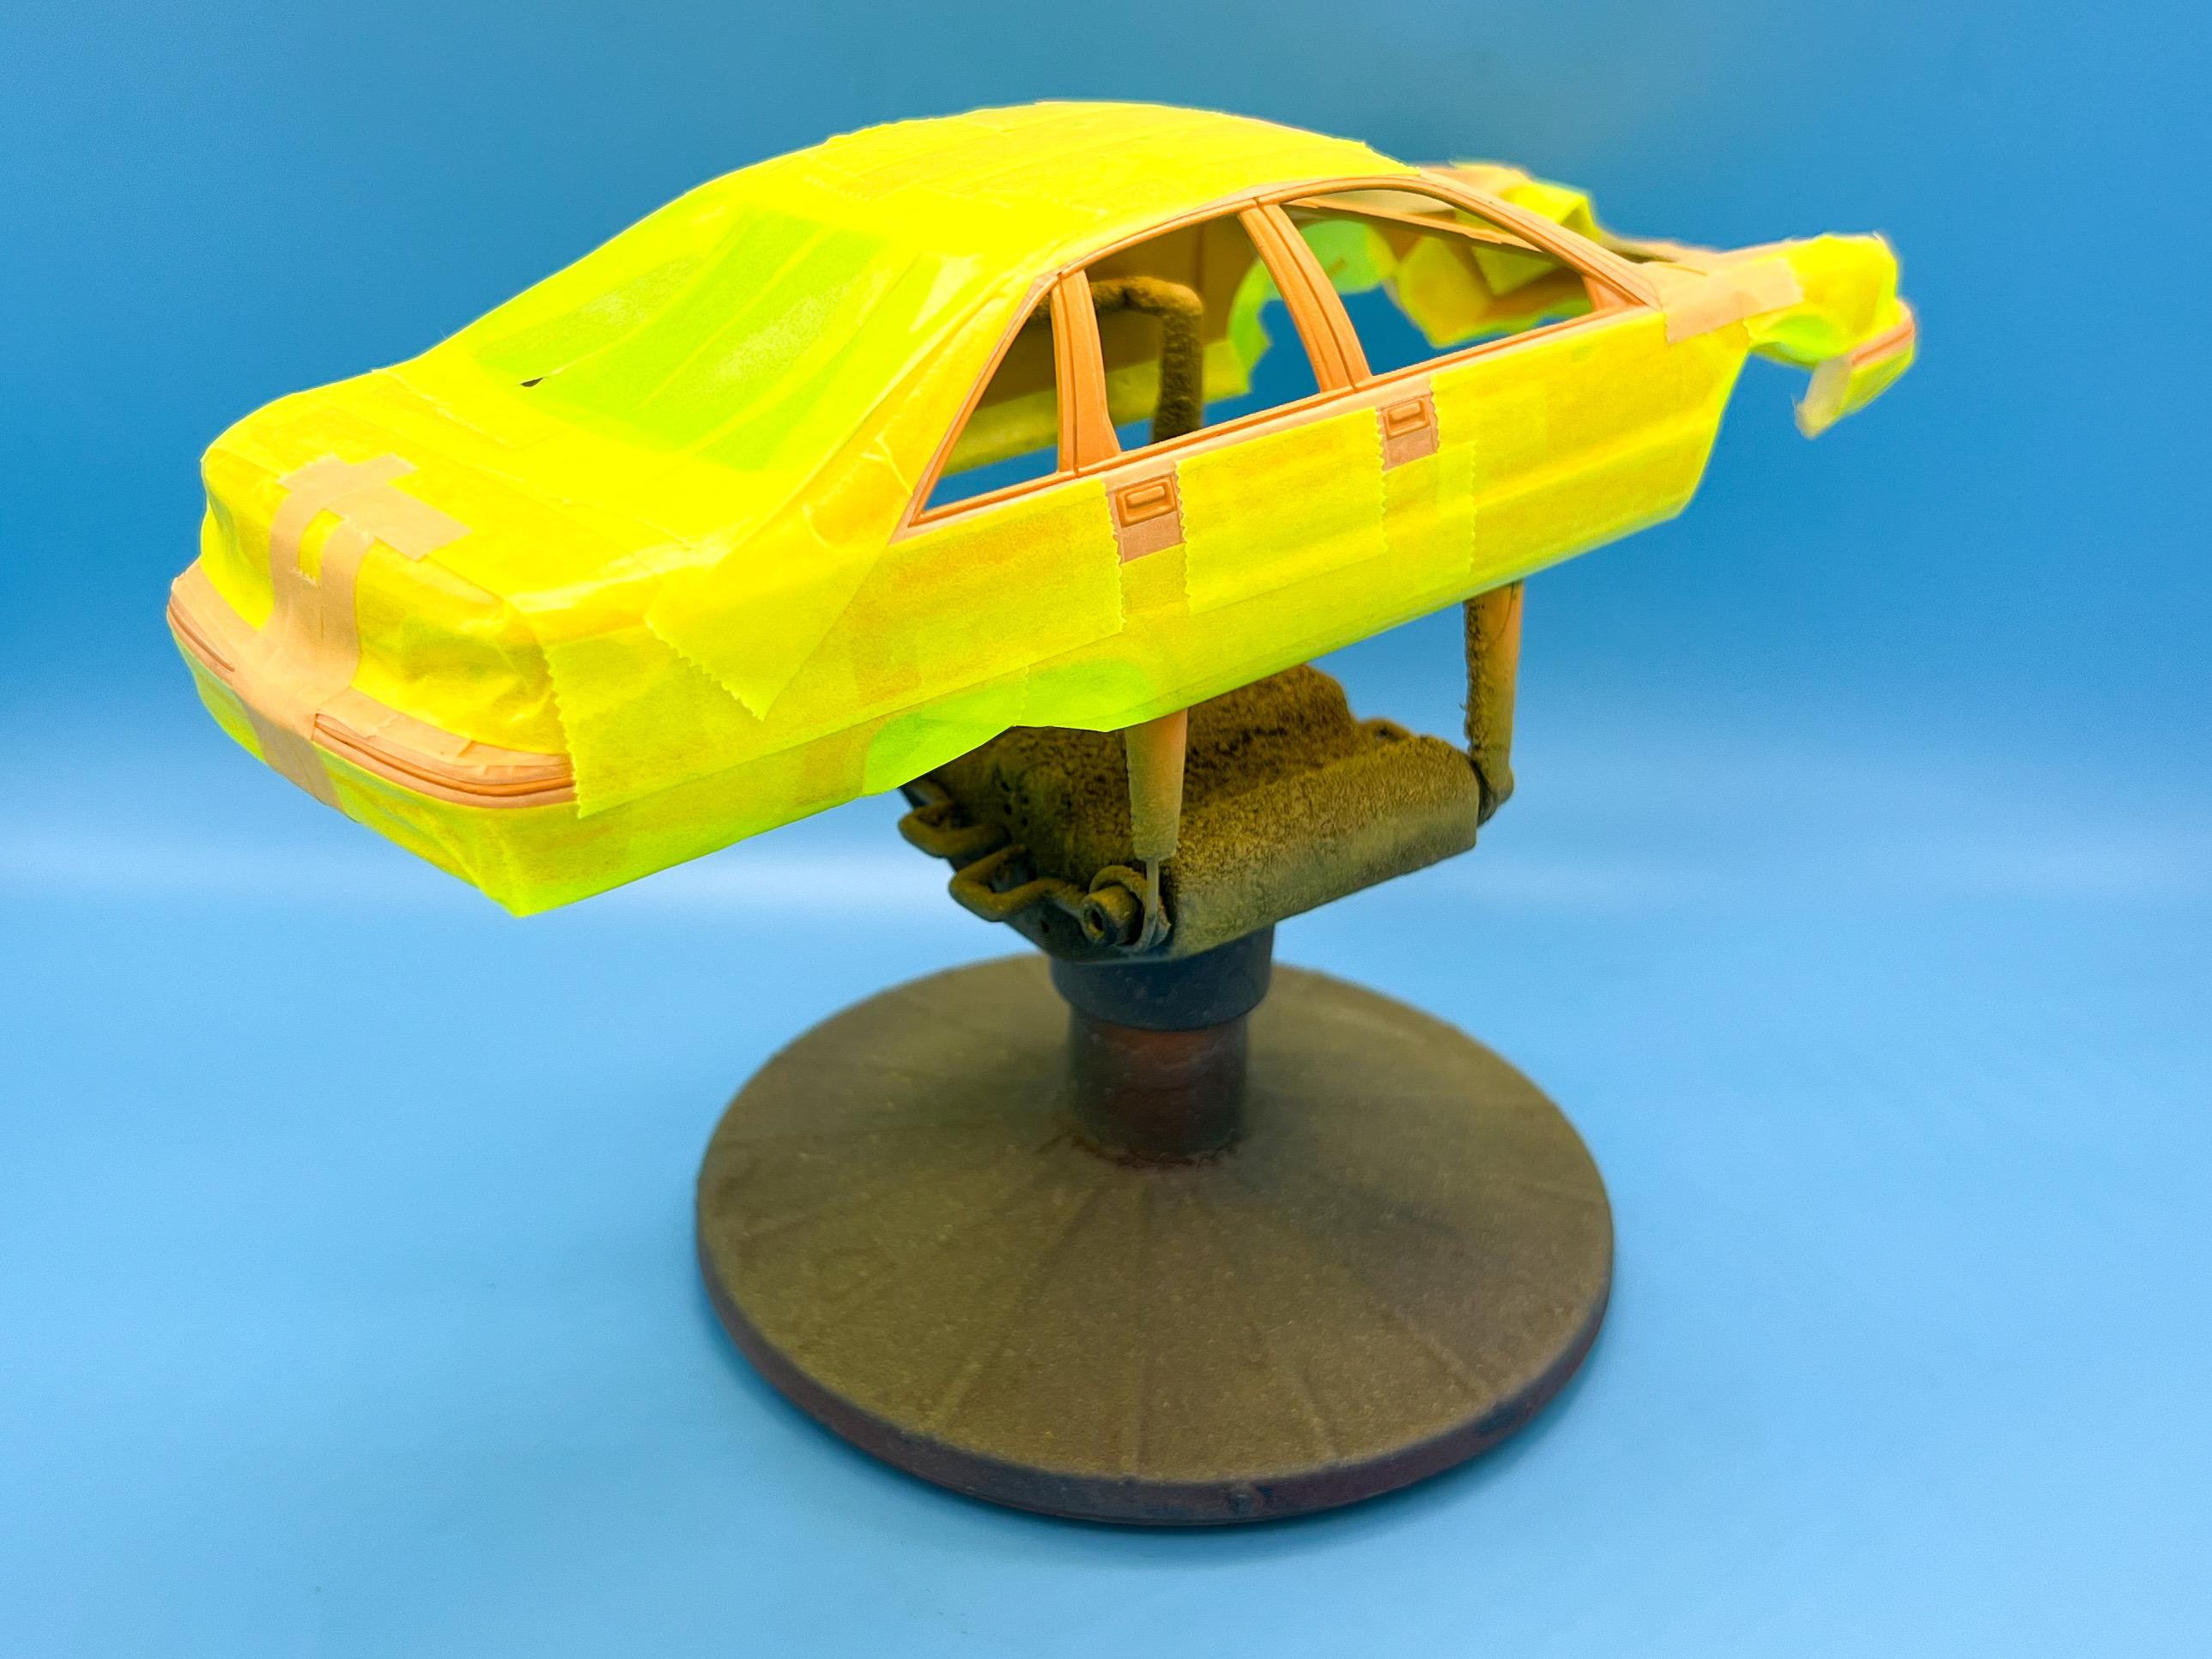
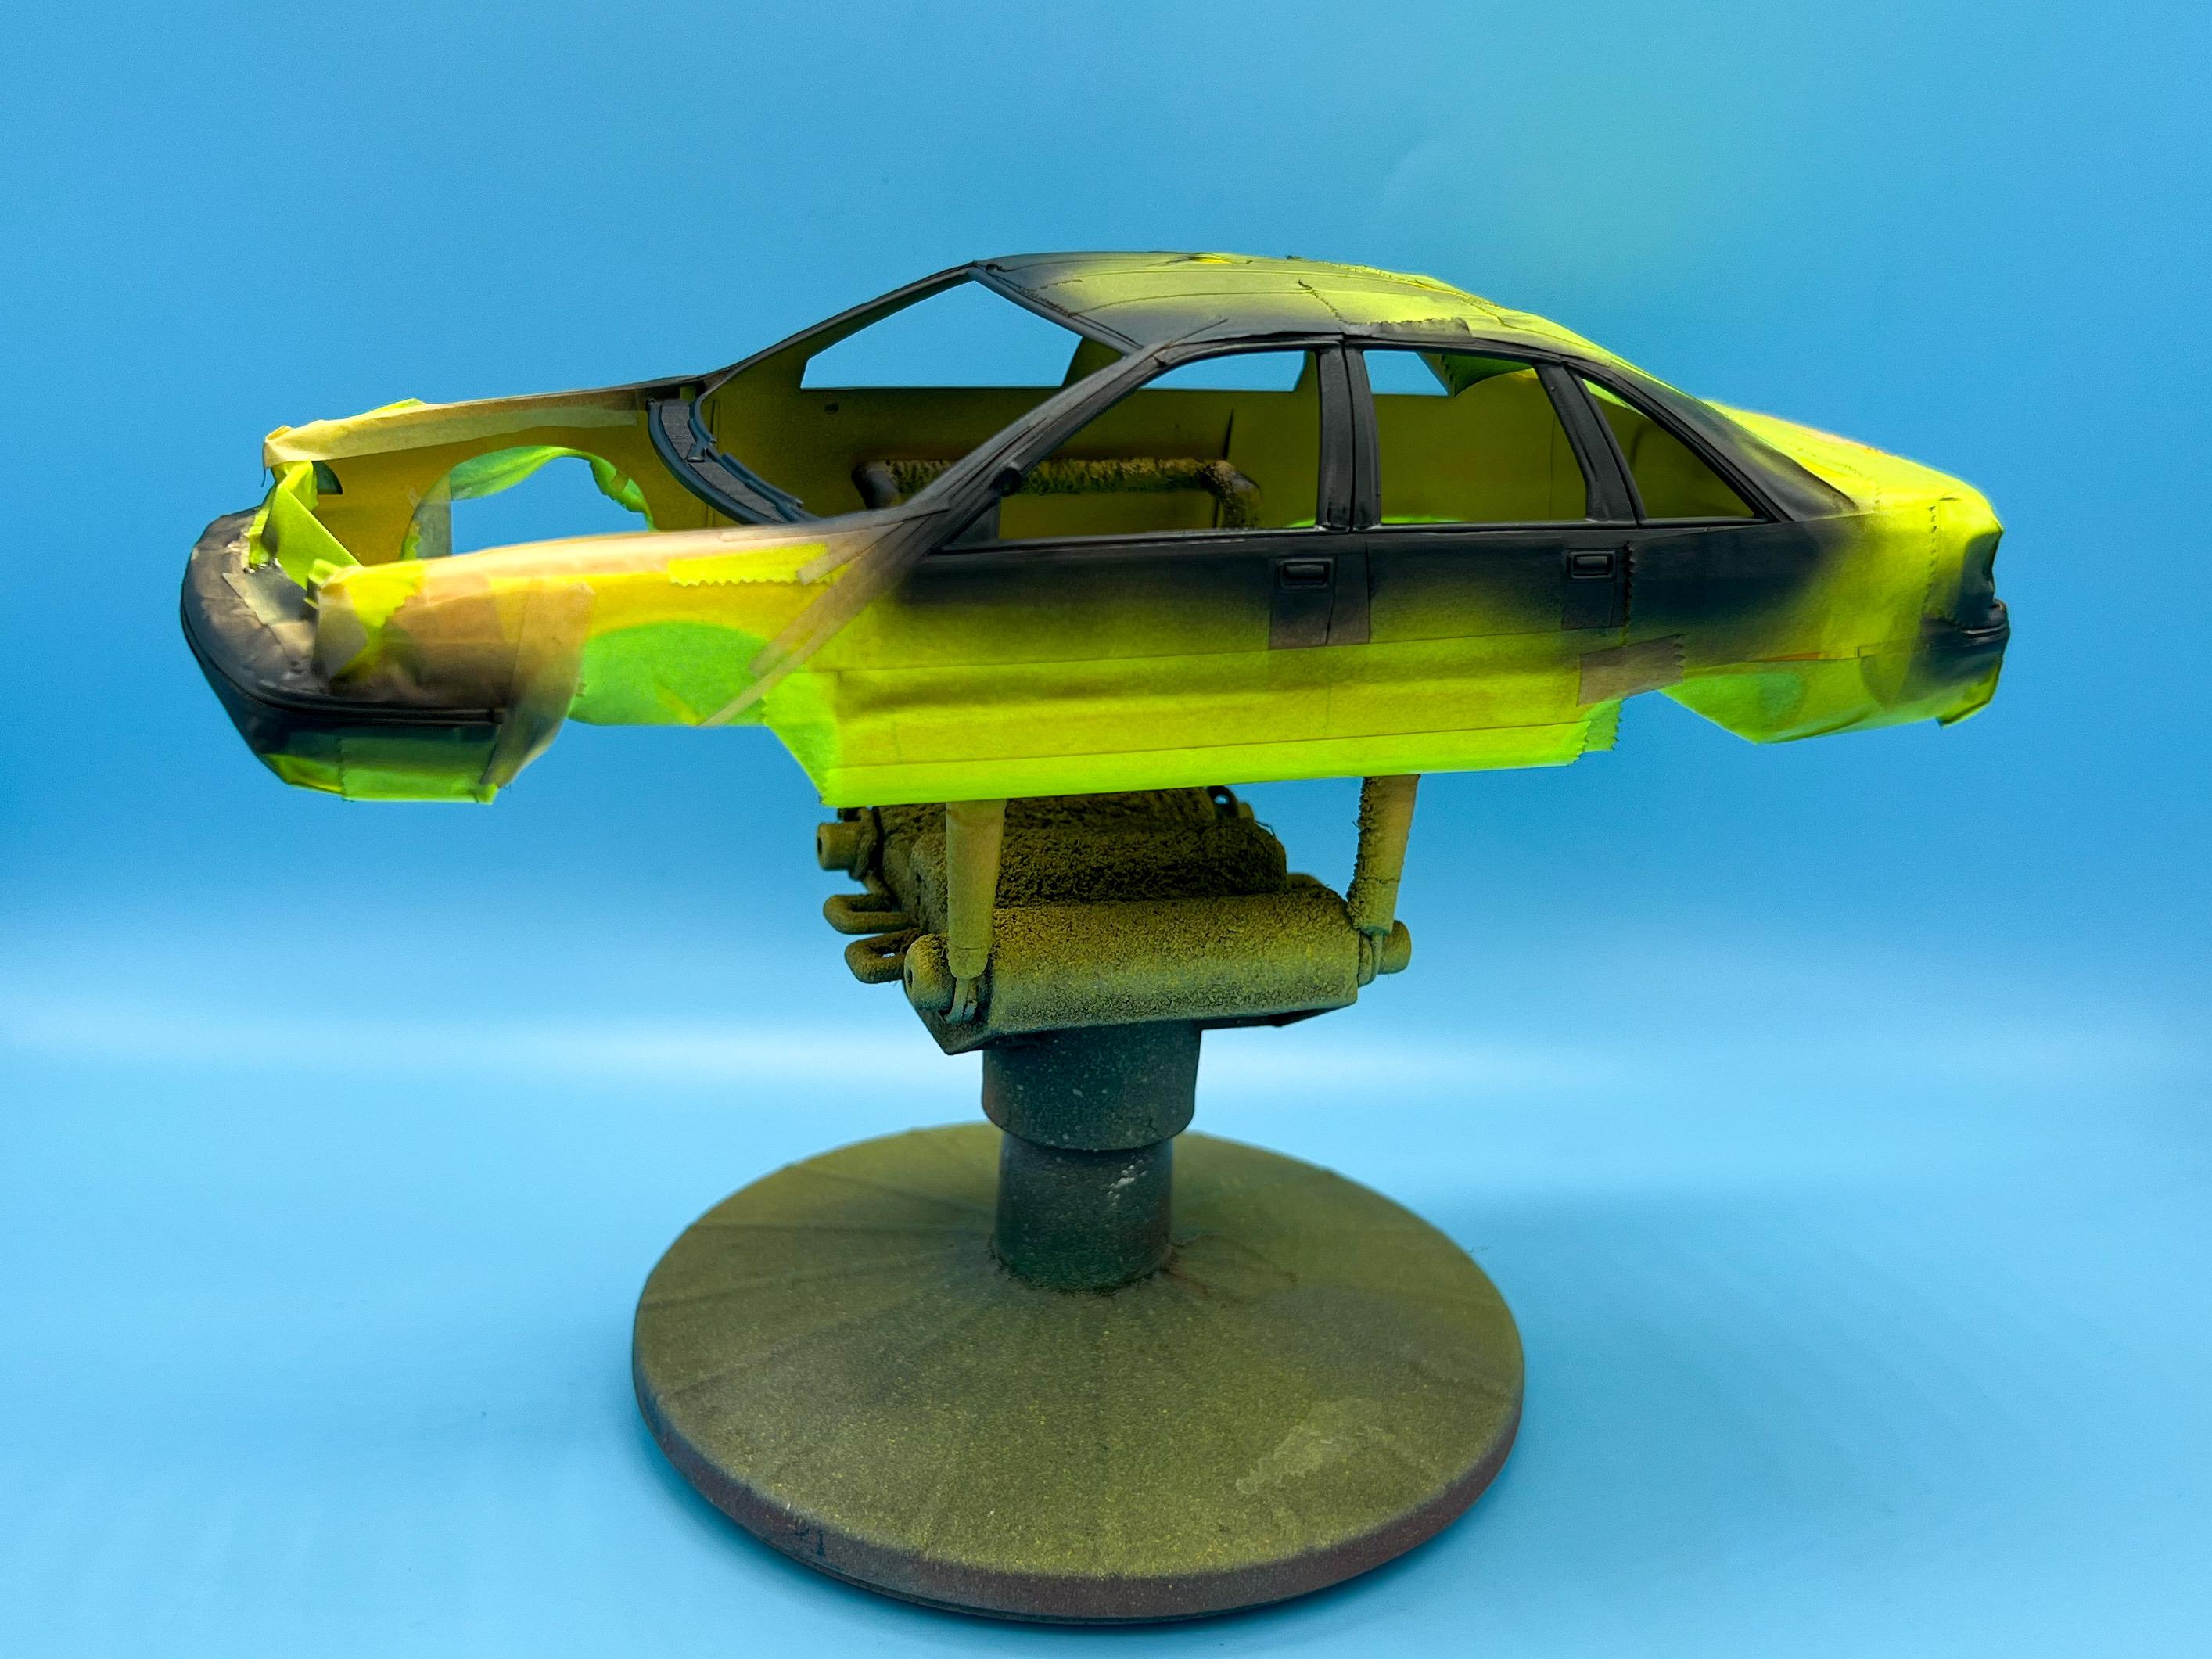
Thanks for the replies, fellas! You ever notice how you spend all your time on these simple kits doing masking, which takes longer than just painting a bunch of individual parts in the first place? Good thing I like masking… Did a tiny bit more on the interior tub (also the engine bay): Silly putty to the rescue again! The interior of the taxi-spec Caprices was a dark blue, apparently, so I found some reference pics and shot the main components ready for future detailing (and picked out that washer bottle too)…plenty more stuff to paint on these bits… Next job, get the frame assembled (or at least the suspension and exhaust…): I’m pretty pleased with the general look (at least for what is MEANT to be a quick easy snap-kit build ?) Just a mini update - more soon, soon as I’ve done more!
-
This is really impressive and masterful building - great work on the 3D modeled AND scratchbuilt parts alike!
-
Bondo sells a smaller tube of their two-part stuff, with an even smaller tube of activator right in the box…that’s the one I like. AutoZone or places like that usually carry it…
-
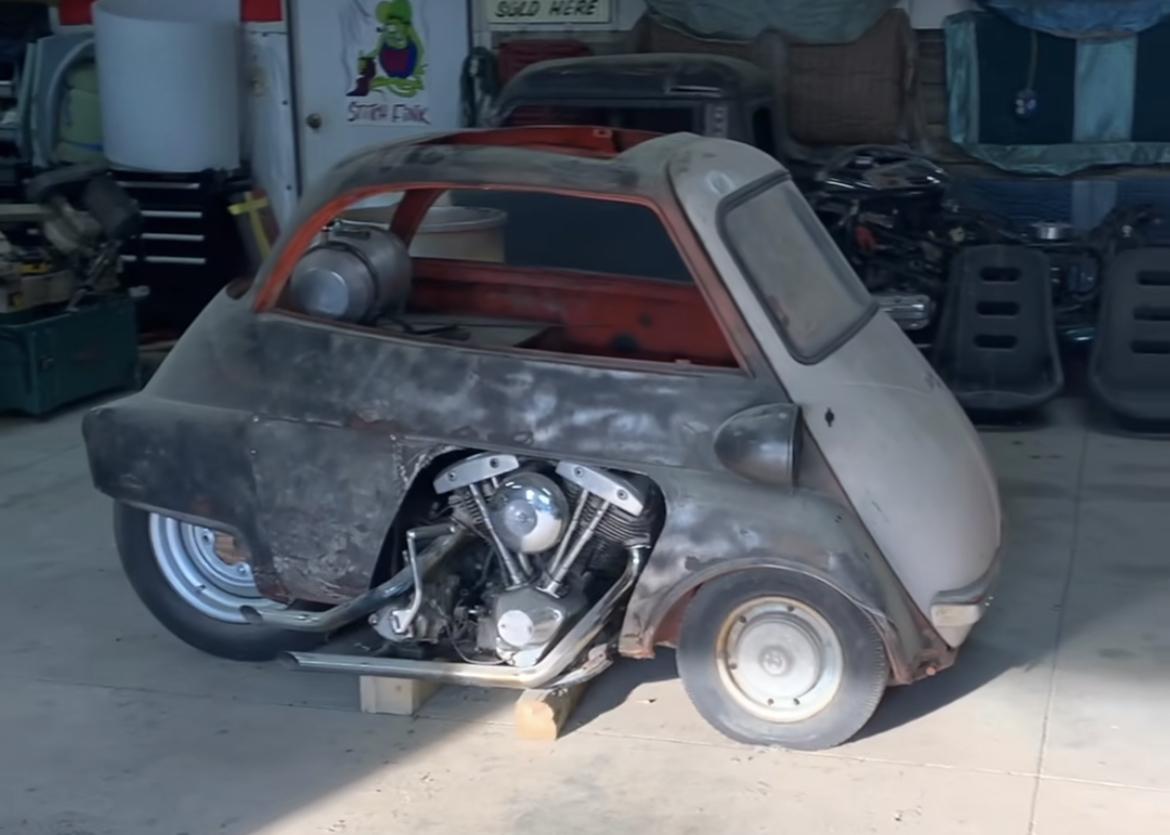
What is this little RHD thing?
OldNYJim replied to NOBLNG's topic in General Automotive Talk (Trucks and Cars)
Oh, and Honda's version of the same idea - if you had a hardtop it's almost like a baby NSX! Mid engined too!
-
What is this little RHD thing?
OldNYJim replied to NOBLNG's topic in General Automotive Talk (Trucks and Cars)
I sat in one of these at the NY Auto Show a couple of years back - and, yeah, they're tiny: 3 cylinder, 660cc (I think?) engine - I bet it's super fun to drive! Reminded me a LOT of a shrunk-down version of my 2nd generation Miata, particuarly in looks. I'd drive the heck outta one of those
-
Building a New York taxi from the Revell Caprice Snap Kit
OldNYJim replied to OldNYJim's topic in WIP: Model Cars
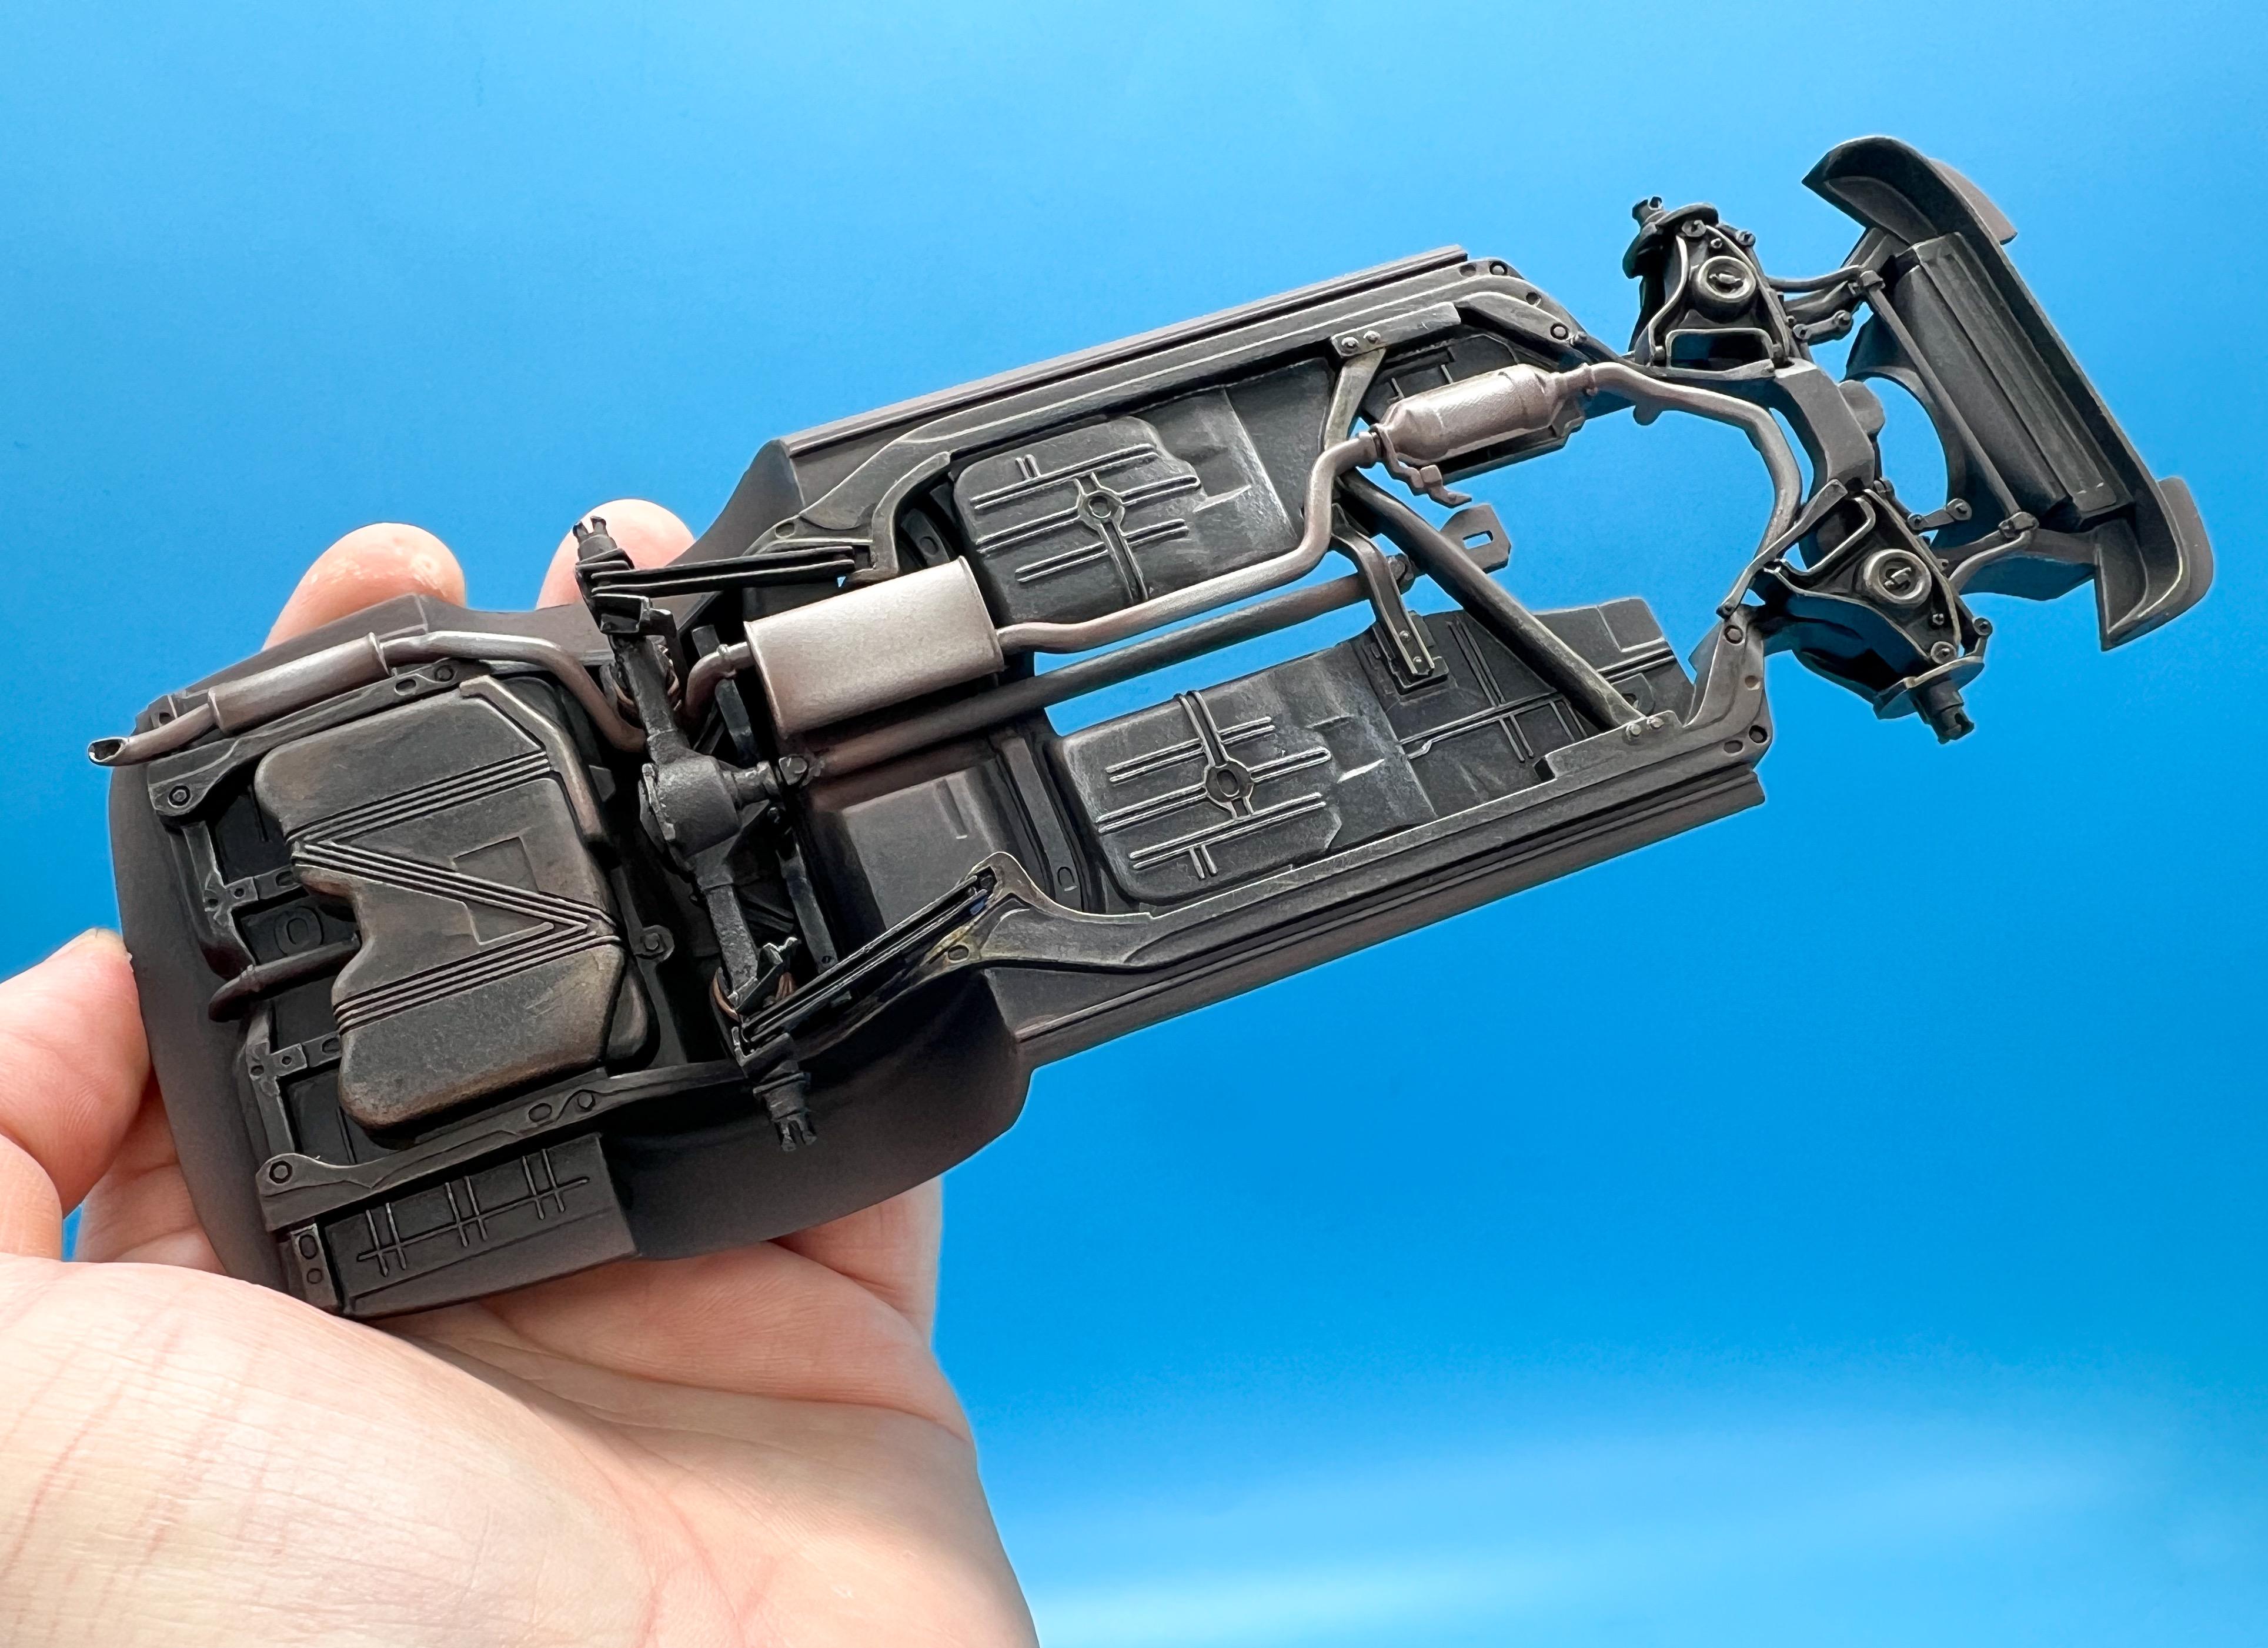
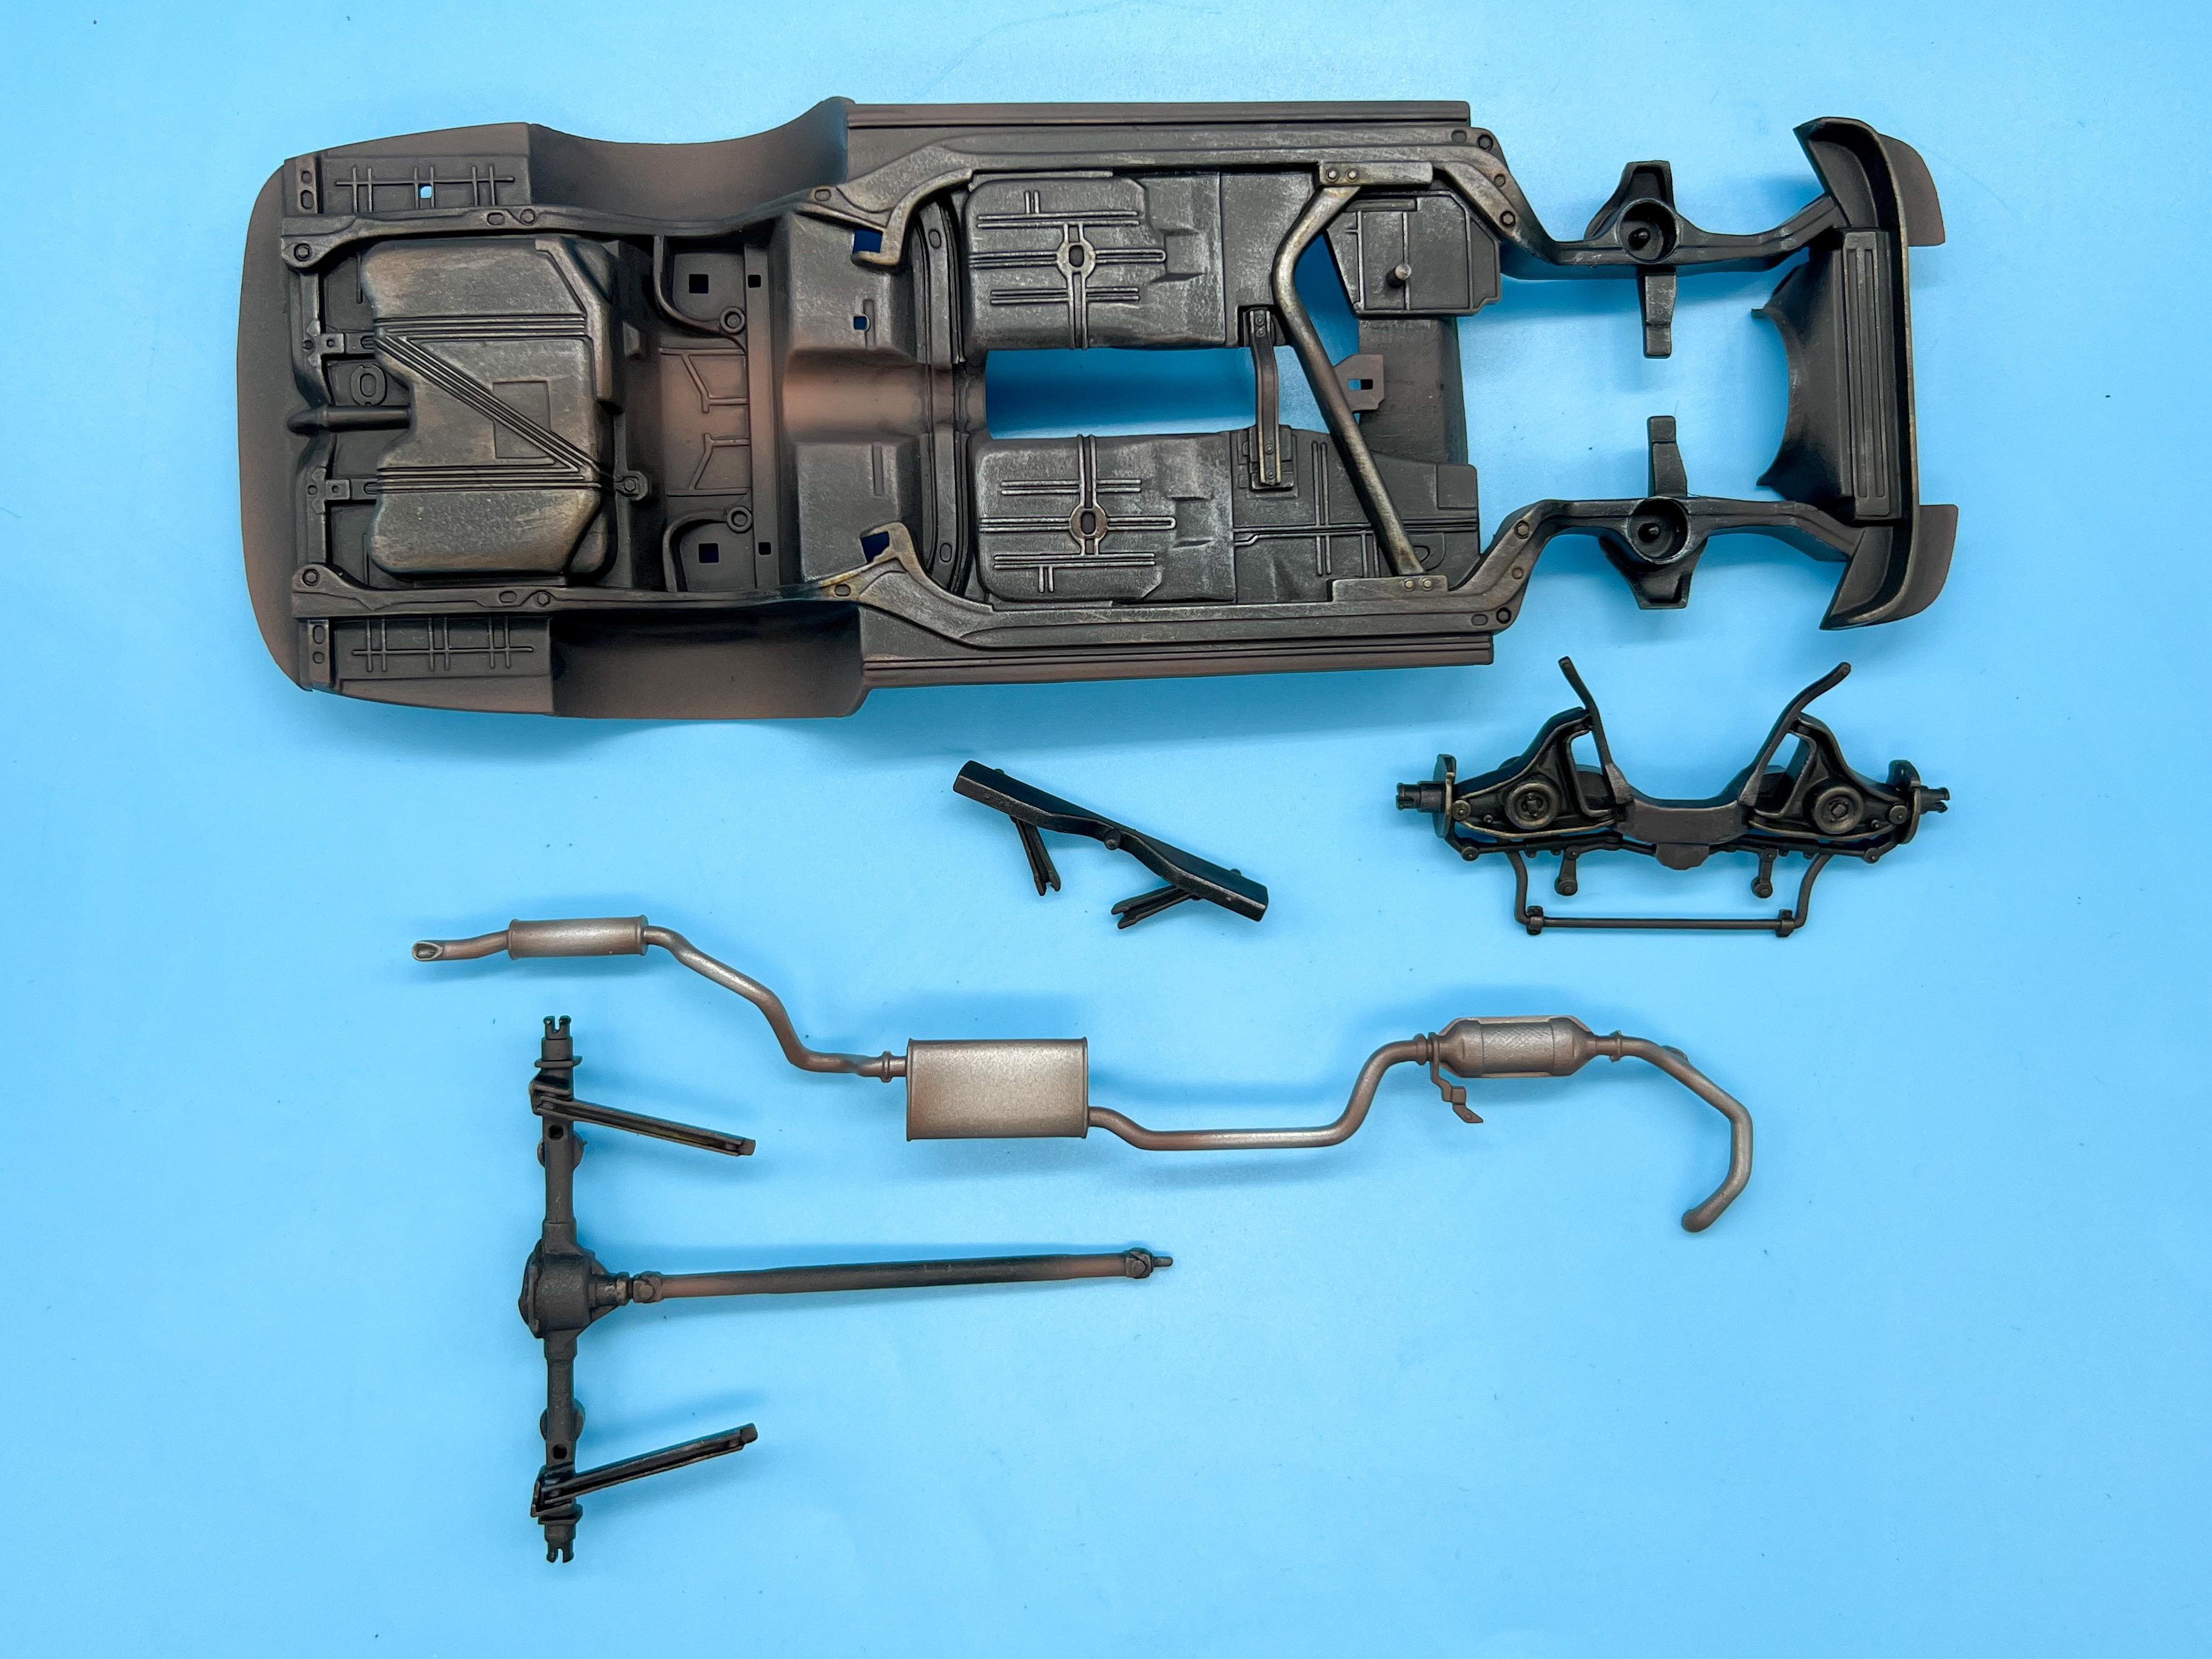
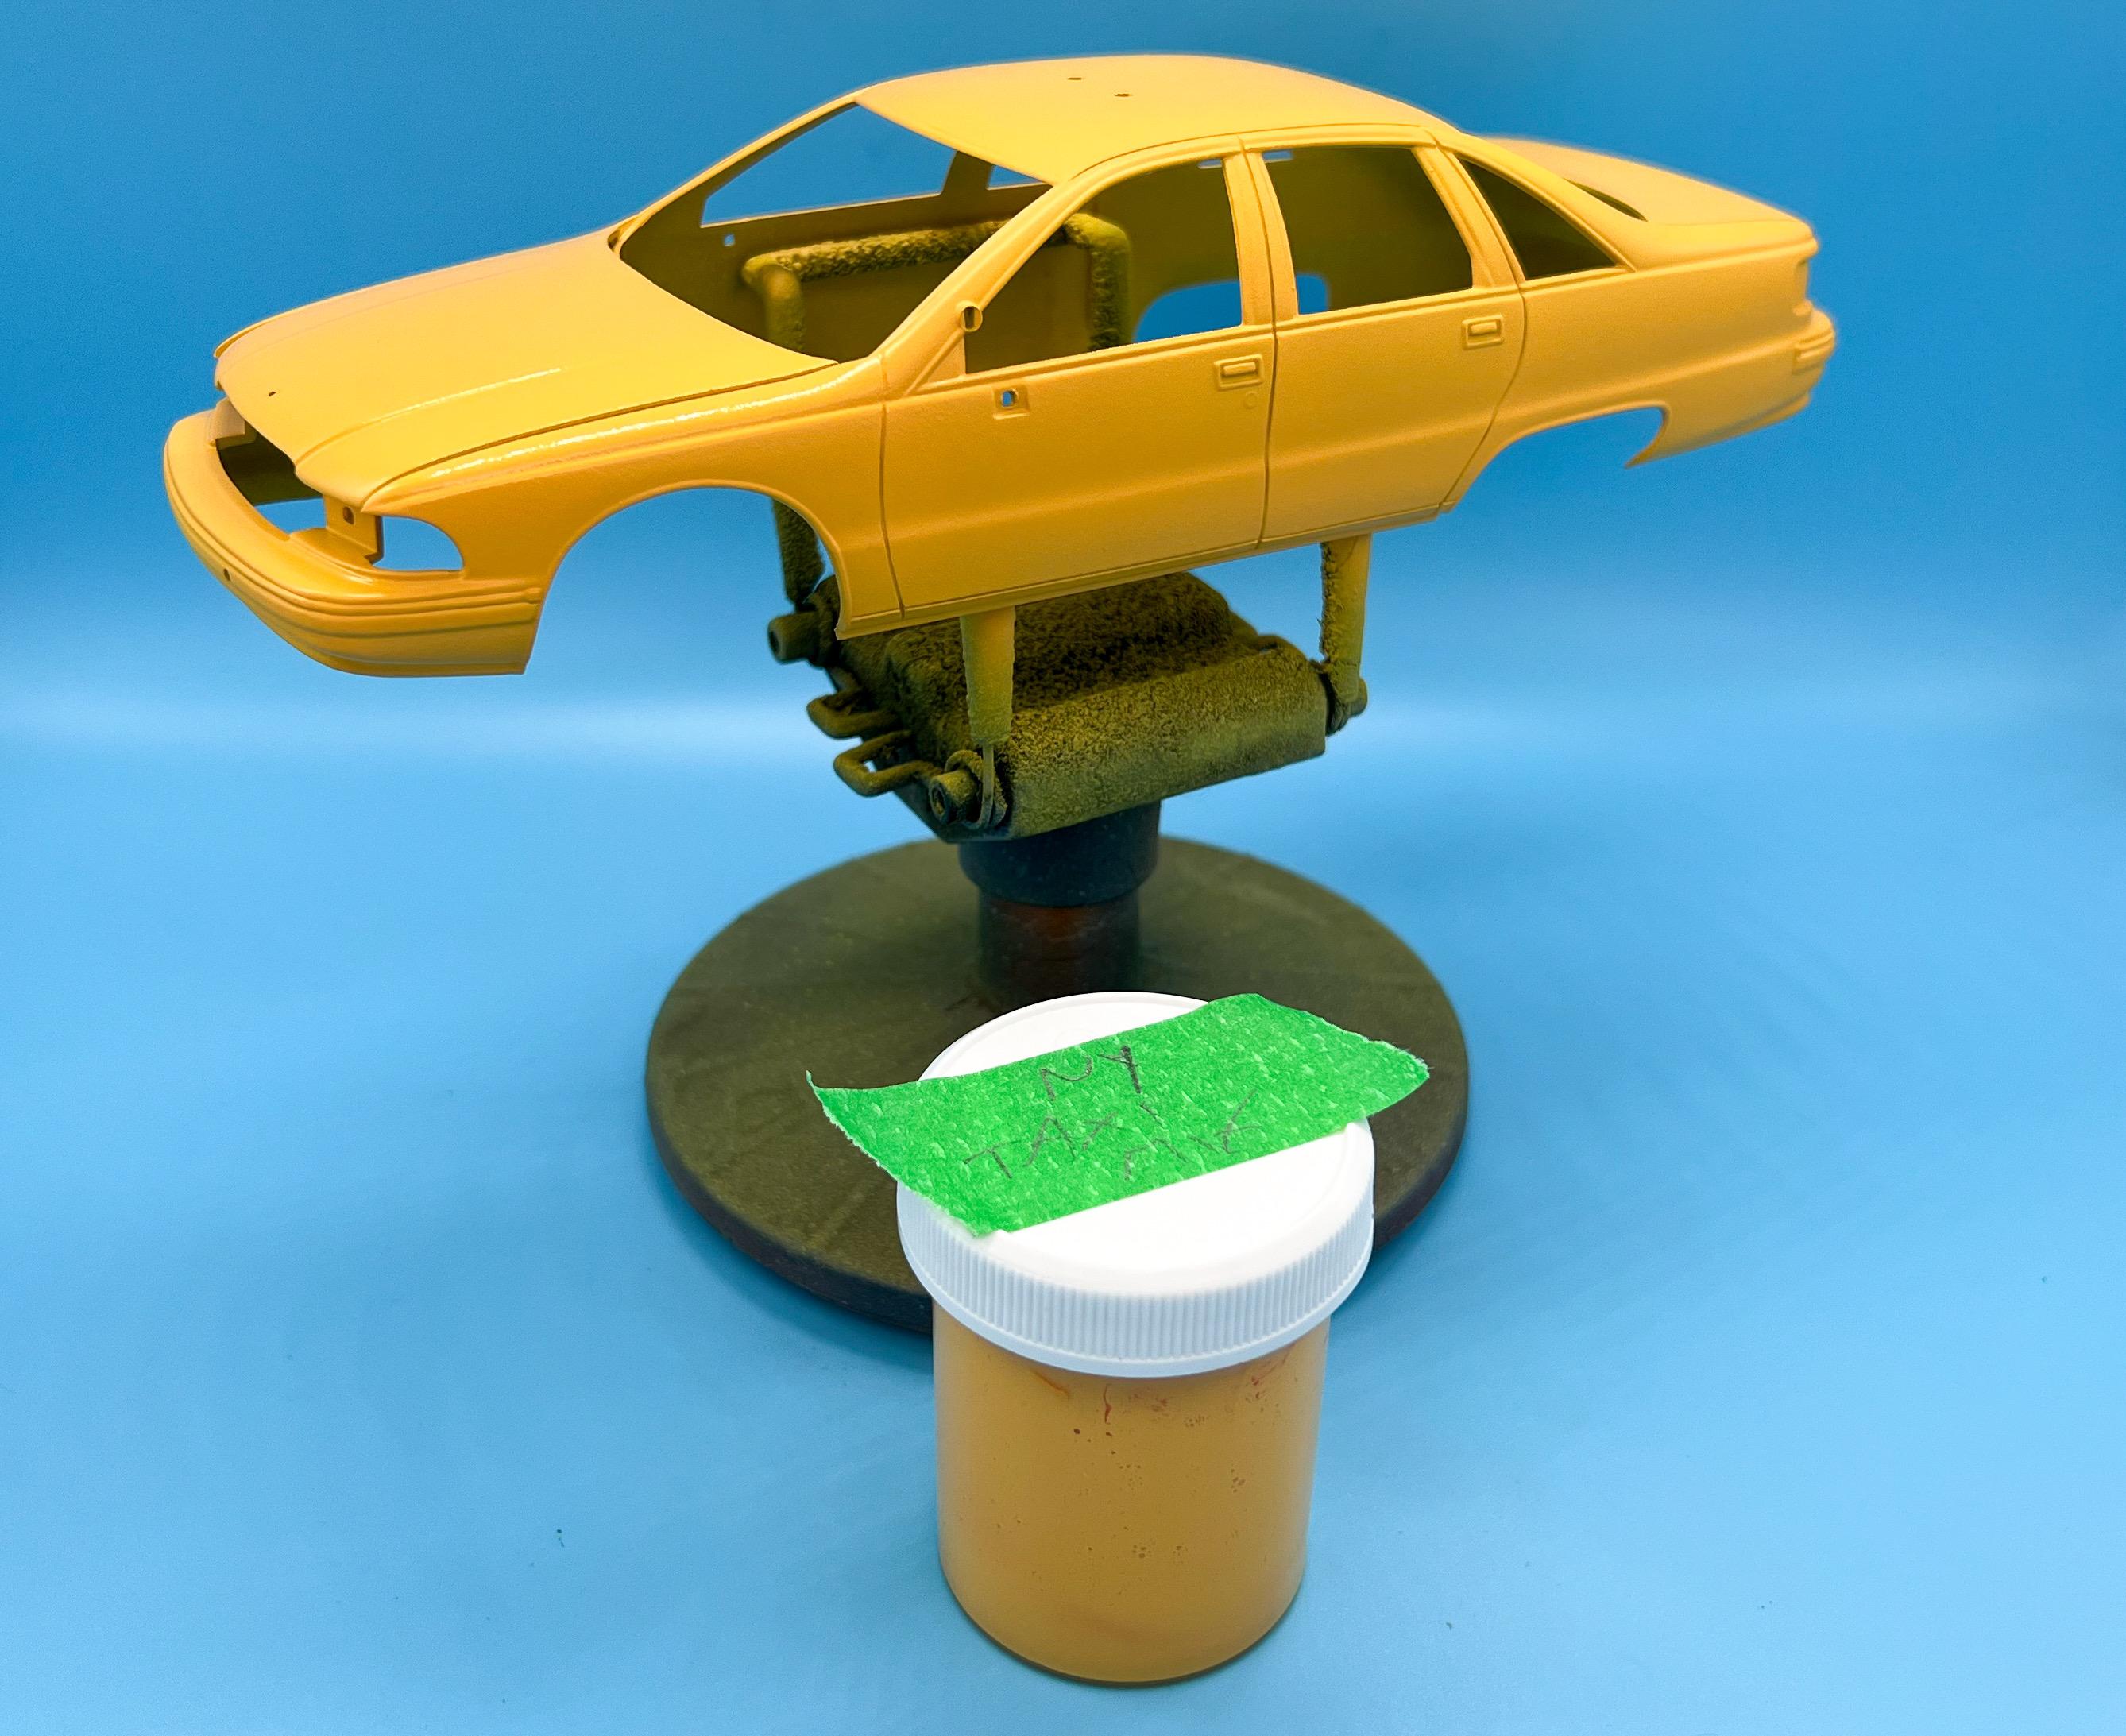
Thank you! I seem to remember seeing a resin Checker cab at one point, but I’m hazy on who made it… I will do! So far it was gray primer, a yellow base, the ‘actual’ yellow, then a light coat of clear lacquer to seal it in, followed by Createx for the black. I’ve got some more steps to do when it comes to the weathering tho. I’d bet there’s more taxi cab kits out there, but I’m no expert… I don’t know all of the mods, but there WAS a ‘taxi package’ Caprice offered. In NY in the early nineties the requirement for a cab be that it was a vehicle that, when registered to the livery commission, had less than 500 miles on the clock - so I’d guess most of these Caprices were brand new off the showroom floor. A little more progress today… Applied the decals I had printed, and ran some Tamiya panel line into the panel gaps… The engine bay needs a few stages of painting and masking to get all the details correctly painted, so I did the next step on that today. Silly Putty is a LIFESAVER for masking tasks like this… As you can see, the engine bay is also the interior tub, so this part is going to get a bunch more attention before I’m done… And I got the frame into paint…I’m going for used-not-ruined as my guide for the weathering on this project, but bad as the five borough’s streets are, even a fairly new car is going to get beat on pretty hard…first step was Createx black, followed by a healthy dose of drybrushing and then a little airbrushed Vallejo brown to bring out some of that nice detail: Then, once that was all dry, I used some washes and did a little more airbrushing to add some visual interest…I’m pretty pleased with how the frame turned out! The exhaust got much the same treatment; Vallejo dull silver with a couple of shades of brown airbrushed to add some grime and wear: I’m excited to see these bits all together…but I forgot to paint a couple of the suspension pieces so that’s on hold for now… And, that’s about the progress for today…plenty more to do…more soon, soon as I’ve done more!
-
Who doesn't love a mock-up? Let's see yours!
OldNYJim replied to Belairconvertable's topic in WIP: Model Cars
That looks great! -
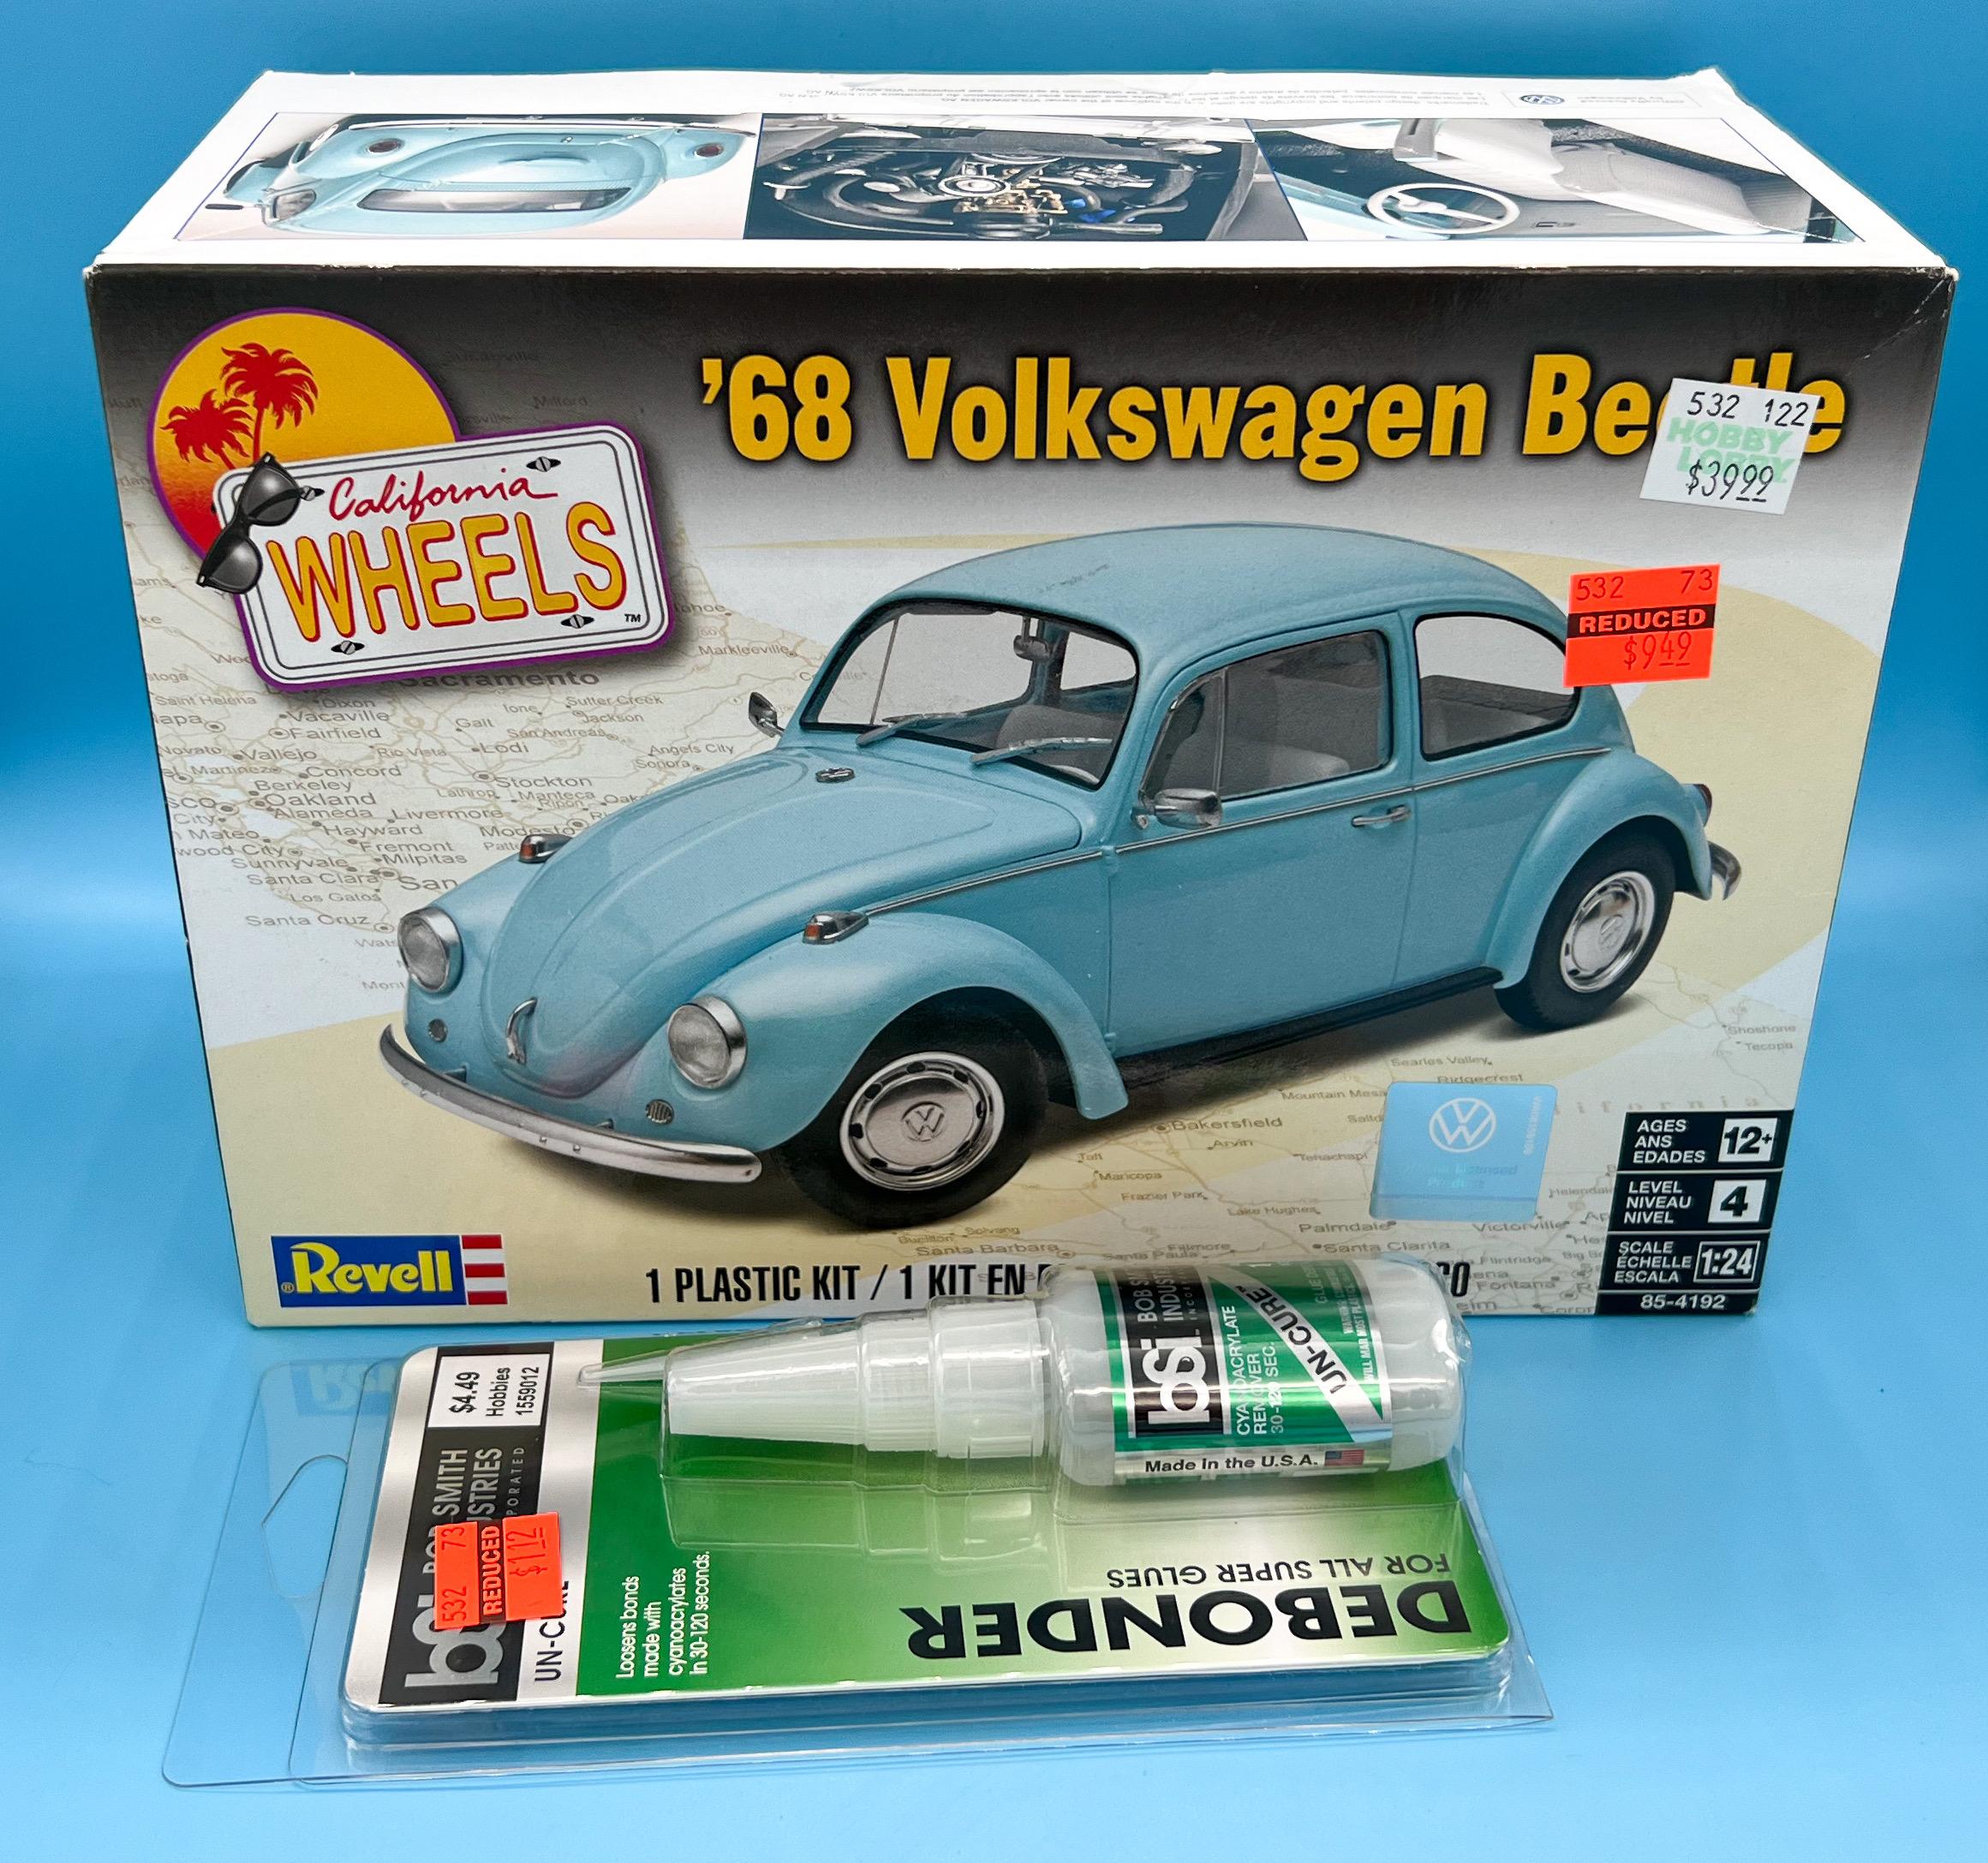
Quick trip to the Lobby of Hobby today…I don’t need another Revell Beetle but for $9 it was following me home… Plus, I didn’t need superglue debonder particularly, but for a dollar that followed me home too ?
- 38,881 replies
-
- 2
-

-
- johan
- glue bombs
- (and 1 more)
-
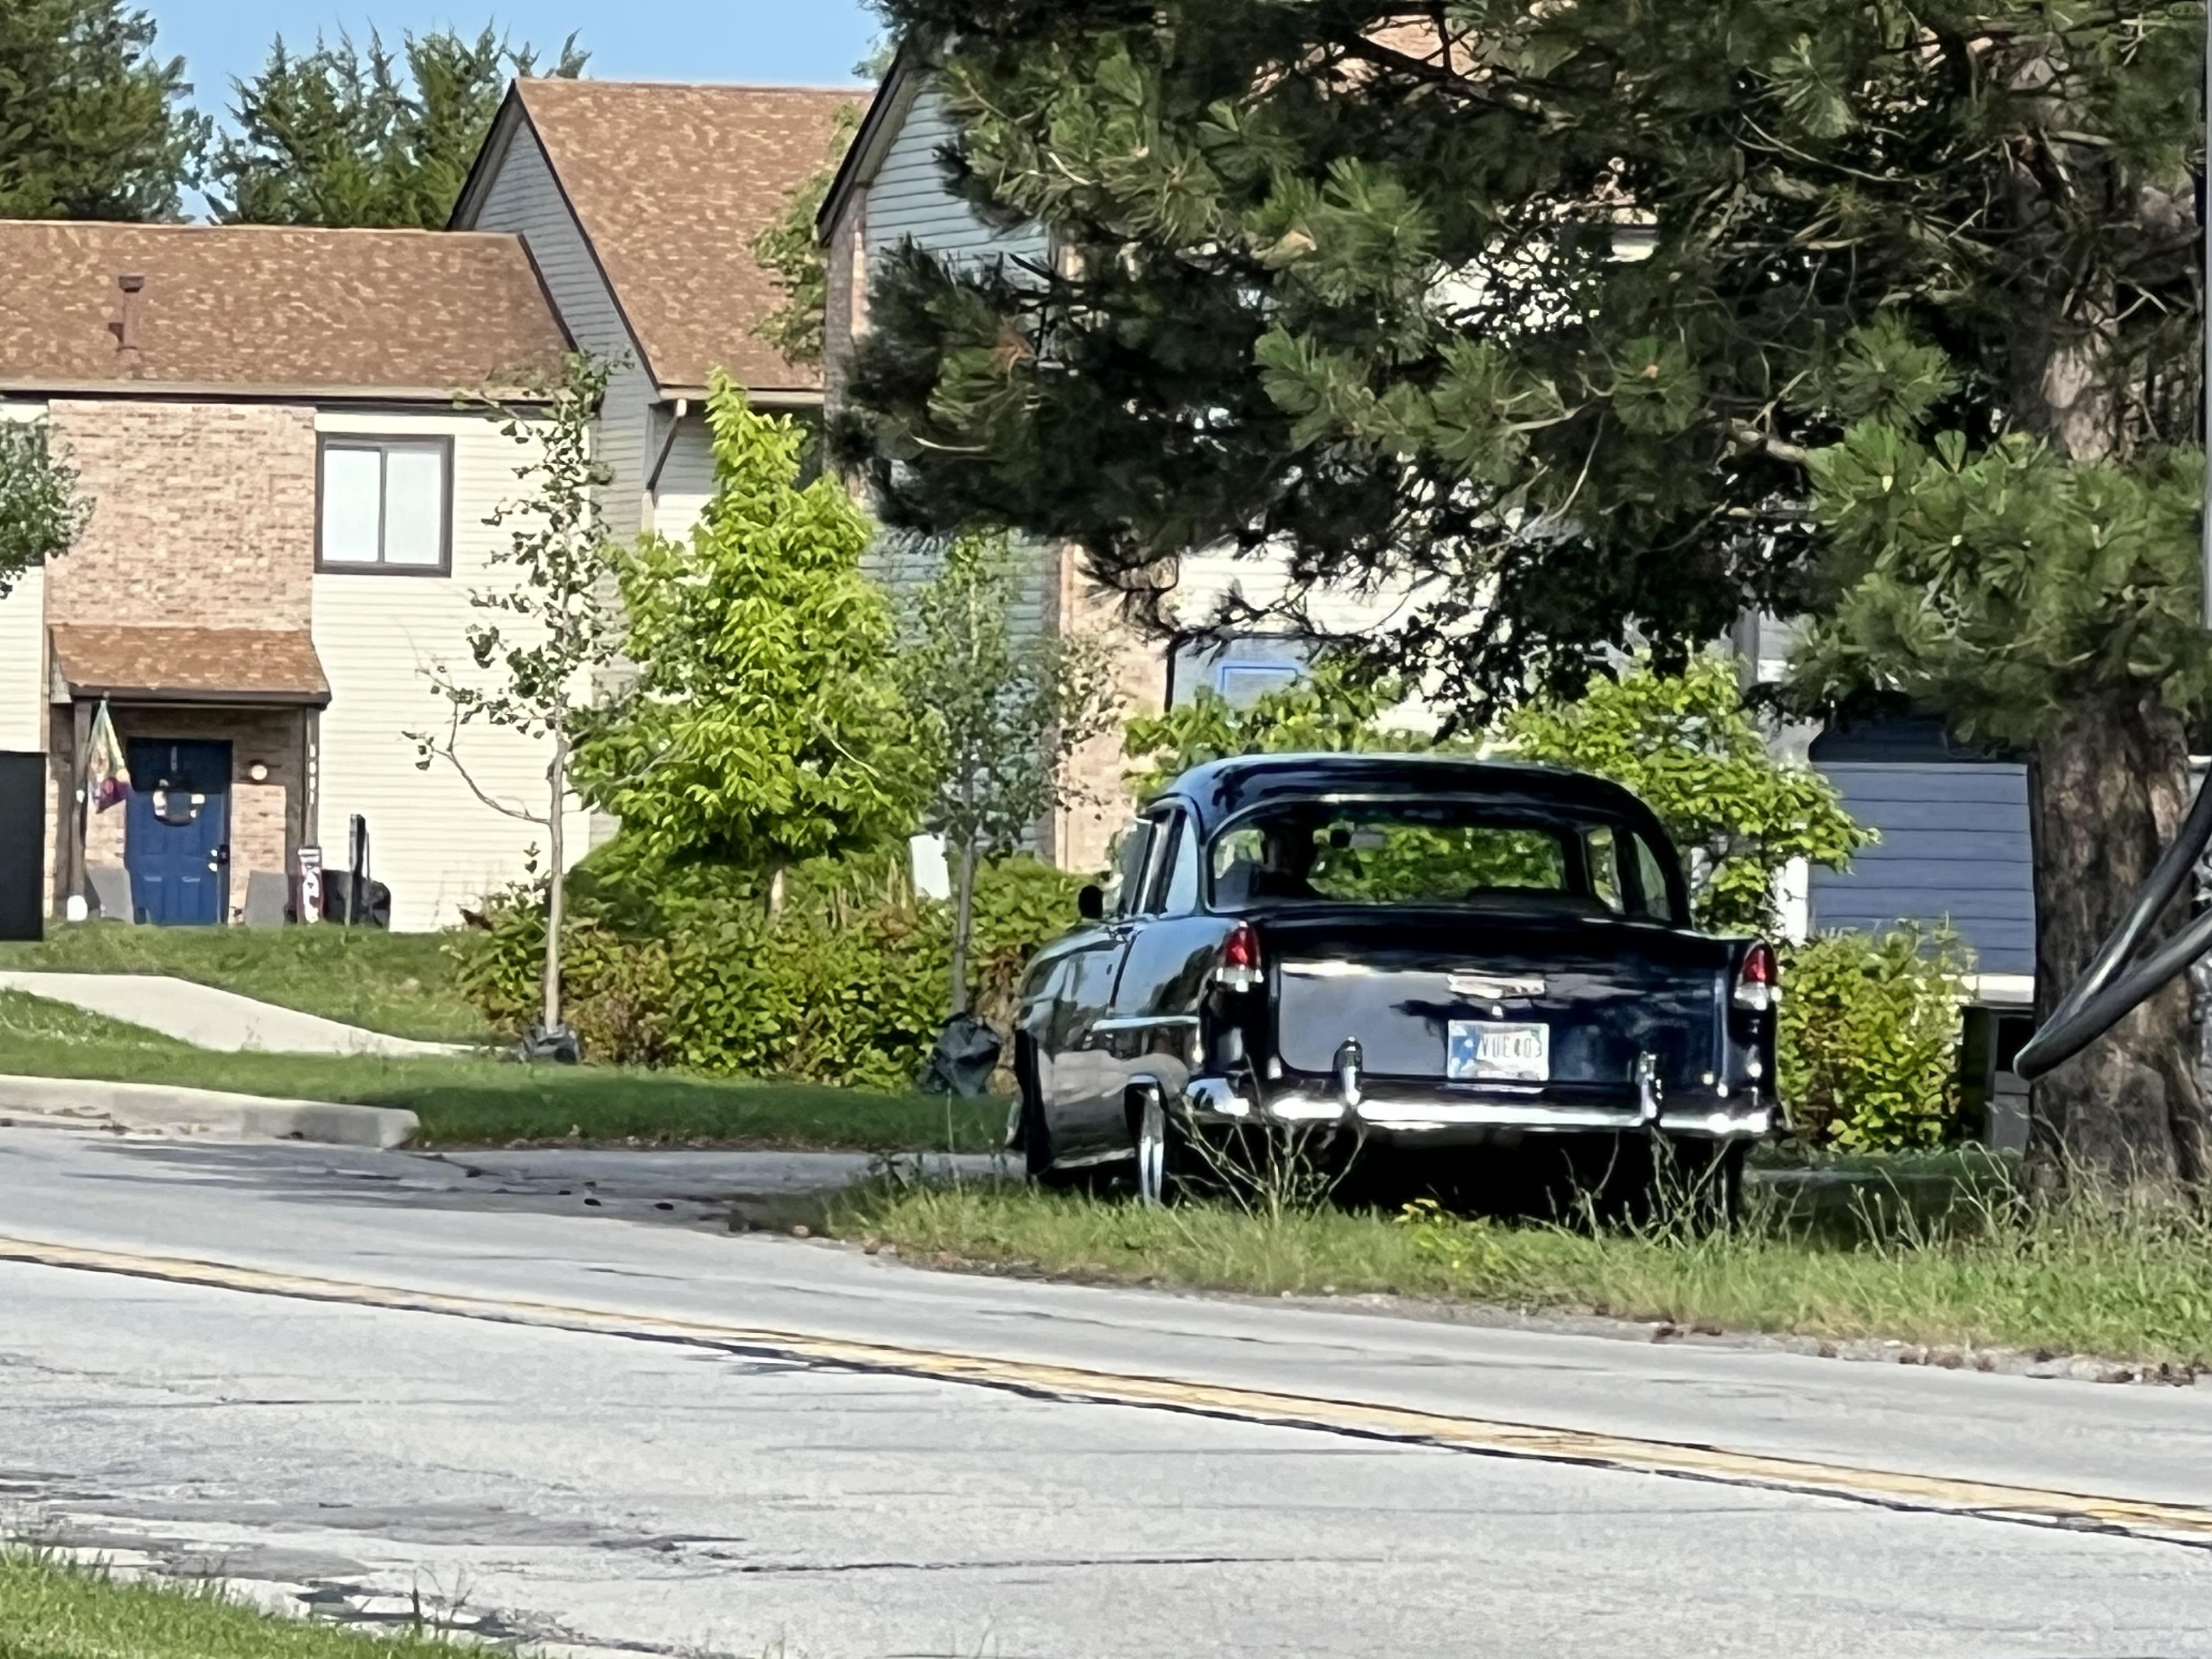
What did you see on the road today?
OldNYJim replied to Harry P.'s topic in General Automotive Talk (Trucks and Cars)
Super clean 55 Chevy, just sitting under a tree:
-
I’m envious - I’d love a scanner! I’ll be interested to see how you like it, and see some results!
-
Building a New York taxi from the Revell Caprice Snap Kit
OldNYJim posted a topic in WIP: Model Cars
I picked up one of these kits at a model show last year, and this project has been rattling around my brain for long enough… Actually, I got taken on the first one of these I picked up - it was sealed with tape and allegedly complete…and it was, besides the interior pieces, chassis, a tire…some crucial stuff like that. Still, I was impressed enough with the quality and detail of this self-proclaimed Snap Kit that I REALLY wanted to build one, so I picked up another, designed some decals and here goes nothing… As any model builder knows, following the directions is CRITICALLY IMPORTANT, and step one was gluing the engine halves together: Once I’d done that, I lost interest in following the directions and jumped ahead to painting the body ? I regularly (daily, in fact) use a Pantone swatch book for my work; a Pantone book is a color chart used most commonly in the print industry to match colors, and when I was still living in NY I made notes of various colors in the city’s color palette for projects like this. Having that reference number allowed me to mix up some Createx to get really close to the proper 90s NY taxi color: Whilst that was drying, I got back to what I was meant to be doing and prepped and painted some engine components (more on those after the weekend, most likely): And then last night I spent a ‘fun’ hour masking up the body to shoot the black trim: I like Createx black for projects like this - it shoots super smooth and clean, clean-up is easy and you can touch in any flaws with a brush. Just a little clean-up required here and then I’ll shoot some intercoat before the next steps. And…that’s about as far as I got so far…not a bunch of progress so far but I’ve got the idea in my mind that this one will be realistically used and weathered but not TOO much…a nice clean cab still, fairly early into it’s probably-long career. More soon, soon as I’ve done more!
-
1/25 Revell SnapTite Taxi/Fire Chief Chevy Caprice
OldNYJim replied to Casey's topic in Car Kit News & Reviews
Agreed! I'm just starting to dig into one of these now too, and it's well done! The engine suffers from simplification the most, it looks like, but so much of the block is hidden anyway that I THINK it's not worth re-engineering it completely or finding other parts to swap in. -
Testors Boyd Coddington kits
OldNYJim replied to RickRollerLT1's topic in General Automotive Talk (Trucks and Cars)
Yeah, I'd like to see the full kit especially get another go-around...prices are pretty high these but I'd like to complete my Boyd collection... -
Testors Boyd Coddington kits
OldNYJim replied to RickRollerLT1's topic in General Automotive Talk (Trucks and Cars)
Bear in mind too that there's Snap and Full Detail variations of the Chezoom, Aluma-Coupe and I think the Hauler too? I haven't done a TONNE of research, but was the Vantastic actually anything to do with Boyd? Showrods lists it as being designed by Dave Carlock of AMT...was there ever actually a 1:1? http://www.showrods.com/showrod_pages/vantastic.html -
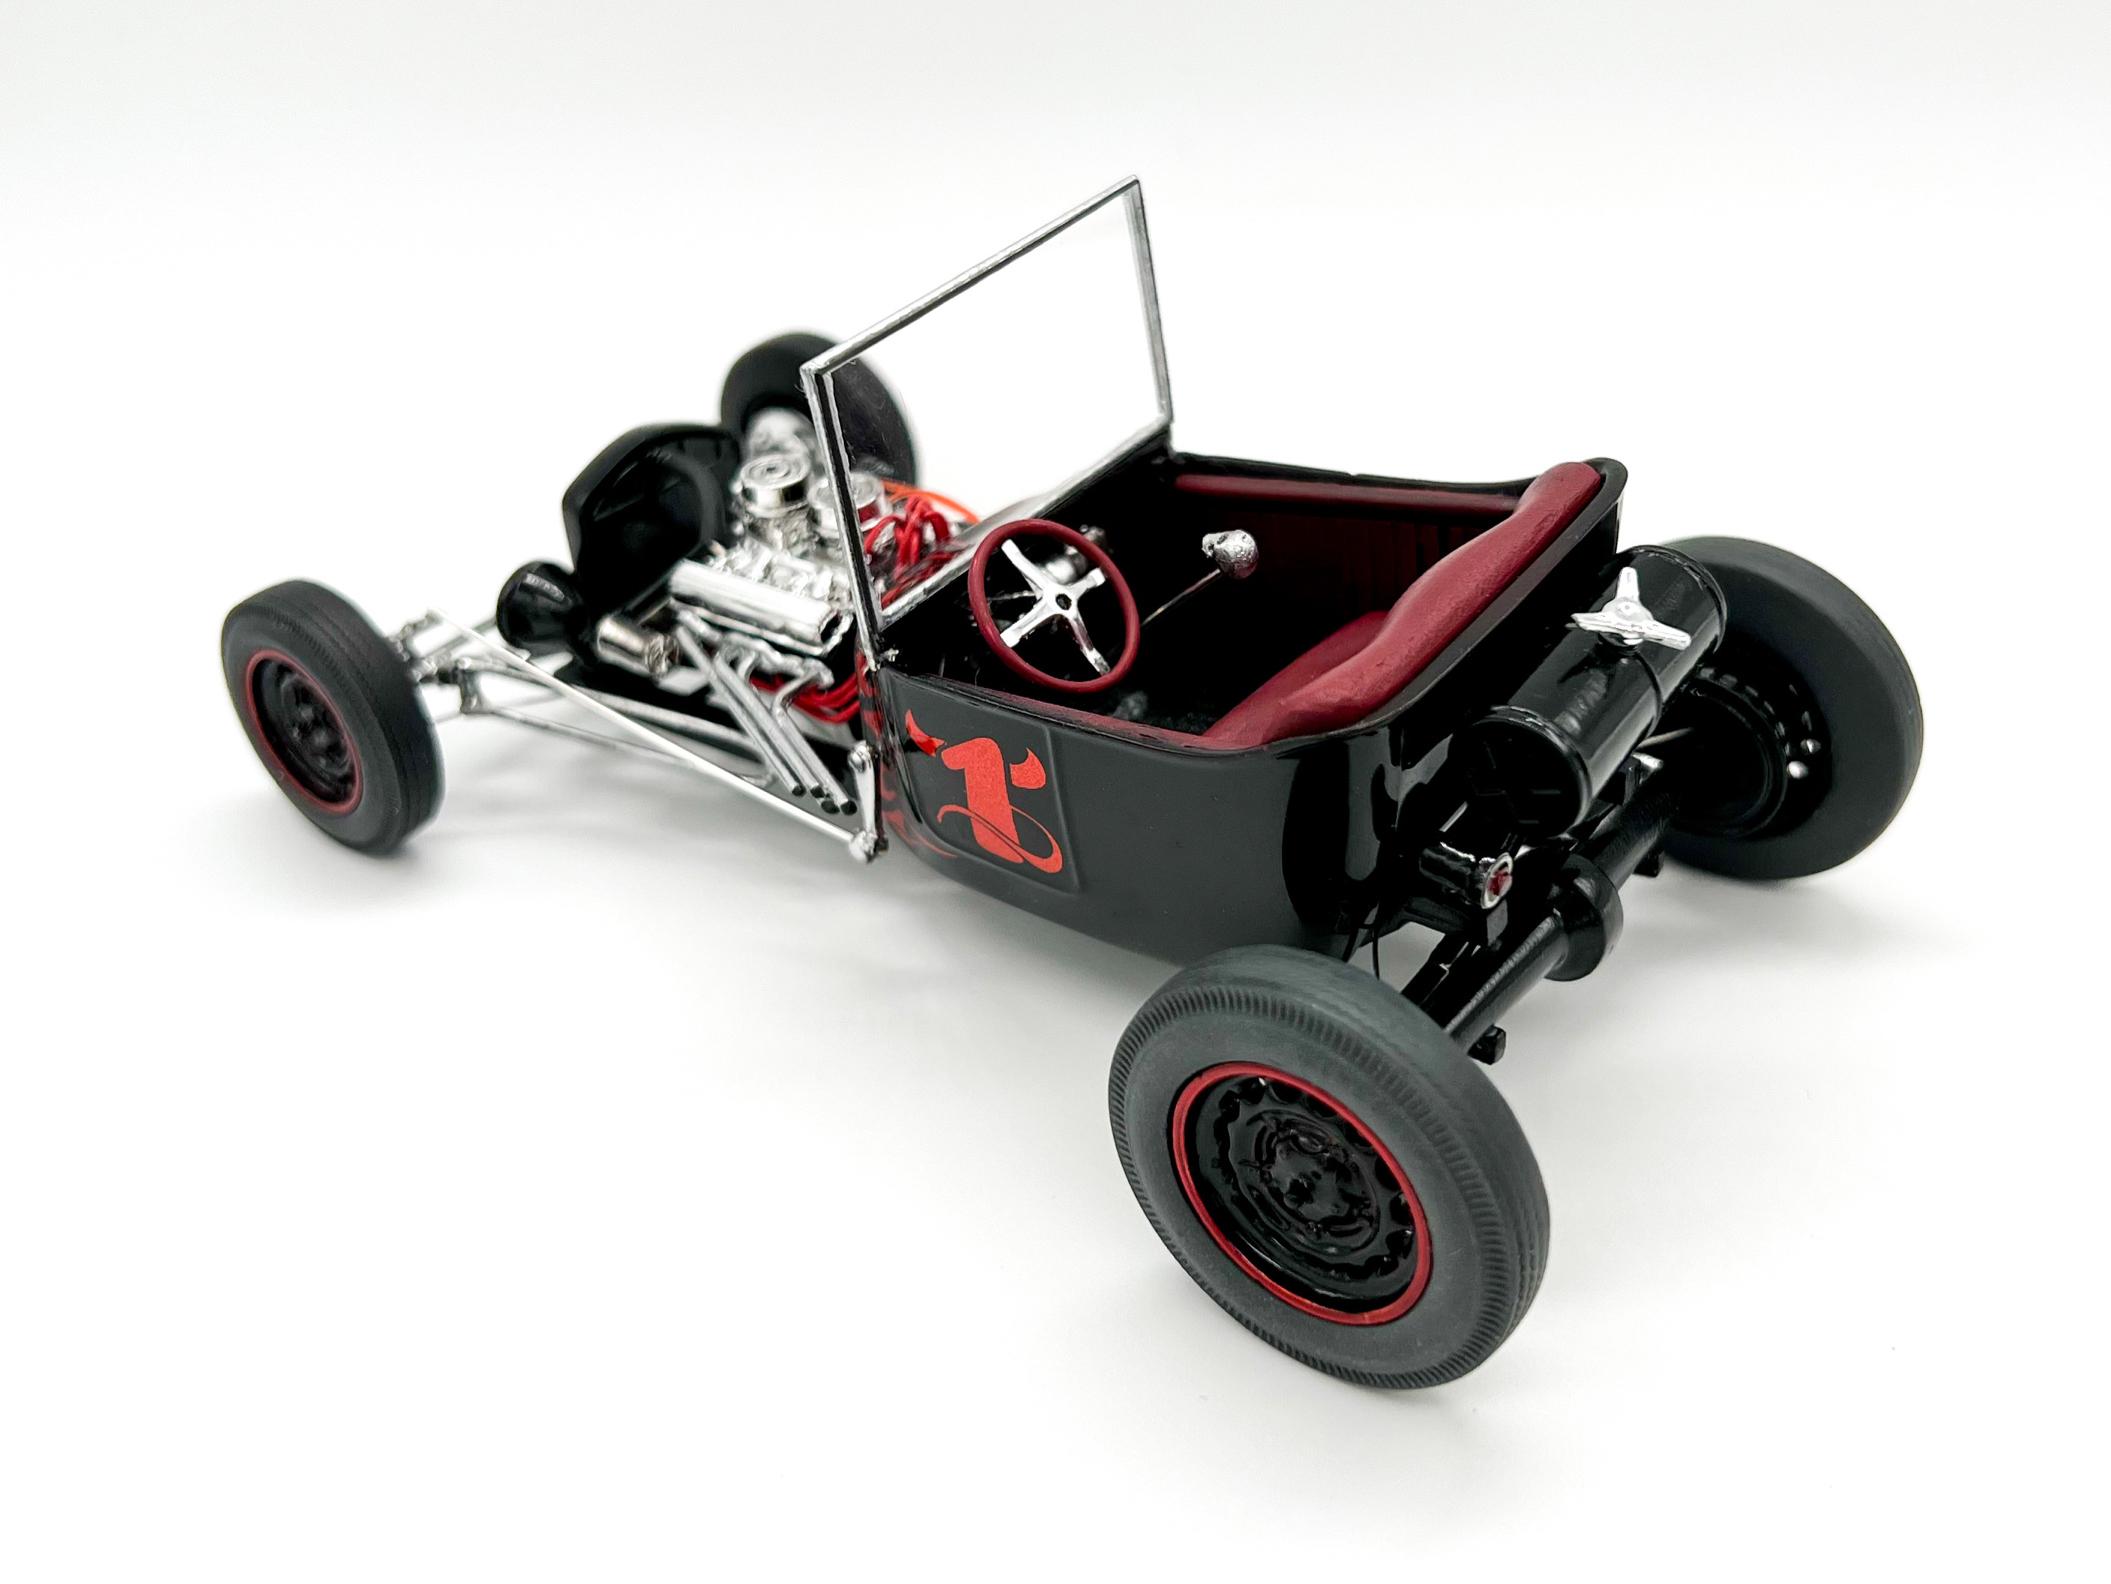
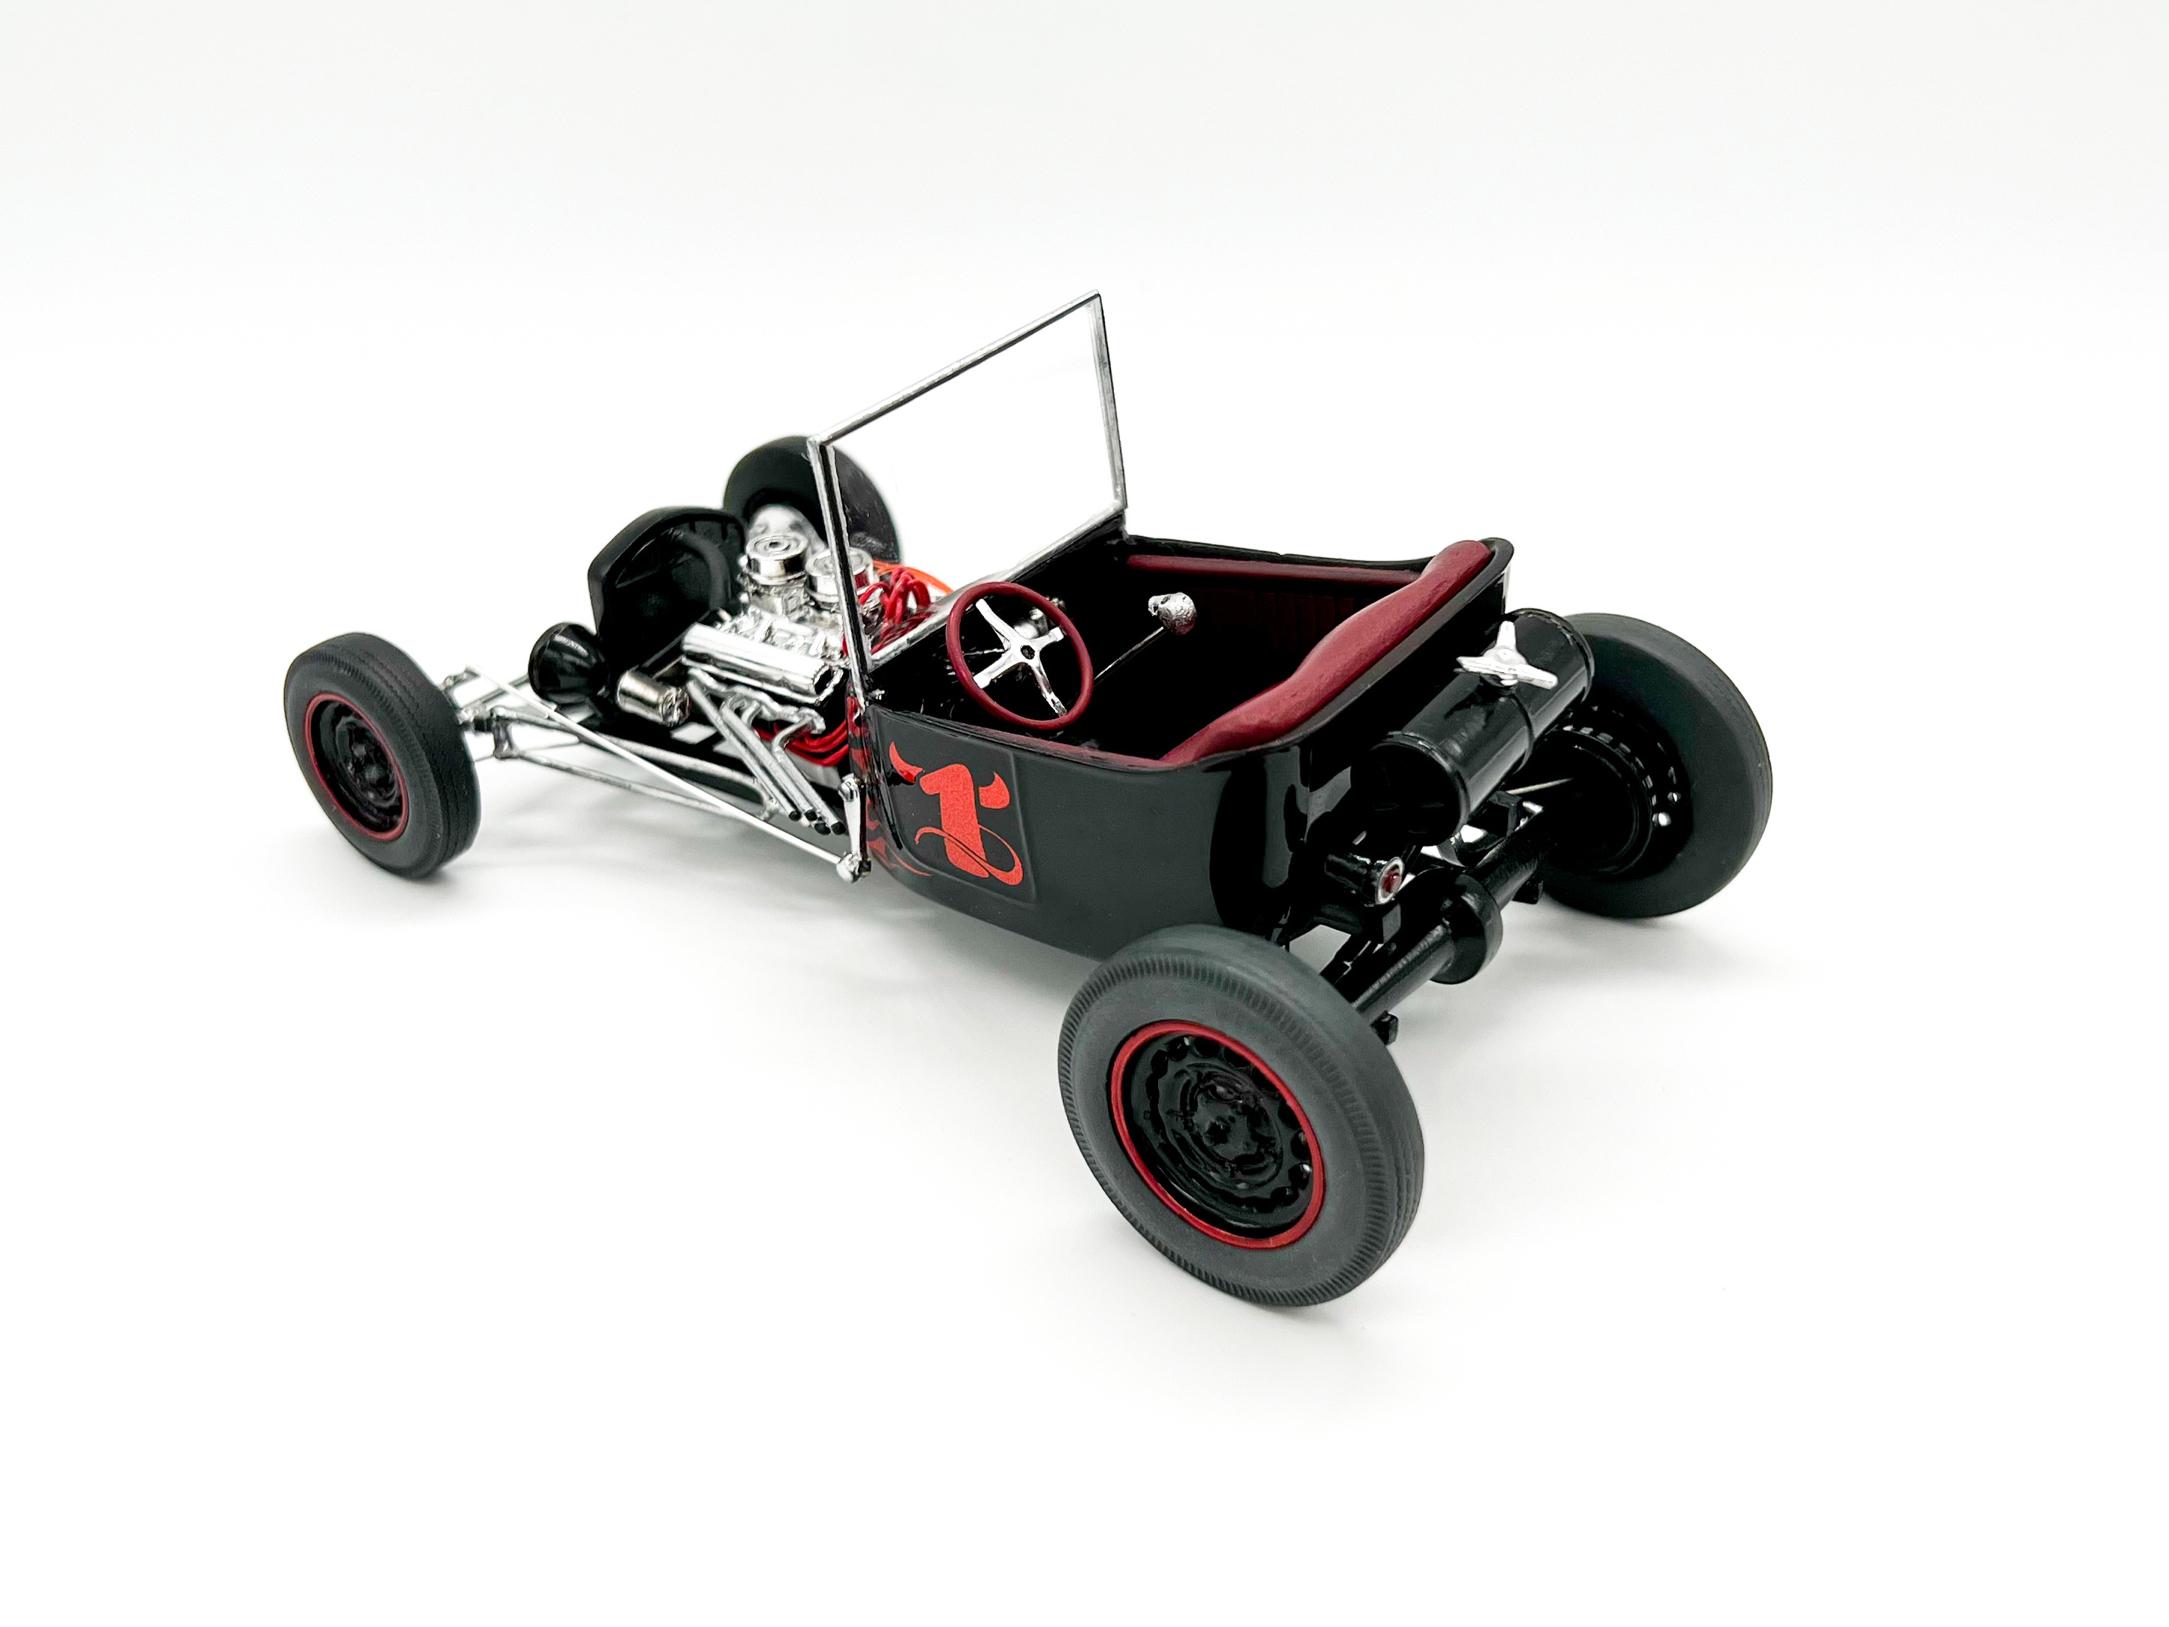
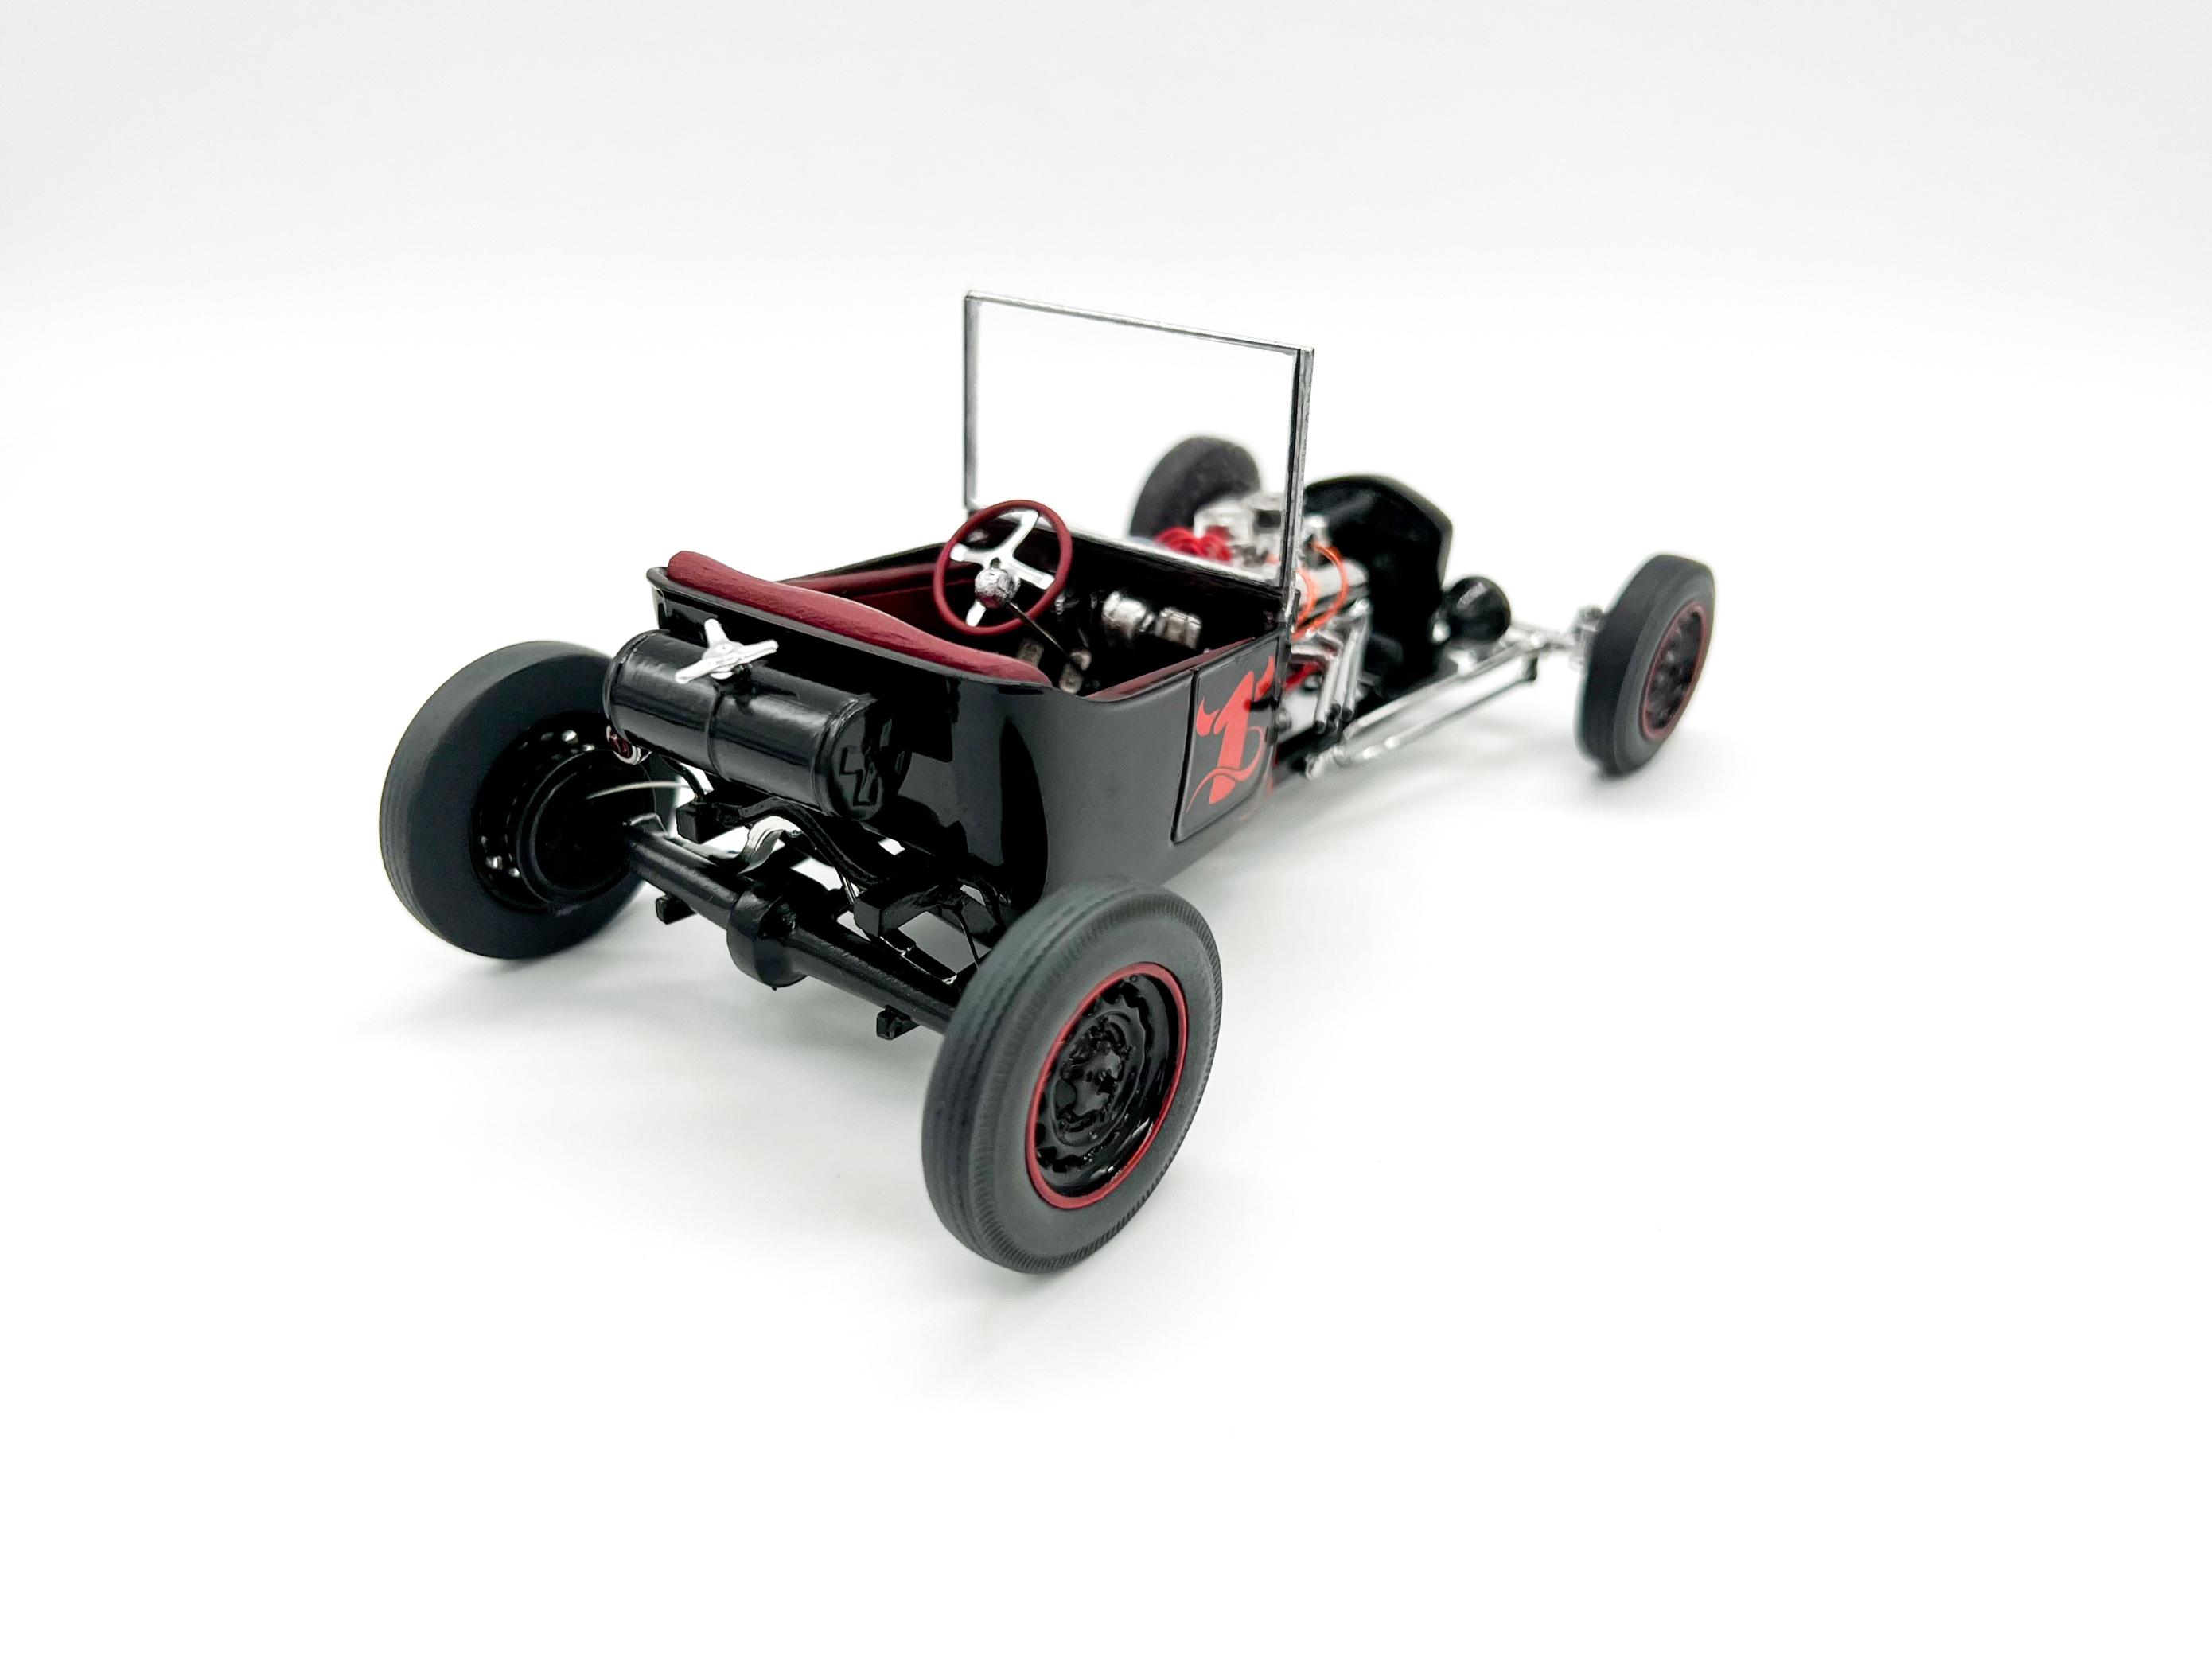
Thank you!!! Haha, that's perfect! The Li'l Hotty! Thanks Dan! And thanks to everyone who followed along on this thread - some finished pics here:
-
I had started a couple of different T-bucket builds earlier in the year, but neither of them quite were hitting the spot for me...so third time's a charm! To nail the T-Bucket I had in my head, I started with an AMT '23 T body, scratchbuilt a frame, used a parts box front axle with Atlantis hairpins and spring, a Revell grille and radiation, AMT T lights leftover from some other project, a Parts Pak Small Block Chevy built out of the packet except for wiring and fuel lines, a scratchbuilt brass windshield, scratchbuilt interior, steering wheel from a Boothill Express, a resin cast skull shift knob, a 3d print gas tank with a Revell '29 Ford wheel nut as a cap, a single scratchbuilt tail light, an AMT early Ford rear axle with an Atlantis leaf spring and linkages, parts box front brakes, 3d printed rear drums and 3d printed 36 Ford wheels and tires. Paint is Createx for the black parts, silver base with Tamiya Candy red for the numbers and flames, Hyperchrome for the chrome parts and Citadel Oxblood for the interior. Glad to finally have a T-bucket that I'm pleased with on my shelf...and now that I've built one I've got about a hundred more I wanna do...probably one with a shorty pick bed next. Thanks for looking - build thread here, for anyone interested:
-
Nice work Scott - I've been following this one on Instagram, but the larger pics really show off the quality of your work. Great build!
-
BMW Outlaws and Hot Rods
OldNYJim replied to JollySipper's topic in General Automotive Talk (Trucks and Cars)
Spotted online today:
-
I found that my wife’s hairspray works well for that too, when I don’t feel like breaking out the airbrush
-
NICE!!! I’ll be picking this one up!!!