
Ron Hamilton
-
Posts
4,466 -
Joined
-
Last visited
Content Type
Profiles
Forums
Events
Gallery
Everything posted by Ron Hamilton
-
 I have the original ;66 Cyclone wheelcovers, but I want to do a "day two" car. I like mags.
 -
I thought it was yellow, as it looked yellow in the first pic, but white in the second and thirs. I had no doubt in my mind that I was going to do the build in yellow. However, I may change the 5-spokes out for a set of Cragar S/S, or a set of Ansen Sprints to keep the '60's flavor.
-
I really like Comets, as I have several in my collection. This '66 is under construction, which will be a combination of an original annual kit body and interior, with the chassis and running gear from the latest issue of the AMT '66 Fairlane GT. I have not decided the color of the interior, or else it would be finished, which will be either Black, or Beige. I also have 2 original '67 Comet annuals to be re-built, as I prefer the old annual bodies from the latest tool bodies. I really like that white Caliente.
-
That is how that car should look. Fantastic!!!!!
-
Hocus Pocus!!!!
-
It looks great Tulio.
-
Missing link 1961 Pontiac Catalina
Ron Hamilton replied to kevin l's topic in Car Aftermarket / Resin / 3D Printed
I saw one of these in person at our club meeting a couple of months ago, and I can say that it is fantastic!!!!! -
WOW!!!!!
-
I agree with you. As long as you like it, it makes no difference what color it is.
-
1969 Dodge Coronet R/T, 10/17, So Close I Can Taste It!!
Ron Hamilton replied to StevenGuthmiller's topic in WIP: Model Cars
As good as that one looks, I figure one of the kit manufacturers would have to bring one of those out. I know Revell has the Super Bee tool available, but it does not feel right to me, and it lacks the steelies and red-lines that was part of the '69 "Six Pack" package. The Road Wheels and Radials are not doing it for me. I love that one Steve!!!! -
1950 Oldsmobile may be what you expect........
Ron Hamilton replied to thatz4u's topic in Model Cars
Interesting!!! Looks like it came out of the "Fast and Loud" garage. I like it!!! -
I really like that one. I have built three off of that kit, as well as a '61 Pace Car. which yours reminds me of, and a couple of '63's. I love the bullet birds, and that one is striking.
-
Very nice work. The hood stripes do look a little splayed towards the outside edges, as they should be evenly spaced down the middle. I did not use the kit decals on my '79 Camaro, as I did mine as an SS350, and not a Z28, so I cannot speak about how the stripes will go on it. That is one handsome car.
-
Certainly. I have several Camaros to build one of these days. I had several of them for my Company Car, as well as owning a couple of them. I have one of my personal cars built, the '91 RS Convertible, and one under construction, the '78 Sports Coupe with T-Tops. Speaking of the '74, I built one back in the day, and I have an unbuilt MPC to be built as Joe Mannix' last ride on the show. I have to turn the '78 Z28 into a Sport Coupe, by getting a non scooped hood, and filling the fender louvers. Just about everything else is done. I like the yellow theme you are going with. When I did my '70 Baldwin Motion Camaro, I painted it Daytona Yellow, with the Black Stripes. I think I am going to display my Yellow Camaros together, like you are doing, as I like Yellow Camaros too.
-
Wow! That looks kind of familiar. Very nice.
-
Handsome!!!!! I love it, and only hope that mine comes out half as good.
-
Handsome!!!! That is why I like Imperials of that era!
-
I can hear the slanter humming and clattering away!!!
-
That is also going to be taken care of when I fix the other things. At least I was able to get it to hunker down better in the front.
-
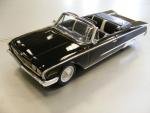
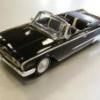
I am pretty happy with the paint on these...
-
Here is the underhood detail. Looking at this photo, I am going to see if I can do a better job of recessing the headlamps and brake vent detail. The hair you see on the fender is not in the paint. The digital camera picks up everything.
-
I smoothed the body with fine sanding pads after I removed the mould lines and minor sinks that did not belong on the body, and leveled it out at the door and trunk seams with polishing sticks after I deepened the seams. When I painted the model, I used Tamiya Fine White Primer, which dried for a day, then I painted the car with several coats of Tamiya Chrome Yellow Lacquer, which dried for about 24 hours, and I clear coated it with Testors' Clear Lacquer. The finish was pretty smooth after a 24 hour drying time. I then polished the finish very carefully with Novus #2 Polish with a soft rag. I lucked out, as there were no rub through on the edges with this one. All of the paint came from spray cans. I think it came out pretty good.
-
So do I.
-
Contact Norm Veber @ Replicas & Miniatures Co. of MD. 410-368-7648. You will have to cut the boss off of the back of the wheel, and finish it yourself, as they are cast in white resin. I know this because I have a couple of sets of them for a couple of projects.
-
Oh yeah!!!!